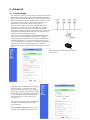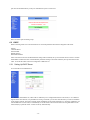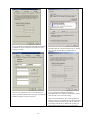
1
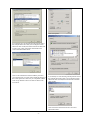
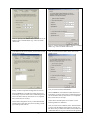
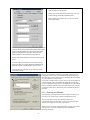
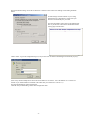
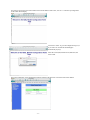
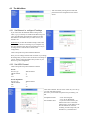
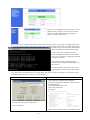
Solwise Ltd.
Quick set-up instructions for
Asus AAM60xx
ADSL Routers
(read these notes whilst also referring to the manual supplied with the product)
www.solwiseforum.co.uk
The Solwise Forum is designed to be the first port-of-call for technical support and sales advice for the whole Solwise
product range.
Please check the forum for coverage on any technical problems you have. Many people have trodden your path before you,
and a quick check on the forum will reduce the pressure on our support staff.
-1-
Notification is hereby given that Solwise Ltd. reserves the right to modify, change, update or revise this document from time
to time as required without the prior obligation to notify any person, company or organization. Further, Solwise makes no
warranty or representation, either express or implied, with respect to merchantability, or fitness of its products for a
particular purpose.
Solwise Ltd.
13/15 Springfield Way
Anlaby
Hull HU10 6RJ
UK
Tel 0845 458 4558 (local rate)
Fax 0845 458 4559
Email [email protected]
Http www.solwise.co.uk
-2-
Quick set-up instructions for
Asus AAM60xxEV/BI/VI ADSL Router
(read these notes whilst also referring to the manual supplied with the product)
1 Passwords............................................................................................................................................................................... 4
2 Notes....................................................................................................................................................................................... 4
3 Connecting to your network and line .................................................................................................................................... 4
3.1
EV Model........................................................................................................................................................................... 4
3.2
BI and VI Model ................................................................................................................................................................ 4
4 Basic Configuration ............................................................................................................................................................... 4
4.1
Setting up TCP/IP protocol on your PC ............................................................................................................................ 4
4.1.1
Checking your TCP/IP settings ................................................................................................................................. 6
4.1.2
Running your Browser............................................................................................................................................... 8
4.2
Setting up TCP/IP protocol on your Mac........................................................................................................................10
4.3
The Main Menu................................................................................................................................................................12
4.3.1
Set Ethernet i.e. configure IP settings .....................................................................................................................12
4.3.2
Set ADSL Channel ..................................................................................................................................................12
4.3.3
Restarting .................................................................................................................................................................13
5 Trouble Shooting .................................................................................................................................................................13
5.1
Testing..............................................................................................................................................................................13
5.2
Fault diagnosis script when you can’t get on to the internet (a more detailed process)?...............................................16
6 Advanced..............................................................................................................................................................................18
6.1
Port Forwarding ...............................................................................................................................................................18
6.2
DHCP ...............................................................................................................................................................................19
6.2.1
Setting Up DHCP Server.........................................................................................................................................19
6.2.2
Setting up Your PC Clients to use DHCP...............................................................................................................20
6.3
Using your Router in Bridging Mode..............................................................................................................................22
6.4
Altering Configuration User/Password ...........................................................................................................................23
6.5
IP Filter.............................................................................................................................................................................24
6.5.1
Aims:........................................................................................................................................................................24
6.5.2
Procedures:...............................................................................................................................................................24
6.6
Firmware Upgrade ...........................................................................................................................................................27
6.7
BSP Mode ........................................................................................................................................................................28
6.8
DNS Addresses ................................................................................................................................................................29
6.9
Other Information ............................................................................................................................................................30
-3-
1 Passwords.
Some levels of access in the firmware are password protected. Below shows the default password for the current firmware
version:
name
password
: adsl
: adsl1234
2 Notes
These notes cover basic set-up and configuration of the Asus AAM ADSL routers. In most cases configuration is the same
for all current Asus router models. However the VI model is slightly different because of the wireless set-up. A
supplementary set-up guide is supplied to cover the wireless set-up for that model.
3 Connecting to your network and line
3.1
EV Model
The LAN port on the EV router is the type designed to be connected to an ‘uplink’ (or crossover) port on a hub. This means
you can also connect the router LAN port direct to the port on a PC LAN card using a standard cat5 LAN cable. If you wish
to connect the router to a ‘normal’ port on a hub then you will need to use a crossover cable or adapter. For the purposes of
configuration the easiest way is to connect the router directly to the LAN card of a standalone PC. After you have gone
through initial set-up of the router (see below) you can then connect the router to the uplink port of your hub if required.
3.2
BI and VI Model
Simply connect you PC to one of the normal LAN ports on the router using a standard CAT5 LAN cable.
Then refer to the product manual and connect to the ADSL line using RJ11/RJ11 cable as supplied by your provider (if you
don’t have a cable then we can supply one for you) from the socket marked ‘Line’ on the back of the router.
4 Basic Configuration
Please note that the author is assuming you are using MS Windows (Win9x or 2K/XP) or Mac OS10; please make
appropriate allowances if using another operating system or platform such as Linux. Please note that if there is some reason
why you cannot do configuration via a web browser then you will have to use console management via the WAN port of the
router connected to the serial port of your PC and then run a terminal application. To do this you will require a 9 pin serial
lead. Details on how to do configuration via the console port are given in the product manual. If you are using console
management then the following sections concerning TCP set-up can be skipped and you can go direct to the section
concerning configuration from the Main Menu.
4.1
Setting up TCP/IP protocol on your PC
The easiest way to configure the router is using a standard web browser (e.g. Explorer). You first of all need to check the
TCP/IP settings of your PC. If you already use TCP/IP on your PC for LAN use then this section can be skipped.
Win9x
Go to Start/Settings/Control Panel/Network....
Win2K/XP
Go to Start/Settings/Network and Dialup Connections...
Click on ‘Local Area Connection’.
-4-
Then on Properties..
If you already see a line showing TCP/IP protocol such as
the example shown above then you can skip this section.
Otherwise click on Add, then select Protocol and then click
on Add.. again. Then on the Select Network Protocol
screen select Microsoft/TCP/IP...
Click on OK and Windows will then add the protocol to
your network set-up. You now need to check the settings of
the TCP/IP protocol to ensure they are compatible with the
router set-up. Details on how to do this are shown in the
next section.
If you already see a line showing TCP/IP protocol such as
the example shown above then you can skip this section.
Otherwise click on Install, then select Protocol and then
click on Add.
Then on the Select Network Protocol screen select
Microsoft/TCP/IP...
-5-
Click on OK and Windows will then add the protocol to
your network set-up. You now need to check the settings of
the TCP/IP protocol to ensure they are compatible with the
router set-up. Details on how to do this are shown in the
next section.
4.1.1 Checking your TCP/IP settings
The default IP address of the EV router is 192.168.1.1 on subnet mask 255.255.255.0. In simple terms this means that, in
order for your PC to talk to the router, the IP address of your PC’s should be in the range from 192.168.1.2 to
192.168.1.254. If you already use TCP as your default network protocol and you don’t use IP settings in the required range
then you will have to either permanently alter the settings of your computers to suite or change the default address of the
router. If you wish to alter the settings of all your PC’s to suite then it is probably best to ask the person in charge of your
network set-up to do this for you. If you want to alter the router then you will have to temporarily change the settings for
your PC.
Win9x
Win2K/XP
Go to network settings (Start/Settings/Control
Go to your local network settings (Start/Settings/Network
Panel/Network).
and Dialup Connections/Local Area
Connection/Properties).
Scroll down the list of network settings until you find the
entry showing TCP/IP. There may be several such entries
(see example); the one you need is the entry associated
with your network card. Select it and then click on
Properties:
-6-
Scroll down the list of network settings until you find the
entry showing TCP/IP. Select it and then click on
Properties:
Click on ‘Specify an IP address’ and, on the first screen (IP
Address) enter a suitable address (e.g. as above) and the
subnet mask.
Click on ‘Use the following IP address’ and enter a suitable
address (e.g. as above) and the subnet mask.
Next, for each PC you must enter a Gateway address. This
is the address of the router and tells your PC where to send
internet TCP requests:
Finally you must set-up DNS Configuration on each PC:
Each PC MUST have the address for DNS entered in it’s
TCP setting. If your PC doesn’t have a DNS setting then it
will not be able to find any internet sites so it’s important
that you have this set correctly!
On the DNS Configuration screen you must Enable DNS
and then enter a Host name; this can be anything you like –
just a made up name will do!
-7-
Now you need to enter the address of the router as the
default gateway.
Now you need to enter the DNS address.
Each PC MUST have the address for DNS entered in it’s
TCP setting. If your PC doesn’t have a DNS setting then it
will not be able to find any internet sites so it’s important
that you have this set correctly!
On the main TCP/IP Properties screen select ‘Use the
following DNS server addresses’.
Now you need to enter an address for the ‘Preferred DNS’.
You now enter the address for the DNS server from your
ISP. Please ask your ISP for the address of their DNS (a list
of ISP DSN addresses is given at the back of this guide but
it might not be up to date). Enter the DNS address and then
‘add’ the address to the DNS list.
Finally click on OK, then OK and then Close. The new
TCP/IP settings should take immediate effect.,
That’s all there is to the basic set-up. The next section
covers basic testing.
You now need to enter the address for the DNS server from
your ISP. Please ask your ISP for the address of their DNS
(a list of ISP DSN addresses is given at the back of this
guide but it might not be up to date). Enter the DNS
address and then ‘add’ the address to the DNS list.
Finally click on OK and then OK from the main Network
menu.
Windows will now install the revised network settings;
please note that your original Windows installation CD
might be required. You should then reboot your PC.
That’s all there is to the basic set-up. The next section
covers basic testing.
So now you should have the ethernet and ADSL settings correctly
configured on your router. If you altered the IP address settings of
the router then you may need to now go and change the TCP settings
of your computer (or LAN) to suite.
If you want to use the router via your LAN (i.e. not just connected to
a single computer) then you should now unplug the network cable
from your computer and connect it to an uplink port on your network
hub. If you did this with the router power still on then now press the
reset button on the router. Alternatively now reconnect the power to
the router.
4.1.2 Running your Browser
After checking your connections and TCP settings (see above) you
are ready to run your browser in order to configure the router.
Any browser can be used on any operating system: The
configuration screens are the same. If you are using Explorer then
click on your Explorer icon to start your browser.
When your browser starts up first check that it’s using your LAN for
internet access. To do this in Explorer go to Tools/Internet
Options/Connections.
-8-
Then check that the setting ‘Never dial a connection’ is selected. Then on the LAN Settings screen nothing should be
ticked.
No other changes need to be made. If you’re using
Netscape then no configuration is required for your
browser to automatically use your LAN.
Now enter the address of the router on the Address/URL
line of your browser. The browser should then load the
start-up page from the router:
Click in ‘Enter’ to go to the configuration logon (or if you wait a few seconds this should happen automatically anyway).
(Don’t worry that the example above shows the router address as 192.168.0.9 – this is the address we’ve used on our
network. If you left the addresses as default in the router then yours will show as 192.168.1.1).
Now enter the default user name and password.
Click OK and you should then go to the main configuration menu.
-9-
4.2
Setting up TCP/IP protocol on your Mac
Configuration of the router is done using your web browser but first of all you need to ensure that the IP settings on
computer are correctly set to enable you to talk with the router. The default IP address of the Asus router is 192.168.1.1 with
netmask 255.255.255.0. This means your computers and other network resources should have IP address’s in the range
192.168.1.2 to 192.168.1.254. First of all go to the Network set-up on your Mac:
Enter a suitable IP address (e.g. 192.168.1.2) and
the netmask as shown above and click on Apply
Now.
Now enter the IP address of the router in ‘Router’ box.
You also need to enter an address for your ‘Domain Name
Server’.
You now need to enter the address for the DNS server
from your ISP. Please ask your ISP for the address of their
DNS (a list of ISP DSN addresses is given at the back of
this guide but it might not be up to date). Add the DSN
address to the Domain Name Server list.
That’s all you should have to do. Click on Apply Now and
your new settings should be set.
So now you should have the ethernet and ADSL settings
correctly configured on your router. If you altered the IP
address settings of the router then you may need to now go
and change the TCP settings of your computer (or LAN)
to suite.
If you want to use the router via your LAN (i.e. not just connected to a single computer) then you should now unplug the
network cable from your computer and connect it to an uplink port on your network hub. If you did this with the router
power still on then now press the reset button on the router. Alternatively now reconnect the power to the router.
- 10 -
Now start up your browser and on the Address line enter the address of the router; 192.168.1.1. The start-up configuration
for the router should display:
Now click in ‘Enter’ to go to the configuration logon (or
if you wait a few seconds this should happen
automatically anyway).
Enter the UserID (adsl) and Password (adsl1234) and
click on OK.
The initial configuration screen should then be displayed showing the Firmware version and router MAC address:
- 11 -
4.3
The Main Menu
After successfully entering the user name and
password the main configuration menu will be
shown:
4.3.1 Set Ethernet i.e. configure IP settings
If you want to alter the default IP address settings of the
router (e.g. if you already use a different IP address range for
your LAN) then below shows the basic outlines to do this.
Note that this is the address that your router uses for your
internal LAN.
WARNING If you alter the IP address settings of the router
then remember that the TCP settings of your computer may
have to be altered to suite (this will especially be true if you
are using Telnet or web interface to do the router
configuration).
Click on the quick Set-up Wizard and then Ethernet:
Enter your new settings and then click on submit. If you change
the settings then you will now have to alter the TCP settings on
your PC and also change the address that you enter on your
browser to go into configuration.
4.3.2 Set ADSL Channel
Click on the quick Set-up Wizard and then Channel:
For BT
Service Type
Channel number
VPI
VCI
: PPPoA Routed.
:1
:0
: 38
For KC RapidTime
Service Type
Channel number
VPI
VCI
: PPPoA Routed.
:1
:1
: 50
Then click on Submit. The next screen is then for you to set-up
your user name and password:
Now enter your user name and password as provided by your
ISP.
Encapsulation Mode
Get IP Address from
- 12 -
: ‘Auto’ when using BT
: ‘LLC’ for KC RapidTime.
: if you have a static IP from your
ISP then enter select ‘Customize’
and then enter your IP address in the
Wan IP Address box. However
normally your ISP will provide your
IP address so you should select
PPP starting status
‘Service Provider’
: ‘UP’ i.e. start service automatically
DoD : ‘DISABLE’ Dial on Demand – basically this tells the router to disconnect from the ISP if you don’t use the service
for a specified time. Then the router will automatically reconnect when there is an demand for internet access from you
LAN. Normally you would want the service permanently up i.e. DoD disabled BUT if you are worried about security and
unsolicited access from the ISP then selecting DoD means that the connection will break if you are away from your PC for a
period of time or if your don’t use the connection for a while. The Idle Timeout value specifies when the connection should
be dropped. Once the connection is dropped then the router will automatically reconnect if it detects internet demand.
Reconnection is very quick; typically just a second or two.
NAT : normally this should be selected. If you have a block of IP addresses from your provider then you may want to
disable NAT and fully ‘expose’ your LAN.
IP Filter
: this feature enables or disables to IP filter firewall. Normally you would have this NOT ticked. However if
you run non-NAT mode, with a fully ‘exposed’ LAN then you may wish to enable this feature. You will then need to set-up
IP filtering; see Network Service, IP Filtering.
Auto Discovery DNS... : This setting doesn’t matter unless you are going to use DNS relay.
Now click on Submit to store the changes.
4.3.3 Restarting
To make the changes have an effect you must now select Restart...
5 Trouble Shooting
5.1
Testing
After doing a restart on the router the following things should happen.
1. Power, Status, Line and PC lights go on and then go out.
2. Then the PC light goes on and the Status LED should start to flicker; this indicates there is a line negotiation taking place.
3. If the Status does not come on or stays flickering all the time then there might be something wrong with the line (but see
note about bsp mode in the Advanced section).
4. After line synchronisation the Status light stays on and then the router verifies the user name and password. It is possible
to have a connection (Status light on) but no internet because of failure to logon.
5. Reconnect using your web browser (as shown above).
6. From the login screen enter your user name and password.
7. Then go ADSL Line Status.
It should look something like this....
- 13 -
However, if it says MODEM ACTIVATING then it’s not
finding the line or failing to synchronise. This could be
because your ADSL phone cable is not plugged in or
maybe even faulty. Check and retry.
8. Now you need to do some ping tests. These are tests to make sure that you can ‘see’ the router. If running windows then
drop into DOS (DON’T PANIC!). For W9x do start/run enter ‘command’ and then click on OK. For W2K do start/run/cmd
and then click on OK. If using Mac (OSX) then run
ping from Applications/Utilities/Network Utility.
For DOS enter ‘ping’ followed by the router
address (remember the DEFAULT router address
is 192.168.1.1 but if you’ve changed this remember
to use the new address):
You should get a reply if not then check the
addresses of your computer match the gateway (as
shown below)....
For a MAC enter the address of the router in the
ping programme. You should get a reply message.
9. If you have a PC you should check your actual IP settings (not what you think your settings are). If it’s a MAC you can
assume that what the values are is what you’ve set them to be!
Win9x
From your PC go Start/Run/winipcfg.
Win2K
To check your actual IP settings under W2K you first of all
need to drop into DOS again: Isn’t W2K great –
Microsoft’s great Windows OS and you still have to run
DOS programmes?!
Do start/run/cmd and click on OK.
Then, at the prompt enter
ipconfig \all
Ethernet adapter Local Area Connection:
Make sure that the Ethernet Adapter Information is for your
actual network card (see the example above).
Click on ‘More Info’:
Connection-specific DNS Suffix
Description . . . . . . . . . .
Fast Ethernet Adapter
Physical Address. . . . . . . .
DHCP Enabled. . . . . . . . . .
Autoconfiguration Enabled . . .
IP Address. . . . . . . . . . .
Subnet Mask . . . . . . . . . .
Default Gateway . . . . . . . .
DHCP Server . . . . . . . . . .
DNS Servers . . . . . . . . . .
NetBIOS over Tcpip. . . . . . .
Lease Obtained. . . . . . . . .
Lease Expires . . . . . . . . .
. : company
. : Realtek RTL8139(A)-based PCI
.
.
.
.
.
.
.
.
.
.
.
:
:
:
:
:
:
:
:
:
:
:
00-E0-18-2F-92-4B
No
Yes
192.168.1.20
255.255.255.0
192.168.1.1
192.168.1.1
Disabled
28 February 2002 12:57:21
03 March 2002 12:57:21
Check you have sensible numbers for IP address, Subnet,
- 14 -
and Default Gateway. If you just have 0.0.0.0 then either
you haven’t correctly set-up you IP settings on your PC or,
if trying to use DHCP, you haven’t correctly set-up DHCP
on the router. Also check that the IP address for your PC is
on the same subnet as the address given for the gateway
e.g. if the gateway is 192.168.1.1 then your computers
should be addresses where the first three numbers match
e.g. PC’s could be 192.168.1.2 or 192.168.1.3 or
192.168.1.4 or 192.168.1.xx etc.. If the address of your PC
does not match the subnet range of the gateway then either
the address of your PC or the gateway must be changed to
suite.
Also check you have a valid DNS address, if not then
check you have it set correctly in your IP settings or the
DHCP set-up on the router. Remember that if you are using
the DNS Relay feature of the router then the DNS address
should be the same address as the router/gateway.
Check you have sensible numbers for IP address, Subnet,
and Default Gateway. If you just have 0.0.0.0 then either
you haven’t correctly set-up you IP settings on your PC or,
if trying to use DHCP, you haven’t correctly set-up DHCP
on the router. Also check that the IP address for your PC is
on the same subnet as the address given for the gateway
e.g. if the gateway is 192.168.1.1 then your computers
should be addresses where the first three numbers match
e.g. PC’s could be 192.168.1.2 or 192.168.1.3 or
192.168.1.4 or 192.168.1.xx etc.. If the address of your PC
does not match the subnet range of the gateway then either
the address of your PC or the gateway must be changed to
suite.
Also check you have a valid DNS address, if not then
check you have it set correctly in your IP settings or the
DHCP set-up on the router. Remember that if you are using
the DNS Relay feature of the router then the DNS address
should be the same address as the router/gateway.
10. Then start your browser. If using IE then go to Tools/Internet Options/Connections. Check it says ‘Never dial a
connection’
- 15 -
11. Finally enter a valid web site name on the ‘Address’ line e.g. www.solwise.co.uk! It should work!!
5.2
Fault diagnosis script when you can’t get on to the internet (a more detailed
process)?
1. Is your modem/router actually connected to the ADSL line?
Check the STATUS light. Is it flashing or on full. If flashing then this means you haven’t got a connection to the DSLAM at
the local exchange.
Things to check:
I. Cable okay
plugged in right?
not going via an alternative route e.g. a patch panel?
faulty?
II. Check the Modulation
it should be G.dmt BUT might need to be ANSI.
To change Asus to use ANSI then you need to drop into CLI mode (via HyperTerminal or Telnet option 9).
Then enter
bsp mode ANSI
config save
@close
Reset router....
We had one Asus customer who had to do switch debug mode on so..
bsp mode ANSI
bsp debug on
config save
@close
Reset router....
III. Have you really got ADSL on the line?
IV. Lastly faulty router (but very unlikely – more likely line not set-up right by ISP/BT).
2. Have you got a connection to your ISP?
How can you tell?
On the Asus router go into the web configuration and select Statistics/PPP. Then click on Status.
Check the IPCP settings:
- 16 -
If the IPCP state is ‘Starting’ and the various IPCP IP values are 0.0.0.0 then you AREN’T logged into the ISP. You
should have ‘sensible’ IP values here for ‘local options IP address’ and also ‘remote options IP address’. If DNS relay
(with autodiscover) is on then you should also have sensible values for the DNS IP.
If no connection then things to check:
I. Obviously look at the user name and password. Are these correct. e.g. for Pipex the correct format of the user name is
‘[email protected]’.
II. For the Asus make sure that the ‘PPP Starting Status’ (on the second screen of the Channel set-up) is set to UP. If not
then the router won’t auto login.
III. Also for the Asus check that DOD (Dial On Demand – on the second screen of the Channel set-up) is not enabled. If it
is then the router will need to detect some local traffic before it will login.
IV. Check the VCI/VPI/Encapsulation. Get it wrong and it won’t login (not settings for KC are different than for BT).
V. Try the BT test account:
Enter the user name of bt_test@startup_domain
The password doesn’t matter.
NAT on.
Save settings and reset.
After Synch then check the PPP status again.
If now connected then the problem is with the ISP not letting you login with them.
(please note that using the bt test account the only web site that will work is www.bt.net/digitaldemo and you must be
using the bt_test DNS – see DNS list below)
VI. Lastly faulty router (but very unlikely – more likely line not set-up right by ISP/BT).
3. IP settings on Computer(s)?
Things to check:
I. Can you ping the router from the computer?
No?
Check IP address of computer is suitable (same subnet).
Can you ping yourself? e.g. if computer is 192.168.0.2 then can you ping 192.168.0.2? If not the IP set-up on
computer is really knackered. Removes ALL LAN settings on the computer and reinstall.
Check no clashes with any other computers (or net printers) on the LAN. Best to try normal LAN cable direct from
router to computer LAN card/port. If okay then check other computers/hubs/wiring.
Check LAN cable: You should have a ‘PC’ light on on the router (or for BI/VI the LAN light on the port should be
on) and also the ‘link’ light on the hub/PC LAN card should also be on.
Check LAN card.
Try removing ALL LAN set-up on computer and also LAN card installation. Reinstall and try again.
II. So you can ping router. Can you ping the DNS?
If you don’t know this and using DNS relay (with auto-discover) then check the ‘IPCP primary DNS server’ setting
for the DNS address.
No joy?
Check ‘default gateway’ on computer.
For Win 95/98/ME run ‘winipcfg’ to check this.
For NT4/2K/XP run ‘ipconfig \all’ in a DOS box.
Possibly might have some ‘wrong’ routes set-up on computer. Remove ALL LAN settings and
reinstall.
III. So you can ping the DNS (or outside address).
Does the computer have DNS enabled?
Check the DNS settings in TCP/IP set-up. DNS is enabled yes?
Does the computer have a valid DNS entry. Check winipcfg or ipconfig (see above). Note if using DNS relay
then DNS address on computer should be the same as the gateway. Also, if using DNS relay ensure that
‘IPCP primary DSN server’ has a sensible IP address (0.0.0.0 is not sensible!).
4. Browser set-up.
So the router’s working and the basic IP settings on the PC are correct (e.g. you can correctly ping the external DNS).
Common browser problems:
I. IE set to dial up when it should be using LAN – set connections to ‘Never Dial a Connection’.
II. Browser set to ‘work offline’
- 17 -
6 Advanced
6.1
Port Forwarding
The normal way of using your Asus router is in NAT mode (see below).
Most users will use their router with NAT enabled because this allows
them to ‘share’ their internet connectivity across their whole network
without needing a block of static IP addresses from the ISP i.e. the ISP
sees the whole of your LAN as a single IP address and the router
automatically sorts out traffic to the correct local clients:
However using NAT has it’s advantages and disadvantages. The
advantages are it allows you to easily run multiple PC’s through a
single user ISP account and it acts as a natural firewall stopping
unsolicited incoming traffic. However the disadvantage of NAT is that
some software needs the IP address of the PC to be ‘exposed’ to the
outside world – this is just what NAT stops!
The normal way around this problem whilst still retaining the NAT
mode is to use port forwarding. Port forwarding (also sometimes
called pinholeing) tells the router to direct certain incoming traffic to
specified local addresses. e.g. if you are wanting to run a local web
server on address 192.168.1.10 and you want external internet users to
be able to see your server then you need to instruct the router to
forward all port 80 TCP requests (the port used by http) to your local
server.
To set-up port forwarding bring up the router web
based configuration screen and click on Network
Service/NAT:
Now to add a port forwarding rule enter first of all
select the Protocol (e.g. http uses TCP). Then
enter the incoming port range (so, for example if
it’s just port 80 you want to forward then it will be
80~80) and enter the same range for the New ports
(e.g. 80~80). Finally enter the IP address of the
local client computer to receive the ports (e.g.
192.168.0.10):
Now click on submit. The rule is now added to the
‘Multiple Port Forwarding Table List’ in the
centre of the page.
Finally, and this is important (!), select Action
Save and click on submit again. This saves the
- 18 -
port rules into the flash memory so they are remembered if you do a router reset:
That covers basic port forwarding set-up.
6.2
DHCP
When connecting clients to a TCP network there are various IP parameters that must be configured on the client.
Namely:
Client IP address
Network Mask
Default Gateway
DNS address/domain
In the notes above it has been assumed that these settings will be manually set-up on each client. However there is a feature
called DHCP in which the router will automatically send these settings to the clients when they boot up and connect to the
router. To do this the router needs to be configured as a DHCP server.
6.2.1 Setting Up DHCP Server
Go to Network Service/DHCP Server:
For ‘interface’ select Ethernet or, if this is the VI model and you’ve configured the WLAN to be routed (i.e. on a different
segment to the wired network, see Quick/WLAN if using a VI model) you can also select WLAN if you want to use DHCP
on the wireless network. Then enter a starting and an end address for auto client IP allocation i.e. the range of addresses you
want the DHCP server (the router) to automatically use for the clients. The lease time tells it how long this address can be
used (leased) by a particular client. A Value of one day should be okay.
- 19 -
The click on Next....
The next screen is where you enter the other IP values that your clients will require: You remember above we said that a
client needs to know an IP address? Well the address values to be assigned to the clients was set-up on the first screen. This
second screen covers the other parameters required i.e. subnet mask, default route (gateway), DNS server address (and
domain name). The broadcast address is the address used by the DHCP server to tell the clients there is a DHCP server here
on the network; the segment address. 255 is the normal value to use to e.g. if your segment is 192.168.2.x then the broadcast
address is 192.168.2.255 or if it’s 192.168.1.x then use 192.168.1.255.
Click on Submit and reset the router. Now you need to make sure your clients are set-up to expect IP assignment from the
server.
6.2.2 Setting up Your PC Clients to use DHCP
For simplicity we shall assume you’re running Win98 or W2K. However the principles covered are exactly the same for
other operating systems albeit the screen shots will look different!
Win9x
Go to Start/Settings/Control Panel/Networks. Then select
the TCP/IP protocol entry for your network card and then
click on Properties. To use DHCP click on ‘Obtain an IP
address automatically’:
- 20 -
Win2K
Go to your local network settings (Start/Settings/Network
and Dialup Connections/Local Area
Connection/Properties).
Next go to the DNS Configuration and make sure that DNS
is enabled and you have entered a host name (this can be
anything you want!).
That’s all you should have to do! To test operation just
reboot your client and then check winipcfg; you should find
sensible IP settings (see previous section).
Scroll down the list of network settings until you find the
entry showing TCP/IP. Select it and then click on
Properties:
Tick on “Obtain an IP address automatically”
and “Obtain DSN server address automatically”. Finally
click OK, OK, Close to save the settings.
That’s all you should have to do! To test operation just
reboot your client (you shouldn’t have to reboot but I have
sometimes found it necessary to get W2K to request the
new settings from the server) and then in ipconfig you
should find sensible IP settings (see previous section).
- 21 -
6.3
Using your Router in Bridging Mode
Most users will use their router with NAT enabled. This allows
them to ‘share’ their internet connectivity across their whole
network without needing a block of static IP addresses from
the ISP i.e. the ISP sees the whole of your LAN as a single IP
address and the router automatically sorts out traffic to the
correct local clients:
However using NAT has it’s advantages and disadvantages.
The advantages are it allows you to easily run multiple PC’s
through a single user ISP account and it acts as a natural
firewall stopping unsolicited incoming traffic. However the
disadvantage of NAT is that some software needs the IP
address of the PC to be ‘exposed’ to the outside world – this is
just what NAT stops! For some applications you can get
around this using port forwarding but not always. In this case
the only way around the problem is to turn NAT off and open
up you network.
To do this you will first of all need to get a block of IP
addresses from your ISP so that you can allocate an IP address
to each of your clients. Then untick nat on the Quick Channel/Channel set-up page:
Now with NAT not running both the LAN side and WAN side of the
router are visible from the ISP (internet) along with your whole
network i.e. you will have no security!
Therefore you should now go to the IP Filter configuration and set-up
a rule which denies access to the router on ports 23 (used for Telnet)
and 80 (used for http configuration). Make sure that you have enabled
IP Filter on the Channel Configuration screen then go to the router
configuration, now on its allocated address (e.g. 123.45.67.137).
Select Network Service, then IP Filter. Click on RULES, then enter
the details for each of the following rules and click ADD:-
- 22 -
Rule 0
Rule 1
Source IP
0.0.0.0
0.0.0.0
Source Mask
0.0.0.0
0.0.0.0
Destination IP
<router's IP address (e.g. 205.192.150.100)>
<router's IP address (e.g. 205.192.150.100)>
Destination Mask
255.255.255.255
255.255.255.255
Protocol
TCP
TCP
Port
23
80
Next click on GROUPS. Leave Groups No set to 0. First enter 0, then 1 into Rules, followed each time by clicking ADD.
Make sure that the Policy is deny for Group 0 (i.e. deny access).
Finally click on HOME. For Channel No 1, enter 0 into Groups and click ADD.
Now click SAVE to save the router configuration.
6.4
Altering Configuration User/Password
The default user name and password are ‘adsl’ and ‘adsl1234’. However the AAM6000EV does allow you to both alter the
default user set-up and also create new users with three levels of permission:
MAINTENANCE
SETUP
MONITOR
-
Full access and configuration capability
Similar to above but no permission to create or edit users
Only permission to read or monitor settings
Go to Sys-Maintenance/User:
To alter the default ‘adsl’ main user select EDIT
for the ‘Action’ then enter the user number (1 for
the first ‘adsl’ user). Then alter the settings and
then click on Submit.
To add a new user select ADD for the ‘Action’
and then enter the new user details. Then click on
Submit.
After doing all the changes select SAVE for the
‘Action’ and then click on Submit again.
The new settings are then stored:
You should now ‘Reset’ the modem.
If you ever loose or forget your user name/passwords you will need to connect to your router user the Console interface with
a serial cable (see full manual for details). Then, when the router boots up press the ‘?’ key to restore the default user
(adsl/adsl1234).
- 23 -
6.5
IP Filter
6.5.1 Aims:
The IP filter function is working like a simple firewall. Users can set up policies per ATM channel to allow/deny the data
transfer to/from a certain IP address, or TCP/UDP port number. The IP filter should be used to give basic firewall capability
when not using NAT.
6.5.2 Procedures:
<Channel Configuration>
Before IP Filter Configuration starts, there MUST be at least one routing channel defined in Quick Setup/Channel and you
must check the IP Filter box in Channel Setup. check to enable the IP filter function for the channel.
<IP Filter Configuration Menu>
The <IP Filter> function can be found under <Network Service>. The IP filter configuration is independent in each channel,
so, users may define different group or set of groups to each channel. A channel may have up to 16 groups.
Channel No
The number of the ATM channel to be set up; normally this would be one
Groups
The policies to be ADDed or DELETEd for the channel. Users can type one or more groups or a range of groups. For
example, “0-2,4-5” means all Groups 0, 1, 2, 4, and 5 are included.
ADD
To add one or more pre-defined Groups to the channel. The new configuration will work immediately but NOT be
remembered after a router restart unless you do a SAVE (see below).
DELETE
To remove one or more Groups from the channel. The new configuration will work immediately but NOT be remembered
after a router restart unless you do a SAVE (see below).
FLUSH
- 24 -
To remove all Groups from the channel. As before, the new configuration will work immediately but NOT be remembered
after a router restart unless you do a SAVE (see below).
SAVE
To write the current settings of all channels to flash memory. All new settings are now available after the ADSL router
restarts.
Notes - ADD, DELETE and FLUSH are per channel actions.
<GROUPS>
To go to Groups Sub-menu
<RULES>
To go to Rules Sub-menu
List of IP-Filter Active Channels
It display the current status of the active channels
No: channel number with IP Filter enable
Interface:
ppp_device (e.g. PPPoA or PPPoE)
(e.g. MpoA or IpoA)
Groups:
selected groups in this channel
<Groups Sub-menu >
A group is the policy to deny or allow a certain packets, which are defined in rules. Each group is independent, and they
may refer to a single rule or a set of rules (max. 127). Users may define up to 16 different groups in a router.
Group No
The number of the Group to be defined.
Rules
The rules to be ADDed or DELETEd in the Group. Users can type one or more rules or a range of rules. For example, “02,4-5” means all Rules 0, 1, 2, 4, and 5 are included.
ADD
To add one or more pre-defined Rules in the Group. It will have effect after this action, but, the new setting will disappear
after ADSL router restarts (see SAVE below).
DELETE
To remove one or more Rules from the Group. It will have effect after this action, but, the new setting will disappear after
ADSL router restarts.
FLUSH
To remove all Rules in the Group. It will have effect after this action, but, the new setting will disappear after ADSL router
restarts.
SAVE
To write the current setting of the channel to flash memory. The new settings are now stored and available after ADSL
router restarts.
Notes - ADD, DELETE and FLUSH are per group actions.
POLICY
This simply means do you want the action of this rule to deny access or allow access.
<RULES>
To go to Rules Sub-menu
<HOME>
To return IP Filter Configuration Menu
- 25 -
<VIEW>
To open the ALL Rule List window
Groups List
It displays the current status of all groups.
Groups No: Group number 0~15
Modify:
toggle to allow or deny all rules included in the Group
DETAIL:
display to Rule List of the Group
<Rules Sub-menu>
Each rule can define the source and destination IP address, Port number and Protocols for se in Group sub-menu. A
maximum of 256 rules can be defined in the ADSL router.
NO
Rules index number. Enter the correct rule number for DELETE only.
Source IP
To define the source IP address in the rule.
Source Mask
To define the source subnet mask in the rule.
Destination IP
To define the destination IP address in the rule.
Destination Mask
To define the destination subnet mask in the rule.
For example,
IP = 192.168.1.1 Mask = 255.255.255.255 means 192.168.1.1 only
- 26 -
IP = 0.0.0.0 Mask = 0.0.0.0 means all IPs
IP = 192.168.0.0 Mask = 255.255.0.0 all IPs in 192.168.x.x subnet
Protocol
To define the protocol in the rule.
ALL = All IP packet
TCP = TCP packet only
UDP = UDP packet only
ICMP = ICMP packet only
Port
To define the TCP/UDP port number in the rule. Null entry means all ports.
ADD
To add a new defined Rule in the Rule List. It will have effect after this action, but, the new setting will disappear after
ADSL router restarts unless you do SAVE (see below).
DELETE
To delete a pre-defined Rule from the Rule List. The rule number MUST be entered in NO. It will have effect after this
action, but the new setting will disappear after ADSL router restarts.
FLUSH
To remove all Rules in the Rule List. It will have effect after this action, but, the new
setting will disappear after ADSL router restarts.
SAVE
To write the current setting to flash memory. The new settings are available after ADSL
router restarts.
<GROUPS>
To go to Groups Sub-menu
<HOME>
To return IP Filter Configuration Menu
List of Rules
It displays the current status of all groups.
6.6
Firmware Upgrade
To accomplish a firmware upgrade you will need the Asus Firmware Update software application which is available for the
downloads section of the Solwise site, www.solwise.co.uk/downloads.htm (it is assumed that you are using a standard PC
running Windows 9x or similar). Also, of course, the latest firmware file for upload. Contact Solwise direct or your dealer
for these files. DO NOT GO TO THE ASUS SITE FOR THIS. Solwise have their own, special firmware for UK use. You
cannot get this from the Asus site. To be kept informed of firmware releases as they happen you can also send and email to
the ev firmware mailing list. Just send a blank email (with a valid reply-to address) to [email protected].
Upgrade Procedure:
1.Set up the modem and pc ip address in the same subnet.
2.power on the modem.
3.After the modem has booted up then run the upgrade utility.
4.Enter the router username and password ("adsl" with password "adsl1234" is the default).
5.Click the button "open" to choose the "71146a1.hex"
6.Click the button "upgrade"
- 27 -
7.Select "Modem image" and "Configuration", click "upgrade"
8.Then click the button "Ok" to start upgrade firmware.
9.Wait about 40 seconds for the file to be sent to the router and the modem will then auto reboot.
10.After modem reboot go into router configuration via console or telnet or via http and choose System Maintenance and
then Factory Default Configuration.
11.After this all configurations of the modem will be cleared, and the modem's ip will become "192.168.1.1"
12.Modify you PC's ip to the same subnet with modem or modify the modem's ip via rs-232 console.
13.Open browser to access modem, the username is "adsl",password is "adsl1234"
14.Configure the modems Channel.
6.7
BSP Mode
This should only really be of interest if your router is refusing to synch with the line. The symptoms are that the Status LED
on the front of the router just keeps on flashing. You’ve checked the cable and the line and they’re okay.
If this happens then it might be that your line is using a non-standard ADSL mode. Normally UK ADSL lines use G.DMT
protocol however, occasionally if you have an RADSL line (Rate-adaptive ADSL) then your line might be a different
protocol. However, by default the Asus routers are set to use G.DMT protocol only. We set the routers this way to reduce
the amount of time taken by the router to synch with your line.
To get around this problem you need to configure your router to use ‘auto bsp mode’. When set to auto your router will
automatically try all the different protocols until it finds a match with your line. The only down side of doing this is that
synching will take a bit longer to achieve; however, since you only connect to your line the first time you switch the router
on then it doesn’t matter too much if it takes an extra minute or so to connect.
To change your router to use bsp mode auto you need to access the router using Telnet: For Win9x/Me you do
Start/Run/Telnet to start telnet but if unsure how to do this then talk to your dealer or software guru!.
Connect via telnet and enter your user name and password.
Then from the menu select option 9 (Exit User Mode...).
Now enter the command ‘bsp mode auto’...
- 28 -
Now tell the router to save this new setting. Enter
the command ‘config save’ and wait whilst the
router saves the settings...
Now shut the config screen down by doing
‘@close’. This will cause the connection to the
router. Now press the reset button on the router to
initiate the new setting.
If the problem with synching is due to the bsp
mode then hopefully this should fix the problem
:-)
6.8
DNS Addresses
Below shows the current name server (DNS) addresses as used by the most popular ISP’s. Please note that this should not be
taken as a definitive list and it might be that the address for a listed provider might have changed. You are therefore advised
to check with your ISP:
ISP
Pipex
DNS
158.43.240.4
158.43.240.3
194.72.7.57
194.73.82.242
212.159.11.150
212.159.13.150
195.112.4.4
195.112.4.7
158.152.1.58
158.152.1.43
213.120.62.100
194.72.6.57
194.72.6.52
194.72.6.51
212.50.160.28
194.106.56.6
212.104.130.9
212.104.130.65
BT_test (as used by bt_test@startup_domain)
PlusNet
Nildram
Demon
BT Openworld
KC
Freedom-2-Surf
Eclipse
- 29 -
6.9
Other Information
http://www.schneider.eclipse.co.uk/
http://www.solwiseforum.co.uk
http://www.adslguide.org.uk/
http://www.kemyst.com/aam6000ev.htm
http://www.nzdsl.co.nz/howtos/ASUS/externalhowto.html
- 30 -
A good selection of FAQ’s covering typical set-up scenario’s
with good examples of using IP Filter rules.
Solwise’s own forum for users to discuss problems and products.
Excellent source of ‘gossip’ and news on ADSL
A list of the command line interface commands
A quick set-up guide as written for the New Zealand market.
Contains several useful pointers.