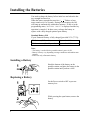
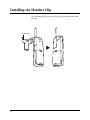
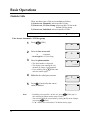
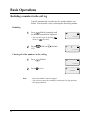
1
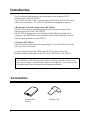
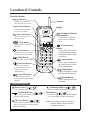
Digital Super Hybrid System
KX-TD816CE
KX-TD1232CE
User Manual Addendum
for
KX-TD7500CE
In this manual, the last letter “CE” of each model number is omitted.
Introduction
This User Manual Addendum provides information for the Panasonic DECT
Portable Station (PS), KX-TD7500.
Up to 16 PSs in the KX-TD816 system and up to 64 PSs in the KX-TD1232 system
can be used as extensions. To use the PS, the following equipment is required.
2-RF Interface Unit with 4-Station Line (KX-TD144)
The KX-TD144 must be optionally equipped with the Panasonic Digital Super
Hybrid System, KX-TD816 / KX-TD1232.
One KX-TD144 supports up to two Cell Stations (KX-TD142) and eight wired
extensions. One KX-TD144 can be installed to the KX-TD816 and up to two KXTD144s can be installed to the KX-TD1232.
Cell Station (KX-TD142)
This unit determines the range of the supporting PSs. Up to four calls can be made
at the same time in the range.
For more details about the KX-TD144 and KX-TD142, please refer to the
Installation Manual Addendum for the KX-TD144 / KX-TD142 / KX-TD7500.
The Cell Station (KX-TD142) in this product is a Restricted Product subject to the
laws of your country. It should not be exported or brought out of your country without authorization from the appropriate governmental authorities.
Accessories
Rechargeable
Battery
2
Handset Clip
Contents
Location of Controls .........................................................................
About the LCD (Liquid Crystal Display) .............................................
Installing the Batteries .....................................................................
4
6
8
Installing a Battery .............................................................................
Replacing a Battery ............................................................................
Charging a Battery..............................................................................
8
8
9
Initial Settings ...................................................................................
10
Registering the PS ..............................................................................
Selecting the Display Language.........................................................
Adjusting the Ringer Volume .............................................................
Adjusting the Receiver Volume..........................................................
10
10
11
11
Installing the Handset Clip ..............................................................
Basic Operations ...............................................................................
12
13
Making Calls ......................................................................................
Answering Calls .................................................................................
Call Hold ............................................................................................
Key Lock Setting................................................................................
13
17
18
19
Using the Directory...........................................................................
20
Storing Names and Numbers in the PS Dialing Directory ................
Storing Names and Numbers in the PBX Station Speed Dialing
Directory/Editing an Item in the PS Dialing and PBX Station Speed
Dialing Dierctory................................................................................
Dialing Using the Directory ...............................................................
Erasing an Item from the PS Dialing/PBX Station Speed Dialing
Directory.............................................................................................
Entering Characters ............................................................................
22
28
29
Key Operations .................................................................................
Other Operations ..............................................................................
Programming Overview ...................................................................
PS Programming...............................................................................
31
32
43
44
PS Programming Items Description...................................................
PS Programming Operations ..............................................................
44
49
PBX Programming............................................................................
52
PBX Programming Overview ............................................................
PBX Programming Operations...........................................................
52
53
Before Requesting Help....................................................................
Safety Instructions ............................................................................
54
56
24
26
3
Location of Controls
Portable Station
Ringing Indicator
Antenna
Flashes green when an
incoming call is received.
Volume Control Button
Display
Used to select the ringer
or receiver volume.
F1-F3
(Flexible CO) Buttons
(F1 through F3)
INT'
(Intercom) Button
Used to make or receive
intercom calls.
Used to seize a CO line or
access one of several features.
(Talk) Button
INT'
F1
F2
F3
Used to make, receive or
end calls.
(Clear/Transfer)
Button
CLR
C
CLR
(Cancel) Button
C
ABC
DEF
GHI
JKL
MNO
PQRS
TUV
WXYZ
Used to end calls, or exit the
directory or Function mode.
(Hold) Button
Used to place a call on hold.
(Book) Button
(Function) Button
Used to enter into the directory mode or select a menu
in the Function mode.
OK
Used to enter into the
Function mode or access
features by pressing
additional keys.
OK
Used to clear incorrect digits while entering numbers,
and transfer a call to another extension.
(Flash) Button
Used to disconnect a current
call and make another call.
(Auto/OK) Button
Used for System Speed
Dialing and storing program
changes.
(Redial) Button
Used to redial the last number dialed.
Combination buttons
(Pause) Button (
+
(Conference) Button (
)
+
ABC
Used to set the Call Forwarding or Do Not
Disturb (DND) features.
(Message) Button (
+
DEF
)
Used to leave a notification to the called
party or call back the message sender
(Message Waiting).
4
GHI
)
Used to establish a three party conversation.
Used to insert a pause in numbers.
(FWD/DND) Button (
+
)
Tone Button (
+
JKL
)
Used to change the dialling mode temporarily to tone (Pulse to Tone Conversion).
Note: These buttons can also be activated
using the display. Refer to the Key
Operations on page 31.
Location of Controls
Power Switch
ON
INT'
F1
F2
C
OFF
F3
CLR
ABC
DEF
GHI
JKL
MNO
PQRS
TUV
WXYZ
Headset Jack
OK
Microphone
Charge Contacts
Charger (KX-A275)
Charge Contacts
Charge Indicator
5
About the LCD (Liquid Crystal Display)
The display has two lines with 16 characters per line, and related
symbols to show information for call activities as shown below.
Symbols and Descriptions
In off-hook status.
In the Function mode.
In the Directory or Programming mode.
Message Waiting notification. Someone is waiting for your call.
The radio signals from the Cell Station
Strong
Medium
Weak
(Flashing)
The portable station is out of range. Move closer to the CS.
The battery strength
Fully charged.
Medium
Low
(Flashing)
6
The battery needs to be charged.
About the LCD (Liquid Crystal Display)
After setting the Power Switch to ON, the following displays may appear.
The portable station is in the stand-by mode.
The date and time (day / month / time) are displayed on the top
line. You can select displaying the date only (day / month) in PS
Programming. (Selecting the Date / Time Display)
The number which is determined in PS Programming (e.g., your
extension number) can be displayed on the bottom line. (Selecting
the Standby Display; default – OFF)
1 JAN 11:00
Consult with your dealer.
FAULT
The Call Forwarding feature has been set.
FWD
The Do Not Disturb (DND) feature has been set.
DND
KEYPAD LOCKED
PRESS F FOR 2SEC
The key lock mode has been set to ON. To cancel the mode, press
(Function) for 2 seconds. (Refer to page 19.)
Your PS is not registered in the system.
REGISTER UNIT
Your PS is out of range.
NO SERVICE
7
Installing the Batteries
You need to charge the battery before initial use and when the battery strength becomes low.
When the battery strength becomes low, “
” flashes or beep
tones sound every five seconds. During a conversation, the call
will hang up automatically within three minutes. If idle or in the
programming status, “BATTERY EMPTY” is displayed and the key
operation is canceled. In these cases, recharge the battery or
replace with a fully charged optional spare battery.
Standard Battery Life
If your Panasonic battery is fully charged [provided 25°C (77°F)]:
While in use (Talk mode)
While not in use (Stand-by mode)
Up to about 10 hours
Up to about 100 hours
Note:
– The battery is used while the portable station’s power is ON.
– Battery life may vary depending on usage conditions and ambient temperature.
– Please use only a Panasonic battery.
Installing a Battery
Hook the bottom of the battery on the
portable station, and place the battery in the
portable station until you hear a click.
1
Replacing a Battery
Set the Power switch to OFF to prevent
memory loss.
1
INT'
OFF
F1
F2
C
2
8
F3
CLR
While pressing the open-button, remove the
battery.
Installing the Batteries
Charging a Battery
1
Connect the Charger to a power outlet using the AC adaptor.
Cord Holder
Charger
(KX-A275)
To Power Outlet
(230 VAC, 50 Hz)
AC Adaptor
(KX-A11BS1)
Slide the battery-attached portable station
or the battery in the Charger.
2
INT'
F1
F2
C
Note:
CLR
ABC
DEF
GHI
JKL
MNO
PQRS
TUV
WXYZ
OK
Charge
Indicator
F3
Charge the battery for about 1.5 hours.
When charging is completed, the charge
indicator will change from orange to green.
CAUTION
The AC adaptor is used as the main disconnect device, ensure that the socket-outlet is
located / installed near the equipment and is
easily accessible.
– Do not let the charged battery’s electrodes to touch metallic objects.
The terminal may short and overheat, causing burns.
– Clean the charge contacts on both the portable station and the Charger
with a soft cloth once a month, or the battery may not charge properly.
– The portable station can receive calls even while charging.
– You need not worry about overcharging.
9
Initial Settings
Registering the PS
After charging the battery, you must register your PS in the system
and determine its’ extension number.
For registration, refer to System Program [650], “PS
Registration”, in Section 3 in the Installation Manual Addendum
for the KX-TD144/KX-TD142/KX-TD7500.
Selecting the Display Language
The default setting of the PS displaying language is “AUTO
(English)”. For example, to select the German display, see the
method below. If your PS is assigned to the Digital Super Hybrid
System while the default setting is still “AUTO”, the displaying
language will depend on the setting of the system.
1
Press
(Function).
KEY
2
Press
(Book) 2 times.
• You can also search by pressing
(Next) or
(Previous).
3
Press
OK
PROGRAMMING
(OK).
PS-PROGRAM
4
Press
OK
(OK).
BACKLIGHT
= ON
5
6
7
8
10
Press
(Next) or
(Previous)
repeatedly until the display for the
Language Selection appears.
Press
(Book) repeatedly until the
language you use is displayed.
Press
OK
LANGUAGE
= AUTO
LANGUAGE
= GERMAN
(OK).
To exit the PS Programming mode,
press C (Cancel).
Verzeichnissper.
= Aus
Initial Settings
Adjusting the Ringer Volume
The ringer volume has seven levels which is indicated by the number of asterisks on the display. [Default: *** (level 3)]
If you do not want your portable station to ring, you can select Off,
or Vibration which is convenient while in a meeting, etc.
INT'
F1
F2
C
During on-hook status or when the portable station is ringing
Press the VOLUME (UP
/ Down ) Control
button.
F3
CLR
ABC
DEF
GHI
JKL
MNO
PQRS
TUV
WXYZ
Example: Level 3
RINGER
***
Example: Off
RINGER
Example: Vibrating
VIBRATION CALL
OK
Note
– In addition to the ringer patterns above, there are several combination
of vibration and ring types. Refer to “Selecting the Vibration and Ring
Type” in PS Programming.
– The portable station rings for an incoming call while charging even
when it is set to vibrate.
Adjusting the Receiver Volume
The receiver volume has three levels which is indicated by the
number of asterisks on the display.
During a conversation
Press the VOLUME (UP
button.
INT'
F1
F2
C
F3
/ Down
) Control
Example: Level 2
CLR
ABC
DEF
GHI
JKL
MNO
PQRS
TUV
WXYZ
RECEIVER
**
11
Installing the Handset Clip
You can hang the PS on your belt or pocket by attaching the handset clip.
Handset Clip
12
Basic Operations
Making Calls
Intercom Calls
Make sure the Power Switch is set to ON (●) and “ ” is displayed.
INT'
1
Press
(Talk) or
(Intercom).
2
Enter the extension number.
• The dialed number is displayed.
• If you misdial, press
(Flash) and
enter the number again.
3
201
Talk after the called party answers.
201
4
Note:
Press C (Cancel) after the conversation is finished.
– Predialing is also possible. In this case, reverse steps 1 and 2.
– If you misdial while predialing, press
(Clear) to clear each digit
from the last one, and enter the number again.
– You can also finish the conversation by placing the PS on the Charger
or pressing
(Talk).
– If “ ” flashes, move towards the Cell Station and try again.
CLR
Handover:
Even if you move during a conversation, the linking CS is automatically
switched without disconnecting the call.
Handover is available only during a conversation (except a conference call).
It is not available when the switched CS is busy or there is no CS in the
moving range.
13
Basic Operations
Outside Calls
There are three types of line access methods as follows:
1) Line Access, Automatic: selects an idle CO line.
2) Line Access, CO Line Group: selects an idle CO line in the
desired CO line group.
3) Line Access, Individual: selects a specific CO line.
Make sure the Power Switch is set to ON (●) and “ ” is displayed.
Line Access, Automatic / CO line group
1
Press
(Talk).
2
Enter the line access code.
–
9
: Automatic
– 81 through 88 : CO Line Group
3
Enter the phone number.
• The dialed number is displayed.
• The display starts counting the call
duration (or charge, if programmed).
• If you misdial, press
(Flash) and
enter the number again.
4
01234567
Talk after the called party answers.
CO01
5
Note:
14
0:01’15
Press C (Cancel) after the conversation is finished.
– Predialing is also possible. In this case, press
(Talk) (step 1)
after entering the phone number (steps 2 and 3).
– You can also finish the conversation by placing the PS on the Charger
or pressing
(Talk).
– If “ ” flashes, move towards the Cell Station and try again.
Basic Operations
Line Access, Individual
F1-F3
1
Press
2
Enter the phone number.
(Flexible CO).
• The dialed number is displayed.
• The display starts counting the call
duration (or charge, if programmed).
• If you misdial, press
(Flash) and
enter the number again.
3
01234567
Talk after the called party answers.
CO01
4
Note:
Press
sation.
C
0:01’15
(Cancel) after the conver-
– Predialing is also possible. In this case, reverse steps 1 and 2.
– You can also finish the conversation by placing the PS on the Charger
or pressing
(Talk).
– If “ ” flashes, move towards the Cell Station and try again.
15
Basic Operations
Redialing a number in the call log
Your PS automatically saves the last five outside numbers you
dialed. You can make a call by selecting the desired log number.
Redialing
1
Press
(Redial) repeatedly until
the desired log number is displayed.
• You can also search by pressing
(Next) or
(Previous).
01234567
F1-F3
2
Press
CO).
(Talk) or
(Flexible
01234567
Clearing all of the numbers in the call log
1
Press
(Redial).
01234567
2
Note:
16
Press
CLR
(Clear).
CLEARED
– Extension numbers cannot be logged.
– You can also execute the redialing or clearing the call log operation
after going off-hook.
Basic Operations
Answering Calls
When you receive a call, the portable station (PS) rings or vibrates,
and the CO line number or extension number of the receiving call
appears on the display.
Make sure the Power Switch is set to ON (●) and “ ” is displayed.
If the PS is not on the Charger
1
Press
(Talk) or the flashing
F1-F3
(Flexible CO).
CO01
0:01’15
CO01
0:01’15
• The display starts counting the call
duration (or charge, if programmed).
2
To hang up, press C (Cancel) or
or place the PS on the Charger.
(Talk)
If the PS is on the Charger (Quick Answering)
1
Just lift up the PS.
• The display starts counting the call
duration (or charge, if programmed).
2
Note:
To hang up, press C (Cancel) or
or place the PS on the Charger.
(Talk)
– Quick Answering is available only when the Quick Answering mode is
set to “ON”. Refer to “Setting the Quick Answering Mode” in PS
Programming.
If a headset is connected to the PS
You can select the answering mode by PS Programming as follows.
– OFF (default): Answers using normal operations.
(Refer to the operations above.)
– INT/CO: Automatically receives all incoming calls.
– INT ONLY: Automatically receives incoming intercom calls.
To select the automatic answer mode, refer to “Setting the
Automatic Answer Mode” in PS Programming.
17
Basic Operations
Call Hold
You can place a call on hold. Exclusive hold is also possible so
that no one can retrieve the call.
Placing a call on hold
1
Press
tion.
(Hold) during a conversa-
Retrieving a call on hold
F1-F3
1
Note:
INT'
Press the
(Flexible CO) or
(Intercom) button which is flashing
green slowly.
– You can retrieve a call on hold which has been placed on hold by
another extension. Refer to “DPT Features – Call Hold Retrieve” in
the User Manual for the model KX-TD816 / KX-TD1232.
Placing a call on exclusive hold
1
Press
(Hold) twice during a conversation.
Retrieving a call on exclusive hold
F1-F3
1
18
INT'
Press the
(Flexible CO) or
(Intercom) button which is flashing
green moderately.
Basic Operations
Key Lock Setting
You can lock the dialing buttons. Incoming calls can be answered,
but no outgoing calls can be dialed.
Setting
While on-hook
Press
(Function) for 2 seconds.
KEY
KEYPAD LOCKED
PRESS F FOR 2SEC
Canceling
While on-hook
Press
(Function) for 2 seconds.
1 JAN 11:00
19
Using the Directory
You can store names and/or phone numbers in the directory.
A stored number is dialed out by selecting a name or phone number in the directory.
There are four types of directory features, including one PS directory and three PBX directories, as follows.
PS Dialing Directory:
You can store up to 100 private names and phone numbers of outside parties. All directory items are stored in alphabetical order.
To store the names and numbers, refer to page 22.
PBX System Speed Dialing Directory:
You can make a call via the system by selecting system-assigned
names and phone numbers. To store the names and numbers (500
max.), refer to program [001-002], “System Speed Dialing
Number/Name Set” in System Programming of the KXTD816/KX-TD1232 Installation Manual.
PBX Extension Dialing Directory:
You can make a call via the system by selecting system-assigned
extension names. To store the names, refer to program [004],
“Extension Name Set” (in System Programming of the KXTD816/KX-TD1232 Installation Manual) and [653], “PS Extension
Name Set” (in Installation Manual Addendum for the KXTD144/KX-TD142/KX-TD7500).
PBX Station Speed Dialing Directory:
You can make a call via the system by selecting your privately
assigned names and phone numbers. To store the names and numbers (10 max.), refer to page 24.
You can store, edit or delete the PS Dialing Directory or PBX
Station Speed Dialing Directory items at your PS. There are five
displays for directory entry/edition/deletion as shown on the next
page.
20
Using the Directory
KEY
MODIFY BOOK
*: Only displayed when registered
to a Panasonic Digital Super
Hybrid System.
Also, it is not displayed when
out of range.
PS-NEW-ENTRY
Storing the PS Dialing
Directory items
PS-EDIT
Editing the PS Dialing
Directory items
PBX-STA-EDIT
Storing or editing the
PBX Station Speed
Dialing Directory items*
PS-DELETE
Deleting the PS Dialing
Directory items
PBX-STA-DELETE
Deleting the PBX Station
Speed Dialing Directory items*
21
Using the Directory
Storing Names and Numbers in the PS Dialing Directory
Note:
– If you misdial, press
(Clear) to clear each digit from the last one,
and enter the number again.
– Press C (Cancel) to exit the Directory mode.
CLR
Storing from Name to Phone Number
1
Press
(Function).
KEY
2
Press
(Book).
• You can also search by pressing
(Next) or
(Previous).
3
Press
OK
MODIFY BOOK
(OK).
PS-NEW-ENTRY
4
5
Press
OK
(OK).
• The number of stored items and
remaining capacity are displayed.
ENTER NAME
=1/99 REMAINS
Enter the name (up to 16 characters).
(Refer to page 29.)
Panasonic
• If you only want to store a phone number, skip this step.
6
Press
OK
(OK).
Panasonic
ENTER PHONE-NO.
7
8
Enter the phone number (up to 32
digits).
Press
OK
Panasonic
0123456789
(OK).
STORED
22
Using the Directory
Storing from Phone Number to Name
1
Enter the phone number (up to 32
digits).
0987654321
2
Press
(Function).
KEY
3
Press
(Book).
• You can also search by pressing
(Next) or
(Previous).
4
Press
OK
MODIFY BOOK
(OK).
PS-NEW-ENTRY
5
Press
OK
(OK).
• The number of stored items and
remaining capacity are displayed.
6
Enter the name (up to 16 characters).
• If you only want to store a phone number, skip this step.
7
ENTER NAME
=1/99 REMAINS
Press
OK
Panasonic-SCD
(OK).
Panasonic-SCD
0987654321
8
Press
OK
(OK) again.
STORED
23
Using the Directory
Storing Names and Numbers in the PBX Station Speed Dialing Directory /
Editing an Item in the PS Dialing and PBX Station Speed Dialing Directory
1
Press
(Function).
KEY
2
Press
(Book).
• You can also search by pressing
(Next) or
(Previous).
3
Press
OK
MODIFY BOOK
(OK).
PS-NEW-ENTRY
4
Press
(Book) repeatedly until
the desired “EDIT” display appears.
– PS-EDIT: PS Dialing Directory
– PBX-STA-EDIT: PBX Station Speed
Dialing Directory
Example
PS-EDIT
• You can also search by pressing
(Next) or
(Previous).
5
Press
OK
(OK).
Panasonic
0123456789
6
To edit an item, press
(Book)
repeatedly until the desired item is
displayed.
To store an item in the PBX Station
Speed Dialing Directory for the first
time, press
(Book) repeatedly to
select the blank display.
Panasonic
0123456789
• You can also search by pressing
(Next) or
(Previous).
7
Press
OK
(OK).
PPanasonic
0123456789
24
Using the Directory
8
Edit the name. (Refer to page 29.)
• Up to 10 characters can be stored in the
PBX Station Speed Dialing Directory.
Panasonic-SCD
0123456789
• If you only want to edit a phone number, skip this step.
9
Press
OK
(OK).
Panasonic-SCD
0123456789
10
Edit the number.
• Up to 24 digits (including the CO line
access code) can be stored in the PBX
Station Speed Dialing Directory.
Panasonic-SCD
09876543211
• If you only want to edit a name, skip
this step.
11
Press
OK
(OK).
• You can store, edit or delete directory
items continuously.
STORED
Example
PS-EDIT
Note:
– It is not possible to edit the items in the PBX System Speed Dialing or
PBX Extension Dialing Directories.
– The CO line access code must be entered to store the phone number of
an outside party in the PBX Station Speed Dialing Directory, while it is
not required in the PS Dialing Directory.
– If you misdial, press
(Clear) to clear each digit from the last one,
and enter the number again.
– Press C (Cancel) to exit the Directory mode.
CLR
25
Using the Directory
Dialing Using the Directory
There are two ways you can dial for items in the directory.
• Dialing by selecting the name
• Dialing by selecting the entry
There are four displays for directory dialing as follows.
Note:
PS-DIALING
PS Dialing Directory
PBX-SYS-DIALING
PBX System Speed Dialing Directory
PBX-EXT-DIALING
PBX Extension Dialing Directory
PBX-STA-DIALING
PBX Station Speed Dialing Directory
– Press C (Cancel) to exit the Directory mode.
– These displays do not appear when registered to a PBX other than the
Panasonic Digital Super Hybrid System or when out of range. In this
case, the directory item (e.g., display in step 2 in “Dialing by selecting
the name”) appears after pressing
(Book).
– Transferring a call using the directory item is also possible. In this
case, press
(Transfer) during a conversation and then dial by
selecting the directory item.
CLR
Dialing by selecting the name
Example
1
26
Press
(Book) repeatedly until
the desired directory feature is displayed.
PS-DIALING
Using the Directory
2
Press
3
Press the dialing button of the letter
of the desired name repeatedly until
the first item under the desired letter
is displayed. (Refer to page 29.)
4
OK
(OK).
BILLY JANE
0011223344
Press
OK
Example
P
(OK).
Panasonic
0123456789
5
Press the
(Next) or
(Previous) repeatedly until the desired
item is displayed.
6
Press
Panasonic-SCD
0123456789
INT'
(Talk),
(Intercom)
F1-F3
or
Panasonic-SCD
0123456789
(Flexible CO).
Dialing by selecting the entry
Example
1
2
Press
(Book) repeatedly until
the desired directory feature is displayed.
Press
OK
PS-DIALING
(OK).
BILLY JANE
0011223344
3
Press the
(Next) or
(Previous) repeatedly until the desired
item is displayed.
4
Press
Panasonic
0123456789
INT'
(Talk),
F1-F3
or
(Flexible CO).
(Intercom)
Panasonic
0123456789
27
Using the Directory
Erasing an Item from the PS Dialing / PBX Station Speed
Dialing Directory
1
Press
2
Press
(Function).
KEY
(Book).
• You can also search by pressing
(Next) or
(Previous).
3
Press
4
Press
(Book) repeatedly until
the desired “DELETE” display
appears.
OK
MODIFY BOOK
(OK).
PS-NEW-ENTRY
Example
PS-DELETE
• You can also search by pressing
(Next) or
(Previous).
5
Press
6
Press
(Book) repeatedly until
the desired item that you want to edit
is displayed.
OK
(OK).
Panasonic
0123456789
Panasonic
0123456789
• You can also search by pressing
(Next) or
(Previous).
7
Press
OK
(OK).
• You can store, edit or delete directory
items continuously.
DELETED
Example
PS-DELETE
Note:
28
– It is not possible to delete the items in the PBX System Speed Dialing
or PBX Extension Dialing Directories.
– Press C (Cancel) to exit the Directory mode.
Using the Directory
Entering Characters
Dialing buttons can be used as letters and symbols for character
input keys. Pressing each button selects a character as shown
below. While entering characters, the cursor will flash on the display.
Combination Table
Number of pressing times
8
9
s
7
Z
z
9
)
0
Keys
1
2
3
4
5
6
7
1
Ä
ä
Ö
ö
Ü
ü
1
2
A
a
B
b
C
c
2
3
D
d
E
e
F
f
3
4
G
g
H
h
I
i
4
5
J
j
K
k
L
l
5
6
M
m
N
n
O
o
6
7
P
p
Q
q
R
r
S
8
T
t
U
u
V
v
8
9
W
w
X
x
Y
y
0
(space)
.
:
/
–
(
Note:
– If you misdial, press
(Clear) to clear each digit from the last one,
and enter the number again.
– Use
or
to move the cursor to change or enter a character.
CLR
29
Using the Directory
For example, to enter “Tom Jones”:
1
Press
TUV
.
T
2
Press
MNO
six times.
To
3
Press
right.
4
Press
to move the cursor to the
To
MNO
two times.
Tom
5
Press
to enter a blank.
Tom
6
Press
JKL
.
Tom J
7
Press
MNO
six times.
Tom Jo
8
Press
right.
9
Press
to move the cursor to the
Tom Jo
MNO
four times.
Tom Jon
10
Press
11
Press
DEF
four times.
Tom Jone
PQRS
eight times.
Tom Jones
30
Key Operations
The following buttons can be activated by display operations.
Pause Button
FWD/DND Button
Message Button
Conference Button
Tone Button
These buttons can also be activated using a combination of buttons.
For descriptions and button combinations, refer to page 4.
For operations where the buttons are used, refer to the “DPT
Features” in the KX-TD816 / KX-TD1232 User Manual.
1
Press
(Function).
KEY
2
Press
OK
(OK).
PAUSE
3
Press
(Book) repeatedly until
the desired button is displayed.
• You can also search by pressing
(Next) or
(Previous).
4
Press
5
Continue with the required operations.
OK
(KEY1)
Example
FWD/DND
(KEY2)
(OK).
31
Other Operations
Most of the features described in the User Manual for the model
KX-TD816 / KX-TD1232 are supported by a system with a DECT
portable station (PS).
However, there are some exceptions and advanced feature as listed
below.
NEWLY SUPPORTED FEATURE
Super Extra Device Port (SXDP)
– Refer to page 41.
Note:
32
NOT SUPPORTED FEATURES
Background Music (BGM)
Executive Busy Override – CO Line
EXtra Device Port (XDP)
Handsfree Operation
– PS is not provided with a built-in speaker.
Live Call Screening (LCS)
Log-In / Log-Out
Microphone Mute
Off-Hook Monitor
Paging – Deny
Paralleled Telephone (PT and SLT)
Phantom Extension
Redial, Automatic
Operator Service Features
Ring Group
Uniform Call Distribution (UCD)
– For more details, please refer to the User Manual for the model KXTD816 / KX-TD1232.
– For buttons which are not provided with the PS, refer to the Key
Operation or PBX Programming.
– While on-hook status, the LED (Light Emitting Diode) button indicators do not work.
– The PS may not show complete displays like other PTs with displays.
– In the operation procedure, note the expressions shown below.
Off-Hook : Press the Talk button.
On-Hook : Press the Talk or Cancel button.
Other Operations
■ Absent Message Capability
■ Alternate Calling — Ring/Voice
There are nine flexible absent messages available. If you select a message, it will be shown
on the display of the calling party’s telephone.
If required, messages 7, 8 and 9 can be
assigned by System Programming. For System
Programming, refer to the KX-TD816/KXTD1232 Installation Manual.
You can select ring or voice calling when making an intercom call to a proprietary telephone
(PT) user. In the Voice-Calling mode, you can
announce to the other party immediately after
the confirmation tone.
Setting
• Off-hook.
• Dial 750.
• Dial a message number (1-9) + parameter
(such as an extension number, if required).
- 1 : “Will Return Soon”
- 2 : “Gone Home”
- 3 + extension number :
“At Ext (extension number)”
- 4 + hour (00-23) + minute (00-59) :
“Back at (time)”
- 5 + month (01-12) + day (01-31) :
“Out Until (date)”
- 6 : “In a Meeting”
- 7-9 : User programmable messages
• On-hook.
• Press , when hearing the ringback tone.
— A confirmation tone is audible.
(The Voice-Calling mode is active.)
Canceling
• Off-hook.
• Dial 7500.
• On-hook.
■ Account Code Entry
Used to identify outside calls, for accounting
and billing purposes. If required, you may be
forced to enter account code before dialing.
Entering before dialing
• Off-hook.
• Dial 49 (or press the Account button).
• Enter the account code (up to five digits) + #.
Entering during or after a conversation
During a conversation or while hearing a
reorder tone after the other party hangs up
• Dial 49 (or press the Account button).
• Enter the account code + #.
If the called extension has set the RingCalling mode;
If the called extension has set the VoiceCalling mode;
• Press , when hearing the confirmation tone.
— A confirmation tone is audible.
(The Ring-Calling mode is active.)
■ Answering, Direct CO Line
You can answer an outside call by simply
pressing a CO button.
• Press the CO button (flashing red rapidly).
■ Automatic Callback Busy (Camp-On)
When the selected CO line or extension you
have dialed is busy, dial the camp-on code and
hang up. Your PS will ring when the selected
CO line or called party becomes idle. When
you answer the callback, the called extension
automatically starts ringing or the CO line is
automatically selected to make an outside call.
Setting
While hearing a busy tone
• Dial 6.
— A confirmation tone is audible.
• On-hook.
Answering an intercom recall
• Off-hook.
Answering a CO line recall
• Off-hook.
• Dial the phone number.
33
Other Operations
Canceling
• Off-hook.
• Dial 46.
• On-hook.
■ Busy Station Signaling (BSS)
You can inform a busy extension, which has set
Call Waiting, that you are waiting. The extension will hear three beeps.
While hearing a busy tone
• Dial 1.
• Wait for an answer.
■ Call Forwarding
Automatically transfers incoming calls to
another extension or to an external destination.
The following types are available:
All Calls
All calls are forwarded to another extension.
Busy
Calls are forwarded to another extension when
your extension is busy.
No Answer
Calls are forwarded to another extension if you
don’t answer the call.
Busy/No Answer
Calls are forwarded to another extension if your
extension is busy or you don’t answer.
to CO Line
Calls are forwarded to a CO line.
Follow Me
You can remotely set Call Forwarding – All
Calls from another extension.
Setting
• Off-hook.
• Dial 710 (or press the FWD/DND button).
34
• Dial as follows:
- 2 + extension number : All Calls
- 3 + extension number : Busy
- 4 + extension number : No Answer
- 5 + extension number : Busy/No Answer
- 6 + line access code (9, 81-88) + phone
number + # : to CO Line
- 7 + your extension number : Follow Me
• On-hook.
Canceling
- At the original extension
• Off-hook.
• Dial 710 (or press the FWD/DND button).
• Dial 0.
• On-hook.
- At the destination extension — “Follow Me
(All Calls)” only
• Off-hook.
• Dial 710 (or press the FWD/DND button).
• Dial 8 + your extension number.
• On-hook.
■ Call Hold, Retrieve
You can retrieve a call which has been placed
on hold by another extension.
Retrieving an outside call on hold
- at another extension
• Press the CO button (flashing red slowly).
Retrieving an intercom call on hold
- at another extension
• Dial 51 + the holding extension number.
Other Operations
■ Calling/Connected Line Identification
Presentation (CLIP/COLP)
Allows you to display your number on the LCD
of the called party’s telephone when making a
call (CLIP), or allows you to display your number
on the LCD of the calling party’s telephone when
answering a call (COLP) through an ISDN line.
To select a CLIP/COLP number for an outside line
• Off-hook.
• Dial 7111.
• On-hook.
To select a CLIP/COLP number for an
extension
• Off-hook.
• Dial 7112.
• On-hook.
■ Call Park
You can place a held call into a system parking
area so that any other extension user can
retrieve it.
Setting
During a conversation
• Press the Transfer button.
— A confirmation tone is audible.
• Dial 52 + parking zone number (0 through
9).
— A confirmation tone is audible.
• On-hook.
■ Call Pickup, CO Line
You can answer an incoming outside call ringing at another extension.
• Off-hook.
• Dial 4 .
■ Call Pickup, Directed
You can answer an incoming call ringing at any
other extension.
• Off-hook.
• Dial 41 + the extension number.
■ Call Pickup, Group
You can answer an incoming call ringing at
another extension within your extension group.
• Off-hook.
• Dial 40.
■ Call Pickup Deny
You can prevent another extension from picking
up your calls.
Setting / Canceling
• Off-hook.
• Dial 720.
• Dial 1 or 0.
- 1 : to set
- 0 : to cancel
— A confirmation tone is audible.
• On-hook.
Retrieving
• Off-hook.
• Dial 52 + the parking zone number.
35
Other Operations
■ Call Splitting
■ Call Waiting
You can have a two callers on a line and alternate between them.
Informs you with three beeps that there is a call
waiting.
During a conversation while holding another call
• Press the CO or INT' button (flashing red
moderately).
Setting / Canceling
• Off-hook.
• Dial 731.
• Dial 1 or 0.
- 1 : to set
- 0 : to cancel
— A confirmation tone is audible.
• On-hook.
(Pressing this button alternates between the callers.)
During a conversation with an intercom call
while holding another intercom call
• Press Hold button.
(Pressing this button alternates between the callers.)
■ Call Transfer – to CO Line
You can transfer a call to a CO line.
During a conversation
• Press the Transfer button.
• Press the CO button.
• Dial the phone number.
• Wait for an answer and announce.
• On-hook.
■ Call Transfer – to Extension
You can transfer a call to another extension
(screened or unscreened).
Screened Call Transfer
During a conversation
• Press the Transfer button.
• Dial the extension number.
• Wait for an answer and announce.
• On-hook.
Unscreened Call Transfer
During a conversation
• Press the Transfer button.
• Dial the extension number.
• On-hook.
36
To talk to the new caller, terminate the current call
While hearing a Call Waiting tone
• Press the CO or INT' button.
To talk to the new caller, hold the current
call
While hearing a Call Waiting tone
• Press the Hold button.
• (Press the CO or INT' button.)
■ Conference
You can make a three-party conversation.
During a conversation
• Press the Conference button.
• Dial the third party.
• Talk to the third party.
• Press the Conference button.
■ Conference, Unattended
You can leave a three-party conversation with
two other outside parties and let them continue
their conversation.
During a conversation with two outside parties
• Press the Conference button.
Other Operations
■ Data Line Security
Your extension is protected against interruption
from the “Call Waiting,” “Hold Recall,” and
“Executive Busy Override” features.
Setting / Canceling
• Off-hook.
• Dial 730.
• Dial 1 or 0.
- 1 : to set
- 0 : to cancel
— A confirmation tone is audible.
• On-hook.
■ Direct Inward System Access (DISA)
Allows a CO caller to access specific system
features as if the caller is an extension in the
system. The DISA outgoing message is used to
give CO callers assistance with things such as
listing the extension numbers in the system.
■ Display Call Information
You can alternate the display (the meter, phone
number, phone charge) during a conversation
with an outside party.
• Press the FWD/DND button.
■ Do Not Disturb (DND)
You can prevent other parties from disturbing
you. The extension will not receive calls and
the call may be transferred to a backup extension.
Setting
• Off-hook.
• Dial 710 (or press the FWD/DND button).
• Dial 1.
— A confirmation tone is audible.
• On-hook.
• Off-hook.
• Dial 710 (or press the FWD/DND button).
• Dial 0.
— A confirmation tone is audible.
• On-hook.
■ Do Not Disturb Override
You can call an extension even though Do Not
Disturb is set.
• Dial 1 while hearing the Do Not Disturb tone.
■ Doorphone Call
You can answer or make a doorphone call.
Moreover, you can unlock the door.
Answering a doorphone call
• Off-hook.
Calling a doorphone
• Off-hook.
• Dial 31.
• Dial the doorphone number as follows.
– 1 or 2 : if connected to a KX-TD816
– 1 through 4 : if connected to a KX-TD1232
To unlock the door (programmed extensions
only)
• Off-hook.
• Dial 55.
• Dial the doorphone number as follows.
– 1or 2 : if connected to a KX-TD816
– 1 through 4 : if connected to a KX-TD1232
— A confirmation tone is audible.
• On-hook.
To unlock the door while talking to the doorphone
• Dial 5.
— A confirmation tone is audible.
• On-hook.
Canceling
37
Other Operations
■ Electronic Station Lockout
You can lock your extension so that other users
cannot make outside calls at your extension.
You can prevent other extension users from
interrupting your conversation.
Locking
• Off-hook.
• Dial 77 + the lock code (000 through 999).
• Dial the same lock code again.
— A confirmation tone is audible.
• On-hook.
Setting / Canceling
• Off-hook.
• Dial 733.
• Dial 1 or 0.
- 1 : to set
- 0 : to cancel
— A confirmation tone is audible.
• On-hook.
Unlocking
• Off-hook.
• Dial 77 + the lock code.
— A confirmation tone is audible.
• On-hook.
■ Emergency Call
You can make an emergency call without dial
restrictions. You can store up to ten emergency
numbers by System Programming. For System
Programming, refer to the KX-TD816/
KX-TD1232 Installation Manual.
• Off-hook.
• Press the CO button.
• Dial the desired emergency number.
■ Executive Busy Override – Extension
You can enter into an existing extension conversation.
When the line is busy
• Dial 2.
38
■ Executive Busy Override Deny
■ External Feature Access
Allows you to access special features (e.g. Call
Waiting) offered by a PBX, or Central Office.
During a conversation
• Press the Flash button.
• Dial the desired service code.
■ Full One-Touch Dialing
You can make a call or access a system feature
with the touch of a button.
• Press an One-Touch Dialing or DSS button.
■ Message Waiting
You can leave a message notification for another extension. For PS users, “
” is displayed
as notification.
Setting / Canceling
• Off-hook.
• Dial 70.
• Dial 1 or 0.
- 1 : to set
- 0 : to cancel
• Dial the extension number.
— A confirmation tone is audible.
• On-hook.
Other Operations
Setting when the extension is busy
• Dial 4 (or press the Message button).
— A confirmation tone is audible.
• On-hook.
Calling back the message sender
• Off-hook.
• Dial 702 (or press the Message button).
Clearing all messages by the message receiver
• Off-hook.
• Dial 700 + your extension number.
Note
You cannot check or select a message notification sender. You can only call back the sender
in the order the notification were left.
■ One-Touch Dialing
You can make a call or access a system feature
with a touch of a button after going off-hook.
• Off-hook.
• Press an One-Touch Dialing button.
■ Operator Call
You can call an operator. A general call does
not specify the operator, while a specific call
does.
General Call
• Off-hook.
• Dial 0.
■ Paging
You can announce (page) through the built-in
speaker of the wired telephone or by the external speakers.
All
You can page using both the built-in speakers
and external pagers.
External
You can page using all of the external pagers
simultaneously or using a specific external
pager.
Group
You can page all groups (all wired extensions)
simultaneously or a particular group of wired
extensions using the built-in speakers.
All
• Off-hook.
• Dial 32 (or 33) + .
— A confirmation tone is audible (optional).
• Announce.
External
– To access all external pagers
• Off-hook.
• Dial 320.
— A confirmation tone is audible (optional).
• Announce.
– To access a particular pager only
• Off-hook.
• Dial 32.
• Dial the external pager number as follows.
– 1 : if connected to a KX-TD816
– 1 – 4 : if connected to a KX-TD1232
— A confirmation tone is audible (optional).
• Announce.
39
Other Operations
Group
– To access all groups simultaneously
• Off-hook.
• Dial 33 + 0.
— A confirmation tone is audible (optional).
• Announce.
– To access a particular group of extensions
• Off-hook.
• Dial 33 + extension group number
(1 through 8).
— A confirmation tone is audible (optional).
• Announce.
■ Paging – ANSWER
You can answer a page which is being
announced over a nearby proprietary wired telephone or external pager. However, you cannot
be directly paged at the PS.
• Off-hook.
• Dial 42 + external pager number, or 43.
- 42 + external pager number :
To answer a “Paging – External”
- 43 : To answer a “Paging – Group” in the
same extension group
■ Paging and Transfer
You can transfer a call to the paged person.
• Press the Transfer button before dialing the
paging feature number (32 or 33).
— Check the feature number you wish to use
in the “Paging” section.
■ Pickup Dialing (Hot Line)
You can make a call by simply going off-hook.
Programming the phone number
• Off-hook.
• Dial 742 + the phone number + #.
— A confirmation tone is audible.
• On-hook.
40
Setting / Canceling
• Off-hook.
• Dial 74.
• Dial 1 or 0.
- 1 : to set
- 0 : to cancel
— A confirmation tone is audible.
• On-hook.
Dialing
• Off-hook.
■ Pulse to Tone Conversion
You can change from the Pulse to Tone dialling
mode.
• Dial the phone number (Pulse mode).
• Select the Tone button (or dial + #).
• Dial the phone number (Tone mode).
■ Redial, Last Number
You can redial the last dialed number.
• Off-hook.
• Dial #.
■ Redial, Saved Number
The desired outside call number can be stored
and then redialed.
Storing
During a conversation or while hearing a busy
tone
• Press the Auto/OK button.
• Press the Save button.
Dialing
• Off-hook.
• Press the Save button.
Other Operations
■ Station Feature Clear
■ System Speed Dialing
You can reset all of the station features you programmed to their default settings.
The system supports 500 speed dial numbers
which are available to all extension users.
• Off-hook.
• Dial 790.
— A confirmation tone is audible.
• On-hook.
• Off-hook.
• Press the Auto/OK button.
• Dial the system speed dial number (000
through 499).
■ Station Speed Dialing
■ Timed Reminder
You can store up to ten speed dial numbers
which can only be used by you.
You can set an alarm once or everyday at a preset time as a wake up or reminder.
Storing a phone number
• Off-hook.
• Dial 30 + the station speed dial number (0
through 9) + the phone number + #.
— A confirmation tone is audible.
• On-hook.
Setting
• Off-hook.
• Dial 761.
• Enter hour (01 through 12).
• Enter minute (00 through 59).
• Dial 0 or 1.
- 0 : AM
- 1 : PM
• Dial 0 or 1.
- 0 : for a one time setting
- 1 : for a daily setting
— A confirmation tone is audible.
• On-hook.
Dialing
• Off-hook.
• Dial 3 + the station speed dial number.
■ Super EXtra Device Port (SXDP)
SXDP allows a PS to be used in parallel with a
proprietary wired (PT) or single line telephone
(SLT). When in the SXDP mode, incoming
calls to a wired telephone also reach the paired
PS, while incoming calls to a PS only reach the
PS. If either paralleled telephone is busy, you
cannot make a call from the other telephone.
The memory of Call Log can be used with a PS
and a paired telephone.
Setting
• Off-hook.
• Dial 481 + wired extension number.
— A confirmation tone is audible.
• On-hook.
Canceling
• Off-hook.
• Dial 760.
— A confirmation tone is audible.
• On-hook.
Checking the setting time
• Off-hook.
• Dial 762.
Canceling
• Off-hook.
• Dial 480.
— A confirmation tone is audible.
• On-hook.
41
Other Operations
■ Trunk (CO Line) Answer From Any
Station (TAFAS)
You can answer any page or ring sent to a
ringer.
Answering the external pager
• Off-hook.
• Dial 42 + the external pager number as follows.
– 1 : if connected to a KX-TD816
– 1 – 4 : if connected to a KX-TD1232
■ Two-Way Recording into Voice Mail†
You can record a conversation into your mailbox or another mailbox, while talking on the
phone.
Recording into your mailbox
• Press the Two-Way Record button.
Stopping recording into your mailbox
• Press the Two-Way Record button.
Recording into another mailbox
• Press the Two-Way Transfer button.
• Dial the extension number or press the
desired DSS button.
Stopping recording into another mailbox
• Press the Two-Way Transfer button.
■ Voice Mail Integration
When you are busy or away from your desk,
your calls can be forwarded to a mailbox in the
Voice Processing System.
Setting Call Forwarding destination to Voice
Mail (VM)
• Off-hook.
• Dial 710 (or press the FWD/DND button).
• Dial the Call Forwarding number
(2 through 5).
- 2 : Call Forwarding – All Calls
- 3 : Call Forwarding – Busy
- 4 : Call Forwarding – No Answer
- 5 : Call Forwarding – Busy/No Answer
• Dial the VM extension number.
— A confirmation tone is audible.
• On-hook.
Listening to a stored message
• Off-hook.
• Dial the VM extension number (or press the
Message button).
■ Voice Mail Transfer
You can transfer outside calls to the Voice
Processing System so that the caller can leave
their message in the mailbox of the desired
extension.
If you forward an outside call to an extension
and the call is returned to you
• Press the Voice Mail (VM) Transfer button.
• Dial the extension number.
42
†: Available when the Digital Super Hybrid System is connected to a Digital
Proprietary Telephone capable Panasonic Voice Processing System (one
that supports digital proprietary telephone integration).
Programming Overview
There are three programming modes.
The list below shows the programming overview.
KEY
MODIFY BOOK
PROGRAMMING
PS-PROGRAM
PS Programming
PBX-PROGRAM
PBX Programming
REGISTRATION
Registration
(This program is used to register your PS in the system and
determine its extension number. Refer to system program
[650] “PS Registration” in
Section 3 in the KX-TD816 /
KX-TD1232 Installation
Manual Addendum.
If the DECT System Lock is
set, this display will not
appear. To cancel the DECT
System Lock, refer to “Setting
the DECT System Lock” in PS
programming.)
43
PS Programming
PS Programming Items Description
You can change the default settings or programming of your PS
according to your needs.
You may be required to enter a PS Programming password or a
DECT System Lock password when entering into the PS
Programming mode.
PS Programming password: programmed in PS Programming.
DECT System Lock password: programmed in the initial PS registration or in PS Programming.
The PS Programming menu displayed differs depending on the
password level as follows.
Level 0: A password is not required.
Level 1: A PS Programming password is required.
Level 2: A System Lock password is required.
The combination of the passwords are as follows.
System Lock
PS Programming
Disable
Disable
Disable
Enable
Enable
Disable
Enable
Enable
System Lock
Password
—
—
Level
0–2
Level
0–2
PS Programming
Password
—
Level
0–2
—
Level
0–1
Level
0–2
Level
0
Level
0–1
Level
0
No Password
or
Incorrect Password
44
PS Programming
The possible programming items and their password levels and
displays are shown below in the order they are displayed.
Setting the Keypad Backlight Mode (Level 0)
You can turn off the keypad lights to save
electricity.
(Default: ON)
Setting the Key Tone (Level 0)
You can select whether the button on your
PS sounds a tone or not. If “ON” is
selected, a key tone will be heard when
you press a button (except during the PBX
Programming mode).
(Default: ON)
Selecting the Ringer Pattern (Level 0)
You can select the PS ringer pattern (6
patterns).
(Default: Ringer 1)
BACKLIGHT
= ON
KEY TONE
= ON
RING PATTERN
= 1
Selecting the Vibration and Ring Type (Level 0)
You can select the vibration and ring type;
off, vibrate and ring simultaneously
VIBRATION & RING
= OFF
(RING & VIB), or vibrate for nine seconds and then ring (VIB→RING).
(Default: OFF)
This program can be set in combination with the VOLUME
Control button adjustment (page 11) as shown below.
VOLUME Control Button Adjustment
RINGER (1 – 7)
OFF
RINGER
PS
RING & VIB RINGER and VIB†
Prog.
VIB→RING VIB for 9 sec and then RINGER
RINGER OFF
OFF
VIB
VIB for 9 sec
VIBRATION
VIB
VIB
VIB
†: Battery life may decrease faster than the other settings.
45
PS Programming
Selecting the Display Language (Level 0)
You can select the display language;
English, German, French, Italian, Spanish
or Dutch.
(Default: AUTO [English])
If you are connected to a Panasonic Digital
Super Hybrid System (DSHS) while the
default setting is still “AUTO”, the display
language will depend on the setting of the
system.
Controling the Directory Lock (Level 1)
You can lock (ON) or unlock (OFF) the
PS Dialing Directory.
(Default: OFF)
Setting the Quick Answering Mode (Level 0)
You can quickly answer an incoming call
by just lifting your ringing PS off the
Charger.
(Default: ON)
Setting the Automatic Answer Mode (Level 0)
You can answer all calls (INT/CO) or
intercom calls (INT ONLY) without lifting
your PS when using the headset.
(Default: OFF)
Selecting the Automatic Answer Delay (Level 0)
You can select the number of rings before
answering calls automatically when using
the headset. This program is displayed
only when “Setting the Automatic Answer
Mode” is set to “INT/CO” or “INT ONLY”.
(Default: 1RING)
46
LANGUAGE
= AUTO
DIRECTORY LOCK
= OFF
QUICK ANSWER
= ON
AUTO ANSWER
= OFF
AUTO ANS DELAY
= 1RING
PS Programming
Selecting the DECT System (Level 2)
When the registration of your PS is completed, this program is automatically set to
the registered DECT system (DECT-SYS1
through DECT-SYS4). If you want your
PS to access all connected terminals automatically, select AUTO in this program.
After changing the selection, it may takes a
few seconds to complete the setting.
This program is only displayed when more
than two fixed terminals are connected.
Selecting the Standby Display*1 (Level 0)
You can select the number, extension number (EXT), DECT system number (DECTSYS-NO.), or DECT system and extension
number (DECT-SYS-NO.&EXT), which is
displayed in the standby mode. You can
also select not to display any of these numbers (OFF).
(Default: OFF)
Selecting the Date / Time Display*1 (Level 0)
You can select showing only the date
(DATE) or date and time (TIME) in the
standby mode display.
(Default: TIME)
ACCESS DECT-SYS
= DECT-SYS1
STANDBY DISPLAY
= OFF
DATE/TIME DISPLY
= TIME
Clearing the Settings in Memory (Level 1)
All of the following settings can be
returned to their default settings at one
MEMORY CLEAR
time.
– Call log numbers*2
– Ringer volume
– Receiver volume
– PS Programming items
(except: Selecting the DECT System;
Canceling the PS Registration;
Setting the PS Programming Password;
Setting the DECT System Lock)
*1: Only displayed when registered to a Panasonic Digital Super Hybrid System and “ ” is displayed.
*2: Only cleared when registered to a system other than a Panasonic Digital Super Hybrid System.
47
PS Programming
Canceling the PS Registration (Level 2)
To cancel your PS registration, use the system program [651], “PS Termination”. If
“Rejected” or “Time Out” is displayed in
program [651], delete the PS again by PS
programming. It may take a few seconds
to complete the cancelation.
Refer to System Programming in the
Installation Addendum for program [651].
Setting the Guidance Menu (Level 0)
You can enable the guidance menu. This
will show the selectable keys, and helps you
operate the PS without the operating manual.
(Default: OFF)
CANCEL DECT-SYS
= DECT-SYS1
GUIDANCE
= OFF
Guidance Menu
BOOK (
OK (
# (
)=NEXT
OK
)=OK
)=NEXT
* (
)=PREV
HOLD (
C (
C
)=BACK
)=EXIT
Setting the PS Programming Password (Level 1)
You can set the PS Programming password. In this case, you must enter your
password in order to display the following
programs.
– Controling the directory lock
– Clearing the settings in memory
– Setting the PS programming password
(Default: DISABLE)
Setting the DECT System Lock (Level 2)
You can enable or disable the DECT
System Lock. If enabled, you must enter
your password when entering the PS
Programming mode in order to display the
following programs.
– Selecting the DECT system
– Canceling the PS registration
– Setting the DECT system lock
(Default: DISABLE)
48
PS PASSWORD
= DISABLE
DECT-SYS LOCK
= DISABLE
PS Programming
PS Programming Operations
Make sure the Power Switch is set to ON (●).
PS Programming (– except for Setting the PS Programming Password)
Note:
– A PS Programming password or DECT System Lock password
may be required after step 4.
1
Press
(Function).
KEY
2
Press
(Book) 2 times.
• You can also search by pressing
(Next) or
(Previous).
3
Press
OK
PROGRAMMING
(OK).
PS-PROGRAM
4
Press
OK
(OK).
BACKLIGHT
= ON
5
6
Press
(Next) or
(Previous)
repeatedly until the desired program
item is displayed.
Press
(Book) repeatedly until the
desired selection is displayed.
• This step is not necessary for clearing
settings in memory.
7
Press
OK
Example
RING PATTERN
= 1
Example
RING PATTERN
= 6
(OK).
RING PATTERN
= 6
8
Repeat steps 5 through 7 if you want to
program other items.
9
To exit the PS Programming mode,
press C (Cancel).
49
PS Programming
Setting the PS Programming Password / DECT System Lock Password
Example
1
Search the PS Password or DECT
System Lock display. (Refer to steps 1
through 6 on page 49).
2
Press
3
Press
PS PASSWORD
= DISABLE
(Book) to select ENABLE.
PS PASSWORD
= ENABLE
OK
(OK).
ENTER PASSWORD
=
Example
4
Enter the password (4 digits).
ENTER PASSWORD
= ****
5
Press
OK
(OK).
REENTER PASSWORD
=
Example
6
Enter the same password again.
REENTER PASSWORD
= ****
50
7
Press
8
To exit the PS Programming mode,
press C (Cancel).
OK
(OK).
PS Programming
Canceling the PS Programming Password / DECT System Lock Password
Example
1
2
Search the PS Password or DECT
System Lock display. (Refer to steps 1
through 6 on page 49).
Press
PS PASSWORD
= ENABLE
(Book) to select DISABLE.
PS PASSWORD
= DISABLE
3
Press
4
To exit the PS Programming mode,
press C (Cancel).
OK
(OK).
51
PBX Programming
PBX Programming Overview
You can enter into the proprietary wired telephone (PT) programming mode and program several items for your PS. However,
some items may not be supported depending on your system.
For more details, refer to Station Programming in the KX-TD816 /
KX-TD1232 User Manual.
KEY
MODIFY BOOK
PROGRAMMING
PS-PROGRAM
PBX-PROGRAM
Flexible Button Assignment
Single-CO Button
DSS Button
One-Touch Dialing Button
Message Button
FWD/DND Button
Save Button
Account Button
Conference Button
Voice Mail Transfer Button
Two-Way Record Button
Two-Way Transfer Button
One-Touch Dialing with Auto Hold Button
Loop-CO Button
Group-CO Button
Preferred Line Assignment – Outgoing
Self-Extension Number Confirmation
Charge Fee Reference
Station Programming Data Default Set
Note:
52
– The LED does not work when a flexible button is assigned other than a
Single-CO, DSS, Loop-CO or Group-CO button.
PBX Programming
PBX Programming Operations
Make sure the Power Switch is set to ON (●) and “ ” is displayed.
1
Press
2
Press
(Function).
KEY
(Book) 2 times.
PROGRAMMING
• You can also search by pressing
(Next) or
(Previous).
3
Press
OK
(OK).
PS-PROGRAM
4
Press
(Book).
• You can also search by pressing
(Next) or
(Previous).
5
Press
• The
Note:
OK
INT'
PBX-PROGRAM
(OK).
(Intercom) flashes green.
6
Program the desired PBX Programming
items. For more details, refer to
Station Programming in the KX-TD816
/ KX-TD1232 User Manual.
7
To exit the PBX Programming mode,
press C (Cancel).
– The following PS buttons replace
the buttons of the proprietary
telephone (PT) shown in Station
Programming in the KX-TD816 /
KX-TD1232 User Manual.
Exception: Charge Fee
Reference – All Clear;
Use
(Book) instead of the
NEXT (S3) button in step 4.
PT Button
CLR (S2)
PS Button
=
CLR
(Clear)
NEXT (S3) = Not supported.
PREV
=
STORE
=
HOLD
=
(Redial)
OK
(OK)
(Hold)
53
Before Requesting Help
PROBLEM
54
REMEDY OR SOURCE OF TROUBLE
The PS does not work.
• The battery is empty. Charge the batteries fully (p. 9).
• The PS has been canceled or the PS has not been registered. To register the PS, refer to system program
[650], “PS Registration”, in the Installation Manual
Addendum for the KX-TD144/KX-TD142/KXTD7500.
The PS does not operate.
• The power switch is OFF (❍). Turn it ON (●).
The PS does not ring.
• Ringer volume is set to OFF or VIBRATION.
• The PS is out of range or the Cell Station (CS) is
busy.
• The radio channel is busy or radio communication
error occurs. Try again later.
You cannot dial.
• The number which you dialed is restricted by the system.
• The key lock mode is set. To cancel the mode, see
page 19.
• The radio channel is busy or radio communication
error occurs. Try again later.
Static, sound cuts in/out, fades.
Interference from other electrical units.
• Set the PS and CS away from other electrical appliances.
• Move closer to the CS.
“CS Busy” is displayed.
• The Cell Station is busy. Try again later.
“PS NO CONNECTED” is displayed.
• The power switch is set to OFF.
• The PS is out of range.
• The radio channel is busy or radio communication
error occurs. Try again later.
You cannot store a phone number and
name in the directory.
• Your entry exceeds the maximum digits or characters.
• Do not pause for over 30 seconds while programming.
The alarm sounds after pressing
(Redial).
• No number is saved in the Call Log.
“
” flashes or beeps tones sound
every 5 seconds during a conversation.
• The battery is low. Charge the batteries fully (p. 9).
Before Requesting Help
PROBLEM
REMEDY OR SOURCE OF TROUBLE
You charged the batteries fully,
but “
” flashes.
• Clean the charge contacts and charge again.
• It is time to change the batteries. Please purchase
new batteries.
The PS stops working during operation.
• Turn the power switch OFF (❍) and ON (●). Then
try again.
• Re-insert the battery and try again.
Handover does not work.
• You moved to a busy CS or are out of range.
• You moved while not having a conversation (e.g.,
while hearing a busy tone).
• The radio channel is busy or radio communication
error occurs.
The display does not show a strong
radio signal “
” even though you are
near the CS.
• The PS user can make a call normally even in the
“ ” status. In this case, the current linked CS is
still connected even though the other CS is closer.
The alarm sounds during a conversation while receiving a weak radio signal “ ”.
• The radio signal is weak. Move closer to the CS.
55
Safety Instructions
Take special care to follow the safety suggestions
listed below.
Safety
1) Power Source: The Charger should be connected to a power supply only of the type
described in the operating instructions or as
marked on the Charger.
2) Non use Periods: When the portable station
(PS) is not being used, turn the power off.
When left unused for a long period of time, the
Charger should be unplugged from the household AC outlet.
Installation
Environment
1) Water and Moisture: Do not use this PS and
the Charger near water – for example, near a
bath tub, washbowl, sink, etc. Damp basements
should also be avoided.
2) Heat: The PS and the Charger should be kept
away from heat sources such as radiators,
kitchen ranges, etc. It also should not be placed
in rooms where the temperature is less than
5°C (41°F) or greater than 40°C (104°F).
Placement
1) Stacking: Do not place heavy objects on top of
the PS and Charger.
2) Foreign Material: Care should be taken so that
objects do not fall onto and liquids are not
spilled into the PS and Charger. Do not subject
the PS and Charger to excessive smoke, dust,
mechanical vibration, or shock.
3) Surface: Place the Charger on a flat surface.
56
Battery
To reduce the risk of fire or injury to persons, read
and follow these instructions.
1) Use only the battery specified.
2) Do not dispose of the battery in a fire. It may
explode. Check with local waste management
codes for special disposal instructions.
3) Do not open or mutilate the battery. Released
electrolyte is corrosive and may cause burns or
injury to the eyes or skin. The electrolyte may
be toxic if swallowed.
4) Exercise care in handling the battery in order
not to short the battery to conductive materials
such as rings, bracelets, and keys. The battery
and/or conductor may overheat and cause
burns.
5) Do not recharge batteries, which are provided
or specified as replacement part for use with
other products. The battery may leak corrosive
electrolyte or explode.
6) Do not attempt to rejuvenate the battery provided with or identified for use with this product by heating. Sudden release of battery electrolyte may occur causing burns or irritation to
eyes or skin.
7) Remove the battery from this product if the
product will not be used for a long period of
time (several months or more). During this
time the battery could leak in the product.
8) Discard the “dead” battery as soon as possible.
The “dead” battery may leak in the product.
9) Do not store this product, or the battery provided with or identified for use with this product,
in high temperature areas. Batteries that are
stored in a freezer or refrigerator for the purpose of extending shelf life should be protected
from condensation during storage and defrosting. Batteries should be stabilized at room
temperature prior to use after cold storage.
Safety Instructions
For Best Performance
Operating Range
1) The range of operation depends on the topography of your office, weather or usage conditions, because signals are transmitted between
the Cell Station (CS) and the portable station
(PS) by radio waves.
2) Normally, you get greater range outdoors than
indoors. If there are obstacles such as walls,
noise may interfere with your telephone calls.
In particular, high metal shelves or reinforced
concrete walls will shorten your operating
range.
3) A PS may not work if used in places that are
too far from the CS depending on the structure
of the building.
Noise
Occasional noise or interference may occur due to
other sources of electromagnetic radiation, such as
refrigerators, microwave ovens, faxes, TVs,
radios, or personal computer.
If noise affects your telephone calls, keep the PS
away from other electrical appliances.
WARNING:
TO PREVENT FIRE OR SHOCK HAZARD, DO
NOT EXPOSE THIS PRODUCT TO RAIN OR
ANY TYPE OF MOISTURE.
57
This PBX fulfills the requirements of following European Regulations:
73/23/EEC
89/336/EEC
92/31/EEC
93/68/EEC
“Low Voltage Directive”
“Electromagnetic compability” (Basic EMC Publication)
“Electromagnetic compability” (Supplement)
“CE mark”
For above mentioned standards, the unit is signed with the CE-mark.
Any technical details given in these instructions are subject to change without notice.
Printed in Japan
PSQX1730ZB
K1198KM1128