1
Natural Log 8™
Radio Traffic-Log-Billing-A/R System
Version 8 for use with Windows®
Natural Broadcast Systems, Inc.
10431 Gulfdale
San Antonio TX 78216
Voice: (210) 349-5808 Fax: (210) 344-7567
www.nat-soft.com
Table of Contents
Discussion Topic
1.
2.
3.
4.
5.
6.
7.
8.
9.
Getting Started – Technical Requirements and Registering …..
Program Versions and Updates……………………………………………...
Data Backups………………………………………………………………...
Program Setup……………………………………………………………….
a. Administrator Controls……………………………………………….
i. Program Options and User Permissions……………………….
ii. Station Settings Document Formats……………………………
iii. Default Screen Entry Values…………………………………...
b. Major field setup (Acct Reps, Revenue Types, etc…)……………….
Traffic………………………………………………………………………..
a. Creating Customer Accounts…………………………………………
b. Entering Orders……………………………………………………….
c. Entering Schedules (Orderlines)……………………………………...
d. Creating and Using Copy (Rotators, Schedules, Packets)……………
Logs………………………………………………………………………….
a. Create & Edit New Log Templates……………………………………
b. Commercial Logs………………………………………………………
c. Converting Logs to Automation (Reconciling, Charging & Reports)…
Billing…………………………………………………………………………
a. Charging Logs………………………………………………………….
b. Edit Billing Errors……………………………………………………...
c. Finalizing Invoices to A/R……………………………………………..
Accounts Receivable………………………………………………………….
a. Payment Entry …………………………………………………………
b. Editing and Adjusting Account Balances………………………………
c. Generating Statements………………………………………………….
d. End of Month Closing………………………………………………….
Reports………………………………………………………………………...
a. Creating Reports………………………………………………………..
b. Memorizing reports…………………………………………………….
c. Printing Reports………………………………………………………...
Page No.
2
4
4
6
6
6
6
7
9
12
12
15
15
21
25
25
30
32
33
33
34
30
34
35
36
36
36
37
37
37
38
1
1. Getting Started:
Technical Requirements: Natural Log 8 will run on any computer that can efficiently run Windows XP,
Windows 7 or Windows 8, with either a 32 or 64 bit operating system and with at least 2 gigabyte free hard
drive space. The program also requires a data backup device such as flash drive, tape backup, or
automatic online data backup system. Note: If running across a Local-Area-Network 100mbps minimum is
recommended for best performance
Once Natural Log 8 has been installed on your computer you can open it by double clicking on the NL8 Icon
that has been created as a shortcut on your desktop.
Click on the “Continue Evaluation Mode” button and the program will open to a “Sample” database.
The blank screen that is displayed is the Main Menu of Natural Log 8. Along the tool bar at the top of the
screen you will see the menu items.
Note: The “Sample” database is part of the program and should never be deleted. You can browse through
the data stored here and play with the customer accounts without disturbing any database that you may
have created to use for your station.
If you choose to work with your own data, you can create a new database as follows.
Creating your own Database – On the main menu toolbar, click on {File] [New Natural Log Database].
This will open the “Add a new Natural Log Database” box. In the 3rd field shown enter the name you wish to
call your database
(Note: Do Not use a period (.) anywhere in the name of your database. It will disable the backup feature
for your database.) Click on the “Create” button and NL8 will prompt you for an internal backup of the
database. Always click “Yes” at this prompt.
You will now be able to begin entering your information into your database. We suggest that you begin in
the [Setup] [Administrator Controls] [Station Settings/Document Format] here you will change the station
name from “Station One” to the Call Sign for your station. Go to Page 6 of this manual for more information.
Natural Log will continue to operate for the remainder of your evaluation period (60 days) when you click the
“Continue” button.
Registering the Software:
When you open Natural Log program, you will have the option to „Continue Evaluation‟ or „Register Now‟.
Natural Log will run for up to 60 days in Evaluation Mode. At any time after purchase, you can click on
„Register Now‟. Complete the registration form and fax or email to us. Once we receive the registration
form, we will generate the software key and return to you.
You will need to be logged into Windows as an Administrator to unlock the software. Additionally, the key is
computer specific and will work ONLY on the machine that the form was generated from. It will not work on
any other machine. Each machine will need to be registered separately. All information on your registration
screen must match exactly the information that you receive back from us with your software key.
2
2. Program Versions and Updates
To locate the version of the Natural Log 8 that you are currently running, from the main menu click on [Help]
[About Natural Log]. This will open up a box that lists the version number (8.0.xxx). We are mainly
interested in the last three digits.
Occasionally we will issue “Patches” or “Updates” to the Natural Log 8 program that may or may not affect
you. Once these updates have been tested to our satisfaction, we will post them on our website at
www.nat-soft.com listed under Downloads, then under “Patches”. There are times when you will call with a
problem that we are aware of and we will ask you to download the latest update that is not be listed on our
website. The following are the steps to download and update to the newest version of Natural Log 8.
1. Make a data backup of your NL8 database. (Reference the next section on Data Backups)
2. From the Natural Log menu, click on Help/ Natural Log Help and then select Natural Log
Updates Website. This will open your browser to our Updates page. This page will list the most
current version number as well as information on previous updates.
The direct link to this page is http://www.nat-soft.com/nl8/nl8patches.htm
3. Click the link under # 2 to download the file. You may be asked if you want to run or save the
file. Always select the SAVE option. Do not attempt to open it across the internet.
4.
After the file downloads, you must exit Natural Log 8 and then run the downloaded nl8setup.exe
from your hard drive.
5. The program will ask if you want to Repair, Modify or Remove. Select Remove.
6. Run the downloaded nl8setup.exe a second time to install the fully updated program files.
7. After the installer finishes, restart Natural Log and click [Help][About] to verify that you now have
the most current version as listed at the top of the Updates webpage.
3. Data Backups
Beware: Due to the wide range of computer systems in use, the existence of malevolent computer viruses,
and the fact that no hardware is completely fail-safe, the Natural Log developers make no warranty of any
kind that your data won't be corrupted or lost. Do regular data backups to multiple locations!
Your data is valuable! Think of how much time it will take you to manually re-enter all your data!
The only protection you have is to do frequent Data-Backups, daily if possible! We cannot recover lost data
for you so please do not ask.
We recommend that you save Data-Backups to several different media and locations on a rotating basis in
case the backup media goes bad or there is a fire or natural disaster.
The NL8 database is very large and should NOT be backed up to floppy discs. It takes too many discs and
is inherently unreliable. We recommend you use USB Flash Drives, Zip discs, CD-R or CD-RW, or tape
backup devices.
To begin the EXTERNAL Data-Backup, from the Main screen:
Click [Data][BackUp] Select the Natural Log Database to be backed up.
3
Select the folder to which you want to backup the data or click [Browse to New Folder] to add a new folder
to the list. You may select type of media such as USB-Drive, Zip-Disc™, or send the Data-Backup file to a
folder on another computer across a Local Area Network.
Click [Start Data Backup] to begin the backup.
Natural Log will report whether it successfully created the Data-Backup file. Natural Log uses standard
pkZip™ data compression to reduce storage requirements for the Data-Backup files.
Special Note for USB-Drive and Zip-Disc™ Backups
Create a folder on the USB-Drive or Zip-Disc and do all backups into that folder instead of the root directory.
You can use your station call letters as the folder name.
3. Data Backups (Continued)
Natural Log sees USB-Drives and all Zip-Discs as "removable media" and will enable the "multi-volume"
support needed to backup large files onto multiple discs. This causes all existing files in the root directory of
the USB-Drive or Zip-Disc to be deleted each time a new backup is done. By creating a folder on the
removable disk drive you will be able to backup several Natural Log database files to one USB-Drive or ZipDisc. This prevents deletion of the pre-existing files on the USB-Drive or Zip-Disc during the backup of
additional databases.
Internal Data Backups: Everyday when you first open the Natural Log 8 you will be prompted to perform
an internal Data Backup. It is important that you respond with “YES” to this prompt. It only takes a few
seconds and will store this backup on your hard drive. Once this has been performed you will not be
prompted for this again during the day. This internal backup is important especially if incorrect changes are
made or data becomes corrupted for any reason during the day and you need to return your data to your
last backup. You will only have to re-enter information for that day.
4
4. Program Setup
Setting up program options and default entry values is very important since it can save a lot of time during
the customer order entry process. There are two main areas in the Setup section of the Natural Log 8
toolbar. The first we will discuss is [Administrator Controls] includes the following setup items:
Program Options:
Data Options – Allows you to set the interval time for Internal and External Backups as well as the number
of years to retain history for Orders, Logs and Accounts Receivable information.
Required Reviews/Approvals – Allows you to set the required level of review before orders can be logged.
This is an optional setting that can be used when Account Reps are allowed to enter there own orders into
the system. Also in this area you can check a box that will Prohibit Order Entry if a set Credit Limit has
been exceeded.
Day Weights for Front-Loading Random-Type Schedules - Most stations do not use Front-Loading so
these should be set to NORMAL. However for those that do use Front-Loading , this option allows you to
specify how much front-loading can be done for each day of the week when using Random-Type
Scheduling.
Miscellaneous - This option allows you to specify if NL8's PDF print driver is used. You must set this to
Enabled in order to use the PDF writer included with NL8. You can also tell the system to Automatically
display the Reminders at Startup and Show On Screen Help when the mouse is held over and item. (Once
you get used to using the NL8 you will want to turn this to OFF to get it out of your way.) The Calendar
Setting allows you to configure the built in calendar to display either Calendar Month or Broadcast Month.
Finance Charges - This option allows you to set how finance charges will be assessed on accounts. If you
will be using the Finance Charge feature of this program you will need to follow through the setup of this
section. The annual percentage rate is then entered on the Customer Data Screen for each account that
will be affected. More information on Finance Charges can be found in your help menu of the NL8.
User permissions:
Natural Log allows the NL_Administrator significant control over what individual users can do in NL. To
enter the User section, from the main NL menu, click [Setup] [Administrator Controls] [User Permissions].
Require User LogIn/Remember Last User - To have user permissions in effect you MUST check the
“Require user LogIn” checkbox. If this box is unchecked, NL does not prompt for a UserID or password
during startup.
If you click [Require user LogIn], you can also click [Remember Last User] to tell NL8 to remember the last
user logged in on each computer. This means the user won't have to type in their user name each time, but
they still must provide their password.
Usernames and User Types - When you click [New User], the NL_Administrator can enter information for
that user. Each use must have a unique Username and be assigned to one of the User Types.
NL_Administrator can do anything in NL including setting permissions for other users.
Sales Managers are allowed to review and approve orders for air (if Sales Manager approval is required).
Also may have any additional permissions granted by the NL_Administrator.
Traffic Director is allowed to review and approve orders for air (if Traffic Director approval is required). Also
may have any additional permissions granted by the NL_Administrator.
5
4. Program Setup (Continued)
User permissions: (cont’d)
Account Rep should have user permissions defined by the NL_Administrator since you may not want them
to change accounts receivable information or close months. For Account Reps you will also want to set the
User Account Rep Restrictions located at the bottom of this screen to only allow that salesman to see his
own customer information not all customers.
User Module Permissions - Each user may be assigned any of the following permission levels for each
main module of Natural Log (such as Traffic, Logs, Billing, A/R, etc.)
Allow - The user can do anything within that module.
Deny - The user may not enter that module.
Read-Only - The user may view that module but may not make any change
Read + Payments – The user can see the A/R account and enter payments, but no other adjustments or
changes can be made.
Station Settings/Document Formats:
This section allows you to setup and edit Station information.
Station Call Sign - This is how the station is identified within the Natural log system and each station must
have a unique identifier. You may rename the station at any time without affecting anything already entered
in NL but you will have to manually modify the station return address on the NL station document settings if
you rename the station.
Station is Inactive - You can't delete any station that has 1 or more transactions in the Natural Log system.
These transactions may include Customer Account assignments, running Orders, or any billing or collection
items assigned to this Station. This deletion prohibition maintains the referential database integrity and
assures that all items are properly accounted for in the historical accounting records.
Solution: Instead of deleting a discontinued station, in [Setup] [Administrator Controls][Station Settings /
Document Formats], check the [Inactive] box for the discontinued station after you have ended any running
orders and zeroed out any open Accounts Receivable items for that station. This will cause the Inactive
station to no longer show up on any menus, however its Accounts Receivable history will show up on billing
history reports on which you do not restrict the stations included in the report.
Automation Log Type - This is the type of automation log NL must create (if any).
Station - This is not used for most automation systems, but may be used to uniquely identify the automation
log for a particular station. For example the NL8 automation log for BSI Simian™ is named mmddyyT#
where # is the station number you enter in this box. RDS Phantom™ uses AM or FM in this box. If this box
is not displayed by NL8, the log for your automation system does not use this entry.
Automation Log Send Path and Automation Log Read Path – These will be set up during your first log
conversion and reconciliation.
When Reconciling Play-Log, match items... - Natural Log can reconcile its log against the actual play-log
from some automation systems. The value you set here tells NL how much time difference there can be
between the logged time for an item and the time it played and still "match" the items in the log
6
reconciliation. If the time difference is outside this window, the spot will show on the reconciliation as
missed. Default value is +/- 60 minutes.
7
4. Program Setup (Continued)
Station Settings/Document Formats: (cont’d)
Logging Options - On the station setup screen, you can tell NL if you want to:
Attempt to equalize commercial loads between hours when generating logs. NL8's log generator has
2 conflicting goals when generating a log: [1] good horizontal and vertical rotation of customer's spots into
all allowed hours and [2] even spot loading in each hour. This setting tells NL8 to give priority to equally
filling log hours over trying to equally rotate customers' spots into every possible hour. All customer's spots
will run within the time window ordered and will rotate into different day parts and hours but they may not
rotate absolutely equally into every possible hour when this option is selected.
Prohibit Same Announcer Voice Back-to-Back this stations' Logs – If you Check mark this box you will
have to make sure that you use the “Voice ID” area when creating your copy for it to take effect.
Prohibit Live or Call-In Spots Back-to-Back on this station's Logs
Station Return Address / Optional Logo - This is the address to be printed as the station's address on all
documents for this station such as Confirmations, Invoices, and Statements.
You can add an optional small logo by right clicking on the [Logo] button or in the Logo picture box. If you
do add a logo, you are responsible for assuring proper dimensions. NL does not shrink or expand the logo,
NL just prints it as-is. The printed logo should be approximately the size of a first class postage stamp.
Generally any Windows-compatible graphics file format is supported (bitmap, jpg, etc.) The Logo is printed
to the left of the station return address on the documents.
Station document Formats - At the bottom of the Station Setup box are 5 buttons, which allow you to
format your documents. These documents are Order Confirmation, Production Order, Log, Invoices and
Statements. Be advised that the default font size is the already set to print any of these forms in the
“Portrait” orientation. The largest font you should ever try is “9” and you will have to set the page orientation
to “Landscape” in order to get a good printout. We realize the print is really small, but there is a lot of
information trying to get onto your form.
Default Screen Entry Values:
Natural Log allows you set the initial default values for new Customer Accounts, Broadcast Orders, Order
Lines, and Copy Manager. To access and set the default values, from the main NL menu, click [Setup]
[Administrator Controls] [Default Screen Entry Values].
Once default screen entry values have been set up for Customer Accounts/Broadcast Orders/Order
Lines/Copy Manager, these values will be entered by default whenever a new Customer Account/Broadcast
Order/Order Line/Copy is created. You will still always have the option of changing any of these values on
individual customers/orders/order lines or pieces of copy.
8
4b. Major Field Setup
This section of the NL8 program allows you to enter default value information for your Account Reps
(salesmen), Agencies, Product Codes, Revenue Types, Tax Rates and Time Classes. Most of these can
be created while you are entering your Customer account information, but the default rules and definitions
for these fields are setup in this area of the program.
Account Reps - Natural Log uses the term "Account Rep" to refer to 'Salesmen". This section allows you to
enter and edit information on your Account Reps. To enter this section, from the Main Menu select
[Setup][Account Reps].
Commission on Direct Sales, Agency Sales, and Trades - In the Account Reps setup section, these are
default values for this Account Rep's sales commissions. Whenever a broadcast order is entered into one of
this salesman's accounts, this is the % that will be entered for commission depending on whether the
account is direct, agency, or a trade. The actual commission percentage can be changed on each order
during order entry, so here you are only setting up the default value.
Monthly Sales Goals - In the Account Reps setup section, you can enter a monthly sales goal for each of
the Account Reps for each station. This is used in reports to compare actual versus goals for each Account
Rep and Station. The Station's sales goals are the sum of all the individual Account Rep sales goals for that
station. You can show these sales goals on Sales Projection Reports.
Account Rep e-mail Address - In the Account Reps setup section, you may enter an e-mail address for
each Account Rep. If an e-mail address is entered, NL can send carbon copy e-mails you send to the
Account Reps customers (items such as order confirmations, invoices, etc.)
Deleting Account Reps - You can't delete any Account Rep that has 1 or more transactions in the Natural
Log system. These transactions may include Customer Account assignments, Orders, and any billing or
collection items assigned to this Account Rep. This deletion prohibition maintains the referential database
integrity and assures that all items are properly accounted for in the historical accounting records.
Solution: Instead of deleting a discontinued Account Rep, in [SetUp] [Account Reps], check the [Inactive]
box for the discontinued AccountRep after you have reassigned any customers, running orders, and any
open Accounts Receivable items for that AccountRep. This will cause the inactive AccountRep to no longer
show up on any menus.
Agencies - To create an agency item, from the Main Menu select [Setup][Agencies]. This section allows
you to enter and edit information on advertising agencies you deal with. This is optional but is advantageous
in the following instances.
1. If you enter many new customers [sponsors] that use the same agency, you can create an agency in the
NL8 setup, then simply select that agency during entry of the new sponsor. NL8 will then auto-fill the data
fields for the new customer including billing address, invoice type, billing cycle, etc.
2. If you use electronic invoicing through the Encoda / SpotData clearinghouse, each invoice must have
specific agency information attached such as AgencyIDB. This agency setup is where that information is
entered.
9
4b. Major Field Setup (Continued)
Product Codes - These allow you to protect similar products from appearing together on the log. Then
during order entry you put 1 or 2 Product Codes on the Order. Natural Log will then provide the required
protection between all Orders that have been assigned the same Product Code. This prevents 2 car
dealers from running too close together.
Note: Product code separation only applies to spots from different customers. To separate spots from the
same customer see Customer Spot Separation or Order Spot Separation.
You can specify which type of protection these product codes need. When generating the LOGS, the
computer will not schedule spots with the same Product Codes together. You can select the type of
protection for each product code from the following:
1-per-Break - 1 item with this Product Code may play within a commercial break.
No Back-Back - 2 items with this Product Code may NOT play Back-to-Back.
### Minutes - Protect this Product Code for a number of minutes.
Revenue Sources - Assigned at the customer level, Revenue Source allows you to filter your sales reports
as National/Agency, National/Direct, Local/Agency, Local/Direct, Other/Agency, Other/Direct, National Rep,
or Unwired Network sales.
Revenue Types - Revenue Types allow you to "break out" certain sales into separate sales reports. When
you enter an Order, you will assign that Order to a Revenue Type. All Natural Log reports allow you to
specify which Revenue Types to include in the report. These are most often used to designate orders as
Cash, Trade, etc. Natural Log has 3 default Revenue Types that are sufficient for most users.
Note: Revenue Type is your best sorting tool for all your reports. You will be able to either include
a certain revenue type on a report or leave it off of the report.
Tax Rates - To enter or edit a Tax Item, from the Main Menu select [Setup][Tax Rates]. Enter a unique
name for this tax item. Enter percent tax to be applied. Indicate whether it is applied to the net, gross, or
discounted-gross invoice amount. When entering Customers, each customer can be assigned one of the
defined tax rates (or no tax rate if none is to be applied) as their default tax rate.
When entering Orders, the Tax Rate on the Order will default to the Customer's Tax Rate but may be
changed during Order entry. This allows you to have taxable and untaxable orders on the same customer
account.
Time Classes - Use of these classes is Optional but is included for your optional use. These are only
required when you want to run spots in non-contiguous times, for example drive times. Normal order entry
requires you to provide a scheduling window like 6:00:00 AM to 10:00:00 AM for spots to run but what if the
required time window is not contiguous? See the following example:
Non-Contiguous Schedule Window Example - You could create a time class D for Drive-Times which
includes 06:00:00AM to 10:00:00AM and 3:00:00PM to 7:00:00PM. Then on your order you could specify D
times and any spots on that order line would run in any hour 6-10A or 3-7P. You are allowed up to 5
different day parts in a time class.
10
5. Traffic
The Traffic section of NL8 is where you enter your New customer accounts or access customer accounts
that have already been created through the Customer Accounts Browser. You can also access customer
Orders directly using the Broadcast Order Browser.
Two other items found in the Traffic module of NL8 are the Network Spot Scheduler for tracking network
spots and the Special Events, which allows you to create Special Event templates and the Special Event
Scheduler to schedule those events.
Copy Manager is also located in the Traffic module of NL8 and houses the list of all Copy that has been
created. The browser for Copy Manager allows you to make changes to copy, sort and print the list as well
as get a list of expired copy.
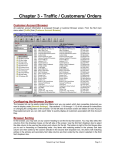
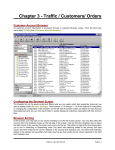
5a. Customer Accounts
Customer Accounts are accessed through the NL main menu under the [Traffic][Customer Browser] or
[AcctsRec][Customer Browser] menu. The accounts are displayed on a browser screen that can be
configured, sorted, and filtered as desired.
To create a new customer account, click the [New] button. To open an existing customer account, click the
[Open] button or double click the customer listing. When the Customer Account opens, you will see the
following tabs:
Customer Data tab - On the Customer entry screen, this is where you enter customer information such as
name, address, etc. See Customer data entry for a description of the customer account data fields.
Orders tab - On the Customer entry screen, this tab lists the Broadcast Orders for the displayed customer.
Using dropdown boxes you can select Active Orders, Expired Orders, or All Orders for any or all stations.
You can right-click in the order list to use the Orders menu. See Broadcast Orders
You can use the [New] button to create a new order on this account
You can use the [Open] button (or double-click the item) to view/edit the highlighted order.
You can use the [Delete] button to delete an Order only if nothing has run from the Order. If 1 or more items
has already been logged from the order, just change the end date to stop it from running anymore.
Note: If the logged-on user's Traffic permission setting is Deny, the Orders tab will not be visible.
Accounts Receivable tab - On the Customer entry screen, this tab lists the unpaid A/R items for the
displayed customer. Using dropdown boxes you can select Revenue Type items to be displayed and station
items to be displayed. You can right-click in the Accounts-Receivable list to use the Accounts-Receivable
menu. See Accounts Receivable
You can use the [Statement] button to view/print the current account statement for this customer.
You can use the [View Transaction] button (or double-click the item) to view/print the highlighted
transaction.
You can use the [History] button to view/print a history of the A/R transactions on the account. See
customer history.
Note: If the logged-on user's Accounts Receivable permission setting is Deny, the Accounts Receivable tab
will not be visible.
11
12
5a. Customer Accounts (Continued)
Copy Manager tab - On the Customer entry screen, this tab lists the Copy items in NL for the displayed
customer. Using dropdown boxes you can select Active Copy, Expired Copy, or All Copy. You can rightclick in the Copy Manager list to use the Copy Manager menu.
You can use the [New] button to create a new piece of Copy on this account
You can use the [Open] button (or double-click the item) to view/edit the highlighted Copy item.
You can use the [Delete] button to delete a piece of copy.
Note: If the logged-on user's Copy Manager permission setting is Deny, the Copy Manager tab will not be
visible.
Customer Memo tab - On the Customer entry screen, this tab allows you to enter memo items for this
customer. Additionally, you can enter dated reminders using the [Contact Manager / Account Date
Reminders] button.
Items Found in Tools Menu On the Customer Screen:
Send E-mail - On the Customer entry screen, the [Tools][Send e-mail] menu allows you to send a e-mail to
this customer's Contact e-mail Address from within NL8 [provided you have an e-mail program on the NL8
computer)
Print Envelope / Mailing Label - On the Customer entry screen, the [Tools][Print Envelope / Mail Label]
menu allows you to print these items for the displayed customer account.
Reminders - You can view the date specific Reminders for the displayed customer using the
[Tools][Reminders] menu choice on the customer entry screen.
Activity Log - You can view the log of all changes to the displayed customer account using the
[Tools][Activity Log] menu choice on the Customer entry screen.
13
5b. Entering Orders
Broadcast Orders are accessed through the NL main menu under the [Traffic] [Broadcast Order Browser]
menu. The orders are displayed on a browser screen that can be configured, sorted, and filtered as desired.
You can also access the orders for any customer on the Orders tab on the customer screen.
To create a new Broadcast Order, click the [New] button on the Broadcast Order Browser or on the
Customer entry screen "Orders" tab. To open an existing Order, click the [Open] button or double click the
Order listing.
General Tab - This is where you enter tell NL8 on what station(s) the order is to run as well as basic
information about the order. See Broadcast Orders-General Instructions
Invoice Instructions tab - This tab allows you to specify how the order is to be invoiced. You can set up
package-pricing or per-broadcast pricing and specify the billing cycle and invoice type. You can also set up
commissions for agency and account rep as well as discounts and trade credits. See Broadcast OrdersInvoice Instructions.
Schedule tab - The Schedule tab displays the Order-Lines that actually schedule the broadcasts. There is
no limit to how many Order-Lines may be attached on an order.
Approvals / Memos tab - This tab allows you to enter memo items for this order. Additionally, you can
enter dated reminders using the [Contact Manager / Account Date Reminders] button. See Reminders. If
order review is required in NL8 program options, the review check boxes will be visible. If the logged-on
user is one of the user types that can review orders, the review boxes will be available for that user to click
to show they have reviewed the order.
Order Confirmation - You can print an order confirmation (and verify the order is correctly entered) using
the [Confirmation] button on the order entry screen.
Production Order - You can print a Production Order showing when production is required for this order
using the [Production] button on the order entry screen.
Items Found in Tools Menu On the Order Screen
Copying an Order - You can make a copy of an order using the [File][Duplicate this Order] menu choice on
the Order entry screen. You will need to specify the Customer to receive the duplicated order and the
CopyID to be used on the duplicated order.
Reminders - You can view the date specific Reminders for the displayed order using the
[Tools][Reminders] menu choice on the Order entry screen.
Order Billing History - You can view all invoice issued from the displayed order using the [Tools][Billing
History] menu choice on the Order entry screen.
Activity Log - You can view the log of all changes to the displayed order using the [Tools][Activity Log]
menu choice on the Order entry screen. See Activity Log.
14
5c. Entering Schedules “Order lines”
Order Lines - Orders are accessed through the NL main menu under the [Traffic][Broadcast Order
Browser] or from an open Customer Account screen Orders tab. Within each order there is a Schedule tab
that lists the order lines that actually schedule broadcasts for that order.
You can use the [Add Order Line] button to create/add a new schedule line. NOTE: If you highlight an
existing order line before clicking this button, the default values for the new order line will match the values
of the highlighted line. That way if you have to enter a bunch of similar lines, you don't have to reenter the
same information over and over. Just highlight the line to be copied, click [Add Order Line] and make any
changes applicable to the new order line.
You can use the [Edit Order Line] button (or double-click the item) to view/edit the highlighted Order Line.
You can use the [Delete Order Line] button to delete a piece of copy. Warning: You will not be permitted to
delete any Order Line if it has logged 1 or more items since all logged items must be attached to an Order
Line. If this is the case, and you want to the Order Line to stop running, change the Order Line end date.
Cost per Broadcast - On the Order entry screen, this tells NL8 what to charge for each item scheduled
from this Order-Line. Each station on which the Order runs should be assigned a cost (0.00 is OK) Note:
This entry is not used if Level Package or Variable Package is selected on the Order - Invoice Instructions
tab.
Date Range - On the Order-Line entry screen, this tells Natural Log the start and end date for the items
scheduled on that order line. These Order-Line dates must fall within the run dates entered on the "General
tab" of the Order itself. See order entry-general tab.
Runs - On the Order-Line entry screen, this field has multiple uses but is most commonly set to All Weeks.
This means this order line will run the # Broadcasts per Day as specified for each weekday [see below]
between the order line Start date and End date. However additional uses can arise in complex scheduling
situations.
15
5c. Entering Schedules – “Order lines” (Continued)
Runs – (cont’d)
Alternating Weeks - On the Order-Line entry screen, the Run field may be set to every 2nd week through
every 13th week in the Runs field to turn the Order-Line on only for the weeks desired in an alternating
fashion.
Alternating Weeks Example If you have 2 Order-Lines that alternate, you could set them up starting 1 week
apart and have each alternate every 2nd week. When line 1 runs, line 2 is off, and when line 2 runs, line 1 is
off.
Specified Weeks - On the Order-Line entry screen, the Run field may be set to Specified Weeks you can
then list the exact weeks you want the Order-Line to run. The specified weeks must be within the run dates
of the Order (see Order Entry-General tab) and the date range of the Order-Line.
Specified Weeks Example Assume you have an Order-Line that extends for a whole year but does not run
every week in that year. Select Specified Weeks and you will see an [Edit Specified Weeks] button that you
can use to set the weeks.
Link=> (Linking an Order-Line to a Special Event Template) - On the Order-Line entry screen, the Run field
may be set to Link=> followed by the name of the Special Event Template to which the Order-Line is to be
linked. This allows you to use the Runs field to link this Order-Line to a Special Event Template [see
definition in glossary] so the order line will run only when that Special Event Template is scheduled using
Special Event Scheduling subject to any Run Dates restrictions on the Order Line. This means you don't
have to change all orders that run within that Special Event Template if a Special Event is canceled or
changed. Note: You must have created an empty Special Event Template (even if it is simply an empty
template) before you can link to that template.
Filler Only (Specifying Filler Material to Auto-Fill Network Breaks) - On the Order-Line entry screen,
the Run field may be set to Filler-Only. This is used when you are running programming from a satellite for
other network and you need to specify filler items to be used fill Mandatory or If-Used commercial breaks to
exact length if you don't have enough paid spots. You can add these as bonus spots on selected paid
orders or you may enter separate orders to run PSA',s, promos, etc. as filler material. These items are not
counted on Order Confirmations because until a log is generated, NL8 has no way to know how many items
it will schedule to fill any unfilled breaks.
Notes on Filler Items: Filler Items are logged only after all non-filler items are logged [or attempted to be
logged and are bumped due to rule violations].
This only applies to breaks with If-Used Fill-Code and at least 1 regular item logged in the break or
Mandatory Fill-Code whether or not any spots are already logged.
The number of spots per day on the Order-Line is treated as the maximum number of items that can be
scheduled from the Order-Line as filler for that day.
If NL8 does not need the item(s) to fill a commercial break, this Order-Line is not used and nothing from this
Order-Line is ever listed in the bumped items list for the log.
NL8 will never open a new break and log only filler items in the break unless the break is Mandatory.
16
5c. Entering Schedules – “Order lines” (Continued)
Time Range - On the Order-Line entry screen, you most commonly tell Natural Log the start time and end
time within which the item on that Order-Line must be scheduled. You can enter time in your local time
format. If the desired time is not one of the predefined times, just type the time in the box in your local time
format. You may also select one of your user-defined Time Classes [if used].
Important Note regarding Time Range: NL8 will assume it can schedule items anytime within the
specified time range. NL8 will attempt to rotate an item through all allowed hours but may not be able to do
so depending on how full your log is with higher priority and/or more time-restricted items. This means you
cannot assume NL8 will schedule an equal number of items within any subset of the time range. That is, if
you schedule an item to run 6A to 7P, it will be logged within that time range but NL8 may not schedule an
equal number of items 6A-10A, 10A-3P and 3P-7P. For example, if your log is full with higher priority items
that must run between 6A-10A, an item scheduled 6A-7P would likely not appear in 6A-10A. To force some
items to appear in specific dayparts, you must schedule them that way. In this case schedule some items
specifically 6A-10A, some 10A-3P and some 3P-7P.
# Broadcasts per Day in the Specified Date/Time Range - This tells NL8 how many of item(s) to be
scheduled from that Order-Line. This can be specified in 2 ways. You cannot mix these methods on the
same Order-Line.
Normal Scheduling - Recommended method! Specify the actual number to run in the Spots-per-day box
for each weekday. Leave blank in any day in which nothing is to run. Specifying the actual number to run is
the preferred method and gives best control.
Spots-Per-Week Scheduling - Some stations enter the Order-Line to specify how many spots per week to
run but let NL decide how to distribute them within the allowed days. This is done by placing an X in the
Spots-per-day box for any day the spots may run and then specifying the number to run per week in the
Per-Week box. This was previously referred to in NL-DOS and NL8 as "random" scheduling. This also
allows you to specify Front-Loading.
Length / Type - On the Order-Line entry screen, this specifies the length [ formatted as :ss or mm:ss or
hh:mm:ss] of the item being scheduled. If the desired length is not one of the default values in the dropdown
box just type it in formatted as :ss, mm:ss, or hh:mm:ss. Log types simply describe what type of event is
being scheduled. Some automation systems (such as Scott Studios and MediaTouch) use this LogType as
their audiocut "Categories".
Types – A listing of types and definitions are as follows.
CA (Commercial Announcement), CM (Commercial Matter), COM (Commercial) - Designates that the spot
to run is a commercial.
CP (Commercial Program) – Used for commercial programs that haver a length that is larger then any of
your total stop set lengths. Commercial Programs look for blank lines on the log not avails. [Note: This CP
type will block out all Template Avails and anything scheduled within its start and end time on any day it is
scheduled.]
CPN (Commercial Pgm Non-Exclusive) – Same as CP except it allows breaks to still fill and doesn‟t block
out the log.
MAC (Macro) – Advanced function of this program. [See section 3.09 of the NL8 manual for a discussion of
macros]
NLC (Non-Log Charge Item) - This does not place anything on the log but passes the specified charge
invisibly through the log to the invoice. This might be used for production or talent fees.]
17
The following are all optional choices for the type field. - POL (Political Announcement), FCC (FCC
Announcement), PRO (Promotional Announcement), PSA (Public Service Announcement), SPA (Station
Promo Announcement), UW (UnderWriting Anouncement).
18
5c. Entering Schedules – “Order lines” (Continued)
Description / Note - On the Order-Line entry screen, this specifies how the item will be shown on the log
and on invoices. Default values that can be selected from the dropdown box are listed below. If the default
values do not meet your needs, you can also type in anything you want as the description / note.
During order line entry, if you include the word LIVE or CALL-IN in the description field, the item is treated
as a live spot or call-in spot.
Avail-Type Restrictions - On the Order-Line entry screen, this tells NL8 to put ordered items only into avail
slots whose Log Template Avail-Type matches the Broadcast Order Avail-Type. Normally the Avail-Type in
both NL8 Log Templates and Broadcast Order Lines should be Unrestricted! This means any item from the
Broadcast Order can be logged into any avail slot within the order line's time window. The only time you use
Avail-Types is when you want to force a particular customer's item into a particular avail slot or to reserve
an avail slot for a particular type of ordered item [such as a program sponsorship or adjacency]. In That
case the same Avail-Type must be entered on both the Log template and the Broadcast Order. See AvailTypes on Log Templates.
Position - On the Order-Line entry screen, this tells NL8 if the item being scheduled must be placed in a
particular position within a commercial break. Normally this should be to UnRestricted.
Preemption Level - On the Order-Line entry screen, this lets NL8 know how important it is for the item to
be logged. If you are oversold and NL8 cannot schedule all ordered items, it needs to know what items to
log first and what items can be bumped if needed. Items with Preemption level 0 are logged first, then
preemption level 2, then 3, and so on. Less important items should have inferior preemption levels (7,8,9)
so they get bumped. More important items should have superior preemption levels (0,1,etc.) so they are
more certain to be logged. ANY items not logged are always placed in the log's Bump-Item file regardless of
their preemption level.
CopyID to be Played - On the Order entry screen, this tells NL8 what specific CopyID to tell your
announcer or automation system to play when this Order-Line is scheduled. If using automation, this
CopyID is simply the audiocut identifier in the automation system. When you click the [Change] button you
will get a screen on which you can select an existing CopyID for this customer or create a new CopyID.
This CopyID can be Normal Copy, Packet, Rotator, or Copy Schedule. See the Copy Manager section of
the NL8 User Manual for more detailed Copy information and examples.
19
5d. Creating and Using Copy
Copy Manager
Warning! The Copy manager never, by itself, causes anything to be logged. All the NL8 Copy manager
does is determine exactly which piece of copy should run when an order calls for items to be logged.
Automation Warning - Natural Log 8 allows CopyID's of 1 to 20 characters [letters and/or numbers] to
uniquely identify a piece of copy in NL8 and in your automation system. Some automation systems have
additional restrictions. See your automation manual and automation in chapter 11 of the Natural Log 8
manual for more information on these CopyID restrictions particularly Scott Studios and MediaTouch.
Unless you have a specific need for CopyID's longer than 8 characters, we recommend you use no more
than 8 characters since many standard automation log files only have space for 8 characters in the CopyID
field. If you do use more than 8 characters, you may need to use a special log interface file format to
transfer the log to your automation system. This 8-characater restriction does not apply to identifiers of copy
rotators, copy packets, or copy schedules in NL8 because these items are converted into actual copyIDs'
during log generation.
The NL8 Copy Manager is accessed through the NL main menu under the [Traffic][Copy Manager] menu.
The Copy list is displayed on a browser screen that can be configured, sorted, and filtered as desired. See
Browsers. You can also access the Copy for any customer on the Copy Manager tab on the Customer
Screen. This section of NL8 allows you to manage your Copy within NL8. CopyID's are specified for each
order line during order entry
Copy Types - NL8 allows you to use 4 types of Copy items. They are Normal Copy, Rotator, Packet and
Schedule.
Normal Copy - This is the simplest Copy item in NL8. It consists of a single piece of Copy. During order
entry you just specify the exact CopyID of the individual piece of copy to be scheduled when that order line
runs. This CopyID should exactly match the AudioCut ID (or Filename) within your automation system. See
Automation.
Note: When Copy is displayed, the [Listen] button launches your default MediaPlayer if you have one (e.g.
Windows MediaPlayer, RealPlayer, WinAmp, etc.) so you can listen to the copy. This work only if the audio
cut is available to the NL8 computer through a network connection. NL8 will open a browse window so you
can locate the actual audio cut. The audio must also be in a format understood by the Windows
MediaPlayer.
Note: Copy Rotators, Copy Packets and Copy Schedules are created using the same steps. The only
difference is in the ”Copy Item” box of each type.
20
5d. Creating and Using Copy (Cont’d)
Rotator
Copy Type – Rotator - A Rotator consists of 2 or more individual pieces of Normal Copy and/or Packets
that you want to rotate on a percentage basis. During order entry you just specify the exact CopyID of the
Rotator itself to be used when that order line runs. When NL creates the log, it will find the appropriate
individual CopyID within the Rotator and schedule it. There is no limit to how many Copy items you can
rotate.
Rotator Example: Suppose you have 2 pieces of copy, CopyID 0018 and 0450 you want to rotate equally.
You can create a Rotator named R0118-004 (or any unique CopyID you want to use), and insert CopyID
0018 and 0450 into the Rotator each set to run 50%. During order entry you just specify R0118-004 (the
CopyID of the Rotator itself) to be used when that order line runs. During log generation, NL8 will play the
appropriate cuts to maintain the 50/50 rotation. Each Rotator line can have any rotation % (allowing uneven
rotations if needed) but the rotation % total for all lines on the each Rotator must equal 100%.
Rotator Numbering – Natural Log will assign a number for your rotator using the following pattern. R####### where R stands for rotator and ####-### is the CustomeID number followed by the rotator number that
NL8 assigns to is.
Warning for Rotator Edits: If at least one item has already been logged from a Rotator, any edits of any
Rotator lines will cause that Rotator to reset. That is, it will restart the Rotation process with the first item in
the Rotator and set all play counters to 0. This is to prevent a situation in which you might have 2 spots
running 50/50 and then add a third to rotate 33/33/33. If the rotator did not reset, the added spot would run
exclusively until it achieved 33% of the total spots already run, not a desirable result.
Creating a Rotator - There are 4 simple steps to creating a rotator. If you keep these in mind they are not
difficult to create. Rotators are usually created from the Orderline instead of from Copy Manager so that
you can use it right away. The following steps are done from the Orderline by clicking on the “Change”
button. This takes you to the “Select Copy” box where you continue with the steps below.
Step 1 - Make sure that all the copy you will need to rotate has been created. If not, then create them
now.
Step 2 – Create the Rotator by clicking on the “New” button while in the “Select Copy” box. In the “New
Copy Information” box select “Rotator” in the “Type” field. NL8 will create a rotator number for you that will
begin with and “R”, then make sure the date range is correct and click on the create button.
Step 3 – Edit the Rotator by “Appending” in the items to rotate. Highlight the rotator in the “Select
Copy” box and click on the “Edit Copy” button. This opens the “Rotator Information” box. In this box you
click on the “Append” button. This opens the “Select Copy” box where you will double-click on the first
piece of copy to rotate. If you are going to rotate the copy equally, then just click on the save button while
in the “Rotator Copy Item” box. (If you want to set the percentage of rotation you can enter it here.) Keep
appending in you items until all copy is listed in the rotator then you can click on the “Equal Rotation” button.
Remember the percentage of copy rotation must always equal 100%. Close the “Rotator Information” box.
Step 4 – Use the Rotator on the Orderline as the copy to be played.
5d. Creating and Using Copy (Cont’d)
Packets
Copy Type – Packet - A packet consists of 2 or more individual pieces of Normal Copy that run together
and substitute for each other in various dates, days and/or time periods. During order entry you just specify
21
the exact CopyID of the Packet itself to be used when that order line runs. When NL creates the log, it will
find the first Packet line that can run at that day / date / time and schedule it. There is no limit to how many
Copy items you can Packet together.
Packet Example: Suppose you have 2 pieces of copy, CopyID 0018 and 0450. You want 0018 to run any
days before 10AM and cut 0450 to run any days after 10AM. Create a Packet named P0118-002 (or any
unique CopyID you want to use) and insert CopyID 0018 on the 1st line of the Packet and specify it to run
before 10AM. Then insert CopyID 0450 on the 2nd line of the Packet and specify it to run after 10AM.
During order entry specify P0118-002 (the CopyID of the Packet itself) to be used when that order line runs.
Packet Numbering – Natural Log will assign a number for your packet using the following pattern. P####### where P stands for Packet and ####-### is the Customer ID number followed by the packet number
that NL8 assigns to it.
Packet Settings - When you add a new packeted item or edit an existing packeted item you will see a
screen on which you may restrict the dates, day-of-week, and times the packeted item may be used.
WARNING: Only use the packet item restrictions necessary to accomplish your goal. For example, if the
packet item is restricted only based on time, do not use the date or day-of-week restrictions. Leave the
unneeded restrictions set to As Ordered. These settings only restrict the copy played for order lines placed
on the log that have this packet as their CopyID. This does not restrict the dates, days, or times an order
line can be logged. See Broadcast Orders in Chapter 3 of this manual to restrict when order lines are
actually logged.
Creating a Packet - There are 4 simple steps to creating a packet. If you keep these in mind they are not
difficult to create. Packet s are usually created from the Orderline instead of from Copy Manager so that
you can use it right away. The following steps are done from the Orderline by clicking on the “Change”
button. This takes you to the “Select Copy” box where you continue with the steps below.
Step 1 - Make sure that all the copy you will need for the packet have been created. If not, create
them.
Step 2 – Create the Packet by clicking on the “New” button while in the “Select Copy” box. In the “New
Copy Information” box select “Packet” in the “Type” field. NL8 will create a packet number for you that will
begin with and “P”, then make sure the date range is correct and click on the create button.
Step 3 – Edit the Packet by “Appending” in the copy. Highlight the packet in the “Select Copy” box and
click on the “Edit Copy” button. This opens the “Packet Information” box. In this box you click on the
“Append” button. This opens the “Select Copy” box where you will double-click on the first piece of copy to
place in the packet. You will see a screen on which you may restrict the dates, day-of-week, and times the
packeted item may be used. After appending in all the copy into the packet you then close the “Packet
Information” box.
Step 4 – Use the Packet on the Orderline as the copy to be played.
22
5d. Creating and Using Copy (Cont’d)
Schedule
Copy Type – Schedule - Use this type of copy item when the copy changes on one or more dates during
the order run. This Copy type consists of 2 or more individual pieces of Normal Copy, and/or Packets,
and/or Rotators each of which expires on a particular date. These items sequentially substitute for each
other after the previous line(s) in the Schedule expire. During order entry you just specify the exact CopyID
of the Schedule itself to be used when that order line runs. When NL creates the log, it will find the
appropriate individual CopyID within the Schedule and schedule it. There is no limit to how many Copy
items you can Schedule.
Copy Schedule Example: Suppose you have 2 pieces of copy, CopyID 0018 and 0450. You want to run
0018 until Dec 24 and cut 0450 thereafter. You can create a Schedule named S0018-001 (or any unique
CopyID you want to use), and insert CopyID 0018 first in the Schedule and 0450 second into the Schedule.
Then within the Schedule designate cut 0018 to expire on Dec 24. During order entry you just specify
S0018-001 (the CopyID of the Schedule itself) to be used when that order line runs. After Dec 24, the first
line of the Schedule will no longer run (Cut 0018) and NL8 will drop to the second line and play cut 0450.
This will also works with Packets and Rotators inserted into the Schedule.
Copy Schedule Numbering– Natural Log will assign a number for your schedule using the following
pattern. S####-### where S stands for Schedule and ####-### is the Customer ID number followed by the
schedule number that NL8 assigns to it.
Copy Schedule Settings - When you add a new Copy Schedule item or edit an existing Copy Schedule
item you will see a screen on which can you set the date and time this Copy Schedule Item expires. These
settings only restrict the copy played for order lines placed on the log that have this Copy Schedule as their
CopyID. This does not restrict the dates, days, or times an order line can be logged. See Broadcast Orders
in Chapter 3 of the NL8 manual to restrict when order lines are actually logged.
Creating a Schedule - There are 4 simple steps to creating a Schedule. If you keep these in mind they
are not difficult to create. Schedules are usually created from the Orderline instead of from Copy Manager
so that you can use it right away. The following steps are done from the Orderline by clicking on the
“Change” button. This takes you to the “Select Copy” box where you continue with the steps below.
Step 1 - Make sure that all the copy you will need to schedule have been created. If not, then create
them now.
Step 2 – Create the Schedule by clicking on the “New” button while in the “Select Copy” box. In the “New
Copy Information” box select “Schedule” in the “Type” field. NL8 will create a schedule number for you that
will begin with and “S”, then make sure the date range is correct and click on the create button.
Step 3 – Edit the Schedule by “Appending” in the copy. Highlight the Schedule in the “Select Copy”
box and click on the “Edit Copy” button. This opens the “Schedule Information” box. In this box you click on
the “Append” button. This opens the “Select Copy” box where you will double-click on the first piece of copy
to place in the Schedule. After you have added in all the copy close the “Schedule Information” box.
Step 4 – Use the Schedule on the Orderline as the copy to be played.
23
6. Logs
Log Templates:
Overview of Log Templates - To access the Log Template Editor, from the main NL8 menu, select [Logs]
then the Template Type you want to work with. You can then use the drop-down boxes to select the Station,
Log Template Type, the Specific Log Template, and the hour to be displayed.
What Are Log Templates? - Log Templates (or skeleton logs) are used by NL8 so that it will know where
you want commercial avails, programs, text, and automation commands to appear on your log. Each station
has its own set of Log Templates. At a minimum, there must be a Normal Daily Log Template for weekdays
(Monday-Sunday).
Normal Daily Log Templates - You must have one Log Template for each weekday (Monday-Sunday) for
each station. These templates are used by Natural Log as the default Log Template when generating logs
for that respective day unless it finds a Special Date Log Template for the date for which a log is being
generated.
Special Date Log Templates - Occasionally you may need to use a Special Log Template instead of your
regular daily log format for only one day. The easiest way to do this is to open the Normal Daily Log
Template for the day and copy it to a Special Date Log Template for the date. You can then make any
changes in that new Special Date Log Template that will not affect the Normal Daily Log Template. On the
specified date only, that Special Date Log Template will automatically be used in place of the Normal Daily
Log Template. Creating New Log Templates
Special Events Templates
These are "partial-day" Log Templates useful for stations that run programming that often changes times
and days, such as sports programming. See Creating New Log Templates. These Special Event Templates
have the same formatting as regular Log Templates except:
1. They apply to less than a full day.
2. The Log Template Time column is elapsed time instead of scheduled time since the start of the Special
Event is not always the same.
These Special Event Templates overlay the regular Log template during the specified date and time period
that you set in the Special Event Scheduler when you generate a log. Order Lines may be linked to the
Special Event Template so the order line runs anytime the special event is scheduled.
WARNING: NL8 allows scheduling a Special Events Template to start at a time [and with a length] that
causes it to continue past 11:59:59 PM. However the "past midnight" events will appear after the 11PM hour
in the log for the date on which in Special Event began. This MAY create unwanted results in your
automation system, particularly if there are any "timed events" in the template that occur past midnight.
Other Log Templates
These are Log templates you save under a specific name for later use. For example, you might save the
Friday Normal Daily Log Template as Other Log Template named "Friday-Old". Then you can edit the
Friday Normal Daily Log Template to add some more commercial breaks for a heavy advertising period.
Later when you want to revert to the original Friday Log Template, open the "Friday-Old" Other Log
Template and copy it back to the Friday Normal Daily Log Template.
6a. Creating & Editing New Log Templates
24
To access the Log Template Editor, from the main NL8 menu, select [Logs] then the Template Type you
want to work with. You can then use the drop-down boxes to select the Station, Log Template Type, the
Specific Log Template, and the hour to be displayed.
In the Log Template Editor, click [File] then [New] to create a new Log Template.
Basis for New Log Template - Choose if you want to create a new blank Log Template or a new Template
using a copy of the open existing Log Template as the basis for the new Log Template.
Station - Select the station to which the Log Template belongs.
Normal Daily Log Template - These are the default Log Templates used by NL8 when creating a log
unless it finds a Special Date Log Template. There must be a Normal Daily Log template for each weekday.
Other Log Template - These are Log templates you save under a specific name for later use. For example,
you might save the Friday Normal Daily Log Template as Other Log Template named "Friday-Old". Then
you can edit the Friday Normal Daily Log Template to add some more commercial breaks for a heavy
advertising period. Later when you want to revert to the original Friday Log Template, open the "Friday-Old"
Other Log Template and copy it back to the Friday Normal Daily Log Template.
Special Date Log Template - These are Log Templates used only on their specified dates by NL8 when
creating a log in lieu of the Normal Daily Log Template for that date.
Special Event Template - Log Templates useful for those stations that run programming that often
changes times and days, such as sports programming. These Special Event Templates have the same
formatting as regular Log Templates (using elapsed time instead of scheduled time) but they apply to less
than a full day and may be scheduled to overlay the regular Log template on any given date and time.
During the period these special templates are used, it writes over the regular Log Template during the
length of the special event. Order Lines may be linked to the Special Event Template so the order line runs
anytime the special event is scheduled, but not any other time.
25
6a. Creating & Editing New Log Templates (Continued)
To access the Log Template Editor, from the main NL8 menu, select [Logs] then the Template Type you
want to edit. You can then use the drop-down boxes to select the Station, Log Template Type, the Specific
Log Template, and the hour to be displayed.
Event ID’s
Log Template event numbers do not correspond to time, except that the first 2 digits indicate the hour in
which the event occurs. Example: Event 0810 is simply the 10th line or event in the 8 o'clock AM Template
hour and may occur at any time in that hour which you enter in the time column.
Editing or Adding Log Template Events
To enter an individual Log template event [double-click] that event number. This opens up the “Log
Template Edit” box. In this box you setup the information for that particular line or line of events.
Filling in the Log Template Edit box:
The fields in this box represent the columns on your log template and are described as follows.
Log Template Event Type – The selections for this field are described as follows. (Note: An avail is an
available line for a commercial spot to log on.)
** Start New Commercial Break Avail (used when you want to allow more than one avail in the break)
*^ Continue Commercial Break Avail (used during editing if you take out a continuation avail by mistake.)
* Stand-Alone Avail (used when you only want to schedule one avail during the break)
Log Text / Program Title / Automation Command (used when you want to show log text or program titles on
the description line of the template. Also, when you want to put an Automation command on the description
line (this begins with an “&” which tell the automation to perform a particular task).
--[PageBreak] – (usually placed on the last event line of the hour to force NL8 to start a new page when the
log is printed This gives the user control over where page breaks occur and allows the user to combine
hours on one printed log page if desired.
Maximum Spots in Break – This field will appear when you select the log type as Commercial Break. You
enter the maximum number of commercials you want to allow for this break. (Rule of thumb is to allow 30
seconds per avail, so a 1:30 break will have a maximum of 3 spots in the break.)
Scheduled Time - You enter the time for the event in this filed. (If you leave the time blank, NL8 looks up
the Log Template and uses the last valid time entered in this column and applies it to this event). If it is a
scheduled time for a Commercial Break you should enter a valid time. Note: If the Log Template being
edited is a Special Event Template this column is elapsed time since the start of the program. In all other
cases this is actual time of day.
Description – If the event type chosen is a Commercial Break this field will display **, if the type is a Stand
Alone Avail it will display *, but if the event type is Log Text, Program Title or Automation command, you will
have to fill it in so that it displays on your log when you generate it. (Note:Automation Commands always
start with an ampersand (&) followed directly (no space) by the copy number or command to be played.
6a. Creating & Editing New Log Templates (Continued)
Length – Put the maximum length of the event in this field. Just click on the drop down arrow and find the
length of time you want to be scheduled, (if you need the length to be a :10 just select :00 and change the
26
first 0 to a 1). The length entry is required only in the circumstances shown below. If you don't care about
the length, leave it blank.
Commercial Break Length For an event which starts a commercial break, the length you enter (if any) will
specify a maximum minutes:seconds for the Total commercial set length.
Stand-Alone Commercial Use this setting for an event that is a Stand-Alone commercial avail. Remember
whatever length you put for this avail on the template is the only length that NL8 will look for to fill that avail.
For example if you call it a :30 is will only place a :30 spot on this avail when you create your log.
Fill-Priority - Within each hour you can specify the order in which NL8 uses the avails in each hour by
specifying a Fill-Priority. Within each hour, NL8 will fill all priority 1 avails, then priority 2, etc., up to priority
99. In this way you can control how an hour is filled with spots or which commercial sets are used first. You
can use the same Fill-Priority for each line within a commercial break or use different Fill-Priorities on each
line in a break to force NL8 to skip around between breaks.
Also, by assigning a priority of 100 to 199 or 200 to 299, etc., to a commercial avail, you can create
secondary avails to be used only when all lower level avails (priority 0 to 99) are full in all hours of the day.
Your choices:
First Level:
Second Level:
Third Level:
Continuing to the 8th level
1 to 99
100 to 199
200 to 299
900 to 999
NOTE: Mandatory commercial breaks must have priority level of 0 to 99, never 100 to 899! If you leave the
Fill-Priority blank, NL8 assigns it a level of 99.
Log Template Fill-Code - The fill code is requested only for events with ** designating a commercial break
or * designating a Stand-Alone commercial avail. It is skipped for all other event types. Unless one of the
following situations applies, this should always be left blank! Your choices are:
Mandatory - NL8 will force all Mandatory stand-alone avails to be filled. It will also fill to the proper length
any Mandatory commercial breaks provided you enter a desired length.
If Used Fill - NL8 will fill commercial breaks to the proper length only if at least one spot is logged in that
commercial break and a length is entered for the commercial break. This is helpful for satellite network
formats in which you must fill certain commercial breaks because the network does not cover them.
Note: If no length is entered for a Mandatory or If Used commercial set, NL8 only will fill the avails in that
commercial break that have an Avail-Type restriction.
Log Template Source - This allows you to enter the source for an event. Usually this will be Local but you
may also enter Network. The computer uses this information to generate network spot files containing avails
for you to quickly enter network spots. If this is entered as Local, NL8 will use this avail for local spots. If
you enter this as Network, the NL8 will save this avail for network spots only.
27
6a. Creating & Editing New Log Templates (Continued)
Notes about Creating Log Templates:
Sign-ON/Sign-OFF - NL8 assumes you are on the air 24 hours unless you enter Sign-ON as the event
description at your Sign-On time and Sign-OFF as the event name at your Sign-Off time. [Hyphen is
required].
Copying Log Templates
To access the Log Template Editor, from the main NL8 menu, select [Logs] then the Template Type you
want to work with. You can then use the drop-down boxes to select the Station, Log Template Type, the
Specific Log Template, and the hour to be displayed.
Copy an Entire Log Template - To copy an entire Log Template, open the Log Template to be copied from
and click [File][Copy Template] and select the Log Template to be copied to.
Copy an Entire Hour of a Log Template - To copy one hour to other days/hours, display the hour to be
copied from. Then click [Edit][Mass Change][Paste Hour to Other Days/Hours]. Then select the appropriate
days and hours into which the displayed hour should be pasted.
Copy a Portion of a Log Template - To copy one or more events from one Log Template to other(s),
select the item(s) to be copied by either:
Hold down the [Right-Click] and Drag your mouse slowly over the items to be copied or
[Ctrl] and [Right-Clicking] them to select multiple items one at a time then, click [Edit][Select All]
After the item(s) are selected, click [Edit][Mass Change][Paste Selected Item(s) to other Days/Hours]. Then
select the appropriate days and hours into which the selected items should be pasted.
28
6b. Commercial Logs
Creating a New Log - At the Natural Log main screen, select [Logs]. This section of the Natural Log system
allows you to generate and edit Logs. These logs can be printed for a live DJ's use or converted into
Automation Logs if you are using an Automation system.
Note: You can't create a log for a station for a day until you have first created a default Normal Daily Log
Template for that weekday (Monday-Sunday) for that station so NL8 knows where your commercial avails
are scheduled. See Creating Log Templates.
Create New Log - Click [Logs] [New Log]. This generates a new Log for a day. Please note that these New
"real" Logs must be generated in chronological order such as 01-01-99 then 01-02-99, etc. After the new log
is created it is automatically loaded into the Log Editor where it may be edited, printed, and converted into
an automation log.
Create Trial Log - Click [Logs] [Trial Log]. This generates a Trial Log for any day in the future. Copy
rotators are not affected. After the trial log is created it is automatically loaded into the Log Editor where it
may be viewed but not edited.
Log Editor - Editing an Existing Log / Converting to Automation / Reconciling / Charging:
At the Natural Log main screen, select [Logs]. Select an existing Log and then click [Open].
Changing the Log Editor Display - You can adjust the split between the upper Log window and the lower
Log Diagnostics window by dragging the bottom of the log window up or down. NL8 remembers where you
last placed the divider. You can return to default log display by selecting [Editor Settings][Restore Default
Settings].
You can select which log item properties [columns] are displayed on the Log Editor screen by selecting
[Editor Settings][Columns] from the menu on the Log Editor. Then add or remove the desired columns to be
displayed, click [Apply], and the Log Editor will display only your selected columns. You can adjust the
column widths by dragging the column dividers left or right and NL8 will remember these column choices
and widths in the future.
If you prefer not to see the avails information displayed in the left column, click [Editor Settings][Hide Avails].
NL8 will remember this menu setting until you change it again.
Note: The Log Editor display settings are set separately for each station if you are using a multi-station
version of NL8.
Selecting Items on the Log
To highlight (select) more than one line on the log for some action (such as cut-and-paste), use the
[Ctrl][Left-Click] keys simultaneously on each individual line or hold the right mouse button down while you
move the mouse over the lines to be selected.
29
6b. Commercial Logs (Continued)
Edit Menu
In the Log Editor, the Edit menu can be displayed by [Right-Clicking] on any logged item. This menu has
many useful commands such as:
Clipboard Commands - Cut, Copy, and Paste
Log Item Commands - Add, Edit, Swap, Delete, Insert Blank Line(s), Find
View Commands - OrderLine, History-PlayTimes, Listen
Item Activity Log - Shows user changes to this log item
Rearranging Items on the Log - In the Log Editor, you may drag and drop items from one place on the
Log to another by holding the left mouse button down until you have moved the item to where you'd like it to
appear. When you release the mouse button, the item will drop into that slot. If you drop it onto an existing
item, that item [and all following items up to the first blank line] will be pushed down a line to accommodate
the moved item.
Swapping Items on Log - In the Log Editor, you can use the [Ctrl] key combined with [Left-Click] of the
mouse to highlight 2 items to automatically swap log positions. Then click [Edit][Swap Log Items] to
automatically swap the items' positions on the log. This only works when you have exactly 2 lines
highlighted using the [Ctrl][Left-Click] method.
Inserting Bumped Items onto Log - In the Log Editor, the Bump Errors list includes all items NL was
unable to log due to rule violations plus any items you delete from the log. You may drag-and-drop items
from the "Bump Errors" window by [Left-Clicking] and holding the button down until you have moved the
Item to where you'd like it to appear. When you release the mouse button, the item will drop into that slot. If
you drop it onto an existing item, that item [and all following items up to the first blank line] will be pushed
down a line to accommodate the moved item. You can also highlight an item in the Bump Errors window
and click [Place] to put that item at the currently-highlighted position on the log.
Hiding [deleting or removing] Bumped Items - [Right-click] on the bumped item list to get a popup menu
on which you can [Hide Bumped Item] to remove the highlighted bumped item from the list. This is useful if
some bumped items don't need to be logged [such as promos, bonus spots, etc.] and you want to remove
them from the bumped item list. This is equivalent to deleting the item from the bumped item list, however
you can later select [Show Hidden Bumped Items] to view all items that were in the bump list but have been
hidden. Do NOT hide items unless you want to remove them from the bumped item list! If you change your
mind you can also [UnHide] the items to return them to the bumped item list.
ClipBoard - Cutting and Pasting Log - In the Log Editor, the ClipBoard is just a temporary container to allow
you to hold items while cutting, copying, or pasting items on the Log. See ClipBoard
Inserting/Deleting Lines on Log - In the Log Editor, to add a blank line into the Log, highlight the spot
where you'd like it to appear and click on the menu [Edit][Insert Blank Line(s)] or [Edit][Delete Line(s)].
Undo Log Edit - In the Log Editor, you may click [Edit][UnDo] to reverse the most recent Log edit.
Search for Items on Log - In the Log Editor, click [Find] to search for any logged item.
6b. Commercial Logs (Continued)
30
Compute Length for a Segment of the Log - In the Log Editor, using your mouse, hold the [Right Button]
and move the mouse over the area for which you need the total length. When you release the mouse
button, the computed length will appear in the red text box on the toolbar.
Printing the Log - In the Log Editor, click [Print] [Log] in the Log Editor to print your Log. See Log Page
Setup to design the printed Log Page. [Print][Preview Log] displays on-screen a preview of the way the
printed log will look. You can also print the Log Diagnostics that includes the contents of the Time Errors,
Copy Errors, and Break Errors tabs.
6c. Converting Logs to Automation
Convert Log to Automation Log - In the Log Editor, click [Convert-Log][Automation Log] in the Log Editor
to create a Log in the appropriate format for the Automation system you selected in Natural Log [Setup]
[Station]. See Automation Interfacing
Convert Log - Reading Actual Runtimes from Play Log - In the Log Editor, click [Convert-Log][Reconcile
Schedule-Log with Air-Log] to read the automation play-log and reconcile it with the NL8 log as originally
scheduled. This reads actual runtimes for invoicing and creates a discrepancy report showing items that did
not run properly or were not scheduled to play but did play. See Reconciling Automation Logs
Log Reconciliation - In Natural Log you can match the Log that you sent over to your automation system
with the log that actually aired. To see if your automation system is compatible with this process you click
on [Help][Natural Log Help] [Contents] [Interfacing With Automation Systems] and look for you‟re on air
system to see if you will be able to perform the reconciliation
Charging [Finalizing] Logs - Charging the log is what causes the billable items on the log to be attached
the customers' invoices. To create final invoices, logs must be charged through the last day of the month
being billed. Logs can be charged individually in the Log Editor using the [File] [Finalize Log & Charge to
Invoices] or multiple logs can be charged from the Billing section.
Note: After a log is charged, it is considered a "final" log and may no longer be edited. Items may still be
edited from the invoice but not on a log after it is charged. For this reason, we highly recommend you not
charge logs until after you have verified that the items on the log ran as scheduled by using the Log
Reconciliation.
Log Reports - In the Log Editor, click [Reports] to generate a Report for the log displayed in the Log Editor.
These reports include summary totals by customer / order, log detail report, and log report by scheduled
time for one log or multiple logs. See Log Reports. You can also view a grid-type report showing an "avails
distribution analysis" for an individual log.
.
31
7. Billing
In the [Billing][Broadcast Invoices] section you can correct invoice errors [even on finalized invoices] as long
as the month in which the invoice is issued is not closed. (If the month has closed and you need to reissue
a corrected invoice, call NL support). The invoice list displays the invoice information in red if the invoice is
short from what should have been billed, black if the invoice is OK, and blue if the invoice is over what
should have been billed
Logs must be Charged [Finalized] before Invoices can be processed & printed - In the
[Billing][Broadcast Invoices] section, at the top of the invoice list, NL8 will show you the last Charged Log
date for the selected station(s). Charging the log is what causes the billable items on the log to be attached
the customers' invoices. To create final invoices, logs must be charged through the last day of the month
being billed. Logs can be charged individually in the Log Editor or multiple logs can be charged from the
Billing screen under the [Charge Logs] menu.
Note: After a log is charged, it is considered a "final" log and may no longer be edited. Items may still be
edited from the invoice but not on a log after it is charged. For this reason, we highly recommend you not
charge logs until after you have verified that the items on the log ran as scheduled.
7a. Process and Print Broadcast Invoices
To generate Broadcast Invoices, from the main NL8 screen, click[Billing] [Broadcast Invoices].
Select the Invoices to be Listed - Select the invoice list settings at the top of the screen to obtain an
invoice list. You can select the Status, Station(s), Billing Cycle, and billing period. Status selects the
invoices that are displayed in the list:
Ready Invoices not yet issued and are ready to be issued. That means the logs have been charged through
the end of the Billing Cycle or at least through the Order End Date.
Pending Invoices that have not yet been issued but may be ready or not ready.
Final Invoices that have been already issued for the selected billing period.
Verify and Correct Invoices Before Finalizing & Printing - In the [Billing][Broadcast Invoices] section you
can correct invoice errors [even on finalized invoices] as long as the month in which the invoice is issued is
not closed. If the month has not closed, see editing an invoice. If the month has closed and you need to
reissue a corrected invoice, see reissuing a broadcast invoice. The invoice list displays the invoice
information in red if the invoice is short from what should have been billed, black if the invoice is OK, and
blue if the invoice is over what should have been billed. The columns of interest when fixing errors are:
How many items were ordered versus how many are invoiced
How much cost was ordered versus how much is invoiced
You will need to verify and correct your invoices before finalizing them.
32
7b. Edit Billing Errors
[Right-Click] on an invoice from the billing list to obtain a drop-down Edit/View menu and select [View Error
Detail]. To help in troubleshooting invoice errors, this shows each order-line and lists any errors [on the
displayed invoice] for each order-line.
Then on the View Error screen, if you select an order-line that shows an error, you can click [View Line
Error Detail] and see the exact times items from that order line ran.
Once you have determined what the "error" is for the invoice, you can fix it if needed as follows.
1. If the Package price is incorrect - [Right-Click] on an invoice from the list to obtain a drop-down
Edit/View menu and select [View Order]. Click on the “Invoice Instructions” tab and fix the package
price. Close the order and click the “Refresh Invoices” button on the billing screen.
2. If the per broadcast cost is incorrect or you need to add or delete a spot – Double-click on the
customer line in the billing error screen to open the invoice for editing. Once in the invoice you need
to make sure that the invoice type showing on the screen is set to “Detail”. Then you can change
the per spot cost and add or delete items on the invoice.
Verifying script status for Invoices requiring notarized script affidavits - In the [Billing][Broadcast
Invoices], with the desired invoice list displayed, click [Tools] [Pre-Billing Script Status Verification] on the
top dropdown menu. The displayed invoice list will be scanned for those that require script affidavits. Each
script and its status will be displayed as OK or missing depending on whether the script has been typed into
the NL8 Copy Manager.
Note: Do a Data Backup - It is highly recommended you do a [Data][Backup] prior to generating final
invoices.
7c. Finalizing Invoices To A/R
In [Billing][Broadcast Invoices], after you have verified invoices are correct, you can click [Final Invoices] to
print and post all [Ready] invoices to Accounts Receivable. Alternatively you can manually finalize and print
individual invoices by double-clicking on an invoice from the invoice list and using the [Finalize] button and
then [Print] on the invoice display screen.
Create Trial Invoices - To get a paper copy of an invoice prior to finalizing it, in the [Billing][Broadcast
Invoices] section, optionally, you can click [Trial Invoices] to print trial copies (but not post to A/R) the listed
invoices.
33
8. Accounts Receivable
8a. Payment Entry
Payment Entry – This can be done at any time that you receive payments. To enter a payment in Natural
Log, from the main menu click [Accounts-Receivable] [Payments / Adjustments]. Highlight the customer
from whom the payment is being received and click the [Receive Payment] button on the right side of the
screen. If you receive a payment from an agency that applies to multiple customers, you can enter it on
one payment screen by selecting Sort by AgencyName, select the agency, then click [Receive Payment].
On the payment entry screen - Enter the date you want to show the payment as being posted. This must
not be before the last date for which books have been closed. Enter the payment method, check, cash, or
credit card. Enter the check number if applicable. Enter the payment amount. The "UnApplied Amount"
box will keep a running total of the amount of the payment you have not yet applied.
Manually Apply the Payment - The entire payment amount must be applied to one or more of the paying
customer's open invoices listed in the bottom of the payment screen. You can select which invoices are to
be paid by clicking so an X appears in the Pay column on the row for each invoice. The column will toggle
between pay and not pay, so just click again to remove the X in the Pay column. On any invoice with an X in
the Pay column, you can specify how much to apply in the Applied column.
Auto-Apply the Payment - The entire payment amount must be applied to one or more of the paying
customer's open invoices listed in the bottom of the payment screen. You can allow NL8 to automatically
apply the payment to the oldest invoices first by clicking the [Auto-Apply] button. After clicking [Auto-Apply],
you can still manually apply the payment differently as described above so long as you have not saved the
payment.
Pre-Payments - Receipt of payment for an invoice that has not yet been issued. If you receive payment for
an invoice that has already been issued, that is a payment. Payments are applied to pay individual invoices
already issued in NL8. Prepayments are applied as a credit on a customer's account to be used in the
future.
You can create a prepayment for any amount up to the full UnApplied amount on the payment entry screen.
You might want to create a prepayment for less than the full amount if it is split between 2 or more stations,
revenue types, or broadcast orders. In these cases you'd have multiple prepayments combined to apply the
total UnApplied amount.
Prepayment may be applied - If desired, you can reserve the prepayment to only be used for invoices
from a particular order. The prepayment usually will to any invoice for this customer. You choices are
To any invoice for this customer NL8 will automatically assign use this prepayment to pay any invoice for
the stations and revenue type specified.
Only to an invoice for this order specified below. If you reserve it for a specific order, NL8 will never apply
the prepayment to an invoice created by any other order. If the customer has no current orders, this choice
will not be available.
Be sure to click [Save Prepayment] before closing the prepayment screen and click [Save] on the
regular payment screen.
If you later need to manually apply this prepayment to an invoice for an order to which it was not originally
intended you will still be able to do this using the Apply Pre-Payment button on the invoice screen.
34
8b. Editing and Adjusting Account Balances
Editing and Adjusting Account Balances - Select the Accounts Receivable Item to be Adjusted – There
are 2 ways to select the Accounts-Receivable item to be adjusted Natural Log.
1. From the main menu click [Accounts-Receivable] [Payments / Adjustments]. Highlight the customer for
whom you need to post an adjusting entry and click the [Enter Adjustment] button on the right side of the
screen. You must select the invoice or prepayment item to be adjusted and click [Continue]. If the item you
need to adjust is not listed, click the Show Items with $0 Balances checkbox to see all items for the selected
customer.
2. Display the individual invoice to be adjusted and click the [Enter Adjustment] button. You can display the
invoice from Reports, the Transaction Browser, from the individual customer account screen using the
Accounts-Receivable tab, or from the Customer Account History.
Adjustment Entry - Enter the date you want to show the adjustment as being posted. This must not be
before the last date for which books have been closed.
Enter the adjustment type - Valid entries are
CR
DR
TCR
BAD
FIN
TAX
ACM
UCM
RCM
Credit Adjustment - (Always negative amount that removes money from an invoice.)
Debit Adjustment + (Always a positive amount that adds money for an invoice.)
Trade Credit Adjustment (Usually a negative amount that removes money from an invoice.)
Bad Debt Write-Off (Negative amount that removes money to zero out the account.)
Finance Charge Adjustment (Can be either a negative or positive amount)
Tax Adjustment (Can be either a negative or positive amount)
Agency Commission (Can be either a negative or positive amount)
UnWired Network Commission (Can be either a negative or positive amount)
National Rep Commission (Can be either a negative or positive amount)
Enter a description/explanation for the adjustment as it should be shown on the customers account
statement.
Enter the adjustment amount. Negative adjustments reduce the customer's account balance. Positive
adjustments increase the customer's account balance.
8c. Generating Statements
Generating Statements - This section of NL8 creates and prints account statements for all or selected
customers. If you desire you may post finance charges before generating statements. To generate account
statements, from the main NL8 menu, click [Accounts-Receivable][Statement Generator].
After the statement list is generated according to the filter settings you specify, click [Print Statements] to
begin the statement printout. The statements themselves will be printed as you specified in NL8 document
settings.. You can [double-click] any account statement to view it on-screen.
8d. End of Month Closing
Accounts Receivable End-of-Month Closing
While we highly recommend performing this process monthly, this process is optional.
35
If you choose not to perform this process at the end of each month, any NL8 user could go back and enter a
new transaction or change or delete any transaction in the past. This can change your previous Accounts
Receivable reconciliation and therefore throw your current month out-of-balance.
Not running this process also invites misconduct by your employees. One example could be issuing an
invoice, collecting the cash, and then deleting the invoice and pocketing the cash. Once the month is
closed, deletions are not allowed and even if the user credits off the invoice balance, at least there is an
audit trail and, if require user-login is selected in NL8 setup, a record of who made the credit entry is saved.
When this process is performed each month, NL8 will print a closing confirmation to verify that the closing
process has been done and the date and time closing was performed. We recommend accountants collect
these confirmation sheets along with the end-of-month accounts receivable reconciliation paperwork to
verify that the closing was actually performed.
End of Month Closing Defined - This closes an Accounts Receivable month in NL8. After a month is
closed, NL8 prohibits entering any Accounts Receivable transactions dated before the last closing date.
This serves to protect any month-closing Accounts Receivable reconciliation for that month you have
submitted to your accountant from being changed after you submit the reconciliation.
You can still post payments to invoices issued before that closing date, the payment transaction itself must
have a date after the closing date.
You can still post adjustments to invoices issued before that closing date, the adjusting transaction itself
must have a date after the closing date.
You can still reissue corrected invoices for invoices issued before that closing date, the corrected / reissued
invoice will be dated after the closing date.
End-of-Month Closing Process From the main NL8 menu click [Accounts-Receivable][End-of-Month
Closing]. The first time you close a month NL8 will allow you to specify the month. Thereafter it will
automatically close the next month. Before NL8 will allow you to proceed you must click to verify you have
performed the following tasks prior to closing.
All invoices for this month have been issued.
All payments RECEIVED DURING this month have been posted.
All accounts receivable adjustments for this month have been posted.
If required by your accountant, an accounts receivable reconciliation has been completed and approved for
this month.
Performed a data backup and stored it in a safe location.
Then click [Close this Month ==>]. NL8 will then close the month and print a closing confirmation (if a printer
is available).
36
9. Reports
9a. Creating Reports
Natural Log has several standard Reports that are accessible from the Natural Log main screen under
[Reports]. All of these reports may be printed to paper, sent to an Adobe Acrobat PDF file, or exported a
text file for importing into any other program [such as a spreadsheet].
Customers / Billing History Reports – This includes Customer Lists, Mailing Labels, Envelopes, Agency
Lists, Billing History and Payment History reports.
Order Lists – This includes Order Lists, Confirmations, Sponsorships, Missing Copy, Average Rates and
Bulk Contract Fulfillment reports.
Log Reports - This includes Log Summary, Times and Non-Log Charge reports.
Accounts Receivable Reports – This includes AR Aging, AR Reconciliation and Unapplied Pre-payments
reports.
Transactions Reports – This includes Invoices, Payments, Aged-Collections, Adjustments and Finance
Charges and Tax Due reports.
Projection Reports – This includes a Sales Projection and Sales Projection-Comparative Report
Inventory Reports – This includes an Inventory-Sold, Inventory-Unsold, Inventory-Total Avails, InventorySold VS Unsold, Inventory-Sold VS Total, Inventory-Avg Rate and Inventory-Total Cost Report.
Sorting Reports – All reports can be sorted in different ways by choosing the tab on the left side of the
screen and making changes to suit their needs. Once all the items are selected you click on the “Generate
Report” button at the bottom left of the page to produce the report on the screen. If you would like to save
these settings for the next month, you can Memorize the report as mentioned below.
Customizing Reports - The following settings for each report may be customized by the user,
Title/SubTitle, Column Settings, Filter Settings, Sort Settings, and Page Settings. This is accomplished by
clicking on Report on the toolbar from the report screen and clicking on the “Customize Report Format”.
Note: The maximum Font size for any of these reports is “9” and you must set the page orientation
to Landscape.
View Underlying Report Data - On reports [except inventory reports] you can [double-click] on any data
line on the report to view the underlying data that created that line on the report. If the report is a summary
type report, a window will open with the details of the summary report line. Then you can [double-click] the
detail data line you want to display. Note: The user must have appropriate user permission to view the
underlying data or it won't display!
37
9b. Memorizing Reports
Memorized Reports - You can save the customized report settings [described above] for future use by
clicking [Memorize]. You can later recall them under the [Reports][Memorized Reports] menu choice.
To memorize a report you must have the report opened on the screen. Click on the [Memorize] button and
change the name from “standard” to any name that makes sense to you so that it is easy to recall next time
you want to use it.
9c. Printing Reports
Report Printing / Exporting - Reports initially appear on-screen but may be printed to any Windowscompatible printer using the [Print] button. Any report may be exported using the [Report][Export Report
Data] menu choice on any report screen. NL8 can export to a normal text file or to delimited files that can be
easily imported into other programs such as Excel. NL8 also includes a PDF output module so any report
can be "printed" to an Adobe Acrobat PDF file for easy transfer via e-mail.
38