1
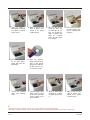
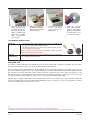
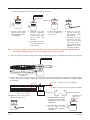
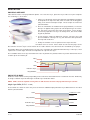
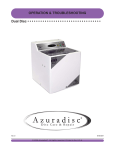
5. Place the disc on the
small turn table with
the label side up. The
disc will overlap the
Stage 1 polish head.
Place the retaining
plate, felt side down,
over the disc.*
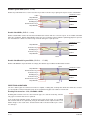
6. Hold the retaining plate
and disc the stationary
and turn the retaining
knob until tight.**
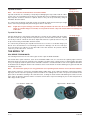
7. Close the clear lid, turn
on the main power
switch and push the
start button.
8. When the machine
stops, remove the disc,
spray it with Optical
spray cleaner and wipe
the disc from the center to the outer edge.**
TROUBLE SHOOTING
No Power
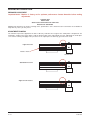
• Verify the power cord is properly inserted in a working outlet; test the outlet with another device.
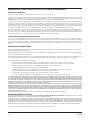
• On 220 Volt machines, check the fuse (by the power connector) as shown on the right.
Caution: To avoid electrical shock, ensure the outlet is properly
equipped with a ground connection.
Machine
Overheating
Fuse
• Verify the machine is on a flat sturdy surface. A carpeted surface may block the air inlet on
the bottom of the machine.
POLISHING TIPS:
If scratches remain on the disc after polishing, verify they are not top side scratches or foil dents. For more information on this subject, please refer to the section “Identifying Scratches”.
When repairing black or dark discs such as PlayStation games, light repair marks may be visible on the disc surface after using the Stage 2 head. These marks should be consistent and should be removed by Stage 1 polishing. If there are scratches that still remain, simply repeat the repair process. If there are deep scratches in the
disc that seem to be too stubborn to remove, and they are not top side scratches or foil dents, these will need to
be repaired with a wet micro-abrasive type machine such as the Azuradisc Model 1600.
Using a dirty or regular cotton cloth may re-scratch discs. For the best results use a clean Azuradisc super soft
micro-fiber wiping cloth. All polish marks should disappear entirely. However, if there are still hairline scratches
from the last polish pattern repeat the process.
Tips
* Caution: To prevent disc breakage, ensure the disc is properly aligned on the small platen turntable.
** Note: When inserting or removing a disc from the machine, hold the disc stationary while tightening or loosening the retaining knob.
3
Ver 3.0
05-05-2004