1
Verify you are familiar with all the parts and their purposes found in the Part Identifcation section.
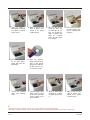
1.
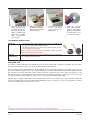
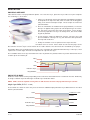
Start the adjustment by cleaning the set and lock screws.
Set Screw
Lock Screw
2. Remove rubber plug
from the center of the
small platen and store
in a safe place.
3. Using the 3/32 inch
hex key, completely
remove
the
set
screw from the small
platen, clean and
lubricate.
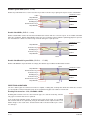
5. Roll the black rubber
cover to expose the
lock screw.
4. Re-install the clean
set screw and turn it
until it stops.
Note:
8.
6. Using the 1/8 inch
hex key, remove the
lock screw, clean
and lubricate.
7. Re-install the clean
lock screw and turn
until it is snug and
then back it out 2
full turns to allow the
adjustment in Step
10. Do not tighten!
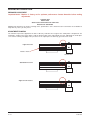
It may be necessary to remove the small platen and clean the mounting shaft to make adjustment easier.
Re-install the turntable, with the lock screw located on the flat spot on the shaft.
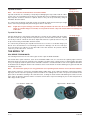
Place the Stage 2 head on the large platen and the adjusting CD on the small platen like a disc to be repaired.
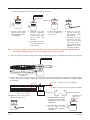
9. With the 3/32 inch hex key, turn the set screw until the top of the adjusting CD is flush with the top of the Stage
2 head. To lower the turntable, lightly tap the top with the plastic handle of a screwdriver (to avoid damaging
the threads).
To raise - Turn the set screw clockwise
To lower - Turn the set screw counter clockwise
Clockwise
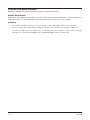
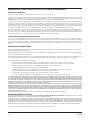
10. Tighten the lock screw securely
with the 1/8 inch hex key.
11. Roll black rubber cover back
into place and insert rubber
plug into the center of the
small platen.
Counter clockwise
Graphite type
Lube here
12.Carefully lube the threads
for the knob on the
turntable with a graphite
type spray.
5
Ver 3.0
05-05-2004