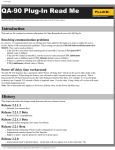
1
®
Victoreen 451EXL
451 Assistant for Excel
Users Manual
February 2005
Manual No. 1020040001 Rev. 2
©2004, 2005 Fluke Corporation, All rights reserved. Printed in U.S.A.
All product names are trademarks of their respective companies
Fluke Biomedical
Radiation Management Services
6045 Cochran Road
Cleveland, Ohio 44139
440.498.2564
www.flukebiomedical.com/rms
Table of Contents
Section 1:
1.1
1.2
1.3
1.4
1.5
General Information................................................................................... 1-1
Introduction .................................................................................................. 1-1
System Requirements.................................................................................. 1-1
Manual Addenda.......................................................................................... 1-1
Customer Service – Sales/Technical Support.............................................. 1-1
Version Information...................................................................................... 1-1
Section 2:
2.1
2.2
2.3
Installation.................................................................................................. 2-1
Installing the 451 Assistant for Excel ........................................................... 2-1
Configuring Excel to Run the 451 Assistant................................................. 2-1
Uninstalling the 451 Assistant for Excel ....................................................... 2-2
Section 3:
3.1
3.2
3.3
3.4
3.5
Using the 451 Assistant for Excel ............................................................ 3-1
Connecting the 451 to a PC......................................................................... 3-1
Starting the 451 Assistant for Excel ............................................................. 3-1
Data Logging ............................................................................................... 3-3
Integrated Dose ........................................................................................... 3-5
Options ........................................................................................................ 3-7
i
(Blank Page)
General Information
Introduction
1
Section 1
General Information
1.1 Introduction
The 451 Assistant for Excel is an Excel Add-In. An Excel Add-In is a program that adds optional
commands and features to Microsoft Excel. The 451 Assistant provides remote control for many of the
Model 451’s functions such as its internal data log and integrated dose measurement functions. The 451
Assistant also provides real-time computer controlled data logging in an Excel spreadsheet. The 451
Assistant works with Microsoft Excel versions 97 and 2000. Since the 451 Assistant for Excel is an Excel
Add-In, it is automatically loaded with Excel once it is installed.
1.2 System Requirements
The minimum system requirements are as follows:
•
Windows® 95, 98, NT 4.0, 2000
•
Microsoft® Excel 97, 2000
•
One serial port (COM1 through COM4)
1.3 Manual Addenda
Any improvements or changes concerning the manual will be explained in an addenda included with the
manual. Be sure to note these changes and incorporate them into the manual.
1.4 Customer Service – Sales/Technical Support
For Sales and Technical Support contact Fluke Biomedical, Radiation Management Services at
440.248.9300.
1.5 Version Information
The 451 Assistant version information can be viewed by clicking on “About 451 Assistant” in the Help
menu.
1-1
Victoreen 451 EXL
Operators Manual
(Blank page)
Installation
Installing the 451 Assistant for Excel
2
Section 2
Installation
2.1 Installing the 451 Assistant for Excel
Microsoft Excel must be installed on your computer before the 451 Assistant for Excel may be installed. If
Excel is not currently installed on your computer, INSTALL EXCEL FIRST. The 451 Assistant for Excel
can then be installed following the
directions below.
NOTE
Administrator rights are required to install this
software on Microsoft Windows NT and Windows
2000.
To install the 451 Assistant for Excel:
1. Start the computer.
2. Insert the 451 Assistant for Excel CD into the disk drive.
3. If the autorun doesn’t automatically start, then click the Start menu and choose Run.
4. In the Run dialog box, type the following command D:\SETUP (assuming that the CD is in the disk
drive). Three installation options are available:
•
Typical – Installs the files required for a typical installation
•
Compact – Installs the minimum files needed for operation
•
Custom – Allows the user to configure several installation options
5. Follow the instructions in each dialog box until the installation is complete, and then click Finish.
6. Read README.TXT file
A Readme.txt file is copied to the installation folder. Readme.txt lists any changes to the 451 Assistant for
Excel documentation since its publication. It can be found on the CD. Please consult the file for details
and new information about installing the 451 Assistant for Excel.
2.2 Configuring Excel to Run the 451 Assistant
The installation software configures Microsoft Excel to run the 451 Assistant automatically whenever
Excel is started. If you do not want the 451 Assistant to be loaded each time Excel starts or if you need to
re-enable the 451 Assistant, do the following:
1. Run Excel
2. If a worksheet is not loaded, open a new worksheet
3. Select the Tools menu
4. Click on Add-ins…
2-1
Victoreen 451 EXL
Operators Manual
The Add-Ins dialog box displays the add-ins that are registered with Excel. A check mark next to the addin means that the add-in is loaded and will load automatically when Excel starts. To unload the add-in,
clear the check mark by the add-in. To load the add-in, check the add-in. If the add-in is not in the list of
registered add-ins, click the browse button to browse for the add-in.
5. Click OK
2.3 Uninstalling the 451 Assistant for Excel
The 451 Assistant for Excel can be properly uninstalled by using the Add/Remove Programs Control
Panel Application. Click Start, Control Panel and open the Add/Remove Programs application. Select
Inovision 451 Assistant for Excel and click on the Add/Remove… button.
NOTE
The Add/Remove Program control panel applet is
the recommended way to uninstall all Windows
applications.
2-2
Using the 451 Assistant for Excel
Connecting the 451 to a PC
3
Section 3
Using the 451 Assistant for Excel
3.1 Connecting the 451 to a PC
To use the 451 Assistant for Excel, the 451 must be connected to an unused serial communications (RS232) port.
To connect the 451 to a personal computer, follow the steps below:
1. Turn ON the 451 and the computer.
2. Plug the 4-pin round connector of the RS-232 cable into the 4-pin round connector jack on the side
of the 451.
3. Plug the female 9-pin cable connector into the 9-pin RS-232 connector on the personal computer.
If multiple connectors exist, consult the computer’s user manual to determine which connector to
use.
3.2 Starting the 451 Assistant for Excel
The installation program should have installed the add-in to Excel meaning that Excel will load the 451
Assistant automatically. For more information about configuring add-ins for Excel, see “Configuring Excel
to Run the 451 Assistant."
Macros must be enabled in Excel for the 451 Assistant to work. Select “Enable macros” when
prompted. Excel 97 and 2000 versions offer macro virus protection as an option. With macro virus
protection enabled, Excel prompts the user whenever a workbook containing macros is opened. If
macros are disabled, the 451 Assistant will not work. Consult the Excel documentation for more
information on macros in Excel 97 or 2000 versions.
The 451 Assistant Menu and Toolbar
The 451 Assistant Menu and Assistant Tool Bar provide an interface for the user to remotely control the
451, configure the 451, download the internal data log, start real time data logging, and start an integrated
dose measurement. All of the menu items are described below.
451 Assistant Tool Bar
451 Assistant Menu
3-1
Victoreen 451 EXL
Operators Manual
Connect – Opens the communications port and instructs the 451 Assistant to read configuration
information such as the alarm settings, unit type, and ranges.
Disconnect - Disables communications and closes the communications port.
Options
The options dialog allows for the configuration of the 451 Assistants options. In addition, the 451 settings
can be modified or viewed from the options dialog. Some of the general options are: setting the alarm
sound, the real time alarm acknowledge, the real time alarm color, and the COM port. Some of the 451
settings are: setting the blink alarm and the 451 logging parameters.
Start Real Time Data Log
Starts real time data logging. Real time means the 451 is connected to the computer during the entire
logging process. See real time data log properties for information about configuring real time data
logging.
Stop Real Time Data Log
Stops real time data logging.
Real Time Data Log Properties
Displays the real time data logging properties. The sample interval, logging duration, and the real time
alarm value are configured through this properties dialog.
Integrated Dose
Starts the 451’s dose integration process.
Download Internal Data Log
Starts downloading the internal data log from the 451. All data stored in the 451 is inserted into the active
Excel workbook.
Chart
Creates a line chart from the data selected on the worksheet. Select the data you want to chart then click
on the Chart button.
451 Connection Status Message Box
451 Connection Status Message Box
From time to time you will see the Connection Status message box. This message box provides the user
with feedback on the current operation and its status.
3-2
Using the 451 Assistant for Excel
Data Logging
3
3.3 Data Logging
Computer Data logging
Once Microsoft Excel has been started and the 451 Assistant has been loaded, data logging can be
started and the data recorded in the active Excel worksheet. When a measurement is performed the 451
Assistant automatically places the measured data in the active worksheet cell, then moves down to the
next row of cells where it will place the next measured data.
The 451 Assistant data logging properties may be accessed by clicking on the data logging
properties button.
Data Logging Properties
The properties dialog allows you to set the length of time to record data and the time interval between
recording data points. The alarm level for computer data logging may also be set from the properties
dialog.
NOTE
The time interval and the alarm level are
independent of the 451s’ internal functions. The
total sample period is limited to 49 days.
Computer data logging is started by pressing the Start Log
Computer data logging is stopped by pressing the Stop Log
button .
button .
Virtual Instrument Display
3-3
Victoreen 451 EXL
Operators Manual
During data logging, the Virtual Instrument Display shows the real time rate measurements from the 451.
Also displayed are the alarm setting, Acknowledge Alarm button and an alarm indicator.
Real Time Data Logged to Excel
The different colors displayed in the data log shown above correspond to different alarm and alarm action
levels. Measurements that are below the alarm threshold are displayed in black. Measurements that are
above the alarm level and while the alarm is in an unacknowledged state are displayed in red.
Measurements that are still above the alarm level after the alarm has been acknowledged are displayed
in yellow. Measurements that are below the alarm level after an unacknowledged alarm state are
displayed in blue. These alarm state colors and other alarm options may be changed through the 451
Assistant options menu.
Downloading the 451’s Internal Data Log
The Model 451 is capable of logging data at a user-defined interval from 1 to 255 seconds. When the
451 has exhausted all of its data log memory, logging is stopped until the user clears the data log
memory.
To download the data log, select a cell on a workbook to insert the log data then click on the Download
log button. Data download will begin immediately. The assistant will download the entire data log stored
in the 451.
3-4
Using the 451 Assistant for Excel
Data Logging
3
Downloaded 451 Data Log
In the downloaded 451 data log shown above, the first spreadsheet column is instrument temperature in
degrees Celsius and the second column shows the measured dose rate.
3.4 Integrated Dose
The 451 Assistant can also be used to make integrated dose measurements. The integration period can
be specified for automatically timed integration or the user may control the integration and the 451
Assistant simply measures the integration period. Click the Integrate button on the toolbar to open the
integrated dose menu. From this menu, the user may set the integration timer length, if one is needed,
then click start. The 451 Assistant will then start the 451 in the run mode. The 451 has a 30-second
reset period after the run mode is started, after which, the instrument will start integrating. After the stop
button is pressed or the timer has expired, the assistant will read the integrated dose from the 451 and
insert the dose in the active cell and the
average dose rate in the next cell to the
NOTE
right.
The average dose rate may be inaccurate at low
integrate time samples. The assistant cannot
accurately determine the time length; therefore the
timer can be off by several seconds.
The following procedure demonstrates the process of making an integrated dose measurement.
Step 1- Click the
integrate button to open the integrated dose measurement dialog box.
Step 2 - Check the “Use the timer to determine when to stop.” button to have the 451 Assistant control
the integration period. If this checkbox remains unchecked, the user must press the Stop button to read
the integrated dose. Regardless of the timer setting the Stop button can be pressed at any time to read
the integrated dose. If the timer mode is selected, enter the integration time then press Start to begin the
measurement.
Integrated Dose Measurement Dialog Box
Step 3 - The Assistant will start the 451 in run mode. After the run mode is started the 451 will reset the
integrated dose for 30 seconds. During this period, the Integrated Dose status message box shows the
3-5
Victoreen 451 EXL
Operators Manual
time remaining in the 30-second reset period. During this period, any radiation detected by the 451 will
not be included in the dose measurement.
Integrated Dose Status Message Box During Reset
Step 4 - After the 30 second reset period, the 451 Assistant will display a status message box indicating
that the 451 is integrating. If timer controlled integration has been selected, the 451 Assistant will indicate
the elapsed integration time and the integration time remaining. If timer controlled integration has not
been selected, the 451 Assistant will only indicate the elapsed integration time. Stop can be pressed at
any time to stop the integration process and read the integrated dose measurement.
Integrated Dose Status Message Box During Integration
Step 5 After the specified timer duration or stop is pressed, the Assistant will query the instrument for the
integrated dose.
Integrated Dose Status Message Box, Integration Complete
After integration is complete, the integrated dose measurement and the average dose rate will be inserted
at the active worksheet cell in Excel as shown below.
3-6
Using the 451 Assistant for Excel
Integrated Dose
3
Integrated Dose and Average Dose Rate
The first worksheet cell (A-1) contains the final integrated dose measurement of 34.2 mR or uSv, the next
worksheet cell (B-1) contains the average dose rate for the integration time interval 2018.361 mR/h or
uSv/h. The measured units correspond to the instrument’s default measurement units, mR and mR/h or
uSv and uSv/h.
3.5 Options
The 451 Assistants’ properties and a few of the 451s’ properties can be changed from the Options menu.
The options dialog contains two tabs; the first tab labeled General contains options for the 451 Assistant,
the other tab labeled 451 Settings contains options for the 451.
Options (General)
Several 451 Assistant parameters can be changed from the general options menu, including COM port
and alarm configurations.
451 Assistant General Options Menu
Communications - Is used to select the communication port used by the 451 (default is COM1). To
change the communications port used, click on the “Use COM Port” drop down box and select the desired
port. Click OK to start using that port.
Play Alarm Sound - A check in this box indicates that the 451 Assistant will generate an alarm sound for
every data point received by the 451 that is in the alarm state.
3-7
Victoreen 451 EXL
Operators Manual
Configure Sound - Opens the sound control panel, which is used to configure Windows' sounds. To
change the alarm sound, select the “Inovision 451 Alarm” in the Sound Events list. The name box will
display the wave file currently used to generate the alarm sound. Change the sound by typing the
filename into the name box or select Browse to search for a wave file. Pressing the play button in the
sound control panel will play the sound in the name box.
Enable Acknowledge Alarm Functionality - A check in this box enables the alarm acknowledge button
during real time data logging.
Alarm State Colors - The 451 Assistant can be configured to use 2 or 4 alarm states. The four alarm
states are normal acknowledged, normal unacknowledged, alarm acknowledged and alarm
unacknowledged. If “Enable Acknowledge Alarm Functionality” is not checked, then only two alarm states
are allowed: alarm unacknowledged and normal acknowledged.
Alarm Definitions
Normal Acknowledged - The previous alarm has been acknowledged and the radiation rate is below the
alarm level.
Normal Unacknowledged - The previous alarm has NOT been acknowledged and the radiation rate is
below the alarm level.
Alarm Acknowledged – The alarm has been acknowledged and the radiation rate is above the alarm
level.
Alarm Unacknowledged – The alarm has NOT been acknowledged and the radiation rate is above the
alarm level.
Options (451 Settings)
The 451 Settings menu contains information about the 451 currently connected to the PC. These setting
pertain to the 451 only and have no impact on the operation of the 451 Assistant. These settings allow
the user to change the configuration of the
451.
3-8
Using the 451 Assistant for Excel
Options
3
451 Assistant General Options Menu
Serial Number - Displays the serial number of the 451 that is connected.
Log Parameters:
Data Log Memory is Cleared: – Allows the user to select when the 451 internal data log should be
cleared:
At Turn On Only – The 451 will only clear its internal data log when the unit is first turned on.
At Turn On and integrate reset – The 451 will clear its internal data log at turn on and at integrate reset.
Data Log Interval (1 to 255): - The 451 is capable of storing measured rate data in its internal memory.
The data log interval is the period, in seconds, at which the 451 adds a new data point to its internal data
log.
Clear Log – Pressing the Clear Log button clears the contents of the 451’s internal data log.
Blink Alarm:
Enable Blink Alarm At – A check in this box enables the Model 451’s blink alarm. The blink alarm level
and units may be entered in the boxes to the right.
SaveToEEPROM - Saves the configuration to the permanent EEPROM in the 451.
3-9
Fluke Biomedical
Radiation Management Services
6045 Cochran Road
Cleveland, Ohio 44139
440.498.2564
www.flukebiomedical.com/rms