1
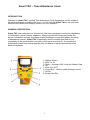
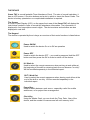
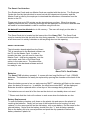
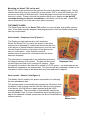
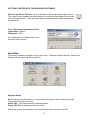
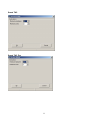
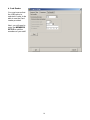
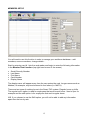
Smart TAC
Time Attendance Clock
Comprehensive User Manual
(Version 1.5)
By Ganis Systems Ltd.
Copyright © 2006 Ganis Systems Ltd
TABLE OF CONTENTS
INTRODUCTION
PG. 3
WHAT'S IN THE BOX?
PG. 4
THE DEVICE
PG. 5
THE SMART CARD INTERFACE
PG. 6
SMART CARD READER
PG. 6
BATTERIES
PG. 6
MOUNTING THE SMART TAC ON THE WALL
PG. 7
THE SMART CARDS
PG. 7
GETTING STARTED
PG. 8
TIME AND DATE SETTINGS
PG. 8
SMART TAC BACKEND SOFTWARE
PG. 9
INSTALLATION NOTES FOR GANIS SMART TAC
PG. 9
MEMBERS SETUP
PG. 14
REPORTS
PG. 17
EMPLOYEE USER INSTRUCTIONS
PG. 20
MANAGEMENT USER INSTRUCTIONS
PG. 21
TROUBLE SHOOTING AND FAQ
PG. 22
TARGET MARKET
PG. 24
CONTACT US
PG. 25
2
Smart TAC – Time Attendance Clock
INTRODUCTION
Welcome to Smart TAC - leading Time Attendance Clock designed to suit the needs of
the small enterprise or mobile work force. You will find that Smart TAC is the most cost
effective and reliable time keeping solution for your company!
GENERAL DESCRIPTION
Smart TAC (also referred to as "the device") has been designed to record the attendance
of individuals – arrival, breaks, departure. Based on individual Employee Cards, the
device records the comings and goings of staff enabling a secure and reliable recording
of attendance records. Smart TAC is especially useful for mobile staff that are not
necessarily at the same location everyday or that move around a lot. It is possible to
download the data from several devices onto one Master Card and transferred to the
back end software.
1. Display Screen
2. Work In, IN
3. Clock – accessed ONLY with the Master Card
4. Off
5. Work Out, OUT
6. Pound Key – Used to switch between zones
7. On/OK
8. Smart Card Slot
3
Recording the attendance history
Information about the employee, times & dates of arrivals/departures are all recorded on
the individual Smart Card and is backed up on the device.
The information from the Smart TAC is downloaded onto the Master Card whenever
necessary.
The Master Card is inserted into the card reader and the information recorded is
transferred into the Smart TAC Backend software. It is then easy to analyse the
information and to produce reports.
WHAT IS IN THE BOX?
1. One Smart TAC device
2. One Smart Card reader
3. One Master Card
4. Five Employee Cards
5. One CD ROM with drivers, software & documentation
6. One Protective Case
7. One Quick reference guide
8. Two Batteries
9. One Plastic hanging unit
10. Two Screws and plugs
4
THE DEVICE
Smart TAC is a small portable Time Attendance Clock. The size of a small calculator, it
has an LCD screen, 6 function buttons and a slot in which to insert the Smart Cards. The
device is battery operated so no complicated installation is required.
The Screen
A Liquid Crystal Display (LCD), on the upper front area of the Smart TAC will display the
instructions needed in order to record the attendance information. The information is
displayed in four large alpha numeric digits. The device status and activities are also
displayed in real time.
The Keypad
The device is operated by the six keys; an overview of their main functions is listed below:
Power ON/OK
Used to switch the device On or to OK an operation
Power OFF
Used to switch the device OFF – you need to press and hold the OFF
button and then press the OK in order to switch off the device.
IN / Work In
Used to select the correct manoeuvre when arriving at work either at
the beginning of the shift or returning back from an absence "on duty".
Will be recorded separately in the individual report.
OUT / Work Out
Used to select the correct manoeuvre when leaving work either at the
end of the shift or on duty. Will be recorded separately in the
individual report.
Pound Key
Used to switch between work zones - especially useful for mobile
workforces, or for project time management.
Clock Key
Using the Master Card, you can check the Time, Date, Year of the
device, and the number of manoeuvres left until memory is full.
5
The Smart Card Interface
Five Employee Cards and one Master Card are supplied with the device. The Employee
Cards are used by the individual to record arrival and departure information and the
Master Card is used by the employer to download the attendance information from the
device to the PC.
Please note that up to 500 entries can be stored at any one time. When the storage
capacity reaches its limit, a warning message will be displayed on the device and the data
will need to be downloaded in order to continue using the device.
No data will ever be deleted due to full memory. The user will simply not be able to
record any more events.
The Smart Card slot is located on the lower side of the Smart TAC. The Smart Card
must be inserted into this slot with the chip facing upwards. The slot must be kept clean
at all times and it is strictly forbidden to slot anything else into this opening.
Smart Card Reader
The information downloaded from the Smart
TAC is transferred to the Backend software on
the PC via the Master Card. In order to
transfer the data, you will need to insert the
Master Card – chip facing upwards - into the
card reader, and click on the Read Card
option in the main menu. The data will be
transferred to the backend software and will
be ready for use.
Figure 1
Smart TAC's Card Reader
Batteries
The Smart TAC is battery operated. It comes with two long-life lithium 3 Volt - CR2450
batteries. The batteries can easily be replaced by opening the chamber at the back of the
device.
When the battery power is low, an early warning "BATT" indication will flash on the screen
when the device is turned on. In addition, the small enunciator BATT will be displayed.
Batteries should be replaced within a few days of this message being displayed.
The batteries are not used all of the time as the device is on standby when not used.
** Please note that the clock will continue to work even when the batteries are low.
Battery Replacement
To open the battery chamber, pull down on the plastic clip and remove the plastic lid
covering the batteries. Gently pull out one of the batteries from its housing unit and
replace it, in the same position as the old battery, with a new battery. Do the same for the
second battery. Notice that the battery should have the "+" side showing upwards.
Return the battery lid to its normal position and push the clip upwards to secure the
battery chamber's plastic lid.
6
Mounting the Smart TAC on the wall
Smart TAC can be mounted on the wall with the use of the plastic hanging unit. Simply
choose the location that you would like to keep Smart TAC in, mark the location for the
screws on the wall and drill two holes. Place the plugs in the holes and screw the unit
securely in place. Please note that the plastic holding unit is fragile and we do NOT
recommend using an electric screwdriver to secure the unit to the wall. Smart TAC
can be lifted easily out of the wall mount when necessary.
THE SMART CARDS
The Smart Card used in the Smart TAC system is a very reliable, high quality memory
card. It has been specially designed and programmed to meet the highest quality and
security requirements
How it works – Employee Card (Figure 2)
The Employee card is personal to each employee.
Switch the Smart TAC on, check the screen to see what
manoeuvre is displayed (if needed use buttons on the front
of the device to switch between manoeuvres), slot the card
into the Smart Card slot at the bottom of the device and
wait for confirmation. Verify that the correct ID
number/name as well as for confirmation that the action
has been accepted.
The information is stored both on the individual card and in
Figure 2
the internal memory of the device. The data will be stored
Employee Card
on the Employee Card until it reaches full capacity. When
full capacity is reached, the data will be stored in a FIFO queue – the oldest data will be
deleted and replaced by the newest data. This process will be completely invisible to the
user and no action needs to be taken when the card reaches full capacity.
How it works – Master Card (figure 3)
The Master Card is used by the person responsible for collecting
the time attendance data.
The devices needs to be activated by pressing the ON button, then
the Master Card is simply inserted into the Card slot at the bottom
of the device, the ON button is again pressed and the LOAD
message appears. The information is automatically transferred
onto the Master Card. For more information about transferring the
data to the backend software, please see the Smart Card Backend
software section.
Figure 3
Master Card
7
Storing the Smart Card
Both the individual and the Master Cards should be kept in a dry, clean environment.
Each card contains a delicate electronic chip and must be handled with care. The Cards
must be kept flat and care should be taken not to fold or break them. They may cease to
function if not handled correctly.
GETTING STARTED - TIME AND DATE SETTINGS
Smart TAC time and date settings are ONLY accessible while the Master Card is
inserted, thus preventing misuse of unauthorised personnel.
Adjusting the clock
1.
Activate the Smart TAC display by pressing
2.
Insert the Master Card …
3.
Press
4.
Use the
5.
Press
6.
Adjust the hour by pressing
7.
Press
8.
Adjust the minutes by pressing
9.
Press
.
button until TIME is displayed.
(HH: value is displayed)
(MM: value is displayed)
Adjusting the date
1.
Activate the Smart TAC display by pressing
2.
Insert the Master Card …
3.
Press
4.
Use the
5.
Press
6.
Adjust the minute by pressing
7.
Press
8.
Adjust the day by pressing
9.
Press
10.
Adjust the year by pressing
11.
Press
.
button until DATE is displayed.
(MM: value is displayed)
(DD: value is displayed)
(YY: value is displayed)
8
SMART TAC BACKEND SOFTWARE
This software is needed in order to analyse the information downloaded from the Smart
TAC onto the Master Card. It is downloaded from the Smart Card and stored into the
Backend software on the chosen computer.
Smart TAC's Backend software can be found on the Backend Software CD in the box.
This software will enable you to decipher and analyse the information downloaded from
the Smart TAC and stored on the Master Card.
Installation notes for GANIS Smart TAC
Windows 98 or Windows ME - if your USB Smart Card reader is connected to the
system, disconnect it.
The MS Base Components were designed for - Windows NT4/3, ME, 98, and 95 Because
there was no Smart Card capabilities in these operating systems once the zip file is
downloaded there will be two files. Install the Base Components before you attempt to
install a Smart Card reader or there will be conflicts.
(1) Run scbase.exe
(2) Run smclib.exe
(3) Reboot
(4) Install Smart Card Reader following manufacturer's instructions
When you are done, you may connect the USB Smart Card reader
Installing the Smart TAC software (all versions of Windows)
1. Connect the USB Smart Card reader
2. If you are asked to provide the USB Smart Card reader driver, you can find it in “<X>:\SCR\DRIVER”.
3. There are two directories - one for Windows 2000 and Windows XP and the other
is for Windows 98 and Windows ME.
4. Install the file - “<X>:\WINDOWS\MDAC\MDAC_TYP_2_8.EXE” (<X> is the
CD-ROM drive letter). Follow the installation instructions.
NOTE: This installation is not needed for Windows XP SERVICE PACK 2.
5. Now install the file “<X>:\INSTALL\SETUP.EXE” (<X> is the CD-ROM drive letter). Follow the
installation instructions.
N.B. Should you get the following error message during the installation; please click on
the OK button in order to continue with the installation process.
9
GETTING STARTED WITH THE BACKEND SOFTWARE
Click on the Smart TAC icon on your desktop to reach the System Login screen.
The Login Screen enables the administrator to protect the information from misuse.
Only the administrator – with the administrator's password can make alterations to
the database.
Your initial login information will be
Login Name - admin
Password - 1234
You will be able to change these in the
Program Setup screen.
MAIN MENU
There are six options available on the main menu – Members Setup, Reports, Read Card,
Program Setup, Systems Setup and Exit.
Systems Setup
Before starting with the setup, you must choose the type of device that you bought.
There are two types of devices:
Smart TAC - 32 employees with 4 different zones
Smart TAC Pro 64 employees with no zones
Select the correct configuration on the following screens and then click OK
10
Smart TAC
Smart TAC Pro
11
PROGRAM FILES
Click on PROGRAM SETUP to enter specific information about your company and your
employees.
Once in the PROGRAM SETUP, you have four more tabs (General, Site, Database, Card
Reader). You should only need this site in the setup process. Once you have set your
options, they will be saved in the system.
1. General
You can choose the language that you would like to use; currently English (USA), English
(UK), and Hebrew are available. (More languages will be available in the near future).
This can be done only from the Administrator level
You can also select your preferred date and time format here.
2. Site
Here you MUST enter the name of your company, which will be displayed on the reports.
(This can be done only from the Administrator level).
12
3. Database
Should you wish
to change the
location of your
database, you
need to find the
Smart TAC.mdb
file and save it in
the destination of
your choice.
You will then need
to select this
location from the
“browse for folder”
dialog on the
database tab.
You can add
members and
select their access
level on this tab.
Each member can have his/her own password. These can be changed on this tab.
There are three access levels to the Smart TAC Backend software:
1. Viewer
The employee can enter the system to view the entries recorded on his/her Card.
The Viewer cannot make any changes to these entries.
2. Editor
The Editor can download the information from the Smart TAC to the Master Card
and enter it into the database.
3. Administrator
The Administrator has full access to the system. He/she can add new members to
the system, enter the program setup tab and make changes to entries in the
database.
13
4. Card Reader
You must ensure that
the USB option is
selected in order to be
able to use the Card
reader provided.
Next, you will need to
enter the MEMBERS
SETUP to add the
members of your staff.
14
MEMBERS SETUP
You will need to use this function in order to manage your workforce database – add
members, remove members, change details…
Start by entering card # 1 into the card reader and begin to enter the following information
in the Member Detail section (top right hand corner of the screen)
•
•
•
•
•
Social Security Number
Last Name
First Name
Card Number
Display Name
The display name will appear every time the user enters the card. Longer names such as
Mathew, for example, may be shortened to four letters (i.e. MATH).
There are two types of working hours in the Smart TAC system. Regular hours or shifts.
The regular hours option is used for employees that work normal hours - 9am to 5pm for
example and the shift option is for employees that work irregular hours.
N.B. If you choose to use the Shift option, you will not be able to add any information
apart from the hourly rate.
15
Regular Hours
The parameters are made up of the following
options:
Start time – insert the time that your employee
is supposed to start. If your employee is meant
to start working at 9am and you do not want to
pay him before that hour – even if he arrives at
8.45, then click on the √ symbol and the time will
only be recorded after 9am. If you do not have a
specific start time, then you can leave this option
blank.
Daily hours
You can insert the number of hours that your employee is supposed to work a day. If you
wish to calculate overtime, you MUST insert the number of hours that the employee is
supposed to work.
Automatic break duration
Here you have the option to automatically deduct your employee's lunch break without
asking them to clock in and out. The break time will AUTOMATICALLY be deducted
from the Total Time Worked.
Overtime
You have the option to allow Smart TAC to automatically calculate the overtime that your
employee has accumulated a day. There are three possibilities of overtime hours– this
will enable you to give different rates for different hours.
You can decide what overtime rate you allocate to each level – this is calculated as a
percentage of the normal hourly rate – from 100% to 400% and higher.
You can use this option to pay different rates for overtime
EXAMPLE of the use of the overtime parameters
Overtime 1
Overtime 2
Overtime 3
100% = up to 2 hours
125% = between 2-4 hours of overtime, Smart TAC will calculate the
salary at 125% of the normal rate
150% = 4+ hours of overtime, Smart TAC will calculate the salary at
150% of the normal rate
You can also decide that your employee will not be paid if he works more than 3 hours of
overtime, for example. This can be set in the overtime hours 1 = 3 hours
overtime hours 2 and 3 would be 0.
Hourly Wage
Use this option if you want Smart TAC to calculate the salaries. Simply enter each
employee's hourly wage (if they get a different rate for overtime, then add it to the
overtime hour fields as a percentage of the normal hourly wage). This is only an option
and it is not essential to fill in the hourly wage.
16
Once all the details have been entered, simply click on the + sign and the entry will be
stored. You can then remove the card and start the process again with the next card.
Continue the same process for cards # 1-5. Should you need to purchase extra cards
please contact your local supplier or [email protected]. The software can
store up to 32 employees.
If you are purchasing new cards to replace cards 1-5, simply insert the new card into
the reader, enter the Member Setup page, click on the card that you wish to replace and
click on "update". The information stored on the device for that member will then be
downloaded onto the new card.
If you are purchasing new cards for new employees, simply enter the new card into
the reader, enter the Member Setup page, and start entering the new employee's details
and give the new card the correct card number. It is important to give each card the
correct number.
Once all the details have been entered, simply click on the + sign and the entry will be
stored. You can then remove the card and start the process again with the next card. Up
to 32 separate members can be stored.
The various icons on the screen are used to:
Add a member
Remove a member
Search for a member by name, last name or Social Security Number
OK to update changes
Empty the Member Detail box so that you can enter a new member
Exit the Member Setup screen
17
The other options on the main menu are:
READ CARD
This is used when the
user/administrator wants to
view or download information
from the Smart TAC. Simply
insert the Card (Master or
employee) into the Card
reader and click on the Read
Card option in the main menu.
Depending on the access
level, the user will be able to
view the information,
download it to the database or
alter it.
See Access Levels in the
Database section above for
more information.
By default, only the latest entries will be displayed on this screen. Should you wish to
view older entries that are saved in the database, simply tick the "Show past entries" box
and all the entries will be displayed.
REPORTS
The type of report is selected from the drop down menu, date range selected and SHOW
button activated.
The manager can produce a variety of reports
General report
Individual monthly report
All the data for all the employees will be displayed for
the given dates.
All the data for individuals working regular hour will be
displayed for the given dates
18
Individual shift report
All the data for individuals working shifts will be
displayed for the given dates
Late entrance report
All the data for all the employees that arrived late will be
displayed for the given dates.
All the data for all the employees that used the
temporarily out function will be displayed for the given
dates.
Temporarily out report
These can be displayed on the screen in an Excel spreadsheet, sent by email or printed.
Monthly reports can be exported to an Excel sheet.
The entries are colour coded to ensure that the data is easy to analyse.
Green – this shows the normal IN, when an employee starts work for the day.
Red – this shows the normal OUT, when an employee finished work for the day.
Black - this shows the time when the employee leaves/returns to the office as a
result of meetings, conferences, etc. The operation is then called Work IN and
Work OUT.
When the "ZONE" is seen in the Operation Type column, this illustrates that the
employee in question has entered a specific zone.
19
Zone 1, for example, could be the canteen. Sometimes employees are entitled to a lunch
subsidy, and is therefore important for the person… The number of highlighted
operations on the report can be added up in order to make the lunch calculations.
INDIVIDUAL MONTHLY REPORT
INDIVIDUAL SHIFT REPORT
20
PRINTING REPORTS
It is possible to print the reports directly from the report screen.
If you wish to review each employee's data before you print the report, select the type of
report and the employee name from the Employee drop down menu, then click on the
SHOW button. Once you have reviewed the data, you can export the data and print the
report.
Or you can print all the reports together. Simply select the report type –select Individual
monthly report and ALL in the Employee box and click on the EXPORT box.
21
EMPLOYEE USER INSTRUCTIONS
Each employee is issued with a personal Smart Card that will record his/her movements
in and out of the office.
The instructions are very simple to follow and are all displayed on the Smart TAC screen.
An employee instruction sheet is available on the CD and should be printed and
distributed to all employees that will use Smart TAC.
Mobile Staff – the # button will allow the mobile worker to clock in and out attendance in
various locations (up to four zones).
For example, you can program Smart TAC to suit your own needs Office – Zone 1
Warehouse – Zone 2
Dining room – Zone 3 (ideal for counting the employee's lunch contribution that
may be deducted from the salary)
Store – Zone 4
This system will enable you to keep track of your employees within their working hours.
How to program the zones
Simply press the # button to select the appropriate work zone, then follow the simple
instructions below. Non mobile staff will not need to use this function as they will always
be in the same work zone.
Upon arrival
1. Turn the Smart TAC on, the time will be displayed and then the operation will be
displayed.
2. Change the operation for the desired operation (IN), using the
3. Insert the Employee Card, the operation will be stored both on the Smart TAC
device and the Employee Card. If the operation was successful, the Card
number/display will be shown on the Smart TAC screen.
Upon departure
1. Turn the Smart TAC on, the time will be displayed and then the operation will be
displayed.
2. Change the operation for the desired operation (OUT)
3. Insert the Employee Card, the operation will be stored both on the Smart TAC
device and the Employee Card. If the operation was successful, the Card
number/display will be shown on the Smart TAC screen.
The in and out times will be recorded in the internal memory of the Smart TAC device.
Please note that if the same operation is performed twice (In and In) by mistake
within 2 minutes, only one operation will be recorded to avoid confusion in the
reports.
22
MANAGEMENT USER INSTRUCTIONS
The information stored in the Smart TAC device can only be accessed using the Master
Card.
The information downloaded onto the Master Card can also be checked against the
information on the individual Cards. This can be used in cases where the information
recorded is disputed.
Downloading the information from the Smart TAC
1.
2.
3.
4.
5.
Insert the Master Card into the slot at the bottom of the device.
Activate the device by pressing the ON button
LOAD should appear on the display
Press OK
When the DONE message appears on the screen, the Master Card can be
removed.
6. Insert the Smart Card into the computer on which the system installed on.
7. Open the Smart TAC backend software and use the Read Card screen to get the
information from the Card into the database.
8. The Master Card is now ready to be used again.
LOCKING A MANOEUVRE
It is possible to lock any of the Smart TAC manoeuvres – Work In, Work Out, In, Out,
Zone visit.
This is very useful if you are using the Smart TAC to check that your staff are patrolling
areas correctly or at the right times.
Smart TAC has 4 zones, making it an ideal tool for patrolling staff / security guards/
travelling salesmen…
LOCKING A ZONE, FOR EXAMPLE
1.
2.
3.
4.
5.
6.
7.
8.
Turn the Smart TAC on.
Click OK
Select the zone you wish to lock, by pressing the # key until you
reach the zone you wish to lock (1-4)
Insert the Master Card
Click Work In using the arrow keys until you reach 'FREE'
Click OK to change FREE to LOCK and remove the Master Card
This zone is now locked
RELEASING A ZONE
1. Turn the Smart TAC on.
2. Insert the Master Card
3. Press OK
4. Press the arrow keys until you reach "LOCK"
5. Press OK to change to FREE
6. The zone is now FREE and you can remove the Master Card
23
TROUBLESHOOTING AND FAQ
1. What is Smart TAC?
Smart TAC is a state of the art Time Attendance Clock that provides substantial savings
to your business compared to manual or electronic punch-Card time clock systems.
The system integrates time & attendance records and detailed employee information,
allowing for detailed reporting and cost-effective management of payroll and employeerelated issues.
2. What does Smart TAC do?
Smart TAC uniquely integrates time and attendance records, detailed employee
information and project tracking. Smart TAC provides SMEs (Small Medium
Enterprises), shops, security companies, with a simple yet sophisticated device to record
attendance, inspection schedules and other security time related activities.
Smart TAC pays for itself by dramatically reducing the amount of time spent on manually
entering the hours worked for each employee, allowing you to easily track time spent on
projects as well as time spent on duties out of the office.
3. How will Smart TAC save my business money?
Smart TAC will save your business money by enabling you to manage the movements of
your staff in and out of the office more efficiently. No more leaving early or arriving late
without you knowing about it, mistakes will no longer be made when the information is
transferred from the punch Cards to the computer, and staff working out of the office will
be made more accountable for their whereabouts. All in all, with more accuracy in the
hours worked and less time spent in preparing the payrolls – you will soon see your ROI!
4. What if I have problems using the Smart TAC?
Should you face any problems with Smart TAC or in using Smart TAC, do not hesitate to
contact our customer support department who will be happy to help you. [email protected]
5. Will you provide updates for the Smart TAC?
You will be able to subscribe to a newsletter that will inform you of any changes in
the software or any updates available. This information will also be available from our
website in the near future.
6. I have accidentally clocked into the wrong work zone, how can I change this?
After downloading the information from the Smart TAC, ONLY the Administrator can
make changes to recorded events. It is important to check events after having
downloaded them from the Master Card, before storing them into the database. Viewers
and Editors cannot make any changes in the database.
7. My batteries are running low – will all the information saved on the Smart TAC
be lost?
No, the information will not be lost as the data is stored on an EPROM, meaning a nonvolatile memory so it cannot be erased because of a lack of power. However, you should
replace the batteries as soon as the "low battery" enunciator appears, as batteries are
required in order to download the information on the Master Card.
24
8. I have lost my Master Card – what can I do?
You can buy new Master Cards and Employee Cards from your local distributor or contact
Ganis directly. Please contact [email protected] for more information.
9. How secure is the Smart TAC – how do I know that the information recorded has
not been tampered with?
The Smart TAC system cannot be accessed by anyone without the Master Card. The
time cannot be altered nor can the date. The information stored on the device is also
stored on the Employee Card so if there are any discrepancies between what the
employee claims and the reports that have been produced, they can be easily checked.
10. What happens when my Master Card or Employee Card is full? Will I still be
able to store data?
Yes – the data is stored on the card in FIFO queue. New data will be added to the card
until it reaches full capacity. Once full capacity has been reached, the oldest data will be
replaced by the newest data. Only the newest data will be stored on the card. The end
user will not even be aware of the fact that the card is reaching its limit (approximately
500 entries can be stored at any one time).
11. How will Smart TAC simplify the work needed to be done in order to prepare the
salaries at the end of the month?
Using Smart TAC, you will never have to manually transfer staff hours into the computer.
You will never have to decipher other people's handwriting, the data transferred from the
Smart TAC device is saved per employee in individual reports that are clear and easy to
analyse. The reports can be saved, printed or sent directly to the accounts department
responsible for the salaries.
25
TARGET MARKET
Any company that needs to record the movements of staff in and out of the office. but that
does not have the means to invest in an expensive and complicated system.
•
•
•
•
•
•
•
•
SOHO (Small Office / Home Office)
Project Management
Security companies
Construction sites
Classrooms
Mobile workforces
Restaurants, fast food outlets, shops
And many more…
Benefits for management
•
•
•
•
•
•
No complicated installation
Convenient and cost effective method to check mobile staff
Easy to produce reports – Ins & Outs, monthly totals, breaks and tardy arrivals
User expandable
Battery operated and light to carry
Ideal for small businesses – no installation expense, flexible and affordable!
Benefits for administration
•
•
•
•
•
•
•
No punch cards, paper trails or hand written entries
No more data entry and adding up hours
Reduces errors and time spent on the payroll management
Easy to analyze individual reports
All the information downloaded from one portable device
No more running after staff for their hours!
Reports can be exported and sent for approval via email.
Benefits for the staff
•
•
•
•
•
Secure and backed up – all information is stored on the personal Smart Card
Can be used in various locations
Can be used to keep track of time spent on various projects
Light to carry
Easy to operate
26
CONTACT US
Ganis Systems
53, Hairusim St
Kenyoter St
Nes Ziona
74066
Israel
Tel: +972 8 9389990
Fax: +972 8 9389995
Email: [email protected]
Or your local Smart TAC distributor
SMART TAC CERTIFIED DISTRIBUTOR
27