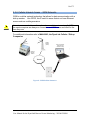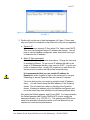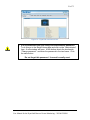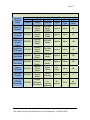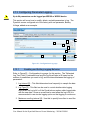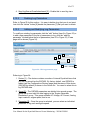
1
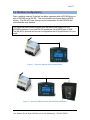
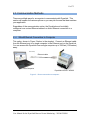
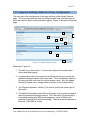
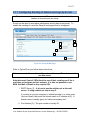
DynaLink Remote
Genset Monitoring
WS100 / WS200 User Manual
WS200 shown
(WS100 does not have an antenna)
Installation and User Manual – Revision 1.3
Full Version File: MAN-0082R1.3, DynaLink User Manual.doc
September 2011
2 of 73
Thank You For Purchasing This DynaGen Product
Please Read Manual Before Installing Unit
Receipt of Shipment and Warranty Return
Information
Upon receipt of shipment, carefully remove the unit from the shipping container
and thoroughly examine the unit for shipping damage. In case of damage,
immediately contact the carrier and request that an inspection report be filed prior
to contacting DynaGen.
All returned items are to be shipped prepaid and include a Return Material
Authorization (RMA) number issued by DynaGen. RMA forms are available by
contacting DynaGen Technical Support through the contact methods listed
below.
Limited Warranty
The Dynagen DynaLink WS100 and WS200 products carry a one year warranty.
For more information refer to the standard terms and conditions of sale at
http://www.dynagen.ca.
Support
For updated user manuals and help go to www.dynagen.ca/support.
User Manual for the DynaLink Remote Genset Monitoring – WS100/WS200
3 of 73
Specifications
Operating Temperature
Storage Temperature
IP Protection Class
Vibration
Humidity
RS485 Optical Isolation
WS100: -400C to 750C (-400F to 1670F)
WS200: -300C to 600C (-220F to 1400F)
-400C to 850C (-400F to 1850F)
IP20 (Protected against solid objects over 12.5mm
e.g. hands, large tools. No protection against
ingress of liquids.)
Should not install on vibrating surfaces. Consult
factory.
10-93%RH, non-condensing
WS100: yes
WS200: no
User Manual for the DynaLink Remote Genset Monitoring – WS100/WS200
4 of 73
Abbreviated Table of Contents
1.
DynaLink WS100 and WS200............................................................................ 7
2.
DynaLink Installation and Configuration ........................................................... 9
3.
Using DynaLink................................................................................................... 45
4.
NetBiter.net Configuration and Use (Optional).............................................. 51
Appendix A Troubleshooting ........................................................................................... 59
Appendix B Direct Computer Connection........................................................................ 61
Appendix C Drawings....................................................................................................... 70
Table of Contents
1.
DynaLink WS100 and WS200............................................................................ 7
1.1
This Manual....................................................................................................... 7
1.2
Safety Information ............................................................................................ 8
2.
DynaLink Installation and Configuration ........................................................... 9
2.1
Accessories ....................................................................................................... 9
2.2
Modbus Configurations ................................................................................. 10
2.3
Communication Methods .............................................................................. 11
2.3.1
Wired Ethernet Connection to Computer ............................................... 11
2.3.2
Wired Ethernet Connected to Switch or Router .................................... 12
2.3.3
Wired Ethernet Setup with Internet Access ........................................... 13
2.3.4
Phone Line Dial-up – WS100 Only.......................................................... 14
2.3.5
Cellular Internet Access – GPRS Networks........................................... 15
2.3.6
Cellular Internet Access – GSM Networks............................................. 16
2.4
Connecting the DynaLink Device ................................................................ 17
2.5
Local Network Configuration ........................................................................ 18
2.5.1
Obtaining the LAN/Computer IP Address .............................................. 18
2.5.2
Connecting to an Existing Network ......................................................... 18
2.5.3
Logging into DynaLink ............................................................................... 20
2.6
Accessing DynaLink from Outside the Local Network ............................. 22
2.7
Modbus Wiring................................................................................................ 23
2.8
Modbus Configuration ................................................................................... 28
2.9
Adding Additional Users................................................................................ 30
2.10
Regional Settings (Date and Time) Configuration .................................... 31
User Manual for the DynaLink Remote Genset Monitoring – WS100/WS200
5 of 73
2.11
Configuring Sending of Alarms and Logs by E-mail................................. 33
2.11.1
E-mailing Alarms to Personnel............................................................. 34
2.11.2
E-mailing Logs to Personnel ................................................................ 34
2.12
Alarm Configuration ....................................................................................... 36
2.12.1
Enabling SMS and E-mail Notification ................................................ 36
2.12.2
Deleting an Alarm................................................................................... 37
2.12.3
Modifying an Alarm ................................................................................ 37
2.13
Configuring Parameter Logging ................................................................... 41
2.13.1
Enabling and Setting Logging Behavior ............................................. 41
2.13.2
Deleting Log Parameters ...................................................................... 42
2.13.3
Adding and Modifying Log Parameters .............................................. 42
2.13.4
Cautions when Logging......................................................................... 43
2.14
3.
Localization ..................................................................................................... 43
Using DynaLink................................................................................................... 45
3.1
Logging in to DynaLink.................................................................................. 45
3.2
Pages View – Commonly Used Parameters.............................................. 46
3.2.1
Starting and Stopping the GSC400 ......................................................... 48
3.2.2
Parameter Notes ........................................................................................ 49
3.3
Alarm View ...................................................................................................... 50
3.4
Status View ..................................................................................................... 50
3.5
Devices View .................................................................................................. 50
4.
NetBiter.net Configuration and Use (Optional).............................................. 51
4.1
DynaLink Configuration ................................................................................. 51
4.2
Online Account Setup.................................................................................... 51
4.3
Netbiter.net Account Configuration ............................................................. 53
4.3.1
Upgrade Account........................................................................................ 53
4.3.2
Adding Devices / Projects ......................................................................... 54
4.3.3
Configure Device – View GSC400 Data................................................. 56
4.3.4
Reading GSC400 Parameters Using Netbiter.net ................................ 57
Appendix A Troubleshooting ........................................................................................... 59
A.1 Loading the GSC400 Settings File ......................................................................... 60
Appendix B Direct Computer Connection........................................................................ 61
B.1 Windows XP ........................................................................................................... 61
B.2 Windows XP - No Network Connection Icon ........................................................ 64
User Manual for the DynaLink Remote Genset Monitoring – WS100/WS200
6 of 73
B.3 Windows Vista / Windows 7 .................................................................................. 66
Appendix C Drawings....................................................................................................... 70
User Manual for the DynaLink Remote Genset Monitoring – WS100/WS200
7 of 73
1. DynaLink WS100 and WS200
DynaLink can send e-mails to users notifying them about active GSC400 failures
and warnings. DynaLink also allows the user to monitor GSC400 parameters
from a remote location.1
The DynaLink WS100 communicates over a wired Ethernet connection or via an
external RS-232 dial-up modem (that supports Hayes commands) while the
WS200 has Ethernet and cellular modem (GSM or GPRS) capability.
In addition the user can monitor alarms and parameters for all their generators
online at www.netbiter.net for an additional monthly charge. This is useful if you
have multiple generators to monitor as you can access them by logging into
netbiter.net instead of having to log in separately using port forwarding. This
service is optional for the WS100 but required for viewing parameters on the
WS200. There is also a free limited account that supports up to three devices.
1.1 This Manual
This manual covers the basic setup and use of the DynaLink WS100 and WS200
devices (hereafter referred to as DynaLink). It assumes that you are using an
Ethernet connection.
If you are using either the WS200 cellular modem or the WS100 External Dial-up
Modem it is required that you get everything setup and working over Ethernet
first. Then refer to manual MAN-0083, DynaLink Cellular / Dial-up Companion
for information on setting up the WS100 optional external dial-up modem or the
WS200 internal cellular modem.
This manual is divided into the following sections:
1. Section 2: DynaLink Installation and Configuration – This section
explains how to install and configure DynaLink.
2. Section 3: Using DynaLink – This section explains how to use
DynaLink on a daily basis to monitor data and alarms, and to log
parameters.
3. Section 4: NetBiter.net Configuration and Use – This section explains
how to setup and use the online webpage (monthly fee applies) to
monitor one or more DynaLink devices. The DynaLink devices can be
spread out all over the world.
1
WS100 requires static LAN and WAN IP addresses and port forwarding setup on the router or use of
www.netbiter.net service. WS200 requires the www.netbiter.net service.
User Manual for the DynaLink Remote Genset Monitoring – WS100/WS200
8 of 73
1.2 Safety Information
Generator systems contain high voltage circuitry. Failing to power down and lock
out equipment can cause damage to the equipment, or injury or death to
personnel. The symbols below will be used in this document to classify
information.
Indicates something that you should take special note of
but that is not a threat to safety.
Indicates a potential for injury or death.
This is similar to Danger above but relates specifically to
conditions where high voltage is encountered.
User Manual for the DynaLink Remote Genset Monitoring – WS100/WS200
9 of 73
2. DynaLink Installation and Configuration
This section will explain how to connect the DynaLink device to your network
and/or internet.
The firmware on the GSC400 must be version 2.03 or
greater. If it is not, stop here, and contact Dynagen for further information.
To check the firmware on your controller remove power to the GSC400 for one
second then apply power again. The GSC400 will display the firmware and
hardware revision before going to the OFF or AUTO mode.
The WS100 RS-485 terminal is optically isolated while the WS200 RS-485
terminal is not. This may be a factor in selecting the DynaLink product for your
application. If your Modbus network is prone to lightning strikes, the WS100
is strongly recommended.
2.1 Accessories
The following accessories are available for purchase from Dynagen.
Table 1 – Accessory List
Manufacturer
Part Number
K-016-US
Dynagen Part
Number
ACC0112
E-020
E-021
E-022
E-023
E-024
E-025
E-019
N/A
ACC0113
ACC0114
ACC0115
ACC0116
ACC0117
ACC0118
ACC0119
DWG1454
Description
Accessory Kit – Power
adapter and cables
Straight
SMA
quadband
Right Angle
antenna
Magnetic foot
9.8ft
Cables for
SMA
16.4ft
antenna
32.8ft
GPS receiver
RS-485 (Modbus) cable for
GSC400
Applies to:
WS100 WS200
x
x
x
x
x
x
x
x
x
x
User Manual for the DynaLink Remote Genset Monitoring – WS100/WS200
x
10 of 73
2.2 Modbus Configurations
Over a modbus network, DynaLink can either be paired with a GSC400 alone or
with a GSC400 and a RA-400. This is illustrated in the figures below (WS200
shown). The RA-400 is an optional remote annunciator for the GSC400 that
communicates over modbus.
The DynaLink comes preconfigured from the factory with support for one
GSC400 at address 1 and one RA-400 at address 2 at a BAUD rate of 9600.
The RA-400 is optional and no extra configuration has to be performed if it is not
used.
Figure 1 – DynaLink (WS200 shown) with GSC400.
Figure 2 – DynaLink (WS200 shown) with GSC400 and RA-400.
User Manual for the DynaLink Remote Genset Monitoring – WS100/WS200
11 of 73
2.3 Communication Methods
There are multiple ways for a computer to communicate with DynaLink. This
section will explain the various options so you can pick the one that best matches
your application.
Regardless of the communication option, the DynaLink must be initially
configured over a wired Ethernet network or direct Ethernet connection to a
computer.
2.3.1 Wired Ethernet Connection to Computer
This option, shown in Figure 3 below, is the simplest. Connect an Ethernet cable
from the Ethernet port on a single computer to the Ethernet port on the DynaLink.
You can access the DynaLink from a single computer up to 328 feet (100 meters)
away.
Ethernet cable
Local Computer
DynaLINK WS100 / WS200
Figure 3 – Direct connection to computer.
User Manual for the DynaLink Remote Genset Monitoring – WS100/WS200
12 of 73
2.3.2 Wired Ethernet Connected to Switch or Router
The next step up is to use a switch or router to connect one or more DynaLink
devices to one or more local computers. The DynaLink and PCs are connected
to the LAN ports of the router or switch.
In effect, this creates a local network (LAN) and allows multiple local computers
to communicate with one or more DynaLink devices. The Ethernet cable run can
be 328ft between the router and computer and an additional 328ft between the
router and DynaLink. This can double the length from the computer(s) to the
DynaLink when compared to the wiring option described in the previous section
(2.2.1).
Local Computer
DynaLINK WS100 / WS200
Local Router
Figure 4 – Local Ethernet Setup
User Manual for the DynaLink Remote Genset Monitoring – WS100/WS200
13 of 73
2.3.3 Wired Ethernet Setup with Internet Access
By setting the DynaLink to a static IP address and setting up port forwarding on
the local router it is possible to allow a computer anywhere in the world, with
access to the internet, to communicate with the DynaLink (see section 2.6 on
page 22).
Note that the internet service provider must provide a static public (WAN) IP
address or a dynamic DNS service must be used in order to access the DynaLink
device on a remote computer.
DynaLINK WS100 /
WS200
Local Computer
(optional)
Remote Computer
Local Router
Remote Router
Remote Modem
Local Modem
Figure 5 – Wired Ethernet Network with Internet Access
User Manual for the DynaLink Remote Genset Monitoring – WS100/WS200
14 of 73
2.3.4 Phone Line Dial-up – WS100 Only
This section only applies to the WS100. The WS200 does not support
external RS-232 modems.
In areas with no Ethernet network and where setting up an Ethernet connection
is not possible or desirable, a Dial-up modem can be connected to a DynaLink
WS100 via a RS-232 connection. The dial-up modem can then be connected to
a phone line. Any RS-232 analog modem that supports Hayes commands is
compatible with the WS100. The remote computer will also need a built in or
external dial-up modem.
Refer to MAN-0083, the DynaLink Cellular / Dial-up Companion.
Local RS232 Dial-up Modem
DynaLink WS100 only
Remote
Computer
(With
modem)
Local Telephone Jack
Remote Telephone
Jack
Figure 6 – Dial-up Modem with phone line.
User Manual for the DynaLink Remote Genset Monitoring – WS100/WS200
15 of 73
2.3.5 Cellular Internet Access – GPRS Networks
The DynaLink WS200 has an internal cellular modem built in with support for
GPRS.
This type of modem is useful for genset locations with no phone or internet
service or where they are not practical (i.e. mobile generators). It can be used
for outgoing communications (having the WS200 e-mail alarms and logs to
personnel). If incoming communications (viewing parameters/alarms on the
WS200) are required the netbiter.net service must be used.
For more information on settings up the WS200 GPRS cellular feature refer to
MAN-0083, the DynaLink Cellular / Dial-up Companion.
Cellular
Provider
(GPRS)
DynaLINK
WS100 / WS200
Remote
Computer
Remote Modem
Remote Router
Figure 7 –GPRS Cellular Network
User Manual for the DynaLink Remote Genset Monitoring – WS100/WS200
16 of 73
2.3.6 Cellular Internet Access – GSM Networks
GSM is a cellular network technology that allows for data communication with a
dial-up modem. Like GPRS, this is useful in areas that do not have Ethernet
access such as mobile generators.
It is not recommended to use the optional www.netbiter.net service with GSM as
the service requires an always on connection and GSM users are billed for the
time they use.
For additional information refer to MAN-0083, the DynaLink Cellular / Dial-up
Companion.
Cellular
Provider
(GSM)
Remote Computer
(with internal or
external modem)
DynaLink
WS100 /
WS200
Figure 8 –GSM Cellular Networks
User Manual for the DynaLink Remote Genset Monitoring – WS100/WS200
17 of 73
2.4 Connecting the DynaLink Device
Connect DC power and ground to the appropriate terminals on the WS100 /
WS200. See Table 2 on page 24 for the power specifications. The WS100 /
WS200 units have four status lamps. Note their location and purpose below.
Figure 9 – DynaLink lamps
Figure 10 – Lamp functions.
User Manual for the DynaLink Remote Genset Monitoring – WS100/WS200
18 of 73
2.5 Local Network Configuration
To initially configure the DynaLink, it must be connected to a local network (LAN).
This step should be performed by the site’s network administrator with
knowledge of LAN networks.
Direct Computer Connection Option
To connect a DynaLink device directly to a computer you will need a crossover
Ethernet cable if using a WS100 with firmware version below 1.43. WS100 with
firmware 1.43 or above and all WS200 units can use a normal Ethernet cable.
See page 61 to configure your computer. Then continue at section 2.5.3.
2.5.1 Obtaining the LAN/Computer IP Address
All LAN devices use an IP address to communicate with each other. The IP
address is a group of four numbers (called octets) separated by periods. On a
local network all devices have the same first three octets. You must obtain these
numbers. To do this:
1. In Start menu click Run on right hand side (for XP). For Vista/7 you will
use the search box.
2. In the box type “cmd” (for XP). For Vista/7 type “cmd” in the search box.
3. A command window opens. Type “ipconfig” and hit enter. Write down the
four octets of the IP address. If you don’t see “IP Address” look for “IPv4
Address”.
Alternatively you can log into your router. Usually the router displays a list of
devices currently on the network and their IP address.
2.5.2 Connecting to an Existing Network
1. Connect the Ethernet cable to the DynaLink. After waiting for a few
seconds, ensure that the Ethernet Link LED is either green (10 Mbps
network) or orange (100 Mbps network). If the LED is not on, the
DynaLink did not detect the Ethernet network. Check that the Ethernet
cable is ok and try again.
2. Use the “NetBiter Config” utility to detect the DynaLink. There is a link
to the netbiter.net configurator at www.dynagen.ca/support.
User Manual for the DynaLink Remote Genset Monitoring – WS100/WS200
19 of 73
Figure 11 – NetBiter Config Utility showing one WS200 active with IP address of
192.168.1.1.
3. Double click on the row of data that appears (in Figure 11 there was
only one DynaLink connected to the network so only one row appears).
a. Dynamic IP
If you are using a dynamic IP then select “On” option under DHCP.
This is not recommended as the IP address can change. You will
have to use the NetBiter configurator every time before you log in,
to determine the IP address.
b. Static IP (Recommended)
Enter the IP address you wrote down above. Change the last octet
to something different. Do not use an IP address that falls in the
range of IP addresses that the router uses for DHCP. Log into your
router to determine this. Usually 200 or above is a safe choice for
the last octet but confirm this before final commissioning.
It is recommended that you use a static IP address for
DynaLink to make it easier to login to the device and to use port
forwarding (to access DynaLink from the internet) if required.
You must also log into your router to setup the static IP address
there. You will need to know the MAC address of the DynaLink
device. This is located on a label on the side of the DynaLink
device. Entering an address only in the NetBiter configurator and
not in the router may work initially but could cause problems latter.
Also enter the Default gateway, and Primary DNS. For home networks
the Default gateway and Primary DNS forth IP octet is usually the
same and usually 1 (e.g. 192.168.1.1). The gateway and DNS do not
need to be entered to access the device on a local network but are
required for e-mail and external access.
User Manual for the DynaLink Remote Genset Monitoring – WS100/WS200
20 of 73
Leave the hostname blank, but the password must be entered which is
“admin” by default.
Figure 12 – NetBiter Config Utility DynaLink device details screen.
4. The DynaLink device will disappear from the utility. Wait for a few
minutes and check that the WS100/200 appears again. Confirm the IP
of the device is the same as you entered.
2.5.3 Logging into DynaLink
1. Open a web browser (only IE or Firefox are supported), type in the IP
address of the NetBiter you entered above (e.g. 192.168.1.200), and
press enter.
Note that when you type in 192.168.1.200, the web browser assumes
192.168.1.200:80 where 80 is the port number. On home networks
especially, port 80 is often used to access the router. If you have
problems try using port 8080 (e.g. 192.168.1.200:8080).
You should see a login screen. Enter the user name and password
which are defaulted to “admin.” You should see the GSC400 Status
page shown in Figure 13.
The DynaLink device is now able to communicate locally over your
local network (LAN).
User Manual for the DynaLink Remote Genset Monitoring – WS100/WS200
21 of 73
Figure 13 – DynaLink welcome screen.
2. It is recommended that you change the administrator password.
To do this go to the Setup>Users page and click on the “Administrator”
item. A new window will open. At the bottom check the box beside
“Change password:” and enter the password in the two boxes. Click
the save button.
Do not forget this password. It cannot be easily reset.
User Manual for the DynaLink Remote Genset Monitoring – WS100/WS200
22 of 73
2.6 Accessing DynaLink from Outside the Local Network
This section applies if the DynaLink device is attached to an Ethernet network.
This section does not apply if you:
1. are using an external RS-232 modem (WS100 only)
2. a cellular network
3. direct computer connection
To access the DynaLink device from outside your network (i.e. outside the local
LAN) you will need to setup port forwarding. Most, if not all, routers have this
capability. Check your router manual or the router’s manufacturer for instruction
on how to setup this up.
You will need to setup your router to forward any incoming traffic from the
internet (WAN) IP address to the local (LAN) IP address of DynaLink using port
80 or port 8080. To use another port other than 80 or 8080, go to the
Setup>Webserver page and enter a number other than 8080 in the “Extra
webserver port” field. The DynaLink always listens to port 80.
The DynaLink device must have a static LAN IP address for port forwarding
to work.
Your internet service provider (ISP) also may block access to port 80 so confirm
with your ISP if you are having problems.
Most routers use port 80 to provide a web interface to configure the router’s
settings but most will automatically move the port they use from 80 to another
port if you use port 80 for port forwarding. Check with your router manufacturer.
You internet service provider must provide you with a static WAN IP
address. This is the IP address that you would use to access the DynaLink
device from the internet. If it is not static a dynamic DNS service can be used
such as www.dyndns.com (not covered in this manual).
Once port forwarding has been setup to access the DynaLink device, on a
remote computer type the WAN or internet IP address (not the local or LAN IP
address) or the DNS URL followed by a colon, followed by a port number. For
example: “24.124.154.456:8080” or “abc.dyndns.org:8080. Firefox and Internet
Explorer assume port 80 if you leave the colon and port number out.
User Manual for the DynaLink Remote Genset Monitoring – WS100/WS200
23 of 73
2.7 Modbus Wiring
Connect Power and Ground and the RS-485 (Modbus) A, B, and ground
connections to the DynaLink terminal strip. You can use one of the following
cables listed below. If using your own make sure it is twisted pair, 120Ohms
impedance, at least 24AWG, and shielded with a drain wire. The drain wire can
be used for the Modbus common connection.
a. Beldin 9841: 120Ohms impedance and 24AWG one twisted pair shielded.
Drain wire can be used for modbus common. A separate power supply is
required or separate wires run from the GSC400 extra Batt + / connections to power the DynaLink device.
b. Beldin 7895A: 2 twisted pairs: 18AWG pair for power/ground, 20AWG
pair (120Ohm impedance) for modbus A and B. Drain wire for modbus
common.
c. Dynagen DWG1454: Dynagen sells a premade 5 foot cable that plugs
into the GSC400 modbus and extra battery+/- connections to provide
power and communications to the DynaLink device. The other end of the
cable is pigtails that can go to the DynaLink device or a terminal block for
longer runs.
For options (a) and (b) you must crimp your own connectors to the cable to plug
into the GSC400. Refer to the GSC400 User Manual. Alternatively option (c)
can be used alone or in combination with (a) or (b) to eliminate this need.
1. Use a power supply capable of sourcing 3W (250mA at 12VDC, 125mA at
24VDC) with a voltage output in the range of 9VDC to 28VDC.
OR
You can run power and ground from the GSC400 extra Batt + and Batt connections
The WS100 and WS200 both consume 3W continuously and do not have
a low power sleep mode. Ensure that your setup can handle this power
consumption.
In addition, a low battery dip below 9V (for example during starting) can cause
the WS100 / WS200 to reset and a temporary loss of communications. If this
is not desirable, a secondary battery or capacitor must be used with a
switching diode to provide backup to the device during battery dip conditions.
See Figure 16 below.
User Manual for the DynaLink Remote Genset Monitoring – WS100/WS200
24 of 73
2. The RS-485 A (+) and B (-) connections should be run together as a twisted
pair shielded cable with an impedance of 120Ω. The shield itself may be
used as the Modbus ground wire.
Table 2 – DynaLink Terminals
Pin Description
WS200 Power
WS200
Ground
RS-485 A (+)
RS-485 B (-)
RS-485
Ground
Terminal Pin Number
WS100
WS200
24
24
23
23
14
13
15
14
13
17
Notes
9VDC to
28VDC, 3W
Modbus
connections
3. Terminate the ends of the Modbus network with 120Ω resistors.
4. If you are using the RA-400 and it is not the last device on the Modbus
network, remove jumper J13 located near the Modbus 5 pin connector on the
back of the RA-400. This removes the terminating resistor from lines A and
B.
5. Older GSC400 LXB / LSB units have an internal 100Ohm resistor between
modbus common and battery -. This may cause damage to the GSC400
modbus transceiver in some applications. It is recommended to run a jumper
from modbus common to battery negative on the GSC400.
To determine if this resistor is in your unit disconnect the modbus cable from
the GSC400 and measure resistance from modbus ground (common) on the
GSC400 modbus terminal (pin 2) to the GSC400 battery negative terminal. If
it reads 100Ohms then your unit has the resistor.
Troubleshooting Note: if you get CRC errors (check DynaLink Status page)
check cable continuity and impedances (has to be 120Ohms on either end
of bus).
User Manual for the DynaLink Remote Genset Monitoring – WS100/WS200
Figure 14 –WS100 General System Wiring Diagram
Figure 15 – WS200 General System Wiring Diagram
Figure 16 – Backup power for the WS100 / WS200
28 of 73
2.8 Modbus Configuration
The GSC400 and RA-400 (optional) must be configured properly to work with the
WS200. The firmware on the GSC400 must be 2.03 or greater. By default, the
DynaLink is setup to connect to a GSC400 with an address of 1 and to a RA-400
with an address of 2.
To setup Modbus do the following:
1. Set the Device ID to 1 in the GSC400 front panel menu. This is set to 1
from the factory.
2. Set the BAUD rate to 9600 in the GSC400 front panel menu. This is the
factory default for firmware 2.03 and greater.
Alternatively for (1) and (2) you can use the GSC400 PC Interface if you have
a GSC400 programmer.
3. If a RA-400 is also being used, set RA-400 DIP switch 1 and 4 to the ON
position and ensure all others are in the OFF position. This places the
RA-400 in slave mode with an address of 2 and a BAUD rate of 9600.
Refer to the RA-400 user manual for other configurations.
4. With Firefox or Internet Explorer, access the DynaLink (by typing its IP
address in the web browser) and enter the appropriate username and
password.
5. If your Modbus BAUD rate or device address differs from steps (1) to (3)
above:
a. Go to Setup>Modbus. Change the BAUD rate here. Note that the
RA-400 only supports 9600 and 19200.
b. Go to Configuration> Devices. There will be two devices already
added there (RA-400 and GSC400). Click edit and change the
device Modbus address for each as desired.
6. Ensure that the Modbus Status LED is flashing green on the DynaLink (it
will be red while booting up, wait for a few seconds if power was just
connected). It will flash red to indicate that it is transmitting messages, but
it should also flash green intermittently which indicates it is receiving
messages.
User Manual for the DynaLink Remote Genset Monitoring – WS100/WS200
29 of 73
7. You can now view parameters from the GSC400. In the top left hand
corner, select a page from the “Select page” dropdown box (Figure 17) to
view various GSC400 parameter groups. In Figure 18 below the “GSC400
Status” page is shown.
Figure 17 – “Select Page” Dropdown box.
Figure 18 –“GSC400 Status” page view.
User Manual for the DynaLink Remote Genset Monitoring – WS100/WS200
30 of 73
2.9 Adding Additional Users
Although there is no programmed limit to the amount of user accounts you can
add, it is not recommended to add more than 16.
Additional users can be added from the Setup>Users menu. Multiple users can
access DynaLink with varying permissions. The different accounts that users
can be setup with are as follows:
1. Super Admin – This is the default user when first logging in. This gives
the user complete control over the DynaLink device.
2. Admin – No ability to change network, modem, e-mail sever and other
non-Modbus related setup (cannot change Modbus BAUD rate or
timeout). This user can add and remove Modbus devices from the
network and setup device templates, add new alarms, add new
parameter pages etc.
3. Write – Can view parameter pages and change writable parameters if
applicable. Can also view alarms and log. Cannot add or remove
Modbus devices.
4. Read – Can only view parameters, alarms, and log. Cannot make
changes to any writable parameters.
Alarm Class – Alarms can be divided into 9 classes. By default all alarms are
class 1 but this can be changed in the Configuration>Alarm menu (super admin
or admin user levels only). By checking the alarm class box, the user will receive
alarms for that class if e-mail or SMS (text messaging) are setup and enabled.
Show Device browser in menu – If enabled, shows the Devices menu. Each
device (e.g. GSC400 and RA-400) has a template that links a parameter (such
as battery voltage) to the Modbus register. The template contains a little more
detail than what is displayed in the pages alone. This setting, if enabled, allows
the user to browse this template but not to change it.
User Manual for the DynaLink Remote Genset Monitoring – WS100/WS200
31 of 73
2.10 Regional Settings (Date and Time) Configuration
The next step is the configuration of the date and time in the Setup>Regional
page. The most important item here is setting the date, time, and time zone as
these are used for alarm history and data logging. Figure 19 shows the Regional
page.
1
2
3
4
5
6
7
8
9
10
Figure 19 – Setup>Regional page.
Referring to Figure 19:
1. The date, time, time zone [1 to 3] must be configured for proper alarm
history and data logging.
2. Communication with a time server [4 and 5] can be set as to provide the
greatest insurance that the time is accurate. This is disabled by default to
cut down on traffic and costs for cellular modem users. Also the update
interval [6] can be set to a larger value to reduce costs if using cellular.
3. The “Decimal Separator” section [7] is used to specify the format type of
the log file.
4. The Module Information section [8 and 9] can be used to store information
about the particular DynaLink module. The “Site name” [8] specifically is
used when sending test SMS text messages or e-mail to identify the
particular DynaLink that sent the message. The site name text appears in
the body of the SMS or e-mail.
User Manual for the DynaLink Remote Genset Monitoring – WS100/WS200
32 of 73
5. Click the “save settings” button when you are finished. If you do not want
to save the changes you made just browse to another page.
User Manual for the DynaLink Remote Genset Monitoring – WS100/WS200
33 of 73
2.11 Configuring Sending of Alarms and Logs by E-mail
There is one e-mail per user account. The number of e-mails is limited by
number of accounts you can setup.
E-mail can be used to send alarm notifications and log data to personnel. To
enable the sending of e-mail the Setup>E-mail page must be configured.
2
1
3
4
5
6
7
8
Figure 20 – Setup>E-Mail Page
Refer to Figure 20 as you follow these instructions:
It is recommended to use the netbiter.net e-mail server. There is no cost to
use this server.
Note that most, if not all, ISPs block the use of their e-mail server if the email does not originate on their network. It is also not possible to use
MSN, Hot Mail, or Gmail as they require SSL.
1. SMTP Server [1] – It is best to use the netbiter.net as the mail
server. If using netbiter.net skip to step 5.
If you wish to use your company’s, internet provider’s, or online sever
(such as Gmail), then enter the domain name or IP address in [2]. A
domain name is usually given as “mail.yourcompany.com”.
2. Port Number [3] – The port number is usually 25.
User Manual for the DynaLink Remote Genset Monitoring – WS100/WS200
34 of 73
3. SMTP Authentication [4] – For Microsoft Exchange Server this can be
set to login, otherwise this usually has to be set to plain or disabled.
Cram-md5 is an encrypted protocol for sending the e-mail username
and password but is rarely used by e-mail providers.
4. User name / Password [5] – Enter your e-mail username and password
here.
5. Sender / Reply Path [6] – Enter the name and e-mail you want linked
with any e-mail sent from the DynaLink. Any user receiving an e-mail
from DynaLink will see the name entered for Sender. Any e-mail a
user sends by replying to the e-mail sent by the DynaLink will be sent
to the e-mail address in the Reply Path.
6. Click the save settings button [8] to save the E-mail settings.
7. Once you save the settings, the “Send Test E-mail” field will be
enabled. You can enter an e-mail here and click send and the
DynaLink will send a test e-mail to that address.
2.11.1
E-mailing Alarms to Personnel
To send e-mail notices of active alarms follow these steps:
1. In the Setup>Users page, each user must have the appropriate alarm
class enabled and an e-mail address entered in the “E-mail” field. By
default all GSC400 alarms are set to class 1.
2. In the Configuration>Alarm page, the “E-mail alarm” field must be
enabled.
All the possible alarms for the GSC400 have been added by default. The user
also has the ability to add alarms, delete alarms, or change the alarm class by
going to the Configuration>Alarm page. Only Super Admin and Admin level
users can do this.
2.11.2
E-mailing Logs to Personnel
To have the DynaLink send logs to people follow these steps:
1. In the Setup>Users page, each user that is to receive logs must have the
“Receive log files via E-mail” field enabled.
2. In the Configuration>Log page:
User Manual for the DynaLink Remote Genset Monitoring – WS100/WS200
35 of 73
a. Set the “Estimated Log Time”, “Log Interval”, “Log Type”, and
“Maximum send log interval”.
b. Enable the “Send log files as E-mail attachment” field.
c. Add the parameters you wish to log. Battery Voltage is already
added as an example.
d. Click the Start button.
If the optional netbiter.net service is enabled (see the Setup>Netbiter.net page to
enable or disable this) it is not possible to e-mail logs.
User Manual for the DynaLink Remote Genset Monitoring – WS100/WS200
36 of 73
2.12 Alarm Configuration
Up to 64 alarms can be set on a single WS100 or WS200 device.
This section will cover how to modify, delete, and add alarms. The DynaLink
WS100 and WS200 come configured out of the factory with all the alarms
configured for one GSC400 at address 1.
Note that the DynaLink device polls every 30s for alarm status so it may miss
intermittent GSC400 warnings.
The following sections will refer to Figure 21.
1
2
3
4
6
5
7
…
…
…
8
Figure 21 – Alarm Setup Page
2.12.1
Enabling SMS and E-mail Notification
Alarms can be sent by various means: SMS text messaging, E-mail, and SNMP
(not covered in this manual). Select Enabled or Disable in the Alarm Settings
page [1], [2].
User Manual for the DynaLink Remote Genset Monitoring – WS100/WS200
37 of 73
In addition to being enabled in the Configuration>Alarms page, the following must
also be done:
SMS (Text Messaging) – The cellular modem (Setup>Modem) and a cell phone
number must be setup and the alarm class must be enabled for the user(s) who
will receive the text message notification (Setup>Users). This is only available
on the WS200 and only when using cellular.
E-mail – The e-mail server (Setup>E-mail) must be setup, an e-mail address
given, and the alarm class enabled for the user(s) who will receive the e-mail
notification (Setup>Users).
2.12.2
Deleting an Alarm
An alarm can be deleted by clicking the delete button [7] next to the alarm. The
alarms are listed below the ”Alarm Settings” section in the “Alarm Configuration”
section.
2.12.3
Modifying an Alarm
To modify an alarm, click the edit button [6] next to the alarm. To add a new
alarm scroll down to the end of the alarm list and click the “add alarm parameter”
button. In both cases a new window will pop up as shown in Figure 22.
1
2
3
4
5
7
6
8
9
10
11
12
13
Figure 22 – Edit/Add Alarm Window
User Manual for the DynaLink Remote Genset Monitoring – WS100/WS200
38 of 73
Refer to Figure 22 as you follow along:
Note: It is recommended to only change only the Alarm Properties section when
you are modifying an alarm. The other sections (1 to 7 in Figure 22 above) are
for advanced users only.
1. Alarm Class [8] – by default Dynagen sets all alarms are to Class 1. You
may set the class from 1 to 10. DynaLink uses the alarm class to
determine which user(s) receives the alarm notification. The
administrator, when adding a user, picks which alarm classes a user
receives.
2. Severity [9] – You can also select the severity of the alarm (Warning,
Major, Critical, etc).
3. Description [10] – This is the text that is displayed in the alarm list and
alarm history views.
4. Subject [11] – The text to display in the SMS and E-mail subject line.
5. Message [12] – The text to display in the SMS and E-mail body.
6. Once you are finished making changes, click the “save settings” [13]
button or if you want to discard any changes you made click the “back”
button next to it.
User Manual for the DynaLink Remote Genset Monitoring – WS100/WS200
39 of 73
The DynaLink device comes preconfigured to alarm on all GSC400 warnings and
failures. However there are some events (such as generator shutdown and
startup) that you may want to alarm on. You will have to set these alarms
yourself. Below are examples of possible alarms you may want to set and Table
3 describes how to set these. You may have to delete existing alarms before
creating new ones.
1. Generator Started – There is no alarm for this directly but the Warm-up
feature can be used. The alarm is active as long as the warm-up is
active. The GSC400 warm-up time must be set to at least 30s, ideally
60s or more.
2. Generator Shutdown – The Cool-down feature can be used for this. The
GSC400 cool-down time must be set to at least 30s, ideally 60s or more.
The alarm is active as long as the cool-down is active. Note that cooldown can be skipped in certain circumstances. “GSC400 in OFF Mode”
and “GSC400 in AUTO Mode” alarms below should be set to catch all
cases.
3. GSC400 Sleeping/in menu system – When the GSC400 is in the OFF
mode after a certain amount of time of inactivity it goes into the sleep
mode. This also applies if someone is accessing the GSC400 menu
system. The alarm is active as long as one of these two conditions
applies.
4. GSC400 in OFF Mode – Applies when the GSC400 is in the OFF mode.
5. GSC400 in AUTO Mode – Applies when the GSC400 is in the AUTO
mode.
6. GSC400 in RUN Mode – The alarm remains active while the generator is
running. This is similar to the “Generator Started” alarm above but in this
case the alarm remains active as long as the generator is running.
7. Failure Occurred – The alarm is active whenever the GSC400 shuts
down on failure.
8. Warning Occurred – The alarm is active whenever there is a warning.
9. All GSC400 parameters (AC Voltage, engine speed, etc) are located in
the “Engine Generator Parameters” Group. You can set alarms on these
if desired.
User Manual for the DynaLink Remote Genset Monitoring – WS100/WS200
40 of 73
Table 3 – Additional Alarms
DynaLink
Desired
Alarm
1
2
Device
Group
Parameter
System
Control
Status
System
Control
Status
GSC400
Mode
Detail
GSC400
Mode
Detail
System
Control
Status
Warm-up
Entered
GSC400
Cool-down
Entered
GSC400
GSC400 is
sleeping or
in menu
system
GSC400
GSC400 in
OFF Mode
GSC400
GSC400 in
Auto Mode
GSC400
GSC400 in
Run Mode
GSC400
Failure
Occurred
GSC400
Warnings
Present
GSC400
GSC400
Parameters
Number from Figure 22.
3
4
GSC400
System
Control
Status
System
Control
Status
System
Control
Status
System
Control
Status
System
Control
Status
Engine
Generator
Parameters
5
Trig
Type
6
Trig
Value
Equal to
Value
22
Equal to
Value
25
GSC400
Mode
Equal to
Value
144
GSC400
Mode
Equal to
Value
147
GSC400
Mode
Equal to
Value
150
GSC400
Mode
Equal to
Value
156
Active
Failure
Not
Equal
Value
255
Active
Warning
Equal to
Value
5
Depends
on
required
parameter
As
desired.
Value
As
desired.
Trigger
User Manual for the DynaLink Remote Genset Monitoring – WS100/WS200
41 of 73
2.13 Configuring Parameter Logging
Up to 64 parameters can be logged per WS100 or WS200 device.
This section will cover how to modify, delete, and add parameters to log. The
DynaLink comes configured out of the factory with one parameter, Battery
Voltage, added as an example.
2
1
3
4
5
6
7
8
9
10
Figure 23 – Configuration>Log page.
2.13.1
Enabling and Setting Logging Behavior
Refer to Figure 23 – Configuration>Log page. for this section. The “Estimated
Log Time” field [1] estimates how long the log file will take to fill based on the
number of parameters you want to log, and the interval between the logging of
parameters.
1. Log Interval [2] – This field determines how frequently to sample the data.
2. Log Type [3] – This field can be used to control whether data logging
stops when the log is full or if the DynaLink can replace older logged data
with the new data. Since an e-mail can be sent when the log is full it is
recommended to use circular logging option so that logging is continuous.
3. Maximum send log interval [4] – Use this to specify how often to send the
log.
User Manual for the DynaLink Remote Genset Monitoring – WS100/WS200
42 of 73
4. Send log files as E-mail attachment [5] – Enable this to send log via email.
2.13.2
Deleting Log Parameters
Refer to Figure 23 for this section. It is easy to delete a log that you do not want.
Just click the “delete” button [9] beside the parameter [7] that you want to delete.
2.13.3
Adding and Modifying Log Parameters
To modify an existing log parameter click the “edit” button (item 8 in Figure 23) or
to add a new parameter to the list of parameters to log, click the “add log
parameter” located below the list of parameters (item 10 in Figure 23) A new
page will be shown (Figure 24).
1
2
3
4
5
6
7
Figure 24 – Edit log parameter page.
Referring to Figure 24:
1. Device [1] – The device contains a number of internal DynaLink items that
you can log as well as the GSC400. By factory default, one GSC400 is
added (see the Configuration>Devices page) and the name of this device
(GSC400 by default) is shown in the Device list. You need to select this to
log GSC400 data.
2. Group [2] – The GSC400 parameters are divided into several groups. The
group that is most valid for data logging is the “Engine Generator
Parameters” group. This group contains AC Voltage, AC Current, Analog
Input readouts, engine speed, and so on.
3. Parameter [3] – Once the group is selected, you can select an individual
parameter to log such as engine speed.
User Manual for the DynaLink Remote Genset Monitoring – WS100/WS200
43 of 73
4. Delta Logging [4] – Enabling this will cause the actual value of the
parameter NOT to be logged. Instead, the difference between the current
value of the parameter and the value when it was last logged will be
displayed.
5. Description [5] – Here you can add text that will show up in the list of
parameters to log and in the actual data log graph. For convenience,
there is a button beside the “Parameter” drop down box [3] that you can
click to copy the text in the drop down box to the “Description” text box.
6. Once you are finished, click the “save settings” button [7] to save the
settings or click the “back” button [6] to discard the settings.
2.13.4
Cautions when Logging
There are a few things that need to be taken into consideration when setting up
logging.
1. If any of the sensor input types are set to a switch they cannot be logged.
When set to a switch the register does not indicator the active state of the
switch, it only indicates that the parameter is set to a switch (the “Set to
Switch” value of 6528.0 or 11782.30600). This applies to Engine
Temperature, Oil Pressure, Low Engine Temperature, Fuel In Basin, Fuel
Level, and Oil Level.
2. If any of the sensor input types are set to J1939 and J1939 is lost the
“J1939 not available” value of 6528.1 or 11782.48600 will be displayed in
the log.
2.14 Localization
When managing multiple DynaLink units, to uniquely identify the unit that you are
logged into or that just sent you an e-mail you can do the following:
1. On the login page the DynaLink unit can display custom text.
To set this up go to Setup > Regional and enter under Site Name in the
Module Information section at the bottom.
2. E-mail customization
Go to Setup > E-mail. Change the Sender and Replay Path fields. You
can use a different e-mail for each DynaLink unit.
User Manual for the DynaLink Remote Genset Monitoring – WS100/WS200
44 of 73
It is also possible keep the same e-mail in the Reply path field and change
only the Sender field. This requires testing on your e-mail system as some email clients will replace the Sender field with the user’s name if the received
e-mail is the user’s own.
User Manual for the DynaLink Remote Genset Monitoring – WS100/WS200
45 of 73
3. Using DynaLink
DynaLink allows the user to monitor parameters, alarms, and to view logged
data. This section will describe the basic features of DynaLink.
3.1 Logging in to DynaLink
1. Type in the IP address of the DynaLink into Internet Explorer or Firefox
web browser. You can use the NetBiter Config utility to determine the
IP address.
2. A login screen should appear. The default username and password
are “admin”. If you did not setup the DynaLink ask the person
responsible for the user name and password.
3. Once logged in, the page in Figure 25 should be shown unless it was
changed by the administrator.
Figure 25 – The DynaLink view on login.
Once logged in, near the top of the browser window, you will see a menu
consisting of Status, Devices, Alarm, Log, Configuration, Setup, and About.
Depending on your user privileges (which are set in the Setup>Users page)
some of these may not be shown. The following sections will cover the first five
menu items and will explain how to use the DynaLink on a daily basis.
User Manual for the DynaLink Remote Genset Monitoring – WS100/WS200
46 of 73
3.2 Pages View – Commonly Used Parameters
When you first login, the “GSC400 Status” page is shown by default (see Figure
25 above). This contains the most commonly used GSC400 parameters such as
AC voltage and current, and warning and failure status. By default there are
three pages in total but an admin level user can add more pages. Any page can
be viewed by going to the drop down list in the upper left hand corner of the page
and selecting the desired page. Figure 26 and Figure 27 show the other two
pages.
All parameters shown are Read-only with the exception of the GSC400 Mode
Control parameter on the “GSC400 Status” page. This parameter allows you to
disable and enable automatic starting and start and stop the engine.
For the GSC400 and DynaLink you will see the term Low Engine Temperature.
This is the same as the Low Coolant Temperature that appears on the RA400.
Figure 26 – GSC400 Status – Advanced page.
User Manual for the DynaLink Remote Genset Monitoring – WS100/WS200
47 of 73
Figure 27 – GSC400 Warnings.
User Manual for the DynaLink Remote Genset Monitoring – WS100/WS200
48 of 73
3.2.1 Starting and Stopping the GSC400
The GSC400 Mode Control Parameter located in the GSC400 Status page can
be used to remotely control the GSC400. There are four commands that can be
selected (Off, Auto, Start, and Stop). These can be divided into 2 categories.
Category 1 – Off / Auto
1. Off places the controller in the OFF mode (or wakes it from sleep mode if
in sleep mode) from any other mode. It is also needed to stop generator if
someone manually started the generator from the front panel.
2. Auto places controller in AUTO mode from the OFF mode. It only works
when the GSC400 is in OFF mode.
Category 2 – Start / Stop
1. Stop places the controller in the AUTO mode when GSC400 is in the RUN
mode. It only works when GSC400 is in the RUN mode and only when
modbus or remote start was the reason for the start.
2. Start only works from the Auto mode and places the GSC400 in the run
mode (i.e. starts generator).
The GSC400 Sleep Delay parameter (found in the Basic Setup Menu in the
GSC400 Front Panel Menu System) should be set to at least 1 minute (especially
if using the netbiter.net service).
This will prevent the GSC400 from quickly going to sleep again – if an OFF
command is sent to wake the GSC400 from sleep – before the operator has a
chance to send an AUTO command to set the GSC400 to the AUTO mode.
If a user initiates a local start (i.e. presses the Run button on the GSC400 front
panel) the modbus STOP command in DynaLink cannot override it. The OFF
command must be used instead. Then an AUTO command if you want to place
the controller in the AUTO mode.
User Manual for the DynaLink Remote Genset Monitoring – WS100/WS200
49 of 73
3.2.2 Parameter Notes
This section will discuss some of the parameters in more detail.
Active Warnings Æ GSC400 Status Page
This field does not indicate all warnings. Only the warnings that are selected in
the GSC400 common fault 1 warnings table. By default all warnings are
selected. The available warnings are High Engine Temperature, Low Oil
Pressure, Over Speed, Low Fuel Level, Oil Level, Fuel In Basin, Auxiliary Warn,
Charger Fault, Low Battery, High Battery, Under Speed, Under Voltage, Over
Voltage, Over Current, Low Engine Temp, High Fuel Level, Config Warn 1, and
Config Warn 2.
Engine Temperature, Fuel Level, Oil Pressure Æ GSC400 Status Page
Fuel In Basin, Low Engine Temperature, Oil Level Æ GSC400 Status –
Advanced Page
If these are set to a switch on the GSC400 the switch state is not displayed. The
text “(switch input)” is displayed.
Engine Speed, Engine Temperature, Oil Pressure Æ GSC400 Status Page
Oil Level, Low Engine Temperature Æ GSC400 Status – Advanced Page
If any of these are set to J1939 and J1939 become unavailable the text “(not
available)” is displayed.
User Manual for the DynaLink Remote Genset Monitoring – WS100/WS200
50 of 73
3.3 Alarm View
The Alarm View allows you to see what alarms are currently active and to view a
history of previously active alarms. The DynaLink comes preconfigured with all
available alarms.
Common Fault Failure
If Not In Auto is active on the GSC400 this will cause a Common Fault Failure to
appear on the DynaLink Device instead of a Common Fault Warning. This is by
design.
3.4 Status View
The Status View displays basic information on the DynaLink operation such as
the amount of Modbus messages sent and the amount of messages that timed
out. If the valid responses are incrementing, this indicates that the DynaLink is
able to communicate with the GSC400.
3.5 Devices View
This is only available if enabled by the administrator for the particular
WS100/WS200. It allows you to view the all the Modbus parameters available to
the DynaLink in a tree-like structure.
Figure 28 – Devices View tree structure.
User Manual for the DynaLink Remote Genset Monitoring – WS100/WS200
51 of 73
4. NetBiter.net Configuration and Use (Optional)
This section will explain the setup, configuration, and use of the www.netbiter.net
website. There are both free and paid versions. The free version is used mainly
for demonstration. See www.netbiter.net for more information.
Netbiter.net is useful if you have several DynaLink devices because it allows you
to monitor them all in one location instead of having to log in to each device
individually.
Netbiter.net is required to view GSC400 parameter data if using the WS200
cellular feature.
4.1 DynaLink Configuration
These steps are necessary to allow the DynaLink device to access Netbiter.net
which lies outside your local network.
1. Go to Setup>Ethernet in the DynaLink menu. Set the Gateway and
Primary DNS if these are not already set up.
2. Unblock port 5222 (outgoing) on the firewall.
3. Go to Setup>Netbiter.net in the DynaLink menu and enable Netbiter.net,
then enter the activation code that came with your device.
4. Create an account on www.netbiter.net. You will need the Device ID and
activation code that came with the DynaLink package. See section 4 on
page 51 on how to do this.
4.2 Online Account Setup
1. First you will need to create an account at www.netbiter.net (Figure
29). Under “Get Started” in the lower left hand corner of the webpage
click the “Create an Account” link.
User Manual for the DynaLink Remote Genset Monitoring – WS100/WS200
52 of 73
Figure 29 – www.netbiter.net
2. Enter the account information as desired. You will need the Device ID
located on the sheet of paper that came with the DynaLink. Then click
register and follow the given instructions.
Figure 30 – Netbiter.net create account page.
3. Once your account is created browse to www.netbiter.net and login
with your username and password. The next section will explain how
to configure the etbiter.net account.
User Manual for the DynaLink Remote Genset Monitoring – WS100/WS200
53 of 73
4.3 Netbiter.net Account Configuration
This section will explain how to setup netbiter.net projects and devices in order to
read/write data from the GSC400.
4.3.1 Upgrade Account
If you wish to use the entire capability of netbiter.net you will need to sign up for
the paid version. To do this:
1. Log into netbiter.net and
click on “Account
Settings” on the left hand
side.
Figure 31 – Netbiter.net after login.
2. Scroll down to Account
Status and click on the
link beside “Account
Level”.
Figure 32 – Account Status.
3. To change the
account type, click
the “contact sales”
link.
Figure 33 – Change Account Level page.
User Manual for the DynaLink Remote Genset Monitoring – WS100/WS200
54 of 73
4.3.2 Adding Devices / Projects
1. Click on
“Configure
Devices” in the
left menu.
Figure 34 – Configure Devices
Netbiter.net organizes DynaLink devices by grouping them into projects. By
default there is one project already created when you first log in. If you wish to
add devices to more than one group then follow the steps below otherwise you
can skip to step 4 to add the device.
2. Click on “Projects”
under “Configure
Devices”.
Figure 35 – Project configuration menu.
3. You can edit the
default project
and/or add any new
project you need.
OR
Figure 36 – Project configuration.
User Manual for the DynaLink Remote Genset Monitoring – WS100/WS200
55 of 73
Once the projects are added the DynaLink devices can be added to each project.
4. Click on devices
under “Configure
Devices” in the left
hand menu.
Figure 37 – Devices menu.
5. Under “Pending
Devices” section,
click the “add
device” button.
Figure 38 – Pending/Active devices page.
6. Fill in the appropriate
information including the
device ID and activation
code. These should
have come on a sheet of
paper with the DynaLink.
Then click the “add”
button.
Figure 39 – Add Device page.
User Manual for the DynaLink Remote Genset Monitoring – WS100/WS200
56 of 73
4.3.3 Configure Device – View GSC400 Data
Once the projects and devices are added to netbiter.net the next step is to
configure the devices so they can display data from the GSC400.
1. Click on “Configure
Devices” to the left.
Under the “Active
Devices” section
beside the device you
want to modify, click
the arrow in the
“Configuration column.
Figure 40 – Active Devices
2. You will see a drop down menu of additional items. Click on
“Backup”.
Figure 41 – Dropdown menu.
3. Netbiter.net will now backup the DynaLink
settings. A popup will appear indicating the
progress of the backup. Once it is finished
click the “close” button. You will be taken
back to the active devices page.
Once the backup is complete you can view the pages for the GSC400 connected
to that DynaLink device.
User Manual for the DynaLink Remote Genset Monitoring – WS100/WS200
57 of 73
4.3.4 Reading GSC400 Parameters Using Netbiter.net
With Netbiter.net setup, this section will explain how to view GSC400
parameters.
1. Click on “Project View” in
the menu to the left. Then
click on “Projects” below it.
Figure 42 – Project View
2. Click on the desired
project.
Figure 43 – Project list.
3. Select the
desired device.
Figure 44 – Device list.
User Manual for the DynaLink Remote Genset Monitoring – WS100/WS200
58 of 73
4. In the left hand menu
make sure that the
“Overview” submenu is
selected. If it is not
then select it. Click on
the “Select page”
dropdown list and
select the GSC400
parameter group page
you wish to view.
Figure 45 – Device overview page.
5. The GSC400 group of
parameters will be
displayed for that page.
By default there are
three pages of
parameters that you
can view with each
page covering a
specific aspect of the GSC400.
The netbiter.net updates the page data when the user changes the page or
presses the refresh arrow (shown circled in red). Alarms, on the other hand, are
sent in real time.
The GSC400 Sleep Delay parameter (found in the Basic Setup Menu in the
GSC400 Front Panel Menu System) should be set to at least 1 minute.
This will prevent the GSC400 from quickly going to sleep– if a System Disabled
command is sent to wake the GSC400 from sleep – before the operator has a
chance to send a System Enable set the GSC400 to the AUTO mode.
User Manual for the DynaLink Remote Genset Monitoring – WS100/WS200
59 of 73
Appendix A Troubleshooting
(TS1) No parameters are being displayed in the webSCADA.
1. When you log into the webSCADA do you see a picture of the GSC400?
a. No – The settings file needs to be reloaded. See section A.1
below.
b. Yes – go to next step.
2. Try to power down the DynaLink unit, wait 10s, then power it back up. If
the DynaLink device can’t establish communications with a slave it quits
trying to communicate with that slave for a period of time. A reboot resets
this behavior.
3. If you are using DWG1454 to connect the GSC400 to the DynaLink device
connect the DynaLink device to the other end of the DWG1454. Does it
work now?
a. No – go to the next step:
4. Firmware version 2.03 and higher is required. Power down GSC400 and
check display when power is applied. The firmware version will appear
just after power up.
5. Check the modbus address and baud rate of the GSC400. The DynaLink
device is configured to communicate with a GSC400 with an address of 1
and a baud rate of 9600.
(TS2) The NetBiter configurator utility cannot find the WS100 or WS200.
1. Is the module status lamp green
a. No: Make sure the unit has 12VDC or 24VDC power.
b. Yes: go to next step.
2. Is the Ethernet activity (or Activity / Collision) lamp flashing green.
a. No: Check the Ethernet cable for proper connection and for any
damage.
b. Yes: go to next step.
3. Did you wait up to 5 minutes?
4. Try powering down the unit, wait 10 seconds, and power up unit. Wait for
2 or 3 minutes for it to appear.
5. If direct connection to a computer, did you follow the steps given in the
appendix for connecting directly to a computer.
6. If above steps do not work try reloading the firmware.
a. To reload the firmware browse to the “DynaLink Files\Firmware”
folder on the CD that came with the unit.
b. There are two folders: one with WS100 in the name, the other has
WS200 in the name. Pick the appropriate folder.
User Manual for the DynaLink Remote Genset Monitoring – WS100/WS200
60 of 73
c. Follow the instructions given in the “AN-1014 How to update
NetBiter webSCADA.pdf” document. A null modem cable is
recommended.
d. Log into the WS100 or WS200 unit. If successful the settings file
must be loaded into the unit. See section A.1 below.
A.1 Loading the GSC400 Settings File
The settings file loaded in the GSC400 from the factory is
1. WS100: “WS100 with GSC400 and RA400 RevX.X.nbb”
2. WS200: “WS200 with GSC400 and RA-400 RevX.X.nbb”
These files are located in the CD that came with your DynaLink unit under
“Dynalink Files\Settings Files.”
To load these settings do the following:
1. Log into the WS100 or WS200.
2. Go to Setup > System.
3. Under the “Backup Settings” section, click the Browse button to the right
of “Restore module from backup”.
4. The File Upload window will open. Browse to the appropriate location on
the CD, select the file, and click Open. The File Upload window will close.
5. Click the restore button.
6. The WS100 / WS200 will load the settings. It will then ask you to reboot
the module. Do this by clicking the reboot button at the bottom of the
screen.
7. Wait 2 to 3 minutes and log in again.
8. END
User Manual for the DynaLink Remote Genset Monitoring – WS100/WS200
61 of 73
Appendix B Direct Computer Connection
This section explains how to configure your computer if you are connecting the
DynaLink device directly to your computer with the Ethernet cable.
B.1 Windows XP
1. Disconnect the Ethernet cable from the computer if it is connected.
2. You should see icon to the right in the windows icon notification
area.
3. If you do not see the icon try clicking the expand button to see
all the icons. If you still do not see it, try the instructions on
page 64, and then go to step 5.
4. Double click on it. The
Network Connections
Window should appear.
5. Under the “LAN or HighSpeed Internet” double click
on the “Local Area
Connection” icon.
6. The “Local Area Connection Properties”
window should appear.
7. In the box below “This connection uses the
following items:” highlight the “Internet Protocol
(TCP/IP).” Do not uncheck any entry (this will not
occur if you click on the wording only).
User Manual for the DynaLink Remote Genset Monitoring – WS100/WS200
62 of 73
8. Double click on the entry or click the
“Properties” button below. The Internet
Protocol (TCP/IP) Properties window
should open.
9. Select the “Use the following IP address:”.
In this section enter the IP address as
“10.200.1.10”, subnet mask as 255.255.0.0.
Leave the default gateway blank. Do not
make any other changes. Click the Ok
button. The “Internet Protocol (TCP/IP)
Properties” window will close. Do not click
on the red X to close window.
10. Click Ok in the “Local Area Connection Properties” window to close it. Do
NOT click on the red X to close the window.
11. You can close the “Network Connections” windows by clicking the red x at
the top right hand side.
12. Power DynaLink and plug network cable into both computer and
DynaLink.
13. The DynaLink “Module Status” LED should come on first orange for a few
seconds, then green and stay green.
User Manual for the DynaLink Remote Genset Monitoring – WS100/WS200
63 of 73
14. Wait 1 to 2 minutes. The DynaLink “Link” indicator should be solid and
the “Activity/Collision” should flicker green. The network icon should
disappear from the task bar. These indicate that an Ethernet connection
has been made between DynaLink and the computer.
15. Open NetBiter configurator
program. The IP address of
the NetBiter should be
10.200.1.1.
User Manual for the DynaLink Remote Genset Monitoring – WS100/WS200
64 of 73
B.2 Windows XP - No Network Connection Icon
If the network icon with the X does not appear in notification tray following these
steps.
1. Click on the start icon in the lower left hand
corner of the desktop.
2. This will open up the start menu. Click on
“Control Panel” in the middle on the right.
3. This will open up the “Control
Panel” window (Classic). If you
see a different view go to step 6
below.
4. Double click on the “Network
Connections” icon. The icons are
listed in alphabetical order.
5. The “Network Connections” window will appear. END.
User Manual for the DynaLink Remote Genset Monitoring – WS100/WS200
65 of 73
(Default Control Panel Window)
6. This will open up control panel
window. Click on “Network and
Internet Connections” in the first
column.
7. The window to the right will open.
Click on Network Connections
under the “or pick a Control
Panel icon” section.
The Network Connections
window will appear.
END
User Manual for the DynaLink Remote Genset Monitoring – WS100/WS200
66 of 73
B.3 Windows Vista / Windows 7
1. Unplug any Ethernet cables from your computer. You should see the
following icon to the right.
2. Click on the start menu icon in the lower left hand corner of
the desktop.
3. In the column to the right, click on Control Panel.
4. The Control Panel window will open. Ensure “Category” is enabled in
“View By”.
User Manual for the DynaLink Remote Genset Monitoring – WS100/WS200
67 of 73
5. Connect the Ethernet cable to computer and to WS100.
The DynaLink “Module Status” LED should come on first orange for a few
seconds, then green and stay green.
Wait 1 to 2 minutes. The DynaLink “Link” indicator should be solid and the
“Activity/Collision” should flicker green. This indicates that an Ethernet
connection has been made between the DynaLink and the computer.
6. Click the “View Network
Status and Tasks”
under “Network and
Internet”.
7. The Network and Sharing
window should appear.
Under the “View your active
networks” section you may
see Identifying… If so wait
for this to complete.
User Manual for the DynaLink Remote Genset Monitoring – WS100/WS200
68 of 73
8. Should see one “Local
Area Connection”
under “View your
active networks”
Click the “Local Area
Connection” link.
9. The Local Area Connection Status window should
open. Click the Properties button located at the
bottom of the window.
10. The Local Area Connection Properties window
should appear.
Click Internet Protocol Version 4 (TCP / IPv4). Do
not click on checkbox as this will uncheck this entry.
Then click the Properties button.
User Manual for the DynaLink Remote Genset Monitoring – WS100/WS200
69 of 73
11. The Internet Protocol Version 4 (TCP/IPv4)
Properties window should appear.
Select the “Use the following IP address.” In
this section enter the IP address as
“10.200.1.10”, subnet mask as 255.255.0.0.
Leave the default gateway blank. Do not make
any other changes. Click the Ok button. The
Internet Protocol Version 4 Properties
window will close. Do not click on red X to
close window.
Close all other windows that are open.
8. Open NetBiter configurator
program. The IP address of
the NetBiter should be
10.200.1.1.
User Manual for the DynaLink Remote Genset Monitoring – WS100/WS200
70 of 73
Appendix C Drawings
This appendix contains various drawings that may be useful.
User Manual for the DynaLink Remote Genset Monitoring – WS100/WS200