1
GPRS Cradle
For 8000 Series Mobile Computers
Version 1.05
Copyright © 2008 CIPHERLAB CO., LTD.
All rights reserved
The software contains proprietary information of CIPHERLAB CO., LTD.; it is provided
under a license agreement containing restrictions on use and disclosure and is also
protected by copyright law. Reverse engineering of the software is prohibited.
Due to continued product development this information may change without notice. The
information and intellectual property contained herein is confidential between CIPHERLAB
and the client and remains the exclusive property of CIPHERLAB CO., LTD. If you find
any problems in the documentation, please report them to us in writing. CIPHERLAB
does not warrant that this document is error-free.
No part of this publication may be reproduced, stored in a retrieval system, or
transmitted in any form or by any means, electronic, mechanical, photocopying,
recording or otherwise without the prior written permission of CIPHERLAB CO., LTD.
For product consultancy and technical support, please contact your local sales
representative. Also, you may visit our web site for more information.
The CipherLab logo is a registered trademark of CIPHERLAB CO., LTD.
CIPHERLAB CO., LTD.
Website: http://www.cipherlab.com
IMPORTANT NOTICES
FOR USA
This equipment has been tested and found to comply with the limits for a Class B digital
device, pursuant to Part 15 of the FCC Rules. These limits are designed to provide
reasonable protection against harmful interference in a residential installation. This
equipment generates, uses and can radiate radio frequency energy and, if not installed
and used in accordance with the instructions, may cause harmful interference to radio
communications. However, there is no guarantee that interference will not occur in a
particular installation. If this equipment does cause harmful interference to radio or
television reception, which can be determined by turning the equipment off and on, the
user is encouraged to try to correct the interference by one or more of the following
measures:
Reorient or relocate the receiving antenna.
Increase the separation between the equipment and receiver.
Connect the equipment into an outlet on a circuit different from that to which the
receiver is connected.
Consult the dealer or an experienced radio/TV technician for help.
This device complies with Part 15 of the FCC Rules. Operation is subject to the following
two conditions: (1) This device may not cause harmful interference, and (2) this device
must accept any interference received, including interference that may cause undesired
operation.
FOR CANADA
This digital apparatus does not exceed the Class B limits for radio noise emissions from
digital apparatus as set out in the interference-causing equipment standard entitled
"Digital Apparatus," ICES-003 of Industry Canada.
This device complies with Part 15 of the FCC Rules. Operation is subject to the following
two conditions: (1) This device may not cause harmful interference, and (2) this device
must accept any interference received, including interference that may cause undesired
operation.
Cet appareil numerique respecte les limites de bruits radioelectriques applicables aux
appareils numeriques de Classe B prescrites dans la norme sur le material brouilleur:
"Appareils Numeriques," NMB-003 edictee par l'Industrie.
SAFETY PRECAUTIONS
RISK OF EXPLOSION IF BATTERY IS REPLACED BY AN INCORRECT TYPE.
DISPOSE OF USED BATTERIES ACCORDING TO THE INSTRUCTIONS.
The use of any batteries or charging devices, which are not originally sold or
manufactured by CipherLab, will void your warranty and may cause damage to
human body or the product itself.
DO NOT disassemble, incinerate or short circuit the battery.
DO NOT expose the scanner or the battery to any flammable sources.
For green-environment issue, it's important that batteries should be recycled in a
proper way.
Under no circumstances, internal components are self-serviceable.
The charging and communication cradle uses an AC power adaptor. A socket outlet
shall be installed near the equipment and shall be easily accessible. Make sure there
is stable power supply for the mobile computer or its peripherals to operate properly.
CARE & MAINTENANCE
This cradle is intended for indoor use only. It may do damage to the cradle when
being exposed to extreme temperatures or soaked wet.
When the body of the cradle gets dirty, use a clean and wet cloth to wipe off the dust.
DO NOT use/mix any bleach or cleaner. Always keep the cradle dry.
If you shall find the cradle malfunctioning, write down the specific scenario and
consult your local sales representative.
RELEASE NOTES
Version
Date
Notes
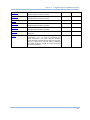
1.05
Aug. 07, 2008
Modified: Overview — illustration updated
New: 2.1.2 View the Current Cradle Settings
1.04
July 15, 2008
1.03
June 24, 2008
1.02
June 04, 2008
1.01
1.00
May 23, 2008
Apr. 25, 2008
Modified: Installation — illustration updated
Modified: 1.4 Download Mode — illustration updated
Modified: 2 Configuring the 8000 GPRS Cradle – update
screenshots by adding a submenu “5. Cradle Settings” to collect
information on the current settings of the cradle
Modified: Specifications – Power Consumption
New: 4.2.3 ATDT — ATDT[HostName:Port]<CR>
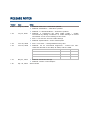
Modified: 4.2 AT Commands Supported – Extend the max.
characters allowed for AT+APN, AT+PSW, and AT+USER
Maximum characters allowed
Before
Now
AT+APN
20 char.
128 char.
AT+PSW
32 char.
64 char.
AT+USER
32 char.
64 char.
Modified: Inside the Package
Modified: section 4.2.9 Examples
Initial release
CONTENTS
IMPORTANT NOTICES ...................................................................................................................... - 3 For USA .......................................................................................................................................... - 3 For Canada .................................................................................................................................... - 3 Safety Precautions ........................................................................................................................ - 4 Care & Maintenance ..................................................................................................................... - 4 RELEASE NOTES .............................................................................................................................. - 5 INTRODUCTION .................................................................................................................................... 1
Overview............................................................................................................................................. 2
Installation ......................................................................................................................................... 3
Inserting SIM Card........................................................................................................................ 3
Removing SIM Card...................................................................................................................... 3
Features............................................................................................................................................. 4
Inside the Package............................................................................................................................ 4
USING THE 8000 GPRS CRADLE ........................................................................................................ 5
1.1 How It Works ............................................................................................................................... 6
1.2 Dial Modes .................................................................................................................................. 8
1.2.1 GSM Connection ................................................................................................................ 8
1.2.2 GPRS Connection ............................................................................................................... 8
1.3 Configuration Mode .................................................................................................................... 9
1.3.1 General Settings................................................................................................................. 9
1.3.2 Connection Settings........................................................................................................... 9
1.4 Download Mode........................................................................................................................11
CONFIGURING THE 8000 GPRS CRADLE ......................................................................................... 13
2.1 View the Settings ...................................................................................................................... 15
2.1.1 Preview the New Settings ................................................................................................15
2.1.2 View the Current Cradle Settings ....................................................................................16
2.2 Configure Settings ....................................................................................................................17
2.2.1 Authentication ..................................................................................................................17
2.2.2 PIN Code ...........................................................................................................................17
2.2.3 GPRS Settings ..................................................................................................................17
2.3 Download Settings....................................................................................................................18
2.3.1 Download Settings ...........................................................................................................18
2.3.2 Reset to Defaults .............................................................................................................19
2.4 Test ............................................................................................................................................ 20
2.4.1 GPRS Test .........................................................................................................................20
2.4.2 GSM Test ..........................................................................................................................21
UPGRADING FIRMWARE.................................................................................................................... 23
PROGRAMMING YOUR MOBILE COMPUTER..................................................................................... 25
4.1 Programming in C Language....................................................................................................25
8000 GPRS Cradle Reference Manual
4.2 AT Commands Supported ........................................................................................................26
4.2.1 AT Command Syntax ........................................................................................................28
4.2.2 AT ...................................................................................................................................... 29
4.2.3 ATDT .................................................................................................................................. 30
4.2.4 ATF .................................................................................................................................... 32
4.2.5 ATW ................................................................................................................................... 33
4.2.6 AT+APN .............................................................................................................................34
4.2.7 AT+CHAP ...........................................................................................................................35
4.2.8 AT+CLCK=SC ....................................................................................................................36
4.2.9 AT+CPIN ............................................................................................................................37
4.2.10 AT+CPWD=SC.................................................................................................................38
4.2.11 AT+DHCP ........................................................................................................................39
4.2.12 AT+DLMT ........................................................................................................................40
4.2.13 AT+DOWNLOAD..............................................................................................................41
4.2.14 AT+ERR...........................................................................................................................42
4.2.15 AT+IP............................................................................................................................... 43
4.2.16 AT+KVER.........................................................................................................................44
4.2.17 AT+PSW ..........................................................................................................................45
4.2.18 AT+SN .............................................................................................................................46
4.2.19 AT+USER ........................................................................................................................47
4.2.20 AT+VER ...........................................................................................................................48
4.3 Error Code ................................................................................................................................. 49
SPECIFICATIONS ................................................................................................................................ 51
INTRODUCTION
Capable of charging the 3.7 V, 700 mAh Li-ion battery (inside 8001/8061/8071), the
8000 GPRS Cradle is specifically designed for 8000 Series Mobile Computers to connect
to WWAN via GPRS or GSM data services.
This manual serves to guide you through how to install, configure, and operate the 8000
GPRS Cradle. We recommend you to keep one copy of the manual at hand for quick
reference or maintenance purposes. To avoid any improper disposal or operation, please
read the manual thoroughly before use.
Thank you for choosing CipherLab products!
1
8000 GPRS Cradle Reference Manual
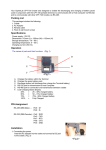
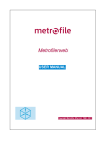
OVERVIEW
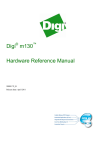
The cradle provides three LED indicators on the front panel to indicate connection status.
Refer to the flow chart for information on the initialization stages after powering on the
cradle.
Front Panel LEDs
Tasks
Indication of Connection Status
LED 1
Power status
Solid red
Power ON
Off
Power OFF
Flashing green
Transmitting or receiving data
Off
No activity
Flashing green
Dialing out
Solid green
Connected
Off
Disconnected
LED 2
LED 3
2
Tx / Rx status
Link status
Introduction
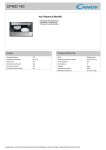
INSTALLATION
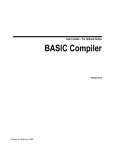
1) Screw the antenna to the cradle.
For initial configuration, skip steps 2 and 3.
2) Remove the rubber cover at the back of the cradle.
3) Insert your SIM card and replace the rubber cover.
4) Seat the mobile computer in the cradle.
5) Connect the power supply cord to a suitable power outlet, and the cradle’s LED will
become red (see LED 1). The cradle is ready for charging the mobile computer.
INSERTING SIM CARD
The SIM card orientation is as shown in the illustration above, with contacts facing down.
Do not insert your SIM card while resetting the cradle. Refer to Chapter 2 Configuring the
8000 GPRS Cradle.
REMOVING SIM CARD
You will need pliers to take out your SIM card when it is not desired in use. Always
disconnect the power supply cord before removing the SIM card.
3
8000 GPRS Cradle Reference Manual
FEATURES
Dual-band EGSM900 and GSM1800
GPRS multi-slot Class 10
Full PBCCH support
Comply with GSM phase 2/2+
Output power — Class 4 (2W) for EGSM900 and Class 1 (1W) for GSM1800
Power consumption —
GSM connection: Typical 900 mA (while charging battery)
GPRS connection: Typical 1200 mA (while charging battery)
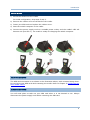
INSIDE THE PACKAGE
The following items are included in the package. Save the box and packaging material for
future use in case you need to store or ship the cradle.
8000 GPRS Cradle, complete set including power adaptor and supply cord
Antenna
Quick Installation Guide
Note: This manual is included on Software & Manual CD shipped with CipherLab 8000
Series Mobile Computers.
4
Chapter 1
USING THE 8000 GPRS CRADLE
The 8000 GPRS Cradle is a charging & communication cradle that is specifically designed
for connecting CipherLab 8000 Series Mobile Computers to WWAN via GPRS or GSM data
services. Refer to Chapter 4 Programming Your Mobile Computer.
This chapter explains how it works and the three working modes supported by the 8000
GPRS Cradle. Please contact your Internet service provider (ISP) or network operator for
information on GPRS related settings, such as
APN (name of access point that connects the mobile network to the Internet)
IP address (DHCP or static)
User name and password (may be optional, depending on Challenge-Handshake
Authentication Protocol)
For quick deployment, we provide a utility (.SHX) that can be downloaded to your mobile
computer and used to configure, test, and upgrade firmware of as many cradles as you
have. Refer to Chapter 2 Configuring the 8000 GPRS Cradle and Chapter 3 Upgrading
Firmware.
Warning:
It is recommended that the charging devices be operated at room
temperature (18°C to 25°C) for optimal performance. The charging devices
will not charge the battery when the temperature exceeds 40°C.
5
8000 GPRS Cradle Reference Manual
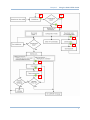
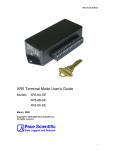
1.1 HOW IT WORKS
Referring to the flow chart on the next page, LED 2 and LED 3 are used to indicate a
specific stage of initialization, data connection, as well as firmware download. They are
explained below (by number).
1) Initializing
After powering on, the LEDs of Tx/Rx and Link will flash by turns at the time interval
of 0.25 seconds for about 30 seconds, indicating the cradle is in initialization process.
2) Initialization OK
If initialization is done successfully, the LED of Link will flash at the time interval of 1
second, waiting for AT commands.
3) Initialization NG
If initialization fails, the LED of Tx/Rx will flash at the time interval of 0.5 seconds,
indicating an error occurs. For example, it might fail to pass PIN authentication, the
signal strength is weak for the GSM network, the Access Point name is incorrect, etc.
For details on the specific initialization error, use “AT+ERR?” to get the error code.
Although initialization fails, the cradle can still accept AT commands. In case of the
“ATDT” command, it will re-initialize before dialing out.
4) Dialing out
When in Dial mode (ATDT), the LED of Link will flash at the time interval of 0.3
seconds for about 20 seconds.
5) Connected
When in Dial mode (ATDT), the LED of Link will be green after successfully
establishing a connection.
6) Data Transmission
When in Dial mode (ATDT), the LED of Tx/Rx will flash as long as data transmission
occurs.
7) Download Ready
When in Download mode (AT+DOWNLOAD), the LEDs of Tx/Rx and Link will flash by
turns to indicate the cradle is ready.
8) Downloading
When in Download mode (AT+DOWNLOAD), the LEDs of Tx/Rx and Link will flash
simultaneously to indicate downloading is in progress.
6
Chapter 1
Using the 8000 GPRS Cradle
1
3
2
7
8
4
5
6
7
8000 GPRS Cradle Reference Manual
1.2 DIAL MODES
When the mobile computer is seated in the cradle, it can send the collected data back to
a remote server, as well as download lookup files, via GSM or GPRS.
When dialing out (ATDT), the LED of Link will flash at the time interval of 0.3 seconds for
about 20 seconds. When connected, the LED of Link will be green after successfully
establishing a connection. The LED of Tx/Rx will flash as long as data transmission
occurs.
Note: It is suggested to issue the command “AT” every five seconds for best practice, in
order to check whether the mobile computer is seated in the cradle.
The escape sequence, consisting of three characters “+++”, is used to terminate
the data connection.
1.2.1 GSM CONNECTION
When initialization is done, issue ATDT(phone number) to establish data connection via
GSM.
1.2.2 GPRS CONNECTION
When initialization is done, issue ATDTxxx.xxx.xxx.xxx:kkkk or ATDT[HostName:Port] to
establish data connection via GPRS. The buffer size of the cradle is 1460 bytes, and data
packet will be sent out as long as it satisfies any of the following requirements:
buffer is full (= maximum packet size is 1460 bytes)
delimiter character is encountered
end of transmission timeout (= no transmission for 5 milliseconds)
Due to the limited memory size, the cradle cannot send three packets at the same time,
and therefore, the third packet will be discarded. We suggest you enable the
Challenge-Handshake Authentication Protocol (CHAP) setting for best practice.
8
Chapter 1
Using the 8000 GPRS Cradle
1.3 CONFIGURATION MODE
Regardless of the result of initialization, you can issue AT commands to configure the
cradle, such as
Perform the echo test between the mobile computer and the cradle.
Write the current settings to flash or load factory defaults.
Get the hardware version (Serial Number) or firmware version of the cradle.
Set PIN authentication, enable or disable.
Change PIN code of SIM card.
Send delimiter during data transmission.
For GPRS connection — Change Access Point name, apply Challenge-Handshake
Authentication Protocol (CHAP), and so on.
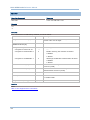
1.3.1 GENERAL SETTINGS
AT Commands
Description
GSM
GPRS
AT
Get echo from the cradle.
√
√
ATF
Load factory defaults.
√
√
ATW
Write the current settings to flash.
√
√
AT+KVER?
Get the firmware version of the cradle kernel
program.
√
√
AT+SN?
Get the serial number of the cradle.
√
√
AT+VER?
Get the firmware version of the cradle user
program.
√
√
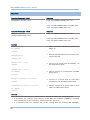
1.3.2 CONNECTION SETTINGS
AT Commands
Description
GSM
GPRS
AT+CLCK=SC, 2
Get the information about whether PIN
authentication is applied to the facility lock of
SIM card.
√
√
AT+CLCK=SC,
<Parameter>, <PIN>
Set PIN authentication, enable or disable.
√
√
AT+CPIN?
Get the information about whether PIN or PUK
code is required.
√
√
AT+CPIN=
Set PIN code for authentication.
√
√
AT+CPWD=SC
Change PIN code of SIM card.
√
√
AT+DLMT?
Get the delimiter check status, as well as the
delimiter character if in use.
√
√
AT+DLMT=
Set the delimiter check, enable or disable.
√
√
AT+APN?
Get the Access Point Name (APN) currently in
use.
√
9
8000 GPRS Cradle Reference Manual
AT+APN=
Set the Access Point Name (APN) you want to
connect to.
√
AT+CHAP?
Get the Challenge-Handshake Authentication
Protocol (CHAP) setting.
√
AT+CHAP=
Set the Challenge-Handshake Authentication
Protocol (CHAP) setting, enable or disable.
√
AT+DHCP?
Get the Dynamic Host Configuration Protocol
(DHCP) setting.
√
AT+DHCP=
Set the Dynamic Host Configuration Protocol
(DHCP) setting, enable or disable.
√
AT+IP?
Get the fixed IP address of the cradle.
√
AT+IP=
Set the fixed IP address of the cradle.
√
AT+PSW?
Get the password for Challenge-Handshake
Authentication Protocol (CHAP).
√
AT+PSW=
Set the password for Challenge-Handshake
Authentication Protocol (CHAP).
√
AT+USER?
Get the user name for Challenge-Handshake
Authentication Protocol (CHAP).
√
AT+USER=
Set the user name for Challenge-Handshake
Authentication Protocol (CHAP).
√
10
Chapter 1
Using the 8000 GPRS Cradle
1.4 DOWNLOAD MODE
Regardless of the result of initialization, you can issue “AT+DOWNLOAD” to upgrade to a
new firmware version when available. Refer to Upgrading Firmware for downloading
updates via the mobile computer.
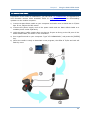
1) Connect a spare 8000 cradle to your computer and make sure its baud rate is 57,600
bps. If not, adjust the DIP switch.
2) Connect the power supply cord of the spare cradle and the 8000 GPRS Cradle to a
suitable power outlet separately.
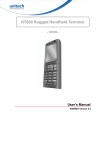
3) Hold the spare cradle upside-down so that its IR port is facing to the IR port of the
8000 GPRS Cradle, as shown in the illustration.
4) Run HyperTerminal on your computer. Type “AT+DOWNLOAD”, and press the [ENTER]
key.
5) When the cradle is ready to download a new program, the LEDs of Tx/Rx and Link will
flash by turns.
11
8000 GPRS Cradle Reference Manual
6) Exit HyperTerminal.
7) Run CipherLab download utility, such as ProgLoad.exe, on your computer.
8) While downloading, the LEDs of Tx/Rx and Link will flash simultaneously.
9) The 8000 GPRS Cradle will restart itself automatically upon completion of program
download.
12
Chapter 2
CONFIGURING THE 8000 GPRS CRADLE
For deployment engineers, you can download the utility “8000DeployGPRS.shx” to your
mobile computer, and then use it to deploy a set of standard settings to the cradles, as
well as perform light functionality testing.
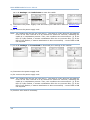
1) Run one of the CipherLab download utilities on your desktop computer, for example,
“ProgLoad.exe”. Choose the correct interface, COM port, baud rate, file type, and
browse the file system to locate the utility “8000DeployGPRS.shx”.
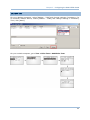
2) Press [8]+[Power] on the mobile computer to turn it on and access the Program
Manager menu.
You may download the program directly to the active memory sector “AC”, or to an
empty sector and activate the program later. Choose the correct interface and baud
rate that match the settings on your desktop computer.
3) Upon completion of the download process, you will have to activate the program if it
is downloaded to an empty sector.
4) The utility “8000DeployGPRS.shx” will start itself in a few seconds.
5) Go to 1. Settings > 2. Configure to configure GPRS settings, such as PIN code,
name of access point, etc.
Note: You must input the correct PIN code even though authentication is disabled!
You can check all these settings via 1. Settings > 1. Information.
Go through the following steps on each cradle.
6) Screw the antenna to the cradle.
7) Connect the power supply cord to a suitable power outlet.
Note: The cradle’s LED will be red (see LED 1). The LEDs of Tx/Rx and Link will flash by
turns at the time interval of 0.25 seconds for about 30 seconds, indicating the
cradle is in initialization process. Then, the LED of Tx/Rx will flash, indicating
initialization failed due to lack of SIM card. Ignore it.
8) Seat the mobile computer in the cradle.
13
8000 GPRS Cradle Reference Manual
Go to 1. Settings > 4. Default Set to reset the cradle.
9) Disconnect the power supply cord and insert your SIM card. Refer to Inserting SIM
Card.
10) Re-connect the power supply cord.
Note: The cradle’s LED will be red (see LED 1). The LEDs of Tx/Rx and Link will flash by
turns at the time interval of 0.25 seconds for about 30 seconds, indicating the
cradle is in initialization process. Then, two conditions are encountered: (1) If the
LED of Tx/Rx flashes, it means initialization fails due to incorrect PIN; (2) If the
LED of Link flashes, it means initialization is done successfully – correct PIN or PIN
not required.
11) Go to 1. Settings > 3. Download to download your settings to the cradles.
12) Disconnect the power supply cord.
13) Re-connect the power supply cord.
Note: The cradle’s LED will be red (see LED 1). The LEDs of Tx/Rx and Link will flash by
turns at the time interval of 0.25 seconds for about 30 seconds, indicating the
cradle is in initialization process. Then, two conditions are encountered: (1) If the
LED of Tx/Rx flashes, it means initialization fails due to incorrect PIN; (2) If the
LED of Link flashes, it means initialization is done successfully – correct PIN or PIN
not required.
14) Perform echo tests if necessary.
14
Chapter 2
Configuring the 8000 GPRS Cradle
2.1 VIEW THE SETTINGS
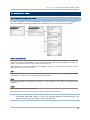
2.1.1 PREVIEW THE NEW SETTINGS
In order to double-check the GSM/GPRS configuration you are working on, information of
the new settings can be previewed here. Press the Up or Down key to turn pages.
PIN (for authentication)
When enabled, it means you need to provide PIN code for authentication while connecting the
cradle to a GSM or GPRS network. If the current and new PIN codes listed below this entry are
blank, you will have to input them via the Configure menu.
When disabled, it means authentication is disabled; however, you still have to input the correct
PIN code as the current one in use.
APN
Name of access point that connects the mobile network to the Internet — For establishing a GPRS
connection, you will have to provide the access point name.
CHAP
Challenge-Handshake Authentication Protocol — When enabled, user name and password are
required.
DHCP
When enabled, DHCP server is in use.
When disabled, you will have to specify a static IP address for the cradle.
Note: You must input the PIN code even though authentication is disabled!
The default PIN, APN, CHAP, as well as IP settings should be obtained from your
Internet service provider (ISP) or network operator.
15
8000 GPRS Cradle Reference Manual
2.1.2 VIEW THE CURRENT CRADLE SETTINGS
You may like to find out the current cradle settings, before or after configuring the cradle.
Such information is especially helpful when you fail to configure the cradle.
When it fails to collect information on the current settings of the cradle, the LED of Tx/Rx
will flash to indicate the cradle is not ready. A warning message is displayed along with
the error code, as shown below. Refer to 4.3 Error Code.
Ver: (version number)
The current firmware version of the cradle. Refer to 4.2.20 AT+VER.
+CPIN: (status)
The current PIN code status. Refer to 4.2.9 AT+CPIN.
APN: (access point name of ISP)
The current access point you are connecting to. Refer to 4.2.6 AT+APN.
CHAP: (status), USER & PSW
The current status of Challenge-Handshake Authentication Protocol (CHAP). Refer to 4.2.7
AT+CHAP. When CHAP is enabled, user name and password are required.
DHCP & IP
The current status of DHCP server. Refer to 4.2.11 AT+DHCP.
IP address assigned to the cradle is displayed in the second line:
16
dynamic IP address when DHCP server is enabled
static IP address when DHCP server is disabled
Chapter 2
Configuring the 8000 GPRS Cradle
2.2 CONFIGURE SETTINGS
2.2.1 AUTHENTICATION
Set or modify the security setting of your SIM card. When enabled, PIN code is required.
2.2.2 PIN CODE
Set or change the PIN code used for authentication.
Note: You must input the correct PIN code even though authentication is disabled!
2.2.3 GPRS SETTINGS
The access point name, CHAP, and IP settings should be the same as obtained from your
Internet service provider (ISP) or network operator.
17
8000 GPRS Cradle Reference Manual
2.3 DOWNLOAD SETTINGS
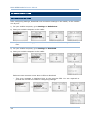
2.3.1 DOWNLOAD SETTINGS
After configuring settings, download new connection settings to the cradle, or the cradles
one by one.
1) On your mobile computer, go to Settings > Default Set.
2) Seat your mobile computer in the cradle.
Note: For initial downloading, you are advised to load the default settings to the cradle
first.
3) On your mobile computer, go to Settings > Download.
4) Seat your mobile computer in the cradle.
Below are two common errors when it fails to download.
This error message is displayed due to the incorrect PIN. You are required to
provide the correct one while re-configuring settings.
18
Chapter 2
Configuring the 8000 GPRS Cradle
This error message is displayed due to PUK issue. You are required to use your
cellular phone to unlock the SIM card, with the PUK code provided by the network
operator.
2.3.2 RESET TO DEFAULTS
For initial downloading, or in case the cradle is malfunctioning, you are advised to load
the default settings to the cradle first.
1) On your mobile computer, go to Settings > Default Set.
2) Seat your mobile computer in the cradle.
19
8000 GPRS Cradle Reference Manual
2.4 TEST
You may find it necessary to test the basic functionalities of the cradle. Seat your mobile
computer in the cradle and run the Echo Test utility on your desktop computer.
Note: (1) Echo Test – Dial Test and Dial GPRS are for internal testing.
(2) CMU200 Test is for manufacturing use.
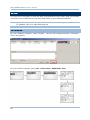
2.4.1 GPRS TEST
On your desktop computer, select [TCP/IP - Server] and change settings if necessary.
Then, click [Start].
On your mobile computer, go to Test > Echo Test > GPRS Echo Test.
20
Chapter 2
Configuring the 8000 GPRS Cradle
2.4.2 GSM TEST
On your desktop computer, select [Modem - TAPI] and change settings if necessary. For
an external modem device, select [Modem – COM] and change settings if necessary.
Then, click [Start].
On your mobile computer, go to Test > Echo Test > GSM Echo Test.
21
8000 GPRS Cradle Reference Manual
22
Chapter 3
UPGRADING FIRMWARE
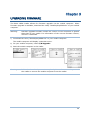
The 8000 GPRS Cradle allows for firmware upgrade via the mobile computer. When
firmware upgrade is available, download the utility “8000DeployGPRS.shx” to your mobile
computer.
Warning:
DO NOT upgrade firmware unless the version of new firmware is greater
than that of your cradle. For information of the current firmware version,
check AT commands.
1) Download the utility “8000DeployGPRS.shx” to your mobile computer.
The mobile computer will display a selection menu.
2) On your mobile computer, select F/W Upgrade.
3) Seat the mobile computer in the cradle.
Warning:
Before the download process is completed, do not disconnect the power to
the cradle or remove the mobile computer from the cradle!
23
8000 GPRS Cradle Reference Manual
24
Chapter 4
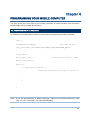
PROGRAMMING YOUR MOBILE COMPUTER
You may write your own code for the mobile computer to communication with the 8000
GPRS Cradle via the Cradle-IR interface.
4.1 PROGRAMMING IN C LANGUAGE
An example is provided below. Refer to CipherLab C Programming Guide for details.
char c;
SetCommType(1,COMM_IR);
/*Set COM1 for IR*/
open_com(1,BAUD_57600|DATA_BIT8|PARITY_NONE|HANDSHAKE_NONE);
…
clear_com(1);
write_com(1,"AT\r");
/* Send string or char to COM1*/
while (!com_eot(1));
while (1) {
if (read_com(1,(void*)&c) )
/*read COM1 buffer data and save it in the C*/
{
…
}
…
}
…
Note: If you are programming in BASIC language, make sure the default delimiter 0x0d
(CR) is in use; otherwise, call COM_DELIMITER().
25
8000 GPRS Cradle Reference Manual
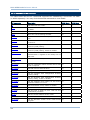
4.2 AT COMMANDS SUPPORTED
The table below lists the AT commands supported for establishing a connection via GSM
or GPRS separately. You may click the desired command to view details.
AT Commands
Description
GSM Mode
GPRS Mode
AT
Get echo from the cradle.
√
√
ATDT
Dial out to establish a data connection via GSM
or GPRS.
√
√
ATF
Load factory defaults.
√
√
ATW
Write the current settings to flash.
√
√
AT+APN?
Get the Access Point Name (APN) currently in
use.
√
AT+APN=
Set the Access Point Name (APN) you want to
connect to.
√
AT+CHAP?
Get the Challenge-Handshake Authentication
Protocol (CHAP) setting.
√
AT+CHAP=
Set the Challenge-Handshake Authentication
Protocol (CHAP) setting, enable or disable.
√
AT+CLCK=SC, 2
Get the information about whether PIN
authentication is applied to the facility lock of
SIM card.
√
√
AT+CLCK=SC,
<Parameter>,
<PIN>
Set PIN authentication, enable or disable.
√
√
AT+CPIN?
Get the information about whether PIN or PUK
code is required.
√
√
AT+CPIN=
Set PIN code for authentication.
√
√
AT+CPWD=SC
Change PIN code of SIM card.
√
√
AT+DHCP?
Get the Dynamic Host Configuration Protocol
(DHCP) setting.
√
AT+DHCP=
Set the Dynamic Host Configuration Protocol
(DHCP) setting, enable or disable.
√
AT+DLMT?
Get the delimiter check status, as well as the
delimiter character if in use.
√
√
AT+DLMT=
Set the delimiter check, enable or disable.
√
√
AT+DOWNLOAD
Download firmware to the cradle.
√
√
AT+ERR?
Get the last 4 digits of error code for the
initialization procedure.
√
√
AT+IP?
Get the fixed IP address of the cradle.
√
AT+IP=
Set the fixed IP address of the cradle.
√
AT+KVER?
Get the firmware version of the cradle kernel
program.
26
√
√
Chapter 4
Programming Your Mobile Computer
AT+PSW?
Get the password for Challenge-Handshake
Authentication Protocol (CHAP).
√
AT+PSW=
Set the password for Challenge-Handshake
Authentication Protocol (CHAP).
√
AT+SN?
Get the serial number of the cradle.
AT+USER?
Get the user name for Challenge-Handshake
Authentication Protocol (CHAP).
√
AT+USER=
Set the user name for Challenge-Handshake
Authentication Protocol (CHAP).
√
AT+VER?
Get the firmware version of the cradle user
program.
√
√
“+++”
The escape sequence, consisting of three
characters “+++”, is used to terminate the
data connection. The time interval between
each character should be less than one second,
and the guard time periods before (leading)
and after (trailing) should be longer than one
second separately.
√
√
√
√
27
8000 GPRS Cradle Reference Manual
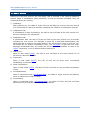
4.2.1 AT COMMAND SYNTAX
The "AT" or "at" prefix must be set at the beginning of each command line. To terminate
a command line, enter <CR>. Commands are usually followed by a response that
includes "<CR><LF><response><CR><LF>".
Parameter […]
Specify user-definable parameter values, which may be <text> or <number>.
(ERR_STR)
If a connection fails, the response may include a string after the message “NO
CARRIER”, providing further information on the connection error.
[ERR_CODE]
If a connection fails, the response will always include a 6-digit hexadecimal number
(always starting with “0x”). Refer to the Error Code table for detailed information.
Note: If you are programming in BASIC language, the delimiter 0x0d (CR) is in use by
default. Refer to COM_DELIMITER().
The escape sequence consists of three characters “+++”. Once a connection has been
established, type the escape sequence to return to command state. When entering the
next command after an escape sequence, always wait to receive “\r\nOK\r\n”. An escape
attempt in the interval may fail because the modem is not in on-line data state. There
are equal guard time periods before (leading) and after (trailing).
The “+++” timing for this escape sequence is as illustrated below.
If the escape sequence is not followed by another command within 1 second (trailing guard time),
the cradle will hang up immediately. Normally, the mobile computer will receive the message “OK”
unless the line is abnormally busy.
Note: The escape sequence will break the connection. The Guard Time is 1 second and
cannot be changed.
28
Chapter 4
Programming Your Mobile Computer
4.2.2 AT
Execution Command
Response
AT<CR>
<CR><LF>OK<CR><LF>
Example
AT
OK
Remarks
This command is to do the echo test between the mobile computer and the cradle. It is suggested
to issue the command “AT” every five seconds for best practice, in order to check whether the
mobile computer is seated in the cradle.
See Also
Back to the Supported AT Commands.
29
8000 GPRS Cradle Reference Manual
4.2.3 ATDT
Execution Command – GSM
Response
ATDT[Phone_Number]<CR>
<CR><LF>CONNECT(INFO)<CR><LF>
<CR><LF>NO CARRIER<CR><LF>(ERR_STR)
<CR><LF>[ERR_CODE]<CR><LF>
Execution Command – GPRS
Response
ATDT[IP:Port]<CR>
<CR><LF>CONNECT(INFO)<CR><LF>
ATDT[HostName:Port]<CR>
<CR><LF>NO CARRIER<CR><LF>(ERR_STR)
<CR><LF>[ERR_CODE]<CR><LF>
Example
ATDT0286471166
Make a GSM data call but the remote party
hangs up.
Make a GSM data call and the remote party
answers the call.
Connect to a remote host successfully, via
the GPRS access point.
Cannot connect to a remote host via GPRS
access point.
Connect to a remote host by host name
successfully, via the GPRS access point.
Cannot connect to a remote host by host
name via GPRS access point.
NO CARRIER
[0x0b01]
ATDT0286471166
CONNECT 9600
ATDT192.168.2.1:1024
CONNECT
ATDT192.168.6.176:21
NO CARRIER
[0x8005]
ATDTgprs.Cipherlab.com.tw:20009
CONNECT
ATDTdynamicIP.xyznet.org.tw:20000
NO CARRIER
[0x9011]
Remarks
This command is to dial out for a data connection via GSM or GPRS (see examples above).
If successful, the response may include a string after the message “CONNECT”, providing
more information on the connection, such as baud rate, and so on.
If a connection fails, the response may include a string after the message “NO CARRIER”,
30
Chapter 4
Programming Your Mobile Computer
providing further information on the connection error, and it will always include a 6-digit error
code. Refer to the Error Code table for detailed information.
See Also
AT+DLMT (GSM) AT+APN, AT+CHAP, AT+DHCP, AT+DLMT (GPRS), Escape Sequence <+++>
Back to the Supported AT Commands.
31
8000 GPRS Cradle Reference Manual
4.2.4 ATF
Execution Command
Response
ATF<CR>
<CR><LF>OK<CR><LF>
Example
ATF
OK
Remarks
This command is to load factory defaults, as shown below.
Parameters
Defaults
Description
unsigned char PINCode[9]
‘0000’
PIN (Personal Identity Number) of SIM card; an
access code of 4~8 digits
internet
AP name for GPRS
unsigned
GPRSAccessPoint[21]
char
GPRS_FLAG Flag
See GPRS_FLAG structure below.
unsigned int Reserved:14
---
---
unsigned int DelimEnable:1
0
Enable checking the delimiter character
0:Disable
1:Enable
unsigned int CHAPEnable:1
0
Challenge Handshake Authentication Protocol
0:Disable
1:Enable
char CHAPPassword[33]
Null
Password for Challenge Handshake Authentication
Protocol (CHAP)
char CHAPUserName[33]
Null
User
name
for
Challenge
Authentication Protocol (CHAP)
char DelimiterChar
0x0d
Delimiter Character
int DhcpEnable
1
0: Disable DHCP
1: Enable DHCP
unsigned char IpAddr[4]
0,0,0,0
See Also
ATW
Back to the Supported AT Commands.
32
Static IP address for the cradle
Handshake
Chapter 4
Programming Your Mobile Computer
4.2.5 ATW
Execution Command
Response
ATW<CR>
<CR><LF>OK<CR><LF>
Example
ATW
OK
Remarks
This command is to write the current settings to flash.
See Also
ATF
Back to the Supported AT Commands.
33
8000 GPRS Cradle Reference Manual
4.2.6 AT+APN
Read Command
Response
AT+APN?<CR>
<CR><LF>[AP_Name]<CR><LF>
Example
AT+APN?
GPRS Access Point “internet” is in use.
internet
Write Command
Response
AT+APN=[AP_Name]<CR>
<CR><LF>OK<CR><LF>
Example
AT+APN=emome
Change to Access Point “emome”.
OK
Remarks
The Read command is to get the Access Point Name (APN) currently in use.
The Write command is to set the Access Point Name (APN) you want to connect to.
[AP_Name] is a string for the name of a GPRS access point, maximum 128 characters.
See Also
ATDT, AT+CHAP, AT+DHCP, AT+DLMT (GPRS)
Back to the Supported AT Commands.
34
Chapter 4
Programming Your Mobile Computer
4.2.7 AT+CHAP
Read Command
Response
AT+CHAP?<CR>
<CR><LF>DISABLE<CR><LF>
<CR><LF>ENABLE<CR><LF>
Example
AT+CHAP?
CHAP is currently disabled.
DISABLE
Write Command
Response
AT+CHAP=[Parameter]<CR>
<CR><LF>OK<CR><LF>
<CR><LF>ERROR<CR><LF>
Example
AT+CHAP=1
Enable CHAP successfully.
OK
Remarks
The Read command is to get the Challenge-Handshake Authentication Protocol (CHAP) setting.
The Write command is to set the Challenge-Handshake Authentication Protocol (CHAP) setting,
enable or disable.
[Parameter] is a character that determines whether CHAP is enabled —
Parameter =0: Disable CHAP
Parameter =1: Enable CHAP
See Also
ATDT, AT+APN, AT+DHCP, AT+DLMT, AT+PSW, AT+USER (GPRS)
Back to the Supported AT Commands.
35
8000 GPRS Cradle Reference Manual
4.2.8 AT+CLCK=SC
Read Command
Response
AT+CLCK=SC,2<CR>
<CR><LF>+CLCK:[Parameter]<CR><LF>
Example
AT+CLCK=SC,2
PIN authentication is disabled.
+CLCK:0
Write Command
Response
AT+CLCK=SC,[Parameter],[PIN]<CR>
<CR><LF>OK<CR><LF>
<CR><LF>+CME ERROR<CR><LF>
Example
AT+CLCK=SC,1,0000
Enable PIN authentication, using PIN code
“0000”
Command syntax is incorrect!
OK
AT+CLCK=SC,2,
+CME ERROR
Remarks
The Read command is to get the information about whether PIN authentication is applied to the
facility lock of SIM card.
The Write command is to set PIN authentication, enable or disable.
[Parameter] is a character that determines whether PIN authentication is enabled —
Parameter =0: Disable PIN authentication
Parameter =1: Enable PIN authentication
[PIN] is a string for the PIN code.
PIN (Personal Identity Number) is a 4~8 digit access code which can be used to secure your
SIM card from use. If the wrong PIN is entered in more than three times, the SIM card will be
locked.
See Also
AT+CPIN, AT+CPWD=SC
Back to the Supported AT Commands.
36
Chapter 4
Programming Your Mobile Computer
4.2.9 AT+CPIN
Read Command
Response
AT+CPIN?<CR>
<CR><LF>+CPIN:READY<CR><LF>
<CR><LF>+CPIN:SIM PIN<CR><LF>
<CR><LF>+CPIN:SIM PUK<CR><LF>
Write Command
Response
AT+CPIN =[PIN]<CR>
<CR><LF>OK<CR><LF>
AT+CPIN =[PUK],[New_PIN]<CR>
<CR><LF>ERROR<CR><LF>
Example
AT+CPIN?
PIN code has already been entered
successfully, or the PIN authentication is
disabled.
PIN code is required.
Enter PIN code “0000”.
PUK code is required.
+CPIN: READY
AT+CPIN=0000
ERROR
AT+CPIN?
+CPIN: SIM PIN
AT+CPIN=0000
OK
AT+CPIN?
+CPIN: SIM PUK
AT+CPIN=12345678,1111
OK
Remarks
The Read command is to get the information about whether PIN or PUK code is required.
The Write command is to set the PIN code for authentication.
[PIN] is a string for the PIN code, [New_PIN] is a string for the new PIN code, and [PUK] is a
string for the PUK code.
PIN (Personal Identity Number) is a 4~8 digit access code which can be used to secure your
SIM card from use. If the wrong PIN is entered in more than three times, the SIM card will be
locked.
PUK (Personal Unblocking Key) is an 8-digit code used to unlock the PIN code if your SIM card
is blocked. Contact your service provider for PUK. If the wrong PUK is entered ten times in a
row, the device will become permanently blocked and unrecoverable, requiring a new SIM
card.
See Also
AT+CLCK=SC, AT+CPWD=SC
Back to the Supported AT Commands.
37
8000 GPRS Cradle Reference Manual
4.2.10 AT+CPWD=SC
Write Command
Response
AT+CPWD=SC,[Old_PIN],[New_PIN]<CR>
<CR><LF>OK<CR><LF>
<CR><LF>ERROR<CR><LF>
Example
AT+CPWD=SC,0000,2008
Change PIN code “0000” to “2008”
Command syntax is incorrect!
OK
AT+CPWD=SC,2008
ERROR
Remarks
The Write command is to change PIN code of SIM card.
[Old_PIN] is a string for the current PIN code, and [New_PIN] is a string for the new PIN code.
PIN (Personal Identity Number) is a 4~8 digit access code which can be used to secure your
SIM card from use. If the wrong PIN is entered in more than three times, the SIM card will be
locked.
See Also
AT+CLCK=SC, AT+CPIN
Back to the Supported AT Commands.
38
Chapter 4
Programming Your Mobile Computer
4.2.11 AT+DHCP
Read Command
Response
AT+DHCP?<CR>
<CR><LF>ENABLE<CR><LF>
<CR><LF>DISABLE<CR><LF>
Example
AT+DHCP?
DHCP is currently enabled.
ENABLE
Write Command
Response
AT+DHCP=[Parameter]<CR>
<CR><LF>OK<CR><LF>
<CR><LF>ERROR<CR><LF>
Example
AT+DHCP=0
Disable DHCP successfully.
OK
Remarks
The Read command is to get the Dynamic Host Configuration Protocol (DHCP) setting.
The Write command is to set t the Dynamic Host Configuration Protocol (DHCP) setting, enable or
disable. [Parameter] is a character that determines whether DHCP is enabled —
Parameter =0: Disable DHCP
Parameter =1: Enable DHCP
See Also
ATDT, AT+APN, AT+CHAP, AT+DLMT, AT+IP (GPRS)
Back to the Supported AT Commands.
39
8000 GPRS Cradle Reference Manual
4.2.12 AT+DLMT
Read Command
Response
AT+DLMT?<CR>
<CR><LF>ENABLE:[HEX]<CR><LF>
<CR><LF>DISABLE<CR><LF>
Example
AT+DLMT?
Delimiter check is applied, and
character “0x0d” is currently in use.
No delimiter check.
ENABLE:0x0d
AT+DLMT?
DISABLE
Write Command
Response
AT+DLMT=[Parameter](,HEX)<CR>
<CR><LF>OK<CR><LF>
the
<CR><LF>ERROR<CR><LF>
Example
AT+DLMT=1,0x0a
Enable delimiter check successfully, and
the character “0x0a” is in use.
Command syntax is incorrect!
Disable delimiter check successfully.
OK
AT+DLMT=1
ERROR
AT+DLMT=0
OK
Remarks
The Read command is to get the delimiter check status. [HEX] is a character in hexadecimal, with
the prefix “0x”.
The Write command is to set the delimiter check, enable or disable. [Parameter] is a character
that determines whether a delimiter character is applied —
Parameter =0: Disable delimiter
Parameter =1: Enable delimiter
When Parameter =1, [HEX] is a character in hexadecimal, with the prefix “0x”. For example,
“0x0d” for Carriage Return (CR).
See Also
ATDT
Back to the Supported AT Commands.
40
Chapter 4
Programming Your Mobile Computer
4.2.13 AT+DOWNLOAD
Execution Command
Response
AT+DOWNLOAD<CR>
<CR><LF>OK<CR><LF>
Example
AT+DOWNLOAD
OK
Remarks
This command is to upgrade firmware, either downloading a user program or kernel program to
the cradle. After replying with the message “OK”, the cradle will enter the Download Mode.
The two LEDs to the right of the front panel (Tx/Rx and Link) will flash by turns to indicate the
cradle is ready, and will flash simultaneously while downloading.
See Also
AT+KVER, AT+VER
Back to the Supported AT Commands.
41
8000 GPRS Cradle Reference Manual
4.2.14 AT+ERR
Read Command
Response
AT+ERR?<CR>
<CR><LF>[dddd]<CR><LF>
Example
AT+ERR?
0b00
Remarks
This Read command is to get the error code for the initialization procedure.
[dddd] is the last 4 digits of the error code, which is a hexadecimal number starting with “0x”.
Refer to the Error Code table for detailed information.
See Also
AT+KVER, AT+VER
Back to the Supported AT Commands.
42
Chapter 4
Programming Your Mobile Computer
4.2.15 AT+IP
Read Command
Response
AT+IP?<CR>
<CR><LF>[IP]<CR><LF>
Example
AT+IP?
192.168.1.2
The fixed IP assigned to the cradle is
192.168.1.2
Write Command
Response
AT+IP=[IP]<CR>
<CR><LF>OK<CR><LF>
<CR><LF>ERROR<CR><LF>
Example
AT+IP=192.168.2.100
Assign 192.168.2.100
successfully.
The dotted-decimal notation is incorrect!
OK
AT+IP=192.168.8
ERROR
to
the
cradle
Remarks
The Read command is to get the fixed IP address of the cradle.
The Write command is to set the fixed IP address of the cradle.
[IP] is a string in dot-decimal for IP address xxx.xxx.xxx.xxx
See Also
AT+DHCP (GPRS)
Back to the Supported AT Commands.
43
8000 GPRS Cradle Reference Manual
4.2.16 AT+KVER
Read Command
Response
AT+KVER?<CR>
<CR><LF>[Kernel_Version]<CR><LF>
Example
AT+KVER?
KV-1.00
Remarks
This Read command is to get the firmware version of the cradle kernel program.
[Kernel_Version] is a string that identifies the kernel; it will be updated after having downloaded a
different kernel program to the cradle.
See Also
AT+DOWNLOAD, AT+VER
Back to the Supported AT Commands.
44
Chapter 4
Programming Your Mobile Computer
4.2.17 AT+PSW
Read Command
Response
AT+PSW?<CR>
<CR><LF>[Password]<CR><LF>
Example
AT+PSW?
The current CHAP password is “123456”.
123456
Write Command
Response
AT+PSW=[Password]<CR>
<CR><LF>OK<CR><LF>
Example
AT+PSW=123456
Set “123456” for CHAP password.
OK
Remarks
The Read command is to get the password for Challenge-Handshake Authentication Protocol
(CHAP).
The Write command is to set the password for Challenge-Handshake Authentication Protocol
(CHAP).
[Password] is a string for the CHAP password, maximum 64 characters.
See Also
AT+CHAP, AT+USER (GPRS)
Back to the Supported AT Commands.
45
8000 GPRS Cradle Reference Manual
4.2.18 AT+SN
Read Command
Response
AT+SN?<CR>
<CR><LF>[Serial_Number]<CR><LF>
Example
AT+SN?
EK8001024
Remarks
This Read command is to get the serial number of the cradle.
[Serial_Number] is a read-only string that identifies the hardware.
See Also
AT+KVER, AT+VER
Back to the Supported AT Commands.
46
Chapter 4
Programming Your Mobile Computer
4.2.19 AT+USER
Read Command
Response
AT+USER?<CR>
<CR><LF>[UserName]<CR><LF>
Example
AT+USER?
The current CHAP user name is “Vodafone”.
Vodafone
Write Command
Response
AT+USER=[UserName]<CR>
<CR><LF>OK<CR><LF>
Example
AT+USER=Vodafone
Set “Vodafone” for CHAP user name.
OK
Remarks
The Read command is to get the user name for Challenge-Handshake Authentication Protocol
(CHAP).
The Write command is to set the user name for Challenge-Handshake Authentication Protocol
(CHAP).
[UserName] is a string for the CHAP user name, maximum 64 characters.
See Also
AT+CHAP, AT+PSW (GPRS)
Back to the Supported AT Commands.
47
8000 GPRS Cradle Reference Manual
4.2.20 AT+VER
Read Command
Response
AT+VER?<CR>
<CR><LF>[UserProgram_Version]<CR><LF>
Example
AT+VER?
Ver: 1.00
Remarks
This Read command is to get the firmware version of user program.
[UserProgram_Version] is a string that identifies the firmware; it will be updated after having
downloaded a different user program to the cradle.
See Also
AT+DOWNLOAD, AT+KVER
Back to the Supported AT Commands.
48
Chapter 4
Programming Your Mobile Computer
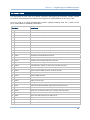
4.3 ERROR CODE
The provision of error code is to assist engineers debugging the firmware. Please contact
your sales representative to submit your request for interpretation of an error code.
An error code is a 6-digit hexadecimal number (always starting with “0x”). Refer to the
Error Code table for detailed information.
Error Code
Description
0x
0101
GSM/GPRS module failure
0x
0201
Hardware error
0x
0301
Disable network registration information error
0x
0401
Get PIN/PUK authentication state timeout
0x
0402
Get PIN/PUK authentication State error
0x
0404
PUK code required to unblock the SIM card
0x
0405
SIM card error or no SIM card inserted
0x
0501
Get the number of remaining PIN attempts timeout
0x
0502
Get the number of remaining PIN attempts error
0x
050a
Initialization procedure broken due to invalid remaining PIN attempts
0x
0601
Set PIN for authentication timeout
0x
0602
Set PIN for authentication failed
0x
0701
Disable new message indication timeout
0x
0702
Disable new message indication failure
0x
0801
Automatically register to the home operator timeout
0x
0802
Automatically register to the home operator failure
0x
0901
Specify Packet Data Protocol Context timeout
0x
0902
Specify Packet Data Protocol Context failure
0x
0a01
Attach GPRS timeout
0x
0a02
Attach GPRS failure
0x
0b01
Dialing out timeout
0x
0b02
Dialing out failure
0x
0c01
Read International Mobile Equipment Identity timeout
0x
0c02
Invalid International Mobile Equipment Identity
0x
0e0b
Fatal error as disconnecting the existing call/connection
0x
0f01
Query the SIM security lock state timeout
0x
0f02
Query the SIM security lock state error
0x
8003
Negotiation with the GPRS network timeout
0x
8011
No buffer space for link control packets
0x
8012
Unable to transmit link control packets
49
8000 GPRS Cradle Reference Manual
0x
8021
No buffer space for password authentication packets
0x
8022
Unable to transmit password authentication packets
0x
8031
No buffer space for IP control packets
0x
8032
Unable to transmit IP control packets
0x
8074
Connection terminated during link control negotiation
0x
8084
Connection terminated during IP control negotiation
0x
8095
CHAP authentication failure
0x
9001
Connect to the remote IP timeout
0x
9004
Connection terminated while connecting to the remote IP
0x
9010
Host name is too long.
0x
9011
DNS server is no response.
0x
9012
There is no IP information in the response message of DNS.
0x
9013
The resource type is not correct.
0x
9014
The resource class is not correct.
0x
a002
Connection terminated by the GPRS network
0x
a003
TCP/IP Connection error
0x
--ff
Disconnected by DCD line pulled high
50
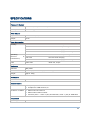
SPECIFICATIONS
Processor & Memory
CPU
16-bit CMOS, low power consumption
Memory
Firmware upgradeable
Power Adapter
Input
AC 100~240 V, 50/60 Hz
Output
5V DC
Power Consumption
Standby
Operating
(dial-out
transmission)
225 mW
: 45 mA for cradle only
400 mW
: 80 mA when battery is charged to full
2950 mW
: 590 mA while charging
3400 mW
: 680 mA while charging with backlight on
1650 mW
: 330 mA when battery is charged to full
& 3350 mW
Peak
: 670 mA while charging
3850 mW
: 770 mA while charging with backlight on
10000 mW
: 2000 mA, 577µs
Enclosures
Materials
ABS plastic
Dimensions
110 mm (L) × 100 mm (W) × 60 mm (H)
Weight
Approx. 220g
Notifications
Status Indicators
3 LEDs for connection status
Communications
Data Call via GSM
IP Packet via GPRS
Frequency bands - Dual-band EGSM900 and GSM1800
Compliant to GSM Phase 2/2+
GPRS multi-slot Class 10
GPRS mobile station Class B
Transmit power – Class 4 (2W) at EGSM 900; Class 1 (1W) at GSM 1800
Temperature
Operating
-10 °C to 60 °C
51
8000 GPRS Cradle Reference Manual
Storage
-20 °C to 70 °C
Humidity
Operating
10% to 90%, non-condensing
Storage
5% to 95%, non-condensing
Regulations
EMC Regulations
52
CE, SRMC, MII