1
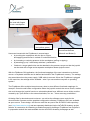
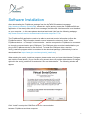
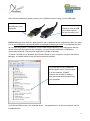
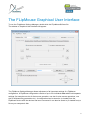
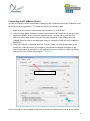
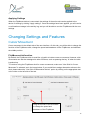
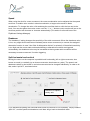
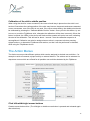
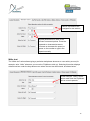
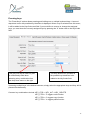
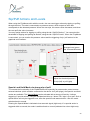
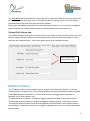
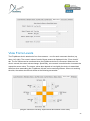
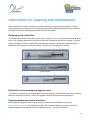
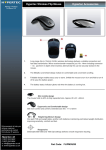
FLipMouse Alternative Computer Input Device User Manual Preface The FLipMouse is an open source Assistive Technology module developed by the AsTeRICS Academy project of the University of Applied Sciences, Technikum Wien. The FLipMouse allows control of a computer mouse cursor as well as typing desired keyboard keys for people who cannot use standard computer input devices. The FLipMouse device can be actuated with minimal fingeror lip-movements and/or sip & puff activities via a dedicated mouthpiece. The FLipMouse Graphical User Interface (GUI) is a software application intended for use in conjunction with the FLipMouse device. This user manual includes a description of the Graphical User Interface for the configuration of the different functions of the FLipmouse – as well as explanations of how to use those features. A configured FLipmouse module can be used on any computer without installation of special software, because the FLipMouse module behaves exactly like a standard mouse and keyboard which is plugged into the computer. Furthermore, this manual covers the installation of the FLipMouse GUI application and important guidelines for using the FLipMouse, in particular cleaning procedures and hygienic precautions. The AsTeRICS Academy project. http://www.asterics-academy.net “Flip”, the vagabound grasshopper, cartoon character © by Waldemar Bonsels 2 Contents FLipMouse ...................................................................................................................................... 1 Alternative Computer Input Device .................................................................................................. 1 User Manual ................................................................................................................................... 1 Preface ........................................................................................................................................... 2 Contents ......................................................................................................................................... 3 Hardware overview ......................................................................................................................... 4 Instructions for proper mounting and use ........................................................................................ 6 Software Installation........................................................................................................................ 7 The FLipMouse Graphical User Interface ........................................................................................ 9 Changing Settings and Features ................................................................................................... 12 Cursor Movement ...................................................................................................................... 12 The Action Menus ..................................................................................................................... 14 Using the Stick for Alternative Actions ....................................................................................... 19 Sip/Puff Actions and Levels ....................................................................................................... 20 Buttons Actions ......................................................................................................................... 21 View Force Levels ..................................................................................................................... 22 Instructions for cleaning and maintenance .................................................................................... 23 Contact Information....................................................................................................................... 24 Disclaimer ..................................................................................................................................... 24 Acknowledgement......................................................................................................................... 24 3 Hardware overview The FLipMouse device consists of a microcontroller and several electronic components (pressureand force sensors, momentary switches, LEDs etc.) These components are mounted on a custommade Printed Circuit Board (PCB) which is fixed in a plastic enclosure made from acrylic glass, using a laser cutter. Reset switch (for software updates) Internal switch (Button1) The hardware features of the FLipMouse: “Zero-way”-joystick / mouthpiece: very low forces are sufficient to create up/down/left/right movement o The zero-way-joystick can be used with fingers or toes etc. o It can also be used as a mouthpiece (actuated by lips / mouth movements). o If desired, sip / puff activities into the mouthpiece can trigger additional functions One function selection switch, to change the active configuration of functions Two 3.5mm jack plug sockets for attaching external switches to trigger additional functions 3 Indicator Leds for showing the active configuration, calibration procedure etc. “Hot Shoe” Adapter for mounting to Manfrotto Magic Arm or similar mount Additional upgrade modules for future extensions (e.g. universal infrared remote control) Firmware upgrade via Arduino IDE (the reset button is only needed for this purpose) The mouthpiece (“Hygienic Stick”) is made by the company QuadJoy and can be ordered via the homepage: http://www.quadjoy.com. We want to thank Bill and Debra Street of QuadJoy for letting us use their mouthpiece for our FLipMouse construction kit ! 4 “Hygienic Stick”, can be used with fingers or as a mouthpiece. 3 indicator LEDs (red, yellow, green) Users can interact with the FLipMouse in several ways: 3.5mm jack plug connectors for external switches (Button2 and Button3) by touching the mouthpiece with the lips or fingers and applying small forces in vertical or horizontal direction by increasing or reducing pressure in the mouthpiece (puffing or sipping) by actuating (up to) 3 momentary switches / pushbuttons if desired, a longer plastic tube can be attached to the pressure sensor so that the joystick can be used with a finger and a separate mouthpiece allows sip/puff control. With the FlipMouse GUI application, the functional mappings of the user interactions to desired mouse- or keyboard activities can be defined and stored in the FLipMouse’s memory. The settings stay saved also when the power supply / USB cable is removed. When the FLipMouse is plugged in the next time, the settings will be available – also if you use another computer or operating system ! The FLipMouse offers multiple internal memory slots to store different functional mappings, for example: One slot could hold a configuration where the joystick controls the mouse cursor, another slot could change the joystick function to selected keyboard keys; different mouse clicks could be created by sip / puff actions or the external switches, etc. etc. – there are many possibilities ! All design files for electronics and enclosure - as well as the software source code for the microcontroller firmware and the graphical configuration software (FLipMouse GUI) are available as open source. These design- and source code files are part of the AsTeRICS code repository (see: http://www.asterics.org) and are separately distributed via the AsTeRICS Academy project website. A construction kit containing a detailed manual for building a FLipMouse from its parts is in preparation and will be made available via the AsTeRICS Academy homepage as well. 5 Instructions for proper mounting and use Please follow these instructions carefully when using the AsTeRICS Academy FLipMouse to avoid the occurrence of unwanted side-effects: 1. Attach a clean plastic pipe (“hygienic stick” mouthpiece) 2. Mount the FLipMouse device appropriately for the user for example by using a “Manfrotto Magic Arm + SuperClamp” mount combination see : http://www.manfrotto.com/magic-arm-kit 3. When positioning the FLipMouse, it must be ensured that the head of the user can be held comfortable 4. Plug in the FLipMouse via the provided USB cable a. Do not touch the mouthpiece as long as the LEDs are blinking (the initial blinking indicates the zero point calibration phase) b. Wait until the device is recognized by the computer c. Move the joystick / mouthpiece to check correct operation 5. If the mouthpiece is actuated with the lips: a. One mouthpiece must be used exclusively by one person b. The filter tip must be replaced whenever saliva or dirt have formed c. The mouthpiece must be cleaned whenever saliva or dirt have formed (see chapter “Cleaning and Maintenance”) Involved risks There are some risks using the AsTeRICS Academy FLipMouse which can be minimised by following the instructions mentioned above. The risks by not following the instructions are: With the lack of hygiene concerning the mouthpiece, especially when the mouthpiece is used by more than one person, it is possible that o skin rashes arises o viruses and bacteria are transmitted causing diseases o dirt formats in the mouthpiece, which is dangerous to health. With wrong positioning of the FLipMouse there is the risk that you will feel uncomfortable while using the FLipMouse, it is possible that you get muscle cramps or muscle pain due to unusual head positioning – pay attention to a convenient position and schedule pauses if you work for longer time periods. 6 Software Installation After downloading the FLipMouse package from the AsTeRICS Academe homepage (http://asterics-academy.net/tools/flip), extract the .zip file and try to start the FLipMouseGUI.exe application. If the startup fails with an error message, the Microsoft .Net framework is not installed on your computer – in this case please download and install .Net from the following webpage: http://www.microsoft.com/en-us/download/confirmation.aspx?id=17718 The FLipMouseGUI application needs to be able to send and receive information to/from the FLipMouse device. This information transfer occurs between the electronic “brain” of the FLipMouse device – a TeensyLC microcontroller – and the computer the FLipMouse is connected to, through a communication port (COM port). The COM port driver must be installed before you plug in the FLipMouse device for the first time. To install the COM port driver, start the serial_install.exe program which is contained in the download package. (Alternatively it can be downloaded from https://www.pjrc.com/teensy/serial_install.exe) When starting the serial_install.exe program, please make sure you have Administrator Privileges, and click the install button. (If your current user account does not provide Administrator Privileges, right-click the serial_install.exe file and select “Run as Administrator”. The following window will appear: Click “Install” to setup the COM-Port driver for communication between FLipMouse and host computer 7 After finishing installation, please connect your FLipMouse device using a micro USB cable. Connect this end to a USB port in your computer Connect this end to the FlipMouse. Not all USB mini cables might fit into the connector slot ! Please note that every time you apply power to the FLipMouse device (respectively when you plug it in) a zero-calibration is performed which is indicated by blinking all 3 leds. It is important that you do not touch the joystick / mouthpiece until the leds stopped blinking. After making sure that the device is securely connected to the computer, you may check if the device’s COM port is successfully detected. The detection might take a couple of seconds. To check if a COM port is detected, go to Control Panel on your computer, and open the Device Manager. A window similar to the one below should be opened: The COM port of your FlipMouse should appear here. The port name is in this example “COM28”, however the number is arbitrary and gets automatically selected by your computer. If you see a COM port as in the example above – congratulations! You are now ready to use the FLipMouse GUI. 8 The FLipMouse Graphical User Interface To use the FLipMouse Settings Manager, double-click the FLipMouseGUI.exe file. The window of Graphical User Interface will appear: The FlipMouse Settings Manager allows adjustment of all important settings of a FlipMouse configuration. A FlipMouse configuration consists of up to five individual slots which hold separate settings (for example one slot for fast mouse operation, one slot for slow mouse operatione, one slot for keyboard key generation etc.). A configuration can be stored to (or loaded) from the FlipMouse device after the devices has been connected. It can also be saved to (or loaded from) a file on your computer’s disk. 9 Managing Slots The Slot management bar consists of the Buttons “New Slot”, “Previous Slot”, “Next Slot” and “Delete Slot”. After starting the FLipMouse Settings Manager, only one default slot named “mouse” exists. When you create a slot using the “New Slot” button, you can assign a name that will help you remember the slot’s purpose. To write in a new name, click into the drop-down box in the middle of the slot management bar: Display for the current slot name; Update slot name here ! Clicking will highlight the default text, as seen above. You may now the type the new name, as desired. Using the “Previous Slot” and “Next Slot” Buttons you can change between the existing slots. The settings of the current slot will be stored and remembered when changing to another slot. The maximum slot count is five. The active slot can be removed using the “Delete Slot” button. Changing the settings of the active slot The functional features and settings of the active slot can be changed by using the sliders and selection boxes displayed on the different tabs of the FLipmouse Settings Manager window. These settings tabs will be described in detail in the next chapter. Loading and saving the configuration to/from disk The File Menu allows transferring all current slots from to a settings (.set) file on your computer. All settings can thus be transferred to the same or to another FLipMouse device. Multiple setups (for example for individual users or use-cases) can be kept on a computer and applied with a single click. A file chooser window will be opened which allows selection of the desired filename for saving or loading the configuration. 10 Connecting the FLipMouse Device In order to be able to use the configuration settings on the FLipMouse device, the FlipMouse must be connected to the application. To connect the device, follow these steps: 1. Make sure your device is connected to your computer vie an USB port. 2. Select the appropriate COM port (communication port) in the combo box at the top of the application window. If the combo box appears empty, it means that no port has been detected. In this case, please reconnect the device and wait for the COM ports to be updated, and then click on the drop-down menu to refresh the COM port list or restart the application. 3. Once the COM port is selected, click the “Connect” button on the right hand side of the combo box. When the device is connected, a confirmation message will appear in the activity log window at the bottom of the application window, and the port status at the top right corner of the window will change to “connected”: COM Port selection box Now you should see live feedback of the stick movement and other sensor values on the screen. 11 Applying Settings When the FlipMouse device is connected, the settings of the active slot can be applied to the device for testing by clicking “Apply settings”. Once the settings have been applied, you will receive a confirmation message in the activity log, and you will be able to use the FLipMouse with the new settings. Changing Settings and Features Cursor Movement Cursor movement is the default tab of the user interface. On this tab, you will be able to change the function of the FLipMouse stick, change the speed and deadzone of the FLipMouse, and calibrate the middle position. FLipMouse stick function By default, the FLipMouse stick is used like a joystick to induce cursor movements. However, stick movements can also be reassigned to other functions, such as pressing the key ‘A’ when the stick is pushed up. To continue using the FLipMouse stick for cursor movements, make sure “Use Stick for Cursor Movement” is selected, as in the image below. If you would like to assign alternative actions to the stick, please select the “Use Stick for Alternative Actions” option by clicking on the appropriate text or the circle on the left side of the text. Drag the thumbs of the scroll bars to change the speed and deadzone of the FLipMouse 12 Speed When using the stick for cursor movement, the cursor acceleration can be adjusted via the speed scroll bar. A smaller value results in slower acceleration, a larger value results in faster acceleration. To change the value, click and drag the scroll bar knob or click the bar next to the knob. You can also place the mouse cursor over the “+” or “-“ buttons next to each scroll bar so the scroll bar position will decrease or increase automatically (This works for all scroll bars of the FlipMouse Settings Manager). Deadzone The “deadzone” setting changes the sensitivity of the stick movements. When the deadzone value is low, very slight stick movements will already cause cursor movement (or execute the assigned alternative function in case “Use Stick for Alternative Actions” is selected). If the default sensitivity is too high and the cursor starts unintended drifting or alternative functions are triggered unintendedly, the deadzone value may be increased so that a greater stick movement will be necessary to cause movement / function triggering. Split horizontal and vertical Moving the cursor on the computer is possible both horizontally (left or right movements, also known as x axis) or vertically (up or down movements, also known as y axis). The speed- and deadzone values for horizontal or vertical movements can be changed individually. In order to do that, select “split X/Y”, as shown below: Checkbox for splitting x and y axis If you decide that splitting the horizontal and vertical movements is not necessary, simply unselect “split X/Y”, and the speed and deadzone scroll bars will go back to the default state. 13 Calibration of the stick’s middle position When using the stick for cursor movement, the cursor should stay in place when the stick is not touched. Sometimes the resting position of the stick may become inaccurate and cause unwanted cursor movements, even if the stick is not used. If the cursor starts drifting, the middle point should be calibrated by pressing the “Calibrate Middle Position” button. Once you click this button, try not to move or touch the FLipMouse stick, otherwise the calibration will be done incorrectly. When the button is clicked, the LEDs on the device will flash and the speaker will emit a low tone, indicating the start of the calibration. This will last for about 1 second - then the calibration sequence is accomplished. Calibration can also be assigned as an action in response to button pressing, sip/puff actions, or alternative FLipMouse stick actions, so that it can be performed on demand, while using the FLipMouse device. The Action Menus The Action menus provide different actions which can be assigned to desired user activities – for example to stick movements, sip/puff activity or external buttons. The actions can be selected via drop-down menus which are offered for all possible user activities detected by the FlipMouse: Click left/middle/right mouse buttons Creates mouse button clicks. (The left/right or middle mouse button is pressed and released again after short time). 14 Double click left mouse button Double clicking the left mouse button may be necessary in cases such as opening a file. However, producing a double click with the regular click mouse button function may not be convenient, so you may assign a double click to a desired user activity. Hold left/middle/right mouse buttons The hold action creates a continued pressing of a particular mouse button (for example, when dragging a file, continuously pressing the left mouse click is necessary). The mouse button is released when the assigned user activity stops (for example when the stick is moved back to middle position or the sip/puff activity ends). Wheel up/down The actions “Wheel up” or “Wheel down” emulate the mouse scroll wheel. The picture below displays an example of a scroll wheel. Triggering the “Wheel up” option results in upwards scrolling, while “wheel down” results in downward scrolling. Scroll wheel on a typical computer mouse; allows scrolling in both directions Mouse move X or Y Cursor movements on the computer screen occur in horizontal direction (X-axis) and vertical direction (Y-axis). The “Move mouse X” and “Move mouse Y” actions emulate computer mouse movements. When triggered a mouse movement in the selected direction starts. These two actions also offer a speed parameter to indicate how quick the cursor should move. The input field for the speed parameter appears once the mouse move action is selected: 15 Mouse movements are assigned for two actions Speed parameters for each of the mouse movement options. Press the upwards or downward arrows to increase or decrease the speed, or press on the number to type in the speed manually Write text The “Write text” action allows typing a particular text/phrase whenever a user activity occurs (for example: write “Hello” whenever you move the FLipMouse stick up). Selecting this action displays a blank text box under the drop-down menu where the text can be entered, as shown below: In this example, “Hello!” will be written each time the FlipMouse will be moved upwards 16 Pressing keys The “Press Keys” actions allows pressing and holding one or multiple keyboard keys. A second drop-down menu with possible key identifiers is displayed. When a key is selected from this menu, it will be added to the KeyCodes text field. If you would like to remove or change the assigned keys, you must clear the currently assigned keys by pressing the “X” button next to the KeyCodes field. This gray text field is read-only and is automatically filled when selecting a key combination from the drop down menu on the right This drop down menu includes all the possible key identifiers to be added to the KeyCodes field. If pressing multiple keys is the desired outcome, simply select the appropriate keys and they will be pressed simultaneously. Common key combinations include: KEY_CTRL + KEY_ALT + KEY_ DELETE KEY_CTRL + Z: triggers undo function KEY_CTRL + C: triggers copy function KEY_CTRL + V: triggers paste function 17 Calibrate middle position The action starts the calibration sequence for the middle position of the stick. Please refer to the description “Calibration of the stick’s middle position” on page 14. Load Slot by Name This action allows to switch to another slot by it’s name. The name can be specified in the text field. (This action is only relevant if you saved multiple FLipMouse setting configurations to memory slots as described on page 10.) The Leds indicate the slot number as described below. Load Next Slot This action switches to the next slot. After when the last slot is already reached, triggering this action will switch to the first slot. This action is only relevant if you saved multiple FLipMouse setting configurations to memory slots as described on page 10. When you switch the slot, the built in LED bulbs will change accordingly, showing the active slot. There are three built in LEDs (red, yellow-orange, green), which will display the binary number for the slot position of the configuration that you have selected. In other words, if you saved two configurations: Game settings and Mouse, game settings will be position 1 and Mouse will be position 2. The following are the configuration of the LEDs for each position number: Position 1 will be displayed as 1 shining bulb: Position 5 will be displayed as 2 shining bulbs: Position 2 will be displayed as 1 shining bulb: Position 3 will be displayed as 2 shining bulbs: Position 4 will be displayed as 1 shining bulb: Position 6 will be displayed as 2 shining bulbs: Position 7 will be displayed as 3 shining bulbs: Additionally to the LEDs, an acoustic signal will indicate the change of the slot. No Command If the action “No Command” is selected, no action will be assigned to the respective user activity. Switch cursor/alternative This allows allows switching between using the FLipMouse stick to perform cursor movements and using the stick for alternative assigned actions (see next chapter). 18 Using the Stick for Alternative Actions The “Alternative Actions” tab allows the assignment of specific actions to FLipMouse stick activities (moving the stick up / down / left / right). For using these alternative actions instead of mouse cursor movement, the option “Use stick for alternative actions” must be selected in the tab “Cursor Movement”. When using alternative actions, the stick behaves differently! According to the stick activities (up/down/left/right), there are four drop down menus from which you may choose an alternative action for each stick movement. By default, alternative actions for all four possible stick movements are preselected as cursor key presses. Press here to see more options! 19 Sip/Puff Actions and Levels When using the FLipMouse stick with the mouth, the user can trigger actions by sipping or puffing through the tube. The tube is connected to a pressure sensor, which outputs a value that corresponds to the detected pressure. When the user sips, the sensor value decreases, and when the user puffs the value increases. You may assign actions for sipping or puffing using the tab “Sip/Puff Actions”. You can select the thresholds for sipping and puffing as desired, using the tab “Sip/Puff Levels”. When the FLipMouse is connected, you can monitor the pressure values and the triggering of sip / puff actions in the graphical user interface: Observe pressure changes here (green bar increase/decrease) Use these scroll bars to adjust the threshold pressure for sip (left) or puff (right) Special- and Hold Mode via strong sip of puff To increase the functionality of the FlipMouse device especially for persons who cannot access external switches (which could be connected to the device via 2 jack plugs), the Special- and Hold modes are available. The Special Mode can be activated with a strong puff activity. It allows triggering 6 “special actions” using the standard activities up / down / left / right / sip or puff. Such a special action will only be triggered once, after the special mode was selected – then the mode switches back to normal. Entering the Special Mode is indicated via an acoustic signal (high tone). If no special action is triggered within a second, the mode is switched back to normal (indicated via a short high tone). 20 The Hold Mode can be activated via a strong sip activity. When activated, the next user activity will be held until another strong sip occurs. This can be useful for gaming, when one key should be pressed permanently while other keys should be pressed. Entering the Hold Mode is indicated via an acoustic signal (mid tone). If no hold action is triggered within a second, the mode is switched back to normal (indicated via a short mid tone). Sip and Puff Actions tab The actions assigned to the sip- and puff activities can be defined in the “Sip/Puff Actions” tab. This works in exactly the same manner as selecting alternative action for stick movements or button actions in the respective tabs – via the drop-down menus for the assigned actions: Select sipping and puffing actions here Buttons Actions The FLipMouse has one built-in button which is ready to use (referred as “Button 1” in the tab “Button Actions”), as well as two 3,5mm jack plugs where two external buttons may be connected (referred as “Button2” and “Button3”). These three buttons can trigger actions that may be assigned in the “Button Actions” tab. The selected action for Button1 can also be triggered via Special Mode + stick up movement. The selected actions for Button2 can also be triggered via Special Mode + stick left movement. The selected actions for Button3 can also be triggered via Special Mode + stick right movement. Special Mode + stick down movement can trigger a separate action which is not associated with a specific button. 21 View Force Levels The FLipMouse stick is attached to four force sensors – one for each movement direction (up, down, left, right). The numeric value of each of those sensors is displayed in the “Force Levels” tab. The live values can be monitored when the FlipMouse device is connected. Whenever the stick is moved, the sensor values change. Specifically, a movement in each direction increases the respective sensor value. The sensor values also depend on how tightly the device is assembled, therefore when assembling the FLipMouse, this tab can be used as guidance. When not touching the stick, the values should look similar to the following screenshot: (the gain values are currently experimental and should not be used) 22 Instructions for cleaning and maintenance If the mouthpiece is used to actuate the cursor movements via lip/mouth movements, a careful cleaning procedure is essential to avoid bacteria and health problems! Read this section carefully and apply the needed cleaning procedures whenever necessary. Exchanging the saliva filter: The saliva filter is placed inside the hygienic stick. Usually, no (or nearly no) saliva should enter the stick – but it strongly depends on the person using the mouthpiece and his/her condition. If saliva enters the hygienic stick, the saliva filters prevents the moisture entering the inner parts of the FlipMouse (respectively the pressure sensor). The filter can be replaces as follows: Removal of the saliva filter, using a normal screw to grab the filter The removed filter Inserting a new filter (pushing it back into the hygienic stick) Disinfection of the mouthpiece/hygienic stick: To disinfect a mouthpiece, use boiling water. Place the hygienic stick (without saliva filter) in boiling water for at least five minutes. Then let the hygienic stick dry before the next application. Ordering replacement sticks and filters: Saliva filters and hygienic sticks can be directly ordered from the Quadjoy online shop: https://quadjoy.com/shop. We would like to thank Bill and Debra Street for letting us use their Quadjoy hygienic stick together with our FlipMouse device – you guys are great !! 23 Contact Information The AsTeRICS Academy: Department of Embedded Systems University of Applied Sciences Technikum Wien Höchstädtplatz 6 A-1200 Wien AUSTRIA Webpage: http://www.asterics-academy.net Email: [email protected] Disclaimer The University of Applied Sciences Technikum Wien and the AsTeRICS Academy project team do not assume any warranty and liability for the functionality of the set of Assistive Technology and the correctness of the documents handed over. Additionally, the UAS TW is not liable for any damages to health due to the use of the Assistive Technology provided. The provided software applications and hardware modules are used at own risk ! Acknowledgement We want to thank Ilana Snitkovski for her support in creating this manual and implementing the FLipMouse Gui Application. The AsTeRICS Academy is partly funded by the City of Vienna, Municipal department of Economic Affairs, Labour and Statistics (MA 23). 24