1
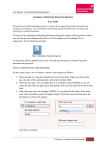
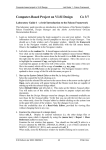
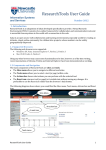
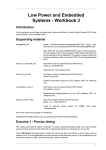
Standard Project in VLSI Design Lab Guide 1 - Falcon Framework Standard Project in VLSI Design SB1 Laboratory Guide 1 - a brief introduction to the Mentor Framework This laboratory guide provides an introduction to the features of the Mentor Graphics Design Framework and the Adobe Acrobat-based On-Line Documentation Browser. 1. Logging in Log in as instructed using the login assigned to you. Use the information in the Getting Started pamphlet to start up. 2. Start up Pyxis Project Manager Most of your design and development work will be done using a new integrated development environment for chip design called Pyxis. This allows for management of projects, capture of schematics and design layouts, and even basic simulations can be carried out within the Pyxis environment. Pyxis supports the notion of projects, that is, assemblies of linked data files all related to the same design project. The first time you start Pyxis you need to set up a project to contain the files you develop. Each designer should do this individually, though note that later in the project you will each have an opportunity to work on a different part of the project, with the results being merged into a joint final design. To start up Pyxis, first issue the source command to execute the startup script described in the Getting Started pamphlet. Once execution has completed you should find yourself in the cbt directory of the shared mentorxx workspace, in which projects you create will reside. Give the following command in the terminal window: dmgr_ic This will start up Pyxis in its Project Manager mode. 3. Explore Pyxis Project Manager When Pyxis Project Manager starts, you will be presented with a familiar form of graphical user interface with a menu bar at the top, one or more tool bars below, and a number of panes arranged to display information of various sorts. Most other Mentor tools present a similar interface; some have additional toolbars or palettes of commands to left and right. The topmost pane is the Project Navigator window. This displays projects and other structured hierarchical data related to them. Access is by ‘point and click’. The first time you start it up there should be no projects, as you have yet to create these. In fact, only ‘open’ projects are displayed in this space – see on for more information about open or closed projects. The left half of the pane displays the hierarchy of the design space, which will include projects and libraries; the right half shows the contents of these. Typically this is the list of design objects within a project or library. A design object could be anything from a single transistor to a multi-million gate digital block. This approach is useful for organising your designs as reusable blocks. D M Holburn May 2014 41 Mentor Pyxis v10.2 SB1lab1.doc Standard Project in VLSI Design Lab Guide 1 - Falcon Framework A Tools menu, accessed from the menu bar, allows you to call up a number of supporting tools without leaving the Project Manager GUI. It is possible to display these in a window of their own, but this is not normally necessary. At the bottom are Transcript and Message areas. The Transcript area holds the complete set of commands issued during the current session, presented in an internal script language form. The Message area receives diagnostic or warning messages. You generally will only need to refer to this window if you have difficulty starting up other programs in the Mentor Graphics package. Other windows may appear temporarily as you administer your projects and libraries. You can see more details in the User’s Manual for Pyxis Project Manager – see Accessing Mentor Documentation … later in this session. Feel free to explore the various menus available, although you should take care not to issue commands that will delete or change any pre-existing design data at this stage. 4. Create a project for your work Projects are Pyxis Project Manager’s solution for organising all data that is specifc to a design project, within a single directory hierarchy. The main components of a project are: Project, Technology Library, Library, and Cell. In addition, In addition, Pyxis supports the idea of an External Library which must be compatible with the Project, but resides outside it. The structure of the Project hierarchy is shown in the diagram below. Projects, Libraries and External Libraries must reside at the root of the hierarchy Dotted arrow-lines represent references; solid arrows indicate containment The External Library references a compatible Technology Library and may contain cells You may create as many projects as necessary within Pyxis. For this project, each designer should create one project, compatible with their co-designer’s, to allow for interoperability of design objects. D M Holburn May 2014 42 Mentor Pyxis v10.2 SB1lab1.doc Standard Project in VLSI Design Lab Guide 1 - Falcon Framework Once created, a project’s hierarchy can be kept open or closed. This is useful when there are multiple existing projects and you wish to view and work on just one at a time. It is possible to close a project by issuing the (menu bar) File > Close Hierarchy command, placing it in a dormant state and removing it from display in the Project Navigator window. However, such projects can easily be re-opened with the (menu bar) File > Open > Hierarchy command, and browsing to the directory where the project exists ($CBT_WD for this project). If you use a regular file browser, you will be able to explore how these files are organised. However, you should never use the file browser (or commands like cp, mv) to make changes to any of these files. Any changes should only be made from within Pyxis Project Manager, which will take care of any necessary dependencies. To create a new project for your work, follow the steps below, which are fairly intricate, but you should only need to do this once. Each designer should carry out these steps. Give the command: (menu bar) > File > New > Project … When the Create New Project dialogue opens, enter the prefix: $CBT_WD/[project-name] into the Project Path text box, followed immediately by a project name of your choosing – make it something that will be meaningful to you in the context of this project. For example: $CBT_WD/sb1-xyz99 on the assumption that one designer has the CRSid xyz99. In the Technology section, enter the following into the Library text box: $HK_C35 This is a soft prefix that references the AMS C35 Technology. Once you enter this, the lower part of the pane should populate with C35 process references. OK the dialogue box and wait a few seconds – this part of the process takes a little while, as it will create a new project directory and set up various configuration files that point to the selected AMS technology. In a few moments the Manage External/Logic Libraries should appear. The following steps are important to ensure your project will have access to standardcell and other libraries. If this part is not completed correctly you will have difficulty later. In the top row, click on the yellow folder icon. In the File Browser dialogue that opens up, enter the following prefix into the Look in: text box, clearing any other text if necessary: $AMS_DIR followed by Enter. This prefix points to the root of the required AMS library cells for this process. The file browser should now list a number of library folders under this prefix. Double-click on lib, which should open up to show a list of files of type: mgc_ext_lib or mgc_logic_lib. All are needed for this project (though some will not be required until later). D M Holburn May 2014 43 Mentor Pyxis v10.2 SB1lab1.doc Standard Project in VLSI Design Lab Guide 1 - Falcon Framework Select the first entry, ANALOGLIB, and OK the dialog. The top row should populate with details of the newly-imported ANALOGLIB library, in black. If you make a mistake, you can click on the faulty entry and click on Remove Selected, then resume. Otherwise, if the text appears in red, something has gone wrong, and you should ask a demonstrator. Assuming all is well, a second row will open up. Click on its yellow folder icon, and repeat the process just carried out, for CORELIB, ESDLIB, GATES, IOLIB5_4M and IOLIB_ANA_4M. On each subsequent occasion, the file browser should open at the correct directory, simplifying this operation. Once this has been completed you should have six external library entries in the Manage External/Logic Libraries dialogue box. There is one further step. Click on the button: Add Standard Libraries. This loads a number of generic libraries supplied by Mentor Graphics, needed for schematic entry, simulation, and other activities. Five further libraries should appear. Assuming all has gone well, OK the Manage External/Logic Libraries dialogue. Your project should now be visible in the Project Navigator pane. View the hierarchy by clicking on the ‘+’ sign of any of the items, and note what appears in the right-hand part of the pane. 5. Understanding libraries Pyxis Project Manager allows you to organise the elements of your design in a logical way in collections called libraries. In effect, these are customised directories stored hierarchically within your workspace. Pyxis Project Manager presents a graphical representation of these to assist you in accessing the data within. You can see additional details in the User’s Manual for Pyxis Project Manager – see Accessing Mentor Documentation … later in this session. If you use a regular file browser, you will be able to explore how these files are organised. However, you should never use the file browser (or commands like cp, mv) to make changes to any of these files. Any changes should only be made from within Pyxis Project Manager, which will take care of any necessary dependencies. Pyxis does not provide access level protection itself and depends on the underlying file system to provide it. Only one designer can work on a given entity at any one time. So care needs to be taken if you choose to work on a shared library. 6. Using libraries In order to work together as a team, it may be useful to work on each part of your project individually, while still having access to each partner's work. A good way to facilitate this is to create your projects in different libraries and share your libraries with each other. Each user may create local libraries with unique names, and each partner user maps the other's libraries into their own project space. You may need to take a few minutes to plan out how you will be organising your work. D M Holburn May 2014 44 Mentor Pyxis v10.2 SB1lab1.doc Standard Project in VLSI Design Lab Guide 1 - Falcon Framework 7. Creating a custom library You can create a library within your own project to help organise your design objects. Note that it should be possible to agree with your partner/co-designer the name of a common shared library. For the purpose of this handout, for future reference, we will just call any such library the Shared-Library. To do this, highlight the project you created in step 4, by clicking it once in the Pyxis Project Navigator window. Note: if you do not carry out this step, you will only be able to create an External Library. Give the command (menu bar) > File > New > Library, and enter the library name; OK the dialogue box. Nothing further is required, as the new library will inherit references to the AMS technology from the project. Click OK to create the library. An internal library will appear in the Navigator pane as a plain yellow folder with an ‘L’ superposed. Although it is in theory possible to rename a library any time, this is not generally advisable, as any change of name mid-design may mean that dependencies may need to be resolved, one by one. It is best to select a name and stick to it throughout your project. Your name should also be unique. 8. Accessing an external custom library External Libraries are Pyxis Project Manager’s solution for organising re-usable design data so it can be imported into one of more projects. An External Library must reference a Technology Library. Its contents can be used only in projects that reference the same Technology Library. You are unlikely to need to create an External Library for this project, though ths can easily be done if necessary. Details are available in the CamTools VLSI Design 2014 Wiki. A certain amount of pre-existing data will be made available to designers through the medium of an External Library, sb1_nor2_lib, which has been set up with the $HK_C35 technology. An external library will appear outside the project hierarchy as a grey folder with an arrow superposed. With Pyxis Project Navigator, navigate to the sb1_nor2_lib object, and clikc on its ‘+’ sign to view the contents. This external library contains schematic, layout and symbol objects which you will need in a later session. 9. Cut/Copy/Paste/Delete It is possible to move designs around by using the Cut/Copy/Paste/Delete commands. It is possible to perform these operations on libraries, groups, cells and views. Try this out by copying an existing technology library cell into your custom library. Care should be taken when deleting any part of your design, as it is not normally recoverable. D M Holburn May 2014 45 Mentor Pyxis v10.2 SB1lab1.doc Standard Project in VLSI Design Lab Guide 1 - Falcon Framework 10. Access Mentor documentation using Acrobat or a browser We intend that the majority of the information you will need for this project can be found in this Project Guide. However, there may be occasions when you need to consult the official documentation for the packages. Mentor documentation is held in two different forms to suit different requirement: Adobe PDF, and html. Instructions are given for both, and both are likely to be useful in this project. To open the html documentation, select the item: (menu bar) Help > Open User’s Manual or alternatively (menu bar) Help > Open Reference Manual to start up the default browser, normally Firefox, at the cover page of the compilation. A pane at left allows navigation from chapter to chapter, and tabs in that pane give access to an alphabetical index, and to a ‘search this document’ feature. An Acrobat icon at top right allows you to select the Acrobat version of the reference, normally by download to your own workspace; the Acrobat utility can then be used to view the document. Another button gives details of other related manuals that can be accessed. Sometimes it may be more convenient to browse PDF manuals outside the Pyxis environment and even away from the workstation. Although printed copies of the manuals are not available (they extend to many tens of thousands of pages), most of the key manuals can be accessed on a computer within the University by means of a web browser. Please note that it is a condition of our End-User Agreement with Europractice, Mentor Graphics and Austriamicrosystems that we may not distribute this documentation except to those involved in these projects, and copies may not be made. 11. Accessing AMS 0.35m CMOS process documentation A copy of parts of the original AMS documentation for the 0.35m process, cell library and other features is available locally, in PDF form, via CamTools. The CamTools worksite for this project is described in step 12, so you may prefer to carry out this investigation as part of that step. To access the documentationt, start up a suitable web browser and use it to access CamTools (see step 12) and open up VLSI Design 2014 Worksite. In the menu at left, click on Project Documents. Scroll to the section: Mentor and AMS User Manuals and Reference Guides. The AMS 0.35 μm CMOS Digital Standard Cell Databook describes the characteristics of the digital cells, from inverters to complex logic systems, available in the AMS C35 library. It is a useful reference for as designer planning to use AMS library cells in a design. This may be useful in Labs 3, 4, 7 and 8. The AMS C35 0.35 μm CMOS Design Rules reference describes the physical and electrical design rules that apply to designs for manufacture by AMS. Although design-rule checking is undertaken by the design tools themselves, correcting any violations inevitable requires that the designer should understand the way the rules are meant to apply. This may be useful in Lab 5. D M Holburn May 2014 46 Mentor Pyxis v10.2 SB1lab1.doc Standard Project in VLSI Design Lab Guide 1 - Falcon Framework 12. A quick tour of the CamTools worksite There is a dedicated CamTools Project Worksite in support of this project. This is accessible 24/7 from any workstation or networked PC with a suitable browser. It is open to all participants, demonstrators and staff, and offers a convenient way of sharing information among participants, including outside the timetabled sessions. We strongly recommend that while engaged in the project you should get into the habit of checking the Worksite on a regular basis, since it will be used routinely for speedy distribution of information e.g. reminders about deadlines, minor amendments to the lab sheets, etc. Start up the Mozilla Firefox application during your session so you can monitor it. This is especially important outside scheduled periods, when the demonstrators will not be available This procedure guides you through a quick tour of the main features of the worksite. Start a suitable web browser; for the Teaching System this will be Mozilla Firefox, and navigate to the CamTools entry point: https://camtools.cam.ac.uk/ You will be asked to login with your Raven ID and password. On your Startpage you should see (in the My Course and Projects pane) an entry: VLSI Design Project 2014. Click on the link and you should be taken to the Worksite Home Page. At the head of the page, below the heading, is a short count-down message indicating how much time remains to the next key deadline e.g. start of project, hand-in of next report, etc. This is updated each time you visit the home page. The menu in the leftmost column contains links to the main features of the worksite. There is a summary table of the most important of these at the end of this section. All sections are accessed by clicking the links in the left-most column. We recommend you briefly visit them all, to get some familiarity with the service they provide. You are also welcome to visit the additional links not mentioned below. First visit the Project Documents link. Here are held electronic copies of the Project Guide, as a single PDF, and section by section. If it becomes necessary to update any of the Lab Guides, they will be published here as individual documents. The complete guide will not be updated. Further down, you can find links to the most important manuals in PDF form for the Mentor Graphics tools in use for this project. Access to these does n ot depend on you being logged in at the Mentor server, clae01. The links are to a site which allows access from workstations in the .cam domain – note that the CamTools site itself may be viewed from anywhere. This is necessary because of restrictions imposed by the companies concerned. Now click on Announcements. These fulfil the same function as on any CamTools site. If there are any high-priority announcements, you should also receive details to your personal email account (note that this may depend on your D M Holburn May 2014 47 Mentor Pyxis v10.2 SB1lab1.doc Standard Project in VLSI Design Lab Guide 1 - Falcon Framework own CamTools setting, which you can control from the Personal Tools page in CamTools). Now click on Discussion. The Discussion Forum is divided into a number of relevant sessions, roughly mapped on to the various sections of the Project. If you have difficulties when undertaking this project, particularly if they occur outside the scheduled periods, we strongly recommend you post a question (with as much information as possible about the specific problem). The message will be seen by all users and demonstrators, and there is a far greater probability that someone will come up with a helpful suggestion than if you were to try email. Before posting a message, scan the existing posts and the Wiki – see below. Someone may already have encountered the same problem and may have posted a solution. Members of the project are welcome to use the Chat Room for live exchanges, particularly out of hours. The demonstrators and others monitor the Chat Room, and will be able to chip in if they can help, or (we hope this will not be necessary) if there is evidence of misuse. The Wiki is organised in the form of an FAQ, and currently has about 40 entries. A few may need update as there have been radical changes to the project this year. You are welcome to contribute amendments or updates yourself if you become aware of an error or of a better solution to a problem. The SB1 Signup feature lists all the available slots that can be booked for the accompanying experimental activity (investigating the electrical characteristics of a ring oscillator) which occurs in weeks 2 and 3 of the project, during normal scheduled sessions. We can accommodate a maximum of 6 students per 2 hour session, so about three two hour sessions will be needed. The signup tool gives you the opportunity to pick a time when there is a natural break in your design work. You work in pairs for the experimental activity. Reminder: if you run into problems outside the scheduled sessions, please post details of the difficulty to the CamTools Forum. This is monitored by all the demonstrators on a regular basis, and while we cannot guarantee turn-around on solutions for problems reported in this way, we will always do our best. This concludes our preliminary investigation of Pyxis and the Mentor environment. D M Holburn May 2014 48 Mentor Pyxis v10.2 SB1lab1.doc Standard Project in VLSI Design Lab Guide 1 - Falcon Framework Camtools Worksite Summary Table Please remember you are welcome to access the Worksite from your own account at any time and from anywhere you have web access. The URL is as follows: Worksite: https://camtools.cam.ac.uk/ Home Project Documents Schedule Announcements Discussion Chat Room Wiki Email Archive SB1 Lab Signup D M Holburn May 2014 Title: VLSI Design 2014 The Home Page; description of project and worksite; actively updated key dates Links to PDF copies of the Project Guide, Manuals for Mentor tools, AMS references, other reference material A calendar listing scheduled sessions in the DPO, availability sessions for the linked activity in EIETL, and report deadlines Information about updates, amendments to documents, scheduling, etc The VLSI Design 2014 Forum. This is where you should post any questions or comments on difficulties you may be having, so all demonstrators and users have the benefit. Live chat with live IC designers ;-) This is organised as an FAQ, and is updated and extended regularly For announcements sent out to users by email Sign-up facility for the experimental activity in EIETL 49 Mentor Pyxis v10.2 SB1lab1.doc Standard Project in VLSI Design D M Holburn May 2014 Lab Guide 1 - Falcon Framework 50 Mentor Pyxis v10.2 SB1lab1.doc