1
User's Manual
Before operation, please oarefully read the instuction manual
Androld4.I .l
IN CAR MULTTMEIIIA&EPs sYsTElvI
@@H@@@rq@@
CATATOTU!
1. Qulck Review
Warnlng: Before uslng this device, please read thc manual
ffhtl ffil Ef
l6f6rmall,,rr
1.1 Turnlng On and Turnlng Off
When you plug in the car keyt, rwltgh On
car's ACC power, the device wlll
displaying the boot animatlon
When you take off the key, swltch to ACC OFF, et tUtn gff thf
car's ACC power, the device will automttlotlly bllhUt aeWfr,
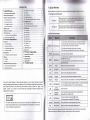
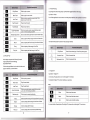
1.2 Panrl Functlon Button
ln the offstate, press this button short, the system is turnod on,
@. ln the boot state, press this button short, the system becomos
mute; press this button, the system is shutdown
O.
PWR/VOL
Power/Volume
this button clockwise, the volume is increased
0) Turn thls button counterclockwise, the volume is decreased.
G) Turn
HOM:
Mrln lntrrfror
Cllok to cnter lnto maln lnterfaoe.
o), ln aaoh lunctlon,
MENU
Mrln Mrnu
ouloklv
Cllsk to brok to
th. lr.t lnt.rfro.,
NAVI
N!vl0rtlon
Cllck to cnttr lnto GPS navlgatlon lnterface.
DVD
DVD Play
Cllck to enter lnto dlek play lnterface.
PHONE
PHONE
Cllck to enter lnto BluEtooth telephone lnterface.
RADIO
RADIO
Click to enter into radio interface for receiving FM1/FM2/AM radio
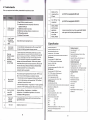
TUNE
Compound
ln/Out
Disc Button
USB
laser, indicating that the device uses theweakest level of laScr baem, and thore is
no risk of radiation outside the unit.
lunollon
Brok
SD
This mark indicates that the product used a label whlch le claralfled CLASSl
r.l
BACK
The use of certain features of these devices depends on your network service provider's
network settings and performance. ln addition, due to the different network service providers,
some certain functions of this device may not be able to apply or restrict to apply. And
please contact your network service provider for consulting the network functions and
availability of this device
.xt.nd.d manlpulatlon of lnformatlon, press
th. MENU k.y to pop upi
O, ln tha maln lnlattto., pra.. lh. MENU kcy for th. rystem to
RESET
Mtc
SD Medla
Card slot
O. in the audio and video playback interface, up / down one playe
@. ln the radio interface up / move down frequency
disk in and out
lnsert the appropriate memory card ,multimedia file
slotsystem can read the card
USB Sockat
O.Connect other devices by USB socket.
(D.Connectino an external WlFl/3G donole
Reset Button
Cllok reeet button to reset syetem and re-start.
Mlcrophonc
Rccclva volce from bluetooth tslephon€ call.
Remark: All long prttr marna praa! llmo at lcalt lartlng 3 8oconds; Button and socket is
different accordlng to dlffarant oar typcr, plcelc tako real type ae standard.
w
t
1.3 Tips
for Using Touch Screen
When using the touch screen, you can use sov6rnl wdyri l() porform corresponding
operations on the device.
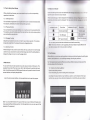
1.5 Statue bar lndlcator
;
ts"
t,','=,.,il.,,i,tlrl
Itt[r€rclsrrowrnossage,itwill bedisplayedonthestatuchEr,rllr]eyrutfi,rgsrgErtryrr!,,trlr!,
rrlrrltts hur, lrll lrornpts would be displayed. Then you coul(l (ili(ih llte tttetaagc slrl ..r,'u. llr,.
1.3.1 Clicking Eunction
You could select an application icon or optlon orr llro sr:roerr to realize clicking function.
For example, click Bluetooth to enter into bluntoolh npplication.
'1
lr:onsonthololttopofthescreenarenotificationsformsriagcaBttd_EyEfrlF
top of tho $(;r(,on irro device status indicator.
ilon
tonl.
.3.2 Pressing Function
I
tt rl
m
you could perform some function
F
Drag the touch screen or pr€ss the scroll bar for up and down operation. For example,
browse the contact list of the bluetooth phones by dragging function.
M
Network signal strength
[)errit lpllrrtt
Nttlwrrrh.ltJl6l
USB r;orrrrer;llorr
E
1.3. 3 Dragging Function
lndicators on tho riUhl
ir:n torB II
You could press the current user intorfaco, lr;urr, lrrputting column by pressing function.
For example, press on the blank aroa of tho ntnln lntorface, then comes a pop-up menu,
Current Tlnro lrtdir:nllorr
WlFl signal indicator
llp: You can tap and hold the status indication bar to view the current day.
Note: Tho (lovl(:o software is under upgrading, the status indicator may be different with
yurrr tlovlr:n; plorrso rofor to the actual device software.
1.3.4 Zooming Function
When browsing the web, click the screen twice, then you could zoom in or out the page
content. Or you could press the screen with two fingers by control the sliding distance
between the fingers to zoom in or out the page content.
t,0
lrrl
Errlarlrrg
Whctr erlll lorl, ylri r,nlrltl usn oxlBllng ttrolllotl of otrtorlng ancJ Android keyboard to edit English,
rrrrrrrlrerr, arrtl lynrlrola alr: , rur:h na erlilirrg rn.lBrn{lo, nonrchlng; koy words etc.
ll;r
1.4 Main Screen
You can use the touch screen operation to use the various functions ofthe device. This
equipment has a total of five main screen, left or right sliding can be switched with each
other. Any interface press the HOME physical buttons on the panel to return to the main
(I 'l Swllr;lr
llrn I nlnrlnll Mollrorl
orlllltrll lnlorlrrt:tr
(lllr;k lrr tiro orlltlrrly rrron, thon tho odltlng monu would appoar.
1
orr
Oglotr tlro ltrxt
screen interface, and display the application
Ar;r;ording to tho input nlothod, input method you want to use the midpoint of the input
rrrothod monu, you can choose the Android keyboard or install third-party input method.
icon in the main screen interface, click any application icon to open the program.
Note: You can add the freedom of the space of the main screen or Remove Programs icon
to see equipment Basic Settings section. Click the application icon; you can view all of the
programs of the equipment.
lltorllalrlayftrttttalwrrrrlrl lrarllflorerrtar:corrllrrlltorliffcrorrlstntusandkeyboardofthe
nrrtorlrrg, pleaec roler lho aclrralorre
i
*
J
w
U
1.6.2 Android Keyboard Input
Switch the input method intoAndroid keyboarrl (aon riwilr;lr trrlrut method)
Remark:
'1
. You can click the number sign key
2.Click
XI
E,o
ewilr:lr lo trrrrrrbe rs and symbols input mode.
to switch letter case.
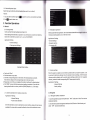
2. Function Operations
2.1 General
2.1.1SteeringWheel
2.
Users could set the steering whool a(:(rordin0 to hlnt.
il
*
> General Settings
> Steering wheel Settings
.3 Navigation application
Select appropriate map application, then it can beassociated with the navlgallon httllott ott
the physical andnavigation icon on the main screen-
Note: Steering wheel interfaco ls spor:lrrl for cars with buttons, but some cars' steering
button are not able for study but by "can", such as Ford MONDEO
Application >Setting
1
Applications> Settings
> General Settings
> Navigation options
, For example: GO
Steering Wheel lnterface
2.1
a. First to click "Start"
b. Click the buttons as you want.
c. Click the corresponding button on the wheel, if the study displays successful,
there will be a change on the corresponding color on the main screen.
d. Repeat step 1 and 2 till you complete allthe buttons'setting on the steering wheel.
e. Click "END" to ensure that the steering wheel setting is completed. lf you want the
steering wheel button to re-learn, press the [CLEAR] Repeat a, b, c, three steps
2.1 .2 Screen
Calibration (For resistive screen only)
When the system is unable to work orthere is problems after user used the system, it can
be restored to the factory settings. Once it's restored to factory settings, all the third-party
software would be deleted, and the current system settings would be lost. For navigation
software, justneed to install corresponding APK. Please operate carefully.
Applications> Settings
> General Settings
>
factory settings
2.2 Navigation
2.2.1 Navigation Software lnstallation
Applications> Settings
> General Settings
> Touch screen
.4factoty settings
calibration
Enterthe calibration screen to calibrate the screen interface, please click as close as
possible to the cross until a successful calibration, then exit the calibration screen.
"APK" to SD card or U disk, There are two
1 . Copythe application program with suffix name
installation methods:
(D.Cticf into the document management interface to find SD card or U disk directory and
select "APK" and click installdirectly.
il
Aftor successful installation required to choora yflu hEed !s u.c fhe nErru=t,.,'. ..r'i,li, J!ll,)rr
rr'!: rrrilrrl
t)rogram, association panel on navigation phyrlaal h:yc llAVl epg lnlElia'F ;,r
navigation application icon ( see 2.2.4navigallon opllonr )
2.
Applications> File Management lnterface
> Expansion card or U disk
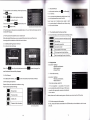
2,3 Radlo
File Management lnterface
@. Extra lnterface->Applicatlon Program->lnstall
Application Program
Select the application program wlth suffix named "ApK"
and install.
!:
t
t
2 3,1 RADrO
Pross the RADIO button on panel or click the icon on
tho maln menu to enterthe radio interface, the specific
functions and operations are as follows:
Radlo lnterface
The functions of lcons in the radio interface are described
below:
Click BAND to switch between mode FM1/FM2lAM.
Application Program lnterface
Application > Settings
> Applications
> Application Program lnstallation
Scan all Channels
Note: Please copy the navigation map software to the system storage memory first, and then
install the navigation
APK. Steps are as follows:
e.
Locate and DX
Change between locate and DX models,
Audio settings
Click enter the EQ setup
list of radio stations
List of radio stations, according to the storage for
the playing frequency Point
Forward tuning
Forward tuning radio
Insert navigation data packets to the SD card or a U disc
@.Start the ES file browser ( or other document management software )
@. Enter the" /sdcard/Favorites/mnt/usb/mmcblklpl"( SD) or" Favorites / mnt/usb/mmcblklpl',
( U-disk) directory, find the navigation packet directory ( forexample:APK (3rd party application)),
long press the directory and select "Copy" in pop-up menu
@. Go back to the "/sdcard/" directory, choose the paste command
@.Waiting for the copy is complete (30 minutes approximately /3.5G )
g
E
r
Click to search channel backwards then stopwhen find
clear channel
Click to search channel forwards then stop whenflnd
strong and clear channel.
Scan automatically and save channols(Coupled wlth a
scanning radio signals broadcast for 10 seconds, no
signal of the radio scan play 3 seconds)
Backward tuning radio
Main Menu
Click to back to main menu.
Click to go back to last interface.
Automatically search
Search and save band automatically.
il
2.3.2 RDS
Radio interface with RDS lcon details as below
TrafficAnnounc emen
Alternative
Frequencies
Cllck TA Eynrhol l() llulrl ut), it can source automotive the
statlon wlllrlr {;ail brrrr(10;rrit traffic information, the system
wlll Eource o[r]E tsvnry rrrlrrute, it will stop to display traffic
mattGr wh€il wE UFI lllo rrows; and it will directly go back to the
sltuallon allor lrelllr; lnlormation displays.
,
Clle k Al' eymhol to ll0ht up
RDS can swift to the station which
heB Btrong€r HiUnril wlton tho frequency is weak, but the content
Choose the Bluetooth device name on the search ferulla
Cllck lt I
Y ayrnlrol to
llght up , RDS radio display type When the
rocolvod llDS slntlon, the corresponding PTY information is
Hu
torn{rtlo{rlly
d
I
I pl ayod.
l€ mtlch gglttErir.,. !!
automaticallyaftertheconnectionissuccessfulJumplolhEfnelBhlEElttl,enrtlhe,e*rrr
llluetooth icon besides the successful connected Blu6loolh d€vlrrE!
Note: The following operations are performed in the Blu€loolh FalflfiH
rrrrder the conditions of operation.
EUtstsEEE
2.4.3 Bluetooth Phone Book
ln the Bluetooth interface, click
to enter the Bluetooth Address book lnlq,lEr;e
And follow
download the phone book
thep
l!
Cllck REG symbol, it will only search the RDS stations with the
Regional Link
samo national area code (Pl 8-bit representation of the high
country area code) of the current RDS station. lf REG is not
highlighted, you can search RDS station while ignoring the
area code (excluded the high 8-bit Pl code )
2.4 Bluetooth Wireless Gonnection
You could create a wireless connection between a mobile phone and this device for data exchange,
Note: C.There may be plohibition or restriction for Bluetooth devices, please abide by local laws,
@.ln order to ensu re bluetooih security by the greatesi degree, you should in safe and non-pu bllc
place when connecting a bluetooth device.
A list of
dial-up operation when long names and numbers are used to scroll the dlsplay
Bluetooth Phone Book lnterface
2.4.1 staftup bluetooth application
Under the default status, the bluetooth would be turned
on when the power is connected. Panel"PHONE" key
Download the phone book Again after the download is compl6to, cllck tho
phone is the search function
toquickly enterthe Bluetooth interface;
Download Mobile phone SIM card phone book Again after tho download is
complete, click the phone is the search function
2.4.2 Bluetoolh pairing
mobile phone book
The whole information of the Bluetooth interface, the mobile search auto-complete matching
(the default passkey: 0000) Matching refers to the mutual recognition process of two Bluetooth
devices for the first communication. After the first connection, the subsequent communication
Delete all phone book imported
connection will automatically pair and not have to pair every time. ( depending on mobile
phones).
2,4.4 Phone
2.4.41fo achieve the dialing function via Bluetooth
ln the Bluetooth interface, cticf
@
.rtll
I'r..r
6rirl , ,,r'r,,,,
-
of RDS clatlotr wlll not change,.lust move to the other f requency.
Moanwhlle lt only r;nrr source RDS station.
Program Type
gel lrlHlherlalureltt,ely..+ ri,..r,irrlr
-a.,rrr wrll
rnode and this machine is searching for Blueloolh tlFvlr,EE aafcqng FtEas
E
;riltomatically terminate the search state.
nru.rpinBluetoothpairinginterface, ltwlll
to enter into the Bluetooth Dial interface.
I
il
.'
O. Ctict numbers on the interface, if the input la wrong,
ctict
ptto
@.clict<
cricr<{
Music lnterface.
to end up the call.
p
pl,rying music player for bluetooth music when using
lrlrrctooth music function.
rtllrt" for MlC.
Bluetooth phone Dial Records lnterfac€
EUerasltr lluatE lfllcf leFE
G).Function keys on the panel are unavallablo whon in the call; the function keys return to
normal after hang up.
.' 4
7
f
@
@
@
@
When the mobile When phone ls connocted wlth Bluetooth device and there is an
incoming call, the interface is divlded into two situations
Application lnterface
@. ln other function interfaces
@ .ln the Bluetooth
the call is pickupthe phone,
The head unit name when searching on phones
Pair settings
Automatic connection
Automatic answer
rr
E
?.5 3G
fl
he whole Bluetooth hardware settings
ln Uluetooth interface, enter the Bluetooth settings screen.
2.4.4.2fo achieve the called functlon vla Bluotooth
t,tot"' cti"t
into Bluetoolh
Note: Some kind of mobile phones need to start
switch to lhe grlrorrr:
ff,
I
Wlrcn connected with bluetooth mobile phone, it can
(,l)()rate play/pause/down music function.
after entering phone number;
@.Are on a call, press tne
call, press
Bluetooth Music
ln lhe Bluetooth interface, click
detete
!fl
,1 6
and.ri"r.p
Click to back to main menu.
Click to go back to last interface
Back to matching the main interface
Application
Alrplications> Settings
> Wireless and Network
> Mobile network
meansto hang up, the
>
small window will a utomatically d isappear
Access Points
,'.5.1 Allow data roaming
2.4.5 Call Record
A
ln the Bluetooth interface, click
I
to enter into bluetooth call history interface.
>
I Click data roaming, select OK.
' lf the recognition is successful, the access
Remark: When the names and numbers are long,
they would be displayed rollingly.
r
Wireless and Network
> Mobile network
Click for doing dial operation.
I
rlil
grplications> Settings
would automatically identify the type of 3G device
trr populate the appropriate access automatically,
Missed calls
,r:; shown below:
I
Received calls
please confirm data roaming open, otherwise you cannot use the 3G funcllon
Dialed calls
Delete all call information
Call recording interface
2 5.2 Set the access point information
tJse 3G, please 3G module connected to the USB interface, and available to confirm insert
rr 3G card.
WMW
ffiEW
ruKW
a.
b. Sel6ct th6
Enter the system mai n interface,
"lirlllil0h" li) onlor the
maln lnl6rldre
d. Select Mobile networks ". ontor
the mobile network s6lllngs 0F
themain interface,
o.First mako sure the " Data roaming
is seloctod, if you havo no choice,
point the" Data roaming "pop-up
prompt menu, select" Ok
g.Set the Access Point Names ", enter
the name of the network access
point settinqs to the main interface.
Jrt=
=*?#*"":l#[i;:#""",
h. Press the "Menu" button on the
machine panel, pop-up menu option.
supplier,
enter
to ihe network selection screen.
I'r,,:is lhe "Menu" button on the machine
pop-up menu option.
t,.ur()1,
m. Select "Save" to save the selltnUr
content, and return to the mHlI
interface of Apn settings
I WlrFlr lhE lblldrrfl! ri!itsr.a . ,
InFIF BrrE lhel At€i I rE
llrrllr6 lr, !ElItn lE llrF xrair i,,lE,r-r
rsl,Eal I l6€lEF.
,, ln theApn the main interface, selectNewAPN network behind thecircle,
so that it is selected can
l)
Back to the main interface, the3G network has opened, the search to the
3G signal, can use3G network.
f. Results shown in Figure 7. Choose
the successful:
l. Select "NewAPN" new "APN" into
the "APN" to set the main interfac6
rc M
K. Select "APN", enter "the Apn access
name in the Chinese mainland of China
Unicom's 3G theAPN settings for:" 39net
"in Hong Kong, lvlacao and Taiwan and
foreign, should be consulted local 3G
network
c. Select "Wireless networks", access
2.6 Multimedia
., 6.1 Equalizer
Agrplications > Equalizer
,,ti,,t
equalizer application icon into the equalizer interface. Or clickto entor lnto EO
!{
ri()tup operation in all audio or video playing interface. Equalizer settings intorfa<:o ls rllvlrlorl
rnlo two functions: namely, equalizer and sound field settings function.
Equalizer settings interface
Balance Setup lntorftr(:o
,lntheequalizersettingsinterfaceprovides8kindsof audioplaybackmodechooso:
Nr>te: ln the Normal mode, users can customize effects model through the effect ad.just0r
'lnafieldsettinginterfacetheusercanfreelyadjustthebassandloudnessof thocontrast,
the
llr{) user can also on the front left, front right, left, right
afterthe four angularly audio sottings,
Balance Setup
Note: the subwoofer adjustment is only effective when it is linked to external 5.1 amp.
correspondingAPN value.
.r:; shown below:
12
2.6.2 DVD Play
2.6.3 CD Player
lnsert the DVD disk the system will automatically enter
the DVD interface and read the disk lnformatlon
automatically when a disk is detected and thEn start to
OD interface, when a disc is detected, it will automatlcally
read the disc information and start normal play.
play normally.
lrrsert a CD disc, the system will automatically entar lha
Function details as below:
tr
E
E
E
@
E
Function details as below:
Play/Pause
Wh€n playlng, click it to pause.
Whsn pause, cllck it to continue playing.
Next Track
Cllck to play the next track or next chapter.
Last Track
Click to play the last track or next chapter
Fast forward
Click to fast forward increasingly as by 2X I 4X I 8X I 20X
DVS:Clicktofastforward increasingly as by 2X / 4X i 8X I 16X I 32X
Fast Backward
Clickto fast rewind increasingly as by 2X I 4Xl gxl20X
DVS:Click to fast rewind increasinqly as by 2X / 4X / 8X I 16X l32X
Extended function
Used to eject the expansion function
Title
Click to show title (need disk support)
Cycle Play Mode
Click to set up playback mode, DVD: Chapter cycle /heading
cycle / full catalog circulation / cycle cancellation; VCD : single
cycle / all cycle / cycle cancellation.
Random play mode
Options for ON and OFF, ON, switch on the next song, random play
Channel Switch
Subtitle
EQ Setup
Main lnterface
Back
tr
E
E
rr
E
r
Click to switch in different languages and audiotracks
(need disk support).
Play/Pause
Click to play or pause
Next Track
At one time to play the next song, press down
roll list for tracks
Cycle Play Mode
Random playb mode
Click to set up playback mode
Click to set the random playback mode
Last Track
Click to play the last track or next chapter.
EQ Setup
Click to enter into EQ setup lnt€rface.
Main Menu
Back
Click to go back to maln menu.
Click to go back to the last lnterface.
2.6.4 iPod Play
Click to switch subtitle display(need disk support)
Application> iPod
Click to enter into EQ setup interface.
(
)lick the iPod application icon to enter into the iPod play interface, just as shown below,
Click to back to main interface
Click to back to the last interface.
iPod Play lntorface
2.6.6 Video Playing
E
rr
rr
E
Play/Pause
@
@
Su
Click to play the next track.
Last Track
Cllck one tlm€ to replay the current track; Click
twlc€ to play the last track.
Fast Forward
PreBs to fast forward.
Fast Rewind
PrgBB to
g form of the video
player: mp4 I avilw mv l3gp/flvhaf/mOv/mky/mpg
Press Video application icon to enter into video playin
Artist
Click to play the iPod's song in the form of an artist
Album
Click to display the iPod's song in the form of album.
ph6l6 t€f et6mfrl€
Click to display all the songs in the iPod.
Click to display the listed songs in the iPod.
Press Pause when play / Press Play when pause
Click to forwards fast
Backwards Fast
Audio player supports the following formats:
mp3 I aaclflaclwav/amr/m4alogg
>M
a
The detail of the button function of video playing interface
2.6.5 Audio Play
Application
lntcrttoe, lllta
Cllck to set up play modes: sequential play,single
cvcl€, the whole cataloq circulation.
Click to start random play mode or cancel random play
Play List
n
fast rewind.
Random play mod€
Song
pporti
Application >Video
Next Track
Cycle Play Mode
E
Click to play or pause.
Click to backwards fast
usic
Click music application icon to enter into the music
player interface, as shown below:
Artist lnterface
2 6.7 Digital TV
Application > Digital TV
Click to play or pause.
Next Track
Click analog TV application icon into the digital TV interface
The details of digital TV function interface are as below.
Play the next track.
Note
:
Play the last track.
Cycle Play Mode
Click to set up play mode: sequential play,single
cycle, the whole catalog circulation
Click to back into menu
Click to start or cancel random play.
Click to back into last content
Click to play all the song as if to be performed by an artist.
Click to display all the songs in the form of album.
Click to enter into EQ interface
For more details of description of the digital TV, please refer to the digital TV instruction
Click to display all the songs.
Click to display the most recently added songs.
17
Upgrading
2.6.8Analog TV
3 Firmware
Application
3.1 preparing for upgrade
>
Analog TV
'l .
Click Analog TV lcon to enter into Analog TV playlng
interface, details as below.
Firstly, format your SD card for what you use to firmwarO upgftda
3.2. Update MCU
3. 2.
1 c o py " 378 a2 e7
0 - 44 bf - 1 1 e 1 - b L cf - 0 00
c29b a27 c0
"
to the root directory of SD card and Inserted into the
machine SD card slot.
Click to back into menu
3.2.2 Start to update MCU(Settings->General->MCU update)
click OK
,
Automatic search and save
Switch to last channel
Switch to last channel
Click on the search on previous channels
Search on the next channels
3.2.3Wait for the upgrade is completed. The system will
automatically restart after the upgrade is completed, please
don't lgnition or shut down during the upgrade process.
Click on the search on the next channels
Click to back into last content
3.3 Update system
3.3.1.copy "u-boot-skip.bin, ulmage, uramdlsk.img,
system. img" to the root directory of SD card , and lnserted
into the machine SD card slot.
2.7 AUX lN Function
To ensure after
Application
>
3.3.2. Shutdown
video source under the normal state when it works.
AUX lN
Press screen to come out a hide menu, click
adjust EQ
effects,clickpto
E
,o enter into EQ setting interface, it can
back into last content,
cticrlf
to back into system menu.
2.8 Rear View
Auto start reverse gear, such as with a mirror, the system switches to the rear-view mirror
screen output automatically,audio output sound still; if not equipped with rear-view mirror,
the system remains the same player
18
3.3.3. Press and hold any panel buttons , and boot , the
system will enter the upgrade interface automatically.
3.3.4 The system willautomatically restart after update.(The system wlllenter th6 touch gcreen
calibrationinterfaceaftertherestart,pleasecompleteit.)3.3.5,
lfoneormoreerrorgocour,
please lgnore andrepeat step 2 to step 4.
3.4. Update DVD
3.4.1 Burn "dvdrom.bin"toCD-ROM, and inserted into the machine dish mouth
3.4.2 Waitforthe update is complete.
3.4.3 Ejectthe disc
19
4.
Trouble handle
When your equipment met troubles, please chcck thc problems as below.
Media can't be
recognized from
SD card.
I
3G. WlFlcan' tbe
10
Unable connect
to the network
@.SEe 3G Card ls lnetalled correctly
@.to makc turt th€ corr€ct and proper 3G terminal
opsretor'! SIM card
@.weathcr launched 3G card data
@,Mobllc data roaming setting is connected or not.
(E,APN woather Belected
G).Whcther 3G card arrears
prohibit hot-swappable SD card
prohibit hot-swappable 3G/Wl Fl
recognized
MUSIC, RADIO
and third-party
Long press panel Back to exit the system MUSIC RADIO
mode, again into third-party applications can
application
11
mlx€s, can not
tu rn off the
MUSIC, RADIO
Check the 3G card lnetall rlght or not.
5.Specification
O. Verify that the install application suffix is named "APK"
@. Enter into Setting to select unknown sources
When the
Bluetooth paired
success,
sometimes will be
mentioned
connect failed
How to install
applications
How to uninstall
users APK
application
Radio can't
research
channels
O.Some cellphones with Android system may occur this
problem at the first connection. Please just find the pairedn
device in matching list and then connect them once more.
@. The unsuccessful connection is compatibility issues
between cell phone and Bluetooth. lf this occurs, please
check the options in pair list of your cell phone. And you will
find that the setting of Bluetooth Media and Mobile Media
has been turned off. Turn on them and the
connection will be successful.
First, please copy the application files with suffix ".APK" to your
SD or U disk. And the following are installation methods:
1. Click into the document management interface to find the SD
card or U disk directory, and then select the ".APK" suffixed
application file and click to install.
2. Find the Setting interface->Applications->install applica
3. select the ".APK" suffixed application file and click to install.
lnterface Setting->Applications->lnstallation
Applications->Uninstalltion Applications. To click the
unistallation APK Applications
to check the radio antenna whether connected and have
signal before use it.
Operating voltager DC 12V
Dltplay screen part
Operating voltage range: 1 0.8V
Maximum operating current:
lnstallation
I
size:
1
-
1
6V
Sc16en dlm€n8ion:7'
0A
167-1 78.100mm
nstallation angle: The front and r€ar lncllnatlon ls less than 30
FM radio
part
R6sponse tlmer Response =30ms, fall =50ms
PIx6l: 384.000 Plxels
Operatlng t€mperature:-20-+70"C
50dB):1 5dBuV
Frequency response range: 30Hz-
1
SKHz
(
t
Storage temp€raturer -30- +80'C
3dB)
AM radio part
Frequency ran ge: 522-1 62OKHZ (Ev ope)
530 1 71 oKHz (America) 1 8 stations preset
Sensitivity (SN=20dB): 20dBuV
l\4irror-image suppression: 60dB
Frequency responser 50Hz -2KHz
(
t
3dB)
DVD/CD play part
Compatible discs and format:
DVD-R, DVD-RW, DVD+R. DVD+RW, CD-R, CD-RW, CD-DA, MP3,
WMA,SVCD, VCD, MPEG, JPEG
Op€rating humldity: 45%- 80% (Relativ€ humidity)
Storage humidity: 300.6-90% (Relative humidity)
Package Contents
PC
GPsantenna
Remote control (optional)
Metal fasteners and screws
iPod and USB cable
Usermanual
WlFldongle
Power cable
Car
,l
1
1
,l
.1
1
1
'l
Audio SNR: 85dBA
MagneticDigitalTVantenna(optional)
1
Dynamic range: 95dB
UserManual
1
Frequency responser50Hz -2KHz ( t 3dB)
Digital audio sampling: 24bit
Electronic shock protection (ESP):
DVD
CD-DA
MP3
2- 3seconds
10s
100s
200s
System is muted or not
Mechanical shock protection
i
1
0-200H2,x/Y lz1 .oG
Power output: 4*45W, impedance4 Ohm
SRN:70dB
,
Amblent temperature
Sensitivity (-30d8)r1 2dBu
(
6.2"
Angular field: Top visw =65 ,bottom vl€w =40
L6ft vlew =65", Right viow=65'
Frequency range: 87.5- 1 08MHz (Europe)
87.5-'107.9M Hz (America) 36 statlons pr€set
SNR
I
Scro€n typ6r TFT