Download MecWise Payroll System

Transcript
STARVISION INFORMATION TECHNOLOGY
(SDA)
HUMAN RESOURCES INFORMARION SYSTEM
(HRIS)
USER MANUAL
FOR
PAYROLL MANAGEMENT SYSTEM
VERSION 1.0
STARVISION INFORMATION TECHNOLOGY (SDA)
1.
INTRODUCTION ........................................................................................................... 2
2.
MASTER FILE MAINTENANCE ................................................................................... 5
3.
PAYROLL ENTRY ........................................................................................................ 6
3.1 Bonus Entitlement ....................................................................................................... 6
3.2 Standard Allowance/ Deduction Entry ......................................................................... 8
3.3 One Time Transaction Entry........................................................................................ 9
3.4 Daily/ Hourly Rated Entry .......................................................................................... 10
3.5 Overtime Entry .......................................................................................................... 11
3.6 No Pay Leave Entry (NPL) ........................................................................................ 12
3.7 Transaction Upload .................................................................................................... 13
3.8 Excel Template ......................................................................................................... 14
4.
PROCESSING OF PAYROLL CALCULATION .......................................................... 15
4.1 Creating a new payroll calculation ............................................................................. 15
4.2 Checking the pre-payment report .............................................................................. 19
4.3 Reprocess the payroll calculation .............................................................................. 20
5.
PAYMENT................................................................................................................... 23
5.1 Creating a payment record ........................................................................................ 23
5.2 Exporting Payment Journal ....................................................................................... 25
5.3 Exporting Bank GIRO ................................................................................................ 26
5.3 Exporting CPF PAL/CPFLine .................................................................................... 28
5.4 Viewing all Payment Job Status ................................................................................ 30
5.5 Viewing Payment Reports ......................................................................................... 30
5.6 Viewing employee’s salary history ............................................................................. 31
6. PAYMENT CANCELLATION ......................................................................................... 32
6.1Payment Cancellation ................................................................................................ 32
6.2 Re-Calculating Payroll .............................................................................................. 35
6.3 Processing Payment Again ....................................................................................... 42
7.
PERIOD CLOSE ......................................................................................................... 49
7.1 Closing the pay period ............................................................................................... 49
7.2 Re-Open the pay period ............................................................................................ 50
8.
IRAS (YEAR END PROCESSING) ............................................................................. 51
8.1 Creating a IRAS record ............................................................................................. 51
User Manual | HRIS | Version 1.0
Page 1
STARVISION INFORMATION TECHNOLOGY (SDA)
Human Resources Information System (HRIS)
1. Introduction
Human Resources Information System (HRIS) was designed to enhance productivity and
effectiveness in payroll administration and data processing online. It enables the processing
of payroll efficiently by providing the built-in intelligence to assist in managing the payroll
functions from recruitment to termination. It caters to varying policies relating to wages; leave
entitlement and salary payment methods.
Features available: 











Employee Profile
New / Change Appointment, Resignation and Rejoin of Employee
Promotion / Increment
Bonus and Benefit Entitlement
Standard Allowance / Deduction Entry and One Time Transaction Entry
Recurrent Transactions
Overtime and No Pay Leave Entry
Advance Pay
Payroll processing and payment
CPF Pal/Line & IR8A (Year End Processing)
CPF Returns Report
Pre-Payment & Payment Reports
User Manual | HRIS | Version 1.0
Page 2
STARVISION INFORMATION TECHNOLOGY (SDA)
1. Master File Maintenance
Standard Allw/Ded
One Time Transaction
2. Employee Profile Maintenance
OT Entry
Bonus / Benefit Ent.
3. Payroll Transaction/Entry
No Pay Leave
4. Payroll Calculation
Pre-payment
Reports
5. Payment
Payment
Reports
Backup
6. Period Close
CPFPAL/Line
IR8A
Bank Giro
Fig 1. Payroll Work Flow
User Manual | HRIS | Version 1.0
Page 3
STARVISION INFORMATION TECHNOLOGY (SDA)
2. Master File Maintenance
You only need to maintain the master files when there are changes such as creation
of new organization unit or salary scale changes. Otherwise, you may ignore this
step.
The master files that need to maintain are as below.
a.
b.
c.
d.
e.
f.
g.
Payroll Master File > Job Family (changes to appointments)
Payroll Master File > Transaction Type (changes to payroll transaction type)
Payroll Master File > Salary Scale (changes to range of salary capping)
Payroll Master File > Company > Pay Period (changes to range of payroll yr/mth)
Position Database > Segment Code (changes to organization unit)
Position Database > Organization Unit (changes to organization unit)
Payroll Master File > Transaction Type (changes to payroll transaction type)
STARVISION INFORMATION TECHNOLOGY (SDA)
3. Payroll Entry
Payroll Entry keeps track of information required and affecting payroll calculations. All
the operation modes listed as below will ultimately affect the calculation of payroll.
Features available:  Entry of Bonus Entitlements
 Entry of Benefit Transactions
 Entry of Standard Allowances/Deductions
 One Time Entry by Transaction Code/Employee
 Daily/ Hourly Rated Entry
 Overtime Entry
 No Pay Leave Entry
 Back pay Entry
 Transaction Upload
 Back Pay Upload
3.1 Bonus Entitlement
This module allows the selection of employees eligible for the relevant bonus based
on different criteria as defined by user.
Go to Payroll Entry > Bonus Entitlement, click on the Add icon to create a new
payroll entry record.
STARVISION INFORMATION TECHNOLOGY (SDA)
Click the New button and enter in the payment details of the Bonus Entitlement.
Enter the Bonus Amount and the Qualifying Period.
Save the record.
User Manual | HRIS | Version 1.0
Page 7
STARVISION INFORMATION TECHNOLOGY (SDA)
3.2 Standard Allowance/ Deduction Entry
This module allows user to set the various types of standard allowances/deductions
and pay period applicable to the employees for payroll calculation in every pay
year/month within the effective date range defined.
Go to Payroll Entry > Standard Allowance / Deduction Entry, and click on the
Add icon to create a new payroll entry record.
Enter in the Allowance Details and the Date Range to effect this entry.
Training Manual | HRIS | Version 1.0
Page 8
STARVISION INFORMATION TECHNOLOGY (SDA)
Save the record and run payroll to see the results.
3.3 One Time Transaction Entry
This module provides the entry for one time transaction payroll item for employees.
The Pay Yr/Mth field is defaulted to the current pay month. But user is allowed to
change it to the pay month the transaction has taken place for payroll calculation.
Go to Payroll Entry > One Time Transaction Entry, click on the Add icon to create
a new payroll entry record.
Training Manual | HRIS | Version 1.0
Page 9
STARVISION INFORMATION TECHNOLOGY (SDA)
Enter in the One Time Transaction Details and the Date Range to effect this entry.
Save the record and run payroll to see the results.
3.4 Daily/ Hourly Rated Entry
This module allows user to enter an employee’s daily rate.
Training Manual | HRIS | Version 1.0
Page 10
STARVISION INFORMATION TECHNOLOGY (SDA)
Go to Payroll Entry > Daily/ Hourly Rated Entry, click on the Add icon to create a
new payroll entry record.
Enter in the Details and the Date Range to effect this entry.
Save the record and run payroll to see the results.
3.5 Overtime Entry
This module allows user to enter the employee’s overtime records.
Training Manual | HRIS | Version 1.0
Page 11
STARVISION INFORMATION TECHNOLOGY (SDA)
Go to Payroll Entry > OverTime Entry, click on the Add icon to create a new
payroll entry record.
Enter in the OT Entry Details and the Date Range to effect this entry.
Save the record and run payroll to see the results.
3.6 No Pay Leave Entry (NPL)
This module allows user to enter an employee’s no pay leave record.
Training Manual | HRIS | Version 1.0
Page 12
STARVISION INFORMATION TECHNOLOGY (SDA)
Go to Payroll Entry > No Pay Leave Entry, click on the Add icon to create a new
payroll entry record.
Enter in the No Pay Leave Entry Details and the Date Range to effect this entry.
Save the record and run payroll to see the results.
3.7 Transaction Upload
This module allows users to upload One-Time Transactions easily into the One-Time
Transaction Entry module, using a pre-defined excel file.
Go to Payroll Entry > Transaction Upload.
Training Manual | HRIS | Version 1.0
Page 13
STARVISION INFORMATION TECHNOLOGY (SDA)
Select the Transaction Type to upload.
Select the file to import and click on the Import button.
Save the record and run payroll to see the results.
3.8 Excel Template
This module allows user to save the pre-defined excel file format for the Transaction
Type.
Training Manual | HRIS | Version 1.0
Page 14
STARVISION INFORMATION TECHNOLOGY (SDA)
4. Processing of Payroll Calculation
After entering all transactions into the system for the pay period, you can now
start to process the payroll.
Payroll Management System Processing Work Flow








Processing of payroll calculation
Preview and print options of pre-payment reports available
Processing of payment
Preview and print options of payment reports available
Generate pay slips
Generation of Giro file for submission
Generation of CPF Line/Pal for submission
Closing of Payment Period (Period Close).
4.1 Creating a new payroll calculation
Go to Payroll Processing > Payroll Calculation, and click on the Add icon to
create a new payroll calculation record.
Training Manual | HRIS | Version 1.0
Page 15
STARVISION INFORMATION TECHNOLOGY (SDA)
Select the correct Payroll Mode and all grey fields will populate automatically. You
may wish to change the Run Date (default as the current date).
Note: The Process Year/Mth is the last Payment Year/Mth period which is not
closed yet.
Check the Process Date From/To to ensure the dates are within the Process
Year/Month.
Training Manual | HRIS | Version 1.0
Page 16
STARVISION INFORMATION TECHNOLOGY (SDA)
Select the Payroll Run Type as ALL. There are 4 options: ALL (which computes all
transaction, pay, and also covers the computation of BONUS, FEST_ADV and
FIXED_ADV), BONUS (which only computes BONUS), FEST_ADV (which only
computes FEST_ADV) and FIXED_ADV (which only computes FIXED_ADV).
If you only wish to process only for a group of employees, you can make use of
Selection Criteria Section consisting of: Additional Selection button to display the
query builder to filter the employee records and/or with Organization Unit, Job
Family, Appointment Code, Grade, Employee ID From/To.
Training Manual | HRIS | Version 1.0
Page 17
STARVISION INFORMATION TECHNOLOGY (SDA)
Use Check… button to view the defined employees.
Otherwise, you can just click on the Show Selection button to check whether all your
employees are selected for payroll processing.
Note: You will not be able to filter employee for processing once the payroll
calculation record is created.
Click on the Submit button to proceed with the payroll processing and the record will
be sent to the payroll job processing. (Note: The screen will proceed to the main
Payroll Processing page).
Training Manual | HRIS | Version 1.0
Page 18
STARVISION INFORMATION TECHNOLOGY (SDA)
Go to Payroll Processing > Payroll Calculation Job Status (on success, you
should see the status as ‘Completed’), select the record you have added for the
above. Click and check on the Show Details button to check how system computes
certain calculations.
Note: If the status is ‘Failed’, go to the record and click on the Show Errors
button to see the cause of the error. Redo the payment calculation creation
with the error corrected from Section 4.3.
4.2 Checking the pre-payment report
After payroll processing is completed, you need to preview/print pre-payment report
to check the details of individual employee payment such as basic pay, CFP amount,
fund contributions, allowances, deductions and etc.
There are a numbers of pre-payment reports that you can generate to check the
employee payment. One such report is the Pre-Payment Transaction Listing By
Organization Unit.
Training Manual | HRIS | Version 1.0
Page 19
STARVISION INFORMATION TECHNOLOGY (SDA)
Go to Payroll Report > Pre-Payment Transaction Listing By Organization Unit.
Here, you can select to ‘Print All Records’ or ‘Print Selected Records’. You will need
to click on the Selection Criteria button to define the query for certain group of
employees if the latter option is selected.
Select the Payroll Batch No and set the Report Parameters.
Click on the Click Here button to generate the report. The report will be displayed as
pdf format where you can choose to save or print the report.
4.3 Reprocess the payroll calculation
After checking the pre-payment reports, you may need to make amendments to the
employee profile or the transaction amount. You will have to go back to Section 3
and Section 4 to clear the amendments.
Upon clearing all amendments, you will need to reprocess the payroll calculation so
that the employee payment will reflect correctly.
Training Manual | HRIS | Version 1.0
Page 20
STARVISION INFORMATION TECHNOLOGY (SDA)
Go to Payroll Processing > Payroll Calculation Job Status, select the correct
existing payroll calculation record in the list.
Click on the Update button. You will notice that the Submit button has changed to
Re-Submit.
Training Manual | HRIS | Version 1.0
Page 21
STARVISION INFORMATION TECHNOLOGY (SDA)
Click on the Re-Submit button to proceed with the payroll processing and the record
will be sent to the payroll job processing. (Note: The screen will proceed to the main
Payroll Processing page).
Again, Go to Payroll Processing > Payroll Calculation Job Status (on success,
you should see the status as ‘Completed’), select on the record you had redone for
the above. Click and check on the Show Details button to check how system
computes certain calculations.
You may proceed to step 4.2 to check the pre-payment reports.
Note: Make sure the payment for the particular Pay Year/Mth was not made as it will
affect the payroll calculation. If so, delete the Payment record for the Pay Year/Mth.
Training Manual | HRIS | Version 1.0
Page 22
STARVISION INFORMATION TECHNOLOGY (SDA)
5. Payment
Once the checking of the pre-payment reports is completed and there are no more
amendments to employee net pay, you may proceed to generate payment.
Note: If you need to re-process the payroll calculation after generating the payment, you
need to delete the payment record and proceed to step 5.3.
5.1 Creating a payment record
To begin with, Go to Payroll Processing > Payment and click on the Add icon to
create a new record.
Note: The Payment No, Bank Code, etc (grey fields) will be automatically populated
with the last payment Pay Year/Month.
Click on the Add New icon under the Payroll Batch tab to add a new payroll
payment batch.
Training Manual | HRIS | Version 1.0
Page 23
STARVISION INFORMATION TECHNOLOGY (SDA)
After adding and saving the payroll payment batch, click on the Return icon to return
to previous screen. Next, click on Submit button and the record will be sent to the
payment job processing. (Note: after that, the screen will display the main Payroll
Payment page).
Then go to Payroll Processing > Payment Job Status (on success, you should see
the status as ‘Completed’), select the record you have added for the above. In
Section 5.1, system will generate a list of employee under the Employee Payment
tab. You must check whether all your employees are in the list. If no, please click on
the Delete icon to remove this record and redo the payment creation from Section
5.1.
Note: If the status is ‘Failed’, go to the record and click on the Show Errors
button to see the cause of the error. Redo the payment creation with the error
corrected from Section 5.1
Training Manual | HRIS | Version 1.0
Page 24
STARVISION INFORMATION TECHNOLOGY (SDA)
Finally, click on the Export button if you wish to export the payment out as GIRO
(Refer to Section 5.2)
5.2 Exporting Payment Journal
Click on the GIRO Export Tab.
Choose “HSBC ENC MRI(SG)” in the Bank Format textbox. Then choose either
GIRO or Text or Text (Pipe Delimited) from the Output Format textbox.
Training Manual | HRIS | Version 1.0
Page 25
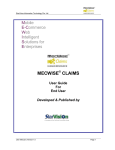
STARVISION INFORMATION TECHNOLOGY (SDA)
Click on the Export button to start generation and a pop up save dialog will appear.
Click on the Save button to continue.
5.3 Exporting Bank GIRO
This option allows you to export a defined bank formats such as DBS Ideal to credit
the salary into your employee bank account.
If you wish to generate a bank that is not available in the selection, please contact us
for more information.
Note: You need to make sure that the bank accounts information is entered in the
employee profile and Payment Method By are set to ‘Bank’.
Click on Payroll Processing  Payment Export
Training Manual | HRIS | Version 1.0
Page 26
STARVISION INFORMATION TECHNOLOGY (SDA)
Choose the latest payment batch from header grid.
Click on GIRO export tab
Choose Output Format (either GIRO or Text format)
Training Manual | HRIS | Version 1.0
Page 27
STARVISION INFORMATION TECHNOLOGY (SDA)
Choose Payment Type and Payment Set No.
Click Export to generate GIRO
A GIRO file will be created in the pre-defined output folder/directory.
5.3 Exporting CPF PAL/CPFLine
This option allows you to export a defined CPF PAL/CPFLine formats and upload
them to CPF Board.
Training Manual | HRIS | Version 1.0
Page 28
STARVISION INFORMATION TECHNOLOGY (SDA)
To begin with, Go to Payroll Processing > CPF Export.
Select the correct bank format and output format. The 2 available formats are
CPFLine, CPFPAL and MSO Balance Refund.
Key in the Pay Year/Month (Enter the Year in '’yyyy’ in the first textbox and ‘mm’ in
the second textbox). Select on the Pay Period.
Click to define the export file name and directory that you wish to save it to. Click on
the Save button.
Click on the Export button and select the export format correctly. The 2 available
formats are PAL CPFLine and CPFLine.
If you registered with CPF board on the e-submission, select CPFPAL format.
Otherwise, if you subscribe to Crimson Logic services, select CPFLine format.
Otherwise, if you subscribe to government once a year, select MSO Balance Refund
format.
Click Export button. A Save file dialogue box will appear. The Messages text box will
also display the export status. At the same time, you can check the summary on the
export screen to tally with you payment reports.
Training Manual | HRIS | Version 1.0
Page 29
STARVISION INFORMATION TECHNOLOGY (SDA)
You can also generate CPF returns reports. Go to Payroll Reports > CPF Returns.
5.4 Viewing all Payment Job Status
This option allows you to view the status, information of all the payment submitted.
To begin with, Go to Payroll Processing > Payment Job Status.
Click on any of the record’s link to view the payment record details.
5.5 Viewing Payment Reports
After the payroll payment is completed, you need to preview/print payment
report to check the details of individual employee payment such as basic pay,
CFP amount, fund contributions, allowances, deductions, payslips and etc.
There are a numbers of payment reports that you can generate to check the
employee payment. One such report is the Payment Transaction Listing By
Organization Unit.
Training Manual | HRIS | Version 1.0
Page 30
STARVISION INFORMATION TECHNOLOGY (SDA)
Go to Payroll Report > Payment Transaction Listing By Organization Unit.
Here, you can select to ‘Print All Records’ or ‘Print Selected Records’. You will need
to click on the Selection Criteria button to define the query for certain group of
employees if the latter option is selected.
Select the Payment Run No and set the Report Parameters.
Click on the Click Here button to generate the report. The report will be displayed as
pdf format where you can choose to save or print the report.
5.6 Viewing employee’s salary history
This option allows you to view the salary history (gross pay, allowance, deduction,
net pay for each pay year/mth) till date. Only enquiry mode is enabled here.
To begin with, Go to Payroll Processing > Employee Salary History Enquiry.
Click on the Query by form icon to show a listing of employees.
Training Manual | HRIS | Version 1.0
Page 31
STARVISION INFORMATION TECHNOLOGY (SDA)
Click on any of the record’s link to view the salary history details at the bottom
segment. You may wish to click on the individual employee pay records to view the
breakdown details of the allowance, deduction, etc.
6. Payment Cancellation
Once the checking of the pre-payment reports is completed and there are no
more amendments to employee net pay, you may proceed to generate payment.
Note: If you need to re-process the payroll calculation after generating the payment, you
need to delete the payment record and proceed to step 5.3.
6.1
Payment Cancellation
To begin with , Go to Payroll Processing >> Payment .
Training Manual | HRIS | Version 1.0
Page 32
STARVISION INFORMATION TECHNOLOGY (SDA)
Click the Query Button to view existing Payment records.
Training Manual | HRIS | Version 1.0
Page 33
STARVISION INFORMATION TECHNOLOGY (SDA)
Choose the Latest Payment Batch from header grid to delete.
Click on the “Delete” button on the toolbar.
The pop-up dialog will appear. Click OK button to continue .
Training Manual | HRIS | Version 1.0
Page 34
STARVISION INFORMATION TECHNOLOGY (SDA)
6.2 Re-Calculating Payroll
To begin with, Go to Payroll Processing >> Payroll Calculation .
Choose the Latest Payment Calculation Batch from header grid to re-calculate.
Training Manual | HRIS | Version 1.0
Page 35
STARVISION INFORMATION TECHNOLOGY (SDA)
Click on Submit Button to start the Payroll Calculation process.
Training Manual | HRIS | Version 1.0
Page 36
STARVISION INFORMATION TECHNOLOGY (SDA)
Click on the menu Payroll Processing - Payroll Calculation Job Status
menu.A list of job calculation batch displayed on the screen with the Job Status.
Click on the latest payroll calculation batch to view, system will redirect to the
particular batch processing to the Payroll Calculation main page.
Training Manual | HRIS | Version 1.0
Page 37
STARVISION INFORMATION TECHNOLOGY (SDA)
Click on Show Details Button, to show the details after processing calculation.
Training Manual | HRIS | Version 1.0
Page 38
STARVISION INFORMATION TECHNOLOGY (SDA)
Click on Show Errors Button, to show the errors records after processing
calculation.
Note thatThe System will save the record. If mandatory field(s) is left blank, the
system will prompt error message.
Training Manual | HRIS | Version 1.0
Page 39
STARVISION INFORMATION TECHNOLOGY (SDA)
Click Save Button to save the record.
Note : The System will save the record. If mandatory field(s) is left blank, the
system will prompt error message.
And then click on the Payroll Reports  Pre-payment reports menu.
The System will show the following screen:Click on the report: - 18. [Pre018.SG]
Pre-Payment Transaction Listing By Employee ID (Month)
Training Manual | HRIS | Version 1.0
Page 40
STARVISION INFORMATION TECHNOLOGY (SDA)
The System will show the following screen:Enter the Year and Month for the prepayment report.
Click on the “Click Here” button to generate the report.
Training Manual | HRIS | Version 1.0
Page 41
STARVISION INFORMATION TECHNOLOGY (SDA)
6.3 Processing Payment Again
Once the checking of the pre-payment reports is completed and there are no more
amendments to employee net pay, you may proceed to generate payment.
To begin with, Go to Payroll Processing – Payment menu.
Click Add Button to create a new record.
Training Manual | HRIS | Version 1.0
Page 42
STARVISION INFORMATION TECHNOLOGY (SDA)
Click on Pay Period Pick list to select the Pay Period, Pay Year and Pay month for
which Payment is to process.
Note: The Payment No, Bank Code, etc (grey fields) will be automatically
filled up with the last payment Pay Year/Month.
After the above fields have been set, click on the Batch Registry tab in the Grid
below.
This tab is to add the Payroll batch(s) which have been processed/calculated before
and are ready for making final Payment.
Click on the Add New Button.
Training Manual | HRIS | Version 1.0
Page 43
STARVISION INFORMATION TECHNOLOGY (SDA)
A new screen, Payroll Payment Batch, appears.
Click on the Pick list button next to ‘PBA’.
Select a batch to add for Payment process.
Click on Save Button.
Training Manual | HRIS | Version 1.0
Page 44
STARVISION INFORMATION TECHNOLOGY (SDA)
If there are more than 1 batch for the select year/month/period, and if you wish to
process Payment for all the batches together, choose the batches 1 by 1 as above
and save.
After selecting and saving the batch(s), click on Cancel Button and then click on
Exit Button to exit .and return to main screen.And then return to main screen.
Next click on the Submit Button.
Click on the Payroll Reports  Payment reports menu.
Training Manual | HRIS | Version 1.0
Page 45
STARVISION INFORMATION TECHNOLOGY (SDA)
The System will show the following screen:Click on the report: - 18. [PYT015.SG]
Payment Transaction Listing by Employee ID(Month)
The System will show the following screen:
Training Manual | HRIS | Version 1.0
Page 46
STARVISION INFORMATION TECHNOLOGY (SDA)
Enter the Year and Month for the payment report.
Click on the “Click Here” button to generate the report.
Training Manual | HRIS | Version 1.0
Page 47
STARVISION INFORMATION TECHNOLOGY (SDA)
Training Manual | HRIS | Version 1.0
Page 48
STARVISION INFORMATION TECHNOLOGY (SDA)
7. Period Close
You have completed the monthly payroll and now you need to close the current pay
period and prepare for the next month payroll.
7.1 Closing the pay period
Note: Once you have closed the pay period, you are not able to rollback to do
any amendment. If you really need to rollback to previous pay periods, you
need to contact us.
Go to Payroll Processing > Period Close.
Click the Query by form button to show a listing of periods (enter under Payroll
Master File > Company > Pay Period > M/H > Pay Period Details). Select on the
pay period you wish to close.
Click on the Update icon. Set the Status Close as ‘Yes’.
Training Manual | HRIS | Version 1.0
Page 49
STARVISION INFORMATION TECHNOLOGY (SDA)
Click on the Save icon and this pay period is closed.
7.2 Re-Open the pay period
Go to Payroll Processing > Period Close.
Select on the pay period you wish to re-open.
Click on the Re-Open Pay Period. The Status Close will be set to ‘No’.
Training Manual | HRIS | Version 1.0
Page 50
STARVISION INFORMATION TECHNOLOGY (SDA)
8. IRAS (Year End Processing)
At the end of the year, employer will need to generate the IRAS forms for the
employees on taxation statements based on the tax year and employer tax ref number
specified. The IRAS form is divided into two sections: Company details and Employee
details.
8.1 Creating a IRAS record
To begin with, Go to Payroll Processing > IRAS and click the Add icon to create a
new IRAS record.
Input the Pay Year, Employer Tax Ref, Company Type, Tax Ref Type, Employer
Name and Employer Address.
Click the Add New button and enter in the IR8A details of the Employee IRAS Form.
Training Manual | HRIS | Version 1.0
Page 51
STARVISION INFORMATION TECHNOLOGY (SDA)
Enter in the IR8A details of the Employee IRAS Form.
Click on any employee record in the bottom segment to view employee’s details.
You may fill in the information under the Income Tab, Income/Others (d1-d4) Tab,
Income/Others (d5/d9) Tab and Deductions Tab (if any) to complete the form.
Once the company details are completed, click on the Import 8A Details button to
import employees’ details. Individual employee records will be listed in the bottom
segment.
After making the necessary changes, click on the Save icon.
Training Manual | HRIS | Version 1.0
Page 52