1
AMOS
System Commands
Reference Manual
DSM-00043-18
© 1998 Alpha Microsystems
REVISIONS INCORPORATED
REVISION
DATE
00
01
02
03
04
05
06
07
08
09
10
11
12
13
14
15
16
17
18
March 1988
December 1988
September 1989
April 1991
September 1996
March 1997
June 1997
December 1997
June 1998
April 1999
October 1999
February 2000
August 2000
January 2001
March 2001
February 2002
May 2004
October 2006
September 2007
To re-order this document, request part number DSO-00043-00.
This document applies to AMOS version 2.3A, PR 06/00, AMOS 8.0 and later.
The information contained in this manual is believed to be accurate and reliable. However, no
responsibility for the accuracy, completeness or use of this information is assumed by Alpha
Microsystems.
The following are registered trademarks of Alpha Microsystems, Irvine, CA 92614:
AMOS
AlphaBASIC
AlphaWRITE
Alpha Micro
AlphaCALC
inSight/am
Alpha Micro
AlphaFORTRAN 77
AlphaRJE
AlphaACCOUNTING
AlphaLAN
The following are trademarks of Alpha Microsystems, Irvine, CA 92614:
AlphaBASIC PLUS
AlphaDDE
AlphaNET
AlphaVUE
AlphaConnect
ESP
AMPC
DART
MULTI
All other copyrights and trademarks are the property of their respective holders.
ALPHA MICROSYSTEMS
17534 Von Karman
Irvine, CA 92614
AMTEC
AlphaMAIL
Table of Contents
CHAPTER 1 - INTRODUCTION TO THE MANUAL
CONCEPTS
AMOS Command Level
AMOS Prompt
Command Line
Command File
Defaults
File Specification
Re-entrant
Re-usable
Switch (or Option)
Wildcard
Wildcard File Command Switches
CONVENTIONS USED IN THIS MANUAL
CHAPTER 2 - INTRODUCTION TO AMOS COMMANDS
COMMANDS TO BE USED WITH CAUTION
Commands That Can Destroy Disk Contents
System Operator Commands
Access Limitations
1-1
1-1
1-1
1-1
1-1
1-1
1-2
1-2
1-2
1-2
1-2
1-3
1-3
1-3
2-1
2-2
2-2
2-2
2-2
CHAPTER 3 - FILE SPECIFICATIONS
3-1
CHAPTER 4 - DEFAULTS AND WILDCARD SYMBOLS
4-1
STANDARD SYSTEM DEFAULTS
WILDCARD SYMBOLS
STANDARD SYSTEM WILDCARD SYMBOLS
4-1
4-1
4-2
CHAPTER 5 - INPUT/OUTPUT REDIRECTION
5-1
REDIRECTION SYMBOLS
USING REDIRECTION
System Commands Reference Manual, Rev. 18
5-1
5-1
Page ii
Table of Contents
CHAPTER 6 - SYSTEM COMMANDS LIST BY FUNCTION
ALPHABETIC LIST OF AMOS COMMANDS
FUNCTIONAL SUMMARY OF COMMANDS
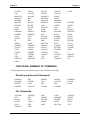
Directory and Account Commands
File Commands
Wildcard File Commands
Disk and File Copy Commands
Text Processing Commands
Language Processor Commands
Job and Terminal Handling Commands
Memory Partition Commands
Analysis and Certification Commands
Magnetic Tape Unit Commands
Backup Commands
System Information Commands
System Maintenance Commands
6-1
6-1
6-2
6-2
6-2
6-3
6-3
6-3
6-3
6-3
6-3
6-4
6-4
6-4
6-4
6-4
THE REFERENCE SHEETS
APPENDIX A - CHARACTER SETS
DOCUMENT HISTORY
System Commands Reference Manual, Rev. 18
Chapter 1 -
Introduction
to the Manual
The purpose of this manual is to provide information on every command on the AMOS system. In
writing these reference sheets, we've assumed you are already familiar with the AMOS system. If this is
not true, please read your AMOS User's Guide.
This manual does not contain reference sheets for any AMOS products sold separately from the operating
system, such as AlphaWRITE, AlphaCALC, etc. These products come with their own documentation
(sometimes in the form of reference sheets that may be inserted into this manual, if you wish).
For detailed information on the system language and text processors, see the specific manuals for those
processors.
CONCEPTS
Below we define several of the terms that appear frequently in the command reference sheets. For more
information on system concepts, see your AMOS User's Guide.
AMOS Command Level
When you are at AMOS command level, you are communicating directly with AMOS (the Alpha Micro
Operating System) and not with a program AMOS is executing.
AMOS Prompt
When you're at AMOS command level, you see the AMOS prompt symbol, which tells you the operating
system is ready for you to enter a command. This prompt may be the system default, a period (.), or it
may be defined using SET.
Command Line
Whenever you enter a command to AMOS, you include the name of the command optionally followed by
device and/or file specifications, option switches, etc. The entire input line is called a command line.
Command File
A command file is an ASCII text file containing valid AMOS system commands and file specifications.
It can contain most commands and data you can enter at AMOS command level (including the name of
another command file). As AMOS processes a command file, it performs the functions called for by
System Commands Reference Manual, Rev. 18
Page 1-2
Chapter One
each line of the file. Command files can also contain several special symbols that affect the way the file
is displayed on the terminal screen as it is processed, and that allow the file to ask for input from the user.
A special kind of command file, called a DO file, allows you to specify text arguments which AMOS
substitutes in place of special parameter symbols.
Defaults
When you leave information out of a command line, AMOS often has a set of information it substitutes
for the missing items. For example, if you don't tell AMOS what account a file is in, it usually assumes it
is in the account you are currently logged into.
Defaults vary among commands. Check the reference sheet for a specific command to see what defaults
it uses. In particular, the special commands called wildcard file commands handle defaults differently
than other commands on the system.
File Specification
Data on a disk is organized into logically-related groups called files. Whenever you want to identify a
file to an AMOS command, enter that file's specification, which includes its name, and where it is
located, if necessary.
Re-entrant
A program is re-entrant when it can be used by more than one user at a time, and is therefore able to be
loaded into System Memory, where it can be shared by all users. Re-entrant programs are also re-usable.
Re-usable
A program is re-usable when it can be interrupted during its operation, and then resumed again, or when
it can be run again after it has run. Since AMOS is a multi-user system, most of its programs are reusable. Re-usable programs cannot be loaded into System Memory (unless, of course, they are also reentrant).
Switch (or Option)
Many AMOS commands and programs allow you to select among several options by including switches
on a command line. A switch is a slash (/) followed by one or more characters. You can sometimes
include several switches on one command line.
The specific form switches take varies depending on the particular command. Some commands expect
every single character after a slash to represent a different switch (e.g., MAP/FSR); others require each
switch begin with a new slash (e.g., PRINT NET.BAS/COPIES:2/BAN/HE). See the reference sheet for
a particular command to see the switches for it.
System Commands Reference Manual. Rev. 18
Introduction to the Manual
Page 1-3
Wildcard
A wildcard is a special symbol appearing in a file specification. Wildcards allow a file specification to
represent more than one file. For example, the wildcard symbol * in this file specification:
F*.TXT
RETURN
will select all .TXT files whose names begin with F, regardless of the rest of the file name.
The use of wildcard symbols varies among commands. Some commands do not recognize wildcards;
others handle wildcards differently than do the rest of the commands on the system. See a command's
reference sheet to see how it handles wildcards.
Wildcard File Command Switches
Wildcard file commands distinguish between two types of switches: file switches and operation switches.
If a file switch is directly after a file specification, it affects only that file. For example:
ERASE MTDVR.M68,MTDVR.LIT/QUERY,MTDVR.OBJ
RETURN
tells ERASE to ask for confirmation before erasing MTDVR.LIT. It erases the other two files without
asking for confirmation.
An operation switch affects all files on the command line, no matter where it is placed. For example, the
/WIDE option with the DIR command affects the directory display for all specified files, no matter where
it appears on the command line.
Wildcard file commands allow you to set the default switch by placing the switch in front of a file
specification. For example:
ERASE/Q MTDVR,MTDVR.OBJ/NOQ,SRCFIL.BAS
RETURN
tells ERASE to ask for confirmation before erasing the first and third files specified on the command
line.
See your AMOS User's Guide for more information on wildcard file command switches and default
switches.
CONVENTIONS USED IN THIS MANUAL
This manual conforms to the other Alpha Micro publications in its use of a standard set of graphics
conventions. We hope these graphics simplify our examples and make them easier for you to use.
Unless stated otherwise, all examples of commands are assumed to be entered at AMOS command level.
System Commands Reference Manual, Rev. 18
Page 1-4
Chapter One
SYMBOL
MEANING
devn:
Device-Name. The "dev" is the three letter physical device code, and the "n" is
the logical unit number. Examples of device names are DSK0:, DSK5:, WIN1:,
and MTU0:. Usually, device names indicate disk drives, but they can also refer
to magnetic tape drives and video cassette recorders.
filespec
File Specification. A file specification identifies a specific file within an account.
A complete filespec is made up of the devn:, the filename, the file extension, and
the project-programmer number. For example:
devn:filename.ext[p,pn]
or
DSK0:SYSTEM.INI[1,4]
This abbreviation represents an account on a disk you can store files and data in.
An actual disk account number looks like this: [100,2] or [1,4]. Disk account
specifications are sometimes referred to as "Project-programmer numbers."
[p,pn]
{}
Braces are used in some examples to indicate optional elements of a command
line. In the example:
DIR{/switch}
the braces tell you "/switch" is not a required portion of the DIR command line.
/
The slash symbol precedes a command line switch or "option request." For
example:
DIR/WIDE:3 RETURN
This command requests a directory display of the disk account you are currently
logged into. The switch (/WIDE:3) indicates you want the display to be three
columns wide.
TEXT
Bold text in an example of user/computer communication represents the
characters you type.
TEXT
Text like this in an example of user/computer communication represents the
characters the computer displays on your terminal screen.
KEY
In our examples, the keycap symbol appears whenever you need to press a certain
key on your terminal keyboard. The name of the key you need to press appears
inside the keycap symbol, like this: RETURN . If you need to press the TAB key,
you would see TAB , or the ESCAPE key, ESC . (Sometimes the ESCAPE key is
labeled ESC or ALT MODE.)
CTRL
^
/ KEY
This indicates a control sequence you press on the keyboard. The
pressed and held down while the indicated key is also pressed.
CTRL
key is
This symbol in front of a capital letter means the letter is a "control character."
For example, when you press CTRL /C, it appears on your screen as ^C. (^C is the
control character used like the CANCEL key to cancel most programs and return
you to AMOS command level.)
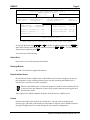
This symbol means "halt!" It indicates an important note you should read
carefully before going further in the documentation. Usually, text next to this
symbol contains instructions for something you MUST or MUST NOT do, so
read it carefully.
System Commands Reference Manual. Rev. 18
Introduction to the Manual
SYMBOL
Page 1-5
MEANING
This symbol means "hint." It indicates a helpful bit of information, or a "short
cut" that could save you time or trouble.
This symbol means "remember." It indicates something you should keep in mind
while you are following a set of instructions.
System Commands Reference Manual, Rev. 18
Chapter 2 - Introduction to AMOS
Commands
Each reference sheet in this manual gives you detailed information on the use of a specific command.
Before getting into the use of particular commands, however, it is a good idea to discuss exactly what we
mean by the term command.
A command is simply a specification that selects a disk file. AMOS looks for the file, and if it finds it, it
loads it into memory (if it is not already in memory) and executes it. The file selected by a command
must be either a machine language program (usually identified by a .LIT file extension) or a command
file (identified by a .CMD or .DO extension.)
Because the programs specified by commands are not actually part of the operating system, but are
simply files on the disk, you can add to the commands AMOS recognizes by creating your own machine
language programs and command files. When you enter a command at AMOS command level, AMOS
performs a thorough search procedure as it looks for the program or command file specified by the
command. It looks in various accounts on the System Disk and on the device you are logged into. For
example, if you enter:
RECALL
RETURN
AMOS follows this search path when looking for a command:
1. Look for RECALL.LIT in system memory (RES:).
2. Look for RECALL.LIT in user's memory partition (MEM:).
3. Look for RECALL.LIT in DSK0:[1,4].
4. Look for RECALL.CMD in system memory (RES:).
5. Look for RECALL.CMD in user's memory partition (MEM:).
6. Look for RECALL.CMD in DSK0:[2,2].
7. Look for RECALL.LIT in current account.
8. Look for RECALL.CMD in current account.
9. Look for RECALL.LIT in user's project library account.
10. Look for RECALL.CMD in user's project library account.
11. Look for RECALL.DO in user's memory partition (MEM:).
12. Look for RECALL.DO in current account.
13. Look for RECALL.DO in user's project library account.
14. Look for RECALL.DO in DSK0:[2,2].
At the end of its search, if it still has not found the file, AMOS echoes the command back to you
enclosed in question marks.
System Commands Reference Manual, Rev. 18
Page 2-2
Chapter 2
COMMANDS TO BE USED WITH CAUTION
This section is a quick reference to those commands you should use with caution. Some of these
commands can destroy the contents of your disk if used improperly. Others can bring other users on your
system to a halt or must only be used under certain conditions. See the particular reference sheet for
more information.
Commands That Can Destroy Disk Contents
The following commands may wipe out some or all of your data if used improperly:
BADBLK
CRT415
DSKANA
DVDRES
FMTFLP
FMTFLP
QDT
BDRESCLEAR
CRT420
DSKCPY
FIXLOG
FMTSCZ
FMTSCZ
RESTOR
CLEAR
CRT520
DSKDDT
FMSFLP
FMTS2
FMTS2
SYSACT
CRT410
DIRSEQ
DSKPAK
FMTDVD
FMT210
FMT210
VCRRES
MOUNT
MOUNT
XMOUNT
System Operator Commands
You must be logged into the System Operator's account, DSK0:[1,2], to run these commands:
CLEAR
FMTDVD
MONTST
CRT415
FMTFLP
MUSER
CRT420
FMTSCZ
QDT
CRT520
FMTS2
FMSFLP
FMT210
DSKCPY
HASHER
DSKDDT
SYSACT
DSKDMP
You must be logged into [1,2] to run:
ASCDMP
DSKPAK
DSKANA
FIXCRC
Access Limitations
These commands lock up all other users on the system while they are running:
FMTDVD
STRSAV
FMTFLP
FMT210
MONTST
System Commands Reference Manual. Rev. 18
Introduction to AMOS Commands
Page 2-3
These commands may only be used when no other user is accessing the affected logical disk or disk
controller:
ACD
CRT415
DIRSEQ
FMSFLP
MAKBD
SYSACT
BACKUP
CRT420
DSKCPY
FMTDVD
MAKDVD
VCRDIR
BAKDIR
CRT520
DSKPAK
FMTSCZ
MFDSEQ
VCRRES
System Commands Reference Manual, Rev. 18
BDRES
DBD
DVD
FMTS2
MOUNT
VCRSAV
DVDRES
MAKACD
RESTOR
XMOUNT
Chapter 3 - File Specifications
For more information on any AMOS system concepts discussed in this chapter, see your AMOS User's
Guide.
Most AMOS commands ask you for one or more file specifications on a command line. The file
specification identifies a file to AMOS, and takes this form:
devn:filename.extension[p,pn]
devn:
Three letters and a number that select a logical unit of a physical device. This
specification tells AMOS the device the specified file resides on. The device
specification and the filename are separated by a colon.
devn: usually identifies a disk (e.g., DSK0:, the System Disk), but can identify a
streaming tape drive (e.g., STR0:) or a special device (such as system memory,
RES:).
Several commands also recognize a different type of device called an "ersatz
device." Ersatz devices identify specific accounts on the System Disk. For
example, the ersatz device BAS: identifies the System AlphaBASIC Language
Library account, DSK0:[7,6]. You may also define your own Ersatz names. For
more information on ersatz devices, see your System Operator's Guide.
filename
A one- to six-character file name. AMOS usually considers upper and lower case
letters in a filename to be the same, but some programs require that you enter
filenames as all upper case. If you enter more than six characters, AMOS may not
(depending on the command you are using) process any extension or PPN that
follows the name.
extension
Zero to three characters that follow the filename and give information to the
command about the contents of the file. The filename and extension are separated
by a dot.
[p,pn]
Identifies the account in which the file resides. When it is part of a file
specification, always enclose the account number within square brackets. An
example of a typical file specification:
DSK2:PROJCT.TXT[100,2]
the device specification, DSK2:, tells AMOS the file is on logical unit DSK2 of
the physical device DSK; the filename PROJCT identifies the file; the extension
.TXT further identifies the file (and tells AMOS it contains text data); and the
account number [100,2] specifies the account on DSK2: where AMOS can find the
file.
System Commands Reference Manual, Rev. 18
Chapter 4 - Defaults and Wildcard
Symbols
If you leave out elements of a file specification, most commands can fill in some of the missing
information for you. The assumptions commands make about missing file specification elements are
called defaults. The defaults a command uses depends on the specific command. Each reference sheet in
this manual lists the defaults used by the command if they differ from the standard system defaults.
STANDARD SYSTEM DEFAULTS
All AMOS commands use the standard file specification defaults below. Several other commands (the
wildcard file commands) also assume additional default information.
• If you leave out a device and unit number from a specification, AMOS assumes you want to
access a file on the device you are currently logged into.
• If you leave out the device unit number (e.g., DSK:PAYROL.LIT[23,4]), AMOS uses the default
unit number zero. The specification above, then, selects file DSK0:PAYROL.LIT[23,4].
• If you leave out the PPN, AMOS uses as the default the account you are currently logged into.
• If you leave out a file extension, the default extension depends on the command you are
communicating with. For example, TXTFMT assumes a .TXT extension; ERASE assumes an
empty extension.
The wildcard file commands handle file specification defaults differently than the rest of
the commands on the system. See your AMOS User's Guide for information on these
commands.
WILDCARD SYMBOLS
This section discusses special symbols in file specifications. A basic specification selects only one file.
For example:
DSK1:CRLF.M68[300,2]
elects the file CRLF.M68 on device DSK1: in account [300,2]. Wildcard symbols allow one file
specification to select several files. For example:
*.TXT
selects all files in the account and device you are logged into having .TXT extensions, regardless of
name. Not all AMOS commands recognize wildcard symbols. All of the commands able to process
wildcards recognize the standard system wildcards. In addition, wildcard file commands have an
advanced wildcarding ability not shared by the rest of the commands on the system.
System Commands Reference Manual, Rev. 18
Page 4-2
Chapter Four
STANDARD SYSTEM WILDCARD SYMBOLS
*
Matches any symbol or group of symbols in a filename or extension. STOCK.*
selects all files in your account having the name STOCK, regardless of extension.
You may precede the * with one or more symbols (e.g., F1*.M68), but within that
name or extension, no symbols may follow the *.
?
Matches any one symbol in a filename or extension. ???DSK.M68 selects any file
name of six characters ending with "DSK" and has an .M68 extension, such as
PACDSK.M68, DIRDSK.M68, and ARTDSK.M68.
You may place characters before or after ?s. If ?s appear at the end of a filename or
extension, that many or fewer characters can match the ? symbols; otherwise, the
number of characters matching these wildcard symbols exactly equals the number of
?s.
ALL:
Matches all device names on the system.
Dev:
Matches all devices of the same name. For example, DSK: would represent DSK1:,
DSK2:, etc.
[]
Matches all accounts on the specified device.
System Commands Reference Manual. Rev. 18
Chapter 5 - Input/Output
Redirection
Any command in AMOS that allows switches before the file specification can use Input/Output
Redirection. This lets you redirect the input and/or output of an AMOS command—take input from or
send output to a file or another program rather than your terminal.
In order to use redirection, redirection must be on for your job (this is the default condition). If
you use redirection and it does not work, use the SET REDIRECTION command (see the SET
reference sheet). You can also use the REDIR command, as mentioned below.
If you use I/O redirection with the AMOS line editor, your TRMDEF statement cannot have
buffers larger than 200 bytes or a line editor setting of more than 20.
REDIRECTION SYMBOLS
>
Send output to the following file.
>>
Append output to the end of the following file.
<
Input the contents of the following file into the AMOS command.
|
Place the output of the following file into the input of the AMOS command.
#
Removes terminal dependent escape sequences from the redirected data. Must be the
first symbol following REDIR on the line.
\
Quotes the character following it so it is not interpreted as a command.
The default extensions are .INP for input files and .LST for output files.
USING REDIRECTION
To use redirection, enter the AMOS command followed by the redirection symbol and the redirection
command. For example:
SYSTAT/N >OUT.LST
RETURN
The above command places the output of SYSTAT into the file OUT.LST. Another example:
VUE INPUT.TST <VUECMD.INP
RETURN
The above command takes the contents of VUECMD.INP and uses it as input to the VUE program. You
can also combine the kinds of redirection. For example:
VUE INPUT.TST <VUECMD.INP >OUT.LST
System Commands Reference Manual, Rev. 18
RETURN
Page 5-2
Chapter Five
If you are redirecting input from a file, and the end of the file is reached, the input source reverts to the
keyboard.
I/O redirection can both execute DO files and be used within CMD or DO files. Because input
redirection works regardless of terminal input mode, redirection works where DO files won't—for
example, connecting across a network, running VUE, etc. I/O direction uses process spawning. This
means you must have extra jobs available on your system (allocated in a JOBS statement in your system
initialization command file). Redirection reduces the size of your memory partition by about 8K while it
is being used.
Some programs, such as AlphaWRITE, use terminal features that require responses back from a real
terminal. Since I/O redirection does not provide such responses, these programs will hang. You can free
it (at least until the next time it asks for a response) by using CTRL /F (ACK).
If a program is run with the # option, and that program requests the number of rows and columns
on the terminal, it receives a value of zero for both. This is technically correct, but it causes some
programs to lock up.
With redirection you can use "piping"—redirecting the output of one program into the input of another.
For example:
REDIR ERSATZ | TYPE/P
RETURN
This command takes the output of the ERSATZ program (typically a very long list) and feeds it to the
TYPE command which, because of /P, lets you see a paginated display on your terminal.
This example:
#PROCES >OUTPUT.LST
RETURN
runs the command file PROCES and sends the output (minus terminal-dependent escape sequences) to
OUTPUT.LST.
In another example:
REMOVE \<THE MEMO\> >OUTPUT.LST
RETURN
the phrase <THE MEMO> is an argument for the REMOVE.DO file. If you left out the "\" before the
< and > brackets (needed to indicate to the .DO file that THE MEMO is one argument, not two), the
command would try to find a file called THE to get input for REMOVE.DO. The above command calls
REMOVE.DO with THE MEMO as an argument, and puts the results in OUTPUT.LST.
The REDIR command forces redirection if NOREDIRECTION has been set for your job.
REDIR is useful in command files when it is not known if redirection is on or off. See the
REDIR reference sheet for more information. That reference sheet also includes a list of
messages you may get when using redirection.
System Commands Reference Manual. Rev. 18
Chapter 6 - System Commands
List by Function
The rest of this manual consists of reference sheets explaining the use of each system command. We
have organized these sheets alphabetically to help you find them quickly. Below is an alphabetically
ordered list of all AMOS commands. We also provide a functional summary of the AMOS commands,
so if you are not familiar with the name of a specific command, but know its function, you will be able to
find it.
AlphaTCP commands do not have reference sheets in this manual, and are not included in the
lists in this chapter. For information on AlphaTCP commands, please see the AlphaTCP User's
Guide and the AlphaTCP Administrator's Guide.
Commands marked with an asterisk (*) in the list are included for compatibility with older software only;
we recommend you do NOT use them.
ALPHABETIC LIST OF AMOS COMMANDS
ACD
ASCDMP
BASBP
BATCH
CACHE
CDIR
COMPIL
CPMDIR
CRT520
DB
DING
DO
DOSIMP
DSKCPY
DUMP
ESLSI
FILTAP
FIXTRN
FLPWIN
FMTSCZ
FREE
HELP
JOBALC
ADJIT
ATTACH
BASIC
BAUD
CAL100
CLEAR
COMPLP
CREATE
CRT610
DBD
DIR
DOSDEL
DOSMKD
DSKDDT
DVD
ESNIC
FIX
FIX210
FMSFLP
FMTS2
FWUPD
ISMBLD
JOBPRI
AGREP
BACKUP*
BASICP
BDRES
CBDS
CMP
CONT
CRT410
CRT620
DEL
DIRBD
DOSDR
DOSRMD
DSKDMP
DVDRES
EXP
FIXCRC
FIX219
FMTDVD
FMT210
GETVER
ISMDMP
JOBS
System Commands Reference Manual, Rev. 18
AMSCFG
BADBLK
BASICX
BITMAP
CBEN
COMPAT
COPY
CRT415
CTYPE
DEVTBL
DIRSEQ
DOSEXP
DOSTYP
DSKFIL
ERASE
FILCOM
FIXFLP
FIX420
FMTFLP
FMT219
GLOBAL
ISMUTL
KILL
APPEND
BAKDIR*
CPMCPY
CRT420
DATE
DSKANA
DSKPAK
ERSATZ
FILDMP
FIXLOG
FLPDIR
FORCE
HASHER
ISOCD
LABEL
Page 6-2
LDVSTS
LOG
MAKACD
MAKQUE
MFDSEQ
MONTST
MTUSAV
PASS
PRINT
RADMON
REWIND
SAVE
SENDT
SI
SMEM
STRDIR*
SYSACT
TAPE
TMODE
UTC
VER
WRDCNT
640INI
Chapter 6
LIBLIT
LOGOFF
MAKBD
MAP
MK
MOUNT
MUSER
PATCH
PRNT
REDALL
RNDRED
SCSI
SET
SIZE
SORT
STRRES*
SYSLOG
TAPFIL
TRMDEF
VCRDIR
VERIFY
WRMGEN
LINCNT
LOGON
MAKDVD
MEMORY
MONGEN
MTBOOT
M68
PLAYCD
PUSH
REDIR
RUN
SCZCSH
SETJOB
SKIP
SRCCOM
STRSAV*
SYSTAT
TAPLOG
TXTFMT
VCRRES
VUE
XED
LNKLIT
LOKUTL
MAKE
MENU
MONHSH
MTUDIR
OSINST
POP
QDT
RENAME
RUNP
SCZERR
SETPEN
SLEEP
STAT
SUBMIT
SYSTEM
TDVDEF
TYPE
VCRSAV
WAIT
XMOUNT
LOAD
MTURES
PARITY
PPN
QUEUE
RESTOR*
RUNX
SCZPIC
SHELL
SLEEPR
STAT1
SYMLIT
TAPDIR
TIME
U
VDKUTL
WINFLP
XY
FUNCTIONAL SUMMARY OF COMMANDS
Commands that do several functions appear under more than one heading.
Directory and Account Commands
BAKDIR*
DOSRMD
MUSER
STRDIR*
DIR
FLPDIR
PASS
SYSACT
DIRSEQ
LOG
POP
TAPDIR
DOSDR
LOGOFF
PPN
VCRDIR
DOSMKD
LOGON
PUSH
CMP
DIRSEQ
FILCOM
MAKE
SORT
COPY
DSKDMP
FILDMP
PRINT
SRCCOM
CREATE
DSKFIL
ISOCD
PRNT
VUE
File Commands
ASCDMP
DEL
ERASE
LINCNT
SAVE
WRDCNT
APPEND
DIR
EXP
LOAD
SIZE
XED
System Commands Reference Manual. Rev. 18
System Commands List by Function
Page 6-3
Wildcard File Commands
AGREP
DEL
DOSEXP
FLPDIR
MTUSAV
STRDIR*
VCRDIR
APPEND
DIR
DOSIMP
FLPWIN
PRINT
STRRES*
VCRRES
BACKUP*
DIRSEQ
DVDRES
MAP
PRNT
STRSAV*
VCRSAV
BAKDIR*
DOSDEL
ERASE
MTUDIR
RENAME
TAPDIR
WINFLP
COPY
DOSDIR
FILTAP
MTURES
RESTOR*
TAPFIL
Disk and File Copy Commands
APPEND
COPY
DVDRES
MTUDIR
STRRES*
VCRSAV
BACKUP*
DOSEXP
EXP
MTURES
STRSAV*
WINFLP
BDRES
DOSIMP
FILTAP
MTUSAV
TAPFIL
CMP
DSKCPY
FLPWIN
RESTOR*
VCRRES
Text Processing Commands
AGREP
VUE
CMP
WRDCNT
EXP
XED
LINCNT
TXTFMT
BASICX
GLOBAL
RUNP
COMPIL
LIBLIT
RUNX
DING
KILL
SET
XY
FORCE
LOG
SETJOB
MEMORY
SAVE
Language Processor Commands
BASBP
COMPLP
LNKLIT
SYMLIT
BASIC
DB
M68
BASICP
FIX
RUN
Job and Terminal Handling Commands
ADJIT
JOBALC
LOGOFF
SLEEP
ATTACH
JOBPRI
LOGON
TDVDEF
BAUD
JOBS
SEND
WAIT
Memory Partition Commands
DEL
SMEM
LOAD
MAP
System Commands Reference Manual, Rev. 18
Page 6-4
Chapter 6
Analysis and Certification Commands
BADBLK
CRT610
FMTS2
CLEAR
CRT620
HASHER
CRT410
DSKANA
REDALL
CRT415
FIXCRC
RNDRED
CRT520
FMTSCZ
VERIFY
MTUDIR
SET
TAPLOG
MTUINI
SKIP
640INI
MTURES
TAPE
CRT610
MTUDIR
STRRES*
WRMGEN
DVDRES
MTURES
STRSAV*
MAKACD
MTUSAV
VCRDIR
BITMAP
ERSATZ
HELP
LDVSTS
QUEUE
SI
SYSTAT
VER
COMPAT
ESLSI
JOBALC
LOKUTL
SCSI
SMEM
SYSTEM
CAL100
DIRSEQ
ISMUTL
MUSER
SET
VDKUTL
CBDS
DSKANA
LOKUTL
OSINT
SYSACT
WRMGEN
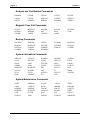
Magnetic Tape Unit Commands
FILTAP
MTUSAV
TAPDIR
MTBOOT
REWIND
TAPFIL
Backup Commands
BACKUP*
MAKBD
RESTOR*
VCRRES
BAKDIR*
MAKDVD
STRDIR*
VCRSAV
System Information Commands
AMSCFG
DATE
ESNIC
JOBPRI
MEMORY
SCZCSH
STAT
TIME
ATTACH
DEVTBL
FREE
JOBS
MONHSH
SCZERR
STAT1
TRMDEF
BADBLK
DUMP
GETVER
LABEL
PPN
SET
SYSLOG
UTC
System Maintenance Commands
ADJIT
CBEN
DSKDDT
MFDSEQ
PASS
SYSLOG
BADBLK
COMPAT
DSKPAK
MONGEN
PATCH
TIME
CACHE
DATE
FIXCRC
MONTST
QDT
TMODE
System Commands Reference Manual. Rev. 18
ACD
FUNCTION
Makes the logical devices on an AMOS CD accessible without being defined in a DEVTBL
statement in your system initialization command file.
CHARACTERISTICS
ACD is re-entrant and re-usable. It temporarily takes control of the SCSI bus, preventing other
users from accessing it while you connect or disconnect the CD-ROM drive.
To make the CD-ROM always usable, you can add the ACD command to your system
initialization command file. See the System Operator's Guide to the System Initialization
Command File for more information.
For more information about using AlphaCD, see the AlphaCD Installation Instructions, which
come with AlphaCD.
FORMAT
ACD {/U}
OPTIONS
/U
Unload. Use this switch to temporarily prevent other users from accessing
the SCSI bus while you disconnect the CD-ROM drive or switch CDs. It
also removes the ACDxxx: device table entries created by ACD.
OPERATION
If you need to attach a CD-ROM to your computer, follow the instructions below:
1. Before attaching your CD-ROM drive to the computer, type SCSI
IDs are available on your computer.
RETURN
to see what SCSI
2. Follow the instructions for your CD-ROM drive to set the drive’s SCSI ID to an available
ID.
3. Make sure no one is using the computer and power it down following the instructions in your
Owner’s manual.
4. Attach the CD-ROM drive to the external SCSI connector or an available connector on an
external SCSI cable. Be sure not to exceed the allowed length of the physical SCSI bus. This
is especially important on the Wide SCSI-2 bus.
System Commands Reference Manual, Rev. 15
ACD
Page 2
5. Turn on power to the CD-ROM drive and power up the computer.
Insert the correct media into the CD-ROM, then type
ACD
RETURN
ACD locates the CD-ROM drive and displays the number of logical units on the drive, the
number of queue blocks used while the CD is attached (normally less than 100), and the name of
each logical device on the CD.
If there is no CD in the drive, the program displays:
?There is no CD-ROM installed in the CD-ROM drive
and exits.
If the CD-ROM disk driver, ACD.DVR, has been loaded into system memory by the SYSTEM
command in the system initialization command file, the AlphaCD is accessible to all users after
ACD has exited successfully. Otherwise, the AlphaCD is available only to the user entering the
ACD command. In the latter case, ACD displays:
"%WARNING - ACD.DVR is not loaded in system memory,
therefore this job will be the only one able to
access AlphaCD."
If you want to detach the CD-ROM drive or switch to another CD, use the /U switch:
ACD/U
RETURN
To remove the CD-ROM from the computer after you have finished using it, remove the media
from the CD-ROM. Then make sure you power down the computer before unplugging it from
the SCSI bus.
MESSAGES
?AlphaCD is already installed
You've used the ACD command, but the CD-ROM drive is already installed on the SCSI
bus. ACD has no effect.
CD-ROM drive found at SCSI id: <#>
ACD is confirming the SCSI ID of the CD-ROM it is about to use.
?CD-ROM is not an AlphaCD - insert an AlphaCD and try again
System Commands Reference Manual, Rev. 15
Page 3
ACD
ACD cannot read AMOS device information from the CD-ROM disk. Remove the CD
disk from the drive and make sure it is an AlphaCD, clean, and not scratched. Re-insert
the disk and try ACD again. If the problem still occurs, either the disk is unreadable, it
does not contain AMOS information, or the CD-ROM drive needs cleaning or
maintenance.
?FATAL ERROR - can't locate DVR:ACD.DVR Reboot the system and copy
?
ACD.DVR into DVR: before using ACD again.
ACD cannot find a necessary companion file, ACD.DVR in the DVR: account (usually
DSK0:[1,6]). Reboot the system and copy the needed file into DVR:.
?Impossible error - can't find ACDn: entries in DEVTBL
?Impossible error - freeing queue blocks that aren't allocated
ACD detected a system problem when unmounting the CD-ROM. Reboot the system.
Invalid command line - ACD to install or ACD/U to un-install.
ACD did not understand the command line you entered.
?No free SCSI addresses - you must remove at least one SCSI peripheral
?in order to access AlphaCD
All available SCSI IDs are in use, and there is no CD-ROM drive attached. (The SASI
bus supports only four SCSI devices; the SCSI-2 bus supports seven; and the Wide
SCSI-2 bus supports 15.) To use a CD-ROM drive, power down your computer, remove
one of the devices from the SCSI bus, and attach the CD-ROM.
?Not enough contiguous queue blocks to create device table
?You must allocate more via the QUEUE statement in your system
? initialization command file
ACD uses a system resource called queue blocks to temporarily create device table
entries describing the logical units on the CD-ROM disk. ACD cannot allocate enough
contiguous blocks. As queue blocks are a dynamic, system-wide resource, either try
again in a few seconds, or increase the number of queue block entries allocated by the
QUEUE command in your system initialization file and reboot the system.
Using AM-PC CD-ROM interface
ACD found and is using an "ACD=" line in the AMPC.INI file.
?You must install a SCSI dispatcher prior to using this program.
If your system uses the SCSI-2 or Wide SCSI-2 bus, you must install a SCSI dispatcher
to use ACD.
System Commands Reference Manual, Rev. 15
ADJIT
FUNCTION
Displays and changes the values in the dynamic job scheduling priority table.
CHARACTERISTICS
When dynamic job scheduling is on, the length of the time slice given to each job varies continually
based on the number of jobs currently in the run queue. The dynamic job scheduling priority table
sets the length of the time slice each job receives depending on the number of jobs in the queue.
ADJIT displays the priority table and lets you change the time slice length for any queue size.
The priority values take effect only when dynamic job scheduling is on. You can turn
dynamic job scheduling on and off using the SET command.
OPERATION
To see the dynamic job scheduling priority table, type:
ADJIT
RETURN
This shows, in columns, the current time slice settings for each queue size. Generally, the settings
for smaller size queues are higher than for larger queues—the fewer jobs that are waiting for
attention, the more time each job gets.
The maximum setting is 40. To change a setting, type the queue size you want to change the value
for, RETURN , then type the setting you want and RETURN .
To leave the ADJIT screen, type END
RETURN
or press
CTRL
/C.
The values you enter are changed only in memory. When you reboot the system, the
priority settings will return to their default values.
MESSAGES
?Error - feature not supported by this release
Your current AMOS monitor doesn't support dynamic job scheduling.
System Commands Reference Manual, Rev. 04
AGREP
FUNCTION
Searches all files in the local account for an ASCII string.
CHARACTERISTICS:
AGREP is re-entrant and re-usable. AGREP is a quick way to find a string of characters in a set
of files without having to VUE each in turn. You may search in a binary file, but only for ASCII
characters. AGREP will not search in random files.
OPTIONS
/D
Sends file name(s) and number of occurrences to SEARCH.DIR.
/F
Turn on folding. All characters compared without regard to case.
/L
Send output to SEARCH.LST.
/N
Turn off screen auto-paging.
/T
Turn on token mode search.
OPERATION
Enter AGREP RETURN in the account you want to search. You are then prompted for the search
string, which can be any length sequence of printable characters, including blanks and tabs. There
are no wildcard characters. When you press RETURN , you are prompted for the file(s) to be
searched (the files must be in your current account). Enter the files to be searched, and any options.
For example:
AGREP RETURN
String to search for: INVENTORY'CONTROL
Files to search: *.BP/F
RETURN
As shown, you can use wildcards in the files to search.
Each line containing the search string is displayed on the screen. If there are more than 24
occurrences, AGREP displays one screen at a time (unless you use /N). If the display pages, press
any character to continue to the next page. You may use CTRL /C at any time to stop the search.
You may specify a file that contains the files to be searched by using an at sign (@). For example:
AGREP RETURN
String to search for: INVENTORY'CONTROL
Files to search: @FILES.TXT
System Commands Reference Manual, Rev. 06
RETURN
AGREP
Page 2
In this case, AGREP would search for the string in the files listed in the file FILES.TXT. If just
an @ is entered, AGREP looks for a file called SEARCH.DIR to use as a list of files.
MESSAGES
Besides standard AMOS file messages, you may see:
?File open error, error code = [code]
See the code explanation in the Monitor Calls Manual.
?Invalid switch
You entered an invalid command line switch. Use one of the valid options only.
?Output specification not allowed
You cannot enter an output file specification in the line defining the files to be searched.
Use the /D or /L option instead.
System Commands Reference Manual, Rev. 06
AMSCFG
FUNCTION
Analyzes and reports on the configuration of a running system.
CHARACTERISTICS
AMSCFG is re-entrant and re-usable. It scans system memory locations and system tables set up
by AMOS at bootup time and by other products as they initialize. AMSCFG sends a report of the
system configuration either to the screen or a disk file. You can control the level of detail in the
report by using command line switches. The disk file is a standard ASCII sequential file, which
you can view by using programs such as TYPE, VUE or XED.
AMSCFG is an unsupported product from Alpha Microsystems. It is supplied as-is without any
warranty.
FORMAT
AMSCFG {/switch{,/switch}}
switch is an option request.
DEFAULTS
AMSCFG defaults to continuous screen output and summary information on each section reported,
with no system resident or installed program information.
OPTIONS
/A
Report on AlphaBASE job usage, if any.
/D
Display disk information. Same as /DF
/DS
Do not report on each logical unit individually. Summarize information by
physical unit only.
/DF
Output full device information per logical unit, together with a summary per
physical unit.
/DL
Output disk label information as well. Forces /DF.
/F:fname
Output the report to a file named fname. Unless you also use the /K switch, if
the file already exists, it is not overwitten and the program aborts. Default
extension is .CFG.
/H:text
Output text as a header at the top of each printed page. Ignored for screen
output.
System Commands Reference Manual, Rev. 06
AMSCFG
Page 2
/H
Prompt for the printed page header separately. Ignored for screen output.
/IDV
Output details on used .IDVs.
I:fname
Include a printout of the contents of the file named fname at the end of the report.
/IP:fname
As /I:fname, but starting each file at the top of a new page.
/J
Output detailed job table information.
/K
Used with the /F:fname option. If the file named fname already exists, delete it
without further ado.
/L:n
Output n printed lines per page. Ignored for screen output, see the /P option.
The defaults for the /LL, /LR, /LDP, /LTS, /LDF, and /LTF switches are those defined in
the job's active language definition file.
/LL:c
Set the left PPN symbol to c.
/LR:c
Set the right PPN symbol to c.
/LDP:c
Set the decimal point character to c.
/LTS:c
Set the thousands separator to c.
/LDF:n
Set the date format: 0=MDY, 1=DMY, 2=YMD.
/LTF:n
Set the time format: 0=12 hour clock, 1=24 hour clock
/N
Output detailed AlphaNET node and AlphaTCP information.
/NOA
Suppress AlphaBASE job totals.
/NODL
Suppress disk label information.
/NOF
Suppress FOLDERS device information.
/NOJ
Suppress job detail.
/NON
Suppress network detail.
/NOR
Suppres system memory content detail.
/NOT
Suppress terminal detail.
/NOTDV
Suppress terminal driver information.
/NOX
Suppress installed program information
/P
Pause at the end of each screenful of information and wait for a key to be
pressed. Screen length is determined by the terminal’s TRMCHR settings.
Ignored for file output—use the /L:n option to specify the number of lines per
page for printed output.
/R
Output information on system resident modules.
/S
Output details on information held in the System Communications Area, and
certain details on hardware settings.
/T
Output information on terminal definitions.
/TDV
Output full information on used terminal drivers.
/X
Report details on certain installed programs.
/*
Output the fullest possible report. Can be used with the /NOxxx options.
/?
Output a brief help screen.
System Commands Reference Manual, Rev. 06
Page 3
AMSCFG
OPERATION
Enter AMSCFG followed by the option switches you want. For example:
1. To output full information to a file called SYSTEM.CFG, erasing any existing SYSTEM.CFG
file, with a header of "Joe's system":
AMSCFG/*/F:SYSTEM/K/H:Joe's System
RETURN
2. Same as above, but ignore terminal driver and FOLDERS information:
AMSCFG/*/F:SYSTEM.CFG/K/H:Joe's System/NOTDV/NOF
RETURN
3. Output the same detail to the screen, pausing between screenfuls:
AMSCFG/*/P/NOTDV/NOF
RETURN
4. Output the same detail to a file called SYSTEM.CFG, entering a page header separately:
AMSCFG/*/NOTDV/NOF/F:SYSTEM.CFG/H
RETURN
AMSCFG will then prompt you for the header:
Enter header:
AMSCFG does most of its work by scanning tables set up by system or application software. The
only hardware scanning is for SSDs, boot PROM revisions, CPU settings and devices connected to
the SCSI bus. If a device has not been set up by software (usually in the system initialization file),
AMSCFG will generally not report the presence of the device. AMSCFG only detects Herbie
controllers (AM-515, AM-520 and AM-522s) by looking at .DVR files and comparing fields with
standard Alpha Micro-defined IO memory space locations. .DVRs using non-standard locations,
or third-party drivers that occupy that address space, may be misreported.
Settings descriptions are taken from the appropriate manuals. In particular, the message May be
on VME bus is particularly unreliable, as the software setting more accurately reflects the use of
particular hardware components on the CPU motherboard.
Reported sizes are rounded to the nearest whole number (or nearest tenth if a decimal point is
displayed). In some circumstances, adding individual items may not equal the displayed total, due
to rounding errors. The total figure is more accurate than the sum of the items, as it is based on the
sum of individual byte or block counts, not on the accumulation of rounded values.
Certain early versions of the monitor (especially prior to AMOS 1.3D) may not report certain
fields fully or properly.
AMSCFG knows about the following third-party products in their released versions of October
1995. Earlier or later versions of these products may produce incompatibilities with AMSCFG.
System Commands Reference Manual, Rev. 06
AMSCFG
Page 4
Alpha Microsystems does not support AMSCFG handling of other software versions, but
welcomes user feedback of any problems:
Interlink Systems, Inc. SuperDisk
Soft Machines, Inc. FOLDERS
U.A. Systems, Inc. AlphaLAN
Alpha Base Systems, Inc. AlphaBASE and Metropolis
ProVUE Development, Inc. SuperVUE
It is not possible to consistently locate SuperVUE modules by looking in system files. If
SuperVUE is installed in a different account than DSK0:[1,20], AMSCFG will not find
the files.
Any trademarks are the property of their respective holders.
FOLDER devices do not affect the figures for disk capacity for the logical device on which the
folder resides (or for total disk space). The logical's disk capacity and free space counts reflect the
fact that FOLDER is an allocated contiguous file, and so takes up room on the logical unit. The
fact that the FOLDER may contain free space is not germane to the logical's statistics.
The /IDV and /TDV switches report on only those drivers that are actually in use by physical
terminals on the system. Drivers attached to the appropriate system chain but not referenced
through the terminal definition chain are not reported on in detail.
AMSCFG cannot tell from where a particular file has been loaded. AMSCFG always assumes the
Alpha Microsystems' specified default. If you have loaded a file from a different account, or
renamed or copied a file to a different name, AMSCFG may incorrectly report a setting.
AMSCFG does, however, always display the unambiguous filename of the file on which it is
reporting.
If non-Alpha Microsystems' products are used in the running system, AMSCFG may not report
correct information. Alpha Microsystems does not support AMSCFG in such circumstances.
MESSAGES
%Bad 'include' filename or out of memory
AMSCFG could not read the include file specified by the /I or /IP command. Either the file
does not exist or you do not have enough memory in your partition.
%Cannot find file <name>
AMSCFG cannot locate a file you requested be appended to the report with the /I or /IP
switch. Re-enter the command line.
System Commands Reference Manual, Rev. 06
Page 5
AMSCFG
Cannot INIT buffer - cannot read file
AMSCFG cannot process a file. Try increasing your memory allocation and rerunning
AMSCFG.
Cannot read file any further
AMSCFG had a problem reading a file. Usually this means there is a device error on the
disk. Contact your System Operator.
Could not hash file
AMSCFG could not produce a hash total for this file. Either you have run out of memory
or there is a problem reading the file from the disk. Contact your System Operator for
assistance.
%filename is a contiguous file. Cannot include!
AMSCFG can print only sequential files.
%Illegal switch settings
One of the switches you used had an invalid option setting. Check the command line and
try again.
%Illegal value in date format setting.
The /LDF:n value is invalid. Enter a value of 0-2 only.
%Illegal value in time format setting.
The /LTF:n value is invalid. Enter a value of zero or one only.
%Invalid command line
AMSCFG could not understand your command line. Identify the error and retype the
corrected line.
%No queue blocks available
AMSCFG needs queue blocks for its internal operation. Ask your System Operator to
increase the number of queue blocks allocated by AMOS at system initialization time.
Report is in filename
A reminder of the name of the report file you selected with the /F command.
System Commands Reference Manual, Rev. 06
AMSCFG
Page 6
%Program aborted by
CTRL
/C
You stopped the program by pressing
CTRL
/C.
System Commands Reference Manual, Rev. 06
APPEND
FUNCTION
APPEND combines one or more source files into a single file.
CHARACTERISTICS
APPEND is re-entrant and re-usable. You cannot create a file in an account outside of the project
you are currently logged into, unless you are logged into [1,2].
You may use APPEND to combine sequential files of any type. You can append one file onto the
end of another file by specifying the same specification for the new file as one of the old files you
are combining. APPEND does not change the contents of the old files (unless the new file has the
same name and extension as one of the old files).
FORMAT
APPEND newfilespec=filespec{,filespec(s)}
newfilespec specifies the new file that will hold the contents of the combined files, and the
filespec(s) are the files you want to merge.
DEFAULTS
Assumes the account and device you are currently logged into and a null file extension (i.e., a nocharacter extension) for the new file specification.
Assumes the extension of the new file specification for the first file specification, and then assumes
for each subsequent file specification the actual or assumed extension of the previous file
specification.
OPERATION
Enter APPEND and the specification of the new file, an equal sign, and one or more specifications
of files you want to merge. For example:
APPEND ASMBLR.M68=PARSE.M68,SCAN,TABLE,CNVRT
RETURN
When APPEND has written the combined contents of the old files into the new file, you are
returned to AMOS.
System Commands Reference Manual, Rev.07
APPEND
Page 2
EXAMPLES
If you enter:
APPEND ASMBLR.M68=PARSE,SCAN,TABLE,CNVRT
RETURN
APPEND assumes the default extension of .M68 for each of the files PARSE, SCAN, TABLE and
CNVRT because that is the extension of the new file ASMBLR. If you enter:
APPEND ASMBLR=PARSE,SCAN,TABLE,CNVRT
RETURN
APPEND assumes that the extension of the file ASMBLER is a null extension (ASMBLR.), an
extension having no characters. APPEND assumes, by default, that the extensions of PARSE,
SCAN, TABLE and CNVRT are also null extensions. If you enter:
APPEND EXAMPL.TXT=INTRO,SAMPL1.BAS,SAMPL2,CLOSE.TXT
RETURN
APPEND creates the new file EXAMPL.TXT to include INTRO.TXT (the extension is assumed
to be the same as the new file specification), SAMPLE1.BAS, SAMPL2.BAS (the extension is
assumed to be the same as the previous file specification, SAMPL1.BAS), and CLOSE.TXT.
MESSAGES
Cannot OPEN [filespec] - file not found
Check your syntax, or use DIR to locate the file.
?Command error
Check your syntax and try again.
?File specification error
Check your syntax and try again.
?You may not append to files on device MEM:
You cannot change the size or contents of a module in user memory by using the APPEND
command.
System Commands Reference Manual, Rev. 07
ASCDMP
FUNCTION
ASCDMP displays the data in physical disk blocks in ASCII form on your terminal.
CHARACTERISTICS
ASCDMP is re-entrant and re-usable. It displays all printable ASCII characters in the block,
including HT, LF, CR, and FF. All non-printable characters display as periods (.). Enter the
number of the disk block you want to display in the same number base the system is using for your
numeric displays (usually octal). You can change the system display base to hexadecimal by using
the SET command.
You must be logged into DSK0:[1,2] to use ASCDMP.
FORMAT
ASCDMP {devn:}{physical-block-number}
devn: is the device name and physical-block-number is the number of the physical block on the
disk you want to display.
DEFAULTS
devn: defaults to DSK0:. The physical-block-number defaults to zero.
OPERATION
Log into OPR: (DSK0:[1,2]) and enter ASCDMP optionally followed by a device specification and
physical block number. For example:
LOG OPR: RETURN
ASCDMP DSK2:200
RETURN
To find out what blocks are contained in a specific file, use DSKFIL.
MESSAGES
?Cannot INIT [device-name] - device does not exist
Check your syntax, or use DEVTBL to see the devices defined on your system.
System Commands Reference Manual, Rev. 04
ASCDMP
Page 2
?Cannot read [device-name] - disk not mounted
MOUNT the disk and try again.
?Privileged program - must be logged into OPR:
Log into DSK0:[1,2] and try again.
System Commands Reference Manual, Rev. 04
ATTACH
FUNCTION
Connects a job to a terminal, or displays the jobs and terminals attached on a system.
CHARACTERISTICS
ATTACH is re-entrant and re-usable. When the system is reset or powered up, it automatically
attaches the first job to the first terminal defined in your system initialization command file.
Except for that special case, however, the system does not automatically attach any jobs to
terminals. If you want a job to be able to use a terminal for input and output, you must explicitly
attach the job and the terminal by using the ATTACH or SETJOB command.
If you want to attach a job and a terminal already linked to other units, the ATTACH command
detaches the job and the terminal from their previous attachments. Then it will attach the freed job
and terminal to each other. This is the only way you can detach jobs and terminals (i.e., by
attaching them to something else).
If you want to attach a terminal to a job logged into an account, ATTACH asks you for the
password of that account, if one exists, before it attaches the specified job and terminal. You can
attach your terminal to a job, but be careful the job has some memory allocated to it or you will not
be able to do much.
A typical use for ATTACH might be to attach a printer to a job as a terminal so you can get a
paper copy of the program's output.
FORMAT
ATTACH {terminal,}{job}
If you specify a terminal, you should also specify a job. If you specify a job alone, it will attach
that job to your own terminal.
OPERATION
To find out what jobs and terminals are attached to each other, enter ATTACH. For example:
ATTACH RETURN
TERM1 attached to JOBA
TERM2 attached to JOBC
DUKE attached to SPOOL
System Commands Reference Manual, Rev. 07
ATTACH
Page 2
To attach your terminal to a specific job, add a job name. For example:
ATTACH JOBA
RETURN
To attach a specific job to a specific terminal, enter ATTACH followed by the terminal name, a
comma, and the job name. For example:
ATTACH TERM1,JOB4
RETURN
The terminal names are set by the TRMDEF commands in your system initialization command file.
To see the names of all of the terminals on the system, enter TRMDEF at AMOS level. The first
column on the left of the display lists all of the terminals.
MESSAGES
?Account not found on login disk for specified job
You attempted to attach a terminal to a job logged into an account which no longer exists
on the device specified (or the default device). See what can be done to log the job into
another account.
?Bad password
You did not specify the correct password. Check your spelling and try again.
?Nonexistent job
You tried to attach a terminal to a job not defined on your system. Check your typing or
use SYSTAT to see a list of the jobs defined on your system.
?Nonexistent terminal
You tried to attach a job to a terminal not defined in a TRMDEF command in your system
initialization command file. Use the TRMDEF command to see a complete list of all of
the terminals defined on your system.
System Commands Reference Manual, Rev. 07
BACKUP
FUNCTION
The BACKUP command copies files from a hard disk drive to the specified backup device along
with their disk device and account specifications, and the date and time of the backup.
The BACKUP, BAKDIR, and RESTOR commands are included only for compatibility
with earlier operating system versions. Do NOT use these commands unless absolutely
necessary. Use the MTUxxx commands for all tape backup, and CRT620 to create warm
boot tapes!
CHARACTERISTICS
BACKUP is re-entrant and re-usable, and a wildcard command. Files can be copied from any disk
account to the backup medium regardless of the account logged into. No account passwords are
copied.
You use BACKUP in combination with BAKDIR (which displays a directory of files on backup
media) and RESTOR (which copies files from backup media to a hard disk).
When you are using a VCR (except with the /TRANSFER option), BACKUP locks up all
other users on your system. Notify other users before using BACKUP.
BACKUP can be set up to use a default backup device. This is useful if you normally use one
device for most or all of your backups. When this default is in effect, you don't have to tell
BACKUP what device you wish to use, thus saving a step in the backup process. To set a device
as the default, define an ersatz device called BACKUP: in your ERSATZ.INI file. For example:
BACKUP: = MTU0:
Define the device you want as your default backup device after the name. If you want to use
another device after the default device has been set, you can use the /OVERRIDE switch to be
prompted for the device name. If you don't have a default device and you don't use /OVERRIDE,
BACKUP presents a menu of available devices to select from.
FORMAT
BACKUP{/switch} {filespec,filespec(s)}{/switch}
switch is an option request, and filespec(s) specify the files to be transferred.
System Commands Reference Manual, Rev. 07
BACKUP
Page 2
DEFAULTS
The default filespec is *.* and the device and account you are logged into. For video tape backup,
the default number of copies is 5.
OPTIONS
All switches may be abbreviated to any unique characters. Placing NO before a switch turns that
switch off. The default switches are /NOAPPEND, /NOBOOT, /NOHASH, /NOQUERY,
/NOSUPPRESS, and /NOTRANSFER.
/AFTER:date&time
Back up only files modified after specified date and time.
Operation switch.
/APPEND
Add files to end of backup medium (floppy disks only).
Operation switch.
/BEFORE:date&time
Back up only files modified before specified date and time.
Operation switch.
/BOOT
Generate warm boot tape (not for floppy disks). Operation
switch.
/COPIES:n
n+5 extra copies of each data block. Default for n is 0 (5 extra
copies). VCR only, operation switch.
/HASH
Calculate a hash total. Operation switch.
/QUERY
Confirm files before backup. File switch.
/MODIFIED
Back up only files modified since last backup. Operation
switch.
/OVERRIDE
Used to override the default backup device (if one exists). You
are prompted for the name of the device. Operation switch.
/SUPPRESS
Suppress "files selected" display. File switch.
/TRANSFER
Back up without locking out other users, using at least 20 extra
copies. VCR only. To use more than 20 extra copies, use
/COPIES:n switch also and set n to more than 15. Operation
switch.
/VOID
Use when transferring files between systems connected by video
cables. Operation switch.
/WAIT:+@HH:MM
Wait specified time before backup begins. VCR only.
Operation.
If you inadvertently enter both /QUERY and /SUPPRESS, /QUERY takes precedence and the
/SUPPRESS switch is ignored.
In the /AFTER and /BEFORE switches, you must specify dates and times in the following format:
/switch:{month-day-year}{@hour:minute{AM/PM}}
System Commands Reference Manual, Rev. 07
Page 3
BACKUP
You must specify either a date, a time, or both. Specifying a time without a date defaults to the
current date, while a date without a time defaults to zero time (midnight).
The argument for /WAIT must be a relative number of hours and minutes from the current time:
/WAIT:+@hours:minutes
OPERATION
Enter BACKUP followed by the desired file specifications. For example:
BACKUP DSK0:MEMO.TXT[150,0],DSK1:TEST.M68[100,3]
RETURN
BACKUP responds with a menu of the available backup devices. After you make your selection,
BACKUP asks you to confirm that the device specification is correct. If it is, press RETURN . If
not, enter the correct specification.
BACKUP then gives you step-by-step instructions for completing the backup. These instructions
vary according to the type of backup device you are using.
MESSAGES
?All "date and time" switches must be in absolute format.
See the rules above for specifying dates and times, and try again.
?Attempt to initiate device handler failed, error code n
Check to see if the number of jobs defined in your system initialization file is enough to
include one for the device handler task. The error codes are:
1 = Job table is full
4 = %HNDLR task already exists
If you see #1, add more jobs in the JOBS command in your system initialization file. If
you see #4, it means someone else is running BACKUP, RESTOR or BAKDIR.
?BACKUP media not compatible with current software.
The backup medium you are using is not compatible with the current version of your
software. See your System Operator for help.
?Cannot be logged onto the backup device
Check your entry for errors. Make sure you used a colon after the device name.
System Commands Reference Manual, Rev. 07
BACKUP
Page 4
?Cannot open message socket. ITC error: n
See your AMOS Monitor Calls Manual for an explanation of the error code. This
indicates an internal communication error—ask your System Operator or Alpha Micro
dealer for help if this occurs frequently. Make sure you have a MSGINI line in your
system initialization file.
?Cannot use [ersatz name] - ersatz name not found
Check your syntax, or define the ersatz name in your ERSATZ.INI file.
?Cannot use [device] - [AMOS error message]
Either your ersatz default device definition or the device you specified after /OVERRIDE
was incorrect. Using the AMOS error message as a clue to what is wrong, check the
appropriate entry and correct it.
?Can't find device handler in DEVTBL
See your Alpha Micro dealer for help.
%Device specified is not a supported backup device
Check your entry for errors. Make sure you used a colon after the device name.
?Diskette is full
Place a new diskette in the drive and continue the backup.
?End of media detected.
The device handler detected the end of a streaming tape cartridge before completing the
backup—there was not enough room on the tape for all the files you specified. Use a
larger capacity backup device or split your backup into two or more sections.
?End of media detected on a split file.
Place a new diskette in the drive and continue the backup.
?Fatal error, aborting device handler task
This is an informative message that occurs after some other fatal error, and indicates the
device handling task is also aborting.
?Fatal error, illegal message code n received from device handler.
The main task received an error it did not understand from the device handler. Try again—
if the problem persists, see your Alpha Micro dealer for help.
System Commands Reference Manual, Rev. 07
Page 5
BACKUP
?Fatal error, ITC error code [n]
See your Monitor Calls Manual for an explanation of the error code. This indicates an
internal communication error—ask your System Operator or Alpha Micro dealer for help
if this occurs frequently.
%Field size exceeded. Re-enter.
You've exceeded the length of the current field. Make a shorter entry.
%No supported backup devices found
Your system is not set up for any of the three supported backup devices, so you can't
specify a device.
?Program aborted by device handler.
?Device not ready.
The medium you are trying to back up to is write protected. Either switch media or writeenable the medium you're using.
?Tape is full
The streaming tape drive is full. BACKUP then tells you how many of the files you
requested were actually backed up.
?Unable to run device handler task
The device handler failed to communicate with the main task after it was spawned. See
your System Operator or Alpha Micro dealer for help.
?Unspecified error received.
The main task received an error it did not understand from the device handler. Try again—
if the problem persists, see your Alpha Micro dealer for help.
?VCR failed to respond to command.
The problem could be in the VCR remote control, the remote control cable, or the
computer. Make sure the cable is properly connected—if it is, try to determine if it's the
VCR or computer so you can get it fixed.
?WAIT switch format error detected.
The amount of time specified with the WAIT switch must be relative. For example,
/WAIT:+@2:30 would cause the VCR backup to start two and a half hours after you enter
the BACKUP command.
System Commands Reference Manual, Rev. 07
BACKUP
Page 6
?Warm Boot Monitor [monitor-name] not found.
Make sure you specified the monitor correctly, or use DIR to locate the file.
%WARNING -- Device handler task failed to respond. Reboot system.
Reboot your system. There should be no damage to your data.
System Commands Reference Manual, Rev. 07
BADBLK
FUNCTION
Lets you view the list of defects (bad blocks) for a disk device. For most disks, you can add or
delete bad blocks from the list.
CHARACTERISTICS
BADBLK is re-entrant and re-usable. It reads the list of disk defects created by a disk certification
program. Depending on the type of disk, this list is either in the file BADBLK.SYS[1,2], or
handled by the drive internally on a portion of the disk reserved for that purpose. In either case, the
list is created when the disk is certified.
Certifying a disk is a serious procedure which you should do only if you have a situation
where the data on the disk is not recoverable. In cases where you need to modify the list of
disk defects, we strongly recommend you use BADBLK rather than re-certifying the disk.
For disks which use BADBLK.SYS[1,2], BADBLK also verifies the file's hash total (a value
based on the file's contents that checks the validity of the data in the file).
While AM-520 and AM-522 controlled disks do have BADBLK.SYS[1,2] files, these files are not
used by the operating system. Defects are handled internally by the disk controller. You can still
use BADBLK to update the defect list.
To use BADBLK on a SCSI disk, the disk must be connected to the SCSI bus. You cannot
use BADBLK on a SCSI disk connected to an AM-515 disk controller.
For a discussion of when to use BADBLK to create or modify the BADBLK.SYS file, see your
System Operator's Guide.
FORMAT
BADBLK devn:
OPERATION
When used from an account other than OPR:
Enter BADBLK and the logical device you want a bad block list for. For example:
BADBLK PLD0:
RETURN
BADBLK displays the serial number of the device, the number of blocks or tracks marked as bad,
and lists the bad blocks or tracks.
System Commands Reference Manual, Rev. 07
BADBLK
Page 2
Block numbers are octal or hex depending on your current output radix. Track and head
numbers are decimal.
When used from OPR:
For most Winchester disk systems, you can add blocks to the bad block list for the device. For
non-SCSI devices, you can also delete blocks from the list or modify the serial number of the
device. Some disks also let you create a BADBLK.SYS[1,2] file if it doesn't already exist.
To perform any of these functions, be sure you are logged into DSK0:[1,2] and enter the BADBLK
command. For example:
LOG OPR RETURN
BADBLK DSK2:
*
RETURN
The * is the BADBLK prompt. There are general commands you can use with all disks:
E
H
L
S
Write out new information and exit.
Help (list instructions).
List bad blocks/tracks
Modify serial number.
Other commands depend on the type of device you have—enter H to see a menu for your device.
Adding and Deleting Bad Blocks
If you consistently receive messages stating a certain block has an error, such as:
Error 5 Drive 2 Block 4 (Cylinder 3 Head 2 Sector 1)
you may want to add that block to the bad block list.
Except for SCSI devices and AM-520/AM-522 controlled drives, before using the A, D or
M commands, back up the entire physical device you are going to be changing. Modifying
the bad block list destroys all the data on the physical disk!
When you add a block to the defect list for a SCSI or AM-520 or AM-522 controlled drive,
BADBLK tries to salvage the data in the bad block. However, if the block is unreadable, the data
will be lost, and you must restore the file from a backup.
After backing up the physical disk, if necessary, enter the BADBLK command as described above
and use the A option. In our example, using the track (cylinder) and head numbers:
* A 3,2
RETURN
System Commands Reference Manual, Rev. 07
Page 3
BADBLK
If you don't have a SCSI, AM-520, or AM-522 controlled device, you see:
%Warning: This command will destroy all data on disk!!
%Type "Y" if you wish to proceed. Proceed? Y RETURN
When adding or deleting a bad block, be sure you enter the block number in the correct
radix, either octal or hex.
If you want to delete a bad block, follow the same procedure, but use the D command. You cannot
use the D command with a SCSI disk.
When you use the M command, BADBLK reads the disk and creates a BADBLK.SYS[1,2] file on
it, or tells you if one already exists. The M command does not work on AM-415, AM-515, AM520/522 or AM-1000 controlled devices, or SCSI disks, which maintain the bad block list
internally.
To leave BADBLK, type E and press
RETURN .
MESSAGES
?BADBLK.SYS[1,2] does not exist.
Use the DIR command to search for the file. If the file has truly been lost, you have to
create a new one, either using the M option or by re-certifying the disk. Remember, some
disks do not have a BADBLK.SYS file.
?BADBLK.SYS is full
?No more entries allowed
BADBLK.SYS for this device is full. Contact your Alpha Micro representative.
Cannot read defect map, controller not initialized
The AM-520 or AM-522 disk controller for the specified disk has not been properly
initialized in the system initialization file. Revise the initialization file and reboot the
system before retrying.
?Can't fetch BADBLK.SYS[1,2]
This message occurs only on AM-415 and AM-1000 systems. The BADBLK program
could not load BADBLK.SYS into memory. Contact your Alpha Micro representative.
?CAUTION: hash total did not verify
The BADBLK.SYS file contains a bad hash total—the data in the file does not match the
hash total for the file. The data in the file is invalid. Make a backup copy of the entire
physical device, then re-certify the disk.
System Commands Reference Manual, Rev. 07
BADBLK
Page 4
?Command format error
You entered the A or D command incorrectly. Be sure you specified the proper number or
numbers for your type of disk.
%Could not list defects. Format code unrecognized.
The list of defects on a SCSI drive is not in a supported format. The drive is not usable in
its current state.
?D command not allowed on SCSI drives
You cannot delete a bad block from the list for a SCSI device.
?Duplicate entry
The block you tried to add to the bad block list is already listed. Make sure you entered the
block numbers correctly.
?Error sending REQUEST SENSE command
The SCSI drive returned an error condition when the list of defects were read. The drive is
not usable in its current state.
?Invalid command
The command you entered is not allowed. Check your entry, or use the help option to see
the proper commands and formats.
?Illegal disk address
The block or track and head number you specified is outside the valid range for the device.
Check your entry and/or the specifications for the device. Make sure you entered the block
in the correct radix.
?M command not allowed on [device-name]
You cannot use the M command with the specified device.
?S command not allowed on SCSI drives
You cannot change the serial number of a SCSI disk device using BADBLK.
?SCSI error code type n, code n
BADBLK had difficulty with the SCSI device. See the System Operator's Guide for an
explanation of the error code and type.
System Commands Reference Manual, Rev. 07
Page 5
BADBLK
?Unable to delete or add entry
If deleting, the block you specified was not listed. If adding, this appears after the
"Duplicate entry" message if the block is already listed.
Unable to read Bad Block Map - insufficient memory.
There is not enough free memory in your memory partition to read in the bad block map
from the disk. Delete unwanted memory modules or increase the size of your partition with
the MEMORY command.
%Unable to write defect map - error n
The AM-520 or AM-522 disk controller encountered an error when writing back the
modified defect map to the disk. The error number is a standard DDB error in the AMOS
Monitor Calls Manual.
?You must install a SCSI dispatcher prior to using this program
You must install a SCSI dispatcher for your system by using the SCZDSP command in the
system command initialization file and rebooting the system.
You may also see several system error message if you enter an invalid device specification. For
example:
?Cannot INIT [device-name] -- device does not exist
Check your entry, or use DEVTBL to see a list of the valid system devices.
?Cannot READ [filespec] - disk not mounted
Mount the disk and try again.
System Commands Reference Manual, Rev. 07
BAKDIR
FUNCTION
Displays a list of the files on a specified backup medium. Can also create a disk file containing a
directory of files.
The BACKUP, BAKDIR, and RESTOR commands are included only for compatibility
with earlier operating system versions. Do NOT use these commands unless absolutely
necessary. Use the MTUxxx commands for all tape backup, and CRT620 to create warm
boot tapes!
CHARACTERISTICS
BAKDIR is re-entrant and re-usable. The backup medium read by BAKDIR must have been
previously created with the BACKUP command. BAKDIR is a wildcard command.
Unless you are using a VCR and /T, BAKDIR locks up all users on your computer.
Notify other users before using BAKDIR.
BAKDIR can be set up to use a default backup device. This is useful if you normally use one
device for most or all of your backups. When this default is in effect, you don't have to tell
BAKDIR what device you wish to use, thus saving a step in the backup process. To set up a
device as the default, define an ersatz device called BACKUP: in your ERSATZ.INI file. For
example:
BACKUP:
VCR0:
Define the device you want as your default backup device after the name. If you want to use
another device after the default is "set up," use /OVERRIDE, and you will be prompted for the
device name. If you don't have a default device, and if you don't use /O, BACKUP displays a
menu of available devices.
FORMAT
BAKDIR{/switch} {{listspec}=}{filespec(s)}{/switch}
switch is an option request, listspec specifies a disk file for the directory, and filespec(s) specify
the file(s) you want displayed.
DEFAULTS
The default filespec is *.* and the device and account you are logged into. The default
switches are /NOK and /NOT. The default listspec is DIRECT.LST and the device and account
you are logged into.
System Commands Reference Manual, Rev. 07
BAKDIR
Page 2
OPTIONS
All BAKDIR switches affect all filespecs on the command line. Placing NO before a switch turns
off the switch. Switches may be abbreviated.
/FULL
Displays all available information about the files on the media.
/HASH
Displays the hash total of the file (if backed up with /H).
/KILL
Delete existing file matching the listpec before creating a list file.
/OVERRIDE
Overrides default backup device. You are prompted for the
device name.
/PROTECTION
Displays the protection codes (if any) of the files on the media.
/SUPPRESS
Don't display a dot on the terminal as records are read.
/TRANSFER
Don't lock out users from system (VCR only).
/UDATE
Displays the last date updated. Useful if you are going to use the
/BEFORE or /AFTER switches with RESTOR.
OPERATION
Enter BAKDIR and the desired switches and file specifications. For example:
BAKDIR DSK0:MEMO.TXT[150,0],DSK1:TEST.M68[100,3]
RETURN
BAKDIR displays a menu of available backup devices. Select the device you want. BAKDIR
then asks you to confirm the device name is correct—if so, press RETURN . If not, enter the correct
one. BAKDIR instructs you in running the backup device selected. Follow its directions, and
BAKDIR displays the directory. The first number on each line is the file's relative position on the
medium. Next, you see the full file specification, and the size of the file in 512-byte blocks. The
letter after the file size tells if the file is a random, or linked (L) file, or a sequential, or contiguous
(C) file. Then you see the date the file was backed up, and the file protection bits. If the files were
backed up with /H, the last item on the line is the hash total.
MESSAGES
?Attempt to initiate device handler failed, error code n
Check to see if the number of jobs defined in your system INI file are enough to include
one for the device handler task. The error codes you may see are:
1 = Job table is full
4 = %HNDLR task already exists
If you see #1, add more jobs in the JOBS command in your system INI file. If you see #4,
it means more than one user was running BACKUP, RESTOR, or BAKDIR at the same
time.
System Commands Reference Manual, Rev. 07
Page 3
BAKDIR
?BACKUP media not compatible with current software.
The backup medium you are using is not compatible with the current version of your
software. See your System Operator for help.
?BACKUP media not file structured.
BAKDIR could not read the label information block. BAKDIR can only read media
created by the BACKUP command.
?BACKUP media not written by BACKUP program.
Restore using the appropriate restore program.
?Cannot be logged onto the backup device
Check your entry for errors. Make sure you used a colon after the device name.
?Cannot open message socket. ITC error: n
See your Monitor Calls Manual for an explanation of the error code. This indicates an
internal communication error—ask your System Operator or Alpha Micro dealer for help
if this occurs frequently.
?Cannot use [device] - [AMOS error message]
Either your ersatz default device definition, or the device you specified after /OVERRIDE
was incorrect. Using the AMOS error message as a clue to what is wrong, check the
appropriate entry and correct it.
?Can't find device handler in DEVTBL
See your Alpha Micro dealer for help.
%Device specified is not a supported backup device
Check your entry for errors. Make sure you used a colon after the device name.
?End of media detected
While reading the directory from a streaming tape, BAKDIR reached an "end of tape"
marker. This normally indicates a problem with the streaming tape.
?Fatal error, aborting device handler task
This is an informative message that occurs after some other fatal error, and indicates the
device handling task is also aborting.
System Commands Reference Manual, Rev. 07
BAKDIR
Page 4
?Fatal error, illegal message code n received from device handler.
The main task received an error from the device handler it did not understand. Try
again—if the problem persists, see your Alpha Micro dealer for help.
?Fatal error, ITC error code [n]
See your Monitor Calls Manual for an explanation of the error code. This indicates an
internal communication error—ask your System Operator or Alpha Micro dealer for help
if this occurs frequently.
?List file already exists
This message appears if you used the /NOK switch and the specified listspec already
exists. Erase the listspec, or use another listspec.
%No supported backup devices found
Your system is not set up for any of the supported backup devices, so you can't specify a
default device.
?TOC file not found
This may mean your cassette is damaged. Use CRT610 to check the tape.
?Unable to run device handler task
The device handler failed to communicate with the main task after it was spawned. See
your System Operator or Alpha Micro dealer for help.
?Unspecified error received.
The main task received an error from the device handler it did not understand. Try
again—if the problem persists, see your Alpha Micro dealer for help.
?VCR failed to respond to command.
This could indicate a problem with the remote control of your VCR, with the connection
between your computer and your VCR, or with your computer. Make sure your cables are
properly connected—if the cable is okay, try to locate whether it's the VCR or computer so
you can get it fixed.
?%WARNING -- Copy count on tape is below the minimum level when
using the TRANSFER switch.
If your computer is busy, this could mean BAKDIR won't work properly. You may want
to try again without /T.
System Commands Reference Manual, Rev. 07
Page 5
BAKDIR
%WARNING -- Device handler task failed to respond. Reboot system.
Reboot your system. There should be no damage to your data.
System Commands Reference Manual, Rev. 07
BASBP
FUNCTION
Aids in converting AlphaBASIC programs to AlphaBASIC 1.4 or AlphaBASIC PLUS files.
CHARACTERISTICS
BASBP is re-entrant and re-usable. Accepts one or more AlphaBASIC (.BAS) files as input and
outputs the converted file (.BP). For more information on AlphaBASIC PLUS programs, see your
AlphaBASIC PLUS User's Manual.
FORMAT
BASBP {switch} filespec(s) {switch}
switch is an option beginning with - or /. Multiple switches can be specified with one delimiter
(i.e., /dki). filespec can be a single file, or a list of files contained in a reference data file
(@filname.DAT) created by the DIR command using /D.
OPTIONS
/C
Creates a .CMD file to compile all converted programs. Only with multiple files.
/D
Displays all changed lines on the terminal as processed.
/I
Flags all ISAM statements and fixes all ISAM PLUS keyword conflicts.
/K
Fixes all keyword conflicts except ISAM PLUS.
/L
Flags all XCALLS to XLOCK or FLOCK.
All options are global switches. If no switches are added, all switches are in effect. If any one
switch is specified, all the other switches are off.
OPERATION
Enter BASBP at AMOS command level:
BASBP ACCNT.BAS
RETURN
To convert all .BAS files in an account to AlphaBASIC PLUS:
DIR/D CONV.DAT=*.BAS
BASBP @CONV RETURN
CONV RETURN
RETURN
; Generates file list
; Converts the files
; Compiles the files
System Commands Reference Manual, Rev. 03 (AMOS 2.2 - 4/91)
BASBP
Page 2
To convert AlphaBASIC 1.3 files to AlphaBASIC 1.4, use the /I switch to convert and flag only
ISAM/ISAM PLUS related conflicts. Under AMOS 2.0 and 2.1, AlphaBASIC 1.4 supports only
ISAM PLUS, but under AMOS 2.2, it supports both ISAM and ISAM PLUS. So, the ISAM
PLUS keyword conversion is always needed, but there is no need to modify the ISAM statements
for AMOS 2.2 (unless you want to upgrade to ISAM PLUS as well).
To convert AlphaBASIC 1.3 files to AlphaBASIC PLUS under 2.0 or 2.1, use the default (no
switches). To go to AMOS 2.2, use the default, or /KI if old style XLOCK/FLOCK file-locking
exists in the 1.3 program.
MESSAGES
?Cannot access input file
Check your syntax, or use DIR to locate the file.
System Commands Reference Manual, Rev. 03 (AMOS 2.2 - 4/91)
BASIC
FUNCTION
Allows you to use the AlphaBASIC language processor in interactive mode.
CHARACTERISTICS
BASIC is re-entrant and re-usable. AlphaBASIC is an easy-to-learn programming language. The
BASIC command puts your terminal in AlphaBASIC interactive mode. Once "in" AlphaBASIC,
you may use the interactive mode commands to load, create, save, and run AlphaBASIC programs.
For information on writing AlphaBASIC programs or on using either the compiler (COMPIL.LIT)
or the runtime package (RUN.LIT) portions of AlphaBASIC separately, see your AlphaBASIC
User's Manual.
To exit from AlphaBASIC, enter BYE. To interrupt the execution of a program, press
CTRL /C.
OPTIONS
/A
Increases memory, allowing larger files to be worked on.
OPERATION
Enter BASIC at AMOS command level:
BASIC
RETURN
You see a version number and READY, which tells you BASIC is working. You can either load in
a BASIC program, for example:
LOAD PAYROL.BAS
RETURN
or begin to create a new program, by typing in the program lines. For example:
10 PRINT "This program computes interest rates."
20 INPUT "Enter balance: $",BALANCE RETURN
To run a program in memory, enter RUN.
System Commands Reference Manual, Rev. 03 (AMOS 2.2 - 4/91)
RETURN
BASIC
Page 2
MESSAGES
The AlphaBASIC error messages are listed in your AlphaBASIC User's Manual.
System Commands Reference Manual, Rev. 03 (AMOS 2.2 - 4/91)
BASICP
FUNCTION
Allows you to use AlphaBASIC PLUS in interactive mode.
CHARACTERISTICS
BASICP is re-entrant and re-usable. See the AlphaBASIC PLUS User's Manual for information
about the AlphaBASIC PLUS programming language.
To exit from AlphaBASIC PLUS, enter BYE. To interrupt the execution of a program,
press CTRL /C.
System Commands Reference Manual, Rev. 04
BASICX
FUNCTION
Allows you to use AlphaBASIC in interactive mode, using the integral math coprocessor on a
68040 CPU chip.
CHARACTERISTICS
BASICX is re-entrant and re-usable. It functions only on a computer with a 68040 CPU with an
integral math coprocessor. Except for using the math functions of the 68040 to increase
performance, it works exactly like the BASIC command. See the AlphaBASIC User's Manual for
information about the AlphaBASIC programming language.
To exit from AlphaBASIC, enter BYE. To interrupt the execution of a program, press
CTRL /C.
System Commands Reference Manual, Rev. 04
BATCH
FUNCTION
Loads commands frequently used by command files into your memory partition.
CHARACTERISTICS
BATCH is a command file in DSK0:[2,2] (the command file library account) that accepts no
arguments or switches. BATCH loads these programs into memory:
LOAD
EXITEXIT
GOTO
TRACE
LOOKUP
PAUSE
Using BATCH speeds up the execution of a command file if that file uses many or all of these
programs. The BATCH command is best used at the front of a command file. All of the above
programs are re-entrant, so the System Operator may place them into system memory where they
can be used by everyone on the system.
BATCH takes up about 1500 bytes of your memory partition. You may want to include a DEL*
command at the end of a command file containing the BATCH command, so the programs loaded
into your memory partition will be deleted when you exit the command file.
OPERATION
Enter the command at AMOS level:
BATCH
RETURN
MESSAGES
You may see the standard AMOS message file not found if any of the files have been
deleted from DSK0:.
System Commands Reference Manual, Rev. 07
BAUD
FUNCTION
Changes the baud rate (data-transfer rate) the system uses to communicate with a terminal.
CHARACTERISTICS
BAUD is re-entrant and re-usable. Make sure your terminal is able to communicate at the speed
you specify to the BAUD command. The baud rates the system supports are:
50
200
2400
19200
75
300
3600
38400
110
600
4800
57600
134.5
1200
7200
150
1800
9600
FORMAT
BAUD {baud-rate-number}
If you do not enter a baud-rate-number, the current baud rate will be displayed.
OPERATION
To find the current baud rate, enter BAUD:
BAUD RETURN
Current baud rate is 9600
To change the baud rate, type BAUD followed by a legal baud rate. For example:
BAUD 300
RETURN
MESSAGES
?Baud rate [baud-rate] is not a legal baud rate
Try again with one of the baud rates listed above.
System Commands Reference Manual, Rev. 07
BDRES
FUNCTION
Copies one or more AMOS logical disks from a recordable DVD-RAM or Blu-ray media in a
supported DVD-RAM or Blu-ray drive to AMOS logical disks. The logical disk(s) being copied
to must be the same bitmap word size as the AMOS logical disk if the entire logical is being
copied without wild carding. If wild carding is being used, then any file on any logical can be
copied to any AMOS logical with sufficient unused capacity.
BDRES is only supported on AM-8000, Eagle 800, and AMPC 7.X systems.
CHARACTERISTICS
BDRES copies logical AMOS disk(s) from a DVD-RAM or Blu-ray media to an AMOS disk
drive. The DVD-RAM or Blu-ray media AMOS disk and the AMOS disk being copied to must
be the same bitmap word size if the entire logical is being copied without wild carding. The
BDRES software will copy logical drives of differing sizes if the logical is being copied with wild
carding. BDRES will not allow for differing bitmap size logicals to be copied without wild
carding. If an unequal bitmap word size is tried, BDRES will ignore the request and continue
with the restoring.
FORMAT
BDRES {switches}
OPTIONS
/HELP
Display the available options and exits
/?
Same as /HELP
/DEV:xxx:
Uses device and driver named xxx: instead of the
default DVD:
/ID:n
Uses the DVD-RAM or Blu-ray Drive at SCSI ID
n instead of scanning the SCSI bus to find a DVDRAM Drive. The ID can be from 0 to 15.
/V
Display version information.
/PIC
Display Product Installation Code
System Commands Reference Manual, Rev. 18
BDRES
Page 2
OPERATION
BDRES works best on a job with 132 columns set as the terminal width.
Before starting the program, place the DVD-RAM or Blu-ray media with the logicals you wish to
copy in the DVD-RAM or Blu-ray drive. Then type BDRES from the AMOS prompt:
BDRES
RETURN
BDRES will attempt to find a DVD-RAM or Blu-ray drive that is compatible with the driver
being used. The driver must have the same name as the DVD-RAM or Blu-ray drive device
name and be loaded in system memory. BDRES will find the drive either using the command
line switches /DEV and /ID or by defaulting to DBD:. If more than one DVD-RAM or Blu-ray
type device is found when scanning the SCSI bus, you will be asked to choose the device you
wish to use for copying from.
After entering the BDRES command, the following will be displayed:
BDRES Version X.X(xxx)- x – Copyright 2007, Alpha Microsystems
If BDRES finds multiple possible DVD-RAM or Blu-ray drives while scanning the SCSI bus, the
following message will be displayed to allow you to select the drive to use:
Found the following possible DBD-Recorders:
ID
Description
1.
nn
xxxxxxxxxxxxxxxxxxxxxxxxx
2.
nn
xxxxxxxxxxxxxxxxxxxxxxxxx
Select one of the above devices:
More information about the DVD-RAM or Blu-ray drive, driver, and media contents is displayed:
DVD-RAM, BLU-RAY drive found at SCSI id: 4
------- ---------B--L--O--C--K--S---------- --BITMAP-- -SECTOR- -OFFSET- --DEV--ITEM-- ---Total--- ---Used---- ---Free---- --words--- ---SOL-- ---SOL-- -SPEC-DBD000:
307200.
20928.
286272.
19200.
0
0 blk REX000:
DBD001:
307200.
216928.
90272.
19200.
1470
3 blk REX001:
DBD002:
307200.
2617.
304583.
19200.
E849
2 blk REX002:
DBD003:
307200.
36155.
271045.
19200.
EAD8
2 blk REX003:
DBD004:
307200.
63972.
243228.
19200.
10E28
0 blk REX004:
DBD005:
307200.
7085.
300115.
19200.
14CA1
3 blk REX005:
DBD006:
307200.
57016.
250184.
19200.
1538D
3 blk REX006:
DBD007:
307200.
17996.
289204.
19200.
18B3C
2 blk REX007:
DBD008:
307200.
40664.
266536.
19200.
19CD0
1 blk REX008:
DBD009:
307200.
8072.
299128.
19200.
1C487
0 blk REX009:
DBD010:
307200.
32551.
274649.
19200.
1CC69
3 blk REX010:
DBD011:
307200.
3804.
303396.
19200.
1EC34
1 blk REX011:
DBD012:
307200.
84153.
223047.
19200.
1EFEC
0 blk REX012:
DBD013:
307200.
19063.
288137.
19200.
2421B
0 blk REX013:
DBD014:
307200.
52946.
254254.
19200.
254B9
2 blk REX014:
DBD015:
307200.
241467.
65733.
19200.
2886E
3 blk REX015:
------- ---------B--L--O--C--K--S---------- --BITMAP-- -SECTOR- -OFFSET- --DEV--ITEM-- ---Total--- ---Used---- ---Free---- --words--- ---SOL-- ---SOL-- -SPEC-TOTAL:
4915200.
905417.
4009783.
Media Label: "NIGHTLY BACKUP..."
(megabytes)
2400.000
442.098
1957.901
(gigabytes)
2.3438
0.4317
1.9120
L
T
E
E
E
E
E
E
E
E
E
E
E
E
E
E
E
E
L
T
Logical Type:
S = Standard
E = Extended
------------------------------------------------------L-A-B-E-L---------------AM-8000 8.0 Release & Static Files ......
AM-8000 8.0 Build & Source Files ........
AM-8000 EAMOS Release ...................
CD AMOS Release 01/31/2006 .............
AlphaTCP 1.5A Source & Release .........
AlphaNET 2.4(159)-4 Rel & Src ..........
AlphaFAX 2.1(100)-1 Rel & Src ..........
MULTI 2.1(192)10 rEL & sRC .............
AlphaODBC 1.0(100) Rel & Src ...........
AlphaMAIL 1.2B PR09/05 .................
Xadmin Release & *.INIs ................
Command & Do Files .....................
Open Logical...REX12:...................
AMPC 7.0 Release .......................
AlphaODBC 1.0(100) Rel & Src ver. 1.4Y .
Open Logical...REX15:...................
------------------------------------------------------L-A-B-E-L----------------
DBD media contains 16 logical units.
System Commands Reference Manual, Rev. 18
Page 3
BDRES
BDRES then asks for the DBD logical(s) that you wish to copy from the backup media.
Which DBD Logical(s) would you like to restore?
Each DBD Logical entered may have one MASK following it. A space must separate the DBD
Logical and the MASK. MASK characters are (?) & (*). (e.g.: DBD0: *.DIR[1,2], DBD5:
A*.LIT[1??,*] or DBD16: FLP*.*[] ) Enter the list of disk Logicals to be transferred. Disk
Logicals may be entered as a range (e.g.: DBD0: -20 for DBD0: thru DBD20:), or may be comma
separated. The list is terminated with a blank line:
*DBD0: -15
Which Disk Logical(s) would you like to restore to?
Enter list of disk Logicals to be transferred. Disk Logicals may be entered as a range (e.g.:
DBD0: -20 for DBD0: thru DBD20:), or may be comma separated, The list is terminated with a
blank line:
*UPD0: -15
If no wildcarding is used, a Note is displayed warning you that all data on these logical(s) will be
lost and asking you to enter “YES” to continue. If “YES” is entered the entire logical(s) will be
copied. The copying process then begins. As it progresses, status messages are displayed.
Following are samples of a BDRES process. The first sample has no wildcarding, and the second
sample shows the process with wildcarding:
SAMPLE 1:
*
----- Date & Time: Thu 5-Jul-2007 11:38:01 AM
Note: One or more logical(s) have no wildcarding assigned.
Therefore, these logical(s) will have their label block, MFD, UFDs,
bitmap and data blocks restored from the backup. All data currently
on these logical(s) will be lost.
Are you sure that you want to do this?
If so enter "yes". YES
DBD0: [19200.] 150 Mb -----> UPD0: [19200.] 150 Mb
Used Blocks: [20928.] Total: [20928.] [ 10.219 Mb ]
--- Date & Time: Thu 5-Jul-2007 11:40:37 AM
Restoring............................................................
Logical has been restored & remounted.
--- Date & Time: Thu 5-Jul-2007 11:40:51 AM Elapsed Time: 00:00:14 747.429 Kbytes per second
DBD1: [19200.] 150 Mb -----> UPD1: [19200.] 150 Mb
Used Blocks: [216928.] Total: [237856.] [ 116.141 Mb ]
--- Date & Time: Thu 5-Jul-2007 11:40:57 AM
Restoring............................................................
Logical has been restored & remounted.
--- Date & Time: Thu 5-Jul-2007 11:43:20 AM Elapsed Time: 00:02:23 758.490 Kbytes per second
System Commands Reference Manual, Rev. 18
BDRES
Page 4
DBD2: [19200.] 150 Mb -----> UPD2: [19200.] 150 Mb
Used Blocks: [2617.] Total: [240473.] [ 117.418 Mb ]
--- Date & Time: Thu 5-Jul-2007 11:43:24 AM
Restoring.........................................................
Logical has been restored & remounted.
--- Date & Time: Thu 5-Jul-2007 11:43:26 AM Elapsed Time: 00:00:02 654.250 Kbytes per second
DBD3: [19200.] 150 Mb -----> UPD3: [19200.] 150 Mb
Used Blocks: [36155.] Total: [276628.] [ 135.072 Mb ]
--- Date & Time: Thu 5-Jul-2007 11:43:29 AM
Restoring............................................................
Logical has been restored & remounted.
--- Date & Time: Thu 5-Jul-2007 11:43:53 AM Elapsed Time: 00:00:24 753.229 Kbytes per second
DBD4: [19200.] 150 Mb -----> UPD4: [19200.] 150 Mb
Used Blocks: [63972.] Total: [340600.] [ 166.309 Mb ]
--- Date & Time: Thu 5-Jul-2007 11:43:58 AM
Restoring............................................................
Logical has been restored & remounted.
--- Date & Time: Thu 5-Jul-2007 11:44:40 AM Elapsed Time: 00:00:42 761.571 Kbytes per second
DBD5: [19200.] 150 Mb -----> UPD5: [19200.] 150 Mb
Used Blocks: [7085.] Total: [347685.] [ 169.768 Mb ]
--- Date & Time: Thu 5-Jul-2007 11:44:43 AM
Restoring ...........................................................
Logical has been restored & remounted.
--- Date & Time: Thu 5-Jul-2007 11:44:48 AM Elapsed Time: 00:00:05 708.500 Kbytes per second
DBD6: [19200.] 150 Mb -----> UPD6: [19200.] 150 Mb
Used Blocks: [57016.] Total: [404701.] [ 197.608 Mb ]
--- Date & Time: Thu 5-Jul-2007 11:44:52 AM
Restoring............................................................
Logical has been restored & remounted.
--- Date & Time: Thu 5-Jul-2007 11:45:29 AM Elapsed Time: 00:00:37 770.486 Kbytes per second
DBD7: [19200.] 150 Mb -----> UPD7: [19200.] 150 Mb
Used Blocks: [17996.] Total: [422697.] [ 206.395 Mb ]
--- Date & Time: Thu 5-Jul-2007 11:45:33 AM
Restoring ...........................................................
Logical has been restored & remounted.
--- Date & Time: Thu 5-Jul-2007 11:45:45 AM Elapsed Time: 00:00:12 749.833 Kbytes per second
DBD8: [19200.] 150 Mb -----> UPD8: [19200.] 150 Mb
Used Blocks: [40664.] Total: [463361.] [ 226.250 Mb ]
--- Date & Time: Thu 5-Jul-2007 11:45:48 AM
Restoring ...........................................................
Logical has been restored & remounted.
--- Date & Time: Thu 5-Jul-2007 11:46:15 AM Elapsed Time: 00:00:27 753.037 Kbytes per second
DBD9: [19200.] 150 Mb -----> UPD9: [19200.] 150 Mb
System Commands Reference Manual, Rev. 18
Page 5
BDRES
Used Blocks: [8072.] Total: [471433.] [ 230.192 Mb ]
--- Date & Time: Thu 5-Jul-2007 11:46:18 AM
Restoring ...........................................................
Logical has been restored & remounted.
--- Date & Time: Thu 5-Jul-2007 11:46:23 AM Elapsed Time: 00:00:05 807.200 Kbytes per second
DBD10: [19200.] 150 Mb -----> UPD10: [19200.] 150 Mb
Used Blocks: [32551.] Total: [503984.] [ 246.086 Mb ]
--- Date & Time: Thu 5-Jul-2007 11:46:27 AM
Restoring ...........................................................
Logical has been restored & remounted.
--- Date & Time: Thu 5-Jul-2007 11:46:49 AM Elapsed Time: 00:00:22 739.795 Kbytes per second
DBD11: [19200.] 150 Mb -----> UPD11: [19200.] 150 Mb
Used Blocks: [3804.] Total: [507788.] [ 247.943 Mb ]
--- Date & Time: Thu 5-Jul-2007 11:46:52 AM
Restoring ...........................................................
Logical has been restored & remounted.
--- Date & Time: Thu 5-Jul-2007 11:46:55 AM Elapsed Time: 00:00:03 634.000 Kbytes per second
DBD12: [19200.] 150 Mb -----> UPD12: [19200.] 150 Mb
Used Blocks: [84153.] Total: [591941.] [ 289.034 Mb ]
--- Date & Time: Thu 5-Jul-2007 11:46:59 AM
Restoring ...........................................................
Logical has been restored & remounted.
--- Date & Time: Thu 5-Jul-2007 11:47:55 AM Elapsed Time: 00:00:56 751.366 Kbytes per second
DBD13: [19200.] 150 Mb -----> UPD13: [19200.] 150 Mb
Used Blocks: [19063.] Total: [611004.] [ 298.342 Mb ]
--- Date & Time: Thu 5-Jul-2007 11:47:59 AM
Restoring ...........................................................
Logical has been restored & remounted.
--- Date & Time: Thu 5-Jul-2007 11:48:11 AM Elapsed Time: 00:00:12 794.292 Kbytes per second
DBD14: [19200.] 150 Mb -----> UPD14: [19200.] 150 Mb
Used Blocks: [52946.] Total: [663950.] [ 324.194 Mb ]
--- Date & Time: Thu 5-Jul-2007 11:48:15 AM
Restoring ...........................................................
Logical has been restored & remounted.
--- Date & Time: Thu 5-Jul-2007 11:48:50 AM Elapsed Time: 00:00:35 756.371 Kbytes per second
Restored (0.) Files.
DBD15: [19200.] 150 Mb -----> UPD15: [19200.] 150 Mb
Used Blocks: [241467.] Total: [905417.] [ 442.098 Mb ]
--- Date & Time: Thu 5-Jul-2007 11:48:54 AM
Restoring ...........................................................
Logical has been restored & remounted.
--- Date & Time: Thu 5-Jul-2007 11:51:37 AM Elapsed Time: 00:02:43 740.696 Kbytes per second
----- Date & Time: Thu 5-Jul-2007 11:51:37 AM Elapsed Time: 00:13:36
DBD Logicals are being uninstalled.
System Commands Reference Manual, Rev. 18
BDRES
Page 6
The program has completed.
.
SAMPLE 2:
.BDRES
BDRES Version 8.0(101)-13 - Copyright 2007, Alpha Microsystems
Found the following possible DBD-Recorders:
1.
2.
ID
5
4
Description
SONY
BDRW BWU-100A
HL-DT-STDVD-RAM GSA-H22N
Select one of the above devices: 1
DVD-RAM, BLU-RAY drive found at SCSI id: 5
------- ---------B--L--O--C--K--S----------ITEM-- ---Total--- ---Used---- ---Free---DBD000:
231424.
60.
231364.
DBD001:
231424.
60.
231364.
DBD002:
231424.
1154.
230270.
DBD003:
231424.
137.
231287.
DBD004:
231424.
60.
231364.
DBD005:
231424.
60.
231364.
DBD006:
231424.
60.
231364.
DBD007:
231424.
60.
231364.
DBD008:
231424.
60.
231364.
DBD009:
231424.
60.
231364.
DBD010:
231424.
60.
231364.
DBD011:
231424.
60.
231364.
DBD012:
231424.
60.
231364.
DBD013:
231424.
60.
231364.
DBD014:
231424.
60.
231364.
DBD015:
231424.
60.
231364.
DBD016:
231424.
60.
231364.
DBD017:
231424.
60.
231364.
DBD018:
231424.
60.
231364.
DBD019:
231424.
60.
231364.
DBD020:
1048576.
183837.
864739.
DBD021:
20480.
21.
20459.
DBD022:
20480.
12771.
7709.
DBD023:
20480.
18477.
2003.
DBD024:
20480.
6545.
13935.
DBD025:
20480.
5723.
14757.
DBD026:
20480.
12079.
8401.
DBD027:
20480.
6926.
13554.
DBD028:
20480.
2106.
18374.
DBD029:
20480.
5925.
14555.
DBD030:
20480.
3000.
17480.
DBD031:
20480.
6914.
13566.
DBD032:
20480.
1268.
19212.
DBD033:
20480.
1759.
18721.
DBD034:
20480.
564.
19916.
DBD035:
20480.
216.
20264.
DBD036:
20480.
2065.
18415.
DBD037:
20480.
907.
19573.
DBD038:
20480.
154.
20326.
DBD039:
20480.
529.
19951.
DBD040:
20480.
537.
19943.
DBD041:
20480.
1401.
19079.
DBD042:
20480.
1820.
18660.
DBD043:
20480.
638.
19842.
DBD044:
20480.
1032.
19448.
DBD045:
20480.
1051.
19429.
DBD046:
20480.
178.
20302.
DBD047:
20480.
4701.
15779.
DBD048:
20480.
12347.
8133.
DBD049:
20480.
19205.
1275.
DBD050:
20480.
4280.
16200.
DBD051:
20480.
17606.
2874.
DBD052:
20480.
18673.
1807.
DBD053:
20480.
12208.
8272.
DBD054:
20480.
570.
19910.
DBD055:
20480.
1773.
18707.
--BITMAP-- -SECTOR- -OFFSET- --DEV-- L -----------------------------------------words--- ---SOL-- ---SOL-- -SPEC-- T ---------------L-A-B-E-L---------------14464.
0
0 blk TST000: E Open Logical...TST00:...................
14464.
F
3 blk TST001: E Open Logical...TST01:...................
14464.
1F
2 blk TST002: E Open Logical...TST02:...................
14464.
140
3 blk TST003: E Open Logical...TST03:...................
14464.
163
3 blk TST004: E Open Logical...TST04:...................
14464.
173
2 blk TST005: E Open Logical...TST05:...................
14464.
183
1 blk TST006: E Open Logical...TST06:...................
14464.
193
0 blk TST007: E Open Logical ..TST07:...................
14464.
1A2
3 blk TST008: E Open Logical...TST08:...................
14464.
1B2
2 blk TST009: E Open Logical...TST09:...................
14464.
1C2
1 blk TST010: E Open Logical...TST10:...................
14464.
1D2
0 blk TST011: E Open Logical...TST11:...................
14464.
1E1
3 blk TST012: E Open Logical...TST12:...................
14464.
1F1
2 blk TST013: E Open Logical...TST13:...................
14464.
201
1 blk TST014: E Open Logical...TST14:...................
14464.
211
0 blk TST015: E Open Logical...TST15:...................
14464.
220
3 blk TST016: E Open Logical...TST16:...................
14464.
230
2 blk TST017: E Open Logical...TST17:...................
14464.
240
1 blk TST018: E Open Logical...TST18:...................
14464.
250
0 blk TST019: E Open Logical...TST19:...................
65537.
25F
3 blk NEW000: E Open Logical...NEW00:...................
1280.
B5E7
3 blk ACC000: E General Information ....................
1280.
B5ED
3 blk ACC001: E AMOS 1.4E PR06/2000 ....................
1280.
C267
1 blk ACC002: E AMOS 2.3A PR08/2002 ....................
1280.
D473
1 blk ACC003: E Eagle 100TX Terminal Server Flash Rel. .
1280.
DAD8
1 blk ACC004: E Eagle 100MX Fax Server Flash Release ...
1280.
E06F
3 blk ACC005: E Eagle 100MX Fax Server Disk Release ....
1280.
EC3C
1 blk ACC006: E Eagle 450 TX Terminal Server Flash Rel.
1280.
F300
2 blk ACC007: E AlphaFAX 2.0 PR10/99 ...................
1280.
F50F
3 blk ACC008: E AlphaTCP 1.5A PR08/2002 ................
1280.
FAD9
3 blk ACC009: E AlphaWRITE 1.2A PR08/2000 ..............
1280.
FDC8
2 blk ACC010: E AlphaWRITE 2.2 PR06/2000 ...............
1280.
10489
3 blk ACC011: E AlphaCALC 2.0 PR4/99 ...................
1280.
105C7
2 blk ACC012: E ESP 2.2 PR10/99 ........................
1280.
10780
0 blk ACC013: E AlphaNET 2.4 PR10/99 ...................
1280.
1080D
3 blk ACC014: E OS/EXEC 1.0 ............................
1280.
10844
2 blk ACC015: E VersiCOMM-Plus 3.1 PR08/2002 ...........
1280.
10A49
2 blk ACC016: E Appointment Scheduler 3.5 ..............
1280.
10B2D
0 blk ACC017: E AlphaRJE 4.0 PR10/96 ...................
1280.
10B54
1 blk ACC018: E InSight/am Toolkit 2.0 AMOS ............
1280.
10BD9
1 blk ACC019: E UPS Monitor Software V1.3(178) .........
1280.
10C60
1 blk ACC020: E AlphaMAIL 1.2B PR10/99 .................
1280.
10DBF
1 blk ACC021: E AlphaLAN++ 8.0 (Alpha Side) PR08/02 ....
1280.
10F87
0 blk ACC022: E MULTI 2.1 PR4/99 .......................
1280.
11027
1 blk ACC023: E Filer 1.4A (ISAM) ......................
1280.
1112A
0 blk ACC024: E Filer 2.0 (ISAM+) ......................
1280.
11231
2 blk ACC025: E VPSearch 1.6 PR8/93 ....................
1280.
1125E
3 blk ACC026: E AcuCOBOL-85 2.3B .......................
1280.
116F6
3 blk ACC027: E AlphaC 2.0 (Volume 1 of 2) PR12/97 .....
1280.
12306
1 blk ACC028: E AlphaC 2.0 (Volume 2 of 2) PR12/97 .....
1280.
135C8
1 blk ACC029: E Soft Machines Products .................
1280.
139F7
0 blk ACC030: E Starr Accounting 4.10 Vol #1 ...........
1280.
14B29
1 blk ACC031: E Starr Accounting 4.10 Vol #2 ...........
1280.
15D66
1 blk ACC032: E Metropolis 7.5 (y2k Version) PR08/2002 .
1280.
16953
0 blk ACC033: E DART Release (UNSUPPORTED) PR10/99 .....
1280.
169E2
1 blk ACC034: E Unsupported Software PR09/2005 .........
System Commands Reference Manual, Rev. 18
Page 7
DBD056:
DBD057:
DBD058:
DBD059:
DBD060:
DBD061:
DBD062:
DBD063:
DBD064:
DBD065:
DBD066:
DBD067:
DBD068:
DBD069:
DBD070:
DBD071:
DBD072:
DBD073:
DBD074:
DBD075:
DBD076:
DBD077:
DBD078:
DBD079:
DBD080:
DBD081:
DBD082:
DBD083:
DBD084:
DBD085:
DBD086:
DBD087:
DBD088:
DBD089:
DBD090:
DBD091:
DBD092:
DBD093:
DBD094:
DBD095:
DBD096:
DBD097:
DBD098:
DBD099:
DBD100:
DBD101:
DBD102:
DBD103:
DBD104:
DBD105:
DBD106:
DBD107:
DBD108:
DBD109:
DBD110:
DBD111:
DBD112:
DBD113:
DBD114:
DBD115:
DBD116:
DBD117:
DBD118:
DBD119:
DBD120:
DBD121:
DBD122:
DBD123:
DBD124:
DBD125:
DBD126:
DBD127:
DBD128:
DBD129:
DBD130:
DBD131:
DBD132:
DBD133:
DBD134:
DBD135:
DBD136:
20480.
20480.
20480.
20480.
20480.
307200.
307200.
307200.
307200.
307200.
307200.
307200.
307200.
307200.
307200.
307200.
307200.
307200.
307200.
307200.
307200.
2048000.
20480.
20480.
20480.
20480.
20480.
20480.
20480.
20480.
20480.
20480.
20480.
20480.
20480.
20480.
20480.
20480.
20480.
20480.
20480.
20480.
20480.
20480.
20480.
20480.
20480.
20480.
20480.
20480.
20480.
20480.
20480.
20480.
20480.
20480.
20480.
20480.
20480.
20480.
20480.
20480.
20480.
20480.
20480.
20480.
20480.
20480.
20480.
20480.
20480.
20480.
20480.
20480.
20480.
20480.
20480.
20480.
20480.
20480.
20480.
BDRES
19720.
18220.
12343.
361.
4979.
20928.
216928.
2617.
36155.
63972.
7085.
57016.
17996.
40664.
8072.
32551.
3804.
84153.
19063.
52946.
241467.
205991.
11803.
5940.
190.
2340.
635.
2995.
6914.
1268.
1753.
1425.
482.
663.
12347.
18993.
267.
9061.
2067.
1773.
17914.
1866.
11921.
5933.
190.
2339.
634.
2995.
6913.
1268.
1753.
1431.
482.
663.
12256.
18992.
242.
9060.
2067.
1773.
17835.
1865.
11894.
5932.
191.
2334.
634.
2995.
6914.
1268.
1754.
1431.
654.
663.
12258.
18993.
226.
8901.
2062.
1773.
18633.
760.
2260.
8137.
20119.
15501.
286272.
90272.
304583.
271045.
243228.
300115.
250184.
289204.
266536.
299128.
274649.
303396.
223047.
288137.
254254.
65733.
1842009.
8677.
14540.
20290.
18140.
19845.
17485.
13566.
19212.
18727.
19055.
19998.
19817.
8133.
1487.
20213.
11419.
18413.
18707.
2566.
18614.
8559.
14547.
20290.
18141.
19846.
17485.
13567.
19212.
18727.
19049.
19998.
19817.
8224.
1488.
20238.
11420.
18413.
18707.
2645.
18615.
8586.
14548.
20289.
18146.
19846.
17485.
13566.
19212.
18726.
19049.
19826.
19817.
8222.
1487.
20254.
11579.
18418.
18707.
1847.
1280.
1280.
1280.
1280.
1280.
19200.
19200.
19200.
19200.
19200.
19200.
19200.
19200.
19200.
19200.
19200.
19200.
19200.
19200.
19200.
19200.
128001.
1280.
1280.
1280.
1280.
1280.
1280.
1280.
1280.
1280.
1280.
1280.
1280.
1280.
1280.
1280.
1280.
1280.
1280.
1280.
1280.
1280.
1280.
1280.
1280.
1280.
1280.
1280.
1280.
1280.
1280.
1280.
1280.
1280.
1280.
1280.
1280.
1280.
1280.
1280.
1280.
1280.
1280.
1280.
1280.
1280.
1280.
1280.
1280.
1280.
1280.
1280.
1280.
1280.
1280.
1280.
1280.
1280.
1280.
1280.
16B9E
17EE1
190AC
19CBB
19D16
1A1F3
1B664
28A3D
28CCC
2B01B
2EE95
2F581
32D30
33EC4
3667A
36E5D
38E28
391DF
3E40E
3F6AD
42A62
51632
5DF5C
5EAE4
5F0B1
5F0E2
5F32B
5F3CB
5F6B8
5FD7A
5FEB7
6006E
601D3
6024D
602F3
60F03
62190
621D3
62AAD
62CB3
62E6F
63FEE
641C1
64D66
65332
65362
655AC
6564B
65939
65FFA
66137
662EE
66455
664CE
66575
6716D
683FA
68437
68D11
68F17
690D3
6A23E
6A411
6AFAF
6B57B
6B5AC
6B7F4
6B893
6BB81
6C242
6C380
6C537
6C69D
6C742
6C7E8
6D3E1
6E66E
6E6A8
6EF5A
6F15E
6F31A
1
0
3
1
1
3
2
1
1
3
2
2
1
0
3
2
0
3
3
1
2
0
2
0
3
0
3
1
3
0
3
3
3
0
2
0
0
2
2
0
0
1
2
2
2
3
1
2
0
0
3
3
1
2
0
3
2
3
2
0
0
2
2
3
2
0
1
2
0
1
0
1
3
0
2
3
3
0
0
1
1
blk
blk
blk
blk
blk
blk
blk
blk
blk
blk
blk
blk
blk
blk
blk
blk
blk
blk
blk
blk
blk
blk
blk
blk
blk
blk
blk
blk
blk
blk
blk
blk
blk
blk
blk
blk
blk
blk
blk
blk
blk
blk
blk
blk
blk
blk
blk
blk
blk
blk
blk
blk
blk
blk
blk
blk
blk
blk
blk
blk
blk
blk
blk
blk
blk
blk
blk
blk
blk
blk
blk
blk
blk
blk
blk
blk
blk
blk
blk
blk
blk
ACC035:
ACC036:
ACC037:
ACC038:
ACC039:
REX000:
REX001:
REX002:
REX003:
REX004:
REX005:
REX006:
REX007:
REX008:
REX009:
REX010:
REX011:
REX012:
REX013:
REX014:
REX015:
TSS000:
AMO000:
AMO001:
AMO002:
AMO003:
AMO004:
AMO005:
AMO006:
AMO007:
AMO008:
AMO009:
AMO010:
AMO011:
AMO012:
AMO013:
AMO014:
AMO015:
AMO016:
AMO017:
AMO018:
AMO019:
AMN000:
AMN001:
AMN002:
AMN003:
AMN004:
AMN005:
AMN006:
AMN007:
AMN008:
AMN009:
AMN010:
AMN011:
AMN012:
AMN013:
AMN014:
AMN015:
AMN016:
AMN017:
AMN018:
AMN019:
AMM000:
AMM001:
AMM002:
AMM003:
AMM004:
AMM005:
AMM006:
AMM007:
AMM008:
AMM009:
AMM010:
AMM011:
AMM012:
AMM013:
AMM014:
AMM015:
AMM016:
AMM017:
AMM018:
E
E
E
E
E
E
E
E
E
E
E
E
E
E
E
E
E
E
E
E
E
E
E
E
E
E
E
E
E
E
E
E
E
E
E
E
E
E
E
E
E
E
E
E
E
E
E
E
E
E
E
E
E
E
E
E
E
E
E
E
E
E
E
E
E
E
E
E
E
E
E
E
E
E
E
E
E
E
E
E
E
AMUS Network Library (1 of 3) ..........
AMUS Network Library (2 of 3) ..........
AMUS Network Library (3 of 3) ..........
Miscellaneous Software Products ........
SuperVUE 3.1H PR01/2000 ................
AM-8000 8.0 Release & Static Files ......
AM-8000 8.0 Build & Source Files ........
AM-8000 EAMOS Release ...................
CD AMOS Release 01/31/2006 .............
AlphaTCP 1.5A Source & Release .........
AlphaNET 2.4(159)-4 Rel & Src ..........
AlphaFAX 2.1(100)-1 Rel & Src ..........
MULTI 2.1(192)10 rEL & sRC .............
AlphaODBC 1.0(100) Rel & Src ...........
AlphaMAIL 1.2B PR09/05 .................
Xadmin Release & *.INIs ................
Command & Do Files .....................
Open Logical...REX12:...................
AMPC 7.0 Release .......................
AlphaODBC 1.0(100) Rel & Src ver. 1.4Y .
Open Logical...REX15:...................
BD TESTING LOGICAL ONLY ................
AMOS 8.1 June 2007 Release .............
AlphaTCP 1.5A June 2007 Release ........
AlphaNET 2.4 January 2006 Release ......
AlphaFAX 2.1 February 2007 Release .....
MULTI 2.1B June 2007 Release ...........
AlphaWRITE 1.2A PR06/2000 ..............
AlphaWRITE 2.2 PR06/2000 ...............
AlphaCALC 2.0 April 2004 Release .......
ESP 2.2 PR10/99 ........................
AlphaMAIL 1.2B June 2007 Release .......
AM-8000 configuration files *.INIs ......
Eagle 800 configuration files *.INIs ...
AlphaC (vol 1 of 2) PR12/97 ............
AlphaC 2.0 (vol 2 of 2) PR12/97 ........
XAdmin for AM-8000 Only. Release 1.0 ....
AlphaODBC 1.4A February 2007 Release ...
VersiCOMM-Plus V3.1 and ZARC OCT2004 ...
Unsupported Software January 2006 ......
AMPC 7.1 Release June 2007 .............
d/Soft Release February 2007 ...........
AMOS 8.1 February 2007 Release .........
AlphaTCP 1.5A February 2007 Release ....
AlphaNET 2.4 January 2006 Release ......
AlphaFAX 2.1 February 2007 Release .....
MULTI 2.1B January 2006 Release ........
AlphaWRITE 1.2A PR06/2000 ..............
AlphaWRITE 2.2 PR06/2000 ...............
AlphaCALC 2.0 April 2004 Release .......
ESP 2.2 PR10/99 ........................
AlphaMAIL 1.2B PR04/05 .................
AM-8000 configuration files *.INIs ......
Eagle 800 configuration files *.INIs ...
AlphaC (vol 1 of 2) PR12/97 ............
AlphaC 2.0 (vol 2 of 2) PR12/97 ........
XAdmin for AM-8000 Only. Release 1.0 ....
AlphaODBC 1.4A February 2007 Release ...
VersiCOMM-Plus V3.1 and ZARC OCT2004 ...
Unsupported Software January 2006 ......
AMPC 7.0 Release February 2007 .........
d/Soft Release February 2007 ...........
AMOS 8.1 January 31, 2006 Release ......
AlphaTCP 1.5A January 31, 2006 Release .
AlphaNET 2.4 January 31, 2006 Release ..
AlphaFAX 2.1 March 1, 2005 Release .....
MULTI 2.1B January 31, 2006 Release ....
AlphaWRITE 1.2A PR06/2000 ..............
AlphaWRITE 2.2 PR06/2000 ...............
AlphaCALC 2.0 April 22, 2004 Release ...
ESP 2.2 PR10/99 ........................
AlphaMAIL 1.2B PR04/05 .................
AM-8000 configuration files *.INIs.......
Eagle 800 configuration files *.INIs....
AlphaC (vol 1 of 2) PR12/97 ............
AlphaC 2.0 (vol 2 of 2) PR12/97 ........
XAdmin for AM-8000 Only. Release 1.0.....
AlphaODBC 1.4Y January 31,2006..........
VersiCOMM-Plus V3.1 and ZARC OCT2004....
Unsupported Software January 31, 2006 ..
AMPC 7.0 Bootable Release Jan2006.......
System Commands Reference Manual, Rev. 18
BDRES
Page 8
DBD137:
20480.
9.
20471.
DBD138:
204800.
162036.
42764.
DBD139:
204800.
152190.
52610.
DBD140:
204800.
9839.
194961.
DBD141:
204800.
21720.
183080.
DBD142:
204800.
34277.
170523.
DBD143:
204800.
29214.
175586.
DBD144:
204800.
32100.
172700.
DBD145:
204800.
57897.
146903.
DBD146:
204800.
37409.
167391.
DBD147:
204800.
44953.
159847.
DBD148:
204800.
27154.
177646.
DBD149:
204800.
47953.
156847.
DBD150:
204800.
50552.
154248.
DBD151:
204800.
134200.
70600.
DBD152:
204800.
35733.
169067.
DBD153:
204800.
28233.
176567.
DBD154:
204800.
28736.
176064.
DBD155:
204800.
64765.
140035.
DBD156:
204800.
54594.
150206.
DBD157:
204800.
100907.
103893.
DBD158:
231424.
151778.
79646.
DBD159:
231424.
87003.
144421.
DBD160:
231424.
86383.
145041.
DBD161:
231424.
82310.
149114.
DBD162:
231424.
70025.
161399.
DBD163:
231424.
31219.
200205.
DBD164:
231424.
37498.
193926.
DBD165:
231424.
25669.
205755.
DBD166:
231424.
46682.
184742.
DBD167:
231424.
12575.
218849.
DBD168:
231424.
105815.
125609.
DBD169:
231424.
82987.
148437.
DBD170:
231424.
167523.
63901.
DBD171:
231424.
37236.
194188.
DBD172:
231424.
11755.
219669.
DBD173:
231424.
16106.
215318.
DBD174:
231424.
92088.
139336.
DBD175:
231424.
132169.
99255.
DBD176:
231424.
101411.
130013.
DBD177:
231424.
72597.
158827.
------- ---------B--L--O--C--K--S----------ITEM-- ---Total--- ---Used---- ---Free---TOTAL:
23412736.
4445326.
18967410.
(megabytes)
(gigabytes)
11432.000
11.1641
1280.
7054D
1 blk AMM019:
12800.
70550
1 blk DSK000:
12800.
7A38E
0 blk DSK001:
12800.
8382E
1 blk DSK002:
12800.
841CA
3 blk DSK003:
12800.
85701
2 blk DSK004:
12800.
8787B
2 blk DSK005:
12800.
89503
3 blk DSK006:
12800.
8B45D
2 blk DSK007:
12800.
8ECE8
2 blk DSK008:
12800.
91171
2 blk DSK009:
12800.
93D58
2 blk DSK010:
12800.
957DD
3 blk DSK011:
12800.
986B2
3 blk DSK012:
12800.
9B811
2 blk DSK013:
12800.
A3B20
1 blk DSK014:
12800.
A5E06
1 blk DSK015:
12800.
A7999
1 blk DSK016:
12800.
A95AA
0 blk DSK017:
12800.
AD4EA
0 blk DSK018:
12800.
B0A3B
1 blk DSK019:
14464.
B6CC6
3 blk UPD000:
14464.
C0100
0 blk UPD001:
14464.
C55F7
2 blk UPD002:
14464.
CAA54
0 blk UPD003:
14464.
CFAB6
1 blk UPD004:
14464.
D3F19
1 blk UPD005:
14464.
D5D96
3 blk UPD006:
14464.
D8236
0 blk UPD007:
14464.
D9B48
0 blk UPD008:
14464.
DC8DF
1 blk UPD009:
14464.
DD527
3 blk UPD010:
14464.
E3C7E
1 blk UPD011:
14464.
E8D89
3 blk UPD012:
14464.
F3123
1 blk UPD013:
14464.
F5581
0 blk UPD014:
14464.
F60FC
2 blk UPD015:
14464.
F70B7
3 blk UPD016:
14464.
FCAA6
2 blk UPD017:
14464.
104BB9
2 blk UPD018:
14464.
10AEC3
0 blk UPD019:
--BITMAP-- -SECTOR- -OFFSET- --DEV---words--- ---SOL-- ---SOL-- -SPEC-Media Label: "NIGHTLY BACKUP ALL
2170.569
2.1197
E Open Logical ...........................
E AMOS System Disk (Oct2004)..............
E Working Logical for CD "OCT" Release ...
E AlphaC 1.1(406) Release Logical ........
E LOTTO: & UNOFICIAL WIP..................
E Folders from Library System ............
E OPEN LOGICAL ...........................
E SSD Stuf for AMOS Systems (Current).....
E MEXICO'S VERSION OF ALPHAFAX............
E OPEN LOGICAL ...........................
E AlphaFAX Accounts ......................
E Metropolis Source from Barry on 08/23/05
E Backup of AND0:[] World Fence News DSK0:
E AlphaTCP 1.5A Release & Source WIP JC ..
E D/SOFT SOURCE WIP ......................
E SSD Stuf for AMOS Systems...............
E D/SOFT SOURCE WIP (CONT.) ..............
E Backup Copy of amd_files\Jose.amd.......
E ISAM TESTING LOGICAL ...................
E CD Update AlphaFAX 2.1(100)-8...........
E OPEN LOGICAL ...........................
E METROPOLIS SOURCE FILES MET00:-MET19:...
E ***** No Label *****
E ***** No Label *****
E ***** No Label *****
E ***** No Label *****
E ***** No Label *****
E ***** No Label *****
E ***** No Label *****
E ***** No Label *****
E ***** No Label *****
E ***** No Label *****
E DB.COD 226-222-016-212 7.5(180) ........
E ***** No Label *****
E ***** No Label *****
E ***** No Label *****
E ***** No Label *****
E 7.4 Flip Source & Others ...............
E ***** No Label *****
E ***** No Label *****
E ***** No Label *****
L ---------------------------------------T ---------------L-A-B-E-L---------------DEVICES"
9261.431
9.0444
DBD media contains 178 logical units.
Which DBD Logical(s) would you like to restore?
Each DBD Logical entered may have one MASK following it. A space must
separate the DBD Logical and the MASK. MASK characters are (?) &(*).
(e.g.: DBD0: *.DIR[1,2], DBD5: A*.LIT[1??,*] or DBD16: FLP*.*[] )
Enter list of disk Logicals to be transferred. Disk Logicals may
be entered as a range (e.g.: DBD0: -20 for DBD0: thru DBD20:), or
may be comma separated, The list is terminated with a blank line:
*DBD61: -76 *.LIT[1,4]
With Wildcarding
*
Which Disk Logical(s) would you like to restore to?
Enter list of disk Logicals to be transferred. Disk Logicals may
be entered as a range (e.g.: DBD0: -20 for DBD0: thru DBD20:), or
may be comma separated, The list is terminated with a blank line:
*UPD0: -15
*
----Date & Time: Thu 5-Jul-2007 01:45:12 PM
---
File Name Mask: "******.LIT[001,004]"
ENTERED: "*.LIT[1,4]"
DBD61: [19200.] 150 Mb -----> UPD0: [19200.] 150 Mb
Date & Time: Thu 5-Jul-2007 01:45:15 PM
System Commands Reference Manual, Rev. 18
Page 9
---
-----
-----
-----
-----
-----
-----
-----
---
BDRES
Files have been restored.
Date & Time: Thu 5-Jul-2007 01:53:18 PM Elapsed Time: 00:08:03
Restored 204 files.
File Name Mask: "******.LIT[001,004]"
ENTERED: "*.LIT[1,4]"
DBD62: [19200.] 150 Mb -----> UPD1: [19200.] 150 Mb
Date & Time: Thu 5-Jul-2007 01:53:20 PM
Files have been restored.
Date & Time: Thu 5-Jul-2007 01:53:20 PM Elapsed Time: 00:00:00
Restored (0.) Files.
File Name Mask: "******.LIT[001,004]"
ENTERED: "*.LIT[1,4]"
DBD63: [19200.] 150 Mb -----> UPD2: [19200.] 150 Mb
Date & Time: Thu 5-Jul-2007 01:53:21 PM
Files have been restored.
Date & Time: Thu 5-Jul-2007 01:55:17 PM Elapsed Time: 00:01:56
Restored (106.) Files.
File Name Mask: "******.LIT[001,004]"
ENTERED: "*.LIT[1,4]"
DBD64: [19200.] 150 Mb -----> UPD3: [19200.] 150 Mb
Date & Time: Thu 5-Jul-2007 01:55:17 PM
Files have been restored.
Date & Time: Thu 5-Jul-2007 01:55:17 PM Elapsed Time: 00:00:00
Restored (0.) Files.
File Name Mask: "******.LIT[001,004]"
ENTERED: "*.LIT[1,4]"
DBD65: [19200.] 150 Mb -----> UPD4: [19200.] 150 Mb
Date & Time: Thu 5-Jul-2007 01:55:19 PM
Files have been restored.
Date & Time: Thu 5-Jul-2007 02:00:47 PM Elapsed Time: 00:05:28
Restored (35.) Files.
File Name Mask: "******.LIT[001,004]"
ENTERED: "*.LIT[1,4]"
DBD66: [19200.] 150 Mb -----> UPD5: [19200.] 150 Mb
Date & Time: Thu 5-Jul-2007 02:00:48 PM
Files have been restored.
Date & Time: Thu 5-Jul-2007 02:00:52 PM Elapsed Time: 00:00:04
Restored (14.) Files.
File Name Mask: "******.LIT[001,004]"
ENTERED: "*.LIT[1,4]"
DBD67: [19200.] 150 Mb -----> UPD6: [19200.] 150 Mb
Date & Time: Thu 5-Jul-2007 02:00:52 PM
Files have been restored.
Date & Time: Thu 5-Jul-2007 02:01:01 PM Elapsed Time: 00:00:09
Restored (8.) Files.
File Name Mask: "******.LIT[001,004]"
ENTERED: "*.LIT[1,4]"
DBD68: [19200.] 150 Mb -----> UPD7: [19200.] 150 Mb
Date & Time: Thu 5-Jul-2007 02:01:02 PM
Files have been restored.
Date & Time: Thu 5-Jul-2007 02:01:12 PM Elapsed Time: 00:00:10
Restored (2.) Files.
File Name Mask: "******.LIT[001,004]"
ENTERED: "*.LIT[1,4]"
DBD69: [19200.] 150 Mb -----> UPD8: [19200.] 150 Mb
Date & Time: Thu 5-Jul-2007 02:01:13 PM
Files have been restored.
System Commands Reference Manual, Rev. 18
BDRES
---
-----
-----
-----
-----
-----
-----
-----
-----
Page 10
Date & Time: Thu 5-Jul-2007 02:02:44 PM Elapsed Time: 00:01:31
Restored (3.) Files.
File Name Mask: "******.LIT[001,004]"
ENTERED: "*.LIT[1,4]"
DBD70: [19200.] 150 Mb -----> UPD9: [19200.] 150 Mb
Date & Time: Thu 5-Jul-2007 02:02:44 PM
Files have been restored.
Date & Time: Thu 5-Jul-2007 02:02:45 PM Elapsed Time: 00:00:01
Restored (6.) Files.
File Name Mask: "******.LIT[001,004]"
ENTERED: "*.LIT[1,4]"
DBD71: [19200.] 150 Mb -----> UPD10: [19200.] 150 Mb
Date & Time: Thu 5-Jul-2007 02:02:45 PM
Files have been restored.
Date & Time: Thu 5-Jul-2007 02:02:46 PM Elapsed Time: 00:00:01
Restored (1.) Files.
File Name Mask: "******.LIT[001,004]"
ENTERED: "*.LIT[1,4]"
DBD72: [19200.] 150 Mb -----> UPD11: [19200.] 150 Mb
Date & Time: Thu 5-Jul-2007 02:02:46 PM
Files have been restored.
Date & Time: Thu 5-Jul-2007 02:02:46 PM Elapsed Time: 00:00:00
Restored (0.) Files.
File Name Mask: "******.LIT[001,004]"
ENTERED: "*.LIT[1,4]"
DBD73: [19200.] 150 Mb -----> UPD12: [19200.] 150 Mb
Date & Time: Thu 5-Jul-2007 02:02:47 PM
Files have been restored.
Date & Time: Thu 5-Jul-2007 02:02:47 PM Elapsed Time: 00:00:00
Restored (0.) Files.
File Name Mask: "******.LIT[001,004]"
ENTERED: "*.LIT[1,4]"
DBD74: [19200.] 150 Mb -----> UPD13: [19200.] 150 Mb
Date & Time: Thu 5-Jul-2007 02:02:50 PM
Files have been restored.
Date & Time: Thu 5-Jul-2007 02:15:36 PM Elapsed Time: 00:12:46
Restored (267.) Files.
File Name Mask: "******.LIT[001,004]"
ENTERED: "*.LIT[1,4]"
DBD75: [19200.] 150 Mb -----> UPD14: [19200.] 150 Mb
Date & Time: Thu 5-Jul-2007 02:15:36 PM
Files have been restored.
Date & Time: Thu 5-Jul-2007 02:16:59 PM Elapsed Time: 00:01:23
Restored (4.) Files.
File Name Mask: "******.LIT[001,004]"
ENTERED: "*.LIT[1,4]"
DBD76: [19200.] 150 Mb -----> UPD15: [19200.] 150 Mb
Date & Time: Thu 5-Jul-2007 02:16:59 PM
Files have been restored.
Date & Time: Thu 5-Jul-2007 02:16:59 PM Elapsed Time: 00:00:00
Restored (0.) Files.
Date & Time: Thu 5-Jul-2007 02:16:59 PM Elapsed Time: 00:31:47
DBD Logicals are being uninstalled.
The program has completed.
.
System Commands Reference Manual, Rev. 18
Page 11
BDRES
REQUIREMENTS AND SETUP
DBD requires the following:
•
•
•
AM-8000, Eagle 800, or AMPC 7.X based systems
AMOS 8.1 or later
A supported DVD-RAM or Blu-ray drive.
BDRES is only supported on AM-8000, Eagle 800, and AMPC 7.X Systems.
The DBD package contains the following required files:
•
•
•
•
•
•
DBD.LIT
The device driver (DBD.DVR) for the DVD-RAM and Blu-ray drive, in system
memory.
The SSD overlay file (DVD000.OVR)
MAKBD.LIT
DIRBD.LIT
BDRES.LIT
MODIFYING THE SYSTEM INITIALIZATION FILE:
You must load the device driver into system memory during system initialization by adding the
following statement in your system initialization file:
SYSTEM DSK0:DBD.DVR[1,6]
This statement should be added in the same area of the system initialization file that is currently
loading other system device drivers.
MESSAGES
Command line syntax messages:
•
•
Invalid switch
Invalid switch option
System requirements messages:
•
•
BDRES requires AMOS 8.x or compatible operating system.
If your memory partition is too small for MAKBD, the following message will display:
%Error - Memory requirements have not been met. CODE: N.
- Minimum memory to run BDRES.LIT is 1,240 KB (1,269,760 bytes)
DVD-RAM or Blu-ray Recorder device or driver messages:
•
Device specified is not a DVD-RAM or Blu-ray Recorder.
System Commands Reference Manual, Rev. 18
BDRES
•
Page 12
Unable to find a DVD-Recorder.
Error messages when setting up or reading from the DVD or Blu-ray Recorder
•
•
•
•
•
•
•
•
•
•
•
Error - Buffer not initialized.
Error - Device is already in use.
This indicates that either another user is running the BDRES program or the DVD is
being used in shared read/write mode.
Error - Disk in DVD-Recorder is not writeable.
Error - DBD driver must be in system memory.
Error - Unable to load DVD media.
This indicates a hardware problem with the DVD-RAM drive or a problem with the DVD
media.
Error - Unable to read disk information from media.
Try a different DVD media. This can also indicate a possible DVD-RAM drive problem.
Fatal SCSI error. Sense key=nn additional sense=nn
DVD drive device error has occurred. Sense key and additional sense provide further
error information.
Please insert a DVD-RAM media
Warning - Maximum number of devices exceeded - extras ignored.
Warning - Unable to close DVD.
Device error occurred while closing the current DVD. The DVD-RAM may or may not
be usable.
SCSI error message from the driver
DVD-RAM drive device error has occurred. Code provides additional SCSI error sense
information.
SCSI error – SCSI status =(nn)
sense key = xx
sssssssssssssss Add Sense Code/Qualifier Code = ac.qc
nn
xx
ssss
ac
qc
=
=
=
=
=
SCSI Status Code
SCSI Sense Key code
Interpreted sense key code if known
SCSI Additional Sense Code
SCSI Qualifier Code
Errors concerning the AMOS DVD-RAM or BD-RE data structure:
•
•
•
•
•
Error - Disk geometry calculation was incorrect.
The AMOS hidden sector parameters calculated are invalid.
Error - memory previously calculated as available isn't
Memory required for data buffers has increased.
Error - Unable to calculate AMOS disk geometry.
The AMOS hidden sector parameters could not be calculated.
Error - unable to get AMOS data buffer
The system was unable to acquire memory for data buffers.
Error- Unable to remove DVD Recorder data buffer from memory.
System Commands Reference Manual, Rev. 18
Page 13
BDRES
Normal informational messages:
•
•
•
•
The program has completed
The recording of data from the DVD media is done.
DVD-RAM Recorder located at SCSI id n
This shows the SCSI id of the DVD-RAM Drive being used.
Note that once started, the restoring operation can be stopped by pressing ^C.
However, if the restoring is stopped, a DSKANA or SYSACT to the last logical that was
interrupted needs to be performed. The last logical that was interrupted will have a
mixture of new and old blocks that will cause problems.
Restoring DSK0:
System Commands Reference Manual, Rev. 18
BITMAP
FUNCTION
Displays memory locations used by AMOS.
CHARACTERISTICS
BITMAP is re-entrant and re-usable.
A bitmap is a storage allocation map that tells the system which disk records are free and which
are in use. The bitmap is originally set up in your system initialization command file using
BITMAP statements. See your System Operator's Guide to the System Initialization Command
File for more information.
OPERATION
Enter BITMAP:
BITMAP
RETURN
The display you see tells you what memory locations have been assigned to the disk bitmaps
defined at the time of system initialization. For example, you might see something like this:
DSK0 - Bitmap DDB at 55349, buffer at 394938, paged bitmap (16665 words)
or:
DSK0 - Bitmap DDB at 430, buffer at 402, size of 810. words
MIN0 - No bitmap allocated
Each line of the BITMAP display gives you the following information:
Devn - Bitmap DDB at x, buffer at y, paged bitmap, size
x is the memory location of the bitmap DDB and y is the location of its buffer.
MESSAGES
?Cannot allocate bitmaps after system startup
At AMOS level, BITMAP has no specifications or options. Try again, entering only
BITMAP RETURN .
System Commands Reference Manual, Rev. 07
CACHE
FUNCTION
Allows you to control the Disk Cache Buffer system, and to find out information about it. Disk
"caching" may speed up your system by reducing disk access.
CHARACTERISTICS
CACHE is re-entrant and re-usable. For more information on setting up and using the cache, see
your System Operator's Guide.
When used from an operator's account [1,2] or from [1,4], CACHE puts you in an interactive
mode in which you can modify the cache. When used from any other account, CACHE displays
statistics about the disk cache system.
OPERATION
Enter CACHE at AMOS command level. For example:
CACHE
RETURN
Normally, you see the CACHE display. When used from [1,2] or [1,4], CACHE enters an
interactive mode. In interactive mode, you see an asterisk prompt symbol. The format for an
interactive command in this mode is:
command{switch} {device}{filename}
The commands are:
ON
OFF
LOCK
UNLOCK
CLEAR
STATUS
HELP
LIST
EXIT
Turn on the disk cache system.
Turn off the disk cache system.
Lock the specified block or file in the cache.
Unlock the specified block or file.
Remove the specified block or file from the cache.
Display statistics about the cache.
List the available commands.
List static, dynamic, or hash blocks (you must specify a
switch).
Return to AMOS.
System Commands Reference Manual, Rev. 07
CACHE
Page 2
The switches for the LOCK, UNLOCK, and CLEAR commands are:
/BLOCK
/FILE
/MFD
/UFD
Perform the operation on a specified block.
Perform the operation on the specified file.
Perform the operation on the specified MFD.
Perform the operation on the specified UFD.
The switches for the LIST command are:
/STATIC
/DYNAMIC
/HASH
List the blocks in the static queue.
List the blocks in the dynamic queue.
List the blocks in the hash queue.
The switches may be abbreviated.
You can use an ersatz name for the device specification.
Here are some examples:
*ON RETURN
*UNLOCK/F PAYROL.DAT RETURN
*LOCK/MFD DSK0:,DSK2: RETURN
*CLEAR/FILE DSK1:PAYROL.DAT[126,10]
RETURN
You may add a CACHE command to your System Initialization Command File after the final
SYSTEM command so the CACHE is set up at the time of system bootup.
MESSAGES
?Argument error
You specified an invalid argument in the input line. An arrow (^) points to the incorrect
part of the line.
?Command error
You specified an invalid command name in the input line. An arrow (^) points to the
incorrect command.
?Disk cache does not exist
The disk cache file, DCACHE.SYS, does not exist, is in the wrong account, or was not
loaded into system memory by your system INI file. Check to see DCACHE.SYS exists
in DSK0:[1,4], and use SYSTEM to be sure it's loaded.
System Commands Reference Manual, Rev. 07
Page 3
CACHE
?Disk cache is already OFF
?Disk cache is already ON
You tried changing the state of the disk cache to the state it was in already. The
command is ignored.
Disk cache is OFF
The disk cache was not enabled at bootup time or has been turned off with the OFF
command. Edit your system command initialization file to enable the disk cache, and
reboot the system.
?Network access denied
You specified a device on another computer networked to your own. You cannot use
CACHE across the network.
?Not enough cache space available
There are not enough disk buffers available in the cache to lock the MFD, UFD, file, or
block you specified. You may have to allocate more memory to the disk cache system.
?Specification error
You made a syntax error in the input line. An arrow (^) points to the error.
?Switch error
You specified an invalid switch. See the operation section above for the switches and reenter the command.
System Commands Reference Manual, Rev. 07
CAL100
FUNCTION
Calibrates the time-of-day clock oscillator on AM-100/L, AM-1000, AM-1200, AM-1500, and
AM-2000 series systems.
CHARACTERISTICS
CAL100 is re-entrant and re-usable. For further information on calibration, see your Alpha Micro
Integrated Systems User's Guide.
This program is only for use by qualified maintenance personnel. Requires the use of a
high-precision counter for the calibration procedure.
The CPU is shipped from the factory fully calibrated. Normally, you will not need to re-calibrate
the time-of-day clock. You will only need to use this program if the time-of-day clock oscillator is
out of calibration when you initially install the CPU board in the system, or during subsequent
maintenance.
After you have completed the calibration procedure, you should reset the clock/calendar by using
the TIME and DATE commands.
OPERATION
Enter CAL100 at AMOS command level:
CAL100
RETURN
Adjust the trimmer capacitor to exactly 1024 Hz at the calibration test point. When you have
completed the calibration procedure, press CTRL /C to exit CAL100.
MESSAGES
?This program is not supported.
You cannot use CAL100 on this computer.
System Commands Reference Manual, Rev. 07
CBDS
FUNCTION
Disables the cache for certain high-performance Alpha Micro Central Processing Unit (CPU)
boards, such as those using the 68030, 68040, or 68060 CPU.
CHARACTERISTICS
CBDS is re-entrant and re-usable.
If the cache is already disabled, or if there is no on-board memory cache on your system, CBDS
has no effect.
The on-board memory cache controlled by CBEN/CBDS should not be confused with the memory
cache contained on the CPU chip itself.
The on-chip cache is an instruction cache only. The on-board cache is a combined instruction and
data cache that is transparent to users and programmers in everyday use. Both the on-chip and onboard caches are enabled at bootup time automatically. The on-chip cache is turned on and off by
executing a sequence of program instructions (see the AMOS Monitor Calls Manual for details),
whiile the on-board cache is turned off by the CBDS command and re-enabled by the CBEN
command.
The on-board cache is not affected by the COMPAT database: Self-modifying code does
not have to deal with the on-board cache.
OPERATION
Type CBDS and press
CBDS
RETURN :
RETURN
MESSAGES
?This program is not supported
Your system is not running either a RoadRunner CPU board or the AMOS/32 operating
system. The on-board cache is not supported.
System Commands Reference Manual, Rev. 07
CBEN
FUNCTION
Enables the cache for certain high-performance Alpha Micro CPU boards, such as those using the
68030, 68040, and 68060 CPUs. The on-board memory cache improves system performance by
holding frequently used instructions and data in high-speed memory to eliminate slower accesses to
main memory.
CHARACTERISTICS
CBEN is re-entrant and re-usable.
The on-board memory cache controlled by CBEN/CBDS should not be confused with the memory
cache contained on the CPU chip itself. The on-chip cache is an instruction cache only. The onboard cache is a combined instruction and data cache that is transparent to users and programmers
in everyday use. Both the on-chip and on-board caches are enabled at bootup time automatically.
The on-chip cache is turned on and off by executing a sequence of program instructions (see the
AMOS Monitor Calls Manual for details), while the on-board cache is turned off by the CBDS
command, and re-enabled by the CBEN command.
The on-board cache is not affected by the COMPAT database: self-modifying code does
not have to deal with the on-board cache.
If you use CBDS to disable the cache during testing or debugging, you then need to use CBEN
(or reboot your computer) to re-enable it.
If you use CBEN and the cache is already enabled, it causes the cache to be flushed. If there is no
on-board memory cache on your system, CBEN has no effect.
OPERATION
Type CBEN and press
CBEN
RETURN :
RETURN
MESSAGES
?This program is not supported
Your system is not running either a RoadRunner CPU board or the AMOS/32 operating
system. The on-board cache is not supported.
System Commands Reference Manual, Rev. 07
CDIR
FUNCTION
Displays the full name, uncompressed size and file type for a file compressed by the CMP
command.
CHARACTERISTICS
CDIR is an OS/Exec program that may be used as an AMOS command. CDIR can also display
one file at a time—multiple files may be processed using the "CDIR" function in OS/Exec. Only
files compressed using the OS/Exec program CMP may be CDIR'd.
The CTYPE command can be used to display the contents of a compressed sequential file. The
EXP command can be used to expand a file that was compressed using the OS/Exec program
CMP.
FORMAT
CDIR filespec
DEFAULTS
CDIR assumes an extension of CMP.
OPERATION
Enter CDIR and the specification of the file. For example:
CDIR TRANS
RETURN
CDIR now displays a message listing the file name, uncompressed size in blocks, and the type of
file:
TRANS.CMP
is
TRANS.TXT
43
sequential
MESSAGES
File is not an OS/Exec compressed file
Use the DIR or TYPE command to get information about the file.
System Commands Reference Manual, Rev. 07
CDIR
Page 2
The file specified is not in the format expected by CDIR.
Use the DIR or TYPE command to get information about the file.
System Commands Reference Manual, Rev. 07
CLEAR
FUNCTION
Writes zeros to all (or to a specified number) of the free blocks on the specified disk.
CHARACTERISTICS
CLEAR is re-entrant and re-usable. When you erase a file from the disk, the data is not
destroyed—only the "access" to it is. Until those blocks are used again, the contents of the file
remain. CLEAR guarantees the data is overwritten with zeros so it cannot be retrieved.
You must be logged into DSK0:[1,2] to run CLEAR. You can't use CLEAR across a
network. CLEAR locks the logical disk you specify so nobody else can access it until
CLEAR is finished. CLEAR will NOT write to any blocks marked in the bitmap as
being in use.
FORMAT
CLEAR devn:
DEFAULTS
CLEAR assumes you want to clear all the free blocks on the disk if you do not specify a number of
blocks to clear.
OPERATION
Log into OPR:. Enter CLEAR and the device you want to clear. For example:
CLEAR DSK3:
RETURN
You then see:
How many blocks do you want to clear?
You may press
CTRL
/C at any time to stop the program.
If you just press RETURN , CLEAR will write zeros to all of the free blocks on the disk. CLEAR
displays a period for every block it clears. When CLEAR is finished, it displays the number of
blocks cleared. This number may be smaller than the number you specified if there were fewer free
blocks on the disk than the number of blocks you asked to clear.
System Commands Reference Manual, Rev. 07
CLEAR
Page 2
MESSAGES
?Cannot use CLEAR over network
You cannot CLEAR disks on another system through a network.
?File specification error
Try again, using a valid device name. Use SYSTAT to display a list of active devices for
your system.
?Invalid number, try again
You entered an illegal number. Try again, using a positive whole number.
?Privileged program -- must be logged into [1,2]
Log into [1,2] and try again.
System Commands Reference Manual, Rev. 07
CMP
FUNCTION
Compresses an AMOS file.
CHARACTERISTICS
CMP is an OS/Exec program that may be used as an AMOS command. Although CMP can only
compress one file at a time, multiple files may be compressed using the "Compress" function in
OS/Exec.
Compress DOES NOT delete the files it compresses. This must be done as a separate operation.
Prior to erasing the uncompressed files, make a backup copy of them as a precaution.
Files are compressed using a one pass adaptive algorithm. Files need not contain repeated
characters to be compressed. Virtually all uncompressed files are compressible. CMP can process
sequential and contiguous (i.e. random) files. The resulting compressed files are in the sequential
file format.
The CTYPE command can be used to display the contents of a compressed sequential file. The
CDIR command can be used to list the type, size and name of a file that has been compressed.
FORMAT
CMP filespec
If no file extension is specified, CMP assumes an extension of TXT.
OPTIONS
No switches are currently defined.
OPERATION
Type CMP followed by the specification of the file you want to compress, then press
example:
CMP TRANS.TXT
RETURN
System Commands Reference Manual, Rev. 03 (AMOS 2.2 - 4/91)
RETURN .
For
CMP
Page 2
CMP now displays a message indicating compression of the file is in progress:
Compressing TRANS.TXT........................
Each dot represents a block of the uncompressed file. When compression is done, a message is
output indicating the name of the compressed file and the amount of compression achieved. For
example:
TRANS.CMP compressed
37.7%
When a file, such as "NAME.EXT" is processed, the compressed file is named "NAME.CMP",
unless "NAME.CMP" already exists. In this case the file is named "NAME.C00", or
"NAME.C01", etc., depending on how many such files already exist.
If the file processed has already been compressed, the resulting "compressed" file will likely be
larger than the original file. In this case the compression percentage is negative.
MESSAGES
?FILE.EXT not found
Check your syntax or your directory and try again.
?More than 101 files with this file name
Rename and recompress
Erase or rename older compressed files and try again.
System Commands Reference Manual, Rev. 03 (AMOS 2.2 - 4/91)
COMPAT
FUNCTION
Allows you to list programs to be run with the instruction cache on a 68030 or later CPU disabled.
Some programs which use self-modifying code will not run properly with the on-chip instruction
cache enabled.
CHARACTERISTICS
COMPAT is re-entrant and re-usable. It lets you run some programs with instruction cache
disabled while all other programs run with the cache on. The programs to run with the cache
disabled are listed in a text file in SYS: named COMPAT.DAT.
The proper way to solve the problem of self-modifying code and the instruction cache is to
modify the program so it either doesn't use self-modifying code or it disables and enables
the instruction cache. You should use COMPAT only when you have programs which, for
some reason, cannot be properly modified.
You can include COMPAT in your system initialization file so the listed programs are never run
with the cache enabled.
COMPAT checks the name of the current program, held in the JOBPRG field in the job's
job control block, against the COMPAT database. If a program modifies the JOBPRG
field, it will be incorrectly run with the instruction cache enabled. Also, if there are two
programs of the same name located on different devices and/or accounts, both are affected
by the entry into the COMPAT database: you cannot differentiate one from the other
without renaming one.
The external on-board cache (controlled by the CBDS and CBEN commands) does not
need controlling in the same way. The on-board cache is transparent in operation and is not
affected by such programming tricks as self-modifying code.
FORMAT
COMPAT {COMPAT.DAT}
System Commands Reference Manual, Rev. 07
COMPAT
Page 2
OPERATION
Entering COMPAT with COMPAT.DAT on the command line disables caching for the programs
listed in the COMPAT.DAT file. In COMPAT.DAT, list the programs one to a line. List only the
program name, with no file extension or account specification. You can put comments in
COMPAT.DAT by starting a line with a semi-colon. Here is a sample COMPAT.DAT, using
fictitious program names:
SCHDLP
INIJOB
; This is a comment
When you enter COMPAT by itself, it shows statistics for each program set to run without
instruction caching, listing what percentage of CPU context switches are non-cached. For example:
The following programs run with internal cache disabled:
SCHDLP
INIJOB
(active in 1.2% of total context switches, 80% of non-cached)
(active in 0.3% of total context switches, 20% of non-cached)
A total of 1.5% of context switches were non-cached
MESSAGES
?Invalid program spec: [name]
There is an invalid program name in the COMPAT.DAT file. Edit the file and correct the
error.
?COMPAT requires 68030 processor or better to run
Your computer does not have an instruction cache; you do not need to use COMPAT.
?Cache compatibility mode is not active
You have not specified any programs to run with the cache disabled.
System Commands Reference Manual, Rev. 07
COMPIL
FUNCTION
Compiles AlphaBASIC programs, producing an executable .RUN file.
CHARACTERISTICS
COMPIL is re-entrant and re-usable. The program you compile is a BASIC source program
previously saved after using AlphaBASIC in interactive mode, or created using AlphaVUE. For
more information on COMPIL, RUN, and BASIC, see your AlphaBASIC User's Manual.
COMPIL does not require your AlphaBASIC program to have line numbers. If COMPIL
finds an error, it does not produce a .RUN file.
FORMAT
COMPIL filespec{/switch(s)}
filespec is the file containing the program you want to compile and switch is an option request.
COMPIL assumes an extension of .BAS.
OPTIONS
/A
/L
/M
/N
/O
/T
Selects long addressing mode (24-bit).
Creates a file listing your program line by line after an offset number, so
errors can be easily found.
Displays message for each unmapped variable.
Suppresses printing of COMPIL statistics.
Omits line number references from compiled code to reduce size. Error
messages won’t report line numbers.
Displays each line as it compiles, to help find errors.
OPERATION
Enter COMPIL and the specification of the file you want to compile. For example:
COMPIL PROJCT.BAS
RETURN
COMPIL displays messages after the command line showing the compilation status. When
COMPIL finishes, and if it found no errors, it produces a file containing a compiled program. This
file has the same name as the file you specified on the COMPIL command line, but with a .RUN
extension. To execute this file, use RUN.
System Commands Reference Manual, Rev. 03 (AMOS 2.2 - 4/91)
COMPIL
Page 2
MESSAGES
The AlphaBASIC error messages are explained in your AlphaBASIC User's Manual.
System Commands Reference Manual, Rev. 03 (AMOS 2.2 - 4/91)
COMPLP
FUNCTION
Compiles an AlphaBASIC PLUS source file.
CHARACTERISTICS
COMPLP is re-entrant and re-usable. See the AlphaBASIC PLUS User's Manual for information
about the AlphaBASIC PLUS programming language.
System Commands Reference Manual, Rev. 04
CONT
FUNCTION
Resumes execution of a command file previously interrupted by a PAUSE command.
CHARACTERISTICS
CONT is a .DO file located in DSK0:[2,2].
When you are using a command file, and its execution is interrupted because of a PAUSE
command in that file, you are then returned to AMOS command level. At that point, you can use
other command files, run programs, use the text editor, etc. When you are ready to resume
execution of the command file, you may use CONT to do so.
When command file execution is interrupted, PAUSE saves the remainder of the unexecuted
command file in a disk file named CNT.CMD in the account the command file is logged into.
CONT loads the CNT.CMD file into memory from the account you are logged into and executes it.
Therefore, do not erase CNT.CMD from that account, unless you do not intend to continue the
command file. Each use of a PAUSE command erases any current CNT.CMD file and creates a
new one.
OPERATION
Enter CONT at AMOS command level:
CONT
RETURN
After CONT loads CNT.CMD into memory and processes it, CONT erases the CNT.CMD file
from the disk. You may also include CONT within another command file, which then resumes
execution of the first command file.
MESSAGES
?CAN'T CONTINUE
No CNT.CMD file exists in the account you are logged into. Make sure you are logged
into the correct account. Use DIR to locate the CNT.CMD file.
System Commands Reference Manual, Rev. 07
COPY
FUNCTION
Copies one or more files. You can copy within an account, between accounts, and between disks.
Also copies files across AlphaNET networks. Can also copy files to a terminal or to and from user
memory.
CHARACTERISTICS
COPY is re-entrant and re-usable. You may use the ersatz names defined for your system. You
may not copy to an account if it is not in the project you are logged into, unless you are logged into
an operator's account, [1,2]. You may copy files into your account from any other account,
regardless of project number. COPY ignores files without any contents.
You must have the correct driver program loaded into system memory if you wish to COPY from a
peripheral device.
COPY is a wildcard file command. See your AMOS User's Guide for more information on
wildcarding.
The file BADBLK.SYS[1,2] is created by a disk certification program for certain kinds of
disk devices. It contains a list of the bad blocks or tracks on those devices. You must
never destroy or alter the contents of a BADBLK.SYS[1,2] file. To protect the integrity of
a device's certification data, COPY won't overwrite BADBLK.SYS[1,2].
COPY supports command file error checking. See your Command File User's Manual.
FORMAT
COPY {newfspec}={filespec{,...filespec}}{/switch}
newfspec is the specification of the file to be created, and the filespec(s) are the files to be copied.
A switch is an option request.
To copy to a terminal, newfspec is the name of the terminal, in the format
TRM:terminal-name. You can only copy to a terminal which uses the TRM driver.
DEFAULTS
The initial default filespec is *.* and the account and device you are logged into. The default
newfspec is *.* and the account and device you are logged into unless you are logged into [1,2], in
which case it is *.*[ ] and the device you are logged into. The default switches are /D, /NOQ,
/NOR, and /NOS.
System Commands Reference Manual, Rev. 07
COPY
Page 2
OPTIONS
All the switches are file switches, and may be abbreviated.
/QUERY
Confirm before copying.
/NOQUERY
Don't confirm copy. Default.
/DELETE
Overwrite existing file. Default.
/NODELETE
Don't overwrite existing file.
/REPLACE
Overwrite existing files only. Do not copy if there is no
existing file.
/NOREPLACE
Do not overwrite existing files only. Default.
/SUPPRESS
Don't display the name of each file as it is copied. Display
the total number of files transferred at the end of the copy.
/NOSUPPRESS
Display each file name as it is copied. Default.
OPERATION
Enter COPY and the file specifications for the new file and the files you want copied. For
example:
COPY SORT.TXT=WORK1.TXT RETURN
WORK1.TXT to SORT.TXT
Total of 1 file transferred
Remember you can use wildcard symbols, and COPY assumes certain filespec defaults. For
example:
COPY DSK1:*.OLD=*.NEW
RETURN
copies all files with a .NEW extension from the account and device you are logged into over to the
same account on DSK1:. The new files have the same names, but have extension .OLD.
When you use the /Q switch, COPY asks you for confirmation of each transfer. Remember the
placement of the switch on the command line can affect which files it affects. When COPY
prompts you for confirmation, answer with a Y for Yes or an N for No. Do not press RETURN after
your answer. For example:
COPY SRCFIL[110,2]=WRKFIL/QUERY RETURN
WRKFIL.BAS TO SRCFIL.BAS[110,2]? Y
WRKFIL.RUN TO SRCFIL.RUN[110,2]? N
You may use
CTRL
/C at any time to halt the copy.
System Commands Reference Manual, Rev. 07
Page 3
COPY
To copy to a terminal, use the terminal name in place of the new file specification. For example:
COPY TRM:TRM2=SYS:AMOS.INI
RETURN
This displays the contents of AMOS.INI on the terminal TRM2.
MESSAGES
?Account does not exist - [x,x]
You specified an account that does not exist. Check your typing, find the correct account,
or create the account you need.
?Attempt to copy file to self
You specified (or wildcard processing yielded) the same name for the output file as the
input file. You cannot copy a file onto itself.
%Bypassing BADBLK.SYS[1,2]
BADBLK.SYS exists to prevent bad blocks
on a device from being allocated, and
should never be directly accessed.
You cannot copy BADBLK.SYS[1,2].
?Cannot find DSK0:CMDLIN.SYS[1,4]
The COPY program needs this file to be able to process wildcard symbols. Check to see if
CMDLIN.SYS exists in DSK0:[1,4]—if so, you did not have enough memory to load it
into your partition—try to increase your memory by erasing unnecessary files. See your
System Operator for further help.
?Cannot load [filename] - contiguous files may not be loaded
You may only COPY sequential files into your memory partition.
?Device Error
You specified a peripheral device in a filespec, and the device driver for that device is not
loaded into system memory—so AMOS can't access it. See your System Operator about
defining the device to the system, and try again when it is ready for access.
?Device full
There is not enough room on your disk to do the COPY you requested. See what you can
do to free up memory space.
System Commands Reference Manual, Rev. 07
COPY
Page 4
?Files may not be transferred to RES:
You cannot use COPY to transfer files to resident system memory. You must use a
SYSTEM command in your system initialization command file.
?Maximum input exceeded
You put more characters on the command line than COPY could handle. Break your
command into smaller commands.
?MEM: or RES: specified on network
You cannot access MEM: or RES: over a network.
?Missing output specification
You left out the equal sign, and COPY could not tell which was your new file and which
was the old file.
?More than one output specification
You may not specify more than one new file. Check your entry.
?Not copied - Destination file already exists
You tried to copy to a file that already exists while using /NOD. Try again with /D, or
specify a different new file.
?Not copied - Destination file does not already exist
Using /REPLACE, you tried to copy to a file which does not already exist in the
destination account. Try again using /NOREPLACE, or specify an existing destination
file.
Specification error ^
Your command line is not in the proper format. The ^ symbol points to the part of the line
COPY did not understand.
%Unsuccessful copy - [filename]
This is usually followed by another message detailing what went wrong with the copy.
Check with your system operator if you have trouble locating the problem.
?Wildcard device or unit specified on network
You cannot use wildcard symbols over a network.
System Commands Reference Manual, Rev. 07
Page 5
COPY
?You are not logged in under [1,2], can't create [p,pn]
You tried to copy one or more files to an account that does not exist. You must be logged
into [1,2] to create such an account.
System Commands Reference Manual, Rev. 07
CPMCPY
FUNCTION
Transfers a copy of a file from a floppy diskette created under the CP/M operating system to an
AMOS file-structured device.
CHARACTERISTICS
CPMCPY is not re-entrant or re-usable. CPMCPY assumes the data in the CP/M file is in ASCII
or binary form; it does no translation of the data. CPMCPY assumes the CPMCPY diskette is
mounted on CP/M device A: (CP/M device A: is AMOS device IMG0:). You must have the
IMG.DVR floppy driver in account DSK0:[1,6]. For information on configuring floppy disk
drivers, see your System Operator's Guide. You must have the IMG device defined in your system
device table-see your System Operator's Guide to the System Initialization Command File.
The extension in your CP/M file specification must be three characters. This means if the CP/M
extension is only two characters, you must enter a space as the third character. If the extension is a
null extension, you must enter three spaces.
CP/M is a registered trademark of Digital Research. In order to use CP/M on an AMOS
system, you must purchase the Alpha Micro implementation of CP/M, and your computer
must be equipped with the proper Communications Controller. For information on using
AMOS CP/M, see your CP/M Installation Instruction and User's Guide and the CP/M
Operating System Manual.
FORMAT
CPMCPY AMOS-file=CPM-file{/switch}
AMOS-file is the AMOS file you want to create, and CPM-file is the CP/M file you want to copy.
A switch is an option request. The default extension for the AMOS file is .CPM.
OPTIONS
/B
Use if the file being copied contains binary data.
OPERATION
Enter CPMCPY, the AMOS file, an equal sign, and the CP/M file. For example:
CPMCPY DSK1:FORMS.CPM = A:FORMS.ASM
System Commands Reference Manual, Rev. 03 (AMOS 2.2 - 4/91)
RETURN
CPMCPY
Page 2
MESSAGES
?Account does not exist - [x,x]
Check your syntax, find the correct account, or create the account you need.
?Cannot DELETE [filename] - file may not be deleted
You cannot copy over the filename in memory, because it is locked by the system. Use the
LOKUTL program to erase the old module and add the new file.
?Cannot find DSK0:CMDLIN.SYS[1,4]
The program needs this file to process wildcard symbols. Make sure CMDLIN.SYS is in
DSK0:[1,4]—if it is, you did not have enough memory to load it in your partition. If so,
DELete unneeded files to increase your memory.
CPM file not found in directory search
Check your syntax and/or use CPMDIR to locate the file, then try again.
?Device Error
The device driver for the device you specified as a peripheral is not loaded into system
memory, so AMOS can't access it. See your System Operator about defining the device to
the system, and try again when it is ready for access.
?Device full
There is not enough room on your disk to do the copy you requested. See what you can do
to free up memory space.
?Files may not be transferred to RES:
You cannot transfer files to resident system memory. You must use a SYSTEM command
in your system initialization command file.
?Missing Output specification
You left out the equal sign, and CPMCPY could not tell which was your AMOS file and
which was your CP/M file.
?More than one output specification
You may not specify more than one AMOS file. Check your entry.
System Commands Reference Manual, Rev. 03 (AMOS 2.2 - 4/91)
Page 3
CPMCPY
Specification error ^
Your command line is not in the proper format. The ^ symbol points to the part of the line
CPMCPY did not understand.
System Commands Reference Manual, Rev. 03 (AMOS 2.2 - 4/91)
CPMDIR
FUNCTION
Displays the directory of a CP/M diskette.
CHARACTERISTICS
CPMDIR is not re-entrant or re-usable. CPMDIR uses the IMG.DVR floppy driver to access the
data on the CP/M diskette; you must have a valid copy of that program in account [1,6] of the
System Disk. For information on configuring floppy disk drivers, see your System Operator's
Guide. The IMG device must be defined in your system device table. CPMDIR assumes the
diskette whose directory you want to see is mounted on CP/M device A: (AMOS device IMG0:).
CP/M device B: is AMOS device IMG1:.
CP/M is a registered trademark of Digital Research. In order to use CP/M on an Alpha
Micro computer system, you must purchase the Alpha Micro implementation of CP/M, and
your computer must be equipped with the correct Communication Controller. For
information on using CP/M on an Alpha Micro computer system, see your CP/M
Installation Instruction and User's Guide and your CP/M Operating System Manual.
FORMAT
CPMDIR devn:
devn: is the CP/M format specification of the CP/M diskette.
OPERATION
Enter CPMDIR and the device name. For example:
CPMDIR B:
RETURN
You then see a directory display for that CP/M device.
MESSAGES
?Cannot READ IMGx: - device does not exist
Make sure IMG is defined as a valid device on your system and the IMG.DVR program
exists in account DSK0:[1,6].
System Commands Reference Manual, Rev. 03 (AMOS 2.2 - 4/91)
CPMDIR
Page 2
?Cannot READ IMGx: - device not mounted
Use the MOUNT command to mount the diskette, and try again.
System Commands Reference Manual, Rev. 03 (AMOS 2.2 - 4/91)
CREATE
FUNCTION
Creates a random file of specified size.
CHARACTERISTICS
CREATE is re-entrant and re-usable. A random (or contiguous) file is one in which the blocks
making up the file are next to each other on the disk (as opposed to a sequential file, in which the
disk blocks may be scattered across the disk). Since random files may not be expanded once they
are allocated on the disk, programs that increase the size of files (such as text editors) will not
work with random files.
FORMAT
CREATE filespec,size{,record-size}
filespec selects the file you want to create and size is the number of disk blocks you wish to
allocate to that file. The optional record-size specifies the size of the records.
DEFAULTS
The default device and account are where you are logged. The default extension is .DAT.
OPERATION
Enter CREATE, the file you want to create, and the number of blocks to allocate to it. For
example:
CREATE CUSIDX.NEW,10
RETURN
If you have an extended format file system, you can specify a record-size to define the size of the
records for the file. For example:
CREATE SUPPLY.RCD,10,1200
MESSAGES
?Command error
Check your syntax and try again.
System Commands Reference Manual, Rev. 07
RETURN
CREATE
Page 2
?Cannot allocate random file [filespec] - device full
There were not enough contiguous blocks available on the disk to create a file of the
specified size. Use DSKPAK to consolidate disk blocks, and/or erase files to create more
disk space.
?File specification error
Check your syntax and try again.
?Record size must be greater than 0, if specified
If you specify the optional record size, the size must be greater than zero.
System Commands Reference Manual, Rev. 07
CRT410
FUNCTION
Certifies the disk media of a device controlled by the AM-410 Hard Disk Controller.
CHARACTERISTICS
CRT410 is re-entrant and re-usable. Because of the high data density of the disks that run with the
AM-410 (Phoenix disks), media flaws are a more likely possibility than on more conventional
drives (for example, Winchester disks). Therefore, you must run CRT410 on each logical device
of every disk controlled by an AM-410 before using that device.
CRT410 runs only under the AMOS/L operating system. You may use it ONLY on devices
controlled by an AM-410. CRT410 communicates directly with the AM-410 without going
through the 410DVR.DVR driver program. Therefore, you MUST NOT run CRT410 at
the same time as other programs that access devices under control of the AM-410.
CRT410 will also lock up or severly slow down all other users on your system—warn them
before using this command.
CRT410 formats and certifies a logical device by writing and verifying data in every block of the
device, so make sure you back up any data you need on that device before you certify it. Because
CRT410 destroys any data on the disk it is certifying, CRT410 requires you be logged into the
System Operator's account, DSK0:[1,2], before certifying a disk.
CRT410 creates account [1,2] on the disk you are certifying. Then it creates a file
BADBLK.SYS[1,2] containing a list of all bad disk tracks on the certified device. CRT410
assigns alternate tracks for these bad tracks, thereby making the fact some tracks are bad
completely "transparent" to the user of the device. For more information, see the BADBLK
reference sheet.
CRT410 also computes and stores a hash total for BADBLK.SYS within the file. Other programs
can check this hash total against the contents of the file to make sure BADBLK.SYS contains
undamaged data.
You must mount a logical device before certifying it.
FORMAT
CRT410 devn:
devn: is the specification of the device you want to certify.
System Commands Reference Manual, Rev. 07
CRT410
Page 2
OPERATION
Enter CRT410 and the specification of the device. For example:
CRT410 SMD5:
RETURN
Make sure you have backed up any data on the disk you may need; CRT410 destroys all data
on the disk. You can interrupt the program at this point by pressing CTRL /C.
CRT410 now creates a file named BADBLK.SYS in account [1,2] of the disk you are certifying.
This file will hold a list of all bad disk blocks CRT410 finds. It then asks you several questions:
1. Enter maximum acceptable number of bad tracks:
Give the number of bad tracks you will accept on the disk. You may specify up to 15
tracks. When CRT410 finds more than this number, it tells you so and returns you to
AMOS command level.
2. Enter number of accounts to preallocate:
This information allows CRT410 to pre-initialize blocks in the Master File Directory
(MFD). There is no practical limit to the number of accounts you may specify, and the
number you enter here in no way restricts the number of accounts you can add to the disk
in the future. The only limiting factors are the size of the logical devices and the amount of
data you plan to store in each account.
3. Display current track? (Y or N):
If you want each track displayed as it certifies, enter Y; otherwise, enter N.
4. Enter serial number (10 char. max):
You may optionally give CRT410 a ten-character alphanumeric I.D. for the logical device
it is certifying. CRT410 writes this identifier into the BADBLK.SYS file.
After you answer the questions, CRT410 certifies the disk. When CRT410 encounters a track it
can't verify, it tells you so. When it finishes, it displays the number of bad tracks it found.
MESSAGES
?Cannot certify devn: - device not mounted
Use the MOUNT command to mount the specified device.
?Certification incomplete
You pressed CTRL /C, or some other event interrupted the certification. CRT410 now
intentionally writes a bad hash total to BADBLK.SYS so other programs know the data in
the file is incomplete and not to be trusted. Re-run CRT410 to create a good
BADBLK.SYS file.
System Commands Reference Manual, Rev. 07
Page 3
CRT410
?Device does not exist
Check the device name and re-enter the command. Use DEVTBL to see a list of devices.
?Device has exceeded maximum number of errors
CRT410 found more bad tracks than the value you specified as the maximum number of
bad tracks you will accept.
%devn: is not at the standard port address. Make sure that you are
% using the correct format program. Do you wish to continue?
The device driver for the specified device defines the hardware address of the device to be
a non-standard port. Carefully check that you want to certify this device, as you may be
specifying a device not under control of an AM-410 disk controller. Then enter Y or N as
appropriate.
?Nonexistent device
Check your spelling and try again. Use DEVTBL or SYSTAT to see a list of the devices
on your system.
?Privileged program - must be logged into OPR:
Log into OPR: and try again.
?S100 data transfer error
An error occurred with the AM-410 controller. A number of these errors can indicate
hardware problems.
?Track 0 did not verify. (First track must verify.)
Get technical help to determine why track 0 did not verify.
?Track n did not verify
CRT410 marked track #n as a bad track in the BADBLK.SYS file.
?15 bad tracks is maximum
Try again, entering 15 or less.
System Commands Reference Manual, Rev. 07
CRT415
FUNCTION
Certifies the disk media of a Winchester device that runs under control of the AM-415 HighPerformance Winchester disk controller.
CHARACTERISTICS
CRT415 is re-entrant and re-usable. CRT415 certifies a physical unit by reading the factoryencoded media flaw information on each track and head of the unit and constructing a
BADBLK.SYS file in account [1,2] of the first logical device.
You may use this certification program ONLY on High`-Performance Winchester
devices that run under control of the AM-415. CRT415 communicates directly with
the AM-415 controller board without going through the disk driver program.
Therefore, you MUST NOT run CRT415 at the same time as other programs that
access devices that run under control of the AM-415. CRT415 destroys all data that
may currently exist on the device it certifies. Therefore, you must make backup copies
of all your files before you use CRT415. You must be logged into the System
Operator's account, DSK0:[1,2] to run CRT415.
The file BADBLK.SYS[1,2] contains a list of all bad disk blocks on the certi`fied device. For
information on the program you can use to display the BADBLK.SYS file, see the BADBLK
reference sheet. Multiple logical devices on the same Winchester technology physical unit share
the same BADBLK.SYS file.
FORMAT
CRT415 devn:{/switch}
devn: is the specification of the device you want to certify, and switch is an option.
OPTIONS
/Z
Initialize the disk by writing data to every block on the disk in addition to
certifying the contents of BADBLK.SYS This takes longer than regular
certifying.
System Commands Reference Manual, Rev. 03 (AMOS 2.2 - 4/91)
CRT415
Page 2
OPERATION
Log into OPR: and enter CRT415 and the device you want to certify. For example:
LOG OPR: RETURN
CRT415 DSK0: RETURN
CRT415 warns you the program will destroy all the data on your disk. Make sure you have
backed up any data on the disk you may need. You can interrupt the program at this point by
pressing CTRL /C.
If you continue, CRT415 creates a file named BADBLK.SYS in account [1,2] of the disk you are
certifying. This file will hold a list of all bad disk blocks CRT415 finds. CRT415 asks you
several questions:
Enter maximum acceptable number of bad blocks:
Enter the largest number of bad blocks you are willing to accept on your disk. CRT415 has a
certain upper limit for errors depending on the data capacity of the drive—you may wish to accept
less. When CRT415 finds more than the number you specify, it tells you so and returns you to
AMOS command level.
Enter number of accounts to preallocate:
This information allows CRT415 to pre-initialize blocks in the Master File Directory (MFD).
There is no practical limit to the number of accounts you may specify, and the number you enter
here in no way restricts the number of accounts you can add to the disk in the future. The only
limiting factors are the size of the logical devices and the amount of data you plan to store in each
account.
Display current track? (Y or N):
If you want CRT415 to tell you as it certifies each track, enter Y; otherwise, enter an N.
Enter serial number (10 char. max):
You may optionally give CRT415 a ten-character alphanumeric I.D. for the physical unit it is
certifying. CRT415 writes this identifier into the BADBLK.SYS file. If you do not wish to give
the physical unit an identifier, just press RETURN .
After you answer the questions above, CRT415 begins to certify the disk. When CRT415
encounters a bad block, it tells you so. For example:
Track 79, Head 2, Sector 3 assigned alternate
If all sectors on a track are bad, CRT415 displays just the track and head numbers on your
terminal. When it finishes certifying the disk, CRT415 tells you how many bad blocks it found.
System Commands Reference Manual, Rev. 03 (AMOS 2.2 -4/91)
Page 3
CRT415
CRT415 computes and stores a hash total for BADBLK.SYS in the file. Other programs can
check this hash total against the contents of the file to make sure BADBLK.SYS contains
undamaged data.
MESSAGES
?n bad blocks is maximum
n is the maximum number of allowable bad blocks for the drive. You tried to give a
number larger than n. Re-enter a proper number.
?Cannot certify [device-name] - device not mounted
Use MOUNT to mount the device and run CRT415 again.
?Cannot certify [device-name] - not the physical device
The device you specified on the command line was not the first logical device on the
physical unit. Run CRT415 again using the device specification of the first logical device
on the drive.
?Certification aborted
Informs you the program was interrupted. CRT415 writes a bad hash total to the
BADBLK.SYS file so other programs know the data in the file is incomplete and should
not be trusted. Re-run CRT415 to provide a good BADBLK.SYS file.
?Control-C abort
Informs you the program was interrupted prior to certification. The BADBLK.SYS file on
the disk remains untouched.
?Device does not exist
The system does not recognize the device specification you entered. Check your syntax or
use DEVTBL to see a list of devices on your system and try again.
?Device has exceeded maximum number of bad blocks
CRT415 found more bad blocks than the value you specified as the maximum number of
bad blocks you will accept. You may wish to re-run CRT415 and accept a higher number
of bad blocks.
System Commands Reference Manual, Rev. 03 (AMOS 2.2 - 4/91)
CRT415
Page 4
?Devn: is not at the standard port address. Make sure you are using
the correct format program. Do you wish to continue (Y or N)?
The physical device you specified is not attached to the AM-415 controller at the expected
I/O port. Make sure you are using the correct certification program for the device type
you wish to certify. Also, check the cable connecting the disk to the AM-415 controller
board, and check your system INI file to make sure your DEVTBL statements are correct.
You can either continue the certification by entering Y, or cancel CRT415 by entering N.
?Drive defective
CRT415 could not verify track #0, head #0. Because the first track MUST verify for the
certification to continue, CRT415 stops the certification. Get technical help to resolve the
problem with the drive.
?Insufficient memory to perform certification
The System Operator's job does not have a large enough memory partition to run CRT415.
Use the MEMORY command to increase the amount of memory available temporarily to
at least 32K. You may wish to adjust memory allocations permanently in your system INI
file.
?Privileged program - must be logged into OPR:
Log into DSK0:[1,2] and try again.
?Track n, Head n, Sector n assigned alternate
CRT415 marked track #n, head #n, sector #n as a bad block in the BADBLK.SYS file and
assigned an alternate sector to be used instead. If the entire track is bad, CRT415 omits
the Sector number from this message.
System Commands Reference Manual, Rev. 03 (AMOS 2.2 -4/91)
CRT420
FUNCTION
Certifies the disk media of disks under control of an AM-420 or AM-1000 Winchester Disk
Controller.
CHARACTERISTICS
CRT420 is re-entrant and re-usable.
You may use this certification program ONLY on devices controlled by an AM-420 or
AM-1000 Winchester Disk Controller. CRT420 communicates directly with the AM420 or AM-1000 Winchester Disk Controller without going through the AM-420 or
the AM-1000 driver program. Therefore, you MUST NOT run CRT420 at the same
time as other programs that access devices under control of an AM-420 or an AM1000. You must be logged into the System Operator's account, DSK0:[1,2] to run
CRT420.
The disk is pre-certified at the factory with much greater accuracy than is possible
with this program. Therefore, use this program only in extreme cases, such as the
unrecoverable loss of your BADBLK.SYS file.
CRT420 certifies a physical unit by writing and verifying data in every block of the
device. THIS DESTROYS ALL THE DATA CURRENTLY ON THE DISK. If you
must use CRT420, make sure you back up any data you need on that device before
you certify it.
CRT420 creates account [1,2] on the disk you are certifying. Then it creates a file
BADBLK.SYS[1,2] containing a list of all bad disk blocks on the device. For information on the
program that displays BADBLK.SYS, see the BADBLK reference sheet. Multiple logical devices
on the same Winchester technology physical unit share the same BADBLK file.
FORMAT
CRT420 devn:
OPERATION
Make sure no one else is using your system! Then log into OPR: and enter CRT420 and the
specification of the device you want to certify. For example:
LOG OPR: RETURN
CRT420 PLD0: RETURN
System Commands Reference Manual, Rev. 03 (AMOS 2.2 - 4/91)
CRT420
Page 2
CRT420 now warns you that CRT420 will destroy all the data on the disk. Make sure you
have backed up any data on the disk you may need. You can stop the program at this point by
pressing CTRL /C.
CRT420 creates a file named BADBLK.SYS in account [1,2] of the disk you are certifying.
CRT420 then asks you several questions:
Enter maximum acceptable number of bad tracks:
CRT420 has a set maximum number of bad tracks depending on the data capacity of the drive—
you may choose to accept less.
Enter number of accounts to preallocate:
This information allows CRT420 to pre-initialize blocks in the Master File directory (MFD).
There is no limit to the number of accounts you may specify, and the number you enter here in no
way restricts the number of accounts you can add to the disk in the future. The only limiting
factors are the size of the logical device and the amount of data you plan to store in each account.
Display current track? (Y or N):
If you want CRT420 to tell you as it certifies each track, enter Y; otherwise, enter N.
Enter serial number (10 char. max):
You may optionally give CRT420 a ten-character alphanumeric ID for the physical unit it is
certifying. CRT420 writes this identifier into the BADBLK.SYS file. If you do not wish to give
the physical unit an identifier, just press RETURN .
After you answer the questions above, CRT420 begins to certify the disk. When CRT420
encounters a track it cannot verify, it tells you so. For example:
Track 79, Head 2, Sector 3 did not verify
On an AM-1000 it displays something like:
Block 24 did not verify.
When it finishes certifying the disk, CRT420 tells you how many bad tracks it found. CRT420
includes a hash total for BADBLK.SYS inside the file. Other programs can check this hash total
against the contents of the file to make sure BADBLK.SYS contains undamaged data.
MESSAGES
?Block n did not verify
CRT420 marked block n as a bad block in the BADBLK.SYS file (AM-1000 drive).
System Commands Reference Manual, Rev. 03 (AMOS 2.2 4-91)
Page 3
CRT420
?Certification incomplete
You pressed CTRL /C, or some other event interrupted the certification. CRT420
intentionally writes a bad hash total to the BADBLK.SYS file so other programs know the
data in the file is incomplete and not to be trusted. Re-run CRT420 to provide a good
BADBLK.SYS file.
?Control C abort
The program was interrupted before certification. The data on your disk is still complete.
?Cylinder zero did not verify
Cylinder 0 must contain no errors. Get technical help to determine what is wrong with the
drive.
?Device has exceeded maximum number of errors
CRT420 found more bad tracks than the value you specified as the maximum number of
bad tracks you will accept. You may want to re-run CRT420 and allow more bad tracks.
?Error during initialization
An error on the AM-1000 Winchester Controller has been detected. This may indicate a
hardware problem. See your Alpha Micro representative for help.
?Error during recalibrate
An error on the AM-1000 Winchester Controller has been detected. This may indicate a
hardware problem. See your Alpha Micro representative for help.
?Format drive error
An error on the AM-1000 Winchester Controller has been detected. This may indicate a
hardware problem. See your Alpha Micro representative for help.
?n bad tracks is maximum
Try again with a number less than or equal to n.
?Nonexistent device
Your device specification was invalid. Check your syntax or use DEVTBL to see a list of
devices for your system, and try again.
?Privileged program - must be logged into OPR:
Log into DSK0:[1,2] and try again.
System Commands Reference Manual, Rev. 03 (AMOS 2.2 -4/91)
CRT420
Page 4
?S100 data transfer error
An error occurred with the AM-420 controller. A number of these errors can indicate
hardware problems.
?Track 0, Head 0 did not verify. (First track must verify.)
CRT420 could not verify track #0, head #0, which MUST verify. Get technical help to
determine what is wrong with the drive.
?Track n, Head n, Sector n did not verify
CRT420 marked track #n, head n as a bad track in the BADBLK.SYS file.
System Commands Reference Manual, Rev. 03 (AMOS 2.2 4-91)
CRT520
FUNCTION
Formats and incorporates defect list for disks controlled by the AM-520 Intelligent Disk
Controllers.
The AM-522 controller is a variant of the AM-520, and works in the same way. The
information in this sheet also applies to the AM-522.
CHARACTERISTICS
CRT520 is re-entrant and re-usable. Because of the high data density of the disks that run under
the control of the AM-520, media flaws are likely and must be compensated for. All drives that
run under control of the AM-520 must be formatted using CRT520.
All drives purchased from Alpha Micro to be used with the AM-520 are formatted before
leaving the factory. You do not need to run CRT520 again on these drives. You do need
to run CRT520 if you are upgrading an existing drive to use with the AM-520 instead of
an AM-415 disk controller.
CRT520 writes a format data pattern to every block of the device, so make sure you back up any
data you need on that device before you format it. CRT520 DESTROYS ALL DATA ON THE
DRIVE IT IS FORMATTING. CRT520 requires you be logged into the System Operator's
account, DSK0:[1,2].
CRT520 creates account [1,2] on each logical unit of the disk you are certifying. Then it creates a
file BADBLK.SYS[1,2] on logical device 0, containing a list of all bad disk blocks and media
flaws on the certified device. This BADBLK file is a copy of a built-in file on the AM-520, and is
therefore not essential to your system.
Use CRT520 ONLY on devices controlled by the AM-520 Disk Controller. CRT520
communicates directly with the AM-520 Disk Controller without going through the AM520 driver program. Therefore, you MUST NOT run CRT520 at the same time as other
programs that access devices under control of the same AM-520 board. CRT520 locks up
or severely slows down other users on your system—warn them before using.
FORMAT
CRT520 devn:
devn: is the specification of the device you want to format.
System Commands Reference Manual, Rev. 03 (AMOS 2.2 - 4/91)
CRT520
Page 2
OPERATION
If you are not familiar with the way the AM-520 handles media defects, you may want to
read Installation Instructions: AM-520 Intelligent Disk Controller, PDI-00520-00, before
using CRT520.
Enter CRT520 followed by the specification of the device you want to certify:
CRT520 PLD0:
RETURN
Make sure you have backed up any data you need from the disk—CRT520 destroys all data on
the disk. You can stop CRT520 at this point by pressing CTRL /C.
CRT520 displays a menu of supported drive types. Select the type of drive you want to format.
The program then asks you for the drive serial number. Enter the number, up to 20 characters.
CRT520 then asks if you want to format using a bad block map or a defect list. The next two
sections describe the procedures Alpha Micro recommends you use. After that is a discussion of
the other methods available.
If the drive has not been formatted on an AM-520 before:
Choose option 2, format using a defect list. Then CRT520 asks if you want the formatting data
from a file, from the drive, or from the keyboard. Select 2 again, to take the bad block information
directly from the manufacturer's defect list built into the drive.
You then have the option of saving the media defect list and the bad block map in files. These files
are created in the account you're currently logged into, not on the drive you're formatting. We
strongly recommend you create these two files:
• The defect list (default name DEFECT.DEF), is an ASCII file containing all the media
defect information from the drive.
• The bad block map (default name DEFECT.MAP) is a binary file, an exact copy of the
bad block map CRT520 writes to the hidden area of the drive during formatting.
CRT520 now writes the format pattern to every block on the disk, writes the bad block map in the
hidden area of the drive, and creates a file named BADBLK.SYS in account [1,2] of the first
logical disk on the drive. BADBLK.SYS contains a copy of the bad block map for the drive.
If the drive has been previously formatted using CRT520:
Which CRT520 options you should use depends on whether you have added new bad blocks to the
drive using BADBLK since formatting the drive:
• If you have not added any bad blocks, use the same method described above.
System Commands Reference Manual, Rev. 03 (AMOS 2.2 - 4/91)
Page 3
CRT520
• If you have added bad blocks to the list, select option 1, then choose to input information
from the drive. When CRT520 asks if you want to include alternate blocks, answer Y.
BADBLK updates only the bad block map in the hidden sector of the drive, so this is the
only option which incorporates these blocks into the new bad block map.
CRT520 then continues by asking if you want to create copies of the map in disk files, as described
above.
Other methods of formatting
The above methods suggest you take the defect information directly from the drive you're
formatting. If, for some reason, this is not possible, you have two options:
• Take the information from a file: if the drive has been previously formatted, you may have
copied the bad block information to disk files, as described above. You can use either the
media defect list file (.DEF), or the bad block map file (.MAP).
You can also use the "from a file" option if the drive has not been previously formatted, by
typing the manufacturer's defect list into an AlphaVUE file, then using that file as the
source.
• If the bad block map is not in a file on the drive, you can choose to enter the information
from the keyboard, and type in the manufacturer's defect list. Each entry is in this format:
Cylinder,Head,Byte from index,length (in bits)
All numbers are in decimal.
After you choose either method, answer CRT520's questions and proceed as described above. If
you are inputting from a file, you are not asked if you want to create the equivalent (media defect
list or bad block map) file, since it already exists.
MESSAGES
Errors on the AM-520 may be recoverable or non-recoverable. At AMOS level, when DSKERR is
set, the driver may report two types of recoverable errors—Recoverable disk error or
ECC correctable error. Both of these errors result in correct operation and good data.
The messages below are unrecoverable errors (you will have to correct the condition before reusing CRT520).
?Bad Block Map in incorrect format
These errors indicate the AM-520 was able to read the Bad Block Map from the disk, but
its format was not intact. Use CRT520 again, using a media defect list or inputting the
bad block map from a file.
System Commands Reference Manual, Rev. 03 (AMOS 2.2 - 4/91)
CRT520
Page 4
?Cannot format drive, AM520 not initialized
?Cannot read MFR defect map - AM-520 not initialized
?Cannot read defect map, AM-520 not initialized
These errors indicate the AM-520 board has not been downloaded with the AM520.MIC
microcode file. MOUNT the drive and try again.
?Cannot have defect block on track zero - drive is defective
Disk drives under control of the AM-520 must not have any defects on cylinder 0, head 0.
It is not possible to add bad blocks in this area. If you took the defect information from
the drive, contact your Alpha Micro dealer. If you typed in the defect information, you
probably made a typographical error. Run CRT520 again.
Defect format not intact on cylinder n, head n
While reading the manufacturer's media defect list, a track was found with a bad media
defect format. The track is ignored and defects (if any) on the track are not registered. If
there are any defects on the track, you can add them using BADBLK (check the printed
manufacturer's defect list).
?Defect map has bad hash total
These errors indicate the AM-520 was able to read the Bad Block Map from the disk, but
its format was not intact. Use CRT520 again, using a media defect list or inputting the
bad block map from a file.
DEVTBL ENTRY NOT FOUND
The device requested has not been defined with a DEVTBL statement in your system
initialization file. See your System Operator about updating the system initialization file.
?Disk spare area has been exceeded - defect count must be reduced
A fixed number of blocks are allocated for bad blocking for each drive type. This number
has been exceeded by adding bad blocks. See your System Operator or contact your
Alpha Micro reseller or service representative.
?Error Initializing Disk
After formatting, when creating account [1,2] and writing BADBLK.SYS, an error was
encountered which prevented proper operation. This error generally appears with another
system error message which indicates the actual error condition. The most common cause
is incorrect bitmap size in a BITMAP statement which causes a Bitmap Kaput error
during initialization.
System Commands Reference Manual, Rev. 03 (AMOS 2.2 - 4/91)
Page 5
CRT520
Formatting Operation Aborted
You pressed CTRL /C during the formatting operation. This message confirms the format
has been stopped.
!!!!Illegal Input Format - try again
!!!!Illegal Input Line Format
See the format above and re-enter.
%Insufficient memory to run CRT520
Allocate more memory to your job.
?Privileged program - must be logged into OPR:
Log into DSK0:[1,2] and try again.
%Unable to format - error [n]
During the formatting operation, the AM-520 experienced a hard error at the physical
drive level. n is the specific error code—in the current output radix—returned by the
hardware. This generally indicates the disk drive is not functioning properly or is not
cabled properly. The bit positions are:
0
Header failed though sector matched.
1
Data field error. The AM-520 couldn't read data and ECC failed in
trying to correct.
2
Sector not found.
3
Sector overrun. Check if bytes per sector is set correctly on drive.
4
No data synch.
5
FIFO data lost. Indicates failure of data path between AM-520 and
paddle cards.
6
Reserved for future use.
7
Indicates recoverable error.
For example, an error 4 message indicates the third bit is set (100 binary), and the
problem is a sector overrun.
?Unable to read defect map in internal format. Reading Manufacturer's Media defect list
When instructed to input the media defect list from the drive, CRT520 first tries to recover
the list from the copy in the hidden area of the drive. If the drive has not been previously
formatted, this list does not exist and it reads the information from the manufacturer's
media defect list. This is the normal operation when formatting a drive for the first time.
System Commands Reference Manual, Rev. 03 (AMOS 2.2 - 4/91)
CRT520
Page 6
%Unable to read existing Bad Block Map
The AM-520 was unable to read the Bad Block Map from the disk when requested to do
so. Try again, using a media defect list or inputting the bad block map from a file.
?Unable to read Manufacturer's Media defect list
While reading the manufacturer's media defect list, ten consecutive tracks were
unrecoverable. At this point, CRT520 assumes the list is not readable, and aborts the
operation. Try again, but input the media defect list from a file or type it in from the
keyboard.
System Commands Reference Manual, Rev. 03 (AMOS 2.2 - 4/91)
CRT610
FUNCTION
Checks and verifies the quality of video cassettes for use as disk file backup media. Optionally
creates a warm boot monitor cassette using a warm boot monitor file built by WRMGEN. Also
has the option of calibrating a remotely controlled VCR.
CHARACTERISTICS
CRT610 is re-entrant and re-usable. Your system must contain the appropriate video controller
board. A "warm boot" boots your system from a special warm boot video cassette when it can't
boot from the System Disk. See the WRMGEN reference sheet for more information.
FORMAT
CRT610 {filespec}{/switch}
filespec specifies the warm boot monitor you want to copy onto video cassette and switch indicates
an option. The default warm boot monitor is your system monitor (for example,
DSK0:AMOSL.WRM[1,4] or DSK0:AMOS32.WRM[1,4]).
OPTIONS
All options are operation switches, and may be abbreviated to unique characters.
/BOOT
Creates a warm boot cassette. If you specify a filespec, /B is assumed
default.
/CALIBRATE
Calibrates a remote control VCR. Must also use /V. Locks out other
users on your system.
/CHECK
Reads a cassette and displays status. Does not harm data. Turns off /B
and /V.
/FILE
Like /C, but status put in file VCRSTS.LST where you are logged.
Overwrites existing LST file.
/HARD
Used with /CHECK to retry a maximum of four times if a hard error is
found (remote-control VCRs only).
/TRACK
Lets you adjust the tracking of your VCR to optimize a restore.
/VERIFY
Writes data to cassette, reads it back, and prints statistics. Destroys all
data on the tape.
System Commands Reference Manual, Rev. 04
CRT610
Page 2
OPERATION
TO CREATE A WARM BOOT MONITOR TAPE:
Create a warm boot monitor disk file using WRMGEN. Load a blank cassette into your VCR and
enter CRT610 followed by the optional file specification of the warm boot monitor. For example:
CRT610 SPECAL.WRM
RETURN
If you enter just a file name and extension, CRT610 looks first in DSK0:[1,4]; if the file is not
there, it searches the device and account you are in. It then asks you for information to put in the
cassette label: Volume name (maximum of 40 characters); Volume ID (maximum of ten
characters); Installation (maximum of 30 characters); System (maximum of 30 characters); and
Creator (maximum of 30 characters).
The video recorder is activated and file transfer occurs. If the recorder you are using is not a
remote controlled VIDEOTRAX Video Tape Recorder (VTR), CRT610 steps you through
operating the VCR: rewinding the cassette, recording the boot monitor onto the cassette, and
stopping the VCR.
Use CRT610/C to check the cassette is good. Label the cassette container and return it to its
storage location.
TO CHECK A PREVIOUSLY RECORDED CASSETTE:
Load the cassette you want to check into the VCR. Enter CRT610/C:
CRT610/C
RETURN
If you have a manually operated recorder, follow CRT610's instructions. CRT610 reads each
block of the tape and checks it for accuracy. This takes as long as it did to originally record the
tape. As it reads, CRT610 displays statistics about the tape.
If all totals are zero, either the tape is completely bad, or the VCR unit is not connected to the
system properly.
Total Blocks Read is the number of unique blocks on the tape; Total Copies Read is the actual
number of blocks read; Total CRC Errors is the number of bad blocks read that could be
recovered; Total Hard Errors is the number of unrecoverable bad blocks; Reliability Ratio is the
number of blocks read per CRC ("soft") error.
You should write these totals on the case of the cassette, to give you an idea of how the tape is
wearing. A low Reliability Ratio may indicate hard errors can occur unless you increase the
number of extra copies the next time you record on the tape. CRC errors are acceptable as long as
the Reliability Ratio is greater than 100:1.
If you get a hard error, check to see if you have equipment problems. If that is not the case, re-run
CRT610 using /C and /H, and CRT610 will try four times to recover the hard error. If the data
System Commands Reference Manual, Rev. 04
Page 3
CRT610
still cannot be recovered, CRT610 aborts—this means the tape is bad and no data past the hard
error can be recovered. Recover what you can off the tape and discard it.
When you are finished, rewind the tape and store it.
TO VERIFY A CASSETTE:
This function writes a specific data pattern to the cassette and then reads it back to make sure the
data was recorded accurately. If you have a video monitor, you can attach it to the VCR and
visually verify the data was recorded accurately (the words "Alpha Micro" appear in large block
letters).
This procedure destroys all data on the cassette.
Load a cassette into the VCR and rewind it. Make sure the tape doesn't contain data you need.
Then enter CRT610/V. CRT610 asks for the cassette size in hours. You can specify a value of
one to six hours. The default is two. Press RETURN after your answer. Then it asks for the number
of copies. You can specify from four to 255. Press RETURN after your answer. The default value
is four.
If the recorder you are using is a remote controlled VIDEOTRAX VTR, CRT610 automatically
operates the VTR until the function is finished. If the recorder you are using is not remote
controlled, CRT610 gives you step-by-step directions for manually operating your VCR.
CRT610/V displays the number of blocks written as it goes along. When it is done writing, it
reads the tape to check the data. This takes as long as the original recording. As it reads the tape,
CRT610 displays the same statistics /C does (see above).
TO CHECK A CASSETTE USING THE /F SWITCH:
The /F switch functions like /C, except it sends the statistics display to the disk file VCRSTS.LST
instead of to a terminal display. The main purpose of the /F switch is to allow you to force the
CRT610/F command to a job attached to a pseudo terminal, allowing you to check a cassette
without tying up a real terminal.
To force the CRT610/F command to another job, make sure: 1) there is an unused job; 2) that job
is attached to a pseudo terminal; 3) the job is logged into a disk account; and, 4) the job has
memory (allocate at least 10K). For example:
ATTACH PSEUDO,EXTRA RETURN
FORCE EXTRA MEMORY 10K RETURN
FORCE EXTRA LOG DSK2:100,1 RETURN
FORCE EXTRA CRT610/F RETURN
After the job is forced, CRT610 begins. If you have a manual VCR, do not start the VCR before
the job is forced. You may run CRT610/F without forcing it to another job, if you don't mind
having your terminal tied up during the certification.
System Commands Reference Manual, Rev. 04
CRT610
Page 4
TO CALIBRATE A REMOTE CONTROL VCR:
Load a cassette in your VCR and rewind it. Make sure the tape does not contain data you need.
Log into an operator's account and enter the command. For example:
LOG [1,2] RETURN
CRT610/V/CA RETURN
CRT610 verifies the tape (see above). The /CA option sets the cassette size to a minimum of two
hours— if your VCR is set for SP mode, you must use a two hour (or longer) VCR tape. The
number of copies defaults to five. If your VCR is set for EP mode, use a six hour tape.
The calibration process takes approximately one hour. A remote VCR table file,
DSK0:REMVCR.TBL[1,4] is created by /CA. This table allows the remote controlled VCR to
operate the fast forward ability of your VCR for faster RESTOR operations.
TO ADJUST THE TRACKING OF YOUR VCR:
Enter CRT610/TRACK. A screen appears displaying information and giving you directions for
adjusting your VCR to best match the tape. This may improve your chances of restoring data from
a tape made on another machine.
MESSAGES
?Cannot assign VCR0: - device in use
Turn off your AlphaNET network using the SET NOLINK command (remember to inform
other users), and try again.
?Cannot record tape
?Cannot write VCR0:
The VCR tape you are using is write-protected (the write-enable tab has been removed). If
you do want to write over the data on the tape, place a piece of tape over the write-enable
hole and re-insert the tape. If you have the wrong tape, insert the correct tape or, to halt
the CRT610 program, re-insert the tape and use CTRL /C.
?Cannot rewind tape
The tape may already be rewound, or there may be a problem with your VCR—check it
and try again.
?Illegal cassette size
You entered an invalid number of hours in response to the CRT610/V cassette size
question. You may only enter from 1 to 6. Start over again.
System Commands Reference Manual, Rev. 04
Page 5
CRT610
?Illegal number of copies
When you are verifying a cassette, you must enter from 4 to 255. Start over.
?Record ID error detected while building remote VCR tables
The tape you used was not long enough. Either use a tape with a longer recording time, or
set your VCR to a faster recording rate.
?Remote control error
Your VCR or the software had a problem with the remote control. Try again—if the
problem persists, check your VCR or contact your Alpha Micro representative for help.
?Tape control error
Your VCR or the software had a problem with the remote control. Try again—if the
problem persists, check your VCR or contact your Alpha Micro representative for help.
?The VERIFY switch must be specified along with the CALIBRATE switch
Re-enter the command line using both /V and /CA.
?VCR cannot be remotely controlled
Your VCR is not remote-controllable, you can't calibrate a tape for it.
?VCR failed to respond to command
Try again, if the problem persists, check your VCR or contact your Alpha Micro
representative.
?Warm boot monitor file has zero blocks. Not used.
The warm boot file you specified had a zero block size; this is not allowed.
%Warning - Possible equipment/media problems.
This message appears if the Reliability Ratio of your tape is less than 100:1. It indicates
either your cassette is bad or your VCR has a problem. Possible causes might be: worn
out tape, dirty recording heads on the VCR, or improper cabling to the VCR. If you
determine you have no equipment problems, the tape is probably bad. Copy off all the
files and discard it.
?You must be logged into [1,2] to calibrate VCR
Log into [1,2] and try again.
System Commands Reference Manual, Rev. 04
CRT620
FUNCTION
Checks and verifies the quality of 1/2" mag tape, 1/4" streaming tape, 8mm tape, or DAT tape for
use as disk file backup media. Also, re-tensions streamer cartridges, and builds a warm boot
streamer cartridge from a warm boot monitor file created by WRMGEN.
CHARACTERISTICS
CRT620 is re-entrant and re-usable. A warm boot is a procedure you can use to restore your
system when your System Disk is erased or written over accidentally. A warm boot from the
streamer tape requires a special monitor file, generated using WRMGEN, with enough information
to get your system up and running on one terminal and in one memory partition. Then you can
restore the damaged files to your System Disk from other backups previously created with
MTUSAV.
CRT620 performs a CRC check to make sure it can read each block of data on the tape. It
does not check the file structure of the tape. It is possible for a tape to show no errors after
CRT620 and still be unreadable. To properly check a backup, use MTUDIR to display a
directory of the entire tape, since the directory process reads the structure of the entire tape.
FORMAT
CRT620 {filespec} {size} {/switch}
filespec is the specification of the warm boot monitor file you want to copy onto the streamer tape
if you are using the /BOOT switch.
Used with /VERIFY, size is the number of megabytes to write to the tape; if you omit it, VERIFY
writes until the tape is full.
switch is one of the options listed below.
DEFAULTS
The default switch is /BOOT. The default filespec is your system warm boot monitor, for example
DSK0:AMOS32.WRM[1,4]
System Commands Reference Manual, Rev. 07
CRT620
Page 2
OPTIONS
All switches are operation switches and may be abbreviated.
/BOOT
Creates a warm boot cartridge. Default.
/CHECK
Reads cartridge and displays status.
/ERASE
Erases all data and re-tensions cartridge.
/FILE
Used only with /VERIFY. Writes the verification statistics to a file in
addition to displaying them. The file is called xxxSTS.LIT. xxx is
the name of the tape device.
/GRAPH
Used only with /VERIFY. Creates an AMIGOS graph file showing
the relationship between soft errors and tape position. The graph is
displayed and written to a file called xxxSTS.GDF, where xxx is the
name of the tape device. You cannot use GRAPH with an MTUx:
device.
/TENSION
Re-tensions tape by spinning it start to finish and back at high speed.
/VERIFY
Writes data to tape, reads it back, and displays status. Destroys all
data on the tape.
OPERATION
HOW TO CREATE A WARM BOOT TAPE (/B)
Create a warm boot monitor file using WRMGEN. Load a blank tape in your streamer drive and
enter CRT620 and the optional file specification of the warm boot monitor. Since /B is the default,
you don't have to specify it. For example:
CRT620 SPECAL.WRM
RETURN
If you enter just a file name and extension, as above, CRT620 looks first in DSK0:[1,4]; if the file
is not there, it looks next in the device and account you are logged into. CRT620 then asks you for
information it will place in the cassette label: Volume name (maximum of 40 characters); Volume
ID (maximum of ten characters); Installation (maximum of 30 characters); System (maximum of
30 characters); and Creator (maximum of 30 characters).
The streamer is activated and the file transfer occurs. Use CRT620/C to check the tape. Perform
a test warm boot to make sure it works, write-protect the tape, label it, and return it to its storage
location.
HOW TO VERIFY A CARTRIDGE (/V)
Load a blank or scratch cartridge into your streamer unit. Type CRT620/V RETURN . CRT620
rewinds the tape and then erases it. The writing of data to the tape will take a few minutes.
During the operation, CRT620 prints statistics on the screen and updates them every 1024 blocks.
CRT620 then rewinds the cartridge, and begins reading the tape and prints the statistics on the
screen.
System Commands Reference Manual, Rev. 07
Page 3
CRT620
"Blocks Read" is the number of unique blocks of data read from the tape. "Soft Errors" is the
number of times a block had to be re-read. "Hard Errors" is the number of data blocks which
could not be read after 16 tries. A non-zero number of hard errors is unacceptable, because it
means you have lost data. Although soft errors do not necessarily mean trouble, a large number of
soft errors per number of blocks read could indicate the tape is going bad or you have faulty
hardware. When all of the tape has been read, CRT620 rewinds the tape and erases all of the data
it wrote. Remove the cartridge and store it.
The statistics available will vary from device type to device type. For example, soft error
statistics are not available from MTX (Exabyte) devices.
You can use the /FILE and/or /GRAPH switches during verification to write the verification
statistics and a plot of soft errors by tape position to files. You can later look at these files to check
the quality of the tape.
HOW TO CHECK A PREVIOUSLY RECORDED CARTRIDGE (/C Switch)
Load the cartridge you want to check into your 1/4" streamer unit. Type CRT620/C
When it is through, CRT620 displays the same statistics as /V.
RETURN .
See the warning about verifying backup quality in the Characteristics section.
MESSAGES
?Data error undetected by device
The data pattern read from the tape was not the same as that written to the tape. You
either have the wrong tape in the streamer drive, or the tape may be bad.
%Field size exceeded. Re-enter.
Try again, using only the number of characters allowed or less.
?
^ Specification error
Check your spelling and try again—the arrow points to the error.
System Commands Reference Manual, Rev. 07
CTYPE
FUNCTION
Displays a file compressed by the CMP command.
CHARACTERISTICS
CTYPE is an OS/Exec program that may be used as an AMOS command. Although CTYPE can
only display one file, multiple files may be displayed using the "CTYPE" function in OS/Exec.
CTYPE tries to output the uncompressed content of ANY file compressed by OS/Exec.
Before using CTYPE, use CDIR to be sure the uncompressed file is a sequential file that can be
displayed on a terminal. Only sequential files compressed using the OS/Exec program CMP may
be displayed using CTYPE. The EXP command can be used to expand the contents of a
compressed sequential file. The CDIR command can be used to list the type, size and name of a
compressed file.
FORMAT
CTYPE filespec
OPERATION
Enter CTYPE and the file specification. For example:
CTYPE TRANS
RETURN
CTYPE then displays the uncompressed content of the file.
MESSAGES
?Bad Input File
The file cannot be expanded due to a problem in the compressed file's content.
File is not an OS/Exec compressed file
Use the TYPE command to display the file.
The file specified is not in the format expected by CTYPE.
Use the TYPE command to display the file.
System Commands Reference Manual, Rev. 03 (AMOS 2.2 - 4/91)
DATE
FUNCTION
Sets or displays the system date.
CHARACTERISTICS
DATE is re-entrant and re-usable. You don't need to be logged in to display the date. To set the
system date, you must be logged into an operator's account, [1,2].
FORMAT
DATE {datespec}
datespec is a date in the date format specified in your language definition file. For U.S. English,
the format is mm/dd/yy. If you include datespec, you reset the system date to the date you enter.
DATE automatically sets the day of the week to match.
If you do not include datespec, DATE displays the current system date.
OPERATION
To display the date, enter DATE at AMOS command level. For example:
DATE RETURN
Thursday, February 22, 1996
To set the date, log into [1,2] and enter DATE followed by the new date in the format for your
language. For example:
LOG 1,2 RETURN
DATE 10/21/95
RETURN
MESSAGES
Invalid year entered
Only dates from 1980 through 2079 are allowed. Two-digit years from 80 through 99 are
considered 1980 - 1999. Years from 00 through 79 are considered 2000 - 2079.
?Use format [date format]
You did not enter the date in the proper format for your current language definition file—
try again.
System Commands Reference Manual, Rev. 04
DATE
Page 2
?You must be logged into [1,2] to reset the date
Log into [1,2] and try again.
System Commands Reference Manual, Rev. 04
DB
FUNCTION
DB is an interactive program that lets you debug a BASIC PLUS program at the source language
level.
CHARACTERISTICS
DB is re-entrant and re-usable. Functions, variables and statements are referred to by the names
from the original source file. It lets you set breakpoints at statements, view and change variable
values, and run the program on a statement-by-statement basis. See your AlphaBASIC PLUS
User's Manual for complete information on DB's features and commands.
DB has two modes: screen mode and command mode. Screen mode shows you your source code
and its execution displays. Command mode, like command mode in AlphaVUE or AlphaFIX, lets
you enter commands. In command mode, you see the command mode prompt: >.
To use the debugger, you must compile the source program with /D. For example:
COMPLP test/D
RETURN
This produces the .RPD file (or .SPD if a subprogram) used with the debugger.
FORMAT
DB filespec
The default extension is .RPD.
OPERATION
Enter DB and the name of your file. For example:
DB TEST
RETURN
You then see your program text, and can step through the program, using the debugging commands
detailed in your AlphaBASIC PLUS User's Guide.
MESSAGES
See your AlphaBASIC PLUS User's Guide for a complete list of messages.
System Commands Reference Manual, Rev. 03 (AMOS 2.2 -4/91)
DBD
FUNCTION
DBD is a utility that can be used to uninstall the DBD: device, display the PIC code, or eject the
media from one of the DVD-RAM or Blu-ray drives.
CHARACTERISTICS
DBD is re-entrant and re-usable.
FORMAT
DBD {/switches}
OPTIONS
/HELP
/?
/V
/ID:n
/PIC
/EJECT
/U
Display HELP
Same as /HELP
Display version information and exit
DVD-Recorder is at SCSI ID n
Display Product Installation Code
Eject any DVD or Blu-ray media
Uninstall
OPERATION
DBD/U is used to uninstall the DBD: device prior to removing the media from the DVD or Bluray drive.
Type DBD {/switches} from the AMOS prompt:
DBD
RETURN
DBD will attempt to find a DVD-RAM or Blu-ray drive. The DBD driver must be in system
memory. DBD will find the DVD-RAM drive either using the command line switch /ID or by
defaulting to DBD:. If more than one DVD or Blu-ray device is found when scanning the SCSI
bus, you will be asked to choose the device you wish to use.
Found the following possible DBD-Recorders:
1
2
ID
nn
nn
Description
xxxxxxxxxxxxxxxxxxxxxxxxxxx
xxxxxxxxxxxxxxxxxxxxxxxxxxx
System Commands Reference Manual, Rev. 18
DBD
Page 2
Select one of the above devices:
Additional information about the DVD-RAM or Blu-ray drive is then displayed:
DVD-RAM or Blu-ray Recorder located at SCSI id 3
The option is performed.
If you want to remove the DVD or Blu-ray media or switch to another DVD media, use the /U
switch:
DBD/U
RETURN
REQUIREMENTS AND SETUP
DBD requires the following:
•
•
•
AM-8000, Eagle 800, or AMPC 7.X based system
AMOS 8.1 or later.
A supported DVD-RAM or Blu-ray drive.
The DBD package contains the following required files:
•
•
•
•
•
•
DBD.LIT
The device driver (DBD.DVR) for the DVD-RAM or Blu-ray drive, in system memory.
The SSD overlay file (DVD000.OVR)
MAKBD.LIT
DIRBD.LIT
BDRES.LIT
MESSAGES
DVD-RAM or Blu-ray drive found at SCSI id: <#>
DBD is confirming the SCSI ID of the DVD drive it is about to use.
Error - Device specified is not a DVD-RAM or Blu-ray Recorder
Error - DVDram driver must be in system memory.
The DVD or Blu-ray driver must be loaded into system memory during the AMOS boot
process.
System Commands Reference Manual, Rev. 18
Page 3
DBD
Media is not AMOS format - insert an AlphaDBD and try again
DVD cannot read AMOS device information from the DVD or Blu-ray media. Remove
the media from the drive and make sure it is an AlphaDBD. Re-insert the media and try
DBD again. If the problem still occurs, either it does not contain AMOS information, or
the DVD drive needs maintenance.
?There is no media installed in the DVD-RAM drive
Insert a DVD or Blu-ray media into the drive.
Unable to find a DVD-RAM Recorder.
No device that looks like a DVD or Blu-ray recorder was found
?You must install a SCSI dispatcher prior to using this program.
A SCSI dispatcher is required to use DBD.
System Commands Reference Manual, Rev. 18
DEL
FUNCTION
Erases modules from your memory partition.
CHARACTERISTICS
DEL is re-entrant and re-usable. When you load a file into memory from the disk, that copy in
memory is called a module. DEL erases such modules from your memory partition (NOT from the
disk). You may use the wildcard symbols * and ? in your file specifications.
When it deletes modules, it shifts any remaining modules down in memory if they have memory
addresses greater than the deleted modules.
DEL cannot delete modules which have been locked in memory by setting the LOK bit flag in the
module's flags word.
FORMAT
DEL filespec,{filespec(s)}
filespec(s) is one or more valid file specifications selecting the modules you want to erase from
your memory partition. DEL assumes a file extension of * (any extension).
OPERATION
Enter DEL followed by one or more file specifications. For example:
DEL CREATE
CREATE.LIT
RETURN
DEL erases from your memory partition the modules selected by your specifications; then it
displays them to let you know they have been deleted. You can use standard wildcard symbols in
your file specifications. For example:
DEL NEWPR*
NEWPR1.SBR
NEWPRT.LIT
RETURN
System Commands Reference Manual, Rev. 07
DEL
Page 2
MESSAGES
?Cannot DELETE [filename] - file may not be deleted
DEL cannot delete modules which have been locked in memory by setting the LOK bit flag
in the module's flags word.
System Commands Reference Manual, Rev. 07
DEVTBL
FUNCTION
Displays data about the devices defined on your system.
CHARACTERISTICS
DEVTBL is re-entrant and re-usable. In order for your system monitor to know about and have
access to physical devices on your system, such as disk drives and backup devices, those devices
must be defined to the monitor in your system initialization command file. See your System
Operator's Guide to the System Initialization Command File for more information about how
devices are defined.
OPERATION
Enter DEVTBL at AMOS command level:
DEVTBL
RETURN
the display you see tells you what devices have been defined on your system, and some information
about them. A line from the display might be:
DSK0 (sharable) (alternate) (physical unit 0, logical unit 0)
(sharable) means the device can be accessed by more than one user at a time. Non-sharable
devices are those devices only one user can access at a time, such as a printer. (alternate) means
an alternate track table has been assigned. Certain disk devices, such as Winchester technology
devices, use an alternate track table to handle media flaws.
Sharable devices can be assigned to a particular job for exclusive use.
You may also see (no network access), which tells you the device is not connected to a network, or
(extended directory), or other informative messages.
The physical and logical unit numbers tell you if the device has multiple logical devices. All
logical devices on a single physical unit share the same alternate track table (if there is one), which
is stored on the first logical device. If a device is listed as "assigned to" a job, it is a non-sharable
device currently being used by that job.
System Commands Reference Manual, Rev. 07
DEVTBL
Page 2
MESSAGES
?No device table allocated
Your system does not have a device table. See your System Operator for help.
System Commands Reference Manual, Rev. 07
DING
FUNCTION
Rings the terminal bell.
CHARACTERISTICS
DING is re-entrant and re-usable. Useful in a command file to tell the user input is expected or a
process is finished.
FORMAT
DING number-of-rings
OPERATION
Enter DING and the number of times you want the terminal bell to ring at AMOS command level.
For example:
DING 5
RETURN
You can also use DING in a command file. For example:
:T
:<Backup Project 100 accounts on DSK1: over to DSK0:>
COPY DSK0:[]=DSK1:[100,*]
:<FINISHED... Remove backup disk.>
DING 5
System Commands Reference Manual, Rev. 03 (AMOS 2.2 -4/91)
DIR
FUNCTION
Produces a directory listing for specific files or accounts.
CHARACTERISTICS
DIR is re-entrant and re-usable, and understands ersatz names. You can use DIR to display the list
of all files in a specific account, tell you what accounts and devices a particular file appears in,
find the complete specification of a file, and to place a copy of a directory listing into a file.
If you use DIR to create a file to hold a directory listing (and if you use the /DATA option) then
programs (such as those written in AlphaBASIC) can read the file specifications in that file and
use that data to open files.
If your system uses the file protection system, protected files will not be displayed by DIR to users
without the required access level.
DIR is a wildcard file command. For more information on wildcards, see your AMOS User's
Guide.
FORMAT
DIR {listfspec}=}{filespec,filespec(s)}{/switch(s)}
filespec is a file specification that selects a file for which you want a directory listing. If you want
the directory listing in a file, include a listfspec.
DEFAULTS
The default file specification is *.*. The default device and account specifications are where you
are logged. The default listfspec is DIRECT.LST in the account and device you are logged into.
OPTIONS
All the switches may be specified with /NO before them to cancel them, and may be abbreviated to
the shortest unique combination.
/BASE
Displays base disk address of the file (or base memory address for
DIR/B MEM:). File switch.
/BDATE
Displays last backup date.
/BTIME
Displays last backup time.
System Commands Reference Manual, Rev. 03 (AMOS 2.2 - 4/91)
DIR
Page 2
/CONTIGUOUS
Adds “C” if file is contiguous (random). Operation switch.
/CDATE
Displays date of creation.
/CTIME
Displays time of creation.
/DATA
Lists complete filespecs. Operation switch. Overrides /FULL switch.
/EXPANDED
Displays all information in an expanded format.
/FULL
Full data list. Same as adding /H/B/C/V.
/HASH
Displays hashmark for each file. Helps tell file versions apart. File
switch.
/KILL
Delete and replace listfile if one exists. Operation switch.
/PROTECTION
Displays protection code.
/UDATE
Displays last update date.
/UTIME
Displays last update time.
/VERSION
Displays version number of .LIT and .RUN files. File switch.
/WIDE{:n}
List in n columns; default is 4. Operation switch.
The switches BDATE, BTIME, CDATE, CTIME, EXPANDED, PROTECTION, UDATE, and
UTIME will only display useful information if used with extended file structure disks.
OPERATION
Enter DIR and any file specifications and options you wish at AMOS command level. For
example:
DIR VRTUAL.LIT[110,7],DPL.LIT[]
RETURN
DIR displays directory listings for the files you specified. It gives you the following information
for each file: the filename, extension, and the number of disk blocks. For example, if you enter
DIR MEM:, it shows you the number of bytes of memory for each module in your memory
partition.
At the end of the directory listing, DIR gives the total number of blocks taken up by all of the files
in the listing (or bytes, in the case of memory modules).
If you want your directory in a file, specify a listfilespec. For example:
DIR/W MYFILS=*.*
RETURN }
If you want a directory of files on another computer you are connected to by AlphaNET, specify a
cpuID:
DIR 16842754- DSK0:[1,4]*.LIT
RETURN }
Use the /V option to display the version of a .LIT or .RUN file. For .RUN files, the AlphaBASIC
program that created it must have the PROGRAM keyword. See your AlphaBASIC User's
Manual for information on the PROGRAM keyword.
System Commands Reference Manual, Rev. 07
Page 3
DIR
To search for a particular file on all mounted devices and in all accounts, use something like this:
DIR ALL:[]TAX.TBL
RETURN
To display all of the files in the account you are logged into:
DIR RETURN
DUMP1
LIT
APPEND
TXT
DIRECT
LST
DSKCLR
CMD
Total of 4 files
8
DSK1:[12,34]
16
3
5
in 32 blocks
To display a directory listing for specific files:
DIR []HEX.LIT,SYSIT?.AA RETURN
HEX
LIT
11
DSK1:[105,5]
SYSIT1 AA
87
DSK1:[105,5]
SYSIT2 AA
8
Total of 2 files in 95 blocks
SYSIT3 AA
42
DSK1:[140,2]
SYSIT0 AA
6
Total of 2 files in 48 blocks
Grand total of 5 files in 154 blocks
Notice DIR gives subtotals for each listing matching a filespec if that listing contains two or more
files.
MESSAGES
?Account does not exist - [p,pn]
The indicated account does not exist. Check your entry, and, if you need to create the
account, see the SYSACT reference sheet for help.
?Cannot find DSK0:CMDLIN.SYS[1,4]
DIR needs this file to process wildcard symbols in your file specifications. CMDLIN.SYS
does not exist in the proper account or you don't have enough memory in your partition to
load in the file. See your System Operator for help.
?Device not found
The device you specified does not exist. Check your spelling, or use DEVTBL to see a list
of the devices defined on your system.
System Commands Reference Manual, Rev. 07
DIR
Page 4
?Device not mounted
Mount the device and try again.
?Illegal output specification
The output specification you used was incorrect. Check your spelling, and the description
of output specification above.
?Maximum input exceeded
You put more characters on the command line than DIR could handle. Break your
command into smaller commands.
?MEM: or RES: specified on network
You cannot access MEM: or RES: over the network.
?More than one output specification
Try again with only one listfile specification.
%No such files
DIR couldn't find any files matching your file specifications. Check your entry, or specify
DIR *.* to see what files are in the account.
Specification error ^
Your command line isn't in the proper format. The ^ symbol points to the error.
?Wildcard device or unit specified on network
You cannot use wildcard symbols over the network. Type in the full specification for the
files you want to see.
System Commands Reference Manual, Rev. 07
DIRBD
FUNCTION
Produces a directory listing of the AMOS logicals on the media in the selected DVDRAM or Blu-ray device (DBD).
DIRBD is only supported on AM-8000, Eagle 800, and AMPC 7.X systems.
CHARACTERISTICS
DIRBD reads the selected media and displays the AMOS logicals.
FORMAT
DIRBD
OPTIONS
None
OPERATION
DIRBD works best on a job with 132 columns set as the terminal width.
Before starting the program, place the DVD or BD-RE media in the DVD-RAM or Bluray drive.
Type DIRBD from the AMOS prompt:
DIRBD
RETURN
DIRBD will attempt to find a DVD-RAM or Blu-ray drive by defaulting to DBD:. The
driver DBD.DVR must be loaded in system memory. If more than one DVD-RAM or
Blu-ray type device is found when scanning the SCSI bus, you will be asked to choose
the device you wish to use.
After entering the DIRBD command, the following will be displayed:
DIRBD Version X.X(xxx)-x – Copyright 2007, Alpha Microsystems.
If DIRBD finds multiple DVD-RAM or Blu-ray drives while scanning the SCSI bus, the
following message will be displayed to allow you to select the drive to use:
System Commands Reference Manual, Rev. 18
DIRBD
Page 2
Found the following possible DBD-Recorders:
1.
2.
ID
nn
nn
Description
xxxxxxxxxxxxxxxxxxxxxxxxx
xxxxxxxxxxxxxxxxxxxxxxxxx
Select one of the above devices: nn
The following is a sample of a DIRBD process:
.DIRBD
DIRBD Version 8.0(100) - Copyright 2007, Alpha Microsystems
Found the following possible DBD-Recorders:
1.
2.
ID
5
4
Description
SONY
BDRW BWU-100A
HL-DT-STDVD-RAM GSA-H22N
Select one of the above devices: 2
DVD-RAM or Blu-ray drive found at SCSI id: 4
-------ITEM-DBD000:
DBD001:
DBD002:
DBD003:
DBD004:
DBD005:
DBD006:
DBD007:
DBD008:
DBD009:
DBD010:
DBD011:
DBD012:
DBD013:
DBD014:
DBD015:
-------ITEM--
---------B--L--O--C--K--S------------Total--- ---Used---- ---Free---307200.
20928.
286272.
307200.
216928.
90272.
307200.
2617.
304583.
307200.
36155.
271045.
307200.
63972.
243228.
307200.
7085.
300115.
307200.
57016.
250184.
307200.
17996.
289204.
307200.
40664.
266536.
307200.
8072.
299128.
307200.
32551.
274649.
307200.
3804.
303396.
307200.
84153.
223047.
307200.
19063.
288137.
307200.
52946.
254254.
307200.
241467.
65733.
---------B--L--O--C--K--S------------Total--- ---Used---- ---Free----
--BITMAP---words--19200.
19200.
19200.
19200.
19200.
19200.
19200.
19200.
19200.
19200.
19200.
19200.
19200.
19200.
19200.
19200.
--BITMAP---words---
-SECTOR---SOL-0
1470
E849
EAD8
10E28
14CA1
1538D
18B3C
19CD0
1C487
1CC69
1EC34
1EFEC
2421B
254B9
2886E
-SECTOR---SOL--
-OFFSET---SOL-0 blk
3 blk
2 blk
2 blk
0 blk
3 blk
3 blk
2 blk
1 blk
0 blk
3 blk
1 blk
0 blk
0 blk
2 blk
3 blk
-OFFSET---SOL--
TOTAL:
4915200.
905417.
4009783.
(megabytes)
2400.000
442.098
1957.901
(gigabytes)
2.3438
0.4317
1.9120
--DEV--SPEC-REX000:
REX001:
REX002:
REX003:
REX004:
REX005:
REX006:
REX007:
REX008:
REX009:
REX010:
REX011:
REX012:
REX013:
REX014:
REX015:
--DEV--SPEC--
L
T
E
E
E
E
E
E
E
E
E
E
E
E
E
E
E
E
L
T
------------------------------------------------------L-A-B-E-L---------------AM-8000 8.0 Release & Static Files ......
AM-8000 8.0 Build & Source Files ........
AM-8000 EAMOS Release ...................
CD AMOS Release 01/31/2006 .............
AlphaTCP 1.5A Source & Release .........
AlphaNET 2.4(159)-4 Rel & Src ..........
AlphaFAX 2.1(100)-1 Rel & Src ..........
MULTI 2.1(192)10 rEL & sRC .............
AlphaODBC 1.0(100) Rel & Src ...........
AlphaMAIL 1.2B PR09/05 .................
Xadmin Release & *.INIs ................
Command & Do Files .....................
Open Logical...REX12:...................
AMPC 7.0 Release .......................
AlphaODBC 1.0(100) Rel & Src ver. 1.4Y .
Open Logical...REX15:...................
------------------------------------------------------L-A-B-E-L----------------
Media Label: "MONTHLY BACKUP"
The program has completed.
REQUIREMENTS AND SETUP
DBD requires the following:
•
•
•
AM-8000, Eagle 800, or AMPC 7.X based systems
AMOS 8.1 or later
A supported DVD-RAM or Blu-ray drive
DIRBD is only supported on AM-8000, Eagle 800, and AMPC 7.X systems.
The DBD package contains the following required files:
•
DBD.LIT
System Commands Reference Manual, Rev. 18
Page 3
DIRBD
•
•
•
•
•
The device driver (DBD.DVR) for the DVD-RAM & Blu-ray disc drive, in
system memory
The SSD overlay file (DVD000.OVR)
MAKBD.LIT
DIRBD.LIT
BDRES.LIT
System Commands Reference Manual, Rev. 18
DIRSEQ
FUNCTION
Arranges the entries in the directory of a disk account in alphabetical order. All directories may be
arranged from account [1,2].
CHARACTERISTICS
DIRSEQ is re-entrant and re-usable. If you are not in [1,2], you may only sequence the account
you are in. Arranges the directory based on the RAD50 value of the file names. This means
names beginning with numbers come after names beginning with letters.
Do NOT use DIRSEQ while other jobs are accessing the logical disk containing the
account you are sequencing! The BADBLK.SYS file is always the first file in its account.
The number of files DIRSEQ can sequence in a single PPN is proportional to your job's memory.
If an account has a large number of files in it, it may not sequence if you have a small memory
partition. DIRSEQ displays how many files can be sequenced.
DIRSEQ needs more memory to sequence files on extended-directory logical devices than
on conventional disks. The /A switch also requires more memory. When you use /A on a
standard logical, you can sequence only about half as many files per PPN in a given
memory partition as when you don't use it. When you use /A on an extended directory, you
can sequence only about 80% as many files.
FORMAT
DIRSEQ {devn:}{[p,pn]}{/switch}
devn: specifies the logical unit containing the directories you want to arrange, [p,pn] is the
account, and switch is an option.
OPTIONS
/A
Use ASCII sort order (numbers sort before letters).
/E
Sort file names by extension, then name.
/N
Don’t delete unused directory blocks.
DEFAULTS
DIRSEQ assumes the device and account you are logged into and RAD50 sort order.
System Commands Reference Manual, Rev. 04
DIRSEQ
Page 2
OPERATION
Enter DIRSEQ (with specifications and options if needed). For example:
DIRSEQ
RETURN
DIRSEQ displays your current memory and how many files it can sequence, then it orders the
entries in the directory for the account. Use DIR to see a display of your alphabetically ordered
account directory.
If you are in an operator's account, [1,2], you can sequence the directories for all accounts on that
disk by using wildcards. You may also specify accounts or use ersatz names. For example:
DIRSEQ DSK2:[] RETURN
DIRSEQ DSK2:[12,35]
DIRSEQ BAS: RETURN
RETURN
If there is an error during sequencing, the erroneous PPN is skipped, and sequencing continues.
When all PPNs are done, those PPNs not sequenced are listed.
MESSAGES
?Cannot INIT [device] - device does not exist
Check your syntax, or use DEVTBL to see a list of the valid system devices.
?Cannot READ [device] - disk is not mounted
Use the MOUNT command to mount the logical device, and try again.
?Command error. To use DIRSEQ, enter:
Your command syntax was in error. Re-enter using the guidelines given.
?File in use
A file is being used by another job, and will not be sequenced, though other files will be
sequenced as normal.
?Insufficient free memory to sequence PPN
There is not enough room in your memory partition to sort all the files in the account.
Either increase the size of your memory partition or divide the files among two or more
accounts.
?You must be logged into PPN [1,2] to sequence other directories.
Log into [1,2] and try again.
System Commands Reference Manual, Rev. 04
DO
FUNCTION
Executes DO files.
CHARACTERISTICS
DO is re-entrant and re-usable. A DO file is a special, extended type of command file. For
information on command and DO files, see your Command File User's Manual. Briefly, a
command file is a text file containing system commands. You can execute such a file by entering
its name at AMOS command level. A DO file can contain all of the elements of a command file.
In addition, a DO file allows you to pass arguments to the file by including parameter symbols in
that file. You can then specify the arguments to be substituted for those symbols when you execute
the DO file. A DO file can be created using the AlphaVUE text editor.
If a DO file has a .DO extension, you may call it simply by entering its name at AMOS command
level, providing no .LIT or .CMD files of the same name exist in your account or the system
library accounts. If the file does not have a .DO extension, you must specify DO before the name
of that file in order to execute it.
FORMAT
{DO} filespec {argument} {argument...}
filespec selects the DO file you want to execute and the arguments are optional text items
(separated by spaces) you wish to substitute for parameter symbols in the DO file. DO assumes a
file extension of .DO.
OPERATION
Enter the name of the DO file and the arguments for the file (if any). For example:
PROCES WRITE.TXT
RETURN
If your DO file does not have a .DO extension, type the command DO, the name of your DO file,
and the arguments. For example:
DO FORMAT.GO WRITE.TXT
RETURN
System Commands Reference Manual, Rev. 03 (AMOS 2.2 - 4/91)
DO
Page 2
MESSAGES
?Cannot locate [filespec]
Check your syntax, or use DIR to find the file.
System Commands Reference Manual, Rev. 03 (AMOS 2.2 - 4/91)
DOSDEL
FUNCTION
Deletes a file from an MS-DOS formatted diskette.
CHARACTERISTICS
DOSDEL accepts wildcards for the DOS file(s). It is re-entrant, re-usable, and works with these
diskette formats:
5 ¼” 360K
3 ½” 1.44M
DOSDEL understands only directory and file names that conform to the MS-DOS 8.3 convention.
It does not understand Windows 95 long file names.
To use this command, you must have a proper disk driver program for your computer's
type of floppy disk (and defined as MS-DOS format when created by FIXFLP). The
device must be defined in BITMAP and DEVTBL statements in your system initialization
command file—you may want to load the driver into system memory. See your system
operator for help.
FORMAT
DOSDEL devn:\DOS-filespec
RETURN
devn: is the AMOS device name for the diskette drive and DOS-filespec is the complete
specification of the file you want to delete. There are no defaults.
OPERATION
Enter DOSDEL and the file specification for the file you want to delete. For example:
DOSDEL LFD0:\DBASE\TUTORIAL\READ.ME
DOSDEL then deletes the file from the diskette.
MESSAGES
?Invalid path specified
Check your directory lists or your syntax and try again.
System Commands Reference Manual, Rev. 07
RETURN
DOSDEL
Page 2
?This is not a supported MS-DOS format
?Sorry, but can't be decoded.
Your floppy diskette is in a format DOSDEL can't read.
System Commands Reference Manual, Rev. 07
DOSDR
FUNCTION
Displays a directory listing of an MS-DOS formatted diskette.
CHARACTERISTICS
DOSDR accepts wildcards for the DOS file. It is re-entrant, re-usable, and works with these
diskette formats:
5 ¼” 360K
3 ½” 1.44M
DOSDR understands only directory and file names that conform to the MS-DOS 8.3 convention. It
does not understand Windows 95 long file names.
To use this command, you must have a proper disk driver program for your computer's
type of floppy disk (and defined as MS-DOS format when created by FIXFLP). The
device must be defined in BITMAP and DEVTBL statements in your system initialization
command file—you may want to load the driver into system memory. See your system
operator for help.
FORMAT
DOSDR {listfilespec=}devn:\DOS-path
listfilespec is an optional AMOS filespec of a file to hold the directory display, devn: is the AMOS
device name for the diskette drive, and DOS-path is the complete MS-DOS specification of the
directory you want to display. The default path is the root directory. Without a listfilespec, the
directory displays on your terminal.
OPERATION
Enter DOSDR and the device/path/filename you want. For example:
DOSDR LFD0:\ALAN
RETURN
DOSDR then displays the directory.
MESSAGES
?Invalid path specified
Check your subdirectory lists or your syntax and try again.
System Commands Reference Manual, Rev. 07
DOSDR
Page 2
?This is not a supported MS-DOS format
?Sorry, but can't be decoded.
Your floppy diskette is in a format DOSDR can't read.
System Commands Reference Manual, Rev. 07
DOSEXP
FUNCTION
Transfers a file from AMOS to an MS-DOS formatted diskette.
CHARACTERISTICS
DOSEXP accepts wildcards for the DOS file, and for a full AMOS specification (see
OPERATION, below). It is re-entrant, re-usable, and works with these diskette formats:
5-1/4" 360 K
3-1/2" 1.44 M
Because MS-DOS does not support contiguous (random) files, DOSEXP will not transfer
contiguous files.
To use this command, you must have a DOS disk driver program (created using FIXFLP
or FIX219) for your computer's diskette drive. The drive must be defined using this driver
in BITMAP and DEVTBL statements in your system initialization command file—you
may want to load the driver into system memory. See your system operator for help.
FORMAT
DOSEXP devn:{{DOS-filespec}=AMOS-filespec{{/switch}
RETURN
devn: is the diskette device, DOS-filespec is the optional name to be given the file on the diskette
(uses AMOS name if not specified), and AMOS-filespec is the specification of the file to be
transferred. The AMOS device and account default to where you are logged. Do not put any
spaces on either side of the equal sign.
OPTIONS
/B
Transfers data in binary.
/Q
Query. Asks you to confirm export of each selected file.
OPERATION
Enter DOSEXP and the DOS and AMOS specifications. For example:
DOSEXP LFD0:\TEST\NEWPROGR.EXE=DSK3:NEW.ABC[120,53]
RETURN
DOSEXP then transfers the file to the MS-DOS diskette. The file is converted into MS-DOS
format.
System Commands Reference Manual, Rev. 07
DOSEXP
Page 2
You can specify a wildcard that represents a complete AMOS file specification, but not for a
partial AMOS file specification. For example, you could enter:
DOSEXP LFD0:=*.*
RETURN
but not:
DOSEXP LFD0:=DSK2:[10,2]*.TXT
RETURN
MESSAGES
?Directory full
Choose another directory.
?Diskette full
There isn't room on the diskette for the selected file. Erase any un-needed files and try
again, or transfer to another diskette.
?Invalid file type
Check your directory lists or your syntax and try again.
?Invalid path specified
Check your subdirectory lists or your syntax and try again.
?This is not a supported MS-DOS format
?Sorry, but can't be decoded.
Your floppy diskette is in a format DOSEXP can't read.
?Unable to open [filespec]
DOSEXP couldn't find the file on the AMOS side. Check your AMOS directory and
syntax.
System Commands Reference Manual, Rev. 07
DOSIMP
FUNCTION
Transfers a file from an MS-DOS formatted diskette to AMOS.
CHARACTERISTICS
DOSEXP accepts wildcards for the DOS file, and for a full AMOS specification (see
OPERATION, below). It is re-entrant, re-usable, and works with these diskette formats:
5 ¼” 360K
3 ½” 1.44M
To use this command, you must have a proper disk driver program for your computer's
type of floppy disk (and defined as MS-DOS format when created by FIXFLP). The
device must be defined in BITMAP and DEVTBL statements in your system initialization
command file—you may want to load the driver into system memory. See your system
operator for help.
FORMAT
DOSIMP {AMOS-filespec}=devn:{\path}DOS-filespec{/switch}
AMOS-filespec is the file specification (which may include the device and account) of the file on
the AMOS side, devn: is the diskette device, path is the directory path (defaults to root account)
and DOS-filespec is the file you want to transfer. Do not put any spaces on either side of the
equal sign.
DEFAULTS
The AMOS device and account default to where you are logged. The AMOS-filename defaults to
the DOS-filename.
The name is truncated to six characters if the DOS-filespec is longer than six characters.
OPTIONS
/B
Transfer in binary mode.
/Q
Query. Asks you to confirm import of each selected file.
System Commands Reference Manual, Rev. 07
DOSIMP
Page 2
OPERATION
Enter DOSIMP and the AMOS and DOS device and file specifications you want. For example:
DOSIMP DBTUT.TXT=LFD0:\DBASE\TUTORIAL\READ.ME
RETURN
DOSIMP then transfers the file to the specified AMOS account. The file is converted to AMOS
format.
You can specify a wildcard that represents a complete AMOS file specification, but not for a
partial AMOS file specification. For example, you could enter:
DOSIMP *.*=LFD0:*.*
RETURN
but not:
DOSIMP DSK2:[10,2]*.TXT=LFD0:*.*
RETURN
MESSAGES
?File not found
The file was not found on the MS-DOS diskette. Check your directory lists or your syntax
and try again.
?Invalid file type
Check your directory lists or your syntax and try again.
?Invalid path specified
Check your directory lists or your syntax and try again.
?This is not a supported MS-DOS format
?Sorry, but can't be decoded.
Your floppy diskette is in a format DOSIMP can't read.
?Unable to open [filespec]
DOSIMP couldn't open the file on the AMOS side. Check your AMOS directory and
syntax.
System Commands Reference Manual, Rev. 07
DOSMKD
FUNCTION
Creates a subdirectory on an MS-DOS formatted diskette under the specified directory.
CHARACTERISTICS
DOSMKD is re-entrant, re-usable, and works with these diskette formats:
5 ¼” 360K
3 ½” 1.44M
To use this command, you must have a proper disk driver program for your computer's
type of floppy disk (and defined as MS-DOS format when created by FIXFLP). The
device must be defined in BITMAP and DEVTBL statements in your system initialization
command file—you may want to load the driver into system memory. See your system
operator for help.
FORMAT
DOSMKD {devn:}\path
devn: is the name of the diskette device and path is the route to the directory (including the new
directory name). If you specify only the new directory name, it is created under the root directory.
OPERATION
Enter DOSMKD, the device specification you want to create a directory on, and the path. For
example:
DOSMKD LFD0:\DBASE\TUTORIAL
RETURN
DOSMKD then creates the directory.
MESSAGES
?Directory full
Choose another directory.
?Disk full
There isn't room on the diskette for another directory.
System Commands Reference Manual, Rev. 03 (AMOS 2.2 - 4/91)
DOSMKD
Page 2
?Invalid directory name
Check your directory lists or your syntax and try again.
?Invalid path specified
Check your directory lists or your syntax and try again.
?This is not a supported MS-DOS format
?Sorry, but can't be decoded.
Your floppy diskette is in a format DOSMKD can't read.
System Commands Reference Manual, Rev. 03 (AMOS 2.2 - 4/91)
DOSRMD
FUNCTION
Removes a directory from an MS-DOS formatted diskette.
CHARACTERISTICS
DOSRMD is re-entrant, re-usable, and works with these diskette formats:
5 ¼” 360K
3 ½” 1.44M
A directory can't be removed if it has files in it, or if a subdirectory of it has files in it.
To use this command, you must have a proper disk driver program for your computer's
type of floppy disk (and defined as MS-DOS format when created by FIXFLP). The
device must be defined in BITMAP and DEVTBL statements in your system initialization
command file—you may want to load the driver into system memory. See your system
operator for help.
FORMAT
DOSRMD devn:\path
devn: and path give the device and directory you want to delete.
OPERATION
Enter DOSRMD and the description of the directory you want to remove. For example:
DOSRMD LFD0:\DBASE\TUTORIAL
RETURN
DOSRMD then removes the directory.
MESSAGES
?Directory not empty
Remove or re-locate the files and try again.
?Directory not found
Check your syntax and try again.
System Commands Reference Manual, Rev. 03 (AMOS 2.2 - 4/91)
DOSRMD
Page 2
?Invalid directory name
Check your directory lists or your syntax and try again.
?Invalid path specified
Check your directory lists or your syntax and try again.
?This is not a supported MS-DOS format
?Sorry, but can't be decoded.
Your floppy diskette is in a format DOSRMD can't read.
System Commands Reference Manual, Rev. 03 (AMOS 2.2 - 4/91)
DOSTYP
FUNCTION
Types a file from an MS-DOS formatted diskette on your terminal screen.
CHARACTERISTICS
DOSTYP is re-entrant, re-usable, and works with these diskette formats:
5 ¼” 360K
3 ½” 1.44M
To use this command, you must have a proper disk driver program for your computer's
type of floppy disk (and defined as MS-DOS format when created by FIXFLP). The
device must be defined in BITMAP and DEVTBL statements in your system initialization
command file—you may want to load the driver into system memory. See your system
operator for help.
FORMAT
DOSTYP devn:DOS-filespec
devn: is the diskette device and DOS-filespec is the file you want to display.
OPERATION
Enter DOSTYP and the device/file specification you want. For example:
DOSTYP LFD0:\DBASE\TUTORIAL\READ.ME
RETURN
DOSTYP then displays the file on your terminal screen. You can stop the display at any time by
pressing NO SCRL or CTRL /S, and resume it again by pressing NO SCRL or CTRL /Q. You can end the
display by pressing CANCEL or using CTRL /C.
MESSAGES
?File not found
Check your directory lists or your syntax and try again.
?Invalid file type
You can't display this type of file.
System Commands Reference Manual, Rev. 03 (AMOS 2.2 - 4/91)
DOSTYP
Page 2
?Invalid path specified
Check your directory lists or your syntax and try again.
?This is not a supported MS-DOS format
?Sorry, but can't be decoded.
Your floppy diskette is in a format DOSTYP can't read.
System Commands Reference Manual, Rev. 03 (AMOS 2.2 - 4/91)
DSKANA
FUNCTION
Analyzes the data on a disk, tracks lost disk blocks, and optionally recreates the disk bitmap.
Reports file errors, inconsistent block counts, and bad bitmap hash totals.
CHARACTERISTICS
DSKANA is re-entrant and re-usable. DSKANA reads every block on the disk. It keeps track of
what the bitmap should be, and compares that to what it actually is. DSKANA should be run on a
regular basis since it reclaims temporarily allocated disk blocks. DSKANA also tells you if more
than one file claims the same disk block, if there are illegal block links in a file, and if your bitmap
has a bad hash total. Unless you specify otherwise, DSKANA updates and rewrites the bitmap
based on its analysis. To see a summary of DSKANA switches and modes, enter DSKANA at
AMOS level in an operator's account.
DO NOT run DSKANA when other users are accessing the specified logical disk, or you
could damage the data on that disk. You must be logged into an operator's account, [1,2],
to run DSKANA.
DSKANA builds an image of the logical disk's bitmap in your memory partition. This means that
you need a larger memory partition to analyze large logical devices. For example, a 1GB logical
disk requires about 250KB of memory just to store the bitmap, in addition to any other memory
requirements.
If you use disk cache, DSKANA saves and restores the statically locked blocks for the
device you're analyzing. However, this requires extra memory, and the amount needed is
proportional to the total number of statically locked blocks (for all devices) in the cache.
DSKANA will report how much memory it uses to save the cache. You may have enough
memory for DSKANA to restore the disk cache, but not enough to continue analyzing the
disk. If so, increase your job's memory partition or run DSKANA from a job with more
memory.
FORMAT
DSKANA {filespec=}{devn:}{/switch}
filespec selects a DSKANA output file, devn: selects the disk device you want to analyze, and
switch is an option. filespec must not be on the device you are analyzing.
System Commands Reference Manual, Rev. 07
DSKANA
Page 2
OPTIONS
/B
Bypass analysis termination if there is not enough memory to save the disk
cache. If you use this switch, locked blocks for the device will not be restored
into the cache if there is not enough memory to do so. May be used with other
switches.
/C
Checks for errors without rewriting the bitmap (open files won’t corrupt the file
structure). Don’t use if other users are ACTIVELY using the disk—you may
get false blocks marked in use errors (through the file structure won’t
be damaged). Good for automated “overnight” file backups where users might
have left files open. Can be used with /E and /L to select the type of display.
/E
Lists only account numbers and disk blocks where errors occur.
/L
Displays full list of all accounts, account directories, and files—plus disk
addresses of blocks they occupy. Displays error messages as they occur.
/M
Checks if device is mounted. If not, displays error message and bypasses
device.
OPERATION
Enter DSKANA followed by the specification of the device whose contents you want to analyze
and any optional switches. For example:
DSKANA DSK3:
RETURN
You see nothing for some moments until DSKANA finishes reading the disk, except the numbers
of the accounts as DSKANA progresses through the disk accounts. When DSKANA finishes
reading the disk, it displays information about the disk analysis (see MESSAGES, below).
Every time the system updates the bitmap it computes a hash total and compares it with the
previously stored value. This allows you to verify the bitmap was correct, since DSKANA also
computes a bitmap hash total based on the blocks it has processed. If this value does not match the
official bitmap hash total, you see a message. Whether the previous official bitmap hash total was
correct or not, DSKANA rewrites the bitmap (unless you use /C). The last line of data in the
terminal display tells you how many file errors were detected. The messages listed in
MESSAGES, below, tell you what kinds of file errors occurred. Frequent file errors can indicate
hardware or software problems.
If you want to see more information about how DSKANA is progressing as it analyzes your disk
(or if DSKANA has reported file errors on your disk and you want to find out where the errors
occurred), use /L or /E. If DSKANA finds an error, you see where on the disk it occurred. For
example:
Block 1703 - block creates endless loop in file MDO.LIT
System Commands Reference Manual, Rev. 07
Page 3
DSKANA
If you want to place the DSKANA output into a file, include a file specification and an equal sign
on the DSKANA command line. For example:
DSKANA DSK0:ERROR.TXT=DSK1:/L
RETURN
If the specified file already exists, DSKANA deletes it before beginning the disk analysis. The first
line of the file includes the date of the analysis. Remember: the output file must not be on the
device you are analyzing.
If you use disk cache, you will see this message:
DSKANA DSK5:
RETURN
Allocating memory for cached disk blocks... [10540 bytes]
DSKANA needs four bytes of memory for each statically locked block in cache, regardless of its
device. If you do not have enough memory in your partition, you will receive an error message, as
listed below, and DSKANA will terminate. If you use the /B switch, running out of memory for the
cache will still display an error message, but DSKANA will continue. Any statically locked blocks
for the device you're analyzing will not be restored to the cache.
MESSAGES
Besides the errors listed below, you may see the standard system error messages dealing with
invalid device specifications.
Allocating memory for cached disk blocks... [status]
DSKANA is storing statically locked disk blocks. Status may be:
• xxx bytes - xxx is the number of bytes used to store the cached blocks.
• No disk cache - Disk cache doesn’t exist.
• Insufficient memory - Your job doesn't have enough memory to store the cache.
Increase memory and try again.
[BITMAP on disk had a bad hash total]
The bitmap DSKANA just calculated disagreed with the system bitmap. Unless you used
/C, DSKANA re-writes the corrected bitmap anyway, so this is usually not a problem. If
this occurs frequently, it could indicate a disk problem.
Bitmap size is 0 - not mounted or driver not in RES:
Either the device could not be mounted, or the disk driver is not loaded into system
memory. Correct the error and retry.
System Commands Reference Manual, Rev. 07
DSKANA
Page 4
?Cannot output list file to memory.
You cannot specify MEM: as the output device. Choose another device and re-enter an
amended command line.
?Cannot output to device being analyzed
Make sure the output file is on another disk.
Checking disk cache for locked blocks...[status]
DSKANA is looking for statically locked blocks in disk cache. Status may be:
• Done - DSKANA has saved all statically locked blocks for the device.
• No disk cache - Disk cache does not exist.
• Error? Not enough space to store all locked buffers - DSKANA could not save all
locked blocks for the device. Check the cache manually after DSKANA finishes.
?Device write protected - Please unprotect for retry
type RETURN when ready
Write-enable your disk and press
RETURN .
?Error reading directory structure
A UFD is damaged in some way. The analysis will be incomplete.
?Memory allocation failed
%Analysis terminated
Your memory partition is too small for DSKANA to save and restore the disk cache.
Either run DSKANA from a job with more memory or use the /B switch to continue
analysis without restoring the cache.
?Memory allocation failed
%Continuing with analysis. Disk cache will not be preserved
Same as previous message, except you used the /B switch. DSKANA continues to analyze
the disk, but any statically locked blocks for the device being analyzed are not restored to
the disk cache.
?Memory allocation failed
%[xxx bytes] more are needed to analyze device
Your job does not have enough memory to store the bitmap of the device you're analyzing.
Run DSKANA from a job with more memory or increase your memory partition size.
System Commands Reference Manual, Rev. 07
Page 5
DSKANA
No file errors
There were no file errors found during the DSKANA.
?Privileged program - must be logged into [1,2]
Log into an operator's account, [1,2], and try again.
Restoring blocks into disk cache...[status]
DSKANA is putting the statically locked blocks for the device back into the disk cache.
Status may be:
• Done - All blocks for the device have been restored to the disk cache.
• Error ?Not enough space to store all locked buffers - There were not enough buffers in
the disk cache to restore all previously locked blocks.
• Error [?General disk error] - A disk error of some type has occurred.
[Rewriting BITMAP]
Informs you DSKANA is rewriting the bitmap.
[number] file errors detected
This displays the number of file errors found. If you used /C, you should re-run
DSKANA without /C to correct these file errors.
[The following blocks were marked in use but not in a file]
You may see a list of block numbers following this message. This is not necessarily
anything to be alarmed about. Running DSKANA "frees up" the blocks listed under this
message by marking them free for use.
If the list of blocks is extremely long, you can press CTRL /C to interrupt it. While the rest
of the block numbers will not display, DSKANA will still write the corrected bitmap and
hash total to the disk.
System Commands Reference Manual, Rev. 07
DSKANA
Page 6
[The following blocks were in a file but not marked in use]
You may next see a list of block numbers (if you don't, there is nothing to worry about). A
list of block numbers following this message is an indication of something wrong—for
example, the linking structure of the disk has gone astray; you must run DSKANA again,
using /L or /E. The second time, look for the file error messages listed below, so you can
figure out what's wrong.
If the list of blocks is extremely long, you can press CTRL /C to interrupt it. While the rest
of the block numbers will not display, DSKANA will still write the corrected bitmap and
hash total to the disk.
You only see the following messages if you use the /L or /E switches. If you see
any of these messages in the listing of the blocks processed by DSKANA, you
have serious problems with the data on your disk. Your best course is to delete the
files affected, run DSKANA again, and restore the deleted files from your backup.
BITMAP rewrite error code [code number]
The bitmap could not be written back out to the disk. The number you see is the error
code indicating what the problem was. For a list of these error codes, see your AMOS
Monitor Calls Manual.
Block creates endless loop in file
The linking structure of this file allows the blocks to point back to themselves.
Block marked as bad
A block marked as bad in the BADBLK.SYS[1,2] file was allocated to a file.
Block reserved for system use only
A link in the file where this message appears points to a block that can't be allocated to a
file, such as the label block, MFD, or bitmap area.
Block used in previous file
The last block in the file also exists in a previous file.
Device error [description]
Errors beginning with "Device error" tell you DSKANA found a block containing a hard
error the system could not recover from. The "description" tells you the specific file or
device and block number where the error occurred.
%Device not mounted
Informative message indicating the device in question was bypassed by DSKANA.
System Commands Reference Manual, Rev. 07
Page 7
DSKANA
Illegal block link
A link in the file points to an invalid block address.
This file has a bum active count
See your System Operator about using DSKDDT to correct the situation.
This file has a bum block count
See your System Operator about using DSKDDT to correct the situation.
[unable to locate BITMAP for rewrite]
DSKANA couldn't find the bitmap area for the device in memory. This means the bitmap
in memory may be invalid.
System Commands Reference Manual, Rev. 07
DSKCPY
FUNCTION
Creates a backup disk by making a literal image of one disk onto another. Optionally generates a
hash total for the backup disk.
CHARACTERISTICS
DSKCPY is re-entrant and re-usable.
Do not run DSKCPY while anyone is accessing either of the disks involved in the copy!
DSKCPY makes a LITERAL image of one disk onto another. This means any data on the
disk you are copying to will be irretrievably lost after a disk copy is done. DSKCPY will
wipe out the BADBLK.SYS file if you are copying to a disk with a BADBLK.SYS file.
You must be logged into [1,2] to run DSKCPY.
You may use DSKCPY on any kind of disk device. However, the three-character device
specification must be the same for both devices you are copying between. For example, if you
want to make a copy of DSK0: (a Winchester disk) you may copy it to DSK1: or DSK6:, but you
may not copy it to AMS0: or STD3:.
DSKCPY works only on devices which use the traditional directory structure. Do not use
DSKCPY on extended-format disks.
DSKCPY optionally generates a hash total for the backup disk when it has finished the disk copy.
This feature is useful if you are making multiple copies of a disk— the hash total displayed at the
end of the disk copy should be the same for each disk copied. The hash total gives you an extra
way to verify the copies made are identical to the master disk, since two disks will only have the
same hash total if their contents are identical. For information on generating a hash total for a disk
without using DSKCPY, see the HASHER reference sheet.
FORMAT
DSKCPY {/switch}
switch is an option request.
DEFAULTS
If you enter just the unit numbers of the disks you want to copy between instead of a full device
specification, DSKCPY assumes you are copying between DSK devices. For example, if you enter
1 and 0 as the input and output drives, DSKCPY assumes you want to copy from DSK1: to
DSK0:.
System Commands Reference Manual, Rev. 07
DSKCPY
Page 2
OPTIONS
/H
Generates a hash total for the copied disk.
OPERATION
Log into [1,2] and enter DSKCPY:
LOG 1,2 RETURN
DSKCPY RETURN
If your disk drive permits, you should now write-protect the drive you are copying from; this
ensures you won't accidentally copy the backup disk onto your source disk.
DSKCPY asks you for the Input drive. Enter the specification of the device you are copying
FROM. Now DSKCPY asks you for the Output drive. Enter the specification of the device you
are copying TO. For example:
DSKCPY RETURN
Input drive: DSK0: RETURN
Output drive: DSK1: RETURN
Now DSKCPY makes a literal image of DSK0: onto DSK1:. As it copies and verifies, it tells you
how many blocks it is copying (DSKCPY copies every block on the disk, even if some blocks
contain no data). The amount of time it takes to perform this disk copy depends on the device.
MESSAGES
?Could not find DEVTBL entry for disk mount
Please submit to Alpha Micro, on a Software Performance Report, the details of your use
of DSKCPY.
?CRC error during disk copy - drive N block X
drive N and block X are octal or hexadecimal numbers. The Cyclic Redundancy Check
detected a problem in data transmission. First verify there is a problem by using REDALL
to diagnose the disk and report any read errors. The problem can be fixed using
DSKDDT, but the data in the block may be lost.
?Disk size not defined in table
DSKCPY doesn't know the number of disk blocks per disk for the devices you are trying to
copy between. This means you are copying between devices DSKCPY doesn't know
about. See your System Operator for help.
System Commands Reference Manual, Rev. 07
Page 3
DSKCPY
?Driver not found
DSKCPY couldn't find the device driver program for the specified non-DSK device. That
means the driver was not in system memory, user memory, or DSK0:[1,6]. See your
System Operator.
?Input and output devices must be the same
You entered device specifications in which the three-character device code was different.
For example, you tried to copy DSK1: to AMS1:.
?Invalid switch
Re-enter the command line using a valid switch.
?No BADBLK.SYS on input device
?No BADBLK.SYS on output device
?No BADBLK.SYS on output device. Recertification recommended.
?Cannot fetch BADBLK.SYS
The device has lost its BADBLK.SYS media flaw file, or that file cannot be read from
disk. The drive needs to be backed up using another backup method before recertification
and DSKCPY is tried again.
?Privileged program - must be logged into [1,2]
Log into [1,2] and try again.
?Sector not found during disk copy - drive N block X
drive N and block X are octal or hexadecimal numbers. The contents of a disk sector have
become unformatted. Verify there is a problem by using REDALL to diagnose the disk
and report any read errors.
?Sentinel field error during disk copy - drive n block x
drive n and block x are octal or hexadecimal numbers. The contents of a disk block have
become unformatted. Verify there is a problem by using REDALL to diagnose the disk
and report any read errors.
?Sorry - output disk is write-protected
Write-enable the disk and try again.
?Undefined error during disk copy - drive n block x
drive n and block x are octal or hexadecimal numbers. A hard error occurred which was
not definable. Verify there is a problem by using REDALL to diagnose the disk and report
any read errors.
System Commands Reference Manual, Rev. 07
DSKCPY
Page 4
?Verification error at block nnn
After DSKCPY copied the data in the specified disk block, it was not able to verify the
data on the output disk. This means the data changed between the time it was read on the
source disk and the time it was read on the output disk. Try using DSKCPY again. If you
see this message frequently, you may have hardware problems.
System Commands Reference Manual, Rev. 07
DSKDDT
FUNCTION
Allows you to examine and change data directly on the disk.
CHARACTERISTICS
DSKDDT is re-entrant and re-usable. The numbers you give to DSKDDT tell it which disk
locations you want to examine.
DSKDDT should be used only by an experienced System Operator, and with extreme
caution. A mistake could easily destroy your disk's file structure. You must be logged into
an operator's account, [1,2], to run DSKDDT.
You cannot use DSKDDT across a network; you can use it only on local disks.
The block number for DSKDDT must be in the current numeric display base (usually octal). The
replacement data must be in octal regardless of the current display base.
See the SET reference sheet for information on setting the display base.
FORMAT
DSKDDT {devn:}block
devn: is the device containing the block you want to see, and block is the number of the disk block
you want to examine and change. The devn: defaults to the disk you are logged into.
OPERATION
Be sure you are logged into [1,2] and enter DSKDDT followed by an optional device specification
and a block number. For example:
DSKDDT DSK1:202
RETURN
DSKDDT reads the block, lists any errors it finds, and is then ready for you to modify the block.
Use the DSKDDT commands listed below. DSKDDT displays two bytes of data at a time. To see
the first two bytes of the block, type a slash, /. To see the next two bytes, press or LINE FEED .
For example:
0/
2/
00452
44510
System Commands Reference Manual, Rev. 07
DSKDDT
Page 2
The number on the left of the slash is the RELATIVE disk location within the block you want to
examine (the first byte is offset zero, not one). If you are examining block 202, the display above
tells you the first two bytes in block #202 are 00452, and the second two bytes are 44510. After
you finish using the DSKDDT commands, enter E to exit. DSKDDT then rewrites the block and
returns you to AMOS command level.
COMMAND SUMMARY
nnn/
nnn is the relative position of the disk location from the front of the block.
For example, 6/ displays the contents of bytes six and seven (the seventh and
eighth bytes) in the block.
nnn/NNN
nnn is the relative disk location you want to see (enter in octal), and NNN is
the octal data (two bytes) to replace contents of nnn.
LINE FEED
Display the next two bytes of data in the block. You may also use
^
Display the previous location.
/
Display location zero (first two bytes).
RETURN
No operation.
RUBOUT
Cancel current command line. Displays XXX and a TAB.
E
Re-write the modified block and exit.
nN
Write the current memory contents to block n when E is entered. This
allows copying from one block to another.
O
Set the entire block to minus ones (177777 octal or FFFF hex). The data on
the disk will not be changed until E is entered.
Z
Set the entire block to zeros. The data on the disk won’t be changed until E
is entered.
CTRL
/C
.
Exit without updating the block.
MESSAGES
?
DSKDDT didn't understand your command. Enter a valid command.
?Cannot INIT [device-name] - device does not exist
Check your syntax, or use DEVTBL to see a list of valid devices, and try again.
?Cannot READ [device-name] - disk is not mounted
MOUNT the disk and try again.
?Cannot rewrite disk block - insufficient privileges
Your job doesn't have the "write to physical disk blocks" privilege.
System Commands Reference Manual, Rev. 07
Page 3
DSKDDT
?Privileged program - must be logged into [1,2]
Log into [1,2] and try again.
Program restricted to use on local system only
You cannot use DSKDDT across a network. Log into the remote system as a user, then
use DSKDDT.
System Commands Reference Manual, Rev. 07
DSKDMP
FUNCTION
Displays contents of physical disk blocks on your terminal in numeric form.
CHARACTERISTICS
DSKDMP is re-entrant and re-usable. The system internally represents all data in numeric form.
The DSKDMP display shows you the data in the number base the system is currently using for
your numeric displays. Enter block numbers in that same base. See the SET reference sheet for
information on changing the display base. You must be logged into an operator's account, [1,2],
to use DSKDMP.
You may freeze and resume the display by pressing
To interrupt the display, press CTRL /C.
NO SCRL ,
or by pressing
CTRL
/S and
CTRL
/Q.
FORMAT
DSKDMP {devn:}{block}
devn: is the logical device and block is the number of the physical disk block you want to see.
DEFAULTS
The default device is where you are logged. The default block is block zero.
OPERATION
Enter DSKDMP and a device specification and a disk block number. For example:
DSKDMP DSK1:202
RETURN
DSKDMP asks for the size of the block you wish to dump. Enter the number of bytes you want
displayed. Each line displays eight groups of 16 bits. For example:
DSKDMP 3063 RETURN
Block size: 128 RETURN
003101 052057 046124 042040 045523 046504 020120 034002
This example shows the first 128 bytes of block 2063. DSKDMP always begins with the first byte
of the block.
The default block size is 512. If the block size is larger than 256, DSKDMP pauses every 256
bytes. Press RETURN to continue.
System Commands Reference Manual, Rev. 03 (AMOS 2.2 - 4/91)
DSKDMP
Page 2
MESSAGES
Block size is too large.
Enter a smaller block size.
?Cannot read - illegal block number
You gave DSKDMP a block number that does not exist. Use the DUMP command to
display the blocks on your disk.
?Cannot INIT [device-name] - device does not exist
Check your syntax or use DEVTBL to see a list of the devices on your system.
?Cannot READ [device-name] - disk not mounted
MOUNT the disk and try again.
?Privileged program - must be logged into [1,2]
Log into account [1,2] and try again.
System Commands Reference Manual, Rev. 03 (AMOS 2.2 - 4/91)
DSKFIL
FUNCTION
Tells you what disk blocks are used by a specified file.
CHARACTERISTICS
DSKFIL is re-entrant and re-usable. The numbers you see are displayed in the number base
currently in use on your system (usually octal). See the SET reference sheet for information on
changing number bases.
FORMAT
DSKFIL filespec
filespec selects the file whose block numbers you want to see. The default file extension is .LIT.
OPERATION
Enter DSKFIL and the specification of the file whose disk addresses you want to see. For
example:
DSKFIL SWITCH.TXT
RETURN
MESSAGES
?Cannot DSKFIL [filespec] - file not found
Check your syntax, or use DIR to find the file.
?File specification error
Check your syntax and try again. Make sure you entered a filespec.
No blocks in file
There are no blocks allocated to this file.
System Commands Reference Manual, Rev. 07
DSKPAK
FUNCTION
Consolidates the blocks in use on the disk to create a single area of free blocks.
CHARACTERISTICS
DSKPAK is re-entrant and re-usable. It is used to avoid fragmentation of open space on the disk.
For more information on file allocation, see your System Operator's Guide.
Before packing the disk, you MUST use DSKANA to make sure there are no
problems with the disk's file link structure. If a minor error in the file link structure
does exist, packing the disk will magnify the error dramatically, possibly resulting in
loss of all files on the disk. Using DSKANA also frees up any disk blocks marked in
the bitmap as in use but not allocated to any file (otherwise, DSKPAK will not be able
to move those blocks into the free block area on the disk, resulting in an incompletely
packed disk). You may also want to use DSKANA on the disk after packing it. You
also must make sure nobody is using the disk you want to pack before using DSKPAK.
You must be logged into the System Operator's Account (DSK0:[1,2]).
Because DSKPAK re-organizes the disk file structure completely, it is a good idea to back up the
disk before using DSKPAK on it, just in case there are any problems with the disk.
If the system crashes while a DSKPAK is in progress, you must use DSKANA after you
reboot the system to clean up the disk before writing to it.
FORMAT
DSKPAK devn:
OPERATION
Log into account DSK0:[1,2]. Use DSKANA to clear up the disk you want to pack. You should
also be sure you have a current backup of the disk. Then enter DSKPAK and the specification of
the device you want to pack. For example:
DSKPAK DSK1:
RETURN
DSKPAK warns you all users must be off the disk you are going to pack. When you are sure this
is true, press RETURN . You may press CTRL /C to stop at this point.
System Commands Reference Manual, Rev. 07
DSKPAK
Page 2
DSKPAK makes as many passes through the disk as it needs to pack it completely. The number of
passes DSKPAK makes depends on how much your disk is in need of packing. DSKPAK prints
one dot for each disk account processed.
MESSAGES
?Cannot INIT [device-name] - device does not exist
Check your syntax, or use DEVTBL to display the devices defined on your system, and try
again.
?Cannot lock directory or [device-name] - disk not mounted
MOUNT the disk and try again.
?File specification error
The file specification was entered wrong. Check to be sure you included the device
specification, and check your spelling. Then try again.
?Insufficient free memory
You do not have enough memory in your partition to run DSKPAK. See your System
Operator about increasing your memory.
?Privileged program - must be logged into OPR:
Log into account DSK0:[1,2] and try again.
Some blocks are marked in use but not in a file
Please run DSKANA immediately
After the disk was packed, DSKPAK detected a file system problem. Prevent other users
from accessing the disk and run DSKANA. Then run DSKPAK again.
System Commands Reference Manual, Rev. 07
DUMP
FUNCTION
Displays on your terminal the contents of memory, random and sequential disk files, Master File
Directories, disk bitmaps, user directories, or disk blocks.
CHARACTERISTICS
DUMP is re-entrant and re-usable. DUMP accepts different kinds of arguments, depending upon
the kind of data you want to display. Specify numbers in the same number base the system is
currently using for displays (usually octal). All hexadecimal numbers must start with a number or
a zero. See the SET reference sheet for information on changing the system display base. You
may abbreviate the DUMP keywords (for example, BI instead of BITMAP).
FORMAT
There are six different formats for the DUMP command:
To display memory
DUMP start-address {end-address}
start-address is the first address of the memory block you want to display and end-address is the
last.
To display a file
DUMP filespec
filespec is a valid file specification of a file.
You can dump a file from MEM: or RES:.
To display a disk block
DUMP BLOCK {start-block} {end-block} {devn:}
start-block is the number of the first block you want to see, end-block is the last block you want to
see, and devn: is the specification of the logical device containing the block(s). DUMP RECORD
does the same thing as DUMP BLOCK.
System Commands Reference Manual, Rev. 07
DUMP
Page 2
To display a disk bitmap
DUMP BITMAP {devn:}
To display the disk Master File Directory
DUMP MFD {devn:}
To display a user's disk directory
DUMP UFD {[p,pn]} {devn:}
or:
DUMP UFD {block#} {devn:}
You cannot use an ersatz device name to specify the disk account.
DUMP DI performs the same function and uses the same format as DUMP UFD.
DEFAULTS
DUMP assumes the device and account you are currently logged into, and a file extension of .LIT.
OPERATION
Enter DUMP and the keyword and arguments you need. For example:
DUMP BLOCK 16407 DSK0:
RETURN
You can suspend and re-start the scrolling of the DUMP display by using the NO SCRL key, or by
pressing CTRL /S and CTRL /Q. To interrupt a display, press CTRL /C. The display types are:
Memory, Block, and File Displays
The most common type of display looks like:
Block number 12033 of DSK1:DUMP.TXT, next block link is 6562
00005620:006562 020056
... 067543The most common
00005640:066555 067157
... 071551type of display
00005660:066160 074541
... 063040takes the form
00005700:071157 006555
... 066541of this example
The first number on the left (ending with a colon) is the memory address containing the first byte of
data on the line. In this example, memory addresses 00005620 and 00005621 contain the two
bytes of data 006562.
System Commands Reference Manual, Rev. 07
Page 3
DUMP
Each group of six digits after the memory address represents two bytes (16 bits) of data in octal
form. If the system is using hexadecimal for your numeric displays, dump displays the data in
groups of eight bits—one byte.
On the far right of the display is a field showing the eight-bit ASCII form of the data. It displays
the same data as the numbers in the center of the display, but translated into their character
representation. Non-printing characters (such as Control-characters) appear as dots.
Bitmap Display
The disk bitmap display consists of ones and zeros. Each disk block is represented in the bitmap
by a one (if the block is in use) or a zero (if it is empty). Each line of the display begins with a
number which ends in a colon; this octal or hex number is the number of the disk block represented
by the first one or zero on that line. At the end of the display is the total number of free blocks (in
decimal) on the disk.
Since the format for dumping the bitmap is different than the format for dumping a disk
block, dumping the disk block containing the bitmap will appear to give different
information than using DUMP BITMAP. Actually, the information is the same; only the
format is different.
Master File Directory Display
Every disk contains a Master File Directory containing a list of all accounts on the disk and the
starting block number of all individual user file directories (UFDs). Each line of the display
represents one UFD. The number on the left gives the disk block number and the relative address
of the MFD entry in that disk block. The characters in the center give the account PPN. The
number on the right gives the disk block at which the UFD for that account begins. Deleted
accounts are marked with an asterisk (*).
User File Directory Display
The display gives the following information about the directory entries:
Block
The disk block number containing the directory entry being displayed.
Offset
The position (in bytes) of the directory entry relative to the start of the
block. Displayed in octal or hex.
Filename
The name and extension of the file. (On traditional format disks, “:80”
indicates the file has been erased.)
Size
The number of disk blocks in the file displayed in decimal.
Active
The number of active data bytes in the last block of the file. Displayed in
octal or hex.
Link
The address of the first disk block of the file. Displayed in octal or hex.
Deleted files are marked with an asterisk (*).
System Commands Reference Manual, Rev. 07
DUMP
Page 4
MESSAGES
?Cannot open [filespec] - device does not exist
The system does not understand your device specification. Check your spelling, and try
again.
?Cannot open [filespec] - disk not mounted
Use the MOUNT command to mount the device and try again.
?Cannot open [filespec] - file not found
Check your syntax, or use DIR to find the file.
?Cannot open [filespec] - invalid filename
Check your syntax and try again.
?Cannot perform specified operation - device is not file structured
The device you specified is not a file structured device. Choose another device name and
re-enter an amended command line.
?Command format error
Make sure you have followed the proper DUMP format for what you wanted to do.
?File specification error
Check the FORMAT section above for information on the valid formats of the DUMP
command, and try again.
?PPN does not exist
DUMP was not able to find the account on the device you specified in a DUMP UFD
command. Make sure the account exists on that device, and check your syntax.
System Commands Reference Manual, Rev. 07
DVD
FUNCTION
Makes the logical devices on an AMOS DVD accessible without being defined in a DEVTBL
statement in your system initialization command file.
CHARACTERISTICS
DVD is re-entrant and re-usable.
For more information about using AlphaDVD, see the Alpha DVD-RAM Installation
Instructions, which comes with AlphaDVD.
FORMAT
DVD {/Options……}
OPTIONS
/HELP
/?
/V
/DEV:xxx
/ID:n
/PIC
/U
/V
Display HELP
Same as /HELP
Display version information and exit
DVD-Recorder device name is xxx:
DVD-Recorder is at SCSI ID n
Display Product Installation Code
Uninstall
Set hardware read after write verification
OPERATION
DVD adds DEVTBL and BITMAP entries to the AMOS system so that data can be randomly
read or written on the DVD media. DVD/U is used to uninstall the DEVTBL and BITMAP
entries prior to removing the media from the DVD drive.
Before starting the program, place an AMOS formatted DVD media into the DVD-RAM drive.
The media may contain existing data. See the FMTDVD or MAKDVD commands for
instructions on formatting a blank media or for copying AMOS logical disks to the DVD media.
Type DVD {options} from the AMOS prompt:
DVD
RETURN
System Commands Reference Manual, Rev. 15
DVD
Page 2
DVD will attempt to find a DVD-RAM drive. The DVD driver must be in system memory. DVD
will find the DVD-RAM drive either using the command line switches /DEV and /ID or by
defaulting to DVD: if /DEV is not specified and by scanning the SCSI bus if /ID is not specified.
If more than one DVD/CD type device is found when scanning the SCSI bus, you will be asked
to choose the device you wish to use.
Found the following possible DVD-Recorders:
1
2
ID
nn
nn
Description
xxxxxxxxxxxxxxxxxxxxxxxxxxx
xxxxxxxxxxxxxxxxxxxxxxxxxxx
Select one of the above devices:
Additional information about the DVD-RAM drive is then displayed:
DVD-RAM-Recorder located at SCSI id 3
If there is no media in the drive, the program displays: ?There is no media installed
in the DVD-RAM drive and exits.
If you want to remove the DVD media or switch to another DVD media, use the /U switch:
DVD/U
RETURN
REQUIREMENTS AND SETUP
DVD requires the following:
•
•
•
•
•
A 68030 or faster processor
A full interrupt enabled SCSI dispatcher.
AMOS 2.3A or later.
A supported DVD-RAM drive.
Enough SMEM to hold DEVTBL and BITMAP entries.
The DVD package contains the following required files:
•
•
•
•
DVD.LIT
The device driver for the DVD-RAM drive, in system memory.
The SSD overlay file (DVD000.OVR)
FMTDVD.LIT
MESSAGES
DVD-RAM device already exists
The DVD is already installed on the AMOS system. Either DVD has already been run to
define the DVD device for random I/O or MAKDVD is currently using the DVD
recorder.
System Commands Reference Manual, Rev. 15
Page 3
DVD
DVD-RAM drive found at SCSI id: <#>
DVD is confirming the SCSI ID of the DVD drive it is about to use.
Error - Device specified is not a DVD-RAM Recorder
Error - DVDram driver must be in system memory.
The DVD driver must be loaded into system memory during the AMOS boot process.
?Impossible error - can't find DVDn: entries in DEVTBL
DVD detected a system problem when unmounting the DVD. Reboot the system.
Media is not AMOS format - insert an AlphaDVD and try again
DVD cannot read AMOS device information from the DVD media. Remove the media
from the drive and make sure it is an AlphaDVD. Re-insert the media and try DVD
again. If the problem still occurs, either it does not contain AMOS information, or the
DVD drive needs maintenance.
?There is no media installed in the DVD-RAM drive
Insert a DVD media into the drive.
Unable to find a DVD-RAM Recorder.
No device that looks like a DVD recorder was found
?You must install a SCSI dispatcher prior to using this program.
A SCSI dispatcher is required to use DVD.
System Commands Reference Manual, Rev. 15
DVDRES
FUNCTION
Copies one or more AMOS logical disks from a recordable DVD-RAM media in a supported
DVD-RAM-drive to AMOS logical disks. The logical disk(s) being copied to must be the same
bitmap word size as the AMOS logical disk being copied from.
DVDRES is only supported on AM8000, Eagle 800 and AMPC 7.0 Systems.
CHARACTERISTICS
DVDRES copies logical AMOS disk(s) from a DVD-RAM media to an AMOS disk drive. The
DVD-RAM media AMOS disk and the AMOS disk being copied to must be the same bitmap
word size! The MAKDVD software will create logical drives of differing sizes by padding the
smaller logicals. DVDRES will not allow for differing bitmap size logicals to be copied! If an
unequal bitmap word size is tried, DVDRES will ignore the request and continue with the
restoring.
FORMAT
DVDRES {switches}
OPTIONS
/HELP
Display the available options and exits
/?
Same as /HELP
/DEV:xxx:
Uses device and driver named xxx: instead of the
default DVD:
/ID:n
Uses the DVD-RAM Drive at SCSI ID n instead of
scanning the SCSI bus to find a DVD-RAM Drive.
The ID can be from 0 to 15.
/V
Display version information.
/PIC
Display Product Installation Code
System Commands Reference Manual, Rev. 17
DVDRES
Page 2
OPERATION
Before starting the program, place the DVD media with the logicals you wish to copy in the
DVD-RAM drive.
Type DVDRES from the AMOS prompt:
DVDRES
RETURN
DVDRES will attempt to find a DVD-RAM drive that is compatible with the DVD-RAM driver
being used. The driver must have the same name as the DVD-drive device name and be loaded in
system memory. DVDRES will find the DVD-RAM drive either using the command line
switches /DEV and /ID or by defaulting to DVD:. If more than one DVD-RAM type device is
found when scanning the SCSI bus, you will be asked to choose the device you wish to use for
coping from.
After entering the DVDRES command, the following will be displayed:
DVDRES Version X.X(xxx)- x – Copyright © 2002 Alpha Micro Products
If DVDRES finds multiple possible DVD-RAM drives while scanning the SCSI bus, the
following message will be displayed to allow you to select the drive to use:
Found the following possible DVD-Recorders:
1.
2.
ID
nn
nn
Description
xxxxxxxxxxxxxxxxxxxxxxxxx
xxxxxxxxxxxxxxxxxxxxxxxxx
Select one of the above devices:
Additional information about the DVD-RAM drive, driver, and media contents is then displayed:
DVD-RAM drive found at SCSI id: x
BITMAP
WORDS
CD title: xxxxxxxxxxxxxxxxxxxxxxxxxxx
DVD-RAM
DVD0:
DVD1:
DVD2:
DVD3:
DVD4:
DVD5:
contains x logical units.
xxxxxxxxxxxxxxxxxxxxxxxxxxx
xxxxxxxxxxxxxxxxxxxxxxxxxxx
xxxxxxxxxxxxxxxxxxxxxxxxxxx
xxxxxxxxxxxxxxxxxxxxxxxxxxx
xxxxxxxxxxxxxxxxxxxxxxxxxxx
xxxxxxxxxxxxxxxxxxxxxxxxxxx
(xxx)
(xxx)
(xxx)
(xxx)
%ERROR
(xxx)
mounted [xxxxx.]
mounted [xxxxx.]
mounted [xxxxx.]
mounted [xxxxx.]
– zero UFD link! [0.]
mounted [xxxxx.]
Blank logical with no data!
DVDRES then asks for the DVD Logical(s) that you wish to copy.
Which DVD Logical(s) would you like to restore?
System Commands Reference Manual, Rev. 17
Page 3
DVDRES
Enter list of disk logicals to be transferred. Disk logicals may be entered as a range
(ex. Dev0: -20 for dev0: thru dev20:), or may be comma separated. The list is terminated with a
blank line:
Enter the logical drives to be copied from.
DVD0: -4
RETURN
DVDRES then asks for the AMOS Disk Logical(s) that you wish to copy to.
Which Disk Logical(s) would you like to restore to?
Enter list of disk Logicals to be transferred. Disk Logicals may be entered as a range
(ex. Dev0: -20 for dev0: thru dev20:), or may be comma separated. The list is terminated with a
blank line:
Enter the logical drives to be copied to.
AGB0: -4
RETURN
The copying process then begins. As it progresses, status messages are displayed:
The following is a sample of a DVDRES process:
.dvdres
DVDRES Version 8.0(101)-5 - Copyright (C) 2002 Alpha Micro Products
Found the following possible DVD-Recorders:
1.
2.
ID
5
3
Description
HL-DT-STDVDRAM GSA-4081B
HITACHI DVD-RAM GF-2050
Select one of the above devices: 1
DVD-RAM drive found at SCSI id: 5
RETURN
CD title: Alpha DVD Backup
DVD-RAM
DVD0:
DVD1:
DVD2:
DVD3:
DVD4:
DVD5:
DVD6:
DVD7:
DVD8:
contains 9 logical units.
Open Logical...UPD0:....................
Open Logical...UPD1:....................
Open Logical...UPD2:....................
Open Logical...UPD3:....................
Open Logical...UPD4:....................
Open Logical...UPD5:....................
Open Logical...UPD6:....................
Open Logical...UPD7:....................
Open Logical...UPD0:....................
(
(
(
(
(
(
(
(
(
)
)
)
)
)
)
)
)
)
mounted
mounted
mounted
mounted
mounted
mounted
mounted
mounted
mounted
[56320.]
[56320.]
[56320.]
[56320.]
[56320.]
[56320.]
[56320.]
[56320.]
[56320.]
Which DVD Logical(s) would you like to restore?
Enter the list of disk Logicals to be transferred. Disk Logicals may be entered as a range
(ex. dev0: -20 for dev0: thru dev20:), or may be comma separated. The list is terminated with a
blank line:
DVD0: -8
RETURN
System Commands Reference Manual, Rev. 17
DVDRES
Page 4
Which Disk Logical(s) would you like to restore to?
Enter list of disk Logicals to be transferred. Disk Logicals may be entered as a range
(ex. dev0: -20 for dev0: thru dev20:), or may be comma separated. The list is terminated with a
blank line:
TST0: -8
---
---
---
---
---
---
---
---
---
---
---
---
---
---
---
---
RETURN
Date & Time: Mon 18-Sep-2006 08:47:14 AM
DVD0: [56320.] 440 Mb -----> TST0: [56320.] 440 Mb
Date & Time: Mon 18-Sep-2006 08:47:14 AM
Restoring .....................................................
Logical has been restored & remounted!
Date & Time: Mon 18-Sep-2006 09:00:38 AM Elapse Time: 00:13:24
DVD1: [56320.] 440 Mb -----> TST1: [56320.] 440 Mb
Date & Time: Mon 18-Sep-2006 09:00:38 AM
Restoring .....................................................
Logical has been restored & remounted!
Date & Time: Mon 18-Sep-2006 09:14:07 AM Elapse Time: 00:13:29
DVD2: [56320.] 440 Mb -----> TST2: [56320.] 440 Mb
Date & Time: Mon 18-Sep-2006 09:14:07 AM
Restoring .....................................................
Logical has been restored & remounted!
Date & Time: Mon 18-Sep-2006 09:27:36 AM Elapse Time: 00:13:29
DVD3: [56320.] 440 Mb -----> TST3: [56320.] 440 Mb
Date & Time: Mon 18-Sep-2006 09:27:36 AM
Restoring .....................................................
Logical has been restored & remounted!
Date & Time: Mon 18-Sep-2006 09:41:00 AM Elapse Time: 00:13:24
DVD4: [56320.] 440 Mb -----> TST4: [56320.] 440 Mb
Date & Time: Mon 18-Sep-2006 09:41:00 AM
Restoring .....................................................
Logical has been restored & remounted!
Date & Time: Mon 18-Sep-2006 09:54:23 AM Elapse Time: 00:13:23
DVD5: [56320.] 440 Mb -----> TST5: [56320.] 440 Mb
Date & Time: Mon 18-Sep-2006 09:54:23 AM
Restoring .....................................................
Logical has been restored & remounted!
Date & Time: Mon 18-Sep-2006 10:07:44 AM Elapse Time: 00:13:21
DVD6: [56320.] 440 Mb -----> TST6: [56320.] 440 Mb
Date & Time: Mon 18-Sep-2006 10:07:44 AM
Restoring .....................................................
Logical has been restored & remounted!
Date & Time: Mon 18-Sep-2006 10:21:00 AM Elapse Time: 00:13:16
DVD7: [56320.] 440 Mb -----> TST7: [56320.] 440 Mb
Date & Time: Mon 18-Sep-2006 10:21:00 AM
Restoring .....................................................
Logical has been restored & remounted!
System Commands Reference Manual, Rev. 17
Page 5
---
---
-------
DVDRES
Date & Time: Mon 18-Sep-2006 10:34:15 AM Elapse Time: 00:13:15
DVD8: [56320.] 440 Mb -----> TST8: [56320.] 440 Mb
Date & Time: Mon 18-Sep-2006 10:34:15 AM
Restoring .....................................................
Logical has been restored & remounted!
Date & Time: Mon 18-Sep-2006 10:47:30 AM Elapse Time: 00:13:15
Date & Time: Mon 18-Sep-2006 10:47:30 AM Elapse Time: 02:00:16
DVD Logicals are being uninstalled!
The program has completed!
Now all data has been copied to the AMOS Logicals (TST0: - TST8:) and the AMOS logicals
(TST0: - TST8:) are ready to use.
REQUIREMENTS AND SETUP
DVDRES requires the following:
AM-8000, Eagle 800 or AMPC 7.0 based systems
AMOS 8.1 or later
A supported DVD-RAM drive.
DVDRES is only supported on AM8000, Eagle 800, and AMPC 7.0 Systems.
The DVDRES package contains the following required files:
DVDRES.LIT
The device driver for the DVD-RAM drive.
The DVD.DEV file that contains supported DVD-RAM drive information
The SSD overlay file (DVD000.OVR)
MODIFYING THE SYSTEM INITIALIZATION FILE:
See the software installation instructions in the AMOS 8.X Owner’s Manual, DSM00226-00.
System Commands Reference Manual, Rev. 17
DVDRES
Page 6
MESSAGES
Command line syntax messages:
•
•
Invalid switch
Invalid switch option
System requirements messages:
•
•
DVDRES requires AMOS 8.x or compatible operating system.
Memory partition is too small for DVDRES. An additional nnnK of memory is required.
DVD-RAM Recorder device or driver messages:
•
•
•
•
Device specified is not a DVD-RAM Recorder.
This DVD-RAM Recorder requires a different driver.
The current driver is: xxxxxx
The required driver is: xxxxxx
The device and driver selected are inappropriate for the physical DVD-RAM drive.
Unable to find a DVD-Recorder.
Unknown DVD-Recorder!
Error - Unsupported DVD-Recorder drive found.
The DVD-RAM Recorder is not supported by DVDRES.
Error messages when setting up or reading from the DVD Recorder
•
•
•
•
•
•
•
•
•
•
Error - Buffer not initialized.
Error - Device is already in use.
This indicates that either another user is running the DVDRES program or the DVD is
being used in shared read/write mode.
Error - Disk in DVD-Recorder is not writeable.
Error - DVDram driver must be in system memory.
Error - Unable to load DVD media.
This indicates a hardware problem with the DVD-RAM drive or a problem with the DVD
media.
Error - Unable to read disk information from media.
Try a different DVD media. This can also indicate a possible DVD-RAM drive problem.
Fatal SCSI error. Sense key=nn additional sense=nn
DVD drive device error has occurred. Sense key and additional sense provide further
error information.
Please insert a DVD-RAM media
Warning - Maximum number of devices exceeded - extras ignored.
Warning - Unable to close DVD.
Device error occurred while closing the current DVD. The DVD-RAM may or may not
be usable.
System Commands Reference Manual, Rev. 17
Page 7
DVDRES
•
SCSI error message from the driver
DVD-RAM drive device error has occurred. Code provides additional SCSI error sense
information.
SCSI error – SCSI status =(nn)
sense key = xx
sssssssssssssss Add Sense Code/Qualifier Code = ac.qc
nn
xx
ssss
ac
qc
=
=
=
=
=
SCSI Status Code
SCSI Sense Key code
Interpreted sense key code if known
SCSI Additional Sense Code
SCSI Qualifier Code
Example:
.DVDRES/noeject
DVDRES Version 8.0(101)-4 - Copyright (C) 2001 Alpha Micro Products
Initializing SCSI DVD-RAM Recorder...
Found the following possible DVD-Recorders:
ID
6
5
1.
2.
Description
HL-DT-STDVDRAM GSA-4082B
SAMSUNG SCR-1231 REV1.01
Select one of the above devices: 1
Using Generic SCSI-DVD-RAM driver (DVDRAM).
DVD-RAM Recorder located at SCSI id 6
You may enter an optional title for the DVD or press RETURN for none.
Title: AlphaDVD backup “A”
Enter list of disk devices to transfer onto the DVD media. Devices
may be entered as a range (ex. dev0: -20 for dev0: through dev20:), or
may be comma separated, The list is terminated with a blank line:
dsk0: -6
DSK0:
DSK1:
DSK2:
DSK3:
DSK4:
DSK5:
DSK6:
RETURN
131072
131072
131072
131072
131072
131072
131072
blocks.
blocks.
blocks.
blocks.
blocks.
blocks.
blocks.
The DVD logical unit size is greater than 64K blocks
which could mean compatibility problems on AMOS 1.x systems.
Press RETURN to continue, or ^C to abort DVDRES:
Calculating space requirements:
AMOS partition requires 229376 sectors.
2007327 unused sectors remain.
Note that once started, the recording operation can be stopped
by pressing ^C.
Press RETURN to start recording or ^C to abort.
System Commands Reference Manual, Rev. 17
DVDRES
Page 8
Transferring DSK0:
SCSI error - SCSI status = (1)
sense key = 03 medium error Add Sense Code/Qualifier Code = 32.00
Error - Unable to write to the DVD.
No defect spare location
available
Errors concerning the AMOS DVD data structure:
•
•
•
•
•
•
•
Error - Disk geometry calculation was incorrect.
The AMOS hidden sector parameters calculated are invalid.
Error - memory previously calculated as available isn't
Memory required for data buffers has disappeared.
Error - Unable to calculate AMOS disk geometry.
The AMOS hidden sector parameters could not be calculated.
Error - unable to get AMOS data buffer
The system was unable to acquire memory for data buffers.
Error- Unable to remove DVD Recorder data buffer from memory.
Error - Source Bitmap Words could not be calculated!
For DVDs created before MAKDVD 8.0(101)-4, this error may exist. This error appears
when DVDRES tries to calculate the Bitmap Words for a specific logical. The last block
of the bitmap area following the hash value has garbage following it. This needs to be
cleared for DVDRES 8.0(101)-5 to calculate the logical bitmap words. The logical will
be ignored and you must use the COPY command to restore that logical.
Error - zero UFD link! [0.]
This error may appear when DVDRES displays the contents of the DVD. It means that
the logical which was backed up had no data in it other than the label block and MFD. It
is ignored because the bitmap words cannot be calculated.
Normal informational messages:
•
•
•
•
•
•
The program has completed
The recording of data from the DVD media is done.
DVD-RAM Recorder located at SCSI id n
This shows the SCSI id of the DVD-RAM Drive being used.
Note that once started, the restoring operation can be stopped by pressing ^C.
However, if the restoring is stopped, a DSKANA or SYSACT to the last logical that was
interrupted needs to be done! The last logical that was interrupted will have a mixture of
new and old blocks that will cause problems.
Restoring DSK0:
Using Generic SCSI-DVD-RAM driver (DVDRAM)
This message shows the DVD driver name and description being used.
Using Panasonic DVD-RAM driver (DVDPAN)
System Commands Reference Manual, Rev. 17
ERASE
FUNCTION
Erases files from the disk.
CHARACTERISTICS
ERASE is re-entrant, re-usable, a wildcard command, and recognizes ersatz names.
FORMAT
ERASE filespec{,filespec(s)}{/switch}
filespec is a file to be erased, and switch is an option request.
or:
ERASE filespec1=filespec2{,...filespecn}{/switch}
filespec1 is a file to be erased if a file matching any of filespec2 through filespecn is present.
DEFAULTS
ERASE uses the device and account you are logged into as default file specifications. The default
extension is null (an extension zero characters long).
OPTIONS
The switches are file switches, and may be abbreviated.
/QUERY
Confirm the erase.
/NOQUERY
Don’t confirm the erase.
OPERATION
Enter ERASE and the files you want to erase. For example:
ERASE ACCNT.BAK RETURN
ACCNT.BAK
Total of 1 files deleted, 45 disk blocks freed
System Commands Reference Manual, Rev. 07
ERASE
Page 2
If you use /Q, ERASE asks you to confirm each deletion:
ERASE *.BAK/QUERY
MATH.BAK? Y
TRIG.BAK? N
You don't need to press
erasing files.
RETURN
RETURN
after typing Y or N. You may press
CTRL
/C at any time to stop
The second format lets you erase a file only if some other file is present. For example, you want to
delete backup (.BAK) files, but only if the corresponding .M68 file exists. You can use this
command:
ERASE *.BAK=*.M68
RETURN
ERASE finds each .M68 file in turn, checks to see if there is a matching .BAK file, and erases it if
it finds it.
MESSAGES
?Account does not exist - [p,pn]
Check your typing, or use PPN to list the accounts on your disk.
%Bypassing BADBLK.SYS[1,2]
BADBLK.SYS exists to prevent bad blocks on a device from
being allocated, and should never be directly accessed.
%No files transferred
You cannot erase the BADBLK.SYS file.
?Cannot find DSK0:CMDLIN.SYS[1,4]
ERASE needs this file to be able to process wildcard symbols. Check to see if
CMDLIN.SYS exists in DSK0:[1,4]—if it does, it means you didn't have enough memory
to load it into your partition. If so, try to increase your memory by erasing unnecessary
files. See your System Operator for further help.
?Device not found or mounted - [device-name]
Check your syntax, or use DEVTBL to see a list of valid devices on your system, and try
again. If the device isn't mounted, use MOUNT.
?FATAL ERROR. Program terminated.
Either the device's bitmap was corrupted or its Master File Directory (MFD) was
damaged. Stop other users from accessing the device, and run the DSKANA program
before trying again.
System Commands Reference Manual, Rev. 07
Page 3
ERASE
?Maximum input exceeded
You put more characters on the command line than ERASE could handle. Break your
command into smaller commands.
?MEM or RES specified on network
You cannot access MEM: or RES: over a network.
?More than one output specification
Re-enter the command using one output specification.
%No files deleted
Check your syntax, or use DIR to find the file(s).
Specification error ^
The ^ symbol points to the error—try again with a corrected command line.
?Wildcard device or unit specified on network
You cannot use wildcard symbols over a network.
System Commands Reference Manual, Rev. 07
ERSATZ
FUNCTION
From the AMOS command line, displays or edits the currently defined ersatz names. In the system
initialization command file, names an ersatz definition file.
CHARACTERISTICS
ERSATZ is re-entrant and re-usable. Ersatz names are defined in INI file(s) referred to by the
ERSATZ command in your system initialization command file. ERSATZ will not display ersatz
specifications added to the ersatz .INI file(s) since the last system reset. See your System
Operator’s Guide for more information about ersatz .INI files and ersatz names.
ERSATZ can change or delete current ersatz definitions and add new ones while your system is
running. Any changes you make using ERSATZ are not stored in the ersatz .INI files and are
therefore lost when your computer reboots.
FORMAT
ERSATZ{/switch}
OPTIONS
/A ersatzdef
Add new ersatz definition. There must be a blank entry in the ersatz
table in order to use /A (see below).
/D ersatzname
Delete ersatz definition for ersatzname.
/O ersatzdef
Change (override) definition of an existing ersatz name with the one
you enter.
/WIDE or /W
Display ersatz definitions in multiple columns. Number of columns
depends on the width of your terminal display.
OPERATION
To display existing ersatz definitions, enter ERSATZ at AMOS command level, with or without
the /W switch. For example:
ERSATZ
RETURN
To add, change or delete an ersatz definition, you must be logged in to OPR:.
System Commands Reference Manual, Rev. 07
ERSATZ
Page 2
To change an existing ersatz definition, use the /O switch, followed by an existing ersatz name and
the new meaning you want:
ERSATZ/O OLDDEF:=DSK2:[112,0]
RETURN
This changes the definition of OLDDEF: from whatever it was to DSK2:[112,0].
To delete an existing ersatz definition, use the /D switch and the ersatz name:
ERSATZ/D OLDDEF:
RETURN
This deletes the ersatz definition for OLDDEF:.
Any change you make using /D or /O takes effect immediately, for all users. If other users
are using the ersatz name you change or delete, you could keep their commands from
working, or cause a file copy or deletion, for example, to affect the wrong disk account. Be
very careful when affecting ersatz names used by multiple users.
To add a new ersatz definition, follow the /A switch with the new definition:
ERSATZ/A NEWDEF:=1964439999-DSK3:[66,77]
RETURN
This adds the indicated meaning for the name NEWDEF:.
To add an ersatz definition, there must be a blank entry in the ersatz table. Blank entries are
created when you delete an ersatz entry, or by using the /B switch with the ersatz command in the
system initialization command file. See the System Operator's Guide to the System Initialization
Command File for more information about the /B switch.
When adding an ersatz name, remember that ersatz names cannot start with a number. The
first character in the name must be a letter.
MESSAGES
?Cannot add definition, ERSATZ table full
You used the /A switch to add a new ersatz name, but there are no blank entries in the
ersatz table. You can use /D to delete an ersatz definition and create a blank entry, or add
the /B switch to an ERSATZ command in the system initialization command file to create
blank entries when the system boots.
?Ersatz device specification is not formatted properly
The definition of the ersatz name is not valid. Retype the line.
System Commands Reference Manual, Rev. 07
Page 3
ERSATZ
?Illegal Switch
You have entered an illegal switch (not /A, /D, /O, or /W). ERSATZ ignores the switch
and continues.
%No ersatz devices have been defined
No ERSATZ statement was executed in the system INI file. See your System Operator's
Guide for more information.
?You must define ersatz names from a file prior to the first SYSTEM command
You entered something after ERSATZ which was not recognized. If you want to add an
ersatz name, use the /A switch.
System Commands Reference Manual, Rev. 07
ESLSI
FUNCTION
Displays Ethernet statistical information accumulated by the PCI LAN driver (.LDV) for use
only with the AM-7000 computer system.
LDVs are similar to NDVs. The most notable difference is that LDVs are hardware
drivers only. They do not perform any network protocol-specific functions. Use this
command only on the AM-7000.
CHARACTERISTICS
ESLSI is re-entrant and re-usable. It displays Ethernet statistical information retrieved from a
central depository. The LDV updates the central depository continuously. You can press CTRL /C
at any time to exit the program.
FORMAT
ESLSI{/S}{/C}{/E}
If no switch is provided, a usage prompt is displayed.
OPTIONS
/S
/C
/E
Retrieves PCI static page (PAGE I)
Retrieves PCI Rx and Tx status page (PAGE II)
Clears accumulated totals and a new accumulation
summary starts (PAGE III)
OPERATION
ESLSI returns the following information from the PCI hardware:
PAGE I:
Static Page
BASE 10 – 24 is PCI base address & memory requirements
RDA is Rx descriptor starting & ending address
TDA is Tx descriptor starting & ending address
RBA is Rx buffer area
TBA is TX buffer area
MBADDR is the next available PCI memory address
MEMEND is the system end of memory address
CBMAR is the starting address for the PCI port 0 card
System Commands Reference Manual, Rev. 14
ESLSI
Page 2
PCIPBR.BUF is the address of the PCI informational memory module
PCI.IMPURE is the address of the PCI impure area
PCI.FLAGS is the general flags
PCI.P0.FLAGS is the Port 0 flags
PCI.P1.FLAGS is the Port 1 flags
FLAGS is PCI Ethernet flags
RDA count is the number of Rx descriptors
TDA count is the number of Tx descriptors
HTDA is the currently held TDA index
ETDA is the end or last TDA
FREE.RX.QUEUE is the next Rx queue index
FREE.TX.QUEUE is the next Tx queue index
CTDAPFP is current TDA index
PAGE II:
Rx & Tx Status Page
No RDA to Process is the number of RDAs to process
No TDA to Process is the number of TDAs to process
Interrupts (Total) is the count of all interrupts
Rx Interrupts (All) is the count of all Rx interrupts
Tx Interrupts (All) is the count of all Tx interrupts
Both Rx & Tx Int. is the count of all interrupts with Rx & Tx bits set
RDA Last & First is the count of Rx packets with the last & first segment bit set
Tx Collision count is the total Tx collision counts returned from the chip
Unregistered Type is the total count of unidentifiable packets
Total Send Packets is the total number of packets sent
Total Rx Stop is the total number of times the Rx process has stopped
Total No Rx Buffers is the total number of times an Rx buffer was not available
CINV is total count of referenced packets not on the receive queue
CDISC is total count of discarded request
NOFSD is the total number of Rx packets with no first segment flag set
NOLSD is the total number of Rx packets with no last segment flag set
ARDA.FCNT is the total number of free Rx descriptors
PRDA.UCNT is the total number of used Rx descriptors
ATDA.FCNT is the total number of free Tx descriptors
PTDA.UCNT is the total number of used Tx descriptors
TX.QU.CNT is the Tx queue count
FLAGS is processing flags used by PCI programs
RDES0 is the latest Rx descriptor processed
NTRI is the total count of interrupts without a Tx or Rx request present
CTDAPFP is the current TDA pointer for processing
Missed Frames is the total number of missed frames
Master Abort is the total number of Master Aborts encountered
TLLCNT is the total Tx link loop count (wrap count)
RLLCNT is the total Rx link loop count (wrap count)
PTDA is pending TDA index
CTDA is current free TDA index
System Commands Reference Manual, Rev. 14
Page 3
ESLSI
CRDA is current RDA pending to be processed
RDA count* is total number of Rx descriptors assigned
TDA count* is total number of Tx descriptors assigned
Wrap count is the total number of times the Rx descriptors have been wrapped
TIMER.CNT is the total number of timer interrupts
ARL.CNT is current total number of available Rx descriptors
PRH.CNT* is the highest level of Rx descriptors used
ATL.CNT is current total number of available Tx descriptors
PTH.CNT* is the highest level of Tx descriptors used
PINFUS.CNT is the total number of packets not for us
IINT.CNT is total invalid interrupt count
NIS.CNT is the total number of normal interrupt count
AIS.CNT is the total number of abnormal interrupt count
CUNF.CNT is the total Tx underrun count
PRDA(A5) is pending RDA index
RCOKERR is the total receive dead status count
TCOKERR is the total transmit dead or txabort status count
*The PRH.CNT & PTH.CNT fields are very important. RDA count tells you
the number of receive descriptors have been allocated. PRH.CNT tells you the
highest number of receive descriptors that have been used at any one time.
Conversely TDA count tells you the number of transmit descriptors have been
allocated and PTH.CNT tells you the highest number of transmit descriptors
that have been used at any one time. If the numbers become close to each
other, then it might be time to think about increasing your allocation in the INI
file.
Rx Status:
Rx Error Summary is the total of Rx Status Errors
Length Error is the count of Rx packets larger than standard
Runt Frame is the count of Rx packets smaller than standard
Collision is the total number of collisions encountered
CRC Error is the total number of CRC errors encountered
Frame Too Long is the total number of Rx packets with frames larger than standard
MII Error Report is total number of MII errors encountered
Receive Watchdog is total number of watchdogs encountered
Dribbling Bit is total number of dribbling bits encountered
FIFO Overflow is total number of FIFO overflows encountered
Fatal Bus Error is total number of fatal bus errors encountered
Tx Status:
Tx Error Summary is the total of Tx Status Errors
Loss of carrier is total number of times carrier was lost
No Carrier is total number of times no carrier was encountered
Late Collision is number of late collisions encountered
Excessive Collisions is number of excessive collisions encountered
Link Fail Report is number of link failures reported
Underflow Error is number of underflow errors encountered
Jabber Timeout is number of jabber timeouts encountered
Heartbeat Fail is number of heartbeat failures encountered
System Commands Reference Manual, Rev. 14
ESLSI
Page 4
Deferred is the number of Tx packet that were not sent out directly
Illegal Descriptor is number of illegal descriptors encountered
PAGE III:
Clearing Accumulated Totals
All totals are cleared and a new accumulation summary starts.
MESSAGES
%ERROR - This program is for an AM-7000 only!
This program is only for an AM-7000 Ethernet controller.
%ERROR - invalid switch
The switch you specified is invalid.
%ERROR - invalid impure index!
The PCI impure index has changed. PCI memory has been corrupted.
%ERROR - PCIPBR.BUF not found in system memory!
The PCI bus was not properly initialized.
System Commands Reference Manual, Rev. 14
ESNIC
FUNCTION
Displays Ethernet statistical information accumulated by the PCI LAN driver (.LDV) for use
only with the Eagle 450 computer system.
LDVs are similar to NDVs. The most notable difference is that LDVs are hardware
drivers only. They do not perform any network protocol-specific functions. Use this
command only on the Eagle 450.
CHARACTERISTICS
ESNIC is re-entrant and re-usable. It displays Ethernet statistical information retrieved from a
central depository. The LDV updates the central depository continuously. You can press CTRL /C
at any time to exit the program.
FORMAT
ESNIC{/S}{/C}{/E}
If no switch is provided, a usage prompt is displayed.
OPTIONS
/S
/C
/E
Retrieves PCI static page (PAGE I)
Retrieves PCI Rx and Tx status page (PAGE II)
Clears accumulated totals and a new accumulation
summary starts (PAGE III)
OPERATION
ESNIC returns the following information from the PCI hardware:
PAGE I:
Static Page
BASE 10 – 24 is PCI base address & memory requirements
RDA is Rx descriptor starting & ending address
TDA is Tx descriptor starting & ending address
RBA is Rx buffer area
MBADDR is the next available PCI memory address
MEMEND is the system end of memory address
CBMAR is the starting address for the PCI port 0 card
PCIPBR.BUF is the address of the PCI informational memory module
System Commands Reference Manual, Rev. 14
ESNIC
Page 2
PCI.IMPURE is the address of the PCI impure area
PCI.FLAGS is the general flags
PCI.P0.FLAGS is the Port 0 flags
PCI.P1.FLAGS is the Port 1 flags
RDA count is the number of Rx descriptors
TDA count is the number of Tx descriptors
PAGE II:
Rx & Tx Status Page
Broadcast (Ours) is the count of broadcast packets sent by us.
Broadcast (All) is the count of all broadcast packets.
Interrupts (Total) is the count of all interrupts
Rx Interrupts (All) is the count of all Rx interrupts
Tx Interrupts (All) is the count of all Tx interrupts
Both Rx & Tx Int. is the count of all interrupts with Rx & Tx bits set
RDA Last & First is the count of Rx packets with the last & first segment bit set
Tx Collision count is the total Tx collision counts returned from the chip
Unregistered Type is the total count of unidentifiable packets
Total Send Packets is the total number of packets sent
Total Rx Stop is the total number of times the Rx process has stopped
Total No Rx Buffers is the total number of times an Rx buffer was not available
CINV is total count of referenced packets not on the receive queue
CDISC is total count of discarded request
NOFSD is the total number of Rx packets with no first segment flag set
NOLSD is the total number of Rx packets with no last segment flag set
ARDA.FCNT is the total number of free Rx descriptors
PRDA.UCNT is the total number of used Rx descriptors
ATDA.FCNT is the total number of free Tx descriptors
PTDA.UCNT is the total number of used Tx descriptors
CSR5 is the contents of the configuration register five
FLAGS is processing flags used by PCI programs
RDES0 is the latest Rx descriptor processed
NTRI is the total count of interrupts without a Tx or Rx request present
MF Overflow is the total number of missed frame count overflows
Missed Frames is the total number of missed frames
Master Abort is the total number of Master Aborts encountered
TLLCNT is the total Tx link loop count (wrap count)
RLLCNT is the total Rx link loop count (wrap count)
PTDA is pending TDA index
CTDA is current free TDA index
CRDA is current RDA pending to be processed
RDA count* is total number of Rx descriptors assigned
TDA count* is total number of Tx descriptors assigned
Wrap count is the total number of times the Rx descriptors have been wrapped
TIMER.CNT is the total number of timer interrupts
ARL.CNT is current total number of available Rx descriptors
PRH.CNT* is the highest level of Rx descriptors used
System Commands Reference Manual, Rev. 14
Page 3
ESNIC
ATL.CNT is current total number of available Tx descriptors
PTH.CNT* is the highest level of Tx descriptors used
PINFUS.CNT is the total number of packets not for us
IINT.CNT is total invalid interrupt count
NIS.CNT is the total number of normal interrupt count
AIS.CNT is the total number of abnormal interrupt count
CUNF.CNT is the total Tx underrun count
*The PRH.CNT & PTH.CNT fields are very important. RDA count tells you
the number of receive descriptors have been allocated. PRH.CNT tells you the
highest number of receive descriptors that have been used at any one time.
Conversely TDA count tells you the number of transmit descriptors have been
allocated and PTH.CNT tells you the highest number of transmit descriptors
that have been used at any one time. If the numbers become close to each
other, then it might be time to think about increasing your allocation in the INI
file.
Rx Status:
Rx Error Summary is the total of Rx Status Errors
Length Error is the count of Rx packets larger than standard
Runt Frame is the count of Rx packets smaller than standard
Collision is the total number of collisions encountered
CRC Error is the total number of CRC errors encountered
Frame Too Long is the total number of Rx packets with frames larger than standard
MII Error Report is total number of MII errors encountered
Receive Watchdog is total number of watchdogs encountered
Dribbling Bit is total number of dribbling bits encountered
FIFO Overflow is total number of FIFO overflows encountered
Fatal Bus Error is total number of fatal bus errors encountered
Tx Status:
Tx Error Summary is the total of Tx Status Errors
Loss of carrier is total number of times carrier was lost
No Carrier is total number of times no carrier was encountered
Late Collision is number of late collisions encountered
Excessive Collisions is number of excessive collisions encountered
Link Fail Report is number of link failures reported
Underflow Error is number of underflow errors encountered
Jabber Timeout is number of jabber timeouts encountered
Heartbeat Fail is number of heartbeat failures encountered
Deferred is the number of Tx packet that were not sent out directly
Illegal Descriptor is number of illegal descriptors encountered
PAGE III:
Clearing Accumulated Totals
All totals are cleared and a new accumulation summary starts.
System Commands Reference Manual, Rev. 14
ESNIC
Page 4
MESSAGES
%ERROR - This program is for an AM-450 only!
This program is only for an AM-450 Ethernet controller.
%ERROR - invalid switch
The switch you specified is invalid.
%ERROR - invalid impure index!
The PCI impure index has changed. PCI memory has been corrupted.
%ERROR - PCIPBR.BUF not found in system memory!
The PCI bus was not properly initialized.
System Commands Reference Manual, Rev. 14
EXP
FUNCTION
Expands a file compressed by the CMP command.
CHARACTERISTICS
EXP is an OS/Exec program that may be used as an AMOS command. Multiple files may be
expanded using the "Expand" function of OS/Exec. Only files compressed by the CMP program
may be expanded using EXP. The CTYPE command can be used to display the contents of a
compressed sequential file. The CDIR command can be used to list the type, size and name of a
compressed file.
FORMAT
EXP filespec
EXP assumes an extension of CMP.
OPERATION
Enter EXP and the specification of the file. For example:
EXP TRANS
RETURN
EXP now displays:
Expanding TRANS.CMP...............
Each dot represents a block of the uncompressed file that has been expanded. If the original file
already exists on the system, a message such as this appears:
%TRANS.TXT already exists - expanding to TRANS.EXP
When a file, such as "NAME.CMP" is processed, the expanded file is given the original name and
extension of the file unless it already exists. In this case the file is named "TRANS.EXP", or
"TRANS.E01", etc., depending on how many such files already exist.
MESSAGES
?Bad input file
The file can't be expanded due to a problem in the compressed file's content. Recover your
backup file.
System Commands Reference Manual, Rev. 03 (AMOS 2.2 - 4/91)
EXP
Page 2
File is not an OS/Exec compressed file
You can't expand this file.
?[filename] not found
The file could not be located as specified.
?Insufficient space to allocate this file
There isn't enough space on the disk. Erase unneeded files, or see your System Operator
for help.
?More than 101 files with this file name
Rename and reexpand
Too many expanded copies exist. Rename the file and try again.
System Commands Reference Manual, Rev. 03 (AMOS 2.2 - 4/91)
FILCOM
FUNCTION
Lets you compare the memory contents of two sequential files. Displays the data differences
between the two files.
CHARACTERISTICS
FILCOM is re-entrant and re-usable. All numeric displays are in the number base set for your job
(see the SET reference sheet). You may press NO SCRL to stop and re-start the display, or press
CTRL /S and CTRL /Q. Press CTRL /C to halt FILCOM.
FILCOM reads through the specified files comparing them byte by byte, reporting mismatches as
encountered and/or indicating file matches/mismatches. A mismatch or error is reported as a pair
of lines which display a mismatch count, the contents of the files at the point of the mismatch in
hex/octal, the length(s) of the mismatching sequences, and the byte offsets of the sequences within
the files. If a mismatch is longer than the output device width, the output is truncated.
FILCOM doesn't compare multi-part files like ISAM and USAM files. Files with the
same data content but different in directory-stored information (e.g. protection, creation
date, etc.) aren't reported as different by FILCOM.
See the SRCCOM reference sheet. SRCCOM is slower than FILCOM, but better for variablelength ASCII records of less than 511 characters that end with a carriage-return/line feed.
FORMAT
FILCOM filespec1,filespec2 {/switches}
filespecs specify the sequential files you want to compare.
SWITCHES
/A
/B{=#}
/C
/E{=#}
/F{fspec}
/P{=#}
/Q{=#}
/S{=#}
Output in ASCII instead of hex/octal. Non-printable characters shown as “.”.
Minimum length sequence to resume matching. Default is 6.
Compare contiguous files.
Maximum errors to report before terminating. Default is to report to end of
file. A zero reports file match/no-match only.
Optional output file. Default is on terminal.
Starting byte offset in first file. Default is 0.
Starting byte offset in second file. Default is 0.
If a mismatch string is > n, end compare. Default is 128.
System Commands Reference Manual, Rev. 03 (AMOS 2.2 - 4/91)
FILCOM
Page 2
OPERATION
Enter FILCOM and the files you want to compare. For example:
FILCOM DSKRED[1,4],DSKRED[100,3]
RETURN
You see a display listing like this:
mismatch 1, length = 5:5
0104 43 20 50 4F 57
0104 42 4E 4D 4A 4B
The first line of the display above gives the number of the mismatch, and the length of the strings
involved. Then you see the byte offset of the string within the file (0104) and the contents of the
data (in this case, in hexadecimal).
MESSAGES
%End of file 2 [@offset] in file 1
The second file is shorter than the first.
%End of file 1 [@offset] in file 2
The first file is shorter than the second.
?Equal expected
Try again, using an equal sign. See the format.
?Extraneous file name
You can only compare two files at one time.
?File specification error
Check your syntax and try again.
%Files are identical from offsets [numbers]
From this point to the end of the files, they are the same.
?[filespec] not found
FILCOM couldn't find one or both of the files you specified. Check your syntax or use
DIR to find the file(s).
System Commands Reference Manual, Rev. 03 (AMOS 2.2 - 4/91)
Page 3
FILCOM
?[filespec]: file type mismatch
At least one of the files you selected is a random file or other illegal type.
?Number expected
Try again, using a number. See the format.
?Starting address [addr] for file [fspec] not within file, size= [size]
You specified a starting point past the end of the file. Re-enter with a smaller number.
** termination by error count offsets [@offsets] **
The error count exceeded the number you specified.
** termination for max mismatch length of [size] exceeded **
The size of the string mismatch is greater than the size you specified (or the default). You
may want to change the size with /S.
System Commands Reference Manual, Rev. 03 (AMOS 2.2 - 4/91)
FILDMP
FUNCTION
Displays the contents of a sequential file in numeric form.
CHARACTERISTICS
FILDMP is re-entrant and re-usable. May only be used with sequential files. See the DUMP
reference sheet for information on dumping random files. Displays the file data in the number base
currently in use on your job. See the SET reference sheet for information about setting number
bases. Sixteen bytes of data are displayed on each screen line.
FORMAT
FILDMP filespec
filespec specifies the file whose contents you want to see. The default device and account is where
you are logged. The default extension is .OBJ.
OPERATION
Enter FILDMP and the specification of the file whose data you want to see. For example:
FILDMP INIT.LIT RETURN
057 124 124 114 040 106 111 114 104 115 120 040 050 103
157
^C
Press the NO SCRL key (or
display, press CTRL /C.
CTRL
/S and
CTRL
/Q) to freeze and re-start the display. To end the
MESSAGE
?Cannot open [filespec] - file not found
Check your syntax, or use DIR to find the file, and try again.
?Cannot open [filespec] - file type mismatch
The file is a random file—use the DUMP command.
?File specification error
Check your format and typing, and try again.
System Commands Reference Manual, Rev. 07
FILTAP
FUNCTION
Writes copies of disk files to magnetic tape.
CHARACTERISTICS
FILTAP is re-entrant and re-usable. Writes files to a magnetic tape along with their device and
account specifications. Used in combination with TAPFIL (to transfer files from a magnetic tape
to a disk) and TAPDIR (to see list of files on a tape). FILTAP writes the date and time of backup
to the tape.
This program is included for compatibility purposes. MTUSAV and MTURES are the
preferred backup methods for magnetic tape—see those reference sheets. FILTAP does
not work with extended format disks. FILTAP is NOT for transferring data between
Alpha Micro and non-Alpha Micro computers—use TAPE for that purpose. FILTAP
works only on the AMOS/32 and AMOS/L versions of the operating system.
Lets you perform one backup on multiple tape reels. FILTAP is a wildcard file command. See
your AMOS User's Guide for information on wildcard specifications. You may back up files from
any disk account onto tape whether or not the account is within the project you are logged into.
Although FILTAP writes the disk specification of the file to the magnetic tape along with the file, it
does not transfer any password.
FORMAT
FILTAP filespec{/switch}{,...filespec}{/switch}
filespec specifies a file to back up, and switch is an option request.
DEFAULTS
The default file specification is *.* and the account and device you are logged into. The default
magnetic tape drive device specification is MTU.
OPTIONS
Placing NO before the switch cancels it. All switches may be abbreviated. Defaults are
/NOQUERY and /APPEND. Use /NOAPPEND if you are writing to a blank tape, otherwise
FILTAP continuously searches for a file to append after.
/QUERY
Confirm each file before copying. File switch.
/APPEND
Add files at the end of existing files. Operation.
System Commands Reference Manual, Rev. 07
FILTAP
Page 2
OPERATION
Enter FILTAP and the files you want to back up onto tape. For example:
FILTAP MEMO.TXT,SCHDLE.TXT[310,2]
RETURN
Now FILTAP asks you to enter the tape unit number. Enter the unit number of the magnetic tape
drive containing the tape reel you want to access (FILTAP uses the MTU device code
automatically). FILTAP then tells you what files it is transferring. Remember you can use
wildcard file specifications. For example, if you want to back up all .BAS files on the disk:
FILTAP *.BAS[]
RETURN
When you use /Q, FILTAP asks for confirmation before each transfer. Enter Y for yes, or N for
no; do not press RETURN after your answer. For example:
FILTAP/Q,*.BAS,*.LIT/NOQ,*.LST RETURN
Enter tape unit number: 1
LSTSQR.BAS to MTU1:LSTSQR.BAS? Y
STATUS.LIT to MTU1:STATUS.LIT
NEW.LST to MTU1:NEW.LST? N
You may press CTRL /C at any time to prevent further transfers. If FILTAP can't fit all the files
you specified on one tape, it lets you continue the backup on another reel.
MESSAGES
?Cannot find DSK0:SCNWLD.SYS[1,4] or MEM:SCNWLD.SYS
FILTAP needs this file to process wildcard symbols. Make sure SCNWLD.SYS is in
DSK0:[1,4] and you have enough memory to load it in your partition.
?Cannot INIT [device-name] - device does not exist
Check your syntax, or use DEVTBL to see a list of valid devices, and try again.
?Cannot READ [device-name] - device is not mounted
Mount your device and try again.
?FILTAP does not support extended directories -- use MTUSAV instead.
Move the required files to a logical drive with a traditional format directory structure, or
use the MTUSAV program.
%No file-oriented device corresponding to [device-name] is mounted
Check your syntax and try again, or mount the device.
System Commands Reference Manual, Rev. 07
Page 3
FILTAP
?Program is not supported
FILTAP will not work under this version of AMOS.
%Tape is full, please mount another tape then type RETURN to
% continue, or type Control-C to abort copy
There is no more room on the current reel of tape. Mount another reel and press RETURN
to continue the backup process, or press CTRL /C to abort the backup.
System Commands Reference Manual, Rev. 07
FIX
FUNCTION
Executes and symbolically debugs an assembly language program and data structures in a
controlled manner.
CHARACTERISTICS
FIX is a screen-oriented debugger, similar in operation to AlphaVUE. It has two modes, Display
Mode and Command Mode. In Display Mode you can examine your program and data areas, and
you may single-step through portions of the program. In Command Mode you may examine and
modify registers, examine data structures, and set up the debugging environment. You may switch
between the two FIX modes by pressing ESC .
Both input and output values may be either in symbolic or numeric form. If FIX finds a .SYM file
for the program you are debugging, it attempta to display all values in symbolic form. Either octal
or hex form may be used for numeric values; use the SET command in Command Mode to change
the current radix. For more information, see your AlphaFIX User's Manual.
FORMAT
FIX {/T:termname} filespec {command-line}
T:termname displays the output from the program being debugged on termname, filespec is the
file you want to debug, and command-line is any input the program you want to debug would
have. The default file extension is .LIT.
If you use /T, termname cannot be attached to a job.
OPERATION
Enter FIX followed by the specification of the file you want to debug and any following command
line text. For example:
FIX REMOVE ACCT.LIT
RETURN
FIX loads the file into your memory partition (unless it is already there). It also attempts to locate
the corresponding .SYM file and load it into memory. FIX then enters Command Mode, prints a
status display and the registers. It then prompts you with a right angle bracket >. You may now
enter FIX commands, or press ESC to enter Display Mode. In the case above, FIX will debug the
program REMOVE, which is acting upon the file ACCT.LIT.
System Commands Reference Manual, Rev. 07
FIX
Page 2
To exit AlphaFIX, go to Command Mode and enter Q. FIX deletes all memory modules it
created (including the program you were debugging) and returns you to command level.
To access a local symbol, specify the non-local symbol preceding the local symbol, enter a space,
then enter the local symbol. For example, in using the Search command:
>S LABEL:10$
RETURN
LABEL is the non-local symbol preceding the local symbol 10$.
COMMAND SUMMARY
Below is a brief list of FIX commands—see your AlphaFIX User's Manual for a full list.
Display Mode
or
CTRL
/J
Move cursor down one instruction.
or
CTRL
/K
Move cursor up one instruction.
NEXT SCREEN
HOME
F5
or
CTRL
or
or
CTRL
CTRL
CTRL
/T
/^
/P
/X
RETURN
Move cursor down a page (24 instructions).
Move cursor to current PC location.
Toggle breakpoint.
Proceed to breakpoint.
Single-step
Command Mode
S
Search for symbol.
Q
Leave AlphaFIX.
Dn or An
Modify address register.
GO
Execute AMOS command.
MESSAGES
?Alternate terminal does not exist
The terminal name you specified with the /T switch does not exist. Use TRMDEF to list
the names of available terminals, and re-enter an amended command line.
?Alternate terminal is attached to a job
The terminal you specified is attached to a job. Detach it by attaching another terminal to
that job, and re-enter the FIX command.
System Commands Reference Manual, Rev. 07
Page 3
FIX
%Incorrect symbol file version
FIX only supports .SYM files generated with later versions of SYMLIT that produced
variable-length symbols. FIX will ignore the .SYM file.
%Symbol file not found - debugging without symbols
A .SYM file corresponding to the file you are debugging was not found in the same
directory as the file being debugged. FIX will continue, but it can only display numeric
information and offsets rather than symbolic literals and labels.
What?
AlphaFIX does not recognize your command.
System Commands Reference Manual, Rev. 07
FIXCRC
FUNCTION
Reads and re-writes a disk block to try to correct a bad Cyclic Redundancy Checksum (CRC).
CHARACTERISTICS
FIXCRC is re-entrant and re-usable. You must be logged into an operator's account [1,2] to use
FIXCRC.
You cannot use FIXCRC over a network.
The data written back to the specified disk block may not be correct, but at least you will be able to
access that block. You should check the contents of the block for accuracy using DUMP after
using FIXCRC.
FORMAT
FIXCRC {devn:}{block}
devn: is the disk device and block is the number of the block you wish to try to correct. The
default device is DSK0:, and the block number defaults to block zero.
OPERATION
Log into [1,2]. Enter FIXCRC and the device and/or block number. For example:
LOG 1,2 RETURN
FIXCRC DSK1:512
RETURN
The block number is in either octal or hex, depending on your job's current setting.
If the block can't be corrected, an error message will be displayed.
Sometimes the block can be read from the disk seemingly successfully, especially if the CRC error
is in a non-data part of the disk sector. However, some drives or controllers return a block filled
with zeroes if a CRC error occurs on a read; in that case you cannot retrieve any byte of data, good
or bad, from that sector. FIXCRC will warn you if the returned block consists of all zeroes, and
ask you to confirm you want to write back zeroes to the block, overwriting any data in that block.
System Commands Reference Manual, Rev. 07
FIXCRC
Page 2
MESSAGES
?Privileged program - must be logged into [1,2]
Log into [1,2] and try again.
?Unable to correct disk error
The disk block you specified cannot be corrected. See your Alpha Micro representative
for help.
System Commands Reference Manual, Rev. 07
FIXFLP
FUNCTION
Configures a floppy diskette driver for a specific combination of diskette format, disk drive, and
disk controller. Used with the AM-212 and AM-214 controllers.
CHARACTERISTICS
FIXFLP is re-entrant and re-usable. Because of the large number of possible permutations of
diskette formats, drives and controllers, it is no longer possible to provide a separate disk driver
program for each combination. For information on the large number of floppy disk formats
available, see your Alpha Micro dealer.
You must be logged into DSK0:[1,6] to use FIXFLP. You may not use single-density AMS
format with either the AM-212 or AM-214 controller.
Remember to add a BITMAP command to your system initialization command file for each new
format/drive/controller combination you create. You may also need to modify a DEVTBL
command line. See your System Operator's Guide for details.
OPERATION
Log into the system Device Driver Library account, and enter FIXFLP:
LOG DSK0:[1,6]
FIXFLP RETURN
RETURN
FIXFLP now asks questions to identify the type of diskette drive you have and the type of driver
you want to create: diskette size, drive type, diskette format, single or double density, and single or
double sided. Finally, it asks you for the driver name. Each driver must have a unique, three-letter
name. Then, FIXFLP configures the driver and tells you the bitmap size. This is the number of
words you assign to the bitmap when you define the device in your system initialization file. Write
this number down.
For example, here is how you could define a driver for a 3.5" diskette drive using double-sided,
double-density diskettes under AMOS:
System Commands Reference Manual, Rev. 07
FIXFLP
Page 2
FIXFLP RETURN
Enter drive type (A) 8 inch
(B) 5 1-4 inch
(C) 3 1-2 inch
Selection: C RETURN
Format (A) AMS or (B) DOS
Selection: A RETURN
Density (A) Double or (B) High
Selection: A RETURN
Enter new driver name: DDA RETURN
New driver is now in memory, bitmap size is 180
Although the new driver is in memory, it is not yet a file on the disk. Save it to the disk by using
the SAVE command. For example:
SAVE DDA.DVR
RETURN
If you are adding a new device to the system, remember to modify your system initialization
command file to change the system device table and bitmap areas. See your System Operator's
Guide.
MESSAGES
?AM-212 or 214 does not support single-density AMS format
Re-run FIXFLP, and select another format.
?Could not find 21XDVR.DVR
?Could not find APCDVR.DVR
The file listed was not found in DSK0:[1,6]. Use DIR to try and locate the file, or see
your System Operator for help.
?Illegal filename
Check your syntax and re-enter the filename.
?Invalid device
You have a bad version of 21XDVR.DVR in DSK0:[1,6]. See your System Operator for
help.
?Invalid response
Check your typing, and try again with a valid response.
Please enter Y or N
Enter Y for Yes or N for No.
System Commands Reference Manual, Rev. 07
Page 3
FIXFLP
?You must be logged into PPN 1,6 to modify the driver
Log into DSK0:[1,6] and try again.
System Commands Reference Manual, Rev. 07
FIXLOG
FUNCTION
Changes the number of logical devices on a self-configuring disk, or defines a new subsystem
driver for a self-configuring disk.
CHARACTERISTICS
You must be logged into account DSK0:[1,2] to change the number of logical devices on a selfconfiguring disk. FIXLOG should only be run on self-configuring disks. You must be logged into
account DSK0:[1,2] or DSK0:[1,6] to define a new subsystem driver.
Running the FIXLOG program without following all the procedures outlined below
could severely damage the data on your disk and you may be unable to boot your
system. Follow the instructions carefully.
If you are generating a new monitor, you do not have to run FIXLOG unless you wish to change
the number of logical devices. When using MONGEN for self-configuring disks, you should
specify the correct generic SCSI driver program for your computer/SCSI bus combination in
response to the "New Disk Driver Name:" prompt. See your System Operator's Guide.
OPERATION
Using FIXLOG itself is relatively simple. Log into DSK0:[1,2] or DSK0:[1,6] and type the
command, then choose which of the two options you want to use. For example:
LOG OPR: RETURN
FIXLOG RETURN
1. Change the number of logicals
2. Create a subsystem driver
Enter choice:
However, FIXLOG itself is only part of a larger process. The two procedures FIXLOG is part of
are described below.
TO CHANGE THE NUMBER OF LOGICAL DEVICES
Before starting this procedure, back up the entire disk on which you are going to change
the number of devices. If you are changing the number of devices on your system disk,
also make a warm boot tape. As part of this procedure, you erase all data on the disk
you're changing!
System Commands Reference Manual, Rev. 07
FIXLOG
Page 2
After backing up, follow this procedure:
1. Log into OPR: and enter FIXLOG, as described above.
2. Type 1 on the FIXLOG menu. For the device specification, type the name of the first
logical device on the physical disk you want to change the number of logicals on. For
example:
Enter device spec: DSK0:
RETURN
If you have changed the number of logical devices before, FIXLOG displays the current
number of logical devices. You then are asked to enter the new number of logical devices.
The number may range from 1 to 65535.
3. After you answer the above question, FIXLOG asks you to confirm you really want to
change the number of devices. If you answer N, FIXLOG returns you to AMOS without
making any changes. If you answer Y, FIXLOG changes the number of logical devices,
and displays:
[device-name] has been changed to [number] logical drives.
New bitmap size is [size] words.
Write down the bitmap size given in this message—you may need this number in the next
step.
DO NOT reboot your system or mount the drive you just changed until you are
told to below.
4. If necessary, update your system initialization command file to change the bitmap size and
define the new number of logical devices. You may not need to do this if you are using
self-configuring BITMAP and/or DEVTBL statements. See your System Operator's
Guide to the System Initialization Command File for more information about changing the
system initialization command file.
5. Back up the entire system. You need this backup, in addition to the one you made before
starting this procedure, because this one includes the changes you've made up to this point.
You will use this backup tape later in the procedure. The previous backup is a "failsafe" so
you can return to your previous configuration if something goes wrong.
6. Create a warm boot tape that reflects the NEW number of logical devices. Make sure the
warm boot tape contains VUE.LIT, DSKANA.LIT, the command to let you restore from
your backup tape (MTURES.LIT, RESTOR.LIT, etc.) and other useful programs.
7. Warm boot using the new warm boot tape.
8. Run the SYSACT program (using the I—initialize option) on all of the disks on which you
are changing the number of logical devices.
9. Run the DSKANA program. If everything is correct, run the SYSTAT command. If no
?Bitmap kaput error appears for DSK0:, then continue.
System Commands Reference Manual, Rev. 07
Page 3
FIXLOG
10. If the disk you're changing is a SCSI drive, skip this step. If not, type the BADBLK
command followed by the device name. Select the 'L' option to list the bad blocks on the
disk. Select the 'H' option to see a list of other possible selections. Every disk has a
certain number of bad blocks which are quite acceptable as long as they're listed in the bad
block file so the system can work around them. An error message tells you if there are any
problems. If no error messages appear, you know the logical devices have been
successfully changed. If you have problems, contact your Alpha Micro dealer or the
Alpha Micro Technical Assistance Center for help.
11. Now use MTURES or RESTOR to load all the information back onto the disk you
changed.
12. Reboot your system.
If you have any problems with your system initialization command file that do not allow
your system to boot, perform the warm boot again, and then edit your system initialization
command file to correct the problem.
It is a good idea to run the DSKANA program after this to verify everything is correct with your
disk.
TO DEFINE A SUBSYSTEM DRIVER PROGRAM
1. Log into DVR: and enter FIXLOG:
LOG DSK0:[1,6]
FIXLOG RETURN
RETURN
2. Type 2 on the FIXLOG menu. FIXLOG asks for the name of the generic driver to be used.
The file extension default is .DVR.
3. FIXLOG next asks for the number of logical drives per physical device. Then, it asks for
either the subsystem number (0 - 3), or the SCSI ID number (0 - 6 for the narrow SCSI
bus, 0 - 6 or 8 - 15 for the Wide SCSI bus). If you are not sure what the subsystem
number should be, see the documentation for your type of system and for your drive unit—
the subsystem number depends on many hardware factors. If you have trouble, see your
System Operator or Alpha Micro representative for help.
4. If you have a SCSI controller and driver which support it, FIXLOG then asks for the
number of read-ahead blocks.
5. If you have an intelligent disk controller, you are next asked for the controller board
number. FIXLOG needs to know which controller the disk for which you are defining a
driver is connected to. See your Installation Guide to find out a board's number.
6. Finally, FIXLOG asks you for the new driver name. Enter a unique three-letter name for
your driver program. FIXLOG then builds the driver program, and tells you the driver is
in memory.
System Commands Reference Manual, Rev. 07
FIXLOG
Page 4
7. SAVE the driver to the disk. For example:
SAVE WIN.DVR
RETURN
If you do not specify an extension, SAVE saves the file under the .DVR extension
(indicating a device driver program).
Now that FIXLOG has defined a driver for you, you must revise your system initialization
command file to include the new information about the device. For information on changing this
file, see your System Operator's Guide to the System Initialization Command File.
MESSAGES
?[device-name] contains invalid disk controller information
The device you tried to run FIXLOG on is not a self-configuring drive. You cannot use
FIXLOG on that device. See your System Operator's Guide for information on changing
the number of logical devices.
?[devn:] is not the 1st logical unit
The device you entered is not the first logical device of its physical unit. Only that device
name can be specified to FIXLOG. Use DEVTBL to locate the correct device name, and
redo the FIXLOG command.
?[dev0:] does not exist
You either misspelled the device name or are trying to change the number of logical
devices on a device that is not currently defined on the system.
?The number of logical drives requested is invalid.
The maximum number of logical drives allowed is n.
You asked for an invalid number of logical drives. Try again with a proper number.
?Cannot find [driver-name]
The driver for your drive was not found. You may have mistyped the name. See your
Alpha Micro representative if you need help restoring the driver to the proper account
(DSK0:[1,6]).
?Could not load [driver-name] - [AMOS error message]
The driver could not be loaded for the reason given. You may not be logged into
DSK0:[1,6], or you may have typed the name incorrectly. Try to correct the situation or
see your Alpha Micro representative for help.
System Commands Reference Manual, Rev. 07
Page 5
FIXLOG
?Invalid device driver
The device driver for your drive is incorrect. See your Alpha Micro representative for
help.
?Invalid entry. {Must be between x and y.}
You entered an invalid number. Check the choices allowed and re-enter.
System Commands Reference Manual, Rev. 07
FIXTRN
FUNCTION
Lets you create and edit function key translation files.
CHARACTERISTICS
FIXTRN is re-entrant and re-usable.
Creates a file on the disk (with a default extension of .XLT), which can then be loaded into user or
system memory as needed. You must be on the same type of terminal as the one the .XLT file will
be used on.
You will get unpredictable results if you use FIXTRN on a file that is not a function key
translation table.
FORMAT
FIXTRN translation-table-name
OPERATION
Enter FIXTRN and the translation table name. For example:
FIXTRN KEYS
RETURN
If the file does not exist, you are asked if you want to create it. FIXTRN then asks:
Enter the unique character to terminate the sequence:
Press whatever single key you want to use to tell FIXTRN you are finished with a definition. The
most commonly used key for a terminator (since you rarely want to include it in a definition) is
RUBOUT or DELETE . As you press the key, FIXTRN echoes it (or its code) to your screen. You may
NOT use as a terminator any key that sends a two-character sequence (for example, another
function key). Next FIXTRN asks:
Enter the key you wish to have translated:
Press the key you wish to define (or re-define)—for example, the F1 key. If the .XLT module in
memory already has a definition for the key you just pressed, FIXTRN displays the current
definition.
You must enter the characters EXACTLY as you wish them sent—EVERY character you enter at
this point is part of the key definition. This means you can't edit your definition, since a RUBOUT or
System Commands Reference Manual, Rev. 03 (AMOS 2.2 - 4/91)
FIXTRN
Page 2
CTRL /U is entered as part of the key definition. If you make a mistake typing, just start again by
entering the terminator character and re-entering the key to define. Once the key is defined to your
satisfaction, enter the terminator character to end the definition.
To enter a decimal for a number (pressing a numeric key on the keyboard gives an ASCII value),
press CTRL and the underline character followed by CTRL and a letter. CTRL /A represents an ESC
sequence (which also equals decimal value one), CTRL /B represents decimal 2, CTRL /C equals
decimal 3, etc. instead of a key you wish to define.
Once you have exited from FIXTRN, an updated module is saved on the disk. If you want the
module to have a different name, you can use the RENAME command to rename the disk file.
MESSAGES
?File specification error
Enter FIXTRN again with a filename for the file you wish to create.
System Commands Reference Manual, Rev. 03 (AMOS 2.2 - 4/91)
FIX210
FUNCTION
Configures a floppy disk driver for a specific combination of floppy disk format, disk drive, and
disk controller. Used with the AM-210 Floppy controller, and the AM-1000 and AM-1200
systems.
CHARACTERISTICS
FIX210 is re-entrant and re-usable. Because of the large number of possible permutations of
floppy disk formats, drives and controllers, it is no longer possible to provide a separate disk driver
program for each combination. For information on the large number of floppy disk formats
available, see your Alpha Micro dealer.
You must be logged into DSK0:[1,6] to use FIX210. You may not use single-density
AMS format for 8 inch floppies if you are going to be running the drive under control of
the AM-210 disk controller.
FIX210 works only under the AMOS/L version of the operating system.
Remember to add a BITMAP command to your system initialization command file for each new
format/drive/controller combination you create. You may also need to modify a DEVTBL
command line.
OPERATION
Log into the system Device Driver Library account, and enter FIX210:
LOG DSK0:[1,6]
FIX210 RETURN
RETURN
FIX210 now asks you questions to identify the type of floppy drive you have.
CDC 8" drives have an LED indicator light in the middle of the door latch. Qume 8"
drives have an LED indicator light on the front, upper left hand corner of the drive.
Then it asks you if you want to use double-density disks—enter Y for Yes or N for No. FIX210
then asks you to select the type of format you want the driver to use. You may not specify the
AMS format if it is for an 8 inch floppy using single-density format.
FIX210 asks if you are using double-sided disks. Answer Y or N. Finally, FIX210 asks you to
enter the new driver name. Each driver must have a unique, three-character name.
System Commands Reference Manual, Rev. 07
FIX210
Page 2
Now FIX210 configures the driver and tells you the bitmap size. This is the number of words you
assign to the bitmap when you define the device in your system initialization file. Write this
number down.
Although the new driver is in memory, it is not yet a file on the disk. Save it to the disk by using
the SAVE command. For example:
SAVE DDS.DVR
RETURN
If you are adding a new device to the system, remember to modify your system initialization
command file to change the system device table and bitmap areas. See your System Operator's
Guide to the System Initialization Command File.
MESSAGES
?AM-210 does not support single-density AMS format
Re-run FIX210, and select another format.
?Could not find 210DVR.DVR
The file 210DVR.DVR was not found in DSK0:[1,6]. Use DIR to try and locate the file,
or see your System Operator for help.
?Illegal filename
Check your syntax and re-enter the filename.
?Invalid device
You have a bad version of 210DVR.DVR in DSK0:[1,6]. See your System Operator for
help.
?Invalid response
Check your typing, and try again with a valid response.
Please enter Y or N
Enter Y for Yes of N for No.
?Program is not supported.
You are not running under the AMOS/L version of the operating system. The AM-210
floppy disk controller is only supported under that version.
System Commands Reference Manual, Rev. 07
Page 3
FIX210
?You must be logged into PPN 1,6 to modify the driver
Log into DSK0:[1,6] and try again.
System Commands Reference Manual, Rev. 07
FIX219
FUNCTION
Configures a diskette driver for use with the AM-219 diskette drive controller. Supports both 3.5"
and 5.25" drives and both AMOS and DOS diskette formats.
CHARACTERISTICS
FIX219 is re-entrant and re-usable. The AM-219 supports a large number of diskette capacities
and formats; FIX219 lets you create one or more drivers to support the types of diskettes you want
to use.
You must be logged into DSK0:[1,6] to use FIX219.
Remember to add a BITMAP command to your system initialization command file for each new
format/drive combination you create. You may also need to modify a DEVTBL command line.
See your System Operator's Guide for details.
OPERATION
Log into the system Device Driver Library account, and enter FIX219:
LOG DSK0:[1,6]
FIX219 RETURN
RETURN
FIX219 now asks what type of driver you want to create, and the name you want to give the driver
program. It then configures the driver and tells you the bitmap size. This is the number of words
you assign to the bitmap when you define the device in your system initialization file. Write this
number down.
For example:
FIX219 RETURN
Enter desired driver format
(A) PC 1.44Mb 3 1/2"
(B) PC 720Kb 3 1/2"
(C) PC 1.2Kb 5 1/4"
(D) PC 360Kb 5 1/4"
(E) AMOS 720Kb 3 1/2"
(F) AMOS 800Kb 5 1/4"
(G) AMOS 1.2Mb 5 1/4"
(H) AMOS 1.44Mb 3 1/2"
Selection: F RETURN
Enter new driver name: MIN RETURN
New driver is now in memory. Bitmap size is 100 words.
System Commands Reference Manual, Rev. 07
FIX219
Page 2
This creates a driver for AMOS-formatted 5.25" diskettes with 800KB capacity.
Although the new driver is in memory, it is not yet a file on the disk. Save it to the disk by using
the SAVE command. For example:
SAVE MIN.DVR
RETURN
If you are adding a new device to the system, remember to modify your system initialization
command file to change the system device table and bitmap areas. See your System Operator's
Guide.
MESSAGES
?Cannot load DSK0:219DVR.DVR[1,6]
The file 219DVR.DVR was not found in DSK0:[1,6]. Use DIR to try and locate the file,
or see your System Operator for help.
?Invalid response
Check your typing, and try again with a valid response.
?You must be logged into PPN 1,6 to modify the driver
Log into DSK0:[1,6] and try again.
System Commands Reference Manual, Rev. 07
FIX420
FUNCTION
Configures a disk driver for a specific Winchester disk drive.
CHARACTERISTICS
FIX420 is re-entrant and re-usable. You must be logged into DSK0:[1,6] to use FIX420.
Remember to add a BITMAP command in your system initialization command file for each new
format/drive/controller combination you create. You also need to add a separate DEVTBL
command line for each drive you add to the system. See your System Operator's Guide to the
System Initialization Command File for more information.
OPERATION
Log into the system Device Driver Library account and enter FIX420:
LOG DSK0:[1,6]
FIX420 RETURN
RETURN
FIX420 begins by asking you to select the type of drive you have (from a menu of devices). Select
the letter corresponding to your type of drive.
If you are not sure what kind of disk drive you have, see the System History label.
FIX420 then asks you how many logical drives per physical unit. Enter a number between the
minimum and maximum listed. Then you are asked if you want to create a subsystem driver. If
your drive is an AM-1001 subsystem, answer Y (yes) to this question, and FIX420 creates a
subsystem driver for you. As part of this process, FIX420 asks you to specify the subsystem.
Enter the AM-1001 controller address (1, 2, or 3) for the subsystem you wish to create a driver
for.
FIX420 continues by asking for the new driver name. Each driver must have a unique three
character name.
After you have finished entering the information above, FIX420 configures the driver and displays
the bitmap size. Write this number down—you will need it when you modify your system
initialization command file.
System Commands Reference Manual, Rev. 03 (AMOS 2.2 - 4/91)
FIX 420
Page 2
Although the new driver is in memory, it is not yet a file on the disk. Save it to the disk by using
the SAVE command. For example:
SAVE PLD.DVR
RETURN
If you are adding a new device to the system, remember to modify the system initialization
command file to change the system device table and bitmap areas. See your System Operator's
Guide to the System Initialization Command File.
MESSAGES
?Could not find [filename]
FIX420 couldn't find the necessary file. You must have the proper driver program in
DSK0:[1,6]. Use DIR to see what drivers are available in [1,6], and see your Alpha Micro
representative if you need one you don't have.
?Invalid device
You have a bad version of your driver program in DSK0:[1,6]. See your Alpha Micro
representative for help.
?Invalid response
Check your typing, and enter a valid response.
?You must be logged into PPN 1,6 to modify the driver.
Log into DSK0:[1,6] and try again.
[filename] is not compatible with this version of FIX420.
Your driver program was created under an earlier version of AMOS, and will not work
with the current version. Re-create the driver on your system—see your Alpha Micro
representative for help.
System Commands Reference Manual, Rev. 03 (AMOS 2.2 - 4/91)
FLPDIR
FUNCTION
Allows you to display a list of the files on a floppy disk. Also allows you to create a disk file
containing the floppy disk directory.
CHARACTERISTICS
This program is provided for compatibility. You normally should use BAKDIR. FLPDIR
does not work with extended format disks.
FLPDIR is re-entrant and re-usable. Used in combination with WINFLP (to write Winchester disk
files to a floppy disk and FLPWIN (to copy files from a floppy disk to a Winchester disk). The
floppy disk you read with FLPDIR must previously have been written by the WINFLP program.
FLPDIR is a wildcard command. See your AMOS User's Guide for information on wildcard file
specifications.
FORMAT
FLPDIR {/switch}{listfilespec=}{filespec(s)}
switch is an option request. The optional listfilespec specifies a disk file to contain the floppy disk
directory display. The filespec(s) specify the files on the floppy disk you want listed.
DEFAULTS
The default listfilespec is DIRECT.LST in the account and device you are logged into. The default
filespec is *.* and the account and device you are logged into. The default floppy drive device
specification is DDA0:.
OPTIONS
/KILL
Delete existing listfile before creating the new one. Operation switch.
OPERATION
Enter FLPDIR and the specifications you need. For example, to display all the files on a floppy
disk on your terminal:
FLPDIR ALL:[]
RETURN
Now FLPDIR asks you to enter the device name of the backup device. Enter the name of your
floppy drive. The default device code is DDA0:.
System Commands Reference Manual, Rev. 07
FLPDIR
Page 2
The first number on the directory display line tells you the file's relative position on the floppy disk.
Next you see the device specification, the filename and extension, and the account specification of
the file as it appeared on the disk it was being backed up from. The next number tells you the
number of disk blocks the file takes up on this disk. FLPDIR now tells you whether the file is a
linked (sequential) file (L), or a contiguous (random) file (C), and also whether a file is split across
multiple media (S). Finally, FLPDIR displays the date and time of the backup. At the end of the
directory display, FLPDIR tells you how many files were listed in the display.
If your printer has been defined on your system as a terminal, you may send the display directly to
a printer by using an output specification of TRM:printer-name.
MESSAGES
?Cannot find DSK0:SCNWLD.SYS[1,4] or MEM:SCNWLD.SYS
See your System Operator about locating the file.
?Cannot INIT [device-name] - device does not exist
Check your syntax, or use DEVTBL to see a list of devices on your system, and try again.
?Cannot READ [device-name] - device is not mounted
Mount the device, and try again.
?Device full
See your System Operator about clearing room on the disk and try again.
?Device is not properly file structured
The floppy disk was not written by WINFLP. Make sure you mounted the correct floppy
disk.
?DSK is not a valid backup device
You could not have used DSK (the system disk) as a backup drive. Choose another device.
?More than one output specification
Try again, entering only one listfilespec.
%No file-oriented device corresponding to [device-name] is mounted
FLPDIR can't find a logical unit matching your specification. Check your syntax, or try
mounting the device.
System Commands Reference Manual, Rev. 07
Page 3
FLPDIR
%No such files
FLPDIR couldn't find any files matching your input specification. Check your spelling, or
use a more general specification.
System Commands Reference Manual, Rev. 07
FLPWIN
FUNCTION
Copies files from a floppy disk to a Winchester disk.
CHARACTERISTICS
This program is provided for compatibility purposes. You normally should use the
RESTOR program. FLPWIN does not work with extended format disks.
FLPWIN is re-entrant and re-usable. FLPWIN may not be used to transfer data between Alpha
Micro and non-Alpha Micro computers.
Used in combination with WINFLP (to write disk files to the floppy disk) and FLPDIR (to see a
list of files on the floppy disk). Only copies files written using the WINFLP program.
You must use a separate FLPWIN command for each floppy disk. You may not copy to a disk
account unless you are either in the same project as the account you are copying files to or you are
logged into a System Operator's account, [1,2]. You may copy files into the account you are
logged into from any other account.
FLPWIN is a wildcard file command. See your AMOS User's Guide for information on wildcard
commands.
FORMAT
FLPWIN{/switch}{outspec}=filespec{,filespec{/switch}}
switch specifies a FLPWIN option, outspec is the device and account the files are to be written to
on the disk, and to optionally rename the files as they are written out to the disk. The filespec(s)
are the file(s) to be transferred from the floppy disk (including the disk device and account
specifications where they were backed up from).
DEFAULTS
The output specification defaults to the input specification. If you are logged into [1,2], the default
output account specification is [], and if the account you are copying to does not exist, FLPWIN
creates it.
The input specification defaults to *.* and the account and device you are logged into. The default
switches are /NOQ and /D. The default floppy device specification is DDA0:.
System Commands Reference Manual, Rev. 07
FLPWIN
Page 2
OPTIONS
If you place NO before the switch (i.e., /NOQ), it cancels the switch. Switches may be
abbreviated. Defaults are /NOQ and /D.
/QUERY
Confirm before copying files. File switch.
/DELETE
Copy over existing files. File switch.
OPERATION
Enter FLPWIN followed by the specifications you need. For example, to copy all .LIT files from
the floppy disk originally backed up from account [110,2] on DSK2: over to your current account
DSK3:[110,5]:
FLPWIN DSK3:[110,5]=DSK2:*.LIT[110,2]
RETURN
Now FLPWIN asks you to enter the backup device name (the name of your floppy drive).
Remember you may specify wildcard file specifications to FLPWIN (as in the input specification
*.LIT, above).
Use the /Q switch to ask for confirmation before each transfer. Enter Y for Yes or N for No after
each prompt. Do not press RETURN after your answer. For example:
FLPWIN *.OLD[]=DSK3:*.M68[10,*]/Q RETURN
Enter backup device: DDA0: RETURN
DDA0:DSK3:NEW.M68[10,3] to DSK2:NEW.OLD[10,3]? Y
DDA0:DSK3:SCRTCH.M68[10,6] to DSK2:SCRTCH.OLD[10,6]? N
You may press CTRL /C at any time to stop the file transfer. Remember, the placement of the
FLPWIN switches modifies their effect.
MESSAGES
?Attempt to copy files out of sequence.
?New file is number N, last file was number M
Files split between two floppy disks are given sequence numbers (0, 1, 2, etc.). You tried
to get a file which is split between two floppy disks, but the file on the floppy disk you
inserted isn't the second half of the file. Make sure you have the right floppy.
%Bypassing BADBLK.SYS[1,2]
% BADBLK.SYS exists to prevent bad blocks
% on a device from being allocated, and
% should never be directly accessed.
You cannot copy the BADBLK.SYS[1,2] file.
System Commands Reference Manual, Rev. 07
Page 3
FLPWIN
?Cannot find DSK0:SCNWLD.SYS[1,4] or MEM:SCNWLD.SYS
FLPWIN needs this file to be able to process wildcard symbols in your file specifications.
This message can mean SCNWLD.SYS does not exist, is not in the proper account, or you
do not have enough memory to load it into your partition. See your System Operator for
help.
?Cannot INIT [device-name] - device does not exist
Check your syntax, or use DEVTBL to see a list of devices on your system, and try again.
?Cannot OPEN [device-name] - protection violation
Either log into [1,2] or the account you want to write to, and try again.
?Cannot READ [device-name] - device is not mounted
Mount the device and try again.
?Cannot restore 1.3 files to a 1.4 disk.
You cannot restore the files to a logical disk with an extended directory structure. Choose
another output device.
?Device full
There is no more room on the disk. See if you can clear some memory space on the disk
by erasing old files, .BAK files, etc.
?Device is not properly file-structured
The floppy disk you are trying to read was not written by WINFLP. Make sure you
mounted the correct floppy disk.
?File unsplit mismatch error
You tried to restore a split file, but the next disk entered contained a new file. Make sure
you have the correct disk.
?Files may not be transferred to RES:
You may only add programs to system memory by using the SYSTEM command in your
system INI file. Change your output specification to restore the files to the disk.
?Missing output specification
You left out the equal sign in the FLPWIN command line; FLPWIN couldn't tell which
information was your input specification and which was your output specification. Try
again with an equal sign.
System Commands Reference Manual, Rev. 07
FLPWIN
Page 4
?More than one output specification
Try again with one output specification.
%No file-oriented device corresponding to [device-name] is mounted
You specified a device, but left off the unit number. FLPWIN tried to find a logical device
that matched the device code you specified, but failed to do so. Check your syntax, or try
mounting the device.
%Not copied - Destination file already exists
You tried to copy to an existing file while the /NOD option was in effect. Either specify
/D, or move, rename or erase the file now on the disk.
?You are not logged in under [1,2]; can't create [p,pn]
Either log into [1,2] and try again, or change your output specification to an existing
account.
System Commands Reference Manual, Rev. 07
FMSFLP
FUNCTION
Formats diskettes using the AM-212-20 SCSI diskette drive, initializes diskettes, or rewrites the
hidden sector.
CHARACTERISTICS
FMSFLP is re-entrant and re-usable.
To run FMSFLP you must be logged into the System Operator’s Account.
To run FMSFLP, your computer must support the AM-212-20 floppy disk drive. You must have
a SCSI dispatcher installed, and have an AM-212-20 diskette drive attached to the SCSI bus
contained in your computer.
FMSFLP supports narrow and wide SCSI interfaces.The AM-SCSI and traditional AMOS format
is supported, but PC formats are not supported and must be pre-formatted on a PC.
FORMAT
FMSFLP
RETURN
If you use the format or initialize option, FMSFLP destroys all data on all logical
devices on the diskette!
OPERATION
FMSFLP runs in interactive mode.
FMSFLP displays a list of the removable media SCSI drives on your computer. Select the drive
you want to use and press RETURN . The FMSFLP menu then displays, as shown:
System Commands Reference Manual, Rev. 09
FMSFLP
Page 2
Alpha Micro SCSI Floppy Media Format Utility
FMSFLP Version 1.0(100)
Selected SCSI
Functions
Select Drive
Drive Info
ID: 05
Vendor: TEAC
Reassign Blocks
List Defects
Model: FC-1
HF
Rewrite Hidden Sector
Initialize Drive
11 Rev. RV J
Format
Mode Sense
Logical Format Parameters
Media Format.......AM-SCSI HD
Directory Type....Traditional
Usable Capacity
1.40 MB
Optimize for Capacity.....Yes
Logical Drive Size
1.40 MB
Number of Logicals..........1
Bitmap Size...............179
Drive Utilization
100.00%
Select logical drive parameters and press Return to continue
or press ESCape to abort
AMOS format is for compatibility with older floppy disk systems
To navigate the menus use , , , and . To invoke a highlighted function press RETURN . To
abort menu functions and return to the AMOS prompt press ESC or CTRL /C. To return to menu
functions from submenus press ESC .
You can do any of the following:
Select Drive
Selects drive to use in the operations listed below.
Reassign Blocks
The AM-212-20 does not support this function.
Rewrite Hidden Sector
Re-initializes the media’s hidden sector. If the hidden sector becomes corrupted, you may use
this command to restore it without destroying any user data (assuming the hidden sector is
initialized as it was before it became corrupted).
Whenever the hidden sector is written, the diagnostic cylinder is also re-initialized. This
is necessary since the diagnostic cylinder always begins right after the last logical drive
defined on the media.
This is ignored for AMOS compatible diskettes, which do not have a hidden sector.
Format
Formats and initializes the media in the selected drive. You can select the media format,
directory type, and either set the bitmap size and number of logicals or have FMSFLP optimize
the logical configuration. Here are the settings for some common configurations:
System Commands Reference Manual, Rev. 09
Page 3
FMSFLP
• For traditional directories using the entire drive with the largest possible bitmaps:
set Directory Type to Traditional and Optimize to Yes. FMSFLP calculates both bitmap
size and number of logical devices.
• For extended directories using the entire drive: set Directory Type to Extended and
Optimize to Yes. Enter the number of logical devices you want. FMSFLP calculates the
best bitmap size.
• For any other removable media configuration, you can set Optimize to No and enter the
Directory Type, Bitmap Size, and Number of Logicals you want.
The number of logicals must be one (1) for AMOS format media. Although AM-SCSI
format media will support multiple logical devices, one (1) logical is recommended for
these diskettes.
The type of media in the drive is not detected prior to formatting, so the configuration
defaults to high density AM-SCSI.
After choosing a configuration, press
RETURN
to continue.
If you decide you don’t want to format the drive, select Cancel and press
drive begins formatting when you make your selection.
RETURN .
Otherwise, the
Drive Info
Displays the following information about the currently selected media if available.:
• Usable capacity.
• Block size.
• Format status.
• Formatted capacity: amount of space being used for logical drives.
• Number of logicals.
• Size of each logical drive.
• Bitmap size.
• Cylinders, heads, and sectors per track. These are calculated values; they don’t reflect
the physical structure of the drive.
AMOS formatted media does not have the information available to display the logical
information.
List Defects
The AM-212-20 floppy diskette drive does not support this feature.
System Commands Reference Manual, Rev. 09
FMSFLP
Page 4
Initialize Media
Same as the format option described above, except that it doesn’t format the media before
writing the logical drive information.
If the diskette’s formatting is OK, use this option instead of format. This will save you
time.
If you initialize a diskette using a density that differs from its formatted density, the
diskette will be unusable.
Mode Sense
Retrieves mode sense information from the drive. You can view these values:
• Current Values: control the current operation of the drive.
• Changeable Values: indicate which bytes/bits are changeable.
• Saved Values: control the current operation of the drive, unless they are changed by a
Mode Selected command.
• Default Values: used by the drive if current values have not been set or the drive is
unable to access its saved values.
The information you requested is displayed within a scrollable window. Use
the information. Press ESC when you are done.
and
to view
ERROR MESSAGES
?Logical format exceeds usable drive capacity!
You specified a logical drive count and bitmap size that exceeds the capacity of the
drive. Specify a smaller number of logical drives and/or bitmap size.
?Program requires AMOS/32 execution!
FMSFLP requires an MC68020 or later processor. It will not run on a computer with an
MC68000 or MC68010 processor.
?You must install a SCSI dispatcher to use FMSFLP on the system!
You are trying to run FMSFLP on a system that has a SCSI interface but does not have a
dispatcher installed.
?Device error id 5 - sense key: 03 (media error) additional sense: 12h 00h!
Ignore this error message.
System Commands Reference Manual, Rev. 09
FMTDVD
FUNCTION
Formats DVD media using the AM-403 DVD-RAM drive for use by AMOS. Displays the drive
status, initializes a drive, or rewrites the hidden sector.
CHARACTERISTICS
To run FMTDVD you must be logged into the System Operator’s Account.
To run FMTDVD, your computer must support the AM-403 DVD-RAM drive. You must have a
SCSI dispatcher installed and have an AM-403 DVD-RAM drive attached to the SCSI bus.
FMTDVD supports narrow and wide SCSI interfaces.
FORMAT
FMTDVD
RETURN
If you use the format or initialize option, FMTDVD destroys all data on all logical
devices on the DVD media.
OPERATION
FMTDVD runs in interactive mode.
Interactive Mode
FMTDVD displays a list of the SCSI CD/DVD drives on your computer. Select the drive you
want to affect and press RETURN . The FMTDVD menu then displays, as shown on the next page:
System Commands Reference Manual, Rev. 15
FMTDVD
Page 2
Alpha Micro SCSI DVD-RAM Drive Format Utility
FMTDVD Version 1.0(100)
Selected SCSI
Functions
Select Drive
Drive Info
ID: 03
Vendor: HITACHI
Reassign Blocks
List Defects
Model: DVD_RAM GF-2050 Rev. XXXX
Rewrite Hidden Sector
Initialize Drive
Format
Mode Sense
To navigate the menus use , , , and . To invoke a highlighted function press RETURN . To
abort menu functions and return to the AMOS prompt press ESC or CTRL /C. To return to menu
functions from submenus press ESC .
You can do any of the following in interactive mode:
Select Drive
Selects drive to use in the operations listed below.
Reassign Blocks
The AM-403 does not support this function.
Rewrite Hidden Sector
Re-initializes the drive’s hidden sector. If the hidden sector becomes corrupted, you may use this
command to restore it without destroying any user data (assuming the hidden sector is initialized
as it was before it became corrupted).
Whenever the hidden sector is written, the diagnostic cylinder is also re-initialized. This
is necessary since the diagnostic cylinder always begins right after the last logical drive
defined on the device.
Format
Unless you are tryingto correct a media problem, you should always use Initialize Drive
instead of Format.
Formats and initializes the selected drive. You can select the directory type, and either set the
bitmap size and number of logicals or have FMTDVD optimize the logical configuration. Here
are the settings for some common configurations:
• For traditional directories using the entire drive with the largest possible bitmaps:
set Directory Type to Traditional and Optimize to Yes. FMTDVD calculates both bitmap
size and number of logical devices.
• For extended directories using the entire drive: set Directory Type to Extended and
Optimize to Yes. Enter the number of logical devices you want. FMTDVD calculates the
best bitmap size.
System Commands Reference Manual, Rev. 15
Page 3
FMTDVD
• For any other drive configuration, you can set Optimize to No and enter the Directory
Type, Bitmap Size, and Number of Logicals you want.
To figure the best traditional bitmap size for a given number of logical devices, set
Directory type to Extended and Optimize to Yes. Enter the number of logical devices you
want; FMTDVD calculates the bitmap size. Then, first turn off optimization and then
change Directory Type to Traditional.
After choosing a configuration, press
select Vendor Default Format.
RETURN
to continue. Then, to begin formatting the drive,
If you decide you don’t want to format the drive, select Cancel and press
drive begins formatting when you make your selection.
RETURN .
Otherwise, the
Drive Info
Displays the following information about the currently selected drive:
• Usable capacity.
• Block size.
• Format status.
• Formatted capacity: amount of space being used for logical drives.
• Number of logicals.
• Size of each logical drive.
• Bitmap size.
• Cylinders, heads, and sectors per track. These are calculated values; they don’t reflect the
physical structure of the drive.
List Defects
The AM-403 does not support this feature.
Initialize Drive
Same as the format option described above, except that it doesn’t format the drive before writing
the logical drive information.
If the drive’s formatting is OK, use this option instead of format. This will save you
time.
System Commands Reference Manual, Rev. 15
FMTDVD
Page 4
Mode Sense
Retrieves mode sense information from the drive. You can view these values:
• Current Values: control the current operation of the drive.
• Changeable Values: indicate which bytes/bits are changeable.
• Saved Values: control the current operation of the drive, unless they are changed by a
Mode Selected command.
• Default Values: used by the drive if current values have not been set or the drive is
unable to access its saved values.
The information you requested is displayed within a scrollable window. Use
the information. Press ESC when you are done.
and
to view
ERROR MESSAGES
?Can’t specify bitmap size with optimization enabled!
Don’t specify a bitmap size, or turn optimization OFF.
?Logical format exceeds usable drive capacity!
You specified a logical drive count and bitmap size that exceeds the capacity of the
drive. Specify a smaller number of logical drives and/or bitmap size.
?Logical format MUST be completely specified!
When optimization is disabled you must specify both the number of logical drives to
create and the bitmap size.
?Program requires AMOS/32 execution!
FMTDVD requires an MC68020 or later processor. It will not run on a computer with an
MC68000 or MC68010 processor.
?You must install a SCSI dispatcher to use FMTDVD on the system!
You are trying to run FMTDVD on a system that has a SCSI interface but does not have
a dispatcher installed.
System Commands Reference Manual, Rev. 15
FMTFLP
FUNCTION
Formats diskettes used in floppy disk devices that run under the control of the AM-212 or AM-214
Floppy Disk Controller boards. Not used in Alpha Micro series prior to the AM-1500.
CHARACTERISTICS
FMTFLP is re-entrant and re-usable. The AM-212 and AM-214 Floppy Disk Controllers handle
devices using single- or double-density and single- or double-sided diskettes.
When you run FMTFLP, your job MUST be the only job running on your system. You
must be in the System Operator's Account (DSK0:[1,2]) to run FMTFLP. You cannot use
FMTFLP over a network.
FMTFLP selects the format to use based on the device specification you provide. For example, if
you have configured a floppy disk driver named DDA.DVR for a 3.5" drive using double-sided,
double-density AMOS format, the device specification DDA0: tells FMTFLP to use AMOS
format to format the diskette in drive zero of that device. For information on configuring floppy
disk drivers, see your System Operator's Guide.
As it formats, FMTFLP writes over any data currently on the diskette. FMTFLP disables buffered
writes if the diskette was mounted with /B (see MOUNT).
If the device is not mounted, FMTFLP mounts it, but without buffered writes enabled.
After formatting the diskette, you may want to remount it to enable buffered writes.
After formatting a diskette, use the SYSACT I command to initialize it (unless you are going to use
DSKCPY to make a literal image of another diskette on the newly formatted one).
FORMAT
FMTFLP devn: {/D}
devn: specifies the device holding the diskette you want to format. /D is an option which causes
FMTFLP to display diagnostic information as it formats the diskette.
OPERATION
Enter FMTFLP and the device that holds the diskette you want to format. For example:
FMTFLP DDA1:
RETURN
System Commands Reference Manual, Rev. 07
FMTFLP
Page 2
This tells FMTFLP to format the diskette in drive one of the floppy device using the DDA driver
program.
MESSAGES
?[Cannot format diskette - write protected]
Remove the write-protection tab from the diskette and try again.
?Device does not exist
The device you specified is not defined. Check your spelling, or use DEVTBL to see a list
of currently defined devices.
%Device being mounted without buffered writes. You may
%want to remount the device after formatting
The device you are formatting was not mounted, so FMTFLP mounted it for you. To use
buffered writes after formatting, you must remount the device. See the MOUNT reference
sheet.
[Error code x on track n]
A media, drive, or controller error occurred at track n of the diskette. For information on
the error codes, see the hardware documentation that came with your disk device.
?Invalid device
The device you specified is not a floppy disk device, or is not compatible with the AM-212
or AM-214 Floppy Disk Controller board.
[No interrupt received after WRITE TRACK]
May indicate there is no diskette in the drive, or the door of the drive is not completely
closed. If these are not the case, it indicates either a bad drive or a bad controller board.
See your Alpha Micro representative for help.
?Privileged program - must be logged into OPR:
Log into DSK0:[1,2] and try again.
?Sector not found - MIN0:block0
This message is displayed when mounting an unformatted diskette— if this is the case, it
may be ignored. If it occurs at any other time, it indicates a problem with the diskette—
see your System Operator.
System Commands Reference Manual, Rev. 07
Page 3
FMTFLP
?Unit number for 5 1/4 inch floppies must be 0 or 1
Try again, specifying 0 or 1.
?Unit number must be 0-3
Re-enter, specifying a unit number of 0, 1, 2, or 3.
System Commands Reference Manual, Rev. 07
FMTSCZ
FUNCTION
Formats SCSI (Small Computer Systems Interface) disk drives, displays the drive status, lists
defects for the drive, re-assigns defective blocks, initializes a drive, or reformats the hidden
sector.
As of March 1997, FMTSCZ has been superseded by FMTS2 for all 68020 and later
systems. Use FMTSCZ only on computers which do not support FMTS2.
CHARACTERISTICS
FMTSCZ is re-entrant and re-usable. You must be logged into the System Operator's Account,
DSK0:[1,2], to run FMTSCZ.
If you use the format option, FMTSCZ destroys all data on all logical devices on the
specified physical disk! Be sure you have a complete backup of the entire physical disk
before proceeding. You can only run FMTSCZ on SCSI drives connected to the
SASI/SCSI port. It does not use the SCZDVR.DVR driver program, nor does it require
the drive to be set up in the system initialization command file.
SCSI drives do not have a BADBLK.SYS[1,2] file; all disk defects are handled automatically by
the drive. However, you may use BADBLK to add new defects. See the BADBLK reference
sheet for details.
FMTSCZ sets up account [1,2] on each logical device when it is done formatting. You must then
re-install your files from your backup.
OPERATION
Log into DSK0:[1,2], and type FMTSCZ:
LOG OPR: RETURN
FMTSCZ RETURN
FMTSCZ displays the drive status for all drives on the SCSI bus. You are asked to press
to continue, and when you do, you see the FMTSCZ menu, shown on the next page:
System Commands Reference Manual, Rev. 05
RETURN
FMTSCZ
Page 2
1.
2.
3.
4.
5.
6.
7.
8.
Drive status
List defects
Reassign defective blocks
Format drives
Initialize drive
Rewrite hidden sector
Display drive table
Exit to AMOS
Enter choice:
You may type ? at the main menu to see a HELP display. For more detailed instructions on
using FMTSCZ, see Installation Instructions, SCSI Disk Drives, PDI-00436-21.
MESSAGES
%Could not list defects. Possible incompatibility. Press RETURN:
See your System Operator or contact your Alpha Micro representative for help.
Defect is in the wrong format. Re-enter.
The defect you entered is not in the proper format for the drive on your system. Re-enter
a valid number.
Drive would not select
Make sure the drive is working and properly defined. See your System Operator for
help.
Error on drive #n: sense key=n sense code=n
See your System Operator's Guide for a list of the error codes.
%Incompatible format of defect file.
The file you entered contained the wrong type of defect data. Use VUE to check your
file. Option #3 will show you how the format should appear.
%Insufficient memory to run FMTSCZ.LIT
FMTSCZ could not allocate enough memory to execute. Try deleting unnecessary
memory modules, or see about increasing memory.
Number of logicals is zero.
Try again, and enter a valid number of logical devices.
System Commands Reference Manual, Rev. 05
Page 3
FMTSCZ
There are no drives available. Use the SELECT DRIVES option or abort.
Select option #1 or #5.
Warning. Drive displayed is the system disk.
This message reminds you the selected drive is your system disk. Be certain you have
both a complete backup media and a bootable backup media.
System Commands Reference Manual, Rev. 05
FMTS2
FUNCTION
Formats SCSI (Small Computer Systems Interface) disk drives, displays the drive status, lists
drive’s defects, reassigns defective blocks, initializes a drive, or rewrites the hidden sector.
CHARACTERISTICS
FMTS2 is re-entrant and re-usable.
To run FMTS2 you must be logged into the System Operator’s Account.
To run FMTS2, your computer must use an MC68020 or later processor. To use it with a SCSI
interface, you must have a SCSI dispatcher installed.
Since FMTS2 lets you change the logical drive configuration, you can use any drive of equal or
greater capacity as a replacement for a failed drive. FMTS2 also lets you create maximum size
(32 MB) traditional logical drives.
The maximum size of a logical device is 4.2GB, which has a bitmap size of 524,288
words. FMTS2 will not let you create a logical device larger than this.
.CMD or .DO files can control the format process through the command line interface. FMTS2
sets JOBERR if it detects an error in the command line or a failed drive operation.
FMTS2 supports narrow and wide SCSI interfaces. It supports both SCSI and SASI interfaces
when both are present, and lets you specify the one you prefer.
FORMAT
FMTS2 {/ID=number}{/switch(es)}
RETURN
number is the SCSI ID of the drive you are interested in, and switch(es) is one or more option
requests.
If you use the format or initialize option, FMTS2 destroys all data on all logical
devices on the specified physical disk! Be sure you have a complete backup of the
entire physical disk before proceeding.
System Commands Reference Manual, Rev. 15
FMTS2
Page 2
OPTIONS
Options may be abbreviated only as shown in parentheses.
/BITMAP (/B) = number
Specifies bitmap size of a logical drive.
/EXTENDED (/E)
Creates extended format logicals.
/FORMAT (/F)
Formats and initializes.
/INFORMATION (/INFO)
Displays device information (default).
/INITIALIZE (/INIT)
Initializes only.
/LOGICALS (/L) = number
Specifies number of logical drives to create.
/NO OPTIMIZE (/NOPT)
Disables logical format optimization. Must also use /B and
/L switches.
/OPTIMIZE (/O)
Optimizes logical format for drive capacity (default).
/REWRITE-HSZ (/RHSZ)
Rewrites just the hidden sector.
/SASI
The drive to format is on SASI bus.
/SCSI
The drive to format is on SCSI bus (default).
OPERATION
FMTS2 runs in command line or interactive mode.
Three features—Reassign Blocks, List Defects, and Mode Sense—are available only in
interactive mode.
Command Line Mode
To use FMTS2 in command line mode, you include the SCSI ID and options you want on the
command line. For example:
FMTS2 /ID=6 /SCSI /F /E
RETURN
This command formats the disk at SCSI ID 6, and creates extended logicals.
Interactive Mode
To run FMTS2 in interactive mode, don’t include any parameters or switches on the command
line.
If FMTS2 detects both SASI and SCSI interfaces on the system, a dialog box asks you to
select the interface you want.
FMTS2 displays a list of the SCSI drives on your computer. Select the drive you want to affect
and press RETURN . The FMTS2 menu then displays, as shown on the next page:
System Commands Reference Manual, Rev. 15
Page 3
FMTS2
Alpha Micro SCSI Drive Format Utility
FMTS2 Version 1.0(101)
Selected SCSI
Functions
Select Drive
Drive Info
ID: 00
Vendor: QUANTUM
Reassign Blocks
List Defects
Model: FIREBALL540S
Rewrite Hidden Sector
Initialize Drive
Rev. 1Q09
Format
Mode Sense
To navigate the menus use , , , and . To invoke a highlighted function press RETURN . To
abort menu functions and return to the AMOS prompt press ESC or CTRL /C. To return to menu
functions from submenus press ESC .
You can do any of the following in interactive mode:
Select Drive
Selects drive to use in the operations listed below.
Reassign Blocks
Allows you to add one or more blocks to the drive’s grown defect list. Enter the number of the
physical block to reassign (in hex or octal depending on the job’s current radix setting).
Rewrite Hidden Sector
Re-initializes the drive’s hidden sector. If the hidden sector becomes corrupted, you may use this
command to restore it without destroying any user data (assuming the hidden sector is initialized
as it was before it became corrupted).
Whenever the hidden sector is written, the diagnostic cylinder is also re-initialized. This
is necessary since the diagnostic cylinder always begins right after the last logical drive
defined on the device.
Format
Unless you are tryingto correct a media problem, you should always use Initialize Drive
instead of Format.
Formats and initializes the selected drive. You can select the directory type, and either set the
bitmap size and number of logicals or have FMTS2 optimize the logical configuration. Here are
the settings for some common configurations:
• For traditional directories using the entire drive with the largest possible bitmaps:
set Directory Type to Traditional and Optimize to Yes. FMTS2 calculates both bitmap
size and number of logical devices.
• For extended directories using the entire drive: set Directory Type to Extended and
Optimize to Yes. Enter the number of logical devices you want. FMTS2 calculates the
best bitmap size.
System Commands Reference Manual, Rev. 15
FMTS2
Page 4
• For absolute maximum 32MB traditional logicals: set Directory Type to Traditional
and Optimize to No. Enter 4096 for the bitmap size. Adjust the number of logicals until
adding one more will put drive utilization over 100% (FMTS2 recalculates the
percentage each time you leave the Number of Logicals field).
• For any other drive configuration, you can set Optimize to No and enter the Directory
Type, Bitmap Size, and Number of Logicals you want.
To figure the best traditional bitmap size for a given number of logical devices, set
Directory type to Extended and Optimize to Yes. Enter the number of logical devices you
want; FMTS2 calculates the bitmap size. Then, first turn off optimization and then
change Directory Type to Traditional.
After choosing a configuration, press
select which drive defect list to use:
RETURN
to continue. Then, to begin formatting the drive,
• Format Without Grown Defects: reassigns only the bad blocks included in the
manufacturer’s defect list. It does not reassign any blocks marked as bad since the drive
was installed.
Use this option only if you have reason to believe blocks have been added to the
defect list in error—for example, if a bad cable had caused blocks to appear
defective. Some drives reassign bad blocks automatically. If you use this option,
those blocks are no longer marked as bad.
• Format With Grown Defects: reassigns all blocks currently marked as bad. Use this
option in most circumstances.
• Vendor Default Format: use this option only if you cannot format the drive using either
of the above options. It uses vendor default parameters to format the drive.
If you decide you don’t want to format the drive, select Cancel and press
drive begins formatting when you make your selection.
RETURN .
Otherwise, the
Drive Info
Displays the following information about the currently selected drive:
• Usable capacity.
• Block size.
• Format status.
• Formatted capacity: amount of space being used for logical drives.
• Number of logicals.
• Size of each logical drive.
• Bitmap size.
• Cylinders, heads, and sectors per track. These are calculated values; they don’t reflect the
physical structure of the drive.
System Commands Reference Manual, Rev. 15
Page 5
FMTS2
List Defects
Displays one or both defect lists maintained by the drive. You can display the primary defect list,
grown defect list, or both. The drive displays the list in one of these three formats:
• Cyl. Hd. Sector: defect location specified by cylinder, head, and sector.
• Cyl. Hd. Offset: defect location specified by cylinder, head, and the number of bytes
from the beginning of the track.
• Block #: defect location specified by 32-bit decimal block number.
You may scroll the list output by using and . To return to the above defect list options,
press ESC . Because of the different implementations, this information cannot be compared to
AMOS block numbers.
Initialize Drive
Same as the format option described above, except that it doesn’t format the drive before writing
the logical drive information.
If the drive’s formatting is OK, use this option instead of format. This will save you
time.
Mode Sense
Retrieves mode sense information from the drive. You can view these values:
• Current Values: control the current operation of the drive.
• Changeable Values: indicate which bytes/bits are changeable.
• Saved Values: control the current operation of the drive, unless they are changed by a
Mode Selected command.
• Default Values: used by the drive if current values have not been set or the drive is
unable to access its saved values.
The information you requested is displayed within a scrollable window. Use
the information. Press ESC when you are done.
ERROR MESSAGES
?Can’t specify bitmap size with optimization enabled!
Don’t specify a bitmap size, or turn optimization OFF.
System Commands Reference Manual, Rev. 15
and
to view
FMTS2
Page 6
?Can’t specify logical count or size while optimized traditional logical format is selected!
You must turn optimization OFF to be able to specify the number of traditional logicals
to create and the bitmap size.
?Logical count incorrectly specified!
You used the /LOGICALS switch but did not specify a logical drive count, or specified a
drive count of zero or greater than 999.
?Logical format exceeds usable drive capacity!
You specified a logical drive count and bitmap size that exceeds the capacity of the
drive. Specify a smaller number of logical drives and/or bitmap size.
?Logical format MUST be completely specified!
When optimization is disabled you must specify both the number of logical drives to
create and the bitmap size.
?Program requires AMOS/32 execution!
FMTS2 requires an MC68020 or later processor. It will not run on a computer with an
MC68000 or MC68010 processor.
?SASI interface not available on this system!
You used the /SASI switch on a system that does not have a SASI interface.
?SCSI ID of drive to operate on MUST be specified!
You must tell FMTS2 which SCSI drive to format.
?SCSI interface not available on this system!
You used the /SCSI switch on a system that does not have a SCSI interface.
?Specified drive does not exist!
There is no disk drive at the specified SCSI ID on the selected interface bus.
?You must install a SCSI dispatcher to use FMTS2 on the system!
You are trying to run FMTS2 on a system that has a SCSI interface but does not have a
dispatcher installed.
System Commands Reference Manual, Rev. 15
FMT210
FUNCTION
Formats diskettes used in floppy disk devices under the control of the AM-210 Floppy Disk
Controller board and the AM-1000 and AM-1200 5-1/4" Mini-floppy Disk Controller.
CHARACTERISTICS
FMT210 is re-entrant and re-usable. The AM-210 Floppy Disk Controller handles devices that
use double- or single-density diskettes and single- or double-sided diskettes.
When you run FMT210, your job MUST be the only job running on your system. You
must be in the System Operator's Account (DSK0:[1,2]) to run FMT210. The AM-210
controller does not support single-density AMS format for 8 inch floppies.
FMT210 runs only under the AMOS/L version of the operating system.
FMT210 selects the specific format to use based on the device specification you provide. For
example, if you have previously configured a floppy disk driver named DDS.DVR for a Qume
device that uses double-sided, double-density STD format, the device specification of DDS0: tells
FMT210 to use STD format to format the diskette in Drive Zero of that device. For information
on configuring floppy disk drivers, see your System Operator's Guide.
As it formats, FMT210 writes over any data currently on the diskette. FMT210 requires you to
mount a diskette before formatting it. After formatting a diskette, use the SYSACT I command to
initialize it (unless you are going to use DSKCPY to make a literal image of another diskette on the
newly formatted one).
FORMAT
FMT210 devn:
devn: specifies the device holding the diskette you want to format.
OPERATION
Enter FMT210 followed by the specification of the device holding the diskette you want to format.
For example:
FMT210 DDA1:
RETURN
This tells FMT210 to format the diskette in Drive One of the floppy device using the DDA driver
program (and therefore, to use the AMS format).
System Commands Reference Manual, Rev. 07
FMT210
Page 2
MESSAGES
?[Cannot format diskette - write protected]
Remove the write-protection tab from the diskette and try again.
?Device does not exist
The device you specified is not defined. Check your spelling, or use DEVTBL to see a list
of currently defined devices.
?Disk not mounted
Mount the diskette and try again.
[Error code x on track n]
A media, drive, or controller error occurred at track n of the diskette. For information on
the error codes, see your disk device hardware documentation.
?Invalid device
The device you specified is not a floppy disk device, or is not compatible with the AM-210
Floppy Disk Controller board. Check your spelling, or use DEVTBL to see the devices on
your system.
[No interrupt received after WRITE TRACK]
Indicates either a bad drive or a bad controller board. See your Alpha Micro
representative.
?Privileged program - must be logged into OPR:
Log into DSK0:[1,2] and try again.
Program not supported
You can only run FMT210 under the AMOS/L version of the operating system.
?Sector not found - MIN0:block0
This message is displayed when mounting an unformatted diskette—if this is the case, it
may be ignored. If it occurs at any other time, it indicates a problem with the diskette—
see your System Operator.
?Unit number for 5 1/4 inch floppies must be 0 or 1
Try again, specifying 0 or 1 for the unit number.
System Commands Reference Manual, Rev. 07
Page 3
FMT210
?Unit number must be 0-3
Re-enter, specifying a unit number of 0, 1, 2, or 3.
System Commands Reference Manual, Rev. 07
FMT219
FUNCTION
Formats diskettes used in diskette drives that run under the control of the AM-219 diskette drive
controller.
CHARACTERISTICS
FMT219 is re-entrant and re-usable.
When you run FMT219, your job MUST be the only job running on your system. You
must be in the System Operator's Account (DSK0:[1,2]) to run FMT219.
FMT219 selects the format to use based on the device specification you provide. For example, if
you have configured a floppy disk driver named PCF.DVR for a 3.5" drive using double-sided,
double-density PC format, the device specification PCF0: tells FMT219 to use PC format to
format the diskette in drive zero of that device. For information on configuring floppy disk drivers,
see your System Operator's Guide.
As it formats, FMT219 writes over any data currently on the diskette. FMT219 disables buffered
writes if the diskette was mounted with /B (see MOUNT).
If the device is not mounted, FMT219 mounts it, but without buffered writes enabled.
After formatting the diskette, you may want to remount it to enable buffered writes.
After formatting a diskette, use the SYSACT I command to initialize it (unless you are going to use
DSKCPY to make a literal image of another diskette on the newly formatted one).
FORMAT
FMT219 devn:
devn: specifies the device holding the diskette you want to format.
OPERATION
Enter FMT219 and the device that holds the diskette you want to format. For example:
FMT219 MIN1:
RETURN
This tells FMT219 to format the diskette in drive one of the floppy device using the MIN driver
program.
System Commands Reference Manual, Rev. 04
FMT219
Page 2
MESSAGES
?Cannot format diskette - [AMOS error message]
The diskette could not be formatted for the reason given. Try to correct the situation or see
your System Operator for help.
?Privileged program - must be logged into OPR:
Log into DSK0:[1,2] and try again.
?Sector not found - MIN0:block0
This message is displayed when mounting an unformatted diskette—if this is the case, it
may be ignored. If it occurs at any other time, it indicates a problem with the diskette—
see your System Operator.
?This program is for use with AM-219 drivers only
You have attempted to format a diskette using a device driver that was not created for the
AM-219 controller. You can use FMT219 only with the AM-219 controller and drivers
created for it using FIX219.
?Unit number for 5 1/4 inch floppies must be 0 or 1
Try again, specifying 0 or 1.
?Unit number must be 0-3
Re-enter, specifying a unit number of 0, 1, 2, or 3.
System Commands Reference Manual, Rev. 04
FORCE
FUNCTION
Allows you to force terminal input to another job.
CHARACTERISTICS
FORCE is re-entrant and re-usable. FORCE has two modes; single-line and multi-line. Be careful
when using FORCE to make sure the job you are forcing input to has enough memory allocated to
it to handle the task you are giving it.
You can't force input to a job not attached to a terminal, but you can use FORCE to force input to
a job attached to a pseudo-terminal (for example, to bring up the printer spooler under control of a
pseudo-terminal).
You may not use FORCE to force input to a guarded job unless you are logged into the System
Operator's account, [1,2]. For information on "guarding" a terminal, see the SET reference sheet.
FORMAT
FORCE jobname commands/data
or:
FORCE jobname
commands/data
commands/data
[blank line]
commands/data are any valid AMOS commands or data you can enter from the keyboard.
OPERATION
Enter FORCE followed by the name of the job you wish to force input to. Then enter the
commands/data you want to force. For example:
FORCE JOB2 RUN INVEN
RETURN
Here's an example of a multi-line FORCE:
FORCE JOB3 RETURN
LOG DSK0:110,5 RETURN
TXTFMT HEADER RETURN
RETURN
System Commands Reference Manual, Rev. 07
FORCE
Page 2
MESSAGES
?Guarded
The job you tried to force is guarded. Log into OPR: if you want to try again.
?Job busy
The targeted job is not ready to receive further commands (it is not in Ti state). Try again
later.
?No terminal attached to job
You need to use the ATTACH command to assign a terminal to the job you want to force
input to. You can assign a pseudo-terminal if you do not need to see any output from that
job. However, you cannot force to a pseudo-terminal that uses a NULL terminal driver.
?Nonexistent job
FORCE doesn't recognize the name of the job you are trying to force to. Check your
syntax or use TRMDEF to see what jobs are on your system.
System Commands Reference Manual, Rev. 07
FREE
FUNCTION
Displays the number of free blocks on the disk, and the number of blocks in the largest free
contiguous space.
CHARACTERISTICS
FREE is re-entrant and re-usable.
FORMAT
FREE devn:
devn: is the disk you want information about.
OPERATION
Enter FREE and the specification of the disk you want information about. For example:
FREE DSK2: RETURN
9414 free blocks
9410 blocks in largest free contiguous space
MESSAGES
?File specification error
Check your syntax, or use the DEVTBL command to see what devices are defined on your
system, and try again.
System Commands Reference Manual, Rev. 03 (AMOS 2.2 - 4/91)
FWUPD
FUNCTION
Switches the firmware in the flash ROM of the AM-627 tape drive between SCSI-1 and SCSI-2
versions. You should use SCSI-2 with the AM-190 board for maximum performance.
CHARACTERISTICS
FWUPD works only from the system operator account (DSK0:[1,2]. Once you use FWUPD to
update the AM-627 to SCSI-2, it is not compatible with CPU boards earlier than the AM-190. To
use the tape drive with an earlier CPU, you must convert the firmware back to SCSI-1.
FORMAT
FWUPD DVR:file
file is TSCZ2 to update to SCSI-2 firmware or TSCZ1 to convert back to SCSI-1 firmware.
OPERATION
To update an AM-627 to SCSI-2, enter the following commands:
LOG OPR: RETURN
FWUPD DVR:TSCZ2
RETURN
FWUPD asks you for the name of the device. Type:
Enter target device (e.g. STR0:): STR0:
RETURN
FWUPD then updates the firmware; this takes about a minute. After the AMOS prompt
re-appears, you need to power the computer down and then up again for the new firmware to take
effect.
If you need to return the AM-627 to SCSI-1 operation, follow the same procedure, but enter this
command:
FWUPD DVR:TSCZ1
RETURN
MESSAGES
?Can't locate specified firmware file
Check to make sure you typed the firmware file name correctly and try again.
System Commands Reference Manual, Rev. 07
FWUPD
Page 2
?FWUPD is for use with non-disk devices only
Check your device specification; you cannot use FWUPD on a disk device.
?Invalid device specification
The device you entered does not exist. Check your spelling and try again.
?Privileged program - must be logged into OPR:
You must be logged into the System Operator's account, DSK0:[1,2], to use FWUPD.
System Commands Reference Manual, Rev. 07
GETVER
FUNCTION
Extracts version data from AlphaBASIC, AlphaBASIC PLUS, AlphaC, and M68 program source
files.
CHARACTERISTICS
GETVER is an OS/Exec program that may be used as an AMOS command. Multiple files may be
processed using the "Get Source Version" function of OS/Exec. If the source file does not have a
recognizable extension, the file is processed as if it were an M68 file.
FORMAT
GETVER filespec{/switches}
GETVER assumes an extension of M68.
OPTIONS
/L:n
Specifies the number of lines to search in the source file for the version
information (default is 500).
OPERATION
Enter GETVER and by the specification of the file. For example:
GETVER TRANS.M68
RETURN
GETVER then displays the current version data from the source file. For example:
4.3(453)
MESSAGES
?Invalid switch -- ignored
Check your syntax and try again.
?Language not supported, assuming M68...
If the source file does not have a recognizable extension, the file is processed as if the file
were an M68 file.
System Commands Reference Manual, Rev. 03 (AMOS 2.2 - 4/91)
GLOBAL
FUNCTION
Produces an alphabetic cross-reference of all global symbols in one or more object (.OBJ) files.
Also shows which files define which symbols, and which are externally defined symbols.
CHARACTERISTICS
GLOBAL is re-entrant and re-usable. The Alpha Micro macro-assembler, M68, allows you to
segment assembly language programs. You can assemble these segments separately, and then link
them together with LNKLIT, the linkage editor. Each segment is able to refer to symbols
occurring in other segments, using INTERN and EXTERN statements.
M68 also allows you to overlay a portion of a program with a program from the disk; the
OVRLAY statement does this. For each OVRLAY statement, an INTERN statement must exist in
another segment which identifies the start of the overlay in that segment.
GLOBAL produces a listing file containing a cross-reference of all symbols that have been
referenced in an INTERN, EXTERN, or OVRLAY statement, so you can see in which segments
those references occur. For more information on INTERN, EXTERN, OVRLAY, and M68, see
your Assembly Language Programmer's Manual.
GLOBAL produces the listing file in the account and device you are logged into. The list file has a
.GLB extension and the name of the first segment specified on the GLOBAL command line.
FORMAT
GLOBAL{/switch} {filespec}{,filespec(s)}
switch is an option and the filespecs specify the .OBJ files.
DEFAULTS
The default file extension is .OBJ. The device and account defaults to where you are logged.
OPTIONS
GLOBAL switches may be abbreviated, and are operation switches.
/LONG:n
/T
/WIDE:n
Produces a list file up to n lines long. The default is 80.
Outputs in a slightly different format with more lines per page.
Produces a list file up to n characters on a line. The default is 130.
System Commands Reference Manual, Rev. 07
GLOBAL
Page 2
OPERATION
Enter GLOBAL, any optional switches, and a list of the files you want. For example:
RETURN
GLOBAL/W/L MAIN,SUB1,SUB2
If you have more file specifications than will fit on one command line, end the line with a comma.
GLOBAL prompts you with an asterisk, and you can enter the next line of file specifications. You
may enter as many lines as you want, as long as all preceding lines end with a comma.
GLOBAL reads each file you specify and builds a table of global symbols in memory. Here is a
portion of what a GLOBAL listing file might look like:
ALPHA
BETA
ZETA
M
A
I
N
I
I
I
S
U
B
1
E
.
O
S
U
B
2
.
E
.
The listing file above tells us the symbol ALPHA appeared in an INTERN statement in the file
MAIN and in an EXTERN statement in file SUB1, BETA appeared in an INTERN statement in
MAIN and in an EXTERN statement in SUB2, and ZETA appeared in an INTERN statement in
MAIN and in an OVRLAY statement in SUB1.
MESSAGES
?Fatal error - Incompatible object file version
One or more of the specified object files is in an old format incompatible with the current
version of GLOBAL. The object file source should be re-assembled with the current
version of the assembler.
?Undefined switch [switch] - ignored
If you made a typing mistake, re-run GLOBAL with the proper switch.
System Commands Reference Manual, Rev. 07
HASHER
FUNCTION
Generates a hash total for a specified disk.
CHARACTERISTICS
HASHER is re-entrant and re-usable. A hash total is a number computed based on the
characteristics of a group of data; the hash total thus uniquely identifies that group of data.
HASHER generates a hash total for a disk based on the contents of the disk. Therefore, two disks
only have the same hash total if they contain identical data. You must be logged into [1,2] to run
HASHER.
HASHER is especially useful when you are making multiple copies of a disk. You can use
HASHER to generate the hash total of the source disk. Then, every time you use DSKCPY to
make copies of that disk, you can tell DSKCPY to generate a hash total for the disk copied to. If
the hash total for the source disk does not match the hash totals for the disks copied to, it means a
problem occurred during the disk copy.
OPERATION
Enter HASHER at AMOS command level:
HASHER
RETURN
HASHER prompts you to specify the device you want a hash total for. It then displays how many
blocks are on the disk, and the hash total.
MESSAGES
?Disk size not defined in table
HASHER can't find the device. Check your syntax, or use DEVTBL to see a list of
devices on your system, and try again.
?Driver not found
Check your syntax, or make sure the proper device driver is available. See your System
Operator for help.
?Privileged program - must be logged into [1,2]
Log into [1,2] and try again.
System Commands Reference Manual, Rev. 03 (AMOS 2.2 - 4/91)
HELP
FUNCTION
Displays text files on your terminal containing information about the system.
CHARACTERISTICS
HELP is re-entrant and re-usable. HELP looks first for the specified .HLP file in the System
HELP File Library, DSK0:[7,1]; next it searches in your project library account ([your-proj#,0]),
and if unsuccessful there, it looks in the device and account you are currently logged into.
If there are .HLP files on the same topic in different accounts, HELP uses the searching technique
described above and displays the first one it finds. For example, if there is a .HLP file for DATE
in DSK0:[7,1], your project library account, and the account you are logged into, you see the
contents of the one in DSK0:[7,1]. If it exists only in your project library account and the account
you are currently logged into, you see the one in your project library account.
HELP uses a function key translation file for your terminal if it finds one with the name drivername.AMX in system or user memory, or in DSK0:[7,0].
FORMAT
HELP {topic}
If you do not specify a topic, HELP displays the HELP.HLP file, which contains a list of help
topics, or which may be modified to include whatever helpful information you wish.
You can insert TCRT codes for terminal attributes (-1,x) in a help file by entering an ESCAPE
character followed by the decimal value of the code for the required attribute. See Chapter 7 of the
AMOS Monitor Calls Manual for the values for each attribute. Terminate the codes with a nonnumeric character or a trailing ESCAPE character.
A FORMFEED character in a help file displays [Press any key to continue] and
pauses for keyboard input before clearing the screen and displaying the rest of the file.
You can also design help files that call other help files in response to user input. This allows you
to have multi-level help files that cover broad areas of information and allowing users to see only
the information pertinent to their needs. You do this by associating help file specifications with
numbers. A left brace, {, begins the definitions, and a right brace, }, ends the definitions (the text
of which is not displayed on the screen). For example:
System Commands Reference Manual, Rev. 07
HELP
Page 2
{
1=TAX.HLP
2=FILE.HLP
3=INVEN.HLP
}
When the file above is accessed, you'll see only the help file text (without the definition part), and
then you can press 1, 2, or 3 to see the appropriate help file. If you press CTRL /C or CANCEL , you
return to AMOS command level. If you press MENU or ESC / ESC , you are returned to the last help
file level.
OPERATION
Enter HELP followed by the name of a topic to see the text file associated with that topic. For
example:
HELP VUE
RETURN
Now the screen clears and you see information on the topic you have chosen.
MESSAGES
[ Error while reading help file ]
A disk (or other) error was encountered while reading the help file from disk. Contact your
System Operator.
[ Unable to locate help file ]
There is no .HLP file for that topic.
System Commands Reference Manual, Rev. 07
ISMBLD
FUNCTION
Builds an ISAM index file/data file combination.
CHARACTERISTICS
ISMBLD is re-entrant and re-usable.
ISAM (Indexed Sequential Access Method) is a method for organizing and accessing data. An
ISAM file is an index file/data file combination. The index file contains pointers to records in the
data file. The ISAM.SYS program quickly finds data records by searching the index file instead of
searching the data file itself.
Although you call ISAM functions from within your AlphaBASIC or assembly language
programs, you may not run the program ISAM.SYS directly from AMOS command level.
ISMBLD can create a new ISAM file, it can add data to a new or existing file, and it can change
the device specification of a data file. You can use ISAM functions from within AlphaBASIC
programs or assembly language programs. For information on using ISAM, see your ISAM
System User's Guide.
Two keyed sequential access methods may co-exist on your computer, the traditional
ISAM and the newer ISAM Plus. ISAM Plus is a re-organized, easier-to-use version of
ISAM, with more power and features. If you are using ISAM Plus, use the ISMUTL
utility instead of ISMBLD. See the ISMUTL reference sheet.
FORMAT
ISMBLD filespec{/switch(s)}
filespec selects the name you want to assign to the .IDA (data) and .IDX (index) files, and a switch
is an option request.
OPTIONS
/D
Change the data file device specification.
/N
Prevent ISMBLD from using Exclusive Open Mode.
For information on Exclusive Open Mode and Counted Update Mode, see your ISAM System
User's Guide.
System Commands Reference Manual, Rev. 03 (AMOS 2.2 - 4/91)
ISMBLD
Page 2
OPERATION:
Enter ISMBLD followed by the name you want to assign to the file. For example:
ISMBLD LABELS
RETURN
To create an ISAM file in Counted Update Mode, use the /N switch. If the file you specify does
not yet exist, ISMBLD asks you a series of questions; from the parameters you supply, ISMBLD
generates a data file/primary index file combination. ISMBLD asks:
1. Size of key: - Enter the size of the desired key in bytes. When you later access the ISAM
file you are now building, you must remember to pad with blanks or other characters keys
smaller than this size.
2. Position of key: - Enter the location of the key within the data record. Enter the number of
the first character-position in the record the key occupies.
3. Size of data record: - Specify in bytes the size of the records in the data file (or the
maximum size in the case of variable length records).
4. Number of records to allocate: - Number of records which the data file is to contain.
5. Empty index blocks to allocate: - Enter the number of additional empty index blocks you
want to allocate.
6. Primary Directory? - If you are creating a data file/primary index file combination, enter
Y; otherwise, enter N.
7. Secondary index to file: - If you are creating a secondary index file instead of a data
file/primary index file combination, ISMBLD prompts you for the specification of the
primary index file to which this secondary index file cross-indexes. After you supply this
information, ISMBLD returns you to AMOS command level.
8. Data File Device? - ISMBLD asks this question if you are creating a data file/primary
index file combination. If the index file and data file are to be on the same device, just
press RETURN —otherwise enter the specification of the device on which the data file is to
reside.
Once ISMBLD has created a new data/primary index file combination, it enters file loading mode.
It asks you which file you want to load data from. You may either press RETURN (to create an
empty data file) or you may specify a sequential data file from which you want to load data.
ISMBLD assumes a file extension of .SEQ for this data file. After loading the data file, ISMBLD
returns you to AMOS command level.
If you are not creating a new data/index file combination (that is, if you specified a file to
ISMBLD that already exists), ISMBLD goes directly into file loading mode. Instead of asking you
the list of file parameter questions above, it tells you it is processing the existing file, and asks for
the name of the file from which to load data. If you press RETURN , ISMBLD does not load from a
file.
System Commands Reference Manual, Rev. 03 (AMOS 2.2 - 4/91)
Page 3
ISMBLD
To change the data file device after an ISAM file has been created, use the /D switch on the
ISMBLD command line. For example, if you want to change the device of the data file from
DSK0: to DSK1:
ISMBLD MAIL/D
RETURN
[Processing existing file]
Current device name is DSK0:
Enter new device name: DSK1:
RETURN
MESSAGES
%Attempt to add duplicate key [key]
Make sure you have not tried to load a key twice from the same data file.
?Duplicate secondary key left out [key]
You tried to use ISMBLD on a secondary index file—the key listed is already in an index
file.
?End of input file in middle of record
You loaded an ISAM file with data from a sequential data file, but the parameters you
gave to ISMBLD when you originally created the file did not match the data in the data file
(the record size in the data file is not the same as the size you specified to ISMBLD).
?Illegal device specification
Use DEVTBL to see a list of legal devices and try again.
?Invalid record size
Make sure all your records are less than 513 bytes.
?Invalid number
Check the proper range of numbers for the question and try again.
?ISBAFL Data file full
You did not specify enough records when you built the ISAM file. When you loaded the
ISAM file, the data file was not large enough to hold all of the data.
?ISBXFL Index file full
You did not specify enough additional index blocks when you built the ISAM file. When
you loaded the ISAM file with data, the index was not large enough to hold the necessary
entries.
System Commands Reference Manual, Rev. 03 (AMOS 2.2 - 4/91)
ISMBLD
Page 4
?Key must be within record
You entered an incorrect number for the record or key size. Check the size limits and try
again.
?Key size causes entries per index block to be 2 or less.
Key size must be reduced.
Try again with a smaller key size.
System Commands Reference Manual, Rev. 03 (AMOS 2.2 - 4/91)
ISMDMP
FUNCTION
ISMDMP writes the contents of an ISAM data file to a sequential file or displays the structure of
an index file on your terminal.
CHARACTERISTICS
ISAM (Indexed Sequential Access Method) is a method of organizing and accessing data. An
ISAM file is a data file/index file combination. The index file contains pointers to records in the
data file. ISAM.SYS quickly finds data records by searching the index file instead of searching the
data file itself.
Two keyed sequential access methods may co-exist on your computer, ISAM and the more
powerful, easier-to-use ISAM Plus. If you are using ISAM Plus, use the ISMUTL utility
instead of ISMDMP. See the ISMUTL reference sheet. ISMDMP may also be used to
convert ISAM files to ISAM Plus format. See the conversion hints in your ISAM Plus
User's Guide.
The purpose of ISMDMP in display mode is to aid in debugging programs that use ISAM. Much
of the information in the display is of help only to the experienced systems programmer and some
of the information is of use only to programmers working on the ISAM program itself. Dumping
data to a sequential file can be useful for data backup.
Although you call ISAM functions from within your AlphaBASIC or assembly language
programs, you may not run the ISAM.SYS program directly from AMOS command level.
For more information on using ISAM and ISMDMP, see your ISAM System User's Guide.
FORMAT
ISMDMP filespec{/N}
filespec selects the ISAM data or index file you want to dump and /N selects the Counted Update
Mode option.
DEFAULTS
The default extension of the ISAM file you want to dump is .IDX. The default extension of the file
that will contain the data is .SEQ.
System Commands Reference Manual, Rev. 03 (AMOS 2.2 - 4/91)
ISMDMP
Page 2
OPTIONS
/N
Use Counted Update Mode instead of Exclusive Open Mode.
For information on Counted Update and Exclusive Open Mode, see your ISAM System User's
Guide.
OPERATION
Enter ISMDMP followed by the specification of the ISAM file whose contents you want to see.
For example:
ISMDMP ADDRSS
RETURN
Now ISMDMP asks you for the file to output the data to. If you want to see the file on your
terminal, type TTY: RETURN ; otherwise, enter the name of the file you want the data in. ISMDMP
displays the number of data records it wrote to the file.
You can now use the TYPE or PRINT commands to display the file, or AlphaVUE to examine the
file. Your ISAM System User's Guide discusses the elements of the ISMDMP display in detail.
Several of the items of information in the upper portion of the display are parameters that you
supply when you used ISMBLD to build the ISAM file (for example, Size of data record:, Size of
key:, etc.). Some of the other important elements of this display are:
1. Size of dir entry: - Amount of storage needed to store key—key (rounded up to even) + 4.
2. Size of dir block: - 512 bytes.
3. Type of key: - Always zero.
4. Blocking factor: - This value gives the number of logical data records that fit into each
physical disk block. This number gives the blocking factor for the data file, and is thus
512/record size.
5. IDA freelist pointer: - A longword pointer into the data file.
6. IDA freecount: - Number of records free in data file.
7. IDX freelist pointer: - Logical block number of next free block in index.
8. IDX freecount: - Number of free logical index blocks.
9. Records allocated: - Number of data records used.
10. Top dir blk pointer: - Block pointer to beginning of top index block.
The rest of the display contains debugging information about the structure of the index file. This
information is mostly of use to the experienced programmer who understands the internal workings
of ISAM.
System Commands Reference Manual, Rev. 03 (AMOS 2.2 - 4/91)
Page 3
ISMDMP
MESSAGES
?Cannot rename [filespec] - file not found
Check your device and account specifications and your spelling, and try again.
No records dumped
You tried to dump data from an empty ISAM data file.
System Commands Reference Manual, Rev. 03 (AMOS 2.2 - 4/91)
ISMUTL
FUNCTION
ISMUTL performs a variety of operations on an ISAM Plus file, including: creating the ISAM
Plus file, loading records into it, reformatting, displaying, and adjusting it. ISMUTL may be used
interactively, or may be accessed through your assembly language, AlphaBASIC, or AlphaC
programs.
CHARACTERISTICS
ISAM (Indexed Sequential Access Method) is a method of organizing and accessing data. An
ISAM Plus file is a data file/index file combination. The index file contains pointers to records in
the data file. ISAM Plus quickly finds data records by searching the index file instead of searching
the data file itself.
Two keyed sequential access methods may co-exist on your computer, ISAM and the
newer ISAM Plus. If you are using ISAM, use the ISMDMP and ISMBLD utilities
instead of ISMUTL.
Although you call ISAM Plus functions from within your AlphaBASIC, AlphaC or
assembly language programs, you may not run the ISAMP.SYS program directly from
AMOS command level. For more about using ISAM Plus, see your ISAM Plus User's
Guide.
FORMAT
ISMUTL filespec
filespec selects the ISAM Plus index/data file combination you want to create, examine, or change.
DEFAULTS
The default extensions of the index/data ISAM Plus file combination are .IDX and .IDA. If you
use ISMUTL to load or dump an ISAM Plus file, the default extension of the input/output file is
.SEQ.
OPERATION
Enter ISMUTL and the specification of the ISAM Plus file you want to create, modify or examine.
For example:
ISMUTL ADDRSS
RETURN
System Commands Reference Manual, Rev. 03 (AMOS 2.2 - 4/91)
ISMUTL
Page 2
If the file does not exist, ISMUTL begins to ask a series of questions concerning the number of
data records and their size, as well as information on the position, type, and size of the keys the
new index file will contain.
If the file does exist, ISMUTL displays a menu from which you can choose the operation you want
to perform on the file. You may choose from the following:
LOAD
Load a file.
CHANGE
Change data device name.
ADD2ND
Add secondary key directory.
DELETE
Delete existing secondary key directory.
DUMP
Dump ISAM Plus file.
STAT
Display statistical information.
ADDIDX
Add index block.
DESCRP
Change key description.
REBUILD
EXIT
Rebuild an index file.
Exit to AMOS.
You may enter a ISMUTL command from the list above in any combination of upper or lower
case. You may abbreviate if there is no conflict between command names.
MESSAGES
?Attempt to add duplicate key
Duplicate keys aren't allowed for this file.
?Cannot add record, not enough free index blocks
Use the ADDIDX utility to add extra index blocks or delete some records.
?Cannot change key
The ISAM Plus file was created in such a way that the keys in this file can't be modified.
?Cannot create existing ISAM Plus file
An ISAM Plus file by the same name already exists. This message only appears if you
interface your assembly language program to ISMUTL.
?Cannot delete primary key
You may not delete a primary key for any reason.
?Data file full
System Commands Reference Manual, Rev. 03 (AMOS 2.2 - 4/91)
Page 3
ISMUTL
You are trying to add more records than you allowed room for when you created the file.
?Data file smashed
This message appears if the .IDA free list chain is smashed. See your System Operator or
Alpha Micro representative for help.
?Incompatible ISAM Plus file
Your file is in an older ISAM format—see your ISAM Plus User's Guide for help
converting an old ISAM file to ISAM Plus format.
?Index file full
If this happens during the splitting of an index block, your index file may be destroyed.
It's always a good idea to add extra empty index blocks when you create the file.
?Index structure is smashed
This message indicates serious structural damage to your index file. You may need to
rebuild your ISAM Plus file.
?Invalid key type
Enter 1 for alphanumeric, 2 for unsigned binary, and 3 for concatenated key.
?Invalid record size
Enter a record size of between 4 and 65535 bytes.
?ISAMP.SYS not found
You must load ISAMP.SYS in MEM: or RES: prior to using ISMUTL's functions.
?Key outside record
The key is outside the record boundary. All keys must be within a record.
?Maximum binary type size = 8
Enter a key size of eight bytes or less.
?Maximum extra percentage = 900
You can request up to tenfold the number of index blocks allocated.
?Maximum key size = 161
Enter a key size of 161 or less.
System Commands Reference Manual, Rev. 03 (AMOS 2.2 - 4/91)
ISMUTL
Page 4
?Maximum number of 2nd key directories = 64
This message appears when an assembly language program is interfacing with ISMUTL.
Make sure the number is 64 or less.
?No such secondary key number
You are trying to access a secondary key directory which has not been created.
?Number of records dumped is mismatched with the number of records in the file
There is an inconsistency between the number of records dumped and the number of the
records in the file. This usually means your index file is damaged. You might see this
message if you are dumping the file and you press CTRL /C before the task was finished.
?Overlap keys must be alphanumeric type
You can't define any byte in a record as both binary and alphanumeric. You may define
any byte as alphanumeric and concatenated, since a concatenated key is an alphanumeric
key which is formed by combining alphanumeric fields into one key.
?System error
This message indicates a serious error. Contact your Alpha Micro dealer with information
on the conditions under which the error occurred.
?This secondary key has been deleted
This message also appears when you're trying to obtain statistical information about a
deleted directory.
?Too many concatenated fields
The number of repetitions for a concatenated key may not exceed 16. Check your program
key definitions.
?Too many data file blocks
Your .IDA file contains more than 2**32 logical records.
?Too many index blocks
Your index file has more than 2 ** 32 blocks.
?Warning, free index blocks is less than minimum requirement
Use the ADDIDX command to add more index blocks, or delete some records. You won't
be allowed to add more records until you create more space.
System Commands Reference Manual, Rev. 03 (AMOS 2.2 - 4/91)
ISOCD
FUNCTION
Allows access to the files on ISO-9660 CDs. Files may be typed or copied to AMOS sequential or
random access files.
CHARACTERISTICS
[*]
This is currently unsupported software, meaning it has not been fully tested and documented,
that errors may not be corrected, and that its specifications and/or behavior may be changed.
But please advise us of any documentation or program errors so that we have the opportunity
to correct them.
ISOCD is both re-entrant and re-useable and requires a 68020 or higher processor.
ISOCD enters a DOS like prompt and allows for displaying directories, changing directories, copying
files (both sequential and random), typing files, specifying DOS or UNIX line termination.
FORMAT
ISOCD
Please contact Alpha Micro Products if you wish to customize this program or to access an ISO CD
from within a program.
DEFAULTS
Uses the first CD it finds on the SCSI bus, starting with ID 6 and scanning down.
OPERATION
Enter ISOCD. It will return with a failure message or a C:\> prompt. At the prompt, you may enter a
question mark (?) to get a list of commands and their descriptions. For example:
ISOCD RETURN
ISOCD Version 1.0(101) - Copyright (C) 1993 Alpha Microsystems Inc.
Scanning SCSI bus for CD-ROM....
CD-ROM drive located at SCSI id 4
Volume ID: PR062000
created: 11/20/2005 06:43:15
CD:\>? RETURN
Available commands:
QUIT
CD directory
DIR
DIR/W
COPY file amosfile
COPYR file amosfile
TYPE file
SET DOS
SET UNIX
-
return to AMOS
change directory
list files
wide file list
transfer file to AMOS
transfer random file to AMOS
display file on terminal
sets normal line termination
sets UNIX style line termination
CD:\>
System Commands Reference Manual, Rev. 15
ISOCD
Page 2
MESSAGES
?AlphaCD is installed - please uninstall ACD before using ISOCD
?ISOCD requires a SCSI dispatcher - it cannot be used with the SASI port.
?No CD-ROM drives found - cannot continue
?Disc is not an ISO-9660 or High Sierra compatible CD-ROM
?Invalid command
Unix line termination mode selected
Normal line termination mode selected
?File specification error
For at least the TYPE command.
?File not found
For at least the TYPE, COPY, and COPYR commands.
?ISO file specification error
Bad CD file name. For at least the COPY and COPYR commands.
?AMOS file specification error
Bad AMOS file name. For at least the COPY and COPYR commands.
?No directory specified
For at least the CD command.
?Invalid directory
Means "not found" for the CD command.
Fatal dispatcher execution error code
The SCSI dispatcher got an error that it could not process. Usually this means the SCSI bus
is not functioning properly. Note that it may or may not include a leading question mark
symbol.
?CD-ROM drive is not ready
?Disc appears to be an audio CD
additional sense=
The SCSI code information from the CD device indicates that this is not an acceptable data
CD. The additional SCSI sense information may be of assistance in trouble shooting.
System Commands Reference Manual, Rev. 15
JOBALC
FUNCTION
Displays your job name.
CHARACTERISTICS
JOBALC is re-entrant and re-usable.
JOBALC is also used in the system initialization command line to define jobs to the system. See
your System Operator's Guide to the System Initialization Command File for more information.
OPERATION
Enter JOBALC at AMOS level. For example:
JOBALC RETURN
Your job name is MELVIN
System Commands Reference Manual, Rev. 03 (AMOS 2.2 - 4/91)
JOBPRI
FUNCTION
Displays and changes job priorities.
CHARACTERISTICS
JOBPRI is re-entrant and re-usable. In a timesharing environment, each user receives a certain
number of real time clock ticks before the CPU moves on to another job. If you increase this unit
of time (called a quantum) for a particular user, you speed up that job and, consequently, slow
down the jobs of the other users on the system.
Increasing the number of ticks the CPU spends on a job is called increasing the job's priority. You
should not change your job's priority or the priority of other jobs on the system unless there is a
very good reason for it; indiscriminate changes in job priorities might be unpopular with other
users on the system, and may slow overall system performance.
You may have job priorities between 1 and 254. The JOBPRI command value tells the system to
use that many clock ticks for the specified job. The normal setting for a job is 13.
To change another job's priority, you must be logged into an operator's account [1,2], or the
command must appear in your system initialization command file before the final SYSTEM
command.
You cannot use JOBPRI to change any job's priority if dynamic job priority scheduling is active.
You turn dynamic scheduling on and off using the SET command; you can adjust the values in the
dynamic scheduling priority table using the ADJIT command.
FORMAT
JOBPRI {jobname} {priority}
jobname is the name of the job whose priority you want to change and priority is the number of
clock ticks you want the job to have.
OPERATION
To find out your job's priority, enter JOBPRI:
JOBPRI RETURN
Current priority is 13
System Commands Reference Manual, Rev. 04
JOBPRI
Page 2
To find out another job's priority, enter JOBPRI and the name of the job. For example:
JOBPRI MELVIN RETURN
Current priority is 15
To change your job's priority, enter JOBPRI and a priority number. For example:
JOBPRI 50
RETURN
To change the priority of another user's job, log into [1,2], enter JOBPRI, the name of the job, and
a priority number. For example:
LOG 1,2 RETURN
JOBPRI MELVIN 50
RETURN
MESSAGES
?Dynamic job priority scheduling is active!
?Request is denied
You cannot change any job's priority while dynamic job priority scheduling is active. You
can turn dynamic scheduling on and off using the SET command.
%Illegal job priority level
You specified a number less than 1 or greater than 254. Re-enter a valid number.
?Nonexistent job
JOBPRI could not find the job you entered on the command line. Check your spelling.
For a list of jobnames defined on your system, use TRMDEF.
?You must be logged into PPN [1,2] to set another job's priority.
Log into [1,2] and try again.
System Commands Reference Manual, Rev. 04
JOBS
FUNCTION
Displays the number of jobs allocated on the system and the number currently in use.
CHARACTERISTICS
JOBS is re-entrant and re-usable.
Also used in the system initialization command file to define the number of jobs on the system. See
your System Operator's Guide to the System Initialization Command File for more information.
OPERATION
Enter JOBS at AMOS level. For example:
JOBS RETURN
20 jobs allocated, 8 currently assigned
MESSAGES
?Cannot allocate jobs after system is up
Enter JOBS and press RETURN . JOBS has no other functions at AMOS level. If you need
to allocate jobs, see your System Operator about changing the JOBS command in your
system initialization file.
System Commands Reference Manual, Rev. 03 (AMOS 2.2 - 4/91)
KILL
FUNCTION
Forces a Control-C interrupt to another user's job to attempt to halt the program that job is
currently running.
CHARACTERISTICS
KILL is re-entrant and re-usable. Depending on what the job you want to stop is doing, KILL may
not be able to halt the task. In this case, and if that job is "locked up," you may have to reboot
your system to free the job.
FORMAT
KILL jobname
jobname selects the job you want to try to interrupt.
OPERATION
Enter KILL and the name of the job whose program you want to try to stop. For example:
KILL JOB4
RETURN
MESSAGES
?No terminal attached to job
The job you tried to KILL does not have a terminal attached (and so KILL cannot work on
it).
?Nonexistent job
You entered an invalid job name. Check your spelling or use the TRMDEF command to
see a list of the valid jobs on the system.
System Commands Reference Manual, Rev. 03 (AMOS 2.2 - 4/91)
LABEL
FUNCTION
Assigns a descriptive label to a logical unit of a disk, and displays disk labels. Can also correct a
damaged label block.
CHARACTERISTICS
LABEL is re-entrant and re-usable. To create or change a label, or correct a damaged label block,
you must be logged into an operator's account, [1,2].
You cannot run LABEL across a network. The disk you are accessing the label for cannot be on a
remote system.
Changing a logical device's directory format can damage its file structure! You should
use the /E and /S switches only on a logical device which has had its block 0 label damaged
in some way. To change the directory structure of a disk, you should back up the entire
disk, use SYSACT to re-initialize the disk (this erases all data on the disk), then restore the
files from the backup.
Disk labels are stored in block zero of the logical device and are used both to allow the operator to
easily determine what disk is mounted, and to allow programs to verify the correct disk has been
mounted. LABEL maintains as part of the label the date the disk was last mounted and the date
the disk was originally labeled.
FORMAT
LABEL devn: {/switch}
devn: is the device which you want to label or for which you want the current label displayed or
changed, and switch is an option.
OPTIONS
/E
Force logical device to extended format.
/S
Force logical device to standard (traditional) format.
System Commands Reference Manual, Rev. 07
LABEL
Page 2
OPERATION
To display a label, enter LABEL and a disk specification. For example:
LABEL DSK0: RETURN
Payroll Data (PAY001)
Created on 1-Jan-80 at OzWiz, Inc. on System 1 by Melvin
Last access: 2-Apr-88
To create or change a label, log into 1,2 and enter LABEL and the device specification. LABEL
displays the old label (if one exists) and asks for new contents for each of the label fields. You can
press CTRL /C at any time to halt the program. The fields are:
Volume Name:
Enter the textual description of the disk, up to 40 characters. The operator
can use this field to determine which disk is mounted.
Volume ID:
Enter up to ten characters as the Volume ID. This field may be used by
programs to determine if the proper disk has been mounted. The XMOUNT
subroutine (which can be called from AlphaBASIC) returns this field. The
MOUNT program also displays this field whenever a disk is mounted.
Installation:
Enter the name of your installation or company. This field, which may be
up to 30 characters long, may be useful when exchanging disks between
different installations.
System:
Enter the name of the computer system this disk was created on. This field,
which can be up to 30 characters long, is useful when a particular
installation has more than one computer system.
Creator:
Enter the name of the person creating the disk. This field may be up to 30
characters long.
To change a logical device to extended format after its label block has been damaged:
LABEL DSK0: /E RETURN
Payroll Data (PAY001)
Created on 1-Jan-90 at OzWiz, Inc. on System1 by Melvin.
Last access: 2-Apr-94
Are you sure you want an EXTENDED logical? Y
Logical changed to extended format.
RETURN
Label updated
MESSAGES
?Cannot combine both /E and /S switches
These two switches are mutually exclusive; you cannot use them in the same LABEL
command.
System Commands Reference Manual, Rev. 07
Page 3
LABEL
?Cannot INIT [device-name] - device does not exist
Check your syntax, or use DEVTBL to see what devices are defined on your system, then
try again.
?Disk is not labeled
The disk does not have a label. If you wanted to give it a label, this message means you
are not logged into account [1,2]—do so, and try again.
?File specification error
Check your syntax against the format of the LABEL command, and try again.
?Illegal switch
You have entered an invalid switch. Only /E and /S are legal switches for LABEL.
Label updated
The label block has been successfully updated—its directory format was changed and/or
the "noise" words were corrected.
"Noise" words will be updated
When using the /E or /S switch, if the label block's "noise" words are wrong, LABEL will
update them when it updates the label.
%Switch valid only in Operator Account [1,2]
You can use the /E or /S switches only when logged in an operator account ([1,2]). Log
into [1,2] and try again.
System Commands Reference Manual, Rev. 07
LDVSTS
FUNCTION
Displays statistical information accumulated by a particular LAN driver (.LDV).
LDVs are similar to NDVs. The most notable difference is that LDVs are hardware drivers
only. They do not perform any network protocol-specific functions.
CHARACTERISTICS
LDVSTS is re-entrant and re-usable. It displays statistical information retrieved from the LDV
specified on the command line. The LDV is polled for this information several times a second; only
changed statistics are updated on the screen. You can press CTRL /C at any time to exit the
program.
FORMAT
LDVSTS ldv
ldv is the name of the driver whose statistics you want to see. You do not need to include the .LDV
extension.
OPERATION
LDVSTS displays three categories of information:
Driver Information: The driver name, version, type of network hardware it controls, and a device
number indicating which hardware interface it controls (some interfaces can be re-addressed to
allow multiple interfaces on the system).
Driver Status: These fields let you monitor the activity level of the network connection, and its
quality. The individual fields are:
Packets Transmitted
Number of packets transmitted by this interface.
Packets Received
Number of packets received that were specifically addressed to this
interface. This does not include broadcast packets.
Broadcasts Received
Packets received with a broadcast destination address. Broadcast packets
are typically used for network management functions. Some broadcast
packets are normal: a high rate of broadcast packets may indicate a
network problem.
System Commands Reference Manual, Rev. 04
LDVSTS
Page 2
Transmissions
Pending
Packets the driver has received for transmission from upper level network
software. This is normally zero. but can briefly become non-zero if the
system or network is exceptionally busy.
Receptions Pending
Packets the driver is holding, waiting to be retrieved by upper level
network software. This is normally zero, but can briefly become non-zero
if the system or network is exceptionally busy.
Protocols Registered
The number of network protocols registered with the driver. Protocols
must register their type with the driver in order for the driver to receive
packets of that type.
Failed Transmissions
The number of packets that could not be successfully transmitted. This is
normally the result of too many collisions.
CRC Errors
The number of incoming packets that were rejected due to a CRC error.
A high CRC rate may indicate a faulty network card or poor signal
quality on the network cable.
Framing Errors
The number of incoming packets that were rejected due to a framing
error. A high framing error rate may indicate a faulty network card or
poor signal quality on the network cable.
Collision
The number of transmission attempts that were unsuccessful because
another interface tried to transmit at the same time. This number will
normally go up gradually; if it increases quickly, it indicates a high
amount of network traffic.
Lost Packets
The number of incoming packets lost because the network interface was
not in a state where it could receive packets. It is normally zero; if it
isn’t, it usually indicates the system could not respond fast enough to the
packet being received.
Rx Resources
Exhausted
The number of times the driver ran out of buffers to hold received
packets. This should normally be zero; if it isn’t, the driver had to discard
one or more received packets to make room for new incoming packets.
The lost packet count includes the number of packets discarded.
Protocols: The protocol type code and name for each protocol registered with the driver. If
LDVSTS doesn't recognize a type code, it displays "unknown" as the protocol name.
MESSAGES
?Could not find driver in system memory
The specified LDV was not found in system memory. Since LDVs must be in system
memory to be used, LDVSTS only looks there for them.
?Retrieving driver statistics failed
LDVSTS cannot retrieve all the information the driver can provide, or the format of the
information has changed. Contact Alpha Micro for an updated version of LDVSTS
System Commands Reference Manual, Rev. 04
Page 3
LDVSTS
?Usage: LDVSTS driver name
You must specify the name of the LDV you want LDVSTS to display information for.
System Commands Reference Manual, Rev. 04
LIBLIT
FUNCTION
LIBLIT is an object file library generator. It combines separate .OBJ files into one library (.LIB)
file. You may also use LIBLIT to update an existing .LIB file.
CHARACTERISTICS
LIBLIT is re-entrant and re-usable. A library file gives you a way to make available to all
programmers on the system a standardized set of machine language routines. It also keeps you
from having to rewrite the same utility routines again and again for multiple programs.
At the time you link your object files into an executable program (using LNKLIT or SYMLIT),
you may include the specification of a library file on the command line. If the other files specified
on the command line make use of a symbol defined in the library file, LNKLIT or SYMLIT will
process the routine within the library file that defines that symbol, linking it into your program file.
Each object file placed into the library file should be a separate routine because when your
program refers to a symbol in the library file, LNKLIT or SYMLIT links in the entire
object file required to resolve the reference. For example, if the library file UTILIT.LIB
contains the object files GETNUM, SUBT, REAL, and BINWRT, and your program
refers to a routine contained in the GETNUM file, LNKLIT or SYMLIT links in the entire
object file GETNUM from UTILIT.LIB even if that file contains more than one routine.
For more information on library files, and on LIBLIT, M68, LNKLIT, and SYMLIT, see your
Assembly Language Programmer's Manual.
FORMAT
LIBLIT works either in a creating/editing mode, or in a display mode:
LIBLIT {library-spec=}{filespec}{\}{(}{,...filespec}{)}
or:
LIBLIT{/L} {listspec=}{library-spec}}{\{(}filespec...{)}}
The first mode is the creating/editing mode, where library-spec selects the name of the library file
you want to build, and the filespec(s) specify the object files for the library. The second is the
display mode, where listspec indicates a disk file for the listing.
The backslash symbol (\) indicates the following file should be removed from the library file or
excluded from the listing. If you include files inside parenthesis, those files are treated as a group.
System Commands Reference Manual, Rev. 07
LIBLIT
Page 2
You must supply at least one filespec. If you don't specify it on the LIBLIT line, you see an
asterisk prompt. If you want to specify more files than will fit on one command line, you may
continue the command line by ending the current line with a comma. LIBLIT displays an asterisk
and you may continue entering filespecs. You may enter as many lines as you wish as long as the
preceding line ends with a comma.
DEFAULTS
The default library-spec extension is .LIB. The default filespec extension is .OBJ. If you do not
include an account and device specification, LIBLIT looks for the files specified in the account and
device you are logged into, then it looks in your project library account, [P,0]. Finally, LIBLIT
looks in the System Library account, DSK0:[7,7].
If you do not include an output specification, LIBLIT creates an output file with the same name as
the first input specification. If you use the /L switch to create a library listing, LIBLIT uses the
default extension .LST for that listing output file. If you use the /L switch and omit an output file
specification, LIBLIT displays the listing on your terminal.
OPTIONS
/L
List the library file, either on the terminal or in a file. This listing looks like a
load map file, and lists all library object files and all INTERNed symbols.
OPERATION
TO CREATE A LIBRARY FILE:
Enter LIBLIT and the specification of the library file you want to create, an equal sign, and the
specifications of the object files you want to combine. For example:
LIBLIT MYLIB=ADNUM,RDBIN,WRTBIN,ASCCHK
RETURN
The command line above causes LIBLIT to create an output file named MYLIB.LIB containing
the specified .OBJ files.
TO DISPLAY A LIBRARY FILE:
Use the /L switch. For example:
LIBLIT/L NEWLIB
RETURN
sends the listing of NEWLIB to your terminal display. To tell LIBLIT to place the listing in a disk
file, specify an output file and the /L switch. For example:
LIBLIT/L LIST=NEWLIB
RETURN
System Commands Reference Manual, Rev. 07
Page 3
LIBLIT
TO UPDATE A LIBRARY FILE:
To update an existing library file, enter LIBLIT, the library file you want to modify, an equal sign,
and the list of filespecs you wish to add and/or delete. For example:
LIBLIT UTILIT=UTILIT.LIB,NADDR
RETURN
or:
LIBLIT UTILIT,NADDR
RETURN
Both of these command lines tell LIBLIT to take the existing library, UTILIT.LIB, and modify it
by adding the object file NADDR to it.
You may specify a group of files by using the () inclusion symbols, and you may delete files by
using the \ symbol. For example:
LIBLIT NUMLIB\FORMAT
RETURN
This command line tells LIBLIT to delete the object file FORMAT. The command:
LIBLIT NEWLIB,MATH\(BINADR,SMLLNUM,BINWRT)
RETURN
tells LIBLIT to add MATH, and delete the BINADR, SMLLNUM, and BINWRT from NEWLIB.
When replacing an existing module in a library, DO NOT just add a new version of the module
without first deleting the original module of the same name. Doing so can cause problems because
both versions will still be in the library. The recommended procedure is to first delete the module
and then to add the new version of the module. For example, to replace the object file KEYSUB:
LIBLIT MACLIB\KEYSUB,KEYSUB
RETURN
MESSAGES
Command error
LIBLIT did not understand your command line. Check your syntax and try again.
?Fatal error - Incompatible library file version
?Fatal error - Incompatible object file version
An object file or library file you specified is in an incompatible format. The object file
should be re-assembled and the library rebuilt using the current versions of M68 and
LIBLIT.
?Fatal error - xxx is an overlay
You may not specify an overlay as an element of an object file library. Re-type the
command line without the overlay.
System Commands Reference Manual, Rev. 07
LIBLIT
Page 4
?Listing aborted
LIBLIT was not able to finish the library listing. For example, an error occurred while
LIBLIT was trying to access a file.
?OBJ files are not libraries -- they cannot be restricted by a modifier
You may only use the \ and () symbols if you are modifying a library.
?The following module was not found - xxx
You tried to modify an existing library file, but the object files you specified were not
present in the library file. Make sure you did not accidentally use \.
?Undefined switch [switch] - ignored
Make sure you did not accidentally type \ when you meant to type /, and try again.
System Commands Reference Manual, Rev. 07
LINCNT
FUNCTION
Counts and displays the number of lines in a file. You may also adjust the line count prior to the
display.
CHARACTERISTICS
LINCNT is re-entrant and re-usable. LINCNT considers a line to be terminated by a line-feed
character, whether or not a corresponding carriage-return character accompanies it.
LINCNT is designed to work with text files. Using it on binary data files will not yield useful
results.
FORMAT
LINCNT filespec {adjustment}
filespec is the file specification and adjustment is a factor applied to the result number.
OPERATION
Enter LINCNT followed the file specification for the file in which you wish to count lines. For
example:
LINCNT MALLST.TXT
RETURN
You may optionally include an adjustment factor which is applied to the line count prior to
displaying the count. This can be used to account for fixed format output which may contain blank
or header lines you do not wish to count. For example:
LINCNT MALLST.TXT -5
RETURN
LINCNT is useful when used with IO redirection and piping. For example, to display the number
of ersatz devices defined on your system, you can send the output of the ERSATZ program to
LINCNT, and include an adjustment factor to account for the header and blank line output by
ERSATZ:
ERSATZ | LINCNT -2
RETURN
System Commands Reference Manual, Rev. 03 (AMOS 2.2 - 4/91)
LINCNT
Page 2
MESSAGES
?Cannot OPEN [filename] - file not found
Check your syntax, or use DIR to see what files exist and try again.
System Commands Reference Manual, Rev. 03 (AMOS 2.2 - 4/91)
LNKLIT
FUNCTION
Creates executable machine language programs by linking and resolving one or more assembled
object files.
CHARACTERISTICS
LNKLIT is re-entrant and re-usable. When you use M68 to assemble an assembly language
program, the .OBJ file that results is in an intermediate form that is not ready for execution.
Separate .OBJ files may contain symbol references to each other that cannot be fully resolved
because these files cannot be assembled together.
LNKLIT is a linkage editor that links together and resolves several .OBJ files to produce an .OVR
or .LIT program file. If the program you assembled with M68 was made up of only one file that
contains no internal or external symbol references, M68 automatically calls LNKLIT for you as
Phase 4 of the assembly to produce a program file. Otherwise, you must use LNKLIT yourself to
link the .OBJ files that will make up the single .LIT file.
LNKLIT links files together in the order in which you specify them on the LNKLIT command line.
LNKLIT does not produce a program file if one or more of the files you specify is not found in its
assembled object (.OBJ) form.
LNKLIT supports the use of object file libraries (see the LIBLIT reference sheet for information
on library files). For more information on LNKLIT and assembly programming, see your
Assembly Language Programmer's Manual. It also contains information on library, optional, and
load map files.
FORMAT
LNKLIT {/switch}filespec{,...filespec(s)}{/switch}
filespec is the specification of a file you want to link and /switch is an option request. You may
not specify an overlay or library file as the first filespec on the command line.
If you have too many filespecs to fit on one screen line, you may continue the LNKLIT command
line by ending it with a comma. LNKLIT accepts as many lines of filespecs as you wish, as long
as you end the preceding line with a comma.
If a switch appears in front of a filespec (e.g., LNKLIT MATH,/O NUM,SUB), that option
request becomes the default for the rest of the command line. If a switch follows a filespec (e.g.,
LNKLIT MATH,NUM/O,SUB), it affects only that filespec. Certain switches (identified in the
discussions below as "operation switches") affect all filespecs on the command line no matter how
they are placed.
System Commands Reference Manual, Rev. 03 (AMOS 2.2 - 4/91)
LNKLIT
Page 2
DEFAULTS
LNKLIT uses the default extension of .OBJ, unless you are specifying a library file, in which case
LNKLIT uses the default extension of .LIB.
If your filespec does not contain an account and device specification, LNKLIT assumes the file is
in the account and device you are logged into. Next it looks in your project library account, [P,0].
Finally, it looks in the System M68 account, DSK0:[7,7]. The default switches are /P and /R.
OPTIONS
/B
Doesn’t force word alignment of .OBJ modules.
/D
Requests DSECT initialization. The default is no DSECT initialization.
Operation switch.
/E
Includes equated symbols in symbol table file. Must use with /M or /S.
Operation switch.
/L
Designates a library file. File switch.
/M
Generates a load map (.MAP) file. Operation switch.
/N
Suppresses the /P switch. Operation switch.
/O
Designates an optional file. File switch.
/P
Generates a program (.LIT or .OVR) file. Operation.
/R
Designates a required file. Cancel /L and /O. Default, file switch.
/S
Generates a symbol table (.SYM) file. Default, operation switch.
/U
Doesn’t automatically include SYSLIB.LIB in linkage.
/X
Allows maximum DSECT area of 64K, rather than the 32K default, by allowing
full, 16-bit signed offsets.
OPERATION
Enter LNKLIT and the specifications of the files you want to link together. For example:
LNKLIT/M VISFIL,VIS1,UTILIT.LIB/L
RETURN
Notice the command line above specifies a library file, UTILIT.LIB. By using the /M switch, we
are also asking LNKLIT for a load map file.
LNKLIT displays several messages as it process the files (the exact messages you see depend on
the options you have requested and files you have specified).
MESSAGES
?Attempt to directly reference a DSECT symbol
Index through a base register when referencing a symbol defined in a data section.
System Commands Reference Manual, Rev. 03 (AMOS 2.2 - 4/91)
Page 3
LNKLIT
?Command error
Check your syntax and try again.
?Fatal error - At most one DSIZE may appear in an overlay
Check the instructions for use of the DSIZE pseudo opcode, and try again.
?Fatal error - Attempt to specify overlay [overlay-name] as optional
You may not use /O if that object file is an overlay.
?Fatal error - DSIZE must not appear in an overlay
Check the instructions for use of the DSIZE pseudo opcode, and try again.
?Fatal error - Expression stack error
An error occurred when LNKLIT evaluated some expressions in your files. If you see this
error, report it, and the conditions under which it occurred, to Alpha Micro.
?Fatal error - Expression stack overflow
You exceeded the number of nested expressions that LNKLIT can handle. Try to find the
overly complex expression in your source file and simplify it.
?Fatal error - First file must not be a library
To enable LNKLIT to correctly resolve external references to a library, you must specify
the program referencing that library before you specify the library file itself. Try again
with the library file after the reference file.
?Fatal error - First file must not be an overlay
To enable LNKLIT to correctly resolve external references to an overlay, you must specify
the program that references that overlay before you specify the overlay file itself. Try
again with the files in the proper order.
?Fatal error - Incompatible library/object file version
One or more of the object or library files is in an old format not compatible with the
current version of LNKLIT. The object file should be re-assembled or the library file
rebuilt using a current version of the software.
?Fatal error - Insufficient memory
See your System Operator about increasing the size of your memory partition.
System Commands Reference Manual, Rev. 03 (AMOS 2.2 - 4/91)
LNKLIT
Page 4
?Fatal error - Overlays of code are not permitted
Next expected address is [address]
Overlay code address is [address]
Your program is trying to overlay previous code. Check your .M68 programs to make
sure your overlay references are correct.
?Fatal error - Overlay symbol [symbol] in segment [segment-name]
was not defined in a previous input segment
You may not reference an undefined overlay. In other words, LNKLIT is trying to process
a supposed overlay file, but has seen no references to the overlay in a previous file.
Without such a reference, LNKLIT cannot construct the overlay, so it aborts and returns
you to AMOS command level.
?Fatal error - Overwriting of impure zone not permitted Next
expected address is xxxx Overwriting address is yyyy.
You backstepped the DSECT location counter, overwriting previously allocated storage in
a DSECT area.
?[symbol] undefined
An external symbol is undefined. This is a very common error. You have referenced a
symbol which has not previously been defined. Make sure an EXTERNed symbol in one
segment is defined by an INTERN statement in another segment.
?Undefined switch [switch] - ignored
Try again, using a valid switch.
System Commands Reference Manual, Rev. 03 (AMOS 2.2 - 4/91)
LOAD
FUNCTION
Loads disk files into your memory partition as memory modules.
CHARACTERISTICS
LOAD is re-entrant and re-usable. You may use LOAD to load memory modules only in your own
memory partition.
You cannot load a file from a remote system over a network.
LOAD does not understand wildcard symbols, but it does understand ersatz names. If you specify
an ersatz name but omit a file extension, LOAD uses the default extension for that ersatz name.
For example, the default extension for the BAS: account is .SBR. The ersatz device default
extensions are:
Ersatz Device/Extension
Ersatz Device/Extension
BAS:
.SBR
BOX:
.BOX
CMD:
.CMD
DVR:
.DVR
HLP:
.HLP
LIB:
.LIT
SYS:
.LIT
MAC:
.M68
OPR:
.LIT
PAS:
.PSB
FORMAT
LOAD filespec
filespec selects the disk file you want to load.
OPERATION
Enter LOAD and the specification of the file you want to load into your memory partition. For
example:
LOAD DSK0:ISAM.SYS[1,4]
RETURN
If you see the AMOS prompt symbol (and you don't see an error message), you know the program
you requested is now loaded into memory. You can verify this by using the DIR MEM: or MAP
command.
System Commands Reference Manual, Rev. 07
LOAD
Page 2
MESSAGES
?Cannot DELETE [filespec] - file may not be deleted
A file of the same name as the one you tried to LOAD already exists in memory—
normally, LOAD would write your new file over the old, but the one in memory is locked
there by AMOS.
?Cannot INIT [filespec] - device does not exist
Check your syntax, or use DEVTBL to see a list of devices on your system, and try again.
?Cannot load [filespec] - file not found
Check your syntax, or use DIR to find the file, and try again.
?Cannot load [filespec] - disk not mounted
MOUNT the disk and try again.
?Contiguous files may not be loaded
Random files cannot be loaded into memory.
?Program restricted to use on local system only
You cannot LOAD a file from a remote system over a network. COPY the file to your
system, then LOAD it.
%Warning -- Program is not reusable
You have loaded a program file that is not re-usable. The file has been loaded, but it may
not function properly after the first time it is executed. We recommended you use DEL to
remove it from your memory partition.
System Commands Reference Manual, Rev. 07
LOG
FUNCTION
Logs you into an account. Once you are on the system, LOG displays which account you are
logged into or transfers you between accounts and devices.
CHARACTERISTICS
LOG is re-entrant and re-usable. You may only use a few AMOS commands if you are not logged
into the system, such as: LOG, LOGON, SYSTAT, MEMORY, ATTACH, SYSTEM, DATE,
TIME, HELP, and SET.
LOG recognizes ersatz devices. For example, LOG BAS: RETURN logs you into the AlphaBASIC
library account, DSK0:[7,6]. For a list of the ersatz devices available on your system, enter
ERSATZ at AMOS command level.
Because they are such common typing mistakes, LOG treats the characters "m" and "." as commas.
However, if the "comma" comes right after the word LOG, a mistake is not translated (because
LOG doesn't know if you made a typing mistake or mis-entered a user name). For example, LOG
100m5 RETURN works, LOG m5 RETURN doesn't.
If an account is password protected, LOG checks your password entry before logging you into that
account. It also validates your user name and user password before logging you in. LOG also sets
your job's file-locking status according to the Lock/Nolock and Elock/Noelock options set up by
MUSER. If the status is changed, the event is recorded in the system log file (if event logging is
active).
If you have a command file in your account named START.CMD, LOG automatically runs that
file after it logs you in (unless you specify /N). This command file can contain AMOS system
commands, program invocations, the names of other command files, etc.
If you have a MAIL.JNK file in DSK0:[7,2], LOG displays the first line of that file whenever a
user logs into the system.
FORMAT
LOG {/switch}{devn:}{[{p}{,pn}]} {user name}
switch is an option, devn: is the device name, p is the project number, and pn is the programmer
number. If you are already logged into an account, you may be able to abbreviate the account
number depending on where you want to LOG to (see OPERATION, below). The user name is
required if you are not logged in and you have a user-name system, but if you do not include it in
the LOG command, you are prompted for it. If you use user name alone, you are logged into your
root account.
System Commands Reference Manual, Rev. 07
LOG
Page 2
DEFAULTS
If you leave out a device specification when you first log into the system, LOG uses DSK0: as a
default. If the account you have specified doesn't appear on DSK0:, LOG searches the rest of the
units of that device.
If you are already logged in, but leave out the device specification, LOG uses as a default the
device you are logged into; if the account does not appear on that device, LOG searches the rest of
the units of that device, beginning with device unit #0.
If you use LOG when you are already logged into the system, LOG uses the project or programmer
number of the account you are logged into as the defaults.
OPTIONS
/N
Do not access the START.CMD file when logging in to this account. Operation
switch.
OPERATION
To log into the system, enter LOG and an account specification and/or user name. For example:
LOG DSK1:47,2 RETURN
LOG RANDOLPH RETURN
LOG then searches for the account you specified. In the first example above, LOG looks on
DSK1: for account [47,2]. In the second example, the user name causes LOG to log you into your
root account. When the account is entered, LOG then looks to see if a password is required
(passwords are assigned by the System Operator for system security). If an account password is
needed, you are prompted for it.
The system doesn't display your password on the terminal as you type it; this prevents other users
from seeing your password. If AMOS recognizes the password, it logs you into the system. Once
you have logged onto the system, LOG displays a message telling you which device and account
you've logged into. If any other users are logged into the same account, LOG warns you (certain
AMOS programs should not be run if other people are active in your account and/or logged into
the same disk).
The first time a user logs on to a computer, the first line of the file DSK0:MAIL.JNK[7,2]
is displayed, if that file exists.
If you are already logged into an account, enter: LOG
device you are logged in under.
RETURN
to find out which account and
Once you are logged into the system, you can use LOG to transfer to other accounts. Enter LOG
followed by the device and account to which you wish to transfer. For example:
LOG DSK4:123,5
RETURN
System Commands Reference Manual, Rev. 07
Page 3
LOG
If you are in a project, and you wish to move to another account in the same project, you can
abbreviate the LOG command, because of the defaults. For example:
LOG ,5
RETURN
MESSAGES
?Account number invalid
Make sure you gave the correct device, and the account number is in the proper form, and
try again.
?Already logged in as [user name]
?Please use LOGOFF, then try again
You tried to log to another account using a different user name than the one you are
currently logged in under. In order to change your user name, you must first LOGOFF,
then LOG on under a different user name.
?Already logged in under [account]
You tried to log to where you are currently logged.
?Bad password
Try again, and be careful with your spelling. If you still have no success, see your System
Operator for help.
?Command format error
You made a mistake in typing in the LOG command. Check your syntax and spelling and
try again.
?Disk not mounted
Mount the disk and try again.
?Error setting lock mode
?Insufficient queue blocks
LOG could not set your file-locking status because there are not enough queue blocks.
You are logged on, but file locking is as it was. See your System Operator about
allocating more queue blocks.
System Commands Reference Manual, Rev. 07
LOG
Page 4
?Invalid user name
The user name you specified is not defined on your system. Use MUSER to display a list
of valid user names for your system. See your System Operator if you want to add or
change a user name.
?Nonexistent device
You tried to log to an account on a device LOG cannot access; the device is not defined in
the DEVTBL command in your system INI file, does not have a driver program in account
[1,6] of your System Disk, or is not file-structured. Use DEVTBL to see a list of currently
defined devices on your system.
Not logged in
You entered LOG to find out what account you are logged in under, but you are not logged
in. This message is also seen when you try to execute a command that can't be run unless
you are logged in.
?User [name] is a remote user only and may not log in to this system
You cannot log into the system you tried to log into. See your System Operator if you
need information about the network.
?Unable to locate requested language
Your user definition specifies a language not defined on your system. Either use a
different user name to log in, or see your System Operator about defining that language or
changing your user definition to an available language.
System Commands Reference Manual, Rev. 07
LOGOFF
FUNCTION
Logs you off the system.
CHARACTERISTICS
LOGOFF is re-entrant and re-usable. Use LOGOFF if you leave your terminal for any length of
time; this prevents other users from using your terminal to access your files.
LOGOFF resets your default device to DSK0:. LOGOFF also resets the flags in your job table to
ECHO, OCTAL, NODSKERR, NOVERIFY, and NOGUARD. See the SET reference sheet for
an explanation of these flags.
You may only use a few AMOS commands when logged off, such as: ATTACH, SYSTEM,
HELP, LOG, LOGON, SYSTAT, MEMORY, DATE, TIME, and SET.
LOGOFF deletes any memory modules in your memory partition as it logs you off the system. It
updates the accounting information that tells how much computer time you used. This information
can be viewed using the MUSER program.
OPERATION
Enter LOGOFF at AMOS command level:
LOGOFF
RETURN
LOGOFF logs you off the system and lets you know which account you are leaving, the date and
time, the number of disk reads and writes since you logged on, the CPU (or actual processing)
time, and the connect time (length of time since you logged in).
MESSAGES:
?Error reading USER.SYS
?Error writing USER.SYS
The user database file, DSK0:USER.SYS[1,2], could not be accessed. Usage information
is not updated for the user logging off the system.
?Unable to locate current user in USER.SYS
There is no record of the user in the user database file, DSK0:USER.SYS[1,2]. No usage
information can be updated.
System Commands Reference Manual, Rev. 07
LOGON
FUNCTION
Logs you into your root account.
CHARACTERISTICS
LOGON is re-entrant and re-usable. You may use the conversational LOGON program when
signing on to the system from a logged out state. The program displays a menu request for your
user name. When you enter your user name and an optional password, you are logged in to your
root account. LOGON also sets your job's file-locking status according to the Lock/Nolock and
Elock/Noelock options set up by MUSER. If the status is changed, the event is recorded in the
system log file (if event logging is active).
The LOGON program makes use of function keys and provides an online HELP facility.
Translation tables with the extension .AMX must be installed to use the function keys.
OPERATION
Enter LOGON at AMOS level:
LOGON
RETURN
LOGON displays a menu screen. A blinking cursor shows you where to enter information.
LOGON asks you for your user name, and possibly a password (if you have security on your
system). If your identification is correct, LOGON will verify you have been logged in to your root
account.
MESSAGES
?Command format error
Check your syntax and spelling and try again.
?Disk not mounted
Mount the disk and try again.
?File in use - cannot set lock mode Press RETURN to continue
LOG could not set your file-locking status because the job has a file locked. You are
logged on, but file locking is as it was. See your System Operator for help.
System Commands Reference Manual, Rev. 07
LOGON
Page 2
?Insufficient queue blocks - cannot set lock mode Press RETURN to continue
LOG could not set your file-locking status because there are not enough queue blocks.
You are logged on, but file locking is as it was. See your System Operator about
allocating more queue blocks.
?Improper password - try again.
Try again, and be careful with your spelling. If you still have no success, see your System
Operator for help.
?That name is not recognized - try again.
The user name you entered is not defined on your system. Try another user name, or see
your System Operator for help.
System Commands Reference Manual, Rev. 07
LOKUTL
FUNCTION
LOKUTL allows general system users to see a status display of the File/Record Locking Service
system. LOKUTL also allows the System Operator (when logged into OPR:) to display the
current file lock status, and monitor its operation.
CHARACTERISTICS
LOKUTL is re-entrant and re-usable. When you use LOKUTL from OPR:, LOKUTL enters a
privileged mode and allows you to execute a variety of functions. When you use LOKUTL from
any other account, LOKUTL displays the current status of the file locking data base.
OPERATION
FROM STANDARD SYSTEM ACCOUNTS:
Enter LOKUTL:
LOKUTL
RETURN
The program displays data on which files and records are currently locked on your system.
LOKUTL then lists each job currently active. The Job ID is shown on the same line as its first file
specification.
Under each job ID, LOKUTL lists the files the job is currently using. The word "Exclusive"
indicates the file is locked exclusively, and the word "Writer" indicates the file is open for output.
If it's a random file, LOKUTL then lists the records locked by this job. If a file is locked
exclusively, LOKSER doesn't need to lock individual records.
FROM THE SYSTEM OPERATOR'S ACCOUNT:
Enter LOKUTL as above. LOKUTL displays an asterisk prompt to indicate LOKUTL is waiting
for a command.
COMMAND SUMMARY
A = Abort a User from the Data Base
Cancels the program being run by a particular job, and releases all of its locked files and
records. LOKUTL asks you the name of the job and processes the job as if it EXITed.
The job is not aborted and the files are not CLOSEd as far as AMOS is concerned.
System Commands Reference Manual, Rev. 07
LOKUTL
Page 2
C = Close a File for a User
Unlocks a file and releases all its records. LOKUTL asks you for the job name and file ID
shown on the File Sequence Display (see the F command below). As in the command
above, the file is not CLOSEd as far as AMOS is concerned.
F = List Data Base Sorted by File ID
Allows you to see the same information as the U command, but sorted in a different order.
Instead of showing you the files being used by each job, this command shows you which
jobs are accessing each file.
H = List LOKUTL commands
L = List Lock options.
Lists jobs, filespecs, and job/filespec combinations that have locking turned off.
M = Monitor File Locking Operation
Gives you a dynamic display of the data base. The display is the same as you see from
any normal account, except that it is updated whenever AMOS services a request, or every
50 seconds to reflect the current file lock status of each job. At the bottom of your screen
you see the word "Waiting." LOKUTL prints one dot after this word every second until it
renews the display. When you are ready to stop, press CTRL /C.
O = Set Lock options.
Turn locking ON or OFF for jobs, filespecs or job/filespec combinations.
Q = Quit
Returns you to AMOS command level when you are finished using LOKUTL.
R = Unlock a Record for a User
Unlocks a specific record in a random file. LOKUTL asks you for the job name, the file
ID, and the record number.
S = Unlock a Stream for a User
Unlocks a specific stream in a USAM file. LOKUTL asks you the job name, the file ID,
the starting byte position, the stream length, and whether or not it is locked exclusively.
U = List data base sorted by User ID
Displays the currently active jobs on your system and the files they are using. This display
is the same as when you use LOKUTL from normal accounts.
System Commands Reference Manual, Rev. 07
Page 3
LOKUTL
W = Wake up a user
Wakes up a job waiting for a file or record. Can also wake up a job trapped in a deadlock.
X = Enable Diagnostic Messages
Causes diagnostic messages to appear on your terminal whenever a program tries to
execute a conflicting instruction. The messages are %File not OPEN and %File
already OPEN. You probably want to use these two messages only when debugging a
program.
Y = Disable Diagnostic Messages
Turns off the diagnostic messages.
MESSAGES
?File in use
Try again later.
?File not found
Use DIR to list files and try again.
?File specification error
Check your syntax, or use DIR to see files, and try again.
?Insufficient queue blocks
See your System Operator about increasing system queue blocks.
?Invalid argument
Check your syntax and try again.
?Invalid job name
Use SYSTAT to see the jobnames on your system and try again.
System Commands Reference Manual, Rev. 07
MAKACD
FUNCTION
Copies one or more AMOS logical disks to a recordable CD media in a supported CD-recorder.
CDs created with MAKACD can be used for software distribution or for system backups. Using
a 4 speed CD-recorder it only takes about 15 minutes to record an entire 600MB CD. CD's
created with MAKACD can be easily read after mounting the CD with the ACD program.
CHARACTERISTICS
MAKACD copies logical AMOS disk drives onto a recordable or rewritable CD in a format that
is compatible with the Alpha Micro ACD program. An ACD compatible CD can contain up to
approximately 600 megabytes of data. MAKACD creates a logical drive structure on the CD
media such that each logical drive is equal in size to the largest logical disk drive copied. If
logical drives of differing sizes are specified, the smaller drives will be padded on the CD to
equal to the largest logical size copied. Only entire logical drives, including unused areas, can be
copied to the CD. Rewritable CDs may be erased and reused.
When recording to a blank CD, MAKACD will start recording at the beginning of the CD and
use only as much space as required to hold the desired data. The Table of Contents will normally
be written and the CD can then be used with the ACD program.
When recording to a partially recorded CD, MAKACD will start recording at the first available
unrecorded location on the CD. Normally, all of the desired data will be recorded and then extra
filler will be recorded followed by the ACD special sector. Finally, the Table of Contents will
normally be recorded and the newly recorded data can then be used with the ACD program. If
you record data on a previously recorded CD, ACD will use the newly recorded information and
ignore all data that was previously placed on the CD.
MAKACD uses the available user memory for data buffers in order to continue supplying data to
the CD-recorder while other system or multi-user activity occurs. Excessive system or multi-user
activity can still interfere with the steady flow of data to the CD-recorder, causing fatal recording
errors.
FORMAT
MAKACD {switches}
System Commands Reference Manual, Rev. 11
MAKACD
Page 2
OPTIONS
/HELP
Display the available options and exits
/?
Same as /HELP
/V
Display version information and exits
/COUNT:n
Creates n CDs containing the same data
/DEV:xxx:
Uses device and driver named xxx: instead of the default CDR:
/EJECT
Ejects the CD in the recorder and exits
/ERASE:ALL
Erases the entire rewritable CD by overwriting all data areas on
the CD.
/ERASE:QUICK
Erases the rewritable CD by clearing only the control information
without actually overwriting the data areas of the CD. This
causes the CD to react like a blank CD when read or written. Do
not use this switch if the rewritable CD contains more than one
session.
/ERASE:SESSION
Erases the last session from a multi-session rewritable CD by
overwriting all data areas of the last recorded session on the CD.
This command may be used more than once to successively erase
multiple sessions from the CD. Once a session is erased, the
previous session may become available.
/ID:n
Uses the CD-Recorder at SCSI ID n instead of scanning the SCSI
bus to find a CD-Recorder. The ID can be from 0 to 15.
/NOEJECT
The CD will not be ejected from the recorder.
/NOFILL
Do not write AMOS filler and ACD special sector information.
The newly recorded data will not be accessible by the ACD
program.
/NOTOC
Do not write out the table of contents when recording is finished.
The newly recorded data will be inaccessible until the /TOC
option is used to write the table of contents.
/PIC
Displays the Product Installation Code
/SPEED:n
Sets the maximum recording speed to n times the normal audio
speed. This switch can be used to force recording at a slower
speed if the system is unable to supply data to the CD-Recorder.
System Commands Reference Manual, Rev. 11
Page 3
MAKACD
Speeds from 1 to 32 may be specified. If the CD-Recorder does
not support the speed specified, recording will be done at a lower
supported speed.
/TOC
Writes the table of contents of the current CD and exits.
/TEST
Write CD in test mode, which does everything except turn the
CD laser on when recording.
/TESTFIRST
Does a TEST first, followed by the actual CD recording if no
errors were encountered in the TEST.
/VERBOSE
Display additional error messages.
MAKACD with no switches will create an ACD compatible CD, using the CDR: device found
by scanning the SCSI bus. The CD will be created using the maximum recording speed of the
CD-Recorder, without first doing a test copy.
OPERATION
Before starting the program, place a blank CD or partially recorded CD in the CD-recorder.
Recording on a partially recorded media will render all previously recorded information
inaccessible.
It is recommended that the system be idle. Other users or system activity could interfere
with CD recording and cause the CD to be unusable. Once recording has started, the CDrecorder must receive a constant stream of data until the entire recording is finished. If
the CD-recorder runs out of data before recording is finished, the program will abort with
a fatal error.
Copying logical disks to the CD-recorder that are being updated by other users can result
in CDs containing incorrect or incomplete data.
Type MAKACD from the AMOS prompt:
MAKACD
RETURN
MAKACD will attempt to find a CD-recorder that is compatible with the CD-recorder driver
being used. The driver must have the same name as the CD-recorder device name and either be
loaded in system memory or reside in DSK0:[1,6]. MAKACD will find the CD-recorder either
using the command line switches /DEV and /ID or by defaulting to CDR: if /DEV is not
specified and by scanning the SCSI bus if /ID is not specified. If more than one CD type device
is found when scanning the SCSI bus, you will be asked to choose the device you wish to use for
recording.
Scanning the SCSI bus will find CDROM devices as well as CD-recording devices.
System Commands Reference Manual, Rev. 11
MAKACD
Page 4
After entering the MAKACD command, the following will be displayed:
MAKACD Version X.X(xxx) - Copyright (C) 1999 Alpha Microsystems Inc.
Initializing SCSI CD-Recorder...
If MAKACD finds multiple possible CD-recorders (including CDROM drives) while scanning
the SCSI bus, the following message will be displayed to allow you to select the drive to use:
Found the following possible CD-Recorders:
1
2
ID
nn
nn
Description
xxxxxxxxxxxxxxxxxxxxxxxxxxx
xxxxxxxxxxxxxxxxxxxxxxxxxxx
Select one of the above devices:
Additional information about the CD-recorder, driver, and media is then displayed:
Using Generic SCSI-MMC CDR driver (CDRMMC)
CD-Recorder located at SCSI id 5
A blank CD is in the CD-Recorder
MAKACD then asks for an optional title for the CD. The title may be up to 60 characters long.
You may enter an optional title for the CD or press RETURN for
none.
Title:
Next MAKACD asks for the AMOS logical drives to copy to the CD, as follows:
Enter the list of disk devices to transfer onto the CD-Recordable
disk. Devices may be entered as a range (ex. dev0: -20 for dev0:
through dev20:), or may be comma separated, The list is terminated
with a blank line:
*
Enter the logical drives to be copied and then just a [return] when all
desired drives have been entered.
*DSK0:
*DSK6:
*
MAKACD will the check the transfer rate of the drives specified to make sure they are fast
enough to supply the continuous data stream required by the CD-recorder. If the speed is less the
300K per second, the program will terminate. If the speed is between 300K and 600K per second,
recording speed will be limited to 1x. If the speed is between 600K and 1000K per second,
recording speed will be limited to 2x. If the speed is greater than 1000k per second, recording
will take place at the maximum speed of the CD-recorder or the speed specified by /SPEED in
the command line, whichever is slower.
DSK0: 64660 blocks. Transfer rate: 1263K per second - ok
DSK6: 64660 blocks. Transfer rate: 1196K per second - ok
System Commands Reference Manual, Rev. 11
Page 5
MAKACD
MAKACD then displays information about how much space is required on the CD and where
recording will start.
Calculating space requirements:
AMOS partition requires 16165 sectors
289735 unused sectors remain
Calculated starting AMOS sector is 0
MAKACD then gives you the opportunity to abort or to start the recording process.
Note that once started, the recording operation can be stopped by
pressing ^C which will render the CD-R disk unusable.
Warning: The CD-Recorder must receive data constantly. Other users
on the system could delay data transfers and render the CD-R disk
unusable.
Press RETURN to start recording or ^C to abort.
The recording process then begins. As it progresses, status messages are displayed:
Transferring DSK0: in real mode
Transferring DSK6: in real mode
Waiting for CD-recorder to finish writing...Completed.
Also the following information is displayed on the status line:
20% complete
buffer 95%
The percentage complete shows how much of the total amount of data has been written to the
CD. The buffer percentage shows how full the CD-recorder's internal cache buffer is.
When all data has been written to the CD in real mode the following messages are shown:
Writing Table Of Contents...
AlphaCD creation complete
And then the CD is ready to use.
REQUIREMENTS AND SETUP
MAKACD requires the following:
•
•
•
•
•
A 68030 or faster processor
A full interrupt enabled SCSI dispatcher.
DCACHE, with the number of read-ahead blocks set to 7 for best performance
AMOS 2.3A or later.
A supported CD-Recorder.
The MAKACD package contains the following required files:
•
•
The device driver for the CD-Recorder.
The CDR.DEV file that contains supported CD-recorder information.
System Commands Reference Manual, Rev. 11
MAKACD
•
Page 6
The SSD overlay file (CDR000.OVR)
MODIFYING THE SYSTEM INITIALIZATION FILE:
The CD-recording device must be specified as a non-sharable device in a DEVTBL statement in
the system initialization file.
Example:
DEVTBL
/CDR0
No other changes are required in the system initialization file.
The available CD-recorder device driver files are supplied either with the MAKACD package or
with the Alpha Micro CD-recorder you purchased. The device driver must be installed in
DSK0:[1,6] and given the same name as the CD-recorder device in the DEVTBL statement. For
example, using the supplied CDRMMC.DVR device driver and the device name CDR: you
would have:
DEVTBL
/CDR0
in the system initialization file. Then copy the supplied device driver as follows:
LOG DSK0:[1,6]
COPY CDR.DVR=CDRMMC.DVR
If desired you may load the device driver into system memory during system initialization by
adding the following statement in you system initialization file:
SYSTEM DSK0:CDR.DVR[1,6]
This statement should be added in the same area of the initialization file that is currently loading
other system device drivers.
The CDR.DEV device information file must be installed in DSK0:[1,4]. This file is supplied
with the MAKACD package or with the Alpha Micro CD-recorder. If you received more than
one copy of the file, you should use the newer one.
You must enter the Product Installation Code (PIC) to actuate MAKACD. Contact your dealer
for the PIC for your computer system. The first time you attempt to use MAKACD you will be
asked to enter the PIC. After entering the correct PIC, MAKACD is ready to use.
MESSAGES
Command line syntax messages:
•
•
Error - Cannot have /EJECT, /TOC, /NOTOC together.
Error - Cannot have /TEST and /TESTFIRST together.
System Commands Reference Manual, Rev. 11
Page 7
•
•
MAKACD
Invalid switch
Invalid switch option
System requirements messages:
•
•
•
•
•
MAKACD requires a 68030 or higher CPU.
MAKACD requires a full interrupt level dispatcher.
MAKACD requires a SCSI dispatcher.
MAKACD requires AMOS 2.x or compatible operating system.
Memory partition is too small for MAKACD. An additional nnnK of memory is required.
CD-Recorder device or driver messages:
•
•
•
•
•
?Cannot open xxx: - device in use
Another user is currently using the CD-recorder.
Device specified is not a CD-Recorder.
This CD-Recorder requires a different driver.
The current driver is: xxxxxx
The required driver is: xxxxxx
The device and driver selected are inappropriate for the physical CD-recorder.
Unable to find a CD-Recorder.
Unknown CD-Recorder!
Error - Unsupported CD recorder found.
The CD-recorder is not supported by MAKACD.
Error messages when setting up or writing to the CD-Recorder
•
•
•
•
•
•
•
•
•
•
•
Error - Buffer not initialized.
Error - CD-Recorder out of data during recording.
The computer was unable to supply data to the CD-recorder fast enough to keep the
recorder supplied with data. The CD is incomplete and unusable. If others were using
the system during recording, try again without the other users. Otherwise try again
using a slower maximum recording speed (see the /SPEED switch).
Error - Disk in CD-Recorder is not writeable.
Error - Disk in CD-Recorder is not writeable, last session is not empty
Error - Disk is full and cannot be used.
Error - Media is not rewritable and cannot be erased.
Error - Total data requirements exceed CD-R capacity.
Error - Unable to load CDR media.
This indicates a hardware problem with the CD-recorder or a problem with the CD
media.
Error - Unable to open CD recording session.
Try a different CD media. This can also indicate a possible CD-recorder problem.
Error - Unable to open track for recording.
Try a different CD media. This can also indicate a possible CD-recorder problem.
Error - Unable to read disk information from media.
Try a different CD media. This can also indicate a possible CD-recorder problem.
System Commands Reference Manual, Rev. 11
MAKACD
•
•
•
•
•
•
•
•
•
•
Page 8
Error - Unable to set desired write mode.
A device error has occurred while attempting to setup the CD-recorder for real mode or
test mode recording.
Error - Unable to set recording speed.
A device error has occurred while attempting to setup the CD-recorder for the desired
recording speed.
Error - Unable to set write mode.
A device error has occurred while attempting the setup the CD-recorder recording
mode.
Error - Unable to write to the CD.
A device error has occurred while attempting to record data on the CD.
Fatal SCSI error. Sense key=nn additional sense=nn
CD-recorder device error has occurred. Sense key and additional sense provide further
error information.
Please insert a CD-Recordable disk
SCSI error - xxxxxxxxx
[sense error message] Code= nn.nn
CD-recorder device error has occurred. Code provides additional SCSI error sense
information.
Too slow.
The disk drive is too slow to keep up with the CD-recorder.
Warning - Unable to close track.
Device error occurred while closing the current CD track. The CD may or may not be
usable.
Warning - Unable to read existing track numbers. Starting with track 0.
Errors concerning the AMOS CD data structure:
•
•
•
•
•
•
•
•
Calculated and true starting points are different.
Recording will start at sector nnnnnn with a filler of nnnnnn sectors
This is only a warning indicating that recording will start at a different location on the
CD than originally assumed.
The AlphaCD logical unit size is greater than 64K blocks which could mean compatibility
problems on AMOS 1.X systems. Press RETURN to continue, or ^C to abort MAKACD:
The logical disk size on the CD will be greater than the maximum size of a traditional
logical drive.
Error - Disk geometry calculation was incorrect.
The AMOS hidden sector parameters calculated are invalid.
Error getting AMOS data buffer
The system was unable to acquire memory for data buffers.
Error - memory previously calculated as available isn't
Memory required for data buffers has disappeared.
Error - No devices specified.
User did not specify any AMOS logical disks to be copied to the CD.
Error - Unable to calculate AMOS buffer size.
The system was unable to find a buffer size that allows the AlphaCD special sector to
properly recorded.
Error - Unable to calculate AMOS disk geometry.
System Commands Reference Manual, Rev. 11
Page 9
•
•
•
MAKACD
The AMOS hidden sector parameters could not be calculated.
Error- Unable to remove CD-Recorder data buffer from memory.
Error - Unable to write AlphaCD special sector.
An error was received while trying to record the AlphaCD special sector.
Unable to continue due to one or more errors shown above.
Testing of logical disk drive transfer rates resulted in the errors listed above.
Normal informational messages:
•
•
•
•
•
•
•
•
•
•
•
A blank CD is in the CD-Recorder.
The CD media in the CD-Recorder is blank and unused. A blank CD does not require
filler and an AlphaCD special sector.
AlphaCD test complete
The test recording is done.
AlphaCD creation complete
The recording of data on the CDR media is done.
Are you sure you want to erase data from this CD (Y/N)?
If you really want to erase the CD, type Y RETURN . The CD will be erased as requested. If
this was a mistake, type N RETURN and the program will exit without erasing the CD.
Calculating space requirements:
AMOS partition requires 16165 sectors
Filler requires 38127 sectors
Calculated starting AMOS sector is 251608
This shows information about where data will be recorded on the CD and how much
space it consumes.
CD-Recorder located at SCSI id n
This shows the SCSI id of the CD-Recorder being used.
Completely erase entire CD
MAKACD will erase all data from the rewritable CD. This writes to the entire CD and
can take 30 minutes or longer.
DSK0: 64660 blocks. Transfer rate: 1273K per second - ok
The disk transfer rates are being tested.
Erase last session on CD
MAKACD will erase the last session on the rewritable CD. This overwrites the entire
last session on the CD and can take 30 minutes or longer, depending on the size of the
session.
not calculated - disk is too small.
The specified disk is too small for speed testing. The disk will be copied to the CD.
Note that once started, the recording operation can be stopped by pressing ^C which will
render the CD-R disk unusable.
Warning: The CD-Recorder must receive data constantly. Other users on the system could
delay data transfers and render the CD-R disk unusable.
•
•
Press RETURN to start recording or ^C to abort.
This is the final prompt before recording begins. You may abort by pressing control-C
or start the recording process by pressing RETURN.
NOTE: Disk will be recorded as a multi-session recording
System Commands Reference Manual, Rev. 11
MAKACD
•
•
•
•
•
•
•
•
•
•
Page 10
Disk currently has nnnnn free sectors
CD contains tracks 1 through 10
If the CDR media is not blank, this message shows how much space is available and
what CDR tracks are currently recorded. Recording new information on this CDR will
make the previously recorded data inaccessible by the ACD program.
NOTE: Writing in TEST mode.
This message is shown if the /TEST or /TESTFIRST switches are included in the
command line.
OK for 2x recording.
The disk is too slow for 4 speed recording so 2 speed recording will be used for the
entire CD.
Quick erase CD
MAKACD will erase just enough information to make the rewritable CD look like a
blank CD. This normally takes less than 5 minutes to complete. Do not use this switch if
the rewritable CD contains more than one session.
This operation may take over 30 minutes to complete
This just warns that the erase operation requested will take a long time to complete.
Nothing will be shown on the terminal screen until the erase operation completes.
Transferring DSK0:in test mode
Test mode does everything but turn on the recording laser.
Using Generic SCSI-MMC CDR driver (CDRMMC)
This message shows the CDR driver name and description being used.
Waiting for CD-recorder to finish writing...Completed.
The memory data buffers and the CD-Recorder's cache buffers are being recorded on the
CDR media.
Writing filler...
This message is shown if filler is required before recording the AlphaCD special sector.
Writing Table Of Contents...
All data has been recorded and the Table of Contents is being recorded on the CDR
media.
nn% complete buffer nn%
This message shows percentage of the recording process already completed and how full
the CD-recorder's cache buffer is. This message appears on the terminal's status line.
System Commands Reference Manual, Rev. 11
MAKBD
FUNCTION
Copies one or more AMOS logical disks to a recordable DVD-RAM or Blu-ray disc (BD-RE) in
a supported DVD-RAM or Blu-ray drive. DVDs and BD-REs created with MAKBD can be used
for system backups. DVDs and BD-REs created with MAKBD can be easily read with the
DIRBD or BDRES programs.
AlphaDVD is NOT compatible with AlphaDBD. AlphaDVD supports DVD-RAM media
backups. AlphaDBD supports DVD-RAM and BD-RE media. The two packages have
different formats. AlphaDVD copies an entire logical, but AlphaDBD copies only used
logical blocks. AlphaDVD can not read AlphaDBD media and AlphaDBD cannot read
AlphaDVD media.
CHARACTERISTICS
MAKBD copies used blocks from logical AMOS disk drives onto a DVD or BD-RE in a format
that is compatible with the DBD program. A DVD can contain up to approximately 4.7
gigabytes of data, and a BD-RE contains up to 23 gigabytes of data. MAKBD creates a drive
structure on the DVD or BD-RE that is supported by the DBD program. Only used blocks are
copied to the DVD-RAM or BD-RE media. DVD-RAM or BD-RE media may be reused.
MAKBD will start recording at the beginning of the DVD or BD-RE and use only as much space
as required to hold the used data blocks.
MAKBD uses the available user memory for data buffers in order to continue supplying data to
the DVD-RAM or Blu-ray drive while other system or multi-user activity occurs.
FORMAT
MAKBD {switches}
OPTIONS
/HELP
Display the available options and exits
/?
Same as /HELP
/V
Display version information and exits
/COUNT:n
Creates n DVDs or BD-REs containing the same data
/DEV:xxx:
Uses device and driver named xxx: instead of the default DBD:
System Commands Reference Manual, Rev. 18
MAKBD
Page 2
/EJECT
Ejects the DVD or BD-RE in the drive
/ID:n
Uses the DVD-RAM or Blu-ray drive at SCSI ID n instead of
scanning the SCSI bus to find a DVD-RAM or Blu-ray drive. The
ID can be from 0 to 15.
/NOEJECT
The DVD or BD-RE media will not be ejected from the drive.
/PIC
Displays the Product Installation Code
/VERBOSE
Display additional error messages.
MAKBD with no switches will create a DVD or BD-RE using the DBD: device found by
scanning the SCSI bus.
OPERATION
MAKBD works best on a job with 132 columns set as the terminal width.
Before starting the program, place a DVD-RAM or BD-RE media in the drive.
Copying logical disks that are being updated by other users to the DVD-RAM or Bluray drive can result in DVD-RAMs or BD-REs containing incorrect or incomplete data.
Type MAKBD from the AMOS prompt:
MAKBD
RETURN
MAKBD will attempt to find a DVD-RAM or Blu-ray drive that is compatible with the DVDRAM or Blu-ray driver being used. The driver must have the name DBD.DVR and be loaded in
system memory. MAKBD will find the DVD-RAM or Blu-ray drive either using the command
line switches /DEV and /ID or by defaulting to DBD: if /DEV is not specified and by scanning
the SCSI bus if /ID is not specified. If more than one DVD-RAM or Blu-ray type device is found
when scanning the SCSI bus, you will be asked to choose the device you wish to use for
recording.
After entering the MAKBD command, the following will be displayed:
MAKBD Version X.X(xxx) - Copyright 2007, Alpha Microsystems
Initializing SCSI DVD-RAM or Blu-ray Recorder...
If MAKBD finds multiple DVD-RAM or Blu-ray drives, the following message will be displayed
to allow you to select the drive to use:
Found the following possible DVD-RAM or BD-RE Recorders:
1
ID
nn
Description
xxxxxxxxxxxxxxxxxxxxxxxxxxx
System Commands Reference Manual, Rev. 18
Page 3
MAKBD
2
nn
xxxxxxxxxxxxxxxxxxxxxxxxxxx
Select one of the above devices:
Additional information about the DVD-RAM or Blu-ray drive, driver, and media is then
displayed:
Using Generic SCSI DVD-RAM or BD-RE driver (DVDBD).
DVD-RAM or BD-RE Recorder located at SCSI id 4
MAKBD then asks for an optional title for the DVD or Blu-ray drive. The title may be up to 60
characters long.
You may enter an optional title for the DVD or press RETURN for
none.
Title: END OF MONTH BACKUP...
Next MAKBD asks for the AMOS logical drives to copy to the DVD or BD-RE, as follows:
Enter list of disk devices to transfer onto the DVD or Blu-ray
media. Devices may be entered as a range (e.g.: DEV0: -20 for
DEV0: thru DEV20:), or may be comma separated, The list is
terminated with a blank line:
*
Enter the logical drives to be copied and then just a [return] when all desired drives have been
entered.
*REX0: -15
*
L ---------B--L--O--C--K--S--------- --BITMAP-ITEM T --Total--- ---Used--- ---Free---- --words--1 REX00: E
307200.
20928.
286272.
19200.
2 REX01: E
307200.
216928.
90272.
19200.
3 REX02: E
307200.
2617.
304583.
19200.
4 REX03: E
307200.
36155.
271045.
19200.
5 REX04: E
307200.
63972.
243228.
19200.
6 REX05: E
307200.
7085.
300115.
19200.
7 REX06: E
307200.
57016.
250184.
19200.
8 REX07: E
307200.
17996.
289204.
19200.
9 REX08: E
307200.
40664.
266536.
19200.
10 REX09: E
307200.
8072.
299128.
19200.
11 REX10: E
307200.
32551.
274649.
19200.
12 REX11: E
307200.
3804.
303396.
19200.
13 REX12: E
307200.
84153.
223047.
19200.
14 REX13: E
307200.
19063.
288137.
19200.
15 REX14: E
307200.
52946.
254254.
19200.
16 REX15: E
307200.
241467.
65733.
19200.
TOTAL:
4915200.
905417.
4009783.
(megabytes)
2400.000
442.098
1957.901
(gigabytes)
2.3438
0.4317
1.9120
#
MAKBD then displays information about how much space is required on the media and where
recording will start.
System Commands Reference Manual, Rev. 18
MAKBD
Page 4
Calculating space requirements:
AMOS partition requires 226354 sectors. (442.098 Mb)
Media sectors available = 2462959
2236605 unused sectors remain. (4368.369 Mb)
MAKBD then gives you the opportunity to abort or to start the recording process.
Note that once started, the recording operation can be stopped
by pressing ^C.
Press RETURN to start recording or ^C to abort.
The recording process then begins. As it progresses, status messages are displayed:
Transferring REX000:
20928 used blocks
1 of 16
Transferring REX001:
216928 used blocks
2 of 16
Transferring REX002:
2617 used blocks
3 of 16
Transferring REX003:
36155 used blocks
4 of 16
Transferring REX004:
63972 used blocks
5 of 16
Transferring REX005:
7085 used blocks
6 of 16
Transferring REX006:
57016 used blocks
7 of 16
Transferring REX007:
17996 used blocks
8 of 16
Transferring REX008:
40664 used blocks
9 of 16
Transferring REX009:
8072 used blocks 10 of 16
Transferring REX010:
32551 used blocks 11 of 16
Transferring REX011:
3804 used blocks 12 of 16
Transferring REX012:
84153 used blocks 13 of 16
Transferring REX013:
19063 used blocks 14 of 16
Transferring REX014:
52946 used blocks 15 of 16
Transferring REX015:
241467 used blocks 16 of 16
Waiting for DVD-recorder to finish writing...Completed.
Also the following information is displayed on the status line:
The percentage complete shows how much of the current logical’s used blocks has been
written to the DVD-RAM or Blu-ray media.
When all data has been written to the DVD-RAM, the following message is shown:
AlphaDBD creation complete.
And then the DVD-RAM or BD-RE is ready to use.
REQUIREMENTS AND SETUP
DBD requires the following:
•
•
•
•
AM-8000, Eagle 800, or AMPC 7.x system
A fully interrupt-enabled SCSI dispatcher.
AMOS 8.1(102)-2 or later.
A supported DVD-RAM or Blu-ray drive.
The DBD package contains the following required files:
•
DBD.LIT
System Commands Reference Manual, Rev. 18
Page 5
•
•
•
•
•
MAKBD
The device driver (DBD.DVR) for the DVD-RAM or Blu-ray drive, in system memory.
The SSD overlay file (DVD000.OVR)
MAKBD.LIT
DIRBD.LIT
BDRES.LIT
MODIFYING THE SYSTEM INITIALIZATION FILE:
You must load the device driver into system memory during system initialization by adding the
following statement in your system initialization file:
SYSTEM DSK0:DBD.DVR[1,6]
This statement should be added in the same area of the system initialization file that is currently
loading other system device drivers.
MESSAGES
Command line syntax messages:
•
•
Invalid switch
Invalid switch option
System requirements messages:
•
If your memory partition is too small for MAKBD, the following message will display:
%Error - Memory requirements have not been met. CODE: N.
- Minimum memory to run MAKBD.LIT is 430 KB (449,320 bytes)
DVD-RAM or Blu-ray Recorder device or driver messages:
•
•
Device specified is not a DVD-RAM or Blu-ray Recorder.
Unable to find a DVD or Blu-ray Recorder.
Error messages when setting up or writing to the DVD Recorder
•
•
•
•
•
•
Error - Buffer not initialized.
Error - Device is already in use.
This indicates that either another user is running the MAKBD program or the DBD is
being used in shared read/write mode.
Error - Disk in DVD-Recorder is not writeable.
Error - DVD-RAM driver must be in system memory.
Error - Total data requirements exceed DVD capacity.
Error - Unable to load DVD media.
This indicates a hardware problem with the DVD-RAM drive or a problem with the DVD
media.
System Commands Reference Manual, Rev. 18
MAKBD
•
•
•
•
•
•
•
•
•
Page 6
Error - Unable to open DVD recording session.
Try a different DVD media. This can also indicate a possible DVD-RAM drive problem.
Error - Unable to open for recording.
Try a different DVD media. This can also indicate a possible DVD-RAM drive problem.
Error - Unable to read disk information from media.
Try a different DVD media. This can also indicate a possible DVD-RAM drive problem.
Error - Unable to write to the DVD.
A device error has occurred while attempting to record data on the DVD.
Fatal SCSI error. Sense key=nn additional sense=nn
DVD drive device error has occurred. Sense key and additional sense provide further
error information.
Please insert a DVD-RAM media
SCSI error - xxxxxxxxx
[sense error message] Code= nn.nn
DVD-RAM drive device error has occurred. Code provides additional SCSI error sense
information.
Warning - Maximum number of devices exceeded - extras ignored.
Warning - Unable to close DVD.
Device error occurred while closing the current DVD. The DVD-RAM may or may not
be usable.
Errors concerning the AMOS DVD data structure:
•
•
•
•
•
•
Error - Disk geometry calculation was incorrect.
The AMOS hidden sector parameters calculated are invalid.
Error - memory previously calculated as available isn't
Memory required for data buffers has increased, bump your memory partition.
Error - No devices specified.
User did not specify any AMOS logical disks to be copied to the CD.
Error - unable to get AMOS data buffer
The system was unable to acquire memory for data buffers.
Error- Unable to remove DVD Recorder data buffer from memory.
Unable to continue due to one or more errors shown above.
Testing of logical disk drive transfer rates resulted in the errors listed above.
Normal informational messages:
•
•
•
•
AlphaDBD creation complete
The recording of data on the DVD media is done.
Calculating space requirements:
AMOS partition requires 16165 sectors
Media sectors available = 2236703
2220538 unused sectors remain.
This shows information about how much space the data consumes on the DVD and how
much empty space remains.
DVD-RAM Recorder located at SCSI id n
This shows the SCSI id of the DVD-RAM Drive being used.
Note that once started, the recording operation can be stopped by pressing ^C.
System Commands Reference Manual, Rev. 18
Page 7
•
•
•
•
•
MAKBD
Press RETURN to start recording or ^C to abort.
This is the final prompt before recording begins. You may abort by pressing control-C
or start the recording process by pressing RETURN.
Transferring DSK0:
Using Generic SCSI DVD-RAM and BD-RE driver (DVDBD)
This message shows the DVD driver name and description being used.
Waiting for DVD-Recorder to finish writing...Completed.
The memory data buffers and the DVD-RAM Drive's cache buffers are being recorded
on the DVD media.
nn% complete
This message shows percentage of the recording process completed for the current
logical. This message appears on the terminal's status line.
System Commands Reference Manual, Rev. 18
MAKDVD
FUNCTION
Copies one or more AMOS logical disks to a recordable DVD-RAM media in a supported DVDRAM-drive. DVDs created with MAKDVD can be used for software distribution or for system
backups. DVDs created with MAKDVD can be easily read or written after mounting the DVD
with the DVD program.
CHARACTERISTICS
MAKDVD copies logical AMOS disk drives onto a DVD in a format that is compatible with the
Alpha Micro DVD program. A DVD can contain up to approximately 4.7 gigabytes of data.
MAKDVD creates a logical drive structure on the DVD media such that each logical drive is
equal in size to the largest logical disk drive copied. If logical drives of differing sizes are
specified, the smaller drives will be padded on the DVD to equal to the largest logical size
copied. Only entire logical drives, including unused areas, can be copied to the DVD. DVDram media may be erased, reused, and modified.
If logical drives of differing sizes are specified, the smaller logicals that have been
padded on the DVD media will not be randomly writeable later when using the
DVD program. However, all logical units on the DVD can be randomly read when
using the DVD program.
MAKDVD will start recording at the beginning of the DVD and use only as much space as
required to hold the desired data.
MAKDVD uses the available user memory for data buffers in order to continue supplying data to
the DVD-RAM-drive while other system or multi-user activity occurs.
FORMAT
MAKDVD {switches}
System Commands Reference Manual, Rev. 17
MAKDVD
Page 2
OPTIONS
/HELP
Display the available options and exits
/?
Same as /HELP
/V
Display version information and exits
/COUNT:n
Creates n DVDs containing the same data
/DEV:xxx:
Uses device and driver named xxx: instead of the default DVD:
/EJECT
Ejects the DVD in the drive and exits
/ID:n
Uses the DVD-RAM Drive at SCSI ID n instead of scanning the
SCSI bus to find a DVD-RAM Drive. The ID can be from 0 to
15.
/NOEJECT
The DVD media will not be ejected from the drive.
/PIC
Displays the Product Installation Code
/VERBOSE
/VERIFY
Display additional error messages.
Set hardware read after write verification.
MAKDVD with no switches will create a DVD, using the DVD: device found by scanning the
SCSI bus.
OPERATION
Before starting the program, place a DVD media in the DVD-RAM drive.
Copying logical disks that are being updated by other users to the DVD-RAM drive can
result in DVDs containing incorrect or incomplete data.
Type MAKDVD from the AMOS prompt:
MAKDVD
RETURN
MAKDVD will attempt to find a DVD-RAM drive that is compatible with the DVD-RAM driver
being used. The driver must have the same name as the DVD-drive device name and be loaded
in system memory. MAKDVD will find the DVD-RAM drive either using the command line
switches /DEV and /ID or by defaulting to DVD: if /DEV is not specified and by scanning the
SCSI bus if /ID is not specified. If more than one DVD-RAM type device is found when
scanning the SCSI bus, you will be asked to choose the device you wish to use for recording.
System Commands Reference Manual, Rev. 17
Page 3
MAKDVD
After entering the MAKDVD command, the following will be displayed:
MAKDVD Version X.X(xxx) - Copyright (C) 2001 Alpha Micro Products
Inc.
Initializing SCSI DVD-RAM-Recorder...
If MAKDVD finds multiple possible DVD-RAM drives while scanning the SCSI bus, the
following message will be displayed to allow you to select the drive to use:
Found the following possible DVD-Recorders:
1
2
ID
nn
nn
Description
xxxxxxxxxxxxxxxxxxxxxxxxxxx
xxxxxxxxxxxxxxxxxxxxxxxxxxx
Select one of the above devices:
Additional information about the DVD-RAM drive, driver, and media is then displayed:
Using Generic SCSI-DVD-RAM driver (DVDRAM)
DVD-RAM-Recorder located at SCSI id 3
MAKDVD then asks for an optional title for the DVD. The title may be up to 60 characters
long.
You may enter an optional title for the DVD or press RETURN for
none.
Title:
Next MAKDVD asks for the AMOS logical drives to copy to the DVD, as follows:
Enter the list of disk devices to transfer onto the DVD media.
Devices may be entered as a range (ex. dev0: -20 for dev0: through
dev20:), or may be comma separated, The list is terminated with a
blank line:
*
Enter the logical drives to be copied and then just a [return] when all
desired drives have been entered.
*DSK0:
*DSK6:
*
DSK0: 64660 blocks.
DSK6: 64660 blocks.
MAKDVD then displays information about how much space is required on the CD and where
recording will start.
Calculating space requirements:
AMOS partition requires 16165 sectors
2220538 unused sectors remain
MAKDVD then gives you the opportunity to abort or to start the recording process.
System Commands Reference Manual, Rev. 17
MAKDVD
Page 4
Note that once started, the recording operation can be stopped by
pressing ^C.
Press RETURN to start recording or ^C to abort.
The recording process then begins. As it progresses, status messages are displayed:
Transferring DSK0:
Transferring DSK6:
Waiting for DVD-Recorder to finish writing...Completed.
Also the following information is displayed on the status line:
20% complete
The percentage complete shows how much of the total amount of data has been written to the
DVD-RAM.
When all data has been written to the DVD-RAM, the following message is shown:
AlphaDVD creation complete.
And then the DVD is ready to use.
REQUIREMENTS AND SETUP
MAKDVD requires the following:
•
•
•
•
•
A 68030 or faster processor
A full interrupt enabled SCSI dispatcher.
DCACHE, with the number of read-ahead blocks set to 7 for best performance
AMOS 2.3A or later.
A supported DVD-RAM drive.
The MAKDVD package contains the following required files:
•
•
•
•
MAKDVD.LIT
The device driver for the DVD-RAM drive.
The DVD.DEV file that contains supported DVD-RAM drive information.
The SSD overlay file (DVD000.OVR)
MODIFYING THE SYSTEM INITIALIZATION FILE:
See the software installation instructions in PDI-00403-00 for software installation information.
System Commands Reference Manual, Rev. 17
Page 5
MAKDVD
MESSAGES
Command line syntax messages:
•
•
Invalid switch
Invalid switch option
System requirements messages:
•
•
•
•
•
MAKDVD requires a 68030 or higher CPU.
MAKDVD requires a full interrupt level dispatcher.
MAKDVD requires a SCSI dispatcher.
MAKDVD requires AMOS 2.x or compatible operating system.
Memory partition is too small for MAKDVD. An additional nnnK of memory is required.
DVD-RAM Recorder device or driver messages:
•
•
•
•
Device specified is not a DVD-RAM Recorder.
This DVD-RAM Recorder requires a different driver.
The current driver is: xxxxxx
The required driver is: xxxxxx
The device and driver selected are inappropriate for the physical DVD-RAM drive.
Unable to find a DVD-Recorder.
Unknown DVD-Recorder!
Error - Unsupported DVD-Recorder drive found.
The DVD-RAM Recorder is not supported by MAKDVD.
Error messages when setting up or writing to the DVD Recorder
•
•
•
•
•
•
•
•
•
•
Error - Buffer not initialized.
Error - Device is already in use.
This indicates that either another user is running the MAKDVD program or the DVD is
being used in shared read/write mode.
Error - Disk in DVD-Recorder is not writeable.
Error - DVDram driver must be in system memory.
Error - Total data requirements exceed DVD capacity.
Error - Unable to load DVD media.
This indicates a hardware problem with the DVD-RAM drive or a problem with the DVD
media.
Error - Unable to open DVD recording session.
Try a different DVD media. This can also indicate a possible DVD-RAM drive problem.
Error - Unable to open for recording.
Try a different DVD media. This can also indicate a possible DVD-RAM drive problem.
Error - Unable to read disk information from media.
Try a different DVD media. This can also indicate a possible DVD-RAM drive problem.
Error - Unable to write to the DVD.
System Commands Reference Manual, Rev. 17
MAKDVD
•
•
•
•
•
Page 6
A device error has occurred while attempting to record data on the DVD.
Fatal SCSI error. Sense key=nn additional sense=nn
DVD drive device error has occurred. Sense key and additional sense provide further
error information.
Please insert a DVD-RAM media
SCSI error - xxxxxxxxx
[sense error message] Code= nn.nn
DVD-RAM drive device error has occurred. Code provides additional SCSI error sense
information.
Warning - Maximum number of devices exceeded - extras ignored.
Warning - Unable to close DVD.
Device error occurred while closing the current DVD. The DVD-RAM may or may not
be usable.
Errors concerning the AMOS DVD data structure:
•
•
•
•
•
•
•
•
The DVD logical unit size is greater than 64K blocks which could mean compatibility
problems on AMOS 1.X systems. Press RETURN to continue, or ^C to abort MAKDVD:
The logical disk size on the DVD will be greater than the maximum size of a traditional
logical drive.
Error - Disk geometry calculation was incorrect.
The AMOS hidden sector parameters calculated are invalid.
Error - memory previously calculated as available isn't
Memory required for data buffers has disappeared.
Error - No devices specified.
User did not specify any AMOS logical disks to be copied to the CD.
Error - Unable to calculate AMOS disk geometry.
The AMOS hidden sector parameters could not be calculated.
Error - unable to get AMOS data buffer
The system was unable to acquire memory for data buffers.
Error- Unable to remove DVD Recorder data buffer from memory.
Unable to continue due to one or more errors shown above.
Testing of logical disk drive transfer rates resulted in the errors listed above.
Normal informational messages:
•
•
AlphaDVD creation complete
The recording of data on the DVD media is done.
Calculating space requirements:
AMOS partition requires 16165 sectors
2220538 unused sectors remain.
This shows information about how much space the data consumes on the DVD and how
much empty space remains.
DVD-RAM Recorder located at SCSI id n
This shows the SCSI id of the DVD-RAM Drive being used.
Note that once started, the recording operation can be stopped by pressing ^C.
•
Press RETURN to start recording or ^C to abort.
•
•
System Commands Reference Manual, Rev. 17
Page 7
•
•
•
•
•
MAKDVD
This is the final prompt before recording begins. You may abort by pressing control-C
or start the recording process by pressing RETURN.
Transferring DSK0:
Using Generic SCSI-DVD-RAM driver (DVDRAM)
This message shows the DVD driver name and description being used.
Using Panasonic DVD-RAM driver (DVDPAN)
Waiting for DVD-Recorder to finish writing...Completed.
The memory data buffers and the DVD-RAM Drive's cache buffers are being recorded on
the DVD media.
nn% complete
This message shows percentage of the recording process already completed. This
message appears on the terminal's status line.
System Commands Reference Manual, Rev. 17
MAKE
FUNCTION
Creates a sequential file by making an entry in your User File Directory and creating an empty disk
record for it.
CHARACTERISTICS
MAKE is re-entrant and re-usable.
FORMAT
MAKE filespec{,size}
filespec specifies the new file, and size is the number of bytes for the file. The size can be any
positive number (use caution with very large numbers or you may use up too much disk space).
DEFAULTS
The default device and account are where you are logged. The default extension is .M68, and the
size is 0 bytes.
OPERATION
Enter MAKE followed by the specification of the file you want to create, and (optionally) a size in
bytes. For example:
MAKE SRCFIL.BAS,1000
RETURN
You can use DIR to verify the file was created.
MESSAGES
?File specification error
Check your spelling and syntax, and try again.
?Command error
You did not specify a valid size, or you left out the comma in the command line. Check
your syntax and try again.
System Commands Reference Manual, Rev. 07
MAKQUE
FUNCTION
Creates a queue file for use with the Task Manager. Creates both batch queues and print spooler
queues.
CHARACTERISTICS
MAKQUE is re-entrant and re-usable. MAKQUE creates batch queue files inside the account you
are logged into. Therefore, if you wish to submit tasks to that queue from more than one account,
you must create it in account [1,4]. Otherwise, the queue is only available to run tasks if you are
logged into the specific account where the queue file was created. We recommend you allocate 100
records for BATCH queue files. This is usually enough space in which to schedule tasks, and it
does not take up much disk space. If you schedule a great number of tasks, allocate more records.
MAKQUE creates only one spool file: DSK0:SPLQUE.SYS[1,4]. You can use MAKQUE to recreate the file if you need to change its parameters. Spool queue files handle one file per record—
set up as many records as you need to handle your usual load of printer requests. For example, if
you allocate 20 records to SPLQUE.SYS, it will be able to handle 20 print requests at a time.
For information on the Task Manager, see your Task Manager User's Manual. For information on
the Print Spooler, see your System Operator's Guide.
OPERATION
Enter MAKQUE at AMOS command level:
MAKQUE
RETURN
MAKQUE asks you what type of queue file you want, Batch (B) or Spooler (S). Enter the letter
for the type of queue file you would like to create.
Then you are asked for the name of the queue file (this question won’t display if you are creating
the spool queue). The program assumes an extension of .SYS. You must specify a name for the
queue, or you will get a file specification error.
MAKQUE then asks for the number of queue records to be allocated. Your response defines the
size of the queue and how many tasks it can handle, or how many files the printer queue can have
in it. For example, if you specify 100 records, the Task Manager would be able to schedule about
100 tasks. This number also controls the sequence rotation. The sequence numbers in this case
would increment to 100 before starting again at 1. If you do not enter an allocation number,
MAKQUE prompts you again.
System Commands Reference Manual, Rev. 07
MAKQUE
Page 2
MESSAGES
?Cannot delete [filename] - file in use
A problem was encountered while processing the queue file; usually a disk block could not
be read from or written to. Contact your System Operator.
??Fatal Error - RES:QFLOCK.SYS not found.
?File error during queue file initialization.
You did not provide enough queue blocks. Run MAKQUE again, and increase the number
of queue blocks you specified.
?File specification error
You did not provide a correct name for the queue file you wanted to create. Run
MAKQUE again and enter a correct filename.
System Commands Reference Manual, Rev. 07
MAP
FUNCTION
Allows you to see what modules are in your memory partition and in system memory. Also
provides information about those memory modules.
CHARACTERISTICS
MAP is re-entrant and re-usable. You may not use MAP to see information about memory
modules in other users' partitions.
When you load disk files into your memory partition, those copies in memory are called memory
modules. A memory module retains the same name and extension as its corresponding disk file.
MAP displays memory addresses in the number base the system is using for your numeric displays
(usually octal). If you want MAP to display these memory addresses as hexadecimal numbers,
make sure the HEX option is in effect before using MAP. For information on changing the number
base the system uses for your numeric displays, see the SET reference sheet.
FORMAT
MAP {filespec}{/switch(s)}
filespec selects the memory module about which you want information. A switch selects various
options.
DEFAULTS
If you do not specify a filespec, MAP assumes you want information on all of the memory modules
in your partition. If you do not specify any switches, MAP assumes you want full information on
the memory module(s) you specified. Specifying any one switch cancels all the defaults.
OPTIONS
MAP assumes each character after the slash is a separate switch. The switches are:
/B
/F
/H
/M
/R
/S
/U
Display octal base memory address for each module.
Display number of free memory bytes available (in decimal). Use with /S.
Display hash totals for each memory module.
Display information about modules.
Display information about modules in RES:.
Display number of bytes (in decimal) of each module.
Display information about modules in MEM:.
System Commands Reference Manual, Rev. 07
MAP
Page 2
OPERATION
To see what modules are in your memory partition, enter MAP. You see a list of the memory
modules currently in your partition. Here is a sample line:
CHECK
LIT
1016
35022
513-543-124-555
|
|
|
|
|
|
|
|
|
Hash total
|
|
|
|
|
|
|
Base address (where module begins)
|
|
|
|
|
Size (in decimal bytes)
|
|
|
Extension
|
Module name
The hash total is an identifying code unique to that module. The last line of the display tells you
how many bytes are free in your memory partition and gives the octal memory address of the first
free memory location.
To see information about a particular memory module, include a filespec on the MAP command
line. For example:
MAP LOG RETURN
LOG
LIT 1016
30522
432-672-122-411
To see information about modules in system memory, enter:
MAP/RSHMF RETURN
TRM
DVR
252
552-107-745-717
System Commands Reference Manual, Rev. 07
MEMORY
FUNCTION
Allocates memory to your job or displays the size of your memory partition.
CHARACTERISTICS
MEMORY is re-entrant and re-usable. You can't increase your memory allocation if other users
on the system have already been allocated the rest of memory. If there is not enough free memory
to fill your entire request, MEMORY allocates as much memory as it can.
If you try to allocate a very small, non-zero amount of memory to your job, you may not have
room to load and execute programs or files—you may not even have enough memory to load the
MEMORY command back into your partition to change that allocation. So, be careful to check
your MEMORY command line to make sure you have made no mistakes. Also, be careful when
attaching your terminal to another job—make sure the job has some memory allocated to it, or you
will run into the same kind of problem.
FORMAT
MEMORY {memory-allocation{K}{M}}
memory-allocation is the amount of memory (in bytes) you want to allocate to your job. If you
include a K after the amount, MEMORY will multiply the amount specified by 1024 (1 Kilobyte).
If you include an M after the amount, MEMORY will multiply the amount by 1048576 (1
Megabyte). If you use both K and M on the same command line, MEMORY will use whichever
comes first, and ignore the other.
OPERATION
To see how much memory has been allocated to your job, enter MEMORY at AMOS command
level. For example:
MEMORY RETURN
Current memory is 231148 bytes
To allocate memory to your job, enter MEMORY followed by the amount of memory you want to
allocate to yourself. For example:
MEMORY 32K RETURN
[32768 bytes assigned]
You may not increase your memory allocation beyond its current amount unless you first use the
MEMORY 0 command. If you allocate MEMORY 0 to your job, AMOS will re-assign as much
System Commands Reference Manual, Rev. 07
MEMORY
Page 2
free memory to you as it has available for user partitions as soon as you run a command or
program.
MESSAGES
?Insufficient memory for program load
The memory assigned to your job is not enough to load the program you tried to run. If
you have enough memory to run MEMORY, try to add more memory to your job. If you
do not have enough memory to run MEMORY, you will have to re-boot your system.
?The MEMORY command may not be used within a spawned job
You cannot use MEMORY within a job created (spawned) by another program—for
example, within a "window" created by MULTI. You will have to get your terminal out of
the spawned job situation before you can use MEMORY.
System Commands Reference Manual, Rev. 07
MENU
FUNCTION
Works on AlphaMENU menu-definition files to produce executable menus.
CHARACTERISTICS
MENU is re-entrant and re-usable. You must have at least 32K of memory in your memory
partition to use MENU. Compiles only the .MNU file—does not compile or include query or
help files. These are searched for separately when needed by the .CMN file. Don't use MENU on
already-compiled files. Compiled menus have a .CMN extension. See your AlphaMENU User's
Manual for more information.
FORMAT
MENU filespec
filespec is the file containing the menu definition code. The default file extension is .MNU. The
default device and account specifications are where you are logged.
OPERATION
Enter MENU and the file containing the menu definition for the menu you wish to compile. For
example:
MENU MYMENU
RETURN
When MENU finishes compiling the Menu file, a message tells you if any errors were detected and
whether the menu file was completed.
If your file compiled without errors, a menu file is created in the account you are logged into with
the filename of your menu and the extension .CMN. To call the menu, use the SHELL command.
For example:
SHELL MYMENU
RETURN
Account DSK0:[7,11] is the menu library account—if you place a menu in this account, it can be
called from any account on the system. See the SHELL reference sheet for more information about
using menus.
System Commands Reference Manual, Rev. 07
MENU
Page 2
MESSAGES
?Syntax error - [number] errors detected
Your .MNU file has an error—check the file and correct it, then try again.
?Out of memory
Increase the free memory in your job's partition before trying again.
System Commands Reference Manual, Rev. 07
MFDSEQ
FUNCTION
Sorts the accounts within a "traditional" logical disk unit into ascending order.
CHARACTERISTICS
MFDSEQ is re-entrant and re-usable. Used primarily as a tool for producing floppy disks on an
AMOS 2.0 or later system which can be read on a pre-2.0 version of AMOS.
MFDSEQ does not work on extended disks. You cannot run MFDSEQ on a remote disk across a
network.
Do NOT use MFDSEQ while other jobs are accessing the logical disk you are sequencing!
FORMAT
MFDSEQ devn:
devn: specifies the logical unit you want to arrange.
OPERATION
Enter MFDSEQ and the logical unit. For example:
MFDSEQ DSK1:
RETURN
MFDSEQ puts the directories of the logical device in ascending order.
An appropriate use of MFDSEQ is to copy one or more files to a floppy disk which has been
SYSACTed as a traditional format disk from either an extended or traditional logical unit (that is
in AMOS 2.0 or later format), and then run MFDSEQ on the floppy disk. The floppy can then be
read by a pre-2.0 AMOS system. For example:
LOG OPR: RETURN
MOUNT FLP0: RETURN
COPY FLP0:=DSK1:[2,2]*.FIL,DSK1:[1,4]*.FIL
MFDSEQ FLP0: RETURN
MOUNT FLP0:/U RETURN
System Commands Reference Manual, Rev. 07
RETURN
MFDSEQ
Page 2
MESSAGES
?Program for Traditionally Formatted Disks Only - Cannot Continue!
You cannot run MFDSEQ on this disk.
?No PPNs found on this Traditional Logical - Cannot Continue
No disk accounts have been allocated on this logical device, so there are no entries to sort.
System Commands Reference Manual, Rev. 07
MK
FUNCTION
Provides a method of compiling and linking a group of files on extended directory disks so only the
files that have been recently changed are actually assembled.
CHARACTERISTICS
MK is re-entrant and re-usable. MK is a tool that helps you automate the re-compilation and/or relinking of program modules in an application when one or more of the modules has been modified.
Because MK compares the file's last modification date and time to decide whether it should
rebuild the file, the file should reside on an extended directory format device. If a file is on
a traditional directory, it is considered as very old, defeating the update detection and
forcing the file to be recompiled.
MK assumes you provide a description of the structure of your application in a file called a
makefile. The makefile provides information about the modules that make up the application—the
modules that should result from a re-build (target-files), lists of other modules the target-files
depend on, and the command(s) to be issued to get new target-files. This is done by entering
dependency lines and command lines in the makefile. For example:
ACOUNT.LIT < CREDIT.OBJ DEBIT.OBJ INTRST.OBJ
TAB
GLC ACOUNT
In this example, ACOUNT.LIT is the target-file monitored by MK. Each time MK is invoked, it
compares the modification date and time of ACOUNT.LIT to those of CREDIT.OBJ,
DEBIT.OBJ, and INTRST.OBJ. If any of those files have been modified more recently than
ACOUNT.LIT, the command-line (GLC ACOUNT) is issued to AMOS, which should produce a
new version of ACOUNT.LIT.
The process can be a lot more complex, and the makefile can have more than one target-file.
Some dependencies may appear in many places also. There can only be one target-file per
dependency line.
To ease the creation of a makefile, the macro and rule facilities are included. Macro is a kind of
shorthand for items that occur in many different places. A macro is defined either in the makefile
or in the MK command line. It can then be used either to reproduce its definition text at different
places or with some part of its original text replaced by text specified when it is invoked.
System Commands Reference Manual, Rev. 07
MK
Page 2
A macro line defines the text of a macro. Macros may not be nested. Macro lines have the format:
name = text
name is any alphanumeric symbol and text is anything not containing a $ sign. Spaces and tabs
before and after the text are removed. A macro is invoked by:
$(macro-name{{:txt1=}txt2})
If the invoked macro is not defined, it is ignored.
If txt1 is not specified, the macro invocation is replaced by the text of the macro itself. Since
macros can be redefined, the current text is used.
If txt1 is specified, the current text of the macro is processed and all occurrences of txt1 are
replaced by txt2.
If macros are defined in the command line, attempts to redefine them are ignored.
Here's an example of a macro:
SWITCHES = /D/A/V
x.obj < x.c ...
TAB
cc x $(SWITCHES)
The rule facility is a way to give a default way to build a module if it is not specified as a
target-file in the makefile. Rules define an action to take by default if no explicit command is
given for a file. The format is:
.ext1.ext2:
ext1 and ext2 are AMOS file extensions. A rule line should be followed by one or more command
lines. If there is no explicit description on how to build a specific file, all the rules are examined to
see if one could be applied in order to build the file. The first extension is the one of the source and
the second the one of the target file.
If different rules exist to build the same target, they are examined in order, and the first one which
works is considered as fulfilling the search. For example, if both a .C.OBJ rule and a .M68.OBJ
rule exist, they should be defined in that order for the C file to be compiled, otherwise the .M68 file
would be considered as the source of the target. If the .M68.OBJ rule is defined first, a new .OBJ
file is created if the .M68 file is compiled, and therefore the .C program won't be compiled.
Here's an example of a rule:
.m68.obj
TAB
m68 $*/n
System Commands Reference Manual, Rev. 07
Page 3
MK
This specifies that for any .OBJ module not defined as a target-file in a dependency line, an
attempt is made to rebuild it using M68 with the /N switch ($* is a special macro that indicates the
filename without the extension).
A dependency line describes what files trigger the re-creation of the target file if they are modified.
The format is:
target < {filename(s)}
target is the name of the file that should be made and the filename(s) is a list of file the target
depends on. If any of the filenames is more recent than the target, the commands that should
follow the dependency line are executed and their result should be to produce a new target file.
Target can also have a name starting with a period (.). In that case, it is considered as a pseudotarget—a file that does not actually exist. Also, the list of dependents should be empty in this case.
The use of pseudo-targets is handy to do special functions like erasing temporary files or printing
sources files.
A command line gives an AMOS command to be executed. The line must start with a TAB
character to be considered a command line. It must follow either a rule or dependency line, or
another command line. Macros can be invoked, and a special marker, "\n", can be used to force a
carriage return-line feed pair to be inserted at a given point. In addition, in a command line related
to a rule, the following macros can be used:
$*
represents the name of the target without the extension.
$@
represents the full name of the target.
$<
represents the name of the source file.
If you want to continue any logical line onto the next line of the file, end the line with a backslash
(\) followed by a newline. If the following line starts with a non-blank character, it will be
appended to the line with no intervening spaces. If the next line starts with one or more blanks, it
will be appended with a single intervening space.
You may also put comments any place in the makefile. A comment begins with the pound
character (#) and continues to the end of the line.
System Commands Reference Manual, Rev. 07
MK
Page 4
Here is a complete example of a makefile:
# Description file for the make command:
.c.obj:
TAB cc$*/d/r
.m68.obj:
TAB m68 $*/n
mk.lit < tdvcng.obj fdtser.obj allocb.obj parse.obj proces.obj mk.obj
TAB lnklit/s mk,fdtser,allocb,parse,proces,tdvcng,cinit,syslb0/l
parse.obj < parse.c mkdefs.h mac:memory.h mac:stdio.h
TAB cc parse/d/r
proces.obj < mk.c mac:stdio.h mac:memory.h mac:ctype.h
TAB cc proces/d/r
mk.obj < mk.c mac:stdio.h mac:memory.h mac:ctype.h
TAB cc md/d/mins:65535/maxs:1048575
The modification time of a file has a precision of a minute, so a modification to a source
file done within a minute after the last update will not be detected.
FORMAT
MK{/switch(es)} {macro(s)}{target-file} {target-file...}
macros specifies macros that affect the assembly process and target-file specifies the file(s) to be
made.
DEFAULTS
The default makefile is MK.MKF in your current account.
OPTIONS
/A
If no target specified, /A attempts to rebuild all targets that are not up to
date.
/C{:filename}
Put commands in a command file instead of executing them.
/F:filename
Specify a different makefile.
/I
Ignore errors.
/N
Don’t execute commands, but display them on screen.
/S
Don’t display anything on the screen.
/T
Change the file modification timestamp to current time without executing
the commands.
System Commands Reference Manual, Rev. 07
Page 5
MK
OPERATION
Enter MK followed by any macros or target-files you need. For example:
MK STOCK.RP ORDER.RP
RETURN
MESSAGES
?Can't allocate file table - not enough memory
Try increasing your available memory space or reducing the number of files in your
makefile.
?Can't make file [filename]
Check the makefile command that tried to build the file for errors.
?Can't open file [filename]
Check your spelling and syntax, or use DIR to find the file, and try again.
?Command line macro improperly terminated
Check your syntax and try again.
?Don't know how to make file [filename]
Add a rule or dependency to your makefile.
?Duplicate target name at line # [number]
Check your makefile for an error at the indicated line number.
?Error while processing file [filename]
?Cycle detected
A target name in your makefile depends on itself. Check your dependency tree for the
illegal cycle reference.
?Illegal command line macro
Check your syntax and try again.
?Illegal rule at line # [number]
Check your makefile for an error at the indicated line number.
System Commands Reference Manual, Rev. 07
MK
Page 6
?Invalid line type at line # [number]
Check your makefile for an error at the indicated line number.
?Invalid option in command line
Check your spelling and syntax and try again.
?Invalid source name at line # [number]
Check your makefile for an error at the indicated line number.
?Invalid substitution at line # [number]
Check your makefile for an error at the indicated line number.
?Invalid symbol at line # [number]
Check your makefile for an error at the indicated line number.
?Invalid target name at line # [number]
Check your makefile for an error at the indicated line number.
?Invalid target name in command line
Check your spelling and syntax and try again.
?Line too long at line # [number]
Shorten the long line.
?Nested macros not supported at line # [number]
Check your makefile for an error at the indicated line number.
?Not enough memory
Your job does not have enough available memory. Unload modules from your memory
partition, switch to another job with more memory, or ask your System Operator to
increase your job's memory allocation.
?Too many files
Reduce the number of files referenced in your makefile.
?Unexpected end-of-file at line # [number]
Check your makefile for an error at the indicated line number.
System Commands Reference Manual, Rev. 07
Page 7
MK
?Unknown target name in command line
Check your spelling and syntax and try again.
?Unrelated command at line # [number]
Check your makefile for an error at the indicated line number.
System Commands Reference Manual, Rev. 07
MONGEN
FUNCTION
Generates a new system monitor.
CHARACTERISTICS
MONGEN is re-entrant and re-usable. The system monitor is generated by overlaying the
specified disk driver program into the existing monitor. This new monitor lets you access any disk
(for which you have a disk driver program) as the System Device.
The monitor you usually use is in account DSK0:[1,4], and has a name that reflects your type of
system. The disk driver you will use is one of the driver programs in DSK0:[1,6]. MONGEN
inserts the specified driver into the monitor (overlaying the old driver) and then leaves the new
monitor in memory.
On AM-212 and AM-214 devices with AMOS release 2.2 or later, you must create a monitor
using either BFLP.DVR (for 3.5" disks) or BMIN.DVR (for 5.25" disks) as the system driver in
order to create a bootable floppy diskette. On AM-219 drives, use FIX219 to generate a system
driver for diskettes.
DEFAULTS
The default monitor file is DSK0:AMOSL.MON[1,4]. This means you must enter the monitor
name, AMOS32.MON, on AMOS/32 systems.
The default device and account specification for the disk driver is DSK0:[1,6]. The default disk
driver file extension is .DVR.
OPERATION
Enter MONGEN at AMOS command level:
MONGEN
RETURN
MONGEN asks for the specification of the system monitor you want to modify. Enter the file
specification of the monitor program you are going to use. If you want to use the default monitor,
AMOSL.MON[1,4], just press RETURN .
MONGEN locates the specified monitor and loads it into your memory partition. Be sure you have
enough memory to accommodate the monitor and disk drivers as well as the MONGEN program
itself (usually at least 128K of memory).
System Commands Reference Manual, Rev. 07
MONGEN
Page 2
Now MONGEN asks for the specification of the disk driver you want to insert into the monitor.
Enter the file specification of the correct disk driver program. You may NOT just press RETURN .
MONGEN looks first in system memory for the driver, then in your memory partition, then
on the disk. If you have just updated a driver to use with MONGEN, be sure there isn't an
older version in memory!
On systems which use CMOS boot settings, if your boot drive is not SCSI ID 0, you
should use a disk driver created by FIXLOG for the correct SCSI ID. If you use a generic
disk driver which doesn't have the SCSI ID embedded, you will not be able to MONTST
with this monitor.
Next you are asked for the language definition table name. If you just press
selects the default language file ENGLSH.LDF.
RETURN ,
MONGEN
MONGEN then asks for a name to be given to the new monitor. Enter a one- to six-character
name (the default extension is .MON). This name is now the name of the new monitor.
You can now test the new monitor by using the MONTST program or you can save the monitor as
a disk file by using the SAVE command. For example:
SAVE TRISYS.MON
RETURN
Remember MONGEN does not affect the running monitor either in memory or on the System Disk.
Nor does MONGEN test the new monitor; it merely builds a new monitor as a module in your
memory partition.
MESSAGES
?Cannot INIT [filespec] - device does not exist
Check your syntax, or use DEVTBL to see a list of current devices, and try again.
?Cannot READ [filespec] - disk not mounted
Mount the specified device and try again.
Disk driver [filespec] not found
Check your syntax—if there is no mistake, use the DIR command to search for the file—it
may be in the wrong account.
Input monitor [filespec] not found
Check your syntax—if there is no mistake, use the DIR command to search for the file—it
may be in the wrong account.
System Commands Reference Manual, Rev. 07
Page 3
MONGEN
?System disk driver is too large
The disk driver is too large to be embedded into the monitor. Choose another, smaller,
driver.
System Commands Reference Manual, Rev. 07
MONHSH
FUNCTION
Lets you check the hash totals of AMOS monitors, regardless of which disk driver has been
inserted into the monitor by the MONGEN program.
CHARACTERISTICS
MONHSH calculates hash totals only for monitor files. It can't be used on any other type
of file.
Monitor patches published by Alpha Micro include the monitor hash; after you make a monitor
patch, use MONHSH to make sure the patch was made correctly. To check the version number of
your monitor, use the DIR/V command.
FORMAT
MONHSH monitor-name
monitor-name is the name of the monitor file.
DEFAULTS
MONHSH assumes account [1,4] on the device you are currently logged into.
OPERATION
Enter MONHSH and the name of the monitor at AMOS command level. For example:
MONHSH AMOSL.MON
RETURN
If you leave out the monitor name, MONHSH prompts you for it. When MONHSH is finished, it
displays the hash total.
MESSAGES
?Cannot hash [monitorname] - [reason]
Be sure you've spelled the name correctly and that it is a monitor file.
System Commands Reference Manual, Rev. 03 (AMOS 2.2 - 4/91)
MONHSH
Page 2
?File specification error
Try again, and specify a correct monitor name.
System Commands Reference Manual, Rev. 03 (AMOS 2.2 - 4/91)
MONTST
FUNCTION
Tests a new monitor and/or system initialization command file by bringing up the system under the
control of a new monitor and/or command file.
CHARACTERISTICS
MONTST first looks in your memory partition for the monitor you want to test; then it looks on
the disk. MONTST always looks directly on the disk for the system initialization command file
you want to test.
You must be logged into the system operator's account, DSK0:[1,2], to use MONTST.
Make sure everyone is off the system when you use MONTST.
You can also use MONTST with MONGEN to boot up on a device other than your regular
System Disk. For example, say your system has more than one Winchester disk. Although you
normally boot from your main Winchester disk, you could boot from the other.
To do so, use MONGEN to create a test monitor, TEST.MON, containing the driver for the
second Winchester disk; place this monitor on the first logical device of your Winchester System
Device. Then use MONTST to boot using that special monitor with a special system initialization
command file, TEST.INI, in which the second disk has been defined as the System Device and the
main Winchester device has been defined as a peripheral.
If your computer uses CMOS boot settings, and your system disk is not at SCSI ID 0, the
monitor file you use to MONTST must contain a disk driver created with FIXLOG for the
correct SCSI ID. If the monitor file uses an embedded generic SCSI driver, MONTST will
not find the correct SCSI ID and will not work. See the MONGEN and FIXLOG reference
sheets for more information.
You can also use MONTST to test warm boot files. When doing this, don't specify an .INI file.
FORMAT
MONTST {monitor-spec}{,system-INI-filespec}
monitor-spec specifies the monitor you want to test and system-INI-filespec specifies the system
initialization command file you want to use. The initialization file MUST be in DSK0:[1,4] of the
newly booted system. For example, if you are MONTSTing a monitor with a floppy driver
MONGENed into it, the initialization file must be on DSK0: of the floppy drive.
System Commands Reference Manual, Rev. 06
MONTST
Page 2
DEFAULTS
The default monitor file is your system default monitor file (DSK0:AMOSL.MON[1,4] or
DSK0:AMOS32.MON[1,4]). The default extension is .MON; the default account for the monitor
is DSK0:[1,4].
MONTST assumes the default system initialization file (DSK0:AMOSL.INI[1,4] or
DSK0:AMOS32.INI[1,4]) for the system-INI-filespec. The default file extension is .INI; the
default account is DSK0:[1,4].
These defaults apply even for computers which use CMOS boot settings and have a
different default monitor or initialization file specified in CMOS.
OPERATION
Log into account DSK0:[1,2], and enter MONTST followed by the specifications of the system
monitor and the system initialization command file to bring the system up under. For example:
LOG OPR: RETURN
MONTST AMOSL.MON,NEWSYS.INI
RETURN
If you want to test with the standard AMOS monitor and the standard system initialization
command file enter:
MONTST AMOSL[1,4]
RETURN
MESSAGES
?Cannot test filespec - file not found
Either the monitor or the initialization file cannot be found. Check your syntax and try
again.
?File specification error
Check your syntax and try again.
?Filespec not found
Check your syntax, or use DIR to find the file—it may be in another account. This
message can also appear if you don't have enough memory in your partition to load the
monitor file—if so, run MONTST from another job, or increase the memory in your
partition.
System Commands Reference Manual, Rev. 06
MOUNT
FUNCTION
Mounts or unmounts a disk and displays a list of all mounted disks on the system. Can mount all
logical devices on a physical drive with one command.
CHARACTERISTICS
MOUNT is re-entrant and re-usable. The system has no way of knowing when you change disks in
your disk drives. When you change disk cartridges in your hard disk system or change floppy
disks in your floppy disk drives, you must tell the system you have done so.
Floppy disk drives defined to use buffered I/O (see your System Operator's Guide) must be
mounted immediately after a new diskette is inserted, and unmounted before it is removed.
Failure to do so may result in lost or corrupted data!
Your system INI file can be set up to initially mount your disks for you every time the system
comes up, but if you change a hard disk cartridge or a floppy disk, or bring up a drive after the
system is up and running, you still must explicitly mount it using the MOUNT command.
Do not mount or unmount a tape drive or any other device that is not file structured.
Trying to do so may render your tape or device unreadable and result in partial or complete
data loss.
Using MOUNT tells the system you are changing a disk or adding a new disk and the system must
therefore look at the new disk to fetch the appropriate bitmap. A disk bitmap is a map of the disk;
it tells the system which disk blocks are free and which are used. If the disk is a Winchester
technology disk drive, MOUNT mounts and sequences up the drive for you. If you don't sequence
up the drive, you cannot access the disk at all. MOUNT can also be used to sequence down a
Winchester technology drive.
If you don't mount a disk after you change it, when it comes time to transfer data, the
system writes to the new disk as if it had the same free and used locations as the old disk.
It is likely data will be overwritten. Also, NEVER mount or unmount a disk while
someone is accessing it—this can severely damage the file structure of that disk!!
If your System Disk, DSK0:, is a Winchester technology disk, you must never use
MOUNT to sequence down the System Disk before sequencing down other Winchester
technology disks on the system. MOUNT checks to see if any active jobs are logged into
the device you want to mount, but does not check if there are open files.
You cannot use MOUNT across a network to mount or unmount a disk on a remote system.
System Commands Reference Manual, Rev. 07
MOUNT
Page 2
FORMAT
MOUNT {{devn:}{/switch}}
devn: is the specification of the device you want to mount, and switch is an option. If you don't
include a device specification, MOUNT displays a list of all of the disks mounted on the system.
OPTIONS
The switches are operation switches, and may be abbreviated.
/BUFFEREDWRITES
Mounts an AMS-format diskette with buffered writes enabled.
/UNMOUNT
Unmounts and sequences down the specified disk.
/WAIT
Waits until the device is ready before mounting.
OPERATION
To mount a disk, enter MOUNT followed by a device specification. For example:
MOUNT DSK1:
RETURN
If the disk has a label, MOUNT lists the Volume Name and Volume ID of the disk mounted, so
you can verify you have mounted the proper disk. If you want to mount a disk, but you know the
device containing the disk is not yet ready, use the /W switch. This ties up your terminal until the
device is ready.
To mount all the logical devices of a physical disk, use the three-letter name of the drive as the
device name, without a unit number. For example:
MOUNT DSK:
RETURN
This mounts all logical devices on the DSK: physical device. You can use this format only with
SCSI drives.
If you want to unmount a disk, enter MOUNT, the device, and /U. For example:
MOUNT ARC4:/U
RETURN
If you want to sequence down a Winchester disk, use the /U option as above—using this option
sequences down the entire physical disk.
Remember to unmount the physical unit containing DSK0: LAST!
To display a list of the disks mounted on the system, enter MOUNT. MOUNT displays the
Volume Name and Volume ID of each disk containing a label. For information on labeling a disk
see the LABEL reference sheet.
System Commands Reference Manual, Rev. 07
Page 3
MOUNT
MESSAGES
?Buffered Writes Enabled - Failure to unmount
disk before removing will result in lost data
Reminder to unmount the disk when you're done.
?Command Error
The command line you entered is invalid. Try again, using the correct format.
?Device not ready
Try again when the device is fully cycled up. If you wish MOUNT to wait until the device
is ready, use /W.
?Drive sequence error
The device you tried to mount did not sequence up properly. See your System Operator—
this could indicate a problem with the disk.
?Error removing DDB buffer
An internal error occurred. Try the command again. If the error persists, inform your
System Operator.
?No buffer pool allocated for specified device
?Buffered writes not enabled
You tried to mount with /B, but the device is not set up for buffered writes. Remount
without /B.
?No disk currently mounted
Check your syntax, or use DEVTBL to see a list of devices on your system.
?Nonexistent device
Check your syntax, or use DEVTBL to see a list of devices on your system.
?Program restricted to use on local system only
You can't MOUNT devices on another system over a network. Contact someone on the
other system to mount the device.
System Commands Reference Manual, Rev. 07
MOUNT
Page 4
?Unable to load BADBLK.SYS from unit DSK0:
?WARNING - BADBLK.SYS has a bad hash total
You tried to mount a Winchester technology drive before mounting DSK0:.
BADBLK.SYS is reported to have a bad hash total because the hash total looked at is not
from the BADBLK file on DSK0:, and is thus invalid. Mount DSK0:, and try again.
?WARNING - BADBLK.SYS has a bad hash total
When reading in the alternate track information for a device using alternate tracks,
MOUNT found the BADBLK.SYS file is damaged and doesn't have the correct hash total.
See your System Operator for help.
%WARNING - There are active jobs logged in on the device being mounted
Enter a "Y" when it is OK to mount the device:
The disk has active users on it. Such jobs may include the spooler, task manager, or other
jobs processing background tasks. When you are sure none of the jobs are really active
users, type Y to continue. If you don't type Y, MOUNT will not mount the disk.
System Commands Reference Manual, Rev. 07
MTBOOT
FUNCTION
Creates a bootable magnetic tape for use by 1/2" magnetic tape drives.
CHARACTERISTICS
MTBOOT is re-entrant and re-usable. The warm boot is a procedure you use to restore your
system when your System Disk is erased or written over accidentally. A warm boot from a 1/2"
tape requires a special monitor file you generate using the WRMGEN command and which is preinitialized with enough information to get your system up and running on one terminal and in one
memory partition. Then you can restore the damaged files to your System Disk from other 1/2"
tape backups you previously created using FILTAP.
A magnetic tape cannot contain both a warm boot monitor and data files. See the FILTAP
reference sheet for information on creating a separate data backup tape.
MTBOOT works only on AMOS/32 and AMOS/L versions of the operating system.
FORMAT
MTBOOT {filespec} {/switch}
filespec is the specification of the warm boot monitor file you want to copy onto the streamer tape.
The default filespec has the same name as your system monitor with a .WRM extension (i.e.,
DSK0:AMOSL.WRM[1,4] or DSK0:AMOS32.WRM[1,4]).
switch is one of the options listed below.
OPTIONS
/BOOT
Transfers a warm boot file from disk onto the tape, and labels the tape as a
warm boot tape.
/CHECK
Reads entire tape and checks that the tape can be read without device errors.
Block statistics are updated as the check proceeds.
/VERIFY
Writes known data pattern to the entire tape, then rewinds tape and reads it
back, checking for data errors. Block statistics and errors are updated as the
program proceeds. This function destroys any existing data on the tape.
System Commands Reference Manual, Rev. 07
MTBOOT
Page 2
OPERATION:
Load a tape into your magnetic tape drive. Enter MTBOOT and the name of the warm boot file.
For example:
MTBOOT MAGTAP.WRM
RETURN
MTBOOT requests information for the tape label:
Volume Name:
(40 characters)
Volume ID:
(10 characters)
Installation:
(30 characters)
System:
(30 characters)
Creator:
(30 characters)
Fill in these fields with information to help identify the tape. Press
MTBOOT then creates the bootable tape.
RETURN
after each response.
MESSAGES
?Data error undetected by device
The /VERIFY phase read back a block from the tape that did not match the expected
pattern. However, the tape unit did not report a read or write error in transferring the data.
This may indicate a problem with the tape or the tape drive. Check the tape drive for
correct operation, and clean it. Try the /VERIFY option using another tape.
%Field size exceeded
You put too much in one of the label fields. Re-enter, using fewer characters.
?Specification error ^
The ^ points to the error. Check your syntax and try again.
?Tape is not file structured
The tape directory block at the start of the tape could not be located. Either the tape was
not written by AMOS, or the tape is damaged.
System Commands Reference Manual, Rev. 07
MTUDIR
FUNCTION
Displays a list of the files on a tape backup created by MTUSAV. Can also create a disk file
containing the directory.
CHARACTERISTICS
MTUDIR is re-entrant and re-usable. MTUDIR can only read magnetic tapes created by
MTUSAV. It may be used with 1/2" 9-track, streaming, and Exabyte tape drives. MTUDIR
works with both traditional and extended format disks. Used also with MTURES (to restore files
from tape to disk).
A group of files backed up onto magnetic tape at the same time by the same MTUSAV command
is known as a "save set." A save set can be on more than one reel of tape. MTUDIR is a wildcard
command. The account and device portions of the specification refer to the disk account and
device from which the files were originally backed up. See your AMOS User's Guide for more
about wildcard specifications.
FORMAT
MTUDIR {listfilespec=}filespec{,filespec...}{/switch}
listfilespec specifies a disk file to contain the tape directory display, filespecs are files on the tape
whose directory listing to display, and switch is an option request.
DEFAULTS
The default listfilespec is DIRECT.LST in the account and device you are logged into. The default
filespec is *.* and the account and device you are logged into.
OPTIONS
/AFTER:date{time}
List only those files saved with a date and time of last modification
after the specified date and time. The date and time must be in the
format specified in your current language definition file.
/BEFORE:date{time}
List only those files saved with a date and time of last modification
before the specified date and time. The date and time must be in
the format specified in your current language definition file.
/KILL or /K
Deletes an existing listfile before creating a new one. Operation
switch.
System Commands Reference Manual, Rev. 07
MTUDIR
Page 2
OPERATION
Enter MTUDIR, an optional listfilespec, and the input filespec(s). For example:
MTUDIR ALL:[]*.DAT,*.BAS
RETURN
MTUDIR asks you for the tape unit number. Enter a single digit for the tape drive you wish to
use. If your computer has more than one tape backup device with the same unit number, MTUDIR
asks:
Enter tape device name [devices]:
MTUDIR lists the devices that share that unit number. Enter the one you wish to use. MTUDIR
displays the reel label for the reel mounted on the selected unit. Beginning a directory display with
a tape from the middle of a multi-reel save set may result in error messages being displayed while
MTUDIR tries to synchronize itself with the tape's directory structure.
After displaying the label information, MTUDIR displays a line of data for each selected file in the
directory. The first number on the line tells you the file's relative position on the tape. Next you
see the device specification of the file as it appeared on the disk it was backed up from, then the
number of disk blocks the file takes up. The letter following the block count tells you whether the
file is a linked (sequential) file, or a contiguous (random) file. If you want to see a list of all the
files on a tape, enter:
MTUDIR ALL:[]
RETURN
To create a disk file containing the directory display, specify a listfile. For example:
MTUDIR =ALL:[]*.DAT
RETURN
MESSAGES
?All "date and time" switches must be in absolute format
Specify dates and times in absolute, not relative, format.
?A "date" or a "time" switch must be specified for
all "date and time" switches
MTUDIR could not understand the format of the /AFTER or /BEFORE switch you
entered.
System Commands Reference Manual, Rev. 07
Page 3
MTUDIR
%Bypassing bad directory block.
MTUDIR did not find the block it expected to during a search. The bad block is bypassed
and MTUDIR continues to look for a directory block. Both the preceding file and the
current file are probably corrupt, and cannot be successfully restored to disk. This is most
often caused by backing up a disk which has file errors on it (use DSKANA before
backing up!).
?Cannot read [device-name] - [explanation]
MTUDIR is not able to read from the tape unit for the reason given. Make sure you
specified the correct tape drive, and the correct tape is mounted.
%Drive is not on-line and at load point.
%Please correct, then press RETURN when ready.
Correct the problem and continue.
%End of reel, please mount next tape in save set and press
%RETURN to continue, or press Control-C to cancel directory.
Remove the tape and mount the next reel in the save set.
?More than one output specification.
Try again, using only one listfilespec.
%Tape is not file structured.
%Please correct, then press RETURN when ready.
The tape you have mounted is not in MTUSAV format. Make sure the correct reel of tape
is mounted on the correct tape unit.
?Unit number must be between 0 and 7
You've entered an invalid tape unit number. Try again.
System Commands Reference Manual, Rev. 07
MTURES
FUNCTION
Writes files to disk from 1/2" 9-track magnetic tape, streamer tape, 4mm tape, or 8mm tape. Lets
you restore file-oriented disk backup from tape to disk.
CHARACTERISTICS
MTURES is re-entrant and re-usable. Used with MTUSAV (to write disk files to magnetic tape)
and MTUDIR (to display files on a tape). Only reads tapes created by MTUSAV. Not for
transferring data between Alpha Micro and non-Alpha Micro computers. MTURES works with
both traditional and extended format disks.
You may not restore files to a disk account unless you are logged into that account or an operator's
account, [1,2]. MTURES is a wildcard command. See your AMOS User's Guide for information
on using wildcard commands.
The input specification must give the full specification of the files you want to transfer from the
magnetic tape, including device and account specifications of the files as they were written to the
tape.
The output specification lets you specify the device and account the files are to be written to on the
disk, and to rename the files as they are written out to the disk.
FORMAT
MTURES {outfilespec}=filespec{,filespec...}{/switch}
outfilespec specifies the files to be created on the disk, the filespec(s) specify the files to be
transferred from the magnetic tape, and switch is an option request.
DEFAULTS
The input specification defaults to the device and account you are logged into. The output
specification defaults to the input specification in the case of the filename and extension, and to the
account and device you are currently logged into. Therefore, if you do not specify a device
everything on the tape will be written to the device you are logged into. For example, if you are
logged into DSK0:, everything on the tape will be written onto DSK0: even if the files were
originally backed up from other disks.
Be careful to specify an output specification if the files on the tape came from more than
one disk—unless you do intend to transfer them all onto one disk.
System Commands Reference Manual, Rev. 07
MTURES
Page 2
If you are logged into the System Operator's account, DSK0:[1,2], the default output specification
is [ ] (all accounts). This means files will be restored to their original accounts (the ones from
which they were backed up). If an account does not exist on the disk, MTURES creates it. If you
are logged into account [1,2] on any other disk, the output specification is [ ] (all accounts on that
logical disk).
OPTIONS
The switches are file switches, and may be abbreviated to any unique characters. Defaults are /D,
/NOQ and /T.
/AFTER:date{time}
Restore only those files saved with a date and time of last
modification after the specified date and time. The date and
time must be in the format specified in your current language
definition file.
/BEFORE:date{time}
Restore only those files saved with a date and time of last
modification before the specified date and time. The date and
time must be in the format specified in your current language
definition file.
/DELETE
Copy over existing files.
/NODELETE
Do not copy over existing files.
/QUERY
Confirm before selecting files.
/NOQUERY
Do not confirm files.
/TAPESKIP
Use fast tape search on SCSI streamers.
/NOTAPESKIP
Do not use fast tape search.
OPERATION
Enter MTURES followed by an optional output specification, an equal sign, and the input
specification(s). For example, to copy from a magnetic tape all .BAS files originally backed up
from account [110,2] on DSK2: over to your current account, enter:
MTURES =DSK2:*.BAS[110,2]
RETURN
Then MTURES asks you to enter the tape unit number. Enter a digit from 0 to 7 for the tape unit
you wish to use. If your computer has more than one device assigned to the same unit number, you
are asked for the device name (the choices are listed for you).
MTURES scans the directory on the tape and displays a list of the files that fit the specification
you entered earlier. If you used the /Q switch, MTURES waits after the appropriate statement for
you to respond Y for yes or N for no. You don't need to press RETURN after Y or N. For example:
MTURES =*.BAS/Q RETURN
Enter tape device name (MTU0,STR0): MTU RETURN
MTU0:DSK3:NEW.BAS[10,3] to DSK2:NEW.BAS[10,3]? Y
MTU0:DSK3:SCRTCH.BAS[10,6] to DSK2:SCRTCH.BAS[10,6]? N
System Commands Reference Manual, Rev. 07
Page 3
MTURES
MTURES requires the first reel mounted be the first reel of a save set, and each subsequent reel be
from the same save set, and be in the correct order. If MTURES detects an out-of-sequence reel, it
displays a message on your terminal and gives you a chance to mount the correct one. MTURES
prompts you each time a new reel is required. When the restore is finished, rewind the tape and
return it to its storage location.
To restore all files on the tape to the disks and accounts they were originally backed up from, log
into account DSK0:[1,2], and enter:
MTURES ALL:[]=ALL:[]
RETURN
You can restore all files backed up from one logical device to a different logical device. For
example, to restore files from DSK2: onto DSK5:, log into DSK0:[1,2] and enter:
MTURES DSK5:[]=DSK2:[]
RETURN
To restore all the logical devices on a tape to the devices of a subsystem disk (for example, SUB:),
log into DSK0:[1,2] and enter:
MTURES SUB??:[]=ALL:[]
RETURN
The subsystem you're restoring to should have the same number of logical devices as the disk the
files were backed up from.
Using the default /TAPESKIP option can dramatically decrease the time needed to restore
single files from SCSI streaming tape devices. However, it may significantly affect the
performance of other jobs on the system, especially if other jobs are accessing other SCSI
devices. Therefore, on systems with many users, you may want to use /NOTAPESKIP.
MESSAGES
%Bypassing bad directory block.
MTURES did not find the directory block it expected. The bad block is bypassed and
MTURES continues to look for a directory block. The current file may be corrupt. Note
the filename, and check the file carefully after the restore process has completed. This is
most often caused by backing up a disk which has file errors on it (use DSKANA before
backing up!).
%Bypassing BADBLK.SYS[1,2]
BADBLK.SYS[1,2] is a file holding device-specific information, and should not be
transferred from one logical device to another. The file will not be transferred to disk.
%Bypassing unrequested account devn:[p,pn]
The restore is skipping the account listed because you are not restoring any files from it.
System Commands Reference Manual, Rev. 07
MTURES
Page 4
?Cannot create PPN [377,377] - it is not a valid PPN under AMOS 2.x
You requested a transfer of files to PPN [377,377], which is not available under AMOS
2.x.
?Device Full
Make more room on the device by erasing unwanted files, or select a different output
device.
%Drive is not on-line and at load point.
%Please correct, then press RETURN when ready,
%or press Control-C to abort.
Correct the situation and continue.
%End of reel, please mount next tape in save set and press
%RETURN to continue, or press Control-C to abort restore.
Remove the reel and mount the next.
?Missing output specification.
Try again, with an output specification.
?More than one output specification.
Re-enter, using only one outfilespec.
%Not Copied - Destination file cannot be deleted
The current file was selected for transferring to disk. However, the disk file could not be
deleted so it could be replaced. The tape file was not copied to disk.
%Not Copied - Destination file already exists.
You specified the /NOD switch and the destination file already exists. If you do want the
file copied over the current one, try again without the /NOD switch.
%Tape is not first reel of save set.
%Please correct, then press RETURN when ready,
%or press Control-C to abort.
Place the first reel in the drive and try again.
System Commands Reference Manual, Rev. 07
Page 5
MTURES
%Tape is not file structured.
% Please correct, then press RETURN when ready.
The tape was not created in MTUSAV format. Make sure you have the correct reel of
tape, and you specified the correct tape unit number.
%Tape is not from the same save set or is out of sequence.
Place the correct tape in the drive and try again.
?Unable to continue restore - output device full
The disk you are copying to is full. Remove unwanted files from the disk before rerunning
MTURES, or use MTURES to restore files to a different device.
?Unit number must be between 0 and 7.
Re-enter a correct number.
?You are not logged in under [1,2], you can't create [p,pn].
Log into [1,2] and try again.
System Commands Reference Manual, Rev. 07
MTUSAV
FUNCTION
Writes copies of disk files to 1/2" 9-track magnetic tape, streamer tape, Exabyte tape, or DAT. A
file-oriented disk backup program.
CHARACTERISTICS
MTUSAV is re-entrant, re-usable, and used for file-oriented disk backup. Used with MTURES
(to transfer files from magnetic tape to disk) and MTUDIR (to list a directory of files on a tape).
You can also use MTUSAV to check the quality of a backup tape. MTUSAV works with both
traditional and extended format disks.
MTUSAV spawns a slave job during the backup process. Therefore, the JOBS statement in the
system initialization command file must be at least one larger than the number of jobs allocated
in the JOBALC statements.
Before using MTUSAV, you should always use DSKANA to check the device for errors.
If there is a problem on the disk you copy from, you may not be able to restore from the
tape later.
MTUSAV is a wildcard command. See your AMOS User's Guide for information on using
wildcard specifications.
You may back up files from any disk account, whether or not the account is within your current
project. A group of files backed up at the same time by the same command is known as a "save
set." A save set can extend to more than one reel of tape.
Only some tape drive/tape combinations support multi-reel backups (also called "tape
spanning"). Tape spanning is not allowed during a backup controlled by the Task
Manager, as there is no way to signal when to change the tape.
MTUSAV records the disk file specification, date, and reel number on the tape along with the
file. However, it does not transfer any account password; when backing up across an AlphaNET
network, it also does not record the CPU ID of the source computer.
MTUSAV is not for transfer of data between AMOS and non-AMOS computer systems.
MTUSAV sets the JOBERR field in your job's JCB. If there are no errors or warnings, JOBERR
is zero, otherwise it is non-zero. In a command file you can check the JOBERR field using the IF
command immediately following MTUSAV. Error processing is explained in detail below.
System Commands Reference Manual, Rev. 11
MTUSAV
Page 2
FORMAT
MTUSAV {cpuID}filespec{,filespec...}{/switches}
cpuID is an AlphaNET network identification number, the filespec(s) specify the files you want
to back up, and switches are one or more option requests.
DEFAULTS
The default file specification is *.* and the account and device you are logged into.
OPTIONS
Except as noted, the switches are file switches. All may be abbreviated to any unique characters.
Defaults are noted in the list.
/AFTER:date@time
Back up only files modified after specified date and time. Operation
switch.
/APPEND
Append .LOG output to existing MTUSAV.LOG in login account, if
present. Operation switch.
/NOAPPEND
If MTUSAV.LOG already exists, overwrite it. Default; operation
switch.
/BEFORE:date@time
Back up only files modified before specified date and time.
Operation switch.
/BRIEF
Display only the accounts backed up and the number of files in
each, not the file names. This shows the progress of the backup
without the slowdown displaying file names can cause. Operation
switch.
/DMY
Reports all dates in the format dd-mm-yy (or yyyy after 1999).
Operation switch.
/NODMY
Reports all dates in the format set in your language definition file.
Default; operation switch
/EXTRA
Output additional information on the screen and in the
MTUSAV.LOG file. Allows you to see the current error severity
settings after MTUSAV.OPT has been processed. Operation switch.
/NOEXTRA
Don’t include extra information in MTUSAV.LOG. Default;
operation switch.
/LOG
Creates a disk file log of the MTUSAV procedure. The log file is
MTUSAV.LOG in the current disk account. The contents and layout
of the log file may vary between software versions. Programs which
parse this file for key words or phrases may need to be changed
when a new version of MTUSAV is released. Operation switch.
/MODIFIED
Back up only files modified since last backup. Operation switch.
System Commands Reference Manual, Rev. 11
Page 3
MTUSAV
/OPTLIST
Display the default error severity settings, or, with /LOG, output
them to MTUSAV.LOG file. Does not perform a backup. All other
switches are ignored. Operation switch.
/NOOPTLIST
Do not display error severity settings. Default; operation switch.
/OPT2LIST
Same as /OPTLIST, except settings are written to MTUSAV.LOG
in format usable for MTUSAV.OPT file, as described below.
Operation switch.
/NOOPT2LIST
Do not display error severity settings. Default; operation switch.
/QUERY
Confirm before selecting files.
/NOQUERY
Do not confirm files. Default.
/SOFTABORT
Allow rest of command or control file to execute if MTUSAV
detects an incident with an “Error” severity. Otherwise, command
and control files are aborted. Operation switch.
/NOSOFTABORT
Abort command or control file after MTUSAV error. Default;
operation switch.
/SUPPRESS
Don’t list file names or account numbers on terminal as they are
backed up. May speed up backup.
/NOSUPPRESS
List files on the terminal. Default.
/SYSFILES
Look for MTUSAV.INF and MTUSAV.OPT only in OPR:, instead
of normal search path: (1) login account, (2) [P,0], (3) OPR:.
Operation switch.
/NOSYSFILES
Use normal search path for MTUSAV.INF and MTUSAV.OPT.
Default; operation switch.
/TIMEOUT: n
Number of minutes for a command file to wait for terminal input or
a control file to wait for an error condition to clear. Only works with
certain tape-drive related problems (e.g. drive not on line).
Operation switch.
/NOTIMEOUT
Don’t wait for input or error condition to clear. Abort MTUSAV
under control of /SOFTABORT. Default; operation switch.
/TMSYMBOL
Include the error type symbol—either “?” or “%” at the beginning of
displayed messages. Default; operation switch.
/NOTMSYMBOL
Do not include the error type symbol at the beginning of messages.
Generally used only in control files to avoid Task Manager
automatic error aborts. Operation switch.
/VERIFY
After performing backup, rewind tape, read files, and compare to
disk files to verify the data. Displays any errors on the screen.
Does not work when backing up across a network. Operation
switch.
/VONLY
Do not back up; verify only. Used to verify a previous backup or if
a combined backup/verification is interrupted. Displays any errors
on the screen. Does not work when used across a network.
Operation switch.
System Commands Reference Manual, Rev. 11
MTUSAV
Page 4
OPERATION
The rest of this reference sheet describes how to use MTUSAV. It starts with basic instructions
on entering the command itself, then talks about recommended backup procedures, using
command files and Task Manager control files to automate backups, and finally discusses
MTUSAV’s extensive error reporting and how you can adjust it to your situation.
Basic Use
Before backing up, make sure the tape is not write-protected. Type MTUSAV and the
specification of the files you want to back up. For example:
MTUSAV MEMO.TXT,SCHDLE.TXT[310,2]
RETURN
or
MTUSAV DSK5:*.*[]
RETURN
MTUSAV asks for the tape unit number. Enter a digit from 0 to 7. If your computer has more
than one device with the same unit number, MTUSAV asks which device to use.
Next, MTUSAV prompts you for information it stores in the save set label: the Volume name
(40 characters); Volume ID (10 characters); Installation (30 characters); System (30 characters);
and Creator (30 characters).
Now MTUSAV copies the files onto the tape. If your tape device supports tape spanning, and all
the files won't fit on a single tape, MTUSAV prompts you to mount new tapes as needed. As you
remove each tape, label it with the reel number (as well as other backup information) so you can
tell which is which. You may also want to write-protect the tape so it is not accidentally
overwritten. The process continues until all files are backed up.
Not all backup devices support multi-reel backups ("tape spanning"). If your device does
not support tape spanning, an error message displays if the tape is filled.
For error checking, you can use the /VERIFY switch. VERIFY reads every file on the tape
block-by-block and compares it to the corresponding file on the disk. If a file is not copied to
tape (for example, if it was a sequential file locked by another job), it does not cause a
verification error, since only files actually on the tape are checked. You can use /LOG with
/VERIFY to write the verification data to a log file. For example:
MTUSAV DSK1:*.*[66,1]/VERIFY/LOG
RETURN
This backs up all files in the account DSK1:[66,1], then compares the files on the tape to the disk
and writes the results to the MTUSAV.LOG file in the account you’re logged into.
System Commands Reference Manual, Rev. 11
Page 5
MTUSAV
Recommended Procedures
This section gives recommended procedures for using MTUSAV. We do not recommend a
particular backup frequency, completeness of backup, backup method (full, incremental, etc.), or
tape rotation. These all depend on your situation. Plan for the worst!
These procedures refer to topics, especially error handling and reporting, covered later in
this reference sheet.
MTUSAV can record a lot of information about each backup, which can be invaluable if you
need to restore data. To take advantage of these abilities, we recommend:
• Always do a DSKANA of the devices from which you are backing up before the
MTUSAV. Correct any file system errors before backing up.
• Before running MTUSAV, always log into a device with enough free space to record all
of the .TOC and .VER entries. The .TOC file needs roughly one block for each 30 files
backed up; the .VER file requires one block for each ten files.
• Always use the /LOG and /VERIFY options. The /LOG switch creates a disk file
containing all the information MTUSAV records about the backup process; /VERIFY
compares the files on tape against the disk files.
• Always have LOGGER set up on the system. MTUSAV cannot recover from CPU
exceptions (such as address errors) adequately, so it aborts with a JOBERR value
reflecting the type of CPU exception. The system may be in an unstable state after the
exception, and should be reset as soon as possible. The backup tape may not be readable
or restorable. All CPU exceptions are reported to LOGGER. Always create a
SYSLOG.LST file and examine it for errors.
• Always use a command file to run unattended MTUSAVs. Structure the command file to
trap as many errors as possible. Here is a skeleton .DO file which you can adapt to your
needs:
:R
LOG <account>
ERASE MTUSAV.LOG, MTUSAV.VER
MTUSAV <filespecs>/LOG/VERIFY/BRIEF
.... ; enter MTUSAV data here
;
IF ERROR = SEV’NUL AND LOOKUP(“MTUSAV.LOG”)=-1
GOTO ALL.OK
ENDIF
;
; Insert problem reporting procedures here
;
PRINT MTUSAV.LOG
LOG OPR:
; insert OPR: password here if needed
SYSLOG
PRINT SYSLOG.LST
LOG $:[$P]
EXIT
;
;ALL.OK
System Commands Reference Manual, Rev. 11
MTUSAV
Page 6
PRINT MTUSAV.LOG
LOG OPR:
SYSLOG
PRINT SYSLOG.LST
:<MTUSAV finished without errors
>
LOG $:[$P]
EXIT
This file follows all of the recommendations. It logs into an account on a device with
plenty of free space and erases any existing .LOG and .VER files. The MTUSAV
command line includes /LOG and /VERIFY: these are an integral part of the checking
process. As shown, the IF command must immediately follow MTUSAV’s input
parameters, or AMOS will overwrite JOBERR. The IF command branches to ALL.OK if
there were no errors and MTUSAV.LOG was produced. Checking for the log file is
crucial: since MTUSAV.LOG was erased before MTUSAV and we used the /LOG
option, if there is no MTUSAV.LOG after MTUSAV runs, something bad happened. For
example, there may have been insufficient memory to execute MTUSAV.
• After a backup, print the MTUSAV.LOG file and keep it with the tape. If you need to
restore files, you can quickly check to see if the backup was intact. If any files had a
problem when they were backed up, you may want to take special action before restoring
them. For example, you may want to copy an existing disk file to a file with a different
name before restoring the tape copy.
Using in Command/Control Files
Using MTUSAV in a command file or Task Manager control file is often very convenient, as it
allows unattended backups to run when no one is using the computer. However, an unattended
backup can present its own problems. Using the /SOFTABORT and /TIMEOUT switches can be
key to getting the best results from MTUSAV in a command or control file.
The /SOFTABORT and /TIMEOUT Switches
By default, if an error occurs while MTUSAV is running in a command or control file,
MTUSAV aborts the entire command or control file and writes the reason to the .LOG file, the
screen (for command files), and, usually, SYSLOG.SYS. If a condition requires user
interaction—such as changing a tape—a control file aborts, while a command file waits forever
for the action. In either of these situations, any actions after the MTUSAV are not performed.
/SOFTABORT and /TIMEOUT let you change this behavior, to give both MTUSAV and the
other procedures in your command or control file a better chance of completing successfully.
• The /SOFTABORT switch prevents an error from aborting MTUSAV. Instead,
MTUSAV shuts down cleanly (including swallowing any unused command lines for
tape unit number, device name, and tape label information), signals the error via reports
and JOBERR, and continues with the rest of the file. If the error occurs during a backup,
and a verification was requested, the verification is not performed.
• The /TIMEOUT:n switch causes MTUSAV to wait n minutes for user response if a
situation occurs which needs it. For example, in a command file, changing tapes or
correcting a tape drive condition requires an action, then an entry from the keyboard.
System Commands Reference Manual, Rev. 11
Page 7
MTUSAV
Without /TIMEOUT, MTUSAV waits forever for this keyboard entry. If you use
/TIMEOUT, MTUSAV waits for the time you specify, then, if there has been no
response, MTUSAV aborts and, if you’ve used the /SOFTABORT switch, the command
file continues.
If this same situation occurs in a control file, it doesn’t ask for user input. Instead, if you
use /TIMEOUT, the control file checks the error condition—for example, is the tape in
the drive still write-protected?—every few seconds for the number of minutes you
specify. If the error isn’t corrected in that time, MTUSAV aborts and, if you’ve used the
/SOFTABORT switch, the control file continues.
Entering /TIMEOUT:0 is the same as not using the /TIMEOUT switch.
Even using /TIMEOUT, there is no way to change tapes for a multi-tape backup while in
a control file. MTUSAV will abort, according to the /SOFTABORT setting, if there is
not enough room on a single tape.
If you use /TIMEOUT without /SOFTABORT, any actions following MTUSAV in the command
or control file are not performed unless you correct the error condition within the /TIMEOUT
time limit.
Neither /SOFTABORT or /TIMEOUT has any effect if you are using MTUSAV from AMOS
command level, not in a command or control file.
Using MTUSAV With the Task Manager
Because little interaction is possible when running a control file under the Task Manager,
MTUSAV reduces its functionality. MTUSAV’s responses to error conditions which can be
corrected (e.g. a tape is write protected or no tape is in place) are controlled by the /TIMEOUT
and /SOFTABORT switches, as described above.
Other conditions cannot be corrected. For example, tapes cannot be changed during either
backup or verification, so tape spanning is impossible. In such cases, MTUSAV aborts
gracefully, under control of the /SOFTABORT flag, and JOBERR is set appropriately.
Regardless of the /SOFTABORT and /TIMEOUT settings, if you submit the control file
containing MTUSAV to the Task Manager using the /ERROR switch, the Task Manager
will abort the control file after MTUSAV exits if MTUSAV has displayed a message
starting with “?” (with /ERROR:FATAL), “%” (with /ERROR:WARNING), or either
(with /ERROR:ALL). You can avoid this by using the /NOTMSYMBOL switch on the
MTUSAV command line.
If a control file entry for the tape label is too large, MTUSAV truncates it to the maximum
length.
System Commands Reference Manual, Rev. 11
MTUSAV
Page 8
Using MTUSAV in a Command File
Command files allow more interaction than control files. In particular, terminal input is possible.
In fact, if an action is necessary (for example, a tape is write-protected) MTUSAV forces a
prompt to the screen regardless of the setting of Trace or Silence mode in the command file,
Therefore, you can see the message, correct the problem and respond to the prompt so the
command file will continue.
If the command file is run unattended (such as for an overnight backup), operator intervention is
not possible, and you will want to use the /TIMEOUT:n and/or /SOFTABORT switches,
discussed above, so the command file can continue in case of an error.
If a command file entry for the tape label is too large, MTUSAV truncates it to the maximum
length.
As discussed above in “Recommended Procedures,” you can use the IF command to check
JOBERR after MTUSAV finishes. To do this, IF must be the next command after the MTUSAV
data; otherwise AMOS resets JOBERR and the value from MTUSAV is lost.
Error Reporting
You do not need to know the following information to use MTUSAV successfully. We
provide it for advanced users who want to understand the technical aspects of error
handling, or who want to be able to customize MTUSAV’s error reporting.
A great many things can go wrong during a backup: disks can fill up, files can be left open (or
opened during the backup), and more. To handle all of these situations, MTUSAV’s error
processing procedures are necessarily complex. The following sections contain:
• A discussion of incident severity and priority.
• A series of tables showing the various incidents that can occur at each stage of
MTUSAV processing and MTUSAV’s response to each.
• Ways you can control incident reporting, both by listing files for which some types of
errors shouldn’t be reported and by changing the severity of certain incidents.
The rest of this reference sheet refers to any condition which triggers exception (error)
processing as an “incident.” “Error” refers only to an incident of a specific severity, as
discussed below.
Incident Severity and Priority
MTUSAV tracks all incidents it encounters, and reports them along the way as detailed below.
Just before it finishes, MTUSAV sets JOBERR to an appropriate value. Because JOBERR can
only hold one value, and any number of incidents can occur during MTUSAV, it is important to
understand MTUSAV’s concept of Incident Severity and Incident Priority.
System Commands Reference Manual, Rev. 11
Page 9
MTUSAV
With the exception of a few extremely serious incidents, and a Control-C user abort, MTUSAV
classifies all incidents into three severity levels:
Severity
Role
Symbol
Note
Warning
Fatal
Least severe: will not set JOBERR on exit
More severe: will set JOBERR to JE$WRN on exit
Most severe: will set JOBERR to JE$MSC or other value
shown in the error tables on exit.
<N>
<W>
<E>
All incidents are preset to one of these severities. For some incidents, the severity cannot be
changed, for others, you can override the default severity by making an entry in the
MTUSAV.OPT file. You can also use MTUSAV.OPT to have MTUSAV “accumulate” a
number of less severe incidents into one more more severe one. This lets you tailor MTUSAV’s
operation for an individual system environment. For example: on some systems, having a
sequential file open during a backup could be classified as an error, while on other systems, it
may be worth only a note. Or, while any single open file could be a note, ten or more should be
treated as a warning. Using MTUSAV.OPT to adjust severity is described below.
MTUSAV indicates the final severity of an incident, after all MTUSAV.OPT processing, by
starting each message relating to the incident with the symbol shown above.
As MTUSAV executes, it remembers the severity of the gravest incident encountered so far. In
addition to the three discussed above, there are two severities MTUSAV.OPT cannot adjust:
standard AMOS DDB errors and Control–C aborts. These five levels form a hierarchy of
incident importance, the Incident Priority hierarchy, as listed:
Priority
Used For
None
Low
Notes; do not set JOBERR
DDB (file) error codes, usually temporary conditions
Warnings, setting JE$WRN
Other errors defined in error tables, except JE$CTC
Control-C, setting JE$CTC
Highest
Just before MTUSAV exits, it writes the value of the highest priority incident to JOBERR. You
can then test this value by using IF.LIT as the next command in a command file, or by using a
program that has its PH$ERR bit set in its program header.
Listing Severity Levels
You can list MTUSAV’s default severity levels for user-controllable incidents by running
MTUSAV/OPTL or MTUSAV/OPT2; if you add the /LOG switch, the list is also placed in the
MTUSAV.LOG file. You should use /OPT2/LOG to create a list you can then modify to create
an MTUSAV.OPT file, as discussed below.
After you have set up an MTUSAV.OPT file, you can list the settings that result from the merge
of the default settings and MTUSAV.OPT by running MTUSAV/EXTRA.
System Commands Reference Manual, Rev. 11
MTUSAV
Page 10
Error Tables
The following tables list the incidents that cause error processing during MTUSAV. There is a
table for each stage of MTUSAV processing: program initialization, tape drive interaction,
backup, and verification, with an additional table of incidents which could occur at any point.
Notes following each table expand on some of the descriptions.
The columns in each table are:
•
Incident: A brief description.
•
Mode: Some incidents are handled differently depending on the mode MTUSAV is
operating in. There are three modes:
• T: operating under the Task Manager
• C: operating under a command file
• I: interactive
•
Abort?: If the problem is essentially irrecoverable, MTUSAV will abort its operation
quickly. It may finish any pending operations before terminating.
•
Where: How the error is reported:
• T: a message on the terminal
• S: an entry in SYSLOG.SYS
• L: a message in MTUSAV.LOG.
•
JOBERR: How is JOBERR affected? This could be:
• Blank: JOBERR is not set.
• Asterisk (*): JOBERR is set based on the user settings in MTUSAV.OPT and the
runtime history.
• A fixed value: JOBERR is set to this value on termination, under the rules
described above for JOBERR priority.
•
.OPT Text: The text used in MTUSAV.OPT for defining the incident severity. This is
blank if the incident severity cannot be set in MTUSAV.OPT.
•
Acc?: Answers the question “Can the severity of this incident be changed through
accumulation?” For some incidents, you can set, in MTUSAV.OPT, a number of
occurrences after which the incident’s severity increases. This column appears only in
some tables.
•
Note: Further details are found in the Notes section following each table.
System Commands Reference Manual, Rev. 11
Page 11
MTUSAV
Incident
Mode
Abort?
Where
JOBERR
Insufficient memory
Bad version (1.x version
under AMOS 2.x)
Cannot locate, load, or
initialize CMDLIN.SYS
Bad command line switches
Invalid line in MTUSAV.OPT
Error reading MTUSAV.OPT
Invalid line in MTUSAV.INF
Error reading MTUSAV.INF
Cannot spawn slave task
Cannot execute TAPSER on
slave task
All
All
Yes
Yes
T
T
JE$MSC
JE$MSC
All
Yes
T
JE$MSC
All
All
All
All
All
All
All
Yes
No
No
No
No
Yes_
Yes
T
T,L
T,L,S
T,L
T,L,S
T,L
T,L
JE$CLS
*
*
*
*
JE$MSC
JE$MSC
.OPT Text
Note
1
2
MTUSAV.OPT invalid line
MTUSAV.OPT read error
MTUSAV.INF invalid line
MTUSAV.INF read error
3
4
Initialization Incidents
Notes:
1. This refers only to an insufficient memory condition that exists after MTUSAV.LIT has
been loaded and starts to execute.
2. Only triggered if you run the latest AMOS 1.x version of MTUSAV under AMOS 2.x.
3. Some command line switches are automatically adjusted if bad values or incompatible
options are selected, in which case no error is reported, but the adjustments are displayed
on the screen and put in MTUSAV.LOG.
4. MTUSAV.LIT has defaults for all optional control values. If a line in MTUSAV.OPT is
invalid, it is ignored, and the default value used. If the rest of MTUSAV.OPT cannot be
read, defaults are used for all subsequent options. The control of this setting by
MTUSAV.OPT assumes the control line is processed without error.
Incident
Mode
Abort?
Where
JOBERR
Invalid tape unit details
Tape driver not loaded into
RES:
Old version of tape driver
used?
Using old version of
TAPSER
Cannot ASSIGN/DEASGN
tape drive
Write-protected tape
Write-protected tape
Drive not ready or off-line
Drive not ready or off-line
Tape read or write errors
C,T
All
Yes
Yes
T,L,S
T,L
JE$MSC
JE$MSC
All
No
T,L
All
Yes
T,L
JE$MSC
All
Yes
T,L
JE$MSC
C,T
I
C,T
I
All
Yes
No
Yes
No
Yes
T,L
S
T,L
S
T,L,S
JE$MSC
.OPT Text
Note
1
JE$MSC
2
3
2
3
JE$MSC
Tape/Drive Interaction Incidents
Notes:
1. If the driver cannot report on the tape spanning ability of the selected drive, MTUSAV
will prevent multi-reel operation, even if the drive itself supports it.
System Commands Reference Manual, Rev. 11
MTUSAV
Page 12
2. MTUSAV will wait under control of /TIMEOUT until the time-out period has expired.
3. The incident is displayed on the screen, and the user resolves it manually.
Incident
Mode
Abort?
Where
JOBERR .OPT Text
Error reading or writing
.TOC file
Error writing TOC
Error reading disk directory
structure
Unable to open sequential
file – file in use
Unable to open sequential
file – other
Unable to open contiguous
file – file in use
Unable to open contiguous
file – other
Contiguous file hijacked by
another job
Unable to read all blocks in
sequential file
Unable to read all blocks in
contiguous file
One or more contiguous file
blocks are locked with
LOKSER
Sequential file: bum block
count – pad file
Sequential file: bum block
count – truncate file
Tape spanning needed, but
not supported
Tape spanning allowed and
needed
Tape spanning allowed and
needed
Unable to update “Last
Backup” date
All
No
T,L
*
Acc?
Note
All
1
Yes
T,L,S
JE$MSC
All
No
T,L
*
Bkup seq file in use
All
No
T,L,S
*
3
All
No
T,L
*
Bkup error seq file
open
Bkup contig file in use Yes
All
No
T,L,S
*
3
All
No
T,L
*
All
No
T,L,S
*
All
No
T,L,S
*
All
No
T,L,S
*
Bkup error contig file
open
Bkup contig file
hijacked
Bkup seq file read
error
Bkup contig file read
error
Bkup record in use
All
No
T,L,S
*
All
No
T,L,S
*
All
Yes
T,L,S
D$EFUL
T
Yes
T,L,S
D$EFUL
I,C
No
T
All
No
T,L
Error reading TOC
2
Yes
3, 11
4, 11
Yes
5, 11
Yes
6
Yes
7
Yes
8, 11
Bkup seq file padded
Yes
9
Bkup seq file
truncated
Yes
9
10
*
Dir date update failed
1
Backup Incidents
Notes:
1. Only files in extended directory format whose details are successfully written to
MTUSAV.TOC have their date of last backup updated.
2. This error stops all further file processing, and MTUSAV aborts under control of
/SOFTABORT.
3. The file is not backed up.
4. The contents of the file are saved regardless of file or record locking. Data integrity may
be compromised.
System Commands Reference Manual, Rev. 11
Page 13
MTUSAV
5. This occurs when MTUSAV has opened a contiguous file for reading (sharing) and
another job opens the same file exclusively. LOKSER allows this, but forces a “file in
use (D$EFIU)” error the next time MTUSAV reads the file. The file is saved regardless
of record or file locking, and data integrity may be compromised.
6. If a block of a sequential file cannot be read, a block containing nulls is written to tape.
If there are unread blocks in the file, the tape file is padded with the same number of null
blocks. This file will not verify, and data integrity is compromised. Some remedial disk
management and data restoration work is required.
7. If a block of a contiguous file cannot be read, a block containing an ASCII message
followed by nulls is written to tape in its place. Data integrity is compromised.
Subsequent blocks will be handled normally. Some remedial disk management and data
restoration work is required.
8. The block is read regardless of locking. Data integrity may be compromised.
9. The disk file system is corrupted. The number of blocks in the file as defined by the
file’s directory entry does not match the number of blocks AMOS can read from the file.
MTUSAV treats the file size defined in the disk directory entry as “correct.” A file that
is too short is padded to the correct size on the tape with null bytes at the end. A file that
is too long is truncated on the tape. In both cases, the disk files and directory entries are
not altered. Data integrity has been compromised, and remedial disk management work
is required.
10. The incident is displayed on the screen, and the user resolves it manually.
11. Not processed as an incident for files listed in MTUSAV.INF; still reported.
Incident
Mode
Abort?
Where
JOBERR .OPT Text
Tape file does not match
disk file
Contig file verif error
Error reading or writing
.VER file
Error writing VER
Tape label not found
Tape label found in wrong
place
Tape directory block not
found
Sequence number error
Sequential file no longer
exists
Contiguous file no longer
exists
Sequential file in use
Error reading disk file
All
No
T,L,S
*
Seq file verif error
Yes
All
5, 6
No
T,L
*
Error reading VER
All
All
Yes
Yes
T,L,S
T,L,S
JE$MSC
JE$MSC
All
No
T,L,S
*
All
All
No
No
T,L,S
T,L,S
JE$MSC
All
No
T,L,S
All
All
No
No
T,L,S
T,L,S
Verif contig file read error
File protection changed
Yes
All
No
T,L,S
Directory dates changed
Tape spanning needed, but
All
All
No
Yes
T,L,S
T,L,S
System Commands Reference Manual, Rev. 11
JE$MSC
Acc?
Note
Tape dir block not
found
Yes
Verif seq file not
found
Verif contig file not
found
Verif seq file in use
Verif seq file read
error
Yes
5
Yes
5
Yes
5
Verif file protection
Yes
changed
Verif dir date changed
2
3
MTUSAV
Page 14
Incident
not supported
Tape spanning allowed and
needed
Tape spanning allowed and
needed
Tape is not part of save set
Tape is not part of save set
Tape reel number not in
sequence
Tape reel number not in
sequence
Mode
Abort?
Where
JOBERR .OPT Text
Acc?
Note
T
Yes
T,L,S
D$EFUL
I,C
No
T
I
C
I
No
Yes
No
T
T,L
T
JE$MSC
1
1,4
1
C
Yes
T,L
JE$MSC
1,4
1
Verification Incidents
Notes:
1. The incident is displayed on the screen, and the user resolves it manually.
2. The file is checked further: MTUSAV does not bypass the rest of the file.
3. This setting can also adjust the resulting severity for a verification error.
4. This error cannot occur when under the Task Manager.
5. Not processed as an incident for files listed in MTUSAV.INF; still reported.
6. This incident is overridden by a “directory date changed” incident.
Incident
Mode
Abort?
Where
JOBERR
.OPT Text
Note
CPU exceptions
Control-C abort during
backup
Control-C abort during
directory update
Control-C abort during
verification
Error writing .LOG file
All
All
Yes
Yes
T,S
T,L
Varies
JE$CTC
Bkup user abort
1
2
All
No
T,L
JE$CTC
Date update user abort
All
Yes
T,L
JE$CTC
Verif user abort
All
No
T
JE$WRN
Error writing LOG
2
General Incidents
Notes:
1. CPU exceptions (address error, bus error, etc.) cannot be handled cleanly. At best,
JOBERR is set, a message is displayed on the screen, and a SYSLOG entry made. The
system or the job may crash. MTUSAV may not report any error, and (under AMOS 2.x)
may leave a zero-block MTUSAV.LOG file on disk. Other temporary files may also be
present.
2. A Control-C while MTUSAV is listing the .TOC or .VER file is handled separately,
outside the scope of user-defined severity. Such a Control-C stops further listing of the
file and continues processing. A Control-C at other times follows the severity procedures
outlined earlier.
System Commands Reference Manual, Rev. 11
Page 15
MTUSAV
Omitting Files from Error Checking: the MTUSAV.INF File
Under previous versions of MTUSAV, backing up certain files would always, or almost always,
cause errors. Examples include the MAL*.QUE files that AlphaMAIL always has open, and
NETLOG.LST that AlphaTCP always keeps open. This complicated meaningful error reporting
and handling.
MTUSAV now lets you list files for which certain incidents should not be considered problems.
The incidents are still reported to the screen and MTUSAV.LOG, but they are not considered for
JOBERR processing, and do not contribute toward any incident accumulation, as discussed
below.
To enable this special handling, you create a file called MTUSAV.INF, listing the files to be
“ignored” by the error handler. If MTUSAV encounters one of the incidents listed below while
processing a file listed in MTUSAV.INF, it assigns the incident the severity given in the “Bkup
file known” or “Verif file known” entry in MTUSAV.OPT, or a “Note” severity if these
incidents aren’t listed in that file.
MTUSAV searches for MTUSAV.INF using the following search path:
1. Login account of the MTUSAV job
2. [P,0] account of the MTUSAV job
3. DSK0:[1,2]
If MTUSAV.INF is not found, MTUSAV assumes all files are handled through its standard
incident handling scheme.If you use the /SYSFILES switch, MTUSAV looks for MTUSAV.INF
only in DSK0:[1,2].
MTUSAV.INF is an ASCII sequential file. Each line contains a single unambiguous file
specification. Wildcarding is not supported, and a full device-drive-filename-ppn specification is
strongly recommended. If any part of the full file specification is missing, MTUSAV defaults
that part of the specification to the current login device and/or account. This can cause a problem
as MTUSAV will behave differently if you run it from different accounts. Blank lines, text after
a semicolon or hash (#) character, and tabs or spaces before or after a file specification are all
ignored, letting you format and comment the file for best readability.
These incidents are affected by MTUSAV.INF:
• During backup phase: sequential file in use, contiguous file in use, contiguous file
hijacked, contiguous file record in use
• During verification phase: tape file does not match disk file, file not found, sequential
file in use
All other incidents, such as disk errors, are always treated and reported as errors, even for files
listed in MTUSAV.INF.
System Commands Reference Manual, Rev. 11
MTUSAV
Page 16
Setting Backup Options: the MTUSAV.OPT File
The MTUSAV.OPT file contains the severity settings for incidents with a user-definable
severity. Other incidents have a set severity level which cannot be altered by a user.
MTUSAV searches for MTUSAV.OPT using the following search path:
1. Login account of the MTUSAV job
2. [P,0] account of the MTUSAV job
3. DSK0:[1,2]
If MTUSAV.OPT is not found, MTUSAV uses the default severity settings, as listed in the table
below. If you use the /SYSFILES switch, MTUSAV looks for MTUSAV.OPT only in
DSK0:[1,2].
MTUSAV.OPT is an ASCII sequential file. Each line contains the name of the incident being
handled (as in the first column of the table below), an equals sign, and the incident severity:
either “Note,” “Warning,” or “Error.” Blank lines, text after a semicolon or hash (#) character,
and tabs or spaces before or between words, or around the equals sign, are all ignored, letting
you format and comment the file for best readability. The text is not case-sensitive.
The easiest way to create MTUSAV.OPT is to start by using
MTUSAV/OPT2LIST/LOG. This places the default incident severity levels in the
MTUSAV.LOG file, in the correct format for MTUSAV.OPT. Rename MTUSAV.LOG
to MTUSAV.OPT, then edit it to change the severities as you want.
You can set the severity for the following incidents in MTUSAV.OPT:
Incident Name
Default
Meaning
Note
Error reading TOC
Warning
For all incidents in this category, MTUSAV either
cannot read or cannot write a block to the disk.
MTUSAV will not try to access the file again. The
program will continue, but the file will not be complete.
1
Error writing TOC
Error reading VER
Error writing VER
Error writing LOG
Warning
Warning
Warning
Warning
Temporary File Control
2
3
4
5
User Abort Control
Verif user abort
Warning
Date update user abort
Warning
If a ^C comes in while the list of verification errors in
being displayed, the list is terminated, but MTUSAV
continues.
Even if set to Error, MTUSAV will not treat this as a
fatal error.
Parameter File Control
MTUSAV.INF invalid line
MTUSAV.INF read error
MTUSAV.OPT invalid line
MTUSAV.OPT read error
Warning
Warning
Warning
Warning
Usually a file specification error
Cannot read a block from the disk.
Cannot read a block from the disk.
System Commands Reference Manual, Rev. 11
Page 17
Incident Name
MTUSAV
Default
Meaning
Note
Bkup seq file in use
Warning
6
Bkup error seq file open
Error
Bkup contig file in use
Warning
Bkup error contig file open
Error
Bkup record in use
Warning
Bkup contig file hijacked
Warning
Bkup seq file padded
Warning
Bkup seq file truncated
Error
Bkup seq file read error
Error
Bkup contig file read error
Error
Bkup file known
Note
MTUSAV could not open the sequential file for input
as another job had the file open. The file is not saved
to tape.
MTUSAV could not open the sequential file for any
reason other than another file had the file already
open. The file is not saved to tape.
On trying to open the contiguous file, LOKSER
reported that another user had the file open for
exclusive use. MTUSAV will save the file, but its data
may not be consistent, as the other job(s) may be
writing to the file while it is being saved to tape.
MTUSAV could not open the contiguous file for any
reason other than another job had the file opened for
exclusive use. MTUSAV will save the file, but its data
may not be consistent, as the other job may be writing
to the file while it is being saved to tape.
MTUSAV tried to read a block from a contiguous file
on disk, but LOKSER reported that the block (or part
of it) was locked by another job. MTUSAV will read the
block anyway, but the data in the file may not be
consistent.
Another job opened a contiguous file for exclusive use
while MTUSAV was copying it to tape. MTUSAV will
continue to save the file to tape, and will read
subsequent blocks regardless of locking. The data in
the tape file may not be consistent.
The number of blocks in a sequential file that can be
read from the disk (by following the internal forward
pointers) was fewer than the number of blocks
indicated in the disk file’s directory entry. The file
system is corrupt. MTUSAV will save the entire file,
but will append null blocks to the tape file to pad its
length out to the number of blocks specified in the
directory entry. The file is corrupt.
The number of blocks in a sequential file that can be
read from the disk (by following the internal forward
pointers) was larger than the number of blocks
indicated in the disk file’s directory entry. The file
system is corrupt. MTUSAV truncates the tape file to
the number of blocks specified in the disk directory
entry, and data may be lost. The file is corrupt.
MTUSAV cannot read a disk block from a sequential
file on disk.
MTUSAV cannot read a disk block from a contiguous
file on disk
The file is listed in MTUSAV.INF. If the incident is one
of those listed for MTUSAV.INF, use this severity.
A sequential file on tape did not match its partner on
disk. For AMOS 2.x systems, the file sizes are the
same but the contents differ.
A contiguous file on tape did not match its partner on
disk. For AMOS 2.x systems, the file sizes are the
7,9
Problems During
Backup
6
6
6
Problems During
Verification
Verif seq file error
Error
Verif contig file error
Error
System Commands Reference Manual, Rev. 11
7,9
MTUSAV
Page 18
Incident Name
Default
Tape dir block not found
Error
Verif seq file not exist
Warning
Verif contig file not exist
Warning
Verif seq file in use
Note
Verif seq file read error
Error
Verif contig file read error
Error
Verif file protection changed
Note
Verif dir date changed
Note
Verif file known
Note
Meaning
Note
same but the contents differ.
A directory block on the tape was not found when
MTUSAV was expecting one. The AMOS disk file
system is corrupted, and/or the tape is bad. One or
more files may be missing or corrupted on the tape.
A sequential file that was present when the backup
was made, and copied to tape, had been erased by
the time MTUSAV tried to verify it from tape.
A contiguous file that was present when the backup
was made, and copied to tape, had been erased by
the time MTUSAV tried to verify it from tape.
A sequential file present and copied to tape was in
use when MTUSAV tried to verify it. The file cannot be
checked.
MTUSAV could not read a disk block from a
sequential file. The file cannot be verified further.
Remedial disk housekeeping is necessary.
MTUSAV could not read a disk block from a
contiguous file. The file cannot be verified further.
Remedial disk housekeeping is necessary.
AMOS 2.x only: The file protection for the disk file has
changed since the backup was made.
The date of creation or last modification has changed
between the time of backing up the disk file to the time
of verifying the file.
The file is listed in MTUSAV.INF. If the incident is one
of those listed for MTUSAV.INF, use this severity.
7
7
7
8
9
Problem During
Directory Date Updating
Dir date update failed
Warning
The date of last update in all the files listed in the
MTUSAV.TOC file could not be updated.
Max read errors
5
Max bum block count count
2
Max verif error count
5
Max seq file in use count
5
Max contig file in use count
5
Max rec in use count
10
Max tape dir block not found
count
Max warnings before error
0
Maximum number of disk read incidents before
triggering an error.
Number of sequential file size problems on backup
before triggering an error.
Number of files that fail verification before triggering
an error.
Number of sequential files in use (during backup and
verification combined) encountered before triggering
an error.
Number of contiguous files in use (during backup and
verification combined) encountered before triggering
an error.
Maximum number of record-in-use incidents before
triggering an error. One file may give rise to more than
one record-in-use error.
Maximum number of tape directory entry problems
encountered before triggering an error.
Maximum number of warnings generated before
triggering an error.
Accumulation of Errors
5
MTUSAV.OPT User-defined Severity Settings
System Commands Reference Manual, Rev. 11
Page 19
MTUSAV
Notes:
1. Occurs when summarizing the incidents during the backup phase. While the totals and
JOBERR setting will be correct, the details will not be complete. Only those files which
were listed completely will have their date of last backup updated (AMOS 2.x only).
2. Occurs when writing a completion record about the backup of a particular file. Further
completion records will not be recorded, although subsequent files will be processed and
backed up as appropriate. An “Error reading TOC” will probably occur in the summary
part of the backup phase report.
3. Occurs when summarizing incidents during the verification phase. While the totals and
JOBERR setting will be correct, the incident list will not be complete. MTUSAV.LOG
will have the incident details listed after the appropriate file.
4. Occurs when writing an incident record about the verification of a particular file. Further
incident records will not be recorded in the MTUSAV.VER file, but will still be listed in
the MTUSAV.LOG file. An “Error reading VER” will probably occur in the summary
part of the verification phase report.
5. Occurs when writing to the MTUSAV.LOG file. Totals and JOBERR will continue to be
set correctly, but details of incidents will not be recorded in the .LOG. Certain errors will
still be reported to SYSLOG, as lsited in the Error Tables.
6. If a file listed in MTUSAV.INF encounters this incident, the severity is taken from the
“Bkup file known” entry if that entry is less severe than the original entry. Can be further
modified by error accumulation processing.
7. If a file listed in MTUSAV.INF encounters this incident, the severity is taken from the
“Verif file known” entry if that entry is less severe than the original entry. Can be further
modified by error accumulation processing.
8. If this incident is encountered, MTUSAV continues to verify the file.
9. If a file encounters this incident, the severity of the reported error is taken from the
“Verif dir date changed” entry if the entry is less severe than the original entry. Can be
further modified by error accumulation.
Error Accumulation and Modification
As you review the MTUSAV log file, some incidents may be reported with a severity other than
you expect. As described below, four procedures can modify the severity of a particular incident:
two can boost the severity, and two can reduce it.
A Boost: Error Accumulation
The total effect of a number of incidents of low severity may be larger then any one of them.
Therefore, MTUSAV counts certain types of incidents, and triggers an incident with a severity of
“error” if the total reaches a certain number. Any component incident that occurs after the
triggering of “error” will report another “error.” The following MTUSAV.OPT settings control
error accumulation. The “Components” are the incidents which are counted in that category:
System Commands Reference Manual, Rev. 11
MTUSAV
Page 20
MTUSAV.OPT Setting
Components
Notes
Max seq file in use count
Max contig file in use count
Bkup seq file in use
Bkup contig file in use
Bkup contig file hijacked
Bkup record in use
Tape dir block not found
Bkup seq file read error
Bkup contig file read error
Verif seq file read error
Verif contig file read error
Bkup seq file padded
Bkup seq file truncated
Any incident with a severity
of “Warning”
Seq file verif error
Contig file verif error
The adjusted severity must be
“Warning,”, not the default severity.
If the file is listed in MTUSAV.INF,
the incident is not counted.
Max rec in use count
Max tape dir block not found count
Max read errors
Max bum block count count
Max warnings before error count
Max verif error count
Error Accumulation Details
Except as noted, error accumulation has precedence over “directory date changed” processing
and “file listed in MTUSAV.INF” processing. If an incident triggers an error accumulation, the
other procedures cannot undo that severity boost.
Boost: Max Warnings Before Error
You can also set a number of less serious incidents, of any type (except as noted below), which
will cause MTUSAV to report an error. This is controlled by the “Max warnings before error”
setting in MTUSAV.OPT. When the total number of notes and warnings equals or exceeds this
value, MTUSAV reports an error. Subsequent incidents of Warning or Note severity are also
reported as having Error severity.
There are two exceptions to this rule. Neither of these incidents are counted:
• Incidents which are not reported because the file is listed in MTUSAV.INF.
• Directory date change warnings (AMOS 2.x extended directories only).
Be careful with this setting, as incidents of both Warning and Note severity are accumulated.
Reduction: Directory Date Changed
Under AMOS 2.x, files in extended directories store the date they were created and last
modified. If either of these dates changes between backup and verification, it indicates someone
has edited, or deleted and recreated, the file. In this case, even if the file size has changed, or the
data on the disk doesn’t match the data on the tape, the incident is reported as a “Verif dir date
changed” note, rather than a size or data mismatch, either of which has a default value of
warning.
You can change the severity of all three incidents involved (dir date changed, size
mismatch, and data mismatch) in MTUSAV.OPT. The directory date mismatch severity is
used only if it is less than the other incident encountered.
System Commands Reference Manual, Rev. 11
Page 21
MTUSAV
Reduction: File is Known to MTUSAV
If a file is listed in MTUSAV.INF, the incidents listed in “Omitting Files from Error Checking:
the MTUSAV.INF File” are reported with the severity defined for “known files” in
MTUSAV.OPT, as long as this is less than the severity they would otherwise have. For more
details on known files and MTUSAV.INF, see page 15.
MESSAGES
A "date" or a "time" must be specified for all "date and time" switches.
You specified a /BEFORE or /AFTER switch without also specifying both a date and
time.
All "date and time" switches must be in absolute format.
The /BEFORE or /AFTER switch must include a date and time in absolute format, not a
relative format.
%Backup date update aborted by ^C
You aborted the updating of the disk directory entries for each file backed up. Each disk
which has an extended directory structure records the time and date of the last backup of
each file. You aborted this update process, but any transfer to tape and verification prior
to the abort is complete.
?Cannot ASSIGN devn: - reason
?Cannot DEASGN devn: - reason
MTUSAV could not get exclusive use of the tape unit. Someone else has been assigned
exclusive use. Try using MTUSAV later. You can find out which job has the tape
assigned by using the DEVTBL command.
%Cannot locate TAPSER.LIT in spawned task's partition.
The background task launched by MTUSAV could not load and launch TAPSER.LIT.
The backup will be aborted.
?Cannot use filename - reason
MTUSAV encountered an error while accessing one of its work files. If filename is a
.TOC (table of contents) or .VER file, the backup and verification proceed and the
number of verification errors encountered will be correct, but details on all the errors
will not be available. If filename is a .LOG file, further log details are not recorded in the
.LOG file, but still display on the screen.
System Commands Reference Manual, Rev. 11
MTUSAV
Page 22
?Data verification failure in file fspec
The block-by-block comparison of a file on tape against its corresponding image on disk
failed. The file on tape is not identical to the now-current contents of the file on disk.
Verification continues from the start of the next tape file.
%Drive is not on-line and at load point.
% Please correct, then press RETURN when ready.
Correct the problem and continue.
%Error reading MTUSAV.TOC file.
An error occurred while MTUSAV was trying to read the TOC file. The error listing is
not complete.
%Error reading MTUSAV.VER file.
%Listing of files that failed to verify is incomplete.
An error occurred while MTUSAV was reading the file containing details of verification
errors. The list of verification errors is incomplete, although the count of verification
errors is accurate.
%Error listing terminated.
You pressed Control-C during the file error listing.
?Error reading disk file
During verification, MTUSAV cannot read a disk file for comparison against a tape file.
A verification error is raised, and verification continues from the start of the next tape
file.
nn errors caused by file or record locks
nn contiguous (random) files were either locked exclusively by another job, or had one
or more records locked when MTUSAV tried to save those records to tape. In either
case, MTUSAV read the affected blocks by bypassing AMOS's record locking system.
Although the data was saved correctly to tape, the consistency of data saved is
questionable, as the file might have been undergoing update as it was being backed up.
The file list will be incomplete if there was an earlier error in the MTUSAV.TOC file.
System Commands Reference Manual, Rev. 11
Page 23
MTUSAV
nn errors caused by file verification failure
During verification, MTUSAV either encountered an error trying to open a disk file, or
the contents of the disk file did not match the file on the tape. If no other errors were
reported, and no other job was active between the backup and the verification, then the
backup did not correctly save the data in this file. More likely is that another message
will indicate the cause for the verification error (for example, there was another job
writing to the file as it was being saved).
The file list will be incomplete if there was an earlier error in the MTUSAV.TOC file.
nn errors during a directory scan for devn:[p,pn]
There was a disk device error while MTUSAV was searching for files in the AMOS disk
directory structure. This aborts the MTUSAV. The backup is incomplete—not all the
files are transferred to tape. If this occurs in the backup phase, verification is not
attempted. Check the tape carefully to see if it can be used to restore those files saved to
tape prior to the disk error.
nn errors while opening a file
nn files reported an error when MTUSAV tried to open them for reading. A list of files
causing the errors follows this message. Listed sequential files were not transferred to
the tape, and do not generate a verification error. Listed contiguous (random) files are
transferred if the error is "File in Use." MTUSAV backs up the file block-by-block
without regard for record locking. Therefore the data integrity of the tape file is in
question. If a contiguous file signals a different error, it is not transferred to tape.
The file list will be incomplete if there was an earlier error in the MTUSAV.TOC file.
nn errors while reading a file
nn errors were encountered reading files. The files with errors are listed after this
message. All files listed are corrupt and should not be restored. So the backup can
continue, MTUSAV truncates or extends the listed sequential files on the tape to match
the number of blocks in the disk directory entry for the file. For contiguous (random)
files, MTUSAV could not read a particular block for reasons other than record locks. It
writes a dummy block to act as a placeholder for the block where the error occurred.
The file list will be incomplete if there was an earlier error in the MTUSAV.TOC file.
%Field size exceeded, please re-enter.
Re-enter the information, using less characters.
System Commands Reference Manual, Rev. 11
MTUSAV
Page 24
%File size in directory and on disk do not match (bum block count)
The number of blocks as defined by the directory entry for a sequential file does not
match the number of blocks read from the disk. If the number of blocks read is less than
the number of blocks in the directory entry, the file is padded with dummy data to the
size defined in the directory entry. If the number of blocks read is more than the number
of blocks in the directory entry, the file is truncated to the size specified in the directory
entry. In either case, the file is corrupt.
?File size on tape does not match disk file.
During verification, the size of the file on tape does not match the file on disk.
Verification continues from the start of the next tape file.
%File verification phase aborted -- not all files have been verified
You aborted verification by pressing ^C. Not all the files on the tape have been checked
against the same files on disk.
?Insufficient memory to run MTUSAV
See your System Operator for help in increasing your memory partition.
Multi-reel backup (tape spanning) is available if needed
This informational message confirms that the hardware and software combination in use
supports multi-reel backup if needed.
?Multi-reel backup (tape spanning) is not supported by this tape device
The selected tape device does not support multi-reel backups. If the backup overflows
the tape, it will be aborted without any verification phase, and not all files will be backed
up.
%Not all files have been updated with correct backup date
Either you aborted the backup date update phase with a ^C, there was an error in reading
the MTUSAV.TOC file, or the .TOC file was prematurely closed by an earlier error.
Only those files on a disk with an extended directory structure whose details were
successfully recorded and read back from the TOC file will have their last backup date
updated.
%Please mount first reel in save set and press
% RETURN to continue, or control-C to abort verify
A multi-reel set was created during the backup. The verification phase is starting, and
you need to load the first reel into the drive.
System Commands Reference Manual, Rev. 11
Page 25
MTUSAV
%Reading record without regard to locking, which may compromise file integrity
While reading a contiguous (random) file, a block was locked by another user.
MTUSAV saves the block by bypassing the record lock. However, if the other user was
modifying the file, this may compromise the data integrity of the tape file.
%Tape contains partially copied files
Either an error occurred, or you aborted the program with a ^C, while the backup phase
was in progress. The tape does not contain all the files that match the command line
specification. The last file transferred to tape may be incomplete.
?Tape directory block not found where expected
During verification, there is a problem with the file format on the tape. At what should
have been the directory block for a file on the tape, MTUSAV found a different type of
block, probably a data block. At a minimum, the previous file is corrupt, and possibly
the rest of the tape is corrupted as well. Verification continues from the start of the next
properly-detected tape file
If you receive this error, we strongly recommend you check the disk file structure using
DSKANA, and clean the tape drive heads. The tape may be damaged and need replacing.
The backup may need to be performed again.
%Tape full: multi-reel backup is not supported
% Backup is being aborted
All the files you specified cannot fit onto a single tape. A multi-reel backup cannot be
done with the hardware and software combination being used. The backup is aborted
without a verification phase. Not all files are backed up.
%Tape full: running under Task Manager
% Cannot change tape: backup aborting
All the files you specified cannot fit on a single tape. A new tape cannot be loaded as the
backup is running under control of the Task Manager. The backup aborts without any
verification phase, and the Task Manager control file continues to execute.
%Tape is file protected - please insert a write ring or
% mount a different tape, then press RETURN when ready.
Make sure you have the correct tape, then install a write ring to continue.
System Commands Reference Manual, Rev. 11
MTUSAV
Page 26
%Tape is full, please mount another tape then press C to
% continue. Pressing Control-C will abort the backup
% and leave the tape with partially copied files.
Remove the tape, label it, and mount another reel to continue the backup. If you want to
stop the backup, you can use CTRL /C at this point—but be aware the tape you just
created may not be restorable.
%Tape is not from the same save set
% Please correct, then press RETURN when ready or press control-C to abort
The tape you mounted is not from the correct save set. Replace it with the correct reel
from the correct save set.
%Tape is out of sequence -- please mount the correct tape
Current reel is mm, reel nn is required
You've mounted the wrong tape; it is from the current save set, but is the wrong reel
number. Replace it with the correct tape.
?TAPSER.LIT is out-of-date. You must use version 3.0(126) or later
The version of TAPSER.LIT you are using (usually held in SYS:) does not support
driver interrogation for tape spanning features. Tape spanning is not allowed, even if the
tape device supports it. If tape spanning is not required on this backup, the backup will
proceed normally. Update your software to the latest version.
?Transfer was aborted with errors
The backup was aborted due to a tape or disk directory search error. The backup is
incomplete, with one or more selected files not on tape. The tape may not be restorable,
as the end-of-transfer protocol may not have been written. The tape needs careful
inspection to determine its usefulness.
Transfer was completed without DIR, OPEN, READ, or LOCK errors
The specified files were transferred to tape without any directory search, file in use,
device, bum block count, or record-in-use errors. Errors could still be found during
verification (if one was requested).
?Transfer was completed with errors
One or more errors were encountered in transferring the specified files to tape. The
backup completed, but one or more files were not correctly backed up. A list of the
errors follows this message.
?Unable to continue writing to tape - [explanation]
Correct the problem and continue. See your System Operator for help.
System Commands Reference Manual, Rev. 11
Page 27
MTUSAV
?Unable to open disk file
During verification, a file on the tape either no longer exists on the disk, or there is a
problem opening it. Verification continues from the start of the next tape file.
?Unable to spawn slave task.
See your System Operator—the number of jobs in the JOBS statement probably needs to
be increased to be two or three more than the number of job names listed in the JOBALC
statement(s).
?Unit number must be between 0 and 7.
Re-enter a correct number.
Updating backup time and date in disk directory
Press control-C to skip.
The backup has completed and MTUSAV is now writing the backup time and date to the
file directory on an extended disk. This can take quite some time for large backups. You
can press CTRL /C to abort the process. Your backup is complete. However, the "last
backed up" date and time for these files will not reflect this backup.
?User aborted execution with ^C
You ended MTUSAV by pressing ^C. The backup and verification procedure (if any)
will abort before completion. The tape may contain partially copied files.
%User aborted execution at reel changeover
You ended MTUSAV when it asked you to mount a new tape. The backup and
verification procedure (if any) will abort before completion. The tape may contain
partially copied files.
System Commands Reference Manual, Rev. 11
MUSER
FUNCTION
Defines and maintains the list of valid user names.
CHARACTERISTICS
MUSER is re-entrant and re-usable. You must be in DSK0:[1,2] to run it. When the user names
feature is in operation, everyone who uses the system has an entry in the list of valid user names.
To create this list, the System Operator defines each user by means of the MUSER formatted
screen displays. Each person is given a unique user name to use when logging in to the system.
Every user is also assigned a root disk account. At log in time, the user definition is made
available to system and application programs. The programs rely on this information to support
each user at that user's level of knowledge.
You can use MUSER to view the list of active users, to update the list, and to track each user's
system usage. MUSER uses function key translation tables with the extension of .AMX in
DSK0:[7,0].
OPERATION
Log in to account DSK0:[1,2], and enter MUSER:
LOG OPR: RETURN
MUSER RETURN
USER brings up the main menu and directs you. You may add, change, or delete a user definition
and display the list of active users.
When you choose the add or change command, MUSER displays a data entry form. Enter data
values in the appropriate fields as described below. The MENU function key ( F13 on most
keyboards) or pressing ESC twice returns you to the main menu.
Fields of the First Screen:
User Name
The symbolic name for the user is a string of printable ASCII characters,
including spaces. The maximum length is 20 characters. Letters are
stored and displayed in upper or lower case, but are compared
independent of case.
Password
The “user password” is independent of any password assigned to a
particular PPN. This optional field provides extra security.
System Commands Reference Manual, Rev. 07
MUSER
Page 2
Root Account
The root account is the device and disk account which is the user’s central
or home account. Because a user may have many accounts for different
projects, the way to identify him personally is by his root account. This is
where the user can touch base regularly to read reminders and messages.
In the case of a user who is defined but not allowed to log in to your
system, assign “REMOTE” for his root account. With a network, you
can send electronic mail to users on remote systems without allowing
them to log in to your own system.
Mail Account
Every AlphaMAIL user has four mail accounts. This field includes the
first account where a user’s mail will be delivered.
Privileges
This field defines the default privileges this user will be assigned at login
time. The possible privileges are: read system memory, write system
memory, read physical disk blocks, write physical disk blocks, change
privilege levels, and use diagnostics. If the user has a privilege, MUSER
displays it in “bright” text; otherwise, MUSER displays it in “dim” text.
On the basis of privilege, certain programs will deny the user access to
certain functions. To change the setting of a privilege bit, move the
cursor to the setting you wish to change by using the arrow keys.
Pressing the SPACE BAR toggles the privilege from one state to the
other.
Class of user
Class is a value in the range of 0 to 100. It indicates what kind of access
the user has (where they can log into and what they can do—see your
System Operator’s Guide for more information). For example, a system
programmer might belong in class 100, a clerical worker in 20.
Experience Level
A value in the range 0 to 100 defines the amount of “experience” a user
has with the system. A long-time user of the system might be assigned 95
or 100, a novice, the value 10. This value determines how much
prompting and help information is given to the user.
Statistics
Several statistics are maintained on each user by the system. These are
displayed by the MUSER program and are intended to be used by billing
or charge-back systems for the purpose of monitoring system use on a
user-by-user basis. These statistics include the total CPU time used, the
total connect time, the total number of disk reads and writes, and the total
number of pages printed.
Job Priority
Priorities range from 1 (lowest) to 127 (highest). Default is 13.
File Protection
Sets the default File Protection level for newly created files. See your
System Operator’s Guide for more about file protection.
Language
The name of the language specified in this field must be one of the
languages available as part of the system. The default is ENGLSH.
System Commands Reference Manual, Rev. 07
Page 3
MUSER
Prompt
May be up to 19 characters in length. Default is a period. If
PROMPT.SYS is loaded in system memory, you may use any of the
following symbols to display variable information as part of the prompt.
This is called an interpreted prompt and may result in a displayed prompt
longer than 19 characters.
$:
Current device and drive number.
$C#
Sends TCRT -2,#.
$E
Ersatz name of current account. If none, same as $:$P.
$LG
Name of current language.
$NA
Same as $NI=$NP,$NB.
$NB
Baud rate.
$ND
Terminal driver name.
$NI
Interface driver name.
$NJ
Job name.
$NM
Modem driver name.
$NP
Interface driver port number, in decimal.
$NS
Operating system name.
$NU
User name.
$P
Account number, in brackets.
$SC
AlphaNET cpu-ID.
$SE
Ersatz name for AlphaNET cpu-ID. If none, same as $SC.
$SV
Monitor version.
$UF
Free memory in user partition, in KB.
$UM
Total memory in user partition, in KB.
$UX
Radix. ^H for hexadecimal, ^O for octal.
$VB
Set to bright display.
$VD
Set to dim display.
You can also change the AMOS prompt using the SET command. See
the SET reference sheet for more information about interpreted prompts.
Job Settings
MUSER displays the current settings. The settings are: OCTAL or HEX;
DISK-ERROR or NO-DISK-ERROR; VERIFY or NO-VERIFY;
CONTROL-C ON or CONTROL-C OFF; GUARD or NO GUARD;
ECHO or NO ECHO; and LOCK or NOLOCK, and ELOCK or
NOELOCK. These are the same settings that may be changed by the
SET program from AMOS command level. To change these settings, use
the arrow keys or RETURN to move to the item you wish to change. Press
the SPACE BAR to change the setting from one state to the other.
System Commands Reference Manual, Rev. 07
MUSER
Page 4
MESSAGES
?Duplicate user name - choose another name
You entered a user name that already exists. Find another name and try again.
?Not enough disk space to save updated user file
MUSER was unable to finish due to insufficient disk space. Exit from MUSER, erase
some files you no longer need, and try again.
?Not enough memory to run MUSER
You will need approximately 45K. Run MUSER from another job, or allocate more
memory to your job.
?Unrecognized command - type HELP for more information
The word you entered is not one of the MUSER commands. Read the menu and try again.
System Commands Reference Manual, Rev. 07
M68
FUNCTION
Assembles an assembly language program file into an unlinked machine language file.
CHARACTERISTICS
M68 is a full macro-assembler. It assembles a source text file (.M68 file) into an intermediate
object form (.OBJ file) that can be linked into an executable machine language program (.LIT or
.OVR) file. M68 understands nested macro calls, nested conditionals, and program segmentation
(using overlay statements and AUTOEXTERN, EXTERN, and INTERN statements).
M68 is not re-entrant or re-usable, and so can't be loaded into system memory.
M68 runs in five distinct phases, some of which are called in response to optional switches or
special situations. If your file contains no internal or external references, M68 automatically calls
the linkage editor to link your program as Phase 4 of the assembly; otherwise, you must explicitly
use the LNKLIT or SYMLIT commands to create a resolved, executable program from the .OBJ
file created by M68.
For information on using the macro-assembler, LNKLIT, and SYMLIT, see your Assembly
Language Programmer's Manual. It also contains information on the object file library generator,
LIBLIT, and the global cross reference generator, GLOBAL.
FORMAT
M68 filespec{/switches}
filespec selects the source file you want to assemble, and the optional switches select the M68
options you want to use.
DEFAULTS
M68 assumes a file extension of .M68. Unless you specify one of the listing switches, M68 does
not provide an assembly listing. The device and account default to where you are logged.
System Commands Reference Manual, Rev. 03 (AMOS 2.2 - 4/91)
M68
Page 2
OPTIONS
You may specify multiple switches by entering them after a single / symbol at the end of the
command line.
/B text
/C
Generate a bottom footer title on every page of the listing using text as the title.
Must be the last switch on the command line.
Include conditionals in the assembly listing (conditionals are usually suppressed).
/E
Write to assembly listing only lines containing an error.
/L
Generate a listing file by calling Phase 3 during assembly. Creates an output file
with the same name as your source file but a .LST extension.
/M20
Allow assembler to accept 68020 instructions and addressing modes. Syntax
error S appears if you do not use and such code exists.
/N
Don’t force assembler to fold lower case to upper.
/O
Use the current object file by omitting assembly Phases 1 and 2. You must use
either the /T, /L, or /R switch with this switch—/L is default.
/R
Generate a cross-reference listing.
/T
Display assembly listing on your terminal.
/V{a}:x
Lets you specify a value on the M68 command line to be examined during the
assembly process. a specifies type of value, and x the value.
/X
List all macro expansions (usually suppressed).
OPERATION
Enter M68 followed by the specification of the file you want to assemble. For example:
M68 MATH.M68
RETURN
If you want to select one or more of the M68 options, specify the appropriate switches at the end of
your command line after a single / symbol. For example:
M68 MATH/RT
RETURN
As it assembles your file, M68 reports on the status of the assembly process. It tells you what
errors occurred, how large your program is, whether it is copying from any copy files, and if any
symbols have been automatically EXTERNed.
M68 produces a .OBJ file of the same name as the file you specified on the M68 command line. If
M68 does not automatically call Phase 4 to create an executable .LIT file, you must use the linkage
editor, LNKLIT (or SYMLIT).
System Commands Reference Manual, Rev. 03 (AMOS 2.2 - 4/91)
Page 3
M68
MESSAGES
You can see these errors in your assembly listing:
A
Branch address was out of the 127-byte range.
B
Boundary error—a word operand was on an odd byte address.
C
Conditional statement syntax error.
D
Duplicate user symbol (defined more than once).
E
User generated error.
I
Illegal character in source line.
M
Missing term or operator in operand or expression.
N
Numeric error, a digit out of the current radix range.
O
The specific operand is illegal when used with this instruction.
P
An expression which had to be resolvable on the first pass of the assembly could
not be resolved.
Q
Questionable syntax. A general catch-all error code.
R
A register expression not in the range of 0-7.
S
Indicates offset requiring more than 16 bits—must use /M20 switch.
T
Source line or operand terminated improperly.
U
Undefined user symbol during Pass 2.
V
Absolute parameter value out of its defined range.
X
Assembler system error, please notify Alpha Micro.
You may see the following messages during the program assembly:
%Assembly Fold - No Fold switch doesn't match .UNV file
You used /N when the .UNV file was being created, but you are not using it on the current
assembly, or vice versa. Symbols may be undefined due to case differences—use /N, or
compile without /N, as appropriate to how you first did.
?Cannot OPEN [device-name] - invalid file name
Check your syntax and try again.
?Copy file [filespec] not found
The file you wanted to COPY was not where you said it was. Check your syntax or use
the DIR command to find the file, and try again.
?Expression stack error
This is an internal M68 error. Check your source program to see if you made any errors
in specifying expressions.
System Commands Reference Manual, Rev. 03 (AMOS 2.2 - 4/91)
M68
Page 4
?File specification error
You made a mistake in your file specification. Check your syntax and try again.
?Invalid .UNV file version number - aborting
Re-create your .UNV file by re-assembling the source program using the current version of
M68.
?M68n.OVR not found
n is a number from 0 to 3. M68 can't find one of the overlays that are a part of M68.
Check to see if the specified overlay is in DSK0:[1,4]. If not, use the DIR command to
look for the overlay—if you find it in another account, copy it to DSK0:[1,4]. If it is in
DSK0:[1,4] and you still get this message, or if you cannot find the file, see your System
Operator.
?No ENDM statement
You left off the final statement, "ENDM," in a macro definition. Check your source
program.
%Old format .UNV file - assembly being done with No fold option
Your .UNV file was created under an older version of M68 that did not allow lower case in
symbols, and you are using /N. This could cause problems with symbol definitions. You
may wish to re-compile without /N, or change your source program.
?Search file [filespec] not found
The file you wanted to SEARCH was not where you said it was. Check your syntax or
use the DIR command to find the file, and try again.
?Sync error
This message probably means you are using an object file generated by a different version
of M68 than the one you are using now, and you have specified the /O assembly switch.
Or, you may have found an undiagnosed error in M68. Check your source code—if you
see no obvious errors, try to re-assemble the program again without using the /O switch
(thus building a new object file).
System Commands Reference Manual, Rev. 03 (AMOS 2.2 - 4/91)
OSINST
FUNCTION
Lets the System Operator enter the Product Installation Code (PIC) when new versions of AMOS
are installed.
CHARACTERISTICS
OSINST is re-entrant and re-usable.
You must be in DSK0:[1,2] (OPR:) or DSK0:[1,4] (SYS:) to run OSINST.
FORMAT
OSINST
OPERATION
Log into SYS: or OPR: and enter OSINST:
LOG OPR: RETURN
OSINST RETURN
A screen appears directing you to enter the PIC. When entered, AMOS asks you to confirm you
wish to enter the PIC, and, if so, tests the PIC for correctness. Once the PIC is confirmed, you can
continue the installation.
MESSAGES
?PIC code does not verify
?? will need actual error...
Check to be sure you entered the correct number. If problems persist, contact your Alpha
Micro representative.
System Commands Reference Manual, Rev. 03 (AMOS 2.2 - 4/91)
PARITY
FUNCTION
Turns on parity error detection for most Alpha Micro memory boards and Central Processing
Units.
CHARACTERISTICS
PARITY is re-entrant and re-usable. Most Alpha Micro memory boards and CPUs have a parity
error detection capability which you can turn on by using PARITY. For more information, see
your Alpha Micro Integrated Systems User's Guide. If you don't use PARITY, the boards are not
able to detect and report parity errors.
You will probably want to put PARITY in your system initialization command file. For
information on editing the system initialization file, see your System Operator's Guide to the
System Initialization Command File.
OPERATION
Enter PARITY at AMOS command level:
PARITY
RETURN
MESSAGES
See your System Operator's Guide for information on what happens when a parity error occurs,
and how to handle such a situation.
System Commands Reference Manual, Rev. 03 (AMOS 2.2 - 4/91)
PASS
FUNCTION
Changes your current account password.
CHARACTERISTICS
PASS is re-entrant and re-usable. Protects system security by not displaying your old or new
password.
PASS cannot change the password of an account on a write-protected disk, so make sure the
correct device is write-enabled. A password must be six characters or less in length. PASS doesn't
check the length of the password you enter, but cuts it off at the sixth character.
FORMAT
PASS {devn:}
devn: is the specification of the logical device containing an account with the same PPN as you are
logged into.
DEFAULTS
PASS won't allow any other account except the one you are logged into. The devn: defaults to the
device you are logged into.
OPERATION
Enter PASS, optionally followed by a device name. For example:
PASS DSK1:
RETURN
PASS asks you for your old password (if one exists) and your new password. Then it asks you to
verify your new password (in other words, to type your new password again). PASS then changes
your password.
MESSAGES
?Account number invalid
Check your syntax, and remember you can't password an account you are not logged into.
System Commands Reference Manual, Rev. 03 (AMOS 2.2 - 4/91)
PASS
Page 2
?Bad password
You entered your old password incorrectly or made a typing mistake. PASS did not
change your old password. Try again.
?Cannot write [device-name] - write-protected
Remove the write-protection and try again.
?PPN has been deleted
While you were running PASS, someone deleted the account you are logged into. See your
System Operator about re-creating your account.
System Commands Reference Manual, Rev. 03 (AMOS 2.2 - 4/91)
PATCH
FUNCTION
Installs software patches into existing machine language programs.
CHARACTERISTICS
PATCH is re-entrant and re-usable. The patch you install will normally be supplied to you by
your dealer in either printed form or on recording media. If the patch is given to you in printed
form, you will need to enter the patch into the computer using AlphaVUE before you use PATCH.
Patch files are special macro assembler source files. PATCH assembles the patch file using M68,
and then uses PTCH.LIT to insert the changes into the existing program. PATCH checks for the
proper hash total and version number of the existing file and, once the patch has been completed, it
also makes sure the new hash total and updated version number are correct. If for any reason the
hash total or version number is wrong, no patch is done, and your original program file remains
unmodified.
FORMAT
PATCH existing-program WITH patch-file
existing-program is the program you want to patch, and patch-file is the source file containing the
patch to be made. The default existing program extension is .LIT; the default patch file extension
is .M68.
OPERATION
Enter PATCH, the name of the original program, WITH, and the name of the patch program. For
example:
PATCH TEST WITH TESTP
RETURN
PATCH displays information as it processes. You will see hash totals for the old and new
(patched) version of the program you patched.
MESSAGES
?Assembly errors exist in patch file
The patch file contained errors. If you typed in the patch file from a written record, make
sure you entered the patch information correctly. If the patch file came from Alpha Micro,
see your representative for help.
System Commands Reference Manual, Rev. 07
PATCH
Page 2
?Bad object format
The data in the patch object (.OBJ) file has been damaged. Make sure you entered the
patch information correctly in the patch file.
?Expression error in patch file
The patch file contains errors. Make sure you entered the patch file correctly. Your patch
file may have tried to reference an external symbol within an expression.
?Fatal error - Overlays of code are not permitted
The changes within a patch file must occur in sequential order; make sure you entered the
patch information correctly in the patch file.
?File being patched has wrong hash code
The file you want to patch doesn't have the same hash total the patch program was
designed for—see if you are patching the correct file (there may be another version of the
program on your system elsewhere), or see your Alpha Micro representative to get the
proper patch version.
?File being patched has wrong version
The file you want to patch doesn't have the same hash total the patch program was
designed for—see if you are patching the correct file (there may be another version of the
program on your system elsewhere), or see your Alpha Micro representative to get the
proper patch version.
?Illegal assembler pseudo-op appears in patch file
Only certain assembler pseudo op-codes are allowed within patch files. Make sure your
patch file doesn't contain the following conditional assembly pseudo-ops: ASECT,
DSECT, PSECT, SYM, NOSYM or INTERN.
?Incompatible object file version
The versions of M68.LIT and PTCH.LIT on your system are not compatible. See your
Alpha Micro representative for help.
?Patched file has wrong hash total
Inserting the patch into the existing program file did not give the proper results. Make
sure you are using the proper versions of both the program and patch files, and check your
patch file.
System Commands Reference Manual, Rev. 07
PLAYCD
FUNCTION
PLAYCD lets you play music or other audio CDs using the CD-ROM drive attached to your
AMOS computer.
CHARACTERISTICS
PLAYCD is reentrant and reusable. While it may work with any SCSI-2 compatible CD-ROM
drive, it has been tested only with the Toshiba Model TXM3401E1 portable CD-ROM drive.
OPERATION
Place the CD you want to listen to in the CD-ROM drive and, from AMOS command level, type:
PLAYCD
RETURN
A menu which allows you to control the CD-ROM drive appears on your screen. You can make
the CDROM drive play, stop, eject, jump to the next track, return to a previous track, pause, or
exit by pressing the key indicated in the menu. The PLAYCD menu is shown below:
CURRENT
TOTAL
←
→
S
P
E
space
^C
previous track
next
stop
play
eject disk
pause
exit
TRACKS
01
02
03
04
05
06
07
08
09
10
11
12
13
00:02
00:42
05:14
08:26
12:32
15:49
20:18
25:12
29:43
34:10
38:08
43:32
46:06
If you want to run another program while listening to the CD, press CTRL /C. You return to
the AMOS prompt and the CD-ROM drive continues to play. You can re-enter the
PLAYCD command at any time, allowing you to change tracks, eject the disc, stop the
audio, etc.
System Commands Reference Manual, Rev. 07
PLAYCD
Page 2
If you enter the PLAYCD command when you don't have a CD-ROM drive attached to your
computer, you see this message:
Free SCSI IDs: xx xx xx
Connect a CD-ROM drive with its SCSI ID set to one of the above IDs.
Press RETURN when ready.
Connect the CD-ROM drive to the SCSI bus and press
return to AMOS command level.
RETURN
to play a CD, or press
CTRL
/C to
MESSAGES
?AlphaCD is installed - please uninstall ACD before using PLAYCD
PLAYCD has detected that an AlphaCD CD-ROM is still installed on the system. Use
ACD/U to unmount the AlphaCD before using PLAYCD
?CD-ROM drive reported an unknown error (Sense = n)
The CD-ROM drive encountered an error. Check that the CD is undamaged and free from
scratches.
?Impossible error - this CD contains no tracks
On querying the CD-ROM for its table of contents, the CD-ROM reported that it is empty.
?No free SCSI addresses - you must remove at least one SCSI device
?in order to use PLAYCD
All SCSI addresses on the SCSI bus are in use, and none of them contains a CD-ROM. As
there is not an empty SCSI address for the CD-ROM player, PLAYCD cannot work. Free
up a SCSI address and try again.
?This CD-ROM drive is not SCSI-2 compliant and therefore cannot be used
PLAYCD requires a SCSI-2 CD-ROM player. The player reported that it is not a SCSI-2
device.
?You must install a SCSI dispatcher prior to using this program
You must add the appropriate SCSI dispatcher to your system's initialization file, and
reboot the system, before using PLAYCD.
System Commands Reference Manual, Rev. 07
POP
FUNCTION
POP works with PUSH, to return you to a previously recorded account.
CHARACTERISTICS
POP is re-entrant and re-usable. If you do not include an option, POP returns you to the last
account you were in. You must have SMEM defined in your system initialization command file
for this feature to work.
FORMAT
POP {option}
OPTIONS
A
Clear all recorded accounts.
S
Swap with last logged account.
OPERATION
Enter POP, and perhaps an option:
POP RETURN
POP S RETURN
Moves back one account
Swaps with previous account
POP then returns you to the proper account (as defined by the PUSH you used).
MESSAGES
?Account number invalid
Make sure you gave the correct device, and the account number is in the proper form, and
try again.
?All POPped out!
There is no account currently PUSHed to go to.
?Already logged in under [account]
You tried to log to where you are currently logged.
System Commands Reference Manual, Rev. 07
POP
Page 2
?Disk not mounted
Mount the disk and try again.
System Commands Reference Manual, Rev. 07
PPN
FUNCTION
Displays a list of the account numbers on a specific device.
CHARACTERISTICS
PPN is re-entrant and re-usable. The device holding the Master File Directory you want to display
must be mounted. PPN lists the account numbers in sorted order, but this is not necessarily the
order they are in the Master File Directory.
FORMAT
PPN {devn:}
devn: is the device whose account numbers you want to see.
DEFAULTS
If devn: is not entered, PPN defaults to the current device.
OPERATION
Enter PPN and a device name. For example:
PPN DSK1:
RETURN
MESSAGES
?Cannot INIT [device name] - device does not exist
Check your syntax, or use DEVTBL to see a list of the current devices on your system.
?File specification error
Try again, entering a valid device name.
System Commands Reference Manual, Rev. 07
PRINT
FUNCTION
Sends files to a printer, or edits the memory-based print spooler entries.
CHARACTERISTICS
PRINT is re-entrant, re-usable, a wildcard command, and recognizes ersatz devices. It sends a
print request to the line printer spooler program; the spooler places your request into a queue (or
waiting line). When a printer becomes available, the spooler prints your file. You may have
several requests in the printer queue waiting for available printers. Use the SET command to
define the type of form to be mounted on a specific printer on the system.
FORMAT
PRINT {/switch}{printer=}{filespec{,filespec...}}{/switch}
printer is the specification for a printer, filespec is a file to be printed, and switch is an option
request.
If you use PRINT/K while connected to another computer using a version of AlphaNET
earlier than 2.2, the /Q switch has no effect.
DEFAULTS
The default printerspec is the printer with the least number of blocks waiting in the queue to be
printed (unless the System Operator has used the DEFAULT command in the spooler parameter
file to define another printer default).
The default switch settings depend upon the specific printer being used. The defaults for each
printer are set by the System Operator. The default filespec is a null name and .LST extension.
The initial default device and account is the account and device you are currently logged into.
OPTIONS
All switches may be abbreviated to any unique characters.
/BANNER{text}
Print a banner page up to 50 characters at listing front. Operation switch.
/NOBANNER
No banner. Default, operation switch.
/COPIES:n
Number of copies to print. File switch.
/DELETE
Delete file after print. File switch.
System Commands Reference Manual, Rev. 07
PRINT
Page 2
/NODELETE
Don’t delete. Default, file switch.
/FORMFEED
Print a final form feed at each listing end. File switch. Abbreviation is
/FF.
/NOFORMFEED
No form feed. Default, file switch.
/FORMS:form
Specify form needed. If form is not on, notifies operator job. File switch.
/HEADER
Print a page header at top of each page. File switch.
/NOHEADER
No page headers. Default, file switch.
/KILL
Stop file from printing. Operation switch.
/LPP:n
Maximum lines per page. File switch.
/QUERY
Confirm before printing/killing a file. File switch.
/NOQUERY
No confirmation. Default, file switch.
/WAIT
Wait to print if queue is full. Ties up terminal. Operation switch.
/WIDTH:n
Page width (1-132 characters). File switch.
OPERATION
To find out what is in the print queue:
PRINT
RETURN
This command lists the contents of the queue for all of the printers defined on the system. If you
wish to see the contents for a single printer, enter PRINT followed by the name of the printer
whose queue you want to see, and an equal sign.
The display you see tells you what files are waiting to be printed, what form-type they are to be
printed on, how many blocks total are in the queue, how many blocks remain for each file, how
many copies of each file are to be printed, and which file is currently being printed. It also displays
which options have been selected for each file. If there are no print requests in the queue, you do
not see any files listed.
To send files to the printer with the least number of blocks in its queue (or to the default printer set
by the System Operator), simply enter PRINT followed by the specifications of the files you want
to print. For example:
PRINT *.LST
RETURN
If you wish to send files to a specific printer, enter PRINT, the name of the printer you want to use,
an equal sign, and your list of files. For example:
PRINT DRAFT=BACKUP.*,S?CFIL
System Commands Reference Manual, Rev. 07
RETURN
Page 3
PRINT
MESSAGES
?A device must have network access enabled to be able to print from it
You have specified one or more files on a device that has "No Network Access" set. You
cannot print files from such a device. Use the SET command to enable network access,
then use the PRINT command again.
?Cannot INIT [device-name] - device does not exist
Check your syntax, or use DEVTBL to see what devices are on your system.
?Cannot INIT [device-name] - device not mounted
Mount the device and try again.
?Device or [P,PN] on output are illegal
You can only specify a printer name on the left of the equals sign.
?Fatal ITC error n
?Unknown error n returned by remote system
The printer you specified is located on a remote system. On submitting the print request, a
network or remote system error occurred. Try the print request again. If the problem
persists, contact your System Operator.
?Input file error - [error message]
An error occurred while your file was printing. Correct the situation indicated by the
error, and print the file again.
?Invalid argument for COPIES
You did not specify a colon followed by a number for the /COPIES switch, or the number
specified was zero or more than 255. Re-enter the command with an adjusted COPIES
value.
?Invalid argument for FORMS
You did not follow /FORMS with a colon and the forms name. Re-enter the command with
a corrected /FORMS switch.
?Invalid argument for LPP
?Invalid argument for WIDTH
You did not specify a colon followed by a number for the switch. Re-enter the command
with the correct switch format.
System Commands Reference Manual, Rev. 07
PRINT
Page 4
;LPTSPL - Please mount form [form-name] on [printer-name]
The spooler operator job gets this message if you specify a form-type that is not defined as
being mounted on the printer. The spooler operator should put the proper form on the
printer.
?More than one printer specified
You specified more than one printer on the command line (to the left of the equals sign).
Re-enter the command specifying only one printer.
?No files in print request
PRINT was not able to find the files you specified. Check the command line again, and
make sure the device and account specifications are correct.
%No spooler allocated
A print spooler has not been installed on your system. Ask your System Operator to install
one.
?Not enough free queue blocks for entire request
Each file in the print request uses a system resource called a queue block. There are not
enough queue blocks for your entire request to be satisfied. Wait until some files have
printed, then resubmit the PRINT command for those files which were not selected.
Including the /WAIT switch pauses the processing of the print requests until more queue
blocks are available.
?Output printer not found on remote system
There was no active printer of the given name on the remote system you specified. Choose
another printer name.
?Printer not found
Check your spelling or enter PRINT at AMOS level to see what printers are defined on
your system.
?Remote printer chains to another remote printer
The printer network is configured incorrectly. The specified printer does not have a
physical device associated with it. Instead, the remote system is trying to redirect the print
request to another printer on another remote system. This is invalid. Contact your System
Operator.
System Commands Reference Manual, Rev. 07
Page 5
PRINT
?Remote print spooler not responding
Either the remote system or the spooler on the system cannot be contacted.
System Commands Reference Manual, Rev. 07
PRNT
FUNCTION
Sends files to a printer, or edits the printer queue.
CHARACTERISTICS
PRNT is re-entrant, re-usable, a wildcard command, and recognizes ersatz names. It prints files
using the Task Manager print spooler. The spooler places your request into a queue (or waiting
line). When a printer becomes available, the spooler prints your file. You may have several
requests in the printer queue waiting for available printers.
Use the SET command to define the type of form to be mounted on a specific printer on the system.
See the SET reference sheet for information on setting forms.
FORMAT
PRNT {/switch}{printer=}{filespec}{,filespec...}{/switch}
printer is the specification for a printer, and the filespecs identify the file(s) you want to print.
DEFAULTS
The default printer is the printer with the least number of blocks waiting in the queue to be printed
(unless your System Operator has used the DEFAULT command in the spooler parameter file to
define another printer default).
The default switch settings depend upon the specific printer being used (the defaults for each
printer are set by the System Operator). The default filespec is a null name and .LST extension.
The initial default device and account is where you are logged.
OPTIONS
With some switches, such as /SUSPEND and /START, where the PRNT command must
identify page numbers, the file being printed must either have been formatted using
TXTFMT, or have been specified with the /HEADER switch.
Placing NO before a file switch cancels the switch. The default switches are /NOB, /NOD, /FF,
/NOFINISH, /NOH, /NOINFORM, /NOLIMIT, /ON, /NOQ, /NORESTART, and /NOSTART.
Switches may be abbreviated to any unique characters.
System Commands Reference Manual, Rev. 07
PRNT
Page 2
/AFTER:{+}mm-dd-yy
{@hh:mm{A/PM}}
File prints after date/time, which may be absolute (i.e. 4-1388@3:17PM) or relative (i.e., +0-1-0@0:03). File switch.
/BANNER {:"text"}
Print a banner page at list front. “text” is printed on the bottom
of banner page (up to 50 characters). Operation switch.
/COPIES:n
Number of copies to print. File switch.
/DELETE
Delete file after printing. File switch.
/FF
Print a form feed at list end. File switch.
/FINISH:page
Prints up to and including specified page. File switch.
/FORMS:form
Specifies the form needed. If form is not on, prompts operator
job. File switch.
/HEADER
Print a page header at top of every list page. File switch.
/INFORM
Sends you a message when file is done. File switch.
/KILL
Stops the file from printing. Operation switch.
/LIMIT{:n}
Sets (n * file blocks) as maximum number of form feeds
allowed. Limits endless loop form-feed errors. File switch.
/LPP:n
Maximum number of lines per page. File switch. Used with /H.
/OFF
Turns off specified printer. Files in queue will be printed. Can
only be used by the System Operator. Operation switch.
/ON
Turns on a printer. Can only be used by System Operator.
Default, operation switch.
/PRIORITY:n
Gives files queue priority n. Default is 128; range is 1 to 255.
The higher n is, the higher the file is in the queue. File switch.
/QUERY
Confirms before printing/killing a file. File switch.
/RESTART{:page}
Restarts file (at page or interrupted page) if system resets. File
switch.
//SEQ:n/switch
Revises printing instructions for a file already in the queue, with
sequence #n, by adding or replacing specified switch(es). Note
two slashes. File switch. Do not enter a file specification when
using the //SEQ switch.
/START:page
Start at specified page. File switch.
/SUSPEND
Suspend file printing. File switch.
/REVIVE
Revives suspended file. File switch.
/WAIT
Wait to print if queue is full. Ties up terminal. Operation
switch.
/WIDTH:n
Page width in characters (80-132). Used with /H. File switch.
OPERATION
To find out if any print requests are waiting in the printer queue:
PRNT
RETURN
System Commands Reference Manual, Rev. 07
Page 3
PRNT
This command lists the contents of the queue for all of the printers defined on the system. If you
wish to see the contents for a single printer, enter PRNT followed by the name of the printer whose
queue you want to see, and an equal sign. For example:
PRNT DIABLO=
RETURN
The display you see tells you what files are waiting to be printed, their sequence number and
priority, what form-type they are to be printed on, which options have been selected for each, how
many blocks remain for each file, how many copies of each file are to be printed, and which file is
currently being printed. It also displays the total number of blocks in the queue.
If there are no print requests in the queue, you will not see any files listed. If you have more than
one printer defined on your system, you will see a message at the bottom of the screen telling you
to press the Return key to continue. When you do so, the next printer's queue listing is displayed.
To send files to the printer with the least number of blocks in its queue (or to the default printer set
by the System Operator), enter PRNT and the files you want to print. For example:
PRNT *.LST
RETURN
If you wish to send files to a specific printer, enter PRNT and the name of the printer you want to
use, an equal sign, and your list of files. For example:
PRNT DRAFT=BACKUP.*,S?CFIL
RETURN
You can change the switch settings for a file already in the queue using the sequence number of
the file you want to change, and the switch or switches you want to add or change. For example:
PRNT//SEQ:17/C:5
RETURN
This causes PRNT to print five copies of the file with sequence number 17.
MESSAGES
You may see any of the standard system error messages resulting from invalid device and account
specifications. In addition, you may see:
%Buffer full, some files not listed
The number of files in the print queue exceeds the number displayed on the screen.
?Command line too long
%Buffer full, some files are not killed
The command line passed to a remote printer is too long. Split the command into two, and
enter each shorter command in turn.
System Commands Reference Manual, Rev. 07
PRNT
Page 4
?Destination network does not exist
?Destination node does not exist
?Destination socket does not exist
?Destination socket not enabled
You have specified a remote system which cannot be accessed, or which does not have a
spooler accessible over the network. Check your printer and network specification, and try
again.
?Destination socket is full
The destination system cannot accept your print request at this time. Try again later. If the
problem persists, see your System Operator.
?Ersatz name not allowed when killing a file on remote spoolers
You may not specify an ersatz name (in association with the file name) if the filename is
being printed on a remote printer. The ersatz name is translated by the local system, which
may not be what is desired. Re-enter the command using the full file name.
?Insufficient Message Blocks
You do not have a MSGINI nK command in your system INI file, or your MSGINI
command does not specify enough memory. See your System Operator about changing the
system INI file to correct this problem.
?Message length greater than destination's specified maximum
An internal network error has occurred. This error may indicate that there are incompatible
versions of network and spooler software installed on the local and remote systems. Check
with your System Operator.
?Message system not supported
%No messages are pending receipt
?No socket has been established
?Not enough memory to perform KILL or LIST option
There is not enough free memory in your job's partition to carry out the command. Use
DEL to remove files loaded into your partition, or see your System Operator.
%No files in print request, no files updated
PRNT was not able to find the files you specified. Check the command line again, and
make sure the device and account specifications are correct.
?Only operator is allowed to turn printer on or off
Only a user logged into the System Operator's account (OPR:, DSK0:[1,2]) can use the
/ON and /OFF switches.
System Commands Reference Manual, Rev. 07
Page 5
PRNT
?Output printer not found
Check your spelling or use the PRNT command alone to display the printers set up for
your system.
?Print spooler is not installed
The Task Manager communicates with the spooler through the Inter-Task Communication
system. This error means some part of the process is not "hooked up." This could be
because the Task Manager is not properly installed, or because the Inter-Task
Communication system is not set up. See your System Operator.
?Printer already turned off
?Printer already turned on
You tried to turn off or on a printer that was already in that state.
?Printer name not specified
The command needs to have a printer to operate on. One was not specified. Re-enter the
command, specifying the appropriate printer.
%Queue entry not found
The specified printer queue entry was not found and could not be updated. Check the
sequence number and try again.
?Queue file is full
The destination printer's file holding outstanding print requests is full, and cannot accept
more requests until current ones have been satisfied. Try again later.
?Spooler file error
The destination spooler encountered an error while processing its queue file. Contact your
System Operator
;TSKSPL - Please mount form [form-name] on [printer-name]
The spooler operator job sees this message if you specify a form-type not defined as being
mounted on the printer. The spooler operator should then put the proper form on the
printer and use the SET program to tell the printer spooler that form is ready.
System Commands Reference Manual, Rev. 07
PUSH
FUNCTION
PUSH works similarly to LOG, except it remembers the account you came from, so you can use
the POP command to return.
CHARACTERISTICS
PUSH is re-entrant and re-usable. See the LOG reference sheet for operation details.
Unlike LOG, PUSH will not log you from one device to another unless you enter the device name
to log to. For example, if you are logged into an account on DSK1:, and want to PUSH to account
[66,5] on DSK2:, you must enter PUSH DSK2:[66,5] RETURN . Just entering PUSH [66,5]
RETURN does not work.
Your system must have shared memory to use PUSH and POP. See your System
Operator's Guide to the System Initialization Command File for information on shared
memory. For every five PUSHes, you use one system queue block.
FORMAT
PUSH {/switch} {devn:}{[{p}{,pn}]}
switch is an option, devn: is the device name, p is the project number, and pn is the programmer
number. If you are already logged into an account, you may be able to abbreviate the account
number depending on where you want to PUSH to (see OPERATION, below).
OPTIONS
A
Pop to first PUSHed account; clear recorded account list.
D
Display recorded accounts.
P
Pop to previous account.
S
Pop to previous account; PUSH the current account onto list.
OPERATION
Enter PUSH, an option, and an account specification and/or user name. For example:
PUSH DSK1:47,2 RETURN
PUSH RANDOLPH RETURN
System Commands Reference Manual, Rev. 07
PUSH
Page 2
PUSH then searches for the account you specified, logs you in (if it can), and "remembers" the
account you left. In the first example above, PUSH looks on DSK1: for account [47,2]. In the
second example, the user name causes PUSH to log you into the root account of RANDOLPH.
When you are ready to return, enter POP (see the POP reference sheet) or PUSH/P.
MESSAGES
In addition to the messages below, see the messages listed in the LOG reference sheet.
?All popped out!
There was no account remembered by previous PUSHes to get POPped.
?Can't allocate SMEM memory, abort
Either SMEM shared memory has not been installed on your system, or it is fully
allocated. Check with your System Operator.
?Can't do push!
An internal error occurred.
?Can't process, out of queue blocks, abort
PUSH needs to allocate a queue block (a system resource), but none are available. Contact
your System Operator about allocating more queue blocks at bootup time.
?Illegal option specified, abort
You specified an invalid option on the command line. Re-enter the command.
?Invalid path spec, abort
You entered the account to transfer to in an invalid format. Try again.
System Commands Reference Manual, Rev. 07
QDT
FUNCTION
Allows you to examine and modify locations in memory.
CHARACTERISTICS
QDT is re-entrant and re-usable. The primary use for QDT is not to debug programs, but to
examine the contents of memory locations in the monitor or at the locations used by the I/O ports.
This is a dangerous program; you can destroy the monitor in system memory or
damage data. You CAN reload a valid copy of your monitor by rebooting the system, but
you should still be careful using QDT, especially if other users are working on the system.
You must be logged into DSK0:[1,2] to run QDT.
If hex mode has been set (by use of the SET HEX command), you may enter and display numbers
in hexadecimal. However, any hex number which starts with a letter must be preceded by a 0 (for
example, 0FF instead of FF).
OPERATION
Log into OPR: and enter QDT at AMOS command level:
LOG OPR:
QDT RETURN
RETURN
Now you can begin to enter QDT commands. Unless you specify a memory address, QDT
assumes the first memory location you want to display is at address zero.
You are entering characters in data mode: the usual line editing facilities are not available.
System Commands Reference Manual, Rev. 07
QDT
Page 2
COMMAND SUMMARY
B
Modify single bytes. Place counter changes by 1.
E
Exit from QDT.
L
Modify 32-bit Longwords. Place counter changes by 4.
W
Modify full words. Place counter changes by 2.
#
Display current word as two octal bytes.
TAB
Puts contents of current location at next address.
RUBOUT
Cancels current command/number.
n/
Moves to n (octal) location.
n
RETURN
Stores n at current location.
nLINEFEED
Stores n at current location and adds to counter.
^
Stores n at current location and decrements counter.
MESSAGES
Any command not in the list above will be echoed back with a question mark.
?Privileged program - must be logged into OPR:
Log into DSK0:[1,2] and try again.
System Commands Reference Manual, Rev. 07
QUEUE
FUNCTION
Displays the number of monitor queue blocks available for use.
CHARACTERISTICS
QUEUE is re-entrant and re-usable.
Various portions of the system (for example, the line printer spooler) use the monitor queue
system. The monitor queue is also available for use by user programs—see your Monitor Calls
Manual for information on the monitor queue system.
The initial size of the queue is 80 blocks. The number of queue blocks you need depends on the
tasks you need to perform.
Each queue block defined uses a certain amount of memory in the monitor—so, don't define many
more queue blocks than you need, or you will waste monitor memory (and possibly slow down
your system).
QUEUE is also used in the system initialization command file to allocate the number of queue
blocks for the system. See your System Operator's Guide to the System Initialization Command
File.
OPERATION
Enter QUEUE at AMOS command level. For example:
QUEUE RETURN
97 Queue blocks available
MESSAGES
?No queue blocks allocated
See your System Operator about increasing the number of blocks assigned in your system
initialization file.
?Requested queue block allocation extends beyond 8MB
?No queue blocks allocated
The number of queue blocks you requested would cause a queue block to reside at a
memory location greater than 8MB. This in not a valid AMOS configuration. Reduce the
number of queue blocks requested, and try again.
System Commands Reference Manual, Rev. 07
RADMON
FUNCTION
Monitors status of AM-445, AM-446, and AM-447 RAID controller. Sends notification
messages if a fault occurs.
CHARACTERISTICS
RADMON runs on a background job and checks the RAID controller for error conditions once a
minute. If it finds one, it sends messages to the system operator's terminal and, optionally, to one
or more email addresses. It is used only in the system initialization command file.
FORMAT
RADMON {/ID=id} {/EMAIL=address{,address}}{/option(s)}
id is the SCSI ID of the RAID controller. If you leave it out, RADMON polls the SCSI bus until
it finds the controller.
Each address is an email address to send notification messages to. It must be in standard Internet
mail format: name@system.
OPTIONS
/O
/R
/S
/Z
With AM-446 and AM-447, displays event types other than those normally displayed.
With AM-446 and AM-447, displays messages for all event types.
Suppresses the email message sent when the program starts.
Monitor events from the beginning of the RAID log file. Otherwise, when RADMON
restarts, it begins checking events from the point where it left off..
The /O, /R, and /Z switches are generally used only when a problem is suspected or known and
you need more diagnostic information. They work only with the AM-446 and AM-447
subsystems, not the earlier AM-445 RAID Controller.
OPERATION
RADMON runs on a background job attached to a pseudo-terminal. There is no reason to run it
on a real terminal unless debugging a RADMON installation, since it sends all important
messages to the system operator’s terminal. Follow the steps below to set up RADMON. If you
want more information about any part of the initialization file, see the System Operator’s Guide
to the System Initialization Command File.
System Commands Reference Manual, Rev. 13
RADMON
Page 2
1. If you want to use e-mail notification, you must have AlphaMAIL and AlphaTCP’s
SMTPD installed, and be able to send mail from AlphaMAIL to the intended Internet
mail user.
2. Run MUSER and add a user name to uniquely identify the RADMON job on this
computer. This will be the FROM name on any mail message RADMON sends.
3. Allocate a mailbox for the user name you’ve just created. Refer to your mail package
documentation for instructions. Log in as that user and send mail to the intended
Internet mail user.
4. Log to the SYS: account, then create a test copy of your initialization file:
COPY TEST.INI=AMOS32.INI
RETURN
Then VUE the test file.
5. Add one to the number of jobs in the JOBS statement.
6. Add a JOBALC statement defining a job called RADMON.
7. Add a TRMDEF statement for a pseudo-terminal called RADMON. For example:
TRMDEF RADMON,PSEUDO,NULL,80,80,80
8. Add a SETJOB command to attach the RADMON job to the RADMON pseudoterminal:
SETJOB RADMON,RADMON,70K,RADMON.JIN
9. If you want RADMON to send e-mail notification, make sure the e-mail driver
program is loaded into memory somewhere before the first SYSTEM statement. This
statement must also be before the SETJOB statement for the RADMON job.
10. Finish from the test initialization file.
11. In SYS:, create a file called RADMON.JIN containing these statements:
:T
LOG user-name
RADMON {/ID=id}
{/EMAIL=address{,address}}{/option(s)}
user-name is the RADMON name you set up in step 2. If you aren’t using e-mail
notification, it can be any user name.
id is the SCSI ID of the RAID controller. If you don’t include the SCSI ID,
RADMON will poll the SCSI bus until it finds the controller.
Each optional address is an e-mail address you want RADMON to send notification
messages to. Each one must be in standard Internet address format: person@system.
12. Make sure no one else is using the computer and use MONTST to test your new
initialization file.
If everything is correct, STAT should show the RADMON job in an Sl (sleep) state. If you set up
e-mail notification, a message is sent to the specified addresses telling them that RADMON is
running, unless you also used the /S switch.
System Commands Reference Manual, Rev. 13
If there is a problem, change the SETJOB statement to attach RADMON to a real terminal and
MONTST again. Check the terminal for error messages so you can correct the situation.
Once you’re satisfied everything is working correctly, rename your test initialization file to make
it your standard initialization file.
MESSAGES
?Micropolis RAID controller not found
Either you entered an incorrect value for the SCSI ID, or you did not enter a SCSI ID and
RADMON could not find the controller when it polled the SCSI bus.
No supported RAID controller found
Either you entered an incorrect value for the SCSI ID, or you did not enter a SCSI ID and
RADMON could not find the controller when it polled the SCSI bus.
RADMON - Error communicating with RAID controller
RADMON did not understand the responses it received when it polled the RAID
controller.
?This program requires a SCSI dispatcher be installed
You cannot use RADMON if your computer doesn't use a SCSI dispatcher.
Usage: RADMON [/ID=x] [/email=person@system[,person@system] /S] [/R/Z/O]
The syntax of your RADMON command line in RADMON.JIN is not correct. Check the
format and reboot your computer.
REDALL
FUNCTION
Performs a disk diagnostic test by reading all (or a specified number) of the records on a disk and
reporting any read errors.
CHARACTERISTICS
REDALL is re-entrant and re-usable. Does not harm the data on your disk.
FORMAT
REDALL devn:{number-of-records}
devn: specifies the logical device you want to read and number-of-records is the number of disk
records you want to read. If you omit number-of-records, REDALL reads all of the records on the
disk.
OPERATION
Enter REDALL, the device to test and the number of records to read. For example:
REDALL DSK1:100
RETURN
REDALL displays the number of records it is reading. It displays the appropriate messages if any
read errors occur.
If you see any read errors, notify your System Operator. They may be correctable with
FIXCRC or DSKDDT.
MESSAGES
?Cannot INIT [device-name] - device does not exist
Check your spelling, or use DEVTBL to see a list of valid devices.
?Cannot perform REDALL on [device-name] - [AMOS error message]
Check the AMOS error message and correct the condition.
?Cannot read [device-name] - disk not mounted
MOUNT the device and try again.
System Commands Reference Manual, Rev. 07
REDIR
FUNCTION
Redirects Input/Output. Lets you send input or output from a command or program to another
command or program.
CHARACTERISTICS
REDIR is re-entrant and re-usable. The REDIR command itself is only necessary when SET
NOREDIRECTION is in effect, otherwise the redirection symbols work with most AMOS
commands. REDIR is useful in command files when it is not known if redirection is on or off.
REDIR spawns a slave job to assist with redirection. Therefore you may need to increase
the JOB settings in your system initialization command file.
For general characteristics of I/O redirection, whether you are using the REDIR command or not,
see Chapter 5.
REDIR does not work with all AMOS software. Any program that doesn't allow switches
before the file specifications will not work with REDIR.
If you use redirection and the AMOS line editor, your TRMDEF statement cannot have
buffers larger than 200 bytes or a line editor setting over 20.
FORMAT
REDIR AMOS-command redirection-specification
AMOS-command is an AMOS level command or a CMD or DO file, and redirectionspecification is a directional symbol combined with a destination file specification. The directional
symbols are:
>
Send output to the following file.
>>
Append output to the end of the following file.
<
Input the contents of the following file into the AMOS-command.
|
Place the output of the following file into the input of the AMOS-command.
#
Removes terminal dependent escape sequences from the redirected data. Must be
the first symbol following REDIR on the line.
\
Quotes the character following it so it is not interpreted as a command.
System Commands Reference Manual, Rev. 07
REDIR
Page 2
DEFAULTS
Default extensions are .INP for input files, .LST for output files.
OPTIONS
You can use any of the switches available to the AMOS-command you use. REDIR has no
switches of its own.
OPERATION
Enter REDIR, the name of the program you want run, the direction symbol, and the file
specification where you want the I/O redirection to go to/come from. For example:
REDIR SYSTAT/N >OUT.LST
RETURN
This places the output of SYSTAT into the file OUT.LST.
For more examples of redirection, see Chapter 5.
MESSAGES
?Insufficient memory to run job by n bytes Reduce EDITOR line count!
See your System Operator for help adjusting the line editor in the system initialization
command file.
?Invalid command line argument
Check your syntax and try again.
?Job table is full - allocate more jobs via the JOBS command
You need extra jobs on your system for redirection.
?No alternate languages have been defined
There are no other languages available on your system at this time. For information on
languages, see your System Operator's Guide.
?Unable to locate PSEUDO.IDV within AMOS
See your system operator about locating the file.
System Commands Reference Manual, Rev. 07
Page 3
REDIR
?Unable to locate REDIR2.LIT in system memory of SYS:
See your system operator about locating the file.
?Unable to locate selected terminal driver within AMOS
See your system operator about locating the file.
?Unrecognized error code n returned by $SPAWN
See your system operator for help.
System Commands Reference Manual, Rev. 07
RENAME
FUNCTION
Changes the names of files.
CHARACTERISTICS
RENAME is re-entrant, re-usable, a wildcard file command, and recognizes ersatz names.
FORMAT
RENAME newfilespec=filespec{,...filespec(s)}{/switch}
filespec(s) select the files you want to rename, newfilespec(s) is the new name(s), and switch is an
option request.
or:
RENAME filespec/PROTECTION:value
for /PROTECTION operation only. See Chapter 6 of Monitor Calls Manual for more information
on value.
DEFAULTS
The default device and account are where you are logged. The default switches are /NOD and
/NOQ. Defaults for unspecified filenames and extensions are *.*.
OPTIONS
The switches are file switches and may be abbreviated to any unique characters.
/QUERY
Confirm each renaming.
/NOQUERY
Rename without confirmation.
/DELETE
Delete existing file before renaming.
/NODELETE
If the new name is in use, don’t rename.
/PROTECTION:n
Update the file protection code.
System Commands Reference Manual, Rev. 07
RENAME
Page 2
OPERATION
Enter RENAME followed by a new name, an equal sign, and one or more files you want renamed.
For example:
RENAME ACCNT.TXT=AC.TXT
RETURN
or:
RENAME TTY??.*=DVR??.*
DVR12.LIT to TTY12.LIT
DVRAA.TXT to TTYAA.TXT
RETURN
The /PROTECTION switch allows you to change the protection level of files as you rename them.
Each file on an extended disk has a protection level controlling who can access and modify that
file. The default is 0505051717. For more about protection, see your System Operator's Guide.
For example:
RENAME MYTEXT/P:0505051210
RETURN
If you use /Q, RENAME asks you to confirm the renamings. For example:
RENAME/Q BASTXT.*=WRKFIL.*,WRKTXT.*
WRKFIL.BAS to BASTXT.BAS? Y
WRKTXT.TXT to BASTXT.TXT? N
You may press
CTRL
RETURN
/C to stop further renamings.
MESSAGES
?Account does not exist - [x,x]
Check your syntax, find the correct account using PPN, or create the account you need,
and try again.
%Bypassing BADBLK.SYS[1,2]
BADBLK.SYS exists to prevent bad blocks
on a device from being allocated, and
should never be directly accessed.
No files transferred
You can't rename BADBLK.SYS[1,2].
?Cannot find DSK0:CMDLIN.SYS[1,4]
The RENAME program needs this file to be able to process wildcard symbols. See if
CMDLIN.SYS exists in DSK0:[1,4]—if it does, it means you didn't have enough memory
to load it into your partition. If so, try to increase your memory by erasing unnecessary
files. See your System Operator for further help.
System Commands Reference Manual, Rev. 07
Page 3
RENAME
?Cannot RENAME [filename] - file already exists
You tried to rename a file, but a file of that name already exists. If you want RENAME to
overwrite the existing file, use the /D option.
?Device not found/mounted - [device-name]
Check your syntax, or use DEVTBL to see a list of devices on your system. If the device
is not mounted, MOUNT it.
?Device or [p,pn] specifications on output are illegal
Your newfilespec and filespec(s) must be in the same device and account.
?Maximum input exceeded
You put more characters on the command line than RENAME could handle. Break your
command into smaller commands, and try again.
?MEM or RES specified on network
You cannot access MEM: or RES: over a network.
?Missing Output specification
You must give a new file name so RENAME knows what to call your new file.
?More than one output specification
Try again using only one new file name.
%No files renamed
RENAME couldn't find any files matching your filespecs or wasn't able to carry out the
renaming procedure because of an error. Make sure you used the correct filespec and try
again.
?Specification error ^
The ^ symbol points to the error. Check your syntax, and try again.
?Wildcard device or unit specified on network
You can't use wildcard symbols over a network.
System Commands Reference Manual, Rev. 07
RESTOR
FUNCTION
Writes files from a specified backup device to a hard disk. RESTOR is a file-oriented program
that transfers files previously saved by the BACKUP command.
The BACKUP, BAKDIR, and RESTOR commands are included only for compatibility
with earlier operating system versions. Do NOT use these commands unless absolutely
necessary. Use the MTUxxx commands for all tape backup, and CRT620 to create warm
boot tapes!
CHARACTERISTICS
RESTOR is re-entrant, re-usable, and a wildcard command. Files can be transferred into the disk
account you are logged into from another account on the backup medium regardless of project
number. However, files can't be transferred to a disk account if they are not in the same project
number you are logged into unless you're logged into the operator's account, [1,2].
RESTOR is used with BACKUP (which transfers files from the disk to the specified backup
medium) and BAKDIR (which gives a directory of files from the backup medium). RESTOR
works on both traditional and extended format disks.
Unless you are using a VCR and /T, RESTOR locks up all other users on your system.
Inform other users before using RESTOR.
RESTOR can be set up to use a default backup device. This is useful if you normally use one
device for most or all of your backups. When this default is in effect, you don't have to tell
RESTOR what device you wish to use, thus saving a step in the backup process. To set up a
device as the default, define an ersatz name called BACKUP: in your ERSATZ.INI file. For
example:
BACKUP:
VCR0:
Define the device you want as your default backup device after the name. If you want to use
another device after the default device has been "set up," you can specify the /OVERRIDE switch,
and you are prompted for the name of the device you wish to use. If you don't have a default
device, and if you don't use /OVERRIDE, RESTOR presents a menu of available devices to select
from.
System Commands Reference Manual, Rev. 07
RESTOR
Page 2
FORMAT
RESTOR{/switch}{outfspec}=fspec{,fspec...}{/switch}
switch is an option request. The fspecs define files to be restored. You must use the exact file
specification as it was written onto the backup medium by BACKUP.
The outfspec defines which device and account the backed up files are written to on the disk. It
also allows you to rename the files as they are copied onto the disk.
DEFAULTS
The default fspec is the device and account you are logged into, and is equivalent to entering:
RESTOR {outspec}=*.* RETURN . The outfilespec defaults to the filename of fspec and the
device and account you are logged into. If you are logged into the System Operator's account,
DSK0:[1,2], the default outfspec is [ ] (all accounts). If you are logged into account [1,2] on any
other disk, the default is [ ] (all accounts on that disk).
OPTIONS
Placing NO before the switch turns it off. The default switches are /D, /NOH, /NOQ, /NOS, and
/NOT.
/AFTER:date-time
Restore only files that were last updated after the specified date and/or
time. Operation switch.
/BEFORE:date-time
Restore only files that were last updated before the specified date
and/or time. Operation switch.
/DELETE
Copy over existing files. Operation switch.
/HASH
Restore only files with different hash totals. Operation.
/OVERRIDE
Overrides the default backup device (if one exists). You are prompted
for the name of the device to use.
/QUERY
Confirm files to restore. File switch.
/SUPPRESS
Suppress display of files during the restore. Operation.
/TRANSFER
Restore from VCR without locking users out. Operation.
With /AFTER and /BEFORE, you must specify a date and/or time in this format:
/switch:{month-day-year}{@hour:minute{AM/PM}}
A time without a date defaults to the current date, while a date without a time defaults to zero time
(midnight).
System Commands Reference Manual, Rev. 07
Page 3
RESTOR
OPERATION
Enter RESTOR and the desired switches and file specifications. For example, to restore from the
backup medium all the files with .BAS extensions backed up from account [110,2] on DSK2:,
enter:
RESTOR =DSK2:*.BAS[110,2]
RETURN
RESTOR responds with a menu of the available backup devices. Select the backup device you
want. RESTOR asks you to confirm the specification of the device you selected. If the backup
device specification shown is correct, just press RETURN , otherwise enter the correct specification.
RESTOR prompts you to ready your backup device in an appropriate way—follow the
instructions. RESTOR displays a list of the file on the backup medium that fit the file
specifications you gave (you won't see this list if you used /SUPPRESS). It also displays a dot for
each file transferred from the backup device to the disk.
After the selected files have been transferred to the disk, RESTOR updates the disk directory and
lists the restored files on your terminal.
MESSAGES
?All "date and time" switches must be in absolute format.
See the rules above for specifying dates and times, and try again.
?Attempt to initiate device handler failed, error code n
Check to see if the number of jobs defined in your system initialization file are enough to
include one for the device handler task. See your System Operator about solving the error
condition. The error codes are:
1 = Job table is full
4 = %HNDLR task already exists
?BACKUP media not compatible with current software.
The backup medium you are using is not compatible with the current version of your
software. See your System Operator for help.
?BACKUP media not file structured.
RESTOR could not read the label information block. RESTOR can only read media
created by the BACKUP command.
System Commands Reference Manual, Rev. 07
RESTOR
Page 4
?BACKUP media not in correct sequence
The second media of a split-media backup didn't match the first. Make sure you have the
correct media. If so, see your System Operator for help.
?BACKUP media not written by BACKUP program.
The backup wasn't written by BACKUP. See your System Operator about which program
restores the data.
Bypassing [filename]
RESTOR is not restoring the file because it would overwrite an existing file.
Bypassing Table of Contents.
An informative message.
?Cannot be logged onto the backup device
Check your entry for errors. Make sure you used a colon after the device name.
?Cannot open message socket. ITC error: n
See your Monitor Calls Manual for an explanation of the error code. This indicates an
internal communication error—ask your System Operator or Alpha Micro dealer for help
if this occurs frequently. Make sure you have a MSGINI line in your system INI file.
?Cannot use [device] - [AMOS error message]
Either your ersatz default device definition, or the device you specified after /OVERRIDE
was incorrect. Using the AMOS error message as a clue to what is wrong, check the
appropriate entry and correct it.
?Can't find device handler in DEVTBL
See your Alpha Micro dealer for help.
?CMDLIN error detected during file transform process.
Your version of CMDLIN doesn't match your version of RESTOR. See your System
Operator or Alpha Micro dealer about updating CMDLIN or RESTOR.
System Commands Reference Manual, Rev. 07
Page 5
RESTOR
?Directory is damaged
Something is wrong either with your RESTOR command or with your system's account
structure. This message could occur if your command caused an attempt to create an
account, and you were not logged into OPR:. If this is not the case, see your System
Operator about using DSKANA or other diagnostic programs to check the account
structure.
?Disk device specified for file restore does not exist
Your backup media contained files from a disk that does not exist on your system, and
your RESTOR command tried to restore to it. Try again, restoring files from that disk
onto a disk that does exist on your system.
%Device specified is not a supported backup device
Check your entry for errors. Make sure you used a colon after the device name.
?End of media detected
The table of contents for the tape indicated a file past the end of the tape—trying to read
the file, RESTOR reached the end of the tape. Not all of your files are actually on the
backup tape; some files included in the table of contents may not be restorable.
?Error detected while skipping to next file.
This could indicate a file you were skipping over on your media has a problem. See your
System Operator for help.
?Fatal error, aborting device handler task
This is an informative message that occurs after some other fatal error, and indicates the
device handling task is also aborting.
?Fatal error, illegal message code n received from device handler.
The main task received an error from the device handler it did not understand. Try
again—if the problem persists, see your Alpha Micro representative for help.
?Fatal error, ITC error code [n]
See your Monitor Calls Manual for an explanation of the error code. This indicates an
internal communication error—ask your System Operator or Alpha Micro dealer for help
if this occurs frequently.
System Commands Reference Manual, Rev. 07
RESTOR
Page 6
?File sequence error detected
The file sequence number of the next file was not the expected number. This could
indicate a tape problem. It can also occur if you fast forward during a restore, and the
tape has gone past the end of the data (if so, just try again).
?File size mismatch on split file detected.
The second media of a split-media backup didn't match the first. Make sure you have the
correct media. If so, see your System Operator for help.
?Filename or PPN [name] not found while updating directory
The Filename or PPN specified was not found while updating the directory of a disk
formatted with extended directories. See your Alpha Micro dealer for help.
?Label date and time mismatch on BACKUP media detected.
The second media of a split-media backup did not match the first. Make sure you have the
correct media. If so, see your System Operator or your Alpha Micro dealer for help.
?No record ID detected
The files on the tape were recorded with an early BACKUP version, and your RESTOR
program is a later version. See your Alpha Micro dealer for help.
%No supported backup devices found
Your system does is not set up for any of the 3 supported backup devices, so you can't
specify a default device.
?Output specification not found.
Even if the default specifications are what you want, you MUST enter an equal sign to let
RESTOR know which is the output specification.
?Program error detected on split file.
An error occurred on the second media of a split-media backup. Check to make sure you
have the correct media. If so, see your System Operator or your Alpha Micro dealer for
help.
?Split file sequence number mismatch detected.
The second media of a split-media backup did not match the first. Check to make sure you
have the correct media. If so, see your System Operator or your Alpha Micro dealer for
help.
System Commands Reference Manual, Rev. 07
Page 7
RESTOR
?Table of Contents file not found.
This message appears whenever a Table of Contents file was written onto the backup
medium by the BACKUP command, but RESTOR could not find it. This error should not
occur unless the backup recording medium is damaged.
?Unable to run device handler task
The device handler failed to communicate with the main task after it was spawned. See
your System Operator or Alpha Micro dealer for help.
?Unspecified error received.
The main task received an error from the device handler it did not understand. Try
again—if the problem persists, see your Alpha Micro dealer for help.
?VCR failed to respond to command.
This could indicate a problem with the remote control of your VCR, with the connection
between your computer and your VCR, or with your computer. Make sure your cables are
properly connected—if the cable is okay, try to locate whether it's the VCR or computer so
you can get it fixed.
%WARNING -- Copy count is below the minimum level when using
the TRANSFER switch.
This message appears whenever you are restoring files from a VCR using /T, and the
backup tape was created with fewer than twenty copies. Warn other users on your
computer system that you need to use RESTOR without /T, and when they are ready, try
again without /T.
%WARNING -- Device handler task failed to respond. Reboot system.
Reboot your system. There should be no damage to your data.
%WARNING -- Run DSKANA to ensure the integrity of the bitmap.
This is displayed after an error or a ^C occurs during the restore. Run DSKANA.
%WARNING -- The next file is a "split file" and is NOT complete
The media has ended in a split file and you have chosen not to continue the restore. This
reminds you the last file restored is not complete.
?You must be logged into the operator's account [1,2]
to restore files to any but the logged in project.
Either log into the same project number, or log into account [1,2].
System Commands Reference Manual, Rev. 07
REWIND
FUNCTION
Rewinds a 1/2", 9-track magnetic tape, or a video cassette.
CHARACTERISTICS
DO NOT use REWIND when another job is using the tape unit. Such an action causes
unpredictable results.
The tape unit you access must be defined in your system device table. MTSTAT.SYS must be in
system memory for magnetic tape units if you have an S-100 Bus or any non-VME system. See
your System Operator's Guide to the System Initialization Command File.
A magnetic tape is said to be at load point when the metallic film at the start of the tape is
positioned at the read head.
Use REWIND for remotely-controlled VCRs which start to play when a write-protected
cassette is inserted to rewind the tape back to load point.
REWIND works with the AMOS/32 and AMOS/Lversions of the operating system only.
FORMAT
REWIND devn:
devn: is the tape unit you want to rewind.
OPERATION
Make sure the tape you want to rewind is mounted. Then enter REWIND followed by the
specification of the tape unit. For example:
REWIND MTU7:
RETURN
REWIND VCR0:
RETURN
or:
REWIND returns you to AMOS command level while the tape is still rewinding.
System Commands Reference Manual, Rev. 07
REWIND
Page 2
MESSAGES
?Cannot INIT [device-name] - device does not exist
Check your entry or use DEVTBL to see a list of valid devices for your system, and try
again.
?Device not ready
The tape drive reported that it is not ready for operation. Check that the tape is loaded
correctly and the drive is ready for operation.
?File specification error
Check your syntax, and try again.
% Tape cannot be rewound—it is at load point
The tape is already fully rewound and ready for use.
% Tape is already rewinding
The tape is already rewinding. The command was superfluous.
System Commands Reference Manual, Rev. 07
RNDRED
FUNCTION
RNDRED randomly selects disk tracks and performs a seek and read operation on a random record
on them. It lists any read errors it finds.
CHARACTERISTICS
RNDRED is re-entrant and re-usable. Does not harm the data on your disk.
FORMAT
RNDRED devn:
devn: specifies the device you want to test.
OPERATION
Enter RNDRED and the logical device you want to test. For example:
RNDRED DDA1:
RETURN
When you want the program to stop, press
CTRL
/C.
MESSAGES
?Cannot INIT [device-name] - device does not exist
Check your syntax, or use the DEVTBL command to see a list of current devices.
?Cannot perform RNDRED on [device-name] - [AMOS error message]
Check the AMOS error message and correct the condition.
System Commands Reference Manual, Rev. 07
RUN
FUNCTION
Runs compiled AlphaBASIC programs.
CHARACTERISTICS
RUN is re-entrant and re-usable. If RUN is in system memory, each user who wants to use it may
use the copy in system memory instead of loading it into his own memory partition. Use RUN only
on previously compiled programs. For more information on AlphaBASIC, see your AlphaBASIC
User's Manual.
FORMAT
RUN filespec
filespec is the compiled AlphaBASIC program you want to execute.
DEFAULTS
The default file extension is .RUN. RUN assumes the device and account you are logged into.
OPERATION
Enter RUN and the file you want to run. For example:
RUN INVOIC
RETURN
AlphaBASIC executes your program. To stop a program, press
CTRL
/C.
MESSAGES
?Cannot find program [filename]
Check your syntax, or use DIR to locate the file, and try again.
Insufficient memory to load program [filename]
Use MEMORY to check your memory partition size. You may need to increase it. See
your System Operator for help.
You may also see any of the standard AlphaBASIC error messages if your program has an error in
it—see your AlphaBASIC User's Manual.
System Commands Reference Manual, Rev. 03 (AMOS 2.2 - 4/91)
RUNP
FUNCTION
Runs a previously compiled AlphaBASIC PLUS program.
CHARACTERISTICS
RUNP is re-entrant and re-usable. See the AlphaBASIC PLUS User's Manual for information
about the AlphaBASIC PLUS programming language.
System Commands Reference Manual, Rev. 04
RUNX
FUNCTION
Runs a previously compiled AlphaBASIC program, using the integral math coprocessor on a
68040 CPU chip.
CHARACTERISTICS
RUNX is re-entrant and re-usable. It functions only on a computer with a 68040 CPU with an
integral math coprocessor. Except for using the math functions of the 68040 to increase
performance, it works exactly like the RUN command. See the AlphaBASIC User's Manual for
information about the AlphaBASIC programming language.
System Commands Reference Manual, Rev. 04
SAVE
FUNCTION
Saves memory modules as disk files.
CHARACTERISTICS
SAVE is re-entrant and re-usable, and understands the wildcard symbols ? and *. SAVE will not
save modules as disk files in accounts other than the one into which you are currently logged.
Memory modules have the same name and extension as their corresponding files on the disk. Use
MAP or DIR MEM: to display modules in your memory partition.
FORMAT
SAVE filename.ext{,filename.ext...}{/rename-extension}
filename.ext selects a module you want to save as a disk file.
DEFAULTS
SAVE assumes a file extension of *. If you specify just a filename, SAVE saves all memory
modules of that name regardless of their extensions.
OPERATION
Enter SAVE and the file(s) you want to save. For example:
SAVE *.SYS,*.LIT
RETURN
SAVE displays a list of the memory modules being saved as disk files. These files are placed in
the account into which you are currently logged.
If you ask SAVE to transfer a copy of a module to your account and a disk file of that name
already exists, SAVE erases the original disk file and replaces it with a copy of the memory
module. For example:
SAVE TLC RETURN
ERASE TLC.LIT, SAVE TLC.LIT
System Commands Reference Manual, Rev. 03 (AMOS 2.2 -4/91)
SAVE
Page 2
If you do not want SAVE to erase an existing file, use the rename option. Follow the list of
filespecs with a slash and any extension you choose. Before saving any memory modules, SAVE
will rename to the new extension any existing files with the same names as those memory modules.
For example, assume you have a file in your account named EXIT.SBR:
SAVE EXIT.SBR/OLD RETURN
RENAME EXIT.SBR,SAVE EXIT.SBR
The example above renames your existing file EXIT.SBR to EXIT.OLD; then it saves the memory
module in your partition as EXIT.SBR. If a file named EXIT.OLD already exists in the account,
SAVE erases it before renaming EXIT.SBR to EXIT.OLD.
MESSAGES
?Cannot save [filespec] - memory module not found
Use MAP or DIR MEM: to see what modules are in memory.
?Illegal backup switch
You tried to use the rename option, but you did not specify a legal extension after the
backslash. A file extension may only include letters or numbers, and may only be three
characters or less long.
System Commands Reference Manual, Rev. 03 (AMOS 2.2 -4/91)
SCSI
FUNCTION
Displays a list of all SCSI devices attached to your computer.
CHARACTERISTICS
SCSI is reentrant and reusable. It displays which SCSI IDs are in use and which are available.
For the IDs in use, it displays the type of device, manufacturer's model number, and firmware
revision.
If available from the SCSI dispatcher, this command also displays the currently configured data
transfer parameters. This is the same information that is displayed during bootup initialization of
the SCSI dispatcher
OPERATION
To see a list of SCSI devices, type:
SCSI
RETURN
You will see a display similar to this:
Dispatched SCSI port:
SCSI
SCSI
SCSI
SCSI
SCSI
SCSI
SCSI
SCSI
id
id
id
id
id
id
id
id
7:
6:
5:
4:
3:
2:
1:
0:
(reserved) SCSI bus host adaptor
SCSI-2 (tape)
TANDBERG TDC 4100
No device or unable to report
No device or unable to report
No device or unable to report
No device or unable to report
No device or unable to report
SCSI-2 (disk)
MAXTOR MXT-1240S
CMDQUE wide synchronous: 20.00 MB\16
=05:10CREATED121592
H6F+AAA
MESSAGES
?You must install a SCSI dispatcher prior to using this program
This program requires the correct SCSI dispatcher to be installed via the system’s
initialization file. Change the file, and reboot the system.
System Commands Reference Manual, Rev. 13
SCZCSH
FUNCTION
Displays a continuously updated bar display showing write buffer usage and effectiveness.
CHARACTERISTICS
SCZCSH is reentrant and reusable. It works only on systems which use the SCSI dispatcher.
FORMAT
SCZCSH dev
dev is the three-letter name of the device you want to see write buffer use for.
OPERATION
Enter SCZCSH and the name of the device you want to see write buffer use for. For example:
SCZCSH DSK
RETURN
The top bar of the screen display generated by SCZCSH shows the approximate percentage of
write cells in use. This bar should move around constantly while writes are occurring, usually
hovering around 50 percent.
The next bar shows the approximate percentage of writes which were placed in a cell, but were
overwritten by another write before actually being sent to the disk. This is the same as disk writes
occurring over previous writes; however the seek and write overhead of previous writes was
avoided.
The final bars represent a breakdown of sequentially written blocks per physical disk write. When
physical writes are performed, the driver attempts to perform them as multi-sector operations
whenever possible. Up to eight sequential blocks may be written per disk access, resulting in better
overall performance.
MESSAGES
?Driver not found
The requested driver could not be found. Check the name (by using DEVTBL) and try
again.
System Commands Reference Manual, Rev. 07
SCZCSH
Page 2
?Invalid driver type
The specified driver does not support write caching. Choose another driver.
System Commands Reference Manual, Rev. 07
SCZERR
FUNCTION
Displays and optionally clears the SCSI error statistics.
CHARACTERISTICS
SCZERR is re-entrant and re-usable. The SCSI dispatcher counts all errors for each SCSI device
whether corrected or not. SCZERR displays the accumulated error counts for each SCSI device
on the system.
FORMAT
SCZERR {/A}
OPTION
/A
Causes SCZERR to report errors for all 16 possible SCSI devices whether or not
they exist on the system. Without the /A switch, errors are displayed for only
those SCSI devices that exist in the dispatcher.
OPERATION
Type SCZERR
RETURN
or SCZERR /A
RETURN
SCZERR displays a screen showing the SCSI ID of the first SCSI device on the computer, with
the number of errors of each type for that device. Press RETURN to see the error statistics for the
next device. When the errors for the last device have been displayed, the program asks:
Do you want to clear the error counters (yes, no)?
Typing Y clears the error counters and exits the program. Typing N exits the program without
clearing the counters. Any other response repeats the question.
MESSAGES
Error statistics are not available.
The version of the SCSI dispatcher on your computer does not support error reporting.
You need a later version of the dispatcher to use this feature.
System Commands Reference Manual, Rev. 07
SCZERR
Page 2
Please answer the question correctly.
You must respond either Yes or No.
System Commands Reference Manual, Rev. 07
SCZPIC
FUNCTION
Enters the Product Installation Code (PIC) for the SCSI dispatcher. Once the PIC has been entered,
displays the PIC.
OPERATION
See your system owner's manual or the installation instructions for your SCSI controller for how to
use SCZPIC to enter the PIC for your SCSI dispatcher. Once you've entered the PIC, you can
display it by entering:
SCZPIC
RETURN
SCZPIC is not required in AMOS 2.3 or later versions of the operating system.
System Commands Reference Manual, Rev. 07
SEND
FUNCTION
Sends a message to another job.
CHARACTERISTICS
SEND is re-entrant and re-usable, and recognizes ersatz names. Sends a one line message to any
job that can receive terminal input and does not have GUARD set (see the SET reference sheet for
information on GUARD).
FORMAT
SEND {cpuID/ersatz name}jobname message
If you specify an asterisk instead of jobname, the message is sent to all jobs on the system.
OPERATION
Enter SEND, the name of the job you want to communicate with, and the message you wish to
send. For example, assume you are job RAY:
SEND BOB What time is your meeting with the Board?
RETURN
If the terminal attached to job BOB is not guarded and is not busy performing a task that interferes
with input/output, the message appears on BOB's terminal:
;RAY - What time is your meeting with the Board?
MESSAGES
?Busy
SEND can't send the message because the job's not at AMOS command level or in
terminal input mode. Use STAT to see what the job is doing, and try again when it is not
busy.
?File specification error
Check your syntax, and make sure you specified a jobname. Use SYSTAT or STAT to
see the jobnames on your system.
System Commands Reference Manual, Rev. 07
SEND
Page 2
?Guarded
The job is protected by SET GUARD. Try another method of communication.
?Invalid CPU number
The remote system you specified does not exist.
?ITC error occured during send
Your message did not arrive at the remote system due to a network problem Try again. If
the problem persists, contact your System Operator.
?Job has no terminal attached
The job you want to send to is not attached to a terminal and can't receive your message.
?Job not found
Check your syntax, or use STAT or SYSTAT to see a list of jobs.
?Job specification error
A job was not specified on the command line. Try again.
System Commands Reference Manual, Rev. 07
SET
FUNCTION
Sets or displays various system and terminal options.
CHARACTERISTICS
SET is re-entrant and re-usable. SET lets you define your own SET verbs. If you have a
SET.INI file in your current account, your library account, or DSK0:[1,4], SET reads the INI file
when SET is used. The format for an entry in a SET.INI file is:
verb, filespec
For example:
GRAPH,DSK0:GRAPHC.LIT[1,4]
RETURN
If you had such a line in a SET.INI file, entering SET GRAPH RETURN at AMOS command
level would execute the file DSK0:GRAPHC.LIT[1,4]. When a file is called by SET, the
register A2 points to the remainder of the SET command line, allowing you to add arguments to
the keyword.
FORMAT
SET {option} {specifications}
DEFAULTS
The system comes up with these options as defaults: CTRLC, ECHO, LOCK, ELOCK, OCTAL,
NODSKERR, NOGUARD, NOREDIRECTION, and NOVERIFY. The default form-type for a
specific printer is set by the printer initialization file for that printer. The initial tape density at
the time of system start-up is 1600 BPI.
OPTIONS
ACCESS
Turns on access to a network for the device.
NOACCESS
Turns off network access for the device.
BPI
Sets magnetic tape bits per inch rate.
BROADCAST cpuid
Turns on AlphaNET broadcasting. Must be in OPR:.
NOBROADCAST cpuid
Turns off AlphaNET broadcasting. Must be in OPR:.
BUFWRT devn:
Enables buffered writes on AM-520 disks.
NOBUFWRT devn:
Disables buffered writes on AM-520 disks.
System Commands Reference Manual, Rev. 10
SET
Page 2
CACHE dskn
Turns on disk cache for disk #n.
NOCACHE dskn
Turns off disk cache for disk #n.
CTRLC
Enables
NOCTRLC
Disables
DSKERR
Reports soft disk errors and retries.
NODSKERR
Does not report soft disk errors and retries.
DYN
Turns dynamic job scheduling on or off.
DYNNO
Turns dynamic job scheduling off for the system.
DYNYES
Turns dynamic job scheduling on for the system.
NODYNAMIC
Turns dynamic job scheduling off for this job only. You can
then set priority for this job using JOBPRI. Other jobs
continue to have their time slice dynamically.
DYNJOBNO {job}
Turns dynamic job scheduling off for this job.
DYNJOBYES {job}
Turns dynamic job scheduling on for this job.
ECHO
Displays terminal input.
NOECHO
Silences terminal input.
ELOCK {job}
Enables file locking for job, for extended devices.
NOELOCK {job}
Disables file locking for job, for extended devices.
FORMS
Assigns a form to a printer. Must be in OPR: to set Task
Manager spooler forms.
GUARD
Prevents SENDs and FORCEs to your terminal.
NOGUARD
Allows SEND and FORCE.
HCACHE {devn:}
Enables on board caching for the specified device controlled by
a Herbie disk controller board. Must be in OPR:.
NOHCACHE {devn:}
Disables on-board caching for the specified device. Must be in
OPR:
HEX
Displays whole numbers in hexadecimal.
LANGUAGE
Sets the language translation table for the job.
LINK cpuid
Turns on the specified network. Must be in OPR:.
NOLINK cpuid
Turns off the specified network. Must be in OPR:
LOCK {job}
Enables file locking for job for traditional devices. Records
event in system log.
NOLOCK {job}
Disables file locking for job for traditional devices. Records
event in system log.
NDV cpuid
Turns on network driver for non-AlphaNET network. Must be
in OPR:.
NONDV cpuid
Turns off network driver for non-AlphaNET network. Must be
in OPR:.
OCTAL
Displays whole numbers in octal.
PFK
Programs terminal function keys.
CTRL
/C (user-interrupt command).
CTRL
/C.
System Commands Reference Manual, Rev. 10
Page 3
SET
PROMPT x
Defines the AMOS prompt. Maximum 19 characters. See
below for interpreted prompt information.
QIC11
Uses QIC11 format for streaming tape drive.
QIC24
Uses QIC24 format for streaming tape drive.
QICNORMAL
Uses normal format for streaming tape drive.
REDIRECTION
Enables I/O redirection. See Chapter 5.
NOREDIRECTION
Disables I/O redirection. See Chapter 5.
SEEKOP dsk
Turns on seek optimization for the specified device (including
all logical units on the device). Improves disk access speed for
heavily used systems.
NOSEEK dsk
Turns off seek optimization for the specified device (including
all logical units on the device).
TERMINAL
Sets terminal characteristics (see below).
TEST
Sets the system into test mode by setting a bit in the SYSTEM
longword in the monitor. See Appendix C of the AMOS
Monitor Calls Manual for details.
NOTEST
Sets the system out of test mode by clearing a bit in the
SYSTEM longword in the monitor. See Appendix C of the
AMOS Monitor Calls Manual for details.
VERIFY
Verifies each write operation by re-reading data. Does NOT
compare written data with data in memory.
NOVERIFY
ISIABT {job}
Does not verify write operations.
Clears the “ignore IS$ABT flag” processing.
Except for those options which include an optional jobname, these options are only set
for the job that used SET.
With the SET TERMINAL option, you have a number of added commands. Enter WIDTH,
SCROLL, HEIGHT n, FCOLOR (foreground), BCOLOR (background), or DRIVER, then a
setting (or a driver name). If TERMINAL alone is specified, SET displays settings. The
WIDTH can be 80 or 132, colors can be:
0 = Black
4 = Red
1 = White
5 = Yellow
2 = Blue
6 = Green
3 = Magenta
7 = Cyan
Scrolling can be:
0 = Jump
3 = Medium smooth
1 = Fastest smooth
4 = Slow smooth
2 = Fast smooth
The SET TERMINAL commands can be abbreviated to any unique name, i.e., SET TERMINAL
DRIVER [filespec] could be SET TDV [filespec]. SET TERMINAL HEIGHT lets you define
the number of lines on your terminal screen (if your terminal supports this feature).
With SET PROMPT, you can enter the actual string you want, or one or more codes from this
list:
System Commands Reference Manual, Rev. 10
SET
Page 4
$:
Current device and drive number.
$C#
Sends TCRT -2, #.
$E
Ersatz name of current account. If none, same as $:$P.
$LG
Name of current language.
$NA
Same as $NI=$NP,$NB.
$NB
Baud rate.
$ND
Terminal driver name.
$NI
Interface driver name.
$NJ
Job name.
$NM
Modem driver name.
$NP
Interface driver port number, in decimal.
$NS
Operating system name.
$NU
User name.
$P
Account number, in brackets.
$SC
AlphaNET cpu-ID.
$SE
Ersatz name for AlphaNET cpu-ID. If none, same as $SC.
$SV
Monitor version.
$UF
Free memory in user partition, in KB.
$UM
Total memory in user partition, in KB.
$UX
Radix. ^H for hexadecimal, ^O for octal.
$VB
Set to bright display.
$VD
Set to dim display.
These codes result in an "interpreted prompt" which changes depending on the user,
account, etc. When using an interpreted prompt, keep the following in mind:
• PROMPT.SYS must be loaded into system memory and initialized for interpreted
prompts to work.
• If you use SET PROMPT in a DO file, you must double the dollar sign before any
interpreted prompt code. for example, use $$P for the current account, not $P.
• While the maximum length of the prompt string you enter is 19 characters, interpreted
prompts may result in a displayed prompt much longer than this.
• Calculating the prompt length in a program is more difficult—you cannot do so by
counting the characters in JOBPRM.
OPERATION
To see the current settings, enter SET. For example:
SET RETURN
Current settings are:
System Commands Reference Manual, Rev. 10
Page 5
SET
HEX
ECHO
DSKERR
NOVERIFY
GUARD
CTRLC
REDIRECTION
LOCK ELOCK
All non-locking jobs are displayed. If the job has locking off for both traditional and
extended devices, there is an asterisk (*) before the job name.
To change the SET options, enter SET followed by an option. For example:
SET
SET
SET
SET
SET
HEX RETURN
BPI MTU1:800 RETURN
LANGUAGE GERMAN RETURN
LOCK RETURN
ELOCK RETURN
SET
SET
SET
SET
FORMS QUME CHECKS RETURN
TERMINAL FCOLOR 4 RETURN
PROMPT WELCOME! RETURN
TDV MYDRIV RETURN
MESSAGES
?File in use
The file is locked by another user. Try again later.
%Filespec within SET.INI is too long
The filename you entered into SET.INI is invalid. Edit SET.INI and try again.
?The format for the command is: SET BPI MTUn: XX Where n = tape
? drive number in the range 0 through 7 and XX is the desired density.
Make sure you designated the magnetic tape unit correctly and you have specified a BPI
of 800, 1600, 3200 or 6250. For a list of valid MTUs, enter SET.
?The format for the command is: SET TERMINAL DRIVER [driver]. Where
? [driver] is the desired new terminal driver. Your current terminal
? driver is: [driver]. Available terminal drivers are: [list]
Make sure you have specified the correct disk and account for the driver, check your
spelling, etc, and try again.
?Insufficient queue blocks
See your system operator about increasing or freeing system queue blocks.
?Invalid function
SET did not recognize the option you entered. Check your syntax and try again.
?Invalid job name
Use STAT or SYSTAT to see the current jobnames and try again.
%Memory module deletion failed.
System Commands Reference Manual, Rev. 10
SET
Page 6
An internal error occurred. Try again. If the problem persists, contact your System
Operator.
?MTSTAT.SYS must be loaded into system memory
?when using the SET QIC commands.
Add a SYSTEM MTSTAT.SYS command to a test copy of your system initialization
file, MONTST it, re-name it (when successful), and try again.
?Network identification must be specified
You did not specify a network ID in a LINK or NDV option.
?Specified network not active
Your system cannot locate the specified network.
?No alternate languages have been defined
There are no other languages available on your system at this time. For information on
languages, see your System Operator's Guide.
?Operation is only available in release [number] or higher
Check your syntax, and the list of options, and try again.
?Printer not found
SET doesn't recognize the printer you specified. Check your spelling or use PRINT or
PRNT to see what printers are on your system.
?Privileged operation - must be logged into OPR:
Log into DSK0:[1,2] and try again.
?SET QIC commands are not available on AM1000 systems.
?SET QIC commands are not available with the
? current hardware configuration.
The type of streamer and/or system hardware you have does not allow SET QIC
commands to work.
?You may only set density on MTU devices
It is invalid to try to set recording density on any other device than an MTU (½” tape)
device.
?Your terminal does not support [option]
You tried to SET your terminal to do something it can't do.
System Commands Reference Manual, Rev. 10
SETJOB
FUNCTION
Starts up a job.
CHARACTERISTICS
SETJOB is both re-entrant and re-usable.
When the system is reset or powered up, it automatically attaches the first job to the first terminal
defined in your system initialization command file. Except for that special case, however, the
system does not automatically attach any jobs to terminals. If you want a job to be able to use a
terminal for input and output, you must explicitly attach the job and the terminal. This process
involves the use of such commands as ATTACH, KILL, FORCE, MEMORY, WAIT, etc. The
SETJOB command consolidates all these lines into one easy-to-understand line.
SETJOB is most commonly used in your system initialization command file, but it can be used at
AMOS level.
FORMAT
SETJOB jobname, terminal, memory{, command{,...,command}}
jobname is the name of the job you want to start, terminal is the terminal to ATTACH it to,
memory is the amount of memory to assign to the job (you may specify K or M for kilobytes and
megabytes), and command is one or more optional commands FORCEd to the job. These could be
any AMOS command, a command file to be executed, etc.
OPERATION
Enter SETJOB and the parameters for the job. For example:
SETJOB MARK,GOLDEN,150K,TIME
RETURN
The AMOS command(s) at the end of the SETJOB line cannot include any commas. If
they do, SETJOB interprets each comma as the end of one command and the beginning of
a new one. For example, do not include an account number in the command, since
SETJOB interprets the comma between the project and programmer numbers as the end of
the command.
System Commands Reference Manual, Rev. 07
SETJOB
Page 2
MESSAGES
?Account not found on login disk for specified job
You attempted to attach a terminal to a job logged into an account which no longer exists
on the device specified (or the default device). See what can be done to log the job into
another account.
?Bad password
You did not specify the correct password. Check your spelling and try again.
?Command is not in proper format, Correct format is:
.SETJOB jobname,terminal,memory, command,....command
where "command" is optional
SETJOB cannot understand the command line you entered. Re-enter the command,
ensuring you have entered the command in the correct format (especially the commas).
%Setjob Logged in, but Port is Busy!
%Last forced command did not execute
For some reason, the job you were setting up could not respond to all the commands. It has
been allocated memory, and logged in, but one or more commands failed to process.
?You must specify a memory size of at least 512 bytes
SETJOB can only allocate a job more than 512 bytes of memory. Re-enter the command
line with a larger memory allocation.
?Unable to locate job with specified name
You tried to attach a terminal to a job not defined in the JOBS command in your system
initialization command file. Use SYSTAT to see a list of the jobs defined on the system.
?Unable to locate terminal with specified name
You tried to attach a job to a terminal not defined in a TRMDEF command in your system
initialization command file. Use TRMDEF to see a complete list of all of the terminals
defined on your computer.
System Commands Reference Manual, Rev. 07
SETPEN
FUNCTION
Lets you set read/write penalties for disk activity.
CHARACTERISTICS
SETPEN lets you set the read/write penalty values for a particular logical disk. The read/write
penalty value affects the amount of time a job is charged for performing disk activity. With
intelligent disk controllers, a disk read or write requested by a job can continue into another job's
time slice, effectively reducing the amount of time the following job receives. Changing the penalty
setting can have two advantages: it can prevent jobs performing heavy disk access from excessively
slowing other jobs on the system, and it causes the amount of CPU time being used by each job to
be reported more accurately. However, it may slightly increase the time necessary for programs
which do extensive disk I/O.
The default value for both reads and writes is 200. You can change these values to any value in the
range 0 - 3312. Your change lasts only until the system is rebooted or you use SETPEN again.
FORMAT
SETPEN devn:
devn: is the device name of the disk you want to change the penalty values for.
OPERATION
To adjust the read/write penalties, type SETPEN and the name of the device you want to affect.
For example:
SETPEN DSK0:
RETURN
This displays the current settings. Enter the read penalty value you want to use and
enter the new write penalty and RETURN .
RETURN ,
then
You may want to increase the read/write penalty settings if a disk-intensive job slows down other
jobs, indicating that its disk accesses are reducing the time allotted to them. However, be careful in
changing these values, as setting them incorrectly could decrease overall system performance.
The values you enter are changed only in memory. When you reboot the system, the
penalties will return to their default values.
System Commands Reference Manual, Rev. 07
SETPEN
Page 2
MESSAGES
?Error - Device not found - devn:
The device you specified could not be found.
Error - Driver not found in system memory - devn:
The device driver for the device you entered is not in system memory.
?Error - Drive does not support penalty enforcing - devn:
The device driver for the device you entered does not allow you to set the penalty values.
You cannot use SETPEN with devices which use this driver.
System Commands Reference Manual, Rev. 04
SHELL
FUNCTION
Executes AlphaMENU menu programs. Calls up a compiled menu to the screen.
For complete information about AlphaMENU, please refer to the AlphaMENU User’s
Manual, DSS-10044-00.
CHARACTERISTICS
SHELL is re-entrant and re-usable. You must have at least 32K of memory in your memory
partition to use SHELL.
Do not try to use SHELL with any file that is not a SHELL command file or you may
lock up your terminal.
FORMAT
SHELL {filename}
filename is the specification of the file that contains the menu definition code.
DEFAULTS
The default file specification is DSK0:AMOSL.CMN[7,11], default extension is .CMN.
OPERATION
CALLING THE MENU
To bring a menu to the terminal screen, log into the account containing the menu, and
enter the name of the menu you want to use. For example:
SHELL DOC
RETURN
WHAT YOU SEE
You will see six "boxes," some or all containing numbered choices. You may (depending
on what kind of terminal you have) see an area highlighted in reverse-video display—if so,
this is called the "selection marker." You will see a question displayed at the bottom of the
screen, followed by a number.
System Commands Reference Manual, Rev. 07
SHELL
Page 2
MAKING A SELECTION
There are two different ways you can select a menu option. The first way is to enter the
number of the selection you want. The six major options are numbers 10 to 60. Type the
number of the selection you wish, and press RETURN , and the next level of menu appears,
or that function is performed.
The second way is to use the cursor control (arrow) keys to move the selection marker onto
the function you wish to select, press RETURN , and the next level of menu appears, or that
function is performed.
MOVING THE SELECTION MARKER
Use the cursor control (arrow) keys to move the position of the selection marker. If your
terminal doesn't have such keys, you can move the selection marker by pressing and
holding down CTRL while typing K (up), J (down), H (left) or L (right).
The menus are set up so the selection marker "wraps" around the screen. If you are at any
edge of the menu screen, and you press a key that would move the selection marker in a
direction that is off the screen, you will see the selection marker appear on the opposite
side of the menu.
This features makes it easy to reach any place on the screen with just a few keystrokes.
With a little imagination, you can find the quickest way to position the selection marker to
any place on the menu.
GETTING HELP
To see a display of helpful information, place the selection marker on the function you
want information on (or type the number of it), and type ?.
EXITING A MENU DISPLAY
To go back to the previous menu, press ESC or CTRL /C. You will then see the next highest
level of menu. If you are using the standard AMOS menu, typing "55" as the selection
number when you at the main menu will bring you out of the menu and back to AMOS
command level—other menus may have such a selection also.
MESSAGES
?File not found - [filename]
Check your syntax, or use the DIR command to locate the file, and try again.
System Commands Reference Manual, Rev. 07
SI
FUNCTION
Analyzes and reports on system configuration and speed.
CHARACTERISTICS
SI is neither re-entrant nor re-usable. It scans the system hardware and software to report on the
computer, CPU, math coprocessor, and memory management unit type, AMOS and boot PROM
revision levels, number of SSDs, total memory and system memory sizes. It then derives some
speed indexes for the system.
FORMAT
SI {disk}
disk is the name of the logical unit on which to conduct a disk index.
DEFAULTS
SI defaults to not reporting a disk speed index.
OPERATION
Enter SI followed by the options you want. For example:
SI RETURN
SI SUB0:
RETURN
SI does a set of operations that measure CPU power and floating point speed. A disk speed
benchmark is optional. The results give a rough guide for the relative power of AMOS-equipped
systems. You cannot use this test to compare AMOS and non-AMOS systems.
SI should be run with no other active users or background jobs on the system. Results for a given
system should be within approximately 5% per run.
MESSAGES
?SI cannot be run from a spawned job
Your job is a spawned job (for example, a network connection or a MULTI job). You
cannot get accurate statistics from this configuration. SI will refuse to run.
System Commands Reference Manual, Rev. 12
SIZE
FUNCTION
Displays the size (in bytes) of a disk file.
CHARACTERISTICS
SIZE is re-entrant and re-usable. The display is in decimal form.
FORMAT
SIZE filespec
filespec specifies the file whose size you want to know.
DEFAULTS
SIZE assumes the account and device you are logged into and a file extension of .LIT.
OPERATION
Enter SIZE and the file name. For example:
SIZE FORM.TXT RETURN
Size is 1483 bytes
MESSAGES
?Cannot open [filespec] - file not found
SIZE was not able to find the file you specified. Check your spelling and make sure the
account and device specifications were correct.
?Cannot read [filespec] - device does not exist
Check your syntax or use DEVTBL to see a list of valid devices.
System Commands Reference Manual, Rev. 03 (AMOS 2.2 - 4/91)
SKIP
FUNCTION
Skips to the next file mark on a tape mounted on a magnetic tape unit.
CHARACTERISTICS
SKIP is re-entrant and re-usable.
Don't use SKIP while another job is using the specified tape drive.
You may specify up to 7 tape drives (for example, MTU0:-MTU6:). The magnetic tape drive you
specify must be defined in the system device table as a non-shareable device. The program
MTSTAT.SYS must be in system memory if you have an S-100 Bus system or any non-VME
system. For information, see your System Operator's Guide to the System Initialization
Command File.
In order to use MTSTAT.SYS, you must be running the AMOS/32 or AMOS/L version of
the operating system.
FORMAT
SKIP devn:
devn: specifies a magnetic tape drive.
OPERATION
Make sure the tape you want to access is mounted, then enter SKIP followed by the specification
of the tape drive you want to access. For example:
SKIP MTU5:
RETURN
SKIP issues a command to the magnetic tape driver to read forward on the currently mounted tape
until it detects a file mark. If the drive is positioned at the front of a file, this command causes the
tape driver to skip to the next file.
MESSAGES
?File specification error
Check your syntax, or use DEVTBL to see a list of the valid devices.
System Commands Reference Manual, Rev. 07
SLEEP
FUNCTION
Puts the current job in a waiting state for a specified period of time. While in this waiting state, the
job will not accept any input, or perform any tasks.
CHARACTERISTICS
SLEEP is re-entrant and re-usable.
The SLEEP command is useful in command files for keeping your job inactive until another
procedure completes. Allows you to select the length of time messages will stay on the terminal
screen.
FORMAT
SLEEP {seconds}
DEFAULTS
The default is 0 seconds.
OPERATION
Enter SLEEP followed by the number of seconds you want your job to remain inactive. For
example:
SLEEP 20
RETURN
You may halt the sleep at any time by pressing
CTRL
/C.
System Commands Reference Manual, Rev. 03 (AMOS 2.2 - 4/91)
SLEEPR
FUNCTION
Causes suspension of a job until the time specified.
CHARACTERISTICS
SLEEPR is re-entrant and re-usable.
Generally used inside a command file. Can be used with the BACKUP command to perform file
backups at specified times without human control.
FORMAT
SLEEPR HH:MM {AM/PM}
HH is the hour, and MM is the minute your terminal will become active again.
DEFAULTS
SLEEPR assumes AM.
OPERATION
Enter SLEEPR and the time you want your terminal to wake up. For example:
SLEEPR 2:10 PM
RETURN
MESSAGES
? Specification error
You did not specify a time, or specified the time in an incorrect format. Check your syntax
and try again.
System Commands Reference Manual, Rev. 03 (AMOS 2.2 - 4/91)
SMEM
FUNCTION
Displays data about the system shared memory pool, and lets you remove "stuck" blocks.
CHARACTERISTICS
SMEM is re-entrant and re-usable. It displays memory addresses in the number base the system is
using (usually octal). If you wish to see addresses in hexadecimal, make sure the HEX option is
set before using SMEM. See the SET reference sheet for information on changing the numeric
display base.
The PUSH and POP commands use shared memory, but do not show up on the display
because they execute and clear immediately.
For information about using SMEM in your system initialization command file to set up the shared
memory pool, see the System Operator's Guide to the System Initialization Command File.
FORMAT
SMEM {/switch}
switch is an option.
OPTIONS
/S
Display a summary report.
/D {address or name}
From OPR: only; removes specified memory block.
OPERATION
Enter SMEM at AMOS command level. For example:
SMEM
RETURN
You then see an information display about the memory pool. The display shows:
Range
Size
Name
Owner
Count
Flags
Address range in memory of the shared memory block.
Size in bytes.
Name of the block (if any). **FREE** means unallocated.
First job that allocated the block.
Number of jobs currently using the block.
2 indicates a named block, 4 a permanent block. 6 means both.
System Commands Reference Manual, Rev. 07
SMEM
Page 2
A summary of total blocks and bytes used follows. The "total bytes" displays are in decimal (the
others display in octal or hex, depending on how your job is set). If you use /S, you see only the
summary display.
The System Operator may use /D to free a memory block from DSK0:[1,2]. This function,
if used incorrectly, could damage memory—be sure you know what you are doing, and be
sure you are removing the block you want to remove. For example:
LOG OPR: RETURN
SMEM/D pool1 RETURN
In the example above, pool1 is the name of the "stuck" block you want to remove. You can find
the address (or address name) by looking at the normal SMEM display.
MESSAGES
?Cannot locate shared memory block with address: xxxx
You specified an invalid memory block address to delete. Use SMEM without a switch to
display valid addresses, then try again.
?Cannot locate shared memory block with name: xxxx
You specified an invalid or non-existent memory block name to delete. Use SMEM without
a switch to display valid block names, then try again.
%Possible system interaction: xxx no longer exists, but SMEM did not remove.
Another job deleted the shared memory block while you were deleting it too. The block has
been deleted.
?SMEM: already defined and can only be defined once
Check your syntax and try again.
?SMEM: can only be assigned during boot time
You cannot define shared memory after the system has finished booting.
?SMEM: illegal value specified on command line
Check your syntax and try again.
?SMEM: invalid address specification
The address you entered is incorrect. Use SMEM without switches to see the addresses.
System Commands Reference Manual, Rev. 07
Page 3
SMEM
?SMEM: invalid name specification
The name you entered is incorrect. Use SMEM without switches to see the addresses.
?SMEM: not defined
Shared memory is not defined in your system initialization command file.
?SMEM: specified address out of range
The address you entered is incorrect. Use SMEM without switches to see the addresses.
?SMEM: specified size will not fit into available memory
Your system memory size is too large. Reduce it and try again.
?SMEM: you must be logged into PPN 1,2 to remove shared memory
Log into 1,2 and try again.
System Commands Reference Manual, Rev. 07
SORT
FUNCTION
Alphabetically and numerically sorts data records in a sequential text file.
CHARACTERISTICS
SORT is re-entrant and re-usable. Sorts logical records in ascending or descending order. Sorts
only sequential files—will not sort Random files. SORT replaces the file you specify with another
file of the same name in which the data are arranged in the proper order. SORT uses the
precedence in whatever language table is set for your job (i.e., for American English, the ASCII
values). If you are sorting ASCII text in ascending order, all data that begin with upper case
letters come before those with lower case. If you are sorting in descending order, all data records
that begin with lower case letters come before those with upper case. You may sort a text file too
large to fit into memory all at one time. SORT does not understand wildcard symbols.
SORT can handle a maximum record size of 510 bytes. The file cannot contain a null
byte.
FORMAT
SORT filespec
filespec is the file you want to sort. SORT assumes an extension of .DAT and the account and
device you're logged into.
OPERATION
Enter SORT and the specification of the file you want to sort. For example:
SORT LABELS.DAT
RETURN
SORT now asks you for the following information:
RECORD SIZE
SORT recognizes a RETURN as the end of each data record, but needs to
know the size of the largest data record it is going to be dealing with.
Enter the maximum size (in bytes) of the logical records in your file.
Every character is one byte of data, including spaces and punctuation.
Exclude carriage return and line-feed bytes. The minimum record size is
two bytes.
System Commands Reference Manual, Rev. 07
SORT
Page 2
KEY SIZE
The key is the field in the record on which you want to sort (for example,
customer name). SORT asks this question for each key you define. You
can define up to three keys. If you want SORT to use less, press RETURN
after you define the keys you want. Enter the size (in bytes) of the key.
KEY
POSITION
SORT asks this question for each of the keys you define. Enter the column
number in the record where the first byte of the sort key occurs. The first
byte of a record is position #1.
KEY ORDER
SORT asks this question for each of the keys you define. Enter an A for
ascending or D for descending ASCII order.
SORT now sorts the file. If your system has 8-bit character support, you see: Using
extended collating sequence. After the sort is done, SORT displays statistics.
MESSAGES
?Cannot delete [filespec] - write protected
Write-enable your disk and try again.
?Cannot open [filespec] - file type mismatch
You tried to sort a random file. You may only sort sequential files.
?Command specification error
A filename was not entered on the command line. Re-enter the line including the name of
the file to be sorted.
?Cannot find Sort I-O module
A file, SYS:SORSVA.SYS, was not found. SORT.LIT requires that file to be accessible.
?Enter A or D
Answer A for ascending order, or D for descending order.
?Entire key must be within record
Either the record size is too small, or the key size is too big. Re-enter the numbers,
adjusting one or the other.
?Insufficient memory for sort
Delete any unnecessary memory modules from your user memory, or see your System
Operator about increasing your memory.
System Commands Reference Manual, Rev. 07
Page 3
SORT
?Key size must be > 0
?Key size must be less than record size
?Record size must be > 0
Enter a correct number.
?Maximum record size is 510 bytes
The maximum size of a data record in your file is 510 bytes. SORT cannot handle larger
record sizes.
?Sort error - Device (VDK0:) has overflowed!
The virtual disk (VDK0:) was used for temporary file storage, and that temporary file
became too large, aborting the COPY. Either increase the VDK size, or remove the
temporary (*.SRT) name from your VDK.INI file.
-- Using extended collating sequence -A message to say that an 8-bit collating sequence has been found in your job's active
language definition file. That sequence will be used to order data in the file.
%Warning - A null byte was encountered in the input file. Nulls
are discarded and not rewritten to the sorted file, resulting in
lost data. You may press ^C at this time to terminate the sort
and leave your data intact, or press RETURN to continue.
There is at least one non-ASCII character in the file you are sorting.
System Commands Reference Manual, Rev. 07
SRCCOM
FUNCTION
Compares two sequential files and lists the differences between them.
CHARACTERISTICS
SRCCOM is re-entrant and re-usable, and is useful for distinguishing between two versions of the
same file so you can determine what changes have been made.
FORMAT
SRCCOM {listfilespec=}filespec,filespec{/switch}
The filespecs select the files you want to compare, listfilespec is a disk file to hold the comparison,
and switch is an option request.
DEFAULTS
SRCCOM assumes a file extension of .M68 for the filespecs and .LST for the listfilespec. If no
listfilespec is specified, the listing is displayed on the terminal.
OPTIONS
The switches may be abbreviated.
/QUICK
List only differences.
/BRIEF
List only differences, without line numbers.
OPERATION
Enter SRCCOM and (optionally) the specification of the file you want to create to hold the file
comparison. Then type an equal sign and the two files you want to compare. If you want a brief
or quick listing, use the /B or /Q option. For example:
SRCCOM CMPARE=CTLOG1.TXT,CTLOG2.TXT
RETURN
Now you can edit, print, or display the list file. Here is an example of the comparison:
00001
00002
00003
00004
+++++
00001
00002
----00003
00004
First line of text
So far, all the same.
A line only in the first file.
Text is again the same, but line # is different.
A line only in the second file
System Commands Reference Manual, Rev. 03 (AMOS 2.2 - 4/91)
SRCCOM
Page 2
The numbers on the left of the display are the line numbers of the first file. The next column of
numbers are the line numbers of the second file. The dashes (-----) indicate a line not appearing in
the second file, but appearing in the first file. The pluses (+++++) indicate a line of characters not
appearing in the first file.
MESSAGES
?Cannot open [filename] - file not found
SRCCOM could not find one or both of the files you specified. Check your syntax, or use
DIR to see what files are in your account.
System Commands Reference Manual, Rev. 03 (AMOS 2.2 - 4/91)
STAT
FUNCTION
Displays a continuously-updating status of all the jobs on your system.
CHARACTERISTICS
STAT displays memory addresses in the number base the system is using for your numeric
displays (usually octal). If you wish to see these addresses as hexadecimal numbers, make sure the
HEX option is set before using STAT. See the SET reference sheet for information on changing
the numeric display base.
Do not use STAT inside a Task Manager Control file. The nature of Control file operation
means it can't halt the STAT display. Therefore, the Control file locks up, and STAT
continues to run until you reboot the system.
OPERATION
Enter STAT at AMOS command level. For example:
STAT
RETURN
Status of AMOS Version 2.0(151) on 27-Apr-89
Job
Term
PPN
JOB1 TERM1 DSK0:[200,2]
JOB2 TERM2
TASK MANAGR DSK0:[1,2]
Qfree: 109
Up time:
Time: 05:00:32 PM
Prog
Bytes @ address
VUE
LOGOFF
TSKIDL
68122
68608
8192
52:20:22
CPU Time Status
1572746 00:08:34.4 RN Ti
430746 00:00:00.0 ^C Ti
222746 00:02:59.9 RN Sl
Disk queue: 0
All of the displays are updated as they change. The first item is the job name. These jobs are
defined in your system initialization command file. Next, the display shows you which terminal
each job is attached to, and the account it is logged into (if there is no PPN number, the terminal is
logged off).
The program the job is executing is displayed next, with the number of Bytes in use and the
memory address of the program following. After that, it shows the amount of CPU time the
program has used, and the status code, which shows what phase is currently operating. The codes
for the Status display are:
^C
Control-C (job at AMOS command level)
Cc
Control-C pending
Ew
Waiting for external event
Fi
Waiting in LOKSER queue
System Commands Reference Manual, Rev. 07
STAT
Page 2
Io
I/O accessing other than terminal
Ms
Waiting for ITC message
Pl
Has processor locked
Rn
Running
Si
Waiting for software interrupt
Sl
Sleeping
Sp
Suspended
Sw
Semaphore wait
Ti
Waiting for terminal input
To
Waiting for terminal output to complete
For more information on job status codes, see your AMOS User's Guide.
Qfree is the number of queue blocks allocated but not in use. If this number is less than 15, it
indicates your system is low on queue blocks. You may want to allocate more by adding to the
number that follows the QUEUE command in your system INI file.
The Up time is the time the system has been running since it was booted. The Disk queue number
is the number of users waiting to access the disk or waiting for a disk access to complete. This
information is valid only on certain hardware configurations.
During the display you may press ESC to suspend the display and show the question: Enter
command (Q,R): on the bottom line. Typing Q clears the screen and returns you to AMOS.
Typing R resumes the STAT display. You may also use CTRL /T or CTRL /R. These cause the
display to move forward or backward over 17 jobs. This is useful if you have more than 17 jobs
defined on your system.
A down arrow on the display indicates there are more jobs to view; an up arrow means you can
move backward.
You may press
CTRL
/C to exit the display at any time.
System Commands Reference Manual, Rev. 07
STAT1
FUNCTION
Displays a continuously-updating status of all the jobs on the system, concentrating on job
scheduler and disk activity.
CHARACTERISTICS
STAT1 displays more detailed, technical information than the STAT command. It switches your
terminal to 132-column display and shows this information for each job:
• Name
• Program being executed
• How many times the job has run
• How many times the job has been placed next in the run queue
• How many times the job has acted as a preemptor job
• How many times the job has been preempted by another job
• How many times the job has been placed at the end of the job queue
• CPU time used
• Job status bits
• Number of cached disk reads and writes
• Total disk reads and writes
• Percentage of reads and writes that were cached
• Job priority setting
If your terminal is not capable of 132-column display, the disk read/write and cache information,
and the job priority, do not display.
The bottom of the screen shows the original uptime, the uptime since you last cleared values (see
below), total CPU time used by all jobs, the number of jobs in the run queue, and the number of
jobs in a wait state.
OPERATION
Enter STAT1 at AMOS command level.
The display is continuously updated. If you want to reset it, you can type C. This clears all fields
except the job status and priority and the original uptime.
System Commands Reference Manual, Rev. 04
STAT1
Page 2
If there are more jobs than fit on your screen, you can use the up and down arrows to scroll the list
or CTRL /T and CTRL /R to go forward and back.
When you want to leave the display, press
ESC
. Type Q to exit or R to return to the STAT1 screen.
System Commands Reference Manual, Rev. 04
STRDIR
FUNCTION
Displays a list of the files on a 1/4" Streaming Tape Drive cartridge. Can also create a disk file
containing the list.
The STRxxx commands are included only for compatibility with earlier operating system
versions. Do NOT use these commands unless absolutely necessary. Use the MTUxxx
commands for all tape backup, and CRT620 to create warm boot tapes!
CHARACTERISTICS
Used with STRSAV (to write disk files to tape) and STRRES (to copy files from tape to disk).
STRDIR can read only cartridges written by STRSAV.
If your system contains both traditional format and extended disks, you must be logged onto the
same type of disk when you use STRDIR that you were when you created the backup using
STRSAV. While STRSAV does work with extended disks in some situations, we strongly suggest
you use BACKUP to back up extended disks.
Accepts full wildcard specifications, which select the files to be listed in the directory. The account
and device portions of the specification refer to the disk account and device from which the files
were originally backed up. See your AMOS User's Guide for information on wildcard file
specifications.
FORMAT
STRDIR {/switch}{{listfilespec}=}{filespec}{,filespec(s)}
switch is an option request, and listfilespec specifies a disk file to contain the directory display.
The filespec(s) specify the files on the tape you want to see.
DEFAULTS
The default listfilespec is DIRECT.LST in the account and device you are logged into. The default
filespec is *.* and the account and device you are logged into.
OPTIONS
The only STRDIR switch is /KILL. It is an operation switch that deletes any listfile that matches
the specified listfilespec before creating the new listfile.
System Commands Reference Manual, Rev. 04
STRDIR
Page 2
OPERATION
Enter STRDIR and the files you need. For example, to send a directory display of all the .DAT
and .BAS files on a cartridge to your terminal, load the desired cartridge into the streamer unit and
enter:
STRDIR ALL:[]*.DAT,*.BAS
RETURN
The first number of the display is the file's relative position on the tape. Next you see the device
specification, the filename and extension, and the account specification of the file as it appeared on
the disk it was backed up from. The next number tells you the number of disk blocks the file takes
up.
The letter following the block count tells you whether the file is sequential, or linked file (L), or a
random, or contiguous file (C). Then STRDIR gives the date and time the file was originally
copied onto that cartridge. Finally, STRDIR gives the hash total for the file if one was calculated
with the STRSAV/HASH option. At the end of the directory display, STRDIR tells you how
many files were listed. If the cartridge contains a warm boot monitor, a message tells you the tape
is Bootable. This indicates a warm boot monitor is the first file on the cartridge even though it
may not appear on the directory listing you requested.
MESSAGES
?Cannot find DSK0:SCNWLD.SYS[1,4] or MEM:SCNWLD.SYS
STRDIR needs this file to process wildcard symbols. Make sure SCNWLD.SYS is in
DSK0:[1,2], and you have enough memory to load it in your partition.
?Cannot INIT [device-name] - device does not exist
Check your syntax, or use DEVTBL to see what devices are listed on your system, and try
again.
?Cannot READ [device-name] - device is not mounted
MOUNT the device, and try again.
?More than one output specification
Try again, using only one listfilespec.
?No file oriented device corresponding to [device-name] is mounted
Check your syntax, or MOUNT the device, and try again.
System Commands Reference Manual, Rev. 04
Page 3
STRDIR
%No such files
STRDIR was unable to find any files matching your input specification. Try using
STRDIR ALL:[ ]*.* to see all files listed on the tape.
?Tape is not file structured
STRDIR can only read tapes written by STRSAV. Make sure you loaded the correct tape
cartridge.
System Commands Reference Manual, Rev. 04
STRRES
FUNCTION
Writes files from a 1/4" Streaming Tape Drive cartridge to disk. Allows you to restore fileoriented disk backup from tape cartridge to disk.
The STRxxx commands are included only for compatibility with earlier operating system
versions. Do NOT use these commands unless absolutely necessary. Use the MTUxxx
commands for all tape backup, and CRT620 to create warm boot tapes!
HINTS/RESTRICTIONS
Used in combination with STRSAV (to write disk files to tape) and STRDIR (to display a list of
files on a tape). Only reads tapes created by the STRSAV command. Not for transferring data
between Alpha Micro and non-Alpha Micro computers.
If your system contains both traditional format and extended disks, you must be logged on to the
same type of disk when you use STRRES that you were when you created the tape using
STRSAV. While STRSAV does work on extended disks in certain situations, we strongly suggest
you use BACKUP to back up extended disks.
You may not copy to a disk account other than the account you are currently logged into unless
you are logged into an operator's account, [1,2]. If you are in [1,2], and you specify an account
that does not exist, STRRES creates that account. You may copy files into the account you are
logged into from any other account, regardless of project number or device specification.
STRRES is a wildcard command. See your AMOS User's Guide for information on using
wildcard commands.
The input specification must give the exact specification of the files you want to transfer from the
1/4" streamer cartridge, including device and account specifications of the files as they were
written to the tape. The output specification allows you to specify the device and account the files
are to be written to on the disk, and to rename the files as they are written out to the disk.
FORMAT
STRRES{/switch}{outfilespec}={filespec}{,filespec}{/switch}
switch specifies a STRRES option, outfilespec specifies the files to be created on the disk, and the
filespecs specify the files to be transferred from the tape (with device and account specifications of
the files when they were backed up).
System Commands Reference Manual, Rev. 04
STRRES
Page 2
DEFAULTS
The output specification defaults to the input specification. If you are logged into [1,2], the
default output account specification is [ ]. The input specification defaults to *.* and the account
and device you are logged into. The defaults are /NOQ, /D, /NOH.
OPTIONS
Switches are all file switches, and may be abbreviated to any unique letters.
/DELETE
Copy over existing file(s).
/NODELETE
Don’t copy over existing file(s).
/HASH
Restore only files with different hash totals on the disk (if files were
saved using STRSAV/H).
/NOHASH
Don’t check hash totals.
/QUERY
Confirm before selecting files.
/NOQUERY
Don’t confirm before selecting files.
OPERATION
Load the desired cartridge into the streamer unit and enter STRRES and the files you need. For
example, to copy from a cartridge all .BAS files originally backed up from account [110,2] on
DSK2: over to your current account DSK3:[110,5]:
STRRES DSK3:[110,5]=DSK2:*.BAS[110,2]
RETURN
STRRES rewinds the tape and starts searching for the specified files. It reads the directory from
the beginning of the cartridge and scans it to select which files to restore. This allows STRRES to
stop looking when it locates the files, without scanning the whole cartridge.
Use /Q to ask for confirmation before each selection. Enter a Y for Yes or an N for No after each
STRRES prompt. You don't need to RETURN . For example:
STRRES *.OLD[]=DSK3:*.BAS[10,*]/QUERY RETURN
STR0:DSK3:B32.BAS[10,4] to DSK2:B32.OLD[10,4]? Y
STR0:DSK3:SCRTCH.BAS[10,6] to DSK2:SCRTCH.OLD[10,6]? N
You may press CTRL /C at any time to stop the transfer. When STRRES has located each file in
the directory, it begins transferring them to the disk and accounts you have specified. When it is
finished, STRRES tells you how many files were transferred.
System Commands Reference Manual, Rev. 04
Page 3
STRRES
MESSAGES
%Bypassing BADBLK.SYS[1,2]
% BADBLK.SYS exists to prevent bad blocks
% on a device from being allocated, and
% should never be directly accessed.
An informative message.
%Bypassing STRTOC.IPF[1,2]
% STRTOC.IPF is the name of
% Table-of-contents file from tape,
% cannot be destination file name.
An informative message.
?Cannot find DSK0:SCNWLD.SYS[1,4] or MEM:SCNWLD.SYS
STRRES needs this file to process wildcard symbols in your file specifications. This
message can mean SCNWLD.SYS does not exist or you do not have enough memory to
load the file into your partition.
?Cannot INIT [device-name] - device does not exist
Check your syntax, or use DEVTBL to see a list of devices on your system, and try again.
?Cannot OPEN [device-name] - protection violation
Log into OPR: or the account you want to write into, and try again.
?Cannot read [device-name] - device is not mounted
Mount the device and try again.
?Cannot restore extended directory format files to an old format disk
?Cannot restore old format files to an extended directory format disk
You must restore files to the same format (traditional or extended) disk they were backed
up from. When restoring, you must also be logged on to the same type of device you were
logged on to when creating the backup.
?Device full
See your System Operator about erasing files from or clearing room on the device.
System Commands Reference Manual, Rev. 04
STRRES
Page 4
?Files may not be transferred to RES:
You may only add programs to system memory by using SYSTEM statements in your
system initialization file.
?Missing output specification
You left out the equal sign in the STRRES command line; STRRES couldn't tell which
information was your file specification and which was your outfilespec. Try again.
?More than one output specification
Try again, using only one output specification.
%Not copied - Destination file already exists
Try again, using /D if you want the file copied over.
%Not selected - Destination file has same HASH as source file
You used /H and STRRES found matching hash totals on the cartridge and the disk. The
files are identical so no transfer is necessary.
%Not selected - Source file does not have a calculated HASH total
You used /H but the cartridge does not contain a HASH total to compare—/H was not
used when the files were saved.
?Output MFD is full
The Master File Directory only has room for 63 entries. The transfer in progress would
have created a new account, but there is not enough room in the MFD. See your System
Operator.
?Tape is not file-structured
The tape you are trying to read was not written by STRSAV. Make sure you have
mounted the right tape.
?You are not logged in under [1,2], can't create [p,pn]
You cannot copy to a nonexistent account unless you are logged into an operator's
account, [1,2]. If you copy to a nonexistent account while logged into [1,2], STRRES
creates the account for you.
System Commands Reference Manual, Rev. 04
STRSAV
FUNCTION
Writes copies of disk files to 1/4" streaming tape drive cartridges. It is a file-oriented disk backup
program.
The STRxxx commands are included only for compatibility with earlier operating system
versions. Do NOT use these commands unless absolutely necessary. Use the MTUxxx
commands for all tape backup, and CRT620 to create warm boot tapes!
CHARACTERISTICS
STRSAV is re-entrant and re-usable. Copies a file and its device/account specification, along with
the date and time of backup. Used with STRRES (to restore files to disk) and STRDIR (to give a
directory of files on a tape). STRSAV is for file backup only; not for transfer of data between
Alpha Micro and non-Alpha Micro computer systems.
STRSAV is a wildcard file command. See your AMOS User's Guide for information on wildcard
specifications.
You may back up files from any disk account onto tape whether or not the account is in the project
you are logged into. STRSAV writes the disk specification of each file to the tape, but does not
transfer any password associated with the disk account. You cannot append files to an existing
tape.
Because STRSAV writes the date and time of backup to the tape cartridge, use DATE and TIME
to check the system date and time before using STRSAV.
STRSAV creates a temporary directory file named STRTOC.IPF in the current disk account. This
file is erased and rewritten each time STRSAV is used within the account. Do not use this
filename for one of your own files since it will be written over the next time you use STRSAV or
STRRES. If you specify STRTOC.IPF in an STRSAV command line, STRSAV automatically
bypasses it.
STRSAV locks up all other users on your system. Be sure to notify other users before
using STRSAV.
FORMAT
STRSAV filespec{/switch}{,filespec(s){/switch}}
filespec specifies the file(s) you want to back up and switch is an option request. The default file
specification is *.* and the account and device you are logged into.
System Commands Reference Manual, Rev. 04
STRSAV
Page 2
OPTIONS
The switches can be abbreviated to any unique combination of letters.
/BOOT
Create a warm boot cartridge (operation switch).
/NOBOOT
Don’t create a warm boot cartridge (default, operation switch).
/HASH
Calculate a hash total (file switch).
/NOHASH
Don’t calculate a hash total (default, file switch).
/QUERY
Confirm before selecting files (file switch).
/NOQUERY
Don’t confirm (default, file switch).
/SUPPRESS
Don’t list files on terminal as they are backed up. May speed up
backup.
/NOSUPPRESS
Lists files on the terminal.
OPERATION
Load an empty cartridge into the streamer unit and enter STRSAV followed by the specification
selecting the files you want to back up. For example:
STRSAV MEMO.TXT,SCHDLE.TXT[310,2]
RETURN
STRSAV reminds you no one else may use the system while it is running. Press RETURN to
continue or CTRL /C to exit. If you press RETURN , STRSAV erases and rewinds the cartridge.
If you used /BOOT, STRSAV first asks for the input warm boot file name. Type the name of the
warm boot monitor file you generated with the WRMGEN program. The default specification is
DSK0:AMOSL.WRM[1,4].
STRSAV then asks for the tape label data: Volume name (up to 40 characters); Volume ID (up to
ten characters); Installation (maximum 30 characters); System (also 30 characters); and Creator
(thirty characters). This information is displayed by STRDIR. It helps other people know what is
on the tape, and who put it there.
STRSAV now displays the names of the files it is selecting to save.
As STRSAV copies, it prints one dot for each fifteen files transferred. You may press
CTRL /C at any time to stop further transfers.
When you use /Q, STRSAV asks for confirmation before each transfer. Enter Y for yes, or N for
no; it is not necessary to press RETURN . Remember the placement of /Q in the command line can
affect which files it applies to. For example:
STRSAV *.DAT,/Q *.BAS RETURN
C40.DAT to C40.DAT
LSTSQR.BAS to LSTSQR.BAS? Y
NEW.BAS to NEW.BAS? N
System Commands Reference Manual, Rev. 04
Page 3
STRSAV
You can use /H to calculate hash totals for certain files to identify a particular version of the file.
This saves time when you use STRRES to restore files to the disk, because you can specify /H to
transfer only the files with different hash totals.
You can use /B to transfer a warm boot monitor to a cassette and also back up other files onto the
same cassette. See the CRT620 and WRMGEN reference sheets to find out more about warm
boot monitors.
MESSAGES
?Cannot find DSK0:SCNWLD.SYS[1,4] or MEM:SCNWLD.SYS
STRSAV needs this file to process wildcard symbols in your file specifications. Make
sure SCNWLD.SYS is in the proper account and you have enough memory to load it in
your partition.
?Cannot INIT [device-name] - device does not exist
Check your syntax, or use DEVTBL to see a list of devices on your system, and try again.
?Cannot READ [device-name] - device is not mounted
MOUNT the device and try again.
%Cannot save. File beyond 32MB boundary. Use BACKUP command.
One of the files you've specified is past the 32MB boundary of an extended disk. You
must use BACKUP to save these files.
%Field size exceeded. Re-enter.
Check the maximum length of the field, and try again.
?nn files not transferred. Beyond 32MB boundary. Use BACKUP command.
If you attempted to save files past the 32MB boundary on an extended disk, this message
tells you how many files were not transferred. Use BACKUP to save these files.
?Output file spec not allowed
You tried to specify an output file or included an equal sign (=) before the input
specifications. Try again without the output file.
%Zero blocks in this file. Not selected.
STRSAV found a directory entry for a file with a size of zero blocks. It will not copy a
zero block file. It skips the file and continues.
System Commands Reference Manual, Rev. 04
STRSAV
Page 4
STRSAV can also display standard AMOS error messages followed by while copying
[filespec]. This tells you how far STRSAV got before the error. You can then use STRDIR
to display the directory file of the cartridge and see how many files were actually transferred. All
the files listed before the one shown in the message are recoverable; the rest are not.
System Commands Reference Manual, Rev. 04
SUBMIT
FUNCTION
Submits files to, and edits, the Task Manager queue file.
CHARACTERISTICS
Used with a control file to execute jobs on the Task Manager system. For information on the Task
Manager, see your Task Manager User's Manual.
FORMAT
SUBMIT {queue-filespec=}{control-filespec}{/switch}
queue-filespec is the specification of the Task Manager queue you want to use, control-filespec is
the control file to submit or edit, and switch is an option request.
DEFAULTS
Default queue is DSK0:BATQUE.SYS[1,4]. Default control-file extension is .CTL. The default
queue-file extension is .SYS. Default switches are \NOR, /NOP, and /NOLO.
OPTIONS
All switches can be abbreviated to any unique name.
/AFTER:{+}mm-dd-yy{,hh:mm AM/PM}
Task is run after specified absolute or relative time.
/DEADLINE:{+}mm-dd-yy {,hh:mm
AM/PM}
Task must run before specified time, or it will be
killed.
/ERROR:{NONE} {FATAL} {ALL}
{WARNING}
FATAL, WARNING or ALL will abort task if a
system error occurs. FATAL kills on fatal system
errors, WARNING on warning messages.
/KILL
Removes file from the queue.
/LIMIT:{+}mm-dd-yy {,hh-mm AM/PM}
Task must be completed in specified time period or
it will be removed from the queue.
/LIST
Lists queue file contents. Default if no filespec
specified.
/LOGTIME
Puts run date/time in log file.
/NOLOGTIME
Negates /LOGTIME.
/MEMORY:n
Task needs nK to run. Default is 32K.
System Commands Reference Manual, Rev. 07
SUBMIT
Page 2
/NEXT:mm-dd-yy{,hh,mm}
Task will execute specified relative time after
submitted time.
/OUTPUT:filespec
Specify an output file for the task. Default is
control-filename.LOG.
/PERMANENT
File remains permanently in the queue, executing at
specified time.
/NOPERMANENT
Negates /PERMANENT.
/PRIORITY:n
Task needs priority of 1 to 512 to run. Default is
256. The greater the number, the higher in the
queue. You cannot change a task's priority while
it is running.
/RESTART
File restarts if system crashes while it is running.
/NORESTART
File will not restart.
/REVIVE
Revives a suspended task.
/SEQUENCE:n/switches
Updates task #n with switches.
/SUSPEND
Suspends task.
OPERATION
Enter SUBMIT followed by an optional queue-filespec and equal sign. Then enter a control
filespec and any optional switches. If no control file is specified, SUBMIT shows you the queue
listing. For example, to submit the file TEST.CTL:
SUBMIT TEST
RETURN
The next command submits TEST.CTL to queue OURQUE.SYS. It is placed permanently in the
queue, and runs every day after 3:12 AM, starting on March 17, 1989. If the system crashes, the
task is restarted upon bootup. The queue display shows a "P" under status to show it is permanent.
SUBMIT OURQUE=TEST/RESTART/PERM/AFTER+17-03-89,03:12
RETURN
In the next case, the command instructs the Task Manager to change the memory requirements of
job #14 in the queue to 40K. You don't need a job name, since the sequence number is unique.
SUBMIT/SEQUENCE:14/MEMORY:40K
RETURN
MESSAGES
?Cannot open [filespec] - invalid filename
Check the syntax of your file specification and try again.
?Cannot open [filespec] - file not found
Check your file specification, or use DIR to find the file, and try again.
System Commands Reference Manual, Rev. 07
Page 3
SUBMIT
?Not enough free queue records for request
The queue file is full. No more SUBMIT jobs can be put in the queue until either a nonrecurring job finishes, or the queue file is expanded.
?Queue file not BATCH compatible
The queue file you specified is not a Task Manager batch queue file. Select another
filename and try again.
?Specified entry not found in queue.
Make sure you have the right queue file.
?Task not found in queue
The task you specified was not in the batch file queue. Use SUBMIT to view the current
entries, and try again with a different task sequence number.
System Commands Reference Manual, Rev. 07
SYMLIT
FUNCTION
Creates a symbol table file for machine language object files to let you reference user defined
symbols when you use the AlphaFIX symbolic debugging program. Also lets you generate a
program or load map file.
CHARACTERISTICS
SYMLIT is re-entrant and re-usable. The object files M68 (the assembler) creates contain
complete information about the symbols used in your program, as well as the actual generated
code. To make this list of symbols available to the debugging program, AlphaFIX, you must use
the SYMLIT program to generate a symbol table file.
SYMLIT processes files in the order in which their specifications appear on the command line.
You may not specify an overlay or library file as the first file on the command line.
SYMLIT supports library and optional files. For information on library, optional, and load map
files, see your Assembly Language Programmer's Manual. This manual also contains information
on SYMLIT, M68, LNKLIT, GLOBAL, and LIB. For information on AlphaFIX, see your
AlphaFIX User's Manual.
FORMAT
SYMLIT{/switch}filespec{filespec...}{/switch}
The filespecs select the files you want to process and switch is an option request. You may not
specify an overlay or library file as the first filespec on the command line.
DEFAULTS
SYMLIT uses the default extension of .OBJ, unless you are specifying a library file, in which case
it uses the default extension of .LIB.
SYMLIT assumes the account and device you are logged into. If it does not find the file there, it
looks in your project library account, [P,0]. Finally, it looks in the System Assembly Language
account, DSK0:[7,7].
OPTIONS
/B
Doesn’t force word alignment of .OBJ modules.
/E
Includes equated symbols in symbol table file. Use with /M to put equated
symbols in the load map file. Operation switch.
System Commands Reference Manual, Rev. 03 (AMOS 2.2 - 4/91)
SYMLIT
Page 2
/L
Designates a library file. File switch.
/M
Generates a load map (.MAP) file. Operation switch.
/N
Suppresses the /S switch. Operation switch.
/O
Designates an optional file. File switch.
/P
Generates a program (.LIT or .OVR) file. Operation.
/R
Designates a required file. Cancels /L and /O. Default, file switch.
/S
Generates a symbol table (.SYM) file. Default, operation switch.
/U
Doesn’t automatically include SYSLIB.LIB in linkage.
/X
Allows maximum DSECT area of 64K, rather than 32K default, by allowing
full, 16-bit signed offsets.
OPERATION
Enter SYMLIT and the files you want to process. For example:
SYMLIT/M VISFIL,VIS1,UTILIT/L
RETURN
The command line above specifies a library file, UTILIT.LIB/L. By using /M, a load map file is
also created.
If you have more file specifications than will fit on one line, end the current command line with a
comma. SYMLIT then displays an asterisk and you may continue your list of file specifications.
SYMLIT displays several messages as it processes the files. The exact messages you see depend
on the options requested and files specified.
MESSAGES
?Attempt to directly reference a DSECT symbol
Index through a base register when referencing a symbol defined in a data section.
?Command error
Check your syntax and try again.
?Fatal error - At most one DSIZE may appear in an overlay
Check the instructions for use of the DSIZE pseudo opcode, and try again.
specify overlay [overlay] as optional
Overlays may not be optional. Try again.
System Commands Reference Manual, Rev. 03 (AMOS 2.2 - 4/91)
Page 3
SYMLIT
?Fatal error - DSIZE must not appear in an overlay
Check the instructions for use of the DSIZE pseudo opcode, and try again.
?Fatal error - Expression stack error
An error occurred when SYMLIT evaluated some expressions in your files. Contact your
Alpha Micro service division.
?Fatal error - Expression stack overflow
You exceeded the number of nested expressions that SYMLIT can handle. Find the overly
complex expression in your source file and simplify it.
?Fatal error - First file must not be a library
To let SYMLIT correctly resolve external references to a library, you must specify the
program that references that library before you specify the library file itself.
?Fatal error - First file must not be an overlay
To let SYMLIT correctly resolve external references to an overlay, you must specify the
program that references that overlay before you specify the overlay file itself.
?Fatal error - Insufficient memory
There wasn't enough memory for what you specified. Increase the memory in your
partition if you can. See your System Operator for help.
?Fatal error - Overlays of code are not permitted
Next expected address is [address]
Overlay code address is [address]
Your program is trying to overlay previous code. Check your .M68 programs to make
sure your overlay references are correct.
?Fatal error - Overlay symbol "[symbol]" in segment [segment]
was not defined in a previous input segment
SYMLIT is trying to process a supposed overlay file, but has seen no references to the
overlay in a previous file. Without such a reference, SYMLIT cannot construct the
overlay.
?Fatal error - Overwriting of impure zone not permitted Next
expected address is xxxx Overwriting address is yyyy.
Check the instructions for use of the DSIZE pseudo opcode, and try again.
System Commands Reference Manual, Rev. 03 (AMOS 2.2 - 4/91)
SYMLIT
Page 4
Symbol file finished, n errors exist
Lets you know how many errors occurred during the processing.
?Undefined switch /x - ignored
SYMLIT didn't recognize the switch you specified. See OPTIONS above for the valid
switches.
?[symbol] undefined
An external symbol is undefined. You referenced a symbol not previously defined or you
made a reference to a non-existent label. Make sure any EXTERNed symbols in one
segment are defined by an INTERN statement in another segment.
System Commands Reference Manual, Rev. 03 (AMOS 2.2 - 4/91)
SYSACT
FUNCTION
Adds or deletes user accounts on a specific disk. Adds or changes account passwords. SYSACT
can also initialize an entire disk.
CHARACTERISTICS
SYSACT is re-entrant and re-usable. SYSACT modifies the Master File Directory (MFD) of a
specific disk. The MFD lists all accounts on the disk (listed by their project-programmer numbers)
and the password (if assigned) for each one. You may add or delete disk accounts, and add,
change, or delete account passwords. You must be logged into an operator's account, [1,2], to run
SYSACT.
If a disk has never been used before, you may need to prepare it before you can use SYSACT on
that disk. All disks received from Alpha Micro are pre-certified for you.
See your System Operator's Guide for information on what type of disks should be
formatted or certified, and for instructions on when and how to certify a disk.
Always use SYSACT to initialize a disk after you format it. Initializing a disk erases all data on
it. Certified disks do not need to be initialized; however, if you want to delete all data from a
logical device of a disk that has been certified, you may do so by initializing the device.
Initializing a floppy diskette disables buffered writes if the diskette was mounted with /B (see the
MOUNT reference sheet).
SYSACT does not erase the BADBLK.SYS file from the first logical device of any physical drive.
This file contains the bad block information for the entire physical drive. SYSACT erases
BADBLK.SYS from logical devices which are not the first device on their physical drive.
After the device has been formatted (and initialized) or certified, use SYSACT to add accounts to
the disk. When adding accounts, remember the project-programmer numbers are in octal—the
project number may range from 1 to 377; the programmer number may range from 0 to 377. You
cannot use account [377,377]—it is reserved for special use. The numbers are separated by a
comma.
Project numbers 1 through 77 on DSK0: (the system disk) are reserved for use by Alpha Micro.
Accounts with the same project number are in the same project; users may transfer files into
another account if both accounts are in the same project. If an account's programmer number is 0,
that account is the library account for the project. For example, [110,0] is the library account for
all accounts in the 110 project.
System Commands Reference Manual, Rev. 07
SYSACT
Page 2
You can exit from SYSACT using the E command or CTRL /C. However, all changes you
make in SYSACT become effective when you make them, not later when you exit.
Therefore, be very sure you know exactly what you want to do before you use any
SYSACT commands.
FORMAT
SYSACT devn:
devn: is the specification of the logical unit whose MFD you want to modify.
OPERATION
Log into an operator's account ([1,2]). Enter SYSACT followed by the specification of the logical
unit whose MFD you want to modify. For example:
LOG 1,2 RETURN
SYSACT DSK2:
RETURN
The SYSACT prompt symbol is an asterisk, *. After the asterisk you may enter any of the
commands below.
COMMAND SUMMARY
A p,pn
Adds account p,pn to the disk. SYSACT asks you for a password. If you don't want
the account to have a password, just press RETURN . Passwords must be six
characters or less.
C p,pn
Changes the password of the account p,pn. SYSACT prompts you for a new
password (0-6 alphanumeric characters). You can change a password to no
password by pressing RETURN in response to the new password question.
D p,pn
Deletes account p,pn. You can't delete an account with files in it.
E
Returns you to AMOS command level. You may also exit by pressing
H
Displays a list of all SYSACT commands.
I
Initializes the entire disk. Erases all data on the disk by zeroing out the MFD. It also
initializes the bitmap. It saves the BADBLK.SYS file if that file exists. SYSACT
asks you to confirm this command before it initializes the disk. If you enter Y,
SYSACT continues. On AMOS 2.0 and later systems, SYSACT prompts: Create
extended directory structure?. If you want the disk to use extended directories and
larger files, enter Y. If you don't, enter N. If you just press RETURN , it defaults to
extended directories.
L
Displays a list of all of the accounts in the MFD and any associated passwords. For
example:
CTRL
/C.
*L RETURN
1,2
SYSOP
200,1
System Commands Reference Manual, Rev. 07
Page 3
SYSACT
MESSAGES
?Account already exists
Use the L command to see what accounts are on the disk.
?Account does not exist
You tried to change the password of an account or tried to delete a non-existent account.
Use the L command to see a list of all accounts on the disk.
?Account has files on it
If you want to delete the account, exit SYSACT, log into the account you want to delete,
and move or erase all files. Run SYSACT again to delete the account.
?Damaged MFD
The Master File Directory structure on the disk has somehow been damaged. If the MFD
structure has been damaged while using the DELETE option of SYSACT, it may still be
intact for all other MFD-oriented operations. Recovery from a damaged MFD may
require a complete re-initialization of the disk. See your System Operator for help.
?Cannot INIT [device-name] - device does not exist
Check your syntax, or use DEVTBL to see a list of devices.
?Device in use - try again later
SYSACT must have exclusive use of the disk MFD and bitmap while making any
changes. These items are "locked" at the moment by another program. Try again in a
moment.
?Error during [function]
A device error occurred. You may see other messages to further define the error. See your
System Operator for help.
?Error - PPN not written to MFD
A project-programmer number was added to a floppy diskette, and the User File Directory
was updated, but not the Master File Directory. See your System Operator for help.
?Fatal system error while running SYSACT
Try using SYSACT again. You may want to reboot (after warning the other users on the
system).
System Commands Reference Manual, Rev. 07
SYSACT
Page 4
?File specification error
You made a mistake in specifying the device name. Make sure you included the colon (:)
and try again.
?PPN format is octal P,Pn(P = 1 to 377, Pn = 0 to 377)
Check your typing, or use the L command to see a list of accounts on the disk. Then try
again.
?Illegal password - must be alphanumeric
Check your syntax and try again.
?Invalid command - type H for help
Use the H option to see a summary of all of the commands, and try again.
%MFD forms an endless loop
Add some accounts to the device before using the "L" option again.
%No initialization performed.
This message assures you the initialization did not take place.
?Out of memory
See your System Operator for help with increasing your memory partition size.
%Warning - You may lose data if this logical
is fully used. This logical is greater than 32MB!
You have initialized this disk to a traditional format directory structure but the logical disk
size is larger than the largest traditional format drive (32MB). This can cause problems if
data is loaded onto the disk. Check the disk size and your choice of format type before
proceeding or aborting.
Please enter a number
Enter a number and press
RETURN .
?Privileged program - must be logged into [1,2]
Log into an operator's account, [1,2], and try again.
?PPN 377,377 is reserved and may not be used
Under AMOS 2.x, you cannot assign a PPN of [377,377]. Choose another PPN.
System Commands Reference Manual, Rev. 07
SYSLOG
FUNCTION
Produces a system error list.
CHARACTERISTICS
SYSLOG is the formatting program of the event logging system. SYSLOG reads the log file,
SYSLOG.SYS, and produces a listing in the file SYSLOG.LST. This is a chronological listing
of all events logged since the last time the log file was cleared. Its summary gives the total
number of times each event type occurred, the average time between system restarts (average
uptime), and the system availability as a percentage of the total time covered by the report. For a
complete list of special events which are monitored under AMOS, and instructions on setting up
event logging, see your System Operator's Guide.
LOGGER.LIT, which actually records the error messages, will report an error code 99 to
the status display if it cannot record the message because there are not enough queue
blocks available. If this error tends to reoccur, please contact the Alpha Micro Technical
Assistance Center.
FORMAT
SYSLOG {/switch} {filespec}
The optional filespec is the specification of the log file for the event logging system. The default
specification is DSK0:SYSLOG.SYS[1,2]. This should match the file you enter in the LOGGER
statement in your system initialization command file.
Even if you specify a different log file name, the output file for SYSLOG is always
SYSLOG.LST in the account which the user is logged in to.
OPTIONS
/C
Clears the log file, SYSLOG.SYS after producing the report.
/D
Adds a second line to the log file which includes diagnostic information.
The diagnostic information added to the log file is the content of the stack
at the time of the event. For ease of interpretation, ensure your job is set to
give hexadecimal output by using the SET HEX command before running
SYSLOG/DIAG.
System Commands Reference Manual, Rev. 10
SYSLOG
Page 2
OPERATION
To generate a listing of logged events with diagnostic information, enter:
SYSLOG/D
RETURN
SYSLOG generates a new listing in the SYSLOG.LST file. You may print the file or view it
using AlphaVUE. To clear the log file:
LOG [1,2] RETURN
SYSLOG/C RETURN
MESSAGES
?The /C switch requires that you be logged-in to [1,2]
Log into an operator's account, [1,2], and try again.
?Invalid opcode in filename -- opcode is nn
SYSLOG cannot decode the information in the specified LOGGER file. SYSLOG will
attempt to resynchronize output at the next entry in the file.
System Commands Reference Manual, Rev. 10
SYSTAT
FUNCTION
Displays information about the jobs running on the system.
CHARACTERISTICS
SYSTAT is re-entrant and re-usable.
FORMAT
SYSTAT{/switch}
switch is an option request.
OPTIONS
/N
Don’t list the devices and blocks free.
OPERATION
Enter SYSTAT at AMOS command level:
SYSTAT
RETURN
The name of the job is displayed first, then the name of the terminal to which the job is attached.
Then comes the user name. Next is the account the job is logged into. Following that is the
terminal status for the job. The codes stand for:
^C
Control-C—job is inactive
EW
External Wait state
IO
I/O access other than terminal
MS
Message Wait
RN
Running
SI
Wait for Software Interrupt
SL
Sleep state
SP
Suspended state
SW
Semaphore Wait
TI
Terminal Input wait state
TO
Terminal Output wait state
System Commands Reference Manual, Rev. 07
SYSTAT
Page 2
For more information on job status codes, see your AMOS User's Guide. After that you see the
name of the last program run by the job before you used the SYSTAT command, and the number
of bytes of memory (in decimal) allocated for that job.
System Commands Reference Manual, Rev. 07
SYSTEM
FUNCTION
Displays the programs currently in system memory and provides information about your system.
CHARACTERISTICS
SYSTEM is re-entrant and re-usable.
Also used in the system initialization command file to add programs to the system monitor. See
your System Operator's Guide to the System Initialization Command File for information.
OPERATION
Enter SYSTEM at AMOS command level. SYSTEM lists all of the programs currently in system
memory and tells you how many bytes of memory are used by the monitor. For example:
SYSTEM RETURN
The following programs are allocated in system memory:
SYSMSG USA
CMDLIN SYS
VUE
LIT
TRM
DVR
Total resident monitor size is 361838 bytes.
Monitor version is 2.0A(308)-3
Depending on your type of system, you may also see other information.
System Commands Reference Manual, Rev. 03 (AMOS 2.2 - 4/91)
TAPDIR
FUNCTION
Displays a list of the files on a magnetic tape reel. Also allows you to create a disk file containing
the tape directory.
CHARACTERISTICS
Used with FILTAP (to copy disk files to magnetic tape) and TAPFIL (to copy files from tape to
disk). The tape you read with TAPDIR must have been written by FILTAP. TAPDIR is a
wildcard command. The account and device portions of the specifications refer to the disk account
and device the files were backed up from. See your AMOS User's Guide for information on
wildcards.
TAPDIR only works under AMOS/32 and AMOS/L versions of the operating system.
This program is included for compatibility purposes, for those who have existing tapes
created by FILTAP. MTUSAV and MTURES are the preferred backup methods for
magnetic tape—see those reference sheets. TAPDIR does not work with extended
format disks.
FORMAT
TAPDIR {/switch}{{listfilespec}=}{filespec{,filespec...}
switch is an option request and the filespec(s) specify the files on the tape whose directory listing
you want to see. The optional listfilespec specifies a disk file to contain the tape directory display.
DEFAULTS
The default listfilespec is DIRECT.LST in the account and device you are logged into. The
listfilespec extension default is .LST. The default filespec is *.* and the account and device you
are logged into. The default magnetic tape drive device specification is MTU.
OPTIONS
/KILL or /K
Overwrites matching listfiles. Operation switch.
OPERATION
Enter TAPDIR and the files you need. For example:
TAPDIR ALL:[]*.*
RETURN
System Commands Reference Manual, Rev. 07
TAPDIR
Page 2
TAPDIR asks you to enter the tape unit number. It then displays the directory. The first number
on the line tells you the file's relative position on the tape. Next you see the device specification,
the filename and extension, and the account specification of the file as it appeared on the disk it
was being backed up from. The next number tells you the number of disk blocks the file takes up.
TAPDIR now tells you whether the file is a linked (sequential) file (L), or contiguous (random) file
(C). Finally, TAPDIR gives the date and time of the backup. To create a disk file containing the
directory display, include a listfilespec. For example:
TAPDIR DATAFL.LST= ALL:[]*.DAT
RETURN
creates the file DATAFL.LST in the account and device you are logged into containing a directory
display for all .DAT files on the tape. If your printer is defined as a terminal, you may send the
display to a printer by using an output specification of TRM:.
MESSAGES
?Cannot find DSK0:SCNWLD.SYS[1,4] or MEM:SCNWLD.SYS
TAPDIR needs this file to process wildcard symbols in your file specification. See your
System Operator for help.
?Cannot INIT [device-name] - device does not exist
Check your syntax or use DEVTBL to see a list of devices on your system.
?Cannot READ [device-name] - device is not mounted
Mount the device and try again.
?Cannot read filemark - reason
A tape error was encountered.
?Device full
See about erasing unneeded files or acquiring more disk memory.
?More than one output specification
Try again, using only one output specification.
%No file-oriented device corresponding to [device-name] is mounted
TAPDIR cannot find a logical unit matching your specification. Check your syntax. This
could also indicate the tape was not written by FILTAP.
System Commands Reference Manual, Rev. 07
Page 3
TAPDIR
%No such files
TAPDIR was unable to find any files matching your input specification. You may want to
use TAPDIR ALL:[]*.* RETURN to display every file on the tape.
?Tape is not file structured
The tape you are trying to read was not written by the FILTAP program. Make sure you
have mounted the correct reel of tape.
?Unit number must be between 0 and 7
The unit number must be within the range indicated. Re-enter a valid number.
System Commands Reference Manual, Rev. 07
TAPE
FUNCTION
Copies data from disk files to tape or from tape to disk.
CHARACTERISTICS
TAPE is re-entrant and re-usable. TAPE can perform customized data conversion between ASCII
and EBCDIC, and it recognizes a conversion table, CONVRT.TBL in the System Library account
DSK0:[1,4] which you can modify character for character. CONVRT.TBL MUST be in SYS: for
TAPE to function.
If you are copying a magnetic tape created on another system, chances are the data is incompatible
with the AMOS system. For example, AlphaBASIC requires all data records end with a carriage
return/linefeed pair. If these are not present, AlphaBASIC may be unable to read the mag tape
data you have written into the file. As another example, the screen-oriented text editor,
AlphaVUE, requires each line end with a carriage return/linefeed pair, and the line be 510 or less
characters.
For such reasons, TAPE optionally appends a carriage return/linefeed character pair to the end of
every record as it transfers the records from tape to an AMOS disk. Beyond converting data from
EBCDIC to ASCII or vice versa, and optionally appending carriage return/linefeed pairs, the task
of modifying data so it is compatible with AMOS is up to you.
MTSTAT.SYS must be in system memory on older Alpha Micro systems. If you have an S-100
Bus system, or any non-VME system, see your System Operator's Guide to the System
Initialization Command File for information about adding it to system memory.
TAPE only works with sequential disk files containing fixed-length data records. It does
not support any random-access file format on the tape. Before you use TAPE, use the
SET BPI command to set the recording density of your tape.
Remember to note the size of the data records you write to the tape and the number of records you
write per tape block; when you read the data back to a disk file, you will need that information.
You can read one file after another on the magnetic tape by using TAPE several times in a row
without rewinding the tape. You can also use the SKIP command to skip over files. Some tapes
contain a one-block header file at the front of each file. You can skip over this header block by
using TAPE once or by using the SKIP command. To rewind tapes, use the REWIND command.
If you make a mistake in answering TAPE questions, you may press
System Commands Reference Manual, Rev. 07
CTRL
/C to exit TAPE.
TAPE
Page 2
OPERATION
If you intend to use the TAPE option of converting ASCII characters to EBCDIC characters or
vice versa, you can customize the conversion for your application. You must do the customizing
modification BEFORE using TAPE. The modification is made to a table in the System Library
account TAPE refers to. For further information about making customized conversions between
ASCII and EBCDIC, see your System Operator's Guide.
Enter TAPE at AMOS command level:
TAPE
RETURN
The screen clears and TAPE asks you if you want to copy a file from disk to tape or copy a file
from tape to disk. Select the appropriate option. Then you are asked to select what type of
character code conversion you want. Remember the conversion (if any) is done on the data going
to the output device. Whether this device is the disk or tape unit depends on your answer to the
first question.
Copying Disk Files to Tape
TAPE begins to ask a series of questions. It requests a file specification (give the AMOS
specification of the file you want to copy) and a device specification (give the specification of the
tape drive to which you want to copy).
Now TAPE asks if you want to do reblocking. Reblocking consists of specifying the number of
file data records to place in each tape block. If you say no to this question, TAPE assumes each
data record is 512 bytes long, and the blocking factor is 1 (that is, you want to write one disk
block of 512 bytes into one tape block). If you tell TAPE you want to do reblocking, it asks you
the size of the data records in the file (in bytes, including record delimiters) and the blocking factor
(the number of data records in each tape block).
TAPE now displays a message telling you how many characters will be written in each tape block.
If this number is not satisfactory (for example, if it is zero), you have made a mistake in answering
the TAPE questions. Press CTRL /C to return to AMOS and try again.
Now TAPE is ready to write to the tape. It asks you to press RETURN if the tape is properly loaded.
Make sure the tape has been physically loaded on the tape drive and it is at load point (the metallic
film at the start of the tape is positioned at the read heads). Press RETURN when you are ready.
TAPE now asks you to confirm the drive is on-line. When the drive is ready, press
RETURN .
TAPE transfers your file to the tape. When it is finished, you see a message tells you how many
blocks were written and how many errors were found.
System Commands Reference Manual, Rev. 07
Page 3
TAPE
Copying Tape Files to Disk
TAPE asks for a file specification (give the AMOS specification of the file you want to create) and
a device specification (give the specification of the tape drive you want to use).
You must now supply blocking information to TAPE. When writing data from a disk file to tape
this information is optional—TAPE has a default record size and blocking factor it can use.
However, when writing from tape to a disk file, you MUST supply blocking information. TAPE
asks you the size of the data records (in bytes, including record delimiter characters) and the
number of data records in each tape block. These values were established when you first wrote the
data onto the tape.
TAPE now tells you how many characters it is going to read per tape block. If this number is not
satisfactory (for example, if it is zero), you made a mistake in answering the earlier TAPE
questions. Press CTRL /C to exit TAPE. Then try again.
If the number is okay, TAPE asks you if you want carriage return/linefeed pairs after each record.
Answer with Y for YES or N for NO and press RETURN . You may wish to have TAPE append
carriage return/linefeed characters at the end of each record if you will be reading the data file with
an AlphaBASIC program or AlphaVUE.
TAPE now asks you how many tape blocks you want to read. When you enter this value,
remember TAPE reads fewer blocks if it finds an end-of-file marker or if it reaches the end of the
tape.
TAPE asks you to press RETURN when the tape is loaded and when the drive is on-line. After
TAPE reads the data from the tape, it displays a message telling you how many tape blocks were
read and how many errors were found.
MESSAGES
?Cannot INIT [device-name] - device does not exist
Check your syntax and use DEVTBL to see a list of devices on your system.
You are writing 0 characters in a tape block
This message indicates you made an error in entering values to the TAPE questions asking
for blocking information. Press CTRL /C to exit and try again.
?Tape is not loaded or is not ready - press RETURN when it is
TAPE cannot read or write to the tape unit you specified. Check the unit's status and
correct the problem, then press RETURN.
System Commands Reference Manual, Rev. 07
TAPFIL
FUNCTION
Writes files from magnetic tape to disk.
CHARACTERISTICS
TAPFIL is re-entrant and re-usable, and a wildcard file command. See your AMOS User's Guide
for information on using wildcard commands. Used in combination with FILTAP (to write disk
files to the tape) and TAPDIR (to see a list of files on magnetic tape).
This program is included for compatibility purposes, for those who have existing tapes
created by FILTAP. MTUSAV and MTURES are the preferred backup methods for
magnetic tape—see those reference sheets. TAPFIL does not work with extended
format disks.
Only reads tapes written by FILTAP. Not for transferring data between Alpha Micro and nonAlpha Micro computers—use TAPE for that. Use a separate TAPFIL command for each
magnetic tape reel.
FILTAP only works under AMOS/32 and AMOS/L versions of the operating system.
You may not copy to a disk account if it is not in the project you are copying from unless you are
logged into the System Operator's account, [1,2]. You may copy files into the account you are
logged into from any other account, regardless of project number.
FORMAT
TAPFIL{/switch}{outfilespec}={filespec{,filespec}{/switch}
switch is an option request, outfilespec specifies the files to be created on the disk, and the
filespec(s) specify the files to be copied from the tape (including the disk device and account
specifications of the files when they were backed up).
DEFAULTS
The output specification, filename and extension default to the file specifications, and the device
and account you are logged into. If you're logged into [1,2], the default output account
specification is [], and if the account you are copying to does not exist, TAPFIL creates it.
The file specification defaults to *.* and the account and device you are logged into. The default
magnetic tape drive device specification is MTU.
System Commands Reference Manual, Rev. 07
TAPFIL
Page 2
OPTIONS
All switches are file switches, and may be abbreviated.
/QUERY
Confirm before copying files.
/NOQUERY
Don't confirm copy. Default.
/DELETE
Copy over existing files. Default.
/NODELETE
Don't copy over existing files.
OPERATION
Enter TAPFIL, the optional output specification, an equal sign, and any file specifications. For
example, to copy all .LIT files from the tape originally backed up from account [110,2] on DSK2:
over to your current account DSK3:[110,5]:
TAPFIL DSK3:[110,5]=DSK2:*.LIT[110,2]
RETURN
Now TAPFIL asks you to enter the tape unit number. Use /Q to confirm files before transfer.
Enter a Y for Yes or an N for No after each TAPFIL prompt. You do not need to press RETURN
after Y or N. For example, suppose you are logged into DSK2:, and you are copying files from
magnetic tape drive MTU0:
TAPFIL *.OLD[]=DSK3:*.M68[10,*]/Q RETURN
Enter tape unit number: 0 RETURN
MTU0:DSK3:B32.M68[10,4] to DSK2:B32.OLD[10,4]? Y
MTU0:DSK3:SCRTCH.M68[10,6] to DSK2:SCRTCH.OLD[10,6]? N
You may press CTRL /C at any time to stop the file transfer. To restore all files to the devices and
accounts they were backed up from, enter:
TAPFIL ALL:[]=ALL:[]
RETURN
MESSAGES
%Bypassing BADBLK.SYS[1,2]
% BADBLK.SYS exists to prevent bad blocks
% on a device from being allocated, and
% should never be directly accessed.
You can't copy the BADBLK.SYS[1,2] file.
?Cannot find DSK0:SCNWLD.SYS[1,4] or MEM:SCNWLD.SYS
TAPFIL needs this file to be able to process wildcard symbols in your file specifications.
This message can mean SCNWLD.SYS does not exist or you do not have enough memory
to load it into your partition.
System Commands Reference Manual, Rev. 07
Page 3
TAPFIL
?Cannot OPEN [device-name] - protection violation
Either log into [1,2] or the account you want to write into, and try again.
?Cannot perform special function [device-name] - device does not exist
You tried to copy to or from a device not listed in the DEVTBL command in your system
INI file, does not have a driver in account [1,6] of the System Disk, or is not filestructured. Fix the condition and try again.
?Cannot READ [device-name] - device is not mounted
Mount your device and try again.
?Cannot read file mark - reason
A tape error has been encountered.
?Device full
See your System Operator about erasing unneeded files or otherwise making more room on
your disk.
?Files may not be transferred to RES:
Try again, and transfer the file(s) to the disk. You can then, if you wish, add them to
resident memory in your system INI file.
?Missing output specification
You left out the equal sign in the TAPFIL command line; TAPFIL couldn't tell which
information was your file specification and which was your output specification. Try
again.
?More than one output specification
Try again, using only one output specification.
%No file-oriented device corresponding to [devn] is mounted
Check your syntax, or mount the device.
%Not copied - Destination file already exists
If you want to copy over the existing file, try again without using /NOD.
System Commands Reference Manual, Rev. 07
TAPFIL
Page 4
?Tape is not file structured
The tape you are trying to read was not written by FILTAP. Make sure you have mounted
the correct reel of tape.
%TAPFIL cannot restore files to extended directories
TAPFIL can only be used on traditional format logical devices. Use DEVTBL to identify
such a device.
?You are not logged in under [1,2], can't create [p,pn]
Log into [1,2] and try again.
?Unit number must be between 0 and 7
The unit number you entered is invalid. Enter a number between 0 and 7.
System Commands Reference Manual, Rev. 07
TAPLOG
FUNCTION
Checks quality of tape by reading statistics from certain tapes used by certain SCSI-based tape
drives.
CHARACTERISTICS
TAPLOG is re-entrant and re-usable. Many newer tape drives, particularly DAT drives, record
statistics about tape operation in a special area of the tape, called the log page. TAPLOG uses the
LOGSNS command to read and display these statistics. It works only with the SCSI dispatcher,
and only with tape drives that support the LOGSNS command.
The system must be running a SCSI dispatcher in order to run TAPLOG. The LOGSNS
command is an internal SCSI command that the tape drive must be able to understand.
LOGSNS is NOT an AMOS command.
FORMAT
TAPLOG devn: {/C}
devn: is the name of the tape device containing the tape you want to check. The /C switch clears
the log page of the tape after reading it.
OPERATION
Mount the tape you want statistics about and type the TAPLOG command. For example:
TAPLOG DAT0: /C
RETURN
This displays the statistics recorded on the tape in the DAT0: device and clears the log page of the
tape when it finishes.
Different tape drives record different statistics in the log page. The information you see
depends on the tape drive you're using.
MESSAGES
?Device does not log tape statistics
Either your tape drive does not support the LOGSNS command, or it does not support the
error log pages that TAPLOG does. You cannot us TAPLOG with this drive.
System Commands Reference Manual, Rev. 07
TAPLOG
Page 2
?Device error - sense key: ## [meaning] Additional sense codes ## ##
The drive returned a SCSI error message with the sense key and sense codes listed.
meaning is the description of the sense key listed. For more information on SCSI error
sense codes, see the tape drive manufacturer's manual.
If you do not have DSKERR set, all you see of this message is Device error.
?Device is not a tape drive
You entered TAPLOG followed by the device name of a disk drive instead of a tape drive.
?Device busy - info
?Device error - info
?Request sense command failed
The tape drive did not respond properly to a SCSI command. Check the drive and its
connection before retrying TAPLOG. If it fails a second time, contact your System
Operator and have the additional information on hand.
?SCSI dispatcher not found
TAPLOG works only with the SCSI dispatcher. No dispatcher is running on your
computer, so you can't use TAPLOG.
%Usage: TAPLOG dev0:{/C} where dev0: is name of tape device ...
You've used the wrong syntax for TAPLOG, so this message reminds you how to enter the
command correctly.
System Commands Reference Manual, Rev. 07
TDVDEF
FUNCTION
Displays the currently available terminal drivers.
CHARACTERISTICS
TDVDEF is re-entrant and re-usable.
Also used in the system initialization command file to define alternate terminal drivers to your
system. See your System Operator's Guide to the System Initialization Command File for
information.
You can switch your terminal to use a different terminal driver by using the SET TERMINAL
DRIVER command (see the SET reference sheet).
OPERATION
Enter TDVDEF, and AMOS will display the currently available terminal drivers defined on your
system. For example:
TDVDEF
RETURN
Currently defined Terminal Drivers:
ALPHA
AM60
TV171
GRAF
MESSAGES
?Cannot define terminal drivers after system startup
Enter only TDVDEF and press RETURN . You can't define terminal drivers at command
level—only in your system INI file.
System Commands Reference Manual, Rev. 03 (AMOS 2.2 - 4/91)
TIME
FUNCTION
Displays or sets the system time of day.
CHARACTERISTICS
TIME is re-entrant and re-usable. You must be logged into an operator's account, [1,2], to set
the time. Allows you to use military (24-hour) format when you set the time.
Some clock/calendar chips in early AMOS systems do not allow the seconds to be set.
This is a limitation of the chip, not of AMOS.
FORMAT
TIME {HH:MM {AM/PM}}
HH is hours and MM is minutes.
DEFAULTS
If the hours is set to 12, the default is PM. If set higher than 12, PM will be set even if you add
AM. If hours is less than 12, the default is AM.
OPERATION
To see the time of day, enter TIME at AMOS command level. For example:
TIME RETURN
12:30:12 PM
To set the system time of day, log into any operator's (1,2) account, type TIME and the time you
want set. Some examples:
LOG 1,2 RETURN
TIME 3:12 PM RETURN
TIME 16:00 RETURN
MESSAGES
?Improper time format
Check your syntax and try again.
System Commands Reference Manual, Rev. 07
TIME
Page 2
?You must be logged in to [1,2] to reset the time
Log into [1,2] and try again.
System Commands Reference Manual, Rev. 07
TMODE
FUNCTION
For SCSI-2 tape drives, displays information about tape drive and cartridge format. For tape
drives that support it, sets data compression mode and write format.
CHARACTERISTICS
TMODE is re-entrant and re-usable. It works only with cartridge tape drives attached to a SCSI-2
interface. For these drives, it displays the current cartridge type and recording format, and whether
the drive supports data compression or tape format options. On drives which support it, you can
set the compression mode and/or tape format.
FORMAT
TMODE devn: {option}
devn: is the device name of the drive you want information on or to set the write format for, and
option sets the compression mode or cartridge format.
OPERATION
To display information about the tape drive and the cartridge currently in it, type TMODE and the
device name. For example:
TMODE STR0: RETURN
Cartridge type: DC6320 or DC6525
Recording format: Unknown
Options for this drive:
none
If you use TMODE with a drive which supports compression modes, such as an AM-648 DAT
drive, this is the result:
TMODE DAT0: RETURN
Recording format: DDS-DC (compression)
Options for this drive:
DDS - Standard 2Gb format
DDS-DC - compressed 4Gb format
To force the AM-648 drive to write in standard DDS (non-compressed) mode, type:
TMODE DAT0: DDS
RETURN
System Commands Reference Manual, Rev. 07
TMODE
Page 2
To return to compressed mode, type:
TMODE DAT0: DDS-DC
RETURN
Drives which support setting the tape format as well as the compression mode, such as the AM650, have more options, but the operation method is the same: Type TMODE and the device name
to see the current format options, then set the option by using TMODE again with the device name
and the setting you want.
When setting an option, the cartridge in the drive should support the format or
compression mode you want to set.
For more details about using TMODE with your tape drive, please refer to the installation
instructions for your drive.
MESSAGES
%Cannot INIT Devn: - device does not exist
The device name you entered does not exist. Check your spelling and re-enter the
command.
?File specification error
You must enter a device name with TMODE.
?TMODE is only supported on SCSI-2 interfaces
The tape device you've entered is not connected to a SCSI-2 interface. TMODE does not
work with SCSI-1 devices.
System Commands Reference Manual, Rev. 07
TRMDEF
FUNCTION
Displays information about the system terminals.
CHARACTERISTICS
TRMDEF is re-entrant and re-usable.
Also used in the system initialization command file to define terminals to the system. See your
System Operator's Guide to the System Initialization Command File for information.
OPERATION
Enter TRMDEF at AMOS command level. You then see a display about the terminals attached to
your computer. For example:
TRMDEF RETURN
TRM1 JOB1 025574
AM355 1 ALPHA 100,100,100
19200
Edit
Each line is the display tells you the terminal name; the job to which it is attached; the memory
address (in octal) where the terminal definition block for the terminal exists; the interface driver
used by the terminal; the port number the terminal is using; the terminal driver; the terminal
parameters; and the baud rate. If your terminal uses the line editor, the word "Edit" will follow the
baud rate.
TRMDEF will also display any modem drivers in use.
MESSAGES
?Cannot define terminals after system startup
Terminals can only be defined in the system initialization command file at bootup time.
You cannot add extra terminals by running TRMDEF subsequently. See your System
Operator about adding more terminal definitions to the file.
System Commands Reference Manual, Rev. 07
TXTFMT
FUNCTION
Formats text file(s) to produce a printer-ready list file. The format of the list file is based on
TXTFMT commands embedded in the files.
CHARACTERISTICS
TXTFMT is re-usable, but is not re-entrant. The formatted file has the same name as the first file
specified on the TXTFMT command line, but with a .LST extension.
For more on using TXTFMT and on the TXTFMT commands, see your TXTFMT User's Manual.
FORMAT
TXTFMT filespec{,filespec...}
filespec is a file specification for a file you want to format.
DEFAULTS
The default file extension is .TXT. The default device and account specification is the account you
are logged into.
OPERATION
Enter TXTFMT followed by the one or more file specifications that select the text files you want to
format. For example:
TXTFMT HEADER,COPYRT,TITLE,PRFACE,MAIN
RETURN
This formats HEADER.TXT, COPYRT.TXT, TITLE.TXT, PRFACE.TXT, and MAIN.TXT
into the single file HEADER.LST.
To see your formatted file, you can either print it (using the PRINT or PRNT command) or display
it on the monitor screen (using the TYPE command). PRNT, PRINT and TYPE use the default
file extension of .LST.
MESSAGES
?Cannot open [filespec] - file not found
Check your spelling or use DIR to find the file.
System Commands Reference Manual, Rev. 03 (AMOS 2.2 - 4/91)
TXTFMT
Page 2
?Illegal command [command]
TXTFMT did not recognize a command you had in the text file. TXTFMT inserts the
illegal command into your .LST file so you can find the problem.
%Line too long - remainder of line ignored
TXTFMT found a line in your text file of more than 300 characters. It ignored everything
past the 300th character.
There are other less commonly seen messages—see your TXTFMT User's Manual.
System Commands Reference Manual, Rev. 03 (AMOS 2.2 - 4/91)
TYPE
FUNCTION
Displays a text file on your terminal screen.
CHARACTERISTICS
TYPE is re-entrant and re-usable. TYPE works only on sequential files containing ASCII
characters.
FORMAT
TYPE{/switch} filespec{/switch}
filespec selects the file you want to see, and switch is an option request. The default file extension
is .LST.
OPTIONS
/P
Display one screen of text at a time. Operation switch.
/S{:n}
Display at slower speed. n selects how slow—the higher the number, the
slower the display. File switch.
OPERATION
Enter TYPE and the file you want to display. For example:
TYPE MEMO.TXT
RETURN
You now see the file displayed on your terminal screen.
If the file display covers more than one screen page, and you haven't used the P option, you can
halt the display by pressing the NO SCRL key, or by pressing CTRL /S. When you want to continue,
press the NO SCRL key again (or press CTRL /Q). You can press CTRL /C at any time to stop the
display. If you use /P, pressing RETURN , the down arrow key, or the space bar brings up the next
screen page.
MESSAGES
?Cannot INIT [filespec] - device does not exist
Check your syntax, or use DEVTBL for a list of devices.
System Commands Reference Manual, Rev. 03 (AMOS 2.2 -4/91)
TYPE
Page 2
?Cannot open [filespec] - disk not mounted
MOUNT the disk, and try again.
?Cannot open [filespec] - file not found
Check your syntax, or use DIR to find the file.
?Cannot open [filespec] - file type mismatch
You tried to TYPE a random file. You have to use another method (such as a BASIC
program) to display the contents of that file.
?Cannot open [filespec] - illegal user code
You specified an account that does not exist. Check your syntax, or use PPN to see a list
of accounts on the device you are using.
?Command syntax error
Check your syntax and try again.
System Commands Reference Manual, Rev. 03 (AMOS 2.2 -4/91)
U
FUNCTION
Allows you to save AMOS command lines temporarily and to run them later by typing a single
character.
CHARACTERISTICS
U is re-entrant and re-usable. Because the AMOS command line is saved in user memory, a
system reset erases the command line.
You can save more than one command line at a time by making a copy of the U.LIT program
under different names. You can then use those programs to save command lines too. The
command line is stored in your user memory partition with a .SCS extension.
FORMAT
U {AMOS Command-line}
OPERATION
To save an AMOS command line, type U and the command line. For example:
U PRINT/COPIES:2 *.LST,*.RST/WAIT/NOBANNER
RETURN
U remembers the command line, but does not send it to the monitor. To change the saved
command line, use U again and enter a new command line.
To run a saved command line, enter U
RETURN
at AMOS command level.
MESSAGES
?No previous command is saved
There is no AMOS command line saved. Save the line you want to use and try again.
System Commands Reference Manual, Rev. 07
UTC
FUNCTION
Retrieves the current time and date from the U.S. Naval Observatory in Washington DC,
optionally setting the system date and time to the retrieved value. The Observatory maintains a
cesium (atomic) clock which provides a highly accurate source of timing information.
CHARACTERISTICS
UTC is re-entrant and re-usable. Requires the use of a Hayes compatible modem capable of 1200
baud communication.
Places a short (less than one minute) long-distance toll phone call to (202) 653-0351 in
Washington DC. Resets the system time and date if run while logged in to OPR:. Only
understands time zones from Atlantic to Nome Standard Times.
Remember that most systems can only set the system clock to the nearest minute, so the seconds
value retrieved from the Observatory is effectively lost.
While the Observatory's clock is highly accurate, remember the time information is being
transmitted over telephone circuits that may introduce considerable delay, up to .5 seconds for
satellite circuit routings.
This program can be placed into a Task Manager control file which can be set to run every few
days to keep the system clock up to date. When doing this, however, remember to change back and
forth between standard and daylight savings time in the UTC command line, on the appropriate
day.
FORMAT
UTC {/switch} modem-port time-zone {dial-prefix}
See the Operation section for a description of the format.
OPTIONS
/P
Preserves the baud rate the computer is using to communicate with the modem
port. Without this switch, the computer talks to the modem port at 1200 baud.
This is how fast the computer talks to the modem, not the baud rate the modem
uses on the phone line.
System Commands Reference Manual, Rev. 07
UTC
Page 2
OPERATION
Enter UTC and the name of the terminal port to which the Hayes compatible modem is connected,
followed by your local time zone, and optionally, any dialing prefix required to access an outside
phone line. For example:
UTC MODEM1 PST 9W
RETURN
UTC dials the observatory, retrieves the current date and time, converts it from UTC (Universal
Time Coordinated) format to your local time zone, and displays that time and date. If you are
logged in to OPR:, the system date and time is also reset.
The modem-port argument must be the name of a terminal port (defined by a TRMDEF statement
in your system initialization command file) to which a Hayes compatible modem is connected.
The time-zone argument lets you specify your local time zone. This is necessary so UTC can
convert the time as received from the Observatory to your local time. The time zone can be
specified using one of the three-character time zone names shown below, or, for those users outside
of North America, can be specified as the number of hours difference between your local time zone
and Universal Time Coordinated (UTC) (also known as Greenwich Mean Time (GMT) or Zulu
Time (Z)). The difference is negative for time zones west of Greenwich and positive for those
located east. For example, Pacific Standard Time can be given as either PST or -8.
The symbolic time zones the UTC program understands are:
AST
ADT
EST
EDT
CST
CDT
MST
MDT
PST
PDT
YST
YDT
HST
HDT
NST
NDT
Atlantic Standard Time
Atlantic Daylight Time
Eastern Standard Time
Eastern Daylight Time
Central Standard Time
Central Daylight Time
Mountain Standard Time
Mountain Daylight Time
Pacific Standard Time
Pacific Daylight Time
Yukon Standard Time
Yukon Daylight Time
Hawaii/Alaska Standard Time
Hawaii/Alaska Daylight Time
Nome Standard Time
Nome Daylight Time
System Commands Reference Manual, Rev. 07
Page 3
UTC
The optional dial-prefix argument lets you specify any special dialing information that must
precede the main telephone number, such as digits to access an outside phone line, to select a long
distance carrier, or to specify necessary country codes. In addition to the digits 1-9, you may also
use the * and # characters. A comma introduces a pause into the dialing, and a W causes the
dialing to wait for a second dialtone before proceeding. Common values for this argument are 9
and 9W.
MESSAGES
Busy
The Observatory clock is busy. Try again later.
No answer
The Observatory clock did not answer the phone. Make sure you have specified any
necessary outside line access prefixes, or try again later.
No carrier
The Observatory clock answered the phone, but did not handshake with your modem.
Make sure you have specified any necessary outside line access prefixes or try again later.
No dialtone
The modem could not get a dialtone on your phone line. Make sure you have specified any
necessary outside line access prefixes.
System Commands Reference Manual, Rev. 07
VCRDIR
FUNCTION
Displays a list of the files on a video tape cassette. Can also create a disk file containing the video
tape directory.
CHARACTERISTICS
VCRDIR is re-entrant and re-usable. The video tape read by VCRDIR must previously have been
written by VCRSAV. Used in combination with VCRSAV (to write files to video cassette tape)
and VCRRES (to copy files from video cassette to disk).
This program is provided for compatibility for tapes created by VCRSAV. If your VCR
tape was created using the BACKUP program, use BAKDIR to see a directory.
If your system contains both traditional format and extended disks, you must be logged onto the
same type of disk when you use VCRDIR that you were when you created the backup using
VCRSAV. While VCRSAV does work with extended disks in some situations, we strongly suggest
you use BACKUP to back up extended disks.
VCRDIR can be run with or without locking the others users out of the system—even if the tape
was created without using /T. You probably don’t want to lock other users out unless having them
on the system interferes with VCRDIR.
If you are going to lock other users out, you should check with them before proceeding
with VCRDIR—if another user is reading from or writing to the disk that you are on
when you use VCRDIR, you both could be locked up.
VCRDIR accepts full wildcard specifications, which select the files to be listed in the directory.
The account and device portions of the specification refer to the disk account and device from
which the files were originally backed up. See your AMOS User's Guide for information on
wildcard file specifications.
FORMAT
VCRDIR {/switch}{{listfilespec}=}{filespec}{,filespec(s)}
switch is an option request. The listfilespec specifies a disk file to contain the tape directory
display. The filespecs are the files on the tape whose directory listing you want to see. If you
want a list of all the files on the tape, enter:
VCRDIR ALL:[]
RETURN
System Commands Reference Manual, Rev. 07
VCRDIR
Page 2
DEFAULTS
The default listfilespec is DIRECT.LST in the account and device you are logged into. The
default filespec is *.* and the account and device you are logged into.
OPTIONS
All switches are operation switches, and can be abbreviated.
/KILL
Deletes existing listfile before creating new listfile.
/TRANSFER
Don't lock other users out of system.
OPERATION
Enter VCRDIR followed by an optional listfilespec and equal sign, and your file specifications.
For example, to send a directory display of all the .DAT and .BAS files on a video cassette to your
terminal, enter:
VCRDIR ALL:[]*.DAT,*.BAS
RETURN
You then see a message telling you other users will be locked out, or you are using /T.
If you continue, VCRDIR runs your VCR and produces the directory. If you do not have a
computer-controlled VideoTRAX VTR, VCRDIR gives you instructions for running your VCR.
The first number on the directory line tells you the file's relative position on the tape. Next you see
the device specification, the filename and extension, and the account specification of the file as it
appeared on the disk it was backed up from. The next number tells you the number of disk blocks
the file takes up.
The letter following the block count tells you whether the file is a sequential, or linked file ("L"), or
a random, or contiguous file ("C"). Next, VCRDIR gives the date and time the file was originally
backed up. And finally, VCRDIR shows you the hash total of the file if one was calculated when
the file was backed up by VCRSAV. At the end of the directory display, VCRDIR tells you how
many files were listed in the display.
If the cassette contains a warm boot monitor, the display notes the backup media is BOOTable,
meaning a warm boot monitor is the first file on the cassette even though it may not appear on the
directory listing you just requested.
If your printer has been defined on your system as a terminal, you may send the display directly to
the printer by using an output specification of TRM:[printer-name].
System Commands Reference Manual, Rev. 07
Page 3
VCRDIR
MESSAGES
?Cannot find DSK0:SCNWLD.SYS[1,4] or MEM:SCNWLD.SYS
VCRDIR needs this file to be able to process wildcard symbols. This message can
indicate SCNWLD.SYS does not exist, or you don't have enough memory to load the file
into your partition.
?Cannot INIT [device-name] - device does not exist
Check your syntax, or use DEVTBL to see a list of device for your system.
?Cannot READ [device-name] - device error
VCRDIR found something wrong with the tape. Be sure the cassette is loaded properly,
and the internal mechanism of the VCR unit is clean. Try again. If the problem persists,
see your System Operator.
?Cannot READ [device-name] - device is not mounted
MOUNT the device, and try again.
?More than one output specification
Try again, using only one output specification.
%No such files
VCRDIR could not find any files matching your input specification. Try VCRDIR
ALL:[ ]*.* to see a list of all files on the tape.
?Tape is not file structured
The header of the VCR tape cannot be found, or is corrupted, or the tape was not written
using VCRSAV. The data on the tape cannot be read.
System Commands Reference Manual, Rev. 07
VCRRES
FUNCTION
Writes files from video cassette tape to disk. Lets you restore file-oriented disk backup from video
cassette to disk.
CHARACTERISTICS
VCRRES is re-entrant and re-usable. Used in combination with VCRSAV (to write disk files to
video cassette tape) and VCRDIR (to display a list of files on a video cassette). Only reads tapes
created by VCRSAV. Not for transferring data between Alpha Micro and non-Alpha Micro
computers.
This program is provided for compatibility purposes. If your VCR tape was created by
BACKUP, use RESTOR to restore files.
If your system contains both traditional format and extended disks, you must be logged onto the
same type of disk when you use VCRRES that you were when you created the backup using
VCRSAV.
You may not copy to a disk account other than the account you are currently logged into unless
you are logged into an operator's account, [1,2]. If you are in [1,2], and you specify an account
that does not exist, VCRRES creates that account. You may copy files into the account you are
logged into from any other account, regardless of project number or device specification.
VCRRES locks out the other users on your system unless you specify the /T option. Check
with other users on your system before proceeding with VCRRES. If another user is
reading from or writing to the disk when you use VCRRES, you both could be locked up.
However, VCRRES can only be run under control of the Task Manager or a spawned task
if the /T switch is specified. Such operation is not recommended by Alpha Microsystems.
VCRRES is a wildcard command. See your AMOS User's Guide for information on using
wildcard commands.
If the cassette you are restoring files from contains a warm boot monitor as well as data files,
VCRRES skips over the warm boot monitor, ignoring it, and goes on with the normal file restore
process.
It is a good idea to run DSKANA after you have finished running VCRRES, to be sure no
errors were introduced into the bitmap—especially if you press CTRL /C to interrupt the
restore process, since the bitmap may be disorganized.
System Commands Reference Manual, Rev. 07
VCRRES
Page 2
VCRRES creates a temporary directory file named VCRTOC.IPF in the current disk account.
This file is erased and re-created each time VCRRES is used in the account. VCRRES also
creates a temporary file named FRGTBL.IPF. Don't use either VCRTOC.IPF or FRGTBL.IPF as
filenames.
FORMAT
VCRRES{/switch}{outfilespec}={filespec{,filespec(s)}{/switch})
switch is an option, outfilespec specifies the files to be created on the disk, and filespec is a file to
be transferred from the cassette (including the disk device and account specifications of the files
when they were backed up).
DEFAULTS
The file specifications default to the device and account you are logged into. The output
specification defaults to the file specification in the case of the filename and extension, and to the
account and device you are currently logged into. Therefore, if you don't specify a device,
everything on the tape is written to the device you are logged into.
For example, if you are logged into DSK0:, everything is written onto DSK0:, even if the files were
written to the tape from other disks. Be careful to specify an output specification if the files on the
tape came from more than one disk. Unless, of course, you do want to transfer them all onto one
disk.
If you are logged into an operator's account, [1,2], the default output specification is [ ] (all
accounts on that disk). In the System Operator's account, it is all accounts on all disks—this
means files are restored to their original account numbers (from which they were written to the
tape).
If you use ALL:[ ] as the input specification, VCRRES restores all the files on the tape (to where
depends on the output specification).
OPTIONS
All switches can be abbreviated to any unique letter combination.
/DELETE
Copy over existing file (default, file switch).
/NODELETE
Don't copy over existing file (file switch).
/HASH
Restore only files with different hash totals on the disk (file switch).
Files must have been saved with VCRSAV/H
/NOHASH
Don't compare hash totals. Default, file switch.
/QUERY
Confirm before selecting files (file switch).
System Commands Reference Manual, Rev. 07
Page 3
VCRRES
/NOQUERY
Don't confirm copy (default, file switch).
/SEARCH
Search for a file using FAST FORWARD. Operation switch. Manual
VCRs only.
/TRANSFER
Copy files without locking other users out of the system. Operation
switch.
Because with /T you share CPU time with other users, the restore could miss files if your
system is being heavily used. Since VCRRES erases files of the same name on the disk
before trying to restore from the tape, this means you could lose files. What constitutes
"heavy use" depends on the system and the number of copies saved—if you have any doubt
about the restore, don't use /T.
OPERATION
Enter VCRRES and the files you need. For example, to copy all .BAS files originally backed up
from account [110,2] on DSK2: over to your current account, enter:
VCRRES =DSK2:*.BAS[110,2]
RETURN
You then see a warning other users will be suspended while VCRRES is running (or, if you used
/T, you may not be able to restore files if your system is in heavy use). If you proceed, VCRRES
either runs the VCR to complete the restore (if you have a VideoTRAX automatic VTR), or
instructs you in running your VCR.
VCRRES displays a list of the files on the cassette that fit the specifications you entered earlier. If
you used /Q, VCRRES waits after the appropriate statement for you to respond Y for yes or N for
no. You don't have to press RETURN . For example:
VCR0:DSK3:B32.BAS[10,4] to DSK2:B32.OLD[10,4] ? Y
VCR0:DSK3:SCRTCH.BAS[10,6] to DSK2:SCRTCH.OLD[10,6] ? N
You may use CTRL /C at any time to stop the file transfer. But remember: if you are
restoring files with the same specification as other files already on the disk, any of those
files that were already selected will be erased.
Once the restore is finished, rewind and remove the cassette, and return it to its storage location.
If a disk error is encountered during the restore, all files prior to the error are restored properly.
You will see an error message, the restore stops, and you are returned to AMOS. Run DSKANA
on your disk to be sure no problems occur.
When you use /S, VCRRES reads the file's position in the tape table of contents in the normal
manner, and then guides you to locating the file on the tape. Once you get close to the file, press
PLAY on the VCR and the restore process proceeds as usual.
System Commands Reference Manual, Rev. 07
VCRRES
Page 4
MESSAGES
?Backup media is not file structured.
The tape you are trying to read was not written by VCRSAV. Make sure you have
mounted the correct tape cassette.
?Backup media not compatible with current software.
The tape was saved by a version of VCRSAV which is not compatible with the current
version of VCRRES. Check with your System Operator to see what can be done.
?Cannot allocate record on [filespec] - Device full
This indicates a disk error during the restore. Run DSKANA on your disk and try the
restore again.
?Cannot close [filespec] - Device full
This indicates a disk error during the restore. Run DSKANA on your disk and try the
restore again.
?Cannot restore extended directory format files to an old format disk
?Cannot restore old format files to an extended directory format disk
You must restore files to the same format (traditional or extended) disk they were backed
up from. When restoring, you must also be logged on to the same type of device you were
logged on to when creating the backup.
%Cannot restore tape when logged device format
%does not match that of the device restoring to
You cannot restore files when you are logged into a device whose file system differs from
the device you are restoring to (one uses extended files, the other uses traditional). Log into
a device with the same file system as the target device, then try again.
%Cannot restore with SET VERIFY on.
%Enter RETURN to continue without VERIFY or CTRLC to abort:
If the number of copies you specified with the /COPIES command is less than four (or if
you specified none, as default is 0), and the VERIFY option is set ON, the system cannot
restore. If you press RETURN , NOVERIFY is set and the restore continues.
?Disk transfer error.
An error occurred while the data was being transferred to or from the disk. Run
DSKANA and correct any problems, then try again.
System Commands Reference Manual, Rev. 07
Page 5
VCRRES
?End of tape detected
The tape you are restoring was interrupted for some reason, and VCRRES has come to the
end of tape marker. All the restorable files from this tape have been restored.
?File too fragmented for recording current filespace
The software is unable to keep a record of all the disk space used by the file currently
being created because the file contains more than 511 fragments. See your System
Operator about compressing disk space before trying again.
?Files may not be transferred to RES:
You may only add programs to system memory by using the SYSTEM command within
your system initialization command file.
?Fragments Table out of sequence
An error occurred during the search of the Fragments Table. Rerun VCRRES. If it still
does not work, see your System Operator.
?FRGTBL blocks not found
The end of the fragments table was reached before all of the files have been processed.
Rerun VCRRES. If you see this again, see your System Operator.
?Job aborted
You pressed CTRL /C to stop the restore. No files are restored, and no damage is done to
any bitmaps.
?Memory buffer unavailable.
No memory was available for the I/O buffers during a critical process, so VCRRES
aborted. See if you can increase the memory allocated to your memory partition, and try
again.
?Missing output specification
You left off the equal sign in the VCRRES command line; VCRRES couldn't tell which
information was your file specification and which was your output specification. Try
again.
%Not selected - Source file does not have a calculated HASH total
You specified /H but the cassette doesn't have a HASH total to compare. /H was not used
when the tape was created. Run VCRRES without /H.
System Commands Reference Manual, Rev. 07
VCRRES
Page 6
?Table of Contents out of sequence
An error occurred when VCRRES was searching through the tape's table of contents. Try
again, and see your System Operator if it occurs again.
%Tape has passed specified location.
Press REWIND to back up and try again.
In a SEARCH operation, you went past the location of the file you specified. Rewind the
tape and continue searching.
?Unable to load Disk Driver
Usually, this means you don't have enough memory available in your partition. Increase
your memory and try again.
?Unable to rehash bitmap - run DSKANA immediately
Due to I/O errors, the software is unable to read in the bitmap and write out a new hash for
it. To correct any invalid bitmap condition, run DSKANA right away.
?VCR blocks not in sync with VCRTOC.IPF file
The number of blocks in a file on the tape is not equal to the number of blocks the table of
contents says are on the tape. This tape cannot be restored. To prevent this occurrence,
run DSKANA and correct all file errors before using VCRSAV to create the tape.
%WARNING -- Extra copies count on backup media is below
the minimum level for usage of the TRANSFER switch.
You don't have twenty copies of the files on your tape to use /T. If you continue, you may
lose files. You may want to restore without /T.
?You are not logged in under [1,2], can't create [p,pn] ?Job aborted
You can't copy to a nonexistent account unless you are logged into an operator's account,
[1,2]. If you copy to a nonexistent account while logged into [1,2], VCRRES creates the
account. The job aborts. Any files selected prior to this error have been erased from the
destination accounts.
System Commands Reference Manual, Rev. 07
VCRSAV
FUNCTION
Writes copies of disk files to video tape cassettes.
CHARACTERISTICS
VCRSAV is re-entrant and re-usable. Included on the tape are the device and account
specifications of the files, and the date and time of the backup. Used in combination with
VCRRES (to transfer files from video tape cassettes to disk) and VCRDIR (to list a directory of
files on a cassette).
The VCR software is included for compatibility with older software. While VCRSAV
may work on extended disks of less than 32Mb, we strongly recommend you use
BACKUP to save files from extended disks. VCRSAV will not work on extended
directories over 32MB in size.
VCRSAV is a wildcard file command. See your AMOS User's Guide for information on wildcard
specifications.
VCRSAV locks out other users on your system unless you specify the /T option. You
should check with other users on your system before proceeding with VCRSAV. If
another user is reading from or writing to the disk when you use VCRSAV, you both
could be locked up. VCRSAV cannot be run from a job under the control of the Task
Manager or from a spawned task if the /T switch is used.
You may back up files from any disk account onto tape whether or not the account is within the
project you are logged into. Although VCRSAV writes the disk specification of the file to the tape
cassette along with the file, it does not transfer any password associated with that disk account.
Before using VCRSAV, use the DSKANA program to check the device for errors. If there
is a problem on the disk you copy from, you may not be able to restore from the tape later.
VCRSAV is for file backup only; not for transfer of data between Alpha Micro and non-Alpha
Micro computer systems. Because VCRSAV writes the date and time of backup to the tape, you
should remember to use the DATE and TIME programs to make sure the system date and time are
correct before you use VCRSAV.
VCRSAV creates a temporary directory file named VCRTOC.IPF in the disk and account you are
currently logged into. This file is erased and recreated each time VCRSAV is used within the
account. If you specify VCRTOC.IPF in a VCRSAV command line, it bypasses it.
System Commands Reference Manual, Rev. 07
VCRSAV
Page 2
FORMAT
VCRSAV {filespec{/switch}{,filespec(s)}{/switch}}
the filespec(s) specify the files you want to back up onto the video cassette, and switch is an option
request.
DEFAULTS
The default file specification is *.* and the account and device you are logged into. Default
switches are /NOQUERY and /NOHASH. If you do not use /COPIES, VCRSAV makes five
copies of each data block.
OPTIONS
All switches can be abbreviated to any unique letter combination.
/BOOT
Create a warm boot cassette (operation switch).
/COPIES:n
Copy n extra copies of each data block. Default is 0, operation
switch. If you use /C with /T, n must be 20 or more.
/HASH
Calculate a hash total (file switch).
/NOHASH
Don't calculate hash (default, file switch).
/QUERY
Confirm before selecting files (file switch).
/NOQUERY
Don't confirm copy (default, file switch).
/SUPPRESS
Suppresses the listing of the files selected.
/TRANSFER
Copy without locking users out. Operation switch. Saves 20
copies, unless /C used.
/WAIT:nn:nn {AM/PM}
Gives time for backup to begin, standard or military format.
Locks up terminal until specified time.
Using /TRANSFER means you share CPU time with other users while backing up files. If
your system is heavily used while you are creating a backup tape, this could affect your
ability to restore the files from the tape later. What constitutes heavy use depends on the
particular system.
OPERATION
Enter VCRSAV and the files you want to save. For example:
VCRSAV MEMO.TXT,SCHDLE.TXT[310,2]
RETURN
or, using /WAIT:
VCRSAV/W:2:08 AM MEMO.TXT,SCHDLE.TXT[310,2]
RETURN
System Commands Reference Manual, Rev. 07
Page 3
VCRSAV
You can save space on a cassette by selecting all the sequential files or all the random files
you want to save at once.
VCRSAV begins by asking for information it will place in the cassette label: Warm boot file name
(if you are creating one); Volume name (maximum of 40 characters); Volume ID (10 characters);
Installation (30 characters); System (30 characters); and Creator (30 characters).
You then see a message that all other users will be suspended while VCRSAV is running. (If you
are using /T, you get a prompt reminding you it could affect your ability to restore files later.) If
you continue, VCRSAV then tells you what files it is selecting for transfer, and begins the copy
process. If you do not have a computer controlled Videotrax VCR, VCRSAV gives you
instructions on operating your VCR.
You may press CTRL /C at any point to halt the transfers. If you do, use DSKANA to
make sure your bitmap was not affected. When CTRL /C is entered, VCRSAV writes an
end-of-tape marker to the tape and stops with a message. The files already on the tape can
be restored, though the table of contents lists all files originally selected. A similar thing
occurs if a disk error or a file block-count discrepancy happens during the restore—a
message appears, and files to that point can be restored.
When VCRSAV is finished, you should use the CRT610 command with the /CHECK option to
check the cassette. See the CRT610 reference sheet for more information.
MESSAGES
?Cannot find DSK0:SCNWLD.SYS[1,4] or MEM:SCNWLD.SYS
VCRSAV needs this file to be able to process wildcard symbols in your file specifications.
This can mean SCNWLD.SYS does not exist or you do not have enough memory to load
the file into your partition.
%Cannot save. File beyond 32mb boundary. Use BACKUP command.
One of the files you've specified is past the 32Mb boundary of an extended disk. You
must use BACKUP to save these files.
?Discrepancy in file block count for [filename]
?Process suspended while saving [filename]
The transfer is now complete
?Job aborted
This message is given if the actual number of blocks in a file does not equal the count in
the table of contents. VCRSAV aborts the job and marks the tape with an end-of-tape
marker at the point before the bad file. All files prior to that point can be restored. This
indicates your disk has an error. Run DSKANA to correct the file error, then re-run
VCRSAV again.
System Commands Reference Manual, Rev. 07
VCRSAV
Page 4
%Field size exceeded. Re-enter.
While entering the label information, you tried to put more data into a field than it could
hold. Check the maximum field length and try again.
?File read error detected while saving [filename]
?Process suspended while saving [filename]
The transfer is now complete
?Job aborted
This message appears if a disk error occurred. VCRSAV aborts the job and marks the
tape with an end-of-tape marker at the point before the disk error. All files prior to that
point can be restored. This indicates your disk has an error. Run DSKANA to correct the
file error, then re-run VCRSAV again.
?Invalid argument for WAIT.
Check your syntax. You may have to put the /WAIT switch at the end of the command
line so it doesn't interpret other parts of the command line as a time.
?nn files not transferred. Beyond 32mb boundary. Use BACKUP command.
If you attempted to save files past the 32Mb boundary on an extended disk, this message
tells you how many files were not transferred. Use BACKUP to save these files.
?Process suspended while saving [filename]
The transfer is now complete
?Job aborted
This message appears if you press CTRL /C during the save. VCRSAV aborts the job and
marks the tape with an end-of-tape marker. All files prior to that point can be restored.
%Zero blocks in this file. Not selected.
VCRSAV found a directory entry for a file with a size of zero blocks. It will not copy a
zero block file. It skips the file and continues.
System Commands Reference Manual, Rev. 07
VDKUTL
FUNCTION
VDKUTL allows general system users to see a status display of the virtual disk cache system.
VDKUTL also allows the System Operator (when logged into OPR: or SYS:) to implement
changes to the list of wildcard specifications for the files to be used on the virtual disk system.
These changes must have been previously made in the VDK.INI file.
CHARACTERISTICS
VDKUTL is re-entrant and re-usable. When you use VDKUTL from OPR: or SYS:, VDKUTL
enters a privileged mode and allows you to execute a variety of functions. When you use VDKUTL
from any other account, it displays the current VDK statistics.
The virtual disk must be set up as either a traditional or extended format disk, and can then only
transfer files from the same type of disk. If you have a system with both traditional and extended
format disks on it, you have to choose which type of disk you wish to use with the virtual disk.
VDK transfers a file into memory only if it meets these requirements: the file must use a
default specification (neither a device nor an account may be included with the file name);
and the default specification must match a specification in the VDK.INI file. Keep this in
mind when looking at the VDKUTL display. See the System Operator's Guide for more
information about the virtual disk cache system.
OPERATION
Enter VDKUTL:
VDKUTL
RETURN
The program displays data on how efficiently the virtual disk system is working. If you are in
OPR: or SYS:, you see an asterisk prompt, and can then enter the commands below.
COMMAND SUMMARY
E = Exit VDKUTL
Returns you to AMOS command level.
H = (HELP) - List VDKUTL commands
System Commands Reference Manual, Rev. 07
VDKUTL
Page 2
I = Initialize
Make effective any changes that have been made to VDK.INI since the computer was last
rebooted.
S = Statistics Display
The display you would normally see from any account.
MESSAGES
?VDK does not exist
The VDK system was not installed when your system was booted. See your System
Operator to make the appropriate changes to the system command initialization file to load
the VDK system on bootup.
System Commands Reference Manual, Rev. 07
VER
FUNCTION
Displays the name and version number of your system.
CHARACTERISTICS
VER is re-entrant and re-usable.
VER is also used in the system initialization command line to unlock keyboards after bootup. See
your System Operator's Guide to the System Initialization Command File for more information.
OPERATION
Enter VER at AMOS level. For example:
VER
RETURN
-- AMOS/L Version 2.0(304)-2 up and running --
System Commands Reference Manual, Rev. 03 (AMOS 2.2 - 4/91)
VERIFY
FUNCTION
Verifies the file(s) transferred in a system disk copy were correctly copied.
CHARACTERISTICS
VERIFY is re-entrant and re-usable.
When you receive software from Alpha Micro, the media containing that software includes a file
with a name similar to the product and a .DIR extension (for example, for AMOS releases the file
is called AMOS.DIR). This file contains the names, version numbers, and hash totals for all the
files included on that release. After you have loaded the software unto your system, you can run
VERIFY, which compares the software now on your system with the directory file to make sure
that the software copied correctly to your system.
The directory programs are created using the DIR command with the /D, /V, and /H switches.
FORMAT
VERIFY {/switch} {filespec}
filespec is the file specification for the Master Directory Listing and switch is an option request.
DEFAULTS
VERIFY assumes the device and account you are currently logged into. The default filespec is
DSK0:AMOS.DIR.[1,4].
OPTIONS
/FILE or /F
Puts results in a file named VERIFY.LST in the account you are in.
/D:devn:
Override device specification in the .DIR file with the device name entered.
OPERATION
Enter VERIFY (add a filespec if other than AMOS.DIR, or if the file is in another account). For
example:
VERIFY NEWREL.DIR
RETURN
System Commands Reference Manual, Rev. 04
VERIFY
Page 2
You see a display of the files listed in NEWREL.DIR, and a status message for each. When
VERIFY has finished, it displays a summary of the errors found.
If the files you want to verify are on a logical device other than the one specified in the .DIR file,
use the /D switch. For example:
VERIFY /D:DSK2 NEWREL.DIR
RETURN
The files listed in NEWREL.DIR are looked for and verified on DSK2:, regardless of the device
specified in NEWREL.DIR.
MESSAGES
?[filespec] not found
The indicated file was listed in the Master Directory Listing, but was not found on your
system. It might have been erased, or renamed, or might not have been copied at all. Try
copying it again from the backup media.
?Hash mismatch
The hash total of the file on your system did not match the hash total for that file as listed
in the Master Directory Listing. This could indicate a copying error. If the file does not
have a version number, this could also indicate your current file is a different version than
the one in the MDL. Try copying the file again from the backup media.
?Invalid MDL format
The Master Directory Listing was not created with the /H, /V, and /D switches. If your
release AMOS.DIR file caused this error message, contact Alpha Micro. If you are trying
to use another file as the MDL, re-run DIR with these three switches only.
Verified
The file has verified as being the same as it was on the transfer medium.
?Version mismatch is - x.x(xxx) MDL = x.x(xxx)
The version of the file on your system did not match the version listed in the Master
Directory Listing. This could mean a different version of the file was copied over the
original file, or a copying error occurred. Check your source file, and determine which
version you wish to have.
System Commands Reference Manual, Rev. 04
VUE
FUNCTION
Creates and edits text files.
CHARACTERISTICS
AlphaVUE is re-entrant and re-usable. AlphaVUE is a screen-oriented text editor. You see the
text you are editing displayed on the screen, and move the screen cursor to the location in your file
you want to view or edit.
In Command mode, AlphaVUE allows you to search for specific strings of text, perform local and
global replacements, move and delete blocks of text, and change various editing parameters.
AlphaVUE copies into memory the file you want to edit and makes a backup file by renaming the
disk file to a .BAK extension. When you exit AlphaVUE, the new, edited version of the file goes
out to disk under the original name and extension of the file. You may edit a file too big to fit into
your memory partition.
An AlphaVUE initialization file, INI.VUE, allows you to set your own default editing parameters.
See your AlphaVUE Text Editor User's Guide for more detail on using AlphaVUE and setting up
the INI.VUE file.
To exit AlphaVUE, enter Command mode (if you see lines of asterisks or if you see your
text, you are in Screen mode. Pressing ESC brings you to Command mode). Now enter an
F to exit and update your file, or a Q if you want to exit without updating.
FORMAT
VUE filespec {/switch}
filespec selects the file you want to edit, and switch is an option request.
DEFAULTS
The defaults AlphaVUE uses (for example, the default file extension), are defined in the
AlphaVUE initialization file, INI.VUE.
System Commands Reference Manual, Rev. 03 (AMOS 2.2 - 4/91)
VUE
Page 2
OPTIONS
All the switches may be abbreviated to any unique characters.
/BATCH
Suppresses most screen display output. Especially for use with Task
Manager to reduce unnecessary screen output to the .LOG files.
/NOYANK
Opens a file without putting any text into memory. Useful if you have
a file larger than your memory, and you want to YANK data into the
front of it.
/R
Opens a file in another account for Read-only access. Allows you to
see a file in a "protected" account. You can only exit by using Q—any
changes you make to the file will not be retained.
/SUBROUTINE
Executes VUE as if it were being called as a subroutine from another
program. Suppresses most interactive input and output.
/TRACE
Displays each line of the INI.VUE file as it processes.
OPERATION
Enter VUE followed by the specification of the file you want to edit. For example:
VUE LETTER.TXT
RETURN
If the file you specify does not yet exist, you are asked if you want to create it. Enter a Y for Yes
or an N for No. If you enter N, AlphaVUE returns you to AMOS command level.
When you enter a file, you will see either text, or a screen full of lines of asterisks (if the file is
empty or new). Now you can enter or edit your text. If the WRAP feature is set to OFF in your
INI.VUE file, you will have to press RETURN at the end of each line to begin a new line. If the
WRAP feature is ON, AlphaVUE will begin a new line for you when you reach the end of a line.
If you are editing an existing file, AlphaVUE loads a copy of that file into memory and takes you
directly to the mode (Screen mode or Command mode) indicated by the START command in the
INI.VUE file.
If you are in Screen mode, you can use the various cursor movement and screen-to-screen
movement commands to move the cursor to the point in your text where you want to make changes.
Then use the appropriate screen editing commands to effect those changes.
To transfer from Screen mode to Command mode, or from Command mode to Screen mode, press
ESC or press CTRL /[.
In Command mode, you see several lines of information on the screen. The cursor is waiting after
the AlphaVUE prompt symbol, ">".
If HELP is ON in the INI.VUE file, and if the file MENU.HLV exists either in account
DSK0:[7,1] or in the account you are currently logged into, following the display shown above you
System Commands Reference Manual, Rev. 03 (AMOS 2.2 - 4/91)
Page 3
VUE
will see a summary of the AlphaVUE editing commands. You may now use the various Command
mode commands.
MESSAGES
The AlphaVUE error messages are explained in your AlphaVUE Text Editor User's Guide.
System Commands Reference Manual, Rev. 03 (AMOS 2.2 - 4/91)
WAIT
FUNCTION
Allows you to delay the execution of any programs by your job until another job completes a task.
CHARACTERISTICS
WAIT is re-entrant and re-usable.
Sometimes a task you want to do must be done AFTER another task is finished. If another job is
performing the task you have to wait for, you can use WAIT to let you know when that other job is
finished with what it is doing.
A job's task is said to be completed when that job enters one of the following states: terminal input,
sleep, external wait, or message waiting status.
WAIT is often used in the System Initialization Command File when your jobs are being set up.
See your System Operator's Guide to the System Initialization Command File for more
information.
FORMAT:
WAIT jobname
OPERATION
Enter WAIT and the name of the job for whom you want to wait. For example:
WAIT JOB3
RETURN
When the specified job finishes its current task, you see the AMOS prompt. You can now proceed
with what you wanted to do.
MESSAGES
?Non-existent Job
Check your syntax, or use the SYSTAT command to see what jobs are active on your
system, and try again.
System Commands Reference Manual, Rev. 07
WINFLP
FUNCTION
Writes copies of files from Winchester disk to a floppy disk.
CHARACTERISTICS
WINFLP is re-entrant and re-usable. Includes the device and account specifications of the files,
and the date and time of backup. Used with FLPWIN (to copy files from a floppy to a Winchester
disk) and FLPDIR (to display a list of files on a floppy disk). Allows you to perform one backup
on multiple floppy disks.
This program is provided for compatibility purposes. You normally should use BACKUP.
WINFLP doesn't work with extended format disks.
WINFLP is a wildcard file command. See your AMOS User's Guide for information on wildcards.
Not for transferring data between Alpha Micro and non-Alpha Micro computers. You may back
up files from any disk account onto the floppy disk whether or not the account is within the project
you are logged into. WINFLP does not transfer any account password.
FORMAT
WINFLP filespec{/switch}{,filespec(s){/switch}
filespec is a file you want to copy to a floppy disk, and switch is an option request. The default
file specification is *.* and the account and device you are logged into. The default floppy drive
device specification is DDA0:.
OPTIONS
All switches are file switches, and may be abbreviated. Placing NO before a switch turns it off.
/APPEND
Append files at end of existing files. Default.
/QUERY
Confirm before copying files. File switch.
OPERATION
Enter WINFLP and the files you need. For example:
WINFLP MEMO.TXT,SCHDLE.TXT[310,2]
System Commands Reference Manual, Rev. 03 (AMOS 2.2 - 4/91)
RETURN
WINFLP
Page 2
WINFLP asks you to enter the backup device—enter the device code and unit number of the floppy
disk drive. When you use /Q, WINFLP asks you to confirm the files before the transfer. Enter Y
for yes, or N for no. You do not need to press RETURN . For example:
WINFLP/Q,*.BAS, RETURN
Enter backup device: DDA0: RETURN
LSTSQR.BAS to DDA0:LSTSQR.BAS? Y
NEW.BAS to DDA0:NEW.BAS? N
You may press
CTRL
/C at any time to prevent further transfers.
MESSAGES
?Cannot find DSK0:SCNWLD.SYS[1,4] or MEM:SCNWLD.SYS
WINFLP needs this file to process wildcards in file specifications. Use DIR to find the
file, or get help from your System Operator.
?Cannot INIT [device-name] - device does not exist
Check your syntax, or use DEVTBL to see a list of valid devices.
?Cannot READ [device-name] - device is not mounted
Mount the device and try again.
%Device is full. Please insert another disk, then type RETURN to
% continue, or type Control-C to abort copy
Follow the instructions to continue or abort.
%Did not copy [filespec]
Informs you the copy was aborted.
?DSK is not a valid backup device
Try again, using a floppy device name.
%No file-oriented device corresponding to [device-name] is mounted
You specified a device, but left off the unit number. Try again.
?No room to perform append; device full.
Try again with a floppy disk with room left on it.
System Commands Reference Manual, Rev. 03 (AMOS 2.2 - 4/91)
WRDCNT
FUNCTION
Counts and displays the number of words in a file. Can optionally adjust the word count prior to
display.
CHARACTERISTICS
WRDCNT is re-entrant and re-usable. WRDCNT considers a word to be any collection of
characters separated by one or more spaces, tabs, returns, linefeeds, or formfeeds.
WRDCNT is designed to work with text files. Using it on binary data files will not yield useful
results.
FORMAT
WRDCNT filespec {adjustment}
filespec is the file specification and adjustment is a factor applied to the result number.
OPERATION
Enter WRDCNT followed the file specification for the file in which you wish to count words. For
example:
WRDCNT NOVEL.TXT
RETURN
You may optionally include an adjustment factor which is applied to the word count prior to
displaying the count. This can be used to account for fixed format output which may contain extra
formatting words you do not wish to count. For example:
WRDCNT MALLST.TXT -5
RETURN
MESSAGES
?Cannot OPEN [filename] - file not found
Check your syntax, or use DIR to see what files exist and try again.
System Commands Reference Manual, Rev. 03 (AMOS 2.2 - 4/91)
WRMGEN
FUNCTION
Creates a warm boot monitor file on the disk for transfer to a backup media.
CHARACTERISTICS
A warm boot monitor is an abbreviated, pre-initialized version of your normal monitor file
containing enough information to get your system up and running when your System Disk has
been erased or written over accidentally. After you have performed a warm boot, you can restore
the other necessary files to your system from backup media, and perform a normal boot to
restore your entire system to its former configuration.
For suggestions on what programs to include in your warm boot monitor, and for examples of
use, see your System Operator's Guide.
FORMAT
WRMGEN {filename}
filename is an optional name for your warm boot monitor file. The filename will default to the
name of your system type with a .WRM extension (for example, AMOSL.WRM) and the device
and account you are logged into.
OPERATION
You may want to use the DEVTBL command to see (and make note of) what devices are defined
on your system, and whether they are sharable or not. You may need this information during the
WRMGEN process.
If you have a self-configuring disk, use the BITMAP command and write down the size (in
words) of your bitmap.
Enter WRMGEN at AMOS command level. Enter a filename if you want your warm boot file to
be called something other than the default. For example:
WRMGEN RETURN
WRMGEN BACKUP.WRM
RETURN
Now the program asks you to specify how you want the warm boot monitor to be initialized.
First it will ask for the Input monitor. Enter the name of your system monitor file. You
must enter at least the file name, such as AMOSL. The rest of the filespec defaults to
DSK0:filename.MON[1,4].
System Commands Reference Manual, Rev. 09
WRMGEN
Page 2
Next WRMGEN asks for the System disk driver. You must enter at least the file name,
such as SCZRR or SCZR60. The rest of the filespec defaults to DSK0:Filename.DVR[1,6]. The
filespec must be three characters, and cannot be "DSK". Depending on your system type, use the
following guidelines to specify the disk driver filename to use:
System Type
Older Systems with SASI Interface and no
Roadrunner board
(AM-1000, 1200, 1400, 1600, 1500VME,
2000M/VME, 3000M/VME)
Older Systems with Roadrunner board (AM172 or AM-174 boards)
AM-4000M/VME or AM-3000M with AM540 SCSI controller
Eagle 100, 200, 300, 500, 550
AM-6000 or AM-6060
Eagle 450
Disk Driver
Filename
SCZDVR.DVR
SCSI Dispatcher
None (enter
SCZRR.DVR
SIMRR.SYS
SCZ190.DVR
SIM190.SYS
SCZRR.DVR
SCZR60.DVR
SCZ138.DVR
SIMRR.SYS
SIMR60.SYS
SIM138.SYS
RETURN )
If your computer uses CMOS boot settings and your system disk is not at SCSI ID 0, the
system disk driver must be a driver created with FIXLOG for that SCSI ID.
Then WRMGEN asks for the Number of logical units. If you do not have a selfconfiguring disk, or if the disk driver was created with FIXLOG, this question will not appear.
If you have a self-configuring disk, Bitmap size is the next question.
WRMGEN asks for a Language definition table name. The default is
DSK0:filename.LDF[1,6].
Next WRMGEN asks for the SCSI dispatcher. Enter the name of the simple SCSI
dispatcher for your computer or RETURN if your system doesn't use a dispatcher.
Then WRMGEN asks for your System terminal interface driver. Enter at least the
filename of your system terminal interface driver, such as AM318. The rest of the filespec
defaults to DSK0:filename.IDV[1,6].
Then enter your System terminal interface port number. The default value is
zero.
WRMGEN asks for the System terminal interface baud rate. You must enter the
actual baud rate, such as 9600. These baud rates are documented in your System Operator's
Guide to the System Initialization Command File. The default is 19200.
Next the program prompts you for the System terminal driver. Enter at least the file
name of your system terminal driver, such as ALPHA. The rest of the filespec will default to
DSK0:filename.TDV[1,6].
System Commands Reference Manual, Rev. 09
Page 3
WRMGEN
After you have entered this basic information, you will see a message asking you to enter the
names of Secondary Devices to be defined into system memory.
These are devices on your system you want to be operational after the warm boot (you may have
noted them in step 1 above). If you enter a device name, you must enter the name of the device,
one device name per line (for example, VCR0). Note there is no colon (:) after VCR0.
If a device is non-sharable, put a slash (/) in front of the device name. Printers, 1/4" streaming
tape drives, and video cassette recorders are non-sharable. Bitmaps, etc., are automatically set
up as needed.
When defining secondary devices, you must define all sharable devices (such as disks)
before any non-sharable devices.
For self-configuring disks, WRMGEN asks for the bitmap size; if the disk driver was not created
with FIXLOG, it also asks for the number of logical units.
This only defines the device into system memory; it does not load the actual device
driver programs (such as VCR.DVR).
WRMGEN then asks you to enter the names of the programs to be pre-loaded into System
memory.
If you have an intelligent controller (such as an AM-515), you must enter the microcode
file (such as AM515.MIC) along with the driver program. If the microcode file is not in
system memory, the device will not function. This applies to any device with a microcode
file (such as an AM-350).
The drivers for any tape devices you want to use must also be in system memory.
Enter only one program name at a time. To stop loading, press
Program
Program
Program
Program
Program
to
to
to
to
to
load:
load:
load:
load:
load:
RETURN
only. For example:
VCR.DVR[1,6] RETURN
CMDLIN.SYS RETURN
MTURES RETURN
SYSMSG.USA RETURN
RETURN
You may enter only the program name, if you wish. The rest of the program specification
defaults to DSK0:filename.LIT[1,4].
Alpha Micro systems prior to AM-1500 series systems may have a size limit of 64K for
a warm boot monitor. Consider this when defining programs, if you have such a system.
Now you will be asked to enter the names of the programs to be pre-loaded into the User
Partition. As before, enter only one program name at a time, and enter a blank line to stop.
The same defaults apply.
System Commands Reference Manual, Rev. 09
WRMGEN
Page 4
After you have transferred the warm boot monitor file to your backup media, remember to label
the container with the various programs you included in the monitor file so you will know which
programs you can use when you perform a warm boot.
MESSAGES
?Cannot open [filespec] - file not found
Check your syntax or use DIR to locate the file, and try again.
System Commands Reference Manual, Rev. 09
XED
FUNCTION
Creates and edits text files, especially program files.
CHARACTERISTICS
AlphaXED is re-entrant and re-usable. AlphaXED is a screen-oriented text editor designed
especially for writing program code. You see the text you are editing displayed on the screen, and
move the screen cursor to the location in your file you want to view or edit.
In Command mode, AlphaXED lets you search for specific strings of text, perform local and global
replacements, move and delete blocks of text, and change various editing parameters.
AlphaXED copies into memory the file you want to edit and makes a backup file by renaming the
disk file to a .BAK extension. When you exit AlphaXED, the new, edited version of the file goes
out to disk under the original name and extension of the file. You may edit a file too big to fit into
your memory partition.
An AlphaXED initialization file, XED.INI, lets you set your own default editing parameters. See
your AlphaXED User's Guide for more detail on using AlphaXED and setting up the XED.INI
file.
To exit AlphaXED, enter Command mode by pressing ESC . At the AlphaXED prompt, >,
enter F to exit and update your file, or Q if you want to exit without updating.
FORMAT
XED filespec {/switch}
filespec selects the file you want to edit, and switch is an option request. If you don't specify a
filespec, you are prompted for one. The default extension can vary—see your AlphaXED User's
Manual.
DEFAULTS
The defaults AlphaXED uses (for example, the default file extension), are defined in the
AlphaXED initialization file, XED.INI.
System Commands Reference Manual, Rev. 03 (AMOS 2.2 - 4/91)
XED
Page 2
OPTIONS
All the switches may be abbreviated to any unique characters.
/BATCH
Suppresses most screen display output. Especially for use with Task
Manager to reduce unnecessary screen output to the .LOG files.
/BIN
Used with binary and data files. Carriage returns and nulls are
transparent.
/NOJOURNAL
Turn journaling off.
/NODISPLAY
Turns off display of changes during a journal file recovery.
/NOYANK
Opens a file without putting any text into memory. Useful for
YANKing data into the front of a file too large for your memory.
/READ
Opens a file in another account for Read-only access. Lets you see a
file in a "protected" account. You can only exit with Q!—any changes
to the file are not kept.
/SUBROUTINE
Executes XED as if it were being called as a subroutine from another
program. Suppresses most interactive input and output.
/TRACE
Displays each line of the XED.INI file as it processes.
OPERATION
Enter XED followed by the specification of the file you want to edit. For example:
XED INVEN.M68
RETURN
If the file you specify does not yet exist, you are asked if you want to create it. Enter Y for Yes or
N for No. If you enter N, AlphaXED returns you to AMOS command level.
When you enter a file, you see either text, or a screen full of lines of asterisks (if the file is empty
or new). Now you can enter or edit your text. If the WRAP feature is set to OFF in your
XED.INI file, you must press RETURN at the end of each line to begin a new line. If the WRAP
feature is ON, AlphaXED begins a new line for you when you reach the end of a line.
If you are editing an existing file, AlphaXED loads a copy of that file into memory and takes you
directly to the mode (Screen mode or Command mode) indicated by the START command in the
XED.INI file.
If you are in Screen mode, you can use the various cursor movement and screen-to-screen
movement commands to move the cursor to the point in your text where you want to make changes.
Then use the appropriate screen editing commands to effect those changes. To transfer from
Screen mode to Command mode, or from Command mode to Screen mode, press ESC or press
CTRL /[. In Command mode, you see the cursor waiting after the AlphaXED prompt symbol, ">".
System Commands Reference Manual, Rev. 03 (AMOS 2.2 - 4/91)
Page 3
MESSAGES
The AlphaXED error messages are explained in your AlphaXED User's Guide.
System Commands Reference Manual, Rev. 03 (AMOS 2.2 - 4/91)
XED
XMOUNT
FUNCTION
Opens and makes an external AMOS format disk file available for use as a disk sub-device.
Closes and makes unavailable a sub-device that was previously XMOUNTed.
This command is only available on AMOS 8.x systems.
CHARACTERISTICS
XMOUNT is re-entrant and re-usable. XMOUNT is used to tell the system that you want to
access an externally defined native Alpha Micro Diskfile (AMD) as an AMOS disk subdevice.
When access to the subdevice is no longer required, it can be unXMOUNTed. AMOS 8.x
systems may have multiple AMD files on the local hard drives or on removable media such as
DVD-RAM. This command makes it possible to change which AMD file is accessible to AMOS
for a particular device name. It also allows the removable media to be conveniently replaced.
Read-only AMD files, whether on the hard drive or on read-only removable media, are not
supported.
After a device is XMOUNTed it must then be MOUNTed before full AMOS access is available.
XMOUNT/U will automatically do an unmount.
XMOUNT automatically creates the DEVTBL and BITMAP information in system shared
memory and therefore requires SMEM to be initialized.
Prerequisites:
A DVR:dev.DVR (=DVR:PCDSK.DVR) must exist or be created.
There must NOT be DEVTBL and BITMAP entries for the device in the system.INI file.
SMEM must be initialized and have sufficient free space to hold the device's DEVTBL entries
and BITMAP information. This means that XMOUNT cannot be used until after the final
SYSTEM and SMEM statements in the system.INI.
The device driver (dev.DVR) must be in system memory (loaded during system initialization).
The device must be defined on the [AMOS Disk] tab of the System Configuration screen and
point to a valid AMD file.
FORMAT
XMOUNT {/U} dev: {/U}
dev: is the specification of the device you want to xmount and /u is a switch that causes the
device to be unmounted.
System Commands Reference Manual, Rev. 16
XMOUNT
Page 2
OPTIONS
This switch is an operation switch, and may be abbreviated.
/UNMOUNT
Unmounts the specified disk.
OPERATION
To allow access to a removable AMD file, enter XMOUNT followed by the device specification.
For example:
XMOUNT REM: [return]
XMOUNT then displays how many logicals the device contains. This opens the AMD file and
builds the appropriate DEVTBL and BITMAP entries in SMEM. You must then use the AMOS
MOUNT command to mount the desired logical drives.
To close and disable access to a removable AMD file, enter XMOUNT/U followed by the device
specification. For example:
XMOUNT/U REM: [return]
This will flush any remaining unwritten data to the AMD file, close the file, and remove the devtbl
and bitmap entries from SMEM. If the AMD file is on a removable media, you must ensure that
the removable device has actually finished its writing process before ejecting the media. Failure to
allow the device to finish writing may cause loss of data or data corruption.
Using XMOUNT in conjunction with changing the AMD file in the [AMOS disks] tab of the
System Configuration screen allows you to change the AMD file referenced by the AMOS device
without rebooting the AMOS system.
SYSTEM INITIALIZATION FILE
The following changes in the system initialization file may be required:
Load the device driver into system memory. For example:
SYSTEM REM.DVR[1,6]
Do NOT add DEVTBL or BITMAP for this device to the system initialization file.
Setup SMEM if it is not already defined. For example:
SMEM 5000K
This sets up a 5MB shared memory area. The SMEM statement must be after the last SYSTEM
statement.
System Commands Reference Manual, Rev. 16
Page 3
XMOUNT
MESSAGES
?Device contains nnn logical units.
Shows that the device has nnn logical drives configured.
?Device does not exist.
Device does not exist in DEVTBL when doing XMOUNT/U.
?Device is not AMOS format
The hidden sector of the device is invalid.
?Error - Driver must be in system memory.
The driver for the device is not in system memory. The system initialization file should be
modified if necessary.
?Error - Invalid Switch.
A switch other than /U was entered.
?Error: Not a releasable device.
The specified device is defined in system memory instead of in SMEM and cannot be
unXMOUNTed.
?Error opening device - ....
The AMD file could not be opened for the reason shown.
?Error -- unable to acquire shared memory.
Either SMEM does not exist or there is insufficient free space or device already exists in
SMEM. You cannot XMOUNT a device that is already XMOUNTed.
?Impossible error - can't find DEV SMEM module
For some unknown reason the device information could not be found in SMEM when
doing a XMOUNT/U.
System Commands Reference Manual, Rev. 16
XY
FUNCTION
Lets you position the screen cursor on your terminal display and set certain terminal attributes.
CHARACTERISTICS
XY is re-entrant and re-usable. To be able to use the XY command, your terminal driver (the
program that takes care of the screen-positioning functions of your terminal) must allow use of
TCRT screen calls.
XY can perform any TCRT function your terminal supports. See your AMOS Terminal
Programmer's Manual for a complete list of TCRT calls.
XY can be used at AMOS command level directly or within a command file. You will probably
find this command most useful within a command file; you can use XY to help you position and
control the display of your command file messages.
FORMAT
XY row-number column-number
or:
XY = screen-function
or:
XY negative-number positive number
The first format is for positioning the cursor on the screen—row-number is the horizontal position
and column-number is the vertical position. The row-number may be between 1 and the length of
your screen (usually 24). The column number may be between 1 and the width of your screen
(usually 80).
The second format is for special screen function calls (TCRT -1,n).
The third format, called direct format, lets you enter any TCRT command, including foreground
and background color changes.
OPERATION
TO POSITION THE CURSOR:
Type XY followed by the numbers of the screen row and column where you want the cursor to be.
For example:
XY 12 40
RETURN
System Commands Reference Manual, Rev. 04
XY
Page 2
This positions the cursor to the 12th line on the screen and the 40th character position (about the
middle of the screen on most terminals).
You can also use the row-column format to perform TCRT functions, by subtracting the
first number of the TCRT call from 256. For example, an AlphaBASIC TAB (-5,42),
would be XY 251 42.
TO SELECT A SCREEN FUNCTION (TCRT (-1,n)):
Enter XY, an equal sign, and the number of the screen function you want to perform. For
example:
XY = 0 RETURN
XY = 32 RETURN
The first command clears your screen. The second turns on reverse video, so characters are
displayed the opposite way they normally are—i.e., if your screen normally displays green letters
on a black background, you would see black letters on a green background.
USING DIRECT FORMAT
To use any TCRT function, enter XY and the TCRT codes. For example:
XY -2 1
RETURN
This sets the foreground color to color number 1.
You can use any of the three formats to perform a TCRT (-1,n) function. For example,
each of these commands clears the screen:
xy = 0 RETURN
xy 255 0 RETURN
xy -1 0 RETURN
Screen function format
Row-column format
Direct format
System Commands Reference Manual, Rev. 04
640INI
FUNCTION
Loads the AM-515 controller with AM-640 mag tape interface microcode. Use after warm booting
from a mag tape attached to the AM-640 paddle card to provide file-structured access to tapes
created with MTUSAV or another file-structured tape utility.
CHARACTERISTICS
640INI is re-entrant and re-usable. It works only if you have an AM-515-10 in your VME system.
If not, your job may lock up if you try to run 640INI. 640DVR.DVR must be in either system or
user memory to use 640INI.
OPERATION
You need to use 640INI only after warm booting your computer from a mag tape. If your system
meets the requirements for 640INI, create a warm boot tape containing AM640.MIC,
640DVR.DVR, and 640INI.LIT added to the system memory partition list.
When you warm boot using this tape, after you see the Up and running... message, type:
640INI
RETURN
You should see the message:
Microcode initialization successful
You can now read file-structured tapes on your mag tape drive.
MESSAGES
?640DVR.DVR expected to be in memory
640INI requires 640DVR.DVR in system memory. Load the file into memory and try
again.
?Driver does not contain an initialization routine
The copy of 640DVR.DVR in system memory has somehow been corrupted and 640INI
cannot find and read the initialization routine. You need to find a clean copy of
640DVR.DVR and load it into system memory.
System Commands Reference Manual, Rev. 04
640INI
Page 2
?Error during initialization
A problem occurred during microcode initialization and the process could not complete.
Make sure AM640.MIC is available in memory or in DSK0:[1,6].
System Commands Reference Manual, Rev. 04
Appendix A - Character Sets
AMOS uses a single-byte character set. Such a character set can represent 256 different characters. The
character set is aligned with a number of international standards.
A SHORT HISTORY OF CHARACTER SETS
The first international standard was set in 1965 by ECMA (European Computer Manufacturer’s
Association) and was known as ECMA-6. The character set was adopted by other standards bodies, and is
also known as US-ASCII, DIN 66003, and ISO 646. The standard only defined a basic alphabet, and did
not allow for national characters in use in many European countries. Such characters were incorporated by
specifying twelve code points (see Note 1 in the table below) as being places where replacement characters
could be defined. For example, Germany defined the letter Ä at code point 91, where the [ character was
located. These character sets were called the “national ISO 646 variants”. Portability of files containing
such characters were low.
In 1981, the IBM PC introduced an 8-bit character set with Code Page 437, a character set with many
special characters. In 1982 DEC MCS (Multi Language Character Set) was released. This character set
was very similar to ISO 6937/2, which in turn is almost identical to the modern standard for 8-bit character
sets, ISO 8859. In 1985 ECMA standardized ECMA-94, which dealt with almost all European languages.
ECMA-94 was taken up by ISO, as ISO 8859-1 through 8859-4, and standardized in 1987.
Microsoft released MS-DOS 3.3 in 1987, which used Code Page 850. This code page uses all the
characters from ISO 8859-1, plus a few extra at code points representing the non-printing characters. A
second code page, Code Page 819, is fully ISO 8859-1 compliant.
THE ISO 8859 FAMILY OF STANDARDS AND AMOS
The ISO 8859-x character sets are designed for maximum interoperability and portability. All of them are a
superset of US-ASCII and will render English text properly. The code points 0xA0 through 0xFF are used
to represent national characters, while the characters in the range 0x20 through 0x7F are the same as in the
ISO 646 (US-ASCII) character set. Thus ASCII text is a subset of all ISO 8859 character sets, and will be
rendered properly by them. The code points 0x80 through 0x9F are earmarked as extended control
characters and are not used for encoding characters.
The ISO 8859 family of standards consists of:
8859-1
8859-2
8859-3
8859-4
8859-5
8859-6
8859-7
For Europe, Latin America, the Caribbean, Canada, and Africa
For Eastern Europe
For SE Europe, and a miscellany of alphabets, such as Esperanto, and
Maltese
For Scandinavia, and the Baltic states (mostly covered by 8859-1 also)
For languages using the Cyrillic alphabet
For languages using Arabic
For modern Greek
System Commands Reference Manual, Rev. 07
Page 2
Appendix A
8859-8
8859-9
For Hebrew
Known as Latin-5. The same as 8859-1 except for Turkish instead of
Icelandic characters
Known as Latin-6, for Lappish, Nordic, and Eskimo languages
8859-10
ISO 8859-1 (also known as ISO Latin-1) has the required characters to display most Western European
languages. It supports Afrikaans, Basque, Catalan, Danish, Dutch, English, Faeroese, Finnish, French,
Galician, German, Icelandic, Irish, Italian, Norwegian, Portuguese, Spanish and Swedish. It cannot support
Welsh, due to two missing characters (Latin Letter W with circumflex and Latin Letter Y with circumflex).
It is the preferred encoding for the Internet.
AMOS follows this lead, and expects 8-bit aware software to use these ISO standards.
In passing, the ISO 8859-1 standard is a subset of the Unicode 1.x and 2.0 standards, which use 16-bit
character sets to encode most of the world’s alphabets. Unicode has aligned itself with a further ISO
standard for 32-bit character sets, ISO 10646-1:1993. There are several mappings available (such as UTF8) which can map Unicode characters to a variable length 8-bit based encoding.
Character
Also
Called
Octal Decimal Hex
Value Value Value
NULL
SOH
STX
ETX
EOT
ENQ
ACK
BEL
BS
HT
LF
VT
0
1
2
3
4
5
6
7
10
11
12
13
0
1
2
3
4
5
6
7
8
9
10
11
0
1
2
3
4
5
6
7
8
9
A
B
FF
CR
SO
SI
DLE
DC1
DC2
DC3
DC4
NAK
SYN
ETB
CAN
EM
SUB
ESC
FS
GS
RS
US
SP
!
14
15
16
17
20
21
22
23
24
25
26
27
30
31
32
33
34
35
36
37
40
41
12
13
14
15
16
17
18
19
20
21
22
23
24
25
26
27
28
29
30
31
32
33
C
D
E
F
10
11
12
13
14
15
16
17
18
19
1A
1B
1C
1D
1E
1F
20
21
IS4
IS3
IS2
IS1
ISO/IEC 10646-1:1993(E)
and Unicode 2.0 Name
Also Known As
Null
Start of Heading
Start of Text
End of Text
End of Transmission
Enquiry
Acknowledge
Bell
Backspace
Character Tabulation (Tab)
Line Feed
Line Tabulation (Vertical
Tab)
Form Feed
Carriage Return
Shift Out
Shift In
Data Link Escape
Device Control One
Device Control Two
Device Control Three
Device Control Four
Negative Acknowledge
Synchronous Idle
End of Transmission Block
Cancel
End of Medium
Substitute
Escape
File Separator
Group Separator
Record Separator
Unit Separator
Space
Exclamation Mark
Type. See
Note
Cc
Cc
Cc
Cc
Cc
Cc
Cc
Cc
Cc
Cc
Cc
Cc
Cc
Cc
Cc
Cc
Cc
Cc
Cc
Cc
Cc
Cc
Cc
Cc
Cc
Cc
Cc
Cc
Cc
Cc
Cc
Cc
Zs
Po
System Commands Reference Manual, Rev. 07
Character Sets
Character
"
#
$
%
&
'
(
)
*
+
,
.
/
0
1
2
3
4
5
6
7
8
9
:
;
<
=
>
?
@
A
B
C
D
E
F
G
H
I
J
K
L
M
N
O
P
Q
R
S
T
U
V
W
X
Y
Z
[
Also
Called
Page 3
Octal
Value
42
43
44
45
46
47
50
51
52
53
54
55
56
57
60
61
62
63
64
65
66
67
70
71
72
73
74
75
76
77
100
101
102
103
104
105
106
107
110
111
112
113
114
115
116
117
120
121
122
123
124
125
126
127
130
131
132
133
Decimal
Value
34
35
36
37
38
39
40
41
42
43
44
45
46
47
48
49
50
51
52
53
54
55
56
57
58
59
60
61
62
63
64
65
66
67
68
69
70
71
72
73
74
75
76
77
78
79
80
81
82
83
84
85
86
87
88
89
90
91
Hex
Value
22
23
24
25
26
27
28
29
2A
2B
2C
2D
2E
2F
30
31
32
33
34
35
36
37
38
39
3A
3B
3C
3D
3E
3F
40
41
42
43
44
45
46
47
48
49
4A
4B
4C
4D
4E
4F
50
51
52
53
54
55
56
57
58
59
5A
5B
ISO/IEC 10646-1:1993(E)
and Unicode 2.0 Name
Quotation Mark
Number Sign
Dollar Sign
Percent Sign
Ampersand
Apostrophe
Left Parenthesis
Right Parenthesis
Asterisk
Plus Sign
Comma
Hyphen-Minus
Full Stop
Solidus
Digit Zero
Digit One
Digit Two
Digit Three
Digit Four
Digit Five
Digit Six
Digit Seven
Digit Eight
Digit Nine
Colon
Semicolon
Less-Than Sign
Equals Sign
Greater-Than Sign
Question Mark
Commercial At
Latin Capital Letter A
Latin Capital Letter B
Latin Capital Letter C
Latin Capital Letter D
Latin Capital Letter E
Latin Capital Letter F
Latin Capital Letter G
Latin Capital Letter H
Latin Capital Letter I
Latin Capital Letter J
Latin Capital Letter K
Latin Capital Letter L
Latin Capital Letter M
Latin Capital Letter N
Latin Capital Letter O
Latin Capital Letter P
Latin Capital Letter Q
Latin Capital Letter R
Latin Capital Letter S
Latin Capital Letter T
Latin Capital Letter U
Latin Capital Letter V
Latin Capital Letter W
Latin Capital Letter X
Latin Capital Letter Y
Latin Capital Letter Z
Left Square Bracket
System Commands Reference Manual, Rev. 07
Also Known As
(Hash)
Apostrophe-Quote
Opening Parenthesis
Closing Parenthesis
Minus Sign
Period
Slash
Opening Square Bracket
Type. See
Note
Po
So
1
Sc
1
Po
So
Po
Ps
Pe
So
Sm
Po
Pd
Po
Po
Nd
Nd
Nd
Nd
Nd
Nd
Nd
Nd
Nd
Nd
Po
Po
Sm
Sm
Sm
Po
Po
1
Lu
Lu
Lu
Lu
Lu
Lu
Lu
Lu
Lu
Lu
Lu
Lu
Lu
Lu
Lu
Lu
Lu
Lu
Lu
Lu
Lu
Lu
Lu
Lu
Lu
Lu
Ps
1
Page 4
Character
Appendix A
Also
Called
\
]
^
_
Octal
Value
134
135
136
137
Decimal
Value
92
93
94
95
Hex
Value
5C
5D
5E
5F
ISO/IEC 10646-1:1993(E)
and Unicode 2.0 Name
Reverse Solidus
Right Square Bracket
Circumflex Accent
Low Line
`
a
b
c
d
e
f
g
h
i
j
k
l
m
n
o
p
q
r
s
t
u
v
w
x
y
z
{
|
}
~
DEL
PAD
HOP
BPH
NBH
IND
NEL
SSA
ESA
HTS
HTJ
140
141
142
143
144
145
146
147
150
151
152
153
154
155
156
157
160
161
162
163
164
165
166
167
170
171
172
173
174
175
176
177
200
201
202
203
204
205
206
207
210
211
96
97
98
99
100
101
102
103
104
105
106
107
108
109
110
111
112
113
114
115
116
117
118
119
120
121
122
123
124
125
126
127
128
129
130
131
132
133
134
135
136
137
60
61
62
63
64
65
66
67
68
69
6A
6B
6C
6D
6E
6F
70
71
72
73
74
75
76
77
78
79
7A
7B
7C
7D
7E
7F
80
81
82
83
84
85
86
87
88
89
Grave Accent
Latin Small Letter A
Latin Small Letter B
Latin Small Letter C
Latin Small Letter D
Latin Small Letter E
Latin Small Letter F
Latin Small Letter G
Latin Small Letter H
Latin Small Letter I
Latin Small Letter J
Latin Small Letter K
Latin Small Letter L
Latin Small Letter M
Latin Small Letter N
Latin Small Letter O
Latin Small Letter P
Latin Small Letter Q
Latin Small Letter R
Latin Small Letter S
Latin Small Letter T
Latin Small Letter U
Latin Small Letter V
Latin Small Letter W
Latin Small Letter X
Latin Small Letter Y
Latin Small Letter Z
Left Curly Bracket
Vertical Line
Right Curly Bracket
Tilde
VTS
PLD
PLU
RI
SS2
SS3
DCS
PU1
PU2
STS
212
213
214
215
216
217
220
221
222
223
138
139
140
141
142
143
144
145
146
147
8A
8B
8C
8D
8E
8F
90
91
92
93
Also Known As
Backslash
Closing Square Bracket
Spacing Circumflex; Caret
Spacing Underscore;
Underscore
Spacing Grave
Opening Curly Bracket
Vertical Bar
Closing Curly Bracket
Delete
Padding Character
High Octet Preset
Break Permitted Here
No Break Here
Index
Next Line
Start of Selected Area
End of Selected Area
Character Tabulation Set
Character Tabulation with
Justification
Line Tabulation Set
Partial Line Forward
Partial Line Backward
Reverse Line Feed
Single-Shift Two
Single-Shift Three
Device Control String
Private Use One
Private Use Two
Set Transmit State
Type. See
Note
Po
1
Pe
1
Lm
1
So
Lm
Ll
Ll
Ll
Ll
Ll
Ll
Ll
Ll
Ll
Ll
Ll
Ll
Ll
Ll
Ll
Ll
Ll
Ll
Ll
Ll
Ll
Ll
Ll
Ll
Ll
Ll
Ps
So
Pe
So
Cc
Cc
Cc
Cc
Cc
Cc
Cc
Cc
Cc
Cc
Cc
1
1
1
1
1
Cc
Cc
Cc
Cc
Cc
Cc
Cc
Cc
Cc
Cc
System Commands Reference Manual, Rev. 07
Character Sets
Character
CCH
MW
SPA
EPA
SOS
SGCI
Also
Called
Page 5
Octal
Value
224
225
226
227
230
231
Decimal
Value
148
149
150
151
152
153
Hex
Value
94
95
96
97
98
99
SCI
CSI
ST
OSC
PM
APC
232
233
234
235
236
237
154
155
156
157
158
159
9A
9B
9C
9D
9E
9F
NBSP
¡
¢
£
¤
¥
¦
§
¨
©
ª
«
240
241
242
243
244
245
246
247
250
251
252
253
160
161
162
163
164
165
166
167
168
169
170
171
A0
A1
A2
A3
A4
A5
A6
A7
A8
A9
AA
AB
¬
®
¯
°
±
²
³
´
µ
¶
·
¸
¹
º
»
254
255
256
257
260
261
262
263
264
265
266
267
270
271
272
273
172
173
174
175
176
177
178
179
180
181
182
183
184
185
186
187
AC
AD
AE
AF
B0
B1
B2
B3
B4
B5
B6
B7
B8
B9
BA
BB
¼
½
¾
274
275
276
188
189
190
BC
BD
BE
¿
À
277
300
191
192
BF
C0
Á
301
193
C1
Â
302
194
C2
Ã
303
195
C3
Ä
304
196
C4
ISO/IEC 10646-1:1993(E)
and Unicode 2.0 Name
Also Known As
Cancel Character
Message Waiting
Start of Guarded Area
End of Guarded Area
Start of String
Single Graphic Character
Introducer
Single Character Introducer
Control Sequence Introducer
String Terminator
Operating System Command
Privacy Message
Application Program
Command
No-Break Space
Inverted Exclamation Mark
Cent Sign
Pound Sign
Currency Sign
Yen Sign
Broken Bar
Section Sign
Diaeresis
Copyright Sign
Feminine Ordinal Indicator
Left-Pointing Double Angle
Quotation Mark
Not Sign
Soft Hyphen
Registered Sign
Macron
Degree Sign
Plus-Minus Sign
Superscript Two
Superscript Three
Acute Accent
Micro Sign
Pilcrow Sign
Middle Dot
Cedilla
Superscript One
Masculine Ordinal Indicator
Right-Pointing Double Angle
Quotation Mark
Vulgar Fraction One Quarter
Vulgar Fraction One Half
Vulgar Fraction Three
Quarters
Inverted Question Mark
Latin Capital Letter A With
Grave
Latin Capital Letter A With
Acute
Latin Capital Letter A With
Circumflex
Latin Capital Letter A With
Tilde
Latin Capital Letter A With
System Commands Reference Manual, Rev. 07
Type. See
Note
Cc
Cc
Cc
Cc
Cc
Cc
Cc
Cc
Cc
Cc
Cc
Cc
Zs
Po
Sc
Sc
Sc
Sc
So
So
Lm
So
So
Ps
Sm
Po
So
Lm
So
Sm
So
So
Lm
So
So
Po
Lm
So
So
Pe
So
So
So
Po
Lu
Lu
Lu
Lu
Lu
Page 6
Character
Appendix A
Also
Called
Octal Decimal Hex
Value Value Value
Å
305
197
C5
Æ
Ç
306
307
198
199
C6
C7
È
310
200
C8
É
311
201
C9
Ê
312
202
CA
Ë
313
203
CB
Ì
314
204
CC
Í
315
205
CD
Î
316
206
CE
Ï
317
207
CF
Ð
Ñ
320
321
208
209
D0
D1
Ò
322
210
D2
Ó
323
211
D3
Ô
324
212
D4
Õ
325
213
D5
Ö
326
214
D6
×
Ø
327
330
215
216
D7
D8
Ù
331
217
D9
Ú
332
218
DA
Û
333
219
DB
Ü
334
220
DC
Ý
335
221
DD
Þ
ß
à
336
337
340
222
223
224
DE
DF
E0
á
341
225
E1
â
342
226
E2
ã
343
227
E3
ISO/IEC 10646-1:1993(E)
and Unicode 2.0 Name
Diaeresis
Latin Capital Letter A With
Ring Above
Latin Capital Ligature AE
Latin Capital Letter C With
Cedilla
Latin Capital Letter E With
Grave
Latin Capital Letter E With
Acute
Latin Capital Letter E With
Circumflex
Latin Capital Letter E With
Diaeresis
Latin Capital Letter I With
Grave
Latin Capital Letter I With
Acute
Latin Capital Letter I With
Circumflex
Latin Capital Letter I With
Diaeresis
Latin Capital Letter Eth
Latin Capital Letter N With
Tilde
Latin Capital Letter O With
Grave
Latin Capital Letter O With
Acute
Latin Capital Letter O With
Circumflex
Latin Capital Letter O With
Tilde
Latin Capital Letter O With
Diaeresis
Multiplication Sign
Latin Capital Letter O With
Stroke
Latin Capital Letter U With
Grave
Latin Capital Letter U With
Acute
Latin Capital Letter U With
Circumflex
Latin Capital Letter U With
Diaeresis
Latin Capital Letter Y With
Acute
Latin Capital Letter Thorn
Latin Small Letter Sharp S
Latin Small Letter A With
Grave
Latin Small Letter A With
Acute
Latin Small Letter A With
Circumflex
Latin Small Letter A With
Tilde
Also Known As
Type. See
Note
Lu
Lu
Lu
2
Lu
Lu
Lu
Lu
Lu
Lu
Lu
Lu
Lu
Lu
Lu
Lu
Lu
Lu
Lu
Sm
Lu
Lu
Lu
Lu
Lu
Lu
Lu
Ll
Ll
Ll
Ll
Ll
System Commands Reference Manual, Rev. 07
Character Sets
Character
ä
å
æ
ç
è
é
ê
ë
ì
í
î
ï
ð
ñ
ò
ó
ô
õ
ö
÷
ø
ù
ú
û
ü
ý
þ
ÿ
Also
Called
Page 7
Octal Decimal Hex
ISO/IEC 10646-1:1993(E)
Value Value Value
and Unicode 2.0 Name
344
228
E4
Latin Small Letter A With
Diaeresis
345
229
E5
Latin Small Letter A With
Ring Above
346
230
E6
Latin Small Ligature AE
347
231
E7
Latin Small Letter C With
Cedilla
350
232
E8
Latin Small Letter E With
Grave
351
233
E9
Latin Small Letter E With
Acute
352
234
EA
Latin Small Letter E With
Circumflex
353
235
EB
Latin Small Letter E With
Diaeresis
354
236
EC
Latin Small Letter I With
Grave
355
237
ED
Latin Small Letter I With
Acute
356
238
EE
Latin Small Letter I With
Circumflex
357
239
EF
Latin Small Letter I With
Diaeresis
360
240
F0
Latin Small Letter Eth
361
241
F1
Latin Small Letter N With
Tilde
362
242
F2
Latin Small Letter O With
Grave
363
243
F3
Latin Small Letter O With
Acute
364
244
F4
Latin Small Letter O With
Circumflex
365
245
F5
Latin Small Letter O With
Tilde
366
246
F6
Latin Small Letter O With
Diaeresis
367
247
F7
Division Sign
370
248
F8
Latin Small Letter O With
Stroke
371
249
F9
Latin Small Letter U With
Grave
372
250
FA
Latin Small Letter U With
Acute
373
251
FB
Latin Small Letter U With
Circumflex
374
252
FC
Latin Small Letter U With
Diaeresis
375
253
FD
Latin Small Letter Y With
Acute
376
254
FE
Latin Small Letter Thorn
377
255
FF
Latin Small Letter Y with
Diaeresis
System Commands Reference Manual, Rev. 07
Also Known As
Type. See
Note
Ll
Ll
Ll
Ll
Ll
Ll
Ll
Ll
Ll
Ll
Ll
Ll
Ll
Ll
Ll
Ll
Ll
Ll
Ll
Sm
Ll
Ll
Ll
Ll
Ll
Ll
Ll
Ll
2
Page 8
Appendix A
Notes:
1. This code point is used by National Replacement Character Sets (7-bit character sets). Devices
using such an NRC will not print the glyph shown, neither will it print glyphs for code points
above 127.
2. ISO may be reclassifying these code points as “Latin Letter”, as certain Scandinavian
languages use these characters as a complete letter, not as a ligature.
Type: The characters are broken down into “character types” by Unicode:
Cc
Ll
Lm
Lu
Nd
Pd
Pe
Po
Ps
Sc
Sm
So
Zs
Control or Format Character
Lowercase Letter
Modifier Letter
Uppercase Letter
Decimal Number
Dash Punctuation
Close Punctuation
Other Punctuation
Open Punctuation
Currency Symbol
Math Symbol
Other Symbol
Space Separator
System Commands Reference Manual, Rev. 07
Document History
Revision
Release
Date
Description
A00
L 1.0
06/82
New Document, Part Number DSS-10004-00.
A01
L 1.0A
10/82
Added AM-600/T Magnetic Tape Utility Program Reference Sheets.
A02
L 1.1
03/83
Added VCR and 1/4" Streamer Tape Driver backup commands. Added
info on initializing BADBLK.SYS disk drives and modifying
BADBLK.SYS to Added new LOKSER commands, LOKGEN and
LOKUTL. Other minor changes.
A03
L 1.1
06/83
Added AM-415 information to BADBLK and FIX420. Added CRT415
and VER reference sheets.
A04
L 1.1A
08/83
Added Winchester disk information to BADBLK and FIX420. Added
CPMCPY, CPMDIR, MENU, MTBOOT, and SHELL. Added 1/2"
mag tape density settings to SET.
A05
L 1.2
05/84
Added the MONHSH reference sheet. Revised CRT610, DIR, SET,
VCRDIR, VCRRES, VCRSAV, and VUE commands.
A06
L 1.3
06/85
Updated DSKANA, MONGEN, MAKQUE, SET, STAT and TSKINI.
Added CACHE, ERSATZ, PRNT and VERIFY.
A07
L 1.3B
05/86
Added new VCR remote control information. Changed BITMAP to
include size field. Added FIXLOG sheet.
A08
32 1.0
07/86
Added reference sheets for new commands: IF, LOGGER, LOGON,
MUSER, SETJOB, SYSLOG. Updated DO, LOG, LOGOFF,
SYSTAT, and TRMDEF. AMOS/32 only.
A09
L 1.3C
32 1.0A
12/86
Added reference sheets for new commands: MTUDIR, MTURES, and
MTUSAV, updated BITMAP and FIXLOG.
00
2.0
03/88
New Manual, DSO-00043-00. Re-wrote the book to include all new
2.0 features. Information on extended disks, new BACKUP commands,
etc.
01
2.0A
12/88
Added CRT520 and FMTSCZ; added SCSI disk information to
BADBLK; added error messages and clarified BACKUP, BAKDIR,
RESTOR, all STR... and VCR... commands. Revised chapter 2, chapter
5, DSKDDT, DSKDMP, MONTST, PRNT and SYSACT.
02
2.1
09/89
Added changes to BACKUP and related programs. Added new
FIXTRN and MFDSEQ reference sheets, revised CREATE, CRT610,
DSKANA, FILCOM, LOG, REDALL, RNDRED, and SET to
document new features.
03
2.2
04/91
Added new DOS utility programs, also CBEN, CBDS, UTC, XED,
WRDCNT, LINCNT, CDIR, CMP, CTYPE, EXP, TDVDEF, REDIR,
POP, PUSH, GETVER, MK, OSINST, AGREP, DB, SMEM and
BASBP. Updated BACKUP, BADBLK, CRT610, DIRSEQ,
DSKANA, ERASE, FILCOM, FILTAP, FIXFLP, FIXTRN, FMTFLP,
FMTSCZ, LOG, LOGON, LOKUTL, MONGEN, MOUNT, MTUDIR,
MTURES, MTUSAV, MUSER, SET, SORT, SYSACT, TAPDIR,
TAPFIL, VCRRES, and VCRSAV.
04
2.3
09/96
Added ACD, ADJIT, AMSCFG, BASICP, BASICX, COMPAT,
COMPLP, DOSEXP, FIX219, FMT219, FWUPD, LDVSTS,
System Commands Reference Manual, Rev. 18
Document History
Page 2
Revision
Release
Date
Description
PLAYCD, RADMON, RUNP, RUNX, SCSI, SCZCSH, SCZPIC,
SETPEN, SI, STAT1, TAPLOG, TMODE, and 640INI. Updated
Chapters 5 and 6, ASCDMP, BACKUP, CACHE, CBEN, CBDS,
COPY, CRT610, CRT620, DATE, DIRSEQ, DSKANA, DUMP,
ERSATZ, FIXLOG, FIXFLP, FMTFLP, FMTSCZ, JOBPRI, LABEL,
MK, MONTST, MOUNT, MTURES, MTUSAV, MUSER, PPN,
PRINT, PUSH, REDIR, SET, SETJOB, SMEM, STAT, STRDIR,
STRRES, STRSAV, SYSLOG, UTC, VCRRES, VDKUTL, VERIFY,
WRMGEN, and XY.
05
2.3
03/97
Added FMTS2. Added note about FMTS2 to FMTSCZ sheet.
06
2.3A
06/97
Updated DSKANA, MONGEN, MONTST, SET, WRMGEN.
07
2.3A
12/97
Added SCZERR. Reformatted manual. General update and corrections
as necessary to all commands. Updated Appendix A.
08
2.3A, PR
6/98
6/98
Rewrote MTUSAV; updated FMTS2 (maximum logical size), and
RADMON (new switches)
09
2.3A, PR
4/99
4/99
Added FMSFLP; updated SYSLOG andWRMGEN.
10
2.3A, PR
10/99
10/99
Updated SET and added MAKACD.
11
2.3A, PR
10/99
2/00
Updated MAKACD and added ESTAT.
12
2.3A, PR
06/00
8/00
Updated SI
13
2.3A, PR
06/00
1/01
Updated SCSI and RADMON
14
2.3A, PR
06/00
3/01
Added ESLSI and ESNIC, deleted ESTAT.
15
2.3A, PR
06/00
2/02
Added ISOCD, DVD, MAKDVD, and FMTDVD
16
8.0, 05/04
5/04
Added XMOUNT
17
8.X, 10/06
10/06
Added DVDRES
18
8.X, 9/07
09/07
Added MAKBD, DIRBD, DBD, and BDRES
System Commands Reference Manual, Rev. 18