Download View or Instructions

Transcript
ReportWare
1460 Manzanita Lane
Reno, NV 89509-5207
(888) REPWARE
(775) 827-4494/ fax 827-3213
www.ReportWare.com
[email protected]
Demo Instructions
Cabaret Management Software
May, 2004
Thank you for considering a demonstration of ReportWare’s Cabaret Management
software. This download contains a demo of the entire Cabaret Management Software
suite, incorporating both our Labor Law compliant Cabaret Management and
Timekeeping software and our integrated Secure Dance Dollar software. You may view
the package without the dance dollar features if you wish, to see only the features of the
basic Cabaret Management Software.
You may install the program on your computer by running Setup.exe from download. At
each program launch, you’ll be prompted to select the feature set you wish to view and
offered a chance to register. Registration will turn this demo into a fully functioning
program.
Demo Instructions:
The following document contains the instructions for installing and using the Demo
version of ReportWare’s Cabaret Management Software.
Some features are unavailable or crippled in this demonstration version. While the live
product can fully support multi user environments, the demo version does not. Most
security functions are disabled, as are some printing functions. The demo will, however,
let you perform most normal functions.
This demo version will expire after a certain number of launches. Should you require
additional time, please contact us.
MINIMUM SYSTEM REQUIREMENTS
Windows users must have Windows 98, NT 4.0 (SP 6), ME, XP, 2000 (any version: Pro,
Server, or Advanced Server), or 2003, on a PC with a Pentium II or better processor.
Macintosh users must have a G3 or better processor with System 8.1 or later. Mac OS X
native versions are available. You must have 30 Mb free hard disk space to install this
software with all supporting files.
INSTALLATION INSTRUCTIONS
Windows:
Load the Demo Version to your hard drive:
ReportWare
Download Setup.exe to any location on your hard drive. Double click this Setup.exe file
(or “RUN” it from your Start Menu). This will allow you to select a subdirectory for
installation or, by default, install into your Programs subdirectory. An uninstall program
is also created.
BASIC OPERATION
These instructions are only to initially familiarize you with some of ReportWare’s
features. This is a deep, fully featured program whose extensive features are more fully
described in our user manual and supported in the full version of our software.
1. Launching the program:
Windows: Launch DanceWare from the ReportWare Group on your Start Menu.
You may also open the DanceWare subdirectory and double click the file called
DanceWare.exe.
2.
Selections: When you launch the program, you will be prompted to register this
software. If you have purchased a license, you may register the software to fully
enable it, or you may click to Run Demo (without registering the software). You are
now presented with an information screen that you may dismiss with the “Continue”
button. If you don’t press Continue, the screen will move on to the Main Menu
anyway in 30 seconds. You will be asked if you want this Demo to display Dance
dollar printing and tracking functions. If you say NO, the menu above will be
Demo Instructions
Page 2
ReportWare
presented; otherwise, you will see a more extensive menu which includes all this,
plus more—all of which is described below in the section on Dance Dollars.
3. Dummy records are provided with employee ID’s of 1 through 8. This demo will not
let you set up new employees, but you may edit these as you please. Some demo
employees have quite a lot of information and even photographs; some don’t. If you
don’t like the information you see, change it. Only social security numbers may not
be changed.
4. You may enter all the Dance and Regular Employee Timekeeping records you wish.
Use these to experiment and learn the software, then you may delete these records
when you wish. Do not be afraid to experiment with making new entries and dummy
records.
ReportWare’s Main Menu
INTERFACE AND MODULE NOTES
1. When you launch the program, you will be presented with ReportWare’s Main Menu.
Simply click on whatever looks interesting. Lost?? You can return to the Main
Menu by pressing the Main Menu button or typing Ctrl-2 from any screen.
2. Interface notes: This program is very button and mouse oriented for ease of use. For
example, in several modules, such as the Main Employee Module, you will notice the
File Tab looking buttons labeled “Main Data”, “Tax & Payroll”, etc.
Main
Da ta
Ta x &
Payroll
Pe rs onne l
Photo &
Date s
Click on these to navigate to more data entry screens. Some screens, for example,
“Tax & Payroll”, have submenu buttons like “Transfers”, “Emp. Times”, etc.
Transfer s
Emp. Time s
Be nefits
Try clicking around on these. Wherever you see a little green grid like button at the
left side of a scrolling list, you may click on it for more information.
The little gray graph like button at the top of lists will cause the list to sort in the
order named.
The small yellow box with a question mark gives on screen instructions. The Tab
key is used to go from one field to the next; shift-tab goes backward. The Enter key
(by the number keypad, not the Return key) dismisses dialogs and makes things
happen.
Demo Instructions
Page 3
ReportWare
3. Searching: This is a full-featured database and anything entered may be located later.
You may use the automated search buttons to locate single or groups of records, or
you may do free form searches on anything. From any screen, type Ctrl-F, fill in the
data you’re looking for in the field in which it was entered and press the Enter key
(the one on the extreme right side of your keyboard by the number pad, not the
“return” key).
4. Employee Module: Employee files are set up in the Employee Module, including tax
and withholding status. This is done for each employee. Each employee must
(obviously) have a different social security and employee ID number. Employee ID
numbers are user assigned and must be numbers (not alpha).
5. Preferences: Click on the Preferences tab from the Main Menu to set up company
wide preferences. Some items are not alterable in this demo. Click on each tab and
sub tab to see choices offered. Notice that here is where you may set up and review
employee passwords and jargon for performance reviews. For the purpose of this
demo, we recommend that you do not alter the preferences.
6. Timekeeping: The “Employee Times” button on the Main Menu gives access to a
module to input and track employee clock ins and outs. When you click this, you are
presented a list view of some existing records. To do a new clock in, click on the
“New Clock In” button. Enter an employee ID number (try a number from 1 to 8).
The current date is filled in and times in and out may be entered. The Employee’s
position and (for cost accounting) Task Code may be filled in.
Demo Instructions
Page 4
ReportWare
ReportWare supports Biometric Fingerprint Readers, Mag Card swipes and other
timekeeping device interfaces, as well as direct keyboard entry. Pick what you like
and we customize to match.
7. Reports: Click on the “Reports” button from the Main Menu to see a sampling of
available reports. Some buttons, such as “Timekeeping Reports” bring up further
dialog choices.
8. Employee Reviews: ReportWare facilitates preparation of employee performance
reviews. To look at this function, click on the “Employee Details” button from the
Main Menu, then the Personnel Tab, then the “Evaluations” sub tab. Look at an
existing Evaluation by clicking on the green detail button by a date in the Evaluations
screen. (Hint: Suzy, employee 1, has some evaluations). You may do a new
evaluation on anyone by selecting a blank line, filling in the date and evaluator, then
clicking the green button. All pop up menus are user definable, as is the sample
review jargon that’s filled in automatically (and may be edited for each employee).
9. Notice that ReportWare offers some unusual features: Photos of each employee, as
well as scans of their W-2s, etc. may be attached to their computer file; Company
property may be tracked; Training and Professional certificates may be tracked. New
Hire Reporting for Federal Child Support Enforcement requirements (mandatory
everywhere after October 1, 1998) is provided.
10. To see dancer functions: Click on Dance Times from the Main Menu. You will be
presented with a list of existing clock ins which you may edit or add to. Click on the
New Clock in button. Your new record will appear at the bottom of the existing list.
Fill in an employee’s ID number in the first box (dummy employee IDs of 1 through
8 may be used). Time in is filled in with the current time. The number of cash
dances and the dollar amount of dance dollars is filled in, along with tips declared.
The program uses the employee’s tax information (from the personnel file) to
calculate the maximum allowable advance and shows how much must be collected.
Details showing how the calculations are done are accessible by clicking on the View
Detail button. The Dance module has its own set of reports unique to the cabaret
business.
Demo Instructions
Page 5
ReportWare
SECURE DANCE DOLLARS
If you chose to display dance dollar functions when you launched this demo, you will be
presented with the following Menu, which has a bottom row of buttons not displayed in
the other Main Menu pictured above:
1. To sell Dance Dollars, click on the button on the bottom row marked “Sell”. You
will see the Tickets Screen:
Demo Instructions
Page 6
ReportWare
(For demo purposes, these instructions assume that you are using a Verifone terminal or
the like. The software may also work with your existing POS system or with
ReportWare’s credit card authorization functions.)
The customer’s credit card information is swiped via mag stripe reader into the box
called Card Swipe. For Demo purposes, you may type in a pretend credit card number
here. You must fill in a pretend authorization code. Next, click on the number pad (this
is designed for touch screen operation) and fill in the quantity of items you want. Next,
click on the desired item type (Champagne, Dance Dollar, or F&B Certificate). You may
delete any mistakes by clicking on the red X button beside the unwanted item. Each item
selection shows its face value. Note that when dance dollars are rung up, a 20% service
charge is added. In actual use, this service charge is in any amount you set. Two $20
dance dollar items appear as $48 on the screen.
When you’ve ordered what you want, click on the Print All button. You may actually
print, or hit the cancel button on the Windows print dialog. Click to mark the Items as
printed in the subsequent dialog if they printed correctly. You must print the dollars in
order to redeem them in the next example. You may print them on any common letter
size printer, using any kind of paper.
Simply repeat the above process to sell whatever you like.
2. Redemption of items sold: Go back to the Main Menu by clicking the Main Menu
button. Click on the “Redeem” button. In the top left, fill in the employee ID
Demo Instructions
Page 7
ReportWare
number of the person turning in these items. If using a touch screen, you may click
on the calculator interface to enter their employee ID number, then click on the green
Redeemed By button to move this information into their ID number field. Hit the tab
key to move the cursor into the Serial Number Scan box. In normal operation, you
will scan the bar code of each item presented to cause it to be filled into the Serial
Number Scan box. For demo purposes, type the serial number, exactly as it appears
on the dance dollar into the box. Press Tab. As you do each, you will see if initial
tests of validity are passed. You may scan items upside down or right side up, just so
the scanner beeps in recognition of the item. If you accidentally scan the same item
twice, don’t worry, it will show as already redeemed later on. When you finish
scanning all presented items, click the “Validate” button. After about 2 seconds,
you’ll see the validation result on all items scanned.
If this person is just turning in items for the interim and going back to work, you fill in
how much you paid out to them; if it’s the end of their shift, click on the button to clock
them out, using the Clockout Reg Emp or Clockout Dancer button as appropriate.
As you clock this person out, fill in the other information for tips declared and collect or
pay as indicated.
3. To set up or edit items for sale: From the Main Menu, click on the Preferences
Button, then Continue, then Secure Dance $ (on the lower right part of the screen).
Demo Instructions
Page 8
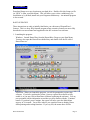
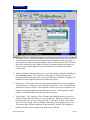
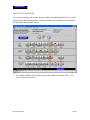
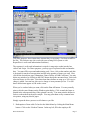
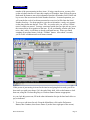
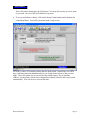
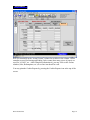
ReportWare
Then, click on the Setup Items for Sale button. You may sell as many or as few items
as you wish. Be sure to fill in all details for any item.
4. To set up and balance cashiers, click on the Setup Cashier button on the bottom line
of the Main Menu. You will be presented with a setup screen:
Fill in the Cashier’s ID (initials) and the date the shift started. ReportWare uses fiscal
days, with times between midnight and 8:00 a.m. being treated as part of the previous
night. Then click on the Set up a record for this cashier button. If you run many
cashiers, you may find it easier to have ReportWare identify all users and set up records
automatically. You will next see a screen like this:
Demo Instructions
Page 9
ReportWare
Here you should fill in the “Actual Counts” column for each box in the column. Dollar
amounts are used for Starting and Ending Cash; counts (how many pieces of paper) are
used for “# F& B”, etc. After filling this information in, you may click on the various
subtabs (Sales, Redemptions, etc.) to see line item detail for each.
You may print the Cashier Reports by pressing the Cashier Reports icon at the top of the
screen.
Demo Instructions
Page 10