1
Reset the SCOUT ip, and immediately press the ESC key. You will see some device information, and
a => prompt. Enter the command “config”, and press the Enter key. You will then be asked to adjust
the IP auto configuration, the IP address, the net mask, and the default gateway. Pressing the Enter
key without entering values does not change the settings.
The gateway value has to be set to 0.0.0.0 (for no gateway) or any other value for the IP address of
the gateway. After the confirmation the SCOUT ip performs a reset using the new values set.
Web Interface
The SCOUT ip can be accessed using a standard Java enabled web browser. You can use either the
HTTP protocol or HTTPS secure protocol. You will need to enter the IP address that you configured
the SCOUT ip for into your web browser, and you should be presented with a login page. Initially there
is only one user configured who has unrestricted access to all the SCOUT ip features, this is the user
named “super”.
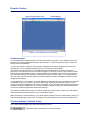
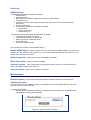
Figure 2 - The Login Screen
NOTE: The initial settings are Username: super, Password: pass.
Once you typed the default username and password, click login. The SCOUT ip’s Home page will
appear, as shown in Figure 3
Figure 3 - The SCOUT IP Home Page