1
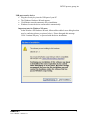
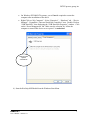
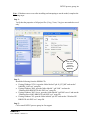
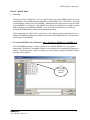
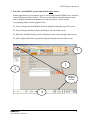
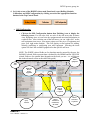
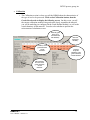
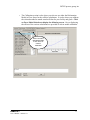
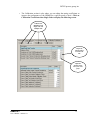
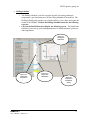
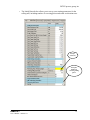
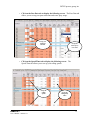
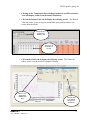
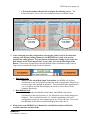
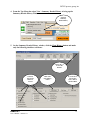
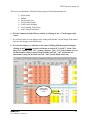
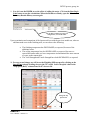
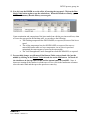
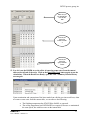
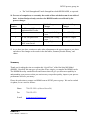
An AISI/DOE Technology Getting Started with HSMM v6.1 Release 2.0 INTEG process group, inc. 11279 Perry Highway, Suite 502 Wexford, PA 15090 PH (724) 933-9350 FAX (724) 933-9333 Copyright 2004 All Rights Reserved An AISI/DOE Technology What is HSMM? HSMM is a Hot Strip Mill Model PC-based computer program that performs a variety of calculations to simulate the physical process of rolling steel in a hot mill. The HSMM allows you to simulate the processing of the steel strip or plate from your reheat furnace dropout to your coiler or cooling bed. The model’s tracking module tracks the head, middle and tail points along the length of the piece while calculating the temperature evolution, rolling forces, microstructure changes and final mechanical properties. Calculated results are presented to you in the form of tables, graphs, and exported files for loading into Microsoft Excel. Getting Started with HSMM This document is broken down into three sections and is intended to help you get quickly oriented with the HSMM, understand how to utilize the HSMM to study and improve your mill operations and to make you aware of some of the advanced features of the HSMM. The three sections of this document are as follows: • • Part I – Quick Tour Part II – Working with the HSMM We hope that this document allows you to appreciate the HSMM. It is an advanced tool that is easy to use. The HSMM has many wonderful tools and features that will give you that extra capability in understanding your process so that you can increase your product quality, improve your process performance and save you money. Before we get started exploring the features of the HSMM and how to use it, let’s review some basic installation requirements and instructions. You should have an installation CD and a security device to install and utilize the HSMM. If not, please contact INTEG process group inc. Should you have any questions or need any additional information, please feel free to contact us at the following: Phone Fax E-mail HSMM v6.1 Getting Started Rev 2 724-933-3950 (x10 or x16 or x26) 724-933-9333 [email protected] 2 INTEG process group, inc. System Requirements • • • • Operating System (any of the following): Microsoft Windows NT 4 (Workstation or Server) with Service Pack 6a Microsoft Windows 2000 (Professional, Server, or Advanced Server) Microsoft Windows XP (Home or Professional) Microsoft Windows Server 2003 family 500 MHz Processor or faster 200 Mb of available hard disk space or more 256 Mb minimum of RAM or more Installation 1) If you have been supplied a USB security device, complete the Hot Strip Mill Model installation procedure before attaching the device to the USB port (this installation procedure will install the appropriate drivers for the security device). 2) Place the HSMM disk in the CD-ROM drive. 3) The installation procedure will automatically start. 4) Follow the instructions given by the setup procedure. When prompted, select which type of security device (either USB or LPT) will be used with this version of the model. The version of the model that is compatible with the appropriate device will be installed. 5) Attach hardware security key to the appropriate port (if using a USB security device, follow any instructions that may appear after attaching the device). Follow instructions for the security device that has been supplied to you: Parallel port security device: • Plug the security device into the parallel port of your PC – you can go to Step 6 now. HSMM v6.1 User’s Manual – Release 2.0 3 INTEG process group, inc. USB port security device: • Plug the security key into the USB port of your PC • The Windows Hardware Wizard appears. • Click Next to start the automatic driver installation. • Windows locates the driver and installs it automatically. Important note for Windows XP users: In the Windows XP Hardware Wizard, Microsoft has added a new dialog box that may be confusing (please see picture below). Please disregard this message. Click “Continue Anyway” to proceed with the driver installation. HSMM v6.1 User’s Manual – Release 2.0 4 INTEG process group, inc. • • On Windows XP/2000/NT4 systems, you will not be required to restart the computer after installation of the driver. Right-Click on “My Computer”. Select “Properties” – “Hardware” tab – “Device Manager”. Expand the “Universal Serial Bus Controllers” item. Double-Click on “USB Root Hub”, thus displaying the “USB Root Hub Properties” window. Click on the “Power Management” tab. Make sure the selection for “Allow the computer to turn off this device to save power” is unchecked. Make sure this option is “Unchecked”. 6) Start the Hot Strip Mill Model from the Windows Start Menu. HSMM v6.1 User’s Manual – Release 2.0 5 INTEG process group, inc. Note: If database errors occur after installing and attempting to run the model, complete the following steps: Step 1: Verify that the properties of all project files (*.hcg, *.hsm, *.hcg) are not marked as readonly. Make sure all files in the “projects” folder are not Read-only. Step 2: Install the following from the HSMM CD: • If using Windows NT 4.0, open the folder labeled "sp8 98_NT_ME" and run the" Jet40SP8_9xNT.exe" setup file. • If using Windows 2000, open the folder labeled " sp8 2000 " and run the “Windows2000-KB829558-x86-ENU.exe" setup file. • If using Windows 2003 Server, open the folder labeled "sp8 2003 server" and run the “WindowsServer2003-KB829558-x86-ENU.exe" setup file. • If using Windows XP, open the folder labeled "sp8 XP" and run the “WindowsXPKB829558-x86-ENU.exe" setup file. Step 3: Call or email INTEG process group inc for support. HSMM v6.1 User’s Manual – Release 2.0 6 INTEG process group, inc. Part I – Quick Tour 1. Overview The purpose of the “Quick Tour” is to give the first time user of the HSMM a quick overview of the features of the HSMM and the capabilities of the HSMM. The “Quick Tour” will walk you through the various areas of the HSMM. Additional details about each area can be found in your HSMM User’s Manual. The HSMM User’s Manual is installed as an Adobe Acrobat PDF at the time you installed the HSMM. It can be found in the directory in which you installed the HSMM and/or under your Windows Start menu. After completing this “Quick Tour”, please take a few minutes to browse through the User’s Manual for additional information about the operation of the HSMM and for an explanation of the theory of the HSMM. 2. To start the HSMM, click on Windows Start / Programs / HSMM v6.1 / HSMM v6.1 When the HSMM program is started, a splash screen with the HSMM v6.1 logo appears momentarily, followed by a standard Windows screen with a title bar indicating no project is loaded. An “Open Project” window is displayed as shown below listing the available Project files that can be loaded. We are going to be using this one HSMM v6.1 User’s Manual – Release 2.0 7 INTEG process group, inc. 3. Select the “LearnHSMM” project and click the Open button. Within approximately 30 seconds the project will be loaded and the HSMM User’s Interface screen is displayed as shown below. This screen is divided into the following four main areas to display information and handle user control selections. (Please see the corresponding numbers on the graphic below.) 1) Project Settings and Grade Builder Shortcuts (displayed along the top of the screen) 2) Project Management Panel (displayed along the left side of the screen) 3) Data Entry and Main Display window (displayed in the center and right of the screen) 4) Mill Configuration Picture (optionally displayed along the bottom of the screen) 1 3 2 Mill picture is displayed via VIEW 4 HSMM v6.1 User’s Manual – Release 2.0 8 INTEG process group, inc. 4. Let’s take a tour of the HSMM’s three main Functional Areas (Rolling Schedule, Calibration, and Mill Configuration) by clicking on each of the appropriate function buttons in the Top Control Panel. • Mill Configuration o Click on the Mill Configuration button then Finishing Area to display the following screen. You can also click on each of the mill areas tabs (Furnace Area, Roughing Area, etc) and view the equipment and associated information in each mill area. After selecting one of the mill areas, you can “right click” on the mill equipment icon (move your mouse pointer over the piece of equipment and press your right mouse button). This will display several options for adding, deleting, modifying or configuring your mill equipment. Selecting the insert option will show the available equipment for that specific mill area. NOTE: The WHITE colored fields are for data that must be entered by the user, the SALMON colored fields represent data calculated by the HSMM and the YELLOW colored fields are for optional data (depends on the mode you use – we will discuss this in the advanced section at the end of this guide). Select equipment Mill Areas Right click here to change equipment Data in WHITE is required Spray selection HSMM v6.1 User’s Manual – Release 2.0 Data in SALMON is calculated by the model Data in YELLOW is optional 9 INTEG process group, inc. • Calibration o The Calibration section is where you tell the HSMM about the characteristics of the type of steel to be processed. Click on the Calibration button, then the Grade Selection tab to display the following screen. On this screen, you tell the current calibration module what grade most closely resembles the material you will be modeling (as configured in the Grade Builder Module), as well as the actual chemistry of that material. You also select whether to perform the microstructure calculations or not. Select the grade that is to be associated with this chemistry. Chemistry of the grade selected in “Grade Selection” Enter the actual piece chemistry Thermal Properties Chemistry of the grade selected in “Grade Selection” Microstructure Overview of the grade selected in “Grade Selection” HSMM v6.1 User’s Manual – Release 2.0 10 INTEG process group, inc. o The Calibration section is also where you select to use either the Deformation Model or Flow Stress for the roll bite calculations. It is also where you calibrate the selected method to match actual mill data for your facility and grade. Click on Force Model Selection to display the following screen. Curves displaying the effects of the various calculations are provided to aide in model calibration. Select to use either Deformation Model or Flow Stress for roll force calculations HSMM v6.1 User’s Manual – Release 2.0 11 INTEG process group, inc. o The Calibration section is also where you can adjust the tuning coefficients to improve the performance of the HSMM for a specific grade of steel. Click on Calibration Coefficients then Single Node to display the following screen. Calibrate the HSMM for both Single Node and Multiple Node Adjust the amount of heat lost in the roll bite Adjust the amount of heat lost by the water sprays HSMM v6.1 User’s Manual – Release 2.0 12 INTEG process group, inc. • Rolling Schedule o The Rolling Schedule is used to set-up the specific processing parameters (temperature, speed and water use) for the rolling schedule to be modeled. The Rolling Schedule also provides you with the ability to view, chart, and export the results of the HSMM. Click on the Rolling Schedule button for the following exercises. o Click on the Initial Data tab to display the following screen. The Initial Data tab allows you to set-up your starting parameters for slab dimensions, grain size and temperatures. Input your starting slab dimensions Input your starting slab temperature HSMM v6.1 User’s Manual – Release 2.0 And create a temperature distribution Watch the temperature distribution change 13 INTEG process group, inc. o The Initial Data tab also allows you to set-up your starting parameters for the rolling mill, including number of reversing passes and zoom acceleration rates. Set-up a zoom rate Set-up the number of reversing rolling passes HSMM v6.1 User’s Manual – Release 2.0 14 INTEG process group, inc. o Click on the Pass Data tab to display the following screen. The Pass Data tab allows you to set-up your pass reductions and water spray usage. Set-up your reduction schedule Set-up the water sprays to be used o Click on the Speed/Time tab to display the following screen. The Speed/Time tab allows you to set-up your rolling speeds. Set-up the rolling speeds HSMM v6.1 User’s Manual – Release 2.0 Set-up any rolling delay times 15 INTEG process group, inc. o Clicking on the Temperature Data, Rolling Parameters and Microstructure Tabs will display results from the model calculations. o Click on the Runout Table tab to display the following screen. The Runout Table tab allows you to set-up your runout table spray patterns and to view results from the model. Set-up and view for the head, middle or tail Turn on or off the headers to be used o Click on the Charts tab to display the following screen. The Charts tab allows you to view the results in a graphical format. Select to view single and/or multiple node data HSMM v6.1 User’s Manual – Release 2.0 Select the data to be charted and up to two parameters 16 INTEG process group, inc. o Click on the Summary Results tab to display the following screen. The Results tab allows you to view select summary results in a tabular format. Selected results for the Single Node Model Selected results for the Multiple Node Model 5. After setting up your mill configuration, selecting the grade of steel to be rolled and entering your starting rolling parameters, the HSMM is now ready to be used to simulate the rolling process. Let’s perform a calculation by clicking on one of the two Run buttons in the Top Control Panel. To save time, let’s use the Run Single Node Button. (Please note as stated below that the Multiple Node calculations require a much longer time to run than the Single Node calculations.) • • Run Single Node o When we click on the Run Single Node button, the HSMM will perform calculations for the steel properties parameters such as temperature and grain size as one average value through its thickness. This calculation takes approximately 2 to 5 seconds to run and should display the results as shown above on the Summary Results tab. Run Multiple Node o If we click on the Run Multiple Node button, the HSMM will perform calculations for the steel properties as 101 individual values (nodes) through its thickness. This calculation can take 2 to 5 minutes depending on the mill configuration complexity and computer speed. If you have the time, click on the Run Multiple Node button and it should display the results above. 6. Please refer to the HSMM User’s Manual for a detailed description of all of the available functions and data fields. HSMM v6.1 User’s Manual – Release 2.0 17 INTEG process group, inc. Part II – Working with the HSMM Now that we know how to set-up, configure and run the HSMM, let’s understand how we can utilize the HSMM to help study various process parameters and their influence on the final product. For this demonstration, we will continue to use the LearnHSMM project and will demonstrate how the model results (temperatures and final mechanical properties) are affected by changing processing parameters such as applied water in the mill, rolling speeds, and applied Runout Table water. For quicker results, we will use only the Run Single Node calculation button. The “Summary Results History” tool will be used to keep a record of the changes in the calculated results. Please perform the following steps: 1. Make sure you are running the Learn HSMM project as loaded in the Quick Tour. If not, click on the top menu bar, click on File \ Open Project. Click on “LearnHSMM” in the list and then on the Open button. NOTE: If you made any changes to the LearnHSMM project during the Quick Tour, you may want to exit the project, but DO NOT save the project. This way, you will eliminate any possible problems of accidentally entering wrong set-up information. 2. Make sure your Current Schedule is “HSLA80~Sched1” as shown in the top Status and Control Panel. If not, select this schedule from the Project Management Panel by expanding the Current Project and HSLA80 until Sched1 is visible. Double-click on Sched1 to load it. Click on the ‘+’ or ‘-‘ to expand or collapse Double Click here to load this schedule 3. Click on the Run Single Node button to run the calculations. HSMM v6.1 User’s Manual – Release 2.0 18 INTEG process group, inc. 4. From the Top Menu bar select View \ Summary Results History to bring up the Summary Results History Window. Select the Summary Results History 5. On the Summary Results History window, click the Clear History button and make only the following checkbox selections: Click on the “x” to close this Window Select the appropriate data to be tracked HSMM v6.1 User’s Manual – Release 2.0 Click on the Clear History button If you do not see the selection boxes, click on the Show/Hide 19 INTEG process group, inc. The boxes you should have checked for the purposes of this demonstration are: • • • • • • • Single Node Middle Ferrite Grain Size Total Yield Strength Total Tensile Strength Avg Finishing Temperature Avg Coiling Temperature 6. Exit the Summary Results History window by clicking on the “x” in the upper right corner. 7. We will now make several changes to the rolling mill schedule, run the Single Node model and view the changes to the final results. 8. For our first change, we will turn on the entire Finishing Mill Interstand Cooling by clicking on the Pass Data tab and scroll down to stations IC1, and IC2. In the “Pass Spray On” column, enter “111” at these 2 stations. (The “111” is the coded way to set the Interstand Cooling on for the Head, Middle, and Tail. “101” would turn on Interstand Cooling for the Head and Tail, “100” just the Head, and so on.) Change these spray patterns to 111 HSMM v6.1 User’s Manual – Release 2.0 20 INTEG process group, inc. 9. Now let’s run the HSMM to see the effect of adding the water. Click on the Run Single Node button to run the calculations. When the Results are Ready, open the View \ Summary Results History screen again. You can add a comment as to what was changed after you run the model Upon examination and comparison of the latest model run with the previous model run, when we add Interstand water in the finishing mill, we can observe the following: • • • The finishing temperature has DECREASED, as expected, because of the additional water. The coiling temperature has also DECREASED, as expected, because we entered the runout table at a lower temperature and maintained the same amount of water on the runout table. The Yield Strength and Tensile Strength have both INCREASED, as expected. 10. For our second change, we will lower the Finishing Mill top speed by clicking on the Speed/Time tab and scrolling down to the CF7 stand. Lower the speed value in the “Top Speed (Roll)” column from 10.417 down to 9.0. Change the Top Speed to 9.0 HSMM v6.1 User’s Manual – Release 2.0 21 INTEG process group, inc. 11. Now let’s run the HSMM to see the effect of lowering the top speed. Click on the Run Single Node button again to run the calculations. When the Results are Ready, open the View \ Summary Results History screen again. Upon examination and comparison of the latest model run with the previous model run, when we lower the top speed in the finishing mill, we can observe the following: • The finishing temperature has DECREASED, as expected, because of the lower speed. • The coiling temperature has also DECREASED, as expected, because we entered the runout table at a lower temperature, ran at a lower speed and maintained the same amount of water on the runout table. • The Yield Strength and Tensile Strength have both INCREASED, as expected. 12. For our third change, we will turn off the Runout Table water at bank 4 for just the middle by clicking on the Runout Table tab and also on the Mid button. Un-check all the checkboxes in the top banks BNK4 and the bottom banks SP4 and SP5. Note: A shortcut to turning all the headers in a bank on or off is to click in the bank name column to select the entire bank and then press the spacebar or enter key. HSMM v6.1 User’s Manual – Release 2.0 22 INTEG process group, inc. Make sure you are changing the water for the Mid Turn off (uncheck) the headers in bank 4 Turn off (uncheck) the sprays in banks 4 and 5 13. Now let’s run the HSMM to see the effect of removing some water from the runout table on the tail end of the strip. Click on the Run Single Node button again to run the calculations. When the Results are Ready, open the View \ Summary Results History screen again. Upon examination and comparison of the latest model run with the previous model run, when we remove some water from the runout table, we can observe the following: • • The finishing temperature has STAYED the SAME, as expected. The coiling temperature has INCREASED, as expected, because we maintained the same speed, but with less water on the runout table HSMM v6.1 User’s Manual – Release 2.0 23 INTEG process group, inc. • The Yield Strength and Tensile Strength have both DECREASED, as expected. 14. For ease of comparison, we can study the results of four calculation runs in one table of data. As described previously, note how the HSMM results were affected by the process changes. Run Number Original Process Parameters 1 No IC, normal FM speed and normal ROT water IC on 2 IC on, FM speed lower 3 IC on, FM speed lower, less ROT water on tail Middle Temperature Changes Mechanical Props Changes Finishing and Coiling: Lower Finishing and Coiling: Lower Coiling: Higher YS and TS: Higher YS and TS: Higher YS and TS: Lower 15. As we have just done, continue to make other adjustments to the process inputs as you desire and observe the changes to the results in the data tables, Summary Results History, and charts. Summary Thank you for taking the time to complete this “Quick Tour” of the Hot Strip Mill Model (HSMM). Hopefully this tour gave you an idea of how simple, yet complex the HSMM can be. The HSMM has many wonderful tools and features that will give you that extra capability in understanding your process so that you can increase your product quality, improve your process performance and save you money. Please do not hesitate to contact our HSMM team at INTEG process group. We can be reached via phone, fax or e-mail as follows: Phone 724-933-3950 (x10 or x16 or x26) Fax 724-933-9333 E-mail [email protected] HSMM v6.1 User’s Manual – Release 2.0 24