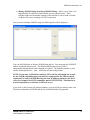
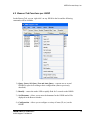
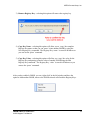
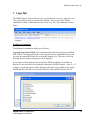
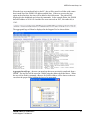
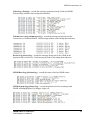
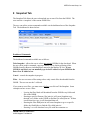
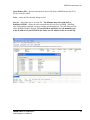
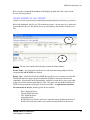
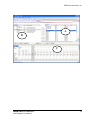
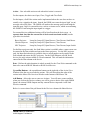
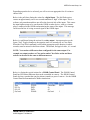
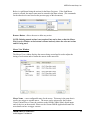
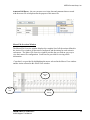
1
JNIOR Series 3 A Network I/O Resource Utilizing the JAVA Platform JNIOR Support Tool Manual Release 5.1 NOTE: JNIOR OS 3.4 or greater required INTEG Process Group, Inc. 2919 East Hardies Rd, First Floor Gibsonia, PA 15044 PH (724) 933-9350 FAX (724) 443-3553 www.integpg.com [email protected] © 2012 INTEG Process Group, Inc. All Rights Reserved Last updated on: June 1, 2012 INTEG Process Group, Inc. TABLE OF CONTENTS 1 2 3 4 Overview ..................................................................................................................... 3 Installation................................................................................................................... 4 Using the JNIOR Support Tool................................................................................... 6 Beacon Tab ............................................................................................................... 11 4.1 General Beacon Tab Functions .......................................................................... 12 4.2 Beacon Tab Functions per JNIOR ..................................................................... 16 5 Update Tab ................................................................................................................ 19 5.1 Running an Update Project ................................................................................ 22 5.2 Creating and Editing a Project ........................................................................... 24 6 Registry Editor Tab ................................................................................................... 33 7 Logs Tab ................................................................................................................... 36 8 Snapshot Tab ............................................................................................................. 42 9 Devices Tab .............................................................................................................. 45 10 Macro Tab ................................................................................................................. 49 11 JNIOR Web Page and Manuals ................................................................................ 59 JNIOR A Network I/O Resource JNIOR Support Tool Manual 2 INTEG Process Group, Inc. 1 Overview The JNIOR Support Tool is an application that runs on a Windows-based PC that helps the user manage their JNIORs and applications. It allows the users to configure their JNIOR IP settings, update or add JNIOR software, review JNIOR logs and back-up files from the JNIOR. The JNIOR Support Tool also has special features to help users of the Cinema.JNIOR software application to configure devices and macros. Cinema.JNIOR is a software program that runs on the JNIOR to provide central control functionality for a theater implementing a digital cinema system. Please refer to the Cinema.JNIOR Application Manual for details on its functionality and configuration. NOTE: The JNIOR Support Tool can only be used on a PC running the Microsoft Windows operating system. JNIOR A Network I/O Resource JNIOR Support Tool Manual 3 INTEG Process Group, Inc. 2 Installation The JNIOR Support Tool is provided by INTEG as an installation package. To install the JNIOR Support Tool, you must be logged into the Windows operating system with Administrator privileges. However, you do not need to be an Administrator to use the JNIOR Support Tool. Please double click on the installation file and it will be installed on your PC in C:\Program Files\INTEG\JNIOR Support Tool A shortcut key will be provided on your desktop. You can also navigate to the Start – Programs – INTEG – Support Tool and there will be a link to launch the program. The JNIOR Support Tool User Manual is also installed on your PC. You can view it by going to Start – Programs – INTEG – Support Tool and there will be a PDF to open the manual. All the data files associated with the various features of the JNIOR Support Tool will be stored on your local PC drive under the Users folder. The User will be the person who is currently logged into the PC. In Windows XP, the data will be stored in a directory similar to the following. A similar path structure is used for Windows 7. C:\Documents and Settings\rshulkosky.INTEGPG2\Application Data\INTEG\JNIOR Support Tool Updates to the JNIOR Support Tool will install over the current version. You do not need to uninstall the old version first unless specifically requested by INTEG with the update. NOTES: The Beacon portion of the JNIOR Support Tool may not work across routers or where proxy servers are used or wherever other methods may restrict UDP packets from getting through. Beacon communicates using UDP packets over port 4444, so please make sure this port is available. If not, you can still use the other features of the JNIOR Support Tool, but you will have to manually enter the JNIOR IP address. You can also manually enter a list of IP addresses into the JNIOR Support Tool. Beacon will then try to send the packet directly to this IP address. This may help find JNIORs located across a VPN connection, router, etc. If you have Windows Firewall (or another firewall package) enabled, you may receive the following pop-up when you first launch the JNIOR Support Tool. This is because the JNIOR Support Tool sends out a message on the network to ask all JNIORs to report in and the JNIORs send a message back. PLEASE click on the UNBLOCK button to register the JNIOR Support Tool with Windows Firewall to allow the Beacon messages through. This will allow several features of the JNIOR Support Tool to work best. JNIOR A Network I/O Resource JNIOR Support Tool Manual 4 INTEG Process Group, Inc. If you have already installed the program and clicked on the Keep Blocking button, then you can go to the Windows Control Panel and click on the Windows Firewall icon to enable the program. When the Windows Firewall pop-up is displayed, click on the Exceptions tab and then ‘check’ the box for the JNIOR Support Tool and click OK. JNIOR A Network I/O Resource JNIOR Support Tool Manual 5 INTEG Process Group, Inc. 3 Using the JNIOR Support Tool The JNIOR Support Tool has seven main functions (Tabs) described below and shown in the screen picture. Functions 1, 4, 5, 6 and 7 are available via the Standard View mode and all seven functions are available via the Cinema View mode. 1) Beacon Tab – identifies JNIORs on the Ethernet network for ease of selection and configuration. Many functions are available by ‘right-clicking’ on a JNIOR in the list. 2) Devices Tab – allows the user to define the IP addresses and/or serial settings for devices to be controlled via the JNIOR macros utilized with the Cinema.JNIOR application. The list of devices is saved as a file and transferred to the JNIOR. (NOTE: This tab is not visible in the Standard View. The user must go to the View pull down and select Cinema View.) 3) Macro Tab – allows the user to configure Actions and Macros utilized with the Cinema.JNIOR application. The list of macros is saved as a file and transferred to the JNIOR. (NOTE: This tab is not visible in the Standard View. The user must go to the View pull down and select Cinema View.) 4) Update Tab – allows the user to configure an update package to transfer software updates, configuration files and registry settings to one or many JNIORs. 5) Registry Editor Tab – allows the user to view and edit the Registry Keys for one or many JNIORs. 6) Logs Tab – allows the user to aggregate, view, filter and print the various logs being created on the JNIOR. 7) Snapshot Tab – allows the user to download to their PC any or all of the files located on a JNIOR. A filter feature is provided to selectively download files. JNIOR A Network I/O Resource JNIOR Support Tool Manual 6 INTEG Process Group, Inc. From the navigation line in the JNIOR Support Tool, there are several other selections available besides View and they are File, Tools, Options, About and a pull down menu for the tab you are currently on (Beacon in the picture below). File – will close the JNIOR Support Tool. If you have any unsaved work, the JNIOR Support Tool should ask you if you want to save your work before closing. Tools – the tools selection gives you the option to utilize the Macro Execution feature and open a Command Line window. The Macro Execution function allows you to execute a macro loaded on a JNIOR that is running the Cinema.JNIOR program. Enter the macro name or number (the number is the relative location of the macro in the macro file list) and then enter your IP address, click Connect and then Send. The HEX string that is created is the complete JNIOR protocol command for the JNIOR to execute the macro via the JNIOR Protocol Port (default port is 9200). The HEX String can be copied and entered into any other device for sending to the JNIOR (for example a cinema server using a message box or raw Ethernet socket connection). JNIOR A Network I/O Resource JNIOR Support Tool Manual 7 INTEG Process Group, Inc. A Command Line window is similar to a Telnet (or Putty) window for Ethernet connections or a HyperTerminal session for serial connections. JNIOR A Network I/O Resource JNIOR Support Tool Manual 8 INTEG Process Group, Inc. Options – the options selection allows the JNIOR Support Tool to Check For Updates to the JNIOR Support Tool via the Internet whenever the JNIOR Support Tool is launched or this box is checked for the first time. This option is set on (checked) by default. The following dialogue box will be displayed in the lower right corner of your computer screen when an update is available. Please click on the Download link to get the latest version. Set (and Open) Default Directory – All the files created by the JNIOR Support Tool will be saved under your Documents and Settings folder unless you change the default directory location. JNIOR A Network I/O Resource JNIOR Support Tool Manual 9 INTEG Process Group, Inc. Set Simultaneous Update Count – Starting with this version of the JNIOR Support Tool, multiple JNIORs can be updated at the same time (in parallel). The option sets the number of JNIORs to be updating at once. The default is 3. The maximum number is 25. About – the about function will display a pop-up box with information about the version you are running. MENU Feature – The last selection item will match the tab you are currently displaying. It provides you with an alternate way of selecting one of the functions specific to that tab. Below is an example for the Beacon tab. JNIOR A Network I/O Resource JNIOR Support Tool Manual 10 INTEG Process Group, Inc. 4 Beacon Tab The JNIOR Support Tool includes the PC side of Beacon. The JNIOR side of Beacon is included in the JNIOR operating system version 3.1 and greater. Beacon allows the user to find their JNIOR on the Ethernet network even if the JNIOR does not have an IP address appropriately configured for the local network. Beacon utilizes a UDP packet that is sent out over port 4444. The JNIOR will recognize and read the packet sent out by the PC side of Beacon and the PC side of Beacon will recognize the packet sent out by the JNIOR. The JNIOR only sends out a UDP packet on boot. The PC side of Beacon sends out a UDP packet when the JNIOR Support Tool is first loaded and then whenever the user requests one be sent (‘right-click’ in Beacon window). The list of JNIORs running Beacon will be as shown below. If your JNIOR is not listed, there are several possible reasons: 1) 2) 3) 4) Your JNIOR does not have the proper JNIOR operating system (3.1 or greater) Beacon was disabled on your JNIOR The JNIOR is on the other side of a network device that is blocking UDP packets Your PC firewall is preventing the UDP packets from being accepted. NOTE: You can adjust the settings of your PC firewall by going to Control Panel and then Windows Firewall and enabling the JNIOR Support Tool. If your JNIOR is not listed, but you know it is available on the other side of a router or through a VPN connection, etc., then you can manually enter your IP address into a table using the Manage IP List feature (described below). Beacon will try to send a packet directly to this IP address and see if the JNIOR will respond. If this message is successful, the data for your JNIOR will be filled in on the Beacon tab. JNIOR A Network I/O Resource JNIOR Support Tool Manual 11 INTEG Process Group, Inc. 4.1 General Beacon Tab Functions If you ‘right-click’ in the white area of the Beacon tab, the following choices are provided: 1) Query All, Query New and Auto Query – requests one or several JNIORs to report in according to their configuration. a. Query All – sends a request to all JNIORs on the network and those that have Beacon enabled will respond. b. Query New – sends a request to all JNIORs on the network and only those that have Beacon enabled and set as ‘new’ (default setting) will respond. c. Auto Query – allows you to set an automatic sending of a Query All or Query New at a user defined time period. 2) Macro Execution – allows you to execute a macro (same as described previously) 3) Command Line – launches a window that allows you to make a serial or Ethernet connection to the JNIOR (similar to a connection made with HyperTerminal or Telnet). This tool is helpful on computers utilizing Windows 7 since Telnet and HyperTerminal are no longer installed by default. JNIOR A Network I/O Resource JNIOR Support Tool Manual 12 INTEG Process Group, Inc. Once you select Command Line, the following window will be displayed. At the bottom of the window, you can select a TCP/IP connection (similar to Telnet when using port 23) or utilize one of your USB or serial ports (similar to a HyperTerminal connection). If you select the TCP/IP connection and use the default port of 23, then the Command Line window will make a connection to the JNIOR using the Telnet port. You can also change the port to any other port that may be listening on the JNIOR, such as a port being used by the Cinema.JNIOR program or Serial Control Plus program. If you select one of your COM ports, then you will get a new bar across the bottom allowing you to set your serial port configuration. The Options pull down on the right of the bottom bar allows you to set features about the connection. JNIOR A Network I/O Resource JNIOR Support Tool Manual 13 INTEG Process Group, Inc. 4) Manage JNIOR Listing/Load Saved JNIOR Listing – allows you to enter, save and reload the IP addresses of the JNIORs you are trying to locate. These JNIORs might exist on another segment of the network or can be made viewable via Beacon if you are working via a VPN connection. Once you select Manage JNIOR Listing, the following box will be displayed: You can Add, Duplicate or Remove JNIORs from the list. You must enter the JNIOR IP address, username and password. The default JNIOR protocol port (9200) is automatically displayed and can be changed, if required. The default username is jnior and the default password is jnior unless the user has changed them. NOTE: If you enter an IP address ending in 255 to the list (this should not be used by any JNIOR), depending upon your network configuration, the UDP broadcast request may be sent to all JNIORs using the same IP address scheme for the first 3 octets (for example, 10.0.0.255) assuming a mask of 255.255.255.0. This function is network dependent as to whether it will work or not. If you click on the Generate IP Addresses button, a pop-up will be provided to enter your IP scheme and number of JNIORs and the list will automatically be generated. JNIOR A Network I/O Resource JNIOR Support Tool Manual 14 INTEG Process Group, Inc. After you click on the Save As button, you will be able to enter a unique name for this list of JNIORs. This will be helpful if you are supporting a variety of theatre locations across a VPN connection. You can select the list you want to use by selecting the Load Saved JNIOR Listing function from the Beacon window. The list of IP addresses will be displayed in the Beacon tab and the JNIOR Support Tool will send a message to each JNIOR to see if it can be found. If it is found on the network, the JNIOR will respond and display the appropriate information. JNIOR A Network I/O Resource JNIOR Support Tool Manual 15 INTEG Process Group, Inc. 4.2 Beacon Tab Functions per JNIOR On the Beacon Tab, you can ‘right click’ on any JNIOR in the list and the following commands will be available: 1) Query, Query All, Query New and Auto Query – requests one or several JNIORs to report in according to their configuration (same as previously described). 2) Identify – causes the amber LED to rapidly flash for 5 seconds on the JNIOR. 3) Set Hostname – allows you to enter the hostname for the JNIOR and will be displayed in the Beacon window. 4) Configuration – allows you to configure a variety of items (IP, etc.) on the JNIOR. JNIOR A Network I/O Resource JNIOR Support Tool Manual 16 INTEG Process Group, Inc. By selecting Configuration, you can set-up the complete JNIOR IP settings as shown below. The Primary and Secondary DNS are primarily used for sending e-mail or checking an NTP server. The Domain Name is also used as part of the JNIOR e-mail. NOTE: Each time you open this window and select OK, the JNIOR will reset all values and this will cause some connections (like a Telnet window) to be closed. If you are only opening this window to view the settings, please click the Cancel button when done. 5) Macro Execution – allows you to execute a macro on the JNIOR (same as previously described excepts fills in the selected JNIOR IP address) 6) Reboot – allows you to reboot the JNIOR. 7) Telnet – launches a Telnet window to connect to the JNIOR. However, this function will only work after the JNIOR IP address has been set to work on your local network. JNIOR A Network I/O Resource JNIOR Support Tool Manual 17 INTEG Process Group, Inc. 8) Open FTP – opens an FTP connection via Windows Explorer. It may take approximately 20 – 30 seconds to establish the FTP link. However, this function will only work after the JNIOR IP address has been set to work on your local network. (NOTE: This feature may not work with some Windows operating systems.) 9) Edit Registry – opens the Registry for the selected JNIOR in the Registry Editor tab in the JNIOR Support Tool 10) Launch Web Page – opens the main JNIOR Web Page for the selected JNIOR. 11) Manage JNIOR Listing– opens the window that allows you to manually enter a list of JNIOR IP addresses (same as previously described). 12) Load Saved JNIOR Listing – opens a file manager window that allows you to select a previously saved JNIOR IP list. JNIOR A Network I/O Resource JNIOR Support Tool Manual 18 INTEG Process Group, Inc. 5 Update Tab The Update Tab allows the user to process update files supplied by INTEG and/or to create a project that will update their JNIOR for a variety of reasons. Starting with JNIOR Support Tool version 5.1, multiple JNIORs can be updated simultaneously. The number of JNIORs to be updated simultaneously is adjusted by going to the Options pull down at the top of the JNIOR Support Tool. The default setting is 3 JNIORs. The maximum number to be updated simultaneously is 25. NOTE: Regardless of the number selected for simultaneous update, you can select more JNIORs to update, but the simultaneous update will only occur to the number selected. For example, if you set the number of simultaneous updates to be 3, but have checked 10 JNIORs to update, 3 will start to be updated and as 1 finishes, 1 more will be started so that 3 are always be updating simultaneously. Of course this number drops as the JNIORs are completed. The user can utilize various commands available via the dashboard area of the Update Tab. The dashboard is shown below: JNIOR A Network I/O Resource JNIOR Support Tool Manual 19 INTEG Process Group, Inc. Dashboard Commands The dashboard commands available are as follows: Open Project – the user can open a previously created project or a project sent to them by INTEG. A project has an extension as an ldr file or a project can be a ZIP file (zip extension) that contains the Steps and the files associated with the project. NOTE: If the file is a ZIP file, the user should NOT unzip it. The Support Tool will unzip it and move the files to the proper folders. Just select the zip file in the pop up Window. A typical file location in Windows XP is shown below: C:\Documents and Settings\rshulkosky.INTEGPG2\Application Data\INTEG\JNIOR Support Tool\Files\Update Projects Close Project – closes the project. Edit Project Configuration – allows the user to edit the project. Publish Update to JNIOR – allows the user to select one or more JNIORs for the update. When the user clicks on this command, a pop-up window will be displayed listing all the JNIORs found by Beacon, including those entered in the Manage IP List. If your JNIOR is not listed, you can manually type in the IP address of your JNIOR in the Enter New IP Address box. JNIOR A Network I/O Resource JNIOR Support Tool Manual 20 INTEG Process Group, Inc. The Update project will make a variety of connections to the JNIOR and the JNIOR Support Tool may need to log in to the JNIOR. It will try to use the default user name and password. If you have deleted the default user name and password, you will be asked to enter the User Name and Password for the JNIOR. If you are doing multiple JNIORs and they are the same for all JNIORs, you can check the Use For All box. Otherwise, you will be prompted for each JNIOR. Cancel – cancels the update. JNIOR A Network I/O Resource JNIOR Support Tool Manual 21 INTEG Process Group, Inc. 5.1 Running an Update Project To update a JNIOR, the user must have an active project open. The user can “uncheck” any step that you do not want to execute. When the user clicks on the Publish Update to JNIOR command, a pop-up box will be provided to select one or more JNIOR IP address or to manually enter it. Once the OK button is selected, the update will begin. The IP address of the current JNIOR will be displayed in the dashboard. JNIOR A Network I/O Resource JNIOR Support Tool Manual 22 INTEG Process Group, Inc. The user will receive status information for each step of the project for each JNIOR being updated. Progress and feedback will also be provided in the bottom area of the Update Tab for a temporary record of each step for each JNIOR. The user can click on the Cancel command in the dashboard to stop the Update. JNIOR A Network I/O Resource JNIOR Support Tool Manual 23 INTEG Process Group, Inc. 5.2 Creating and Editing a Project When the user clicks on the Edit Project Configuration command, a blank project window is displayed. The user must enter a project Title. The user has the option to set a password. If a password is entered, whenever this project is opened, the password will have to be entered to edit the project. You do NOT need the password to run the project, only to edit the project. You can delete the password and then click Save & Close and it will no longer be needed. The Add Step button will give the user a choice of various Steps to be used in a project. NOTE: The Add Step button is only available after you have entered text in the Title box at the top. JNIOR A Network I/O Resource JNIOR Support Tool Manual 24 INTEG Process Group, Inc. Update JNIOR OS – this Step is designed to allow the user to transfer a jr310.upd file to update the JNIOR operating system. This file is provided by INTEG, as needed. When the user clicks in the Local File cell, clicking on the icon with three dots will allow the user to navigate to the location of this file. The Support Tool will pull this file from the remote location and put it in a local folder. The JNIOR OS version is automatically detected and displayed in the Version cell. The Option to reboot the JNIOR is set as true by default. This causes the JNIOR to reboot immediately after the file is transferred. The user could set this to false and utilize the Reboot Step later in the project. The user can edit the Name cell for display purposes in the Step list window on the left. Registry Key – this Step is designed to allow the user to create and/or set a registry key on the JNIOR with a value. The RegKey cell must contain the exact text and capitalization needed for the Registry key. The RegValue cell must contain an acceptable value for the Registry key. The RebootRequired cell can be set to false or true to indicate if a reboot is required as a result of this step. A Reboot Step must also be included in the Project to trigger a reboot after this step is executed. The user can edit the Name cell for display purposes in the Step list window on the left. JNIOR A Network I/O Resource JNIOR Support Tool Manual 25 INTEG Process Group, Inc. Delete File – this Step is designed to allow the user to delete a file on the JNIOR. The user must enter the file name in the RemoteFile cell and any folder name where the file is stored (besides the root directory) in the RemoteFolder cell. The user can edit the Name cell for display purposes in the Step list window on the left. Make Remote Directory – this Step is designed to allow the user create a new folder (directory) on the JNIOR for storing an application or other file. The user must enter the folder name and any path in the RemoteFolder cell. The user can edit the Name cell for display purposes in the Step list window on the left. JNIOR A Network I/O Resource JNIOR Support Tool Manual 26 INTEG Process Group, Inc. Reboot – this Step is designed to allow the user to reboot the JNIOR during the execution of the project. A reboot must occur to update the JNIOR OS, or stop and start an application or for some Registry setting changes to take effect. If any of the steps require a reboot, then a Reboot step must be included in the project to respond to the reboot flag set by one of the other steps. The user can also set the ClearSystemMemory to true to clear the RAM memory on reboot. This deletes all the logs and some other temporary files, but does not delete anything in the flash memory (same as a reboot –a command). The user can also set the MustReboot option to true to force a reboot regardless of the previous steps. The user can edit the Name cell for display purposes in the Step list window on the left. Applications – these Steps are designed to allow the user to load an application developed by INTEG or the user. The Support Tool has built-in Steps for the standard applications developed by INTEG. These Steps are configured to automatically rename the application to the appropriate file name recognized by the JNIOR and load it in the appropriate folder on the JNIOR. These Steps will also display the version number of the INTEG program to be loaded. The generic Load Application Step can be used for custom applications. JNIOR A Network I/O Resource JNIOR Support Tool Manual 27 INTEG Process Group, Inc. The location of the application file on the PC must be selected via the LocalFile cell. For the Load Application Step, the location for the file on the JNIOR must be entered in the RemoteFile cell. The file can be transferred to a specific folder on the JNIOR by entering the complete path in the RemoteFolder cell. The user can rename the file and the Support Tool will change the name of the file before it is transferred to the JNIOR. NOTE: The folder on the JNIOR must exist or must be created with a Make Remote Folder Step prior to this Step. The user can set the RebootRequired cell to true to have the JNIOR rebooted after the application file is transferred to the JNIOR. This is helpful if the Run registry key has been set to start the program on reboot. The user can edit the Name cell for display purposes in the Step list window on the left. Below is a typical Step used to load an INTEG developed program. Below is the generic Load Application Step and can be used to load any application. You do NOT need to have a version or version location registry key (location) defined. If a version number is available, the Load Application Step will check it and compare the version numbers. You can also use the Generic File Transfer Step to transfer an application besides a standard INTEG application. JNIOR A Network I/O Resource JNIOR Support Tool Manual 28 INTEG Process Group, Inc. Transfer Functions – there are several types of file transfer functions available. There is a generic File Transfer Step and two specific steps for use with the Cinema.JNIOR application. Generic File Transfer – this Step is designed to allow the user to transfer a file to the JNIOR. The location of the file on the PC must be selected via the LocalFile cell and the location for the file on the JNIOR must be entered in the RemoteFile cell. The file can be transferred to a specific folder on the JNIOR by entering the complete path in the RemoteFolder cell. NOTE: The folder on the JNIOR must exist or must be created with a Make Remote Folder Step prior to this step. The user can rename the file and the Support Tool will change the name of the file before it is transferred to the JNIOR. A file on the JNIOR with the same name will be removed before transferring the new file (RemoveFirst). The user can edit the Name cell for display purposes in the Step list window on the left. NOTE: If you are transferring a jnior.ini file to reconfigure your JNIOR, the Support Tool will pause after transferring the jnior.ini file to detect that the JNIOR has properly recognized the jnior.ini file and reconfigured your JNIOR to the new settings before moving on to the next step. This can take up to 1 minute to confirm. JNIOR A Network I/O Resource JNIOR Support Tool Manual 29 INTEG Process Group, Inc. Cinema Macro File Transfer – this Step is designed to allow the user to transfer a Macro file used by Cinema.JNIOR. This step is different than a Generic File Transfer because this step will first check the JNIOR to see if a macro file exists with the same name or a different name. In either case, it will delete the macro file so that only one macro file exists on the JNIOR. The location of the file on the PC must be selected via the LocalFile cell. The name for the file on the JNIOR must be entered in the RemoteFile cell and must be macro_xxx.csv (where xxx can be anything) to be recognized by the Cinema.JNIOR program. The file can only be transferred to the root directory. The user can edit the Name cell for display purposes in the Step list window on the left. Cinema Device File Transfer – this Step is designed to allow the user to transfer a Devices file used by Cinema.JNIOR. This step is different than a Generic File Transfer because this step will first check the JNIOR to see if a devices file exists with the same name or a different name. In either case, it will delete the devices file so that only one devices file exists on the JNIOR. The location of the file on the PC must be selected via the LocalFile cell. The name for the file on the JNIOR must be entered in the RemoteFile cell and must be devices_xxx.csv (where xxx can be anything) to be recognized by the Cinema.JNIOR program. The file can only be transferred to the root directory. The user can edit the Name cell for display purposes in the Step list window on the left. JNIOR A Network I/O Resource JNIOR Support Tool Manual 30 INTEG Process Group, Inc. Cleanup – this Step allows you to delete one or more files on the JNIOR. When the user clicks in the Remote Files cell, a window will pop-up allowing the user to enter the file names and/or folder/filenames of the files to be deleted. The user can edit the Name cell for display purposes in the Step list window on the left. JNIOR A Network I/O Resource JNIOR Support Tool Manual 31 INTEG Process Group, Inc. Below is the window where the file names and paths (if required) are entered one per line. The wild card * can be used. Up and Dn Buttons – the up and down buttons in the middle of the Edit Project Configuration window allow the user to reorder the Steps. The order of the Steps can be important for proper implementation of a project. Package, Save & Close, and Close Buttons The user can Package a project that will include all the steps and any software files into a zip folder. This zip folder can be sent to another user for use with the Support Tool. The other user will open this zip file by using the Open Project command in the Support Tool. The other user does not have to unzip the project. The Save & Close button will only save the Steps as an ldr file that references the folder containing any files being loaded. The Close button will close the current Edit Project Configuration window without saving any of the changes. JNIOR A Network I/O Resource JNIOR Support Tool Manual 32 INTEG Process Group, Inc. 6 Registry Editor Tab The JNIOR Support Tool provides an easy way for the user to edit settings in the JNIOR Registry without using the JNIOR Web page. To view and edit the Registry for a JNIOR, you must first Add the JNIOR to the Registry Editor page. You can do this by clicking on the Registry Editor menu selection at the top of the screen or by ‘right-clicking’ in the left window and selecting Add Jnior. After you select Add Jnior, you will get the pop-up window with the list of all the JNIORs available. Select your JNIOR and click Ok. The registry keys will be displayed. NOTE: The Registry Editor tab will also display ‘default keys’ that are NOT displayed in the web page in light grey. This will allow you to view Registry Keys that you may want to change in the future. If you wanted to change these keys from the JNIOR Web page, you would have to enter the complete key name. JNIOR A Network I/O Resource JNIOR Support Tool Manual 33 INTEG Process Group, Inc. By ‘right-clicking’ on a Registry Key in the right window, you will have the following options: 1) New Registry Key – selecting this option will allow you to enter a new Registry Key in this folder. 2) Edit Registry Key – selecting this option will allow you to edit the Registry Key JNIOR A Network I/O Resource JNIOR Support Tool Manual 34 INTEG Process Group, Inc. 3) Remove Registry Key – selecting this option will remove the registry key 4) Copy Key Name – selecting this option will allow you to ‘copy’ the complete Registry Key name so that you can ‘paste’ it into another JNIOR by using the New Registry Key command. The Registry Key ‘name’ is stored in Windows so you can use the ‘paste’ command. 5) Copy Key Value – selecting this option will allow you ‘copy’ the value for the Registry Key and pasting it into the value of another JNIOR using the Edit Registry Key command. The Registry Key ‘value’ is stored in Windows so you can use the ‘paste’ command. After you have added a JNIOR, you can ‘right-click’ in the left window and have the option to Add another JNIOR, remover the JNIOR selected or Refresh the Registry Keys. JNIOR A Network I/O Resource JNIOR Support Tool Manual 35 INTEG Process Group, Inc. 7 Logs Tab The JNIOR Support Tool provides an easy way for the user to retrieve, aggregate, view, filter, print and save the logs created on the JNIOR. The user can utilize various commands available via the dashboard area of the Logs Tab. The dashboard is shown below: Dashboard Commands The dashboard commands available are as follows: Aggregate Logs from JNIOR – this command will transfer the logs from any JNIOR back to the PC and aggregate all the various log files into one integrated file with each log entry in chronological order for use with the Support Tool. The source of the log message, the time stamp and message will be displayed. A pop-up box will be displayed for selecting the JNIOR IP address (if available via Beacon) via the pull down or for manually entering the JNIOR IP address. After 10 – 15 seconds, a second pop-up box will be displayed listing the logs available on the remote JNIOR and allow the user to select which logs they want transferred back to the PC. JNIOR A Network I/O Resource JNIOR Support Tool Manual 36 INTEG Process Group, Inc. When the logs are transferred back to the PC, they will be stored in a folder with a name that is made up of the JNIOR’s IP address and the date. If the user accesses the logs again on the same date, the time will be added to the folder name. The path will be displayed in the dashboard area below the commands. In the example below, the JNIOR had an IP address of 10.0.0.214 and the files were retrieved on 2011, November 04, at 13:43. The aggregated logs will then be displayed in the Support Tool as shown below. Aggregate Saved Logs – the user can open logs that were previously transferred from a JNIOR. The log files will be stored in a folder using the pattern described above. When the user clicks on this command, a Browse for Folder window will be shown so the user can select the proper folder holding the logs to be aggregated. JNIOR A Network I/O Resource JNIOR Support Tool Manual 37 INTEG Process Group, Inc. Save Current View – allows the user to save the current view whether it is the complete log aggregation or a ‘filtered’ view. A pop-up window will be displayed asking the user where they want to store the file and the file name. The user should use a .txt file name extension so the file can be opened with a program such as Notepad or WordPad. Print Preview – allows the user to see a print preview of the data being displayed Print – prints the aggregated logs, either the complete set or the filtered set Filter – allows the user to filter the data based on a date and time range. A pop-up box is provided for entering the date and time range. Clear Filter – clears the filtered range and displays the complete data set again. Close – closes the log aggregation. Search Aggregated Logs On the right side of the Logs Tab, the user can enter text and the Support Tool will search for every instance of this text. The user can then click on any line in the right window area and the source line will be highlighted in the left window. JNIOR A Network I/O Resource JNIOR Support Tool Manual 38 INTEG Process Group, Inc. The screen shot below demonstrates how the source line be highlighted when clicking on one of the search results in the right window. LOGS The following logs are available with the JNIOR and/or the Cinema.JNIOR Application. All or several of these logs can be aggregated with the JNIOR Support Tool. A sample of each is provided. Cinema Log (cinema.log) – records general activities about the cinema application including events surrounding the initial program loading, specific connections, exceptions, etc. I/O Log (jniorio.log) – records the change in state of the internal and external I/O. Each status change contains a time stamp (date and time). JNIOR A Network I/O Resource JNIOR Support Tool Manual 39 INTEG Process Group, Inc. Client Log (client.log) – records the messages going between the Client and JNIOR. Each message includes a time stamp (date and time). Cinema Server Log (cinemaserver.log) – records the messages going between the Cinema Server Client and JNIOR. Each message includes a time stamp (date and time). Devices Log (devices.log) – records the messages being sent by the JNIOR to the projectors and serial devices. Each message includes a time stamp (date and time). JNIOR Boot Log (jniorboot.log) – records the status of the last JNIOR reboot JNIOR System Log (jniorsys.log) – records the general activities occurring on the JNIOR, including Registry key changes, logins, etc. JNIOR A Network I/O Resource JNIOR Support Tool Manual 40 INTEG Process Group, Inc. The JNIOR does not have a large hard disk or unlimited memory. Making effective use of log files is essential. The maximum file size varies by log type and is predefined and may not be adjustable. If the file size reaches the maximum file size, a back-up copy of the file will be created (called *.bak) and a new log file will be created. This will allow the user additional time to remove the log files (.bak) before the information is overwritten. The amount time before the log creates a .bak file varies by log type and system activity. With JNIOR OS 4.0 and later, a ‘compression’ feature is available. The compression feature is enabled by going to the JNIOR Main Web page and then the Configuration tab and then the Misc tab. If you check the box to enable compression, each time the .bak file is created it will be added to a zip file on the JNIOR. Up to 5 .bak files will be added to the zip file. When you use the Logs tab in the JNIOR Support Tool, it will bring back the zip files and intertwine the back-up files amongst all the logs in the appropriate sequence. NOTE: It is recommended that you do not leave the compression feature enabled on a permanent basis. It should be used to gather logs for a limited period for troubleshooting purposes only. JNIOR A Network I/O Resource JNIOR Support Tool Manual 41 INTEG Process Group, Inc. 8 Snapshot Tab The Snapshot Tab allows the user to download one or more files from the JNIOR. The user can take a ‘snapshot’ of the current JNIOR files. The user can utilize various commands available via the dashboard area of the Snapshot Tab. The dashboard is shown below: Dashboard Commands The dashboard commands available are as follows: Take Snapshot – allows the user to select one or more JNIORs for the download. When the user clicks on this command, a pop-up window will be displayed listing all the JNIORs found by Beacon, including those entered in the Manage IP List. If your JNIOR is not listed, you can manually type in the IP address of your JNIOR in the Enter New IP Address box. Cancel – cancels the snapshot in progress. Filter – the user can enter a filter string to have only certain files downloaded from the JNIOR. The user can use the * wildcard. If you want to use a filter, you must enter it before you click on Take Snapshot. Some examples on how to use a filter: - JNIOR Leaving the filter blank will download from the JNIOR every folder and file on the JNIOR. Entering a specific filename, like jnior.ini, will cause Snapshot to go through every folder on the JNIOR to find the file called jnior.ini. If there is more than one copy, it will download them all. Entering the filter flash/jnior.ini will cause Snapshot to go to a specific folder, the flash folder, to find the file called jnior.ini Entering *.csv will download every file with the extension csv A Network I/O Resource JNIOR Support Tool Manual 42 INTEG Process Group, Inc. Below is an example of a Snapshot download from one JNIOR with an IP address of 10.0.0.117 using the filter *.csv. Snapshot will go through every folder and download every file with the csv extension. The FTP progress will display the current status and the dialog box at the bottom of the Snapshot tab will provide specific details. Snapshot creates a folder for each IP address and then under this folder, it creates a folder with the date and time for the current snapshot. A tilde (~) will be placed at the beginning of the date/time folder indicating that the snapshot is in progress. If the tilde remains after the snapshot has completed, then an error occurred during the download. The word ‘filtered’ will be added after each snapshot that was done using a filter. A SNAPSHOT.log file is created with a log of the download session and can also be used to determine if or why a snapshot did not complete. JNIOR A Network I/O Resource JNIOR Support Tool Manual 43 INTEG Process Group, Inc. The files that are downloaded can be opened by ‘right clicking’ on the filename in the right window. The Find Target command will be displayed and if you click on this, Windows will attempt to launch an application, such as Notepad for a .txt file, and open the file. You can also ‘double click’ on a file and Windows will try to launch the appropriate application. By ‘right clicking’ on a folder in the left window, you can either ‘zip’ the folder or Open the folder using Windows Explorer. Once the folder is opened in Windows Explorer, you can manage the files. JNIOR A Network I/O Resource JNIOR Support Tool Manual 44 INTEG Process Group, Inc. 9 Devices Tab NOTE: In order to view the Devices tab, the View must be set to Cinema. If you are not using Cinema.JNIOR, then please skip this section. The Cinema.JNIOR application can communicate with a variety of external devices via the Ethernet and the serial ports on the JNIOR. These devices can be controlled as part of a macro running on the JNIOR with the Cinema.JNIOR program. The Devices Tab is used to configure the devices available for use by the macros. The Devices file provides the JNIOR with important set-up information about the device being connected to. NOTE: The devices file must be built using the JNIOR Support Tool. Only one devices file can be utilized on the JNIOR at a time. The JNIOR Support Tool should be used to transfer the devices file since it will verify there is only one devices file on the JNIOR. If more than one devices file is transferred to the JNIOR, the JNIOR may select the first file found which may or may not be the one intended for operation. When the JNIOR Support Tool is first launched, a ‘default’ file is opened. The user can edit the default file and save it. NOTE: The devices file must be saved as a filename that starts with devices_. A valid filename that will be recognized by the Cinema.JNIOR application is: devices_x.csv where x can be any number of acceptable characters The user can utilize various commands available via the dashboard area of the Devices Tab. The dashboard is shown below: Dashboard Commands The dashboard commands available are as follows: Open Local File – the user must initially edit the default file and save it. When the user clicks on this command, a Windows pop-up box will be displayed that allows the user to select a previously saved devices file. JNIOR A Network I/O Resource JNIOR Support Tool Manual 45 INTEG Process Group, Inc. Open Remote File – the user can transfer a devices file from a JNIOR back to the PC to be viewed and/or edited. Close – closes the file currently being viewed Save As – allows the user to save the file. The filename must start with devices_ Publish to JNIOR – allows the user to transfer the devices file to a JNIOR. When the user clicks on this command, a pop-up window will be displayed. The pull down will list all the JNIORs found by Beacon. If your JNIOR is not listed, you can manually type in the IP address of your JNIOR in the Enter New IP Address at the box at the top. JNIOR A Network I/O Resource JNIOR Support Tool Manual 46 INTEG Process Group, Inc. Below are the commands the dashboard will display the path and name of the current devices file being edited: Below the dashboard, the Devices Tab contains two areas – the top area (A) is where the user builds their devices file and the lower area (B) displays the contents of the devices file. A B Area A - The top area contains the following columns and functionality: Device Name – free form name for the device with each name being unique with the exception that NO SPACES are allowed Device Type – this field will tell the JNIOR the specific device to connect to so that the JNIOR can utilize the proper protocol and make available to the macro the relevant commands. More details on the functionality available for each device type is provided in the next section of this manual (Macro Tab). The names for this field are defined by INTEG and represent the valid types of devices available. A separate data sheet has the current list of devices, but the typical devices include: - JNIOR Barco digital projector Christie digital projector NEC digital projector Sound processors RAW Ethernet (will only send a user entered message defined in the macro) RAW Serial (will only send a user entered message defined in the macro) A Network I/O Resource JNIOR Support Tool Manual 47 INTEG Process Group, Inc. IP Address – the IP address of the external device on the Ethernet (blank for serial devices). Port – the port number to be used by the JNIOR when opening the connection to the external device over the Ethernet or the JNIOR serial port to be used for serial connections. The default Ethernet port number will be shown in a pop-up box for the Barco, Christie and NEC projectors and some sound devices. The user can accept the default or change the port number. For a serial device, the user must select AUX (if the Aux. Serial port is used) or RS232 (if the RS-232 port is used) to define which serial port is being used on the JNIOR. Baud, Data Bits, Parity, Stop Bits, and Flow Control – settings to be used for connections to serial devices (blank for Ethernet devices). Pull downs are provided to indicate the available settings available with the JNIOR serial ports. Termination String – the characters to be sent at the end of the message. The user must select one of the defaults or select Other and enter their own. \n is line feed and \r is carriage return. Add and Remove Buttons – these buttons allow the user to add or delete devices from the list. Area B - The bottom area is for display purposes only and displays the contents of the devices file. JNIOR A Network I/O Resource JNIOR Support Tool Manual 48 INTEG Process Group, Inc. 10 Macro Tab NOTE: In order to view the Macro tab, the View must be set to Cinema. If you are not using Cinema.JNIOR, then please skip this section. The Cinema.JNIOR Application has the ability to run macros stored on the JNIOR. The macros can control the JNIOR outputs and interact with the connected devices. A macro file includes a complete list of the all the macros and their associated actions and timing. The following describes the functionality of the JNIOR macros and how they are configured. NOTE: The macros must be built using the JNIOR Support Tool. Only one macros file can be utilized on the JNIOR at a time. The JNIOR Support Tool should be used to transfer the macro file since it will verify there is only one macros file on the JNIOR. If more than one macros file is transferred to the JNIOR, the JNIOR may select the first file found which may or may not be the one intended for operation. When the JNIOR Support Tool is first launched, a ‘default’ file is opened. The user can edit the default file and save it. NOTE: The macro file must be saved as a filename that starts with macro_. A valid filename that will be recognized by the Cinema.JNIOR application is as follows: macro_x.csv where x can be any number of acceptable characters The user can utilize various commands available via the dashboard area of the Macro Tab. The dashboard is shown below: Dashboard Commands The dashboard commands available are as follows: Open Local File – the user must initially edit the default file and save it. When the user clicks on this command, a Windows pop-up box will be displayed that allows the user to select a previously saved macro file. JNIOR A Network I/O Resource JNIOR Support Tool Manual 49 INTEG Process Group, Inc. Open Remote File – the user can transfer a macro file from a JNIOR back to the PC to be viewed and/or edited. Close – closes the file currently being viewed Save As – allows the user to save the file. The filename must start with macro_ Publish to JNIOR – allows the user to transfer the macro file to a JNIOR. When the user clicks on this command, a pop-up window will be displayed. The pull down will list all the JNIORs found by Beacon. If your JNIOR is not listed, you can manually type in the IP address of your JNIOR. (Please see the Devices Tab section for a typical screen shot.) Link Devices – allows the user to include in the macro file commands that will be sent to a remote device such as a projector or serial device. When you click on the Link Devices command, a pop-up window will ask you to provide the devices filename to use. The file ‘linked to’ will be displayed to the right of the Link Devices command. NOTE: The linkage to this file is not dynamic, so if you make changes to your devices file, you must link again. Whenever you open this macro file again, a different pop-up window will inform you that this macro file contains linked devices and you will be asked to click on the devices file to use. This linkage will not automatically happen each time the macro file is opened. You must remember the devices file name to use. However, if you are not making any changes to the auxiliary devices, you do not have to open the devices file each time you open the macro file. JNIOR A Network I/O Resource JNIOR Support Tool Manual 50 INTEG Process Group, Inc. Below the commands, the dashboard will display the path and name of the current macro file being edited and the devices file that was linked: Below the dashboard, the Macro Tab contains three main areas (letters correspond to letters in screen shot below): A) – Action View Window – used to display and manage actions that can be used in macros B) – Macro View Window – used to display and create macros consisting of actions and timing C) – Macro File Overview Window – display only – shows all the macros, actions and timing JNIOR A Network I/O Resource JNIOR Support Tool Manual 51 INTEG Process Group, Inc. A B C JNIOR A Network I/O Resource JNIOR Support Tool Manual 52 INTEG Process Group, Inc. Action View Window The Action View window by default lists all the actions available involving the digital inputs and the digital outputs on the JNIOR and 4 Relay Output Expansion Module. The JNIOR can utilize one or two expansion modules giving the JNIOR a total of 8, 12 or 16 relay outputs. The Action View window contains the following information: Name – User configurable field to describe the action or output (spaces are allowed) Device – A macro can utilize any of the JNIOR inputs or outputs, or connect to an external device. The external devices must be configured in the Devices Tab of the JNIOR Support Tool and then the Devices file must be ‘linked’ to the Macro file using the Link Devices feature in the dashboard at the top of the macro configuration area. The link function will add the devices from the Devices file to the pull down in the Action column. JNIOR A Network I/O Resource JNIOR Support Tool Manual 53 INTEG Process Group, Inc. Action – User selectable action to take when this Action is executed. For the outputs, the choices are Open, Close, Toggle and Close Pulse. For the inputs, a Soft Pulse action can be implemented where the user does not have to actually wire a signal to the input. Instead, the JNIOR can create the input ‘high’ (or on) message with a Soft Pulse. The JNIOR will send out the message packet indicating the input has gone ‘high’ for external devices, such as a cinema server, which are monitoring the JNIOR I/O and using the input signal as a trigger. For external devices, additional actions will be listed based on the device type. A separate data sheet has the current list of devices and associated actions, but the typical devices include: Barco Projector Christie Projector NEC Projector Lamp On, Lamp Off, Open Dowser, Close Dowser, Send Macro Lamp On, Lamp Off, Open Dowser, Close Dowser Lamp On, Lamp Off, Open Dowser, Close Dowser, Input Switch For the Barco projector only, the Send Macro action is available where a macro name can be entered in the Data column and sent to the Barco projector. For the NEC projector only, the Input Switch action is available where a switch number can be entered in the Data column and sent to the NEC projector. For the RAW Ethernet or RAW Serial devices, the only action available is a Send command. This will send the information entered in the Data column to the device. Data – Defines the pulse duration (in whole seconds) for the Close Pulse command or the data to be sent to the RAW Ethernet or RAW Serial devices. Up and Dn Buttons – the up and down buttons on the right side of the Action View Window allow the user to reorder the actions. This will also adjust the order of the actions in the Macro File Overview Window at the bottom of the Macro Tab. Add Button – allows the user to enter new Actions. You will enter a name and then when you click on the Devices column, you will be given a choice of the eight JNIOR Inputs, the sixteen JNIOR Outputs and any external devices imported via the Link Devices command. Below is a screen shot of the pull down for the Devices column with linked devices. JNIOR A Network I/O Resource JNIOR Support Tool Manual 54 INTEG Process Group, Inc. Depending upon the device selected, you will receive an appropriate list of Actions to choose from. Below is the pull down listing the action for a digital input. The Soft Pulse action creates an approximately one to two second transition to ‘high’ of this input. This is a software only transition and does not affect the electrical side of the inputs. This causes the input high message to be sent from the JNIOR to other devices, such as a cinema player, connected to the JNIOR and monitoring the status of the inputs. This message can be used in lieu of wiring an actual signal to the JNIOR input. Below is a pull down listing the actions for a relay output. An output action can be Open, Close, Toggle (changes to the opposite state it is currently in) or Close Pulse. When the Close Pulse command is selected the appropriate pulse duration, in whole seconds, must be entered in the Data column. The default, and typical value, is 1 second. NOTE: You can have different actions configured for the same output. For example, an output can have a Close action and a Close Pulse action and these actions can be used in the same or different macros. Below is a listing the typical actions for a JNIOR Control Panel. The JNIOR Control Panel has LED status indicators that can be controlled in a macro. The JNIOR Control Panel also has a speaker that can play alarms (sounds) as part of a macro. See the JNIOR Control Panel documentation for further instructions. JNIOR A Network I/O Resource JNIOR Support Tool Manual 55 INTEG Process Group, Inc. Below is a pull down listing the actions for the Barco Projector. If the Send Macro action is selected, the macro name must be entered in the Data column. (The commands for the other devices are listed on the previous page of this document.) Remove Button – allows the user to delete any action. NOTE: Deleting unused actions is not required, but can be done so that the Macro File Overview Window at the bottom is cleaner and only shows the relevant Actions and I/O being used. Macro View Window The Macro View window displays the macros being created and is used to adjust the timing of each action and to reorder the macros in the macro file. Macro Name – a user configurable name for the macro. This name is the name that is used by any trigger to run this macro. The macro can be triggered by the Preshow Client, Cinema Server Client, the switches on the JNIOR Control Panel, digital inputs and via devices on the network. Please see the Cinema.JNIOR Application manual for more details on how to trigger a macro. JNIOR A Network I/O Resource JNIOR Support Tool Manual 56 INTEG Process Group, Inc. Timing – The number of seconds from the time the macro is triggered that the specific action will be executed. Two actions can occur at the same time. However, if they are two different types of actions, they may not actually occur at the exact same time. Relay Outputs on the JNIOR (outputs 1 – 8) must be separated by their pulse duration. For example, if you increase the pulse duration to 3 seconds, the next action must occur at least 3 seconds later. This does not apply to relay outputs on the 4 Relay Output Expansion Module where actions can occur at the same time, but do not have to be separated by more than 1 second regardless of pulse duration length. Action Description – Displays the action, device and any data associated with the action. Add Button – allows the user to add a new macro Remove Button – allows the user to delete a macro Adding An Action to a Macro – the user can ‘move’ an action from the right window to a macro in the left window by: 1. Clicking on the desired macro in the left window 2. Clicking on the desired action in the right window 3. clicking on the <- (left arrow) button in between the two windows As an alternative to step 3 above, the user could click on the Add button and then the Action to Macro option as shown below. Timing + and – Buttons – allows the user to increase or decrease the timing value for an action within a specific macro Up and Dn Buttons – the up and down buttons on the right side of the Macro View Window allow the user to reorder the macros. This will also adjust the order of the macros in the Macro File Overview Window at the bottom of the Macro Tab. NOTE: Starting a macro can be done by using the macro name or its macro number. The macro number is the sequential number given to each macro based on its listing order in the Macro File Overview Window. One is given to the first one, two the second, and so on. So reordering the macros will change this macro number. JNIOR A Network I/O Resource JNIOR Support Tool Manual 57 INTEG Process Group, Inc. Annotate Pull Down – the user can enter a revision, date and comment that are stored with the macro file to help describe the purpose of the macro file. Macro File Overview Window The Macro File Overview window displays the complete list of all the actions defined in the Action View window, all the macros configured, and the timing for each action in each macro. The Macro File Overview window provides the user with an easy way to view their macro file configuration. Scroll bars are provided for viewing all the information. ‘Cross hairs’ are provided by highlighting the macro selected in the Macro View window and the Action selected in the Action View window. Action List Macro List Action Timing JNIOR A Network I/O Resource JNIOR Support Tool Manual 58 INTEG Process Group, Inc. 11 JNIOR Web Page and Manuals With the JNIOR Support Tool installation, the JNIOR Main Web page, the JNIOR Web Based Interface Manual and JNIOR Getting Started Manual are also installed on your PC. If you navigate to Start – Programs – INTEG – JNIOR and click on JNIOR Main Applet, the web page will load from your PC and give you a dialog box to enter the IP address of your JNIOR. This saves the time of waiting for the JNIOR to send out the web page over the Ethernet. After you enter the IP address, a connection will be made to the JNIOR and the web page populated with all the data. JNIOR A Network I/O Resource JNIOR Support Tool Manual 59 INTEG Process Group, Inc. If you ‘right click’ on the tab at the top of the web page containing the JNIOR IP address, you can create a New Tab and enter a different JNIOR IP address. This gives you the capability to be connected to more than one JNIOR. If you select the Close Tab, you can individually disconnect from a JNIOR. If you enter an incorrect IP address and the web page cannot find the JNIOR, then press the ESC button on your keyboard to cancel the request. JNIOR A Network I/O Resource JNIOR Support Tool Manual 60 INTEG Process Group, Inc. Summary Thank you for purchasing the JNIOR. Hopefully this manual made the getting-to-know process of your new JNIOR very quick and easy. The JNIOR has many more wonderful tools and features available, and are explained in detail in the supplied documents. Copyright Copyright 2009 – 2012 INTEG Process Group, Inc. All rights reserved. Notice Every effort was made to make this manual as accurate and useful as practical at the time of the writing of this manual. However, all information is subject to change. Trademarks Trademarks are the property of their respective holders. Sun, Sun Microsystems, the Sun logo and Java are trademarks or registered trademarks of Sun Microsystems, Inc. in the United States and other countries. Microsoft, Windows, MS-DOS and Internet Explorer are registered trademarks of Microsoft Corporation. HyperTerminal is a registered trademark of Hilgraeve, Inc. Use Restrictions This User’s Manual and the software contained in the JNIOR are copyrighted by INTEG Process Group, Inc. and may not be copied or reproduced without prior consent from INTEG Process Group, Inc. INTEG Process Group, Inc. is not responsible for any errors or omissions that may be contained in this manual. Please do not hesitate to contact our JNIOR team at INTEG Process Group, Inc. We can be reached via phone, fax or e-mail as follows: INTEG Process Group, Inc. 2919 E. Hardies Road 1st Floor Gibsonia, PA 15044 www.integpg.com [email protected] PH (724) 933-9350 extension 20 FAX (724) 443-3553 JNIOR A Network I/O Resource JNIOR Support Tool Manual 61