1
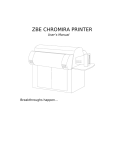
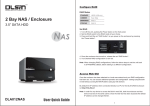
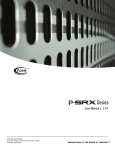
Connecting Your HP SureStore CD-Writer Plus Drive Windows 95 and Windows NT 4.0 R U.S.: Hewlett-Packard Company, 815 SW 14th Street Bldg. E., Loveland, CO 80537 Europe: Hewlett-Packard Nederland B.V., P.O. Box 58144, 1040 HC Amsterdam, The Netherlands C4358-90100 Rev. B Copyright 1997. Hewlett-Packard Company. All rights reserved. Hewlett-Packard is a registered trademark of Hewlett-Packard Company. Microsoft and Windows are U.S. registered trademarks of Microsoft Corporation. Pentium is a U.S. registered trademark of Intel Corp. Names of products mentioned herein are used for identification purposes only and may be trademarks and/or registered trademarks of their respective company. ii Copyright notice for Denmark: VIGTIGT! Copyright ved brug af CD-Writer 7100i/e enheder solgt i Danmark I henhold til gældende dansk lov om ophavsret er det forbudt at foretage digital kopiering af et digitalt værk. CD-RW brænderen må derfor IKKE anvendes til at kopiere en musik-CD. CD-RW brænderen må desuden kun benyttes til at kopiere et digitalt EDB-program, når en sådan kopiering tjener til at fremstille et sikkerhedseksemplar af programmet eller hvor kopiering er nødvendig, for at programmet kan anvendes efter dets formål. Hvis De selv har ophavsretten til værket, har De også retten til at foretage digital kopiering med CD-RW brænderen. Table of Contents Table of Contents . . . . . . . . . . . . . . . . . . . . . . . . . . . . . . . . . . .iii Before You Start . . . . . . . . . . . . . . . . . . . . . . . . . . . . . . . . . . . . 1. Whats in Your Package . . . . . . . . . . . . . . . . . . . . . . . . . . . . . . . . . . . . . . .1 Connecting the CD-Writer drive . . . . . . . . . . . . . . . . . . . . . . . 2 . If You Have Problems... . . . . . . . . . . . . . . . . . . . . . . . . . . . . . . . . . . . . . . .8 Using the CD-Writer drive on Another Computer . . . . . . . . . . . . . . . . . .8 Installing the Software . . . . . . . . . . . . . . . . . . . . . . . . . . . . . . 11 . Identifying the CD-Writer drive . . . . . . . . . . . . . . . . . . . . . . . . . . . . . . .15 Where to Go Next . . . . . . . . . . . . . . . . . . . . . . . . . . . . . . . . . . . . . . . . . .15 If You Have Problems... . . . . . . . . . . . . . . . . . . . . . . . . . . . . . . . . . . . . . .15 Uninstalling the Software Programs . . . . . . . . . . . . . . . . . . . . . . . . . . . . 19 Using CDs . . . . . . . . . . . . . . . . . . . . . . . . . . . . . . . . . . . . . . . .20 . Inserting a CD . . . . . . . . . . . . . . . . . . . . . . . . . . . . . . . . . . . . . . . . . . . . .20 Removing a CD . . . . . . . . . . . . . . . . . . . . . . . . . . . . . . . . . . . . . . . . . . . .21 Choosing CDs for Your HP CD-Writer drive. . . . . . . . . . . . . . . . . . . . . . 21 Maintenance . . . . . . . . . . . . . . . . . . . . . . . . . . . . . . . . . . . . . . . . . . . . . .22 Problem Solving . . . . . . . . . . . . . . . . . . . . . . . . . . . . . . . . . . . 23 . Things to Try First . . . . . . . . . . . . . . . . . . . . . . . . . . . . . . . . . . . . . . . . . .23 Common Symptoms and Solutions. . . . . . . . . . . . . . . . . . . . . . . . . . . . . 24 Technical Specifications . . . . . . . . . . . . . . . . . . . . . . . . . . . . . 32 . Minimum System Requirements . . . . . . . . . . . . . . . . . . . . . . . . . . . . . . .32 What Affects System Performance . . . . . . . . . . . . . . . . . . . . . . . . . . 33 Drive Specifications. . . . . . . . . . . . . . . . . . . . . . . . . . . . . . . . . . . . . .35 Returning a Drive. . . . . . . . . . . . . . . . . . . . . . . . . . . . . . . . . . . . . . . . . . .43 Before You Call Customer Support . . . . . . . . . . . . . . . . . . . . . . . . . . . . .44 Where to find this information . . . . . . . . . . . . . . . . . . . . . . . . . . . . 45 Customer Support . . . . . . . . . . . . . . . . . . . . . . . . . . . . . . . . . . 47 . iii Before You Start Before you start connecting your Hewlett-Packard SureStore CD-Writer Plus rewritable CD drive, be sure that: 1. You received the entire CD-Writer package. 2. Your system meets minimum system requirements (page 32). Whats in Your Package Make sure you have the items shown below. (Keep the packaging in case you need to transport the CD-Writer drive.) Blank Rewritable CD Installation guide HP SureStore CD-Writer Plus drive Software InstallationCD and Getting Started brochure Power supply Power cord Audio cable Driver installation disk Data cable 1 Connecting the CDWriter drive CAUTION: The CD-Writer drive contains sensitive, high-precision optical equipment. Dropping or shaking the CD-Writer drive may cause damage to these sensitive components. Please be careful when handling your drive. NOTE: Refer to the manual that came with your computer if you need more information than what is provided here. WARNING: DO NOT, under any circumstances, open the external CDWriter drives case. If you suspect problems with your drive, service must be performed by a certified HP technician. See "Customer Support" on page 47. 1. Shutdown Windows and turn OFF your computer. NOTE: The CD-Writer drive can be used with laptops, desktops, and towers that meet "Minimum System Requirements" on page 32. 2 3 Connecting the CD-Writer drive 2. Connect one end of the power cord into the power supply and the other end to a wall outlet or power strip. (The power plug and outlet may look different in your country.) To CD-Writer drive Green light power cord Power supply 3. Connect the power supply to the power connector on the back of the CD-Writer drive, with the arrow on the cable facing up. To power supply (arrow up) Power connector Check that you have power to the CD-Writer drive by opening and closing the CD tray by pressing the eject button. NOTE: There is no power switch on the CD-Writer drive or power supply. The energy-efficient power supply automatically switches into power-saving mode when the drive is not in use, and may be safely left plugged in at all times. However, you may safely unplug the power supply without damage to the CD-Writer drive. 4 Installation Guide 4. Locate the parallel port (printer port) connector on your computer. If you are having trouble finding the parallel port connector, your printer may already be attached to it. The CD-Writer drive can share the parallel port with your printer. Parallel ports have receptacles for 25 pins. Select an available parallel port. TIP: Your CD-Writer drive can share a parallel port with a printer. If the CD-Writer drive and your printer will share the parallel port, go to the next step. If the CD-Writer drive will not share the parallel port with your printer, proceed to step 6. 5 Connecting the CD-Writer drive 5. If you have a printer cable attached to the computers parallel port, disconnect it from the computer and plug it into the CDWriter drives connector that is closest to the power cord connector. Printer connector Secure the connector by tightening the retaining screws. Printers data cable (If a printer is sharing the parallel port with the CDWriter drive.) Power cord connector CAUTION: Do not plug any device other than a printer into the CDWriter drives printer connector. NOTE: If your printer is attached to the CD-Writer drive, printing documents while using the rewritable CD drive (for example, playing audio CDs, writing to disc) will yield unpredictable results and is not a supported function. This is because the printer and CD-Writer drive are sharing the same data cable. 6 Installation Guide 6. Attach the CD-Writer drives data cable to your computers 25pin parallel port connector and hand tighten the retaining screws. Attach the data cables remaining connector to the rewritable drive and secure it by tightening the retaining screws. Attach this end to the computers parallel port. Attach this end to the CDWriter drive. CD-Writer drives data cable 7 Connecting the CD-Writer drive 7. Connecting the audio cable is OPTIONAL. If you do not wish to use it, go to step 10. The audio cable is used only for hearing music CDs through your computers sound system. If you do not have a sound board in your computer, you can still hear music CDs through speakers or earphones attached to the front of the CD-Writer drive. NOTE: When the CD-Writer drive records music or data, it uses the data cable, not the audio cable. 8. If you have a sound board, connect the audio cable to aLINE IN audio connector on the back of your computer. (Your sound board may be labeled differently.) 9. Connect the other end of the audio cable to the audio connector on the back of the CD-Writer drive. LINE IN connector on sound board (Your sound board may be labeled differently.) Audio connector Audio cable (optional) 10. Plug in and turn ON your computer. 11. You are now ready to Install the parallel port drivers and the application software. (See "Installing the Software" on page 11.) 8 Installation Guide If You Have Problems... After connecting your CD-Writer drive and turning on your computer, the computer should start (boot) as it normally does. If it does not, check the following items: ■ Is the computer power plugged in? ■ Is each device plugged in and turned on? ■ ■ Are all cables properly plugged into the back of your computer and the CD-Writer drive? Try turning off your computer. Wait at least 20 seconds before turning it back on. TIP: Save the original packaging materials, in case you need to transport the drive or return any items to HP. Using the CD-Writer drive on Another Computer CAUTION: The CD-Writer contains sensitive, high-precision optical equipment. Dropping or shaking the CD-Writer may cause damage to these sensitive components. Please be careful when handling your drive. You can disconnect the CD-Writer drive and move it to another computer, as long as the other computer meets the minimum requirements (see page 32). The CD-Writer drive can be used by only one computer at a time. Do not try to use the CD-Writer drive on more than one machine by attaching it to a switch box. To disconnect the CD-Writer drive: 1. In Windows NT, go to step 2. In Windows 95, click on the Connect or Disconnect external drive icon on the desktop. Select Shuttle EPAT External ATAPI Adapter , then click Disconnect . Connecting the CD-Writer drive 2. 9 Unplug the CD-Writers power supply from the outlet or power strip. Power supply NOTE: There is no power switch on the CD-Writer drive or power supply. You may safely unplug the power supply without damage to the CD-Writer drive. (The power plug and outlet may look different in your country.) 3. Disconnect the data cable and audio cable (if any) from the back of the computer. Data cable 10 Installation Guide 4. Disconnect the printer cable (if any) from your CD-Writer drive and reconnect it to the back of your computer (other cables not shown but still attached). 5. You are ready to connect the CDWriter drive to another computer. To connect the CD-Writer drive to another computer: 1. Follow the directions for Connecting the CD-Writer drive on page 2. 2. The first time you attach the CD-Writer drive to this computer, follow the directions for Installing the Software on page 11. Each additional time, after connecting all the cables: In Windows NT, reboot your computer. In Windows 95 , simply click on the Connect or Disconnect external drive icon on your desktop. Select Shuttle EPAT External ATAPI Adapter , then click Connect . Installing the Software After the CD-Writer drive is attached to your computer, you are ready to install the application software. NOTE: You must run the installation program. The installation program converts the files from the Software Installation CD into a usable format. 1. Insert the CD labeled Software Installation into your CD-ROM drive (not the CD-Writer drive), if you have not already done so. If your computer DOES NOT have a CD-ROM drive To get your CD-Writer started right away, insert the diskette labeled Driver Installation into your floppy drive. ■ ■ ■ Click the Start button on the task bar, select Run. Type A:\SETUP (where A: is your floppy drives letter), and press Enter. The parallel port driver files are installed. This may take several minutes and your mouse cursor will not move. (Windows NT only: Reboot your computer before continuing.) Now insert the CD labeled Software Installation into your new CD-Writer drive and proceed with step 2. NOTE: For information about inserting a CD into the CD-Writer drive, see "Inserting a CD" on page 20. 11 12 Installation Guide 2. If the language-selection screen doesnt automatically appear, click on the Start button on the task bar, select Run, type D:\SETUP (where D: is your CD drives letter), then click onOK. The following screen appears: 3. Select the desired language or leave the default. Click onNext. 4. Click on the Install Software button on this menu: Click here to install the software . Click here for a fun multimedia tour of the programs that came with your drive. Click here to register your new drive and software. Click here to view the CDs contents. Installing the Software 13 5. The parallel-driver files are installed first. This may take several minutes and your mouse cursor will not move. (If you used the diskette, this step will be skipped.) 6. The Welcome window appears, click on Next. 7. The software license agreement window appears. After reading it, click on Yes. 8. The Setup window asks you to choose either acomplete or custom installation. NOTE: For information about the software programs included with the CD-Writer drive, see the insert with the Software Installation CD. 9. Click on the Complete Installation icon to install all the programs, including the multimedia QuickTour. The programs will be stored in the directory C:\Program Files\HP CD-Writer Plus. Go to step 10. Or click on the Custom Installation icon to select specific programs or install the programs to a directory other than C:\Program Files\HP CD-Writer Plus. Then: 14 Installation Guide ■ ■ ■ 10. To install to a different directory, click theBrowse button and type the name of the directory into which you want to install the programs. To select the programs you wish to install, click on the check boxes. (A indicates that the program is selected.) Click on Next to install the programs. The programs are installed, one at a time. When all files are installed: ■ ■ You are prompted to fill out the electronic registration. You can view the multimedia QuickTour to learn about the software packages that came with the CD-Writer drive. 11. Remove the Software Installation CD and store it in a safe place. 12. You must restart your computer before using the CD-Writer drive. A window showing the CD-Writer drives program group appears. 13. To start using your CD-Writer drive, double-click on an icon in the CD-Writer drives program group that appears on your desktop, or: ■ Click the Start button. ■ Highlight Programs. ■ Select HP CD-Writer Plus . ■ Select the program that you wish to use. Installing the Software 15 Identifying the CD-Writer drive Not sure which drive letter was assigned to the CDWriter drive? The CD-Writer drive will have a drive icon just like a CD-ROM drive icon. You can determine which icon is your CDROM drive and which icon is your CD-Writer drive by doubleclicking on the My Computer icon, right-click on the CD drive icon, and select Eject. The tray of the selected drive will open. Where to Go Next To learn more about using the software that came with your CDWriter, check the Getting Started brochure with theSoftware Installation CD, check the information in the QuickTour tutorial, and check the online Help within each program. If You Have Problems... Things to try first... ■ ■ ■ ■ ■ ■ Make sure the computer and each device is plugged in and turned on. Does your computer meet the minimum system requirements listed in "Minimum System Requirements" on page 32? Turn off the computers power, wait 20 seconds, then turn it on again. Unplug the CD-Writer drive and plug it in again. (This is called cycling power.) Disconnect all the cables, look for and straighten any pins, and then reconnect the cables. Sometimes just reconnecting a cable aligns it correctly or adjusts the pin connections, fixing a faulty connection. Check the list of known compatibility problems (see page 30) and in the Readme file. Make sure that there is no switch box anywhere in the CDWriter drives cabling configuration. 16 Installation Guide ■ ■ If you have a printer connected to the CD-Writer drive, check to see if your computer can detect the CD-Writer drive when the printer is disconnected. Check to make sure that your parallel port is truly configured as either EPP or ECP. Check the manual that came with your computer to find out how. Check for a conflict with the parallel port (some other device using the same IRQ or I/O as the parallel port). In Windows 95, to find out if there is a conflict: - Right-click on the My Computer icon - Select Properties - Select the Device Manager tab: Under the heading SCSI Controllers , find Shuttle EPAT External ATAPI Adapter , and select Properties AND Under the heading Ports, find Printer Port, and select Properties If you see a yellow exclamation mark to the left of this line, you do have a conflict. Figure out which other device is using the same settings as your parallel port and change the settings on the other device. If you discover you do have a conflict, to find out which device is in conflict: ■ ■ In Windows 95, right-click on the My Computer icon, select Properties, select the Device Manager tab, double-click on the computer icon to see a list of which device is using each resource setting on your computer. In Windows NT (while signed on as Administrator), from the Start menu on the task bar, select Programs/Administrative Tools (Common)/Windows NT diagnostics . Select the Resources tab to view the list of which resources are being used by which device. Installing the Software 17 Error message when I double-click on the CD-Writer drives icon ■ ■ ■ ■ There is no CD in the CD-Writer drive; insert a CD and try again. After inserting a CD, you need to wait a moment to let the CD-Writer drive read the disc information (wait until the light on the front of the drive stops flashing and stays green), then click on the CD-Writer drives icon again. The CD may be in the tray upside-down or a little off-center; try reinserting the CD. The label should be facing up. You are trying to read from a blank recordable CD. Try again after copying some information to the CD. In Windows Explorer, unable to see the CD label or all the sessions/files on the CD Refresh the screen. Select the My Computer icon in Windows Explorer and press F5. Printer no longer works after connecting the CD-Writer drive Problems printing a file ■ ■ See "Check for a conflict with the parallel port (some other device using the same IRQ or I/O as the parallel port)." on page 16 . For example, a sound board or fax/modem board may be using the same IRQ. If you discover conflicts, change the IRQ setting on the other device. Refer to the manuals that came with your computer and other devices for instructions. If your printer is attached to the CD-Writer drive, printing documents while using the rewritable CD drive (for example, playing audio CDs, writing to disc) will yield unpredictable results and is not a supported function. This is because the printer and CD-Writer drive are sharing the same data cable. 18 Installation Guide System does not recognize the CD-Writer drive ■ In Windows 95, simply click on the Connect or Disconnect external drive icon on your desktop. Select Shuttle EPAT External ATAPI Adapter , then click Disconnect . ■ ■ ■ ■ Restart your computer, or shut it down and then turn it on again. Watch for the green light on the front of the CD-Writer drive to blink as the computer boots up. Make sure the CD-Writer drives cables are connected properly. See "Check for a conflict with the parallel port (some other device using the same IRQ or I/O as the parallel port)." on page 16 . For example, a sound board or fax/modem board may be using the same IRQ. If you discover a conflict(s), change the setting on the other device. Refer to the manuals that came with your computer and other devices for instructions. The power supply should have a steady green light when connected at both ends. If it is flashing, try a different power outlet. If it is still flashing the power supply could be damaged. Installing the Software 19 Uninstalling the Software Programs You can remove all CD-Writer drives programs or individual programs. CAUTION: If you want to reinstall the CD-Writer drives software, first be sure to uninstall the original software. 1. Click the Start button. ■ Highlight Programs. ■ Select CD-Writer drive . ■ Select Uninstall . 2. Select the CD-Writer drives program(s) that you wish to remove. 3. Click the Finish button. The software is removed, including all related entries in your system registry. Using CDs This section describes the use of the recordable and rewritable CDs. It shows you how to: 1. Insert and remove a CD 2. Purchase additional CDs 3. Maintain your CD-Writer drive Inserting a CD 1. Press the eject button on the CD-Writer front panel. 2. Set the CD in the tray with the labeled side up. Eject button 3. Press the eject button again or push gently on the front of the tray to shut the tray. When you access the CD-Writer drive from within a program, you should be able to read the files on the inserted CD. If you have problems: ■ 20 The CD may be in the tray upside-down or a little off-center; try reinserting the CD. The label should be facing up. Using CDs ■ ■ 21 After inserting a CD, you need to wait a moment to let the CD-Writer drive read the disc information (wait until the light on the front of the drive stops flashing and stays green), then click on the CD-Writer drives icon again. Are you trying to read from a blank recordable CD? Try again after copying some information to the CD. Removing a CD 1. Press the eject button on the HP CD-Writer drive front panel. 2. Remove the CD from the tray. 3. Press the eject button again or push gently on the front of the tray to shut the front panel. Choosing CDs for Your HP CD-Writer drive For best results, use Hewlett-Packard CD-RW (rewritable) or CD-R (write-once) media, available from your local vendor. Ideas for using CD-RW (rewritable) discs which can only be used in CD-rewritable drives or newer MultiRead CD-ROMs: Use as if it were a large-capacity floppy disk Back up your hard drive each week Free up disk space on your hard drive Transport files to and from work/home Hold large complex files as you develop them Share presentations in editable form Create personalized presentations Ideas for using CD-R (write-once) discs which can be read in most CD-ROM or CD-recorder drive: Permanently save large project files Share non-editable presentations Permanently store home records Share memories with family and friends Copy your music onto CD for personal use Make copies of music you created for record company demos Permanently archive files 22 Installation Guide Purchase HP CD-RW (re-writable) media Available from your local vendor, these CDs can only be used with CD-Rewritable drives or read from newer MultiRead CDROMs: ■ 12 cm (650 MB, 74-minute) 1 pack (C4431A) ■ 12 cm (650 MB, 74-minute) 3 pack (C4431C) ■ 12 cm (650 MB, 74-minute) 25 pack (C4431D) NOTE: Do not mix audio and data files on the same CD since they require different formats. Purchase HP CD-R (write-once) media Available from your local vendor, any CD-ROM and CD-recorder drive can read this type of CD: ■ 12 cm (650 MB, 74-minute) 1 pack (C4432A) ■ 12 cm (650 MB, 74-minute) 3 pack (C4432C) ■ 12 cm (650 MB, 74-minute) 25 pack (C4432D) NOTE: Do not mix audio and data files on the same CD since they require different formats. Maintenance The CD-Writer drive requires no maintenance or cleaning. If you simply keep your discs clean, you will prevent most problems. CAUTION: Do NOT use the CD-ROM cleaning discs that rely on a small brush to sweep dirt off the laser. Do NOT use high-pressure air to clean the inside of the drive. These cleaning techniques will damage the CD-Writer drive. Problem Solving Review this section first if you run into trouble using the programs that came with your CD-Writer drive. If you need further assistance, call the phone numbers listed in theSoftware Installation CDs Getting Started brochure. Gather the information on page 44 before calling for help.Having this information ready will greatly facilitate your call. Things to Try First ■ ■ ■ ■ ■ ■ ■ ■ ■ Make sure your computer and CD-Writer drive are plugged in and that each device attached to your computer is turned on. Turn off the computers power, unplug the CD-Writer drive, and wait 20 seconds. Then plug in the CD-Writer drive and turn on your computer. (This is called cycling power.) Disconnect all the cables and then reconnect them. Sometimes just reconnecting a cable aligns it correctly or adjusts the pin connections, fixing a faulty connection. (Check for bent pins on the connectors and straighten them.) Make sure that you are using the right type of CD. See "Choosing CDs for Your HP CD-Writer drive" on page 21. Try the operation with a different CD. Check the list of known compatibility problems (see page 30) and in the Readme file. If your computer has a power-management feature, disable it (see the manual that came with your computer). If your system is running printer status monitor software, disable it (see page 30). Make sure that you are not attaching a parallel port switch box anywhere in the CD-Writer drives cabling configuration. 23 24 Installation Guide Common Symptoms and Solutions ■ ■ ■ ■ Not sure which drive letter was assigned to the CD-Writer drive? (see page 15) Error message when I double-click on the CD-Writer drives icon (see page 17) In Windows Explorer, unable to see the CD label or all the sessions/files on the CD (see page 17) Printer no longer works after connecting the CD-Writer drive (see page 17) ■ Problems printing a file (see page 17) ■ System does not recognize the CD-Writer drive (see page 18) ■ Copying directly from one CD to another doesnt work. (see page 25) ■ Audio sounds poor (see page 25) ■ Video is choppy (see page 26) ■ Buffer underrun error messages (see page 26) ■ ■ ■ Unable to read a second session reading from a CD-ROM drive (see page 27) Applications cannot find your CD in the CD-Writer drive (see page 28) Lost power to your computer or had to press CTRL-ALT-DEL while writing to the CD! (see page 29) ■ Hard Drive Compression Software (see page 29) ■ Achieving optimal performance (see page 29) ■ Printer Status Monitor Software (see page 30) ■ Known Compatibility Problems (see page 30) ■ Finding the CD-Writer driver files. (see page 31) Problem Solving 25 Copying directly from one CD to another doesnt work. WARNING: Only reproduce material for which you own the copyright or have obtained permission to copy from the copyright owner. Unless you own the copyright or have permission to copy from the copyright owner, you may be violating copyright law and be subject to payment of damages and other remedies. If you are uncertain about your rights, contact your legal advisor. Some CD-ROMs will not allow direct copying to the CD■ Writer drive or are not capable of digital audio extraction. ■ ■ You must have either a SCSI 2 CD-ROM drive (see the drives guide for information) or a supported ATAPI drive to use as your source. Some CDs have a copy prevention feature or other features that do not allow a CD-to-CD copy. Audio sounds poor ■ ■ ■ ■ If your printer is attached to the CD-Writer drive, printing documents while playing audio CDs will yield unpredictable results and is not a supported CD-Writer drive function. This is because the printer and CD-Writer drive are sharing the same data cable. Make sure the audio connectors are completely plugged in to the back of the CD-Writer drive and the LINE IN connector of the sound card on the back of the computer. (Your sound board may be labeled differently.) Make sure that you do not have a sound-muting feature turned on, by way of the monitor or software. Check the sound coming from the CD-Writer drive by plugging earphones or speakers to the audio connector on the front of the CD-Writer drive. If the sound quality is good, the problem is probably with the sound board, speakers, or audio cable. Refer to the documentation that came with your sound board and speakers for help. 26 Installation Guide ■ Try listening to the .WAV files on your hard drive to see if they sounded poor before copying them to CD. (You can use the CD Player program in Windows Accessories.) Video is choppy This can be caused by the same situations that cause buffer underruns. This can also happen if your video card is slow. Try the following: ■ Try the solutions for buffer underruns (page 26). ■ Upgrade your video card. ■ Reduce the size of the video window and close any other programs that are running. Buffer underrun error messages When using a program other than Direct CD: ■ ■ ■ ■ ■ Make sure your system meets the minimum system requirements (page 32). Buffer underrun may be caused by hard drive compression software (page 29). NEVER write to the recordable CD while other applications are running that could interrupt the writing-to-CD process. Log off any networks, disable any fax modem, email, screen saver, or other programs (such as TSRs, terminate-and-stayresident programs) that may automatically send messages to your computer while writing data to the CD. If the interruption is long enough, you could ruin a write-once CD to which you are writing. Exit any other programs while writing data to the CD. If your computer has a power-management feature, disable it (see the manual that came with your computer). Problem Solving ■ 27 Run SCANDISK.EXE and DEFRAG.EXE periodically on your hard drive (see your Windows manual for more information). These programs improve access times to the hard drive, which will help improve system performance while writing to and reading from the CD-Writer drive. Buffer underruns could also be caused by an unsupported parallel port (standard mode SPP). See Minimum System Requirements on page 32. Try the following: ■ ■ ■ ■ Change the parallel port settings to EPP or ECP in CMOS, if your computer can support the change. See the manual that came with your computer to find out how. Install a new EPP or ECP parallel port card. Write data to the CD at 1x speed if you are given the choice within the software. Disable any printer status monitor software (page 30). Unable to read a second session reading from a CD-ROM drive ■ ■ ■ ■ Eject the CD and reinsert it. Refresh the screen. Select theMy Computer icon in Windows Explorer and press F5. CD-RW (rewritable) discs can only be used in CD-rewritable drives or newer MultiRead CD-ROMs. If you are trying to read your CD from Windows 3.x: Multisession CDs created with Direct CD cannot be read in DOS or Windows 3.x. If your multi-session CD was created using some other program, verify that you are using version 2.23 of the MSCDEX.EXE file. First, restart your computer and when you see Starting MS-DOS... appear on your monitor, press F8. Each line in your CONFIG.SYS and AUTOEXEC.BAT file will load one at a time. Press Y until you see a line containing MSCDEX.EXE. Then press Y and the version number of your MSCDEX file will display. The number must be 2.23 or greater. Call Microsoft for an updated file if you need it. 28 Installation Guide ■ ■ In Windows 95 only, to verify that you are using version 4.00.1111 or higher of the ESDI_506 file, start Explorer. Access Windows\System\Iosubsys. Look for the ESDI_506.pdr file. Right-click on the file name, select Properties, then select the Version tab to view the version number. Call Microsoft for an updated file if you need it. See if the CD-Writer drive or other CD-ROM drives can read the CD. If so, the problem is probably with the CD-ROM drive. Contact the manufacturer of this drive for updated drivers. Applications cannot find your CD in the CD-Writer drive Some programs (CD-ROM games, etc.) look only for the first logical drive letter assigned to a CD-ROM drive or CD-Writer drive. For example, if your CD-ROM drive is assigned drive D:\ and the CD-Writer drive is assigned drive E:\, the program is looking for the CD only in drive D:\ and will not see the CD in drive E:\. If you want to use the CD-Writer drive for these types of programs, reassign the drive letters, making the CD-Writer drive come before the CD-ROM drive, as follows: ■ ■ In Windows 95 , display the Device Manager and double-click on CDROM. Click on the CD-ROM drive, and then click on the Settings tab. Under Reserved drive letters, select the drive letter after the existing letter (for both start and end drive letter) and click on OK. Then double-click on the CD-Writer drive, and then click on the Settings tab. Under Reserved drive letters, select the drive letter before the current one and click on OK. In Windows NT, click on Start/Programs/Administrative Tools(common) . Choose Disk Administrator . Right-click on the drive letter you wish to change. SelectAssign Drive Letter. Change the drive letter. Problem Solving 29 Lost power to your computer or had to press CTRL-ALTDEL while writing to the CD! If you lose power while writing to your CD (the CD-Writer drive's Red Light is On) OR If you exit an application or press CTRL-ALTDEL while writing to CD... You may be able to salvage your CD, but ONLY if you: A. LEAVE YOUR CD IN THE DRIVE, DO NOT OPEN THE DISC TRAY B. turn your machine off C. turn it back on D. then re-enter the application you were using Once the application tries to access the CD-Writer drive, the recovery operation will make it appear that the last session is there. However, in reality, only a part of the CD's directory may be there. Your recordable CD is still usable if you can read the directory. Repeat the entire copy operation to make sure that your files are copied to the recordable or rewritable CD. Hard Drive Compression Software We do not recommend using hard drive compression software. If you use hard drive compression software, it estimates free hard drive space based upon a compression ratio (often user selectable). Programs may check your hard drive for space needed and may think you have the necessary free space. However, depending on the type of files you are copying, you may in fact not have enough hard drive space. Achieving optimal performance Run SCANDISK.EXE and DEFRAG.EXE on your hard drive before using your CD-Writer drive for the first time (see your Windows manual for more information). Then run them periodically after that. These programs improve access times to the hard drive, which will help improve system performance while writing to and reading from the CD-Writer drive. 30 Installation Guide Printer Status Monitor Software NOTE: This is only a problem if your printer is connected to the back of the CD-Writer drive. If your printer came with a program that notifies you about the status of the printer (such as when it is out of paper), thisprinter status monitor software might cause problems. The printer status monitor software checks the status of your printer every few seconds. If this happens while you are writing data to your recordable CD, it will cause data corruption. Turn off theprinter status monitor software to prevent this problem. Check the information that came with your printer to find out how to do this. Known Compatibility Problems ■ ■ ■ Check the Readme file that came with the CD-Writer drive for additional information. Check the web site listed on page 47 for the most recent information. Maxtor Hard Drives You might be unable to write reliably to the CD-Writer drive if your computer has a Maxtor hard drive (the following models): 71626A/AP (1.6 Gbyte) 712260A (1.2 Gbyte) 72004A/AP (2.0 Gbyte) CD recordable devices require an uninterrupted data stream from the hard drive in order to write successfully to a CD. These hard drive models are designed with a built-in interrupt loop that may cause CD corruption. Please contact Maxtor's customer support at 1-800-2-MAXTOR or on the World Wide Web at http://www.maxtor.com/ for more information. ■ Acer computers, some models P75 to P120 DO NOT connect the CD-Writer drive to the printer (parallel) port. On these models, connecting an external storage device, Problem Solving 31 such as the CD-Writer drive, to the parallel port will damage the port. Contact your computer manufacturer for more information. ■ ■ ■ IBM Aptiva computers Most have the parallel port configured to I/O base address 3BC. This must be changed, see "Minimum System Requirements" on page 32. Printers in General If your printer came with a program that notifies you about the status of the printer (such as when it is out of paper), this printer status monitor software might cause problems. The printer status monitor software checks the status of your printer every few seconds. If this happens while you are writing data to your recordable CD, it will cause data corruption. Turn off the printer status monitor software to prevent this problem. Check the information that came with your printer to find out how to do this. Okidata printer model 4w Finding the CD-Writer driver files. ■ In Window 95, the following files are needed for your CDWriter drive to work successfully attached to a parallel port: EPATAP9X.MPD (mini port driver file) These files will be copied from the Software Installation CD during installation and located in the \WINDOWS\SYSTEM\IOSUBSYS\ directory. ■ In Window NT, the following files are needed for your CDWriter drive to work successfully attached to a parallel port: EPATAPNT.MPD (mini port driver file) SHARSHTL.SYS (printer driver support file) These files will be copied from the Software Installation CD during installation and located in the \WINNT\SYSTEM32\DRIVERS\ directory. Technical Specifications Minimum System Requirements Your computer should meet or exceed these requirements: ■ IBM or compatible Pentium/75 Mhz processor ■ Microsoft® Windows 95® or Windows NT® 4.0 TIP: For Windows NT, we recommend Service Pack 2, Version 4.00.1381. ■ ■ ■ ■ 16 MB RAM Hard drive with at least 528 MB storage capacity (that is, with a transfer rate of at least 800 kB/sec and disk access time of less than 20 msec) 10-22 MB free hard drive space for installing software 10 MB free hard drive space for each minute of music to be recorded High-speed parallel port (EPP or ECP) set to: - IRQ 7 and I/O address 378 or - IRQ 5 and I/O address 278 In Windows 95, to check the configuration settings of your parallel port: - Right-click on the My Computer icon - Select Properties - Select the Device Manager tab - Highlight Printer Port - Click on the Properties button - Select the Resources tab - Look at the numbers listed for Input/Output Range (I/O) and Interrupt Request (IRQ) If the numbers need to be changed, see the documentation that came with your computer. 32 Technical Specifications ■ 33 Windows 95 only: ESDI_506 version 4.00.1111 To verify that you are using version 4.00.1111 or higher of the ESDI_506 file, start Explorer. Access Windows\System\Iosubsys. Look for the ESDI_506.pdr file. Right-click on the file name and select the Version tab to view the version number. Call Microsoft for an updated file if you need it. What Affects System Performance How well your computer functions with the CD-Writer drive, particularly how fast it writes data to a CD, depends on a number of factors. Some of these factors are listed below. Processor (CPU). The type and speed of your processor greatly affects the speed at which your computer transfers data to and from the CD-Writer drive. If the processor speed is too slow, you may have to write at 1x speed. RAM. Your computer must have enough memory available to handle its operating system, the CD-Writer drives applications, and the data you are transferring to and from CDs. The system should not have to swap data to and from the hard drive. Your Hard Drive. The speed at which your hard drive accesses and transfers data (its access time and transfer rate ) affects performance. Newer hard drives, those with a storage capacity greater than 528 MB, are fast enough to handle the CD-Writer drives 2x write speed. Parallel Port Type. The type of parallel port on your computer has a major influence in determining the speed at which your CD-Writer drive runs. Possible parallel port types are: Standard parallel port (SPP) which is sometimes called bidirectional or compatible Enhanced parallel port (EPP) Extended capabilities port (ECP) Most PCs shipped since January 1995 contain support for the required high-speed EPP and ECP modes. Systems shipped before this date may only support SPP. 34 Installation Guide SPP mode allows the CD-Writer drive to run at up to a 2x read speed and up to a 1x write speed if the other minimum system requirements are met. EPP and ECP modes allow the CD-Writer drive to run at up to a 6x read speed and a 2x write speed if the other minimum system requirements are met. TIP: Check your computers specifications to see which kind of parallel port was installed. Sometimes a fast ECP/EPP port will be set up as a slow standard mode port at the factory (for example, some HP Vectra models). Check your computers manual to find out how to reset it to the faster speed. If that doesnt work you can also install a faster parallel port. I/O and IRQ. The IRQ (interrupt request level) and I/O (input/output) base address are the computer resources used by the parallel port. The CD-Writer drive requires a parallel port set to: IRQ 7 with I/O base address 378, or IRQ 5 with I/O base address 278 Most computers automatically assign these. But, depending on your configuration, you may run into conflicts with other devices. For example, another device (such as your sound card) may be assigned the same settings. If there is a conflict, it must be corrected before installing the drive. To find out which device is in conflict: In Windows 95, right-click on the My Computer icon, select Properties, select the Device Manager tab, double-click on the computer icon to see a list of which device is using each resource setting on your computer. For optimum performance, run SCANDISK.EXE and DEFRAG.EXE on your hard drive before using your CD-Writer drive for the first time (see your Windows manual for more information). Then run them periodically after that. These 35 Technical Specifications programs improve access times to the hard drive, which will help improve system performance while writing to and reading from the CD-Writer drive. NOTE: Refer to your computer manual or contact your computer vendor if you have any questions about your computers configuration or capabilities. Drive Specifications Discs supported 120 mm and 80 mm CD-R (write-once) media (any CD-ROM drive can read this media) 120 mm CD-RW (rewritable) media (for use only in CD-Rewritable and MultiRead CD-ROM drives) ISO 9660 Disc Data Capacity (74 Minute CD) Number of sessions Size required for header information Size available for data/per session 1 approximately 14 MB* 636 MB one session 5 approximately 70 MB (approximately 14 MB each) 116 MB each session 10 approximately 140 MB (approximately 14 MB each) 51 MB each session 30 approximately 420 MB (approximately 14 MB each) 7.7 MB each session *1 MB is defined as 106 bytes UDF 1.5 Disc Data Capacity (74 Minute CD) 546.8 MB Dimensions Height: 2.6" (66 mm) Width: 7.1" (180 mm) Depth: 11.2" (284 mm) Weight (net): 2,157 grams (~4.7 lbs) 36 Installation Guide Performance Buffer size: 750 kB Average access time (1/3 stroke): <325 ms Data transfer rate (recording): 150 KB/s sustained (1x speed) 300 KB/s sustained (2x speed) Data transfer rate (reading): 150 KB/s (1x speed) 300 KB/s (2x speed) up to 900 KB/s (6x speed) Error rate: < 1 frame/1012 bits Audio distortion: < 0.1% Interface Electrical interface: parallel port EPP/ECP Loading mechanism: tray Logical recording format (depending on application used): ISO 9660 UDF 1.5 or higher Environmental Temperature operating: 5° to 35° C nonoperating: -25° to 55° C Humidity (no condensation allowed) operating: 10% to 80% RH nonoperating: 5% to 95% RH Shock and Vibration HP Corporate Environmental Test Class B1 Power requirements Typical dissipation: 6 W Maximum dissipation: 9 W Technical Specifications 37 Product Certifications UL, cUL, TÜV, NOM, CE, meets or exceeds FCC Class B requirements Laser: CDRH on internal laser product Laser Safety This unit employs a laser. Do not remove the cover or attempt to service this device when connected due to the possibility of eye damage. Laser-Sicherheit In das Gerät ist ein Laser eingebaut. Nehmen Sie die Abdeckung nicht ab und versuchen Sie nicht, das Gerät zu reparieren, solange es angeschlossen ist. Es besteht die Gefahr einer Augenverletzung. CAUTION Use of controls or adjustments or performance of procedures other than those specified herein may result in hazardous laser radiation exposure. WARNUNG Die Vornahme von Regelungen oder Einstellungen oder die Durchführung von Verfahren, die nicht in diesem Dokument angegeben sind, kann eine gefährliche Einwirkung von Laserstrahlung zur Folge haben. Contains: Class 1 Laser Product Innehåller: Klass 1 Laserapparat Sisältää: Luokan 1 Laserlaite Enhält: Klasse 1 Laser-Produkt CAUTION: Invisible laser radiation when open. Avoid exposure to beam. VARNING: Osynlig laserstrålning när denna del är öppnad. Betrakta ej strålen. VARO! Avattaessa olet alttiina näkymättömälle lasersäteilylle. Alä katso säteeseen. VORSICHT: Unsichtbare Laserstrahlung wenn Abdeckung geöffnet. Nicht dem Strahl aussetzen. Laser Type: Semiconductor laser GaAlAs Wave length: 775~795 nm (at 25°C) Output power: 2.5 mW (read), 35 mW (write) Beam divergence: 60 degrees 38 Installation Guide FCC Declaration of Conformity According to 47CFR, Parts 2 and 15, Class B Computer Peripherals: This device complies with Part 15 of the FCC Rules. Operation is subject to the following two conditions: (1) this device may not cause harmful interference (2) this device must accept any interference received including interference that may cause undesired operations. This applies to all product options. Hewlett-Packard Company Colorado Memory Systems Division 815 SW 14th Street, Building E Loveland, Colorado 80537 USA Telephone 970-635-1500 August 1, 1997 Richard M. Spangler, Quality Manager DECLARATION OF CONFORMITY according to ISO/IEC Guide 22 and EN 45014 Manufacturers Name: Hewlett-Packard Company Colorado Memory Systems Division Manufacturers Address: 815 SW 14th Street, Building E Loveland, Colorado 80537 declares that the product: Product Name: Product Number: Product Options: HP SureStore CD-Writer Plus 7100e and 7110e C4358A and C4366A All conforms to the following Product Specifications: Safety: EN60950:1992 + A1:1993 + A2:1993 + A3:1995 EN60825:1991 EMC: EN 55022:1994 Class B EN 50082-1:1992 IEC 801-2:1991 - 4kV CD, 8kV AD IEC 801-3:1984 - 3V/m IEC 801-4:1988 1kV Power Lines 0.5kV Signal Lines ENV 50140:1993 - 3V/m Supplementary Information The product herewith complies with the requirements of the Low Voltage Directive 73/23/EEC and the EMC Directive 89/336/EEC and carries the CE mark accordingly. August 01, 1997 Richard Spangler, Quality Manager European contact: Your local Hewlett-Packard Sales and Service Office or Hewlett-Packard GmbH, Department HQ-TRE, Herrenberger Stra βe 130, D-71034 Böblingen (FAX: +49-7031-143143). Technical Specifications 39 Federal Communications Commission R.F. Interference Statement WARNING: This equipment has been tested and found to comply with the limits for a Class B digital device, pursuant to Part 15 of the FCC Rules. These limits are designed to provide reasonable protection against harmful interference in a residential installation. This equipment generates, uses and can radiate radio frequency energy and, if not installed and used in accordance with the instructions, may cause harmful interference to radio communications. However, there is no guarantee that interference will not occur in a particular installation. If this equipment does cause harmful interference to radio or television reception, which can be determined by turning the equipment off and on, the user is encouraged to try to correct the interference by one or more of the following measures: ■ ■ ■ ■ Reorient or relocate the receiving antenna. Increase the separation between the equipment and receiver. Connect the equipment into an outlet on a circuit different from that to which the receiver is connected. Consult the dealer or an experienced radio/TV technician for help. CAUTION: Changes or modifications to this equipment not expressly approved by Hewlett-Packard could result in violation of Part 15 of the FCC rules. To maintain compliance with FCC rules and regulations, use properly shielded cables with this device. Notice for Canada This digital apparatus does not exceed the Class B limits for radio noise emissions from digital apparatus as set out in the radio interference regulations of the Canadian Department of Communications. Le présent appareil numérique n'émet pas de bruits radioélectriques dépassant les limites applicables aux appareils numériques de Classe B prescrites dans le règlement sur le brouillage radioélectrique édicté par le Ministère des Communications du Canada. Notice Europe: This drive shall be installed only with an EN60950 (IEC950) approved Power supply. USA/Canada: This drive is for use only with IBM compatible UL listed personal computers. 40 Installation Guide Users manual statement for VCCI class B product Translation for VCCI class B product This equipment is in the Class B category information technology equipment based on the rules of Voluntary Control Council For Interference by Information Technology Equipment (VCCI). Although aimed for residential area operation, radio interference may be caused when used near a radio or TV receiver. Read the instructions for correct operation. Korean RRL Statement 41 Technical Specifications Hewlett-Packard Limited Warranty Statement HP SureStore CD-Writer Plus Drive DURATION OF LIMITED WARRANTY Hardware - 1 year Software - 90 days 1. HP warrants to you, the end-user customer, that HP hardware, accessories and supplies will be free from defects in materials and workmanship after the date of purchase, for the period specified above. If HP receives notice of such defects during the warranty period, HP will, at its option, either repair or replace products which prove to be defective. Replacement products may be either new or like-new. 2. HP warrants to you that HP software will not fail to execute its programming instructions after the date of purchase, for the period specified above, due to defects in material and workmanship when properly installed and used. If HP receives notice of such defects during the warranty period, HP will replace software media which does not execute its programming instructions due to such defects. 3. HP does not warrant that the operation of HP products will be uninterrupted or error free. If HP is unable, within a reasonable time, to repair or replace any product to a condition as warranted, you will be entitled to a refund of the purchase price upon prompt return of the product. 4. HP products may contain remanufactured parts equivalent to new in performance or may have been subject to incidental use. 5. Warranty does not apply to defects resulting from (a) improper or inadequate maintenance or calibration, (b) software, interfacing, parts or supplies not supplied by HP, (c) unauthorized modification or misuse, (d) operation outside of the published environmental specifications for the product, or (e) improper site preparation or maintenance. 6. HP MAKES NO OTHER EXPRESS WARRANTY OR CONDITION WHETHER WRITTEN OR ORAL. TO THE EXTENT ALLOWED BY LOCAL LAW, ANY IMPLIED WARRANTY OR CONDITION OF MERCHANTABILITY, SATISFACTORY QUALITY, OR FITNESS FOR A PARTICULAR PURPOSE IS LIMITED TO THE DURATION OF THE EXPRESS WARRANTY SET FORTH ABOVE. Some countries, states or provinces do not allow limitations on the duration of an implied warranty, so the above limitation or exclusion might not apply to you. This warranty gives you specific legal rights and you might also have other rights that vary from country to country, state to state, or province to province. 7. TO THE EXTENT ALLOWED BY LOCAL LAW, THE REMEDIES IN THIS WARRANTY STATEMENT ARE YOUR SOLE AND EXCLUSIVE REMEDIES. EXCEPT AS INDICATED ABOVE, IN NO EVENT WILL HP OR ITS SUPPLIERS BE LIABLE FOR LOSS OF DATA OR FOR DIRECT, SPECIAL, INCIDENTAL, CONSEQUENTIAL (INCLUDING LOST PROFIT OR DATA), OR OTHER DAMAGE, WHETHER BASED IN CONTRACT, TORT, OR OTHERWISE. Some countries, States or provinces do not allow the exclusion or limitation of incidental or consequential damages, so the above limitation or exclusion may not apply to you. FOR CONSUMER TRANSACTIONS IN AUSTRALIA AND NEW ZEALAND: THE WARRANTY TERMS CONTAINED IN THIS STATEMENT, EXCEPT TO THE EXTENT LAWFULLY PERMITTED, DO NOT EXCLUDE, RESTRICT OR MODIFY AND ARE IN ADDITION TO THE MANDATORY STATUTORY RIGHTS APPLICABLE TO THE SALE OF THIS PRODUCT TO YOU. U.S. Office: HP/Colorado Memory Systems 815 SW 14th Street Bldg. E Loveland, Colorado 80537 U.S.A. 42 Installation Guide Software License Agreement ATTENTION: USE OF THE SOFTWARE IS SUBJECT TO THE HP SOFTWARE LICENSE TERMS SET FORTH BELOW. USING THE SOFTWARE INDICATES YOUR ACCEPTANCE OF THESE LICENSE TERMS. IF YOU DO NOT ACCEPT THESE LICENSE TERMS, YOU MAY RETURN THE SOFTWARE FOR A FULL REFUND. IF THE SOFTWARE IS BUNDLED WITH ANOTHER PRODUCT, YOU MAY RETURN THE ENTIRE UNUSED PRODUCT FOR A FULL REFUND. HP SOFTWARE LICENSE TERMS License Grant. HP grants you a license to Use multiple copies of the Software but only for Use in conjunction with the HP hardware product that accompanied the Software. Use means storing, loading, installing, executing or displaying the Software. You may not modify the Software or disable any licensing or control features of the Software. Ownership. The Software is owned and copyrighted by HP or its third party suppliers. Your license confers no title or ownership in the Software and is not a sale of any rights in the Software. HP's third party suppliers may protect their rights in the event of any violation of these License Terms. Copies and Adaptations. You may only make copies or adaptations of the Software for archival purposes or when copying or adaptation is an essential step in the authorized Use of the Software. You must reproduce all copyright notices in the original Software on all copies or adaptations. You may not copy the Software onto any bulletin board or similar system. No Disassembly or Decryption . You may not disassemble or decompile the Software unless HP's prior written consent is obtained. In some jurisdictions, HP's consent may not be required for limited disassembly or decompilation. Upon request, you will provide HP with reasonably detailed information regarding any disassembly or decompilation. You may not decrypt the Software unless decryption is a necessary part of the operation of the Software. Transfer. Your license will automatically terminate upon any transfer of the Software. Upon transfer, you must deliver the Software, including any copies and related documentation, to the transferee. The transferee must accept these License Terms as a condition to the transfer. Termination. HP may terminate your license upon notice for failure to comply with any of these License Terms. Upon termination, you must immediately destroy the Software, together with all copies, adaptations and merged portions in any form. Export Requirements. You may not export or re-export the Software or any copy or adaptation in violation of any applicable laws or regulations. U.S. Government Restricted Rights.The Software and any accompanying documentation have been developed entirely at private expense. They are delivered and licensed as commercial computer software as defined in DFARS 252.227-7013 (Oct 1988), DFARS 252.211-7015 (May 1991) or DFARS 252.2277014 (Jun 1995), as a commercial item as defined in FAR 2.101(a), or as Restricted computer software as defined in FAR 52.227-19 (Jun 1987)(or any equivalent agency regulation or contract clause), whichever is applicable. You have only those rights provided for such Software and any accompanying documentation by the applicable FAR or DFARS clause or the HP standard software agreement for the product involved Technical Specifications 43 Returning a Drive All other countries except USA.If your Hewlett-Packard product requires repair or replacement, call Customer Support at the phone number listed in "Customer Support" on page 47 to receive instructions. In the USA. If your Hewlett-Packard product requires repair or replacement, follow these instructions: Call the number listed in "Customer Support" on page 47. Customer Support will help you determine if your drive is defective. Provide the product type, serial number, and date of purchase. You will be given a return authorization number. Keep the return authorization (RA) number for future reference. Securely repackage the product to prevent shipping damage (use the original packaging, if possible) and mark the return authorization number on the box. All product returns must have an accompanying return authorization number. To ensure timely and accurate processing of your return, the number must be clearly printed on the outside of the box. Use the appropriate address for your location. A traceable shipping method is recommended. The postage, shipping, and insurance charges incurred in shipping to Hewlett-Packard will be paid by Purchaser and all risk for the product shall remain with Purchaser until such time as Hewlett-Packard takes receipt of the product. Once your product is received at Hewlett-Packard, we will ship the replacement product. Hewlett-Packard will pay shipping charges to the Purchaser for replacement product covered under warranty. If the product is still under warranty, there is no charge for the replacement. If the product is not covered under warranty, an exchange cost will be quoted when the return authorization number is issued. 44 Installation Guide Before You Call Customer Support If your own troubleshooting efforts fail, contact Customer Support. For hardware problems see page 47, or for software problems see the phone numbers in the Software Installation CD Getting Started insert. Before you contact them, have the information below ready. For help finding this information, see page 45. If you receive an error message, write it down before you call. Information For your computer CD-Writer drive model Drive firmware version Drive serial number Computer brand and model Operating system and version Windows 95 or Windows NT 4.0 Version: (for NT) Service Pack Number: Amount of RAM installed Other CD-ROM drives? yes/no (If yes, list them) Sound card? yes/no Type: Parallel port type and system resources in use EPP, ECP, other IRQ _______ I/O port _______ Printer connected to the CDWriter drive? What kind? Technical Specifications 45 Where to find this information CD-Writer drive model The CD-Writer drive model number appears on a sticker on the back of the CD-Writer drive, as well as on the box.Example: 3100i (internal) or 3100e (external) Drive firmware version In Windows 95 , the drive firmware version and model number (above) appear in the CD-ROM settings. Right-click on theMy Computer icon, select Properties , select the Device Manager tab, double-click on CDROM. Double-click on the CD-Writer drive, and then click on the Settings tab. Example: Firmware revision 1.00 In Windows NT, the drive firmware version and model number (above) appear in the CD-ROM settings. Open the Control Panel. Then do one of the following: Click on SCSI. Scroll down the list, double-click on ATAPI. Double-click on the CD-Writer drive, and then click on the Settings tab. Example: Firmware revision 1.00 Click on SCSI. Scroll down the list, double-click on Shuttle parallel-to-ATAPI CD. Double-click on the CD-Writer drive, and then click on the Settings tab. Example: Firmware revision 1.00 Drive serial number The CD-Writer drive serial number appears on a sticker on the back of the CD-Writer drive. Computer brand and model The computer brand appears on the front of your computer and in the documentation that came with your computer.Example: Dell Dimension XP-90. 46 Installation Guide Operating system and amount of RAM installed In Windows 95 , from the Start menu on the task bar, select Settings/Control Panel . Double-click on System. Select the Performance tab. Write down the version number and the amount of memory installed; for example: 4.00.950 and 16 MB RAM. In Windows NT (while signed on as Administrator), from theStart menu on the task bar, select Programs/Administrative Tools (Common)/Windows NT Diagnostics . Select the Version tab and write down the version number and service pack number;for example: 4.00.1381 and Service Pack 2 . Then select the Memory tab and write down the amount of memory listed under Physical Memory - Total; for example: 16 MB RAM . Other CD-ROM drives Your computer may have come with an internal CD-ROM or you may have purchased a CD-ROM drive. Check the documentation that came with your computer or CD-ROM drive.Example: Mitsumi 4x CD-ROM Sound board Your computer may have come with a sound board and speakers or you may have purchased them separately. Check the documentation that came with your computer or sound board. Example: 16-bit audio card Parallel port type and system resources in use In general, computers manufactured after January 1995 have the required high-speed parallel port (EPP or ECP). Check the manuals that came with your computer to confirm this. Older computers generally have a slower standard port.Example: standard, bidirectional In Windows 95, display the Device Manager. Double-click on Ports (COM & LPT) . Double-click on the printer port, and then click on the Resources tab. Example: I/O Range 0378-037B, Interrupt Request 7 . Customer Support If you have questions about the HP VersaWriter CD drives software, call the numbers listed in the Getting Started brochure. If you need help with your HP VersaWriter CD drive, your local reseller has the latest information regarding HP products and services and can provide support under HP's comprehensive menu of reseller services. If your reseller is not able to help, you can obtain support from HP directly either through free 24-hours/day interactive electronic services or by telephone (free during warranty). America Online . . . . . . . . . . . . . . . . . . . . . . . . . . . . . . . . Keyword: hpstor CompuServe . . . . . . . . . . . . . . . . . . . . . . . . . . . . . . . . . . . . . . . . Go HPSYS World Wide Web . . . . . . . . . . . . . . www.hp.com/isgsupport/versawriter Bulletin board site (8,N,1,F, 1200-28.8K baud) USA and Canada . . . . . . . . . . . . . . . . . . . . . . . . . . . . . . . . . 970-635-0650 Europe . . . . . . . . . . . . . . . . . . . . . . . . . . . . . . . . . . . . . +31 (0)495 546909 Asia/Pacific Korea. . . . . . . . . . . . . . . . . . . . . . . . . . . . . . . . . . Hitel: (02) 762-0228 Access: Go HPK Chollian: (02) 220-2001 New Zealand. . . . . . . . . . . . . . . . . . . . . . . . . . . . . . . . . (09) 356 6642 Taiwan . . . . . . . . . . . . . . . . . . . . . . . . . . . . . . . . . . . . . . (02)9233233 First Name: HP Last Name: BBS HPFirst Faxback Service Simply dial the fax number from a touch-tone phone or Group 3 fax machine and follow the voice prompts to select the index of available support and product information documents. USA and Canada . . . . . . . . . . . . . . . . . . . 800-368-9673 or 970-635-1510 Europe Austria (free line) . . . . . . . . . . . . . . . . . . . . . . . . . . . . . . . . 0660 8128 Belgium (free line) - Dutch . . . . . . . . . . . . . . . . . . . . . . . . . . . . . . . . . . . . . . . 0800 11906 - French . . . . . . . . . . . . . . . . . . . . . . . . . . . . . . . . . . . . . . 0800 17043 Denmark (free line) . . . . . . . . . . . . . . . . . . . . . . . . . . . . . . 800 10453 Finland (free line). . . . . . . . . . . . . . . . . . . . . . . . . . . . . . . 9800 13134 France (free line) . . . . . . . . . . . . . . . . . . . . . . . . . . . . . . . . 05 905900 Germany (free line) . . . . . . . . . . . . . . . . . . . . . . . . . . . 0130 810 061 Italy (free line) . . . . . . . . . . . . . . . . . . . . . . . . . . . . . . . . . 1678 59020 Netherlands (free line) . . . . . . . . . . . . . . . . . . . . . . . . . . 06 022 2420 Norway (free line) . . . . . . . . . . . . . . . . . . . . . . . . . . . . . . . 800 11319 Spain (free line) . . . . . . . . . . . . . . . . . . . . . . . . . . . . . . . . 900 993123 Sweden (free line) . . . . . . . . . . . . . . . . . . . . . . . . . . . . . . . 020 795743 Switzerland (free line) - French . . . . . . . . . . . . . . . . . . . . . . . . . . . . . . . . . . . . . . . . 155 1526 - German . . . . . . . . . . . . . . . . . . . . . . . . . . . . . . . . . . . . . . . 155 1527 United Kingdom (free line) . . . . . . . . . . . . . . . . . . . . . . 0800 960271 Other locations in Europe (toll line) . . . . . . . . . .+31 (0)20 681 5792 48 Customer Support Asia/Pacific China . . . . . . . . . . . . . . . . . . . . . . . . . . . . . . . . . . . (8610) -65055280 Japan. . . . . . . . . . . . . . . . . . . . . . . . . . . . . . . . . . . . . . . (3) 3335-8622 Korea. . . . . . . . . . . . . . . . . . . . . . . . . . . . . . . . . . . . . . . (02) 769-0543 New Zealand. . . . . . . . . . . . . . . . . . . . . . . . . . . . . . . . . (09) 356 6642 Singapore . . . . . . . . . . . . . . . . . . . . . . . . . . . . . . . . . . . (65) 291-7951 Taiwan . . . . . . . . . . . . . . . . . . . . . . . . . . . . . . . . . . . . . . (02)7195589 E-mail . . . . . . . . . . . . . . . . . . . . . . . . . . . . . . [email protected] FTP Site . . . . . . . . . . . . . . . . . . . . . . . . . . . . . . . . . . . . . . . . . . . . ftp.hp.com Login: . . . . . . . . . . . . . . . . . . . . . . . . . . . . . . . . . . . . . . . anonymous Password: . . . . . . . . . . . . . . . . . . . . . . . . . . . . . (Your email address) Directory: . . . . . . . . . . . . . . . /pub/information_storage/versawriter Telephone USA and Canada(M-F, 7am-5pm Mountain time) Literature and dealer referral . . . . . . . . . . . . . . . . . . . . 970-635-1500 Canada (for French-speaking customers) pour assistance en français . . . . . . . . . . . . . . . . . . . . . . 800-387-3867 During warranty period - Technical support . . . . . . . . . . . . . . . . . . . . . . . . . . . 970-635-1500 After warranty period (charges begin only when you connect to a Support Technician, prices are subject to change without notice) Technical Support . . . . . . . . . . . . . . . . . . . . . . . . . . . . 800-810-0130 (Per incident fee of $25 US dollars charged to Visa, MasterCard or American Express) U.S. only Technical Support . . . . . . . . . . . . . . . . . . . . . 900-555-1800 ($2.50 per minute/maximum of $25. You must be 18 years of age or have parental permission to call 900 numbers.) Europe (M-F, 8:30-18:00 Central European Time) Use these Technical Support numbers during and after your warranty period. No charge for Technical Support during warranty period. Per incident charge after warranty period. Austria (German) . . . . . . . . . . . . . . . . . . . . . . . . . . . . . . . 06 60 63 86 Belgium - Dutch . . . . . . . . . . . . . . . . . . . . . . . . . . . . . . . . . . . . . . 02 626 88 06 - French . . . . . . . . . . . . . . . . . . . . . . . . . . . . . . . . . . . . . 02 626 88 07 Denmark . . . . . . . . . . . . . . . . . . . . . . . . . . . . . . . . . . . . . . 39 29 40 99 Finland . . . . . . . . . . . . . . . . . . . . . . . . . . . . . . . . . . . . . . 02 03 47 288 France . . . . . . . . . . . . . . . . . . . . . . . . . . . . . . . . . . . . . 04 50 43 98 53 Germany . . . . . . . . . . . . . . . . . . . . . . . . . . . . . . . . . . . 0180 52 58 143 Ireland (English) . . . . . . . . . . . . . . . . . . . . . . . . . . . . . . . 01 662 55 25 Italy . . . . . . . . . . . . . . . . . . . . . . . . . . . . . . . . . . . . . . . 02 2 641 0350 Netherlands . . . . . . . . . . . . . . . . . . . . . . . . . . . . . . . . . 020 606 87 51 Norway . . . . . . . . . . . . . . . . . . . . . . . . . . . . . . . . . . . . . . . 22 11 62 99 Portugal . . . . . . . . . . . . . . . . . . . . . . . . . . . . . . . . . . . . . 01 44 17 199 Spain. . . . . . . . . . . . . . . . . . . . . . . . . . . . . . . . . . . . . . . . 90 23 21 123 Sweden . . . . . . . . . . . . . . . . . . . . . . . . . . . . . . . . . . . . . . 08 61 92 170 Switzerland (French, Italian, and German) . . . . . . . . 08 48 80 11 11 United Kingdom. . . . . . . . . . . . . . . . . . . . . . . . . . . . . 0171 512 52 02 English language support from other countries . +44 171 512 52 02 Customer Support Asia/Pacific Australia (M-F 7am-7pm, Eastern Standard Time) . . . (03) 9272 8000 China (M-F 8:30-17:30) . . . . . . . . . . . . . . . . . . . . . (8610)-62625666 extensions 5602 through 5609, 5611 and 5612 (8610)-62614174 (8610)-62624175 (8610)-62614176 Korea (M-F, 8:30-19:00) . . (02) 3270-0700 / 080-999-0700 (toll free) New Zealand (M-F, 9am to 9pm Auckland Time) . . . . (09) 356 6640 Singapore (M-F, 9:00-17:00) . . . . . . . . . . . . . . . . . . . . . (65) 271-7233 Taiwan (M-F, 8:30-17:30) . . . . . . . . . . . . . . . . . . . . . . . (02) 717-9609 FAX USA. . . . . . . . . . . . . . . . . . . . . . . . . . . . . . . . . . . . . . . . . . . . 970-667-0997 Asia/Pacific Australia . . . . . . . . . . . . . . . . . . . . . . . . . . . . . . . . . . . (03) 9272 4099 Korea. . . . . . . . . . . . . . . . . . . . . . . . . . . . . . . . . . . . . . (02) 3270-0707 New Zealand. . . . . . . . . . . . . . . . . . . . . . . . . . . . . . (+61 3) 9272 4099 Singapore . . . . . . . . . . . . . . . . . . . . . . . . . . . . . . . . . . . (65) 278-9225 Taiwan . . . . . . . . . . . . . . . . . . . . . . . . . . . . . . . . . . . . . . (02)5140276 49 Index A access time 27, 33, 35, 36 Acer brand computer 30 application software complete installation 13 custom installation 13–14 installing 11–18 starting 14 uninstalling 19 assigning drive letter 28 audio cable connecting 7 disconnecting 9 audio connector 7 audio distortion 25–26, 36 B bi-directional parallel port 27, 33, 34 buffer size 36 buffer underrun 26–27 C cables audio 7, 9 data 6, 9 power 3 printer 5 , 10 capacity, CD 35 CD-ROM cleaning discs 22 CD-ROM drive changing drive letter 28 identifying 46 identifying drive letter 15 problem reading CDs 27 –28 SCSI 2 25 CDs cannot find CD 28 capacity 35 cleaning discs 22 copy prevention feature 25 inserting 20 –21 maintenance 22 multi-session 27 music 7 power loss while writing 29 problems inserting 20 –21 purchasing 22 reading problem 27–28 removing 21 rewritable 21, 22, 35 selecting 21–22 supported by CD-Writer drive 35 write-once 21, 22, 27, 35 CD-Writer drive audio cable 7, 9 changing drive letter 28 compatibility problems 30–31 connecting 2 –10 connecting to another computer 8, 10 Customer Support 44 data cable 6, 9 dimensions 35 disconnecting 8–10 driver files 31 Driver Installation diskette 11 handling 2 identifying drive letter 15 installing application software 11– 18 installing software without CDROM drive 11 model number 45 not recognized 28 optimizing performance 29, 34–35 package contents 1 performance 33–35, 36 performance enhancement 27 power supply 3 power switch 3, 9 printer cable 10 I-1 I-2 registering 14 returning 43 selecting CDs 21–22 serial number 45 sharing parallel port with printer 4–5, 25 Software Installation CD 11 software programs included in package 13 starting the application software 14 supported discs 35 system requirements 32–33 uninstalling 19 using earphones or speakers 25 cleaning CD-Writer drive 22 closing tray 20 compatibility 32 –33 compatibility problems 30 –31 compatible parallel port 27, 33, 34 compression software 29 computer identifying model 45 processor speed 32, 33 system requirements 32–33 connecting audio cable 7 CD-Writer drive 2–10 CD-Writer drive to another computer 8, 10 data cable 6 power cord 3 connector audio 7 parallel port 4, 6 printer port 4 contacting Customer Support 44 contents, package 1 copy prevention feature 25 copying from CD to CD 25 CTRL-ALT-DEL 29 custom installation 13–14 Customer Support, contacting 44 cycling power 8, 15, 23 D data cable connecting 6 disconnecting 9 Device Manager 16, 28 , 32, 45, 46 dimensions 35 Direct CD 26, 27 disc. See CDs disconnecting audio cable 9 CD-Writer drive 8 –10 data cable 9 printer cable 10 diskette, installing driver files from 11 distortion audio 25–26 video 26 drive letter changing 28 identifying 15 drivers finding 31 installing 13 installing from floppy diskette 11 E earphones 25 eject button 20, 21 electronic registration 14 email 26 environmental specifications 36 error message buffer underrun 26–27 cannot find CD 28 CD not recognized 17 unable to read 27–28 error rate 36 F fax modem 26 firmware version 45 floppy diskette, installing driver files from 11 H hard drive access time 27, 33 , 35, 36 compression software 29 I-3 Maxtor brand 30 speed 33 storage requirements 32 transfer rate 32, 33 high-pressure air 22 humidity specifications 36 I I/O channel setting 31, 32 IBM Aptiva brand computer 31 inserting a CD 20–21 installing application software 11–18 complete installation 13 custom installation 13–14 directory selection 13 installing parallel driver files 11, 13, 31 IRQ setting 32, 34 L listening to music CDs 7 M maintenance 22 Maxtor brand hard drive 30 memory 32 , 33, 46 model number, locating 45 moving CD-Writer drive to another computer 10 MSCDEX version 27, 33 multi-session CD 27 music CDs 7 N networks 26 O Okidata brand printer 31 opening tray 20 operating system compatible 32 identifying version 46 P package contents 1 parallel driver files 11, 13 parallel port 36, 46 compatible 27 , 33, 34 configuration 16, 32 conflicting device 16, 17, 18, 34 connector 4 , 6 ECP 16, 27, 33 , 34 EPP 16, 27, 33 , 34 minimum requirements 32 sharing 4–5, 25 SPP 27 , 33, 34 performance 33–35, 36 optimizing 29, 34–35 power cord connecting 3 power loss while writing 29 power management feature 23 , 26 power requirements 36 power supply 3 light 3, 18 power switch 3, 9 power-saving mode 3, 9 problems 18 unplugging 9 power switch 3, 9 power-saving mode 3, 9 printer compatibility problems 31 monitor software 30 Okidata brand 31 problems 17 sharing parallel port with CD-Writer drive 4–5, 25 printer cable connecting 5 disconnecting 10 printer monitor software 30 printer port connector 4 printer status monitor software 27, 30, 31 printing 5 problems 17 while playing audio CDs 25 problems. See troubleshooting processor speed 32, 33 product certification 37 programs uninstalling 19 I-4 purchasing CDs 22 Q QuickTour 13, 14 R RAM. See memory reading error 27–28 reading from CD speed 34, 36 recording CD to CD 25 power loss during 29 while running other applications tray, opening and closing 20 troubleshooting audio distortion 25–26 cable connections 8, 15–16, 23 compatibility problems 30–31 copying from CD to CD 25 Customer Support 44 hardware connections 8, 15 –16, 23 inserting CDs 20–21 IRQ conflict 34 not recognizing CD-Writer drive 18 parallel port configuration 16, 17, 18, 34 power supply 18 printing 17, 31 reading error 27–28 returning your CD-Writer drive 43 video distortion 26 writing to CD 26 26 refreshing the screen 17, 27 registering the CD-Writer drive 14 removing a CD 21 returning a CD-Writer drive 43 rewritable CDs 21, 22, 27, 35 S serial number 45 sharing parallel port 4–5 , 25 software installing 11–18 uninstalling 19 software compression 29 Software Installation CD 11 driver files 31 software license agreement 13 sound board 7, 25, 46 sound system 7 sound-muting feature 25 speakers 25 speed reading from CD 34 , 36 writing to CD 27 , 34, 36 starting the CD-Writer drive application software 14 switch box 8, 15, 23 system requirements 32–33 T temperature specifications 36 transfer rate 32, 33, 36 U uninstalling 19 V vibration specifications 36 video card 26 video distortion 26 volume control 25 W wave files 26 write-once CDs 21, 22 , 26, 27, 35 writing to CD 25, 26 power loss 29 speed 27, 34, 36