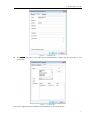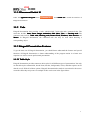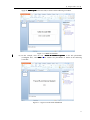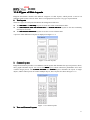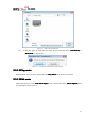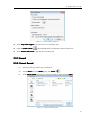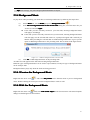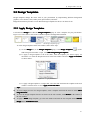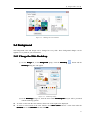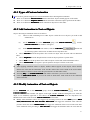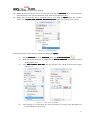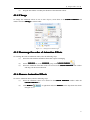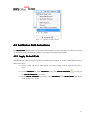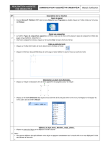
1
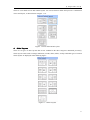
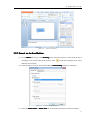
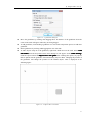
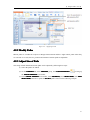
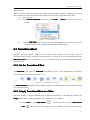
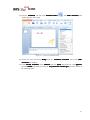
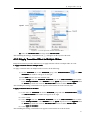
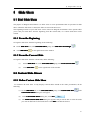
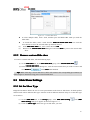
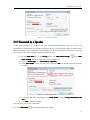
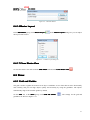
【 Kingsoft Office 2012 】
1
CHAPTER FOUR
12
Kingsoft Presentation 20
2012
Kingsoft Presentation is one of the components of Kingsoft Office 2012, the latest version
of the Kingsoft Office Suite. Kingsoft Office is supported on Windows XP, Windows Vista
and Windows 7 operating systems. Kingsoft Presentation 2012 includes a greater amount of
animation effects, and is fully compatible with Microsoft PowerPoint animations as well.
Kingsoft Presentation has also made great improvements in supporting different types of
multimedia. Now featuring integrated access to Microsoft Windows Media Player, users can
play audio and video files directly on their slides. Furthermore, Kingsoft Presentation 2012
provides advanced functions to help the user enhance their presentations in the most
creative ways possible.
1
user manual
1 Basic Operation of Kingsoft Presentation
1.1 Introduction of Kingsoft Presentation
Kingsoft Presentation is a software program used to create presentations in the form of slides, These slides
allow the user to organize and present information with text, picture, audio, or video files in a professional
and presentable manner. As a software upgrade, Kingsoft Presentation 2012 not only inherits the
advantages of the preceding version, but also provides a new and improved 2012 interface style. This new
interface brings additional features aimed towards enhancing the user's experience. However, the classic
interface style still remains for those users that prefer it. Now let's cover the Kingsoft Presentation
functional interface and describe the main functions and basic operations of the software.
1.1.1 Kingsoft Presentation Environment
When you start Kingsoft Presentation, the main interface appears as shown in the following picture:
Figure 1.1—1 Kingsoft Presentation Main Interface
The window contains the Application Program menu, tabs, ribbon, root directory, slide editing area and
task window.
� The ribbon displays the different functions of each respective tab.
� The root directory previews the thumbnails of each slide in a presentation.
� The slide editing area displays the slide that is currently being modified.
� The task window on the right side contains 11 kinds of task windows which include: New
2
【 Kingsoft Office 2012 】
Presentation, Clip Art, AutoShapes, Slide Layout, Slide Design-Design Templates, Slide
Design-Color Schemes, Slide Design-Animation Schemes, Custom Animation, Slide Transition,
Table Style and Backup Management.
1.1.1.1 Application Program Menu
The Application Program menu
is the red zone on the top left corner of the Kingsoft
Presentation main interface. The Application Program menu includes the following functions: New, Open,
Close, Save, Save As, Print, Export to PDF, Send E-mail, Encrypt, Properties, Switch UI
UI, and so on.
Next we will briefly introduce the less common features found under the Application Program menu.
Export to PDF
1.1.1.1.1
1.1.1.1.1Export
PDF has become a popular file format in network file sharing and exchange. In order to meet the users'
need to save in PDF format, Kingsoft Office 2012 has made it possible to convert a Kingsoft Presentation
file into a PDF file. Steps to export to PDF are as follows:
(1) Click the Application Program menu
and select Export to PDF
PDF. An
Export Adobe PDF File dialog box will appear.
(2) Click Browse to choose the destination for the PDF you want to export.
(3) Type the file name and choose the range of slides to export. You can choose to export all of
the slides or a specific range of slides.
(4) Click Advanced to configure more options such as Export options and Permission settings
settings..
(5) Click OK to begin converting your document to a PDF file.
Tip: The function Export to PDF can only be used on Windows 2000 operating systems and above.
Send E-mail
1.1.1.1.2
1.1.1.1.2Send
A presentation can be sent as an E-mail attachment directly from Kingsoft Presentation by following these
steps:
(1) Click the Application Program menu
and select Send E-Mail
. If you haven't saved the presentation, a Save As dialog box will pop up
to prompt you to save the presentation. Enter a file name, and click Save.
(2) In the To and Subject text boxes, type in the E-mail address of the recipient and the subject of
your E-mail.
(3) Click Send
Send.
3
user manual
Document Encryption
1.1.1.1.3
1.1.1.1.3Document
If you need to protect the presentation with a password, you can encrypt your document by doing the
following:
(1) Click the Application Program menu
and select Encrypt
Encrypt. An Options
dialog box will appear.
(2) Type the password in to the Password to open text box.
(3) Re-type the password in to the Reenter password to open text box to ensure the correct
password is used.
(4) Click OK to successfully to encrypt the document.
1.1.1.1.4
Properties
Click Properties under the Application Program menu
. In the Properties
dialog box, you can view the information relating to the presentation. Steps are as follows:
(1) Click the Application Program menu and select Properties
Properties.
(2) In the Properties dialog box, click the General tab which is shown in the following
picture:
Figure 1.1—2 General Tab
�
To modify or reset the properties, click the Summary tab.
4
【 Kingsoft Office 2012 】
Figure 1.1—3 Summary Tab
�
The Custom tab allows you to add more information and to further alter the properties of your
presentation.
Figure 1.1—4 Custom Tab
You can also right-click the presentation icon in Windows to view the properties.
5
user manual
1.1.1.2 Document Switch UI
Under the Application Program menu
click Switch UI to switch the interface of
Kingsoft Presentation.
1.1.2 Tab
Tabss
Kingsoft Presentation 2012 provides 13 tabs, which include 7 main tabs and 6 contextual tabs. The
main tabs include: Start, Insert, Design, Animation, Slide Show, View and Develop tools
tools.. The
contextual tabs include: Table tool
toolss, Drawing tools, Picture Tools, WordArt, Print Preview and
Master
Master. In Kingsoft Presentation, the contextual tabs can only be used when inserting a
corresponding object.
1.1.3 Kingsoft Presentation Features
To get the most out of Kingsoft Presentation, you should better understand the features and special
functions of Kingsoft Presentation. A better understanding of the program results in a better user
experience as well as a more professional presentation.
1.1.3.1 Table Style
Kingsoft Presentation provides numerous table styles for all different types of presentations. Not only
are the table styles customizable, but the fonts, borders, backgrounds, colors, and other aspects can be
altered as well. With all of these options, Kingsoft Presentation has made it convenient for the user to
create the slides they truly want. An example of this can be seen in the figure below:
6
【 Kingsoft Office 2012 】
Figure 1.1—5 Table Style
1.1.3.2 Animation Sound Effect
Sound effects under the custom animation tab in Kingsoft Presentation allow the user to insert sounds
such as applause, hammering, explosions, and other custom sound effects onto slides.
1.1.3.3 Highlighter
In Kingsoft Presentation, you can outline and punctuate text directly on the slide while it is being
presented by using the Highlighter tool. It plays an important role in helping the speaker present his
or her information more clearly. The Highlighter tool can be found in the lower left corner of the
screen while a slide is being presented. This is displayed in the screen shot below.
Figure 1.1—6 Highlighter Menu and its position
7
user manual
1.1.3.4 Double-screen Function
The double-screen function allows the user to take advantage of computer systems that support
multiple monitors. An operation interface exclusive to the speaker is provided during his or her
presentation, while the audience is only able to view the slide being presented. This function is most
effective when using a system with two or more monitors connected. The double-screen function
includes two modes:
� Clone mode synchronizes the display seen by the speaker and the audience.
� Extended mode keeps the speaker's user interface separate from what is being displayed to the
audience. In this case, the audience can only view the slide being presented at the time.
8
【 Kingsoft Office 2012 】
1Home Tab
1.1 Slide
A blank presentation should be used when first creating a presentation. A slide layout should then be
selected. You can then begin to enter basic content onto the slides. You can customize these slides through
the Home tab in the Slide group.
1.1.1 Create a Presentation
1.1.1.1 Create a Blank Presentation
You can choose the colors, style and other properties of a blank presentation. This allows more room for
users to be creative and flexible with their imaginations.
There are three ways to create a blank presentation:
�
Under the Application Program menu
click New
. In
the New Presentation task window, under New
New, click Blank Presentation.
�
On the Quick Access toolbar, click New
�
Right click the blank space on the document tab and click New Blank Presentation under the
shortcut menu.
.
1.1.1.2 Use the Ready-made Styles to Create a Presentation
The ready-made presentation slide styles can be used to create a presentation. These styles preset the fonts
and background colors and therefore save the user some time while creating a presentation. These
ready-made slide styles can also be customized to the users liking.
1.1.1.3 Use the Templates to Create a Presentation
Kingsoft Presentation 2012 provides multiple templates, which is convenient for creating all types of
presentations. The steps to apply templates are as follows:
(1) In the New Presentation task window, click New from Other Templates, and the
Templates dialog box pops up.
(2) Click a template tab of your choice and select a template from the templates list. You can
then preview the corresponding template in the Preview window as shown below:
9
user manual
(3)
Figure 1.1-1 Templates Tab
Click OK to create a presentation with several slides automatically.
1.1.2 New Slide
There are two ways to insert a new slide into a presentation.
�
On the Home tab, click New Slide
�
Right click the blank space in the slide thumbnails pane on the left and select New Slide under
the shortcut menu.
.
1.1.3 Duplicate
You can create a duplicate slide of the selected slide. Steps are as follows:
(1) Select the slide you want to duplicate
(2) On the Home tab, in the Slide group, click Duplicate
to create a duplicate slide.
1.1.4 Slide Layout
The slide layout defines the alignment of the content on your slides. A layout contains placeholders that
can hold text and other content as well. Applying slide layouts is a convenient way to get different
arrangements on your slides.
1.1.4.1 Apply Slide Layout
When creating a presentation, it is important to choose an appropriate layout in order to make the slides
more attractive.
Steps to apply a slide layout are as follows:
(1) When you start Kingsoft Presentation, it will automatically create a blank presentation and
10
【 Kingsoft Office 2012 】
apply the Title Layout to the first slide, as shown in the following screenshot:
Figure 1.1-2 Blank Presentation
Travel E-commerce System
" in the title placeholder
(2) In this example, enter the text, "T
ystem"
GIS
" in the subtitle text placeholder as shown in the following
(rectangular box), and "GIS
GIS"
screenshot:
Figure1.1-3 Type text in the Title and Subtitle
11
user manual
1.1.4.2 Types of Slide Layouts
Kingsoft Presentation contains four different categories of slide layouts, which provide a total of 30
automatic slide layouts to choose from. There is an appropriate layout for every type of presentation.
1.
Text layouts
There are 6 types of text layouts that define the arrangement of the text.
� The Title Slide and Title Only layouts are used most often in introduction slides.
� The Title and Text
Text, Title and Vertical Text and Vertical Title Text layouts are the most commonly
used layouts for slides.
� The Title and 2-Column Text layouts are used to a create column effect.
A preview of the different text layouts is displayed in Figure 1.1-4.
Figure 1.1-4 Text Layouts
2.
Content Layouts
Kingsoft Presentation provides seven different content layouts that determine the layout of pictures, tables,
titles, graphs and other objects. You can use the Blank layout, which contains no placeholders for a more
versatile design process. The Content and Title and Content layouts determine the layout of single
objects, and the other layouts can control multiple objects, These layouts are shown in Figure 1.1-5.
Figure 1.1-5 Content Layouts
3.
Text and Content Layouts
12
【 Kingsoft Office 2012 】
There are seven kinds of text and content layouts. You can use them to define the layout of a combination
of text and objects, as shown below in Figure 1.1-6.
Figure1.1-6 Text and Content Layouts
4.
Other Layouts
There are 10 types of other layouts that are not included in the three categories mentioned previously.
These layouts can be used to arrange animations, sounds, charts, tables, art clips and other types of content.
These layouts are displayed in the following figure::
Figure 1.1-7 Other Layouts
13
user manual
1.2 Drawing
Kingsoft Presentation includes many types of tools that are capable of drawing linear objects such as: lines,
rectangles, circles, arrows and so on. You can also adjust the arrangement and effects associated with these
objects.
1.2.1 Draw Line
Liness and Connectors
Take the following steps to draw lines and connectors:
(1) On the Home tab,in the Drawing group ,select the style of Lines or Connectors you desire
from the list of AutoShapes. You can also click the drop-down arrow
next to the
AutoShape list to select Lines or Connectors. This is shown in the following figure.
Figure 1.2—1 Lines and Connectors
(2) Click the area where you want the shape to begin. Drag to draw and then click wherever you
want the line or connector to end.
1.2.2 Draw a Comment Bubble
Comment bubbles are often used to mark or label the content, which can make your presentation more
vivid and understandable. Steps to creating a comment bubble on your slide are as follows:
(1) On the Home tab, and go to the Drawing group.select the type of comment bubble you want
from the list of AutoShapes. You can also click the drop-down arrow
next to the
AutoShape list to select the type of comment bubble you desire.
(2) Click the area you want the comment bubble to appear. A blinking cursor indicates that text
can be placed in the bubble. The shape of the bubble can be adjusted, and this can be seen in
the figure below:
14
【 Kingsoft Office 2012 】
Figure 1.2—2 Draw a Comment
1.2.3 Insert an Action Button
(1) On the Home tab and go to the Drawing group. Select the button you want from the list of
autoshapes. You can also click the drop-down arrow
beside the AutoShape list to select
different action buttons.
(2) Click the slide to create an action button and an Action Setting dialog box will appear.
Figure 1.2—3 Action Settings dialog box
(3) Select the Mouse Click or Mouse Over tab to determine the function of the action button..
15
user manual
(4) Select None if you do not want any actions to be performed. To insert a hyperlink, click the
drop-down arrow under Hyperlink to for different options.
(5) To run a program upon a mouse click or mouse over, select Run program and click Browse
to choose the desired program.
(6) To play sounds, select Play sound and choose a sound from the drop-down menu provided.
1.2.4 Show or Hide the Grid
The grid is used as a reference to guide the position of contents on a slide. To show or hide the grid, locate
the Drawing group, click Arrange, select Align from the drop-down list, and click Show/Hide Grid
Grid. This
process is shown below.
Figure 1.2—4 Show /Hide grid
Tips: The grid makes it convenient to measure and arrange objects accurately. Keep in mind that the grid
does not appear when printing your slides.
1.2.5 Grid and Guides
The grid and guidelines work together to make aligning slide content quicker and more accurate. The
guidelines can be moved and the grid can be adjusted so that objects will snap to it. The settings for the
grid and guidelines can be reached by doing the following:
/Guides
(1) On the Home tab, in the Drawing group,,click Arrange
Arrange, Align and then select grid
grid/Guides
Grid/Guides
from the drop-down list. The
dialog box will appear.
(2) The Grid/Guides dialog box will allow you to set the options for the grid and guidelines. It is
shown in the following figure:.
16
【 Kingsoft Office 2012 】
Figure 1.2—5 grid/Guides dialog box
�
�
�
�
Move the guidelines by clicking and dragging them. The distance of the guidelines from the
center of the slide will appear when they are being dragged.
To add guidelines, click and drag a guideline to a new location. Repeat this process to add more
guidelines.
Delete guidelines by clicking and dragging them out of the slide
To make objects snap on to the guidelines, right-click a blank area on the slide. Select Grid
and Guides from the drop-down menu and a dialog box will appear. Under Guide Settings
Settings,
check the option labeled as Objects move with guides
guides. After enabling this option, any objects
that are placed near the guidelines will automatically snap on to them. Changing the position of
the guidelines will change the position of the attached objects. This is displayed in the
following figure:
Figure 1.2—6 Objects Move with Guides
17
user manual
1.2.6 Markup
The speaker can use markups while they present their slides to an audience to emphasize key points.
Markups can be used freely as shown by the red line pictured in figure below:
Figure 1.2—7 Markup
Markups that are used and saved while the slides are being presented cannot be deleted until the
presentation is ended and the presenter edits his or her slides. Markups that are saved are categorized as
special shape objects, which can be moved, copied, deleted, etc.
� To remove the markups on slides, take the following steps:
(1) Select the slides you want to remove the markups from.
(2) On the Home tab, in the Edit group, click Markup
Markup, and then select Erase Markup on
Slide
Slide.
� To remove all of the markups from each slide of the presentation, do the following:
On the Home tab, in the Edit group, click Markup
Markup, and then select Erase all Markups.
2 Insert Tab
2.1 Link
In Kingsoft Presentation, hyperlinks act as objects and this enables slides to connect to web pages, emails
and other files.
2.1.1 Action Settings
Actions can be added to a hyperlink after it is inserted. To do this, take the following steps:
(1)
Action Settings
On the Insert tab and go toin the Link group,click.Action
. Select it and an
Action Settings dialog box appears as shown below:
18
【 Kingsoft Office 2012 】
Figure 2.1—1 Action Settings dialog box
(2)
There are two tabs labeled as Mouse Click and Mouse Over in the Action Settings dialog
box.
� To remove any actions or to use no actions, select None.
� To insert a link to another slide, web page, file or presentation, select Hyperlink
to: and choose from the options found on the drop-down list.
� To run a program, select Run program and use the Browse button to choose the
desired program.
� To play a sound, select Play sound and choose from the options found on the
drop-down list.
2.2 Text
2.2.1 Word Art
2.2.1.1 Insert WordArt
WordArt is a simple and convenient way to add special effects to text. Below are a few examples of the
versatility provided by WordArt:
19
user manual
Figure 2.2—1 WordArt
Steps to insert WordArt on slides are as follows:
(1)
On the Insert tab,in the Link group,click WordArt
(2)
(3)
(4)
Choose from the different WordArt styles found in the WordArt Gallery and click OK.
In the Edit WordArt Text dialog box, insert the text you want to be changed into WordArt.
You can further customize your WordArt by doing the following:
� To change the font type, select a font type from the Font list.
� To change the font size, select an appropriate size from the Size list.
�
To make the text bold, click the
button.
�
To make the text italic, click the
button.
2.2.1.2 Word Art Tools
The WordArt tab appears when the user selects any form of WordArt. This tab allows you to choose the
effects, shape, alignment and other features of the selected WordArt.
1. Insert WordArt
On the WordArt tab, click WordArt
and insert a WordArt again. Steps are as follows:
(1)
Select a WordArt that has already been created.
(2)
On the WordArt tab,in the WordArt group, click WordArt
. The WordArt Gallery
dialog box will appear as pictured below:
20
【 Kingsoft Office 2012 】
Figure 2.2—2 WordArt Gallery dialog box
In the WordArt Gallery dialog box, select a WordArt style and click OK.
In the Edit WordArt Text dialog box, type the words to be converted into WordArt and set
the font, size and font format.
(5) Click OK.
2. Edit WordArt Text
Under the WordArt tab, select Edit Text to modify the text. Steps are as follows:
(1) Select the WordArt you wish to edit.
(3)
(4)
(2)
On the WordArt tab,in the WordArt group,click Edit Text
.
(3) Insert the text you desire in to the Edit WordArt Text dialog box.
(4) Click OK.
You can also double-click the selected WordArt to edit the text in the Edit WordArt Text dialog box.
3. WordArt Character Spacing:
To adjust character spacing, select WordArt Character Spacing
Spacing. Steps are as follows:
(1) Select the WordArt you wish to modify.
(2)
4.
On the WordArt tab,in the WordArt group,click WordArt Character Spacing
and
choose between the five character spacing options on the drop-down list. These options
include: Very Tight, Tight, Normal, Loose, and Very Loose
Loose.
(3) To manually customize the character spacing, select Custom and enter the amount of
spacing in to the prompt box.
(4) Click OK.
Artistic Word Same Letter Heights
Click the Artistic Word Same Letter Heights
button to adjust the letters
in the selected WordArt graphic to the same height.
5. Artistic Word Vertical Text:
Click the Artistic Word Vertical Text
button to change the text direction of the
21
user manual
selected WordArt. This feature changes horizontal text into vertical text.
6. WordArt Alignment
Select WordArt Alignment
and choose the alignment you desire from the
drop-down list. Kingsoft Presentation provides six kinds of alignment options shown in Figure 2.2-3.
Figure 2.2—3 WordArt Alignment list
7. WordArt Styles
The functions of the WordArt Styles found under the WordArt tab are as follows:
� WordArt Gallery: Select this to open the WordArt Galley dialog box.
� WordArt Fill: Choose the color and effect of the WordArt from the drop-down list
� WordArt Line
Line: Choose the color and shape of the WordArt line from the drop-down list.
WordArt
Shape
�
Shape: Choose the shape of the WordArt from the drop-down list.
2.2.2 Date and Time
Steps to add the date and time to slides are as follows:
(1) Position the insertion point of the placeholder or text box where you want to add the date
and time.
(2)
On the Insert tab,for the Text group,click Date and Time
pictured below will appear.
Date/Time dialog box
.Date/Time
22
【 Kingsoft Office 2012 】
Figure 2.2—4 Insert Date and Time
(3)
(4)
Select the date and time format you desire from the Date/Time dialog box.
Click OK
OK.
2.2.3 Slide Number
Steps to add the slide number to slides are as follows:
(1) Position the insertion point of the placeholder or text box where you want to add the slide
number.
(2) Onfound the Insert tab,in the Text group,click Slide Number
Number.
Tips: To add the slide number, date or time to each slide, go to the Insert tab and look in the Text
group for the Header and Footer
Footer.. options. The slide number, date and time are positioned at default
placeholder locations on each slide. The positions of these placeholders can be altered in the slide master.
2.3 Media
In Kingsoft Presentation, the media content that can be inserted on to slides include sounds, movies, flash
files, and other objects. Their playing modes can be set so that the media plays automatically or when
clicked.
2.3.1 Movie
Unlike pictures and shapes, movies are linked to the presentation slides rather than embedded. This means
a link to the location of the movie will be created when it is inserted on to the slide. Therefore, if the
location of the movie is changed, the slide will not be able to find or play the movie. Moving or copying
the movie file into the same folder as the presentation itself can avoid this problem.
A trigger effect will be added when inserting a movie. This effect allows the presenter to play and pause
the movie with a click of the mouse button while the slide is being presented.
2.3.1.1 Insert movie
The following steps will guide you in inserting a movie on to your slides:
(1) Select the slide that you want to insert a movie on to.
(2)
On the Insert tab for the Media group,click Movie
. An Insert Movie browsing box
will appear as shown below. Select the movie you wish to insert and click Open
Open..
23
user manual
Figure 2.3—1 Insert Movie dialog box
(3)
A dialog box pops up which offers two ways for you to start the movie, Automatically or
When Click
Click, as shown below.
Figure 2.3—2 Prompt for how the movie will be played
2.3.1.2 Play movie
Right click the movie you have inserted and select Play Movie on the quick access menu.
2.3.1.3 Edit movie
Right click the movie, select Edit Movie Object on the shortcut menu and a Movie Options dialog
box will appear as shown below:
24
【 Kingsoft Office 2012 】
Figure 2.3—3 Movie Options dialog box
�
Select Loop until stopped to play the movie in a continuous loop.
�
Click the Sound volume
�
Select Zoom to full screen to play the movie in full screen.
button and slide the bar to adjust the volume of the movie.
2.3.2 Sound
2.3.2.1 Insert Sound
(1)
Select the slide you want to insert sound on to.
(2)
On the Insert tab,in the Media group, click Sound
(3)
In the Insert Sound browsing box, select the sound you want and click Open
Open.
.
Figure 2.3—4 Insert Sound dialog box
25
user manual
(4)
A dialog box pops up which offers two ways to play the sound, Automatically or When
Click
Click.. Figure 2.3-5 displays this dialog box.
Figure 2.3—5 Prompt on method of playing the sound
(5)
When sound is added to a slide, an audio icon
appears on the slide.
2.3.2.2 Play Sound
Right-click the sound and select Play Sound on the quick access menu.
2.3.2.3 Edit the Sound
(1) Right-click the sound, select Edit Sound Object on the quick access menu and a Sound
Options dialog box appears.
Figure 2.3—6 Sound Options dialog box
(2) Select Loop until stopped to loop the sound continuously.
(3) Click the Sound volume
button and slide the bar to adjust the volume.
(4) Click OK.
2.3.3 Flash
Insert flash files on to slides by following these steps:
(1) Select the slide you wish to insert flash on to.
(2)
(3)
.
On the Insert tab,for the Media group,click Flash
In the Insert Flash Animation dialog box, select the desired flash file and click Open
Open.
26
【 Kingsoft Office 2012 】
Tips: You can copy, cut; paste and group flash animations as objects.
2.3.4 Background Music
To play music when presenting your slide show, insert background music by following the steps below:
On the Insert tab , for the Media group.click Background Music
.
(2) In the Insert background music for the current slide dialog box, select the music file you
wish to use and click Open.
� If the slide you have currently selected is your first slide, inserting background music
will apply it accordingly
� If the slide you have currently selected is not your first slide, inserting background music
will also apply it to the selected slide. However, a prompt will appear and it will tell you
that the slides preceding the selected slide are without background music. It gives you the
option to add background music to the preceding slide. This is shown in the figure below:
(1)
Figure 2.3—7 Add the background music to the first slide
(3) Click Yes to add background music to the preceding slide.
An audio icon will appear on the slide after inserting background music.
Different types of background music can be used in a presentation, but only one type of background music
can be used per slide.
Background music plays only when the slides are being presented.
2.3.4.1 Preview the Background Music
Right-click the music icon
and select Play Sound on the shortcut menu to preview background
music. Double-clicking the icon to preview the background music works as well.
2.3.4.2 Edit the Background Music
Right-click the music icon
and select Edit Sound Object on the shortcut menu. The Sound Options
dialog box should appear as shown below:
27
user manual
Figure 2.3—8 Sound Options dialog box
Click the Sound volume
button and slide the bar to adjust the volume of the background music.
ckground Music,
2.3.4.3 Delete Ba
Background
To delete the background music, simply delete the audio icon from your slide. You can insert new
background music to replace it or overwrite it.
3 Design
3.1 Page Setup
On the Design tab,click Page Setup
to configure page settings. Figure 3.1-1 features the Page Setup
dialog box.
Figure 3.1—1 Page Setup dialog box
28
【 Kingsoft Office 2012 】
3.2 Design Templates
Design templates change the entire look of your presentation by implementing different background
graphics, color schemes, fonts, bullet points, place holders, and more.
Kingsoft Presentation provides several different design templates for the user to choose from.
3.2.1 Apply Design Templates
Look under the Design tab within the Design Templates group to select a template for your presentation.
Figure 3.2-1 below shows some of the available templates in Kingsoft Presentation.
Figure 3.2—1 The Design Templates group
To select design templates in the task window, follow these steps:
(1) On the Design tab ,in the Design Templates group, Click Design Templates
. (If the
Design Templates
Slide Design task window is open, click Slide DesignDesign-Design
Templates)
(2) To apply a design template to all of the slides, click the template you want to apply. An
alternative is to click the drop-down arrow in the task window and select Apply to All Slides
as shown below:
Figure 3.2—2 Apply to All Slides
�
�
�
(3) To apply a design template to a single slide, select the slide and locate the template in the task
window. Click the arrow to select Apply to Selected Slides
Slides.
Tips:
To view a larger preview of a design template, select a template and click the arrow to select Show
Large Previews.
To view the design templates that are not shown in the task window, click Browse at the bottom of
the task window.
To apply a Blank design template, go to the task window and click the first template named Default
Design under Available For Use.
29
user manual
3.3 Color Scheme
Color schemes can be applied to one or all slides in a presentation. They set specific colors for different
aspects of your presentation to create a streamlined look and feel for your presentation.
Color schemes control the colors of eight different features of each slide in the presentation. These features
s,
include, but are not limited to the Background, Text and Lines, Shadow
hadowss, Title Text, Fill
illss, Hyperlink
yperlinks,
and Accents
Accents. The colors of each of these features will automatically be set when a specific color scheme is
chosen. A brief description of the features controlled by Color schemes is as follows:
� Background: The background is the canvas for each and every slide. It is a critical feature in slide
design.
� Text and Lines: All objects created with the text tool and drawing tools are included in this category.
It is important to choose a color that contrasts with the background.
Shadowss: Shadows enhance the display of objects on slides. It is better to have a darker shadow
� Shadow
color compared to the background in order to highlight the shadow effect.
� Title Text: Like text and lines, the title text color should contrast with the background in order to be
noticeable.
Fillss: Fills set the color of basic shapes and other objects created with the drawing tool.
� Fill
Accent:: Accents are used to highlight important text and can be used to emphasize key points.
� Accent
link
hyperlink
link: These accents control the colors of hyperlinks.
� Accent and hyper
link: These accents control the colors of hyperlinks that have already
hyperlink:
� Accent and followed hyper
been clicked.
3.3.1 Apply Color Schemes
Take the following steps to apply color schemes:
(1) On the Design tab,in the Design Templates group,Click Color Scheme
and the Color
Schemes task window will appear as shown below.
30
【 Kingsoft Office 2012 】
Figure 3.3—1 Color Schemes
(2) Choose a color scheme from the Apply a color scheme list box.
Figure 3.3—2 Apply Color Scheme
�
�
�
To apply a color scheme to all of the slides, select the color scheme or click the arrow next to
the color scheme and select Apply to All Slides
To apply a color scheme to a single slide, click the arrow next to the color scheme and select
Apply to Selected Slide
Slide.
To apply a color scheme to multiple selected slides, select the slides and click the arrow next
to the color scheme and select Apply to Selected Slide.
3.3.2 Custom Color Scheme
Color schemes can be customized to fit the needs of every user. If the default color schemes do not suffice,
users have the option to create their own.
31
user manual
Steps to creating a custom color scheme are as follows:
(1) On the Design tab,in the Design Templates group,click Color Scheme
Scheme, and then click Slide
Color Schemes to make the task window appear.
DesignDesign-Color
(2) Select a color scheme to edit in the task window.
(3) Click Edit Color Schemes at the bottom of the task window.
Figure 3.3—3 Custom Color Schemes
(4) Click the Custom tab in the Color Schemes dialog box.
Figure 3.3—4 Change the Color of Color Schemes
(5) Choose the colors for the Background, Text and Lines
Lines,, Shadows, etc
etc. You can customize
the colors for eight different aspects of the color scheme
(6) Click OK to save the changes.
� The custom scheme can be added to the standard color schemes tab for future use by selecting
Set as Standard Scheme
Scheme.
Apply
� Selecting
will place the color scheme on all of the slides in the current presentation.
32
【 Kingsoft Office 2012 】
Figure 3.3—5 Manage the Color Schemes
3.4 Background
The background color and design can be changed on every slide. These background changes can be
applied to every slide for your convenience.
3.4.1 Change the Slide Backdrop
(1) On the Design tab, in the Background group, click the Backdrop
button and the
Backdrop dialog box will appear.
Figure 3.4—1 Backdrop Design
�
�
(2) In the Backdrop dialog box, click the arrow under Backdrop fill and you will be presented
with the following options:
To select a color from the color scheme, choose one of the eight colors displayed.
To select a color outside of the color scheme, click More Colors. Choose a color from either the
Standard tab or the Customize tab and click OK.
33
user manual
�
To change the gradient, texture, pattern or picture, click Fill Effects
Effects.. The following menu should
appear:
Figure 3.4—2 Fill Effects
• To apply a gradient to the backdrop, go to the Gradient tab and select a color style, transparency,
and shading style. Click OK to apply the changes.
• To apply a texture to the backdrop, go to the Texture tab and select a texture. Custom textures can
be applied by selecting a file with the Other Texture button. Click OK to apply the changes.
• To apply a pattern to the backdrop, go to the Pattern tab and select a pattern, foreground and
background color. Click OK to apply the changes.
• To use a picture for the backdrop, go to the Picture tab and select a picture file through the Select
Picture button. Click OK to apply the changes.
4 Animation
4.1 Custom Animation Effects
Kingsoft Presentation offers several animation effects that can be placed on text, pictures and other content.
These animation effects are easy to add to the presentation and allow the presenter to make each and every
slide unique.
The settings of each animation effect can be adjusted to fit all types of needs. These settings allow the
presenter to customize the motion path, speed and duration of each animation effect.
If there are animation effects on a slide, they will appear in order and can be rearranged within the Custom
Animation task window.
Tip: Animation schemes can be used to simplify and hasten the designing process of animation
effects.
34
【 Kingsoft Office 2012 】
4.1.1 Types of Custom Animation
There are three general categories for custom animation effects in Kingsoft Presentation.
� There are 52 different Entrance Effects which control how objects initially appear on the slides.
� There are 31 different Emphasis Effects which control the actions that objects perform on the slides.
� There are 52 different Exit Effects which control how objects leave the slides.
4.1.2 Add Animation to Text or Objects
Steps to inserting an animation effect are as follows:
(1) Choose a slide containing text or other objects. Select the text or objects you wish to add
animations to.
(2)
On the Animation tab, in the Animation group, click Custom Animation
and the
Custom Animation task window will appear.
(3)
In the Custom Animation task window, click the Add Effect
button and
the following options will become available from a drop-down list:
• Choose Entrance from the drop-down list to make an object enter the slide with an animation
effect.
• Choose Emphasis from the drop-down list to make an object perform a special effect.
• Choose Exit from the drop-down list to make an object exit the slide with an animation effect.
• Choose Motion Paths to designate a specific path for an object to follow on the slide.
Tips
� After applying animation effects to objects, number markers appear on the objects. These markers
indicate the order that the animations occur and the ordered list can be found in the task window.
These markers will not be shown when the presentation is in Slide Show mode.
� Selecting Play in the Custom Animation task window will show a preview of the animations.
� Click the Slide Show button to preview the slide in Slide Show mode with all of the animation
effects included.
4.1.3 Modify Animation of Text or Objects
On the Animation tab, in the Animation group, click the Custom Animation
button. The
Custom Animation task window will appear on the right. Another method of doing this is to select the
object to be modified, right-click it and choose the Custom Animation from the drop-down list.
Modifications can be made from the Custom Animation task window.
� Modify when animation effects are triggered by choosing between the three Start options: When
Click, With Previous and After Previous. When Click will trigger the animation effect when the
presenter clicks the mouse. With Previous will trigger the animation effect to occur at the same time
as the animation effect preceding it. After Previous will trigger the animation effect to occur after the
35
user manual
�
�
animation effect preceding it has finished.
Modify the direction objects enter or exit the slide from with the Direction option. Some animation
effects do not have this option available due to the nature of the animation effect.
Modify the time necessary for an animation effect to occur with the Speed option The available
ery Slow, Slow, Medium, Fast and Very Fast. Figure 4.1-1 displays these options.
options are: Very
Figure 4.1—1 Custom Animation
The following steps describe another method of modifying the Speed
Speed:
(1)
On the Animation tab, in the Animation group, click Custom Animation
(2)
Select the animation effect to be modified in the Custom Animation task window and click
the drop-down arrow.
Click Show Advance Time Line from the drop-down list and the result should resemble
Figure 4.1-2.
(3)
.
Figure 4.1—2 Show Advanced Timeline
(4)
Upon mousing over a time block, the cursor will change to a resizing arrow that allows you
to click and drag the time blocks.
36
【 Kingsoft Office 2012 】
(5)
Drag the time blocks to modify the duration of the animation effects.
4.1.4 Change
To change the animation effects of one or more objects, select them in the Custom Animation task
window and click Change, as shown below:
Figure 4.1—3 Change the Animation Type
4.1.5 Rearrange the order of Animation Effects
To rearrange the order of animation effects, take the following steps:
(1) Select the slide with the animation effects that require rearranging.
(2)
On the Animation tab, in the Animation group, click Custom Animation
(3)
Select the animation effect that needs to be moved in the Custom Animation task window
and drag it to the desired location.
.
4.1.6 Remove Animation Effects
To remove animation effects, take the following steps:
(1) Select the animation effect to be deleted in the Custom Animation window under the
Custom Animation list.
(2)
Click Remove
in Figure 4.1-4.
or right-click and select Remove on the drop-down list shown
37
user manual
Figure 4.1—4 Remove Custom Animation
4.2 Set Motion Path Animations
The Motion Path function creates an animation effect path for text and other objects to follow. Users can
use the default paths, edit the default paths or create their own custom motion paths.
4.2.1 Apply Default Path
The Motion Path function assigns a path for text and objects to follow. To create a path animation effect,
follow these steps:,
(1) Choose a slide with text or other objects you wish to assign a path to and select the text or
object
(2) On the Animation tab, in the Animation group, click Custom Animation
, to bring up
the Custom Animation task window.
(3) In the Custom Animation task window, click Add Effects, select Motion Paths
Paths, and choose
a path for the text or object.
38
【 Kingsoft Office 2012 】
Figure 4.2—1 Applying A Path
4.2.2 Modify Paths
Motion paths are considered as objects in Kingsoft Presentation and have eight control points when they
are selected. As a result, the size, position and rotation of motion paths are adjustable.
4.2.3 Adjust Size of Path
The sizing of both default and custom paths can be adjusted by following these steps:
(1) Select the path to be edited.
(2) On the Animation tab, in the Animation group, click Custom Animation
to bring up
the Custom Animation task window.
(3) In the Custom Animation task window, click Add Effects, select Motion Paths
Paths, click More
Motion Paths and select a path. The S Curve path is chosen in the following example:
39
user manual
Figure 4.2—2
S Curve Motion Path
(4) Click the path and eight control points appear as shown in figure 4.2-3.
Figure 4.2—3 Adjust the path size
(5) Select one of the control points and drag it to adjust the size of path.
4.2.4 Adjust the Position of a Path
After selecting a motion path, the cursor becomes a
when you hover your mouse over it. Left-click
and drag the mouse button to relocate the path. However, the text or object associated with the path will
not move. When the animation plays, the corresponding object will start from the path head and move
40
【 Kingsoft Office 2012 】
along the path.
The text or object will move according to the path if the motion path is unlocked. Accordingly, the text or
object will not move when the motion path is locked. To lock the motion path, follow these steps:
(1) Select the path.
(2) In the Custom Animation task window, select Lock in the Path drop-down list box shown
as follow.
Figure 4.2—4 Lock the path
(3)
Click the Slide Show button or press F5 to view the animation. You will notice that the text
or object will jump to the starting point of the motion path on queue.
4.3 Transition effect
Transition effects are special effects that occur between slides during slide show mode. Kingsoft
Presentation 2012 provides 60 different transition effects for almost all of your presentation needs. The
Slide Sorter View serves as a convenient way to view all of the slides in your presentation for inserting
transition effects.
4.3.1 Set the Transition Effect
The Transform group under the Animation tab contains previews of the different kinds of transition
effects available. This is displayed in figure 4.3-1.
Figure 4.3—1 Transition Effect showcase
The Slide Transition task window offers additional options for transition effects, which include transition
type, speed and sound.
4.3.1.1 Apply Transition Effect to a Slide
Each slide can have a unique transition effect in Kingsoft Presentation. In the following example, the
Wedge transition effect will be applied to a new slide. The steps are as follows:
(1) On the View tab, click Slide Shorter
View
. Another option is to click the Slide Shorter
button, which is located right below the window to switch to the Slide Shorter
41
user manual
View.
(2) Find the Animation tab and click Transition Effect
. The Slide Transition task
window appears on the right.
Figure 4.3—2 Select the Transition Effect
(3) Choose the slide and select Wedge from the Animation Transition List in the Slide
Transition task window.
(4) Under Modify transition
transition, select Medium from the Speed drop-down list, and Applause
from the Sound drop-down list. Select the Loop until next sound begins check box shown in
the following figure:
42
【 Kingsoft Office 2012 】
Figure 4.3—3 Set the speed and sound for transition effect
(5) Select the On mouse click check box under Advance slide
slide..
After finalizing the settings, an animation icon
will appear on the top left of the slide.
4.3.1.2 Apply Transition Effect to Multiple Slides
Kingsoft Presentation provides different ways to apply transition effects to multiple slides at a time.
1. Apply transition effects to multiple slides
To apply a transition effect to multiple slides at a time, do the following:
(1) On the Animation tab, in the Transform group, click Transition Effect
. The Slide
Transition task window will appear on the right.
(2) Hold Ctrl and select the first and third slide.
(3) Select Wedge from the Animation Transition List in the Slide Transition task window.
Under Modify transition
transition, select Medium from the Speed drop-down list and Applause from
the Sound drop-down list. Click the On mouse click check box under Advance slide
slide..
After finishing the settings, an animation icon appears on the bottom left of the selected slides.
2.Apply transition effects to all slides
(1) Look under the Animation tab for the Transform group and click Transition Effect
.
The Slide Transition task window will appear on the right.
(2) Select a slide.
(3) Select Wedge from the Animation Transition List in the Slide Transition task window.
Under Modify transitio
transition, select Medium from the Speed drop-down list and Applause from
the Sound drop-down list. Click the On mouse click check box under Advance slide
slide..
(4) Click Apply to All Slides
Slides..
After finishing the settings, an animation icon appears on the bottom left of all the slides.
43
user manual
Tips
Tips:: When a presentation contains multiple masters, the Apply to Master button will appear in the
Slide Transition task window. Click the button to apply the transition effects to the corresponding master.
iew
4.4 Slide Prev
Preview
To preview transition effects directly look under the Animation tab for the Transform group and select a
slide transition effect.
Go to the Animation tab and click Preview
after adding the transition effect.
After adding a transition effect, go to the Slide Transition task window and click Play
To preview as a slide show, click Slide Show
.
in the Slide Transition task window.
In the Slide Transition task window, select the AutoPreview check box on the bottom and select a
transition from the Transition list.
Figure 4.4—1 Slide Transition Window
Tips: To remove the Animation Scheme, on the Slide Show tab, in the Set Up group, click
Animation Scheme and select No Animation under Apply to selected slides in the task window.
44
【 Kingsoft Office 2012 】
5 Slide Show
5.1 Start Slide Show
The purpose of Kingsoft Presentation is to allow users to create presentations that are presented as slide
shows. When the slide show is started, the slides are resized to full screen.
The beginning location of your slide show can be chosen in Kingsoft Presentation. These options allow
you to start your slide show from the beginning, from the current slide, or a custom slide show can be
created.
ning
5.1.1 From the Begin
Beginning
To begin the slide show from the beginning, do the following:
�
On the Slide Show tab ,in the Start Slide Show group, click Slide Show From Begin
�
Click Slide Show
.
on the right bottom of the window.
5.1.2 From the Current Slide
To begin the slide show from the current slide, do the following:
(1)
On the Slide Show tab ,in the Start Slide Show group,click From Current Slide
(2)
Click Slide Show
.
on the right bottom of the window.
5.2 Custom Slide Shows
5.2.1 Define Custom Slide Show
To customize the slide show to only display selected slides instead of the entire presentation, do the
following:
(1) On the Slide Show tab, in the Start Slide Show group, click Custom Slide Show
. The
Custom Slide Show
Showss dialog box will appear.
(2)
(3)
In the Custom Slide Show
Showss dialog box, click New
.
The Define Custom Slide Show dialog box appears and you will be able to select the slides
you want to add to the custom slide show. Click Add to confirm the choices.
45
user manual
Figure 5.2—1 Custom Slide Show
�
To select multiple slides, click a slide, and then press and hold CTRL while you click the
other slides.
�
To reorder the slides, select a slide from the Slides in custom slide show list. Click the
arrow buttons to move the selected slides up and down the list.
(4) In the Slide show name box, enter a name and click OK
(5) Return to the Custom Slide Show dialog box and click Show to preview the custom slide
show.
5.2.2 Remove custom Slide show
To remove a custom slide show, take the following steps:
(1) On the Slide Show tab, in the Start Slide Show group, select Custom Slide Show
.
(2) In the Custom Slide Show
Shows dialog box, select the custom slide show you need to remove and
click Remove
Remove.
Click Close when finished.
Tips
Tips:: When removing a custom slide show, slides will remain in the corresponding presentation, but
will no longer be marked as being part of a custom slide show.
5.3 Slide Show Settings
5.3.1 Set the Show Type
Kingsoft Presentation allows the user to create presentations in the form of slide shows for both speakers
and for kiosks. These different show types meet the needs of different situations. Steps to set the show type
are as follows:
(1) On the Slide Show tab, in the Set Up group, select Slide Show Setting
, The Slide
Show Settings dialog box appears as shown in Figure 5.3-1.
(2) Under the Show Type
Type, choose the type of slide show you need.
46
【 Kingsoft Office 2012 】
Figure 5.3—1 Slide Show Settings
5.3.2 Presented by a Speaker
A slide show presented by a speaker is the most common and default show type. The flow of the
presentation is controlled this way and the speaker can choose to use the autoplay function. This function
allows the speaker to stop, add details, record narration, use the pen tool and to exit the show by pressing
Esc. The show type can be changed by taking the following steps:
(1) On the Slide Show tab, in the Set Up group, click Slide Show Setting
. The Slide
Show Settings dialog box pops up as shown in Figure 5.3-2.
(2) Under the Show Type
Type, select Presented by a Speaker
Speaker..
(3) Under Show slides
slides, set the page range to be presented. All is the default option and is shown
as follows
Figure 5.3—2 Show all the slides
(4) To loop the slide show continuously, go to Show option and check Loop continuously until
'Esc'.
(5) Click OK to finish the settings.
There are three ways to start a slide show:
�
Click Slide Show
on the bottom right of the window.
47
user manual
�
On the Slide Show tab, in the Start Slide Show group, select From Current Slide
.
� Press F5 to start showing from current slide.
If the animations in the presentation are set to start when clicked, they will be unable to show. If the
animations are set to start with the previous, then the next animations will start automatically.
5.3.3 Browsed at a Kio
Kiossk
The presentation will play automatically when the slide show type is set to Browsed at kiosk. This type of
slide show is appropriate for shows in an exhibition or conference where a speaker or presenter cannot
control the slide show. This type of show is similar to Presented by speaker, but the flow of the
presentation cannot be controlled with a mouse. To set the show type to Browsed at kiosk, take the
following steps:
(1) On the Slide Show tab, in the Set Up group and click Slide Show Setting
Settingss
. The Slide
Show Settings dialog box appears as shown in Figure 5.3-3.
(2) Under the Show Type
Type, select Browsed at a kiosk.
(3) Under Show slides
slides, set the page range to be presented. All is the default option and is shown
as follows:
Figure 5.3—3 Browsed at a kiosk
(4) Click OK to finish the settings.
The browsed at a kiosk show type is similar to the presented by speaker show type. If the animations in the
presentation are set to start when clicked, they will be unable to show. If the animations are set to start with
the previous, then the next animations will start automatically.
os
k show types will loop continuously by default. To exit the show, press Esc.
Browsed at a Ki
Kios
osk
5.4 Skip Slide
To skip certain slides during a slide show without deleting them, follow these steps:
48
【 Kingsoft Office 2012 】
(1)
Select the slide you want to skip.
(2)
Look under the Slide Show tab in the Set Up group and select Skip Slide
to skip the
selected slide during the slide show.
(3)
Next to the slide you have skipped, the hidden slide icon
appears with the slide
number inside.
Tips
Tips: To remove a skip, select the slide, and click Skip Slide
Slide..
5.5 Rehearse Timings
Rehearse Timing is used to control the time of the presentation accurately. Steps to doing this are as
follows:
(1) On the Slide Show tab, in the Set Up group, select Rehearse Timings
to rehearse the
show.
(2) A Rehearsal toolbar appears on the top left and the time in the middle of the toolbar
represents the timing for the current slide. The time on the right represents timing for the
entire presentation. Figure 5.5-1 depicts this toolbar.
Figure 5.5—1 Rehearsal Timings
�
Click the down arrow button
to complete the rehearsal time for the current slide and to begin
the timing for the next slide. You can also implement this feature by clicking the slide.
�
Click the Pause button
to pause the timing of the current slide.
�
Click the Back button
to reset the current slide timings.
(3) When the slide show is over, the system will prompt you on whether to keep the rehearsal
timing or not. Click Yes to set the slides to switch at the rehearsed times.
Figure 5.5—2 Rehearsal time prompt
49
user manual
6 View Tab
6.1 Types of views
Kingsoft Presentation provides multiple types of views to make it easier for the user to view and edit the
slides in his or her presentation. The types of views available are normal view, slide sorter view, slide show
view and slide master view. Each type of view has different features and is better suited towards the user
under different circumstances.
6.2 Normal View
Normal view is the default view in Kingsoft Presentation; there are three panes in this view. The Outline
and Slides tabs are on the left, where you can switch outlines and slides through the thumbnails.
The normal view combines the slide, outline and notes ribbons into one view. The Outline is used to view
the outline. The Slides are used to preview the effects and to edit a single slide. The Notes pane is used to
type notes.
To switch to the normal view, On the View tab, in the Presentation View group, click Normal View
.
6.3 Slide Sorter View
To organize, review, rearrange or set timing or transitions for your slides, you can use slide sorter view. It
is an exclusive view where slides are shown as thumbnails.
Steps to switch to the Slide Sorter View are as follows:
�
On the View tab, in the Presentation View group, click Slide Sorter
�
The Slide Sorter View appears as shown in Figure 6.3-1.
.
50
【 Kingsoft Office 2012 】
Figure 6.3—1 Slide Shorter View
6.4 Slide Master View
The slide master view stores the information about design templates. This information includes font style,
sizes or positions of placeholders, background design and color schemes. Every slide includes at least one
slide master. The main advantage of using the slide master view is being able to view all the modifications
made to each and every slide. Therefore, when new slides are added, the same information can be taken
from existing slides and placed on to the new slides instead of inputting the information all over again. The
slide master view is well suited for large presentations that require every slide to be uniform. To use the
slide master view, On the View tab, click Slide Master
. The Slide master view is shown in Figure
6.4-1.
51
user manual
Figure 6.4—1 Slide Master
6.4.1 Slide Master Tab
On the View tab, click Slide Maste
Master to make the Slide Master tab appear. Under the Slide Master tab, in
the Edit Master group, you can edit the slide master.
6.4.1.1 Add a Slide Master
On the Slide Master tab, in the Edit Master group, click New Slide Master to add a slide master.
6.4.1.2 Insert a New Title Master
Title master is an element of the design template, which stores information about title styles of slides. This
information includes sizes or positions of placeholders, backdrop design, and color schemes.
To create a new presentation in the design template by default, click New Slide Master on the Slide
52
【 Kingsoft Office 2012 】
Master tab to insert a new slide master. If you cannot find the New Slide Master, then on the Slide Master
tab, in the Edit Master group, click New Title Master
If the New Title Master button
to insert a master.
is grey, that means your presentation already has a slide master.
Generally speaking, when applying design templates, the presentation will be inserted a slide master.
Besides, most of the design templates contain a title master.
A slide master and a title master compose the slide-title master pair. They can show together in the Master
View. However, one slide master cannot exist with more than one title master.
Tips
Tips: It is preferable to create a slide master before you edit the slides. If you have inserted a slide
master, then all slides in the presentation will be applied the associated slide master and layout. Therefore,
if you want to modify the slides, be sure to operate on the slide master.
If the slide master is created after editing the slides, some items on slides may not correspond with the
slide master. You can use background and text formatting features in slides to cover some custom content
on slide master, but the other content can be modified only in the Slide Master View.
Delete a Slide Master
6.4.1.3
Delete a slide master by following these steps:
(1) Select the slide master to be deleted in the Slide Master View.
(2)
On the Slide Master tab, in the Edit Master group, click Delete Master
.
Tips: If you delete the slide master, the corresponding title master will be deleted as well.
6.4.1.4 Preserve Master
Sometimes, if you delete all of the slides with a certain master, or apply a design template to them, the
slide master will be deleted in Kingsoft Presentation. To preserve a master in these cases, please do the
following:
(1) Click the slide master you want to preserve in the Slide Master View.
(2) On the Slide Master tab, in the Edit Master group, click Preserve Master.
(3) If you don't want to preserve the slide master, just click the button again.
Tips: Though you have preserved the master, you can delete it manually.
In the slide-title master pair, if you preserve one master, the other will be preserved also.
When you insert, copy or paste and drag the slide master, or insert design templates in Master View,
slide masters will be preserved by default.
6.4.1.5 Rename Master
To rename the master, On the Slide Master tab, in the Edit Master group, click Rename Master
.
In the Rename Master dialog box, in the Master Name
Name, enter the new name and click Rename. This is
shown in Figure 6.4-2.
53
user manual
Figure 6.4—2 Rename Master
6.4.1.6 Master Layout
In the Edit Master group, click Master Layou
Layout
. In the Master Layout dialog box you can adjust
the layout of the master.
Figure 6.4—3 Master Layout dialog box
6.4.1.7 Close Master View
To close the master view look under the Slide Maste
Master tab and click Close Master View
.
6.5 Show
6.5.1 Gr
Griid and Guides
The grid is used to regulate the location of an object. Guidelines are two lines that can move horizontally
and vertically, and you can align objects quickly and accurately by using the guidelines. The objects
automatically align to the invisible guides by default,
On the View tab, in the Show group, click Grid and Guides
, The settings for the grid and
guidelines are shown in Figure 6.5-1.
54
【 Kingsoft Office 2012 】
Figure 6.5—1 Set the grid and guides
There are another two ways to open the Gr
Griid/Guide
d/Guides dialog box,
On the Home tab, in the Drawing group, click Arrange and select Align. Then select Grid and
�
Guides in drop-down list.
On the Picture Tools
Tools, Drawing tools and WordArt tab, in the Arrange group, click Align and
�
select Grid and Guides in drop-down list.
Right-click the blank in slide, select Grid and Guides from the shortcut menu.
�
6.5.2 Task Window
Under the View tab, in the Show group, you can check to open or cancel to close the Task Window.
Kingsoft Presentation provides 11 kinds of task windows, including New Presentation, Clip Art,
AutoShapes
AutoShapes,, Slide Layout, Slide Design-Design Templates
Templates,, Slide Design-Color Schemes
Schemes,, Slide Design
- Animation Schemes and Backup Management
anagement..
6.6 Window
Under the View tab, in the Window group, you can select the options you need such as: New Window,
Arrange All, Switch Window, Close Other Window, Close Window.
6.6.1 New window
You can create a new window by following these steps:
�
On the View tab, in the Window group, click New Window
to create a new presentation
window
�
On the Application Program menu
, click New and a Templates dialog box
appears. Select the template you desire and click OK to create new presentation.
55
user manual
�
Keyboard shortcut Ctrl +N
�
On the Quick Access toolba
toolbar, click New
�
On the Quick Access toolba
toolbar, right-click and selectt New Blank Presentation
Presentation..
.
6.6.2 Arrange All
In Kingsoft Presentation, you can arrange the windows, which is convenient for editing multiple
presentations at one time. Steps to do so are as follows
(1)
On the View tab, in the Window group, click Arrange All
(2)
Select an option from the drop-down list, such as Horizontal Title, Vertical Title or
Cascade.
.
Figure 6.6—1 Arrange windows
Based on your needs and presentation, you can adjust the size and position of the window manually.
Figure 6.6—2 Adjust the size and position of the window manually
Switch windows
You can quickly switch between multiple documents in Kingsoft Presentation 2012. On the View tab, in
the Window group, click Switch Window
to switch windows.
56
【 Kingsoft Office 2012 】
6.6.3 Close window
On the View tab, in the Window group, click Close Window
to exit.
You can also select the document tab you need to close in the Quick Access toolbar and click on the right
side.
6.6.4 Close other window
If you need to close multiple windows quickly, select the window you want to remain open. On the View
tab, in the Window group, click Close Other Window.
6.7 Print Preview Tab
To preview before printing, look under the View tab for the Presentation View group and click Print
Preview
in this tab.
. The Print Preview tab appears and you can preview the presentation and set for printing
In addition, on the Application Program menu
, click Print Preview and the Print
Preview tab appears.
6.7.1 Contents to be Printed
On the View tab, in the Presentation View group, click the down arrow under WpPrintWhat_Slides
.
In the drop-down list, you can preview slides, outline and notes. You can also select the number of slide
pages to be printed on one page. The names of the different contents that can be printed include:
WpPrintWhat_1, WpPrintWhat_2, WpPrintWhat_3, WpPrintWhat_4, WpPrintWhat_5,
WpPrintWhat_6, WpPrintWhat_7, WpPrintWhat_8, WpPrintWhat_9, WpPrintWhat_1Notes,
WpPrintWhat_3Notes and WpPrintWhat_OutlineView.
6.7.2 Print Skipped Slides
On the Print Preview tab, in the Settings group, click Print Skipped Slides
to print hidden slides.
To turn off Print Skipped Slides, click it again.
6.7.3 Framed Slide
lidess
On the Print Preview tab, in the Settings group, click Frame Slide
Slidess
to choose whether or not to
57
user manual
print the frame slides. This is depicted in Figure 6.7-1.
Framed the printing
slides.
Figure 6.7—1 Framed slides to print
6.7.4 Close
To close the Print Preview window, click Close
on the Print Preview tab to exit.
58