1
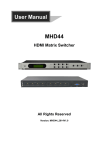
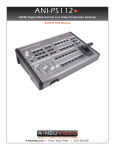
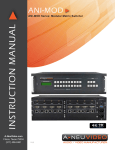
ANI-44H5-POE
INSTRUCTION MANUAL
HDBaseT™ 4x4 Matrix Switcher with PoH
A-NeuVideo.com
Frisco, Texas 75034
(317) 456-2461
V2.0
AUDIO / VIDEO MANUFACTURER
SAFETY INFORMATION
1. To ensure the best results from this product, please read this manual and all other documentation before operating your equipment.
Retain all documentation for future reference.
2. Follow all instructions printed on unit chassis for proper operation.
3. To reduce the risk of fire, do not spill water or other liquids into or on the unit, or operate the unit while standing in liquid.
4. Make sure power outlets conform to the power requirements listed on the back of the unit. Keep unit protected from rain, water and
excessive moisture.
5. Do not attempt to clean the unit with chemical solvents or aerosol cleaners, as this may damage the unit. Dust with a clean dry cloth.
6. Do not use the unit if the electrical power cord is frayed or broken. The power supply cords should be routed so that they are not
likely to be walked on or pinched by items placed upon or against them, paying particular attention to cords and plugs, convenience
receptacles, and the point where they exit from the appliance.
7. Do not force switched or external connections in any way. They should all connect easily, without needing to be forced.
8. Always operate the unit with the AC ground wire connected to the electrical system ground. Precautions should be taken so that the
means of grounding of a piece of equipment is not defeated.
9. AC voltage must be correct and the same as that printed on the rear of the unit. Damage caused by connection to improper AC
voltage is not covered by any warranty.
10. Turn power off and disconnect unit from AC current before making connections.
11. Never hold a power switch in the “ON” position.
12. This unit should be installed in a cool dry place, away from sources of excessive heat, vibration, dust, moisture and cold. Do not use
the unit near stoves, heat registers, radiators, or other heat producing devices.
13. Do not block fan intake or exhaust ports. Do not operate equipment on a surface or in an environment which may impede the normal
flow of air around the unit, such as a bed, rug, carpet, or completely enclosed rack. If the unit is used in an extremely dusty or smoky
environment, the unit should be periodically “blown free” of foreign dust and matter.
14. To reduce the risk of electric shock, do not remove the cover. There are no user serviceable parts inside. Refer all servicing to
qualified service personnel. There are no user serviceable parts inside.
15. When moving the unit, disconnect input ports first, then remove the power cable; finally, disconnect the interconnecting cables to
other devices.
16. Do not drive the inputs with a signal level greater than that required to drive equipment to full output.
17. The equipment power cord should be unplugged from the outlet when left unused for a long period of time.
18. Save the carton and packing material even if the equipment has arrived in good condition. Should you ever need to ship the unit,
use only the original factory packing.
19. Service Information Equipment should be serviced by qualifier service personnel when:
A. The power supply cord or the plug has been damaged.
B. Objects have fallen, or liquid has been spilled into the equipment.
C. The equipment has been exposed to rain
D. The equipment does not appear to operate normally, or exhibits a marked change in performance
E. The equipment has been dropped, or the enclosure damaged.
THIS SAFETY INFORMATION IS OF A GENERAL NATURE AND MAY BE SUPERSEDED BY INSTRUCTIONS CONTAINED WITHIN THIS MANUAL
A NEUVIDEO
TABLE OF CONTENTS
CONTENTS
Introduction & Contents .................................................. 1
Features & Specifications ................................................. 2
SAFETY PRECAUTIONS
Please read all instructions before attempting to unpack, install or
operate this equipment and before connecting the power supply.
Please keep the following in mind as you unpack and install this
equipment:
• Always follow basic safety precautions to reduce the risk of fire,
electrical shock and injury to persons.
• To prevent fire or shock hazard, do not expose the unit to rain,
moisture or install this product near water.
• Never spill liquid of any kind on or into this product.
• Never push an object of any kind into this product through any
openings or empty slots in the unit, as you may damage parts
inside the unit.
• Do not attach the power supply cabling to building surfaces.
• Use only the supplied power supply unit (PSU). Do not use the
PSU if it is damaged.
• Do not allow anything to rest on the power cabling or allow any
weight to be placed upon it or any person walk on it.
• To protect the unit from overheating, do not block any vents or
openings in the unit housing that provide ventilation and allow for
sufficient space for air to circulate around the unit.
Front Panel ........................................................................... 3
Real Panel ............................................................................... 4
System Connection ............................................................. 5
System Operations .............................................................. 6
IR Control / Remote Control ............................................. 7
IR Operations ......................................................................... 8
RS-232 Communication Port / Twist Pair ........................ 11
RS-232 Control .................................................................... 12
TCP/IP Control ................................................................... 17
TCP/IP Settings .................................................................... 18
USB Firmware Updating .................................................... 21
INTRODUCTION
ANI-44H5-POE HDBaseT™ 4x4 Matrix Switcher includes (4) HDMI
inputs, (4) HDBaseT™ outputs, (2) local HDMI outputs, (4) deembedded stereo audio & (4) de-embedded digital audio outputs.
It enables cross-point switching from any input to any output, and
supports high resolution 1080p, HD3D. The HDBaseT™ output
can work with the HDMI PoH Twisted Pair Receiver, to transmit
HDMI, IR, RS-232 and PoH over a CAT5e/CAT6 cable. And its
transmission distance can up to 200 feet (60M).
DISCLAIMERS
The information in this manual has been carefully checked and
is believed to be accurate. We assume no responsibility for any
infringements of patents or other rights of third parties which may
result from its use.
PACKAGE CONTENTS
We assume no responsibility for any inaccuracies that may be
contained in this document. We make no commitment to update or
to keep current the information contained in this document.
Before attempting to use this unit, please check the packaging and
make sure the following items are contained in the shipping carton:
• HDBaseT™ 4x4 matrix switcher
We reserve the right to make improvements to this document and/
or product at any time and without notice.
• (2) Mounting ears
• (6) Screws (white color)
• Power adapter (DC48V)
• IR remote
COPYRIGHT NOTICE
• Power cord
No part of this document may be reproduced, transmitted,
transcribed, stored in a retrieval system, or any of its part translated
into any language or computer file, in any form or by any means
— electronic, mechanical, magnetic, optical, chemical, manual, or
otherwise — without the express written permission and consent.
• RS-232 cable
• CAT5e twisted pair
• IR converting cable
• (8) Captive screw connectors
• (4) Plastic cushions
© Copyright 2015. All Rights Reserved.
Version 2.0 MAY 2015
• User manual
TRADEMARK ACKNOWLEDGMENTS
All products or service names mentioned in this document may be
trademarks of the companies with which they are associated.
1
A NEUVIDEO
FEATURES & SPECIFICATIONS
FEATURES
• Supports 1080p@24Hz & 3D
• HDCP Compliant and DVI compatible, supporting HDMI 1.4a & DVI 1.0
• Powerful EDID & HDCP management
• HDBaseT™ outputs, to transmit HDMI, IR & RS-232 to 200 feet (60M) long distance over a CAT5E/6 cable
• Supports PoH, provides power for all the receivers connected to HDBaseT™ outputs
• Supports front panel control, RS-232, IR and optional TCP/IP control (works with the Network Controller GUI)
• IR OUT signal follows the video source or broken away from video switching
• Supports remote control from receiver by IR & RS-232
• Supports centralized IR control to control all the remote display devices
• Supports PCM, Dolby, and DTS 5.1 surround
• LCD indicator shows connection status, switching status, HDCP status, and output resolution
Specifications
• Video Input
• Input: (4) HDMI
• Input Connector: Female HDMI
• Input Level: T.M.D.S. 2.9V/3.3V
• Input Impedance: 100Ω (Differential)
• Video Output
• Output: (2) HDMI / (4) HDBaseT™
• Output Connector: Female HDMI / Female RJ-45 (with LED indicators)
• Output Level: T.M.D.S. 2.9V/3.3V
• Output Impedance: 100Ω (Differential)
• Video General
• Gain: 0 dB
• Video Signal: HDMI (or DVI-D)
• Resolution Range: Up to 1920x1200@60Hz or 1080p@60Hz
• Transmission Distance: 60m with PoH
• Bandwidth: 6.75Gbit/s
• Maximum Pixel Clock: 225MHz
• Switching Speed: 200ns (Max)
• HDBaseT™ Output Resolution: 1080p@60Hz
• EDID Management: Built-in EDID data and manual EDID management
• HDCP: Supports HDCP 1.3, auto and manual HDCP management
• Audio General
• Output Signal: Stereo audio/Digital audio
• Stereo Output: Earphone output distortion: 0.1% 32Ω/70mW@1KHz, 0.1% 16Ω/105mW @1KHz
• Frequency Response: 20Hz~20KHz
• Output Connector: (4) 3p captive screw connectors/(4) Coax (RCA)
• Coax Output : Supports PCM, Dolby, DTS 5.1
• CMRR: >90dB @20Hz ~ 20KHz
• Control Ports: (4) IR OUT (green) / (4) IR IN (black) / (1) IR EYE (black) / (1) TCP/IP (female RJ-45) / (1) RS-232 (9 pin female D)
/ (4) RS-232 (3p captive)
• Panel Control: Front panel buttons
As product improvements are continuous, specifications are subject to change without notice.
2
A NEUVIDEO
PANEL DESCRIPTIONS
FRONT PANEL
q Firmware: Micro USB port for update firmware.
w Power Indicator: Keep light when power on.
e IR Receiver: Receive control signal from IR remote.
r LCD: Real-time shows system status.
INPUTS/ Menu buttons: Normal mode: Input buttons, ranging from “1” to “4”.
tInquire
mode: Press “AV” more than 3 seconds to enter this mode.◄ ► to change different menus, ▲▼ to change different channels.
buttons:
yAVFunction
synchronal button: To transfer AV and IR signal (from IR OUT port) synchronously by the switcher.
Note: The IR OUT port number is corresponding with HDMI INPUTS port number as default.
Example: To transfer both AV and IR signals from input channel No.1 to output channel No.3.
Operation: Press buttons in this order “1”, “AV”, “3”.
ALL outputs button: To transfer one input to all outputs.
Example: To transfer both AV and IR signals from input channel No.1 to all output channels.
Operation: Press buttons in this order “1”, “ALL”
EDID management button: manually capture and copy the EDID data from output device to input port.
Example: To capture and copy the EDID data from output channel No.4 to input channel No.2.
Operation: Press buttons in this order “EDID”, “2”, “4” Press button “2” in INPUTS area, “4” in OUTPUTS area.
u OUTPUTS: Output buttons, ranging from “1” to “4”.
With the front control panel, the switcher could be control directly and rapidly by pressing the buttons under below format.
• “Input Channel” + “AV” + “Output Channel”
• “Input Channel”: Fill with the number of input channel to be controlled.
• “Output Channel”: Fill with the number of output channels to be controlled.
3
A NEUVIDEO
PANEL DESCRIPTIONS
REAR PANEL
q IR ALL IN: IR control signal input port, connect with IR receiver, pass through to all the HDBaseT™ ports to control remote devices.
w HDMI INPUTS: HDMI input ports, (4) in total, type A female HDMI connector, connect with HDMI input source devices.
e IR OUT: Connect with IR transmitter, to send out the IR signal from the HDBaseT™ port of the far-end Receiver. These IR OUTs make
up an IR matrix with the IR INs on the HDBaseT™ receivers, and all can be switched synchronously with the AV signal, or separately
switching.
r OUTPUTS:
IR IN: Connect with IR receiver, fixed IR input for the output, cannot be switched separately. It makes up an IR bi-directional transmission
with the IR OUT on the corresponding HDBaseT™ receiver.
HDMI: HDMI output port, connect with HDMI output devices. To split HDMI output for local monitoring.
COAX: HDMI de-embedded digital audio output.
HDBaseT™: Works with receivers using HDBaseT™ technology, such as the HDMI twisted pair receiver & HDMI PoH twisted pair
receiver. It can pass through AV, IR and RS-232 signal to 60m distance. Meanwhile, it can provide power for the receivers which
support PoH.
RS-232: RS-232 port to communicate with the RS-232 port on corresponding HDBaseT™ receiver. When controlled by HDBaseT™
receiver, the communication protocol must be the same with the HDBaseT™ 4x4 matrix switcher.
AUDIO: HDMI de-embedded stereo audio output
t RS-232: The serial port for unit control, 9-pin female connector, connects with control device such as a PC.
y Power Indicator: Turn red and keep on when power on.
u 48V DC: Connect with 48V DV power adaptor.
i GROUND: Connect to grounding, make the unit ground well.
o TCP/IP: TCP/IP port for unit control, optional feature (not field installable).
a IR EYE: Connect with extended IR receiver, use the IR remote to control the HDBaseT™ 4x4 matrix switcher.
4
A NEUVIDEO
System Connection
Connection Procedure
1. Connect HDMI sources (e.g. DVD) to HDMI inputs of the HDBaseT™ 4x4 matrix switcher with HDMI cables.
2. Connect HDMI displays (e.g. HDTV) to HDMI outputs of the HDBaseT™ 4x4 matrix switcher with HDMI cables.
3. Connect speakers/earphones to AUDIO output ports (3p captive screw connectors).
4. Connect the HDBaseT™ port of HDBaseT™ receiver and the HDBaseT™ 4x4 matrix switcher with twisted pair.
5. Connect the RS-232 port (9 pin female D) of the HDBaseT™ 4x4 matrix switcher with control device, e.g. PC.
6. Connect the RS-232 port of controlled device to any other RS-232 port (3p captive screw connector) of the HDBaseT™ 4x4 matrix
switcher. The control signal can be transmitted bi-directionally.
7. The HDBaseT™ 4x4 matrix switcher can be controlled by its built-in IR receiver or through the IR EYE port by connecting with external
IR receiver. The IR signal can also be transmitted bi-directionally (connect IR OUT port of the HDBaseT™ 4x4 matrix switcher to IR IN port
of other far-end IR device, and connect IR IN ports of the HDBaseT™ 4x4 matrix switcher to IR OUT port of other far-end IR device), and
in this mode, we can control the HDBaseT™ 4x4 matrix switcher remotely. Note: The IR IN port has built-in infrared carrier receiver.
8. Connect DC48V power adaptor to the HDBaseT™ 4x4 matrix switcher.
5
A NEUVIDEO
System Operations
Button Control
The operation examples are showed in the section Front Panel. Here we make a brief introduction to the system inquire operations. Keep
pressing the button “AV” for 3 seconds, it will enter into system inquire menu. Use Left and Right direction button to check the previous/
next item.
Function Items
Pin
Description
Check the connection status of inputs
(Y) means the corresponding port is connected with
input device, (N) means not.
Check the connection status of outputs
(Y) means the corresponding port is connected with
output device, (N) means not.
Correspondence between inputs and outputs
Shows the correspondence between the (4) inputs and
(4) outputs.
Check if the input is with HDCP
(Y) means the input signal is with HDCP, (N) means
not.
Check if the output is with HDCP
(Y) means the output signal is with HDCP, (N) means
not.
Check the output resolution
Use the UP and DOWN direction button to check all the
(4) output resolutions.
6
A NEUVIDEO
IR Control / REMOTE CONTROL
IR CONTROL
By using IR & HDBaseT™ transmission technology, the HDBaseT™ 4x4 matrix switcher has some functions as follows:
1. Control far-end output device from local.
2. Control local input/output device remotely.
3. Control the HDBaseT™ 4x4 matrix switcher locally/remotely.
The HDBaseT™ 4x4 matrix switcher can be controlled by its built-in IR receiver or through the IR EYE port by connecting with extended
IR receiver, or even can be controlled remotely by a far-end IR device through the twisted pair.
REMOTE CONTROL
1. Standby button: press it to enter in standby mode.
2. Input channels: Range from 1~4, IR signal switched following HDMI
signal correspondingly
3. Menu buttons: AV and ALL buttons have the same function as the front
panel. THROUGH: To transfer the signals directly to the corresponding output
channels.
Example: Press “3”, “THROUGH”, the result will be IN 3 → OUT 3.
Press “ALL”, “THROUGH”, the result will be: 1→1, 2→2, 3→3, 4→4
4. Output channels: Range from 1~4.
Each channel has (1) IR IN, (1) COAX, (1) HDBaseT™, (1) RS-232, and
(1) AUDIO outputs, and channel No.1 & No.2 has (1) HDMI output.
7
A NEUVIDEO
IR Operations
IR Matrix Switching
1. The (4) “IR OUT” ports make up a 4x4 IR matrix with the “IR IN” ports of the far-end receivers. See as below:
Control Local Devices or the HDBaseT™ 4x4 Matrix Switcher Remotely
The IR signal is received from corresponding remote controller, and then transferred to HDBaseT™ receiver, then to corresponding zone
of the matrix through the twisted pair, finally transferred to IR OUT port and received by controlled device.
Switching Operation:
a) Sending command (reference to RS-232 Control): [x1]R[x2].
x1: Corresponding to the (4) IR OUT ports of the matrix, The IR transmitter connected to this port can be placed at IR receiving area
of output device or the matrix itself.
x2: Corresponding to the zone number (IR signal transmit to the HDBaseT™ receiver and then gets to HDBaseT™ port of this zone
via the twisted pair)
E.g.: Command “3R2.” means to transfer IR signal received from zone 2 to IR OUT port 3.
b) Using IR remote: Input channel→button IR→Output channel
Input channel: the (4) INPUTS buttons, corresponding to the (4) IR OUT ports of the matrix.
Output channel: the (4) OUTPUTS buttons, corresponding to the zone (receive IR signal from HDBaseT™ receiver with IR IN port
connects with IR receiver) number of the matrix.
E.g.: Press buttons “3”, “IR”, “1” in order, “3” in OUTPUTS area, “1” in INPUTS area, to transfer IR signal received from zone 3 to IR
OUT port 1.
Note: When switch all the (4) IR input signal channels to a same IR out channel, it is not able to control the controlled device(s)
at the same time.
2. IR Carrier Enforcing
a) Only if the IR receiver connected with HDBaseT™ receiver is with IR carrier, the received IR signal can be transferred to IR OUT port
of the matrix.
b) Only if the IR receiver connected with IR ALL IN port of the matrix is with IR carrier, the received IR signal can be transferred to IR OUT
port of the matrix.
If the IR receiver connected with HDBaseT™ receiver or IR ALL IN port of the matrix is not with IR carrier, you need to send the command
“%0901.”, and then you are able to transfer the IR signal to IR OUT port.
8
A NEUVIDEO
IR Operations
3. Control far-end output device from local
To control a remote display from local, the IR receiver used must be with IR carrier. The IR signal is transferred to the corresponding zone
connected with HDBaseT™ receiver connected with the IR transmitter. When the IR receiver is connected to IR ALL IN port, the IR signal
can be finally transferred to all the (4) IR transmitters connected with HDBaseT™ receivers. As the figure below:
Control far-end device from Local
4. Control far-end device through IR ALL IN port
The IR signal received from IR ALL IN port will be transmitted to all the (4) far-end HDBaseT™ receivers connected to HDBaseT™ ports
of the HDBaseT™ 4x4 matrix switcher. See as below:
Control far-end device through IR ALL IN port
9
A NEUVIDEO
IR Operations
5. Control local device from remote
User can control local device such as video source device, HDBaseT™ 4x4 matrix etc remotely. When using, the IR signal received from
the HDBaseT™ receiver will be transmitted to the corresponding IR OUT port of the HDBaseT™ 4x4 matrix switcher. See below:
6. Controlled by a Third-party IR Control Device
Use the included IR converting cable (see as below), connect the red end to IR input port of the HDBaseT™ 4x4 matrix switcher, the
black end to IR output port of the third-party control device. Then the IR signal is able to be transmitted via the twisted pair, and finally
gets to the remote output device.
10
RS-232 Communication Port/
TWIST PAIR
A NEUVIDEO
Connection with RS-232 Communication Port
Except the front control panel, the HDBaseT™ 4x4 matrix switcher can be controlled by far-end control system through the RS-232
communication port. This RS-232 communication port is a female 9-pin D connector. The definition of its pins is as the table below.
No
Pin
Function
1
N/u
Unused
2
Tx
Transmit
3
Rx
Receive
4
N/u
Unused
5
Gnd
Ground
6
N/u
Unused
7
N/u
Unused
8
N/u
Unused
9
N/u
Unused
Twist Pair Connection
The cables for HDBaseT™ ports must be straight-through ones, using T568A or T568B standard.
TIA/EIA T568A
TIA/EIA T568B
Pin
Cable color
Pin
Cable color
1
green white
1
orange white
2
green
2
orange
3
orange white
3
green white
4
blue
4
blue
5
blue white
5
blue white
6
orange
6
green
7
brown white
7
brown white
8
brown
8
brown
1st
4--5
1st
4--5
2nd
3--6
2nd
1--2
3rd
1--2
3rd
3--6
4th
7--8
4th
7--8
11
A NEUVIDEO
RS-232 Control
RS-232 Commands
Through the RS-232 communication port, user can control a far-end device whose bound rate is 2400, 4800, 9600, 19200, 38400, 57600 or
115200. Default setting of the HDBaseT™ 4x4 matrix switcher: bound rate is 9600, data bit is 8, stop bit is (1) and parity bit is none.
Communication protocol: RS-232 Communication Protocol
Baud rate: 9600
Data bit: 8
Stop bit: 1
Parity bit: none
Command
Types
Command
Codes
Functions
System Command
Operation Command
/*Type;
Inquire the models information.
/%Lock;
Lock the front panel buttons on the Matrix.
/%Unlock;
Unlock the front panel buttons on the Matrix.
/^Version;
Inquire the version of firmware
/:MessageOff;
Turn off the feedback command from the com port. It will only show the “Switch Ok”.
/:MessageOn;
Turn on the feedback command from the com port.
Demo.
Switch to the “demo” mode, 1->1, 2->2, 3->3 … and so on .The switching interval is 2
seconds.
Undo.
To cancel the previous operation.
[x]All.
Transfer signals from the input channel [x] to all output channels
All#.
Transfer all input signals to the corresponding output channels respectively.
All$.
Switch off all the output channels.
[x]#.
Transfer signals from the input channel [x] to the output channel [x].
[x]$.
Switch off the output channel [x].
[x]@.
Switch on the output channel [x].
All@.
Switch on all output channels.
[x1] V[x2].
Transfer the AV signal from the input channel [x1] to the output channel [x2].
[x1] B[x2].
Transfer the AV and IR signal from the input channel [x1] to the output channel [x2].
Status.
Inquire the input channel to the output channels one by one.
Save[X].
Save the present operation to the preset command [X], ranges from 0 to 9.
Recall[Y].
Recall the preset command [Y].
Clear[Y].
Clear the preset command [Y].
PWON.
Work in normal mode.
PWOFF.
Enter into standby mode and cut off the power supply to HDBaseT™ receivers.
STANDBY.
Enter into standby mode.
/%[Y]/[X]:[Z].
HDCP management command. [Y] is for input (value: I) or output (value: O). [X] is the
number of one port, if the value of X is ALL, it means all ports. [Z] is for working status
(value: 1 or 0).
Y=I & Z=1, means the input port is compliant with HDCP.
Y=O & Z=1, means output with HDCP.
Y=I & Z=0, means the input port is not compliant with HDCP.
Y=O & Z=0, means output without HDCP.
[x1] R[x2].
Transfer the IR signal from the input channel [x1] to the output channel [x2].
DigitAudioON[x].
Enable HDMI audio output of port x.
X=1, 2, 3, 4, enable this one port.
X=5, enable all the 4 ports.
DigitAudioOFF[x].
Disable HDMI audio output of port x.
X=1, 2, 3, 4, disable this one port.
X=5, disable all the (4) ports.
12
A NEUVIDEO
Command
Types
Command
Codes
Operation Command
/+[Y]/[X]:******.
RS-232 Control
Functions
Set communication between PC and HDBaseT™ receiver.
1. Y is for RS-232 port (connect with RS-232 port of HDBaseT™ receiver)
Value = 1,2,3,4,5,A,B,C,D,E,F,G or H
The value of Y is defined into the following meanings (in a given baud rate depended by
the value of X):
a. Y = 1, 2, 3 or 4, send this command to the corresponding HDBaseT™ receiver to
control far-end device.
b. Y = 5, send this command to all HDBaseT™ receivers to control all far-end devices.
c. Y = A, B, C or D
d. Y = E, F, G or H
For items c or d, send this command, it will be saved to the matrix switcher but taken
without action to corresponding HDBaseT™ receiver. And its command function will be
effective almost at the same time when you send the command PWON (for item c) or
PWOFF (for item d).
Note:
A & E are for port 1.
B & F are for port 2.
C & G are for port 3.
D & H are for port 4.
2. X is for bound rate (Value ranges from 1 to 7, (1) is for 2400, (2) for 4800, (3) for 9600,
(4) for 19200, (5) for 38400, (6) for 57600 and (7) for 115200)
3. ***** is for data (max 48 Byte)
4. The symbol “.” is the end of one command. If there are some symbols of “.” in one
command, this case is allowed and the last one is the end.
EDIDH[x]B[y].
Copy the EDID from output port [x] to input port [y]. If the EDID data is effective and the
audio part supports not only PCM mode, then force-set it to PCM mode. If the EDID data
is not effective, then set it as initialized EDID data.
EDIDPCM[x].
Set the audio part of input port [x] to PCM format in EDID database.
EDIDG[x].
Get EDID data from the output and display the output port number of X.
EDIDMInit.
Recover the factory default EDID data.
EDIDM[X]B[Y].
Manually EDID switching. Copy the EDID data of output[X] to the input[Y].
EDIDUpgrade[x].
Upgrade EDID data via the RS-232 port
[X] is for input port, when the value of X is (5), it means to upgrade to all input ports.
When the switcher gets the command, it will show a message to send EDID file (.bin file).
Operations will be canceled after 10 seconds. (Note 1) Please cut off all connections
of HDBaseT™ ports.
UpgradeIntEDID[x].
Select one type of EDID data and upgrade built-in EDID data. Supports (4) types of EDID
data:
1. 1080p, 2D, PCM2.0
2. 1080p, 2D, 5.1 (audio)
3. 1080p, 3D, PCM2.0
4. 1080p, 3D, 5.1 (audio)
[x] = 1, 2, 3 or 4
When the switcher gets the command, it will show a message to send EDID file (.bin file).
Operations will be canceled after 10 seconds.
EDID/[x]/[y].
Set the built-in EDID data of input port [x] to type [y].
%0801.
Automatically HDCP management. Input is with HDCP, so is output.
%0900.
Set as infrared carrier following mode.
13
A NEUVIDEO
Command
Types
Command
Codes
RS-232 Control
Functions
Operation Command
%0900.
Set as infrared carrier following mode.
%0901.
Set as infrared carrier enforcing mode.
%0911.
Reset to factory default.
%9951.
Check the command sent by port 1 when PWON.
%9952.
Check the command sent by port 2 when PWON.
%9953.
Check the command sent by port 3 when PWON.
%9954.
Check the command sent by port 4 when PWON.
%9955.
Check the command sent by port 1 when PWOFF.
%9956.
Check the command sent by port 2 when PWOFF.
%9957.
Check the command sent by port 3 when PWOFF.
%9958.
Check the command sent by port 4 when PWOFF.
%9961.
Check the system locking status.
%9962.
Check the status while in standby mode.
%9963.
Check the working mode of infrared carrier.
%9964.
Check the IP address (only for the PCB with GUI).
%9971.
Check the connection status of the inputs.
%9972.
Check the connection status of the outputs.
%9973.
Check the HDCP status of the inputs.
%9974.
Check the HDCP status of the outputs.
%9975.
Check the switching status.
%9976.
Check the output resolution.
%9977.
Check the status of digital audio of output channels.
Note:
1. Please disconnect all the twisted pairs before sending command EDIDUpgrade[X].
2. In above commands, “[”and “]” are symbols for easy reading and do not need to be typed in actual operation.
3. Please remember to end the commands with the ending symbols “.” and “;”.
4. Type the command carefully, it is case-sensitive.
14
A NEUVIDEO
RS-232 Control
Control the HDBaseT™ 4x4 Matrix Switcher
To control the HDBaseT™ 4x4 matrix switcher, you need to connect its 9 pin female RS-232 port to PC’s RS-232 port, or you can just
connect any one of the HDBaseT™ receiver’s RS-232 port with PC (RS-232 command transmits to the HDBaseT™ 4x4 matrix switcher
via the twisted pair). By using RS-232 control software and setting right specifications, you are able to control the HDBaseT™ 4x4 matrix
switcher.
Control the HDBaseT™ 4x4 Matrix Switcher from local
Control the HDBaseT™ 4x4 Matrix Switcher from local
Control the HDBaseT™ 4x4 Matrix Switcher from remote
Control the HDBaseT™ 4x4 Matrix Switcher from remote
Control 3rd-Party Device from Local
Connect the 9 pin female RS-232 port of the HDBaseT™ 4x4 matrix switcher with PC, by using the RS-232 command “/+[Y]/[X]:******.”,
you are able to control the 3rd-party device connected with the HDBaseT™ receiver.
Please reference to the detailed command description in RS-232 Commands.
Control 3rd-party Device through 9 pin female RS-232 port
15
A NEUVIDEO
RS-232 Control
Bi-directional RS-232 Control
By connecting one 3p captive screw RS-232 port with PC (or controlled device), and connecting the RS-232 port of corresponding
HDBaseT™ receiver with controlled device (or PC), the RS-232 signal is able to be transmitted bi-directionally.
Control far-end device from local
Connect the RS-232 (3P captive screw) port in one zone to PC, and connect the controlled RS-232 device (3rd party device) to the
corresponding (same zone as PC) receiver, see below:
Control far-end device from local
Control the HDBaseT™ 4x4 matrix switcher from remote
Connect the RS-232 (3p captive screw) port in one zone to controlled device (3rd party device), and connect PC to the corresponding
(same zone as controlled device) receiver, see below:
Control the HDBaseT™ 4x4 matrix switcher from remote
16
A NEUVIDEO
TCP/IP Control
OPTIONAL MODULE (not field installed)
Control Modes
TCP/IP default settings: IP is 192.168.0.178, Gateway is 192.168.0.1, and Serial Port is 4001. IP & Gateway can be changed as you
need, Serial Port cannot be changed.
Controlled by Single PC
Connect a computer to the TP port of the HDBaseT™ 4x4 matrix switcher, and set its IP address and gateway to the same IP section as
the default IP of the HDBaseT™ 4x4 matrix switcher (192.168.0.178).
Controlled by PC(s) in LAN
The HDBaseT™ 4x4 matrix switcher can be connected with a router to make up a LAN with the PC(s), this make it able to be controlled
in a LAN. When control, just make sure the HDBaseT™ 4x4 matrix switcher’s IP section is the same with the router. Please connect as
the following figure for LAN control.
Step1. Connect the TCP/IP port of the HDBaseT™ 4x4 matrix switcher to Ethernet port of PC with twisted pair.
Step2. Set the PC’s IP address and gateway to the same IP section as the HDBaseT™ 4x4 matrix switcher. Do please remember the
PC’s original IP address and gateway.
Step3. Set the HDBaseT™ 4x4 matrix switcher’s IP address and gateway to the same IP section as the router.
Step4. Set the PC’s IP address and gateway as the original one.
Step5. Connect the HDBaseT™ 4x4 matrix switcher and PC(s) to the router. In the same LAN, each PC is able to control the HDBaseT™4x4
matrix switcher asynchronously.
17
A NEUVIDEO
TCP/IP Settings
Step1. Connect the TCP/IP port of the HDBaseT™ 4x4 matrix switcher to Ethernet port of PC with twisted pair.
Step2. Set the PC’s IP and gateway to the same IP section as the default IP of the HDBaseT™ 4x4 matrix switcher (192.168.0.178).
Step3. Enter the 192.168.0.178 to the Internet Explore, you will see the LOGIN page as below:
Step4. Enter the password “88888”, and you can only press the Login button, not the Enter key on your keyboard. Then you can enter
the configuration page to configure the IP port, including the IP reset, Serial reset and password reset etc. As pictured below:
18
A NEUVIDEO
TCP/IP Settings
Step5. Change IP/Serial Port
Change IP
a. Select the tab “system info”, and then you are able to change the IP
b. Press the button Apply to save your settings. Then the PC(s) in this LAN (connected with this router) will be able to control the matrix
switcher.
Change Serial Port
a. Select the tab “serial info”, and then you are able to change the serial port.
19
A NEUVIDEO
TCP/IP Settings
b. Set the port number to 4001 (unique, other number are unavailable), as pictured below:
c. Press the button Apply on present page to save your settings, as below:
Step6. Select the tab “reset device”, then your settings will be loaded to the HDBaseT™ 4x4 matrix switcher.
20
A NEUVIDEO
USB Firmware Updating
When required and supplied by the manufacture, you can update the firmware using the devices USB port.
When the update program is running normally, it will show the interface as shown in next figure. Click
upgrade file. Followed by clicking
and select the
. The upgrade process will begin. When the upgrade is completed a display window
will show “Update success.”
Note: The COM number connected with a PC only ports 1 thru 9 are selectable.
21
A NEUVIDEO
TERMS AND CONDITIONS OF USE
PLEASE READ THE FOLLOWING TERMS AND CONDITIONS CAREFULLY BEFORE USING THIS HARDWARE, COMPONENTS AND SOFTWARE PROVIDED
BY, THROUGH OR UNDER A-NeuVideo, INC (COLLECTIVELY, THE “PRODUCT”). By using installing or using the Product, you unconditionally signify your
agreement to these Terms and Conditions. If you do not agree to these Terms and Conditions, do not use the Product and return the Product to A-NeuVideo, Inc. at
the return address set forth on the Product’s packing label at your expense. A-NeuVideo, Inc. may modify these Terms and Conditions at anytime, without notice
to you.
Restrictions On Use of the Product
It is your responsibility to read and understand the installation and operation instructions, both verbal and in writing, provided to you with respect to the Product.
You are authorized to use the Product solely in connection with such instructions. Any use of the Product not in accordance with such instructions shall void any
warranty pertaining to the Product. Any and all damages that may occur in the use of the Product that is not strictly in accordance with such instructions shall be
borne by you and you agree to indemnify and hold harmless A-NeuVideo, Inc. from and against any such damage.
The Product is protected by certain intellectual property rights owned by or licensed to A-NeuVideo. Any intellectual property rights pertaining to the Product are
licensed to you by A-NeuVideo, Inc. and/or its affiliates, including any manufacturers or distributors of the Product (collectively, “A-NeuVideo”) for your personal use
only, provided that you do not change or delete any proprietary notices that may be provided with respect to the Product.
The Product is sold to you and any use of any associated intellectual property is deemed to be licensed to you by A-NeuVideo for your personal use only.
A-NeuVideo does not transfer either the title or the intellectual property rights to the Product and A-NeuVideo retains full and complete title to the intellectual
property rights therein. All trademarks and logos are owned by A-NeuVideo or its licensors and providers of the Product, and you may not copy or use them in any
manner without the prior written consent of A-NeuVideo, which consent may be withheld at the sole discretion of A-NeuVideo.
The functionality and usability of the Product is controlled by A-NeuVideo, Inc. from its offices within the State of Texas, United States of America. A-NeuVideo
makes no representation that materials pertaining to the Product are appropriate or available for use in other locations other than the shipping address you provided
with respect thereto. You are advised that the Product may be subject to U.S. export controls.
Disclaimers and Limitation of Liability
A-NeuVideo may change or modify the Product at any time, from time to time.
THE PRODUCT IS PROVIDED “AS IS” AND WITHOUT WARRANTIES OF ANY KIND EITHER EXPRESS OR IMPLIED. A-NeuVideo DOES NOT WARRANT OR
MAKE ANY REPRESENTATIONS REGARDING THE USE OR THE RESULTS OF THE USE OF THE PRODUCT’S CORRECTNESS, ACCURACY, RELIABILITY,
OR OTHERWISE.
A-NeuVideo has no duty or policy to update any information or statements pertaining to the Product and, therefore, such information or statements should not be
relied upon as being current as of the date you use the Product. Moreover, any portion of the materials pertaining to the Product may include technical inaccuracies
or typographical errors. Changes may be made from time to time without notice with respect to the Product.
TO THE FULLEST EXTENT PERMISSIBLE PURSUANT TO APPLICABLE LAW, A-NeuVideo DISCLAIMS ALL WARRANTIES, EXPRESS OR IMPLIED,
INCLUDING, BUT NOT LIMITED TO IMPLIED WARRANTIES OF MERCHANTABILITY, FITNESS FOR A PARTICULAR PURPOSE AND NON-INFRINGEMENT.
A-NeuVideo DOES NOT WARRANT THE ACCURACY, COMPLETENESS OR USEFULNESS OF ANY INFORMATION WITH RESPECT TO THE PRODUCT.
A-NeuVideo DOES NOT WARRANT THAT THE FUNCTIONS PERTAINING TO THE PRODUCT WILL BE ERROR-FREE, THAT DEFECTS WITH RESPECT TO
THE PRODUCT WILL BE CORRECTED, OR THAT THE MATERIALS PERTAINING THERETO ARE FREE OF DEFECTS OR OTHER HARMFUL COMPONENTS.
A-NeuVideo WILL USE ITS REASONABLE EFFORTS TO CORRECT ANY DEFECTS IN THE PRODUCT UPON TIMELY WRITTEN NOTICE FROM YOU NOT
TO EXCEED 10 BUSINESS DAYS AFTER RECEIPT BY YOU OF THE PRODUCT, BUT YOU (AND NOT A-NeuVideo) ASSUME THE ENTIRE COST OF ALL
NECESSARY SERVICING, REPAIR AND CORRECTION THAT WAS CAUSED BY YOU UNLESS OTHERWISE AGREED TO IN A SEPARATE WRITING BY
A-NeuVideo.
UNDER NO CIRCUMSTANCES, INCLUDING, BUT NOT LIMITED TO, NEGLIGENCE, SHALL A-NeuVideo BE LIABLE FOR ANY SPECIAL OR CONSEQUENTIAL
DAMAGES THAT RESULT FROM THE USE OF, OR THE INABILITY TO USE THE PRODUCT IN ACCORDANCE WITH ITS SPECIFICATIONS, EVEN IF
A-NeuVideo OR ITS REPRESENTATIVES HAVE BEEN ADVISED OF THE POSSIBILITY OF SUCH DAMAGES. IN NO EVENT SHALL A-Neuvideo’s TOTAL
LIABILITY TO YOU FROM ALL DAMAGES, LOSSES, AND CAUSES OF ACTION (WHETHER IN CONTRACT, OR OTHERWISE) EXCEED THE AMOUNT YOU
PAID TO A-NeuVideo, IF ANY, FOR THE PRODUCT.
END OF DOCUMENT
22