1
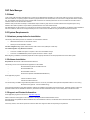
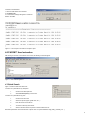
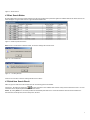
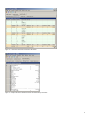
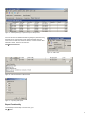
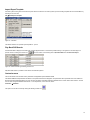
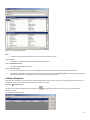
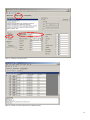
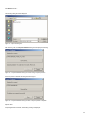
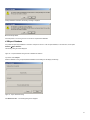
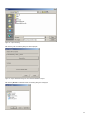
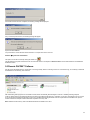
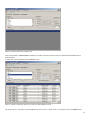
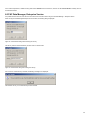
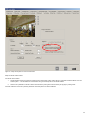
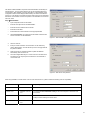
1 SMALL COFF....0.99
2 LG POP........1.99
1 EGG SAND......2.50
SUB-TOTAL.....5.48
TAX....0.82
TOTAL.....6.30
VOID
TOTAL.....0.00
CASHR...........TH6
TR..001-01-22-05 11:39
PACDM
TM
How to use:
PAC Data Manager v 3.04 - POS
©2006 i³DVR International Inc.
The contents of this user manual are protected under copyrights and
computer program laws.
INNOVATIONS AT THE SPEED OF THOUGHT
®
PAC DATA MANAGER ............................................................ 2
1.0 ABOUT ............................................................................... 2
2.0 SYSTEM REQUIREMENTS ............................................... 2
2.1 Hardware prerequisites for installation....................... 2
2.2 Software Installation ..................................................... 2
2.3 Support and Contact Information: ............................... 2
3.0 SYSTEM SETUP FOR INTEGRATION.............................. 3
Figure 1 – System Setup Menu ................................................ 3
Figure 2 – User login dialog ...................................................... 3
3.1 Serial communication protocol.................................... 3
Figure 3 – System Setup dialog – serial communication .......... 4
Figure 4 – List of the 51 different templates.............................. 4
3.2 TCP/IP communication protocol .................................. 5
Figure 5 – System Setup dialog – TCP/IP communication ....... 5
3.3 Email setup .................................................................... 5
Figure 6 – is an example of an email from exception report. .... 6
4.0 PACDM™ USER INSTRUCTION....................................... 6
Figure 7 – PAC Data Management........................................... 6
4.1 Quick Search.................................................................. 6
Figure 8 – Search Interval......................................................... 7
4.2 Start Search Button....................................................... 7
Figure 8 – Results of quick items search .................................. 7
Figure 10 – No available data ................................................... 7
Figure 11 – Too Many Records ................................................ 7
4.3 Quick Item Search Result ............................................. 7
Figure 12 – Structured View shows transactions with details ... 8
Figure 13 - Simple View shows Items/transactions with limited
history information..................................................................... 8
Figure 14 - Details pertaining to a specific receipt on Receipt View
.................................................................................................. 9
Figure 15 - Menu View .............................................................. 9
Figure 16 - Search Parameters in Quick Search ...................... 9
Figure 17 – Exporting data options ........................................... 9
Export Functionality .................................................................. 9
Figure 18 – Saving the data search ........................................ 10
Figure 19 - Format Text report ................................................ 10
Figure 20 - Format XLS report ................................................ 11
4.4 Custom Search ............................................................ 11
Figure 21 - Custom Reports tab.............................................. 11
4.5 Create new Report Template...................................... 12
Search Interval ........................................................................ 12
Select Detail level ................................................................... 12
Select Report Type ................................................................. 12
Select Extended Criteria ......................................................... 13
Figure 22 - Sample Transaction Report.................................. 13
Figure 23- Sample Transaction Report Summarized by Method of
Payment (Graph view). ........................................................... 13
Search Parameters: ................................................................ 14
Save Report Template ............................................................ 14
Figure 24 - Report Name Dialog ............................................. 14
Figure 25 - Confirmation about saving report ......................... 14
Figure 26 - New Report Template Added ............................... 14
Delete Report Template .......................................................... 14
Export Report Template .......................................................... 14
Import Report Template .......................................................... 15
Figure 27 - File Menu .............................................................. 15
Play Back DVR Search: .......................................................... 15
Figure 28 - Detail of Results grid showing Camera icon......... 15
Customize menu ..................................................................... 15
Figure 29 - Customize Database Fields ..................................16
4.6 Define Exceptions........................................................16
Figure 30 - Exceptions dialog ..................................................17
Figure 31 - Add/Edit exception definition.................................17
Searching on Exceptions Report .............................................17
Figure 32 - Selection for Exception search..............................18
Figure 33 - Results of a custom report search of a defined
exception .................................................................................18
Edit Exception..........................................................................19
Figure 34 - Selected row on Exceptions definition ..................19
Deleting one of the Exception Definitions:...............................19
4.7 Database menu ............................................................19
Figure 35 - Database menu.....................................................19
Figure 36 - Compact Databases dialog box ............................19
Figure 37 - Open File dialog box .............................................20
Figure 39 - Compact Databases dialog box shown during
Compact operation ..................................................................20
Figure 40 - Compact Databases dialog box after Compact
operation completed ................................................................20
4.8 Export Database...........................................................21
Figure 38 - Compact Database dialog box with a database file
selected ...................................................................................21
Figure 41 - Export Databases dialog .......................................21
Figure 42 - Open File dialog ....................................................22
Figure 43 - Export Databases dialog box with a selected database
to export...................................................................................22
Figure 44 - Browse for Folder dialog .......................................23
Figure 45 - Export Databases dialog box with selected database
and selected destination..........................................................23
4.9 Synchronize database .................................................23
5.0 REMOTE PACDM™ SOFTWARE....................................24
Figure 46 - Quick Item Search tab in Remote mode ...............25
Figure 47 - Results of a Quick Item Search on a remote server
with PAN5500 as PAC ID ........................................................25
6.0 PAC DATA MANAGER, ENTERPRISE VERSION ..........26
Figure 48 - Serial Number dialog before entering the CD key 26
Figure 49- Serial Number dialog after entering the CD key ....26
Figure 50 - Sample Quick Item Search with data received from 2
remote servers.........................................................................27
Figure 51 - Sample Custom Transaction Report with data
received from 2 remote servers (Simple View)........................27
APPENDIX I – PASSWORD SETUP ......................................28
Figure 52 - Setup i³DVR system for text overlay setup ...........28
Figure 53 - Setup i³DVR system for serial communication......29
APPENDIX II: PACDM 4.01 CHANGES.................................30
Figure 54 – Web PACDM™ Setup interface ...........................31
Figure 55 – Web Server Setup interface .................................31
APPENDIX III: INSTALLATION OF PACDM™ APPLICATION
PROGRAM..............................................................................32
Installation of the i³Server Remote and PACDM™ Remote ....33
Installing the Regular Remote PACDM™ application program33
Installing the PACDM™ Enterprise Remote application program
.................................................................................................34
Microsoft software packages upgrade requirement for PACDM™
.................................................................................................34
APPENDIX IV: FREQUENTLY ASKED QUESTIONS ...........35
1
PAC Data Manager
1.0 About
Point of sale, ATM (Automated Teller Machine), and Card Access Data Manager (PACDM™) is a search tool written to be used in conjunction with
i³Server and SRX Pro. Its primary purpose is to allow any peripheral device such as POS, ATM, and Card access to integrate with i³Server and SRX
Pro. The integration with a third party product will allow data received from an external system which can then be overlaid onto the video. Data is
collected, stored, and can be searched in real time.
PACDM™ tools provide users the ability to create different reports in table or graph view from the data collected in the integrated system. Using
PACDM™ also makes it possible to export data to a printable file format or to other data file formats.
PAC Data Manager can be accessed on a local machine or remotely via remote mode. In order to run the PACDM™, the software must be installed on
i³Server and SRX Pro. Data can be managed remotely from one or more i³Server and SRX Pro using the i³Remote and SRX Pro software.
2.0 System Requirements
2.1 Hardware prerequisites for installation
The following i³DVR Series products are certified for use with PACDM™ software:
•
SRX Series with 6 lanes and 120-Lite with 4 lanes
•
SPK key to activate PACDM™ software
For Serial integration only: Specific cables for POS, ATM or Card Access (COM port or SIIG card)
For TCP/IP integration only: Ethernet connection
•
A minimum of 20GB of free space is required on the D drive for database storage
•
A minimum of 512MB RAM and processor speed of Pentium 4 1.8GHz or higher
Before beginning installation, all hardware peripherals should be properly attached from the POS peripheral device to the i³DVR system.
2.2 Software Installation
Requirements: Windows XP or Microsoft Windows 2000 SP II
The following is a list of the required software applications to be installed:
o
Microsoft Windows patches and data base tools:
o
Microsoft DotNetfx.exe
o
Microsoft MDAC-TYPE.exe
o
Window Patch (Window 2000-KB829558-86-ENU.exe)
i³DVR application programs:
o
i³Server and SRX Pro Server
o
i³Remote and SRX Pro Remote
For remote viewing: PACDM™ Regular Remote (Relation based on one to one) or PACDM™ Enterprise Remote (Relation based on one to many)
o
Microsoft Access (Optional - used for troubleshooting)
All required Microsoft patches and i³DVR application software are available for download from the i³DVR FTP site. (Microsoft operating system and
application software are not available for download.) All software should be downloaded directly on to the DVR system or transferred to a CD.
2.3 Support and Contact Information:
i³DVR application programs can be found on: http://files.123ip.com/
Please contact technical support for more information on locating the desired PACDM software version.
Microsoft patches and updates files Microsoft DotNetfx.exe, Microsoft MDAC-TYPE.exe, and Windows Service Packs should be downloaded from
Microsoft website.
For security reasons, users will be required to contact the i³DVR Tech Support to obtain the required login and password.
2
Contact Information:
i³DVR International Inc.
780 Birchmount Road, Unit 16
Scarborough, Ontario
Canada M1K 5H4
416.261.2266 (Tel)
1.877.877.7241 (Toll Free Tech Line)
416.759.7776 (Fax)
Email: [email protected]
Requirements to launch PACDM™:
3
Install PACDM™ software
3
Connect necessary cables for the peripheral device
3
Configure System Setup Integration
3
Install SPK (software protection key)
3
Correctly select the right template for the peripheral device
I³DVR has no control over the type of data available from the POS interface products provided by others. The i³DVR components identified within this
document provide means of capturing transaction data for use by the SRX family of digital video recording / transmission products. The PACDM™
components translate the data into a useable format by the i³Server and permits associating transaction data with specific cameras. i³DVR assumes no
responsibility for the amount and type of information available, the operation, non-operation, or erroneous operation of these third party products. The
actual configuration and equipment required may vary based upon the specific POS.
3.0 System Setup for Integration
This function allows integration between PAC Data Manager and other peripheral
devices. Setup for external data (POS and CA) can be done on the PACDM™ Setup
page.
To set up communication, on the menu bar, go to:
SetupÆSystem Setup
Figure 1 – System Setup Menu
Step 1 –Automatic Login
A Login dialog will appear. For security purposes, users have to confirm access rights to
the PAC communication setup page. A login is required using the correct user name and
password. If the user cannot recall the password, open D://PAC/Data/user.pwd and delete
the file.
Figure 2 – User login dialog
3.1 Serial communication protocol
I³DVR utilizes two types of serial connection.
1.
Through an SIIG card with 2, 4, or 8 serial inputs.
2.
USB to serial converter with 2, 4, or 8 serial outputs
3
Note: A working COM port is required in order for the software to use an external device.
Figure 3 – System Setup dialog – serial communication
1.
Select the camera that is to be used for text overlay display by clicking the checkbox corresponding to the appropriate camera.
2.
Select proper text overlay area. A single camera can have up to 2 boxes of text overlay.
3.
Select the Baud rate that the outside device will use for data transfer to the i³DVR system. 9600 is usually, but not always correct.
4.
Specify the COM port number in the Port Number dropdown box. This is the port to be used to communicate from the POS to our
DVR.
5.
Specify the template file used to modify the transaction data by clicking the … button. This is the template to be used for both text
overlay and search functionality. Click Save to save the configuration.
Figure 4 – List of the 51 different templates
Note: Cancel is available for exiting the PAC System Setup window without saving any if Save has not been selected.
4
3.2 TCP/IP communication protocol
If the DVR system is using the TCP/IP communication protocol, perform the following steps for the PAC
Parser configuration.
Select TCP/IP under the Communication Type drop down menu.
Select the appropriate port number in the Port Number drop down menu. The default port number is 5111.
To use two text overlays select Support two Text overlay box per camera.
Figure 5 – System Setup dialog – TCP/IP communication
3.3 Email setup
Basic SMTP information must be set up before user can add/delete new user. In setting up the basic SMTP information the user is allowed to change
this information at any time. On the menu bar, go to
Settings Æ Email Setup
To change the basic SMTP information:
1. Click Change Settings
2. The user will be prompted to input or change the
email name, email address, IP address, port, login
method, user name and password
3. When the required information has been input,
Change Settings will have turned into Save
Settings. Click Save Settings, to save all changes
The user is allowed to add new addresses to which
emails will be sent when an exception is triggered.
The user first needs to add one or multiple emails.
Once this has been done, the user can choose a
specific address for specific exceptions.
To add a new email address:
1. Click Add User
2. Enter the user login and email address in the
appropriate fields
3. Click Save Settings to implement the changes
5
To delete an email address:
1. Click the email address to be removed
2. Click Delete user
3. A confirmation message will appear to confirm the
deletion. Click Yes.
Figure 6 – is an example of an email from exception report.
4.0 PACDM™ User Instruction
After clicking on the PAC on the i³Server main screen, the following screen will appear:
Figure 7 – PAC Data Management
4.1 Quick Search
Figure 1 shows the Quick Item Search tab.
To search for a particular item by description:
1.
Check the Item Description box
2.
Select Item description(s) in the list box
To search for a particular item by price:
1.
Check the Item Price box
2.
Select the operator (equal, greater than, etc…)
3.
Enter the amount in the text box
4.
To search for items by time interval:
5.
Select a start and end time to perform a search between the two
Note: Date parameters can be selected from a specific hour to a specific date/time range (today, yesterday, etc…).
6
Figure 8 – Search Interval
4.2 Start Search Button
By clicking Start Search, the search will be executed using the user-specified search parameters against the available data and the results returned. The
results will appear in a grid located under the original window illustrated below:
Figure 8 – Results of quick items search
Note: If there is no data return for selected criteria, an alert box message will be shown below.
Figure 10 – No available data
Figure 11 – Too Many Records
If there is too much data, an alert box message will be shown as above.
4.3 Quick Item Search Result
Within the grid, the results of the search will be returned. The following options are available:
the user will be able to view available video with text overlay from the transactions chosen. For more
Camera icon - By clicking the camera icon,
information refer to chapter Play Back DVR Search in this manual.
Details - By clicking Details, the user will be provided with the detailed presentation of the current item/transaction with tabs to select between the
Structured View, the Simple View, and the Receipt View, as below.
7
Figure 12 – Structured View shows transactions with details
Figure 13 - Simple View shows Items/transactions with limited history information
8
Figure 14 - Details pertaining to a specific receipt on Receipt View
If the user wants to see detailed information regarding the parameters being
searched such as: Total number of rows, related information about the
current search in Table view, Number of cameras, Previous /Current / Next
transaction number, select from the menu bar:
ViewÆSearch Parameters
Figure 15 - Menu View
Figure 16 - Search Parameters in Quick Search
Figure 17 – Exporting data options
Export Functionality
To activate Export functionality on the menu bar, go to:
FileÆExport…
9
This option provides the user with the option to transfer
the results of a data search or a search report in text,
XML, Excel, and Word format. The ability to export to
different formats exists in both Quick Search mode and
Custom Report mode for all data searches including
reported results.
Formats that may be chosen are:
•
XML
•
Microsoft Word 9.0 (or higher)
•
Microsoft Excel 9.0 (or higher)
•
Text
The Exporting data will automatically save in drive D,
sub-folder PAC, or D:\PAC. Users can choose different
location in the hard drive and file name.
Figure 18 – Saving the data search
The following example shows reports in text format and MS Excel.
Figure 19 - Format Text report
Saving the document in one of the aforementioned formats will facilitate presentation of the data in a more readily understood report format.
10
Figure 20 - Format XLS report
A file exported as an XML file can be imported into another program that can load XML files e.g. Microsoft Access.
Note: If Microsoft Office is not available, options for exporting in Excel and Word will be disabled.
4.4 Custom Search
Custom search provides the ability to develop more detailed reports using a Report Template. Report templates can be provided at different levels of
detail such as item level, transaction level, or sub item level. Custom reports also allow a user to see all details pertaining to a transaction in Table or
Graphic view.
Figure 21 - Custom Reports tab
11
After installation – the user will be able to see a list of default report templates. The following are the available Freeport templates:
•
List Report (Transaction level)
•
List Report (Item Level)
•
Summary Report (Transaction level): summarized by Camera No
•
Summary Report (Item level): summarized by Camera No
•
Summary Report (Transaction level): summarized by Method of Payment
•
Summary Report (Item level): summarized by Method of Payment
Default Report Templates use pre-selected parameters to create an automatic report for viewing. These reports can not be deleted, imported, or
exported (features such as delete, import and export can be referenced in this manual).
4.5 Create new Report Template
At the very top of the list of templates, exists an entry named “$$$ New Report $$$”. This feature allows users to create new report templates.
Otherwise use the PACDM™ report template. To create a new template, on the menu bar, click
FileÆNew Report Template.
Search Interval
Select the time interval in which to conduct the search. The choices are Today, Last Number of hours, Last Number of Days, or a Custom Interval where
the user can specify the starting day/time and the ending day/time. (See chapter Searching items by time Interval in the manual for more information)
Select Detail level
Choose between Transaction, Item, and Sub Item.
If Transaction is selected, the report will contain transaction information such as transaction number, transaction date/time, information about payment,
etc...
If Item is selected, the report will contain both Transaction and Item information. I.e. all available data about an item description as well as the
transactions for the item will be displayed.
If Sub Item is selected, the report will contain Transaction, Item, and Sub Item information. I.e. all information regarding sub items but also information
about the item and transactions.
Note: If no sub item information is available, this option will not be available.
Select Report Type
If List is selected, the report will provide a list of transactions, items or sub items in datasheet view. The report will consist of a Simple View and an
Extended View.
If Summary by is selected, the report will be a summary of transactions, items, or sub items based. The field by which to summarize can be selected in
the Summary by drop down box. The report will consist of a Grid View and a Graph View.
12
Select Extended Criteria
To narrow down the search and produce a more accurate report, using different queries can be helpful.
Figure 22 - Sample Transaction Report
Sample Transaction Report Summarized by Method of Payment (Grid view) summary. To obtain this, do the following:
1.
Select the Custom Search tab
2.
Under Search Interval, choose Today
3.
Under Report Type select Summary By
4.
For the fields under Extended Criteria, in the dropdown menu, Method of Payment, select All
5.
Click Start Search
Figure 23- Sample Transaction Report Summarized by Method of Payment (Graph view).
13
Click the tab Graph View to get the above result.
Search Parameters:
If the user wishes to see more detailed information regarding the results shown, select: from the menu bar:
ViewÆSearch Parameters
Save Report Template
If the user wishes to save the report results using the selected
criteria, select from the menu bar:
FileÆSave Report Template
A dialog box, shown in Figure 19, is then displayed prompting the
user to name the report using the text box.
Figure 24 - Report Name Dialog
When OK is clicked, a report will be generated containing the query
results at the requested date and time.
After saving the report, the message on the right will appear.
Figure 25 - Confirmation about saving report
If the viewed report was saved, it will be listed in the Report Template list as shown in Figure 26 in the Custom Search tab.
Figure 26 - New Report Template Added
Delete Report Template
To delete a Report Template, the user needs to select Template from Report Template List and in the menu bar, choose:
File Æ Delete Report Template
Note: Users cannot delete default Templates.
Export Report Template
Exporting Report Template will make it possible to use already defined templates on with other systems. To export a template select the report to export
and from the menu bar choose the following options:
FileÆExport Report Template
The exported report has an extension of .paccrit. This file can be copied to another machine and then imported to another PACDM™.
14
Import Report Template
If another system is being used and the same reports need to be viewed on the newer system, import the existing templates into the new PACDM™ by
selecting on the menu bar,
FileÆImport Report Template
Figure 27 - File Menu
The default extension for imported report templates is: .paccrit.
Play Back DVR Search:
All searchable data is displayed in the table view. A simple playback search is conducted by double-clicking on the grid line to see the image for a
specific camera or clicking the camera icon
in the first column of the results grid of a Quick Item Search or a Custom List Report.
Figure 28 - Detail of Results grid showing Camera icon
Play Back DVR Search is possible in both i³Server and i³Remote systems.
Customize menu
This function allows users to define search parameters in Single/Multi-system Database Fields
The default Database Field parameters are based on the specific POS machine integrated. The parameters will be presented to the user divided into
Numeric fields and Alphabetical fields. The user can select the search parameters that will be available on the Custom Search user interface. The end
user can also change the Database Field names. To accomplish this, on the menu bar, select:
Customize Æ File Name
This option can also be accessed by clicking the following toolbar icon.
15
Figure 29 - Customize Database Fields
Set Id
•
Presents a drop down menu that allows the user to select the POS machines to be used.
Column: Is Used
•
Allows the user to select the items to be presented in the Customer Report.
Column: Fixed Database Name
•
This field describes database field names.
Column: Customized Name
•
The user has the ability to change the name of the Database Field to make it more user-friendly when building a Custom Search.
•
The Database Field Names on the left are those selected for use by a specific POS. The Customized Name, on the right, is the name that will
appear on the main screen of the application and on the column headers of the report grids.
4.6 Define Exceptions
An exception is an event which occurs when certain conditions, determined by the user, are met. Exceptions can be used to trigger an alarm which can
subsequently notify a user of a suspicious anomaly by email. To define an exception:
Customize Æ Define Exceptions
This option can also be accessed by clicking on the toolbar icon.
exceptions occurred.
Defining exceptions allows the user to search for specific items for which
This will display the following dialog:
16
Figure 30 - Exceptions dialog
The first time the program is executed, the grid will be empty. To add new exceptions, click Add.
The screen illustrated in Figure 33 will be shown.
Figure 31 - Add/Edit exception definition
The following exception parameters are available:
•
The option Description is followed by a drop down menu, thereby allowing the user to select the exception item.
•
The drop-down menu, Related To allows the user to select Previous Item, Next Item, or Whole Transaction. This will allow the user to indicate
which item to display relative to the exception item selected. For example, selecting Previous Item with an Exception Item of Void will display
the item previous to a void transaction when a search is conducted.
•
Maximum Hits allows the user to specify the number of exception items to display. This option is also important for user notification as it
defines the number of occurrences before a user is notified about an exception (if defined).
•
The section Interval allows the user to define the valid search interval for the exception.
•
Camera gives the option to choose on which camera the user wants to follow the exceptions.
•
Email Setup allows the user to set up one or more emails for the server to send an email to when an exception has been triggered. The user
interface allows the user to add user, delete user, or change the previous email address/components. Information such as the SMTP server,
IP address, port number and user login/password (refer to the figure 27A for detail description) must be set up before a new user can be
added or deleted.
Searching on Exceptions Report
The user must click Synchronization to define the exception within the database. Users also have to select Item and Exception to get the result.
A search with exception criteria must begin with the selection of the Item level for searching.
17
Figure 32 - Selection for Exception search
Figure 33 - Results of a custom report search of a defined exception
18
Edit Exception
It is possible to change the parameters for an exception by selecting the row containing the exception to be modified and clicking Edit.
To select a row, click the furthest left cell in front of the exception to be changed. The line becomes blue when the row is selected.
Figure 34 - Selected row on Exceptions definition
Deleting one of the Exception Definitions:
Select the definition to be deleted. Click Delete.
The following message to the left will appear.
Answer Yes to save the changes.
To delete all exceptions:
Click Delete All.
4.7 Database menu
The Database menu provides the option to backup PACDM™ data to a remote location. The basic tools provided in this menu are Compact Database,
Export Database, Refresh Database and Synchronize Database.
Figure 35 - Database menu
Compact Database
It certain situations, such as the need to export the existing database to another device, it may prove useful to compact the database prior to exporting.
This can be accomplished by selecting on the menu bar:
Database ÆCompact Database
This will result in the display of the following dialog box.
Figure 36 - Compact Databases dialog box
19
Click Browse for files…
The following dialog box will be displayed:
Figure 37 - Open File dialog box
After selecting a file, the Compact Databases dialog box will display the following:
Figure 39 - Compact Databases dialog box shown during Compact operation
Once the process is finished, the dialog box will change to:
Figure 40 - Compact Databases dialog box after Compact operation completed
Special cases:
If ReportingDb.mdb is selected, the following message is displayed:
20
If today’s database is selected, the following message is displayed:
No is selected by default.
If the PAC parser is not running, the user can choose to compact these databases.
4.8 Export Database
It is possible to export daily databases to some other computer or device. In order to export database, on the menu bar, choose option:
Database ÆExport Database
The following dialog box will be displayed:
Figure 38 - Compact Database dialog box with a database file selected
To proceed, click Compact.
While the database is being compacted, Close is disabled and the dialog box will display the following:
Figure 41 - Export Databases dialog
Click Browse for files… The following dialog box is displayed:
21
Figure 42 - Open File dialog
After selecting a file, the following dialog box will be displayed:
Figure 43 - Export Databases dialog box with a selected database to export
After selecting Browse for destination folder, the following dialog box is displayed:
22
Figure 44 - Browse for Folder dialog
Select the folder where the database file is to be exported.
Figure 45 - Export Databases dialog box with selected database and selected destination
When the process is completed, the following message is displayed:
If there is a database file with the same name in the destination folder, the following message is displayed:
The user can choose to overwrite the file by selecting Yes or cancel the export of the file by selecting No.
4.9 Synchronize database
To refresh current values such as Item Description or Method of Payment and be able to see only those values that are currently used, select:
DatabaseÆSynchronize Database
The following message will appear:
To continue, click Yes. The progress bar will show how much time is left to finish this task
23
If the refresh function has been completed, the following message will be displayed.
If any unnecessary data is found, the following message will appear:
Synchronize with Database
To synchronize the current data and refresh information on a report select on the menu bar:
Database Æ Synchronize with Database
This option can also be accessed by clicking the toolbar icon.
This will reload the drop-down list where the user can select the criteria in the left panel of Search Criteria to ensure that all data from the database is
available for search.
5.0 Remote PACDM™ Software
PAC ID (server data identification) is needed when connecting remotely. Before conducting a search on a remote server(s), it is necessary to download
the database from the server(s) to be searched.
After downloading these programs from the i³DVR FTP site, double click PACDM_Remote-Regular V3.04.exe or PACDM_Remote_Enterprise
V3.04.exe. Both programs must download data from the i³Server and SRX Pro first before any comparison can be done. The software can only connect
to one site at a time and download daily data one at a time. PACDM™ Remote Regular allows users to compare data from PACDM™ from just one
location whereas the enterprise solution allows data comparison from many sites.
Note: PACDM™ remote will only works if the i3Remote software is installed on the client.
24
Figure 46 - Quick Item Search tab in Remote mode
When working remotely, the Remote PAC IDs checklist box is enabled, and shows the PAC IDs which have downloaded data available using the
i³Remote program.
In regular mode, it is only possible to select one PAC ID at a time.
Figure 47 - Results of a Quick Item Search on a remote server with PAN5500 as PAC ID
For remote searching, it is important to specify a PAC ID for the server to search. In regular mode, it is only possible to search one PACID at a time.
25
In the Custom Reports tab, in addition to being able to select PAC IDs in the check list box, the user can also select PAC ID as a field by which to
summarize the results.
6.0 PAC Data Manager, Enterprise Version
It is possible to search back on more than one server at the time in remote mode if using the PAC Data Manager – Enterprise version.
When running PAC Data Manager Enterprise for the first time, the following dialog is displayed:
Figure 48 - Serial Number dialog before entering the CD key
The CD Key must be entered followed by the word “PAC” as shown below.
Figure 49- Serial Number dialog after entering the CD key
If an incorrect or invalid CD key is entered, the following message box is displayed:
The software can only run if a valid CD key has been entered.
26
Data can be searched on multiple servers simultaneously.
Figure 50 - Sample Quick Item Search with data received from 2 remote servers
Figure 51 - Sample Custom Transaction Report with data received from 2 remote servers (Simple View)
27
Appendix I – Password Setup
Using PACDM™ software requires setup in the i³DVR system environment. This appendix describes the setup process on the i³Server to use the
PACDM™ software.
Setup for Text Overlay
In order to change the setup for text overlay, a user must be logged in with POS text overlay rights. To confirm that the user has the required access
rights for text overlay every login:
1.
Go to the Password Setup tab
2.
Under the heading Setup List, check Text Overlay Setup
In the Enable Camera section, it is also necessary to ensure the desired cameras have their check boxes selected.
Figure 52 - Setup i³DVR system for text overlay setup
Setup for Serial Communication
For serial communication, set the selected cameras to receive text overlay from the external PAC system. Check Show on Live Mode and Search
Mode under Text Overlay Function. This will enable serial protocol communication to the i³DVR system.
28
Figure 53 - Setup i³DVR system for serial communication
Setup for TCP/IP Communication
For TCP/IP communication:
1.
Set the selected cameras to receive text overlay from the external PAC system. Select “Show on Live Mode and Search Mode” and “Use
TCP/IP System…” This will enable the communication using the TCP/IP protocol to the i³DVR software.
2.
Save the set up features for TCP/IP or Serial communication by clicking Save. Exit text overlay set up page by clicking Close.
For further instruction how to set up this tab, please refer to the Help section on i³Server Software.
29
Appendix II: PACDM 4.01 Changes
As of February 28, 2006, PACDM™ 4.01 will be available to clients. Providing improved stability and user friendliness, PACDM™ 4.01 is a step forward
from the earlier versions, 3.03 and 3.04, released over the past few months. The following changes have bee made to the software.
1.
Email Set Up within PACDM™
The user is no longer required to go to the server setup to set up email functionality. This feature is now available in the drop down menu under the Email
Setup within the PACDM™ tool. This will allow multiple emails to be set up and enable the sending of red flagged item notifications.
2.
Card Access Demo
PACDM™ 4.01 will allow a user to mimic a Card Access system. With a simple click of the tool, the user will be able
the action of a card being swiped and delivering data such as employee number, enter time, and other criteria,
search back on the information within the Card Access database.
3.
to replicate
allowing
Export Features
The existing Export Features allow the user to take database information and store it in certain formats. In PACDM™ 4.01, the improved features will
allow the user to store the information in CD format as well.
4.
POS simulation Data Feeder:
The previous Data Feeder allowed only the same looped data to be fed into the database. However, this caused slow downs during a search due to
repetitive data being continually fed into the system. The POS simulation Data Feeder creates random, non-repetitive data. This eliminates the slow
downs previously seen during search backs of the PACDM™.
5.
Interface improvement in Customize Reports
Improvements have been made to allow the reports to be listed in alphabetical order. Buttons labeled ‘up’ and ‘down’ have been added to select reports
for viewing. Using the mouse scroll wheel is no longer the only option to see reports.
6.
Search Functionality Improvement PACDM™ 4.01
Search items can now be made available in either DVR or POS time. The user can select POS from the drop down menu under Search By with a
specified time to search for video corresponding to POS transaction time. The user can also select the DVR option with a specified time to search for text
overlay video associated with the DVR time.
7.
Web PACDM Setup in PACDM™ 4.01
30
The release of Web PACDM™ will provide users with PACDM™ functionality via
Internet Explorer. The user will be allowed to set up the associated Web server
communication. After validation of the login information, a Web PACDM™ Setup
configuration interface will be displayed automatically. This feature is available in
version 4.01. The following summarizes the steps required to set up the associated
Web server communication and other components in the PACDM™ tool. Under the
menu bar, select
Setup Æ Web PACDM™
1.
Input all required web server information.
o
Enter the URL http://216.254.142.66/PACDM™
o
Enter the Server IP address 216.254.142.66
o
Enter the Port No 5452
o
Enter desired User ID and Password in the appropriate fields
2.
Click Test Connection to confirm that the information entered is valid
and the connection can be established.
Figure 54 – Web PACDM™ Setup interface
3.
Click the Local tab.
4.
Enter your Public IP address. This information can be retrieved by
clicking "What is MyIP". The link will take you to the web page that has
the public IP address.
5.
Select the check box Automatic Update to update the database
automatically when the time is set.
6.
The button Register Manually is to connect user the to the web server
and allows the user to specify the local server the user would like to
communicate with.
Figure 55 – Web Server Setup interface
When using PACDM™ 3.03 with i³Server 2.47 and 3.04 with i³Server 4.01, please consider the following notes on compatibility:
Version of i³Server
Version of PACDM™ Compatibility issues
I³Server 2.47
PACDM™ 3.03
no issues observed
I³Server 2.47
PACDM™ 3.04 and
4.01
The check box Show TCP/IP text overlay on the Text overlay tab on the server must
be checked.
I³Server 4.01
PACDM™ 3.03
I³Server 4.01 with PACDM™ 3.03 = no issues observed for TCP/IP POS. However,
COM port conflict message for serial™ POS
I³Server 4.01
PACDM™ 3.04 and
4.01
no issues observed
31
Appendix III: Installation of PACDM™ application program
Installing PACDM™ application software will allow the data received from the PAC (POS, ATM and Card Access) system to be managed by the
PACDM™ software. Hence, the PACDM™ application was designed in conjunction with i³Server to provide search capabilities, discrepancy reporting,
and graphical reporting.
To install:
1.
Ensure that the server is not running. To exit from the
server use Ctrl+Alt+Shift+F4 (only if you are “master user”)
2.
Ensure that the SPK key is inserted into the USB port
located in the back or front of the DVR system.
3.
Choose the desired version of PACDM™ located on the
i³DVR ftp site. Download and run the executable file.
4.
When prompted, designate a folder in which to install the
program. Answer the installation messages with the
appropriate response to continue with the installation.
5.
The PACID is a seven-character name identifier for the
server. This name is used to identify the server when
using the remote capabilities of the PACDM™ software.
Enter a unique name for the server in the dialog box. It is
recommended that the serial number for the DVR be used.
A successful installation will result in a message indicating a
successful installation.
To validate the installation, go to Start Menu and click Control PanelÆAdd/Remove Programs. If the application was installed successfully there will
be an application program entry as shown below:
32
Installation of the i³Server Remote and PACDM™ Remote
Installation of PACDM™ software requires the installation of i³Remote software on a remote desktop computer.
Download i³Server Remote software available from the FTP site (http://files.123ip.com)
Run the executable program by double clicking on the setup file. The installation program is located in the directory: /i3DVR Remote/Data1
A series of installation messages will appear. Provide the required responses to complete the installation.
A completed installation will result in the message “Installation is completed successfully”.
Installing the Regular Remote PACDM™ application program
One server can be remotely searched after installing the Regular Remote PACDM™ in conjunction with installation of the i³Remote software. Viewing
one server database does not require the CD Key.
Download and run the PAC DM_Remote-Regular V3.04.exe from the FTP site. Please contact Technical Support for more information.
Accept the agreement and proceed with the installation. The program will be stored by default in the directory D:\RPAC. It is suggested that the
recommended default drive be used.
Note: If default drive is not available, Install will be disabled. Use Browse to select any available drive.
When the PACDM™ Remote software has completed installation, a message will be displayed indicating a successful installation.
33
Installing the PACDM™ Enterprise Remote application program
If remote viewing and search capabilities are required for more than one machine, download and install the PACDM™ Enterprise Remote. Please
uninstall any previous versions of PACDM™ Regular Remote on the system.
Download and run the PAC DM_Remote-Enterprise V3.04.exe file from the folder found in the FTP site. Contact Technical Support for more information.
Follow the steps in the installation Wizard setup to continue with the installation. Specify the desired installation folder.
When the PACDM™ Remote Regular software has completed installation, a message will be displayed indicating a successful installation.
For security reasons, users will be required to contact i³DVR to obtain a CD key in order to run the PAC Data Manager Enterprise for the initial
installation.
Microsoft software packages upgrade requirement for PACDM™
The Microsoft applications/patches necessary noted above need to be installed to ensure that the i³Server software will work correctly with the
PACDM™ application.
Download and run the Windows2000-KB829558-x86-ENU.exe file from the Microsoft site to upgrade your version of Windows 2000 to SP3/4, Jet4.0
to SP8, or Windows XP to SP2.
If required, download and execute the dotnetfx.exe from Microsoft.
Note: If the .NET Framework has not previously been installed on the system, an error message will appear when installing the PACDM™ software.
3. If required, download the MDAC_TYPE.exe file and run the executable from Microsoft. This file is required for i³DVR software to run properly
Note: If the Microsoft Data Access Component program has not previously been installed on the system, an error message will appear when using the
PACDM™ software.
34
Appendix IV: Frequently Asked Questions
Before calling our technical support line 1.877.877.7241, to troubleshoot PACDM™ the following steps should be considered to solve some of your
technical issues.
Which POS is integrated?
Answer: We are integrated with over 63 peripheral devices. Please see below:
1
ALOHA
21
Panasonic 7800
41
Wayne Nucleus
2
AutoZone
22
Panasonic 5500
42
BreakPoint Software (TEC)
3
Bulloch
23
Panasonic 7500
43
Retalix SurePOS 500
4
CNC POS
24
Panasonic 7750
44
CLR
5
DataSym
25
PennyLane
45
HDS
6
Electralogics
26
Radiant
46
POSitouch
7
Gasboy (NBS)
27
RapidFire
47
Maitre D
8
Printer)
Gilbarco Passport (Receipt
28
Restaurant Manager
48
DineAmix
29
Ruby Verifone
49
Logivision
9
Gilbarco Passport (Pole Display)
30
Sharp 700
50
Radiant
10
Gilbarco (G-Site)
31
Sharp 770
51
Panasonic 930 (System 3)
11
Logivision
32
Sharp 600
52
Micros 8700
12
Logivision French
33
Sharp UP 3000
53
Micros 9700
13
MICROS 3700
34
Samsung ER-650
54
Documentor
14
MSI
35
StoreNex
55
SMS
15
NCR 7453/7456/7458
36
SYNERCOM – POS
56
Retail Expert
16
NCR Scan Master
37
TVS-1066
57
XBR
17
NCR Documentor
38
TVS-2100
18
Pinnacle
39
Uniwell
19
Progressive Software (IBM)
40
Wayne Nucleus O/S 2
20
Panasonic 5000
What type of communications we use for text overlay?
Answer: Serial and network TCP/IP
What port number are we using in TCP/IP for socket connection?
Answer: The default is 5111; however, remember that i³Server setup needs to enable TCP/IP connection on Text Overlay and requires a
reboot of the server. The latest version, v4.01, is no longer required because it is always on.
I have done the setup, but I don't get text overlay. Why?
Answer: Usually this situation occurs with connection issues. Check for the following: is the unit physically disconnected? Are the wrong ports
being used? Have you checked the pins on your cable? Etc.
Answer the following questions:
Is my pin layout correct for this peripheral device?
1.
Did I install the PACDM™ software?
2.
Did I select the appropriate text overlay template?
3.
Did I select the correct COM Port or TCP/IP port?
4.
Did I restart my i³Server?
5.
Did I connect the SPK key (software protection key)?
6.
Did I enable Text Overlay on live mode and search mode under Text Overlay setup in i³Server?
I get text overlay, but I don't see data in PACDM™. Why?
35
Answer: Under i³Server password setup the user might not have the PACDM™ privilege.
How do I show text overlay on only part of the video?
Answer: Under setup -> Text Overlay, adjust the red box on video.
How long does the text overlay stay on screen?
Answer: The staying time of the text displayed can be adjusted in setup.
How do I setup my POS terminals to connect to your DVR?
Answer: It is always best to have the POS technicians setup the POS, as it is a liability issue if we have our technician do it, but generally the
information on how to setup is gathered in documents from dealers/company/manufacturers, and from request for integration phase.
What is needed to get my POS integrated?
Answer: There is a form from the PACDM™ department that needs to be filled out with information on communication type, contact person,
version of POS, etc. You can also email [email protected].
Does the POS software have additional cost to enable text insertion?
Answer: It depends on the maker of the POS hardware/software. Some do require fees to activate certain features and some are included in
the package. Cost varies between companies and dealers.
Why was everything working a week ago, and now it's not capturing any data?
Answer: If any updates have been done on the POS, a new data capture is required to see if data format has changed. The templates are
sensitive on how data is formatted.
How to I do data capturing?
Answer: In C:\i3dvr server folder, there is a file named "datac.exe" which captures data from serial ports and TCP/IP. Refer to the manual on
how to use this program.
Does the POS server/terminal require feedback to continue data feeding?
Answer: Unique to certain POS's, which have some sort of flow control on the data communication, we need to customize PACDM™ to send
feedback on all data sent to the DVR. For example Micro9700 and RDS/HDS. Other POS devices need a reply from the DVR, thus using I3P75 (Panasonic 7750) would help this situation.
Where can I get the updated/new version of PACDM™?
Answer: Tech Support can provide username and password to get the software from our FTP site. Please contact our technical support line
1.877.877.7241.
What is the maximum length of cable I can run from the POS to i³Server?
Answer: Since the voltage is low, i³DVR recommends the cable should be no longer than 75 feet.
What type of cable should I use to integrate with the POS and i³Server?
Answer: i³DVR recommends 18 AWG cable or Cat-5 UTP.
I have this cable and its only 3 ft long. The register is 40 ft away from the DVR, how do I extend it?
Answer: Splice the cable that is going to the DVR and extend it.
I installed PACDM™ and I’m getting an error "database not recognized, local mode not available", what do I do?
Answer: Make sure PACDM™ POS Server is installed. Make sure MDAC is installed.
I'm getting text overlay but I get nothing in the database.
Answer: Make sure that the correct template is being used. Otherwise the template needs to be worked on and data will need to be collected.
Which version of PACDM™ works with which version of i³Server?
•
PAC 3.01 works with i³Server Version 2.09 – 2.31
•
PAC 3.03 works with i³Server Version 2.47
PAC 3.04 works with i³Server Version 4.01
37