1
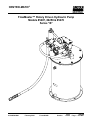
CENTRO-MATIC® PUMP, MODEL 85487 & 86258
INSTALLING THE PUMP
MAINTENANCE & REPAIR
Place the unit in the approximate location making sure that
electric and hydraulic power connections are accessible.
Mark center locations of the six holes at the bottom of the
reservoir. Then drill six 1/2” (13 mm) holes. The use of
7/16” (11 mm) bolts will offer some flexibility in securing the
reservoir to the equipment.
Lubricant outlet of pump should be connected to system with
suitable hose capable of 3,500 PSI (241 bar) working
pressure. Hydraulic inlet connection should be made with at
least 3/8” (9 mm) I. D. hose capable of at least 3,000 PSI (207
bar) operating pressure. Hydraulic return to tank connection
line should be 3/4” (19 mm) I. D. hose or pipe.
Please refer to the 85481 operation manual, section C8, page
269, series “B” for setting the pump pressure and flow
control.
Low Level Kit (Model 85490)
Low Level Kit is recommended whenever higher viscosity
greases or lower temperatures are encountered and when
an external indicator of lubricant level is desired. The kit is
composed of a follower with wiper and a level indicator gage
located on the cover of the reservoir.
PUTTING PUMP INTO OPERATION
Filling Reservoir
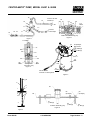
• To bulk fill the reservoir, remove the lower and upper pipe
plugs from the side of the reservoir (see Figure 4). Attach
the appropriatebulk-filling pump to the lower inlet (3/4
NPT). Fill reservoir until grease appears at the top 1/2
NPT vent high level port.Remove the bulk-filling pump.
Replace both pipe plugs.
• To use the reservoir with a five-gallon pail of lubricant
(Model 85487 only), first remove the six bolts that secure
the lid. Remove the entire assembly of lid, pump and vent
valve. Using pipe wrench or vice grips, remove the filler
nipple extension (35) (Figure 4) attached inside the
reservoir at the 3/4 NPT inlet nipple. Insert opened pail of
lubricant and reattach lid and pump assembly.
Note: If five gallon pail lubrication is to be used (for Model
85487 only), then the optional wing screws (38) should be
used in place of the hex bolt (39).
When filling the reservoir, caution should be used as extreme
pressure can cause damage to the reservoir or serious
personal injury.
Form 403048
General Maintenance
• Keep area around pump clean. Clean off filling port area
prior to filling reservoir. Clean area around filler after filling
as lubricants will attract dirt.
• Keep lubricants clean and free of dirt and debris.
• When replacing grease pails be especially careful to
prevent any foreign matter from entering the grease pail or
contaminating the grease, as it adheres to the pump.
In Case of System Malfunction
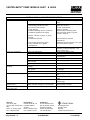
(See Trouble Shooting Chart Page 8)
• Use the Trouble Shooting Charts to determine where to
look if problems occur.
• See the sections below for replacement and repair of
specific areas of the check valve, vent valve or safety
unloader valve.
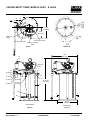
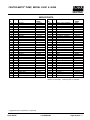
• Each part is identified with a number keyed to the
matching part on the illustrated views.
• General recommendations of tools required are also
specified in each step.
• Pay particular attention to the Warning statements to
prevent personal injury and possible damage to pump
components.
Outlet Check Service
(See Figures 1, 2, 7 & 8, Pages 5 & 6)
The pump will not build up sufficient lubricant pressure if the
outlet check (47) is fouled. Foreign material may lodge
beneath the Check Ball (25) or between check disc (21) and
the seat of bushing assembly (22). Sealing surfaces of the
seat must form a perfect seal. Clean parts or replace if
pitted, worn or scored.
1. Turn off and disconnect the hydraulic and electric power
supply to the pump assembly.
2. Standard tools required are a bench mounted vice, a set of
open end wrenches ranging from 7/16” to 1-1/2”, a large
24” (600 mm) adjustable wrench and a smaller 10”
(254 mm) adjustable wrench.
3. Remove bolts and lock washers (52 & 53).
4. Loosen adapter union (48). Set vent valve assembly to
the side.
5. Remove entire outlet check assembly (47) by loosening
adapter (46) from pump outlet.
6. Remove adapter (46) from outlet check assembly (47).
7. Remove outlet connector (26) from bushing (22).
8. Remove ball check seat (23) from outlet connector (26).
9. Inspect all check components (21, 22, 23, 25) for presence
of foreign material, scoring and or other damage, which
may cause internal leakage. Replace components if
damage is found.
4.1A-68560-G00
Page Number - 3