1
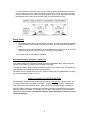
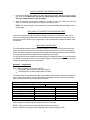
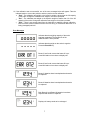
MODEL
User Manual
WIRELESS PORTABLE SCALE
Revision 1.0
June 15, 2010
THIS EQUIPMENT CONTAINS NO USER SERVICEABLE COMPONENTS.
Servicing of the equipment must only be carried out by trained and authorized personnel.
Use only the AC adapter supplied with the scale. Other adapters may cause damage.
Routine maintenance
Harsh abrasives, solvents, scouring cleaners and alkaline cleaning solutions should
not be used; especially on the display window.
The outside of the product may be wiped down with a clean cloth, moistened with
water containing a small amount of soap.
- The display unit can be washed down with water.
“CE” logo here somewhere…
Installation
1. Unpack display unit and both weigh beams
2. Set weigh beams on a flat and level surface. A concrete slab is recommended.
3. The beams feature adjustable feet at each end. This enables side-to-side and front-to-back
adjustment when setting up the system.
4. Install cattle chute or temporary platform
5.
Install indicator in a suitable viewing area using mounting bracket
NOTES:
- The indicator comes with a pre-installed rechargeable battery
- The weigh beams come with pre-installed “C” cell alkaline batteries
- Do not mix the type of batteries. Replace all batteries at the same time.
- If the scale is not to be used for a long period of time, remove all batteries from the battery compartment to avoid leakage which may cause damage to the instrument.
- To extend the life of your digital scale, do not drop items to be weighed onto the platform or overload
the scale beyond its rated capacity. Shock-loading and overloading may damage the load cell and
void the warranty.
-
Be sure that the feet are not screwed all the way into the bar, as this will result in inaccurate
weighing
Never weld any installation attached to the weigh beams. Damage to the scale’s electronics
can result
When placing the weigh beams under a cattle squeeze chute, locate the bars at the far
ends (front & back) of the squeeze chute in order to minimize the risk of tipping when animals enter and exit the chute
Be sure that no equipment or objects prevent downward movement of the weigh beams.
Be sure that the set up does not rock from corner to corner.
1
-
In certain situations, a squeeze chute may move forward and/or backward when an animal
enters or exits the chute. To restrict movement, a section of 1” angle iron may be mounted
to the concrete pad in front of the chute and behind the chute. A 1/4” space should be maintained between the weigh bar feet and the angle iron (see illustration below).
Getting Started
1. After installing the scale per section above, first switch on each weigh beam by pressing
the BLUE button once. The blue LED will turn solid for a few seconds and then start to
flash.
2. Next press and hold the ON/PRINT key on the display unit for two seconds. After a brief
initialization period, the scale will revert to a zero (“0”) weight display.
Your wireless scale is now ready for operation!
Rechargeable battery information - display unit
Your scale’s display unit contains an internal lead-acid rechargeable battery. Before using the
indicator for the first time, please charge the battery overnight.
The indicator’s battery should operate for about 85 hours if left on continuously. The display unit
is configured to power down after 30 minutes of inactivity.
The battery can be charged while ON or OFF and the indicator can be operated while it’s charging unless the state of charge is very low.
WHEN TO CHARGE THE INTERNAL BATTERY
The best time to charge the sealed lead-acid type battery is any time the indicator is not in use.
You need not wait for the Low Battery Indication – in fact it’s best that you don’t. Charging the
battery when not in use keeps the battery “fresh” and is the recommended way to manage it.
When the battery needs to be charged, the Low Battery Indicator will start blinking in the upper
left-hand corner of the display. The indicator may be used for an additional 2 minutes before it
automatically powers down. It is imperative that you charge the battery at this time to avoid
permanent damage.
2
HOW TO CHARGE THE INTERNAL BATTERY
1. Connect the charger (AC Adapter 12 VDC, 800mA) to the scale, and then plug the charger
into an AC outlet. Make sure that the AC voltage appearing at the wall outlet matches
the input voltage marked on the AC adapter.
2. After the charging period expires, unplug the charger from the AC outlet, then from the
scale. The scale is now ready for use under its own battery power.
NOTE: The charger may be left connected to the scale indefinitely without damage to the internal battery.
HOW LONG TO CHARGE THE INTERNAL BATTERY
In general, the battery should be allowed to charge a minimum of 1.5 hours for every hour of
use. If you discharge the battery below 50% and do not allow the proper time for charging, you
may start to notice a decline in the usage period. This is normal and eventually the battery must
be replaced.
REPLACING THE BATTERY
The recommended practice when removing the battery is to disconnect the ground connection
(black) first, then the red terminal. This ensures that a short circuit will not occur from a battery
lead or fuse lead touching the grounded housing while disconnecting the other terminal. Similarly, the ground should be connected last when installing a new battery.
The US government has classified the internal battery as hazardous waste. Do not place battery
into landfill. An automotive store or a local waste agency may accept the batteries for recycling.
Contact the manufacturer for more information.
Operation – weigh beams
Each beam contains two buttons and one LED.
The BLUE button is used to power up the beams
The RED button is used to power down the beams
The beams have several operating modes to save battery life and also to alert the user when its
time to replace the batteries. You can determine the operating mode by observing the blinking
behavior of the blue LED contained within each beam:
LED Functionality – Blinking interval
During Power-up (Initialization)
FULL BATTERY
Working Mode
Sleep Mode (power savings)
Blink interval
1.5 seconds
4 seconds
LOW BATTERY
Working Mode
Sleep Mode
Blink interval
10 seconds
10 seconds
ON for 5 seconds
Double Flash
Double Flash
Please replace the batteries when the blink interval is 10 seconds!
NOTE 1: Beams will shut down completely after two hours of inactivity.
NOTE: 2: Beams will only enter sleep mode when the indicator (display) is OFF.
3
When shipped from the factory, the display unit is configured to automatically switch off after 30
minutes if not in use.
Replacing the batteries – weigh beams
Each beam has a battery holder which contains 4 “C” cell alkaline batteries.
1.
2.
3.
4.
5.
6.
7.
Turn the bean OFF (Press the RED button)
Remove the rubber cover
Grasp the metal cylinder inside and carefully pull free from the housing
Unscrew either end cap to reveal batteries
Exchange the batteries – be careful to note polarity
Replace the end cap
Slide the metal cylinder back into the metal housing being careful not to crimp or cut the
wire
Keyboard and Display Description
4
Symbol
Display
0
Displays when the scale is on Zero.
N
Indicates that the indicator is displaying net weight (Gross weight minus Tare weigh).
G
Indicates that the indicator is displaying gross weight
T
Indicates that a push-button tare weight has been established in the system
lb
Indicates that the unit of the displayed weight is in pounds
kg
Indicates that the unit of the displayed weight is in kilograms
This light is on whenever the scale is at rest (stable reading).
When blinking, indicates that battery life of the indicator has reached its useful end and
needs to be recharged soon. More information below
The display unit can show overall system battery health. See the Error Messages for more information.
Function Keys
Units
Zero/Off
This key toggles the indicator between lb and kg.
This key sets the indicator to display zero weight provided the following conditions
are met:
1. The indicator is displaying Gross weight.
2. The scale is not in motion.
3. The scale is not in overload (see error codes).
Press and hold for five seconds to shut the unit off.
Net/Gross
Tare
This key toggles the indicator between Gross weight and Net weight - but only if a
Tare weight has been established first
This key is used to establish a Tare weight provided the following conditions are
met:
1. The indicator is displaying a Gross weight above zero.
2. The scale is not in motion.
3. The scale is not in overload (see error codes).
5
Function Keys
On/Print
Press and hold for two seconds to turn the unit on. When the unit is on, this key is
used to send weight information out to the serial port provided the following conditions are met:
1. The scale is not in motion.
2. The scale is not in overload (see error codes).
Hold operation:
Coming soon
Calibration
Your WB5040-SWP portable scale is ready to use right out of the box. There is no need to
calibrate the scale unless you feel that the scale has become inaccurate. It is a good idea
to check the calibration of your scale from time to time with a precision test weight.
1. Switch off the display unit by pressing and holding the ZERO/OFF key for about 5 seconds.
2. Enter the Setup mode by pressing and holding the ON/PRINT key for about 20 seconds or
until the screen shows “SETUP”.
3. While in the Setup mode, scroll to "F 16", and then scroll down once using the
ZERO/OFF key to enter zero calibration menu. The display will momentarily show "C 0" followed by a value. This value is the internal A/D count and can prove useful when trying to
troubleshoot setup problems.
4. Remove all items from the beams and press the ZERO/OFF key to zero out the displayed
value.
5. Press the NET/GROSS key to save the zero point value. The display will show "EndC0"
momentarily, and then revert back up to F16.
6. Press the ON/PRINT key to progress to the F17 menu.
7. While at the "F 17" screen, scroll down once using the ZERO/OFF key to enter span calibration menu. The display will momentarily show "C 1" for the span calibration point, followed
by a value with one flashing digit.
8. Place the test weight on the weighing platform.
9. Use the four directional keys to adjust the displayed value to the actual test weight value.
Increase the flashing digit by pressing the UNITS key. Decrease the flashing digit by pressing the ZERO/OFF key. Pressing the TARE key or the ON/PRINT key will change the position of the flashing digit.
10. After entering the exact value, press the NET/GROSS key to save the value. If the calibration was successful, the display will show "EndC1" momentarily, followed by "C 2" for the
second calibration point.
11. Repeat steps 8-10 for C2 and C3. At the conclusion of C3, the indicator displays the current
gravity settings, e.g. “9.800”.
12. Press the NET/GROSS key to revert back up to F17.
6
13. If the calibration was not successful, one of the error messages below will appear. Take the
indicated action to correct the problem, and then perform a new calibration.
"Err0" - The calibration test weight or the keyed-in weight is larger than the full capacity
of the scale. Change the calibration test weight or check the input data.
"Err1" - The calibration test weight or the keyed-in weight is smaller than 1% of the full
capacity of the scale. Change the calibration test weight or check the input data.
"Err2" – There is not enough signal from the load cells to establish a proper calibration.
Most commons causes include incorrect load cell wiring, a mechanical obstruction or a
faulty (damaged) load cell.
Error Messages
Indicates that the weighing capacity of the scale
has been exceeded. The weight limit of the
WB5040-SWP is 5000 pounds.
Indicates that the weight on the scale is negative.
Press the Zero/Off key.
Beam #1 not found; ensure that beam #1 is powered ON and/or move closer to display unit.
Beam #2 not found; ensure that beam #2 is powered ON and/or move closer to display unit.
Beam #1 batteries have been depleted and need to
be replaced.
Beam #2 batteries have been depleted and need to
be replaced.
Both Beam #1 and Beam #2 batteries have been
depleted and need to be replaced.
Display unit battery needs to be recharged
7
Error Messages – continued
Display unit battery needs to be recharged AND
Beam #1 batteries need to be replaced
Display unit battery needs to be recharged AND
Beam #2 batteries need to be replaced
Display unit battery needs to be recharged AND
Beam #1 and Beam #2 batteries need to be replaced
Specifications
STANDARD CAPACITY
5,000 lb x 1 lb
NOTE: If specified by the purchaser, the scale’s capacity and divisions may be different than the
standard configuration.
MAIN COMPONENTS
- TS-500SS RF stainless steel digital indicator and AC adapter
- Two 40” weigh beams
BEAM CONSTRUCTION
- Carbon steel tube
- High grade epoxy paint finish
LOAD CELLS
- 350 ohm, two per weigh beam
- Overload protection 200%
- Operating temperature 14°F to 104°F (-10°C to 40°C)
- NTEP approved
Digital Indicator Specifications
- NEMA 4X washdown stainless steel enclosure
- Operating temperature 14°F to 104°F (-10°C to 40°C)
- Connection port for optional printer
- AC adapter included, 12 VDC 800 mA
- Tilt adjustable bracket included
Digital Indicator BATTERY
- 6 volt
- Built in
- Rechargeable
- 85+ continuous hours of operation on full charge under typical operating conditions
8
Weigh Beam BATTERY
- 1.5 volt x 4 “C” alkaline
- User replaceable
- 130+ continuous hours of operation under typical operating conditions
Troubleshooting
Issue Recommendations
“Low Battery” icon blinks on the digital readout, then the indicator powers off.
Recharge the battery. Plug the indicator into 230 VAC for 18+ hours (using the included AC
adapter). When not operating under battery power, it is recommended that the indicator remains
plugged in to 230VAC. This will keep a full charge in the battery.
Indicator displays a weight after the animal has left the scale.
Check for mechanical binding in the overall equipment set up, such as restraining chains on
squeeze chute, platform rubbing against walls, or similar. Check weighing platform area for buildup of mud or manure.
Weight reads out lower at one end of the weighing platform/squeeze chute than the other
end.
Check for any type of mechanical binding or impingement of the weigh beam that is displaying
the lower weight. Check underneath the weigh beam for any obstructions. Make sure that the
weigh beam feet are not screwed in so far as to restrict downward movement of the weigh
beam.
Indicator displays six small zeros.
Scale is overloaded. Remove weight from scale.
Scale turns off on its own.
The indicator has a power conservation feature, set to automatically power off the scale after 30
minutes of non-use. If your needs require a different setting, call us.
.
Display is erratic.
The battery may be fully depleted. If so, this condition can cause erratic displays even if the digital indicator is plugged into 230 VAC. Power off the indicator and fully charge the battery for 18+
hours.
Limited 12 month Warranty
This product is warranted by Transcell Technology against manufacturing defects in material
and workmanship under normal use for twelve (12) months from the date of purchase. For complete warranty details and service information, please contact us at the address below.
Contents subject to change without notice.
Vetek Weighing AB
Box 79
76040 Väddö, Sweden
Tel +46176-208920
Fax+46176-208929
Web: www.vetek.com
9