1
Copyright © EPiServer AB
Table of Contents | 3
Table of Contents
The EPiServer Commerce User Guide
About This Documentation
Online Community on EPiServer World
Copyright Notice
The EPiServer Commerce Platform
Overview
Functions and Page Templates
Access Rights
Editorial Content
Store Administration
Terminology
Editorial Content
Modes
13
15
15
15
16
16
16
17
17
17
17
17
17
View mode
Edit mode
Admin mode
Commerce Manager interface
Roles
Visitor
Editor
Store Administrator
System Administrator
Commerce Manager roles
Commerce Manager Glossary
Application Configuration
Business Foundation
Catalog Management
Customer Management
Marketing
Order Management
Reporting
Prerequisites
Getting Started
Logging on to the Website
Accessing the Different Modes
Logging on to Commerce Manager
Navigation
Navigating Commerce Manager
Other Basic UI and Navigation Elements
Working Procedures
EPiServer OnlineCenter
EPiServer CMS
Edit mode
Admin mode
Commerce Manager
System Administration and Configuration
Administrative Users and Customers
Catalogs and Product Entries
Purchase Orders, Shopping Carts, Shipping, and Returns/Exchanges
17
17
17
17
18
18
18
18
18
18
18
18
19
19
20
20
21
22
22
24
24
24
25
25
25
26
26
27
27
27
27
27
27
27
27
28
© EPiServer AB
4 | User Guide for EPiServer Commerce 1 R2 SP1
Customer Campaigns, Promotions, and Discounts
Assets and Web Files
User Access and Roles
User Access from Commerce Manager
User Access from EPiServer CMS
Globalization
Working With Language Settings
Specific Language Settings
Content Language
Languages for Product Catalogs
User Interface Language
File Management
Working With File Management
Working with the File Manager
28
28
29
29
31
32
32
32
32
33
33
35
35
35
Working with the Asset Manager
File Formats
Commerce Manager
Dashboard
Customizing the Dashboard
Rearranging, Collapsing, and Removing Controls
Adding Controls and Adjusting the Page Template
Customer Management
Organizations
Browsing Organizations
Viewing Organization Details
Searching for Organizations
Printing a List of Organizations
Creating or Customizing Views for Browsing Organizations
Example View Filter Setups
Example 1: Creating a View to Only Show Organizations that Match a Business Category and Organization Name
Applying and Editing a View
Example 2: Creating a View to Display Companies with Specific Business Category or Organization Name
Example 3: Creating a View to Display Companies with Specific Business Category and/or Name
Creating an Organization
Creating an Organization Unit
Creating an Organizational Hierarchy
Creating and Editing Dictionary Entries
Adding New Dictionaries for Organization Type
Adding New Business Categories
Contacts
Browsing Contacts
Viewing Detailed Contact Information
Searching for Contacts
Generating a Printer Friendly List of Contacts
Creating or Customizing Views for Browsing Contacts
Creating a New View
Applying and Editing a View
Creating a Contact
36
36
37
37
37
37
38
39
39
40
40
41
41
41
43
44
44
45
45
46
47
47
48
48
49
49
49
49
50
51
51
52
54
54
© EPiServer AB
Table of Contents | 5
Creating an Account
Editing an Account, Changing an Account Password, and Removing Accounts
Create an Order Within a Contact
Roles and Permissions
Definitions of Roles
Creating, Editing, and Deleting Roles
Creating a Role
Editing Existing Roles
Deleting Roles
Assigning Roles to Individual Accounts
Catalog Management
Catalog and Catalog Entries
Working with Catalogs
Browsing Catalogs
Creating a Catalog
Importing and Exporting Catalogs
Accessing the Import & Export Functions
Importing Catalogs
Exporting Catalogs
Using CSV Files to Quickly Create Custom Catalogs
Why Should I Use a CSV File?
Import Overview
Format for CSV Files
Mapping Types
Example: Importing and Setting up a New Catalog
Prerequisite: Create a new catalog
Step 1: Create CSV files containing data for your new entries
Step 2: Create necessary meta fields for the new catalog entries
Step 3: Upload the CSV data files to the CSV Import page
Step 4: Create a mapping file for each CSV file
Step 5. Import the CSV files and their corresponding mapping files into a specific catalog
Step 6. Verify Your Import
Deleting a Catalog
Categories and Nodes
Browsing Categories
Menu Bar Functions
Creating a Category
Overview Fields
SEO
Assets
Deleting a Category
Organizing Categories
Creating a Sub-Category
Cloning, Moving or Linking a Category
Products, Variations and SKUs, Bundles, Packages, Dynamic Packages and Associations
Browsing Products
Creating a Product (including Variations and SKUs, SEO, Associations, Assets)
Overview Tab
Variations/SKU Tab
SEO Tab
© EPiServer AB
56
57
57
58
58
58
58
60
60
61
63
63
63
64
64
65
65
66
66
67
67
67
67
68
68
69
69
72
73
74
76
77
77
77
77
78
79
80
81
81
82
83
83
84
85
86
86
86
88
89
6 | User Guide for EPiServer Commerce 1 R2 SP1
Associations Tab
Assets Tab
Relations Tab
Editing Product Tabs
Overview Tab
Variations/SKU Tab
SEO Tab
Associations Tab
Assets Tab
Relations Tab
Setting Pricing Data at the Product Level
Creating a Variation or a SKU
Overview Tab
Pricing/Inventory Tab
SEO Tab
Associations Tab
Assets Tab
Relations Tab
Creating a Package
Overview Tab
Pricing/Inventory Tab
Package Items Tab
SEO Tab
Associations Tab
Assets Tab
Relations Tab
Creating a Bundle
Overview Tab
Bundle Items Tab
SEO Tab
Associations Tab
Assets Tab
Relations Tab
Creating a Dynamic Package
Overview Tab
Package Items Tab
SEO Tab
Associations Tab
Assets Tab
Relations Tab
Creating Product Associations
CrossSelling Other Products - "What You May Like"
Associating Related Products and Accessories
Managing Assets
Associating Additional Digital Materials with Catalog Entries
Searching for Entries in Your Catalog
Catalog Search Filters
Deleting and Cloning Entries
Paging and Sorting Results
Updating Multiple Catalog Entries at Once
Order Management
© EPiServer AB
90
92
93
93
93
94
95
96
98
100
100
100
100
101
103
104
104
104
105
105
105
106
106
107
107
107
108
108
108
108
108
109
109
109
110
110
110
110
111
111
111
112
112
112
112
113
114
114
115
115
116
Table of Contents | 7
Order Workflow
Creating a New Order
Option 1: Creating an Order Within a Contact
Filling Out the New Purchase Order
Advanced Search
Configuring the Selected Entry
Completing the Rest of the Purchase Order Form
Option 2: Creating an Order from Purchase Order List
Fulfilling an Order
Processing the Order, Submitting a Payment, and Releasing to Shipping
Canceling an Order
Splitting Shipments
Viewing Purchase Orders by Date or Status
Viewing and Searching for Orders
Using Order Search to Find Existing Purchase Orders
Shipping and Receiving Workflow
Processing Shipments and Creating Picklists
Printing Picklists and Printing Packing Slips
Finalizing a Package for Shipment
Method 1
Method 2
Processing Returns and Exchanges
Initiating a Return
Return Actions
Initiating an Exchange Order
Viewing an Exchange
Shopping Cart
Converting a Shopping Cart to a Purchase Order
Payment Plans
Setting up a Payment Plan
Creating a Payment Plan
Payment Plan Order Detail Page Explained
Editing and Canceling a Payment Plan
Creating a Recurring Payment Plan Using Authorize.Net
Marketing
Campaigns
Browsing Campaigns
Creating a Marketing Campaign
Promotions
Browsing Promotions
Deleting a Promotion
Creating an Entry Level Promotion
Example: Build Your Own Discount - "40% Off Canon PowerShot S5"
Buy catalog entry X, get catalog entry Y at a discount
Buy X Get $ Off Discount
Buy X, get N quantity of Y at a discount
Creating an Order Level Promotion
Order Sub Total Volume Discount
Example: Build Your Own Discount - "20% Off for a Shopping Cart Subtotal of $100 or More"
Creating a Shipping Level Promotion
© EPiServer AB
116
116
116
117
117
117
118
119
120
120
122
123
125
125
125
126
126
128
129
129
130
130
130
131
133
135
135
135
137
137
138
138
139
139
140
141
141
141
143
143
144
144
145
147
147
148
148
148
148
149
8 | User Guide for EPiServer Commerce 1 R2 SP1
Buy X Get $ Off Shipment Discount
Buy X Get Y Free
Creating Custom Promotions
How to Use "Or" When Building Your Own Promotions
Building the Discount
Seeing the Discount Applied
Customer Segments
Creating a Customer Segment
Creating a Customer Segment Assigned to Contacts
Creating a Customer Segment with Conditions
Working with Expressions
Working with Policies
Asset Management
Browsing, Editing, and Deleting Folders and Assets
Copying/Moving and Deleting Folders and Assets
Creating Folders and Uploading Files (Assets)
Creating Folders
Uploading Individual Files
Uploading Multiple Files at One Time
Reporting
SQL Reporting Services
Generating and Customizing Reports
Customizing/Filtering and Exporting Reports
System Administration
System Settings
Business Foundation
Customizing Existing Business Objects
Fields in the Business Foundation
Adding Fields to Business Objects
Editing Fields of Business Objects
Relations in the Business Foundation
Adding a 1 to Many Relation
Adding a Many to 1 Relation
Adding a Many to Many Relation
Forms in the Business Foundation
Customizing an Existing Form
Editing the Layout of a Form
Adding Sections and Fields
Deleting Sections and Fields
Recreating a Form
Saving a Customized Form
Creating a New Business Object
Scenario - Creating and Publishing a Contract Business Object
Creating a New Contract Object
Connecting a Contract to an Organization Using a "Many to One" Relationship
Publishing a Contract
Adding Contracts to an Organization
Publishing Business Objects
Permissions
Deleting Published Business Objects
Creating Dictionary Values for Adding Languages, Countries and Currencies
© EPiServer AB
149
150
150
150
150
150
151
151
151
153
154
155
156
157
158
159
159
161
162
163
163
164
164
165
165
165
165
165
166
168
168
169
171
173
174
175
175
176
180
181
181
182
182
183
185
188
189
190
190
191
192
Table of Contents | 9
Adding New Languages
Adding New Countries
Adding New Currencies
Setting Your Default Language, Currency and Units
Customizing Left Menu
Adding a Left Menu Item from the Left Menu Page
Editing, Ordering, or Deleting a Left Menu Item
Indexing Your New or Edited Catalog
Catalog System
Setting up Meta Fields and Meta Classes
Adding Meta Fields to a Meta Class
Warehouses
Order System
Payment Gateways
Using a Built-In Payment Gateway
Setting up Payment Methods using nSoftware Provided Payment Gateways
Editing Payment Methods
Deleting Payment Methods
Shipping
Shipping Methods
Customizing Shipping Methods
Deleting Shipping Methods
Shipping Providers
Customizing Shipping Providers
Deleting Shipping Providers
Tax Configuration
Introduction
Method 1: Configuring Taxes Manually
Method 2: Configuring Taxes Using CSV Import
Sample CSV Files and Example Scenarios
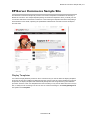
EPiServer Commerce Sample Site
Display Templates
Adding a display template
Updating an existing display template
Importing the Sample Catalog
Import the Sample Catalogs
Indexing the Sample Catalog
Page Templates
The Page Tree Structure
Start Page
Content Tab
Name
Fetch News list from
Images
Links
Site Configuration Tab
Login page
Display top menus from
Display menus from
Display bottom menus from
Account page
© EPiServer AB
192
193
194
195
196
196
197
199
199
199
199
200
202
202
203
206
207
208
208
209
209
213
213
213
214
215
215
215
215
216
217
217
218
218
218
219
220
220
221
222
222
222
222
223
223
223
224
224
225
225
226
10 | User Guide for EPiServer Commerce 1 R2 SP1
Address book page
Account edit page
Search page
Product page
Wish list page
Shopping cart page
Check out page
DIBS Payment page
Order history page
Compare products page
Allow empty column
Path to template for display entry without SEO info
PayPalPaymentPage
Standard Page
Product Listing
Function Pages
My Account Pages
Account Dashboard
Account Information
Account My Orders
Account Address Book
Check Out
Step 1: Shipping Address
Step 2: Shipping Options
Step 3: Payment Options
Step 4: Order Confirmation
Shopping Cart
Wish List
Login
Register
Search
Payment
Forgot Password
Product Page
Products Compare
PayPal
Tools and Plug-ins
Product Picker Property
Displaying Product Information in a Page
Removing Product Information in a Page
Product Link Tool
Adding a Product Link
Editing a Product Link
Removing a Product Link
Product Dynamic Content
Adding Product Information as Dynamic Content
Editing Dynamic Content for a Product
Removing Dynamic Content for a Product
Gadgets in EPiServer Commerce
Adding gadgets to the dashboard
Commerce Orders Gadget
© EPiServer AB
226
226
226
226
226
226
227
227
227
227
227
227
227
227
228
229
229
230
230
231
232
232
233
233
234
235
235
237
238
239
240
241
241
242
244
244
245
245
245
246
246
246
247
247
247
247
248
249
249
249
250
Table of Contents | 11
Commerce Overview Gadget
Comment Approval Gadget
Comment Abuse Report Gadget
Commerce Settings for CMO Gadget
Adding the Commerce Settings for CMO Gadget
Editing Commerce Settings for the CMO Gadget
Deleting Commerce Settings for the CMO Gadget
Managing the Tag Cloud
Listing tag cloud items
Sorting the tag cloud list
Searching for a tag
Updating a tag
Deleting a tag
Personalization
250
251
251
252
252
253
253
253
254
254
255
255
255
255
Customer Properties Criteria
Order Frequency Criteria
Product in Cart or Wish List Criteria
Recent Orders Criteria
Total Spent Criteria
Rating and Commenting
Rating
Commenting
Abuse reporting of comments
Payment Options
Payment Options Available with the Sample Site
Payment Options Available as Separate Modules
PayPal Express Payment Provider
DIBS Credit Card Payment Services
Search Providers
Scheduled Job Clear Commerce Cache
256
256
256
256
257
257
257
257
258
258
258
258
258
259
261
262
© EPiServer AB
The EPiServer Commerce User Guide | 13
The EPiServer Commerce User Guide
EPiServer Commerce is based on EPiServer CMS for content management and the Commerce Manager module for managing online purchasing procedures. With EPiServer Commerce you can quickly build and deploy state-of-the-art online stores.It is tightly integrated with EPiServer CMS so that you can combine powerful content display with your online store management in the background. The EPiServer OnlineCenter provides easy access to both your web content through EPiServer CMS, and your online store through the Commerce Manager module.
This User Guide provides guidance to the usage of the various functions of EPiServer Commerce, both within web store administration as well as content management for your website. The purpose of the EPiServer Commerce sample site, which is described here, is to provide an example of how you can work with EPiServer Commerce, in order to get your web store up and running in as little time as possible.
To find out more about how to integrate, develop and extend the functionality of EPiServer Commerce, please refer to the EPiServer Commerce Developer Guide.
© EPiServer AB
About This Documentation | 15
About This Documentation
This documentation is intended for the target groups as described below.
l The EPiServer Commerce User Guide:
l Content editors and system administrators working in EPiServer Commerce and EPiServer CMS.
l Web shop administrators working with online store procedures in EPiServer Commerce and Commerce Manager.
l The EPiServer Commerce Developer Guide:
l Developers working with development and customization of EPiServer Commerce sites.
l System architects and others with an interest in the technical features of EPiServer Commerce.
This documentation describes features in EPiServer Commerce. The following documentation accessible from world.episerver.com, may be of use for reference purposes:
l User documentation for editors of EPiServer CMS.
l User documentation for administrators of EPiServer CMS.
l User documentation for EPiServer OnlineCenter.
l SDK for EPiServer CMS and the EPiServer Framework.
Online Community on EPiServer World
EPiServer World is an online community where you can find the latest product information. It is open to the public, for partners, customers, and everyone working with EPiServer products, such as editors, webmasters, site owners and developers. Here you can download material, participate in discussions, read articles, receive support and much more. Feel free to sign up as a member.
Copyright Notice
Copyright © 1996 — 2011 EPiServer AB. All rights reserved.
Changes to the contents, or partial copying of the contents, may not be done without permission. The document may be freely distributed in its entirety, either digitally or in printed format, to all users of EPiServer Software. We assume no liability or responsibility for any errors or omissions in the content of this document. We reserve the right to alter functionality and technical system requirements. EPiServer is a registered trademark of EPiServer AB.
© EPiServer AB
16 | User Guide for EPiServer Commerce 1 R2 SP1
The EPiServer Commerce Platform
EPiServer Commerce comes with a sample site including a complete set of page templates containing all the necessary functions for setting up a website with an online store. The purpose with the sample site is to exemplify and illustrate the code behind the templates, and to provide inspiration when building your own e-commerce solution.
The Commerce Manager module is closely integrated with EPiServer CMS. Editors and store administrators can work with the content as well as managing the online store administration using the same interface for easy access. The EPiServer OnlineCenter provides the overall frame for accessing the entire website and other systems integrated, as well as the personalized dashboard with gadgets for individual users.
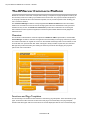
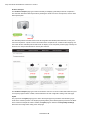
Overview
The foundation of the EPiServer Commerce platform is EPiServer CMS for presentation, and the Commerce Manager module for web store management with functionality for managing customers, products and orders. Customers can register an account on the website and manage their account details, as well as create their own personal wish lists. When a shopper is ready to finalize a purchase, the Commerce Manager will provide functionality for handling the checkout procedure with shipping and payment options and order confirmation.
Functions and Page Templates
The functionality of an EPiServer CMS website is controlled by page templates. These are linked to page types, in which the editor enters the content of the web page. The functionality in the page template decides what will happen with the content and how it will be displayed. With the use of customized page © EPiServer AB
The EPiServer Commerce Platform | 17
templates the various products and shopping activities can be displayed on the website, with information collected from the Commerce Manager module.
Access Rights
Access rights control what editors and administrators can do and what visitors to the website can see. Access rights in EPiServer Commerce can be managed from the EPiServer CMS Admin and Edit mode, as well as from the Commerce Manager administration interface, depending on type of role and permissions.
Editorial Content
Editors enter information into the page types, and the information is then stored in the EPiServer database. Generally the EPiServer Commerce specific sample templates contain few editor fields, since they are only used for display, and most of the functionality is built into the page templates. Store Administration
The online store is administered through the Commerce Manager user interface. Store administrators can easily access all the online store functions including customer, product and order management, as well as system configuration features. The Commerce Manager information is stored in the Commerce database.
Terminology
In this section we will describe some of the specific terms used in e-commerce and EPiServer Commerce.
Editorial Content
With editorial content we mean content that is created from inside the EPiServer CMS Edit mode, such as articles, news or other information pages. Compare this to content that is displayed as pages on the website, but where the content itself is data fetched from Commerce Manager. This type of data cannot be only be edited in Commerce Manager.
Modes
You will work with EPiServer Commerce in different modes.
View mode
What will be displayed to visitors of the website.
Edit mode
Editors will work in the EPiServer CMS edit mode when creating and editing EPiServer CMS content pages of the website.
Admin mode
System administrators will work in the EPiServer CMS administration mode to modify system settings and access rights.
Commerce Manager interface
Store administrators will access the Commerce Manager interface to manage online store data and activities. The Commerce Manager interface can be reached either from inside the EPiServer OnlineCenter, or directly from View mode when right-clicking in a page. © EPiServer AB
18 | User Guide for EPiServer Commerce 1 R2 SP1
Roles
EPiServer Commerce has a number of different roles that are active in the editorial and online store management activities. These are described further in the following.
Visitor
A visitor is someone using a web browser to visit the website and use available functions and services. A visitor can register an account and become a customer when purchasing a product. Customers can update information related to their personal account. In EPiServer Commerce, visitors use the same login procedure to the website as site administrators, without getting access to the back-end functions.
Editor
The editor will work with website content from the EPiServer CMS Edit mode. Working with content here means create editorial content such as news, company related information, or articles on different subjects.
Store Administrator
The store administrator works in the Commerce Manager interface, with information related to customers, orders and products. Store administrators may also work with configuration of the Commerce Manager system settings.
System Administrator
The system administrator works with the administration of the entire EPiServer Commerce platform. This is done from the EPiServer CMS administration mode and involves setting access rights for pages, website language management and other tasks. Commerce Manager roles
The Commerce Manager module has its own set of user roles covering the different tasks that store administrators work with. These roles are described further in the Commerce Manager section under Customer Management.
Commerce Manager Glossary
Application Configuration
l Shipping Gateways - Under Shipping Providers, a shipping gateway is the specific class that you select (Generic Gateway or Weight/Jurisdiction Gateway).
l Shipping Jurisdictions - an option which allows you to define values for region-specific shipping rates; this is only used when you select the Weight/Jurisdiction Gateway (i.e. California).
l Shipping Jurisdiction Groups - group of jurisdictions; this is required because this is a required field when configuring the Shipping Method parameters (i.e. Southwest region).
l Shipping Method - A shipping method manages a set of information and rules that determines the shipping cost and displays it on the front-end public site while a customer checks out an item from his/her shopping basket. The shipping fee is added to the total price of the purchase. A shipping method is mapped to a shipping provider visible to a back-end administrator in Commerce Manager. This allows the public site to display friendly names such as "Ground Shipping" to the customer and this is mapped to a provider such as UPS. Therefore, when a customer picks "Ground Shipping," he/she will be using UPS.
l Shipping Providers - A shipping provider is the class(es) that interacts directly with one or more actual shipping services such as USPS, UPS, or FedEX. It retrieves shipping price information from the shipping service(s) its associated with. One typical scenario would be to have a provider that represents a particular service (e.g. USPS). A provider can also represent a particular type of © EPiServer AB
The EPiServer Commerce Platform | 19
shipping situation. One example is that you could have a provider for overnight delivery. The provider could retrieve pricing for that service to determine the lowest price given the location of the customer. A provider could also represent other specific scenarios with one or more services such as price by weight or ground shipping.
Business Foundation
l Business Foundation Object (BF Object) - Similar to a meta class; allows end users to create custom objects with UI presentation, business objects, and a database layer without modify code.
l Bridge - A "many to many" or N:N relationship between two business objects.
l Extension - this allows you to extend an existing meta class with extra properties. For example, you can have a download class and you can extend it with "imagedownload" which contains width and height as extra parameters.
l Field Type - The type of data that the data field supports. There are multiple types included with Commerce Manager out of the box:
l Boolean
l Currency
l DateTime
l Dictionary items
l File
l Guid
l Integer
l Referenced Field (read-only)
l String
l 1 to Many Relationship - 1 object can be associated or related with multiple object-related data. For example, one organization can be associated with multiple contracts.
l Many to 1 Relationship - Multiple object-related data can be associated or related with a single object. For example, multiple contacts can be related to a single organization.
l Many to Many Relationship - Multiple object-related data can be associated or related with multiple objects. For example, different SKUs (Store Keeping Unit) can be associated with one or more Warehouses for tracking and storage.
Catalog Management
l Assets - downloadable contents such as documents, links, videos, and images that can be linked to specific products.
l Associations - one or more products can be related to or associated to another product so that these associated products can be displayed or advertised on the public site as a product accessory, or as an upselling/cross-selling item. Associations can be made from any of the individual products (Product Entries, SKUs, Bundles, Packages, and Dynamic Packages).
l Catalog - a catalog is a top-level container for all catalog entries such as Categories, Products and SKUs.
l Category - a category is a grouping of purchasable products.
l Node - a node is the same thing as a category.
l Product - a product represents various forms of merchandise that you can display and purchase from the public site, including Products, Variations/SKUs, Bundles, Packages and Dynamic Packages.
© EPiServer AB
20 | User Guide for EPiServer Commerce 1 R2 SP1
l Product Entry - a product entry typically contains a product name, part number, description and images.
l Variation/SKU - a variation or SKU (Store Keeping Unit) corresponds to a specific type of product with specific characteristics. For example, a product of Shirts will have an individual variation/SKU which includes size, color and sleeve length.
l Bundle - a bundle is a collection of variations and SKUs allowing customers to purchase two or more items at once.
l Package - a package is comparable to an individual SKU because the package item must be purchased as a whole (i.e. computer system).
l Dynamic Package - a dynamic package is similar to the package definition above with the added ability to configure the package during checkout.
l Tax Category - this separation of taxes by category allows you to charge a different rate of taxes depending on what is being purchased; for example, you can have one rate for "General Sales" items and another rate for "Luxury Sales" items.
Customer Management
l Account - a user account that can be created under a Contact. Once an Account has been created, the Contact can be assigned Roles and access the Commerce Manager. A user account is automatically created for a user who registers from the front-end public website which allows a customer to login prior to checking out. They default to the "Everyone" and "Registered" roles and permissions.
l Contacts - these are users that are created either when an external customer registers on the public site or when a Commerce Manager admin creates them directly from the Commerce Manager; typically, users that are internal to your organization are assigned to organizations or organization units and assigned varying permissions based on role. By default, new users that are created by registering from the public site are given the "Registered" and "Everyone" roles.
l Organizations (or organization units) - groups or sub-groups of registered users and customers. An organizational unit is a "child" or subsidiary of a "parent" organization. Within Commerce Manager, you can assign an organization as a parent of another organization. For example, the parent company Company X, and the organizational units are Company X West and Company X East. Organization units include regional branches or departments or you could name them by business categories such as "Computer and Electronics" or "Clothing and Accessories." Organizations can be structured into a tree structure with sub-units with different levels of permissions assigned to each. So for example, you can set up your company as a parent level organization while your departments such as Sales & Marketing, IT/Development, and Operations as organization units. With this scenario, you can allow users in each departments to have access to only relevant subsystems, screens and functionality within Commerce Manager.
l Roles - these control the level of access privileges of each user account in Commerce Manager. Users can be either granted or restricted access to an entire subsystem or a particular menu item within a subsystem based on the role assigned to them. Different roles may be added to user accounts (i.g., store operator or webmaster) so that they can access, edit, or process relevant information. By default, a customer who registered his/her account to make a purchase in the front-end site will have no roles assigned to them, hence giving him/her preventing access to both the editing feature of the front-end site as well as the back-end Commerce Manager.
Marketing
l Campaigns - a way to organize marketing activities. Campaigns must be associated with Promotions in order to provide customer discounts. Optionally, Campaigns can also be tied to © EPiServer AB
The EPiServer Commerce Platform | 21
Customer Segments for targeted marketing purposes.
l For example, you can create a seasonal campaign that will include different Promotions targeted for the Spring season.
l Customer Segments - these determine the target audience for the Promotions. Customer Segments determine the target audience for the Promotions. Within a Campaign, all Promotions will be applied to whatever Customer Segments associated with the same Campaign. Members of the Customer Segments can be pre-defined in static groups or you can use the Expressions Engine to create dynamic groups whenever Promotions are run.
l For example, you can have a Customer Segment that targets all users from the Los Angeles area. You can create an Expression that will include all the customers whose home city is Los Angeles. Thus, when a user registers on the site he immediately becomes part of the target Customer Segment.
l Expressions - these are customizable Conditions which allow users to extend different aspects of the Marketing system -- Promotions, Customer Segments and Policies all rely on Expressions. There is an Expressions Engine which is a core technology behind the Marketing system.
l For example, you want to set a Promotion for "40% off Item X." The Expression or Condition to enable this Promotion would include: Catalog ID for Item X and Reward of 40%.
l Policies - rules that are always executed when Promotions are applied. This allows a Marketing manager to declare rules just once for the whole site.
l An example of a rule is as follows: Do not allow negative orders.
l Promotions - a way to apply various discounts to the products, order totals or shipping. A Promotion is a marketing tool used to increase sales of certain products or product lines. Various incentives such as lowered pricing and other discounts can be employed as part of a Promotion.
l Promotions are always tied to Campaigns.
l Promotions can be classified into two types: 1) either you can create a Promotion that is visible prior to checkout or 2) you can configure the Promotion to be displayed during the checkout process.
l The most powerful aspect of the Marketing system is the Expression Engine which allows variable conditions to be applied when creating a Promotion. These conditions vary from the number of items, the percentage discount, shipping rates and many others.
Order Management
l Browsing and Creating Purchase Orders
l Purchase Orders - the manual method of generating an order for a customer (rather than having the customer checkout and complete an order from the front-end website). It allows Commerce Manager users to generate orders directly from the Commerce Manager.
l Status - set to "NewOrder," "Submitted," "Processing," "Canceled," "Rejected," "Shipped".
l Currency - select a Currency type from the drop-down menu.
l Customer - select a Customer from the drop-down list of Contacts.
l Billing Address - select a Billing Address from the drop-down menu.
l Affiliate - select an Affiliate from the drop-down list. (Affiliates can be used when integrating with other systems and can only be edited in the database. Users do not have Commerce Manager access for managing Affiliates).
l Tracking Number - enter in a Tracking Number of the shipment.
© EPiServer AB
22 | User Guide for EPiServer Commerce 1 R2 SP1
l Expiration Date - enter in an Expiration Date for the order if this order is tied to a recurring payment plan for subscription-based transactions.
l Parent Order Id - this can be used to relate Purchase Orders to a payment plan or other order. When creating a Purchase Order from a Recurring Payment Plan, the Parent Order ID is automatically associated with the Payment Plan ID.
l Line Items - you can associate actual Products/SKUs/Packages/Bundles to orders or Purchase Orders.
l ID - it is automatically generated.
l Display Name - this can be edited and changed.
l List Price - enter in the price that will appear for the item.
l Discount - enter is the Discount value that will subtract from the List Price.
l Shipping Address - This is automatically generated if a Shipping Address has already been associated with the Purchase Order.
l Shipping Method - This is automatically generated if a Shipping Address has already been associated with the Purchase Order.
l Creating a Recurring Payment Plan
l Recurring Payment Plans - payments that are initiated by the Commerce Manager on a regular cycle (i.e. applicable in a subscription-based scenario).
l Plan Cycle - this determines the period of time that a payment plan will be initiated. Options include: "No Cycle," "Daily Cycle," "Weekly Cycle," "Monthly Cycle," "Yearly Cycle."
l Cycle Length - Unit of the PlanCycle.
l Max Cycle - the maximum number of cycles that this payment plan will be initiated.
l Completed Cycles - this value displays the number of times that this payment plan has been initiated.
Reporting
l Best Sellers Report this report is used to determine which products sold the most in terms of quantity and total revenue over a period of time.
l Low Stock Report - this report is used to determine which products are running low in inventory. If a product's inventory is less than its reorder minimum quantity, it will be included in this report.
l Sales Report - this report provides an overview of a site's sales performance over a period of time.
l Shipping Report - this report provides the shipping method, number of orders and total shipping cost over a period of time.
Prerequisites
This documentation is intended for website editors, and store and system administrators. The documentation describes a sample installation based on EPiServer CMS and the sample template package of EPiServer Commerce. Please be aware that your specific system may differ from what is described here, since your website is most likely customized and may be integrated with additional products.
© EPiServer AB
The EPiServer Commerce Platform | 23
In order for EPiServer Commerce to work properly, it is essential that you are using the specific language culture setting "UI Culture" (ASP.NET) on your website (i.e. "en-US", e"en-GB", "nlBE" etc.). This is crucial in order for the different languages to display correctly on the site. Make sure this is set up correctly from the start to avoid problems later on. Find out more about this topic in the Globalization section.
In this documentation you will learn about specific functions and features of the EPiServer Commerce sample site and templates. Prior knowledge of EPiServer CMS and e-commerce procedures is required to fully understand what is described. To find out more about other EPiServer products such as EPiServer CMS, please refer to the documentation for each specific product available on world.episerver.com.
© EPiServer AB
24 | User Guide for EPiServer Commerce 1 R2 SP1
Getting Started
In the following sections we will describe how you can access, log on to and navigate an EPiServer Commerce website. Note that the logon procedures may be slightly different from what is described here, depending on how your website and infrastructure is set up.
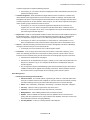
Logging on to the Website
To access the website, open a web browser and enter the address of the website. Most often, Commerce Manager is accessed through the front-end of the EPiServer CMS site. There are different ways of logging on as an editor or administrator of an EPiServer Commerce site. Often you add a path such as "epi/ui/edit" or "epi/ui/admin" to the URL of your website, or there might be a login link as for the EPiServer Commerce sample site.
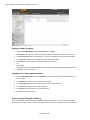
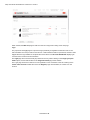
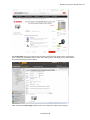
On the EPiServer Commerce sample site, clicking on Log in in the top menu will take you to the login page of the website. Enter your user name and password, and click Log In. Note that this login page is the same for both customers logging on to their account, as well as for web editors and store administrators logging on to work with content or administer the online store parts. What you are allowed to do after logging on to the website depends on your access rights.
Accessing the Different Modes
When you are logged on to your EPiServer Commerce website, right-clicking on a page will display a menu with a number of options. What you see here depends on your access rights, here we assume that you have full permission to the different parts.
From the EPiServer right-click menu you can directly access the Commerce Manager module of EPiServer Commerce. Choosing this option will take you directly to the Commerce Manager administration interface. Selecting the Edit or Admin mode will take you to the EPiServer CMS editor or administration interface. If you select Dashboard you will be taken to the Dashboard of the EPiServer OnlineCenter.
© EPiServer AB
Getting Started | 25
For the other options available, please refer to the EPiServer CMS user documentation.
Logging on to Commerce Manager
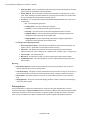
You can access Commerce Manager through right-clicking in View mode after logging in to the website, and then select Commerce Manager in the right-click menu. You can also select Commerce in the top menu when you are in the EPiServer Online Center or from the EPiServer CMS Edit mode.
You may be required to provide your logon credentials once more when accessing the Commerce Manager module. When you log on you will be taken to the Commerce Manager Dashboard Home page.
Navigation
EPiServer Commerce has an intuitive navigation. When logged on to EPiServer Commerce, use the rightclick menu to go directly to the Commerce Manager interface to work with web store back-end procedures. Or, choose the EPiServer CMS Edit or Admin mode to work with content management or system administrative tasks. See also Accessing the different modes .
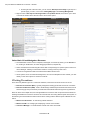
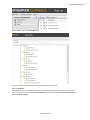
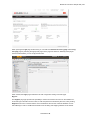
Navigating Commerce Manager
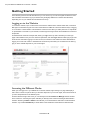
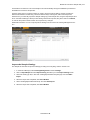
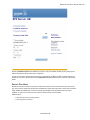
Once you first login to Commerce Manager, you are directed to the Dashboard homepage.
l The Dashboard has Controls showing various information, including Alerts, News & Announcements, Help, and a Summary.
l More Controls can be added by clicking on Add.
l On the left is the Left Menu or Navigation iframe where users can switch between Commerce Manager systems and navigate a folder trees of options.
l On the top-right, you can see your login name, product version, and installed license.
l By clicking on the top-left header, you will be directed back to the front-end site.
l On the menu bar below header, there are additional options available to the user.
l By clicking Welcome, you can adjust your Settings, Sign In As a Different User, or Sign
Out of Commerce Manager. You can also change the language used to a different one if your Commerce Manager is configured for multiple languages.
l By clicking About, you can Send Feedback using a form, get information on the Database
Schema for support purposes, and open up our Online Help repository.
© EPiServer AB
26 | User Guide for EPiServer Commerce 1 R2 SP1
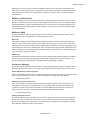
l On the right side of the menu bar, you can click on Get Help For this Page to get help on a specific page you are in, such as the Catalog Edit page under Catalog Management.
l Right next to the Get Help For This Page button is an Up-Down Arrow, which allows you to hide or unhide the header above the menu bar to save screen space.
Other Basic UI and Navigation Elements
l The Dashboard Controls can be collapsed, rearranged, and closed by clicking on the Arrow button, clicking on the X button, and click-dragging the title bar, respectively.
l There are tabs below the left navigation frame that corresponding to a specific system of the Commerce Manager. Clicking on each button results in a change of the top side menu.
l A common navigational model is the hierarchical folder/node structure.
l Some systems, such as Customer Management, do not have collapsible nodes. Instead, you click directly on the menu options to access its contents.
Working Procedures
There are many different types of e-commerce websites, however the two most common ones are:
l Business-to-Consumer (B2C) - typically designed for selling goods and services to consumers.
l Business-to-Business (B2B) - used to build strategic relationships with other businesses, and to ease the supply and procurement processes that characterize trade among those organizations.
Sites can also have multiple roles, and a single EPiServer Commerce site can provide several functions.
Working with EPiServer Commerce involves various tasks and roles using different parts of the system. In the following we will describe the tasks involved when working with the different parts of EPiServer Commerce:
l EPiServer OnlineCenter - for monitoring website activities.
l EPiServer CMS - for managing and displaying content on the website.
l Commerce Manager - for administration of back-end online store tasks.
© EPiServer AB
Getting Started | 27
Depending on how you choose to work with editorial content and your online store administration, you will define your user roles and groups, and give them access rights to the different parts.Example of user roles in EPiServer Commerce are content editors, marketers, business owners, and store and system administrators.
EPiServer OnlineCenter
All users of EPiServer CMS and Commerce Manager, including business and website owners, can use EPiServer OnlineCenter to get an overview of the website and activities of interest. Through the usage of customized gadgets on the personalized dashboard, you can create your own website workspace. The OnlineCenter also has a global search function where you can search for topics in both pages and files on the entire website.
EPiServer CMS
In EPiServer CMS you will work with your editorial content, just as you would with any website. The different tasks are done in the EPiServer CMS Edit and Admin modes.
Edit mode
Web editors will work inside the EPiServer CMS editorial interface to update content of web pages. Perhaps you want to create news or article content related to the products in your online store. This is most typically done by web editors creating EPiServer CMS pages.The EPiServer Commerce page types in the sample site do not require much editorial work, since most of these are only for display purposes fetching data from elsewhere. Some editorial efforts are often needed on content pages such as news listings, privacy and shopping policies and similar. Admin mode
The EPiServer administration interface is where you will manage the administrative tasks for the website. These may involve setting access rights for EPiServer CMS web pages in the page tree structure, configuration of page types, management of scheduled jobs, and globalization settings.
Commerce Manager
This section describes the most common tasks for users including business managers, marketing staff, UI staff and IT professionals. For your convenience, these tasks have been categorized by functional area.
System Administration and Configuration
System Administration includes various configuration tasks such as setting up shipping and payment gateways, your default language, currency, units, tax configuration, licensing, and search settings.
l System Administration
Administrative Users and Customers
Users and customers are managed by the Customer Management system. Users are internal to your organization and should not be confused with customers, partners and organizations. Generally, only your team of internal users will have access to the Commerce Manager and depending on their permissions will have varying access to the systems and menu items within each system.
l Customer Management
Catalogs and Product Entries
An Commerce Manager front-end site allows customers to shop for products. Products are arranged into a particular catalog. Catalogs are independent from one another and you may create as many catalogs as you need. Catalogs can be structured in a number of ways and organized into Categories, Products, SKUs, Bundles, Packages and Dynamic Packages.
© EPiServer AB
28 | User Guide for EPiServer Commerce 1 R2 SP1
The Catalog Management system provides users with the ability to manage catalogs, product categories and products. A default B2C Sample Site along with a default electronics catalog (consisting of a Brands catalog + Everything catalog) is included giving you a running demo site after you run the installer.
l Catalog Management
Purchase Orders, Shopping Carts, Shipping, and Returns/Exchanges
The Order Management system is where you can monitor, track, change or create new orders, ship out items, and create returns/exchanges. Orders are highly flexible, giving internal Commerce Manager users the ability to create Purchase Orders with various options including split payments, split shipping, and split shipping addresses.
l Order Management
Customer Campaigns, Promotions, and Discounts
One area handled by the Marketing system is promotions. A Promotion is a marketing tool used to increase sales of certain products or product lines. Various incentives such as lowered pricing and other discounts can be employed as part of a promotion.
Promotions can be classified into two types: either you can create a promotion that is visible prior to checkout or you can configure the promotion to be displayed during the checkout process. The most powerful aspect of the Marketing system is the Workflow Engine which allows variable conditions to be applied when creating a Promotion. These conditions vary from the number of items, the percentage discount, shipping rates and many others.
Creating custom promotions is incredibly powerful; users have many ways in which to configure promotions based on their needs.
Marketing teams also have the ability to target specific customer segments by region, individual customers or customer groups.
l Marketing
Assets and Web Files
The Asset Management system allows for Assets including images, mp3s, pdfs, software packages and other downloadable files to be centrally stored, displayed on either the public site or the Commerce Manager site and ultimately to be shared or purchased.
l Asset Management
© EPiServer AB
User Access and Roles | 29
User Access and Roles
By default, EPiServer Commerce uses a customized role and membership provider where groups and users are stored in the Commerce Manager database. The information is then shared between EPiServer CMS and Commerce Manager. This means that the same users and groups will be available both from the EPiServer CMS Admin mode as well as from Commerce Manager under Customer Management. Both website administrators and customers registering on the e-commerce site will managed by the same provider and the user account information will be saved in the same place.
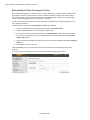
Most of the user and group/role management for the e-commerce part will be done from Commerce Manager. This includes managing user accounts and adding roles to users (contacts). When you need to set access rights for editorial content management in the page tree of the website, this will be done from the EPiServer CMS Admin mode.
The EPiServer Commerce sample site has a number of predefined users and groups (roles), both for managing editorial content as well as for administering the e-commerce tasks. Remember that these users and groups are only examples of how you can set up access rights for your website.
User Access from Commerce Manager
Managing users and roles for store administrators is done from Commerce Manager under the Customer
Management sub-system. EPiServer Commerce is built with flexibility in mind for structuring internal teams and departments as well as external organizations, partners and customers. The Customer Management system allows for creating users and groups with either pre-configured Roles or custom Roles which control access to different systems or individual elements within a system.
When you install EPiServer Commerce, you are provided with an administration account. This account is given full privileges, meaning it is full access to all systems and all elements within each system. Additional accounts used by your internal team to access Commerce Manager must have one or more Roles assigned to them. A role can be for instance "Catalog Viewers", "Marketing Admins" or "Asset Managers".
Commerce Manager users are internal to your organization and should not be confused with customers. By default, customers who register from your public site are given the "Everyone" and "Registered" Roles, but these roles do not allow access to Commerce Manager.
A standard installation of the EPiServer Commerce sample site has a number of predefined roles. These roles are based on common e-commerce working procedures and provides a suggestion to how you can work with the system.
© EPiServer AB
30 | User Guide for EPiServer Commerce 1 R2 SP1
Each role is associated with a range of permissions on different levels, related to the various parts of the Commerce Manager system.
The following roles are available by default, with a set of permissions for each role:
l Admins - default role allowing to fully administer most areas of the Commerce Manager.
l Order Managers - this role can create returns and exchanges, view and edit orders, send notifications, process payments and split shipments. You can also allow order managers to manage discounts and/or change the line item price.
l Order Supervisors - this role has full permissions for the entire order management procedure, including the entire Order Managers permissions.
l Shipping Manager - this role allows for viewing, packing and completing shipments.
l Receiving Manager - this role can view shipments and receive returns.
l Everyone - assigned when a customer registers an account from the front-end public site.
l Registered - assigned when you register from an Account from the front-end public site.
l Management Users - this role allows users access to Commerce Manager.
l Administrators - this role has extensive administration rights in areas such as assets, catalogs, core functions, marketing and customer and order management.
l WebAdmins - this role is EPiServer CMS specific and provides access to the EPiServer CMS administration interface, needed when administering the content management parts of EPiServer Commerce.
l WebEditors - this role is EPiServer CMS specific and provides access to the EPiServer CMS editing interface, needed when working with content on the EPiServer Commerce website.
You can change the detailed permissions for each of these roles, as well as define your own roles and set permissions, all in order to match the specific working procedures in your organization.
© EPiServer AB
User Access and Roles | 31
User Access from EPiServer CMS
You will need to access the EPiServer CMS Admin mode to manage access rights for content editors. In the EPiServer CMS Admin mode, you will be able to view all users and user groups under Search
User/Groups.
Setting access rights for editorial content and the page tree structure is done from the Set access rights section, just as you normally do in EPiServer CMS.
In EPiServer CMS, there are the following default roles:
l Everyone - an anonymous visitor browsing to your website. Can only access the View mode of the website.
l WebAdmins - membership in this group provides access to the EPiServer CMS administration interface.
l WebEditors - membership in this group provides access to the EPiServer CMS editing interface.
Please refer to the EPiServer CMS administration documentation on world.episerver.com, for more information on how to work with access rights for editorial content.
As with any EPiServer CMS website, you can work with role and membership providers from Windows or SQL, or both using the multiplexing setting. You can also build your own user and membership provider to be used with EPiServer Commerce. Find out more about membership and role provide management in the documentation for EPiServer CMS on world.episerver.com.
© EPiServer AB
32 | User Guide for EPiServer Commerce 1 R2 SP1
Globalization
With "globalization" we mean the possibility to display content in different languages to website visitor groups with different language preferences. When a visitor to the website selects a language option, the content for that language will be displayed. If content doesn't exist in a selected language, a fallback procedure may be applied if this has been configured. Another dimension of globalization is the possibility for users to select different language options for the user interface inside EPiServer Commerce.
Find out more about globalization and language management in general on a website in the documentation for EPiServer CMS on world.episerver.com. In this section we will describe in more detail how you work with the different language settings in EPiServer Commerce.
Working With Language Settings
Specific Language Settings
In EPiServer CMS there are three different language concepts, two which are defined by ASP.NET (Culture and UI Culture), and one which is the EPiServer content language. The ASP.NET Culture is referred to as "System Language", and UI Culture as "User Interface Language". A typical culture is "en-US" which defines the language as English (en) with the culturally defined specifics for United States (US).
In EPiServer Commerce, "UI Culture" is used and "English (United States)" is the default language used by the system. This is due to the Commerce Manager database which uses "UI culture" in the matching. In order for EPiServer Commerce to work properly, it is therefore essential that you are using the "UI Culture" setting on your website to make the different languages display correctly. Make sure this is set up right from the start to avoid problems later on. It is recommended that only "UI Culture" languages, i.e. "en-US", "en-GB", "nl-BE" etc., are enabled on the website.
Content Language
To display content in the desired language on your EPiServer Commerce website, you may apply the language management options available in EPiServer CMS Edit mode, to create pages in different languages. Available languages for CMS pages are enabled from the EPiServer CMS Admin mode under Config and Manage Website Languages. For more detailed information on how the language settings work, please refer to the user documentation for EPiServer CMS.
© EPiServer AB
Globalization | 33
Languages for Product Catalogs
For products in the product catalog, the language information is set in the product database. EPiServer Commerce will display the product information in the language selected by the website visitor. Languages for the content of a product catalog is set when you create the product catalog. Find out more about this under Create a Catalog in the Catalog Management section.
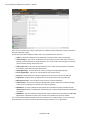
User Interface Language
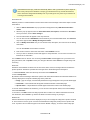
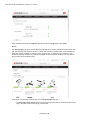
To set the user interface language from EPiServer CMS, click your user profile name in the upper right corner. Select My Settings and then the Display Options tab. Select the language of your choice in the list, and click Save. Note that you may need to refresh the browser window for the changes to apply.
© EPiServer AB
34 | User Guide for EPiServer Commerce 1 R2 SP1
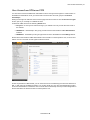
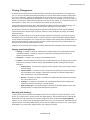
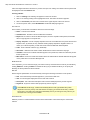
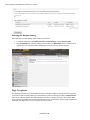
To set the user interface language from Commerce Manager, select Change Language in the upper menu of Commerce Manager. Choose the language of your choice in the list and click OK to save you changes.
© EPiServer AB
File Management | 35
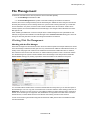
File Management
In EPiServer Commerce, there are two places to store content files (assets):
l In the File Manager of EPiServer CMS.
l In the Asset Management sub-system of Commerce Manager in EPiServer Commerce.
However, files can be managed entirely from the File Manager in EPiServer CMS. Using the Virtual Path Provider (VPP) technique, the two storage areas are "synchronized" meaning that when you create folders and add files in one place, the same content will be available in the other location. Assets can be created, updated, moved and deleted from the File Manager, and changes will be reflected in the Asset Manager as well.
When installing the EPiServer Commerce sample site, the Asset Management sub-systemwill be automatically configured and available in the File Manager as the Commerce Assets starting point. In the following we will briefly describe how files are managed in EPiServer Commerce.
Working With File Management
Working with the File Manager
Files such as images and documents, that are used in the editorial parts of the sample website, are stored in the File Manager of EPiServer CMS, just as for any other EPiServer CMS site. With editorial content, we hereby mean web pages with content that is created from the EPiServer CMS Edit mode. For instance, this could be a news section with news items, or articles related to products on the e-commerce website.
The Asset Manager sub-system is made available in the File Manager of the sample site as the Commerce Assets starting point, making it possible to work with all files on the website in one place.
You work with folders and files in the Commerce Assets folder structure just as you do with other parts of the File Manager. You can copy and move folders from Commerce Assets to other starting points such as Global Files. However you cannot move or copy folders and files from other starting points to Commerce Assets, since versioning is not supported. Also, metadata is not supported for the files under Commerce Assets structure, so these fields need not to be filled in when adding new files to the structure.
To find out more about general file management in EPiServer CMS, please refer to the EPiServer CMS user documentation.
© EPiServer AB
36 | User Guide for EPiServer Commerce 1 R2 SP1
Working with the Asset Manager
Files can also be managed from the Asset Management sub-system in Commerce Manager. The Asset Manager folder structure can be used for storing documents related to products in the product catalog. This can be for instance user guides, software downloads or product sheets. Each asset file can then be related to a product in the product catalog.
For more information about asset management, please refer to the Asset Management section.
Product images in the EPiServer Commerce sample site are stored in the database, and thus are not available from the File Manager or the Asset Management sub-system.
File Formats
Files stored in EPiServer Commerce are often image files in different formats such as .jpg or .png, or documents in .pdf formats. However, files stored in EPiServer Commerce can be of almost any type since a wide selection of file formats are supported. Depending on how your website is configured, files will also be indexed and appear in the global search for the website.
© EPiServer AB
Commerce Manager | 37
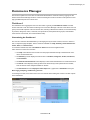
Commerce Manager
This section explains how end users can administer the EPiServer Commerce site by logging into the back-end Commerce Manager module. Commerce Manager includes a number of sub-systems for managing the different parts of an online store.
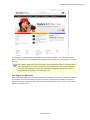
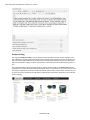
Dashboard
The Dashboard is an aggregated view of a site's status. Typically, the Dashboard > Home is the first screen seen that a user sees when he/she logs into Commerce Manager. This is the area that a user can get a quick overall snapshot of his ecommerce site, including notifications and alerts, an overall summary of products, categories, orders, customers, and promotions, sales performance graphs, customizable news and announcements, and a search field for help.
Customizing the Dashboard
The user can customize the Dashboard by re-arranging the layout of the Controls, remove or add Controls, or adjust the page template. The five Controls available are: Help, Summary, News & Announcements, Alerts, and Performance.
To access the Dashboard, click on Dashboard > Home from the left navigation frame. Users have five controls out of the box:
l The Help control allows users to search for help topics that links directly to the EPiServer Commerce documentation site.
l The Summary control displays the total number of Products, Categories, Orders, Customers, and Promotions.
l The News & Announcements control displays a feed of the latest articles from a selected source.
l The Alerts control displays warnings about each site that may hinder performance and sales, such as the lack of site analytics installed on the site
l The Performance control displays a Sales Graph and a graph for the Total Sales of the year.
Rearranging, Collapsing, and Removing Controls
To rearrange Controls, hover the mouse cursor over the title bar and drag the Control to another "space" in the Dashboard.
© EPiServer AB
38 | User Guide for EPiServer Commerce 1 R2 SP1
To collapse Controls, click on the Up-arrow icon. To expand a collapsed Control, click on the Downarrow.
To remove a Control, click on the X icon.
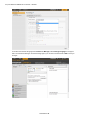
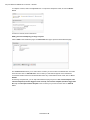
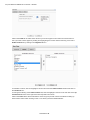
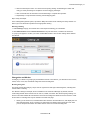
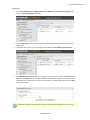
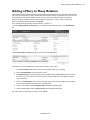
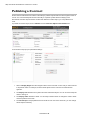
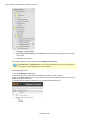
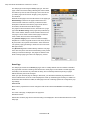
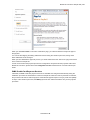
Adding Controls and Adjusting the Page Template
Click on Add on the Dashboard page. The Information form pops up above the Dashboard page.
The Controls Set tab allows you to select which Controls you want to add to the Dashboard. Check the boxes and then click on Add and Close. The Controls you selected will appear on the Dashboard.
To reset the Dashboard back to the default state before any customizations were made, click on Set to
Default.
On the Page Template tab, you can adjust the Dashboard page layout to a One column template, Two
columns template (first twice bigger than the second), Two columns template (2nd twice bigger than
the 1st), and Two equal columns template. Click on the layout you want and then click on Add and
close. © EPiServer AB
Commerce Manager | 39
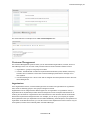
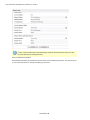
The screen below is an example of how a One column template looks.
Customer Management
The Customer Management system is where you can add individual organizations, contacts, and Commerce Manager users. You can also create purchase orders for each individual customer account.
l Organizations - groups or sub-groups of Contacts
l Contacts - individuals with a certain set of personalized information (name, address, email, etc.). Contacts can be customers or users with Commerce Manager permissions to manage one or more systems.
l Commerce Manager User - this is a user with an assigned role which provides access to the Commerce Manager site.
Organizations
In the Organizations section, Commerce Manager users can create new organizations or organization units, which are basically groups or sub-groups of assigned contacts.
Organizations can be categorized into different types such as organization or organization units (i.e., regional branches, departments) and also business categories such as "Computer and Electronics" or "Clothing and Accessories." Organizations can be structured into a tree structure with sub-units with different levels of permissions assigned to each. For example, you can set up your company as a parent level organization while your departments such as Sales & Marketing, IT/Development, and operations as organization units. With this scenario, you can allow users in each departments to have access to only relevant systems, screens and functionality within Commerce Manager.
© EPiServer AB
40 | User Guide for EPiServer Commerce 1 R2 SP1
The Organizations section also comes with a new customizable filtering feature to display organizations and sub-units based on any of their attributes such as name, organization types, business categories, etc.
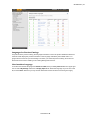
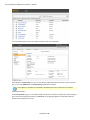
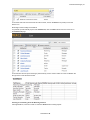
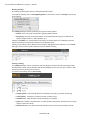
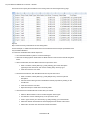
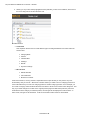
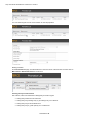
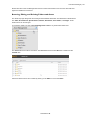
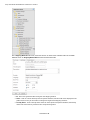
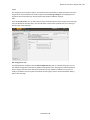
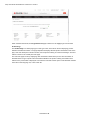
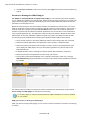
Browsing Organizations
Organizations are one of the major function areas of the Customer Management system. You can browse and view existing Organizations.
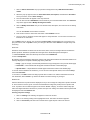
To browse Organizations, go to Customer Management > Organization on the left menu.
This will open the Organization List page.
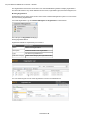
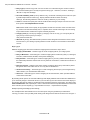
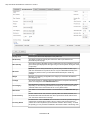
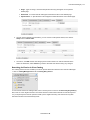
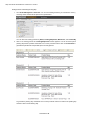
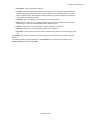
Viewing Organization Details
Organization details are separated by four columns:
Field
Description
Name
Name of the organization
Description
Additional details of the organization
Type
The kind of organization it is
Business Category Under which category the organization falls You can click through the name of the Organization to view more details about it.
© EPiServer AB
Commerce Manager | 41
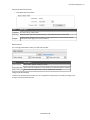
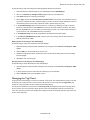
Searching for Organizations
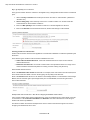
You can also use the search field on the Organization List to find specific Organizations by name. To conduct a search, enter in your search terms and click on the Search button.
To conduct a new search, click on the Reset button to reset the form and enter your new search terms.
Printing a List of Organizations
If you want to generate a printer-friendly list of Organizations, click on Printer Version. A new window will pop-up and render a simple table suitable for printing. Click on the Print button on the upper right corner of the page.
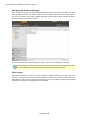
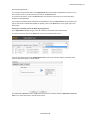
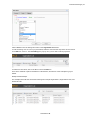
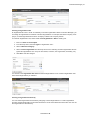
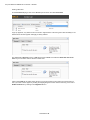
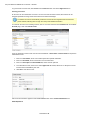
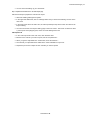
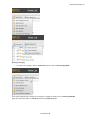
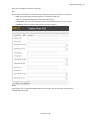
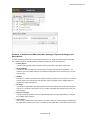
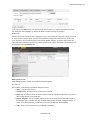
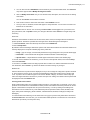
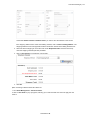
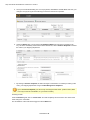
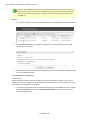
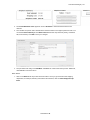
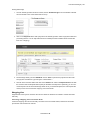
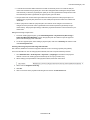
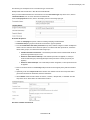
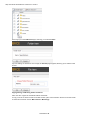
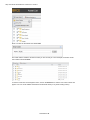
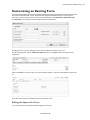
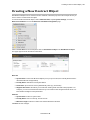
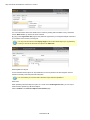
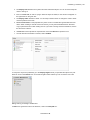
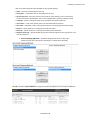
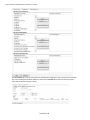
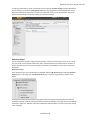
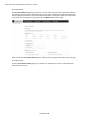
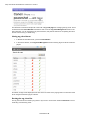
Creating or Customizing Views for Browsing Organizations
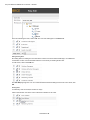
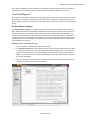
As an Organization List gets longer, users can create and customize views to filter the list.
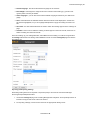
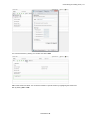
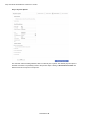
To create a new view, click on the View drop-down menu and select "New View."
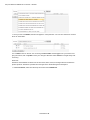
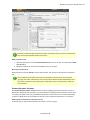
A pop-up form appears above the Organization ListThis form gives users the ability to customize which columns appear and apply a variety of filters.
The default tab is General. Enter in a Title for the custom View. Click the check-box Show this view for all
users, if you want other users to see this custom View.
© EPiServer AB
42 | User Guide for EPiServer Commerce 1 R2 SP1
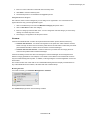
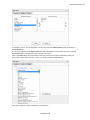
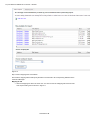
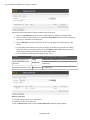
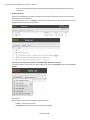
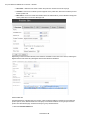
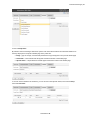
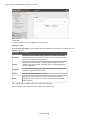
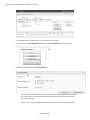
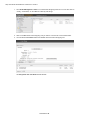
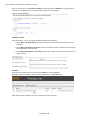
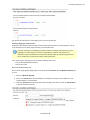
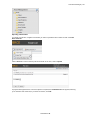
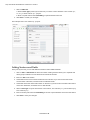
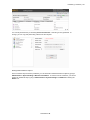
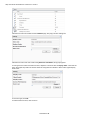
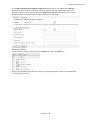
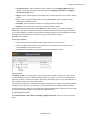
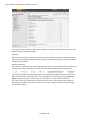
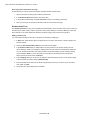
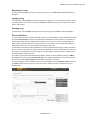
Click on the Fields tab to select which columns you want to appear in the custom View. Select the columns you want to have appear by clicking and highlighting the column name and moving it over to the Visible columns list by clicking on the Right Arrow icon.
To deselect a column, click and highlight a column name from the Visible columns list and then click on the Left Arrow icon.
To change the ordering of the Visible columns list, click and highlight a column name and click on the Up
and Down Arrow icons on the right of the list to reposition the column.
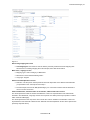
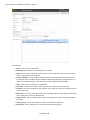
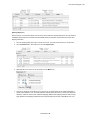
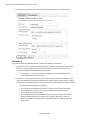
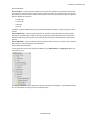
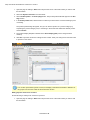
Click on the Filters tab to set the View filters. Users are given precise controls over filters for setting up rules for their custom View. Clicking on the + icon allows you add an additional filter.
© EPiServer AB
Commerce Manager | 43
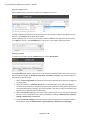
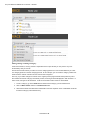
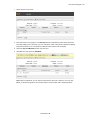
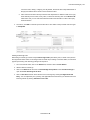
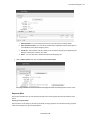
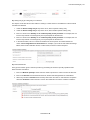
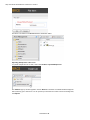
Click on Save to save the settings and return to the Organization List screen.
To edit an existing View or a View you just created, select the View from the drop-down menu and click on the Edit icon next to it. The View Editing form pops up and you are able to edit all properties.
To delete a custom View, click on the X icon next to the Edit icon.
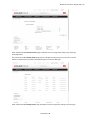
There are a multitude of options available for customization, but here are some examples to get you started.
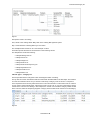
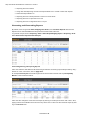
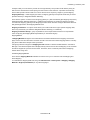
Example View Filter Setups
The examples here will start off with the following list of sample Organizations, Organization Units, and Divisional Units:
© EPiServer AB
44 | User Guide for EPiServer Commerce 1 R2 SP1
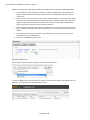
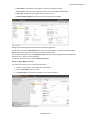
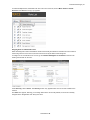
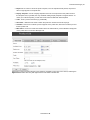
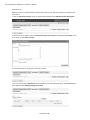
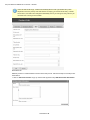
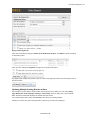
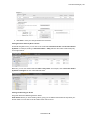
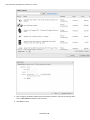
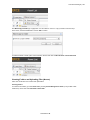
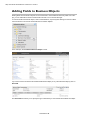
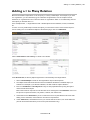
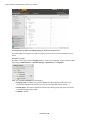
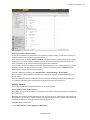
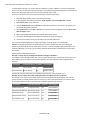
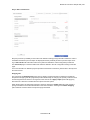
Example 1: Creating a View to Only Show Organizations that Match a Business Category and Organization Name
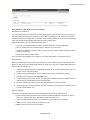
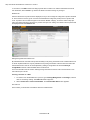
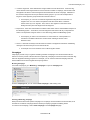
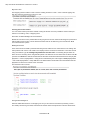
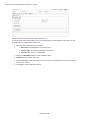
1. In this example, we will create a filter condition that display Organizations with a Business Category that equals "Business & Professional Services" and an Organization Name that equals "Company X."
2. Click on the + icon and from the drop-down select "Business Category." Two fields, which default to "Equals" and "Arts & Entertainment," automatically appear. Click on "Equals" and a drop-down appears. Keep the field as "Equals." Click the field to the right of it and select a "Business Category" name (such as "Business and Professional Services").
3. Since we want to add another filter so that the Organization not only matches this "Business Category," but also a specified name, click on the following + icon and then on the drop-down select "Name."
4. In the next field, select "Equals" and then on the field that says "Text" enter in the name of the Organization (such as "Mediachase").
5. Once done, click Save to save the View.
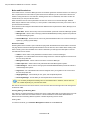
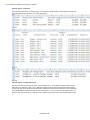
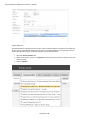
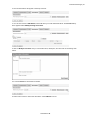
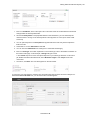
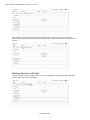
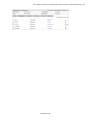
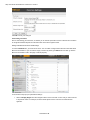
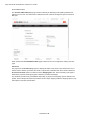
Applying and Editing a View
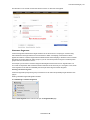
Once a View is created and saved, it appears in the View drop-down box.
To apply the View, select it from the drop-down. Based on the columns and filters you applied for the custom View, your Organization List will reflect those options.
© EPiServer AB
Commerce Manager | 45
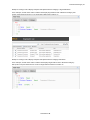
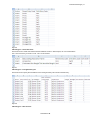
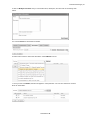
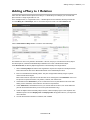
Example 2: Creating a View to Display Companies with Specific Business Category or Organization Name
In this example, we will create a filter condition that display Organizations with a Business Category that equals "Computer & Electronics" or an Organization Name that contains "X."
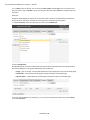
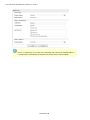
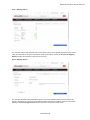
Example 3: Creating a View to Display Companies with Specific Business Category and/or Name
In this example, we will create a filter condition that displays Organizations with a "Business Category" that equals "Computer & Electronics" and/or an Organization Name that contains "X."
© EPiServer AB
46 | User Guide for EPiServer Commerce 1 R2 SP1
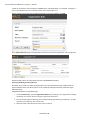
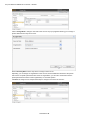
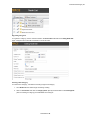
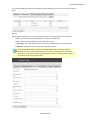
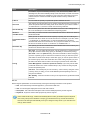
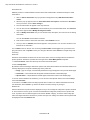
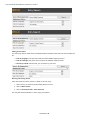
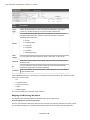
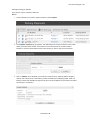
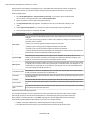
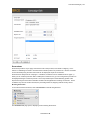
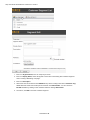
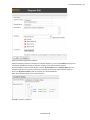
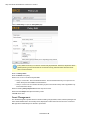
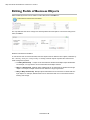
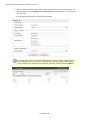
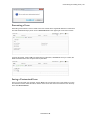
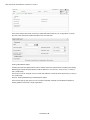
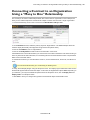
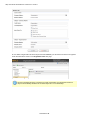
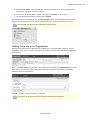
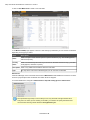
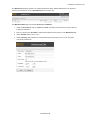
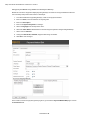
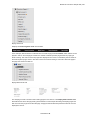
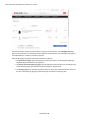
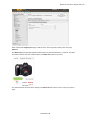
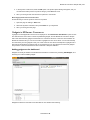
Creating an Organization
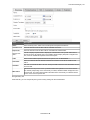
To create an Organization, click on New Organization.
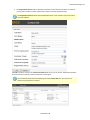
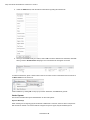
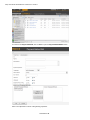
The Organization Edit page appears. Field
Description
Name
Enter in the organization name (this is the only required field).
Description
For additional details about the organization.
Type
Select from the drop-down menu to assign a type to the organization. More types can be added to the drop-down by clicking on the icon.
Business Category
Select from the drop-down menu to assign a category to the organization. You can add more categories by clicking on the icon.
Parent
You can assign a parent organization to an organization. If the organization you are creating is a sub-unit of a larger organization, then select the parent in the drop-down menu. If you do not see the Organization listed on the drop-down menu, click on "More..."
Once you have entered all relevant information, click on OK. The Organization Info window of the organization appears.
From here, you can view Information about the Organization you just created. Out of the box, you can also see associated Contracts, Organizations, Addresses, and Credit Cards. You can further edit the Organization by clicking the Edit button. To go back to the Organization List, click on Organizations on the menu bar next to Edit.
© EPiServer AB
Commerce Manager | 47
Creating an Organization Unit
An Organizational Unit is a "child" or subsidiary of a Parent organization. Within Commerce Manager, you can assign an Organization as a Parent of another Organization. For example, the Parent company "Company X," and the Organizational Units are "Company X West" and "Company X East."
To create an Organization Unit, either create a New Organization or Edit an existing one.
1. Enter in a Name and Description.
2. From the drop-down, select the Type as "Organization Unit."
3. Select a Business Category.
4. Select a Parent Organization from the drop-down menu. Selecting a Parent Organization will designate this Organization as a unit (or in other words, a division, sub-organization, subsidiary, etc.)
5. Click OK to save the changes.
You will see in the Organization Info View form that the Organization is now a child or Organization Unit of the Parent Organization you selected.
Creating an Organizational Hierarchy
You can create Organization Hierarchies by assigning a Parent Organization to a "child" Organization and then another Organization to the child. Permissions can be set to determine which users can view certain Organizations in the hierarchy.
© EPiServer AB
48 | User Guide for EPiServer Commerce 1 R2 SP1
Create an Organization Unit by assigning a Parent with a child Organization. For example, "Company X" is the Parent Organization and "Company X West" is the Organization Unit.
Assign another Organization with the child Organization ("Company X West"). Click OK.
In the Organization Info page, the Organization becomes the child to the Organization Unit you selected.
Repeat the steps above to create further subunits of the Parent Organization.
Creating and Editing Dictionary Entries
By default, when creating or editing an Organization, there is a default list of Types and Business Categories available to the user. More options can be created by editing the Dictionary within the Organization Edit page.
Adding New Dictionaries for Organization Type
1. To edit the Dictionary, open the Organization Edit page by creating a new organization or editing an existing one. Click on the icon next to the Type drop-down menu.
2. The new window appears allowing you to edit the existing organization Type dictionary . To add a new item to the dictionary, click on New Item.
3. Select the order of the item from the drop-down on the left.
© EPiServer AB
Commerce Manager | 49
4. Enter in a name of the item on the field next to the drop-down.
5. Click Save to save the dictionary item.
6. The dictionary item is now available in the Type drop-down.
Adding New Business Categories
Out of the box, there is a list of categories you can assign to an organization. You can add more categories the same way you add organization types.
1. Click on the dictionary icon next to the Business Category drop-down menu.
2. Click on New Item to add a new category.
3. Enter in a category name and then click . You can change the order the category is on the list by clicking on number drop-down menu.
4. The category now appears in the drop-down menu.
Contacts
Contacts are individuals with a certain set of personalized information (name, address, email, etc.).
l Contacts with Accounts - a customer who registers on the public site. If this customer chooses, he/she can login to his/her Account from the public site and access his/her order history and other personalized information. He/she cannot access the Commerce Manager.
l Contacts with User Permissions - someone internal to your team who has varying levels of access to the systems within Commerce Manager.
Contacts consisting of users who will be accessing the Commerce Manager can be assigned Roles based on varying permissions. For example, a user with the "Cms Admins" role will have full access to only the Content Management system. In addition, notes regarding the Contact's registration source can be recorded.
The Contact section also comes with a new customizable filtering feature to display contacts based on any of their attributes such as Name, Last Order Date and Customer Group.
Browsing Contacts
To browse Contacts, go to Customer Management > Contacts.
Viewing Detailed Contact Information
The Contact List page shows a list of existing Contacts.
© EPiServer AB
50 | User Guide for EPiServer Commerce 1 R2 SP1
You can click through the name an existing Contact to view more information.
From within the Contact Info form, you can view other recorded information about the Contact. For example, you can view Addresses and Order History related to this Contact.
More objects or metadata can be added to the default View Form via Business Foundation.
Searching for Contacts
On the Contact Info page, you can use the search form above to search for a particular Contact using key terms. Conduct the search by clicking on the Search icon (magnifying glass). Contacts that match the search terms will appear on the list.
© EPiServer AB
Commerce Manager | 51
To clear the search and revert back to show all Contacts, click on the Reset icon (eraser) next to the Search icon.
Generating a Printer Friendly List of Contacts
To generate a printer friendly layout of the Contact List, click on Printer Version from the menu bar on the Contact List page.
A new browser window opens showing a printer-friendly version of the Contact List. Click on Print on the far right corner of the browser window.
Creating or Customizing Views for Browsing Contacts
LIke Organizations, users can create or customize Views when browsing objects.
© EPiServer AB
52 | User Guide for EPiServer Commerce 1 R2 SP1
Creating a New View
On the Contact List page, click on the View drop-down menu and select New View.
A pop-up appears, very similar to the one found in Organizations. This form gives users the ability to customize which columns appear and apply a variety of filters.
The default tab is General. Enter in a Title for the custom View. Check the box Show this view for all
users if you want other users to see this custom View.
Click on the Fields tab to select which columns you want to appear in the custom View. Select the columns you want to have appear by clicking and highlighting the column name and moving it over to the Visible columns list by clicking on the Right Arrow icon.
© EPiServer AB
Commerce Manager | 53
To deselect a column, click and highlight a column name from the Visible columns list and then click on the Left Arrow icon.
To change the ordering of the Visible column list, click and highlight a column name and click on the Up
and Down Arrows on the right of the list to reposition the column.
Click on the Filters tab to set the view filters. Users are given precise controls over filters for setting up rules for their custom View. Clicking on the + icon allows you add an additional filter.
There are a multitude of options available for customization.
© EPiServer AB
54 | User Guide for EPiServer Commerce 1 R2 SP1
Applying and Editing a View
Once a View is created and saved, it appears in the View drop-down box.
To apply the View, select it from the drop-down. Based on the columns and filters you applied for the custom View, your Contact List will reflect those options.
To edit an existing View or a View you just created, select the View from the drop-down menu and click on the Edit icon next to it. The View Editing form pops up and you are able to edit all properties.
Creating a Contact
To create a new Contact, from the Contact List page, click on New Contact.
The Contact Edit page appears where you can enter all relevant information about the contact. The only required fields to complete are Full Name, First Name, Last Name, and Email. The rest of the fields are optional but are recommended.
1. Select a Parent Organization from the drop-down menu to associate the Contact with a single Parent Organization.
2. Assign the Contact to a Customer Group. More Customer Groups can be added by editing the Customer Group Dictionaries. Customer Groups become useful when setting specific permissions and targeted Marketing Campaigns. (For more information, see "How to Assign a Customer Group Sales Price for a Particular Item" section below.)
3. Select a Preferred Currency for the contact. If the Contact is in France, you may want to associate the Euro currency. Available currency options are based on settings in Administration > System
Settings > Dictionaries > Currencies.
4. Select a Preferred Language to associate with the Contact. Languages are populated based on the languages set under Administration > System Settings > Dictionaries > Languages.
© EPiServer AB
Commerce Manager | 55
5. The Registration Source field is a text field for entering in notes about the Contact. For instance, you may want to reference which website the Contact is currently registered under.
The Registration Source field is automatically filled when a user creates a new Account from the public website.
Click OK to save the Contact. The Contact Info View Form, where you can enter in additional information about the Contact as well as go back and edit the Contact again.
The screenshot below shows the default layout of the Contact Info form. This can be customized using Business Foundation.
© EPiServer AB
56 | User Guide for EPiServer Commerce 1 R2 SP1
To go back to the Contact List, click Cancel or the Contacts button next to the Right Arrow icon.
Creating an Account
An Account can be created with a Contact. Once an Account has been created, the Contact can be assigned permissions using Roles and access the Commerce Manager. A customer Account is automatically created for a customer who registers from the front-end public website, allowing them to login and view personalized information.
To create an Account for an existing Contact, click on a Contact name from the Contact List. On the Contact Info page, click on Create Account.
A pop-up appears to enter in their user account credentials. A User Name and Password are required to create the Account.
1. Enter in a User Name, which can include spaces and special characters.
2. Enter in a Password, which must be four or more characters.
3. Enter in a Description and Email Address, which are both optional.
4. To enable the account, select "Yes" under Approved. Otherwise, select "No" to keep the account inactive and inaccessible by the user.
5. Click OK to save the account.
User account information appears under the Account section of the Contact Information form.
Fields Explained:
© EPiServer AB
Commerce Manager | 57
l Last Activity - last time the user logged in or made any changes to the site
l Last Lockout - last time a user was locked out due to too many failed login attempts
l Last Login - last time the user logged into his or her account
l Last Password Changed - last time the user account password changed
Editing an Account, Changing an Account Password, and Removing Accounts
To edit an Account, click on Edit Account. The same pop-up will appear. You cannot change the User
Name unless you remove the Account and recreate the same Account.
To change the password, click on Change Password. A password pop-up appears with an editable field that allows you to enter in the new password.
To delete or remote the account, click on Remove Account.
Create an Order Within a Contact
For customer accounts, you can create purchase orders.
1. Click on a contact name. You will see the contact details.
2. Click on New Order on the menu bar.
3. The New Order form appears to generate an order for the customer.
© EPiServer AB
58 | User Guide for EPiServer Commerce 1 R2 SP1
Roles and Permissions
In the Roles section, Commerce Manager users can be either granted or restricted access to an entire system or a particular menu item within a system. Each Role is defined by a set of Permissions that can be added or changed based on user selection. Existing Roles can be customized; new Roles can also be created to suit your unique business needs.
Roles control the level of access permissions of each user account in Commerce Manager. Different Roles may be added to user accounts (i.e., store operator or webmaster) so that they can access, edit, or process relevant information.
There are three main categories that determine the different levels of permissions: Admin, Manager, and Schema Manager.
l Admin Role - allows users to fully access and administer a particular Commerce Manager system.
l Manager Role - allows users to manage (View/Create/Edit/Delete) existing aspects of a particular Commerce Manager system .
l Schema Manager - allows users to access only the administrative side of an Commerce Manager system (e.g. setting up Meta Data).
Definitions of Roles
Selecting Roles in the left menu opens a Roles List page with the default Roles shown below. The Roles List page allows Commerce Manager administrative users to add new, edit or delete these existing roles.
Here is a listing of the roles available out-of-the-box followed by a brief high-level description of what a user with this role can access:
l Admins - allows users to fully administer most areas of the Commerce Manager.
l Everyone - one of the default roles which is assigned when a customer registers an account from the front-end public site.
l Management Users - allows users access to the Commerce Manager.
l Order Supervisor - allows users to fully administer the Order Management system.
l Order Managers - allows users to manage (View/Create/Edit/Delete/Others) elements within the Order Management system.
l Registered - one of the default roles which is assigned when you register from an account from the front-end public site.
l Shipping Manager - has the ability to view, pack, and complete shipments.
l Receiving Manager - has the ability to view shipments and receive returns.
You can easily modify these existing roles or consolidate roles. In addition, custom roles can be created depending on your business needs.
See also the User Access and Roles section, to find out more about access rights and role management in EPiServer CMS.
Creating, Editing, and Deleting Roles
Out of the box, Commerce Manager includes a list of pre-existing Roles that can be assigned to Accounts. Users can also create their own Roles based on a set of Permissions. Roles allow Administrators to restrict users from accessing different systems or folders depending on their needs.
Creating a Role
To create a new Role, go to Customer Management > Roles to see the Role List.
© EPiServer AB
Commerce Manager | 59
Click on New to open up the Role Edit page.
There is a wealth of Permissions options Administrators can set for a Role.
Enter a Role Name.
Checkmark the boxes to give Permissions to the Account for this particular function or action. For example, if you want an Account to only View and Edit Assets, you will need to expand Assets > Manage and checkmark View and Edit.
© EPiServer AB
60 | User Guide for EPiServer Commerce 1 R2 SP1
Once done defining the Role, click on OK. The new Role will appear on the Role List.
Editing Existing Roles
All existing Roles, including the ones included out of the box with Commerce Manager, can edited and customized. It is also a recommended reference to how each pre-existing Role works.
To edit a Role, click on the Edit icon.
The Role Edit page appears. You can customize the Permissions settings for the Role. Once done, click OK.
Deleting Roles
To delete any Role on the list, there are two ways:
Click on the X button next to the name of the Role to delete one at a time.
© EPiServer AB
Commerce Manager | 61
To delete multiple Roles, checkmark each box and on the menu bar, click on More Actions > Delete
Selected. Click OK when the pop-up appears.
Assigning Roles to Individual Accounts
Roles are designed to allow and disallow certain functionality and folders to individual accounts. When a Contact logs into his or her account, that Account is bound by the Roles it was assigned.
To assign one or more Roles to an account, go to Customer Management > Contacts and click on an existing Contact with an Account.
Under Security, click on Roles. The Security section only appears after an Account was created for the Contact.
The Roles form appear, allowing you to assign Roles to the Account. By default, an Account is already assigned to the "Registered" and "Everyone" roles.
© EPiServer AB
62 | User Guide for EPiServer Commerce 1 R2 SP1
Click on Assign Role to assign a new Role to the Account. A pop-up appears allowing you to assign a specific Role from the drop-down menu.
Select a Security Role from the drop-down to assign to the Account.
Optionally, you can assign an Organization to the Account, which enables the Inheritance drop-down menu below. If specific permissions are set for an Organization, you can set to "Inherit from Parent" (inherit permissions from the Parent organization) or "Overwrite parent."
Click Save to assign the role. Repeat these steps to assign more roles to the Account.
© EPiServer AB
Commerce Manager | 63
Catalog Management
An EPiServer Commerce front-end public site allows customers to shop for products. To manage products, you can go to the back-end Commerce Manager and you will notice that products are arranged into one or more catalog(s). Catalogs are independent from one another and you may create as many catalogs as you need. Catalogs can be structured in a number of ways. For example, you may have various brands or product lines. Each brand or product line can have its own catalog. Or, a retailer may have multiple suppliers, in which case, you can segment each supplier into its own catalog.
A default B2C Sample Site along with a default electronics catalog (consisting of a Brands catalog + an Everything catalog) is included giving you a running demo site after you run the installer.
The EPiServer Commerce Catalog Management provides full complement of tools and capabilities to create and manage a diverse range of products, variations, pricing strategies, languages, and related website functions.
EPiServer Commerce allows you to easily and flexibly organize and categorize your products. All products referenced on a front-end site reside in a catalog created in Commerce Manager. Multiple catalogs can be created and assigned to one or more sites. The dates that each catalog will be available to the customer can also be defined. In this way, future revisions to items and pricing can be prepared easily and reviewed in advance of the release date to the site.
Catalogs can be organized into Categories, Products, SKUs, Bundles, Packages and Dynamic Packages.
Catalog and Catalog Entries
l Catalogs - a catalog is a top-level container for all catalog entries such as Categories, Products and SKUs.•Catalogs - a Catalog is a top-level container for all Catalog Entries such as Categories, Products and SKUs.
l Categories - a Category is a grouping of purchasable products.
l Products - a Product represents various forms of merchandise that you can display and purchase from the front-end site, including Products, Variations/SKUs, Bundles, Packages and Dynamic Packages.
l Product Entries - a Product Entry typically contains a product name, part number, description and images.
l Variations/SKUs - a Variation or SKU corresponds to a specific type of product with specific characteristics. For example, a shirt product will have an individual Variation/SKU which includes size, color and sleeve length.
l Bundles - a Bundle is a collection of Variations and SKUs allowing customers to purchase two or more items at once.
l Packages - a Package is comparable to an individual SKU because the Package item must be purchased as a whole (i.e. computer system).
l Dynamic Packages - a Dynamic Package is similar to the Package definition above with the added ability to configure the Package during checkout.
Working with Catalogs
A catalog is a top-level container for all catalog entries such as Categories, Products and SKUs. In this section, you will learn how to browse, create, and delete catalogs. We recommend that you start with the catalog that came with the EPiServer Commerce sample site, which contains the Everything/Brands catalog. You can use the import functionality to get this into one of your environments, edit/master the content and export it so that this polished catalog can be used in a different environment. Also, you are given the flexibility to use a CSV file to rapidly create a new catalog from scratch.
© EPiServer AB
64 | User Guide for EPiServer Commerce 1 R2 SP1
Browsing Catalogs
All Catalogs are managed under the Catalog Management system.
To browse the Catalog, click on Catalog Management on the left menu. Click on Catalogs to browse the list of Catalogs.
The Catalog List page shows the following two sample nodes by default:
l Brands - this node contains information regarding different brands.
l Everything - this node contains information on individual sales items grouped in different categories ("Digital Cameras," "Daily Specials," etc.).
Clicking on the Memo icon, located between the check box and the folder icon, will display more information and settings of the particular Catalog in the Catalog Edit page.
Clicking on the Catalog names ("Brands" and "Everything" highlighted in blue) will take you to the Node
List page, which is the list of Sub-Categories under the selected Catalog.
Creating a Catalog
The Catalog List page, used to organize and manage catalogs, contains information regarding brands and sales items. These sets of information will either be displayed on the front-end site, or used for other purposes such as for pricing and Promotions.
To create a new Catalog, click on New Catalog.
l Category Name - this name will appear in the Catalog List Page (e.g., Brands, Everything).
l Catalog Owner - designate an existing user as the Catalog owner.
l Available from - select the date to which the Category is activated.
l Expires on - select the expiration date; once the expiration date passes, the Product will no longer appear on the front-end site.
l Default Currency - this setting will set the Default Currency for the relevant Catalog contents.
© EPiServer AB
Commerce Manager | 65
l Default Language - this will set the Default Language for the contents.
l Base Weight - this assigns the weight units for the contents of the Catalog (e.g. pounds or kilograms). More units may be added.
l Other Languages - you can also select other available Languages other than your default Language.
l Sites - this determines the site/sites that the relevant Products will be displayed in. At least one site must be highlighted, but you can highlight multiple sites to apply the catalog more than one site.
l Sort Order - the Sort Order determines the order to which the Catalog appears in the Catalog List page.
l Available - select "Yes" to make the Catalog contents appear on the front end site; select "No" to hide the Catalog from the front-end site.
Once done setting up your catalog attributes, select OK to save the catalog. You will be brought back to the Catalog List with the new catalog. Select Cancel to cancel out of the Catalog Edit page and back to the Catalog List.
Importing and Exporting Catalogs
Preexisting catalog data can be imported or exported quickly to and from the Commerce Manager. Accessing the Import & Export Functions
1. Access the Catalog List page in the Catalog Management subsystem. The Import/Export menu is located in the upper left corner of the main window.
2. For exporting catalogs, click on the check box for the appropriate catalog nodes.
© EPiServer AB
66 | User Guide for EPiServer Commerce 1 R2 SP1
3. Click on the Import/Export pull-down menu to choose either import or export. The corresponding page will appear in the main window.
Importing Catalogs
1. Browse and select the file to upload.
2. Click on the Upload file button. The files upload will appear in the list below.
3. Click on the Start Import button. The progress window will show that the import is taking place.
4. When the import is 100% complete, close the progress window.
Exporting Catalogs
There are two ways to export catalogs in the Export Catalogs page.
1. Export everything included in the catalog node that you've selected.
l To do this, click on the Start Export button. The progress window appears and shows the status of the export.
l When the export is 100% complete, click on Close to close the progress window
2. Export only the desired files.
l To do this, click on the Download links highlighted in blue.
© EPiServer AB
Commerce Manager | 67
Using CSV Files to Quickly Create Custom Catalogs
Why Should I Use a CSV File?
The CSV catalog import is a feature in the Catalog Management system that enables you to import and manage catalog entries (such as Products, Variations/SKUs, Packages) in bulk using an excel spreadsheet (.csv format). It is an alternative to manually creating catalog entries directly in Commerce Manager, which can be tedious when dealing with a large amount of catalog data. This feature enables you to accomplish these key tasks: l Import your .csv spreadsheets and create new catalog entries in Commerce Manager. l Set your catalog items into a desired category structure of your choosing l Create entry relations to associate one entry with others (e.g., variation/SKUs will appear within a product or a package) l Edit or delete existing catalog items..
The CSV catalog import feature can be used for your entire catalog data, or just portions of them. Import Overview
Here are the basic steps you can take to import and set up a new catalog using the CSV import feature. Before you start, choose an existing catalog folder or create a new one (in the Catalog Management system) to import the CSV files to.
1. Create CSV data files (using Excel Spreadsheet, Notepad, etc.) with information about your categories, entries, and entry relations.
2. Create necessary meta fields for the new catalog entries (in the Administration system).
3. Upload the CSV data files to the CSV Import page.
4. Create a mapping file for each CSV file. A mapping file is needed to link each column of data in a CSV file to the correct attributes in Commerce Manager.
5. Import the CSV files and their corresponding mapping files into a specific catalog.
6. Create entry relations to associate one entry with another (e.g., a Package and a Product, a Product and a Variation/SKU, etc.).
Format for CSV Files
CSV files you create and import into Commerce Manager need to have a particular format.
l The first row should have headers that correspond to different attributes of the data you want to import (e.g., product name, price, description, image file location, etc.).
l There are a few attributes that are in your CSV file to correctly structure your catalog:
l Code: A unique code to identify each category or entry
l Name: A unique name for each row of data
© EPiServer AB
68 | User Guide for EPiServer Commerce 1 R2 SP1
l Entry Type (for entries only): Each row must contain one of the following five words in order for the Commerce Manager to correctly recognize its entry type --"Variation", "Product", "Package", "Bundle" or "Dynamic Package"
l Parent & Child Entry Code (for entry relations only): A CSV file containing these codes can specify relationships between entries (e.g., display different Variations within a Product).
Although , the following attribute is useful in creating a hierarchy in your catalog:
l Action: A command to specify the action that will be taken during the import. Choose one of the three options: Insert/Update/Delete or I/U/D.
Note: Please make sure to specify an appropriate command for each line of the CSV files. Entering "Insert" when that data already exist, or "Update" when no data exist will give an error during import and those line of data will not get successfully imported.
l Category Code (by comma): By assigning a category code to an entry, you can specify the category that you want to place your entry in.
Also please note this rule:
l SEO URL: By design, this attribute that is present in both categories and entries must be unique for each item in your catalog. Importing files that contain more than one identical url will result in an error.
Mapping Types
Different mapping types are used to create the mapping files mentioned in step 4 above.
l Category w/ Meta Data – select this type to create a mapping file for your category files.
l Entry w/ Meta Data – select this type to create a mapping file for all the entry files (i.e., Packages, Products, Variation/SKUs, Bundles, and Dynamic Packages).
l Entry Relation – select this type to create a mapping file for your entry relation file that specifies the relationships between entries such as many SKUs to one Product, or SKUs and Products to a Package.
l Entry Association – select this type when creating a mapping file for entry associations (Advertizing other items under titles such as "You may also be interested in...
l Variation w/ Inventory – select this type to create a mapping file to import your Pricing/Inventory data located in your Variation/SKU Edit screen.
l Sale Price – Select this type to create a mapping file for Sale Price file, which specifies different currencies for each item.
By selecting these options, the Commerce Manager will display different sets of Fields and Attributes for you to manually assign to each data column of your CSV file. Figure 8 and 9 below shows the display of the mapping files with the Category w/ Meta and Entry Relations Data type respectively. The items under Fields and Attributes with superscripts 1 and/or 2 are headers that are required attributes that must exist in the CSV files you are importing (1- required field for Insert, 2 – required field for Update).
Example: Importing and Setting up a New Catalog
The example below demonstrates how to use CSV import using the guidelines provided above.
Let's say you want to set up a "Baby Stuff" catalog with categories and entries as shown here in Figure 1. © EPiServer AB
Commerce Manager | 69
Figure 1 Prerequisite: Create a new catalog
First, create a new catalog called "Baby Stuff" in the Catalog Management system.
Step 1: Create CSV files containing data for your new entries
The example below is based on an a set of sample .csv files.
These files provide the base for the discussion in the following section.
The sample files contain the following:
l BabyStuffCategories.csv
l BabyProducts.csv
l BabyPackages.csv
l BabyVariations.csv
l BabyVariationInventoryPricing.csv
l BabyEntryRelations.csv
l BabyAssociations.csv
l BabySalePrice.csv
CSV File Type 1 - Category File
This file specifies data for categories and/or subcategories within a Catalog. The top line has column headers that will be matched with the Meta fields in the later steps. The headers can also have different names. As you will see in later steps, Category Code in column 1 is important since it specifies where the entry data will be stored. The code entered in under Parent Code in column 2 can be used to create subcategories. If the Parent Code is set to "null" or "root," then that category will be created in the root level of a catalog. In this example, the "Infants" and "Toddlers" category will be created at the root level, while the "Diapering Supplies" category will be located under "Infants" as a subcategory.
Figure 2 © EPiServer AB
70 | User Guide for EPiServer Commerce 1 R2 SP1
CSV File Type 2 – Entry Files
These files specifies data for Catalog Entries. The Products, Variation/SKUS, and Packages CSV files for this example are shown in Figure 3, 4, and 5 respectively.
Figure 3 Figure 4 Figure 5 CSV File Type 3 – Entry Relations File
This file is used to link one entry to others. In this example, Var1 ~ Var5 (different diaper sizes) are associated to Prod1 "Diapers," Var9 ~ Var11 (different quantity for wipes) are associated with Prod2 "Wipes" and so forth. Also some variations are assigned to packages. Please note that the Prod, Var and Package codes MUST BE the codes from the entry CSV files (Figure 3, 4, and 5). If you include codes that are not defined in the entry CSV files, you will get an error while importing them into Commerce Manager in Step 4.
© EPiServer AB
Commerce Manager | 71
Figure 6 CSV file type 4 - Associations file
This file is used to create associations between different entries. In this example, Var 10 is associated to Var 1 as an Accessory, and Var 2 to Var 1 as a cross-sell item. Figure 7 CSV file type 5 - Pricing/Inventory file
This file is used to specify the information for the Pricing/Inventory tab of each individual entry. Figure 8 CSV file type 6 - Sale Price file
© EPiServer AB
72 | User Guide for EPiServer Commerce 1 R2 SP1
This file is used to specify the information for the Pricing section of the Pricing/Inventory page. Figure 9 Step 2: Create necessary meta fields for the new catalog entries
For this example, no additional meta fields need to be created because the sample spreadsheet uses only the default attributes.
To create new meta fields follow these steps here.
l Go to the Administration system in Commerce Manager.
l Select the "Catalog System" folder and then "Meta Classes" node located in the left navigation frame.
l Select Create New, then New Meta Class from its pull-down menu. l Enter in a Name, Friendly Name (e.g., Baby Catalog), and some description (optional) for the meta class, and choose "Catalog Entry" for Entry Type.
l Click OK to save the new class.
l Next Select Create New, then New Meta Field from its pull-down menu. l Enter in a Name, Friendly Name (e.g., Baby Diaper Size), and some optional description.
l Also Choose the data type for this meta field and other properties by clicking on the checkboxes.
l Click OK to save the new field.
l Repeat the steps to create all the necessary fields.
l Associate the new meta fields to the meta class you created. l Select to "Meta Classes" node on the left navigation frame again.
l For "Element" choose "Catalog Entry" in the pull-down menu.
l Under "Type" choose your meta class (e.g., Baby Catalog) you created earlier.
l Select the desired meta fields from the list displayed at the bottom of the screen.
l Select OK to save the new meta class to fields association.
© EPiServer AB
Commerce Manager | 73
l You are done with setting up your meta fields.
Step 3: Upload the CSV data files to the CSV Import page
Follow these steps to prepare the CSV files for import:
l Select the Catalog Management system.
l In the upper-left detail area, click on Catalogs folder and you will see the Catalog List view in the main area.
l In the action area above the main view, click the Import/Export drop-down button and select CSV Import Catalog.
l You will now see the CSV Import Catalog page in the main screen. The screen contains two tabs 1) CSV Import and 2) Mapping File, which we will be talking about next.
CSV Import Tab
l In the "CSV Import" tab in the main view, click "Add New File."
l Browse for the CSV file you wish to import, then click "Upload File."
l When you get the "Uploaded File:" confirmation, click "Save the file."
l The CSV file you uploaded will be added to the "Files available for import:" list.
l Repeat the previous four steps for each CSV file you wish to upload. © EPiServer AB
74 | User Guide for EPiServer Commerce 1 R2 SP1
Figure 10 Step 4: Create a mapping file for each CSV file
Now create a mapping file that will specify the data in the CSV file to its corresponding attributes in the Commerce Manager.
Mapping file tab
l Click the "Mapping file" tab in the main view. You will now see the "Mapping file" tab view of the CSV Import Catalog view as shown in Figure 11.
© EPiServer AB
Commerce Manager | 75
Figure 11
Edit existing mapping file section
l Load mapping file: This section is used to retrieve previously created and saved mapping files. Since there is no existing mapping file in this example, leave this section blank.
Meta Class, Language section
l Mapping Type*: Select "Category w/ Meta Data"
l Meta Class*: Select "Default Catalog Node"
l Language*: English
Data fle and CSV adjustment section
l Data File*: The drop down values presented here are dependent on the different CSV data files you uploaded on the "CSV Import" tab in step 2.
l For this example, first choose "BabyStuffCategory.csv."Leave the rest of the field as default and move on to the next section.
Fields and Attributes, Column headers in the data file, and Selected values section
The values presented under the "Fields and Attributes" column are representative of the "Meta Class" selected in the "MetaClass, Language" section above (which were either previously imported or created within Commerce Manager).
The values presented in the drop-down menus under the "Column headers in the data file" column are representative of the "Data file" selected in the "Data file and CSV adjustment" section above (which were previously imported above).
© EPiServer AB
76 | User Guide for EPiServer Commerce 1 R2 SP1
l Select the appropriate "Column header" drop-down value to "map" with the MetaClass "Fields and Attributes" to the left; the value selected will be reflected in the "Selected values" column to the right.
Save mapping file section
l Enter a file name for the "Enter file name" textbox. For this example, save the mapping files using the same CSV file names.
l Click the "Save" button. The browser returns to the CSV Import tab, and the mapping file in .XML format will be added to the list in the "Choose mapping file" section. l Repeat Step 3 to create and save a mapping file for each CSV files you wish to import.
l For CSV Entry files, select the "Entry w/ Meta Data" option under "Mapping Type."
l For CSV Entry Relations file, select "Entry Relation".
l For CSV Associations file, select "Entry Association."
l For CSV Pricing/Inventory file, select "Variation w/ Inventory."
l For CSV Sale Pricing file, select "Sale Price."
l When all the mapping files are saved, your CSV Import tab screen should look something like this. Figure 12 Step 5. Import the CSV files and their corresponding mapping files into a specific catalog
At the "CSV Import" tab view (Figure 12), do the following:
l Select and highlight the CSV file you wish to import in the "Files available for import" section. For this example, select BabyStuffCategories.csv.
l Select and highlight the mapping file that corresponds to the selected CSV file in the "Choose mapping file for import" section. For this example, select BabyStuffCategories.xml.
l Select the catalog in the "Catalog" drop-down into which you would like to import your CSV data. In this example choose "Baby Stuff".
© EPiServer AB
Commerce Manager | 77
l Click the "Start import" button. You will see the "Importing catalog" modal dialog box which will notify you of the percentage of completion as well as logging messages.
l Click "Close Window" at the bottom of the modal dialog to complete the operation.
l Repeat Step 4 to import all the remaining CSV & Mapping pairs.
Step 6. Verify Your Import
In the Catalog Management system, expand the "Baby Stuff" folder under Catalog and verify that the contents of your CSV file were imported into the appropriate catalog.
Deleting a Catalog
1. At the Catalog List page, check off the box to the respective Catalog you wish delete.
2. Select More Actions and then Delete Selected from its pull-down menu, located in the menu bar.
3. A pop up will appear to confirm your action. Select OK to delete it. The chosen catalog will be deleted from the list.
Categories and Nodes
A Category or a Node is a grouping of purchasable Products. In this section, you will learn how to browse, create, clone, move, link, and delete Categories and Sub-Categories.
Browsing Categories
The Node List (aka the Category List) is used to organize and manage nodes/categories, subcategories created within a Catalog.
The "Brand" Catalog for example, which is available in the Commerce Manager by default, includes nodes assigned with brand names such as "Canon", "IZOD", and "Dell". Also the Everything Catalog contains a node called "Mobile Phones & Plans" which has subcategories called "Phones" and "Plans". Additional nodes or subcategories may be created in the Node List page.
1. Clicking on the memo icon, located between the check box and the folder icon, will display the Catalog Node Edit page, which contains more information and settings of that particular node. Here you can setup the information and status that are common for all it's subcategories.
© EPiServer AB
78 | User Guide for EPiServer Commerce 1 R2 SP1
2. Clicking on any node names (highlighted in blue) will take you to the next sublevel, which shows the list of categories under the selected node.
Menu Bar Functions
l Create New
This dropdown allows users to create different types of Categories/Nodes or Product entries as shown below. l Category/Node
l Product
l Variation/SKU
l Package
l Bundle
l Dynamic Package
l More Actions l Delete Selected
l Clone Selected l Move/Link to Folder Under "More Actions," cloning creates a duplicates with a unique ID that you can place in any location/hierarchy that you choose. "Move/Link to Folder" allows you either to move a category/product to a new location/hierarchy or to link one category/product to another category/product. So for example, you can create a category called "Featured Products" and link it to items across various other categories. This way, if you make changes to content on the original product page and that same product is part of the "Featured Products" category as a linked product, the changes will be displayed in both locations. In other words, changes are bi-directional. Links can be broken if either of the two are deleted.
© EPiServer AB
Commerce Manager | 79
Creating a Category
1. To create a new category, click on Create New and then click on New Category/Node.
This page will appear when creating a new category or editing an existing one. The Catalog Node Edit page will contain information of a Node selected from the Node List page.
© EPiServer AB
80 | User Guide for EPiServer Commerce 1 R2 SP1
Overview Fields
l Name - enter a name for the product
l Available from - the date to which the product is activated
l Expires on - the date on which the product expires; once the expiration date passes, the product will no longer appear on the public site
l Display Template - choose a display template used to show the products in the public site from this dropdown box; by default, the only available catalog display template is "Digital Camera". To create your custom template, you will need some technical skills with html templates.
l Code - enter a product code here (e.g. DIGICAM)
l Sort Order - determines the order to which the product is sorted in the Node List page
l Available - select Yes to make the product appear on the public site; select No to hide the product from the public site
l Meta Class - the choice made here dictates which the meta-fields or product attributes will appear on the public site or Commerce Manager site
l Display Name - enter a name the way you like to be displayed in the public site with appropriate languages
l Primary Image - use the browse button to select and upload an image here
l Description - enter a description of a product with appropriate languages
© EPiServer AB
Commerce Manager | 81
Once done, click OK on the bottom of the page.
SEO
Search Engine Optimization can be achieved by entering the following information for the product.
l Title - this is the friendly name that appears in your browser's title area
l URL - this is what gets displayed in the browser URL window
l Description - this is the meta description that is used for SEO purposes by search engines
l Keywords - keywords used for SEO purposes by search engines
Assets
Under Assets, you can associate additional files such as images, pdf, and video files all stored in the Asset Management system.
© EPiServer AB
82 | User Guide for EPiServer Commerce 1 R2 SP1
Follow these three simple steps to add an asset file to the current entry.
1. Click on the Find Assets pull-down menu to display all files available in the Asset system.
2. Choose one file at a time and type in an appropriate Group Name (see table below), depending now how you would like it to be displayed.
3. Click on Add Asset. The asset associated to this entry will appear in the lower section of the screen.
l You can edit the Group Name or sort order by clicking on the Edit icon to the left of an existing asset. After making any changes, make sure to click Update (Clicking OK at the bottom of the screen during the editing mode will not save the changes made).
l You can delete any existing asset by clicking on the "X" icon.
File type
Group Names How it gets displayed in the public site
mage Files (jpg, pgn, etc.) image
Thumbnail icon will appear on the product details page
Downloadable Files (docs, pdf, mp3s)
Downloads
A "Downloads" tab will appear towards the bottom of the details page Specification Files (docs, pdf)
Specifications
A "Specifications" tab will appear towards the bottom of the details page
Deleting a Category
1. To delete a category/node, go to the Node List.
2. Checkmark the box next to the node.
3. Click on More Actions and then click on Delete Selected to delete the Category/Node.
© EPiServer AB
Commerce Manager | 83
Organizing Categories
To organize a category, enter a numerical order in the Sort Order field within the Catalog Node Edit page. Categories and node will sort based on numercial order. Creating a Sub-Category
To create a sub-category, it is similar to creating a high-level category.
1. Go to Node List and click through an existing Catalog
2. Click on Create New and click on Category Node. Specify the information under Catalog Edit (refer to Creating a Category) and click OK to save changes.
© EPiServer AB
84 | User Guide for EPiServer Commerce 1 R2 SP1
Cloning, Moving or Linking a Category
Under "More Actions," cloning creates a duplicates with a unique ID that you can place in any location/hierarchy that you choose. "Move/Link to Folder" allows you either to move a category/product to a new location/hierarchy or to link one category/product to another category/product. So for example, you can create a category called "Featured Products" and link it to items across various other categories. This way, if you make changes to content on the original product page and that same product is part of the "Featured Products" category as a linked product, the changes will be displayed in both locations. In other words, changes are bi-directional. Links can be broken if either of the two are deleted.
1. To link a category, go to the Node List and checkmark a category you want linked back.
2. Click on More Actions and then click Move/Link folder.
3. Select link to folder and select the link destination from the dropdown menu. Click OK to create the link to that category under that directory.
© EPiServer AB
Commerce Manager | 85
Products, Variations and SKUs, Bundles, Packages, Dynamic Packages and
Associations
A product represents various forms of merchandise that you can display and purchase from the public site, including Products, Variations/SKUs, Bundles, Packages and Dynamic Packages.
l Product Entries
A product entry typically contains a product name, part number, description and images.
l Variations/SKUs
A variation or SKU corresponds to a specific type of product with specific characteristics. For example, a product of Shirts will have an individual variation/SKU which includes size, color and sleeve length.
l Bundles
a bundle is a collection of Variations and SKUs allowing customers to purchase two or more items at once (all pricing is SKU specific and separate, unlike a package which is multiple SKUs put together in a single unified price).
l Packages
A package is comparable to an individual SKU because the package item must be purchased as a whole (i.e. computer system).Items can be put within a package and package can have its own unique pricing.
l Dynamic Packages
A dynamic package is similar to the package definition above with the added ability to configure the package during checkout.
l Associations
One or more products can be associated to a product so that they can be displayed advertised on the public site as product accessories, or upselling/cross-selling item. Associations can be made © EPiServer AB
86 | User Guide for EPiServer Commerce 1 R2 SP1
from any of the individual products (Product Entries, SKUs, Bundles, Packages, and Dynamic Packages).
Browsing Products
Products are created within a catalog. Products can be placed one level beneath the root of a Catalog and further down into subfolders.
To browse products, click on a Catalog and drill down categories until you see Products such as the one highlighted below in the second screenshot..
Creating a Product (including Variations and SKUs, SEO, Associations, Assets)
To create a product, click through an existing catalog and click on Create New and then click on Create
Product.
Overview Tab
This is where you enter basic information about the Product.
l Name - a name for the product.
l Available from - the date to which the product is activated
© EPiServer AB
Commerce Manager | 87
l Expires on - the date on which the product expires; once the expiration date passes, the product will no longer appear on the public site
l Display Template - choose a display template used to show the products in the public site from this dropdown box; by default, the only available catalog display template is "Digital Camera". To create your custom template, you will need some technical skills with html templates.
l Code - enter a product code here (e.g. DIGICAM).
l Sort Order - determines the order to which the product is sorted in the Node List page.
l Available - select Yes to make the product appear on the public site; select No to hide the product from the public site
l Meta Class - the choice made here dictates which the meta-fields or product attributes will appear on the public site or Commerce Manager site.
Depending on the meta class selected, more fields are available to enter data. For instance, selecting the Digital Camera meta class will yield digital camera meta fields and attributes.
© EPiServer AB
88 | User Guide for EPiServer Commerce 1 R2 SP1
Variations/SKU Tab
Variations/SKUs are subcategories of a Product, which represents different "variations" of the particular product (colors, sizes, different editions for example). Such Variations/SKUs can be grouped a chosen product from this tabbed page. Follow these steps to group variations/SKUs.
1. Select the Variations/SKUs tab
2. Within the drop-down menu next to Find Item, select from the list variations or SKUs to associate with the product.
3. Click on Add Item.
© EPiServer AB
Commerce Manager | 89
You can add multiple associations to the product and they will appear in a list under the column headers below.
SEO Tab
Search Engine Optimization can be achieved by entering the following information for the product.
l Title - this is the friendly name that appears in your browser's title area
l URL - this is what gets displayed in the browser URL window
l Description - this is the meta description that is used for SEO purposes by search engines
l Keywords - keywords used for SEO purposes by search engines
If the URL field is left empty, it will be automatically filled in with a generated url (which depends on the entry name). If the URL field is not empty (you entered some url), it will be saved as it is, and w will not be changed automatically even if you change an entry name. If you need the url to change, leave it blank.
© EPiServer AB
90 | User Guide for EPiServer Commerce 1 R2 SP1
Associations Tab
Different products or variations/SKUs can be linked to this product. Follow these steps to create product associations:
1. Click on Add an Association. A pop-up window will appear that says Edit Association Information.
2. When the pop-up appears, enter an Association Name, Description, and define the Sort Order. Once you're done, click on Save Changes.
3. The new association will appear in the drop-down list.
4. You can also choose to Edit Details, which will allow you to edit associated items. The Pick Item dropdown appears below Modify Existing Association.
© EPiServer AB
Commerce Manager | 91
5. Click on Modify Association and you can edit the name, description, and sort order of an existing association.
You can also Delete an association if needed.
6. Pick an item or items to add to the association. Click Add Item to do so.
7. Once you click on Add Item, the item will appear in a list just below. You can have more than one item tied to an association.
© EPiServer AB
92 | User Guide for EPiServer Commerce 1 R2 SP1
You can Edit an item on the list. You can change the Sort Order and the Type. Once you're done modifying the values, click on Update to save your changes. Otherwise select Cancel to navigate away without saving.
Assets Tab
Assets are downloadable contents such as documents, links, videos, and images that can be linked to specific products. Assets are uploaded and managed in the Asset Management system.
1. Under Find Assets, select from the drop-down list and click Add Asset.
2. Enter a Group Name.
By default EPiServer Commerce offers three options with names that will allow the associated assets to be correctly displayed on the product details page of the public site.
l Image - (type as "image," all lowercase) thumbnail icon(s) will appear on the product details page
l Downloads - a "Downloads" tab will appear towards the bottom of the details page
l Specifications - a "Specifications" tab will appear towards the bottom of the details page
3. Once an asset is added to the list below, you can choose to edit specific assets, such as their Group name and Sort Order.
© EPiServer AB
Commerce Manager | 93
4. Once done, click OK and the new category/node will be created. You will be redirected to the Node List. Otherwise, select Cancel to go back to the Node List without saving any changes.
Relations Tab
Here the relations for a product will be displayed, and you can manage the categories a product is linked to. This is useful in order to get an overview of all the different categories (nodes) where a product will occur. A product can for instance appear in the "French Market" category, as well as under "Daily Specials" and "Digital Cameras". Browse to a product and open it for editing. The relations for the product will be displayed under the Relations tab.
Editing Product Tabs
When editing a Product, options are divided by tabbed navigation.
Overview Tab
This is where you enter basic information about the Product.
l Name - a name for the product
l Available from - the date to which the product is activated
l Expires on - the date on which the product expires; once the expiration date passes, the product will no longer appear on the public site
l Display Template - choose a display template used to show the products in the public site from this dropdown box; by default, the only available catalog display template is "Digital Camera". To create your custom template, you will need some technical skills with html templates.
l Code - enter a product code here (e.g. DIGICAM1, DIGCAM2,...)
© EPiServer AB
94 | User Guide for EPiServer Commerce 1 R2 SP1
l Sort Order - determines the order to which the product is sorted in the Node List page
l Available - select Yes to make the product appear on the public site; select No to hide the product from the public site
l Meta Class - the choice made here dictates which the meta-fields or product attributes will appear on the public site or Commerce Manager site
Depending on the meta class selected, more fields are available to enter data. For instance, selecting the Digital Camera meta class will yield digital camera meta fields and attributes.
Variations/SKU Tab
Variations/SKUs are subcategories of a Product, which represents different "variations" of the particular product (colors, sizes, different editions for example). Such Variations/SKUs can be grouped a chosen product from this tabbed page. Follow these steps to group variations/SKUs.
1. Select the Variations/SKUs tab
© EPiServer AB
Commerce Manager | 95
2. Within the drop-down menu next to Find Item, select from the list variations or SKUs to associate with the product.
3. Click on Add Item.
You can add multiple associations to the product and they will appear in a list under the column headers below.
SEO Tab
Search Engine Optimization can be achieved by entering the following information for the product.
l Title - this is the friendly name that appears in your browser's title area
l URL - this is what gets displayed in the browser URL window
l Description - this is the meta description that is used for SEO purposes by search engines
l Keywords - keywords used for SEO purposes by search engines
© EPiServer AB
96 | User Guide for EPiServer Commerce 1 R2 SP1
If the URL field is left empty, it will be automatically filled in with a generated URL (which depends on the entry name). If the URL field is not empty (you entered some URL), it will be saved as it is, and will not be changed automatically even if you change an entry name. If you need the URL to change, leave it blank.
Associations Tab
Different products or variations/SKUs can be linked to this product. Follow these steps to create product associations:
1. Click on Add an Association. A pop-up window will appear that says Edit Association Information.
© EPiServer AB
Commerce Manager | 97
3. The new association will appear in the drop-down list.
4. You can also choose to Edit Details, which will allow you to edit associated items. The Pick Item dropdown appears below Modify Existing Association.
5. Click on Modify Association and you can edit the name, description, and sort order of an existing association.
You can also Delete an association if needed.
6. Pick an item or items to add to the association. Click Add Item to do so.
© EPiServer AB
98 | User Guide for EPiServer Commerce 1 R2 SP1
7. Once you click on Add Item, the item will appear in a list just below. You can have more than one item tied to an association.
You can Edit an item on the list. You can change the Sort Order and the Type. Once you're done modifying the values, click on Update to save your changes. Otherwise select Cancel to navigate away without saving.
Assets Tab
Assets are downloadable contents such as documents, links, videos, and images that can be linked to specific products. Assets are uploaded and managed in the Asset Management subsystem.
1. Under Find Assets, select from the drop-down list and click Add Asset.
© EPiServer AB
Commerce Manager | 99
2. Enter a Group Name.
By default Commerce Manager offers three options with names that will allow the associated assets to be correctly displayed on the product details page of the public site.
l Image - (type as "image," all lowercase) thumbnail icon(s) will appear on the product details page
l Downloads - a "Downloads" tab will appear towards the bottom of the details page
l Specifications - a "Specifications" tab will appear towards the bottom of the details page
3. Once an asset is added to the list below, you can choose to edit specific assets, such as their Group name and Sort Order.
© EPiServer AB
100 | User Guide for EPiServer Commerce 1 R2 SP1
4. Once done, click OK and the new category/node will be created. You will be redirected to the Node List. Otherwise, select Cancel to go back to the Node List without saving any changes.
Relations Tab
Here the relations for a product will be displayed, and you can manage the categories a product is linked to. This is useful in order to get an overview of all the different categories (nodes) where a product will occur. A product can for instance appear in the "French Market" category, as well as under "Daily Specials" and "Digital Cameras". Browse to a product and open it for editing. The relations for the product will be displayed under the Relations tab.
Setting Pricing Data at the Product Level
By default EPiServer Commerce ships with the ability to set pricing information at the variation/SKU level. In certain implementations it may be preferable to set pricing information at the Product level and/or the variation/SKU level. This can be accomplished by editing a configuration file to add the EntryPricingEditTab to the list of tabs available at the Product level.
For more information see the section "Setting Pricing Data at the Product Level" in the EPiServer Commerce Developer's Guide.
Creating a Variation or a SKU
1. To create a new variation/SKU for a product, go to Catalog Management and Catalogs, and then click on an existing catalog. The Node List window appears.
2. Select Create New and New Variation/Sku. The Variation/SKU Edit window appears.
Overview Tab
This is where you enter basic information about the Variation/SKU.
© EPiServer AB
Commerce Manager | 101
Field
Description
Name
Enter a friendly name, which can include spaces and special characters.
Available from Enter the date and time the SKU will be available and active.
Expires On Enter the date and time the SKU will be unavailable and deactivated.
Display Template
Chose a display template used to display the Variation/SKU in the public site from this drop-down menu. By default, the only available catalog display template is "Digital Camera," however additional templates can be developed.
Code
Enter a value without special characters or spaces, such as "BlueShirtXL." Sort Order Enter a numerical value to determine the SKU's sort order on the list of variations and SKUs.
Available
Set "Yes" to activate the SKU. Set "No" to keep the SKU inactive and unsearchable on the front-end site.
Meta Class Select from the drop-down menu a particular Meta Class (add link to how meta classes are created). Depending on the meta class you select, additional fields will appear in the Overview tab. The values entered within the fields of the meta class you selected will be shown on the front-end public site.
Pricing/Inventory Tab
Under this tab, you can set specific pricing and inventory settings for the variation/SKU.
© EPiServer AB
102 | User Guide for EPiServer Commerce 1 R2 SP1
Field
Description
Display Price
Enter the price that will be displayed on the public site.
Min Quantity
This sets the minimum quantity the customer is able to purchase the variation/SKUs product page.
Max Quantity
This is the maximum allowable number of items that can be purchased at one time (this number gets displayed as the upper range in the drop-down during the checkout process).
Merchant
Optional: if you use many merchants on your site, this provides another way to add more information for a product; this can only be added/edited directly in the database so please contact your site administrator/developer to make any changes.
Weight
Based on your shipping configuration, the weight you enter here will affect the total shipping cost .
Package
This value is based on width/length/height dimensions; the options for this dropdown are configured in the Administration area.
Tax Category
This separation of taxes by category allows you to charge a different rate of taxes depending on what is being purchased; for example, you can have one rate for "General Sales" items and another rate for "Luxury Sales" items.
Warehouse
The details on the available selections are maintained in the Administration system.
Track Inventory
Yes/No. If this is set to "Yes," then the quantity value of In Stock, Preorder, and Backorder fields will be deducted each time a purchase is made. If this is set to "No," then those values will not change.
Inventory Status
Enable/Disable. If this is Enabled, then the number of units of a product being purchased cannot exceed the inventory value. In other words, the check out procedure cannot be completed if you exceed the number in the inventory -- instead the quantity you can purchase will default to the actual number of remaining units. © EPiServer AB
Commerce Manager | 103
Field
Description
For instance, if you have Tracking Inventory = Yes, and Inventory Status = Disabled/Ignored, then the available quantity will be monitored, but it will not limit the number of units that can be checked out. If you only have a quantity of 5 and you order 6 items, the checkout will still complete and the inventory number will become -1. In Stock
You can enter the quantity of a particular product available for sale.
Reserved
The quantity you set here allows you to reserve a specified number of inventory "In Stock" and prevent them from being used. So for instance, if you set the In Stock = 10 and Reserved = 5, then the In Stock count will not go below 5.
Reorder Min Qty
If the inventory falls below the value specified here, then this item will appear in the "Low Stock Report" in the Dashboard or Reporting system.
Allow Preorder/Backorder
Yes or No; you need to set Allow Preorder/Backorder status to Yes to turn either of these features On.
Preorder/Backorder
Avail
When you turn on either of the two and specify a quantity, the count will begin to decrease after the In Stock count reaches its limit. For example, if you set In Stock = 10, Reserved =3, and Backorder =10, then the Backorder qty will start to decrease after In Stock count reaches 3. So if you place an order for 10 units, then the final count will be In Stock = 3, Reserved =3, and Backorder = 7.
Backorder Qty
The quantity you set here will determine the backorders that can be made by customers even when the item is out of stock. Pricing
Sale Type - you can select All Customers, a single Customer or a Customer Price Group (the Customer Price Group gives you the ability to create tiered pricing).
Sale Code - This is an optional setting. The Sale Code field is used for assigning a price to a specific group of customers. For instance, when you add a new price and select "Customer Price Group" as the Sale Type, you need to put the name of the customer group in the Sale Code field. The name of the group that you put in the Sale Code field needs to match one of the group names found under Customer Management > Contacts > (Name of Contact). If your entry into the Sale Code field matches one of the Customer Groups, any member of that group will receive the specified price.
Unit Price - discounted price per unit *Currency * enter currency using the correct currency code (i.e. USD); you can create different prices depending on the currency that is selected.
Min. Quantity - minimum number of units you must purchase to get the discounted bulk rate.
SEO Tab
Search Engine Optimization can be achieved by entering the following information for the product.
l Title - this is the friendly name that appears in your browser's title area.
l URL - this is what gets displayed in the browser URL window.
l Description - this is the meta description that is used for SEO purposes by search engines.
l Keywords - keywords used for SEO purposes by search engines.
If the Url field is left empty, it will be automatically filled in with a generated url (which depends on the entry name). If the Url field is not empty (you entered some url), it will be saved as it is, and will not be changed automatically even if you change an entry name. If you need the url to change, leave it blank.
© EPiServer AB
104 | User Guide for EPiServer Commerce 1 R2 SP1
Associations Tab
Different products or variations/SKUs can be linked to this Variation/SKU. Follow these steps to create associations:
1. Click on Add an Association. A pop-up window will appear that says Edit Association Information.
2. When the pop-up appears, enter an Association Name, Description, and define the Sort Order. Once you're done, click on Save Changes.
3. The new association will appear in the drop-down list.
4. You can also choose to Edit Details, which will allow you to edit associated items. The Pick Item drop-down appears below Modify Existing Association.
5. Click on Modify Association and you can edit the name, description, and sort order of an existing association.
You can also Delete an association if needed.
6. Pick an item or items to add to the association. Click Add Item to do so.
7. Once you click on Add Item, the item will appear in a list just below. You can have more than one item tied to an association.
You can Edit an item on the list. You can change the Sort Order and the Type. Once you're done modifying the values, click on Update to save your changes. Otherwise select Cancel to navigate away without saving.
Assets Tab
Assets are downloadable contents such as documents, links, videos, and images that can be linked to specific products. Assets are uploaded and managed in the Asset Management subsystem.
1. Under Find Assets, select from the drop-down list and click Add Asset.
2. Enter a Group Name.
By default Commerce Manager offers three options with names that will allow the associated assets to be correctly displayed on the product details page of the public site.
l Image - (type as "image," all lowercase) thumbnail icon(s) will appear on the product details page
l Downloads - a "Downloads" tab will appear towards the bottom of the details page
l Specifications - a "Specifications" tab will appear towards the bottom of the details page
3. Once an asset is added to the list below, you can choose to edit specific assets, such as their Group name and Sort Order.
4. Once done, click OK and the new category/node will be created. You will be redirected to the Node List. Otherwise, select Cancel to go back to the Node List without saving any changes.
Relations Tab
Here the relations for a product will be displayed, and you can manage the categories a product is linked to. This is useful in order to get an overview of all the different categories (nodes) where a product will occur. A product can for instance appear in the "French Market" category, as well as under "Daily Specials" and "Digital Cameras". Browse to a product and open it for editing. The relations for the product will be displayed under the Relations tab.
© EPiServer AB
Commerce Manager | 105
Creating a Package
1. Click on Catalogs. The Catalog List appears on the main window.
2. Click on an existing catalog name highlighted in blue. The Node List window appears.
3. Click on Create New pull-down menu located in the upper left part of the main window.
4. On the drop-down menu, select New Product Package. The Product Package Edit page appears.
Overview Tab
This is where you enter basic information about the Product Package.
l Name - a name for the Product Package
l Available from - the date to which the Product Package is activated
l Expires on - the date on which the Product Package expires; once the expiration date passes, the Product Package will no longer appear on the public site
l Display Template - choose a display template used to show the Product Package in the public site from this dropdown box; by default, the only available catalog display template is "Digital Camera". To create your custom template, you will need some technical skills with html templates.
l Code - enter a Product Package code here (e.g. DIGICAM).
l Sort Order - determines the order to which the Product Package is sorted in the Node List page.
l Available - select Yes to make the Product Package appear on the public site; select No to hide the product from the public site
l Meta Class - the choice made here dictates which the meta-fields or Product Package attributes will appear on the public site or Commerce Manager site
Pricing/Inventory Tab
l Display Price - the price that will be displayed in public site
l Min Quantity - this forces your customer to purchase a minimum number of items as set here (this number gets displayed as the lower range in the dropdown during the checkout process) l Max Quantity - this is the maximum allowable number of items that can be purchased at one time (this number gets displayed as the upper range in the dropdown during the checkout process)
l Merchant - (optional) if you use many merchants on your site, this provides another way to add more information for a product; this can only be added/edited directly in the database so please contact your site administratior/developer to make any changes
l Weight - based on your shipping configuration, the weight you enter here will affect the total shipping cost
l Package - this value is based on width/length/height dimensions; the options for this dropdown are configured in the Administration area
l Tax Category - this separation of taxes by category allows you to charge a different rate of taxes depending on what is being purchased; for example, you can have one rate for "General Sales" items and another rate for "Luxury Sales" items
l Warehouse - the details on the available selections are maintained in the Administration Subsystem
l Track Inventory - Yes/No. If this is set to "Yes," then the quantity value of In Stock, Preorder, and Backorder fields will be deducted each time a purchase is made. If this is set to "No," then those values will not change.
© EPiServer AB
106 | User Guide for EPiServer Commerce 1 R2 SP1
l Inventory Status - Enable/Disable. If this is Enabled, then the number of units of a product being purchased cannot exceed the inventory value. In other words, the check out procedure cannot be completed if you exceed the number in the inventory -- instead the quantity you can purchase will default to the actual number of remaining units. For instance, if you have Tracking Inventory = Yes, and Inventory Status = Disabled/Ignored, then the available quantity will be monitored, but it will not limit the number of units that can be checked out. If you only have a quantity of 5 and you order 6 items, the checkout will still complete and the inventory number will become -1.
l In Stock - you can enter the quantity of a particular product available for sale
l Reserved - The quantity you set here allows you to reserve a specified number of inventory "In Stock" and prevent them from being used. So for instance, if you set the In Stock = 10 and Reserved = 5, then the In Stock count will not go below 5.
l Reorder Min Qty - If the inventory falls below the value specified here, then this item will appear in the "Low Stock Report" in the Dashboard or Reporting subsystem.
l Allow Preorder/Backorder - Yes or No; you need to set Allow Preorder/Backorder status to Yes to turn either of these features On.
l Preorder/Backorder Avail - When you turn on either of the two and specify a quantity, the count will begin to decrease after the In Stock count reaches its limit. For example, if you set In Stock = 10, Reserved =3, and Backorder =10, then the Backorder qty will start to decrease after In Stock count reaches 3. So if you place an order for 10 units, then the final count will be In Stock = 3, Reserved =3, and Backorder = 7.
l Backorder Qty - The quantity you set here will determine the backorders that can be made by customers even when the item is out of stock.
Pricing .
l Sale Type - you can select All Customers, a single Customer or a Customer Price Group (the Customer Price Group gives you the ability to create tiered pricing).
l Sale Code - (optional) enter code to give special pricing for a group of Customers (i.e. Dealers).
l Unit Price - discounted price per unit.
l Currency - enter currency using the correct currency code (i.e. USD); you can create different prices depending on the currency that is selected.
l Min. Quantity - minimum number of units you must purchase to get the discounted bulk rate.
For more information regarding Sales Type, Sales Code and tiered pricing, please read Creating a Contact.
Package Items Tab
In the dropdown, you can search through your entire inventory and select items to add to your Package by clicking Add Item. Clicking the Edit icon beside the item you just added will allow you to specify the Quantity, the Group Name and the Sort Order.
SEO Tab
Search Engine Optimization can be achieved by entering the following information for the product.
l Title - this is the friendly name that appears in your browser's title area
l URL - this is what gets displayed in the browser URL window
l Description - this is the meta description that is used for SEO purposes by search engines
l Keywords - keywords used for SEO purposes by search engines
© EPiServer AB
Commerce Manager | 107
If the Url field is left empty, it will be automatically filled in with a generated url (which depends on the entry name). If the Url field is not empty (you entered some url), it will be saved as it is, and w will not be changed automatically even if you change an entry name. If you need the url to change, leave it blank.
Associations Tab
Different products or variations/SKUs can be linked to this Product Package. Follow these steps to create associations:
1. Click on Add an Association. A pop-up window will appear that says Edit Association Information.
2. When the pop-up appears, enter an Association Name, Description, and define the Sort Order. Once you're done, click on Save Changes.
3. The new association will appear in the drop-down list.
4. You can also choose to Edit Details, which will allow you to edit associated items. The Pick Item drop-down appears below Modify Existing Association.
5. Click on Modify Association and you can edit the name, description, and sort order of an existing association. You can also Delete an association if needed.
6. Pick an item or items to add to the association. Click Add Item to do so.
7. Once you click on Add Item, the item will appear in a list just below. You can have more than one item tied to an association.
You can Edit an item on the list. You can change the Sort Order and the Type. Once you're done modifying the values, click on Update to save your changes. Otherwise select Cancel to navigate away without saving.
Assets Tab
Assets are downloadable contents such as documents, links, videos, and images that can be linked to specific products. Assets are uploaded and managed in the Asset Management subsystem.
1. Under Find Assets, select from the drop-down list and click Add Asset.
2. Enter a Group Name.
By default Commerce Manager offers three options with names that will allow the associated assets to be correctly displayed on the product details page of the public site.
l Image - (type as "image," all lowercase) thumbnail icon(s) will appear on the product details page
l Downloads - a "Downloads" tab will appear towards the bottom of the details page
l Specifications - a "Specifications" tab will appear towards the bottom of the details page
3. Once an asset is added to the list below, you can choose to edit specific assets, such as their Group name and Sort Order.
4. Once done, click OK and the new category/node will be created. You will be redirected to the Node List. Otherwise, select Cancel to go back to the Node List without saving any changes.
Relations Tab
Here the relations for a product will be displayed, and you can manage the categories a product is linked to. This is useful in order to get an overview of all the different categories (nodes) where a product will occur. A product can for instance appear in the "French Market" category, as well as under "Daily Spe-
© EPiServer AB
108 | User Guide for EPiServer Commerce 1 R2 SP1
cials" and "Digital Cameras". Browse to a product and open it for editing. The relations for the product will be displayed under the Relations tab.
Creating a Bundle
1. Click on Catalogs. The Catalog List appears on the main window.
2. Click on an existing catalog name highlighted in blue. The Node List window appears.
3. Click on Create New pull-down menu located in the upper left part of the main window.
4. On the drop-down menu, select New Bundle. The Bundle Edit page appears.
Overview Tab
This is where you enter basic information about the Product Package.
l Name - a name for the Bundle
l Available from - the date to which the Bundle is activated
l Expires on - the date on which the Bundle expires; once the expiration date passes, the Bundle will no longer appear on the public site
l Display Template - choose a display template used to show the Bundle in the public site from this dropdown box; by default, the only available catalog display template is "Digital Camera". To create your custom template, you will need some technical skills with html templates.
l Code - enter a Bundle code here (e.g. DIGICAM).
l Sort Order - determines the order to which the Bundle is sorted in the Node List page.
l Available - select Yes to make the Bundle appear on the public site; select No to hide the product from the public site
l Meta Class - the choice made here dictates which the meta-fields or Bundle attributes will appear on the public site or Commerce Manager site
Bundle Items Tab
In the dropdown, you can search through your entire inventory and select items to add to your Bundle by clicking Add Item. Clicking the Edit icon beside the item you just added will allow you to specify the Quantity, the Group Name and the Sort Order.
SEO Tab
Search Engine Optimization can be achieved by entering the following information for the product.
l Title - this is the friendly name that appears in your browser's title area
l URL - this is what gets displayed in the browser URL window
l Description - this is the meta description that is used for SEO purposes by search engines
l Keywords - keywords used for SEO purposes by search engines
If the URL field is left empty, it will be automatically filled in with a generated URL (which depends on the entry name). If the URL field is not empty (you entered some URL), it will be saved as it is, and will not be changed automatically even if you change an entry name. If you need the URL to change, leave it blank.
Associations Tab
Different products or variations/SKUs can be linked to this Bundle. Follow these steps to create associations:
© EPiServer AB
Commerce Manager | 109
1. Click on Add an Association. A pop-up window will appear that says Edit Association Information.
2. When the pop-up appears, enter an Association Name, Description, and define the Sort Order. Once you're done, click on Save Changes.
3. The new association will appear in the drop-down list.
4. You can also choose to Edit Details, which will allow you to edit associated items. The Pick Item drop-down appears below Modify Existing Association.
5. Click on Modify Association and you can edit the name, description, and sort order of an existing association. You can also Delete an association if needed.
6. Pick an item or items to add to the association. Click Add Item to do so.
7. Once you click on Add Item, the item will appear in a list just below. You can have more than one item tied to an association.
You can Edit an item on the list. You can change the Sort Order and the Type. Once you're done modifying the values, click on Update to save your changes. Otherwise select Cancel to navigate away without saving.
Assets Tab
Assets are downloadable contents such as documents, links, videos, and images that can be linked to specific products. Assets are uploaded and managed in the Asset Management subsystem.
1. Under Find Assets, select from the drop-down list and click Add Asset.
2. Enter a Group Name.
By default Commerce Manager offers three options with names that will allow the associated assets to be correctly displayed on the product details page of the public site.
l Image - (type as "image," all lowercase) thumbnail icon(s) will appear on the product details page
l Downloads - a "Downloads" tab will appear towards the bottom of the details page
l Specifications - a "Specifications" tab will appear towards the bottom of the details page
3. Once an asset is added to the list below, you can choose to edit specific assets, such as their Group name and Sort Order.
4. Once done, click OK and the new category/node will be created. You will be redirected to the Node List. Otherwise, select Cancel to go back to the Node List without saving any changes.
Relations Tab
Here the relations for a product will be displayed, and you can manage the categories a product is linked to. This is useful in order to get an overview of all the different categories (nodes) where a product will occur. A product can for instance appear in the "French Market" category, as well as under "Daily Specials" and "Digital Cameras". Browse to a product and open it for editing. The relations for the product will be displayed under the Relations tab.
Creating a Dynamic Package
1. Click on Catalogs. The Catalog List appears on the main window.
2. Click on an existing catalog name highlighted in blue. The Node List window appears.
3. Click on Create New pull-down menu located in the upper left part of the main window.
© EPiServer AB
110 | User Guide for EPiServer Commerce 1 R2 SP1
4. On the drop-down menu, select New Dynamic Package. The Product Dynamic Package Edit page appears.
Overview Tab
This is where you enter basic information about the Product Package.
l Name - a name for the Dynamic Package
l Available from - the date to which the Dynamic Package is activated
l Expires on - the date on which the Dynamic Package expires; once the expiration date passes, the Product Package will no longer appear on the public site
l Display Template - choose a display template used to show the Dynamic Package in the public site from this dropdown box; by default, the only available catalog display template is "Digital Camera". To create your custom template, you will need some technical skills with html templates.
l Code - enter a Dynamic Package code here (e.g. DIGICAM).
l Sort Order - determines the order to which the Dynamic Package is sorted in the Node List page.
l Available - select Yes to make the Dynamic Package appear on the public site; select No to hide the product from the public site
l Meta Class - the choice made here dictates which the meta-fields or Dynamic Package attributes will appear on the public site or Commerce Manager site
Package Items Tab
In the dropdown, you can search through your entire inventory and select items to add to your Dynamic Package by clicking Add Item. Clicking the Edit icon beside the item you just added will allow you to specify the Quantity, the Group Name and the Sort Order.
SEO Tab
Search Engine Optimization can be achieved by entering the following information for the product.
l Title - this is the friendly name that appears in your browser's title area
l URL - this is what gets displayed in the browser URL window
l Description - this is the meta description that is used for SEO purposes by search engines
l Keywords - keywords used for SEO purposes by search engines
If the URL field is left empty, it will be automatically filled in with a generated URL (which depends on the entry name). If the URL field is not empty (you entered some URL), it will be saved as it is, and will not be changed automatically even if you change an entry name. If you need the URL to change, leave it blank.
Associations Tab
Different products or variations/SKUs can be linked to this Dynamic Package. Follow these steps to create associations:
1. Click on Add an Association. A pop-up window will appear that says Edit Association Information.
2. When the pop-up appears, enter an Association Name, Description, and define the Sort Order. Once you're done, click on Save Changes.
3. The new association will appear in the drop-down list.
© EPiServer AB
Commerce Manager | 111
4. You can also choose to Edit Details, which will allow you to edit associated items. The Pick Item drop-down appears below Modify Existing Association.
5. Click on Modify Association and you can edit the name, description, and sort order of an existing association. You can also Delete an association if needed.
6. Pick an item or items to add to the association. Click Add Item to do so.
7. Once you click on Add Item, the item will appear in a list just below. You can have more than one item tied to an association.
You can Edit an item on the list. You can change the Sort Order and the Type. Once you're done modifying the values, click on Update to save your changes. Otherwise select Cancel to navigate away without saving.
Assets Tab
Assets are downloadable contents such as documents, links, videos, and images that can be linked to specific products. Assets are uploaded and managed in the Asset Management subsystem.
1. Under Find Assets, select from the drop-down list and click Add Asset.
2. Enter a Group Name.
By default Commerce Manager offers three options with names that will allow the associated assets to be correctly displayed on the product details page of the public site.
l Image - (type as "image," all lowercase) thumbnail icon(s) will appear on the product details page
l Downloads - a "Downloads" tab will appear towards the bottom of the details page
l Specifications - a "Specifications" tab will appear towards the bottom of the details page
3. Once an asset is added to the list below, you can choose to edit specific assets, such as their Group name and Sort Order.
4. Once done, click OK and the new category/node will be created. You will be redirected to the Node List. Otherwise, select Cancel to go back to the Node List without saving any changes.
Relations Tab
Here the relations for a product will be displayed, and you can manage the categories a product is linked to. This is useful in order to get an overview of all the different categories (nodes) where a product will occur. A product can for instance appear in the "French Market" category, as well as under "Daily Specials" and "Digital Cameras". Browse to a product and open it for editing. The relations for the product will be displayed under the Relations tab.
Creating Product Associations
Product Associations help you to highlight certain products in your public site. For example, one or more products can be related to or associated to another product so that these associated products can be displayed or advertised on the public site as a product accessory, or as an up-selling/cross-selling item. Associations can be made from any of the individual products (Product Entries, SKUs, Bundles, Packages, and Dynamic Packages). (Product Entries, Variations/SKUs, Bundles, Packages, and Dynamic Packages).
To create Product Associations go to the edit screen of any type of product entry listed above and select the Associations tab. Out of the box, you can associate related products or accessories or cross-sell different kinds of products ("You May Also Like").
© EPiServer AB
112 | User Guide for EPiServer Commerce 1 R2 SP1
CrossSelling Other Products - "What You May Like"
1. Click on the Add an association button to enter the name "CrossSell" (without the quotes), an optional description and sort order number. Click Save Changes to save and exit the screen. CrossSell should appear in the dropdown menu.
2. Next select the new association that you just created from the drop-down menu and click on Edit
Details.
3. Use the drop-down menu to add one or more products and select Add Item to save the association. The items you have added to this association will render on the product detail page under "You May Also Like" on the default template.
Associating Related Products and Accessories
1. Click on the Add an association button to enter the name "Accessories" (without the quotes), an optional description and sort order number. Click Save Changes to save and exit the screen. Accessories should appear in the drop-down menu.
2. Next select the Accessories product association that you just created from the drop-down menu and click on Edit Details.
3. Use the drop-down menu to add one or more products and select Add Item to save the association. The items you have added to this association will render on the product detail page under "Related Products and Accessories" on the default template.
Managing Assets
Assets are downloadable contents such as documents, links, videos, and images that can be linked to specific products. Assets are uploaded and managed in the Asset Management system and then these Assets can be associated with Catalog entries..
In order for the Asset files to correctly display in catalogs, you'll need to configure your Internet Information Services (IIS). Find out more Displaying Assets section of the Developer Guide for EPiServer Commerce.
Associating Additional Digital Materials with Catalog Entries
Assets are downloadable contents such as documents, links, videos, and images that can be linked to specific products. Assets are uploaded and managed in the Asset Management system.
1. Under Find Assets, select from the drop-down list and click Add Asset.
2. Enter a Group Name.
By default Commerce Manager offers three options with names that will allow the associated assets to be correctly displayed on the product details page of the public site.
© EPiServer AB
Commerce Manager | 113
l Image - (type as "image," all lowercase) thumbnail icon(s) will appear on the product details page.
l Downloads - a "Downloads" tab will appear towards the bottom of the details page.
l Specifications - a "Specifications" tab will appear towards the bottom of the details page.
3. Once an asset is added to the list below, you can choose to edit specific assets, such as their Group name and Sort Order.
4. Once done, click OK and the new category/node will be created. You will be redirected to the Node List. Otherwise, select Cancel to go back to the Node List without saving any changes.
Searching for Entries in Your Catalog
The Catalog Search function enables you look for specific sales items stored in the Commerce Manager.
1. Click on Catalog Management and then Catalog Entry Search. 2. To do a basic search for catalog entries, enter a one keyword or more into the Search by Keywords(s) field, such as "canon digital cameras". The search will return entries that match either of those keywords. 3. If you input keywords around quotation marks ("canon digital cameras"), then search will only fetch entries that have those exact three keywords.
© EPiServer AB
114 | User Guide for EPiServer Commerce 1 R2 SP1
Catalog Search Filters
To narrow entry search results, there are Additional Filters available. Click search once those filters are set.
l Filter by language: Pull-down menu will show the available language choices
l Filter by catalog(s): Pull-down menu will show the available catalog choices
l Search by code/id: Instead of text, you can search by code or ID
Deleting and Cloning Entries
Users can Delete and Clone entries. To delete or clone an entry:
1. Select an entry or entries by checkmarking the box next to it.
2. Click on More Actions.
3. Click on Delete Selected or Clone Selected .
The entry will either be deleted or a clone (copy) of it appears.
© EPiServer AB
Commerce Manager | 115
Paging and Sorting Results
Users can sort results by clicking on Name, ID, Available From, Expires, and Status in either ascending or descending order.
Users can also change the Page Size ranging from 10 entries to All entries.
To page through multiple entry results, users can click on the paging controls on the lower-right corner of the main window.
Updating Multiple Catalog Entries at Once
This area gives you the ability to quickly make mass changes to your catalog. You can sort by Entry
Type, Meta Class, Field, Language, Catalog and Keyword(s). Once you apply one or more of these filters, the search results will appear in the bottom half of the screen.
If you make changes to the entry, click Save All to save all of your catalog updates.
Clicking on a result, such as the example below, will direct you to the entry's edit page. © EPiServer AB
116 | User Guide for EPiServer Commerce 1 R2 SP1
Order Management
The Order Management System provides shopping carts, order capture, order fulfillment, and payment function support. Features and functionality include return merchandise authorization (RMA), support for item exchanges, and UI enhancements.
The Order Management System, in most respects, works much differently compared to previous versions of EPiServer Commerce. The overall order management workflow involves the Customer Management System, as orders are now directly attached to individual contacts.
Order Workflow
The order workflow is described in the topics of this section.
Creating a New Order
Option 1: Creating an Order Within a Contact
1. Go to Customer Management > Contacts and create or click on an existing contact. The contact details appear.
2. Click on New Order.
3. The New Order pop-up window appears. Select the site to apply the order to and click OK. The Purchase Order New form appears, allowing users to enter basic information about the order.
© EPiServer AB
Commerce Manager | 117
Filling Out the New Purchase Order
1. Enter Basic Order Information.
Field
Description
Customer This is the name of the contact.
Currency
Select from the drop-down list the currency to associate with the Purchase Order.
Coupon
Coupon codes created with a promotions can be applied here to associate with the Purchase Order. Click Apply once code is entered.
Advanced Search
You can apply three filters to refine your item search results.
Field
Description
Select catalog
Select which specific catalog to search
Select language Select a specific language (such as German) for items described in German
Select entry type Select a specific type of entry, such as variation/sku or bundle
Configuring the Selected Entry
1. Before you add the item to the order, you can configure the actual price, the quantity, and apply a percentage or discount based discount.
© EPiServer AB
118 | User Guide for EPiServer Commerce 1 R2 SP1
Required Fields
l Price
l Quantity
Field
Description
Display Price
This is the price seen on the public website. This is set at the catalog entry level.
Price
This is the actual cost of the item that will be charged when the item is added to the order.
Quantity
Set how many of the item to add to the order.
Discount
You can apply a discount to the item, either Value or Percentage based.
Total
The total is automatically calculated, factoring in the actual price, quantity, and any discounts applied
2. Once the item is configured, click Add item to the order. The item will appear on the Purchase Order form.
Completing the Rest of the Purchase Order Form
1. Enter a Billing and a Shipping Address.
When entering the Shipping or Billing Address, you can select an existing address associated with the contact, if any.
© EPiServer AB
Commerce Manager | 119
Checkmark Add to customer's address book if you want to save the address to the contact.
If the Shipping Address is the same as the Billing Address, click on Same as Billing Address. The Shipping Address form is autopopulated with the information entered in the Billing Address form.
2. Select the kind of shipping to use for the order under Shipment Details. Select from the dropdown the shipping methods (add link) available.
3. Click on Recalculate to generate the cost summary.
4. Click OK.
Option 2: Creating an Order from Purchase Order List
1. Go to Order Management > Purchase Orders.
2. Click on New Order. A pop-up appears, allowing you to select the site and contact to apply the new order to.
© EPiServer AB
120 | User Guide for EPiServer Commerce 1 R2 SP1
3. Click OK.
4. Follow the steps above to complete the Purchase Order.
Fulfilling an Order
Once the Purchase Order form is completed, the order fulfillment process begins. The order form consists of five sections:
Tab Name
Description
Summary
Displays an overview of the order, including the customer information, billing address, and other data. From here you can cancel orders, edit information, and place an order on hold.
Details
Displays the shipment details, including shipment status, items to be shipped, and a list of applied discounts/coupons. Returns/Exchanges are also created here.
Payments
You can create and assign payments to the order here. Payments are automatically processed when saved.
Returns
Displays the details of a return, if made.
Notes
Displays the notes attached to the order. Notes are automatically logged when certain events occur within the order (e.g. the shipment status changed)
Processing the Order, Submitting a Payment, and Releasing to Shipping
The basic workflow from purchase order to shipping is done this way.
© EPiServer AB
Commerce Manager | 121
1. Add a payment to the order.
2. Enter the amount of the payment. The Amount field auto-populates the value of the total order, including shipping costs. However, you can change the value of the payment (useful for splitting payments between two or more payment methods at the request of the customer).
3. Select the Payment Method from the drop-down list.
4. Click OK. The order goes into Edit Mode.
Note: When in Edit Mode, you can add more payments to the order. However, once you click Save, you finalize the payment. This means that you cannot further add or delete payments.
© EPiServer AB
122 | User Guide for EPiServer Commerce 1 R2 SP1
5. Once you have finished adding one or more payments, click Save to exit Edit Mode and save your changes. The payment gets automatically processed for the amount specified.
6. Check the Details tab. You will see that the Shipment Status has changed to "Awaiting Inventory." Once the availability of the item has been determined, click on Release Shipment to release the order to your shipping department.
7. By clicking on Release shipment, the status changes to "Released." For further processing of the order, your shipping department will go to Order Management > Shipment.
If you click Cancel shipment, you will end up canceling the entire order. (At the moment, there is no way to undo the cancellation, so you must be careful.)
Canceling an Order
Under the Summary tab, click on Cancel Order. This will completely cancel the order. The status of the order changes to "Canceled."
The cancellation of the order will be logged under the Notes tab.
© EPiServer AB
Commerce Manager | 123
Splitting Shipments
IIf there are two or more items within an order, they can be split into separate shipments. This is useful for expediting items within the order that are immediately ready for shipment, while other items have extra shipping lead time.
1. Go to an existing purchase order or create a new one. The order must have two or more items.
2. Go to the Details tab in the order form. Look for Shipment # 1.
3. Select the item you want to move by clicking on the Move icon.
4. The pop-up appears, which allows you to choose to move the item(s) to an existing shipment or create a new shipment. You can also select the quantity of the item to move. Each new shipment within the order can have its own separate shipping address and shipping method. Select a shipping address and shipping method from their respective drop-down lists. Click OK to save your © EPiServer AB
124 | User Guide for EPiServer Commerce 1 R2 SP1
changes.
5. After splitting the shipments, the order form goes into Edit Mode. The Details page shows the new shipment, which can be processed completely separate from one another, but tied to a single purchase order. © EPiServer AB
Commerce Manager | 125
6. Click Save to save your changes made to the order form.
Viewing Purchase Orders by Date or Status
On the left navigation menu, you can click on the nodes below Purchase Orders and Purchase Orders
by Status. For example, clicking on Purchase Orders > Today will show the orders created today only on the right window.
Moreover, you can view orders within the Order List by status. For example, click on Purchase Orders
by Status > InProgress to view orders with that status.
Viewing and Searching for Orders
Using Order Search to Find Existing Purchase Orders
Order Search allows you to find existing orders, giving you six different search filters to help refine your search results. You can click on the ID number of the order to view it.
© EPiServer AB
126 | User Guide for EPiServer Commerce 1 R2 SP1
Filter
Name
Description
Class
Type
Select "Purchase Orders" on the drop-down list. Otherwise, if you want to search for a specific shopping cart or payment plan, select those.
You can filter results by their statuses. For example, if you want to find only completed purchase orders, select from the drop-down list "Completed".
Available status options are:
l OnHold
Status
l PartiallyShipped
l InProgress
l Completed
l Cancelled
l AwaitingExchange
Date
Range
You can select from date ranges from "today," "last week," or "this month."
Return #
Enter in the return number of a purchase order if a return was created for that particular order.
ID
You can specify the order ID. Orders created out of the box with EPiServer Commerce are typically numbered as PO####.
Customer
Enter in a customer name and the search results will return only orders filtered by the specified name.
Click on Search to being your search query. The desired results appear below. The results are broken down by five column fields:
l ID
l Customer (name)
l Total (cost of order)
l Status
l Modified (date)
You can sort results by ID, Customer, Total, or Status.
Shipping and Receiving Workflow
The Shipping and receiving workflow is described in the topics of this section.
Processing Shipments and Creating Picklists
Once an order has been released for shipment, the order then goes through shipment processing, where you can add the shipment to a Picklist and select the warehouse where the item will be packed and © EPiServer AB
Commerce Manager | 127
shipped from.
1. Go to Order Management > Shipping/Receiving > Shipments > Released for Shipping. This shows the Released Shipments screen.
2. Select a Warehouse from the drop-down list to determine where the item ship be packed and shipped from.
3. Checkmark which orders you want to add to the Picklist and click Add Shipment to Picklist.
4. The Add Shipments to Pick List pop-up appears. You can choose to create a New Pick List (by default, the List Name shows the date and time the Pick List was generated) or add the chosen shipment(s) to an existing Pick List you can select from the List Name drop-down list. Click OK to save your changes.
Note that it is currently not possible to change the pick list name. It defaults to date and time. © EPiServer AB
128 | User Guide for EPiServer Commerce 1 R2 SP1
Printing Picklists and Printing Packing Slips
1. Go to Order Management > Pick Lists. You can see existing Pick lists; you can filter the view by choosing which warehouse the pick list was generated in.
You can also sort existing pick lists by Name, Packing Shipments, Warehouse, and Created By.
2. Click on an existing pick list. The Packing Shipments window appears. You can choose to print a packing slip and/or a picklist. Checkmark one or more purchase orders. Click on Print Picklist to generated a printable and exportable (Excel or PDF) pick list.
To generate a packing slip, checkmark one or more purchase orders to include in the packing slip and then click on Print Packing Slip.
© EPiServer AB
Commerce Manager | 129
Finalizing a Package for Shipment
There are two ways to complete a shipment.
Method 1
1. Check mark the box next to the shipment and then click Complete:
2. The Complete shipment pop-up appears. The default shipment number is based on the number after the purchase order number. For example, in the screenshot above, the PO number is PO7884-7. The last number after the dash is the number you want to enter into the text field.
3. Click on Validate. Once validated, you will see the customer name, shipping address, shipping method, and a field to enter in the tracking number provided by the shipping provider. Enter in a tracking number and click OK. The shipment is sent out and completed. The purchase order status will change to "Completed."
© EPiServer AB
130 | User Guide for EPiServer Commerce 1 R2 SP1
Currently, the Complete shipment pop-up is rendered over the purchase order number. So to reference the shipment number without closing the pop-up, you can move and drag the popup so you can see the PO number by hovering your mouse cursor over the Complete shipment title bar.
Method 2
1. To complete a shipment, click on the complete shipment icon highlighted in the screenshot below:
2. The Complete shipment pop-up appears. The shipment # is already validated with the last number of the PO number.
3. Enter a tracking number provided by the shipping provider and then click OK to complete the shipment and complete the order.
Processing Returns and Exchanges
Initiating a Return
Once a package has been finalized and shipped out, EPiServer Commerce enables you to process returns and exchanges directly in the order. Returns and exchanges can only be processed once a purchase order status is tagged as "Completed."
1. Go to purchase order that has been finalized and shipped. Go to the Details tab and you will see that the Create Return is available under Returns/Exchanges. Click on it to begin the return and/or exchange process.
© EPiServer AB
Commerce Manager | 131
2. The Create/Edit Return form appears. Click on New Item to add associate the items to be returned. 3. The LineItem drop-down menu defaults to the items that were in the original purchase order. You can set the Return Quantity and the Return Reason from the drop-down list (Faulty, Unwanted Gift, Incorrect Item). Click OK to save your changes.
4. The purchase order will go into Edit Mode. Click Save to continue the return process. Otherwise, click Cancel to cancel the return.
Return Actions
1. Click on the Returns tab to process the return further. Once you get notice from the shipping department, for example, that they received the returned item, click on Acknowledge Receipt
Items.
© EPiServer AB
132 | User Guide for EPiServer Commerce 1 R2 SP1
You can also choose to edit the return or cancel the return completely.
2. Once you click on Acknowledge Receipt Items, the Complete Return becomes available.
3. Click on the button to open the Create Refund form.
1. The Amount value defaults to the invoice cost of the item (not including the shipping costs). For example, if the item cost $49.99 and the shipping cost was $2, then the Amount text box will show $49.99.
However, you can specify a different amount to refund to the customer, including the full © EPiServer AB
Commerce Manager | 133
cost of the order, item(s) + shipping cost. By default, the refund will be deposited based on the payment method the customer used to make the order.
2. If the customer wants the refund processed and deposited to a different credit card or payment method (such as cash, money order, or electronic transfer), click on the New Credit radio button and you can enter their alternate credit card information or other refund payment information.
4. Once done, click OK to create and process the refund. The status of the purchase order changes to Completed.
Initiating an Exchange Order
Generating an exchange creates a separate Exchange Order (denoted by "EO", instead of "PO") tied to the original Purchase Order. An Exchange Order is similar to processing a Purchase Order, as it involves payment processing and releasing packages for shipment.
1. Go to a Purchase Order, click on the Details tab, and then click on Create Return.
2. Add the items for exchange.
3. Click on the Returns tab and click on Acknowledge Receipt Items. Click Create Exchange to open the Create Exchange Order form.
4. Click on New Item and then select the item to be exchanged by clicking Configure Selected
Entry. You can adjust the price, quantity, and applicable discounts before you add the item to the Exchange Order by clicking Add items to the order.
© EPiServer AB
134 | User Guide for EPiServer Commerce 1 R2 SP1
5. Enter a shipping and billing address. Select the shipping method to use for the Exchange Order. Click on Recalculate to adjust the Summary total.
6. Click OK once done.
© EPiServer AB
Commerce Manager | 135
Viewing an Exchange
1. Once an Exchange Order has been created, click on View Exchange to view the details of the EO. An EO is similar to how a Purchase Order is set up.
2. Click on the Payments tab to add a payment to the Exchange Order. Select a payment method for processing the EO. You can adjust the amount if needed (the amount default value is based the item cost + shipping).
3. The Exchange Order goes into Edit Mode. Click on Save to process the payment and the order. The payment Transaction Type changes to "Authorization."
4. Go back to the Purchase Order and click on the Returns tab. Click on Complete Return to enable the Customer Service Representative (CSR) to release the EO shipment. Optionally, you can cancel the shipment to cancel the Exchange Order. Once you release shipment, the CSR repeats the
same process as he would when shipping a Purchase Order.
Shopping Cart
Registered and anonymous customer carts can be viewed in detail and converted to a Purchase Order manually.
Converting a Shopping Cart to a Purchase Order
Customer shopping carts can be manually converted over to Purchase Orders, rather than have them process the order via the front-end site.
© EPiServer AB
136 | User Guide for EPiServer Commerce 1 R2 SP1
1. Go to Order Management > Carts. You will see the Shopping Carts List. You can also click on "Today," "This Week," or "This Month" to filter by date range.
2. Click on the ID number of the shopping cart you want to convert over to a Purchase Order.
3. You will see the Cart View window and details of the customer's shopping cart.
An anonymous user Cart View will look like this:
© EPiServer AB
Commerce Manager | 137
1. Edit Information - You can change the currency to be used for the Purchase Order.
2. Open Customer Profile - You can view the profile of the registered customer (this option is not available for anonymous shopping carts).
3. Line Items - This is the list of items currently in the customer's shopping cart, displaying the Quantity of each item, List Price, and Total.
4. Notes - You can add, edit, or delete notes about the shopping cart.
4. Click on More Actions and click on Convert to Purchase Order.
The page refreshes and shows the Order view page for further processing of the purchase order.
Payment Plans
This section describes how to work with payment plans and recurring payment plans in EPiServer Commerce.
Setting up a Payment Plan
Payment plans can be setup by the CSR to generate recurring payments. An example recurring payment would be for magazine or grocery subscriptions.
© EPiServer AB
138 | User Guide for EPiServer Commerce 1 R2 SP1
Payment plans are handled in the background by a scheduled Quartz job which should be configured by your IT team based on your business needs. Ideally, the payment plan job should run once per day.
Creating a Payment Plan
1. Go to Order Management > Payment Plans (recurring). You will open up the Payment Plans List. To create a new payment plan, click on New Payment Plan.
2. Select a customer contact to attach the payment plan to.
3. The Payment Plan New page appears. Complete the form as you would when creating a new order.
4. Under Payment Plan Details, you will set the cycles and parameters of the payment plan.
5. Once the payment plan is configured, click OK.
Field
Description
You can choose from the following plan cycles, which determine how often the customer is charged.
- No Cycle: No recurring payment is created. The customer is charged once when the initial purchase order is created.
Plan Cycle
- Daily Cycle: recurring payment happens daily from start date.
- Weekly Cycle: recurring payment happens weekly from start date.
- Monthly Cycle: recurring payment happens monthly from start date.
- Custom1/Custom2: these are placeholders for developers to create custom cycles within the Mediachase.Commerce.Orders.PaymentPlanCycle class.
Cycle Length
Determines how many times to run a cycle runs. For example, the cycle length of "2" for a weekly cycle means the cycle will run twice after two weeks from start date. Setting a cycle length of "0" means the cycle will run an unlimited number of times.
Max Cycles
Determines the maximum number of cycles to run for this payment plan. The max cycles value is typically set to the same value as the cycle length. For example, if the cycle length is 12, you will set the max cycle length to 12 as well. If the cycle length is set to 0 (for unlimited) then the max cycles length should also be set to 0.
Completed Cycles
This tallies the number of completed cycles so far after the payment plan was created. When initially creating the payment plan, set this field to 0.
Start Date
Set the start date and time to determine when the payment plan should begin (beginning recurring transactions).
End Date
Set the end date and time when the payment plan should end (ending recurring transactions).
Is Plan Active
Set "True" to enable the payment plan. Set "False" to create the payment plan but keep it inactive.
Last Transaction Date
Logs the last transaction date. The date and time already in those two fields when first creating the payment plan should be kept as is.
Payment Plan Order Detail Page Explained
The payment plan begins once the first purchase order is generated. The purchase order can be created manually (by clicking on Create First Purchase Order) or automatically by the payment plans quartz job.
After creating a new payment plan, a new Order page appears. This is slightly altered from the original Order detail page that appears after creating a new order. The changes include:
l Inability to manage shipments (i.e. release shipments for further processing)
l An Orders tab that shows a history of processed purchase orders from this payment plan
© EPiServer AB
Commerce Manager | 139
l A "Create First Purchase Order" button that a CSR can manually click on to create the first purchase order related to this payment plan. The button disappears after creating the first purchase order manually or when the payment plan quartz job runs and generates the first purchase order. Once that first purchase is generated, the payment plan goes into effect.
l The purchase order number that is generated includes the parent ID of the payment plan. For example, if the payment plan parent ID is 35, the subsequent purchase orders are numbered as "PO35XXX."
l When a payment is added to a payment plan, the customer is not charged. The customer is charged once the purchase order is generated for the first time (and through subsequent purchase orders). The payment plan simply collects the payment information until converted to a purchase order.
Editing and Canceling a Payment Plan
1. To edit an existing payment plan, go to Order Management > Payment Plans (Recurring) or Today/This Week/This Month/All. Click on the payment plan ID number to open the payment plans order details page and make edits.
2. To cancel a payment plan, when editing a payment plan, click on the Summary tab and then click on Cancel Payment Plan.
Creating a Recurring Payment Plan Using Authorize.Net
Out of the box, EPiServer Commerce supports Authorize.net as a recurring payment plan gateway.
For more information on how to setup payment methods, refer to the Payment Gateways section.
1. Go to Administration > Order System > Payments > (Language) and create a new payment method or click on an existing payment method (such as "Pay by Credit Card").
2. When setting up the parameters of the payment method, select this class name:
3. Select "Yes" for Supports Recurring.
4. Click OK.
5. Click on the name of the payment method again and click on the Parameters tab.
© EPiServer AB
140 | User Guide for EPiServer Commerce 1 R2 SP1
6. Configure your Authorize.net account for both regular payments and recurring payments.
Marketing
The Commerce Manager Marketing system consists of the following components:
l Campaigns - a way to organize marketing activities. Campaigns must be associated with Promotions in order to provide customer discounts. Optionally, Campaigns can also be tied to Customer Segments for targeted marketing purposes. l For example, you can create a seasonal campaign that will include different Promotions targeted for the Spring season.
l Promotions - a way to apply various discounts to the products, order totals or shipping. A Promotion is a marketing tool used to increase sales of certain products or product lines. Various incentives such as lowered pricing and other discounts can be employed as part of a Promotion. l Promotions are always tied to Campaigns.
l Promotions can be classified into two types: 1) either you can create a Promotion that is visible prior to checkout or 2) you can configure the Promotion to be displayed during the checkout process.
l The most powerful aspect of the Marketing system is the Expression Engine which allows variable conditions to be applied when creating a Promotion. These conditions vary from the number of items, the percentage discount, shipping rates and many others.
© EPiServer AB
Commerce Manager | 141
l Customer Segments - these determine the target audience for the Promotions. Customer Segments determine the target audience for the Promotions. Within a Campaign, all Promotions will be applied to whatever Customer Segments associated with the same Campaign. Members of the Customer Segments can be pre-defined in static groups or you can use the Expressions Engine to create dynamic groups whenever Promotions are run. l For example, you can have a Customer Segment that targets all users from the Los Angeles area. You can create an Expression that will include all the customers whose home city is Los Angeles. Thus, when a user registers on the site he immediately becomes part of the target Customer Segment.
l Expressions - these are customizable Conditions which allow users to extend different aspects of the Marketing system -- Promotions, Customer Segments and Policies all rely on Expressions. There is an Expressions Engine which is a core technology behind the Marketing system. l For example, you want to set a Promotion for "40% off Item X." The Expression or Condition to enable this Promotion would include: Catalog ID for Item X and Reward of 40%.
l Policies - rules that are always executed when Promotions are applied. This allows a Marketing manager to declare rules just once for the whole site. l An example of a rule is as follows: Do not allow negative orders.
Campaigns
Campaigns provide a way to organize marketing activities. Campaigns must be associated with Promotions in order to provide customer discounts. Optionally, Campaigns can also be tied to Customer Segments for targeted marketing purposes. For example, you can create a seasonal Campaign that will include different Promotions targeted for the spring season. Browsing Campaigns
To browse Campaigns, go to Marketing > Campaigns to open the Campaign List.
From the Campaign List, you can create a New Campaign or edit existing ones.
Creating a Marketing Campaign
Sales promotions are tied to specific Campaigns. A Campaign could be related to seasonal sales, such as Easter or Christmas. Campaigns are the first step to deploying targeted marketing efforts.
To create a new Campaign, click on New Campaign on the Campaign List page.
© EPiServer AB
142 | User Guide for EPiServer Commerce 1 R2 SP1
This opens up the Campaign Edit page.
1. Enter in a Campaign Name, such as "Christmas Campaign" or "Back to School Sale."
2. Enter in any Comments as notes about the Campaign.
3. Enter in a date directly (or click on the Calendar icon to select a date) and time into the Available
From field. This will indicate when the Campaign is expected to start.
4. Enter in a date and time in the Expires On field.
5. Select the Target Segments from the list. Target segments are created under the Customer Segments section
6. Indicate whether or not the Campaign is Active, "Yes" or "No."
7. Indicate whether or not to Archive the Campaign, "Yes" or "No. NOTE This feature has not been implemented and switching its status from "No" to "Yes" will not change anything.
8. Once done, click on OK.
© EPiServer AB
Commerce Manager | 143
Promotions
Promotions provide a way to apply various discounts to the products, order totals or shipping. A Promotion is a marketing tool used to increase sales of certain products or product lines. Various incentives such as lowered pricing and other discounts can be employed as part of a Promotion.
Promotions are always tied to Campaigns. In addition, Promotions can be classified into two types: 1) either you can create a promotion that is visible prior to checkout or 2) you can configure the promotion to be displayed during the checkout process. The most powerful aspect of the Marketing system is the Expressions Engine which allows variable conditions to be applied when creating a Promotion. These conditions vary from the number of items, the percentage discount, shipping rates and many others.
Browsing Promotions
To view and browse Promotions, click on Promotions on the left navigation bar.
The Promotion List page opens, displaying a list of existing Promotions.
© EPiServer AB
144 | User Guide for EPiServer Commerce 1 R2 SP1
You can click through the name of a Promotion to view its properties.
Deleting a Promotion
On the Promotion List page, checkmark the box next to the name of the Promotion and then click on More Actions > Delete Selected on the menu bar.
Creating an Entry Level Promotion
Out of the box, users can build these Catalog Entry Promotion Types:
l Catalog Entry: Build Your Own Discount
l Catalog Entry: Buy Catalog entry X, get catalog entry Y at a discount
l Catalog Entry: Buy X Get $ Off Discount
l Catalog Entry: Buy X, get N quantity of Y at a Discount
© EPiServer AB
Commerce Manager | 145
The following are examples of how to create each type of Promotion.
Example: Build Your Own Discount - "40% Off Canon PowerShot S5"
Once you have selected "Build Your Own Discount" from the Promotion Type drop-down menu, enter in a Promotion Name, such as "40 % Off Canon PowerShot S5"
Under the Display Name section, enter in the display name for each language type.
Promotion Properties:
l Under the Campaign drop-down, select an existing Campaign created earlier
l Promotion Group is grayed out because the Promotion Type is specified
l From the Combination with other promotions drop-down, select the degree to which multiple Promotions can be combined. There are three options: "Combine with other promotions", "Exclusive within select groups", and "Exclusive within all groups."
l Combine with other Promotions - The selected promotion will be combined with all other promotion types that may be in use
l Exclusive within Selected Groups - If the selected promotion is applied, no other promotions within that group will be applied (but other promotions in other groups may be applied)
l Exclusive within all Groups - If the selected promotion is applied, no other promotions will be applied.
l Enter a numerical value into the Priority field (Promotions with a higher priority will be evaluated first)
l Optionally, enter in a Coupon Code that customers can redeem from the front-end public site to get receive the discount. Otherwise, leave the field blank.
l Set the Status of the Promotion either as "Active", "Inactive," "Suspended," or "Deleted" from the drop-down menu. Select Active to enable the Promotion.
Purchase Condition and Reward:
© EPiServer AB
146 | User Guide for EPiServer Commerce 1 R2 SP1
Here you can set your own Purchase Condition to receive the discount Rewards. To apply a 40% discount for Canon digital cameras, use the following settings in the screenshot.
Redemption Limits:
Under this section, you can specify the redemption limits of this Promotion.
l Next to Max. Total Redemption, enter in the maximum number of times the Promotion can be redeemed.
l Next to Max. Redemptions Per Order, enter in the maximum number of times the Promotion can be redeemed per customer order.
l Next to Max. Redemptions Per Customer, enter in the number of times a Promotion can be by a single customer.
Schedule:
Enter the date and time when the Promotion is Available and when it Expires.
Click OK to save the Promotion. The Promotion will appear in the Promotion List.
When the Promotion is applied, the price on the front-end should change.
© EPiServer AB
Commerce Manager | 147
Buy catalog entry X, get catalog entry Y at a discount
The steps to create this discount are similar to creating a custom discount. The difference is the Purchase Condition and Reward.
1. Under the Select catalog entry X drop-down menu, select a specific catalog entry.
2. Under the Select catalog entry Y drop-down menu, select another specific catalog entry.
3. Enter in a value for the Quantity of "X" needed to qualify for the promotion. For example, the customer must purchase 2 of Catalog Entry X as a prerequisite for the discount.
4. Enter in a value for the Quantity of "Y" needed to quality for the promotion. For example, the customer must purchase 3 of Catalog Entry Y as a prerequisite for the discount.
5. In the Amount field, enter in a number and select from the drop-down to indicate that the Promotion is Percentage Based or Value Based. For example, if you enter 40 and select Percentage Based, the Promotion will take off 40%. If Value based, it will be 40 off the total price.
Buy X Get $ Off Discount
This type of Promotion gives a discount per item by purchasing the minimum quantity specified under these Purchase Conditions.
1. Enter in a Minimum quantity that the customer needs to purchase in order to receive the discount.
2. Enter in the Amount of the Promotional discount, whether Percentage Based or Value Based.
3. Select any number of Variations from the drop-down menu and click on "add variation." Repeat to add more Variations to this Promotion. Click on the red X button next to the Variation to delete it.
© EPiServer AB
148 | User Guide for EPiServer Commerce 1 R2 SP1
Buy X, get N quantity of Y at a discount
This type of Promotion allows a customer to be eligible to buy a designated number of items at a reduced price.
1. Select an Entry X variation from the drop-down menu and click on "add variation." (What does "Exclude" do?)
2. Select catalog entry Y from the drop-down menu. A certain number of "Y" entries will be discounted based on the Purchase Conditions.
3. Enter in a Max quantity Y for the maximum number of Y entries eligible for a discount.
4. Enter in the Amount of the Promotional discount, whether Percentage or Value based.
Creating an Order Level Promotion
Order Level Promotions are discounts applied if the overall Order satisfies the conditions specified by the Promotion.
There are two types of Order Level Promotions available to the user:
l Order Sub Total Volume Discount - if the order subtotal minimum is met, then the customer receives the discount
l Build Your Own Discount - can create a custom Order Level promotion based on a range of Purchase Conditions and Rewards (similar to creating a custom catalog entry discount)
Order Sub Total Volume Discount
Enter in the Minimum order amount into the field. For example, if the order amount was set to $200, then the customer must have $200 or more in his shopping cart to qualify for the discount.
Enter in the Amount of the discount. It can either be "Percentage Based" or "Value Based." If Percentage Based, then the customer gets a percentage off the price. If Value Based, the customer gets a fixed amount discounted off.
Example: Build Your Own Discount - "20% Off for a Shopping Cart Subtotal of $100 or More"
Like a custom Catalog Entry discount (add link here), users can create their own custom Order Level discount based on a list of Purchase Conditions and Rewards. This means that there is a wide range of Order Level discount possibilities.
The follow Condition and Reward example shows how to create a Promotion that gives 20% off for a shopping cart subtotal of $100 or more.
© EPiServer AB
Commerce Manager | 149
The discount should reflect on the shopping cart on front-end public site.
Creating a Shipping Level Promotion
Shipping Level Promotions are promotions that give discounts based on the overall shipment. The discount will appear on the order page just before you submit the order.
Currently, creating a "Free Shipping" promotion based on a certain order amount (e.g. free shipping for an order of $50 or more) is not available out of the box and requires customization. Refer to the EPiServer Commerce Developer Guide for preliminary guidance on how to create such a promotion and other custom promotions.
There are two types of Shipping Level Promotions available to the user:
l Buy X Get $ Off Shipment Discount
l Buy X Get Y Free
Buy X Get $ Off Shipment Discount
This Promotion type applies shipping discount if the specified Variations total the Minimum Quantity set or more.
1. Enter in a Minimum Quantity.
2. Enter in an Amount of the discount Reward, and select from the drop-down whether it is "Percentage Based" or "Value Based."
3. Select the Variations from the drop-down list that qualify for the discount. Click on Add Variation to add the Variation to the list.
© EPiServer AB
150 | User Guide for EPiServer Commerce 1 R2 SP1
Buy X Get Y Free
This shipping discount allows a user to set two Catalog entries for X and Y. If X is in their shopping cart, then the customer receives the Y item at no cost.
Creating Custom Promotions
You can create custom promotions instead of using the built-in ones. It is possible to create custom promotions on a catalog, order, or shipping level.
How to Use "Or" When Building Your Own Promotions
EPiServer Commerce has a powerful discounting engine and can be used to build all types of promotions without writing custom code. In most cases these discounts can be built using one of the built in "Build Your Own Discount" options.
Building the Discount
In this case we want to build a promotion that will give a $10 discount on certain items in our catalog. We want products with "Canon" OR "Vista" in the display name to receive $10 off the item. In this case we are using a Promotion Type of "Catalog Entry:Build Your Own Discount". Constructing the purchase condition can be a confusing when using the Or operator. The first item we must add to the condition is the Or operator since And is the default. The Or will have the effect we desire if added first which is And (Or (DisplayName = Canon, DisplayName = Vista)) which is translated by the rules engine to And (DisplayName = Canon Or DisplayName = Vista). If the Or is not added first the results will not be as desired as the DisplayName would have to contain Canon And Vista.
The Reward is set to $10 Off.
Seeing the Discount Applied
We have added three items to our shopping cart. As you can see two of the items (containing "Canon" and "Vista") have been given the $10 off discount and the name of the promotion is shown with the item. © EPiServer AB
Commerce Manager | 151
The third item in our cart did not meet the criteria we set so no discount was applied.
Customer Segments
Customer Segments determine the target audience for the Promotions or Campaigns. Customer Segments determine the target audience for the Promotions. Within a Campaign, all Promotions will be applied to whatever Customer Segments associated with the same Campaign. Members of the Customer Segments can be pre-defined in static groups or you can use the Expressions Engine to create dynamic groups whenever Promotions are run.
For example you can have a Customer Segment that targets all users from the Los Angeles area. You can create an Expression that will include all the customers whose home city is Los Angeles. Thus, when a user registers on the site he immediately becomes part of the target Customer Segment.
Creating a Customer Segment
Customer segments specify which group of Customers a user wants to specifically target with their Campaigns.
Creating a Customer Segment Assigned to Contacts
Go to Marketing > Customer Segments.
Click on New Segment on the menu bar to open the Segment Edit page.
© EPiServer AB
152 | User Guide for EPiServer Commerce 1 R2 SP1
1. Enter in a Segment Name, such as "Company X Team."
2. Enter in a Display Name, which will appear to users when associating this Customer Segment when Creating a Marketing Campaign.
3. Enter in a Description.
4. Select from a list of contacts from the Members drop-down to assign them to this Customer Segment. Select the name from the drop-down and then click add member. You can choose to Exclude member by clicking on the checkbox and then clicking add member.
5. Once done, click OK to save the Customer Segment.
© EPiServer AB
Commerce Manager | 153
Creating a Customer Segment with Conditions
Instead of assigning members manually to a Customer Segment, you can use Conditions to apply rules. If a customer satisfies the Conditions, then the customer is part of the Customer Segment.
To add Conditions to the Customer Segment, click on New Condition on the Segment Edit page. This example will show how to specify Company X or Techarts emails as part of this Customer Segment.
Enter in an Expression Name, such as "Company X or Email Addresses."
Setup the Conditions based on the screenshot below.
Click OK to save the Conditions.
© EPiServer AB
154 | User Guide for EPiServer Commerce 1 R2 SP1
Working with Expressions
Expressions are customizable Conditions which allow users to extend different aspects of the Marketing system -- Promotions, Customer Segments and Policies all rely on Expressions. There is an Expressions Engine which is a core technology behind the Marketing system.
Users can create Expressions under Promotion, Segment, or Policy.
To access and create Expressions, click on Marketing > Expand Expressions > Either Promotions/Segment/Policy to view the Expression List page.
To create a new Expression, click on New Expression. The Expression Edit page appears.
In order to create an Expression, knowledge of XML is required. Non-technical users may want to skip this section.
Enter in an Expression Name, such as "ShippingCustomDiscount."
Enter in a Description of the Expression.
Enter in the Expression XML.
Under Category, select from the drop-down whether this Expression is for a "Promotion," "Segment," or "Policy." Depending on your selection, the Expression will appear under those respective folders. Click OK to save changes.
To create a new Expression, click on New Expression. The Expression Edit page appears.
In order to create an Expression, knowledge of XML is required. Non-technical users may want to skip this section.
Enter in an Expression Name, such as "ShippingCustomDiscount."
© EPiServer AB
Commerce Manager | 155
Enter in a Description of the Expression.
Enter in the Expression Xml.
Under Category, select from the drop-down whether this Expression is for a "Promotion," "Segment," or "Policy." Depending on your selection, the Expression will appear under those respective folders. Click OK to save changes.
Working with Policies
Policies are rules that are always executed when Promotions are applied. Promotion policies determine whether a conflict situation will arise when a particular promotion is applied in addition to any previously applied promotions. If no conflict is detected, this promotion is added to the list of applicable promotions; otherwise it is eliminated and will not be applied to the order.
Policies are the business rules on how to eliminate similar promotions for the same order or same product. Policies are pre-configured for each store. Policies can be optionally associated with one or more promotion groups.
l Local Policy - If a policy is associated with a promotion group, it is considered a local policy, and applies only to those promotions in the group to which this policy is associated. If a policy is not associated with a promotion group, it is considered a global policy which applies to all promotions.
This allows a Marketing manager to declare rules just once for the whole site. For example, you can create a Policy such as this: Do not allow negative orders.
Creating Policies, like creating Expressions, is meant for advanced users. Most non-technical users will want to skip this section.
To create a new Policy, go to Marketing > Policies to open the Policy List.
© EPiServer AB
156 | User Guide for EPiServer Commerce 1 R2 SP1
Click on New Policy to open the Policy Edit page.
Policy Status and Policy Is Local has not been fully implemented. Therefore, all policies will be global (meaning it cannot be limited to a Promotion Group) until this feature becomes available in a future release.
Enter in a Policy Name.
Enter the Status of the policy.
Select "Yes" or "No" to set the Policy Is Local.
l Policy Is Local is No - this is the default behavior. This means that this Policy is not part of a Promotion Group and is available for all Promotions.
l Policy Is Local is Yes - this means this Policy is part of a Promotion Group and is applicable only for that Promotion Group
Select an existing Policy Expression from the drop-down menu.
Select from the Groups list to place the Policy under.
Click OK when done.
Asset Management
The Asset Management system allows for assets including images, MP3s, PDFs, software packages and other downloadable files to be centrally stored, displayed on either the front-end site or the Commerce Manager site and ultimately to be shared or purchased.
© EPiServer AB
Commerce Manager | 157
Please refer also to the File Management section in this documentation to find out more about file management in EPiServer Commerce.
Browsing, Editing, and Deleting Folders and Assets
The Asset List page categorizes and manages downloadable Asset files. The default list of Asset folders are: Video, Presentations, Specifications, Software, Downloads, User Guides, and Images. These folder names can be changed.
To access the Asset List, click on Asset Management > Root or any other folder below Root. The Asset List shows folders and assets. The Asset List shows the total Size of the Assets and the Created date.
Folder and Asset names can be edited by clicking on the Edit icon next to the Name. © EPiServer AB
158 | User Guide for EPiServer Commerce 1 R2 SP1
This brings you to the Folder Item page, allowing you to edit the Name.
If you are editing an Asset such as an image, the File Item page appears, allowing you to edit the name as well.
Copying/Moving and Deleting Folders and Assets
Users can also copy/move and delete Folders and Assets.
To copy or move an Asset or Folder to another location, place a check mark in the box next to the Folder or Asset name and then click on More Actions > Move/Copy. © EPiServer AB
Commerce Manager | 159
The Move/Copy to Folder pop-up appears. You can select to "move" or "copy to folder." From the dropdown menu, select the destination. Click on OK to confirm.
To delete a Folder or Asset, place a check mark in the box and click on More Actions > Delete Selected. Creating Folders and Uploading Files (Assets)
Users can create their own Folders and upload files.
Creating Folders
To create a new Folder, go to the Asset List by clicking Asset Management > Root (or any Folder underneath Root). Then click on Create New > New Folder.
© EPiServer AB
160 | User Guide for EPiServer Commerce 1 R2 SP1
Enter in a name for the Folder and click Create.
The Folder will be created in whichever folder you are currently in. In this example, the Folder "Audio" was created underneath Root.
To see the Folder in the left navigation frame, click on the Refresh icon and the new Folder "Audio" will appear. You can create additional subfolders underneath Audio (or any other existing Folder).
© EPiServer AB
Commerce Manager | 161
Uploading Individual Files
To upload a single File, navigate to the Folder you want to upload the File to and then click on Create
New > New File.
Click on Browse or enter in the file path into the field. Once done, click on Upload.
A progress bar appears below. Once the upload is complete, the FolderElement form appears, allowing you to edit the name of the File, if you wish. Once done, click OK.
© EPiServer AB
162 | User Guide for EPiServer Commerce 1 R2 SP1
The File is now visible on the Asset List of the destination folder.
Uploading Multiple Files at One Time
To upload multiple Files to a Folder, click on Create New > Upload Multiple Files.
The Add Files pop-up window appears. Click on Browse to add Files. An additional field will appear below, allowing you to add more. You can upload up to five Files at one time. One done adding Files, click Upload.
© EPiServer AB
Commerce Manager | 163
A progress bar window will pop-up, showing you the progress of the uploads. Once complete, the Files will appear in the Asset List.
Reporting
Various reports are included out-of-the-box to help management and other personnel to make informed decisions. The default reports include:
l Sales Report - this report provides an overview of a site's sales performance over a period of time
l Shipping Report - this report provides the shipping method, number of orders and total shipping cost over a period of time
l Best Sellers Report this report is used to determine which products sold the most in terms of quantity and total revenue over a period of time
l Low Stock Report - this report is used to determine which products are running low in inventory. If a product's inventory is less than its reorder minimum quantity, it will be included in this report.
The display of these reports can be generated by Start and End date/time and filtered by Day/Month/Year. In addition, they can be exported to Excel or PDF format, or printed.
SQL Reporting Services
Since the Commerce Manager utilizes SQL databases, custom reports can be created using Microsoft
SQL Server Reporting Services. Reporting Services provides a complete, server-based platform designed to support a wide variety of reporting needs enabling organizations to deliver relevant information where needed across the entire enterprise. Read through the resources below to get familiarized with Reporting Services and how you can create custom SQL reports to display data from your EPiServer Commerce site.
© EPiServer AB
164 | User Guide for EPiServer Commerce 1 R2 SP1
l Reporting Services Features
l Using SQL 2008 Reporting Services and Report Builder 2.0 to Create Custom SQL Reports
l Download Report Builder 2.0
l Reporting Services and ReportViewer Controls in Visual Studio
l Reporting Services Components and Tools
l Reporting Services Configuration How-To Topics
Generating and Customizing Reports
By default, users can generate Sales, Shipping, Best Sellers, and Low Stock Reports about the site. Reports can be customized/filtered and exported to suit the needs of the user. To generate a report, click on Reporting > Sales > Sales Report/Shipping Report or Reporting > Products > Best Sellers Report/Low Stock Report.
Customizing/Filtering and Exporting Reports
Users can select the Start Date and End Date ranges and time as well as group the Report data by "Day," "Month" or "Year." Once done, click on Apply Filter.
An example Sales Report with a date range from 5/1/2010 at 6am to 6/7/2010 at 12pm Grouped By
Month is in the screenshow below.
Users can also change the zoom size of the report by clicking on the drop-down menu with "100%." Also, paging controls are available next to the zoom drop-down menu. Users can also reload the report by clicking on the Refresh icon.
© EPiServer AB
Commerce Manager | 165
To Export a report to a file format for sharing with others, click on the drop-down that says "Select a format." Select a format from the drop-down menu, such as Excel or PDF. Click on Export and Open or Save the file once the prompt appears.
System Administration
This guide includes various configuration tasks such as setting up Shipping and Payment Gateways, your default language, currency, units, tax configuration, licensing, and search settings. Often, these settings are not configured by users. Most of these configuration tasks are achieved in the Commerce Manager Administration area.
System Settings
This sections covers how to setup EPiServer Commerce with payment methods using built-in Payment Gateways and setup the default Language, Currency, and Units.
Business Foundation
It is a new generation of Meta Data Engine that allows no-code customization of the Data Model. We enhanced our Meta Model in this new version. In the previous version you could only add fields to the existing meta objects and now you can define new objects and relations between them.
The form is fully customizable so you can define layout and specify which fields you want to display. You can also work with system fields which was previously impossible.
The current implementation of Business Foundation only supports the Customer Management and Asset Management systems. Support for other Commerce Manager systems is planned for the future.
Customizing Existing Business Objects
Out of the box, Commerce Manager includes Business Objects that can edited and customized. Customizing existing business objects is a good starting point for end users to model business objects for their needs. However, pre-existing business objects such as "Address" and "Organization" cannot be deleted, only edited.
The current implementation of Business Foundation only supports the Customer and Asset Management subsystems. Support for other subsystems such as Order and Catalog are planned for future releases.
Fields in the Business Foundation
This section covers how to add or edit different types of data fields within an existing business object.
© EPiServer AB
166 | User Guide for EPiServer Commerce 1 R2 SP1
Adding Fields to Business Objects
Existing Business Foundation Objects can be customized to have additional data entry fields. For example, you can add fields to the New Credit Card form built-in to Commerce Manager.
To add new fields to Business Object, click on Administration, expand System Settings, and click on Business Foundation to access the list of Business Foundation Objects.
In this example, the CreditCard Business Object is used.
If you want to add a new field to this CreditCard Business Object (or any other Business Object), click on New Field.
The New Field form allows you to specify the type of data field you want created for the Business Object.
© EPiServer AB
Adding Fields to Business Objects | 167
1. Enter in a Field Name, which is the system ID or name of the field. The Field Name that is entered autopopulates the Friendly Name field.
2. Since the Friendly Name is autopopulated based on the Field Name, you can either keep the name the same or change it. The Friendly Name is what appears on a form (such as the Credit Card form)
3. You can optionally enter in a Description that appears below the data entry field to explain the field to the user.
4. Checkmark on or off to Allow Nulls for this field
5. You can choose to Add Field To an existing Form. Checkmark all that apply.
6. Enter in a Field Type. For further explanation of each Field Type, refer to the Reference Section on the bottom of this page. In this example, a String field type is used.
a. The Format drop down menu and options depend on your Field Type selection. In this example, Text is selected as the field format, with a Maximum Length of 100. Unique value is left unchecked. 7. Once done, click Save. The new field appears on the list of fields.
To verify if the new field appears, check the form associated with that new field. Since this example customized the New Credit Card form, you will see that the new field appears.
© EPiServer AB
168 | User Guide for EPiServer Commerce 1 R2 SP1
Editing Fields of Business Objects
Fields created by the user can be edited. To edit a field, click on the Edit icon.
Fields that are locked cannot be edited. The only attributes that can be changed are Friendly Names and Descriptions. Once those changes are made, click Save.
Relations in the Business Foundation
In order to track and record relevant data, business objects must be related to other objects, whether they are "1 to many," "many to 1","many to many." Currently, business objects only affect the customer and asset management systems.
l 1 to Many Relationship - 1 object can be associated or related with multiple object-related data. For example, one organization can be associated with multiple contracts.
l Many to 1 Relationship - Multiple object-related data can be associated or related with a single object. For example, multiple contacts can be related to a single organization.
l Many to Many Relationship - Multiple object-related data can be associated or related with multiple objects. For example, different SKUs can be associated with one or more Warehouses for tracking and storage.
© EPiServer AB
Adding a 1 to Many Relation | 169
Adding a 1 to Many Relation
Business Foundation objects allow a user to specify "1 to many" relationships. For example, if you have one organization, you can relate many types of data to that organization, such as multiple contacts, addresses, or organizational units or divisions within an organization. Within a 1:N relationship, the business object you selected will be "1."
In the example below, 1 = Organization and N = related objects such as Address, Contact, CreditCard, etc.
To add a 1 to many relationship to a business object, you will need to create a new business object or use an existing one. On the Business Object Customization page, click on 1:N Relations.
Click on New Relation "one to many" to create a new relation.
Under General Info, the Primary Object Organization is automatically set to Organization.
1. Select a Related Object to relate an the Organization object in the dropdown.
2. The Object section below General Info will have a different title based on Related Object you selected. For example, if you selected "Address," the title would be "Object 'Address'".
3. Enter in a Field Name and Friendly Name. They are autopopulated already using the system name of the business object.
Both names must be unique and not be the same as an existing field. The Field Name cannot contact spaces or special characters, only letters, numbers, and underscores.
4. Checkmark the box Allow Nulls if you do not want this to be a required field the user fill in while editing a form. Otherwise, uncheck the box to make it a required field.
5. Under Add Field To, checkmark the Forms you want the field to render in, such as the Edit Form (to enter and submit information) or View Form (read information only).
© EPiServer AB
170 | User Guide for EPiServer Commerce 1 R2 SP1
6. Under the Object "Name of Primary Object" section, select a Display region in the dropdown box. Additional options such as Display Text and Display Order will appear based on your dropdown menu selection.
7. Once all the relevant information is entered, click on Save.
The Related Object will have the Primary Object appear under the opposite relationship (N:1) on its configuration form. For instance, if organization is the Primary Object and the Related Object is Address, the relationship is automatically generated under the N:1 tab in Address.
© EPiServer AB
Adding a Many to 1 Relation | 171
Adding a Many to 1 Relation
Users can also relate business objects via a "Many to 1" relationship. For example, you can relate multiple contacts to a single organization or unit.
In the example below, N = Organization and 1 = related objects such as ParentId, PrimaryContactId etc.
To create Many to 1 relationships, click on a business object and click on the N:1 Relations tab.
Click on New Relation "Many to one" to create a new relationship.
The Relation N:1 form is very similar to the Relation 1:N form, except you can select the Primary Object from the dropdown, whereas the Related Object defaults to the name of the Business Object.
Under General Info, the Primary Object Organization is automatically set to Organization.
1. Select a Primary Object to relate an the Organization object in the dropdown.The Object section below General Info will have a different title based on the Related Object name.
2. Enter in a Field Name and Friendly Name. They are autopopulated already using the system name of the business object.
Both names must be unique and not be the same as an existing field. The Field Name cannot contact spaces or special characters, only letters, numbers, and underscores.
3. Checkmark the box Allow Nulls if you do not want this to be a required field the user fill in while editing a form. Otherwise, uncheck the box to make it a required field.
4. Under Add Field To, checkmark the Forms you want the field to render in, such as the Edit Form (to enter and submit information) or View Form (read information only).
5. Under the Object "Name of Primary Object" section, select a Display region in the dropdown box. Additional options such as Display Text and Display Order will appear based on your dropdown menu selection.
6. Once all the relevant information is entered, click on Save.
© EPiServer AB
172 | User Guide for EPiServer Commerce 1 R2 SP1
Like an 1:N relationship, if you create a N:1 relationship with a Primary and Related Object, a 1:N relationship is automatically generated for the Primary Object under the 1:N tab.
© EPiServer AB
Adding a Many to Many Relation | 173
Adding a Many to Many Relation
Users can also create Many to Many relationships with business objects. For example, many to many relationships help to track different SKUs and their inventory levels with different warehouse locations. Another example is multiple contacts a part of multiple organizations. A Many to Many relationship between two objects is also referred to as a Bridge.
In the example both Organization and Organization_Contact = N.
To create a Many to Many relationship, click on a business object and then click on the N:N Relations tab.
Click on New Relation "many to many" to create a new N:N relationship.
The Relation N:N is much different compared to the Relation 1:N/N:1 forms.
1. The Current Object defaults to the name of the Business Object you are editing
2. Select a Related Object from the dropdown menu
3. The Relation Name is autopopulated by (Current Object Name_Related Object Name). Change this name if you wish, but you cannot have spaces or special characters, only letters, numbers, and underscores.
4. Enter in a Friendly Name, which can have special characters and spaces. Make sure both Relation and Friendly Names are unique do not already exist.
5. Under Current Object, select a Display Region where the field will appear.
6. Under Related Object, select a Display Region where the field will appear.
Once all the relevant information is entered, click on Save.
© EPiServer AB
174 | User Guide for EPiServer Commerce 1 R2 SP1
A many to many relationship is automatically generated for the related object when you click on its N:N tab under its configuration form. Forms in the Business Foundation
Forms dictate how fields are presented to the user when view and editing information. This section shows you can customize forms for viewing and editing by end users.
© EPiServer AB
Customizing an Existing Form | 175
Customizing an Existing Form
Every field is associated with a Form. Each Business Object is associated with one or more types of forms. The common types of forms found in Commerce Manager are the Edit Forms, Short Info Forms, and View Forms. For example, the New Credit Card form looks like this:
By editing the form, you can change the layout, add new fields and sections, and more.
To edit an existing form, click on a Business Object and click on the Forms tab to see the list of associated forms.
Click on the Edit icon next to the form you want to make changes to. The form customization window pops up.
There are various functions available to edit and customize a form.
Editing the Layout of a Form
You can change the layout and the fields that appear on the form.
© EPiServer AB
176 | User Guide for EPiServer Commerce 1 R2 SP1
1. Click on Edit Form.
a. Select a View Type (or the layout of the form). You have a choice between a Two Column (1:1, 1:2, 2:1), or Three Column (1:1:1) layout. b. Enter in a pixel value for the Cell Padding, or spaces between each cell.
2. Click Save to confirm your changes.
This example uses a Two Column (1:1) layout.
Adding Sections and Fields
Once your layout is set, you can add additional sections and/or additional fields.
1. Click on Add --> Add Section to add a new section. Adding sections allows you to separate and divide groups of fields on a form with their own header and border.
2. Enter in a Title for the section.
3. Checkmark the box next to "Show border line for this section" if you want to show the border around section. Otherwise, uncheck the box to hide the border.
4. Checkmark "Show the name of this section on the form" if you want to show the title of the section on the form. Otherwise, uncheck the box to hide the title.
5. Select a View Type or layout of the section: One Column, Two Columns (1:1), Two Columns (1:2), Two Columns (2:1)
6. Enter a numeric pixel value for Cell Padding or amount of space between each cell in the section.
7. Click Save to save your changes.
© EPiServer AB
Customizing an Existing Form | 177
You can edit a section by clicking on a section and click on Edit.
Within each section are fields. You can add new fields to a specific section by highlighting the section and then by clicking Add --> Edit.
© EPiServer AB
178 | User Guide for EPiServer Commerce 1 R2 SP1
Select an existing associated field in the dropdown menu.
a. Checkmark the "Field is Read Only" box if you want the field to be unavailable for edit. When you see the rendered form, the field will be grayed out.
1. Select the "Item label showing on the form."
2. l Hide Label: No label appears next to the text box
l System Label: Shows the system name next text box
l Custom Label: Enter in a custom label
3. Enter in a Label Width numerical value. Default is 120px.
4. Tab Index: enter an index for the tab.
5. Select a View Type, either a One Column or Two Column. In the dropdown, enter in the number of text box rows, up to 3.
6. Click Save to add the field to the section.
© EPiServer AB
Customizing an Existing Form | 179
To edit a field, click and highlight the field and click on Edit to change your previous settings.
You can re-arrange fields on a form but using the arrow controls on menu bar. Highlight the field and then click on the directional arrow you want the field to move to.
© EPiServer AB
180 | User Guide for EPiServer Commerce 1 R2 SP1
In this example, the "Security Code" field is moved to the right where the "Customer Service Phone Number" field is placed by clicking on the right directional arrow. Fields are moved from cell to cell within a section.
Deleting Sections and Fields
To delete a section or field, highlight either one and click on Remove. A popup will appear. Click OK to confirm deletion. Otherwise, click Cancel.
© EPiServer AB
Customizing an Existing Form | 181
Recreating a Form
Recreating a form allows a user to create a form from scratch with a single field rather than customize a form with all fields already in place. Click on Recreate Form on the upper right corner of the window. A popup will appear. Click on OK to recreate the form. Otherwise, click Cancel. Once you confirm, the fields will clear from the form except for the required field.
Saving a Customized Form
Once you are done with your changes, click on Save on the upper right corner of the window. To save and close the window at the same time, click the down-arrow next on the Save button and on the dropdown click Save and close.
© EPiServer AB
182 | User Guide for EPiServer Commerce 1 R2 SP1
Once those changes are saved, the form you edited will render based on your configuration. For example, here is the customized Credit Card edit form an end user sees.
Creating a New Business Object
Creating new business objects allows users to extend customer and asset forms for tracking and relating different types of data. Business Objects could be related in a "one to many," "many to one," or "many to many" relationship.
This section covers an example of how to create and publish a Contract business object using a "many to one" relationship.
Scenario - Creating and Publishing a Contract Business Object
This is a basic step-by-step guide on how to create and publish a simple Contract Business Object for relating multiple contracts to a single organization.
© EPiServer AB
Creating a New Contract Object | 183
Creating a New Contract Object
New Business Objects can be created to suits a multitude of business purposes. This example shows you how to create a Contract business object.
To add new fields to Business Object, click on Administration, expand System Settings, and click on Business Foundation to access the Business Foundation Configuration page.
Click on Create New and on the dropdown click on New Business Object. The New Business Object form page appears. Enter all relevant information.
Base Info
l System Name: name of the Business Object (once you input a name, the Friendly Name and Plural Name fields are autopopulated)
l Friendly Name: alternative to the System Name
l Plural Name: plural version of the system/friendly name (e.g. inventories)
l Supports Extensions: this allows you to extend an existing meta class with extra properties. For example, you can have a download class and you can extend it with "imagedownload" which contains width and height as extra parameters.
Field Info
l System Name: enter in a system name
l Friendly Name: enter in a friendly, front-end name
l Maximum Length: maximum number of characters allowed in this field
Click Save to save changes.
© EPiServer AB
184 | User Guide for EPiServer Commerce 1 R2 SP1
Add fields to the Contract business object as needed. Refer to Adding New Fields to Business Object section for instructions on how to add new fields to a business object.
Click Save to save changes.
© EPiServer AB
Connecting a Contract to an Organization Using a "Many to One" Relationship | 185
Connecting a Contract to an Organization
Using a "Many to One" Relationship
The next step is to create a relationship between this contract with an organization. In this example, the "Many to one" relationship will be used because multiple contracts can be tied to a single organization.
1. To add a relationship, click on the N:1 tab and click New Relation "Many to one" .
2. On the Relation N:1 form, select the primary object as "Organization." The Related Object will be the Contract object (the friendly name appears as opposed to the system name)
3. Enter in a Field Name, such as "Organization." 4. Enter in a Friendly Name that will render next to the field in a user view.
Checkmark the box next to Allow Nulls if you want the user to be able to submit the form without having to enter any data into the field. Otherwise, an unchecking this box means that this becomes a required field that the user must enter data in.
5. Checkmark the boxes you want the field to render in, such as the Edit Form, View Form, and Short Info Form.
To learn more about forms, go to Customizing an Existing Form.
6. Lastly, set the Display Region using the dropdown menu. The display region determines which section the field will appear within the business object--in this case, the Organization object. Note: Depending on your selection, you may have additional options below the dropdown menu, such as Display Text and Display Order. An example is below.
7. Click Save to save your changes and go back to the Business Object Customization form.
© EPiServer AB
186 | User Guide for EPiServer Commerce 1 R2 SP1
So now that the Organization business object is tied to Contract, you will see that Contract now appears under the Information section or the Organization Info view page.
Since this example ties many contracts to a single organization, the organization business object is automatically related to the contracts object as a "1:N" relationship.
© EPiServer AB
Connecting a Contract to an Organization Using a "Many to One" Relationship | 187
© EPiServer AB
188 | User Guide for EPiServer Commerce 1 R2 SP1
Publishing a Contract
Another feature of Business Foundation is the ability to publish objects within the left navigation frame as a node. You can essentially add more functionality to a specific system without modifying code.
Now that the Contract object has been created and related to another object, you can publish it as a node.
To publish a business object, click on Publish under the Business Object Customization form. A new window will pop up for publication settings.
1. Select a Display Region from the navigation three on the left. Click on the node you want Contract to be placed under. For example, Contract will be placed on the root level of Customer Management.
2. The Display Text defaults to the system name of the Business Object. You can choose to keep the name or change it.
3. The Display Order defaults to 10000. You can keep it at that number or change the value to determine the position of the node.
4. The Client Script is autopopulated and can be left as is for most users. However, you can change Client Script if necessary.
© EPiServer AB
Publishing a Contract | 189
5. Access Permissions is autopopulated and can also be left as is. If you want to change Access Permissions, refer to the Permissions section.
6. An Item Icon can be uploaded to represent the node. Click Browse to upload an icon.
7. Once all relevant information is entered, click on Publish.
To verify if the object was published, go to the Display Region where you specified the object to be published to. Click on the refresh icon on the left navigation frame if you at first do not see the new node.
Always refresh your browser after publishing a business object. Adding Contracts to an Organization
Now that the contract business object has been published, you can add multiple contracts to a single organization using a form. Click on the Contract node to bring up the list of contracts. Click on New to add a new contract.
Enter in a Contract Name (friendly name of the contract object) and select an Organization from the dropdown menu to associate the contract with. This functionality is in harmony with the "N:1" relationship between contract and organization.
Click OK to save the contract. The View Form appears.
To learn how to edit forms, go to the Customizing and Existing Form section.
© EPiServer AB
190 | User Guide for EPiServer Commerce 1 R2 SP1
You can make further edits to the details of the Contract by clicking Edit or delete the entry. Otherwise, click on Back to list to go back to the list of contracts.
By going to the Organization Info page for the particular organization you assigned multiple contracts to, you will see the list contracts you assigned.
You may need to make sure the Display Region is set for the related object (i.e. organization) or else you will not see the business object in the Edit Form.
Publishing Business Objects
A user-created business object can be published as a node anywhere in the left navigation frame to extend functionality under that particular subsystem.
You must refresh your browser after a business object has been published. Permissions
When publishing Business Objects to place on a node on the left Navigation Frame, you can set permissions before publishing a Business Object.
Click on Publish on the Business Object Customization page.
© EPiServer AB
Publishing a Contract | 191
You can set permissions by customizing Access Permissions. This string is auto-generated. To change, you can copy and paste string values from other objects.
Deleting Published Business Objects
Once a business object has been published, you can delete all customized business object by going to Administration > System Settings > Business Foundation. To remove from the Left Menu, you have to perform an additional step of going to Administration > System Settings > Left Menu and clicking the Delete icon.
© EPiServer AB
192 | User Guide for EPiServer Commerce 1 R2 SP1
Creating Dictionary Values for Adding Languages, Countries and Currencies
This guide walks you through how to add Languages, Countries, and Currencies to EPiServer Commerce.
Adding New Languages
By default, you are given several Language options. To add a new Language, login to Commerce Manager and go to Administration --> System Settings --> Dictionaries --> Languages. When you click New Language fill in the following:
l Language Code - to obtain code, go to this MSDN site: http://msdn.microsoft.com/en-us/library/ms533052%28VS.85%29.aspx (you must use the codes that contain dashes "-")
l Friendly Name - this name is displayed in the front-end site language drop-down and various Commerce Manager admin pages.
l Is Default - Yes/No
© EPiServer AB
Publishing a Contract | 193
Click OK to save the language.
Adding New Countries
To add a new Country, login to Commerce Manager and go to Administration > System Settings > Dictionaries > Countries. Click on New Country and fill in the following displayed in the Overview tab:
l Country Name - this is the friendly name that is displayed in the public site during the checkout process
l Code - to obtain the code, go to this MSDN site http://msdn.microsoft.com/en-us/library/ee799297%28CS.20%29.aspx (use the ISO Short Code or ISO Long Code as long as you remain consistent)
l Sort Order - enter a number starting from 0 (the lower number is listed on the top of the dropdown)
l Visible - Yes/No
Regions refer to states, provinces or prefectures. In the Region tab, fill in the following:
l Type a Friendly Name (e.g. CA - this will be displayed in the public site during the checkout process) and click Add. You can checkmark it either as Visible or not on the public site
© EPiServer AB
194 | User Guide for EPiServer Commerce 1 R2 SP1
When you click the Edit icon, you can change the Ordering of the region. Click Update to save those changes.
Adding New Currencies
To add a new Currency, login to Commerce Manager and go to Administration > System Settings >
Dictionaries > Currencies. Click on New Currency. Fill in the following displayed in the Overview tab:
l Currency Name - this name is displayed in the front-end public site currency drop-down and various Commerce Manager admin pages
l Code - this currency code needs to be obtained from this site http://en.wikipedia.org/wiki/ISO_
4217#Active_codes
In the Rates tab, you can Add Rates which are the foreign exchange rate when you want to convert from one currency to another.
© EPiServer AB
Publishing a Contract | 195
When the Edit Currency Rate Information popup appears, enter in:
l To Currency - select from the drop-down the Currency to convert to from the current currency.
l End of Date Rate - enter in the End of Day rate.
l Average Rate - enter in the Average rate.
l Currency Rate Date - enter in a Currency Rate Date.
Then click on Save Changes.
Setting Your Default Language, Currency and Units
To set your default language, currency or unit, login to the Commerce Manager and go to the Administration --> System Settings --> Common Settings and make appropriate selection. Out of the box, you have the following options:
l Language - English, German, Spanish, French
l Currency - US dollars, Canadian dollars, Euros, Yen, Pound sterlings and many others
l Length units - meters, feet
l Weight units - kilograms, pounds
© EPiServer AB
196 | User Guide for EPiServer Commerce 1 R2 SP1
Click OK to save your changes.
Customizing Left Menu
Prior to customizing your left menu, we advise you to read the publication section of Business Foundation to configure Business Objects as individual nodes in the left navigation frame.
Adding a Left Menu Item from the Left Menu Page
To add a Left Menu item, you have two choices. You can either configure the entire menu item first within Business Foundation or you can add an empty container by clicking the Add button and then go back to Business Foundation to fill in the page contents (objects).
A new window will pop up for publication settings.
1. Select a Display Region from the navigation three on the left. Click on the node you want Contract to be placed under. For example, Contract will be placed on the root level of Customer Management.
© EPiServer AB
Publishing a Contract | 197
2. The Display Text defaults to the system name of the Business Object. You can choose to keep the name or change it.
3. Enter in an Item Link, an URL to a page. When the object is clicked, a new window will appear on the right based on the given link.
4. The Display Order defaults to 10000. You can keep it at that number or change the value to determine the position of the node.
5. Access Permissions is autopopulated only when a menu is created through the Business Foundation. When creating a new left menu from scratch, you may leave this field blank or otherwise copy in permissions from other existing menus. If you want to change Access Permissions, refer to the Permissions section.
6. An Item Icon can be uploaded to represent the node. Click Browse to upload an icon.
7. Once all relevant information is entered, click on Publish.
To verify if the object was published, go to the Display Region where you specified the object to be published to. Click on the Refresh icon on the left navigation frame if at first you do not see the new node.
Editing, Ordering, or Deleting a Left Menu Item
To Edit a user-generated node in the left menu, click on the Notepad icon.
© EPiServer AB
198 | User Guide for EPiServer Commerce 1 R2 SP1
If the left menu item was created via the Left Menu page, this popup window will appear.
If the left menu item node was created using Business Foundation, this popup appears.
To change the sort order of the left menu item, adjust the numerical value in Display Order. The lower the value, the higher the position of the item within the navigation tree relative to items with a higher Display Order value.
To save changes, click OK.
To delete a left menu item, click on X icon.
© EPiServer AB
Publishing a Contract | 199
Indexing Your New or Edited Catalog
In order to see products in a new Catalog or changes to an existing catalog, you will need to index your catalog to reflect those changes in your search results.
There are two types of indexing: Build and Rebuild. Use Build to make a quick re-indexing of an existing catalog where you made changes to existing products. Build is shorter than a Rebuild because it performs a reindexing of only the items that were changed since the last Build.
If you are using a brand new catalog or you made structural changes to your existing catalog (i.e. moving categories around, changing a product name, etc.), then you will need to perform a Rebuild. Rebuild takes longer because it does a complete indexing.
To Build or Rebuild your catalog, go to Administration > System Settings > Search Index.
Once you perform either of these two operations, you will see the changes or additions reflected in your search results.
If you have the Quartz service installed (this can be installed automatically during the SDK install), then your catalog is reindexed every five minutes or whatever time interval you decide upon.
Catalog System
This section describes the system administration for the catalog system.
Setting up Meta Fields and Meta Classes
Using meta classes and meta classes, it is possible for end-users to extend the meta data of catalog items and order forms.
Meta fields are for adding specific data about an item. For instance, if you create a meta class called "Digital Cameras," you will want to add meta fields that are specific details related to digital cameras (such as number of megapixels, focal length, red-eye reduction support, etc.).
Adding Meta Fields to a Meta Class
1. Go to Administration > Catalog System > Meta Fields.
© EPiServer AB
200 | User Guide for EPiServer Commerce 1 R2 SP1
2. Click on New Meta Field to create a new meta field.
3. The Meta Field Edit page appears. There is a wide variety of parameters you can set for the meta field depending on the type you select.
Field
Description
Name
Enter in a system name without spaces or special characters (e.g. "NumberMegapixels," without the quotes).
Friendly
Name
Enter in a user-friendly name seen by end-users on the back and front-end (e.g. "Number of Megapixels," without the quotes).
Description Enter in any additional information about the meta field.
Type
The drop-down menu shows the field types you can use for the meta field.
Warehouses
Commerce Manager users can add and track a list of Warehouses within EPiServer Commerce. A Warehouse is a physical place with an address from which items are shipped.
To access Warehouses, navigate to Administration > Expand Catalog System > Warehouses.
The important thing to keep in mind is that you can only associate a single warehouse for every SKU. So when you are creating a new SKU, you will have to specify the Warehouse where the item is being stored within the Pricing/Inventory tab.
© EPiServer AB
Publishing a Contract | 201
The Warehouse List page appears. An example warehouse called "Default Warehouse" is on the list. To create a new Warehouse, click on New Warehouse on the menu bar.
The Warehouse Edit page has two tabs: Overview and Address.
1. Under the Overview tab enter in a Name and Code. The Name and Code name can have spaces in between characters.
2. Enter in a value for the Sort Order to determine the Warehouse's position on the Warehouse List.
3. Under Available select "Yes" or "No."
4. Under Is Primary select whether or not this Warehouse is the primary one. You can only have one primary Warehouse.
© EPiServer AB
202 | User Guide for EPiServer Commerce 1 R2 SP1
5. Under the Address tab, enter all relevant information regarding this Warehouse.
6. Once you are satisfied with your entries, click on OK to save the Warehouse. Otherwise, click Cancel to go back to the Warehouse List page. The new Warehouse will appear on the list.
To delete a Warehouse, place a check mark on the box next to the name of the Warehouse and the click on More Actions on the menu bar.
Confirm deletion by clicking OK on the pop-up window. Otherwise, click Cancel to go back.
Order System
This section describes the system administration for the order system.
Payment Gateways
When creating and configuring payment methods in EPiServer Commerce, there are three components that need to be created or re-used as well as configured: Payment Types, Payment Gateways and © EPiServer AB
Publishing a Contract | 203
Payment Methods.
Payment Types – Payment types are classes which contain the properties of a particular payment type. For example, a credit card payment type contains credit card number, card expiration date, card type, etc. All payment types inherit from the abstract class Payment. The most common payment types are already built-in to EPiServer Commerce:
l Credit card
l Cash Card
l Gift Card
l Invoice
In addition, a generic OtherPayment type is included in EPiServer Commerce. Payment types are meta classes.
Payment Gateways – Payment gateways provide an interface to the system which provides payment processing. A payment type is passed to the payment gateway and the gateway executes the payment transaction with the payment system (e.g. PayPal). One payment type is associated with each payment gateway.
Payment Methods – Payment methods contain information about the way the customer views a payment option and has a payment gateway associated with it.
Using a Built-In Payment Gateway
To setup payments using a built-in Payment Gateway, go to Administration -> Language (English, German, Spanish, etc.)
The Payment Methods window appears. By default, "Payment by Card (DIBS)", "Pay by PayPal Express", "Pay by Credit Card" and "Pay by Phone" are already setup.
© EPiServer AB
204 | User Guide for EPiServer Commerce 1 R2 SP1
To create a new Payment Method, click on New to open the Payment Method Edit screen.
Here is an explanation of some of the gateway properties:
© EPiServer AB
Publishing a Contract | 205
l ID – the system-assigned unique identifier for the payment gateway
l Name – the name to be displayed to the user
l Description – a description that can be displayed to the user
l System Keyword – the unique name for each instance of the gateway; new non-unique keywords will not save to the database. This is not be editable after a gateway is initially created
l Language – allows a specific language to be specified for the payment gateway
l Class Name – name of the gateway class to be associated with the payment
l Sort Order – specifies the order of the payment method on the list of payment methods page
l IsActive – specify whether or not the payment method is active\
l IsDefault – specific whether or not the payment method is the default one
l Supports Recurring – specify whether this payment methods supports recurring payments, such as for subscriptions l Restricted Shipping Methods – Restricted shipping methods is not fully implemented out of the box and requires a developer to complete the functionality.
Click OK to save the Payment Method. The payment method will appear in the list of Payment Methods.
© EPiServer AB
206 | User Guide for EPiServer Commerce 1 R2 SP1
Setting up Payment Methods using nSoftware Provided Payment Gateways
EPiServer Commerce supports multiple payment gateways out of the box using nSoftware that the end user can easily setup without the need for a developer.
1. To enable nSoftware supported gateways, create a new payment method.
2. Enter in a Name, such as nSoftware or anything else.
3. Enter in a Description.
4. Enter in the System Keyword as "ICharge".
5. Select a Language from the dropdown menu.
6. Select the Class Name "Mediachase.Commerce.Plugins.Payment.ICharge.IChargeGateway".
7. Select "Yes" for IsActive.
8. Change the Sort Order, IsDefault, Supports Recurring as needed.
9. Click OK to save changes.
Once created, click on the payment gateway again to go back to the Payment Method Edit page. Click on the Parameters tab.
© EPiServer AB
Publishing a Contract | 207
The Configure IBiz E-Payment Integrator Component appears and you can select from the Gateway dropdown menu several dozen of the most popular payment gateways will appear. Depending on the gateway you select, such as Authorize.Net, the Configuration Parameters will change. Enter in your credentials and other relevant information to activate the gateway and click OK.
Editing Payment Methods
To edit an existing payment method, click on the Notepad icon next to the Delete icon.
The ID is autogenerated. Every field can be changed except System Keyword. After you are satisfied with your changes, click on OK.
© EPiServer AB
208 | User Guide for EPiServer Commerce 1 R2 SP1
Deleting Payment Methods
To delete Payment Methods, click on the X icon next to the payment method name and click OK when the popup appears. To delete multiple payment methods at once, check mark each payment method you want to delete, then click on More Actions --> Delete on the dropdown menu. Click OK when the popup appears.
Shipping
This guide will walk you through how to setup Shipping Methods, Shipping Providers and Shipping Gateways. Shipping Method - A shipping method manages a set of information and rules that determines the shipping cost and displays it on the front-end site while a customer checks out an item from his/her shopping basket. The shipping fee is added to the total price of the purchase. A shipping method is mapped to a shipping provider visible to a back-end administrator in Commerce Manager. This allows the public site to display friendly names such as "Ground Shipping" to the customer and this is mapped to a provider such as UPS. Therefore, when a customer picks "Ground Shipping," he/she will be using UPS.
Shipping Providers - A shipping provider is the class(es) that interacts directly with one or more actual shipping services such as USPS, UPS, or FedEX. It retrieves shipping price information from the shipping service(s) its associated with. One typical scenario would be to have a provider that represents a particular service (e.g. USPS). A provider can also represent a particular type of shipping situation. One © EPiServer AB
Publishing a Contract | 209
example is that you could have a provider for overnight delivery. The provider could retrieve pricing for that service to determine the lowest price given the location of the customer. A provider could also represent other specific scenarios with one or more services such as price by weight or ground shipping.
Shipping Gateways - Under Shipping Providers, a shipping gateway is the specific class that you select (Generic Gateway or Weight/Jurisdiction Gateway).
There are two options out of the box for shipping gateways: 1) Generic Gateway (flat shipping rate) and 2) Weight/Jurisdiction Gateway (base price + additional fee depending on weight and shipping location). You select the shipping gateway in the Shipping Provider screen and then configure the actual values for that gateway/provider in the Shipping Methods area.
Shipping Jurisdictions - an option which allows you to define values for region-specific shipping rates; this is only used when you select the Weight/Jurisdiction Gateway (i.e. California)
Shipping Jurisdiction Groups - group of jurisdictions; this is required because this is a required field when configuring the Shipping Method parameters (i.e. Southwest region)
Shipping Methods
A Shipping Method manages a set of information and rules that determines the shipping cost and displays it on the front-end site while a customer checks out an item from his/her shopping basket. The shipping fee is added to the total price of the purchase.
A shipping method is mapped to a Shipping Provider visible to a back-end administrator in Commerce Manager. This allows the public site to display friendly names such as "Ground Shipping" to the customer and this is mapped to a provider such as UPS. Therefore, when a customer picks "Ground Shipping," he/she will be using UPS.
Customizing Shipping Methods
There are two Shipping Methods available out of the box for you to customize: Ground Shipping and Fixed Shipping.
To customize the Shipping Methods, first go to Administration > Order System > Shipping > Shipping
Methods > English (United States) or any other languages.
© EPiServer AB
210 | User Guide for EPiServer Commerce 1 R2 SP1
At the Shipping Methods List screen, select the edit icon for either of the available methods. The Overview tab screen for Shipping Method Edit will load with the below fields:
l ID - this is auto-generated after saving the new shipping method
l Name - enter in a name without spaces or special character; this name will not be displayed in the public site, but is only for end users to manage and organize the shipping methods
l Friendly Name - enter a friendly name which can have spaces and special character; the friendly name is the name seen by customers who are purchasing items
© EPiServer AB
Publishing a Contract | 211
l Description - enter a description (optional)
l Provider - select an available provider from the dropdown menu; the options displayed here are created in the Shipping Providers screen (Generic Gateway is for a fixed shipping fee specified below under base price, while Weight/Jurisdiction Gateway is used for a shipping fee depended on the weight and shipping location)
l Language - select a language of your choice from the dropdown menu
l Base Price - the base price you specify here will become the fixed shipping fee for the Generic Gateway option, and part of the Weight/Jurisdiction Gateway option.
l IsActive - select Yes or No under IsActive to enable is disable it, respectively
l IsDefault - select Yes or No if this shipping method is the default one
l Sort Order - enter a number for the sort order to determine its position on the list of shipping methods
The Settings tab is used to exclude any Countries, Regions, and Payments from a particular shipping method.
To exclude a selection, highlight the items on the Available boxes on the left and move them to the Chosen Countries boxes by clicking Add.
© EPiServer AB
212 | User Guide for EPiServer Commerce 1 R2 SP1
The Parameters tab is use to set conditions to determine the shipping fee. This screen become available only when the Weight/Jurisdiction Gateway is select in the Provider field in the Overview tab (it will be empty with the Generic Gateway option).
© EPiServer AB
Publishing a Contract | 213
l Jurisdiction Group - select a jurisdiction group to apply the current Shipping Method using the dropdown menu; the options listed here are set up in the Shipping Jurisdictions and Shipping
Jurisdiction Groups screen.
l Weight - enter a numerical value for the weight; units for the weight is set in the Common Settings screen
l Price - enter a price to be added to the base price (Overview tab) when the weight and jurisdiction group conditions are met.
l Start Date - enter a start date and time for the shipping method to take effect
l End Date - enter a end date and time for the shipping method to expire
When finish entering the values above, select Add to save the condition. The condition will appear on table below. In the above example, if the customer checks out an item that weights anywhere between 0 to 10 weight units (lbs for example), and the customer's shipping address is in the United States, then the total shipping fee will equal $10 + the base price you enter in the overview screen.
Click OK to save changes.
Deleting Shipping Methods
1. Check off the box that corresponds to the shipping methods you want to delete.
2. Click on the More Actions button on the upper left corner of the main window menu bar, and choose Delete from the pull down menu.
3. Click OK when prompted. The selected methods will be deleted from the list.
Shipping Providers
A Shipping Provider is an actual service such as USPS, UPS, or FedEX. However, a provider can also be a type of shipping in order to determine shipping price. For example, one can have a "Percentage of Total Cost" provider or "Fixed Price" provider. In this case, the shipment "types" can be associated to one of the existing providers (i.e. USPS, UPS, FEDEX).
The Shipping Providers page manages the list of these providers/types. There are two shipping methods available out of the box for you to customize: 1) Generic Gateway and 2) Weight/Jurisdiction Gateway.
A Generic Gateway is is used for a fixed shipping fee while Weight/Jurisdiction Gateway is used for a shipping fee that is calculated based on the weight and shipping location.
Customizing Shipping Providers
Go to Administration > Order System > Shipping > Shipping Providers. Edit one of the two providers listed.
© EPiServer AB
214 | User Guide for EPiServer Commerce 1 R2 SP1
1. Edit Name, and Description.
2. System Keyword (no spaces) and Classes are something that your developers need to code and provide. 3. Click OK to save changes.
The revised shipping provider will appear in the Shipping Providers page.
The Parameters and Packages tabs are not fully implemented; they serve as a starting point for developers for full implementation of those features.
Deleting Shipping Providers
1. Go to the Shipping Providers page.
2. Check off the box that corresponds to the shipping providers you want to delete.
3. Click on the More Actions button on the upper left corner of the main window menu bar, and choose Delete from the pull down menu.
4. Click OK when prompted. The selected providers will be deleted from the list.
© EPiServer AB
Publishing a Contract | 215
Tax Configuration
Introduction
Taxes can be configured in the Administration subsystem so that specified rates are calculated and added to the total price during the checkout process. Depending on your configuration, it is also possible to combine and apply multiple taxes (such as federal, state and local tax) to a purchase.
Taxes can be set up and maintained using two methods: 1) creating/editing each tax control manually or 2) importing all data using a CSV file. Here we will discuss both methods and also provide you with a few examples to demonstrate how this works.
Method 1: Configuring Taxes Manually
To set up your taxes manually, you will need to work with the following areas in the Administration tab of the Admin Site – Tax Categories, Tax Jurisdiction Groups, Tax Jurisdictions, and Taxes – as well as the configuration pages for each of the catalog items.
The steps below summarize the process you need to follow to configure taxes.
1. Create and configure Countries and Regions (Go to Administration > System Settings > Dictionaries > Countries): In Countries section create the countries you plan to sell your products in and set the appropriate country codes. For the country codes, it is important that you use the ISO Short code provided in the following link (http://msdn.microsoft.com/en-us/library/ms866171.aspx). Using the ISO Long code or anything else will not correctly calculate taxes during checkout.
2. Create new Tax Categories (Go to Administration > Catalog System): In this step you will create tax categories that will be used later to associate your catalog items with the tax rates you define. For example you may create categories such as "General Sales," "Food," and "Luxury Items" depending on the tax regulations for your item types. The categories you create here will become selectable on the Page Details of your items (i.e., Variations/SKU Edit page) and on the Tax Edit page.
3. Create and configure Tax Jurisdictions (Go to Administration > Order system > Tax Configuration): In this step you will specify particular Tax Jurisdictions. You can create different Tax Jurisdictions for a particular region by specifying zip codes, country codes, etc. Tax rates will be applied to whatever level of information you specify for each Jurisdiction. For example, if you specify only the country code as US, all shoppers with a US address (regardless of state, county etc.) will be included in this jurisdiction. Note: Country Code and Region Code you enter in the Jurisdictions Edit page must match the codes you used in step 1.
4. Create and configure new Tax Jurisdiction Groups (Go to Administration > Order system >
Tax Configuration): New Tax Jurisdiction Groups created here can include multiple Tax Jurisdictions.
5. Create and configure Taxes (Go to Administration > Order System > Tax Configuration): Here you will specify tax rates and also associate the Tax Categories and Jurisdiction groups created in Steps 2 and 4.
6. Associate Catalogs to the Tax Categories created in Step 2 (Go to Order Management > Catalogs): Now you will switch over to the Catalog Management subsystem and link specific catalog items to the appropriate Tax Categories. This can be done on the Pricing/Inventory page within each Variation/SKU Edit page.
Method 2: Configuring Taxes Using CSV Import
Using the CSV Tax Import functionality is a convenient way to quickly setup and update tax data in bulk. Creating a CSV tax file with a specified format (see "Example Scenarios" below) will allow you to © EPiServer AB
216 | User Guide for EPiServer Commerce 1 R2 SP1
complete steps 2 through 5 in one shot (above in Method 1). Step 6 of Method 1 can be done manually, but you can also use the CSV import functionality in the Catalog Management subsystem to associate catalogs to tax categories. Click here to see how CSV Catalog Import works.
Import your CSV tax file into your Commerce Manager by following the steps:
1. Select the Administration tab in the Commerce Manager.
2. In the navigation tree drill down to Taxes: Order System > Taxes Configuration > Taxes.
3. Click Import Taxes on the menu bar.
4. Choose Add New File and then Browse to select and upload your CSV tax file. The path of your chosen file will appear in the field.
5. Click Upload File and then Save The File icon. The CSV tax file will appear under the Files Available for Import section.
6. Select and highlight the CSV file and click the "Start Import" button.
7. Your import should begin and complete successfully in a pop-up dialog box.
8. You will now be able to view your tax setup in the Commerce Manager.
If you want to edit the existing setup, simply repeat steps 1 through 8 with your modified file.
Caution: Re-importing CSV files only edits existing information or adds new data, but nothing gets deleted. If you delete an entire row of data in the CSV file, you must manually delete those entries in the Commerce Manager. If in doubt, you can always delete all the tax data and perform the CSV tax import from scratch.
Sample CSV Files and Example Scenarios
Example 1: Single Tax Per Catalog Item Based on a Single Jurisdiction
For example, if your variable is State, then you can specify the tax rate on a state-level. So let's say CA is 9% and MA is 6%. If you placed an order from California, then 9% sales tax would be applied during checkout.
Jurisdiction
Jurisdiction Group Tax Rate
Tax Category
California CA Tax Group 9% General Sales Massachusetts MA Tax Group 6% General Sales A sample tax CSV file called test.csv is available in this directory – [taxcsvsample1.zip ].
Example 2: Two or More Taxes Per Catalog Item Based on More Than One Juridiction
For example, if you have a luxury item that requires State and Federal tax to be applied, then you can specify tax rates on a state and federal level. So let's say a luxury item purchased in CA has a 9% state tax rate and a federal tax rate of 3%. Both taxes would be applied during checkout.
Jurisdiction
Jurisdiction Group Tax Rate
Tax Category
California General CA GS Tax Group 9% General Sales Massachusetts General MA GS Tax Group 6% General Sales California Luxury CA LX Tax Group 9% Luxury Sales Massachusetts Luxury MA LX Tax Group 6% Luxury Sales US Federal Luxury US LX Tax Group 3% Luxury Sales © EPiServer AB
EPiServer Commerce Sample Site | 217
EPiServer Commerce Sample Site
The EPiServer Commerce sample site provides a set of demo templates to illustrate the functionality of EPiServer Commerce. The sample template package is intended as inspiration when you build your own e-commerce site based on EPiServer Commerce. In the following the templates included in the package are described in more detail, explaining the possibilities with EPiServer Commerce to both developers and end-users.
Display Templates
To be able to display different products on the e-commerce site you need to define the display templates to be used. These can be different for different language groups on the site. On the EPiServer Commerce sample site, the display templates will automatically be imported and configured during the installation procedure. However, when new templates have been created you may want to define their use in the system, or modify the use of existing ones. This is done in Commerce Manager in the Catalog Management sub-system under Templates.
© EPiServer AB
218 | User Guide for EPiServer Commerce 1 R2 SP1
Adding a display template
1. Under Catalog Management, select Templates and click New.
2. In the Name field, enter the name of the display template, for instance "DigitalCameraTemplate".
3. In the Friendly Name field, enter the display name for the template, for instance "Digital Camera".
4. In the Type field, enter the type of display template, for instance "entry".
5. In the Path field, add the path to the display template, for instance:
~/Templates/Everything/BusinessControls/CatalogBrowseControls/EntryTemplates/DigitalCameraTemplate.ascx.
6. Click OK to save your changes.
Updating an existing display template
1. Under Catalog Management, select Templates and the language version and template that you want to update.
2. In the Name field, enter the name of the display template.
3. In the Friendly Name field, enter the display name of the display template.
4. In the Type field, enter the type of display template.
5. In the Path field, add the path to the display template.
6. Click OK to save your changes. Importing the Sample Catalog
The product catalog contains information regarding brands and sales items. This information will either be displayed in the public site, or used for pricing and promotions. Product catalogs needs to be imported © EPiServer AB
EPiServer Commerce Sample Site | 219
into EPiServer Commerce. This will normally be done automatically during the installation procedure for the EPiServer Commerce sample site.
However, there may be occasions where you need to import a product catalog, and the procedure is therefore described in the following. There are different ways of doing this, and in this example we describe how you manually import the sample catalogs (2) of the sample site, using the import/export function in Commerce Manager. When product catalogs have been imported, they also need to be indexed, in order for the product search function to incorporate any changes.
Additional information on how to import product catalogs can be found in the Catalog Management section.
Import the Sample Catalogs
The sample site includes two product catalogs providing the "everything" and the "brand" view.
1. In Commerce Manager, select Catalog Management and then Catalogs.
2. Click on Import/Export and then Import Catalog, this takes you to the Import Catalog screen.
3. Select the catalog zip file, in this case "CatalogExport-BG2C-Everything.zip" and click Start
Import.
4. When the import has completed, click Close Window.
5. Select "CatalogExport-B2C-Brands.zip" and click Start Import.
6. When the import has completed, click Close Window.
© EPiServer AB
220 | User Guide for EPiServer Commerce 1 R2 SP1
Indexing the Sample Catalog
After importing a product catalog, at also needs to be indexed.
1. In Commerce Manager, select Administration, System Settings and then Search Index.
2. Click Rebuild Index to index the catalog for the first time. The Build Index option is used for future updates when you import the same catalog again and only want to index the changes.
Page Templates
The EPiServer Commerce product package is based on EPiServer CMS for managing content, and the ecommerce module Commerce Manager. The EPiServer Commerce package includes a sample website with a set of display templates. The page templates provide an example of how you can work with EPiServer Commerce to create your own web publishing and online store platform. Use the page templates as inspiration and adapt them to your own online store environment.
© EPiServer AB
EPiServer Commerce Sample Site | 221
The sample site contains sample product data stored in a product database. The template package in EPiServer CMS contains a set of templates for displaying content and providing other typical e-commerce functions.
The templates, fields and functions described in this documentation refers to a "standard installation" of an EPiServer Commerce sample site. The standard functions and fields of EPiServer CMS are not described here. Please refer to the EPiServer CMS documentation for editors and administrators available on world.episerver.com.
The Page Tree Structure
When installing the EPiServer Commerce package with a sample site, a number of pages will be created and displayed in a specific structure in the page tree. Some of them will show editorial content. Other pages are used as containers for other pages These will not display any content of their own and will be hidden in navigation menus.
© EPiServer AB
222 | User Guide for EPiServer Commerce 1 R2 SP1
The Start page is built using the Home page type. The Start page contains numerous settings affecting the entire website, for instance top menus, search and login. This is also where you define pages to be used for shopping carts, payments and checkout.
Editorial content pages are most often based on the page type Standard Page. These are the pages where editors can create and edit content the usual way in EPiServer CMS. Examples of editorial content are the pages under the sections News, Get the Product and More Support.
The pages under the Products section, are based on a page type called Product Listing. These pages will provide the top menu of the website, based on what is listed under the Products page. The sort order of the Products page controls the order in which the menu items will be displayed.
The [Function Pages] section of the tree holds the display template for a number of typical functions such as My Account, My Cart, Wish List, Payment and Checkout. These have their own specific page types linking to functions in the Commerce Manager module.
The [Resources] section resides directly under the root page of the site. This part is used for the actual linking to the product catalog in Commerce Manager. The pages are based on the Product Listings page type and do not display any content.
Start Page
The Start page is based on the Home page type and is normally defined when the website is installed. The page holds a number of settings with references to other pages on the website. The start page will most likely not be touched very often after the setup, but occasionally references pointing to pages defined here may need to be changed. When you open the Start page for editing in Edit mode, you will find that the Start page itself does not have an editorial area, since the content displayed is made up of different types of listings. In addition to the standard tabs of EPiServer CMS, the Start page has a tab containing specific site configuration property settings.
Content Tab
Below are the properties that can be changed in Edit mode under the Content tab of the Start page.
Name
The name of the page, as displayed in the page tree.
Fetch News list from
Defines the container page for the news item listing to be displayed in the mid-left information area of the start page.
© EPiServer AB
EPiServer Commerce Sample Site | 223
Images
The start page has a top banner image. The image area has functionality for altering between a set of two images which can be defined here. Define images in the fields Image 1/Image 2 to be displayed in the top banner area of the start page. Select images in the EPiServer CMS file manager.
Links
In the fields Link 1/Link 2 you can define links for each of the altering top banner images on the start page using the EPiServer CMS link dialog. The link will take the visitor to the specified URL when clicking on the top image of the start page.
Site Configuration Tab
The settings that are available under the Site Configuration tab when you edit the Start page, are common website configuration items that are defined as properties on the start page and will be inherited to the sub-pages. Most often these settings are defined when the website is installed but it may be necessary to update them at some point. Note that the function pages must be created first before defining them on the start page.
© EPiServer AB
224 | User Guide for EPiServer Commerce 1 R2 SP1
Open the Start page for editing in Edit mode, to change the settings for the different properties. Save and publish the page to update the settings.
Login page
Defines the login page to be used when visitors log in to the website. The login page itself has settings to define the account register and password recovery pages. Select the login page in the page tree structure to define it for the website.
Display top menus from
In this field you configure the menu at the very top of the website. In this example the menu contains functions My Account, My Cart and Wish, as well as Log in/out and the language and currency selector. Links to the login page and the language selector will be displayed by default, but the other options are listed from the container page defined here. In this example, the container page is the page [Function
Pages]. Under this page you create the other function pages such as My Account, Wish list etc.
The order in which they are presented in the menu is set by the sort order of the [Function Pages] container page. Pages that are set not to be visible in menus, will not appear. Select the page in the page tree structure to define it.
© EPiServer AB
EPiServer Commerce Sample Site | 225
Display menus from
Displays the main navigation menu of the website.
In this example, this information is collected from a container page named Products, which itself is not displayed in menus. The sub-pages consists of a number of selected product pages based on page type Product Listing. The order in which the pages are displayed in the menu is controlled by the sort order for the Product parent page, which in this case is set to be sorted according to sort index. Select the page in the page tree structure to define it.
Display bottom menus from
The start page contains a bottom section listing pages in five columns. The Display bottom menus from field defines from where the page listing will be fetched. In this example the listing will display pages and their one-level sub-pages under the start page. All pages will be listed except those that are set not to be displayed in menus.
© EPiServer AB
226 | User Guide for EPiServer Commerce 1 R2 SP1
In this example, the bottom menu listing will start with "Buyers guide", to be followed by "About us", "Our services" etc. Note that the listing will go from left to right to fill the columns. The order is controlled by the sort order of the start page, which is set to be sorted according to sort index in this case. The number of columns can be changed programatically in the ColumnCount property, default and maximum value is five. For additional information on this, please refer to the technical documentation for EPiServer Commerce available on world.episerver.com.
In the Display bottom menus from field, select the page in the page tree structure to define it.
Account page
This setting defines the Account Dashboard page to be used. This page displays a snapshot of recent account activities for a customer, and also provides possibility to update account information. Select the page in the page tree structure.
Address book page
This setting defines the address book page to be used when displaying a customers address information. Select the page in the page tree structure.
Account edit page
This setting defines the account edit page to be used when displaying a customers account details. Select the page in the page tree structure.
Search page
This setting defines the search page to be used on the website. Select the page in the page tree structure.
Product page
This setting defines the product page to be used when displaying details for a particular product. Select the page in the page tree structure to define it for the website. If you are using the EPiServer Commerce catalog page provider, the property setting here can be ignored.
Wish list page
This setting defines the wish list page to be used when displaying a customers wish list. Select the page in the page tree structure.
Shopping cart page
The page to be used when displaying a shopping cart. Select the page in the page tree structure.
© EPiServer AB
EPiServer Commerce Sample Site | 227
Check out page
The page to be used when displaying the check out page for a customer. Select the page in the page tree structure.
DIBS Payment page
The page to be used when displaying a DIBS payment page. The page will process a DIBS payment through the DIBS payment gateway. Select the page in the page tree structure to set the payment page to be used.
Order history page
The page to be used when displaying the order history page for a customer. Select the page in the page tree structure.
Compare products page
This setting defines the page to be used when comparing products. This page provides functionality for displaying selected products next to each other for comparison. Select the page in the page tree structure.
Allow empty column
Check this field to allow empty columns to be displayed in the footer menu, in case a menu item does not have any sub-pages.
Path to template for display entry without SEO info
Enter a path for a display template to use for an entry that does not have any information for search engine optimization (SEO).
PayPalPaymentPage
The page to be used when displaying a PayPal payment page. PayPal is the default payment provider on the EPiServer Commerce sample site. Select the page in the page tree structure to set the payment page to be used
The different pages and page types are described in more detail in other sections of this documentation.
Standard Page
The page type Standard Page in EPiServer Commerce is used for creating an ordinary information page. The Standard Page in the EPiServer Commerce sample site has some additional fields in comparison with a standard page in an ordinary EPiServer CMS sample site.
l The Fetch left menu listing fromfield, which allows editors to define which pages should be displayed in the left menu listing.
Select a page in the page tree from which to display the left side menu listing. If nothing is selected here, the left column will be empty.
l The Select Product field allows you to select a product from the product catalogue, to display the product content for that product.
© EPiServer AB
228 | User Guide for EPiServer Commerce 1 R2 SP1
Product Listing
The page type Product Listing is used for listing product information from the product catalog in Commerce Manager. The listing will be fetched from the selected product category (node) in the product catalog, for instance digital cameras as in this example. The listing will display a short product description with price as well as an image, for each of the products. There are four products listed side by side in a row.
The page functionality will also include a product compare option as well as an Add to Cart button for each product in the list. The product listings will appear when a visitor clicks on a product in the top menu. The listing will display 20 products at the time as default, and the listing can be sorted according to product name and price. The left column will display related product information, depending on the selected product category.
© EPiServer AB
EPiServer Commerce Sample Site | 229
To define a product listing, create a page based on the page type Product Listing and select the desired product category (node) in the Catalog node name field. The categories (nodes) available here are collected from the [Resources] section in the page tree structure which is set up at installation. This in turn reflects what is defined in the product catalog in Commerce Manager.
Function Pages
Function pages is a collection of pages holding typical e-commerce functionality such as account, shopping cart, check out and payment information. Many of these features are personal and connected to a specific customer account. The function pages also include general features such as login, search and registration.
My Account Pages
In the sample site, the account information is gathered under the My Account page under the [Function
Pages] branch of the page tree. The My Account page is a container page holding a number of subpages.
These sub-pages are based on specific page types with functionality for extracting personal customer information from the customer management part of Commerce Manager. The page types hold no editorial information of their own. After they have been created they will be defined in the site configuration setting
of the start page.
© EPiServer AB
230 | User Guide for EPiServer Commerce 1 R2 SP1
Account Dashboard
The Account Dashboard page type provides an overview of the personal account information collected from various parts of the system. Information about recent orders are displayed, together with billing and shipping address information. Contact and password information can also be reached from here for editing. The left column displayes the sub-pages under the My Account container page.
When created, the Account Dashboard page is defined in the site configuration setting of the start page.
Account Information
From the Account Information page type a customer can update the user name, e-mail address and password for the account.
© EPiServer AB
EPiServer Commerce Sample Site | 231
When created, the Account Information page is defined in the site configuration setting of the start page.
Account My Orders
The purpose of the Account My Orders page type is to display the order history for an account. The information is collected from the customer management part of Commerce Manager.
When created, the Account My Orders page is defined in the site configuration setting of the start page.
© EPiServer AB
232 | User Guide for EPiServer Commerce 1 R2 SP1
Account Address Book
The Account Address Book page type holds functionality for displaying and updating address information for an account. The information is collected from the customer management part of Commerce Manager.
When created, the Account Address Book page is defined in the site configuration setting of the start
page.
Check Out
The purpose of the Check Outpage type is to display the steps of the check out procedure when a customers wants to finalize a purchase.The check out procedure is initiated when the customer selects the Proceed to checkout option for instance from the Shopping Cart view. The functionality of the page is linked to the payment and shipping options defined in Commerce Manager.
The checkout procedure may look different depending on payment and shipping options defined in the system. In this example the checkout procedure has four steps: Shipping Address, Shipping Options, Payment Options and Order Confirmation.
© EPiServer AB
EPiServer Commerce Sample Site | 233
Step 1: Shipping Address
The customer enters name, address and contact details, if these are not already registered in the system. If they are, there will be an option to update the existing information. Clicking on Proceed To Shipping
Options will take the customer to step two in the process.
Step 2: Shipping Options
The customer selects the desired shipping options. The contact details from the previous step are displayed in the left column, and there is a possibility to back to the previous step to update any information. Clicking on Proceed To Payment will take the customer to step three in the process.
© EPiServer AB
234 | User Guide for EPiServer Commerce 1 R2 SP1
Step 3: Payment Options
The customer enters the billing address, if this is not already in the system. The desired payment option is selected. Here there is a possibility to back to the previous steps. Clicking on Review & Place Order will take the customer to step four in the process.
© EPiServer AB
EPiServer Commerce Sample Site | 235
Step 4: Order Confirmation
Step four provides a possibility to review the order details including pricing information before the order is submitted. Details from previous steps are displayed with the possibility to back to previous steps. Clicking on Place Order will submit the order to the system and initiate the order management procedures.
The Check Out page is created in Edit mode and then defined in the site configuration setting of the start
page.
For more information on different payment providers in EPiServer Commerce, please refer to the Payment
Providers section.
Shopping Cart
The purpose of the Shopping Cart page type is to display product items that a customer have added to the personal shopping cart. The page also provides functionality for changing the quantity of items as well as removing items from the list or moving them to the wish list. The Apply coupon option will apply any discount from a selection of related discount options from the system.
When the shopping cart information has been changed, clicking the Update Cart option will cause the pricing information to be recalculated based on the new information. Clicking the Continue Shopping option takes the customer back to the product page last visited.
© EPiServer AB
236 | User Guide for EPiServer Commerce 1 R2 SP1
General information regarding store and privacy policies are also defined on the Shopping Cartpage type for this sample site. This information will be displayed as default links on the Shopping Cart page, to be visible before the customer proceeds to checkout.
Open the Shopping Cart page in Edit mode to define the following:
l The Review store page. Page describing the general store policy. Create the page (page type Standard Page) and select it in the page tree.
l The Return and exchange policy page. Page describing the general return and exchange policy. Create the page (page type Standard Page) and select it in the page tree.
l The Privacy page. Page describing the general privacy policy for personal information stored on the site. Create the page (page type Standard Page) and select it in the page tree.
© EPiServer AB
EPiServer Commerce Sample Site | 237
When created, the Shopping Cart page is defined in the site configuration setting of the start page.
Wish List
The Wish Listpage functionality displays product items in a personal wish list for a customer. The items are added to the list when the customer clicks on the Wish List option for a product.
The wish list itself is accessed when clicking on the Wish List option in the menu on the very top of the page.
© EPiServer AB
238 | User Guide for EPiServer Commerce 1 R2 SP1
When created, the Wish List page is defined in the site configuration setting of the start page.
Login
The purpose of the Login page is to provide a login possibility for registered customers of the e-commerce website. The user provides a user name or e-mail address as well as a password, and then clicks Log in. When the login details are accepted the user is taken to the Account Dashboard displaying an overview of the current account information.
The Loginpage also has functionality for password recovery. When clicking on the Forgot your password? option, the user will be taken to the Forgot Password page of the website. The Login page is also the entrance for new registration of new customers to the site. Clicking on the Create a New account will take the user to the Register page of the website, for creation of a new account.
© EPiServer AB
EPiServer Commerce Sample Site | 239
When opening the Login page in Edit mode, you can define the Password recovery page and the Register page page by selecting the appropriate pages in the page tree structure. Naturally these pages must be created before you can configure them here.
When created, the Login page is defined in the site configuration setting of the start page.
Register
The Register page type provides the possibility to create new customer accounts on the website. Personal and login information such as name, e-mail and password is entered by the user, and by clicking Register the account is created and the account details are saved in the customer database of Commerce Manager. Later on additional information such as billing and shipping address can be added.
© EPiServer AB
240 | User Guide for EPiServer Commerce 1 R2 SP1
When created in Edit mode, the Register page is defined in the Login page of the website.
Search
The Search pagepage type is used for displaying the results of a product search performed on the website. The matching search hits are shown in a listing with rows of four product items. Product details are displayed, with the possibility to add items to the shopping cart, or select items for comparison. The number of matching hits listed on a search result page can be customized. Clicking on an item will display the full product information page.
In Edit mode, the following properties are set in the Search page page type:
l The Start page for the search. Select a page in the page tree to define where the search should begin, often this will be the start page of the website.
© EPiServer AB
EPiServer Commerce Sample Site | 241
l The Number of items in a search result page. Set a number to define the number of matching hits listed on a search result page.
When created, the Search page is defined in the site configuration setting of the start page.
Payment
The purpose of the Payment page is to link to the appropriate payment procedure when finalizing a purchase in the checkout process. There are many different payment methods to use in different markets, and the payment gateways of e-commerce websites are often parts that are highly customized.
Payment methods are set up under application configuration for payment gateways in Commerce Manager. The Payment page functionality is linked to the corresponding payment method. Other payment methods may be payment by phone or by credit card.
The Payment page is created in Edit mode and then defined under the site configuration setting of the
start page. Several payment methods may apply on an e-commerce website. The default payment provider for the EPiServer Commerce sample site is PayPal Express. Find out more in the Payment Providers section.
Forgot Password
The purpose of the Forgot Password page is to provide possibility for registered users to retrieve lost passwords. The user will enter the e-mail address that is registered in the system to receive a new password set by the system.
© EPiServer AB
242 | User Guide for EPiServer Commerce 1 R2 SP1
When created in Edit mode, the Forgot Password page is defined on the Login page of the website.
Product Page
The Product Page is a central page type on this type of site, since this is used for displaying product details and related information. The page template will display selected product information such as display name and description and item number, from the product catalog of Commerce Manager. This information is shown in the central part of the page.
The rest of the page is built up displaying other information related to the product. The information is selected based on type of product and meta data available in the product catalog. Stock status information for the product item is displayed. From here the customer has the option to add selected numbers of the item to the shopping cart, or to the wish list.
© EPiServer AB
EPiServer Commerce Sample Site | 243
The Product Page page type is linked to the information stored about the product in the product database. For instance, information such as name, code, catalog image, and display price is collected from the Commerce Manager product catalog. When created, the Product page is defined in the site configuration setting of the start page.
© EPiServer AB
244 | User Guide for EPiServer Commerce 1 R2 SP1
Products Compare
The Products Compare page type holds functionality for displaying selected products for comparison. The customer selects the desired products by marking the check box next to each product, an then clicks theCompareoption.
The selected products are listed next to each other together with related product features, for easy overview and comparison. A product can be removed from the comparison list, or added to the shopping cart or the wish list.The selected products will remain for display on the compared products page until they are removed or a new product selection is done by the customer.
The Products Compare page type holds no information of its own so it has no editor field. When the product compare page has been created, it will be defined in the site configuration setting of the start page.
PayPal
The purpose of the PayPal page type is to link to the PayPal payment procedure when finalizing a purchase in the checkout process. The PayPal payment gateway is the default payment provider in the EPiServer Commerce sample site. When created, the PayPal page is defined in the PayPalPaymentPage field of the site configuration setting of the start page.
© EPiServer AB
EPiServer Commerce Sample Site | 245
There are many different payment methods to use in different markets. Please refer to the Payment Providers section to find out more about the different payment gateways for EPiServer Commerce. Tools and Plug-ins
In this section we describe a number of tools and plug-ins for EPiServer Commerce. These are for example a plug-in for the EPiServer CMS Editor making it possible to select product details directly from the product catalog. The plug-ins described here are all included by default in the EPiServer Commerce sample site.
Product Picker Property
The Product Picker Property is a property which can be included in any EPiServer CMS 6 page template. The property will add a field making it possible for editors to select products from the product catalog, to be displayed in an EPiServer CMS content page, using a predefined display template of your choice. The product information will be fetched from the product catalog. Please refer to the EPiServer
Commerce technical documentation for information on how to add the Product Picker property plug-in to a page template. Here we describe how Product Picker works in the standard page of a sample installation of EPiServer Commerce.
Displaying Product Information in a Page
1. Open an standard content page for editing in Edit mode.
2. In the Select Product field, click the selection button. The product picker dialog will open. When you expand the catalog tree on the left, related products will be displayed. You can browse the structure and select products. The product display can be sorted by clicking on product ID or Name. You can also search for a product by entering free text or product ID. Select a product in the list and click Select.
3. Save your changes. The selected product will be linked to the page and displayed in the page using the display template that has been defined.
© EPiServer AB
246 | User Guide for EPiServer Commerce 1 R2 SP1
Removing Product Information in a Page
Do the following to remove product information inserted with the Product Picker.
1. Open an standard content page for editing in Edit mode.
2. In the Select Product field, click the selection button.
3. In the product picker dialog, select No selection to remove an existing product link.
4. Save your changes. The product information will be removed from the page.
Product Link Tool
The Product Link Tool is a plug-in to the EPiServer CMS 6 Editor. The tool adds a new function to the toolbar allowing an editor to link content to products in the product catalog in Commerce Manager. When the link is clicked on, the visitor will be transferred to the product page "view mode" for that product.
Adding a Product Link
You can add product links to text, files or images in an EPiServer CMS page.
1. In Edit mode, select the text, files or images where you want to add a link to a product page in the product catalog.
2. Select the Insert/edit Product Link tool in the toolbar of the Editor.
3. In the Select Product field, you will be able to access products in the product catalog of Commerce Manager. When you expand the catalog tree on the left, related products will be displayed. You can browse the structure and select products. The product display can be sorted by clicking on product ID or Name. You can also search for a product by entering free text or product ID. Select a product in the list and click Select.
4. In the Language field you can choose to select the desired language version for the product page, or let the system decide by selecting Automatically.
5. Enter the details for the link such as title and target frame, just as you would for any link in EPiServer CMS. Click OK.
6. The product link will be displayed in the Editor.
© EPiServer AB
EPiServer Commerce Sample Site | 247
EPiServer Commerce supports permanent links, meaning that when a product is renamed the URL will be remembered and will not be broken.
Editing a Product Link
1. Select the link and choose the Insert/edit Product Link tool in the toolbar. This will open the Product Link dialog.
2. Edit the link options as desired and click OK to save your changes.
Removing a Product Link
Select the link and click the Unlink tool in the Editor toolbar. This will remove the link from the selected text.
The tool buttons in the editor toolbar can be customized, for instance you can change the grouping and orders of the buttons. This is done from the EPiServer CMS administration interface and is described in the Configuring the HTML Editor section of the EPiServer CMS user
documentation.
Product Dynamic Content
The Product Picker Dynamic Content function is used for displaying products as dynamic content. In Edit mode in EPiServer CMS, the editor can use the function to display product information from the product catalog. This adds to the many possibilities with dynamic content, where you can reuse and display content in multiple places on the website, but will only need to update the information in one location.
Adding Product Information as Dynamic Content
Do the following to add product information as dynamic content to a page:
© EPiServer AB
248 | User Guide for EPiServer Commerce 1 R2 SP1
1. Open the page for editing in Edit mode and place the cursor in the editor where you want to add the information.
2. Select the Dynamic Content tool in the toolbar.
3. Select Product picker in the Select plug-in field. The product picker fields will appear in the Settings section.
4. In the Select product field, click the button to select a product from the Commerce Manager product catalog.
The product picker dialog will appear, and you can select a product or a product category by expanding the product category tree, or searching in the search field. Select the desired product and click Select. 5. The product display template is defined in the Select display path (can be changed here if needed).
6. Click OK. A dynamic content box will appear in the editor. Save your changes and view the result in preview or view mode.
You can also personalize dynamic content, and display customized information to different visitor groups. Find out more under the Personalization section.
Editing Dynamic Content for a Product
Do the following to edit dynamic content for a product:
1. Open the page for editing in Edit mode and place the cursor in the editor where you want to add the information.
© EPiServer AB
EPiServer Commerce Sample Site | 249
2. In the dynamic content box, select the Edit option. The product picker dialog will appear, and you can selected another product or product category. Click OK when done.
3. Save your changes and view the result in preview or view mode.
Removing Dynamic Content for a Product
Do the following to remove dynamic content for a product:
1. Open the page for editing in Edit mode.
2. Select the dynamic content box and press Delete on your keyboard.
3. Save your changes to the page.
Gadgets in EPiServer Commerce
A gadget is a small application which can be displayed on the OnlineCenter dashboard for quick access. The OnlineCenter comes with a number of predefined gadgets, and the EPiServer Commerce sample site is also delivered with gadgets customized for e-commerce solutions. In the user documentation for EPiServer OnlineCenter you can read more about gadgets and how to use them. You can also develop and customize your own gadgets to suit your needs. Find out more about development of gadgets in the technical documentation for OnlineCenter on world.episerver.com. The EPiServer Commerce gadgets are part of the common framework and are included in a sample installation.
Adding gadgets to the dashboard
Gadgets can easily be added to the dashboard in EPiServer Commerce by selecting Add Gadgets, and selecting one of the available gadgets.
Gadgets for EPiServer Commerce are described in more detail in the following.
© EPiServer AB
250 | User Guide for EPiServer Commerce 1 R2 SP1
Commerce Orders Gadget
The Commerce Orders gadget displays orders statistics in the form of a sales graph and a list of purchase orders in a time interval of your choice.
Do the following to add and configure the Commerce Orders gadget:
1. Log on to EPiServer Commerce and select Dashboard in the right-click menu. 2. Select the Dashboard tab under which you want the gadget to appear.
3. Select Add Gadgets in top left corner of the dashboard, and then select the Commerce Orders gadget by clicking on it in the list. The gadget will be displayed on the dashboard. By default, it will be updated to display new data every 30 seconds.
4. To update the refresh interval, select Edit in the drop-down menu of the gadget, and enter a new time interval. Click OK to save you changes.
When the Commerce Orders gadget has been added to your dashboard, you will be able to easily monitor sales activities for your EPiServer Commerce website.
Commerce Overview Gadget
The Commerce Overview gadget shows sales data from the e-commerce system. The data is grouped by products, categories, orders, customers and promotions.
Do the following to add and configure the Commerce Overview gadget:
1. Log on to EPiServer Commerce and select Dashboard in the right-click menu.
2. Select the Dashboard tab under which you want the gadget to appear.
3. Select Add Gadgets in top left corner of the dashboard, and then select the Commerce Overview gadget by clicking on it in the list. The gadget will be displayed on the dashboard. By default, it will be updated to display new data every 30 seconds.
4. To update the refresh interval, select Edit in the drop-down menu of the gadget, and enter a new time interval. Click OK to save you changes.
© EPiServer AB
EPiServer Commerce Sample Site | 251
When the Commerce Overview gadget has been added to your dashboard, you will be able to easily monitor sales data from your EPiServer Commerce website.
Comment Approval Gadget
The Comment Approval gadget makes it possible for EPiServer Commerce administrators and editors to manage comments that are left by website visitors. This gadget provides an overview of the commenting status, and you can view, approve or delete comments from here.
Do the following to add and configure the Comment Approval gadget:
1. Log on to EPiServer Commerce and select Dashboard in the right-click menu. 2. Select the Dashboard tab under which you want the gadget to appear.
3. Select Add Gadgets in top left corner of the dashboard, and then select the Comment Approval gadget by clicking on it in the list. The gadget will be displayed on the dashboard.
4. By selecting Edit in the drop-down menu of the gadget, you can set the number of approval items to display, as well as the length of the description.
5. Click OK to save you changes. The gadget will be displayed on your dashboard.
Do the following to use the Comment Approval gadget:
1. Log on to EPiServer Commerce and select Dashboard in the right-click menu and select the Dashboard tab under which the Approval gadget is located.
2. You can chose to view all comments, or filter them according to their status - Approved, Pending or Deleted. Click Refresh to update the list if needed.
3. Select one or more comments for which you want to update the status, by clicking the checkbox to the left of each comment. Click the top left checkbox to select all comments displayed in the list.
4. Select the status you want to apply - Approve, Mark Pending or Delete. For instance, select Approve to approve the selected comments. Comment Abuse Report Gadget
The Comment Abuse Report gadget makes it possible for EPiServer Commerce administrators and editors to manage comment abuse reports that have been created by website visitors. This gadget provides an overview of abuse reports, and you can remove selected comments from here.
Do the following to add and configure the Comment Abuse Report gadget:
1. Log on to EPiServer Commerce and select Dashboard in the right-click menu. 2. Select the Dashboard tab under which you want the gadget to appear.
3. Select Add Gadgets in top left corner of the dashboard, and then select the Comment Abuse
Report gadget by clicking on it in the list. The gadget will be displayed on the dashboard.
4. By selecting Edit in the drop-down menu of the gadget, you can set the number of items to display, as well as the number of abuse reports to be displayed for each comment.
5. Click OK to save you changes. The gadget will be displayed on your dashboard.
Do the following to use the Comment Abuse Report gadget:
1. Log on to EPiServer Commerce and select Dashboard in the right-click menu and select the Dashboard tab under which the Comment Abuse Report gadget is located.
2. Select the comments you want to manage by clicking the checkbox to the left of each comment. Click the top left checkbox to select all comments displayed in the list.
© EPiServer AB
252 | User Guide for EPiServer Commerce 1 R2 SP1
3. Click Remove Comment to remove the comment. Select Ignore to leave the comment without any actions. Commerce Settings for CMO Gadget
With EPiServer Campaign Monitor and Optimization (CMO) you can measure and monitor campaigns on your website and optimize your landing pages. EPiServer CMO provides a simple way to analyze campaigns and landing pages, rather than whole sites. Find out more about EPiServer CMO in the user documentation on world.episerver.com.
EPiServer CMO can also be used for monitoring activities on an EPiServer Commerce site. You can for instance monitor the number of views or orders for a specific product or product category. The logging of Commerce KPI data is supported using the Generic KPI function in CMO. The number of orders is an example of a generic KPI. This allows for external applications such as Commerce to send notifications using a specific application key. The application names and keys are defined in EPiServer CMO, which will then listen for incoming notifications with these specific key values, and collect and store the data.
The following procedure applies when setting up the integration between CMO and Commerce:
l Set up the web services to be used by EPiServer CMO and the corresponding URL to be used.
l Define the external applications, their application names and keys, in EPiServer CMO.
l Define the product views and/or product orders you want to monitor, using the EPiServer Commerce Settings for CMO gadget. Here you will need the application keys and the URL for the CMO Web Services.
l In EPiServer CMO, create a campaign and add the generic KPI for EPiServer Commerce.
l EPiServer Commerce will update the KPI value using web services.
l The monitoring result will be displayed on the campaign report page in CMO, or by using the CMO KPI Summary gadget for EPiServer Commerce on the site that has the EPiServer CMO service installed.
The collected data for EPiServer Commerce is defined in the EPiServer OnlineCenter using the Commerce settings for CMO gadget, as described in the following.
To use this gadget you need to have both EPiServer CMO and EPiServer Commerce installed on your website.
Adding the Commerce Settings for CMO Gadget
When you add and configure this gadget, you can choose to monitor activities for a selection of product(s) or order(s).
© EPiServer AB
EPiServer Commerce Sample Site | 253
Do the following to add and configure the CMO gadget for EPiServer Commerce:
1. Open the EPiServer OnlineCenter for your website(s) and select Add Gadgets.
2. Click on the Commerce setting for CMO gadget to add it to your dashboard.
3. Click Add to define the monitoring parameters.
4. Select Type, choose either Product View or Product Order. The Product View will define views of a product or all products under a specific category (node). The Product Order will define orders for one selected product or all orders of products under a specific category (node).
5. In the Product/Category field, choose a product or a category by selecting an option in the tree structure on the left hand, and click Search in the area to the right. Select a product in the search list and click Select. Or, you can select an entire category (node). You can also search directly for a product name or ID. Click Select to add your selection.
6. In the Application Key field, enter the application ID (defined in EPiServer CMO).
7. In the URL for CMO Web Service field, enter the URL to be used by CMO for the web service (defined in EPiServer CMO).
Editing Commerce Settings for the CMO Gadget
Do the following to edit a set of settings for the CMO Gadget:
1. Open the EPiServer OnlineCenter Dashboard, and navigate to the Commerce settings for CMO gadget.
2. Click the Edit icon for the settings you want to edit.
3. Update the settings information, please refer to the section about adding the Commerce settings for CMO gadget.
4. Click OK to save your changes.
Deleting Commerce Settings for the CMO Gadget
Do the following to delete the settings for the CMO Gadget:
1. Open the EPiServer OnlineCenter Dashboard, and navigate to the Commerce settings for CMO gadget.
2. In the check box to the left, select the set of settings you want to delete.
3. Click the Delete button and click OK to confirm.
Managing the Tag Cloud
"Tags" are words describing the content of a website. A "tag cloud" is a visual depiction of tags on the site. In a tag cloud the importance of a word is shown with font size or color. Tags are also hyperlinks, and clicking on a tag will display content marked with that particular tag.
The tag cloud in EPiServer Commerce is a search tag cloud generated by users when searching for an item on the site. The more popular a search phrase is the more highlighted it will be in the search tag cloud. The search tag cloud on the sample site is displayed under the "Popular searches" part of the midsection of the start page. © EPiServer AB
254 | User Guide for EPiServer Commerce 1 R2 SP1
The EPiServer Commerce sample site comes with a tag cloud plugin for managing the tag cloud. This is accessed from the Action Window of EPiServer CMS. From the Tag Cloud Management section in the Action Window, you can manage the tag cloud list items, and perform tasks such as updating the name and hit count for a tag, or delete a tag. Listing tag cloud items
1. In EPiServer CMS Edit mode, open the Action Window.
2. In the Action Window, click Tag Cloud Management. A list of existing tag cloud items will be displayed.
As default, 20 tags will be displayed at the time in the list. Click on the paging section in the footer of the list to navigate to between pages of the list.
Sorting the tag cloud list
The tag cloud list can be sorted by tag name or by hit count. Click column headers Name/Hits to sort in ascending or descending order.
© EPiServer AB
EPiServer Commerce Sample Site | 255
Searching for a tag
To search for an existing tag, enter part of or the full tag name, in the Search for a tag field at the top of the tag list.
Updating a tag
To update a tag, click the Edit symbol next to the tag in the tag list. You can change the tag name and you can update the hit count number for the tag. Click Save to update the changes. Note that each tag must have a unique name.
Deleting a tag
To delete a tag, click the Delete symbol next to the tag in the tag list. Click OK to confirm the deletion.
Personalization
The personalization feature in EPiServer CMS allows you to create adapted content that will be displayed to targeted Visitor Groups. Based on user information collected when visitors access your website, different content will be shown to different visitor groups of your choice. You can for instance display different content to first time visitors and returning visitors on your website. The personalization feature is described in detail in the user documentation for EPiServer CMS 6 R2.
The EPiServer Commerce sample site features a number of predefined visitor group criteria customized for an e-commerce site where you want to monitor user activities for instance for products and orders. Visitor groups can be applied to the various content on your EPiServer Commerce site, thus creating a personalized website visitor experience.
The visitor groups and their associated personalization criteria can be accessed by clicking on CMS in the global menu, and then selecting Visitor Groups in the submenu displayed. Or, you can right-click in View mode and select Visitor Groups in the EPiServer CMS right-click menu.
The personalization criteria for EPiServer Commerce are available under Commerce Criteria when you click Add to define visitor groups for your site. The various criteria can then be dropped into the configuration area.
© EPiServer AB
256 | User Guide for EPiServer Commerce 1 R2 SP1
The predefined personalization criteria for EPiServer Commerce are described in more detail in the following.
Customer Properties Criteria
With the Customer Properties criteria you can personalize content based on for instance age and geographic location.
Personalize content based on the following information (select from drop-down list):
l Date of Birth - define an age range by entering a from/to date. Select a date in the calendar or enter a date directly in the field (default format mm/dd/yyyy).
l Customer group - select one of the existing groups Customer, Partner or Distributor.
l Registration source - enter the source of registration in free text format. l Country - select a country from the list.
l Region code - select a region code based on the address region in addresses.
l Address postal code - based on state selected, select a postal code from the list.
l State - select a state from the list.
Only one property type with a related value can be selected for a criterion, but several Customer Properties criteria can be defined for a Visitor Group.
Order Frequency Criteria
With the Recent Orders criteria you can identify customers that have placed an order in the store" X" times in the last "Y" days.
Personalize content based on the following information:
l Order times - select the number of times an order has been placed.
l Number of days - select the number of days.
Product in Cart or Wish List Criteria
With the Products in Cart or Wish List criteria you can identify shoppers that have placed a product of a certain type or brand in their cart or on their wish list. Personalize content based on the following information:
l Specified product code - enter the desired product code in free text format.
l Product from a specified category - select the desired product category from the list.
l Product has a specified property and value - enter the desired product property and value, for instance "brand" and "Sony".
Only one property type with a related value can be selected for a criterion. However, you can add several criteria of the type "Products in Cart or Wish List" to a Visitor group.
Recent Orders Criteria
With the Recent Orders criteria you can personalize content for visitors that have placed an order on the site in the last "X" days.
Personalize content based on the following information:
l Number of days - select the number of days.
© EPiServer AB
EPiServer Commerce Sample Site | 257
Total Spent Criteria
With the Total Spent criteria you can personalize content for visitors that have spent "X" amount of money (in a specified currency) on the site in the last "Y" days.
Personalize content based on the following information:
l Spent at least - select amount and currency.
l Select number of days.
Rating and Commenting
Visitors to the EPiServer Commerce sample site have the possibility to rate and comment on the various products displayed. This functionality is built into the product display template of the EPiServer Commerce sample site. Rating
To rate a product a visitor needs to be registered with an account, and logged on to the site. When selecting a product, there will be a clickable rating field available. The system will calculate an average rating value based on the number of votes from users. The average rating for a product, as well as the number of votes, will be displayed to all visitors to the site regardless of whether they are logged on or not.
Commenting
To comment on a product, a visitor needs to be registered with an account, and logged on to the site. You also need to be logged on to the site to see the comments for a product. When selecting a product, there will be a Post Comment button available. Clicking on the button will open a comment editor where the user can add and save commenting text.
© EPiServer AB
258 | User Guide for EPiServer Commerce 1 R2 SP1
Logged on users can remove their own comments. By default, comments added will receive status "pending" and must be approved by the site administrator before they are visible to others on the site. The approval is done from the dashboard using the Approval Gadget. Commerce Manager administrators can see the status for each comment, and remove all comments, from the display for each product.
Abuse reporting of comments
When logged on to the website, you can abuse report comments that others have posted for a product. This makes it possible for site administrators to monitor inappropriate content using the Abuse Gadget on the dashboard. When a comment is abuse reported, it will generate an item in the list of abuse reports for the site administrator to manage. Payment Options
EPiServer Commerce is a flexible platform allowing you to use many of the most popular payment providers within e-commerce. There are a number of payment solutions for different markets available "outof-the-box" for EPiServer Commerce. Some can be installed automatically with the EPiServer Commerce sample site, and some are available as separate modules.
Payment Options Available with the Sample Site
When you install the EPiServer Commerce sample site, the payment provider options listed below will be available. These will be included in the installation, and all you need to do is to configure the accounts for these payment providers in Commerce Manager.
l Pay by PayPal Express -payment option using the PayPal Express payment services provider. This solution is described more in the PayPal Express section.
l DIBS Pay by credit card - payment option using the DIBS credit card payment services provider. This solution is described more in the DIBS Credit Card Payment Services section.
l Pay by Phone - payment option where payment is done by phone.
l Pay by Credit Card - payment option for other common credit cards.
Payment Options Available as Separate Modules
The following payment options are available as separate modules for EPiServer Commerce:
l Klarna Payment Provider - payment using the Klarna Invoice and Part Payment services provider. Please refer to world.episerver.com for more information about this solution.
l DataCash - payment option using the DataCash payment services provider. Please refer to world.episerver.com for more information about this solution.
Refer to the EPiServer Commerce Developer Guide for more information on how to create and configure different payment options.
PayPal Express Payment Provider
If selected, the PayPal Express payment services are installed and configured automatically during the installation procedure for the EPiServer Commerce sample site. When the order is placed and confirmed, the procedure will continue with the payment. If the selected payment option is "Pay by PayPal Express" in step 3 of the checkout procedure, the PayPal Express payment function will be activated to carry out the payment procedure.
© EPiServer AB
EPiServer Commerce Sample Site | 259
When you click Place Order on the order confirmation page, you will be redirected to PayPal to approve the payment.
You can see the shipping and billing addresses entered during the checkout procedure, during which these addresses can be changed.
When you have finalized the approval process, you will be redirected to the “Thank You” page of the EPiServer Commerce sample site.
To find out more about the payment process and configuration of PayPal and other payment methods for EPiServer Commerce, please refer to the Configuration section of the EPiServer Commerce Developer
Guide.
DIBS Credit Card Payment Services
If selected, the DIBS credit card payment services are installed and configured automatically during the installation procedure for the EPiServer Commerce sample site. When the order is placed and confirmed, the procedure will continue with the payment. If the selected payment option is "Pay by credit card (DIBS)" in step 3 of the checkout procedure, the DIBS payment function will be activated to carry out the payment procedure.
© EPiServer AB
260 | User Guide for EPiServer Commerce 1 R2 SP1
Selecting the desired credit card brand will allow for entering the credit card details.
© EPiServer AB
EPiServer Commerce Sample Site | 261
Selecting Validate Payment will validate the payment. If the card details validate properly the payment will be accepted and the process will be completed.
To find out more about the payment process and configuration of DIBS and other payment methods for EPiServer Commerce, please refer to the Configuration section of the EPiServer Commerce Developer
Guide.
Search Providers
EPiServer Commerce features a provider model for the search index for both indexing and search queries. This provision allows the development of additional custom search provider to other search systems.
When installing the EPiServer Commerce sample site, Lucene will be the default search provider installed. To find out more about Lucene, please visit the official Lucene website.
Related topics:
l Searching for product catalog entries
l Indexing product catalogs
© EPiServer AB
262 | User Guide for EPiServer Commerce 1 R2 SP1
Scheduled Job Clear Commerce Cache
When working with EPiServer Commerce and for instance importing or deleting a product catalog, it will be necessary to clean the runtime cache in order to make the website up to date. This is done using a scheduled job which is managed from the EPiServer CMS administration interface. The scheduled job can be executed repeatedly at given time intervals, or manually.
To find out more about how to work with product catalogs, please refer to the Catalog Management section in this documentation.
Do the following to manage the Clear Commerce Cache scheduled job:
1. Login as an administrator and navigate to the EPiServer CMS Admin mode.
2. Check the Activate check box to activate the scheduled job.
3. If you want to run the scheduled job manually, click Start Manually and the job will be executed.
4. If you want the scheduled job to be run automatically, set the desired time interval in the Scheduled job interval field.
5. The time when the scheduled job will be run the next time will be displayed in the Next scheduled
date field.
6. Click Save to save your changes.
Under the History tab, you can monitor the status and results when the scheduled jobs have been executed.
To verify that the cache has been cleared,you need to refresh the catalog display pages.
© EPiServer AB