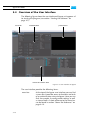
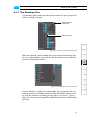
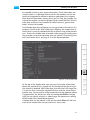
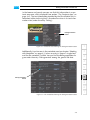
1
Spycer User Guide (Version 1.2)
Content Management Software
Spycer
Version 1.2
User Guide
Spycer User Guide
Introduction
1
Basics
2
Getting Started
3
Browsing and Searching
4
Previewing Data
5
Working with Metadata
6
Management Tools and Job List
7
Miscellaneous
8
Appendix
A
Index
I
User Guide Version 1.2 for Spycer Version 1.2
Copyright © 2006-2007 by DVS Digital Video Systems GmbH, Hanover. All rights reserved.
The manuals as well as the soft- and/or hardware described here and all their constituent parts are
protected by copyright. Without the express permission of DVS Digital Video Systems GmbH any
form of use which goes beyond the narrow bounds prescribed by copyright legislation is prohibited
and liable to prosecution.
This particularly applies to duplication, copying, translation, processing, evaluation, publishing, and
storing and/or processing in an electronic system.
Specifications and data may change without notice. We offer no guarantee that this documentation
is correct and/or complete. In no event shall DVS Digital Video Systems GmbH be liable for any
damages whatsoever (including without limitation any special, indirect, or consequential damages,
and damages resulting from loss of use, data, or profits, or business interruption) arising out of the
use of or inability to use the hardware, software and/or manual materials.
Those parts of this documentation that describe optional software or hardware features usually
contain a corresponding note. Anyway, a lack of this note does not mean any commitment from
DVS Digital Video Systems GmbH.
ADIC and StorNext are registered trademarks of Advanced Digital Information Corporation (ADIC).
Apple, Mac, Mac OS, and QuickTime are trademarks of Apple Computer, Inc., registered in the U.S.
and other countries. CLIPSTER, DVS and Spycer are registered trademarks of DVS Digital Video
Systems GmbH. Kodak and Cineon are trademarks of Eastman Kodak Company. Linux is a registered trademark of Linus Torvalds. Microsoft, Windows, Windows Server, and Windows Vista are
registered trademarks or trademarks of Microsoft Corporation in the United States and/or other
countries. SUSE is a trademark of Novell, Inc. in the United States and other countries. IRIX and SGI
are registered trademarks of Silicon Graphics, Inc.
Any other product names mentioned in this documentation may be trademarks or registered trademarks of their respective owners and as such are subject to the usual statutory provisions.
Headquarters:
DVS Digital Video Systems GmbH
Krepenstr. 8
30165 Hannover
GERMANY
Phone:
+49-511-67807-0
Fax:
+49-511-630070
E-mail:
[email protected]
Internet:
http://www.dvs.de
Support:
Phone:
+49-511-67807-25
Fax:
+49-511-67807-31
E-mail:
[email protected]
For the Americas:
U.S. Headquarters:
DVS Digital Video, Inc.
300 East Magnolia Boulevard, Suite 102
Burbank, CA 91502
USA
Phone:
+1-818-846-3600
Fax:
+1-818-846-3648
E-mail:
[email protected]
Internet:
http://www.dvsus.com
Support:
E-mail:
[email protected]
Contents
1
Introduction ............................................................................... 1-1
1.1
1.2
1.3
1.4
1.5
1.6
2
C
Overview ............................................................................. 1-3
Target Group ........................................................................ 1-4
Conventions Used in this User Guide .................................... 1-4
Program Variants of Spycer .................................................. 1-6
System Requirements ........................................................... 1-8
New in Spycer Version 1.2 .................................................... 1-9
Basics .......................................................................................... 2-1
2.1 Key Features of Spycer ......................................................... 2-2
2.2 Software Structure................................................................ 2-4
2.2.1 The User Interface ....................................................... 2-5
2.2.2 SpycerAgent ............................................................... 2-5
2.2.3 SpycerNet .................................................................. 2-7
2.2.4 Notes about Networking with Spycer ............................ 2-8
2.3 License Issues ..................................................................... 2-10
2.3.1 The Dongle .............................................................. 2-10
2.3.2 Floating License ........................................................ 2-13
3
Getting Started .......................................................................... 3-1
3.1 Installing the Software .......................................................... 3-2
3.1.1 Installation under Linux ................................................ 3-2
3.1.2 Installation under Mac OS ............................................ 3-4
3.1.3 Installation under Windows .......................................... 3-5
3.2 Starting the Software ........................................................... 3-7
3.2.1 Starting the Software under Linux ................................. 3-7
3.2.2 Starting the Software under Mac OS ............................. 3-7
i
Spycer User Guide
3.2.3
Starting the Software under Windows ........................... 3-8
3.3 Initial Setup of Spycer ........................................................... 3-9
3.3.1 General Settings .......................................................... 3-9
3.3.2 Watch Folder Settings ................................................ 3-11
3.3.3 Sequence File Types Settings ....................................... 3-13
3.3.4 Remote Access Permissions ........................................ 3-14
3.3.5 Finishing the Setup .................................................... 3-15
3.4 Overview of the User Interface ........................................... 3-16
3.5 The Integrated Spycer ........................................................ 3-18
3.5.1 Starting the Integrated Spycer ..................................... 3-18
3.5.2 Using the Integrated Spycer ........................................ 3-19
3.5.3 Configuring the Integrated Spycer ............................... 3-20
3.5.4 Exiting the Integrated Spycer ...................................... 3-21
3.6 Changing the Layout of the User Interface ......................... 3-22
3.7 Exiting the Software ........................................................... 3-23
4
Browsing and Searching .......................................................... 4-1
4.1 Browsing for Data ................................................................ 4-2
4.1.1 The Directory Tree ....................................................... 4-3
4.1.2 The Directory Controls ................................................. 4-5
4.1.3 The Contents Area ...................................................... 4-6
4.1.4 The Status Bar ............................................................. 4-9
4.1.5 The Context Menu ...................................................... 4-9
4.1.6 Using the Browse Tool ............................................... 4-13
4.2 Searching for Data .............................................................. 4-16
4.2.1 The Search Parameter Area ........................................ 4-16
4.2.2 The Results Area ....................................................... 4-19
4.2.3 Using the Search Tool ................................................ 4-20
5
Previewing Data ........................................................................ 5-1
5.1 Previewing Data via Thumbnails ........................................... 5-2
5.2 Previewing Data with the Preview Area ................................ 5-4
5.2.1 General Information about Proxies ................................ 5-4
5.2.2 The Video Overlay ...................................................... 5-5
5.2.3 The Scrub Bar ............................................................. 5-6
5.2.4 The Preview Controls ................................................... 5-6
5.2.5 The Status Bar ............................................................. 5-7
5.2.6 Using the Preview Area ................................................ 5-8
ii
Contents
6
Working with Metadata .......................................................... 6-1
6.1 Displaying Metadata ............................................................ 6-2
6.2 The Metadata Controls ........................................................ 6-3
6.3 Metadata Views ................................................................... 6-5
6.3.1 File Metadata ............................................................. 6-5
6.3.2 Header Data ............................................................... 6-6
6.3.3 Production Metadata ................................................... 6-8
6.4 Working with Metadata ..................................................... 6-10
6.4.1 Altering the Header Metadata .................................... 6-10
6.4.2 Changing the Production Metadata ............................. 6-11
7
Management Tools and Job List ........................................... 7-1
7.1 The Management Tools ........................................................ 7-2
7.1.1 Renaming .................................................................. 7-2
7.1.2 Defragmenter ............................................................. 7-4
7.1.3 High-Speed Copying ................................................... 7-7
7.1.4 File Format Converter .................................................. 7-8
7.1.5 Calculator ................................................................ 7-10
7.2 The Job List ........................................................................ 7-12
8
Miscellaneous ........................................................................... 8-1
8.1 The Properties Window ........................................................ 8-2
8.2 Configuring Spycer ............................................................... 8-4
8.2.1 Accessing the Configurations and Overview ................... 8-4
8.2.2 The Group ’General’ .................................................... 8-5
8.2.3 The Group ’Jobs’ ......................................................... 8-8
8.2.4 The Group ’Network Drives’ (Windows Only) ............... 8-10
8.2.5 The Group ’Permissions’ ............................................. 8-11
8.2.6 The Group ’Scan Filter’ .............................................. 8-13
8.2.7 The Group ’Watch Folders’ ......................................... 8-13
8.3 Menu Bar Reference ........................................................... 8-16
8.3.1 The Menu Bar on Mac OS .......................................... 8-16
8.3.2 The ’Spycer’/Spycer Icon Menu .................................. 8-17
8.3.3 The ’Options’ Menu .................................................. 8-18
8.3.4 The ’Tools’ Menu ...................................................... 8-18
8.3.5 The ’View’ Menu ...................................................... 8-19
8.3.6 The ’Help’ Menu ....................................................... 8-20
iii
Spycer User Guide
8.4 Maintenance ...................................................................... 8-22
8.4.1 The SpycerAgent Script/Tool ....................................... 8-22
8.4.2 The CodeMeter Control Center ................................... 8-25
8.4.3 Gathering Diagnostic Information ............................... 8-26
A
Appendix ....................................................................................A-1
A.1
A.2
A.3
A.4
I
iv
Troubleshooting ...................................................................A-2
Supported File Formats .........................................................A-4
Keyboard Shortcuts ..............................................................A-8
Interesting Files and Folders ..................................................A-9
Index ............................................................................................. I-1
Introduction
1
This document describes Spycer, the innovative data and content management application developed by DVS. It is a software program capable of handling large amounts of video data and their corresponding
metadata, providing users with integrated browse, search and management tools to retrieve data and gather information about them locally
as well as via a network.
The video and film post production industry often deals with massive
amounts of data stored on centralized storages or circulating on client
stations. For most projects it is a challenge to keep track of the different
shots and takes during the various production stages. With Spycer you
can easily maintain transparency and control over video and audio data
and their corresponding metadata. Accompanied by a conclusive rights
management, browsing, searching and viewing of video and audio material can be done without any difficulty and metadata, even in DPX file
headers, can be added and edited effortlessly. Several management
tools supplement the usage of Spycer comprising, for example, a renaming function for image sequences, an integrated high-speed copying process and a sophisticated defragmentation of image sequences.
All the above said can be achieved on the respective computer system
locally with one Spycer alone, but the real benefit comes when several
Spycer applications operate combined in a network. Then they form the
SpycerNet, a scalable distributed content management network for
data search and retrieval. For example, the instant a Spycer application
detects new clips on its local storage (the watched folders) they and
their metadata are made available to all other Spycer applications
present in the network immediately. Furthermore, to perform management tasks such as a defragmentation or a copying your Spycer may be
controlled by other Spycer applications or you may control others available in the SpycerNet. Of course, all these behaviors can be fully configured via rights management.
Spycer can be run on a standard computer system and does not require
any special DVS hardware. On the CLIPSTER and the Pronto2K.2 /
ProntoHD.2 video systems it is already integrated in the DVS software
and accessible the same way as the other software modules such as the
Edit Tool.
1-1
1
2
3
4
5
6
7
8
A
I
Spycer User Guide
There are several different variants of Spycer available, from Spycer Basic providing a limited feature set to Spycer for DVS-SAN able to access
storages in the StorNext file system (SNFS). For further information
about the different variants please refer to section “Program Variants of
Spycer” on page 1-6.
1-2
Introduction
1.1 Overview
This user guide informs you about the installation and general handling
of Spycer as well as about its complete controllable interface. The chapters in this user guide contain the following information:
Chapter 1
Begins with a short introduction to Spycer, followed by a note regarding the audience this
manual is written for and an explanation of the
conventions used in this manual. Furthermore,
it details the new features, the available software variants and their respective capabilities,
as well as the system requirements necessary to
run Spycer when it is not already installed.
Chapter 2
This chapter provides basic information about
Spycer. First the key features of Spycer are described, followed by some background information regarding the software structure of
Spycer and license issues.
1
Describes the first steps to get started with
Spycer. In this chapter you can find details
about how to install the program, how to perform its first setup as well as about how to start
and end it. This is complemented by a first
overview of the user interface of Spycer as well
as information about the program variant integrated in the CLIPSTER and the Pronto2K.2 /
ProntoHD.2 software.
2
Chapter 4
Explains the browse and search tools of Spycer.
Chapter 5
Provides a description where and how to preview video and image data in the software.
6
Chapter 6
This chapter explains how to work with metadata, i.e. how to view and how to edit them.
Chapter 7
Describes the management tools that come
with Spycer, such as the renaming of image sequences, the built-in defragmenter and the calculator. Furthermore, this chapter provides
information about the job list of Spycer.
Chapter 3
Chapter 8
Details other items of the software, such as the
configuration settings available for Spycer or
the options provided by its menu bar.
1-3
3
4
5
7
8
A
I
Spycer User Guide
Appendix
Gives additional information about the software. Among others you can find here a list of
the directly supported file formats and troubleshooting issues.
Index
This chapter facilitates the search for specific
terms.
1.2 Target Group
To use this user guide and Spycer correctly you should have experience
in PC handling. For the full use of the software it would be best to have
some knowledge in the field of digital video and its accompanying
metadata.
1.3 Conventions Used in this User Guide
The following typographical conventions will be used in this documentation:
y Texts preceded by this symbol describe activities that you must perform in the order indicated.
– Texts preceded by this symbol are parts of a list.
Texts preceded by this symbol are general notes intended to facilitate work and help avoid errors.
You must pay particular attention to text that follows this
symbol to avoid errors.
“ ” Texts enclosed by quotation marks are references to other manuals, guides, chapters, or sections.
’Window’
BUTTON
Group/Menu
Menu » Option
1-4
Text in bold with single quotation marks indicates a window name
Text in small caps and bold indicates push buttons
Text in italic and bold indicates either a group
name, menu name or options in a menu list
In the specified group or menu select the stated
item
Introduction
Item
File
Entry
[Key]
Text in bold only stands for other labeled items
of the user interface
Directory structure or file
Parameters, selections or entries made in the
program, or commands entered at a prompt
An individual key or a key combination on a
keyboard
Keyboard Shortcuts
To perform options or procedures with the keyboard often requires simultaneous pressing of two keys.
Example:
[Ctrl + F1]
If this is given, hold down the [Ctrl] key and
press simultaneously the [F1] key.
1
Screenshots
The screenshots shown in this documentation have been taken for the
most part from the Windows-based version of Spycer in its standard
stand-alone application variant providing a full feature set (SAN access
included). Depending on the software variant available to you and the
installed operating system, your Spycer application may look different
and/or may not provide all the features described here. However, due
to the fact that the descriptions given here and their screenshots are
complete, they will contain the interface items that concern your variant and/or operating system as well.
2
3
4
5
6
7
8
A
I
1-5
Spycer User Guide
1.4 Program Variants of Spycer
Spycer is available in several different program variants, from Spycer
Basic providing a limited feature set to Spycer for DVS-SAN able to access storages in the StorNext file system (SNFS). This section details the
available variants, their differences and their capabilities.
The stand-alone variants Spycer Basic and Spycer are the same
application differing only in their licensed features. To run a
Spycer Basic as Spycer you need an appropriate license provided by a dongle. See section “License Issues” on page 2-10 for
further details about the dongle and licenses.
The following lists the available variants:
Spycer Basic
’Spycer Basic’ is available for free. Compared to
the other program variants it provides a limited
feature set (see table 1-1 on page 1-7). Together
with Spycer it is the stand-alone application that
can be run on a standard computer system (see
section “System Requirements” on page 1-8).
Spycer
’Spycer’ is the standard version of the Spycer application. It is the stand-alone application that can
be run on a standard computer system (see section “System Requirements” on page 1-8). It provides the complete feature set with the exception
that it cannot perform a file management or scanning of data on storages in the StorNext file system (SNFS).
integrated Spycer This variant of Spycer is integrated in the CLIPSTER and the Pronto2K.2 / ProntoHD.2 software.
As the standard variant of Spycer (’Spycer’) it provides the complete feature set and, furthermore,
works seamlessly together with the available DVS
products (see section “The Integrated Spycer” on
page 3-18).
1-6
Spycer for
DVS-SAN
This Spycer application variant can be found on
SAN systems. Compared to the standard variant
of Spycer (’Spycer’) it is also capable of managing
and scanning data on storages in the StorNext file
system (SNFS).
SpycerBox (for
DVS-SAN)
This Spycer application variant is a special version
for the SpycerBox system by DVS. It provides preview proxies of a connected SAN system for
downloads to other Spycers in the SpycerNet.
Introduction
The next table details the features of the different Spycer application
variants:
Table 1-1: Features of the program variants
Spycer
Basic
Requirements
Local and SpycerNet
browsing/searching
X
Spycer
integrated
Spycer
Spycer for
DVS-SAN
SpycerBox (for
DVS-SAN)
dongle or
floating license
DVS
hardware
dongle and
DVS-SAN
SpycerBox
hardware
X
X
X
X
X
X
Watch folders on SAN
volumes
Remote control this
Spycer via SpycerNet
X
X
X
X
Remote control other
Spycer applications
via SpycerNet
X
X
X
X
Renaming of image
sequences
X
X
X
X
Editing of metadata
X
X
X
X
High-speed copying
X
X
X
X
Built-in defragmenter
local storage
local storage
local storage,
SAN
local storage,
SAN
File format converter
X
X
X
X
Generation of preview
proxy clips
X
X
X
X
1
2
3
4
This user guide describes all possible features that a Spycer application may provide, thus covering all above mentioned variants. The feature set of Spycer Basic is limited as detailed
above. However, because the descriptions given here are complete, its functions are explained as well. In case one feature is
available for a particular variant only, it will be explicitly mentioned in the text.
5
6
7
8
A
I
1-7
Spycer User Guide
1.5 System Requirements
The stand-alone application of Spycer (’Spycer Basic’ and ’Spycer’, see
section “Program Variants of Spycer” on page 1-6) is able to run on a
standard computer system that fulfills the following system requirements:
Supported Hardware
These are the minimum hardware requirements that the computer system has to meet if you want to use the program:
–
–
–
–
–
–
2 GHz processor recommended
512 MB of RAM
50 MB free space on system disk
CD-ROM drive
Graphic card (minimum resolution 1024 × 768)
Network card for communication between Spycer applications
(SpycerNet)
– FC card to connect to a SAN (if required)
To run a Spycer Basic as Spycer without floating licenses you
will also need one free USB port for the dongle to enable the
licensed feature set. See section “License Issues” on page 2-10
for further details about the dongle and licenses.
Supported Operating Systems
The program can be executed on the following operating systems:
Be sure that you have installed the newest service packs and/
or patches for your system, otherwise you may encounter softand/or hardware problems.
– Linux (SUSE Linux Enterprise Server 10 or SUSE Linux Enterprise
Desktop 10)
– Mac OS X
– Windows 2000, Windows Server 2003, Windows XP (recommended), or Windows Vista
Other Requirements
The following other requirements may be necessary to run Spycer:
– Mac/Windows only: QuickTime Version 7.1.0 or higher to display
*.mov files
– Mac/Windows only: QuickTime plug-in for DNxHD content in
*.mov files
– License to run the program with a licensed feature set (dongle or
floating license, see section “License Issues” on page 2-10)
1-8
Introduction
1.6 New in Spycer Version 1.2
The following lists the features and functions that are new in Spycer:
– Spycer displays all files stored in the watched folders, even files of
unknown formats, and to each file separate production metadata
can be added.
– New and enhanced icons to indicate systems, drives, directories and
files (e.g. one icon shows systems in the SpycerNet where older
Spycer versions are running).
– Copying of data within the SpycerNet, even between peers with
different operating systems.
– Files can be loaded in other applications from the browse and
search area.
– File format converter for image files and video clips.
– To locate files after a search more easily, they can be shown directly
in the directory tree of the browse tool.
– It can be configured which file formats to display as video clips (i.e.
as image sequences showing one file entry in Spycer only).
– Preview area with integrated media player for video clips.
– For a real-time preview of clips, proxy clips can be generated of the
locally available material. When viewing clips over the SpycerNet,
the proxies will be temporarily downloaded from the other system.
– Enhanced properties dialog for peers as well as volumes and content.
1
2
3
4
Please note that older Spycer versions available in a SpycerNet
do not provide the above mentioned features. File related tasks
or further information due to new features may not be available on systems with older Spycer versions, even if triggered
from a newer application version in the SpycerNet.
5
6
7
8
A
I
1-9
Spycer User Guide
1-10
Basics
2
This chapter provides basic information about Spycer. First concise descriptions of the key features of Spycer are given. This is followed by
some background information about the software structure providing
details about the user interface, the SpycerNet and the SpycerAgent in
particular. The chapter will be concluded with details and explanations
of some license issues regarding Spycer.
1
2
3
4
5
6
7
8
A
I
2-1
Spycer User Guide
2.1 Key Features of Spycer
Spycer is a software program for content management especially designed for the needs of the Digital Intermediate post production. It is
capable of handling large amounts of video and audio data as well as
their corresponding metadata, either locally stored or distributed on
several systems connected to a network. Additionally, Spycer is
equipped with powerful tools such as a high-speed copying and a sophisticated defragmenter. The following lists and explains shortly the
key features of Spycer:
There are several variants of Spycer available. Further information about them can be found in section “Program Variants of
Spycer” on page 1-6.
Browse and Search
With Spycer you can browse local or network storages via the SpycerNet. It offers you two browsing panes where you can browse for data
and perform move/copy procedures between different directories easily via drag and drop. With its search tool you can find the desired material swiftly by combining various parameters, such as file names or
metadata information. All material and data displayed in the browse
and search area can be shown either in text information or thumbnail
view.
Viewing of Material
You can preview video clips and image data without any difficulty in
Spycer. They can be viewed either with their thumbnails in the browse
or search area or, when double-clicked, in the enlarged preview area.
Both, the thumbnails as well as the preview area, provide a scrub bar
(timeline) where you can move to different positions within a video
clip’s sequence. Once video material is available in the preview area,
you may also use the built-in media player for a viewing (real-time preview requires a proxy of the clip) or gather further information about it
in the metadata area. Other files than video or image data can be selected and may provide information in Spycer as well: For example,
when a project file of a DVS video system software is singled out, you
can see the media files that are used in the project’s timeline as a list in
the metadata area.
Adding and Editing Metadata
After data is selected and shown in the preview area, its metadata, such
as the header data or production information, are displayed as well.
Then they can be added or changed easily. The background process of
Spycer enabling the local content management also administers the
metadata and alters the file header(s) and/or the respective data record
2-2
Basics
of the file/sequence in its database. With them added you can afterwards search for specific metadata with Spycer’s search tool.
Management Tools
Spycer is equipped with several management tools such as a highspeed copying or a sophisticated defragmenter:
To copy vast amounts of video material from one storage location to
another is often a time consuming procedure when performed with the
standard tools of an operating system, such as a file manager. To do this
faster DVS integrated in Spycer a high-speed copying program which
deals with such tasks in about four times the speed of a standard operating system copy.
The built-in defragmenter of Spycer has been designed to optimize the
physical alignment of image sequences (video clips) on storages so that
they are more suited for real-time operations. It defragments any other
data available on the selected storage as well. With Spycer you can initiate a defragmentation of one or more clips/files without any difficulty.
Spycer also offers a renaming tool for image sequences where you can
easily change, for instance, the name prefixes, frame numbers or file
extensions.
There is also a file format converter available allowing you to convert
video and image data from one file format to another.
1
2
3
4
SpycerNet
One Spycer can perform all the above said on the computer system
where it is installed locally. But as soon as there are several Spycer applications installed on different computers and when they are able to
communicate with each other via a network connection, you may access them and their data depending on the permissions for a remote access. By communicating with each other, sharing their databases and
enabling a remote control of the applications for management tasks
such as copying or defragmentation, they form the SpycerNet, a scalable distributed content management network for data search and retrieval.
Rights Management
Each Spycer contains a rights management to allow other Spycer applications in the network (SpycerNet) access to its data or a remote control
of it. For example, the browse and search permission enables others to
take a look at your data and metadata (i.e. they have access to the database of the watched folders which is created and administered by the
background process), while read and write permissions enable them to
control your Spycer application for system specific tasks such as a copying or defragmentation.
2-3
5
6
7
8
A
I
Spycer User Guide
2.2 Software Structure
The following provides basic information about the software structure
of the Spycer application to help you understand how the software operates.
In its parts the Spycer application consists of three elements that together provide the software’s capabilities:
– the user interface,
– the SpycerAgent and
– the SpycerNet.
While the first two are software components actually installed on the
computer, the latter is the means of communication between different
Spycer installations in a network enabling the scalable and distributed
content management. The following diagram shows the software
structure and communication processes between the individual elements of Spycer applications in a SpycerNet in detail:
Client
Client: File Server
Spycer
for DVS-SAN
Spycer
user interface
user interface
SpycerAgent
SpycerAgent
Database
Database
SpycerNet
DVS-SAN
SpycerAgent
Database
integrated
Spycer
user interface
Client: CLIPSTER
Spycer
user interface
[ local content
management disabled ]
Client
Figure 2-1: Overview of the software structure
The ovals in the drawing above represent the user interfaces of the
Spycer applications, while the lines indicate the communication ways
2-4
Basics
on the individual clients as well as between them in the SpycerNet. It is
of no consequence to the SpycerNet whether the software applications
are all of the same variant of Spycer or not (see section “Program Variants of Spycer” on page 1-6).
The following sections will explain the drawing above in more detail.
2.2.1 The User Interface
With the user interface of Spycer you can view, edit and administer the
data shown in its areas and/or tools, for example, you can browse and
search for data or edit their metadata. It can be used to display the contents that is locally available and furthermore, when operating in a
SpycerNet, it may also show the material that is stored on other systems.
To put it in simple terms the user interface of Spycer is just a browsing
tool where you can view data and trigger certain events that the background process SpycerAgent may execute. In case it is running without
the background process enabled (as the bottom right Spycer in
figure 2-1 on page 2-4 indicates), the user interface can still be used as
a network browser in the SpycerNet to display data available on other
systems.
Because the user interface runs independently from the
SpycerAgent it will check separately whether a valid license is
provided. When found it will run with the respective feature set
enabled (see section “License Issues” on page 2-10).
For further information about the background process SpycerAgent,
the SpycerNet and networking see the next sections.
1
2
3
4
5
6
7
2.2.2 SpycerAgent
To scan and display any data locally stored on your computer system
the Spycer application installs a background process (Mac/Windows:
service, Linux: daemon) called SpycerAgent right after the first program
start. It will be launched in the background of the system and in the future start automatically during the loading of the operating system.
The SpycerAgent administers a database that contains all worthwhile
information about the contents of the watched folders (the scanned
and indexed local storages), such as file names, storage location, pixel
formats, color spaces, or metadata. This database is then used in the
user interface of Spycer to display video and audio material as well as
all other data. By using a database to present the contents of storages
Spycer offers you fast access to large amounts of data, for example, for
search procedures. Once the database is created, the SpycerAgent
monitors the watched folders, for example, for new files, deletions, re2-5
8
A
I
Spycer User Guide
namings, etc., whereupon the local database of Spycer is revised so that
it is always up-to-date with the actual content stored.
The very first writing of the database may take some time depending on the amount of data stored in the watched folders.
Further information about the watched folders can be found in
section “Watch Folder Settings” on page 3-11.
The SpycerAgent is an important part of the SpycerNet. On the one
hand it makes the data in the database available to the user interface
installed locally and on the other to all other Spycer applications in the
network (if browse and search permissions are given, see section “Remote Access Permissions” on page 3-14). Without it only the data provided by other SpycerAgents in the network can be seen and accessed.
Thus, it is the database that will be visible to other Spycer user interfaces in the SpycerNet.
Furthermore, the SpycerAgent controls the Spycer application tasks on
your system such as copy or defragmentation processes. Usually, these
are initiated by the user interfaces in the SpycerNet. Locally you can
perform read and write as well as browse, search and edit processes as
desired: The user interface triggers the event and the SpycerAgent carries them out. Nevertheless, when operating in a SpycerNet and initiating a Spycer application task on another system, it may be denied by
the other Spycer due to insufficient remote access permissions. Then
the access rights have to be set accordingly on the systems where you
want to perform the task (see section “Remote Access Permissions” on
page 3-14).
The SpycerAgent runs totally independent of Spycer’s user interface. It
is started automatically during the loading of the operating system and,
when not terminated otherwise, it is stopped when the operating system is turned off. This makes it possible to maintain the SpycerNet almost at all times. Even with no user logged in to the system and no
Spycer user interface running, other Spycer user interfaces will be able
to search and browse in your data (if permitted on your system). Copy
or write procedures on your system initialized by other Spycer are possible as well and all processes are written to the database by the SpycerAgent soon after they occurred.
Because the SpycerAgent runs independently from the user interface it will check separately whether a valid license is provided. When found it will run with the respective feature set
enabled (see section “License Issues” on page 2-10).
With the local content management (i.e. the SpycerAgent) enabled,
Spycer not only displays the data scanned and indexed in its database.
The viewing or reading of the contents of other drives or directories on
your system (local reading) as well as of mounted network drives is possible even without their contents added to the database. The user interface displays all data available when selected in its browsing pane.
2-6
Basics
However, because the contents of these locations are not detailed in
the database, they are read when accessed only and neither will a
search with Spycer include these locations nor will they be visible in the
SpycerNet. File-based tasks on these drives/directories locally performed, such as copy procedures to and from these drives/directories
or the deletion of directories or files, are also possible.
To administer the background process DVS offers you a tool (Linux/
Mac: script) especially designed for this purpose. Please refer to section
“The SpycerAgent Script/Tool” on page 8-22 for more details about
this. Nevertheless, the standard operating system tools to administer a
background process can be used as well.
To administer the background process administrator rights
(Linux/Mac: root) are required.
2.2.3 SpycerNet
1
The SpycerNet is one of the main features of Spycer. It is the part of the
software that constitutes the scalable and distributed content management.
2
With a single Spycer application you can access data locally stored only.
But if there are more than one Spycer installed on different computer
systems connected via a network, they will form the SpycerNet. Then
they communicate with each other and share their databases providing
information about the data stored locally on each system. The more
Spycer applications are installed, the more data you can gather from
different systems. This is meant by the terms ’scalable’ and ’distributed’:
’scalable’ because there is no limit to the number of Spycer applications
working together and ’distributed’ because they work independently
on separate workstations as well as provide separate databases.
3
This way no central server is required because the individual Spycer installations communicate with each other and share their databases as
soon as they are present in the network and browse and search permissions are given.
7
In the SpycerNet you will be able to use your Spycer user interface to
access data on other systems or you may use their SpycerAgents for
certain operations (read, write, defragment) depending on the permissions assigned for a remote access. Thus you can easily maintain transparency and control over all video and audio data in your post
production workflow, even if distributed on various client stations.
To configure a Spycer application to take part in the SpycerNet an IP address other than the local host address has to be stated in the network
settings of Spycer (see section “General Settings” on page 3-9). For
further information about the conditions necessary to establish a
2-7
4
5
6
8
A
I
Spycer User Guide
SpycerNet see section “Notes about Networking with Spycer” on
page 2-8.
2.2.4 Notes about Networking with Spycer
Newer versions of Spycer usually provide features that older applications may be missing. Due to the fact that it is the native SpycerAgent
which performs file related tasks, it may not be possible to trigger later
developed functions on older Spycer applications in the SpycerNet. For
a list of what is new in this Spycer version see section “New in Spycer
Version 1.2” on page 1-9.
The SpycerNet is best set up in a way that the overall workload is distributed over the client stations. If working with a central storage (e.g.
a SAN) only one Spycer should provide the database for this storage.
This is one of the major features of Spycer: Not every system has to scan
the central storage but only one which will share its database in the
SpycerNet. This will reduce the overall traffic greatly because only one
Spycer monitors the central storage.
Furthermore, each Spycer contains a basic rights management to allow
other Spycers in the SpycerNet access to your data or a remote control
of the SpycerAgent installed. The permissions what other Spycers are
allowed to do on your system (as well as all other settings mentioned
in this section) have to be stated during the initial setup of the software
(see section “Initial Setup of Spycer” on page 3-9). Of course, they can
be altered at any time later without difficulty (see section “Configuring
Spycer” on page 8-4).
Listed in the following are some basics regarding the role of your Spycer
application in a SpycerNet:
The following network ports have to be free and available to
connect successfully to the SpycerNet:
à
à
à
à
Port 9960 UDP
Port 9961 TCP
Port 9970 UDP
Port 9971 TCP
See to it that these ports are free in your network (e.g. as exceptions in the firewall settings) otherwise Spycer will be confined to its localhost only (IP address 127.0.0.1 has to be used).
In case of problems or questions please contact your local network administrator.
When the local content management is disabled, i.e. the SpycerAgent
is not installed on your system:
– Your Spycer application will not appear in the SpycerNet regardless
of any other setting.
2-8
Basics
– Your Spycer user interface will not show any files locally stored nor
can mounted network drives be accessed.
When the local content management is enabled:
– If set to localhost, your Spycer will not appear in the SpycerNet
regardless of the permissions given.
– With no permissions given and when an IP address is stated other
than the localhost address, your Spycer application will be registered in the SpycerNet but provide no data.
– With permissions given and when an IP address is stated other than
the localhost address, your Spycer application will be registered in
the SpycerNet. Other Spycer applications can perform at least
browse and search operations in your database.
The browse and search permissions enable others to take a look at your
data and metadata, i.e. they have access to the database administered
by the SpycerAgent. However, with only this permission given they
cannot change the contents of your database nor have they a real access to your system: They see the contents of the database only and, if
available on your system, can download proxy clips.
1
2
With the ’Edit metadata’ permission activated you enable others in the
SpycerNet to change metadata entries of the files in your watched folders (file headers as well as database entries). This permission includes
the browse and search permission but still a real access to your system
is denied.
3
All other permissions enable them to control your SpycerAgent for file
related tasks such as a copying or defragmentation. This is meant by remote controlling other Spycers. For moving or copying operations you
must have at least read permissions on the source system and write permissions on the target system. Nevertheless, real damage can only be
done with the write permission, because with it you can, for example,
rename file sequences or delete data.
5
4
6
7
8
A
I
2-9
Spycer User Guide
2.3 License Issues
On DVS video devices ex factory equipped with Spycer, such as the
DVS-SAN, CLIPSTER and the Pronto2K.2 / ProntoHD.2, the Spycer application is already properly installed and licensed. Then the program
can be started immediately.
The stand-alone application of Spycer, however, needs a special license
provided by a dongle to run with more than the basic features. In case
the dongle is not available or the license is invalid, the stand-alone application runs as Spycer Basic (see section “Program Variants of Spycer”
on page 1-6). Additionally, there is also the possibility to acquire a floating license to run a dedicated number of Spycer applications on a single
dongle.
The license for a Spycer connected to a SAN system is provided
by a special version of the dongle. It also has to be used as described in the following.
You can order license(s) from DVS via the Spycer web sites
(www.spycer.net or www.spycer.de).
Details about the license currently assigned to your Spycer application can be found in the ’About Spycer’ window (e.g. for
troubleshooting purposes, see section “About” on page 8-20).
This section details some issues that may occur when licensing Spycer.
2.3.1 The Dongle
The license for Spycer to run the Spycer application with a licensed feature set is provided via a dongle (USB stick) that has to be connected to
a free USB port on the computer system where Spycer is to be installed
(see section “Installing the Software” on page 3-2).
When running a local content management, it is generally recommended to plug in the dongle prior to starting the computer, which will ensure that the SpycerAgent operates with the licensed feature set
enabled. Additionally, it should be left connected to the system even
when the user interface of Spycer is not running, because otherwise
you may disrupt SpycerNet processes running on your system (e.g. a
defragmentation). It can be disconnected safely only when the computer system is turned off. Further information about the SpycerAgent
2-10
Basics
and the SpycerNet can be found in section “Software Structure” on
page 2-4.
The user interface of Spycer and the SpycerAgent run independently from each other. Both will check separately whether a
valid license is provided to enable the respective feature set
(see section “Software Structure” on page 2-4).
You can find enclosed in the delivery of the licensed version of
Spycer a special key chain. Please fasten it to the dongle to recognize it later without difficulty as belonging to Spycer.
Mac only: Please note that in some cases your system may not
shutdown or boot normally with the dongle plugged in. To
solve this problem, unplug the dongle during shutdown or
(re-)boot.
How to Connect the Dongle to a Running Computer
When a license is not available, for example, because the dongle is not
connected, Spycer (the user interface as well as the background process) will run as Spycer Basic only. To connect the dongle to the computer system afterwards and run Spycer with the licensed feature set
enabled you have to perform the following:
y If running close the Spycer user interface (see section “Exiting the
Software” on page 3-23).
1
2
3
y Connect the dongle to a free USB port on the computer system.
4
y Afterwards restart the Spycer user interface (see section “Starting
the Software” on page 3-7).
5
The above steps are enough if a local content management is disabled
on your system (SpycerAgent not running). However, if your Spycer application runs with the local content management enabled, during the
start-up of Spycer a message will appear informing you about the new
detected license. Then you have to do the following in addition:
6
7
y Follow the instructions given on the screen necessary to restart the
SpycerAgent.
8
Once the SpycerAgent has started, the background process as well as
the user interface of Spycer will run with the licensed feature set enabled.
A
How to Upgrade Spycer Basic to a Licensed Spycer
To upgrade the free version of Spycer (Spycer Basic) to a licensed version of Spycer without floating licenses available (see section “Floating
License” on page 2-13) you will need a dongle that provides a valid license for the application. You can order it from DVS via the Spycer web
sites (www.spycer.net or www.spycer.de).
2-11
I
Spycer User Guide
Once you have received the dongle perform the following:
If your computer where Spycer is installed is already running,
instead of the following, perform the procedure described in
section “How to Connect the Dongle to a Running Computer”
on page 2-11.
y Connect the dongle to a free USB port on the computer system
where Spycer is installed.
y Next start the system and afterwards the Spycer user interface (see
section “Starting the Software” on page 3-7).
When Spycer is started, it will run with the licensed feature set.
How to Update the License on the Dongle
The license on the dongle can be updated, for instance, to enable new
features or change an evaluation license to a non-expiring one. For this
you have to send a request with internal license information to DVS. In
return you will receive an update file which has to be used to program
the dongle with a new license. After this the dongle is updated.
To update the license on the dongle do the following in detail:
y Start Spycer (see section “Starting the Software” on page 3-7).
y From its menu bar (see section “Overview of the User Interface” on
page 3-16) select Tools » License Management » Request….
This will open a message window instructing you to connect the dongle
to the computer:
y If not already the case connect the dongle to a free USB port on the
computer system and click the button OK in the message window.
This saves the license information of the dongle to a file with the name
SpycerLicense.WibuCmRaC (exact location will be detailed in a
message window) and simultaneously starts your e-mail software. The
saved information will also be added to an e-mail automatically.
y Send the encrypted dongle information to DVS by doing one of the
following:
– If you are connected to the internet send the dongle information already added to the opened e-mail to
[email protected], or
– copy the file SpycerLicense.WibuCmRaC to a common
storage medium (e.g. CD-ROM) which you can then send to
DVS per mail.
Once received, the e-mail/file will be evaluated by DVS and a license
update file with the extension *.WibuCmRaU will be created. DVS will
send this to you as soon as possible.
After receiving the license update file do as follows:
2-12
Basics
y Store the file on the computer where the dongle is connected.
y If appropriate start Spycer and select from its menu bar Tools »
License Management » Update….
This will open a message window instructing you to connect your dongle to the computer and afterwards select the update file:
y If not already the case connect the dongle to the computer system
and click the button OK in the message window.
y In the opening window browse for the update file *.WibuCmRaU
on your storage and confirm your choice with the button OPEN.
This will program the dongle with the new license which may take some
time. Once the programming of the dongle is complete, a message will
report this.
y Close the Spycer user interface and restart it to take the changes
into effect.
When Spycer is started once again, it will run with the new license.
In case the new license is still not available, you have to reboot
your computer with the dongle connected.
If your new license is a floating license you have to configure
the dongle as a license server to enable a sharing of the license
(see section “Configuring a Dongle to Run as a License Server”
on page 2-14).
1
2
3
4
5
2.3.2 Floating License
With a floating license you can share the license of a single dongle with
other Spycer applications, i.e. enabling a Spycer Basic on another system in the network to run as a licensed version of Spycer. The dongle
provides a certain number of licenses for the sharing only and the Spycer applications (user interface as well as SpycerAgent) can grab the licenses from the dongle when they are connecting to the SpycerNet
(only one license per system will be assigned). As long as there are licenses available, each Spycer Basic registering in the SpycerNet will
then run with the licensed feature set. Once the maximum number of
licenses is assigned, every other Spycer Basic connecting to the network
will run with the limited feature set only.
To share the license of a dongle in the SpycerNet the dongle has to be
configured as a license server. It will then monitor the shared licenses
and assign them anew when available again.
Dedicated dongles, i.e. single workstation licenses, and floating
licenses can be used together in a SpycerNet.
2-13
6
7
8
A
I
Spycer User Guide
It is possible to run a dedicated dongle as a license server.
However, then you may not be able to start your Spycer with
the licensed feature set, because the license may already be
grabbed by another application.
How to Get a Floating License
Usually, you can order dedicated licenses and/or floating licenses from
DVS via the Spycer web sites (www.spycer.net or www.spycer.de, see
also section “How to Upgrade Spycer Basic to a Licensed Spycer” on
page 2-11). However, if a dongle is already available, you can convert
a dedicated license to a floating licence with the procedure described in
section “How to Update the License on the Dongle” on page 2-12.
Configuring a Dongle to Run as a License Server
To enable a floating license and share the license of a dongle in the
SpycerNet the dongle has to be configured as a license server. For this
perform the following:
y If appropriate start Spycer and select from its menu bar (see section
“Overview of the User Interface” on page 3-16) Tools » License
Management » License Server….
This will open the following dialog window:
Figure 2-2: License server setup
y Activate the Enable license server radio button to enable the
license server for the connected dongle.
Do not enable the license server if your dongle provides
one license (dedicated license) only. Then you may not be
able to start your Spycer with the licensed feature set, because the license may already be assigned to another application.
y Confirm your selection with the OK button.
2-14
Basics
After this another message window appears asking you again whether
you are really sure about your selection:
y Confirm the setting once more with the button YES.
y Next close the Spycer application and restart your system.
Once the system is rebooted, the dongle connected locally to your system will run as a license server offering other Spycer applications licenses to run with the licensed feature set enabled.
To deactivate the license server for the dongle you have to perform the same procedure as mentioned above with the following exception: Instead of selecting the radio button to enable
the server you have to activate the radio button Disable license server.
How to Grab a License
Licenses are not given only to the user interface of Spycer but the
SpycerAgent as well as soon as it is started (local content management
enabled, see section “SpycerAgent” on page 2-5). To get one of the licenses provided by a dongle in the SpycerNet do as follows:
y If the computer system where your Spycer application is installed is
turned off, simply start it.
y Afterwards start the Spycer user interface (see section “Starting the
Software” on page 3-7).
During the loading of the operating system it will ask locally as well as
in the network if there is a dongle available and whether it provides a
license. If a license is available, it will be handed to the SpycerAgent (if
enabled) as well as the user interface of your Spycer application.
Nevertheless, to grab a license with an operating system already running and a Spycer application registering as Spycer Basic you have to
do the following:
y If running close the Spycer user interface (see section “Exiting the
Software” on page 3-23).
y Next restart the Spycer user interface (see section “Starting the
Software” on page 3-7).
1
2
3
4
5
6
7
8
A
During the start-up the Spycer user interface will ask locally as well as
in the network if there is a dongle available and whether it provides a
license. If a license is available, it will be given to your user interface.
The above steps will be enough to grab a license if a local content management is disabled on the system. However, if your Spycer application
runs with the local content management enabled, a message will appear informing you about the new detected license. Then you have to
do the following in addition:
2-15
I
Spycer User Guide
y Follow the instructions given on the screen necessary to restart the
SpycerAgent.
Once the SpycerAgent has started, the background process as well as
the user interface of Spycer will run with the licensed feature set and
the procedure to grab a license is finished.
How to Make a License Available again to the Dongle
Licenses are not given only to the user interface of Spycer but to the
SpycerAgent as well as soon as it is started (local content management
enabled, see section “SpycerAgent” on page 2-5). To make a license
available again to a dongle in the network perform the following:
y If running close the user interface of Spycer (see section “Exiting
the Software” on page 3-23).
The above step will be enough to give back the license to the dongle if
a local content management is disabled on the system. However, if your
Spycer application runs with the local content management enabled,
you have to do the following in addition:
y With a local content management enabled on your system you
have to stop the background process SpycerAgent as well, which
can be done either manually, for example, with its script/tool (see
section “The SpycerAgent Script/Tool” on page 8-22) or by shutting down the computer system.
Once the user interface and the SpycerAgent are closed, the license of
your Spycer application is given back to the dongle and can then be assigned to another Spycer connecting to the network.
2-16
Getting Started
3
This chapter describes how to get started with Spycer. First the installation of the software is described, followed by details how to start the
application. When Spycer is started for the first time, it will guide you
through some initial configuration settings that you have to specify in
order to run Spycer. They will be described next in this chapter. Among
them you can find, for instance, the remote access permissions and the
network configuration settings. The chapter will be concluded with
some more details about the software, such as an overview of the user
interface of Spycer, a short description of the program variant of Spycer
integrated in the CLIPSTER and the Pronto2K.2 / ProntoHD.2 software
as well as an explanation about how to exit the software.
1
2
3
4
5
6
7
8
A
I
3-1
Spycer User Guide
3.1 Installing the Software
The stand-alone application variant of Spycer able to run on a standard
computer system (see section “Program Variants of Spycer” on
page 1-6) has to be installed first. It is available for several operating
systems. This section describes for each available operating system separately how to install Spycer.
On some DVS video devices Spycer is already installed (e.g. on
the DVS-SAN, CLIPSTER and the Pronto2K.2 / ProntoHD.2).
Then you may skip this section and continue with section
“Starting the Software” on page 3-7.
When downloading the Spycer installation files from the Spycer internet sites (www.spycer.net or www.spycer.de), they will
usually be available in single archive files. In case you want to
install Spycer as Spycer Basic, you need the archive file that
contains the Spycer application only. The archive containing
the CodeMeter installation (application to recognize and administer the dongle) will not be necessary.
The newest version of the Spycer application can be found on
the Spycer internet site (www.spycer.net or www.spycer.de).
3.1.1 Installation under Linux
The installation of a stand-alone Spycer for Linux operating systems
normally requires two files:
– The CodeMeter installation file (application to recognize and
administer the dongle) and
– the Spycer installation file.
If you are in possession of a licensed Spycer, they usually can be found
on the enclosed CD-ROM. With a licensed Spycer it is recommended
to install the CodeMeter application first. In case you require Spycer Basic only, you can leave out the CodeMeter installation.
CodeMeter Installation
The CodeMeter application is the application that recognizes and administers the dongle (license). With a licensed version of Spycer it is recommended to install it first:
You can leave out the CodeMeter installation when you intend
to run Spycer as Spycer Basic only.
y Fasten the Spycer key chain to the dongle (both are included in the
delivery of a licensed version). With this you will be able to identify
the dongle belonging to Spycer easily in the future.
3-2
Getting Started
y Next, open a command line (shell) and log on to the system as root.
y Then install the CodeMeter application, for example, by entering:
rpm -ihv <path>/CodeMeter4<version no.>.
<OS architecture>.rpm
This installs the CodeMeter application on your computer.
y Afterwards plug the dongle into a free USB port at the computer
system (see also section “License Issues” on page 2-10).
The dongle providing the license is registered automatically by the
CodeMeter application and you will see the dongle as an additional
drive on your desktop. After this continue the installation with the installation of the Spycer application.
Spycer Installation
To install Spycer perform the following:
y If applicable, open a command line (shell) and log on to the system
as root.
1
y Then install the Spycer application by entering, for example:
2
rpm -ihv <path>/Spycer_<version no.>.
<OS architecture>.rpm
3
This installs all necessary files and libraries of Spycer on the computer
system.
4
With this the installation of the software is complete and as a next step
you have to perform its initial setup to be able to run the program. It
has to be made when the Spycer application is started for the first time
(see section “Starting the Software” on page 3-7 and section “Initial
Setup of Spycer” on page 3-9), and requires a log-on as root as well.
Once this is finished, you can use Spycer with a normal user account.
5
Under Linux the Spycer application can usually be found in the
system menu under the entry Audio & Video » Spycer. It can
be deinstalled by entering rpm -e Spycer in a command
line.
The CodeMeter application can usually be found in the system
menu under the entry System » CodeMeter Control Center.
It can be deinstalled by entering rpm -e CodeMeter4 in a
command line.
3-3
6
7
8
A
I
Spycer User Guide
3.1.2 Installation under Mac OS
The installation of a stand-alone Spycer for the Mac operating system
usually comes as a single archive file that contains two sets of installations:
– The CodeMeter installation (application to recognize and
administer the dongle) and
– the Spycer installation.
If you are in possession of a licensed Spycer, it usually can be found on
the enclosed CD-ROM. With a licensed Spycer it is recommended to install the CodeMeter application first. In case you require Spycer Basic
only, you can leave out the CodeMeter installation.
CodeMeter Installation
The CodeMeter application is the application that recognizes and administers the dongle (license). With a licensed version of Spycer it is recommended to install it first:
You can leave out the CodeMeter installation when you intend
to run Spycer as Spycer Basic only.
y Fasten the Spycer key chain to the dongle (both are included in the
delivery of a licensed version). With this you will be able to identify
the dongle belonging to Spycer easily in the future.
y Next, open the installation file of Spycer (Install_Spycer_
<version no.>_<OS>.dmg, e.g. with a double-click of the
mouse).
This will mount the Spycer application as a volume and display its content on the screen.
y From this volume open the installation file of the CodeMeter application (CmRuntimeUser_<version no.>.dmg, e.g. with a
double-click of the mouse).
This as well will mount the CodeMeter application as a volume and display its content on the screen.
y From the last volume install the CodeMeter application by executing its *.mpkg file.
The installation routine of the CodeMeter application is started which
will guide you through the installation.
y Follow the instructions given on the screen.
The CodeMeter application is then installed on your computer. The installation is finished as soon as a message reports this.
y Afterwards plug the dongle into a free USB port at the computer
system (see also section “License Issues” on page 2-10).
3-4
Getting Started
The dongle providing the license is registered automatically by the
CodeMeter application (this may take some time) and you will see the
dongle as an additional drive on your desktop. After this continue the
installation with the installation of the Spycer application.
Spycer Installation
To install Spycer perform the following:
y If not already the case, open the installation file of Spycer which will
mount it as a volume (Install_Spycer_<version
no.>_<OS>.dmg, e.g. with a double-click of the mouse).
y From this volume install the Spycer application by executing its
*.mpkg file.
The installation routine of the Spycer application is started which will
guide you through the installation.
y Follow the instructions given on the screen.
This installs all necessary files and libraries of Spycer on the computer
system.
With this the installation of the software is complete and as a next step
you have to perform its initial setup to be able to run the program. It
has to be made when the Spycer application is started for the first time
(see section “Starting the Software” on page 3-7 and section “Initial
Setup of Spycer” on page 3-9), and requires a log-on with administrator rights (i.e. as root) as well. Once this is finished, you can use Spycer
with a normal user account.
1
2
3
4
5
6
3.1.3 Installation under Windows
The installation routine of a stand-alone Spycer for the Windows operating system consists of several files. Usually, they can be found on the
enclosed CD-ROM. To begin the installation perform the following:
y If you are in possession of a licensed version of Spycer fasten the
Spycer key chain to the dongle (both are included in the delivery of
a licensed version). With this you will be able to identify the dongle
belonging to Spycer easily in the future.
y Next, if available, plug the dongle into a free USB port at the computer system where Spycer should be installed (see also section
“License Issues” on page 2-10).
y Afterwards open a file manager (e.g. Windows Explorer) on the
computer system and browse the CD-ROM.
y Execute the installation file of Spycer, for example, with a doubleclick of the mouse.
3-5
7
8
A
I
Spycer User Guide
This starts the installation routine which will guide you through the installation.
y Follow the instructions given on the screen.
The installation files also comprise the CodeMeter installation
(application to recognize and administer the dongle). Right after the installation of Spycer the installation routine for CodeMeter is called automatically. In case you want to use Spycer as
Spycer Basic only, you may abort the installation of the CodeMeter application.
During the installation procedure all necessary files and libraries will be
installed on the computer system. The installation is finished as soon as
a message reports this.
With this the installation of the software is complete and as a next step
you have to perform its initial setup to be able to run the program. It
has to be made when the Spycer application is started for the first time
(see section “Starting the Software” on page 3-7 and section “Initial
Setup of Spycer” on page 3-9).
3-6
Getting Started
3.2 Starting the Software
This section provides you with a description how to get Spycer started.
Because the software can be run under several operating systems, it is
divided into the different starting procedures for each supported operating system.
On the CLIPSTER and the Pronto2K.2 / ProntoHD.2 video system Spycer is by default integrated in the DVS software and
thus not needed as a stand-alone application. To start the software there you have to start the respective DVS software (see
section “Starting the Integrated Spycer” on page 3-18).
The very first starting of the software will launch its initial setup
necessary to run the software (see section “Initial Setup of
Spycer” on page 3-9).
When Spycer is started, a log file is written to a directory that
logs the actions performed with the Spycer user interface (see
section “Gathering Diagnostic Information” on page 8-26 for
further information).
1
2
3
3.2.1 Starting the Software under Linux
To get the software started under the Linux operating system perform
the following:
y Select from the system menu of Linux the entry Audio & Video »
Spycer.
Alternatively, you may also start the program from a command line
(shell) by entering Spycer.
This will load the Spycer application by DVS (see section “Overview of
the User Interface” on page 3-16).
4
5
6
7
8
3.2.2 Starting the Software under Mac OS
To get the software started under a Mac operating system perform the
following:
A
y Select from the Applications folder of Mac OS the entry
Spycer.app.
I
This will load the Spycer application by DVS (see section “Overview of
the User Interface” on page 3-16).
3-7
Spycer User Guide
3.2.3 Starting the Software under Windows
To get the software started under the Windows operating system perform the following:
y Select from the START button menu of Windows on the submenu
DVS the entry for Spycer (for example, All Programs » DVS »
DVS Spycer).
Alternatively, you may also start the program via the Spycer icon on
the desktop of Windows.
This will load the Spycer application by DVS (see section “Overview of
the User Interface” on page 3-16).
In case the option Mount network drives was selected the
last time the program was exited, you will be asked by a message window to type in your password to legitimize your access
to mounted network drives (see section “The Group ’Network
Drives’ (Windows Only)” on page 8-10).
3-8
Getting Started
3.3 Initial Setup of Spycer
When Spycer is started for the first time (see section “Starting the Software” on page 3-7), it will automatically initiate a setup procedure and
guide you through some configuration settings. These have to be specified in order to run Spycer.
In detail the setup procedure consists of the following configuration
steps:
1.
2.
3.
4.
5.
General settings
Watch folder settings
Sequence file types settings
Remote access permissions
Finishing the setup
Once the respective settings for the displayed configuration step are
concluded, you can proceed to the following configuration step with
the NEXT button until the setup is finished and the software is started.
The button BACK takes you to the previous configuration step while the
button CANCEL aborts the setup procedure without starting the program. The required settings possibilities will be explained in this section.
The settings of the initial setup procedure are identical to some
of the general configuration settings of Spycer. For further descriptions about individual settings items not explained in the
following please refer to section “Configuring Spycer” on
page 8-4.
For further information about the SpycerNet and the background process SpycerAgent see section “Software Structure”
on page 2-4.
1
2
3
4
5
6
7
3.3.1 General Settings
The first configuration settings to make are some general settings. With
them you determine the network connection of Spycer and whether a
local content management should be enabled or disabled:
8
A
I
3-9
Spycer User Guide
Figure 3-1: General settings
From the available combo box choose the IP address that Spycer should
use to communicate with other Spycer applications in a network, thereby forming the SpycerNet.
The IP addresses that can be selected with the combo box are detected
by Spycer automatically. They are read from the currently active network connections of your system. If there is more than one network
connection available, you can select between them via their IP addresses. In case a network connection is inactive (e.g. no cable connected),
its IP address will not appear in the drop-down list. Then establish a network connection at the respective connector and click the REFRESH
button. This will make its IP address available in Spycer.
Under Windows you can gather the IP address of a network
port via the network connection icon in the system tray of the
Windows task bar.
Additionally available is the localhost address (127.0.0.1) to disable the
network connection for Spycer and run it locally only.
The following network ports have to be open to connect successfully to the SpycerNet: Port 9960 UDP, Port 9961 TCP, Port
9970 UDP, Port 9971 TCP. Set these as exceptions in your firewall settings otherwise Spycer will be confined to its localhost
only (IP address 127.0.0.1 has to be used).
The two radio buttons at the bottom of the settings area determine
whether a local content management should be performed. Without a
local content management enabled Spycer will not display any local
drives or storages nor observe any locally stored content. Then the user
3-10
Getting Started
interface can be used as a network browser only, i.e. it will display data
provided by other Spycer applications via the SpycerNet only. If the local content management is enabled, the process SpycerAgent will be
running in the background of your system showing you the local drives
and storages as well as administering the database making the locally
stored material available to Spycer and the SpycerNet.
You have to select one of the radio buttons. As long as no selection is made, the button NEXT will be unavailable.
If the IP address is set to ’localhost’ and the local content management is disabled, Spycer will display no data at all.
3.3.2 Watch Folder Settings
If a local content management has been enabled, you have to set the
watch folders next. This step will be skipped in case the local content
management has been disabled (SpycerAgent disabled, see section
“General Settings” on page 3-9).
With the watch folders you determine the locations on your local storage that should be searched for video and audio material by the SpycerAgent and afterwards be monitored for file movements. All data found
in these volumes/directories will be written into a database administered by the SpycerAgent. The contents of the database is then displayed in Spycer and available for search procedures. Additionally, it is
the database that will be visible to other Spycers in the SpycerNet if
browse and search permissions are given (see section “Remote Access
Permissions” on page 3-14).
Viewing or reading the contents of other drives or directories
on your system (local reading including that of mounted network drives) is still possible with Spycer. With a local content
management enabled, the application displays all data locally
available when selected in its browser. However, because the
contents of these locations are not scanned and indexed in the
database, they are read when accessed only and neither will a
search with Spycer include these locations nor will they be visible in the SpycerNet.
1
2
3
4
5
6
7
8
A
I
3-11
Spycer User Guide
Figure 3-2: Watch folders settings
To determine that a folder (either a drive or directory) should be
watched by the background process, add it to the list box with the button INCLUDE FOLDER…. Normally this will be the local drive or directory
where the video data is stored. Of course, you can add more than just
one folder to this list in case your data is distributed over several drives/
directories. For example, the CLIPSTER and the Pronto2K.2 /
ProntoHD.2 video systems by DVS usually use the local drive V:/ to
store video and audio data. So the drive V:/ should be added to the list
box above via the INCLUDE FOLDER… button.
Network drives and important system drives/directories cannot
be selected as watch folders.
The SpycerAgent registers all data (even unknown files) as well
as all events that take place in the watch folders. To minimize
the size of its database and the overall traffic for the SpycerAgent it is recommended to include directories/drives that contain video/audio files only.
With the button EXCLUDE FOLDER… you can specify drives and directories that should not appear in the SpycerNet or the Spycer user interface. Usually with this you exclude them from being scanned into the
database (as a subdirectory of an included folder). For example, the
CLIPSTER and the Pronto2K.2 / ProntoHD.2 video systems also store
video related system data on the video drive to make this information
available in real time (e.g. proxies or prerendered images). Normally
they would be displayed in Spycer as well. To exclude them from an appearance during browsing or searching add their location to the list box
above via the button EXCLUDE FOLDER…. Nevertheless, other drives/
3-12
Getting Started
directories can be excluded as well whereupon they will not be displayed in Spycer at all.
3.3.3 Sequence File Types Settings
With a local content management enabled, you have to determine the
sequence file types as well. This step will be skipped in case the local
content management has been disabled (see section “General Settings” on page 3-9).
Video material is often stored not in a single file, but in numerous individual image files gathered in one directory, where one file on the hard
disk equals one frame of video. These image sequences can be displayed by Spycer as a single entry. With the sequence file types settings
you determine the file formats that Spycer should display as sequences,
i.e. as single video clip entries. For this the file names on the storage
must contain a numbering (frame numbering) of the same length.
1
2
3
4
5
6
7
8
Figure 3-3: Sequence file types settings
The most common file formats that can be used for video clips are already predefined.
Add additional file formats to the list that Spycer should recognize as
video clips with the help of the button ADD, or revise the list by either
altering entries (double-click with the mouse) or selecting an entry and
deleting it from the list with the button REMOVE.
3-13
A
I
Spycer User Guide
3.3.4 Remote Access Permissions
If a local content management has been enabled, you have to set the
remote access permissions next. This step will be skipped in case the local content management has been disabled (see section “General Settings” on page 3-9).
With the remote access permissions you determine what other Spycer
applications in the network (SpycerNet) are allowed to do on your system.
Figure 3-4: Permissions settings
In the right pane titled Remote Access Permissions select the permissions according to the following:
Other Spycer applications have access to the material in your
watched folders only (see section “Watch Folder Settings” on
page 3-11 and section “SpycerAgent” on page 2-5).
To allow other Spycer applications to defragment data on your
system both read and write permissions have to be given.
Browse & Search
Edit Metadata
3-14
Other Spycer applications can browse your data
and perform searches. If a proxy clip of a video
clip is available on your system, other Spycer applications can download it for a preview.
If this check box is enabled, other Spycer applications can edit the metadata of your material
on your system, including the header data of
*.dpx image sequences.
Getting Started
Read Essence
Write Essence
This setting allows the reading of data on your
system, for example, for copying processes. To
allow for a remote defragmentation or proxy
clip generation this check box has to be activated as well.
This setting allows the writing of data on your
system, for example, for copying processes. To
allow for a remote defragmentation or proxy
clip generation this check box has to be activated as well.
3.3.5 Finishing the Setup
When the last configuration is made, the following screen will be displayed:
1
2
3
4
5
6
7
Figure 3-5: Setup completed
Then you can finish the setup procedure by pressing the button OK
which will start the Spycer application (see section “Overview of the
User Interface” on page 3-16).
If Spycer is started for the first time with no database available,
the initial scanning of the watched folders may take some time
depending on the amount of data stored in these locations. As
long as the scanning process is active, your system will have the
status ’busy’ (see section “The Status Bar” on page 4-9).
3-15
8
A
I
Spycer User Guide
3.4 Overview of the User Interface
The following figure shows the user interface of Spycer as it appears after starting the program (see section “Starting the Software” on
page 3-7):
menu bar
metadata area
preview area
browse and search area
Figure 3-6: User interface of Spycer
The user interface provides the following items:
menu bar
3-16
At the top of the Spycer user interface you can find
a menu bar. It provides access to functions and tasks
of an administrative nature to Spycer. Here you can
find, for example, its configuration settings as well
as several tools. A short reference to the menu bar
can be found in section “Menu Bar Reference” on
page 8-16.
Getting Started
metadata area
preview area
browse and
search area
On Mac systems the menu bar is not available as it is under other operating systems.
Instead its options can be found in the
standard program menu bar of the operating system (see section “The Menu Bar on
Mac OS” on page 8-16).
Directly below the menu bar you can find the metadata area which will show you the properties and
metadata of the file currently singled out in the
browse and search area. You can switch through as
well as add and edit the metadata easily with the
buttons provided to the left. For more details about
the metadata area and its various functions see
chapter “Working with Metadata” on page 6-1.
To the right of the metadata area you can find the
preview area. In Spycer this area is used to view the
currently singled out video and image data. At the
top you can find a video overlay where you can see
the content of the material. Below the video overlay
a scrub bar of the material’s timeline is available as
well as the preview controls. The preview area is described in chapter “Previewing Data” on page 5-1.
With the browse and search area you can browse local or network storages in up to two browsing
panes. This area also provides the search tool of
Spycer which enables you to find material easily by
combining various parameters, such as file names or
metadata information. This area and its functionality
is explained in chapter “Browsing and Searching” on
page 4-1.
The view of the metadata and preview area can be switched
with the job list of Spycer. You can find further information
about the job list in section “The Job List” on page 7-12.
1
2
3
4
5
6
7
8
A
I
3-17
Spycer User Guide
3.5 The Integrated Spycer
On CLIPSTER and the Pronto2K.2 / ProntoHD.2 Spycer is already integrated in the DVS software which makes it unnecessary to install Spycer
as a stand-alone application. With the integrated Spycer you can seamlessly work together with the other software modules of the DVS software.
3.5.1 Starting the Integrated Spycer
To start Spycer integrated in the DVS software you have to start the
DVS software. Then it can be loaded the same way as most other modules of the DVS software:
y Start the DVS software of the DVS video device. For details about
how to do this please refer to the documentation of the video system software.
y Next press the button SPYCER in the task bar of the DVS software
(see figure 3-7 on page 3-19).
When the software module of Spycer is started for the first
time, the initial setup of the application will be launched. Then
you have to detail the necessary configurations as described in
section “Initial Setup of Spycer” on page 3-9.
In case the option Mount network drives was selected the
last time the program was exited, you will be asked by a message window to type in your password to legitimize your access
to mounted network drives (see section “The Group ’Network
Drives’ (Windows Only)” on page 8-10).
This will load Spycer as a software module of the DVS software:
3-18
Getting Started
bin
1
task bar
Figure 3-7: The integrated Spycer
For an overview of the Spycer software module please see section “Overview of the User Interface” on page 3-16.
2
3
4
5
3.5.2 Using the Integrated Spycer
The integrated Spycer can be used the same way as described in this
user guide. In addition it provides the following functionality:
With the integrated Spycer you will notice right below the menu bar of
the DVS software the bin as it is available in the Edit or I/O Tool. Once
audio and video clips are displayed in the browse and search area that
are locally available or stored on a SAN, they can be dragged and
dropped to the contents area of the bin:
6
7
8
A
I
3-19
Spycer User Guide
Figure 3-8: Drag and drop of clip to bin
This will add the selected clip to the contents area of the bin.
Below the user interface of the Spycer software module the task bar of
the DVS software will be available as usual. With it you can switch to
other software modules such as the Edit or the I/O Tool. After a switching to the Edit or I/O Tool of the DVS software the clip(s) added to the
bin will still be available and can be used as usual.
Further information about the bin and the task bar can be
found in the documentation of the Edit Tool of the respective
DVS video system.
3.5.3 Configuring the Integrated Spycer
The general configuration settings available for the stand-alone application of Spycer (see section “Configuring Spycer” on page 8-4) can be
set for the integrated Spycer as well. For this you have to start the Configuration Tool of the DVS software.
3-20
Getting Started
1
Figure 3-9: The Configuration Tool with Spycer settings
Under the default settings for the DVS software (tab Default) you can
find in the group list several entries regarding Spycer. They provide the
same settings as described in section “Configuring Spycer” on
page 8-4.
Further information about the Configuration Tool of the DVS
software can be found in the documentation of your DVS video system.
2
3
4
5
6
3.5.4 Exiting the Integrated Spycer
The Spycer application integrated in the CLIPSTER and the
Pronto2K.2 / ProntoHD.2 software will be ended when the whole DVS
software is exited. Further information about how to do this can be
found in the documentation of the video system software.
Exiting the DVS software and thus the integrated Spycer will
not terminate the background process when a local content
management is enabled. The process is started during the loading of the operating system (fully operational even with no user
logged in) and terminated only when the system is shut down
(see section “SpycerAgent” on page 2-5 for more details).
3-21
7
8
A
I
Spycer User Guide
3.6 Changing the Layout of the User Interface
The layout of the user interface of Spycer can be changed to your personal requirements. You can maximize the view of the user interface or
of the preview area as well as change the size of areas. All alterations
will be saved when the software is closed.
This section describes how to change the size of areas of Spycer.
Information about how to maximize certain areas or the user
interface itself can be found in section “The Video Overlay” on
page 5-5 and section “The ’Spycer’/Spycer Icon Menu” on
page 8-17.
Generally, the software user interface shows a separation line vertically
or horizontally wherever the layout of areas can be changed.
separation line
Figure 3-10: Separation line between areas
This line can be taken with the mouse and moved to another position.
For example, to alter the size of the two browsing areas perform the
following:
y Move the separation line between the two browsing areas to the
left or to the right:
Figure 3-11: Example how to adjust the layout of the software
The horizontal size of the two browsing areas will adjust accordingly.
Furthermore, if you pull a separation line completely to the left/right or
up/down, the respective area will no longer be visible and thus can be
turned off (hidden). This way you can, for instance, make information
visible that you may otherwise have to scroll to.
The layout of the user interface can be set back to a default layout by using the menu option Reset Layout on the menu
View (see section “The ’View’ Menu” on page 8-19).
3-22
Getting Started
3.7 Exiting the Software
To end the current Spycer session perform the following:
The Spycer application integrated in the CLIPSTER and the
Pronto2K.2 / ProntoHD.2 software will be ended when the
whole DVS software is exited. Further information about how
to do this can be found in the documentation of the video system software, while for more information about the integrated
Spycer consult section “The Integrated Spycer” on page 3-18.
Exiting Spycer will not terminate the background process when
a local content management is enabled. The process is started
during the loading of the operating system (fully operational
even with no user logged in) and terminated only when the
system is shut down (see section “SpycerAgent” on page 2-5
for more details).
y Select the option Quit on the Spycer menu (Mac: Spycer » Quit
Spycer) or press the key combination [Alt + F4] (Mac: [ + Q])
alternatively.
Linux/Windows only: In fullscreen mode the menu Spycer
will be replaced by the Spycer icon. However, it provides the
same menu options as the menu Spycer (see section “The
’Spycer’/Spycer Icon Menu” on page 8-17).
The user interface of Spycer will be closed and you can then, for instance, shut down the computer system.
When exiting Spycer, the log file opened during the starting of
the application is finished and saved (see section “Starting the
Software” on page 3-7).
1
2
3
4
5
6
7
8
A
I
3-23
Spycer User Guide
3-24
Browsing and Searching
4
In the lower part of the Spycer user interface you can find the browse
and search area. With it you can browse local or network storages in up
to two browsing panes.
This area also provides Spycer’s search tool enabling you to find any
searched for material easily by combining various search parameters,
such as file names or metadata information.
1
This chapter first explains the browse tool, followed by a description
how to initiate and perform a search with Spycer.
2
3
4
5
6
7
8
A
I
4-1
Spycer User Guide
4.1 Browsing for Data
With the button BROWSE at the top left side of the
browse and search area you can activate the browse
tool of Spycer if not already visible in the user interface.
Figure 4-1: The browse tool
It offers two browsing panes for overview purposes and drag-and-drop
procedures. The following figure gives an overview of one of the
browsing panes:
directory
tree
directory
controls
contents
area
status
bar
Figure 4-2: Overview of a browsing pane
This section explains the browse tool in detail. First the individual items
of a browsing pane as indicated in the figure above will be described,
complemented by an explanation of the context menu available in the
browse and search area. The section will be concluded with some sample step-by-step descriptions how to use the browse tool of Spycer.
4-2
Browsing and Searching
4.1.1 The Directory Tree
The directory tree enables you to see the contents of your system/network in a folder structure.
network/system
combo box
folder structure
1
Figure 4-3: Overview of the directory tree
With the network/system combo box at the top of the directory tree
you can select whether you want to view the contents of a particular
system or the whole network:
2
3
4
5
6
7
8
Figure 4-4: Network/system combo box
Once a selection is made in the combo box, you can browse the network or system in the folder structure. Either by double-clicking an entry with the mouse or by clicking on the plus (+) or minus (-) sign in
front of an icon you can expand or collapse the contents sorted under
this item.
4-3
A
I
Spycer User Guide
The different icons provided by the directory tree indicate the following:
The whole network. The whole network, i.e. all systems
in the SpycerNet as well as the home system, is displayed
and can be used for the respective task.
A foreign system. This icon indicates a foreign system in
the SpycerNet. When selected, only this particular system (i.e. its watched folders) will be visible and used for
the respective task.
Same as ’a foreign system’ but with an older Spycer version running. Some features that you can perform on
your system cannot be triggered on the foreign system.
See section “Notes about Networking with Spycer” on
page 2-8 for further information.
The home system. This icon stands for the host system.
When selected, all its local storages will be visible and
used for the respective task (for a search only the
watched folders).
When an icon is displayed together with a clock ( ), its system is busy (see section “The Status Bar” on page 4-9).
Furthermore, there are several drive and directory icons available:
A drive of an SNFS volume (SAN).
A normal system drive (e.g. an NTFS volume).
A directory/subdirectory of a drive that does not contain
data directly. However, it may contain subfolders that
carry data.
A directory/subdirectory of a drive containing data that
will be displayed in the contents area of the browsing
pane as soon as the folder is selected.
Other drives, such as USB storages or network drives will also
be indicated by different icons.
4-4
Browsing and Searching
The states of the drives and folders are shown in the folder structure of
the directory tree via colors:
Directory Color
light blue
Explanation
This drive/directory is locally available but neither
explicitly included nor excluded in the watch folder settings. However, it may contain a subdirectory that is a watched folder. File-based processes in
these drives/directories are possible (e.g. copy,
move or delete procedures).
The contents of these locations are not included in the database of Spycer and they
are read when accessed only. Thus it may
take some time to open them, especially
when they contain a lot of data.
With the menu option View on the context menu of the directory tree, it is also
possible to hide these locations. Then
only the watch folders will be visible in
the directory tree (see section “The Context Menu” on page 4-9).
dark blue
This drive/directory is monitored by the background process, i.e. it is a watched folder.
1
2
3
4
For further information about watched folders see section
“Watch Folder Settings” on page 3-11.
5
As soon as a drive/directory is selected that contains data, its contents
will be displayed in the contents area of the browsing pane.
6
7
4.1.2 The Directory Controls
With the directory controls at the top of each browsing pane you can
control the directory tree. It offers the following possibilities:
This button moves you one item up in the folder structure.
This button adds a new subdirectory to the currently selected drive/directory. It opens a dialog window where
you have to enter the name of the new directory. After
confirming the name with the button OK the directory
will be created.
4-5
8
A
I
Spycer User Guide
The field Path details the path to the currently selected
directory: First the drive letter is given, followed by the
directory path.
4.1.3 The Contents Area
The contents area of a browsing pane shows you the contents of the
currently selected drive/directory in the directory tree. All files at the selected storage location will be displayed, either in text information or
thumbnail view depending on the viewing settings for the respective
browsing pane (see section “The Status Bar” on page 4-9).
A contents area providing the same features as explained here
as well as in section “The Status Bar” on page 4-9 and section
“The Context Menu” on page 4-9 is also available in the
search tool after performing a search (see section “The Results
Area” on page 4-19).
With the menu option View on the context menu of the contents area, you can also display directories that are available at
the selected location (see section “The Context Menu” on
page 4-9).
In the text information view you will receive a detailed list of the folder’s
contents. In this view you can easily sort the files/clips in ascending or
descending order by clicking on the column heading that the data
should be sorted by.
Figure 4-5: Contents area in text view
When in the thumbnail view, still images and video clips are shown in
the contents area of a browsing pane with a thumbnail preview. In this
view you will get additional information about the displayed material
via text that appears to the right of the thumbnail.
4-6
Browsing and Searching
Figure 4-6: Contents area in thumbnail view
The following table shows the material and data types that can be
viewed in the contents area of a browsing area and explains the way
they are displayed:
video clips:
audio clips:
In the thumbnail view video clips are
shown in the contents area of a browsing pane with a thumbnail preview.
When a clip is selected, a scrub bar below the thumbnail will be available that
can be used to preview the clip in still
images (see section “Previewing Data
via Thumbnails” on page 5-2).
In the text information view video clips
are indicated by this icon. In case it is
visible in the thumbnail view, it indicates either a video clip whose data is
currently not available or an invalid clip.
Then wait a few seconds and give
Spycer time to gather the data. If necessary, refresh the view of the directory/contents area. If after that the icon is
still visible, see to it that the right video
material is provided on the respective
video storage.
Audio clips are shown with this icon in
the browsing pane (in the text information as well as thumbnail view). Audio
files that contain more than one mono
or stereo channel (multiple channels)
are also supported by Spycer.
4-7
1
2
3
4
5
6
7
8
A
I
Spycer User Guide
project files:
still images:
unknown:
directories/
drives/
systems:
4-8
Project files of the CLIPSTER and the
Pronto2K.2 / ProntoHD.2 software will
be shown with this icon in the browsing
pane (text information as well as
thumbnail view).
Still images, i.e. single image files of a
file format that Spycer supports, are
also displayed in Spycer. In the thumbnail view still images are shown with a
thumbnail preview. However, because
they are not video clips they do not
provide a scrub bar when selected.
In the text information view still images
are indicated by this icon. In case it is
visible in the thumbnail view, it indicates either a still image whose data is
currently not available or an invalid image. Then wait a few seconds and give
Spycer time to gather the data. If necessary, refresh the view of the directory/contents area. If after that the icon is
still visible, see to it that the right data
is provided on the respective storage.
Spycer shows all files available on the
storage, even files of unknown formats. Files that are not recognized by
Spycer are displayed with this icon (text
information as well as thumbnail view).
However, because each will be worth
one entry in the database of the
SpycerAgent, your storage should contain as few of these files as possible.
Otherwise search procedures may get
lengthy due to unnecessary overhead.
Other items may be displayed in the contents area with
appropriate thumbnails/icons as well, such as directories
(if enabled, see menu option View in section “The Context Menu” on page 4-9), drives or systems. For further
information about them see section “The Directory
Tree” on page 4-3.
Browsing and Searching
4.1.4 The Status Bar
The status bar at the bottom of a browsing pane offers you several configuration settings for its contents area as well as a status indication of
the currently selected system. In detail it provides the following:
Further information about the text information and thumbnail
view can be found in section “The Contents Area” on
page 4-6.
Use the button TEXT to view the files/clips in the contents area with their text information only.
With the button IMAGE you can activate the view of the
thumbnails.
This combo box enables you to a selective viewing of the
material displayed in the contents area. Select from it the
type of data that should be visible in the contents area
only.
This field indicates the status of the system currently selected in the directory tree (indicated by the field Path
of the directory controls, see section “The Directory
Controls” on page 4-5). When it shows Online, it is
ready for further processing tasks. When it shows Busy
written in red, the system is occupied by a task and will
react to your command as soon as it is ready again. The
status Busy may be displayed, for example, when the
system is performing a real-time operation or in case the
database of its Spycer application is updated. In the
browsing panes the icons of systems that are busy will be
displayed together with a clock (see section “The Directory Tree” on page 4-3).
1
2
3
4
5
6
7
4.1.5 The Context Menu
The context menu of the browsing pane (usually invoked with a rightclick of the mouse) provides different directory and file related functions, such as the deletion of a directory and/or file.
8
A
I
4-9
Spycer User Guide
Figure 4-7: Context menu of a directory
The context menu provides the following functions:
Depending on whether the context menu is invoked in a directory tree or in a contents area it may provide different menu
options. The following list details all options that are available.
Open with
Available for the contents area and files on the
home system only. This menu option provides a
submenu where you can select between several
possible applications to open the currently selected
file with. You can, for example, open the file in the
standard file manager of your operating system
(Mac and Windows only) or in the application that
is configured as the default application for this file
format (menu option Default).
Show all meta- Available for the contents area only. Performs the
data
same operation as a double click on a file in the
contents area: The file is singled out and is displayed in the metadata and preview area.
Show in browser Available for the results area after a search only.
Shows the selected file in the browse area of Spycer thereby displaying its location.
Save as TXT… Available for the contents area only. Saves the text
information of the files currently selected in the
contents area to an ASCII file.
Select all
Available for the contents area only. Selects all files
available in the contents area.
4-10
Browsing and Searching
Move to folder… Moves the selected directory/file(s) to another location. When activated it will open a dialog window where you can select a new storage location
on your home system.
Copy
Paste
Delete
New folder…
Rename…
Re-scan
Refresh
A direct moving of directories/files in the
SpycerNet is not possible. Within the network directories/files can be copied only.
Copies the selected directory/file(s) to the clipboard of the operating system.
Pastes the contents of the clipboard (see Copy) at
the currently selected location.
After the confirmation of a warning message this
menu option deletes the selected directory/file
from the storage.
This menu option deletes the selected directory/file physically from the storage. It
is directly deleted and there is no undo
functionality or recycle bin available to restore the data.
Creates a new subdirectory at the currently selected location. This menu option opens a dialog window where you have to enter the name of the new
directory. After confirming the name with the button OK the directory will be created.
Changes the name of an already existing directory/
file. It opens a dialog window where you have to
enter the new name. After confirming the changes
with the button OK the directory/file will be
named accordingly.
When called for a video clip whose frames
consist of still images, it will open the renaming tool for clips (see section “Renaming” on page 7-2).
Available for the directory tree only. Sometimes the
SpycerAgent may not detect an event. Then you
can use this menu option to rescan the currently
selected drive/directory and revise its entries in the
database. Any virtually added metadata such as
the production metadata will be retained.
This menu option refreshes and updates the view
of the currently selected drive/directory.
4-11
1
2
3
4
5
6
7
8
A
I
Spycer User Guide
Defragment
Create proxy
Initiates a defragmentation of the currently selected file, directory or drive. Further information
about this can be found in section “Defragmenter”
on page 7-4.
Available for the contents area and video clips only.
Creates a proxy of the currently selected video clip.
Then the proxy clip is created on the system where
the clip resides. Afterwards you can use it to view
the video clip in real time.
To create a proxy you must have read and
write permissions on the respective system and the native Spycer application
must be appropriately configured for the
creation of proxies.
Convert…
View
Further information about proxies and the
previewing of proxies can be found in section “Previewing Data with the Preview
Area” on page 5-4.
Available for the contents area and video/image
files only. Opens the file format conversion tool of
Spycer to convert the selected video clip or still image to another file format. Further information
about this can be found in section “File Format
Converter” on page 7-8.
The menu option View enables you to configure
which items to see in the directory tree and/or the
contents area.
When invoked on the directory tree, it shows the
menu option Hide unwatched folders. With it
you can hide all drives/directories, that are not
watched by the SpycerAgent. Once the menu option is activated, it shows a cross in front and only
the watched folders will be displayed in the directory tree.
When invoked in the contents area, it shows Show
folders. This menu option allows you to view directories in the contents area. Once activated, it
shows a cross in front and directories available at
the selected location will be displayed in the contents area as well.
4-12
Browsing and Searching
Properties…
With this menu option you can call up the properties of the file, directory or drive where the context
menu was invoked. They will be shown in the
properties window. Further information about this
can be found in section “The Properties Window”
on page 8-2.
4.1.6 Using the Browse Tool
With the browse tool you can browse local or network storages in up
to two browsing panes. Additionally, you can perform all directory and
file related tasks here, for example, create new or delete existing as well
as copy, move or rename directories or files.
The following describes step-by-step some sample tasks illustrating
how to use the browse tool, i.e. it will be explained how to copy and
move directories/files as well as how to delete them.
Copying (Moving) Directories/Files
Copying directories/files with the browse tool of Spycer can be performed without effort. It offers two browsing panes where you can do
this easily via drag-and-drop. When operating between storage locations at your home system, directories and files can also be moved:
y If not already visible in the user interface activate
the browse tool with the button BROWSE at the
top left side of the browse and search area.
1
2
3
4
5
Then the user interface displays the two browsing panes of Spycer.
6
7
8
A
Figure 4-8: The browse tool
y In the directory tree of the left pane browse to your target directory,
i.e. the directory where the data should be copied to.
y In the right browsing pane browse to the directory containing the
material that should be copied, i.e. the source directory.
4-13
I
Spycer User Guide
y After that select in the right browsing pane the material (either a
drive/directory from the directory tree or files from the contents
area) that should be copied or moved.
Files in the contents area can be selected as easily as in a file
manager. For example, you can select a range of adjoining
files with the mouse when the [Shift] key is pressed, while
disjointedly you can select them when the [Ctrl] key
(Mac: [ ]) is pressed. Further information about this can be
found in section “Keyboard Shortcuts” on page A-8.
y Now drag and drop the selected material to the left browsing pane
by using the left mouse button. It can be dropped either in its contents area as shown in the following figure or on the target directory in the directory tree.
Figure 4-9: The browse tool
This will copy the material to the target location.
Between different systems in the network data can be copied
only to prevent an unintentional removing of material from the
native system.
Within the home system the material can also be moved. To
change from a copying to a moving, press the [Alt] key during
the drag-and-drop procedure.
If the drag-and-drop procedure is performed with the right
mouse button instead of the left one, you will receive a context
menu at the target location allowing you to select whether the
data should be copied or moved.
A copying or moving can also be performed via the menu options available on the context menu of files and directories
(Copy, Paste or Move to folder…, see section “The Context
Menu” on page 4-9).
4-14
Browsing and Searching
Deleting Files/Directories
Files or directories can be deleted just as easily as they can be copied:
y Select a file or directory in one of the browsing panes.
y After this press the key [Del] on your keyboard.
A warning message will appear where you have to confirm that you really want to delete the file/directory.
The file/directory will be directly deleted from the storage.
There is no undo functionality or recycle bin available to restore the data.
y In the warning message press the button YES to confirm the deletion.
This will delete the selected file or directory. If a directory is deleted, the
subdirectories and all material sorted under this directory will be deleted
as well.
To delete files or directories you may also use the menu option
Delete on the context menu of the respective item (see section
“The Context Menu” on page 4-9).
1
2
3
4
5
6
7
8
A
I
4-15
Spycer User Guide
4.2 Searching for Data
With Spycer you can as easily search for data as you can browse for it.
You will be able to find any searched for material by combining various
search parameters, such as file names or metadata information.
With a click on the button FIND at the top left side of
the browse and search area you can activate the
search tool of Spycer if not already available in the user interface.
Alternatively you can use the keyboard combination [Ctrl + F]
(Mac: [ + F]) to switch to the search tool of Spycer.
search parameter area
results area
Figure 4-10: The search tool
It provides the following areas:
search parameter
area
results area
In the search parameter area you can determine
the location where the search should be conducted as well as define the search parameters.
Here you can also save a search query to a file
(*.sq) as well as load previously saved ones.
The results area of the search tool will display
the results once a search has been conducted. It
offers almost the same features as the contents
area of a browsing pane.
This section explains the search tool of Spycer in detail. First the search
parameter area will be described, followed by a description of the results area. The section will be concluded with a step-by-step description
how to use the search tool of Spycer.
4.2.1 The Search Parameter Area
In the search parameter area you can determine the location where the
search should be conducted as well as define the search parameters.
Here you can also save defined search parameters to a file as well as
load previously saved ones.
4-16
Browsing and Searching
search location
search parameters
controls
Figure 4-11: The search parameter area
All items of the search parameter area will be explained in the following:
1
Search Location
2
With the combo box Content on you can determine the location
where the search should be conducted. Select from it whether you
want to search the contents of a particular system or the whole network. It offers the same possibilities as the system/network combo box
in a browsing pane (see section “The Directory Tree” on page 4-3 for
more details).
Only the database of the local storage and/or the databases of
the Spycer applications in the SpycerNet will be used for a
search. Drives and directories not indexed in the database(s),
i.e. not included in the watched folders settings, will be disregarded (see section “SpycerAgent” on page 2-5).
Search Parameters
3
4
5
6
7
8
Below the combo box for the search location the search parameters
have to be detailed. With the combo box to the left determine the
search criteria that should be used for the search. You can choose from
a variety of different criteria ranging from file name or extension over
video/audio properties to metadata information such as the production
date or company.
Depending on the selected criteria the number of the available fields for
a search parameter may vary. If three are available, use the one in the
middle to set an operator for the search (e.g. for a file name
contains ..., is ..., begins with ... and ends
with ...). With the last field to the right you have to specify the criteria. It may provide an entry field where you have to type in your
4-17
A
I
Spycer User Guide
search term or a combo box providing you with a list to choose the
search item from.
The button + ( ) below the search parameters adds another search parameter that the search will also observe. With it an AND search is provided (e.g. when searching for a file name that begins with start AND
the file extension *.wav, you will receive all file names with the prefix
’start’ and the Wave file extension such as start_01+02.wav). You
can add as many AND searches as you like and they can be deleted just
by clicking the - button ( ) right in front of the additional parameter.
For names of video clips you have to observe the C notation
usually with the syntax <string>%0Yd.<ext>:
<string> Preceding string of file name
%
Marker that the following is a format string
0
If the output of the format string does not provide the stated length, fill it with zeros (0)
Y
Number of digits, for example, 5
d
Marker that the format string is a decimal number
<ext>
File extension
With the search Hollywood%05d.dpx entered Spycer will
yield as a result the clip Hollywood in the DPX file format
that provides a five digit frame number.
Controls
With the controls at the bottom of the search parameter area you can,
for example, initiate a search, clear the already defined search parameters or build up a library of often used search queries. In detail it provides the following items:
The button RESET clears the already defined search parameters and resets the search parameter area.
The LOAD button allows you to load previously saved
search parameters from a file. It opens a dialog window
where you have to select the respective file containing
the search query (*.sq). After its confirmation the
saved search parameters will be loaded into the search
parameter area of Spycer.
4-18
Browsing and Searching
With the button SAVE you can save the currently set
search parameters to a file. Thus you can build up a library of search queries to use them in the future again.
A click on this button opens a dialog window where you
have to specify the storage path and file name of the
search query file to be saved. After the confirmation of
your settings the file will be saved to the specified location (*.sq).
With the button FIND IT! you start a search. It will be performed at the selected location and will yield the results
according to the set search parameters in the results area
to the right. As long as the search is processed, the system(s) where the search is performed will be busy, i.e.
their icons will appear with a clock superimposed (see
section “The Directory Tree” on page 4-3).
With the focus on the search parameter area a
search can also be initiated by pressing the [Enter] key.
1
2
4.2.2 The Results Area
3
The results area of the search tool displays the results soon after a
search was initiated.
4
5
6
7
8
A
I
Figure 4-12: The results area
Once a search is finished, the number of hits will be displayed at the top
left of the results area. Right below it the found files can be seen.
4-19
Spycer User Guide
Most of the results area resembles the contents area of a browsing pane
and provides its possibilities as well. For example, you can adjust the
viewing with the controls at the bottom of the results area or you can
invoke the same context menu on the found files. Therefore, for more
information about this please refer to section “Browsing for Data” on
page 4-2.
With the menu option Show in browser on the context menu
of a clip in the results area, you can immediately display the selected file in a browsing pane of Spycer. This way you can determine its location easily.
4.2.3 Using the Search Tool
The usage of the search tool of Spycer is quite straight forward. To start
a search and display its results do as follows:
Figure 4-13: The search parameter area
y Select from the combo box Content on the location where the
search should be made. Choose from it, for example, a particular
system in the network.
y Afterwards select the search criteria that you want to search for
from the first combo box of the available search parameter. In our
example here we will select the criteria File Format.
This will slightly change the appearance of the search parameter entry
fields and instead of three now only two fields are displayed.
4-20
Browsing and Searching
y Select from the second combo box of the search parameter the
entry, for example, for the *.tif file format.
You may use the + button below the specified search parameter to add another parameter that the found *.tif files also
must provide to be displayed as a result (AND search).
With the criteria File Format you can only select formats
that are supported by Spycer directly (see section “Supported
File Formats” on page A-4). However, you can search for any
file format, even ones unknown to Spycer, by entering its extension in the criteria File Name (e.g. enter .txt).
y Next start the search with the button FIND IT!.
The search will be conducted at the specified location(s). As long as the
search is processed, the system(s) where the search is performed will be
busy, i.e. their icons will be shown together with a clock. When finished, the result will be shown in the results area to the right.
To limit the displayed findings in the results area further you
may also use the selective view combo box (see section “The
Status Bar” on page 4-9).
By selecting entries in the results area and using the menu option Save as TXT… on their context menu you can save the
search result to a text file, for example, for later evaluation.
With the menu option Show in browser on the context menu
of a clip in the results area, you can immediately display the selected file in a browsing pane of Spycer. This way you can determine its location easily.
1
2
3
4
5
6
7
8
A
I
4-21
Spycer User Guide
4-22
Previewing Data
5
This chapter provides a description where and how to preview video
and image data in the software.
To the right of the user interface you can find the preview area. In Spycer this area is used to view or play the currently singled out material
(video and image data). By creating and using proxy clips, video material can also be viewed in real time. At the top of the preview area you
can find a video overlay where you will see the contents of the material.
Below the video overlay a scrub bar of the material’s timeline is available as well as the preview controls.
1
Additionally, you can preview image and video data via the thumbnails
provided in the contents areas when browsing or searching.
3
2
4
5
6
7
8
A
I
5-1
Spycer User Guide
5.1 Previewing Data via Thumbnails
When in the thumbnail view, video and image data can be seen with
thumbnails in the contents areas of the browse and search tools. Each
thumbnail is on-the-fly created and displayed as soon as a directory is
selected that holds video or image data.
Further details about the contents areas of the browse and
search tools not explained in the following can be found in section “Browsing for Data” on page 4-2.
Figure 5-1: A contents area
Still images (i.e. single image files) in the browse and search area just
provide their thumbnails. For video clips, however, the complete timeline can be previewed via the little scrub bar below its thumbnail. To do
this perform the following:
y If not already selected, select the clip that you want to preview with
a click of the mouse.
This will make the scrub bar of the thumbnail available.
y Move the cursor of the scrub bar to the left or right to view the
contents of the clip:
For this you may also use the keys [Left Arrow]/[Right Arrow] when the scrub bar has the focus (e.g. after selecting
it with the mouse).
5-2
Previewing Data
thumbnail
scrub bar
with cursor
Figure 5-2: Preview of a clip in a contents area
The thumbnail above the scrub bar will show you the contents of the
clip in still images. This can also be used to select a preliminary position
for the metadata and preview area: When singling out the clip (see e.g.
section “Previewing Data with the Preview Area” on page 5-4), the position of the scrub bar cursor will be retained and available there as well.
1
2
3
4
5
6
7
8
A
I
5-3
Spycer User Guide
5.2 Previewing Data with the Preview Area
At the right-hand side of the user interface you can find the preview area. In Spycer this area is used to preview the currently singled out video
and image data. Additionally, by creating and using proxy clips video
material can also be played and viewed in real time.
In case the preview area is not visible it is either hidden (see
section “Changing the Layout of the User Interface” on
page 3-22) or the view is switched from the metadata and preview area to the view of the job list. To switch back to the
metadata and preview areas use the button METADATA at the
top left side of the user interface (see also chapter “Working
with Metadata” on page 6-1).
video overlay
scrub bar
preview controls
status bar
Figure 5-3: The preview area
At the top of the preview area you can find a video overlay. In case the
singled out material is a video clip or still image, it will show you its content. Additionally, for video clips a scrub bar is provided below the video
overlay as well as the preview controls, both allowing you to move
within the clip’s content. At the very bottom a status bar is available
that details further information about video and their proxy clips.
5.2.1 General Information about Proxies
Proxy clips are downscaled versions of high-resolution video material,
especially created by Spycer to enable previews of video clips in real
5-4
Previewing Data
time on systems, even when they are not equipped with real-time hardware. Usually they are generated in a container file format that allows
for a compression of images as well as an embedding of audio data (if
available).
The proxy generation, such as its storage location, file format or resolution, can be configured freely with the general configuration settings
of Spycer (see section “The Group ’Jobs’” on page 8-8). There you can
also determine that they should be created automatically as soon as
clips are added to the storage. In case the automatic generation is deactivated, proxies can be easily created via the context menu of clips in
the contents areas of the browse and search tools (menu option Create
proxy, see section “The Context Menu” on page 4-9).
To create proxies on your system the proxy generation has to
be enabled and configured first (see section “The Group
’Jobs’” on page 8-8).
Just as with the database of the local storage, each Spycer application
cares for and administers the proxies of the video material that is locally
available only. During the creation of a proxy an entry with a progress
bar will appear in the job list (see section “The Job List” on page 7-12)
and the proxy clip is saved at the configured location. There, the directory structure of the watch folder where the clip is stored is reproduced
to provide for an easy identification of the proxy clips.
For a real-time preview of clips locally stored, the proxies will be available immediately. The proxy’s status is detailed in the status bar of the
preview area (see section “The Status Bar” on page 5-7) when a clip is
singled out.
In the SpycerNet proxies are shared among the Spycer applications.
When a proxy clip is available on a foreign system and the clip is singled
out for a preview, its proxy will be downloaded from the other system
and temporarily stored on your system. It will be removed from your
system again as soon as another file is singled out or the Spycer user
interface is closed.
1
2
3
4
5
6
7
To create proxies on another system in the SpycerNet you must
have read and write permissions on this system and the native
Spycer application must be properly configured for the creation
of proxies.
A
To preview an already available proxy in the SpycerNet only the
browse and search permission are required.
I
5.2.2 The Video Overlay
The video overlay at the top of the preview area allows you to preview
content of image and video data. Once a still image or video clip is sin-
5-5
8
Spycer User Guide
gled out in the browse and search area (e.g. with a double-click of the
mouse), its contents is displayed there.
With the context menu of the video overlay you can, for example, configure the appearance of the video overlay or the behavior of plays further. It provides the following menu options:
Fit to screen
Maximize /
Minimize
Play original
Reload proxy
Scales the video overlay to the maximum available
width or height of the preview area. If enabled it
shows a cross in front.
Either maximizes the preview area, i.e. hides all
other areas of the Spycer user interface (see section
“Changing the Layout of the User Interface” on
page 3-22), or restores the previous layout of the
user interface.
This can also be performed with a doubleclick of the mouse somewhere in the preview area or the menu option Maximize
Preview Area on the View menu (see
section “The ’View’ Menu” on
page 8-19).
With a proxy available this menu option forces the
play of the original video material instead. If enabled it shows a cross in front.
Reloads the proxy of the clip displayed in the preview area.
5.2.3 The Scrub Bar
If the singled-out file is a video clip you can find beneath the video
overlay a scrub bar, representing a timeline of the clip’s contents. With
its cursor you can move within and view the contents of the video clip.
Simply select the cursor with the mouse and move it along the scrub bar
to the desired position, or click somewhere on the scrub bar to move
the scrub bar cursor there instantly. While working with the scrub bar
or the preview controls below, the video overlay always adjusts to your
moves and displays the image of the selected position.
5.2.4 The Preview Controls
In addition to moving the scrub bar cursor manually, you can control it
via the preview controls below the scrub bar, e.g. the play button. In
5-6
Previewing Data
detail the controls beneath the scrub bar perform the following functions:
A preview can also be controlled with various keyboard shortcuts. Further information about the available shortcuts can be
found in section “Keyboard Shortcuts” on page A-8.
With these buttons you can step one frame foror backward in the contents of the video clip.
The scrub bar cursor will move accordingly.
With this button you can play the video clip. If a
proxy is available, it will be played in the overlay
in real time. Otherwise Spycer tries to display
the contents as fast as possible. After activation
the button changes its appearance to its active
state (
) and you have to press it
again to stop the play.
With this button activated a play of the clip’s
timeline will be performed endlessly in a loop:
Once the scrub bar cursor reaches the end of
the clip, the play will start from the beginning
again. To switch off the loop mode simply click
this button again.
These buttons jump to the beginning or end of
the clip displayed in the preview area. The first
button jumps to the beginning of the scrub bar
while the second button jumps to its end.
1
2
3
4
5
5.2.5 The Status Bar
6
At the bottom of the preview area a status bar can be found showing
you information about the video clip and its proxy. It details, for example, whether a proxy clip is available for a preview, the current position
of the scrub bar cursor in frames, and the clip’s total amount of frames.
Furthermore, when viewing clips over the SpycerNet, the status bar also
indicates the download progress of the proxy from the foreign system
as well as the data rate of the download:
7
8
A
I
Figure 5-4: Progress bar of a proxy download via the SpycerNet
5-7
Spycer User Guide
5.2.6 Using the Preview Area
To single out image and video data and view its content in the preview
area you have to do the following:
y In the browse and search area (see chapter “Browsing and Searching” on page 4-1) make the desired material available in a contents
area by browsing or searching for it.
y In case a specific image of a video clip should be displayed in the
preview area select it with the help of the thumbnail’s scrub bar (see
section “Previewing Data via Thumbnails” on page 5-2).
y Next you have several possibilities at hand. Use either one of the
following:
– Select the respective file with the mouse and drag and drop it
somewhere in the metadata or preview area.
– Double-click the file with the mouse.
– Use the menu option Show all metadata on its context menu
(see section “The Context Menu” on page 4-9).
This will single out the selected data and further information about it
will be displayed in the metadata area (see chapter “Working with
Metadata” on page 6-1). If the singled out data is either a video clip or
a still image, its content will be displayed in the video overlay of the preview area.
Furthermore, with video data displayed in the preview area you can
then use the scrub bar or the preview controls to preview the clip:
y Move the cursor of the scrub bar to the left or right to move to a
certain position within the clip:
For this you may also use the keys [Left Arrow]/[Right Arrow] when the preview area has the focus (e.g. after selecting it with the mouse).
scrub bar
with cursor
Figure 5-5: Preview of a clip in the preview area
5-8
Previewing Data
The video overlay shows you the contents of the clip in still images.
The position of the scrub bar cursor also determines the file
specific metadata that will be displayed in the header data view
(see section “Header Data” on page 6-6).
If a proxy clip is already available for the singled out video clip (detailed
in the status bar of the preview area), you can also preview the video
clip in real time:
A proxy clip can be created with the menu option Create
proxy of the context menu of the clip in the contents area of
the browse and search tools (see section “The Context Menu”
on page 4-9). Further information about proxy clips can be
found in section “General Information about Proxies” on
page 5-4.
y Press the play button (
) of the preview controls.
Then the contents of the clip is shown in real time in the video overlay
of the preview area. Without a proxy clip the preview would be displayed as fast as possible.
1
2
3
4
5
6
7
8
A
I
5-9
Spycer User Guide
5-10
6
Working with Metadata
Metadata is data about data. In the field of digital video it stands for
further information that describe the content (footage) throughout the
various production stages. This may include everything from the planning and pre-production stage over the actual production and post production to the final delivery of the content. With Spycer you can add
and edit metadata effortlessly.
If not already visible in the user interface, you can activate the view of the metadata and preview areas of
Spycer with the button METADATA directly below the menu bar.
metadata controls
1
2
3
metadata fields
4
5
6
7
8
A
I
Figure 6-1: The metadata area
The metadata area will show you the properties and metadata of the
file currently singled out in the browse and search area. You can switch
6-1
Spycer User Guide
through as well as add and edit the metadata with the buttons (controls) provided to the left.
This chapter describes in detail the metadata area as well as how to
work with metadata.
6.1 Displaying Metadata
The procedure to display metadata is the same as if you want to preview the material in the preview area to the right of the metadata area:
It has to be singled out in a contents area of the browse or search tool.
For further information about the preview area please refer to
section “Previewing Data with the Preview Area” on page 5-4.
To single out data and view its metadata you have to do the following:
y In the browse and search area (see chapter “Browsing and Searching” on page 4-1) make the material available in a contents area by
browsing or searching for it.
y In case a specific image of a video clip should be displayed in the
preview area select it with the help of the thumbnail’s scrub bar (see
section “Previewing Data via Thumbnails” on page 5-2).
y Next you have several possibilities at hand. Use either one of the
following:
– Select the respective file with the mouse and drag and drop it
somewhere in the metadata or preview area.
– Double-click the respective file with the mouse.
– Use the menu option Show all metadata on its context menu
(see section “The Context Menu” on page 4-9).
This will single out the selected file and its metadata will be displayed
in the metadata area. If the singled out data is either a video clip or a
still image, its content will be displayed in the video overlay of the preview area.
With the metadata displayed you can now switch through as well as
add or edit its metadata with the metadata controls (see section “The
Metadata Controls” on page 6-3). Once an entry is changed and
saved, it will be stored in the file header(s) and/or in the data record of
the respective file/sequence in the database administered by the
SpycerAgent.
6-2
Working with Metadata
6.2 The Metadata Controls
After metadata are displayed in the metadata area (see section “Displaying Metadata” on page 6-2) you can switch through the different
metadata views as well as add or edit the metadata with the controls
provided to the left. The following controls are available:
The button FILE (the first view activated when Spycer is started and the metadata area is displayed)
shows the file related metadata information in the
metadata fields to the right of the controls. For more
details about this metadata view see section “File
Metadata” on page 6-5.
This view of the metadata allows you to review most information only. Because they
are properties of the singled out data they
cannot be changed.
This button switches the view of the metadata to a
display of the header data provided by the singled
out file. Most file formats feature a file header where
further information about its contents are detailed.
In the header data view of Spycer you can get a look
at the data as it is written in the file itself. With video
data it will display the header data of the frame (image file) that is currently selected with the scrub bar
cursor of the preview area (see section “Header Data” on page 6-6). Certain entries in the header data
can be edited if supported by the file format, e.g. the
timecode information (source timecode). Once
saved they will be directly written to the file(s).
Currently, only the header data of *.dpx
files can be edited with Spycer.
With the PRODUCTION button you switch the metadata view to its production information. Here you
can add or edit additional information about the
production stages of the content.
Currently this information is provided virtually by Spycer’s database only. A change of
the files’ headers cannot be made in this
metadata view.
This button allows you to add or change the metadata as they are available in the production metadata view (button PRODUCTION) or the header data
view (button HEADER DATA). Once clicked the
metadata can be changed.
6-3
1
2
3
4
5
6
7
8
A
I
Spycer User Guide
With the SAVE button you can save your alterations
to the metadata. The changes will be stored in the
file header(s) (when in the header data view and
supported by the file format) and/or in the data
record of the respective file in the database administered by the SpycerAgent.
The CANCEL button discards all alterations to the
currently active metadata view.
6-4
Working with Metadata
6.3 Metadata Views
Spycer provides three metadata views to the metadata of the singled
out file: file metadata, header data and production metadata. You can
switch through the different metadata views with the upper controls
provided to the left (buttons FILE, HEADER DATA and PRODUCTION).
Once the button EDIT is clicked and if the respective fields are not
dimmed, you can change their metadata. The changes will be stored either in the file header directly and/or in the data record of the respective file with the button SAVE.
This section explains shortly the different metadata views provided by
the Spycer user interface.
6.3.1 File Metadata
If not already displayed in Spycer activate the view of the file metadata
with the button FILE of the controls (see section “The Metadata Controls” on page 6-3).
1
2
3
4
5
6
7
8
A
Figure 6-2: The file metadata
When a file is singled out (see section “Displaying Metadata” on
page 6-2), the file metadata view shows its file related information. All
files displayed in Spycer will deliver metadata in this view: For example,
in the area ’General File Data’ standard information about storage location and file name are detailed. Additionally, video, audio and project
6-5
I
Spycer User Guide
files supported by Spycer (see section “Supported File Formats” on
page A-4) provide the following:
This view of the metadata allows you to review most information only. Because they are properties of the singled out file
they cannot be changed.
Some areas of the file metadata view will alter their appearance
and show different metadata in dependence on the selected
file type.
video/still images Video and still image files present further details
about their format in the area ’Image’ as well as
timecode or keycode information in the area
’Timecode’ when timecode and/or keycode are
stored in the file’s headers (source timecode).
audio
Audio files detail further information about their
audio properties in the area ’Sound’.
project files
Project files of CLIPSTER and the Pronto2K.2 /
ProntoHD.2 will deliver information about their
output settings (video format settings) as well as
give a list of all media that are included in the
project.
With the button RENAME you can change the file name(s) of
the singled out material. Please refer to section “Renaming” on
page 7-2 for further details.
A defragmentation of the singled out material can be initiated
with the button DEFRAG. See section “Defragmenter” on
page 7-4 for more information.
With the combo box Source of the area ’Timecode’ you can
select different types of timecode to be displayed in the file
metadata view (GENERIC: the first and last source timecode
read from the files’ headers, KEYCODE: the first and last keycode information read from the files’ headers, and INDEX: the
start and stop index (first and last frame number) read from the
file names).
6.3.2 Header Data
You can switch to a view of the header data of the singled out material
with the button HEADER DATA (see section “The Metadata Controls”
on page 6-3).
Most file formats provide a file header where further information about
its contents are detailed, for example, in an image file often its height,
width and color depth is detailed. Some file formats, e.g. *.dpx files,
6-6
Working with Metadata
are capable of storing even more information. These information are
usually written in a specified format into the file headers and can be
read and interpreted by different software applications that support
these kind of information. Among them you can find, for example, the
name of the creator (usually the program that created the files), the creation date and time, the timecode (so called source or generic timecode), and/or the keycode.
In the header data view of Spycer you can get a look at the data as it is
written in the file itself. With video clips it displays the header data of
the file that is currently selected with the scrub bar cursor of the preview
area. To view the header data of another video image file simply move
the scrub bar cursor of the preview area (see section “Previewing Data
with the Preview Area” on page 5-4) to the desired position.
1
2
3
4
5
6
7
Figure 6-3: The header data
8
At the top of the header data view you can find further information
about the material that is singled out. At the top left the file name of
the material is detailed. With video clips that consist of still image files
it is the one that is currently selected with the scrub bar cursor of the
preview area. Certain entries of the header data can be added or edited
if supported by the file format. With the combo box Edit at the top
right you can specify where in a video image file sequence an editing
of the header data should be performed.
If header data can be altered, a click on the button EDIT will alter the
view of the header data and you receive an entry mask:
6-7
A
I
Spycer User Guide
Figure 6-4: Changing the header data
The header data values that are detailed in this mask can be altered by
adapting or entering a value in an entry field and activating it with its
preceding check box. For further information about this see section
“Altering the Header Metadata” on page 6-10.
Currently, in the header data view only the data of *.dpx files
can be edited in Spycer.
6.3.3 Production Metadata
With the PRODUCTION button you switch the metadata view to the production metadata (see section “The Metadata Controls” on page 6-3).
6-8
Working with Metadata
1
Figure 6-5: The production metadata
2
In this metadata view you can add or edit additional information about
the production stages of the content. All fields can be changed (see section “Changing the Production Metadata” on page 6-11).
3
Currently the production metadata are provided virtually by
Spycer’s database only. A changing of the files’ headers, even
if supported by the file format, will not be triggered when
changing or saving this metadata.
4
5
6
7
8
A
I
6-9
Spycer User Guide
6.4 Working with Metadata
Once material is singled out as described in section “Displaying Metadata” on page 6-2, its metadata are displayed in the metadata area. All
files displayed in Spycer provide metadata in the different metadata
views. This way you can gather information from the file metadata view
(button FILE), for instance, about the video or audio format of material
or check the timecodes provided by a video clip with the combo box
Source. Furthermore, you may compare these information with the
actual header data stored in the file(s) with the help of the header data
view (button HEADER DATA). In the production metadata view (button
PRODUCTION) you can view its production metadata.
In the production and header data view metadata can also be added
and edited. This section describes shortly how to add and/or edit metadata.
6.4.1 Altering the Header Metadata
Certain file formats of video clips also support the storing of metadata
information in their files’ headers. Among these metadata you can find,
for example, the name of the creator, the creation date and time, the
source timecode, and/or the keycode.
To change the header data of an image sequence perform the following:
Currently, in the header data view only the data of *.dpx files
can be edited in Spycer.
y Single out the video clip whose metadata you want to change as
described in section “Displaying Metadata” on page 6-2.
y In case you want to alter the metadata of a specific image or image
range, move the scrub bar cursor of the preview area to the desired
position (see section “Using the Preview Area” on page 5-8).
y After this switch to the header data view by activating the button
HEADER DATA.
This displays the header data of the file currently selected with the scrub
bar cursor in the header data view. Now you can change its metadata:
y Via the combo box Edit at the top right of the header data view
select where in the file sequence an editing of the header data
should be performed.
y After this activate the button EDIT from the metadata controls.
6-10
Working with Metadata
This will alter the appearance of the header data view and an entry
mask is displayed.
In case no entry mask is displayed when the button EDIT is activated, an editing of the header data is not supported by the
selected file format.
y Type in or alter the respective metadata information in the available
fields.
To create file names with a proper frame numbering as metadata for video clips you have to observe the C notation, usually
with the syntax <string>%0Yd.<ext> (see section “The
Search Parameter Area” on page 4-16).
y Check whether the check boxes of the values that should be
changed in the file header(s) are enabled.
y Afterwards save the metadata with the button SAVE.
This will change the values stored in the file header(s). Depending on
the selected file range for the changes it may take some time. When
finished, the original header data view is restored and you can see the
alterations in the information displayed.
1
2
3
6.4.2 Changing the Production Metadata
Production metadata can also be changed. They will be stored virtually
in the database of the Spycer application:
4
y Single out the material whose metadata you want to change as
described in section “Displaying Metadata” on page 6-2.
5
y If not already displayed switch to the production metadata with the
button PRODUCTION of the metadata controls (see section “The
Metadata Controls” on page 6-3).
6
y From the metadata controls activate the button EDIT.
7
This enables you to change the metadata displayed in the metadata area.
8
y Type in or alter the respective metadata information in the available
fields.
A
y Afterwards save the metadata with the button SAVE.
The metadata will be stored and written to the material’s data record in
the database administered by the SpycerAgent. With this you can easily
find the material again by searching for the added metadata with the
search tool of Spycer (see section “Searching for Data” on page 4-16).
6-11
I
Spycer User Guide
6-12
Management Tools and Job List
7
This chapter describes the management tools that are available in Spycer, such as the renaming of image sequences, the built-in defragmenter
and the storage space calculator. Because most of the tools generate an
entry in the job list of Spycer, it is explained here as well.
1
2
3
4
5
6
7
8
A
I
7-1
Spycer User Guide
7.1 The Management Tools
Several management tools supplement the usage of Spycer comprising,
for example, a renaming function for image sequences, an integrated
high-speed copying process and a sophisticated defragmentation of
image sequences. All management tools will be described in this section.
7.1.1 Renaming
Spycer provides a renaming tool for image sequences where you can
easily change, for instance, the name prefixes, frame numbers or file
extensions. When viewing the file related metadata of the currently singled out file, you can find right beside the Filename(s) entry the button RENAME (see chapter “Working with Metadata” on page 6-1).
With it you can rename the currently singled out material.
In case the singled out material is available as a single file on the storage
(e.g. an audio file), the button RENAME opens a dialog window where
you simply have to enter the new name. Once the file name changes
are confirmed with the button OK, the file will be named accordingly.
However, when the button RENAME is called for an image sequence
consisting of still images, it opens the renaming tool of Spycer:
A renaming either for a single file or a file sequence can also be
called with the menu option Rename… on the context menu
of a directory/file in the browse and search area (see section
“The Context Menu” on page 4-9).
Figure 7-1: The renaming tool
7-2
Management Tools and Job List
The renaming tool of Spycer provides the following items:
Name Pattern
Start Number
With the check box Name Pattern you enable a
change of the pattern of the files. Usually, this is
used to alter the frame numbering.
Change the name pattern in the entry field below
the check box. The hash symbols (#) indicate the
pattern of the frame numbering. If the number of
hash symbols exceed the number of digits of the
frame numbering, they will be filled with zeros.
This entry field can also be used to change the file
names’ prefixes (same effect as ’Replace/With’).
Extension
Case
Replace
With
Case Sensitive
table
OK
CANCEL
The Start Number entry field changes the frame
number of the first frame file (start frame). All other files will be numbered in ascending order.
If activated, it will change the file extension of the
image sequence with the term entered in the entry
field to the right.
When enabled, it will change the upper and/or
lower cases of the file names’ letters. Select the applicable alteration from the combo box to the right.
An enabled check box of these items allows you to
replace any string in your file names with the specified one. It works also over several occurrences. In
the Replace field type in the string that should be
replaced. In case the string to be replaced occurs
several times, i.e. it is available more than once,
you can enter it case sensitive. Then by activating
the Case Sensitive check box you may rule out
any other lower or upper case occurrence. In the
field With you have to type in the replacement
string to be inserted in the file names.
With the table at the bottom of the renaming tool
you can verify the result of the renaming by comparing the old file name with the new one.
The OK button closes the renaming tool and applies the specified changes to the whole sequence
of the video clip: All file names will be changed.
Cancels the renaming and closes the tool without
changing the file names.
7-3
1
2
3
4
5
6
7
8
A
I
Spycer User Guide
7.1.2 Defragmenter
Spycer provides a built-in defragmenter especially designed to optimize
the physical alignment of image sequences (video clips) on storages so
that they are more suited for real-time operations.
The alignment of clips on a storage is of special importance when performing real-time operations with clips in HD or larger: The performance of the hard disk(s) is limited and may soon be reached, especially
when the storage contains large amounts of data. Then, a real-time operation (play-out or record) may get interrupted due to the facts that
files are stored in segments or even fragments on the hard disks and
disk drives tend to get slower the fuller they are. With the built-in defragmenter you can defragment any file that is fragmented and, furthermore, align image files of video clips contiguously in larger blocks
on the storage which will minimize access times during read procedures.
The built-in defragmenter uses proprietary routines to defragment the data on the storage. The results will not be the same
when using the standard defragmentation tool of the operating system, because it will not heed image file sequences.
Therefore, do not use it for a defragmentation of a video storage.
It is recommended to defragment storages at regular intervals,
even with lesser amounts of data stored on them. Then, newly
copied or captured material can be better positioned on the
storage and later defragmentation runs have less to deal with.
To run the defragmenter on an SNFS storage you must log on
to the computer system with administrative rights for the storage.
With Spycer you can defragment either single files/clips or several ones
in one step. To defragment more than one file/clip you can either select
several ones in a contents area of the browse and search tools or defragment the main directory or drive that contains them.
With a Spycer that supports SNFS (see section “Program Variants of Spycer” on page 1-6) you can also optimize the free
space of a storage. For this initiate a defragmentation of the
complete drive/volume. Works only on SNFS storages.
The following details how to assess the defragmentation degree and
how to initiate a defragmentation.
Assessing the Defragmentation Status
The defragmentation status of a file/clip can be seen in the browse and
search area as well as in the file metadata view of the metadata area.
7-4
Management Tools and Job List
In the browse and search area you can find this information in a contents area once a file is displayed (see section “The Contents Area” on
page 4-6). The text information provided by the file will detail this information (either to the right of a thumbnail or when in its text information view) under the entry ’Defrag’:
defragmentation
status
Figure 7-2: Contents area showing the defragmentation status
Additionally, it can be seen in the metadata area (see chapter “Working
with Metadata” on page 6-1) when an entry in Spycer is singled out
and the file metadata is visible. You can find the defragmentation degree under the entry ’Defragmented’ among the general file data.
1
2
3
4
5
6
7
defragmentation
status
8
A
I
Figure 7-3: File metadata showing the defragmentation status
7-5
Spycer User Guide
In Spycer the defragmentation status of a file or clip is indicated with
the help of colors and percentage values:
Color
Percent
Explanation
blue
100%
The file/clip is optimally aligned on the storage
and none of its data is fragmented.
–
red
1% - 99% The clip exists in segments but none of its files
are fragmented.
0%
The file or at least one image of a clip is stored in
fragments on the storage. If this is the case with
a video clip, it may cause problems during playout operations, depending on its resolution and
file sizes.
Segmentation: A clip is segmented when its image files are not
aligned contiguously in larger blocks on the hard disk array but
scattered over the storage.
Fragmentation: Either a file is fragmented or a video clip contains fragmented files. In contrast to segmentation here it is the
data of a single file that is scattered over the storage.
Initiating a Defragmentation
A defragmentation can be started in the metadata area with the file
metadata view selected or via the browse and search area. Even files of
unknown formats are defragmented by the defragmenter of Spycer. To
initiate a defragmentation perform either one of the following:
– To initiate a defragmentation from the metadata area:
With the metadata of the file or clip displayed in the file metadata
view of the metadata area select the button DEFRAG.
– To initiate a defragmentation from the browse and search area:
Browse or search for the respective file/clip. When it is displayed in
a contents area select from its context menu the menu option
Defragment (see section “The Context Menu” on page 4-9).
This will start a defragmentation of the selected data and an entry in
the job list is created (see section “The Job List” on page 7-12). The job
entry also shows a progress bar for the defragmentation process. As
long as the defragmentation is under way the system will have the status ’busy’ (see section “The Status Bar” on page 4-9).
Furthermore when in the browse and search area, you can defragment
more than one file/clip with a single step:
7-6
Management Tools and Job List
– You can select several individual ones when displayed in a contents
area, for example, by holding down the [Ctrl] key (Mac: [ ]) while
selecting them with the mouse.
With the search tool you can search for a defragmentation
degree. Once displayed in the contents area of the search
results, the entries can be selected and then defragmented.
– You can select a main directory or volume that contains these clips
in the directory tree of the browse area, which will defragment all
files stored at this location (files in subdirectories as well).
Then initiate the defragmentation with the menu option Defragment
from the context menu (see section “The Context Menu” on
page 4-9).
With a Spycer that supports SNFS (see section “Program Variants of Spycer” on page 1-6) you can also optimize the free
space of a storage. For this initiate a defragmentation of the
complete drive/volume. Works only on an SNFS storage.
As long as the defragmentation is in progress, the system will have the
status ’busy’. Depending on the amount of data to be defragmented
this process may take a while. The defragmentation operation ends automatically as soon as all selected data is processed. Then the files/clips
will be perfectly aligned on the storage and show a defragmentation
status of 100% (blue).
1
2
3
4
5
7.1.3 High-Speed Copying
To copy vast amounts of video material from one storage location to
another is often a time consuming procedure when performed with the
standard tools of an operating system, such as a file manager. To do this
faster DVS integrated in Spycer a high-speed copying program which
deals with such tasks in about four times the speed of a standard operating system copy.
The high-speed copying tool is truly integrated in Spycer: It will be
started and used as soon as a copying or moving is performed (see section “Copying (Moving) Directories/Files” on page 4-13).
The copying/moving can also be combined with an automatic
defragmentation of the copied or moved material. For further
information about how to set this please refer to section “The
Group ’Jobs’” on page 8-8.
7-7
6
7
8
A
I
Spycer User Guide
7.1.4 File Format Converter
Spycer provides an integrated e file format converter able to convert
still images as well as complete video clips to another file format.
Whether you want to convert, for example, a video clip in a container
format to an image file sequence or vice versa, this tool deals with such
tasks effortlessly. It can be accessed from the context menu of image or
video data displayed in the browse or search area:
y In the browse and search area (see chapter “Browsing and Searching” on page 4-1) browse or search for the still image or video clip
that should be converted.
y Then select from its context menu the menu option Convert… (see
section “The Context Menu” on page 4-9).
This will open the window of the file format converter of Spycer:
Figure 7-4: The file format converter of Spycer
The source settings, i.e. details about the material that should be converted, are displayed in the upper part of the window. The lower part
determines its destination, i.e. such things as name, file format or resolution. The following items are provided:
Source
Startindex
Duration
7-8
Indicates the directory and path to the source material. It is already set to the video/image data
where the file format converter was called.
Allows you to select a different inpoint for the
conversion. The conversion will start with this
frame number.
Determines the length of the converted clip, i.e.
how many frames to convert from the start index
onwards. Its maximum value can be:
<last frame no.>-<start index>+1.
Management Tools and Job List
Destination Path The path to the directory where the converted
file(s) will be stored. To set a path you may either
type in a path in the entry field or use the button
to the right (
) to select one via the opening dialog window.
Destination Name The name of the converted file(s). To create file
names with frame numbers you have to observe
the C notation, usually with the syntax
<string>%0Yd.<ext> (see section “The
Search Parameter Area” on page 4-16).
File Format
Determines the file format of the final material.
The respective extension will also be indicated in
the field Destination Name.
Codec
If the selected file format requires a codec it can
be selected with this combo box. Whether this
setting will be available depends on the selected
file format.
Resolution
With this field you can determine the video format of the material to be created. Either select
from its drop-down list one of the predefined video formats or set it to custom to define the resolution yourself.
Width
Details the width of the material to be created in
pixels. If Resolution is set to custom it can be
adjusted freely.
Height
Details the height of the material to be created in
pixels. If Resolution is set to custom it can be
adjusted freely.
Pixel Ratio
Determines the pixel aspect ratio that should be
applied during the conversion. Whether this setting will be available depends on the selected file
format.
Aspect
Available for informatory reasons. It details the
aspect ratio of the set video format, i.e. the ratio
of Width to Height.
Frame Rate
Sets the frame rate of the converted material.
Whether this setting will be available depends on
the selected file format.
Scaling Quality
For the conversion you can select between three
scaling qualities. It also effects the speed of the
conversion. For example, the setting high will
yield the best quality but will also take longest to
process.
7-9
1
2
3
4
5
6
7
8
A
I
Spycer User Guide
OK
CANCEL
The OK button closes the file format converter
and converts the material according to the settings.
Cancels the conversion and closes the file format
converter.
To perform a conversion do the following:
y With the settings items in the window of the file format converter
configure the conversion.
y Then initiate the conversion with the button OK.
This will write the converted material to the destination directory and
an entry in the job list is created (see section “The Job List” on
page 7-12). The entry in the job list also shows a progress bar of the
conversion process. As long as it is under way the system will have the
status ’busy’ (see section “The Status Bar” on page 4-9). If the original
video/image format of the material differs from the destination format,
the image(s) will be skewed accordingly so that they fit optimally in the
new format. After the conversion the source file(s) are not deleted but
remain at their location for further use.
When converting a video clip to a clip format that consists of
still images, the converted files will carry frame numbers as determined by the field Destination Name. However, currently
all converted material will start with zero (0) as a frame numbering. If necessary they can be given another frame numbering via the renaming tool of Spycer (see section “Renaming”
on page 7-2).
7.1.5 Calculator
With the calculator of Spycer you can calculate from a set video format
its maximum recording time (by a given amount of storage capacity) or
the required storage (by a given duration of video data). It can be accessed from the menu bar of Spycer:
y From the menu bar of Spycer (see section “Overview of the User
Interface” on page 3-16) select Tools » Calculator….
This will open the calculator of Spycer:
7-10
Management Tools and Job List
Figure 7-5: The calculator of Spycer
With the upper settings you determine the video format. Once the video format is set, the calculation will be straight forward:
1
y Select the video format from the settings items by choosing the
appropriate values.
2
y Next you have two possibilities at hand:
– To determine the maximum length of the video data by a given
storage capacity enter in the field Size the storage space, or
– enter in the field Duration the duration of the video data if you
want to know the required storage space. It has to be entered
in timecode format without frames (hh:mm:ss)
The calculation will be made as soon as an entry is changed: The remaining value will adjust itself automatically. Once you are finished
with the calculation(s), the window of the calculator can be closed with
the button CLOSE.
With the radio buttons to the right of the fields Size and Duration you can also determine the way a calculation is performed: To calculate from a given storage to a duration the
Duration radio button has to be selected, and vice versa.
A similar calculation regarding disk spaces of a selected storage
can be done in the properties window of a drive or directory
(see section “The Properties Window” on page 8-2).
3
4
5
6
7
8
A
I
7-11
Spycer User Guide
7.2 The Job List
The job list of Spycer provides information about jobs
that are performed on your system or that you have
initiated on other systems in the SpycerNet. Additionally, these jobs can
be controlled from here, for example, by canceling them. You can
switch to the job list of Spycer with the button JOB LIST directly below
the menu bar.
When the job list is not activated and visible, arriving jobs are
indicated by a (three times) flashing JOB LIST button.
Figure 7-6: The job list of Spycer
The job list shows tasks that are concerned with your system: either
they were triggered from or are carried out on your system. Additionally, it details only those tasks that may render a system ’busy’ (see section “The Status Bar” on page 4-9). Whenever such a task is triggered,
an entry can be found here. For example, if you start a defragmentation
on another system in the SpycerNet (see section “Defragmenter” on
page 7-4) or re-scan your watched folders (see section “The Context
Menu” on page 4-9), or someone else in the SpycerNet starts a task on
your system, it will be noted here. Furthermore, as long as the task is
not finished, each entry informs you about its progress in the last column of the list, for example, with the help of a progress bar. Then, it
may detail the time remaining, its progress in percent and the data rate:
Figure 7-7: Job in progress
7-12
Management Tools and Job List
In detail the table of the job list provides the following information:
Column
Explanation
No.
Number of the listed job.
Created by
Details the system that triggered the task.
Job Type
The type of job that has been triggered is stated in
this column, e.g. copy, dvscopy, move, delete,
scan, etc.
Src. Peer
The source peer. Details the source of the data in
the SpycerNet, i.e. the name of the system where
the source data is stored.
Source
States the location of the source files on the source
peer.
Dest. Peer
The destination peer. Details the destination of the
data in the SpycerNet, i.e. the name of the system
where the data is to be transferred to.
1
Destination
Details the target directory on the destination
peer.
2
Status
Indicates the state of the respective job, such as
paused, running, canceled, finished, failed, etc.
3
Progress
Informs you about the progress of the job. Processes that take longer are displayed with the help
of a progress bar (see above).
4
The jobs in the job list are listed in the order they were initiated from
top to bottom, i.e. the latest jobs are listed at the bottom of the job list.
When several jobs are started on a system, they will be processed one
at a time in the sequence stated in the job list. Jobs that wait for one
task to finish have the state ’pending’.
With the buttons below the job list you can control the list as well as
running and pending jobs. To select a job simply click on its entry in the
job list (see also section “Keyboard Shortcuts” on page A-8):
PAUSE SELECTED
RESUME SELECTED
CANCEL SELECTED
REFRESH LIST
Pauses the selected job(s).
Either continues a paused job or starts a pending
one.
Cancels and aborts the selected job(s).
Clears the table, running and pending jobs will
be detailed again.
7-13
5
6
7
8
A
I
Spycer User Guide
7-14
Miscellaneous
8
This chapter details other items of the software, such as the properties
window or the configuration settings available for Spycer. Additionally,
it provides a reference to its menu bar as well as a description of some
maintenance tools and tasks that may be useful when experiencing
problems with the Spycer application.
1
2
3
4
5
6
7
8
A
I
8-1
Spycer User Guide
8.1 The Properties Window
With the menu option Properties… on the context menu of a file, directory or drive visible in the browse and search area (see chapter
“Browsing and Searching” on page 4-1) you can call up the properties
of the respective item. They will be shown in the properties window:
Figure 8-1: Example of a ’Properties’ window
At the top of the window you can find information about the item’s
name, the type of data and its storage location.
However, depending on the data type of the item where the properties
are called, the properties window will look differently beneath these information and provide other details:
Data Type(s)
systems
8-2
Shown Properties
When called on systems, the properties will detail
further information about this system, such as its
hardware, operating system, the Spycer version
running, and the permissions that you have on the
respective system.
Miscellaneous
Data Type(s)
volumes
directories
Shown Properties
When called for volumes or directories you can
find further details about the storage where the
item is located as well as about its capacity. Detailed are, for example, the free, used and total
disk space in binary multiples of their sizes (binary
prefixes). Additionally, time values are provided to
show you, for instance, the amount of free space
available for a record of video. Because these depend on a video raster, you can configure raster
settings in this view of the properties window as
well. The time values of the disk spaces will be
changed accordingly:
1
Figure 8-2: Time calculation settings for disk spaces
Furthermore, a bar is available that tells you
graphically as well as via a percentage value the
amount of disk space currently used on the drive
where the item is stored.
Storage capacities are indicated as they
are truly available, meaning they are detailed without the deduction of a safety
margin necessary to ensure the real-time
capability on a DVS video system.
files
clips
When called for files or video clips, the properties
window will provide various metadata information in a table view, such as file size, file name and
its format. Additionally, depending on the type of
file, it may as well detail such things as number of
audio channels, audio samples, color mode, aspect ratio, field mode, resolution, and so on.
When accessing properties of items on other systems in the
network, question marks (’?’) may appear instead of properties. Then give Spycer time to update the information. During
this the properties window may remain open and once the data
has been gathered they will be displayed.
The properties window can be closed at any time with the button
CLOSE at the bottom of the window.
8-3
2
3
4
5
6
7
8
A
I
Spycer User Guide
8.2 Configuring Spycer
This section describes the general configuration settings of Spycer.
Among them you can find, for instance, the remote access permissions
and the network configuration settings.
Because most of these settings have already been set during
the initial setup procedure, the following provides a description
of the settings items only. For any further information about
the settings please refer to section “Initial Setup of Spycer” on
page 3-9.
8.2.1 Accessing the Configurations and Overview
To set any of the general configuration settings of Spycer you have to
access them first. For this perform the following:
y From the menu bar of Spycer (see section “Overview of the User
Interface” on page 3-16) select Options » Config….
This will open the general configuration settings of Spycer:
group list
settings pane
Figure 8-3: Starting screen of the configuration settings
8-4
Miscellaneous
The window to set the general configurations provides the following
items:
group list
On the left side of the configuration window you can
find a group list that provides access to the different
settings. They will be valid for the Spycer software in
general. Once an entry in the list is selected, the settings pane to the right will alter its appearance and the
configuration items of the respective group are displayed. You can then change the settings of this group.
settings pane The settings pane shows the settings that are available
under the selected group (group list to the left). To
change the settings alter the configurations in the settings pane and confirm your alterations with the OK
button.
RESET
A click on this button resets all values back to the last
confirmed settings.
OK
This button confirms your alterations to the settings in
the configurations window and closes it. Then the new
settings will be in effect. They will be saved when the
Spycer user interface is closed (see section “Exiting the
Software” on page 3-23).
CANCEL
The button CANCEL closes the window for the general
configuration settings without confirming your settings. The Spycer application will use the latest confirmed settings.
1
2
3
4
5
8.2.2 The Group ’General’
With the group General you configure the networking and local content management of Spycer.
With the network settings you determine the connection of your Spycer
application to the SpycerNet.
The local content management will be administered by the background
process SpycerAgent. When it is enabled, the SpycerAgent will write information about the contents of the watch folders (see section “The
Group ’Watch Folders’” on page 8-13) into a database, making it available to your Spycer application as well as to others in the SpycerNet (if
applicable and permissions are given). Afterwards the watch folders will
be monitored and the database will be revised once file processes are
detected.
When a local content management is disabled, Spycer will not
display any local drives or storages. Then the user interface can
be used as a network browser showing the contents of other
Spycers in the SpycerNet only.
8-5
6
7
8
A
I
Spycer User Guide
Figure 8-4: The settings items of the group ’General’
In the group General you can find the following settings items:
combo box
REFRESH
Status message
8-6
Select from the combo box the IP address, i.e.
the network connection, that Spycer should use
to connect to the SpycerNet. The localhost address (127.0.0.1) disables the network connection for Spycer. Afterwards it can be used locally
only.
This button refreshes the IP addresses available
in the combo cox. IP addresses are gathered
from currently active network connections.
When a network connection is inactive (e.g. no
cable connected), its IP address will not be displayed. Then establish a network connection at
the respective connector and click the REFRESH
button which will make its IP address available
in the drop-down list of the combo box.
Details the current state of the background process SpycerAgent.
Miscellaneous
Enable local content management
(SpycerAgent)
ADVANCED…
With this radio button activated the local content management will be enabled. It installs and
starts the background process SpycerAgent allowing you to view local drives and search
through the material stored in the watch folders.
For this a database is written that is used by the
Spycer user interface to display data. Additionally it is visible and usable for other Spycer applications in the SpycerNet (if applicable and
permissions are given).
The background process SpycerAgent may not
be able to access drives that need a particular
user account (usually administrative account).
Background processes generally run with the security context of the local system account which
is a predefined account used by background
processes. To enable accesses of the SpycerAgent to specially secured locations enter the
appropriate user name and password (if applicable) in the window that opens when the ADVANCED… button is pressed. On a SAN this is
normally not necessary when a global super
user is configured via its metadata server.
Use these settings only if you experience access permission issues that can
be traced back to the SpycerAgent.
Windows only: For this make sure that
the respective user has the right to fully access the background process (see
Administrative Tools » Local Security Policy » Local Policies » User
Rights Assignment » Log on as a
service).
Disable local con- This radio button disables the local content
tent management management. It will stop and deinstall the background process SpycerAgent. Then Spycer can
be used as a network browser only, showing
you the contents of other Spycers in the SpycerNet.
Under Linux/Mac you have to log on
to the system as root to administer the
background process.
8-7
1
2
3
4
5
6
7
8
A
I
Spycer User Guide
For further details about the SpycerAgent please refer to section “SpycerAgent” on page 2-5. For further details about networking see section “Notes about Networking with Spycer” on
page 2-8.
8.2.3 The Group ’Jobs’
The group Jobs contains some settings concerned with jobs performed
by the SpycerAgent, most notably the proxy file settings.
Figure 8-5: The settings items of the group ’Jobs’
In detail the group Jobs provides the following settings items:
Path for proxy files Determines the location on the storage where
the proxy files will be stored. In it the directory
structure of the watch folders where the clip is
originally stored is reproduced which makes an
identification of the proxy clips easy.
Temporarily downloaded proxy clips are
not stored here but in one of the system
folders (see section “Interesting Files
and Folders” on page A-9).
8-8
Miscellaneous
Preview proxies
Activates the proxy generation. When the check
box is enabled, proxies can be generated on
your system. Then the configuration items for
the proxies will be available and can be set. If
the check box is disabled, a proxy creation cannot be performed on your system.
Resolution
Details the resolution of the proxies in width and
height (in pixels). This setting will be available
when Preview proxies is enabled.
File format
Select from this combo box the file format of the
container file format that will be used to create
the proxies. This setting will be available when
Preview proxies is enabled.
Scaling quality
For the proxy generation you can select between three scaling qualities. It also effects the
speed of the creation. For example, the setting
high will yield the best quality but will also take
longest to process. This setting will be available
when Preview proxies is enabled.
Default frame rate Sets the default frame rate of the proxy files.
This setting will be available when Preview
proxies is enabled.
Automatic proxy
When this check box is enabled, proxy files are
file generation
generated automatically on your system as soon
as new clips are detected by the SpycerAgent. If
it is disabled, proxies can only be created manually with the menu option Create proxy (see
section “The Context Menu” on page 4-9). This
setting will be available when Preview proxies
is enabled.
Automatic
With this check box you configure the Spycer
defragmentation
application to perform a defragmentation autowhen copy
matically on the processed material when a copy
process is started on your system. This will be
valid even if the job is triggered by another
Spycer in the SpycerNet.
Automatic
With this check box you configure the Spycer
defragmentation
application to perform a defragmentation autowhen move
matically on the processed material when a
move process is started on your system. This will
be valid even if the job is triggered by another
Spycer in the SpycerNet.
8-9
1
2
3
4
5
6
7
8
A
I
Spycer User Guide
8.2.4 The Group ’Network Drives’ (Windows Only)
The group Network Drives is available under Windows operating systems only and enables you to access mounted (mapped) network drives
in the user interface of Spycer. They are then displayed as any other locally available drive/directory that is not defined as a watched folder
(see section “The Directory Tree” on page 4-3) and can be accessed as
such (see section “SpycerAgent” on page 2-5).
Figure 8-6: The settings items of the group ’Network Drives’
The group Network Drives provides the following items:
list
Mount network
drives
8-10
The list details the network drives that are currently mounted in your operating system. The
column ’Drive’ details the drive letter, while the
column ’Source Path’ indicates the path to the
drive/directory in the network.
This check box mounts the network drives detailed in the list above and, once confirmed,
they will be displayed in Spycer. For this you
have to enter the correct password that allows
you access to the network drives in the entry
field Password below.
Miscellaneous
The network drives will also be mounted the
next time Spycer is started. However, then a
message window will appear right after the
starting of the user interface where you have to
legitimize your access again, i.e. you have to enter the correct password once more:
Figure 8-7: Accessing network drives during start-up
User
Password
Details your current user name that will be used
to mount the network drives.
In this entry field you have to enter the correct
password that in combination with the user
name allows you to access the network drives.
1
2
3
4
8.2.5 The Group ’Permissions’
With the group Permissions you set the remote access permissions,
i.e. you configure a remote control of your Spycer application. It may
be useful if other Spycer applications in the SpycerNet should have access to your system, and with these settings you determine what other
peers are allowed to do on your system.
5
6
7
8
A
I
8-11
Spycer User Guide
Figure 8-8: The settings items of the group ’Permissions’
The following settings items are provided:
User & Groups
In this pane select the user or group that you
want to specify the remote access permissions
for.
Currently only the default user group is
available.
Remote Access
Permissions
SELECT ALL
DESELECT ALL
Under this pane you can set the permissions of
the user/group that has been selected in the
pane User & Groups. For a detailed list of the
access permissions and what they indicate see
section “Remote Access Permissions” on
page 3-14.
This button enables all check boxes in the pane
Remote Access Permissions in one step.
This button disables all check boxes in the pane
Remote Access Permissions in one step.
For further information about these settings see section “Remote Access Permissions” on page 3-14 and section “Notes
about Networking with Spycer” on page 2-8.
8-12
Miscellaneous
8.2.6 The Group ’Scan Filter’
This setting allows you to determine sequence file types, i.e file formats
that Spycer should display as video sequences and thus as single entries.
It sets a filter for the scanning of the SpycerAgent. In order to recognize
files of the listed file formats as image sequences each file name must
contain a numbering (frame numbering) of the same length.
1
2
3
4
Figure 8-9: The settings items of the group ’Scan filter’
5
The following settings items are provided by the group Scan Filter:
list
ADD
REMOVE
The list determines the file formats by their extensions (column ’Format’) that Spycer should
recognize as video clips. The entries can be revised by simply double-clicking an entry and altering it.
This button adds an empty entry in the list
above. Then type in the extension of the file format that Spycer should recognize as a video clip.
This button deletes entries from the list: Select
an entry in the list and delete it by clicking the
button REMOVE.
8.2.7 The Group ’Watch Folders’
With the settings items of the group Watch Folders you determine the
locations that will be watched by the background process SpycerAgent
8-13
6
7
8
A
I
Spycer User Guide
(see section “The Group ’General’” on page 8-5). The data that is
stored there will be available for a local content management (e.g. during search procedures) to your Spycer application as well as to others in
the SpycerNet (if applicable and permissions are given).
Network drives and important system drives/directories cannot
be selected as watch folders.
The SpycerAgent registers all events that take place in the
watch folders. To minimize the overall traffic for the SpycerAgent it is recommended to include directories/drives that contain video/audio material only.
Figure 8-10: The settings items of the group ’Watch Folders’
To set up the watch folders the following settings items are provided:
list
INCLUDE FOLDER…
8-14
The list details the specified folders (column
’Path’), whether they are included or excluded
in the watched folders (’Type’) and the current
state of the included folders (’Status’).
This button opens a dialog window where you
have to select a directory. Choose with it the
drive/directory that should be included in the
watched folders.
Miscellaneous
EXCLUDE FOLDER… Excludes a drive/directory from being displayed
in Spycer. Usually the exclusion of a specific directory is made to save it from being scanned
into the database (as a subdirectory of an included folder). However, with this you can exclude any drive/directory whereupon they will
not be displayed in Spycer. A click on this button
opens a dialog window where you can select the
drive/directory that should be excluded.
REMOVE
The included and excluded folders can be revised with this button: Select an entry in the list
and delete it by clicking the button REMOVE.
The list provided by the group Watch Folders implicitly details three
states of the folders if a local content management is enabled. The following shortly summarizes their effects:
State of Watched
Folder
included
not detailed in list
excluded
Effect
1
2
– Scanned by the background process and
written to the database
– Displayed almost instantaneously in the user
interface
– Can be searched with Spycer
– Displayed and usable in the SpycerNet (if
applicable and permissions are given)
– Other local drives and directories
– Not scanned by the background process and
not written to the database
– Displayed in Spycer only when accessed
– Not displayed in the SpycerNet
– File-based processes are allowed
– Not scanned by the background process and
not written to the database
– Not displayed in the user interface of Spycer
or the SpycerNet
3
4
5
6
7
8
A
I
8-15
Spycer User Guide
8.3 Menu Bar Reference
At the top of a stand-alone Spycer application you can find a menu bar.
It provides access to functions and tasks of an administrative nature to
the Spycer application. Here you can find, for example, its configuration
settings as well as several tools.
This section provides a reference to its menu bar. All menus and menu
options will be explained briefly.
This section explains the menu bar as it is available on Windows and Linux. For a reference where to find the individual
menu options on Mac systems see section “The Menu Bar on
Mac OS” on page 8-16.
8.3.1 The Menu Bar on Mac OS
The menu bar as it is explained in the following sections is not available
on Mac systems. Instead the individual menu options can be found integrated in the standard program menu bar.
Figure 8-11: The program menu bar of Mac OS
This section details where to find the menu options compared to the
Linux/Windows versions of the software:
Location on Linux/Windows
Spycer »
Options »
8-16
Location on Mac OS
Full screen
View » Full screen
Minimize
View » Minimize
Quit
Spycer » Quit Spycer
Config…
Spycer » Preferences
Miscellaneous
Location on Linux/Windows
Tools »
View »
Help »
Location on Mac OS
Calculator…
Tools » Calculator
License Man- Request…
agement »
Tools » License Management »
Request…
Update…
Tools » License Management »
Update…
License
Server…
Tools » License Management »
License Server…
Reset Layout
View » Reset Layout
Maximize Preview Area
View » Maximize Preview Area
About
Spycer » About Spycer
Manual
Help » Manual
8.3.2 The ’Spycer’/Spycer Icon Menu
1
The menu Spycer contains the following menu options:
2
3
4
Figure 8-12: The ’Spycer’ menu
5
In fullscreen mode (see section “Full screen” on page 8-17) the menu
Spycer will be replaced by the Spycer icon (Linux and Windows only).
However, then it still provides the same menu options as the menu
Spycer shown in the figure above and detailed in the following.
Full screen
Select the menu option Full screen to activate the fullscreen mode of
Spycer. In fullscreen mode the menu Spycer will be replaced by the
Spycer icon (Linux and Windows only) but still provides access to the
same menu options.
6
7
8
A
I
Figure 8-13: Spycer icon providing the same menu options (Linux/Windows)
8-17
Spycer User Guide
Minimize
To access other programs that are installed on your system when Spycer
runs in the fullscreen mode, click the Minimize menu option on the
menu Spycer. It reduces the Spycer user interface to a button on the
taskbar of the operating system.
Quit
The menu option Quit exits the Spycer user interface. Further details
about this can be found in section “Exiting the Software” on
page 3-23.
8.3.3 The ’Options’ Menu
The Options menu provides a menu option to set up and configure the
Spycer application. It contains the menu option as shown below:
Figure 8-14: The ’Options’ menu
It will be described in the following.
Config…
With the menu option Config… you can access the general configuration settings of the Spycer application. You can find further information
about them in section “Configuring Spycer” on page 8-4.
8.3.4 The ’Tools’ Menu
On the Tools menu you can find several tools to facilitate the usage of
the Spycer application. It provides the following menu options:
Figure 8-15: The ’Tools’ menu
They will be described in the following.
8-18
Miscellaneous
Calculator…
With the calculator of Spycer you can calculate from an adjustable setting of video formats its maximum recording time (by a given amount
of storage space) or the required storage (by a given duration of the
video data). It is described in more detail in section “Calculator” on
page 7-10.
License Management
The License Management menu option allows you to configure your
connected dongle and its license(s). It opens a submenu with the following options:
Figure 8-16: Submenu of the menu option ’License Management’
1
The Request… and Update… menu options are used in case you have
to update your local dongle, for instance, to enable new features or
change an evaluation license to a non-expiring one. For details refer to
section “How to Update the License on the Dongle” on page 2-12.
2
With the menu option License Server… you make a set of floating
licenses available to other Spycers in a network. Further information
about this and how to do it can be found in section “Floating License”
on page 2-13.
4
3
5
6
8.3.5 The ’View’ Menu
With the menu View you can change the layout of the user interface in
certain ways. It contains the following menu options:
7
8
A
Figure 8-17: The ’View’ menu
They will be described in the following.
Reset Layout
In case you have changed the layout of the user interface, for example,
by hiding areas (see section “Changing the Layout of the User Inter-
8-19
I
Spycer User Guide
face” on page 3-22), it can be reset with this menu option. Then the
layout of the user interface will be set to a default layout and all areas
will be visible again.
Maximize Preview Area
This menu option performs the same operation as the Maximize menu
option of the video overlay’s context menu in the preview area (see section “The Video Overlay” on page 5-5), i.e. it maximizes the view on
the preview area. To restore the layout you can use the menu option
Reset Layout (see above) or the menu option Minimize on the context menu of the preview area (see section “The Video Overlay” on
page 5-5).
8.3.6 The ’Help’ Menu
You can get additional information about the Spycer application via the
menu option of the menu Help. It contains the following menu options:
Figure 8-18: The ’Help’ menu
They will be described in the following.
About
You can receive further information about the Spycer software with the
menu option About on the menu Help:
8-20
Miscellaneous
1
2
3
Figure 8-19: The ’About Spycer’ window
4
In the opening window you can find, for example, the precise version
number of the software or additional license information (e.g. the serial
number of the dongle or the expiration date and time). The latter may
be useful to troubleshoot license issues.
5
Manual
7
The online documentation of the Spycer application can be accessed via
the menu option Manual on the Help menu. It opens the documentation in HTML format.
8
The manual is also available in PDF format which is most suited
if you want to print out the document. The documentation of
Spycer in PDF format can be accessed easily via the navigation
buttons at the bottom of each HTML page.
8-21
6
A
I
Spycer User Guide
8.4 Maintenance
The Spycer application, especially when working in a network, is a complex set of individual programs. Because of this DVS provides some
maintenance tools which will help you in the event of service and maintenance work. All the software programs described here are available
for this purpose only. In your daily work with Spycer they should be of
no use.
Before applying anything of the following please refer to section “Troubleshooting” on page A-2 to see whether it is really
necessary.
8.4.1 The SpycerAgent Script/Tool
When a local content management is enabled, the SpycerAgent will be
the most important part of the Spycer application. It is a process (Mac/
Windows: service, Linux: daemon) running in the background of your
system and administering the local data and its database.
Further information about the SpycerAgent can be found in
section “SpycerAgent” on page 2-5.
To administer the background process DVS offers you under Linux and
Mac operating systems a SpycerAgent script and under Windows the
SpycerAgent tool.
The SpycerAgent Script (Linux/Mac)
Under Linux and Mac OS the SpycerAgent process can be administered
via a script. It can be called from any command line by entering:
Linux:
Mac:
8-22
/etc/init.d/spyceragent <command>
/Library/StartupItems/Spycer/SpycerAgent <command>
Miscellaneous
With the SpycerAgent script you can control the SpycerAgent and, for
instance, start or stop it.
The standard operating system tools to administer a background process can be used as well to control the SpycerAgent.
The files IP.conf and Service.conf (see section “Interesting Files and Folders” on page A-9) are configuration files of
the SpycerAgent. By restricting access to them you can deny
other users the possibility to alter the IP or service/daemon
configurations.
To install or deinstall the background process use the Spycer
user interface (Enable/Disable local content management,
see section “The Group ’Watch Folders’” on page 8-13).
The following lists the available commands (<command>) for the
SpycerAgent script:
start
stop
restart
status
When the SpycerAgent is installed as a background
process, it can be started with this command. Afterwards it will be running on your system administering the data and database.
Once the background process is started, it can be
stopped with this command. Afterwards it is no
longer running and the connection to the SpycerNet will be lost. However, after a reboot it will be
started automatically again.
This command stops the process and afterwards
starts it again.
With this command the current state of the
SpycerAgent is returned, i.e. whether it is started or
stopped.
1
2
3
4
5
6
7
The SpycerAgent Tool (Windows)
Under Windows DVS offers you with the SpycerAgent tool a graphical
user interface to administer the service. It can be started by performing
the following:
8
y Select from the START button menu of Windows in the submenu
DVS the entry Maintenance.
A
y From the opening submenu select the entry for the SpycerAgent
tool (for example, All Programs » DVS » Maintenance »
SpycerAgent Tool).
I
This will start the SpycerAgent tool:
8-23
Spycer User Guide
Figure 8-20: The SpycerAgent tool
With the SpycerAgent tool you can control the SpycerAgent and, for instance, start or stop it.
The standard operating system tools to administer a service can
be used as well to control the SpycerAgent.
It provides the following items:
SpycerAgent
This entry field states the path on your system to
the background service as well as its file name. To
select another SpycerAgent you can either enter
another path/file name or use the button to the
right (
) to select one via the opening dialog
window.
ADVANCED…
This button provides the same functionality as the
ADVANCED… button of the general configuration
settings. For a description please refer to section
“The Group ’General’” on page 8-5.
START
After installing the service (button INSTALL) it has
to be started. This can be made with the START
button. Afterwards it will be running on your system administering the data and database.
Once the service is started (button START), it can
be stopped with this button. Afterwards it is no
longer running and the connection to the SpycerNet will be lost. However, after a reboot it will be
started automatically again. A stopping of the service will make the UNINSTALL button available.
STOP
INSTALL
8-24
A service must be installed before it can operate.
This can be done with this button. When the
SpycerAgent is installed, it will be started automatically during the loading of the operating system.
To start it now the button START has to be pressed
(available after an installation of the service).
Miscellaneous
UNINSTALL
To un- or deinstall the service SpycerAgent you
may use this button. Afterwards it will no longer be
started during the loading of the operating system.
The button UNINSTALL will be available once the
service is stopped.
In the middle of the window the current state of the SpycerAgent is detailed. However, when the SpycerAgent tool is running and the state of
the service changes in the meantime, it will not be noticed by the tool
automatically. In this case you have to update the status message as
well as the state of the window by pressing the key [F5] (refresh). Any
changes in the state of the SpycerAgent will be detailed by the status
message and the state of the tool’s controls may change.
8.4.2 The CodeMeter Control Center
CodeMeter is another name for the dongle providing the license for
your Spycer application (see section “License Issues” on page 2-10). It
comes with a control center and web server application for a more detailed configuration of the dongle. This section describes how to access
the CodeMeter Control Center:
1
Because the control center and the web server application
configure the dongle as well as its network capabilities do not
change any of their default configurations unless you are absolutely sure about the outcome, or are instructed to by your
distributor or the DVS service department.
3
The web server application by CodeMeter can be accessed
from the user interface of the CodeMeter Control Center (button WEBADMIN).
You can get further information about the control center as
well as the web server application via the help information
which can be accessed once the user interface of the control
center is displayed.
Accessing the Control Center under Linux
To open the CodeMeter Control Center under Linux perform the following:
y Select from the system menu of Linux the entry Utilities » CodeMeter Control Center.
This will start the user interface of the control center for the dongle.
8-25
2
4
5
6
7
8
A
I
Spycer User Guide
Accessing the Control Center under Mac OS
To open the CodeMeter Control Center on a Mac system perform the
following:
y Select from the Applications folder of Mac OS the entry CodeMeter.app.
This will start the user interface of the control center for the dongle.
Accessing the Control Center under Windows
To open the CodeMeter Control Center under Windows perform the
following:
y Select from the START button menu of Windows in the submenu
CodeMeter the entry CodeMeter Control Center (for example,
All Programs » CodeMeter » CodeMeter Control Center).
This will start the user interface of the control center for the dongle.
8.4.3 Gathering Diagnostic Information
To aid a debugging the Spycer application stores log files which detail
the actions performed by and with the program. You may get asked by
the DVS service department to send in these files in case you experience
operation problems with Spycer. This section explains how to gather
the log files and how to provide DVS with this information.
Gathering the Log Files
To gather the log files stored during your usage of Spycer you have to
access the following directories on your system:
Directory
Details:
8-26
Linux:
/var/opt/DVS/Spycer/log
Mac:
/Library/Application Support/
DVS/Spycer/log
Windows:
C:\Documents and Settings\All
Users\Application Data\DVS\
Spycer\log
The files in this directory log the actions of the built-in
defragmenter (files Defrag-<timestamp>.log, see
also section “Defragmenter” on page 7-4) and of the
SpycerAgent (Agent-<timestamp>.log, see also
section “SpycerAgent” on page 2-5). Only the last ten
files of each log will be kept.
Miscellaneous
Directory
Details:
Linux:
/home/<user>/.DVS/Spycer/log
Mac:
/Users/<user>/Library/Application Support/DVS/Spycer/log
Windows:
C:\Documents and Settings\
<user>\Application Data\DVS\
Spycer\log
When the Spycer user interface is started, a log file is
written detailing all actions performed by and with the
user interface. When exiting Spycer, the log file is finished and saved. Only the last ten files will be kept.
y Locate the files and gather them, for example, in a temporary directory.
When this is done, you can send the log files to DVS.
Sending the Information to DVS
1
Once all log files are gathered and available you may send them to
DVS. If you have retrieved more than one file, it is best to pack them
into an archive file (e.g. *.zip):
2
y Pack the log files in an archive file (e.g. *.zip).
3
y Next locate the archive file and send it to the e-mail address provided by the DVS personnel.
Once your mail is received, the DVS support team will evaluate the information and, if possible, provide you with a solution for your problem.
4
5
6
7
8
A
I
8-27
Spycer User Guide
8-28
Appendix
A
This chapter provides further information about the Spycer application.
First some advice is given to resolve irregularities that may occur when
using Spycer. After that it lists the file formats supported and some interesting files and folders installed or created by Spycer.
1
2
3
4
5
6
7
8
A
I
A-1
Spycer User Guide
A.1 Troubleshooting
The table below lists some errors that may occur during the operation
of Spycer and details how to resolve them:
Error
A contents area of the
browse and search tools
does not show the desired material.
Cause
Solution
The required data is not Move, copy or capture the required data to
stored in the selected di- this directory.
rectory.
The selective view combo box is set to a selective view.
Set the selective view combo box to the
kind of data that you want to display or to
All Files (see section “The Status Bar”
on page 4-9).
Some files (e.g. *.mov) Install the third-party program (see section
require the installation of “System Requirements” on page 1-8) such
third-party programs.
as the QuickTime player.
A network system is visi- The appropriate permisble but provides no data. sions are not given.
No network systems are
displayed in the directory tree of a browsing
pane.
The network/system
combo box is set to display the drives/directories of the local system
only.
The system takes part in the SpycerNet as
well as performs a local content management but browse and search permissions
are not given. Allow at least a browsing and
searching on the system (see section “The
Group ’Permissions’” on page 8-11).
Set the network/system combo box to
Network (see section “The Directory
Tree” on page 4-3).
There are no other Spyc- Either start or install Spycer on another sysers running in the nettem connected to your network and conwork.
figure it for the SpycerNet accordingly (see
section “Getting Started” on page 3-1).
The local Spycer is con- With Spycer running alter the network configured to localhost only. figuration settings from localhost
(127.0.0.1) to the IP address of the network connection that is connected to the
network (see section “The Group ’General’” on page 8-5).
Some network ports are
closed. May be the
cause when no local
drives are displayed as
well.
A-2
The following network ports have to be
open to connect successfully to the SpycerNet: Port 9960 UDP, Port 9961 TCP, Port
9970 UDP, Port 9971 TCP. Set these as exceptions in your firewall settings otherwise
Spycer will be confined to its localhost only
(IP address 127.0.0.1 has to be used).
Appendix
Error
Cause
Solution
No systems/folders are
displayed in the directory trees of the browsing
panes at all.
Spycer is configured to
localhost and the local
content management is
disabled.
With Spycer running alter the network configuration settings from localhost
(127.0.0.1) to the IP address of the network connection that is connected to the
network and/or enable the local content
management (see section “The Group
’General’” on page 8-5).
The SpycerAgent is not
running.
Either close and afterwards re-start the user
interface of Spycer, or use the SpycerAgent
script/tool to get the background process
started (see section “The SpycerAgent
Script/Tool” on page 8-22).
Some network ports are
closed.
The following network ports have to be
open to connect successfully to the SpycerNet: Port 9960 UDP, Port 9961 TCP, Port
9970 UDP, Port 9971 TCP. Set these as exceptions in your firewall settings otherwise
Spycer will be confined to its localhost only
(IP address 127.0.0.1 has to be used).
Spycer runs as Spycer
Basic although a dongle
is connected
You receive an error
message when copying
(moving) data
Your license was available for evaluation reasons only and has
expired.
Get a new non-expiring license from DVS
(see section “License Issues” on
page 2-10).
The dongle has been
plugged in after the user
interface was started.
See section “How to Connect the Dongle
to a Running Computer” on page 2-11.
You tried a copying between different systems
in the network.
For copy procedures the Spycer application
running on the foreign system must be set
to the appropriate access rights (read permissions). Otherwise a copy process will
not be possible. Set the access permissions
of the Spycer application on the other system appropriately.
You tried to copy/move
data to a specially secured location (e.g. on
an SNFS storage).
Access to storage locations may be restricted. To enable accesses of the SpycerAgent
to these locations you have to enter the administrative access permissions via the ADVANCED… button available in the watch
folder configuration settings (see section
“The Group ’Watch Folders’” on
page 8-13).
To troubleshoot license issues the ’About Spycer’ window
provides further details about the license currently assigned to
your application (see section “About” on page 8-20).
A-3
1
2
3
4
5
6
7
8
A
I
Spycer User Guide
A.2 Supported File Formats
Spycer supports over 100 graphic and image file formats. Most are
made available by a special library. For a list of all these file formats see
http://perso.orange.fr/pierre.g/xnview/enformats.html.
The tables in the following list the file formats that are supported by
Spycer directly. They are listed according to their file types: First the video file formats are detailed, then the audio file formats and last but not
least a list of all other file formats supported by Spycer is given.
To be displayed in Spycer some file formats, such as the *.mov
file format, may require the installation of third-party programs
(e.g. the QuickTime player, see section “System Requirements” on page 1-8).
Table A-1: Supported video file formats
Format
Name
File storage
format
Description
BMP
*.bmp
3 × 8 bit RGB
Windows bitmap format. Only uncompressed bitmaps are supported
(no RLE compression).
Cineon
*.cin
3 × 10 bit RGB
10 bit RGB format. Subset of the
ANSI/SMPTE DPX file format. Flexible file format by Kodak, allowing
for variable image headers.
DPX
*.dpx
3 × 8 bit RGB
8 bit RGB file format. SMPTE Standard File Format for digital movingpicture exchange.
3 × 10 bit RGB
10 bit RGB file format. SMPTE Standard File Format for digital movingpicture exchange.
10 bit YUV422
10 bit YUV file format. SMPTE Standard File Format for digital movingpicture exchange.
3 × 12 bit RGB
12 bit RGB file format. SMPTE Standard File Format for digital movingpicture exchange.
4 × 16 bit
RGBA
16 bit RGB file format with key.
SMPTE Standard File Format for digital moving-picture exchange.
3 × 8 bit RGB
8 bit RGB file format of the Joint
Photographic Experts Group. Images are usually stored with lossy compression.
JPEG
A-4
Default
Extension
*.jpg
*.jpeg
Appendix
Table A-1: Supported video file formats (cont.)
Format
Name
JPEG2000
QuickTime
SGI
TGA
TIFF
Default
Extension
*.jp2
*.mov
*.sgi
*.rgb
*.tga
*.tif
*.tiff
File storage
format
Description
3 × 12 bit RGB
12 bit RGB file format. Flexible data
and still image compression standard operating either compressed or
uncompressed.
3 × 16 bit RGB
16 bit RGB file format. Flexible data
and still image compression standard operating either compressed or
uncompressed.
3 × 12 bit XYZ
12 bit XYZ file format. Flexible data
and still image compression standard operating either compressed or
uncompressed.
various (e.g.
RGB or YUV
either compressed or uncompressed +
audio)
Video file format that supports various file storage formats, either compressed or uncompressed. The
whole video clip as well as audio are
stored in one file only (container format). Proprietary streaming video
technology developed by Apple.
3 × 8 bit RGB
8 bit RGB file format. SGI IRIX image format.
3
3 × 16 bit RGB
16 bit RGB file format. SGI IRIX image format.
4
3 × 8 bit RGB
and 4 × 8 bit
RGBA, uncompressed
Targa image format.
3 × 8 bit RGB
and 4 × 8 bit
RGBA
TIFF or Tagged Image File Format in
8 bit RGB with or without key. Highly flexible and platform-independent image format. Not all variants
of this format are supported by
DVS.
3 × 16 bit RGB
and 4 × 16 bit
RGBA
TIFF or Tagged Image File Format in
16 bit RGB with or without key.
Highly flexible and platform-independent image format. Not all variants of this format are supported by
DVS.
1
2
5
A-5
6
7
8
A
I
Spycer User Guide
Table A-1: Supported video file formats (cont.)
Format
Name
yuv
Default
Extension
File storage
format
Description
*.qnt
*.qtl
*.yuv
*.yuv8
8 bit YUV422
Raw 8 bit YUV422 and YUVA4224
and YUVA4224 format.1 This file has no header. The
image format is recognized by the
file size. This is done with a table of
predefined file sizes. Component order UYVY.
*.yuv10
10 bit YUV422 Raw 10 bit YUV422 and YUVA4224
and YUVA4224 format. This file has no header. The
image format is recognized by the
file size. This is done with a table of
predefined file sizes. Component order UYVY. Bits are packed tightly
from left to right for three component samples, then two bits of padding (zero) to fill up to four bytes.
The lines are padded to a multiple of
four bytes. The file is padded to a
multiple of 512 bytes.
*.yuv16
16 bit YUV422
Raw 16 bit YUV422 format.2 This
file has no header. The image format
is recognized by the file size. This is
done with a table of predefined file
sizes. Each component is stored as a
16 bit value in big-endian byte order (left-aligned). Component order
UYVY.
1) 8 bit YUV422 and YUVA4224: 8 bit per component, 16 bit average per pixel
2) 16 bit YUV422 and YUVA4224: 16 bit per component, 32 bit average per
pixel
Table A-2: Supported audio file formats
Format Name
A-6
Default
Extension
Description
aif
aiff
*.aif
*.aiff
Audio interchange format. Platform-independent file format for sound. Capable of
storing multiple mono or stereo channels.
BWF
*.rf64
Broadcast wave format. Platform-independent file format for sound. Extension of the
*.wav format capable of storing multiple
mono or stereo channels and enabling file
sizes of more than 4 GB.
RIFF wave
*.wav
’Resource Interchange File Format’ (RIFF)
for digital audio (waveform) data under
Windows. Capable of storing multiple
mono or stereo channels.
Appendix
Table A-3: Other supported file formats
Format Name
Project file of
DVS video systems
Default
Extension
*.cp
Description
DVS proprietary XML file format detailing
all features of a timeline created with the
CLIPSTER and the Pronto2K.2 /
ProntoHD.2 video system software.
1
2
3
4
5
6
7
8
A
I
A-7
Spycer User Guide
A.3 Keyboard Shortcuts
For a more easy control of Spycer there are various keyboard shortcuts
available which are listed in the table below:
Action
Refresh the view of the directory
tree (must have focus)
Key Action
[F5]
Switch to the search tool of Spycer [Ctrl + F] (Mac: [
Play of video clip in preview area
[Space], [5]
Stop of video clip in preview area
[Space]
Step one (1) frame forward on a
scrub bar (must have focus)
[Right Arrow], [4]
Step one (1) frame backward on a
scrub bar (must have focus)
[Left Arrow], [3]
Step ten (10) frames forward on a
scrub bar (must have focus)
[2]
+ F])
Step ten (10) frames backward on a [1]
scrub bar (must have focus)
Select several items (e.g. files) disjointedly
Hold [Ctrl] key (Mac: [ ]) while
selecting with the mouse
Select a range of adjoining items
(e.g. files)
Hold [Shift] key while selecting
with the mouse
Within the home system: Move
Hold [Alt] key while drag and
material to another location instead drop with the mouse
of copying
Copy selected material to the clipboard
[Ctrl + C] (Mac: [
+ C])
Paste from clipboard to the selected [Ctrl + V] (Mac: [
position/location
+ V])
Delete directories/files from the
storage
[Del]
Close an open window of the Spyc- Linux/Windows only: [Alt + F4]
er application
A-8
Exit Spycer
[Alt + F4] (Mac: [
+ Q])
Open the configuration settings
Mac only: [
+ ,]
Minimize
Mac only: [
+ M]
Open the online help
[F1] (Mac: [
+ Shift + ?])
Appendix
A.4 Interesting Files and Folders
The Spycer application is programed with the best know-how DVS has
to offer in the field of digital video. It provides some files and folders
that may be of interest to the user and/or the system administrator:
Leave the rest of the files in the directories mentioned in the
following as they are. Do not try to run them if they are executables or even delete them. This may cause harm to your
computer system and/or the Spycer application installed.
Folder(s):
log
Location:
Linux:
/var/opt/DVS/Spycer/log and
/home/<user>/.DVS/Spycer/log
Mac:
/Library/Application Support/
DVS/Spycer/log and
1
/Users/<user>/Library/Application Support/DVS/Spycer/log
2
Windows: C:\Documents and Settings\All
Users\Application Data\DVS\
Spycer\log and
3
C:\Documents and Settings\<user>\Application Data\DVS\Spycer\log
Condition: By default available.
Details:
These folders store the log files created by the Spycer application (see section “Gathering Diagnostic Information” on page 8-26).
4
5
6
7
8
A
I
A-9
Spycer User Guide
Folder(s):
proxies
Location:
Linux:
/home/<user>/.DVS/Spycer/proxies
Mac:
/Users/<user>/Library/Application Support/DVS/Spycer/proxies
Windows: C:\Documents and Settings\<user>\Application Data\DVS\Spycer\proxies
Condition: Will be created after the first download of a proxy over
the SpycerNet.
Details:
This folder stores temporarily the proxies that were used
for a preview when a clip from a foreign system is singled
out (see section “General Information about Proxies” on
page 5-4).
File(s):
Agent.cdb and Agent.cdb.bak (backup file)
Location
when
logged in
as admin
(root):
Linux:
/var/opt/DVS/Spycer
Mac:
/Library/Application Support/
DVS/Spycer
Location
when
logged in
as user:
Windows: C:\Documents and Settings\All
Users\Application Data\DVS\
Spycer
Linux:
/home/<user>/.DVS/Spycer
Mac:
/Users/<user>/Library/Application Support/DVS/Spycer
Windows: C:\Documents and Settings\<user>\Application Data\DVS\Spycer
Condition: Will be created when the local content management is
enabled.
Details:
A-10
The database administered by the SpycerAgent and its
backup file. Can be deleted. However, then any virtually
added metadata will be lost and the SpycerAgent will
have to scan the watched folders again which may take
some time and render the system busy. To initiate a new
scan you may have to stop and start the SpycerAgent.
Appendix
File(s):
Agent.conf, IP.conf, Service.conf
Location:
Linux:
/var/opt/DVS/Spycer
Mac:
/Library/Application Support/
DVS/Spycer
Windows: C:\Documents and Settings\All
Users\Application Data\DVS\
Spycer
Condition: Will be created when the local content management is
enabled.
Details:
Configuration files of the SpycerAgent. Do not delete.
Linux/Mac only: By restricting access to the files
IP.conf and Service.conf to ’read only’
you can deny other users the possibility to alter
the IP or service/daemon configurations.
1
2
File(s):
SearchItems.xml
Location
when
logged in
as admin
(root):
Linux:
/var/opt/DVS/Spycer
3
Mac:
/Library/Application Support/
DVS/Spycer
4
Location
when
logged in
as user:
Windows: C:\Documents and Settings\All
Users\Application Data\DVS\
Spycer
Linux:
/home/<user>/.DVS/Spycer
Mac:
/Users/<user>/Library/Application Support/DVS/Spycer
Windows: C:\Documents and Settings\<user>\Application Data\DVS\Spycer
Condition: By default available.
Details:
Contains the parameters for a search in the search tool of
the Spycer application. You may adapt it, for example, to
change the sequence of search parameters in the dropdown list of the very first combo box.
Do not alter this file any further. Otherwise the
search tool may not operate correctly anymore.
A-11
5
6
7
8
A
I
Spycer User Guide
File(s):
BrowserCore.data, BrowserGui.data
Location:
Linux:
/home/<user>/.DVS/Spycer
Mac:
/Users/<user>/Library/Application Support/DVS/Spycer
Windows: C:\Documents and Settings\<user>\Application Data\DVS\Spycer
Condition: Will be created after the first closing of the user interface.
Details:
A-12
These files store the layout of the user interface. They can
be deleted without harm. However, then the program
will start with a default layout. They will be created again
when the program is exited.
I
Index
Cancel selected ....................... 7-13
Content ................................. 3-18
Defrag ..................................... 6-6
Deselect all ............................. 8-12
Edit ...................... 6-3, 6-10, 6-11
end of clip ................................ 5-7
Exclude Folder ...............3-12, 8-15
File ......................... 6-3, 6-5, 6-10
Find ....................................... 4-16
Find it! ..........................4-19, 4-21
frame backward ........................ 5-7
frame forward .......................... 5-7
Header Data ....................6-3, 6-10
Image ...................................... 4-9
Include Folder ................3-12, 8-14
Job List .................................. 7-12
Load ...................................... 4-18
Metadata ................................. 6-1
new directory ........................... 4-5
one directory up ....................... 4-5
Pause selected ........................ 7-13
play ......................................... 5-7
Production ......................6-3, 6-11
Refresh ...........................3-10, 8-6
Refresh list ............................. 7-13
Remove .............. 3-13, 8-13, 8-15
Rename ............................6-6, 7-2
Reset ..............................4-18, 8-5
Resume selected ..................... 7-13
Save ..................... 4-19, 6-4, 6-11
Select all ................................ 8-12
start of clip ............................... 5-7
Text ........................................ 4-9
A
AND search ................................. 4-18
application (open with) ................. 4-10
audio ............................................ 6-6
file formats .............................. A-6
icon of clip ............................... 4-7
metadata ..........................6-6, 8-3
multiple channels ...................... 4-7
text information view ................ 4-7
thumbnail of clip ....................... 4-7
automatic defragmentation ............. 8-9
automatic proxy generation ...... 5-5, 8-9
B
background process ..... 2-5, 3-11, 8-22
bin ............................................. 3-19
binary multiples .............................. 8-3
browse and search area ..........3-17, 4-1
context menu ........................... 4-9
fragmentation degree ................ 7-4
browse and search permission .2-9, 3-14
browse tool ................................... 4-2
icons ....................................... 4-4
usage .................................... 4-13
browsing pane ............................... 4-2
contents area ........................... 4-6
context menu ........................... 4-9
context menu (drag’n’drop) ..... 4-14
status bar ................................. 4-9
thumbnail of still image ............. 4-8
thumbnail of video clip .............. 4-7
busy ......................................4-4, 4-9
button
Add .............................3-13, 8-13
Advanced ................................ 8-7
Browse ...........................4-2, 4-13
Cancel ..................................... 6-4
C
C notation .................. 4-18, 6-11, 7-9
calculator ............................7-10, 8-19
cancel job .................................... 7-13
I-1
1
2
3
4
5
6
7
8
A
I
Spycer User Guide
central server ................................. 2-7
central storage ............................... 2-8
chapter overview ............................ 1-3
client station ...........................1-1, 2-7
clip
audio ................................4-7, 6-6
convert ...........................4-12, 7-8
looped preview ......................... 5-7
metadata ..........................6-6, 8-3
open with .............................. 4-10
play ......................................... 5-7
play original data ...................... 5-6
preview ................................... 5-4
properties ................................ 8-3
proxy ...................................... 5-4
show in browser ..................... 4-10
video ................................4-7, 6-6
codec ............................................ 7-9
CodeMeter .................................. 8-25
control center ......................... 8-25
installation ............................... 3-2
web server ............................. 8-25
colors (fragmentation degree) .......... 7-6
compatibility to older versions .......... 2-8
configuration ................ 3-9, 8-4, 8-18
general settings .................3-9, 8-5
integrated Spycer .................... 3-20
jobs ......................................... 8-8
network ................................... 8-5
network drives ........................ 8-10
overview .................................. 8-4
proxy ...............................5-5, 8-8
remote access permissions ....... 8-11
sequence files ................3-13, 8-13
watch folders ................3-11, 8-13
confirmation of settings .................. 8-5
container format ............. 5-5, 7-8, 8-9
content management ...................... 2-7
disable ..................................... 8-7
enable ............................3-10, 8-7
contents area ........................4-6, 4-20
configuring view ..................... 4-12
selective viewing ....................... 4-9
show folders ........................... 4-12
context menu
after drag and drop ................. 4-14
browse and search area ............. 4-9
of video overlay ........................ 5-6
control center .............................. 8-25
controls
directory .................................. 4-5
preview area ............................ 5-6
I-2
search ....................................4-18
conventions
of screenshots ...........................1-5
of user guide ............................1-4
conversion ........................... 4-12, 7-8
copy .................................. 4-11, 4-13
and SpycerAgent .......................2-6
automatic defragmentation ........8-9
tool .........................................7-7
create proxy ......................... 4-12, 5-5
automatically .................... 5-5, 8-9
D
daemon ............................... 2-5, 8-22
data types .............................. 4-7, 6-6
database .....................2-5, 3-11, A-10
default application (open with) .......4-10
defragmentation ...........................4-12
and SpycerAgent .......................2-6
automatic .................................8-9
of unknown files .......................7-6
SNFS ............................... 7-4, 7-7
start .........................................7-6
defragmenter .................................7-4
delete ................................ 4-11, 4-15
diagnostic information ...................8-26
Digital Intermediate ........................2-2
directory
see also folder
controls ....................................4-5
delete ....................................4-11
hide unwatched folders ............4-12
icon .........................................4-4
new ............................... 4-5, 4-11
one folder up ............................4-5
properties ....................... 4-13, 8-3
state ........................................4-5
thumbnail .................................4-8
tree .........................................4-3
view in contents area ...............4-12
view in directory tree ...............4-12
disable local content management ....8-7
distributed .....................................2-7
dongle ................................. 1-7, 2-10
(DVS-)SAN .............................2-10
CodeMeter ..................... 3-2, 8-25
floating license ........................2-13
information ............................8-21
serial number ..........................8-21
SpycerAgent ...........................2-10
update ...................................2-12
Index
download of proxy ........ 2-9, 3-14, 5-7
drive
icon ........................................ 4-4
properties ................................ 8-3
thumbnail ................................ 4-8
DVS service department ................ 8-26
DVS-SAN ...................................... 1-6
fragmentation ................................ 7-6
colors ...................................... 7-6
frame backward ............................. 5-7
frame forward ................................ 5-7
frame number .......................4-18, 7-2
free disk space ................................ 8-3
fullscreen mode ............................ 8-17
E
G
edit metadata ....................... 6-3, 6-10
permission ......................2-9, 3-14
Edit Tool ....................................... 1-1
enable local content management . 3-10,
general settings .............................. 3-9
generic timecode ............................ 6-7
group list ....................................... 8-5
8-7
essence ....................................... 3-15
exiting the program .............3-23, 8-18
integrated Spycer .................... 3-21
expiration date and time (license) ... 8-21
F
features of variants ......................... 1-7
file
delete .................................... 4-11
extension ..........................7-2, 7-3
header ..................................... 6-6
metadata ..........................6-5, 8-3
open with .............................. 4-10
properties ....................... 4-13, 8-3
show in browser ..................... 4-10
types ................................ 4-7, 6-6
file format ..................................... A-4
audio ......................................A-6
container .................. 5-5, 7-8, 8-9
conversion ......................4-12, 7-8
graphic ....................................A-4
other ....................................... A-7
video .................... 3-13, 8-13, A-4
file format converter .............. 4-12, 7-8
file manager (open with) ............... 4-10
file metadata view ...................6-3, 6-5
fragmentation degree ................ 7-5
firewall .......................................... 2-8
floating license ............................. 2-13
license server .......................... 2-14
folder
see also directory
move to ................................. 4-11
structure .................................. 4-3
foreign system ............................... 4-4
proxy ...............................5-5, 5-7
H
header data view .....................6-3, 6-6
home system .................................. 4-4
1
I
icon .............................................. 4-4
audio clip ................................. 4-7
directory .................................. 4-4
drives ...................................... 4-4
project file ................................ 4-8
still image ................................. 4-8
systems .................................... 4-4
unknown file ............................ 4-8
video clip ................................. 4-7
image
see still image
image sequence ......................7-2, 7-4
as video ........................3-13, 8-13
indexed folders ........................2-5, 2-6
information (diagnostic) ................ 8-26
initial setup .................................... 3-9
finish ..................................... 3-15
installation ..................................... 3-2
under Linux .............................. 3-2
under Mac ............................... 3-4
under Windows ........................ 3-5
instructions
copy ...................................... 4-13
delete files/directories .............. 4-15
exiting program ...................... 3-23
gathering diagnostic info .......... 8-26
installation under Linux .............. 3-2
installation under Mac ............... 3-4
installation under Windows ........ 3-5
move ..................................... 4-14
previewing clips .................5-2, 5-4
I-3
2
3
4
5
6
7
8
A
I
Spycer User Guide
previewing images .................... 5-4
search ................................... 4-20
starting of integrated Spycer .... 3-18
starting under Linux .................. 3-7
starting under Mac .................... 3-7
starting under Windows ............ 3-8
integrated Spycer ..................1-6, 3-18
configuration .......................... 3-20
usage .................................... 3-19
IP address .............................3-10, 8-6
not available ....................3-10, 8-6
M
job list ................................3-17, 7-12
cancel job .............................. 7-13
pause job ............................... 7-13
progress bar ........................... 7-12
refresh list .............................. 7-13
resume job ............................. 7-13
start pending .......................... 7-13
maintenance ................................8-22
media player ..................................2-2
menu bar ........................... 3-16, 8-16
on Mac ..................................8-16
metadata ............................... 6-1, 8-3
display .....................................6-2
edit ............................... 6-3, 6-10
file ...........................................6-5
header data ..............................6-6
production ...............................6-8
show ...................... 4-10, 5-8, 6-2
metadata area ...................... 3-17, 6-1
fragmentation degree ................7-4
minimizing the user interface .........8-18
mounted (mapped) network drives .8-10
move ..........................................4-14
automatic defragmentation ........8-9
to folder .................................4-11
multiple channels (audio) .................4-7
K
N
key chain for Spycer 2-11, 3-2, 3-4, 3-5
key features of Spycer ..................... 2-2
keycode ....................... 6-6, 6-7, 6-10
network .........................................4-4
see also SpycerNet
connection ...............................3-9
disable ........................... 3-10, 8-6
drive ......................................8-10
network configuration ...............8-5
network connection ......... 3-10, 8-6
network drive ................. 2-6, 3-11
ports .............................. 2-8, 3-10
workload ..................................2-8
new directory ....................... 4-5, 4-11
NTFS .............................................4-4
J
L
layout of user interface ........3-22, 8-19
hide unwatched folders ........... 4-12
hide/turn off areas .................. 3-22
license ......................................... 2-10
CodeMeter .....................3-2, 8-25
dongle ................................... 2-10
expiration date and time .......... 8-21
floating license ....................... 2-13
information ............................ 8-21
license server .......................... 2-14
management .......................... 8-19
Spycer Basic ..................2-11, 2-13
SpycerAgent ........................... 2-10
troubleshooting ...................... 8-21
update ................................... 2-12
local reading .........................2-6, 3-11
localhost address ...................3-10, 8-6
log file ....................... 3-7, 3-23, 8-26
log-in ............................................ 2-6
looped preview .............................. 5-7
I-4
O
online ............................................4-9
open with ....................................4-10
operating system ............................1-8
other file formats ........................... A-7
overview
browsing pane ..........................4-2
configuration ............................8-4
integrated Spycer ....................3-18
of chapters ...............................1-3
user interface ..........................3-16
Index
over SpycerNet ......................... 5-5
permissions .....................3-14, 5-5
play original data ...................... 5-6
reload ...................................... 5-6
status ...................................... 5-7
storage location ........................ 8-8
P
password ..................................... 8-10
paste .......................................... 4-11
path ............................................. 4-6
pause job .................................... 7-13
pending job ................................. 7-13
permissions .........................3-14, 8-11
browse and search ........... 2-9, 3-14
edit metadata .................. 2-9, 3-14
proxy .............................3-14, 5-5
read ...............................2-9, 3-15
write .............................. 2-9, 3-15
pixel aspect ratio ............................ 7-9
playing of clip ................................ 5-7
start ........................................ 5-7
stop ........................................ 5-7
ports in the network .............. 2-8, 3-10
post production ....................... 2-2, 2-7
prefix ..................................... 7-2, 7-3
preview area ......................... 3-17, 5-4
controls ................................... 5-6
proxy ...................................... 5-4
proxy status ............................. 5-7
preview controls ............................. 5-6
production metadata view ........6-3, 6-8
program exit .......................3-23, 8-18
integrated Spycer .................... 3-21
program start ................................. 3-7
integrated Spycer .................... 3-18
under Linux ............................. 3-7
under Mac ............................... 3-7
under Windows ........................ 3-8
progress bar ................................ 7-12
project file ..................................... 6-6
icon ........................................ 4-8
metadata ..........................6-6, 8-3
text information view ................ 4-8
thumbnail ................................ 4-8
properties .............................4-13, 8-2
clips ........................................ 8-3
directories ................................ 8-3
files ......................................... 8-3
systems ................................... 8-2
volumes ................................... 8-3
proxy ............................. 1-6, 2-2, 5-4
configuration .................... 5-5, 8-8
create .............................4-12, 5-5
create automatically ........... 5-5, 8-9
download ............... 2-9, 3-14, 5-7
file settings ....................... 5-5, 8-8
from foreign system .................. 5-5
R
read permission .....................2-9, 3-15
recording time .......................7-10, 8-3
refresh ........................................ 4-11
job list .................................... 7-13
remote access permissions ....3-14, 8-11
remote control ............................... 2-9
rename ........................................ 4-11
renaming tool .......................4-11, 7-2
rescan ......................................... 4-11
results area .........................4-16, 4-19
resume job ................................... 7-13
rights management ......................... 2-8
1
2
S
safety margin ................................. 8-3
SAN .............................................. 2-8
dongle ................................... 2-10
save as text .................................. 4-10
search .................................... 4-21
scalable ......................................... 2-7
scaling quality .........................7-9, 8-9
scanning ..... 1-6, 2-5, 2-8, 3-15, 4-11,
7-12
screenshots .................................... 1-5
script (SpycerAgent) ...................... 8-22
scrub bar ....................................... 2-2
cursor ...................................... 5-7
preview area .......5-4, 5-6, 6-3, 6-7
thumbnail .........................4-7, 5-2
search controls ............................. 4-18
search location ............................. 4-17
search parameter area ................... 4-16
search parameters ......................... 4-17
search tool ................................... 4-16
contents area .......................... 4-20
save search as text .................. 4-21
show in browser ..................... 4-21
usage .................................... 4-20
segmentation ................................. 7-6
select all ...................................... 4-10
selective viewing ............................ 4-9
sequence files ......................3-13, 8-13
I-5
3
4
5
6
7
8
A
I
Spycer User Guide
serial number of dongle ................ 8-21
server ............................................ 2-7
service .................................2-5, 8-22
settings confirmation ...................... 8-5
settings pane ................................. 8-5
setup ............................................ 3-9
shortcuts .......................................A-8
show
folders in contents area ............ 4-12
in browser .............................. 4-10
metadata ................ 4-10, 5-8, 6-2
singling out data ............................ 6-2
SNFS .............................. 1-2, 1-6, 4-4
defragmentation ................7-4, 7-7
software structure .......................... 2-4
source timecode ............ 6-6, 6-7, 6-10
Spycer ............................ 1-1, 1-6, 2-2
communication processes .......... 2-4
compatibility to older versions .... 2-8
configuration ............................ 8-4
in this user guide ...............1-5, 1-7
initial setup .............................. 3-9
installation ............................... 3-2
integrated .......................1-6, 3-18
key chain ......... 2-11, 3-2, 3-4, 3-5
key features ............................. 2-2
license ................................... 2-10
maintenance .......................... 8-22
new in this version .................... 1-9
software structure ..................... 2-4
SpycerBox ................................ 1-6
system requirements ................. 1-8
upgrade ................................. 2-11
user interface ........................... 2-5
variants ................................... 1-6
version number ...................... 8-21
web sites ............................... 2-11
Spycer Basic ................................... 1-6
license ..........................2-11, 2-13
Spycer for DVS-SAN ....................... 1-6
SpycerAgent .................................. 2-5
copy ........................................ 2-6
defragmentation ....................... 2-6
dongle ................................... 2-10
license ................................... 2-10
script/tool .............................. 8-22
status ................... 8-6, 8-23, 8-25
watch folders . 2-5, 3-11, 8-5, 8-13
SpycerBox ..................................... 1-6
SpycerNet ................ 1-1, 2-3, 2-6, 2-7
disable ............................3-10, 8-6
IP address .......................3-10, 8-6
I-6
networking ...............................2-8
proxies .....................................5-5
watch folders ........... 2-6, 3-11, 8-5
workload ..................................2-8
starting a pending job ...................7-13
starting of play ...............................5-7
starting of program .........................3-7
integrated Spycer ....................3-18
under Linux ..............................3-7
under Mac ...............................3-7
under Windows ........................3-8
state
included folders ......................8-14
of the drives/directories .............4-5
of the system .................... 4-4, 4-9
SpycerAgent .......... 8-6, 8-23, 8-25
watch folders ..........................8-15
status bar .......................................4-9
still image ......................................6-6
as video ....................... 3-13, 8-13
convert .......................... 4-12, 7-8
icon .........................................4-8
metadata .................................6-6
preview ....................................5-4
text information view ................4-8
thumbnail of image ........... 4-8, 5-2
stopping of play .............................5-7
storage capacity .............................8-3
storage details ................................8-3
storage space ....................... 7-10, 8-3
system
foreign .....................................4-4
home .......................................4-4
icon .........................................4-4
properties .................................8-2
state ................................ 4-4, 4-9
thumbnail .................................4-8
system requirements .......................1-8
T
target group ...................................1-4
task bar .......................................3-20
text information view .............. 4-6, 4-9
audio clip .................................4-7
fragmentation degree ................7-5
project file ................................4-8
still image .................................4-8
unknown file ............................4-8
video clip .................................4-7
text save ......................................4-10
search ....................................4-21
Index
thumbnail
audio clip ................................. 4-7
directory .................................. 4-8
drive ....................................... 4-8
project file ................................ 4-8
still image ......................... 4-8, 5-2
systems ................................... 4-8
unknown file ............................ 4-8
video clip ..........................4-7, 5-2
thumbnail view ............... 4-6, 4-9, 5-2
fragmentation degree ................ 7-5
time .............................................. 8-3
tool ............................................ 8-18
calculator ......................7-10, 8-19
copy ........................................ 7-7
defragmenter ........................... 7-4
file format converter ........4-12, 7-8
license management ............... 8-19
renaming ........................4-11, 7-2
SpycerAgent .......................... 8-23
total disk space .............................. 8-3
tree structure ................................. 4-3
troubleshooting .............................. A-2
license information .................. 8-21
typographical conventions ............... 1-4
U
unknown file
defragmentation ....................... 7-6
icon ........................................ 4-8
text information view ................ 4-8
thumbnail ................................ 4-8
USB port ..................................... 2-10
used disk space .............................. 8-3
user interface ................................. 2-5
hide unwatched folders ........... 4-12
hide/turn off areas .................. 3-22
layout change ...............3-22, 8-19
minimize ................................ 8-18
overview ................................ 3-16
user name ................................... 8-11
V
variants ......................................... 1-6
features ................................... 1-7
video ............................................. 6-6
convert ...........................4-12, 7-8
file formats ............3-13, 8-13, A-4
icon of clip ............................... 4-7
looped preview ......................... 5-7
metadata ..........................6-6, 8-3
play ......................................... 5-7
play original data ...................... 5-6
preview ................................... 5-4
properties ................................. 8-3
proxy ....................................... 5-4
text information view ................ 4-7
thumbnail of clip ................4-7, 5-2
video format ................................ 7-10
video overlay ................................. 5-5
video raster .................................... 8-3
view
file metadata .....................6-3, 6-5
header data .......................6-3, 6-6
items in contents area .............. 4-12
items in directory tree .............. 4-12
production metadata ..........6-3, 6-8
selective ................................... 4-9
text information .................4-6, 4-9
thumbnail ................. 4-6, 4-9, 5-2
volume
icon ......................................... 4-4
properties ................................. 8-3
thumbnail ................................ 4-8
W
watch folders .............. 2-5, 3-11, 8-13
exclude .........................3-12, 8-15
include ..........................3-12, 8-14
web server ................................... 8-25
workload (network) ........................ 2-8
write permission ....................2-9, 3-15
1
2
3
4
5
6
7
8
A
I
I-7
Spycer User Guide
I-8