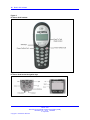
1
Carrier VoIP
Nortel IP Phone WLAN Handset
User Guide (CICM)
Release: CICM 10.1
Document Revision: 04.01
www.nortel.com
NN10042-116
.
Carrier VoIP
Release: CICM 10.1
Publication: NN10042-116
Document status: Standard
Document release date: 4 July 2008
Copyright © 2008 Nortel Networks
All Rights Reserved.
Printed in Canada, the United States of America, and the United Kingdom
LEGAL NOTICE
While the information in this document is believed to be accurate and reliable, except as otherwise expressly
agreed to in writing NORTEL PROVIDES THIS DOCUMENT "AS IS" WITHOUT WARRANTY OR CONDITION OF
ANY KIND, EITHER EXPRESS OR IMPLIED. The information and/or products described in this document are
subject to change without notice.
Nortel, the Nortel logo, Business Made Simple and the Globemark are trademarks of Nortel.
All other trademarks are the property of their respective owners.
.
3
.
Contents
New in this release
Features 9
Other changes 9
Overview 11
IP Phone 221x handset controls 11
IP Phone handset description 12
IP Phone handset controls 18
IP Phone handset display 19
Power off 20
Standby states 20
Active/off-hook state 20
Active/idle state 20
Error state 21
Active call state 21
Push-to-talk state 21
IP Phone handset modes of operation 21
Active 21
Active Idle 22
Config Menu 22
Error 22
Handset Switchover 22
Message Alert 23
Push-to-talk (PTT) 23
Standby 23
IP Phone handset status indicators, icons, and softkeys 24
Inbox 27
Outbox 27
Hardware requirements 28
2245 server 28
Communication Server (CS) 2000 and 2100 28
2246 Application Gateway 28
Access Point (AP) 28
Wireless Security Switch (WSS) 29
UNIStim Security 29
Carrier VoIP
Nortel IP Phone WLAN Handset User Guide (CICM)
NN10042-116 04.01 Standard
4 July 2008
Copyright © 2008 Nortel Networks
.
9
4
WLAN Charger 29
Firmware for the WLAN Handset 6100 Series 29
CICM menu system 33
CICM main menu 33
Logoff 34
Audio 34
Language 34
User 35
History 35
Diagnostics 35
IP Phone WLAN handset menus 37
Function key menu 37
User Option menu 38
Turn the handset on and off
Turning on the handset
Turning off the handset
41
41
42
Logging on
43
Logging off
45
Using the Audio menu
47
Using the main menu
49
Use the CICM Feature menu
51
Navigating the Feature menu 51
Using the Assign menus 52
Labeling a feature key 54
Using the Options menus 54
Auto Hide 56
Resetting the feature keys to their defaults
57
Testing the local mode
59
Using the User menu
Navigating the User information menus
Viewing your user name 62
Enabling Auto Login 62
Viewing your login type 63
Changing your password 63
61
61
Make a call
Using off-hook dialing 65
Using Predial 65
Editing the predial number 66
Redial last number 66
Carrier VoIP
Nortel IP Phone WLAN Handset User Guide (CICM)
NN10042-116 04.01 Standard
4 July 2008
Copyright © 2008 Nortel Networks
.
65
5
Making a call using a headset 67
Answering a call using a headset 67
Making a call using a line 67
Answer a call
69
Answering a call 69
Answering a call while using a headset 69
Call Waiting 70
Ending a call
71
While on an active call
73
Place a call on hold 73
Retrieve a call on hold 74
Call Park 74
Transfer a call 75
Connect calls using Call Join 76
Set up a Conference call 76
Mute a call 77
Unmute a call 77
Record Caller Number 78
Trace a malicious call 78
While away from your desk
79
Call Forward 79
Internal Call Forward 80
Turn off Call Forward 80
Work without interruption
83
Activate Make Set Busy 83
Deactivate Make Set Busy 83
Use the Inbox and Outbox
Using the Inbox 85
Using the Outbox 86
Resetting the Inbox or the Outbox
85
87
Using the User Option menu
Enter an Extension number 89
Select a Language 90
Enable the Lock Key menu 91
Select Phone Options 91
Select Ring Options 95
Silence the Ring 100
View System Information 101
View the alias IP address 101
View the IP address 101
View the server IP address 102
Carrier VoIP
Nortel IP Phone WLAN Handset User Guide (CICM)
NN10042-116 04.01 Standard
4 July 2008
Copyright © 2008 Nortel Networks
.
89
6
View firmware information
View Terminal Type 103
103
Enter text using the dialpad
105
Use the CICM Directory
107
Navigating the directory 107
Adding an entry to the directory 108
Editing a directory entry 109
Deleting a directory entry 109
Making a call using the Directory 110
Additional Call Features
111
Call Charge 111
Enhanced Override 113
Forced Camp-on 114
Privacy Release 114
Push-to-talk 115
Using the Battery Pack
Low battery indicator 120
Removing the battery pack 120
Inserting a battery pack 120
Changing a battery pack during a call
Charging the battery pack 121
119
121
Desktop Charger
123
WLAN Handset 2210 Series Desktop Charger 123
WLAN Handset 6100 Series Desktop Charger 124
Handset maintenance 127
Low power indicators 127
Cleaning the handset 127
Cleaning the handset connector 128
Cleaning the Desktop Charger 128
Cleaning the Desktop Charger connectors 128
Terms you should know
Defining the key type 52
Enabling or disabling the CICM Inbox 53
Configuring Auto Hide 55
Assigning a default DN key 56
Enabling or disabling the CICM Outbox 56
Call Park on the DN 75
Call Park on another DN 75
Select Noise Mode 92
Change the Key Tones 92
Change the Warning Tones 93
Change the Display Contrast 94
Carrier VoIP
Nortel IP Phone WLAN Handset User Guide (CICM)
NN10042-116 04.01 Standard
4 July 2008
Copyright © 2008 Nortel Networks
.
131
7
Change the Keypad Autolock 94
Select Ring Cadence 96
Select Ring Tone 97
Select Ring Volume 98
Select Vibrate Cadence 99
Select Ring Delay 99
Charge a call before dialing a call 111
Charge a call in progress 112
Charge a call when transferring a call 112
Charge a call during a conference call 113
Initiate a PTT call 115
Initiate a PTT option 115
Procedure steps 121
Single Desktop Charger 125
Dual Desktop Charger 125
Quad Desktop Charger 126
Carrier VoIP
Nortel IP Phone WLAN Handset User Guide (CICM)
NN10042-116 04.01 Standard
4 July 2008
Copyright © 2008 Nortel Networks
.
8
Carrier VoIP
Nortel IP Phone WLAN Handset User Guide (CICM)
NN10042-116 04.01 Standard
4 July 2008
Copyright © 2008 Nortel Networks
.
9
.
New in this release
The following sections detail what is new in Nortel IP Phone WLAN
Handset User Guide (CICM), (NN10042-116) for release CICM 10.1.
•
•
"Features" (page 9)
"Other changes" (page 9)
Features
There were no feature changes made to this document.
Other changes
There were no other changes made to this document.
Carrier VoIP
Nortel IP Phone WLAN Handset User Guide (CICM)
NN10042-116 04.01 Standard
4 July 2008
Copyright © 2008 Nortel Networks
.
10 New in this release
Carrier VoIP
Nortel IP Phone WLAN Handset User Guide (CICM)
NN10042-116 04.01 Standard
4 July 2008
Copyright © 2008 Nortel Networks
.
11
.
Overview
This document describes the Nortel IP Phone 2210 Series and 6100
Series wireless handsets. The 2210 Series consists of the Nortel IP
Phone 2210, 2211, and 2212. The 6100 Series consists of the Nortel IP
Phone 6120 and 6140. These wireless handsets bring Voice over Internet
Protocol (VoIP) to the work environment through the WLAN IP Telephony
Manager 2245 server. These handsets access Centrex IP Client Manager
(CICM), which uses Internet Protocol (IP) telephony to integrate voice and
data capabilities. CICM products, and its interactive dependent products,
use Voice over IP (VoIP) technology to deliver central office exchange
service (Centrex) capabilities to users connected to an IP network with a
Call Server 2000 and 2100 (CS2000/2100).
Attention: In this document, the words handset or handsets refer to
the Nortel IP Phone WLAN Handset 2210, WLAN Handset 2211, WLAN
Handset 2212, WLAN Handset 6120, and WLAN Handset 6140.To identify
a specific series of handsets, the series number ending in zero is used.
For example, WLAN Handset 2210 Series and WLAN Handset 6100
Series.To refer to a specific handset, the handset name is used. For
example, to specify Nortel IP Phone WLAN Handset 2210, WLAN Handset
2210 is used.
Navigation
•
•
•
•
•
•
•
•
"IP Phone handset description" (page 12)
"IP Phone handset display" (page 19)
"IP Phone handset modes of operation" (page 21)
"IP Phone handset status indicators, icons, and softkeys" (page 24)
"Inbox" (page 27)
"Outbox" (page 27)
"Hardware requirements" (page 28)
"Firmware for the WLAN Handset 6100 Series" (page 29)
IP Phone 221x handset controls
Table 1 "221x handset controls" (page 12) , provides a brief description of
Nortel IP Phone 2210, 2211, 2212 (221x) handset controls.
Carrier VoIP
Nortel IP Phone WLAN Handset User Guide (CICM)
NN10042-116 04.01 Standard
4 July 2008
Copyright © 2008 Nortel Networks
.
12 New in this release
Table 1
221x handset controls
Control
Meaning
Soft keys
Soft keys provide access to all Centrex IP Client Manager (CICM)
menus and services. Two rocker switches (soft keys), located
immediately below the display area, provide the means to select
menu items and perform operations.
Power on/start call
Press to activate the handset and enter the active/on-hook state.
Power off/end call
Press to deactivate the handset and return to the idle (power save)
state.
Dialpad
A standard telephone push-button pad.
MENU
Transitions the handset from the idle state to the active state, or
from the active state to the idle state without going off-hook.
FCN
Function key that provides access to these feature keys:
1. Mute
2. Hold
3. Goodbye
4. Directory
5. Inbox
6. Outbox
LINE
Provides access to the User Options menu: Ring Type, Noise Mode,
Alias IP Address, Current IP Address, Extension, Current Call
Server, Terminal Type.
* and # keys
Navigation keys that function as left and right key, Navigation keys.
Up/Down
Use to navigate up and down through menus.
IP Phone 2211 and 2212 handsets
Push to Talk
When the feature is enabled, the handset can function like a
walkie-talkie.
IP Phone handset description
Nortel IP Phone WLAN Handset 2210 Series and WLAN Handset 6100
Series have the following features:
•
navigation keys:
— on the WLAN Handset 6100 Series dialpad, the five-way Navigation
key cluster and the Enter key are used to navigate and activate the
various menu options
— depending on the current menu, the volume keys on the handset
can double as up and down keys
•
multifield LCD display screen: 4 lines x 18 characters
Carrier VoIP
Nortel IP Phone WLAN Handset User Guide (CICM)
NN10042-116 04.01 Standard
4 July 2008
Copyright © 2008 Nortel Networks
.
IP Phone handset description
•
13
four soft keys
— four programmable layers, accessed through the More key
•
five fixed keys
— power on/start call
— power off/end call
— FCN
— LINE
— Menu (available on WLAN Handset 2210 Series only, the WLAN
Handset 6100 Series uses the Navigation keys)
•
six call processing keys
— Hold
— Goodbye
— Directory
— Inbox
— Mute
— Outbox
•
•
•
headset controls
•
microphone jack (available on WLAN Handset 2211, 2212, and 6140)
headset jack
push-to-talk radio control (available on WLAN Handset 2211, 2212, and
6140)
To identify the location of the keys and the components available on
each wireless handset, see Figure 1 "IP Phone 2210 handset" (page 14)
, Figure 2 "IP Phone 2211 handset" (page 15) , Figure 3 "IP Phone 2212
handset" (page 16) , Figure 5 "IP Phone 6120 handset" (page 17) , and
Figure 6 "IP Phone 6140 handset" (page 17) .
Carrier VoIP
Nortel IP Phone WLAN Handset User Guide (CICM)
NN10042-116 04.01 Standard
4 July 2008
Copyright © 2008 Nortel Networks
.
14 New in this release
Figure 1
IP Phone 2210 handset
Carrier VoIP
Nortel IP Phone WLAN Handset User Guide (CICM)
NN10042-116 04.01 Standard
4 July 2008
Copyright © 2008 Nortel Networks
.
IP Phone handset description
Figure 2
IP Phone 2211 handset
Carrier VoIP
Nortel IP Phone WLAN Handset User Guide (CICM)
NN10042-116 04.01 Standard
4 July 2008
Copyright © 2008 Nortel Networks
.
15
16 New in this release
Figure 3
IP Phone 2212 handset
Figure 4
IP Phone 2210 Series Navigation keys
Carrier VoIP
Nortel IP Phone WLAN Handset User Guide (CICM)
NN10042-116 04.01 Standard
4 July 2008
Copyright © 2008 Nortel Networks
.
IP Phone handset description
Figure 5
IP Phone 6120 handset
Figure 6
IP Phone 6140 handset
Carrier VoIP
Nortel IP Phone WLAN Handset User Guide (CICM)
NN10042-116 04.01 Standard
4 July 2008
Copyright © 2008 Nortel Networks
.
17
18 New in this release
IP Phone handset controls
The following table provides a brief description of the Nortel IP Phone
2210, 2211, 2212, 6120, and 6140 wireless handset controls. See Table 2
"IP Phone handset controls" (page 18) .
Table 2
IP Phone handset controls
Control
Meaning
Softkeys
WLAN Handset 2210 Series:
Softkeys provide access to all Centrex IP Client Manager (CICM)
menus and services. Two rocker switches (softkeys), located
immediately below the display area, provide the means to select
menu items and perform operations.
WLAN Handset 6100 Series:
Softkeys are located immediately below the liquid crystal display
(LCD) display area. The LCD indicator changes, based on the
softkey function. Use the four softkeys to activate the displayed
softkey feature.
Power on/Start call
Press Start to activate the handset and enter the active/on-hook
state.
Power off/End call
Press End to deactivate the handset and return to the idle (power
save) state. In this state, you can recharge the battery pack.
Dialpad
A standard telephone push-button pad.
MENU
Transitions the handset from the idle state to the active state, or
from the active state to the idle state without going off-hook. For the
WLAN Handset 6100 Series, use the Navigation keys and Enter to
access the Menu.
FCN
Function key provides access to the following feature keys:
1. Mute
2. Hold
3. Goodbye
4. Directory
5. Inbox
6. Outbox
7. Services
8. Quit
9. Copy
Carrier VoIP
Nortel IP Phone WLAN Handset User Guide (CICM)
NN10042-116 04.01 Standard
4 July 2008
Copyright © 2008 Nortel Networks
.
IP Phone handset display
19
Table 2
IP Phone handset controls (cont’d.)
Meaning
Control
Depending on the presence of an optional messaging application,
the FCN key can also provide message browsing functionality.
LINE
Provides access to the User Option menu: Ring Type, Noise Mode,
Alias IP Address, Current IP Address, Extension, Current Call
Server, Terminal Type.
Line emulates the feature keys on an i2004 desktop.
Features activated by Line are locally programmed and may or may
not be available in any given facility.
* and # keys
Used for third party applications, such as, text messaging. Also
when adding an entry to the CICM directory that require symbols,
not represented by numbers 0 to 9.
Up/Down
Use to navigate up and down through menus.
IP Phone 2211, 2212, and 6140 handsets
Push-to-Talk (PTT)
When the Push-to-Talk (PTT) feature is enabled, the handset can
function as a walkie-talkie.
IP Phone handset display
The liquid crystal display (LCD) is divided into three main areas:
•
Top — displays status indicators for various handset conditions, for
example, message waiting (envelope icon) and battery level. It is
referred to as the status bar.
•
Middle — displays a 4 line x 19 character text area with information
about handset identity, user profile, calls in progress, menu options,
and data from telephone. Lines longer than 19 characters are truncated
using an algorithm that first removes spaces and punctuation, then
vowels, then consonants, moving from right to left.
•
Bottom — displays the softkey labels, see Figure 7 "IP Phone 2210
Series display area" (page 20) . A soft label is a maximum of 4
characters long.
Carrier VoIP
Nortel IP Phone WLAN Handset User Guide (CICM)
NN10042-116 04.01 Standard
4 July 2008
Copyright © 2008 Nortel Networks
.
20 New in this release
Figure 7
IP Phone 2210 Series display area
Power off
The handset is turned off. In this state, the handset is not registered with
the call server. Press the Power Off/End Call key for 2 seconds to change
to this state.
In this state, you can recharge the battery pack.
Standby states
In this state, the handset is online, but it is inactive. The handset is still in
communication with the call server, can receive calls, and can access the
User Option menu, but the handset conserves battery power. To perform
other operations, the handset must be in the active/off-hook state.
The handset automatically returns to the standby state if no key is
pressed for a period of 10 seconds. This is the default timeout for the
active/off-hook state.
In this state, you can recharge the battery pack.
Active/off-hook state
This state is equivalent to a wired telephone that is off-hook. The handset
transitions to the active/off-hook state when the handset is in the standby
or active/idle state and you press the Power On/Start Call key.
Active/idle state
This state is equivalent to a wired telephone that is idle. The handset
transitions to idle state in one of two ways.
•
The handset receives an incoming call while it is in the standby state,
which also causes the handset to ring.
•
You press the key on the handset to access the User Options menu,
which causes the transition.
Carrier VoIP
Nortel IP Phone WLAN Handset User Guide (CICM)
NN10042-116 04.01 Standard
4 July 2008
Copyright © 2008 Nortel Networks
.
IP Phone handset display
21
The handset does not ring in this state.
The handset must be brought into the active/idle state before you can
perform any action, or access the CICM functionality. In the active/idle
state, the handset display is active and displays a message EXT-----,
and you hear a loud ring from the handset.
When the phone is in the on-hook state, the MENU, FCN, and LINE keys
are active. The handset remains active as long as a menu is selected or a
soft key is pressed. The timeout does not apply.
Error state
The handset transitions to this state if it loses the signal from the call
server. If the handset regains the signal within approximately 20 seconds,
it returns to the state it was in when it lost the signal. If the signal is lost for
more than 20 seconds, the handset restarts and transitions to the standby
state.
Active call state
The handset transitions to this state when you make or answer a call, and
remains in this state for the duration of the call.
Push-to-talk state
The handset transitions to this state with the first Push-to-talk transmission,
and ends after there has been two-way radio traffic on the channel for
10 seconds. While in this state, you cannot use the keypad for any other
functions, but you can receive and place calls.
IP Phone handset modes of operation
This section describes the modes of operation for the Nortel IP Phone
WLAN Handset 2210 Series and WLAN Handset 6100 Series.
Active
Active mode is equivalent to a wired telephone that is off-hook. The
handset transitions to Active (off-hook) mode when you make or answer a
call, and remains in this mode for the duration of the call.
If the handset is in Standby or Active Idle mode, press Start to transition to
the Active call. When in Active mode, the handset uses a soft ring.
Carrier VoIP
Nortel IP Phone WLAN Handset User Guide (CICM)
NN10042-116 04.01 Standard
4 July 2008
Copyright © 2008 Nortel Networks
.
22 New in this release
Active Idle
This mode is equivalent to a wired telephone that is on-hook or idle, where
the softkey display area is active but there is no dial tone. The handset
transitions to Active Idle mode in the following ways:
•
•
when the handset receives an incoming call while in Standby mode
from the Standby mode press the Actv softkey, once in Active Idle
mode the feature activation softkeys are displayed
The handset must be in Active Idle mode for the terminal to display the
CICM functionality, menus, and softkey features.
When the phone is in the on-hook state, the MENU, FCN, and LINE keys
are active. The handset remains active as long as a menu is selected or
a softkey is pressed.
Config Menu
The Config Menu is used to set user preferences for the Nortel IP Phone
WLAN Handset 6100 Series wireless handsets. In Config Menu mode, the
handset is on, but cannot make or receive calls.
When the handset is in standby mode, press the Cfg soft key to enter the
Config menu. Scroll through the menu options using the Nav keys. When
an asterisk (*) appears to the left of an option, it indicates that the option
is selected. Press Exit to return to standby mode. Press Back to return
to the previous menu.
Error
The handset transitions to the Error mode if it loses the signal from the call
server. If the handset regains its signal within approximately 20 seconds,
it returns to the same mode when signal lost. If the signal is lost for more
than 20 seconds, the handset restarts and transitions to Standby mode.
Handset Switchover
Handset Switchover occurs when a user on an active call is moving
about, the call switches from AP to AP in the subnet. This changeover is
transparent to the user.
If a wireless handset is out of range of all APs, it waits 20 seconds for
a signal to return. If a signal is not reacquired within 20 seconds, the
wireless handset loses connection with the CICM and any calls are
dropped.
When the wireless handset comes back into range of an AP, it
reestablishes a connection to the CICM and goes through the standard
terminal registration process.
Carrier VoIP
Nortel IP Phone WLAN Handset User Guide (CICM)
NN10042-116 04.01 Standard
4 July 2008
Copyright © 2008 Nortel Networks
.
IP Phone handset display
23
However, if a wireless handset is out of contact with the system for four
seconds (worst case scenario) during ongoing UNIStim messaging, a
UNIStim failure can occur and cause the wireless handset to lose the
UNIStim association with the CICM.
Message Alert
The Nortel IP Phone WLAN Handset 6100 Series wireless handsets
support text messaging applications through the WLAN Application
Gateway 2246. If text messaging functions are programmed, the handset
can receive text messages. While accessing text messages, the handset
is in messaging mode and incoming calls ring by using the second call
ringing sound. The * and # keys can be used to move left to right.
Custom text messaging applications can be programmed for your facility.
This mode is activated through FCN+8, 9, # or * if programmed.
Special configuration is required to enable the handsets to communicate
with the optional WLAN Application Gateway 2246. For more information,
see "2246 Application Gateway" (page 28).
Push-to-talk (PTT)
The Push-to-talk (PTT) feature is only available on the WLAN Handset
2211, WLAN Handset 2212, and WLAN Handset 6140. With the PTT
feature activated, handsets can operate in a PTT group-broadcast mode
like a two-way radio, in addition to standard telephone operation. These
handsets use channels for incoming and outgoing radio communication.
The WLAN Handset 6140 supports 24 multicast channels with the current
channel saved in memory on the wireless handset.
While PTT is active, the handset is in PTT mode and the keypad cannot
be used for any other functions, however, you can receive and place calls.
Push-to-talk (PTT) is enabled by the system administrator and set up by
the user through the Config Menu options. If the system administrator
disables the PTT feature, the PTT options do not appear in the Config
Menu.
Standby
Standby is the normal mode when the handsets are online but inactive. In
Standby mode, the handset is still in communication with the call server.
The handset can receive calls and access the User Option menu. When
you are in Standby mode, the terminal displays the EXT----- screen. To
perform other operations, the handset must be Active (off-hook).
Carrier VoIP
Nortel IP Phone WLAN Handset User Guide (CICM)
NN10042-116 04.01 Standard
4 July 2008
Copyright © 2008 Nortel Networks
.
24 New in this release
The handset automatically returns to Standby mode if no key is pressed
for a period of 10 seconds. The Standby mode uses less power than the
Active Idle mode.
In Standby mode, you can recharge the battery pack.
IP Phone handset status indicators, icons, and softkeys
This section describes the on-screen status indicators, icons, and softkeys
that appear on the Nortel IP Phone WLAN Handset 2210, 2211, 2212,
6120, and 6140 wireless handsets.
An LCD or LED steady on (not flashing) indicator light beside an extension
number or feature indicates that the item is active. A flashing indicator
light means the line is on hold or the feature is in the process of being
programmed.
The bottom row of the display area displays labels that are associated
with the softkeys. When a softkey is active, a label appears to describe its
function. If you press the softkey, the feature is activated.
The following table shows some of the indicators, icons, and softkeys
available on the wireless handset. These indicators, icons, and softkeys
may not be available on all wireless handsets, check with your system
administrator. See Table 3 "IP Phone handset status indicators, icons, and
softkeys" (page 24) .
Table 3
IP Phone handset status indicators, icons, and softkeys
Indicator light or Icon
Description and Function
Arrows
Up and down arrows are displayed when the menu has additional
options above or below. Left or right arrows are displayed during
editing when the cursor can be moved left or right.
Battery
Indicates the amount of charge that remains in the battery pack. The
icon flashes when the battery level is low and must be recharged.
Located on the status line.
Charging status light
Indicates the charging status.
The indicator light on the Desktop Charger lights only when the
handset is inserted correctly into the connector.
The WLAN Handset 6100 Series Quad Charger has an indicator
light above each occupied bay. The light indicates the charging
status of the battery pack in the bay.
Check mark
Appears beside specific items to indicate that the item is selected.
Download
Indicates that the handset is downloading code. This icon only
appears while the handset is running the over-the-air downloader. It
appears to the right of the signal strength icon on the status line.
Carrier VoIP
Nortel IP Phone WLAN Handset User Guide (CICM)
NN10042-116 04.01 Standard
4 July 2008
Copyright © 2008 Nortel Networks
.
IP Phone handset status indicators, icons, and softkeys
25
Table 3
IP Phone handset status indicators, icons, and softkeys (cont’d.)
Indicator light or Icon
Description and Function
Envelope
Indicates a new voicemail message is waiting or a missed call in the
Inbox. An on-screen message tells you whether you missed a call or
have a message waiting. Located on the status line.
Line
The Line Indicator area displays the line currently in use. Any lines
which are not idle or active (for example, if the line is on hold or
forwarded) have a plus sign (+) in front of the entry for that line.
Located on the status line.
Hold
Indicates that a call is on hold.
Locked
Indicates the keypad is locked.
Message
Indicates an incoming call from a Messaging application.
Mute
Indicates that the microphone is not transmitting sound. The muted
indicator softkey must be pressed to activate this function. Press the
Mute softkey again to unmute the microphone.
No Service
Indicates that you are out of the service coverage area and cannot
receive or place calls. The out-of-service tone plays. Return to the
coverage area to reestablish a connection.
Push-to-talk (PTT) and
Priority PTT
Indicates an incoming PTT call, on the WLAN Handset 2211, 2212,
and 6140.
The priority PTT ring icon indicates an incoming call on the priority
PTT channel. This call overrides all other calls.
Signal Strength
Gives a visual indication (from weak to strong) of the signal strength
to the handset. A series of symbols is used.
Speakerphone
Indicates when the speakerphone is active, on the WLAN Handset
6100 Series.
Telephone
Indicates a regular incoming telephone call.
Softkey label
Description and Action
Back
Go Back
Returns to the previous menu display.
Bkspc
Backspace
Clears the selected entry to the left of the curser without clearing all
the characters. Appears when you create a Label.
CAPS or caps
Change case
Toggles to allow a change in case when you enter alphabetical text.
Cfg
Configure
Opens the Config menu.
Clr
Clear
Deletes the entry.
Carrier VoIP
Nortel IP Phone WLAN Handset User Guide (CICM)
NN10042-116 04.01 Standard
4 July 2008
Copyright © 2008 Nortel Networks
.
26 New in this release
Table 3
IP Phone handset status indicators, icons, and softkeys (cont’d.)
Indicator light or Icon
Description and Function
Cncl
Cancel
Returns to the previous menu display without saving any data
entered.
Del
Delete
Deletes the characters to the right of the cursor.
Done
Finished
Exits a list when more than one selection is possible.
Down
Down
Scrolls down through the items displayed.
Exit
Exit
Exits the menus.
Help
Help
Accesses online help for additional information.
Lock
Lock keys
Locks the keypad, press Cfg + Enter.
Menu
Menu
Accesses the main Menu options.
No
Negative reply
Confirms a negative response to a prompt or displayed question.
Ok
Okay
Selects the highlighted item on the display area.
Play
Play
Plays the selected ring tone.
Prof
Profile
Opens the Profile menu.
Redl
Redial
Displays a list of the last 10 numbers entered.
Spdc
Speed-dial
Opens the list of speed-dial numbers.
Spkr
Speakerphone
Toggles the speakerphone function.
Unlk
Unlock keys
Unlocks a locked keypad, press Cfg + Unlk.
Up
Up
Returns to the previous menu or scrolls up through the items
displayed.
Carrier VoIP
Nortel IP Phone WLAN Handset User Guide (CICM)
NN10042-116 04.01 Standard
4 July 2008
Copyright © 2008 Nortel Networks
.
Outbox
27
Table 3
IP Phone handset status indicators, icons, and softkeys (cont’d.)
Indicator light or Icon
Description and Function
USB
Active USB
Displays when the handset is being configured by the USB port of
the dual charger.
Yes
Positive reply
Confirms a positive response to a prompt or displayed question.
Inbox
To use the Inbox feature, you must assign it to a directory number (DN)
key. For example, you have two DNs, 1111 and 2222. If you assign 1111
as the Inbox, all calls to that number are logged to the Inbox but calls to
2222 are not.
After you assign the Inbox to a DN key, the handset logs all incoming calls
to that number. The system logs the incoming key number, time, and date.
If the duration of the call is longer than two seconds, the system captures
the display as it appeared when the call was received.
A maximum of six DN keys can be assigned to the Inbox.
The Inbox can store a maximum of 10 calls. When the maximum is
reached, the oldest call is dropped. Calls appear in the list in order in
which they were received, with the most recent call at the top of the list.
Use the up and down navigation keys to scroll through the list.
In the handset display, calls in the Inbox are tagged with a phone icon that
appears on the left side of the Inbox screen. The off-hook icon indicates
that you answered the call, and envelope icon indicates a missed call.
The Inbox call display consists of a time or date stamp and a name and
number. A time stamp appears beside calls you receive on the same
day on which you view the Inbox. A date stamp appears beside calls that
arrived prior to the day of viewing.
Outbox
To use the Outbox feature, you must assign it to a directory number (DN)
key. After you assign the Outbox to a DN, the handset logs all outgoing
calls from that number. The system logs the outgoing key number, time,
and date. If the duration of the call is more than two seconds, the system
captures the display as it appeared when the call was made.
Carrier VoIP
Nortel IP Phone WLAN Handset User Guide (CICM)
NN10042-116 04.01 Standard
4 July 2008
Copyright © 2008 Nortel Networks
.
28 New in this release
The Outbox can store a maximum of 10 calls. When the maximum is
reached the oldest call is dropped. Calls appear in the list in the order they
were received, with the most recent call at the top of the list. Use the up
and down navigation keys to scroll through the list.
The Outbox call list consists of a time or date stamp and a name and
number. A time stamp appears beside calls you made on the same day on
which you view the Outbox. A date stamp appears beside calls you made
prior to the day of viewing. If no name or number was extracted from the
display of the outgoing call, the dialed number is displayed.
Only one DN key can be assigned to the Outbox.
Hardware requirements
To operate the Nortel IP Phone WLAN Handset 2210 Series and WLAN
Handset 6100 Series wireless handsets, they require a 2245 server,
CS2000/2100, 2246 Application Gateway, Access Point, WLAN Security
Switch (WSS), and WLAN Chargers.
2245 server
The WLAN IP Telephony Manager 2245 server acts as a proxy to provide
service to the wireless handset. The 2245 server should be connected to
the same subnet as the wireless handsets.
Communication Server (CS) 2000 and 2100
The Nortel IP Phone WLAN Handset 2210 Series and WLAN Handset
6100 Series require a CS2000 or CS2100. The WLAN Handset 2210
Series call server requires SN09 or SE09 software release. The WLAN
Handset 6100 Series call server requires SN10.1 or later software release.
2246 Application Gateway
The WLAN Application Gateway 2246 is an optional device that provides
an access gateway to enable third-party role-based applications, hosted
off a dedicated application server, to communicate directly with wireless
handsets.
For more information about the WLAN Application Gateway 2246, see
Nortel Wireless Server 2245-Installation and Configuration Guide (CICM),
(NN10300-126).
Access Point (AP)
The Nortel IP Phone WLAN Handset 2210 Series and WLAN
Handset 6100 Series use Voice over IP (VoIP) technology on IEEE
802.11-compliant Wireless Local Area Networks (WLANs). Access Points
Carrier VoIP
Nortel IP Phone WLAN Handset User Guide (CICM)
NN10042-116 04.01 Standard
4 July 2008
Copyright © 2008 Nortel Networks
.
Firmware for the WLAN Handset 6100 Series
29
(AP) use radio frequencies to transmit signals to and from the wireless
handsets. For best quality of service (QoS) performance the Access Point
should be SpectraLink Voice Priority (SVP)-compliant.
Wireless Security Switch (WSS)
The Wireless Security Switch acts as an aggregation point for multiple
access points or ports, as well as, a gateway from the Wireless LAN into
the wired LAN. Wireless Security Switches allow the handset to roam from
subnet to subnet while retaining its IP address.
UNIStim Security is not supported, all IP traffic from the access point
onwards (into the wired LAN) is not encrypted.
UNIStim Security
UNIStim Security is not supported, all IP traffic from the access point (AP)
onward (into the wired LAN) is not encrypted.
WLAN Charger
The wireless handset comes with a charger to recharge the battery pack.
You must have the Nortel Networks WLAN Handset Desktop Charger
appropriate for the model of handset.
The WLAN Handset 6100 Series Chargers have three models: Single slot,
Dual-slot, and Quad-slot. The Dual-slot charger has a USB port.
Firmware for the WLAN Handset 6100 Series
Unlike previous generations of WLAN handsets, the WLAN Handset 6100
Series has its own dedicated software, firmware load version 115.xyz.
The WLAN Handset 6100 Series handset software is stored in flash
memory and can be upgraded in two different ways:
•
Over-the-air transfer of firmware updates from a designated TFTP
server to the wireless handsets:
The download function in the wireless handset checks the firmware
version every time the wireless handset is turned on. If there is any
difference in the firmware version, the wireless handset immediately
begins to download the update.
If the TFTP Server cannot be reached at the time the wireless handset
is powered on, resets, or comes back into a WLAN service area, the
wireless handset tries a few times to contact the TFTP Server, after
which it reverts to using the existing firmware.
•
Direct download from a PC via USB port:
When the handset is docked in the dual charger cradle, software
images can be downloaded into the phone. This method is especially
useful for test terminals, but not advisable for larger deployments.
Carrier VoIP
Nortel IP Phone WLAN Handset User Guide (CICM)
NN10042-116 04.01 Standard
4 July 2008
Copyright © 2008 Nortel Networks
.
30 New in this release
Attention: WLAN Handset 6100 Series firmware cannot be upgraded
over UNIStim. The firmware for these handsets is available on the
CICM-EM, this is to simplify software retrieval for the user.
Therefore, the Firmware Update page has the following disclaimer:
"Terminal downloads for WLAN handsets are not allowed through the
CICM-EM. The Firmware cannot be upgraded via the CICM. Please
use the dedicated TFTP server address provisioned in the terminal
configuration for firmware downloads."
The following figures display examples of the CICM-EM pages modified to
support the WLAN Handset 6100 Series wireless handsets.
Figure 8
CICM-EM Terminal Configuration page for the WLAN Handset 6140
Carrier VoIP
Nortel IP Phone WLAN Handset User Guide (CICM)
NN10042-116 04.01 Standard
4 July 2008
Copyright © 2008 Nortel Networks
.
Firmware for the WLAN Handset 6100 Series
Figure 9
CICM-EM User Profile modification page for the WLAN Handset 6120
Carrier VoIP
Nortel IP Phone WLAN Handset User Guide (CICM)
NN10042-116 04.01 Standard
4 July 2008
Copyright © 2008 Nortel Networks
.
31
32 New in this release
Figure 10
CICM-EM Terminal Audit Results page showing the WLAN 6100 Series handsets
Carrier VoIP
Nortel IP Phone WLAN Handset User Guide (CICM)
NN10042-116 04.01 Standard
4 July 2008
Copyright © 2008 Nortel Networks
.
33
.
CICM menu system
The Centrex IP Client Manager (CICM) menu system provides additional
functions and features to Nortel IP Phone 2210, 2211, 2212, 6120, and
6140 wireless handsets. This section describes the Main Menu system,
Figure 11 "CICM menu hierarchy for IP Phone WLAN Handset" (page 33)
shows a schematic map of the CICM menu system. For procedures on
how to access and use these functions and features, refer to the specific
item in this document.
Figure 11
CICM menu hierarchy for IP Phone WLAN Handset
CICM main menu
After you successfully log on, the menu systems are active and available.
An up or down arrow beside an item indicates the navigation key you can
press to scroll to the next item. Labels appear next to the soft keys, in
response to the item you select on the screen.
Carrier VoIP
Nortel IP Phone WLAN Handset User Guide (CICM)
NN10042-116 04.01 Standard
4 July 2008
Copyright © 2008 Nortel Networks
.
34 New in this release
Logoff
Use this item to log off the IP Phone system.
See "Logging off" (page 45).
Audio
Use this menu item to view and edit your audio profile.
See "Using the Audio menu" (page 47).
Feature
Use the Feature menu to access these submenus:
Assign
Use the Assign menu to:
•
•
define the key type
enable and disable the Inbox
IP Phone WLAN Handset 2210 Series and WLAN Handset 6100 Series
have only one page of feature keys. The Autoscroll feature is therefore
not supported.
See "Using the Assign menus" (page 52).
Label
Use the Label item to change a label associated with a feature key.
See "Labeling a feature key" (page 54).
Options
Use the Options menu to:
•
•
•
enable and disable auto hide
define your default feature
enable the Outbox feature
See "Using the Options menus" (page 54).
Reset
Use the Reset item to reset the feature keys to the default settings.
See "Resetting the feature keys to their defaults" (page 57).
Language
Use the Language item to select the language used in the display.
Carrier VoIP
Nortel IP Phone WLAN Handset User Guide (CICM)
NN10042-116 04.01 Standard
4 July 2008
Copyright © 2008 Nortel Networks
.
CICM menu system
See "Select a Language" (page 90).
User
Use the User menu to:
•
•
•
•
view your user name
view your login type
enable or disable auto login feature
change your password
See "Using the User menu" (page 61).
History
Use History menu to:
•
•
reset the Inbox
reset the Outbox
See "Resetting the Inbox or the Outbox" (page 87).
Diagnostics
Use this item to test the local mode.
See "Testing the local mode" (page 59).
Carrier VoIP
Nortel IP Phone WLAN Handset User Guide (CICM)
NN10042-116 04.01 Standard
4 July 2008
Copyright © 2008 Nortel Networks
.
35
36 New in this release
Carrier VoIP
Nortel IP Phone WLAN Handset User Guide (CICM)
NN10042-116 04.01 Standard
4 July 2008
Copyright © 2008 Nortel Networks
.
37
.
IP Phone WLAN handset menus
Nortel IP Phone WLAN Handset 2210 Series and 6100 Series wireless
handsets have a Function (FCN) key that displays a Features menu, a
LINE key that displays the User Option menu, and Softkeys to configure
optional features, in addition to the Centrex IP Client Manager (CICM)
menus.
Navigation
•
•
"Function key menu" (page 37)
"User Option menu" (page 38)
Function key menu
The function key menu has six non-programmable features. Each feature
is associated with a number and selected by entering that number using
the corresponding number on the dialpad.
These features are independent of Centrex IP Client Manager (CICM)
menus and services. For more information about CICM services, see
"Using the main menu" (page 49) and "Use the CICM Feature menu"
(page 51).
The following table describes the services available through the handset
Function key.
Table 4
Function Key menu
Item number
Function name
Description
1
Mute
Allows you to listen to the incoming call without transmitting.
2
Hold
Allows you to suspend an active call without losing it.
3
Goodbye
Changes the state of the handset to active/idle, giving you
access to the Function menu. Useful if you want to make a
call immediately after you complete a call.
Attention: Unless you intend to place another
call immediately, end the call by pressing the power
off key. This transitions to the standby state and
conserves battery power.
4
Directory
Allows you to access your personal contacts directory.
Carrier VoIP
Nortel IP Phone WLAN Handset User Guide (CICM)
NN10042-116 04.01 Standard
4 July 2008
Copyright © 2008 Nortel Networks
.
38 New in this release
Table 4
Function Key menu (cont’d.)
Item number
Function name
Description
5
Inbox
Allows you to access the CICM Inbox.
6
Outbox
Allows you to scroll through the list of calls to: select a call
to dial, view call information, or select a call to store in the
directory.
User Option menu
The User Option menu lets you configure audio features and view system
information on the wireless handset. The fixed-key labeled LINE or a
configured Softkey are used to access the User Option menu.
Table 5
User Option menu
Function name
Description
Extension number
Enables the user to view the extension number for
the handset. This number is used to identify the
handset. It is displayed when the handset is in the
standby state. The Extension option is for display
purposes. You cannot edit this option, see "Enter
an Extension number" (page 89).
Language
For systems that support multiple languages, the
user can select the display language from a list of
supported languages.
Lock Key
Enables the user to lock the handset by using the
Lock Key menu.
Phone Options
Enables the user to control Noise Mode, Key
Tones, Warning Tones, Display Contrast, and
Keypad Autolock. For example, Noise Mode
enables the user to adjust the handset for varying
noise levels within the work environment, see
"Select Noise Mode" (page 92).
Ring Option
The WLAN Handset 6100 Series has additional
ring tones, which are not available on the WLAN
Handset 2210 Series.
Carrier VoIP
Nortel IP Phone WLAN Handset User Guide (CICM)
NN10042-116 04.01 Standard
4 July 2008
Copyright © 2008 Nortel Networks
.
User Option menu
39
Table 5
User Option menu (cont’d.)
Function name
Description
System Information
Alias IP Address: enables the user to view the IP
address currently assigned to the handset by the
call server, see "View the alias IP address" (page
101).
Current Call Server: enables the user to view the
IP address and port number of the call server, see
"View the server IP address" (page 102).
Current IP Address: enables the user to view the
handset’s current IP address, see "View the IP
address" (page 101).
Terminal Type: enables the user to view the PBX
type used by the system, see "View Terminal
Type" (page 103).
Attention: Check with your system administrator for the specific
features that are supported by your WLAN Handset.
Carrier VoIP
Nortel IP Phone WLAN Handset User Guide (CICM)
NN10042-116 04.01 Standard
4 July 2008
Copyright © 2008 Nortel Networks
.
40 New in this release
Carrier VoIP
Nortel IP Phone WLAN Handset User Guide (CICM)
NN10042-116 04.01 Standard
4 July 2008
Copyright © 2008 Nortel Networks
.
41
.
Turn the handset on and off
This section describes the procedures to turn on and off the Nortel IP
Phone WLAN Handset 2210 Series and WLAN Handset 6100 Series
wireless handsets.
To view the location of the keys on a specific handset, go to "Overview"
(page 11).
Navigation
•
•
"Turning on the handset" (page 41)
"Turning off the handset" (page 42)
Turning on the handset
Follow this procedure to turn on the handset.
Procedure Steps
Step
Action
1
Press and hold the Power on/Start call key for 2 seconds.
Two chirps sound.
Release the Power on/Start call key.
2
The in-service tone sounds and the extension number appears
on the display.
The handset is now in standby mode.
--End--
Carrier VoIP
Nortel IP Phone WLAN Handset User Guide (CICM)
NN10042-116 04.01 Standard
4 July 2008
Copyright © 2008 Nortel Networks
.
42 Turn the handset on and off
Turning off the handset
Follow this procedure to turn off the handset.
You cannot turn off the handset while a call is active.
Procedure Steps
Step
Action
1
Press and hold the Power off/End call key for 2 seconds.
One chirp sounds. The handset turns off.
Release the Power off/End call key.
2
--End--
Carrier VoIP
Nortel IP Phone WLAN Handset User Guide (CICM)
NN10042-116 04.01 Standard
4 July 2008
Copyright © 2008 Nortel Networks
.
43
.
Logging on
Follow these steps to log on. You must be logged onto the system to make
or receive calls.
If you are unsure how to use the dialpad to enter text, see "Enter text using
the dialpad" (page 105) before starting this procedure.
Prerequisites
You must be logged out.
Procedure Steps
Step
Action
1
Press the Power on/Start call key.
The handset changes to the standby state.
2
If you have Selective Gateway Login Feature configured on your
system, a screen appears where you can select a gateway.
Press the down arrow to select a gateway (a check mark
indicates the current selection).
3
Press Ok.
The Login screen appears.
Use keys on the dialpad to enter your user name.
4
If your user name is longer than 19 characters, the characters
scroll to the left and an ellipsis appears to the left of the User
name field.
If you make a mistake entering your user name, press Clear and
start again.
Press Ok.
5
The password screen appears.
Use the dialpad to enter your password. For security, the system
displays your password as asterisks.
6
Carrier VoIP
Nortel IP Phone WLAN Handset User Guide (CICM)
NN10042-116 04.01 Standard
4 July 2008
Copyright © 2008 Nortel Networks
.
44 Logging on
If you make a mistake entering your password, press Clear and
start again.
Press Ok.
7
The display shows the options/idle screen.
--End--
Carrier VoIP
Nortel IP Phone WLAN Handset User Guide (CICM)
NN10042-116 04.01 Standard
4 July 2008
Copyright © 2008 Nortel Networks
.
45
.
Logging off
Follow these steps to log off from the system.
Prerequisites
You must be logged on, and the handset must be active.
Procedure Steps
Step
Action
1
From the main menu, select and open Logout.
2
Press Ok.
The logout confirmation screen appears.
Press Yes.
3
--End--
Carrier VoIP
Nortel IP Phone WLAN Handset User Guide (CICM)
NN10042-116 04.01 Standard
4 July 2008
Copyright © 2008 Nortel Networks
.
46 Logging off
Carrier VoIP
Nortel IP Phone WLAN Handset User Guide (CICM)
NN10042-116 04.01 Standard
4 July 2008
Copyright © 2008 Nortel Networks
.
47
.
Using the Audio menu
Follow this procedure to view and edit your audio profile.
The audio profiles available to you depend on those selected by the
system administrator. Contact your administrator for recommended
profiles.
You must have permission to edit the audio profile. If the administrator has
granted you permission, a check mark appears beside the active profile in
the display.
The WLAN Handset 2210 Series and WLAN Handset 6100 Series
terminals do not support the Play DTMF message. This message is sent
by the CICM in response to key hit reports, to instruct the terminal to play
in-band DTMF. If these terminals are required to interwork to a voicemail
system or Interactive Voice Response (IVR), the CICM and GWC audio
profiles must be set up to negotiate RFC2833 in order for key hits to be
detected, such as, PIN codes for voicemail accounts.
Prerequisites
•
•
You must be logged on, and the handset must be active.
The system administrator must grant you permission to edit your audio
profile. A check mark in front of an item indicates that you are in editing
mode.
Procedure Steps
Step
Action
1
From the main menu, select Audio, then select and open Audio
Profile.
The Audio Profile screen appears, showing your audio profile. If
you have permission to edit your profile, a check mark appears
beside the active profile.
If you do not have permission to edit your profile, the procedure
is complete.
Carrier VoIP
Nortel IP Phone WLAN Handset User Guide (CICM)
NN10042-116 04.01 Standard
4 July 2008
Copyright © 2008 Nortel Networks
.
48 Using the Audio menu
2
If you have permission, and you want to edit your audio profile,
press Ok.
3
Use the navigation keys to toggle between enabling and
disabling the Local Area Network functionality.
4
Press OK to save the setting.
--End--
Carrier VoIP
Nortel IP Phone WLAN Handset User Guide (CICM)
NN10042-116 04.01 Standard
4 July 2008
Copyright © 2008 Nortel Networks
.
49
.
Using the main menu
Follow this procedure to access the Centrex IP Client Manager (CICM)
menu of services.
Prerequisites
The handset must be active, and you must be logged on. See "Logging
on" (page 43).
Procedure Steps
Step
Action
1
Press Menu.
The CICM main menu appears.
Use the up and down navigation keys to scroll through menu.
2
--End--
Carrier VoIP
Nortel IP Phone WLAN Handset User Guide (CICM)
NN10042-116 04.01 Standard
4 July 2008
Copyright © 2008 Nortel Networks
.
50 Using the main menu
Carrier VoIP
Nortel IP Phone WLAN Handset User Guide (CICM)
NN10042-116 04.01 Standard
4 July 2008
Copyright © 2008 Nortel Networks
.
51
.
Use the CICM Feature menu
Follow this procedure to access the Centrex IP Client Manager (CICM)
Feature menu. The Feature menu is used to add or edit feature key
associations. See "Using the main menu" (page 49) to access the Feature
menu.
The Feature menu consists of four menu items: Assign, Label, Options,
and Reset.
The CICM administrator assigns the features. Changing your feature key
associations does not create new functionality.
Navigation
•
To navigate the Feature menu, see "Navigating the Feature menu"
(page 51)
•
•
•
•
For Assign, see "Using the Assign menus" (page 52)
For Label, see "Labeling a feature key" (page 54)
For Options, see "Using the Options menus" (page 54)
For Reset, see "Resetting the feature keys to their defaults" (page 57)
Navigating the Feature menu
Follow these steps to navigate the Feature menu.
Prerequisites
You must be logged on, and the handset must be active.
Procedure Steps
Step
Action
1
From the main menu, select and open Feature.
The Feature screen appears.
2
Press Ok.
3
Use up and down navigation keys to select a feature key.
Carrier VoIP
Nortel IP Phone WLAN Handset User Guide (CICM)
NN10042-116 04.01 Standard
4 July 2008
Copyright © 2008 Nortel Networks
.
52 Use the CICM Feature menu
Press Ok to access the list and select an item.
4
Possible items are: Assign, Label, Options, and Reset.
Select an item and press Ok.
5
The screen for that item appears.
Follow the procedure for the selected item.
6
--End--
Using the Assign menus
Follow these procedures to access the Assign menus: Key Type,
AutoScroll, and Inbox.
Prerequisites
The Feature > Assign menu must be displayed.
Procedure Steps
Step
Action
1
From the main menu, open the Feature menu.
2
On the handset, press the key to which you want to assign a
feature.
3
From the Feature menu, select and open Assign.
The Assign menu opens.
Select an item:
4
•
•
Key Type: see "Defining the key type" (page 52)
Inbox: see "Enabling or disabling the CICM Inbox" (page 53)
Attention: The AutoScroll feature is not supported on Nortel
IP Phone WLAN Handset 2210 Series and WLAN Handset 6100
Series wireless handsets.
--End--
Carrier VoIP
Nortel IP Phone WLAN Handset User Guide (CICM)
NN10042-116 04.01 Standard
4 July 2008
Copyright © 2008 Nortel Networks
.
Using the Assign menus 53
Attention: Defining the key type
Procedure Steps
Step
Action
1
Each feature key can be defined in one of two ways: Central
or Local. A feature key defined as Central can have a Centrex
feature, such as Call Forward, assigned to it. A feature key
defined as Local can have a directory entry assigned to
it. By default, all feature keys are defined as Central. For
further information about Centrex features, see Nortel CICM
Fundamentals, (NN10044-111).
From the main menu, open the Feature menu.
A list of the feature keys and their current assignments appears.
Scroll through the list and select they key to change.
2
The Feature submenu appears.
3
Select and open Assign.
4
Press Key Type.
If the key you selected in step 2 is assigned to a Centrex feature,
these soft key labels appear: Key Type and AutoScroll.
If the selected key is assigned to a local feature, these soft key
labels appear: Key Type and Feature.
Attention: The AutoScroll feature is not supported on Nortel
IP Phone WLAN Handset 2210 Series and WLAN Handset 6100
Series wireless handsets.
Press Key Type.
5
The Key Type screen appears. A check mark appears beside
the type currently assigned to the key.
To change the key type, select the key type that does not have a
check mark beside it, and press Ok.
6
--End--
Carrier VoIP
Nortel IP Phone WLAN Handset User Guide (CICM)
NN10042-116 04.01 Standard
4 July 2008
Copyright © 2008 Nortel Networks
.
54 Use the CICM Feature menu
Attention: Enabling or disabling the CICM Inbox
Procedure Steps
Step
Action
1
From the Feature menu, select and open Inbox.
The Inbox screen appears.
Perform one of these actions:
2
•
•
To enable the Inbox, select Enable.
To disable the Inbox, select Disable.
Press Ok.
3
--End--
Labeling a feature key
Follow this procedure to change the label of a feature key.
If you are unsure how to use the dialpad to enter text, see "Enter text using
the dialpad" (page 105) before starting this procedure.
Prerequisites
You must first access the Feature menu. To access the menu, see
"Navigating the Feature menu" (page 51).
Procedure Steps
Step
Action
1
From the Feature menu, select and open Label.
The Label screen appears.
2
Press Clear to delete the label currently associated with the key.
3
Use the dialpad to enter the new label. Press Bksp to
backspace if you need to make a correction.
4
Press Ok to save the entry.
You return to the Feature menu.
--End--
Using the Options menus
Follow these procedures to access the Options menus: Auto Hide, Default
Feature, and Outbox.
Carrier VoIP
Nortel IP Phone WLAN Handset User Guide (CICM)
NN10042-116 04.01 Standard
4 July 2008
Copyright © 2008 Nortel Networks
.
Using the Options menus 55
Prerequisites
You must first access the Feature menu. To access the Feature menu see
"Navigating the Feature menu" (page 51).
Procedure Steps
Step
Action
1
From the Feature menu, select and open Options.
The Options menu appears.
Select a menu item:
2
•
•
•
Auto Hide: see "Configuring Auto Hide" (page 55)
Default Feature: see "Assigning a default DN key" (page 56)
Outbox: see "Enabling or disabling the CICM Outbox" (page
56)
--End--
Configuring Auto Hide
Procedure Steps
Step
Action
1
Follow this procedure to enable or disable the Auto Hide feature.
When you complete this procedure, you must log out, and then
log back in for the functionality to take effect.
For additional information, see "Auto Hide" (page 56).
From the Options menu, select and open Auto Hide.
The Auto Hide screen appears.
Perform one of these steps:
2
•
•
To enable Auto Hide, select Enable.
To disable Auto Hide, select Disable.
Press Ok.
3
A check mark appears beside your selection.
--End--
Carrier VoIP
Nortel IP Phone WLAN Handset User Guide (CICM)
NN10042-116 04.01 Standard
4 July 2008
Copyright © 2008 Nortel Networks
.
56 Use the CICM Feature menu
Assigning a default DN key
Procedure Steps
Step
Action
1
Follow this procedure to assign a directory number (DN) key to
be your default feature.
From the Options menu, select and open Default Feature.
The Default Feature screen appears, with a list of DN keys.
2
Scroll through the list of DN keys and select the one you want to
assign as your default feature key.
3
Press Ok to make this your default key.
--End--
Procedure Steps
Step
Action
Enabling or disabling the CICM Outbox
Procedure Steps
Step
Action
1
From the Options menu, select and open Outbox.
The Outbox screen appears.
Perform one of these steps:
2
•
•
To enable the Outbox, select Enable.
To disable the Outbox, select Disable.
Press Ok.
3
--End--
Auto Hide
The Auto Hide feature is accessed from the Options menu. When you
enable the Auto Hide feature, only those features that are relevant to the
current activity on your phone are shown in the display.
For example, the Call Transfer and Three Way call features can only be
activated when a user has a call in progress. Auto Hide prevents features
such as Call Transfer and Three Way Call from being displayed on a IP
Phone while the user’s line is idle. Instead, Auto Hide will display a feature
provisioned on the user’s line that is relevant to their current call state,
Carrier VoIP
Nortel IP Phone WLAN Handset User Guide (CICM)
NN10042-116 04.01 Standard
4 July 2008
Copyright © 2008 Nortel Networks
.
Resetting the feature keys to their defaults
57
such as Call Forward and Make Set Busy, (which can only be activated
while the user’s line is idle). Conversely, displaying either of these features
against a key while the user is active in a call is not necessary.
Some features are configured to never be hidden, this is because they are
relevant when the user’s line is both idle and active.
The features relevant states are configured by your administrator.
You cannot change the administrator settings for each feature, but you can
enable Auto Hide (to show only the relevant features), or disable Auto Hide
(to show all features all of the time, regardless of their relevance to the
current state of the phone).
To enable or disable the Auto Hide feature, see "Configuring Auto Hide"
(page 55).
Resetting the feature keys to their defaults
Follow this procedure to reset the handset feature keys to the default
settings.
Prerequisites
You must first access the Feature menu. To access this menu see
"Navigating the Feature menu" (page 51).
Procedure Steps
Step
Action
1
From the Feature menu, select and open Reset.
The Reset screen appears.
Press Yes to reset the feature keys to their default settings.
2
--End--
Carrier VoIP
Nortel IP Phone WLAN Handset User Guide (CICM)
NN10042-116 04.01 Standard
4 July 2008
Copyright © 2008 Nortel Networks
.
58 Use the CICM Feature menu
Carrier VoIP
Nortel IP Phone WLAN Handset User Guide (CICM)
NN10042-116 04.01 Standard
4 July 2008
Copyright © 2008 Nortel Networks
.
59
.
Testing the local mode
The Diagnostics menu is mainly used by an administrator for registering
the terminal with a Survivable Remote Gateway.
Follow this procedure to test the local mode.
Prerequisites
•
•
You must be logged on.
Permission to access this menu must permission granted by the
system administrator.
Procedure Steps
Step
Action
1
From the main menu, select and open Diagnostics.
The Diagnostics screen appears. Test Local Mode transitions
the terminal to its S2 for registration with a Survivable Remote
Gateway.
2
Press Ok to access the confirmation screen.
3
Press Ok to enter local test mode, or No to return to the
Diagnostics menu. Press Help for more information.
--End--
Carrier VoIP
Nortel IP Phone WLAN Handset User Guide (CICM)
NN10042-116 04.01 Standard
4 July 2008
Copyright © 2008 Nortel Networks
.
60 Testing the local mode
Carrier VoIP
Nortel IP Phone WLAN Handset User Guide (CICM)
NN10042-116 04.01 Standard
4 July 2008
Copyright © 2008 Nortel Networks
.
61
.
Using the User menu
Follow this procedure to access and use the Centrex IP Client Manager
(CICM) User menu. Use the User menu to:
•
•
•
•
View your user name
•
•
•
•
•
"Navigating the User information menus" (page 61)
Define your login type
Enable the auto-login feature
Change your password
Navigation
"Viewing your user name" (page 62)
"Enabling Auto Login" (page 62)
"Viewing your login type" (page 63)
"Changing your password" (page 63)
Navigating the User information menus
Follow this procedure to access the User submenus.
Prerequisites
You must be logged on and the handset must be active. See "Turning on
the handset" (page 41) and "Logging on" (page 43).
Procedure Steps
Step
Action
1
From the main menu, select the User menu.
The User menu appears.
Carrier VoIP
Nortel IP Phone WLAN Handset User Guide (CICM)
NN10042-116 04.01 Standard
4 July 2008
Copyright © 2008 Nortel Networks
.
62 Using the User menu
Use up and down navigation keys to select an item.
2
•
To view your user name, go to "Viewing your user name"
(page 62).
•
To enable the auto-login feature, go to "Enabling Auto Login"
(page 62).
•
To redefine your login type, go to "Viewing your login type"
(page 63).
•
To change your login password, go to "Changing your
password" (page 63).
Press Ok.
3
--End--
Viewing your user name
Follow this procedure to view your user name.
Prerequisites
The User menu must be displayed. See "Navigating the User information
menus" (page 61).
Procedure Steps
Step
Action
1
From the main menu, open the User menu.
2
From the User menu, select and open Username.
The Username screen appears, showing your user name.
--End--
Enabling Auto Login
Follow this procedure to enable the Auto Login feature.
Any system maintenance activity, such as a firmware upgrade, results in
logging you out of the system. By enabling the Auto Login feature, you
are automatically logged into the IP Client Manager when the terminal is
available again.
You must have sufficient permission to enable this feature.
Prerequisites
The User menu must be displayed. See "Navigating the User information
menus" (page 61).
Carrier VoIP
Nortel IP Phone WLAN Handset User Guide (CICM)
NN10042-116 04.01 Standard
4 July 2008
Copyright © 2008 Nortel Networks
.
Changing your password
63
Procedure Steps
Step
Action
1
From the User menu, select and open Auto Login.
The AutoLogin screen appears.
2
Use the navigation key to select Enabled.
3
Press Ok.
--End--
Viewing your login type
Follow this procedure to view your login type.
Nortel IP Phone WLAN Handset 2210 Series and WLAN Handset 6100
Series wireless handsets can operate in one of two login types:
•
Unique — the ability to join a session when the m6350 Softclient is not
enabled.
•
Joint — the ability to operate in a joint session when the m6350
Softclient is enabled.
In this scenario, the handset always adopts the Master position, in
their Master Slave relationship, which implies that all audio is rooted to
the physical set. The handset behaves the same as any other wired
IP Phone, it does not support a joint session with another physical
terminal.
Prerequisites
The User menu must be displayed. See "Navigating the User information
menus" (page 61).
Procedure Steps
Step
Action
1
From the User menu, select and open Login Type.
2
Use the navigation keys to view the Unique screen and the
Joint screen.
A check mark indicates the current selection.
--End--
Changing your password
Follow this procedure to change your log on password.
Carrier VoIP
Nortel IP Phone WLAN Handset User Guide (CICM)
NN10042-116 04.01 Standard
4 July 2008
Copyright © 2008 Nortel Networks
.
64 Using the User menu
If you are unsure how to use the dialpad to enter text, see "Enter text using
the dialpad" (page 105) before you start this procedure.
Prerequisites
The User menu must be displayed. See "Navigating the User information
menus" (page 61).
Procedure Steps
Step
Action
1
With the User menu displayed, scroll through the list and select
and open Password.
The Password screen appears.
2
Use the dialpad to enter your current password.
3
In the same screen, use the dialpad to enter the new password.
4
Press Ok.
Use the new password the next time you log on.
--End--
Carrier VoIP
Nortel IP Phone WLAN Handset User Guide (CICM)
NN10042-116 04.01 Standard
4 July 2008
Copyright © 2008 Nortel Networks
.
65
.
Make a call
This section describes the features associated with making a call and their
respective procedures for Nortel IP Phone WLAN Handset 2210 Series
and Nortel IP Phone WLAN Handset 6100 Series handsets. In this section,
the features pertain to both handsets unless otherwise specified.
To view the location of the keys and the headset jack, go to "Overview"
(page 11) and select the specific handset.
Navigation
•
•
•
•
•
•
•
"Using off-hook dialing" (page 65)
"Using Predial" (page 65)
"Editing the predial number" (page 66)
"Redial last number" (page 66)
"Making a call using a headset" (page 67)
"Answering a call using a headset" (page 67)
"Making a call using a line" (page 67)
Using off-hook dialing
Follow this procedure to make a call.
Procedure Steps
Step
Action
1
Press the Power on/Start call key.
2
Use the dialpad to enter the number.
3
Press the Power off/End call key when you finish the call.
--End--
Using Predial
Follow this procedure to make a call using the Predial feature.
Carrier VoIP
Nortel IP Phone WLAN Handset User Guide (CICM)
NN10042-116 04.01 Standard
4 July 2008
Copyright © 2008 Nortel Networks
.
66 Make a call
Procedure Steps
Step
Action
1
Press the MENU key.
The handset state changes from idle to the active/on-hook state.
Use the dialpad to enter the number you want to call.
2
The number appears in the display area.
Press OK to dial the number.
3
--End--
Editing the predial number
Follow this procedure to edit a previously entered predial number.
Procedure Steps
Step
Action
1
Press the MENU key.
The handset state changes from idle to the active/on-hook state.
Perform one of the following steps.
2
•
To delete numbers that appear to the right of the cursor,
press Delete.
•
To delete numbers that appear to the left of the cursor, press
Bksp.
•
To quit without editing a number, press Cancel.
Press Ok to dial the number.
3
--End--
Redial last number
Follow this procedure to use the Last Number Redial (Redl) feature on the
WLAN Handset 6100 Series. The Redial feature automatically redials the
last dialed number.
Procedure Steps
Step
Action
1
Press the End button.
2
Press the Actv soft key.
Carrier VoIP
Nortel IP Phone WLAN Handset User Guide (CICM)
NN10042-116 04.01 Standard
4 July 2008
Copyright © 2008 Nortel Networks
.
Making a call using a line
3
Press the Redl soft key.
4
Scroll using the Nav keys to select the number that you wish to
re-dial.
5
Press the Dial soft key.
--End--
Making a call using a headset
Follow this procedure to make a call using the headset.
Procedure Steps
Step
Action
1
Connect the headset to the handset.
2
Go to one of these procedures to complete the call:
•
•
•
"Using off-hook dialing" (page 65)
"Using Predial" (page 65)
"Making a call using a line" (page 67)
--End--
Answering a call using a headset
Follow this procedure to answer a call using the headset.
Procedure Steps
Step
Action
1
Connect the headset to the handset.
2
Press the Power on/Start call key.
--End--
Making a call using a line
Follow this procedure to make a call using a line.
Procedure Steps
Step
Action
1
Press the MENU key.
Carrier VoIP
Nortel IP Phone WLAN Handset User Guide (CICM)
NN10042-116 04.01 Standard
4 July 2008
Copyright © 2008 Nortel Networks
.
67
68 Make a call
The handset state changes from idle to the active/on-hook state
2
Press the LINE key and select the number key that corresponds
to the DN from which you want the call to originate.
3
Use the dialpad to enter the number.
--End--
Carrier VoIP
Nortel IP Phone WLAN Handset User Guide (CICM)
NN10042-116 04.01 Standard
4 July 2008
Copyright © 2008 Nortel Networks
.
69
.
Answer a call
Follow these procedures to answer an incoming call.
Each incoming call causes the wireless handset to ring or vibrate, and
the line number appears and flashes on the display. The name and the
extension may appear, depending on datafill set by the administrator.
See the handset figures in "Overview" (page 11) for the location of the
keys and the headset jack.
Navigation
•
•
•
"Answering a call" (page 69)
"Answering a call while using a headset" (page 69)
"Call Waiting" (page 70)
Answering a call
Follow this procedure to answer a call.
Procedure Steps
Step
Action
1
Press the Power on/Start call key.
2
Answer the call.
--End--
Answering a call while using a headset
Follow this procedure to answer a call while using a headset.
Carrier VoIP
Nortel IP Phone WLAN Handset User Guide (CICM)
NN10042-116 04.01 Standard
4 July 2008
Copyright © 2008 Nortel Networks
.
70 Answer a call
Procedure Steps
Step
Action
1
Press any key on the handset except Power on/Start call, Power
off/End call, soft keys, or keys on the side of the handset.
2
Speak to the caller.
--End--
Call Waiting
The Call Waiting feature alerts you to an incoming call by producing a
tone. The current call is put on hold while you answer the new call. This
feature is available on the Nortel IP Phone WLAN Handset 6100 Series
wireless handset.
Procedure Steps
Step
Action
1
When the incoming call tone sounds while on another call, press
FCN to place the current call on hold.
2
Press the Line button to access the Feature Keys menu.
3
Press the number key that corresponds to the Call Waiting
feature.
To return to the first telephone call, go to Step 4.
Do one of the following:
4
•
•
Select FCN to place the second call on hold, or
Press the End button to end the second call and then press
the Start button to enter the active (idle) state.
5
Press the Line button to access the Feature Keys menu.
6
Press the number key that corresponds to the first call.
The first call that is on hold flashes, so the number indicator for
that line flashes.
--End--
Carrier VoIP
Nortel IP Phone WLAN Handset User Guide (CICM)
NN10042-116 04.01 Standard
4 July 2008
Copyright © 2008 Nortel Networks
.
71
.
Ending a call
Follow this procedure to terminate a call.
Nortel recommends that you end all calls by pressing the Power off/End
call key, even when the far end disconnects first.
To view the location of the key on a handset, go to "Overview" (page 11).
Procedure Steps
Step
Action
1
Press the Power off/End call key.
2
Release the Power off/End call key.
--End--
Carrier VoIP
Nortel IP Phone WLAN Handset User Guide (CICM)
NN10042-116 04.01 Standard
4 July 2008
Copyright © 2008 Nortel Networks
.
72 Ending a call
Carrier VoIP
Nortel IP Phone WLAN Handset User Guide (CICM)
NN10042-116 04.01 Standard
4 July 2008
Copyright © 2008 Nortel Networks
.
73
.
While on an active call
Follow these procedures to put a call on hold, transfer a call, or use
Conference Call features.
See the handset figures in "Overview" (page 11) for the location of the
keys.
Navigation
•
•
•
•
•
•
•
•
•
•
"Place a call on hold" (page 73)
"Retrieve a call on hold" (page 74)
"Call Park" (page 74)
"Transfer a call" (page 75)
"Connect calls using Call Join" (page 76)
"Set up a Conference call" (page 76)
"Mute a call" (page 77)
"Unmute a call" (page 77)
"Record Caller Number" (page 78)
"Trace a malicious call" (page 78)
Place a call on hold
Follow this procedure to place a call on hold. The Hold feature allows you
to suspend a call without terminating it. Use the Hold feature when talking
on one line and another call arrives on a second line.
Procedure Steps
Step
Action
1
To activate the Hold function, press FCN key.
2
Select the Hold soft key.
Carrier VoIP
Nortel IP Phone WLAN Handset User Guide (CICM)
NN10042-116 04.01 Standard
4 July 2008
Copyright © 2008 Nortel Networks
.
74 While on an active call
The call is on hold. In the display area, Call Held appears, and
the phone number that corresponds to the line on hold flashes in
the upper display area.
Attention: If Automatic Hold is enabled, the active call is
automatically placed on hold when you answer the second call.
--End--
Retrieve a call on hold
Follow this procedure to retrieve a call that is on hold.
Prerequisites
You must have a call on hold.
Procedure Steps
Step
Action
1
Press the LINE key, and press the line number of the call you
wish to retrieve.
This will access the Feature Keys menu in the active (off-hook)
state.
Press Enter.
2
--End--
Call Park
Follow this procedure to use the Call Park feature for the Nortel IP Phone
WLAN Handset 6100 Series wireless handset. Use the Call Park feature to
hold temporarily (park) and retrieve a call from any telephone or handset.
Call Park does not tie up a line and, when configured network-wide, you
can use it across networks. You can configure a System Park Extension to
automatically park most calls.
Carrier VoIP
Nortel IP Phone WLAN Handset User Guide (CICM)
NN10042-116 04.01 Standard
4 July 2008
Copyright © 2008 Nortel Networks
.
Transfer a call
75
Procedure Steps
Step
Action
Call Park on the DN
Procedure Steps
Step
Action
1
To park a call on the System Park DN or your own DN, during an
active call, select the Park soft key.
2
By default, the call is parked on your DN unless a System Park
is enabled to automatically park calls on the system.
--End--
Procedure Steps
Step
Action
Call Park on another DN
Procedure Steps
Step
Action
1
To park a call on a DN other than the System Park DN or your
own DN, select the Park soft key.
2
Enter the DN where you want to park the call.
3
Select the Park soft key again.
--End--
Transfer a call
Follow this procedure to transfer a call to a third party.
Procedure Steps
Step
Action
1
During an active call, press the LINE key.
A list of available features appears.
2
Use the navigation keys to select the Transfer feature.
3
Press Ok.
Carrier VoIP
Nortel IP Phone WLAN Handset User Guide (CICM)
NN10042-116 04.01 Standard
4 July 2008
Copyright © 2008 Nortel Networks
.
76 While on an active call
The caller is put on hold, and you hear a dial tone. An icon
appears beside the Transfer item in the LINE menu, indicating
that the call is transferred.
4
Use the dialpad to enter the number to which to transfer the call.
5
When that number rings or is answered, press the LINE key and
select the Transfer feature again.
The call is transferred.
If you put a call on hold to answer and transfer a call, press the
LINE key and select the line you put on hold.
6
The original call is active.
--End--
Connect calls using Call Join
Follow this procedure to connect calls using the Call Join feature. If you
are on one call while you have another caller on hold, you can merge the
parties to create a conference between the two callers and yourself.
Procedure Steps
Step
Action
1
While on a call, press and hold the FCN key and select 3wc, or
press the Conference softkey and Line button.
2
Press the number key of the call that you want to connect to your
current call.
3
To merge the calls, press and hold the FCN key and select 3wc
again, or press the Conference softkey a second time.
The person on hold has joined the conversation.
--End--
Set up a Conference call
Follow this procedure, using the Conference feature, to set up a
conference call for three people (or a maximum of six people, depending
on your handset configuration), including yourself.
Prerequisites
You must be on an active call.
Carrier VoIP
Nortel IP Phone WLAN Handset User Guide (CICM)
NN10042-116 04.01 Standard
4 July 2008
Copyright © 2008 Nortel Networks
.
Unmute a call
77
Procedure Steps
Step
Action
1
Press and hold the FCN key and select 3wc, or press the
Conference softkey.
The caller is put on hold and a you hear a dial tone.
2
Dial the number of the person you want to add to the call. At this
time, you can talk privately to the person before you add them to
the conference call.
3
Press and hold the FCN key and select 3wc a second time to
merge the parties, or press the Conference softkey a second
time to merge the parties.
4
If necessary, repeat the procedure until all the required people
are in the conference.
--End--
Mute a call
Follow this procedure to mute a call. Muting prevents the transmission of
sounds by the handset.
Procedure Steps
Step
Action
1
Press the FCN key.
The Hidden Keys list appears.
On the dialpad, press the number key that corresponds to the
Mute option.
2
The mute feature is enabled, and Mute appears on the display.
--End--
Unmute a call
Follow this procedure to unmute a call.
Procedure Steps
Step
Action
1
Press the FCN key.
The Feature Keys menu appears
Carrier VoIP
Nortel IP Phone WLAN Handset User Guide (CICM)
NN10042-116 04.01 Standard
4 July 2008
Copyright © 2008 Nortel Networks
.
78 While on an active call
On the dialpad, press the number key that corresponds to the
Mute option.
2
The mute feature is disabled, and Mute disappears from the
display.
--End--
Record Caller Number
Follow this procedure to record a caller’s number for accounting purposes
on the Nortel IP Phone WLAN Handset 6100 Series wireless handset. Use
the Calling Party Number feature to record a caller’s number or to charge a
call to an account number for accounting purposes during an established
call.
Procedure Steps
Step
Action
1
Press the Call Party soft key to place the caller on hold. The
entered number displays.
2
Enter a charge account number or the caller’s number.
3
Press the Call Party soft key to return to the call.
--End--
Trace a malicious call
Follow this procedure to trace a malicious call on the Nortel IP Phone
WLAN Handset 6100 Series wireless handset. Use the Malicious Call
Trace feature to trace nuisance calls within your system.
Procedure Steps
Step
Action
1
To use Call Trace while on a call, press the Line button to
access the Feature Keys menu.
2
Press the number key that corresponds to the Call Trace feature.
--End--
Carrier VoIP
Nortel IP Phone WLAN Handset User Guide (CICM)
NN10042-116 04.01 Standard
4 July 2008
Copyright © 2008 Nortel Networks
.
79
.
While away from your desk
Follow these procedures to receive calls when you are away from your
desk.
For the location of the keys, see the handsets in the section "Overview"
(page 11).
Navigation
•
•
•
"Call Forward" (page 79)
"Internal Call Forward" (page 80)
"Turn off Call Forward" (page 80)
Call Forward
Use Call Forward to send incoming calls to another extension within the
system. You can continue to place outgoing calls from your handset while
the Call Forward is active.
Procedure Steps
Step
Action
1
During an active call, press the FCN key and select Forward.
2
Use the dialpad to enter the number of the DN to which you want
to forward your incoming calls.
3
Press Forward again.
An icon next to the label on the feature key appears on your
display.
--End--
Carrier VoIP
Nortel IP Phone WLAN Handset User Guide (CICM)
NN10042-116 04.01 Standard
4 July 2008
Copyright © 2008 Nortel Networks
.
80 While away from your desk
Internal Call Forward
Follow this procedure to use Internal Call Forward. Use Internal Call
Forward to accept only calls that originate at internal DNs to ring at
another DN. Calls that originate outside your telephone system still ring at
your handset. Current incoming calls cannot be forwarded.
Check with your system administrator whether Internal Call Forward
feature is supported on your handset.
Procedure Steps
Step
Action
1
To forward internal calls, press the Line button to access the
Feature Keys menu.
2
Press the number key that correspond to the Internal Call
Forward feature.
3
Enter the DN to which your internal calls are to be forwarded.
4
Press the Line button to access the Feature Keys menu.
5
Press the number key that corresponds to the Internal Call
Forward feature.
To quit Internal Call Forward, go to Step 6.
6
Press the Line button to access the Feature Keys menu.
7
Press the number key that corresponds to the Internal Call
Forward feature.
To reinstate Call Forward to the same number, go to Step 8.
8
Press the Line button to access the Feature Keys menu.
9
Press the number key that corresponds to the Internal Call
Forward feature twice.
--End--
Turn off Call Forward
Follow this procedure to turn off the Call Forward feature.
Prerequisites
Call forwarding must be activated.
Carrier VoIP
Nortel IP Phone WLAN Handset User Guide (CICM)
NN10042-116 04.01 Standard
4 July 2008
Copyright © 2008 Nortel Networks
.
Turn off Call Forward
Procedure Steps
Step
Action
1
Press the FCN key and select Forward.
2
The icon no longer appears in the display.
--End--
Carrier VoIP
Nortel IP Phone WLAN Handset User Guide (CICM)
NN10042-116 04.01 Standard
4 July 2008
Copyright © 2008 Nortel Networks
.
81
82 While away from your desk
Carrier VoIP
Nortel IP Phone WLAN Handset User Guide (CICM)
NN10042-116 04.01 Standard
4 July 2008
Copyright © 2008 Nortel Networks
.
83
.
Work without interruption
Follow these procedures to enable and disable the Make Set Busy feature.
This feature allows you to work without receiving incoming calls.
For the location of the keys on the handsets, see "Overview" (page 11).
Navigation
•
•
"Activate Make Set Busy" (page 83)
"Deactivate Make Set Busy" (page 83)
Activate Make Set Busy
The Make Set Busy feature provides uninterrupted work time by
responding with a busy signal when the handset receives an incoming call.
Procedure Steps
Step
Action
1
Press the Power On/Start Call key.
2
Press the LINE key.
The Feature Keys menu appears.
3
On the dialpad, press the number key that corresponds to Make
Set Busy.
4
Select Enter.
All incoming calls now receive a busy signal. An icon appears
beside the Make Set Busy option, indicating that the feature is
enabled.
--End--
Deactivate Make Set Busy
Follow this procedure to deactivate the Make Set Busy feature.
Carrier VoIP
Nortel IP Phone WLAN Handset User Guide (CICM)
NN10042-116 04.01 Standard
4 July 2008
Copyright © 2008 Nortel Networks
.
84 Work without interruption
Prerequisites
The Make Set Busy feature must be enabled.
Procedure Steps
Step
Action
1
Press the Power On/Start Call key.
2
Press the LINE key.
The Feature Keys menu appears.
3
On the dialpad, press the number key that corresponds to the
Make Set Busy.
4
Select Enter.
The feature is disabled.
--End--
Carrier VoIP
Nortel IP Phone WLAN Handset User Guide (CICM)
NN10042-116 04.01 Standard
4 July 2008
Copyright © 2008 Nortel Networks
.
85
.
Use the Inbox and Outbox
Follow these procedures to use your Inbox and Outbox.
See the handset figures in "Overview" (page 11) for the location of the
keys.
Navigation
•
•
•
"Using the Inbox" (page 85)
"Using the Outbox" (page 86)
"Resetting the Inbox or the Outbox" (page 87)
Using the Inbox
Follow this procedure to use the Inbox. If you have enabled the Inbox and
assigned it to a directory number (DN) key, an envelope icon appears in
the top left corner of the display if you missed an incoming call. This icon
disappears after you retrieve the message.
You can assign a maximum of six DN keys to the Inbox.
Prerequisites
The handset must be active.
You must have a call in the Inbox.
Procedure Steps
Step
Action
1
Press the FCN key.
2
Use the navigation keys to select Inbox from the menu.
The Inbox screen appears.
Use the navigation keys to scroll through the list and select a
call.
3
Carrier VoIP
Nortel IP Phone WLAN Handset User Guide (CICM)
NN10042-116 04.01 Standard
4 July 2008
Copyright © 2008 Nortel Networks
.
86 Use the Inbox and Outbox
Press Ok.
4
•
•
•
To dial the call, go to step 5.
To view call information, go to step 6.
To store the number in the directory, go to step 7.
Use the navigation keys to select Dial and press Ok.
5
The handset dials the number. The procedure is complete.
Use the navigation keys to select Display and press Ok.
6
The call information appears. The procedure is complete.
Use the navigation keys to select Store.
7
The CICM Directory appears. To add an entry, see "Adding an
entry to the directory" (page 108).
--End--
Using the Outbox
Follow this procedure to use the Outbox.
Prerequisites
You must have assigned the Outbox to a DN key.
Procedure Steps
Step
Action
1
Press the FCN key.
2
Use the navigation keys to select Outbox from the menu.
The Outbox screen appears.
3
Use the navigation keys to scroll through the list and select a
call.
4
Press Ok.
5
Perform one of these actions:
•
•
•
To dial a call, go to step 5.
To view call information, go to step 6.
To store the number in the directory, go to step 7.
Use the navigation keys to select Dial and press Ok.
6
The handset dials the number. The procedure is complete.
Use the navigation keys to select Display and press Ok.
7
The call information appears. The procedure is complete.
Carrier VoIP
Nortel IP Phone WLAN Handset User Guide (CICM)
NN10042-116 04.01 Standard
4 July 2008
Copyright © 2008 Nortel Networks
.
Resetting the Inbox or the Outbox
87
Use the navigation keys to select Store.
8
The CICM Directory appears. To add an entry, see "Adding an
entry to the directory" (page 108).
--End--
Resetting the Inbox or the Outbox
Follow this procedure to access Centrex IP Client Manager (CICM) History
menu, which is used to delete calls from the Inbox or the Outbox. See
"Using the main menu" (page 49) to access the History menu.
Prerequisites
The History screen must be displayed.
Procedure Steps
Step
Action
1
From the main menu, select and open History.
The History screen appears.
2
From the History screen, select Reset Inbox or Reset Outbox.
3
Press Ok.
The calls are deleted.
--End--
Carrier VoIP
Nortel IP Phone WLAN Handset User Guide (CICM)
NN10042-116 04.01 Standard
4 July 2008
Copyright © 2008 Nortel Networks
.
88 Use the Inbox and Outbox
Carrier VoIP
Nortel IP Phone WLAN Handset User Guide (CICM)
NN10042-116 04.01 Standard
4 July 2008
Copyright © 2008 Nortel Networks
.
89
.
Using the User Option menu
Follow these procedures to use User Option menu for the Nortel IP Phone
WLAN Handset 2210 Series and WLAN Handset 6100 Series wireless
handsets.
When the wireless handset is in Standby mode (power is on, but the
handset is not in use), press the Cfg button to display the User Option
menu.
Check with your system administrator for the features that are supported
on your WLAN Handset.
See the handset figures in "Overview" (page 11) for the location of the
keys.
Navigation
•
•
•
•
•
•
•
"Enter an Extension number" (page 89)
"Select a Language" (page 90)
"Enable the Lock Key menu" (page 91)
"Select Phone Options" (page 91)
"Select Ring Options" (page 95)
"View System Information" (page 101)
"View Terminal Type" (page 103)
Enter an Extension number
Follow this procedure to enter an extension number for the wireless
handset. This number is used to identify the handset. It is displayed when
the handset is in the standby state. The Extension option is for display
purposes. You cannot edit this option.
Prerequisites
The handset must be in standby mode.
Carrier VoIP
Nortel IP Phone WLAN Handset User Guide (CICM)
NN10042-116 04.01 Standard
4 July 2008
Copyright © 2008 Nortel Networks
.
90 Using the User Option menu
Procedure Steps
Step
Action
1
Perform one of the following options:
•
press and hold the LINE key, the User Options menu
appears, or
•
while the handset is in standby state, press the Cfg soft key.
2
Use the Up and Down Nav keys to scroll through the list and
select Extension.
3
Press Ok.
The Extension screen appears.
4
Use the dialpad to enter the extension number.
5
Press Save.
6
Perform one of the following actions:
•
to return to the previous menu and choose another option,
press Exit, or
•
to exit all menus and return to standby mode, press the
Power Off/End Call key, or press Exit.
--End--
Select a Language
Follow this procedure to select a language for the wireless handset.
For systems that support multiple languages, you can select the display
language from a list of supported languages.
Procedure Steps
Step
Action
1
While the handset is in standby mode, select the Cfg soft key.
2
Use the Nav buttons to scroll through the menu and highlight
Languages, press Enter.
3
Use the Nav buttons to scroll through the Language menu and
highlight the desired language, press Enter.
Carrier VoIP
Nortel IP Phone WLAN Handset User Guide (CICM)
NN10042-116 04.01 Standard
4 July 2008
Copyright © 2008 Nortel Networks
.
Select Phone Options 91
Do one of the following:
4
•
to return to the previous menu and choose another option,
press Back, or
•
to exit all menus and return to the standby state, press the
End key.
--End--
Enable the Lock Key menu
Follow this procedure to enable the Lock Key menu to lock the wireless
handset.
Procedure Steps
Step
Action
1
To lock the keypad, while the handset is in standby mode,
press the Cfg softkey.
2
Use the Nav keys to scroll through the feature menu and
highlight the Lock Keys feature.
3
Press Enter to lock the keypad.
To unlock the keypad, go to Step 4.
4
While the handset is in standby mode, press the Unlk soft key.
5
Press # to unlock the keypad.
--End--
Select Phone Options
Phone Options presents a menu of choices, such as, Noise Mode, Key
Tones, Warning Tones, Display Contrast, and Keypad Autolock.
•
Noise Mode — enables the user to adjust the handset for different
levels of noise within the work environment. There are three noise
level modes: Normal, High, and Severe. Changing the Noise Mode to
High or Severe adjusts the handset’s microphone and in-ear speaker
volume to account for background noise. Select Normal: for most office
environments; High: for moderate background noise; or Severe: for
extremely noisy conditions. If you use High or Severe modes in a quiet
environment, your caller may find it difficult to hear your voice.
•
•
Key Tones — controls whether pressing a key plays a tone.
Warning Tones — controls whether warning tones are played when
out-of-range or during power up and power down.
Carrier VoIP
Nortel IP Phone WLAN Handset User Guide (CICM)
NN10042-116 04.01 Standard
4 July 2008
Copyright © 2008 Nortel Networks
.
92 Using the User Option menu
•
•
Display Contrast — controls the amount of contrast for the display.
Keypad Autolock — controls automatic locking of the keypad when the
handset is in standby mode.
Prerequisites
The handset must be in standby mode.
Select Noise Mode
Procedure Steps
Step
Action
1
Perform one of the following options:
•
press and hold the FCN key, the User Options menu
appears, or
•
while the handset is in standby state, press the Cfg soft key.
2
Use the Nav keys to scroll through the menu and highlight
Phone Options, press Enter to select the option. The next menu
level is displayed.
3
Use the Up and Down Nav keys to scroll through the list and
select Noise Mode.
4
Press Enter..
The Noise Level submenu appears.
5
Use the Nav keys to scroll through the menu and highlight one
of the following settings (an asterisk [*] indicates the selected
setting): Normal, High, or Severe.
6
Press Ok.
7
Perform one of these actions:
•
to return to the previous menu and choose another option,
press Back, or
•
to exit all menus and return to the standby state, press the
Power Off/End Call key, or press Exit.
--End--
Change the Key Tones
Procedure Steps
Step
Action
1
While the handset is in standby mode, press the Cfg soft key.
Carrier VoIP
Nortel IP Phone WLAN Handset User Guide (CICM)
NN10042-116 04.01 Standard
4 July 2008
Copyright © 2008 Nortel Networks
.
Select Phone Options 93
2
Use the Nav keys to scroll through the list of menu items and
highlight User Profiles.
3
Press Enter to select the setting.
4
Use the Nav keys to scroll through the menu and highlight one
of the following settings (an asterisk [*] indicates the selected
setting): Enable Tones (default), and Disable Tones.
5
Press Enter to choose this setting.
6
Navigate to enable/disable key tones.
7
Press Enter to toggle between Enable/Disable.
8
Do one of the following:
•
to return to the previous menu and choose another option,
press Back, or
•
to exit all menus and return to the standby state, press the
End key.
--End--
Change the Warning Tones
Procedure Steps
Step
Action
1
While the handset is in standby mode, press the Cfg soft key.
2
Use the Nav keys to scroll through the menu and highlight Phone
Options.
3
Press Enter to select the setting.
4
Use the Nav keys to scroll through the menu and highlight
Warning Tones.
5
Press Enter to select the setting.
6
Use the Nav keys to scroll through the menu and highlight one
of the following settings (an asterisk [*] indicates the selected
setting): Enable Warnings (default), and Disable Warnings.
7
Press Enter.
Carrier VoIP
Nortel IP Phone WLAN Handset User Guide (CICM)
NN10042-116 04.01 Standard
4 July 2008
Copyright © 2008 Nortel Networks
.
94 Using the User Option menu
Do one of the following:
8
•
to return to the previous menu and choose another option,
press Back, or
•
to exit all menus and return to the standby state, press the
End key.
--End--
Change the Display Contrast
Procedure Steps
Step
Action
1
While the handset is in the standby state, press the Cfg soft key.
2
Use the Nav keys to scroll through the menu and highlight Phone
Settings.
3
Press Enter to select the menu item.
4
Use the Nav keys to scroll through the menu and highlight
Display Contrast.
5
Press Enter to select the setting.
6
Use the Nav keys to adjust the contrast to a suitable level.
7
Press Enter to save the setting.
8
Do one of the following:
•
to return to the previous menu and choose another option,
press Back, or
•
to exit all menus and return to the standby state, press the
End key.
--End--
Change the Keypad Autolock
Procedure Steps
Step
Action
1
While the handset is in the standby mode, press the Cfg soft key.
2
Use the Nav keys to scroll through the menu and highlight Phone
Settings.
3
Press Enter to select the setting.
Carrier VoIP
Nortel IP Phone WLAN Handset User Guide (CICM)
NN10042-116 04.01 Standard
4 July 2008
Copyright © 2008 Nortel Networks
.
Select Ring Options 95
4
Use the Nav keys to scroll through the menu and highlight
Keypad Autolock.
5
Press Enter to select the setting.
6
Use the Nav keys to scroll through the menu and highlight one
of the following settings (an asterisk [*] indicates the selected
setting): Disable (default), 5 seconds, 10 seconds, and 20
seconds.
7
Press Enter.
8
Do one of the following:
•
to return to the previous menu and choose another option,
press Back, or
•
to exit all menus and return to the standby state, press the
End button.
--End--
Select Ring Options
Follow these procedures to change the ring-tone or any other ring setting.
You must first select a profile, your handset ring behavior is established
by five User Profiles:
•
•
•
•
•
Silent
Vibrate
Loud
Soft
Custom
The currently-active user profile is shown on the standby display. While
the handset is in standby mode, you can change the ring behavior by
pressing Prof and selecting a new profile from the list. The currently-active
profile is marked with an asterisk (*).
Attention: Check with your system administrator for the Ring Options
available on your handset.
The Ring Options menu has the following:
•
Telephone Ring — presents a submenu of choices that you can set:
— Ring Cadence
— Ring Tone (see Note 1)
Carrier VoIP
Nortel IP Phone WLAN Handset User Guide (CICM)
NN10042-116 04.01 Standard
4 July 2008
Copyright © 2008 Nortel Networks
.
96 Using the User Option menu
— Ring Volume
— Vibrate Cadence
— Ring Delay (see Note 2)
•
•
Message Alert 1 — reserved for future use.
Message Alert 2 — reserved for future use.
Note 1: Ring Tone does not appear in the menu when Ring Cadence is
off.
Note 2: Ring Delay does not appear in the menu when Ring Cadence or
Vibrate Cadence is off.
Select Ring Cadence
Procedure Steps
Step
Action
1
While the handset is in standby mode, select the Cfg soft key.
2
Use the Nav keys to scroll to User Profiles.
3
Press Enter to select User Profiles. The next menu level is
displayed.
4
Use the Nav keys to scroll through the menu and highlight one of
the settings. (an asterisk [*] indicates the selected/active setting).
5
Press Enter to select the option.
6
Use the Nav keys to scroll to Ring Settings.
7
Press Enter to select the option.
8
Use the Nav keys to select Telephone Ring.
9
Press Enter to select the option.
10
Use the Nav keys to scroll to Ring Cadence and select one of
the following:
•
•
•
•
•
Off
PBX (default)
Continuous
Short Pulse
Long Pulse
Press Enter to choose the cadence.
11
Carrier VoIP
Nortel IP Phone WLAN Handset User Guide (CICM)
NN10042-116 04.01 Standard
4 July 2008
Copyright © 2008 Nortel Networks
.
Select Ring Options 97
Do one of the following:
12
•
to return to the previous menu and choose another option,
press Back, or
•
to exit all menus and return to the standby state, press the
End key.
--End--
Select Ring Tone
Procedure Steps
Step
Action
1
While the handset is in the standby mode, press the Cfg soft key.
Attention: Ring Tone does not appear in the menu when Ring
Cadence is off.
2
Use the Nav keys to scroll to User Profiles.
3
Press Enter to select User Profiles. The next menu level is
displayed.
4
Use the Nav keys to scroll through the menu and highlight one of
the settings (an asterisk [*] indicates the selected/active setting).
5
Press Enter to select the option.
6
Use the Nav keys to scroll to Ring Tone.
7
Press Enter to select the option.
8
Use the Nav keys to select Telephone Ring.
9
Use the Nav keys to scroll through the menu and select Ring
Tone.
10
Press Enter to select the option.
11
Use the Nav keys to scroll through the list and to highlight one of
the following:
•
•
•
•
•
Tone 1 (default)
Tone 2
Tone 3
Tone 4
Tone 5
Carrier VoIP
Nortel IP Phone WLAN Handset User Guide (CICM)
NN10042-116 04.01 Standard
4 July 2008
Copyright © 2008 Nortel Networks
.
98 Using the User Option menu
12
To play the highlighted setting, press Play.
13
Press Enter to choose the tone.
14
Do one of the following:
•
to return to the previous menu and choose another option,
press Back, or
•
to exit all menus and return to the standby state, press the
End key.
--End--
Select Ring Volume
Procedure Steps
Step
Action
1
While the handset is in the standby mode, press the Cfg soft key.
2
Use the Nav keys to scroll to User Profiles.
3
Press Enter to select User Profiles. The next menu level is
displayed.
4
Use the Nav keys to scroll through the menu and highlight one of
the settings. (an asterisk [*] indicates the selected/active setting).
5
Press Enter to select the option.
6
Use the Nav keys to scroll to Ring Setting.
7
Press Enter to select the option.
8
Use the Nav keys to select Ring Volume.
9
Press Enter to select the option.
10
Do one of the following:
•
to return to the previous menu and choose another option,
press Back, or
•
to exit all menus and return to the standby state, press the
End key.
--End--
Carrier VoIP
Nortel IP Phone WLAN Handset User Guide (CICM)
NN10042-116 04.01 Standard
4 July 2008
Copyright © 2008 Nortel Networks
.
Select Ring Options 99
Select Vibrate Cadence
Procedure Steps
Step
Action
1
While the handset is in standby mode, press the Cfg soft key.
2
Use the Nav keys to scroll to Use Profiles.
3
Press Enter to select the Use Profiles. The next menu level is
displayed.
4
Use the Nav keys to scroll through the menu and highlight one of
the settings (an asterisk [*] indicates the selected/active setting).
5
Press Enter to select the option.
6
Use the Nav keys to scroll to Vibrate Cadence.
7
Press Enter to select the option.
8
Use the Nav keys to highlight one of the following:
•
•
•
•
•
Off (default)
PBX
Continuous
Short Pulse
Long Pulse
9
Press Enter to choose the cadence.
10
Do one of the following:
•
to return to the previous menu and choose another option,
press Back, or
•
to exit all menus and return to the standby state, press the
End key.
--End--
Select Ring Delay
Procedure Steps
Step
Action
1
While the handset is in standby mode, press the Cfg soft key.
Attention: Ring Delay does not appear in the menu when Ring
Cadence or Vibrate Cadence is turned off.
Carrier VoIP
Nortel IP Phone WLAN Handset User Guide (CICM)
NN10042-116 04.01 Standard
4 July 2008
Copyright © 2008 Nortel Networks
.
100
Using the User Option menu
2
Use the Nav keys to scroll to User Profiles.
3
Press Enter to select User Profiles. The next menu level is
displayed.
4
Use the Nav keys to scroll through the menu and highlight one of
the settings (an asterisk [*] indicates the selected/active setting).
5
Press Enter to select the option.
6
Use the Nav keys to scroll to Ring Delay.
7
Press Enter to select the option.
8
Use the Nav keys to highlight one of the following:
•
•
•
No Delay (default)
5 Second Delay
10 Second Delay
9
Press Enter to choose the delay.
10
Do one of the following:
•
to return to the previous menu and choose another option,
press Back, or
•
to exit all menus and return to the standby state, press the
End key.
--End--
Silence the Ring
Follow this procedure to silence the handset ringer.
Procedure Steps
Step
Action
1
When the handset is ringing, press the Power Off/End Call key.
The ringing stops but the call is not interrupted, which gives the
caller the option of leaving a voice mail message.
Release the Power Off/End Call key.
2
--End--
Carrier VoIP
Nortel IP Phone WLAN Handset User Guide (CICM)
NN10042-116 04.01 Standard
4 July 2008
Copyright © 2008 Nortel Networks
.
View System Information
101
View System Information
The System Information displays the following information about the
handset:
•
Phone IP Address — displays the Internet Protocol (IP) address
assigned to the handset.
•
•
Server IP Address — displays the Server IP address.
Firmware Version — displays the software version running on the
handset.
The information in the System Information is for display purposes only.
You cannot edit this information.
View the alias IP address
Follow this procedure to view the IP address currently assigned to the
handset by the call server.
You cannot edit the IP address.
Prerequisites
The handset must be in standby mode.
Procedure Steps
Step
Action
1
Press and hold the LINE key.
The User Options menu appears
2
Use the Up and Down keys to scroll through the list and select
Alias IP Addr.
3
Press Enter.
The IP address appears.
Perform one of these actions:
4
•
•
To return to the previous menu, press Back.
To return the handset to standby mode, press the Power
Off/End Call key, or press Exit.
--End--
View the IP address
Follow this procedure to view the current IP address of the handset.
You cannot edit the IP address.
Carrier VoIP
Nortel IP Phone WLAN Handset User Guide (CICM)
NN10042-116 04.01 Standard
4 July 2008
Copyright © 2008 Nortel Networks
.
102
Using the User Option menu
Prerequisites
The handset must be in standby mode.
Procedure Steps
Step
Action
1
Perform one of the following options:
•
press and hold the LINE key, the User Options menu
appears, or
•
while the handset is in standby state, press the Cfg soft key,
highlight System Information.
2
Use the Up and Down keys to scroll through the menu and select
Phone IPAddress.
3
Press Enter.
The IP address appears.
Perform one of the following:
4
•
•
To return to the previous menu, press Back.
To return the handset to standby mode, press the Power
Off/End Call key, or press Exit.
--End--
View the server IP address
Follow this procedure to view the IP address and port number of the call
server.
You cannot edit the IP address or port number.
Prerequisites
The handset must be in standby mode.
Procedure Steps
Step
Action
1
Perform one of the following options:
•
press and hold the LINE key, the User Options menu
appears, or
•
while the handset is in standby state, press the Cfg soft key,
highlight System Information.
Carrier VoIP
Nortel IP Phone WLAN Handset User Guide (CICM)
NN10042-116 04.01 Standard
4 July 2008
Copyright © 2008 Nortel Networks
.
View Terminal Type
103
2
Press Enter to select the setting.
3
Use the Up and Down keys to scroll through the list and select
Server IP Address.
4
Press Enter.
The Server IP address information appears.
Perform one of the following:
5
•
•
To return to the previous menu, press Back.
To return the handset to standby mode, press the Power
Off/End Call key, or press Exit.
--End--
View firmware information
Follow this procedure to view the hardware identification number (MAC
address), downloader version, function file version, and phint1 file version.
Procedure Steps
Step
Action
1
While the handset is in the standby state, press the Cfg soft key.
2
Use the Nav keys to scroll through the menu and highlight
System Information.
3
Press Enter to select the setting.
4
Use the Nav keys to scroll through the menu and highlight
FirmwareVersion.
5
Press Enter to view the hardware identification number (MAC
address), downloader version, function file version, and phint1
file version.
6
Perform one of the following actions:
•
to return to the previous menu and choose another option,
press Exit, or
•
to exit all menus and return to standby mode, press the
Power Off/End Call key, or press Exit.
--End--
View Terminal Type
Follow this procedure to view the type of public branch exchange (PBX)
terminal the system is using.
Carrier VoIP
Nortel IP Phone WLAN Handset User Guide (CICM)
NN10042-116 04.01 Standard
4 July 2008
Copyright © 2008 Nortel Networks
.
104
Using the User Option menu
You cannot edit this information.
Prerequisites
The handset must be in standby mode.
Procedure Steps
Step
Action
1
Press and hold the LINE key.
The User Options menu appears
2
Use the Up and Down keys to scroll through the list and select
Terminal Type.
3
Press Ok.
The PBX terminal information appears.
Perform one of these actions:
4
•
•
To return to the previous menu, press Back.
To return the handset to standby mode, press the Power
Off/End Call key, or press Exit.
--End--
Carrier VoIP
Nortel IP Phone WLAN Handset User Guide (CICM)
NN10042-116 04.01 Standard
4 July 2008
Copyright © 2008 Nortel Networks
.
105
.
Enter text using the dialpad
Follow this procedure to use the dialpad to enter text.
On the dialpad, keys numbered 2 through 9 each have three letters
associated with them. When entering text, press the key once to enter the
first letter, twice to enter the second letter, and three times to enter the
third letter.
The letters Q and Z do not appear on the dialpad, but are available. Q is
associated with the 7 key, and Z with the 9 key.
Prerequisites
A screen where you can enter text must be active on the handset.
Procedure Steps
Step
Action
1
To enter text, find the number key associated with the letter you
want to enter.
The letter appears on the display.
2
To enter the first letter press the key once.
3
To enter the second letter press the key twice
4
To enter the third letter press the key three times.
--End--
Carrier VoIP
Nortel IP Phone WLAN Handset User Guide (CICM)
NN10042-116 04.01 Standard
4 July 2008
Copyright © 2008 Nortel Networks
.
106
Enter text using the dialpad
Carrier VoIP
Nortel IP Phone WLAN Handset User Guide (CICM)
NN10042-116 04.01 Standard
4 July 2008
Copyright © 2008 Nortel Networks
.
107
.
Use the CICM Directory
Follow these procedures to use the Centrex IP Client Manager (CICM)
Directory feature.
Use the CICM Directory to create a phone directory of names and
numbers. The Personal Directory in the Nortel IP Phone WLAN Handset
2210 Series and the Nortel IP Phone WLAN Handset 6100 Series can
store a maximum of 16 user-defined numbers.
Open the Personal Directory list by selecting FCN from the inactive state
and use the navigation keys. You can add, delete, or edit an entry in the
Personal Directory.
Navigation
•
•
•
•
•
"Navigating the directory" (page 107)
"Adding an entry to the directory" (page 108)
"Editing a directory entry" (page 109)
"Deleting a directory entry" (page 109)
"Making a call using the Directory" (page 110)
Navigating the directory
Follow this procedure to navigate the directory.
Prerequisites
The handset must be active.
Procedure Steps
Step
Action
1
Press the FCN key.
The Function keys menu appears
Use the navigation keys to select Directory.
2
The Directory appears with the list of directory entries displayed.
Carrier VoIP
Nortel IP Phone WLAN Handset User Guide (CICM)
NN10042-116 04.01 Standard
4 July 2008
Copyright © 2008 Nortel Networks
.
108
Use the CICM Directory
3
Use the down navigation key to move to the end of the list.
4
Select the item for the action you want to perform.
5
Press Ok.
•
To add an entry, "Adding an entry to the directory" (page
108).
•
•
•
To edit an entry, "Editing a directory entry" (page 109).
To delete an entry, "Deleting a directory entry" (page 109).
To dial an entry, "Making a call using the Directory" (page
110).
--End--
Adding an entry to the directory
Follow this procedure to add an entry to the directory. The directory stores
a maximum of 16 entries for the Nortel IP Phone WLAN Handset 2210
Series and WLAN Handset 6100 Series wireless handsets. If your entry
requires symbols not represented by numbers 0 to 9, use the * and # keys.
If you are unsure how to enter text using the dialpad, see "Enter text using
the dialpad" (page 105) before you start this procedure.
Prerequisites
The Directory screen must be displayed. To display the screen, see
"Navigating the directory" (page 107).
Procedure Steps
Step
Action
1
From the Directory menu, select New Entry.
2
Press Ok.
The New Entry screen appears.
3
From the New Entry screen, select Number.
4
Use the dialpad to enter the number.
5
Press Ok.
6
From the New Entry screen, select Surname Name, enter the
surname (last) name, and press Ok.
7
From the New Entry screen, select First Name, enter the first
name, and press Ok.
Carrier VoIP
Nortel IP Phone WLAN Handset User Guide (CICM)
NN10042-116 04.01 Standard
4 July 2008
Copyright © 2008 Nortel Networks
.
Deleting a directory entry
109
8
If you want the entry to appear on a Feature key, select Feature
Key on the screen, press Ok, enter the feature key. The entry
should appear, press Ok.
9
From the New Entry screen, select Save.
10
Press Ok.
You are now prompted to confirm the entry before it is saved.
If you press No, the Resume Editing? prompt appears. If you
press Yes, you return to the screen showing the details just
entered.
Press No to exit from the Directory screens.
11
--End--
Editing a directory entry
Follow this procedure to edit a directory entry.
If you are unsure how to enter text using the dialpad, see "Enter text using
the dialpad" (page 105) before you start this procedure.
Prerequisites
The Directory screen must be displayed. To display the screen, see
"Navigating the directory" (page 107).
Procedure Steps
Step
Action
1
From the Directory screen, use the navigation keys to scroll
through the list and select the entry to edit.
2
Press Ok.
The Edit screen appears.
3
On the Edit screen, select the item to edit: Number, Surname,
First Name, or Feature Key Format.
4
Use the dialpad to edit the selection.
5
Press Ok.
6
Repeat step 3 through step 5 for each item you want to edit.
7
On the Edit screen, select Save and press Ok.
--End--
Deleting a directory entry
Follow this procedure to delete a directory entry.
Carrier VoIP
Nortel IP Phone WLAN Handset User Guide (CICM)
NN10042-116 04.01 Standard
4 July 2008
Copyright © 2008 Nortel Networks
.
110
Use the CICM Directory
Prerequisites
The Directory screen must be displayed. To display the screen, see
"Navigating the directory" (page 107).
Procedure Steps
Step
Action
1
With the Directory screen displayed, use the navigation keys to
scroll through the list and select the entry to delete.
2
Press Ok.
A screen appears, asking you to confirm the deletion.
Press Yes.
3
The entry is deleted from the directory.
--End--
Making a call using the Directory
Follow this procedure to dial a number using the directory.
Prerequisites
The Directory screen must be displayed. To display the screen, see
"Navigating the directory" (page 107).
Procedure Steps
Step
Action
1
With the Directory screen displayed, use the navigation keys to
scroll through the list and select the entry to dial.
2
Press Ok.
You are prompted to confirm the call.
Press Yes.
3
The number is dialed.
--End--
Carrier VoIP
Nortel IP Phone WLAN Handset User Guide (CICM)
NN10042-116 04.01 Standard
4 July 2008
Copyright © 2008 Nortel Networks
.
111
.
Additional Call Features
This section describes additional call features available on the Nortel IP
Phone WLAN Handset 6100 Series wireless handset, with the exception
of the Push-to-Talk (PTT) feature. The Push-to-talk (PTT) feature is only
available on the WLAN Handset 2211, WLAN Handset 2212, and WLAN
Handset 6140.
Navigation
•
•
•
•
•
"Call Charge" (page 111)
"Enhanced Override" (page 113)
"Forced Camp-on" (page 114)
"Privacy Release" (page 114)
"Push-to-talk" (page 115)
Call Charge
Follow these procedures to use the Call Charge feature to charge a call to
a specific account. The Forced Charge feature charges long-distance calls
from a handset that is restricted to local calls.
To access these features, press the LINE key to view the Feature Keys
menu.
Charge a call before dialing a call
Procedure Steps
Step
Action
1
To charge a local or long-distance call to an account before you
dial, select the LINE key to view the Features Keys menu.
2
Select the Charge feature key.
3
Enter the charge account number.
4
Press the Charge feature key again.
Carrier VoIP
Nortel IP Phone WLAN Handset User Guide (CICM)
NN10042-116 04.01 Standard
4 July 2008
Copyright © 2008 Nortel Networks
.
112
Additional Call Features
At the tone, dial the number.
5
--End--
Procedure Steps
Step
Action
Charge a call in progress
Procedure Steps
Step
Action
1
To charge a call in progress, first place the call on hold, see
"Place a call on hold" (page 73). Select the LINE key to view the
Features Keys menu.
2
Select the Charge feature key.
3
Enter the charge account number.
4
Press the LINE key to access the Feature Keys menu.
5
Press the number key that corresponds to the line of the call to
return to the call.
--End--
Procedure Steps
Step
Action
Charge a call when transferring a call
Procedure Steps
Step
Action
1
To charge a call to an account when you transfer a call, first
place the call on hold, see "Place a call on hold" (page 73).
Select the LINE key to view the Features Keys menu.
2
Select the Charge feature key.
3
Enter the charge account number.
4
After you hear the dial tone, enter the number to which the call is
to be transferred.
5
Press the Transfer soft key when you hear the handset ring.
Carrier VoIP
Nortel IP Phone WLAN Handset User Guide (CICM)
NN10042-116 04.01 Standard
4 July 2008
Copyright © 2008 Nortel Networks
.
Enhanced Override
113
You can talk privately to the person at the transfer number
before you press the Transfer soft key.
--End--
Procedure Steps
Step
Action
Charge a call during a conference call
Procedure Steps
Step
Action
1
To charge a call to an account when you add someone to a
conference call, first place the call on hold, see "Place a call on
hold" (page 73). Select the LINE key to view the Features Keys
menu.
2
Select the Charge feature key.
3
Enter the charge account number.
4
Enter the number of the person that you want to add to the
conference.
5
Select the Conference soft key.
--End--
Enhanced Override
Follow this procedure to use the Enhanced Override feature to override
an active call after you attempt to use a Forced Camp-on. Use Enhanced
Override to make a simple call or a consultation call (such as placing a call
on hold and calling another party).
Procedure Steps
Step
Action
1
To use Enhanced Override, if you receive a busy signal after
entering a number, press the LINE button to access the Feature
Keys menu.
2
Press the number key that corresponds to the Override feature
to initiate a Forced Camp-on.
If either party on the call disconnects at this time, you hear an
overflow (fast busy/engaged) signal.
Carrier VoIP
Nortel IP Phone WLAN Handset User Guide (CICM)
NN10042-116 04.01 Standard
4 July 2008
Copyright © 2008 Nortel Networks
.
114
Additional Call Features
Press the number key that corresponds to the Override feature
again.
3
The two parties remaining on the call hear an override tone, a
conference call is established between all three participants. If a
participant disconnects, the other two remain connected.
To end the connection, press the End button.
4
--End--
Forced Camp-on
Follow this procedure to use the Forced Camp-on feature to automatically
ring another handset (internal or external) immediately after that handset
disconnects from its current call. Using Forced Camp-on in conjunction
with Priority Override is referred to as Enhanced Override.
Procedure Steps
Step
Action
1
To use Forced Camp-on, if you receive a busy signal after
entering a number, press the LINE button to access the Feature
Keys menu.
2
Press the number key that corresponds to the Override feature
to initiate a Forced Camp-on.
The party that you called receives a tone, and you receive a
ring/ringback signal or busy/engaged signal, depending on the
options chosen. You are now camped-on to the number you
entered.
When the party that you called finishes their call, your handset
automatically enters the number. Both your handset and their
handset ring.
3
To answer a call camped-on to your extension, go to Step 4.
When your handset rings, press the Start button.
4
You can program your handset for either Camp-on or Call
Waiting, but not both.
--End--
Privacy Release
Follow this procedure to use the Privacy Release feature to enable one or
more people who share your DN to join a call.
Carrier VoIP
Nortel IP Phone WLAN Handset User Guide (CICM)
NN10042-116 04.01 Standard
4 July 2008
Copyright © 2008 Nortel Networks
.
Push-to-talk
115
Procedure Steps
Step
Action
1
To use Privacy Release, press the LINE button to access the
Feature Keys menu.
2
Press the Privacy Release feature key during a call. A party
joins the call by pressing the shared number (DN) key on their
handset (Multiple Appearance DN feature).
--End--
Push-to-talk
Follow this procedure to initiate the Push-to-talk (PTT) feature once it has
been enabled by the system administrator. The Push-to-talk (PTT) feature
is only available on the WLAN Handset 2211, WLAN Handset 2212, and
WLAN Handset 6140.
Procedure Steps
Step
Action
Initiate a PTT call
Procedure Steps
Step
Action
1
Press the Push-to-talk button.
Wait for the display to show Transmitting.
Speak into the microphone.
2
Attention: All WLAN Handsets 2211, 2212, and 6140 that are
monitoring the channel can hear the transmission.
To respond to a PTT call, press the Push-to-talk button during
the 10 second wait period.
3
--End--
Carrier VoIP
Nortel IP Phone WLAN Handset User Guide (CICM)
NN10042-116 04.01 Standard
4 July 2008
Copyright © 2008 Nortel Networks
.
116
Additional Call Features
Attention: Initiate a PTT option
Procedure Steps
Step
Action
1
To select a different PTT channel:
Press and release the Push-to-talk (PTT) button.
Select a new channel from the list by scrolling using Nav keys.
To end one PTT call and start another call:
2
Press End to exit the PTT call.
Press Push-to-talk and select a different channel from the list.
Press Push-to-talk to begin to transmit on the new channel.
To receive a PTT call while in a telephone call:
3
Press End to end the telephone call.
You hear the PTT call.
To subscribe to additional PTT channels:
4
Open the Config menu and select Push-to-talk (PTT).
Select Subscribed Channels.
Select the channel that you want to add. Subscribed channels
are marked with an asterisk (*).
To transmit on the priority channel:
5
Press Push-to-talk.
Select the priority channel from the list.
Press Push-to-talk and then speak.
To end a PTT call:
6
Press End to exit the PTT call.
To change PTT volume:
7
Use the Up and Down volume buttons located on the side of the
handset.
To answer a call during a PTT transmission:
8
Press Start. The PTT transmission is preempted by the
telephone call.
To start a telephone call during a PTT transmission:
9
Press Start.
Enter the number that you wish to call. The PTT transmission is
preempted during the telephone call.
To turn off PTT:
10
Carrier VoIP
Nortel IP Phone WLAN Handset User Guide (CICM)
NN10042-116 04.01 Standard
4 July 2008
Copyright © 2008 Nortel Networks
.
Push-to-talk
117
Change to a different profile. Silent and Vibrate disable PTT by
default, or unsubscribe from all PTT channels.
--End--
Carrier VoIP
Nortel IP Phone WLAN Handset User Guide (CICM)
NN10042-116 04.01 Standard
4 July 2008
Copyright © 2008 Nortel Networks
.
118
Additional Call Features
Carrier VoIP
Nortel IP Phone WLAN Handset User Guide (CICM)
NN10042-116 04.01 Standard
4 July 2008
Copyright © 2008 Nortel Networks
.
119
.
Using the Battery Pack
Nortel IP Phone WLAN Handset 2210 Series and WLAN Handset 6100
Series wireless handsets use rechargeable battery packs. The WLAN
Handset 2210 Series handsets have one model of battery pack. The
WLAN Handset 6100 Series handsets have three interchangeable models
of battery packs, depending on user requirement. Replacement battery
packs are available from your supplier or servicing agent.
The WLAN Handset 2210 Series battery pack is composed of Nickel Metal
Hydride (NiMH) and has the following capacity:
•
Battery Pack capacity - 4 hours talk time or 70 hours standby
The WLAN Handset 6100 Series battery packs are composed of Lithium
Ion and have the following capacity:
•
•
Standard Battery Pack capacity - 4 hours talk time or 80 hours standby
•
Ultra-Extended Battery Pack capacity - 8 hours talk time or 160 hours
standby
Extended Battery Pack capacity - 6 hours talk time or 120 hours
standby
Attention: Do not dispose of a battery pack with your domestic waste.
Take battery packs to an appropriate collection point for recycling, or send
them back to your supplier or servicing agent.
Navigation
•
•
•
"Low battery indicator" (page 120)
"Removing the battery pack" (page 120)
"Inserting a battery pack" (page 120)
Carrier VoIP
Nortel IP Phone WLAN Handset User Guide (CICM)
NN10042-116 04.01 Standard
4 July 2008
Copyright © 2008 Nortel Networks
.
120
Using the Battery Pack
•
•
"Changing a battery pack during a call" (page 121)
"Charging the battery pack" (page 121)
Low battery indicator
The handset monitors the power level of the battery pack and notifies you
when the battery pack needs to be charged. Failure to charge the battery
pack will result in the handset being unusable.
The following low battery indicators are used:
•
The Battery Pack icon on the status line of the handset display
provides a visual indication of the amount of charge that remains in the
Battery Pack. When the icon shows empty, a sound indicator is sent.
•
If the handset is in standby mode, you hear a brief, modulated-ring
signal or beep, and the Battery Low message appears.
•
If you are in a call, you hear soft beeps once every six seconds, first
slow and then fast. When you first hear the beeps, you have two
minutes to end the call or change the Battery Pack.
Removing the battery pack
Follow this procedure to remove the battery pack from the handset. For
the location of the release button, refer to IP Phone 2211 handset.
Procedure Steps
Step
Action
1
Press the battery release button.
The battery pack releases from the handset.
Lift the battery pack out of the handset cavity.
2
--End--
Inserting a battery pack
Follow this procedure to insert the battery pack into the handset. For the
location of the release button, refer to IP Phone 2211 handset.
Procedure Steps
Step
Action
1
Press the battery release buttons.
The battery pack releases from the handset.
Slide the battery pack into the handset cavity.
2
Carrier VoIP
Nortel IP Phone WLAN Handset User Guide (CICM)
NN10042-116 04.01 Standard
4 July 2008
Copyright © 2008 Nortel Networks
.
Charging the battery pack
121
Push the top of the battery pack until it snaps into place.
3
Do not force the battery pack into the handset.
--End--
Changing a battery pack during a call
Follow this procedure to change the battery pack while on a call. For the
location of the release button, refer to IP Phone 2211 handset.
Prerequisites
You must have a replacement battery pack. Replacement battery packs
are available from your supplier or servicing agent.
Procedure Steps
Step
Action
Procedure steps
Procedure Steps
Step
Action
1
Place the call on hold. See "Place a call on hold" (page 73).
2
Press the battery release button.
The battery pack releases from the handset.
3
Lift the battery pack out of the handset cavity.
4
Slide the recharged battery pack into the handset cavity.
5
Resume the call. See "Retrieve a call on hold" (page 74).
--End--
Charging the battery pack
Follow this procedure to charge the battery pack. The handset can be
charged when in a power off or standby state. You must charge the
battery pack before its first use.
The Nortel Networks WLAN Handset Desktop Charger is used to charge
the battery pack. The indicator light on the Desktop Charger lights only
when the handset is inserted correctly into the connector. If the light does
not turn on, check that the handset is correctly inserted and that the
charger is connected to a power source.
Carrier VoIP
Nortel IP Phone WLAN Handset User Guide (CICM)
NN10042-116 04.01 Standard
4 July 2008
Copyright © 2008 Nortel Networks
.
122
Using the Battery Pack
Prerequisites
You must have the Nortel Networks WLAN Handset Desktop Charger
appropriate for the model of handset.
Attention:
Desktop Charger — To charge the battery pack, always use the Desktop
Charger provided with the handset. Other chargers can damage the
battery pack.
Power Adapter — Use only the original plug-in power adapter provided
with the handset unit.
Procedure Steps
Step
Action
1
Press the Power Off/End Call key to terminate any calls. Hold
the key down for two seconds if you want to transition to the
power off state.
The handset can be off or in standby mode when charging.
Place the handset face-forward into the Desktop Charger.
2
The red indicator light turns on.
Charge the battery pack.
3
If the handset is in standby mode, the handset extension number
and Charging... appear in the display. The handset is fully
operational and can receive calls.
If the handset is off, the extension number does not appear. The
handset cannot receive calls.
It is normal for the battery pack to warm up when it is recharging.
The battery is fully charged when Charge Complete appears in
the display area. The indicator light stays lighted as long as the
handset is connected to the recharger.
4
Remove the handset from the charger.
--End--
Carrier VoIP
Nortel IP Phone WLAN Handset User Guide (CICM)
NN10042-116 04.01 Standard
4 July 2008
Copyright © 2008 Nortel Networks
.
123
.
Desktop Charger
Nortel Networks WLAN Handset Desktop Chargers are designed to fully
charge the Nortel IP Phone WLAN Handset 2210 Series and WLAN
Handset 6100 Series wireless handsets. To maintain your desktop
charger, see "Cleaning the Desktop Charger" (page 128).
Attention:
Desktop Charger — To charge the battery pack, always use the Desktop
Charger provided with the handset. Other chargers can damage the
battery pack.
Power Adapter — Use only the original plug-in power adapter provided
with the handset unit.
DANGER
Do not immerse the unit into water.
Do not throw the unit into a fire.
Navigation
•
•
"WLAN Handset 2210 Series Desktop Charger" (page 123)
"WLAN Handset 6100 Series Desktop Charger" (page 124)
WLAN Handset 2210 Series Desktop Charger
Nortel Networks WLAN Handset Desktop Chargers are designed to fully
charge the WLAN Handset 2210 Series wireless handset. The Nickel
Metal Hydride (NiMH) battery packs will be fully charged in approximately
1.5 hours. The charger operates in temperatures from 50 F to 85 F (10
C to 30 C).
Carrier VoIP
Nortel IP Phone WLAN Handset User Guide (CICM)
NN10042-116 04.01 Standard
4 July 2008
Copyright © 2008 Nortel Networks
.
124
Desktop Charger
To use the Desktop Charger:
•
•
Place the unit on a flat, horizontal surface.
Plug one end of the power supply into the adapter unit, and the other
end into an appropriate wall outlet.
Attention: Do not place anything in the Desktop Charger other than the
WLAN Handset 2210, 2211, and 2212 as you can damage the contacts.
Bent contacts can stop the charging of the handset.
WLAN Handset 6100 Series Desktop Charger
Nortel Networks WLAN Handset Desktop Chargers are designed to
fully charge the WLAN Handset 6100 Series wireless handset. The
interchangeable Lithium Ion battery packs have a choice of three types
of Desktop Chargers.
•
Single Charger — Charges one handset with an installed battery pack.
The Single Charger is designed for the handset to remain operational
through speakerphone or headset use while the battery pack is being
charged. The handset can also be charged while in standby mode or
powered off mode.
•
Dual Charger — Charges the handset and a spare battery pack. In
addition to the extra charging slot, the Dual Charger provides a USB
port.
The Dual Charger for the WLAN Handset 6120 and 6140 charges
the battery pack in the handset while it remains operational, and also
charges an additional battery pack in the rear charging bay.
The handset and spare battery cannot charge simultaneously. If both
require charging, the handset has priority and recharges first. After the
handset is fully charged, the spare battery is charged.
•
Quad Charger — Charges up to four battery packs at one time.
The Quad Charger is designed for the handset to remain operational
through speakerphone or headset use while the battery pack is being
charged. The Nortel WLAN Handset 6120 and 6140 Quad Charger can
simultaneously charge four battery packs. You can mount the Quad
Charger on either a horizontal or a vertical surface. The battery pack
snaps into the charging slot. The indicator light above the occupied bay
indicates the charging status of the battery pack in the bay.
The Charger comes with the appropriate power supply for the site. Place
the Charger on a flat, horizontal surface. Plug the power supply into the
Charger and into an appropriate wall outlet.
Carrier VoIP
Nortel IP Phone WLAN Handset User Guide (CICM)
NN10042-116 04.01 Standard
4 July 2008
Copyright © 2008 Nortel Networks
.
WLAN Handset 6100 Series Desktop Charger
125
Attention: Do not place anything in the Desktop Charger other than
the WLAN Handset 6120 and 6140, you can damage the contacts. Bent
contacts can stop the charging of the handset.
Navigation
•
•
•
"Single Desktop Charger" (page 125)
"Dual Desktop Charger" (page 125)
"Quad Desktop Charger" (page 126)
• Single Desktop Charger
Procedure Steps
Step
Action
1
Press End to terminate any calls.
The handset can be off or in standby state during charging.
Place the handset, face forward, into the Desktop Charger.
2
An animated charge icon indicates that charging is in progress.
Charge the battery pack.
3
If the handset is in standby mode, it displays its extension
number and Charging. It is fully operational and can receive
calls.
If the handset is off, only Charging is displayed and the handset
cannot receive calls.
It is normal for the battery pack to become warm when charging.
When the handset is fully charged, Charge Complete is
displayed. Remove the handset from the charger.
4
--End--
Procedure Steps
Step
Action
Dual Desktop Charger
Procedure Steps
Step
Action
1
Press End to terminate any calls.
Carrier VoIP
Nortel IP Phone WLAN Handset User Guide (CICM)
NN10042-116 04.01 Standard
4 July 2008
Copyright © 2008 Nortel Networks
.
126
Desktop Charger
The handset can be off or in standby state during charging.
Place the handset, face forward, into the Dual Charger.
2
The LED displays the charging status. If required, refer to Single
Charger procedure.
Charge the handset battery.
3
If the handset is in standby mode, it displays its extension
number and Charging. It is fully operational and can receive
calls.
If the handset is off, only Charging is displayed and the handset
cannot receive calls.
It is normal for the battery pack to become warm when charging.
When the handset is fully charged, Charge Complete is
displayed. Remove the handset from the charger.
4
The battery pack starts to charge.
--End--
Procedure Steps
Step
Action
Quad Desktop Charger
Procedure Steps
Step
Action
1
Insert the battery pack into one of the four charging bays.
The LED above the charging bay turns on.
If the LED starts to blink as soon as the battery pack is inserted,
remove the battery pack and reinsert it into the charger.
If a flashing LED indicates a battery pack failure, check the
battery pack in a different bay or substitute another charger and
repeat the operation that caused the failure.
If the same battery pack lights a steady LED when inserted in a
different bay or charger, the first charger can be faulty. Contact
your system administrator for service information.
When the charge is complete, the LED turns off.
2
Remove the battery pack from the charger.
--End--
Carrier VoIP
Nortel IP Phone WLAN Handset User Guide (CICM)
NN10042-116 04.01 Standard
4 July 2008
Copyright © 2008 Nortel Networks
.
127
.
Handset maintenance
This section contains information you need to maintain the wireless
handset.
Navigation
•
•
•
•
"Cleaning the handset" (page 127)
"Cleaning the handset connector" (page 128)
"Cleaning the Desktop Charger" (page 128)
"Cleaning the Desktop Charger connectors" (page 128)
Low power indicators
The handset monitors the power level of the battery and notifies you in
these ways when the battery per level is low.
•
•
If you are not engaged in a call, you hear a loud beep.
•
The battery icon appears in the upper left corner of the display. See
Display area.
If you are on a call, you hear a soft beep through the earpiece once
every six seconds.
Cleaning the handset
Nortel IP Phone 2210, 2211, 2212 handsets occasionally need exterior
cleaning. Follow these guidelines to clean the handset.
CAUTION
Do not spray liquid directly onto the handset. Always apply the cleaning agent or
water to a clean cloth or paper towel first. Then wipe the cloth or paper towel over
the surface of the handset.
—Do not immerse the handset in any liquid.
—Do not use furniture polishes, waxes, or plasticizer-based cleaners.
—Do not use pre-moistened towelettes containing lanolin, aloe, glycerin, or other
skin care agents.
—Do not use any solvents such as acetone or mineral spirits.
•
•
•
Do not immerse the handset in any liquid.
•
Do not use any solvents such as acetone or mineral spirits.
Do not use furniture polishes, waxes, or plasticizer-based cleaners.
Do not use pre-moistened towelettes containing lanolin, aloe, glycerin, or other
skin care agents.
Moisten a clean cloth or paper towel with water an wipe it over the surface
of the handset.
Carrier VoIP
Nortel IP Phone WLAN Handset User Guide (CICM)
NN10042-116 04.01 Standard
4 July 2008
Copyright © 2008 Nortel Networks
.
128
Desktop Charger
If the handset needs a more rigorous cleaning, you can use:
•
•
a mild detergent solution
•
•
pre-treated cloths sold for cleaning eye glasses or camera lenses
•
Isopropyl alcohol. Do not rub isopropyl alcohol vigorously over the
keypad. The alcohol will significantly degrade the labels on the keys.
•
Be sure to remove any detergent residue from the surface, using a
clean cloth or paper towel dampened with plain water.
a general-purpose household glass and surface cleaner that is sprayed
onto a clean cloth or paper towel
pre-moistened towelettes that use alcohol. Do not use any that contain
lanolin or aloe.
Cleaning the handset connector
If the handset connector is dirty, you may experience a scratchy or
intermittent signal.
To clean connectors:
1. If available, blow compressed air into the connector to clear it of debris.
2. Dip the end of a cotton swab in isopropyl alcohol.
3. Insert the swab into the connector and twist.
4. Repeat step 2 several times.
5. If available, blow compressed air into the connector to dry it.
Cleaning the Desktop Charger
Moisten a clean cloth or paper towel with water and wipe it over the
surface of the unit.
CAUTION
Do not spray liquid directly onto the unit. Always apply the cleaning agent or water
to a clean cloth or paper towel first. Then wipe the cloth or paper towel over the
surface of the handset.
—Do not immerse the unit in water or other liquid.
—Do not pour liquid into the chargers slot.
Cleaning the Desktop Charger connectors
If the Desktop Charger connectors are dirty, you may experience difficulty
recharging the battery pack.
To clean the connectors:
1. If available, blow compressed air into the connector to clear it of debris.
Carrier VoIP
Nortel IP Phone WLAN Handset User Guide (CICM)
NN10042-116 04.01 Standard
4 July 2008
Copyright © 2008 Nortel Networks
.
Cleaning the Desktop Charger
2. Dip the end of a cotton swab in isopropyl alcohol.
3. Insert the swab into the connector and twist.
Do not push or pull the exposed battery pack connectors.
4. Repeat step 2 several times.
5. If available, blow compressed air into the connector to dry it.
Carrier VoIP
Nortel IP Phone WLAN Handset User Guide (CICM)
NN10042-116 04.01 Standard
4 July 2008
Copyright © 2008 Nortel Networks
.
129
130
Desktop Charger
Carrier VoIP
Nortel IP Phone WLAN Handset User Guide (CICM)
NN10042-116 04.01 Standard
4 July 2008
Copyright © 2008 Nortel Networks
.
131
.
Terms you should know
Auto Hide
This feature allows only those features that are available to you to appear
in the display. Availability of features depends on the state of the handset,
and administrator settings.
Auto Login
Any system maintenance activity, such as a firmware upgrade, results
in you forcibly logs you out of the system. By enabling the Auto Login
feature, you are automatically logged into the IP Client Manager after the
terminal is available again.
CICM
The Centrex IP Client Manager (CICM) product delivers Centrex
capabilities uses VoIP technology to connect Nortel IP Phone WLAN
Handset 2210 Series and WLAN Handset 6100 Series wireless handset
users to an IP network. CICM provides the interface between the Centrex
feature set and an IP network.
CICM feature menu
The CICM system provides additional features services to Nortel IP Phone
WLAN Handset 2210 Series and WLAN Handset 6100 Series wireless
handsets. These features are assigned by the CICM system administrator.
Dialpad
The dialpad is comprised of numbered keys 0 through 9, *, and #. Use the
dialpad to select menu items and enter text and telephone numbers.
Directory Number (DN)
A telephone number from one to seven digits in length. Also known as an
extension number.
Display
The liquid crystal display (LCD) on the handset.
Carrier VoIP
Nortel IP Phone WLAN Handset User Guide (CICM)
NN10042-116 04.01 Standard
4 July 2008
Copyright © 2008 Nortel Networks
.
132
Terms you should know
FCN key
A fixed (hard-labeled) key used to access the Feature Keys menus: Mute,
Hold, Goodbye, Directory, Inbox, Outbox.
Feature Access Codes (FAC)
Specialized codes entered using the dialpad that enable features, such
as Call Forward.
Feature Keys menu
A list of six non-programmable features that are not linked to fixed keys on
the handset. Feature keys are selected by pressing the number on the
dialpad that corresponds to the number of the item in the menu.
Fixed key
The hard-labeled keys on the handset.
LCD
Liquid crystal display; this is the lighted display area of the handset.
LINE key
A fixed (hard-labeled) key used to access the User Options menu.
Off-hook
Any line selected to make a call or receive an incoming call. The term
off-hook is applied whether (a) the user presses a line key, (b) the call is
automatically answered at the set, or (c) a line is automatically selected
for an outgoing call.
Push-to-talk
The Push-to-talk (PTT) feature on the handset allows it to function as a
walkie-talkie.
Soft keys (self-labeled)
A set of keys programmed by the system administrator. These two rocker
keys are located directly below the display area.
User Options menu
A list of items (Ring Type, Noise Mode, Alias IP Address, Current IP
Address, Extension, Current Call Server, and Terminal Type) that you
use to configure the handset ring type and noise level and view system
information.
Carrier VoIP
Nortel IP Phone WLAN Handset User Guide (CICM)
NN10042-116 04.01 Standard
4 July 2008
Copyright © 2008 Nortel Networks
.
Carrier VoIP
Nortel IP Phone WLAN Handset User Guide (CICM)
Copyright © 2008 Nortel Networks
All Rights Reserved.
Release: CICM 10.1
Publication: NN10042-116
Document status: Standard
Document revision: 04.01
Document release date: 4 July 2008
To provide feedback or to report a problem in this document, go to www.nortel.com/documentfeedback.
www.nortel.com
Printed in Canada, the United States of America, and the United Kingdom
LEGAL NOTICE
While the information in this document is believed to be accurate and reliable, except as otherwise expressly agreed to in writing
NORTEL PROVIDES THIS DOCUMENT "AS IS" WITHOUT WARRANTY OR CONDITION OF ANY KIND, EITHER EXPRESS
OR IMPLIED. The information and/or products described in this document are subject to change without notice.
Nortel, the Nortel logo, Business Made Simple and the Globemark are trademarks of Nortel.
All other trademarks are the property of their respective owners.
.