1
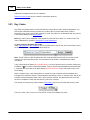
AShop V User Guide
AShop Software © Copyright 2002 - 2010
2
AShop V User Guide
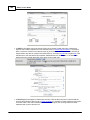
Table of Contents
0
8
Part I About AShop
1 About ...................................................................................................................................
AShop
8
2 Overview
...................................................................................................................................
Of AShop
8
3 AShop...................................................................................................................................
License Agreement
9
4 Try Before
...................................................................................................................................
You Buy!
10
5 How To
...................................................................................................................................
Get Help
10
11
Part II Installation & Setup
1 Install...................................................................................................................................
AShop
11
2 License
...................................................................................................................................
Key Registration
16
3 Page ...................................................................................................................................
Templates
17
4 Modular
...................................................................................................................................
Storefront
19
5 Style ...................................................................................................................................
Sheets - CSS
24
6 Catalog
...................................................................................................................................
First Page
24
7 About...................................................................................................................................
Us and Terms Page
24
8 Receipt
...................................................................................................................................
Templates
24
9 Receipt
...................................................................................................................................
Numbers
28
10 Message
...................................................................................................................................
Templates
30
11 Separate
...................................................................................................................................
Catalog Components
30
12 Most ...................................................................................................................................
Popular and Recently Added Products
33
13 Purchase
...................................................................................................................................
Agreement
35
14 Language
...................................................................................................................................
Selection
36
15 Language
...................................................................................................................................
Specific Files and Folders
37
16 Add A...................................................................................................................................
Language Set
38
17 Language
...................................................................................................................................
Selectable Catalog Pages
40
18 Order-Link
...................................................................................................................................
Ordering Method
40
19 Multi-Product
...................................................................................................................................
Buy Form
46
20 Subscription
...................................................................................................................................
Password Expiration
48
21 Visit Counter
...................................................................................................................................
48
22 Move ...................................................................................................................................
or Copy AShop
49
23 Store ...................................................................................................................................
Configuration
49
Administration..........................................................................................................................................................
Panel
49
Store Configuration
.......................................................................................................................................................... 50
Shop Parameters
.......................................................................................................................................................... 52
Member Shop..........................................................................................................................................................
Categories
60
Shopping Cart..........................................................................................................................................................
Catalog Mode
61
Save Cart Option
.......................................................................................................................................................... 66
AShop Software © Copyright 2002 - 2010
Contents
3
Wholesale Catalog
.......................................................................................................................................................... 67
AShop Software
..........................................................................................................................................................
Affiliates
69
Digital Product..........................................................................................................................................................
Delivery
70
Layout
.......................................................................................................................................................... 71
Payment Options
.......................................................................................................................................................... 78
Fulfilment and..........................................................................................................................................................
Automation
81
Allow Upload ..........................................................................................................................................................
After Order
88
Customer Shipping
..........................................................................................................................................................
Address
90
Shipping and ..........................................................................................................................................................
Taxes
92
Shipping
.......................................................................................................................................................... 92
Taxes
.......................................................................................................................................................... 98
Local Tax Rates
.......................................................................................................................................................... 99
Custom Shipping
..........................................................................................................................................................
Options
100
Shipping Discounts
.......................................................................................................................................................... 102
Storewide Shipping
.......................................................................................................................................................... 102
UPS Options .......................................................................................................................................................... 104
FedEx Options
.......................................................................................................................................................... 104
24 Payment
...................................................................................................................................
Gateway Integration
104
Payment Gateway
..........................................................................................................................................................
Integration
104
Extra Form Fields
.......................................................................................................................................................... 105
Manual Order..........................................................................................................................................................
Activation
107
Traffic Exchange
..........................................................................................................................................................
Credits
108
2CheckOut .......................................................................................................................................................... 108
AlertPay
.......................................................................................................................................................... 108
Authorize.Net..........................................................................................................................................................
SIM
109
Authorize.Net..........................................................................................................................................................
SIM Payment Form Settings
111
Authorize.Net..........................................................................................................................................................
AIM
112
CCBill
.......................................................................................................................................................... 114
ConnectnPay.......................................................................................................................................................... 115
Cybersource.......................................................................................................................................................... 115
Echo
.......................................................................................................................................................... 115
eWay (Australia)
.......................................................................................................................................................... 116
eWay (Australia)_2
.......................................................................................................................................................... 116
Ezic
.......................................................................................................................................................... 116
IC Pay
.......................................................................................................................................................... 117
LinkPoint Basic
..........................................................................................................................................................
- Card Services International
118
LinkPoint Basic
..........................................................................................................................................................
SSL
119
Manual Payment
..........................................................................................................................................................
By Check or Money Order
121
Moneris eSelect
..........................................................................................................................................................
- Canada only
122
Netbilling
.......................................................................................................................................................... 123
Offline Credit..........................................................................................................................................................
Card Processing
123
PayNova
.......................................................................................................................................................... 127
PayPal IPN .......................................................................................................................................................... 127
PayPal Item ..........................................................................................................................................................
Number - 2ashoporderstring4a
129
PayPal Pro &..........................................................................................................................................................
Express Checkout
129
PayPal PayFlow
..........................................................................................................................................................
Link
132
PayPal PayFlow
..........................................................................................................................................................
Pro
133
PayReady .......................................................................................................................................................... 133
PaySat
.......................................................................................................................................................... 134
Plug-N-Pay .......................................................................................................................................................... 134
PSBill
.......................................................................................................................................................... 135
TeleSign Phone
..........................................................................................................................................................
Verification
136
ViaKlix
.......................................................................................................................................................... 137
WorldPay
.......................................................................................................................................................... 137
AShop Software © Copyright 2002 - 2010
3
4
AShop V User Guide
Payment Gateway
..........................................................................................................................................................
Modules
138
25 Sales
...................................................................................................................................
Office Configuration
141
Sales Office ..........................................................................................................................................................
Configuration
141
Add/Edit Users
.......................................................................................................................................................... 144
Vendors and..........................................................................................................................................................
Products
145
Contact Forms
.......................................................................................................................................................... 147
Quote Header/Footer
.......................................................................................................................................................... 148
Recurring Bill
..........................................................................................................................................................
Templates
148
26 Third...................................................................................................................................
Party Software Integration
151
Third Party Software
..........................................................................................................................................................
Integration
151
AutoResponse
..........................................................................................................................................................
Plus
151
Interspire Email
..........................................................................................................................................................
Marketer
152
ListMessenger
..........................................................................................................................................................
Lite & Pro
153
Password Administrator+
.......................................................................................................................................................... 153
ListMail Pro .......................................................................................................................................................... 154
Password Robot
.......................................................................................................................................................... 154
Secure eBook
.......................................................................................................................................................... 155
Aweber
.......................................................................................................................................................... 158
S2Member .......................................................................................................................................................... 158
Wishlist Member
.......................................................................................................................................................... 159
Fitlist Pro .......................................................................................................................................................... 160
27 Maintenance
...................................................................................................................................
& Updates
162
Database Backup
.......................................................................................................................................................... 162
Updating Software
..........................................................................................................................................................
Versions
163
28 Troubleshooting
...................................................................................................................................
& Resources
164
Installation ..........................................................................................................................................................
Troubleshooting
164
Windows .........................................................................................................................................................
Server \t Characters
164
ashoptest.php
......................................................................................................................................................... 164
Curl With .........................................................................................................................................................
SSL
166
Cannot Modify
.........................................................................................................................................................
Header Information - Already Modified By...
166
Database.........................................................................................................................................................
Not Found
167
IonCube Compatibility
......................................................................................................................................................... 167
IonCube Loader
.........................................................................................................................................................
Wrong Version
168
IonCube Loader
.........................................................................................................................................................
Not Working
168
License Text
.........................................................................................................................................................
Inserts Break Tags
169
Orders Not
.........................................................................................................................................................
Recorded - Notices Not eMailed
170
Products .........................................................................................................................................................
Not Saving
170
SAFE MODE
.........................................................................................................................................................
Restriction in effect
170
Time Zone
.........................................................................................................................................................
Offset
171
undefined.........................................................................................................................................................
function: curl_init()
171
Warning: .........................................................................................................................................................
open_basedir restriction in effect
171
Mail Blocked
.........................................................................................................................................................
By Spam Filters
172
File Download
..........................................................................................................................................................
Issues
173
Downloaded
.........................................................................................................................................................
download.php Instead Of Product File
173
Direct access
.........................................................................................................................................................
to this script is not allowed
173
File Downloads
.........................................................................................................................................................
- Mac OS
173
Payment Gateways
.......................................................................................................................................................... 173
AuthorizeNet
.........................................................................................................................................................
AIM Invalid Credit Card Message
173
Error 97 - .........................................................................................................................................................
Authorize.Net SIM
174
Error 99 - .........................................................................................................................................................
Authorize.Net SIM
174
Credit Card
.........................................................................................................................................................
Fraud Prevention
175
Images Broken
.........................................................................................................................................................
On Payment Confirmation Page
176
Local Payment
.........................................................................................................................................................
Orderform Does Not Validate Empty Fields
177
AShop Software © Copyright 2002 - 2010
Contents
5
Payment Page
.........................................................................................................................................................
Cannot Be Found
177
PayPal Duplicate
.........................................................................................................................................................
Transaction Message
177
PayPal - Suspected
.........................................................................................................................................................
Payment Manipulation
178
PayPal Curl
.........................................................................................................................................................
Error
178
FrontPage .......................................................................................................................................................... 179
FrontPage
.........................................................................................................................................................
Removes AShop Tags
179
Tips & Tricks.......................................................................................................................................................... 179
Search Box
.........................................................................................................................................................
In Web Pages
179
HTML Within
.........................................................................................................................................................
Product Descriptions
180
Autobill
.......................................................................................................................................................... 182
Cron Errors
......................................................................................................................................................... 182
Part III Manage Products
183
1 Edit ...................................................................................................................................
Catalog
183
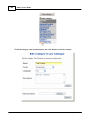
2 New...................................................................................................................................
Category
183
3 Edit ...................................................................................................................................
Category
185
4 Remove
...................................................................................................................................
Category
187
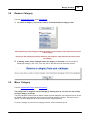
5 Move...................................................................................................................................
Category
187
6 Manage
...................................................................................................................................
Content
188
7 Manage
...................................................................................................................................
Products
189
8 Import
...................................................................................................................................
Products
190
9 Add ...................................................................................................................................
Products
191
10 Edit Products
...................................................................................................................................
194
11 Remove
...................................................................................................................................
Products
195
12 Edit ...................................................................................................................................
Product Inventory
196
13 Move...................................................................................................................................
Products
196
14 Discount
...................................................................................................................................
Coupon Codes
198
15 Quantity
...................................................................................................................................
Based Pricing
200
16 eBay...................................................................................................................................
Item ID
202
17 Product
...................................................................................................................................
License Agreements
204
18 AShop
...................................................................................................................................
Secure Download
205
19 Downloadable
...................................................................................................................................
Products
206
20 Free...................................................................................................................................
Downloads/Products
208
21 Memberships
...................................................................................................................................
209
22 Membership
...................................................................................................................................
Configuration
210
23 Key ...................................................................................................................................
Codes
212
24 Shipping
...................................................................................................................................
and Sales Tax
213
25 Shipping
...................................................................................................................................
Settings For Each Product
213
26 Quantity
...................................................................................................................................
Based Shipping
218
27 Zip Zone
...................................................................................................................................
Shipping Rates
220
28 Product
...................................................................................................................................
Attributes
222
29 Product
...................................................................................................................................
Comment Fields
226
30 Product
...................................................................................................................................
Buy Buttons
226
AShop Software © Copyright 2002 - 2010
5
6
AShop V User Guide
31 Details
...................................................................................................................................
Page Generator
226
32 Penny
...................................................................................................................................
Auctions
227
33 Up Selling
...................................................................................................................................
228
34 E-cards
...................................................................................................................................
and Gift Certificates
229
235
Part IV Customers & Sales
1 Manage
...................................................................................................................................
Sales
235
2 Customers
...................................................................................................................................
and Messaging
235
3 Customer
...................................................................................................................................
Profile
237
4 Sales
...................................................................................................................................
History
238
5 Sales
...................................................................................................................................
Reports
239
6 Chargebacks
...................................................................................................................................
- Reversals
244
7 Resend
...................................................................................................................................
Receipt
245
8 Unpaid
...................................................................................................................................
Orders
246
249
Part V Affiliates & Referals
1 Affiliate
...................................................................................................................................
Program
249
2 Multi...................................................................................................................................
Tier Affiliate Commissions
252
3 Manage
...................................................................................................................................
Affiliates
253
4 E-Mail
...................................................................................................................................
Messages To Affiliates
253
5 View...................................................................................................................................
Affiliates' Websites
255
6 View/Edit
...................................................................................................................................
Affiliate Contact Information
255
7 Statistics
...................................................................................................................................
and Payment
257
8 Affiliate
...................................................................................................................................
Commission Payments
258
9 Affiliate
...................................................................................................................................
Link Code Generator
259
10 Website
...................................................................................................................................
Replication
261
11 Referral
...................................................................................................................................
Codes and Discounts
263
12 Referral
...................................................................................................................................
Form Code
265
13 Affiliate
...................................................................................................................................
Sign Up Form
265
14 Affiliate
...................................................................................................................................
Support Panel
267
269
Part VI Sales Office
1 Introduction
...................................................................................................................................
269
2 Tool...................................................................................................................................
Bar
270
3 Customer
...................................................................................................................................
Messages
272
4 Spam
...................................................................................................................................
Bin
275
5 Vendor
...................................................................................................................................
Messages
276
6 Customers
...................................................................................................................................
276
7 Quotes
...................................................................................................................................
and Orders
289
8 Vendors
...................................................................................................................................
291
AShop Software © Copyright 2002 - 2010
Contents
9 Bills...................................................................................................................................
and Recurring Billing
Part VII Shopping Mall
7
295
300
1 Shopping
...................................................................................................................................
Mall Introduction
300
2 Shopping
...................................................................................................................................
Mall Configuration
300
3 Individual
...................................................................................................................................
Member Catalogs
302
4 Member
...................................................................................................................................
Signup
303
5 Member
...................................................................................................................................
Shop Parameters
305
Index
307
AShop Software © Copyright 2002 - 2010
7
8
AShop V User Guide
1
About AShop
1.1
About AShop
AShop - PHP Shopping Cart and Order Management
version 5
Developed by Andreas Rimheden and Rob Harris
Copyright © 2002-2010 – All Rights Reserved Worldwide
AShop Software
Use of AShop software is subject to a software license agreement.
Included in this documentation are instructions for installation, setup, and usage of the AShop shopping
cart with Sales Office order management section.
1.2
Overview Of AShop
AShop is a shopping cart program, which can be used in a variety of different ways to
manage and sell products and services over the Internet. AShop includes a system of tools and
resources to organize and automate online sales.
AShop can be used to sell many different types of products and services:
· Tangible Products
· Downloadable Products
· Subscriptions for Password Access to Protected Directories
· Key codes
· "Swoopo"-style Auctions
· Wholesale
Click here for a Tour of AShop.
The shopping cart is pre-integrated with software for most popular payment methods.
Click here for a list of supported payment services.
AShop is a commercial software product, which is licensed per domain.
We offer several ways to try before you buy.
Get Trial Key and Download Files.
Install AShop.
AShop is a multi-user sales and order management system
The Sales Office shares data with the AShop shopping cart and provides a work space where sales
people can login to manage messages, orders, vendors, purchase orders, order tracking, and vendor
bills. Like the shopping cart, the Sales Office is a server based system and data can be easily accessed
from multiple locations simultaneously using Internet browsers.
AShop Software © Copyright 2002 - 2010
About AShop
9
The Sales Office works as a separate section of AShop with its' own login.
Click here for a tour of Sales Office.
How to use the Sales Office
AShop is a Shopping Mall
The Shopping Mall features of AShop lets other businesses and individuals sell their products through
your online shopping cart. It includes a system for members to join, manage their products and earn
commissions through a central order processing, payment processing, and digital product delivery
system.
Click here for a tour of the Shopping Mall.
How to Use the Shopping Mall
1.3
AShop License Agreement
Software License Agreement
Use of AShop software is subject to the terms of this license agreement. Buying a license and using the
software signifies that you have read the license agreement and accept its terms. Violation of this
license agreement may void your right to technical support and subject you to legal action.
Ownership Of Software
You acknowledge and agree that all of the computer programs and associated documentation are owned
exclusively by AShop Software. You agree that the price paid by you for the software is a license fee
granting you only the rights set forth in this License Agreement.
Licensed For Each Domain or IP Address
Your purchase of a software license entitles you to install the program on a specific number or domains
or IP addresses. You may NOT copy, reproduce, resell, or give away copies of the software in any way
shape or form without prior written consent from AShop Software. You acknowledge that AShop
Software periodically registers the software with its license server by electronic transfer of information via
the internet to the ashopsoftware.com license server.
IonCube Decryption
The distributed scripts are protected by IonCube encryption. We do not guarantee that the IonCube
decryption will work on all servers and hosting services. Troubleshooting of server configurations is not
included in our software warranty. If you have trouble with IonCube decryption and cannot resolve it with
your hosting service or system administrator, then we recommend changing to a hosting service that
supports the software requirements.
License Fee Nonrefundable
Fees paid for license registration keys and installation services are not refundable. Before purchasing an
AShop software license and receiving a permanent registration key, we recommend that you first upload
and run the pre-installation test script, which can be downloaded from our site. This small program will
report if the server supports the requirements of AShop. It also installs IonCube loaders and tests the
IonCube decryption. If all of the tests pass, then install AShop with a free time limited trial key. When
AShop Software © Copyright 2002 - 2010
10
AShop V User Guide
you are satisfied that the program will serve your needs, then purchase and register a permanent license
key to continue using the program.
Limited Warranty
AShop Software warrants that the software will perform without defect, within the functionality that is in
the program at the time of purchase. This warranty is for one year from the date of purchase. If you notify
AShop Software of defects during the warranty period, AShop Software will replace the defective program
or, at its option, refund the purchase price. Your remedy for breach of this warranty shall be limited to
replacement or refund and shall not encompass any other damages. No dealer, distributor, agent or
employee of AShop Software is authorized to make any modification or addition to the warranty and
remedies stated above.
Limitations Of Liability And Remedies
In no event shall AShop Software or its licensors be liable for any loss of profit or any other commercial
damage, including but not limited to special, incidental, consequential, punitive or other damages, even if
AShop Software or its licensors are advised, in advance, of the possibility of such damages. In no event
shall the liability of AShop Software or its licensors exceed the purchase price paid for the Software.
Copyright © 2002-2010 – All Rights Reserved Worldwide
AShop Software
1.4
Try Before You Buy!
Evaluate The Software Before Buying It!
We provide several methods to evaluate our shopping cart software before buying a permanent license
key.
Permanent license key fees are not refundable.
· Free time limited trial key - A free trial key may be used once per domain. Installation of the
software is not extremely complex, but it does require a few basic webmaster skills. You must be able
to create a MySQL database, upload files using FTP, and change a few file/folder permissions. Do-ityourself installation is NOT recommended for novices, however for or a fee we will install the software
on your server.
1.5
How To Get Help
Step 1. Use This Help System.
If your issue can't be resolved this way, go to step 2.
· The table of contents on the left is organized in order of how the program is typically used.
· The Previous and Next links (top right) go through topics in order of the table of contents.
· Click the Keyword Index link (top left) to see an index of keywords, which are linked to relevant
topics.
· Context sensitive help topic links
and tool tips
are located throughout the administration
panel pages. Context help links open the help topic in this system that relates to that page in the
administration panel. Tool tips pop-up brief explanations of specific functions within the shopping cart
admin panel.
Note: This help system uses frames and JavaScript. If the table of contents panel is not appearing on
AShop Software © Copyright 2002 - 2010
About AShop
11
the left, it is probably because you have an old browser or JavaScript is disabled. Download a current
web browser to fix this.
To print help topics without printing the table of contents (Internet Explorer), right click in the right side
panel where the topic is located. A shortcut menu will open. Click "Print". This will send only the right
side (topic) panel to the printer.
Step 2. Submit Support Request or eMail
If you don't find a solution in the help topics or if you prefer to hire someone to set up your web site and/
or to provide personal training, contact us through our secure contact form. A technician will respond by
email. Once your email address is in our system, you can send email directly to our support team.
Response time by email is typically within a few hours during business days and within 24 hours on
weekends & holidays. The secure contact form submissions and incoming email messages post directly
to our virtual support desk. All of our technicians are qualified to respond by email.
New Feature Requests
We appreciate your suggestions for improvements to AShop. Each new feature is carefully considered
before adding to our development calendar. We may be able to give your feature suggestion priority if
you are willing to pay for the development. Contact us to get a quote for the feature you need.
2
Installation & Setup
2.1
Install AShop
Software Requirements:
· At least version 4.1.0 of PHP4 or any version of PHP5
· Safe Mode = Off
· Enable dl() = On or IonCube decoder installed in php.ini
· File Uploads = On (to use the file upload features)
· MySQL Functions Available
· Curl With SSL Available (needed by some payment gateways)
· The fsockopen-function is working
· IonCube decryption is working.
· The AShop Software license server can be reached
Pre-installation Test Script - ashoptest.php
Before installing the program files, test the site to make sure that the IonCube encoded program files will
run on the server and that all of the server requirements are met. Download the pre-installation test script
. Instructions are included with it in a text file. Run the ashoptest.php script from a browser. If all of the
tests pass, go ahead with the installation.
License Agreement
AShop is protected under US and International copyright laws. The software is licensed for use per
domain. Installing and using this software signifies that you have read and agree to the terms of our
software license agreement.
Software Registration
The program files that are distributed from our shopping cart are encoded for copy protection and to
prevent hacking. A registration key is required to activate the program. A free 30-day trial key can be
used once for a domain. The trial period can be extended if you need more time to evaluate the software.
AShop Software © Copyright 2002 - 2010
12
AShop V User Guide
Permanent registration keys are available through our online store.
Installation of Software & Database
Install AShop
1. Unzip the AShop program files on your local computer.
2.
Ensure that your FTP client is set to images in binary mode. Upload the AShop files and folders
to the server. The AShop V files and folders may be installed in the public root directory or in a
subdirectory. A single domain license can be used to install the shopping cart in any number of
subdirectories with different names. The AShop directory structure must remain the same as in the
distibution packate for each installation.
OR
Note: If there is a lot already going on in the public root or you are not sure, it is safer to install AShop
in a subdirectory.
3. Change permissions of the following directories and files to 777.
·
·
·
·
·
·
·
·
·
·
·
·
·
·
admin/receipts (if you want to save original customer receipts)
admin/config.inc.php
banners
catalog
images
images/logo.gif
ioncube
previews
prodimg
products
updates
emerchant/invoices
emerchant/mail
members/files
AShop Software © Copyright 2002 - 2010
Installation & Setup
13
Note: .htaccess files are included in the products and updates directories to protect product files.
These files may not appear within your FTP explorer on the server side after you have uploaded them,
because a file with a name that begins with a punctuation mark is treated as a hidden file in Unix/Linux,
but can usually be seen within your hosting services online file manager.
4. Create a database for AShop and add a user with a password to the database. If you do not have
access to create a MySQL database on your server, then contact your web host technical support
to have this done for you. You will need the path to the database (if it is not localhost), the database
name, user name and password. The user must have all privileges for database table mods and
creation of new tables.
5. Open config.inc.php in a text editor such as NotePad and edit the following variables BEFORE
running install.php:
$databaseserver = "location of the mySQL database"
The database is usually located at "localhost". If the database is hosted remotely or on a different
server, this setting may be something like "mysql.server_name.com" or http://mysql.server_name.
com.
$databasename = "name of the database that you created in mySQL"
$databaseuser = "user name that you added to the database that you created"
$databasepasswd = "password for the user name that you added to the database"
Note: Changing the $noinactivitycheck variable in config.inc.php to "true" will deactivate the inactivity
time out in your AShop admin panel.
6. Run install.php from a browser. This will create the database tables. To do this, enter something
like this into your browser address bar: http://www.yourdomain.com/install.php or http://
www.yourdomain.com/ashop/install.php depending on where the AShop files and directories are
located.
7. Enter your name, email address, and Registration Key Code in the spaces provided.
8.
Remove the install.php file from the server. Installation of the program files and database is now
completed.
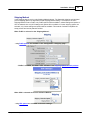
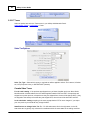
The next page will be the Administration Panel login. The administrator username is: ashopadmin. The
default password for the administrator is "ashopadmin". Login and setup the Configuration, then
Edit Catalog to add categories and products. For security we recommend that you change the
administrator password.
Login to the Administration Panel any time by opening the /admin/login.php script.
Example: http://www.yourdomain.com/ashop/admin/login.php
AShop Software © Copyright 2002 - 2010
14
AShop V User Guide
Setup Of Shopping Cart Design, Layout and Selling Options
Customize The Shopping Cart
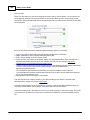
After the initial installation of program files and the database is completed, the shopping cart can be
customized and configured in various ways. Shopping cart pages, receipts, email notices, images,
buttons, and page text for each language can be modified to suite your needs. A sample set of product
categories and products are installed for you but these can also be modified or removed. Here is a quick
list of the most important considerations during initial setup.
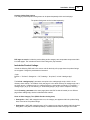
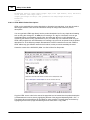
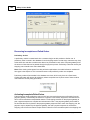
Custom Page Templates
If you have not already seen the tour of AShop, go back and look at the section about page templates. It
describes how page templates are included by the program. HTML templates are simply HTML web
pages with a place where the shopping cart content appears. A separate page template is used for the
catalog, delivery, checkout, affiliate pages and wholesale catalog. You can also edit the storefront file:
index.php to create a more advanced layout for your shopping cart. It is a regular HTML page but named
".php" instead of ".html" and containing some PHP include codes to put the various modules in place.
The other files with names ending in .php are encoded shopping cart software files and should not be
edited or replaced.
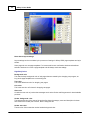
Layout Menu
Login to the admin panel. In the Configuration/Layout menu, set the default colors, sizes, fonts, widths,
borders, thumbnail image size, and various other parameters, which are used in the dynamically
generated areas of the shopping cart pages. These are applied to the shopping cart through a dynamic
CSS stylesheet: includes/ashopcss.inc.php. A sample static CSS file is also included for your
reference: includes/ashop.css. Change the templates to use that file instead if you wish to have full
control over all layout elements.
Pre-designed Themes
If you don't need custom page templates and you just want to begin using the cart with a canned look,
select a theme in the Layout menu. Themes can be a complete collection of page templates with
buttons and pre-configured Layout parameters. Or, themes may only include a set of buttons, or only
Layout parameters. Each them has a config file, which specifies how much it does and sets Layout
parameters. The parameters in the theme.cfg.php file can be set so that the theme's config settings
override the admin panel Layout settings and if the theme includes page templates, they can override the
root AShop page templates. If the theme comes with an index.php.themename file you can put that one
in the AShop root directory and remove the ".themename" part of the filename to use it as a storefront,
AShop Software © Copyright 2002 - 2010
Installation & Setup
15
adapted to the theme.
What! No themes to select from? There is a selection of themes and buttons on our site, which may
be downloaded for free and used with AShop. Select a theme package, download it to your computer
and unzip it. Upload the folder containing the theme to the themes directory where AShop is installed.
Then, select the theme in the Layout menu.
Language Sets
Each supported language has a unique set of files called a Language Set. When a language is selected
the program uses the corresponding language set. Each language set includes a set of images, a set of
language text files, and a set of receipt templates. To change the text in shopping cart pages, edit the
corresponding language file(s). The program file distribution packages contain only an English language
set. More language sets are available for download from our site.
Separate Shopping Cart Buttons and Checkout Links In HTML Web Pages
AShop supports several methods of linking to the shopping cart from HTML web pages and email
messages. See the Order-Link help topic. See the Order-Link Tech Tip for specific step by step
instructions. Also, some example files are included with distribution packages for new installation.
Payment Processing Options
The shopping cart supports a variety of payment methods and integrates with most popular payment
services such as Authorize.net, PayPal, Verisign, Card Services International, WorldPay, and many
more. The degree of difficulty to set up each payment option varies widely. Instructions are provided as
needed for the payment services that are supported by AShop. If you do not find instructions for your
payment service in this help documentation, see if it is listed in the payment processor cross reference
chart. There might not be instructions if the payment option requires only the merchant ID to be entered
in AShop. If a payment service is not listed in the cross reference chart, it is probably not supported by
AShop.
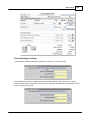
Receipt (orderid) Numbers
When the shopping cart is installed, the first orderid number will begin at 1. New orderid numbers will
then auto increment from the highest existing orderid number in the orders database table each time a
new order is created. The beginning orderid number can be increased using a database management
tool such as phpMyAdmin. Either add a row with the higher orderid number or, if the highest existing
orderid number is not needed for anything else (for instance it is an incompleted/unpaid or a test order),
change the highest orderid to the higher number. Subsequent new orders will then auto increment higher
orderid numbers. See also: Receipt and Order Reference Numbers
Time Zone Offset
Many times the server time is different than your time zone and some servers may be set by Greenwich
Mean Time (GMT). To adjust the time stamp for orders and stats, set the timezoneoffset in Configuration
> Shop Parameters > Advanced Options. The value of the offset is in seconds. To add time enter only
the digits. To subtract time, enter a minus sign in front of the digits. Example, Your time zone is 2 hours
later than the time zone of the server. To adjust the time so that it matches your zone on receipts and
notices, you would enter -7200, which is minus (60 seconds times 60 minutes times 2 hours).
Sales Taxes
If you are selling products that require sales tax calculations, visit Configuration > Taxes.
Shipping Calulations
If you are selling products that require shipping calculations, visit Configuration > Shipping.
AShop Software © Copyright 2002 - 2010
16
AShop V User Guide
Purchase Agreement Required Before Checkout
A purchase agreement may be included with acceptance required before checkout and payment. Create
a file named agreement.txt . Put text or HTML content in the agreement.txt and upload it to the
directory where AShop is installed. There is an agreementEXAMPLE.txt file included with the new
installation packages. The agreement will then be required for each order before checkout. Note: This is
completely separate from individual product license or terms of sale agreements.
Affiliate Program
If you are using the affiliate program, set up the default commission values before adding products.
Otherwise, skip this step.
Fulfilment Notices & Automated Processes
Email notices can be sent automatically based on which products are ordered. An automation fulfilment
option can be used to activate third-party programs. SwiftCD automatic CD fulfilment service is also
supported. To send fulfilment notices or activate fulfilment automation, set up the fulfilment options first
and then assign each product to a fulfilment option.
Visit Counter
There is an automatic visit counter in catalogue.php and search.php, which counts unique visitors. The
current number of visitors, visitors today, and grand total (since last reset) displays in the admin panel
index page.
See instructions to include the visit counter in other pages on the web site.
Technical Support
If you run into trouble, contact us. Technical support is free for trial installations. Technical support and
software updates are provided free for one year after a permanent registration key is purchased. After the
first year, technical support and software updates may be subscribed to for $60 annually.
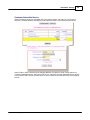
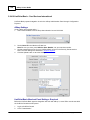
2.2
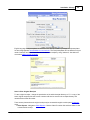
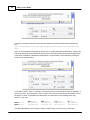
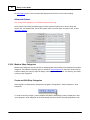
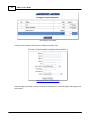
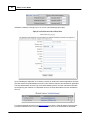
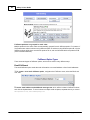
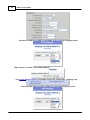
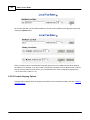
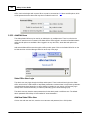
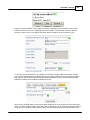
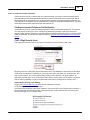
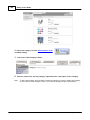
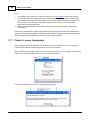
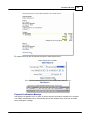
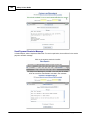
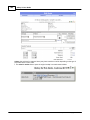
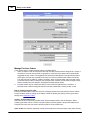
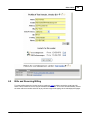
License Key Registration
A license key must be registered to activate the program. A trial key or a permanent key may be used
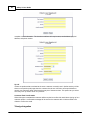
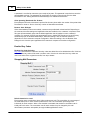
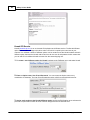
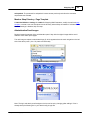
to register the program during the initial installation.
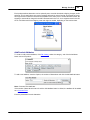
To re-register a license key or to replace a trial key, open the admin/register.php script in a browser.
For instance: http://www.yourdomain.com/ashop/admin/register.php.
Enter the admin password and the license key, then click the Register button.
AShop Software © Copyright 2002 - 2010
Installation & Setup
2.3
17
Page Templates
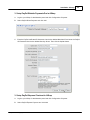
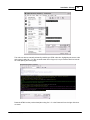
How AShop HTML Page Templates Work
If you have not already seen the tour of AShop, go back and look at the section about page templates. It
describes how page templates are included by the program. The AShop page templates are simply
HTML pages with the AShop start and stop tags inserted where the AShop content is to appear. They
can include HTML, images, links, CSS, and JavaScript just like any other web page but they can not
include PHP or any other server side code. If you are using a WYSIWYG HTML editor such as
Dreamweaver, you can add the AShop script folders to your website and create the AShop templates
just as you would any other page within your website.
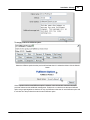
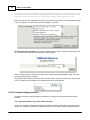
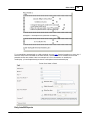
AShop page templates are HTML web pages with comment tags
<!-- AShopstart --> <!-- AShopend -->
inserted into the HTML code. For the page templates, AShop's dynamically generated content appears
between the two tags.
In addition to the start and end tags you will also need to add some code to make the templates use the
right CSS file. Without this the layout and design elements of your AShop will not be activated and the
shopping cart will be presented as unformatted text. Add the following line to the head tag of your
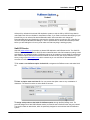
templates to use the dynamic CSS file:
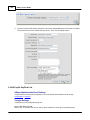
<link rel="stylesheet" href="<!-- AShopcss -->" type="text/css" />
A static CSS file is also included: css/ashop.css, which contains all the styles used by AShop. To get
full control over the layout you can use this one instead or in combination with the dynamic CSS code
above to override specific classes. Add this line to your templates below or instead of the previously
AShop Software © Copyright 2002 - 2010
18
AShop V User Guide
mentioned line:
<link rel="stylesheet" href="css/ashop.css" type="text/css" />
Note: If a template is not present, AShop will generate a catalog page anyway and the default logo.gif
image, which can be uploaded through the Layout menu, will appear at the top of the page above the
dynamically generated content. When a page template is present, it's body tags, such as background,
text, and link colors may override the default page settings made in Layout.
There are some other comment codes available that you can use in your page templates:
<!-- AShopname --> - displays the active Shop Name
<!-- AShoplogo --> - displays the shop's Logo Image
<!-- AShopcart --> - displays a shopping cart box
<!-- AShopcategories --> - lists the product categories Note! Use this one with caution. It is not
compatible with pages in subfolders, the delivery pages or the customer profile pages.
<!-- AShopbgcolor --> - the page background color
<!-- AShopmemberheader --> - a custom header defined by a shopping mall member
There are six templates used for the retail shopping cart and affiliate pages. If the wholesale shopping
cart is activated, it has an additional 4 templates. The page templates can have the same or different
content, depending on your needs.
Example templates are included in the distribution package for new installations. The template examples
are not included in distribution of updates to avoid overwriting any customizations you have made, when
you install the update.
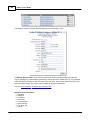
Retail Shopping Cart & Affiliate Page Templates
The following templates are located in the templates directory of AShop.
The <!-- AShopstart --> <!-- AShopend --> tags indicate where the shopping cart content is
rendered on the page.
aboutus.html – used by the About Us page
affiliate.html – used by the affiliate sign up, login, and support pages
cart.html – used by the basket and checkout pages
customer.html – used by the customer profile and order history pages
delivery.html – used by the digital goods delivery pages
signup.html – used by the customer signup page
terms.html – used by the Terms & Conditions page
thankyou.html – used by the payment confirmation page
upsell.html – used by the upsell page
If you are not using the default advanced storefront (index.php) but prefer to use the simplified version
AShop Software © Copyright 2002 - 2010
Installation & Setup
19
(catalogue.php) you will also need to modify this template:
catalogue.html – used by the simplified product catalog and search pages
IMPORTANT! Many payment gateways will host your payment confirmation page through their SSL
connection. When they do this, they take a snap shot of your page and nest it within their page at their
URL. If this is the case, the hyperlinks within the thankyou.html template must use absolute URL's for
links to work and for images to appear. In addition, image links should be https links so that browser
secure/non-secure content warning messages won't appear for customers when the payment processor
redirects to the thankyou (payment confirmation) page.
Wholesale Shopping Cart & Sign up Page Templates
These templates are used by the wholesale pages.
wscart.html - used by the wholesale basket and checkout pages
wscatalogue.html - used by the wholesale product catalog and search pages
wssignup.html - used by pages where wholesale customers sign up for an account
wsthankyou.html - used to display a thank you message page after a customer completes a wholesale
order
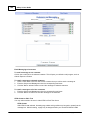
Shopping Mall Page Templates
mall.html - used by mall.php, the member shop directory
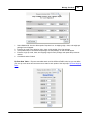
membersignup.html - used by pages where members sign up for an account
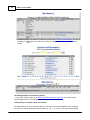
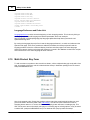
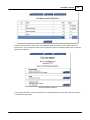
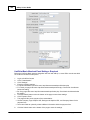
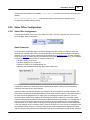
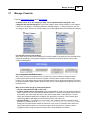
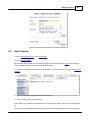
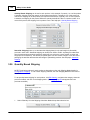
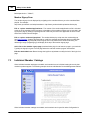
2.4
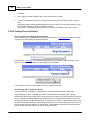
Modular Storefront
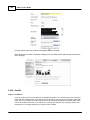
The index.php script is an example of a storefront for AShop. By using the various content modules
found in the includes directory you can put together the frontpage of your shopping cart any way you
like. This way the storefront is an exception from how the pages usually work in AShop, in that it is its
own page template. It is also one of the few scripts included with AShop that isn't ioncube encoded,
which means that you can edit it, for example with a web page editor like Dreamweaver or a text editor.
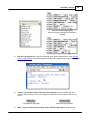
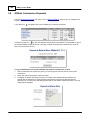
The storefront script always needs to begin with the following PHP code:
<?php
// Initialize the storefront page...
include "admin/config.inc.php";
if (!$lang) $lang = $defaultlanguage;
include "language/$lang/storefront.inc.php";
$databaseuser = "";
?>
This makes the script ready to use the content modules and also makes it multilingual, as long as you
put all text used in the page in the storefront.inc.php language module. To use the text from the
AShop Software © Copyright 2002 - 2010
20
AShop V User Guide
language module you need to replace it with this type of code:
<?php echo HOME; ?>
Where the "HOME" part should be the name of the language constant you want to use, in this case it
will show the word "Home" in the language selected by the visitor. Open the storefront.inc.php language
module in a text editor to see which constants are available and to add your own constants if needed.
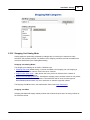
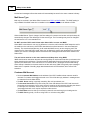
Newsletter Module
If you are using the Autoresponder-Service.com account that is included for free with your full AShop V
license, you can enable the newsletter module to let visitors sign up with your mailing list, which can of
course be an autoresponder. You need to select the list you wish to use for this on the Configuration>Shop Parameters page to make it work. There should be an option labeled "Newsletter Autoresponder"
on that page with a drop down list showing all your available autoresponders/lists.
By using the DHTML popup mode of the newsletter module you can make the storefront page ask every
new visitor to sign up with your list before they start shopping. The whole page will be greyed out while a
signup box shows on top of it. To enable this, put the following code directly after the BODY tag of your
storefront script:
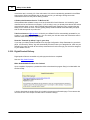
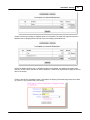
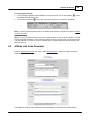
<?php
// Show newsletter subscription form...
$layout = 2;
$subscribe = "index.php";
include "includes/newsletter.inc.php";
?>
The $subscribe parameter must be set to the filename of the page you are using this code on, which
would be index.php when it is used on the storefront.
To just show a form somewhere on the page, use the following code in the location where you want the
form to show up:
<?php
// Show newsletter subscription form...
$layout = 1;
$subscribe = "index.php";
include "includes/newsletter.inc.php";
?>
You can also use the following optional parameter to disable the captcha code:
$captcha = "off";
The captcha parameter must be set before the include statement.
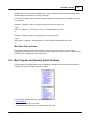
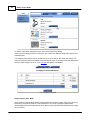
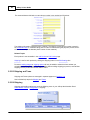
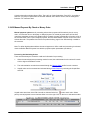
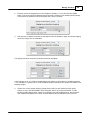
Category List Module
To list your product categories you can use the categories.inc.php module. For example:
<?php
// Show categories...
$catalog = "index.php";
include "includes/categories.inc.php";
AShop Software © Copyright 2002 - 2010
Installation & Setup
21
?>
The name of each category is a link that should lead to a page that shows the products that belong to
the category, the $catalog parameter determines which page the links lead to.
To create a custom list of categories you can use the layout parameter to get the full category tree as
an unordered list:
<?php
// Show categories...
$layout = "2";
$catalog = "index.php";
include "includes/categories.inc.php";
?>
The default value of the layout parameter is "1", which gives you the standard categories list in a table.
Using mode "2" will, for example, let you create vertical or horizontal drop down lists, using CSS.
You can limit the listing to just one category and its subcategories by using the cattree parameter. It
must be set to the category ID of the top category, for example:
<?php
// Show categories...
$cattree = "1";
$catalog = "index.php";
include "includes/categories.inc.php";
?>
Which will show category 1 with all its subcategories.
You can also exclude certain categories from the listing by using the exclude parameter, set to a pipe
separated list of category IDs to exclude, for example:
<?php
// Show categories...
$exclude = "1|2";
$catalog = "index.php";
include "includes/categories.inc.php";
?>
Which will skip categories 1 and 2 from the list.
Language Selection Module
This module will display a drop down list of all available languages.
<?php
// Show language selection...
$redirect="index.php";
include "includes/language.inc.php";
?>
It only takes one parameter: redirect, which should be set to the page that will be shown after the
customer selects a language. If you skip this parameter or leave it blank, the redirect URL configured for
AShop Software © Copyright 2002 - 2010
22
AShop V User Guide
each language in its lang.cfg.php file will be used instead, which can be used to redirect the customer to
a different page for each language.
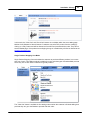
The TopForm Module
If you use the catalogue.php script as your storefront instead of the more advanced modular index.php
script, it will include a form at the top of the page with the search box, the subtotal of the cart contents
and the View Cart and Checkout buttons. These can be placed individually instead, using the topform.
inc.php module, if you wish to use the modular storefront. Here are some examples...
This code will just show the search box:
<?php
// Show search box...
$layout = 3;
$search = "index.php";
include "includes/topform.inc.php";
?>
This one will show the subtotal field, the customer profile links and a placeholder for "added to cart"
messages:
<?php
// Show subtotal...
$layout = 4;
include "includes/topform.inc.php";
?>
This will show only the subtotal field, without the customer profile links or the placeholder:
<?php
// Show shopping cart buttons...
$customerlogin = "off";
$confirmmessage = "off";
$layout = 4;
include "includes/topform.inc.php";
?>
This code will show the shopping cart buttons:
<?php
// Show shopping cart buttons...
$layout = 5;
include "includes/topform.inc.php";
?>
This will show the default box, but wherever you want to place it:
<?php
// Show shopping cart buttons...
$layout = 2;
include "includes/topform.inc.php";
?>
AShop Software © Copyright 2002 - 2010
Installation & Setup
23
This will show only the customer profile links:
<?php
// Show shopping cart buttons...
$layout = 6;
include "includes/topform.inc.php";
?>
Displaying the product list or search results
The catalogue.php script shows the list of products for a selected category while the search.php script
shows the results of a search. They can either be used standalone or as part of a modular storefront
script. To use them in a storefront script add the following code:
<?php
// Show product list or search results...
$topform = "off";
$categories = "off";
if($searchstring) {
$search = "index.php";
include "search.php";
} else {
$catalog = "index.php";
include "catalogue.php";
}
?>
By adding the line: $topform = "off", the output will not include a box at the top of the list, with a search
field, the subtotal of the shopping cart contents and the View Cart/Checkout buttons.
By adding the line: $categories = "off", the output will not include a categories list to the left of the
products/search results. Use this if you want to place the categories using the categories list module
instead.
The $search parameter must be set to the filename of the script that shows the search results and the
$catalog parameter must be set to the filename of the script that shows the product list. Both should be
set to "index.php" when you use the default storefront script.
Using Custom Modules
The storefront script can of course show any other module or dynamic content you want to use. As an
example of this the default index.php script includes a SimplePie RSS reader, which can show news
feeds from an external site or even article links from your own blog. This is the code that runs this script:
<?php
// Demonstrates how to include a news feed reader on your storefront...
$feedurl = "http://www.ecommercetimes.com/perl/syndication/rssfull.pl";
include "includes/simplepie.inc.php";
$feed = new SimplePie();
$feed->set_cache_location("./updates");
$feed->set_feed_url($feedurl);
$feed->init();
if ($feed->data) {
$items = $feed->get_items(0,5);
foreach($items as $item) echo " <img src=\"images/bullet.
AShop Software © Copyright 2002 - 2010
24
AShop V User Guide
gif\"> <a href=\"".$item->get_permalink()."\" target=\"_blank\">".$item>get_title()."</a><br>";
}
?>
To change the news feed just set the $feedurl parameter to the URL of any RSS news feed you want. It
can even be used with AShop's own RSS feed generator to show new items from another shop, if you
run more than one.
2.5
Style Sheets - CSS
The settings in the Layout menu are used to set styles in catalog pages through the includes/ashopcss.
inc.php script, which is read by the page templates in the templates directory. You can replace this with
your own CSS stylesheet file in your page templates to fine tune the layout. The includes/ashop.css file
is an example which lists all the different stylesheets you can change.
Admin Login Page
The admin panel login page, admin/login.php, uses the admin/admin.css style sheet.
.loginform sets the table properties in the admin/login.php page. If the Shopping Mall is installed, this is
also the member login page.
2.6
Catalog First Page
A greeting may be included in the product listing area of the page when the catalog is first opened.
The content for this greeting can be edited on the page Edit Catalog in your AShop admin panel. Click
Edit below the First Page item at the top of the category list to edit the default content. You can also
remove the first page content by clicking Remove, which will make AShop show the top category as a
first page instead. If you removed the first page you can click Add to create a new one.
2.7
About Us and Terms Page
These work similar to the first page. The About Us page is shown by opening aboutus.php and the
Terms & Conditions page by opening terms.php. The design of the pages are controlled by the
templates: aboutus.html and terms.html which can be found in the templates directory. The content you
add on the Edit Catalog page for these two pages will be shown between the <!-- AShopstart --> and <!-AShopend --> comments.
It is not possible to create or manage more pages like these two, this content management feature is
limited to the first page, the about us and terms pages.
2.8
Receipt Templates
Receipts in AShop can be sent in either HTML or plain text format. Select the receipt format in
Configuration > Shop Parameters.
AShop Software © Copyright 2002 - 2010
Installation & Setup
25
English language receipt templates are included in the AShop installation package. Receipt templates
for other languages are downloadable from our web site. The receipt templates can be edited to suit your
needs. Customer and order information is included in the receipts by using %tokens%. See below for
more about editing receipt templates.
Save & View Original Receipts
To save original receipts, change the permissions of the admin/receipts directory to 777. A copy of the
exact original receipt that is sent to each customer will then be saved in the receipts directory and
named with the Order ID number.
There are two places where the original receipt may be accessed through the admin panel Customers
menu.
· Sales Reports - Navigate to Sales Reports. Click the Order ID number link and then select to view
or download the receipt.
AShop Software © Copyright 2002 - 2010
26
AShop V User Guide
· Customer History - Navigate to a customer record through Customers and Messaging and click on
the history link . Click on the Order ID number link and then select to view or download the
receipt.
Resending Receipts and Re-activing Orders
A copy of the original receipt can be resent from Sales Reports in edit mode. If the order included
downloadable products, the download may be reactivated at the same time.
Editing Receipt Template Layout and Content
Receipt templates are in the templates directory. There are two receipt templates for each language;
html and text. Receipt templates are named with -en, -sp, -it, -jp, and so on to indicate the language.
AShop Software © Copyright 2002 - 2010
Installation & Setup
27
Example: English language receipts are named receipt-en.html and receipt-en.txt. Modify the text in
receipt templates as needed, but do not change or remove the divider comment tags and token names.
Here is a list of tokens and how they are used in receipt templates.
%ashopname%
%dateshort%
%invoice%
%customer_firstname%
%customer_lastname%
%customer_address%
%customer_city%
%customer_state%
%customer_zip%
%customer_country%
%customer_email%
%customer_phone%
%customer_info%
%receipt_description%
%payoption%
%payoptionfee%
%subtotal%
%salestax%
%shipping%
%amount%
The name of your store
Date of the order
Invoice/Order number
Customer's first name
Customer's last name
Customer's street address
Customer's city
Customer's state
Customer's zip code
Customer's country
Customer's email address
Customer's phone number
Extra Form Fields
<!-- Shippingdiscount -->
%shippingdiscount%
<!-- /Shippingdiscount -->
Display shipping discount (if any)
Discount on shipping
<!-- Specialinstructions -->
Determines whether any special instructions are to be sent
with the receipt. Necessary for all the following sections of the
receipt to be displayed.
<!-- Shippingaddress -->
%customer_shippingaddress%
Display shipping information (if product is shippable)
Customer's ship to address
<!-- Shippingoption -->
%shipoptions%
<!-- /Shippingoption -->
Display method of shipment (if any)
Method of planned shipment
Method of payment used
Fee charged for using specified payment method
Total before taxes and shipping
Tax total
Shipping costs
Total cost billed
<!-- /Shippingaddress -->
<!-- Downloads -->
%ashopurl%
%customer_email%
%password%
%downloadtimes%
%downloaddays%
<!-- /Downloads -->
Display information for download instructions (if applicable)
Your store's location as a link for product delivery
Customer's email address
Password for customer to download product file
Number of times download can occur
Number of days download is available for
<!-- Unlockkeys -->
Display unlock keys (if any)
AShop Software © Copyright 2002 - 2010
28
2.9
AShop V User Guide
%unlockkeys%
<!-- /Unlockkeys -->
Any Software Registration Keys
<!-- Subscriptions -->
(if applicable)
%subscriptionlinks%
%password%
<!--/ Subscriptions -->
Display instructions on how to access the subscribed directory
<!-- Manualpayment -->
Handling payment option.
<!-- /Manualpayment -->
Display notice that the payment was made using the Manual
<!-- /Specialinstructions -->
End Special Instructions portion of the receipt.
%ashopname%
%ashopaddress%
%ashopemail%
%ashopphone%
Your Shop Name
Your Shop Address
Your Shop Email
Your Shop phone number
<!-- Membershop -->
%membershop%
<!-- /Membershop -->
Displays if order came from a Digital Mall member's catalog
Digital Mall member's shop name
Link to the password protected directory subscribed
Password to access protected directory
Receipt Numbers
Receipt (orderid) Numbers
When the shopping cart is installed, the first orderid number will begin at 1. New orderid numbers will
then auto increment from the highest existing orderid number in the orders database table each time a
new order is created.
The beginning orderid number can be increased using a database management tool such as
phpMyAdmin. Most hosting services provide phpMyAdmin. In Plesk it is called DB WebAdmin.
AShop Software © Copyright 2002 - 2010
Installation & Setup
29
Browse the database table named orders.
Either add a row with the higher orderid number or, if the highest existing orderid number is not needed
for anything else (for instance it is an incompleted/unpaid or a test order), change the highest orderid to
the higher number and save the change (click Go).
Subsequent new orders will then auto increment to higher orderid numbers.
AShop Software © Copyright 2002 - 2010
30
2.10
AShop V User Guide
Message Templates
AShop sends out email messages under some circumstances and most of them can be customized by
editing the corresponding message template. All message templates can be found in the templates
directory, where you also find the receipt templates and page templates. These are the ones that are
currently available:
· affiliatesignupmessage.html - this template defines the message that is sent to affiliates when they
sign up.
· membersignupmessage.html - this template defines the mssage that is sent to shopping mall
members when they sign up. Note: if you are going to have shopping mall member accounts activated
automatically, without review, you will need to make sure that this message template contains the
code %password% to give your new members their password. A second template should be included
to illustrate this: membersignupmessage2.html. Just rename it, removing the "2", to use it instead of
the default one.
· orderactivationmessage.html - this is sent to customers when their order is activated. It is used for
orders where the payment is delayed, for example check payments or bank deposits, which will result
in an activation link in the order notice that the shop owner receives, which can be clicked to activate
the order upon full payment.
· signupmessage.html - this is sent to customers when they sign up for a customer profile.
· wssignupmessage.html - this is sent to customers when they sign up for a wholesale account.
Each of these templates can be made language specific by adding a dash and the two letter language
code after the word "message", for example: signupmessage-sp.html which would be sent to Spanish
customers when they sign up for a customer profile, or affiliatesignupmessage-jp.html which would be
sent to Japanese affiliates.
2.11
Separate Catalog Components
The category tree and product listing area of the catalog may be inserted into PHP pages as separate
components. An unlimited number of unique catalog pages with different file names may be created
using this method.
AShop Software © Copyright 2002 - 2010
Installation & Setup
31
Custom Catalog Page Layout
The category tree and product listing areas can be placed separately within each web page.
The product listing area can be included separately...
...and the category tree can be included separately.
PHP tags are used to include the product listing and/or category tree as separate components within
local web pages. The includes will work in files ending with .php extension.
Include the Product Listings
Include the following PHP code in the source code for the body of the page where the product listings
are to appear. Change the parameters as instructed.
<?php
$search = "find.html"; $categories = "off"; $catalog = "shop.html"; include "catalogue.php";
?>
The include catalogue.php"; parameter must point to the catalogue.php script, which is in the
directory where AShop V is installed. If this new page is in the same directory as catalogue.php, set it
as shown above. If catalogue.php is in a different directory, set the path accordingly. For example, "../
catalogue.php" (to go up one directory) or "store/catalogue.php" (to go down to a specific directory).
Set the $catalog parameter to the same page (where this PHP include is located) or to a different
page where catalogue.php is also included with this method.
Show or Hide Category Tree (Within Product Listing Area)
· $categories = "on"; With categories set to on, the category tree appears within the product listing
area, to the left of the product listings.
· $categories = "off"; With categories set to off, the category tree does not appear within the product
listing area. It may still be included separately in a different location within the page. see Include
AShop Software © Copyright 2002 - 2010
32
AShop V User Guide
Category Tree below.
Search Box Options
· $search = "off"; The search box does not appear in the page.
Example:
<?php
$search = "off"; $categories = "off"; $catalog = "shop.html"; include "catalogue.php";
?>
· $search = "find.html"; The search box is activated and it appears above the product listings. Use
this same include method to create a second page where the search results will appear. The search
results page can be a copy of the catalog page with a different file name or it may be a different
design, but it must exist and it must have this catalogue.php include in the page. In the example file
that is included with the AShop V new installation file package, find.html is simply a copy of the shop.
html page and the file name has been changed.
· $search = "shop.html"; The search box is activated and it appears above the product listings. In this
case, the search results page is same as the catalog= page so that the search results will appear in
the same page. (Change the filename to match the actual file in your site.)
IMPORTANT! For search results to appear in the same catalog page, an if statement must be
added in the php code.
<?php
$search="shop.html"; $categories = "off"; $catalog = "shop.html"; if (!$searchstring) include
"catalogue.php"; else include "search.php";
?>
Include the Category Tree
Include Category Tree In Catalog Page
Include the category tree in the same page where catalogue.php is included by inserting this PHP tag
into the page.
<?php
include "includes/categories.inc.php";
?>
Include Category Tree In Site Navigation
The category tree may be included in site navigation by adding a catalogue.php="shop.html" parameter.
This parameter points to the page where the product listings are to appear. For example, when the
category tree is in a page that does not have any way to show products and a category is selected, the
product listings for that category need a place to appear in a page. In these examples the product listing
page is shop.html. Change this to match the actual product listing page(s) in your site.
Insert the following php statement to include the category tree in a page where the catalogue.php include
is NOT present in the same page. IMPORTANT! The $catalog variable must precede the categories.inc.
php include in this php statement.
<?php $catalog = "shop.html"; include "includes/categories.inc.php"; ?>
This example will make all links in the category list open in the shop.html page. Change the $catalog=
variable to match the actual page in the site. The page that the catalog= variable points to must either be
AShop Software © Copyright 2002 - 2010
Installation & Setup
33
catalogue.php or it must have the catalogue.php include in the page so that the product listings (for the
selected category) will appear in the body of the page.
To include the category tree in a subdirectory below the directory where AShop is installed, add a chdir
(""); parameter.
Example 1: Category include is in a page one directory below the AShop root.
<?php
chdir("../"); $catalog = "../shop.html"; include "../includes/categories.inc.php";
?>
Example 2: Category include is in a page above the "ashop" directory.
<?php
chdir("ashop"); $catalog = "ashop/shop.html"; include "ashop/includes/categories.inc.php";
?>
Web Sites That Use Frames
The separate category tree and product listing includes can be used in frames, but the Continue
Shopping button and the Check out and View cart pages will NOT work when located in a different frame.
Frames are not supported by our technical service.
2.12
Most Popular and Recently Added Products
The top products and latest additions may be displayed in shopping cart catalog and search pages by
inserting PHP code in the page where it is to appear.
The scripts that produce these lists may be included in...
· page templates
· any custom web page of your choice
· the storefront index.php script or any other custom php script
AShop Software © Copyright 2002 - 2010
34
AShop V User Guide
There are two ways to include the lists, either through Javascript or a PHP include. This is how to use
the Javascript version...
<script language="JavaScript" src="top.js.php"></script>
And this is how to use the PHP include version...
include "includes/toplist.inc.php";
Note that the second version only works in a PHP script.
Parameters may be added to both versions of the script to customize the output. To add a parameter to
the Javascript version, first add a question mark "?" and then add the parameter. If more than one
parameter is specified, add an ampersand "&" after the first parameter and to separate additional
parameters. Here is an example.
<script language="JavaScript" src="top.js.php?items=5&redirect=product.html"></
script>
To add a parameter to the PHP include version, set it as a variable before the include statement. For
example:
$redirect="index.php";
include "includes/toplist.inc.php";
Number of Products Shown
If not otherwise specified, the top.js.php script will display the last 10 new products and latest additions.
To display a lower number of products, add the parameter "items=x" where x is the number of products
to display.
This include will display the 5 most popular and latest additions:
<script language="JavaScript" src="top.js.php?items=5"></script>
Or for the PHP include version use:
$items = 5;
include "includes/toplist.inc.php";
Redirect To A Different Product Page
In shops where only custom catalog pages are used and a direct link to the default storefront script is
not desired, the top.js.php product links can be redirected to the custom catalog pages by adding a
"redirect=x" parameter, where x is the local file name or URL.
This include will display the 10 most popular and latest additions in a custom product page named
"product.html".
<script language="JavaScript" src="top.js.php?redirect=product.html"></script>
The Layout Parameter
By setting the layout parameter you can control which lists are shown. These are the possible values of
the parameter:
AShop Software © Copyright 2002 - 2010
Installation & Setup
·
·
·
·
35
layout = 0 : show top sellers and latest additions below top sellers (the default mode)
layout = 1 : show only top sellers
layout = 2 : show only latest additions
layout = 3 : show latest additions as boxes, this mode is currently only supported by the Javascript
version
This example will show only the latest additions, using the PHP include, and will limit the list to 4 items:
$layout = 2;
$items = 4;
include "includes/toplist.inc.php;
Table Header Text
The text that appears at the top of the listings is set in the corresponding language file, language/xx/
topjs.inc.php , where xx is the language abbreviation. For example, the text for English language is
set in language/en/topjs.inc.php.
Colors, and Fonts
The table borders, background colors, and fonts can be controlled through the Layout menu and with
style sheets (CSS).
2.13
Purchase Agreement
An agreement page can appear when your customers click the Check Out button.
Customers must then click the Accept button to proceed to the payment form and the emailed receipt
will contain a copy of the agreement to remind them of the terms they have accepted.
The agreement page feature is activated when a file named agreement.txt exists in the directory where
AShop is installed on your server. For example, http://www.yourdomain.com/ashop/agreement.txt
An example file named agreementEXAMPLE.txt is included with the AShop new installation packages.
To use the example file, rename it to agreement.txt and modify the content as needed. The content can
be plain text or HTML.
AShop Software © Copyright 2002 - 2010
36
2.14
AShop V User Guide
Language Selection
Language Selection For The Retail Catalog and Customer Messages
The language that is displayed in the retail catalog and in receipts to retail customers can be selected
and set as a preference for each customer. If no language is selected, the preference defaults to
English.
The preferred language is set in a cookie by navigating to the language.php script and then clicking on a
language icon/link or by navigating to the language.php script with a language parameter appended to
the URL.
Example: http://www.yourdomain.com/ashop/language.php?language=en
New installation packages for AShop V include only the English language set.
Download other language file sets from our website at:
AShop Software © Copyright 2002 - 2010
Installation & Setup
37
http://www.ashopsoftware.com/dlcounter/downloads.php
Language selection can only be done for language sets that have been installed in AShop.
2.15
Language Specific Files and Folders
There are three areas that have language specific files. Each language is identified by a 2 character
abbreviation, which is used for language subdirectory name, for image file names, and in receipt.html file
names. For instance; en for English, sv for Swedish, etc.
1. Text that retail customers see on pages is kept in editable language files, which are kept in
a subdirectory of the language directory. Each language has its own subdirectory named with the 2
character abbreviation and in each language subdirectory there is a complete set of include (inc)
files, which are named to correspond to the script that uses each one. The text in the language files
is defined as constants, which are then selected and used by the program files based upon the
language preference for each customer.
2. There is a complete set of images for each language, which are all kept in the images
directory. The language for button images that have text is identified by the 2 character suffix. For
instance, buy-en.gif is the name of a buy button image that is used for English language.
AShop Software © Copyright 2002 - 2010
38
AShop V User Guide
3. There is a set of receipt templates for each language. The receipt templates are located in the
templates directory. There is a plain text receipt template and an HTML receipt template for each
language. Plain text or HTML receipt is selected through the admin panel > Configuration > Shop
Parameters menu.
Tokens are used to show customer and order information in the receipt. Start and stop comments
are used to separate each section.
clip of receipt-en.html file
A set of English receipt templates is included with the AShop V new installation package. Receipt
templates are also included with each language set.
If there isn't a receipt template for the language that the customer has selected, the default one
named receipt.html, which is distributed in English language, will be used. To change to a different
default language for the receipt copy the language specific template to receipt.html. To make all
receipts use the same language you would simply remove all the language specific templates and
keep only receipt.html.
See also: Add A Language Set
2.16
Add A Language Set
To create a new complete language set...
1.
Make a copy of the set of files that are in the language/en directory and rename it with the 2
character abbreviation for the language, for instance French is fr, Spanish is sp, etc. Translate the
text in all of the files within the new directory. The words with all capital letters on the left hand side
are the constant names. DON'T CHANGE THE CONSTANT NAMES. The text is on the right hand
side in each line. If you use quotes (single ' or double " ) escape them with a backslash \" or there
will be parse errors when you run the scripts. For some languages, such as French, apostrophes
are used often to accent characters. If the special characters cause parse errors, replace them with
the ascii equivalent. Example: n' in the html source displays n' (n followed by an apostrophe/
accent) in the web page.
AShop Software © Copyright 2002 - 2010
Installation & Setup
39
above is an English language file
below is the same language file translated in
Japanese
2.
Edit the lang.cfg.php file. Change the language name. Set the $langredirect if using language
specific catalog pages. Leave the $langredirect empty for the catalogue.php script to open when a
language is selected.
3.
Create a set of button images with text in that language. Name the images with the 2
character suffix just as the -en and -sv images are already named. The buttons must be in gif
format.
catviewcart-en.gif (english)
4.
catviewcart-sp.gif (spanish)
Make a copy of admin/receipt-en.html and/or admin/receipt-en.txt (if using plain text
AShop Software © Copyright 2002 - 2010
40
AShop V User Guide
receipts), translate the text, rename and save it with the corresponding 2 character language suffix.
See also: Language Selectable Catalog Pages
2.17
Language Selectable Catalog Pages
Language Specific Catalog Pages
The product listing area and the category tree can be inserted into php pages as separate includes.
There is no limit to the number of unique pages that can be created in this way, which makes it possible
to use this to create one storefront page per language. In addition, each category in the catalog can be
set to open only for a specific language. These two features can be combined to create a system of
language selection with custom pages and unique product listings for each language.
See the languages demo.
2.18
Order-Link Ordering Method
The Order-Link method supports Add to Cart, View Cart, and Check Out functionality within HTML
pages. The Order-Links may be located on the local server, on a remote server, or within email
messages.
Order-Link Code Basic Behavior and Customization
The basic Order-Link html code may be copied directly from each product listing in the AShop admin
panel and pasted directly into the source code of a web page, however typically modifications are
needed so that it works best within the context of each store design, for the marketing method, and for
the type of products that are being sold. This topic describes the basics of the html code. For additional
step by step examples and screen shots also see the Order-Link Tech Tip.
The three main scripts used for Order-Link are shipping.php, basket.php, and checkout.php. The scripts
may be run by linking to them or from an html form post. Parameters are added to specify product
information and Order-Link behavior.
Customer Shipping/Tax Information Form Page
Products that are shippable or taxable require collection of shipping information from each customer. The
shipping information must be collected sometime before checkout, but it is optional to ask for it during
the shopping session or at checkout. Use shipping.php for buy buttons to collect the shipping address
before viewing the cart. Use basket.php for buy buttons to allow shopping before entering the shipping
address.
shipping.php - The shipping.php script is used to add products to the cart and to collect address
information for shipping or sales tax. It can also be used for checkout by specifying the parameter
AShop Software © Copyright 2002 - 2010
Installation & Setup
41
"action=checkout" in the link. The Order-Link (buy link/button) html code that is copied directly from the
AShop admin panel runs the shipping.php script. With shipping.php, when shippable or taxable products
are added to the cart the shipping information form appears (before the View Cart page) so that shipping
and taxes will be included in the View Cart page from the beginning of the shopping session.
basket.php - The basket.php script is used to add products to the cart or to view the cart contents. To
View Cart, link to basket.php without any parameters. For Add to Cart and Buy links, parameters must
be added to specify the products. When a product is added to the cart with a link to basket.php, the
View Cart page opens (without first asking for shipping address first) even if shippable or taxable
products are added. In the View Cart page there will be a link to calculate shipping/taxes. With this
method, it is optional for customers to click the calculate shipping/taxes link in the View Cart page at
any time during the shopping session. If the shipping address is needed and it has not been entered yet,
the shipping address page will open before checkout can be completed. The Order-Link (buy link/button)
html code that is copied directly from the AShop admin panel runs the shipping.php script. To change
the shipping address behavior as described, change the Order-Links so that they link to the basket.php
script instead.
add=1 Parameter
The Order-Link (buy link/button) html code that is copied directly from the AShop admin panel does not
include an add=1 parameter. This must be added in order to allow more than one product to be added to
the cart. If the add=1 parameter is not included, each time a product is added it will replace any
previously added product. See examples below....
checkout.php - If there are shippable or taxable products in the cart, links to checkout.php will open the
shipping information page (shipping.php). When the shipping address is submitted, the checkout will
continue to the payment form page or the payment option selection page (depending on if there is more
than one payment option). If there are not any shippable or taxable products in the cart, a link to
checkout.php will go directly to the payment page or payment options.
How to Create an Add to Cart Order-Link Form
For each product Add to Cart button, add a form and set the product ID accordingly. The product ID is
listed next to each product within the Administration Panel > Edit Products.
Here is an example. The required parameters (for products without attributes) are quantity, product, and
add.
<form method="get" action="http://www.yourdomain.com/ashop/basket.php">
<input type="hidden" name="quantity" value="1">
<input type="hidden" name="product" value="1">
<input type="hidden" name="add" value="1">
<input type="submit" name="Submit" value="Add to Cart">
</form>
Note: When a form is inserted inside of a table cell, it may cause unwanted enlargement of the table cell
and distort the intended page design in some browsers. To avoid this problem, put the <form> and </
form> tags between the <tr><td> and the </tr></td> tags.
For example: <tr><form><td> and </tr></form></td>
This is not specifically WC3 compliant, but it works :-)
For quantity selection, substitute a text box in place of the hidden field.
AShop Software © Copyright 2002 - 2010
42
AShop V User Guide
<input type="text" name="quantity" value="18" size="2" maxlength="2">
A drop-down selection box can be substituted for to offer only fixed quantities.
<select name="product">
<option value="1" selected>1</option>
<option value="2">2</option>
<option value="3">3</option>
<option value="4">4</option>
<option value="5">5</option>
</select>
Add to Cart Order-Link Hyperlink With Text Or Image
A hyperlink may be used instead of the form.
<a href="http://www.yourdomain.com/ashop/basket.php?quantity=1&product=1&add=1">Add to Cart</
a>
or an image.
<a href="http://www.yourdomain.com/ashop/basket.php?quantity=1&product=1&add=1"><img
src="addtocart.gif"></a>
Change the quantity= and product= parameters accordingly.
The productid is listed next to each product in Edit Catalog.
Single Product Order Link
Omit the add=1 parameter for single product orders. This will clear the basket each time before the
product is added.
<href="http://yourdomain.com/ashop/shipping.php?quantity=1&product=1&action=checkout">Buy
Now</a>
To go directly to the payment form without viewing the cart.
http://www.yourdomain.com/ashop/shipping.php?quantity=1&product=1&action=checkout
Note that if the product has shipping or taxable set, the shipping information form will appear first.
View Cart Text Link
AShop Software © Copyright 2002 - 2010
Installation & Setup
43
<href="http://www.yourdomain.com/ashop/basket.php">View Cart</a>
Check Out Text Link
<href="http://www.yourdomain.com/ashop/shipping.php?action=checkout">Check Out</a>
View Cart Image Link
<http://www.yourdomain.com/ashop/basket.php><img src="viewcart.gif"></a>
Check Out Image Link
<http://www.yourdomain.com/ashop/shipping.php?action=checkout><img src="checkout.gif"></a>
View Cart Form Button
<form method="get" action="http://www.yourdomain.com/ashop/basket.php">
<input type="submit" name="Submit" value="View Cart"></form>
Check Out Form Button
<form method="get" action="http://www.yourdomain.com/ashop/shipping.php">
<input type="hidden" name="action" value="checkout">
<input type="submit" name="Submit" value="Check Out"></form>
Return URL (Link from thank you page)
The default URL for the "Link from thank you page" is set in Shop Parameters. It may be overridden and
specified for each order by including a returnurl parameter in the Order-Link checkout URL. The returnurl
is stored in the orders table and used for the thank you page "Back to (ashopname)" URL after payment
has been processed.
The following example sets the return URL to http://www.mydomain.com/mypage.html.
http://www.yourdomain.com/ashop/shipping.php?action=checkout&returnurl=http://www.mydomain.com/
mypage.html
http://www.yourdomain.com/ashop/shipping.php?product=111&quantity=1&returnurl=http://www.
mydomain.com/mypage.html
How to include attributes in Order-Link URLs
The Order-Link method can be used to set an attribute by posting the parameter "attribute" with the
value "$attributeid:$valueid" to shipping.php, like this:
http://www.yourdomain.com/ashop/shipping.php?product=123&quantity=1&attribute=34:56
If there is only one attribute, it is simple to copy the URL from the link tool, which is displayed in the
attribute alternatives page.
AShop Software © Copyright 2002 - 2010
44
AShop V User Guide
To specify more than one attribute, put a separator between each attribute:alternative parameter like
this.
http://www.yourdomain.com/ashop/shipping.php?product=123&quantity=1&attribute=34:56|
43:81
URLs are not automatically generated by the link tool for multiple attributes and alternatives, however the
individual parameters can be obtained by viewing each of the attribute alternatives and then appended to
create each combination of attributes and alternatives. The parameters can be obtained by viewing the
Order-Link for each alternative.
It may help to make a chart. For example. Lets say that we have a t-shirt product, which is available in 2
colors and 4 sizes. The parameters in the left column are for white or black and the parameters accross
the top are for sizes. The attributes and alternatives are combined for each possiblity where they
intersect in the chart.
White 68:718
Black 68:719
Sml 65:708
Med 65:709
Lrg 65:710
XL 65:711
68:718|65:708
68:719|65:708
68:718|65:709
68:719|65:709
68:718|65:710
68:719|65:710
68:718|65:711
68:719|65:711
The appended attributes can be used to create an individual buy now link for each combination.
AShop Software © Copyright 2002 - 2010
Installation & Setup
45
For example, this link would buy one small white shirt.
http://www.yourdomain.com/ashop/shipping.php?product=151&quantity=1&attribute=68:718|
65:708
To change the link so that more than one product can be added to the cart, include the
"add=1" attribute.
http://www.yourdomain.com/ashop/shipping.php?product=151&quantity=1&add=1
&attribute=68:718|65:708
To create a form with drop-down selectors, copy the Order-Link form code from the link code generator
for the main product.
The form code can then be modified to work in various ways. Here it is cleaned up and aligned so that it
is easier to read.
<form action="shipping.php" method="post">
<input type="hidden" name="product" value="151">
Quantity: <input type="text" name="quantity" size="5" value="1">
Sizes: <select name="attribute65">
<option value="708">Sml
<option value="709">Med
<option value="710">Lrg
<option value="711">X L</select>
Color: <select name="attribute68">
<option value="718">White
<option value="719">Black</select>
<input type="submit" value="Buy now">
</form>
The add=1 Parameter
The form code copied directly from the AShop admin panel is for buying a single item. When a product
is added, any previous products are cleared from the basket. To convert the form into an Add to cart
button, include the "add=1" parameter so that more than one product can be added to the cart. To view
the basket before requesting shipping information, change the form action="shipping.php" to form
action="basket.php". Here is an example.
<form action="basket.php" method="post">
<input type="hidden" name="add" value="1">
<input type="hidden" name="product" value="151">
Quantity: <input type="text" name="quantity" size="5" value="1">
Sizes: <select name="attribute65">
AShop Software © Copyright 2002 - 2010
46
AShop V User Guide
<option value="708">Sml
<option value="709">Med
<option value="710">Lrg
<option value="711">X L</select>
Color: <select name="attribute68">
<option value="718">White
<option value="719">Black</select>
<input type="submit" value="Buy now">
</form>
Language Preference and Order-Link
Language preference must be set at the beginning of each shopping session. This is done by linking to
the language.php script with language and redirect parameters. Here is an example:
http://yourdomain.com/ashop/language.php?language=sp&redirect=http://www.yourdomain.com/
SpanishOrderPage.html
By running the language.php script first, it sets the language preference in a cookie and redirects to the
Spanish order page. Then when products are added to the basket, the AShop scripts will read the
language preference from the cookie and display View Cart and other pages in the same language.
When the customer checks out the language preference is saved in the database so that future receipts
and notices will be in the same language for each customer.
2.19
Multi-Product Buy Form
To add more than one product to the cart with one button, call the multiproductbuy.php script with a form
post. An example of the form code is included with the AShop V distribution package in the file named
multiproductEXAMPLE.html.
Here is the example code. Change the products value to match the actual productid numbers or each
product as listed in the admin panel under Edit Catalog. The returnurl value is where the Continue
Shopping button returns to. If not set, the Continue Shopping button will return to catalogue.php. This
URL can be set to return to the same order page or to another page of ordering options. It may be set as
a relative URL (multiproductEXAMPLE.html) or an absolute URL (http://yoursite.com/ashop/
AShop Software © Copyright 2002 - 2010
Installation & Setup
47
multiproductEXAMPLE.html).
<form action="multiproductbuy.php" method="post">
<p>
<input name="products[]" type="checkbox" id="products" value="126">
Product 126</p>
<p>
<input name="products[]" type="checkbox" id="products" value="111">
Product 111</p>
<p>
<input name="products[]" type="checkbox" id="products" value="115">
Product 115</p>
<p>
<input type="submit" name="Submit" value="Add to cart">
<input name="returnurl" type="hidden" id="returnurl" value="multiproductEXAMPLE.html">
<input name="action" type="hidden" id="action" value="basket">
<br>
</p>
</form>
Change the productid numbers to match the actual products. Add options for more or less products. The
checkboxes can be initially checked or unchecked. Fields can be hidden to include groups of products
in multiple forms on the page. The HTML forms are editable using an HTML editor program such as
DreamWeaver or FrontPage.
Here is an example where the same three products added from hidden fields.
<form action="multiproductbuy.php" method="post">
<p>
<input name="products[]" type="hidden" id="products" value="126"><input name="products[]"
type="hidden" id="products" value="111"><input name="products[]" type="hidden" id="products"
value="115">
Description of the multi-product.
</p>
<p>
<input type="submit" name="Submit" value="Buy All Three Products">
<input name="returnurl" type="hidden" id="returnurl" value="multiproductEXAMPLE.html">
<input name="action" type="hidden" id="action" value="basket">
<br>
</p>
</form>
AShop Software © Copyright 2002 - 2010
48
2.20
AShop V User Guide
Subscription Password Expiration
AShop V supports the sales of subscription access to password protected members only directories
and provides a simple method to remove expired passwords from the list.
To remove expired passwords manually...
1.
Open checksubscr.php in a text editor.
2.
Change the $ashoppath variable to the full server path where the subscription directory is located.
Example: $ashoppath = '/home/username/public_html/protecteddirectory';
3.
Upload/replace the checksubscr.php file
4.
Make this script executable: chmod 755 checksubscr.php.
5.
Run the checksubscr.php script from a browser when you wish to remove expired passwords.
Example: http://www.yourdomain.com/ashop/checksubscr.php
Note: When PA+ (Password Administrator Plus) is installed on the same server as AShop and the path
to PA+ is set within the third party software integration, each subscription directory can optionally be
managed after the initial order by using the more advanced features of PA+.
2.21
Visit Counter
Unique visitors to the catalog are counted by the counter.php script. It works automatically with the
dynamic catalog pages because catalogue.php calls counter.php each time that it is run.
When using Order-Links exclusively, the catalogue.php script is never called. In order to count visitors to
HTML web pages, a small line of code must be inserted into the head of each page and the server must
be configured to run PHP from within HTML files.
Here is the visit counter code that goes into the head of each page.
<? php include "counter.php"; ?>
Change the relative path to counter.php accordingly.
For instance, if the web page is in the public root and AShop is installed in the ashop subdirectory the
code would look like this:
<? php include "ashop/counter.php"; ?>
If the page is down one directory from the counter script, it would be like this.
<? php include "../counter.php"; ?>
There are two ways to configure the server to run PHP from within HTML pages.
Method A.
Edit the configuration file for the web server (example is for apache) and add:
AddType application/x-httpd-php .php .phtml .php4 .php3 .html .htm
Method B.
Edit the directory configuration file (.htaccess for apache) and add:
AShop Software © Copyright 2002 - 2010
Installation & Setup
49
AddType application/x-httpd-php .php .phtml .php4 .php3 .html .htm
2.22
Move or Copy AShop
An existing shopping cart may be moved or copied from one location to another.
Before installing AShop in a new location, run the ashoptest.php script, which tests for required
functionality and installs the correct IonCube loader for the operating system and version of PHP that is
running on the server.
1.
2.
3.
5.
6.
7.
Download the all of the AShop files and export (save as file) the database (structure and data) from
the existing site.
Upload the files to the new location.
Set the file and directory permissions as listed in the new installation instructions.
Create a database and import the sql structure and data.
Edit the admin/config.inc.php file if necessary so that it will match the database server, name, user,
and password.
Edit all of the path and URL settings in the database so that they match the paths and URLs at the
new location. This can be done with a tool such as phpMyAdmin or DB Admin, which are typically
provided by web hosting services.
That should do it. If there is trouble with any of the settings, error messages will typically indicate the
cause.
License key registration is not required if the domain name is same as what is already registered. If the
domain name is different, it must be registered. To register a license key and activate the installation,
open admin/register.php in a browser.
2.23
Store Configuration
2.23.1 Administration Panel
The Administration Panel can be accessed by navigating to the admin directory where the shopping cart
is installed.
Open the Administration Panel by typing a URL something like this into your browser address bar:
(substitute the actual URL to the cart installation in place of "yourdomain.com/ashop")
http://www.yourdomain.com/ashop/admin
AShop Software © Copyright 2002 - 2010
50
AShop V User Guide
Security Features
The AShop admin login is password protected. The default password that is installed with the program
is ashopadmin. This should be changed after installation. If you forget your password, it can be looked
up with your server's database browsing tools such as phpMyAdmin or through Shell access.
20 Minute Inactivity Security Check - The admin panel login times out after 20 minutes of inactivity.
By adding the line: $noinactivitycheck = "false"; anywhere in the config.inc.php file the time check is
skipped. This might be useful during initial setup or while adding a large number of products.
2 Minute Lockout Prevents Brute Force Entry -The login has protection against brute force attacks
were a hacker writes a script or program that will automatically try every possible combination of letters
to figure out the password. After three incorrect login attempts the login.php script will block all further
attempts until two minutes have passed. It will also send an email message to the administrator. This
should make it very hard (or at least extremely slow) to get unauthorized access to an AShop
administration panel.
Login Cookies - The Administration Panel uses cookies for secure login sessions. If you cannot stay
logged in, it is probably because you have an old browser or your browser security settings are blocking
cookies. Check your security settings and/or download a current browser for free from Microsoft,
Netscape, or Mozilla.
To return to the Administration Panel index page from any other page in the admin panel, click on
the AShop logo at the top of any page within the Administration Panel. This will redirect to the first page
that you see after logging in.
The Administration panel is divided into four main sections:
Configuration
Edit Catalog
Manage Affiliates
Manage Sales
2.23.2 Store Configuration
The Configuration menu is divided into seven submenus.
Shop Parameters
Change Administrators Password
Shop Name, Address, Telephone, Email
Default Language Selection
Currency Selection
AShop Software © Copyright 2002 - 2010
Installation & Setup
Shopping Cart Catalog Mode Selection
Save Cart enable/disable
Add to Cart Confirmation Window enable/disable
Link From Thank You Page
Items Per Page
AShop Affiliate ID
Receipt Mail Format html/text
TeleSign Customer ID
Wholesale Catalog enable/disable
Wholesale Catalog Volume Discount Settings
Download Password Duration
Number of Downloads Allowed Per Password
Random Key Code Delivery Selection
Edit Product Flags
Advanced Options
Layout
Upload Logo Image File (default page heading)
Theme Selections
Background Colors
Text and Link Colors
Forms Colors
Item Border Color and Width
Item Background and Text Colors
Condensed Layout enable/disable
Category Colors
Font Selection and Sizes
Thumbnail Image Size
Affiliate Program
Affiliate Text (displayed on affiliate sign-up page)
Affiliate Administrator E-mail
Second Tier Affiliates enable/disable
Default Affiliate Commission Percentage (per product)
Second Tier Commission Percentage (per order)
Level 2 Affiliate Commissions
Require PayPal ID In Sign up Form on/off
Redirect URL (where visitors end up after clicking on affiliate links)
Payment (not all of the options listed are available for every payment option)
Add New Payment Option
Payment Option Name
Payment Gateway Selector
Payment Fee (optional)
Merchant ID
Transaction Key
SSL URL To Payment Form Logo Image
AShop Software © Copyright 2002 - 2010
51
52
AShop V User Guide
Extra Form Fields (only available for payment gateways that use the AShop Secure orderform script)
Deliver Before Payment enable/disable
Test Mode enable/disable
Automatic Delivery enable/disable
Payment Gateway Description
Text On Order Page
Thank You Message
Fulfilment
Add New Fulfilment Options
Three Options, add as many as you like of each
Email Order Notices To Fulfilment Services
SwiftCD.com CD Fulfilment Service
Automation Fulfilment Method
Shipping
Manage Storewide shipping options for FedEx, UPS, and custom methods.
Allow/Disallow Customer Selection of Shipping Service Options.
Add/Remove Local Country or Countries (used to determine local or international handling charge)
Ship Only Locally Option
Add Local Handling Charge (one-time per order charge if shipping to country of origin)
Add International Handling Charge (one-time per order charge if not shipping to country of origin)
Manage Zip Tables (used only if custom zip-zone lookup and zone rates have been setup for shipping)
Manage Shipping Options (for instance express shipping charges)
Manage Shipping Discounts (quantity based)
Taxes
Sales Tax Type - US, VAT, GST/PST
Taxable State Or Province (US/Canada)
EU/VAT Origin Country Setting
Sales Tax, VAT, GST Percentage
PST Percentage
Request Vat Number from Customer Option
Sales Tax On Shipping Option
2.23.3 Shop Parameters
From the AShop Administration main menu, click Configuration on the left side menu. This will open the
Configure AShop menu. Click on the "Shop Parameters" link.
AShop Software © Copyright 2002 - 2010
Installation & Setup
AShop Software © Copyright 2002 - 2010
53
54
AShop V User Guide
Change Password
The default username and password for the admin panel is: ashopadmin. After installing AShop, the
administrator's password should be changed. Enter the old password, then enter the new password
twice.
Note: If you forget and lose your password, you can have it sent to you by email by clicking the "Did you
forget your password?" link on the login screen. Just leave the username field blank to get the main shop
administrator password. The username is only used for shopping mall member accounts.
Contact Information
Shop Name
The Shop Name will display in many places:
· In the browser title bar of the catalog page and in the product delivery pages by default.
Note that if a page template for the catalog, delivery, or affiliate sections is present, the page title
within the template file will display in web page browser title bars instead of the Shop Name setting.
· The "From" e-mail field of customer receipts and affiliate messages.
It is recommended that you do not use HTML tags or special characters to format the text in the
Shop Name field as most mail servers will reject messages with tags in the "From" field of the
message header and special characters, such as ™ may not appear correctly in e-mail messages.
· With the contact information in receipts and order notices.
· Appears in AShop template pages wherever the comment <!-- AShopname --> is placed.
Do NOT use a comma or appostrophe in your Shop Name as it may cause adverse effects when
messages are received by Outlook and possibly other programs.
Address
The store mailing address is displayed, with the store or organization contact information, on the product
delivery page and receipts.
Telephone
The Telephone number also appears with the contact information, which is displayed on the product
delivery page and receipts.
E-mail
The store administrator's e-mail is where notices of sales transactions and downloads are sent and is
used as the return address for customer e-mail receipts. This e-mail address will also display on the
product delivery page and receipts with the other contact information.
Note! If you set this to the same e-mail that you use for your Sales Office, no email notification will be
sent from your AShop. Instead they will be stored directly in your Sales Office inbox.
Catalog Options
Currency
Set the currency for what will display in the catalog and within receipts and order notices. The currency
AShop Software © Copyright 2002 - 2010
Installation & Setup
55
that is set here also controls which payment options are available. Only payment options that support
the selected currency will be available within Payment Options.
Catalog Mode
The Catalog mode is typically set to Shopping Cart, which enables selection of more than one product
per order and any quantity of each product. Use Single Product Order to go straight to checkout when a
product is put in the cart, allowing only allow one product per order. Use Single Product Shopping Cart
to disable the quantity box and set the quantity of each added product to 1. For a description of how this
works, see Shopping Cart Catalog.
Details Pages Folder
Select which folder to store product details pages in. These pages are generated through the HTML
button on your products. Only writeable folders in your AShop will be available here.
Enable Wishlists
When this box is checked, your customers can save items to a wishlist and add their favorite items
directly from that list. They need to be logged in to use this feature.
Confirm Add To Cart
A small window pops-up when a product is put in the cart to confirm the buyer's intention and also to
view and agree to terms of sale (if set) and to select product attributes (if set). For products that do not
have terms of sale requirements or selectable product attributes, the confirmation window can be set to
require confirmation or not.
Link From Thank You Page
After successful receipt of payment a login page is presented to the customer. Below the name and
address of your store, there is a link that says "Back to [Shop Name]!" This sets that link URL.
Items Per Page
Sets the number of items to be displayed on one page in the product catalog. If more than this number
of items exist in the chosen category or search result, the items will be split up on separate pages that
can be accessed by clicking a page number located beneath the products.
AShop Affiliate ID
To earn commissions by referring visitors to us, sign up for the AShop Software affiliate program and
enter your affiliate ID here. When an affiliate ID is saved, the small "Powered by AShop" logo will appear
below the categories in the catalog. It will link with your affiliate ID to our affiliate tracking and sales. If
the AShop Affiliate ID box is left blank, the AShop logo and link does not appear on the pages.
Receipt Mail Format
Select whether you want your eMailed receipts to be in HTML or Plain Text format. HTML format looks
better and is typically easier to read. Pain text is less likely to be blocked by overactive spam filters. The
choice of receipt format may depend on the type of products that you sell, the keywords that are
included in receipts, and the volume of orders that are processed.
Collect [full contact or only name/email] for gifts
When the total of the order is zero, upon checkout only contact information is collected and no payment
information is required.
only name and email - The checkout orderform will only require name and email address.
AShop Software © Copyright 2002 - 2010
56
AShop V User Guide
complete contact information - The checkout orderform will require name, email address, physical
address, and phone number.
Up sell
If there are products that are related to the ones a customer currently have in his/her cart they will be
shown on a special up sell page when the customer checks out. Use this to offer special deals or
remind your customers about other items that may be of interest to them. This option lets you select
how many such up sells to show: 0-2 products.
Customer Email Confirmation
When this option is activated the customer will be required to confirm their email when signing up for a
customer profile. A confirmation message will be sent to the customer with a link that needs to be
clicked to confirm the email.
Telesign Integration
AShop Software © Copyright 2002 - 2010
Installation & Setup
57
Telesign Customer ID
Telesign automated telephone call verification service is optional. Leave the box blank to disable the
service. Enter a valid Telesign account number to activate the service. Note that it only works for
payment options that use a locally hosted payment form (orderform).
Non-fixed Voip (Voice Over Internet Protocol) and untraceable cell phone numbers are often used by
criminals to get around phone verification. To block fraudulent transactions, Telesign verification identifies
the type of phone number and will not validate untraceable phone numbers. If a customer enters a nonfixed Voip number or an untraceable cell phone number an error message will appear. The Telesign error
message is stored in the TELESIGNINFO text in orderform.inc.php language file.
Example of untraceable phone number error message:
Note! You must enter a fixed phone number without country code. Non-fixed Voip and untraceable cell
phone numbers will not be accepted. An automatic phone call will be made to this number to provide you
with a verification code.
Authentication ID
Set this to the authentication ID for your Telesign account.
SAASU Integration
AShop can integrate with the online accounting service SAASU to store all transactions and use a
centralized inventory that can be accessed from both your AShop(s) and a software cash register at your
physical store. Enter the access key for your SAASU account and the file ID of the SAASU file you wish
to use, to enable the SAASU integration. This will activate the two additional options, which lets you
select the tax code and bank account to use with AShop. These will be populated with information from
your SAASU file once you have configured the first two options.
Twitter Integration
The configuration options for Twitter are no longer available on this page since they are no longer
needed. To setup your AShop for use with Twitter you only need to click the Twitter icon on one of your
products, login to your Twitter account and click "Allow" when asked to give your AShop permission to
post tweets to your account. This only needs to be done once and when it is completed you will be able
to use the same icon to post tweets about a new products or a special offer. This can even be used by
your shopping mall members to allow them to post their own products on your Twitter account. They will
not be able to post anything else though.
Wholesale Catalog
The wholesale catalog is optional. Check the box to activate it. See the Wholesale Catalog topic for
more information about how this works.
Wholesale Discount Levels
The wholesale discount levels only apply to the wholesale catalog.
Downloadable Product Expiration
Allow Download For (quantity) Days
AShop Software © Copyright 2002 - 2010
58
AShop V User Guide
A password is e-mailed to customers upon receipt of payment. This password is required to access the
downloadable products. The password will expire after the number of days that is set in the Allow
Download For box. Setting the allowed download days to 0 disables that restriction.
Allow (quantity) Downloads Per Product
Each password will work to download a product file this many times within the number of days that Allow
Download For is set to. Set it to 0 and any number of downloads are allowed.
Browser Save Dialogue
When downloadable products are ordered, customers are provided with a download link. Depending on
the customers' browser settings and applications that are installed on the customers' computers, some
file types will automatically open with the default application that is installed on each customer's
computer. For example, a pdf file may automatically open in Adobe PDF Reader and an mp3 file may
automatically open in Windows Media Player. When this setting is Off, the browser behavior is
dependent on each customer's computer configuration. When this setting is On, the Browser Save
Dialogue box is forced to open regardless of the customers' computer and browser configuration.
Emailed Key Codes
Random Key Code Selection
Key codes are emailed to customers. New key codes are added from a line delimited text file. If this box
is checked, the key codes will be used in random order. If the box is unchecked, the key codes are
used in the order of the original the text file, from top to bottom.
Shopping Mall Parameters
Default Commission Level
Each member earns commissions when his/her products are sold. The commission is a percentage of
the retail sales price for each member product that is sold. The commission percentage is set
individually for each member. When a new member is activated, that member's commission rate is
initially set to this value. The commission rate for each member may be changed by the mall
administrator (username: ashopadmin) through the Manage Members menu.
AShop Software © Copyright 2002 - 2010
Installation & Setup
59
Member Catalogs
Member products may be displayed in dynamically generated catalog pages in one of two ways:
· Unchecked - all members products are displayed within one dynamically generated catalog.
· Checked - each member has an individual dynamically generated product catalog where only his/her
products appear.
Member Product Management
When set to Simple Mode or Advanced Mode, each member may add and edit his/her products.
Advanced Mode will give the member access to the Make HTML page to create product detail pages for
his/her products, edit shipping options and post tweets to your Twitter account while this is blocked in
Simple Mode. If this option is set to Deactivated the administrator will need to add all products but can
still use the Shopping Mall to automatically calculate commissions for the members.
Member Products Default to Active
When checked, new products added by members will automatically be active. When unchecked, new
products added by members will be inactive and will not appear in the catalog until the mall administrator
(ashopadmin) approves and activates each product.
Display Customer Info
When this option is checked, each member may view customer information relating to sales of his/her
products.
Member Product Template
The "Member Product Template" textbox can be used to set a default product description for new
member products. It can be used to create a standard description format so that members can then add
the missing information. For example:
Artist:
Genre:
Length:
You could also use it as a reminder or instruction to keep the descriptions in the same format:
[Max 80 chars]
Edit Shop Categories
Member shop categories are different and separate from product categories. When Member Catalogs is
checked and each member has an individual catalog, mall.php will display a directory of member shops.
The directory will include a listing of shop categories. When Member Catalogs is unchecked, the shop
categories are only used for internal reference by the mall administrator.
After editing Shop Parameters, click the Submit button to save changes.
Click cancel or the browser back arrow to discard the changes.
Edit Product Flags
Here you can add or remove product flags (comments) that can be assigned to one or more products in
AShop Software © Copyright 2002 - 2010
60
AShop V User Guide
the Edit Catalog menu. These comments will display above the Price in the Product Catalog.
Advanced Options
Only change these settings if you understand what you are doing!
At the bottom of the Shop Parameters page click the Advanced Options link to set the Shop URL,
Secure URL, File System Path, Secure File System Path, time-zone offset, and path or URL to other
third party software.
2.23.4 Member Shop Categories
Member shop categories are only used for the Shopping Mall and are different and separate from product
categories. If the Member Catalogs option is checked in Shop Parameters so that each member has an
individual catalog, the mall.php script will display a directory of member shops. The directory will include
a listing of shop categories.
Create and Edit Shop Categories
When logged in as administrator (ashopadmin) navigate to Configuration > Shop Parameters > Shop
Categories.
To create a new shop category, enter a Caption and click the Add category button. Repeat this to add
more categories. Shop categories will be automatically sorted and listed in ascending alphabetic order.
AShop Software © Copyright 2002 - 2010
Installation & Setup
61
2.23.5 Shopping Cart Catalog Mode
Catalog pages are dynamically generated by catalogue.php or index.php for customers to make
selections, and purchase products. The behavior of the shopping cart when products are added to the
cart will be determined by the Catalog Mode setting.
Shopping Cart Catalog Modes
The Shopping Cart Catalog can be used in 3 different ways.
· Shopping Cart mode (default setting) - Products are added to the shopping cart until shopping is
completed and then the customer clicks view cart or checkout.
· Single Product Order mode - A Buy button next to the product is clicked and the customer is
immediately directed to checkout.
· Single Product Shopping Cart mode - Activates the shopping cart to purchase more than one product,
but only one of each downloadable product. This would work well for music and other types of
downloadable products where only one of each track or selection is typically ordered.
The Shopping Cart Mode is set in the Administration Panel under Shop Parameters.
Shopping Cart Mode
Shopping Cart Mode will display multiple products and will allow the purchase of as many products as
the customer selects.
AShop Software © Copyright 2002 - 2010
62
AShop V User Guide
An "Add to Cart" button will appear next to each product within the catalog.
At the top of the catalog will be the "View Cart" and "Check Out" Buttons, along with a Search and
Subtotal feature.
The Shopping Cart contents can be viewed at any time by clicking on the "View Cart" button. The
customer will be directed to the Basket to proceed with the order. If products have been added to the
cart that require shipping or tax, a link to calculate will appear in the Basket.
* the shopping cart basket
Single Product Order Mode
Single Product Order Mode will display multiple products in the store catalog, but will only allow the
purchase of one product selection in each transaction. This mode is typically enabled where
downloadable products are being sold or where there are buy links from external web sites for single
item purchases.
AShop Software © Copyright 2002 - 2010
Installation & Setup
63
In this mode, the "View Cart" and "Check Out" buttons do not display within the store catalog page.
Neither do the Subtotal or Search features. Customers may select one product from the catalog by
clicking on a "Buy" button and will be directed to Check Out and proceed with the order. They will not
see the Basket page. If the product has a shipping charge or is taxable they will first be directed to the
shipping information form.
Single Product Shopping Cart Mode
Single Product Shopping Cart mode allows the customer to purchase different products, but no more
than one of each. This catalog method is suitable for music and other types of downloadable products
where only one of each track or selection is typically ordered.
The "View Cart" button is available in this catalog mode so when the customer is finished adding their
products they can go to the Basket to proceed with their order.
AShop Software © Copyright 2002 - 2010
64
AShop V User Guide
* the shopping cart basket
Clicking on the Calculate link will open the shipping information form.
*shipping and taxes information form
After the shipping information has been entered, the shopping cart contents will appear with shipping and
taxes added.
AShop Software © Copyright 2002 - 2010
Installation & Setup
65
If more than one payment option is set, the "Checkout" button will show a list of payment options to
select from. If only one payment option is set, the payment options are skipped and the secure payment
gateway form appears.
* payment gateway selection
They are then directed to a secure payment form for the select payment option where billing information
is collected and processed.
AShop Software © Copyright 2002 - 2010
66
AShop V User Guide
* secure payment gateway
· The transaction details, customer's name and shipping information are recorded in the database.
· Upon submission of the payment form, a receipt is e-mailed to the customer. Notice of the
transaction with customer's IP address is e-mailed to the store administrator.
· If a downloadable product was purchased, an automatically generated password and a link to the
download page are e-mailed to the customer. If Automatic Delivery is supported by the selected
payment processor and is set to On within Payment Options, the customer will be immediately
logged into the product file download page. The password will expire after a number of days, which
is set by the store administrator.
· If the sale is the result of an affiliate link, notice of the sale is automatically e-mailed to the referring
affiliate and to the affiliate manager.
· Notice of the order is e-mailed to the store administrator and includes the referring affiliate's id if
applicable.
· If a downloadable product is purchased, the customer is redirected to the delivery page where the
product(s) may be accessed by using the password that was e-mailed to them by the program.
2.23.6 Save Cart Option
The Save Cart feature is optional and is set in Shop Parameters. When enabled, this feature allows
customers to save the contents of the shopping cart for later retrieval.
AShop Software © Copyright 2002 - 2010
Installation & Setup
67
A confirmation notice is sent to the customer by email.
Once the customer is registered they can save the contents of the shopping cart.
Enter the name of the saved cart contents and click the Save Cart button.
Any number of carts can be saved and recalled at a later time.
When the customer comes back at a later time they can login at the View Cart page. They will find they
can load or delete the shopping cart contents they have saved.
2.23.7 Wholesale Catalog
The wholesale catalog is optional. To use the wholesale catalog, it must first be enabled within Shop
Parameters. There are three optional volume discount settings that can be applied.
AShop Software © Copyright 2002 - 2010
68
AShop V User Guide
Wholesale customers must sign up for an account. (wholesale/signupform.php)
Upon submitting the application, the customer receives an email notice that the application has been
received and the shop administrator receives a notice that the customer has submitted an application.
The shop administrator can then login to the administration panel to view the customers information.
Upon approving the customer for a wholesale account, the shop administrator can then activate the
account.
To view the wholesale accounts go to Manage Sales and click the View Wholesale Customers link.
Click the Exclamation Point icon to activate a wholesale account. Once activated the wholesale
AShop Software © Copyright 2002 - 2010
Installation & Setup
69
customer will receive an email notice with their wholesale account login information.
Products are set as active in the catalog by checking a box in add products or edit products. When the
wholesale catalog is active, a check box will appear to make each product active and there will be a
place to set the wholesale price.
When the Catalog Status is unchecked for a product, it does not appear in the dynamically generated
catalog pages, but it can still be ordered using the Order-Link method. This is useful when some
products are only offered in special situations or only from limited web pages. The wholesale price (in
parentheses) and catalog status appears in the category view.
The wholesale catalog is password protected. A password and link to the wholesale catalog login is
automatically sent to the wholesale customer when the account is activated. The wholesale catalog
does not apply sales tax to any orders. It is assumed that the customers have submitted sellers permits
if required for your state or locality. Within the wholesale catalog, the wholesale price appears first and
retail price appears in parentheses as a reference.
2.23.8 AShop Software Affiliates
AShop Software Can Generate Cash For You!
Become an AShop Software sales affiliate and generate income while offering useful software to your
website visitors or e-newsletter subscribers. Earn $50 for every click-thru sale of AShop V! Affiliate sales
commissions are paid out 60 days after the close of each month by PayPal.
2-Tier Commissions - Residual Income From Signing Up Affiliates
Sign up new affiliates and earn the second tier commissions from their orders. The second tier
AShop Software © Copyright 2002 - 2010
70
AShop V User Guide
commission rate is currently 3% of the order totals. Link code is automatically generated in the affiliate
support panel. When new affiliates sign up through your link, you will begin earning second tier
commissions each time they sell an AShop product!
A Product And Customer Service To Be Proud Of
AShop affiliate sales software is easy to use and packed full of useful features. It is backed by great
customer service and full technical support. If you are using it now, you already know that we are serious
and passionate about our work. AShop affiliate sales software will outperform many programs that are
selling for 3 to 4 times as much. Join the growing AShop Software affiliate sales team today and profit
with us while we expand our product line.
Take five minutes to sign-up now. A link with your affiliate ID will be automatically generated for you
to place in your website or e-newsletters. You can check your click-thru sales and commission stats in
real time at the AShop affiliate support panel.
Show the "Powered by AShop" logo in your shop
If you enter your AShop Software affiliate ID on the page Configuration->Shop Parameters in your admin
panel, a "Powered by AShop" logo will automatically be shown below your categories list. It will use your
affiliate link to make sure that all new AShop customers that found us through your link will be assigned
to your affiliate account.
2.23.9 Digital Product Delivery
Digital product files are accessible only after payment has been completed.
See also: Key Code Products
When Downloadable Products Are Ordered
Upon completion of payment, a password and link to download the program file(s) is included within the
emailed receipt.
A login to download the product file(s) is included in the payment confirmation page. The customer also
can click the link in the receipt at a later time to access the files(s).
AShop Software © Copyright 2002 - 2010
Installation & Setup
71
Automatic Delivery is optional with payment gateways that support the feature. When Automatic Deliver
is used, customers still receive the password and link by email AND upon completion of payment, they
will be automatically logged into the product delivery page.
The password can be set to expire in a number of days and/or after a number of downloads. This is set
in Shop Parameters.
2.23.10 Layout
From the AShop Administration main menu, click Configuration on the left side menu. This will open the
Configure AShop menu. Click on the "Layout" link.
AShop Software © Copyright 2002 - 2010
72
AShop V User Guide
AShop Software © Copyright 2002 - 2010
Installation & Setup
73
Upload Logo Image
This logo image file will be displayed on any page that does not have an HTML page template attached
to it. The main pages will use a page template if present. If a page template is not present, the logo will
appear at the top of the page. Some message pages do not use templates and will always display the
logo image at top of the page. The language selection page also displays the logo image.
Theme Selection
A theme is a canned set of design components. Each theme typically includes a set of page templates,
a set of button images, and a configuration file, which sets the Layout parameters. When a theme is not
selected, the root page templates, button images, and Layout parameters are used for shopping cart
pages. Themes and buttons are available to download from AShopSoftware.com.
How To Set Colors
Colors can be selected by clicking on the color selector icon
setting.
, which is on the right side of each color
The colors can also be set by entering the hexadecimal equivalent into the color text box. AShop V does
not include an eyedropper to sample and convert colors in the page to hexadecimal, but Dreamweaver,
PhotoShop, and other similar programs include a color sampler/converter, which can be used to get the
hexadecimal number for colors that are not web standard. Just open an image containing the color that
you want in one of these programs and use any of the color selector tools to activate the eyedropper
tool.
AShop Software © Copyright 2002 - 2010
74
AShop V User Guide
Notes about Layout settings
Layout settings can be overridden by the presence of settings in AShop HTML page templates and style
sheets.
Some pages do not use page templates. For instance add to cart confirmation windows and attribute
selection windows do not use a page template and will always use these settings.
Page Body Colors
Background color
This sets the body background color of web pages that are created by the shopping cart program, as
long as the page templates are not overriding this.
Text color
This is the default text color for shopping cart pages.
Link color
This is the text color of link text for shopping cart pages.
Alert color
Controls the text color of product alert messages such as the filesize and filetypes text for downloadable
products.
Header background color
The background color of the area of the product list where the category name and description is shown.
Also used for the header part of boxes, like the categories list.
Header text color
The text color of the areas that use the header background color.
AShop Software © Copyright 2002 - 2010
Installation & Setup
75
Forms Colors
Forms background color
This field sets the background color in forms used to collect shipping and billing information.
Forms text color
This field sets the text color used in forms that collect shipping and billing information.
Forms border color
This field sets the color of the border around forms.
Product Layout & Colors
Item border color
The products are displayed in the catalog within tables (boxes). The border color of these tables is set
here.
Item border width
This field sets the width of the table borders, in which the products are displayed.
Item background color
This field sets the background color of the tables, in which the products are displayed.
Item text color
This field sets the text color of the tables, in which products are displayed.
Items per row
Sets how many items should be shown on each row in the catalog. The higher this number is, the
smaller the product boxes will be, so make sure it looks ok after changing this value.
Condensed Layout
With the standard layout product listings are separated by borders and there are line breaks between the
product names, descriptions, price, etc. When condensed layout is selected the product listings so not
have as much space between them. Instead of table borders, each product listing is separated by a
horizontal rule. This layout is desirable when there is a large number of product selections.
standard layout
AShop Software © Copyright 2002 - 2010
76
AShop V User Guide
condensed layout
Show product file info
If you sell downloadable products their size and filetypes will be shown next to the name of the products,
unless you deactivate this option.
Product sort order
Lets you select if new items should appear at the top of the product list or at the bottom, by default. You
can always reorder them using the "Up" and "Move to top" buttons, but this option can save you some
time if you want them to be ordered in a certain way.
Category Colors
Category color
The categories have two different background colors to differentiate ones that are not selected from the
one that is selected. This field sets the color of the categories that are not selected in the product
catalog.
Category text color
This field sets the text color within a category.
Selected category color
This field sets the color of a selected category in the product catalog.
Selected category text color
This field sets the text color within a category that is selected.
Hide empty categories
When this is enabled all categories that do not contain any products will be hidden from the categories
list.
Other Settings
Font
This field sets the default text font style that will be used for text within the affiliate pages and in the
product descriptions within the catalog.
Click
to select from a list of fonts.
Text size
The small, medium, and large text sizes are set used
Table width
The Regular and Large table (width) size settings in the Configuration->Layout page are applied to tables
in the catalog and view cart pages. The table size settings are applied through CSS, which makes it
possible to override them and modify the style options through style sheets. The two table size classes
AShop Software © Copyright 2002 - 2010
Installation & Setup
77
are called "tablesize1" (default is 700 pixels) and "tablesize2" (default is 500 pixels).
Top form layout
If you use the simplified catalogue.php storefront instead of the modular index.php storefront you will see
a box at the top of the product list with a search field, a subtotal field and the buttons View Cart and
Checkout. This option lets you determine if the box should use two rows or one. If you have a wide area
defined for the product list in your templates you may find that the one row option works well, but for
narrow layouts the two row option may be necessary.
Thumbnail image size
It's best to set this initially with the size that will be used for all of the product thumbnail images when
displayed in the shopping cart catalog. Note that the images always appear in 100 x 100 pixel size
within the Administration Panel > Edit Products.
When images are uploaded in Add Products or Edit Products, the images are resized to the current
Thumbnail Image Size setting. Original images that are larger than the thumbnail size will be resized to
fit. Original images that are smaller than the thumbnail are not stretched. In cases where the original
image size is smaller or a different ratio of width and height than the thumbnail size, there will be blank
space around the image. To preserve the aspect ratio the blank space in the resulting image will be filled
with the current "Item background color", which is set in Layout > Product Layout and Colors.
Note: For the thumbnail image resizing and optimization to work, the version of PHP on the server must
be 4.3 or higher and GD or ImageMagick must be installed on the server. AShop will check if these
features are available and use one. GD is an additional PHP library that is typically installed on most
servers. Not all versions of the GD library have support for saving gif images so AShop checks and if it
isn't available, all of the thumbnail images will be converted to jpeg. ImageMagick is a similar software
that may be installed on some servers. If both GD and ImageMagick are available, AShop will use
ImageMagick.
Show thumbnails in cart
When this is enabled there will be an additional column in the View Cart page where the thumbnails of
each product in the cart are shown.
Link to large original image
If the thumbnail image is automatically resized by GD or Imagemagick, this setting will, when activated,
keep the (if more than 20%) larger original image file AND create a link above the thumbnail image,
which will open the original larger size image in a new browser window. The default text "Click to
enlarge" may be edited in the catalogue.inc.php file for each language. This feature is in addition to the
preview files, which may also be uploaded through the product Files menu.
AShop Software © Copyright 2002 - 2010
78
AShop V User Guide
Detailed cart list on checkout
This will render a tale similar to the one on the View Cart page, at the top of the Checkout page, instead
of just displaying a text list of the cart contents.
2.23.11 Payment Options
From the AShop Administration main menu, click Configuration on the left side menu. This will open the
Configure AShop menu. Then select "Payment Options".
If only one payment option is set, customers will skip the payment option page and go directly to the
payment form when checking out. If more than one payment option is set, the payment options will be
selectable by customers when checking out. There is no practical limit to the number of payment
options that can be added and the same payment gateway may be used in more than one payment
option with different payment option settings in each occurrence.
This topic describes the payment option settings in AShop V.
For instructions specific to each payment service see: Payment Gateway Integration
Add a new payment option
Select a payment gateway or manual payment method from the drop-down box and click the Add
button. A new payment option is added and displayed on the page.
Payment Option Settings
Enter the payment option settings and click the Update button for one payment option at a time.
AShop Software © Copyright 2002 - 2010
Installation & Setup
79
Option Name
The payment Option Name appears in the payment selection page if there is more than one payment
option. If there is only one payment option created for the shop, then checkout skips the payment
selection page and this Option Name is not seen.
Payment Gateway
This will already be set when the payment method is added.
Payment Fee
A payment fee may be added for each payment option. The amount set here is rounded to 2 decimal
places. When customers check out and select a payment option, the corresponding payment fee for
that payment option will be added to the order total. If a payment fee is not set, the Payment Fee text
will not even appear on the payment options page that customer see.
Merchant ID
The Merchant ID is assigned by the payment gateway. It is usually the same ID that is used to log into
your payment gateway Merchant Control Panel and is required for payment to post transactions to your
AShop Software © Copyright 2002 - 2010
80
AShop V User Guide
merchant account. For PayPal, it must be a verified business account primary e-mail address.
Transaction Key (AuthorizeNet SIM only)
See AuthorizeNet Payment Integration
SSL URL to Logo Image
The payment form can optionally include an image of your choice. This most commonly used for the
store logo. Since the payment form is accessed through a secure socket layer (SSL) connection, the
image URL must also be an SSL connection in order to avoid annoying warning messages. If a nonsecure URL is used to link the logo image, the payment form will still work and will display the logo, but
a warning message will display to customers indicating that non-secure information is being exchanged.
Extra Form Fields
Payment options that use the orderform.php script to collect credit card information can have extra fields
included on the payment form. Data that is entered in the extra fields is saved and can be viewed for
each customer. The extra form field data can also be included in receipts.
See: Extra Form Fields
Deliver Before Payment
Real time payment options provide immediate download of digital products upon receipt of payment.
Manual and offline credit card options will not allow customers immediate access to the digital products.
Instead, the store administrator will receive a link in the e-mailed order notice. Upon receipt of payment,
the store administrator can click on the link to activate the order or run a sales report of unpaid orders in
edit mode to activate each order. The password and link to the product delivery page is then
automatically e-mailed to the customer. To deliver digital products before the manual payment or offline
credit card processing is activated, check the Deliver Before Payment box.
Test Mode (Not all payment services support this.)
Check this box to set the payment form to test mode. This will set the payment gateway in test mode
for each order. When the payment form is in test mode, payments will not post to your merchant
account, but the payment receipt will still function. If you have the Authorize.Net Address Verification
System (AVS) turned on in your Authorize.Net merchant panel, it will not verify addresses while the
payment form is in test mode.
For test orders, enter the following credit card number and any future date: 4111111111111111 (4
followed by fifteen ones)
The personal information and address can be anything since it will not be verified, but to test the e-mail
receipt function you must enter a valid e-mail address.
Automatic Delivery (Supported by some gateways.)
For downloadable products, after payment is received the customer can be automatically logged into the
product download page. It is only available as an option for payment gateways that support it. When
Automatic Delivery is checked, customers who use this payment option will be automatically logged in
to the delivery area after returning from the payment gateway. Note that the Thank you message
(confirmation page) is bypassed when the Automatic Delivery option is functioning.
Gateways that support Automatic Delivery:
Authorize.Net SIM, Authorize.Net eCheck, WorldPay, PlanetPayment, SkipJack
Description
The payment option description will appear below the option name within the Payment Options selection
page. The payment options page only appears if there is more than one payment option. When only one
payment option exists, this page is skipped and the payment details page opens instead.
AShop Software © Copyright 2002 - 2010
Installation & Setup
81
Text on order page (Manual method only)
When a manual payment option is selected during checkout, customers are directed to the order form
page to enter their name and contact information. This text will appear on the order form page above the
form fields.
Thank you message
Upon receipt of the order, customers are redirected to the confirmation page. You can include your own
personalized thank you message and ordering instructions to appear on this page. When each payment
option is added, the Thank you message is populated with a canned message. The canned message
will include the contact information that was set within Shop Parameters. This field may contain HTML
formatting.
Note: Insert variables into the Thank You Message for each payment option by using tokens. The tokens
can be used within ROI tracking scripts to track pay-per-click and other types of referral systems.
%orderid% = Order ID, %amount% = Sale Amount, %firstname% %lastname% = Customer Name, %
email% = Customer Email, %password% = Download/Subscription Password, %keycodes% = Unlock
Key Codes
Note: The download product buttons may not appear on the confirmation page, depending on whether
downloadable products were ordered or if the payment option is manual. For instance, if the manual
payment option is selected and payment is to be mail in the form of a check, the download product
buttons will not appear. In this case, the customer will not have access to the product file until payment
is received and the order is activated. When the order is activated, an e-mail message is sent to the
customer with a link to the delivery page and a password to download the digital product(s).
2.23.12 Fulfilment and Automation
Fulfilment is an automated process that sends customer, order and delivery information to a third party
person, service, or software. It can also send a set of instructions to an external or third-party software.
Fulfilment options are first created in the admin panel through the Configuration > Fulfilment
menu.
There is no limit to the number of fulfilment options that can be created.
Then, each product is assigned to a fulfilment option through the Edit Catalog menu.
AShop Software © Copyright 2002 - 2010
82
AShop V User Guide
Fulfilment products are grouped for each order.
Multiple products in the same order are automatically grouped for each fulfilment option. For instance, if
five products are ordered, with two using fulfilment option A and three using fulfilment option B, only two
fulfilment notices will be sent; one with two products for A, and one fulfilment with three products for B.
(not 5 individual fulfilments)
Fulfilment Option Types
There are several types of fulfilment options, which can be used in many different ways.
Email Fulfilment
The email fulfilment option sends the order information to an email address or list of email addresses.
1. To create a new email fulfilment option, navigate to the Fulfilment menu, select the Email and
click Add.
2. Set the email address and additional message text, which will be included in fulfilment notices,
and click the Update button. To send notices to multiple email recipients, separate them by a comma...
[email protected], [email protected]
AShop Software © Copyright 2002 - 2010
Installation & Setup
83
3. Assign products to fulfilment option.
Select the fulfilment option that the product will activate when it is ordered and then click the Submit
button.
When a product with an email fulfilment option is ordered, notice is sent with customer information,
products ordered and the additional message text. Products in an order that use the same fulfilment
option are grouped together so that there is only one fulfilment notice sent for each fulfilment option and
it includes all of the products that use the same fulfilment option.
AShop Software © Copyright 2002 - 2010
84
AShop V User Guide
Kunaki CD Service
Kunaki (www.kunaki.com) is an on demand CD duplication and fulfilment service. The Kunaki fulfilment
option sends an XML message to Kunaki to order a CD which is copied by them and sent to your
customer. An unlimited number of fulfilment options can be created to use the Kunaki method and each
fulfilment option that uses the Kunaki method can have its own user id and password which means that
you can sell CD's for different Kunaki accounts from the same shopping cart.
1. To create a new fulfilment option for Kunaki, navigate to the Fulfilment menu and select Kunaki.
2. Enter an Option name, User ID and Password. You can rename the Option name to any
combination of characters. The User ID and Password must be valid for an active Kunaki account.
3. Assign each product to the Kunaki fulfilment option through the Edit Catalog menu and enter the
product's unique Kunaki Product ID which has been assigned to the CD at Kunaki.com.
AShop Software © Copyright 2002 - 2010
Installation & Setup
85
AShop will by default tell the Kunaki CD duplication system to ship the CD by USPS Priority Mail for
orders within the USA and Air Mail for international orders. If you need to customize the shipping of your
Kunaki CDs you can edit the file admin/fulfilment/kunaki.ff with a text editor and change the
$internationalshipping and $usshipping options to the shipping options you want to use. In that file you
can also change the $kunakimode setting to "Test" to perform tests on the Kunaki fulfilment products
before you start selling them for real, just to make sure that everything is working properly.
Swift CD Service
Swift CD (www.swiftcd.com) is another on demand CD duplication and fulfilment service. The Swift CD
fulfilment option sends an email to Swift CD with an attached batch order file formatted according to their
specifications. An unlimited number of fulfilment options can be created to use the Swift CD method and
each fulfilment option that uses the Swift CD method can have its own user id (the customer id you get
when you sign up at www.swiftcd.com) which means that you can sell CD's for different Swift CD
accounts from the same shopping cart.
1. To create a new fulfilment option for Swift CD, navigate to the Fulfilment menu and select Swift
CD.
2. Enter an Option name and User ID. You can rename the Option name to any combination of
characters. The User ID must be an active Swift CD account.
3. Assign each product to the Swift CD fulfilment option through the Edit Catalog menu. For
products assigned to a Swift CD fulfilment method, an email is sent to Swift CD when they are ordered.
The email includes an attachment, which is specifically designed to work with the Swift CD fulfilment
system.
AShop Software © Copyright 2002 - 2010
86
AShop V User Guide
Affiliate Signup
The affiliate signup fulfilment module makes it possible to automatically sign up customers as affiliates.
This way you can turn customers into affiliates that promote your products, you can also sell access to
your affiliate program or upgrade affiliates to a higher commission level if they pay for this. Set the option
"Run once" to "Per order" to sign up every customer as an affiliate when they place their first order
through your shopping cart. Set it to "Per associated product" to sign your customers up only when they
buy specific products.
Set the option "Commission Level" to "Normal" to sign your customers up as entry level affiliates or
"Upgraded" to sign them up with a higher level of commission or to upgrade existing affiliates when they
pay for this.
If you define an attribute with the name "affiliateid", you can let existing affiliates enter their affiliate ID
number to select which affiliate account should be upgraded. If you define an attribute with the name
"email" the affiliate can enter the email address they used to initially sign up and if you name it "user"
they can enter the username they login to their affiliate profile with.
Automation Fulfilment
The automation fulfilment option interprets data from AShop and posts it to a third party application. The
data can be posted in a variety of ways. Each fulfilment option that uses the automation method can be
programmed separately. There is no limit to the number of fulfilment options that can use the automation
method.
The Automation fulfilment feature lets you pass the order information for each product separately
to an external script after a customer has completed an order. This makes it possible to integrate AShop
V with almost any type of third party software. For example you can use this to automatically activate a
web hosting account when it has been paid or you can add your customer to a mailing list using a
software that isn't already supported by AShop or you can activate a service on another website or even
another server for your customer.
1. To set up Automation fulfilment option, navigate to the Configuration > Fulfilment menu, select
Automation and click Add.
2. Set Automation Parameters
· Option name is just for your own reference and can be set to anything you want.
· URL to external script or software can be a relative URL, for example: ../activate.php
or it can be an absolute URL, for example: http://www.yourdomain.com/cgi-bin/activateaccount.
pl
AShop Software © Copyright 2002 - 2010
Installation & Setup
87
· Variable Names - Since each website script can use different names for variables and form fields that
they can accept you can map the fieldnames of the fields that AShop sends to match the ones your
external software uses. Each field is listed with a box where you can fill in the name your software
uses. For example the AShop order ID field can be called: "invoicenumber" if your software needs that
name. All fields must be filled in but if you don't use some of them you can simply type in any name
that isn't used by your software.
· Other Fields + Values - The box labeled "Other fields + values" will let you pass along any other
information needed by your external software. For example you can send a username and password.
Just put "fieldname=value" on separate lines in the box:
user=myusername
password=dfkdifk33
3. Click Update when you have completed the form to save it.
AShop Software © Copyright 2002 - 2010
88
AShop V User Guide
4. Assign each product to the automation fulfilment option through the Edit Catalog menu.
5. If your product has any attributes you can send them to the external software.
Each one of your products' attributes are listed with a text box that will let you map its' name to the
name that is used by the receiving software. For example: if your product has an attribute named "Size"
that will let your customer select the size from a number of options and the script that is going to receive
the order information sent by the fulfilment option instead calls this information "attribute2" you can enter
that into the box next to "Size" for the product.
6. Repeat steps 4 and 5 for all other products that are to use this fulfilment option.
Related Topic: Allow Upload After Order - Fulfilment Automation Example
2.23.13 Allow Upload After Order
Customers may upload a file following an order placed through the shopping cart. The file upload is
controlled by a script named buyupload.php, which only allows one file upload for each order and only
allows specific file types. The script works with a mySQL database table to keep track of file uploads. A
file upload notice is emailed to a specified address when a file upload has occurred. An automation
fulfilment option is used to activate the buyupload.php script after payment is completed.
Setup instructions:
1. Create a new MySQL database or add a table to an existing database if one is available that
does not already have a table named "uploads".
2. Edit the automationexamples/buyupload.php script with a text editor to set the configuration
options. The $savepath variable must be set to the full filesystem path to the directory where the
uploaded files will be saved. The $password variable is used to make sure that only you or your AShop
scripts can add new allowed uploads to the database. The database variables should be set according to
what you use to login to your MySQL database. The $allowedfiletypes can be set to a comma separated
list of file extensions. If none are set, any type of file will be allowed. The $notifyemail variable should be
set to an email address where you will receive notifications of uploaded files.
3. Run the automationexamples/buyupload.php script in a web browser to install the database table.
4. Login to your AShop admin panel and open the page Configuration->Fulfilment.
AShop Software © Copyright 2002 - 2010
Installation & Setup
89
5. Add a new Automation fulfilment option and set its' URL to where the buyupload.php script is
located on your site.
6. Ensure that the Fieldname - order ID is set to: "orderid".
7. Enter the text: "pass=mypassword" (changing the "mypassword" part to what you set the
$password variable to in the buyupload.php script) in the text box labeled: "Other fields + values" and
click Update to save the settings.
8. In Configuration > Payment, edit the Thank You Message for the payment option(s) and add the
following html code:
AShop Software © Copyright 2002 - 2010
90
AShop V User Guide
<form action="automationexamples/buyupload.php" method="post" enctype="multipart/formdata" name="productform"><input type="hidden" name="orderid" value="%orderid%"><input
type="file" name="uploadfile"><br><input type="submit" value="Upload"></form>
Make sure that the action parameter of the form tag contains the right URL to your buyupload.php script
if you have placed it in another directory than the default on your site.
10. Add fulfilment to product(s), which when sold will allow the upload. Click the Fulfilment button for
the new product and select the new automation fulfilment option.
When a customer buys the product the order ID will be added to the upload database table. The thank
you page presented to the customer
after payment will contain a text entry box and a browse button, which the customer may use to upload
a file. An upload notice is emailed to the address that is set in buyupload.php.
2.23.14 Customer Shipping Address
Customers are asked to provide shipping information if it is required for the products that have been
selected.
The shipping information form shows fields selectively.
If there are no taxable or shippable products in the basket, the shipping information form page does not
appear. The customer is directed to the basket and there is not an option to enter shipping information.
AShop Software © Copyright 2002 - 2010
Installation & Setup
91
If there is at least one taxable or shippable product in the basket, The View Cart page will include an
additional row for Shipping/Sales Tax with a link to the shipping information form.
If there are taxable products, but no shippable products in the basket, the shipping information page
asks only for the country and state in order to determine if sales tax is required and to apply the correct
rate for the locality.
If there is at least one shippable product in the basket, the shipping information page asks for the state
(or province), zip (or postal code), and country.
AShop Software © Copyright 2002 - 2010
92
AShop V User Guide
The street address and shipping contact phone number is not required until Checkout.
The shipping information is saved for each customer. The shipping contact phone number is saved in
the Customer Profile. If a different billing phone number is entered during the payment process, then it
will also be saved (as an alternate phone number for the customer).
Related Topics
Each product is set as taxable in the Add Product or Edit Product page.
Shipping is set for each product by clicking the Shipping button in the Edit Catalog view.
Per order handling charges or shipping options will only be added to orders that have at least one
shippable product in the basket. To charge handling without adding shipping per product, set Flat Rate
shipping for each product and set the value to .0001
2.23.15 Shipping and Taxes
Shipping and Taxes options are managed in separate pages as of version 4.7.0.
See individual help topics for Shipping and Taxes.
2.23.16 Shipping
Shipping and handling options are set in the Shipping menu in your AShop Administration Panel.
Administration Panel > Configuration > Shipping
AShop Software © Copyright 2002 - 2010
Installation & Setup
93
Shipping Method
In the Shipping page, there is a main Shipping Method selector. The Storewide shipping and individual
product shipping options are dependent on the Shipping Method setting. For example, if the main
Shipping Method is set to FedEx, only FedEx options will be available in related settings and options. If
UPS is selected, then only UPS settings and options will be available. If Custom shipping options are
selected, only custom settings and options will be available. This method of selection simplifies the
setup process and avoids potential conflicts.
When FedEx is selected as the Shipping Method...
...only FedEx options are available in the Configuration > Shipping page...
...FedEx is available, but UPS is NOT available in the shipping options for each product.
When UPS is selected as the main Shipping Method...
...only UPS options are available in the main settings...
AShop Software © Copyright 2002 - 2010
94
AShop V User Guide
...and UPS is available, but FedEx is not available in the per product shipping options.
When Custom is selected as the Shipping Method...
...only Custom Shipping Options are available through the Configuration > Shipping page...
...FedEx and UPS options are NOT available for each product Shipping options.
AShop Software © Copyright 2002 - 2010
Installation & Setup
95
Customer Selectable Service
When the shipping amount is requested during a shopping session, the state, zip, and country is
required. (The street address and shipping contact phone number is not required until Checkout.)
When FedEx or UPS is selected as the Shipping Method, the Options include Yes/No selector for
Customer Selectable Service. When this is set to Yes, customers will have selectable service options.
In this case the rate is looked up based upon the service option that is selected during each shopping
session.
AShop Software © Copyright 2002 - 2010
96
AShop V User Guide
Note that when the main Shipping Method is set to FedEx or UPS AND Customer Selectable Service is
set to Yes, custom shipping options are NOT available in the per product shipping options.
Storewide Shipping
Each product may have an individual shipping calculation method OR it may be included in the
Storewide Shipping calculation. The storewide can be FedEx, UPS, or a flat rate per pound. Total weight
for all products in the cart that are set with storewide shipping is used for the lookup or calculation. A
maximum weight per package setting limits the total weight for each package. The program adds more
packages as needed when the maximum weight for each package is exceeded.
Local Handling Countries
Local Handling country/countries - The local handling charge (per order) will be added to orders where
the shipping destination is a country that is set here.
AShop Software © Copyright 2002 - 2010
Installation & Setup
97
To add a country to the list, click the Add Country button. A new selection box will appear where another
country can be selected and added to the list.
To remove a country from the list, select Remove This Country from the drop-down list. When the form is
submitted, that selection box will be removed.
Ship Locally Only - When this box is checked, only the local handling countries will appear in the
shipping form country selector that customers see and a small note appears below saying "We only
ship to this country." or "We only ship to these countries.". The page gets this text from the language
file shipping.inc.php.
Add Local Handling Charge - This amount will be added to each order where the destination country
is local.
Add International Handling Charge - This amount will be added to each order where the destination
country is NOT local.
Bottom Menu Bar
Zip/Zone Tables - Zip tables can be used to add shipping charges based upon zip code zones within
the United States. Set up the zip/zone lookup tables first. This can be done through Configuration >
Shipping and Taxes or through Edit Catalog > Shipping (for each product that is set to use the zip/zone
method). After a zip/zone table is created, then set each product to use a zip/zone table and set the 7
zone rates for each product. This is essentially how UPS and FedEx look up the zone from the zip code,
however this method allows you to set rates for each zone specifically for each product.
Shipping Discounts - Shipping discounts can be created based upon the quantity of shippable products
that are in the shopping cart basket.
Custom Shipping Options - When Custom is selected as the main Shipping Method, there will be an
additional link in the bottom menu bar.
AShop Software © Copyright 2002 - 2010
98
AShop V User Guide
2.23.17 Taxes
Sales tax options are set in the Taxes menu in your AShop Administration Panel.
Administration Panel > Configuration > Taxes
Sales Tax Options
Sales Tax Type - Select which country or regional tax will be applied to orders. For instance; US sales
tax, VAT (European Union), or GST/PST/HST (Canada).
Canada Sales Taxes
For the retail catalog - If the products are shipped to any of these Canadian provinces: Nova Scotia,
New Brunswick or Newfoundland, the HST will be applied instead of GST and PST. If the products are
shipped to any other province, except the one they are shipped from, the tax will be just the GST. If they
are shipped to the same province that they are shipped from, then the tax will be both GST and PST.
In the wholesale catalog everything is the same except that the PST is never charged. If you ship to
your own province you would still only charge the GST.
State/Province to Charge Sales Tax To – For US sales taxes, this is the origin state. In the US,
state sales tax is typically only collected from residents within the same state as the selling merchant.
AShop Software © Copyright 2002 - 2010
Installation & Setup
99
For Canada sales taxes the province that is set here is used to determine HST, GST, or PST.
EU VAT Origin Country - When Request VAT Number From Customer (see below) is checked, a VAT
Registration Number text box appears within the shipping form. EU businesses can enter their VAT
Number to be exempted from the tax. The country that is set in EU VAT Origin Country is excluded from
the VAT exemption and will be charged VAT even if a registration number is entered by the customer.
Sales Tax/VAT/GST Percentage - This percentage rate used to calculate US sales tax, VAT, or GST
for products that are set as taxable.
PST Percentage (Canada) - The Provincial Sales Tax rate that is set here will be applied to taxable
products for Canada where the customer's province is the same one that is set in the State/Province To
Charge Sales Tax. This tax is in addition to the GST.
HST Percentage (Canada) - The Harmonized Sales Tax rate that is set here will be applied to taxable
products for Canada where the customer's province is within HST jurisdiction. If the products are shipped
to any of these Canadian provinces: Nova Scotia, New Brunswick or Newfoundland, the HST will be
applied instead of GST and PST.
Request VAT Number From Customer - When this box is checked, the VAT Number box appears in
the shipping destination form. EU customers, except countries that are set in EU VAT Origin Country
(above), are exempt from the tax.
Sales Tax On Shipping - If this box is checked, sales tax will be applied to the taxable product
subtotal AND shipping at the rate set above. If the box is not checked, sales taxes are only applied to
the product price (and not the shipping).
Include Sales Tax In Displayed Price - If this box is checked, sales tax will be included in the price
that displays in the retail catalog.
2.23.18 Local Tax Rates
Some states in the USA charge an additional sales tax depending on which city the customer lives in. If
your business is located in an area where you need to calculate these additional local taxes you can set
them up by clicking the Edit Local Tax Rates link on the page Configuration->Taxes.
Enter the name of the city for which there is an additional tax in the box City and the tax rate in percent
in the box Additional rate. Click Add to save this local tax rate to the list.
AShop Software © Copyright 2002 - 2010
100
AShop V User Guide
All local tax rates that you save will be added to a list and can be updated by changing the tax rate and
clicking the Update button.
When a customer from the area defined in this table buys from you the additional rate will be added to
the sales tax. For example, if you are located in Florida and a customer from the Monroe area of Florida
buys an item the sales tax will be the 6% you have defined on the Taxes configuration page plus the
1.5% local tax rate, a total of 7.5%.
2.23.19 Custom Shipping Options
Shipping options appear within the shipping information form for customers to select. See also: Shipping
Information Form
AShop Software © Copyright 2002 - 2010
Installation & Setup
101
Shipping options are set within Configuration > Shipping & Taxes. To create a new shipping option or
modify an existing one, click on the Shipping Options link in the bottom menu bar.
Create A New Shipping Option
1. Enter the Description that customer's will see.
2. Enter the Fee that will be added to the order when this shipping option is selected.
3. Select from the Shipped drop-down box to set if the shipping option will apply to local, international,
or both (all) destination countries. If locally is selected, this shipping option will only appear in the
shipping information form that customers see when they select a destination country that is local. See
Shipping and Taxes for more information about setting local destination countries.
4. Click Add.
Modify An Existing Shipping Option
1. Change the Description, Fee, and/or Shipped
2. Click Update.
Delete An Existing Shipping Option
1. Click Delete.
AShop Software © Copyright 2002 - 2010
102
AShop V User Guide
Move An Existing Shipping Option Up A List Of Shipping Options
1. Click Move Up.
2. Repeat as Necessary.
2.23.20 Shipping Discounts
Shipping discounts are created and modified in Configuration > Shipping and Taxes, in the bottom menu
bar.
Shipping discounts are based upon the quantity of shippable products in the shopping cart basket. They
can be set to apply only to products selectively based upon whether the destination country is local or
international and can also be applied to specific shipping options or to all shippable products in the
basket. There is no limit to the number of shipping discounts that can be created, but you should be
careful not to create shipping discounts that conflict with each other as the results may be
unpredictable.
Add A New Shipping Discount
1. Enter the amount to be deducted from the order.
2. Enter the minimum quantity of products in the basket that will activate this shipping option.
3. Select if the shipping discount applies to local or international country destinations.
4. Select if the shipping discount applies to a specific shipping option or to all shippable products in
the basket.
5. Click the Add button to save the shipping discount.
Modify An Existing Shipping Discount
1. Change the Discount amount, minimum quantity, shipped destination, and shipping option as
needed.
2. Click the Update button to save changes.
Delete An Existing Shipping Discount
1. Click the Delete button.
2.23.21 Storewide Shipping
Each product may have an individual shipping calculation method or it may be included in the storewide
shipping calculation. The storewide can be FedEx, UPS, or a flat rate per pound. Total weight for all
products in the cart that are set with storewide shipping is used for the lookup or calculation. A
maximum weight per package setting limits the total weight for each package. The program adds more
AShop Software © Copyright 2002 - 2010
Installation & Setup
packages as needed when the maximum weight for each package is exceeded.
First set up Storewide Shipping through Configuration > Shipping and Taxes.
or
or
Then set Shipping for each product that is to use Storewide Shipping.
Weight for each product can be entered in decimal lbs or in pounds and ounces.
Decimals are converted to pounds and ounces.
AShop Software © Copyright 2002 - 2010
103
104
AShop V User Guide
2.23.22 UPS Options
The UPS online rate lookup provides different rates based on various shipping parameters. These options
are used for all UPS shipping calculations. The options may change depending on current selections.
2.23.23 FedEx Options
The FedEx online rate lookup provides different rates based on various shipping parameters. These
options are used for all UPS shipping calculations. The options may change depending on current
selections.
2.24
Payment Gateway Integration
2.24.1 Payment Gateway Integration
The shopping cart supports a variety of payment methods and integrates with many popular payment
services such as Authorize.net, PayPal, Verisign, Card Services International, WorldPay, and more...
The degree of difficulty to set up each payment option varies widely between different payment services
and methods. Instructions are provided as needed for the payment services that are supported by
AShop. If you do not find the payment gateway setup instructions that you are looking for in this help
documentation, see if it is listed in the payment processor cross reference chart. It it is listed, but there
are no instructions it is probably so easy to set up that instructions are not necessary. For instance,
you might only need to select the payment option and enter the merchant ID in AShop to begin
processing payments in the shopping cart. If a payment service is not listed in the cross reference chart,
it is probably not supported by AShop.
AShop Software © Copyright 2002 - 2010
Installation & Setup
105
For each supported currency there is a set of payment gateway modules, which contain settings for
each gateway. The gateway modules are pre-configured and under most circumstances do not require
modification. More about payment gateway modules.
Curl with SSL
The Authorize.net SIM method and other payment connection methods where the payment page is
hosted on the payment gateway server typically do NOT require Curl or SSL. This is because the
payment gateway is providing a secure connection when credit card information is exchanged and no
credit card information is passed from server to server over the Internet.
Payment options where credit card information is collected in a page on your server DO require both Curl
with SSL and an https connection. This is because sensitive information is being passed over the
Internet from your server to the payment gateway server.
Payment Gateways That Use Curl with SSL:
· 3rdlevelbilling
· Authorize.net AIM
· Echo
· eSelect
· Iongate
· Linkpoint Connect SSL
· PayNova (old and new v2.0)
· PayPal Pro (both Direct Payment and Express Checkout)
· PayPal IPN uses Curl if available but it is not a requirement.
· Payready
· ViaKlix
3-digit Security Code Requirement
For each payment gateway there is a gateway module. For US merchants, the gateway files are in the
admin/gateways directory. These files are open source and editable. The security code requirement can
be changed here so that it is not required and the field will not appear in orderform.php pages. This only
applies to payment options that use the local orderform.php script to create a payment page locally. For
payment options where the payment form is hosted by the payment gateway, the security code option is
controlled through the payment gateway merchant panel. For instance, Authorize.Net SIM payment form
fields are set at https://secure.authorize.net.
Do Not Require Security Code
The payment gateway modules are set to require the 3 digit security code, but it is easy to change this.
Open the gateway file for the payment option. For instance, if the payment option is Authorize.net AIM,
open the authorizenetaim.gw file. Find the following line and change the word TRUE to FALSE. Save the
modified file on the server.
$ccsecuritycode = "TRUE";
See Also: Configuration > Payment Options
2.24.2 Extra Form Fields
Extra form fields can be used to collect information from customers. The extra fields appear in the
payment page when customers check out. The extra fields require an entry in order to complete
payment.
AShop Software © Copyright 2002 - 2010
106
AShop V User Guide
This feature only works for payment options that use an SSL connection to your local orderform.php
script to collect credit card information. It does not work for PayPal, Authorize.net SIM or any of the
other payment options where the payment form is hosted on the payment processor's server. Payment
options that support extra fields are listed with an X under "Orderform" in the payment gateway cross
reference chart.
Data that is entered in the extra fields is saved and can be viewed for each customer.
It appears in each customer's profile under Additional information.
AShop Software © Copyright 2002 - 2010
Installation & Setup
107
The data can be included in receipts by inserting the %customer_info% token into the receipt
template.
2.24.3 Manual Order Activation
Any of the payment options in AShop may be set up to delay delivery of products, even after real time
payment has been completed by the customer. For instance, if you are selling a downloadable product
and your store becomes a target for credit card or PayPal fraud, it may be advantageous to delay
delivery of product files until after some form of communication is established with the customer or the
customer's identity is verified.
How to delay delivery of downloadable products after payment is received by PayPal
You can make your PayPal payment option work like the Manual handling payment method: when the
customer buys your downloadable items he/she won't be able to download them before you have
activated the order, which you would do once you see that it isn't fraudulent. Activating the order can be
done from the Sales Report page in your admin panel or by clicking a link in the admin notice that you
get by email.
To make this work you should locate the file admin/gateways/paypal.gw (if you are using the regular
PayPal+IPN method, if you use Website Payments Pro you would need to open paypaldp.gw and/or
paypalec.gw instead) and search for the word: "VERIFIED" in capital letters. Change it to: "PENDING"
and save the file + upload it to your site. This will make it possible for you to review each order before
activating it.
The setup process for other payment options is similar.
AShop Software © Copyright 2002 - 2010
108
AShop V User Guide
2.24.4 Traffic Exchange Credits
A manual traffic exchange is a service where members view each others advertisements. In return for
viewing or "surfing" advertisements you get credits which can be used to show your own advertisements
on the exchange. The more views the more credits and the more credits the more members will be
shown your ads.
Because of the nature of a traffic exchange, where you get advertisements in return for looking at
advertisements, this kind of service usually only attracts Internet marketers or entrepreneurs looking for
a new opportunity to make money on the web. Through the integration of AShop and the leading traffic
exchange software Ventrino this is about to change.
AShop can use a Ventrino traffic exchange as a payment gateway where the credits you get for surfing
turn into a virtual currency. This means that you can sell anything and get paid in credits, which you can
then use on the exchange they were paid from to advertise your products. To use this feature you will
first need to change the AShop currency on the page Configuration->Shop Parameters to "TE Credits".
You will also need to become a member of the traffic exchange(s) you wish to use.
Add the traffic exchange(s) you want to use on the page Configuration->Payment. Enter the Merchant ID
and Secret key you got from the traffic exchange. It can be found on their Payment Gateway page after
you log in. Click Update to save the changes.
Note! One AShop can not be configured to receive payments in both traffic exchange credits and a real
currency at the same time. To sell some items for credits and some for real currency you will need to
install two AShops. The products you sell in your traffic exchange enabled shop will give you credits that
you can use to advertise the products you sell in your real currency shop.
2.24.5 2CheckOut
2CheckOut payment integration is set in the AShop Administration Panel through Configuration >
Payment.
You must enter the post back URL in the 2CheckOut.com admin panel. It should be set to the value of
their ashopurl + "/order.php".
Test Mode
Test mode for 2CheckOut Version 2 can be set from within the AShop admin panel in the payment
option settings.
2CheckOut Payment Confirmation Page
After a successful test transaction, the 2CheckOut payment confirmation page appears. A button must
be clicked to proceed and complete the order with AShop. 2CheckOut provides a setting to bypass their
confirmation page under Account Details > Return, but this option disables the return response code. Do
not use it with the shopping cart.
1.
Scroll down the page to the "Overall Passback Requirements".
2.
The Direct Return must be set to No for AShop to work with 2CheckOut.
2.24.6 AlertPay
Website Review
Before you can sell online through your website and let your customers pay with credit card through
AShop Software © Copyright 2002 - 2010
Installation & Setup
109
AlertPay, you will need to go through AlertPay's website review process:
1. Login to your AlertPay account and click My Account->Profile->Websites.
2. Click "Add Website" and enter your website details on the next page.
3. Click "Send" to have AlertPay check the site and allow credit card payments from it, if it is accepted.
IPN Setup
AShop uses AlertPay's Instant Payment Notification (IPN) system to process orders when they are paid.
To make this work you will need to login to your AlertPay account and configure the IPN settings:
1. Open the page Business Tolls in your AlertPay account.
2. Click "IPN Setup" in the section labeled "IPN".
3. Enter your Transaction PIN, which is an extra security measure used by AlertPay to make sure only
you can access sensitive areas of your account. Click Access to go to the next step.
4. Set "IPN Status" to "Enabled" and "Allow Encrypted Payment Details (EPD)" to "Disabled".
5. Set the "Alert URL" to the URL where your AShop order.php script is located, for example: http://
www.yourdomain.com/ashop/order.php
6. Set the "Test Mode" option to "Disabled", unless you want to run some test transactions through your
AShop first to make sure the AlertPay payments work.
7. Take note of the IPN Security Code and click "Update" to save the changes.
Payment Option
Now you should add an AlertPay payment option to your AShop:
1.
2.
3.
4.
5.
Login to your AShop admin panel and open the page Configuration->Payment.
Add a new payment option with the Payment Gateway set to AlertPay.
Enter the email address you use to login to your AlertPay account in the box labeled "Merchant ID".
Enter your IPN Security Code in the box labeled "Security Secret".
Click Update to save the changes.
2.24.7 Authorize.Net SIM
AuthorizeNet SIM payment integration is set in the AShop Administration Panel through Configuration >
Payment.
Important: In addition to adding the AuthorizeNet SIM payment option within the AShop Administration
Panel, the receipt and response URLs must be set within your Authorize.Net Merchant Account
Settings. See instructions below.
1.
2.
3.
Click the Payment Gateway text box and select Authorize Net SIM.
Click Add.
Set the following as needed within the AuthorizeNet payment option form.
Merchant ID (required)
The Merchant ID is assigned by AuthorizeNet. It is viewable through the Authorize.net merchant panel
under Settings > Security > API Login ID & Transaction Key and is labeled "API Login ID".
Transaction Key (Required)
The Transaction Key is required in order to connect to the AuthorizeNet SIM method.
1. Login to your AuthorizeNet Merchant Panel.
2. Select Settings > Security > API Login ID & Tranbsaction Key. Then scroll down to Create New
AShop Software © Copyright 2002 - 2010
110
AShop V User Guide
3.
4.
Transaction Key.
Create a Transaction Key. Your security secret answer, which was created when you opened the
Authorize.Net gateway account, will be required. You may obtain a new Transaction Key as often
as you wish by providing your Secret Answer. You may choose to disable the old one immediately
by checking the Disable Old Transaction Key(s) option. If you do not immediately disable the old
value, it will automatically expire in 24 hours.
Copy the Transaction Key and paste it into the Transaction Key setting within the AShop
Administration Panel > Payment Option settings for the AuthorizeNet SIM payment option.
Response/Receipt URLs (Required)
The Response and Receipt URL's must be set in the AuthorizeNet Merchant Panel under Response/
Receipt URL's. This is only set in the AuthorizeNet Merchant Control Panel. No setting is required for
the Response/Receipt URL within the AShop Administration Panel.
1. Login to the AuthorizeNet Merchant Panel at https://merchant.authorize.net.
2. Select Settings > Response Receipt URL's.
3. Add the URL's to order.php (response) and checkout.php (receipt) for each installation of AShop.
For example; http://www.your_domain/ashop/order.php
http://www.your_domain/ashop/checkout.php
To use AuthorizeNet from your Sales Office you will also need to add emerchant/orderquote.php
and emerchant/payquote.php. For example;
http://www.your_domain/ashop/emerchant/orderquote.php
http://www.your_domain/ashop/emerchant/payquote.php
SSL URL to logo image (optional)
The payment form can optionally include an image of your choice. This most commonly used for the
store logo. Since the payment form is accessed through a secure socket layer (SSL) connection, the
image URL must also be an SSL connection in order to avoid annoying warning messages. If a nonsecure URL is used to link the logo image, the payment form will still work and will display the logo, but
a warning message will display to customers indicating that non-secure information is being exchanged.
Test Mode (Recommended before going live)
Check this box to set the payment form to test mode. The text "Test Mode" will display at the top of the
payment form and e-mail receipts. When the payment form is in test mode, payments will not post to
your merchant account, but the payment receipt will still function. If you have the Authorize.Net Address
Verification System (AVS) turned on in your Authorize.Net merchant panel, it will not verify addresses
while the payment form is in test mode.
To run test transactions for AuthorizeNet, enter the following credit card number and any future date:
4111111111111111 (4 and fifteen ones).
The personal information and address can be anything since it will not be verified, but in order to test the
e-mail receipt function, you must enter a valid e-mail address.
Don't forget to un-check the test mode box and resubmit the changes after successfully testing the
payment gateway.
After editing the AuthorizeNet fields, click the "Submit" button to save the changes. To cancel
without saving changes, click the "Cancel" button or page back on your browser.
How to contact Authorize.Net
Contact Authorize.Net at E-mail: [email protected] or Tel: 1-877-447-3938.
Other Authorize.Net Settings
The following settings are located within the Authorize.Net merchant panel at https://merchant.authorize.
AShop Software © Copyright 2002 - 2010
Installation & Setup
111
net.
Settings > Transaction Submission > Payment Form > Form Fields - The payment form fields can be
set to view, edit, or required. The shipping information fields are usually not necessary to view or require
in the payment form as shipping information is already collected within AShop V for products that require
shipping or tax calculations. See also: AuthorizeNet Payment Form Settings
Transaction Submission > Password-Required Mode - This should be checked.
Transaction Response > Email Receipts - Here is where you can select if the Authorize.Net transaction
receipt is to be emailed to the customers or not. You can optionally include message headers and
footers.
Security > Card Code Verification - This feature is for fraud prevention. It verifies that the 3 digit security
code, which is printed on the back of US credit cards matches with the card issuing bank records. The
down side is that a small percentage of U.S. card issuing banks don't support it and non-US credit cards
almost always don't support it.
Security > Address Verification - Again, this is for fraud prevention, but a small percentage of US banks
and almost all non-US banks don't support it.
2.24.8 Authorize.Net SIM Payment Form Settings
The following settings are located within the Authorize.Net merchant panel at https://merchant.authorize.
net/.
Settings > Transaction Submission > Payment Form > Form Fields - The payment form fields can be
set to view, edit, or required. The shipping information fields are usually not necessary to view or require
in the payment form as shipping information is already collected within AShop V for products that require
shipping or tax calculations. Here are the recommended settings.
AShop Software © Copyright 2002 - 2010
112
AShop V User Guide
There are also some additional fields that are optional and usually not needed.
2.24.9 Authorize.Net AIM
AuthorizeNet AIM payment integration is set in the AShop Administration Panel through Configuration >
Payment.
Important: In addition to adding the AuthorizeNet AIM payment option within the AShop Administration
Panel, the receipt and response URLs must be set within your Authorize.Net Merchant Account
Settings. See instructions below.
AShop Software © Copyright 2002 - 2010
Installation & Setup
1.
2.
3.
113
Click the Payment Gateway text box and select Authorize Net AIM.
Click Add.
Set the following as needed within the AuthorizeNet payment option form.
Merchant ID (required)
The Merchant ID is assigned by AuthorizeNet. It is viewable through the Authorize.net merchant panel
under Settings > Security > API Login ID & Transaction Key and is labeled "API Login ID".
Transaction Key (Required)
The Transaction Key is required in order to connect to the AuthorizeNet AIM method.
1. Login to your AuthorizeNet Merchant Panel.
2. Select Settings > Security > API Login ID & Transaction Key. Then scroll down to Create New
Transaction Key.
3. Create a Transaction Key. Your security secret answer, which was created when you opened the
Authorize.Net gateway account, will be required. You may obtain a new Transaction Key as often
as you wish by providing your Secret Answer. You may choose to disable the old one immediately
by checking the Disable Old Transaction Key(s) option. If you do not immediately disable the old
value, it will automatically expire in 24 hours.
4.
Copy the Transaction Key and paste it into the Transaction Key setting within the AShop
Administration Panel > Payment Option settings for the AuthorizeNet SIM payment option.
Response/Receipt URLs (Required)
The Response and Receipt URL's must be set in the AuthorizeNet Merchant Panel under Response/
Receipt URL's. This is only set in the AuthorizeNet Merchant Control Panel. No setting is required for
the Response/Receipt URL within the AShop Administration Panel.
1. Login to the AuthorizeNet Merchant Panel at https://merchant.authorize.net.
2. Select Settings > Response Receipt URL's.
3. Add the URL's to order.php (response) and checkout.php (receipt) for each installation of AShop.
For example; http://www.your_domain/ashop/order.php
http://www.your_domain/ashop/checkout.php
To use AuthorizeNet from the Sales Office you will also need to add emerchant/orderquote.php and
emerchant/payquote.php. For example;
http://www.your_domain/ashop/emerchant/orderquote.php
http://www.your_domain/ashop/emerchant/payquote.php
SSL URL to logo image (only used when cart.html page template not present)
The payment form for the AIM method is hosted on the local server. The cart.html page template is used
for the payment form page. Images within the cart.html page template and the thankyou.html page
template should have secure image links. If a cart.html page template is not present, the secure logo
image will appear at the top of the page instead. This most commonly used for the store logo. Since the
payment form is accessed through a secure socket layer (SSL) connection, the image URL must also
be an SSL connection in order to avoid annoying warning messages. If a non-secure URL is used to link
the logo image, the payment form will still work and will display the logo, but a warning message will
display to customers indicating that non-secure information is being exchanged.
Test Mode (Recommended before going live)
Check this box to set the Authorize.Net AIM payment form to test mode. The text "Test Mode" will
display at the top of the payment form and e-mail receipts. When the payment form is in test mode,
payments will not post to your merchant account, but the payment receipt will still function. If you have
the Authorize.Net Address Verification System (AVS) turned on in your Authorize.Net merchant panel, it
AShop Software © Copyright 2002 - 2010
114
AShop V User Guide
will not verify addresses while the payment form is in test mode.
To run test transactions for AuthorizeNet, enter the following credit card number and any future date:
4111111111111111 (4 and fifteen ones).
The personal information and address can be anything since it will not be verified, but in order to test the
e-mail receipt function, you must enter a valid e-mail address.
Don't forget to un-check the test mode box and resubmit the changes after successfully testing the
payment gateway.
After editing the AuthorizeNet fields, click the "Submit" button to save the changes. To cancel
without saving changes, click the "Cancel" button or page back on your browser.
How to contact Authorize.Net
Contact Authorize.Net at E-mail: [email protected] or Tel: 1-877-447-3938.
Other Authorize.Net Settings
The following settings are located within the Authorize.Net merchant panel at https://merchant.authorize.
net.
Transaction Submission > Password-Required Mode - This should be checked.
Transaction Response > Email Receipts - Here is where you can select if the Authorize.Net transaction
receipt is to be emailed to the customers or not. You can optionally include message headers and
footers.
Security > Card Code Verification - This feature is for fraud prevention. It verifies that the 3 digit security
code, which is printed on the back of US credit cards matches with the card issuing bank records. The
down side is that a small percentage of U.S. card issuing banks don't support it and non-US credit cards
almost always don't support it.
Security > Address Verification - Again, this is for fraud prevention, but a small percentage of US banks
and almost all non-US banks don't support it.
2.24.10 CCBill
To use your CCBill account to process payments with AShop you will need to ask CCBill to enable
dynamic pricing and create a form for you where the username and password option and the number of
days a customer has access is disabled. They will provide a form name and a security code which they
call "salt".
Set the Postback URL in your CCBill account to: http://www.yourdomain.com/order.php where
"yourdomain.com" should be replaced with the URL to your AShop.
Set the Approval URL to your thank you page, which you will need to create manually since the dynamic
thank you message feature in AShop does not work with CCBill. Just use any web page design tool to
create a new web page, for example thankyou.html, and upload it to your site, then use the URL to this
page.
Once you have your form setup in your CCBill account, create a payment option in your AShop admin
panel on the page Configuration->Payment. Enter your account name in the box Merchant ID. Enter the
salt and form name, separated with a pipe character, in the Security Secret box, for example:
3374676hdhj3737|00h9
Recurring Billing
AShop Software © Copyright 2002 - 2010
Installation & Setup
115
To use the recurring billing features of CCBill you will need to set the recurring price of your products.
This is the price that the customer will be charged monthly, starting 30 days after the initial payment,
while the price you set in the "Price" box is the initial payment. You can set this option by opening the
page Edit Catalog, locating the product and clicking Edit, or by adding a new product using the New
Product button at the top of the page.
Note! This option will only be available if you have already configured a CCBill payment option.
By default AShop will charge your customer every 30 days for as long as the subscription is not
manually ended by you or by the customer through CCBill. You can change the billing period by editing
the file admin/gateways/ccbill.gw. The $ccbill_initialperiod variable controls the period between the
initial payment and the first recurring payment. The $ccbill_recurringperiod variable controls the period
between the recurring payments. The $ccbill_rebills variable controls how many times the customer is
charged. Setting this to 99 will make it continue indefinitely.
2.24.11 ConnectnPay
ConnectnPay.com is a Plug-N-Pay clone. To connect the shopping cart with ConnectnPay, create a
payment option for Plug-N-Pay.
2.24.12 Cybersource
The Cybersource Hosted Order Page service is supported by AShop V.
Requirements
Cybersource does not require Curl with SSL, however SSL with a security certificate is recommended in
order to avoid security warning messages in the customer's browser when redirected back to the AShop
payment confirmation page after payment is completed.
Cybersource free for all demo account for testing
https://businesscenter.cybersource.com/sbc/Login.do
Login with the username/merchant ID: universaldemo and the password: demo4me2 and change it's
settings before running any tests.
These are the steps needed to start using Cybersource HOP:
1. Login to the Business Center and click "Tools & Settings" in the menu to the left.
2. Click "Settings" under Hosted Order Page and scroll down to the Receipt Page section.
3. Change the Receipt Response URL to a secure URL to the AShop order.php script and add ?
payopt=nn where "nn" is replaced with the actual payoption ID in AShop. For example: https://
securedomain.com/~yoursite/ashop/order.php?payopt=113
4. Scroll down to the Notifications section and check the Merchant POST URL option.
5. Change the Merchant POST URL to a regular http URL to the AShop order script, for example:
http://www.yoursite.com/ashop/order.php
6. Click "Security" under Hosted Order Page in the left menu.
7. Select "PHP" under the Generate Security Script section and click Submit to download the
resulting HOP.php script.
8. Upload the HOP.php script to the admin subdirectory in AShop.
9. Create a payment option in AShop using the Cybersource merchant ID/username for the Merchant
ID box and the Cybersource account password for the Security Secret box.
2.24.13 Echo
To use the Echo payment method, SSL must be supported by your hosting service.
AShop Software © Copyright 2002 - 2010
116
AShop V User Guide
Note: The secure URL for AShop is set in Shop Parameters > Advanced Options.
The security secret in AShop must be the PIN number for the Echo account.
2.24.14 eWay (Australia)
The eWay payment gateway service does not require any setup, just an active account. Simply enter
the eWay account number in the Merchant ID setting for the AShop payment gateway option.
To test the eWay payment gateway without having an account, set the Merchant ID with the test
account number 87654321. Buy a product that costs $10 and use the credit card number:
4444333322221111. The exp month must be greater than today's month and the exp year greater than
2007. The sec code can be any 3 digit number.
2.24.15 eWay (Australia)_2
The eWay UK and New Zealand gateways are slightly different from the Australian gateway. They do not
require an SSL certificate since the credit card details are collected at the gateway instead of at your
own site, which is the case for the Australian gateway. To setup an eWay payment option follow these
steps...
1. Login to your AShop administration panel.
2. Open the page Configuration->Payment.
3. Create a new payment option with "eWay" selected as the payment processor.
4. Enter your customer ID into the Merchant ID box.
5. Enter your username into the Transaction Key box.
6. Enter a secure personal password, which can be anything you like, into the box Security Secret.
7. Click Update to save the settings.
To test the eWay payment gateway, activate "Test Mode" and use the credit card number:
4444333322221111.
2.24.16 Ezic
Ezic payment integration is set in the AShop Administration Panel through Configuration > Payment.
AShop Settings
1.
Open the Administration Panel, select Configuration, and then Payment.
2.
Click on the drop-down Payment Gateway box, select Ezic and click Add.
3.
Enter your Merchant ID. The payoption Merchant ID must be set to the Ezic [Account ID]:[Site tag],
for instance: "109748335950:ODOOR1" both of which can be found in the Ezic admin panel by
clicking Setup->Website config in the Ezic Merchant Menu.
4.
The payoption Security Secret should be set to the Ezic Order integrity key which can be found in
the Ezic admin panel by clicking Fraud Controls in the Ezic Merchant Menu, clicking Fraud
Barricade and then looking under the "Order integrity" step in the resulting page.
The field can be left blank too but this will make the payoption a lot less secure.
AShop Software © Copyright 2002 - 2010
Installation & Setup
117
5.
If you wish to do so; you can edit the Option Name, add a Payment Fee, add a Payment
Description, and even edit the Thank You Message that appears upon successful completion of a
transaction.
6.
Don't forget to click the "Update" button to save the changes you made.
2.24.17 IC Pay
IC Pay is one of the few payment services that will process payments for sales of adult content.
IC Pay provides a secure connection to a payment page, which is hosted on their server. It does NOT
use the local orderform.php page and hence cannot use the TeleSign service for credit card fraud
prevention.
IC Pay is different from most other payment services in that there two separate procedures required for
processing orders for physical products and orders for digital products.
Physical product sales can only be done from the shopping cart with "auth" (authorize only)
transactions, which means that no payment will be transfered until the merchant logs in to his IC Pay
SiteManager and captures it in the Orders screen. This payment process will NOT activate orders
automatically in the shopping cart. To complete the order in the shopping cart and send a store receipt,
click the "activate" link in the emailed AShop order notice after the payment has been captured.
Digital product sales will be authorized AND captured immediately from shopping cart transactions.
Unfortunately, having separate methods for handling physical and digital products causes a limitation
and potential conflict where both types of products are sold by the same merchant. For example, if both
physical and digital products are added to the cart within a single order, the transaction must be handled
as if it is for physical products, which means that orders for digital products will not be delivered until the
payment is manually captured through the IC Pay SiteManager and the order is manually activated
through the shopping cart admin panel. There is no way within a single shopping cart to separate the
product types or to force one payment option or another based upon the type of product(s) that are in
each order. If both IC Pay payment options are available at checkout, the selection is left up to each
customer, which is not predictable and may be prone to errors. Because of this limitation, if both types
of products are offered only the IC Pay Physical Goods payment option should be available to
customers.
How to Add the IC Pay Payment Option in AShop V
There are two separate Payment options for IC Pay: IC Pay Physical Goods and IC Pay Digital Goods.
Login to the IC Pay SiteManager
1. Generate a Secret Key.
2. Change the Notification Config setting in the IC Pay SiteManager. Enter the URL to the AShop
order.php script in the URL box, for example: http://www.yourdomain.com/ashop/order.php
Login to the AShop admin panel.
1. Click Configuration and then Payment.
2. Select the IC Pay option for the type of products that will be sold: physical goods or digital goods.
3. Add the payment option.
4. Enter the IC Pay User ID in the Merchant ID box for the payment option.
5. Enter the Secret Key in the Security Secret box for the payment option.
6. Save the changes.
AShop Software © Copyright 2002 - 2010
118
AShop V User Guide
2.24.18 LinkPoint Basic - Card Services International
LinkPoint Basic payment integration is set in the AShop Administration Panel through Configuration >
Payment.
AShop Settings
Under "Add a new payment option..."
1. Select LinkPoint Basic from the drop-down selection box and click Add.
2.
3.
4.
Set the Store ID in the Merchant ID text box.
Note: Be sure you enter your LinkPoint Store Number, not your merchant number.
Set the password that is set for your LinkPoint Basic account in the Security Secret text box.
Note: The other settings are described in Payment Options.
Click the Update button to save the settings.
LinkPoint Basic Merchant Panel Settings - Required
Before the LinkPoint Basic payment integration will work with AShop V, some URLs must be set within
the LinkPoint Central merchant panel.
1.
2.
Login at LinkPoint Central
Click "Customization"
AShop Software © Copyright 2002 - 2010
Installation & Setup
3.
4.
·
·
·
5.
6.
7.
·
·
8.
119
Click "Settings"
Enter the following settings:
For Order submission form URL enter: http://thecustomersashopurl/checkout.php
For Thank you page URL enter: http://thecustomersashopurl/order.php. Check both checkboxes
below this setting.
For Sorry page URL enter: http://thecustomersashopurl/order.php. Check both checkboxes below
this setting.
Click the Submit buttons at the the bottom of the page to save these settings.
Click "Payment Form"
This page will alloy some payment form customization:
Set the Company Logo Graphics URL, Background Graphics URL, and Company Name for the
payment form.
Set custom fields to optionally collect additional information within the payment form.
Click the Submit button at the bottom of the page to save the settings.
2.24.19 LinkPoint Basic SSL
LinkPoint Basic SSL payment integration is set in the AShop Administration Panel through Configuration
> Payment.
It is for the same gateway as the old LinkPoint module but bypasses the payment form that is hosted by
LinkPoint and instead uses orderform.php through the secure URL setting in Advanced Options.
AShop Settings
Under "Add a new payment option..."
1. Select LinkPoint Basic SSL from the drop-down selection box and click Add.
2.
3.
4.
Set the store ID in the Merchant ID text box.
Note: Be sure you enter your LinkPoint Store Number, not your merchant number.
Set the password that is set for your LinkPoint Basic account in the Security Secret text box.
Note: The other settings are described in Payment Options.
Click the Update button to save the settings.
AShop Software © Copyright 2002 - 2010
120
AShop V User Guide
LinkPoint Basic Merchant Panel Settings - Required
Before the LinkPoint Basic payment integration will work with AShop V, some URLs must be set within
the LinkPoint Central merchant panel.
1.
2.
3.
4.
·
·
·
5.
6.
7.
·
·
8.
Login at LinkPoint Central
Click "Customization"
Click "Settings"
Enter the following settings:
For Order submission form URL enter: http://thecustomersashopurl/checkout.php
For Thank you page URL enter: http://thecustomersashopurl/order.php. Check both checkboxes
below this setting.
For Sorry page URL enter: http://thecustomersashopurl/order.php. Check both checkboxes below
this setting.
Click the Submit buttons at the the bottom of the page to save these settings.
Click "Payment Form"
This page will alloy some payment form customization:
Set the Company Logo Graphics URL, Background Graphics URL, and Company Name for the
payment form.
Set custom fields to optionally collect additional information within the payment form.
Click the Submit button at the bottom of the page to save the settings.
AShop Software © Copyright 2002 - 2010
Installation & Setup
121
Linkpoint does allow multiple referrer URLs. They call it an 'Order Submission Form URL'. According to
their tech you just put a space after the first URL Address, then add the second, but the settings are
limited to 127 characters total.
2.24.20 Manual Payment By Check or Money Order
Manual payment options are for processing orders where payment will be made by check, money
order, or some other form or third party or delayed payment. A manual payment option will not allow
customers immediate access to the digital products. Instead, the store administrator will receive a link in
the e-mailed order notice. Upon receipt of payment, the store administrator may then click on the link to
activate the order. The password and link to the product delivery page is then automatically e-mailed to
the customer.
Note: To deliver digital products before the manual payment or offline credit card processing is activated,
check the Deliver Before Payment box within the payment option parameters (see below).
Processing And Activating Orders
There are several ways to access the credit card information for processing.
1.
When the manual payment processing method is used, the administrator's order notice will contain
a link to login and activate the order.
2.
The order activation can also be accessed through the Manage Sales profile for each customer.
3.
Unpaid orders can be accessed and activated through Sales Reports by selecting the Unpaid filter
and Edit.
Unpaid orders are shown in the Edit view with an Activate Order icon, , next to each order. Orders
paid by manual payment have an Activate Order icon to the right. Click on the icon to activate that order.
AShop Software © Copyright 2002 - 2010
122
AShop V User Guide
Create A Manual Payment Option
Create a manual payment option through the Configuration > Payment menu.
Check the Deliver Before Payment box only if you wish to provide immediate access to digital products
and subscriptions before the payment is processed and activated.
Activating Manual Payment Orders Immediately
To activate orders immediately upon submission of the manual payment form, edit the manual.gw
module in the admin/gateway directory for US currency. If you are using a different currency, edit the
manual.gw file in the corresponding directory. For instance Great Britain Pounds is gatewaysgbp, Euro
is gatewayseur, etc. Open it in a text editor and change the following line.
From
else $validate[0] = "PENDING";
To
else $validate[0] = "VERIFIED";
2.24.21 Moneris eSelect - Canada only
AShop V supports integration with the Moneris eSelect payment gateway for Canada only.
We tested the eSelect Plus integration with the following test user/password.
Merchant ID: store1
AShop Software © Copyright 2002 - 2010
Installation & Setup
123
Security Secret: yesguy
Test Method
The following credit card number works for testing.
4111111111111111 (that's 4 and 15 ones)
Use this credit card number and any future expiration date.
Their test server uses the penny value of the charged amount to simulate different types of
responses. .00, .01 and .04 will approve and all other values will decline.
This gateway has a couple of special requirements: the communication with their server is over the port
43924 which must not be blocked by a firewall and like some other gateways it uses Curl with SSL.
Moneris calls the Merchant ID "store ID" and the password is called "api token". To use the gateway
module you must have access to your own secure server (SSL, https connection) since it uses the
orderform.php script on the localhost to collect credit card information.
To put the payment option out of test mode the file admin/moneris.inc.php (which is written by Moneris)
needs to be edited and the line: MONERIS_HOST => 'esqa.moneris.com' near the top of the script
needs to be changed to: MONERIS_HOST => 'www3.moneris.com'
Moneris eSelect files in AShop V
moneris.inc.php goes in the admin directory.
eselect.gw goes in the admin/gatewayscad directory.
2.24.22 Netbilling
Login to your Netbilling account and click Setup->Site Tags. Add a new Site Tag for the site you will be
running AShop on or click "config" on an existing tag that you wish to use. Set the Postback CGI URL
field to the URL where your AShop order.php script is located, for example: http://www.yousite.com/
ashop/order.php
Open the page Fraud Controls->Fraud Defense and locate the box labeled "Order integrity key". Take
note of the code this box contains.
Login to your AShop admin panel and open the page Configuration->Payment. Add a new payment
option with the Payment Gateway set to "Netbilling". A form with settings for the new payment option
should now appear.
Enter your Netbilling account number followed by a colon and then your Netbilling site tag in the box
labeled "Merchant ID", for example: 104555572055:MYASHOP
Enter your Netbilling Order integrity key in the box labeled: Security Secret. Click Update to save the
settings.
2.24.23 Offline Credit Card Processing
The offline credit card processing payment option is used for collecting credit card and billing address
information in order to process payments manually after the sale. The host server must support an SSL
connection to the domain to use this payment option. A security certificate that matches the AShop
URL is recommended to avoid seeing browser security warning messages.
How Offline Credit Card Processing Works
AShop Software © Copyright 2002 - 2010
124
AShop V User Guide
When an offline credit card payment option is selected, the customer is redirected to a payment form
through a secure connection. The secure connection URL is set in Shop Parameters > Advanced
Options. When checking out using this payment method, AShop automatically changes the URL to the
Secure URL and redirects to the secure payment form.
Customer Payment By Credit Card
Customers enter credit card and billing information into the secure payment form and submit it. The
credit card information is encrypted and saved in the database.
Upon submitting the payment form, a receipt is sent to the customer and notice is sent to the
administrator.
If the "Deliver Before Payment" option (see below) is unchecked, the receipt will include the following
message.
"A manual payment method has been selected for this order. Orders will be fulfilled upon receipt of
payment by check or other means. If a free digital product was requested, delivery will be activated
manually by our store administrator during business hours."
If the Deliver Before Payment option is checked, the orders for downloadable products, key codes, or
AShop Software © Copyright 2002 - 2010
Installation & Setup
125
subscriptions will be fulfilled. Links and passwords will be included in the receipt.
Processing And Activating Orders
There are several ways to access the credit card information for processing.
1.
When the offline credit card processing method is used, the administrator's order notice will contain
a link to login through a secure connection and view the credit card information. When the payment
has been processed, click the Activate button to complete the order and send a receipt with link
and password to access digital products. Activating the order also deletes the credit card number
and expiration date from the database.
2.
The above billing information and activation form can also be accessed through the Manage Sales
profile for each customer.
3.
Unpaid orders can be accessed and activated through Sales Reports by selecting the Unpaid filter
and Edit.
Unpaid orders are shown in the Edit view with an activate icon next to each order. Orders paid by offline
credit card payment have an activate icon to the right. Click on the icon to view credit card information
and activate each order.
AShop Software © Copyright 2002 - 2010
126
AShop V User Guide
Create An Offline Payment Option
Create an offline payment option through the Configuration > Payment menu.
Check the Deliver Before Payment box only if you wish to provide immediate access to digital products
and subscriptions before the payment is processed and activated.
Credit Card Validation And Credit Card Options
Credit card numbers are validated for the correct number of digits and also for the first number, which
must correspond to the credit card type that is selected from the drop-down box.
The security code is validated for 3 digits.
It can be turned off by editing admin/gateways/offline.gw and setting $ccsecuritycode = "FALSE"
The expiration date is validated to be a future date.
Accepted Cards - Visa, MasterCard, American Express, and Discover credit cards are accepted in the
payment form by default. Edit the admin/gateways/offline.gw file to remove options for credit cards that
are not accepted. We will add new credit cards and validation upon request.
$gw_cardtypes = "
AShop Software © Copyright 2002 - 2010
Installation & Setup
127
<option value=\"VISA\">VISA</option>
<option value=\"MASTERCARD\">MasterCard</option>
<option value=\"AMEX\">American Express</option>
<option value=\"DISCOVER\">Discover</option>";
Common Problems
The offline credit card processing option requires an SSL connection for the entry of credit card
information by customers and subsequent viewing of the credit card information when it is processed by
the AShop administrator.
If upon check out, the offline payment option is selected and it returns a page not found error, check the
Secure URL setting in Shop Parameters > Advanced Options. A secure URL must be supported by the
server and the secure URL to the directory where AShop is installed must be set as the Secure URL
within AShop.
Garbage characters in the credit card info is caused by a change in the Security Secret for the payment
option that was used for those orders. The Security Secret is used to encrypt/decrypt the credit card
information and if it is changed the decryption of old credit card numbers will fail.
2.24.24 PayNova
PayNova payment integration is set in the AShop Administration Panel through Configuration >
Payment.
AShop Settings
1.
Open the Administration Panel, select Configuration, and then Payment.
2.
Click on the drop-down Payment Gateway box, select PayNova and click Add.
3.
Enter your Merchant ID. The Merchant ID is assigned to you by PayNova.
4.
Enter the payoption Security Secret. The Security Secret is assigned to you by PayNova.
Note: PayNova first issues test account details to each merchant which needs to be tested before
they will issue a real live account id and security secret by phone. This means that the account info
will need to be replaced when switching from test mode to live mode.
5.
If you wish to do so; you can edit the Option Name, add a Payment Fee, add a Payment
Description, and even edit the Thank You Message that appears upon successful completion of a
transaction.
6.
Don't forget to click the "Update" button to save the changes you made.
2.24.25 PayPal IPN
This shopping cart software is certified by PayPal.
AShop Software © Copyright 2002 - 2010
128
AShop V User Guide
PayPal payment integration is set in the AShop Administration Panel through Configuration > Payment.
To add PayPal gateway service as a payment option;
1.
Open the Administration Panel, select Configuration, and then Payment.
2.
Click on the drop-down Payment Gateway box, select PayPal and click Add.
3.
Enter the Merchant ID for your PayPal account (e-mail address). PayPal Instant Payments require
a verified business account. The PayPal e-mail address must also be the primary e-mail address for
the PayPal account.
You must use your primary PayPal ID, which is case sensitive! If the PayPal account ID set within
AShop is a verified business account address, but is not THE primary e-mail address for the PayPal
account, PayPal will accept the payment, but the response codes from PayPal will list the primary
address instead of the one that is set in AShop. As part of the product file download security, the order
will not be recorded and a password is not generated unless the addresses match EXACTLY. The
PayPal IPN system is case sensitive, which means that the email address must set in AShop exactly
as it is set for the PayPal account. For example: [email protected] is NOT the same as
[email protected].
4.
The SSL URL to logo image is for the logo that is displayed within the PayPal secure payment
forms and receipts. If you don't have access to SSL, leave this blank for the PayPal logo to appear
at the upper left of the PayPal pages. You may enter the URL to a logo image that is not SSL, but
an annoying message will appear between each PayPal page to alert your customer that there are
secure and non-secure files being loaded.
5.
Instant Payment Notification (IPN) must be turned on within your PayPal.com account
settings for orders to be completed and notices to be sent by AShop after payment is received!
Login to your PayPal account and select Profile, then select Instant Payment Notification
Preferences. Check the box to activate IPN and enter the URL to your order.php script. For
example; http://www.your_domain/ashop/order.php
Note: AShop resets the payment response code URL for each transaction when the PayPal payment
window is first opened. This overrides the URL that is set within the PayPal account settings so that
multiple installations of AShop can use the same PayPal account.
Other notes about PayPal
· Collecting the customer's phone number when using the PayPal payment option is possible
through a setting in the PayPal account. After logging in at paypal.com, click profile, click website
payment preferences, select "contact telephone on (optional field)" and finally click save.
· Set the language in the PayPal payment page by adding an extra field parameter in the admin/
gateways/paypal.gw. Add the lc parameter as a hidden field in the section $gw_extrafields. ("lc" is
abbreviation for locale.)
Example, to set American English language, add the following.
<input type=\"hidden\" name=\"lc\" value=\"US\">";
Here are a few lc values supported by PayPal:
DE = German
ES = Spanish
FR = French
AShop Software © Copyright 2002 - 2010
Installation & Setup
129
IT = Italian
JP = Japanese
US = American English
· The locale in the shipping address sets the language in the PayPal payment page. For
example, if you sell shippable products and the customer selects Spain for the country field in the
shipping information page, the language (lc value = ES) parameter will automatically be sent to
PayPal to select Spanish for the payment page. This value overrides the value that is set in the
paypal.gw file. If you want Spanish language in the PayPal payment page for downloadable products
you will need to add an extra hidden field named: "lc" with the value: "ES" in the gateways/paypal.gw
file. To override this feature and force the language to always be the same, remove the "lc" value for
the $gw_country variable in the paypal.gw file. Then, the added hidden field (lc value = ES) will always
will set the lc parameter to "ES" regardless of the shipping destination.
Find this line of code: $gw_country = "lc";
Remove the lc setting: $gw_country = "";
· Curl with SSL - PayPal and some other payment gateways require Curl with SSL to be available.
There will be an error during the payment process if Curl with SSL fails. See also: PayPal Curl Error
2.24.26 PayPal Item Number - 2ashoporderstring4a
Starting in AShop V 2.1,there is a field on the PayPal confirmation page that reads "Item Number:
2ashoporderstring4a". What is this and where does it come from?
The "2ashoporderstring4a" is a version of the product string, which contains information about which
products have been ordered. In previous versions of AShop this was an 'a' separated list of product id's
that was split apart by the different scripts to find out what the shopping cart contained or what had been
ordered. Since some of the payment gateways don't allow for more custom fields to be sent we needed
a way to pass through information about which payment method had been chosen without adding
another field. This information was added to the beginning of the product string, which became the order
string.
The 'ashoporderstring' is used to split apart the information about which payment option (id 2 in this
case) has been used from the old product string. The reason for making it a word instead of just a single
letter is that it needs to be clearly identifiable by the order script to make sure that the value of the right
field (the name of the field differs between the different gateways) is used. order.php searches through all
input fields that has been sent and when it finds a field that contains 'ashoporderstring' it uses it as the
product string.
2.24.27 PayPal Pro & Express Checkout
This shopping cart software is certified by PayPal.
How to set up PayPal Express Checkout and Web Site Payments Pro
1. Request API Credentials from PayPal
Website Payments Pro service must be activated in your PayPal Business account.
AShop Software © Copyright 2002 - 2010
130
AShop V User Guide
An application through paypal.com is required and fees must be paid before Website Payments Pro or
Express Checkout will work in the shopping cart. To use the Payment Pro options you will need a
certificate file, a Merchant ID, and a password.
Login to your PayPal account and go to the Website Payments Pro section.
A.
Login to your PayPal Pro enabled PayPal account and click Profile.
B.
Click "Request API credentials" under the section "Account Information".
C.
Click "Set up PayPal API credentials and permissions" under the section "Option 1 - PayPal API".
D.
Click "Request API credentials" (or "View API credentials" if you have done this before) in the box
"Option 2".
E.
Select "Request API certificate" and click "Agree and Submit". The API Username on the following
page should be entered into the box labeled "Merchant ID" in your AShop payment option and the
API Password should be entered in the box labeled "Security Secret".
F.
Click "Download Certificate" and save the file named "cert_key_pem.txt" somewhere on your hard
drive.
G.
Upload the certificate file to the directory admin/paypal where you installed AShop V on your
website.
2. Upload the PayPal Pro program files from AShop
PayPal's Website Payments Pro SDK (Software Development Kit) must be installed on your server. This
can be done at domain level or the SDK software may be installed centrally on the server, which reduces
setup time and disk space usage.
IMPORTANT: If your domain is hosted with a service where PayPal SDK software is installed
centrally on the server (for example the SDK software is in the PEAR repository), skip this step.
Installing the SDK scripts in the admin/paypal directory when the SDK is already installed
centrally will break the PayPal Pro payment options.
On most Unix/Linux servers you should only need to upload the separate SDK files that we distribute to
the admin/paypal subdirectory in the directory where you installed AShop V.
* On some servers you might need to ask your hosting provider to activate PEAR (a PHP code
repository) and possibly also install the PayPal SDK in PEAR. The SDK and installation instructions are
available at: http://www.paypal.com/sdk
To reduce bandwidth usage, the SDK files are not distributed with the shopping cart program installation
or update packages. The SDK files can be downloaded from PayPal.com or from AShopSoftware.com.
You will need to first download these files and upload them to your server in the "admin" directory where
AShop is installed (i.e. yourdomain.com/ashop/admin or yourdomain.com/admin).
The PayPal Pro package will have all the necessary files in a folder named "paypal", update the entire
folder into the admin directory.
AShop Software © Copyright 2002 - 2010
Installation & Setup
131
3. Setup PayPal Website Payments Pro in AShop
A.
Login to your AShop V administration panel and click Configuration->Payment.
B.
Select PayPal Direct Payment and click Add.
C.
Enter the PayPal certificate API Username into the box labeled Merchant ID and enter the PayPal
API Password into the box labeled Security Secret. Then click the Update button.
3. Setup PayPal Express Checkout in AShop
A.
Login to your AShop V administration panel and click Configuration->Payment.
B.
Select PayPal Express Payment and click Add.
AShop Software © Copyright 2002 - 2010
132
AShop V User Guide
C.
Enter the PayPal certificate API Username into the box labeled Merchant ID and enter the PayPal
API Password into the box labeled Security Secret. Then click the Update button.
2.24.28 PayPal PayFlow Link
AShop Administration Panel Settings
Verisign PayFlow Link payment integration is set in the AShop Administration Panel through
Configuration > Payment.
Verisign Settings
In PayFlow Link Info configuration page set:
Return URL Method to LINK
Return URL: To website URL link you wish to send customers to when they complete payment.
AShop Software © Copyright 2002 - 2010
Installation & Setup
133
Assure box is checked for Silent Post URL and enter
http://www.yourwebsite.com/ashop/order.php
This allows PayPal to post the info back to the cart with the Silent Post URL, but allows you to send
people back to the website with the Return URL. Otherwise the orders are not recorded and receipts are
not sent.
The PayFlow payment form must be configured to collect the billing address and email address of your
customers. Login to your PayFlow account, click Account Info, click PayFlow Link Info. Under the
section "Billing Information" check all boxes for "Required Fields" and "Editable Fields" except
"CSC" (unless you want to enable the Card Security Code feature).
2.24.29 PayPal PayFlow Pro
With PayPal PayFlow Pro the payment form is generated by the AShop script orderform.php, on your
own site. Since the form collects sensitive credit card information, an SSL security certificate for your
site is required.
Test Mode
Credit Card Numbers For Testing
Visa: 4111111111111111
MasterCard: 5555555555554444
American Express: 378282246310005
The AShop payment option must be in test mode in order for these test numbers to work.
Troubleshooting
It is very easy to confuse the settings between PayPal and AShop. If everything seems right, but the
credit cards are denied, double check the payment option settings within AShop.
The Merchant ID setting within AShop is the PayFlow Username.
The Security Secret setting within AShop is the password for the PayFlow account login.
2.24.30 PayReady
PayReady payment integration requires access SSL support on the server. This is necessary because
the credit card information is collected through a page that is hosted on the server where AShop is
installed.
Note: There is a hosted payment form option available from PayReady. We don't use it because it uses
the GET method for postbacks, which causes security issues.
PayReady Test Account
PayReady provides a test account that is publicly available. Specific card number and billing information
is required in order for test payments to be accepted.
Account username (Merchant ID): PayReady.net Test Account
Credit card type: Visa
Credit card number: 4012000010000
Security code: 999
AShop Software © Copyright 2002 - 2010
134
AShop V User Guide
Total amount: between $1.00 and $150
Expiration date: Apr 2004
Address* : 8320 SOUTH HARDY DRIVE
City* : TEMPE
State* : AZ
Zip* : 85284
* Only needed to get an exact AVS match
2.24.31 PaySat
PaySat payment integration is set in the AShop Administration Panel through Configuration > Payment.
AShop Settings
1.
Open the Administration Panel, select Configuration, and then Payment.
2.
Click on the drop-down Payment Gateway box, select PaySat and click Add.
3.
Enter your Merchant ID. The Merchant ID must be set to the PaySat Merchant assigned to you by
PaySat.
4.
Enter the payoption Security Secret. The Security Secret must be the secret word that you can
enter for a domain in your PaySat account.
5.
Enter your Page ID. The Page ID must be the Domain ID for your domain in the PaySat account.
6.
If you wish to do so; you can edit the Option Name, add a Payment Fee, add a Payment
Description, and even edit the Thank You Message that appears upon successful completion of a
transaction.
7.
Don't forget to click the "Update" button to save the changes you made.
PaySat Setting
1.
Set the Return Page URL for the domain in your PaySat account to the URL of your AShop followed
by: "/admin/paysat.php" For example: http://www.yourdomain.com/ashop/admin/paysat.php
2.24.32 Plug-N-Pay
Plug-N-Pay payment integration is set in the AShop Administration Panel through Configuration >
Payment.
AShop Settings
1.
2.
3.
4.
Open the Administration Panel, select Configuration, and then Payment.
Click on the drop-down Payment Gateway box, select Plug-N-Pay and click Add.
Enter your Merchant ID. The Merchant ID is assigned to you by Plug-N-Pay.
Note: Test Mode is set within the Plug-N-Pay administration panel at https://pay1.plugnpay.com/
admin. Don't forget to change this setting after testing.
Click the Submit button to save changes.
AShop Software © Copyright 2002 - 2010
Installation & Setup
5.
6.
7.
135
Open the AShop file /admin/gateways/plugnplay.gw in a text editor.
About half way down the page, there is a setting for the accepted credit cards. Delete the ones that
are not accepted.
name=\"card-allowed\" value=\"Visa,MasterCard,Discover,Amex,Diners,JCB,MYAR\">";
Save the plugnplay.gw file on the server.
Plug-N-Pay Settings
There are not any settings required in the Plug N Pay merchant panel in order to use it with AShop.
Important Note: The payment confirmation page, which is a combination of the delivery.html page
template and the thank you text, is nested within a secure page that is hosted by Plug-N-Pay. All links
within the page template and thank you text must be absolute. To avoid browser security warnings from
popping up, all image links must be through secure connections (https).
Company Logo Image In Payment Form
Unlike most other payment gateways, Plug-N-Pay does not support the inclusion of a logo image from
the shopping cart program and merchants cannot customize the payment pages themselves. Plug-NPay support staff can change colors, add your company logo and/or background image within the
payment form by requesting this through their online help desk, which is located within the Plug-N-Pay
merchant panel . Any other changes to the payment form will most likely require custom programming
by Plug-N-Pay for a fee.
Currencies Accepted
Plug-N-Pay can process in multiple currencies. But it is up to the merchant to have a merchant account
in the applicable currency. Except under some rare circumstances a single merchant account can
handle only 1 currency. For instance, if a merchant is setup on the Plug-N-Pay system as processing in
Euro then all amount data would be sent to PnP in Euro's. The currency symbol displayed within the
PnP payment form is the same currency symbol that is set within the AShop Administration Panel >
Configuration > Shop Parameters and used for display purposes. Plug-N-Pay integrates into several
international processors in Europe and the Caribbean.
2.24.33 PSBill
PSBill payment integration is set in the AShop Administration Panel through Configuration > Payment.
AShop Settings
1.
Open the Administration Panel, select Configuration, and then Payment.
2.
Click on the drop-down Payment Gateway box, select PSBill and click Add.
3.
Enter your Merchant ID. The Merchant ID is assigned to you by PSBill. The Merchant ID should be
set to the PSBill SiteID without the leading "S".
4.
The transaction key can be found by logging in to the PSBill backend, clicking Site List in the
menu, clicking the Site's Name and finally clicking Password File Setup in the menu. It is referred
to as the "password script key" in the PSBill backend.
5.
If you wish to do so; you can edit the Option Name, add a Payment Fee, add a Payment
Description, and even edit the Thank You Message that appears upon successful completion of a
AShop Software © Copyright 2002 - 2010
136
AShop V User Guide
transaction.
6.
Don't forget to click the "Update" button to save the changes you made.
7.
To setup the postback to the Ashop V order processing follow the steps above in step 4 and then
enter:
http://www.yoursite.com/ashop/admin/psbill.php in the text input box on that page (replacing "http://
www.yoursite.com/ashop" with the right URL to the site).
Then click the "Get Password Script" button and cancel the download that will result from this.
2.24.34 TeleSign Phone Verification
How to Activate the TeleSign Phone Verification:
There is a setting in your Administration Panel under Configuration > Shop Parameters labeled TeleSign
Customer ID. A valid TeleSign ID must be saved here.
In Configuration > Payment, for each payment option there is a check box to enable TeleSign. Check
the box for payment options that are to use TeleSign phone verification.
* Don't forget to click the "Submit" button to save any changes you make.
How TeleSign Phone Verification Works:
In the payment form, if TeleSign is enabled, there is a comment below the phone number field.
When the payment form is submitted, the customer is redirected to a verification page. TeleSign
automatically calls the customer's phone number and gives a numeric code, which must then be entered
into the verification page and submitted to complete the order. The credit card information is not sent to
the payment gateway until after the verification is complete, which reduces or eliminates the need to void
and refund fraudulent transactions. This saves time and money. It works because theives typically do not
want to risk being found by caller ID or a phone trace. It also works because most of the fraud rings are
typically in Asia and Africa and their phone service may be limited.
AShop Software © Copyright 2002 - 2010
Installation & Setup
137
** Note
TeleSign Phone Verification works with Payment Gateways, such as these, that use the AShop
payment form:
Authorize.Net AIM, Verisign PayFlo Pro, eSelect, Echo, and offline processing.
It does not work with payment options where the payment form is hosted on the processor's server such
as:
Authorize.Net SIM and the majority of other payment options.
** TeleSign Phone Verification is not a Payment Gateway in itself, but a tool to help prevent
credit card fraud.
2.24.35 ViaKlix
1. Login to your viaKLIX account at https://www2.viaklix.com/Admin/login.asp
2. Click "Terminal Setup" in the menu.
3. Click "Adv System Config" in the submenu.
4. Enter the full URL to your AShop orderform.php script in the "Authorizes Referrers" field
Example: https://mydomain.com/ashop/orderform.php, and click "Add Referrer".
2.24.36 WorldPay
WorldPay payment integration is set in the AShop Administration Panel through Configuration >
Payment.
AShop Settings
1.
Open the Administration Panel, select Configuration, and then Payment Options.
2.
Click on the drop-down Payment Gateway box, select WorldPay and click Add.
3.
Enter your Merchant ID. The Merchant ID is assigned to you by WorldPay and is also referred to as
your Installation ID.
Note: Test Mode is set to yes by default. Don't forget to change this setting after testing.
4.
Click the Submit button to save changes.
WorldPay Settings
1.
Open a browser and log in to your WorldPay Administration Server with the user name and
password that was assigned to you by WorldPay. https://select.worldpay.com/wcc/admin
2.
Under Installations for (your company), click the corresponding arrow under Configuration options for
this Installation ID.
3.
In the Callback URL text box, enter the URL to the AShop order.php script. This URL will be
something like http://www.yourdomain.com/ashop1/order.php
4.
Check Callback Enabled.
5.
Check Use Callback Response
AShop Software © Copyright 2002 - 2010
138
AShop V User Guide
6.
Save Changes.
Note: WorldPay grabs the callback URL page and displays it from their server. If you are using
HTML page templates, the images and links within the delivery.html template must have absolute
URL's.
As mentioned in previous notes, there are other settings that you will probably want to change in the
WorldPay Administration Server. After completing any other changes and successfully testing the
payment process, uncheck the Test Mode box as mentioned in step 2. Submit a completed Activation
Request Form (AR) to WorldPay. Once WorldPay Technical Support is satisfied with your site, they will
set your site to live. The Technical Support Team will send you confirmation by email that your web site
can go live, together with any technical changes you must make to enable live operation.
2.24.37 Payment Gateway Modules
For each supported currency there is a set of payment gateway modules, which contain settings for
each gateway. The gateway modules are pre-configured and under most circumstances do not require
modification.
Important! Payment gateways do not follow a standard format or system. Complexity of integration
varies widely among payment services. Depending on the payment gateway, integration may only
require settings in a gw file or it may require installation of additional software. For some gateways
modification of the AShop code may be required. Also, some payment services may not support all of
the required data exchange for the shopping cart to function fully and some payment service may be
problematic. Modify the payment gateway modules and create new ones at your own risk! We do NOT
provide technical support for custom made payment modules.
Gateway Directory Names and Currencies
In the admin directory, there is a directory for each currency.
·
·
·
·
·
·
·
·
gateways - U.S. Dollar
gatewaysaud - Australian Dollar
gatewayscad - Canadian Dollar
gatewayseur - Euro
gatewaysgbp - Great Britain Pound
gatewaysmxn - Mexican Peso
gatewaysnok - Norweigan Krone
gatewaysnzd - New Zealand Dollar
AShop Software © Copyright 2002 - 2010
Installation & Setup
139
· gatewayssek - Swedish Krona
· gatewayssgd - Singapore Dollar
· gatewaystec - Traffic Exchange Credits
For each currency there is a set of payment gateway (.gw) files. Each payment gateway file is named
with an abbreviation for the payment service that it is configured to work with.
Payment Gateway Module Variables
$gatewayname = the name of the payment processor as it will appear in the AShop administration panel
$paymenturl = the URL to which AShop should post order information.
For gateways that require the merchant to collect credit card information on the merchant's site the
function process_payment is used instead and this URL should be set to the orderform.php script that is
included with AShop.
$postbackurl = the URL to the AShop order.php script which will receive the postback of order
information from the payment gateway and then process the order.
$visibleorderprocessing = should be set to TRUE or FALSE.
If it is set to TRUE then the order.php script will process the order directly in the customer's web browser
and then show the thank you text if the order was processed successfully. If it is set to FALSE then the
order.php script will be called through server to server communication with the gateway to process the
order and the thank you text will be shown to the customer regardless of the result of the order
processing.
$resultpagessl = should be set to TRUE or FALSE.
If it is set to true then the order.php script will produce an SSL adapted version of the thank you page.
This is used by some gateways that fetch the thank you page from their own URL instead of redirecting
the customer back to the merchant's site.
$sendpayoptionid = should be set to TRUE or FALSE.
Payment gateways that require the merchant to collect credit card information on the merchant's site
should set this to TRUE. All other gateways should set this to FALSE.
$noquerystring = should be set to TRUE or FALSE.
This was added to fix a problem with some payment gateways that check the referring URL and need an
exact match, with the exact same query string. Setting this to TRUE will simply remove the query string
from the AShop script that sends the order information to the payment gateway.
AShop Software © Copyright 2002 - 2010
140
AShop V User Guide
$gw_orderid ... $gw_shipcountry = the field names of all the order information.
Change these to the field names required by the the payment gateway. For example: if the gateway
requires a variable named totalamount which should contain the amount to be paid then the $gw_amount
variable should be set to: "totalamount". Fields not needed by a specific gateway can be set to "".
$gw_extrafields = if any extra gateway specific fields are needed this variable should contain them as
html input tags of the type hidden. For example: a payment gateway requires a field named x_Method
with the value "ECHECK", the $gw_extrafields can then be set to: <input type=\"hidden\" name=
\"x_Method\" value=\"ECHECK\">
$testrequest = set this to a hidden html input tag with the name and value of a variable to request test
mode if the gateway supports this. Checking the text mode checkbox for the payment option in the
AShop admin panel will then result in this input tag being included in the payment request.
$gw_parameters['settingname'] = these should be set to true or false and will activate or deactivate
the corresponding setting in the AShop admin panel for a payment option using this gateway. For
example: setting $gw_parameters['testmode'] to "true" will make the test mode checkbox appear
for this gateway when used in a payment option in the admin panel.
Payment Gateway Module Functions:
authenticate($gateway_input, $securityhash, $merchant) - checks that the payment has been
authenticated by the payment gateway.
The $gateway_input array contains all the order information fields sent back to the AShop order.php
script, for example: $gateway_input['orderid'] will contain the value of the field orderid if such a field
is posted back to AShop.
The $securityhash variable contains any security hash string or password used by some gateways to
make sure the order information has not been manipulated in any way.
The $merchant variable contains the merchant's username or merchant ID with the payment gateway
and can be checked against any returned field that should contain the same value to add more security.
The function should set $validate[0] to "VERIFIED " if the authentication is successful or "INVALID" if
not. The variable $validate[1] can also be set to any message containing the reason why the
authentication failed if such a message is returned by the gateway.
process_payment($user, $password, $vspartner, $cardtype, $ccnumber, $seccode, $expdate, $amount,
$invoice, $firstname, $lastname, $address, $city, $zip, $state, $country, $phone, $email, $testmode,
$description) - used to process the payment by gateways that require that the merchant collects credit
card information on the merchant's site.
The $user and $password variables are used to authenticate the merchant on the payment gateway's
server. The remaining variables contain the corresponding payment and order information to be used by
the function for processing, for example by using Curl to post the information to the gateway.
If the payment is successfully processed the variable $result["RESULT"] should be set to "success".
The variable $result["REMOTEORDERID"] should also be set to the transaction ID of the payment as
returned by the payment gateway and $result["RESPONSEMSG"] can be set to any response message
from the gateway.
AShop Software © Copyright 2002 - 2010
Installation & Setup
141
If the payment has failed then the variable $result["ERROR"] should be set to the error returned by the
gateway.
parse_response($gateway_input) - maps the fields returned by the payment gateway to the
corresponding variables used by AShop.
2.25
Sales Office Configuration
2.25.1 Sales Office Configuration
From the AShop admin panel, click on the Sales Office link in the main navigation bar on the left. At the
top of the page, select Configuration.
Spam Protection
Upon login to the Sales Office panel, new email messages are fetched from your POP3 mailbox and
stored in your customer inbox. When the box labeled Block POP3 email from unregistered senders is
checked, only email from known contacts will be transferred to the customer inbox. All other messages
will go to the spam bin where they can be browsed and saved individually before dumping. For messages
to be moved to the inbox the following conditions must be met.
· Sender is already in the inbox.
· Sender is already on the contact list.
· Domain of sender is on accepted domain list.
· Message was submitted through and Sales Office contact form.
To accept all mail from specified domains, add the domains to the list of Accepted domains. Do NOT
include http or www before the domain name. Separate each domain name by a line break [Enter].
Submit the form when done to save changes.
Spammers often forge the reply address in an attempt to spoof recipients into opening messages. The
Sales Office compares the reply address with the actual sender address, which is in the email header. If
the reply and sender addresses do not match, then the message goes to the spam bin. This is an
effective method to block spam, however bulk mailings from known contacts may use similar mailing
methods where the sender address in the header is different from the reply address. If a message from a
known contact is found in the spam bin, this is most likely what has happened. To accept messages
from the sender in the future, save the message from the spam bin to the customer inbox and then save
it from the customer inbox to customer history. (Click on the Save icon to the right of the message) If the
reply address already exists in a customer profile, the new sender address will be added to the same
customer's profile under alternate email addresses. Then all future messages from that sender will not be
AShop Software © Copyright 2002 - 2010
142
AShop V User Guide
blocked and messages to/from that sender will automatically be saved in the same customer's history.
Mail Server Type
Mail may be received in the Sales Office inboxes from a POP3 or IMAP mailbox. The IMAP setting is
only available if the IMAP extension is installed on the server. Otherwise, it will default to POP3.
When the Mail Server Type is changed, the Port settings for customer and vendor mail (see below) will
automatically change to the default port for that server type. The Port settings may then be changed if
the mail server is on a non-standard Port.
Do NOT use other POP3 email clients when Sales Office is set to use IMAP!
When IMAP is used there is one very big difference in how the mail is handled. IMAP keeps the mail in
the mailbox on the mail server, while POP3 downloads the mail and stores it in the emerchant/mail
directory. The emerchant/mail directory is still used with IMAP but only to save outgoing mail. This
means that if a client-side POP3 email client such as Outlook is used to get messages from the same
mailbox, the source of messages will be removed and the messages will be blank when viewed in the
Sales Office.
The mail server must be on the same machine as AShop when using IMAP!
IMAP should not be used when the web site running AShop is not the same machine (or at least on the
same network) as the mail server. The entire email is downloaded from the mail server every time it is
opened in the Sales Office. If the mail server is on a remote server, messages could be slow loading.
When AShop is installed on the same machine as the mail server, IMAP will typically open messages
faster and it is capable of handling larger attachments than the POP3 method, which uses a PHP
extension.
Customer Mail Account
· Set the Customer Mail Address to the address of the POP3 mailbox where customer email is
received. For instance [email protected]. This will be the reply address in messages sent
to customers from the Sales Office.
· The Mail Server setting is typically something like mail.yourdomain.com.
· The Account Username is may be the first part of the mail address if the POP3 mail server will
accept the short username, but on some servers it must be the full username including the domain.
For example, the username "service" may work on some servers and the username
"[email protected]" may be required on other servers.
· The Password is the one that you have set for that mail account through your hosting service.
· The Mail Port is typically 110 when using POP3 or 143 when using IMAP.
AShop Software © Copyright 2002 - 2010
Installation & Setup
143
The POP3 mailbox will be checked and mail downloaded automatically to the customer inbox upon
logging into the Sales Office.
If the admin email setting, which is set in Configuration > Shop Parameters is set to the same address
as the Sales Office customer email address, all admin notices will post directly in the Sales Office
customer inbox (not sent by email to the POP3 mailbox). This method is more reliable and secure than
sending admin notices by email and it reduces the load on the local mail server. If the addresses are
different, the admin notices will be sent as regular email.
Vendor Mail Account
Vendor mail is received separate from customer mail so that the messages can be processed and saved
in relation to vendors and purchase orders. To use the vendor mail features, create a separate POP3
mailbox for vendor mail and configure the Vendor Mail Account settings in the Sales Office with the
matching POP3 settings. The vendor mail inbox does not use spam blocking. If you do not publish the
vendor email address, spam will typically not be an issue in this area. If the vendor email does become
compromised, a spam filter such as SpamAssassin can be applied to the POP3 mailbox.
The Vendor Mail Account settings are set in the same way as Customer Mail, but with a different
mailbox.
Automatic Billing
These are the default settings for bills and related messages that are sent to customers. In the Sales
AShop Software © Copyright 2002 - 2010
144
AShop V User Guide
Office, each order begins with a quote. When a quote is converted to a bill there are bill options, which
will be preset with these values and may then be edited for each bill.
2.25.2 Add/Edit Users
The AShop Sales Office may be used by an individual or by multiple users. There is no limit to the
number of users that can be created in the Sales Office. When logged in as admin all available data is
visible and all options are available. When logged in as any other user, some data and options are
hidden.
Add and edit Sales Office users through the AShop admin panel. Click on the Sales Office link on the
left side and then click the Manage Users link at the top of the page.
Sales Office User Login
The admin user may login through the AShop admin panel. There is also a direct login to the Sales
Office, which will be a URL similar to http://www.yourdomain.com/emerchant/ or http://www.youdomain.
com/ashop/emerchant/ depending on where AShop is installed in your domain. All users may login
directly at the emerchant directory. A redirect (index.html) goes to emerchant/login.php.
The admin user may have the same password as for the admin panel or a different one. The default
admin password when AShop is first installed is "emerchantadmin".
Add New Sales Office User
Click on the Add new user link, enter the new username and password, then click Update.
AShop Software © Copyright 2002 - 2010
Installation & Setup
145
Edit Sales Office User
Click on the profile icon to the right of the user that is to be edited. Edit the settings and then click
Update to save the changes.
Delete Sales Office User
Click on the trash icon to the right of the user that is to be deleted. A confirmation page will open. Click
yes to delete the user. Note that the admin user cannot be deleted.
2.25.3 Vendors and Products
To create purchase orders and track order status each product must be assigned to a vendor. Products
are assigned to vendors through the AShop admin panel in Edit Catalog, but before this can be done
vendors must first be added through the Sales Office.
AShop Software © Copyright 2002 - 2010
146
AShop V User Guide
Add New Vendor
Click on the New Vendor button. Add the vendor contact information and click Save.
Assign Each Product to a Vendor
Assign each product to a vendor through the AShop admin panel Edit Catalog menu. Click on the edit
button for each product. When at least one vendor has been added, there will be a drop-down selector in
each product page. Select a vendor and save the product.
Note that products are not required to be assigned to a vendor. All active products will appear in the
shopping cart regardless of their vendor relationship. The vendor assignment simply enables automation
within the Sales Office. For example, when an order is received and it includes products that are
assigned to a vendor, the order will appear in Vendors > Open Orders with an option to automatically
generate a purchase order, filled in with the vendor, customer, and product information. Example 2:
When manually creating purchase orders the vendor products are selectively displayed depending on
which vendor the purchase order will be sent to.
See also: Sales Office > Vendors
AShop Software © Copyright 2002 - 2010
Installation & Setup
147
2.25.4 Contact Forms
AShop contact forms post directly to the Sales Office inbox (database) and do not send any email. An
image recognition character entry requirement in the form prevents most automated spam submissions.
When used with an https connection, the AShop contact forms provide a secure way to receive sensitive
information from a web site submission.
The contact form requires three files, which are distributed in the emerchant directory.
· mailform.php (This is the program script. It is not editable.)
· mailform.tpl (This file, which is in HTML format, defines the page layout and form fields. Edit this
file.)
· thankyou.html (This file defines the confirmation page, after mailform.php is submitted. Edit this
file.)
The contact form files will work in the emerchant directory or within any other subdirectory of your AShop
installation. An unlimited number of custom contact forms may be created by copying these three files,
modifying the html files as needed and uploading the files to separate subdirectories.
To set up a contact form, edit the mailform.tpl and thankyou.html files in an HTML editor. Copy and edit
the example mailform.tpl, which is provided in the emerchant directory. Add or delete fields as needed,
but do NOT delete any of the following required fields or the %errormessage% and %securityimage%
tokens. The fields may be hidden, but a value must be set for each of the following form fields.
·
·
·
·
·
·
·
firstname
lastname
email
confirmemail
subject
message
securitycheck
Tokens are used to set the value of each text field in the form. A token is the name of the field bracketed
with percentage characters. For example, the text field with name="firstname" also has the parameter
AShop Software © Copyright 2002 - 2010
148
AShop V User Guide
value="%firstname%". Each text field should have a value such as this, which corresponds with the field
name. The tokens are used by mailform.php to repopulate the fields if there is a validation error and the
page must be reloaded.
The thankyou.html file is simply an HTML file. There is nothing special about it except for the name and
location.
2.25.5 Quote Header/Footer
Each order begins as a quote. Quotes may be saved and sent to customers by email. Each quote may
then be converted into a bill (unpaid order) or a paid order. The content of emailed quotes includes
header and footer content, which is set in the editable emerchant/header.inc.php and emerchant/footer.
inc.php files. Plain text and html may be used in the header and footer.
2.25.6 Recurring Bill Templates
Billing templates are created through the admin panel in Sales Office > Billing Templates. Billing
templates are currently supported for Authorize.net ARB and Sales Office AutoBill recurring bills.
To automatically initiate recurring billing or ARB from orders, first create a billing template. Then each
product may be assigned to a billing template through Edit Catalog > Edit (for each product).
AShop Software © Copyright 2002 - 2010
Installation & Setup
149
Authorize.net ARB
Authorize.net ARB billing templates create ARB (automated recurring billing) in your Authorize.net
account from product or subscription orders that are placed through the shopping cart and through the
Sales Office. Each ARB is created from the credit card information that was used to pay for the order. If
more than one of the products in the order is assigned to an ARB billing template, an ARB will be
created in Authorize.net for each of the products individually.
PCS Compliance
Credit card numbers, expiration dates and security codes are saved by Authorize.net on their secure
server. Credit card numbers, expiration dates and security codes are only transmitted across a secure
encrypted connection and they are NOT saved on the local server.
Authorize.net Account With ARB Is Required
Before billing templates can create new ARBs in Authorize.net, you must have an account with
Authorize.net and ARB service must be activated for the account. Also, a payment option for Authorize.
net AIM or Authorize.net SIM must be created in the AShop admin panel. If other payment options are
also offered in the shopping cart, the Authorize.net ARB billing templates will not work with them and
there is not a method in the shopping cart to offer different payment options specifically for each product.
How to Add an Authorize.net ARB Billing Template
Select Authorize.net ARB. Give it a name, which will be for your own internal reference. Click Add.
In the new billing template, set the ARB parameters.
· Template name is for your internal reference. It is used to assign a billing template to each product.
· Start is the number of days after the order when the ARB will begin.
· Recurring may be weekly, monthy, quarterly, semiannual, or annual.
· Repeat is the number of times that the ARB will occur before it ends. Set this to 0 (zero) for the ARB
to continue indefinitely.
· Click Update to save the settings.
AShop Software © Copyright 2002 - 2010
150
AShop V User Guide
AutoBill Recurring Bills
When a recurring bill template is set to initiate an AutoBill and a product, which is set to use that billing
template is ordered through the shopping cart or the Sales Office, the Sales Office will subsequently
create new unpaid orders for the product and send invoices on a preset billing cycle. If more than one of
the products in the order is assigned to a billing template, a recurring bill will be created for each of the
products individually.
PCS Compliance
This method does not save any credit card information and it does not automatically debit any credit
card or PayPal. Customers receive invoices and may pay each bill by any option that you offer; online or
offline. A payment link is included in each invoice. It links to the payment page in the shopping cart.
When an AutoBill is paid online through the payment link, payment is applied directly to the unpaid bill
and a confirmation notice is automatically sent. When payment is received offline, for examply by check
or electronic funds transfer, payment may then be applied manually through the Sales Reports for
Unpaid orders.
How To Add an AutoBill Billing Template
Select AutoBill. Give it a name, which will be for your own internal reference. Click Add.
· See Sales Office > Bills and Recurring Billing for a list and description of the AutoBill parameters.
Assign Products To Billing Templates
To use a billing template, assign a product to a billing template and set a recurring amount. Do this
through Edit Catalog. Click on the Edit button for each product. When at least one billing template
exists, there will be a drop-down selector for billing template assignment and a text box to set the
recurring amount. If no recurring price is set the retail price of the product will be used. The amount of
the recurring bill or ARB will be multiplied by the quantity that is ordered.
Manage Unpaid Bills
Unpaid Orders are reported in the admin panel under Sales Reports. Select status Unpaid and Edit
mode to manage unpaid orders and to send reminders. Unpaid orders also appear in each related
customer's history through the Sales Office.
AShop Software © Copyright 2002 - 2010
Installation & Setup
2.26
151
Third Party Software Integration
2.26.1 Third Party Software Integration
To integrate AShop to any of the third party software applications that are supported by AShop
V:
1.
Follow the installation instructions for each application. Setup the program and test to ensure that it
is working correctly.
Note: AShop Software does not provide free support for third party application installation or usage.
To get assistance with the installation or usage of a third party application, please contact the
developer or vendor who provided the software.
2.
Set the full server path to the directory where the third party software is installed.
You do this in your AShop Administration Panel, go to the Configuration, under Shop Parameters,
at the bottom click Advanced Options.
3.
See additional notes for each application.
An automation fulfilment option can be used to integrate with third party applications that are
not specifically supported by AShop.
2.26.2 AutoResponse Plus
The integration with ARP works similar to the other third party tools. You install it by entering the file
system path in the Advanced Shop Parameters in your AShop Administration Panel (update.php must
be run first in old AShop installations to add the new database fields) and then you can select one of the
autoresponders in a drop down list on the Add/Edit product/subscription pages. Whenever a customer
buys one of the products he/she will automatically be added to the corresponding autoresponder and
receive the first follow up message.
There is one thing that can cause trouble with the ARP integration. An open basedir restriction will
prevent the AShop scripts from reading the ARP config file. To fix this...
Copy the config file (it is called arp3-config.pl) to another directory, such as httpdocs, where it can
be read from php. Set the AShop third party software configuration (set in the Advanced Shop
Parameters) to this path. It needs to be an exact copy of the actual config file that is used for ARP
on the site.
OR
Add the cgi-bin directory to the open basedir in the httpd.include file for the domain.
For example: /home/httpd/vhosts/yourdomain.com/conf/httpd.include
There are two methods of signing up with an ARP autoresponder. You can either use an html form or
simply send an email to an address that is connected to the autoresponder. The email is the unique
identifier of each autoresponder in ARP, which is why it is used in the drop down list within AShop
AShop Software © Copyright 2002 - 2010
152
AShop V User Guide
Administration Panel > Edit Products for each product. To be able to use the email method a mail filter
needs to be installed which runs an ARP script automatically when a message is sent to a certain
address.
Note: See ARP instructions for installation of ARP and mail filters.
You don't need to have a mailbox for each email address that is to be used in ARP. You can simply use
the catch all option in the server administrator, and you don't need to use the email sign up method of
ARP at all to be able to use it together with AShop. No additional configuration or setup other than what
is described in the install.txt of ARP is needed for the AShop integration but if you want the email sign
up method you must create a mail filter.
The first ARP message will be sent immediately when customers purchase associated products. Cron
jobs must be setup for ARP to automatically send subsequent messages.
Note: If ARP is installed in a subdomain, add the subdirectory path extension to 3 of the fields in the
arp3-settings.pl script file. For instance: /dir/subdir
Troubleshooting Tips
Internal Server Error When Running ARP
It seems like the most common problem with cgi scripts is that they have the wrong type of linebreaks
(Windows instead of Unix). This might happen when you upload the scripts with ftp in binary mode
instead of ascii mode.
Tips for AutoResponse Plus Users
Sending new messages to subscribers who have already finished the sequence
If you add new messages to a follow-up sequence and want "Finished"
subscribers to get those new messages, here's the process:
1.
Set autoresponder status to "Suspended".
2.
Add your new messages.
3.
Set autoresponder status to "Active".
4.
Filter subscriber list by autoresponder and status "Finished"
5.
Use Subscribers > Group Tasks > Edit to set their status to "Active" en masse.
They will be added back into the sequence and carry on from where they left off.
After they have received the new messages, they will be re-flagged as "Finished".
Note that the above will only work if messages are added at the end of the sequence,
not in the middle of it.
2.26.3 Interspire Email Marketer
You configure and activate the Interspire Email Marketer integration by entering the URL to your IEM
AShop Software © Copyright 2002 - 2010
Installation & Setup
153
xml.php script in the box labeled Email Marketer URL on the page Advanced Shop Parameters in your
AShop Administration Panel. Then enter your IEM XML Username and XML Token in the boxes Email
Marketer User and Email Marketer Token.
You will find the username and token by logging in to your Interspire Email Marketer control panel and
then clicking Users & Groups in the top menu, then View User Accounts, the Edit option on your
System Administrator user and finally Advanced User Settings. Make sure the option "Yes, allow this
user to use the XML API" is checked. The three options you need for your AShop integration are found
below that option: XML Path (=Email Marketer URL), XML Username (=Email Marketer User) and XML
Token (=Email Marketer Token).
Once these settings are added on the advanced options page in your AShop admin panel, a drop down
list should automatically appear on the Add/Edit Product pages, which lets you select one of your lists
from your Interspire Email Marketer. Whenever a customer buys one of the products he/she will
automatically be added to the list you chose for that product.
2.26.4 ListMessenger Lite & Pro
ListMessenger Lite is a free mailing list management program written in PHP using a mySQL database.
The program files can be downloaded from http://www.listmessenger.com/index.php.
When ListMessenger Lite or Pro is installed on the same server as AShop and the path to
ListMessenger is set within the third party software integration, each product can be associated with a
ListMessenger mailing list group.
A drop down list will appear on the add product and edit product pages where you can set the mailing
list group. When someone buys the product, they will automatically be added to the corresponding
group within ListMessenger Lite.
The full path to the ListMessenger directory must be set.
Example: /home/username/public_html/listmessenger
2.26.5 Password Administrator+
Password Administrator+ (PA+) is a commercial password management program. PA+ is no longer sold
or supported by its author. However we still support it in AShop for existing customers who already have
it.
The author of PA+ ceased distribution of it and began selling Password Robot. You can purchase
Password Robot from their website http://www.passwordrobot.com/. You can find integration instructions
for Password Robot here.
AShop V supports the sales of subscription access to password protected members only directories
and provides a simple method to remove expired passwords from the list. When PA+ is installed on the
same server as AShop and the path to PA+ is set within the third party software integration, each
subscription can instead be managed after the initial order by using the more advanced features of PA+.
How AShop V Integrates To PA+
PA+ is written in Perl. It uses simple text files to store information about members. It uses standard web
server access control to protect the directory/directories, but instead of .htpasswd files it writes to its
own password files called d_pass.txt. Depending on which version of PA+ that you have, each protected
directory may have a corresponding set of: d_active.txt, d_expired.txt, d_inactive.txt and d_pass.txt files
AShop Software © Copyright 2002 - 2010
154
AShop V User Guide
stored in a subdirectory to the directory that the PA+ scripts are installed in or there may be only one
set of corresponding .txt files in the directory that PA+ is installed within (not a subdirectory). The only
thing AShop does differently with PA+ integration is to write to those .txt files instead of to a .htpasswd
file.
Note: When we originally created integration to PA+, in version 3.6, separate sets of password files
could be created in order to manage passwords on multiple directories separately. Somewhere between
version 3.6 and 3.6.5, Illmatic removed this feature and changed PA+ to only administrate passwords in
one directory. They now offer a more expensive application called PasswordRobot to manage more than
one directory.
There is no drop down list on the add subscription page for PA+ integration. Just like with ordinary
subscriptions you should enter the name of the protected directory in the box labeled: Protected
directory. If a directory with this name exists within the path that is set for PA+ on the third party tools
page, it will be used when a subscription is bought. If there is no such directory AShop will instead
check for a standard .htpasswd file in $ashoppath/$protecteddirectory. PA+ subscriptions will always
override ordinary subscriptions so you won't have to remove any old protected directories or .htpasswd
files from your $ashoppath to make it work.
To use the PA+ integration
1. Set up the protected directory in PA+
2. Set the path to the cgi-bin directory (not the protected directory itself) where the PA+ scripts are
stored as the $papluspath variable in the AShop Shop Parameters > Advanced Options
Example: /home/httpd/vhosts/yourdomain.com/cgi-bin/subdirectory or /home/httpd/vhosts/
yourdomain.com/cgi-bin
3.
Add a subscription in the AShop catalog and enter the name of the protected directory.
2.26.6 ListMail Pro
ListMail Pro is a commercial mailing list management program written in PHP using a mySQL database.
The program files can be purchased and downloaded from http://www.listmailpro.com/.
When ListMail Pro is installed on the same server as AShop and the URL to ListMail Pro is set within
the third party software integration, each product can be associated with a ListMail Pro mailing list
group.
A text box will appear on the add product and edit product pages where you can enter the name of the
mailing list group. When someone buys the product, they will automatically be added to the
corresponding group within ListMail Pro.
The full path to the ListMail Pro directory must be set.
Example: /home/username/public_html/listmailpro
2.26.7 Password Robot
Password Robot is a commercial password management program. It can be purchased from http://www.
passwordrobot.com/.
AShop V supports the sales of subscription access to password protected members only directories
and provides a simple method to remove expired passwords from the list. When Password Robot is
AShop Software © Copyright 2002 - 2010
Installation & Setup
155
installed on the same server as AShop and the path to Password Robot is set within the third party
software integration, each subscription can instead be managed after the initial order by using the more
advanced features of Password Robot.
How AShop V Integrates To Password Robot
Password Robot is a Perl CGI program that lets you easily manage access to an unlimited number of
password protected directories. It automatically deactivates expired accounts, disables abused
accounts, sends personalized HTML e-mail, and stores its data in a MySQL database. Its capacity is
virtually unlimited-- Your site will never outgrow it. It can easily manage thousands of accounts without
slowing down your site, and you can export your data directly from Password Robot's admin area.
Finally, your data is more secure simply due to the fact that it's not stored in text files.
Just like with ordinary subscriptions you should enter the name of the protected directory in the box
labeled: Protected directory. If a directory with this name exists within the path that is set for Password
Robot on the third party tools page, it will be used when a subscription is bought.
The receipt email will contain a link to the URL that you specify yourself for your subscription product in
AShop. You should enter the complete address to the protected part of your site in the box labeled
"Protected URL" when you create/edit your subscription product. If you want it to be the sign-in page
you can simply enter the URL to that page. The box labeled "Protected directory" must contain the
name of your Password Robot group though. If it is incorrect or misspelled the automatic registration
won't work and the username and password can't be used.
To use the Password Robot integration
1. Set up the protected directory in Password Robot
2. Set the path to the cgi-bin directory (not the protected directory itself) where the Password Robot
scripts are stored as the $passwordrobotpath variable in the AShop Shop Parameters > Advanced
Options
Example: /home/httpd/vhosts/yourdomain.com/cgi-bin/subdirectory or /home/httpd/vhosts/
yourdomain.com/cgi-bin
3.
Add a subscription in the AShop catalog and enter the name of the protected directory.
2.26.8 Secure eBook
Secure eBook: http://www.secure-ebook.com, is a service that makes it possible to protect a PDF file
at a very low cost, compared to more advanced server based DRM systems. It works by packaging the
PDF in an executable EXE file which can only be fully read if you have activated it through Secure
eBook. The author can allow anyone to read a sample set of pages from the eBook for free, which
means that the eBook itself can serve as a promotional tool.
AShop integrates with Secure eBook by automatically delivering the activation code to your customers
after they have bought your eBook. You can put the eBook file itself in your AShop as a preview/demo
file for your product and the Secure eBook packager (a software you get after signing up for an account
at secure-ebook.com) will even let you link to your AShop from within the eBook to make it possible to
buy the activation code from the eBook itself.
To use the Secure eBook integration you will first of all need to sign up for an account at http://www.
secure-ebook.com This is free but to use the service you will need to subscribe to Secure eBook
tokens. One token is used each time an activation code is generated and sent to one of your customers.
There are several different subscription plans available to make sure you don't need to buy more tokens
AShop Software © Copyright 2002 - 2010
156
AShop V User Guide
than you need.
When you have signed up you will be assigned a Vendor code by Secure eBook. You can look this up
on the page My Account->Account Information in your Secure eBook account. On this page you will
also find an option to Enable SDK. Check this option and enter your own security secret in the box SDK
Secret Keyword.
Now you have all the information needed to setup a fulfilment option in your AShop:
1.
2.
3.
4.
Login to your AShop admin panel and open the page Configuration->Fulfilment.
Select "Automation" as the fulfilment method and click Add.
Enter: "Secure eBook" in the box "Option name".
Leave the "Run once" option at the default setting: "Per associated product". Enter the URL to the
automation/secureebook.php script in your AShop in the URL box. For example: http://www.
yourowndomain.com/shop/automation/secureebook.php
5. Leave the various Fieldname boxes unchanged and enter the following in the box labeled "Other fields
+ values" at the bottom of the fulfilment option settings: vendorcode=ASHOP555,
sdksecret=myownsecretword
The "ASHOP555" part should be replaced with your own Secure eBook Vendor code and
"myownsecretword" should be replaced with the keyword you entered into the SDK Secret Keyword
box in your Secure eBook account.
6. Click Update to save the changes you have made.
The next step will be to create a product in your AShop catalog for the eBook. Follow the steps
described here to create your product: Add Product
Click the Fulfilment button for the new product to connect it to the Secure eBook fulfilment option you
previously created. Select "Secure eBook" in the drop down list and click Submit.
In the Edit Catalog page in the upper left corner of your product listing you will see a number. This is the
product ID which we will use to connect the product to the right eBook in your Secure eBook product
list.
AShop Software © Copyright 2002 - 2010
Installation & Setup
157
Login to your Secure eBook account again and open the page My Products->Create a new Product.
Enter the product ID in the box "Shopping Cart Product Code". Fill out the rest of the form with the
values you want to use for your eBook and select "eBook Activation" as the "Protection Type"...
To connect your secured eBook to your AShop from the Buy This eBook Now! link inside the eBook
itself, click the Advanced tab in the product setup of your Secure eBook account and enter the URL to
your AShop in the Purchase URL field. Build or rebuild the eBook using the Secure-eBook Packager
software provided by Secure eBook to add the correct link.
Now you have finished setting up the Secure eBook integration and you should try it out to make sure it
works. The Secure eBook script is set to test mode by default so you can make a test purchase without
using up any of your Secure eBook tokens. When you have tested and found that the activation code
AShop Software © Copyright 2002 - 2010
158
AShop V User Guide
delivery is working properly you should open the file automation/secureebook.php in a text editor - for
example Windows Notepad - and change the line:
$testmode = true;
to:
$testmode = false;
You will find this line near the top of the file. Don't forget to upload the file when you have made the
change.
2.26.9 Aweber
Aweber is one of the most popular hosted autoresponder services available on the web. You can sign up
for an account with them at: www.aweber.com.
To integrate AShop with your Aweber account you will also need to ask them to provide a so called
"email parser", which is an additional service that they charge extra for. It is an email address that is
connected to your Aweber list and whenever someone sends an email to that address they are
automatically signed up with the list. AShop can send an email no behalf of your customers to your
Aweber parser when they buy a product.m This is done through the automation fulfilment feature in
AShop.
Start by editing the file aweber.php in the automation directory. Change the $ashoppath variable to the
filesystem path to your AShop on the server. Change the $password variable to any password you wish
to use to secure the script from unauthorized use. Change the $aweberemail to the email address used
with your parser. Upload the modified aweber.php script to your AShop.
Create a fulfilment option on the page Configuration->Fulfilment in your AShop admin panel. Select
"Automation" as the fulfilment method and enter a descriptive name, for example "Aweber". Select if you
want your customers to be signed up whenever they order something from you "Run once: Per order" or
only if they buy certain products "Run once: Per associated product". Leave the "Include returned data in
receipt" option turned off. Enter the URL to your aweber.php script in the URL field, for example: http://
www.yourdomain.com/ashop/automation/aweber.php. Change the "Other fields+values" box at the
bottom of the page to: "password=yourownpassword" where "yourownpassword" should be changed to
the password you put in your aweber.php script. Leave the other fields with their default values and click
"Update" to save the fulfilment option.
Depending on wether you selected to run the fulfilment option once per order or once per associated
product you may now also need to associate it with some of your products, which is done through the
"Fulfilment" buttons on the page "Edit Catalog".
2.26.10 S2Member
The free s2member plugin for Wordpress can be used to run a membership site where some content is
only available to paying members. You can configure 4 different levels of memberships to give access to
different parts of your website depending on what type of membership your customers have bought.
AShop can be used to sell access to multiple s2member sites through the s2member fulfilment module.
Prepare the Wordpress site
First of all you need to install the s2member plugin on your Wordpress site and configure it. How to do
this is explained in the s2member documentation. Next, you need to prepare your Wordpress theme to
AShop Software © Copyright 2002 - 2010
Installation & Setup
159
make it accept calls from your AShop to register members. Inside the functions.php file for your
Wordpress theme, insert a code like this:
/* AShop remote registration payment */
add_action("init", "make_registrationlink");
function make_registrationlink(){
$secretkey = "myownsecrectkey";
if($_GET["make_registrationlink"]){
$subscr_id = $_GET["orderid"];
$custom = $_SERVER["HTTP_HOST"];
$item_number = $_GET["item"];
$reg = $_GET["reg"];
$checkreg = md5($subscr_id.$item_number.$secretkey);
if ($checkreg == $reg) {
$link = ws_plugin__s2member_register_link_gen ($subscr_id, $custom,
$item_number, TRUE);
echo "<!-- StartAShopS2Member-$link-EndAShopS2Member -->";
exit;
}
}
}
Make sure to change the $secretkey variable to your own personal key for this site.
Prepare your AShop
1. Add a fulfilment option on the page Configuration->Fulfilment in your AShop admin panel. Use the
S2Member Registration method.
2. Set the URL field to the URL of your s2member site.
3. Set the Password field to the value of your $secretkey, which you previously added to the functions.
php page of your s2member site.
4. Create or locate a product on the Edit Catalog page and click Attributes.
5. Add an attribute for the membership level, for example labeled "Level". If you want this to be customer
selectable so your customers can buy different membership levels through the same product, add 4
alternatives, otherwise add just 1.
6. Set the attribute alternative(s) to the s2member membership level(s), for example "1" or "4".
7. Click the Fulfilment button for the product you just prepared and select the s2member fulfilment option
you created previously.
8. Set the name of the level attribute to: level
Note: The name of the attribute on the fulfilment configuration page is case sensitive and must be
exactly "level", not "Level" or "LEVEL" or "membershiplevel".
Now your customers will be given a temporary link that allows them to sign up at your s2member site
when they buy
the product. It will be included in the receipt that is emailed to the customer after successful payment.
By setting up
multiple fulfilment options and/or products you can sell different membership levels or even memberships
at different s2member sites.
2.26.11 Wishlist Member
Wishlist Member is an addon for Wordpress which lets you sell access to restricted areas of your
Wordpress site. AShop can sign customers up with a Wishlist Member site, but only the initial signup is
AShop Software © Copyright 2002 - 2010
160
AShop V User Guide
automated, the customer will still need to complete the last step manually: selecting a username and
password for their account. When a customer buys a product that is integrated with Wishlist Member
they will receive an email with a link that takes them to that last step.
The Wishlist Member integration is done through the automation fulfilment feature. The first thing you
need to do is to edit the wlmember.php script, which you can find in your automation directory. Change
the following variables at the top of the script:
· $ashoppath - set this to the full filesystem path to your AShop
· $wlmemberurl - set this to the URL where external programs can register new accounts with your
Wishlist Member. This URL can be found in your Wishlist Member administration panel.
· $level - set this to the Wishlist Member membership level SKU you want to use.
· $secretkey - set this to the Wishlist Member secret key, required for integration with external
program. You will find this in your Wishlist Member administration panel.
· $password - set this to a personal password, to make sure no one else can run your wlmember.php
script without knowing the password.
Save the modified wlmember.php script and upload it to your AShop. Then login to your AShop admin
panel and open the page Configuration->Fulfilment. Create a new fulfilment option with the Automation
fulfilment method. Enter a descriptive name for your new fulfilment option, for example: "Wishlist
Member". Set the URL to where your wlmember.php script can be found, for example: http://www.
yourdomain.com/ashop/automation/wlmember.php. Activate the "Include returned data in receipt" option
and set the "Run once" option to "Per associated product". Leave all other fields with their default values,
except the "Other fields+values" box at the bottom of the page, which should be set to
"password=yourpasswordhere", where "yourpasswordhere" should be replaced with the personal
password you entered into your wlmember.php script. Click "Update" to save the changes.
Now you need to associate the new fulfilment option with the products you want to use to sell access to
your Wishlist Member site. Open the page Edit Catalog and locate the product(s). Click "Fulfilment" and
select the fulfilment option you just created in the box "Select option". Click "Submit" to save the
changes. When a customer buys this product he/she will now be automatically signed up with your
Wishlist Member site.
To sell access to several membership areas, just create copies of the wlmember.php script and change
them accordingly. Then create a new fulfilment option for each of your copies.
2.26.12 Fitlist Pro
Fitlist Pro - www.fitlistpro.com - is a hosted follow up autoresponder service. You can use it to program
a sequence of automatic responses that are sent to your customers, for example an email course or
promotional letters to sell or upsell your products. AShop can sign your customer up for one of the
autoresponders you have set up in your Fitlist Pro account when they buy your product. Each product
can be assigned to its own autoresponder.
To use Fitlist Pro with AShop you will first need to get some information about your Fitlist Pro account
and the autoresponder you wish to use. This can be done by generating the html form code for the
autoresponder at Fitlist Pro.
1.
2.
3.
4.
5.
Login to your account at www.fitlistpro.com
Open the page Campaigns->Show, if it is not already open.
Click "Form" in the "Actions" column.
Scroll down to the bottom of the new page and click Generate Code.
Scroll down to the "Web based subscription forms" box, which should look something like this:
AShop Software © Copyright 2002 - 2010
Installation & Setup
161
In the <form> tag you will find the URL to your Fitlist Pro account, for example: http://www.fitlistpro.com/
ea/formcapture.php?v=31&W39
The entire URL must be copied and pasted into your AShop. If you are installing AShop for the first time
you will be asked for this information on the last page of the installation guide. If you have already
installed AShop you can enter the URL on the page Configuration->Shop Parameters->Advanced
Options in your admin panel, in the box labeled "URL to Fitlist Pro".
Note: Setting this will also activate a new shortcut icon in the AShop admin panel menu that will open
Fitlist Pro in a new window.
Next you should have another look at the form code that Fitlist Pro generated for you. Somewhere in the
html code you will find a line that looks like this:
<input type='hidden' name='id' value='555'>
The value, in this case 555, is the id of this particular autoresponder and needs to be assigned to one or
several of your products to have AShop sign your customers up with the autoresponder when they buy
those products. Copy or memorize this value and open your AShop admin panel again. Click "Edit
AShop Software © Copyright 2002 - 2010
162
AShop V User Guide
Catalog" in the menu, locate a product you want to connect to the autoresponder and click Edit on that
product. On the page that opens you should find a box labeled "Fitlist Pro Responder ID" where you
should paste or enter the id of your autoresponder.
Now your AShop is set to automatically sign customers who buy this product up with your Fitlist Pro
autoresponder. Repeat the last step for any other product that should be assigned to the same
autoresponder or generate the form code of another autoresponder at Fitlist Pro to get another id to use
if you want your products to be associated with separate autoresponders.
2.27
Maintenance & Updates
2.27.1 Database Backup
You can backup the contents of your mySQL database.
Access your administration panel and click on the Backup Icon
.
You will be prompted to save the file, set as a default to ashop.sql. You may rename the file, though it
must have the file name extension sql.
To restore the contents of your database from the point when you ran the backup simply call import.php
from your browser.
For example: http://www.yourdomain.com/ashop/admin/import.db
You will be prompted for your database password and the location of the sql file you created when you
ran the backup.
AShop Software © Copyright 2002 - 2010
Installation & Setup
163
Be sure to click the "Upload and Restore" button.
2.27.2 Updating Software Versions
As of version 4.2.6, software updates and patches are distributed through the admin panel in the
resources page. The technical support and updates must be current and active for the license key and
resources to be visible.
Update Instructions
Updating from one version to the next, it is typically simple.
1.
As a safety measure, it is always a good idea to have a recent backup of the AShop directory and
SQL database.
2.
Upload and replace all of the files from the update folder to their corresponding AShop directory
location.
Note: the admin/config.inc.php, page template files, and logo.gif are NOT included in the UPDATE
folder so you can upload the entire file structure without accidentally replacing the configured files in
your existing installation.
3.
Ensure that the admin/config.inc.php file has permissions of 777.
4.
Run update.php in a browser.
If no modifications were previously done to payment gateway setup files, language files, or standard
image files then the update is complete at this point. If the setup files have been modified, continue
reading.
Check for Modified Configuration Files
PAYMENT OPTIONS - CREDIT CARDS ACCEPTED
(If there are not any .gw files in the update package or the original .gw files have not been modified,
skip this step.) For some payment options, the accepted credit cards, such as Visa, MasterCard,
Amex, are set in the gateway setup files, which are located in the admin/directory under a
subdirectory for each currency. For example; admin/gateways, admin/gatewaysuk, gatewayseu,
etc.) If the .gw file(s) for payment method(s) used in the cart have been modified and new .gw files
are included in the update package, then it may be necessary to modify the .gw file(s) again to
remove unaccepted cards.
AShop Software © Copyright 2002 - 2010
164
AShop V User Guide
CUSTOM IMAGE FILES
(If there are not any new button image files in the update package or if the original button images
that came with the program have not been changed, skip this step.) If any language specific image
files in the images directory or within a theme/images directory have been replaced or modified, do
not upload the entire images directory. Instead, check the mod dates for new images and only
upload new button images that have been added to the program.
LANGUAGE AND RECEIPT TEMPLATE FILES
(If there are not any language or receipt files in the update package or if the original language and
receipt template files that came with the program have not been changed, skip this step.) If the
language or receipt template files have been modified, make the same mods in the new language
files and/or receipt template files.
Updating From Old Versions
If you are updating from a version earlier than 4.0, it is advisable to first ensure that all program
requirements are met by the server where AShop V is hosted. Versions prior to 3.9.5 used Source
Guardian encoding. Since then, the program is encoded using IonCube.
The update package that are distributed through the admin panel are only available going back a few
versions. If you need a package to update an earlier version, contact us.
2.28
Troubleshooting & Resources
2.28.1 Installation Troubleshooting
2.28.1.1 Windows Server \t Characters
Windows servers have trouble with \t
If a filesystem path contains the characters "\t" which has a special meaning in php code - the
characters are replaced with a tab just like "\n" is replaced with a new line. For example: C:\Websites
\thissite would turn into: C:\Websites
hissite. This kind of problem is unique to Windows servers
where the path uses backslashes (which is also the escape character in php) instead of slashes. To fix
trouble with \t characters in Windows file path replace the backslashes with forward slashes. If this
doesn't work, try to escape the backslashes in the current path by adding another backslash before
each of them.
To change the filesystem path use a MySQL database manager like phpMyAdmin, which is provided by
most web hosting services, and look up the table "preferences". Find the rows where the "prefname" field
is set to: "ashoppath" and "ashopspath". Change the path in the "prefvalue" field of those two rows.
2.28.1.2 ashoptest.php
General Server Requirements For AShop Programs
Software Requirements:
· At least version 4.1.0 of PHP4 or any version of PHP5
· Safe Mode = Off
· File Uploads = On
· MySQL Functions Available
· Curl With SSL Available
· Run-time notices = Off
· The fsockopen-function is working
AShop Software © Copyright 2002 - 2010
Installation & Setup
165
· IonCube decryption is working.
· The AShop Software license server can be reached
AShop Pre-Installation Test
The ashoptest.php script can be used to ensure that the server configuration is compatible with AShop
before uploading all of the progam files, creating a database, and installing the program. The ashoptest.
php script checks and reports the status of the server configuration as it relates to AShop. It also
checks the operating system version, automatically gets the correct IonCube loader from ashopsoftware.
com and uploads the file to the ioncube directory within the new installation. The ashoptest.php script
then checks to see if IonCube decryption is working.
To test and report the status of the above requirements on your server, download the ashoptest.php
script from our program file download page, unzip it on your local computer, upload it to the server where
AShop is to be installed, and call it from a browser.
Checks Performed By ashoptest.php
PHP Version
The version of PHP on the server must be at least 4.1.0.
Safe Mode = Off
Some server administration systems are configured to create new domains with PHP safe mode = On.
The safe mode setting prevents many of the functions in AShop from working. This test reports the Safe
Mode setting. It must be Off for AShop to function completely.
File Uploads = On (Size limit: [filesize])
file_uploads is set in the php.ini configuration file for the server. It must be on so that product and
thumbnail image files can be uploaded through the AShop administration panel. If this setting is off, the
program will run, but files will not upload through a browser.
The File Uploads test also checks the upload_max_filesize. This is an informational test. Product files
that are larger than this limit must be uploaded to the ashop/products directory using FTP and then
selected for each product through the administration panel Edit Catalogue menu. Files that are larger
than this limit will not upload completely through an http browser.
MySQL Functions Available
This test checks to see if MySQL is available on the server and if it can be used from PHP scripts.
AShop requires all privileges on one MySQL database. An error message will appear when privileges are
too low. Example: database user does not have privileges to modify tables OR database user does not
have privileges to add tables.
Curl With SSL Available
Curl is a tool on the server that is used for secure transmission of files with URL syntax. AShop will run
fine without Curl. It is only required in order to use payment gateways where credit card information is
collected locally and transmitted to the payment gateway. Most of the payment gateways supported by
AShop do not require Curl because they provide the secure payment form on their server.
Error Reporting - Run Time Notices Off
This test checks the error_reporting setting in PHP to see if it is set to: "E_ALL & ~E_NOTICE" which is
the equivalent of: 2039. Some other settings will cause all kinds of warnings and other messages to be
displayed at the top of AShop pages. There are other settings besides "E_ALL & ~E_NOTICE" that will
AShop Software © Copyright 2002 - 2010
166
AShop V User Guide
work, but we are not sure which ones or how to check for all of them. If this test fails, you can still install
and run AShop. If there are no PHP warning messages at the top of AShop pages, then the setting is
probably ok.
fsockopen-function is working
The fsockopen-function is used for server to server communication. It is required to update the IonCube
loader and to register the license key.
IonCube decryption is working
Automatically gets the correct IonCube loader from ashopsoftware.com and uploads the file to the
ioncube directory within the new installation. The ashoptest.php script then checks to see if IonCube
decryption is working. This test will also report if IonCube loaders are loaded during run time or if they
are included in php.ini.
The AShop Software license server can be reached
This test confirms that server to server communication is taking place with the AShop license server.
2.28.1.3 Curl With SSL
Payment Gateway Modules That Use Curl SSL
3rdlevelbilling.gw
authorizenetaim.gw
echo.gw
iongate.gw
linkpointform.gw
paynova.gw
paynova2.gw
paypal.gw
payready.gw
Curl with SSL is also used for FedEx and UPS shipping rates calculation, Authorize.Net Automatic
Rebilling, SAASU integration and TeleSign integration. If you do not intend to use any of these features
you can run AShop without Curl with SSL. There are other features that require Curl though, but without
the SSL part.
Some web hosting services set up Curl on a proxy server. In this case Curl must be given parameters to
work with the proxy server.
The scripts that use Curl SSL include a file named admin/curl.inc.php if it exists. Additional Curl settings
can be included in this file, which will then be applied before Curl is run. An example curl.inc.php file for
GoDaddy hosting service is provided with the AShop distribution file package. It is named godaddy-curl.
inc.php. To use it with GoDaddy hosting service, first verify with GoDaddy tech support that the settings
are correct and then rename the file to curl.inc.php
2.28.1.4 Cannot Modify Header Information - Already Modified By...
Installation seems to have gone ok, but upon logging into in, something similar to the following message
appears...
Warning: Cannot modify header information - headers already sent by (output started at
/home/resilien/public_html/yourdomain//ashop/admin/config.inc.php:50) in /home/
AShop Software © Copyright 2002 - 2010
Installation & Setup
167
resilien/public_html/yourdomain/ashop/admin/login.php(2) : eval()'d code on line 102
Some servers have trouble with an empty line feed at the end of config.inc.php. The empty line feed
appears to be inserted by some FTP client programs when uploading PHP files. To fix the trouble in
admin/config.inc.php, remove the extra line feed(s) at the end of config.inc.php and, if necessary, try a
different FTP client.
2.28.1.5 Database Not Found
When install.php is run, the following AShop error message appears.
Database name is incorrect. Check the settings.
1.
Verify that the database settings are correct in config.inc.php.
2.
The user in config.inc.php may not have permission to use the database. Make sure your database
user has full privileges on the database. This can usually be done through your hosting control
panel.
2.28.1.6 IonCube Compatibility
IonCube Copy Protection
AShop program files are compiled using IonCube for copyright protection. IonCube provides run time
loaders for most operating systems and versions of PHP. The correct run time loader must be present or
the loader must be added to PHP on the server in order for the compiled scripts to run.
AShop Pre-Installation Test
The pre-installation ashoptest.php script checks and reports the status of the server configuration as it
relates to AShop. It also checks the operating system version, automatically gets the correct IonCube
loader from ashopsoftware.com and uploads the file to the ioncube directory within the new installation.
The ashoptest.php script then checks to see if IonCube decryption is working.
IonCube Troubleshooting
· Run ashoptest.php first to see if the AShop Software requirements are met on the server.
· If all of the requirements are met and the IonCube decryption is still not working, make sure that there
is an ioncube loader file in the ioncube directory. The file should have a name that indicates what type
and version the operating system is.
· If the ioncube loader file is not there at all, make sure that the ioncube directory permissions are 777,
reset them if necessary and run the ashoptest.php script again. Note that if the fsocket-open function
is failing in the ashoptest.php script, the ioncube loader file will not be uploaded and also the license
registration will not work.
· The ioncube loader file should have a file size of about .15 MB or more. If there is trouble with the
fsocket-open or other server configuration issues, the file might only partially upload. In this case the
file may appear (with a small file size) and still not work. The ashoptest.php script will not overwrite the
ioncube loader file if it is for the correct operating system and version even if it is corrupted. If this
occurs, delete the corrupted ioncube loader file and run ashoptest.php again.
· If the ioncube directory permissions are 777 and the ashoptest.php script passes all requirements and
the ioncube loader file still does not upload correctly to the ioncube directory, you can manually
upload the correct ioncube loader file for your server. The ioncube loader files may be downloaded from
IonCube.com. Note that the files must be transferred in binary mode. If there is any question about it,
check the FTP upload parameters and upload the ioncube loader file(s) again. The version of PHP that
is running on your server can be determined by running phpinfo.php, which is included with the AShop
AShop Software © Copyright 2002 - 2010
168
AShop V User Guide
program files.
· If you are still having issues with the IonCube loader not passing the ashoptest be sure that the PHP
extension_dir is set to a complete file system path, like for example: "/usr/lib/php4". This can be
modified in the file php.ini (typically found in /etc) but you must have system administrator privileges
on the server to be able to change the file so you might need to ask your hosting provider to fix this
problem for you. Without a correct value for this setting PHP extensions like the IonCube loader will
not run.
Note: AShop automatically checks for newer versions of the ioncube loaders and uploads them to your
installation if newer ones are available. If the ashoptest.php script cannot upload the ioncube loader files,
then there is most likely a configuration issue on the server, which will prevent the program from
automatically updating in the future. If this is the case, when the version of PHP is updated on the
server, a new ioncube loader file may need to be manually uploaded again.
Optional PHP Configuration Method
If you have access to php.ini, you can add one line, which will eliminate the need for run time loaders.
Download the loader package from IonCube.com for details.
Technical Support
If you still have trouble getting the compiled files to work on your server or hosting service and you don't
want to move to a different server, we will troubleshoot the configuration on the server for a fee of $50.
Root access or cooperation from the hosting service may be required. For this and other services,
submit a technical service request.
2.28.1.7 IonCube Loader Wrong Version
All of file and folder permissions are set as instructed in the installation instructions and all of the
ashoptest.php tests pass, but when attempting to run install.php, an IonCube error reports that a loader
must be installed. The message may be similar to this.
/home/user/www/install.php requires the ionCube PHP Loader ioncube_loader_lin_4.3.so
to be installed by the site administrator."
In this case, ashoptest.php reported the following:
IonCube decryption is working.
IonCube loader version 3.1 - PASSED
Note that the IonCube loader version reported by ashoptest.php (3.1) is different than the one that
IonCube is asking for (4.3). The IonCube loader version must be compatible with the operating system
and the version of PHP that is running on the server. The ioncube directory may or may not contain the
version 4.3 ioncube loader, but ashoptest.php still reports version 3.1 is installed. This indicates that
IonCube is installed centrally on the server, but the centrally installed version is incorrect and does not
match the version of PHP that is installed on the server. When the IonCube loader is installed centrally
on the server, the centrally installed loader takes precedence over the (runtime) ioncube/loader. The
centrally installed IonCube loader must be updated to match the version of PHP that is running on the
server. Root user access to the server is typically required to make this change.
2.28.1.8 IonCube Loader Not Working
The ashoptest.php script will not run and there is an error message similar to the following.
/home/user/www/ashoptest.php
ioncube_loader_lin_5.1.so
to
requires
the
ionCube
PHP
Loader
be
installed
by
the
site
administrator."
AShop Software © Copyright 2002 - 2010
Installation & Setup
169
Check the ioncube directory permissions. They should be 777. If not, change the permissions and
run ashoptest.php again and refresh the FTP browser. If running ashoptest.php does not get the correct
loader, there is most likely a restriction imposed on server to server communications, which is preventing
the download. If this is the case, manually upload the ioncube loader and run ashoptest.php again.
If the correct ioncube loader is in the directory and the version matches the version of the operating
system and PHP (as listed in the error message), the most common cause - and the most probable
cause in this case - is that the extension_dir setting in php.ini is set to a directory that doesn't really
exists, which breaks the run time loading of the IonCube loader.
The ashoptest.php script will automatically install the ioncube loader in the ioncube directory regardless
of the php extension_dir setting, but run time loading and using the loader once it's there requires this
setting to be an existing directory. It doesn't matter what directory it is set to, just that the directory
exists. The dynamic loading of the ioncube loader searches through the filesystem for the correct
ioncube loader with the PHP extension_dir as it's reference point. It should end up finding the one that is
installed in the ioncube subdirectory of AShop, but can't find anything if extension_dir does not exist.
The extension_dir doesn't matter if the ioncube loader is installed centrally through php.ini.
2.28.1.9 License Text Inserts Break Tags
The license agreement that pop-ups up from the buy confirmation window is distorted. Upon viewing the
source, it is noted that <br> tags have been inserted by the program.
Line breaks or carriage returns within the text that is entered into the license text box for each product
are converted to HTML break <br> tags by AShop. If the auto convert line breaks feature was not used,
line breaks in plain text would become joined and the result would be one long line of text.
For instance:
Line one of your license agreement.
Line two of you license agreement.
Without the auto convert line breaks feature, the lines would appear in a browser as one long line.
Line one of your license agreement.Line two of you license agreement.
HTML can be entered or pasted into the license text box to format the license agreement and include
hyperlinks. HTML code typically has line breaks (carriage returns) between each line of code.
For instance:
<table>
<tr><td>Text within the table cell.
</td><tr>
</table>
The resulting text after PHP auto converts line breaks is something like this.
<table>
<br>
<tr><td>Text within the table cell.
<br>
</td></tr>
AShop Software © Copyright 2002 - 2010
170
AShop V User Guide
<br>
<table>
The extra line breaks will obviously cause the resulting page to look different than intended and quite
likely will cause the page to be severely distorted. The solution is to join the HTML code. This can be
done by copying the HTML source code and pasting it into a text editor that has a "Join Lines" feature,
such as NoteTab Pro or it can be done manually. The resulting code should look something like the
following.
<table><tr><td>Text within the table cell.</td><tr></table>
Paste the joined lines of HTML code into the license text box and submit the changes.
2.28.1.10 Orders Not Recorded - Notices Not eMailed
The checkout seems to work fine, payment is collected on the gateway's secure form, and the customer
is redirected to order.php, but the order is not recorded and notices are not emailed to the customer or
administrator.
1. For PayPal (standard), check that you are using the primary email for your account as the Merchant
ID of your AShop payment option. If you are using a secondary email, the security checks in AShop will
fail and the payment will not be recorded.
2. If this happens with other payment gateways, check that there isn't a requirement to set a postback
URL for the payment gateway you are using. This should always be set to the URL to your AShop
order.php script, for example: http://www.yourdomain.com/ashop/order.php
3. If you are using a payment gateway where the billing information is collected on your own site rather
than through a hosted form at the payment processor, make sure that the fsockopen function in
PHP is operational. This can be done by running the ashoptest.php script, which includes an
fsockopen test. If this test fails, your server is configured not to accept opening network
connections to itself, which is required to make the order processing work. Ask your hosting
provider to fix this.
2.28.1.11 Products Not Saving
1. The installation is completed and everything seems to work except new product files are not
uploading and downloadable products won't save to the database and there is not error
message.
Check the file_uploads option in php.ini. When set to Off, this prevents all html forms that are used for
file uploads (such as the Edit Files page) from working. Set it to On and restart Apache.
2. Installation is completed, but products will not upload and there is an error message.
Permission denied.... editproduct.php on line 0
Permission to write to the folders that your file uploads are stored in is denied if the permission setting is
lower than 777. To fix this use your ftp client to change the permissions on the prodimg, products,
banners, updates and previews folders on the server. Verify that the permissions was actually set. Some
hosting services will not allow 777 permission settings, which means that you will not be able to use the
file upload features in AShop. Upload your files by ftp instead if this is the case.
2.28.1.12 SAFE MODE Restriction in effect
When sending mail using mailcustomer.php. Instead of sending the message, the following error
appears.
AShop Software © Copyright 2002 - 2010
Installation & Setup
171
Warning: Cannot set time limit in safe mode in /home/virtual/usr/html/ashop/admin/
mailcustomer.php on line 11
set_time_limit() lines and the PayFlow Pro modules are affected by safe-mode. set_time_limit() can be
commented out and the program will still run and send mail. To use the PayFlow Pro payment option,
safe-mode must be off.
2.28.1.13 Time Zone Offset
Many times, the server or hosting service is located in a different time zone than where the merchant is
located. Also, many servers are set to Grenich Mean Time (GMT). Unless something is done to
compensate for the difference, the time stamp for orders and stats will show a different time than your
local time. To adjust this so that time stamps and stats are in sync with your local time zone,
1.
2.
Open the page Configuration->Shop Parameters->Advanced Options
Change the Timezone Offset option. Enter the difference of time between your time zone and the
server time in seconds.
For instance: If server time is 3 hours later than your time zone, enter '-10800' (minus 10800, 3
hours x 60 minutes x 60 seconds). If the server time is 2 hours earlier than your time zone, enter
'7200' (2 hours x 60 minutes x 60 seconds).
2.28.1.14 undefined function: curl_init()
When ordering a product that has the UPS shipping lookup method set for it, there is a message similar
to the following.
Fatal error: Call to undefined function: curl_init() in /home/user/www/domain.com/ashop/admin/
ashopfunc.inc.php(2) : eval()'d code on line 79
This error message means that php has been compiled without support for Curl. The UPS calculations
won't work without support for Curl. Ask your hosting service provider to install curl.
2.28.1.15 Warning: open_basedir restriction in effect
Attempted to write to config.inc.php file, denied with error message...
Warning: open_basedir restriction in effect. File is in wrong directory
The open basedir setting normally shouldn't cause any troubles with AShop if the $ashoppath is
correctly set. It only restricts access to files to the users own document root directory which is where
the files are stored anyway. File uploads work with the open basedir setting on but only if the server
administrator hasn't forgotten to include the /tmp directory in the open basedir path. I've found that it is a
common mistake to leave out the /tmp directory which is where php usually stores all uploaded files
before the user moves them somewhere else.
PHP can be set to use open_basedir without having safe mode turned on. Open basedir seems to be
used quite frequently but I don't think there are many hosting companies that actually use the safe mode
of php since it is known to cause a whole lot of trouble for users.
AShop Software © Copyright 2002 - 2010
172
AShop V User Guide
Note: There is a bug in pre 4.2.x versions of PHP that may cause "open_basedir restriction" messages
to appear when OrderForm pages are located within subdirectories. This can be avoided by locating the
OrderForm pages in the same directory as AShop or by updating the version of PHP that is running on
the server to a more recent version.
2.28.1.16 Mail Blocked By Spam Filters
AShop receipts, order notices, messaging to affiliates and customers are not received.
If orders are being recorded, but customers are not receiving the reciepts and the administrator is not
receiving order notices, it is possible that the e-mail is being blocked or filtered by the receiving ISP's
mail server spam filters. This can be caused to the server being on spam black lists.
If this is the case, sometimes mail will be received by some customers and not by others, depending on
the type of spam filtering and which black list or spam filter criterea that they use. Free mail accounts
such as HotMail typically have the highest levels of filtering. AOL also seems to have very high levels of
filtering. Many times the spam filters will block mail even when it is legitimate.
Note: The Return-path is set to the $ashopemail by order.php. To change this you would only need to
change the AShop Email setting in the admin panel, but this is unlikely to make a difference. Blacklists
typically look at the Received header field instead and the only way to change this is to send the mail
through a different server.
If the emailed receipts are received by some customers and not received by others, then the AShop
scripts and mail() function on the server are most likely working properly.
Note: The PHP mail() function on the server can be tested independently from AShop by uploading a
simple script and calling it in a browser. The following is an example. If mail is received at a domain that
does not use spam filtering, but not received at a hotmail address, then the mail() function is working
and the server is being filtered. If this is the case, the solution is to move to a different server that is not
being blocked.
<?php
mail("[email protected]","test","test");
mail("[email protected]","test","test");
?>
Hotmail and MSN email are notorious for blocking messages. They filter messages based on
content and also based upon black lists of troublesome servers.
The message content is evaluated and rated by their spam filters. The ratings are based on usage of
HTML, links, images, and keywords that have been identified as popular in spam messages, such as
"free". Receipts from the shopping cart are less likely to be filtered if the receipt format is Plain Text and
the product names do not include keywords that might trigger spam filters.
Hosting services can end up on spam black lists when any domain hosted on the server is identified as
sending spam. Cheap hosting services that do not closely monitor email activity and check for black
listings are more likely to have email blocked than higher quality services where there are fewer hosted
domains and where the activity is monitored more carefully.
AShop Software © Copyright 2002 - 2010
Installation & Setup
173
2.28.2 File Download Issues
2.28.2.1 Downloaded download.php Instead Of Product File
If a customer reports that he downloaded a file named download.php instead of the product file, your
product file is most likely missing. Check that your "products" directory have 777 permissions, then
check the Edit Files page for the product in your admin panel and reupload any missing files.
2.28.2.2 Direct access to this script is not allowed
The "Direct access to this script is not allowed" is what you will see if cookies are blocked in any way.
This can be cause by browser privacy settings being set too high.
2.28.2.3 File Downloads - Mac OS
For customers Mac computers, after the customer logs into the download area, he is presented with one
button per downloadable product. In this case all of the downloadable products are image files.
On a Windows PC, the download button works fine by bringing up a dialog box and asking the customer
where he would like to save it on his hard drive. However, for the Mac customers this does not work!
When the Mac user clicks the button, he is taken away from the download area by going to a new page
where the large image file begins to download. After the image downloads to the new page, it is then
visible within the browser. All methods within the popular Mac browsers cannot save this large image
appearing in the new window. The save image as option on the Mac browsers result in saving the
translated delivery.php to a text file, and not the image file!
There are two problems:
1) The Mac user should not be taken away from the download area, but be presented with a Save As
dialog box just the PC browsers.
2) The Mac user cannot save the purchased downloaded image.
Some browsers open files based on the file name suffix and not the mime type which is hard to do
anything about. Netscape also causes this kind of trouble on PCs with some files. There is no known
way to solve this other than changing the file name, for example by compressing the file.
The solution is to zip the files.
2.28.3 Payment Gateways
2.28.3.1 AuthorizeNet AIM Invalid Credit Card Message
The Authorize.Net AIM payment option returns a "Credit card is invalid" message when NOT in test
mode even though the credit card it valid.
The credit card invalid message will result if PHP on the server can't use SSL. The AIM module requires
either Curl+SSL support in php or a command line Curl with SSL support. Ask our service department to
run some tests on the server to confirm that there is a command line Curl available and to see if it can
access any URLs with https. This seems to be a common problem with some versions of Curl.
AShop Software © Copyright 2002 - 2010
174
AShop V User Guide
2.28.3.2 Error 97 - Authorize.Net SIM
When submitting an order to the Authorize.Net SIM payment form...
Error (97) This transaction cannot be accepted.
or
Error # 97 The time period for this request has expired.
This is most likely caused by the clock on your server set incorrectly. If the server is set to adjust itself
to Daylight Savings Time, it should be changed so that the time is consistent throughout the year.
See http://www.sluggis.com/error97.htm for more information and a tool that will help you determine if
you need to adjust the time on your server.
The time stamp can be found within the source code of the checkout (payment options) page. In some
versions of AShop, the checkout page is bypassed when only one payment option is set. If this is the
case, create a second payment option temporarily.
1.
2.
4.
5.
Add a product to the shopping cart and click Check Out.
When the payment option page appears, click View Source in the browser tool bar.
Find the text 'x_fp_timestamp' in the source code of the page. Immediately following this form field
name is the value, which is the time in seconds. Copy the number from this value.
Immediately paste the time stamp value into the "Enter your time" box that is provided at http://
www.sluggis.com/error97.htm and click the Test button.
If it isn't possible to adjust the server time, the timestamp that AShop generates can be modified to
accommodate the differential, but it will then need to be manually adjusted twice a year when Daylight
Savings Time begins and ends.
The time stamp is generated by the script /admin/gateways/authorizenetsim.gw for US dollar integration
and /admin/gatewaysgpb/authorizenetsim.gw for British pounds integration.
Open the authorizenetsim.gw file in a text editor and modify the following according to the time
differential that is indicated by the sluggis.com test.
replace the following line: $tstamp = time ();
with something like this: $tstamp = time () -1234;
Replace the " -1234" with the actual time differential that is returned by the sluggis.com test.
2.28.3.3 Error 99 - Authorize.Net SIM
Error 99 "This transaction cannot be accepted." when submitting the order to the Authorize.Net payment
gateway.
The server-generated fingerprint does not match the merchant-specified fingerprint in the x_FPHash
field.
The transaction key needs to be created in the Authorize.Net merchant panel under Settings > Security
and entered into the AShop payment option setting for Authorize.Net SIM.
AShop Software © Copyright 2002 - 2010
Installation & Setup
175
2.28.3.4 Credit Card Fraud Prevention
Credit card fraud can be a nuisance and can indirectly damage your credit. Credit card issuing banks
and organizations have developed security devices to prevent unauthorized use of credit cards. Not all
banks support all security devices and not all payment processors or payment gateways support them.
This help topic is not intended to be a comprehensive coverage of credit card fraud prevention, only some
notes about what we have experienced and what works for us.
TeleSign Automated Telephone Call Verification
It seems that the security codes and address verfication (below) have inherent limitations. For instance,
once the security code is given out, it is likely to be pirated along with the credit card number and
expiration date. Address verification is not supported by all banks and fails often when PO boxes or ATM
Visas are submitted. A new and very effective solution is TeleSign automated telephone call verification
service.
CVV2 3-Digit Security Code
The 3-digit CVV2 security code can be found on the back of most US issued credit cards.
Requiring a security code match reduces exposure to fraud. The drawback is that most non-US issued
credit cards don't support it. Depending on your business location and where your customers are, this
may not be an option. For US merchants selling mostly to US customers, it is highly effective. An
alternative payment option, such as the offline credit card processing option can be used in conjunction
with the real time gateway in order to accommodate cards that do not support the security code.
Authorize.Net Security Code Settings
Login to the Authorize.Net merchant panel and click Settings on the left.
Under Security, click Card Code Verification
Check the boxes to activate code check conditions. Check all of them for the highest level of security. If
you find that cards are rejected too often, look at the rejection code to evaluate how it is working and
adjust accordingly for your customer base.
AShop Software © Copyright 2002 - 2010
176
AShop V User Guide
AVS Address Verification System
AVS is supported by most US credit cards and is not supported by non-US banks. As with the security
code check, it may work for you or not depending on where your customers are located. For merchants
who ship goods mostly within the US, the Address Verification System is a must have. Even within the
US, there will be a small percentage AVS declines due to non-supporting banks and trouble with PO box
addresses. In these cases, the offline credit card processing payment option may be used as an
alternative.
Authorize.Net AVS Settings
Login to the Authorize.Net merchant panel and click Settings on the left.
Under Security, click Address Verification System (AVS)
Here are recommended settings for US merchants who ship hard goods within the US. If you find that a
high number of legitimate orders are declined for AVS, look at the decline code to evaluate if the system
needs to be changed.
2.28.3.5 Images Broken On Payment Confirmation Page
Everything works fine, but your image links are broken in the payment confirmation (thank you) page.
(The page that follows successful payment through a secure gateway connection.)
All payment gateways that AShop integrates to provide a secure (SSL or https:// ) connection and a
payment form to collect sensitive information. After payment is received, many payment gateways keep
the customer on their secure connection and display your thank you text (set in payment options) within
their confirmation page. The AShop content is actually nested within a payment gateway page.
The default logo that is set in Shop Parameters is a relative link and will not appear within the payment
gateway page. The HTML template, delivery.html must be used if your logo or other images are to
appear within the payment confirmation page. All links within delivery.html must be absolute URL's.
Examples:
Relative URL: images/logo.gif
Absolute URL: http://www.yourdomain.com/ashop/images/logo.gif
When using non-secure links as shown in the above example, a warning message may appear before
AShop Software © Copyright 2002 - 2010
Installation & Setup
177
the payment confirmation page can appear.
"This page contains secure and non-secure items. Do you want to proceed?"
Eliminate the secure/non-secure content message by using a secure (SSL) connection for all of the
image links on the page.
Example:
Secure URL: https://www.yourdomain.com/ashop/images/logo.gif
2.28.3.6 Local Payment Orderform Does Not Validate Empty Fields
If you have modified the language files, and are running into the issue where AShop's local order form
page is being submitted without checking to see if the form is filled out. It could be caused by any
forward slashes / in the constant values that you translated in the orderform.inc.php language file.
Sometimes when uploading the language file commas ' can be replaced by a forward slash and comma
combination /'
Check the orderform.inc.php language file and be sure that it does not have any forward slashes in the
constant values.
Related Help Topic(s)
Language Files
2.28.3.7 Payment Page Cannot Be Found
The payment option is selected in checkout.php and there is a browser error: page cannot be not found.
Some payment options use the local orderform page to collect credit card information. See the Payment
Gateway Cross Reference page for a list of payment gateways that use "orderform". For security, credit
card information must be entered through an encrypted SSL connection. An SSL connection with a valid
security certificate must be available and the Secure URL must be set in Shop Parameters > Store
Configuration > Advanced Options.
2.28.3.8 PayPal Duplicate Transaction Message
PayPal returns a duplicate transaction error even though it is not a duplicate. This usually happens when
the same PayPal account has been used on more than one AShop installation.
1.
There is a Block accidental payments setting at PayPal.com under Profile > Payment
Receiving Preferences. Change it to allow multiple payments per invoice ID.
AShop Software © Copyright 2002 - 2010
178
AShop V User Guide
2.
Change the starting orderid number to a higher number such as 1000 or 10000. This can be
done from a command line or with the aid of a database management tool such as phpMyAdmin.
2.28.3.9 PayPal - Suspected Payment Manipulation
After PayPal payment, the following message is received by the AShop administrator.
Suspected payment manipulation: [email protected], firstname, lastname, productid, inv#,
IP address
The money was recieved thru paypal, but the order is not recorded within AShop and the receipt is not
sent to the customer.
This message is sent when PayPals IPN verification reports the payment as invalid. This should only
occur if the payment for some reason haven't been transfered by PayPal, for instance if a customer tries
to send the form fields manually to cheat the order.php script in AShop, but sometimes PayPal brings
their IPN servers down for maintenance for a short period which could also cause this. If you find that the
payment has really been received in your PayPal account you can go ahead and ship the products to
your customer and use the Incomplete/Failed Orders report on the page Customers->Sales Reports in
your admin panel to activate the order and make it appear in the regular sales report instead.
2.28.3.10 PayPal Curl Error
After payment is made using PayPal, the following error message is received from PayPal.
Curl Error! The Curl PHP extension returned the error message: 6 during communication with PayPals
IPN server!
The error number 6 has the following meaning: "Couldn't resolve host. The given remote host was not
resolved." This indicates that there is something wrong with the DNS on the server, making it unable to
AShop Software © Copyright 2002 - 2010
Installation & Setup
179
find the IP of the paypal.com domain.
HTTPS Proxy Settings.
Some servers are set up with Curl on a proxy server. If the proxy server path is not set, the above error
may occur.
See the help topic for Curl SSL.
2.28.4 FrontPage
2.28.4.1 FrontPage Removes AShop Tags
When publishing the web using Microsoft FrontPage 2002, htm and html files may be overwritten even
for page files that are not included in the local web site (on the PC). FrontPage will sometimes remove
comment tags from within the AShop page template files, which causes an "Incorrectly formatted
template file!" message to appear in pages that use the template.
You can keep FP from "updating" any part of a web page by placing the following line before the code
you want to protect:
<!--webbot bot="HTMLMarkup" startspan-->
and the following line after the code you want to protect:
<!--webbot bot="HTMLMarkup" endspan-->
leaving a space between each tag.
For instance, if you were to protect the AShop template tags, it would look like this with a space
between each tag.
<!--webbot bot="HTMLMarkup" startspan--> <!-- AShopstart --> <!-- AShopend --> <!-webbot bot="HTMLMarkup" endspan-->
With FP, type in a space before and after the comments and FP inserts the "HTMLMarkup" tags for
protecting non-FP comments.
Additional information added later...
Rather than hand code the webbot tags, the correct solution is to do this (FP 5.0/XP):
1) Within FP, Select: Insert > Web Component > Advanced Controls > HTML, then click Finish
2) Type in the AShop start and stop tags into the dialogue window that opens.
The webbot tags don't appear in the HTML code for the page, but FP recognizes the instructions and
keeps the AShop tags!
Thanks to Michael Beck of leaders-coach.com for this tip!
2.28.5 Tips & Tricks
2.28.5.1 Search Box In Web Pages
The AShop search function returns search results listed in alphabetic order within the dynamic
catalogue.
Here is the basic HTML code to insert a search box into web pages in the same site.
<form action="http://www.yourdomain.com/ashop/search.php" method="post">
<input type="text" size="19" name="searchstring"style="border: 2px solid #bbbbbb;
AShop Software © Copyright 2002 - 2010
180
AShop V User Guide
background: #ffffff; width: 145px; height: 21px; font: 11px verdana, arial, helvetica;
color: #000000; text-align: left;" >
<input type="image" src="http://www.yourdomain.com/ashop/images/search.gif"
border="0">
</form>
2.28.5.2 HTML Within Product Descriptions
HTML can be used within the product description to format the layout and text. It can also be used to
add images and links. Here are some instructions and tips for using HTML within the product
descriptions.
You can type basic HTML tags directly into the product description box for very simple text formatting
such as using the <b>tags</b> for bold print or inserting a <br> tag for a line break, but it can get
complicated when you add tables, images, links, and other tags. Not only could it become time
consuming, but there are many opportunities for error. An easier way is to create the HTML using an
HTML editor program such as Dreamweaver or FrontPage, copy the code, and paste it into the product
description box. In the following example, Dreamweaver is used to create the source code. Different
HTML editors may give different names to the functions, but the process is essentially the same.
Create the content in the WYSIWYG (What You See Is What You Get) mode.
Copy the HTML source code for the area of the page that is to be inserted into the product description.
In Dreamweaver this can be done by highlighting the area of the page and depressing Shift + Ctrl + V.
The shortcut keys may be different for FrontPage or other programs. The same thing can be done by
highlighting the area of the page and selecting from the menu, Edit > Copy HTML.
AShop Software © Copyright 2002 - 2010
Installation & Setup
181
The code can also be manually selected by switching to HTML code view, highlighting the source code
and copying it with Ctrl + C or the mouse shortcut menu Copy tool, but you must be careful to include
all of the opening and closing tags.
Paste the HTML into the product description using Ctrl + V or the Paste tool from the right click shortcut menu.
AShop Software © Copyright 2002 - 2010
182
AShop V User Guide
Click the Submit button at the bottom of the page to save the changes.
When the product is viewed in the AShop catalogue view, the HTML will be rendered right along with the
rest of the page.
2.28.6 Autobill
2.28.6.1 Cron Errors
If you are receiving Cron errors each time the autobill.php script is run or at least each time it is trying to
create new bills, check that the command line version of PHP on your server is not operating under safe
mode. Even if your domain or whole hosting account has safe mode deactivated, the same might not be
true for the command line PHP. To check this you can login with SSH and run a phpinfo() script on the
command line. The output should tell you if safe mode is enabled.
AShop Software © Copyright 2002 - 2010
Manage Products
3
Manage Products
3.1
Edit Catalog
183
Catalog pages are dynamically generated by index.php or catalogue.php for customers to make
selections, and purchase products. Shopping pages may also be created by inserting Buy buttons in
HTML or PHP web pages using the Order-Link method. In any case, the behavior of the shopping cart
when products are added to the cart will be determined by the Shopping Cart Catalog Mode setting,
which is in Configuration > Shop Parameters.
To manage the catalog, open the Administration Panel and click on the Edit Catalog menu link.
Before adding products to the catalog, set the thumbnail image size in Layout.
Product images are automatically resized when uploaded through the Files menu. Resizing is done
using ImageMagick or GD software, depending on which software is installed on the server. If the
thumbnail image size is later changed, all of the previously uploaded images must be resized again.
Add at least one category, then add products.
3.2
New Category
Before adding products to AShop, at least one category must be added.
When viewing the shopping cart catalog, if only one category exists, the shopping cart catalog does
NOT display the category selector on the left hand side. If more than one category exists, then the
category selector appears to the left of the product listings. Categories that are empty or contain only
inactive products are not listed.
AShop Software © Copyright 2002 - 2010
184
AShop V User Guide
To add a new category, from the Administration Panel,
click Edit Catalog.
1. Click on the "New Category" button.
2. Enter the name of the new top-category. Optionally enter a description for the category.
Note:
To add a sub-category you must first be viewing the category you want to make a sub-category
for then click the "New Category" button. You must also change the type to Subcategory.
AShop Software © Copyright 2002 - 2010
Manage Products
185
3. Select owner. Leave it set to Administrator if you are not using the Shopping Mall features. This
setting lets you assign a product category to a specific shop within your mall and the category will
only be visible in the shop that owns it. The Administrator is the default and the only shop if you are
not using the Shopping Mall.
4. Set the language. Leave it set to Any if the category is to open for all language preferences. Only
languages that are installed will be selectable here. If it is set to a specific language, the category
will only appear in the catalog when that language is selected. See: Language Selection
5. Click the "Submit" button to save the new category.
Note:
3.3
Category levels are limited to three; top-category, sub-category, and sub-sub-category. There is
no limit to the number of top-categories, sub-categories, or sub-sub-categories within the three
levels.
Edit Category
From the Administration Panel, select Edit Catalog.
1. To edit a category, click on the "edit" link underneath the category name.
AShop Software © Copyright 2002 - 2010
186
AShop V User Guide
2. Edit the category name and description, then click Submit to save the changes.
AShop Software © Copyright 2002 - 2010
Manage Products
3.4
187
Remove Category
From the Administration Panel, select Edit Catalog
1. To remove a category, click on the "remove" link underneath the category name.
Warning! Removing a top-category permanently deletes any sub-categories and products that are stored
in that category!
Removing a sub-category permanently deletes any sub-categories and products that are stored in that
sub-category.
2. A warning notice will be displayed before the category is removed. If you are sure about
deleting the category, click "Yes", if not click "No" or the back arrow to cancel the removal.
3.5
Move Category
From the Administration Panel, select Edit Catalog.
The listing order of categories can be changed by moving them up one level at a time and by
moving a category to the top.
Top level categories can be moved in relation to other top level categories. Sub-categories can be moved
up relative to other sub-categories, but not from one top level category to another. The same is true in
reverse. Top level categories cannot be moved into a sub-category position.
To move a category up in the list one category at a time, click on the Move Up link.
AShop Software © Copyright 2002 - 2010
188
AShop V User Guide
To move a category to the top of the category list, click on the Move to top link.
3.6
Manage Content
Content items are HTML and/or text that can be inserted anywhere in your product catalog. This can be
used, for example, to add information about current special offers or inform the customer about other,
related products.
To add a content item open the page Edit Catalog in your administration panel and click the button: New
content.
Enter the text or content you want to use in the box. The HTML editor Tiny MCE is usually installed by
default with your AShop which makes it possible to change the formatting of the text just like you would
in a word processor, through the various tools in the toolbar above the content box.
Click Submit to save the new content. It will now be displayed in your product catalog.
AShop Software © Copyright 2002 - 2010
Manage Products
3.7
189
Manage Products
From the Administration Panel, select Edit Catalog.
Products can be all in one category or they can be organized within categories, subcategories and sub-sub-categories. Click on the category name to view products in each category.
If there is a sub-category, it will display below the selected category. To view its products, click the
sub-category name. If there is a sub-sub-category, it will then appear below the selected sub-category.
Use the Search tool to find products.
When there are more than a few categories it is usually easiest to find products using the Search tool
instead of navigating to it through the categories. The search tool reads the product names, SKU
codes and descriptions.
Search Keywords and Product Codes
When there are only a few products, they are easy to find. As the number of categories and/or
products grows there becomes a need for a system to find products. If there are not too many
products, you might simply identify unique keywords that exist in the product descriptions and search
for those keywords to display specific products. Here are are a few suggestions for getting more out of
the Search tool.
Ways to use search strings in product descriptions
· Include a manufacturers BIN or SKU code.
· Create a simple product code system. It may be preferable to create your own product code and
search system. It can be very simple and still be effective. For instance a book that is fiction and is
by an author with code name Hort and it is his 1st book might have a code "BFHort1". A link to
search.php?searchstring=BFHort1 will display only that product. However, a link to search.php?
searchstring=BFHort will display all of the fiction books by that author, etc.
· Use Search URLs - The Search tool can be used in site navigation and links to display specific
products. For instance a link to http://www.yoursite/search.php?searchstring=keyword will
display only the products that contain the "keyword" in the name or description field. Use this to
simply link to products when it is convenient or take it to the next level by creating a custom
navigation scheme using keywords and search links. The possiblities are limitless.
AShop Software © Copyright 2002 - 2010
190
AShop V User Guide
· Hide product codes in descriptions using HTML comment tags. <!-- productcode -->
Concerned about customers seeing the product codes? Put the product codes in the descriptions
and enclose the keywords or product codes within HTML comment tags. The comment tags will
keep the code from appearing in the catalog pages, but the search tool will still find the keywords
and product codes even when they are between comment tags.
3.8
Import Products
Products may be imported into each category from a pipe separate list. This bulk import tool is limited to
the product name, description, retail price, and a thumbnail image. It will reduce the initial shopping cart
setup time if your product list is very long, but you must still set individual attributes, preview files,
multiple product files, shipping methods, etc.
Create a Pipe Separated List
The products are imported from a pipe separated list. Here is an example. This example is also included
in a file named productimportsample.txt, which is provided with the AShop V new installation package.
Category Name|SKU|Inventory|Product Name|Product Description|Price|Weight|Shipping|
Tax|Product File1|Image File.gif
Category Name|SKU1|10|Product Name 1|Product Description 1|10.00|2|3.00|1|
productfile1.pdf|thumbnailfile1.gif
To skip one of the fields just put the next pipe character directly after the last one, with no other text in
between, for example: "Category Name||" (skips the SKU code).
If you leave the category name field blank, the product will be added to the category that you initiated the
import from, otherwise it will be added to any category with the name you specify. If there are multiple
categories with the same name, the product will be added to all of them.
Excel spreadsheets can be saved as a pipe separated list using Excel 2003 and newer.
Upload Images by FTP
All thumbnail images must be preuploaded to the prodimg directory and all product files to products
directory. They will be copied to the filenames described in the product list file. They aren't renamed or
removed in order to allow the same thumbnail or product file to be used for multiple products.
Import the Pipe Separated List
To import a product list, navigate to Edit Catalog. Click the "edit" link below the category where the
products will be imported to. Browse to the pipe separated list text file.
AShop Software © Copyright 2002 - 2010
Manage Products
3.9
191
Add Products
From the Administration Panel, select Edit Catalog.
See also: Import Products
Before adding the first product to the catalog, set the Thumbnail Image Size in Layout so that resizing
will be consistent for all products and their thumbnail images.
1. Select the category that the product will be added to. If one does not exist, you must first add a new
category.
2.
Click on the New Product button at the top of the page.
3.
Enter the Name, Price, and Description.
Note: HTML may be used in the Description box to include larger images, links to product detail pages,
etc.
Note: There may be additional settings in the add or edit product page depending on how the shopping
AShop Software © Copyright 2002 - 2010
192
AShop V User Guide
cart is configured. For example, when the Shopping Mall is being used there will be a setting to assign
ownership of the product to administrator or a member there may be a setting for Vendor and product
cost. Not all of the possible settings are shown here.
Product Options
· Catalog Status - Choose whether you want the product to be displayed in the catalog or not.
Note: In the Edit Catalog menu, you may also click the Active/Inactive icons to change the
catalog status.
or
· eBay Item Number (optional) - Integrate an eBay store with the AShop shopping cart.
· License Agreement (optional) - If the product requires a license agreement, click the License
Agreement button and enter the license agreement text.
· Affiliate Commission Level 1 - Set per product as a percentage of the product price or as a fixed
currency amount.
· Affiliate Commission Level 2 - Set per product as a percentage of the product price or as a fixed
currency amount.
Note: The affiliate commission you set for each product overrides the default affiliate commission
set in the Affiliate Program menu.
· Sales Tax - Select Yes if sales tax is to be added for this product. If the product is of a type with a
special sales tax percentage in your country you can define this as a second level on the Sales Tax
configuration page and set the product's Sales Tax setting to "Level 2". The taxable state, amount of
tax, selection to tax shipping or not, and order handling fees are set within Administration Panel/
Configuration/Shipping and Taxes.
Note: The Shipping information form will not appear during checkout if only downloadable products or
products that do not have shipping set are in the cart, unless the Taxable option is set for the products.
To avoid the shipping form during checkout, uncheck Taxable.
Third Party Software Integration
AShop Software © Copyright 2002 - 2010
Manage Products
193
AShop will optionally integrate with several popular PHP applications such as mailing list, bulletin board,
and password management programs. If the third party application is installed within the same server
account and the path is set within the admin/config.inc.php, a drop-down selection box will appear on
the add product or edit product pages. Select the group that this product is to be associated with. See
Installation of AShop - Third Party Software Integration.
4.
Click "Submit" to save the product information and go on to manage product files.
Product File Options
· Product Images - Before uploading product images, the Thumbnail image size and Link to large
original image options should first be set in Layout. To add a product image, navigate to a gif or jpg
image or select from files that have been uploaded to the prodimg folder via FTP. Several images may
be added for each product from the Edit Files page. The top one will be used as the main thumbnail
and the other images will be shown in a picture gallery. Images may also be included in the product
description by inserting HTML with links to the images.
· Preview/Demo File - Click the Browse button to navigate to and upload a preview or demo of the
downloadable product. A link to the preview file will appear under the product description in the pages
that are dynamically generated by catalogue.php. The default link text "Download Preview/Demo" may
be edited in the catalogue.inc.php file for each language. If the preview file is an mp3 it will be shown
as a Play button that will start streaming playback of the file. If the file is an xspf playlist it will be
shown in a similar way but will allow the customer to listen to multiple tracks.
· Product Files (for Downloadable Products) - Browse to the product file. Note: Some hosting services
limit http file uploads to less than 2 MB. If this is the case and the product file is larger than 2 MB, you
may alternatively upload the file via FTP to the "product" folder and then select it from the drop-down
box. Another option is to use the same product file(s) that another product is already using by entering
the product ID number of the orignal product.
· Upload Key Codes - Upload your key code list for downloadable products.
Note: If you are uploading product files: Depending on the size of the image, preview, product files and
the type of Internet connection, the upload process may take a few minutes or more. Some browsers will
display a progress meter in the status bar at the bottom of the browser.
AShop Software © Copyright 2002 - 2010
194
3.10
AShop V User Guide
5.
Click the Update/Delete button to upload the files you have selected.
6.
Click the Finish button and proceed to the Shipping Calculation Method page.
7.
Choose the Shipping Calculation Method you desire and click Submit.
Edit Products
From the Administration Panel, select Edit Catalog. Select the category that the product to be edited is
in.
Navigate to the product and click the button for the area that is to be edited.
The Search tool can be used to find products. Type the product name or a portion of it into the search
field and click the search button, all products matching that product name will appear regardless of
which category they are in. Read more about the Search tool in the Manage Products topic.
· Edit - The edit menu is where product details such as Name, Price, Description, License Agreement,
Affiliate Commissions, Taxable are managed. See Add Products
· Remove - Removes the product completely and permanently from all categories.
· Inventory - Manage the product inventory and SKU codes.
· Discount - Manage discount codes and one-time gifts.
· Shipping - Set the shipping method for each product.
· Files - Upload and manage thumbnail image, preview/demo file, product files, key codes
· Attributes - Set selectable options such as color, style, format. Collect product specific information.
· Fulfilment - Send fulfilment notices. Initiate product delivery. Automate services.
· Flags - Product flags provide a way to easily display standardized text for assigned products. Create
and maintain flags through the Configuration > Shop Parameters menu. Then select flags for each
AShop Software © Copyright 2002 - 2010
Manage Products
195
product through Edit Catalog > Flags.
· Make HTML - Generate/Edit product detail pages. Change META tags for the product detail pages.
· Update - Update is a method of sending messages and file downloads selectively to customers who
have purchased a specific product.
· Gift - Send a message with a link and password for a free downloadable product file. A default text
message is written within the message field. This can be edited so that you can use any message
you desire. The default text message also contains two tokens %email% and %password% which
you can use to give the customer the information to login and download their product files.
· Categories - Move or copy a product to a different category.
· Qty Pricing - calculate price of this product based on quantity of this product OR all products in the
order.
· Up - Move a product up within the category.
· Top - Move a product to the top of the category. Note: only one user can do this at a time. If this is
being used by a shopping mall member there might be a short delay while AShop waits for the move
to finish. If a shopping mall member has used this button and then suddenly lost his/her Internet
connection or shut down the browser the Top button might become locked. The administrator will be
able to unlock it through a link that will appear when he/she uses it.
3.11
Remove Products
From the Administration Panel, select Edit Catalog.
Each product may be listed in more than one category. The Remove button removes the product
completely from all categories. If a product is listed in more than one category, to remove it from
only one category while leaving it in the other categories, click on the Categories button
instead and then click on the button labeled Remove From Here (for the category).
1.
2.
Select the category that the product to be removed is in.
Click on the "Remove" button under the product.
Warning! Removing a product permanently deletes it from the database.
3. A warning notice will be displayed before the product is removed. If you are sure about deleting the
product, click "Yes", if not click "No" or the back arrow to cancel the removal.
AShop Software © Copyright 2002 - 2010
196
3.12
AShop V User Guide
Edit Product Inventory
The Product Inventory settings will let you keep track of how many items you have in stock and when a
low stock warning should be displayed to you and your customers. The inventory is also visible as a
small icon next to the name of each product on the Edit Catalog page. If there are items in stock the
inventory meter icon will be green and nearly full. If there are only few it will be yellow and if the product
is out of stock it will be shown as a nearly empty red icon.
The SKU code can be used to identify a product in your inventory and will be included in the order notice
that is sent to you by email or saved in your Sales Office inbox. You can also search for products on the
Edit Catalog page using their SKU codes.
If the Activate inventory option is unchecked your AShop will consider the inventory unlimited and will
not subtract from it when a customer buys an item.
If the Low stock limit is reached the customer will be warned that there are only a few of this product
available but it will still be possible to buy it, until the items in stock reaches zero.
If you use attributes for your product, each combination will have its own inventory settings. For
example: a green t-shirt of size extra small will have an inventory that is separate from a red t-shirt of
size large, even though they are set up as the same product in your AShop.
3.13
Move Products
Products can be moved to a different category without deleting and re-entering the product information or
files.
Note: You may also sort products within a category. Either alphabetically, by product ID number, or
reverse their listed order. The order you select will appear that way in the product catalog as well as in
your Admin Panel.
From the Administration Panel, select Edit Catalog.
Move a product to another category
1.
Select the category that the product is currently in.
2.
Click the Categories button under the product.
AShop Software © Copyright 2002 - 2010
Manage Products
197
Categories will be displayed with a Move here button beneath them.
To display sub-categories, click on the top-category name. Sub-categories will be displayed under their
top-category with a bullet in front of them.
3.
Click the "Move here" button beneath the category that you wish to move the product to. The
product will then be displayed within the new category.
Note: You can copy the product to another category while keeping the product in its existing category
as well. Just click on the "Copy here" button instead of the "Move here" button.
Remove a product from a category.
If a product is listed in more than one category, to remove it from only one category while leaving it in the
other categories, click on the Categories button and then click on the button labeled Remove From Here
(for the category).
AShop Software © Copyright 2002 - 2010
198
AShop V User Guide
Move a product up within a category
1.
Select the category that the product is in.
2.
Click the Move Up button beneath the product.
The product will move up one place within the selected category.
3.14
Discount Coupon Codes
There are two ways that discounts can be created and redeemed in the shopping cart.
Per Order Discounts
An unlimited number of per order discounts may be created. Create per order discounts in Edit Catalog.
Click on the Discounts button on the top right side.
1.
2.
3.
4.
Enter the discount code
Enter the amount or percentage of the discount. Percent discounts are applied to each order
subtotal (before shipping and taxes).
(Optional) Enter a valid affiliate id number to credit an affiliate when this discount is redeemed.
Click Add to add the new discount.
AShop Software © Copyright 2002 - 2010
Manage Products
199
Per Product Discounts
Per product discount codes are created each product in Edit Catalog. Per product discounts may be
entered by customers on checkout, just like per order discounts, but they will only be applied to the
price of the associated product. You can only add one per product discount code for each product.
Create a Discount Code For Each Product
1.
Navigate to the category where the product discount is to be added or edited.
2.
Click on the Discount button under the product.
3.
Enter a discount code up to 50 characters.
4.
Enter the discount amount and check if it is percentage of the product price or an amount.
5.
Click the Add button to save the discount. To remove a discount, simply click the Remove button.
Create a One-Time Discount
AShop will let you allow customers to be able to get a discount good for only one purchase? Here's
how...
When you add or edit a discount you will notice a check box under the discount amount labeled "One
time discount"
Check the box and click the "Add" button.
AShop Software © Copyright 2002 - 2010
200
AShop V User Guide
Only customers who are logged in will be able to use these discounts and when they use them, this will
be recorded to prevent further use.
Create a Gift Certificate
If you have a customer who you would like to send a gift certificate to, you can do so using the one-time
discount feature:
1. Add a product with a price of $0.00 (no taxes or shipping).
2. Click the "Discount" button for that product and add a one-time discount for that customer (or
customers) as described above.
That's all there is to it. The customer(s) will enter their email address and discount code into the fields
provided in the product catalog. Doing so will add a product of to their cart that has a negative dollar
value which will be calculated into the total.
Also see the Gift Certificate Tech Tip.
3.15
Quantity Based Pricing
Incremental Quantity Based Pricing sets the price of one product based upon either the total quantity of
that product OR the total quantity of all products in the basket. Instead of applying one price based upon
the quantity total, a different price will be applied to each quantity range.
To set pricing levels based on the amount of products purchased, click Edit Catalog, navigate to the
product you wish to add quantity based pricing to, and click on the Qty Pricing button. (You may also
set this when you first Add Products).
1.
Add a pricing description, which will appear as the Price in the catalog instead of the regular price
for that product.
2.
Select whether the pricing will calculate based on the total quantity of this product only OR if the
total quantity of all products will affect the pricing of this product.
3.
Click the Update button.
AShop Software © Copyright 2002 - 2010
Manage Products
201
* Note that the initial price is already set into the first pricing level. Add this one first before adding
additional pricing levels.
4.
Add additional pricing levels. Click the Add button each time a new pricing level is inserted.
In this example, prices (set specifically for the quantity of this product only) are $4.00 per item. When 3 5 more are purchased they are $3.00 each additionally. When 6 or more additional are purchased they
are priced at $2.00 each on top of the $4 for the initial 2 items and $3 each for the 3-5 more items.
You may delete a pricing level by simply clicking the Delete button.
When changing the pricing level be sure to click the Update button.
You will notice when in the Edit Catalog menu that the price for a product with Quantity Based Pricing
will now say "Qty Based".
AShop Software © Copyright 2002 - 2010
202
AShop V User Guide
In the actual product catalog the price will show the Pricing Description that you entered in Step 1.
3.16
eBay Item ID
When products are listed in an eBay store and have only the PayPal payment option set for the eBay
listing, payment for the eBay item can be linked to AShop.
eBay Orders Paid Through AShop
To use this feature, you need to have a premier or business PayPal account. No other payment
gateways will work. The default Instant Payment Notification (IPN) URL in the preferences for your
PayPal account (at paypal.com, not in your AShop) must be set to the URL where your ebay.php script
is located (where AShop is installed).
For instance: http://www.yourdomain.com/ashop/ebay.php. The eBay id will only be shown in the receipt
and the admin notice emails when an item has actually been purchased through eBay.
When the customer pays for the item using PayPal, the order is recorded in the AShop database, a
receipt is emailed to the customer and an order notice is emailed to the AShop administrator. If the
product is downloadable, a password and link to download the file is included in the customer's receipt.
If key codes are set for the product, a key code will be included in the customer's receipt. If the product
is a subscription type, a password and link to the subscription directory is included in the customer's
receipt.
eBay > PayPal > AShop Setup
1.
Setup your PayPal account to send default IPN requests to your ashop/ebay.php script.
· Login to your verified PayPal account administration panel at http://www.paypal.com.
· Click "Profile".
· Click "Instant Payment Notification Preferences".
· Set IPN to On.
· Set the IPN URL to the location of your ebay.php script.
· For instance: http://www.yourdomain.com/ashop/ebay.php.
AShop Software © Copyright 2002 - 2010
Manage Products
2.
Add the product to your eBay store and set the payment options to only PayPal.
3.
Enter the eBay Item Number in the product settings in Add Products or Edit Products.
203
The ebay.php works like order.php but uses the eBay Item Number instead of the productid to identify
which product has been purchased.
Note: The affiliate tracking will not work for products sold on eBay.
AShop Admin Order Notice Format
This is the order notice format that will be used in the current version of the ebay.php script:
-------------------------------------------------------------------------------------------------------------The following transaction took place 2004-02-01 07:07:09 from: 65.230.38.65
Customer: 51 Customer Name
Email: [email protected]
Address: 123 5th Ave., 35212-3704, Birmingham, AL, United States
Phone: 123-456-7890
Products: 1: eBay item: 5555555 Product Name
Amount: 25.00
Payment option: eBay+PayPal
Send the products to:
Customer Name
123 5th Ave.
Birmingham, AL 35212
United States
-------------------------------------------------------------------------------------------------------------The eBay item number can be found before the product name.
Using the eBay Item Number With PayPal Buy Buttons
The eBay Item Number functionality may be used with PayPal Buy buttons that are not part of an eBay
AShop Software © Copyright 2002 - 2010
204
AShop V User Guide
store.
1.
2.
3.
Set the eBay item number to the same as the product ID in Edit Catalog > Edit (for the product).
The IPN URL setting in the PayPal account must be set to where the ebay.php is located unless
you make an unencrypted "Buy Now" button, which will let you add the IPN URL as a hidden field
named: notify_url. For example: <input type="hidden" name="notify_url" value="http://www.
yourdomain.com/ashop/ebay.php">
When you create the button in the PayPal account, enter the product ID into the optional item
number/id box.
The ebay.php script doesn't currently support fulfilment and there might be other newer features that is
missing. It will handle downloadable products, third party software integration (ListMail, ListMessenger
etc) and all the basic functionality from the AShop order processing script.
3.17
Product License Agreements
License agreements may be added for each product. When a license agreement is set for a product,
customers must agree to it before being allowed to purchase the product.
When customers add a product to the cart that has a license agreement set, an "I Agree" check box will
display in the confirmation window with a link to the license agreement.
The "terms of the sale" link opens the license agreement window.
AShop Software © Copyright 2002 - 2010
Manage Products
205
License agreements are added in Add Products or Edit Products.
Navigate to the product you want to add a license agreement to and click the "Edit" button.
Click the "Add license agreement" button and enter your license agreement information.
Click the "Submit" button to save your changes.
Note:
The license agreement can contain HTML formatting and links.
Tip: If you upload a text document named agreement.txt, into the directory you have AShop installed at,
a license agreement page will appear when the customer clicks the Check Out button. The customer
must click the Accept button to proceed with the order. The agreement.txt file is included with the
AShop program files, but is named agreementEXAMPLE.txt. You must rename it to agreement.txt for
this functionality to work. You can use HTML code in the text file.
3.18
AShop Secure Download
AShop Secure Download
Protects Downloadable Products Against Unauthorized Downloads in Three Ways:
Payment Verification
An unique, encrypted code is generated for each order and stored in the database. The payment
gateway must return the order code with a successful payment response for AShop to complete the
order and send a password. Attempts to access the order response script without a valid transaction
code results in an error page.
Password Protection
After payment has been processed, a random password is automatically generated and e-mailed to the
customer. This verifies the customer's e-mail address and is required to access the download area. The
password will automatically expire in a number of days, which is set by the administrator. A limit to the
number of downloads may also be set.
Product File Renaming
When adding a digital product to the shopping cart, the file name is stored in a secure database. The
AShop Software © Copyright 2002 - 2010
206
AShop V User Guide
actual data is renamed and saved under a different file name in a protected folder on the server. When
delivery of the product file is authorized, AShop displays the original product file name to the customer,
but the original file (that was renamed) is actually downloaded. The name and location of the product on
the server is never available to the public and is only accessible through the AShop program.
3.19
Downloadable Products
Downloadable products can be software, music, pictures, text, pdf files, or just about any kind of file or
folder. If the product consists of many files and/or folders, zip them into one compressed folder for
distribution.
See also: Add Products
Downloadable product files are protected from piracy and unauthorized linking by AShop Secure
Download.
Each product can have a product file and/or key code delivery. Digital product delivery is not supported
with subscriptions (password protected membership directories).
To add a file download for a product.
1.
Click on Edit Catalog.
2.
Navigate to the product category and either add a new product or click the "Files" button to add a
file to an existing product.
3.
Click the Browse button next to Product Files and navigate to the file on your local machine.
4.
Highlight the product file and click Open.
You may upload more than one downloadable file per product, but only one at a time.
5.
Click the "Upload/Delete" button each time you wish to add or delete a downloadable file.
6.
When done uploading files click the "Finish" button.
When a product file is present, a download icon will appear next to the product in the Edit Catalog page
and "Direct Download!" will appear in the catalog that customers see along with the file type and size.
Uploading Product Files That Are Larger Than The http_upload Limit
The PHP configuration file limits HTTP file uploads to 2 MB on most hosting services. To check the
http_upload file size limit that is set on your server, upload and run a phpinfo.php file.
AShop Software © Copyright 2002 - 2010
Manage Products
207
To upload product files larger than the limit set by your servers PHP configuration:
1.
Upload the product file to the ashop/products folder via FTP or using your hosting service's file
management program.
2.
AShop checks to see if there are any product files that have not already been recorded into the
database and will display a drop-down selection box within the Add Product or Edit Product window
where the file can be selected.
4.
Choose a file from the previously uploaded file selection box.
5.
Click the "Upload/Delete" button, AShop will rename the product file and record the original filename
into the database.
6.
When finished adding product files click the "Finish" button.
Update Notification & Delivery
The update feature emails a notice to each customer who has purchased a specific product. If a file is
uploaded, the update notice includes a link and password to download the file. If a file is not uploaded,
only the message text or html is sent.
For each product there is a button labeled "Update" on the edit product page.
Click that button to see a form where you can select an update file, choose the time period the customer
should have bought the product to receive the update, choose how many days the download will be
available, and add the subject and message text for the email notice to customers.
When sending an update file, you must browse to and select the file from your computer. This file will be
sent to the customers who purchased the product you are sending an update for.
AShop Software © Copyright 2002 - 2010
208
AShop V User Guide
The update notification can be sent in both Plain text or Html formats.
When the form is submitted, the file is uploaded to the updates directory and the message with a
password and download link is sent to all customers who should receive the update.
When customers download the file, a notice is emailed to the shop administrator with the customers
name and IP address.
3.20
Free Downloads/Products
Send a Free Downloadable Gift
It is possible to send a customer a free gift if the product contains a downloadable product file.
Downloadable products will contain an extra button under them in Edit Products labeled Gift.
AShop Software © Copyright 2002 - 2010
Manage Products
1.
209
Click the Gift button to open a menu where you will enter the customer's Name, Email Address,
Subject, and an HTML or Text format message.
Note: Use tags such as %email% in the message to send the customer's email address and %
password% for the login password.
2.
Click the Send Gift button to send the customer their free downloadable gift.
Free Products
When the total of all the products in a customer's shopping cart equals zero dollars, whether the
products have a price of $0.00 or they used their Gift Certificate to purchase products, the local payment
form will automatically be used. Order processing will be done using a built in payment option that uses
manual.gw. All orders with only free products will be treated exactly like paid orders and the customers'
billing info will be stored in the database.
This feature can be used as a sign up form for free membership resources because it collects customer
information, creates and sends subscription directory password, and enters the customer into the
AShop mailing list. It can also be used to get customer information before giving a free download or key
code.
3.21
Memberships
Membership within AShop V are a method to sell access to password protected directories.
When a product configured a a membership is purchased, a receipt is emailed to the customer, which
includes a link and password for access to the protected directory.
The number of days the customer can access the protected content is set within AShop for each
AShop Software © Copyright 2002 - 2010
210
AShop V User Guide
membership. Expired passwords can be removed manually by running a script or the process can be
automated by running a Cron job on the server.
AShop V also integrates with the free s2member Wordpress plugin for selling access to a protected
Wordpress site.
3.22
Membership Configuration
Memberships provides a method to sell password-protected access to specific folders (directories).
To add a membership, you must first create a subdirectory to hold the protected content. The
directory must be below your AShop installation on the server directory tree.
1.
2.
Create a directory below AShop on the server directory tree so that the protected folder is at the
same directory as catalogue.php. Name it whatever you want to.
Change permissions for this directory to 777.
Create A Membership In The Product Catalog
1.
From within the Administration Panel/Edit Catalog, create or locate the product that should become
your membership.
2.
Click the button Membership.
3.
Enter the name of the protected directory.
4.
Enter the URL to the protected directory. If this setting is available it is used to create the link to the
protected directory in the customer receipt.
5.
Enter the length in days until each password expires. Set this to 0 (zero) for no expiration.
AShop Software © Copyright 2002 - 2010
Manage Products
7.
211
Click the Submit button to save the product information.
AShop will now protect the directory and prepare it for use as a membership product.
Note: Since AShop uses .htaccess password protection, this feature is only available on Linux/Unix
servers.
Customers May Recover Forgotten Passwords
If a customer, who has purchased a subscription product, cannot remember their password, they can
retrieve it. If they call sendsubscrpass.php from their browser they will be prompted for the directory that
they have subscription access to and their email address. An email will be sent to your customer with
their password.
example: http://www.yourdomain.com/ashop/sendsubscrpass.php
Deactivating Expired Subscriptions (without Password Robot)
1. The checksubscr.php script deactivates expired subscriptions. You can run this script manually
through a browser or setup a Cron job in the server control panel to run this script on a regular
basis. Your hosting company must provide a method to create Cron jobs or you must have root
access to the server to set up a Cron job. More Info...
2.
Change the $ashoppath at the top of the checksubscr.php script to the correct path to AShop V if
the script is placed outside of the AShop root, for instance outside the document root to avoid
making it publicly accessible.
3.
Change permissions to chmod 755.
The subscription product will be labeled "Instant Access" in the store catalog product listing.
Links to the purchased subscription directories, user names, and passwords will be included in the eAShop Software © Copyright 2002 - 2010
212
AShop V User Guide
mailed store receipts that are sent to customers.
Discount Coupon Codes may be created for subscription products.
3.23
Key Codes
Key-codes are typically used to unlock trial software, activate phone cards, distribute passwords, or to
send unique information with the purchase of a product. When a product that has key codes is
purchased, a key code is sent to the customer by email. Key codes can be distributed with any product
in the AShop catalog except subscriptions.
Note: Key-codes can be distributed in the original key-code text file list order or in random order. This
order of distribution is set within Configuration > Shop Parameters.
To set a product to distribute key-codes:
Within Add Products or Edit Products, click on the Files button, then click on the browse button next to
the Unlock Keys File box and upload a keycode.txt file.
Note: This file must be a text file where each line contains exactly the text that is to be sent to each
customer who purchases the product. This information will be stored in a database table called
unlockkeys.
A key code product will display Direct Email Delivery! next to the product name in the store catalog and
will display a
icon next to it within Edit Catalog. If the product has downloadable files associated with
it, as well as the Key Codes, it will NOT display Direct Email Delivery! next to the product name in the
store catalog.
When a customer buys a key-code product an unused key-code is selected from the database and
included in the customer's receipt. If manual payment processing is used, an "activate order" link will be
included in the administrator's order notice. Upon receipt of payment, the administrator may then click
the link to complete the order and send the key code to the customer.
The number of remaining key codes is listed in Edit Catalog next to each product that has key codes.
The icon is a link. Click on the icon to view the list of used and available key codes.
AShop Software © Copyright 2002 - 2010
Manage Products
213
Each time a key code is ordered, AShop checks how many unused keys are left in the database. When
there are less than 4 keys left a warning message is sent telling the shop administrator to upload new
keys to the database. If there was no keys available at all the warning message tells the shop
administrator to send one manually to the customer and includes a link to the customers email address.
The key codes may be distributed in random order or in the original text file list order. Select random or
list order in Shop Parameters.
How To Delete Key Codes
When a list of unlock keys is uploaded for a product through the Files menu in the AShop admin panel,
the keys are saved in the database table named "unlockkeys". Each key in the table has a separate
record, which can be deleted or edited. You may use a tool such as phpMyAdmin or DatabaseAdmin to
browse or search the database table to find the key and edit or remove it. The database managment
tools are typically available through your domain hosting administration panel. Example: In the Plesk
server admin panel, click on the domain name, Databases, the name of the database, and then
DatabaseAdmin.
3.24
Shipping and Sales Tax
Tangible products are physical as opposed to intellectual property. Tangible products typically require
shipping and/or sales tax amounts to be calculated and added to each order. (Products that are set to
add shipping, handling, and sales tax can ALSO deliver downloadable products and mail out key codes.)
There are two places in the shopping cart administration where shipping calculations are managed.
1.
2.
The main Shipping Method and Storewide settings are managed through Configuration > Shipping.
Settings that apply to each product individually are managed through Edit Catalog > Shipping (for
each product).
(Storewide and per product shipping calculations can be mixed in each order.)
Local and international handling charges (per order) are set in Shipping.
Sales tax regions and rates are set up in Configuration > Taxes.
3.25
Shipping Settings For Each Product
In the Admin Panel, Edit Catalog. Each shippable product has a button under it labeled "Shipping"
AShop Software © Copyright 2002 - 2010
214
AShop V User Guide
To set the shipping charge calculation method, click on the drop-down box labeled Shipping Option.
Each product can use a different shipping option. An unlimited number of products with different shipping
options can be mixed in each order. Each shipping option calculates independently in the background
and then they are added together for the total shipping charges.
Shipping Options:
Note that shipping setting options for each product will be different depending on the main Shipping
Method that is set in Configuration > Shipping.
None - Shipping is not added for this product. If all of the products in an order have None set for
shipping, the shipping information form does not appear for the customer during checkout and handling
charges (if set in Shipping and Taxes) are not added. If any of the products in the order require shipping
calculation, then the shipping information page appears and must be completed before checkout.
Flat rate – A fixed dollar amount for each of this product that is ordered will be added to the shopping
cart.
1.
2.
Select Flat rate from the Select option drop-down box. A Shipping box will appear.
Enter the flat rate shipping amount into the box.
AShop Software © Copyright 2002 - 2010
Manage Products
3.
215
Click the Submit button.
UPS – This shipping option uses the United Parcel Service Online Tools to calculate U.S. and Canada
Ground rates in real time based upon the shipping weight and origin of each package for each product
and the destination zip code of each order. There is no limit to the number of packages that can be
calculated for each product and each package may have a different origin zip code. The shipping amount
is calculated individually for each package and added to the total shipping for each product in the
shopping cart based upon the ship to destination for each order.
1.
2.
3.
4.
5.
Select UPS from the Select option Drop-down box. A shipping origin and weight per package form
will appear.
Enter the zip code of the shipping origin and the weight of the first package.
If the product ships in more than one package, click Add package. A new row will appear.
Enter the origin zip code and shipping weight for each package and repeat the process as needed.
Click the Submit button when finished.
FedEx – This shipping option uses the FedEx Quick Ship online calculator to calculate U.S. Ground
rates in real time based upon the shipping weight and origin of each package for each product and the
destination zip code of each order. There is no limit to the number of packages that can be calculated for
each product and each package may have a different origin zip code. The shipping amount is calculated
individually for each package and added to the total shipping for each product in the shopping cart based
upon the ship to destination for each order.
AShop Software © Copyright 2002 - 2010
216
AShop V User Guide
1.
Select FedEx from the Select option Drop-down box. A shipping origin and weight per package
form will appear.
2.
Enter the zip code of the shipping origin and the weight of the first package.
3.
If the product ships in more than one package, click Add package. A new row will appear.
4.
Enter the origin zip code and shipping weight for each package and repeat the process as
needed.
5.
Click the Submit button when finished.
Watkins ML – AutoRate (Watkins ML) shipping calculation method is used for large and heavy items
such as furniture that are shipped by common carrier. You don't need to have any kind of membership
with Watkins ML to use the calculation. You only need to specify the options on the edit shipping page.
The freight class must be entered. The National Motor Freight Classification (NMFC) tariff is a publication
for motor carriers containing classes, rules, descriptions and ratings of all commodities moving in
commerce. There are 18 classes ranging between 50 and 500. Most manufacturers and professional
transportation managers are participating members of the NMFC, or are familiar with their products'
classifications. If you are not sure of the correct classification for your freight, contact a Watkins
Customer Service Representative at (800) 274-9099 or the National Motor Freight Traffic Association at
(703) 838-1810." The classes must be exactly right or there will be an incorrect zip code error when
submitting the shipping destination.
AShop Software © Copyright 2002 - 2010
Manage Products
1.
2.
3.
4.
5.
217
Select Watkins ML from the Select option Drop-down box. A shipping origin, class, and weight per
package form will appear.
Enter the zip code of the shipping origin, class, and the weight of the first package.
If the product ships in more than one package, click Add package. A new row will appear.
Enter the origin zip code, class, and shipping weight for each package and repeat the process as
needed.
Click Submit when finished.
Zip Zone Rate Tables – Zip zone rate tables work much like UPS and FedEx tools, but you can define
your own zip code zones and set custom zone rates for each product. See help topic: Zip Zone Shipping
Rates
AShop Software © Copyright 2002 - 2010
218
AShop V User Guide
Quantity Based Shipping can be set for each product. In this example, if quantity 1 to 4 of this product
is ordered, shipping will be the quantity of this product times $4.52. If quantity 5 to 9 of this product is
ordered, the shipping will be the quantity of this product times $2.50. If quantity 10 to 14 of this product
is ordered, the shipping for this product will be the quantity times $0.50. When a customer orders 15 or
more of this product, the shipping for this product is zero. See help topic: Quantity Based Shipping
Storewide Shipping looks up or calculates the shipping based on the total weight of (Storewide)
products in each order. Storewide shipping can lookup from UPS or FedEx. A package is added each
time the total weight exceeds the maximum weight per box so that the correct number of boxes and
weight per box is looked up. The flat rate per pound option can have a base charge to cover the cost of
packaging the total flat rate times the total weight of (Storewide) products. See help topic: Storewide
Shipping
3.26
Quantity Based Shipping
NOTE! The shipping options for each product are dependent on the main Shipping Method setting in
Configuration > Shipping. To use custom shipping methods, the main Shipping Method must be set to
"Custom".
To set quantity based shipping for each product, click Edit Catalog, navigate to the category where the
product is located, and click on the Shipping button. (The shipping options also appear after new
products are added.)
1.
Select "Quantity" from the Shipping Calculation Method drop-down selection box.
AShop Software © Copyright 2002 - 2010
Manage Products
219
2.
Enter the amount of shipping that is to be charged for quantity 1 or more and click the Update
button. This amount will be multiplied times the quantity of products in the basket until the quantity
of this product is greater than the next quantity level. (in the next step)
3.
After the form is updated, a second row will appear. Enter the quantity to begin and set the shipping
amount to charge, then click Add Row.
The quantity row will be saved and yet another blank row will appear.
In this example so far, $1.15 will be multiplied times the quantity of this product for quantities less than
5. For quantities 5 or greater, $0.75 will be multiplied times the quantity for this product and added to the
shipping charges.
4.
If there are no more quantity shipping charge levels to add, you are finished and may exit by
clicking on any of the Administration Panel navigation links or by closing the browser. To add
another quantity shipping level, enter the next quantity level and shipping amount, then click Add
Row. Repeat as needed for the number of levels desired and click Add Row to save each one.
AShop Software © Copyright 2002 - 2010
220
3.27
AShop V User Guide
Zip Zone Shipping Rates
Zip zone rate tables provide a method to set 7 shipping zone rates for each product. The zone is looked
up from a custom zip code table that is created for each shipping origin.
If products that have zip zone shipping are in the cart, a shipping information form appears when
checking out. The first three digits of the zip code are used to lookup the zone and the shipping rate that
is set for that zone (for that product) is added to the order.
The zip zone method is essentially what UPS or FedEx Ground uses with their online rate calculation
tools. One advantage of custom zip zone lookup tables is that you don't have to register and link to UPS
or FedEx online tools or rely on a connection to them. Another is that you can calculate similar to
FedEx or UPS, but adjust your zone rates to market products differently in various areas of the country.
For instance, you may want to charge less than FedEx in zone 8 and more in zone 2 to adjust extreme
shipping amounts or to match a competitor's delivered price.
How To Set Up Zip Zone Shipping
First, you set up a custom zip code lookup table. This can be done through Shipping and Taxes or in
Edit Products.
1.
Click on the Manage Zip Zones link to open the Zip Zone Tables management.
2.
Add a new Zip Zone Table and click Submit. You may want to name it in relation to the origin of the
shipment or vendor.
3.
Click Add New Zip.
4.
Enter the first three digits of the zip code, select a zone, and click the Add Zip Zone button.
AShop Software © Copyright 2002 - 2010
Manage Products
5.
221
Repeat steps 3 and 4 until you have the desired amount of zip zones covered.
The Zip Zone tables consist of two columns and as many rows as you need. The left hand column is the
first three digits of the zip code. The right hand column is the zone that will be looked up when a zip
code starting with the corresponding first three digits is processed for an order shipment address. It is
not necessary to put every zip code in. only the points where there is a change in the zone. For
instance, in the above example, zips starting with 000 up to 349 lookup zone 8. Zips starting with 350 up
to 358 lookup zone 7. Then zips 359 up to 364 lookup zone 6 and so on.
After a Zip Zone table is setup, it may be selected as a shipping method for each product and an amount
can be set for each zone. The customer's zip code is used to lookup the zone, then the zone is used to
lookup the rate that is set for the selected products when shipped to that zone. Be sure to click the
Submit button after you have set shipping prices for each Zip Zone.
AShop Software © Copyright 2002 - 2010
222
3.28
AShop V User Guide
Product Attributes
Product attributes provide a method to specify specific versions or variations of each product when
adding the product to the shopping cart. The selected attributes are sent in the receipts and order
notices and are also recorded in the sales history. An unlimited number of product attributes can be set
for each product.
AShop Software © Copyright 2002 - 2010
Manage Products
223
Each product attribute alternative can be optionally set to override downloads, shipping charges, and/or
sales tax. This is useful where one product might be delivered in various formats. An example of where
this might be used is where music titles are available for the same price in several different formats. No
shipping or tax would be charged for the MP3 file download in the U.S., but it might be taxed in the UK.
CD or mini-disks would have shipping costs and might be taxable, depending on the local tax laws.
Add Product Attributes
To create or edit product attributes, click Edit Catalog, select the category, and click the Attributes
button next to the product.
To add a new attribute, enter the Caption, the number of Alternatives and click the Add Attribute button.
Note: Comment Field Attributes...
If the number of alternatives is set to 0 and the Add Attribute button is clicked, the attribute will be added
as a Comment Field.
Enter the parameters for each alternative.
AShop Software © Copyright 2002 - 2010
224
AShop V User Guide
Attribute alternatives can have a different price set for each alternative. Check the "Activate separate
buy buttons and/or prices" box to allow each alternative to have a separate price and separate buy
buttons for each in the catalog.
Check the "Activate separate shipping options" box to have the option of setting each attribute have no
shipping and/or no sales tax.
To delete an alternative simply click the "Delete" button. When finished editing the alternatives click the
"Save" button.
Note: Only one set of alternatives for each attribute can have prices. When prices are set in the
alternatives, separate buy buttons and prices appear in the catalog. The attribute prices and separate
buy buttons will work with shopping cart turned On or Off. A gif image may be displayed in the catalog in
place of each alternative by naming it the same as the alternative, but in all lower case and uploading it
to the images directory. For instance, if the alternative is named "CD", the image file name should be cd.
gif.
Edit Existing Attributes
To edit or remove existing attributes, click the Attributes button in the Edit Catalog menu. Existing
attributes will appear with Update, Remove, and Alternatives buttons next to them.
AShop Software © Copyright 2002 - 2010
Manage Products
225
To change the caption, edit the text and click Update. To exit without changes click the back button or
another menu selection.
To edit alternatives, click the Alternatives button. Edit or delete the alternatives as needed, then click the
Save button.
Attributes for Downloadable Products
When you have a downloadable product there is an extra check box labeled "Activate separate download
options"
If you upload multiple files for a product. You can have each alternative point to one, none, or all (default)
of those files.
Let's say you have a product that can be shippable or downloadable.
With this feature you may use one alternative as the shippable product and the others as specific
downloadable file types.
Deactivate shipping and taxes on the downloadable products.
Change prices accordingly.
Don't forget to click the Save button when you have finished editing the attribute.
Pass productid to third party script using an attribute
AShop Software © Copyright 2002 - 2010
226
AShop V User Guide
The product ID is not included by the automation fulfilment feature but there is a way to include this or
any other product specific information you want to send. An attribute with 1 alternative to the product you
wish to use the automation for. You can for example call this attribute "Product ID". Set the single
alternative to the product ID for your product or to any other identifier you wish to use. Click the
Fulfilment button for the product on the Edit Catalog page and select the fulfilment option you are using.
Enter a field name for the attribute, for example "productid" or any variable name your receiving cgi script
is using. Now your fulfilment option will send this information to the cgi script after a purchase and since
the number of alternatives is just 1 your customers will not see the attribute.
3.29
Product Comment Fields
Comment fields that are editable by customers are created in Edit Products > Attributes for each
product. When a product has a comment field attribute, customers can enter text for each product. The
text will be saved for each product and will appear in the receipt and order notice. This feature might be
useful where a custom inscription or specific instructions are required for each product ordered.
Examples:
3.30
or
Product Buy Buttons
In addition to the automatically generated catalogue.php pages, product buy buttons, view cart and
checkout links may be manually added to HTML and PHP pages using snippets of HTML and/or PHP
code. Here are some examples.
Order-Link is a simple way to add buy buttons in local or remote web pages. Order-link may also be
used in newsletters, forums and blogs.
Multiple Product Buy - More than one product may be added to the cart at one time from a form post.
3.31
Details Page Generator
The Make HTML button under each product listing in Edit Catalog will create static HTML web pages
and save them on the server.
AShop Software © Copyright 2002 - 2010
Manage Products
227
The Make HTML tool will use a page template, get product information and images, and create a new
HTML page from the page template and product data. Buy buttons can be automatically generated in
each product page.
1. Design a page template and save it to the templates directory. An example named template.
html is included with the new installation files. You can also use the AShop page layout templates.
2. Insert placeholder comments in the page template where product data and buttons are
to appear. See example template.html.
3. Create a product page using the Make HTML button. Save it to a subdirectory. Pages
made this way cannot typically be saved to the public root directory because the permissions do not
allow it.
3.32
Penny Auctions
Introduction
If you have visited sites like swoopo.com or madbid.com you know what this is about. Customers buy a
number of bids from you. Each bid raises the price of an item by a very low amount, for example a
penny. When someone places a bid on the item a timer starts to count down. If the timer reaches zero
the last bidding customer wins the item and can buy it for the final price, which usually still is very low.
This concept combines auctions with a kind of lottery. While the merchant selling the items is not very
well paid for the items themselves, the sales of bids will make it up and even give a large profit in most
cases. This does require that there are a lot of bidders though. With few visitors to your site you will be
basically giving away your items. This is not necessarily a bad thing since those first, extremely cheap
items you sell will make the word go around that people can make a real bargain by buying from you,
which in turn will increase the number of visitors and the profit from bids.
AShop is the first shopping cart to introduce this kind of feature, which gives it some unique advantages:
you can sell both penny auction items and regularly priced items on the same site, you can use your
penny auctions to promote your regularly priced products by just running auctions at a certain time, you
can sell items as penny auctions and then sell services related to the items at a regular fixed price.
Bid Code Fulfilment Option
To start using this feature you will first need to provide a way for your customers to buy bids. This is
done through the new fulfilment option: Bid code.
1. Open the page Configuration->Fulfilment in your admin panel.
2. Choose Bid code in the box "Select Fulfilment Method" and click Add.
3. Change the name of your new fulfilment option or accept the default by clicking Update.
AShop Software © Copyright 2002 - 2010
228
AShop V User Guide
Now you need to add at least one product that uses the Bid code fulfilment option.
1.
2.
3.
4.
5.
6.
Open the page Edit Catalog.
Select the category you wish to put the bid codes product in.
Click New product and fill out the forms.
When the new product has been added click the Attributes button.
Add an attribute with 1 alternative. Call it "Bids".
Enter the number of bids you want to sell, for example: 30, into the box labeled "1:" and click Save to
store the new attribute.
7. Click the button Fulfilment for the new product.
8. Select your bid codes option in the box: "Select Option".
9. Enter "bids" in the "Bids" fieldname box and click Submit.
You have now added a product that will automatically generate a bid code that provides a certain number
of bids, for example 30 codes, and send it to your customer when this product is bought. The customer
will also receive instructions about how to use the code. It should be entered into the page bidregister.
php in your AShop along with a nick name that is used to identify the currently active bidder for a
product.
Add an Auction
To add an auction that your customers can bid on you will simply add a new product to any of your
categories but select Floating price instead of entering a regular fixed price.
1. Add or edit a product in your catalog.
2. Click the button Floating price.
3. Enter the least amount the item should be sold for (usually 0.00 on this type of auction) into the box
Startprice.
4. Enter the amount with which the price should be incremented when a customer places a bid on this
item, in the box Bid increment.
5. Enter the number of seconds the timer should count down before the auction is won by the last
bidder, in the box Length.
6. Using the form fields labeled Activate, select a date and time when this auction should go live. After
that time the count down timer will start as soon as the first bid is placed. Before that time the item can
not be bought.
When you have saved your product it will now be available in your catalog as an auction and only the
person who places the winning bid will be able to buy it from you. He/she can still select not to buy it
though. When the item is bought by the winner it is automatically deactivated in your catalog. If you
reactivate it, it will be possible to buy it once again by placing bids.
3.33
Up Selling
The up selling feature in AShop lets you present your customers with 1 or 2 products that are related to
the ones in their cart, when they are checking out. For example: a customer buys a PC, when he clicks
Checkout he would be presented with the option to buy an Antivirus software for his new computer. He
can click Add to cart to buy this item too and then proceed to the checkout, or he can choose to skip
the offer and go straight to the checkout.
To activate up selling open the page Configuration->Shop Parameters in your administration panel and
select "1" or "2" in the configuration option "Up sell X items before check out".
The next step is to relate your product to one another. This is done by first clicking the up arrow in the
AShop Software © Copyright 2002 - 2010
Manage Products
229
upper right corner of one of your product listings on the page Edit Catalog in your administration panel:
This will select the product and let you choose another product which is related to this one. Click the
green accept icon in the upper right corner of the product you wish to select or the red cancel icon to get
out of the relate products mode.
Now you will see a page where you need to confirm if the selected product should be related to the one
you clicked the up sell arrow icon on. You will also be able to select a priority for the relation. A higher
priority means the product should be more likely to show up as an up sell for the one it is related to.
Once you have selected at least one product as related to the first one it will be presented to your
customers before check out, or after check out if you are using a payment method that collects the
payment information from your customers on your own site (this is known as "1 click up selling"). If more
than one product is related to the one the customer is buying, the up sell will be randomly selected in
order of priority. For example: if your customer is buying Product 1 and there are 4 related products of
which one has priority 9 and the other three all have priority 0, then the one with priority 9 will be shown
first of all. If you want to up sell 2 items the second item will be randomly selected from the three with
priority 0.
3.34
E-cards and Gift Certificates
Introduction
Through the new e-card feature you can sell graphical greeting cards or gift certificates with your AShop.
The cards will be delivered by email to an address that the customer can choose, which does not need
AShop Software © Copyright 2002 - 2010
230
AShop V User Guide
to be his/her own email. They can even be sent to multiple email addresses if needed. They can include
an automatically generated gift certificate code which is used on the checkout page in a similar way to
how the per order discounts work, except that these codes will not give the same discount any number
of times, they only let the customer buy for a certain amount just the way a gift certificate works in a
physical store.
The cards can also include unlock keys if you have uploaded any to your product, which means that you
can sell software licenses or other types of PIN codes as gift cards. Your customers can select a
personal greeting message to add to the card.
E-card Fulfilment Option
The first thing you need to start selling e-cards is to set up a fulfilment option. Login to your AShop
administration panel and open the page Configuration->Fulfilment. Select "E-card" in the Fulfilment
Method drop down list and click Add to add your new fulfilment option.
In the new box that is added to the Fulfilment Options page you will be able to change the configuration
of your e-card fulfilment option. You can set a name for the option, which can be set to anything you
want and is only used by yourself to make it easier to find the right fulfilment option later on. You can
select which image to use. AShop comes with three e-card images but you can easily add your own by
uploading them to the admin/ecards folder on your website. Just make sure the images are in jpg
format.
You can select which font the e-card should use for the text on the card and which color the text should
be. By checking the box "Include returned data in receipt" the customer who bought the card will see a
message that the card has been sent in the receipt.
AShop Software © Copyright 2002 - 2010
Manage Products
231
You can define the area where the text should be placed on the card. Just click on the image icon next
to the box "Text top" to define the upper left area. A window will open with the e-card image. Click on the
image where you want the upper left corner to be:
Do the same thing for the lower right corner by clicking the image icon next to the box "Text bottom
right". If you want to you can fine tune the text area by changing the resulting coordinates in the two
boxes. Click "Update" to save your settings.
Add an e-card product
The next step is to set up a product that will use the e-card fulfilment option you just created. Click Edit
Catalog in the left menu of the administration panel and find the product category where you wish to put
AShop Software © Copyright 2002 - 2010
232
AShop V User Guide
the card product. Then click "New product". Fill out the "Add product" forms just like you would normally
do when adding a new product, by giving the product a name, description, price and so on.
When the product is added click the Attributes button in its listing. Add one attribute for the personal
message. It should have zero alternatives and you might want to set it to more than one row of text to
make it easier to add a longer message. It doesn't matter what you call the attribute, it can be called
"Personal message" for example or something similar.
Add one attribute with zero alternatives for the email of the recipient or add several if you want to allow
the customer to send the card to more than one recipient. You can use any name you want to for this/
these attributes, for example "Email 1", "Email 2" or "Gift card recipient".
If you want this to be a gift certificate you will also need to add an attribute for the value of the certificate.
This attribute should have one alternative, which will be the value. You can give the attribute any name
you want, for example "Gift certificate", it will actually never be shown to the customer, just used
internally. The alternative on the other hand must be a numerical value equal to how much money this
card should be worth.
The above attribute will make this card worth $75. When all your attributes are added they should look
something like this:
Click "Finish" to return to the Edit Catalog page. Now we only have one step left to make this e-card
product functional. Click the Fulfilment button on the product listing of your e-card product.
AShop Software © Copyright 2002 - 2010
Manage Products
233
Select your e-card fulfilment option in the "Select Options" box on the Fulfilment Options page. This will
bring up some new input fields on the page, one for each attribute you created for your product. Set the
fieldname of the attribute for the personal message to: "message", set the fieldname of the attribute for
the recipient email address to "email1" (use "email2" for the second one if you have more than one,
"email3" for the third and so on) and set the fieldname of the attribute for the gift certificate value, if any,
to "value".
Note: It is important that the fieldnames you use are exactly these "message", "email1" ("email2",
"email3", "email4"...) and "value". They are case sensitive and if they are not exactly right the e-card will
not work.
Click "Submit" to save your settings when you are done. Now your e-card product is ready. When a
customer adds it to their cart a window will open that looks something like this:
AShop Software © Copyright 2002 - 2010
234
AShop V User Guide
When the customer buys the card it will be sent by email to the address specified in that window, which
can be a different person than the one buying the card. The email will look something like this:
The text on the card in the email is selectable and can be copied and pasted by the recipient to make it
easier to use any gift certificate or unlock key codes.
AShop Software © Copyright 2002 - 2010
Customers & Sales
4
Customers & Sales
4.1
Manage Sales
From the Administration Panel main menu, select Customers. There are two main sections:
Customers and Messaging
View/Edit/Delete Customer Profile
View Individual Customer Purchases
Mail To Individual, Selected, Or All Customers
Sales Reports
Generate Sales Reports For Date Ranges
Order Reports By Date, Price, or Customer
Download Reports In Comma Delimited Files For Viewing Off-line
4.2
Customers and Messaging
From the Administration Panel main menu, select Customers. A top menu bar appears and the
Customers and Messaging page opens with customers listed.
AShop Software © Copyright 2002 - 2010
235
236
AShop V User Guide
Email Messaging to Customers
To email a message to one customer
Click on the e-mail link for the selected customer. This will open your default e-mail program, such as
Outlook Express or Eudora.
To
1.
2.
3.
e-mail a message to selected customers
Place a check mark in the box next to each customer that you wish to send a message to.
Enter the Subject and Message text into the corresponding text boxes.
Click the "Mail to selected" button to send the message to selected customers.
To e-mail a message to all of the customers
1. Enter the Subject and Message text into the corresponding text boxes.
2. Click the "Mail to all" button to send the message to all customers.
HTML-format or Plain Text
You may select emails to be sent in either HTML or Plain Text format.
HTML-format
With HTML-format selected, formatting tags, tables and hyperlinks may be typed or pasted into the
message box. With this setting, a page may be designed within your favorite WYSIWYG HTML
AShop Software © Copyright 2002 - 2010
Customers & Sales
237
editor. You can then copy the HTML code and paste it into the message box to send newsletters,
advertisements, and other notices to customers or affiliates.
Note: With this setting, carriage returns within the message box do not generate line breaks and
must always be inserted with <br> or <p> tags or the text will all flow together in the resulting email message.
Plain text
The Plain text setting does not recognize HTML tags and will render tag text in the e-mail message
just as you enter it into the message box. With this setting, carriage returns in the message box
generate a line break in the resulting e-mail message as they do in your client e-mail software such
as Eudora or Microsoft Outlook.
Delete Customer Record
Warning: This will permanently delete the customer record; there is not an undo.
1.
Click the Delete icon, , next to the customer to that is to be deleted.
2.
A warning message page will appear to confirm your intention.
3.
Click Yes to delete the customer record or No to cancel and return to the Customers and
Messaging page.
View/Edit Customer Profile
To view or edit a customer's billing and shipping information, click the Profile icon,
ID number link next the customers listing.
Sales History By Customer
Customer sales history can be viewed by clicking on the Sales icon,
4.3
, or the customer
, next to each customer.
Customer Profile
Customer contact information can be accessed by clicking the Profile icon,
the customer listings.
, or ID number link next to
To view or edit a customer's profile:
1. Click on the Profile icon or ID number link next to the customer that you wish to view or edit.
2. The selected customer's profile data will appear with their name and contact information displayed
within text boxes.
AShop Software © Copyright 2002 - 2010
238
AShop V User Guide
3.
4.
To view the customer's profile data without editing it, simply click another menu option or page back
when finished viewing.
To edit the customer's data, type or paste the new information into the appropriate text boxes and
overwrite the pre-existing data as needed, then click the Update button. The new data will replace
the previous data and you will be redirected back to the Customers and Messaging page.
Note: The billing information is initially collected when the payment is made. The shipping information is
collected before viewing the cart or checking out in order to calculate shipping and sales tax, if any. If
shipping is not set for any of the products ordered and none of the products are taxable, the shipping
information form does not appear and this information is not collected.
4.4
Sales History
Customer sales history can be viewed by clicking on the Sales link next to each customer from within
Customers and Messaging.
AShop Software © Copyright 2002 - 2010
Customers & Sales
239
To view a customer's sales history:
1. Click on the Statistics icon, , next to the selected customer.
2. A Sales Report page will open for the selected customer with the date, time, product name, and
referring affiliate ID and name for each order.
· To send an e-mail message to the selected customer, click on the customer's name. Your local
mail program will open and be addressed to the customer.
· To view the referring affiliate's statistics, click the affiliate ID number for that order record.
· To send an e-mail message to the referring affiliate, click on the affiliate's name. Your local mail
program will open and be addressed to the affiliate.
· To reactivate the order, click the exclamation point icon, , to the far right.
· Click the Profile icon, , next to the customer ID to view this customer's profile.
4.5
Sales Reports
From the Administration Panel main menu, select Customers. A top menu bar appears and the
Customers and Messaging page opens with customers listed. From the top menu bar, select Sales
Reports. Sales Reports may also be opened by clicking on the Sales Reports icon,
Sales quick stats in the administration panel index page.
Report Filters
Report filters limit the data that is included in each report.
· Transaction Type: Retail, Wholesale or All
AShop Software © Copyright 2002 - 2010
, next to the
240
AShop V User Guide
· Payment Status: Unpaid, Paid, Chargebacks or All
· Date Range From: date, To: date
Sorting and Grouping
The filtered report data may be grouped and sorted to view the data from different perspectives.
· Order By: Date, Amount, Customer ID, Product, Downloadable Product, Physical Product
· Sort Order: Ascending or Descending order.
View - Download - Edit
The View and Edit buttons display the report in the browser, but different data and links appear in the
right column. Download exports the report data in a .csv file.
View - Sales report is shown with date, order ID, products, amounts, customer and affiliate links.
Edit - Sales report is shown with date, order ID, products, amounts, customer and links to chargeback
or reactivate and resend orders. In this mode, the last column has links to take action with each order.
Sales Report Mode: Edit
AShop Software © Copyright 2002 - 2010
Customers & Sales
241
Chargebacks - Reversals
A chargeback in AShop V creates a transaction equal and opposite to the original transaction. The
reverse transaction is dated with todays date so that the sales reports can be reconciled with bank
deposits. To Chargeback an order and the corresponding affiliate commissions, click on the Cancel Sale
icon, , next to each order record.
See: Chargebacks - Reversals
Resend Receipt and Reactivate Orders
Receipts may be resent and download limits may be reset at the same time by clicking on the
Reactivate icon.
See: Resend Receipt
Unpaid Orders will have a payment icon
and a send reminder icon
. Click the payment icon to
mark the order as paid and optionally send a receipt for the payment. Click the reminder icon to send an
email to the customer. A reminder message is automatically generated with the order reference number
and a link to pay online through the shopping cart checkout. The message may be edited before
sending.
Sales Office history: Payment receipts and reminder messages are saved in the Sales Office history
for each customer. You will find an icon
history for that customer.
in each customer's profile, which will open the Sales Office
Download
When the Download button is selected, the sales report data is exported in a .csv file, which can be
imported to Microsoft Excel. The fields are separated by a semicolon. To separate the data into
columns, open the csv file in Excel. If the separator is not already set to semicolon, all of the data fields
will appear in the first column. To separate the fields into columns within Excel, Select (highlight) the
column that contains the data and then select Data > Text In Columns. Select delimited, then click Next
and set the separator to semicolon. This process may be slightly different for each version of Excel.
screen shot from Microsoft Excel 2000
AShop Software © Copyright 2002 - 2010
242
AShop V User Guide
Recovering Incomplete and Failed Orders
Preliminary Orders
A preliminary orderid is created each time a customer begins to add products to his/her cart. A
preliminary order is saved in the database for each shopping session so that many customers may shop
at the same time and also to enable more data to be processed for each order. Payment gateways limit
the amount of data that can be passed through the payment process. Preliminary orders are used by the
shopping cart to handle more order related data.
Note: When viewing sales reports for active paid and unpaid orders, the orderid reference numbers will
have gaps in the sequence. This is normal because not all preliminary orders are completed.
Preliminary orders will accumulate in the database over time, which is why there is a Clear button.
Clicking this button will remove all preliminary orders except the last 10 (since some of them could be
orders that are currently being processed).
Activating Incomplete/Failed Orders
Failed orders are simply preliminary orders, which have not received a payment confirmation from the
payment gateway. Unfortunately the Internet is not perfect. Connections, equipment, and software can
fail for various sometimes unexplainable reasons. The shopping cart relies on the payment gateway to
post a payment response to complete and activate each order. If the payment gateway has trouble at
the time that the order is placed or the payment gateway response fails to reach the shopping cart, the
payment may be captured by the payment gateway, but until a payment response is received the
shopping cart will not send a store receipt and the order will not be recorded as paid in the shopping cart
AShop Software © Copyright 2002 - 2010
Customers & Sales
243
history..
The Incomplete/Failed Orders report provides a way to view preliminary orders to find one that failed, and
then activate the order so that a store receipt will be sent and the order will be recorded in the shopping
cart history. Payment is NOT submitted to any payment service during this process.
1.
From the Sales Report page, under Incomplete/Failed Orders, click Edit to show all of the
preliminary orders.
2.
Find the preliminary order and click the Activate Order icon,
Orders menu.
3.
Select a payment option, verify the customer's shipping address and enter information as needed,
and then click the Submit button to activate the order. Payment is recorded in AShop for the option
selected so that the order appears in sales reports for Paid orders. The receipt, order notice, and
fulfilment notice are sent in the same way as when normal orders are processed. For downloadable
product orders, a link and password will be included. For key code products, the key code(s) will be
AShop Software © Copyright 2002 - 2010
, to open the Complete Preliminary
244
AShop V User Guide
included in the customer's receipt.
4.6
Chargebacks - Reversals
A chargeback in AShop creates a transaction equal and opposite to the original transaction. The reverse
transaction is dated with todays date so that the sales reports can be reconciled with bank deposits and
refunds. To Chargeback an order and the corresponding affiliate commissions, Open Sales Reports and
select the date range of the transaction to be reversed. Click on the Cancel Sale icon, , next to the
order that is to be reversed.
Select or set the options as needed. Different options may appear depending on how the products and
shopping cart are set up. The amounts and product data are selectable here so that report data will be
correct under various circumstances. This chargeback feature is only for reporting and accounting. It
does NOT post any payments or refunds to any payment services.
AShop Software © Copyright 2002 - 2010
Customers & Sales
245
Chargebacks appear in reports with red text and negative amounts. There is an icon next to each
chargeback, which displays the comment when the mouse is passed over it.
Note: If your mail server is in a different time zone and the $timezoneoffset is not set to adjust for the
difference, very recent sales transactions may not be included even when the "To:" date is set for the
current date. This happens when the order is stamped with a time that is ahead of your current time
zone.
4.7
Resend Receipt
Resend - Reactivate Receipts
It is possible to resend a receipt and reactivate the password for downloadable products that were in the
order. Open the Sales Report page, select a date range, and click Edit. Click the Resend/Reactivate
icon, , next to the order.
AShop Software © Copyright 2002 - 2010
246
AShop V User Guide
You will see a page where you can select to resend the receipt, change the email where it will be sent,
send a copy to the administrator, and select to reset the allowed download days and allowed number of
downloads.
Click the Submit button and the Receipt will be resent and/or reactivated accordingly.
View Original Receipts
AShop will save all the sales receipts that have been sent to you customers so that you can view them
any time you have access to your AShop Admin Panel.
If you want receipts to be saved you must change the permissions of the admin/receipts to "777". The
receipts will be saved as a numbered file directly related to the Order ID.
To view the sales receipts you should simply login to your Admin Panel and navigate to Manage Sales. If
you click the Order ID number, for the order you wish to view a receipt for, you can download a copy of
that receipt.
4.8
Unpaid Orders
Unpaid orders are created in the shopping cart when a manual payment option is used.
Apply Payment and Activate Unpaid Order
1. An order notice is emailed to the shop administrator when each order is completed. When a manual
payment method is used to pay for an order, the order notice will include a link, which can be used to
record receipt of payment and activate the order.
AShop Software © Copyright 2002 - 2010
Customers & Sales
247
2. Unpaid orders may also be activated through the Sales Reports menu.
Select Unpaid and click Edit.
Then click the manual payment icon in the Unpaid Orders Sales Report.
Payment Confirmation Message
After payment is applied there is an option to send a payment confirmation message to the customer.
The Subject and Message body is automatically filled in with predefined text, which may be edited
before sending the message.
AShop Software © Copyright 2002 - 2010
248
AShop V User Guide
Send Payment Reminder Message
In Sales Reports, select Unpaid and Edit mode. For each unpaid order, there will be a link to send a
payment reminder message.
Click on the payment reminder icon/link.
The Subject and Message is pre-filled in and may also be edited.
A link to pay will be automatically included in the message.
AShop Software © Copyright 2002 - 2010
Affiliates & Referals
5
Affiliates & Referals
5.1
Affiliate Program
249
From the AShop Administration main menu, click Configuration on the left side menu. This will open the
Configure AShop menu. Click on the "Affiliate Program" link.
Affiliate Text
This text will display on the affiliate sign up page. The most common use for this text is to disclose the
terms of the affiliate program and to invite new affiliates to join. HTML and hyperlinks can be included in
this text area.
Affiliate Email
The Affiliate email is the address of the affiliate administrator, which can be different from the store
administrator email that is set in Shop Parameters. Affiliate sign-up and affiliate sales notices are sent
the Affiliate email address.
Multi Tier
Check this box and set the second tier affiliate commission percentage to enable the multi tier
commissions.
Maximum Number of Tiers
If you use multiple tiers you can set a maximum number here to make sure you don't end up paying all
your profits as commissions to affiliates.
AShop Software © Copyright 2002 - 2010
250
AShop V User Guide
Upgrade Affiliates After
Automatically upgrade your affiliates to a higher commission rate when they have referred a certain
number of orders.
Share Leads
Allow your affiliates to download a list of contact information to customers they have referred, which they
can use to follow up with customer or even to sell other products to them, if you allow this, which can be
a great incentive to join your program.
Default Affiliate Commission
When a new product is added to the catalog, the percentage amount will default to this amount. The
commission may be set to a percentage or flat rate amount for each product from within Add Products or
Edit Products.
Upgraded Affiliate Commission
A second level of commission rates for affiliates that perform well, which you can reward by giving them
a higher commission.
You can select the level of commission an affiliate will receive in their profile: normal or upgraded.
View your affiliate's profiles in the Messaging and Management section of Manage Affiliates
Commission on Wholesale
Check this box to give your affiliates commission on wholesale orders as well as retail orders.
Email Confirmation
Check this box require that your affiliates confirm their email by clicking a confirmation link in an
automatic message they receive when they sign up.
Require PayPal ID
Check this box if you want the PayPal field to be required when affiliates sign up. PayPal ID is used
within AShop to make payments for commissions earned. There is also a manual method of recording
commission payments.
Redirect URL
Customer click a link on an affiliate's website or e-newsletter. The link URL goes to the affiliate.php
script and includes the affiliate's ID. The affiliate.php script immediately reads the affiliate's ID from the
URL and places a cookie on the customer's computer so that, when a sale is made to this customer,
the affiliate will be credited a commission for the sale, then redirects to a page of your choosing. It
doesn't matter if the customer goes directly to the catalog page. It may be preferable to direct the
customer to a different page first, for instance; a product information page or ad copy. The Redirect URL
setting is provided for this purpose. To complete the sale, a link to the shopping cart catalog can be
provided, or OrderLinks may be used, depending on the type of product and how it is marketed.
Note: For affiliates to receive credit for commissions from click-thru sales, the product catalog
must be accessed by navigating to the file affiliate.php and must include the affiliate's ID in the URL.
For instance:
http://www.yourdomain.com/ashop/affiliate.php?id=1.
Hyperlink code, which includes the affiliate ID is automatically generated for affiliates in the Affiliate
Support Panel.
AShop places a cookie on the visitor's computer and redirects to the URL that is set within
Administration Panel/Configuration/Affiliate Program/Redirect URL (usually http://www.yourdomain.com/
AShop Software © Copyright 2002 - 2010
Affiliates & Referals
251
ashop/catalogue.php). Once the cookie is set, visitors can leave and return at any time to make a
purchase. AShop checks the cookie and credits the referring affiliate.
The catalog can also be accessed by navigating directly to the script catalogue.php (for instance, http://
www.yourdomain.com/ashop/catalogue.php) or to the AShop folder, where the index.html file will redirect
to catalogue.php, but these links will not credit any affiliate.
Note: The affiliate link can be manipulated to assign another redirect URL. Affiliate referrals can record
stats, set a cookie, and redirect to a specific product page for each link.
For example:
http://www.yourdomain.com/ashop/affiliate.php?id=1&redirect=http://www.anydomain.com/product.html
This link will set the cookie, record the click, and redirect to http://www.anydomain.com/productinfo.html
The syntax in Admin Panel > Manage Affiliates > Link Codes for adding such an affiliate link is:
%affiliatelink%&redirect=http://www.anydomain.com/product.html
You could use this to create affiliate links to a product page or any page you want. The product pages
could even be on a completely different domain. To complete the order, the productinfo.html page can
have a link to the shopping cart catalog, or directly to checkout with an Order-Link.
Affiliate Commission FAQs
Tier-1 commissions are earned when a customer clicks through an affiliate link and then purchases a
product that has a tier-1 commission set for it.
The tier-1 commission rate is set as a dollar amount or percentage for each product. You can set a
different amount/percentage for two commission levels (not to be confused with tiers). When each
affiliate first signs up, he/she receives level 1 commissions.
See: Add Products
Tier-2 commissions are commissions that are earned by an affiliate when somebody who clicked
through his/her affiliate link signs up as an affiliate and then refers customers who purchase products.
See: Second Tier Affiliate Commissions
Tier-2 commissions are set as a percentage of orders. There are two levels, just as with tier-1
commissions. Tier-2 commission rates are set in the Configuration > Affiliate Program page.
See: affiliate_program_1.htm
You can promote the affiliate to level 2 in the profile page for each affiliate.
See: View Edit Affiliate Contact Information
AShop V posts only one-time payments to PayPal. One-time payments through the shopping cart
and PayPal IPN method do not initiate recurring billing. Recurring billing setup through PayPal does not
affect affiliate commissions in AShop V.
None of the commissions are automatically recurring.
Tier-1 commissions are only earned once when a product with a tier-1 commission is ordered.
Tier-2 commissions are only earned once when a second tier affiliate refers a customer who orders a
product.
AShop Software © Copyright 2002 - 2010
252
5.2
AShop V User Guide
Multi Tier Affiliate Commissions
From the AShop Administration main menu, click Configuration on the left side menu. This will open the
Configure AShop menu. Then select "Affiliate Program".
Multi Tier Affiliate Commission Tracking
Multi tier affiliate commission tracking in AShop Software calculates different types of commissions.
Each affiliate tier promotes your online business in a different way.
Tier one commissions are earned by affiliates who promote your products. Tier one commissions
are set per product by an amount or percentage of the product price and are paid to affiliates for referring
customers who order products directly from your site through affiliate links.
Tier two, three, four... commissions are earned by affiliates who promote your affiliate sales
program. This type of commission is paid to each affiliate who signs up other affiliates (who earn the
tier one commissions for direct referral sales). The amount per order for this commission is typically a
much smaller amount compared to the tier 1 commission rate, however when multiplied by numerous
affiliate sign ups, it creates a powerful incentive to promote your affiliate sales program to earn
commission from a downline of affiliates they have recruited.
How Multi Tier Affiliate Commission Tracking Works
· Tier-1 commissions are set by percentage or dollar amount per product.
· Tier-2 commissions are set by percentage or dollar amount per product.
· Tier-3 commissions are calculated through the "Lower by" value which is subtracted from tier-2. For
example: tier-2 earns 5% commission on a product and "Lower by" is set to 1, which gives tier-3
(the person who referred the person on tier-2, who referred the person who referred the actual
customer) a 4% commission.
· Tier-4 commissions are lowered one more time and so on. From the above example the fourth tier
would get a 3% commission, the fifth tier would get a 2% commission and at the seventh tier the
commission would reach zero which makes this example have a total of 7 tiers. With a small
"Lower by" value, you could get a huge number of tiers and even end up owing more than you get
paid for the products you sell, which is why you should be careful when you set this value and
combine it with the "Maximum number of tiers" option, just in case.
· Every affiliate can potentially earn commission both from referring customers and from referring new
affiliates.
Example:
Affiliate A signs up and places a sign up link on his web site.
Affiliate B signs up through Affiliate A.
Affiliate C signs up through Affiliate B.
When a customer buys something through a link on Affiliate A's site, Affiliate A will receive the tier-1
commission rate for each product that is ordered.
When a customer buys something through a link on Affiliate B's site, Affiliate B will receive the tier-1
commission rate for each product that is ordered and Affiliate A will receive the second tier commission.
When someone buys something from a link on Affiliate C's site Affiliate C will receive the tier-1
commission rate for each product ordered, Affiliate B will receive the second tier commission and
Affiliate A will receive the third tier commission, if any.
AShop Software © Copyright 2002 - 2010
Affiliates & Referals
253
Each affiliate places a sign up form link and a sales link on his or her web site or uses your sales pages,
which can be personalized for each affiliate. Each affiliate earns the tier-1 commissions for AShop sales
that come through his sales link and also earns a smaller commission for sales by the affiliates that
have signed up through his or her sign up form link.
5.3
Manage Affiliates
Click on the "Affiliate Management" link in the Administration Panel main menu to manage affiliates. A
top menu bar appears and the Profiles and Messaging main page opens. There are three areas within
Affiliate Management.
Messaging and Management
E-Mail Messages To All Or Select Affiliates
View The Affiliates' Websites
View And Edit Affiliate Contact Information
View Commission & Payment History
Assign Discount Codes For Manual Referrals
Statistics and Payment
View Affiliate Sales, Commission Stats, and History
PayPal Payments and Update Commissions Paid
Link Codes
Link Code Generator
5.4
E-Mail Messages To Affiliates
From the Administration Panel main menu, select Manage Affiliates. A top menu bar appears and the
Messaging and Management main page opens. Enter the subject and message into the text boxes.
AShop Software © Copyright 2002 - 2010
254
AShop V User Guide
To e-mail a message to one affiliate
1. Click on the e-mail link for the selected affiliate. This will open your default e-mail program, such
as Outlook Express or Eudora.
To e-mail a message to selected affiliates
1. Place a check mark in the box next to each affiliate that you wish to send a message to.
2. Enter the Subject and Message text into the corresponding text boxes.
3. Click the "Mail to selected" button to send the message to selected affiliate.
To e-mail a message to all of the affiliates
1. Enter the Subject and Message text into the corresponding text boxes.
2. Click the "Mail to all" button to send the message to selected affiliates.
HTML-format or Plain text
HTML-format
With HTML-format selected, formatting tags, tables and hyperlinks may be typed or pasted into the
message box. With this setting, a page may be designed within your favorite WYSIWYG HTML
editor. You can then copy the HTML code and paste it into the message box to send newsletters,
advertisements, and other notices to customers or affiliates.
Note: With this setting, carriage returns within the message box do not generate line breaks and
must always be inserted with <br> or <p> tags or the text will all flow together in the resulting eAShop Software © Copyright 2002 - 2010
Affiliates & Referals
255
mail message.
Plain text
The Plain text setting does not recognize HTML tags and will render tag text in the e-mail message
just as you enter it into the message box. With this setting, carriage returns in the message box
generate a line break in the resulting e-mail message as they do in your client e-mail software such
as Eudora or Microsoft Outlook
5.5
View Affiliates' Websites
From the Administration Panel main menu, select Manage Affiliates. A top menu bar appears and the
Profiles and Messaging main page opens.
Click on the URL for the affiliate website that you wish to view. The website will open in a new browser
window. When you are finished viewing the affiliate's website, close the affiliate website browser to return
to the Affiliate Management panel.
5.6
View/Edit Affiliate Contact Information
From the Administration Panel main menu, select Manage Affiliates. A top menu bar appears and the
Messaging and Management page opens. To view or edit an affiliate's contact information, click the
Profile icon, , or the number next to the selected affiliate.
AShop Software © Copyright 2002 - 2010
256
AShop V User Guide
The affiliate's contact information will be displayed in text boxes within a form.
The Manual Referral Code can be used to track word of mouth and print advertising and discount
coupon campaigns. It is automatically generated by AShop when each affiliate signs up. It is generated
with 8 characters; generally the first two letters of the first name, the first three letters of the last name,
and a three digit number. The referral code is editable by the shop administrator.
See also: Discount Codes, Referral Codes And Discounts
Affiliate Contact Information
· Username
· Password
· First Name
· Last Name
· E-mail Address
· Street Address
· City, State, Zip
· Country
AShop Software © Copyright 2002 - 2010
Affiliates & Referals
257
· Telephone Number
· Website URL
· PayPal ID (e-mail address to receive PayPal commission payments)
Note: All of the Affiliate Contact Information is required in the affiliate sign up form, with the exception of
the PayPal ID, which is optionally required.
To edit any of the above fields, type new information into each text box that you wish to change. Click
the Update button. The information that is displayed in the form will replace the existing information in
the database.
5.7
Statistics and Payment
From the Administration Panel main menu, click on Manage Affiliates, and then click on Statistics and
Payment. The affiliates' names are listed with to-date summaries of Clicks, Orders, Earned, and Unpaid
stats. Click the affiliate ID number or the Profile Icon, , to open the affiliate profile page. Click the
affiliate name to email the affiliate.
A Pay Now icon,
, will appear next to each affiliate who is owed a commission.
Click the Pay Now icon,
, to open the Affiliate Payment panel.
Click the Statistics icon,
,to view stats and history for each affiliate.
Click on the Order ID link to view the order details.
Click on the Affiliate ID number in the Referred by column to return to that affiliate's statistics page.
AShop Software © Copyright 2002 - 2010
258
5.8
AShop V User Guide
Affiliate Commission Payments
From the Administration Panel main menu, click on Manage Affiliates, and then click on Statistics and
Payment.
A Pay Now icon,
, will appear next to each affiliate who is owed a commission.
Click the Pay Now icon, , to open the Affiliate Payment page for that affiliate. The total balance due for
the selected affiliate is listed at the top of the page. Unpaid commissions are listed with the Order ID,
Date, and Commission amount.
To pay commissions to the selected affiliate and mark the commissions as paid:
1. Select commissions for payment by placing or removing the check mark next to each unpaid
commission.
2. Check the method of payment. PayPal or Check.
3. Click Mark As Paid to process the payment. If PayPal is the selected payment method, the
browser will be directed to a PayPal payment page with the amount to be paid filled into the
payment form. If Check is the selected payment method, the affiliate contact information for check
writing will be displayed.
AShop Software © Copyright 2002 - 2010
Affiliates & Referals
259
To undo payment records:
1. Click on Manage Affiliates, select Statistics and Payment, then click on the Statistics, , next to
the affiliate that you wish to edit.
2. Click on the Delete icon, , next to the commission payment record that is to be deleted.
Note: To use the PayPal payments feature, the affiliate must first have a PayPal ID recorded in Affiliate
Contact Information.
Note: Your pay from PayPal account must be a verified business account to use this feature or PayPal
will not accept the transaction. The first time this feature is used, you must enter your PayPal account.
This will be stored in a cookie on your PC. Subsequently, the PayPal payment form will default to this
pay from account.
5.9
Affiliate Link Code Generator
From the Administration Panel main menu, select Manage Affiliates. Select Link Code from the top
menu bar.
The affiliate link code generator enables the store administrator to create banners and text ads for
AShop Software © Copyright 2002 - 2010
260
AShop V User Guide
affiliates to use in their web sites, ezines, and newsletters. Once the store administrator enters the
banners and text ads, the code generator automatically inserts each affiliate's ID into the code for them
to copy from their affiliate support panel.
You can sort your links/advertising material into an unlimited number of categories. Click "Edit link
categories" to add or manage your categories.
Add A New Link
1. Select which category the link should be added to.
2. Optionally, browse for a .jpg or .gif image to upload.
3. Optionally, set the image alt text. (Text that appears on the page when the mouse is passed over
the image)
4. Optionally, set the URL. If this is not set, customers will be redirected to the default redirect URL,
which is set within Configuration > Affiliate Program.
5. Optionally, enter text for a text link or ad copy to be shown together with an image.
6. Submit the form to save changes. AShop will generate a link for each affiliate with their ID code for
tracking.
URL
This is where your visitors will be redirected after clicking the link on an affiliate's website. It can be set
to index.php or catalogue.php to redirect to your shopping cart or it can be set to any other page on your
site or URL to a different site, for example if you want to use specific landing pages for your affiliate
marketing. You can also use the website replication feature to personalize your landing/sales pages for
each affiliate, giving them their own personal version of the site/page.
To use the website replication feature you need to add the placeholder code %affiliateuser% to the URL.
The page or site must be in a subdirectory of your AShop and the format of the URL must be like this:
http://www.yourdomain.com/ashop/subfolder/%affiliateuser%/page.html where the "http://www.
yourdomain.com/ashop" part should be replaced with the actual URL to your AShop, the "subfolder" part
should be replaced with the name of your subdirectory and "page.html" with the name of your sales page
to be replicated. The %affiliateuser% code will be automatically replaced with the username of the
affiliate, which will result in the page being personalized for the corresponding affiliate.
To use the replication feature you will also need to put special codes in your web page to mark which
content should be replaced with the affiliate's information. Read more about this in the website
replication help topic.
Link text
Enter the text and HTML that will be provided to affiliates for advertising. Tokens can be used within the
HTML link code to provide affiliates with a copy of the code with the correct affiliate ID number . For
example, if the URL to your affiliate.php script is http://www.yourdomain.com/affiliate.php and the
referring affiliate's ID is 2, then when affiliate number 2 logs in, he will see the link code with the id=2
parameter. http://www.yourdomain.com/affiliate.php?id=2
Link Code Tokens
There are two placeholder codes, which can be used to insert the affiliate.php URL with each affiliates' ID
number.
%affiliatelink% inserts the URL to the affiliate.php script on your site and adds each affiliates' ID
parameter.
Example: You enter this text and HTML into the affiliate link code generator.
We like to <a href="%affiliatelink%">Go here</a>.
Affiliate number 2 sees the following link code when logged into his or her affiliate panel.
AShop Software © Copyright 2002 - 2010
Affiliates & Referals
261
We like to <a href="http://www.yourdomain.com/affiliate.php?id=2">Go here</a>.
Customers see "We like to Go here."
When the mouse is passed over the link, the complete URL appears in the browser status bar.
http://www.yourdomain.com/affiliate.php?id=2
%affiliatecloaklink% inserts the URL to the affiliate.php script on your site and adds each affiliates' ID
parameter. It also adds link cloaking code, which prevents the actual URL from being displayed in the
browser status bar. This token must be placed within the HTML code in a different way so that it can
create the hyperlink opening tag in the correct place.
Example: You enter this text and HTML into the affiliate link code generator.
We like to %affiliatecloaklink% Go here</a>.
Affiliate number 2 sees the following link code when logged into his or her affiliate panel.
We like to <a href="http://www.yourdomain.com" onClick="window.open('http://www.
yourdomain.com/affiliate.php?id=2', 'PGM', 'scrollbars=yes, toolbar=yes, status=yes,
menubar=yes location=yes resizable=yes'); return false;"> Go here</a>.
Customers see "We like to Go here."
When the mouse is passed over the link, only the URL from the beginning of the <a> tag appears in the
browser status bar.
http://www.yourdomain.com
Read more about how affiliate links work in Configuration > Affiliate Program.
5.10
Website Replication
The website replication feature is a powerful marketing tool that automatically creates personal version of
your sales pages or even your entire shopping cart. To use this feature you will first have to prepare your
web pages for replication:
1. Create a subdirectory of your AShop on the server. For example, if your AShop is located in the
public_html directory on your website you could add a new subdirectory called "salesletter" inside the
public_html directory. If your AShop is located one step further down, for example in public_html/
shop, you would put the new subdirectory inside that directory instead, for example: public_html/
shop/salesletter
2. Add a .htaccess file in your new subdirectory, if you are on a Linux/Unix server, or use the URL
Rewrite module if you are on a Windows server. The .htaccess should contain the following lines:
Options +FollowSymLinks
Options +Indexes
RewriteEngine on
RewriteCond %{SCRIPT_FILENAME} !-f
RewriteCond %{SCRIPT_FILENAME} !-d
RewriteRule ^([^/]+)/?([^/]+)?/?$ ../view.php?$1&salesletter/$2
[NC,L]
Where "salesletter" should be replaced with the actual name of your subdirectory. The URL Rewrite
modul has a tool to import this code, but you do not need to add any .htaccess file if you are on a
Windows server, unless it runs Apache as its web server software.
3. Add placeholder codes to your pages, which will be replaced with the affiliate's own information when
a visitor views the pages through the affiliate's link. Each code is a HTML comment tag with a
corresponding end code. You can place default content between the start code and end code. For
example:
<!--
AShop_affiliate_firstname
-->Firstname<!--
/AShop_affiliate_firstname
-->
Which would be seen as just "Firstname" on the page by a visitor, unless the visitor arrived through an
AShop Software © Copyright 2002 - 2010
262
AShop V User Guide
affiliate link where the "Firstname" text will be replaced with the actual first name of the affiliate.
These are the available placeholder codes that you can use for website replication:
Start tag:
<!-- AShop_affiliate_firstname -->
<!-- AShop_affiliate_lastname -->
<!-- AShop_affiliate_user -->
<!-- AShop_affiliate_business -->
End tag:
<!-- /AShop_affiliate_firstname -->
<!-- /AShop_affiliate_lastname -->
<!-- /AShop_affiliate_user -->
<!-- /AShop_affiliate_business -->
Replaced with:
First name of the affiliate
Last name
The affiliate's username
The name of the affiliate's
business, if any
<!-- AShop_affiliate_email -->
<!-- /AShop_affiliate_email -->
Email address
<!-- AShop_affiliate_paypalid --> <!-- /AShop_affiliate_paypalid --> The affiliate's PayPal ID
<!-- AShop_affiliate_address --> <!-- /AShop_affiliate_address --> Street address
<!-- AShop_affiliate_state -->
<!-- /AShop_affiliate_state -->
State/Province
<!-- AShop_affiliate_zip -->
<!-- /AShop_affiliate_zip -->
Zip/Postal code
<!-- AShop_affiliate_city -->
<!-- /AShop_affiliate_city -->
City
<!-- AShop_affiliate_country -->
<!-- /AShop_affiliate_country --> Country
<!-- AShop_affiliate_signedup --> <!-- /AShop_affiliate_signedup --> The date the affiliate signed up
<!-- AShop_affiliate_url -->
<!-- /AShop_affiliate_url -->
The URL to the affiliate's website
<!-- AShop_affiliate_phone -->
<!-- /AShop_affiliate_phone -->
Phone number
<!-- AShop_affiliate_referralcode -- <!-- /AShop_affiliate_referralcode -- The affiliate's manual referral code
>
>
<!-- AShop_affiliate_extrainfo --> <!-- /AShop_affiliate_extrainfo --> Additional information provided by
the affiliate
These can be used both in your own web pages, if you put them in a subdirectory along with a .htaccess
file as described above, and in your AShop templates, which makes it possible to personalize content
on the shopping cart pages, for example to show the customer how to contact the person who referred
them.
In addition to the above codes you can also define an unlimited number of your own codes, to let your
affiliate provide their own Facebook ID, MySpace URL, fax number, custom page header or any other
kind of content that can be added to a web page. These are entered by the affiliate on the Change Profile
page in the affiliate area.
1. Login to your AShop administration panel and open the page Affiliates->Custom Tags.
AShop Software © Copyright 2002 - 2010
Affiliates & Referals
263
2. Enter the name of the new tag, which is what the affiliate will see on the Change Profile page, into the
box "Field name"
3. Enter the tag text of the new tag into the box "HTML tag". AShop will automatically add the text "<!-AShop_affiliate_" to the beginning and "-->" to the end of your tag.
4. Enter the number of rows of text that the affiliate should enter for this custom tag.
5. Click "Add" to create the new custom tag.
In the example "Biography" above, the affiliate can now provide a personal biography text of three lines
and you can automatically place this text on your pages by using the codes <!-AShop_affiliate_biography --> and <!-- /AShop_affiliate_extrainfo -->.
Link codes
Once you have prepared a website or sales page for use with the replication, you should make sure your
affiliates find it and know how to use it. This is done by adding a link code.
1. Open the page Affiliates->Link Codes in your AShop administration panel.
2. Enter just a URL into the "URL" box and leave the other fields empty. The URL should look something
like this: http://www.yourdomain.com/salesletter/%affiliateuser%/page.html where the first part should
be replaced with the actual URL to your AShop, the "salesletter" part replaced with the name of the
subdirectory you created before and the "page.html" part replaced with the actual name of your page.
3. Click "Add" to save the new link code.
The link will now show up on the page Link Codes in the affiliate area and will be automatically converted
into the personal link for each affiliate, which they can copy and paste into their own websites,
newsletters or printed material. When a customer visits the link, the page will be personalized for the
corresponding affiliate.
5.11
Referral Codes and Discounts
Disounts can be created and applied to each order or to each product. The two different types of
discounts are managed in two different places. Per order discounts are set through the Discounts
button, which is at the top right of the Edit Catalog page. Individual product discounts are set by clicking
the Discount button under each product listing in the Edit Catalog page.
Per Order Discounts - Applied At Check Out
Per Product Discounts - Applied To Each Product While Shopping
Per product discounts can be used as incentives to track affiliate referals. One way that this can be
done is by using the Manual Referral Code, which is unique for each affiliate. Each affiliate can be
registered with any number of discount codes by linking the discounts to his/her manual referal code.
To register affiliates with discount codes, go to Manage Affiliates.
Click on the Referral Discounts icon,
, to the right of each affiliate to manage discount registration.
To register an affiliate with a discount code, select from the drop down box and click Add.
AShop Software © Copyright 2002 - 2010
264
AShop V User Guide
All of the registered discount codes will appear for each affiliate.
Customers can be sent to a page where they are prompted to enter a referral code. This page can be
the affiliate.php script or a form that is placed within an HTML page.
affiliate.php (uses the cart.html page template)
When a valid referral code is entered, the affiliate is credited for the click and a tracking cookie is set on
the visitor's browser. The catalog pages will automatically show the discount codes that are registered to
the referring affiliate.
AShop Software © Copyright 2002 - 2010
Affiliates & Referals
5.12
265
Referral Form Code
There are two ways for customers to enter an affiliate's manual referral code. When affiliate.php is
opened without an affiliate ID parameter, the following form opens in the browser. The form page uses the
cart.html page template.
The manual referral form may also be inserted into an HTML web page. An example of the form is
included with distribution of AShop V and is named referralformEXAMPLE.html.
<form action="affiliate.php" method="post">
<input type="text" name="referrer" size="15">
<input type="submit" value="Submit" name="submit">
</form>
5.13
Affiliate Sign Up Form
New Affiliate Sign Up
1.
For new affiliate sign ups, open the signupform.php file.
AShop Software © Copyright 2002 - 2010
266
AShop V User Guide
For example: http://www.yourdomain.com/ashop/affiliate/signupform.php
2.
3.
4.
5.
6.
The new affiliate can choose a User Name and enter contact information, a website URL, and a
PayPal account e-mail address into the sign-up form.
After completing the form, the affiliate clicks the Submit button to save the information.
AShop automatically sends a password to the affiliate's e-mail address and the new affiliate is
instructed to check his/her e-mail for the password before proceeding.
A notice of the new affiliate is automatically e-mailed by AShop to the Affiliate Administrator.
The affiliate is then redirected to the login page where the password is required in order to access
his/her Affiliate Support Panel.
AShop Software © Copyright 2002 - 2010
Affiliates & Referals
5.14
267
Affiliate Support Panel
Affiliate Support Panel
The Affiliate Support Panel is where affiliates sign up and login to update their contact information, view
stats for clicks and commissions earned, and copy link and banner code to paste into their web sites,
ezines, and newsletters.
Existing affiliates will login to view/edit their profiles or change their passwords by navigating to the login.
php file.
For example: http://www.yourdomain.com/ashop/affiliate/login.php
If an affiliate forgets his password, there is a "Forgot your password?" utility that will e-mail the password
to the e-mail address on file for that affiliate.
Upon logging in, the Affiliate Support Panel will open with the affiliate's stats listed:
· Number of Clicks From Affiliate's Page
· Number of Orders From Affiliate's Page
· Number of Orders From Affiliate's Recruited Affiliates (appears only if you have Second Tier affiliates
activated in the Affiliate Program menu)
· Total of Affiliate's Earnings
· Amount of Commissions Currently Owed
AShop Software © Copyright 2002 - 2010
268
AShop V User Guide
View/Edit Affiliate's Profile
The affiliate may view or edit his profile data by clicking on the View/Edit Profile button. The affiliate's
contact information will be displayed in text boxes within a form.
Affiliate Contact Information
· First Name
· Last Name
· E-mail Address
· Street Address
· City, State, Zip, Country
· Telephone Number
· Website URL
· PayPal ID (e-mail address to receive PayPal commission payments)
To edit any of the fields, type new information into each text box to be edited. Click the Update button.
The information that is displayed in the form will replace the existing information in the database.
Change Affiliate Password
Affiliates may change their passwords by clicking on the Change password button. The existing
password must be entered once and the new password entered twice to verify that it is entered correctly.
To save the new password, click the Update button.
Affiliate Link Code
The store administrator adds banners and ads in the Administration Panel/Manage Affiliates/Link Code.
The banner and text code is generated for each affiliate to include a link to the ashop store and also to
include the affiliate's ID number for tracking.
Note: The link will direct customers to the AShop affiliate.php file, which tracks the affiliate's clicks and
sales, and then redirects the customer to the catalog or any other URL specified by the store
administrator from within the Administration Panel/Affiliate Program/Redirect URL setting.
For example: http://www.yourdomain.com/ashop/affiliate.php?id=1 where id=[the affiliate's ID number]
Note: AShop will automatically generate one simple link with affiliate code for each affiliate.
For example: <a href="http://www.yourdomain.com/ashop/affiliate.php?id=1">The Name Of Your Store</
a>
AShop Software © Copyright 2002 - 2010
Sales Office
6
Sales Office
6.1
Introduction
269
See also: Sales Office Configuration , Sales Office Tour
The Sales Office operator pages are divided into three main areas. The tool bar on the left side appears
in all pages.
Messages
The Customer Messages page displays new messages, which are fetched from the customer mailbox
that is set in Sales Office configuration. If spam blocking is enabled, messages from unknown senders
go to the spam bin. A message history link displays previous customer messages in chronological
order.
The Vendor Messages page displays new messages, which are fetched from the vendor mailbox that is
set in Sales Office configuration. Spam blocking is not applied to vendor messages. A message history
link displays previous vendor messages in chronological order.
Customers
Quick Quotes can be created, saved, and sent without requiring complete customer billing or shipping
information. A quick quote may later be retrieved for conversion into a bill or a paid order.
Edit a Quote by entering the quote number. The quote may be resent or converted into a bill or paid
order.
Find Customer - List customers alphabetically by last name or search by full or partial spelling of the
email address, any part of the first or last name, or full or partial phone number.
Add a New Customer
AShop Software © Copyright 2002 - 2010
270
AShop V User Guide
Vendors
Manage Purchase Orders - Create and send purchase orders to vendors. Report purchase orders by
status: sent, unshipped, and shipped (but not billed yet). Look up purchase orders in relation to
customer order numbers. This area provides a comprehensive way to directly access order and shipment
related information from customer or the vendor references.
Manage Bills - Report paid and unpaid bills. Vendor bill reports can be sorted and filtered by vendor,
status and date ranges.
Manage Vendors - Add and edit vendor contact information. View vendor history.
6.2
Tool Bar
The Sales Office tool bar appears in all of the Sales Office operator pages.
The Sales Office tool bar is divided into 5 sections: Open Items, Announcements, Reminders, Links, and
Contact Information.
Open Items include information about and links to: Customer Messages, Vendor Messages, Spam,
Unconverted Quotes
Announcements are set by the AShop administrator panel under Sales Office. This is a place where
the administrator of the shop can post messages for all operators (Sales Office users) to see.
AShop Software © Copyright 2002 - 2010
Sales Office
271
Reminders can be created and deleted by any Sales Office user. Reminders appear for all Sales Office
users when logged in.
Links can be created and deleted by any Sales Office user. Links open in a new window. They may be
to any valid URL. There are two links that cannot be deleted: Product Catalogue opens catalogue.php.
Admin Panel only appears when logged in as admin and it opens the AShop admin panel in a new
browser.
AShop Software © Copyright 2002 - 2010
272
AShop V User Guide
Contact Information is the contact information that is set for the shop in the AShop admin panel
Configuration > Shop Parameters. This is the same information that appears by default in receipts and in
the payment confirmation page. This information is here as reference for Sales Office operators (users).
6.3
Customer Messages
The admin user can login through the admin panel or directly to Sales Office. All other users must login
to the emerchant directory. For example: http://www.yourdomain.com/emerchant or http://www.
yourdomain.com/ashop/emerchant depending on where AShop is installed. emerchant/index.html
automatically redirects to emerchant/login.php
Upon login, mail is fetched from the customer email box, which is set in Sales Office Configuration. If
spam blocking is not enabled all customer messages are moved to the customer messages inbox. If the
spam blocking is enabled in Sales Office Configuration, then email that is from known senders is moved
to the inbox and all other email is moved to the Spam Bin.
If the admin email setting, which is set in Configuration > Shop Parameters is set to the same address
as the Sales Office customer email address, all admin notices will post directly in the Sales Office
customer inbox (not sent by email to the POP3 mailbox). This method is more reliable and secure than
sending admin notices by email and it reduces the load on the local mail server. If the addresses are
different, the admin notices will be sent as regular email.
Customer Messages are received in two ways.
1.
3.
The customer mailbox is checked and new messages are fetched automatically upon logging into
the Sales Office and when the Messages page is opened. Email is fetched from a POP3 mailbox
and the messages are then deleted from the POP3 mailbox.
Messages from contact forms are posted directly to this inbox. Admin notices also post directly to
the Sales Office customer inbox if the admin email address is same as the Sales Office customer
email address.
How to Process Messages
Use the icon/links on the right to reply, save, delete, view profile, and view history. You may view the
sender's email address in the browser status bar by passing the mouse over the From field. Open a new
message to the Sender in your local email client (for example Outlook) by clicking on the From field.
AShop Software © Copyright 2002 - 2010
Sales Office
273
Open the view message window by clicking on the Subject line. There are also links in the view
message window to reply, save or delete the message.
When a Reply is sent, the original message and the reply are saved to the customer history. If a
customer with that email address already exists, the messages are saved to that customer history. If
there is not an existing customer with that email address, a new customer profile is created and the
messages are saved to the new customer history.
Forward the message (and attachment, if any). The forwarding window will open with the Sales
Office customer address. Change it to the forwarding recipient.
Delete completely deletes the message.
Save saves to an existing customer history or creates a new customer profile if there is not already
a customer with that email address.
Customer Profile icon/links only appear for existing customers. They link directly to each
customer's contact information.
Customer History icon/links only appear for existing customers. They link directly to each
customer's history.
AShop Software © Copyright 2002 - 2010
274
AShop V User Guide
To Delete or Save Multiple Messages, click the checkbox to the left of each message to select
specific messages or click the checkbox at the top of the column to select all of the messages. Then
click on delete or save button at the bottom.
Check Mail while logged in by clicking on the Check Mail button in the Messages page. There is also a
check mail link on the left in the tool bar, which appears in every Sales Office page.
Message History
To view previous customer messages in chronological order, click on the Message History link.
Shortcut icon/links provide direct access to related customer information and to process the messages.
Use the page links at the bottom to browse message history by page number or previous/next page.
AShop Software © Copyright 2002 - 2010
Sales Office
6.4
275
Spam Bin
Upon login, mail is fetched from the customer email box, which is set in Sales Office Configuration. If
spam blocking is not enabled all customer messages are moved to the customer messages inbox. If the
spam blocking is enabled in Sales Office Configuration, then email that is from known senders is moved
to the inbox and all other email is moved to the Spam Bin.
Click the Save icon/link next to each message in the spam bin to move it to the customer inbox.
Click the Empty button to delete all the spam messages with one click.
Click the From link to open a local email client such as Outlook. Note that when messages are sent
through a local email client software they are NOT automatically saved in Sales Office message history.
Click the Subject line to open the Sales Office view message window. When a message from the spam
bin is replied to, a customer profile is created for the original sender and related messages are saved in
the customer's history. Future messages from the same sender will then be received in the inbox
AShop Software © Copyright 2002 - 2010
276
AShop V User Guide
instead of the spam bin.
6.5
Vendor Messages
Upon login, mail is fetched from the vendor email box, which is set in Sales Office Configuration. Spam
blocking does not apply to the vendor messages. Use the icon/links on the right to process each
message or to go directly to the vendor profile or history.
Click the From link to open a local email client such as Outlook. Note that when messages are sent
through a local email client software they are NOT automatically saved in Sales Office message history.
Click the Subject line to open the Sales Office view message window. When a vendor message is
replied to through Sales Office, the original message and the reply are automatically saved in the
corresponding vendor's history.
6.6
Customers
In the main menu at the top of the page, click Customers.
AShop Software © Copyright 2002 - 2010
Sales Office
277
Create a (Quick) Quote
The Quick Quote feature is used to look-up product prices, calculate shipping and taxes, and calculate
total amounts. The customer name and address is not necessary for a quick quote. A quick quote can
be saved and sent to a valid email address or printed. Quotes can be looked up, related to a customer,
and converted into orders or bills through the Unconverted Quotes menu, which is in the Sales Office
Tool Bar.
See also: Quotes and Orders
To create a Quick Quote, enter the shipping state and zip and click Go.
Select products and add them to the quote.
· To exit without saving changes, navigate to another page in the main menus or logout.
· Save - the quote and create a reference number.
AShop Software © Copyright 2002 - 2010
278
AShop V User Guide
· Send - the by email, save the quote and create a reference number.
· Bill - converts the quote to an unpaid order and sends an invoice with a link to pay online.
· Print - the quote, save it and create a reference number.
Edit an Existing Quote
Previously saved quotes may be looked up by the reference number. A previously saved quick quote can
then be edited, processed, and related to a specific customer.
AShop Software © Copyright 2002 - 2010
Sales Office
279
Find an Existing Customer
The alphabetic customer lookup lists customers by last name in ascending order.
Find customers by partial or complete spelling of the email address, (first or last) name, or phone
number. Find by phone number ignores non-numeric characters and spaces so that the phone number
may be entered in any format.
AShop Software © Copyright 2002 - 2010
280
AShop V User Guide
Merge Customer Profiles
Each customer's email address is a unique reference. If a customer has used more than one email
address when ordering products or contacting the shop, it is possible for more than one customer profile
to exist for the same customer. To merge the customer profiles into one customer profile, find the
customer by last name or phone number. In the search results, check the box next to each listing for
the customer and click the Merge selected profiles button at the bottom of the page.
Select the customer profile where the multiple profiles will be merged to and click Merge into selected
profile.
AShop Software © Copyright 2002 - 2010
Sales Office
281
The billing and shipping addresses in the selected profile are kept and saved. The billing and shipping
addresses from the unselected profiles are deleted during the merge. eMail addresses and phone
numbers from the unselected profiles are saved in the selected profile under Alternate eMail and
Alternate Phone.
Add a New Customer Record
To add a new customer record, enter the name, email address and billing information. An email address
AShop Software © Copyright 2002 - 2010
282
AShop V User Guide
must be entered as this is the unique reference for each customer. All of the address text fields must
have an entry before the form can be submitted. If some of the information is not known yet, enter
"unknown" or a hyphen or any other character and click Save.
After the customer contact and billing information is saved, shipping information may be entered and
saved with the customer profile. Check the box labeled "Sending email to this customer is allowed" for
the customer to receive mass emails, which may be sent from the customer messaging tools.
Customer History
Click on the history icon
to view a customer's history. History icons are located in the inbox next to
each known contact and at the top of the page in each customer's profile page.
AShop Software © Copyright 2002 - 2010
Sales Office
283
The history for each customer includes all messages, notes, quotes, orders, and bills that relate to that
customer. Historical listings are linked to the original transaction where applicable.
Messages that were received from and sent to the customer appear in the history page with a link to
open the message. Message history includes emails that were sent and received through Customer
Messages. Each customer history also includes reminder and past due messages, which can be sent
manually through Sales Reports and may also be sent automatically for each bill. The message subject
link opens each message in a pop-up window.
AShop Software © Copyright 2002 - 2010
284
AShop V User Guide
Notes that were saved for the customer appear with the word "Comment" and the subject line of the
note, which links to open the note for viewing and editing. When a note is saved, it is datestamped.
When it is edited, the datestamp is replaced with the edit datestamp.
AShop Software © Copyright 2002 - 2010
Sales Office
285
Quotes that were previously sent or saved for the customer appear with the quote number, which
links to the original quote to open it for editing or to convert it into an order. See Quotes and Orders.
AShop Software © Copyright 2002 - 2010
286
AShop V User Guide
Orders that are listed in customer history may have more than one link depending on the type of
products that are in each order.
· The orderid number links to open the original receipt in a new browser window.
AShop Software © Copyright 2002 - 2010
Sales Office
287
· A Status link appears when any products in the order are assigned to a vendor. Click the Status link
to view the status of related purchase orders. If there is multiple vendor assigned products within one
order, the products will be grouped by vendor so that there will be one purchase order for each vendor.
AShop Software © Copyright 2002 - 2010
288
AShop V User Guide
· An Edit link will appear next to the orderid if the order is unpaid. Unpaid orders are created when
payment has not been applied to an order that was paid by a manual payment option. For example
when a customer checks out and selects to pay by check and the check has not been received yet.
Unpaid orders may also be created in the Sales Office by converting a quote into a payable bill. Click
the Edit link to view and edit the bill properties. Additional text such as "Unpaid" or "Overdue" will
appear before the orderid depending on the status of the unpaid order.
· A Recurring link will appear for bills that are recurring. Click the Recurring link to view and edit the
recurring bill properties. With the use of billing templates it is possible to create multiple recurring bills
from each order. If the order included more than one recurring bill, the recurring bills will be listed
separately with a link to edit each bill.
AShop Software © Copyright 2002 - 2010
Sales Office
6.7
289
Quotes and Orders
Every customer order begins as a quote, which may then be converted into an order. Quotes may be
created, edited, and processed in various ways.
Quick Quote
The Quick Quote feature is used to look-up product prices, calculate shipping and taxes, and calculate
total amounts. The customer name and address is not necessary for a quick quote. A quick quote can
be saved and sent to a valid email address or printed. Quotes can be looked up, related to a customer,
and converted into orders or bills through the Unconverted Quotes menu, which is in the Sales Office
Tool Bar.
For more about Quick Quotes see: Customers
Create a New Quote For a New or Existing Customer
To create a new customer profile or find an existing customer profile go to the Customers menu. Note
that a profile is automatically created for each new customer when an order is placed through the
shopping cart and when a new customer contacts the shop through the Sales Office contact form. A
quote may then be created for the selected customer from the customer profile page or from the
customer history page.
Select an existing customer or create a new customer profile.
Click the quote icon/link at the top of the customer's profile or history page.
AShop Software © Copyright 2002 - 2010
290
AShop V User Guide
Add products and comments to the quote and then process it. Shipping and tax will be automatically
calculated and can then be edited manually if desired.
Find a Saved Quote
Saved quotes may be found in several ways.
Sales Office Tool Bar
Quotes are listed in chronological order through the Sales Office tool bar Unconverted Quotes.
Quotes that are related to a customer are listed with the customer name. Quick quotes, which are not
related to a customer are listed with the state and zip.
AShop Software © Copyright 2002 - 2010
Sales Office
291
Search By Quote Number
To search for a quote by the quote reference number, click Customers in the top nav bar. Enter the
quote number and click Go.
Customer History
Quotes also appear in each related customer's history.
6.8
Vendors
To access the vendor management tools, click on the Vendors link at the top of the page.
AShop Software © Copyright 2002 - 2010
292
AShop V User Guide
Manage Purchase Orders
There are two ways to create purchase orders in the Sales Office.
1. When a customer order is received and the order includes products that are assigned to a vendor or
more than one vendor, the products are grouped by vendor and a purchase order is automatically
suggested for each vendor. The suggested new purchase orders appear in the Open Orders report.
At this point, the POs are not saved yet and they do not have purchase order reference numbers.
The new POs may be edited or voided if necessary. When a new purchase order is printed or sent,
a purchase order number is assigned, the purchase order is saved, the PO status changes to Sent,
and the saved PO will now appear in Unshipped Purchase Orders reports.
2. Purchase orders may be created manually for each vendor and referenced to a customer. A
purchase order number is assigned when the manually created PO is saved, printed, or sent.
Edit an existing purchase order.
Enter the purchase order number and click Go. Existing purchase orders may also be found in relation
to each customer order by looking up the Status of Order ID (below) and also by looking up the order
through each customer's history.
Create a new purchase order.
Select the vendor for which the purchase order will be created and then click the Go button. When
creating a purchase order to a vendor, only that vendor's products appear in the product selection box.
Products from more than one vendor cannot be mixed in one purchase order.
Open Orders are customer orders that include vendor products for which purchase orders have not been
AShop Software © Copyright 2002 - 2010
Sales Office
293
created yet. Open Orders may be reported for all vendors or for a specific vendor. To view open orders for
all vendors click Go with All vendors selected (default selection). To view open orders for a specific
vendor, first select the vendor, then click Go.
How to Void a New Purchase Order
New orders that contain vendor products automatically suggest a new purchase order for each vendor in
Open Orders. A purchase order cannot be voided until it is sent and saved. To void a new (suggested)
purchase order, first send it to "No Recipient". After it is sent, a void link will appear at the bottom of the
PO.
Unshipped Purchase Orders have been saved and sent or printed, but have not been marked as
shipped. Orders are typically marked as shipped when the vendor sends notice of shipment and/or the
vendor sends tracking information. To view unshipped orders for all vendors click the Go button on the
right. To view unshipped orders for a specific vendor, first select the vendor, then click Go.
Shipped Purchase Orders are purchase orders that have been marked as shipped, but for which a bill
has not been received yet. To view shipped orders for all vendors click the Go button on the right. To view
shipped orders for a specific vendor, first select the vendor, then click Go.
Manage Vendor Bills
A vendor bill may be entered for each shipped purchase order. Vendor bills may then be reported by date
and status. In the reports, the vendor bills link to the related purchase orders, which link to related
vendor and customer information. Note that this feature is intended to track order and billing status and
to facilitate daily operations. It is not intended to replace an accounting system or to be the authoritative
source of data for accounting.
Select the report filters and click Go.
The Vendor selection can be for all vendors or only one selected vendor. The date range can be selected
by bill date or paid date. Status can be all, paid, or unpaid. The reports can be sorted in order of vendor
or date. Action is display or download in CSV.
Unpaid bills appear in vendor reports with a check box. Check the boxes and click Calculate Selected
to see the total amount to be paid.
AShop Software © Copyright 2002 - 2010
294
AShop V User Guide
Set the paid date and click Submit to mark the selected bills as paid.
Manage Vendors
Select or search for a vendor to view/edit a vendor profile, vendor contacts, vendor history, and related
transactions. To add a new vendor, click the Add Vendor button at the bottom of the page.
Vendor Contacts may be added for each vendor. Notes and messages from the contact will appear in
that contact's history. All notes and messages to and from the main vendor email and all of the vendor
contacts will appear in the main vendor history.
AShop Software © Copyright 2002 - 2010
Sales Office
6.9
295
Bills and Recurring Billing
To create a bill and send an invoice, begin by creating a quote and then convert the quote into a bill.
When a bill is created an invoice may be emailed to the customer. The invoice will automatically include
the order reference number and a link to pay online through the shopping cart checkout/payment pages.
AShop Software © Copyright 2002 - 2010
296
AShop V User Guide
A bill may be one-time or recurring. If it is recurring, a new bill will be automatically created and emailed
to the customer on a schedule, which is set in the edit bill page. Recurring bills may be set to stop after
a specific number of billing cycles or they may be set to continue indefinitely.
AShop Software © Copyright 2002 - 2010
Sales Office
297
The Due Date appears at the bottom of invoices and it is used as a reference for sending reminders,
past due messages, and recurring bills.
For service from: %startdate% to: %enddate% - These dates are used by the tokens in the Add
Comment field (below). The first invoice will use the dates that are set when the bill is first created. If the
bill is recurring, the dates will automatically increment for each billing cycle based on the length of the
billing cycle. For example with monthly recurring bills the next automatically generated invoice will
include from/to dates that are one month after the from/to dates of the previous invoice.
Add Comment - A comment may be included in each invoice. Tokens may be used to include variable
content such as dates and order related data. To omit the comment from invoices, leave this field blank.
Remind (number of days) before due date if not paid - Check the box to enable the reminder
message and enter a number of days that is appropriate for the billing cycle. For example if the recurring
invoice is to be created and sent 10 days before the due date for each billing cycle, the reminder
message can be sent within 1 to 10 days of the due date.
· Reminder messages will not be sent for bills that have already been paid.
· A reminder cannot be sent before the invoice is sent. If the Remind (number of days) is set to a value
that is before the date that the bill will be sent, there will be a pop up error message and the setting
will not be saved.
· The reminder will never be sent if it is time to send the past due message. For example; if the cron job
for autobill.php has been inactive for a while.
Reminder Message - The reminder message text is included in reminder messages that are
AShop Software © Copyright 2002 - 2010
298
AShop V User Guide
automatically sent and also in reminders that are manually sent from Sales Reports (for Unpaid orders in
Edit mode). Tokens may be used to include variable content such as dates and order related data.
Send Past Due Message (number of days) after due date if not paid - When the box is checked, a
past due message will be automatically generated and sent the set number of days after the due date.
Past due messages are not sent for bills that have already been paid.
Past Due Message - This text is included in automatically generated past due messages. Tokens may
be used to include variable content such as dates and order related data.
Recurring options are None, Weekly, Monthly, Quarterly, Semiannually or Annually. After the first bill
sent, recurring bills will be automatically created and sent based upon the cycle that is set for Recurring.
AutoBill will calculate the date to send the next recurring bill by first figuring out its due date and then
subtracting the "send x days before due date" from it. If "send x days before due date" is set to zero, the
next bill will be sent on the next due date.
Repeat number of times - This is how many times automatic recurring bills will be created and sent.
This does not include the first bill, which was manually created or created from a shopping cart order
with a recurring bill template. Set the number of times to zero if the recurring bills are to continue
indefinitely.
Create and send bill (number of days) before due date - Automatic recurring bills are typically
created and sent before the due date so that customers have adequate time to pay before the bill
becomes past due. The number of days set here should be greater than the Reminder Message number
of days.
Tokens are placeholders where variable data is inserted into the message text by the program.
%startdate% - The beginning date of period of time for which the service is being billed.
%enddate% - The ending date of the period of time for which the service is being billed.
%duedate% - This is the due date for each bill.
%orderid%
The %startdate%, %enddate%, and %duedate% values are initially set when a new bill is created. For
recurring bills, the dates are automatically incremented with each billing cycle.
AutoBill - Automatic Recurring Bills
To generate new automatic recurring bills and to send reminder and past due messages the emerchant/
autobill.php script should be run.
Before running autobill.php, open the script in a text editor and set the server path. Do not remove the
quotes or the semicolon around the path setting. Do not edit anything else in this file.
AShop Software © Copyright 2002 - 2010
Sales Office
299
To run autobill.php automatically on a daily schedule, set up a Cron. Set the Crontab to run every day. If
there are other Crons scheduled for the same domain, set this one to run at a different time so that
potential conflicts are avoided. Here is an example of a Cron command to run autobill.php.
/usr/bin/php -q /home/httpd/vhosts/yourdomain.com/httpdocs/emerchant/autobill.php
Typical Cron Setup in Plesk
Daily AutoBill Reports
AShop Software © Copyright 2002 - 2010
300
AShop V User Guide
Each time autobill.php runs, a report is sent to the Sales Office customer inbox. When the Cron runs, an
AutoBill Cron Job Report is sent. When new bills, reminders and past due messages are sent, an
AutoBill Activity report is sent to the Sales Office customer inbox. The daily activity reports help to
insure that the Cron is running and that the bills are being processed consistently. To daily AutoBill
report data is saved in the database table: emerchant_autobillreport, which may be browsed using
phpMyAdmin or a similar tool. (Most hosting services provide phpByAdmin or a similar database
management tool.)
Billing Templates
Billing templates are used to automatically create recurring bills from orders. See Sales Office > Billing
Templates.
Managing Unpaid Orders
Unpaid Orders are reported in the admin panel under Sales Reports. Select status Unpaid and Edit
mode to manage unpaid orders and to send reminders. Unpaid orders also appear in each related
customer's history through Sales Office.
7
Shopping Mall
7.1
Shopping Mall Introduction
See also: Shop Parameters > Member Shops, Shopping Mall Tour
Member products may be displayed in individual catalogs OR in one main catalog. The setting for this is
in Shop Parameters > Member Shops.
Member Catalogs Enabled
· mall.php displays the member shop directory listing and search tools.
· Each member has an individual catalog of products.
· Each member may design custom shopping cart pages.
· Each member may create product categories, which appear only in that member's catalog.
Member Catalogs Disabled
· mall.php redirects to the catalogue.php
· All member and admin products appear in one main catalog.
· The mall administrator designs the shopping cart pages.
· Only the mall administrator may add or change product categories.
New Member Signup and Activation
7.2
Shopping Mall Configuration
Shopping Mall Parameters
Set the Shopping Mall parameters in Configuration > Shop Parameters > Shopping Mall.
Login to the AShop admin panel. When the Shopping Mall is activated and there is at least one member,
a username AND password is required to login. The username for the mall administrator is
AShop Software © Copyright 2002 - 2010
Shopping Mall
301
ashopadmin. The password for ashopadmin is same as was previously set before the username
requirement was activated.
Member Shop Directory - Page Template
If Individual Member Catalogs is enabled in Shopping Mall Parameters, modify the mall.html page
template or create a new one and upload it to the directory where AShop is installed. If Individual
Member Catalogs is disabled, skip this step.
Administration Panel Images
Replace images that appear in the administration panel. Stay with the original image width to avoid
distortion of the admin panel pages.
The main image to replace is admin/adminlogo.gif, which appears above the main navigation on the left
side of the admin panel. (191 x 70 pixels recommended)
Replace the AShop adminlogo.gif
with your own adminlogo.gif
Note: The login and admin panel background colors can be set by changing (after adding it if it isn't
already there) the following line in your admin/config.inc.php file:
AShop Software © Copyright 2002 - 2010
302
AShop V User Guide
$adminpanelcolor = "7589e7";
Member Signup Form
The member signup form is displayed by navigating to the members directory or to the members/index.
php file. For example:
http://www.yourdomain.com/ashop/members or http://www.yourdomain/ashop/members/index.php
Edit or replace members/application.txt - The content of the members/application.txt file is included
at the top of the member signup form page. A description of the member program may be included in the
signup form page by editing or replacing this file. HTML may be used in the application.txt file to format
text and to include links and images.
Edit or replace members/signup.html - The members/index.php script uses the members/signup.
html page template. Create a page template or modify the example page template that is provided with
the AShop files. If a page template named signup.html is not present in the members directory, the
default logo image (images/logo.gif) will display at the top of the member signup page.
Add a link to the member signup page (members/index.php) from at least one page in your web site.
Typically the signup link goes in a web page where the mall and member program is described.
Edit the admin/admin.css file and change the loginform stylesheet to modify the look of the login form
page.
7.3
Individual Member Catalogs
When individual member catalogs are enabled, each member has an individual catalog where only that
member's products appear. The following example is shown with Member Product Management enabled.
When individual member catalogs are enabled, each member has a Layout link when Configuration is
AShop Software © Copyright 2002 - 2010
Shopping Mall
303
selected. Each member may upload a logo image, set fonts, colors, borders and other layout
parameters.
Each member may add a page header and page footer, which is then included at the top and bottom of
catalog, view cart, and check out pages. HTML may be used in the page header and footer to format
text, layout tables, and specify page parameters.
7.4
Member Signup
New members signup a members/index.php. See Shopping Mall Configuration for instructions to set up
the member signup form.
AShop Software © Copyright 2002 - 2010
304
AShop V User Guide
When a member application is submitted, the new applicant sees a confirmation page advising that the
application will be reviewed first before the account is activated. The applicant also receives an email
confirmation with a similar message and the mall administrator receives an email notice of the
application.
Activate New Members
Each new member account must be activated by the mall administrator. This is done in the admin panel
when logged in as ashopadmin. Click on Manage Members.
AShop Software © Copyright 2002 - 2010
Shopping Mall
305
Click on the exclamation icon to activate the new member.
When the member account is activated, a welcome message is emailed to the member with link and
password to the member's admin panel. The exclamation icon then becomes a member history icon.
Member Login
Members login at admin/login.php, same as the mall administrator (ashopadmin). When logged in as a
member, the administration panel functionality is limited and the member has only has access to his/her
products and information.
7.5
Member Shop Parameters
When logged into the admin panel as a member, in the main navigation on the left click Configuration
and then Shop Parameters at the top of the page. This is where each member can edit his contact
information, shop categories and description, and other member related data.
AShop Software © Copyright 2002 - 2010
306
AShop V User Guide
AShop Software © Copyright 2002 - 2010
Index
Index
-22CheckOut
108
-Aabout AShop Deluxe 8, 163
administration panel
49, 50, 52, 61, 66, 67, 71, 78,
81, 92, 98, 100, 102
advanced options 52
affiliates 249, 252, 253, 255, 257, 258, 259, 263,
265, 267
agreement 35, 169, 204
AShop Deluxe free trial 10
AShop Deluxe license agreement 9
AShop Software affiliate program 69
attributes
222, 226
Authorize.net 109, 111, 112, 173, 174
Authorize.net ARB
148
automation 81, 88
autoresponder 151, 152, 154
AutoResponse Plus 151, 152
-Bbackup 162
buy buttons
40
-Ccatalog 30, 67, 183, 185, 187, 189, 190, 191, 194,
195, 196, 202, 204, 206, 226
categories 30, 183, 185, 187
contact
147
credit cards 104, 108, 109, 111, 112, 115, 116,
118, 119, 123, 127, 129, 132, 133, 134, 135, 136, 137,
173, 174, 175, 176, 177, 178
Curl error 178
customers 235, 237, 238, 239, 245, 272, 276
customization
11, 17, 24, 30, 35, 36, 37, 38, 40,
48, 49, 50, 71, 179
CVV2 175
AShop Software © Copyright 2002 - 2010
307
-Ddatabase 162
database not found 167
Digital Mall 300, 302, 303, 305
Direct access...not allowed
173
discounts
102, 198, 208, 263, 265
downloadable product 70, 173, 205, 206, 208
drm 155
Duplicate Transaction error 177
-EeBay
202
ebooks 155
Echo
115
email 172
email fulfilment 81
eMerchant 141, 144, 269, 270
Error 97 - Authorize.net 174
Error 99 - Authorize.net 174
Express Checkout
129
Ezic
116
-Ffile upload 88
first.html
24
fraud prevention 175
free product 208
FrontPage 179
fulfilment 81, 88
-Ggifts
198, 208
-IIncludes 33
Incorrectly formatted template file 179
installation
11, 16, 17, 24, 30, 35, 36, 37, 38, 40,
48, 49, 164, 166, 167, 169, 179, 209, 210
integration with third party software 81, 151, 152,
153, 154, 155
308
AShop V User Guide
Invalid Credit Card - Authorize.net AIM
invoice 148, 295
IonCube 167
173
-Kkey codes
212
-Llanguage 36, 37, 38, 40
Layout Menu 71
license agreement 204
License Key registration
16
link code
259
LinkPoint
118, 119
ListMail Pro
154
ListMessenger
153
-MMac
173
mailing list 151, 152, 153, 154, 235, 253
Make HTML 226
Manage Affiliates menu 253, 255, 257, 258, 259,
263, 265
Manage Products menu 183, 185, 187, 189, 191,
194, 195, 196, 198, 200, 202, 204, 205, 206, 208, 209,
210, 212, 213, 218, 220, 222, 226
Manage Sales menu 235, 237, 238, 239, 245
manual payment handling 121
members 302, 303, 305
messaging 272
-Nnavigation
36, 40
-Ooffline credit card processing 123
open_basedir error 171
OrderLink 40
orders 28, 202, 206, 208, 210, 212, 235, 238, 239,
244, 245, 289
overview of AShop Deluxe 8
-Ppage labels 36, 37, 38, 40
page templates 17, 24, 179
password access
48, 209, 210
Password Administrator+
153
Password Robot 154
PayFlow 132, 133
payment methods 78, 104, 108, 109, 111, 112, 115,
116, 118, 119, 121, 123, 127, 129, 132, 133, 134, 135,
136, 137
PayNova 127
PayPal 127, 129, 170, 177, 178
pay-per-click
78, 81
PayReady 133
PaySat
134
pdf 155
Plug-N-Pay 134
product file 70, 173, 205, 206, 208
product management 169, 170, 180, 183, 185, 187,
189, 190, 191, 194, 195, 196, 198, 200, 202, 204, 205,
206, 208, 209, 210, 212, 213, 218, 220, 222, 226
Products
33
PSBill
135
-Qquantity based pricing
quotes 148, 289
200
-Rreceipt
28, 245
receipt templates
24
recurring bill 148, 295
referrals 249, 252, 253, 255, 257, 258, 259, 263,
265, 267
register License Key
16
ROI tracking 78, 81, 258, 259, 263, 265
-SSAFE MODE Restriction in Effect
170
sales reports 235, 238, 239, 245
save cart option 66
secure ebook 155
AShop Software © Copyright 2002 - 2010
Index
setup shopping cart
11, 17, 24, 30, 35, 36, 37, 38,
40, 48, 49, 50, 52, 61, 66, 67, 71, 78, 81, 92, 98, 104,
170, 171, 179, 209, 210, 213, 218, 220, 249, 252
shipping 90, 92, 102, 213, 218, 220
Shipping & Taxes menu 90, 92, 100, 102
shop parameters 52, 61, 66, 67
Shop Parameters menu 52, 61, 66, 67, 136
shopping cart mode 61
spam blocker
275
store configuration 49, 50, 52, 61, 66, 67, 71, 78,
81, 92, 98, 100, 102, 249, 252
Store Configuration menu 92, 98, 100
subscription products
48, 153, 154, 209, 210
support 10
Suspected Payment Manipulation
178
Swift CD fulfilment 81
-Ttaxes
98, 213
technical assistance
10
Telesign Phone Verification 136
template 170
Templates 33
terms of sale agreement 35, 204
third party software integration 81, 151, 152, 153,
154, 155
time zone offset 171
top.js.php
33
troubleshooting 166, 167, 169, 170, 171, 172, 173,
174, 175, 176, 177, 178, 179
-Uundefined function: curl_init
update 163
upload file 88
171
-Vvendor 145
vendors 276, 291
Verisign 132, 133
visit counter 48
AShop Software © Copyright 2002 - 2010
-Wwholesale catalog
WorldPay
137
67
-ZZipZone shipping rates
220
309