1
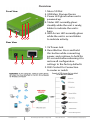
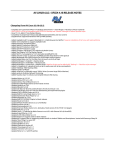
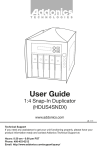
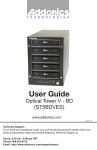
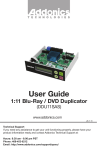
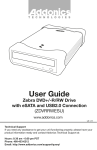
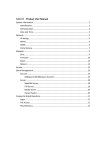
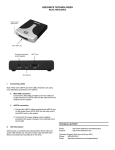
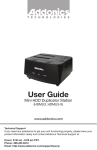
T E C H N O L O G I E S
User Guide
WiFi Drive Adapter
(WDAUSM, WDAUSM-P)
www.addonics.com
Technical Support
If you need any assistance to get your unit functioning properly, please have
your product information ready and contact Addonics Technical Support at:
Hours: 8:30 am - 6:00 pm PST
Phone: 408-453-6212
Email: http://www.addonics.com/support/query/
Overview
1. Micro SD Slot
2. USB Mass Storage Device
3. Power LED glows when unit is
powered up
4. Status LED normally glows
steadily while the unit is ready,
blinks to indicate the unit is
busy.
5. WiFi Access LED normally glows
while the unit is on and blinks
to indicate activity.
Front View
1
2
3 4 5
Rear View
1
www.addonics.com
2
3
1. 5V Power Jack
2. Reset Button. Press and hold
this button while connecting
power, and continue to hold for
20 seconds before releasing it to
restore all configuration
settings to the factory defaults
3. RJ45 Socket for Connection
to router or switch
Technical Support (M-F 8:30am - 6:00pm PST)
Phone: 408-453-6212
Email: www.addonics.com/support/query/
Network Cable
USB Power cable
(Included with Model WDAUSM, WDAUSM-P)
Power Supply
(Included with Model WDAUSM-P)
www.addonics.com
Technical Support (M-F 8:30am - 6:00pm PST)
Phone: 408-453-6212
Email: www.addonics.com/support/query/
Initial Setup
Initial Setup
1. Prepare storage.
- Choose a MicroSD card or USB storage.
- Make sure the storage device is formatted with one partition, FAT32
or FAT64 (exFAT).
NOTE: FAT32 may be used for storage capacity up to 2TB. FAT64 may be used for storage
capacity up to 4TB. USB hard disks with large sector size will not be compatible. Most retail USB
hard disks larger than 2TB will have the large sector size.
2. Connect one storage to the WiFi Drive Adapter.
- The WiFi Drive Adapter only supports one storage device at a time.
- If a MicroSD and USB storage are attached, only the MicroSD will
work.
- The unit will not support multiple USB storage devices or hubs.
- If a USB storage device with independent power is connected, use
the storage device's power supply to power it.
3. Connect the unit to a router using the provided ethernet cable if desired.
4. Connect power to the unit.
5. Use a wireless device with a web browser to connect to the WiFi Drive
Adapter.
- Use the Wireless settings on the device to locate the network.
- The WiFi Drive Adapter's default Wireless network name will be
“Addonics_WDA” followed by some numbers.
- The default wireless password is “12345678”
- This step may be skipped if the unit is connected to a router using
ethernet.
The following steps are optional if customization is desired:
6. Open a web browser and connect to the WiFi Drive Adapter's Web
Interface.
- If connected using wireless, type 192.168.99.1 into the address bar
and press Enter.
- If connected using ethernet, refer to your router's DHCP Clients
table to discover the WiFi Adapter's IP address. The unit's default
hostname will be “Addonics_WDA” followed by some numbers.
Type that IP address into the address bar on the web browser
(instead of 192.168.99.1) and press Enter.
- The web interface will ask for a username and password. Type
“admin” into both (without the qoutes).
7. Change the device name if desired.
- This will be the unit's Wireless Network name, as well as its
Windows Network name.
- This setting is found in the “System Setting” menu.
8. Change the Web Interface password if desired (recommended):
www.addonics.com
Technical Support (M-F 8:30am - 6:00pm PST)
Phone: 408-453-6212
Email: www.addonics.com/support/query/
- the default password is “admin”
- the setting is “Admin Password” in the “System Setting” menu.
- This setting only affects the Web Interface.
9. Change the Date and Time if desired (recommended):
- The setting is “Date & Time” in the “System Setting” menu.
- Change the Time Zone before setting the date and time.
- “Sync from internet” is enabled by default.
Locating the WiFi Drive Adapter on the network
Always refer to the WiFi Drive Adapter using its IP address. If connecting to
the unit using wireless networking, the unit's IP address is 192.168.99.1. If
connecting to the unit using a router it is attached to using ethernet, refer to
the router's DHCP clients table, or use the static IP address configured in the
web interface if the unit was configured for Static IP.
Using the WebDAV Interface
To access the WiFi Drive Adapter's storage using a web browser, connect to
the WiFi Drive Adapter's web interface, then click the WebShare menu. From
there, click “disk1.” The attached storage device's entire contents will be
shown on the next page.
To open a folder on the storage device, simply click on it.
To download a file, click on the filename, or to save it to local storage
right-click (or on Mac systems, Control-click) the filename then choose your
browser's “Save As” menu option (such as “Save target as...”).
Clicking the Options button on the top of any page opens a small menu,
where a folder can be created (“Create Folder”), or return to the Web
Interface main menu (“Go Home”).
Clicking the option button on a file or folder's line opens a small menu where
that item may be renamed or deleted.
Using the SMB Server:
On Windows:
Open a Windows Explorer window, then type two backslashes “\\” followed
by the WiFi drive adapter's IP address (see “Locating the WiFi Drive Adapter
on the network”). Then press Enter. Next, open the share “disk1.” The
attached storage will then be available with full permissions.
On MacOS:
From the Finder menu, choose “Go” then pick “Connect to Server...” In the
Server Address box, type “smb://” followed by the WiFi Drive Adapter's IP
address (see “Locating the WiFi Drive Adapter on the network”). Then press
Enter. Next, open the share “disk1.” The attached storage will then be
available with full permissions.
www.addonics.com
Technical Support (M-F 8:30am - 6:00pm PST)
Phone: 408-453-6212
Email: www.addonics.com/support/query/
The WiFi Drive Adapter Menus
System Setting Menu
Device Name: this option changes the WiFi Drive Adapter's Wireless
Network Name, and also its hostname.
Admin Password: this option changes the password used for accessing the
Web Interface.
Date&Time: this option is used to change the WiFi Drive Adapter's date and
time settings. Choose the time zone first, then check “Sync from internet” to
access time from an Internet connection. If manual settings are desired,
www.addonics.com
Technical Support (M-F 8:30am - 6:00pm PST)
Phone: 408-453-6212
Email: www.addonics.com/support/query/
un-check “Sync from internet,” then either change the date and time fields to
the settings desired, or click “Sync from your device” to set the time based on
the computer or device you are using to change the settings.
Power Saving: The WiFi Drive Adapter includes a sleep mode, which places
the unit and storage into low power mode. This can be set to None, leaving
the unit active at all times, or a selection of 5 minutes, 10 minutes, or 30
minutes.
Reboot: this causes the WiFi Drive Adapter to restart.
Shutdown: this option sets the unit immediately into low power mode.
Wireless Network Menu
Security: this option may be used to enable or disable WPA2 password
protection for the WiFi Drive Adapter's wireless network, and if enabled, the
password may be changed here. The default password is “12345678.”
Internet Access: this option may be used to enable or disable using the WiFi
Drive Adapter with a wireless Router to connect to the Internet. When
enabled, a list of available wireless networks is shown. Only networks with no
authentication or WPA2 authentication with 8 or 13 character passwords are
supported. This option has no effect if the WiFi Drive Adapter is connected to
a router using an ethernet cable.
WiFi Channel: this option is used to select the WiFi Drive Adapter's wireless
network channel. This setting applies to the unit's wireless network, not the
Internet Access wireless network connection.
WAN Setting Menu
This menu is used to configure the WiFi Drive Adapter's ethernet connection
to a router. By default, the unit will connect using DHCP, and acquire settings
www.addonics.com
Technical Support (M-F 8:30am - 6:00pm PST)
Phone: 408-453-6212
Email: www.addonics.com/support/query/
from the router. This may be changed to “Static” for manually setting an IP
address, network mask, gateway, and one or two DNS Servers.
Utility Menu
Disk format: this option may be used to format the attached storage device.
NOTE: While the WiFi Drive Adapter supports storage devices up to 4TB in
capacity, this option may only be used to format storage devices up to 2TB in
capacity.
Firmware Upgrade: this option is used to update the WiFi Drive Adapter's
internal operating system firmware. Details on how to perform this upgrade
will be described in the firmware upgrade release notes.
Factory Default: this option is used to reset the unit to the original settings,
losing all custom settings. The wireless networking and hostname will revert
to “Addonics_WDA” followed by some numbers, the wireless network
password will revert to “12345678,” the Web Interface password will revert to
“admin” and the WAN settings will revert to DHCP.
UI Setting Menu
Language: this option is used to select the language used by the Web
Interface.
Theme: this option is used to select one of several choices for the colors
used in the Web Interface.
WebShare Menu
This menu is used to access the WebDAV server. See “Using the WebDAV
Interface.”
CONTACT US
www.addonics.com
Phone:
Fax:
Email:
408-573-8580
408-573-8588
http://www.addonics.com/sales/query/