1
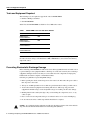
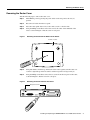
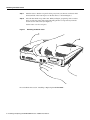
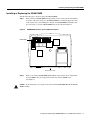
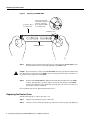
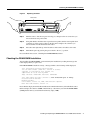
Doc. No. 78-3922-01
Installing or Replacing the DRAM SIMM
in Cisco 1600 Series Routers
Text Part Number: 78-3922-01
Cisco Product Numbers:
MEM1600-2D=
MEM1600-4D=
MEM1600-8D=
MEM1600-16D=
CPA016-MEM2D=
CPA016-MEM4D=
CPA016-MEM8D=
CPA016-MEM16D=
This document describes how to install or replace the dynamic random-access memory (DRAM)
single in-line memory module (SIMM) in Cisco 1600 series routers. You might need to upgrade the
DRAM SIMM for some Cisco Internetwork Operating System (Cisco IOS) feature sets or if the
router is storing large routing or spoofing tables.
This document contains the following sections:
•
•
•
•
•
•
•
•
Tools and Equipment Required, page 2
Preventing Electrostatic Discharge Damage, page 2
Removing the Router Cover, page 3
Installing or Replacing the DRAM SIMM, page 5
Replacing the Router Cover, page 6
Checking the DRAM SIMM Installation, page 7
Obtaining Service and Support, page 8
Cisco Connection Online, page 8
Corporate Headquarters
Cisco Systems, Inc.
170 West Tasman Drive
San Jose, CA 95134-1706
USA
Copyright © 1996
Cisco Systems, Inc.
All rights reserved.
1
Tools and Equipment Required
Tools and Equipment Required
The following tools are required to upgrade the router’s DRAM SIMM:
•
•
Number 1 Phillips screwdriver
One DRAM SIMM
Table 1 lists the DRAM SIMMs available for Cisco 1600 series routers.
Table 1
DRAM SIMMs for Cisco 1600 Series Routers
Cisco Product Number
Amount of DRAM
MEM1600-2D=
CPA016-MEM2D=
2 MB
MEM1600-4D=
CPA016-MEM4D=
4 MB
MEM1600-8D=
CPA016-MEM8D=
8 MB
MEM1600-16D=
CPA016-MEM16D=
16 MB
Note The DRAM SIMMs listed in Table 1 are nonparity SIMMs. You can install a parity SIMM in
the router; however, doing so will disable the 2 MB of DRAM that is stored on the fixed memory
chips in the router.
Preventing Electrostatic Discharge Damage
Before installing a DRAM SIMM, read the electrostatic discharge (ESD) instructions in this section
to prevent damage to the equipment. ESD is a discharge of stored static electricity that can damage
equipment and impair electrical circuitry. It occurs when electronic components are improperly
handled and can result in complete or intermittent failures.
Following are guidelines for preventing ESD damage:
•
Before opening the chassis, ensure that power to the router is off. Disconnect the power cable to
turn off power to the router.
•
•
Always use an ESD-preventive wrist or ankle strap and ensure that it makes good skin contact.
•
Handle printed circuit cards by the edges only; avoid touching the components, traces, or any
connector pins.
•
•
Place a removed card component side up on an antistatic surface or in a static shielding bag.
Avoid contact between equipment and clothing. The wrist or ankle strap only protects the
equipment from ESD voltages on the body; ESD voltages on clothing can still cause damage.
Do not remove the wrist or ankle strap until the installation is complete.
Caution To avoid damaging the equipment, periodically check the resistance value of the antistatic
strap. The measurement should be between 1 and 10 megohms (Mohms).
2 Installing or Replacing the DRAM SIMM in Cisco 1600 Series Routers
Removing the Router Cover
Removing the Router Cover
Take the following steps to remove the router cover:
Step 1
Turn OFF the power by pressing the power switch on the rear panel to the off ( O )
position.
Step 2
Disconnect all cables from the rear panel.
Step 3
Place the router upside down a flat, secure surface, such as a desk or table.
Step 4
Using the Phillips screwdriver, remove the screw at the center of the underside of the
router, as shown in Figure 1. Put the screw in a safe place.
Figure 1
Removing the Screw from the Bottom of the Router
H8610
Bottom of router
Step 5
Using both hands to hold the top and bottom of the router together, turn the router over
so that it is right side up on the flat surface and the rear panel is facing toward you.
Step 6
Using the Phillips screwdriver, remove the two screws from the rear panel of the router,
as shown in Figure 2. Put the screws in a safe place.
Removing the Screws from the Rear Panel
Rear panel screws
DO NOT INSTALL ANY WAN
MODULE WITH POWER ON
H8626
Figure 2
Installing or Replacing the DRAM SIMM in Cisco 1600 Series Routers
3
Removing the Router Cover
Step 7
Turn the router so that the rear panel is facing away from you, then use one hand to hold
the bottom half of the router in place on the flat surface, as shown in Figure 3.
Step 8
Place the other hand on top of the router. With your fingers, grasp the lip of the cover that
hangs over the rear panel of the router and gently pull the cover up and away from the
bottom section of the router. (See Figure 3.)
Set the router cover in a safe place.
Removing the Router Cover
H8609
Figure 3
DO NO
T INSTA
LL ANY
MODU
LE WIT
H POWE WAN
R ON
Proceed with the next section, “Installing or Replacing the DRAM SIMM.”
4 Installing or Replacing the DRAM SIMM in Cisco 1600 Series Routers
Installing or Replacing the DRAM SIMM
Installing or Replacing the DRAM SIMM
Take the following steps to install or replace the DRAM SIMM:
Step 1
If the router has a DRAM SIMM already installed, locate it on the system card. With the
rear panel of the router facing you, the DRAM SIMM is located in the upper left corner
of the system card, as shown in Figure 4. If there is no DRAM SIMM installed the router,
proceed to Step 3 to install a DRAM SIMM in the location shown in Figure 4.
Figure 4
DRAM SIMM Location—Cisco 1600 Series Routers
H8611
DRAM SIMM
Rear panel of router
Step 2
Remove any existing DRAM SIMM. While pulling outward on the tabs to unlatch them,
raise the SIMM to the vertical position and remove it from the SIMM socket.
(See Figure 5.)
Caution To prevent damage, do not push on the center of the DRAM SIMM. Handle the DRAM
SIMM carefully.
Installing or Replacing the DRAM SIMM in Cisco 1600 Series Routers
5
Replacing the Router Cover
Figure 5
Replacing the DRAM SIMM
Connector edge of
the system card
Pull the tabs away with
your thumbs, bracing your
forefingers against the
posts. Raise the SIMM
to a vertical position.
Polarization notch
H5839
DRAM SIMM card
Step 3
With the rear panel of the router still facing you, position the new DRAM SIMM so that
the polarization notch is located at the right end of the SIMM socket.
Caution To prevent damage, note that some DRAM SIMMs have the components mounted on the
rear side; therefore, when you insert the SIMM, always use the polarization notch as a reference, not
the position of the components on the SIMM.
Step 4
Insert the new DRAM SIMM by sliding the end with the metal fingers into the SIMM
socket at approximately a 45-degree angle to the system card. Gently rock the SIMM
back into place until the latch on either side snaps into place. Do not use excessive force
because the connector could break.
Proceed with the next section “Replacing the Router Cover.”
Replacing the Router Cover
Take the following steps to replace the router cover:
Step 1
Align the top and bottom sections of the router.
Step 2
Close the cover by slowly pressing the top and bottom sections together. (See Figure 6.)
6 Installing or Replacing the DRAM SIMM in Cisco 1600 Series Routers
Checking the DRAM SIMM Installation
Figure 6
Replacing the Cover
H8612
Plastic tabs
DO NOT INSTALL ANY WAN
MODULE WITH POWER ON
Step 3
Turn the router so that the rear panel is facing you, and replace the two screws that you
removed from the rear panel earlier.
Step 4
Using both hands to hold the router top and bottom together, turn the router upside down
so that the top of the router is resting on the flat surface. Replace the screw that you
removed earlier from the underside of the router.
Step 5
Place the router right side up on the flat surface and reconnect all cables to the router.
Step 6
Turn ON the power by pressing the power switch to the on ( | ) position.
Proceed with the next section, “Checking the DRAM SIMM Installation.”
Checking the DRAM SIMM Installation
After installing the DRAM SIMM, you should verify the installation by reading the messages the
router displays when you power it on:
If the DRAM SIMM is installed correctly, a message similar to the following will be displayed:
Cisco Internetwork Operating System Software
IOS (tm) 1600 Software (C1600-Y-L), Version 11.1(16539)
Copyright (c) 1986-1996 by cisco Systems, Inc.
Compiled Tue 29-Oct-96 21:30 by xxxxx
Image text-base: 0x08019CB4, data-base: 0x02005000
cisco 1600 (68360) processor (revision C) with 9728K/512K bytes of memory.
Processor board ID 01335537
Bridging software.
X.25 software, Version 2.0, NET2, BFE and GOSIP compliant.
Basic Rate ISDN software, Version 1.0.
Notice that the display shown in bold text indicates how much main memory is installed in the router.
In this example, the router has 10 MB of main memory—the memory stored in the DRAM SIMM
(8 MB) plus the memory stored in the fixed memory chips (2 MB).
Installing or Replacing the DRAM SIMM in Cisco 1600 Series Routers
7
Obtaining Service and Support
If the DRAM SIMM in not installed correctly or is defective, the memory amount stored in the
DRAM SIMM is not reflected in the message display. In the following display, an 8 MB
DRAM SIMM has been installed incorrectly in the router:
Cisco Internetwork Operating System Software
IOS (tm) 1600 Software (C1600-Y-L), Version 11.1(16539)
Copyright (c) 1986-1996 by cisco Systems, Inc.
Compiled Tue 29-Oct-96 21:30 by xxxxx
Image text-base: 0x08019CB4, data-base: 0x02005000
cisco 1600 (68360) processor (revision C) with 1536K/512K bytes of memory.
Processor board ID 01335537
Bridging software.
X.25 software, Version 2.0, NET2, BFE and GOSIP compliant.
Basic Rate ISDN software, Version 1.0.
Notice that the line listing the main memory (shown in bold) shows only the 2 MB of memory that
is stored in the fixed memory chips.
If the DRAM SIMM memory is not reflected in the display, repeat the DRAM SIMM upgrade
procedure to reinstall the DRAM SIMM. Make sure the DRAM SIMM is completely seated in the
SIMM socket. If display still does not reflect the additional memory stored in the DRAM SIMM, the
DRAM SIMM might be defective.
Obtaining Service and Support
For service and support for a product purchased from a reseller, contact the reseller. Resellers offer
a wide variety of Cisco service and support programs, which are described in the section “Service
and Support” in the information packet that shipped with your chassis.
Note If you purchased your product from a reseller, you can access Cisco Connection Online
(CCO) as a guest. CCO is Cisco Systems’ primary, real-time support channel.Your reseller offers
programs that include direct access to CCO’s services.
For service and support for a product purchased directly from Cisco, use CCO.
Cisco Connection Online
CCO is Cisco Systems’ primary, real-time support channel. SMARTnet customers and partners can
self-register on CCO to obtain additional content and services.
Note If you purchased your product from a reseller, you can access CCO as a guest. Your reseller
offers programs that include direct access to CCO’s services.
Available 24 hours a day, 7 days a week, CCO provides a wealth of standard and value-added
services to Cisco’s customers and business partners. CCO services include product information,
software updates, release notes, technical tips, the Bug Navigator, configuration notes, brochures,
descriptions of service offerings, and download access to public and authorized files.
8 Installing or Replacing the DRAM SIMM in Cisco 1600 Series Routers
Cisco Connection Online
CCO serves a wide variety of users through two interfaces that are updated and enhanced
simultaneously—a character-based version and a multimedia version that resides on the World Wide
Web (WWW). The character-based CCO supports Zmodem, Kermit, Xmodem, FTP, and Internet
e-mail, and is excellent for quick access to information over lower bandwidths. The WWW version
of CCO provides richly formatted documents with photographs, figures, graphics, and video, as well
as hyperlinks to related information.
You can access CCO in the following ways:
•
•
•
•
•
WWW: http://www.cisco.com.
WWW: http://www-europe.cisco.com.
WWW: http://www-china.cisco.com.
Telnet: cco.cisco.com.
Modem: From North America, 408 526-8070; from Europe, 33 1 64 46 40 82. Use the
following terminal settings: VT100 emulation; databits: 8; parity: none; stop bits: 1; and baud
rates up to 14.4 kbps.
For a copy of CCO’s Frequently Asked Questions (FAQ), contact [email protected]. For
additional information, contact [email protected].
Note If you need technical assistance with a Cisco product that is under warranty or covered by a
Cisco maintenance contract, contact Cisco’s Technical Assistance Center (TAC) at 800 553-2447,
408 526-7209, or [email protected].
Please use CCO to obtain general information about Cisco Systems, Cisco products, or upgrades. If
CCO is not accessible, contact 800 553-6387, 408 526-7208, or [email protected].
This document is to be used in conjunction with the Cisco 1600 Series Router Installation and Configuration Guide and the NetBeyond Cisco 1600 Series Router Installation and
Configuration Guide publications.
AtmDirector, AutoConnect, AutoRoute, AXIS, BPX, Catalyst, CD-PAC, CiscoAdvantage, CiscoFusion, Cisco IOS, the Cisco IOS logo, CiscoLink, CiscoPro, the CiscoPro logo,
CiscoRemote, the CiscoRemote logo, CiscoSecure, Cisco Systems, CiscoView, CiscoVision, CiscoWorks, ClickStart, ControlStream, EdgeConnect, EtherChannel, FairShare, FastCell,
FastForward, FastManager, FastMate, FastPADlmp, FastPADmicro, FastPADmp, FragmentFree, FrameClass, Fulcrum INS, IGX, Impact, Internet Junction, JumpStart, LAN2LAN
Enterprise, LAN2LAN Remote Office, LightSwitch, NetBeyond, NetFlow, Newport Systems Solutions, Packet, PIX, Point and Click Internetworking, RouteStream, Secure/IP, SMARTnet,
StrataSphere, StrataSphere BILLder, StrataSphere Connection Manager, StrataSphere Modeler, StrataSphere Optimizer, Stratm, StrataView Plus, StreamView, SwitchProbe, SwitchVision,
SwitchWare, SynchroniCD, The Cell, The FastPacket Company, TokenSwitch, TrafficDirector, Virtual EtherSwitch, VirtualStream, VlanDirector, Web Clusters, WNIC, Workgroup
Director, Workgroup Stack, and XCI are trademarks; Access by Cisco, Bringing the Power of Internetworking to Everyone, Enter the Net with MultiNet, and The Network Works.
No Excuses. are service marks; and Cisco, the Cisco Systems logo, CollisionFree, Combinet, EtherSwitch, FastHub, FastLink, FastNIC, FastPacket, FastPAD, FastSwitch, ForeSight,
Grand, Grand Junction, Grand Junction Networks, the Grand Junction Networks logo, HSSI, IGRP, IPX, Kalpana, the Kalpana logo, LightStream, MultiNet, MultiWare, OptiClass,
Personal Ethernet, Phase/IP, RPS, StrataCom, TGV, the TGV logo, and UniverCD are registered trademarks of Cisco Systems, Inc. All other trademarks, service marks, registered
trademarks, or registered service marks mentioned in this document are the property of their respective owners.
Copyright © 1996, Cisco Systems, Inc.
All rights reserved. Printed in USA.
969R
Installing or Replacing the DRAM SIMM in Cisco 1600 Series Routers
9
Cisco Connection Online
10 Installing or Replacing the DRAM SIMM in Cisco 1600 Series Routers