1
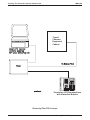
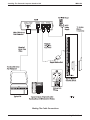
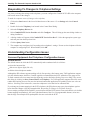
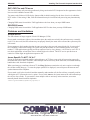
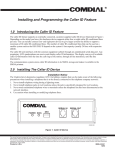
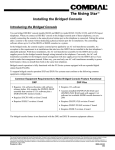
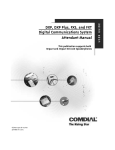
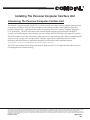
R
Installing The Personal Computer Interface Unit
Introducing The Personal Computer Interface Unit
The Personal Computer Interface Unit (PCIU) is a device that you can connect between a digital station port and
its proprietary telephone. The PCIU allows telephone users to initiate telephone-related functions from their
personal computers (PC). Applications such as this are commonly known as Computer Telephony Integration
(CTI) applications. The PCIU will function with Comdial digital telephone systems (the DSU and DSU II
systems) and Comdial digital communications systems (currently the DXP, DXP Plus, and Impact FX systems).
The PCIU includes Service Provider Interface (SPI) software on computer floppy disks. When you install this SPI
software on a PC, the PC users can employ their Telephony Applications Programming Interface (TAPI),
third-party, Microsoft Windows* applications programs to control many useful telephone functions.
*Microsoft Windows is a registered trademark of Microsoft Corporation, Redmond, Washington
The PCIU comes bundled with wideopen.call software. Wideopen.call is a CTI application that offers on-screen
call management and a detailed call log.
This manual has been developed by Comdial Corporation (the “Company”) and is intended for the use of its customers and service personnel. The information in this manual is subject to change
without notice. While every effort has been made to eliminate errors, the Company disclaims liability for any difficulties arising from the interpretation of the information contained herein.
The information contained herein does not purport to cover all details or variations in equipment or to provide for every possible contingency to be met in connection with installation, operation, or
maintenance. Should further information be desired, or should particular problems arise which are not covered sufficiently for the purchaser’s purposes, contact Comdial, Inside Sales Department,
Charlottesville, Virginia 22906.
Printed in U.S.A.
IMI89–260.05
11/98
IMI89-260
Installing The Personal Computer Interface Unit
Detailing The PCIU Requirements
Minimum PC Requirements
The user-supplied PC must be running the Windows95, 98 or NT operating systems and must provide a serial data
port (the PCIU includes a 9-pin to 9-pin serial data cable).
Proprietary Telephone Requirements
The PCIU operates properly with any Comdial Impact, Impression, or DigiTech LCD speakerphones that provide
interactive button support with exception of the large screen Impact SCS speakerphone. If using a regular Impact
SCS speakerphone, the INTERCOM button must be located in the default button-mapping location; that is, the
lower right-hand button of the 12 or 24 programmable buttons.
System Requirements
wideopen.call
System Software
DSU
18A
Minimum Software Requirements for Specific Systems
DSU II
DXP
DXP Plus
2A
8A
Available Product Codes
Comdial Product Code
PCIU–WOC–01
PCIU–WOC–06
PCIU–PK1
Product Description
one PCIU and wideopen.call software
six PCIUs and wideopen.call software
wideopen.call software for PCIU
2 — Detailing The PCIU Requirements
3A
All
FX
Installing The Personal Computer Interface Unit
IMI89-260
Typical
Common
Equipment
Cabinet
User's PC running
Comdial supplied
SPI plus wideoffice.call
To Station Port
PCIU
COMDIAL
1 QZ
2 ABC 3 DEF
4 GHI 5 JKL 6 MNO
7 PRS 8 TUV 9 WXY
0 OPER #
TRNS/CNF
HOLD
TAP
INTERCOM
SPEAKER
SHIFT
MUTE
pciu02a.cdr
Proprietary LCD Speakerphone
with Interactive Buttons
Reviewing The PCIU Concept
Detailing The PCIU Requirements — 3
IMI89-260
Installing The Personal Computer Interface Unit
Installing The PCIU
Connect the PCIU between a digital station port on the common equipment cabinet and that port’s proprietary
digital speakerphone and also to a user-supplied PC. The PCIU includes Service Provider Interface (SPI) software
that you must load on the user-supplied PC. The SPI software, in conjunction with the wideopen.call software,
allows the PCIU to use the serial data path between it and the user-supplied PC to send messages to the PC and to
the telephone’s display. Complete instructions for installing the SPI software are detailed in the paragraph titled,
Installing The Telephony Driver.
Making The Cable Connections
Four cable connections are required to the PCIU—station line cord, digital telephone line cord, PC cable, and
power cable.
1. Disconnect the digital LCD speakerphone’s line cord from the digital station port connector,and plug it into
the connector labeled PHONE on the PCIU.
2. Connect the supplied serial data cable between the PC’s serial data port (COM port) and the PCIU’s serial
port connector. (A 9-pin to 9-pin cable is supplied with the PCIU. If you are using a 25-pin serial port on the
PC, you must use a 9-to-25 pin adapter.)
3. Plug one end of a standard line cord into the connector labeled LINE on the PCIU. Plug the other end of the
line cord into the digital station port connector.
4. Plug the transformer attached to one end of the power cable into a 115 VAC electrical wall outlet. Connect
the other end of the power cable into the PCIU connector labeled POWER. The green LED on the PCIU turns
on to indicate that power is being supplied to the PCIU.
NOTE: PCIU power loss will create the same symptoms as the disconnection of the PCIU from the digital
telephone system. If this occurs, plug the digital telephone directly into a digital station port connector.
4 — Installing The PCIU
Installing The Personal Computer Interface Unit
IMI89-260
Making The Cable Connections
Installing The PCIU — 5
IMI89-260
Installing The Personal Computer Interface Unit
Installing The Telephony Driver
If this is a first-time installation, skip the next section and go directly to the section titled Installing The New
Telephony Driver.
Removing The Existing Telephony Driver
If you already have a PCIU in service, you must removefrom windows the telephony service provider that the
PCIU was installed with.
To remove an existing PCIU service provider,
1. Click on the Start button in the lower left corner of the screen. Go to Settings and select Control Panel.
2. Double click on the Telephony icon located in the Control Panel dialog.
3. Select the Telephony Drivers tab (Older versions of the Telephony Control Panel may not have this. If you
see a Driver Setup button, click that).
4. Select Comdial PCIU TAPI Service Provider ‘and click Remove. If a message box pops up asking if you
are sure you want to remove it, click Yes.
Installing The New Telephony Driver
After you have physically connected the PCIU to your PC, you must install the floppy disk that contains the SPI
software that runs the PCIU device into the computer's floppy disk drive (drive A).
To install the telephony driver (using Windows95, 98 or NT),
1. Click on the Start button in the lower left corner of the screen and select Run.
2. Type ‘A:SETUP’ at the prompt and click OK.
3. A message box will appear asking you to close any other TAPI applications and services before continuing.
Click OK to continue with the installation. The installation window will display the status as the installation
progresses.
4. If using Windows95, a message box may appear displaying: Current version of TAPI not recent enough….
Install TAPI 2.1 now? If this occurs, click Yes. The service provider installation program will close itself
and run the TAPI 2.1 installation program.
If a message box ever pops up asking: Do you want to keep this file?, click Yes. After TAPI 2.1 is installed,
remove the floppy disk, and click Yes to the prompt that reads: Do you want to restart your computer now?.
The computer will restart and automatically continue with the installation.
5. A dialog window will appear titled Comdial PCIU Service Provider??. Select the appropriate system type
and com port from the drop-down lists.
6. Click the Query Start button.
7. The computer now configures itself according to your telephone’s settings. Do not use your telephone while
the computer is configuring itself.
8. Note that each button that you have mapped to a line has a check box next to it in the Phone Button Usage
section. The system notifies TAPI applications of calls that ring on all lines with checked boxes; therefore,
Comdial engineers recommend that you uncheck all boxes that do not ring at the PCIU station port. When
finished, click OK.
6 — Installing The Telephony Driver
Installing The Personal Computer Interface Unit
IMI89-260
Responding To Changes In Telephone Settings
Any time you change the settings on the telephone, you must configure the Comdial PCIU's SPI so the computer
can become aware of the changes.
To make the computer aware of changes to the telephone,
1. Click on the Start button in the lower left-hand corner of the screen. Go to Settings and select Control
Panel.
2. Double click on the Telephony icon located in the Control Panel dialog.
3. Select the Telephony Drivers tab.
4. Select Comdial PCIU Service Provider and click Configure. This will bring up the same dialog window as
during installation.
5. A dialog window will appear titled Comdial PCIU Service Provider??. Select the appropriate system type
and com port from the drop-down lists.
6. Click the Query Start button.
7. The computer now configures itself according to the telephone’s settings. Do not use the telephone while the
computer is configuring itself. When finished, click OK.
Understanding Configuration Issues
Common Equipment And Telephone Configuration Issues
General Issues
The default manner in which the PCIU automatically makes outbound calls is as follows:
•
•
•
selects the intercom line,
dials access digit or digits (like a 9),
dial the desired telephone number.
Although the SPI software supports making calls by first pressing a line button, many TAPI applications support
only the default manner; therefore, Comdial engineers recommend that the PCIU station have line group access.
To make external calls, users must enter the digits they need to dial in the Dialing Properties dialog. They access
this dialog by clicking on Start, Control Panel, and Telephony. If a TAPI application supports direct line access
(rather than requiring users to first press the intercom button) that application will probably let the user select an
Address. Selecting a line in that case, causes the telephone to seize that line for outbound calls.
If you change any button-mapping for the PCIU telephone, the SPI software must query that telephone again to
know about the changes. (See the paragraph titled, Responding To Changes In Telephone Settings).
If users employ an Impact SCS telephone, you must insure that the PCIU station’s intercom button is at its default
button-mapping location(that is; the lower right-hand button of the 12 or 24 programmable buttons). Also note
that the large screen Impact SCS speakerphone does not work with the PCIU.
Responding To Changes In Telephone Settings — 7
IMI89-260
Installing The Personal Computer Interface Unit
DXP, DXP Plus and FX Issues
You can avoid many call-processing problems by being sure that the PCIU telephone has line appearances for the
lines on which it handles external calls.
You must set the Enhanced LCD display feature to No (its default setting) for the class of service in which the
PCIU resides. If the setting is Yes, caller ID information may be invalid and call processing may intermittently
fail.
Changing DND status from within a TAPI application works best when you map a DND button.
DSU/DSUII Issues
Changing DND status from within a TAPI application ONLY works when you map a DND button.
Problems and Limitations
General Issues
The SPI software no longer supports Visual Call Manager (VCM).
If users make a conference with two lines and then place the conference on hold, the conference may eventually
recall. If it does recall, the SPI software may not properly identify the states of the calls and the system may lose
call control.
If users attempt to dial a number that has the same area code as the area code entered in the My Location tab of
the Telephony Control Panel settings, the system may dial the number as a local number(just the seven-digit
number). TAPI applications typically provide an option to Dial as a long distance call or Dial as a toll call . If
not, these applications at least allow users to edit the digits to be dialed. The PCIU service provider has no
control over what digits an application requests to dial.
Issues Specific To ACT! 3.X, 4.0*
Except for application-initiated transfers and conferences, ACT! Does not provide call processing support for
more than one call at a time. Therefore, when multiple calls are necessary at the same time, users must manually
handle these calls from their telephones.
When users hang up a conference from ACT!, the Hang Up button remains the only active option even though
the call has actually hung up. To cause the proper options to be displayed, users must press the intercom and
speaker buttons on the telephone.
If users make a call, place it on hold, and then manually make another call, the first call may eventually recall at
which point ACT! presents the Answer option. If users click Answer, the system answers the call but then drops
the call in a few seconds. To prevent this, when multiple calls are necessary at the same time, users must
manually handle them from their telephones.
*ACT! is a registered trademark of Symantec Corp. Cupertino, CA.
R
Charlottesville, Virginia 22901-2829
World Wide Web: http://www.comdial.com/