1
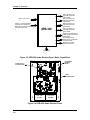
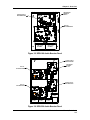
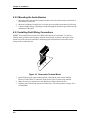
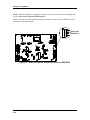
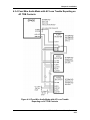
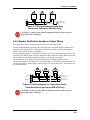
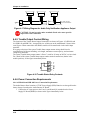
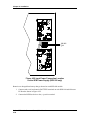
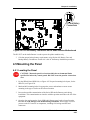
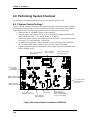
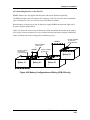
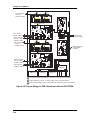
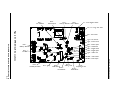
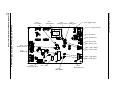
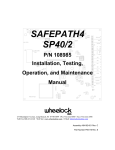
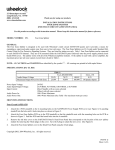
Chapter 4: Installation
1. Orient batteries #1 and #2 so that the terminals of battery #1 are on the right side of the
battery and the terminals of battery #2 are on the left. (See Figure 4-28) Connect the short
YELLOW jumper between battery #1 negative (-) terminal and battery #2 positive (+)
terminal.
2. Place batteries #1 and #2 inside the SPB-320 enclosure, and to the left side with the
yellow jumper to the back of the enclosure. (See Figure 4-28.)
3. Place battery #3 with its terminals on the left and place the battery to the right of battery
#2. Attach the long YELLOW jumper to the positive (+) terminal.
4. Orient battery #4 with the terminals on the left side. Attach the other end of the long
YELLOW jumper to the Negative (-) terminal. Slide the battery in its place.
5. Attach the supplied RED fused battery wire to the (+) terminal and the supplied BLACK
battery wire to the (–) terminal of TB2 (BATTERY) connection on SPB-160 Module #1
and run the wire as shown in Figure 4-28. Attach the red wire to the positive terminal of
battery #4. Do not attach the black or negative wire.
WARNING: Do not attach the black or negative wire until AC
power has been applied to the SPB panel.
6. Attach the second supplied fused RED battery wire to the (+) terminal and the supplied
BLACK battery wire to the (–) terminal of TB2 (BATTERY) connection on SPB-160
Module #2 and run the wire as shown in Figure 4-28. Attach the fused RED wire to the
positive terminal of battery #1. Do not attach the BLACK or negative wire.
Series SPB Audio Boosters Manual, Revision A
4-37