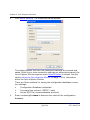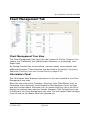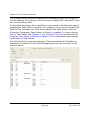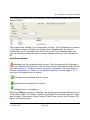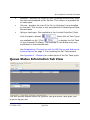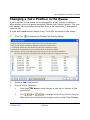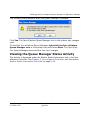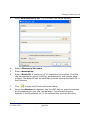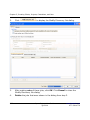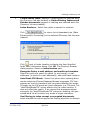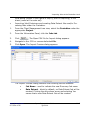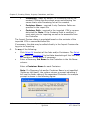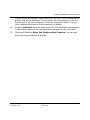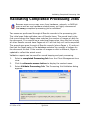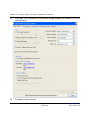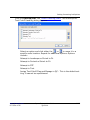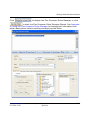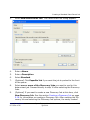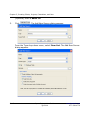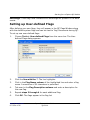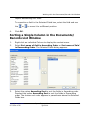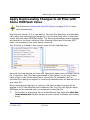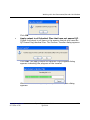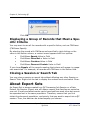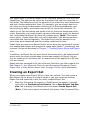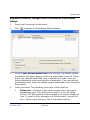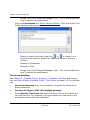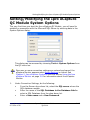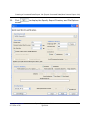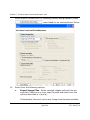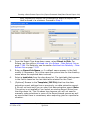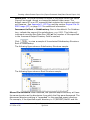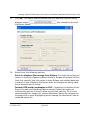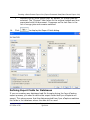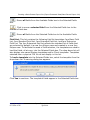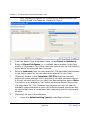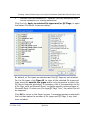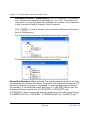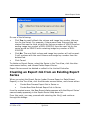
1
User Guide
eCapture 2014.0.0
Q1 2014
www.iprotech.com
877-324-4776
Notices
Disclaimer
Information in this document, including URLs and other references, is subject to change without notice. Unless otherwise noted, any example companies, organizations, products, domain
names, e-mail addresses, logos, people, locations, and events depicted herein are fictitious
and no association with any real company, organization, product, domain name, e-mail
address, logo, person, location or event is intended or should be inferred. Complying with all
applicable copyright laws is the responsibility of the user. Without limiting the rights under
copyright, no part of this document may be reproduced, stored in or introduced into a retrieval
system or transmitted in any form or by any means (electronic, mechanical, photocopying,
recording, or otherwise), or for any purpose, without the express written permission of Ipro
Tech, LLC.
Ipro Tech, LLC may have patents, patent applications, trademarks, copyrights or other intellectual property rights covering subject matter in this document. Except as expressly provided in
any written license agreement from Ipro Tech, LLC, the furnishing of this document does not
give the reader any license to these patents, trademarks, copyrights or other intellectual property. Every precaution has been taken in the preparation of this document however; Ipro Tech
does not assume responsibility for errors or omissions.
Trademarks and Product Notes
Ipro, the Ipro logo, and all of our product names are trademarks of Ipro Tech, LLC. Adobe is a
registered trademark of Adobe Systems Incorporated in the United States and/or other countries. dtSearch is a registered trademark of dtSearch Corp. Oracle is a registered trademark of
Oracle Corporation. Excel, SQL Server, and Windows are registered trademarks of Microsoft
Corporation in the United States and other countries. LEADTOOLS is a registered trademark of
LEAD Technologies, Inc. Other products and company names mentioned herein may be trademarks of their respective companies and are used for editorial purposes and to the benefit of
the trademark owner with no intention of infringing upon that trademark.
Ipro Enterprise products utilize the Oracle® Outside In Viewer and TIF6 filter. The software is
based in part on the work of the Independent JPEG Group.
Outside In Viewer © 1991, 2013 Oracle.
Copyright
©2006-2014 Ipro Tech, LLC All rights reserved.
Ipro eCapture 2014.0.0 Rev6.5/01.14
Published in the United States of America
Ipro Tech
6811 E. Mayo Blvd - Suite 350
Phoenix, AZ USA 85054
ii
Ipro eCapture User Guide
Q1 2014
www.iprotech.com
877-324-4776
Contents
1
Introducing Ipro eCapture™
Overview .................................................................................1-1
Before Using Ipro eCapture ........................................................1-3
Ipro eCapture Workflow ........................................................1-3
Ipro eCapture Components ....................................................1-3
About this Guide .......................................................................1-4
Intended Audience ...............................................................1-4
In This Guide............................................................................1-5
Related Documents ...................................................................1-6
Document Conventions ..............................................................1-7
Enterprise Support ....................................................................1-7
Before Calling ......................................................................1-8
2
Ipro eCapture Controller
Overview .................................................................................2-1
Getting Started .........................................................................2-2
Establishing a Connection with the SQL Server and Setting
the System Options ................................................................2-2
Stopping the Ipro eCapture Controller During Job Execution.......2-7
Accessing Stored Configuration Database Connection Settings....2-7
Worker Maintenance ................................................................ 2-11
Updating the Worker Patch Directory .................................... 2-11
Creating Task Tables ............................................................... 2-13
Assigning Task Tables to Workers .........................................2-15
Reassigning Workers to Different Configuration Databases ....... 2-17
Assigning Enterprise Workers.................................................... 2-18
Configuring Integration with Ipro Enterprise Applications .............. 2-20
Configuring Integration with kCura Relativity .............................. 2-21
Loading the Hash Lists ............................................................. 2-23
Deactivating/Reactivating a Client ........................................ 2-25
www.iprotech.com
877-324-4776
Ipro eCapture User Guide
Q1 2014
iii
Ipro eCapture
Ipro eCapture Controller Interface ............................................. 2-26
Client Management Tab....................................................... 2-27
Worker Status Information Tab View..................................... 2-49
Queue Status Information Tab View...................................... 2-51
Ipro eCapture Controller Toolbar .......................................... 2-52
Ipro eCapture Controller Job Queue Pane .............................. 2-53
Ipro eCapture Controller Status Bar ...................................... 2-54
Changing a Job’s Position in the Queue.................................. 2-55
Modifying Project Options .................................................... 2-56
Export Jobs ....................................................................... 2-58
Maintaining the Ipro eCapture Controller .................................... 2-59
Selecting a Different SQL Server and Database ...................... 2-59
Error Handling ................................................................... 2-60
Setting the Processing Update Intervals ................................ 2-60
Applying Rules Set in the Flex Processor Rules Manager .......... 2-60
3
Ipro eCapture Queue Manager
Overview .................................................................................3-1
Configuring the Ipro eCapture Queue Manager ..............................3-2
Modifying the Ipro eCapture Queue Manager
Configuration Settings ........................................................... 3-14
Testing the Connection ....................................................... 3-14
Starting and Stopping the Ipro eCapture Queue Manager......... 3-14
Viewing the Queue Manager Status Activity ........................... 3-15
About the QueueManager.LOG file ........................................ 3-16
Exiting the Ipro eCapture Queue Manager ............................. 3-16
4
Ipro eCapture Worker
Overview .................................................................................4-1
Starting the Ipro eCapture Worker...............................................4-1
Modifying the Ipro eCapture Worker Configuration .........................4-3
Testing the Connection .........................................................4-4
iv
Ipro eCapture User Guide
Q1 2014
www.iprotech.com
877-324-4776
Contents
Starting and Stopping the Ipro eCapture Worker ......................4-4
Viewing the Ipro eCapture Worker Status ................................4-6
About the Worker.LOG file .....................................................4-7
Exiting the Ipro eCapture Worker ...........................................4-7
5
Creating Clients, Projects,
Custodians, and Jobs
Workflow Overview....................................................................5-2
Before Running any Jobs ............................................................5-3
Creating a New Client ................................................................5-3
Creating a New Project ..............................................................5-4
Creating a New Custodian ..........................................................5-8
Importing Custodians and Jobs at the Project Level........................5-9
Exporting Custodians and Containers for the Project .................... 5-14
Before you Discover ................................................................ 5-15
Indexing with NOISE.DAT and DEFAULT.ABC .......................... 5-15
Creating a Discovery Job .......................................................... 5-16
Modifying a Completed Discovery Job.................................... 5-21
Requeuing Node Level or Item Level Exceptions ..................... 5-31
Changing Error Status for Completed Discovery Job ................ 5-31
Updating NIST Matches for a Discovery Job ........................... 5-32
Password Handling ............................................................. 5-33
Setting Discovery and Indexing Options ................................ 5-35
Importing Jobs at the Custodian Level........................................ 5-46
Exporting Existing Jobs and Containers for the Custodian ............. 5-50
Creating a Standard Processing Job ........................................... 5-51
Validating Completed Processing Jobs ........................................ 5-55
Creating a Data Extract Import (Processing) Job.......................... 5-56
Setting Processing Job Options.................................................. 5-61
Setting General Processing Options....................................... 5-61
Color Depth Options ........................................................... 5-62
Setting Processing Job Options for Excel................................ 5-67
www.iprotech.com
877-324-4776
Ipro eCapture User Guide
Q1 2014
v
Ipro eCapture
Setting Processing Job Options for Word................................ 5-74
Setting Processing Job Options for PowerPoint........................5-78
Setting Data Extraction Options ................................................ 5-81
Setting the Common Options ............................................... 5-84
Setting the Filtering (Flex Processor) Options ......................... 5-87
Setting Alternative System Directories for Jobs....................... 5-92
Creating a Standard Data Extract Job.........................................5-94
Creating a Data Extract Import Job (Data Extract Job) ................. 5-98
Adding Discovery, Data Extract, and/or Processing
Jobs Simultaneously............................................................ 5-103
Adding a Discovery Job ..................................................... 5-103
Adding Data Extract and/or Processing Jobs for
Existing Directory Type Source Containers ........................ 5-107
Adding a Data Extract or Processing Job from an Item List ..... 5-110
Running Post Process Batch Operations on Completed
Processing Jobs or Data Extract Jobs .................................. 5-115
Running Reports for a Selected Job.......................................... 5-125
6
Performing QC
Overview .................................................................................6-1
Starting Ipro eCapture QC Module ...............................................6-3
The Ipro eCapture QC Environment ........................................6-3
QC Module Interface Components...........................................6-5
Selecting a Processing Job and Grouping(s) for a QC Session(s) .6-7
Selecting a Data Extract Job and Grouping(s) for
a QC Session(s) ..............................................................6-14
Saving the QC Interface Layout............................................ 6-21
Setting General QC Options ................................................. 6-23
Setting the Auto-QC Options................................................ 6-24
Setting Merge Job Options ................................................... 6-28
Working with the QC Flags Window....................................... 6-29
Setting up User-defined Flags .............................................. 6-35
Setting up User-defined Placeholders .................................... 6-36
vi
Ipro eCapture User Guide
Q1 2014
www.iprotech.com
877-324-4776
Contents
Working with the Image View Area ............................................ 6-43
Image Tab Window............................................................. 6-43
Thumbnails Tab Window...................................................... 6-46
View Tab Window ............................................................... 6-47
Working with the Documents/Records List Window ...................... 6-49
Working with Session Tabs .................................................. 6-49
Modifying the Column Fields in the Documents/Records
List Window.................................................................... 6-50
Sorting Multiple Columns in the Documents/Records
List Window.................................................................... 6-52
Sorting a Single Column in the Documents/Records
List Window.................................................................... 6-53
Copying the Field Contents for a Record to the Clipboard ......... 6-54
Opening the Output Directory for the Selected Document ........ 6-54
Copying the Native File to the System Temporary Directory ..... 6-55
Conducting a Session Search ............................................... 6-55
Conducting an Advanced Search........................................... 6-57
Setting a Flag for Multiple Records Simultaneously.................. 6-58
Apply Reprocessing Changes to all Files with Same
MD5Hash Value............................................................... 6-59
Displaying a Group of Records that Meet a Specific Criteria ...... 6-62
Closing a Session or Search Tab ........................................... 6-62
About Export Sets ................................................................... 6-62
Creating an Export Set........................................................ 6-63
Modifying an Existing Export Set .......................................... 6-66
Saving Options ....................................................................... 6-67
QCing Items ........................................................................... 6-68
Viewing a Record’s metadata or Extracted Text/OCR ............... 6-76
Setting the QC Reprocess Options for a Processing Job ............ 6-77
Color Depth Options ........................................................... 6-81
Setting the QC Reprocess Options for a Data Extract Job ....... 6-100
Setting/Modifying the Ipro eCapture QC Module System Options.. 6-103
Ipro eCapture QC Keyboard Shortcuts List ................................ 6-104
www.iprotech.com
877-324-4776
Ipro eCapture User Guide
Q1 2014
vii
Ipro eCapture
7
Creating Export Series and
Export Jobs
Overview .................................................................................7-1
Exporting Completed Processing Jobs...........................................7-2
Creating a Processed Data Export Job (Export Processed
Data/New Process Export Job) ..................................................7-3
Autoload into Ipro Eclipse - Processing Job ............................ 7-52
Autoload into Relativity - Processing Job.............................. 7-100
Exporting Completed Data Extract Jobs .................................... 7-146
Creating a Data Extract Export Job (Export Extracted
Data/Data Extract Export Job) .............................................. 7-147
Creating an Overlay Export Job .......................................... 7-182
Autoload into Ipro Eclipse - Data Extract Job ........................ 7-184
Autoload into Relativity - Data Extract Job ........................... 7-218
Export Formats ..................................................................... 7-256
Export to Concordance® DAT............................................. 7-256
Export to Summation Case ................................................ 7-257
Export to OCR CONTROL.LST File ....................................... 7-259
Ringtail Format ................................................................ 7-259
Ipro DLF (Ipro Eclipse)...................................................... 7-262
Custom Export Format (Image Load and/or Data Load Format) ... 7-262
About the EncounteredMetadataFieldList Table ..................... 7-264
About Export Series............................................................... 7-264
Creating an Export Series (Process Export or Data
Extract Export) ............................................................. 7-266
Editing an Export Series .................................................... 7-268
Deleting an Export Series .................................................. 7-268
Creating an Export Job from an Existing Export Series........... 7-269
Saving Export Settings...................................................... 7-270
viii
Ipro eCapture User Guide
Q1 2014
www.iprotech.com
877-324-4776
Contents
8
Running Reports
Overview .................................................................................8-1
Ipro eCapture Legacy Reports .....................................................8-2
Selecting Legacy Discovery Report Options ..............................8-3
Selecting Legacy Processing Report Options .............................8-4
Selecting Legacy Data Extract Report Options ..........................8-5
Running the Selected Legacy Reports......................................8-6
Closing the Report Module .....................................................8-6
Ipro eCapture Reports (3.x and later) ..........................................8-7
Selecting Discovery Report Options.........................................8-9
Selecting Processing Report Options ..................................... 8-10
Selecting Data Extract Report Options ................................... 8-12
Selecting Export Report Options ........................................... 8-14
Running the Selected Reports .............................................. 8-14
Closing Individual Report Windows ....................................... 8-15
Closing the Report Module ................................................... 8-15
Appendix A Using the Flex Processor
Rules Manager
Overview ................................................................................ A-1
Preparation ............................................................................. A-1
Rule Bar Options ................................................................. A-7
Using the Rule Set Management Wizard ...................................... A-9
Import/Create Rules ...........................................................A-11
Export/Copy Rules..............................................................A-14
Master Rule Sets ................................................................A-14
Defining Actions for a Flex Processor Rule..............................A-15
Defining Selection Criteria ........................................................A-27
Item IDs ...........................................................................A-43
E-mail Entry IDs ................................................................A-45
Using the Flex Processor Rules Manager Wizard...........................A-47
www.iprotech.com
877-324-4776
Ipro eCapture User Guide
Q1 2014
ix
Ipro eCapture
Appendix B Fail Task Warning
Messages
Overview ................................................................................ B-1
Appendix C Lotus Notes
Overview ................................................................................
Locating the User ID File ......................................................
Copying the User ID File.......................................................
Switching the ID .................................................................
Changing the Password ........................................................
Switching Back to the Original User ID (if necessary) ...............
Applying the Lotus Notes .ID to Password Protected Files...............
Appendix D
C-1
C-1
C-2
C-3
C-4
C-6
C-6
LFP Files
Overview ................................................................................ D-1
Importing a New Page (IM)................................................... D-3
Changing Boundaries ................................................................ D-5
Setting an Image’s Boundary Flag (BF) .................................. D-6
Applying a Higher Boundary to an Image (BM) ........................ D-6
Grouping a Range of Images (BR) ......................................... D-7
Assigning Level Codes (LC)................................................... D-8
Adding Information to Images ................................................... D-8
Loading Information Only Field Data (IO) ............................... D-8
Appending Data to Information Only Fields (IA)....................... D-9
Importing Boundary (Folder) Descriptions (FD) ..................... D-10
Creating a New Issue Tag (IN) ............................................ D-11
Applying a Tag to an Image (IS) ......................................... D-11
Highlighting Search Text ......................................................... D-12
Full Text Search Highlights (FT) .......................................... D-12
Original Text (OT) ............................................................. D-12
x
Ipro eCapture User Guide
Q1 2014
www.iprotech.com
877-324-4776
Contents
Original File for EDD Image (OF) .........................................
Including OCR Text in the LFP File (OI) ................................
Removing Information from Images..........................................
Removing Data from Information Only Fields (IO)..................
Removing All Tags from a Page (DT) ....................................
Removing a Tag from a Page (RT) .......................................
Moving Images ......................................................................
Moving an Image File to Another Volume (VF).......................
Changing the Location of a Volume (VN) ..............................
Changing an Image’s Filename (FN).....................................
Changing an Image Key (CK) ..............................................
Changing the Date for an Image Key (DA) ............................
Removing Images from a Project..............................................
Removing a Single Page (RP) ..............................................
Removing a Range of Pages from a Project (RR) ....................
Securing Images ....................................................................
Restricting a Page from Being Viewed (SR) ...........................
Removing a Page Restriction (RS)........................................
Comment Line (##) ...............................................................
D-12
D-14
D-14
D-14
D-15
D-15
D-16
D-16
D-17
D-18
D-18
D-18
D-19
D-19
D-19
D-20
D-20
D-20
D-20
Appendix E Password Protected Detection OutsideIn File Types
Overview .................................................................................E-1
Automatic Inclusions ............................................................E-1
Microsoft Access...................................................................E-2
Microsoft Excel.....................................................................E-2
Microsoft Word.....................................................................E-4
Microsoft PowerPoint.............................................................E-5
Microsoft Project ..................................................................E-7
Microsoft Visio .....................................................................E-7
PDF ....................................................................................E-7
www.iprotech.com
877-324-4776
Ipro eCapture User Guide
Q1 2014
xi
Ipro eCapture
Appendix F Glossary
xii
Ipro eCapture User Guide
Q1 2014
www.iprotech.com
877-324-4776
1
Introducing Ipro
eCapture™
In this Chapter
Overview ......................................................................... 1-1
Before Using Ipro eCapture ............................................. 1-2
Ipro eCapture Workflow................................................... 1-3
Ipro eCapture Components .............................................. 1-3
About this Guide ............................................................. 1-4
Intended Audience.......................................................... 1-4
In This Guide .................................................................. 1-4
Related Documents ......................................................... 1-5
Document Conventions ................................................... 1-6
Enterprise Support .......................................................... 1-7
Before Calling ................................................................ 1-7
Overview
Ipro eCaptureTM is designed for high volume EDD processing and incorporates
a distributive processing model whereby the Discovery Jobs, Processing Jobs,
Data Extract Jobs, and Export Jobs are distributed to multiple workers simultaneously. The processes are designed around jobs; not sequential processing.
Ipro eCapture was designed around SQL for large scale data storage.
When a job (Discovery, Processing, Export) is created from the Ipro eCapture
Controller, the Ipro eCapture Workers are automatically assigned the tasks of
completing those jobs. The Worker workstations perform the actual discovery
and processing of the electronic files. The Workers wait for the tasks assigned
by the Ipro eCapture Queue Manager.
www.iprotech.com
877-324-4776
Ipro eCapture User Guide
Q1 2014
1-1
Chapter 1, Introducing Ipro eCapture™
All data that is discovered is indexed (optionally), hashed, and extracted,
allowing for one or more Processing Jobs or Data Extraction Jobs to be run
using a single data set. There is no need to re-discover the same set of data.
Search and/or process as many times as necessary. In addition, Data Extract
Jobs or Processing Jobs can be created using more than one Discovery Job.
Export Jobs are based off of one of more completed Processing Jobs or Data
Extract Jobs.
Multi-language support is available starting with version 4.0 via implementing
Basis Technology’s Rosette Linguistics Platform for Language Identification,
Unicode and Base Linguistics.
The Flex Processor Rules Manager uses rules and focuses on superior functionality that delivers measurable cost savings by reducing data collections prior to
processing. The Flex Processor Rules Manager uses a rule based system, similar to Microsoft Outlook, which allows an action set to be performed on a specific selection of files. Searching, Filtering, QC Flags, NIST (National Institute
of Standards and Technology) of matches, and other criteria are all accessed
from the Flex Processor Rules Manager interface.
Export Sets, also introduced in version 3.0, are used to harness the power of
QC. For example, create an export on an individual document level with sort
capabilities. Export Series, another new feature, makes it easier to output successive unattended exports with sequential image key numbering and volumes.
New in 2013.0.0: Ability to export Containers linked to a Custodian, create
multiple Custodians in one step by importing an external file, Export Series
now has options Direct to Eclipse and Direct to Relativity in addition to Direct
to Disk, a centralized Job interface that allows Discovery, Data Extract and/or
Processing Jobs to be created at one time, Enterprise Worker support was built
into the Worker so support Eclipse production capabilities, and Batch Job creation was added at the Project and Custodian levels.
New in 2013.1.0: Improved Lotus Notes handling, password-protected file
identification, PDF family export, maximum number of threads per Worker
increased from four to eight, and expanded text options for max page threshold.
1-2
Ipro eCapture User Guide
Q1 2014
www.iprotech.com
877-324-4776
Before Using Ipro eCapture
New in 2014.0.0: Lotus Notes handling improvements for speed and distribution, upgraded to dtSearch version 7.72 and to OutsideIn (formerly Stellent)
version 8.4.1, a new metadata field called DocCategory was added, shared
(indexing and data extract) OCR output, and ability to specify an alternative
system directory for each Job type.
Before Using Ipro eCapture
Refer to the Ipro eCapture Installation Guide to install and set up Ipro eCapture.
Ensure the data is available and organized for the discovery process in the
Controller, a component of Ipro eCapture.
Ipro eCapture Workflow
•
•
•
•
•
•
•
•
Data Collection.
Create Clients, Projects (select options), Custodians.
Run Discovery jobs, select options, index, and run reports.
Run Processing Jobs and/or Data Extract Jobs, select options, search/
cull/filter data, and optionally run reports.
QC the processed data.
Create Export Jobs to specified formats.
Run reports.
Repeat.
Ipro eCapture Components
Controller: a console used for creating clients, projects, custodians, discovery
jobs, data extract jobs, processing jobs, managing/assigning task tables, creating export series, viewing detailed information about each Worker and the
tasks being performed.
The Limited Controller was designed to give full viewing access to Clients,
Projects, and Jobs. The Controller is required to perform a number of functions
including, but not limited to, performing NIST matches, modifying Job Priorities, apply/editing Flex Processor Rules, etc.
www.iprotech.com
877-324-4776
Ipro eCapture User Guide
Q1 2014
1-3
Chapter 1, Introducing Ipro eCapture™
Queue Manager: assigns jobs to Worker workstations, shows activity for
each Worker and the task type being performed, and shows status for each
Worker.
Worker: an agent application that resides on the Worker workstations. It processes Discovery Jobs, Data Extract Jobs, and Processing Jobs that are started
through the Ipro eCapture Controller. Each Worker workstation has its own
license.
Quality Control (QC): checks the accuracy of processed jobs by category
and/or flags. View metadata and extracted text/OCR for each image. Create
export sets.
Reports: Numerous reports are available for discovery jobs, data extract jobs,
and processing jobs that include but are not limited to Comprehensive, Deduplication, Search, and Discovery. Choose from Legacy reporting or use the
new reporting function (introduced with version 3.0) that allows for multiple
job selection of the same type. In addition, reporting is now available for
export jobs.
About this Guide
This guide assumes that Ipro eCapture is properly installed and configured.
Note: Oracle® acquired Stellent in 2006. The term Stellent may appear
throughout the guide in reference to IDs and tables. Stellent was renamed
Oracle® Outside-In Technology. The terms are interchangeable.
Intended Audience
This guide is intended for service providers, law firms, and corporate counsel
who will use Ipro eCapture to perform electronic data discovery, processing,
and production tasks.
Users are expected to have basic knowledge and understanding of:
•
•
•
•
1-4
The legal industry and discovery process.
Your organization and how Ipro eCapture will be used within it.
Windows administrative functions; areas such as networks and clientserver issues, as they pertain to your organization.
SQL Databases. The requisite SQL knowledge and skills are required.
Ipro eCapture User Guide
Q1 2014
www.iprotech.com
877-324-4776
In This Guide
In This Guide
This document contains basic instructions on setting up Ipro eCapture, creating projects, discovery jobs, data extract jobs, processing jobs, QC processed
jobs, running reports, and exporting processed data.
Chapter 2, Ipro eCapture Controller, describes how to setup the Ipro eCapture
Controller, modify the system options, set up projects, manage discovery jobs,
data extract jobs, and processing jobs, and maintain the Ipro eCapture Controller.
Chapter 3, Ipro eCapture Queue Manager, describes how to start, configure,
stop, and exit the Ipro eCapture Queue Manager.
Chapter 4, Ipro eCapture Worker, describes how to start, configure, stop, and
exit the Ipro eCapture Worker.
Chapter 5, Creating Clients, Projects, Custodians, and Jobs, describes how to
set up projects, custodians, discovery jobs, data extract jobs, and processing
jobs.
Chapter 6, Performing QC, describes how to perform QC on both in process
and completed processing jobs/data extract jobs, set QC options, create
export sets, and sort metadata.
Chapter 7, Creating Export Series and Export Jobs, describes how to export
completed processing/data extract jobs and create export series.
Chapter 8, Running Reports, describes various reports (discovery, processing,
data extract, and export) that can be run to assist with the electronic discovery process.
Appendix A, Using the Flex Processor Rules Manager, describes the Flex Processor Rules Manager functions, features, and options.
Appendix B, Fail Task Warning Messages, describes the fail task warning messages displayed in the Controller’s Worker Status Information Tab.
Appendix C, Lotus Notes describes the procedures for using the Notes.ID file
for Lotus Mailstores and for password protected. NSF files.
Appendix D, LFP Files, defines the operation codes for LFP files.
www.iprotech.com
877-324-4776
Ipro eCapture User Guide
Q1 2014
1-5
Chapter 1, Introducing Ipro eCapture™
Appendix E, Password Protected Detection OutsideIn File Types, contains a list
of the password protected detection Oracle® Outside-In Technology (formerly
Stellent) file types that are supported when using the Discovery Job option for
password detection.
Appendix F, Glossary, contains definitions.
Related Documents
•
•
•
•
•
•
•
•
•
•
•
•
•
•
•
•
•
•
Ipro Authorization Installation Guide
Ipro Enterprise Service Installation Guide
Ipro Enterprise System Requirements Document
Ipro Enterprise Supported Native Files
Ipro eCapture DB Diagram (Schema) for Case
Ipro eCapture DB Diagram (Schema) for Config
Ipro eCapture Installation Guide
Ipro eCapture Upgrade Guide
Ipro eCapture DB Query Tool Guide
Ipro eCapture Dialog Dismisser Utility
Ipro eCapture Import Wizard Utility
Ipro eCapture System Requirements Document
Ipro eCapture Database Update Utility Guide (updating previous databases for compatibility with the current version of Ipro eCapture)
Ipro eCapture Client Database Change Summary Document
Ipro eCapture Config Database Change Summary Document
Ipro NIST Loader Guide
Ipro Relativity Import Service Installation Guide
Release Notes
Additional information may be obtained by visiting www.iprotech.com.
1-6
Ipro eCapture User Guide
Q1 2014
www.iprotech.com
877-324-4776
Document Conventions
Document Conventions
The following conventions are used throughout the Ipro eCapture documentation:
Bold text indicates keyboard input, a mouse selection, or a menu selection.
Indicates useful information that supplements or emphasizes important points in the surrounding text. This information might apply only
to certain circumstances.
Indicates critical information that should be read before continuing.
> Indicates a submenu. For example, File > Print means choose File from
the menu bar, then choose Print from the File menu.
Alternate mouse button refers to the secondary button on the mouse. Where
right-click is referenced, substitute with left-click for left-hand mouse configuration.
Enterprise Support
If questions arise about Ipro eCapture and the answers cannot be found in the
provided product documentation, please contact:
Within Arizona: 602-324-4776
Corporate Office: 877-324-4776
Fax: 602-324-4784
E-mail: [email protected]
Web site: http://www.iprotech.com
Note: For questions about Microsoft SQL Server, contact Microsoft at
www.microsoft.com.
Ipro Tech Enterprise Support hours are from 7:00 a.m. to 5:00 p.m. Arizona
Time (GMT -7:00) Monday through Friday
www.iprotech.com
877-324-4776
Ipro eCapture User Guide
Q1 2014
1-7
Chapter 1, Introducing Ipro eCapture™
Ipro Tech General Support hours are from 5:00 a.m. to 5:00 p.m. Arizona
Time (GMT -7:00) Monday through Friday**
**Extended support hours for UK and AU
Before Calling
In order to assist the representative in processing your call efficiently and
accurately, please have the following information available before placing the
call:
Item
Details
Activity number
The activity number you were given during your initial
contact with Ipro Tech Enterprise Support. If this is
your initial contact, you will receive an activity number. The activity number helps to expedite your call.
Company information
Your company name, contact name, and phone number
with area code.
Ipro Allegro product information
Ipro eCapture product component (Controller, QC)
Access the main menu and choose Help > About.
System details
Operating system and service pack number if applicable.
Problem description
Exactly what you were doing at the time the error
occurred.
A summary of the steps you followed.
Error messages/
logs
Error messages and/or error log files.
1-8
Ipro eCapture User Guide
Q1 2014
www.iprotech.com
877-324-4776
2
Ipro eCapture Controller
In this Chapter
Overview ......................................................................... 2-1
Getting Started ............................................................... 2-1
Establishing a Connection with the SQL Server
and Setting the System Options ................................... 2-2
Worker Maintenance ..................................................... 2-11
Creating Task Tables ..................................................... 2-13
Assigning Enterprise Workers ....................................... 2-18
Configuring Integration with Ipro
Enterprise Applications .............................................. 2-20
Configuring Integration with kCura Relativity ............... 2-21
Loading the Hash Lists .................................................. 2-23
Ipro eCapture Controller Interface ................................ 2-26
Maintaining the Ipro eCapture Controller ...................... 2-59
Overview
The Ipro eCapture Controller serves as a command center where several different Job types (Discovery, Data Extract, Processing, and Export) can be created, edited, monitored, assigned priorities, and deleted with ease.
The Ipro eCapture Controller user interface is designed for viewing the status
of all the Workers that are actively connected to the Ipro eCapture database.
The Workers perform discovery and processing in addition to other job functions. In addition, view all tasks that are currently running as well as tasks
that are waiting in the queue. Task distribution is handled by the Queue Manager, an application that resides on the same workstation with the Controller
and starts automatically with the Controller by default.
This chapter covers the Ipro eCapture Controller user interface and all of its
functions. Subsequent chapters describe the various components of the Ipro
eCapture application such as the Queue Manager, Worker, QC, and Export.
www.iprotech.com
877-324-4776
Ipro eCapture User Guide
Q1 2014
2-1
Chapter 2, Ipro eCapture Controller
Getting Started
The first time Ipro eCapture Controller runs, do the following:
•
select the system options for the Ipro eCapture Controller through the
System Options dialog - these options include entering the Server name,
Database, Username, and Password. In addition, select Queue Manager
integration options, set a low disk space cutoff value, indicate whether to
expand the Custodian Tree Nodes, select a tree view sorting option, and
test the connection. The System Options are described in the section,
Establishing a Connection with the SQL Server and Setting the System
Options on page 2-2.
•
configure the Queue Manager through the Queue Manager Configuration dialog - this includes entering the Server name, Database, Username, and Password. In addition, configure the Performance settings
and test the connection. Information on configuring the Queue Manager
is described in Chapter 4, Ipro eCapture Worker, section Configuring the
Ipro eCapture Queue Manager on page 3-2.
These dialog boxes will present themselves initially upon starting Ipro
eCapture Controller. Once these settings are established, changes can
be made subsequently, if necessary.
Establishing a Connection with the
SQL Server and Setting the System
Options
Before beginning, ensure that the:
•
•
•
•
1.
2-2
SQL Server Authentication is enabled
local logging in to the SQL Server was successful
SQL Database Script Created the Config database
TCP/IP is enabled in the SQL Server Configuration Manager
Start the Ipro eCapture Controller by double-clicking the icon on the
desktop or choosing it from the Windows Start menu. The first time it is
Ipro eCapture User Guide
Q1 2014
www.iprotech.com
877-324-4776
Establishing a Connection with the SQL Server and Setting the System Options
started, the System Options dialog appears. (If it does not appear,
choose View > System Options from the menu bar.)
2.
Enter the following information to establish the connection:
•
•
•
From the Server drop-down list, select the SQL server where the
SQL database resides. If it does not appear, type the name.
Enter the name of the SQL Database in the Database field.
Enter a User name and a User Password.
www.iprotech.com
877-324-4776
Ipro eCapture User Guide
Q1 2014
2-3
Chapter 2, Ipro eCapture Controller
•
Click
information.
. A dialog appears with connection status
If the connection is not established, the dialog will present some
options to try in order to establish the connection.
If the connection is successful, the dialog will state: The connection was tested successfully. Click OK to close this dialog.
3.
From the Queue Manager Integration box, do any of the following:
•
•
Select Automatically Start Queue Manager to start the Queue
Manager when the Ipro eCapture Controller is started. This is the
default setting. It is recommended to leave this option selected.
Select Automatically Stop Queue Manager to stop the Queue
Manager when exiting the Ipro eCapture Controller. This setting is
deselected by default. It is recommended to leave this option
deselected so that the Queue Manager can continue assigning
tasks to the Workers and processing can continue uninterrupted.
Note: To stop and start the Queue Manager manually from the
Window system tray, do not select either of the above two options.
For more information about the Queue Manager, see Chapter 3,
Ipro eCapture Queue Manager.
4.
From the Low Disk Space Cutoff box, do any of the following:
•
•
5.
2-4
Network: From the drop-down list, select a value. The minimum
space value is determined by the SQL Server database configuration. This value may change based on the Server that is selected
from the drop-down list in this dialog. The range is from 10 MB
through 100 GB, and No Minimum.
Worker: From the drop-down list, select a value. The default value
is set to not check drive space. If set with a value, the worker
changes its status to “low disk space” if the drive’s free space falls
below the limit set. The local drive is defined as the drive where
the system temporary directory is configured (%TEMP%)
Under User-Interface Settings, select from:
Ipro eCapture User Guide
Q1 2014
www.iprotech.com
877-324-4776
Establishing a Connection with the SQL Server and Setting the System Options
•
•
Expand Custodian Tree Nodes in Export Job Creation is
selected by default. When an export job is started, every node is
usually expanded. If there are a lot of custodians, there usually
will also be a lot of processing jobs. This option, when selected,
will minimize the amount of time it will take to scroll through the
tree.
Display Search Progress is selected by default. When Search
criteria is selected in the Flex Processor Rules Manager and applied
or previewed, a search progress meter appears. Deselect this
option to hide the search progress meter.
6.
Select a Tree View Sorting option. The tree view in the Client Management tree view can be sorted by either ID (default) or by name (alphabetically). Sorting applies to all entities. The tree view collapses
(refreshes) after an option is selected.
7.
Select the Enable Fail Task Feature option to manually fail a particular
task for a job, distributed to a particular Worker, in order to facilitate the
completion of a job. The Fail Task feature can be used in any portion of
the Ipro eCapture workflow; Discovery, Processing, Data Extract, and
Exporting. When this option is enabled, tasks may be manually failed
from the Controller’s Worker Status Information Activity Grid. See the
section Worker Status Information Tab View on page 2-49 for instructions.
8.
Select a Remote Desktop option, These settings are available for both
the Full and Limited Controller and allow for connecting via remote desktop to a specific worker.
The machine name and IP address is stored in the Worker Status Information tab.
Select the method to connect by:
•
•
Connect Using Name
Connect using IP address
Enter a Custom Port value to optionally connect to a non-default port.
All connection requests use the same port. Executed by building a command string and shelling to mstsc.exe. See the section Worker Status
Information Tab View on page 2-49 for instructions.
www.iprotech.com
877-324-4776
Ipro eCapture User Guide
Q1 2014
2-5
Chapter 2, Ipro eCapture Controller
9.
Under Flex Processor Rule Application, adjust the Thread values for:
•
•
10.
Search Threads (Default value is 1, maximum value is 8):
Adjust this value to allow for how many dtSearch rules can run
simultaneously. A higher value will use more resources from the
Ipro eCapture Controller; however, it will allow multiple searches
to finish faster if the Controller machine has enough processor
capacity. Too many threads may not be handled well on slow or
heavily loaded machines.
Rule Application Threads (Default value is 1, maximum
value is 8): Adjust this value to allow for how many non-dtSearch
rule applications can run at once (file type filters, item ID imports,
etc). These rule applications impact the SQL server rather than the
Ipro eCapture Controller, and in turn can impact how well Ipro
eCapture runs on the whole due to increased SQL activity while
rules are applied.
(Optional) For the NIST Database Settings, do the following:
•
Enter the name of the NIST database. Note: The NIST database
is optional. It does not come with Ipro eCapture. For information
about NIST, visit http://www.nsrl.nist.gov. Please see the Ipro
NIST Loader Guide for information about installing and using the
optional NIST databases and the Ipro NIST Loader.
•
Click
information.
. A dialog appears with connection status
11.
Click OK to close the System Options dialog. The Queue Manager Configuration dialog appears. This dialog appears the first time the Ipro
eCapture Controller runs. By default the Queue Manager starts at the
same time as the Ipro eCapture Controller and it must be configured as
well.
12.
See Chapter 3, Ipro eCapture Queue Manager and the section Configuring the Ipro eCapture Queue Manager on page 3-2 for information on
populating the Queue Manager Configuration dialog.
2-6
Ipro eCapture User Guide
Q1 2014
www.iprotech.com
877-324-4776
Establishing a Connection with the SQL Server and Setting the System Options
Stopping the Ipro eCapture Controller During
Job Execution
The Ipro eCapture Controller should be running at all times as long as jobs are
executing. The Ipro eCapture Controller needs to be running in order for jobs
to complete that are in the Queue.
Accessing Stored Configuration Database Connection Settings
Once existing configuration database connection settings are saved, they can
be accessed, viewed, deleted, and edited from the Ipro eCapture Monitor.
1.
To access the Properties dialog where the connection settings are
entered and saved, select one of the following:
•
•
•
•
•
From the Controller, choose View > System Options from the
menu bar to open the System Options dialog
From the Limited Controller, choose View > System Options
from the menu bar to open the System Options dialog
From QC, choose Tools > System Options from the menu bar to
open the System Options dialog
From the Worker, alternate click the Worker icon in the System
Tray, choose Configure to open the Ipro eCapture Worker Configuration dialog
From the Queue Manager, alternate click the Queue Manager icon
in the System Tray, choose Configure to open the Queue Manager
Configuration dialog.
www.iprotech.com
877-324-4776
Ipro eCapture User Guide
Q1 2014
2-7
Chapter 2, Ipro eCapture Controller
2.
Click Select Existing. The Properties dialog appears.
This dialog appears the first time connection settings are entered and
saved. Once one or more connection settings are entered and saved, the
Ipro eCapture Monitor appears when Select Existing is clicked. See the
section Using the Ipro eCapture Monitor on page 2-9 for information
about the Ipro eCapture Monitor.
There are three methods for saving the configuration database connection settings:
•
•
•
3.
2-8
Configuration Database credentials
Command line method - MSTSC / path
Saved .RDP file (remote database protocol)
Enter a meaningful name to describe the name of the configuration
database.
Ipro eCapture User Guide
Q1 2014
www.iprotech.com
877-324-4776
Establishing a Connection with the SQL Server and Setting the System Options
4.
Select one of the methods:
•
•
•
5.
Populate the Server, Database, Username, and Password fields.
Enter the command line and select Admin or Full Screen
Select RDP file and browse out to the file.
Click OK. The Ipro eCapture Monitor appears.
Using the Ipro eCapture Monitor
The Ipro eCapture Monitor is used to add/configure additional databases, edit
an existing configuration, order the configurations in the list, delete configurations, and set/change passwords.
Click the View tab. Selected databases (in the Configure tab) appear in the
View tab. The Database details include the name, server/database, active
jobs, inactive jobs, workers, and time last updated. Use the View tab to monitor the activity for the different databases.
www.iprotech.com
877-324-4776
Ipro eCapture User Guide
Q1 2014
2-9
Chapter 2, Ipro eCapture Controller
Click the Configure tab.
To enter and save a new configuration, click
. The Properties dialog
appears. See the section Accessing Stored Configuration Database Connection
Settings on page 2-7 for details.
To edit an existing configuration, select the configuration (highlight it in the
list) and click
Click OK.
. The Properties dialog appears. Make the necessary changes.
To delete an existing configuration, select the configuration (highlight it in the
list) and click
. A Confirm Deletion dialog appears. Click Yes.
To set/change the password for an existing configuration, click
. The Enter
New Password dialog appears. Enter the new password and click OK.
To change the order of a configuration in the list, select the configuration
(highlight it in the list) and use
or
to move it to a different position.
The new order also appears in the View tab.
2-10
Ipro eCapture User Guide
Q1 2014
www.iprotech.com
877-324-4776
Worker Maintenance
Worker Maintenance
Users must have full Administrator permissions to those computers,
workstations, servers, and other devices that they will use to install,
run, and/or update the Ipro eCapture components.
Worker maintenance includes updating worker patch directory, incrementing
patch versions, and queuing the worker restart tasks. These tasks are performed from the Ipro eCapture Controller.
Updating the Worker Patch Directory
All jobs must be completed before applying updates.
Place the updated patch files in a directory that is accessible by the worker or
workers set up on your system. The first time the worker patch directory is
updated, the path will appear in the Worker Maintenance dialog and remain
there. It is only necessary to do this once unless the directory path is changed
manually. We recommend using a UNC path instead of a mapped drive.
www.iprotech.com
877-324-4776
Ipro eCapture User Guide
Q1 2014
2-11
Chapter 2, Ipro eCapture Controller
1.
Choose Tools > Worker Patch Management from the Controller menu
bar. The Worker Maintenance dialog appears.
2.
Click
3.
Browse to the folder containing the patch files. We recommend browsing to a UNC path rather than a mapped drive path. If a mapped drive is
changed, then the path is rendered inaccessible.
4.
Click OK to return to the Worker Maintenance dialog.
5.
Click
. The button grays out and the version
changes to the next incremental values. Your version numbers may differ from those shown here.
2-12
to open the Directory Browser dialog.
Ipro eCapture User Guide
Q1 2014
www.iprotech.com
877-324-4776
Creating Task Tables
6.
Click
. This button grays out after it is
clicked to indicate that the restart tasks for each worker were added.
7.
Click Close in the Worker Maintenance dialog.
Creating Task Tables
Before creating new Task Tables, start the Ipro eCapture Worker and
configure it. To do this, see Chapter 4, Ipro eCapture Worker and the
sections Starting the Ipro eCapture Worker on page 4-1 and Modifying the Ipro eCapture Worker Configuration on page 4-3.
A Task Table contains a list of tasks for the Workers to perform. One default
task table already exists. Additional task tables can be created as required.
Task tables are available for selection at the time a new Client, Project,
Custodian, or Job is created.
After the Task Tables are created, multiple Ipro eCapture Workers can be
assigned to a specific task table. Because multiple workers can be assigned to
a specific task table, certain projects can be partitioned/segregated to a
specific task table in order to expedite production.
The Queue Manager prioritizes and assigns the tasks based on the task table
assignments. The Queue Status Information tab is used to view different Task
Tables via a Task Table drop-down list.
www.iprotech.com
877-324-4776
Ipro eCapture User Guide
Q1 2014
2-13
Chapter 2, Ipro eCapture Controller
1.
Choose Tools > Task Table and Worker Management from the menu
bar. The Task Table and Worker Management dialog appears.
2.
Select the Task Tables tab if it is not already selected.
3.
Click
4.
Enter a meaningful task table name. A maximum of 128 characters
are permitted.
5.
Click OK. The task table name appears under the Task Table Name column. An ID number is automatically assigned because Task Tables are
governed by the SQL Server.
2-14
to open the New Task Table dialog.
Ipro eCapture User Guide
Q1 2014
www.iprotech.com
877-324-4776
Creating Task Tables
6.
To set a task table as the default, right-click the task table and select
Set as Default Task Table from the context menu.
7.
To remove a task table from the list, select the task table and click
.
Assigning Task Tables to Workers
Once one or more task tables exists, then a group (batch) of Workers may be
assigned to a specific task table starting with version 4.2.
Multiple worker assignments to a specific task table helps to expedite production by allowing a specific task table (with its assigned workers) to discover
documents of a certain type; e.g Word documents. Another task table can be
selected (with its assigned workers) to discover Lotus Notes documents.
Example: There are 10 task tables and 50 workers. You may elect to assign 15
workers to one of the 10 task tables allowing the additional 35 workers to be
assigned to the remaining 9 task tables. One or more workers may be
assigned to a task table.
Prior to version 4.2, task table selection was available at the Client level only
when creating a new Client for the first time. Now, a task table can be selected
when creating a new Project, Custodian, or Job (Discovery, Processing, Data
Extract, or Export).
Task table selection is only available in the status panels of Client, Projects and
Custodians. Task table selection is available in the creation screens for all levels (Clients, Projects, Custodians, and Jobs). Changing the task table via the
status panel will affect the default task table for the level directly beneath. For
example, if the task table is changed at the Custodian level, then new Jobs for
that Custodian will display the presently selected task table. The task table
may be changed prior to creating a new job. However, once the job is started,
the task table cannot be modified.
1.
Choose Tools > Task Table and Worker Management from the menu
bar. The Task Table and Worker Management dialog appears.
www.iprotech.com
877-324-4776
Ipro eCapture User Guide
Q1 2014
2-15
Chapter 2, Ipro eCapture Controller
2.
Click the Worker Assignment Tab.
3.
Select a task table from the drop-down list. A task table is comprised of
[Server Name] Config Database Name: Task List (n).
4.
Select the workers to assign to the task table. Workers may be selected
contiguously or non-contiguously. Ctrl-click to select non-contiguous
workers. Shift-click to select a contiguous group of workers. The background color of the workers will alternate between white and gray to
make differentiating them easier. By double clicking a worker, it will
select all workers assigned to that task table.
5.
Click
Workers box.
. The selected worker(s) appear in the Current
This previous figure shows that 1 worker was assigned to a task table
called TaskList1(1) which shows that it has (1) assigned worker.
6.
2-16
Click Close.
Ipro eCapture User Guide
Q1 2014
www.iprotech.com
877-324-4776
Creating Task Tables
Reassigning Workers to Different Configuration Databases
Starting with version 6.2, workers may be re-assigned to different configuration databases.
Task tables for each configuration database, including the instance name of
the SQL server on which the database resides, will be listed along with the
task tables for the current configuration database.
To facilitate the management of configurations, the Ipro eCapture Monitor may
be accessed from the Task Table Management dialog. The Ipro eCapture Monitor is used to add new configurations. See the section Using the Ipro eCapture
Monitor on page 2-9 for information about the Ipro eCapture Monitor.
Once the configurations are added, they appear in the drop-down task table
list.
Best Practices for Table Task Assignment
Switching Workers to different configuration databases will cause issues if
there are differences between Ipro eCapture settings for those databases or
the processing environments. The Worker Patch Management patch version
and patch directory must be the same across all Controllers to ensure Workers
do not inadvertently upgrade themselves with incorrect or old patch files. The
same version of Microsoft Windows updates, specifically time zone version
updates, must be applied to all Ipro eCapture machines across all environments. A Worker with an incorrect time zone version (as determined by the
Controller to which it is assigned) will not accept tasks. Likewise, if a Controller
uses a mapped drive that is not mapped on a Worker switched to that Controller's task table, the Worker will not accept tasks because the drive will be inaccessible. Prior to using this feature, the different environments must be
configured to have the same or similar Worker patch settings, Windows
updates and drive letter configuration.
1.
Select a task table from the drop-down list.
2.
Select the workers to assign to the task table. Workers may be selected
contiguously or non-contiguously. Ctrl-click to select non-contiguous
workers. Shift-click to select a contiguous group of workers.
www.iprotech.com
877-324-4776
Ipro eCapture User Guide
Q1 2014
2-17
Chapter 2, Ipro eCapture Controller
3.
Click
Workers box.
. The selected worker(s) appear in the Current
This previous figure shows that 1 worker was assigned to a task table
called TaskList1(1) which shows that it has (1) assigned worker.
4.
Click Close.
Assigning Enterprise Workers
For Enterprise tasks, it is not necessary for third-party software (e.g.
Microsoft Office, Lotus Notes) to be installed in order to execute
Enterprise tasks on the machine.
Starting with Ipro eCapture 2013.0.0, Workers can be assigned as Enterprise
Workers (accept both Ipro eCapture and Enterprise tasks), Enterprise Only
Workers (accept only Enterprise tasks), or neither (the Worker accepts only
Ipro eCapture tasks).
Enterprise tasks take priority over Ipro eCapture tasks. To perform Enterprise
OCR tasks in eCapture, at least one Worker in a licensed eCapture environment must be set to Enterprise Eligible, or Workers in an unlicensed eCapture
environment must be set to Enterprise Exclusive AND the environment must
have 'Enterprise_OCR' licenses available. Ipro eCapture workers will do OCR
for Ipro Allegro and can be used to handle the OCRing of documents for faster
completion rather than using the existing Ipro Allegro OCR functionality. For
example, if you have 5 OCR licenses, then up to 5 Ipro eCapture Workers can
work on the OCR Enterprise tasks. The more Workers doing tasks, the faster
the OCRing completes.
A Worker license is not consumed for a Worker assigned as Enterprise only.
Workers with this status will not be available for standard Ipro eCapture only
related tasks. Each Exclusive Enterprise Only Worker will consume an
‘Enterprise_OCR’ license.
In the Worker Status Information tab, an Enterprise column indicates the status: Eligible, Exclusive, or Ineligible. See the section Worker Status Information Tab View on page 2-49 for additional information.
2-18
Ipro eCapture User Guide
Q1 2014
www.iprotech.com
877-324-4776
Assigning Enterprise Workers
1.
From the Ipro eCapture Controller menu, choose Tools > Task Table
and Worker Management. The Task Table and Worker Management
dialog appears.
2.
Click the Enterprise Worker Assignment tab.
3.
From the Available Workers grid, select a Worker and click
to move
it to the Enterprise Workers grid. (To move the Worker back to the Available Workers grid, click
).
4.
Repeat step 3 for additional Workers.
5.
(Optional) To assign the Worker as Enterprise Only (accepts only Enterprise tasks) select the check box for that Worker in the Enterprise
Worker grid.
6.
Click OK. The Worker Status Information tab Enterprise column will display the status for the Worker as indicated by the settings in the Enterprise Worker Assignment dialog.
www.iprotech.com
877-324-4776
Ipro eCapture User Guide
Q1 2014
2-19
Chapter 2, Ipro eCapture Controller
Configuring Integration with Ipro
Enterprise Applications
Ipro eCapture will integrate other Ipro Enterprise applications by automatically
populating a user-defined directory with the necessary files (.EXEs and .DLLs).
Starting in version 2014.0.0, Ipro eCapture takes advantage of the new Ipro
Eclipse Import Scheduler for loading data directly from an Export Job into Ipro
Eclipse.
1.
Create a directory. This directory will be used to store the necessary
files.
2.
From the Ipro eCapture Controller menu, choose Tools > Configure
Application Integration > Ipro Enterprise. The Ipro Enterprise Integration dialog appears.
3.
To configure the Integration Directory, do the following:
•
•
2-20
Click
to open the Browse for Folder dialog.
Navigate to the directory (created in step 1) using the UNC path
(mapped and local drive letters not permitted).
Ipro eCapture User Guide
Q1 2014
www.iprotech.com
877-324-4776
Configuring Integration with kCura Relativity
•
4.
5.
Click OK. The External Integration Configuration Complete dialog
appears displaying the selected UNC path directory. The directory
automatically populates with the necessary files required for integration with Ipro Enterprise applications.
To configure the Ipro Eclipse Connection, do the following:
•
Enter the Web Domain, e.g. eclipse.iprotech.com, the Port, and
the User Name and Password credential for the Ipro Eclipse environment.
•
Click
. If connection is successful, a Test Successful
dialog appears. Click OK to exit the dialog.
Click OK to close the Ipro Enterprise Configuration dialog.
Configuring Integration with kCura
Relativity
Ipro eCapture integrates with kCura Relativity. The installation of the Ipro Relativity Import service is required on the machine which the Relativity Desktop
Client is already installed. See the Ipro Relativity Import Service Installation
Guide for procedures. The Desktop Client is used to push data to Relativity by
invoking the executable with command line arguments.
Command line arguments to the Desktop Client and KWE/KWI settings files
may change between versions and are expected to still work with any API version in the event of incompatibility. However, the API connection is not necessary but can be useful when the Relativity version does not have significant
changes.
1.
Ensure the Relativity Service is running by checking the Microsoft Management Console and locating the Ipro Relativity Service under Services.
www.iprotech.com
877-324-4776
Ipro eCapture User Guide
Q1 2014
2-21
Chapter 2, Ipro eCapture Controller
2.
From the Ipro eCapture Controller menu, choose Tools > Configure
Application Integration > kCura Relativity. The Relativity Configuration dialog appears.
3.
Under Ipro Relativity Service (Desktop Client), do the following:
4.
2-22
•
Enter the Relativity Web Services credentials.
•
Click
ativity Service.
. This tests the connection to the Ipro Rel-
Under Relativity Connection, do the following
•
Enter the User Name and Password to connect to the Relativity
Service.
•
Click
. (Note: This button is available if the
Retrieve Case List option is selected.) The Successful Test dialog
Ipro eCapture User Guide
Q1 2014
www.iprotech.com
877-324-4776
Loading the Hash Lists
appears indicating a connection was made to the Relativity Web
Services. Click OK to exit the dialog.
The Retrieve Case List using Relativity API option is selected
by default. The case list is retrieved via the Relativity API during
export and appears in the Relativity Workspace and Options
screen. If this option is deselected, the Relativity Workspace and
Options screen will indicate to enter a valid Workspace ID. In this
case the API communication is bypassed.
See Chapter 7, Creating Export Series and Export Jobs and the
section Autoload into Relativity - Processing Job on page 7-100
and/or the section Autoload into Relativity - Data Extract Job on
page 7-218 for information on running the Autoload Export for Relativity
5.
Click OK. The Relativity Configuration dialog closes.
Loading the Hash Lists
The Custom Hash List works in a similar fashion to the NIST database. (See
the Ipro NIST Loader Guide for information about installing and using the
optional NIST databases and the Ipro NIST Loader.) However, the files that
comprise the Custom Hash List may also be selected.
There are many uses for the Custom Hash List. For example, a project is comprised of many custodians from the same company. Each custodian may have
certain identical files in their collection which are not contained in the NIST
database and which are known to be non-responsive. These files may include
types such as benefits summaries, logos, or files from custom software. By
adding the MD5 hashes of these files to a custom hash list, a user is able filter
out these files from all jobs in the project.
Custom Hash Lists exist at the configuration database level, so they can be
used across multiple clients. The table is called CustomHashList and contains
fields for the MD5 hash, the name of the file, and the name of the hash list.
www.iprotech.com
877-324-4776
Ipro eCapture User Guide
Q1 2014
2-23
Chapter 2, Ipro eCapture Controller
1.
Choose Tools > Custom Hash List Maintenance from the Ipro eCapture Controller menu bar to display the Custom Hash List Maintenance
dialog.
2.
Select a Load Hash List method:
•
2-24
Custom Hash CSV File Name: If the comma-delimited file has
the MD5 hash in the first column, load the list using this option.
The second column is optional, and may contain the file name. All
Ipro eCapture User Guide
Q1 2014
www.iprotech.com
877-324-4776
Loading the Hash Lists
•
other columns are discarded. If the first line contains a header,
select the option The first line of the file is a header.
Folder Containing Files to Add to Custom Hash List: Place
custom hash list files in a folder on the computer and load the
hashes of those files using this option. This looks for files in the
folder specified only; it will not examine sub-folders or containers.
When running, the loader will generate an MD5 hash for each file
and add it to the database.
3.
Assign a Hash Group Name for either method selected above.
4.
Click
Groups.
5.
To view the files and MD5 hashes contained within a custom hash list,
. The current hash lists display under Hash
click
6.
To delete a hash list that is no longer needed, select the appropriate
hash list and click
.
Deactivating/Reactivating a Client
Deactivating a Client removes it from the Controller Client Management Tree
View. However, data will not be deleted or changed. The Client may be deactivated only if all the jobs are allowed to complete. If an attempt is made to
deactivate a client with one or more incomplete jobs, the system notification
indicates that the Client’s jobs must be completed first.
Deactivated Clients may be reactivated.
Deactivate a Client
1.
Click the alternate mouse button on the Client for deactivation.
2.
From the context menu, select Deactivate Client. The Client is
removed from the Client Management Tree View.
www.iprotech.com
877-324-4776
Ipro eCapture User Guide
Q1 2014
2-25
Chapter 2, Ipro eCapture Controller
Reactivate a Client
1.
Choose Tools > Reactivate Client from the Ipro eCapture Controller
menu bar. The Reactivate Client dialog appears.
2.
Select the Client from the list.
3.
Click OK.
Ipro eCapture Controller Interface
The Ipro eCapture Controller main desktop is divided into two parts: a static
Job Queue Pane located in the upper half and three separate screens accessed
by tabs in the lower half. These tabs are:
•
•
•
Client Management
Worker Status Information
Queue Status Information
Click these tabs at any time to see more information about the jobs that are in
the Job Queue pane.
2-26
Ipro eCapture User Guide
Q1 2014
www.iprotech.com
877-324-4776
Ipro eCapture Controller Interface
Client Management Tab
Client Management Tree View
The Client Management tree view (left side) shows the Clients, Projects, Custodians, the Custodian’s jobs (data extract, discovery, or processing), and
Export Jobs.
By clicking the alternate mouse button, various context menus appear with
additional functions. These functions are described in the section, Accessing
Additional Functions from the Context Menus on page 2-46.
Information Panel
The Information Panel displays information for the item selected in the Client
Management tree view.
When the root level of the Custodian, Discovery Jobs, Data Extract Jobs, or
Processing Jobs is selected, the Information Panel displays a list of the jobs
and their current status. Alternate click (or double click) any job in the list to
display the context menu selection Locate Jobname. Click the selection to go
to that job in the Client Management tree view. The Information Panel changes
from list view to the details about the selected job.
www.iprotech.com
877-324-4776
Ipro eCapture User Guide
Q1 2014
2-27
Chapter 2, Ipro eCapture Controller
The columns can be sorted in Ascending or Descending order by clicking the
column heading. For example, click the column heading ID to sort the ID numbers in Descending order.
A Task Table drop-down list is available on each panel to facilitate the ease of
changing the Task Table if necessary. For example, the currently selected Task
Table for the Custodian will show as the default task table when a new Job
(Discovery, Processing, Data Extract or Export) is created. For more information on Task Tables, see Chapter 2, Ipro eCapture Controller and the section
Assigning Task Tables to Workers on page 2-15 for information about assigning Workers to Task Tables.
The following figure shows an example of Jobs associated with Custodian A.
Custodian A is selected in the Client Management tree view as shown in the
previous figure.
2-28
Ipro eCapture User Guide
Q1 2014
www.iprotech.com
877-324-4776
Ipro eCapture Controller Interface
The following figure shows an example of the Projects associated with a Client
called Client A.
The Projects are located in the Description column. The Custodians are located
in the Name column. Projects are listed either alphabetically by name or
numerically by ID. Alternate click the Client in the Client Management tree
view to display the context menu. Choose Change tree view sort by Name or
ID.
Icon Descriptions:
indicates that job completed with errors. This icon appears for Discovery
jobs only. Double-click the job in the list to go to the Information Panel for the
job. See Chapter 5, Creating Clients, Projects, Custodians, and Jobs and the
section Changing Error Status for Completed Discovery Job on page 5-31 if
you wish to change the error status.
indicates job completed with no errors
indicates job completed with errors.
indicates job is in progress.
When the Client root level is selected, the following information displays in the
Information Panel: ID, Name, Location (indicated Client directory when Client
was created), Description, Date Created, Task Table, and a list of Projects (ID,
Name, and Description).
www.iprotech.com
877-324-4776
Ipro eCapture User Guide
Q1 2014
2-29
Chapter 2, Ipro eCapture Controller
The Projects tab shows the ID, Name, Description, and Matter ID.
The Notes tab is used to enter pertinent information.
When the Project root level is selected, the following information displays in
the Information Panel: ID, Name, Location (default directory assigned under
Client root when Project is created), Description, Matter ID (to change the
matter ID, double-click the matter ID and enter a new matter ID in the dialog), Task Table, Date Created, and a list of Custodians (ID, Name, and
Description).
The Custodians tab shows the ID, Name, and Description. From the Custodians tab, Custodians may be added by clicking
as well as using the
context menu (alternate click Project in the tree view). See Chapter 5, Creating Clients, Projects, Custodians, and Jobs and the section Creating a New
Custodian on page 5-8 for procedures.
From the Custodians tab, a batch of Custodians may be created by importing
an external .CSV file. See Chapter 5, Creating Clients, Projects, Custodians,
and Jobs and the section Importing Custodians and Jobs at the Project Level
on page 5-9.
A .CSV file can be created containing existing Custodians for the selected Project through exporting. See Chapter 5, Creating Clients, Projects, Custodians,
and Jobs and the section Exporting Custodians and Containers for the Project
on page 5-14.
The Containers tab (new for Ipro eCapture 2013.0.0) at the Project level
shows the Name of user-defined Container (node), the Custodians, Discovery
Jobs (semicolon delimited list in which container exists), Data Extract Jobs
(semicolon delimited list in which container exists), Processing Jobs, (semicolon delimited list in which container exists) and Path to the container.
If the Data Extract Jobs or the Processing Jobs are blank, this indicates that
data has not been processed.
2-30
Ipro eCapture User Guide
Q1 2014
www.iprotech.com
877-324-4776
Ipro eCapture Controller Interface
The following figure displays the containers (nodes) Custodians, and Jobs
associated with the selected Project.
From the Containers tab, the list of containers may be exported to a .CSV file
by clicking
selected Project.
. This file assists in tracking the Containers with the
1.
Select the Project from the tree view.
2.
Click the Containers tab.
3.
Click
to open the Export Project Containers dialog. A default
filename appears in the File Name field.
4.
Navigate to the location where the file will be saved.
5.
Click Save. The .CSV file will contain the following column headers:
•
•
•
•
•
•
Container Name
Custodian
Discovery Jobs
Data Extract Jobs
Processing Jobs
Container Path
The Notes tab is used to enter pertinent information.
www.iprotech.com
877-324-4776
Ipro eCapture User Guide
Q1 2014
2-31
Chapter 2, Ipro eCapture Controller
When the Custodian root level is selected, the following information displays
in the Information Panel: ID, Name, Description, Task Table, Date Created,
and a list of the Discovery Jobs, Data Extract Jobs, and Processing Jobs. Further detailed information will display in the Information Panel when an individual Discovery Job, Data Extract Job, or Processing Job is selected on the left
side.
The Jobs tab (available from the Custodian level) shows the ID, Name,
Description, Status, and Completed Items.
Starting with Ipro eCapture 2013.0.0, new Jobs can be created by clicking
. See Chapter 5, Creating Clients, Projects, Custodians, and Jobs and
the section Adding Discovery, Data Extract, and/or Processing Jobs Simultaneously on page 5-103 for procedures.
From the Jobs tab, multiple Discovery Jobs, Data Extract Jobs and/or Processing Jobs may be created by importing an external .CSV file. See Chapter 5,
Creating Clients, Projects, Custodians, and Jobs and the section Importing
Jobs at the Custodian Level on page 5-46 for procedures.
A .CSV file can be created containing existing Discovery Jobs and Containers
for the selected Custodian through exporting. See Chapter 5, Creating Clients,
Projects, Custodians, and Jobs and the section Exporting Existing Jobs and
Containers for the Custodian on page 5-50 for procedures.
2-32
Ipro eCapture User Guide
Q1 2014
www.iprotech.com
877-324-4776
Ipro eCapture Controller Interface
The Containers tab (new for Ipro eCapture 2013.0.0) at the Custodian level
shows the Name of user-defined Container (node), Discovery Jobs (semicolon
delimited list in which container exists), Data Extract Jobs (semicolon delimited list in which container exists), Processing Jobs, (semi-colon delimited list
in which container exists) and Path to the container.
If the Data Extract Jobs or the Processing Jobs are blank, this indicates that
data has not been processed.
From the Containers tab, the list of containers may be exported to a .CSV file
by clicking
. This file assists in tracking the Containers associated
with the selected Custodian. This file can also be imported into the selected
Custodian for creating Discovery Jobs. See Chapter 5, Creating Clients, Projects, Custodians, and Jobs and the section Importing Jobs at the Custodian
Level on page 5-46 for import procedures.
1.
Select the Custodian from the tree view.
2.
Click the Containers tab.
3.
Click
to open the Export Custodian Containers dialog. A
default filename appears in the File Name field.
4.
Navigate to the location where the file will be saved.
5.
Click Save. The .CSV file will contain the following column headers:
•
•
•
•
•
Container Name
Discovery Jobs
Data Extract Jobs
Processing Jobs
Container Path
The Notes tab is used to enter pertinent information.
Discovery Job information includes: ID, Status, Name (double-click the
name to display the Rename Job dialog to rename the Job), Task Table,
Batch ID (double-click to open Batch ID dialog if necessary to modify ID
prior to starting job), Location (Path where job files and the SETTINGS.INI are located. This path can either be the default path assigned
by Ipro eCapture or can be user defined. See Chapter 5, Creating Clients, Projects, Custodians, and Jobs and the section Setting Alternative
www.iprotech.com
877-324-4776
Ipro eCapture User Guide
Q1 2014
2-33
Chapter 2, Ipro eCapture Controller
System Directories for Jobs on page 5-92 for additional information.),
Description, Discovered Items, Indexed [Errors], OCR Applied[Errors]
where Applied shows the number of documents that required OCR (not
OCRed) and where [Errors] shows the number of those documents that
did not meet the specified average confidence level, Unextractable Items
(a count of files that were found but could not be extracted), NIST Match
Completed, Index Location, Date Created, Date Launched, Date Started
(indicates when the job began its first actual task), Date Completed and
Index Status (appears if a job was indexed at creation time with indexing details or displays a separate message for the DEFAULT.ABC and/or
the NOISE.DAT files if they were used to index).
For the selected job, view the options set for the job by clicking
will display.
. If the settings can be modified, the
button
The job’s status determines whether the Discovery Job options can be
modified.
. Available for completed Discovery Jobs that may
need reindexing or node/item level exception requeuing. See Chapter 5,
Creating Clients, Projects, Custodians, and Jobs and the section Modifying a Completed Discovery Job on page 5-21 for more information.
2-34
Ipro eCapture User Guide
Q1 2014
www.iprotech.com
877-324-4776
Ipro eCapture Controller Interface
The Update NIST Matches function is used if the NIST database is
loaded or requires updating. See Chapter 5, Creating Clients, Projects,
Custodians, and Jobs and the section Updating NIST Matches for a Discovery Job on page 5-32 for information regarding this function.
The Directories tab displays the directory path where the original data
resided.
The Node-level exceptions tab lists the number of node-level exceptions in parenthesis. Click the tab to view the exceptions. A node level
error means that a problem was encountered extracting the contents of
a container (e.g. Email store - folder within the email store, or a loose
file with attachments). Node level errors indicate items are missing from
the production set. Item Level errors mean that an error was encountered on a specific item. If items in the production are password protected these should be reflected in the Detailed Error Report that lists
errors and status messages encountered during discovery. Indexing
errors means that dtSearch encountered an issue trying to acquire the
text of a document. The Requeue Attempts column lists the number of
times the node-level exception was requeued. The Date Last Requeued
column lists the date the last time the node-level exception was
requeued.
www.iprotech.com
877-324-4776
Ipro eCapture User Guide
Q1 2014
2-35
Chapter 2, Ipro eCapture Controller
Double-click the exception to open the Discovery Error Information dialog to read information about the error.
If an exception can be requeued, double-click it. Otherwise, the system
displays the following message for both the Node Level and/or the Item
Level if it cannot be requeued: requeue unavailable due to process and/
or data extract jobs based on this discovery job.
Use the << Prev or >> Next buttons to view additional errors.
Click OK to close the dialog after reading the information.
The Item-level exception tab lists the number of item-level exceptions in parenthesis. Click the tab to view the exceptions.
The Notes tab is used to enter pertinent information.
2-36
Ipro eCapture User Guide
Q1 2014
www.iprotech.com
877-324-4776
Ipro eCapture Controller Interface
Data Extract Job information includes: ID, Status, Name (double-click
the name to display the Rename Job dialog to rename the Job), Task
Table, Location (Path where job files and the SETTINGS.INI are located.
This path can either be the default path assigned by Ipro eCapture or
can be user defined. See Chapter 5, Creating Clients, Projects, Custodians, and Jobs and the section Setting Alternative System Directories for
Jobs on page 5-92 for additional information.), Description, Processed
Items (# of Errors, Placeholders, Duplicate Placeholders), Removed
Items (# of Duplicates, No Effective Rule), Total Items (Process Items +
Removed Items), Date Created, Date Launched, Date Started (indicates
when the job began its first actual task), and Date Completed. The
Export Jobs box shows any created Exported Jobs with the ID, Name,
and Completion Date/Status.
For the selected job, view the options set for the job by clicking
will display.
www.iprotech.com
877-324-4776
. If the settings can be modified, the
Ipro eCapture User Guide
Q1 2014
button
2-37
Chapter 2, Ipro eCapture Controller
Access the Flex Processor Rules Manager by clicking
.
The job’s status determines whether or not the Flex Processor Rules
Manager options can be modified. A message appears stating if the
options cannot be modified due to the Job’s status. These options are
described in Appendix A - Using the Flex Processor Rules Manager.
Perform post processing batch operations by clicking
. The job’s status determines whether the options
can be modified or post-processing can be performed.
The Selected Discovery Jobs tab shows the ID, Name, Status, Items,
and Description.
The Notes tab is used to enter pertinent information.
Processing Job information includes: ID, Status, Name (double-click
the name to display the Rename Job dialog to rename the Job), Task
Table, Location (Path where job files and the SETTINGS.INI are located.
This path can either be the default path assigned by Ipro eCapture or
can be user defined. See Chapter 5, Creating Clients, Projects, Custodians, and Jobs and the section Setting Alternative System Directories for
Jobs on page 5-92 for additional information.), Description, Processed
Items (# of Errors, Placeholders, Duplicate Placeholders), Removed
Items (# of Duplicates, No Effective Rule), Total Items (Process Items +
2-38
Ipro eCapture User Guide
Q1 2014
www.iprotech.com
877-324-4776
Ipro eCapture Controller Interface
Removed Items), Date Created, Date Launched, Date Started (indicates
when the job began its first actual task), and Date Completed. The
Export Jobs box shows any created Exported Jobs with the ID, Name,
and Completion Date/Status.
For the selected job:
•
view the options set for the job by clicking
. If the
•
settings can be modified, the
button will display.
access the Flex Processor Rules Manager by clicking
•
(A message appears stating if the options cannot be modified due to the Job’s status. These options are
described in Appendix A - Using the Flex Processor Rules Manager.)
perform post processing batch operations by clicking
. The job’s status determines whether the
options can be modified or post-processing can be performed.
The Selected Discovery Jobs tab shows item ID, Name, Status,
Items, and Description.
The Notes tab is used to enter pertinent information.
www.iprotech.com
877-324-4776
Ipro eCapture User Guide
Q1 2014
2-39
Chapter 2, Ipro eCapture Controller
Export Jobs - Starting with version 3.0, additional functionality was added for
Exporting that includes Process Export Sets and Data Extract Export Sets.
These appear under Export Jobs in the Client Management tree view.
When the alternate mouse button is clicked on Process Exports, a context
menu appears with two options: New Process Export Job and New Process
Export Series. When the alternate mouse button is clicked on Data Extract
Exports, a context menu appears with two options: New Data Extract Export
Job and New Data Extract Export Series. Export Sets are also new for version
3.0. Creating Export Jobs and the new functionality is covered in Chapter 7,
Creating Export Series and Export Jobs.
From the Client Management tree view, click:
2-40
Ipro eCapture User Guide
Q1 2014
www.iprotech.com
877-324-4776
Ipro eCapture Controller Interface
•
Either Process Exports or Data Extract Exports to display a list of
Export Jobs, both Process Exports and Data Extract Exports in the Information Panel.
•
Either Process Export Sets or Data Extract Export Sets to display a
list of their Export Sets in the Information Panel.
www.iprotech.com
877-324-4776
Ipro eCapture User Guide
Q1 2014
2-41
Chapter 2, Ipro eCapture Controller
•
A created Export Series for either Process Exports or Data Extract
Exports. The information that displays in the Information Panel includes:
ID, Name, Description, Initial Bates, Next Bates, Initial Volume, Next
Volume, Date Created, and the Export Jobs in the Series.
Click
to open the Settings for Process Export Series dialog
and view the settings for the selected Export Series.
Click
to open the Export dialog containing the Export Formats and the File Handling Options. The most recent options appear for
the Series. Change these options and continue through the remaining
Export dialogs making any additional changes. Any new jobs created
going forward will use the new settings.
Click
to open the Export Series Summary Report for the
selected Process Export Job or Data Extract Export Job. The Export
Series Summary Report shows Series Name, Export Job Name, Volume
Name, Category, and Export Errors (if any) along with # of Documents,
Exported Size, Original Size, Image Key Range, and # of Volumes. Click
Save Report to save it as a .CSV file. The Original Size is the sum of the
native file size of parent document in the export as opposed to the parent documents in the Discovery Job. (Note: For example, Discovery Job
2-42
Ipro eCapture User Guide
Q1 2014
www.iprotech.com
877-324-4776
Ipro eCapture Controller Interface
parents can be excluded from exports by the Flex Processor Rules Manager so that child documents can be exported as standalone documents
rather than children. If this occurs, the native file size will be included in
the total.)
The Export Jobs in Series tab shows the ID, Name, Status, Documents, Bates Range, Volumes, and Volume Range.
The Notes tab is used to enter pertinent information.
•
Either a Process Job in Series or a Data Extract Export Job in
Series. The information that displays in the Information Panel includes:
ID, Status, Name, Location (Path where job files and the SETTINGS.INI
are located), Description, Date Created, Date Launched, Date Completed, and a list of Process Jobs (ID, Name, Status, Items, and Description).
Click
to open the Settings for Process Export Job dialog
where and view the settings for the selected Export Job in the Series.
Click
to access the export directory and view the output.
Click
to open the Export Series Summary Report for the
selected Process Export Job or Data Extract Export Job. The Export
Series Summary Report shows Job Name, Volume Name, Category, and
Export Errors (if any) along with # of Documents, # of Pages, Exported
Size, Original Size, Image Key Range, # of Volumes, Date Created, Date
Completed, and the Export Location. Click Save Report to save it as a
.CSV file. The Original Size is the sum of the native file size of parent
document in the export as opposed to the parent documents in the Discovery Job. (Note: For example, Discovery Job parents can be excluded
from exports by the Flex Processor Rules Manager so that child documents can be exported as standalone documents rather than children. If
this occurs, the native file size will be included in the total.)
•
Either a Process Export Job or a Data Extract Export Job, the information that displays in the Information Panel includes: ID, Status,
Name, Location (Path where job files and the SETTINGS.INI are located),
www.iprotech.com
877-324-4776
Ipro eCapture User Guide
Q1 2014
2-43
Chapter 2, Ipro eCapture Controller
Description, Date Created, Date Launched, Date Completed, and a list of
Process Jobs (ID, Name, Status, Items, and Description).
2-44
Ipro eCapture User Guide
Q1 2014
www.iprotech.com
877-324-4776
Ipro eCapture Controller Interface
Click
to open the Settings for Process Export Job dialog
where and view the settings for the selected Exported Processing Job.
Click
to access the export directory and view the output.
The View Output button will be grayed out for any Export Job that has
not yet completed.
www.iprotech.com
877-324-4776
Ipro eCapture User Guide
Q1 2014
2-45
Chapter 2, Ipro eCapture Controller
Click
to open the Export Summary Report for the selected
Process Export Job or Data Extract Export Job (including Eclipse and Relativity). The Summary Report differs for the type of export job. Information includes: Job Name, Volume Name, Categories, Export Errors (if
any), # of Documents, # of Pages, Exported Size, Original Size Bytes, #
of Volumes, Image Key Range, Date Created, Date Completed, and
Export Location.
Click Save Report to save it as a .CSV file.
The Selected Process Jobs tab or the Selected Data Extracted Jobs tab
shows the ID, Name, Status, Items, and Description.
The Notes tab is used to enter pertinent information.
Accessing Additional Functions from the Context Menus
By clicking the alternate mouse button on a node (Client, Custodian, Project,
etc.) in the Client Management tree view, a context menu will display additional options. The context menu varies based on the selected node.
For example, alternate click a Data Extract job to display the context menu.
The following options are available: New Data Extract Job, Export Extracted
Data, Delete Data Extract Job, and Reporting.
To search the Client Management tree view for a specific job, alternate click
the mouse button on a specific Client to display the context menu.
If you want to do a global tree view search, the system will allow you to search
all Clients regardless of the Client initially selected.
2-46
Ipro eCapture User Guide
Q1 2014
www.iprotech.com
877-324-4776
Ipro eCapture Controller Interface
From the context menu, choose Locate to open the Locate dialog.
Select/deselect the nodes that you want to include/exclude for the search. For
example, to narrow the search results for Discovery Jobs only, deselect all
nodes except Discovery Jobs.
Underneath the nodes box, there are two options: the Client that was selected
in the tree view and All Clients. To search within the specific client, select it if
necessary. To search all clients, select All Clients.
Enter the job name in the field. If the entire job name is not known, enter a
partial job name. For example, if you are looking for a job that contains the
letters “com”, enter com and click Search. All jobs that contain the letters
“com” will appear in the results list. Double click the correct job in the results
list. The Client Management tree view refreshes. The job appears first in the
tree view.
If necessary, perform additional searches. The list will refresh to display the
current search results. When finished, click Close.
For information about setting up Clients, Projects, Custodians, and Jobs using
the context menus see Chapter 5, Creating Clients, Projects, Custodians, and
Jobs.
www.iprotech.com
877-324-4776
Ipro eCapture User Guide
Q1 2014
2-47
Chapter 2, Ipro eCapture Controller
Sorting
Sorting the Client Management Tree View by name or ID can be accessed
through the context menu. Alternate click any Client in the tree view and
choose Change tree view to sort to by name (if already sorted by ID) or
choose Change tree view to sort to by ID (if already sorted by name). This
overrides the option selected in the System Options dialog as long as the Controller remains open. When the Controller is closed, it reverts back to the setting in the System Options dialog. See the section Establishing a Connection
with the SQL Server and Setting the System Options on page 2-2 for more
information.
Refreshing the Tree View
After adding a new Project, Custodian, or Job, the list can be refreshed without
having to close and re-open the Controller. Alternate click the Client in the tree
view, and choose Refresh Project(s). Alternate click the Custodian in the
tree view, and choose Refresh Custodian(s). Alternate click the Project in
the tree view, and choose Refresh Job(s).
Renaming Jobs
Discovery Jobs, Processing Jobs, Data Extract Jobs, Export Jobs, and Export
Series can be renamed. Alternate click the Job/Series to display the context
menu. Choose Rename (job type) Job/Series to display the Rename dialog.
Enter a new name and click OK.
2-48
Ipro eCapture User Guide
Q1 2014
www.iprotech.com
877-324-4776
Ipro eCapture Controller Interface
Worker Status Information Tab View
The Ipro eCapture Queue Manager is responsible for the data shown in the
Worker Status Information tab. For further information about the Ipro eCapture Queue Manager, see Chapter 3, Ipro eCapture Queue Manager.
Columns can be sorted individually. Default sort order is alphabetically by
Worker Name.
Registered Worker’s grid
This grid (see previous figure) shows:
•
•
•
•
Interval value shown in seconds. To adjust this value click the
drop-down arrow and select an interval value in seconds. To manually refresh, click
.
each of the Workers that are connected to the Ipro eCapture Controller
their respective IP Address
status (inactive, ready, ready unlicensed, assigned, busy, inaccessible path, low disk space, print spooler error, pending cleanup,
graceful shutdown, restarting, and bandwidth limit reached.) See
Appendix A - Using the Flex Processor Rules Manager for information about each status.
www.iprotech.com
877-324-4776
Ipro eCapture User Guide
Q1 2014
2-49
Chapter 2, Ipro eCapture Controller
•
•
•
•
number of items in process (discovery jobs, export jobs, and data
extraction jobs) or percentage (%) in process (processing jobs
only)
task table name
enterprise - will show Eligible (indicates the Worker will be
assigned both Ipro eCapture and Enterprise tasks), Exclusive (indicates the Worker will be assigned only Enterprise tasks, or blank
(Ineligible - indicates these Workers will not be assigned Enterprise tasks). See the section Assigning Enterprise Workers on page
2-18 for additional information.
connect to a remote worker: Connection available either by using
the worker name, worker IP address, or via a custom port setting.
(See Establishing a Connection with the SQL Server and Setting
the System Options on page 2-2 for configuring the Remote
options.) Right-click a worker in the Registered Worker’s grid to
display a context menu. Select from:
Connect to Worker with /mstsc/console - No arguments
Connect to worker with /console
•
Connect to worker with /admin
Queue a Restart Task - Right-click a worker in the Registered
Worker’s grid to display the context menu. Select Queue Restart
Task for an active Worker. This option is not visible on the Limited
Controller.
Activity for Worker grid
This grid (see previous figure) shows the present activity of the Worker
selected in the Registered Workers grid located above.
The activity includes:
•
•
•
•
•
•
2-50
task type - discover files in a directory
target item- the path where the files are being stored as they are
created
client
project
custodian
job
Ipro eCapture User Guide
Q1 2014
www.iprotech.com
877-324-4776
Ipro eCapture Controller Interface
•
•
•
duration - displays the length of time (minutes and seconds) since
the task was accepted by the Worker. This column is populated for
all task types.
file size - displays the size of the file (in kilobytes) being handled
by the task. This column is only populated for Processing and Data
Extract tasks.
failing a task type: (Not available in the Limited Controller) Right
click the task to display
. (Note: Not all Task Types
are available to fail.) Click
to display the Fail Task
of type Process File dialog. The message in this dialog may vary
predicated on the selected task.
See Establishing a Connection with the SQL Server and Setting the
System Options on page 2-2 for enabling the Fail Task feature.
See Appendix F - Glossary for a description of the Fail Task types.
Queue Status Information Tab View
The two options located above the Queued Task and Active Task grids (see
previous figure) are:
www.iprotech.com
877-324-4776
Ipro eCapture User Guide
Q1 2014
2-51
Chapter 2, Ipro eCapture Controller
•
•
Interval value shown in seconds. To adjust this value click the
drop-down arrow and select an interval value in seconds. To manually refresh, click
.
The Task Table drop-down lists the Task Tables. Multiple Ipro
eCapture Workers can be assigned to a specific task table. Click
the drop-down list to select a task table. The grid information
below will display information pertaining to the newly selected task
table.
Queued Tasks Grid
This grid (see previous figure) shows the:
•
•
Number of Queued Tasks
Activity (process file, etc.)
For Index Folders, one at a time will display. Therefore, 1 will appear
in the Number column and the individual Index Folder n, [where n
represents the Index Folder’s number], will appear in the Activity column.
•
Task designation of:
Unrestricted (tasks of this type may be performed by any worker
at any time)
Restricted (one task of this type at a time per worker)
Exclusive (only one of that type per Discovery Job, usually indexing)
Active Tasks Grid
This grid (see previous figure) shows the Worker and the Activity being performed on that Worker.
Ipro eCapture Controller Toolbar
The icons/options in the Ipro eCapture Controller toolbar
are as follows:
•
2-52
Refresh Icon: Click it to refresh the Queue.
Ipro eCapture User Guide
Q1 2014
www.iprotech.com
877-324-4776
Ipro eCapture Controller Interface
•
•
•
•
•
•
•
Green Circle Light: Queue operations light. This light changes to
light green to indicate queue activity.
Blue Circle Light: Job start activity light. This light flashes when
a new job is started and to indicate activity.
Interval Drop-Down List: See the section Setting the Processing
Update Intervals on page 2-60.
Job Queue Priority Icon: See the section Changing a Job’s Position in the Queue on page 2-55.
Log File Icon: See the section Error Handling on page 2-60.
Warning Icon: (Not shown). See the section Error Handling on
page 2-60.
: Click to open the Apply Rules dialog and apply rules to
one or more selected jobs from the Job Queue pane before starting the jobs if they were not already applied from the Flex Processor Rules Manager. See the section Applying Rules Set in the Flex
Processor Rules Manager on page 2-60.
Ipro eCapture Controller Job Queue Pane
The Job Queue pane is located in the top half of the Ipro eCapture Controller
interface.
The columns are as follows: ID (used by SQL), Job Type (Discovery, Data
Extract, Export, or Processing), Job (name assigned), Client (name assigned
and which the job is a part of), Project (name assigned and which the job is a
part of), Custodian (name assigned), Status (state job is in such as In progress or Paused), Progress, Date and Time, Filter State, and Task Table.
The Progress column, (Indexing not on), will show the total number of Index
items followed by the number of actual items that were completed, e.g. 2546
(1324). If indexing is turned on, then it will show the number of items not yet
indexed. Using the previous values, 2546 (1324:456), the second value in the
parenthesis (456) reflects those items that have not been indexed. For multiple discovery jobs in a multi-worker environment, the retry progress is shown
for index entries remaining. For example, the values displayed are 512
www.iprotech.com
877-324-4776
Ipro eCapture User Guide
Q1 2014
2-53
Chapter 2, Ipro eCapture Controller
(512:67 - 45), where 45 would indicate index tries remaining only if there are
incomplete retries. Index retries remaining will count down; that is, get
smaller as retries are completed. Processing Jobs and Data Extract Jobs show
percentage complete, e.g. 23.81%, out of 100%. The Filter State, shows
whether or not Filtering was applied for that job. See the section Applying
Rules Set in the Flex Processor Rules Manager on page 2-60 for additional
information.
The Job Queue Pane remains static regardless of which Tab is accessed underneath it. However, the data within the Job Queue Pane is dynamic based on
the discovery job, data extract job, export job and/or processing job activity.
Once a job’s progress is completed, it disappears from the queue.
All queue related options (interval refreshing, job priority changing, manual
refreshing) are disabled while queue operations are being performed.
Deselecting the checkbox in the Job Queue pauses the job but it still remains
in the queue. Jobs may not be paused during the Job start or Job completion
phases. To start any job, select the check box for that job.
To locate the job in the Client Management tree view, alternate click the job
(in the Job Queue) to display the context menu. Choose Locate jobname. The
job highlights in the tree view.
Ipro eCapture Controller Status Bar
The Ipro eCapture Controller Status Bar
at the bottom of the Ipro eCapture Controller shows:
•
•
•
•
2-54
Database Server: The database server (SQL Server) that Ipro
eCapture is connected to
Database: The database currently being accessed.
Authorization Status: Indicates the authorization type.
Authorized by Server: This shows the Server IP and port number that is used for Ipro eCapture’s authorization. For more information about the authorization, see the Ipro Enterprise
Authorization Guide.
Ipro eCapture User Guide
Q1 2014
www.iprotech.com
877-324-4776
Ipro eCapture Controller Interface
Changing a Job’s Position in the Queue
A job’s position in the queue can be changed by either moving it before or
after another job in the queue using the Change Job Priority function. The jobs
that appear can be pending or started. Once a job completes, it disappears
from the list.
If a job was expedited at creation time, it can still be moved in the queue.
1.
Click the
to display the Change Job Priority dialog.
2.
Select a Job from the list.
3.
Do one of the following:
•
Hold the CTRL key to move the job to the top or bottom of the
priority list.
•
Use
or
to change the priority level for the job.
Wait a few seconds while the project moves in the Client Manage-
www.iprotech.com
877-324-4776
Ipro eCapture User Guide
Q1 2014
2-55
Chapter 2, Ipro eCapture Controller
ment Job Queue Pane. Notice that the Job Queue Pane also has a
Priority column for each project.
Modifying Project Options
Once a project is created, project’s options can be changed. The settings take
affect for newly created Discovery Jobs, Data Extract Jobs, and Processing
Jobs for that project.
1.
To view/modify a Project’s options, click the Client Management tab.
2.
Select the Project from the tree view. The Project’s Information appears
in the Information Panel.
3.
Click
to open the Project Options dialog and to view/modify the settings. See the sections:
•
2-56
Setting Discovery and Indexing Options on page 5-35.
Ipro eCapture User Guide
Q1 2014
www.iprotech.com
877-324-4776
Ipro eCapture Controller Interface
•
•
•
Setting Processing Job Options on page 5-61.
Setting the Time Zone Options on page 5-86.
Setting the Filtering (Flex Processor) Options on page 5-87.
The previous figure shows the Job Queue Pane along the top portion. Below
the Job Queue Pane, the Client Management tab has focus and shows the Client, Project, Custodian, etc. tree view. The Information Panel to the right of
the tree view shows data about the selected Data Extract Job (highlighted in
the tree view).
Click through the items in the Client Management tree view, data will display
for that item in the Information Panel to the right of the tree view.
The following figure shows the Information Panel and related data about a Processing Job.
www.iprotech.com
877-324-4776
Ipro eCapture User Guide
Q1 2014
2-57
Chapter 2, Ipro eCapture Controller
Click any item in the tree view. For example, by clicking Process Export Sets (a
default listing in the tree view), a list of Export Sets displays.
Export Jobs
Under Export Jobs, the folder hierarchy is:
Process Exports - displays a list of all the exported Processing Jobs and Data
Extract Jobs
Process Export Sets - displays a list of the Export Sets created in QC
for Processing Job(s). These Export Sets can then be exported.
Data Extract Exports - displays a list of all the exported Processing Jobs and
Data Extract Jobs
Data Extract Export Sets - displays a list of the Export Sets created in
QC for Data Extract Job(s). These Export sets can then be exported.
Managing Process Export Sets or Data Extract Export Sets
Click either Process Export Sets or Data Extract Sets in the Client Management tree view. The Information Panel displays a list of Export Sets.
To create a New Export Set Container, click the alternate mouse button in
a vacant area (underneath the list of Export Sets) to display the context menu.
Choose New Export Set Container. Enter a meaningful Container Name
(e.g. Hot Docs) and click OK. The Container name displays in the list along
with the Export Sets. Once the Export Set Container exists, point, click, and
drag one or more exported Export Sets into the Export Set Container. Creating
Containers is optional.
To create a nested New Export Set Container, click the alternate mouse
button on an existing Export Set Container to display the context menu.
Choose New Export Set Container. Enter a Container Name and click OK.
2-58
Ipro eCapture User Guide
Q1 2014
www.iprotech.com
877-324-4776
Maintaining the Ipro eCapture Controller
To delete an existing Export Set Container (that does not contain children), click the alternate mouse button on the existing Export Set Container to
display the context menu. Choose Delete Export Set Container.
To rename an Export Set Container, click the alternate mouse button on
the existing Export Set Container and choose Rename Export Set Container
from the context menu. Enter a new Container Name and click OK.
To delete an Export Set, click the alternate mouse button on the Export Set,
and choose Delete Export Set from the context menu. If the Export Set has
not yet been exported, it will immediately be deleted without any warning
message. Otherwise, it will not delete. Export Sets, though created in Ipro
eCapture QC, can only be deleted through the Ipro eCapture Controller.
Maintaining the Ipro eCapture Controller
The following sections include selecting a different SQL server and/or database, and modifying the status update interval value.
Selecting a Different SQL Server and Database
1.
Choose View > System Options from the Ipro eCapture Controller
menu bar. The System Options dialog appears.
2.
Select a different server from the drop-down list or enter it manually.
3.
Enter the name of the new database or select the database from the
drop-down list.
4.
Enter a Username and Password.
5.
Click
mation.
www.iprotech.com
877-324-4776
. A dialog appears with connection status infor-
Ipro eCapture User Guide
Q1 2014
2-59
Chapter 2, Ipro eCapture Controller
Error Handling
Errors are logged to a file called CONTROLLER.LOG. When an error occurs, the
Show Log File
icon will change to a Warning
icon. When the warning
icon is clicked, Notepad opens and displays the error(s) and the Warning Icon
changes back to the Show Log File icon. Whenever an error is encountered,
the Warning Icon will display in the Ipro eCapture Controller toolbar. This file
records all job status changes and any timeouts or errors reported during the
job start sequence or during the job queue refresh. It also records starting of
the deletion agent.
Setting the Processing Update Intervals
To control how frequently the processing status updates, select an Interval
Value from the drop-down list in the Ipro eCapture Toolbar. Interval Values
are Off, 5, 10, 15, 20, 25, and 30 seconds as well as 1, 2, 5, 10, and 30 minutes.
Select OFF from the drop-down list to prevent updating.
Turning the interval OFF will prohibit Job start and Job completion
routines to complete.
Applying Rules Set in the Flex Processor Rules
Manager
Rules can be applied two ways: directly from within the Flex Processor Rules
Manager via the Preview Results function or using the Apply Rules function in
the Controller toolbar. The Apply Rules function is used to select multiple jobs
and simultaneously run those jobs while applying their respective rules. The
Job’s priority is automatically set to the highest so the rule application tasks
are distributed and worked on first.
2-60
Ipro eCapture User Guide
Q1 2014
www.iprotech.com
877-324-4776
Maintaining the Ipro eCapture Controller
This method saves time versus creating one job at a time, setting its rules,
and applying those rules using the Preview function in the Flex Processor Rules
Manager.
Jobs started without running the Apply Rules or Preview Rules will not
display in the Apply Rule window.
1.
Click
to display the Apply Rules dialog.
The top portion of the screen displays jobs whose Filter State is Not
Applied. The bottom half of the screen displays jobs where Rules were
Applied.
2.
Select the job or jobs for applying the rules.
3.
Click OK. The Apply Rules dialog closes.
4.
Start the Job or Jobs in the Job Queue Pane. The circle icons in the ID
column are used to quickly determine the status of the Applied Filters for
the job. They are as follows:
•
Red: unstarted job
www.iprotech.com
877-324-4776
Ipro eCapture User Guide
Q1 2014
2-61
Chapter 2, Ipro eCapture Controller
•
•
•
•
•
•
2-62
Red with pause marks: paused job.
Light Green: job is in progress
Dark Green: pending, job will be started on next refresh
Light Blue: unstarted job with pending Rules application
Medium Blue: pending job with pending Applied Rules completing,
will apply rules and be set back to unstarted on refresh.
Dark Blue: unstarted job with applied filters.
Ipro eCapture User Guide
Q1 2014
www.iprotech.com
877-324-4776
3
Ipro eCapture Queue
Manager
In this Chapter
Overview ......................................................................... 3-1
Configuring the Ipro eCapture Queue Manager ............... 3-1
Modifying the Ipro eCapture Queue Manager
Configuration Settings .................................................. 3-14
Testing the Connection.................................................. 3-14
Starting and Stopping the Ipro eCapture Queue Manager ... 3-14
Viewing the Queue Manager Status Activity...................... 3-15
About the QueueManager.LOG file .................................. 3-16
Exiting the Ipro eCapture Queue Manager ........................ 3-16
Overview
AS PER IPRO ECAPTURE’S DESIGN, ONLY ONE QUEUE MANAGER
IS PERMITTED TO RUN PER CONFIG DATABASE.
The Queue Manager is responsible for the tasks that it receives from the Ipro
eCapture Controller. It assigns jobs to the Workers for processing.
Configure these settings before running jobs. These settings can be adjusted
as needed.
The Queue Manager runs on the same machine as the Ipro eCapture Controller. By default, it starts when the Ipro eCapture Controller starts. The Queue
Manager is a system tray application and is referenced by this icon:
www.iprotech.com
877-324-4776
Ipro eCapture User Guide
Q1 2014
.
3-1
Chapter 3, Ipro eCapture Queue Manager
Configuring the Ipro eCapture Queue
Manager
The Ipro eCapture Queue Manager automatically starts along with the
Ipro eCapture Controller by default. During the initial run of the Ipro
eCapture Controller, the Queue Manager Configuration settings dialog
appears. See step 3 through 5 for information about setting the
options.
1.
Right-click the Queue Manager icon
the context menu.
in the system tray to display
Note: The Queue Manager icon changes color based on the Queue Manager’s status:
•
•
•
3-2
Green: Queue Manager is started and ready to send tasks to the
Workers
Green with flashing black dot in the middle: Queue Manager is
sending the tasks.
Red: Queue Manager is stopped and no tasks are being sent to the
Workers.
Ipro eCapture User Guide
Q1 2014
www.iprotech.com
877-324-4776
Configuring the Ipro eCapture Queue Manager
2.
Choose Configure. The Queue Manager Configuration dialog appears.
3.
Click the SQL Connection tab and do the following:
•
•
•
•
From the Server drop-down list, select the SQL server where the
SQL database resides.
Enter the name of the SQL Database in the Database field.
Enter a User name and a User Password.
Enter a Polling Interval value (in milliseconds). Increase this
number to decrease the amount of Queue Manager activity on the
www.iprotech.com
877-324-4776
Ipro eCapture User Guide
Q1 2014
3-3
Chapter 3, Ipro eCapture Queue Manager
SQL Server. However, this will effectively slow the rate at which
tasks are distributed to workers.
•
Click
. A dialog appears with status information.
If the connection is not established, the dialog presents some
options to try in order to establish the connection.
If the connection is successful, the dialog will state: The connection was tested successfully. Click OK to close this dialog.
•
Click
tion dialog appears.
. The Configure Ipro Authoriza-
If the authorization was previously configured via the Controller
(first time launch only), it is not necessary to enter the information
in this dialog because it will already be populated. Otherwise,
enter the following:
Server: Address of the computer on which the Ipro Authorization
Server is installed.
3-4
Ipro eCapture User Guide
Q1 2014
www.iprotech.com
877-324-4776
Configuring the Ipro eCapture Queue Manager
Port: Enter an available port (9800 by default).
Once one or more connection settings are entered and saved, the Ipro
eCapture Monitor appears when Select Existing is clicked. See
Chapter 2, Ipro eCapture Controller and the section Using the Ipro
eCapture Monitor on page 2-9 for information about the Ipro eCapture
Monitor.
www.iprotech.com
877-324-4776
Ipro eCapture User Guide
Q1 2014
3-5
Chapter 3, Ipro eCapture Queue Manager
Click the Task Distribution tab. This tab is where task and bandwidth settings are configured. In Ipro eCapture most tasks are related to the Discovery
process and most of these tasks will generate other tasks. The tasks are created and distributed to the Workers by the Queue Manager. There are two
bandwidth settings: System-wide and Worker. Bandwidth measures the
amount of data that can be sent over a specific connection. See the following
two options (System-wide Bandwidth and Worker Bandwidth) for a description
of Bandwidth as it relates to Ipro eCapture.
•
3-6
System-wide Bandwidth Throttle: Determines the total task
bandwidth acceptance for the Ipro eCapture environment. A setting of 1000 (default) will allow for distribution of tasks across the
Ipro eCapture User Guide
Q1 2014
www.iprotech.com
877-324-4776
Configuring the Ipro eCapture Queue Manager
•
•
•
•
•
environment where the total bandwidth value of those tasks is
1000 or less. With more Workers this value should be increased to
ensure all Workers remain busy. With a low setting and many
Workers there is the possibility that all Workers will not be utilized.
Worker Bandwidth Throttle: Determines the total task bandwidth acceptance per Worker. By setting your throttle to 800, this
allows each Worker to accept tasks that total a bandwidth usage
weight of 800 (8 x 100). The default setting is 175. Every task is
assigned a bandwidth value between 1 and 100, reflecting how
intensive the task can be on the Worker machine. A Worker Bandwidth Throttle too low could cause some of the Worker threads to
remain idle. A value too high could cause all threads to accept high
bandwidth tasks and affect individual task performance.
Queue Manager Non-Blocking Update Count: The number of
non-blocking tasks to be moved from Bullpen to Queued status.
The default setting is 1500. Non-blocking tasks allow all 8 threads
per Worker to be active and therefore should be a higher value
than blocking. Setting this value too high can cause non-blocking
tasks to wait to be assigned and make for inefficient use of a
worker.
Queue Manager Task Cache Count: Number of tasks to move
from the Bullpen to the Queue per Queue Manager iteration when
the Queue Manager Bullpen Trigger Count is reached. Applies to
PST Mailstore, Non-Blocking and Blocking tasks. The default setting is 300.
Queue Manager Blocking Update Count: The number of blocking tasks to be moved from Bullpen to Queued status. The default
setting is 300. Blocking tasks can have dependencies on other
blocking tasks. Setting this number too high can cause them to
wait until blocking tasks have completed and make for inefficient
use of a worker.
Queue Manager Bullpen Trigger Count: The lower threshold at
which Queue Manger begins adding more tasks to the queue, up to
the Queue Manager Task Count value. This setting ensures the
queue does not run out prior to updating the main Queue with new
tasks from the Bullpen. The default setting is 100.
www.iprotech.com
877-324-4776
Ipro eCapture User Guide
Q1 2014
3-7
Chapter 3, Ipro eCapture Queue Manager
•
Queue Manager System Exclusive Update Count: Number of
system exclusive tasks to move from Bullpen to Queued status
when the trigger count is hit. The default setting is 100. System
Exclusive tasks like indexing have a bandwidth of 100. This can be
controlled by making sure the worker bandwidth is set correctly
and the workers are not consumed with System Exclusive tasks.
Click the Functionality tab.
Set the following options:
•
3-8
Allowed Embedded File Extraction Error Percentage: When
extracting from embedded files, the entire node is errored if the
Ipro eCapture User Guide
Q1 2014
www.iprotech.com
877-324-4776
Configuring the Ipro eCapture Queue Manager
•
•
percentage of items in error are greater than this value. A setting
of 100% dictates the node will not error during the file count validation phase. The default setting is 100%.
Allowed Extraction Error Percentage: The entire node is
errored if the percentage of items extracted are in error and are
greater than this value. A setting of 100% dictates the node will
not error during the file count validation phase. The default setting
is 50%.
Allowed Password Protected Percentage: When extracting
from archives, the entire node is errored if the percentage of password protected files is greater than this value. A setting of 100%
dictates the node will not error during the file count validation
phase. The default setting is 100%.
www.iprotech.com
877-324-4776
Ipro eCapture User Guide
Q1 2014
3-9
Chapter 3, Ipro eCapture Queue Manager
Click the Size Limits tab.
3-10
Ipro eCapture User Guide
Q1 2014
www.iprotech.com
877-324-4776
Configuring the Ipro eCapture Queue Manager
Group Task Counts Options
The group tasks are intended to do only the work that requires access to
the NSF, letting the other workers perform the imaging and conversion
tasks that do not require mailstore access.
Group tasks takes groups of documents ready for discovery and performs discovery tasks on those documents. The number of configured
group tasks determines how many groups tasks will be distributed to the
Ipro Workers.
Discover Documents: Discover Document group tasks takes groups of
documents ready for discovery and performs discovery tasks on those
documents. This value determines how many groups tasks will be distributed to the Workers. Recommended setting is twice the number of
Workers.
Discover Lotus mailstore documents: The number of group tasks
created for Lotus Notes email discovery. The maximum value is equal to
the value set for the Copy Distribution to Worker Limit. Setting this value
to the maximum means that all the Workers will receive a copy of the
Lotus Notes mailstore to perform discovery. If there are multiple jobs
containing Lotus Notes mailstores, set the value lower than the maximum to improve distribution of the mailstores in those jobs.
Prepare Notes mailstore documents: The number of group tasks
created for Lotus Notes data in Processing and Data Extract Jobs. The
maximum value is equal to the value set for the Copy Distribution to
Worker Limit. Setting this value to the maximum means that all the
Workers will receive a copy of the Lotus Notes mailstore to perform Processing or Data Extract tasks. If there are multiple jobs containing Lotus
Notes mailstores, set the value lower than the maximum to improve distribution of the mailstores in those jobs.
Mailstore Options
•
Maximum concurrent copies: This setting controls how many
copy operations are taking place across the system. It is used to
control the load placed on the network by copying multiple gigabyte-sized files at once. Generally it is the same value, or less
than, the Copy Distribution setting. The default setting is 5.
www.iprotech.com
877-324-4776
Ipro eCapture User Guide
Q1 2014
3-11
Chapter 3, Ipro eCapture Queue Manager
•
•
•
Copy distribution to worker limit: Controls how many copies of
any one Lotus Notes mailstore are copied to Workers. A setting of
10 means that 10 Workers will be assigned tasks that require a
local copy of the mailstore. When there are many large Lotus
Notes mailstores, set this value higher to improve distribution of
work. Set the value to a minimum of 2 when there are fewer Lotus
Notes mailstores to handle. The default setting is 5.
Days to retain in cache: Maximum number of days to retain a
copy of a mailstore on a Worker. This value should be lowered for
high-volume processing environments to increase clean-up frequency. The default setting is 30 days.
Local cache size: Controls how much local disk space is consumed on each Worker machine by copies of mailstores. As long
as there is sufficient space in the cache, existing mailstores are not
removed providing their associated job was not deleted. If the
cache reaches its maximum size, the Worker will attempt to
remove the oldest, inactive stores. The default setting is 40 GB.
Indexing Options
•
•
3-12
Index directory size limit (MB): The values range from 25MB to
500MB. Represents how large a single index can become before a
new index directory is created.
Indexes Per Job: Maximum number of indexing tasks per Discovery job. The value directly corresponds to the number of separate index directories created for the job. The default setting is 10.
Ipro eCapture User Guide
Q1 2014
www.iprotech.com
877-324-4776
Configuring the Ipro eCapture Queue Manager
Click the Worker Instance Quantity tab.
Worker Instances Quantity Settings: The initial setting is equal to
the number of Workers connected to the configuration database, up to
50+ Workers. Use the Worker Instance Quantity to apply suggested values for a number of important task distribution settings based on the
number of Workers in the environment. The individual configuration settings adjusted by the slider are listed under the slider bar and changed
on the Task Distribution and/or Size Limits tab by clicking the Apply Suggested Settings button.
www.iprotech.com
877-324-4776
Ipro eCapture User Guide
Q1 2014
3-13
Chapter 3, Ipro eCapture Queue Manager
Click
. The Settings Applied prompt appears indicating
that the settings must be accepted by clicking OK before they take
effect. Otherwise, the values may
Click OK.
Click OK to close the Queue Manager Configuration dialog.
Modifying the Ipro eCapture Queue
Manager Configuration Settings
1.
Right-click the Queue Manager icon in the system tray to display the
context menu.
2.
Choose Configure. The Queue Manager Configuration dialog appears.
3.
Please see the section, Configuring the Ipro eCapture Queue Manager on
page 3-2 and proceed from step 3.
Testing the Connection
Test the connection whenever necessary. Please see the section, Configuring
the Ipro eCapture Queue Manager on page 3-2 and step 5 to test the connection.
Starting and Stopping the Ipro eCapture Queue
Manager
If the Queue Manager is stopped, tasks that have already been assigned to
workers will complete; but, it is likely that queued jobs will not.
See the section, Exiting the Ipro eCapture Queue Manager on page 3-16 for
information on exiting.
Right-click the Queue Manager icon (a computer monitor with base) in the
system tray to display the context menu and choose Stop.
3-14
Ipro eCapture User Guide
Q1 2014
www.iprotech.com
877-324-4776
Modifying the Ipro eCapture Queue Manager Configuration Settings
The following dialog appears when the Queue Manager is stopped.
Click Yes. The Ipro eCapture Queue Manager icon in the system tray changes
color.
To start the Ipro eCapture Queue Manager, right-click the Ipro eCapture
Queue Manager icon in the system tray and choose Start. The Ipro eCapture Queue Manager starts and the icon color changes.
Viewing the Queue Manager Status Activity
The activity is displayed under the Worker Status Information tab in the Ipro
eCapture Controller. See Chapter 2, Ipro eCapture Controller, and the section
Worker Status Information Tab View on page 2-49.
www.iprotech.com
877-324-4776
Ipro eCapture User Guide
Q1 2014
3-15
Chapter 3, Ipro eCapture Queue Manager
About the QueueManager.LOG file
This file records: each task distributed by the Queue Manager, all hung job
detection activities, and any errors encountered by the Queue Manager when
attempting to query the SQL tables to distribute tasks. A sample log file follows:
Exiting the Ipro eCapture Queue Manager
1.
3-16
Right-click the Ipro eCapture Queue Manager icon in the system tray
to display the context menu.
Ipro eCapture User Guide
Q1 2014
www.iprotech.com
877-324-4776
Modifying the Ipro eCapture Queue Manager Configuration Settings
2.
Choose Exit. The Exit Queue Manager dialog appears.
3.
Click Yes.
www.iprotech.com
877-324-4776
Ipro eCapture User Guide
Q1 2014
3-17
Chapter 3, Ipro eCapture Queue Manager
3-18
Ipro eCapture User Guide
Q1 2014
www.iprotech.com
877-324-4776
Ipro eCapture Worker
4
In this Chapter
Overview ......................................................................... 4-1
Starting the Ipro eCapture Worker .................................. 4-1
Modifying the Ipro eCapture Worker Configuration ......... 4-3
Testing the Connection.................................................... 4-4
Starting and Stopping the Ipro eCapture Worker................. 4-4
Viewing the Ipro eCapture Worker Status .......................... 4-6
About the Worker.LOG file ............................................... 4-7
Exiting the Ipro eCapture Worker...................................... 4-7
Overview
The Ipro eCapture Worker runs from individual workstations and processes
tasks in the queue according to their priority status. Simply add additional Ipro
eCapture Workers as your workload increases. The Ipro eCapture Worker will
automatically begin to discover or process without user intervention.
The Worker displays a solid circle icon in the system tray and is referenced by
this icon
.
If you are running the Ipro eCapture Worker and the Ipro eCapture QC
Module from the same workstation, do not run them at the same time.
If the Ipro eCapture QC Module is running, please close it before starting the Ipro eCapture Worker.
Starting the Ipro eCapture Worker
The very first time you start the Ipro eCapture Worker, you will need to establish a connection with the Microsoft SQL Server by entering data in the Input
Connection Information dialog.
www.iprotech.com
877-324-4776
Ipro eCapture User Guide
Q1 2014
4-1
Chapter 4, Ipro eCapture Worker
1.
Start the Ipro eCapture Worker by double-clicking the icon on the
desktop or choosing it from the Windows Start menu. The first time you
start it, the Input Connection Information dialog appears.
Once one or more connection settings are entered and saved, the
eCapture Monitor appears when Select Existing is clicked. See
Chapter 2, Ipro eCapture Controller and the section Using the Ipro
eCapture Monitor on page 2-9 for information about the eCapture
Monitor.
1.
Do the following:
•
•
•
2.
4-2
From the Server drop-down list, select the SQL server where the
SQL database resides.
Enter the name of the SQL Database in the Database field or
select a SQL Database from the drop-down list.
Enter a User name and a User Password.
Select one, some, or all of the Printer drivers from the Printer Drivers
box. Starting with version 2013.1.0, eight threads are installed with four
automatically enabled by default. The remaining four threads may be
enabled manually. These extra threads were designed for use on Worker
machines with high-end processor and RAM specifications. Note: The
Worker Bandwidth Throttle in the Queue Manager may be increased to
accommodate the usage of these additional Worker threads. See
Ipro eCapture User Guide
Q1 2014
www.iprotech.com
877-324-4776
Modifying the Ipro eCapture Worker Configuration
Chapter 3, Ipro eCapture Queue Manager and the section Configuring
the Ipro eCapture Queue Manager on page 3-2.
3.
Click
. A dialog appears with status information.
If the connection is not established, the dialog will present some options
for you to try in order to establish the connection.
If the connection is successful, the dialog will state: The connection was
tested successfully. Click OK to close this dialog.
4.
Click OK to close the Input Connection Information dialog.
Modifying the Ipro eCapture Worker
Configuration
1.
Right-click the Ipro eCapture Worker icon in the system tray to display the context menu.
2.
Choose Configure to open the Ipro eCapture Worker Configuration dialog.
3.
Please see the section, Starting the Ipro eCapture Worker on page 4-1
and proceed from step 2.
www.iprotech.com
877-324-4776
Ipro eCapture User Guide
Q1 2014
4-3
Chapter 4, Ipro eCapture Worker
Testing the Connection
You can test the connection at any time. Please see the section, Starting the
Ipro eCapture Worker on page 4-1 and step 4 to test the connection.
Starting and Stopping the Ipro eCapture
Worker
See the section, Exiting the Ipro eCapture Worker on page 4-7 for
information on exiting.
If you stop the Ipro eCapture Worker from a workstation, no tasks will be processed. However, the Ipro eCapture Worker will still be running.
Right-click
Stop.
in the system tray to display the context menu and choose
Note: The Ipro eCapture Worker icon changes color based on its status.
•
•
•
•
Light Green - Started and is processing tasks
Red - Stopped, no longer processing tasks
Dark Green - Started and waiting on tasks to be started from the
Controller
Yellow - Attempting to connect
The following dialog appears when you choose to stop the Ipro eCapture
Worker.
4-4
Ipro eCapture User Guide
Q1 2014
www.iprotech.com
877-324-4776
Modifying the Ipro eCapture Worker Configuration
If you are running tasks and try to shut down, a different dialog
appears asking if you want to those tasks to complete before stopping/
exiting.
Do one of the following:
Click Yes to allow the tasks currently running to finish. When they conclude, no new tasks will be worked on.
Click No. The Ipro eCapture icon in the system tray changes color and
no new tasks will be accepted.
Click Cancel. (Appears only when tasks are processing.) The currently
running tasks continue.
To start the Ipro eCapture Worker, right-click the Ipro eCapture Worker icon in
the system tray and choose Start. The Ipro eCapture Worker accepts new
tasks and the icon color changes.
www.iprotech.com
877-324-4776
Ipro eCapture User Guide
Q1 2014
4-5
Chapter 4, Ipro eCapture Worker
Viewing the Ipro eCapture Worker Status
Right-click the Ipro eCapture Worker icon in the system tray and choose Show
Status to display the Ipro eCapture Worker dialog.
The Ipro eCapture Worker dialog shows:
•
•
•
•
4-6
The Printer Drivers (Note: These printer drivers represent a working thread of activity.) The actual printer driver may not be used
for all activities. For example, during discovery, the printer driver
is not performing a “printing function”.
The activity for each driver (the previous figure shows that Driver
2 is active, while the other drivers are idle)
The activity
Status Bar: SQL Server, Database, and the Worker Name
Ipro eCapture User Guide
Q1 2014
www.iprotech.com
877-324-4776
Modifying the Ipro eCapture Worker Configuration
About the Worker.LOG file
This file records: each task assigned to the worker and any subsequent status
updates to that task, any errors encountered while completing the assigned
tasks, and any errors encountered when communicating with the SQL server.
Right-click
in the system tray to display the context menu and choose
Show Log File. A sample log file follows:
Exiting the Ipro eCapture Worker
Do not exit without first stopping the Ipro eCapture Worker.
1.
Right-click the Ipro eCapture Worker icon in the system tray to display the context menu.
www.iprotech.com
877-324-4776
Ipro eCapture User Guide
Q1 2014
4-7
Chapter 4, Ipro eCapture Worker
2.
Choose Exit. The Exit Ipro eCapture Worker dialog appears.
3.
Click Yes.
4-8
Ipro eCapture User Guide
Q1 2014
www.iprotech.com
877-324-4776
5
Creating Clients,
Projects, Custodians, and
Jobs
In this Chapter
Workflow Overview ......................................................... 5-1
Before Running any Jobs ................................................. 5-2
Creating a New Client ...................................................... 5-2
Creating a New Project ................................................... 5-4
Creating a New Custodian ............................................... 5-8
Importing Custodians and Jobs at the Project Level ....... 5-9
Exporting Custodians and Containers for the Project .... 5-14
Before you Discover ...................................................... 5-15
Creating a Discovery Job ............................................... 5-16
Importing Jobs at the Custodian Level .......................... 5-46
Exporting Existing Jobs and Containers for the
Custodian ................................................................... 5-50
Creating a Standard Processing Job .............................. 5-51
Validating Completed Processing Jobs .......................... 5-55
Creating a Data Extract Import (Processing) Job .......... 5-56
Setting Processing Job Options ..................................... 5-61
Setting Data Extraction Options .................................... 5-81
Creating a Standard Data Extract Job ............................ 5-94
Creating a Data Extract Import Job (Data Extract Job) . 5-98
Adding Discovery, Data Extract, and/or Processing
Jobs Simultaneously ................................................ 5-103
Running Post Process Batch Operations on Completed
Processing Jobs or Data Extract Jobs ....................... 5-115
Running Reports for a Selected Job ............................. 5-125
www.iprotech.com
877-324-4776
Ipro eCapture User Guide
Q1 2014
5-1
Chapter 5, Creating Clients, Projects, Custodians, and Jobs
Ipro eCapture is a distributed application. As a result, the Microsoft
Office, Lotus Notes, and/or GroupWise settings on each Worker (as
well QC workstations) must be the same to ensure that the TIFF
results are consistent. If a Worker/QC workstation has settings that
differ from another Worker/QC workstation, then the resultant TIFFs
will likely differ.
Workflow Overview
The Ipro eCapture hierarchy is:
•
•
•
•
Client
Project
Custodian
Jobs
•
Discovery
•
Processing and Data Extract
•
Export
After the Client is created, the next step is to create the Project and the Custodian. When creating a new Ipro eCapture project, the system will automatically display the Project Options (by default) so that you may select these
options before Proceeding with Discovery Jobs, Processing Jobs, or Data for
the new project.
When creating Discovery Jobs, Processing Jobs, or Data Extract jobs individually, the system will automatically display the options for the relevant job type.
The project options can be viewed and/or modified for each separate project
as well as for each individual job type.
After Clients, Projects, and Custodians are set up, Discovery can begin.
When a Discovery Job is created, a directory of the data collection is selected
for Discovery. This process involves traversing a directory of electronic data
and examining the file types in that directory. All data is hashed and indexed
at this time.
5-2
Ipro eCapture User Guide
Q1 2014
www.iprotech.com
877-324-4776
Before Running any Jobs
Once a Discovery Job exists, multiple Processing jobs or Data Extract Jobs can
be based on it. There is no need to repeat the discovery process on that directory. A Processing Job can be based on incomplete Discovery Jobs but will not
execute until all dependent jobs are complete.
After the Processing and Data Extract Jobs are completed, QC can be performed. The QC functions are discussed in Chapter 6, Performing QC.
After the Processing Jobs or Data Extract Jobs complete, the jobs are available
for export. Export Jobs are discussed in Chapter 7, Creating Export Series and
Export Jobs.
Before Running any Jobs
Open the Queue Manager Configuration to configure the appropriate settings
for your system before running any jobs. See Chapter 3, Ipro eCapture Queue
Manager and the section Configuring the Ipro eCapture Queue Manager on
page 3-2.
Creating a New Client
The first step is to create the Client.
1.
Choose File > New Client from the menu bar. The New Client dialog
appears.
www.iprotech.com
877-324-4776
Ipro eCapture User Guide
Q1 2014
5-3
Chapter 5, Creating Clients, Projects, Custodians, and Jobs
2.
Enter a Client Name using alphanumeric characters. A maximum of 30
characters are permitted. If you enter any invalid characters in this field,
the Invalid Characters dialog appears showing the characters that are
not permitted. This name will be the database name.
3.
Enter a Client Description.
4.
Enter a Client Directory path or click the Browse button to open the
Directory Browser dialog. Select a directory. (Note: Alternate click a
directory to display the context menu. Choose Rename to rename the
directory.) This directory must be empty. If necessary, click
and create a new directory. We recommend using the UNC path vs
mapped drives.
5.
Select a task table from the drop-down list. For more information about
Task Tables, see Chapter 2, Ipro eCapture Controller and the section
Assigning Task Tables to Workers on page 2-15 for information about
assigning Workers to Task Tables.
6.
Click OK. Two directories are created and appear in the Client Management Hierarchy: Export Jobs and Projects.
Creating a New Project
When creating a new Ipro eCapture project, the system will automatically display the Project Options (by default) so that you may select these options
before proceeding with data extract jobs, discovery jobs, or processing jobs for
the new project.
In addition, when creating data extract jobs, discovery jobs, or processing jobs
individually, the system will automatically display the options for the relevant
job.
The project options can be viewed and/or modified for each separate project
as well as for each individual job type.
The option to create a custodian at the same time a project is created is available when you create a new project.
5-4
Ipro eCapture User Guide
Q1 2014
www.iprotech.com
877-324-4776
Creating a New Project
Options set for the Project may be saved as the System Default. The options
are saved into the Configuration Database, DatabaseVersion.DefaultOptions
field. The field is created on demand if it does not exist. This field contains the
contents of the .INI file saved for the Project. It will be saved out as the
options file for any new Projects that are created in any Client.
Otherwise, a custodian can be created separately. The section, Creating a New
Custodian on page 5-8, describes how to create a new custodian.
1.
After the Client is created, select it in the Client Management tree view
and click the alternate mouse button to display the context menu.
2.
Select New Project. The New Project dialog appears.
3.
Enter a project name using alphanumeric characters. If you enter any
invalid characters in this field, a dialog appears showing the characters
that are not permitted.
4.
Enter an optional description.
5.
Enter an optional matter ID. A maximum of 20 characters is permitted.
There are no restrictions on content. The matter ID can be assigned, or
www.iprotech.com
877-324-4776
Ipro eCapture User Guide
Q1 2014
5-5
Chapter 5, Creating Clients, Projects, Custodians, and Jobs
changed if it already exists, through the Project Information Panel. Click
the Client Management Tab, select the Project to display its Information
Panel. Double-click the existing matter ID (or double-click to the right of
the Matter ID field if blank) to display the Edit dialog. Enter or change
the matter ID and click OK.
6.
(Optional) Deselect Create Custodian if you do not want to create a
custodian at this time. Proceed to step 6. If you want to create a custodian at this time, do the following:
•
•
•
Enter a custodian name. A maximum of 30 characters are permitted.
Enter a description.
Proceed to step 7.
7.
Select a task table from the drop-down list. The task table that appears
in the field is based on the last task table selected for the Client. For
more information about Task Tables, see Chapter 2, Ipro eCapture Controller and the section Assigning Task Tables to Workers on page 2-15
for information about assigning Workers to Task Tables.
8.
(Optional) Deselect Show Project Options after Creation if you do
not want the Project Options to display.
5-6
Ipro eCapture User Guide
Q1 2014
www.iprotech.com
877-324-4776
Creating a New Project
9.
Click OK. The Project Options dialog appears as shown in the following
figure.
www.iprotech.com
877-324-4776
Ipro eCapture User Guide
Q1 2014
5-7
Chapter 5, Creating Clients, Projects, Custodians, and Jobs
All Project options are accessed from this tabbed dialog. Options can be
set for Discovery (General, Indexing, and Password Handling), Processing (General, Excel, Word, PowerPoint), Data Extraction, Common
Options (OCR and Time Zone), Filtering (Flex Processor Rules Manager,
introduced in version 3.0), and Advanced (alternative system directories).
10.
Proceed to any of the following sections that apply:
•
•
•
•
•
•
•
Password Handling on page 5-33.
Setting Discovery and Indexing Options on page 5-35.
Setting Processing Job Options on page 5-61.
Setting Data Extraction Options on page 5-81.
Setting the Common Options on page 5-84.
Setting the Filtering (Flex Processor) Options on page 5-87.
Setting Alternative System Directories for Jobs on page 5-92.
Creating a New Custodian
Custodians can be created when a project is created. See the section
Creating a New Project on page 5-4 to create a custodian at the same
time a project is created. Custodians can be created separately. See
the following instructions to create the custodian separately.
After the project is created, the next step is to create the custodian. There can
be as many custodians as necessary for each project.
1.
5-8
Do one of the following:
•
Select the project and click the Custodians tab in the Information
•
Panel. Click
to display the New Custodian dialog. Proceed to step 2.
Select the project in the Client Management tree view, click the
alternate mouse button to display the context menu, and choose
New Custodian. The New Custodian dialog appears. Proceed to
step 2.
Ipro eCapture User Guide
Q1 2014
www.iprotech.com
877-324-4776
Importing Custodians and Jobs at the Project Level
2.
In the New Custodian dialog, enter a custodian name. A maximum of
30 characters are permitted.
3.
Enter a custodian description.
4.
Select a task table from the drop-down list. The task table that appears
in the field is based on the last task table selected for the Project. For
more information about Task Tables, see Chapter 2, Ipro eCapture Controller and the section Assigning Task Tables to Workers on page 2-15
for information about assigning Workers to Task Tables.
5.
Click OK. Ipro eCapture automatically creates three folders: Data
Extract Jobs, Discovery Jobs, and Processing Jobs underneath the custodian in the Client Management tree view.
6.
Click Discovery Jobs and notice that the Information Panel displays
Discovery Jobs but there is no data. Once the discovery job is running,
the Information Panel displays information about the job.
Importing Custodians and Jobs at the
Project Level
Multiple Custodians and Discovery Jobs can be added to a Project at one time
via an imported .CSV or a comma delimited file. Data Extract and/or Processing Job(s) may be optionally created at the same time.
To import Custodians, the .CSV file column headings are:
Custodian Name
Custodian Description
www.iprotech.com
877-324-4776
Ipro eCapture User Guide
Q1 2014
5-9
Chapter 5, Creating Clients, Projects, Custodians, and Jobs
Job Name
Container Name
Container Path
To import Jobs, the .CSV file columns are:
Job Name
Container Name
Container Path
and Discovery Jobs, the .CSV or comma delimited file should contain the two
respective column headers: Custodian Name and Container Path. Custodian
Description and Container Name are optional unless only Container Paths are
specified, then the Container Name is required.
1.
From the Client Management tree view, select the Project.
2.
From the Information Panel, click the Custodians tab.
3.
Click
4.
Navigate to the .CSV or comma delimited file.
5.
Click Open. The Import Preview dialog appears.
. The Open CSV for Import dialog appears.
The Import Preview dialog contains the following column headers:
•
5-10
Custodian Name - required in the imported .CSV or comma
delimited file.
Ipro eCapture User Guide
Q1 2014
www.iprotech.com
877-324-4776
Importing Custodians and Jobs at the Project Level
•
•
•
•
•
•
•
Apply To: - displays existing Custodian or Create New.
Custodian Description - optional
Job Name - used to indicate the new Discovery Job name
Data Extract - blank by default; no Data Extract Job will be
created. Clicking the drop-down arrow and selecting Yes
means that a new Data Extract Job will be created.
Processing - blank by default; no Processing Job will be
created. Clicking the drop-down arrow and selecting Yes
means that a new Processing Job will be created.
Container Name - required if only Container Paths are
specified in the import file.
Container Path - required in the imported .CSV or comma
delimited file. Note: If the Container Path is modified, it
must exist prior to importing as well as be accessible from
the Controller.
The Import Preview dialog is populated based on the contents of the
imported . CSV or comma delimited file.
If necessary, the data may be edited directly in the Import Preview dialog prior to importing.
6.
Do any of the following:
•
(Optional) Click
to modify the current settings for
the selected Project. Proceed to any of the following sections for
additional information:
•
Password Handling on page 5-33.
•
Setting Discovery and Indexing Options on page 5-35.
•
Setting Processing Job Options on page 5-61.
•
Setting Data Extraction Options on page 5-81.
•
Setting the Common Options on page 5-84.
•
Setting the Filtering (Flex Processor) Options on page 5-87.
•
Setting Alternative System Directories for Jobs on page 592.
www.iprotech.com
877-324-4776
Ipro eCapture User Guide
Q1 2014
5-11
Chapter 5, Creating Clients, Projects, Custodians, and Jobs
•
•
Click Select All to select all the Custodians. The Select All changes
to Deselect All to facilitate deselecting all the Custodians in one
action if necessary.
Select one or more Custodians by clicking the box in the designated row. A green check mark appears in the box. (Click the box
with the green check mark to deselect the Custodian.)
Enter a Discovery Job Name for the Custodian in the Job Name
column.
Enter a Container Name for each Container.
Note: If a Discovery Job and/or Container Name is not specified
(fields are left blank), the system returns a prompt indicating it
will use the folder name of the associated Container. An example
prompt is shown in the following figure:
Click Cancel and enter a Job Name and a Container name in the
blank fields. Proceed to step 7. Otherwise, accept the default
names indicated in the Warning Messages dialog.
•
•
5-12
To create Data Extract Jobs and/or Processing Jobs, for all Custodians indicated in the Import Preview dialog, click the option Create
All Data Extract and/or Create All Processing. The Data Extract
column and/or the Processing column(s) changes from blank to
Yes. These columns cannot be edited.
(Optional) Enter a Custodian Description for each Custodian.
Ipro eCapture User Guide
Q1 2014
www.iprotech.com
877-324-4776
Importing Custodians and Jobs at the Project Level
7.
Click OK. The Imported Job Creation dialog appears indicating the number of Custodians, Discovery Jobs, Data Extract Jobs, and Processing
Jobs created.
The newly created Jobs appear in the Job Queue pane of the Controller
as well as the Client Management tab tree view for the selected Custodian indicated in the Import Preview dialog. The Data Extract and Processing Jobs use the name of the Discovery Job. If necessary, rename
the Jobs prior to starting.
The new Custodians appear in the Client Management tab tree view for
the selected Project.
The following figure show a Containers tab. The Containers tab shows
the Container Name, its Custodian and Jobs, and the Container’s Path.
8.
Start the Jobs in the Job Queue pane.
www.iprotech.com
877-324-4776
Ipro eCapture User Guide
Q1 2014
5-13
Chapter 5, Creating Clients, Projects, Custodians, and Jobs
Exporting Custodians and Containers
for the Project
A list of existing Custodians and Containers for the Project may be exported
for reporting purposes as well as checking the required formatting required for
importing Custodians into a Project. If there are no Custodians or Containers
in the Project, the .CSV file will display the column headers only.
1.
From the Client Management tree view, select the Project.
2.
From the Information Panel, do one of the following:
•
Click the Custodians tab.
Click
to open the Save As dialog. A default filename
appears in the File Name field:
Custodians_[Project name of Project]_year_month_day_[hr_min].CSV
Navigate to the location where the file will be saved.
•
Click
ers:
•
•
•
•
•
Click
Save. The .CSV file will contain the following column headCustodian Name
Custodian Description - column required, description optional
Job Name
Container Name
Container Path
the Containers tab.
Click
to open the Save As dialog. A default filename
appears in the File Name field:
Containers_[Project name of Project]_year_month_day_[hr_min].CSV
Navigate to the location where the file will be saved.
5-14
Ipro eCapture User Guide
Q1 2014
www.iprotech.com
877-324-4776
Before you Discover
Click
ers:
•
•
•
•
•
•
Save. The .CSV file will contain the following column headContainer Name
Custodian - column required, description optional
Discovery Job
Data Extract Job
Processing Job
Container Path
Before you Discover
No other applications should be running on any of the machines where
Ipro eCapture components are installed.
Close any Microsoft programs and e-mail clients listed in the Running Applications window to ensure that Ipro eCapture will have access to the files during
the discovery process.
Ipro eCapture closes any pop-up dialog boxes automatically.
Indexing with NOISE.DAT and DEFAULT.ABC
Starting with version 2013.1.0, the dtSearch resource file NOISE.DAT
will be blank to allow for all text to be indexed. This change affects
new indexes and new or existing searches. For reference, the original
dtSearch default noise word list is stored in the Controller, Controller
Limited, and Worker directories. The name is NOISE.DAT.DEFAULT.
Custom NOISE.DAT and/or DEFAULT.ABC files may be used to index a Discovery Job. Prior to starting the Discovery Job, place one or both of these files in
either the Project directory (all Discovery Jobs for the Project will use these
file(s) for indexing when started) or in the Discovery directory (only the single
Discovery Job will use the file(s) when started). Indexing may be created during initial discovery (default setting) or post creation.
www.iprotech.com
877-324-4776
Ipro eCapture User Guide
Q1 2014
5-15
Chapter 5, Creating Clients, Projects, Custodians, and Jobs
The NOISE.DAT file is used to prevent dtSearch from indexing certain noise
words. This file may be modified using a text editor application, such as Notepad. The words in the list can contain the wildcard characters * and ? but must
begin with a letter.
When you create an index, dtSearch stores a copy of the noise word list in the
index. Therefore, changes to the noise word list will only affect indexes created
after the changes were made.
The DEFAULT.ABC file determines how dtSearch interprets certain characters in
the documents (characters in the ASCII range from 32-127). Other character
properties are set to conform to the Unicode Standard and cannot be modified.
You can open this file with Notepad or Textpad for editing.
Creating a Discovery Job
If the optional NIST database is loaded and connected to, Ipro eCapture will always perform NIST matches upon discovery. See the section
Updating NIST Matches for a Discovery Job on page 5-32 for more
information. In addition, the Ipro eCapture Installation and Setup
Guide describes how to set up Ipro eCapture to use the optional NIST
database.
All data discovered is indexed (by default) and hashed, so one or more processing jobs may be run on the same set of data, without re-discovering the
data set repeatedly. Search and process as many times as needed.
You may choose not to index the Discovery Job at creation time. See the section Modifying a Completed Discovery Job on page 5-21 for additional information.
In addition, the NOISE.DAT and/or DEFAULT.ABC files may be used when
indexing. See the section Indexing with NOISE.DAT and DEFAULT.ABC on page
5-15 for more information about using these files.
1.
Select Discovery Jobs underneath the Custodian.
2.
Click the alternate mouse button to display the context menu.
5-16
Ipro eCapture User Guide
Q1 2014
www.iprotech.com
877-324-4776
Creating a Discovery Job
3.
Select New Discovery Job. The Discovery Job dialog appears.
4.
Enter a Discovery Job name.
5.
Enter a description.
6.
Enter a Batch ID. A maximum of 20 characters is permitted. This field
can be selected for export load files, endorsements, and custom placeholders. The Batch ID can be modified by double clicking the Batch ID in
the Discovery
7.
Click
8.
Select the directory to discover. Use the UNC path to ensure consistent
drive mappings for your site configuration. The selected directory
appears in the Directories list. If you selected the incorrect directory,
www.iprotech.com
877-324-4776
to open the Directory Browser dialog.
Ipro eCapture User Guide
Q1 2014
5-17
Chapter 5, Creating Clients, Projects, Custodians, and Jobs
simply select it, and click
tories list.
. The directory is removed from the Direc-
9.
Repeat the previous 2 steps to select additional directories.
10.
Select a task table from the drop-down list. The task table that appears
in the field is based on the last task table selected for the Custodian.
11.
(Optional) Click Expedite Job if you want the job moved to the front of
the queue. Otherwise, it appears at the end of the queue.
12.
(Optional) Deselect Show Job Options after Creation if you do not
want the Project Options to display.
5-18
Ipro eCapture User Guide
Q1 2014
www.iprotech.com
877-324-4776
Creating a Discovery Job
13.
Click OK. The Discovery Job Options dialog appears as shown in the following figure.
www.iprotech.com
877-324-4776
Ipro eCapture User Guide
Q1 2014
5-19
Chapter 5, Creating Clients, Projects, Custodians, and Jobs
Note: If the NIST SQL database link was established, click Update
NIST Matches. See the section Updating NIST Matches for a Discovery
Job on page 5-32.
14.
Proceed to the section Setting Discovery and Indexing Options on page
5-35.
How Ipro eCapture Handles Dates - Time Zones
Starting with version 3.1, Ipro updated the date handling to preserve the date
with respect to daylight saving time. Ipro eCapture will discover the actual true
time, standard or daylight saving time, when the file was originally created.
This date and time is stored as if the file is being viewed on the day, time, and
machine of creation. This will work correctly regardless of the setting on the
machine’s local Windows clock, provided the option to enable this process is
selected in Ipro eCapture.
It is important to note that there is a difference between Windows and Ipro.
Windows will always show all dates with the same exact daylight setting based
on when you are viewing the files. Windows is completely based on the exact
moment you are viewing the files, not when they were created. Ipro will preserve the daylight saving time as if you were viewing it in Windows on the
same day the date was created. To put it in simple terms, Windows is relative
to your current time and Ipro is preserving the original date/time as if you
were viewing it when the date was manifested. The Ipro method is more accurate with regard to the actual incident. Ipro treats the file like it is being
viewed on the same day it was created or saved.
Starting with version 2.0, those dates which are collected during Discovery will
be converted to GMT. All other dates in processing and data extract should
reflect the Time Zone that you select. Jobs that were run in version 1.3 will
retain their existing dates.
Only jobs created in version 2.0 will have the GMT conversion applied to them.
The conversion of GMT will make de-duplication as accurate as possible
because the removal of a difference in time due to local computer settings.
The conversion to GMT will also make filtering accurate to the time zone
selected on the interface.
5-20
Ipro eCapture User Guide
Q1 2014
www.iprotech.com
877-324-4776
Creating a Discovery Job
E-mail dates in the Items Table will now be stored in a field named eMailDate.
eMailDate is to be stored in GMT format. Hashing of e-mail will now use the
eMailDate instead of creation date. Filtering of e-mail and attachments will
now use eMailDate instead of creation date. Filtering of loose files will use last
modified date.
Creation and last modified date will still be stored in the same fields; but now,
in a GMT format. Date filtering will use the time zone setting from the job to
convert the date for filter comparison. In this scenario, the GMT date/time will
be converted to whichever time zone you selected; and then, this date will be
surveyed for inclusion or exclusion in the document population.
eMailDate consists of these fields:
Outlook: Sent Date
Lotus Notes: Posted Date
Outlook Express: MBOX, and all RFC822 messages: Date (which is
really sent date)
GroupWise: Delivered Date
Modifying a Completed Discovery Job
A completed Discovery Job may be modified in order to delete and reindex the
documents. Images and/or PDFs may also be OCRed at this time.
A list of dependent jobs (Data Extract and/or Processing) may be viewed for
the selected Discovery Job. These jobs must be deleted prior to requeue operations to ensure data integrity.
The modified Discovery Job will appear as a new Discovery Job in the Job
Queue Pane. The Data Extract and or Processing Jobs formerly deleted may be
created again for the New Discovery Job.
For requeuing node level or item level exceptions, see the section Requeuing
Node Level or Item Level Exceptions on page 5-31.
1.
Under the Client Management Tab, select a Client, click Discovery
Jobs, and select the Discovery Job to be modified.
www.iprotech.com
877-324-4776
Ipro eCapture User Guide
Q1 2014
5-21
Chapter 5, Creating Clients, Projects, Custodians, and Jobs
2.
Click
3.
After making note of these jobs, click OK. Click Cancel to close the
Modify Discovery Job dialog.
4.
Delete the jobs that were shown in the dialog from step 3.
5-22
to display the Modify Discovery Job dialog.
Ipro eCapture User Guide
Q1 2014
www.iprotech.com
877-324-4776
Creating a Discovery Job
5.
Under the Client Management Tab, select a Client, click Discovery
Jobs, and select the Discovery Job to be modified.
6.
Click
shown in step 2.
7.
Click the General tab and select from the following options:
to display the Modify Discovery Job dialog as
Mail Stores
•
•
Use legacy Lotus Notes Handing (required for hash compatibility
with version 5.0 and earlier) - Legacy Lotus Notes handling uses the
Lotus UI for discovery and is considerably slower than current Lotus Mail
discovery. This option is required for hash compatibility to de-duplicate
across older jobs discovered with the legacy versions 5.0 and earlier.
Create working copy of Outlook mail stores - This option is not
selected by default for both new and existing Projects. When this option
is not selected, the discovery of PSTs will remain the same as previous
Ipro eCapture versions - directly from the PST; no copies are made.
If the option is selected and if any PSTs are encountered in a Discovery
Job, a copy of the PST is made to a working directory located under the
Discovery Job and discovery will be performed on that copy. Once the
Job completes, all working copies of PSTs in the Job are deleted.
If a node-level error on the PST is requeued after the Discovery Job is
complete, the source PST is copied again. The working copy is made
again in this instance only if the option is selected.
Recalculate hash values for email de-duplication - When selected, recalculates the hash value for e-mail messages. Select the e-mail properties
(under Email De-duplication) that will be used to calculate the hash.
E-mail De-duplication
Method of gathering and creating the MD5Hash has changed for newly
created Projects. Hashing of e-mails now uses the GMT time to ensure
proper de-duplication across time zones.
www.iprotech.com
877-324-4776
Ipro eCapture User Guide
Q1 2014
5-23
Chapter 5, Creating Clients, Projects, Custodians, and Jobs
In most cases, MD5 hash values are calculated on the file itself. For
more reliable de-duplication of emails though, it is required that deduplication occur on the information contained within it and not the file
itself. There are many reasons for this; the simplest is the fact that when
an email is saved out of its container (PST, NSF, etc) the file that is created contains information that would change the hash value of the same
email each time that the email was saved out.
When an email is discovered within Ipro eCapture, it is assigned a hash
value based on fields chosen by the user. The values of these fields are
concatenated and the text is hashed. Select from the following email
fields to generate the hash value:
•
•
•
•
•
•
•
•
•
Subject
From/Author
Attachment Count
Body: From the Body Whitespace drop-down list, select
either Include (default) or Remove. Whitespace in the e-mail
body could cause slight differences between the same emails, which could result in different hashes being generated. Remove - removes all whitespace between lines of text
in the e-mail body prior to hashing. Include - keeps the
whitespace.
E-mail Date: The following message types use the specified
date values: Outlook: Sent Date, Lotus Notes: Posted Date,
RFC822: Date, and GroupWise: Delivered Date. See the section How Ipro eCapture Handles Dates - Time Zones on page
5-20 for additional information.
Attachment Names
Recipients
CC
BCC
Select from either Creation Date or Last Modification
Date. The selected value will be used when calculating the
MD5 hash in the event that the normal E-mail Date value is
not present. This commonly occurs for Draft messages that
have not been sent.
5-24
Ipro eCapture User Guide
Q1 2014
www.iprotech.com
877-324-4776
Creating a Discovery Job
•
Use Start and End times for Outlook Appointment
items without a sent date: Ipro eCapture will use both of
these dates in its process of creating the MD5Hash. This creates a unique Hash which is then used in the de-duplication
process.
By default, Subject, From/Author, Email Date, and an Alternate
Email Date of Creation Date are used for email hash generation.
The Node-level exceptions tab lists the number of node-level exceptions in parenthesis. Click the tab to view the exceptions. A node level
error means that a problem was encountered extracting the contents of
a container (e.g. Email store - folder within the email store, or a loose
file with attachments). Node level errors indicate items are missing from
the production set. Item Level errors mean that an error was encountered on a specific item. If items in the production are password protected these should be reflected in the Detailed Error Report that lists
errors and status messages encountered during discovery. Indexing
errors means that dtSearch encountered an issue trying to acquire the
text of a document. The Requeue Attempts column lists the number of
times the node-level exception was requeued. The Date Last Requeued
column lists the date the last time the node-level exception was
requeued. This information is also available under the Node-level exceptions (n) tab for the Discovery Job located in the Client Management tab
www.iprotech.com
877-324-4776
Ipro eCapture User Guide
Q1 2014
5-25
Chapter 5, Creating Clients, Projects, Custodians, and Jobs
Information Panel.
Double-click the exception to open the Discovery Error Information dialog to read information about the error.
If an exception can be requeued, double-click it. Otherwise, the system
displays the following message for both the Node Level and/or the Item
Level if it cannot be requeued: requeue unavailable due to process and/
or data extract jobs based on this discovery job.
Use the << Prev or >> Next buttons to view additional errors.
Click OK to close the dialog after reading the information.
The Item-level exception tab lists the number of item-level exceptions in parenthesis. Click the tab to view the exceptions.
8.
5-26
Click the Indexing tab and select from the following options:
Ipro eCapture User Guide
Q1 2014
www.iprotech.com
877-324-4776
Creating a Discovery Job
•
Create Search Index (appears if indexing was not selected when
the Discovery Job was created) or Delete Existing Indexes and
Reindex documents (appears if indexing was selected when the
Discovery Job was created).
Index Numbers - Select this option to search for numbers.
Click
to view a list of dependent jobs (Data
Extract and/or Processing) for the selected Discovery Job that was
indexed.
Click
next to Index Location to display the User-Specified
Index Path Information dialog. Click OK. The Directory Browser
dialog appears. Select an index location path.
Recognize Dates, e-mail address, and credit card numbers Select this option to search for dates (in any format), e-mail
addresses (or parts of e-mail addresses), and credit card numbers.
Auto Break CJK Words - Select this option when indexing documents containing Chinese/Japanese/Korean languages. CJK text
appears as lines of characters with no spaces between the words.
It breaks up the CJK words as if each character is a CJK word. The
"dtsoTfAutoBreakCJK" option affects only the index creation. It
does not affect the search. If we remove the language analyzer
and apply the "dtsoTfAutoBreakCJK" option for indexing, the generated word list will contain only words of single characters.
Use filtering to index corrupt or encrypted documents when selected this option applies the filtering algorithm to attempt
www.iprotech.com
877-324-4776
Ipro eCapture User Guide
Q1 2014
5-27
Chapter 5, Creating Clients, Projects, Custodians, and Jobs
to recover text from corrupt or encrypted documents. If this option
is not selected, corrupt or encrypted documents will be considered
indexing failures.
•
•
5-28
Index Discovery Path - When selected, the Discovery path will
be searched. Otherwise, if not selected, searching the Discovery
path would create false-positive hits.
Binary Files - dtSearch recognizes and supports many types of
files, including word processor, e-mail, and PDF files (see http://
support.dtsearch.com/faq/dts0103.htm) for a list of file types that
dtSearch recognizes and supports). Non-text files that are in formats that dtSearch does not support are indexed and searched as
binary files. Examples of binary files are executables, fragments of
documents that were recovered from an undelete process, or
blocks of data recovered forensically. Because an individual file can
include plain text, Unicode text, and file fragments such as .DOC
or .XLS, much of the content would be missed if the files were
indexed and searched as if they were simple text files.
•
Filter Binary Unicode - Use a text selection algorithm to
filter text from binary files. The algorithm scans for
sequences of single-byte, UTF8, or Unicode in the file. This
option is recommended for forensic searches, especially
when files may contain text in languages other than English.
•
Filter Binary - Extract plain text items from the binary files.
•
Index Binary - Index all of the contents of binary files as
single-byte text.
•
Skip Binary - Do not index binary files.
Hyphens - These settings determine how hyphens will be treated
during an EDD search.
•
Hyphens as spaces - Treats hyphens found in the files as
spaces. For example, a search for “first-class” will match
incidences of “first class” in the files being searched.
•
Hyphens as searchable - Searches hyphens. For example,
a search for “first-class” will match only incidences of “firstclass” in the files being searched.
Ipro eCapture User Guide
Q1 2014
www.iprotech.com
877-324-4776
Creating a Discovery Job
•
•
Ignore Hyphens - Ignores hyphens entered in the search
criteria. For example, a search for “first-class” will match
incidences of “firstclass” in the files being searched.
•
Index all three ways - Searches for all three possible
treatments of hyphens to ensure that matches are found
regardless of which of these three ways the search criteria is
entered.
Parent/Child Text Handling -These options are used to specify
how text of parent and child documents should be handled during
indexing and are specific to emails (Lotus Notes and Outlook) and
any edocs (non-emails) that contain embedded documents.
•
•
Index child text with parent text - merges and indexes
the text of a child document with that of its parent.
Separate child and parent text - indexes the text of a
child document separately from its parent. The following
string is added as an include filter: *.MSG *.MSG>*.body
*.EML *.EML>*.body. This occurs while indexing. Two documents will be produced in the index for .EML and .MSG files.
One is for the body and the other is for the email (headers...). Any attachments are not included in that index.
OCR
•
•
•
OCR images as necessary - Images will be OCRed for indexing/
language identification if necessary. The OCR text obtained from
the image is then passed on to dtSearch for indexing. The OCR will
be indexed and available to be searched on in the Flex Processor.
OCR PDF documents - PDFs with no embedded text: perform
OCR prior to indexing or language identification. PDFs with embedded text (text-behind) will have text extracted anyway. Optionally,
select PDF page character threshold to perform OCR on imagebased PDFs that may contain a small amount of embedded text,
such as an image key. The default value is 25. The maximum value
is 10000. If there is less than this amount of characters retrieved,
the PDF will be OCRed.
OCR PowerPoint Documents: Turn this option on to perform
OCR on Microsoft PowerPoint files during indexing to get text from
embedded content in the slides. This will result in slower indexing
speeds for PowerPoint files, but more accurate search results.
www.iprotech.com
877-324-4776
Ipro eCapture User Guide
Q1 2014
5-29
Chapter 5, Creating Clients, Projects, Custodians, and Jobs
•
Minimum average OCR confidence [1-100]: The level range
settings are from 1 up to 100. The default is 50. The confidence
level is the average percentage of confidence per document for all
pages within a document on which OCR was performed. Success or
failure of a document for index preparation is based on the average confidence level of the document. If the average confidence
level is below the selected threshold, the document will be considered as an indexing error and is available for re-queueing. The Discovery Job information panel displays OCR Applied[Errors], where
Applied shows the number of documents that required OCR (not
OCRed) and where [Errors] shows the number of those documents
that did not meet the specified average confidence level. Note: For
the purposes of calculating average document confidence, pages in
PDF docs with text behind them are considered 100%. OCR failures are considered 0%.
Index location: click
next to the Index Location field. The UserSpecified Index Path Information dialog appears with additional information regarding user-specified index paths. This option is useful if you
want to place the load of indexing on an alternate file server which is not
handling other Ipro eCapture activities.
5-30
Ipro eCapture User Guide
Q1 2014
www.iprotech.com
877-324-4776
Creating a Discovery Job
•
Click OK to close the User-Specified Index Path Information dialog.
The Directory Browser dialog appears.
9.
Select a task table from the drop-down list. The task table that appears
in the field is based on the last task table selected for the Discovery job.
10.
Click OK. The New Discovery Job appears in the Job Queue Pane.
11.
Start the Discovery Job.
Requeuing Node Level or Item Level Exceptions
1.
Under the Client Management Tab, select a Client, click Discovery
Jobs, and select the Discovery Job with exceptions.
2.
Click
to display the Modify Discovery Job dialog.
Node level exceptions - requeue unavailable due to process and/or data
extract jobs based on this discovery job.
Item Level exceptions: requeue unavailable due to process and/or data
extract jobs based on this discovery job.
3.
If an exception can be requeued, double-click it. Only one at a time may
be requeued.
Changing Error Status for Completed Discovery
Job
If a Discovery Job completed with errors, the error status can be changed to
show complete. Only the icon changes.
1.
Under the Client Management Tab, click the Discovery Job to display the
Information Panel for the job.
www.iprotech.com
877-324-4776
Ipro eCapture User Guide
Q1 2014
5-31
Chapter 5, Creating Clients, Projects, Custodians, and Jobs
2.
Double click
located here
Change Status? dialog appears.
3.
Do one of the following:
. The
•
Click No to keep the Status icon and description the same.
•
Click Yes to change the status to
Complete.
and the status description to
Updating NIST Matches for a Discovery Job
See the Ipro NIST Loader Guide for information about using the
optional NIST Databases and the Ipro NIST Loader. The Ipro NIST
Loader can be used to update the NIST NSRL references.
If the NIST database was loaded or updates were applied to an existing NIST
database, click Update NIST Matches once the Discovery Job completes (no
longer appears in the Job Queue pane). If discovery comparison of NIST takes
place on the Discovery Job, a message displays to the right of: NIST Match
Completed: “Matched and date run”. “Unmatched” if there is no NIST database.
This function allows Discovery Jobs to flag additional items to be filtered. If the
NIST database is loaded after the Discovery Job runs, then this can be utilized
to apply flags to Items with same NIST Hash. Set up the Rule in the Flex Processor Rules Manager Processing or Data Extract Job in order for the Rules to
be applied and filtered. If the NIST database is established, the flag of files
matching Hash values will automatically occur when the Discovery Job starts.
5-32
Ipro eCapture User Guide
Q1 2014
www.iprotech.com
877-324-4776
Creating a Discovery Job
Password Handling
Passwords are stored at the project level.
Passwords that are known to exist in the dataset can be added to the known
password list for a new Project. When a password protected file is encountered
during processing, the system will go through the list of known passwords
when attempting to open and extract the contents. Presently, passwords in the
list will not be applied to password protected files within archives, password
protected files, or password protected mail stores.
www.iprotech.com
877-324-4776
Ipro eCapture User Guide
Q1 2014
5-33
Chapter 5, Creating Clients, Projects, Custodians, and Jobs
1.
Click Discovery Options tab > Password Handling tab to display the
Known Password List.
2.
Click
3.
Enter a password (one password per line - do not include delimiters) and
hit the enter key to go to the next line.
5-34
.
Ipro eCapture User Guide
Q1 2014
www.iprotech.com
877-324-4776
Creating a Discovery Job
4.
Repeat step 3 for each password that needs to be added to the list.
5.
Click
.
Loading a Password List
If a list of passwords already exists, it can be loaded for the project.
1.
Click
. The Open dialog appears.
2.
Navigate to the password list. The list should contain one password per
line.
3.
Click Open. The password lists loads.
Setting Discovery and Indexing Options
The Discovery Options are the same for Project level or Job level. Starting with
version 6.1, the Indexing options were moved to a new tab, Indexing Options.
Indexing options that were previously located in the New Discovery Job dialog
were moved to the Indexing Options tab as well.
Calculate Page Count of the selected files, before processing. When you run
reports, you can elect to include the page count. If you elect not to process
unknown files, those files will appear on the summary report, but their page
count will be zero. You cannot use this setting to count the number of pages in
e-mails. Note: This is a preliminary count. It does not reflect the number of
pages that will be used by metadata, place holders for unknown or exception
files, or blank pages (if you choose to drop blank pages).
Enhanced password detection: When this option is selected, specific file
types are checked for password protection at Discovery time. See Appendix E,
Password Protected Detection OutsideIn File Types for a list of file types. A
password-protected document is defined as a document where a prompt asks
for a password upon opening the document in its native application. Otherwise, if the document can be opened and viewed in its native application, the
document is not considered to be password protected. To see the documents
with password protection, run the Discovery Detailed Error Report. Any password protection errors that occurred during Discovery can be corrected before
running Processing and/or Data Extract Jobs on the data set in order to save
time during QC. For information about this report, see Chapter 8, Running
Reports and the section Selecting Discovery Report Options on page 8-9.
www.iprotech.com
877-324-4776
Ipro eCapture User Guide
Q1 2014
5-35
Chapter 5, Creating Clients, Projects, Custodians, and Jobs
Select Treat archives as directories if you want the files in the archived
folder to be treated as parent and child docs when running a Discovery Job. In
addition, WINMAIL.DAT attachments are treated like archives and will be processed like .ZIP files. The following are treated like archive files:
FI_ZIP = 1802
FI_ZIPEXE = 1803
FI_ARC = 1804
FI_TAR = 1807
FI_STUFFIT = 1812
FI_LZH = 1813
FI_LZH_SFX = 1814
FI_GZIP = 1815
IPRO_FI_RAR = 13000
FI_TNEF = 1197
Treat PDF Portfolios/Packages as Containers: When this option is
selected documents inside the PDF package are treated as parent files. If this
option is not selected, the existing functionality is used.
Mail Stores
•
•
Use legacy Lotus Notes Handling (required for hash compatibility
with version 5.0 and earlier) - Legacy Lotus Notes handling uses the
Lotus UI for discovery and is considerably slower than current Lotus Mail
discovery. This option is required for hash compatibility to de-duplicate
across older jobs discovered with the legacy versions 5.0 and earlier.
Create working copy of Outlook mailstores - This option is not
selected by default for both new and existing Projects. When this option
is not selected, the discovery of PSTs will remain the same as previous
Ipro eCapture versions - directly from the PST; no copies are made.
If the option is selected and if any PSTs are encountered in a Discovery
Job, a copy of the PST is made to a working directory located under the
Discovery Job and discovery will be performed on that copy. Once the
Job completes, all working copies of PSTs in the Job are deleted.
5-36
Ipro eCapture User Guide
Q1 2014
www.iprotech.com
877-324-4776
Creating a Discovery Job
If a node-level error on the PST is requeued after the Discovery Job is
complete, the source PST is copied again. The working copy is made
again in this instance only if the option is selected.
E-mail De-duplication
Method of gathering and creating the MD5Hash has changed for newly created
Projects. Hashing of e-mails now uses the GMT time to ensure proper de-duplication across time zones.
In most cases, MD5 hash values are calculated on the file itself. For more reliable de-duplication of emails though, it is required that de-duplication occur on
the information contained within it and not the file itself. There are many reasons for this; the simplest is the fact that when an email is saved out of its
container (PST, NSF, etc) the file that is created contains information that
would change the hash value of the same email each time that the email was
saved out.
When an email is discovered within Ipro eCapture, it is assigned a hash value
based on fields chosen by the user. The values of these fields are concatenated
and the text is hashed. Select from the following email fields to generate the
hash value:
•
•
•
•
Subject
From/Author
Attachment Count
Body: From the Body Whitespace drop-down list, select either Include
(default) or Remove. Whitespace in the e-mail body could cause slight
differences between the same e-mails, which could result in different
hashes being generated. Remove - removes all whitespace between lines
of text in the e-mail body prior to hashing. Include - keeps the
whitespace.
•
E-mail Date: The following message types use the specified date values:
Outlook: Sent Date, Lotus Notes: Posted Date, RFC822: Date, and
GroupWise: Delivered Date. See the section How Ipro eCapture Handles
Dates - Time Zones on page 5-20 for additional information.
Attachment Names
Recipients
CC
•
•
•
www.iprotech.com
877-324-4776
Ipro eCapture User Guide
Q1 2014
5-37
Chapter 5, Creating Clients, Projects, Custodians, and Jobs
•
BCC
Select from either Creation Date or Last Modification Date. The
selected value will be used when calculating the MD5 hash in the event
that the normal E-mail Date value is not present. This commonly occurs
for Draft messages that have not been sent.
Use Start and End times for Outlook Appointment items without a
sent date: Ipro eCapture will use both of these dates in its process of
creating the MD5Hash. This creates a unique Hash which is then used in
the de-duplication process.
By default, Subject, From/Author, Email Date, and an Alternate Email Date of
Creation Date are used for email hash generation.
File Extraction
Treat email inline images as attachments - When enabled, inline images
in email messages (e.g., signature files) will be extracted as attachments and
treated as child documents. Same behavior as version 3.3x.
When disabled, inline images are not extracted as children. The images will not
be treated as separate documents, and therefore will not be OCRed, languageidentified, or indexed. The images will be rendered in-line as they would look
in the native file.
BlackICE does not return text for any images that are printed. So extracted
text for the (parent) document will not include text from the inline image.
The images will only be OCRed if the image it is printed on does not have any
text, and the option OCR Pages Missing Text is enabled under the Processing Job, General Options tab.
Embedded Files
An embedded file is an object that has been inserted into a document and, if
extracted, can act as a standalone document.
5-38
Ipro eCapture User Guide
Q1 2014
www.iprotech.com
877-324-4776
Creating a Discovery Job
Multiple methods for embedding object and files are available for Microsoft
Office documents via the Microsoft Office Object dialog.
Ipro eCapture can control which embedded object types are extracted from
most Microsoft Office and Rich Text documents. The following embedded file
types each refer to a specific method of embedding documents in Microsoft
Office file types. Deselecting an embedded file type option prevents its
extraction from supported document types.
Excel Documents - When selected, will extract OLE embedded objects
associated with the Microsoft Excel application.
Word Documents - When selected, will extract OLE embedded objects
associated with the Microsoft Word application.
PowerPoint Documents - When selected, will extract OLE embedded
objects associated with the Microsoft PowerPoint application.
E-mail File Attachments (Outlook.FileAttach) - When selected, will
extract Outlook message objects from other Microsoft Office document
formats that were embedded using the Outlook.FileAttach method.
Visio Drawings - When selected, will extract OLE embedded objects
associated with the Microsoft Visio application.
www.iprotech.com
877-324-4776
Ipro eCapture User Guide
Q1 2014
5-39
Chapter 5, Creating Clients, Projects, Custodians, and Jobs
Package-Embedded Documents - When selected, will extract files
that were added to a Word document or an Excel spreadsheet. The
actual documents being extracted are those documents embedded
through the packager. The packager is a Microsoft Windows OS utility
that allows the creation of the packages for subsequent integration into
the file.
Acrobat Documents - When selected, extracts object embedded with
the AcroExch object type.
E-mail Message Attachments (MailMsgAtt) - When selected, will
extract Outlook message objects from other Microsoft Office document
formats that were embedded using the MailMsgAtt method.
E-mail File Attachments (MailFileAtt) - When selected, will extract
Outlook message objects from other Microsoft Office document formats
that were embedded using the MailFileAtt method.
(Optional) Select Save Settings as Project Default to retain these
settings for future Discovery Jobs created for the Project.
5-40
Ipro eCapture User Guide
Q1 2014
www.iprotech.com
877-324-4776
Creating a Discovery Job
Indexing Options
Click the Indexing Options tab to display the indexing options.
www.iprotech.com
877-324-4776
Ipro eCapture User Guide
Q1 2014
5-41
Chapter 5, Creating Clients, Projects, Custodians, and Jobs
Deselect the Create Search Index if you do not want to create an
index during initial discovery.
HOWEVER, THIS OPTION MUST REMAIN SELECTED FOR MULTILANGUAGE DOCUMENT DETECTION.
If you elect to create an index and want to select an index location other
than the default, click
next to the Index Location field. The UserSpecified Index Path Information dialog appears with additional information regarding user-specified index paths. This option is useful if you
want to place the load of indexing on an alternate file server which is not
handling other Ipro eCapture activities.
Click OK to close the User-Specified Index Path Information dialog. The
Directory Browser dialog appears.
Navigate to the index location and click OK.
5-42
Ipro eCapture User Guide
Q1 2014
www.iprotech.com
877-324-4776
Creating a Discovery Job
Search Indexing
Ipro eCapture uses dtSearch to provide full text searching of files before processing. This feature provides advanced search functions including fuzzy
searching, synonym searching, and more. Search options are available in the
Flex Processor Rules Manager. See Appendix A, Using the Flex Processor Rules
Manager for information about the Flex Processor Rules Manager.
In order to facilitate the searching that will take place during an EDD session,
establish the method for searching unsupported files and the treatment of
hyphens during searches.
Index Numbers - Select this option to search for numbers.
Recognize Dates, e-mail address, and credit card numbers Select this option to search for dates (in any format), e-mail addresses
(or parts of e-mail addresses), and credit card numbers.
Auto Break CJK Words - Select this option when indexing documents
containing Chinese/Japanese/Korean languages. It breaks up the CJK
words as if each character is a CJK word.
Use filtering to index corrupt or encrypted documents - when
selected this option applies the filtering algorithm to attempt to recover
text from corrupt or encrypted documents. If this option is not selected,
corrupt or encrypted documents will be considered indexing failures.
Index Discovery Path - When selected, the Discovery path will be
searched. Otherwise, if not selected, searching the Discovery path would
create false-positive hits.
Binary Files
dtSearch recognizes and supports many types of files, including word processor, e-mail, and PDF files (see http://support.dtsearch.com/faq/dts0103.htm)
for a list of file types that dtSearch recognizes and supports). Non-text files
that are in formats that dtSearch does not support are indexed and searched
as binary files. Examples of binary files are executables, fragments of documents that were recovered from an undelete process, or blocks of data recovered forensically. Because an individual file can include plain text, Unicode
text, and file fragments such as .DOC or .XLS, much of the content would be
missed if the files were indexed and searched as if they were simple text files.
Ipro eCapture provides these filtering options for binary files:
www.iprotech.com
877-324-4776
Ipro eCapture User Guide
Q1 2014
5-43
Chapter 5, Creating Clients, Projects, Custodians, and Jobs
•
•
•
•
Filter Binary Unicode - Use a text selection algorithm to filter text
from binary files. The algorithm scans for sequences of single-byte,
UTF8, or Unicode in the file. This option is recommended for forensic
searches, especially when files may contain text in languages other than
English.
Filter Binary - Extract plain text items from the binary files.
Index Binary - Index all of the contents of binary files as single-byte
text.
Skip Binary - Do not index binary files.
Hyphens
These settings determine how hyphens will be treated during an EDD search.
•
•
•
•
Hyphens as spaces - Treats hyphens found in the files as spaces. For
example, a search for “first-class” will match incidences of “first class” in
the files being searched.
Hyphens as searchable - Searches hyphens. For example, a search for
“first-class” will match only incidences of “first-class” in the files being
searched.
Ignore Hyphens - Ignores hyphens entered in the search criteria. For
example, a search for “first-class” will match incidences of “firstclass” in
the files being searched.
Index all three ways - Searches for all three possible treatments of
hyphens to ensure that matches are found regardless of which of these
three ways the search criteria is entered.
Parent/Child Text Handling
These options are used to specify how text of parent and child documents
should be handled during indexing and are specific to emails (Lotus Notes and
Outlook) and any edocs (non-emails) that contain embedded documents.
•
•
5-44
Index child text with parent text - merges and indexes the text
of a child document with that of its parent.
Separate child and parent text - indexes the text of a child document separately from its parent. The following string is added as
an include filter: *.MSG *.MSG>*.body *.EML *.EML>*.body. This
occurs while indexing. Two documents will be produced in the
index for .EML and .MSG files. One is for the body and the other is
Ipro eCapture User Guide
Q1 2014
www.iprotech.com
877-324-4776
Creating a Discovery Job
for the email (headers...). Any attachments are not included in
that index.
OCR
•
•
•
•
OCR images as necessary - Images will be OCRed for indexing/
language identification if necessary. The OCR text obtained from
the image is then passed on to dtSearch for indexing. The OCR will
be indexed and available to be searched on in the Flex Processor.
OCR PDF documents - PDFs with no embedded text: perform
OCR prior to indexing or language identification. PDFs with embedded text (text-behind) will have text extracted anyway. The OCR
text is added to any extracted text from the PDF. The text obtained
through OCR, along with the extracted text from the PDF, is passed
to dtSearch for indexing. The OCR will be indexed and available to
be searched in the Flex Processor. Note: Selecting this option will
impact the time for the Discovery process. OCR Text obtained
through OCR could contain duplicate words as appended to
extracted text file. Search hits could be inflated by these results.
Optionally, select PDF page character threshold to perform OCR
on image-based PDFs that may contain a small amount of embedded text, such as an image key. The default value is 25. The maximum value is 10000. If there is less than this amount of
characters retrieved, the PDF will be OCRed.
OCR PowerPoint Documents: Turn this option on to perform
OCR on Microsoft PowerPoint files during indexing to get text from
embedded content in the slides. This will result in slower indexing
speeds for PowerPoint files, but more accurate search results.
Minimum average OCR confidence [1-100]: The level range
settings are from 1 up to 100. The default is 50. The confidence
level is the average percentage of confidence per document for all
pages within a document on which OCR was performed. Success or
failure of a document for index preparation is based on the average confidence level of the document. If the average confidence
level is below the selected threshold, the document will be considered as an indexing error and is available for re-queueing. The Discovery Job information panel displays OCR Applied[Errors], where
Applied shows the number of documents that required OCR (not
www.iprotech.com
877-324-4776
Ipro eCapture User Guide
Q1 2014
5-45
Chapter 5, Creating Clients, Projects, Custodians, and Jobs
OCRed) and where [Errors] shows the number of those documents
that did not meet the specified average confidence level. Note: For
the purposes of calculating average document confidence, pages in
PDF docs with text behind them are considered 100%. OCR failures are considered 0%.
Click OK to close the Discovery Job Options dialog.
Start the job from the Job Queue pane by selecting its checkbox. Notice
that each line has a checkbox and a color circle beside the checkbox.
See Chapter 2, Ipro eCapture Controller, and the section Client Management Tab on page 2-27 for information on controlling the jobs in the Job
Queue interface.
Importing Jobs at the Custodian Level
Multiple Discovery Jobs can be added to a Custodian at one time via an
imported .CSV or comma delimited file. Data Extract and/or Processing Job(s)
may be optionally created at the same time.
To import Discovery Jobs, the .CSV or comma delimited file should contain the
Container Path column header. Container Name is optional unless only Container Paths are specified, then the Container Name is required.
There are several different scenarios for importing Jobs at the Custodian level:
•
•
•
5-46
Importing Jobs with all columns specified in the import file: Job Name,
Container Name, and Container path. In this scenario, Jobs are created
while focus remains on the selected Custodian. The .CSV or comma
delimited file will contain the columns Job Name, Container Name, and
Container Path (required).
Importing Jobs with just the Container Paths and Container Names specified in the import file. In this scenario, a Job name is required for each
selected Container. The Job name can be added to the .CSV or comma
delimited file, manually entered in the Import Preview dialog (shown in
the Figure in step 5) prior to importing, or left blank (name will be autoset).
Importing Jobs with just the Container Paths specified in the import file.
In this scenario, a Job name and a Container Name is required for each
selected Container. The Job name and the Container Name can be added
to the .CSV or comma delimited file, manually entered in the Import PreIpro eCapture User Guide
Q1 2014
www.iprotech.com
877-324-4776
Importing Jobs at the Custodian Level
•
view dialog (shown in the Figure in step 5) prior to importing, or left
blank (name will be auto-set).
Importing Jobs/Containers and creating Data Extract Jobs and/or Processing Jobs under the Custodian.
1.
From the Client Management tree view, select the Custodian under the
appropriate Project.
2.
From the Information Panel, click the Jobs tab.
3.
Click
4.
Navigate to the .CSV or comma delimited file.
5.
Click Open. The Import Preview dialog appears.
. The Open CSV file for Import dialog appears.
The Import Preview dialog contains the following column headers:
•
•
www.iprotech.com
877-324-4776
Job Name - used to indicate the new Discovery Job name
Data Extract - blank by default; no Data Extract Job will be
created. Clicking the drop-down arrow and selecting Yes
means that a new Data Extract Job will be created.
Ipro eCapture User Guide
Q1 2014
5-47
Chapter 5, Creating Clients, Projects, Custodians, and Jobs
•
•
•
Processing - blank by default; no Processing Job will be
created. Clicking the drop-down arrow and selecting Yes
means that a new Processing Job will be created.
Container Name - required if only Container Paths are
specified in the import file
Container Path - required in the imported .CSV or comma
delimited file. Note: If the Container Path is modified, it
must exist prior to importing as well as be accessible from
the Controller.
The Import Preview dialog is populated based on the contents of the
imported .CSV or comma delimited file.
If necessary, the data may be edited directly in the Import Preview dialog prior to importing.
6.
Do any of the following:
•
•
Click Select All to select all the Jobs and/or Containers. The Select
All changes to Deselect All to facilitate deselecting all the Jobs and/
or Containers in one action if necessary.
Enter a Discovery Job Name for the Custodian in the Job Name
column.
Enter a Container Name for each Container.
Note: If a Discovery Job and/or Container Name is not specified
(fields are left blank), the system returns a prompt indicating it
will use the folder name of the associated Container. An example
prompt is shown in the following figure:
5-48
Ipro eCapture User Guide
Q1 2014
www.iprotech.com
877-324-4776
Importing Jobs at the Custodian Level
•
7.
Click Cancel and enter a Job Name and a Container name in the
blank fields. Proceed to step 7. Otherwise, accept the default
names indicated in the Warning Messages dialog.
To create Data Extract Jobs and/or Processing Jobs, for all Jobs
indicated in the Import Preview dialog, click the option Create All
Data Extract and/or Create All Processing. The Data Extract
column and/or the Processing column(s) changes from blank to
Yes. These columns cannot be edited.
Click OK. The Imported Job Creation dialog appears indicating the number of Discovery Jobs, Data Extract Jobs, and Processing Jobs created.
The newly created Jobs appear in the Job Queue pane of the Controller
as well as the Client Management tab tree view for the selected Custodian indicated in the Import Preview dialog. The Data Extract and Processing Jobs use the name of the Discovery Job. If necessary, rename
the Jobs prior to starting.
The following figure show a Containers tab. The Containers tab shows
the Container Name, Jobs, and the Container’s Path.
8.
Start the Jobs in the Job Queue pane.
www.iprotech.com
877-324-4776
Ipro eCapture User Guide
Q1 2014
5-49
Chapter 5, Creating Clients, Projects, Custodians, and Jobs
Exporting Existing Jobs and Containers for the Custodian
A list of existing Jobs or Containers for the Custodian may be exported for
reporting purposes as well as checking the required formatting required for
importing Jobs into a Custodian. If there are no Jobs or Containers in the Custodian, the .CSV file will display the column headers only.
1.
From the Client Management tree view, select the Custodian.
2.
From the Information Panel, do one of the following:
•
Click the Jobs tab.
Click
to open the Save As dialog.
Navigate to the location where the file will be saved. A default
filename appears in the File Name field:
Jobs_[Custodian Name]_year_month_day_[hr_min].CSV
•
Click
ers:
•
•
•
Click
Click
Save. The .CSV file will contain the following column headJob Name
Container Name
Container Path
the Containers tab.
to open the Save As dialog.
Navigate to the location where the file will be saved. A default
filename appears in the File Name field:
Containers_[Custodian Name]_year_month_day_[hr_min].CSV
Click Save. The .CSV file will contain the following column headers:
5-50
Ipro eCapture User Guide
Q1 2014
www.iprotech.com
877-324-4776
Creating a Standard Processing Job
•
•
•
•
•
Container Name
Discovery Job
Data Extract Job
Processing Job
Container Path
Creating a Standard Processing Job
Ipro eCapture extracts and processes embedded files in the same
manner in which it processes the parent file.
Processing jobs are created from completed discovery jobs. If the Discovery
Job was not indexed, searching is not available. You can create a processing
job based on one or more discovery jobs. Search, filter, and cull the data for
processing either manually or set up rules using the Flex Processor Rules Manager.
1.
Select Processing Jobs underneath the custodian.
2.
Click the alternate mouse button to display the context menu.
www.iprotech.com
877-324-4776
Ipro eCapture User Guide
Q1 2014
5-51
Chapter 5, Creating Clients, Projects, Custodians, and Jobs
3.
Select New Processing Job. The Processing Job dialog appears.
4.
Enter a Processing Job name.
5.
Enter a description.
6.
Select Standard.
7.
(Optional) Click Expedite Job if you want the job to pushed to the front
of the queue.
8.
Select one or more of the Discovery Jobs you want to use for this
processing job. Proceed directly to step 11 if you want to use one or
more of the Discovery Jobs in the Discovery Jobs list.
9.
(Optional) If you want to create a new Discovery Job at this time, click
New Discovery Job. See the section Creating a Discovery Job on page
5-16 for information on creating a Discovery Job. After creating the Discovery Job and selecting the Discovery Job options, the newly created
5-52
Ipro eCapture User Guide
Q1 2014
www.iprotech.com
877-324-4776
Creating a Standard Processing Job
Discovery Job will appear in the Discovery Jobs list (in the Processing Job
dialog) and will be selected. The Discovery Job also appears in the Job
Queue grid of the Ipro eCapture Controller. Proceed to step 10 to continue making selections in the Processing Job dialog.
10.
Select a task table from the drop-down list. The task table that appears
in the field is based on the last task table selected for the Custodian.
11.
(Optional) Deselect Show Job Options after Creation if you do not
want the Project Options to display.
www.iprotech.com
877-324-4776
Ipro eCapture User Guide
Q1 2014
5-53
Chapter 5, Creating Clients, Projects, Custodians, and Jobs
12.
Click OK. The Processing Job Options dialog appears as shown in the following figure.
13.
Proceed to the section Setting Processing Job Options on page 5-61.
5-54
Ipro eCapture User Guide
Q1 2014
www.iprotech.com
877-324-4776
Validating Completed Processing Jobs
Validating Completed Processing Jobs
Because some errors may occur from hardware, network, or NAS failures as well as non hardware related issues, we highly recommend
that every completed processing job be validated.
Two scans are performed through all Results records in the processing job:
The initial scan finds and takes care of Results items. The record kept is the
first record where the Pages value matches the number of images on disk for
the document. If no record has a matching Pages value, then the first is kept;
all other Results records have Pages set to 0 so that they will not be exported.
The second scan goes through all Results records (where Pages > 0) and verifies that the Pages value in the database matches the number of images for
the document on disk. If the number of images on disk is different, Pages is
updated to reflect the actual count.
Validation reports can be saved for record keeping and post processing.
1.
Select a completed Processing Job from the Client Management tree
view.
2.
Click the alternate mouse button to display the context menu.
3.
Select Validate Processing Job. The Processing Job Validation dialog
appears.
www.iprotech.com
877-324-4776
Ipro eCapture User Guide
Q1 2014
5-55
Chapter 5, Creating Clients, Projects, Custodians, and Jobs
If any errors are encountered, they are shown in the Description column
at the end of the path.
4.
Click
to open the Save Validation Report dialog.
5.
Accept or change the filename. The default extension is .CSV.
6.
Click Save.
Creating a Data Extract Import (Processing) Job
The Data Extract Import Processing Job uses the data culled during the review
process from the file that was generated through a Data Extraction Export Job.
Supported formats are one ItemID per line. Valid formats include:
1223
1224
1228
Also:
“1223”
“1224”
“1228”
However, suffixed image key numbers are not supported. For example, these
would be invalid:
“1223”. “Jo Green”
“1224”, “Lou Brown”
1.
Select Processing Jobs underneath the Custodian.
2.
Click the alternate mouse button to display the context menu.
3.
Select New Processing Job. The Processing Job dialog appears.
5-56
Ipro eCapture User Guide
Q1 2014
www.iprotech.com
877-324-4776
Creating a Data Extract Import (Processing) Job
4.
Select Data Extract Import to display the options for a data extract
import processing job.
5.
Enter a Name.
6.
Enter a Description.
7.
Select one of the Import From options:
•
Selected Item IDs File - Browse to the file. This file is either a
text file or a .CSV file containing a list of Item IDs. After selecting
the file, the path will appear in the Select Data Extract Selected
Items File field. Proceed to step 8.
www.iprotech.com
877-324-4776
Ipro eCapture User Guide
Q1 2014
5-57
Chapter 5, Creating Clients, Projects, Custodians, and Jobs
•
Database Table -
Select a Content Type: ItemIDs or ItemGUIDs - ItemGUIDs
allow for a more reliable method to positively identify Ipro eCapture Items records for a Client.
Specify the SQL database table (Note: This table must be created
in the Client database.) containing the ItemIDs list or an
ItemGUID list. For ItemID, the first column of the table must be an
integer field named ItemID. For ItemGUID, the first column of the
table must be ItemGUID and defined as nvarchar(36). This is the
only requirement of the tables. The rest of the tables may contain
any fields or no fields. The location of the tables must be in the client database, [CONFIG]_[CLIENT].
Select the option Validate Item IDs in Table if you want to have
the system check for existence of ItemIDs or ItemGUIDs in the
Items table. If the system does not find any ItemIDs or
ItemGUIDs, an error occurs. If some ItemIDs or ItemGUIDs are
missing, it will indicate the missing items in a LOG file called
ImportMissingItems.LOG located in the Job folder.
Note: For either of the previous two Import From options, a Flex
Processor rule is created (criteria being the ItemID list) for the
main imported list. Also, additional rules could be created based on
the selected Child Item Handling options. The Scope for each of
these rules may be changed as well, further affecting what other
documents will be selected. As you click each rule created from the
imported list, the ItemIDs may be viewed in the ItemID area on
the Advanced Criteria Tab.
Proceed to step 8.
5-58
Ipro eCapture User Guide
Q1 2014
www.iprotech.com
877-324-4776
Creating a Data Extract Import (Processing) Job
8.
Select from the following options:
Select children of items that are parents - processes the parent item
with attachments. Note: The scope options for created rules will affect
parent/child selections as well.
Child Item Handling
•
•
•
Select Item Only
Select Item and Parent
Select item, parent, and all children of parent
9.
(Optional) Click Expedite Job if you want the job to pushed to the front
of the queue.
10.
Select a task table from the drop-down list. The task table that appears
in the field is based on the last task table selected for the Custodian.
11.
(Optional) Deselect Show Job Options after Creation if you do not
want the Project Options to display.
www.iprotech.com
877-324-4776
Ipro eCapture User Guide
Q1 2014
5-59
Chapter 5, Creating Clients, Projects, Custodians, and Jobs
12.
Click OK. The Processing Job Options dialog appears as shown in the following figure.
13.
Proceed to the sections:
5-60
Ipro eCapture User Guide
Q1 2014
www.iprotech.com
877-324-4776
Setting Processing Job Options
•
•
Setting Processing Job Options on page 5-61.
Setting the Filtering (Flex Processor) Options on page 5-87.
Setting Processing Job Options
This section describes the available options for both a Standard Processing Job
and a Data Extract Import (Processing) Job.
Setting General Processing Options
The Save Settings as Project Default option appears in each Processing Job tab. (Any new process/data extract jobs under that project will have the project default filters pre-selected. If you elect to
Save Settings as Project Default, it will not change any existing jobs
or other projects; only new jobs.)
Note: The following two options do not appear if accessing the Processing
options through the Options for Project dialog.
Select OCR Pages missing text to OCR pages within documents that are
missing text. It will cause any page that does not have OCR text to have an
OCR task generated for it. Optionally, select PDF page character threshold
to perform OCR on image-based PDFs that may contain a small amount of
embedded text, such as an image key. The default value is 25. The maximum
value is 10000. If there is less than this amount of characters retrieved, the
PDF will be OCRed.
Minimum average OCR confidence level [1-100]: The level range settings
are from 1 up to 100. The default is 50. The OCR Confidence Level is the average of confidence per document, for all pages within a document on which
OCR was performed. Success or failure of a document for flagging is based on
the average confidence level of the document. If the average confidence level
is below the selected threshold, the document will be flagged in QC with the
OCR Low Confidence Flag.
www.iprotech.com
877-324-4776
Ipro eCapture User Guide
Q1 2014
5-61
Chapter 5, Creating Clients, Projects, Custodians, and Jobs
Select the option Remove Blank Pages and then set the Blank Page
Threshold (1 to 2000) to a value that eliminates the speckles without eliminating any punctuation marks from the pages. Ipro eCapture will remove any
images that have fewer "dots" than this threshold. If this setting is too high,
you may lose images with a few short words. We suggest a setting of 50 as a
starting point.
Process CSV files with Microsoft Excel - Select this option to process .CSV
files with Microsoft Excel instead of Oracle® Outside-In Technology (formerly
Stellent).
Process HTML Files with Internet Explorer - Select this option to process
HTML files with Internet Explorer instead of Oracle® Outside-In Technology
(formerly Stellent).
Color Depth Options
General Color Depth Option
Applies to everything else outside of the 5 types (Word, Excel, PowerPoint,
PDF, and Native TIFF) which Ipro eCapture does not process through Oracle®
Outside-In Technology (formerly Stellent). There are 3 exceptions to this rule:
Lotus Notes, Internet Explorer, and Outlook Express; which also fall under the
General type. All other e-mail, with the exception of Lotus Notes and Outlook
Express at this point, are always Group 4 TIFF because it is rendered from
text.
Single Page Output Type
General Color Depth Options
Rendered as
Black&White (1-bit)
Group 4 TIFF
Grayscale (8-bit)
LZW TIFF
256 Color (8-bit)
LZW TIFF
True Color (24-bit)
JPEG
5-62
Ipro eCapture User Guide
Q1 2014
www.iprotech.com
877-324-4776
Setting Processing Job Options
Multi-Page TIFF Output Type
General Color Depth Options
Rendered as
Black&White (1-bit)
Group 4 TIFF
Grayscale (8-bit)
LZW TIFF
256 Color (8-bit)
LZW TIFF
True Color (24-bit)
JTIFF - (JPEG compressed
TIFF)
Image Color Depth
Applies to: BMP, TIFF, PCX, GIF, WPG, WINDOWSICON, WINDOWSCURSOR,
MACPAINT, CGM, DCX, SUNRASTER, KODAKPCD, PNG, DGN, PBM, and ADOBEPHOTOSHOP.
However, if Lead fails to open a file, it then goes to Oracle® Outside-In Technology (formerly Stellent) and would fall under the General Color Depth
options.
Image Color Depth Options
Rendered as
As Is
If Original is Black&White, then Group 4
TIFF; otherwise, it will be a JPG matching bit depth.
Black&White (1-bit)
Group 4 TIFF
Grayscale (8-bit)
LZW TIFF
True Color (24-bit)
JPG
PDF Color Depth
PDF grouping applies only to PDF files. A PDF will always use the selected color
depth setting in the PDF area. There are two possible outcomes:
www.iprotech.com
877-324-4776
Ipro eCapture User Guide
Q1 2014
5-63
Chapter 5, Creating Clients, Projects, Custodians, and Jobs
•
Successful use of the Adobe Library:
PDF Color Depth Options
Rendered as
As Is
If Original is Black&White, then Group 4
TIFF; otherwise, it will be a JPG matching bit depth.
Black&White (1-bit)
Group 4 TIFF
Grayscale (8-bit)
JPG (8-bit)
True Color (24-bit)
JPG
•
Unsuccessful extraction of Adobe library:
PDF Color Depth Options
Rendered as
As Is
Always 24-bit JPG
Black&White (1-bit)
Group 4 TIFF
Grayscale (8-bit)
JPG (8-bit)
True Color (24-bit)
JPG
PDF Paper Size: Select an output paper size for PDFs. When the As Is option
is selected, the internal PDF document size is used to draw the image.
Paper Size: Select an output paper size from the drop-down list.
Lotus Notes - Use Legacy Handling (Print from Lotus UI) - This legacy
handling option uses the slower print UI from Lotus Notes to create the images
and HTML representations for Lotus mail.
Email Cut Off Text Handling: Separate options are available for handling
emails with cutoff text in Outlook/EML and Lotus Notes. One or more options
may be selected and the order may be set.
5-64
Ipro eCapture User Guide
Q1 2014
www.iprotech.com
877-324-4776
Setting Processing Job Options
Click the Outlook/EML link, Select Handling/Order. The Outlook/EML
Text Cutoff Handling dialog appears.
Select an option and click either the
or
to move it to a
specific order location. Repeat for additional options. Options
include:
Attempt in Landscape w Shrink to Fit
Attempt in Portrait w Shrink to Fit
Attempt in RTF
Attempt in Text
Assign Text Cutoff Flag and Manage in QC - This is the default setting. It cannot be repositioned.
www.iprotech.com
877-324-4776
Ipro eCapture User Guide
Q1 2014
5-65
Chapter 5, Creating Clients, Projects, Custodians, and Jobs
Click the Lotus Notes link, Select Handling/Order. The Lotus Notes Text
Cutoff Handling dialog appears.
Select an option and click either the
or
to move it to a
specific order location. Repeat for additional options. Options
include:
Attempt in Landscape
Attempt in Text
Assign Text Cutoff Flag and Manage in QC - This is the default setting. It cannot be repositioned.
Time Zone Handling
See the section How Ipro eCapture Handles Dates - Time Zones on page 5-20
for additional information.
Note, These options are located under the Common Options tab in the Options
for Project dialog,
•
•
•
5-66
Use local time zone from the workstation on which the discovery is
being performed.
Convert all times to GMT (No daylight savings)
Select Specify Time Zone and select the time zone to be used to convert the times to. For example, you might select the time zone of the
workstation where the files originated.
Ipro eCapture User Guide
Q1 2014
www.iprotech.com
877-324-4776
Setting Processing Job Options
Setting Processing Job Options for Excel
Select the items you want Ipro eCapture to include when it creates images
from the native files.
www.iprotech.com
877-324-4776
Ipro eCapture User Guide
Q1 2014
5-67
Chapter 5, Creating Clients, Projects, Custodians, and Jobs
Click Defaults to populate the dialog with the Excel default settings as shown
in the previous figure. Some of the options show how to access the setting in
Microsoft Excel 2007.
•
•
•
•
•
•
•
•
•
•
•
•
•
5-68
Do not include headers - Insert tab > Text group > click Header & Footer
to open Design tab. Click Header and choose None from the drop-down
menu.
Do not include footers - Insert tab > Text group > click Header & Footer
to open Design tab. Click Footer and choose None from the drop-down
menu.
Reveal hidden columns - Home tab > Cells group. Click Format and
choose Hide & Unhide > Unhide Columns.
Reveal hidden rows - Home tab > Cells group. Click Format and choose
Hide & Unhide > Unhide Rows.
Unhide worksheets - Home tab > Cells group > click Format and choose
Hide & Unhide > Unhide Sheet.
Unhide very hidden worksheets - Unhides worksheets that were hidden
by a Microsoft Visual Basic for Applications program that assigned the
property xlSheetVeryHidden. (From the Microsoft Excel Help File: If
sheets are hidden by a Microsoft Visual Basic for Applications program
that assigns the property xlSheetVeryHidden, you cannot use the Unhide
command to display the sheets. If you are using a workbook with Visual
Basic macros and have problems with hidden sheets, contact the owner
of the workbook for more information.)
Autofit rows - Double click the boundary below that row heading.
Autofit columns - Double click the right boundary of the column heading
for that row.
Wrap text - Home tab > Alignment group. Click Wrap Text.
Print gridlines - Page Layout tab > Sheet Options group. Under Gridlines
select Print.
Unhide windows - View tab > Window group. Click Unhide.
No fill color (for cells) - Home tab > Styles group. Click Cell Styles and
click Normal.
Clear print area - Page Layout tab. Click Print Area and choose Clear
Print Area from the drop-down menu.
Ipro eCapture User Guide
Q1 2014
www.iprotech.com
877-324-4776
Setting Processing Job Options
•
•
•
•
•
Clear print title columns - Page Layout tab. Click Print Titles > Page
Setup dialog. Click Sheet Tab. Under Print Titles select the Columns to
repeat range.
Clear print title rows - Page Layout tab. Click Print Titles > Page Setup
dialog. Click Sheet Tab. Under Print Titles select the Rows to repeat
range.
Display headings - Page Layout tab. Click Print Titles > Page Setup dialog. Click Sheet Tab. Under Print, select the Row and column headings
check box.
Apply Autofilter - Data tab > Sort & Filter group. Click Filter.
Expand Pivot Tables - Alternate click Pivot Table to display context
menu. Choose Expand/Collapse > Expand.
Comments - Review tab > Comments group. Select from the options.
Color Depth Options
Color processing for Excel files is handled separately from color processing of
other types of files. This setting is independent of the Color Depth options
located in the Processing Options:General Options tab. See the section General
Color Depth Option on page 5-62 for more information.
Single Page Output Type
General Color Depth Options
Rendered as
Black&White (1-bit)
Group 4 TIFF
Grayscale (8-bit)
LZW TIFF
256 Color (8-bit)
LZW TIFF
True Color (24-bit)
JPEG
Multi-Page TIFF Output Type
General Color Depth Options
Rendered as
Black&White (1-bit)
Group 4 TIFF
Grayscale (8-bit)
LZW TIFF
www.iprotech.com
877-324-4776
Ipro eCapture User Guide
Q1 2014
5-69
Chapter 5, Creating Clients, Projects, Custodians, and Jobs
General Color Depth Options
Rendered as
256 Color (8-bit)
LZW TIFF
True Color (24-bit)
JTIFF - (JPEG compressed
TIFF)
Page Order
•
•
•
As Is
Down, then over
Over, then down
Orientation - For printing
•
•
•
As Is
Portrait
Landscape
Scaling
•
•
•
As Is
Adjust to % (select a percentage value from the drop-down list)
normal size
Fit to (select a value from 1 to 1000) page(s) wide and (select a
value from 1 to 1000) tall.
Center on Page
•
•
Horizontally
Vertically
Blank Page Removal - default option is Based on Both Page Order
Options if the Remove Blank Pages option is not selected under General
Options. When Remove Blank Pages is selected, the options are:
•
Based on selected Page Order: Down, then over or Over, then
down.
If Down, then over is selected, all vertical page columns that are
blank will be removed.
5-70
Ipro eCapture User Guide
Q1 2014
www.iprotech.com
877-324-4776
Setting Processing Job Options
•
If Over, then down is selected, all horizontal page rows; where all
pages in a horizontal run are blank, will be removed.
Based on both Page Order Options: This bases the removal of
blank pages based on both horizontal page-rows and vertical
page-columns.
Date Field Handling
The Date Field Handling option works by examining each cell that contains a
formula to determine if a date field exists in that cell. This method will be used
for each of the Date Field Handling options (except for ‘Do Not Replace’) since
each option requires that each date field be handled in some way. Note: Documents who have a high number of date formulas could lead to slower perdocument processing times.
Select from the drop-down list:
•
•
•
•
•
•
Replace with date last saved
Replace with date created
Replace with comments - displays the Date Field Comments field
where you can enter the text that should replace the contents of
the date field.
Replace with field code
Do not replace
Remove
Header/Footer Filename Field Handling:
If path or filename options are found in an Excel header or footer, you can
select from the following options to handle these occurrences.
•
•
•
•
•
Replace with filename (no path) - inserts the unqualified filename
Replace with filepath - inserts the fully-qualified path of the original file
Replace with comments - displays the Header/Footer Filename
field comments field where you can enter your own comments
Replace with field code - replaces outputs &[Path] and/or &[File]
Remove - removes the codes entirely
www.iprotech.com
877-324-4776
Ipro eCapture User Guide
Q1 2014
5-71
Chapter 5, Creating Clients, Projects, Custodians, and Jobs
Select Generate a metadata summary image for each Excel spreadsheet, then select the individual types of metadata to capture under Spreadsheet Summary Options:
•
•
•
•
Document Properties
Comments
Formulas
Linked Content - The data collected will include hyperlinks and OLE
linked files. If any linked content exists in a document, a QC flag will be
added.
A separate page entitled Document Properties is generated and is placed at
the end of each Microsoft Excel document.
About metadata
Who creates the metadata? The native program (such as Microsoft Excel
or Outlook) creates the metadata and maintains it with the native file (the
letter or e-mail).
What does Ipro eCapture do with this data? When a document is processed, the metadata is collected from the document and stored in the database.
How is metadata useful? It gives you valuable information as to “Who
knew what, and when.” It can tell you who wrote a document and who
edited it last. It also shows you a file’s revision number, the character count,
and many other pieces of information about a file.
5-72
Ipro eCapture User Guide
Q1 2014
www.iprotech.com
877-324-4776
Setting Processing Job Options
Paper Size: Select an output paper size from the drop-down list. Note: For
Custom[8.5x11.0in], the Custom Paper Size dialog appears.
The Custom Paper size defaults to 8.5x11 inches. The range values are shown
for both Units: Inches and Millimeters. Maximum size in Inches 50.00x70.00;
for Millimeters 1270.00x1778.00. When this option is selected, the document
will be processed through the PDF driver (Text-Based PDF creation) regardless
of the Flex Processor option selected. OCRing is not applicable in this instance.
Export settings will be limited to Text-Based PDF Output only; even if image
format is selected. Non-Excel documents will export as usual.
www.iprotech.com
877-324-4776
Ipro eCapture User Guide
Q1 2014
5-73
Chapter 5, Creating Clients, Projects, Custodians, and Jobs
Setting Processing Job Options for Word
Select the items you want Ipro eCapture to include when it creates images
from the native files.
These following settings determine how any tracked changes will be captured
during discovery.
5-74
Ipro eCapture User Guide
Q1 2014
www.iprotech.com
877-324-4776
Setting Processing Job Options
Select the option Show Hidden Text to see hidden text, if any, contained in
Word documents.
Revisions
•
•
•
•
As is - Print the document as it is according to the Office Settings
on the machine.
Detail Revisions - Print the document with revisions shown.
Final Copy (hide revisions) - Print the document with no revisions
shown.
Both Copies - Documents are printed. If a document has revisions,
it's printed again with the revisions shown. Documents with revisions will then have two sets of images, one right after the other.
Orientation
•
•
•
As is
Portrait
Landscape
Scale to Page: Select this option to scale the contents of the page to fit in the
printable area. This sets the PrintZoomPageWidth and PrintZoomPageHeight to
the paper size of the printer when printing Word documents.
Color Depth
Color processing for Word documents is handled separately from color processing of other types of files. This setting is independent of the Color Depth
options located in the Processing Options:General Options tab. See the section
General Color Depth Option on page 5-62 for more information.
www.iprotech.com
877-324-4776
Ipro eCapture User Guide
Q1 2014
5-75
Chapter 5, Creating Clients, Projects, Custodians, and Jobs
Single Page Output Type
General Color Depth Options
Rendered as
Black&White (1-bit)
Group 4 TIFF
Grayscale (8-bit)
LZW TIFF
256 Color (8-bit)
LZW TIFF
True Color (24-bit)
JPEG
Multi-Page TIFF Output Type
General Color Depth Options
Rendered as
Black&White (1-bit)
Group 4 TIFF
Grayscale (8-bit)
LZW TIFF
256 Color (8-bit)
LZW TIFF
True Color (24-bit)
JTIFF - (JPEG compressed
TIFF)
Date Field Handling - select from the drop-down list:
•
•
•
•
•
•
Replace with date created
Replace with date last saved
Replace with comments - displays the Date Field Comments field
where you can enter the text that should replace the contents of
the date field.
Replace with field code
Do not replace
Remove
Filename Fields - select from the drop-down list:
•
•
5-76
Replace with filename (no path)
Replace with filepath
Ipro eCapture User Guide
Q1 2014
www.iprotech.com
877-324-4776
Setting Processing Job Options
•
•
•
Replace with comments - displays the Filename Comments field
where you can enter the text that should replace the filename.
Replace with field code
Do not replace
About metadata
Who creates the metadata? The native program (such as Microsoft Excel
or Outlook) creates the metadata and maintains it with the native file (the
letter or e-mail).
What does Ipro eCapture do with this data? When a document is processed, the metadata is collected from the document and stored in the database.
How is metadata useful? It gives you valuable information as to “Who
knew what, and when.” It can tell you who wrote a document and who
edited it last. It also shows you a file’s revision number, the character count,
and many other pieces of information about a file.
Select Generate metadata summary images for each Word document,
then select the individual types of metadata to capture under Document
metadata Summary Options:
•
•
•
•
•
Document Properties
Revisions
Comments
Routing Slips
Linked Content - The data collected will include hyperlinks and OLE
linked files. If any linked content exists in a document, a QC flag will be
added.
A separate page entitled Document Properties is generated and is placed at
the end of each Microsoft Word document. For example, The Document Properties page may contain the following data:
Title, Author, Company, Attached Template, Page count, Paragraph Count, Line
Count, Word Count, Character Count (spaces excluded), and Character Count
(spaces included).
Paper Size: Select an output paper size from the drop-down list.
www.iprotech.com
877-324-4776
Ipro eCapture User Guide
Q1 2014
5-77
Chapter 5, Creating Clients, Projects, Custodians, and Jobs
Setting Processing Job Options for PowerPoint
These options are based on the print options offered in PowerPoint. They
determine how images will be generated.
5-78
Ipro eCapture User Guide
Q1 2014
www.iprotech.com
877-324-4776
Setting Processing Job Options
Select Original Settings (AS IS) to use Microsoft PowerPoint’s default settings. Or, clear Original Settings (AS IS) to adjust the settings:
•
•
•
•
•
•
Print Hidden Slides
Print Comments
Frame Slides - Prints a border around each slide.
Output Type - Choose Slides, Outline, Notes Pages (notes and slide on
one page), Notes Pages Split (notes and slide on separate pages), or
Handouts.
Slide Size - select from the drop-down list
Paper Size - select an output paper size from the drop-down list.
Color Depth - Color processing for PowerPoint presentations is handled separately from color processing of other types of files. This setting is independent
of the Color Depth options under the General Options tab in the Options for
Processing Job dialog. See the section General Color Depth Option on page 562 for more information.
The color depth option will be set to color when black&white or grayscale output is selected. Black Ice color depth option remains unchanged making output
print correctly when any of the options are selected.
Single Page Output Type
General Color Depth Options
Rendered as
Black&White (1-bit)
Group 4 TIFF
Grayscale (8-bit)
LZW TIFF
256 Color (8-bit)
LZW TIFF
True Color (24-bit)
JPEG
Multi-Page TIFF Output Type
General Color Depth Options
Rendered as
Black&White (1-bit)
Group 4 TIFF
Grayscale (8-bit)
LZW TIFF
www.iprotech.com
877-324-4776
Ipro eCapture User Guide
Q1 2014
5-79
Chapter 5, Creating Clients, Projects, Custodians, and Jobs
General Color Depth Options
Rendered as
256 Color (8-bit)
LZW TIFF
True Color (24-bit)
JTIFF - (JPEG compressed
TIFF)
Page Orientation
•
Choose As Is, Portrait, or Landscape
Slide Orientation
•
Choose As Is, Portrait, or Landscape
Handouts
•
•
Slides per Page
Order (if generating 4 or more slides per page)
Include Linked Content Summary - The data collected will include hyperlinks and OLE linked files. If any linked content exists in a document, a QC flag
will be added.
Headers and Footers
For Headers and Footers, you can set options for Slides or Notes & Handouts.
The tabs that display are based on the Output Type selected: Slides, Outline,
Notes Pages (notes and slide on one page), Notes Pages Split (notes and slide
on separate page), or Handouts.
For the Output Type of Slides, select from the following options from the Slide
Tab:
Date and Time
Update Automatically: Select from date last saved or date created.
Format: Select from As Is, date, date and time, or time.
Fixed: Enter a fixed date and time.
Footer or As Is
Slide Number: As is, Show, Do not show
Show on title slide: As is, Show, Do not show
5-80
Ipro eCapture User Guide
Q1 2014
www.iprotech.com
877-324-4776
Setting Data Extraction Options
For any Output Type other than Slides, select from the following options under
the Notes & Handouts Tab:
Date and Time
Update Automatically: Select from date last saved, date created, or current date’s format.
Fixed: Enter a fixed date and time.
Header or As Is
Footer or As Is
Page Number: As is, Show, Do not show
Setting Data Extraction Options
Data Extraction Options are set at the Project level or the Data Extract Job
level. If setting options at the Data Extract Job level, the Time Zone Options
are located under the Common Options tab.
The following figure shows the options at the Project Level. To set the Time
Zone Options, click the Common Options tab and see the section Setting the
Common Options on page 5-84.
www.iprotech.com
877-324-4776
Ipro eCapture User Guide
Q1 2014
5-81
Chapter 5, Creating Clients, Projects, Custodians, and Jobs
Click the Data Extraction Options tab to display the Data Extraction
Options.
5-82
Ipro eCapture User Guide
Q1 2014
www.iprotech.com
877-324-4776
Setting Data Extraction Options
Select from the following Data Extraction options:
Replace tabs with spaces when extracting Excel text: When this option is
selected, the extracted Excel text will look similar to this:
Column A Column B
Value1 Value2
The column data is separated by a space rather than a tab (which can be, for
example, the equivalent of 5 spaces). Therefore, if the option is not selected,
then the extracted Excel data would look similar to this:
Column A
Column B
Value1
Value2
In the above example, the column data is separated by a tab (5 spaces).
Expand Pivot Tables when extracting Excel text: Default is unchecked. If
pivot tables exist, they will be expanded when this option is checked. A flag is
also set in QC to indicate the Pivot table exists in the worksheet.
See the section Setting the Common Options on page 5-84 for a description of
the OCR options.
Lotus Notes - select from one of three methods:
•
•
•
High Speed (Optimized for speed)
Medium Speed (Balance of speed and quality)
Low Speed (Optimized for highest quality output - UI Printing)
Note: Existing projects will have the Lotus option set to the Medium Speed
method which was the default method in version 2013.0.0. Newly created
Projects/Jobs will default to the High Speed method. The Low Speed option is
the same as the former Legacy option - extract text from Lotus Print UI. For
error handling, the next option will be used as fall back. For example, if errors
occur when High Speed is selected, then a retry occurs using the next method
of Medium Speed.
If the system defaults are in place, the system default options should be
adhered to using the following rules:
•
•
If Legacy is checked; new Projects have Legacy selected
If Legacy is not checked; new Projects have ESI selected
www.iprotech.com
877-324-4776
Ipro eCapture User Guide
Q1 2014
5-83
Chapter 5, Creating Clients, Projects, Custodians, and Jobs
Setting the Common Options
OCR and Time Zone options are set under the Common Options tab.
5-84
Ipro eCapture User Guide
Q1 2014
www.iprotech.com
877-324-4776
Setting Data Extraction Options
Setting the OCR Options
New in 2014.0.0, data sets are OCRed only once during indexing or data
extraction and the OCR output is stored in a common folder location at the
Project level. This ensures that results during search and review remain the
same. By not repeating OCR work on the same data sets, speed is improved
and time is saved.
All OCR options are deselected by default for new Projects. By setting OCR
options at the Project level, it is not necessary to set them individually for each
Job type because they are now located under the new Common Options tab.
The OCR options apply to all Job types with the exception of a specific OCR
option, OCR Pages Missing Text, which applies to Processing Jobs only.
For Data Extract, an item will use the existing OCR output as its own output
when the following conditions are met:
•
•
OCR is enabled
The PDF page character threshold and Minimum OCR Confidence Level
are the same as when the OCR was first performed.
If the PDF page character threshold or the Minimum OCR Confidence options
are higher than when the OCR was first performed, the document will be reOCRed to allow for more characters in the embedded text of the PDF or to produce a higher quality of OCR, respectively.
•
•
•
Select OCR Pages missing text (Processing Jobs only) to OCR
pages within documents that are missing text. It will cause any
page that does not have OCR text to have an OCR task generated
for it. Optionally, select PDF page character threshold to perform OCR on image-based PDFs that may contain a small amount
of embedded text, such as an image key. The default value is 25.
The maximum value is 10000. If there is less than this amount of
characters retrieved, the PDF will be OCRed.
OCR images as necessary - Images will be OCRed for indexing/
language identification if necessary. The OCR text obtained from
the image is then passed on to dtSearch for indexing. The OCR will
be indexed and available to be searched on in the Flex Processor.
OCR PDF documents - PDFs with no embedded text: perform
OCR prior to indexing or language identification. PDFs with embedded text (text-behind) will have text extracted anyway. The OCR
www.iprotech.com
877-324-4776
Ipro eCapture User Guide
Q1 2014
5-85
Chapter 5, Creating Clients, Projects, Custodians, and Jobs
•
•
text is added to any extracted text from the PDF. The text obtained
through OCR, along with the extracted text from the PDF, is passed
to dtSearch for indexing. The OCR will be indexed and available to
be searched in the Flex Processor. Note: Selecting this option will
impact the time for the Discovery process. OCR Text obtained
through OCR could contain duplicate words as appended to
extracted text file. Search hits could be inflated by these results.
OCR PowerPoint Documents: Turn this option on to perform
OCR on Microsoft PowerPoint files during indexing to get text from
embedded content in the slides. This will result in slower indexing
speeds for PowerPoint files, but more accurate search results.
Minimum average OCR confidence [1-100]: The level range
settings are from 1 up to 100. The default is 50. The confidence
level is the average percentage of confidence per document for all
pages within a document on which OCR was performed. Success or
failure of a document for index preparation is based on the average confidence level of the document. If the average confidence
level is below the selected threshold, the document will be considered as an indexing error and is available for re-queueing. The Discovery Job information panel displays OCR Applied[Errors], where
Applied shows the number of documents that required OCR (not
OCRed) and where [Errors] shows the number of those documents
that did not meet the specified average confidence level. Note: For
the purposes of calculating average document confidence, pages in
PDF docs with text behind them are considered 100%. OCR failures are considered 0%.
Setting the Time Zone Options
Time Zone Options are set at the Project level or the Data Extract Job level. If
setting options at the Data Extract Job level, the Time Zone Options are
located under the Common Options tab.
The following figure shows the options at the Project Level. To set the Data
Extraction Options, click the Data Extraction Options tab and see the section
Setting Data Extraction Options on page 5-81.
Select from the following Time Zone Handling options:
5-86
Ipro eCapture User Guide
Q1 2014
www.iprotech.com
877-324-4776
Setting Data Extraction Options
See the section How Ipro eCapture Handles Dates - Time Zones on page 5-20
for information.
•
•
•
Use local time zone from the workstation on which the discovery is
being performed.
Convert all times to GMT (No daylight saving)
Select Specify Time Zone and select the time zone to be used to convert the times to. For example, you might select the time zone of the
workstation where the files originated.
Setting the Filtering (Flex Processor) Options
Filtering Options are set at the Project level, Processing Job level, and the Data
Extract Job level.
www.iprotech.com
877-324-4776
Ipro eCapture User Guide
Q1 2014
5-87
Chapter 5, Creating Clients, Projects, Custodians, and Jobs
Click the Filtering tab to display the Filtering Options.
5-88
Ipro eCapture User Guide
Q1 2014
www.iprotech.com
877-324-4776
Setting Data Extraction Options
Click
to display the Flex Processor Rules Manager or click
to start the Flex Processor Rules Manager Wizard. See Appendix
A, Using the Flex Processor Rules Manager for background information and
option descriptions before creating and applying the Rules.
www.iprotech.com
877-324-4776
Ipro eCapture User Guide
Q1 2014
5-89
Chapter 5, Creating Clients, Projects, Custodians, and Jobs
As you mouse over various options, an icon appears with a ?. Click this
icon to display information about the specific option.
Creating Rules
As you create a Rule, it appears in the Rules list (top-half of the Flex Processor
Rules Manager interface). The Action, Rule Title, and Criteria display for each
Rule.
A Rule = Action + Selection Criteria
If you create a Rule with more than one criteria, the AND operator is used. For
example, produce all the Word documents between March 1, 2007 and March
3, 2008. The Criteria column will show:
1.
Click New Rule in the Rule Bar.
2.
Type a Rule Title that best describes the Rule.
3.
Select an Action from the Action drop-down list.
For Image (applies to Processing Jobs only), enter Max Pages to set a
threshold for the total amount of pages to be produced for any one document related to the rule. If the maximum page is reached for a document, the Threshold Exceeded QC Flag will automatically be set to
quickly identify those documents affected during QC. This replaces the
Max Pages threshold formerly located in the Processing Job: General
Tab.
Create Placeholder: This option is enabled by default. It determines if
the slipsheet is printed when any Max Pages limit is exceeded. For example, if the Max Pages value is set to 100, then Ipro eCapture will generate placeholders for all the documents that have more than 100 pages.
Text:
Note: During Export, pages with no text are handled the same as a regular Export Job. Placeholders may be created for these pages if desired.
5-90
Ipro eCapture User Guide
Q1 2014
www.iprotech.com
877-324-4776
Setting Data Extraction Options
Searchable PDFs, including hit highlighting, are not affected by the two
Text options (new for version 2013.1.0).
From the Text drop-down menu choose either:
•
•
Truncate text to max pages - text is truncated to match the
output of pages that fall under the threshold (existing behavior).
Retain all text for document - document text is associated to
the number of pages below the set threshold value and all subsequent pages are blank. (This behavior is new starting with version
2013.1.0.)
4.
Select a Scope from the Scope drop-down list.
5.
Select the options from the Criteria tabs that apply for the Rule. Rules
that cannot be combined with other criteria are: All Files (General Criteria Tab), Duplicates Rules (General Criteria Tab), NIST Matches
(Advanced Criteria Tab), and Custom Hash Lists (Advanced Criteria Tab).
6.
Repeat steps 1 through 5 to create another Rule. Continue to create as
many Rules as needed.
The Rules may be re-ordered in the Rules list using the Up and Down
arrows by selecting the specific Rule and clicking the appropriate arrow.
The last Rule in the list is the Effective Rule.
(Optional) Click the Rule Set Manager button to launch the Rule Set
Management Wizard where you may copy, delete, and create Rule Sets.
This function can be accessed after a job has started.
7.
Click Exit in the Rule Bar to return to the Project Options dialog, Filtering
Tab.
8.
(Optional) Click Make System Default (Any new projects created in
any client will have the system default filters pre-selected. If you save as
System Default, it will not change the filters for any existing projects;
only new projects.)
9.
Click OK to close the Project Options dialog.
10.
(Optional) Click
in the Information Panel (Client Management tab) to verify the settings and make any modifications if necessary
www.iprotech.com
877-324-4776
Ipro eCapture User Guide
Q1 2014
5-91
Chapter 5, Creating Clients, Projects, Custodians, and Jobs
Setting Alternative System Directories for Jobs
Starting with version 2014.0.0, alternative system directories may be specified
for the output files generated by Discovery, Data Extract, and/or Processing
Jobs in order to utilize larger capacity storage devices. This is also useful for
organizing different Projects under the same Client that may use different
storage devices. The assignment of the system directories is done at the Project level.
The system directories are specified through the Advanced tab in the Project
Options dialog box as shown in the following figure.
On new and existing Projects, the paths shown are the defaults and are indicated with informational text in each field as shown in the previous figure.
These default paths are the paths that were indicated at the time the Client
was added making it convenient to easily locate the original paths.
For the Discovery, Data Extract, or Processing Job, click
location. The specified path cannot exceed 100 characters.
5-92
Ipro eCapture User Guide
Q1 2014
and browse to a
www.iprotech.com
877-324-4776
Setting Data Extraction Options
A directory must exist for each Job type whether it is the default directory or
an assigned alternative directory. If an alternative path is cleared from any of
the fields, the system reverts to the default path and displays the informational text.
The alternative system directories may be saved as the System
Default. If this is done, new projects and jobs will be organized under
dedicated directories per client.
The following directory structure is created for each alternative path when the
Project settings are saved and/or a Job is created: Project\Job Type\Job Directory. For example: the alternative specified directory for Discovery Jobs in ProjectID 7 is \\data\ecapture\ClientDirectory\LocationOne, then the directory
structure for DiscoveryJobID 77 would be: \\data\ecapture\ClientDirectory\LocationOne\PR000009\DiscoveryJobs\DJ000077
All subdirectories under the Job directory will remain the same for each Job
type. When a Job is running, all output files will go to the alternative specified
location.
Changes may be made to the assigned system directory at any time. Jobs in
progress or completed are not affected by the changes made to the assigned
system directories. Directories that are removed will not be deleted on disk.
Only new Jobs will use the newly specified locations. Note: In the Limited
Controller, the options can only be modified at the time the Project is first created.
Different Clients using the same Alternate Paths
Scenario: If two Clients are created and will use the same alternate Job paths,
the system creates a unique Identifier (e.g. 5K82SZHA) Client directory for
each Client. Therefore, job names may be identical for each Client but data will
not be combined. For example, the paths for each identically named Discovery
Job are:
C:\AltPath\5K82SZHA\PR000001\Discovery Jobs\DJ000001
and
C:\AltPath\5KRTOUIY\PR000001\Discovery Jobs\DJ000001
The unique identifier is stored in the Clients table SystemDirectoryName field.
www.iprotech.com
877-324-4776
Ipro eCapture User Guide
Q1 2014
5-93
Chapter 5, Creating Clients, Projects, Custodians, and Jobs
This structure allows each Project to maintain its own directory when System
Wide defaults are used.
If a Client is deleted, the job directories and files are also deleted, but
an empty directory structure down to the Job level remains.
Creating a Standard Data Extract Job
Data Extraction Jobs are based on completed Discovery Jobs. If the Discovery
Job was not indexed, searching is not available in the Flex Processor Rules
Manager.
The data extract job creates output that contains a paginated text file, an
extracted text file and the original file. It does not output Image Files. The output is stored in the directory that was selected when the Client was created.
An example path follows: \\eCaptureData\ProjectOne\DataExtract
Jobs\DE000009\Output\1000\220. The 220 directory contains the output files
mentioned at the beginning of this paragraph.
1.
Select Data Extract Jobs underneath the custodian.
2.
Click the alternate mouse button to display the context menu.
5-94
Ipro eCapture User Guide
Q1 2014
www.iprotech.com
877-324-4776
Creating a Standard Data Extract Job
3.
Select New Data Extract Job. The Data Extract Job dialog appears.
4.
Enter a Name.
5.
Enter a Description.
6.
Select Standard.
7.
(Optional) Click Expedite Job if you want the job to pushed to the front
of the queue.
8.
Select one or more of the Discovery Jobs you want to use for this
data extract job. Proceed directly to step 10 after selecting the Discovery
Jobs.
9.
(Optional) If you want to create a new Discovery Job at this time, click
New Discovery Job. See the section Creating a Discovery Job on page
5-16 for information on creating a Discovery Job. After creating the Discovery Job and selecting the Discovery Job options, the newly created
www.iprotech.com
877-324-4776
Ipro eCapture User Guide
Q1 2014
5-95
Chapter 5, Creating Clients, Projects, Custodians, and Jobs
Discovery Job will appear in the Discovery Jobs list (in the Data Extract
Job dialog) and will be selected. The Discovery Job also appears in the
Job Queue grid of the Ipro eCapture Controller. Proceed to step 10 to
continue making selections in the Data Extract Job dialog.
10.
(Optional) Deselect Show Job Options after Creation if you do not
want the Data Extraction Job Options to display.
11.
Select a task table from the drop-down list. The task table that appears
in the field is based on the last task table selected for the Custodian.
12.
Click OK. One of the following happens:
•
5-96
The Data Extract Job appears in the Job Queue grid of Ipro eCapture Controller.
Ipro eCapture User Guide
Q1 2014
www.iprotech.com
877-324-4776
Creating a Standard Data Extract Job
•
13.
The Data Extraction Job Options dialog appears as shown in the
following figure.
Proceed to the sections:
•
•
Setting Data Extraction Options on page 5-81.
Setting the Time Zone Options on page 5-86.
www.iprotech.com
877-324-4776
Ipro eCapture User Guide
Q1 2014
5-97
Chapter 5, Creating Clients, Projects, Custodians, and Jobs
Creating a Data Extract Import Job
(Data Extract Job)
You can re-import previously exported Data Extraction Jobs for further culling.
Supported formats are one ItemID per line. Valid formats include:
1223
1224
1228
Also:
“1223”
“1224”
“1228”
However, suffixed image key numbers are not supported. For example, these
would be invalid:
“1223”. “Jo Green”
“1224”, “Lou Brown”
See the section Creating a Standard Data Extract Job on 5-94 for more information about Data Extract Jobs.
1.
Select Data Extract Jobs underneath the custodian.
2.
Click the alternate mouse button to display the context menu.
5-98
Ipro eCapture User Guide
Q1 2014
www.iprotech.com
877-324-4776
Creating a Data Extract Import Job (Data Extract Job)
3.
Select New Data Extract Job. The Data Extract Job dialog appears.
4.
Enter a Name.
5.
Enter a Description.
6.
Select the Type, Data Extract Import.
7.
Select one of the Import From options:
•
Selected Items File - Browse to the file. This file is either a text
file or a .CSV file containing a list of Item IDs. After selecting the
file, the path will appear in the Select Data Extract Selected Items
File field. Proceed to step 8.
www.iprotech.com
877-324-4776
Ipro eCapture User Guide
Q1 2014
5-99
Chapter 5, Creating Clients, Projects, Custodians, and Jobs
•
Database Table -
Select a Content Type: ItemIDs or ItemGUIDs - ItemGUIDs
allow for a more reliable method to positively identify Ipro eCapture Items records for a Client.
Specify the SQL database table (Note: This table must be created
in the Client database.) containing the ItemIDs list or an
ItemGUID list. For ItemID, the first column of the table must be an
integer field named ItemID. For ItemGUID, the first column of the
table must be ItemGUID and defined as nvarchar(36). This is the
only requirement of the tables. The rest of the tables may contain
any fields or no fields. The location of the tables must be in the client database, [CONFIG]_[CLIENT].
Select the option Validate Item IDs in Table if you want to have
the system check for existence of ItemIDs or ItemGUIDs in the
Items table. If the system does not find any ItemIDs or
ItemGUIDs, an error occurs. If some ItemIDs or ItemGUIDs are
missing, it will indicate the missing items in a LOG file called
ImportMissingItems.LOG located in the Job folder.
Note: For either of the previous two Import From options, a Flex
Processor rule is created (criteria being the ItemID list) for the
main imported list. Also, additional rules could be created based on
the selected Child Item Handling options. The Scope for each of
these rules may be changed as well, further affecting what other
documents will be selected. As you click each rule created from the
imported list, the ItemIDs may be viewed in the ItemID area on
the Advanced Criteria Tab.
Proceed to step 8.
8.
5-100
Select from the following options:
Ipro eCapture User Guide
Q1 2014
www.iprotech.com
877-324-4776
Creating a Data Extract Import Job (Data Extract Job)
Select children of items that are parents - processes the parent item
with attachments. Note: The rule scope options for created rules will
affect parent/child selections as well.
Child Item Handling
•
•
•
Select Item Only
Select Item and Parent
Select item, parent, and all children of parent
9.
(Optional) Click Expedite Job if you want the job to pushed to the front
of the queue.
10.
Select a task table from the drop-down list. The task table that appears
in the field is based on the last task table selected for the Custodian.
11.
(Optional) Deselect Show Job Options after Creation if you do not
want the Project Options to display.
www.iprotech.com
877-324-4776
Ipro eCapture User Guide
Q1 2014
5-101
Chapter 5, Creating Clients, Projects, Custodians, and Jobs
12.
Click OK. The Data Extraction Job Options dialog appears as shown in
the following figure.
13.
Proceed to the sections:
•
•
5-102
Setting Data Extraction Options on page 5-81.
Setting the Time Zone Options on page 5-86.
Ipro eCapture User Guide
Q1 2014
www.iprotech.com
877-324-4776
Adding Discovery, Data Extract, and/or Processing Jobs Simultaneously
Adding Discovery, Data Extract, and/
or Processing Jobs Simultaneously
New in 2013.0.0, Discovery, Data Extract and/or Processing Jobs can be created simultaneously from one centralized interface using a selected set of
data. Existing containers may be selected at job creation time or new sources
can be added. A container which was already discovered cannot be re-discovered. Project level defaults are applied by default. Custom changes may be
made for specific jobs manually.
Adding a Discovery Job
One or more Discovery Jobs can be created through the Add Job dialog. As
each new Source (Directory) is added it is automatically available as a selection. Optionally, a Data Extract Job and/or a Processing Job can also be created at the same time. To add Data Extract and/or Processing Jobs for existing
source containers, see the section Adding Data Extract and/or Processing Jobs
for Existing Directory Type Source Containers on page 5-107 for procedures.
1.
From the Client Management tree view, select a Custodian.
2.
From the Information Panel, click the Jobs tab.
www.iprotech.com
877-324-4776
Ipro eCapture User Guide
Q1 2014
5-103
Chapter 5, Creating Clients, Projects, Custodians, and Jobs
3.
Click
. The Add Job dialog appears.
Note: In the above figure, there are no existing Source containers for
the selected Custodian. See the section Adding Data Extract and/or Processing Jobs for Existing Directory Type Source Containers on page 5107 for procedures.
4.
Do the following:
Enter a Job Name.
(Optional) Enter a Description for the Job.
(Optional) Enter a Batch ID.
5-104
Ipro eCapture User Guide
Q1 2014
www.iprotech.com
877-324-4776
Adding Discovery, Data Extract, and/or Processing Jobs Simultaneously
5.
Click
. The Add New Source dialog appears.
(Optional) Enter a Name for the Job. If a name is not entered, then the
Name box populates with the name of the selected folder at the end of
the selected Source Path.
From the Type drop-down list, select the Directory to discover by clicking
. Use the UNC path as drive mappings may change over time.
www.iprotech.com
877-324-4776
Ipro eCapture User Guide
Q1 2014
5-105
Chapter 5, Creating Clients, Projects, Custodians, and Jobs
Click OK to return to the Add Job dialog. The Add Job dialog displays the
new source in the Source grid and in the Selected Sources box. In the
Source grid, it shows that a Discovery Job is [Pending] in the Discovery
Jobs column.
6.
(Optional) Repeat step 5 for each additional Discovery Job source.
7.
(Optional) Under Jobs to Create, select either the Data Extract Job
option and/or the Processing Job option. Note: A check mark appears
in the Discovery Job box. If neither is selected, then only a Discovery Job
will be created.
8.
Select from the following options:
5-106
Ipro eCapture User Guide
Q1 2014
www.iprotech.com
877-324-4776
Adding Discovery, Data Extract, and/or Processing Jobs Simultaneously
•
•
•
9.
Save Selections - Select this option to save the Job type selections for future Jobs.
Expedite Job - Select this option to place this job at the beginning of the Job queue.
Task Table - Select a task table from the drop-down list. The task
table that displays is the most recent task table that was selected
for the Custodian.
Click OK. The Jobs appears under the Discovery, Data Extract Job and/or
Processing Job folders in the Client Management tab for the selected
Custodian. The Job(s) appear in the Job Queue pane ready to start.
Adding Data Extract and/or Processing Jobs
for Existing Directory Type Source Containers
Data Extract and/or Processing Jobs may be created from existing source containers or newly added sources.
1.
From the Client Management tree view, select a Custodian with existing
Discovery Jobs.
2.
From the Information Panel, click the Jobs tab.
www.iprotech.com
877-324-4776
Ipro eCapture User Guide
Q1 2014
5-107
Chapter 5, Creating Clients, Projects, Custodians, and Jobs
3.
Click
. The Add Job dialog appears.
Note: In the above figure, existing Source containers exist for the
selected Custodian. When existing Discovery Source containers exist,
they are grouped in the available nodes. New sources will not be
grouped because they can be added or removed on an individual basis.
If no Source containers exist, then the Source grid will be empty. To add
a Discovery Job, see the section Adding a Discovery Job on page 5-103.
4.
Do any of the following:
Enter a Job Name.
5-108
Ipro eCapture User Guide
Q1 2014
www.iprotech.com
877-324-4776
Adding Discovery, Data Extract, and/or Processing Jobs Simultaneously
(Optional) Enter a Description for the Job.
(Optional) Enter a Batch ID.
5.
(Optional) Click
. The Add New Source dialog appears.
(Optional) Enter a Name for the Job. If a name is not entered, then the
Name box populates with the name of the selected folder at the end of
the selected Source Path.
From the Type drop-down menu, select Directory. (Note: See the section Adding a Data Extract or Processing Job from an Item List on page
5-110 for procedures.)
Select the Directory to discover by clicking
drive mappings may change over time.
. Use the UNC path as
Click OK to return to the Add Job dialog.
6.
Repeat step 5 for each additional new source. Note: Once one or more
existing sources (discovered containers) are added to the Selected
Sources box, a new Source may not be added.
7.
To add a container from the Source grid to the Selected Sources box
either double-click the container or select the container and click
.
Repeat for each container. Note: Selected Sources cannot include both
an existing source container and a new source container. Existing containers may not be selected when an Item List is selected (appears in
the Selected Sources box). An Item List may not be combined with a
Directory when there is already a Directory source in the Selected
Sources box. An Item List may not be combined with another Item List
www.iprotech.com
877-324-4776
Ipro eCapture User Guide
Q1 2014
5-109
Chapter 5, Creating Clients, Projects, Custodians, and Jobs
when there is already an Item List in the Selected Sources box. To
remove a container from the Selected Source box, select the container
and click
or double-click the container.
8.
In the Jobs to Create section, select Data Extract Job and/or Processing Job.
9.
Select from the following options:
•
Save Selections - Select this option to save the Job type selections for future Jobs.
•
Expedite Job - Select this option to place this job at the beginning of the Job queue.
Task Table - Select a task table from the drop-down list. The task
table that displays is the most recent task table that was selected
for the Custodian.
•
10.
Click OK. The Jobs appears under the Discovery, Data Extract Job and/or
Processing Job folders in the Client Management tab for the selected
Custodian. The Job(s) appear in the Job Queue pane ready to start.
Adding a Data Extract or Processing Job from
an Item List
A Data Extract and/or Processing Job may be created from an Item List
(ItemID or ItemGUID) file or from a Database Table containing the ItemIDs
list or the ItemGUIDs list.
1.
From the Client Management tree view, select a Custodian with existing
Discovery Jobs.
2.
From the Information Panel, click the Jobs tab.
5-110
Ipro eCapture User Guide
Q1 2014
www.iprotech.com
877-324-4776
Adding Discovery, Data Extract, and/or Processing Jobs Simultaneously
3.
Click
. The Add Job dialog appears.
Note: In the above figure, existing Source containers exist for the
selected Custodian. If no Source containers exist, then the Source grid
will be empty. To add a Discovery Job, see the section Adding a Discovery Job on page 5-103.
4.
Do any of the following:
Enter a Job Name.
(Optional) Enter a Description for the Job.
www.iprotech.com
877-324-4776
Ipro eCapture User Guide
Q1 2014
5-111
Chapter 5, Creating Clients, Projects, Custodians, and Jobs
(Optional) Enter a Batch ID.
5.
Click
. The Add New Source dialog appears.
From the Type drop-down menu, select Item List. The Add New Source
dialog appears.
5-112
Ipro eCapture User Guide
Q1 2014
www.iprotech.com
877-324-4776
Adding Discovery, Data Extract, and/or Processing Jobs Simultaneously
From Content Type drop-down list, select one of the following:
ItemID - Select one of the following:
File: Click
to browse to the file path (UNC path rather than
drive mappings) where the ItemID file resides. Select the file
(either a text file or a .CSV file containing a list of ItemIDs) and
click Open. The File Path fields populates with the path and
selected file.
Database Table: Specify the SQL database table (Note: This
table must be created in the Client database.) containing the
ItemIDs list. For ItemID, the first column of the table must be an
integer field named ItemID. This is the only requirement of the
table. The rest of the tables may contain any fields or no fields.
The location of the tables must be in the client database, [CONFIG]_[CLIENT].
Select the option Validate IDs in Table if you want to have the
system check for existence of ItemIDs in the Items table. If the
system does not find any ItemIDs, an error occurs. If some
ItemIDs are missing, it will indicate the missing items in a LOG file
called ImportMissingItems.LOG located in the Job folder.
Note: For either File or Database Table, a Flex Processor rule is
created (criteria being the ItemID list) for the main imported list.
Also, additional rules could be created based on the selected Child
Item Handling options. The Scope for each of these rules may be
changed as well, further affecting what other documents will be
selected. As you click each rule created from the imported list, the
ItemIDs may be viewed in the ItemID area on the Advanced Criteria Tab.
ItemGUID - ItemGUIDs allow for a more reliable method to positively
identify Ipro eCapture Items records for a Client.
Select one of the following:
File: Click
to browse to the file path (UNC path rather than
drive mappings) where the ItemGUID file resides. Select the file
(either a text file or a .CSV file containing a list of ItemGUIDs) and
www.iprotech.com
877-324-4776
Ipro eCapture User Guide
Q1 2014
5-113
Chapter 5, Creating Clients, Projects, Custodians, and Jobs
click Open. The File Path fields populates with the path and
selected file.
Database Table: Specify the SQL database table (Note: This
table must be created in the Client database.) containing the
ItemGUID list. The first column of the table must be ItemGUID and
defined as nvarchar(36). This is the only requirement of the table.
The rest of the tables may contain any fields or no fields. The location of the tables must be in the client database, [CONFIG]_[CLIENT].
Select the option Validate IDs in Table if you want to have the
system check for existence of ItemGUIDs in the Items table. If the
system does not find any ItemGUIDs, an error occurs. If some
ItemGUIDs are missing, it will indicate the missing items in a LOG
file called ImportMissingItems.LOG located in the Job folder.
Under Import Options, select from the following:
Select children of items that are parents - processes the parent item
with attachments. Note: The rule scope options for created rules will
affect parent/child selections as well.
Select a Child Item Handling option:
•
•
•
Select Item Only
Select Item and Parent
Select item, parent, and all children of parent
Click OK to return to the Add Job dialog.
6.
(Optional) Repeat step 5 for additional new Item List.
7.
To add a container from the Source grid to the Selected Sources box
either double-click the Item List container or select the Item List container and click
. Repeat for each Item List container. Note: Existing
containers may not be selected when an Item List is selected (appears in
the Selected Sources box). An Item List may not be combined with a
Directory when there is already a Directory source in the Selected
Sources box. An Item List may not be combined with another Item List
when there is already an Item List in the Selected Sources box. Selected
Sources cannot include both an existing source container and a new
source container. Once one or more existing sources (discovered con-
5-114
Ipro eCapture User Guide
Q1 2014
www.iprotech.com
877-324-4776
Running Post Process Batch Operations on Completed Processing Jobs or Data Extract Jobs
tainers) are added to the Selected Sources box, a new Source may not
be added. To remove a container from the Selected Source box, select
the container and click
or double-click the container.
8.
In the Jobs to Create section, select Data Extract Job and/or Processing Job.
9.
Select from the following options:
•
Save Selections - Select this option to save the Job type selections for future Jobs.
•
Expedite Job - Select this option to place this job at the beginning of the Job queue.
Task Table - Select a task table from the drop-down list. The task
table that displays is the most recent task table that was selected
for the Custodian.
•
10.
Click OK. The Jobs appears under the Discovery, Data Extract Job and/or
Processing Job folders in the Client Management tab for the selected
Custodian. The Job(s) appear in the Job Queue pane ready to start.
Running Post Process Batch Operations on Completed Processing Jobs or
Data Extract Jobs
Exit the Processing Job or Data Extract Job in QC before proceeding
with this function. The Processing Job or Data Extract Job cannot be
in QC mode if you want to run the post processing operation on that
same Processing Job or Data Extract Job.
Post processing batch operations can be performed on completed processing
jobs and data extract jobs. However, post processing operations are not available for processing jobs that are a part of any export job regardless of the
export job’s status. Unlike QC, images cannot be viewed using this function.
www.iprotech.com
877-324-4776
Ipro eCapture User Guide
Q1 2014
5-115
Chapter 5, Creating Clients, Projects, Custodians, and Jobs
Starting with version 6.0, there is new *StellentID (14000) for documents
without native files. Any documents that have the imported native placeholder
*StellentID will be filtered for Discovery Job Requeue operations and treated
like unextractable items if they are selected for processing.
1.
From the Client Management tree view do one of the following:
•
•
2.
Select one of the following:
•
•
3.
5-116
expand the Processing Jobs folder to display all the processing
jobs.
expand the Data Extract Jobs folder to display all the data
extract jobs.
a completed Processing Job.
a completed Data Extract Job.
Click
to open the Post Process Batch Operations
dialog. If the buttons are grayed out along the bottom of the screen,
then you cannot perform a post process batch operation on that particu-
Ipro eCapture User Guide
Q1 2014
www.iprotech.com
877-324-4776
Running Post Process Batch Operations on Completed Processing Jobs or Data Extract Jobs
lar Processing Job. However, you can view information about the Processing Job.
Items Area
Rule Title: Enter a meaningful name to describe the Rule.
Action: Select an action from the drop-down list. Processing Job Actions
include:
•
Image: converts the file/files to image format
•
Convert to PDF: Converts documents to text-based PDF files that
are PDF/A compliant. Documents will be converted via PDF-
www.iprotech.com
877-324-4776
Ipro eCapture User Guide
Q1 2014
5-117
Chapter 5, Creating Clients, Projects, Custodians, and Jobs
•
•
XChange drivers and single page PDFs become the intermediate
output. This option differs from Image which uses Black Ice drivers
and produces images as the intermediate format. Exceptions are
native files which are already in an image format. These files will
continue to use Lead Tools for processing. For information about
PDF/A compliant files, visit http://www.pdfa.org/doku.php
Placeholder: creates image placeholder
Placeholder with Document Text: creates image placeholder but
includes the original document text.
The action is recognized and a new Flex Processor Rules Manager Rule is created containing the items being reprocessed. The Rule itself is not processed,
but may be useful for reporting.
Max Pages Count: (Applies to Processing Jobs only) Used to set a threshold
to an Image action (Processing Job). This replaces the Max Pages threshold
formerly located in the Processing Job: General Tab.
Create Placeholder: This option is enabled by default. It determines if
the slipsheet is printed when any Max Pages limit is exceeded. For example, if the Max Pages value is set to 100, then Ipro eCapture will generate placeholders for all the documents that have more than 100 pages.
Text:
Note: During Export, pages with no text are handled the same as a regular Export Job. Placeholders may be created for these pages if desired.
Searchable PDFs, including hit highlighting, are not affected by the two
Text options (new for version 2013.1.0).
From the Text drop-down menu choose either:
•
•
Truncate text to max pages - text is truncated to match the
output of pages that fall under the threshold (existing behavior).
Retain all text for document - document text is associated to
the number of pages below the set threshold value and all subsequent pages are blank. (This behavior is new starting with version
2013.1.0.)
Data Extract Actions include:
•
5-118
Data Extract: performs text and metadata extraction on the files
Ipro eCapture User Guide
Q1 2014
www.iprotech.com
877-324-4776
Running Post Process Batch Operations on Completed Processing Jobs or Data Extract Jobs
•
Text Placeholder: creates an extracted text placeholder text file
Category: Select a category from the drop-down list. This list contains categories selected in the Flex Processor.
Reprocess without changing effective rule: When selected, no new rule is
created for the items being reprocessed, they are set to ‘untried’ status and
processed just like they were on the first try. When not selected, behavior is
unchanged from previous versions (new rule created, items effective rule
becomes the new rule).
Status Filtering
Items are selected for batch operations using the following status filters:
•
•
•
•
•
•
•
All Items - all items for the Processing Job appear in the Items Area.
Processed Items - everything that processed successfully (status Success)
Errored Items - everything that didn't process successfully (status Error)
Not QCed - everything that didn't pass QC
QC Flags - all items matching one or more selected QC flags
Unprocessable items - items we couldn't extract from .ZIP files, e-mail
attachments, etc.
Page Count (optional) - items meeting a selected filter are further filtered by having a page count less than or equal to the user's choice (1100).
Grouping
Selected items from the Items Area are grouped by selecting from the following options:
•
•
•
•
•
Category - Outlook, Excel, Word, etc.
Extension - .DOC, .PDF, etc.
Error code - the numeric code recorded if an item error.
Error Code/Category
Error Code/Extension
4.
Select a Status Filter, a Grouping, and if applicable, QC flag(s) from
the QC Flags box in the lower left corner. These selections will repopulate
www.iprotech.com
877-324-4776
Ipro eCapture User Guide
Q1 2014
5-119
Chapter 5, Creating Clients, Projects, Custodians, and Jobs
the Items Area each time new selections are made. You can also click
the column headings to sort the items in ascending or descending order.
5.
Select the item or items in the Items Area you want to perform post
processing operations.
6.
Select the operation you want to perform:
Before beginning any batch operation, ensure that all jobs are paused
and that the Workers are idle.
Batch Reprocessing
Click
to display the Batch Reprocess dialog.
Ensure that QC is not currently being performed on the Processing Job at
this time. If the Processing Job is currently being QC and this batch
operation is performed, it may result in missing or duplicate flags.
Click OK to continue after checking that QC is not being performed on
the particular Processing Job you selected for a batch reprocessing. The
Processing Options dialog appears.
Accept or change any processing options (filtering changes will not be
applied) and click OK. The selected items from the Items Area will be
requeued for distributed reprocessing. The job is set to Paused Status
and placed in the Job Queue Pane.
5-120
Ipro eCapture User Guide
Q1 2014
www.iprotech.com
877-324-4776
Running Post Process Batch Operations on Completed Processing Jobs or Data Extract Jobs
Upon reprocessing, all data is replaced, including QC flags. There will be
no record of which items have been reprocessed. However, the completion date of the Processing Job changes.
Click OK to continue or click Cancel to abort.
Task Table: Select a task table from the drop-down list. The task table that
displays is the task table that was selected for the Processing Job at creation
time.
Batch Deletion
Click
to display the Batch Delete dialog.
NOTE: Please read the contents of the Batch Delete dialog carefully
before clicking OK.
Click OK.
Ensure that QC is not currently being performed on the Processing Job
at this time. If the Processing Job is currently being QCed, data corruption is a certainty.
After checking to see that the Processing Job is NOT currently being
QCed, click OK.
www.iprotech.com
877-324-4776
Ipro eCapture User Guide
Q1 2014
5-121
Chapter 5, Creating Clients, Projects, Custodians, and Jobs
The selected items from the Items Area will be deleted from the processing job. All metadata, QC flags, images, and text files will be
removed. The list of items deleted will be recorded as a 'remove' search,
accessible from reporting and the Flex Processor Rules Manager. Access
the Flex Processor Rules Manager by clicking
in the Information Panel for the Processing Job.
located
Re-queuing a Deleted Batch
Click
to display the Batch Delete Requeue dialog.
Select the batch(es) for re-queuing.
5-122
Ipro eCapture User Guide
Q1 2014
www.iprotech.com
877-324-4776
Running Post Process Batch Operations on Completed Processing Jobs or Data Extract Jobs
Click OK. The Restore Batch Deleted Items dialog appears.
NOTE: Please read the contents of the Restore Batch Deleted Items dialog carefully before clicking OK.
Click OK.
Ensure that QC is not currently being performed on the Processing Job
at this time. If the Processing Job is currently being QCed, data corruption is a certainty.
Click OK. The Processing Options dialog appears.
Accept or change any processing options (filtering changes will not be
applied) and click OK.
The items are reintroduced into the Processing Job, they are queued for
processing, and the job status is set to Paused.
Click Cancel to close the Post Process Batch Operations dialog.
www.iprotech.com
877-324-4776
Ipro eCapture User Guide
Q1 2014
5-123
Chapter 5, Creating Clients, Projects, Custodians, and Jobs
Batch QC Flag Assignment
1.
Click
after selecting the items from the Items Area.
The Select QC Flags dialog appears.
2.
(Optional) Click
to open the New QC Flag dialog.
Enter the QC flag (without description) and click OK. The QC flag will
appear in the list and automatically be selected. In addition, the flag will
be available for selection from the Ipro eCapture QC Module.
3.
Select the flag(s).
4.
Click OK. The Batch QC Flag Assignment dialog appears stating the flag
or flags that will be assigned for the selected items.
5-124
Ipro eCapture User Guide
Q1 2014
www.iprotech.com
877-324-4776
Running Reports for a Selected Job
Click OK to confirm. The Confirm QC dialog appears.
5.
Click OK. The Operation Complete dialog appears.
6.
Click OK. The selected QC flags have been assigned to the selected documents. The selection screen will now be requeried to reflect the
changes.
7.
Click OK.
Running Reports for a Selected Job
Starting with version 4.0.2, Reports can be accessed for the selected job type
(Data Extract, Processing, or Discovery) under the Client Management tab
using the context menu.
Alternate-click the job to display the context menu and choose Reporting to
display a list of reports that are available for that job.
Select a report. A separate screen opens with the report results. The report
may be saved. Close the report screen when finished.
To run the reports from the Reporting function, see Chapter 8, Running
Reports.
www.iprotech.com
877-324-4776
Ipro eCapture User Guide
Q1 2014
5-125
Chapter 5, Creating Clients, Projects, Custodians, and Jobs
5-126
Ipro eCapture User Guide
Q1 2014
www.iprotech.com
877-324-4776
6
Performing QC
In this Chapter
Overview ......................................................................... 6-1
Starting Ipro eCapture QC Module ................................... 6-2
Working with the Image View Area ............................... 6-43
Working with the Documents/Records List Window ..... 6-49
About Export Sets ......................................................... 6-62
Saving Options .............................................................. 6-67
QCing Items .................................................................. 6-68
Setting/Modifying the Ipro eCapture QC Module
System Options ........................................................ 6-103
Ipro eCapture QC Keyboard Shortcuts List .................. 6-104
Overview
We now allow the ability to reprocess simultaneously from multiple
Terminal Services sessions. When taking advantage of this; however,
keep in mind that you should only reprocess one restricted document
at a time, system-wide.
The Ipro eCapture QC Module (QC.exe) is supplied with Ipro eCapture and is
installed into the Ipro eCapture Program Files directory. QCing can be done on
either complete or incomplete Processing Jobs and Data Extract Jobs.
You can perform the following functions in the Ipro eCapture QC module:
•
•
•
Create export sets (create an export on an individual document level
with sorting capabilities)
Select documents by specific document type categories and/or QC flags
(e.g., Passed QC, Exception, etc.), languages, or encodings.
Assign custom flags.
www.iprotech.com
877-324-4776
Ipro eCapture User Guide
Q1 2014
6-1
Chapter 6, Performing QC
•
•
•
•
•
•
•
•
•
•
•
•
•
•
Modify the Job Options (e.g., Page Threshold, Color Depth, etc.) that
apply to documents you reprocess while QCing.
View all documents including the ability to show parent/child relationships.
Verify the quality of the generated images.
Generate images for unknown files.
Reprocess or view a file in the file’s native program. (Note: Ipro Tech,
LLC does not provide the native applications with Ipro eCapture. Ensure
you have the appropriate native applications installed on the QC/Worker
machine(s) where performing native reprocessing.)
Reprocess any exception files (e.g., documents that could not be
opened, documents whose page counts exceeded the Page Threshold
setting, etc.).
OCR pages with missing text.
OCR the current page in the image view area or all pages in the current
document that are missing text.
Perform extensive searches on document metadata or flags. This searching can cross Job/Custodian/Project boundaries.
Apply custom, user-defined placeholders to any document.
Run the auto-QC function to quickly scroll through all of the documents
being QCed (see the section Setting the Auto-QC Options on 6-24).
Dialog Dismisser can be started/stopped in QC from the menu. See the
Dialog Dismisser Utility Guide for details.
QC selected jobs that contain merged images, text, or metadata.
External Fields (imported via the Ipro eCapture Import Wizard) will be
available for viewing, selecting, and sorting. These fields will be labeled
as External in the field selection dialogs and be prepended with an asterisk * (to differentiate them from the normal metadata fields) in the QC
Jobs grid and the Metadata view.
Multiple QC users can work on the same completed Processing Job or
Data Extract Job simultaneously. It is up to them to make sure they
are working on different types of documents.
6-2
Ipro eCapture User Guide
Q1 2014
www.iprotech.com
877-324-4776
Starting Ipro eCapture QC Module
Starting Ipro eCapture QC Module
If you are running the Ipro eCapture QC Module and the Ipro eCapture
Worker from the same workstation, do not run them at the same time.
If the Ipro eCapture Worker is running, please close it before starting
the Ipro eCapture QC Module.
To open the Ipro eCapture QC Module, do one of the following:
•
•
•
click the Ipro eCapture QC Module shortcut icon on the desktop
double-click the QC.exe file in the Ipro eCapture QC subdirectory
choose Start > Programs > Ipro Tech > eCapture > eCapture
QC
The first time you start the Ipro eCapture QC Module, the System
Options dialog appears. A connection must first be established with
the SQL server. See the section, Setting/Modifying the Ipro eCapture QC Module System Options on page 6-103 for procedures.
Once the Ipro eCapture QC Module is open, you can simply press
ALT+FC to open another Processing Job or press ALT+FR to open
another Data Extract Job if you want to create additional sessions. You
may have multiple Processing Job and /or Data Extract sessions open
at once.
The Ipro eCapture QC Environment
In the Ipro eCapture QC Interface, you can split tabbed windows into multiple
windows, autohide windows, and move windows around the desktop or to a
secondary monitor.
Layouts can be saved to an .INI file and opened later. You can also restore the
default layout without losing your saved layout(s).
QC Options (General, Auto-QC, and Views) can also be saved to an .INI file
and opened later. Saving settings allows for consistency when QCing is performed by several QCers. See the section Saving Options on page 6-67 for
more information.
www.iprotech.com
877-324-4776
Ipro eCapture User Guide
Q1 2014
6-3
Chapter 6, Performing QC
The Image View Area has three tabs: Image, Thumbnail, and View.
The Documents/Records List Window allows for multiple Processing Job and/or
Data Extract Job Sessions. Each session is defined by selecting categories and
flag conditions (Passed QC, Exceptions, etc.). The context menus in the Documents/Records List window allow you to:
•
•
•
•
•
•
•
•
•
•
Create an Export Set
Search through the current session, Job, Custodian or Project.
Refine an existing search.
Sort two or more column fields.
Run a query on the selected item’s column field (e.g, author) and select
from: Equals to, Does not Equal, Contains, or Does not Contain. The system will return all the documents that match the selected criteria. In
addition, an Advanced Search can be conducted where you can further
narrow a search.
Set a flag for all selected items.
Clear a flag for all selected items.
Sort the selected column field in ascending or descending order.
Modify the existing fields.
Close a session.
See the section QC Module Interface Components on page 6-5 for more information about the interface.
6-4
Ipro eCapture User Guide
Q1 2014
www.iprotech.com
877-324-4776
Starting Ipro eCapture QC Module
QC Module Interface Components
Manipulate Image &
OCR Current Page icons
Image Navigation Toolbar
Processing or Data
Extract Job Tabs
QC Functions
Toolbar
The upper left side contains a window where you can click either the metadata
Tab or the Extracted Text/OCR Tab.
The lower left side contains the Documents/Records List window where you
can:
•
•
•
•
navigate through the list of items
sort one or more columns
customize the displayed column fields
manually resize the column fields
www.iprotech.com
877-324-4776
Ipro eCapture User Guide
Q1 2014
6-5
Chapter 6, Performing QC
•
•
•
•
•
•
•
•
•
sort by CategoryID (this column field displays the application’s icon).
double-click the right edge of any column heading for best fit. (The system will query the entire database to locate the record containing the
field containing the value it will use to determine best fit. However, by
default, the system initially determines best fit by examining the first 13
records in the database.)
have multiple sessions for a Processing Job or Data Extract Job
perform searches using Boolean logic and operators
search on job, custodian, or project level
search through SQL Server metadata
QC while job is in progress
easily identify Passed QC records (highlighted green) and Exception
records (highlighted red)
perform the various QC functions.
The metadata Tab displays the Process Status of a QCed item. It will
display ProcessStatus in the Field Name column and Success in the
Field Value column for those successfully processed items. Otherwise,
the Field Value column will display the pertinent error message for an
unsuccessfully processed item. Other conditions may exist such as
Password Protected.
The Image View area (in the center) has its own toolbar and three tabs for a
Processing Job: Image, Thumbnails, and View. The Image Tab has a toolbar
where you can perform additional viewing functions which are described in the
section Image Tab Window on page 6-43. For a Data Extract Job, only the
View tab appears.
Merge Jobs associated with the selected Job will appear to the right of the toolbar. Use the drop-down arrow to select a merge job. The Select Order link
opens the Merge Jobs Sort Order dialog where the order of the merge jobs
may be shown/applied.
The QC Flags are located on the right side of the interface and are described in
the section Working with the QC Flags Window on page 6-29.
6-6
Ipro eCapture User Guide
Q1 2014
www.iprotech.com
877-324-4776
Starting Ipro eCapture QC Module
Selecting a Processing Job and Grouping(s) for
a QC Session(s)
If necessary, the Dialog Dismisser tool may be started before creating
a session for a Processing Job. See the Dialog Dismisser Utility Guide
for details.
1.
Choose File > Create Session for Processing Job(s) from the Ipro
eCapture QC menu bar. The Select Processing Job(s) dialog appears.
Note: To create a session for a Data Extract job, select the Data Extract
option to display the Select Data Extract Job(s) dialog. See the section
Selecting a Data Extract Job and Grouping(s) for a QC Session(s) on
page 6-14 for procedures.
The job selection shows only those jobs where the QCed item count is
less than the Total Item count. To show all the jobs, select Show All
Jobs.
2.
(Optional) Select Sort by name to sort the Clients by name. When this
box is not checked, the Clients are sorted by ID.
www.iprotech.com
877-324-4776
Ipro eCapture User Guide
Q1 2014
6-7
Chapter 6, Performing QC
3.
Expand the Client in the Clients box on the left.
4.
Select one or more Processing Job(s) from the selected Client. The
right box populates with the Client’s completed Processing Job(s). If necessary, click the Project Name column to sort 2 or more jobs. The
button appears. Click
to restore the
default order of the Processing Jobs. The button disappears.
6-8
Ipro eCapture User Guide
Q1 2014
www.iprotech.com
877-324-4776
Starting Ipro eCapture QC Module
5.
Click OK. The Start QC Session dialog appears.
www.iprotech.com
877-324-4776
Ipro eCapture User Guide
Q1 2014
6-9
Chapter 6, Performing QC
By default the two options, Select Compound Documents Separately and
View Compound Documents Separately are both checked. These options
are not mutually exclusive. The "Select" option affects selection; whereas the
"View" option affects the positioning of the messages in the Documents/
Records List window.
Select the option Select Compound Documents (Parent/child relationships) Separately to have each item in the record table treated as its own
entity. When sorting and searching is performed, it will treat each item separately.
Deselect the option Select Compound Documents (Parent/child relationships) Separately if you want the search and sort results to apply to all items
associated within the compound document. Example: A Child is flagged with
Passed QC, and its Parent is not flagged as Passed QC. Therefore, when a
search is performed for items “Passed QC”, then the search results will return
both items.
Ipro eCapture will display any compound documents and their attachments in
the Documents/Records List window. A compound document will show the
expand/collapse buttons (+/-) to indicate it is a document with attachments.
If both options, Select and View are deselected, documents will be
arranged so that the children are directly underneath their parents in the Documents/Records List window.
Select the option Hide Duplicates to hide all duplicate files in the Documents/
Record list window that exist in the document session. This is useful for reducing the amount of documents requiring QC. This option is deselected by
default. When it is not selected, all duplicates are returned.
6.
(Optional) Select the option Set as Default to save the settings for
“Select”, “View”, and Hide Duplicates.
7.
Select from the following as they apply:
•
•
6-10
Select one or more document type categories. Proceed to step
9 if you will not be selecting any flags. Otherwise, continue to the
next bullet.
Click the Flags tab. Select one or more flags by clicking the flag
once (a green + sign appears. The designated category selected
will only be shown if it does have the flag.
Ipro eCapture User Guide
Q1 2014
www.iprotech.com
877-324-4776
Starting Ipro eCapture QC Module
Click the flag twice (a red - sign appears). The designated category selected will only be shown if it does not have the flag.
•
Note: To clear a selected flag, click the flag with the green + sign
twice or click the flag with the red - sign once.
Click the Languages tab. Select one or more languages by clicking the language once (a green + sign appears. The designated
category selected will only be shown if it does have the language.
Click the language twice (a red - sign appears). The designated
category selected will only be shown if it does not have the language.
•
Note: To clear a selected language, click the language with the
green + sign twice or click the language with the red - sign once.
Click the Encodings tab. Select one or more encodings by clicking the encoding once (a green + sign appears. The designated
category selected will only be shown if it does have the encoding.
Click the encoding twice (a red - sign appears). The designated
category selected will only be shown if it does not have the encoding.
•
Note: To clear a selected encoding, click the encoding with the
green + sign twice or click the encoding with the red - sign once.
Click the Merge Jobs tab. Shows all merge jobs within the
selected jobs. Select one or more Merge Jobs by clicking the
merge job once (a green + sign appears. The designated category selected will only be shown if it does have the merge job.
Click the merge job twice (a red - sign appears). The designated
category selected will only be shown if it does not have the merge
job.
Note: To clear a selected merge job, click the merge job with the
green + sign twice or click the merge job with the red - sign once.
When one or merge jobs are selected, it/they appear in the drop-
www.iprotech.com
877-324-4776
Ipro eCapture User Guide
Q1 2014
6-11
Chapter 6, Performing QC
down list of the Image toolbar.
See the section Working with the Image View Area on page 6-43
for additional information.
8.
After the category(ies) and/or flag(s) are selected as flagged and/or not
flagged, click Add to add the Session. The Session appears in the Documents to be QCed grid. There are three columns in the grid: Document
Type Categories, Flagged, and Not Flagged.
For example, if you want to see all Microsoft Word documents that
passed QC, you would select Microsoft Word under Categories and click
Passed QC once under Flags. A Green + sign appears.
9.
(Optional) Repeat steps 8 and 9 as many times as necessary to add
additional, multiple category/flag groupings. Each grouping will appear
as its own line in the Documents to be QCed grid. Boolean OR logic is
applied for 2 or more groupings.
10.
Click
to add those categories to the grid whose documents are
not flagged as passing QC. The Passed QC flag will appear in the Not
Flagged column.
11.
If you want to remove a specific grouping, select it and click Remove.
If you want to clear all groupings, click Clear.
6-12
Ipro eCapture User Guide
Q1 2014
www.iprotech.com
877-324-4776
Starting Ipro eCapture QC Module
12.
When you are finished creating one or more groupings for a Session,
click OK. The Ipro eCapture QC Main Window appears and will show the
newly created Session tab in the Documents/Records List window.
Image Navigation
Processing or Data
Extract Job Tabs
QC Functions
www.iprotech.com
877-324-4776
Ipro eCapture User Guide
Q1 2014
6-13
Chapter 6, Performing QC
The previous figure shows the default layout. The default layout is
assumed for purposes of this Chapter and its contents.
However, you may change the layout to suit your needs. Simply point,
click and grab the title bar or tab of any window to reposition it. A
directional icon appears as you drag the window showing you the areas
where you can dock the window. Mouse over the location in the directional icon and release the mouse button to dock the window. Click the
autohide icon to hide any window except the Image View Area tabbed
windows. To restore a hidden window, click its tab. The layout is temporarily changed. To save the layout to an .INI file see the section
Saving the QC Interface Layout on page 6-21 for more information.
13.
You may optionally create additional Sessions by simply choosing File >
Create Session for Processing Job(s) from the menu bar. There is no
need to exit from QC because you may want to have multiple Sessions
available for QCing at one time.
Selecting a Data Extract Job and Grouping(s)
for a QC Session(s)
If necessary, the Dialog Dismisser tool may be started before creating
a session for a Data Extract Job. See the Dialog Dismisser Utility
Guide for details.
1.
6-14
Choose File > Create Session for Data Extract Job(s) from the Ipro
eCapture QC menu bar. The Select Data Extract Job(s) dialog appears.
Note: To create a session for a Processing Job, select the Processing
option to display the Select Processing Job(s) dialog.
Ipro eCapture User Guide
Q1 2014
www.iprotech.com
877-324-4776
Starting Ipro eCapture QC Module
See the section Selecting a Processing Job and Grouping(s) for a QC
Session(s) on page 6-7 for procedures.
The job selection shows only those jobs where the QCed item count is
less than the Total Item count. To show all the jobs, select Show All
Jobs.
2.
(Optional) Select Sort by name to sort the Clients by name. When this
box is not checked, the Clients are sorted by ID.
3.
Expand the Client in the Clients box on the left.
4.
Select one or more Data Extract Job(s) from the selected Client. The
right box populates with the Client’s completed Data Extract Job(s). If
necessary, click the Project Name column to sort 2 or more jobs. The
button appears. Click
to restore the
default order of the Data Extract Jobs. The button disappears.
www.iprotech.com
877-324-4776
Ipro eCapture User Guide
Q1 2014
6-15
Chapter 6, Performing QC
5.
6-16
Click OK. The Start QC Session dialog appears.
Ipro eCapture User Guide
Q1 2014
www.iprotech.com
877-324-4776
Starting Ipro eCapture QC Module
By default the two options, Select Compound Documents Separately and View
Compound Documents Separately are both checked. These options are not
mutually exclusive. The "Select" option affects selection; whereas the "View"
option affects the positioning of the messages in the Documents/Records List
window.
Select the option Select Compound Documents (Parent/child relationships) Separately to have each item in the record table treated as its own
entity. When sorting and searching is performed, it will treat each item separately.
Deselect the option Select Compound Documents (Parent/child relationships) Separately if you want the search and sort results to apply to all items
associated within the compound document. Example: A Child is flagged with
Passed QC, and its Parent is not flagged as Passed QC. Therefore, when a
search is performed for items “Passed QC”, then the search results will return
both items.
Ipro eCapture will display any compound documents and their attachments in
the Documents/Records List window. A compound document will show the
expand/collapse buttons (+/-) to indicate it is a document with attachments.
If both options, Select and View are deselected, documents will be arranged so
that the children are directly underneath their parents in the Documents/
Records List window.
Select the option Hide Duplicates to hide all duplicate files in the Documents/
Record list window that exist in the document session. This is useful for reducing the amount of documents requiring QC. This option is deselected by
default. When it is not selected, all duplicates are returned.
6.
(Optional) Select the option Set as Default to save the settings for
“Select” and “View”.
7.
Do from the following as they apply:
•
•
Select one or more categories. Proceed to step 9 if you will not
be selecting any flags. Otherwise, continue to the next bullet.
Click the Flags tab. Select one or more flags by clicking the flag
once (a green + sign appears. The designated category selected
will only be shown if it does have the flag.
Click the flag twice (a red - sign appears). The designated cate-
www.iprotech.com
877-324-4776
Ipro eCapture User Guide
Q1 2014
6-17
Chapter 6, Performing QC
gory selected will only be shown if it does not have the flag.
•
Note: To clear a selected flag, click the flag with the green + sign
twice or click the flag with the red - sign once.
Click the Languages tab. Select one or more languages by clicking the language once (a green + sign appears. The designated
category selected will only be shown if it does have the language.
Click the language twice (a red - sign appears). The designated
category selected will only be shown if it does not have the language.
•
Note: To clear a selected language, click the language with the
green + sign twice or click the language with the red - sign once.
Click the Encodings tab. Select one or more encodings by clicking the encoding once (a green + sign appears. The designated
category selected will only be shown if it does have the encoding.
Click the encoding twice (a red - sign appears). The designated
category selected will only be shown if it does not have the encoding.
•
Note: To clear a selected encoding, click the encoding with the
green + sign twice or click the encoding with the red - sign once.
Click the Merge Jobs tab. Shows all merge jobs within the
selected jobs. Select one or more Merge Jobs by clicking the
merge job once (a green + sign appears. The designated category selected will only be shown if it does have the merge job.
Click the merge job twice (a red - sign appears). The designated
category selected will only be shown if it does not have the merge
job.
Note: To clear a selected merge job, click the merge job with the
green + sign twice or click the merge job with the red - sign once.
When one or merge jobs are selected, it/they appear in the drop-
6-18
Ipro eCapture User Guide
Q1 2014
www.iprotech.com
877-324-4776
Starting Ipro eCapture QC Module
down list of the View toolbar.
See the section Working with the Image View Area on page 6-43
for additional information.
8.
After the category(ies) and/or flag(s) are selected as flagged and/or not
flagged, click Add to add the Session. The Session appears in the Documents to be QCed grid. There are three columns in the grid: Categories,
Flagged, and Not Flagged.
For example, if you want to see all Microsoft Word documents that
passed QC, you would select Microsoft Word under Categories and click
Passed QC once under Flags. A Green + sign appears.
9.
(Optional) Repeat steps 8 and 9 as many times as necessary to add
additional, multiple category/flag groupings. Each grouping will appear
as its own line in the Documents to be QCed grid. Boolean OR logic is
applied for 2 or more groupings.
10.
Click
to add those categories to the grid whose documents are
not flagged as passing QC. The Passed QC flag will appear in the Not
Flagged column.
11.
If you want to remove a specific grouping, select it and click Remove.
If you want to clear all groupings, click Clear.
www.iprotech.com
877-324-4776
Ipro eCapture User Guide
Q1 2014
6-19
Chapter 6, Performing QC
12.
When you are finished creating one or more groupings for a Session,
click OK. The Ipro eCapture QC Main Window appears and will show the
newly created Session tab in the Documents/Records List window.
13.
You may optionally create additional Sessions by simply choosing File >
Create Session for Data Extract Job(s) from the menu bar. There is
6-20
Ipro eCapture User Guide
Q1 2014
www.iprotech.com
877-324-4776
Starting Ipro eCapture QC Module
no need to exit from QC because you may want to have multiple Sessions available for QCing at one time.
The previous figure shows the default layout. The default layout is
assumed for purposes of this Chapter and its contents.
However, you may change the layout to suit your needs. Simply point,
click and grab the title bar or tab of any window to reposition it. A
directional icon appears as you drag the window showing you the areas
where you can dock the window. Mouse over the location in the directional icon and release the mouse button to dock the window. Click the
autohide icon to hide any window except the Image View Area tabbed
windows. To restore a hidden window, click its tab. The layout is temporarily changed. To save the layout to an .INI file see the section
Saving the QC Interface Layout on page 6-21 for more information.
Saving the QC Interface Layout
The QC interface layout changes can be permanently saved, temporarily
changed, or the active layout retained upon exiting the QC Module.
www.iprotech.com
877-324-4776
Ipro eCapture User Guide
Q1 2014
6-21
Chapter 6, Performing QC
1.
Choose Tools > QC Options from the Ipro eCapture QC Module
menu bar.
2.
Click the Saved Options Tab.
3.
Under Layouts, select from the following:
•
•
•
•
4.
6-22
Save to File: Allows you to permanently save the layout to an
.INI file.
Load from File: Allows you to open and load the .INI file with the
desired layout.
Restore Default: Restores the default Ipro eCapture QC interface.
Remember Active Layout: Maintains the active layout after Ipro
eCapture QC Module is closed.
Click OK.
Ipro eCapture User Guide
Q1 2014
www.iprotech.com
877-324-4776
Starting Ipro eCapture QC Module
Setting General QC Options
Before beginning to QC, there are several general QC options you may want to
set. You may set these options as needed for each QC session.
1.
Choose Tools > QC Options from the menu bar to display the QC
Options dialog.
2.
Click the General Tab.
3.
Select from the following options:
JPEG Rotate Quality: The default value of 100 represents a mean
value that is best for preserving the image’s original size during rotation.
If the value is changed to 255, for example, then the image will be made
larger than what it originally started as.
Reprocessing Settings - Select the printer drivers you want to use
when reprocessing items. You can choose one, some, or all of the printer
drivers. Or, select the option Auto-Detect Printer Driver if you want
Ipro eCapture to automatically detect the next printer driver to use.
www.iprotech.com
877-324-4776
Ipro eCapture User Guide
Q1 2014
6-23
Chapter 6, Performing QC
NOTE: If multiple people are QCing in a Terminal Services session, it
is necessary to select the Auto-Detect Printer Driver option since Ipro
eCapture installs up to 8 printer drivers. Therefore, there can only be a
maximum of 8 reprocess actions occurring on a machine, though the
number of viewers is [theoretically] unlimited.
Reprocess Timeout: Select a range between 30 and 3600 seconds (1
hour). 1800 seconds is the default timeout setting for normal reprocessing.
Native Reprocess Timeout: Select a range between 30 and 86400
seconds. 86400 seconds is the default timeout setting for native reprocessing.
Max Page Threshold from Flex Processor: Uses the Max page value
set for the Flex Processor Rule. See Appendix A - Using the Flex Processor Rules Manager and the section Defining Actions for a Flex Processor
Rule on page A-15.
Max Page Threshold from QC Options: Uses the settings from the
Reprocessing Options, General Options screen. See the section Setting
the QC Reprocess Options for a Processing Job on page 6-77.
Setting the Auto-QC Options
While QCing documents for a Processing Job, you can use the auto-QC function to automatically scroll through a portion of the documents’ pages.
6-24
Ipro eCapture User Guide
Q1 2014
www.iprotech.com
877-324-4776
Starting Ipro eCapture QC Module
Choose Tools > QC Options, Auto-QC Tab to display the options that control
the portion of images to be viewed and the speed at which the program scrolls
through the images.
www.iprotech.com
877-324-4776
Ipro eCapture User Guide
Q1 2014
6-25
Chapter 6, Performing QC
Image Traversal - Set the portion of images to be displayed during auto-QC:
•
•
•
•
•
Every Page - Use this setting to do 100% QC, or display every page
during auto-QC.
Every nth Page - Use this setting and enter a number. For example,
enter 2 to display every other page.
First Page - Use this setting to have auto-QC display the first page of
each document without displaying any additional pages in the documents.
Time Between Pages - Set the number of milliseconds the program
should display each image. 100 ms is a tenth of a second; 10000 ms is
10 seconds.
Mark Documents as “Passed QC” - When selected, the “Passed QC”
flag is automatically applied.
Image Quality
•
Auto-QC with Low Quality Images - Deselect this setting to get the
best possible image quality, which can slow down the auto-scroll QC process.
Identical File Handling
Select the option, Apply output changes to all identical documents not
passed QC, to automatically apply any reprocessing changes for a given document to all documents with the same MD5 hash value which have not passed
QC. This eliminates repetitive work by applying corrected output to any duplicates.
Select a default scope from the Default Scope drop-down list. Options
include: Current Session, Job Level, Custodian Level, Project Level, and Client
Level. The selected scope is where the system will check for identical documents.
When a single item is selected, and either the
(Reprocess Selected) or the
(Reprocess in Native Application) is clicked, the following conditions
occur:
•
6-26
Reprocess should complete normally at first. Any errors will interrupt
workflow.
Ipro eCapture User Guide
Q1 2014
www.iprotech.com
877-324-4776
Starting Ipro eCapture QC Module
•
After successful reprocess, a dialog displays indicating the number of
duplicates found within the selected scope and prompts if output transfer
should continue.
Click Yes. The Apply Output to Identical Files progress dialog appears
indicating the progress of the transfer.
When the transfer completes, the Operation Complete dialog appears.
Click OK.
To do this manually for a selected item, see the section Apply Reprocessing
Changes to all Files with Same MD5Hash Value on page 6-59.
To start the auto-QC function, click
Documents/Records List.
www.iprotech.com
877-324-4776
in the QC Functions toolbar below the
Ipro eCapture User Guide
Q1 2014
6-27
Chapter 6, Performing QC
During auto-QC, you cannot accept, reject, or reprocess items while scrolling
through the images unless Mark Documents as Passed QC is selected.
To stop the Auto-QC function click
again.
Setting Merge Job Options
Merge Job options are set at the machine/session level. Custom settings determine which merge jobs are available for selection (and their order) from the
Merge Jobs drop-down menu of the QC Image or View tab.
1.
Choose Tools > QC Options, Merge Jobs Tab to display the options
where jobs can be.
2.
Do one of the following:
•
•
3.
6-28
From the drop-down menu, select: Date Ascending, Date Descending (default), Name Ascending, or Name Descending. Proceed to
step 7.
From the drop-down menu, select custom. Proceed to step 3.
Under Job type, select Images or Document Text.
Ipro eCapture User Guide
Q1 2014
www.iprotech.com
877-324-4776
Starting Ipro eCapture QC Module
4.
Click the Client or the Project to display the available merge jobs or the
Client or the Project. The merge jobs appear in the Available Merge Jobs
box.
5.
Move one, some, or all of the available merge jobs to the Selected
Merge Jobs box. Double-clicking an individual merge job moves it to the
Selected Merge Jobs box. For two or more merge jobs, ctrl-click to select
non-contiguous merge jobs or shift-click to select a contiguous merge
job. Once the merge jobs are selected, click
to move them to
the Selected Merge Jobs box. Selected jobs apply to all new sessions in
QC.
6.
Select a merge job in the Selected Merge Jobs box and use the
or
to change the position of the merge job.
7.
Click OK.
Working with the QC Flags Window
The QC Flags Window is located on the right side of the QC Interface (default
view) and shows the flags and their corresponding user/system assigned number. See the section Setting up User-defined Flags on page 6-35 for procedures
to set up user-defined flags.
As you navigate through the documents/records, you may see some flags with
a red shaded box indicating that document was “flagged”.
‘Flagging’ a document/page means that you are assigning a condition to that
document/page such as ‘Passed QC’, ‘Threshold Exceeded’, ‘Zero Bytes’, etc.
When you open the completed Processing Job or Data Extract Job and navigate
through the list of items, you may see some documents/pages that the system
already ‘flagged’ during processing.
Ipro eCapture QC Module comes with several default flags which you can
access using toggle keyboard shortcuts. The QC Flags are numbered sequentially in the QC Flags Window. To use a keyboard shortcut combination, press
CTRL + the number of the keyboard shortcut. For example, to apply the
Restricted Office Document Flag (21), press CTRL, press 2, press 1, and
release. (Repeat to remove the flag.) The QC Flags and their corresponding
user/system assigned number follows:
www.iprotech.com
877-324-4776
Ipro eCapture User Guide
Q1 2014
6-29
Chapter 6, Performing QC
•
•
•
•
•
•
•
•
•
•
•
•
•
•
•
6-30
1. Passed QC: The document has passed QC. The item in the
Documents/Record List window is green.
2. Exception: This document did not process successfully. The
item in the Documents/Record List window is red.
3. Threshold Exceeded: The number of pages in the document
exceeds the max pages (count) values specified in the jobs Flex
Processor rule.
4. Text Missing: The document contains pages with no extracted
text.
5. ZeroByte: The file contains no data.
6. Unprocessable: Items that could not be extracted from .ZIP
files, e-mail messages, etc.
7. Page Count Discrepancy: Results.Pages differs from number
of pages on disk.
8. One Page: The document was successfully processed and
resulted in only one page. Not applicable for protected Office documents.
9. QC Deleted Page: This flag is automatically set when a page is
deleted from a document while in Ipro eCapture QC.
10. Text Cutoff: This flag gets set when the system detects text
that was cutoff at the right margin when processed.
11. Alternate Text Extraction: OCR was used to extract text
from an image file.
12. Protected: This flag is set when encountering encrypted,
ndigital encrypted, documents with protected sections, or password protected files for Office and PDF documents.
13. Untyped Embedded Control: Lotus Notes document had an
untyped embedded control that had to be replaced for successful
processing.
14. Generated Page Based Text: Document contained Arabic or
related language so page text was simulated from data extraction
of the document.
15. Inline Images: Sets this flag for all email types containing
inline images. If necessary, utilize the native reprocessing to manually resize the cutoff images; reprint message. Note: If the DisIpro eCapture User Guide
Q1 2014
www.iprotech.com
877-324-4776
Starting Ipro eCapture QC Module
•
•
•
•
•
•
•
•
•
•
covery option, Treat email Inline Images as Attachments, is
enabled, the inline images are extracted during Discovery and can
be OCRed during Process or Data Extract operations. Text in the
inline images will not be lost even if the images are cut off in the
e-mails’ TIFF images.
16. Missing Document Form: Sets this flag when encountering
Lotus Notes (.NSF) processing errors regarding custom forms.
Reverts to use the default Lotus form.
17. Text Not Extractable: Text cannot be extracted from all
pages of a document, before any OCR is attempted.
18. OCR Failure: Set when one or more OCR errors are encountered.
19. MHT Failure: Indicates that the native file will be exported if
.MHT or .RTF is selected.
20. Collapsed Section: Indicates that all sections were expanded
in Lotus Notes before printing.
21. Restricted Office Document: Indicates that a Word or PowerPoint document has restricted fonts. For a Word document, the
text data is extracted using Oracle® Outside-In Technology (formerly Stellent). For a PowerPoint document, Oracle is used to print
it. In either case, this flag is set so the document may be natively
reprocessed.
22. Legacy Lotus Notes Handling: Indicates either the processing option “Use Legacy Handling (Print from Lotus UI) was
selected; or this Lotus Notes file could not be processed with current method to extract metadata and is passed off to “Use Legacy
Handling (Print from Lotus UI) method.
23. Lotus Notes Custom Form: Indicates this Lotus Notes file is
a Custom Form which could not be processed with current method
to extract metadata and is passed off to “Use Legacy Handling
(Print from Lotus UI) method.
24. Lotus Notes Imaged Through Word: Indicates that the
generated RTF image files of the Lotus Notes document were
printed through Microsoft Word.
25. Lotus Notes DAOS Attachment: Indicates document contains a Domino attachment and Object service (DOAS) attach-
www.iprotech.com
877-324-4776
Ipro eCapture User Guide
Q1 2014
6-31
Chapter 6, Performing QC
•
•
•
•
•
•
•
•
•
6-32
ment. Set for both Medium Speed and Low Speed (Legacy)
processing.
26. Lotus Notes Encrypted Field: Indicates document contains
encrypted items (messages and/or attachments).
27. Lotus Notes Legacy Candidate: Set when the Lotus Notes
Legacy handling mode was not selected for Discovery, Processing,
or Data Extract and the property EsiThrowOnInvalidTypes (located
in the ConfigurationProperties database) is set to 0 (False). The
default setting is 1 (True). This flag is set for any documents normally forced to Legacy due to the following Medium Speed checks
being bypassed: Embedded Links, Layout Fields, and Embedded
OLE documents.
28. Lotus Notes High Speed Failure: Set when the Lotus Notes
email encountered an error when sent through Data Extract using
the High Speed method and had to use the Medium Speed method
instead.
29. Outlook Missing Recipients Table Entries: Indicates document where the recipients table was not populated; contents
extracted for the recipient display fields.
30. Email Cutoff Text Handling Failed: Differentiates between
successful attempt via “Email Cutoff Text Handling’ and those
items that never successfully obtain the cutoff text.
31. Inline Image Exceeds Page Size: Indicates the possibility
that the image size may be larger than the paper’s width or height.
32. HTML Character Codes Detected: Indicates HTML Code was
identified in the text representation of the body.
33. Negative Text Coordinates Detected: Indicates that text
contains negative coordinates less than -25.
34. Stellent Processed: Set if a document is data extracted or
processed via Oracle® Outside-In Technology (formerly Stellent).
For example, if Office 2010 is on the Worker machine, then older
versions of Office (97, 95, etc.) will go through Oracle® Outside-In
Technology rather than the native application due to Microsoft limitations where Office 2010 cannot handle Office 97 and older documents. Applies to both processing jobs and data extract jobs.
Ipro eCapture User Guide
Q1 2014
www.iprotech.com
877-324-4776
Starting Ipro eCapture QC Module
•
•
•
•
•
•
•
•
•
•
•
•
•
•
35. Imported Images: Set for images when Image Files is
selected as an item type in the Ipro eCapture Import Wizard. Flag
is document based.
36. Imported Text: Set for images when Document Text is
selected as an item type in the Ipro eCapture Import Wizard. Flag
not set if all pages are missing text and all pages are OCRed due
to missing text. Flag is document based.
37. Placeholder: Applied to documents that receive a placeholder
through a Flex Processor rule or by user action in QC. The flag is
cleared if the document is reprocessed through QC or post-process
operations.
38. Foreign Language: Document contains a language other
than English.
39. Email Body Contains Tables: Signifies tables found in the
email other than the header.
40. PDF Crop Box: PDF document contains at least one crop box;
possibly containing hidden content.
41. Date Field Exists: Flag is set if a date field exists in MS Office
documents. For PowerPoint files, only the date fields inserted
through "Header & Footer" dialog will be flagged.
42. OCR Low Confidence: Flag is set for documents with a low
average confidence level. The level is set for both processing and
data extract jobs under General options.
43. Possible Header Info In Body: Applied to Lotus Notes
emails (for processing jobs and data extract jobs) when the Message Header of an in-line email (a previous message in the email
thread) is included in the body text when processing through standard (Medium Speed) mode.
44. Embedded Document: Applied if an embedded file’s parent
is not an email file.
45. Word Revisions: Document contains revisions.
46. Word Comments: Word document contains comments.
47. Word Hidden Text: Word document contains hidden text.
48. Excel Hidden Rows: Excel document contains hidden rows.
www.iprotech.com
877-324-4776
Ipro eCapture User Guide
Q1 2014
6-33
Chapter 6, Performing QC
•
•
•
•
•
•
•
•
•
•
49. Excel Hidden Columns: Excel document contains hidden columns.
50. Excel AutoFilter: Excel document has auto filter on.
51. Excel Hidden Worksheets: Excel document contains hidden
worksheets.
52. Excel Very Hidden Worksheets: Excel document contains
very hidden worksheets. This can only be set programmatically.
53. Excel Comments: Excel document contains comments.
54. Excel Protected Workbook: Excel workbook is protected.
55. Excel Pivot Table in Worksheet: Excel worksheet contains
pivot table.
56. PowerPoint Hidden Slides: PowerPoint document contains
hidden slides.
57. PowerPoint Speaker Notes: PowerPoint document contains
speaker notes.
58. Office Linked Content: This flag is set if any linked content
exists. Linked content includes hyperlinks and OLE linked files.
Note: None of the above flags can be modified or deleted.
•
•
•
59. Low Priority: Flag this as a low-priority item
60. Medium Priority: Flag this as a medium-priority item
61. High Priority: Flag this as a high-priority item
NOTE: The above three flags can be modified or deleted. These three flags are
meant to serve as an example to show how flags can be used by organizations
that use Ipro eCapture.
For example, it will ‘flag’ exception pages. These are pages that could not be
opened during processing. Instead of the actual page appearing in the Image
Window, you will see a page with the text “Document Placeholder”. The placeholder page appears provided that the option, Insert Placeholder, was selected
for Unknown File Types in the Processing: General Processing Options.
See the section, About Exception and Unknown Files on page 6-74 for additional information.
Languages: These tag fields indicate which languages are present in the document.
6-34
Ipro eCapture User Guide
Q1 2014
www.iprotech.com
877-324-4776
Starting Ipro eCapture QC Module
Encodings: These tag fields indicate which encodings are present in the documents.
Setting up User-defined Flags
After defining your own flags, they will appear in the QC Flags Window along
with the default system flags and can be used to ‘flag’ documents during QC.
To set up new user-defined flags:
1.
Choose Tools > User-defined Flags from the menu bar. The Userdefined Flags dialog appears.
2.
Click the line with the *. The line highlights.
3.
Click in the Flag Name column of the highlighted line and enter a flag
name. A maximum of 50 characters is permitted.
4.
Tab over to the Flag Description column and enter a description for
the new flag.
5.
Repeat steps 2 through 4 for each additional flag.
6.
Click OK. The flags appear in the flag list.
www.iprotech.com
877-324-4776
Ipro eCapture User Guide
Q1 2014
6-35
Chapter 6, Performing QC
Deleting User-defined Flags
You can delete any user-defined flags (including the user-defined flags already
supplied with the Ipro eCapture QC Module) provided that the flag was not
assigned to a document in a client. The system will display a dialog stating
that you cannot delete the flag because it is in use by a client.
To delete flags:
1.
Choose Tools > User-defined Flags from the menu bar. The Userdefined Flags dialog appears.
2.
Click the shaded area directly to the left of the flag name.
3.
Right-click in this shaded area to display Delete in the context menu.
4.
Click Delete. The flag clears from the dialog.
Setting up User-defined Placeholders
User defined placeholders can be applied to any document. By default, replacing images with a placeholder returns a generic “Document Placeholder” label
for the image. By defining custom placeholders, specific text can be used
instead of the generic label when reprocessing. Document text handling
options include Retain Text, Create Placeholder Text, and Clear Text. The userdefined placeholders can be used across all Ipro eCapture clients. The userdefined placeholders are available for selection when the
is clicked in the
QC Function Toolbar. See the section QCing Items on page 6-68 for additional
information.
To set up new user-defined placeholders:
6-36
Ipro eCapture User Guide
Q1 2014
www.iprotech.com
877-324-4776
Starting Ipro eCapture QC Module
1.
Choose Tools > User-defined Placeholders from the menu bar. The
Client List dialog appears.
2.
Select a Client.
www.iprotech.com
877-324-4776
Ipro eCapture User Guide
Q1 2014
6-37
Chapter 6, Performing QC
3.
Click OK. The Custom Placeholder Configuration dialog appears.
4.
Click the drop-down list located above the Available Fields list, and
select a specific field type. By default, All Fields display. To further narrow the field list, enter a value in the Filter Value field located below
the Available Fields list. For example, to see only those fields that contain the word “date”, enter date and click
delete the value and click
. To display all fields,
.
: Click to move a selected field from the Available Fields box to
the Selected Fields box.
6-38
Ipro eCapture User Guide
Q1 2014
www.iprotech.com
877-324-4776
Starting Ipro eCapture QC Module
: Click to move a selected field from the Selected Fields box to
the Available Fields box.
: Opens the Insert Custom Field dialog where you
can create new group fields and new user fields. Inserting Custom Group
Fields is discussed in Chapter 7, Creating Export Series and Export Jobs
in the section, Inserting Custom Group Fields on page 7-27.
and
: Use these arrows to change the order of the fields in the
Selected Fields box. Select a field (or contiguous fields) and then use
either arrow to reposition it (or the selected fields) accordingly.
5.
Select a field in the Selected Fields box. The selected field appears in the
Font section. Click
to open the Font dialog. Select from the Font
options and click OK to return to the Custom Placeholder Configuration
dialog. Repeat for each additional field.
6.
Select from the following options:
Field Options
Include labels with values: When selected both the field label and its
value are included.
Placement Options
Select from the following metadata field placement options.
Alignment
•
•
Vertical Alignment: Determines placement along the vertical
axis. Options include Top, Center, or Bottom. Top is the default.
Horizontal Alignment: Determines placement along the horizontal axis. Options include Left, Center, or Right. Left is the default.
Indentation: Indicate space for the Left and Right. This setting determines the horizontal spacing to the left or right of the page margins.
Line Spacing: Determines the number of lines or font points that separate each metadata field. Options include None, Single, 1.5 Lines, and
Double. Single is the default.
www.iprotech.com
877-324-4776
Ipro eCapture User Guide
Q1 2014
6-39
Chapter 6, Performing QC
Truncation: Determines the number of characters at which the field
value will be truncated. Default value is 128 characters.
Date Field Formatting Options
Click
Options dialog.
to open the Date Field Formatting
Legacy Date Field Formatting: By default, this option is selected. Deselect
this option to select from the Invalid date options and to select fields for date
format handling.
6-40
Ipro eCapture User Guide
Q1 2014
www.iprotech.com
877-324-4776
Starting Ipro eCapture QC Module
Date Field Formatting: If you want to change the date field to a different
format, select from the following formats:
•
•
•
•
•
YYYYMMDD
YYYY/MM/DD
MMDDYYYY
MM/DD/YYYY
DD/MM/YYYY
Otherwise, select the option, Do Not Convert Date Fields.
Time Format: Select from:
•
•
•
12-hour [displays time in 12 hour format e.g. 1:04]
24-hour [displays time in 24 hour format, e.g. 13:04]
Regional [formats the time according to the “default” Regional Settings
of the Worker the document is being exported on. Note: Changing the
format strings using the “Customize” button of Regional Settings will
have no effect; the actual region needs to be changed to see any effect.
Resolve Times to Second Precision: Select this option if you want to add
seconds to all metadata date fields that have time. This does not apply to the
images.
Invalid date options
Treat date values outside of specified range as invalid dates - Select a
start date and end date range. Any dates outside of the selected range will be
considered as invalid dates. The start date default is set to SQL minimum date.
The end date default is set to SQL maximum date.
Select one of the following options:
•
•
Invalid date field output value - enter text to display in the event an
invalid date is encountered. This field may be left blank.
Invalid date field output do not convert - invalid dates will be output
as a text field.
www.iprotech.com
877-324-4776
Ipro eCapture User Guide
Q1 2014
6-41
Chapter 6, Performing QC
Field Selection
The only fields that are not present in the list are *DATE_ONLY* and
*TIME_ONLY*. The fields in the available field list are comprised of fields that
are marked as valid for date formatting. This is determined by the value of
TRUE in the ExportAttemptDateParse field located in the EncounteredMetatdataFieldList table.
Date field formatting options affect only those fields in the Fields Selected for
Date Format Handling box.
Date field formatting options are set at the Job level.
Filter Value - enter a value to filter the list. For example, to see only those
fields that contain the word “date”, enter date and click
fields, delete the value and click
. To display all
.
Select a field for date format handling by selecting the field from the Fields
Available for Date Format Handling and clicking
to move the single
field to the Fields Selected for Date Format Handling box.
For two or more fields, ctrl-click to select non-contiguous fields or shift-click to
select a contiguous fields. Once the fields are selected, click
them to the Fields Selected for Date Format Handling box.
to move
Ipro eCapture creates two additional fields that “split” the date and time into a
Date Only field and a Time Only field. These two additional fields will be displayed in the Available Fields list in the Export Wizard, Select Export Fields
screen. For example, if the DueDate field was moved to the Fields Selected for
Date Format Handling, the following additional DueDate fields would appear in
the Available Fields list: DueDate*DATE ONLY* and DueDate*TIME ONLY*.
7.
Click OK. The Save dialog appears prompting to save changes.
8.
Click Yes. The Enter Description dialog appears. Enter optional description (maximum 100 characters). A single space may be used for no
description.
6-42
Ipro eCapture User Guide
Q1 2014
www.iprotech.com
877-324-4776
Working with the Image View Area
9.
Click OK. The Success dialog appears indicating the ID number for the
saved Placeholder.
10.
Click OK. The Custom Placeholder Configuration dialog closes.
Saving Custom Placeholder Definitions
See Appendix A - Using the Flex Processor Rules Manager and the section Saving Custom Placeholder Definitions on page A-24.
Loading Saved Custom Placeholder Definitions
See Appendix A - Using the Flex Processor Rules Manager and the section
Loading Saved Custom Placeholder Definitions on page A-25.
Deleting Stored Placeholder Definitions
See Appendix A - Using the Flex Processor Rules Manager and the section
Deleting Stored Placeholder Definitions on page A-25.
Working with the Image View Area
There are three tabs you may select from in the Image View area: Image,
Thumbnails, and View.
Image Tab Window
The Image Tab window shows the output from the file processing. The toolbar
icons are described in the following table:
Click
To:
Fit the image normally; scroll bars may appear.
Fit the image horizontally in the Image Window. If the Image
Window is widened, then a scroll bar will appear on the right
side of the image so you can scroll up or down to view the top
or bottom of the image.
www.iprotech.com
877-324-4776
Ipro eCapture User Guide
Q1 2014
6-43
Chapter 6, Performing QC
Best fit the image in the Image Window based on its size. Use
this icon after zooming in or out to return the image to full
view.
Rotate the page to the left.
Rotate the page to the right.
Every click increases the image size.
Every click decreases the image size.
OCRs the current page.
By default, the image display is high quality. Clicking this icon
renders each image low quality thereby increasing the speed
at which you can navigate through each item in the list.
Merge
Jobs
dropdown
menu
6-44
This drop-down menu contains a list of all merge jobs, by
name, that exist within the scope of the session of selected
jobs/documents and which comply with the Merge Jobs settings from the QC Options dialog. For Processing Jobs, the
drop-down menu appears in the Image tab. For Data Extract
Jobs, the drop-down menu appears in the View tab. See the
section Setting Merge Job Options on page 6-28 for additional
information. When a merge job is selected from this dropdown menu, the associated image for that page from the
merge job is displayed in the Image or View tab. Any associated page-level text will appear in the Extracted Text/OCR
pane if it exists; otherwise, the pane will be blank.
Ipro eCapture User Guide
Q1 2014
www.iprotech.com
877-324-4776
Working with the Image View Area
Select
Order
Click this link to display the Merge Jobs Sort Order dialog.
From this dialog, do the following:
•
from the drop-down menu, select the order (Date,
Ascending; Date, Descending (default); Name, Ascending; Name, Descending; Custom - use the up/down
arrows) merge jobs display in the Merge Jobs drop-down
menu in the Image tab or View tab.
•
deselect one or more merge jobs. By default, all merge
jobs are selected. The “Original” item refers to the original images and text associated with the document. It will
always remain last in the list of merge jobs and remain
checked.
•
select the option Set as Session Default (current QC session only). By default, this option is not selected.
Documents/Records List Window Toolbar
This toolbar located above the Documents/Records List, can be used to navigate through the Documents/Records List and simultaneously display the
selected item in the Image View area. The icons are described as follows:
•
Move to the first document.
•
Move to the previous document.
•
Move to the next document.
•
Move to the last document.
•
Move to the previous page.
•
•
or CTRL+G to open the Go to Page dialog. Enter the designated
page number and click OK. (This dialog shows the range of pages for reference of the selected document.)
Move to the next page.
www.iprotech.com
877-324-4776
Ipro eCapture User Guide
Q1 2014
6-45
Chapter 6, Performing QC
•
or CTRL+F to open the Find Document dialog. Enter the text that the
document contains and click OK. This search is used to search all records
and metadata fields within each Session’s table. Note: Only the records
and metadata fields displayed in the Session’s table are searched. If you
encounter a message “Search Term Not Found’, then most likely the
metadata fields that contains this information in not in the current Session’s table of metadata fields.
•
or F3 to find the next occurrence of the text entered in the Find Document dialog.
•
Refresh the list of items using the last query.
This shows how many pages exist for the selected item.
Thumbnails Tab Window
The Thumbnails Tab Window shows every page for the selected record. When
you right-click an image, a context menu appears where you can select from
several different thumbnail sizes.
One or more thumbnails can be selected contiguously or non-contiguously for deletion by right-clicking on a selected thumbnail to open the
context menu and choosing Delete Selected Pages. However, once
they are deleted, they cannot be undeleted.
To set a default thumbnail size, do the following:
1.
6-46
Choose Tools > QC Options from the menu bar to display the QC
Options dialog.
Ipro eCapture User Guide
Q1 2014
www.iprotech.com
877-324-4776
Working with the Image View Area
2.
Click the Views Tab.
3.
Under Thumbnail View, select:
•
•
4.
a thumbnail size.
the option, Resample Color Images if you want improved quality
when viewing thumbnails. When this option is disabled, thumbnails
load quicker, but image quality is reduced.
Click OK.
View Tab Window
The View Tab Window displays the electronic file rendered by Oracle® OutsideIn Technology (formerly Stellent). Depending on the type of file, the View window may or may not have a toolbar at the bottom to facilitate navigation
through the file.
www.iprotech.com
877-324-4776
Ipro eCapture User Guide
Q1 2014
6-47
Chapter 6, Performing QC
For Merge Jobs, the View toolbar displays a drop-down menu with one or
merge jobs.
Right-click in the View Tab Window to display a context menu where View,
Size, Draft View, and other options can be selected on an individual document
basis. These selections will not overwrite the settings in QC Options.
To set the View options, do the following:
1.
Choose Tools > QC Options from the menu bar to display the QC
Options dialog.
2.
Click the Views Tab.
3.
Under Native Document View, the option Enable Native Document
Viewing is selected by default. The View Tab window displays the file
with the appropriate content. If this option is deselected, The View Tab
window is still available for selection but it will not contain any rendered
data/views.
6-48
Ipro eCapture User Guide
Q1 2014
www.iprotech.com
877-324-4776
Working with the Documents/Records List Window
4.
Under View Options, select Draft, Normal, or Preview. Preview sizes
include Full Size, Fit to Window, and Fit to Window Width.
5.
Click OK.
Working with the Documents/Records
List Window
The Documents/Records List Window is located in the lower left portion of the
QC Interface.
From this window you can:
•
•
•
•
•
•
•
•
•
•
•
•
Navigate through the documents/records list
Conduct simple searches (Find searches) on all records and metadata fields displayed in the documents/records list.
Refresh
Perform multiple QC functions
Conduct metadata searches for the current Session, Job, Custodian, or Project.
Conduct a refined search on an existing search
Sort a single column field or multiple column fields
Customize the order and selection of metadata column fields.
Conduct Advanced searches using Boolean logic and operators (=,
>, etc.)
Search for Flags
Instantly search any record for a field that equals, does not equal,
contains, or does not contain the field’s value
Select a contiguous range of records or non-contiguous records.
Working with Session Tabs
When you initially create a session for a Processing Job or Data Extract Job,
you have the option to create more than one. For each session you create, a
corresponding tab will exist with the conditions you selected. For example, you
may have selected the Category Microsoft Word, and then chose the Passed
QC flag. When you mouse over the Session Tab, it will show this information.
www.iprotech.com
877-324-4776
Ipro eCapture User Guide
Q1 2014
6-49
Chapter 6, Performing QC
When you right-click a Session Tab, a context menu appears where you can do
the following:
•
•
•
•
•
Search through it, its job, its custodian, or its project.
Refine a search.
Sort the column fields.
Close the Session.
Create Export Sets.
Modifying the Column Fields in the Documents/Records List Window
The columns in the Documents/Records List window can be customized.
To select which fields to display, do the following:
1.
Select the Session in the Documents/Records List window.
2.
Choose Tools > Selected Fields from the Ipro eCapture QC menu bar
or right-click any field column (in the applicable Session) to display the
context menu and choose Selected Fields. The Selected Fields dialog
6-50
Ipro eCapture User Guide
Q1 2014
www.iprotech.com
877-324-4776
Working with the Documents/Records List Window
appears. The fields that appear in the Selected Fields box are the fields
that are presently displayed in the Documents/Records List window.
3.
Double-click the Available Fields you want to have displayed in the
Documents/Records List window columns. These fields appear in the
Selected Fields box.
To sort the fields in the Selected Fields box, use the up and down
arrows. Select the field and then click the arrow to move it to the new
position.
Select the option Refresh All Sessions if you want all open sessions to
reflect the changes you made in this dialog. Otherwise, if you do not
select it, only the current session will show the changes.
4.
Click OK.
www.iprotech.com
877-324-4776
Ipro eCapture User Guide
Q1 2014
6-51
Chapter 6, Performing QC
Sorting Multiple Columns in the Documents/
Records List Window
You can click an individual column to sort it, but if you click another column,
the previously sorted column returns to its original state. To sort two or more
columns (sorts can only occur within one Session at a time) and have those
columns maintain the sort (descending and/or ascending sort direction may
apply for each field), follow these steps
1.
Select either a Processing Job Session tab or a Data Extract Job
Session tab.
2.
Right-click the Processing Job Tab or Data Extract Job Tab to display
the context menu and select Sort. The Selected Fields dialog appears.
3.
Double-click the Fields you want to sort from the Available Fields box.
By default, the fields are in ascending order. These fields appear in the
Selected Fields box with an empty check box.
To change the default ascending sort direction to descending, select the
empty check box by the field. Select any other additional fields that
6-52
Ipro eCapture User Guide
Q1 2014
www.iprotech.com
877-324-4776
Working with the Documents/Records List Window
require descending sort order.
To reposition a field in the Selected Fields box, select the field and use
the
4.
or
to move it to a different position.
Click OK.
Sorting a Single Column in the Documents/
Records List Window
1.
Right-click an individual Column to display the context menu.
2.
Select Sort name of field in Ascending Order or Sort name of field
in Descending Order. The Selected Fields dialog appears.
3.
Select the option Ascending Sort to sort the fields in Ascending order.
Deselect the option Ascending Sort to sort the fields in Descending
order. The chosen sort order appears in parenthesis above the Selected
Fields box.
www.iprotech.com
877-324-4776
Ipro eCapture User Guide
Q1 2014
6-53
Chapter 6, Performing QC
4.
Click OK.
Copying the Field Contents for a Record to the
Clipboard
The contents of a field may be copied to the clipboard provided there is data in
the field. The context menu will display a maximum of 25 characters found in a
field. However, the contents of the field (up to 100 characters) will be copied to
the clipboard.
The fields are located above the first record in the Document/Records List Window. If necessary, ensure that the appropriate fields are displayed. See the
section Modifying the Column Fields in the Documents/Records List Window on
page 6-50 for procedures.
1.
Locate the record containing the data to paste to the clipboard.
2.
If necessary, scroll to the right to display the field and its data.
3.
Right-click the field to display the context menu. The first option in the
context menu displays: Copy value for fieldname “contents of field data
up to 25 characters”. If the field is empty, the context menu will not display this option.
4.
Select Copy value for fieldname “contents of field data up to 25 characters”.
5.
Paste the data into a third-party application.
Opening the Output Directory for the Selected
Document
To open the output directory where the Processing Job or Data Extract Job files
reside for a particular document, alternate click the document in the Document/Records List Window to display the context menu and choose Utilities >
Open output directory. The Windows Explorer opens and displays the files
associated with the selected document.
The files are located in a path similar to the following: ...ClientName\ProjectName\Processing Jobs\PJ000002\Output\1000\19\ for a Processing Job or
...ClientName\ProjectName\DataExtract Jobs\DE000001\Output\1000\4 for a
Data Extract Job.
6-54
Ipro eCapture User Guide
Q1 2014
www.iprotech.com
877-324-4776
Working with the Documents/Records List Window
When this option is used with OCR all pages missing text
files are deleted from the output directory.
, the TXT/CXT
Copying the Native File to the System Temporary Directory
The native file for the selected document can be copied to a temporary directory and opened in Windows Explorer (there is no need to touch the source
data); for example, obtaining a copy of the native file for documents in large
extracted email directories. This option is useful for troubleshooting.
To copy the native file for a particular document, alternate click the document
in the Document/Records List Window to display the context menu.
Choose Utilities > Copy native file to temporary directory. A directory
name “Temp_<itemID>” is created in the system temporary directory, the
native file is copied to the directory, and the Windows Explorer opens to the
file’s location.
Path Example: C:\Documents and Settings\TestMachine\Local Settings\Temp\Temp_10, where Temp_10 is the newly created directory with the
Item ID. The native file is stored in this directory.
Conducting a Session Search
The Session Search searches the SQL Server metadata using Boolean logic
and operators. It is not the same as performing an indexed search during Processing using the third-party search tool, dtSearch.
When you created the current session, the results were based on the groupings selected from the Start QC Session screen. A Session Tab appears, and
when you mouse over it, the grouping details appear as shown in the following
example.
www.iprotech.com
877-324-4776
Ipro eCapture User Guide
Q1 2014
6-55
Chapter 6, Performing QC
The searching function allows you to refine a search from a Session. For example, you may want to search for all documents that were authored by CWilliams in the current Session, Job, Custodian, or Project. When you conduct this
search, another tab appears with the results. The tab will display a search icon
with a magnifying glass. This is different than the icon displayed for a created
Session (see previous figure) from the Start QC Session screen. When you
mouse over the tab, the search criteria details appear. An example follows:
Refining a Session Search
From this search, you can conduct another search, further refining the results.
For example, show all the documents authored CWilliams that were sent to
Consolidated Industries. Each time a search is conducted, a separate search
tab appears.
1.
Right-click the Session tab and select from one of the following Search
options:
•
•
•
•
Search
Search
Search
Search
through
through
through
through
Current - Narrow search
Job
Custodian
Project
For example, if you chose Search through Current, the following Search
dialog appears.
6-56
Ipro eCapture User Guide
Q1 2014
www.iprotech.com
877-324-4776
Working with the Documents/Records List Window
This box is titled Narrowing Search. For the Job, Custodian, and Project
searches, the dialog will be titled respectively.
2.
Either leave the modifier field empty to search through system and
metadata fields. Or click the Modifier Field drop-down list and select
Flag, Language, or Encoding to search on items with or without a
specific flag, language, or encoding.
3.
Select a field name from the drop-down Field Name list to search on.
4.
Select a Comparison operator from the Comparison drop-down list.
5.
Select Search Text from the Search Text drop-down list. Note: If you
are searching for a flag, this option does not apply.
6.
(Optional) Click More. Another search row appears where you can continue to indicate additional criteria. Notice that the Modifier field now
shows additional and/or Boolean operators. When including a modifier,
the Comparison operators will also change.
7.
Click OK. The results appear under a separate search tab. You may
right-click the tab to further refine the search.
Conducting an Advanced Search
As indicated in the previous section, when you right-click a Session tab you
can specify exactly what you want to search for. The Narrowing Search dialog
did not have any previous data in it.
However, if you want to start off your search with criteria, such as the Field
Name Author Equals CWilliams, then you would select the record with CWilliams in the Author field, right-click the actual value in the Author field column
to display the context menu. When you select Advanced Search, the Narrowing
www.iprotech.com
877-324-4776
Ipro eCapture User Guide
Q1 2014
6-57
Chapter 6, Performing QC
Search dialog appears populated with those selections. An additional search
row appears underneath where you can indicate further search criteria. The
following figure shows the field name Author, the Comparison Value =, and the
Search Text CWilliams.
Searching for Items Based on ProcessStatus
To conduct a search for any items that did not have a ProcessStatus of Success, do the following:
1.
Click the Field Name drop-down list and select ProcessStatus.
2.
Click the Comparison drop-down list and select Not Equals.
3.
In the Search Text field, enter Success.
4.
Click OK.
Setting a Flag for Multiple Records Simultaneously
By simply selecting the records, whether contiguously or non-contiguously,
you can set a flag for each of those records simultaneously.
1.
Once the records are selected, click the alternate mouse button on the
group of records to display the context menu, select Set Flag to display the flags context menu.
2.
Select the flag.
3.
If you want to apply another flag to the same set of records, repeat
steps 1 and 2. Note: You may also clear all the flags by selecting Clear
Flag from the context menu for a set of selected records.
6-58
Ipro eCapture User Guide
Q1 2014
www.iprotech.com
877-324-4776
Working with the Documents/Records List Window
Apply Reprocessing Changes to all Files with
Same MD5Hash Value
See the section Setting the Auto-QC Options on page 6-24 to reprocess automatically.
Starting with version 5.6, a new option, Identical File Handling, will automatically apply any reprocessing changes for a given document to all of the documents with the same MD5Hash value. The same reprocessing output changes
are applied to the item’s identical files. Identical files share the same MD5
hash, not necessarily the same family structure.
This function is located in the context menu for the selected item.
Identical files are defined as other files having the same valid MD5Hash as the
file in question. Any files that experienced a hash failure; or for any reason,
have a hash in the Items table that is not exactly 32 characters will be
excluded from being an original or from being considered as an identical file of
any other file.
When reprocessing regularly or natively, the same output changes will be
applied to all of the selected item’s identical files. Any file that has the same
MD5Hash as the selected item is considered its identical file.
1.
From either a Processing Job or a Data Extract Job, alternate click the
item/master file (whose output is to be copied) to display the context
menu.
www.iprotech.com
877-324-4776
Ipro eCapture User Guide
Q1 2014
6-59
Chapter 6, Performing QC
2.
Choose Identical File Handling > Open QC session with all Identical Files > Level (choose Job, Custodian, Project, or Client). A new Processing Job tab or Data Extract session opens with the identical files
encountered in the selected level from step 1.
3.
Perform QC on one item in the list (flags, searches, etc.).
4.
Reprocess regularly or natively.
5.
Alternate click the item that was reprocessed to display the context
menu.
6.
Choose Identical File Handling and choose one of the following:
•
Apply output to all Identical Files - Copies the output to all
items in the session. None of the flags set for the item/master files
are copied to the identical files. The Perform Transfer dialog
appears.
Click Yes. The Apply Output to Identical Files progress dialog
appears indicating the progress of the transfer.
When the transfer completes, the Operation Complete dialog
appears.
6-60
Ipro eCapture User Guide
Q1 2014
www.iprotech.com
877-324-4776
Working with the Documents/Records List Window
•
Click OK.
Apply output to all Identical Files that have not passed QC Copies the output to all items in the session that do not have the
QC Passed flag identical files. The Perform Transfer dialog appears.
Click Yes. The Apply Output to Identical Files progress dialog
appears indicating the progress of the transfer.
When the transfer completes, the Operation Complete dialog
appears.
www.iprotech.com
877-324-4776
Ipro eCapture User Guide
Q1 2014
6-61
Chapter 6, Performing QC
Click OK.
Displaying a Group of Records that Meet a Specific Criteria
You may want to see all the records with a specific Author, such as CWilliams.
(CWilliams Equals).
By selecting the record with CWilliams and specifically right-clicking on the
value in the Author column, a context menu appears with four options:
•
•
•
•
Field
Field
Field
Field
Name
Name
Name
Name
Equals Value in Field
Does Not = Value in Field
Contains Value in Field
Does not Contain Value in Field
If you chose Equals, all the records meeting that criteria will appear in a separate search tab. For example, all records with CWilliams in the Author field.
Closing a Session or Search Tab
You may close a session or search tab without affecting any other Session or
Search Tabs. Right-click the tab to display the context menu and select Close.
About Export Sets
An Export Set is always created by a QC Processing Job Session or a Data
Extract Job Session. Export sets will always require that families are sorted as
one unit. E-mails and attachments can be removed from each other but cannot
be separated out in the same population. Therefore, ensure that you first
obtain the document population, exclusively, that you want to export into a QC
session. Then, the data can be sorted anyway you choose.
6-62
Ipro eCapture User Guide
Q1 2014
www.iprotech.com
877-324-4776
About Export Sets
Use Export Sets to create an export on an individual document level with sort
capabilities. The data can be sorted by a selected field and then exported in
that order. The default sort lists the parents in the order they were discovered
and their children attached to them. For example, you can export data for a
job (such as culling the document collection for all Excel spreadsheets, and
then sorting by date), while continuing to QC the rest of the collection. Or
search for all hot documents and create a set for those hot documents exclusively. Essentially, you would isolate a group of documents, apply the desired
sort, and create the Export Set from the context menu. (Note: The context
menu option, Create Export Set, will not be available if the documents were
not sorted with families together.) The default sort lists the parents in the
order they were discovered and their children attached to them.
Export Sets are used in an Export Series, which allow the exporting of successive unattended exports with sequential image keys (Bates™ numbering) and
volumes. Series are discussed in Chapter 7, Creating Export Series and Export
Jobs.
In addition, an Export Set will store which documents are to be exported and
which order they were sorted when the set was created. An Export Job can
only be made up of one Export Set. An export set will be applied to a QC session as a whole.
Export sets are managed in the Ipro eCapture Controller just like a regular job.
See Chapter 2, Ipro eCapture Controller and the section Managing Process
Export Sets or Data Extract Export Sets on page 2-58 for more information.
Creating an Export Set
When you create a new Export Set you have two options. You may create a
New Export Set by giving it a unique name or you may select an existing
Export Set and overwrite it with the newly created Export Set.
1.
Once the Processing Job session or Data Extract Job session is sorted,
right-click the Processing Job Session Tab or Data Extract Job Session Tab to display the context menu and select Create Export Set.
(Note: If this menu option is dimmed, the option, View Compound Doc-
www.iprotech.com
877-324-4776
Ipro eCapture User Guide
Q1 2014
6-63
Chapter 6, Performing QC
uments Separately, was not deselected in the Start QC Session screen.)
The Create Export Set dialog appears.
2.
Do one of the following:
•
Select Create New.
Type a Name and Description for the Export Set.
Click OK. The Export Set will appear in the appropriate folder
under Export Jobs in the Ipro eCapture Controller along with its
associated information in the Information Panel.
6-64
Ipro eCapture User Guide
Q1 2014
www.iprotech.com
877-324-4776
About Export Sets
•
Select Overwrite Existing.
Select the Export Set you want to overwrite.
Click OK. The system displays a prompts asking if you want to
perform the overwrite by replacing the selected Export Set with
the changes you made.
Click Yes to overwrite it. (Otherwise, if you click No, then the
overwrite does not occur.) The Export Set will appear in the appropriate folder under Export Jobs in the Ipro eCapture Controller
along with its associated information in the Information Panel.
www.iprotech.com
877-324-4776
Ipro eCapture User Guide
Q1 2014
6-65
Chapter 6, Performing QC
Modifying an Existing Export Set
An existing Export Set can be opened and resorted, if necessary.
1.
Choose either File > Create Session for Processing Job Export Set
or File > Create Session for Data Extract Job Export Set from the
Ipro eCapture QC menu bar. The Select Export Sets dialog appears.
2.
Select the Client.
3.
Select an Export Set.
4.
Click OK. The Export Set appears in the Documents/Records List Window
as a Session Tab; much like a regular Processing Job Session and a Data
Extract Session appear.
5.
Modify the Export Set.
6.
Right-click the Tab to display the context menu and select Create Export
Set.
7.
Proceed to the section Creating an Export Set on page 6-63. Start at
step 2.
6-66
Ipro eCapture User Guide
Q1 2014
www.iprotech.com
877-324-4776
Saving Options
Saving Options
QC Options (General, Auto-QC, and Views) can be saved to an .INI file and
opened later.
Saving settings allows for consistency when QCing is performed by several
QCers.
The QC interface layout changes can be permanently saved, temporarily
changed, or the active layout retained upon exiting the QC Module.
1.
Choose Tools > QC Options from the Ipro eCapture QC Module
menu bar.
2.
Click the Saved Options Tab.
3.
Under Options, select from the following:
•
•
•
4.
Save to File: Allows you to permanently save the options to an
.INI file.
Load from File: Allows you to open and load the .INI file with the
desired options.
Restore Default: Restores the default Ipro eCapture QC options.
Click OK.
www.iprotech.com
877-324-4776
Ipro eCapture User Guide
Q1 2014
6-67
Chapter 6, Performing QC
QCing Items
Before you begin, see the section Setting up User-defined Flags on 6-35 for
information on adding user-defined flags to the QC flag list. You may want to
add QC flags before you begin the QC process.
The job type (Processing or Data Extract) determines the availability of the QC
functions.
1.
Select a Session tab. For more information about Session Tabs, see the
section Working with Session Tabs on page 6-49.
2.
Select the first item in the Documents/Records List Window. To
customize the displayed fields, see the section Modifying the Column
Fields in the Documents/Records List Window on page 6-50.
To sort a column, click the column heading and choose either Ascending or Descending Order. A dialog appears with the specific selection.
Click OK to apply the sort. If you click another column to sort, the previously sorted column is restored to its original state. To sort multiple columns, see the section Sorting Multiple Columns in the Documents/
Records List Window on page 6-52 for procedures.
3.
Select an Image View area Tab (Image, Thumbnails, or View). For information about the Image View area, see the section Working with the
Image View Area on page 6-43.
4.
Notice the QC flags in the QC Flag window. One or more of these flags
may already be set. See the section Working with the QC Flags Window
on page 6-29 for additional information.
6-68
Ipro eCapture User Guide
Q1 2014
www.iprotech.com
877-324-4776
QCing Items
5.
Begin to QC using the QC function toolbar icons (availability of icons
depend on the Job type) described in the following table:
To
Click...
Result and/or Action
Accept an item
or
the Passed
QC Flag
Reject an item
Auto-QC
Show Reprocess Options
www.iprotech.com
877-324-4776
The item remains in the list until you close
QCing for the Processing Job or Data Extract
Job. The system flags the item as “Passed
QC”.
SHORTCUT: By pressing the Enter Key on
the keyboard, you will move to the next
image in the list AND apply the PASSED QC
flag automatically. To remove the PASSED
QC flag, simply press the DELETE key on the
keyboard. You may now assign a flag or
flags that are appropriate for the current
image.
Rejects a previously accepted item. The
“Passed QC” flag is no longer assigned to
that item.
or F4
or F12
The system automatically scrolls through
each image based on the settings in the
Auto-QC Options dialog. After invoking AutoQC, use the + to increase speed by 25% or
use the - to decrease speed by 25%.
See the section, Setting the Auto-QC
Options on page 6-24 for information on setting the Auto-QC options.
Opens the Reprocess Options dialog applicable for the Processing Job (General, Excel,
Word, PowerPoint) or for the Data Extract
Job.
Ipro eCapture User Guide
Q1 2014
6-69
Chapter 6, Performing QC
To
Reprocess the
selected item
Click...
Result and/or Action
or F7
This option is disabled for a single selected
document that has the imported native
placeholder *StellentID (14000).
The item is reprocessed by Ipro eCapture
and remains in the list until it is flagged as
“Passed QC”. If you hold down the CTRL key
and click the icon, it will force the documents through Oracle® Outside-In Technology (formerly Stellent) instead of the
document type routines of Ipro eCapture.
This does not apply to Lotus Notes e-mails
which cannot be handled by Oracle. When
the Image to PDF option is selected in the
General Tab (Processing Options), the image
is reprocessed as a .PDF and stored in the
Output directory.
If reprocessing a Data Extract document and
one or more OCR options were selected in
the Options for Data Extract Job dialog, a
dialog appears indicating OCR is being performed on the document - page by page.
The OCR operation may be cancelled if necessary. Cancellation results in all pages,
where OCR was not attempted, to be considered an OCR failure. The primary reprocess
operation updates the OCR Low Confidence
(average for all pages) flag accordingly.
6-70
Ipro eCapture User Guide
Q1 2014
www.iprotech.com
877-324-4776
QCing Items
To
Reprocess an
item in its
native application
Note: This
option is disabled for a single selected
document that
has the
imported native
placeholder
*StellentID
14000.
www.iprotech.com
877-324-4776
Click...
Result and/or Action
or F8
The native application opens. Ensure that
the default printer is a Premium EDD Driver.
Click the application’s Print button to reprocess the item. Close the native application.
The item is reprocessed and remains in the
list until it is flagged as “Passed QC”. The
metadata is populated. If you hold the CTRL
key and click the icon, it will display a dialog
where you can reprocess the item using the
selected application.
Ipro eCapture User Guide
Q1 2014
6-71
Chapter 6, Performing QC
To
Reprocess
selected in
Native Application via ShellExecute Print
Applies for both
Processing Job
and Data
Extract Job sessions
We recommend culling the
document set
down to the
minimum number of items to
minimize QCer
interaction as
well as breaking up larger
groups of documents into multiple QC
sessions and
QCers. This will
help cut down
on the amount
of time it takes
to reprocess
using ShellExecute Print
Reprocess.
6-72
Click...
Result and/or Action
This option is disabled for a single selected
document that has the imported native
placeholder *StellentID (14000).
Files must have an associated Print command for this feature to function without
user intervention. This feature works best
with Office, HTML, and text documents.
Office 2007 is required for the full functionality of this feature.
The Office 2003 Print command does not
work with HTML e-mails. If there is no associated Print command, the QCer will be
prompted to Native Reprocess.
The QCer will be prompted to continue or
cancel ShellExecute Print Reprocess if an
error is encountered.
There should be a user monitoring the
ShellExecute Print Reprocess as there may
be dialog prompts that will not be handled
automatically.
Ipro eCapture User Guide
Q1 2014
www.iprotech.com
877-324-4776
QCing Items
To
Click...
Result and/or Action
View in Native
Application
Opens item in the native application for
viewing. If you hold the CTRL key and click
the icon, it will display a dialog where you
can view the item using the selected application. Useful for testing output.
Note: This
option is disabled for a single selected
document that
has the
imported native
placeholder
*StellentID
14000.
Reprocess all
documents in
the set
or F9
All documents in the set are reprocessed. If
you hold down the CTRL key and click the
icon, it will force the documents through
Oracle® Outside-In Technology (formerly
Stellent) instead of the document type routines of Ipro eCapture. This does not apply
to Lotus Notes e-mails which cannot be handled by Oracle.
Rotate every
page in the document to the
left
Rotates every page in the currently selected
document 90 degrees to the left.
Rotate every
page in the document to the
right
Rotates every page in the currently selected
document 90 degrees to the right.
OCR Pages with
missing text
OCRs any pages that do not have extracted
text. If you hold down the CTRL key and
click the icon, it will force OCR of all pages.
www.iprotech.com
877-324-4776
Ipro eCapture User Guide
Q1 2014
6-73
Chapter 6, Performing QC
To
Click...
Result and/or Action
Replace Document Images
with a Document Placeholder image
Launches the Select Placeholder dialog
where an existing, specific user-defined
placeholder can be applied to the document. See the section Setting up Userdefined Placeholders on page 6-36 for information about creating user-defined placeholders.
See the section Replace Document Images
with a Document Placeholder Image on page
6-75.
Delete selected
page
Deletes page in the image window. A deleted
item will not be exported. None of the item’s
information will be referenced.
Delete from
selected page
through the end
of document
Delete from current page through end of
document. Deleted items will not be
exported; nor will the information from the
deleted items be referenced.
Mark Document
As Exception
The marked document will show up as an
exception in the Exception Reports. This differs from the QC Flag because the document
will appear in the exception reports.
About Exception and Unknown Files
Files that could not be processed successfully are flagged as exceptions. Generally, these files are password-protected or exceed the page count set for
Max Page Threshold setting in the Processing Job Options:General
Options Tab. For example, if the setting was 10, then the result would be one
placeholder image as well as the 10 pages that did process before hitting the
threshold setting.
See the section Setting General Processing Options on page 6-77 or more
information.
Placeholder images are used for the document instead of processed images.
Unknown files either have a placeholder images or are processed as is.
6-74
Ipro eCapture User Guide
Q1 2014
www.iprotech.com
877-324-4776
QCing Items
Replace Document Images with a Document Placeholder
Image
1.
Select the Processing Job document.
2.
Click
3.
Select a user-defined placeholder from the grid. The default system
placeholder will always appear as the first placeholder in the list. Subsequent user-defined placeholders are in ascending ID order. Only one
stored placeholder may be selected for a document. If no user-defined
placeholders exist, select the default system placeholder (Ipro Document
Placeholder).
4.
Under Document Text Handling, select one of the following:
•
to display the Placeholder Options dialog.
Retain text - Replaces a document's images with a document
placeholder page. The existing text is kept in a text file called
000001.TXT and contains all text merged from original image text
files. To view the files, alternate click the document, choose Utilities > Open output directory. This is the default setting.
www.iprotech.com
877-324-4776
Ipro eCapture User Guide
Q1 2014
6-75
Chapter 6, Performing QC
•
•
Create placeholder text - Document text is cleared and a text
file is created that matches the text on the placeholder image.
Apply text - Enter text for the new document text file. If no text
is specified, the new document text file will be blank/empty.
5.
Select Set as Session Default (current QC session only) to save the
settings to the current open QC application. The placeholder selections
will be available across all QC sessions.
6.
Select Save settings as Machine Default (all QC sessions on this
machine) to save the settings to the QC.INI file so that new QC sessions will automatically use the settings.
7.
Click OK.
Viewing a Record’s metadata or Extracted
Text/OCR
Reviewing Extracted Text/OCR Data
Click the Extracted Text/OCR Tab above the image list. Each page will show
extracted text.
Reviewing metadata
Click the metadata Tab above the Documents/Records List window. Ipro
eCapture QC supplies all document metadata gleaned during processing.
You cannot edit the metadata.
ProcessStatus field is included and shows a field value of either Failure or Success.
6-76
Ipro eCapture User Guide
Q1 2014
www.iprotech.com
877-324-4776
QCing Items
Setting the QC Reprocess Options for a Processing Job
Setting General Processing Options
Click
in the QC Functions toolbar to open the Options for Processing dialog. Click the General Options Tab to set the general Processing Job options.
www.iprotech.com
877-324-4776
Ipro eCapture User Guide
Q1 2014
6-77
Chapter 6, Performing QC
Select OCR Pages missing text to OCR pages within documents that are
missing text. Optionally, select PDF page character threshold to perform
OCR on image-based PDFs that may contain a small amount of embedded
text, such as an image key. The default value is 25. The maximum value is
10000. If there is less than this amount of characters retrieved, the PDF will be
OCRed.
Minimum average OCR confidence level [1-100]: The level range settings
are from 1 up to 100. The default is 50. The OCR Confidence Level is the average of confidence per document, for all pages within a document on which
OCR was performed. Success or failure of a document for flagging is based on
the average confidence level of the document. If the average confidence level
is below the selected threshold, the document will be flagged in QC with the
OCR Low Confidence Flag.
Select the option Remove Blank Pages and then set the Blank Page
Threshold (1 to 2000) to a value that eliminates the speckles without eliminating any punctuation marks from the pages. Ipro eCapture will remove any
images that have fewer "dots" than this threshold. If this setting is too high,
you may lose images with a few short words. We suggest a setting of 50 as a
starting point.
Process HTML Files with Internet Explorer - Select this option to process
HTML files with Internet Explorer instead of Oracle® Outside-In Technology
(formerly Stellent).
Process CSV files with Microsoft Excel - Select this option to process .CSV
files with Microsoft Excel instead of Oracle® Outside-In Technology (formerly
Stellent).
Image to PDF - Select this option to reprocess selected document as a .PDF.
The .PDF is stored in the Output directory.
Set a Max Page Threshold (1 to 10000) if you want to limit the number of
pages produced by larger files. By default, this option is not checked. If the
Page Threshold is reached, the items are not flagged as exceptions, but
flagged as Page Threshold Exceeded. All pages processed up until the threshold is reached are included in the document. The first page will be the Page
Threshold Exceeded placeholder, and subsequent pages will be those that were
processed within the Max Page Threshold setting.
Placeholder pages over threshold - Select this option to apply a
placeholder to pages exceeding the threshold value indicated.
6-78
Ipro eCapture User Guide
Q1 2014
www.iprotech.com
877-324-4776
QCing Items
Text: From the drop-down menu choose either:
•
•
Truncate text to max pages - text is truncated to match the
output of pages that fall under the threshold (existing behavior).
Retain all text for document - document text is associated to
the number of pages below the set threshold value and all subsequent pages are blank. (This behavior is new starting with version
2013.1.0.)
Email Cut Off Text Handling: Separate options are available for handling
emails with cutoff text in Outlook/EML and Lotus Notes. One or more options
may be selected and the order may be set.
Lotus Notes - Use Legacy Handling (Print from Lotus Print UI) This
option uses the slower Print UI from Lotus Notes to create the Images and
HTML representation for Lotus Mail.
Click the Outlook/EML link, Select Handling/Order. The Outlook/EML
Text Cutoff Handling dialog appears.
Select an option and click either the
or
to move it to a
specific order location. Repeat for additional options. Options
include:
Attempt in Landscape w Shrink to Fit
Attempt in Portrait w Shrink to Fit
Attempt in RTF
Attempt in Text
www.iprotech.com
877-324-4776
Ipro eCapture User Guide
Q1 2014
6-79
Chapter 6, Performing QC
Assign Text Cutoff Flag and Manage in QC - This is the default setting. It cannot be repositioned.
Click the Lotus Notes link, Select Handling/Order. The Lotus Notes Text
Cutoff Handling dialog appears.
Select an option and click either the
or
to move it to a
specific order location. Repeat for additional options. Options
include:
Attempt in Landscape
Attempt in Text
Assign Text Cutoff Flag and Manage in QC - This is the default setting. It cannot be repositioned.
Time Zone Handling
See Chapter 5, Creating Clients, Projects, Custodians, and Jobs and the section How Ipro eCapture Handles Dates - Time Zones on page 5-20 for information.
•
•
•
6-80
Use local time zone from the workstation on which the discovery is
being performed.
Convert all times to GMT (No daylight savings)
Select Specify Time Zone and select the time zone to be used to convert the times to. For example, you might select the time zone of the
workstation where the files originated.
Ipro eCapture User Guide
Q1 2014
www.iprotech.com
877-324-4776
QCing Items
Color Depth Options
General Color Depth Option
Applies to everything else outside of the 5 types (Word, Excel, PowerPoint,
PDF, and Native TIFF) which Ipro eCapture does not process through Oracle®
Outside-In Technology (formerly Stellent). There are 3 exceptions to this rule:
Lotus Notes, Internet Explorer, and Outlook Express; which also fall under the
General type. All other e-mail, with the exception of Lotus Notes and Outlook
Express at this point, are always Group 4 TIFF because it is rendered from
text.
Single Page Output Type
General Color Depth Options
Rendered as
Black&White (1-bit)
Group 4 TIFF
Grayscale (8-bit)
LZW TIFF
256 Color (8-bit)
LZW TIFF
True Color (24-bit)
JPEG
Multi-Page TIFF Output Type
General Color Depth Options
Rendered as
Black&White (1-bit)
Group 4 TIFF
Grayscale (8-bit)
LZW TIFF
256 Color (8-bit)
LZW TIFF
True Color (24-bit)
JTIFF - (JPEG compressed
TIFF)
Image Color Depth
Applies to: BMP, TIFF, PCX, GIF, WPG, WINDOWSICON, WINDOWSCURSOR,
MACPAINT, CGM, DCX, SUNRASTER, KODAKPCD, PNG, DGN, PBM, and ADOBEPHOTOSHOP.
www.iprotech.com
877-324-4776
Ipro eCapture User Guide
Q1 2014
6-81
Chapter 6, Performing QC
However, if Lead fails to open a file, it then goes to Oracle® Outside-In Technology (formerly Stellent) and would fall under the General Color Depth
options.
Image Color Depth Options
Rendered as
As Is
If Original is Black&White,
then Group 4 TIFF; otherwise, it will be a JPG matching bit depth.
Black&White (1-bit)
Group 4 TIFF
Grayscale (8-bit)
LZW TIFF
True Color (24-bit)
JPG
PDF Color Depth
PDF grouping applies only to PDF files. A PDF will always use the selected color
depth setting in the PDF area. There are two possible outcomes:
•
Successful use of the Adobe Library:
PDF Color Depth Options
Rendered as
As Is
If Original is Black&White,
then Group 4 TIFF; otherwise,
it will be a JPG matching bit
depth.
Black&White (1-bit)
Group 4 TIFF
Grayscale (8-bit)
JPG (8-bit)
True Color (24-bit)
JPG
•
Unsuccessful extraction of Adobe library:
PDF Color Depth Options
As Is
6-82
Rendered as
Always 24-bit JPG
Ipro eCapture User Guide
Q1 2014
www.iprotech.com
877-324-4776
QCing Items
PDF Color Depth Options
Rendered as
Black&White (1-bit)
Group 4 TIFF
Grayscale (8-bit)
JPG (8-bit)
True Color (24-bit)
JPG
Paper Size: Select an output paper size from the drop-down list.
www.iprotech.com
877-324-4776
Ipro eCapture User Guide
Q1 2014
6-83
Chapter 6, Performing QC
Setting Excel Options
Click the Excel Options Tab to set the Excel Processing Job options.
6-84
Ipro eCapture User Guide
Q1 2014
www.iprotech.com
877-324-4776
QCing Items
Click Defaults to populate the dialog with the Excel default settings as shown
in the previous figure. Some of the options show how to access the setting in
Microsoft Excel. For example, View > Header and Footer: Header/Footer Tab
means from the View menu, choose Header and Footer and click the Header/
Footer Tab. Or another example, Format > Row > Unhide means from the Format menu, choose Row, and then choose Unhide.
•
•
•
•
•
•
•
•
•
•
•
•
•
•
•
Do not include headers - View > Header and Footer: Header/Footer Tab,
Header drop-down list, None.
Do not include footers - View > Header and Footer: Header/Footer Tab,
Footer drop-down list, None.
Reveal hidden columns - Format > Column > Unhide
Reveal hidden rows - Format > Row > Unhide
Unhide worksheets - Format > Sheet > Unhide
Unhide very hidden worksheets - Unhides worksheets that were hidden
by a Microsoft Visual Basic for Applications program that assigned the
property xlSheetVeryHidden. (From the Microsoft Excel Help File: If
sheets are hidden by a Microsoft Visual Basic for Applications program
that assigns the property xlSheetVeryHidden, you cannot use the Unhide
command to display the sheets. If you are using a workbook with Visual
Basic macros and have problems with hidden sheets, contact the owner
of the workbook for more information.)
Autofit rows - Double click the boundary below that row heading.
Autofit columns - Double click the right boundary of the column heading
for that row.
Wrap text - Format > Cells: Alignment Tab, Wrap Text Option.
Print gridlines - File > Page Setup: Sheet Tab, Under Print, select Gridlines checkbox.
Unhide windows - Window > Unhide.
No fill color (for cells) - Format > Cells: Patterns Tab, Under Color, click
No Color.
Clear print area - File > Print Area > Clear Print Area.
Clear print title columns - File > Page Setup: Sheet Tab, under Print
Titles select the columns to repeat range.
Clear print title rows - File > Page Setup: Sheet Tab, under Print Titles
select the rows to repeat range.
www.iprotech.com
877-324-4776
Ipro eCapture User Guide
Q1 2014
6-85
Chapter 6, Performing QC
•
•
•
Display headings - File > Page Setup: Sheet Tab, under Print, select the
Row and column headings checkbox.
Apply Autofilter - Data > Filter > AutoFilter
Expand Pivot Tables - Alternate click Pivot Table to display context
menu. Choose Expand/Collapse > Expand.
Comments - Select from None, At end of sheet, or As displayed on sheet for
placement of comments.
Color Depth Options
Color processing for Excel files is handled separately from color processing of
other types of files. This setting is independent of the Color Depth options
located in the Processing Options:General Options tab. See the section General
Color Depth Option on page 6-81 for more information.
Single Page Output Type
General Color Depth Options
Rendered as
Black&White (1-bit)
Group 4 TIFF
Grayscale (8-bit)
LZW TIFF
256 Color (8-bit)
LZW TIFF
True Color (24-bit)
JPEG
Multi-Page TIFF Output Type
General Color Depth Options
Rendered as
Black&White (1-bit)
Group 4 TIFF
Grayscale (8-bit)
LZW TIFF
256 Color (8-bit)
LZW TIFF
True Color (24-bit)
JTIFF - (JPEG compressed
TIFF)
PDF Paper Size: Select an output paper size for PDFs. When the As Is option
is selected, the internal PDF document size is used to draw the image.
6-86
Ipro eCapture User Guide
Q1 2014
www.iprotech.com
877-324-4776
QCing Items
Paper Size: Select an output paper size from the drop-down list. Note: For
Custom[8.5x11.00 in], the Custom Paper Size dialog appears.
The Custom Paper size defaults to 8.5x11 inches. The range values are shown
for both Units: Inches and Millimeters. Maximum size in Inches 50.00x70.00;
for Millimeters 1270.00x1778.00. When this option is selected, the document
will be processed through the PDF driver (Text-Based PDF creation) regardless
of the Flex Processor option selected. OCRing is not applicable in this instance.
Export settings will be limited to Text-Based PDF Output only; even if image
format is selected. Non-Excel documents will export as usual.
Page Order
•
•
•
As is
Down, and then over
Over. and then down
Orientation - For printing
•
•
As is
Portrait
•
Landscape
www.iprotech.com
877-324-4776
Ipro eCapture User Guide
Q1 2014
6-87
Chapter 6, Performing QC
Scaling
•
•
•
As is
Adjust to % normal size
Fit to page
Center on Page
•
•
Horizontally
Vertically
Blank Page Removal - this option is available if the Remove Blank Pages
option is selected under the General Options tab.
Select from two options:
•
Remove based on selected Page Order: Down, then over or
Over, then down.
If Down, then over is selected, all vertical page columns that are
blank will be removed.
•
6-88
If Over, then down is selected, all horizontal page rows; where all
pages in a horizontal run are blank, will be removed.
Remove based on both Page Order Options: This bases the
removal of blank pages based on both horizontal page-rows and
vertical page-columns.
Ipro eCapture User Guide
Q1 2014
www.iprotech.com
877-324-4776
QCing Items
The following example pertains to using a spreadsheet with 12 pages that will
be rendered.
If the sheet's page order is Over, then down, Ipro eCapture will remove all horizontal page rows where all pages in a horizontal run are blank. In order to do
that, Ipro eCapture steps through all HPageBreaks and makes sure the range
from the first column to the last column is blank.
If Ipro eCapture determines that 1-3 is blank, then they will be hidden. If Ipro
eCapture determines that 4-6 is blank, then they will be hidden, and so on.
If the sheet's page order is Down, then over, Ipro eCapture will remove all vertical page columns that are blank.
If Ipro eCapture determines that 1-A is blank; then they will be hidden. If Ipro
eCapture determines that 2-B is blank; then they will be hidden, etc.
By using this algorithm, all blank pages will not be eliminated, though many of
them will be.
Note: All page-hiding is done by setting horizontal regions' RowHeight properties and vertical regions’ ColumnWidth properties to 0.
www.iprotech.com
877-324-4776
Ipro eCapture User Guide
Q1 2014
6-89
Chapter 6, Performing QC
Date Field Handling:
The Date Field Handling option works by examining each cell that contains a
formula to determine if a date field exists in that cell. This method will be used
for each of the Date Field Handling options (except for ‘Do Not Replace’) since
each option requires that each date field be handled in some way. Note: Documents who have a high number of date formulas could lead to slower perdocument processing times.
•
•
Replace with date created - will replace with creation date.
Replace with date last saved - will replace current date with last
saved dated.
•
Replace with comments - displays the Date Field Comments field
where you can enter the text that should replace the contents of
the date field.
Replace with field code
Do not replace - will not replace the date (e.g. Macros)
•
•
Header/Footer Filename Field Handling:
If path or filename options are found in an Excel header or footer, you can
select from the following options to handle these occurrences.
•
•
•
•
•
6-90
Replace with filename (no path) - inserts the unqualified filename
Replace with filepath - inserts the fully-qualified path of the original file
Replace with comments - displays the Header/Footer Filename
field comments field where you can enter your own comments
Replace with field code - replaces outputs &[Path] and/or &[File]
Remove - removes the codes entirely
Ipro eCapture User Guide
Q1 2014
www.iprotech.com
877-324-4776
QCing Items
About metadata
Who creates the metadata? The native program (such as Microsoft Excel
or Outlook) creates the metadata and maintains it with the native file (the
letter or e-mail).
What does Ipro eCapture do with this data? When a document is processed, the metadata is collected from the document and stored in the database.
How is metadata useful? It gives you valuable information as to “Who
knew what, and when.” It can tell you who wrote a document and who
edited it last. It also shows you a file’s revision number, the character count,
and many other pieces of information about a file.
Select Generate a metadata summary image for each Excel spreadsheet, then select the individual types of metadata to capture under Spreadsheet Summary Options:
•
•
•
•
Document Properties
Comments
Formulas
Linked Content - The data collected will include hyperlinks and OLE
linked files. If any linked content exists in a document, a QC flag will be
added.
A separate page entitled Document Properties is generated and is placed at
the end of each Microsoft Excel document.
www.iprotech.com
877-324-4776
Ipro eCapture User Guide
Q1 2014
6-91
Chapter 6, Performing QC
Setting the Word Options
Click the Word Options Tab to set the Word processing options.
Select the option Show Hidden Text to see hidden text, if any, contained in
Word documents.
6-92
Ipro eCapture User Guide
Q1 2014
www.iprotech.com
877-324-4776
QCing Items
Revisions
•
•
•
•
As is - Print the document as it is according to the Office Settings
on the machine.
Detail Revisions - Print the document with revisions shown.
Final Copy (hide revisions) - Print the document with no revisions
shown.
Both Copies - Documents are printed. If a document has revisions,
it's printed again with the revisions shown. Documents with revisions will then have two sets of images, one right after the other.
Orientation
•
•
•
As is
Portrait
Landscape
Scale to Page: Select this option to scale the contents of the page to fit in the
printable area. This sets the PrintZoomPageWidth and PrintZoomPageHeight to
the paper size of the printer when printing Word documents.
Color Depth
Color processing for Word documents is handled separately from color processing of other types of files. This setting is independent of the Color Depth
options located in the Processing Options:General Options tab. See the section
General Color Depth Option on page 6-81 for more information.
Paper Size: Select an output paper size or As Is from the drop-down list.
Single Page Output Type
General Color Depth Options
Rendered as
Black&White (1-bit)
Group 4 TIFF
Grayscale (8-bit)
LZW TIFF
256 Color (8-bit)
LZW TIFF
True Color (24-bit)
JPEG
www.iprotech.com
877-324-4776
Ipro eCapture User Guide
Q1 2014
6-93
Chapter 6, Performing QC
Multi-Page TIFF Output Type
General Color Depth Options
Rendered as
Black&White (1-bit)
Group 4 TIFF
Grayscale (8-bit)
LZW TIFF
256 Color (8-bit)
LZW TIFF
True Color (24-bit)
JTIFF - (JPEG compressed
TIFF)
Date Field Handling - select from the drop-down list:
•
•
•
•
•
•
Replace with date created - will replace with creation date.
Replace with date last saved - will replace current date with last
saved dated.
Replace with comments - displays the Date Field Comments field
where you can enter the text that should replace the contents of
the date field.
Replace with field code
Do not replace - will not replace the date (e.g. Macros)
Remove - removes the codes entirely.
Filename Fields - select from the drop-down list:
•
•
•
•
•
6-94
Replace with filename (no path)
Replace with filepath
Replace with comments - displays the Filename Comments field
where you can enter the text that should replace the filename.
Replace with field code
Do not replace
Ipro eCapture User Guide
Q1 2014
www.iprotech.com
877-324-4776
QCing Items
About metadata
Who creates the metadata? The native program (such as Microsoft Excel
or Outlook) creates the metadata and maintains it with the native file (the
letter or e-mail).
What does Ipro eCapture do with this data? When a document is processed, the metadata is collected from the document and stored in the database.
How is metadata useful? It gives you valuable information as to “Who
knew what, and when.” It can tell you who wrote a document and who
edited it last. It also shows you a file’s revision number, the character count,
and many other pieces of information about a file.
Select Generate metadata summary images for each Word document,
then select the individual types of metadata to capture under Document
metadata Summary Options:
•
•
•
•
•
Document Properties
Revisions
Comments
Routing Slips
Linked Content - The data collected will include hyperlinks and OLE
linked files. If any linked content exists in a document, a QC flag will be
added.
A separate page entitled Document Properties is generated and is placed at
the end of each Microsoft Word document. For example, The Document Properties page may contain the following data:
Title, Author, Company, Attached Template, Page count, Paragraph Count, Line
Count, Word Count, Character Count (spaces excluded), and Character Count
(spaces included).
www.iprotech.com
877-324-4776
Ipro eCapture User Guide
Q1 2014
6-95
Chapter 6, Performing QC
Setting PowerPoint Office Document Options
Click the PowerPoint Options Tab to set the PowerPoint processing options.
These options are based on the print options offered in PowerPoint. They
determine how images will be generated.
Select Original Settings (As Is) to use Microsoft PowerPoint’s default settings. Or, clear Original Settings (As Is) to adjust the settings:
6-96
Ipro eCapture User Guide
Q1 2014
www.iprotech.com
877-324-4776
QCing Items
•
•
•
•
•
•
•
Print Hidden Slides
Fit to Page
Print Comments
Frame Slides - Prints a border around each slide.
Output Type - Choose Slides, Outline, Notes Pages (notes and slide on
one page), Notes Pages Split (notes and slide on separate page), or
Handouts.
Slide Size - Choose a slide size or As Is from the drop-down list.
Paper Size - select an output paper size or As Is from the drop-down list.
Color Depth - Color processing for PowerPoint presentations is handled separately from color processing of other types of files. This setting is independent
of the Color Depth options under the General Options tab in the Options for
Processing Job dialog. See the section General Color Depth Option on page 681 for more information.
Single Page Output Type
General Color Depth Options
Rendered as
Black&White (1-bit)
Group 4 TIFF
Grayscale (8-bit)
LZW TIFF
256 Color (8-bit)
LZW TIFF
True Color (24-bit)
JPEG
Multi-Page TIFF Output Type
General Color Depth Options
Rendered as
Black&White (1-bit)
Group 4 TIFF
Grayscale (8-bit)
LZW TIFF
256 Color (8-bit)
LZW TIFF
True Color (24-bit)
JTIFF - (JPEG compressed
TIFF)
www.iprotech.com
877-324-4776
Ipro eCapture User Guide
Q1 2014
6-97
Chapter 6, Performing QC
Page Orientation
•
Choose As Is, Portrait, or Landscape
Slide Orientation
•
Choose As Is, Portrait, or Landscape
Handouts
•
•
Slides per Page
Order (if generating 4 or more slides per page)
Include Linked Content Summary - The data collected will include hyperlinks and OLE linked files. If any linked content exists in a document, a QC flag
will be added.
Headers and Footers
For Headers and Footers, you can set options for Slides or Notes & Handouts.
The tabs that display are based on the Output Type selected: Slides, Outline,
Notes Pages (notes and slide on one page), Notes Pages Split (notes and slide
on separate page), or Handouts.
For the Output Type of Slides, select from the following options from the Slide
Tab:
Date and Time or As Is
Update Automatically: Select from date last saved, date created, or current date’s format.
Fixed: Enter a fixed date and time.
Footer or As Is
Slide Number: As is, Show, Do not show
Show on title slide: As is, Show, Do not show
For any Output Type other than Slides, select from the following options under
the Notes & Handouts Tab:
Date and Time or As Is
Update Automatically: Select from date last saved, date created, or current date’s format.
Fixed: Enter a fixed date and time.
6-98
Ipro eCapture User Guide
Q1 2014
www.iprotech.com
877-324-4776
QCing Items
Header or As Is
Footer or As Is
Page Number: As is, Show, Do not show
Reprocessing Exception Files
Before attempting to reprocess exception files, try to resolve the issue that
prevented them from being open during initial processing. Ensure that no one
has the file open and make sure that it can be open (i.e., the file is not password-protected or encrypted). An exception can also occur with files that have
characteristics that can't be handled in electronic discovery, such as Web
frames in Microsoft Word documents.
Reprocessing Unknown Files
In order to be able to reprocess unknown files, make sure that the settings in
the General Options Tab (See the section Setting General Processing Options
on page 6-77 for more information.) is as follows before initially processing the
EDD session:
•
Generate images from unknown file types must not be selected.
That is because reprocessing simply attempts to generate images and
reprocessing would simply repeat a process that has already been completed.
Before attempting to re process unknown files, double-check the type of file.
Many files that have ASCII characters are not actually text files and would
generate many pages of non-human readable data if processed. Examples are
post script printing files and MP3 files.
www.iprotech.com
877-324-4776
Ipro eCapture User Guide
Q1 2014
6-99
Chapter 6, Performing QC
Setting the QC Reprocess Options for a Data
Extract Job
Click
dialog.
in the QC Functions toolbar to open the Options for Data Extract Job
Replace tabs with spaces when extracting Excel text: When this option is
selected, the extracted Excel text will look similar to this:
Column A Column B
6-100
Ipro eCapture User Guide
Q1 2014
www.iprotech.com
877-324-4776
QCing Items
Value1 Value2
The column data is separated by a space rather than a tab (which can be, for
example, the equivalent of 5 spaces). Therefore, if the option is not selected,
then the extracted Excel data would look similar to this:
Column A
Value1
Column B
Value2
In the above example, the column data is separated by a tab (5 spaces).
Expand Pivot Tables when extracting Excel text: Default is unchecked. If
pivot tables exist, they will be expanded when this option is checked. A flag is
also set in QC to indicate the Pivot table exists in the worksheet.
OCR
OCR images as necessary - Images will be OCRed for indexing/language
identification if necessary. The OCR text obtained from the image is then
passed on to dtSearch for indexing. The OCR will be indexed and available to
be searched on in the Flex Processor.
OCR PDF documents - PDFs with no embedded text: perform OCR prior to
indexing or language identification. PDFs with embedded text (text-behind)
will have text extracted anyway. The OCR text is added to any extracted text
from the PDF. The text obtained through OCR, along with the extracted text
from the PDF, is passed to dtSearch for indexing. The OCR will be indexed and
available to be searched in the Flex Processor. Note: Selecting this option will
impact the time for the Discovery process. OCR Text obtained through OCR
could contain duplicate words as appended to extracted text file. Search hits
could be inflated by these results. Optionally, select PDF page character
threshold to perform OCR on image-based PDFs that may contain a small
amount of embedded text, such as an image key. The default value is 25. If
there is less than this amount of characters retrieved, the PDF will be OCRed.
OCR PowerPoint Documents: Select this option to perform OCR on Microsoft PowerPoint files during Data Extract to get text from embedded content in
the slides. This will result in slower speeds for PowerPoint files, but more accurate text extraction.
Minimum OCR Confidence Level [1-100]: The level range settings are
from 1 up to 100. The default is 50. The OCR Confidence Level is the average
of confidence per document, for all pages within a document on which OCR
was performed. Success or failure of a document for flagging is based on the
www.iprotech.com
877-324-4776
Ipro eCapture User Guide
Q1 2014
6-101
Chapter 6, Performing QC
average confidence level of the document. If the average confidence level is
below the selected threshold, the document will be flagged in QC with the OCR
Low Confidence Flag. For the purposes of calculating average document confidence, pages in PDF docs with text behind them are considered 100%. OCR
failures are considered 0%.
Lotus Notes
Select from one of three methods to reprocess the selected email. The
selected method matches one of the selected Jobs for the QC Session.
•
•
•
High Speed (Optimized for speed - DXL Parsing) This method does not
require the NSF mail store to be copied locally to the QC machine.
Medium Speed (Balance of speed and quality)
Low Speed (Optimized for highest quality output - UI Printing)
Time Zone Handling
See Chapter 5, Creating Clients, Projects, Custodians, and Jobs and the section How Ipro eCapture Handles Dates - Time Zones on page 5-20 for additional information.
•
•
•
6-102
Use local time zone from the workstation on which the discovery is
being performed.
Convert all times to GMT (No daylight savings)
Select Specify Time Zone and select the time zone to be used to convert the times to. For example, you might select the time zone of the
workstation where the files originated.
Ipro eCapture User Guide
Q1 2014
www.iprotech.com
877-324-4776
Setting/Modifying the Ipro eCapture QC Module System Options
Setting/Modifying the Ipro eCapture
QC Module System Options
The very first time you start the Ipro eCapture QC Module, you will need to
establish a connection with the Microsoft SQL Server by entering data in the
System Options dialog.
This dialog can be accessed by choosing Tools > System Options from
the QC menu bar.
Once one or more connection settings are entered and saved, the
eCapture Monitor appears when Select Existing is clicked. See
Chapter 2, Ipro eCapture Controller and the section Using the Ipro
eCapture Monitor on page 2-9 for information about the eCapture
Monitor.
1.
Under Connection Settings, do the following:
•
•
•
From the Server drop-down list, select the SQL server where the
SQL database resides.
Enter the name of the SQL Database in the Database field or
select a SQL Database from the drop-down list.
Enter a User name and a User Password.
www.iprotech.com
877-324-4776
Ipro eCapture User Guide
Q1 2014
6-103
Chapter 6, Performing QC
2.
Click
mation.
. A dialog appears with connection status infor-
If the connection is not established, the dialog will present some options
for you to try in order to establish the connection.
If the connection is successful, the dialog will state: The connection was
tested successfully. Click OK twice to return to the Ipro eCapture Controller desktop.
Ipro eCapture QC Keyboard Shortcuts
List
The Ipro eCapture QC keyboard shortcuts are referenced throughout this
chapter in their relevant locations. The following list shows all the keyboard
shortcuts:
FLAGGING
To set any QC flag: CTRL + [FLAG ID] after releasing the CTRL button
the flag will be set. For example, to apply the Excel AutoFilter QC Flag
(17), press CTRL, press 1, press 7, and release.
Repeat to remove the flag.
PASS / REJECT QC
•
•
To pass an item in QC and immediately move to the next document:
Press the Enter or Return Key
To reject the Passed QC flag on an item: Press the Delete Key
AUTO QC
•
•
•
Speed up the scroll: + Key
Slow down the scroll: - Key
Starts and Stops the Auto QC Process: F4
REPROCESSING
•
6-104
Show options: F12
Ipro eCapture User Guide
Q1 2014
www.iprotech.com
877-324-4776
Ipro eCapture QC Keyboard Shortcuts List
•
•
•
•
Reprocess File: F7
Reprocess All: F9
Native Reprocess: F8
Native Reprocess while selecting custom Reprocessing Application:
CTRL+F8
NAVIGATION
•
•
•
•
•
•
Move between pages of a document: Right/Left arrow Key
Move between documents: Up/Down arrow Key
Go to Page: CTRL + G
Quick Find: CTRL + F
Find Next: F3
Refresh: F5
www.iprotech.com
877-324-4776
Ipro eCapture User Guide
Q1 2014
6-105
Chapter 6, Performing QC
6-106
Ipro eCapture User Guide
Q1 2014
www.iprotech.com
877-324-4776
7
Creating Export Series
and Export Jobs
In this Chapter
Overview ......................................................................... 7-1
Exporting Completed Processing Jobs ............................. 7-2
Creating a Processed Data Export Job (Export Processed
Data/New Process Export Job) .................................... 7-3
Exporting Completed Data Extract Jobs ...................... 7-146
Creating a Data Extract Export Job (Export Extracted
Data/Data Extract Export Job) ................................. 7-147
Export Formats ........................................................... 7-256
Custom Export Format (Image Load and/or Data
Load Format) ........................................................... 7-262
About Export Series .................................................... 7-264
Overview
Ipro eCapture Exports can be created for completed Processing Jobs (PJ) or
Data Extract Jobs (DEJ). Multiple export options are available for selection to
produce image and database load files. Starting with version 4.3, fields (system, flag, metadata, and user defined) may be selected for endorsement in six
different zones.
The export options will vary some degree depending on the type of job being
exported. These differences will reflect (PJ only) or (DEJ only) if the options
are only available for the type of job being exported.
Both types of export jobs are distributed throughout the export process.
In addition, both types of jobs can utilize the power of two additional export
features that are described in the following sections, Export Series and Export
Sets. Before beginning to export jobs, we recommend you read these sections
to better get acquainted with these additional features so that you can take
advantage of the powerful exporting Ipro eCapture has to offer.
www.iprotech.com
877-324-4776
Ipro eCapture User Guide
Q1 2014
7-1
Chapter 7, Creating Export Series and Export Jobs
Starting with version 6.2, create new load files for completed export jobs using
the export overlay function.
New in 6.2.1, predefined numbering source options are available based on
previously exported data or imported/merged document keys. The Suffix first
page option allows for starting the suffix on the first image key of the document rather than the second page.
Export Series
Export Series allows multiple jobs to be queued for an export and assigned to
an Export Series. Export Series (introduced in version 3.0) allow for the output
of successive, unattended rolling exports with sequential Image Key (Bates™)
numbering and volumes.
The Export Series can be created before beginning an Export or at the beginning of the Export Session. If the Export Series is already set up, then you can
optionally select the series to which you want to apply the Job.
Export Sets
Export Sets (discussed further in Chapter 6, Performing QC) allow documents
in a set to be sorted in specific order and an Export Set created for the sorted
document set. Export Sets can be applied to an Export Series. An Export Set is
always created by a QC Processing Job Session or a Data Extract Job Session.
Exporting Completed Processing Jobs
Exporting is the process of creating a deliverable by converting the original
images and data into specified document/image based load formats for a number of database solutions.
Image load formats include:
•
•
•
•
•
•
•
7-2
Delimited ASCII text file
Custom export format
Ipro LFP
Ipro OCR
Summation DII
Opticon and TotalVZN (OPT file)
Sanction and Trial Director (OLL file)
Ipro eCapture User Guide
Q1 2014
www.iprotech.com
877-324-4776
Creating a Processed Data Export Job (Export Processed Data/New Process Export Job)
•
•
•
•
Doculex 3.0 & CaseMap
Doculex 5.0
Ringtail
Ipro DLF (Eclipse)
Database load formats include:
•
•
•
•
•
•
•
Delimited ASCII Text
Custom Export Format
Summation Text File
Concordance .DAT
LaserFiche (includes image links)
DB/Textworks (includes image links)
OCR CONTROL.LST
Ipro eCapture automatically includes the searchable text along with the
images and metadata.
Creating a Processed Data Export Job
(Export Processed Data/New Process
Export Job)
We recommend that you QC the Processing Job(s) before they are
exported to ensure data accuracy. The system will display a message
if it encounters processing jobs that have not yet been QCed.
You can deliver a Processing Job to a client by exporting it. The Process Export
uses a wizard to facilitate the ease of exporting one or more Processing Jobs.
1.
Click the Client Management Tab.
2.
Do one of the following:
•
In the Tree View, navigate to the Processing Jobs folder (under
Custodian). Select a completed Processing Job and click the
alternate mouse button to display the context menu. Select
Export Processed Data from the context menu to display the
New Export Job dialog. The job you selected is already checked in
www.iprotech.com
877-324-4776
Ipro eCapture User Guide
Q1 2014
7-3
Chapter 7, Creating Export Series and Export Jobs
•
3.
Do one of the following:
a.
7-4
the Tree View. Proceed to Step 3 and the letter a if you wish to
select additional jobs. If you want to select an Export Set instead,
proceed to Step 3 and the letter b.
In the Tree View, navigate to Export Jobs (under Client). Select
Process Exports and click the alternate mouse button to display the context menu. Select New Process Export Job from the
context menu to display the New Export Job dialog. Proceed to
Step 3 and the letter a. Or, if you want to select an Export Set
instead, see Step 3 and the letter b.
Select the Select Jobs option to display the Tree View and expand
it. Select one or more jobs for exporting. The Export Job name
field populates with the first processing job you selected. You can
select multiple Processing Jobs for export. The system will go
through each one and store the data under the directory of the
Export Name you indicated in the New Export Job dialog box. It
may be necessary to expand the tree to view the processing jobs.
Proceed to Step 4
Ipro eCapture User Guide
Q1 2014
www.iprotech.com
877-324-4776
Creating a Processed Data Export Job (Export Processed Data/New Process Export Job)
b.
OR
Select the Select Export Set option to display a list of Export Sets
that were created in QC and then select an Export Set. If necessary, expand any Export Set Containers to select an Export Set
that is stored in a Container. Proceed to Step 4.
4.
From the Export Type drop-down menu, select Direct to Disk. For
Eclipse, see the section Autoload into Ipro Eclipse - Processing Job on
page 7-52. For Relativity, see the section Autoload into Relativity - Processing Job on page 7-100.
5.
Enter an Export Job Name, or if a default name appears in the field,
modify it if necessary. This is the name the system uses for the directory
name where the exported data is stored.
6.
Select a task table from the drop-down list. The task table that appears
in the field is based on the last task table selected for the Client.
7.
(Optional) Browse to the Template (.INI File) that has the data
extraction export settings from a previously run data extraction export.
A file will not exist until you run your first data extraction export. Note:
www.iprotech.com
877-324-4776
Ipro eCapture User Guide
Q1 2014
7-5
Chapter 7, Creating Export Series and Export Jobs
This option is not available if you select an existing Export Series from
the drop-down list. This file saves time because you will not need to
manually make selections in some of the Export wizard screens as well
as ensure that there is consistency when exporting jobs for a particular
situation.
8.
(Optional) Do one of the following:
•
•
•
9.
Leave the default setting [none] under Export Series.
Select an Export Series from the drop-down list. When an existing Export Series is selected, the
,
appears. When clicked, the Export settings dialogs will not appear;
instead the Job is placed in the Job Queue. See the section About
Export Series on page 7-264 for background information about
Export Series. Or see the section Creating an Export Series (Process Export or Data Extract Export) on page 7-266 if you want to
create the Export Series before the Export Job is created.
Select [new export series] from the Export Series drop-down list
and enter a New Export Series Name.
Click OK. (NOTE: A warning dialog may appear if one or more of the
selected processing jobs have not yet passed QC. You can elect to continue to export or cancel, QC the jobs, and then export again.) Select
Export Formats and File Handling Options dialog appears unless
was clicked for an existing Export Series.
7-6
Ipro eCapture User Guide
Q1 2014
www.iprotech.com
877-324-4776
Creating a Processed Data Export Job (Export Processed Data/New Process Export Job)
www.iprotech.com
877-324-4776
Ipro eCapture User Guide
Q1 2014
7-7
Chapter 7, Creating Export Series and Export Jobs
10.
Select from the following options:
a.
Image Load Format and Data Load Formats - Select one or
more Formats from each box. (Note: To export and select from
the following Data Load Formats only - Delimited ASCII Text File,
Custom Export Format, Summation Text File, and Concordance
DAT - deselect both the Export Image Files and the Export Image
Text checkboxes.)
Resulting export screens will display options as they pertain to the
selected formats.
•Export to Concordance® DAT
•Export to Summation case
•Export to OCR CONTROL.LST
See the section, Export Formats on page 7-256 for additional
information about the options in the previous bullet list.
For Ringtail Format, see the section Ringtail Format on page 7259.
If the image load file format you need to create does not appear
under Image Load Formats, select Custom Export Format.
See the section, Custom Export Format (Image Load and/or Data
Load Format) on page 7-262 for specific information on populating the Select Custom Load Delimiters screen.
b.
The Data Load Formats, LaserFiche, DB/Textworks, and OCR
Control.lst will not appear unless the option, Export Text Files, is
selected.
Export Image Files - When selected images and text files are
exported. Select one or more Load Formats and select from the
options described in c) and e).
If deselected, there will not be any Image Load formats available
for selection (skip c and e); however, Ringtail and Summation DII
are available for selection under Data Load Formats. In addition,
the option, Use page-based numbering, appears to the right
and is selected by default. When selected, page counts in image
key numbering are retained.
7-8
Ipro eCapture User Guide
Q1 2014
www.iprotech.com
877-324-4776
Creating a Processed Data Export Job (Export Processed Data/New Process Export Job)
c.
Image Format and Options - From the drop-down list, select
one of the image formats to generate during the export process:
•Single Page TIFF/JPG Files creates a separate file for each
image in the job. Black and white images are saved as
TIFFs; color images are saved as JPEG files. Will also export
single page extracted text.
•Single Page PDF Files outputs single page PDF files for images.
•Multiple Page TIFF Files creates a TIFF file for each document.
Will also export multiple page extracted text.
•Multiple Page PDF Files creates multi-page PDF files containing
all documents for the entire family. Each PDF contains all of
the images from all family members, and the associated text
file (if selected) contains all of the images from all family
members as well.
•Both TIFF and PDF Files is specific for the Image Load Format
Ringtail. Multi-page PDF representation of the document is
copied to the output folder along with the single page
images.
•Multiple page PDF files per family is specific for the Image
Load Formats of Ipro LFP and Ipro OCR. This option only
applies when exporting Direct to Disk. When this option is
selected, one multipage PDF file is exported per family. The
name of the PDF is the export number of the parent. When
exporting document text files, the text file for the parent
document contains the text for the entire family; which
matches the PDF. No text files are exported for child documents.
Convert LZW Image to JTIFF - When this option is selected, it
converts LZW compressed Single Page TIFF files to JTIFs. Exported
multi-page TIFFs are always JPEG compression.
Create Searchable PDFs - This option is automatically selected
when either Single Page PDFs or Multiple Page PDFs are selected
from the drop-down list.
Select the option, Make endorsements searchable, if you want
to search for endorsements.
www.iprotech.com
877-324-4776
Ipro eCapture User Guide
Q1 2014
7-9
Chapter 7, Creating Export Series and Export Jobs
d.
Select the option, Convert Fast Web Enable, to create fast view
enabled PDFs at export. PDF documents are restructured for
downloading one page at a time from web servers. Only the
requested page is sent rather than the entire PDF.
Force Image Canvas to: The ratio of a resized image is maintained when selected. From the drop-down list, select a paper size
and then select an image size from the drop-down list underneath.
Options include: For small images, for large images, and for both
small and large images.
Center Vertically: Centers the image vertically on the canvas.
The default vertical alignment is top.
e.
7-10
Center Horizontally: Centers the image horizontally on the canvas. The default horizontal alignment is left.
Click the link, Apply to select file types only, to open the Image
Normalization Inclusions dialog.
Ipro eCapture User Guide
Q1 2014
www.iprotech.com
877-324-4776
Creating a Processed Data Export Job (Export Processed Data/New Process Export Job)
By default, all file types are selected. Click Clear All, to clear all the
selected file types and then select the specific file types for the
Export Job. If necessary, click + to expand the list for a file type,
such as Microsoft Excel, to display specific versions/types of Microsoft Excel.
Click OK to return to the Export screen. A message appears underneath the link that states the number of file types that will be
included.
f.
Export Text Files - select this option to display additional Data
Load Formats of LaserFiche, DB/Textworks, and OCR Control.lst.
Note: if this option is deselected, then no text files are created
except for the VolumeManifest.TXT.
Optionally select from the following Document Text options:
•Include Image Key in Document Text: Select this option if
you want to include the Image Key at the beginning of the
text file. Indicate which token to include in the image key
format. The default is << [k] >>, where token [k] is for the
image key. The other format is << [p] >>, where token [p]
is for the page number. The Image Key will appear like this:
<< EXH_1245 >> The Page will appear like this << 25 >>
This option takes precedence over Create Text Placeholders
for Missing Text Files. Therefore, if both options (Include
Image Key... and Create Text Placeholders...) are enabled,
then a document without text will have a text file with only
the Image Key.
•Create Text Placeholders For Missing Text Files: Creates
placeholder text files for documents where there was no
available text. Text placeholders are created with each combination of export text files and image formats. The option,
Include Image Key in Document Text, takes precedence over
the option, Create Text Placeholders for Missing Text Files. If
both options are selected, a document without text will have
a text file with only the Image Key. (Note: this option is not
available if the option Export Image Files is de-selected.)
www.iprotech.com
877-324-4776
Ipro eCapture User Guide
Q1 2014
7-11
Chapter 7, Creating Export Series and Export Jobs
g.
•Export Document Text as Single File: This option available for
Single Page TIFF/JPG Files or Single Page PDF Files only. Ipro
eCapture’s default is a text file per image. It creates one text
file per document as opposed to per image. One document
can have many images.
(Optional) Export Native Files - (Note: When this option is
selected along with the Ringtail Image Load File format, the Name
file using image key and Copy to output directory options are automatically selected. Starting with version 5.6, the Copy to output
directory option was replaced with the option Directory for each
native which is located in the last screen of the Export Wizard.)
Under Native file options, select from the following:
•Name File Using Image Key: If this option is selected, the
native file directory will no longer create an additional directory per document. By naming the file using the Image Key,
it removes any chance of duplicate filenames occurring.
Therefore, the additional level of directories are not necessary. An example follows:
•
7-12
Copy to Output Directory: This option was replaced with
the option Directory for each native which is located in the
last screen of the Export Wizard.
Ipro eCapture User Guide
Q1 2014
www.iprotech.com
877-324-4776
Creating a Processed Data Export Job (Export Processed Data/New Process Export Job)
Native files are copied to a directory separate from the
images. The directory numbers match their corresponding
image file.
Under Alternate Email Export Options, select from:
•
•
•
•
Outlook - Check this option to export an alternate native file for
Outlook files. The default export format is MSG.
Lotus Notes - Check this option to export an alternate native file
for Lotus Notes files. The default export format is DXL.
Outlook Express - Check this option to export an alternate native
file for Outlook Express files. The default export format is EML.
GroupWise - Check this option to export an alternate native file for
GroupWise files. The default export format is XML.
Select one of the following formats:
•.MHTFormat: Exports selected e-mail type to a standardized format rather than to .DXL or .XML. Types include Outlook,
Outlook Express, Lotus Notes, and GroupWise. (An .MHT file
is an Archived Web Page file with information in Multipurpose
Internet Mail Extension HTML (MHTML) format with an .MHT
file extension. All relative links in the Web page are
remapped and the embedded content is included in the .MHT
file.)
•Rich Text Format (RTF): Uses Microsoft Word to open the MHT
and saves it as an RTF; a more widely accepted format.
•HTML: HTML documents can have inline images, the images
themselves are not included in the HTML. The images must
be included in the export in order to access the inline
images.
File extension options: This option is used in the event the native documents are missing or have incorrect file extensions. When this is the
case, the native file viewers will not work. The correct extension is
defined as the value presented in the Extension field of the StellentDefs
table in the CONFIG database for the StellentID of the file. Oracle® Outside-In Technology (formerly Stellent) will not identify files it cannot discern with a .TXT extension. If necessary, a Database Administrator may
manually update the Extension field in the StellentDefs table with custom extensions using SQL. The options from the drop-down list include:
www.iprotech.com
877-324-4776
Ipro eCapture User Guide
Q1 2014
7-13
Chapter 7, Creating Export Series and Export Jobs
•
•
•
•
None - default setting. Nothing happens.
Add extension only if missing
Append corrected extensions - appends extensions that are incorrect or missing.
Replace incorrect extensions - replaces incorrect extensions with
correct extensions or missing extensions.
Click the link, Apply to selected file types and/or QC Flags, to open
the Native File Export Inclusions dialog.
By default, all file types are selected and the QC flags are not selected.
For the file types, click Clear All, to clear all the selected file types and
then select the specific file types and/or only documents to which the
QC flag or flags are attributed. If necessary, click + to expand the list for
a file type, such as Microsoft Excel, to display specific versions/types of
Microsoft Excel. If either one (file type/QC flag) “hits”, the native file will
7-14
Ipro eCapture User Guide
Q1 2014
www.iprotech.com
877-324-4776
Creating a Processed Data Export Job (Export Processed Data/New Process Export Job)
be exported.
Click OK to return to the Export screen. A message appears underneath
the link that states the number of file types and QC flags, if any, that
were included.
11.
Click Next. One of the following happens:
•
The Custom Load Delimiters screen appears if the Data Load Format, Custom Export Format was selected in the previous screen.
See the section Custom Export Format (Image Load and/or Data
Load Format) on page 7-262 for information on populating this
dialog.
www.iprotech.com
877-324-4776
Ipro eCapture User Guide
Q1 2014
7-15
Chapter 7, Creating Export Series and Export Jobs
12.
Click
to display the Merge Data Options dialog.
This dialog appears if at least one set of images or text exists in one of
the Processing jobs or Export Sets selected for the Export job.
Do the following:
•
7-16
from the drop-down menu, select the order (Date, Ascending;
Date, Descending (default); Name, Ascending; Name, Descending;
Custom - use the up/down arrows) merge jobs display in the
Merge Jobs drop-down menu in the Image tab or View tab.
Ipro eCapture User Guide
Q1 2014
www.iprotech.com
877-324-4776
Creating a Processed Data Export Job (Export Processed Data/New Process Export Job)
•
•
deselect one or more merge jobs. By default, all merge jobs are
selected. The “Original” item refers to the original images and text
associated with the document. It appears as the last item in the
list of merge jobs and remains selected.
(Optional) Select the option Always use original page count for
image key numbering. This is relevant for Process Exports. This
option affects how image keys are assigned to pages when
exported, and could affect how many images are exported. When
this option is selected it uses the original page count for the document. Otherwise, it uses the total page count of the applicable
merge job.
www.iprotech.com
877-324-4776
Ipro eCapture User Guide
Q1 2014
7-17
Chapter 7, Creating Export Series and Export Jobs
Click
to proceed to the Export Fields screen.
Defining Export Fields for Databases
If you are creating any database load file formats during the Ipro eCapture
export process, you need to define the export fields that Ipro eCapture will
export. This step ensures that the data exported from Ipro eCapture matches
the fields in the database where the data will be used.
There are several field types that can be exported. These field types are designated as follows:
7-18
Ipro eCapture User Guide
Q1 2014
www.iprotech.com
877-324-4776
Creating a Processed Data Export Job (Export Processed Data/New Process Export Job)
S (System Fields): These fields only have meaning in the context of an Ipro
eCapture export. If a document was viewed outside of the export, none of
these field types would apply. Any brackets [] will be removed from the label
when exporting. Some of these fields are applicable for endorsement only. The
System field definitions are as follows:
ITEM_ID: The Ipro eCapture unique identifier for the document. Can be
added/removed from Selected Fields.
BEGDOC: Starting Bates number of the document.
ENDDOC: Ending Bates number of the document. Note: May be removed from
the Selected Fields box.
BEGATT: Starting Bates number of the attachment range.
ENDATT: Ending Bates number of the attachment range.
PARENT_ATTACHMENT: "P" for anything not an attachment, "A" for attachment
(child).
ATTACHMENT_BATES: Semicolon-delimited list of Bates numbers of the children of a parent document.
ATTACHMENT_ITEMIDS: Semicolon-delimited list of the ItemIDs of the children of a parent document.
EXTRACTED_ATTACHMENT_COUNT: Counts the children of a document as it
relates to the export. The count should always match up with the number of
ItemIDs in the field ATTACHMENT_ITEMIDS and image keys in the
ATTACHMENT_BATES field. Note: This field will be zero for all documents in the
export that have a parent in the export.
EXTRACTED_ATTACHMENT_NAMES: Generates a semi-colon delimited list of
the child document’s filenames in the order of the export. The number of filenames in the list should match the EXTRACTED_ATTACHMENT_COUNT.
PARENT_BATES: If a document is a child, the Bates of the parent.
PARENT_ITEMID: If a document is a child, the ItemID of the parent.
EXPORT_NATIVE_FILES: Used when exporting native files. Shows export path
to the native files. Defaults to Selected fields box when Export Native Files is
selected from the Formats and File Handling screen. May be moved from
Selected Fields box to Available Fields if required.
www.iprotech.com
877-324-4776
Ipro eCapture User Guide
Q1 2014
7-19
Chapter 7, Creating Export Series and Export Jobs
ABSOLUTE_PARENT_ID: Obsolete - use PARENT_ITEMID instead.
PARENT_ITEMID queries the ExportedItems table to get an absolutely accurate
parent ID relating to the export. ABSOLUTE_PARENT_ID reads from the Items
table. Both should agree, but if not PARENT_ITEMID is the more accurate of
the two.
RELATIVE_PARENT_ID: This field is relative to the Discovery Job, not the
Export. Compound document options may result in the relative parent being
excluded from the export. NOTE: PARENT_ITEMID can differ from
ABSOLUTE_PARENT_ID if compound document options cause the absolute
parent to be excluded from the export. PARENT_ITEMID is relative to the
Export; ABSOLUTE_PARENT_ID is relative to the Discovery Job.
RELATIVE PATH: Original path to native file without directories above where
the directory folder was selected.
SEARCH HITS: Contains the search terms.
CUSTODIAN_NAME: The name of the Custodian containing the process job
that produced the document being exported.
DISCOVERY_CUSTODIAN_NAME: Used to identify the custodian of the Discovery Job in which an exported item was found.
CUSTODIANS: Used to identify the duplicate Custodians for this record.
DUPLICATE_LOCATIONS: Used to list the (Duplicate ID), Custodian Name,
<Filename>, and [Discovery Path] for this record.
PROCESS_JOB_NAME: The name of the Process Job that produced the document being exported.
RULE_CATEGORY: Contains the categories (selected and assigned through the
Flex Processor).
PROCESS_STATUS: Displays the process status results of a job. Items that
processed successfully will show "Success".
IDENTIFIED_LANGUAGES: List of languages, identified by BasisTech, that exist
in a document.
IDENTIFIED_ENCODING: List of encodings, identified by Basis Tech, that exist
in the document.
VOLUME_NAME: The value is the label for the document’s volume.
7-20
Ipro eCapture User Guide
Q1 2014
www.iprotech.com
877-324-4776
Creating a Processed Data Export Job (Export Processed Data/New Process Export Job)
ORIGINAL_CUSTODIAN: Populates with the name of the custodian the original
file belonged to when an item duplicates against another file when doing deduplication at the Project or Client level.
BATCHID: Contains the Batch ID assigned for the Discovery Job.
FULLTEXT: Contains combined contents of body text and OCR text.
EXPORTED_TEXT_FILES: Contains the path to the exported extracted text files
when the option, Export document text as single file, is selected in the first
export screen. The value of this field will be affected if the Replace the export
path with the following drive letter/path field is populated (located in last
Export screen). This field cannot be used for a Group field and is not available
for endorsements.
DocType: Contains eMail, eDoc, and eAttach types.
DocCategory: Contains definitions that represent the document based on
Email (absolute parent and loose email only, e.g. not email attached to email),
Email Attachment (any email attachments to an email), Edocument (files that
are not email and not an attachment of an email family), Edocument Attachment (any embedded file in an edocument; including emails).
USERDEFINED1 through USERDEFINED5: Values to be entered using SQL
Server Manager. These fields can be used for endorsements, custom placeholders, etc.
BARCODE: Contains the barcode (USS Code 39 specification).
F (QC Flags): The QC flags that appear in the list are both system QC flags
and any user defined QC flags for the selected Processing Job or Jobs. The
CUSTMDAT.TXT file, created from the Export, will show a value of Y for flags
that are “on” or be blank for flags that are “off”.
www.iprotech.com
877-324-4776
Ipro eCapture User Guide
Q1 2014
7-21
Chapter 7, Creating Export Series and Export Jobs
M (Metadata Fields): These fields were retrieved from documents during
processing.
Starting with version 2.0, three additional Metadata fields were
added. They are: Last Access Date, Last Access Date*DATE ONLY*,
and Last Access Date*TIME ONLY*. Last Access Date is a volatile system field. The first time that Ipro eCapture discovers a directory of
loose files, Last Access Date will be valid. However, subsequent discovery jobs, run on the same set of files, will get the date the Ipro
eCapture last “touched” the file on the initial discovery job. We highly
recommend that you should not use the Last Access Date metadata
fields. Because there isn’t a legitimate value for any file Ipro eCapture
extracts, this field will be populated for loose files only. In addition, emails that Ipro eCapture extracts, attachments, embedded files, and
files extracted from archives will not have this value populated.
E (External Fields): These fields are from export jobs originating from Ipro
Allegro or from the Ipro eCapture Import Wizard.
U or G (User Defined Fields): These comprise two types: User [U] and/or
Group [G]. These fields are created via the Insert Custom Fields function. The
User fields will export the field label and the value you may optionally enter.
Otherwise the value may be blank. The Group fields are space-delimited combinations of System (S) and/or Metadata (M) field types.
When the Data Extract Export wizard is initiated, the process jobs to be
exported are selected first. The fields available for export are based on a standard list of metadata fields combined with the metadata retrieved during processing. In versions 1.2 and earlier, these fields were called Standard and
Extended Metadata fields with separate selection options. Starting with version
1.3, they are now combined with no differentiation between them.
The available fields listview is populated using this list of Metadata fields, along
with the Ipro eCapture system fields which are available for all exports. In
addition *DateOnly* and *TimeOnly* fields are parsed from date fields and
included in the Metadata fields.
7-22
Ipro eCapture User Guide
Q1 2014
www.iprotech.com
877-324-4776
Creating a Processed Data Export Job (Export Processed Data/New Process Export Job)
The export will always export the non-displayed system fields
[BATES_NUMBER] and [ITEM_ID] as the first two fields regardless of field
selections shown. All other fields to be exported are displayed in the Selected
Fields box and will be exported, in order, named as the field label. The next
section, About the Select Export Fields Screen on page 7-23, describes how to
populate the Selected Fields box.
Sorting Fields
Alternate click a field and choose Make Sort Field from the shortcut menu. This
option appears for those fields that can be sorted such as a metadata field.
A Y appears in the Sort column. To clear this entry, alternate click the field and
choose Clear Sort Field.
When a field is marked as a Sort field, it applies the value of the selected field
to all family members of a parent item. This allows sorting on the specified
field in an external application to be compound-complete. For example, when
the ‘Sent Date’ field is made into a Sort field, the value of the ‘Sent Date’ field
for an email will be used as the value of the same field in the exported load file
for all of the email’s attachments.
About the Select Export Fields Screen
See the section About the EncounteredMetadataFieldList Table on
page 7-264 for more information about the metadata fields.
The field type designator (discussed in the previous section, Defining Export
Fields for Databases on page 7-159) displays in the Type column of both the
Available and Selected Fields boxes.
Available Fields: Displays all fields available to be exported. Click the dropdown list located above the field list, and select a specific field type. By
default, All Fields display. Ctrl-click to select non-contiguous fields. Shift-click
to select a contiguous range.
Filter Value - enter a value to filter the list. For example, to see only those
fields that contain the word “date”, enter date and click
fields, delete the value and click
www.iprotech.com
877-324-4776
. To display all
.
Ipro eCapture User Guide
Q1 2014
7-23
Chapter 7, Creating Export Series and Export Jobs
Selected Fields: Displays all fields selected from the Available Fields for
export. Right-click a field to edit it, use the up or down arrows to reorder the
fields.
: Click to move a selected field from the Available Fields box to the
Selected Fields box.
box.
: Moves all fields from the Available Fields box to the Selected Fields
: Click to move a selected field from the Selected Fields box to the
Available Fields box.
box.
: Moves all fields from the Selected Fields box to the Available Fields
Field List: This list contains the following field list templates: Ipro Basic Field
List, Ipro Standard Field List, Ipro Extended Field List, and Ipro Enterprise
Field List. The Ipro Enterprise field list reflects the standard list of fields that
are selected by default in a new Ipro Allegro case and created in a new Ipro
Eclipse case. To facilitate the ease of field selection, the templates are used to
load the fields, all at once, into the Selected Fields box. The drop-down list will
also display user saved System templates and/or Client templates. Templates
selected from a physical .INI file do not display in this list.
To load a template into the Selected Fields box, select the template from the
drop-down list. A warning dialog box appears.
Click Yes to continue. The template’s fields appear in the Selected Fields box.
7-24
Ipro eCapture User Guide
Q1 2014
www.iprotech.com
877-324-4776
Creating a Processed Data Export Job (Export Processed Data/New Process Export Job)
To save a new template based on manually selected fields, click the dropdown list, choose Save As, click
appears.
. The Save Template As dialog
Select from the following:
•
•
System Template - available to all Export Jobs
Client Template - available only to the Client
For System Template or Client Template, enter a meaningful name for
the template.
•
File - saves to a physical .INI file in selected location
For a File template (.INI), click
to display the File Browser dialog.
Browse to a location, enter a filename, and click Open. The Save Template As dialog appears indicating the pathname in the Location field.
Click Save.
To select an existing user created field list template saved as a physical
.INI file, click the drop-down list, choose Browse, and click
. The Open
dialog appears. Browse to the saved template (.INI) file and click Open. A
warning dialog box appears indicating that loading fields from a template will
clear any selections, including group fields and field label modifications. Click
Yes to continue.
www.iprotech.com
877-324-4776
Ipro eCapture User Guide
Q1 2014
7-25
Chapter 7, Creating Export Series and Export Jobs
Managing Field Templates
User created System and/or Client templates can be renamed, edited, deleted,
and viewed.
From the Controller menu bar, choose Tools > Field Template Management. The Field Template Management dialog appears.
Alternate click a template to display the context menu (options disabled if
there are no saved templates) and choose:
7-26
Ipro eCapture User Guide
Q1 2014
www.iprotech.com
877-324-4776
Creating a Processed Data Export Job (Export Processed Data/New Process Export Job)
Rename Template- displays the Edit Template Name dialog. Enter a new
Template name and click OK.
Edit Template - displays the Edit Template name dialog. A different name
may be given and the Type can be changed. If the type is changed to Client
Template, the dialog expands to display a Client drop-down list where a different Client can be selected. If the type is changed to System Template, the dialog collapses to hide the Client drop-down list.
Delete Template - A Delete Confirmation dialog appears prompting a decision to delete the template. Click Yes to delete the template.
View Template - Opens a dialog with the selected Template in the title bar
and shows the fields assigned for that template. Click Close when through
viewing the fields.
: Moves the Standard Fields from the Available Fields box to
the Selected Fields box.
: Allows the loading of only selected export fields from a previously saved .INI file. The Fields from Export Settings come from the .INI file
which you can optionally load when creating a new export job.
: Opens the Insert Custom Field dialog where you can
create new group fields and new user fields. Inserting Custom Group Fields is
discussed in the section, Inserting Custom Group Fields on page 7-27.
Use
and
to change the order of the fields in the Selected Fields box.
Select a field (or contiguous fields) and then use either arrow to reposition it
(or the selected fields) accordingly.
Inserting Custom Group Fields
You can group several Ipro eCapture fields into a single field in the export file.
For example, you can group the Author and Manager fields to create a group
field called authorgroup.
www.iprotech.com
877-324-4776
Ipro eCapture User Guide
Q1 2014
7-27
Chapter 7, Creating Export Series and Export Jobs
Or, you can sort attachments by a field that you specify instead of by image
key order. For example, you might want to group all of the Microsoft Word
attachments together within their parent documents. To do this, you would
create a Group based on Application Name (a metadata field), add it to the
fields to export, and sort by that field.
You might create a group if you want to:
•
•
Have related information appearing together and/or be treated as a single field in the litigation database.
Sort attachment ranges in some other way than image key order within
their parent documents.
The Ipro eCapture fields are separated by the selected Delimiter (introduced in
version 3.0) in the export file’s group field.
Group fields are available for selection in the Specify Summation Options
screen and in the Specify Endorsements screen.
7-28
Ipro eCapture User Guide
Q1 2014
www.iprotech.com
877-324-4776
Creating a Processed Data Export Job (Export Processed Data/New Process Export Job)
a.
Click
www.iprotech.com
877-324-4776
to open the Insert Custom Field dialog.
Ipro eCapture User Guide
Q1 2014
7-29
Chapter 7, Creating Export Series and Export Jobs
b.
c.
By default, the Type Group is selected. To create a Custom User
Field, see the section Inserting Custom User Field Labels on page
7-31.
Enter a meaningful name for the group of fields in the Field label
field.
Select one of the following:
Output values as delimited list and select a Delimiter to use
from the drop-down list.
d.
e.
. To display all fields, delete the value and click
.
Select each field you want to include in the group by clicking it
twice. Each selected field appears in the Selected Field box. Ctrlclick to select non-contiguous fields. Shift-click to select a contiguous range.
f.
Click
to display the Text Field dialog. Enter text
and click OK. When endorsing, the custom user field is aligned
side by side with the system field. For example, ItemID 77878,
where ItemID is the user field label and 11878 is the actual
[Item_ID].
g.
If necessary, use the
or
to change the order of the fields in
the Selected Fields box. Select a field (or contiguous fields) and
then use either arrow to reposition it (or the selected fields)
accordingly.
Click OK. The Insert Custom Field dialog closes and you return to
the Select Export Fields screen. The newly created Group Field
h.
7-30
Output first non-blank value: Ipro eCapture looks for data
starting with the top field on down for multiple fields. The first field
encountered with data will be placed in the Group field.
Click the drop-down list located above the Available Fields list,
and select a specific field type. By default, All Fields display. To
further narrow the field list, enter a value in the Filter Value field
located below the Available Fields list. For example, to see only
those fields that contain the word “date”, enter date and click
Ipro eCapture User Guide
Q1 2014
www.iprotech.com
877-324-4776
Creating a Processed Data Export Job (Export Processed Data/New Process Export Job)
i.
j.
appears in the Selected Fields box. Notice that G appears in the
Type column. G is for Group Field.
Repeat steps a) through g) to create additional Group Fields.
Click OK to return to the Select Export Fields screen or the Specify
Endorsements screen.
User Defined Group Field Functions
These functions are available from the Select Export Fields dialog only.
To change the Group Field label, select it in the Selected Fields box and
click the alternate mouse button to display the context menu. Choose Change
Field Label to open the Edit Field label dialog. Modify the Field Label. Click
OK. The change made here affects how a field’s label will appear in the header
row of the export file.
To make the Group Field a sort field, select it in the Selected Fields box
and click the alternate mouse button to display the context menu. Choose
Make Sort Field. A Y appears in the Sort column. To remove sorting, alternate click the field to display the context menu. Choose Clear Sort Field.
To edit the Group Field’s value, select it in the Selected Fields box and click
the alternate mouse button to display the context menu. Choose Edit Group
Field to open the Edit Export Group Field dialog. Modify the Field Label value.
Click OK.
To delete the Group Field, select it and click the alternate mouse button.
(Note: If a Group field is needed in either the Summation or Endorsement
screens, do not delete the field. Instead move it to the Available Fields box.)
Choose Delete Group Field. A warning box appears asking if you want to
delete it. Click Yes.
Inserting Custom User Field Labels
Use a Blank Field when you want to export user defined metadata but you
want to incorporate a pre-defined field layout. For example, If you always want
to export the fields, CDAuthor, Filesize, and Location, and none of the
extended metadata consists of a CDAuthor field (CDAuthor didn’t exist in any
of the processed files, therefore it did not appear in the list), you could insert a
blank field and change the field label to CDAuthor to keep the pre-defined field
layout.
www.iprotech.com
877-324-4776
Ipro eCapture User Guide
Q1 2014
7-31
Chapter 7, Creating Export Series and Export Jobs
User fields are available for selection in the Specify Summation Options screen
and in the Specify Endorsements screen.
1.
From the Insert Custom Field dialog, select the Type: User. The Insert
Custom Field dialog appears.
2.
Enter a field label.
3.
Enter an optional Field Value.
4.
Click OK. The Insert Custom Field dialog closes and the field appears in
the Selected Fields box. If necessary, use the
or
to reposition
the selected user field in the list. Notice that U appears in the Type column. U is for User Field.
Three actions can be performed on the User Field once it is in the Selected
Fields box list. They are: changing the field label, deleting the user field altogether from the list, and editing the user field’s value.
To change the field label, select it in the Selected Fields box and click the
alternate mouse button to display the context menu. Choose Change Field
Label to open the Edit Field label dialog. Modify the Field Label. Click OK.
The change made here affects how a field’s label will appear in the header row
of the export file.
7-32
Ipro eCapture User Guide
Q1 2014
www.iprotech.com
877-324-4776
Creating a Processed Data Export Job (Export Processed Data/New Process Export Job)
To delete the blank field, select it in the Selected Fields box and click the
alternate mouse button to display the context menu. (Note: If a User field is
needed in either the Summation or Endorsement screens, do not delete the
field. Instead move it to the Available Fields box.) Choose Delete User Field.
It is removed from the list.
To edit the blank field’s value, select it in the Selected Fields box and click
the alternate mouse button to display the context menu. Choose Edit User
Field to open the User Field dialog. Modify the Field Value field. Click OK.
Selecting the Additional Export Options in the Export Fields
Screen
Populate Child Fields for Parents - If this option is NOT selected, the Parent
fields for all items (PARENT_BATES, PARENT_ITEMID) will only be populated
for child items.
If this option IS selected, the Parent fields will be populated for all items. Nonchild items will enter their own Bates™ number and ItemID.
Select Include Field Names in first line of file if you want to assist readers
in understanding or verifying the file. Do not select this option if the file will be
loaded directly into the database.
If the Concordance DAT File data load format was selected, the Export
OCRTXT field for Concordance option appears. Select this option if you
want to export the OCRTXT field. Select the version that applies from the
drop-down list. Options include v7.x 4mb truncate, v8.x 12mb, truncate, v7.x
4mb, report only, and v8.x 12mb, report only.
www.iprotech.com
877-324-4776
Ipro eCapture User Guide
Q1 2014
7-33
Chapter 7, Creating Export Series and Export Jobs
Click
Options dialog.
to open the Date Field Formatting
Legacy Date Field Formatting: By default, this option is selected. Deselect
this option to select from the Invalid date options and to select fields for date
format handling.
Date Field Formatting: If you want to change the date field to a different
format, select from the following formats:
•
•
7-34
YYYYMMDD
YYYY/MM/DD
Ipro eCapture User Guide
Q1 2014
www.iprotech.com
877-324-4776
Creating a Processed Data Export Job (Export Processed Data/New Process Export Job)
•
•
•
MMDDYYYY
MM/DD/YYYY
DD/MM/YYYY
Otherwise, select the option, Do Not Convert Date Fields.
Time Format: Select from:
•
•
•
12-hour [displays time in 12 hour format e.g. 1:04]
24-hour [displays time in 24 hour format, e.g. 13:04]
Regional [formats the time according to the “default” Regional Settings
of the Worker the document is being exported on. Note: Changing the
format strings using the “Customize” button of Regional Settings will
have no effect; the actual region needs to be changed to see any effect.
Resolve Times to Second Precision: Select this option if you want to add
seconds to all metadata date fields that have time. This does not apply to the
images.
Invalid date options
Treat date values outside of specified range as invalid dates - Select a
start date and end date range. Any dates outside of the selected range will be
considered as invalid dates. The start date default is set to SQL minimum date.
The end date default is set to SQL maximum date.
Select one of the following options:
•
•
Invalid date field output value - enter text to display in the event an
invalid date is encountered. This field may be left blank.
Invalid date field output do not convert - invalid dates will be output
as is with no date conversion applied.
Field Selection
The only fields that are not present in the list are *DATE_ONLY* and
*TIME_ONLY*. The fields in the available field list are comprised of fields that
are marked as valid for date formatting. This is determined by the value of
TRUE in the ExportAttemptDateParse field located in the EncounteredMetatdataFieldList table.
Date field formatting options affect only those fields in the Fields Selected for
Date Format Handling box.
Date field formatting options are set at the Job level.
www.iprotech.com
877-324-4776
Ipro eCapture User Guide
Q1 2014
7-35
Chapter 7, Creating Export Series and Export Jobs
Available Fields: Displays all fields available to be exported. Click the dropdown list located above the field list, and select a specific field type. By
default, All Fields display. Ctrl-click to select non-contiguous fields. Shift-click
to select a contiguous range.
Filter Value - enter a value to filter the list. For example, to see only those
fields that contain the word “date”, enter date and click
fields, delete the value and click
. To display all
.
Select a field for date format handling by selecting the field from the Fields
Available for Date Format Handling and clicking
to move the single
field to the Fields Selected for Date Format Handling box.
For two or more fields, ctrl-click to select non-contiguous fields or shift-click to
select a contiguous fields. Once the fields are selected, click
them to the Fields Selected for Date Format Handling box.
to move
Ipro eCapture creates two additional fields that “split” the date and time into a
Date Only field and a Time Only field. These two additional fields will be displayed in the Available Fields list in the Export Wizard, Select Export Fields
screen. For example, if the DueDate field was moved to the Fields Selected for
Date Format Handling, the following additional DueDate fields would appear in
the Available Fields list: DueDate*DATE ONLY* and DueDate*TIME ONLY*.
Click OK to return to the Export Wizard, Select Export Fields screen.
7-36
Ipro eCapture User Guide
Q1 2014
www.iprotech.com
877-324-4776
Creating a Processed Data Export Job (Export Processed Data/New Process Export Job)
12.
Click
. If the Image Load Format, Summation DII, was
selected, the Specify Summation Options screen appears.
www.iprotech.com
877-324-4776
Ipro eCapture User Guide
Q1 2014
7-37
Chapter 7, Creating Export Series and Export Jobs
Summation Options
•
•
•
Path Notation: Specify Summation Path Notation: Removable Volume (@V) or Directory(@I).
Include @FullText Command: None - no @T command will be
included in the DII file, Page Level (default) - the page will add 1
@T command for each page, Document Level - the document will
add 1 @T command. (These options are not available for selection
if the Export Text Files option in the Export Formats screen is not
selected.)
Treat eMail as edocs: This option is used to retain previous EDII
format. When this option is checked, the @MEDIA tag will use
'eDoc' instead of 'eMail' for all parent e-mails.
Available Tokens: Displays all fields and tokens available for exporting.
Click the drop-down list located above the token list, and select a specific
field type (System, Flags, Metadata, User Defined) or Summation
Tokens. By default, All Fields display. Ctrl-click to select non-contiguous
fields/tokens. Shift-click to select a contiguous range.
Filter Value - enter a value to filter the list. For example, to see only
those fields that contain the word “date”, enter date and click
To display all fields, delete the value and click
•
•
7-38
.
Select one token from the Available Tokens box and click
to move the token to the Selected Tokens box.
For two or more tokens, ctrl-click to select non-contiguous tokens
or shift-click to select contiguous tokens. Once the tokens are
selected, click
•
.
to move them to the Selected Tokens box.
and
: Use these arrows to change the order of the fields in
the Selected Tokens box. Select a field/token (or contiguous fields/
tokens) and then use either arrow to reposition it (or the selected
fields/tokens) accordingly.
Ipro eCapture User Guide
Q1 2014
www.iprotech.com
877-324-4776
Creating a Processed Data Export Job (Export Processed Data/New Process Export Job)
13.
Click
a.
b.
. The Export Endorsements screen appears.
Select an Endorsement Zone. The zone displays a thick border to
indicate it is the active zone.
Click the drop-down list located above the Available Fields list,
and select a specific field type (System [S] Flags [F], External [E],
Metadata [M], and User Defined fields [U and G]). By default, All
Fields display. To further narrow the field list, enter a value in the
Filter Value field located below the Available Fields list. For exam-
www.iprotech.com
877-324-4776
Ipro eCapture User Guide
Q1 2014
7-39
Chapter 7, Creating Export Series and Export Jobs
ple, to see only those fields that contain the word “date”, enter
date and click
click
c.
. To display all fields, delete the value and
.
Select a field and click
. The selected field appears in the
Selected Fields box and is placed in the previously selected
Endorsement box. Once a field has been selected for placement in
a zone, it cannot appear in a different zone. A total of three fields
may occupy a single zone. If a zone is to contain more than one
field, use the
or
to change the order of the fields in the
Selected Fields box in the active Endorsement Zone. Each field
appears in its own line in the Endorsement Zone.
d.
Note: When exporting a bar code, message text, and image key;
and the image key contains underscore delimiters, Ipro eCapture
displays a warning: Lowercase characters and underscores cannot
be combined with bar code endorsement.
To remove a field from an Endorsement Zone, select the Endorsement Zone, select the field in the Selected Fields box, and click
.
e.
To change the appearance (attributes) of a field in the Endorsement Zone, do the following: Select the Endorsement Zone,
select the field in the Selected Fields box, and click
to open
the Font dialog. Select a Font, Font Style, Size, Effects (Strikeout,
Underline), and Color. Click OK to close the Font dialog. Repeat for
additional endorsement fields.
Inserting Custom Group Fields
To insert custom group fields, see the section Inserting Custom Group Fields
on page 7-27.
7-40
Ipro eCapture User Guide
Q1 2014
www.iprotech.com
877-324-4776
Creating a Processed Data Export Job (Export Processed Data/New Process Export Job)
Inserting Custom User Field Labels
A custom message can be added to an Endorsement Zone through User
Defined Fields. See the section Inserting Custom User Field Labels on page 731.
Previewing the Endorsement Placements
To preview the Endorsement Zones and the fields assigned to those Endorsement Zones, click
. The Endorsement Sample Data dialog appears
and displays the Zone, Type, Field Label and Field Value, if any, in a grid format. To preview a sample of the Endorsement Zones and fields on an image,
click
in the Endorsement Sample Data dialog. The Endorsement
Sample Image Preview screen appears and shows the selected fields in their
endorsement zones.
www.iprotech.com
877-324-4776
Ipro eCapture User Guide
Q1 2014
7-41
Chapter 7, Creating Export Series and Export Jobs
Use the first three icons in the toolbar to adjust how the image appears for
viewing: Fit Normal, Fit Horizontally, and Best Fit. The Magnify Glass icons are
used to Zoom In and Zoom Out respectively. The Percentage values can also
be used to Zoom In or Zoom Out. The Sample can be saved if necessary.
7-42
Ipro eCapture User Guide
Q1 2014
www.iprotech.com
877-324-4776
Creating a Processed Data Export Job (Export Processed Data/New Process Export Job)
14.
Click
appears.
www.iprotech.com
877-324-4776
. The Select Export Directory and File Options screen
Ipro eCapture User Guide
Q1 2014
7-43
Chapter 7, Creating Export Series and Export Jobs
Export Directory Path indicates the directory where the exported data
will be saved. Initially, this field shows the area established during workstation setup, but you can click
and navigate to a different directory.
Export Volume Options
Volume Name Enter a name for the CD-ROM label or volume path
directory. This field initially uses a number (e.g., 001) as the volume
name. This setting is for database files.
Increment Output Directory Every n Files: Select a value from the
drop-down list (or enter a value) that indicates the number of files that
will be in each subdirectory.
If the Image Load Format, Ringtail, was selected, the values in this field
will revert to 99, 999, and, so on if the Use Rollover Numbering option is
selected when configuring the Image Key. As the Image Key is entered
and changes leaving space for a leading zero, the values in the Increment Output field changes accordingly. For example, an Image Key of
00001 sets the value to 9999, 0001 sets the value to 999, 001 sets the
value to 99, etc.
Max Data Size If the drive where you are saving the export files has
limited space, select the maximum space (640, 1200, 4300, and 9000)
you want to use from the drop-down list.
Include Volume Name in Loadfile Filename: Select this option if you
want the Volume Name to appear in the VolumeManifest.TXT file.
Directory for each native: Starting with version 5.6, this option
replaces the Copy to output directory option formerly located in the first
Export Wizard screen. This option is not available for selection if Ringtail
was selected. Otherwise, when this option is selected, the Native File
field under the Subdirectory Structure options is not available. When not
selected, a folder name may be entered in the Native File field.
Subdirectory Structure Options
The first field is labeled dynamically based on the Image Format
selected in the first Export Wizard screen under Export Image Files. The
options include:
•
7-44
Single Page TIFF/JPG Files
Ipro eCapture User Guide
Q1 2014
www.iprotech.com
877-324-4776
Creating a Processed Data Export Job (Export Processed Data/New Process Export Job)
•
•
•
Single Page PDF Files
Multiple Page TIFF Files
Multiple Page PDF Files
The field contains the name of the folder where the images will be
stored. Accept or change the default folder name.
Document Text: This field contains the name of the folder where the
text files will be stored. Accept or change the default folder name.
Native File: This field contains the name of the folder where the native
files will be stored. Accept or change the default folder name. The
default name OF is an LFP command that contains the location and original filename. See Appendix D, LFP Files and the section Original File for
EDD Image (OF) on page D-12 for additional information.
Increment in Root or Subdirectory: Root is the default. For Subdirectory, indicate the name of the subdirectory; e.g. 0001. This folder will
increment once the Max Data Size (MB) or the number of files specified
in the Increment Output Directory field is reached.
Click
to view a sample of the selected Subdirectory Structure:
Root or Subdirectory.
The following figure shows a Subdirectory Structure sample.
www.iprotech.com
877-324-4776
Ipro eCapture User Guide
Q1 2014
7-45
Chapter 7, Creating Export Series and Export Jobs
The following figure shows a Root Structure sample.
Mirror File Structure: When selected, the specified export directory will have
the same structure as the directories from which the files were discovered. The
discovered directory pathing is “appended” to the specified export directory.
For example, if the specified export directory is: Z:\EXPORT\Job001 and the
discovered directory paths are: H:\FILES\DOC, H:\FILES\PPT, and
H”\FILES\XLS, then the exported directory pathing will look like the following:
Z:\EXPORT\Job001\H_\FILES\DOC, Z:\EXPORT\Job001\H_\FILES\PPT, and
Z:\EXPORT\Job001\H_\FILES\XLS. Each of these directories will contain the
images and extracted text of the respective, original files. If this option is not
selected, then only one directory is created: Z:\EXPORT\Job001\IMG_0001; it
will contain all of the images.
Create load files only: When selected, no images, text files, or native files
will be copied to the export output directory. Only load files will be created.
The export will perform as if all of the native files and images were exported
based on the export options. The load file will reflect this.
OCR LFP Document Text Option: Select None, OI-inline, or OT-file reference from the drop-down list. For the Image Load Formats, Ipro LFP and Ipro
OCR, select the appropriate option for inclusion in the LFP file. Ipro eCapture
generates an Ipro OCR.LFP file for either of these options, OI, or OT. If the
option Export Text Files, located on the initial Export screen, is not selected,
the OT option will not be available for selection. The OI lines in the
IPROOCR.LFP file will contain document text for each page in all cases as long
as there is document text for the page. The OT lines in the IPROOCRLFP file
will point to text files for each page only when the export image format are
single page images, and the option Export document text as single file (located
in the initial Export screen) is not checked. For multi-page formats, or when
document text is exported as a single file, there will be only one OT entry per
7-46
Ipro eCapture User Guide
Q1 2014
www.iprotech.com
877-324-4776
Creating a Processed Data Export Job (Export Processed Data/New Process Export Job)
document. If there is no text for a document (image where OCR wasn’t
enabled, for example), there will not be an OT line. For the OI-inline option,
the .LFP file will be larger than the LFP file generated when using the OT-file
reference option.
Replace Export Path with the following Drive Letter/Path Enter the path
to replace the root path to the images in the export load files. For example,
enter c:\images\0001\0001a\ to create the Ipro .LFP entries:
VN,DII001,c:\images\0001\0001a\DII001\,99
IM,AUG-001,D,0,@DII001;PROC0001\IMG_0011;AUG-001.TIF;2,0
IM,AUG-002,,0,@DII001;PROC0001\IMG_0011;AUG-002.TIF;2,0
Image Key Numbering
Select Predefined to select a numbering convention for previously exported
data or imported/merged document keys. Proceed to the section Using Predefined Numbering on page 7-49 for information on the options.
Image Keys can increment at different group levels (Page, Document, and Parent). The Image Key can have a total of 70 characters including any selected
delimiters that will be used between the Prefix and the Parent; between the
Parent and the Document; and between the Document and the Page.
As you populate the Image Key fields, the number displayed in parenthesis,
directly to the right of the Field label, will decrement accordingly. The Sample
Image Key field is used to check the Image Key as entered. You may change
the Image Key as often as necessary BEFORE you click Finish to begin the
Export process.
When configuring the Image Key, keep in mind whether you will be exporting
out a single job or using the Export Series concept, which allows output of successive unattended exports with sequential Image Key numbering and volumes. The starting Image Key will automatically be set to the next available
number based on the previous export’s ending number in the given set.
Page: If you do not enter a value in this field, the system will assign a
starting Image Key of 000000001 or the next available Image Key. Otherwise, you can enter a value, not to exceed 15 numeric only characters
(0-9).
Document: The Document portion of the image key number may have
a total of 15 numeric only characters (0-9).
www.iprotech.com
877-324-4776
Ipro eCapture User Guide
Q1 2014
7-47
Chapter 7, Creating Export Series and Export Jobs
Parent: The Parent portion of the image key number may have a total
of 15 numeric only characters (0-9).
Prefix: The Prefix portion of the image key number may have a total of
25 alphanumeric characters, dash [-], and/or underscore [_].
The Delimiters include: None, Underscore, Dash, Semi-colon, Period, or Space.
Each section of the image key number may be padded up to 15 digits.
See the section Using Rollover Numbering for Ringtail Format on page 7-177 if
the Ringtail format was selected for additional information about the Rollover
Numbering option.
Using Generated Numbering
Select Generate. The Image Key Numbering prefix segment shows {Native
Filename}. The Parent and Document segments are disabled.
a.
b.
c.
d.
7-48
Enter a Prefix in the Prefix segment.
Enter a Page number in the Page segment.
Select a Delimiter from the Delimiters drop-down list. If no delimiter is necessary, select (none). The Sample Image Key box is used
to check the desired image key format.
Indicate Base Numbering to be used for Page and/or Document
Level numbering. One-Based is the default setting.
Ipro eCapture User Guide
Q1 2014
www.iprotech.com
877-324-4776
Creating a Processed Data Export Job (Export Processed Data/New Process Export Job)
Using Predefined Numbering
Select Predefined to display the options:
Click the drop-down arrow to display the available numbering options:
•
Use filename: Formerly called Use filename for Image Key.
Do not use this option for Ringtail format because Ringtail relies on the
Bates numbering scheme.
The option, Use Filename, allows for data to be initially pre-processed
using third party tool, such as Ipro Allegro, and then have that same
data processed through Ipro eCapture.
Caveats
The data that will be processed in Ipro eCapture must have the following
characteristics when using this feature:
•
Consistent Bates numbering scheme. Avoid:
filenames that are too long
duplicate Bates numbers
invalid characters
other conditions where the filename does not conform to a Bates
numbering scheme.
An inconsistent Bates numbering scheme will result in incorrect data
output.
•
Originally processed as a native file.
www.iprotech.com
877-324-4776
Ipro eCapture User Guide
Q1 2014
7-49
Chapter 7, Creating Export Series and Export Jobs
•
Ipro eCapture will extract all email attachments that are detected.
Embedded files will be extracted unless the Discovery File Extraction option, Treat email inline images as attachments, is deselected.
This option is used in conjunction with the Flex Processor rules, Create
Parent Item ID List and/or Create Child Item ID list. A rule can be created to load the Item IDs from the native files for each individual job. If
this feature is used without the Flex Processor rules, Create Parent Item
ID List and/or Create Child Item ID list, the result will be incorrect data
output.
See Appendix A, Using the Flex Processor Rules Manager and the section
Create Parent Item ID List or Child Item ID List on page A-46 for specific
information about creating Parent or Child Item ID rules in Flex Processor.
For Processing Jobs, the original file’s filename (TIFFs, TXTs, or PDFs) is
used as the prefix for the image key when exported. The Page segment
for the image key (Bates) number is enabled and used for suffixing the
native filename with each page of the document.
Filename example for a Processing Export Job:
native filename: EX-00001.DOC will be exported as a file named: EX00001.00001.TIF; where EX-00001 is the original filename, 00001 is the
page number, and .TIF is the extension. Subsequent pages for each document will increment.
•
Import/Merged: The export job will use the imported/merged linking
key as the image key base for process exports. It is necessary to enter a
suffix with the option to either suffix all pages (select the option) or skip
the first page.
•
Ipro Enterprise: The export job will use the Ipro Enterprise linking key
as the image key base for process exports. It is necessary to enter a suffix with the option to either suffix all pages (select the option) or skip the
first page.
Data Extract Export: Uses the most recent image key assigned for a
document that was part of a data extract job as the image key for the
same document. Most recent is defined as the ExportedItems record
with the highest ExportedItemID value for records associated with complete data extract export jobs. Jobs are started in sequence; therefore,
•
7-50
Ipro eCapture User Guide
Q1 2014
www.iprotech.com
877-324-4776
Creating a Processed Data Export Job (Export Processed Data/New Process Export Job)
any job that is started will have higher values for ExportedItemID than
any job started before it.
Select a Delimiter from the Delimiters drop-down list. If no delimiter is
necessary, select (none). The Sample Image Key box is used to check
the desired image key format.
Suffix first page: Optionally select this when suffixing. If it is not
selected, the first page is skipped. For multi-page images, page suffix
value is blank.
Concluding the Export
(Optional) Click
to save the export settings to an .INI file. See
the section Creating a Data Extract Export Job (Export Extracted Data/Data
Extract Export Job) on page 7-147 for more information.
Click Finish. (If you did not define an image key number, the system will
prompt you with a starting image key number.)
If this is for a Process Export Job, it will appear in the Ipro eCapture Controller’s Job Queue. Start the Process Export job. The job’s details are available
by selecting the job in the Tree View. (Under Export Jobs, Process Exports).
The Information Panel has two buttons: View Settings and View Output. Click
View Settings to display information about the job. Click View Output to
access the files that were created via the Explorer.
Encoding Options Select an encoding option from the drop-down list.
Options include:
•
•
•
Unicode UTF-16 - load files and extracted text are saved in this format
if Force ANSI is not selected.
Unicode UTF-8 - same as UTF-16 output except for the encoding
applied to output files.
Force ANSI - Select this option and select a character from the dropdown list. This replaces non-ANSI characters with the selected ANSI
character in the loadfile/extracted text. This allows for data loaded into
applications that are not Unicode compliant.
If this is for an Export Series, the Series name will appear in the Client Management tree view under Process Exports; located under Export Jobs. The
Export Series will then be available for selection when creating a Process
Export job.
www.iprotech.com
877-324-4776
Ipro eCapture User Guide
Q1 2014
7-51
Chapter 7, Creating Export Series and Export Jobs
Autoload into Ipro Eclipse - Processing Job
Ipro EclipseSE version 1.4.1 or later is required for autoloading. An
existing Ipro Eclipse case must exist to use this option. It does not
create an Ipro Eclipse case. Ensure the Ipro Eclipse server is running.
You can load Ipro eCapture Processing Job data directly into an Ipro Eclipse
database.
Ensure that the Eclipse Server Information was configured. See Chapter 2,
Ipro eCapture Controller and the section Configuring Integration with Ipro
Enterprise Applications on page 2-20 for instructions on configuring Eclipse.
1.
Click the Client Management Tab.
2.
Do one of the following:
•
•
3.
Do one of the following:
a.
7-52
In the Tree View, navigate to the Processing Jobs folder (under
Custodian). Select a completed Processing Job and click the
alternate mouse button to display the context menu. Select
Export Processed Data from the context menu to display the
New Export Job dialog. The job you selected is already checked in
the Tree View. Proceed to Step 3 and the letter a if you wish to
select additional jobs. If you want to select an Export Set instead,
proceed to Step 3 and the letter b.
In the Tree View, navigate to Export Jobs (under Client). Select
Process Exports and click the alternate mouse button to display the context menu. Select New Process Export Job from the
context menu to display the New Export Job dialog. Proceed to
Step 3 and the letter a. Or, if you want to select an Export Set
instead, see Step 3 and the letter b.
Select the Select Jobs option to display the Tree View and expand
it. Select one or more jobs for exporting. The Export Job name
field populates with the first processing job you selected. You can
select multiple Processing Jobs for export. The system will go
through each one and store the data under the directory of the
Export Name you indicated in the New Export Job dialog box. It
Ipro eCapture User Guide
Q1 2014
www.iprotech.com
877-324-4776
Creating a Processed Data Export Job (Export Processed Data/New Process Export Job)
may be necessary to expand the tree to view the processing jobs.
Proceed to Step 4.
b.
OR
Select the Select Export Set option to display a list of Export Sets
that were created in QC and then select an Export Set.
www.iprotech.com
877-324-4776
Ipro eCapture User Guide
Q1 2014
7-53
Chapter 7, Creating Export Series and Export Jobs
If necessary, expand any Export Set Containers to select an Export
Set that is stored in a Container. Proceed to Step 4.
4.
From the Export Type drop-down menu, select Direct to Eclipse.
5.
Enter an Export Job Name, or if a default name appears in the field,
modify it if necessary. This is the name the system uses for the directory
name where the exported data is stored.
6.
Select a task table from the drop-down list. The task table that appears
in the field is based on the last task table selected for the Client.
7.
(Optional) Browse to the Template (.INI File) that has the data
extraction export settings from a previously run data extraction export.
A file will not exist until you run your first data extraction export. Note:
This option is not available if you select an existing Export Series from
the drop-down list. This file saves time because you will not need to
manually make selections in some of the Export wizard screens as well
as ensure that there is consistency when exporting jobs for a particular
situation.
8.
(Optional) Do one of the following:
•
7-54
Leave the default setting [none] under Export Series.
Ipro eCapture User Guide
Q1 2014
www.iprotech.com
877-324-4776
Creating a Processed Data Export Job (Export Processed Data/New Process Export Job)
•
•
Select an Export Series from the drop-down list. When an existing Export Series is selected, the
,
appears. When clicked, the Export settings dialogs will not appear;
instead the Job is placed in the Job Queue. See the section About
Export Series on page 7-264 for background information about
Export Series. Or see the section Creating an Export Series (Process Export or Data Extract Export) on page 7-266 if you want to
create the Export Series before the Export Job is created.
Select [new export series] from the Export Series drop-down list
and enter a New Export Series Name.
9.
Click OK. (NOTE: A warning dialog may appear if one or more of the
selected processing jobs have not yet passed QC. You can elect to continue to export or cancel, QC the jobs, and then export again.) The
Eclipse Case Selection dialog appears.
10.
Select a Case that will receive the Ipro eCapture data.
www.iprotech.com
877-324-4776
Ipro eCapture User Guide
Q1 2014
7-55
Chapter 7, Creating Export Series and Export Jobs
11.
Click OK. The Select Export Formats and File Handling Options dialog
appears unless
ing Export Series.
12.
7-56
was clicked for an exist-
Select from the following options:
Ipro eCapture User Guide
Q1 2014
www.iprotech.com
877-324-4776
Creating a Processed Data Export Job (Export Processed Data/New Process Export Job)
Point to eCapture file storage from Eclipse: The image/text/native
files will remain in the Ipro eCapture system directory. Eclipse will access
the files from this location. Use this option to have Eclipse use existing
data that is stored in Ipro eCapture directories when no changes are
being made to the output files for review.
Include OCR word coordinates in DLF: (located at the bottom of the
Export Formats and Handling Options screen) Select this option to
increase the amount of time it takes to build the load file. This is only
recommended for image-only review databases. Native file reviews can
leverage built-in word highlighting when viewing the document’s text or
rendered native file.
a.
b.
Export Image Files - When selected images and text files are
exported. Select one or more Load Formats and select from the
options described in c) and e).
If deselected, there will not be any Image Load formats available
for selection (skip c and e); however, Ringtail and Summation DII
are available for selection under Data Load Formats. In addition,
the option, Use page-based numbering, appears to the right
and is selected by default. When selected, page counts in image
key numbering are retained.
Image Format and Options - From the drop-down list, select
one of the image formats to generate during the export process:
•
Single Page TIFF/JPG Files creates a separate file for
each image in the job. Black and white images are saved as
TIFFs; color images are saved as JPEG files. Will also export
single page extracted text.
•
Single Page PDF Files outputs single page PDF files for
images.
•
Multiple Page TIFF Files creates a TIFF file for each document. Will also export multiple page extracted text.
•
Multiple Page PDF Files creates a PDF file for each document.
•
Both TIFF and PDF Files is specific for the Image Load
Format Ringtail. Multi-page PDF representation of the document is copied to the output folder along with the single
page images.
www.iprotech.com
877-324-4776
Ipro eCapture User Guide
Q1 2014
7-57
Chapter 7, Creating Export Series and Export Jobs
Convert LZW Image to JTIFF - When this option is selected, it
converts LZW compressed Single Page TIFF files to JTIFs. Exported
multi-page TIFFs are always JPEG compression.
Create Searchable PDFs - selected by default when either Single
Page or Multipage PDFs is selected from the drop-down list. Select
the option, Make endorsements searchable, if you want to
search for endorsements. Select the option, Convert Fast Web
Enable, to create fast view enabled PDFs at export. PDF documents are restructured for downloading one page at a time from
web servers. Only the requested page is sent rather than the
entire PDF.
c.
This option is deselected by default.
Force Image Canvas to: The ratio of a resized image is maintained when selected. From the drop-down list, select a paper size
and then select an image size from the drop-down list underneath.
Options include: For small images, for large images, and for both
small and large images.
Center Vertically: Centers the image vertically on the canvas. The
default vertical alignment is top.
Center Horizontally: Centers the image horizontally on the canvas. The default horizontal alignment is left.
Click the link, Apply to select file types only, to open the Image
Normalization Inclusions dialog.
7-58
Ipro eCapture User Guide
Q1 2014
www.iprotech.com
877-324-4776
Creating a Processed Data Export Job (Export Processed Data/New Process Export Job)
By default, all file types are selected. Click Clear All, to clear all the
selected file types and then select the specific file types for the
Export Job. If necessary, click + to expand the list for a file type,
such as Microsoft Excel, to display specific versions/types of Microsoft Excel.
Click OK to return to the Export screen. A message appears underneath the link stating the number of file types that will be
included.
d.
Export Text Files - select this option to display additional Data
Load Formats of LaserFiche, DB/Textworks, and OCR Control.lst.
Note: if this option is deselected, then no text files are created
except for the VolumeManifest.TXT.
www.iprotech.com
877-324-4776
Ipro eCapture User Guide
Q1 2014
7-59
Chapter 7, Creating Export Series and Export Jobs
e.
Optionally select from the following Document Text options:
•
Include Image Key in Document Text: Select this option
if you want to include the Image Key at the beginning of the
text file. Indicate which token to include in the image key
format. The default is << [k] >>, where token [k] is for the
image key. The other format is << [p] >>, where token [p]
is for the page number. The Image Key will appear like this:
<< EXH_1245 >> The Page will appear like this << 25 >>
This option takes precedence over Create Text Placeholders
for Missing Text Files. Therefore, if both options (Include
Image Key... and Create Text Placeholders...) are enabled,
then a document without text will have a text file with only
the Image Key.
•
Create Text Placeholders For Missing Text Files: Creates placeholder text files for documents where there was no
available text. Text placeholders are created with each combination of export text files and image formats. The option,
Include Image Key in Document Text, takes precedence over
the option, Create Text Placeholders for Missing Text Files. If
both options are selected, a document without text will have
a text file with only the Image Key. (Note: this option is not
available if the option Export Image Files is de-selected.)
•
Export Document Text as Single File: For direct to
Eclipse exports this option is automatically selected by
default so document-level text will be exported.
(Optional) Export Native Files - (Note: When this option is
selected along with the Ringtail Image Load File format, the Name
file using image key and Copy to output directory options are automatically selected. Starting with version 5.6, the Copy to output
directory option was replaced with the option Directory for each
native which is located in the last screen of the Export Wizard.)
Under Native file options, select from the following:
•
Name File Using Image Key: If this option is selected, the
native file directory will no longer create an additional directory per document. By naming the file using the Image Key,
it removes any chance of duplicate filenames occurring.
7-60
Ipro eCapture User Guide
Q1 2014
www.iprotech.com
877-324-4776
Creating a Processed Data Export Job (Export Processed Data/New Process Export Job)
Therefore, the additional level of directories are not necessary. An example follows:
•
Copy to Output Directory: This option was replaced with
the option Directory for each native which is located in the
last screen of the Export Wizard.
Native files are copied to a directory separate from the
images. The directory numbers match their corresponding
image file.
Under Alternate Email Export Options, select from:
•
•
•
•
Outlook - Check this option to export an alternate native file for
Outlook files. The default export format is MSG.
Lotus Notes - Check this option to export an alternate native file
for Lotus Notes files. The default export format is DXL.
Outlook Express - Check this option to export an alternate native
file for Outlook Express files. The default export format is EML.
GroupWise - Check this option to export an alternate native file for
GroupWise files. The default export format is XML.
Select one of the following formats:
•
.MHTFormat: Exports selected e-mail type to a standardized format rather than to .DXL or .XML. Types include Out-
www.iprotech.com
877-324-4776
Ipro eCapture User Guide
Q1 2014
7-61
Chapter 7, Creating Export Series and Export Jobs
•
•
look, Outlook Express, Lotus Notes, and GroupWise. (An
.MHT file is an Archived Web Page file with information in
Multipurpose Internet Mail Extension HTML (MHTML) format
with an .MHT file extension. All relative links in the Web page
are remapped and the embedded content is included in the
.MHT file.)
Rich Text Format (RTF): Uses Microsoft Word to open the
MHT and saves it as an RTF; a more widely accepted format.
HTML: HTML documents can have inline images, the images
themselves are not included in the HTML. The images must
be included in the export in order to access the inline
images.
File extension options: This option is used in the event the native documents are missing or have incorrect file extensions. When this is the
case, the native file viewers will not work. The correct extension is
defined as the value presented in the Extension field of the StellentDefs
table in the CONFIG database for the StellentID of the file. Oracle® Outside-In Technology (formerly Stellent) will not identify files it cannot discern with a .TXT extension. If necessary, a Database Administrator may
manually update the Extension field in the StellentDefs table with custom extensions using SQL. The options from the drop-down list include:
•
•
•
•
7-62
None - default setting. Nothing happens.
Add extension only if missing
Append corrected extensions - appends extensions that are incorrect or missing.
Replace incorrect extensions - replaces incorrect extensions with
correct extensions or missing extensions.
Ipro eCapture User Guide
Q1 2014
www.iprotech.com
877-324-4776
Creating a Processed Data Export Job (Export Processed Data/New Process Export Job)
Click the link, Apply to selected file types and/or QC Flags, to open
the Native File Export Inclusions dialog.
By default, all file types are selected and the QC flags are not selected.
For the file types, click Clear All, to clear all the selected file types and
then select the specific file types and/or only documents to which the
QC flag or flags are attributed. If necessary, click + to expand the list for
a file type, such as Microsoft Excel, to display specific versions/types of
Microsoft Excel. If either one (file type/QC flag) “hits”, the native file will
be exported.
Click OK to return to the Export screen. A message appears underneath
the link that states the number of file types and QC flags, if any, that
were included.
www.iprotech.com
877-324-4776
Ipro eCapture User Guide
Q1 2014
7-63
Chapter 7, Creating Export Series and Export Jobs
13.
Click
to display the Merge Data Options dialog.
This dialog appears if at least one set of images or text exists in one of
the Processing jobs or Export Sets selected for the Export job.
Do the following:
•
7-64
from the drop-down menu, select the order (Date, Ascending;
Date, Descending (default); Name, Ascending; Name, Descending;
Custom - use the up/down arrows) merge jobs display in the
Merge Jobs drop-down menu in the Image tab or View tab.
Ipro eCapture User Guide
Q1 2014
www.iprotech.com
877-324-4776
Creating a Processed Data Export Job (Export Processed Data/New Process Export Job)
•
•
deselect one or more merge jobs. By default, all merge jobs are
selected. The “Original” item refers to the original images and text
associated with the document. It appears as the last item in the
list of merge jobs and remains selected.
(Optional) Select the option Always use original page count for
image key numbering. This is relevant for Process Exports. This
option affects how image keys are assigned to pages when
exported, and could affect how many images are exported. When
this option is selected it uses the original page count for the document. Otherwise, it uses the total page count of the applicable
merge job.
www.iprotech.com
877-324-4776
Ipro eCapture User Guide
Q1 2014
7-65
Chapter 7, Creating Export Series and Export Jobs
14.
Click
to display the Export Fields dialog.
Defining Export Fields for Databases
If you are creating any database load file formats during the Ipro eCapture
export process, you need to define the export fields that Ipro eCapture will
export. This step ensures that the data exported from Ipro eCapture matches
the fields in the database where the data will be used.
There are several field types that can be exported. These field types are designated as follows:
7-66
Ipro eCapture User Guide
Q1 2014
www.iprotech.com
877-324-4776
Creating a Processed Data Export Job (Export Processed Data/New Process Export Job)
S (System Fields): These fields only have meaning in the context of an Ipro
eCapture export. If a document was viewed outside of the export, none of
these field types would apply. Any brackets [] will be removed from the label
when exporting. Some of these fields are applicable for endorsement only. The
System field definitions are as follows:
ITEM_ID: The Ipro eCapture unique identifier for the document. Can be
added/removed from Selected Fields.
BEGDOC: Starting Bates number of the document.
ENDDOC: Ending Bates number of the document. Note: May be removed from
the Selected Fields box.
BEGATT: Starting Bates number of the attachment range.
ENDATT: Ending Bates number of the attachment range.
PARENT_ATTACHMENT: "P" for anything not an attachment, "A" for attachment
(child).
ATTACHMENT_BATES: Semicolon-delimited list of Bates numbers of the children of a parent document.
ATTACHMENT_ITEMIDS: Semicolon-delimited list of the ItemIDs of the children of a parent document.
EXTRACTED_ATTACHMENT_COUNT: Counts the children of a document as it
relates to the export. The count should always match up with the number of
ItemIDs in the field ATTACHMENT_ITEMIDS and image keys in the
ATTACHMENT_BATES field. Note: This field will be zero for all documents in the
export that have a parent in the export.
EXTRACTED_ATTACHMENT_NAMES: Generates a semi-colon delimited list of
the child document’s filenames in the order of the export. The number of filenames in the list should match the EXTRACTED_ATTACHMENT_COUNT.
PARENT_BATES: If a document is a child, the Bates of the parent.
PARENT_ITEMID: If a document is a child, the ItemID of the parent.
EXPORT_NATIVE_FILES: Used when exporting native files. Shows export path
to the native files. Defaults to Selected fields box when Export Native Files is
selected from the Formats and File Handling screen. May be moved from
Selected Fields box to Available Fields if required.
www.iprotech.com
877-324-4776
Ipro eCapture User Guide
Q1 2014
7-67
Chapter 7, Creating Export Series and Export Jobs
ABSOLUTE_PARENT_ID: Obsolete - use PARENT_ITEMID instead.
PARENT_ITEMID queries the ExportedItems table to get an absolutely accurate
parent ID relating to the export. ABSOLUTE_PARENT_ID reads from the Items
table. Both should agree, but if not PARENT_ITEMID is the more accurate of
the two.
RELATIVE_PARENT_ID: This field is relative to the Discovery Job, not the
Export. Compound document options may result in the relative parent being
excluded from the export. NOTE: PARENT_ITEMID can differ from
ABSOLUTE_PARENT_ID if compound document options cause the absolute
parent to be excluded from the export. PARENT_ITEMID is relative to the
Export; ABSOLUTE_PARENT_ID is relative to the Discovery Job.
RELATIVE PATH: Original path to native file without directories above where
the directory folder was selected.
SEARCH HITS: Contains the search terms.
CUSTODIAN_NAME: The name of the Custodian containing the process job
that produced the document being exported.
DISCOVERY_CUSTODIAN_NAME: Used to identify the custodian of the discovery job in which an exported item was found.
CUSTODIANS: Used to identify the duplicate custodians for this record.
DUPLICATE_LOCATIONS: Used to list the (Duplicate ID), Custodian Name,
<Filename>, and [Discovery Path] for this record.
PROCESS_JOB_NAME: The name of the Process Job that produced the document being exported.
RULE_CATEGORY: Contains the categories (selected and assigned through the
Flex Processor).
PROCESS_STATUS: Displays the process status results of a job. Items that
processed successfully will show "Success".
IDENTIFIED_LANGUAGES: List of languages, identified by BasisTech, that exist
in a document.
IDENTIFIED_ENCODING: List of encodings, identified by Basis Tech, that exist
in the document.
VOLUME_NAME: The value is the label for the document’s volume.
7-68
Ipro eCapture User Guide
Q1 2014
www.iprotech.com
877-324-4776
Creating a Processed Data Export Job (Export Processed Data/New Process Export Job)
ORIGINAL_CUSTODIAN: Populates with the name of the custodian the original
file belonged to when an item duplicates against another file when doing deduplication at the Project or Client level.
BATCHID: Contains the Batch ID assigned for the Discovery Job.
FULLTEXT: Contains combined contents of body text and OCR text.
EXPORTED_TEXT_FILES: Contains the path to the exported extracted text files
when the option, Export document text as single file, is selected in the first
export screen. The value of this field will be affected if the Replace the export
path with the following drive letter/path field is populated (located in last
Export screen). This field cannot be used for a Group field and is not available
for endorsements.
DocType: Contains eMail, eDoc, and eAttach types.
DocCategory: Contains definitions that represent the document based on
Email (absolute parent and loose email only, e.g. not email attached to email),
Email Attachment (any email attachments to an email), Edocument (files that
are not email and not an attachment of an email family), Edocument Attachment (any embedded file in an edocument; including emails).
USERDEFINED1 through USERDEFINED5: Values to be entered using SQL
Server Manager. These fields can be used for endorsements, custom placeholders, etc.
BARCODE: Contains the barcode (USS Code 39 specification).
F (QC Flags): The QC flags that appear in the list are both system QC flags
and any user defined QC flags for the selected Processing Job or Jobs. The
CUSTMDAT.TXT file, created from the Export, will show a value of Y for flags
that are “on” or be blank for flags that are “off”.
www.iprotech.com
877-324-4776
Ipro eCapture User Guide
Q1 2014
7-69
Chapter 7, Creating Export Series and Export Jobs
M (Metadata Fields): These fields were retrieved from documents during
processing.
Starting with version 2.0, three additional Metadata fields were
added. They are: Last Access Date, Last Access Date*DATE ONLY*,
and Last Access Date*TIME ONLY*. Last Access Date is a volatile system field. The first time that Ipro eCapture discovers a directory of
loose files, Last Access Date will be valid. However, subsequent discovery jobs, run on the same set of files, will get the date the Ipro
eCapture last “touched” the file on the initial discovery job. We highly
recommend that you should not use the Last Access Date metadata
fields. Because there isn’t a legitimate value for any file Ipro eCapture
extracts, this field will be populated for loose files only. In addition, emails that Ipro eCapture extracts, attachments, embedded files, and
files extracted from archives will not have this value populated.
E (External Fields): These fields are from export jobs originating from Ipro
Allegro or from the Ipro eCapture Import Wizard.
U or G (User Defined Fields): These comprise two types: User [U] and/or
Group [G]. These fields are created via the Insert Custom Fields function. The
User fields will export the field label and the value you may optionally enter.
Otherwise the value may be blank. The Group fields are space-delimited combinations of System (S) and/or Metadata (M) field types.
When the Data Extract Export wizard is initiated, the process jobs to be
exported are selected first. The fields available for export are based on a standard list of metadata fields combined with the metadata retrieved during processing. In versions 1.2 and earlier, these fields were called Standard and
Extended Metadata fields with separate selection options. Starting with version
1.3, they are now combined with no differentiation between them.
The available fields listview is populated using this list of Metadata fields, along
with the Ipro eCapture system fields which are available for all exports. In
addition *DateOnly* and *TimeOnly* fields are parsed from date fields and
included in the Metadata fields.
7-70
Ipro eCapture User Guide
Q1 2014
www.iprotech.com
877-324-4776
Creating a Processed Data Export Job (Export Processed Data/New Process Export Job)
The export will always export the non-displayed system fields
[BATES_NUMBER] and [ITEM_ID] as the first two fields regardless of field
selections shown. All other fields to be exported are displayed in the Selected
Fields box and will be exported, in order, named as the field label. The next
section, About the Select Export Fields Screen on page 7-23, describes how to
populate the Selected Fields box.
Sorting Fields
Alternate click a field and choose Make Sort Field from the shortcut menu. This
option appears for those fields that can be sorted such as a metadata field.
A Y appears in the Sort column. To clear this entry, alternate click the field and
choose Clear Sort Field.
When a field is marked as a Sort field, it applies the value of the selected field
to all family members of a parent item. This allows sorting on the specified
field in an external application to be compound-complete. For example, when
the ‘Sent Date’ field is made into a Sort field, the value of the ‘Sent Date’ field
for an email will be used as the value of the same field in the exported load file
for all of the email’s attachments.
About the Select Export Fields Screen
See the section About the EncounteredMetadataFieldList Table on
page 7-264 for more information about the metadata fields.
The field type designator (discussed in the previous section, Defining Export
Fields for Databases on page 7-159) displays in the Type column of both the
Available and Selected Fields boxes.
Available Fields: Displays all fields available to be exported. Click the dropdown list located above the field list, and select a specific field type. By
default, All Fields display. Ctrl-click to select non-contiguous fields. Shift-click
to select a contiguous range.
Filter Value - enter a value to filter the list. For example, to see only those
fields that contain the word “date”, enter date and click
fields, delete the value and click
www.iprotech.com
877-324-4776
. To display all
.
Ipro eCapture User Guide
Q1 2014
7-71
Chapter 7, Creating Export Series and Export Jobs
Selected Fields: Displays all fields selected from the Available Fields for
export. Right-click a field to edit it, use the up or down arrows to reorder the
fields.
: Click to move a selected field from the Available Fields box to the
Selected Fields box.
box.
: Moves all fields from the Available Fields box to the Selected Fields
: Click to move a selected field from the Selected Fields box to the
Available Fields box.
box.
: Moves all fields from the Selected Fields box to the Available Fields
Field List: This list contains the following field list templates: Ipro Basic Field
List, Ipro Standard Field List, Ipro Extended Field List, and Ipro Enterprise
Field List. The Ipro Enterprise field list reflects the standard list of fields that
are selected by default in a new Ipro Allegro case and created in a new Ipro
Eclipse case. To facilitate the ease of field selection, the templates are used to
load the fields, all at once, into the Selected Fields box. The drop-down list will
also display user saved System templates and/or Client templates. Templates
selected from a physical .INI file do not display in this list.
To load a template into the Selected Fields box, select the template from the
drop-down list. A warning dialog box appears.
Click Yes to continue. The template’s fields appear in the Selected Fields box.
7-72
Ipro eCapture User Guide
Q1 2014
www.iprotech.com
877-324-4776
Creating a Processed Data Export Job (Export Processed Data/New Process Export Job)
To save a new template based on manually selected fields, click the dropdown list, choose Save As, click
appears.
. The Save Template As dialog
Select from the following:
•
•
System Template - available to all Export Jobs
Client Template - available only to the Client
For System Template or Client Template, enter a meaningful name for
the template.
•
File - saves to a physical .INI file in selected location
For a File template (.INI), click
to display the File Browser dialog.
Browse to a location, enter a filename, and click Open. The Save Template As dialog appears indicating the pathname in the Location field.
Click Save.
To select an existing user created field list template saved as a physical
.INI file, click the drop-down list, choose Browse, and click
. The Open
dialog appears. Browse to the saved template (.INI) file and click Open. A
warning dialog box appears indicating that loading fields from a template will
clear any selections, including group fields and field label modifications. Click
Yes to continue.
www.iprotech.com
877-324-4776
Ipro eCapture User Guide
Q1 2014
7-73
Chapter 7, Creating Export Series and Export Jobs
Managing Field Templates
User created System and/or Client templates can be renamed, edited, deleted,
and viewed.
From the Controller menu bar, choose Tools > Field Template Management. The Field Template Management dialog appears.
Alternate click a template to display the context menu and choose:
7-74
Ipro eCapture User Guide
Q1 2014
www.iprotech.com
877-324-4776
Creating a Processed Data Export Job (Export Processed Data/New Process Export Job)
Rename Template- displays the Edit Template Name dialog. Enter a new
Template name and click OK.
Edit Template - displays the Edit Template name dialog. A different name
may be given and the Type can be changed. If the type is changed to Client
Template, the dialog expands to display a Client drop-down list where a different Client can be selected. If the type is changed to System Template, the dialog collapses to hide the Client drop-down list.
Delete Template - A Delete Confirmation dialog appears prompting a decision to delete the template. Click Yes to delete the template.
View Template - Opens a dialog with the selected Template in the title bar
and shows the fields assigned for that template. Click Close when through
viewing the fields.
: Moves the Standard Fields from the Available Fields box to
the Selected Fields box.
: Allows the loading of only selected export fields from a previously saved .INI file. The Fields from Export Settings come from the .INI file
which you can optionally load when creating a new export job.
: Opens the Insert Custom Field dialog where you can
create new group fields and new user fields. Inserting Custom Group Fields is
discussed in the section, Inserting Custom Group Fields on page 7-27.
Use
and
to change the order of the fields in the Selected Fields box.
Select a field (or contiguous fields) and then use either arrow to reposition it
(or the selected fields) accordingly.
Inserting Custom Group Fields
You can group several Ipro eCapture fields into a single field in the export file.
For example, you can group the Author and Manager fields to create a group
field called authorgroup.
www.iprotech.com
877-324-4776
Ipro eCapture User Guide
Q1 2014
7-75
Chapter 7, Creating Export Series and Export Jobs
Or, you can sort attachments by a field that you specify instead of by image
key order. For example, you might want to group all of the Microsoft Word
attachments together within their parent documents. To do this, you would
create a Group based on Application Name (a metadata field), add it to the
fields to export, and sort by that field.
You might create a group if you want to:
•
•
Have related information appearing together and/or be treated as a single field in the litigation database.
Sort attachment ranges in some other way than image key order within
their parent documents.
The Ipro eCapture fields are separated by the selected Delimiter (introduced in
version 3.0) in the export file’s group field.
Group fields are available for selection in the Specify Summation Options
screen and in the Specify Endorsements screen.
7-76
Ipro eCapture User Guide
Q1 2014
www.iprotech.com
877-324-4776
Creating a Processed Data Export Job (Export Processed Data/New Process Export Job)
a.
Click
www.iprotech.com
877-324-4776
to open the Insert Custom Field dialog.
Ipro eCapture User Guide
Q1 2014
7-77
Chapter 7, Creating Export Series and Export Jobs
b.
c.
By default, the Type Group is selected. To create a Custom User
Field, see the section Inserting Custom User Field Labels on page
7-31.
Enter a meaningful name for the group of fields in the Field label
field.
Select one of the following:
Output values as delimited list and select a Delimiter to use
from the drop-down list.
d.
e.
. To display all fields, delete the value and click
.
Select each field you want to include in the group by clicking it
twice. Each selected field appears in the Selected Field box. Ctrlclick to select non-contiguous fields. Shift-click to select a contiguous range.
f.
Click
to display the Text Field dialog. Enter text
and click OK. When endorsing, the custom user field is aligned
side by side with the system field. For example, ItemID 77878,
where ItemID is the user field label and 11878 is the actual
[Item_ID].
g.
If necessary, use the
or
to change the order of the fields in
the Selected Fields box. Select a field (or contiguous fields) and
then use either arrow to reposition it (or the selected fields)
accordingly.
Click OK. The Insert Custom Field dialog closes and you return to
the Select Export Fields screen. The newly created Group Field
h.
7-78
Output first non-blank value: Ipro eCapture looks for data
starting with the top field on down for multiple fields. The first field
encountered with data will be placed in the Group field.
Click the drop-down list located above the Available Fields list,
and select a specific field type. By default, All Fields display. To
further narrow the field list, enter a value in the Filter Value field
located below the Available Fields list. For example, to see only
those fields that contain the word “date”, enter date and click
Ipro eCapture User Guide
Q1 2014
www.iprotech.com
877-324-4776
Creating a Processed Data Export Job (Export Processed Data/New Process Export Job)
i.
j.
appears in the Selected Fields box. Notice that G appears in the
Type column. G is for Group Field.
Repeat steps a) through g) to create additional Group Fields.
Click OK to return to the Select Export Fields screen or the Specify
Endorsements screen.
User Defined Group Field Functions
These functions are available from the Select Export Fields dialog only.
To change the Group Field label, select it in the Selected Fields box and
click the alternate mouse button to display the context menu. Choose Change
Field Label to open the Edit Field label dialog. Modify the Field Label. Click
OK. The change made here affects how a field’s label will appear in the header
row of the export file.
To make the Group Field a sort field, select it in the Selected Fields box
and click the alternate mouse button to display the context menu. Choose
Make Sort Field. A Y appears in the Sort column. To remove sorting, alternate click the field to display the context menu. Choose Clear Sort Field.
To edit the Group Field’s value, select it in the Selected Fields box and click
the alternate mouse button to display the context menu. Choose Edit Group
Field to open the Edit Export Group Field dialog. Modify the Field Label value.
Click OK.
To delete the Group Field, select it and click the alternate mouse button.
(Note: If a Group field is needed in either the Summation or Endorsement
screens, do not delete the field. Instead move it to the Available Fields box.)
Choose Delete Group Field. A warning box appears asking if you want to
delete it. Click Yes.
Inserting Custom User Field Labels
Use a Blank Field when you want to export user defined metadata but you
want to incorporate a pre-defined field layout. For example, If you always want
to export the fields, CDAuthor, Filesize, and Location, and none of the
extended metadata consists of a CDAuthor field (CDAuthor didn’t exist in any
of the processed files, therefore it did not appear in the list), you could insert a
blank field and change the field label to CDAuthor to keep the pre-defined field
layout.
www.iprotech.com
877-324-4776
Ipro eCapture User Guide
Q1 2014
7-79
Chapter 7, Creating Export Series and Export Jobs
User fields are available for selection in the Specify Summation Options screen
and in the Specify Endorsements screen.
a.
From the Insert Custom Field dialog, select the Type: User. The
Insert Custom Field dialog appears.
b.
c.
d.
Enter a field label.
Enter an optional Field Value.
Click OK. The Insert Custom Field dialog closes and the field
appears in the Selected Fields box. If necessary, use the
or
to reposition the selected user field in the list. Notice that U
appears in the Type column. U is for User Field.
Three actions can be performed on the User Field once it is in the Selected
Fields box list. They are: changing the field label, deleting the user field altogether from the list, and editing the user field’s value.
To change the field label, select it in the Selected Fields box and click the
alternate mouse button to display the context menu. Choose Change Field
Label to open the Edit Field label dialog. Modify the Field Label. Click OK.
The change made here affects how a field’s label will appear in the header row
of the export file.
7-80
Ipro eCapture User Guide
Q1 2014
www.iprotech.com
877-324-4776
Creating a Processed Data Export Job (Export Processed Data/New Process Export Job)
To delete the blank field, select it in the Selected Fields box and click the
alternate mouse button to display the context menu. (Note: If a User field is
needed in either the Summation or Endorsement screens, do not delete the
field. Instead move it to the Available Fields box.) Choose Delete User Field.
It is removed from the list.
To edit the blank field’s value, select it in the Selected Fields box and click
the alternate mouse button to display the context menu. Choose Edit User
Field to open the User Field dialog. Modify the Field Value field. Click OK.
Selecting the Additional Export Options in the Export Fields
Screen
Populate Child Fields for Parents - If this option is NOT selected, the Parent
fields for all items (PARENT_BATES, PARENT_ITEMID) will only be populated
for child items.
If this option IS selected, the Parent fields will be populated for all items. Nonchild items will enter their own Bates™ number and ItemID.
Select Include Field Names in first line of file if you want to assist readers
in understanding or verifying the file. Do not select this option if the file will be
loaded directly into the database.
If the Concordance DAT File data load format was selected, the Export
OCRTXT field for Concordance option appears. Select this option if you
want to export the OCRTXT field. Select the version that applies from the
drop-down list. Options include v7.x 4mb truncate, v8.x 12mb, truncate, v7.x
4mb, report only, and v8.x 12mb, report only.
www.iprotech.com
877-324-4776
Ipro eCapture User Guide
Q1 2014
7-81
Chapter 7, Creating Export Series and Export Jobs
Click
Options dialog.
to open the Date Field Formatting
Legacy Date Field Formatting: By default, this option is selected. Deselect
this option to select from the Invalid date options and to select fields for date
format handling.
Date Field Formatting: If you want to change the date field to a different
format, select from the following formats:
•
•
7-82
YYYYMMDD
YYYY/MM/DD
Ipro eCapture User Guide
Q1 2014
www.iprotech.com
877-324-4776
Creating a Processed Data Export Job (Export Processed Data/New Process Export Job)
•
•
•
MMDDYYYY
MM/DD/YYYY
DD/MM/YYYY
Otherwise, select the option, Do Not Convert Date Fields.
Time Format: Select from:
•
•
•
12-hour [displays time in 12 hour format e.g. 1:04]
24-hour [displays time in 24 hour format, e.g. 13:04]
Regional [formats the time according to the “default” Regional Settings
of the Worker the document is being exported on. Note: Changing the
format strings using the “Customize” button of Regional Settings will
have no effect; the actual region needs to be changed to see any effect.
Resolve Times to Second Precision: Select this option if you want to add
seconds to all metadata date fields that have time. This does not apply to the
images.
Invalid date options
Treat date values outside of specified range as invalid dates - Select a
start date and end date range. Any dates outside of the selected range will be
considered as invalid dates. The start date default is set to SQL minimum date.
The end date default is set to SQL maximum date.
Select one of the following options:
•
•
Invalid date field output value - enter text to display in the event an
invalid date is encountered. This field may be left blank.
Invalid date field output do not convert - invalid dates will be output
as is with no date conversion applied.
Field Selection
The only fields that are not present in the list are *DATE_ONLY* and
*TIME_ONLY*. The fields in the available field list are comprised of fields that
are marked as valid for date formatting. This is determined by the value of
TRUE in the ExportAttemptDateParse field located in the EncounteredMetatdataFieldList table.
Date field formatting options affect only those fields in the Fields Selected for
Date Format Handling box.
Date field formatting options are set at the Job level.
www.iprotech.com
877-324-4776
Ipro eCapture User Guide
Q1 2014
7-83
Chapter 7, Creating Export Series and Export Jobs
Available Fields: Displays all fields available to be exported. Click the dropdown list located above the field list, and select a specific field type. By
default, All Fields display. Ctrl-click to select non-contiguous fields. Shift-click
to select a contiguous range.
Filter Value - enter a value to filter the list. For example, to see only those
fields that contain the word “date”, enter date and click
fields, delete the value and click
. To display all
.
Select a field for date format handling by selecting the field from the Fields
Available for Date Format Handling and clicking
to move the single
field to the Fields Selected for Date Format Handling box.
For two or more fields, ctrl-click to select non-contiguous fields or shift-click to
select a contiguous fields. Once the fields are selected, click
them to the Fields Selected for Date Format Handling box.
to move
Ipro eCapture creates two additional fields that “split” the date and time into a
Date Only field and a Time Only field. These two additional fields will be displayed in the Available Fields list in the Export Wizard, Select Export Fields
screen. For example, if the DueDate field was moved to the Fields Selected for
Date Format Handling, the following additional DueDate fields would appear in
the Available Fields list: DueDate*DATE ONLY* and DueDate*TIME ONLY*.
Click OK to return to the Export Wizard, Select Export Fields screen.
7-84
Ipro eCapture User Guide
Q1 2014
www.iprotech.com
877-324-4776
Creating a Processed Data Export Job (Export Processed Data/New Process Export Job)
15.
Click
log.
to display the Map eCapture Fields to Eclipse Fields dia-
Only the selected fields will be available for mapping. The fields available
for selection are the fields that presently exist in the selected Ipro
Eclipse case. The mapped fields cannot be modified. At least one field
must be selected for mapping in order to proceed. A mapped field can
only be selected once. Not all fields have to be mapped. Unmapped fields
www.iprotech.com
877-324-4776
Ipro eCapture User Guide
Q1 2014
7-85
Chapter 7, Creating Export Series and Export Jobs
will be ignored.
To see document text, the [FULLTEXT] field must be mapped to Eclipse’s
text field, indicated by EXTRACTED TEXT for the field type.
16.
For each Field name, select a mapped field from the drop-down list.
17.
Click one of the following:
18.
7-86
•
to map Ipro eCapture fields to Eclipse fields by position. The first field for Ipro eCapture will be mapped to the first
field for Eclipse, and so on.
•
to map Ipro eCapture fields to Eclipse fields by name.
Field names for Ipro eCapture that match the field names for
Eclipse, exactly, will be mapped.
(Optional) Click
to save the Export settings to an .INI file
which may be imported for a future export. In the Save Batch Export
Settings dialog box, navigate to a different directory if necessary, enter a
filename. The default extension is .INI. Click Save.
Ipro eCapture User Guide
Q1 2014
www.iprotech.com
877-324-4776
Creating a Processed Data Export Job (Export Processed Data/New Process Export Job)
19.
Click
a.
b.
to display the Specify Endorsements screen.
Select an Endorsement Zone. The zone displays a thick border to
indicate it is the active zone.
Click the drop-down list located above the Available Fields list,
and select a specific field type (System [S] Flags [F], External [E],
Metadata [M], and User Defined fields [U and G]). By default, All
Fields display. To further narrow the field list, enter a value in the
Filter Value field located below the Available Fields list. For exam-
www.iprotech.com
877-324-4776
Ipro eCapture User Guide
Q1 2014
7-87
Chapter 7, Creating Export Series and Export Jobs
ple, to see only those fields that contain the word “date”, enter
date and click
click
c.
. To display all fields, delete the value and
.
Select a field and click
. The selected field appears in the
Selected Fields box and is placed in the previously selected
Endorsement box. Once a field has been selected for placement in
a zone, it cannot appear in a different zone. A total of three fields
may occupy a single zone. If a zone is to contain more than one
field, use the
or
to change the order of the fields in the
Selected Fields box in the active Endorsement Zone. Each field
appears in its own line in the Endorsement Zone.
d.
Note: When exporting a bar code, message text, and image key;
and the image key contains underscore delimiters, Ipro eCapture
displays a warning: Lowercase characters and underscores cannot
be combined with bar code endorsement.
To remove a field from an Endorsement Zone, select the Endorsement Zone, select the field in the Selected Fields box, and click
.
e.
To change the appearance (attributes) of a field in the Endorsement Zone, do the following: Select the Endorsement Zone,
select the field in the Selected Fields box, and click
to open
the Font dialog. Select a Font, Font Style, Size, Effects (Strikeout,
Underline), and Color. Click OK to close the Font dialog. Repeat for
additional endorsement fields.
Inserting Custom Group Fields
To insert custom group fields, see the section Inserting Custom Group Fields
on page 7-27.
7-88
Ipro eCapture User Guide
Q1 2014
www.iprotech.com
877-324-4776
Creating a Processed Data Export Job (Export Processed Data/New Process Export Job)
Inserting Custom User Field Labels
A custom message can be added to an Endorsement Zone through User
Defined Fields. See the section Inserting Custom User Field Labels on page 731.
Previewing the Endorsement Placements
To preview the Endorsement Zones and the fields assigned to those Endorsement Zones, click
. The Endorsement Sample Data dialog appears
and displays the Zone, Type, Field Label and Field Value, if any, in a grid format. To preview a sample of the Endorsement Zones and fields on an image,
click
in the Endorsement Sample Data dialog. The Endorsement
Sample Image Preview screen appears and shows the selected fields in their
endorsement zones.
www.iprotech.com
877-324-4776
Ipro eCapture User Guide
Q1 2014
7-89
Chapter 7, Creating Export Series and Export Jobs
Use the first three icons in the toolbar to adjust how the image appears for
viewing: Fit Normal, Fit Horizontally, and Best Fit. The Magnify Glass icons are
used to Zoom In and Zoom Out respectively. The Percentage values can also
be used to Zoom In or Zoom Out. The Sample can be saved if necessary.
7-90
Ipro eCapture User Guide
Q1 2014
www.iprotech.com
877-324-4776
Creating a Processed Data Export Job (Export Processed Data/New Process Export Job)
20.
Click
screen.
www.iprotech.com
877-324-4776
to display the Specify Export Directory and File Options
Ipro eCapture User Guide
Q1 2014
7-91
Chapter 7, Creating Export Series and Export Jobs
Export Directory Path indicates the directory where the exported data
will be saved. Initially, this field shows the area established during workstation setup, but you can click
and navigate to a different directory.
Export Volume Options
Volume Name Enter a name for the CD-ROM label or volume path
directory. This field initially uses a number (e.g., 001) as the volume
name. This setting is for database files.
Increment Output Directory Every n Files: Select a value from the
drop-down list (or enter a value) that indicates the number of files that
will be in each subdirectory.
If the Image Load Format, Ringtail, was selected, the values in this field
will revert to 99, 999, and, so on if the Use Rollover Numbering option is
selected when configuring the Image Key. As the Image Key is entered
and changes leaving space for a leading zero, the values in the Increment Output field changes accordingly. For example, an Image Key of
00001 sets the value to 9999, 0001 sets the value to 999, 001 sets the
value to 99, etc.
Max Data Size If the drive where you are saving the export files has
limited space, select the maximum space (640, 1200, 4300, and 9000)
you want to use from the drop-down list.
Include Volume Name in Loadfile Filename: Select this option if you
want the Volume Name to appear in the VolumeManifest.TXT file.
Directory for each native: Starting with version 5.6, this option
replaces the Copy to output directory option formerly located in the first
Export Wizard screen. This option is not available for selection if Ringtail
was selected. Otherwise, when this option is selected, the Native File
field under the Subdirectory Structure options is not available. When not
selected, a folder name may be entered in the Native File field.
Subdirectory Structure Options
The first field is labeled dynamically based on the Image Format
selected in the first Export Wizard screen under Export Image Files. The
options include:
•
7-92
Single Page TIFF/JPG Files
Ipro eCapture User Guide
Q1 2014
www.iprotech.com
877-324-4776
Creating a Processed Data Export Job (Export Processed Data/New Process Export Job)
•
•
•
Single Page PDF Files
Multiple Page TIFF Files
Multiple Page PDF Files
The field contains the name of the folder where the images will be
stored. Accept or change the default folder name.
Document Text: This field contains the name of the folder where the
text files will be stored. Accept or change the default folder name.
Native File: This field contains the name of the folder where the native
files will be stored. Accept or change the default folder name. The
default name OF is an LFP command that contains the location and original filename. See Appendix D, LFP Files and the section Original File for
EDD Image (OF) on page D-12 for additional information.
Increment in Root or Subdirectory: Root is the default. For Subdirectory, indicate the name of the subdirectory; e.g. 0001. This folder willi
ncrement once the Max Data Size (MB) or the number of files specified
in the Increment Output Directory field is reached.
Click
to view a sample of the selected Subdirectory Structure:
Root or Subdirectory.
The following figure shows a Subdirectory Structure sample.
www.iprotech.com
877-324-4776
Ipro eCapture User Guide
Q1 2014
7-93
Chapter 7, Creating Export Series and Export Jobs
The following figure shows a Root Structure sample.
Mirror File Structure: When selected, the specified export directory will have
the same structure as the directories from which the files were discovered. The
discovered directory pathing is “appended” to the specified export directory.
For example, if the specified export directory is: Z:\EXPORT\Job001 and the
discovered directory paths are: H:\FILES\DOC, H:\FILES\PPT, and
H”\FILES\XLS, then the exported directory pathing will look like the following:
Z:\EXPORT\Job001\H_\FILES\DOC, Z:\EXPORT\Job001\H_\FILES\PPT, and
Z:\EXPORT\Job001\H_\FILES\XLS. Each of these directories will contain the
images and extracted text of the respective, original files. If this option is not
selected, then only one directory is created: Z:\EXPORT\Job001\IMG_0001; it
will contain all of the images.
Create load files only: When selected, no images, text files, or native files
will be copied to the export output directory. Only load files will be created.
The export will perform as if all of the native files and images were exported
based on the export options. The load file will reflect this.
OCR LFP Document Text Option: Select None, OI-inline, or OT-file reference from the drop-down list. For the Image Load Formats, Ipro LFP and Ipro
OCR, select the appropriate option for inclusion in the LFP file. Ipro eCapture
generates an IPROOCR.LFP file for either of these options, OI, or OT. If the
option Export Text Files, located on the initial Export screen, is not selected,
the OT option will not be available for selection. The OI lines in the
IPROOCR.LFP file will contain document text for each page in all cases as long
as there is document text for the page. The OT lines in the IPROOCRLFP file
will point to text files for each page only when the export image format are
single page images, and the option Export document text as single file (located
in the initial Export screen) is not checked. For multi-page formats, or when
document text is exported as a single file, there will be only one OT entry per
7-94
Ipro eCapture User Guide
Q1 2014
www.iprotech.com
877-324-4776
Creating a Processed Data Export Job (Export Processed Data/New Process Export Job)
document. If there is no text for a document (image where OCR wasn’t
enabled, for example), there will not be an OT line. For the OI-inline option,
the .LFP file will be larger than the LFP file generated when using the OT-file
reference option.
Replace Export Path with the following Drive Letter/Path Enter the path
to replace the root path to the images in the export load files. For example,
enter c:\images\0001\0001a\ to create the Ipro .LFP entries:
VN,DII001,c:\images\0001\0001a\DII001\,99
IM,AUG-001,D,0,@DII001;PROC0001\IMG_0011;AUG-001.TIF;2,0
IM,AUG-002,,0,@DII001;PROC0001\IMG_0011;AUG-002.TIF;2,0
Image Key Numbering
Image Keys can increment at different group levels (Page, Document, and Parent). The Image Key can have a total of 70 characters including any selected
delimiters that will be used between the Prefix and the Parent; between the
Parent and the Document; and between the Document and the Page.
As you populate the Image Key fields, the number displayed in parenthesis,
directly to the right of the Field label, will decrement accordingly. The Sample
Image Key field is used to check the Image Key as entered. You may change
the Image Key as often as necessary BEFORE you click Finish to begin the
Export process.
When configuring the Image Key, keep in mind whether you will be exporting
out a single job or using the Export Series concept, which allows output of successive unattended exports with sequential Image Key numbering and volumes. The starting Image Key will automatically be set to the next available
number based on the previous export’s ending number in the given set.
Page: If you do not enter a value in this field, the system will assign a
starting Image Key of 000000001 or the next available Image Key. Otherwise, you can enter a value, not to exceed 15 numeric only characters
(0-9).
Document: The Document portion of the image key number may have
a total of 15 numeric only characters (0-9).
Parent: The Parent portion of the image key number may have a total
of 15 numeric only characters (0-9).
www.iprotech.com
877-324-4776
Ipro eCapture User Guide
Q1 2014
7-95
Chapter 7, Creating Export Series and Export Jobs
Prefix: The Prefix portion of the image key number may have a total of
25 alphanumeric characters, dash [-], and/or underscore [_].
The Delimiters include: None, Underscore, Dash, Semi-colon, Period, or Space.
Each section of the image key number may be padded up to 15 digits.
See the section Using Rollover Numbering for Ringtail Format on page 7-177 if
the Ringtail format was selected for additional information about the Rollover
Numbering option.
Using Generated Numbering
Select Generate. The Image Key Numbering prefix segment shows {Native
Filename}. The Parent and Document segments are disabled.
a.
b.
c.
d.
7-96
Enter a Prefix in the Prefix segment.
Enter a Page number in the Page segment.
Select a Delimiter from the Delimiters drop-down list. If no delimiter is necessary, select (none). The Sample Image Key box is used
to check the desired image key format.
Indicate Base Numbering to be used for Page and/or Document
Level numbering. One-Based is the default setting.
Ipro eCapture User Guide
Q1 2014
www.iprotech.com
877-324-4776
Creating a Processed Data Export Job (Export Processed Data/New Process Export Job)
Using Predefined Numbering
Select Predefined to display the options:
Click the drop-down arrow to display the available numbering options:
•
Use filename: Formerly called Use filename for Image Key.
Do not use this option for Ringtail format because Ringtail relies on the
Bates numbering scheme.
The option, Use Filename, allows for data to be initially pre-processed
using third party tool, such as Ipro Allegro, and then have that same
data processed through Ipro eCapture.
Caveats
The data that will be processed in Ipro eCapture must have the following
characteristics when using this feature:
•
Consistent Bates numbering scheme. Avoid:
filenames that are too long
duplicate Bates numbers
invalid characters
other conditions where the filename does not conform to a Bates
numbering scheme.
An inconsistent Bates numbering scheme will result in incorrect data
output.
•
Originally processed as a native file.
www.iprotech.com
877-324-4776
Ipro eCapture User Guide
Q1 2014
7-97
Chapter 7, Creating Export Series and Export Jobs
•
Ipro eCapture will extract all email attachments that are detected.
Embedded files will be extracted unless the Discovery File Extraction option, Treat email inline images as attachments, is deselected.
This option is used in conjunction with the Flex Processor rules, Create
Parent Item ID List and/or Create Child Item ID list. A rule can be created to load the Item IDs from the native files for each individual job. If
this feature is used without the Flex Processor rules, Create Parent Item
ID List and/or Create Child Item ID list, the result will be incorrect data
output.
See Appendix A, Using the Flex Processor Rules Manager and the section
Create Parent Item ID List or Child Item ID List on page A-46 for specific
information about creating Parent or Child Item ID rules in Flex Processor.
For Processing Jobs, the original file’s filename (TIFFs, TXTs, or PDFs) is
used as the prefix for the image key when exported. The Page segment
for the image key (Bates) number is enabled and used for suffixing the
native filename with each page of the document.
Filename example for a Processing Export Job:
native filename: EX-00001.DOC will be exported as a file named: EX00001.00001.TIF; where EX-00001 is the original filename, 00001 is the
page number, and .TIF is the extension. Subsequent pages for each document will increment.
•
Import/Merged: The export job will use the imported/merged linking
key as the image key base for process exports. It is necessary to enter a
suffix with the option to either suffix all pages (select the option) or skip
the first page.
•
Ipro Enterprise: The export job will use the Ipro Enterprise linking key
as the image key base for process exports. It is necessary to enter a suffix with the option to either suffix all pages (select the option) or skip the
first page.
Data Extract Export: Uses the most recent image key assigned for a
document that was part of a data extract job as the image key for the
same document. Most recent is defined as the ExportedItems record
with the highest ExportedItemID value for records associated with complete data extract export jobs. Jobs are started in sequence; therefore,
•
7-98
Ipro eCapture User Guide
Q1 2014
www.iprotech.com
877-324-4776
Creating a Processed Data Export Job (Export Processed Data/New Process Export Job)
any job that is started will have higher values for ExportedItemID than
any job started before it.
Select a Delimiter from the Delimiters drop-down list. If no delimiter is
necessary, select (none). The Sample Image Key box is used to check
the desired image key format.
Suffix first page: Optionally select this when suffixing. If it is not
selected, the first page is skipped. For multi-page images, page suffix
value is blank.
Concluding the Export
(Optional) Click
to save the export settings to an .INI file. See
the section Creating a Data Extract Export Job (Export Extracted Data/Data
Extract Export Job) on page 7-147 for more information.
Click Finish. (If you did not define an image key number, the system will
prompt you with a starting image key number.)
If this is for a Process Export Job, it will appear in the Ipro eCapture Controller’s Job Queue. Start the Process Export job. The job’s details are available
by selecting the job in the Tree View. (Under Export Jobs, Process Exports).
The Information Panel has two buttons: View Settings and View Output. Click
View Settings to display information about the job. Click View Output to
access the files that were created via the Explorer.
Encoding Options Select an encoding option from the drop-down list.
Options include:
•
•
•
Unicode UTF-16 - load files and extracted text are saved in this format
if Force ANSI is not selected.
Unicode UTF-8 - same as UTF-16 output except for the encoding
applied to output files.
Force ANSI - Select this option and select a character from the dropdown list. This replaces non-ANSI characters with the selected ANSI
character in the loadfile/extracted text. This allows for data loaded into
applications that are not Unicode compliant.
If this is for an Export Series, the Series name will appear in the Client Management tree view under Process Exports; located under Export Jobs. The
Export Series will then be available for selection when creating a Process
Export job.
www.iprotech.com
877-324-4776
Ipro eCapture User Guide
Q1 2014
7-99
Chapter 7, Creating Export Series and Export Jobs
Click
to conclude the autoloading into Eclipse. The job appears in the
Job Queue and the Progress column shows Autoload Initiated. The job also
appears under Process Exports in the Client Management tree view with the
Eclipse icon.
Autoload into Relativity - Processing Job
Ensure that Relativity is configured prior to using this function. See
Chapter 2, Ipro eCapture Controller and the section Configuring Integration with kCura Relativity on page 2-21 for information about configuring Relativity.
1.
Click the Client Management Tab.
2.
Do one of the following:
•
•
3.
Do one of the following:
a.
7-100
In the Tree View, navigate to the Processing Jobs folder (under
Custodian). Select a completed Processing Job and click the
alternate mouse button to display the context menu. Select
Export Processed Data from the context menu to display the
New Export Job dialog. The job you selected is already checked in
the Tree View. Proceed to Step 3 and the letter a if you wish to
select additional jobs. If you want to select an Export Set instead,
proceed to Step 3 and the letter b.
In the Tree View, navigate to Export Jobs (under Client). Select
Process Exports and click the alternate mouse button to display the context menu. Select New Process Export Job from the
context menu to display the New Export Job dialog. Proceed to
Step 3 and the letter a. Or, if you want to select an Export Set
instead, see Step 3 and the letter b.
Select the Select Jobs option to display the Tree View and expand
it. Select one or more jobs for exporting. The Export Job name
field populates with the first processing job you selected. You can
select multiple Processing Jobs for export. The system will go
through each one and store the data under the directory of the
Export Name you indicated in the New Export Job dialog box. It
Ipro eCapture User Guide
Q1 2014
www.iprotech.com
877-324-4776
Creating a Processed Data Export Job (Export Processed Data/New Process Export Job)
may be necessary to expand the tree to view the processing jobs.
Proceed to Step 4
b.
OR
Select the Select Export Set option to display a list of Export Sets
that were created in QC and then select an Export Set. If neces-
www.iprotech.com
877-324-4776
Ipro eCapture User Guide
Q1 2014
7-101
Chapter 7, Creating Export Series and Export Jobs
sary, expand any Export Set Containers to select an Export Set
that is stored in a Container. Proceed to Step 4.
4.
From the Export Type drop-down menu, select Direct to Relativity.
5.
Enter an Export Job Name, or if a default name appears in the field,
modify it if necessary. This is the name the system uses for the directory
name where the exported data is stored.
6.
Select a task table from the drop-down list. The task table that appears
in the field is based on the last task table selected for the Client.
7.
(Optional) Browse to the Template (.INI File) that has the data
extraction export settings from a previously run data extraction export.
A file will not exist until you run your first data extraction export. Note:
This option is not available if you select an existing Export Series from
the drop-down list. This file saves time because you will not need to
manually make selections in some of the Export wizard screens as well
as ensure that there is consistency when exporting jobs for a particular
situation.
8.
(Optional) Do one of the following:
•
7-102
Leave the default setting [none] under Export Series.
Ipro eCapture User Guide
Q1 2014
www.iprotech.com
877-324-4776
Creating a Processed Data Export Job (Export Processed Data/New Process Export Job)
•
•
9.
Select an Export Series from the drop-down list. When an existing Export Series is selected, the
,
appears. When clicked, the Export settings dialogs will not appear;
instead the Job is placed in the Job Queue. See the section About
Export Series on page 7-264 for background information about
Export Series. Or see the section Creating an Export Series (Process Export or Data Extract Export) on page 7-266 if you want to
create the Export Series before the Export Job is created.
Select [new export series] from the Export Series drop-down list
and enter a New Export Series Name.
Click OK. (NOTE: A warning dialog may appear if one or more of the
selected processing jobs have not yet passed QC. You can elect to continue to export or cancel, QC the jobs, and then export again.) The
www.iprotech.com
877-324-4776
Ipro eCapture User Guide
Q1 2014
7-103
Chapter 7, Creating Export Series and Export Jobs
Select Export Formats and File Handling Options dialog appears unless
was clicked for an existing Export Series.
10.
Select from the following options:
a.
Export Image Files - When selected images and text files are
exported. Select one or more Load Formats and select from the
options described in c) and e).
If deselected, there will not be any Image Load formats available
7-104
Ipro eCapture User Guide
Q1 2014
www.iprotech.com
877-324-4776
Creating a Processed Data Export Job (Export Processed Data/New Process Export Job)
b.
for selection (skip c and e); however, Ringtail and Summation DII
are available for selection under Data Load Formats. In addition,
the option, Use page-based numbering, appears to the right
and is selected by default. When selected, page counts in image
key numbering are retained.
Image Format and Options - From the drop-down list, select
one of the image formats to generate during the export process:
•
Single Page TIFF/JPG Files creates a separate file for
each image in the job. Black and white images are saved as
TIFFs; color images are saved as JPEG files. Will also export
single page extracted text.
•
•
•
•
Single Page PDF Files outputs single page PDF files for
images.
Multiple Page TIFF Files creates a TIFF file for each document. Will also export multiple page extracted text.
Multiple Page PDF Files creates a PDF file for each document.
Both TIFF and PDF Files is specific for the Image Load
Format Ringtail. Multi-page PDF representation of the document is copied to the output folder along with the single
page images.
Convert LZW Image to JTIFF - When this option is selected, it
converts LZW compressed Single Page TIFF files to JTIFs. Exported
multi-page TIFFs are always JPEG compression.
Create Searchable PDFs - selected by default when either Single
Page or Multipage PDFs is selected from the drop-down list. Select
the option, Make endorsements searchable, if you want to
search for endorsements. Select the option, Convert Fast Web
Enable, to create fast view enabled PDFs at export. PDF documents are restructured for downloading one page at a time from
web servers. Only the requested page is sent rather than the
entire PDF.
c.
This option is deselected by default.
Force Image Canvas to: The ratio of a resized image is maintained when selected. From the drop-down list, select a paper size
and then select an image size from the drop-down list underneath.
www.iprotech.com
877-324-4776
Ipro eCapture User Guide
Q1 2014
7-105
Chapter 7, Creating Export Series and Export Jobs
Options include: For small images, for large images, and for both
small and large images.
Center Vertically: Centers the image vertically on the canvas. The
default vertical alignment is top.
Center Horizontally: Centers the image horizontally on the canvas. The default horizontal alignment is left.
Click the link, Apply to select file types only, to open the Image
Normalization Inclusions dialog.
By default, all file types are selected. Click Clear All, to clear all the
selected file types and then select the specific file types for the
Export Job. If necessary, click + to expand the list for a file type,
such as Microsoft Excel, to display specific versions/types of Micro7-106
Ipro eCapture User Guide
Q1 2014
www.iprotech.com
877-324-4776
Creating a Processed Data Export Job (Export Processed Data/New Process Export Job)
soft Excel.
Click OK to return to the Export screen. A message appears underneath the link stating the number of file types that will be
included.
d.
e.
Export Text Files - select this option to display additional Data
Load Formats of LaserFiche, DB/Textworks, and OCR Control.lst.
Note: if this option is deselected, then no text files are created
except for the VolumeManifest.TXT.
Optionally select from the following Document Text options:
•
Include Image Key in Document Text: Select this option
if you want to include the Image Key at the beginning of the
text file. Indicate which token to include in the image key
format. The default is << [k] >>, where token [k] is for the
image key. The other format is << [p] >>, where token [p]
is for the page number. The Image Key will appear like this:
<< EXH_1245 >> The Page will appear like this << 25 >>
This option takes precedence over Create Text Placeholders
for Missing Text Files. Therefore, if both options (Include
Image Key... and Create Text Placeholders...) are enabled,
then a document without text will have a text file with only
the Image Key.
•
Create Text Placeholders For Missing Text Files: Creates placeholder text files for documents where there was no
available text. Text placeholders are created with each combination of export text files and image formats. The option,
Include Image Key in Document Text, takes precedence over
the option, Create Text Placeholders for Missing Text Files. If
both options are selected, a document without text will have
a text file with only the Image Key. (Note: this option is not
available if the option Export Image Files is de-selected.)
(Optional) Export Native Files - (Note: When this option is
selected along with the Ringtail Image Load File format, the Name
file using image key and Copy to output directory options are automatically selected. Starting with version 5.6, the Copy to output
directory option was replaced with the option Directory for each
www.iprotech.com
877-324-4776
Ipro eCapture User Guide
Q1 2014
7-107
Chapter 7, Creating Export Series and Export Jobs
native which is located in the last screen of the Export Wizard.)
Under Native file options, select from the following:
•
Name File Using Image Key: If this option is selected, the
native file directory will no longer create an additional directory per document. By naming the file using the Image Key,
it removes any chance of duplicate filenames occurring.
Therefore, the additional level of directories are not necessary. An example follows:
•
Copy to Output Directory: This option was replaced with
the option Directory for each native which is located in the
last screen of the Export Wizard.
Native files are copied to a directory separate from the
images. The directory numbers match their corresponding
image file.
Under Alternate Email Export Options, select from:
•
•
7-108
Outlook - Check this option to export an alternate native file for
Outlook files. The default export format is MSG.
Lotus Notes - Check this option to export an alternate native file
for Lotus Notes files. The default export format is DXL.
Ipro eCapture User Guide
Q1 2014
www.iprotech.com
877-324-4776
Creating a Processed Data Export Job (Export Processed Data/New Process Export Job)
•
•
Outlook Express - Check this option to export an alternate native
file for Outlook Express files. The default export format is EML.
GroupWise - Check this option to export an alternate native file for
GroupWise files. The default export format is XML.
Select one of the following formats:
•
.MHTFormat: Exports selected e-mail type to a standardized format rather than to .DXL or .XML. Types include Outlook, Outlook Express, Lotus Notes, and GroupWise. (An
.MHT file is an Archived Web Page file with information in
Multipurpose Internet Mail Extension HTML (MHTML) format
with an .MHT file extension. All relative links in the Web page
are remapped and the embedded content is included in the
.MHT file.)
•
Rich Text Format (RTF): Uses Microsoft Word to open the
MHT and saves it as an RTF; a more widely accepted format.
•
HTML: HTML documents can have inline images, the images
themselves are not included in the HTML. The images must
be included in the export in order to access the inline
images.
File extension options: This option is used in the event the native documents are missing or have incorrect file extensions. When this is the
case, the native file viewers will not work. The correct extension is
defined as the value presented in the Extension field of the StellentDefs
table in the CONFIG database for the StellentID of the file. Oracle (formerly Stellent) will not identify files it cannot discern with a .TXT extension. If necessary, a Database Administrator may manually update the
Extension field in the StellentDefs table with custom extensions using
SQL. The options from the drop-down list include:
•
•
•
•
None - default setting. Nothing happens.
Add extension only if missing
Append corrected extensions - appends extensions that are incorrect or missing.
Replace incorrect extensions - replaces incorrect extensions with
correct extensions or missing extensions.
www.iprotech.com
877-324-4776
Ipro eCapture User Guide
Q1 2014
7-109
Chapter 7, Creating Export Series and Export Jobs
Click the link, Apply to selected file types and/or QC Flags, to open
the Native File Export Inclusions dialog.
By default, all file types are selected and the QC flags are not selected.
For the file types, click Clear All, to clear all the selected file types and
then select the specific file types and/or only documents to which the
QC flag or flags are attributed. If necessary, click + to expand the list for
a file type, such as Microsoft Excel, to display specific versions/types of
Microsoft Excel. If either one (file type/QC flag) “hits”, the native file will
be exported.
Click OK to return to the Export screen. A message appears underneath
the link that states the number of file types and QC flags, if any, that
were included.
7-110
Ipro eCapture User Guide
Q1 2014
www.iprotech.com
877-324-4776
Creating a Processed Data Export Job (Export Processed Data/New Process Export Job)
11.
Click
to display the Merge Data Options dialog.
This dialog appears if at least one set of images or text exists in one of
the Processing jobs or Export Sets selected for the Export job.
Do the following:
•
from the drop-down menu, select the order (Date, Ascending;
Date, Descending (default); Name, Ascending; Name, Descending;
Custom - use the up/down arrows) merge jobs display in the
Merge Jobs drop-down menu in the Image tab or View tab.
www.iprotech.com
877-324-4776
Ipro eCapture User Guide
Q1 2014
7-111
Chapter 7, Creating Export Series and Export Jobs
•
12.
Click
deselect one or more merge jobs. By default, all merge jobs are
selected. The “Original” item refers to the original images and text
associated with the document. It appears as the last item in the
list of merge jobs and remains selected.
to display the Export Fields dialog.
Defining Export Fields for Databases
If you are creating any database load file formats during the Ipro eCapture
export process, you need to define the export fields that Ipro eCapture will
export. This step ensures that the data exported from Ipro eCapture matches
the fields in the database where the data will be used.
7-112
Ipro eCapture User Guide
Q1 2014
www.iprotech.com
877-324-4776
Creating a Processed Data Export Job (Export Processed Data/New Process Export Job)
There are several field types that can be exported. These field types are designated as follows:
S (System Fields): These fields only have meaning in the context of an Ipro
eCapture export. If a document was viewed outside of the export, none of
these field types would apply. Any brackets [] will be removed from the label
when exporting. Some of these fields are applicable for endorsement only. The
System field definitions are as follows:
ITEM_ID: The Ipro eCapture unique identifier for the document. Can be
added/removed from Selected Fields.
BEGDOC: Starting Bates number of the document.
ENDDOC: Ending Bates number of the document. Note: May be removed from
the Selected Fields box.
BEGATT: Starting Bates number of the attachment range.
ENDATT: Ending Bates number of the attachment range.
PARENT_ATTACHMENT: "P" for anything not an attachment, "A" for attachment
(child).
ATTACHMENT_BATES: Semicolon-delimited list of Bates numbers of the children of a parent document.
ATTACHMENT_ITEMIDS: Semicolon-delimited list of the ItemIDs of the children of a parent document.
EXTRACTED_ATTACHMENT_COUNT: Counts the children of a document as it
relates to the export. The count should always match up with the number of
ItemIDs in the field ATTACHMENT_ITEMIDS and image keys in the
ATTACHMENT_BATES field. Note: This field will be zero for all documents in the
export that have a parent in the export.
EXTRACTED_ATTACHMENT_NAMES: Generates a semi-colon delimited list of
the child document’s filenames in the order of the export. The number of filenames in the list should match the EXTRACTED_ATTACHMENT_COUNT.
PARENT_BATES: If a document is a child, the Bates of the parent.
PARENT_ITEMID: If a document is a child, the ItemID of the parent.
www.iprotech.com
877-324-4776
Ipro eCapture User Guide
Q1 2014
7-113
Chapter 7, Creating Export Series and Export Jobs
EXPORT_NATIVE_FILES: Used when exporting native files. Shows export path
to the native files. Defaults to Selected fields box when Export Native Files is
selected from the Formats and File Handling screen. May be moved from
Selected Fields box to Available Fields if required.
ABSOLUTE_PARENT_ID: Obsolete - use PARENT_ITEMID instead.
PARENT_ITEMID queries the ExportedItems table to get an absolutely accurate
parent ID relating to the export. ABSOLUTE_PARENT_ID reads from the Items
table. Both should agree, but if not PARENT_ITEMID is the more accurate of
the two.
RELATIVE_PARENT_ID: This field is relative to the Discovery Job, not the
Export. Compound document options may result in the relative parent being
excluded from the export. NOTE: PARENT_ITEMID can differ from
ABSOLUTE_PARENT_ID if compound document options cause the absolute
parent to be excluded from the export. PARENT_ITEMID is relative to the
Export; ABSOLUTE_PARENT_ID is relative to the Discovery Job.
RELATIVE PATH: Original path to native file without directories above where
the directory folder was selected.
SEARCH HITS: Contains the search terms.
CUSTODIAN_NAME: The name of the Custodian containing the process job
that produced the document being exported.
DISCOVERY_CUSTODIAN_NAME: Used to identify the custodian of the discovery job in which an exported item was found.
CUSTODIANS: Used to identify the duplicate custodians for this record.
DUPLICATE_LOCATIONS: Used to list the (Duplicate ID), Custodian Name,
<Filename>, and [Discovery Path] for this record.
PROCESS_JOB_NAME: The name of the Process Job that produced the document being exported.
RULE_CATEGORY: Contains the categories (selected and assigned through the
Flex Processor).
PROCESS_STATUS: Displays the process status results of a job. Items that
processed successfully will show "Success".
IDENTIFIED_LANGUAGES: List of languages, identified by BasisTech, that exist
in a document.
7-114
Ipro eCapture User Guide
Q1 2014
www.iprotech.com
877-324-4776
Creating a Processed Data Export Job (Export Processed Data/New Process Export Job)
IDENTIFIED_ENCODING: List of encodings, identified by Basis Tech, that exist
in the document.
VOLUME_NAME: The value is the label for the document’s volume.
ORIGINAL_CUSTODIAN: Populates with the name of the custodian the original
file belonged to when an item duplicates against another file when doing deduplication at the Project or Client level.
BATCHID: Contains the Batch ID assigned for the Discovery Job.
FULLTEXT: Contains combined contents of body text and OCR text.
EXPORTED_TEXT_FILES: Contains the path to the exported extracted text files
when the option, Export document text as single file, is selected in the first
export screen. The value of this field will be affected if the Replace the export
path with the following drive letter/path field is populated (located in last
Export screen). This field cannot be used for a Group field and is not available
for endorsements.
DocType: Contains eMail, eDoc, and eAttach types.
DocCategory: Contains definitions that represent the document based on
Email (absolute parent and loose email only, e.g. not email attached to email),
Email Attachment (any email attachments to an email), eDocument (files that
are not email and not an attachment of an email family), eDocument Attachment (any embedded file in an eDocument; including emails).
USERDEFINED1 through USERDEFINED5: Values to be entered using SQL
Server Manager. These fields can be used for endorsements, custom placeholders, etc.
BARCODE: Contains the barcode (USS Code 39 specification).
F (QC Flags): The QC flags that appear in the list are both system QC flags
and any user defined QC flags for the selected Processing Job or Jobs. The
CUSTMDAT.TXT file, created from the Export, will show a value of Y for flags
that are “on” or be blank for flags that are “off”.
www.iprotech.com
877-324-4776
Ipro eCapture User Guide
Q1 2014
7-115
Chapter 7, Creating Export Series and Export Jobs
M (Metadata Fields): These fields were retrieved from documents during
processing.
Starting with version 2.0, three additional Metadata fields were
added. They are: Last Access Date, Last Access Date*DATE ONLY*,
and Last Access Date*TIME ONLY*. Last Access Date is a volatile system field. The first time that Ipro eCapture discovers a directory of
loose files, Last Access Date will be valid. However, subsequent discovery jobs, run on the same set of files, will get the date the Ipro
eCapture last “touched” the file on the initial discovery job. We highly
recommend that you should not use the Last Access Date metadata
fields. Because there isn’t a legitimate value for any file Ipro eCapture
extracts, this field will be populated for loose files only. In addition, emails that Ipro eCapture extracts, attachments, embedded files, and
files extracted from archives will not have this value populated.
E (External Fields): These fields are from export jobs originating from Ipro
Allegro or from the Ipro eCapture Import Wizard.
U or G (User Defined Fields): These comprise two types: User [U] and/or
Group [G]. These fields are created via the Insert Custom Fields function. The
User fields will export the field label and the value you may optionally enter.
Otherwise the value may be blank. The Group fields are space-delimited combinations of System (S) and/or Metadata (M) field types.
When the Data Extract Export wizard is initiated, the process jobs to be
exported are selected first. The fields available for export are based on a standard list of metadata fields combined with the metadata retrieved during processing. In versions 1.2 and earlier, these fields were called Standard and
Extended Metadata fields with separate selection options. Starting with version
1.3, they are now combined with no differentiation between them.
The available fields listview is populated using this list of Metadata fields, along
with the Ipro eCapture system fields which are available for all exports. In
addition *DateOnly* and *TimeOnly* fields are parsed from date fields and
included in the Metadata fields.
7-116
Ipro eCapture User Guide
Q1 2014
www.iprotech.com
877-324-4776
Creating a Processed Data Export Job (Export Processed Data/New Process Export Job)
The export will always export the non-displayed system fields
[BATES_NUMBER] and [ITEM_ID] as the first two fields regardless of field
selections shown. All other fields to be exported are displayed in the Selected
Fields box and will be exported, in order, named as the field label. The next
section, About the Select Export Fields Screen on page 7-23, describes how to
populate the Selected Fields box.
Sorting Fields
Alternate click a field and choose Make Sort Field from the shortcut menu. This
option appears for those fields that can be sorted such as a metadata field.
A Y appears in the Sort column. To clear this entry, alternate click the field and
choose Clear Sort Field.
When a field is marked as a Sort field, it applies the value of the selected field
to all family members of a parent item. This allows sorting on the specified
field in an external application to be compound-complete. For example, when
the ‘Sent Date’ field is made into a Sort field, the value of the ‘Sent Date’ field
for an email will be used as the value of the same field in the exported load file
for all of the email’s attachments.
About the Select Export Fields Screen
See the section About the EncounteredMetadataFieldList Table on
page 7-264 for more information about the metadata fields.
The field type designator (discussed in the previous section, Defining Export
Fields for Databases on page 7-159) displays in the Type column of both the
Available and Selected Fields boxes.
Available Fields: Displays all fields available to be exported. Click the dropdown list located above the field list, and select a specific field type. By
default, All Fields display. Ctrl-click to select non-contiguous fields. Shift-click
to select a contiguous range.
Filter Value - enter a value to filter the list. For example, to see only those
fields that contain the word “date”, enter date and click
fields, delete the value and click
www.iprotech.com
877-324-4776
. To display all
.
Ipro eCapture User Guide
Q1 2014
7-117
Chapter 7, Creating Export Series and Export Jobs
Selected Fields: Displays all fields selected from the Available Fields for
export. Right-click a field to edit it, use the up or down arrows to reorder the
fields.
: Click to move a selected field from the Available Fields box to the
Selected Fields box.
box.
: Moves all fields from the Available Fields box to the Selected Fields
: Click to move a selected field from the Selected Fields box to the
Available Fields box.
box.
: Moves all fields from the Selected Fields box to the Available Fields
Field List: This list contains the following field list templates: Ipro Basic Field
List, Ipro Standard Field List, Ipro Extended Field List, and Ipro Enterprise
Field List. The Ipro Enterprise field list reflects the standard list of fields that
are selected by default in a new Ipro Allegro case and created in a new Ipro
Eclipse case. To facilitate the ease of field selection, the templates are used to
load the fields, all at once, into the Selected Fields box. The drop-down list will
also display user saved System templates and/or Client templates. Templates
selected from a physical .INI file do not display in this list.
To load a template into the Selected Fields box, select the template from the
drop-down list. A warning dialog box appears.
Click Yes to continue. The template’s fields appear in the Selected Fields box.
7-118
Ipro eCapture User Guide
Q1 2014
www.iprotech.com
877-324-4776
Creating a Processed Data Export Job (Export Processed Data/New Process Export Job)
To save a new template based on manually selected fields, click the dropdown list, choose Save As, click
appears.
. The Save Template As dialog
Select from the following:
•
•
System Template - available to all Export Jobs
Client Template - available only to the Client
For System Template or Client Template, enter a meaningful name for
the template.
•
File - saves to a physical .INI file in selected location
For a File template (.INI), click
to display the File Browser dialog.
Browse to a location, enter a filename, and click Open. The Save Template As dialog appears indicating the pathname in the Location field.
Click Save.
To select an existing user created field list template saved as a physical
.INI file, click the drop-down list, choose Browse, and click
. The Open
dialog appears. Browse to the saved template (.INI) file and click Open. A
warning dialog box appears indicating that loading fields from a template will
clear any selections, including group fields and field label modifications. Click
Yes to continue.
www.iprotech.com
877-324-4776
Ipro eCapture User Guide
Q1 2014
7-119
Chapter 7, Creating Export Series and Export Jobs
Managing Field Templates
User created System and/or Client templates can be renamed, edited, deleted,
and viewed.
From the Controller menu bar, choose Tools > Field Template Management. The Field Template Management dialog appears.
Alternate click a template to display the context menu and choose:
7-120
Ipro eCapture User Guide
Q1 2014
www.iprotech.com
877-324-4776
Creating a Processed Data Export Job (Export Processed Data/New Process Export Job)
Rename Template- displays the Edit Template Name dialog. Enter a new
Template name and click OK.
Edit Template - displays the Edit Template name dialog. A different name
may be given and the Type can be changed. If the type is changed to Client
Template, the dialog expands to display a Client drop-down list where a different Client can be selected. If the type is changed to System Template, the dialog collapses to hide the Client drop-down list.
Delete Template - A Delete Confirmation dialog appears prompting a decision to delete the template. Click Yes to delete the template.
View Template - Opens a dialog with the selected Template in the title bar
and shows the fields assigned for that template. Click Close when through
viewing the fields.
: Moves the Standard Fields from the Available Fields box to
the Selected Fields box.
: Allows the loading of only selected export fields from a previously saved .INI file. The Fields from Export Settings come from the .INI file
which you can optionally load when creating a new export job.
: Opens the Insert Custom Field dialog where you can
create new group fields and new user fields. Inserting Custom Group Fields is
discussed in the section, Inserting Custom Group Fields on page 7-27.
Use
and
to change the order of the fields in the Selected Fields box.
Select a field (or contiguous fields) and then use either arrow to reposition it
(or the selected fields) accordingly.
Inserting Custom Group Fields
You can group several Ipro eCapture fields into a single field in the export file.
For example, you can group the Author and Manager fields to create a group
field called authorgroup.
www.iprotech.com
877-324-4776
Ipro eCapture User Guide
Q1 2014
7-121
Chapter 7, Creating Export Series and Export Jobs
Or, you can sort attachments by a field that you specify instead of by image
key order. For example, you might want to group all of the Microsoft Word
attachments together within their parent documents. To do this, you would
create a Group based on Application Name (a metadata field), add it to the
fields to export, and sort by that field.
You might create a group if you want to:
•
•
Have related information appearing together and/or be treated as a single field in the litigation database.
Sort attachment ranges in some other way than image key order within
their parent documents.
The Ipro eCapture fields are separated by the selected Delimiter (introduced in
version 3.0) in the export file’s group field.
Group fields are available for selection in the Specify Summation Options
screen and in the Specify Endorsements screen.
7-122
Ipro eCapture User Guide
Q1 2014
www.iprotech.com
877-324-4776
Creating a Processed Data Export Job (Export Processed Data/New Process Export Job)
a.
Click
www.iprotech.com
877-324-4776
to open the Insert Custom Field dialog.
Ipro eCapture User Guide
Q1 2014
7-123
Chapter 7, Creating Export Series and Export Jobs
b.
c.
By default, the Type Group is selected. To create a Custom User
Field, see the section Inserting Custom User Field Labels on page
7-31.
Enter a meaningful name for the group of fields in the Field label
field.
Select one of the following:
Output values as delimited list and select a Delimiter to use
from the drop-down list.
d.
e.
. To display all fields, delete the value and click
.
Select each field you want to include in the group by clicking it
twice. Each selected field appears in the Selected Field box. Ctrlclick to select non-contiguous fields. Shift-click to select a contiguous range.
f.
Click
to display the Text Field dialog. Enter text
and click OK. When endorsing, the custom user field is aligned
side by side with the system field. For example, ItemID 77878,
where ItemID is the user field label and 11878 is the actual
[Item_ID].
g.
If necessary, use the
or
to change the order of the fields in
the Selected Fields box. Select a field (or contiguous fields) and
then use either arrow to reposition it (or the selected fields)
accordingly.
Click OK. The Insert Custom Field dialog closes and you return to
the Select Export Fields screen. The newly created Group Field
h.
7-124
Output first non-blank value: Ipro eCapture looks for data
starting with the top field on down for multiple fields. The first field
encountered with data will be placed in the Group field.
Click the drop-down list located above the Available Fields list,
and select a specific field type. By default, All Fields display. To
further narrow the field list, enter a value in the Filter Value field
located below the Available Fields list. For example, to see only
those fields that contain the word “date”, enter date and click
Ipro eCapture User Guide
Q1 2014
www.iprotech.com
877-324-4776
Creating a Processed Data Export Job (Export Processed Data/New Process Export Job)
i.
j.
appears in the Selected Fields box. Notice that G appears in the
Type column. G is for Group Field.
Repeat steps a) through g) to create additional Group Fields.
Click OK to return to the Select Export Fields screen or the Specify
Endorsements screen.
User Defined Group Field Functions
These functions are available from the Select Export Fields dialog only.
To change the Group Field label, select it in the Selected Fields box and
click the alternate mouse button to display the context menu. Choose Change
Field Label to open the Edit Field label dialog. Modify the Field Label. Click
OK. The change made here affects how a field’s label will appear in the header
row of the export file.
To make the Group Field a sort field, select it in the Selected Fields box
and click the alternate mouse button to display the context menu. Choose
Make Sort Field. A Y appears in the Sort column. To remove sorting, alternate click the field to display the context menu. Choose Clear Sort Field.
To edit the Group Field’s value, select it in the Selected Fields box and click
the alternate mouse button to display the context menu. Choose Edit Group
Field to open the Edit Export Group Field dialog. Modify the Field Label value.
Click OK.
To delete the Group Field, select it and click the alternate mouse button.
(Note: If a Group field is needed in either the Summation or Endorsement
screens, do not delete the field. Instead move it to the Available Fields box.)
Choose Delete Group Field. A warning box appears asking if you want to
delete it. Click Yes.
Inserting Custom User Field Labels
Use a Blank Field when you want to export user defined metadata but you
want to incorporate a pre-defined field layout. For example, If you always want
to export the fields, CDAuthor, Filesize, and Location, and none of the
extended metadata consists of a CDAuthor field (CDAuthor didn’t exist in any
of the processed files, therefore it did not appear in the list), you could insert a
blank field and change the field label to CDAuthor to keep the pre-defined field
layout.
www.iprotech.com
877-324-4776
Ipro eCapture User Guide
Q1 2014
7-125
Chapter 7, Creating Export Series and Export Jobs
User fields are available for selection in the Specify Summation Options screen
and in the Specify Endorsements screen.
a.
From the Insert Custom Field dialog, select the Type: User. The
Insert Custom Field dialog appears.
b.
c.
d.
Enter a field label.
Enter an optional Field Value.
Click OK. The Insert Custom Field dialog closes and the field
appears in the Selected Fields box. If necessary, use the
or
to reposition the selected user field in the list. Notice that U
appears in the Type column. U is for User Field.
Three actions can be performed on the User Field once it is in the Selected
Fields box list. They are: changing the field label, deleting the user field altogether from the list, and editing the user field’s value.
To change the field label, select it in the Selected Fields box and click the
alternate mouse button to display the context menu. Choose Change Field
Label to open the Edit Field label dialog. Modify the Field Label. Click OK.
The change made here affects how a field’s label will appear in the header row
of the export file.
7-126
Ipro eCapture User Guide
Q1 2014
www.iprotech.com
877-324-4776
Creating a Processed Data Export Job (Export Processed Data/New Process Export Job)
To delete the blank field, select it in the Selected Fields box and click the
alternate mouse button to display the context menu. (Note: If a User field is
needed in either the Summation or Endorsement screens, do not delete the
field. Instead move it to the Available Fields box.) Choose Delete User Field.
It is removed from the list.
To edit the blank field’s value, select it in the Selected Fields box and click
the alternate mouse button to display the context menu. Choose Edit User
Field to open the User Field dialog. Modify the Field Value field. Click OK.
Selecting the Additional Export Options in the Export Fields
Screen
Populate Child Fields for Parents - If this option is NOT selected, the Parent
fields for all items (PARENT_BATES, PARENT_ITEMID) will only be populated
for child items.
If this option IS selected, the Parent fields will be populated for all items. Nonchild items will enter their own Bates™ number and ItemID.
Select Include Field Names in first line of file if you want to assist readers
in understanding or verifying the file. Do not select this option if the file will be
loaded directly into the database.
If the Concordance DAT File data load format was selected, the Export
OCRTXT field for Concordance option appears. Select this option if you
want to export the OCRTXT field. Select the version that applies from the
drop-down list. Options include v7.x 4mb truncate, v8.x 12mb, truncate, v7.x
4mb, report only, and v8.x 12mb, report only.
www.iprotech.com
877-324-4776
Ipro eCapture User Guide
Q1 2014
7-127
Chapter 7, Creating Export Series and Export Jobs
Click
Options dialog.
to open the Date Field Formatting
Legacy Date Field Formatting: By default, this option is selected. Deselect
this option to select from the Invalid date options and to select fields for date
format handling.
Date Field Formatting: If you want to change the date field to a different
format, select from the following formats:
•
•
7-128
YYYYMMDD
YYYY/MM/DD
Ipro eCapture User Guide
Q1 2014
www.iprotech.com
877-324-4776
Creating a Processed Data Export Job (Export Processed Data/New Process Export Job)
•
•
•
MMDDYYYY
MM/DD/YYYY
DD/MM/YYYY
Otherwise, select the option, Do Not Convert Date Fields.
Time Format: Select from:
•
•
•
12-hour [displays time in 12 hour format e.g. 1:04]
24-hour [displays time in 24 hour format, e.g. 13:04]
Regional [formats the time according to the “default” Regional Settings
of the Worker the document is being exported on. Note: Changing the
format strings using the “Customize” button of Regional Settings will
have no effect; the actual region needs to be changed to see any effect.
Resolve Times to Second Precision: Select this option if you want to add
seconds to all metadata date fields that have time. This does not apply to the
images.
Invalid date options
Treat date values outside of specified range as invalid dates - Select a
start date and end date range. Any dates outside of the selected range will be
considered as invalid dates. The start date default is set to SQL minimum date.
The end date default is set to SQL maximum date.
Select one of the following options:
•
•
Invalid date field output value - enter text to display in the event an
invalid date is encountered. This field may be left blank.
Invalid date field output do not convert - invalid dates will be output
as is with no date conversion applied.
Field Selection
The only fields that are not present in the list are *DATE_ONLY* and
*TIME_ONLY*. The fields in the available field list are comprised of fields that
are marked as valid for date formatting. This is determined by the value of
TRUE in the ExportAttemptDateParse field located in the EncounteredMetatdataFieldList table.
Date field formatting options affect only those fields in the Fields Selected for
Date Format Handling box.
Date field formatting options are set at the Job level.
www.iprotech.com
877-324-4776
Ipro eCapture User Guide
Q1 2014
7-129
Chapter 7, Creating Export Series and Export Jobs
Available Fields: Displays all fields available to be exported. Click the dropdown list located above the field list, and select a specific field type. By
default, All Fields display. Ctrl-click to select non-contiguous fields. Shift-click
to select a contiguous range.
Filter Value - enter a value to filter the list. For example, to see only those
fields that contain the word “date”, enter date and click
fields, delete the value and click
. To display all
.
Select a field for date format handling by selecting the field from the Fields
Available for Date Format Handling and clicking
to move the single
field to the Fields Selected for Date Format Handling box.
For two or more fields, ctrl-click to select non-contiguous fields or shift-click to
select a contiguous fields. Once the fields are selected, click
them to the Fields Selected for Date Format Handling box.
to move
Ipro eCapture creates two additional fields that “split” the date and time into a
Date Only field and a Time Only field. These two additional fields will be displayed in the Available Fields list in the Export Wizard, Select Export Fields
screen. For example, if the DueDate field was moved to the Fields Selected for
Date Format Handling, the following additional DueDate fields would appear in
the Available Fields list: DueDate*DATE ONLY* and DueDate*TIME ONLY*.
Click OK to return to the Export Wizard, Select Export Fields screen.
7-130
Ipro eCapture User Guide
Q1 2014
www.iprotech.com
877-324-4776
Creating a Processed Data Export Job (Export Processed Data/New Process Export Job)
13.
Click
a.
b.
to display the Specify Endorsements screen.
Select an Endorsement Zone. The zone displays a thick border to
indicate it is the active zone.
Click the drop-down list located above the Available Fields list,
and select a specific field type (System [S] Flags [F], External [E],
Metadata [M], and User Defined fields [U and G]). By default, All
Fields display. To further narrow the field list, enter a value in the
Filter Value field located below the Available Fields list. For exam-
www.iprotech.com
877-324-4776
Ipro eCapture User Guide
Q1 2014
7-131
Chapter 7, Creating Export Series and Export Jobs
ple, to see only those fields that contain the word “date”, enter
date and click
click
c.
. To display all fields, delete the value and
.
Select a field and click
. The selected field appears in the
Selected Fields box and is placed in the previously selected
Endorsement box. Once a field has been selected for placement in
a zone, it cannot appear in a different zone. A total of three fields
may occupy a single zone. If a zone is to contain more than one
field, use the
or
to change the order of the fields in the
Selected Fields box in the active Endorsement Zone. Each field
appears in its own line in the Endorsement Zone.
d.
Note: When exporting a bar code, message text, and image key;
and the image key contains underscore delimiters, Ipro eCapture
displays a warning: Lowercase characters and underscores cannot
be combined with bar code endorsement.
To remove a field from an Endorsement Zone, select the Endorsement Zone, select the field in the Selected Fields box, and click
.
e.
To change the appearance (attributes) of a field in the Endorsement Zone, do the following: Select the Endorsement Zone,
select the field in the Selected Fields box, and click
to open
the Font dialog. Select a Font, Font Style, Size, Effects (Strikeout,
Underline), and Color. Click OK to close the Font dialog. Repeat for
additional endorsement fields.
Inserting Custom Group Fields
To insert custom group fields, see the section Inserting Custom Group Fields
on page 7-27.
7-132
Ipro eCapture User Guide
Q1 2014
www.iprotech.com
877-324-4776
Creating a Processed Data Export Job (Export Processed Data/New Process Export Job)
Inserting Custom User Field Labels
A custom message can be added to an Endorsement Zone through User
Defined Fields. See the section Inserting Custom User Field Labels on page 731.
Previewing the Endorsement Placements
To preview the Endorsement Zones and the fields assigned to those Endorsement Zones, click
. The Endorsement Sample Data dialog appears
and displays the Zone, Type, Field Label and Field Value, if any, in a grid format. To preview a sample of the Endorsement Zones and fields on an image,
click
in the Endorsement Sample Data dialog. The Endorsement
Sample Image Preview screen appears and shows the selected fields in their
endorsement zones.
www.iprotech.com
877-324-4776
Ipro eCapture User Guide
Q1 2014
7-133
Chapter 7, Creating Export Series and Export Jobs
Use the first three icons in the toolbar to adjust how the image appears for
viewing: Fit Normal, Fit Horizontally, and Best Fit. The Magnify Glass icons are
used to Zoom In and Zoom Out respectively. The Percentage values can also
be used to Zoom In or Zoom Out. The Sample can be saved if necessary.
7-134
Ipro eCapture User Guide
Q1 2014
www.iprotech.com
877-324-4776
Creating a Processed Data Export Job (Export Processed Data/New Process Export Job)
14.
Click
screen.
www.iprotech.com
877-324-4776
to display the Specify Export Directory and File Options
Ipro eCapture User Guide
Q1 2014
7-135
Chapter 7, Creating Export Series and Export Jobs
Export Directory Path indicates the directory where the exported data
will be saved. Initially, this field shows the area established during workstation setup, but you can click
and navigate to a different directory.
Export Volume Options
Volume Name Enter a name for the CD-ROM label or volume path
directory. This field initially uses a number (e.g., 001) as the volume
name. This setting is for database files.
Increment Output Directory Every n Files: Select a value from the
drop-down list (or enter a value) that indicates the number of files that
will be in each subdirectory.
If the Image Load Format, Ringtail, was selected, the values in this field
will revert to 99, 999, and, so on if the Use Rollover Numbering option is
selected when configuring the Image Key. As the Image Key is entered
and changes leaving space for a leading zero, the values in the Increment Output field changes accordingly. For example, an Image Key of
00001 sets the value to 9999, 0001 sets the value to 999, 001 sets the
value to 99, etc.
Max Data Size If the drive where you are saving the export files has
limited space, select the maximum space (640, 1200, 4300, and 9000)
you want to use from the drop-down list.
Include Volume Name in Loadfile Filename: Select this option if you
want the Volume Name to appear in the VolumeManifest.TXT file.
Directory for each native: Starting with version 5.6, this option
replaces the Copy to output directory option formerly located in the first
Export Wizard screen. This option is not available for selection if Ringtail
was selected. Otherwise, when this option is selected, the Native File
field under the Subdirectory Structure options is not available. When not
selected, a folder name may be entered in the Native File field.
Subdirectory Structure Options
The first field is labeled dynamically based on the Image Format
selected in the first Export Wizard screen under Export Image Files. The
options include:
•
7-136
Single Page TIFF/JPG Files
Ipro eCapture User Guide
Q1 2014
www.iprotech.com
877-324-4776
Creating a Processed Data Export Job (Export Processed Data/New Process Export Job)
•
•
•
Single Page PDF Files
Multiple Page TIFF Files
Multiple Page PDF Files
The field contains the name of the folder where the images will be
stored. Accept or change the default folder name.
Document Text: This field contains the name of the folder where the
text files will be stored. Accept or change the default folder name.
Native File: This field contains the name of the folder where the native
files will be stored. Accept or change the default folder name. The
default name OF is an LFP command that contains the location and original filename. See Appendix D, LFP Files and the section Original File for
EDD Image (OF) on page D-12 for additional information.
Increment in Root or Subdirectory: Root is the default. For Subdirectory, indicate the name of the subdirectory; e.g. 0001. This folder will
increment once the Max Data Size (MB) or the number of files specified
in the Increment Output Directory field is reached.
Click
to view a sample of the selected Subdirectory Structure:
Root or Subdirectory.
The following figure shows a Subdirectory Structure sample.
www.iprotech.com
877-324-4776
Ipro eCapture User Guide
Q1 2014
7-137
Chapter 7, Creating Export Series and Export Jobs
The following figure shows a Root Structure sample.
Mirror File Structure: When selected, the specified export directory will have
the same structure as the directories from which the files were discovered. The
discovered directory pathing is “appended” to the specified export directory.
For example, if the specified export directory is: Z:\EXPORT\Job001 and the
discovered directory paths are: H:\FILES\DOC, H:\FILES\PPT, and
H”\FILES\XLS, then the exported directory pathing will look like the following:
Z:\EXPORT\Job001\H_\FILES\DOC, Z:\EXPORT\Job001\H_\FILES\PPT, and
Z:\EXPORT\Job001\H_\FILES\XLS. Each of these directories will contain the
images and extracted text of the respective, original files. If this option is not
selected, then only one directory is created: Z:\EXPORT\Job001\IMG_0001; it
will contain all of the images.
Create load files only: When selected, no images, text files, or native files
will be copied to the export output directory. Only load files will be created.
The export will perform as if all of the native files and images were exported
based on the export options. The load file will reflect this.
OCR LFP Document Text Option: Select None, OI-inline, or OT-file reference from the drop-down list. For the Image Load Formats, Ipro LFP and Ipro
OCR, select the appropriate option for inclusion in the LFP file. Ipro eCapture
generates an IPROOCR.LFP file for either of these options, OI, or OT. If the
option Export Text Files, located on the initial Export screen, is not selected,
the OT option will not be available for selection. The OI lines in the
IPROOCR.LFP file will contain document text for each page in all cases as long
as there is document text for the page. The OT lines in the IPROOCRLFP file
will point to text files for each page only when the export image format are
single page images, and the option Export document text as single file (located
in the initial Export screen) is not checked. For multi-page formats, or when
document text is exported as a single file, there will be only one OT entry per
7-138
Ipro eCapture User Guide
Q1 2014
www.iprotech.com
877-324-4776
Creating a Processed Data Export Job (Export Processed Data/New Process Export Job)
document. If there is no text for a document (image where OCR wasn’t
enabled, for example), there will not be an OT line. For the OI-inline option,
the .LFP file will be larger than the LFP file generated when using the OT-file
reference option.
Replace Export Path with the following Drive Letter/Path Enter the path
to replace the root path to the images in the export load files. For example,
enter c:\images\0001\0001a\ to create the Ipro .LFP entries:
VN,DII001,c:\images\0001\0001a\DII001\,99
IM,AUG-001,D,0,@DII001;PROC0001\IMG_0011;AUG-001.TIF;2,0
IM,AUG-002,,0,@DII001;PROC0001\IMG_0011;AUG-002.TIF;2,0
Image Key Numbering
Image Keys can increment at different group levels (Page, Document, and Parent). The Image Key can have a total of 70 characters including any selected
delimiters that will be used between the Prefix and the Parent; between the
Parent and the Document; and between the Document and the Page.
As you populate the Image Key fields, the number displayed in parenthesis,
directly to the right of the Field label, will decrement accordingly. The Sample
Image Key field is used to check the Image Key as entered. You may change
the Image Key as often as necessary BEFORE you click Finish to begin the
Export process.
When configuring the Image Key, keep in mind whether you will be exporting
out a single job or using the Export Series concept, which allows output of successive unattended exports with sequential Image Key numbering and volumes. The starting Image Key will automatically be set to the next available
number based on the previous export’s ending number in the given set.
Page: If you do not enter a value in this field, the system will assign a
starting Image Key of 000000001 or the next available Image Key. Otherwise, you can enter a value, not to exceed 15 numeric only characters
(0-9).
Document: The Document portion of the image key number may have
a total of 15 numeric only characters (0-9).
Parent: The Parent portion of the image key number may have a total
of 15 numeric only characters (0-9).
www.iprotech.com
877-324-4776
Ipro eCapture User Guide
Q1 2014
7-139
Chapter 7, Creating Export Series and Export Jobs
Prefix: The Prefix portion of the image key number may have a total of
25 alphanumeric characters, dash [-], and/or underscore [_].
The Delimiters include: None, Underscore, Dash, Semi-colon, Period, or Space.
Each section of the image key number may be padded up to 15 digits.
See the section Using Rollover Numbering for Ringtail Format on page 7-177 if
the Ringtail format was selected for additional information about the Rollover
Numbering option.
Using Generated Numbering
Select Generate. The Image Key Numbering prefix segment shows {Native
Filename}. The Parent and Document segments are disabled.
a.
b.
c.
d.
7-140
Enter a Prefix in the Prefix segment.
Enter a Page number in the Page segment.
Select a Delimiter from the Delimiters drop-down list. If no delimiter is necessary, select (none). The Sample Image Key box is used
to check the desired image key format.
Indicate Base Numbering to be used for Page and/or Document
Level numbering. One-Based is the default setting.
Ipro eCapture User Guide
Q1 2014
www.iprotech.com
877-324-4776
Creating a Processed Data Export Job (Export Processed Data/New Process Export Job)
Using Predefined Numbering
Select Predefined to display the options:
Click the drop-down arrow to display the available numbering options:
•
Use filename: Formerly called Use filename for Image Key.
Do not use this option for Ringtail format because Ringtail relies on the
Bates numbering scheme.
The option, Use Filename, allows for data to be initially pre-processed
using third party tool, such as Ipro Allegro, and then have that same
data processed through Ipro eCapture.
Caveats
The data that will be processed in Ipro eCapture must have the following
characteristics when using this feature:
•
Consistent Bates numbering scheme. Avoid:
filenames that are too long
duplicate Bates numbers
invalid characters
other conditions where the filename does not conform to a Bates
numbering scheme.
An inconsistent Bates numbering scheme will result in incorrect data
output.
•
Originally processed as a native file.
www.iprotech.com
877-324-4776
Ipro eCapture User Guide
Q1 2014
7-141
Chapter 7, Creating Export Series and Export Jobs
•
Ipro eCapture will extract all email attachments that are detected.
Embedded files will be extracted unless the Discovery File Extraction option, Treat email inline images as attachments, is deselected.
This option is used in conjunction with the Flex Processor rules, Create
Parent Item ID List and/or Create Child Item ID list. A rule can be created to load the Item IDs from the native files for each individual job. If
this feature is used without the Flex Processor rules, Create Parent Item
ID List and/or Create Child Item ID list, the result will be incorrect data
output.
See Appendix A, Using the Flex Processor Rules Manager and the section
Create Parent Item ID List or Child Item ID List on page A-46 for specific
information about creating Parent or Child Item ID rules in Flex Processor.
For Processing Jobs, the original file’s filename (TIFFs, TXTs, or PDFs) is
used as the prefix for the image key when exported. The Page segment
for the image key (Bates) number is enabled and used for suffixing the
native filename with each page of the document.
Filename example for a Processing Export Job:
native filename: EX-00001.DOC will be exported as a file named: EX00001.00001.TIF; where EX-00001 is the original filename, 00001 is the
page number, and .TIF is the extension. Subsequent pages for each document will increment.
•
Import/Merged: The export job will use the imported/merged linking
key as the image key base for process exports. It is necessary to enter a
suffix with the option to either suffix all pages (select the option) or skip
the first page.
•
Ipro Enterprise: The export job will use the Ipro Enterprise linking key
as the image key base for process exports. It is necessary to enter a suffix with the option to either suffix all pages (select the option) or skip the
first page.
Data Extract Export: Uses the most recent image key assigned for a
document that was part of a data extract job as the image key for the
same document. Most recent is defined as the ExportedItems record
with the highest ExportedItemID value for records associated with complete data extract export jobs. Jobs are started in sequence; therefore,
•
7-142
Ipro eCapture User Guide
Q1 2014
www.iprotech.com
877-324-4776
Creating a Processed Data Export Job (Export Processed Data/New Process Export Job)
any job that is started will have higher values for ExportedItemID than
any job started before it.
Select a Delimiter from the Delimiters drop-down list. If no delimiter is
necessary, select (none). The Sample Image Key box is used to check
the desired image key format.
Suffix first page: Optionally select this when suffixing. If it is not
selected, the first page is skipped. For multi-page images, page suffix
value is blank.
Encoding Options Select an encoding option from the drop-down list.
Options include:
•
•
•
Unicode UTF-16 - load files and extracted text are saved in this format
if Force ANSI is not selected.
Unicode UTF-8 - same as UTF-16 output except for the encoding
applied to output files.
Force ANSI - Select this option and select a character from the dropdown list. This replaces non-ANSI characters with the selected ANSI
character in the loadfile/extracted text. This allows for data loaded into
applications that are not Unicode compliant.
www.iprotech.com
877-324-4776
Ipro eCapture User Guide
Q1 2014
7-143
Chapter 7, Creating Export Series and Export Jobs
15.
Click
screens.
to display one of two Relativity Workspace and Options
This previous screen appears if the API Case Selection option was
selected in the Relativity Configuration dialog. See Chapter 2, Ipro eCapture Controller and the section Configuring Integration with kCura Relativity on page 2-21 for more information about the API option.
If necessary, expand the workspace categories and select the workspace to receive the data. Proceed to Step 16.
7-144
Ipro eCapture User Guide
Q1 2014
www.iprotech.com
877-324-4776
Creating a Processed Data Export Job (Export Processed Data/New Process Export Job)
If the API Case Selection option was not selected, the following screen
appears. See Chapter 2, Ipro eCapture Controller and the section Configuring Integration with kCura Relativity on page 2-21 for more information about the API option.
Enter the Relativity Workspace ID. Proceed to Step 16.
16.
Select the option, Copy Files to Repository.
17.
(Optional) Click
to open Select Directory for Sample Load Files. Select a directory where the Sample Load Files will be
created. (Note: If the directory is not empty a prompt appears asking to
www.iprotech.com
877-324-4776
Ipro eCapture User Guide
Q1 2014
7-145
Chapter 7, Creating Export Series and Export Jobs
overwrite files. Click Yes to overwrite or No to return and select a different directory.) Click OK. The directory is accessed and displays the sample files (CONCORD.DAT and OPTICON.OPT).
18.
Under Relativity Settings File, click
for:
•
Field Map (.KWE) - browse to the .KWE file and click Open.
•
Image Import (.KWI) - browse to the .KWI file and click Open.
If this is for a Process Export Job, it will appear in the Ipro eCapture Controller’s Job Queue. Start the Process Export job. The job’s details are available
by selecting the job in the Tree View. (Under Export Jobs, Process Exports).
The Information Panel has three buttons: View Settings, View Output, and
View Report. Click View Settings to display information about the job. Click
View Output to access the files that were created via the Explorer. Click View
Report to view the Export Summary Report.
If this is for an Export Series, the Series name will appear in the Client Management tree view under Process Exports; located under Export Jobs. The
Export Series will then be available for selection when creating a Process
Export job.
Click
to conclude the autoloading into Relativity. The job appears in
the Job Queue and the Progress column shows Autoload Initiated. The job also
appears under Process Exports in the Client Management tree view with the
Relativity icon.
Exporting Completed Data Extract
Jobs
Exporting is the process of creating a deliverable by converting the original
data into specified load formats for a number of database solutions.
Database load formats include:
•
•
•
•
7-146
Delimited ASCII Text
Custom Export Format
Summation Text File
Concordance .DAT
Ipro eCapture User Guide
Q1 2014
www.iprotech.com
877-324-4776
Creating a Data Extract Export Job (Export Extracted Data/Data Extract Export Job)
•
•
•
•
•
•
•
LaserFiche (includes image links)
DB/Textworks (includes image links)
Ipro Data Review
Ringtail
Summation DII
OCR CONTROL.LST’
Ipro DLF (Eclipse)
Ipro eCapture automatically includes the searchable text along with the
images and metadata.
Creating a Data Extract Export Job
(Export Extracted Data/Data Extract
Export Job)
Data Extraction Export Jobs are created from completed Data Extraction Jobs.
Several data extract export output options are available for common data load
formats such as Summation, Concordance®, Ringtail, etc. The original files
can be exported. For Concordance® output, the OCRTXT field can be
exported. When the export is complete, a status screen appears showing time,
exported number of files, and disk space information. The data extraction
export uses wizard screens.
1.
Click the Client Management Tab.
2.
Do one of the following:
•
•
In the Tree View, navigate to the Data Extract Jobs folder
(under Custodian). Select a completed Data Extract Job and
click the alternate mouse button to display the context menu.
Select Export Extracted Data from the context menu to display
the New Export Job dialog. The job you selected is already checked
in the Tree View. Proceed to Step 3 and the letter a if you wish to
select additional jobs. If you want to select an Export Set instead,
proceed to Step 3 and the letter b.
In the Tree View, navigate to Export Jobs (under Client). Select
Data Extract Exports and click the alternate mouse button to
display the context menu. Select New Data Extract Export Job
www.iprotech.com
877-324-4776
Ipro eCapture User Guide
Q1 2014
7-147
Chapter 7, Creating Export Series and Export Jobs
from the context menu to display the New Export Job dialog. Proceed to Step 3 and letter a. Or, if you want to select an Export Set
instead, see Step 3 and letter b.
3.
Do one of the following:
a.
b.
7-148
Select the Select Jobs option to display the Tree View and expand
it. Select one or more jobs for exporting. Proceed to Step 4.
OR
Select the Select Export Set option to display a list of Export Sets
that were created in QC and then select an Export Set. If neces-
Ipro eCapture User Guide
Q1 2014
www.iprotech.com
877-324-4776
Creating a Data Extract Export Job (Export Extracted Data/Data Extract Export Job)
sary, expand any Export Set Containers to select an Export Set
that is stored in a container. Proceed to Step 4.
4.
From the Export Type drop-down menu, select Direct to Disk. For
Eclipse, see the section Autoload into Ipro Eclipse - Data Extract Job on
page 7-184. For Relativity, see the section Autoload into Relativity - Data
Extract Job on page 7-100.
5.
Enter an Export Job Name, or if a default name appears in the field,
modify it if necessary. This is the name the system uses for the directory
name where the exported data is stored.
6.
Select a task table from the drop-down list. The task table that appears
in the field is based on the last task table selected for the Client.
7.
(Optional) Browse to the Template (.INI File) that has the data
extraction export settings from a previously run data extraction export.
A file will not exist until you run your first data extraction export. Note:
This option is not available if you select an existing Export Series from
the drop-down list. This file saves time because you will not need to
manually make selections in some of the Export wizard screens as well
as ensure that there is consistency when exporting jobs for a particular
situation.
www.iprotech.com
877-324-4776
Ipro eCapture User Guide
Q1 2014
7-149
Chapter 7, Creating Export Series and Export Jobs
8.
(Optional) Do one of the following:
•
•
•
9.
7-150
Leave the default setting [none] under Export Series.
Select an Export Series from the drop-down list. When an existing Export Series is selected, the
,
appears. When clicked, the Export settings dialogs will not appear;
instead the Job is placed in the Job Queue. See the section About
Export Series on page 7-264 for background information about
Export Series. Or see the section Creating an Export Series (Process Export or Data Extract Export) on page 7-266 if you want to
create the Export Series before the Export Job is created.
Select [new export series] from the Export Series drop-down list
and enter a New Export Series Name.
Click OK. (NOTE: A warning dialog may appear if one or more of the
selected data extract jobs have not yet passed QC. You can elect to continue to export or cancel, QC the jobs, and then export again.) The
Ipro eCapture User Guide
Q1 2014
www.iprotech.com
877-324-4776
Creating a Data Extract Export Job (Export Extracted Data/Data Extract Export Job)
Select Export Formats and File Handling Options dialog appears unless
was clicked for an existing Export Series.
www.iprotech.com
877-324-4776
Ipro eCapture User Guide
Q1 2014
7-151
Chapter 7, Creating Export Series and Export Jobs
10.
Select from the following options:
a.
b.
Export Text Files - select this option to display additional data
load formats of LaserFiche, DB/Textworks, Ipro Data Review, Ringtail, Summation DII, and OCR Control.lst.
Data Load Formats: Select one or more Data Load Formats. For
Ringtail, see the section Ringtail Format on page 7-259 for more
information on assigning export_extras field types.
If the data load file format you need to create does not appear under
Data Load Formats, select Custom Export Format. See the section,
Custom Export Format (Image Load and/or Data Load Format) on page
7-262 for specific information on populating the Select Custom Load
Delimiters screen.
The Ipro Data Review Data Load Format generates an IproReview.LFP
file. An LFP file is an Ipro load file. The IproReview.LFP file contains the
operation codes IM, IO, and OF. See Appendix D, LFP Files for detailed
information about LFP files and the operation codes.
c.
(Optional) Export Native Files - (Note: When this option is
selected along with the Ringtail Data Load format, the Name File
Using Image Key and Copy to Output Directory options are
selected by default. Starting with version 5.6, the Copy to output
directory option was replaced with the option Directory for each
native which is located in the last screen of the Export Wizard.)
Under Native file options, select from the following:
•
Name File Using Image Key: If this option is selected, the
native file directory will no longer create an additional directory per document. By naming the file using the Image Key,
it removes any chance of duplicate filenames occurring.
Therefore, the additional level of directories are not necessary. An example follows:
7-152
Ipro eCapture User Guide
Q1 2014
www.iprotech.com
877-324-4776
Creating a Data Extract Export Job (Export Extracted Data/Data Extract Export Job)
•
Copy to Output Directory: This option was replaced with
the option Directory for each native which is located in the
last screen of the Export Wizard.
Native files are copied to a directory separate from the
images. The directory numbers match their corresponding
image file.
Under Alternate Email Export Options, select from:
•
•
•
•
Outlook - Check this option to export an alternate native file for
Outlook files. The default export format is MSG.
Lotus Notes - Check this option to export an alternate native file
for Lotus Notes files. The default export format is DXL.
Outlook Express - Check this option to export an alternate native
file for Outlook Express files. The default export format is EML.
GroupWise - Check this option to export an alternate native file for
GroupWise files. The default export format is XML.
Select one of the following formats:
•
.MHTFormat: Exports selected e-mail type to a standardized format rather than to .DXL or .XML. Types include Outlook, Outlook Express, Lotus Notes, and GroupWise. (An
.MHT file is an Archived Web Page file with information in
www.iprotech.com
877-324-4776
Ipro eCapture User Guide
Q1 2014
7-153
Chapter 7, Creating Export Series and Export Jobs
•
•
•
•
•
•
7-154
Multipurpose Internet Mail Extension HTML (MHTML) format
with an .MHT file extension. All relative links in the Web page
are remapped and the embedded content is included in the
.MHT file.)
Rich Text Format (RTF): Uses Microsoft Word to open the
MHT and saves it as an RTF; a more widely accepted format.
HTML: HTML documents can have inline images, the images
themselves are not included in the HTML. The images must
be included in the export in order to access the inline
images.
File extension options: This option is used in the event the
native documents are missing or have incorrect file extensions.
When this is the case, the native file viewers will not work. The
correct extension is defined as the value presented in the Extension field of the StellentDefs table in the CONFIG database for the
StellentID of the file. Oracle® Outside-In Technology (formerly
Stellent) will not identify files it cannot discern with a .TXT extension. If necessary, a Database Administrator may manually update
the Extension field in the StellentDefs table with custom extensions using SQL. The options from the drop-down list include:
None - default setting. Nothing happens.
Add extension only if missing
Append corrected extensions - appends extensions that are incorrect or missing.
Replace incorrect extensions - replaces incorrect extensions with
correct extensions or missing extensions.
Ipro eCapture User Guide
Q1 2014
www.iprotech.com
877-324-4776
Creating a Data Extract Export Job (Export Extracted Data/Data Extract Export Job)
Click the link, Apply to selected file types and/or QC Flags, to open
the Native File Export Inclusions dialog.
By default, all file types are selected and the QC flags are not selected.
For the file types, click Clear All, to clear all the selected file types and
then select the specific file types and/or only documents to which the
QC flag or flags are attributed. If necessary, click + to expand the list for
a file type, such as Microsoft Excel, to display specific versions/types of
Microsoft Excel. If either one (file type/QC flag) “hits”, the native file will
be exported.
Click OK to return to the Export screen. A message appears underneath
the link that states the number of file types and QC flags, if any, that
were included.
11.
Click Next. One of the following happens:
www.iprotech.com
877-324-4776
Ipro eCapture User Guide
Q1 2014
7-155
Chapter 7, Creating Export Series and Export Jobs
•
The Custom Load Delimiters screen appears if the Data Load Format, Custom Export Format was selected in the previous screen.
See the section Custom Export Format (Image Load and/or Data
Load Format) on page 7-262 for information on populating this
dialog.
7-156
Ipro eCapture User Guide
Q1 2014
www.iprotech.com
877-324-4776
Creating a Data Extract Export Job (Export Extracted Data/Data Extract Export Job)
12.
Click
to display the Merge Data Options dialog.
This dialog appears if at least one set of text exists in one of the Data
Extract jobs or Export Sets selected for the Export job.
Do the following:
•
from the drop-down menu, select the order (Date, Ascending;
Date, Descending (default); Name, Ascending; Name, Descending;
Custom - use the up/down arrows) merge jobs display in the
Merge Jobs drop-down menu in the Image tab or View tab.
www.iprotech.com
877-324-4776
Ipro eCapture User Guide
Q1 2014
7-157
Chapter 7, Creating Export Series and Export Jobs
•
13.
Click
•
7-158
deselect one or more merge jobs. By default, all merge jobs are
selected. The “Original” item refers to the original images and text
associated with the document. It appears as the last item in the
list of merge jobs and remains selected.
to proceed to the Export Fields screen.
The Select Export Fields screen appears.
Ipro eCapture User Guide
Q1 2014
www.iprotech.com
877-324-4776
Creating a Data Extract Export Job (Export Extracted Data/Data Extract Export Job)
Defining Export Fields for Databases
If you are creating any database load file formats during the Ipro eCapture
export process, you need to define the export fields that Ipro eCapture will
export. This step ensures that the data exported from Ipro eCapture matches
the fields in the database where the data will be used.
There are several field types that can be exported. These field types are designated as follows:
S (System Fields): These fields only have meaning in the context of an Ipro
eCapture export. If a document was viewed outside of the export, none of
these field types would apply. Any brackets [] will be removed from the label
when exporting. The System field definitions are as follows:
ITEM_ID: The Ipro eCapture unique identifier for the document. Can be
added/removed from Selected Fields.
BEGDOC: Starting Bates of the document.
ENDDOC: Ending Bates of the document. Note: Not automatically included in
the Selected Fields box; however, may be selected if it is to be included in the
export.
BEGATT: Starting Bates of the attachment range.
ENDATT: Ending Bates of the attachment range.
PARENT_ATTACHMENT: "P" for anything not an attachment, "A" for attachment
(child).
ATTACHMENT_BATES: Semicolon-delimited list of Bates numbers of the children of a parent document.
ATTACHMENT_ITEMIDS: Semicolon-delimited list of the ItemIDs of the children of a parent document.
PARENT_BATES: If a document is a child, the Bates of the parent.
PARENT_ITEMID: If a document is a child, the ItemID of the parent.
EXPORT_NATIVE_FILES: Used when exporting native files. Shows export path
to the native files. Defaults to Selected fields box when Export Native Files is
selected from the Formats and File Handling screen. May be moved from
Selected Fields box to Available Fields if required.
www.iprotech.com
877-324-4776
Ipro eCapture User Guide
Q1 2014
7-159
Chapter 7, Creating Export Series and Export Jobs
ABSOLUTE_PARENT_ID: Obsolete - use PARENT_ITEMID instead.
PARENT_ITEMID queries the ExportedItems table to get an absolutely accurate
parent ID relating to the export. ABSOLUTE_PARENT_ID reads from the Items
table. Both should agree, but if not PARENT_ITEMID is the more accurate of
the two.
RELATIVE_PARENT_ID: This field is relative to the Discovery Job, not the
Export. Compound document options may result in the relative parent being
excluded from the export. NOTE: PARENT_ITEMID can differ from
ABSOLUTE_PARENT_ID if compound document options cause the absolute
parent to be excluded from the export. PARENT_ITEMID is relative to the
Export; ABSOLUTE_PARENT_ID is relative to the Discovery Job.
RELATIVE PATH: Original path to native file without directories above where
the directory folder was selected.
SEARCH HITS: Contains the search terms.
CUSTODIAN_NAME: The name of the Custodian containing the process job
that produced the document being exported.
DISCOVERY_CUSTODIAN_NAME: Used to identify the custodian of the discovery job in which an exported item was found.
CUSTODIANS: Used to identify the duplicate custodians for this record.
DUPLICATE_LOCATIONS: Used to list the (Duplicate ID), Custodian Name,
<Filename>, and [Discovery Path] for this record.
DATA_EXTRACT_JOB_NAME: The name of the Data Extract Job that produced
the text being exported.
RULE_CATEGORY: Contains the categories (selected and assigned through the
Flex Processor).
PROCESS_STATUS: Displays the process status results of a job. Items that
processed successfully will show "Success".
IDENTIFIED_LANGUAGES: List of languages, identified by BasisTech, that exist
in a document.
IDENTIFIED_ENCODING: List of encodings, identified by Basis Tech, that exist
in the document.
7-160
Ipro eCapture User Guide
Q1 2014
www.iprotech.com
877-324-4776
Creating a Data Extract Export Job (Export Extracted Data/Data Extract Export Job)
EXTRACTED_ATTACHMENT_COUNT: Counts the children of a document as it
relates to the export. The count should always match up with the number of
ItemIDs in the field ATTACHMENT_ITEMIDS and image keys in the
ATTACHMENT_BATES field. Note: This field will be zero for all documents in the
export that have a parent in the export.
EXTRACTED_ATTACHMENT_NAMES: Generates a semi-colon delimited list of
the child document’s filenames in the order of the export. The number of filenames in the list should match the EXTRACTED_ATTACHMENT_COUNT.
VOLUME_NAME: The value is the label for the document’s volume.
ORIGINAL_CUSTODIAN: Populates with the name of the custodian the original
file belonged to when an item duplicates against another file when doing deduplication at the Project or Client level.
BATCHID: Contains the Batch ID assigned for the Discovery Job.
FULLTEXT: Contains combined contents of body text and OCR text.
EXPORTED_TEXT_FILES: Contains the path to the exported extracted text
files. The value of this field will be affected if the Replace the export path with
the following drive letter/path field is populated (located in last Export
screen).This field cannot be used for a Group (User Defined) field.
DocType: Contains eMail, eDoc, and eAttach types.
DocCategory: Contains definitions that represent the document based on
Email (absolute parent and loose email only, e.g. not email attached to email),
Email Attachment (any email attachments to an email), Edocument (files that
are not email and not an attachment of an email family), Edocument Attachment (any embedded file in an edocument; including emails).
USERDEFINED1 through USERDEFINED5: Values to be entered using SQL
Server Manager. These fields can be used for endorsements, custom placeholders, etc.
F (QC Flags): The QC flags that appear in the list are both system QC flags
and any user defined QC flags for the selected Processing Job or Jobs. The
CUSTMDAT.TXT file, created from the Export, will show a value of Y for flags
that are “on” or be blank for flags that are “off”.
www.iprotech.com
877-324-4776
Ipro eCapture User Guide
Q1 2014
7-161
Chapter 7, Creating Export Series and Export Jobs
M (metadata Fields): These fields were retrieved from documents during
processing.
Starting with version 2.0, three additional metadata fields were
added. They are: Last Access Date, Last Access Date*DATE ONLY*,
and Last Access Date*TIME ONLY*. Last Access Date is a volatile
system field. The first time that Ipro eCapture discovers a directory
of loose files, Last Access Date will be valid. However, subsequent discovery jobs, run on the same set of files, will get the date the Ipro
eCapture last “touched” the file on the initial discovery job. We highly
recommend that you should not use the Last Access Date metadata
fields. Because there isn’t a legitimate value for any file Ipro eCapture
extracts, this field will be populated for loose files only. In addition, emails that Ipro eCapture extracts, attachments, embedded files, and
files extracted from archives will not have this value populated.
E (External Fields): These fields are from export jobs originating from Ipro
Allegro or from the Ipro eCapture Import Wizard.
U or G (User Defined Fields): These comprise two types: User [U] and/or
Group [G]. These fields are created via the Insert Custom Fields function. The
User fields will export the field label and the value you may optionally enter.
Otherwise the value may be blank. The Group fields are space-delimited combinations of System (S) and/or Metadata (M) field types.
When the Data Extract Export wizard is initiated, the process jobs to be
exported are selected first. The fields available for export are based on a standard list of metadata fields combined with the metadata retrieved during processing. In versions 1.2 and earlier, these fields were called Standard and
Extended metadata fields with separate selection options. Starting with version 1.3, they are now combined with no differentiation between them.
The available fields listview is populated using this list of metadata fields,
along with the system fields which are available for all exports. In addition
*DateOnly* and *TimeOnly* fields are parsed from date fields and included in
the Metadata fields.
7-162
Ipro eCapture User Guide
Q1 2014
www.iprotech.com
877-324-4776
Creating a Data Extract Export Job (Export Extracted Data/Data Extract Export Job)
The export will always export the non-displayed system fields
[BATES_NUMBER] and [ITEM_ID] as the first two fields regardless of field
selections shown. All other fields to be exported are displayed in the Selected
Fields box and will be exported, in order, named as the field label. The next
section describes how to populate the Selected Fields box.
Sorting Fields
Alternate click a field and choose Make Sort Field from the shortcut menu. This
option appears for those fields that can be sorted.
A Y appears in the Sort column. To clear this entry, alternate click the field and
choose Clear Sort Field.
When a field is marked as a Sort field, it applies the value of the selected field
to all family members of a parent item. This allows sorting on the specified
field in an external application to be compound-complete. For example, when
the ‘Sent Date’ field is made into a Sort field, the value of the ‘Sent Date’ field
for an email will be used as the value of the same field in the exported load file
for all of the email’s attachments.
About the Select Export Fields Screen
The field type designator (discussed in the section, Defining Export Fields for
Databases on page 7-18) displays in the Type column of both the Available
and Selected Fields boxes.
Available Fields: Displays all fields available to be exported. Click the dropdown list located above the field list, and select a specific field type. By
default, All Fields display. Ctrl-click to select non-contiguous fields. Shift-click
to select a contiguous range.
Filter Value - enter a value to filter the list. For example, to see only those
fields that contain the word “date”, enter date and click
fields, delete the value and click
. To display all
.
Selected Fields: Displays all fields selected from the Available Fields for
export. Right-click a field to edit it.
: Click to move a selected field from the Available Fields box to the
Selected Fields box.
www.iprotech.com
877-324-4776
Ipro eCapture User Guide
Q1 2014
7-163
Chapter 7, Creating Export Series and Export Jobs
box.
: Moves all fields from the Available Fields box to the Selected Fields
: Click to move a selected field from the Selected Fields box to the
Available Fields box.
box.
: Moves all fields from the Selected Fields box to the Available Fields
Field List: This list contains the following field list templates: Ipro Basic Field
List, Ipro Standard Field List, Ipro Extended Field List, and Ipro Enterprise
Field List. The Ipro Enterprise field list reflects the standard list of fields that
are selected by default in a new Ipro Allegro case and created in a new Ipro
Eclipse case. To facilitate the ease of field selection, the templates are used to
load the fields, all at once, into the Selected Fields box. The drop-down list will
also display user saved System templates and/or Client templates. Templates
selected from a physical .INI file do not display in this list.
To load a template into the Selected Fields box, select the template from the
drop-down list. A warning dialog box appears.
Click Yes to continue. The template’s fields appear in the Selected Fields box.
7-164
Ipro eCapture User Guide
Q1 2014
www.iprotech.com
877-324-4776
Creating a Data Extract Export Job (Export Extracted Data/Data Extract Export Job)
To save a new template based on manually selected fields, click the dropdown list, choose Save As, click
appears.
. The Save Template As dialog
Select from the following:
•
•
System Template - available to all Export Jobs
Client Template - available only to the Client
For System Template or Client Template, enter a meaningful name for
the template.
•
File - saves to a physical .INI file in selected location
For a File template (.INI), click
to display the File Browser dialog.
Browse to a location, enter a filename, and click Open. The Save Template As dialog appears indicating the pathname in the Location field.
Click Save.
To select an existing user created field list template saved as a physical
.INI file, click the drop-down list, choose Browse, and click
. The Open
dialog appears. Browse to the saved template (.INI) file and click Open. A
warning dialog box appears indicating that loading fields from a template will
clear any selections, including group fields and field label modifications. Click
Yes to continue.
www.iprotech.com
877-324-4776
Ipro eCapture User Guide
Q1 2014
7-165
Chapter 7, Creating Export Series and Export Jobs
Managing Field Templates
User created System and/or Client templates can be renamed, edited, deleted,
and viewed.
From the Controller menu bar, choose Tools > Field Template Management. The Field Template Management dialog appears.
Alternate click a template to display the context menu and choose:
7-166
Ipro eCapture User Guide
Q1 2014
www.iprotech.com
877-324-4776
Creating a Data Extract Export Job (Export Extracted Data/Data Extract Export Job)
Rename Template- displays the Edit Template Name dialog. Enter a new
Template name and click OK.
Edit Template - displays the Edit Template name dialog. A different name
may be given and the Type can be changed. If the type is changed to Client
Template, the dialog expands to display a Client drop-down list where a different Client can be selected. If the type is changed to System Template, the dialog collapses to hide the Client drop-down list.
Delete Template - A Delete Confirmation dialog appears prompting a decision to delete the template. Click Yes to delete the template.
View Template - Opens a dialog with the selected Template in the title bar
and shows the fields assigned for that template. Click Close when through
viewing the fields.
: Opens the Insert Custom Field dialog where you can
create new group fields and new user fields. Inserting Custom Group Fields is
discussed in the section, Inserting Custom Group Fields on page 7-27.
and
: Use these arrows to change the order of the fields in the Selected
Fields box. Select a field (or contiguous fields) and then use either arrow to
reposition it (or the selected fields) accordingly.
Selecting the Additional Export Options in the Export Fields
Screen
There are several options you may choose from located at the bottom of the
Export Fields screen. Some of these options are available based on the Data
Load Format(s) selected in the Export Formats and File Handling Options
screen.
Populate Child Fields for Parents - If this option is NOT selected, the Parent
fields for all items (PARENT_BATES, PARENT_ITEMID) will only be populated
for child items.
If this option IS selected, the Parent fields will be populated for all items. Nonchild items will enter their own Bates™ number and ItemID.
Select Include Field Names in first line of file if you want to assist readers
in understanding or verifying the file. Do not select this option if the file will be
loaded directly into the database.
www.iprotech.com
877-324-4776
Ipro eCapture User Guide
Q1 2014
7-167
Chapter 7, Creating Export Series and Export Jobs
If the Concordance DAT File data load format was selected, the Export
OCRTXT field for Concordance option appears. Select this option if you
want to export the OCRTXT field. Select the version that applies from the
drop-down list. Options include v7.x 4mb truncate, v8.x 12mb, truncate, v7.x
4mb, report only, and v8.x 12mb, report only.
Click
ting Options dialog.
(to open the Date Field Format-
Legacy Date Field Formatting: By default, this option is selected. Deselect
this option to select from the Invalid date options and to select fields for date
format handling.
7-168
Ipro eCapture User Guide
Q1 2014
www.iprotech.com
877-324-4776
Creating a Data Extract Export Job (Export Extracted Data/Data Extract Export Job)
Date Field Formatting: If you want to change the date field to a different
format, select from the following formats:
•
•
•
•
•
YYYYMMDD
YYYY/MM/DD
MMDDYYYY
MM/DD/YYYY
DD/MM/YYYY
Otherwise, select the option, Do Not Convert Date Fields.
Time Format: Select from:
•
•
•
12-hour [displays time in 12 hour format e.g. 1:04]
24-hour [displays time in 24 hour format, e.g. 13:04]
Regional [formats the time according to the “default” Regional Settings
of the Worker the document is being exported on. Note: Changing the
format strings using the “Customize” button of Regional Settings will
have no effect; the actual region needs to be changed to see any effect.
Resolve Times to Second Precision: Select this option if you want to add
seconds to all metadata date fields that have time. This does not apply to the
images.
Invalid date options
Treat date values outside of specified range as invalid dates - Select a
start date and end date range. Any dates outside of the selected range will be
considered as invalid dates. The start date default is set to SQL minimum date.
The end date default is set to SQL maximum date.
Select one of the following options:
•
•
Invalid date field output value - enter text to display in the event an
invalid date is encountered. This field may be left blank.
Invalid date field output do not convert - invalid dates will be output
as a text field.
www.iprotech.com
877-324-4776
Ipro eCapture User Guide
Q1 2014
7-169
Chapter 7, Creating Export Series and Export Jobs
Field Selection
The only fields that are not present in the list are *DATE_ONLY* and
*TIME_ONLY*. The fields in the available field list are comprised of fields that
are marked as valid for date formatting. This is determined by the value of
TRUE in the ExportAttemptDateParse field located in the EncounteredMetatdataFieldList table.
Date field formatting options affect only those fields in the Fields Selected for
Date Format Handling box.
Date field formatting options are set at the Job level.
Filter Value - enter a value to filter the list. For example, to see only those
fields that contain the word “date”, enter date and click
fields, delete the value and click
. To display all
.
Select a field for date format handling by selecting the field from the Fields
Available for Date Format Handling and clicking
to move the single
field to the Fields Selected for Date Format Handling box.
For two or more fields, ctrl-click to select non-contiguous fields or shift-click to
select a contiguous fields. Once the fields are selected, click
them to the Fields Selected for Date Format Handling box.
to move
Ipro eCapture creates two additional fields that “split” the date and time into a
Date Only field and a Time Only field. These two additional fields will be displayed in the Available Fields list in the Export Wizard, Select Export Fields
screen. For example, if the DueDate field was moved to the Fields Selected for
Date Format Handling, the following additional DueDate fields would appear in
the Available Fields list: DueDate*DATE ONLY* and DueDate*TIME ONLY*.
Click OK to return to the Export Wizard, Select Export Fields screen.
7-170
Ipro eCapture User Guide
Q1 2014
www.iprotech.com
877-324-4776
Creating a Data Extract Export Job (Export Extracted Data/Data Extract Export Job)
14.
Click
. If the Image Load Format, Summation DII, was
selected, the Specify Summation Options screen appears.
www.iprotech.com
877-324-4776
Ipro eCapture User Guide
Q1 2014
7-171
Chapter 7, Creating Export Series and Export Jobs
Summation Options
•
•
•
Path Notation: Specify Summation Path Notation: Removable Volume (@V) or Directory(@I).
Include @FullText Command: None - no @T command will be
included in the DII file, Page Level (default) - the page will add 1
@T command for each page, Document Level - the document will
add 1 @T command.
Treat eMail as edocs: This option is used to retain previous EDII
format. When this option is checked, the @MEDIA tag will use
'eDoc' instead of 'eMail' for all parent e-mails.
Available Tokens: Displays all fields and tokens available for exporting.
Click the drop-down list located above the token list, and select a specific
field type (System, Flags, Metadata, User Defined) or Summation
Tokens. By default, All Fields display. Ctrl-click to select non-contiguous
fields/tokens. Shift-click to select a contiguous range.
Filter Value - enter a value to filter the list. For example, to see only
those fields that contain the word “date”, enter date and click
To display all fields, delete the value and click
•
•
7-172
.
Select one token from the Available Tokens box and click
to move the token to the Selected Tokens box.
For two or more tokens, ctrl-click to select non-contiguous tokens
or shift-click to select contiguous tokens. Once the tokens are
selected, click
•
.
to move them to the Selected Tokens box.
and
: Use these arrows to change the order of the fields in
the Selected Tokens box. Select a field/token (or contiguous fields/
tokens) and then use either arrow to reposition it (or the selected
fields/tokens) accordingly.
Ipro eCapture User Guide
Q1 2014
www.iprotech.com
877-324-4776
Creating a Data Extract Export Job (Export Extracted Data/Data Extract Export Job)
15.
Click
to proceed to the Export screen where you will select
additional options for the Export.
www.iprotech.com
877-324-4776
Ipro eCapture User Guide
Q1 2014
7-173
Chapter 7, Creating Export Series and Export Jobs
Selecting Export Directory and File Options
Export Directory Path: indicates the directory where the exported data will
be saved. Initially, this field shows the area established during workstation
setup, but you can click Browse to change it.
Export Volume Options
Volume Name: Enter a name for the CD-ROM label or volume path
directory. This field initially uses a number (e.g., 001) as the volume
name. This setting is for database files.
Increment Output Directory Every n Files: Select a value from the
drop-down list (or enter a value) that indicates the number of files that
will be in each sub-directory. Minimum value is 100. Zero may be
entered for no image increment.
If the Data Load Format, Ringtail, was selected, the values in this field
will revert to 99, 999, and, so on if the Use Rollover Numbering option is
selected when configuring the Image Key. As the Image Key is entered
and changes leaving space for a leading zero, the values in the Increment Output field changes accordingly. For example, an Image Key of
00001 sets the value to 9999, 0001 sets the value to 999, 001 sets the
value to 99, etc.
Max Data Size: If the drive where you are saving the export files has
limited space, select the maximum space (640, 1200, 4300, and 9000)
you want to use from the drop-down list.
Include Volume Name in Loadfile Filename: Select this option if you
want the Volume Name to appear in the VolumeManifest.TXT file.
Directory for each native: Starting with version 5.6, this option
replaces the Copy to output directory option formerly located in the first
Export Wizard screen. This option is not available for selection if Ringtail
was selected. Otherwise, when this option is selected, the Native File
field under the Subdirectory Structure options is not available. When not
selected, a folder name may be entered in the Native File field.
Subdirectory Structure Options
No Image: Displays no image for data extract export job.
Document Text: This field contains the name of the folder where the
text files will be stored. Accept or change the default folder name.
7-174
Ipro eCapture User Guide
Q1 2014
www.iprotech.com
877-324-4776
Creating a Data Extract Export Job (Export Extracted Data/Data Extract Export Job)
Native File: This field contains the name of the folder where the native
files will be stored. Accept or change the default folder name. The
default name OF is an LFP command that contains the location and original filename. See Appendix D, LFP Files and the section Original File for
EDD Image (OF) on page D-12 for additional information.
Increment in Root or Subdirectory: Root is the default. For Subdirectory, indicate the name of the subdirectory; e.g. 0001. This folder will
increment once the Max Data Size (MB) or the number of files specified
in the Increment Output Directory field is reached.
Click
to view a sample of the selected Subdirectory Structure:
Root or Subdirectory.
The following figure shows a Subdirectory Structure sample.
The following figure shows a Root Structure sample.
Mirror File Structure: When selected, the specified export directory will have
the same structure as the directories from which the files were discovered. The
discovered directory pathing is “appended” to the specified export directory.
For example, if the specified export directory is: Z:\EXPORT\Job001 and the
www.iprotech.com
877-324-4776
Ipro eCapture User Guide
Q1 2014
7-175
Chapter 7, Creating Export Series and Export Jobs
discovered directory paths are: H:\FILES\DOC, H:\FILES\PPT, and
H”\FILES\XLS, then the exported directory pathing will look like the following:
Z:\EXPORT\Job001\H_\FILES\DOC, Z:\EXPORT\Job001\H_\FILES\PPT, and
Z:\EXPORT\Job001\H_\FILES\XLS. Each of these directories will contain the
images and extracted text of the respective, original files. If this option is not
selected, then only one directory is created: Z:\EXPORT\Job001\IMG_0001; it
will contain all of the images.
Create load files only: When selected, no images, text files, or native files
will be copied to the export output directory. Only load files will be created.
The export will perform as if all of the native files and images were exported
based on the export options. The load file will reflect this.
OCR LFP Document Text Option: This option is not applicable for Data
Extract Export jobs.
Replace Export Path with the following Drive Letter/Path Enter the path
to replace the root path to the images in the export load files. For example,
enter c:\images\0001\0001a\ to create the Ipro .LFP entries:
VN,DII001,c:\images\0001\0001a\DII001\,99
IM,AUG-001,D,0,@DII001;PROC0001\IMG_0011;AUG-001.TIF;2,0
IM,AUG-002,,0,@DII001;PROC0001\IMG_0011;AUG-002.TIF;2,0
Image Key Numbering
Image Keys can increment at different group levels (Page, Document, and Parent). The Image Key can have a total of 70 characters including any selected
delimiters that will be used between the Prefix and the Parent; between the
Parent and the Document; and between the Document and the Page.
As you populate the Image Keyfields, the number displayed in parenthesis,
directly to the right of the Field label, will decrement accordingly. The Sample
Image Key field is used to check the Image Key as entered. You may change
the Image Key as often as necessary BEFORE you click Finish to begin the
Export process.
When configuring the Image Key, keep in mind whether you will be exporting
out a single job or using the Export Series concept, which allows output of successive unattended exports with sequential Image Key numbering and volumes. The starting Image Key will automatically be set to the next available
number based on the previous export’s ending number in the given set.
7-176
Ipro eCapture User Guide
Q1 2014
www.iprotech.com
877-324-4776
Creating a Data Extract Export Job (Export Extracted Data/Data Extract Export Job)
Page: If you do not enter a value in this field, the system will assign a
starting Image Key of 000000001 or the next available Image Key. Otherwise, you can enter a value, not to exceed 15 numeric only characters
(0-9).
Document: The Document portion of the Image Key may have a total of
15 numeric only characters (0-9).
Parent: The Parent portion of the Image Key may have a total of 15
numeric only characters (0-9).
Prefix: The Prefix portion of the Image Key may have a total of 25
alphanumeric characters, dash [-], and/or underscore [_].
The Delimiters include: None, Underscore, Dash, Semi-colon, Period, or Space.
Each section of the Image Key may be padded up to 15 digits.
Using Rollover Numbering for Ringtail Format
When Ringtail is selected as an Image Load or Data Load format, the Export
Directory and File Options screen will show the option checkbox, Use Rollover
Numbering.
When this option is selected, the field descriptions change (as shown in the
previous figure) to reflect Ringtail numbering characteristics.
The following information and examples summarize the Rollover Numbering
for the Ringtail Format.
As an example, assume a DocID starting number of IPRO.400000.001.0001
www.iprotech.com
877-324-4776
Ipro eCapture User Guide
Q1 2014
7-177
Chapter 7, Creating Export Series and Export Jobs
Note: The numbering input allows for configuring the maximum number of
images per folder. The usual standard is 999; however, this could be anything
up to the maximum number of pages - which in this case is 9999 - because
the last segment is four digits. If the last segment was 01, then the maximum
number would be 99, etc.
Enter the maximum number of images per directory that is needed.
Suppose the starting number is IPRO.400000.001.0001, then the document
sequence would look like the following:
For this example, the maximum number of images per folder is configured at
999:
IPRO.400000.001.0001
IPRO.400000.001.0002
IPRO.400000.001.0003
…..
IPRO.400000.001.0999 (Note: This was limited to 999 as indicated above, but
it could conceivably go up to 9999 as specified.)
Once the numbering hits this maximum number of images per folder (as configured), the numbering sequence continues as follows:
IPRO.400000.002.0001 (Note the second segment has now incremented to
002)
IPRO.400000.002.0002
IPRO.400000.002.0003
……
IPRO.400000.002.0999
……
……
……
IPRO.400000.999.0999 (Once the second segment hits its limit, in this case
999, the third segment is incremented.)
IPRO.400001.001.0001 (And so on and so on. Note, the third segment has
incremented.)
7-178
Ipro eCapture User Guide
Q1 2014
www.iprotech.com
877-324-4776
Creating a Data Extract Export Job (Export Extracted Data/Data Extract Export Job)
……
……
IPRO.999999.999.0999 (This is the maximum theoretical number in the
sequence.)
Some additional information to make note of:
•
•
A document will not be split across number/directory boundaries. For
example, if numbering were up to IPRO.400000.002.0995 and the next
document is a 10 page Word document, it would start at
IPRO.400000.003.0001 rather than IPRO.400000.002.0996. The only
exception to this rule would be a document that prints to a number of
pages that exceeds the directory maximum. For example, if the maximum number of images per directory is 999 and the situation calls for
rendering a 20,000 page document, then that would be split by necessity.
The directory structure will match the number. For example, the image
numbered IPRO.400000.002.0001 would reside in the
\IPRO\400000\002\ directory and would be named 0001.TIF (in the case
of a TIF) or IPRO.400000.002.0001.PDF (in the case of a PDF).
Using Generated Numbering
Select Generate. The Image Key Numbering prefix segment shows {Native
Filename}. The Parent and Document segments are disabled.
a.
b.
Enter a Prefix in the Prefix segment.
Enter a Page number in the Page segment.
www.iprotech.com
877-324-4776
Ipro eCapture User Guide
Q1 2014
7-179
Chapter 7, Creating Export Series and Export Jobs
c.
d.
Select a Delimiter from the Delimiters drop-down list. If no delimiter is necessary, select (none). The Sample Image Key box is used
to check the desired image key format.
Indicate Base Numbering to be used for Page and/or Document
Level numbering. One-Based is the default setting.
Using Predefined Numbering
Select Predefined to display the options:
Click the drop-down arrow to display the available numbering options:
•
Use filename: Formerly called Use filename for Image Key.
Do not use this option for Ringtail format because Ringtail relies on the
Bates numbering scheme.
The option, Use Filename, allows for data to be initially pre-processed
using third party tool, such as Ipro Allegro, and then have that same
data processed through Ipro eCapture.
Caveats
The data that will be processed in Ipro eCapture must have the following
characteristics when using this feature:
•
Consistent Bates numbering scheme. Avoid:
filenames that are too long
duplicate Bates numbers
invalid characters
other conditions where the filename does not conform to a Bates
numbering scheme.
7-180
Ipro eCapture User Guide
Q1 2014
www.iprotech.com
877-324-4776
Creating a Data Extract Export Job (Export Extracted Data/Data Extract Export Job)
An inconsistent Bates numbering scheme will result in incorrect data
output.
•
•
Originally processed as a native file.
Ipro eCapture will extract all email attachments that are detected.
Embedded files will be extracted unless the Discovery File Extraction option, Treat email inline images as attachments, is deselected.
This option is used in conjunction with the Flex Processor rules, Create
Parent Item ID List and/or Create Child Item ID list. A rule can be created to load the Item IDs from the native files for each individual job. If
this feature is used without the Flex Processor rules, Create Parent Item
ID List and/or Create Child Item ID list, the result will be incorrect data
output.
See Appendix A, Using the Flex Processor Rules Manager and the section
Create Parent Item ID List or Child Item ID List on page A-46 for specific
information about creating Parent or Child Item ID rules in Flex Processor.
•
•
Import/Merged: The export job will use the imported/merged linking
key as the image key for data extract exports.
Ipro Enterprise: The export job will use the Ipro Enterprise linking key
as the image key for data extract exports.
Concluding the Export
(Optional) Click
to save the export settings to an .INI file. See
the section Creating a Data Extract Export Job (Export Extracted Data/Data
Extract Export Job) on page 7-147 for more information.
Click Finish. (If you did not define an Image Key, the system will prompt you
with a starting Image Key.)
If this is for a Data Extract Export Job, it will appear in the Ipro eCapture Controller’s Job Queue. Start the Data Extract Export job. The job’s details are
available by selecting the job in the Tree View. (Under Export Jobs, Data
Extract Exports). The Information Panel has two buttons: View Settings and
View Output. Click View Settings to display information about the job. Click
View Output to access the files that were created via the Explorer.
www.iprotech.com
877-324-4776
Ipro eCapture User Guide
Q1 2014
7-181
Chapter 7, Creating Export Series and Export Jobs
If this is for an Export Series, the Series name will appear in the Client Management tree view under Data Extract Exports; located under Export Jobs. The
Export Series will then be available for selection when creating a Data Extract
Export job.
Encoding Options Select an encoding option from the drop-down list.
Options include:
•
•
•
Unicode UTF-16 - load files and extracted text are saved in this format
if Force ANSI is not selected.
Unicode UTF-8 - same as UTF-16 output except for the encoding
applied to output files.
Force ANSI - Select this option and select a character from the dropdown list. This replaces non-ANSI characters with the selected ANSI
character in the loadfile/extracted text. This allows for data loaded into
applications that are not Unicode compliant.
If this is for an Export Series, the Series name will appear in the Client Management tree view under Process Exports; located under Export Jobs. The
Export Series will then be available for selection when creating a Process
Export job.
Creating an Overlay Export Job
Overlay jobs may be created from a completed Process Export Job, a completed Data Extract Export Job, and from autoload export jobs (Eclipse and
Relativity). This applies to individual export jobs only and not export series or
the job type grouping folders.
When creating an overlay export job for autoload export jobs (Eclipse and Relativity), the following conditions apply:
•
•
•
•
Overlay is the default action; not append
The field mapping interface appears.
The same case database selection appears.
The BEGDOC field is always required from the metadata field list while
the rest of the previously selected fields are removed.
Overlays on a direct-export to Eclipse will use the 'overlay' import method;
Relativity's import method must be specified in a new KWE for the overlay.
7-182
Ipro eCapture User Guide
Q1 2014
www.iprotech.com
877-324-4776
Creating a Data Extract Export Job (Export Extracted Data/Data Extract Export Job)
This function is used to apply new or modified metadata fields onto an existing
data set. It modifies the load files that were selected for the original export
job. Data is organized by overlay and volume.
The Export wizard launches and will display screens based on the original load
files selected for the original export job. The settings for the load file types
may be modified. For example, if the Custom Export Format was selected,
then the options screen for this format will appear within the wizard screens.
However, additional load file types may not be added.
The following caveats apply: the Back button is disabled and the [BEGDOC]
field is required, it cannot be removed.
After the wizard closes, the export overlay job goes into the Job Queue pane
and is automatically given the name of the original export job with the word
Overlay added; e.g. CustomExport Overlay. The Overlay job also appears
indented in the Client Management Tree View beneath the export job it was
created from.
The settings, output, and report may be viewed for the export overlay job. The
output folder that is created for the export overlay is called overlay_n where n
represents a number, e.g. overlay_004.
The contents of the overlay_n is based on the load formats that were selected
for the original job.
1.
From the Client Management Tree View, alternate click a completed
export job (either Process Export or Data Extract Export) to display the
context menu.
2.
Choose Create Overlay. The Export Wizard appears.
3.
Make the changes and proceed through the additional wizard screens.
4.
Click Finish to close the Wizard. The Export Overlay job appears in the
Job Queue pane.
5.
Start the job.
6.
After the job is removed from the Job Queue pane, select the Export
Overlay job in the Client Management Tree View.
7.
From the Information panel on the right, click
to access the
export directory and view the output for the selected Export Overlay job.
www.iprotech.com
877-324-4776
Ipro eCapture User Guide
Q1 2014
7-183
Chapter 7, Creating Export Series and Export Jobs
Autoload into Ipro Eclipse - Data Extract Job
Ipro EclipseSE version 1.4.1 or later is required for autoloading. An
existing Ipro Eclipse case must exist to use this option. It does not
create an Ipro Eclipse case. Ensure the Ipro Eclipse server is running.
You can load Ipro eCapture Data Extract Job data directly into an Ipro Eclipse
database.
Ensure that the Eclipse Server Information was configured. See Chapter 2,
Ipro eCapture Controller and the section Configuring Integration with Ipro
Enterprise Applications on page 2-20 for instructions on configuring Eclipse.
1.
Click the Client Management Tab.
2.
Do one of the following:
•
•
3.
Do one of the following:
a.
7-184
In the Tree View, navigate to the Data Extract Jobs folder
(under Custodian). Select a completed Data Extract Job and
click the alternate mouse button to display the context menu.
Select Export Extracted Data from the context menu to display
the New Export Job dialog. The job you selected is already checked
in the Tree View. Proceed to Step 2 and the letter a if you wish to
select additional jobs. If you want to select an Export Set instead,
proceed to Step 2 and the letter b.
In the Tree View, navigate to Export Jobs (under Client). Select
Data Extract Exports and click the alternate mouse button to
display the context menu. Select New Data Extract Export Job
from the context menu to display the New Export Job dialog. Proceed to Step 2 and the letter a. Or, if you want to select an Export
Set instead, see Step 2 and the letter b.
Select the Select Jobs option to display the Tree View and expand
it. Select one or more jobs for exporting. The Export Job name
field populates with the first data extract job you selected. You can
select multiple Data Extract Jobs for export. The system will go
through each one and store the data under the directory of the
Export Name you indicated in the New Export Job dialog box. It
Ipro eCapture User Guide
Q1 2014
www.iprotech.com
877-324-4776
Creating a Data Extract Export Job (Export Extracted Data/Data Extract Export Job)
may be necessary to expand the tree to view the data extract jobs.
Proceed to Step 4.
b.
OR
Select the Select Export Set option to display a list of Export Sets
that were created in QC and then select an Export Set. If neces-
www.iprotech.com
877-324-4776
Ipro eCapture User Guide
Q1 2014
7-185
Chapter 7, Creating Export Series and Export Jobs
sary, expand any Export Set Containers to select an Export Set
that is stored in a Container. Proceed to Step 4.
4.
From the Export Type drop-down menu, select Direct to Eclipse.
5.
Enter an Export Job Name, or if a default name appears in the field,
modify it if necessary. This is the name the system uses for the directory
name where the exported data is stored.
6.
Select a task table from the drop-down list. The task table that appears
in the field is based on the last task table selected for the Client.
7.
(Optional) Browse to the Template (.INI File) that has the data
extraction export settings from a previously run data extraction export.
A file will not exist until you run your first data extraction export. Note:
This option is not available if you select an existing Export Series from
the drop-down list. This file saves time because you will not need to
manually make selections in some of the Export wizard screens as well
as ensure that there is consistency when exporting jobs for a particular
situation.
8.
(Optional) Do one of the following:
7-186
Ipro eCapture User Guide
Q1 2014
www.iprotech.com
877-324-4776
Creating a Data Extract Export Job (Export Extracted Data/Data Extract Export Job)
•
•
•
9.
Leave the default setting [none] under Export Series.
Select an Export Series from the drop-down list. When an existing Export Series is selected, the
,
appears. When clicked, the Export settings dialogs will not appear;
instead the Job is placed in the Job Queue. See the section About
Export Series on page 7-264 for background information about
Export Series. Or see the section Creating an Export Series (Process Export or Data Extract Export) on page 7-266 if you want to
create the Export Series before the Export Job is created.
Select [new export series] from the Export Series drop-down list
and enter a New Export Series Name. This option creates an
autoload-enabled export series along with the autoload export job.
Once the series is created, autoload export jobs can be created
from the series.
Click OK. (NOTE: A warning dialog may appear if one or more of the
selected data extract jobs have not yet passed QC. You can elect to con-
www.iprotech.com
877-324-4776
Ipro eCapture User Guide
Q1 2014
7-187
Chapter 7, Creating Export Series and Export Jobs
tinue to export or cancel, QC the jobs, and then export again.) The
Eclipse Case Selection dialog appears.
10.
7-188
Select a Case that will receive the Ipro eCapture data.
Ipro eCapture User Guide
Q1 2014
www.iprotech.com
877-324-4776
Creating a Data Extract Export Job (Export Extracted Data/Data Extract Export Job)
11.
Click OK. The Select Export Formats and File Handling Options dialog
appears unless
ing Export Series.
12.
was clicked for an exist-
Select from the following options:
Point to eCapture file storage from Eclipse: The text/native files will
remain in the Ipro eCapture system directory. Eclipse will access the files
from this location. Use this option to have Eclipse use existing data that
is stored in Ipro eCapture directories when no changes are being made
to the output files for review.
Include OCR word coordinates in DLF: (located at the bottom of the
Export Formats and Handling Options screen) Select this option to
increase the amount of time it takes to build the load file. This is only
recommended for image-only review databases. Native file reviews can
leverage built-in word highlighting when viewing the document’s text or
rendered native file.
www.iprotech.com
877-324-4776
Ipro eCapture User Guide
Q1 2014
7-189
Chapter 7, Creating Export Series and Export Jobs
a.
b.
Export Text Files - select this option to display additional Data
Load Formats of LaserFiche, DB/Textworks, and OCR Control.lst.
Note: if this option is deselected, then no text files are created
except for the VolumeManifest.TXT.
Include Image Key in Document Text: This option is not available for selection for direct to Eclipse exporting.
•
Create Text Placeholders For Missing Text Files: Creates placeholder text files for documents where there was no
available text. This option is automatically selected for direct
to Eclipse exporting.
•
Export Document Text as Single File: For direct to
Eclipse exports this option is automatically selected by
default so document-level text will be exported.
(Optional) Export Native Files - (Note: When this option is
selected along with the Ringtail Image Load File format, the Name
file using image key and Copy to output directory options are automatically selected. Starting with version 5.6, the Copy to output
directory option was replaced with the option Directory for each
native which is located in the last screen of the Export Wizard.)
Under Native file options, select from the following:
•
Name File Using Image Key: If this option is selected, the
native file directory will no longer create an additional directory per document. By naming the file using the Image Key,
it removes any chance of duplicate filenames occurring.
Therefore, the additional level of directories are not necessary. An example follows:
7-190
Ipro eCapture User Guide
Q1 2014
www.iprotech.com
877-324-4776
Creating a Data Extract Export Job (Export Extracted Data/Data Extract Export Job)
•
Copy to Output Directory: This option was replaced with
the option Directory for each native which is located in the
last screen of the Export Wizard.
Native files are copied to a directory separate from the
images. The directory numbers match their corresponding
image file.
Under Alternate Email Export Options, select from:
•
•
•
•
Outlook - Check this option to export an alternate native file for
Outlook files. The default export format is MSG.
Lotus Notes - Check this option to export an alternate native file
for Lotus Notes files. The default export format is DXL.
Outlook Express - Check this option to export an alternate native
file for Outlook Express files. The default export format is EML.
GroupWise - Check this option to export an alternate native file for
GroupWise files. The default export format is XML.
Select one of the following formats:
•
.MHTFormat: Exports selected e-mail type to a standardized format rather than to .DXL or .XML. Types include Outlook, Outlook Express, Lotus Notes, and GroupWise. (An
.MHT file is an Archived Web Page file with information in
www.iprotech.com
877-324-4776
Ipro eCapture User Guide
Q1 2014
7-191
Chapter 7, Creating Export Series and Export Jobs
•
•
Multipurpose Internet Mail Extension HTML (MHTML) format
with an .MHT file extension. All relative links in the Web page
are remapped and the embedded content is included in the
.MHT file.)
Rich Text Format (RTF): Uses Microsoft Word to open the
MHT and saves it as an RTF; a more widely accepted format.
HTML: HTML documents can have inline images, the images
themselves are not included in the HTML. The images must
be included in the export in order to access the inline
images.
File extension options: This option is used in the event the native documents are missing or have incorrect file extensions. When this is the
case, the native file viewers will not work. The correct extension is
defined as the value presented in the Extension field of the StellentDefs
table in the CONFIG database for the StellentID of the file. Oracle® Outside-In Technology (formerly Stellent) will not identify files it cannot discern with a .TXT extension. If necessary, a Database Administrator may
manually update the Extension field in the StellentDefs table with custom extensions using SQL. The options from the drop-down list include:
•
•
•
•
7-192
None - default setting. Nothing happens.
Add extension only if missing
Append corrected extensions - appends extensions that are incorrect or missing.
Replace incorrect extensions - replaces incorrect extensions with
correct extensions or missing extensions.
Ipro eCapture User Guide
Q1 2014
www.iprotech.com
877-324-4776
Creating a Data Extract Export Job (Export Extracted Data/Data Extract Export Job)
Click the link, Apply to selected file types and/or QC Flags, to open
the Native File Export Inclusions dialog.
By default, all file types are selected and the QC flags are not selected.
For the file types, click Clear All, to clear all the selected file types and
then select the specific file types and/or only documents to which the
QC flag or flags are attributed. If necessary, click + to expand the list for
a file type, such as Microsoft Excel, to display specific versions/types of
Microsoft Excel. If either one (file type/QC flag) “hits”, the native file will
be exported.
Click OK to return to the Export screen. A message appears underneath
the link that states the number of file types and QC flags, if any, that
were included.
www.iprotech.com
877-324-4776
Ipro eCapture User Guide
Q1 2014
7-193
Chapter 7, Creating Export Series and Export Jobs
13.
Click
to display the Merge Data Options dialog.
This dialog appears if at least one set of images or text exists in one of
the Processing jobs or Export Sets selected for the Export job.
Do the following:
•
7-194
from the drop-down menu, select the order (Date, Ascending;
Date, Descending (default); Name, Ascending; Name, Descending;
Custom - use the up/down arrows) merge jobs display in the
Merge Jobs drop-down menu in the Image tab or View tab.
Ipro eCapture User Guide
Q1 2014
www.iprotech.com
877-324-4776
Creating a Data Extract Export Job (Export Extracted Data/Data Extract Export Job)
•
14.
deselect one or more merge jobs. By default, all merge jobs are
selected. The “Original” item refers to the original images and text
associated with the document. It appears as the last item in the
list of merge jobs and remains selected.
Click
to display the Export Fields dialog.
Defining Export Fields for Databases
If you are creating any database load file formats during the Ipro eCapture
export process, you need to define the export fields that Ipro eCapture will
export. This step ensures that the data exported from Ipro eCapture matches
the fields in the database where the data will be used.
www.iprotech.com
877-324-4776
Ipro eCapture User Guide
Q1 2014
7-195
Chapter 7, Creating Export Series and Export Jobs
There are several field types that can be exported. These field types are designated as follows:
S (System Fields): These fields only have meaning in the context of an Ipro
eCapture export. If a document was viewed outside of the export, none of
these field types would apply. Any brackets [] will be removed from the label
when exporting. The System field definitions are as follows:
ITEM_ID: The Ipro eCapture unique identifier for the document. Can be
added/removed from Selected Fields.
BEGDOC: Starting Bates of the document.
ENDDOC: Ending Bates of the document. Note: Not automatically included in
the Selected Fields box; however, may be selected if it is to be included in the
export.
BEGATT: Starting Bates of the attachment range.
ENDATT: Ending Bates of the attachment range.
PARENT_ATTACHMENT: "P" for anything not an attachment, "A" for attachment
(child).
ATTACHMENT_BATES: Semicolon-delimited list of Bates numbers of the children of a parent document.
ATTACHMENT_ITEMIDS: Semicolon-delimited list of the ItemIDs of the children of a parent document.
PARENT_BATES: If a document is a child, the Bates of the parent.
PARENT_ITEMID: If a document is a child, the ItemID of the parent.
EXPORT_NATIVE_FILES: Used when exporting native files. Shows export path
to the native files. Defaults to Selected fields box when Export Native Files is
selected from the Formats and File Handling screen. May be moved from
Selected Fields box to Available Fields if required.
ABSOLUTE_PARENT_ID: Obsolete - use PARENT_ITEMID instead.
PARENT_ITEMID queries the ExportedItems table to get an absolutely accurate
parent ID relating to the export. ABSOLUTE_PARENT_ID reads from the Items
table. Both should agree, but if not PARENT_ITEMID is the more accurate of
the two.
7-196
Ipro eCapture User Guide
Q1 2014
www.iprotech.com
877-324-4776
Creating a Data Extract Export Job (Export Extracted Data/Data Extract Export Job)
RELATIVE_PARENT_ID: This field is relative to the Discovery Job, not the
Export. Compound document options may result in the relative parent being
excluded from the export. NOTE: PARENT_ITEMID can differ from
ABSOLUTE_PARENT_ID if compound document options cause the absolute
parent to be excluded from the export. PARENT_ITEMID is relative to the
Export; ABSOLUTE_PARENT_ID is relative to the Discovery Job.
RELATIVE PATH: Original path to native file without directories above where
the directory folder was selected.
SEARCH HITS: Contains the search terms.
CUSTODIAN_NAME: The name of the Custodian containing the process job
that produced the document being exported.
DISCOVERY_CUSTODIAN_NAME: Used to identify the custodian of the discovery job in which an exported item was found.
CUSTODIANS: Used to identify the duplicate custodians for this record.
DUPLICATE_LOCATIONS: Used to list the (Duplicate ID), Custodian Name,
<Filename>, and [Discovery Path] for this record.
DATA_EXTRACT_JOB_NAME: The name of the Data Extract Job that produced
the text being exported.
RULE_CATEGORY: Contains the categories (selected and assigned through the
Flex Processor).
PROCESS_STATUS: Displays the process status results of a job. Items that
processed successfully will show "Success".
IDENTIFIED_LANGUAGES: List of languages, identified by BasisTech, that exist
in a document.
IDENTIFIED_ENCODING: List of encodings, identified by Basis Tech, that exist
in the document.
EXTRACTED_ATTACHMENT_COUNT: Counts the children of a document as it
relates to the export. The count should always match up with the number of
ItemIDs in the field ATTACHMENT_ITEMIDS and image keys in the
ATTACHMENT_BATES field. Note: This field will be zero for all documents in the
export that have a parent in the export.
EXTRACTED_ATTACHMENT_NAMES: Generates a semi-colon delimited list of
the child document’s filenames in the order of the export. The number of filenames in the list should match the EXTRACTED_ATTACHMENT_COUNT.
www.iprotech.com
877-324-4776
Ipro eCapture User Guide
Q1 2014
7-197
Chapter 7, Creating Export Series and Export Jobs
VOLUME_NAME: The value is the label for the document’s volume.
ORIGINAL_CUSTODIAN: Populates with the name of the custodian the original
file belonged to when an item duplicates against another file when doing deduplication at the Project or Client level.
BATCHID: Contains the Batch ID assigned for the Discovery Job.
FULLTEXT: Contains combined contents of body text and OCR text.
EXPORTED_TEXT_FILES: Contains the path to the exported extracted text
files. The value of this field will be affected if the Replace the export path with
the following drive letter/path field is populated (located in last Export
screen).This field cannot be used for a Group (User Defined) field.
DocType: Contains eMail, eDoc, and eAttach types.
DocCategory: Contains definitions that represent the document based on
Email (absolute parent and loose email only, e.g. not email attached to email),
Email Attachment (any email attachments to an email), Edocument (files that
are not email and not an attachment of an email family), Edocument Attachment (any embedded file in an edocument; including emails).
USERDEFINED1 through USERDEFINED5: Values to be entered using SQL
Server Manager. These fields can be used for endorsements, custom placeholders, etc.
F (QC Flags): The QC flags that appear in the list are both system QC flags
and any user defined QC flags for the selected Processing Job or Jobs. The
CUSTMDAT.TXT file, created from the Export, will show a value of Y for flags
that are “on” or be blank for flags that are “off”.
7-198
Ipro eCapture User Guide
Q1 2014
www.iprotech.com
877-324-4776
Creating a Data Extract Export Job (Export Extracted Data/Data Extract Export Job)
M (metadata Fields): These fields were retrieved from documents during
processing.
Starting with version 2.0, three additional metadata fields were
added. They are: Last Access Date, Last Access Date*DATE ONLY*,
and Last Access Date*TIME ONLY*. Last Access Date is a volatile
system field. The first time that Ipro eCapture discovers a directory
of loose files, Last Access Date will be valid. However, subsequent discovery jobs, run on the same set of files, will get the date the Ipro
eCapture last “touched” the file on the initial discovery job. We highly
recommend that you should not use the Last Access Date metadata
fields. Because there isn’t a legitimate value for any file Ipro eCapture
extracts, this field will be populated for loose files only. In addition, emails that Ipro eCapture extracts, attachments, embedded files, and
files extracted from archives will not have this value populated.
E (External Fields): These fields are from export jobs originating from Ipro
Allegro or from the eCapture Import Wizard.
U or G (User Defined Fields): These comprise two types: User [U] and/or
Group [G]. These fields are created via the Insert Custom Fields function. The
User fields will export the field label and the value you may optionally enter.
Otherwise the value may be blank. The Group fields are space-delimited combinations of System (S) and/or Metadata (M) field types.
When the Data Extract Export wizard is initiated, the process jobs to be
exported are selected first. The fields available for export are based on a standard list of metadata fields combined with the metadata retrieved during processing. In versions 1.2 and earlier, these fields were called Standard and
Extended metadata fields with separate selection options. Starting with version 1.3, they are now combined with no differentiation between them.
The available fields listview is populated using this list of metadata fields,
along with the system fields which are available for all exports. In addition
*DateOnly* and *TimeOnly* fields are parsed from date fields and included in
the Metadata fields.
www.iprotech.com
877-324-4776
Ipro eCapture User Guide
Q1 2014
7-199
Chapter 7, Creating Export Series and Export Jobs
The export will always export the non-displayed system fields
[BATES_NUMBER] and [ITEM_ID] as the first two fields regardless of field
selections shown. All other fields to be exported are displayed in the Selected
Fields box and will be exported, in order, named as the field label. The next
section describes how to populate the Selected Fields box.
Sorting Fields
Alternate click a field and choose Make Sort Field from the shortcut menu. This
option appears for those fields that can be sorted.
A Y appears in the Sort column. To clear this entry, alternate click the field and
choose Clear Sort Field.
When a field is marked as a Sort field, it applies the value of the selected field
to all family members of a parent item. This allows sorting on the specified
field in an external application to be compound-complete. For example, when
the ‘Sent Date’ field is made into a Sort field, the value of the ‘Sent Date’ field
for an email will be used as the value of the same field in the exported load file
for all of the email’s attachments.
About the Select Export Fields Screen
The field type designator (discussed in the section, Defining Export Fields for
Databases on page 7-18) displays in the Type column of both the Available
and Selected Fields boxes.
Available Fields: Displays all fields available to be exported. Click the dropdown list located above the field list, and select a specific field type. By
default, All Fields display. Ctrl-click to select non-contiguous fields. Shift-click
to select a contiguous range.
Filter Value - enter a value to filter the list. For example, to see only those
fields that contain the word “date”, enter date and click
fields, delete the value and click
. To display all
.
Selected Fields: Displays all fields selected from the Available Fields for
export. Right-click a field to edit it.
: Click to move a selected field from the Available Fields box to the
Selected Fields box.
7-200
Ipro eCapture User Guide
Q1 2014
www.iprotech.com
877-324-4776
Creating a Data Extract Export Job (Export Extracted Data/Data Extract Export Job)
box.
: Moves all fields from the Available Fields box to the Selected Fields
: Click to move a selected field from the Selected Fields box to the
Available Fields box.
box.
: Moves all fields from the Selected Fields box to the Available Fields
Field List: This list contains the following field list templates: Ipro Basic Field
List, Ipro Standard Field List, Ipro Extended Field List, and Ipro Enterprise
Field List. The Ipro Enterprise field list reflects the standard list of fields that
are selected by default in a new Ipro Allegro case and created in a new Ipro
Eclipse case. To facilitate the ease of field selection, the templates are used to
load the fields, all at once, into the Selected Fields box. The drop-down list will
also display user saved System templates and/or Client templates. Templates
selected from a physical .INI file do not display in this list.
To load a template into the Selected Fields box, select the template from the
drop-down list. A warning dialog box appears.
Click Yes to continue. The template’s fields appear in the Selected Fields box.
www.iprotech.com
877-324-4776
Ipro eCapture User Guide
Q1 2014
7-201
Chapter 7, Creating Export Series and Export Jobs
To save a new template based on manually selected fields, click the dropdown list, choose Save As, click
appears.
. The Save Template As dialog
Select from the following:
•
•
System Template - available to all Export Jobs
Client Template - available only to the Client
For System Template or Client Template, enter a meaningful name for
the template.
•
File - saves to a physical .INI file in selected location
For a File template (.INI), click
to display the File Browser dialog.
Browse to a location, enter a filename, and click Open. The Save Template As dialog appears indicating the pathname in the Location field.
Click Save.
To select an existing user created field list template saved as a physical
.INI file, click the drop-down list, choose Browse, and click
. The Open
dialog appears. Browse to the saved template (.INI) file and click Open. A
warning dialog box appears indicating that loading fields from a template will
clear any selections, including group fields and field label modifications. Click
Yes to continue.
7-202
Ipro eCapture User Guide
Q1 2014
www.iprotech.com
877-324-4776
Creating a Data Extract Export Job (Export Extracted Data/Data Extract Export Job)
Managing Field Templates
User created System and/or Client templates can be renamed, edited, deleted,
and viewed.
From the Controller menu bar, choose Tools > Field Template Management. The Field Template Management dialog appears.
Alternate click a template to display the context menu and choose:
www.iprotech.com
877-324-4776
Ipro eCapture User Guide
Q1 2014
7-203
Chapter 7, Creating Export Series and Export Jobs
Rename Template- displays the Edit Template Name dialog. Enter a new
Template name and click OK.
Edit Template - displays the Edit Template name dialog. A different name
may be given and the Type can be changed. If the type is changed to Client
Template, the dialog expands to display a Client drop-down list where a different Client can be selected. If the type is changed to System Template, the dialog collapses to hide the Client drop-down list.
Delete Template - A Delete Confirmation dialog appears prompting a decision to delete the template. Click Yes to delete the template.
View Template - Opens a dialog with the selected Template in the title bar
and shows the fields assigned for that template. Click Close when through
viewing the fields.
: Opens the Insert Custom Field dialog where you can
create new group fields and new user fields. Inserting Custom Group Fields is
discussed in the section, Inserting Custom Group Fields on page 7-27.
and
: Use these arrows to change the order of the fields in the Selected
Fields box. Select a field (or contiguous fields) and then use either arrow to
reposition it (or the selected fields) accordingly.
Selecting the Additional Export Options in the Export Fields
Screen
There are several options you may choose from located at the bottom of the
Export Fields screen. Some of these options are available based on the Data
Load Format(s) selected in the Export Formats and File Handling Options
screen.
Populate Child Fields for Parents - If this option is NOT selected, the Parent
fields for all items (PARENT_BATES, PARENT_ITEMID) will only be populated
for child items.
If this option IS selected, the Parent fields will be populated for all items. Nonchild items will enter their own Bates™ number and ItemID.
Select Include Field Names in first line of file if you want to assist readers
in understanding or verifying the file. Do not select this option if the file will be
loaded directly into the database.
7-204
Ipro eCapture User Guide
Q1 2014
www.iprotech.com
877-324-4776
Creating a Data Extract Export Job (Export Extracted Data/Data Extract Export Job)
If the Concordance DAT File data load format was selected, the Export
OCRTXT field for Concordance option appears. Select this option if you
want to export the OCRTXT field. Select the version that applies from the
drop-down list. Options include v7.x 4mb truncate, v8.x 12mb, truncate, v7.x
4mb, report only, and v8.x 12mb, report only.
Click
ting Options dialog.
(to open the Date Field Format-
Legacy Date Field Formatting: By default, this option is selected. Deselect
this option to select from the Invalid date options and to select fields for date
format handling.
www.iprotech.com
877-324-4776
Ipro eCapture User Guide
Q1 2014
7-205
Chapter 7, Creating Export Series and Export Jobs
Date Field Formatting: If you want to change the date field to a different
format, select from the following formats:
•
•
•
•
•
YYYYMMDD
YYYY/MM/DD
MMDDYYYY
MM/DD/YYYY
DD/MM/YYYY
Otherwise, select the option, Do Not Convert Date Fields.
Time Format: Select from:
•
•
•
12-hour [displays time in 12 hour format e.g. 1:04]
24-hour [displays time in 24 hour format, e.g. 13:04]
Regional [formats the time according to the “default” Regional Settings
of the Worker the document is being exported on. Note: Changing the
format strings using the “Customize” button of Regional Settings will
have no effect; the actual region needs to be changed to see any effect.
Resolve Times to Second Precision: Select this option if you want to add
seconds to all metadata date fields that have time. This does not apply to the
images.
Invalid date options
Treat date values outside of specified range as invalid dates - Select a
start date and end date range. Any dates outside of the selected range will be
considered as invalid dates. The start date default is set to SQL minimum date.
The end date default is set to SQL maximum date.
Select one of the following options:
•
•
7-206
Invalid date field output value - enter text to display in the event an
invalid date is encountered. This field may be left blank.
Invalid date field output do not convert - invalid dates will be output
as a text field.
Ipro eCapture User Guide
Q1 2014
www.iprotech.com
877-324-4776
Creating a Data Extract Export Job (Export Extracted Data/Data Extract Export Job)
Field Selection
The only fields that are not present in the list are *DATE_ONLY* and
*TIME_ONLY*. The fields in the available field list are comprised of fields that
are marked as valid for date formatting. This is determined by the value of
TRUE in the ExportAttemptDateParse field located in the EncounteredMetatdataFieldList table.
Date field formatting options affect only those fields in the Fields Selected for
Date Format Handling box.
Date field formatting options are set at the Job level.
Filter Value - enter a value to filter the list. For example, to see only those
fields that contain the word “date”, enter date and click
fields, delete the value and click
. To display all
.
Select a field for date format handling by selecting the field from the Fields
Available for Date Format Handling and clicking
to move the single
field to the Fields Selected for Date Format Handling box.
For two or more fields, ctrl-click to select non-contiguous fields or shift-click to
select a contiguous fields. Once the fields are selected, click
them to the Fields Selected for Date Format Handling box.
to move
Ipro eCapture creates two additional fields that “split” the date and time into a
Date Only field and a Time Only field. These two additional fields will be displayed in the Available Fields list in the Export Wizard, Select Export Fields
screen. For example, if the DueDate field was moved to the Fields Selected for
Date Format Handling, the following additional DueDate fields would appear in
the Available Fields list: DueDate*DATE ONLY* and DueDate*TIME ONLY*.
Click OK to return to the Export Wizard, Select Export Fields screen.
www.iprotech.com
877-324-4776
Ipro eCapture User Guide
Q1 2014
7-207
Chapter 7, Creating Export Series and Export Jobs
15.
Click
log.
to display the Map eCapture Fields to Eclipse Fields dia-
Only the selected fields will be available for mapping. The fields available
for selection are the fields that presently exist in the selected Ipro
Eclipse case. The mapped fields cannot be modified. At least one field
must be selected for mapping in order to proceed. A mapped field can
only be selected once. Not all fields have to be mapped. Unmapped fields
7-208
Ipro eCapture User Guide
Q1 2014
www.iprotech.com
877-324-4776
Creating a Data Extract Export Job (Export Extracted Data/Data Extract Export Job)
will be ignored.
To see document text, the [FULLTEXT] field must be mapped to Eclipse’s
text field, indicated by EXTRACTED TEXT for the field type.
16.
For each Field name, select a mapped field from the drop-down list.
17.
Click one of the following:
18.
•
to map Ipro eCapture fields to Eclipse fields by position. The first field for Ipro eCapture will be mapped to the first
field for Eclipse, and so on.
•
to map Ipro eCapture fields to Eclipse fields by name.
Field names for Ipro eCapture that match the field names for
Eclipse, exactly, will be mapped.
(Optional) Click
to save the Export settings to an .INI file
which may be imported for a future export. In the Save Batch Export
Settings dialog box, navigate to a different directory if necessary, enter a
filename. The default extension is .INI. Click Save.
www.iprotech.com
877-324-4776
Ipro eCapture User Guide
Q1 2014
7-209
Chapter 7, Creating Export Series and Export Jobs
19.
7-210
Click
screen.
to display the Specify Export Directory and File Options
Ipro eCapture User Guide
Q1 2014
www.iprotech.com
877-324-4776
Creating a Data Extract Export Job (Export Extracted Data/Data Extract Export Job)
Export Directory Path indicates the directory where the exported data
will be saved. Initially, this field shows the area established during workstation setup, but you can click
and navigate to a different directory.
Export Volume Options
Volume Name Enter a name for the CD-ROM label or volume path
directory. This field initially uses a number (e.g., 001) as the volume
name. This setting is for database files.
Increment Output Directory Every n Files: Select a value from the
drop-down list (or enter a value) that indicates the number of files that
will be in each subdirectory.
If the Image Load Format, Ringtail, was selected, the values in this field
will revert to 99, 999, and, so on if the Use Rollover Numbering option is
selected when configuring the Image Key. As the Image Key is entered
and changes leaving space for a leading zero, the values in the Increment Output field changes accordingly. For example, an Image Key of
00001 sets the value to 9999, 0001 sets the value to 999, 001 sets the
value to 99, etc.
Max Data Size If the drive where you are saving the export files has
limited space, select the maximum space (640, 1200, 4300, and 9000)
you want to use from the drop-down list.
Include Volume Name in Loadfile Filename: Select this option if you
want the Volume Name to appear in the VolumeManifest.TXT file.
Directory for each native: Starting with version 5.6, this option
replaces the Copy to output directory option formerly located in the first
Export Wizard screen. This option is not available for selection if Ringtail
was selected. Otherwise, when this option is selected, the Native File
field under the Subdirectory Structure options is not available. When not
selected, a folder name may be entered in the Native File field.
Subdirectory Structure Options
Document Text: This field contains the name of the folder where the
text files will be stored. Accept or change the default folder name.
www.iprotech.com
877-324-4776
Ipro eCapture User Guide
Q1 2014
7-211
Chapter 7, Creating Export Series and Export Jobs
Increment in Root or Subdirectory: Root is the default. For Subdirectory, indicate the name of the subdirectory; e.g. 0001. This folder will
increment once the Max Data Size (MB) or the number of files specified
in the Increment Output Directory field is reached.
Click
to view a sample of the selected Subdirectory Structure:
Root or Subdirectory.
The following figure shows a Subdirectory Structure sample.
The following figure shows a Root Structure sample.
Mirror File Structure: When selected, the specified export directory will have
the same structure as the directories from which the files were discovered. The
discovered directory pathing is “appended” to the specified export directory.
For example, if the specified export directory is: Z:\EXPORT\Job001 and the
discovered directory paths are: H:\FILES\DOC, H:\FILES\PPT, and
H”\FILES\XLS, then the exported directory pathing will look like the following:
Z:\EXPORT\Job001\H_\FILES\DOC, Z:\EXPORT\Job001\H_\FILES\PPT, and
7-212
Ipro eCapture User Guide
Q1 2014
www.iprotech.com
877-324-4776
Creating a Data Extract Export Job (Export Extracted Data/Data Extract Export Job)
Z:\EXPORT\Job001\H_\FILES\XLS. Each of these directories will contain the
images and extracted text of the respective, original files. If this option is not
selected, then only one directory is created: Z:\EXPORT\Job001\IMG_0001; it
will contain all of the images.
Create load files only: When selected, no images, text files, or native files
will be copied to the export output directory. Only load files will be created.
The export will perform as if all of the native files and images were exported
based on the export options. The load file will reflect this.
OCR LFP Document Text Option: Select None, OI-inline, or OT-file reference from the drop-down list. For the Image Load Formats, Ipro LFP and Ipro
OCR, select the appropriate option for inclusion in the LFP file. Ipro eCapture
generates an IPROOCR.LFP file for either of these options, OI, or OT. If the
option Export Text Files, located on the initial Export screen, is not selected,
the OT option will not be available for selection. The OI lines in the
IPROOCR.LFP file will contain document text for each page in all cases as long
as there is document text for the page. The OT lines in the IPROOCRLFP file
will point to text files for each page only when the export image format are
single page images, and the option Export document text as single file (located
in the initial Export screen) is not checked. For multi-page formats, or when
document text is exported as a single file, there will be only one OT entry per
document. If there is no text for a document (image where OCR wasn’t
enabled, for example), there will not be an OT line. For the OI-inline option,
the .LFP file will be larger than the LFP file generated when using the OT-file
reference option.
Replace Export Path with the following Drive Letter/Path Enter the path
to replace the root path to the images in the export load files. For example,
enter c:\images\0001\0001a\ to create the Ipro .LFP entries:
VN,DII001,c:\images\0001\0001a\DII001\,99
IM,AUG-001,D,0,@DII001;PROC0001\IMG_0011;AUG-001.TIF;2,0
IM,AUG-002,,0,@DII001;PROC0001\IMG_0011;AUG-002.TIF;2,0
Image Key Numbering
Image Keys can increment at different group levels (Page, Document, and Parent). The Image Key can have a total of 70 characters including any selected
delimiters that will be used between the Prefix and the Parent; between the
Parent and the Document; and between the Document and the Page.
www.iprotech.com
877-324-4776
Ipro eCapture User Guide
Q1 2014
7-213
Chapter 7, Creating Export Series and Export Jobs
As you populate the Image Key fields, the number displayed in parenthesis,
directly to the right of the Field label, will decrement accordingly. The Sample
Image Key field is used to check the Image Key as entered. You may change
the Image Key as often as necessary BEFORE you click Finish to begin the
Export process.
When configuring the Image Key, keep in mind whether you will be exporting
out a single job or using the Export Series concept, which allows output of successive unattended exports with sequential Image Key numbering and volumes. The starting Image Key will automatically be set to the next available
number based on the previous export’s ending number in the given set.
Page: If you do not enter a value in this field, the system will assign a
starting Image Key of 000000001 or the next available Image Key. Otherwise, you can enter a value, not to exceed 15 numeric only characters
(0-9).
Document: The Document portion of the image key number may have
a total of 15 numeric only characters (0-9).
Parent: The Parent portion of the image key number may have a total
of 15 numeric only characters (0-9).
Prefix: The Prefix portion of the image key number may have a total of
25 alphanumeric characters, dash [-], and/or underscore [_].
The Delimiters include: None, Underscore, Dash, Semi-colon, Period, or Space.
Each section of the image key number may be padded up to 15 digits.
See the section Using Rollover Numbering for Ringtail Format on page 7-177 if
the Ringtail format was selected for additional information about the Rollover
Numbering option.
7-214
Ipro eCapture User Guide
Q1 2014
www.iprotech.com
877-324-4776
Creating a Data Extract Export Job (Export Extracted Data/Data Extract Export Job)
Using Generated Numbering
Select Generate. The Image Key Numbering prefix segment shows {Native
Filename}. The Parent and Document segments are disabled.
a.
b.
c.
d.
Enter a Prefix in the Prefix segment.
Enter a Page number in the Page segment.
Select a Delimiter from the Delimiters drop-down list. If no delimiter is necessary, select (none). The Sample Image Key box is used
to check the desired image key format.
Indicate Base Numbering to be used for Page and/or Document
Level numbering. One-Based is the default setting.
Using Predefined Numbering
Select Predefined to display the options:
Click the drop-down arrow to display the available numbering options:
•
Use filename: Formerly called Use filename for Image Key.
Do not use this option for Ringtail format because Ringtail relies on the
Bates numbering scheme.
www.iprotech.com
877-324-4776
Ipro eCapture User Guide
Q1 2014
7-215
Chapter 7, Creating Export Series and Export Jobs
The option, Use Filename, allows for data to be initially pre-processed
using third party tool, such as Ipro Allegro, and then have that same
data processed through Ipro eCapture.
Caveats
The data that will be processed in Ipro eCapture must have the following
characteristics when using this feature:
•
Consistent Bates numbering scheme. Avoid:
filenames that are too long
duplicate Bates numbers
invalid characters
other conditions where the filename does not conform to a Bates
numbering scheme.
An inconsistent Bates numbering scheme will result in incorrect data
output.
•
•
Originally processed as a native file.
Ipro eCapture will extract all email attachments that are detected.
Embedded files will be extracted unless the Discovery File Extraction option, Treat email inline images as attachments, is deselected.
This option is used in conjunction with the Flex Processor rules, Create
Parent Item ID List and/or Create Child Item ID list. A rule can be created to load the Item IDs from the native files for each individual job. If
this feature is used without the Flex Processor rules, Create Parent Item
ID List and/or Create Child Item ID list, the result will be incorrect data
output.
See Appendix A, Using the Flex Processor Rules Manager and the section
Create Parent Item ID List or Child Item ID List on page A-46 for specific
information about creating Parent or Child Item ID rules in Flex Processor.
•
•
7-216
Import/Merged: The export job will use the imported/merged linking
key as the image key for data extract exports.
Ipro Enterprise: The export job will use the Ipro Enterprise linking key
as the image key for data extract exports.
Ipro eCapture User Guide
Q1 2014
www.iprotech.com
877-324-4776
Creating a Data Extract Export Job (Export Extracted Data/Data Extract Export Job)
Encoding Options Select an encoding option from the drop-down list.
Options include:
•
•
•
Unicode UTF-16 - load files and extracted text are saved in this format
if Force ANSI is not selected.
Unicode UTF-8 - same as UTF-16 output except for the encoding
applied to output files.
Force ANSI - Select this option and select a character from the dropdown list. This replaces non-ANSI characters with the selected ANSI
character in the loadfile/extracted text. This allows for data loaded into
applications that are not Unicode compliant.
(Optional) Click
to save the export settings to an .INI file. See
the section Creating a Data Extract Export Job (Export Extracted Data/Data
Extract Export Job) on page 7-147 for more information.
If this is for a Data Extract Export Job, it will appear in the Ipro eCapture Controller’s Job Queue. Start the Data Extract Export job. The job’s details are
available by selecting the job in the Tree View. (Under Export Jobs, Data
Extract Exports). The Information Panel has three buttons: View Settings,
View Output, and View Report. Click View Settings to display information
about the job. Click View Output to access the files that were created via the
Explorer. Click View Report to view the Export Summary Report.
If this is for an Export Series, the Series name will appear in the Client Management tree view under Process Exports; located under Export Jobs. The
Export Series will then be available for selection when creating a Process
Export job.
Click
to conclude the autoloading into Eclipse. The job appears in the
Job Queue and the Progress column shows Autoload Initiated. The job also
appears under Data Extract Exports in the Client Management tree view with
the Eclipse icon.
www.iprotech.com
877-324-4776
Ipro eCapture User Guide
Q1 2014
7-217
Chapter 7, Creating Export Series and Export Jobs
Autoload into Relativity - Data Extract Job
Ensure that Relativity is configured prior to using this function. See
Chapter 2, Ipro eCapture Controller and the section Configuring Integration with kCura Relativity on page 2-21 for information about configuring Relativity.
1.
Click the Client Management Tab.
2.
Do one of the following:
•
•
3.
Do one of the following:
a.
7-218
In the Tree View, navigate to the Data Extract Jobs folder
(under Custodian). Select a completed Data Extract Job and
click the alternate mouse button to display the context menu.
Select Export Extracted Data from the context menu to display
the New Export Job dialog. The job you selected is already checked
in the Tree View. Proceed to Step 3 and the letter a. If you want to
select an Export Set instead, proceed to Step 3 and the letter b.
In the Tree View, navigate to Export Jobs (under Client). Select
Data Extract Exports and click the alternate mouse button to
display the context menu. Select New Data Extract Export Job
from the context menu to display the New Export Job dialog. Proceed to Step 3 and the letter a. Or, if you want to select an Export
Set instead, see Step 3 and the letter b.
Select the Select Jobs option to display the Tree View and expand
it. Select one or more jobs for exporting. The Export Job name
field populates with the first data extract job you selected. You can
select multiple Data Extract Jobs for export. The system will go
through each one and store the data under the directory of the
Export Name you indicated in the New Export Job dialog box. It
Ipro eCapture User Guide
Q1 2014
www.iprotech.com
877-324-4776
Creating a Data Extract Export Job (Export Extracted Data/Data Extract Export Job)
may be necessary to expand the tree to view the data extract jobs.
Proceed to Step 4.
b.
OR
Select the Select Export Set option to display a list of Export Sets
that were created in QC and then select an Export Set. If neces-
www.iprotech.com
877-324-4776
Ipro eCapture User Guide
Q1 2014
7-219
Chapter 7, Creating Export Series and Export Jobs
sary, expand any Export Set Containers to select an Export Set
that is stored in a Container. Proceed to Step 4.
4.
From the Export Type drop-down menu, select Direct to Relativity.
5.
Enter an Export Job Name, or if a default name appears in the field,
modify it if necessary. This is the name the system uses for the directory
name where the exported data is stored.
6.
Select a task table from the drop-down list. The task table that appears
in the field is based on the last task table selected for the Client.
7.
(Optional) Browse to the Template (.INI File) that has the data
extraction export settings from a previously run data extraction export.
A file will not exist until you run your first data extraction export. Note:
This option is not available if you select an existing Export Series from
the drop-down list. This file saves time because you will not need to
manually make selections in some of the Export wizard screens as well
as ensure that there is consistency when exporting jobs for a particular
situation.
8.
(Optional) Do one of the following:
•
7-220
Leave the default setting [none] under Export Series.
Ipro eCapture User Guide
Q1 2014
www.iprotech.com
877-324-4776
Creating a Data Extract Export Job (Export Extracted Data/Data Extract Export Job)
•
•
9.
Select an Export Series from the drop-down list. When an existing Export Series is selected, the
,
appears. When clicked, the Export settings dialogs will not appear;
instead the Job is placed in the Job Queue. See the section About
Export Series on page 7-264 for background information about
Export Series. Or see the section Creating an Export Series (Process Export or Data Extract Export) on page 7-266 if you want to
create the Export Series before the Export Job is created.
Select [new export series] from the Export Series drop-down list
and enter a New Export Series Name. This option creates an
autoload-enabled export series along with the autoload export job.
Once the series is created, autoload export jobs can be created
from the series.
Click OK. (NOTE: A warning dialog may appear if one or more of the
selected data extract jobs have not yet passed QC. You can elect to continue to export or cancel, QC the jobs, and then export again.) The
www.iprotech.com
877-324-4776
Ipro eCapture User Guide
Q1 2014
7-221
Chapter 7, Creating Export Series and Export Jobs
Select Export Formats and File Handling Options dialog appears unless
was clicked for an existing Export Series.
10.
Select from the following options:
Export Text Files - select this option to display additional Data Load
Formats of LaserFiche, DB/Textworks, and OCR Control.lst. Note: if this
option is deselected, then no text files are created except for the VolumeManifest.TXT.
•
•
7-222
Include Image Key in Document Text: This option is not available for selection for direct to Relativity exporting.
Create Text Placeholders For Missing Text Files: Creates
placeholder text files for documents where there was no available
text. For direct to Relativity exports this option is automatically
selected by default.
Ipro eCapture User Guide
Q1 2014
www.iprotech.com
877-324-4776
Creating a Data Extract Export Job (Export Extracted Data/Data Extract Export Job)
(Optional) Export Native Files - (Note: When this option is selected
along with the Ringtail Image Load File format, the Name file using
image key and Copy to output directory options are automatically
selected. Starting with version 5.6, the Copy to output directory option
was replaced with the option Directory for each native which is located in
the last screen of the Export Wizard.)
Under Native file options, select from the following:
•
Name File Using Image Key: If this option is selected, the
native file directory will no longer create an additional directory per document. By naming the file using the Image Key,
it removes any chance of duplicate filenames occurring.
Therefore, the additional level of directories are not necessary. An example follows:
•
Copy to Output Directory: This option was replaced with
the option Directory for each native which is located in the
last screen of the Export Wizard.
Native files are copied to a directory separate from the
images. The directory numbers match their corresponding
image file.
Under Alternate Email Export Options, select from:
www.iprotech.com
877-324-4776
Ipro eCapture User Guide
Q1 2014
7-223
Chapter 7, Creating Export Series and Export Jobs
•
•
•
•
Outlook - Check this option to export an alternate native file for
Outlook files. The default export format is MSG.
Lotus Notes - Check this option to export an alternate native file
for Lotus Notes files. The default export format is DXL.
Outlook Express - Check this option to export an alternate native
file for Outlook Express files. The default export format is EML.
GroupWise - Check this option to export an alternate native file for
GroupWise files. The default export format is XML.
Select one of the following formats:
•
.MHTFormat: Exports selected e-mail type to a standardized format rather than to .DXL or .XML. Types include Outlook, Outlook Express, Lotus Notes, and GroupWise. (An
.MHT file is an Archived Web Page file with information in
Multipurpose Internet Mail Extension HTML (MHTML) format
with an .MHT file extension. All relative links in the Web page
are remapped and the embedded content is included in the
.MHT file.)
•
Rich Text Format (RTF): Uses Microsoft Word to open the
MHT and saves it as an RTF; a more widely accepted format.
•
HTML: HTML documents can have inline images, the images
themselves are not included in the HTML. The images must
be included in the export in order to access the inline
images.
File extension options: This option is used in the event the native documents are missing or have incorrect file extensions. When this is the
case, the native file viewers will not work. The correct extension is
defined as the value presented in the Extension field of the StellentDefs
table in the CONFIG database for the StellentID of the file. Oracle® Outside-In Technology (formerly Stellent) will not identify files it cannot discern with a .TXT extension. If necessary, a Database Administrator may
manually update the Extension field in the StellentDefs table with custom extensions using SQL. The options from the drop-down list include:
•
•
•
7-224
None - default setting. Nothing happens.
Add extension only if missing
Append corrected extensions - appends extensions that are incorrect or missing.
Ipro eCapture User Guide
Q1 2014
www.iprotech.com
877-324-4776
Creating a Data Extract Export Job (Export Extracted Data/Data Extract Export Job)
•
Replace incorrect extensions - replaces incorrect extensions with
correct extensions or missing extensions.
Click the link, Apply to selected file types and/or QC Flags, to open
the Native File Export Inclusions dialog.
By default, all file types are selected and the QC flags are not selected.
For the file types, click Clear All, to clear all the selected file types and
then select the specific file types and/or only documents to which the
QC flag or flags are attributed. If necessary, click + to expand the list for
a file type, such as Microsoft Excel, to display specific versions/types of
Microsoft Excel. If either one (file type/QC flag) “hits”, the native file will
be exported.
Click OK to return to the Export screen. A message appears underneath
the link that states the number of file types and QC flags, if any, that
were included.
www.iprotech.com
877-324-4776
Ipro eCapture User Guide
Q1 2014
7-225
Chapter 7, Creating Export Series and Export Jobs
11.
Click
to display the Merge Data Options dialog.
This dialog appears if at least one set of images or text exists in one of
the Processing jobs or Export Sets selected for the Export job.
Do the following:
•
7-226
from the drop-down menu, select the order (Date, Ascending; Date,
Descending (default); Name, Ascending; Name, Descending; Custom use the up/down arrows) merge jobs display in the Merge Jobs dropdown menu in the Image tab or View tab.
Ipro eCapture User Guide
Q1 2014
www.iprotech.com
877-324-4776
Creating a Data Extract Export Job (Export Extracted Data/Data Extract Export Job)
•
deselect one or more merge jobs. By default, all merge jobs are
selected. The “Original” item refers to the original images and text associated with the document. It appears as the last item in the list of merge
jobs and remains selected.
12.
Click
to display the Export Fields dialog.
Defining Export Fields for Databases
If you are creating any database load file formats during the Ipro eCapture
export process, you need to define the export fields that Ipro eCapture will
export. This step ensures that the data exported from Ipro eCapture matches
the fields in the database where the data will be used.
www.iprotech.com
877-324-4776
Ipro eCapture User Guide
Q1 2014
7-227
Chapter 7, Creating Export Series and Export Jobs
There are several field types that can be exported. These field types are designated as follows:
S (System Fields): These fields only have meaning in the context of an Ipro
eCapture export. If a document was viewed outside of the export, none of
these field types would apply. Any brackets [] will be removed from the label
when exporting. Some of these fields are applicable for endorsement only. The
System field definitions are as follows:
ITEM_ID: The Ipro eCapture unique identifier for the document. Can be
added/removed from Selected Fields.
BEGDOC: Starting Bates number of the document.
ENDDOC: Ending Bates number of the document. Note: May be removed from
the Selected Fields box.
BEGATT: Starting Bates number of the attachment range.
ENDATT: Ending Bates number of the attachment range.
PARENT_ATTACHMENT: "P" for anything not an attachment, "A" for attachment
(child).
ATTACHMENT_BATES: Semicolon-delimited list of Bates numbers of the children of a parent document.
ATTACHMENT_ITEMIDS: Semicolon-delimited list of the ItemIDs of the children of a parent document.
EXTRACTED_ATTACHMENT_COUNT: Counts the children of a document as it
relates to the export. The count should always match up with the number of
ItemIDs in the field ATTACHMENT_ITEMIDS and image keys in the
ATTACHMENT_BATES field. Note: This field will be zero for all documents in the
export that have a parent in the export.
EXTRACTED_ATTACHMENT_NAMES: Generates a semi-colon delimited list of
the child document’s filenames in the order of the export. The number of filenames in the list should match the EXTRACTED_ATTACHMENT_COUNT.
PARENT_BATES: If a document is a child, the Bates of the parent.
PARENT_ITEMID: If a document is a child, the ItemID of the parent.
7-228
Ipro eCapture User Guide
Q1 2014
www.iprotech.com
877-324-4776
Creating a Data Extract Export Job (Export Extracted Data/Data Extract Export Job)
EXPORT_NATIVE_FILES: Used when exporting native files. Shows export path
to the native files. Defaults to Selected fields box when Export Native Files is
selected from the Formats and File Handling screen. May be moved from
Selected Fields box to Available Fields if required.
ABSOLUTE_PARENT_ID: Obsolete - use PARENT_ITEMID instead.
PARENT_ITEMID queries the ExportedItems table to get an absolutely accurate
parent ID relating to the export. ABSOLUTE_PARENT_ID reads from the Items
table. Both should agree, but if not PARENT_ITEMID is the more accurate of
the two.
RELATIVE_PARENT_ID: This field is relative to the Discovery Job, not the
Export. Compound document options may result in the relative parent being
excluded from the export. NOTE: PARENT_ITEMID can differ from
ABSOLUTE_PARENT_ID if compound document options cause the absolute
parent to be excluded from the export. PARENT_ITEMID is relative to the
Export; ABSOLUTE_PARENT_ID is relative to the Discovery Job.
RELATIVE PATH: Original path to native file without directories above where
the directory folder was selected.
SEARCH HITS: Contains the search terms.
CUSTODIAN_NAME: The name of the Custodian containing the process job
that produced the document being exported.
DISCOVERY_CUSTODIAN_NAME: Used to identify the custodian of the discovery job in which an exported item was found.
CUSTODIANS: Used to identify the duplicate custodians for this record.
DUPLICATE_LOCATIONS: Used to list the (Duplicate ID), Custodian Name,
<Filename>, and [Discovery Path] for this record.
PROCESS_JOB_NAME: The name of the Process Job that produced the document being exported.
RULE_CATEGORY: Contains the categories (selected and assigned through the
Flex Processor).
PROCESS_STATUS: Displays the process status results of a job. Items that
processed successfully will show "Success".
IDENTIFIED_LANGUAGES: List of languages, identified by BasisTech, that exist
in a document.
www.iprotech.com
877-324-4776
Ipro eCapture User Guide
Q1 2014
7-229
Chapter 7, Creating Export Series and Export Jobs
IDENTIFIED_ENCODING: List of encodings, identified by Basis Tech, that exist
in the document.
VOLUME_NAME: The value is the label for the document’s volume.
ORIGINAL_CUSTODIAN: Populates with the name of the custodian the original
file belonged to when an item duplicates against another file when doing deduplication at the Project or Client level.
BATCHID: Contains the Batch ID assigned for the Discovery Job.
FULLTEXT: Contains combined contents of body text and OCR text.
EXPORTED_TEXT_FILES: Contains the path to the exported extracted text files
when the option, Export document text as single file, is selected in the first
export screen. The value of this field will be affected if the Replace the export
path with the following drive letter/path field is populated (located in last
Export screen). This field cannot be used for a Group field and is not available
for endorsements.
DocType: Contains eMail, eDoc, and eAttach types.
DocCategory: Contains definitions that represent the document based on
Email (absolute parent and loose email only, e.g. not email attached to email),
Email Attachment (any email attachments to an email), Edocument (files that
are not email and not an attachment of an email family), Edocument Attachment (any embedded file in an edocument; including emails).
USERDEFINED1 through USERDEFINED5: Values to be entered using SQL
Server Manager. These fields can be used for endorsements, custom placeholders, etc.
BARCODE: Contains the barcode (USS Code 39 specification).
F (QC Flags): The QC flags that appear in the list are both system QC flags
and any user defined QC flags for the selected Processing Job or Jobs. The
CUSTMDAT.TXT file, created from the Export, will show a value of Y for flags
that are “on” or be blank for flags that are “off”.
7-230
Ipro eCapture User Guide
Q1 2014
www.iprotech.com
877-324-4776
Creating a Data Extract Export Job (Export Extracted Data/Data Extract Export Job)
M (Metadata Fields): These fields were retrieved from documents during
processing.
Starting with version 2.0, three additional Metadata fields were
added. They are: Last Access Date, Last Access Date*DATE ONLY*,
and Last Access Date*TIME ONLY*. Last Access Date is a volatile system field. The first time that Ipro eCapture discovers a directory of
loose files, Last Access Date will be valid. However, subsequent discovery jobs, run on the same set of files, will get the date the Ipro
eCapture last “touched” the file on the initial discovery job. We highly
recommend that you should not use the Last Access Date metadata
fields. Because there isn’t a legitimate value for any file Ipro eCapture
extracts, this field will be populated for loose files only. In addition, emails that Ipro eCapture extracts, attachments, embedded files, and
files extracted from archives will not have this value populated.
E (External Fields): These fields are from export jobs originating from Ipro
Allegro or from the Ipro eCapture Import Wizard.
U or G (User Defined Fields): These comprise two types: User [U] and/or
Group [G]. These fields are created via the Insert Custom Fields function. The
User fields will export the field label and the value you may optionally enter.
Otherwise the value may be blank. The Group fields are space-delimited combinations of System (S) and/or Metadata (M) field types.
When the Data Extract Export wizard is initiated, the process jobs to be
exported are selected first. The fields available for export are based on a standard list of metadata fields combined with the metadata retrieved during processing. In versions 1.2 and earlier, these fields were called Standard and
Extended Metadata fields with separate selection options. Starting with version
1.3, they are now combined with no differentiation between them.
The available fields listview is populated using this list of Metadata fields, along
with the Ipro eCapture system fields which are available for all exports. In
addition *DateOnly* and *TimeOnly* fields are parsed from date fields and
included in the Metadata fields.
www.iprotech.com
877-324-4776
Ipro eCapture User Guide
Q1 2014
7-231
Chapter 7, Creating Export Series and Export Jobs
The export will always export the non-displayed system fields
[BATES_NUMBER] and [ITEM_ID] as the first two fields regardless of field
selections shown. All other fields to be exported are displayed in the Selected
Fields box and will be exported, in order, named as the field label. The next
section, About the Select Export Fields Screen on page 7-23, describes how to
populate the Selected Fields box.
Sorting Fields
Alternate click a field and choose Make Sort Field from the shortcut menu. This
option appears for those fields that can be sorted such as a metadata field.
A Y appears in the Sort column. To clear this entry, alternate click the field and
choose Clear Sort Field.
When a field is marked as a Sort field, it applies the value of the selected field
to all family members of a parent item. This allows sorting on the specified
field in an external application to be compound-complete. For example, when
the ‘Sent Date’ field is made into a Sort field, the value of the ‘Sent Date’ field
for an email will be used as the value of the same field in the exported load file
for all of the email’s attachments.
About the Select Export Fields Screen
See the section About the EncounteredMetadataFieldList Table on
page 7-264 for more information about the metadata fields.
The field type designator (discussed in the previous section, Defining Export
Fields for Databases on page 7-159) displays in the Type column of both the
Available and Selected Fields boxes.
Available Fields: Displays all fields available to be exported. Click the dropdown list located above the field list, and select a specific field type. By
default, All Fields display. Ctrl-click to select non-contiguous fields. Shift-click
to select a contiguous range.
Filter Value - enter a value to filter the list. For example, to see only those
fields that contain the word “date”, enter date and click
fields, delete the value and click
7-232
. To display all
.
Ipro eCapture User Guide
Q1 2014
www.iprotech.com
877-324-4776
Creating a Data Extract Export Job (Export Extracted Data/Data Extract Export Job)
Selected Fields: Displays all fields selected from the Available Fields for
export. Right-click a field to edit it, use the up or down arrows to reorder the
fields.
: Click to move a selected field from the Available Fields box to the
Selected Fields box.
box.
: Moves all fields from the Available Fields box to the Selected Fields
: Click to move a selected field from the Selected Fields box to the
Available Fields box.
box.
: Moves all fields from the Selected Fields box to the Available Fields
Field List: This list contains the following field list templates: Ipro Basic Field
List, Ipro Standard Field List, Ipro Extended Field List, and Ipro Enterprise
Field List. The Ipro Enterprise field list reflects the standard list of fields that
are selected by default in a new Ipro Allegro case and created in a new Ipro
Eclipse case. To facilitate the ease of field selection, the templates are used to
load the fields, all at once, into the Selected Fields box. The drop-down list will
also display user saved System templates and/or Client templates. Templates
selected from a physical .INI file do not display in this list.
To load a template into the Selected Fields box, select the template from the
drop-down list. A warning dialog box appears.
Click Yes to continue. The template’s fields appear in the Selected Fields box.
www.iprotech.com
877-324-4776
Ipro eCapture User Guide
Q1 2014
7-233
Chapter 7, Creating Export Series and Export Jobs
To save a new template based on manually selected fields, click the dropdown list, choose Save As, click
appears.
. The Save Template As dialog
Select from the following:
•
•
System Template - available to all Export Jobs
Client Template - available only to the Client
For System Template or Client Template, enter a meaningful name for
the template.
•
File - saves to a physical .INI file in selected location
For a File template (.INI), click
to display the File Browser dialog.
Browse to a location, enter a filename, and click Open. The Save Template As dialog appears indicating the pathname in the Location field.
Click Save.
To select an existing user created field list template saved as a physical
.INI file, click the drop-down list, choose Browse, and click
. The Open
dialog appears. Browse to the saved template (.INI) file and click Open. A
warning dialog box appears indicating that loading fields from a template will
clear any selections, including group fields and field label modifications. Click
Yes to continue.
7-234
Ipro eCapture User Guide
Q1 2014
www.iprotech.com
877-324-4776
Creating a Data Extract Export Job (Export Extracted Data/Data Extract Export Job)
Managing Field Templates
User created System and/or Client templates can be renamed, edited, deleted,
and viewed.
From the Controller menu bar, choose Tools > Field Template Management. The Field Template Management dialog appears.
Alternate click a template to display the context menu and choose:
www.iprotech.com
877-324-4776
Ipro eCapture User Guide
Q1 2014
7-235
Chapter 7, Creating Export Series and Export Jobs
Rename Template- displays the Edit Template Name dialog. Enter a new
Template name and click OK.
Edit Template - displays the Edit Template name dialog. A different name
may be given and the Type can be changed. If the type is changed to Client
Template, the dialog expands to display a Client drop-down list where a different Client can be selected. If the type is changed to System Template, the dialog collapses to hide the Client drop-down list.
Delete Template - A Delete Confirmation dialog appears prompting a decision to delete the template. Click Yes to delete the template.
View Template - Opens a dialog with the selected Template in the title bar
and shows the fields assigned for that template. Click Close when through
viewing the fields.
: Moves the Standard Fields from the Available Fields box to
the Selected Fields box.
: Allows the loading of only selected export fields from a previously saved .INI file. The Fields from Export Settings come from the .INI file
which you can optionally load when creating a new export job.
: Opens the Insert Custom Field dialog where you can
create new group fields and new user fields. Inserting Custom Group Fields is
discussed in the section, Inserting Custom Group Fields on page 7-27.
Use
and
to change the order of the fields in the Selected Fields box.
Select a field (or contiguous fields) and then use either arrow to reposition it
(or the selected fields) accordingly.
Inserting Custom Group Fields
You can group several Ipro eCapture fields into a single field in the export file.
For example, you can group the Author and Manager fields to create a group
field called authorgroup.
7-236
Ipro eCapture User Guide
Q1 2014
www.iprotech.com
877-324-4776
Creating a Data Extract Export Job (Export Extracted Data/Data Extract Export Job)
Or, you can sort attachments by a field that you specify instead of by image
key order. For example, you might want to group all of the Microsoft Word
attachments together within their parent documents. To do this, you would
create a Group based on Application Name (a metadata field), add it to the
fields to export, and sort by that field.
You might create a group if you want to:
•
•
Have related information appearing together and/or be treated as a single field in the litigation database.
Sort attachment ranges in some other way than image key order within
their parent documents.
The Ipro eCapture fields are separated by the selected Delimiter (introduced in
version 3.0) in the export file’s group field.
Group fields are available for selection in the Specify Summation Options
screen and in the Specify Endorsements screen.
www.iprotech.com
877-324-4776
Ipro eCapture User Guide
Q1 2014
7-237
Chapter 7, Creating Export Series and Export Jobs
a.
7-238
Click
to open the Insert Custom Field dialog.
Ipro eCapture User Guide
Q1 2014
www.iprotech.com
877-324-4776
Creating a Data Extract Export Job (Export Extracted Data/Data Extract Export Job)
b.
c.
By default, the Type Group is selected. To create a Custom User
Field, see the section Inserting Custom User Field Labels on page
7-31.
Enter a meaningful name for the group of fields in the Field label
field.
Select one of the following:
Output values as delimited list and select a Delimiter to use
from the drop-down list.
d.
e.
Output first non-blank value: Ipro eCapture looks for data
starting with the top field on down for multiple fields. The first field
encountered with data will be placed in the Group field.
Click the drop-down list located above the Available Fields list,
and select a specific field type. By default, All Fields display. To
further narrow the field list, enter a value in the Filter Value field
located below the Available Fields list. For example, to see only
those fields that contain the word “date”, enter date and click
. To display all fields, delete the value and click
.
Select each field you want to include in the group by clicking it
twice. Each selected field appears in the Selected Field box. Ctrlclick to select non-contiguous fields. Shift-click to select a contiguous range.
f.
Click
to display the Text Field dialog. Enter text
and click OK. When endorsing, the custom user field is aligned
side by side with the system field. For example, ItemID 77878,
where ItemID is the user field label and 11878 is the actual
[Item_ID].
g.
If necessary, use the
or
to change the order of the fields in
the Selected Fields box. Select a field (or contiguous fields) and
then use either arrow to reposition it (or the selected fields)
accordingly.
Click OK. The Insert Custom Field dialog closes and you return to
the Select Export Fields screen. The newly created Group Field
h.
www.iprotech.com
877-324-4776
Ipro eCapture User Guide
Q1 2014
7-239
Chapter 7, Creating Export Series and Export Jobs
i.
j.
appears in the Selected Fields box. Notice that G appears in the
Type column. G is for Group Field.
Repeat steps a) through g) to create additional Group Fields.
Click OK to return to the Select Export Fields screen or the Specify
Endorsements screen.
User Defined Group Field Functions
These functions are available from the Select Export Fields dialog only.
To change the Group Field label, select it in the Selected Fields box and
click the alternate mouse button to display the context menu. Choose Change
Field Label to open the Edit Field label dialog. Modify the Field Label. Click
OK. The change made here affects how a field’s label will appear in the header
row of the export file.
To make the Group Field a sort field, select it in the Selected Fields box
and click the alternate mouse button to display the context menu. Choose
Make Sort Field. A Y appears in the Sort column. To remove sorting, alternate click the field to display the context menu. Choose Clear Sort Field.
To edit the Group Field’s value, select it in the Selected Fields box and click
the alternate mouse button to display the context menu. Choose Edit Group
Field to open the Edit Export Group Field dialog. Modify the Field Label value.
Click OK.
To delete the Group Field, select it and click the alternate mouse button.
(Note: If a Group field is needed in either the Summation or Endorsement
screens, do not delete the field. Instead move it to the Available Fields box.)
Choose Delete Group Field. A warning box appears asking if you want to
delete it. Click Yes.
Inserting Custom User Field Labels
Use a Blank Field when you want to export user defined metadata but you
want to incorporate a pre-defined field layout. For example, If you always want
to export the fields, CDAuthor, Filesize, and Location, and none of the
extended metadata consists of a CDAuthor field (CDAuthor didn’t exist in any
of the processed files, therefore it did not appear in the list), you could insert a
blank field and change the field label to CDAuthor to keep the pre-defined field
layout.
7-240
Ipro eCapture User Guide
Q1 2014
www.iprotech.com
877-324-4776
Creating a Data Extract Export Job (Export Extracted Data/Data Extract Export Job)
User fields are available for selection in the Specify Summation Options screen
and in the Specify Endorsements screen.
a.
From the Insert Custom Field dialog, select the Type: User. The
Insert Custom Field dialog appears.
b.
c.
d.
Enter a field label.
Enter an optional Field Value.
Click OK. The Insert Custom Field dialog closes and the field
appears in the Selected Fields box. If necessary, use the
or
to reposition the selected user field in the list. Notice that U
appears in the Type column. U is for User Field.
Three actions can be performed on the User Field once it is in the Selected
Fields box list. They are: changing the field label, deleting the user field altogether from the list, and editing the user field’s value.
To change the field label, select it in the Selected Fields box and click the
alternate mouse button to display the context menu. Choose Change Field
Label to open the Edit Field label dialog. Modify the Field Label. Click OK.
The change made here affects how a field’s label will appear in the header row
of the export file.
www.iprotech.com
877-324-4776
Ipro eCapture User Guide
Q1 2014
7-241
Chapter 7, Creating Export Series and Export Jobs
To delete the blank field, select it in the Selected Fields box and click the
alternate mouse button to display the context menu. (Note: If a User field is
needed in either the Summation or Endorsement screens, do not delete the
field. Instead move it to the Available Fields box.) Choose Delete User Field.
It is removed from the list.
To edit the blank field’s value, select it in the Selected Fields box and click
the alternate mouse button to display the context menu. Choose Edit User
Field to open the User Field dialog. Modify the Field Value field. Click OK.
Selecting the Additional Export Options in the Export Fields
Screen
Populate Child Fields for Parents - If this option is NOT selected, the Parent
fields for all items (PARENT_BATES, PARENT_ITEMID) will only be populated
for child items.
If this option IS selected, the Parent fields will be populated for all items. Nonchild items will enter their own Bates™ number and ItemID.
Select Include Field Names in first line of file if you want to assist readers
in understanding or verifying the file. Do not select this option if the file will be
loaded directly into the database.
If the Concordance DAT File data load format was selected, the Export
OCRTXT field for Concordance option appears. Select this option if you
want to export the OCRTXT field. Select the version that applies from the
drop-down list. Options include v7.x 4mb truncate, v8.x 12mb, truncate, v7.x
4mb, report only, and v8.x 12mb, report only.
7-242
Ipro eCapture User Guide
Q1 2014
www.iprotech.com
877-324-4776
Creating a Data Extract Export Job (Export Extracted Data/Data Extract Export Job)
Click
Options dialog.
to open the Date Field Formatting
Legacy Date Field Formatting: By default, this option is selected. Deselect
this option to select from the Invalid date options and to select fields for date
format handling.
Date Field Formatting: If you want to change the date field to a different
format, select from the following formats:
•
•
YYYYMMDD
YYYY/MM/DD
www.iprotech.com
877-324-4776
Ipro eCapture User Guide
Q1 2014
7-243
Chapter 7, Creating Export Series and Export Jobs
•
•
•
MMDDYYYY
MM/DD/YYYY
DD/MM/YYYY
Otherwise, select the option, Do Not Convert Date Fields.
Time Format: Select from:
•
•
•
12-hour [displays time in 12 hour format e.g. 1:04]
24-hour [displays time in 24 hour format, e.g. 13:04]
Regional [formats the time according to the “default” Regional Settings
of the Worker the document is being exported on. Note: Changing the
format strings using the “Customize” button of Regional Settings will
have no effect; the actual region needs to be changed to see any effect.
Resolve Times to Second Precision: Select this option if you want to add
seconds to all metadata date fields that have time. This does not apply to the
images.
Invalid date options
Treat date values outside of specified range as invalid dates - Select a
start date and end date range. Any dates outside of the selected range will be
considered as invalid dates. The start date default is set to SQL minimum date.
The end date default is set to SQL maximum date.
Select one of the following options:
•
•
Invalid date field output value - enter text to display in the event an
invalid date is encountered. This field may be left blank.
Invalid date field output do not convert - invalid dates will be output
as is with no date conversion applied.
Field Selection
The only fields that are not present in the list are *DATE_ONLY* and
*TIME_ONLY*. The fields in the available field list are comprised of fields that
are marked as valid for date formatting. This is determined by the value of
TRUE in the ExportAttemptDateParse field located in the EncounteredMetatdataFieldList table.
Date field formatting options affect only those fields in the Fields Selected for
Date Format Handling box.
Date field formatting options are set at the Job level.
7-244
Ipro eCapture User Guide
Q1 2014
www.iprotech.com
877-324-4776
Creating a Data Extract Export Job (Export Extracted Data/Data Extract Export Job)
Available Fields: Displays all fields available to be exported. Click the dropdown list located above the field list, and select a specific field type. By
default, All Fields display. Ctrl-click to select non-contiguous fields. Shift-click
to select a contiguous range.
Filter Value - enter a value to filter the list. For example, to see only those
fields that contain the word “date”, enter date and click
fields, delete the value and click
. To display all
.
Select a field for date format handling by selecting the field from the Fields
Available for Date Format Handling and clicking
to move the single
field to the Fields Selected for Date Format Handling box.
For two or more fields, ctrl-click to select non-contiguous fields or shift-click to
select a contiguous fields. Once the fields are selected, click
them to the Fields Selected for Date Format Handling box.
to move
Ipro eCapture creates two additional fields that “split” the date and time into a
Date Only field and a Time Only field. These two additional fields will be displayed in the Available Fields list in the Export Wizard, Select Export Fields
screen. For example, if the DueDate field was moved to the Fields Selected for
Date Format Handling, the following additional DueDate fields would appear in
the Available Fields list: DueDate*DATE ONLY* and DueDate*TIME ONLY*.
Click OK to return to the Export Wizard, Select Export Fields screen.
www.iprotech.com
877-324-4776
Ipro eCapture User Guide
Q1 2014
7-245
Chapter 7, Creating Export Series and Export Jobs
13.
7-246
Click
screen.
to display the Specify Export Directory and File Options
Ipro eCapture User Guide
Q1 2014
www.iprotech.com
877-324-4776
Creating a Data Extract Export Job (Export Extracted Data/Data Extract Export Job)
Export Directory Path indicates the directory where the exported data
will be saved. Initially, this field shows the area established during workstation setup, but you can click
and navigate to a different directory.
Export Volume Options
Volume Name Enter a name for the CD-ROM label or volume path
directory. This field initially uses a number (e.g., 001) as the volume
name. This setting is for database files.
Increment Output Directory Every n Files: Select a value from the
drop-down list (or enter a value) that indicates the number of files that
will be in each subdirectory.
If the Image Load Format, Ringtail, was selected, the values in this field
will revert to 99, 999, and, so on if the Use Rollover Numbering option is
selected when configuring the Image Key. As the Image Key is entered
and changes leaving space for a leading zero, the values in the Increment Output field changes accordingly. For example, an Image Key of
00001 sets the value to 9999, 0001 sets the value to 999, 001 sets the
value to 99, etc.
Max Data Size If the drive where you are saving the export files has
limited space, select the maximum space (640, 1200, 4300, and 9000)
you want to use from the drop-down list.
Include Volume Name in Loadfile Filename: Select this option if you
want the Volume Name to appear in the VolumeManifest.TXT file.
Directory for each native: Starting with version 5.6, this option
replaces the Copy to output directory option formerly located in the first
Export Wizard screen. This option is not available for selection if Ringtail
was selected. Otherwise, when this option is selected, the Native File
field under the Subdirectory Structure options is not available. When not
selected, a folder name may be entered in the Native File field.
Subdirectory Structure Options
Document Text: This field contains the name of the folder where the
text files will be stored. Accept or change the default folder name.
www.iprotech.com
877-324-4776
Ipro eCapture User Guide
Q1 2014
7-247
Chapter 7, Creating Export Series and Export Jobs
Increment in Root or Subdirectory: Root is the default. For Subdirectory, indicate the name of the subdirectory; e.g. 0001. This folder will
increment once the Max Data Size (MB) or the number of files specified
in the Increment Output Directory field is reached.
Click
to view a sample of the selected Subdirectory Structure:
Root or Subdirectory.
The following figure shows a Subdirectory Structure sample.
The following figure shows a Root Structure sample.
Mirror File Structure: When selected, the specified export directory will have
the same structure as the directories from which the files were discovered. The
discovered directory pathing is “appended” to the specified export directory.
For example, if the specified export directory is: Z:\EXPORT\Job001 and the
discovered directory paths are: H:\FILES\DOC, H:\FILES\PPT, and
H”\FILES\XLS, then the exported directory pathing will look like the following:
Z:\EXPORT\Job001\H_\FILES\DOC, Z:\EXPORT\Job001\H_\FILES\PPT, and
7-248
Ipro eCapture User Guide
Q1 2014
www.iprotech.com
877-324-4776
Creating a Data Extract Export Job (Export Extracted Data/Data Extract Export Job)
Z:\EXPORT\Job001\H_\FILES\XLS. Each of these directories will contain the
images and extracted text of the respective, original files. If this option is not
selected, then only one directory is created: Z:\EXPORT\Job001\IMG_0001; it
will contain all of the images.
Create load files only: When selected, no images, text files, or native files
will be copied to the export output directory. Only load files will be created.
The export will perform as if all of the native files and images were exported
based on the export options. The load file will reflect this.
OCR LFP Document Text Option: Select None, OI-inline, or OT-file reference from the drop-down list. For the Image Load Formats, Ipro LFP and Ipro
OCR, select the appropriate option for inclusion in the LFP file. Ipro eCapture
generates an IPROOCR.LFP file for either of these options, OI, or OT. If the
option Export Text Files, located on the initial Export screen, is not selected,
the OT option will not be available for selection. The OI lines in the
IPROOCR.LFP file will contain document text for each page in all cases as long
as there is document text for the page. The OT lines in the IPROOCRLFP file
will point to text files for each page only when the export image format are
single page images, and the option Export document text as single file (located
in the initial Export screen) is not checked. For multi-page formats, or when
document text is exported as a single file, there will be only one OT entry per
document. If there is no text for a document (image where OCR wasn’t
enabled, for example), there will not be an OT line. For the OI-inline option,
the .LFP file will be larger than the LFP file generated when using the OT-file
reference option.
Replace Export Path with the following Drive Letter/Path Enter the path
to replace the root path to the images in the export load files. For example,
enter c:\images\0001\0001a\ to create the Ipro .LFP entries:
VN,DII001,c:\images\0001\0001a\DII001\,99
IM,AUG-001,D,0,@DII001;PROC0001\IMG_0011;AUG-001.TIF;2,0
IM,AUG-002,,0,@DII001;PROC0001\IMG_0011;AUG-002.TIF;2,0
Image Key Numbering
Image Keys can increment at different group levels (Page, Document, and Parent). The Image Key can have a total of 70 characters including any selected
delimiters that will be used between the Prefix and the Parent; between the
Parent and the Document; and between the Document and the Page.
www.iprotech.com
877-324-4776
Ipro eCapture User Guide
Q1 2014
7-249
Chapter 7, Creating Export Series and Export Jobs
As you populate the Image Key fields, the number displayed in parenthesis,
directly to the right of the Field label, will decrement accordingly. The Sample
Image Key field is used to check the Image Key as entered. You may change
the Image Key as often as necessary BEFORE you click Finish to begin the
Export process.
When configuring the Image Key, keep in mind whether you will be exporting
out a single job or using the Export Series concept, which allows output of successive unattended exports with sequential Image Key numbering and volumes. The starting Image Key will automatically be set to the next available
number based on the previous export’s ending number in the given set.
Page: If you do not enter a value in this field, the system will assign a
starting Image Key of 000000001 or the next available Image Key. Otherwise, you can enter a value, not to exceed 15 numeric only characters
(0-9).
Document: The Document portion of the image key number may have
a total of 15 numeric only characters (0-9).
Parent: The Parent portion of the image key number may have a total
of 15 numeric only characters (0-9).
Prefix: The Prefix portion of the image key number may have a total of
25 alphanumeric characters, dash [-], and/or underscore [_].
The Delimiters include: None, Underscore, Dash, Semi-colon, Period, or Space.
Each section of the image key number may be padded up to 15 digits.
See the section Using Rollover Numbering for Ringtail Format on page 7-177 if
the Ringtail format was selected for additional information about the Rollover
Numbering option.
7-250
Ipro eCapture User Guide
Q1 2014
www.iprotech.com
877-324-4776
Creating a Data Extract Export Job (Export Extracted Data/Data Extract Export Job)
Using Generated Numbering
Select Generate. The Image Key Numbering prefix segment shows {Native
Filename}. The Parent and Document segments are disabled.
a.
b.
c.
d.
Enter a Prefix in the Prefix segment.
Enter a Page number in the Page segment.
Select a Delimiter from the Delimiters drop-down list. If no delimiter is necessary, select (none). The Sample Image Key box is used
to check the desired image key format.
Indicate Base Numbering to be used for Page and/or Document
Level numbering. One-Based is the default setting.
Using Predefined Numbering
Select Predefined to display the options:
Click the drop-down arrow to display the available numbering options:
•
Use filename: Formerly called Use filename for Image Key.
Do not use this option for Ringtail format because Ringtail relies on the
Bates numbering scheme.
www.iprotech.com
877-324-4776
Ipro eCapture User Guide
Q1 2014
7-251
Chapter 7, Creating Export Series and Export Jobs
The option, Use Filename, allows for data to be initially pre-processed
using third party tool, such as Ipro Allegro, and then have that same
data processed through Ipro eCapture.
Caveats
The data that will be processed in Ipro eCapture must have the following
characteristics when using this feature:
•
Consistent Bates numbering scheme. Avoid:
filenames that are too long
duplicate Bates numbers
invalid characters
other conditions where the filename does not conform to a Bates
numbering scheme.
An inconsistent Bates numbering scheme will result in incorrect data
output.
•
•
Originally processed as a native file.
Ipro eCapture will extract all email attachments that are detected.
Embedded files will be extracted unless the Discovery File Extraction option, Treat email inline images as attachments, is deselected.
This option is used in conjunction with the Flex Processor rules, Create
Parent Item ID List and/or Create Child Item ID list. A rule can be created to load the Item IDs from the native files for each individual job. If
this feature is used without the Flex Processor rules, Create Parent Item
ID List and/or Create Child Item ID list, the result will be incorrect data
output.
See Appendix A, Using the Flex Processor Rules Manager and the section
Create Parent Item ID List or Child Item ID List on page A-46 for specific
information about creating Parent or Child Item ID rules in Flex Processor.
•
•
7-252
Import/Merged: The export job will use the imported/merged linking
key as the image key for data extract exports.
Ipro Enterprise: The export job will use the Ipro Enterprise linking key
as the image key for data extract exports.
Ipro eCapture User Guide
Q1 2014
www.iprotech.com
877-324-4776
Creating a Data Extract Export Job (Export Extracted Data/Data Extract Export Job)
Encoding Options Select an encoding option from the drop-down list.
Options include:
•
•
•
Unicode UTF-16 - load files and extracted text are saved in this format
if Force ANSI is not selected.
Unicode UTF-8 - same as UTF-16 output except for the encoding
applied to output files.
Force ANSI - Select this option and select a character from the dropdown list. This replaces non-ANSI characters with the selected ANSI
character in the loadfile/extracted text. This allows for data loaded into
applications that are not Unicode compliant.
www.iprotech.com
877-324-4776
Ipro eCapture User Guide
Q1 2014
7-253
Chapter 7, Creating Export Series and Export Jobs
14.
Click
screens.
to display one of two Relativity Workspace and Options
This previous screen appears if the API Case Selection option was
selected in the Relativity Configuration dialog. See Chapter 2, Ipro eCapture Controller and the section Configuring Integration with kCura Relativity on page 2-21 for more information about the API option.
If necessary, expand the workspace categories and select the workspace to receive the data. Proceed to Step 15.
7-254
Ipro eCapture User Guide
Q1 2014
www.iprotech.com
877-324-4776
Creating a Data Extract Export Job (Export Extracted Data/Data Extract Export Job)
If the API Case Selection option was not selected, the following screen
appears. See Chapter 2, Ipro eCapture Controller and the section Configuring Integration with kCura Relativity on page 2-21 for more information about the API option.
Enter the Relativity Workspace ID. Proceed to Step 15.
15.
Select the option, Copy Files to Repository.
16.
(Optional) Click
to open Select Directory for Sample Load Files. Select a directory where the Sample Load Files will be
created. (Note: If the directory is not empty a prompt appears asking to
www.iprotech.com
877-324-4776
Ipro eCapture User Guide
Q1 2014
7-255
Chapter 7, Creating Export Series and Export Jobs
overwrite files. Click Yes to overwrite or No to return and select a different directory.) Click OK. The directory is accessed and displays the sample files (CONCORD.DAT and OPTICON.OPT).
17.
Under Relativity Settings File:
•
click
Open.
for Field Map (.KWE) and browse to the .KWE file. Click
If this is for a Data Extract Export Job, it will appear in the Ipro eCapture Controller’s Job Queue. Start the Data Extract Export job. The job’s details are
available by selecting the job in the Tree View. (Under Export Jobs, Data
Extract Exports). The Information Panel has three buttons: View Settings,
View Output, and View Report. Click View Settings to display information
about the job. Click View Output to access the files that were created via the
Explorer. Click View Report to view the Export Summary Report.
If this is for an Export Series, the Series name will appear in the Client Management tree view under Data Extract Exports; located under Export Jobs. The
Export Series will then be available for selection when creating a Data Extract
Export job.
Click
to conclude the autoloading into Relativity. The job appears in
the Job Queue and the Progress column shows Autoload Initiated. The job also
appears under Data Extract Exports in the Client Management tree view with
the Relativity icon.
Export Formats
This section provides specific information for exporting to these formats:
•
•
•
•
•
Concordance® DAT
Summation Case
OCR CONTROL.LST file
Ringtail
Ipro DLF (Eclipse)
Export to Concordance® DAT
Select Opticon & TotalVZN (OPT File) under Image Load Formats.
7-256
Ipro eCapture User Guide
Q1 2014
www.iprotech.com
877-324-4776
Export Formats
Select Concordance DAT File under Data Load Formats (Process Export
Job or Data Extract Export Job).
Export to Summation Case
If you want to import the Ipro eCapture data into a Summation case, you can
have Ipro eCapture create the necessary files, then import those files into the
Summation case.
1.
Select the Summation export formats:
a.
b.
2.
Select Summation DII File under Image Load Formats for a
Process Export Job or under Data Load Formats for a Data
Extract Export Job. The text file will contain all of the data, and
the DII file will point to the images.
Select Summation Text File under Data Load Formats for a
Process Export Job or Data Extract Export Job.
In the Select Export Directory and File Options screen, select from the
following Specify Summation Path Notation options:
Removable Volume option creates a DII file entry similar to:
@FULLTEXT PAGE
; Record 1
@T 000000001
@DOCID 000000001
@BATESBEG 000000001
@BATESEND 000000001
@MEDIA eDoc
@APPLICATION Plain Text
@D @V 003
IMG_0001\000000001.TIF
; Record 2
@T 000000002
@DOCID 000000002
www.iprotech.com
877-324-4776
Ipro eCapture User Guide
Q1 2014
7-257
Chapter 7, Creating Export Series and Export Jobs
@BATESBEG 000000002
@BATESEND 000000002
@MEDIA eDoc
@DATECREATED 7/26/2005
@FROM Documentation
@DATESAVED 7/26/2005
@APPLICATION Microsoft Word 2000
@D @V 003
IMG_0001\000000002.TIF
Directory option creates a DII file entry similar to:
@FULLTEXT PAGE
; Record 1
@T 000000001
@DOCID 000000001
@BATESBEG 000000001
@BATESEND 000000001
@MEDIA eDoc
@APPLICATION Plain Text
@D @I\002\
IMG_0001\000000001.TIF
; Record 2
@T 000000002
@DOCID 000000002
@BATESBEG 000000002
@BATESEND 000000002
@MEDIA eDoc
@DATECREATED 7/26/2005
7-258
Ipro eCapture User Guide
Q1 2014
www.iprotech.com
877-324-4776
Export Formats
@FROM Documentation
@DATESAVED 7/26/2005
@APPLICATION Microsoft Word 2000
@D @I\002\
IMG_0001\000000002.TIF
Export to OCR CONTROL.LST File
This file can be used for loading OCR text files into a third-party database. The
file contains the image key number followed by its image path; one record per
line. For example:
000000001,001\Exported_0001\000000001.TXT
000000002,001\Exported_0001\000000002.TXT
Ringtail Format
The Ringtail format is available as an Image Load Format for a Processing
Export Job and as a Data Load Format for a Data Extract Export Job.
www.iprotech.com
877-324-4776
Ipro eCapture User Guide
Q1 2014
7-259
Chapter 7, Creating Export Series and Export Jobs
When the Ringtail format is selected for either a Processing Export or Data
Extract Export Job, the following screen appears after the Export Fields are
selected from the Export Fields screen.
From this screen you may individually map fields using any one of four data
types:
•
7-260
MEMO - All fields default to MEMO for new exports. The ‘theMemo’
field will be populated with the field contents.
Ipro eCapture User Guide
Q1 2014
www.iprotech.com
877-324-4776
Export Formats
•
•
•
TEXT - The ‘theValue’ field will be populated with the field contents.
NUMB - The ‘theValue’ field will be populated with the field contents.
DATE - If the field source is one of the *DATE ONLY* fields and
contains a valid date, the contents will be put into the ‘theValue’
field in dd-MMM-yyyy format. Otherwise, the contents of the field
will be put into the ‘theValue’ field exactly as they would for other
export formats. (Note: Ipro eCapture will no longer automatically
assign DATE to a field. Instead, you must specify those fields you
want labeled as dates.)
Only those fields that are always populated in the Ringtail database tables
(Export or Parties) can be set to Exclude.
These fields will show (ex) appended to the name. For example, [BEGDOC](ex). The other fields include: Subject(E), SenderCombined, RecipientCombined, CCRecipientCombined, BCCRecipientCombined, Document Type
Description, Title, Sent Date, and Last Modified.
If you click
, all the (ex) fields are set to Exclude at once and
will be indicated as such in the Ringtail Type column. You may then individually select those fields and assign a data type if necessary.
To assign a data type, select a metadata field and click the data type button
below the field list. The Ringtail Type column will display the selected data
type for that field. (Note: You may also click the alternate mouse button on a
field to display the data types shortcut menu.)
Note: Fields set to Exclude will not go into the Export_Extras table at all.
The final Export screen has an option to use Rollover Numbering for the Ringtail numbering format. See the section Using Rollover Numbering for Ringtail
Format on page 7-177 if the Ringtail format was selected for additional information about the Rollover Numbering option.
www.iprotech.com
877-324-4776
Ipro eCapture User Guide
Q1 2014
7-261
Chapter 7, Creating Export Series and Export Jobs
Ipro DLF (Ipro Eclipse)
The DLF file is used for loading into Ipro Eclipse. For Process Export Jobs, two
files are generated: DATA.DLF and IMAGE.DLF. For Data Extract Export Jobs,
one file is generated: DATA.DLF. Select the option Include OCR word coordinates in DLF (located at the bottom of the Export Formats and Handling
Options screen) to increase the amount of time it takes to build the load file.
This is only recommended for image-only review databases. Native file reviews
can leverage built-in word highlighting when viewing the document’s text or
rendered native file.
Custom Export Format (Image Load
and/or Data Load Format)
This section provides specific information for exporting to these formats for
either a Processing Export Job or a Data Extract Export Job:
•
•
Custom export format (image load file format)
Custom export format (data load format)
A load file is an image-based file (such as an LFP file) used to load the images.
7-262
Ipro eCapture User Guide
Q1 2014
www.iprotech.com
877-324-4776
Custom Export Format (Image Load and/or Data Load Format)
The Load Formats selected in the Export Formats screen affect the options you
can or cannot select in the Select Custom Load Delimiters dialog.
Custom Image Load Delimiters: Select a Between Fields delimiter from
the drop-down list and an Around Fields delimiter from the drop-down list.
The delimiter selection lists show the ASCII character number and a picture of
the character to help you choose the correct delimiters.
The Example (i.e.:) shows you how a record will appear in the export file.
Custom Image Load Field Position, select the entire field you want to reposition and then click either
or
to move it. Repeat for additional fields.
Ensure that the fields you want to include are checked.
If you want a “Y” to indicate a document boundary in the load file, select the
option Replace document flag with “Y”.
Custom Data Load Delimiters
www.iprotech.com
877-324-4776
Ipro eCapture User Guide
Q1 2014
7-263
Chapter 7, Creating Export Series and Export Jobs
Note: These options are valid for a Data Extract Export Job.
Select a Between Fields delimiter from the drop-down list and an Around
Fields delimiter from the drop-down list.
The delimiter selection lists show the ASCII character number and a picture of
the character to help you choose the correct delimiters.
The Example (i.e.:) shows you how a record will appear in the export file. The
previous figure shows quotes around the fields and commas separating the
fields.
About the EncounteredMetadataFieldList Table
Starting with version 5.6, this table was moved from the CONFIG database to
the Client (level) database. Rather than loading the entire list, selection of
metadata fields for QC, Export, Endorsement, and/or Placeholders are based
on the active Client.
The “EncounteredMetadataFieldList” table consists of two columns: Fieldname and Display.
The Fieldname column contains the meta field name.
The Display column is populated with a value of “1” to indicate the meta field
will display in the Available Meta Fields List located in the Export screen.
If you want to exclude certain meta fields from displaying in the Available
Meta Fields List, the SQL Database Administrator would update the Display
column in the “EncounteredMetadataFieldList” table by changing the “1” to
“0”. A value of “0” indicates the meta field will not display in the Available Meta
Fields List located in the Export screen.
The “EncounteredMetadataFieldList” table will list all unique mapped field
names pulled from the client’s MetadataExtended and DataExtractMetadataExtended tables. This is the list of fields that will be displayed at export time.
About Export Series
An Export Series is used to output successive exports with sequential Image
Key numbers, volumes, and like export options (native files, fields, export formats, etc.) for both Processing Export Jobs and Data Extract Export Jobs.
7-264
Ipro eCapture User Guide
Q1 2014
www.iprotech.com
877-324-4776
About Export Series
The Client Management tree view shows the following hierarchy for a new Client:
This hierarchy does not show any user created Series or Export Jobs. The following figure shows the hierarchy (Process) after the user created an Export
Series and an Export Job.
Notice that ProcessExportJob2 is tied to ExportrSeriesA. Export Jobs that are
not tied to a Series (independent) will appear in the hierarchy as shown in the
next figure:
In this example, there is an ExportSeriesB. However, the three Export Jobs
that appear beneath it are not tied to any Export Series.
The Export Sets (Process and Data Extract), though represented in the hierarchy, do not show sub-sets. Rather, when you click the Process Export Set or
Data Extract Export Set, the Information Panel will show a list of Export Sets.
Export Sets are created in Ipro eCapture QC; however, they are managed in
the Ipro eCapture Controller.
www.iprotech.com
877-324-4776
Ipro eCapture User Guide
Q1 2014
7-265
Chapter 7, Creating Export Series and Export Jobs
When an Export Series is created for either a Process Export or a Data Extract
Export, initial information is entered/selected that includes: the Export Series
name, an optional description, and an existing .INI load file (template). For
Series linked to Process Exports, you can elect to export the images. The initial
information, with the exception of exporting images, is the same for Series
linked to Data Extract Exports.
After the initial information is entered/selected, you will then define the output
formats, export fields, export directory options, and Image Key numbering for
the Series. These screens are the same as if you were creating an independent
Export Job.
When an Export Job is tied to an Export Series’ options, it will use the settings
previously defined for the Export Series. The starting Image key and volume
automatically sets to the next available number. Several Export Jobs can be
started simultaneously negating the need to manually set up each Export Job
separately.
In the case, where an Export Series is tied to an Export Job’s options, the
Export Job must be created before or while the Export Series is being set up.
When creating a new Export Job, you may optionally create a New Export
Series at the time you select the jobs for exporting. All of this is done in the
New Export Job dialog. At the completion of the Export Job creation, the
Export Series, along with the Export Job will appear under Export Jobs. The
Export Job(s) will be a subset of the Export Series.
Creating an Export Series (Process Export or
Data Extract Export)
Starting with eCapture 2013.0.0, Eclipse and Relativity exports are available
for an Export Series.
1.
In the Client Management tree view, under Export Jobs, click the alternate mouse button on:
•
•
7-266
Process Exports and choose New Process Export Series from
the context menu.
Data Extract Exports and choose New Data Extract Export
Series from the context menu.
Ipro eCapture User Guide
Q1 2014
www.iprotech.com
877-324-4776
About Export Series
The New Series dialog appears. Proceed to Step 2.
2.
Do the following:
•
•
•
•
From the Export Type drop-down list select one of the following:
Direct to Disk, Direct to Eclipse, or Direct to Relativity.
For
Enter an Export Series Name.
(Optional) Enter a Description.
(Optional) Browse to the .INI file to load previously saved Export
settings.
3.
Click OK. The Export dialog appears.
4.
Do one of the following for Direct to Disk:
•
•
For a Process Export Series: Proceed to Creating a Processed Data
Export Job (Export Processed Data/New Process Export Job) on
page 7-3. Begin with step 9 and follow through the rest of the procedures.
For a Data Extract Export Series: Proceed to Creating a Data
Extract Export Job (Export Extracted Data/Data Extract Export
Job) on page 7-147. Begin with step 8 and follow through the rest
of the procedures.
Do one of the following for Direct to Eclipse:
www.iprotech.com
877-324-4776
Ipro eCapture User Guide
Q1 2014
7-267
Chapter 7, Creating Export Series and Export Jobs
•
•
For a Process Export Series: Proceed to Autoload into Ipro Eclipse Processing Job on page 7-52. Begin with step 9 and follow through
the rest of the procedures.
For a Data Extract Export Series: Proceed to Autoload into Ipro
Eclipse - Data Extract Job on page 7-184. Begin with step 16 and
follow through the rest of the procedures.
Do one of the following for Direct to Relativity:
•
For a Process Export Series: Proceed to Autoload into Relativity Processing Job on page 7-100. Begin with step 15 and follow
through the rest of the procedures.
•
For a Data Extract Export Series: Proceed to Autoload into Relativity - Data Extract Job on page 7-218. Begin with step 13 and follow through the rest of the procedures.
Editing an Export Series
Once the Export Series is created and appears in the Tree View, its setting can
be edited.
Select the Export Series in the Tree View and click
Export dialog opens.
. The
See the section Creating a Processed Data Export Job (Export Processed Data/
New Process Export Job) on page 7-3 or the section Creating a Data Extract
Export Job (Export Extracted Data/Data Extract Export Job) on page 7-147 for
information about the options in the Export dialog boxes.
Deleting an Export Series
An Export Series can only be deleted if all the jobs have been started. If the
Export Jobs that are part of the Export Series are deleted first, then the Export
Series can be deleted. Any Export Jobs that were tied to the deleted Export
Series will be reverted back to independent Export Jobs and repositioned in
the Tree View.
To delete a specific job in the Export Series, click the alternate mouse button,
and choose Delete Export Job. The Delete Confirmation dialog appears. Click
Yes. The job is deleted. However, if the Job was the last Job started for the
Series, then the Rollback Series dialog appears.
7-268
Ipro eCapture User Guide
Q1 2014
www.iprotech.com
877-324-4776
About Export Series
Do one of the following:
•
•
•
Click Yes to reset/rollback the volume and image key number information for the Series. For example, if there were three Jobs and the last
started Job was the third job with the Volume number of VOL003 and an
ending image key number of EXH-0000254, then the next Job for the
series would be VOL003 with a starting image key number of EXH0000255
Click No. The next Job’s volume and image key number will not be reset.
It will continue with the next Volume and image key number from the
deleted Job.
Click Cancel
To delete an Export Series, select the Series in the Tree View, click the alternate mouse button, and choose Delete Export Series.
Export Series cannot be deleted or edited in the Limited Controller.
Creating an Export Job from an Existing Export
Series
When you select the Export Series (under Process Export or Data Extract
Exports) in the Tree View, click the alternate mouse button, and choose either:
•
•
Create New Process Export Job in Series or
Create New Data Extract Export Job in Series
from the context menu, the New Export dialog appears with that Export Series’
name already appearing in the Export Series drop-down list.
From this point, you may proceed with selecting the Job(s) and continue
through the dialogs.
www.iprotech.com
877-324-4776
Ipro eCapture User Guide
Q1 2014
7-269
Chapter 7, Creating Export Series and Export Jobs
See the section Creating a Processed Data Export Job (Export Processed Data/
New Process Export Job) on page 7-3 or the section Creating a Data Extract
Export Job (Export Extracted Data/Data Extract Export Job) on page 7-147.
Saving Export Settings
You can save export settings regardless of completing the export or not. The
appears in most Export screens as available.
If you click
, then the settings up to that point are saved to an
.INI file. The .INI file serves as a template for future export jobs thereby alleviating the need to re-enter some information.
Once you save the .INI file before conclusion of the Export job, the Export
closes and you return to the Ipro eCapture Controller interface.
If you want to conclude an Export all the way through the end, you will be
given an option to save the settings to an .INI file at that point.
In either instance, the .INI file can be used to load settings for a new Export
job.
7-270
Ipro eCapture User Guide
Q1 2014
www.iprotech.com
877-324-4776
8
Running Reports
In this Chapter
Overview ......................................................................... 8-1
Ipro eCapture Legacy Reports ......................................... 8-2
Selecting Legacy Discovery Report Options ........................ 8-3
Selecting Legacy Processing Report Options ....................... 8-4
Selecting Legacy Data Extract Report Options .................... 8-5
Running the Selected Legacy Reports ................................ 8-6
Closing the Report Module ............................................... 8-6
Ipro eCapture Reports (3.x and later) ............................. 8-7
Selecting Discovery Report Options ................................... 8-9
Selecting Processing Report Options................................ 8-10
Selecting Data Extract Report Options ............................. 8-12
Selecting Export Report Options ..................................... 8-14
Running the Selected Reports ........................................ 8-14
Closing Individual Report Windows.................................. 8-15
Closing the Report Module ............................................. 8-15
Overview
A number of reports are available in Ipro eCapture to assist you with the electronic discovery process.
Legacy Reporting is available to support versions 2.1 and earlier. However, filter and search reports are now combined into a report called Flex Processor
Rules Manager.
A new Report interface was introduced starting with version 3.0. Multiple jobs
of the same type may be selected and multiple Reports can be run for those
jobs; including Export Jobs.
Starting with version 4.0.2, Reports can be accessed for the selected job type
(Data Extract, Processing, or Discovery) under the Client Management tab
using the context menu. See Chapter 5, Creating Clients, Projects, Custodians,
and Jobs and the section Running Reports for a Selected Job on page 5-125 for
more information.
www.iprotech.com
877-324-4776
Ipro eCapture User Guide
Q1 2014
8-1
Chapter 8, Running Reports
All reports can be saved to a .CSV output file and imported into a spreadsheet
program.
Ipro eCapture Legacy Reports
1.
From the Ipro eCapture Controller, choose View > Legacy Reporting
from the menu bar to open the Legacy Reports Module. The Legacy
Reports Module opens as a separate application.
2.
Choose the Client from the drop-down list. The Projects and Custodians
for the selected Client appear in the Project/Custodian Filter area.
3.
Select a Project from the Project/Custodian Filter area.
8-2
Ipro eCapture User Guide
Q1 2014
www.iprotech.com
877-324-4776
Ipro eCapture Legacy Reports
4.
Select one of the following tabs:
•
•
•
5.
Discovery Reports
Processing Reports (Summary, Detailed, and Other Reports are
available)
Data Extract Reports (Summary or Detailed)
Proceed to one of the following sections:
•
•
•
Selecting Legacy Discovery Report Options on page 8-3
Selecting Legacy Processing Report Options on page 8-4
Selecting Legacy Data Extract Report Options on page 8-5
Selecting Legacy Discovery Report Options
Select from one of the following Discovery Reports options:
•
•
•
•
Discovery Summary: Summary of items discovered by item type
and category.
Discovery Detailed: List of all items discovered.
Zero-byte files: List of discovered items with zero length.
Detailed Error Report: List of errors and status messages
encountered during discovery.
Item Type Descriptions from the Discovery Report
Node level error (e-mail store) indicates that the system was unable to extract
a portion of a .PST or an archive.
Item level error would be at the file or e-mail level. For example, if a file was
password protected we would not be able to index it.
Indexing exceptions indicate those Items that errored out completely on
indexing.
Warnings vs. Errors
In Ipro eCapture reports, you can run error reports for both Discovery and
Processing. These reports are described in this Chapter. These reports will
show either Errors and/or Warnings, if they exist. Errors and Warnings are not
the same.
www.iprotech.com
877-324-4776
Ipro eCapture User Guide
Q1 2014
8-3
Chapter 8, Running Reports
Warning Example
For example if you run a Detailed Error Report for a Discovery Job and you see
Discovery Warnings listed, they will be classified as either Node or Item.
The following example uses two specific tasks that occur during discovery: indexing and extraction. There are other tasks that occur during the Discovery process.
An example of an item level warning may mean that the system could not
index a particular file for a number of reasons (password protected, corrupt,
etc.). An example of a node level warning may mean the system attempted to
extract a files from an archive and that the extraction succeeded, but no files
were actually extracted because the archive may have been empty.
Error Example
An overall extraction from the e-mail store itself failed.
Selecting Legacy Processing Report Options
Select from one of the following Legacy Processing Report tabs:
Summary Reports Tab: Select one of the following options:
•
•
•
•
•
•
Comprehensive: Combination Report consisting of summaries of
discovery, filtering, de-duplication, and processing.
Processed Items: Summary of items processed by type and category.
Processing Errors: Summary of errors encountered during processing.
Filtered Items: Summary of items not processed due to filter
settings.
Search Results: Summary of items selected for processing
resulting from search hits.
De-duplication: Summary of items not processed due to deduplication settings.
Detailed Reports Tab: Select one of the following options:
•
•
8-4
Processed Items: List of all items processed by discovery path.
Processing Errors: List of errors encountered during processing.
Ipro eCapture User Guide
Q1 2014
www.iprotech.com
877-324-4776
Ipro eCapture Legacy Reports
•
•
•
•
Filtered Items: List of items not processed due to filter settings.
Search Results: List of items selected for processing by search
string.
De-duplication: List of duplicate items and what they were duplicates of.
Office Linked Content: List of hyperlinks and OLE links found in
Microsoft Word, Microsoft Excel, and Microsoft PowerPoint documents.
Other Reports Tab: Select one of the following options:
•
•
•
•
Page Threshold: List of processed items that exceeded the page
threshold.
Zero-Byte files: List of zero-length files encountered while processing.
Extensive De-duplication Report: Lists extensive, additional
information of duplicate items such as Location of Original Discovery Path, De-duplication Level, Required Filename, Scope, etc.
metadata Report: List of all processed items and selected metadata values.
Selecting Legacy Data Extract Report Options
Select from one of the following available Legacy Data Extract Report tabs:
Summary Reports Tab: Select one of the following options:
•
•
•
•
•
•
Comprehensive: Combination Report consisting of summaries of
discovery, filtering, de-duplication, and processing.
Items: Summary of items processed by type and category.
Errors: Summary of errors encountered during processing.
Filtered: Summary of items not processed due to filter settings.
Search Results: Summary of items selected for processing
resulting from search hits.
De-duplication: Summary of items not processed due to deduplication settings.
Detailed Reports Tab: Select one of the following options:
•
Items: List of all items processed by discovery path.
www.iprotech.com
877-324-4776
Ipro eCapture User Guide
Q1 2014
8-5
Chapter 8, Running Reports
•
•
•
•
•
•
Errors: List of errors encountered during processing.
Filtered Items: List of items not processed due to filter settings.
Search Results: List of items selected for processing by search
string.
De-duplication: List of duplicate items and what they were duplicates of.
metadata: List of items processed during data extraction that
contain metadata.
Office Linked Content: List of hyperlinks and OLE links found in
Microsoft Word, Microsoft Excel, and Microsoft PowerPoint documents.
Running the Selected Legacy Reports
1.
(Optional) Select the option Include Page Counts if you want the Report
to display a Page Count column and a Page Count Errors column. (Note:
This option may not be available for some Reports.)
2.
Click Run Report.
3.
(Optional) Click Save Report. The Report Output File dialog opens. Navigate to a directory and assign a filename. The Report is saved as a .CSV
(Comma Separated Value) file format.
Closing the Report Module
The Reports Module is entirely self-contained. You can open more than
one instance of the Reports Module without any conflicts.
Click the Close Icon in the Report Module title bar.
8-6
Ipro eCapture User Guide
Q1 2014
www.iprotech.com
877-324-4776
Ipro eCapture Reports (3.x and later)
Ipro eCapture Reports (3.x and later)
Multiple jobs of the same type may be selected.
For Summary Reports, the data for the multiple jobs will be combined into one
report. For Detail Reports, one report will be generated for each job. For
example, if you selected three Data Extract Jobs and chose to run a Detailed
Items Report, three separate Report windows would open - one for each Data
Extract Job.
The Report windows display cascaded, starting from the upper left corner of
the screen.
The title bar displays the name of the Report; and for Detail Reports, the Job
name displays in the title bar. You may close the Report windows separately
without exiting the Reporting function.
www.iprotech.com
877-324-4776
Ipro eCapture User Guide
Q1 2014
8-7
Chapter 8, Running Reports
1.
From the Ipro eCapture Controller, choose View > Reporting from the
menu bar to open the Reports Module. The Reports Module opens as a
separate application.
2.
Choose the Client from the drop-down list. The Projects, Custodians,
and Jobs appear, for the selected Client, in a tree view.
3.
Select one or more than one of the same job type.
4.
Proceed to one of the following sections for information about the Report
options:
•
•
8-8
Selecting Discovery Report Options on page 8-9.
Selecting Processing Report Options on page 8-10.
Ipro eCapture User Guide
Q1 2014
www.iprotech.com
877-324-4776
Ipro eCapture Reports (3.x and later)
•
•
Selecting Data Extract Report Options on page 8-12.
Selecting Export Report Options on page 8-14.
Selecting Discovery Report Options
Select from the Discovery Reports options for one or more selected Discovery Jobs:
•
•
•
•
•
•
•
•
Discovery Summary: Summary of items discovered by item type
and category. Report lists Node and Item level discovery errors,
indexing exceptions, and number of password-protected files.
Discovery Detailed: List of all items discovered. Displays item
ID, location, filename, file size, item type, child item (Y or blank),
language, encoding, OCR confidence level, and item level discovery warnings (if applicable), and password-protected files.
Detailed Error Report: List of errors, status messages, and password-protected documents encountered during discovery. The end
of the report displays a list of password-protected files that
includes the Item ID, Location, item type, file, and physical location for each file.
Zero-byte files: List of discovered items with zero length.
Language Summary: Summary of items discovered by item type
and language rankings. Also displays document counts and total
size.
Poor OCR files: List of any poor OCR files; shows Item ID, location, file name, create date, and OCR Confidence level.
Source Container Report: List of the top level containers for
each selected Discovery Jobs (Each selected Discovery Job Container Report opens in a separate window.) The report columns
are: Discovery Job [name of Discovery Job and total of Job types
such as eMail Stores, Archives, etc.], Status [EMAIL Store, Success, ARCHIVES, LOOSE DOCS (Parent Level Only), etc.] File Type
[Lotus Notes, Outlook, etc.], File Name, File Path, and Description
[Success, etc.]
OCR Status: List of all documents OCRed during Discovery that
gave low confidence values.
www.iprotech.com
877-324-4776
Ipro eCapture User Guide
Q1 2014
8-9
Chapter 8, Running Reports
Item Type Descriptions from the Discovery Report
Node level error (e-mail store) indicates that the system was unable to extract
a portion of a .PST or an archive.
Item level error would be at the file or e-mail level. For example, if a file was
password protected we would not be able to index it.
Indexing exceptions indicate those Items that errored out completely on
indexing.
Warnings vs. Errors
In Ipro eCapture reports, you can run error reports for both Discovery and
Processing. These reports are described in this Chapter. These reports will
show either Errors and/or Warnings, if they exist. Errors and Warnings are not
the same.
Warning Example: For example if you run a Detailed Error Report for a Discovery Job and you see Discovery Warnings listed, they will be classified as either
Node or Item.
The following example uses two specific tasks that occur during discovery: indexing and extraction. There are other tasks that occur during the Discovery process.
An example of an item level warning may mean that the system could not
index a particular file for a number of reasons (password protected, corrupt,
etc.). An example of a node level warning may mean the system attempted to
extract a files from an archive and that the extraction succeeded, but no files
were actually extracted because the archive may have been empty.
Error Example
An overall extraction from the e-mail store itself failed.
Selecting Processing Report Options
Select from the following Processing Report for one or more selected Processing Jobs.
8-10
Ipro eCapture User Guide
Q1 2014
www.iprotech.com
877-324-4776
Ipro eCapture Reports (3.x and later)
Summary Reports:
Comprehensive: Combination Report consisting of summaries of discovery, filtering, de-duplication, and processing. If job has metadata
fieldnames exceeding 50 characters, the report will show this above the
Totals line.
Keyword Hits: Summary of keyword hits by phrase and document
counts resulting from Flex Processor rules. It shows search terms
encountered by number of documents containing search hits, documents
containing unique hits only, and documents containing unique hits compound complete. Shows a percentage of document population containing
search hits. A separate breakdown of search terms is listed below the
reports with totals for: Documents, Total Hits, Unique Documents, and
Unique Documents Compound Complete.
Processed Items: Summary of items processed by type and category.
If job has metadata fieldnames exceeding 50 characters, the report will
show this above the Totals line.
Processing Errors: Summary of errors encountered during processing.
Flex Processor Results: Summary of items not processed due to rules
settings. Returns Total Rule Hit, Effective Rule, and Action Summary.
The Total Rule Hit summary gives a total count per rule of documents
that fit the criteria of the rule. This is regardless of what was actually
processed; if a document fit the criteria of more than one rule, it will be
included in the count for that rule. Effective Rule summary differs. A single document can only have one Effective Rule (the last rule encountered
for which a document fits the criteria). Though the single document may
fit the criteria of multiple rules, the last rule it hits on will be its Effective
Rule. Action Summary shows action selection totals.
De-duplication: Summary of items not processed due to de-duplication
settings.
Detailed Reports:
Processed Items: List of all items processed by discovery path. If job
has metadata fieldnames exceeding 50 characters, the report will show
this above the Totals line.
Processing Errors: List of errors encountered during processing.
www.iprotech.com
877-324-4776
Ipro eCapture User Guide
Q1 2014
8-11
Chapter 8, Running Reports
Flex Processor Results: List of items not processed due to the rules
settings. Columns include Rule (Order), Criteria, Search String, Action,
Item ID, File Path, File Name, Extension, and File Size.
De-duplication: List of duplicate items and what they were duplicates
of. Displays de-duplication settings and Project/Custodian descriptions.
For MD5Hash duplicates, the MD5Hash column appears between the columns File Size and Project.
Office Linked Content: List of hyperlinks and OLE links found in Microsoft Word, Microsoft Excel, and Microsoft PowerPoint documents.
Custodian Pivot: List of each item encountered as a duplicate. The
Report columns are: OriginalItemID, OriginalFileName, DuplicateCustodianInfo (Item IDs and Custodian Names), and DuplicatePathInfo (duplicate ID, container name, <duplicate filename>, and [discovery path]).
Other Reports:
Page Threshold: List of processed items that exceeded the page
threshold.
Zero-Byte files: List of zero-length files encountered while processing.
metadata Report: List of all processed items and selected metadata
values.
OCR Status: List of image files sent through the OCR engine and the
OCR results.
Selecting Data Extract Report Options
Select from the following Data Extract Reports for one or more selected
Data Extract Jobs.
Summary Reports:
Comprehensive: Combination Report consisting of summaries of discovery, filtering, de-duplication, and processing. If job has metadata
fieldnames exceeding 50 characters, the report will show this above the
Totals line.
Keyword Hits: Summary of keyword hits by phrase and document
counts resulting from Flex Processor rules. It shows search terms
encountered by number of documents containing search hits, documents
containing unique hits only, and documents containing unique hits com8-12
Ipro eCapture User Guide
Q1 2014
www.iprotech.com
877-324-4776
Ipro eCapture Reports (3.x and later)
pound complete. Shows a percentage of document population containing
search hits. A separate breakdown of search terms is listed below the
reports with totals for: Documents, Total Hits, Unique Documents, and
Unique Documents Compound Complete.
Items: Summary of items processed by type and category. If job has
metadata fieldnames exceeding 50 characters, the report will show this
above the Totals line.
Errors: Summary of errors encountered during processing.
Flex Processor Results: Summary of items not processed due to the
rules settings. Summary of items not processed due to rules settings.
Returns Total Rule Hit, Effective Rule, and Action Summary. The Total
Rule Hit summary gives a total count per rule of documents that fit the
criteria of the rule. This is regardless of what was actually processed; if a
document fit the criteria of more than one rule, it will be included in the
count for that rule. Effective Rule summary differs. A single document
can only have one Effective Rule (the last rule encountered for which a
document fits the criteria). Though the single document may fit the criteria of multiple rules, the last rule it hits on will be its Effective Rule.
Action Summary shows action selection totals.
De-duplication: Summary of items not processed due to de-duplication
settings.
Detailed Reports:
Items: List of all items processed by discovery path. If job has metadata fieldnames exceeding 50 characters, the report will show this above
the Totals line.
Errors: List of errors encountered during processing.
Flex Processor Results: List of items not processed due to the rules
settings. Columns include Rule (Order), Criteria, Search String, Action,
Item ID, File Path, File Name, Extension, and File Size.
De-duplication: List of duplicate items and what they were duplicates
of. Displays de-duplication settings and Project/Custodian descriptions.
For MD5Hash duplicates, the MD5Hash column appears between the columns File Size and Project.
metadata: List of items processed during data extraction that contain
metadata.
www.iprotech.com
877-324-4776
Ipro eCapture User Guide
Q1 2014
8-13
Chapter 8, Running Reports
Office Linked Content: List of hyperlinks and OLE links found in Microsoft Word, Microsoft Excel, and Microsoft PowerPoint documents.
Custodian Pivot: List of each item encountered as a duplicate. The
Report columns are: OriginalItemID, OriginalFileName, DuplicateCustodianInfo (Item IDs and Custodian Names), and DuplicatePathInfo (duplicate ID, container name, <duplicate filename>, and [discovery path]).
OCR Status: List of all documents that were OCRed during Discovery
that gave low confidence values.
Selecting Export Report Options
Select from the following Export Report option for one or more selected
Export Jobs.
Export Summary: This report summarizes non-exported items. This
summary only appears for items that were not exported.
Export Complement - documents not exported: Lists all of the documents individually of the export job's constituent processing jobs/data
extract jobs that were not included in the export. This report should be
empty most of the time unless an Export Set was used to filter the documents.
Export Series Summary: This report summarizes all export jobs and
volume names for the selected series. If any export errors occur, they
are shown separately underneath the report’s data. Export Series Summary reports cannot be combined; an individual report is generated for
each series selected.
Running the Selected Reports
1.
(Optional) Select the option Include Page Counts if you want the
Report to display a Page Count column and a Page Count Errors column.
(Note: This option may not be available for some Reports.)
2.
Click Run Report. A separate window opens and displays the results for
each selected report type.
3.
(Optional) Click Save Report. The Report Output File dialog opens. Navigate to a directory and assign a filename. The Report is saved as a .CSV
(Comma Separated Value) file format.
8-14
Ipro eCapture User Guide
Q1 2014
www.iprotech.com
877-324-4776
Ipro eCapture Reports (3.x and later)
Closing Individual Report Windows
Most Reports open in their own separate individual window unless otherwise
specified. To close a Report window, click the Close Icon in its title bar.
Closing the Report Module
The Reports Module is entirely self-contained. You can open more than
one instance of the Reports Module without any conflicts.
Click the Close Icon in the Report Module title bar.
www.iprotech.com
877-324-4776
Ipro eCapture User Guide
Q1 2014
8-15
Chapter 8, Running Reports
8-16
Ipro eCapture User Guide
Q1 2014
www.iprotech.com
877-324-4776
Appendix A Using the Flex
Processor Rules Manager
In This Appendix
Overview ......................................................................... A-1
Preparation ..................................................................... A-1
Rule Bar Options ............................................................A-6
Using the Rule Set Management Wizard .......................... A-8
Import/Create Rules ..................................................... A-10
Export/Copy Rules ........................................................ A-13
Master Rule Sets .......................................................... A-13
Defining Actions for a Flex Processor Rule ........................ A-14
Defining Selection Criteria ............................................ A-26
Item IDs ..................................................................... A-42
E-mail Entry IDs........................................................... A-44
Using the Flex Processor Rules Manager Wizard ........... A-46
Overview
The Flex Processor Rules Manager implements various strategies by applying
Rules to cull and manage large data collections.
The RULE based module contains a host of Actions and criteria that are flexible
and can be quickly applied to efficiently remove non-responsive files resulting
in a smaller collection.
The rules are easy to manipulate, adjust, remove; and can be reapplied multiple times until the desired results are achieved.
Preparation
As always, ensure that you have a clear understanding of the work order. In
order to achieve the correct results, it is important to first understand how
each Rule can affect the results as it is applied.
www.iprotech.com
877-324-4776
Ipro eCapture User Guide
Q1 2014
A-1
Appendix A, Using the Flex Processor Rules Manager
Each Rule is executed on every single document in the order in which they
were defined. Each Rule is an “OR” in the rules list. The selection of two or
more criteria in a rule uses the “AND” Boolean logic.
The document is given to each rule. If it fits the criteria, it is marked as a rule
hit. There may be multiple rule hits, but only one final action.
There may be cases where one Rule may contradict another Rule, but this will
not impact the overall process because the last Rule to “touch” the file will be
the Effective Rule.
The Effective Rule determines how a document will be processed. Usually, deduplication Rules are located at the bottom of the Rules list.
For example, if the rules were created in this order: Image, Placeholder, and
Remove, Ipro eCapture will apply the remove rule first, then apply the placeholders, and will image only the remaining files when the Job is started.
There is no limit in the number of Rules that can be created.
De-duplication is the process of identifying and separating identical electronic
documents based on the MD5 hash value of each document, either at the
client, custodian, project, or processing job level. The MD5 hash value can be
compared to a fingerprint.
Rules may be re-ordered in the list to affect the outcome. Select documents
into the results set before removing them. Typically “include” actions are at
top while “exclude” (remove) actions are at the bottom.
A-2
Ipro eCapture User Guide
Q1 2014
www.iprotech.com
877-324-4776
Preparation
The following diagram depicts flex processor rule criteria (document selection,
multiple criteria options) as it pertains to an action: process, placeholder, or
remove. There is one action per rule.
Criteria options includes: date range, search terms, file types, file extensions,
file size, ItemIDs/ItemGUIDs, Hash/NIST list, de-duplication (job, custodian,
project, client levels).
www.iprotech.com
877-324-4776
Ipro eCapture User Guide
Q1 2014
A-3
Appendix A, Using the Flex Processor Rules Manager
The following table contains common action/criteria pairings.
Image/PDF/Data Extract
Placeholder
Remove
Non privileged search terms
Privileged
search terms
Duplicates
Date filters
Special file
types: Excel,
AutoCAD, Database
NIST matches
Custom hash lists
Extension list
The Flex Processor Rules Manager may be launched several ways:
•
•
•
when creating a new Processing Job or Data Extract Job (the relevant
Job options for either Job type have a Filtering tab). Click the Filtering
tab and click
or
.
when viewing the Information Panel for a selected Processing Job or
Data Extract Job in the Client Management Tree View. Click
to view the settings. If the Job started, you cannot
modify the options.
when creating a new Project. The Project Options has a Filtering tab.
Click the Filtering tab and click
A-4
Ipro eCapture User Guide
Q1 2014
.
www.iprotech.com
877-324-4776
Preparation
The Flex Processor Rules Manager screen is shown here.
The Flex Processor Rules Manager is comprised of four main sections:
•
Rule Bar Section: From here you can create New Rules, Save Rules,
Discard Changes made to rules, Delete Rules, Preview the Results of the
Rules, Access the Rule Set Manager Wizard, and Exit from the Flex Processor Rules Manager. See the section Rule Bar Options on page A-7.
www.iprotech.com
877-324-4776
Ipro eCapture User Guide
Q1 2014
A-5
Appendix A, Using the Flex Processor Rules Manager
•
•
Action section: This section includes naming each rule, specifying what
action that Rule will perform, scope criteria, and whether the affected
files will be applied a QC flag. See the section Defining Actions for a Flex
Processor Rule on page A-15.
Criteria Selection Tabs: The selection criteria can be mixed and
matched to refine exactly what you are looking for. In some cases, criteria is exclusive and cannot be combined with other criteria.
The Criteria Selection tabs are:
•
•
•
•
•
General
Date
Search
Advanced
The Criteria Selection tabs are discussed in the section Defining
Selection Criteria on page A-27.
Rule List: This is a list of rules at the top of the interface indicating the
Rule, ID, Action, Criteria, and Rule Title of each Rule. As Rules are created, they are added to the Rules List. The Rules List dictates the Rule
execution order. Each Rule is executed by the system in the order in
which they are listed - top to bottom. However, you may reposition the
order of the Rules to affect the outcome by using the Arrow icons on the
right side of the Rules box.
Alternate click a rule to display the context menu (New Rule, New
Search-In-Results Rule, Delete Rule). These options are explained in the
next section Rule Bar Options on page A-7.
Select the Rule and use either the middle two arrows to move up or
down in the list. To move to the beginning of the list or the end of the
list, select the rule and click one of the outer arrows. The very last Rule
to “touch” a file is the Effective Rule.
The Rule icons that appear at the beginning of the rule are white arrows,
either facing right
or up
, inside solid color circles. The color of the
circle indicates the action. For example, Red is for Remove, Green is for
Image or Data Extract, Yellow is for Placeholder/Placeholder with Document Text or Text Placeholder.
A-6
Ipro eCapture User Guide
Q1 2014
www.iprotech.com
877-324-4776
Preparation
Arrows facing Up indicate that the rule is a Search-In-Results based rule.
Arrows facing right indicate a New Rule at Level 0, or a dependent/child
rule if it is at Level 1, Level 2, etc. See the next section Rule Bar Options
on page A-7 for information about New Rules and Search-In-Results
rules.
Rule Bar Options
New Rule: This button activates the Rule for criteria selection. If the down
arrow is clicked to the right of the New Rule button, two options appear: New
Rule and New Search-In-Results Rule. New Rule is used to create a new rule, a
rule that is not dependent on any other rules. This is the default.
The Search-In-Results Rule option is used to create a new rule that is dependent on one or more selected rules. Search-In-Results rules allow refined filtering scenarios without the complexity. For example, Rule1 will select all
documents with the responsive term “criminal”, and then SubRule1 will search
within Rule1 to placeholder Excel documents with the responsive term
“money”. Essentially, Excel documents with the words “criminal” and “money”
will be placeholdered.
The Search-In-Results Rule options are:
•
•
Applies to Results of All Previous Rules - The “catch-all” rule for all documents selected by upper rules. Example: placeholder unknown file
types.
Applies to Results of Selected Rule - Refined criteria/action for only documents fitting criteria of selected “parent” rule. Example: keyword
search on documents in a date range. Note: This option is not available
if the selected rule is a De-duplication rule. In addition, de-duplication
options will not be available when creating a rule that is one of these
child rules.
Caveats for these options are:
Any rule with an action to remove documents will not be allowed to have
any child rules. However, a rule with an action to remove documents can
be set as a child rule.
Rules will only move within their level when reordering rules in the list.
www.iprotech.com
877-324-4776
Ipro eCapture User Guide
Q1 2014
A-7
Appendix A, Using the Flex Processor Rules Manager
Tree hierarchy will be used to display the level of dependent rules. For
example, Level 0 represents a parent rule. Level 1 would represent the
child rule for Level 0. Level 2 would represent the child rule for Level 1.
The following hierarchy of Rule examples levels are shown here:
Rule ID: Action - Rule Title
1: Image - Search 1
2: Image - Search 2
3: Placeholder - XLS
5: Image - PPT Max 20
4: Image - Privilege Search
6: Image - Search 3
Save Rule: This button saves the Rule.
Discard Changes: This button evokes a confirmation dialog asking if you
want to discard the changes made for the selected Rule in the Rules List.
Delete Rule: This button evokes a confirmation dialog asking if you want to
remove the selected Rule in the Rules List.
Preview Results: Initially will display a rule application status bar on top of
the Flex Processor dialog’s title bar. For large rule sets, the bar will remain for
a several seconds to show the status of rules applied. (Note: If necessary, click
Cancel to return to the Flex Processor dialog and to cancel the rule application.)
A-8
Ipro eCapture User Guide
Q1 2014
www.iprotech.com
877-324-4776
Using the Rule Set Management Wizard
The Flex Processor Preview dialog appears after the rule application status bar
closes and applies each Rule to the data collection. The Flex Processor Preview
displays an Item level report for the Rules as well as the number of Records.
Use this Preview to verify the accuracy of the Rules and their desired results.
The following figure shows the Preview fields.
These results can be saved to a .CSV file for distribution.
Rule Set Manager: The Rule Set Manager button activates the Rule Set Management Wizard. See the section Using the Rule Set Management Wizard on
page A-9 for additional information.
Help: This button evokes a single dialog that gives an example for setting a
Rule. Throughout the Flex Processor Rules Manager, you will see a blue icon
question mark
Click
icon appear as you mouse over (or near) different options.
to display a pop up with information about the options.
Exit: Exits the Flex Processor Rules Manager. However, if any files were not
produced, a dialog appears stating so and asking for a decision.
Status Information: Includes No Rule Selected, Rule n; where n represents
the number of the Rule (e.g. Rule 12).
Using the Rule Set Management Wizard
The Rule Set Management Wizard is available at the Project, Processing Job,
and Data Extract Job levels. The New Rule Wizard button is available in the Filtering Tab of the Project, Processing, and Data Extract Job Options dialog
boxes. Use the Wizard to create multiple rules. De-duplication rules are autowww.iprotech.com
877-324-4776
Ipro eCapture User Guide
Q1 2014
A-9
Appendix A, Using the Flex Processor Rules Manager
matically moved to the end. (Ipro eCapture prompts with a warning that this
occurred.) Only one de-duplication rule can be created using the Wizard. If a
de-duplication rule exists when creating a new rule, the de-duplication criteria
will be disabled. De-duplication occurs “on the fly” during processing and will
not reflect in the effective rules. This is the same case with NIST de-duplication.
When either a Processing Job or Data Extract Job is started, the button
becomes disabled. However, you can access the Rule Set Management Wizard
through the Flex Processor Rules Manager (after a Processing Job or Data
Extract Job is started) in the event you want to export/copy rules or manage
master rule sets. You cannot import/create rules or delete rules at this stage.
Click
A-10
to display the Rule Set Management Wizard.
Ipro eCapture User Guide
Q1 2014
www.iprotech.com
877-324-4776
Using the Rule Set Management Wizard
The first screen in the Rule Set Management Wizard displays four separate
main options (as shown in the previous figure).
When you select one of these main options and click Next, the next Wizard
screen displays additional, related options for the selected main option.
The next four sections describe the related options for each main option.
Import/Create Rules
If the Import/Create Rules option is selected and you click Next, the following
related options may be selected:
•
•
Import rules from another job or project: Replace the rules in my
current job/project with the rules from another job or project.
Search term file support: Create new rules for my current job/project
from a list of search terms. The list of search terms is imported into the
Flex Processor Rules Manager from a file.
The import file can be a .TXT file (or an .XML file) that may contain a
header; such as Categories; Search Terms. It may contain one search
term per line. Each line (search term) in the file represents a rule that
will be created and the selected criteria; such as a date range, will be
applied to each rule created from the import file. Documents with the
effective rule will receive a category folder. Each line entry in the file
could contain the same category for different search terms.
An example of an import file that contains search terms and categories
Hot Review and Confidential) separate by a pipe delimiter follows:
electricity w/5 Brazil |Hot Review
Bill Smith|Confidential
electricity or peak or grid|Hot Review
You can also select an action to be applied to all search terms in the file.
The Actions include: Image, Placeholder, Placeholder with Document
Text, or Remove.
After selecting the import search terms file and selecting an Action, the
next screen presents two options:
www.iprotech.com
877-324-4776
Ipro eCapture User Guide
Q1 2014
A-11
Appendix A, Using the Flex Processor Rules Manager
Use current rule (Note: When Edit Rule is clicked, it opens the
Rule Template Wizard for further edits. See the section Using the
Flex Processor Rules Manager Wizard on page A-47 for information
on the options.) If this option is selected, the next screen presents
four “category” options. See the section Category Options on page
A-12 for more information.
OR
Create a new rule and set that rule as the current rule. If
you select this option, the New Rule Template Wizard opens
where you can select the general criteria, the date range filtering,
the search terms, the advanced criteria, and assign a rule title and
action.
•
Import rules from a file: Import rules from a file, replacing the rules
in my current job/project. Rules that were exported from another project
are saved to a rules file with an .XML extension. Click
to display the
Select File to Import dialog. Navigate to the rules file (.XML) and click
Open.
Category Options
Categories (new for 3.1) were added for assigning a category title to a rule.
The category is applied only to the effective rule. Duplicate categories cannot
be created. Four category options are available:
A-12
Ipro eCapture User Guide
Q1 2014
www.iprotech.com
877-324-4776
Using the Rule Set Management Wizard
•
Don’t use a category - No category will be assigned to any rules. Only
the search terms will appear.
Note: If any one of the other “category” options are selected, a Field
Mapping Utility preview screen appears that displays the contents of the
selected Search Terms file.
In the example indicated on page A-11, a pipe delimiter was used to
separate the search term field from the category field. If necessary,
select the delimiter that separates the fields from the Between Fields
drop-down list. Select the delimiter used around the fields from the
Around Fields drop-down list. Click the Header drop-down list and select
Detect column header as name and/or Ignore first row. Both of these
options are deselected by default.
When changes are made, click Refresh to reload the data, if necessary.
www.iprotech.com
877-324-4776
Ipro eCapture User Guide
Q1 2014
A-13
Appendix A, Using the Flex Processor Rules Manager
•
•
•
Use each search term as the category - This creates a category
named the same as the search term.
The import file has a category entry for each search term - The
category will be included in the search term import file as a second field.
Use a specific (user-defined) category for all search terms - This
applies whatever you enter or select as the category.
Export/Copy Rules
If the Export/Copy Rules option is selected and you click Next, the following
related options may be selected:
•
•
Copy rules: Copy the rules from my current job/project to other jobs/
projects that I select.
Export rules: Export the rules from my current job/project to an XML
file which can then be imported into a different current job or a different
current project.
Master Rule Sets
If the Master Rule Sets option is selected and you click Next, the following
related options may be selected:
The Master Rule Set allows saving a Rule set at the Client level for indefinite
use. These Rule Sets are very useful for large projects. It is possible to copy
across Job types: Processing or Data Extract.
•
•
•
•
Create new master rule set: Create a new master rule set from the
rules in my current job/project
Delete master rule: Delete a master rule set
Set project’s default rule set: Set a master rule set as this project’s
default rule set.
Delete all rules from my current job/project: If this option is
selected and you click Next, the screen displays a message indicating
that all the rules for the current job or project will be deleted. This action
cannot be undone. When the rules are deleted, the database is updated.
Continue to click Next to advance through the screens. Each screen displays
information and instructions relevant to the selected option. You may also click
Back, if necessary to change options. The last screen describes the outcome.
At this point, you may click Finish or Cancel.
A-14
Ipro eCapture User Guide
Q1 2014
www.iprotech.com
877-324-4776
Using the Rule Set Management Wizard
Defining Actions for a Flex Processor Rule
There are 5 Action options of criteria that can be used to create any Rule. Only
2 Action criteria are required for every created Rule: Action and Scope.
Rule Title: Assign a (singular) Rule Title to reflect the Action and Criteria. If
you choose a Placeholder Action, the Rule Title will display on the created
placeholders. A Rule Title can be a full page or narrative. A maximum of 750
characters is permitted.
Action: These items differ for a:
•
•
Project (global): Produce, Placeholder, Remove
Processing Job:
Image (converts the file/files to image format)
Max Pages Count: Used to set a threshold for the total amount of
pages to be produced for any one document related to the rule. Blank
page removal is applied prior to considering the page as part of a document when Remove Blank Pages is selected in the General Processing
Options screen. For example, a 12 page document that has 5 blank
pages removed will no longer be flagged as Threshold Exceeded if Max
Pages is set to 10.
Create Placeholder: This option is enabled by default. A Page Threshold Exceeded page is placed in the Image tab and at the beginning of the
document’s pages in the Thumbnail tab.
Text:
Note: During Export, pages with no text are handled the same as a regular Export Job. Placeholders may be created for these pages if desired.
Searchable PDFs, including hit highlighting, are not affected by the two
Text options (new for version 2013.1.0).
From the Text drop-down menu choose either:
•
Truncate text to max pages - text is truncated to match the
output of pages that fall under the threshold (existing behavior).
Retain all text for document - document text is associated to
www.iprotech.com
877-324-4776
Ipro eCapture User Guide
Q1 2014
A-15
Appendix A, Using the Flex Processor Rules Manager
the number of pages below the set threshold value and all subsequent pages are blank. (This behavior is new starting with version
2013.1.0.)
Convert to PDF: Converts documents to text-based PDF files that are
PDF/A compliant. Uses dynamically created PDF print drivers (PDFCreator). Documents will be converted via PDF-XChange drivers and single
page PDFs become the intermediate output. This option differs from
Image which uses Black Ice drivers and produces images as the intermediate format. Exceptions are native files which are already in an image
format. These files will continue to use Lead Tools for processing. For
information about PDF/A compliant files, visit http://www.pdfa.org/
doku.php
Placeholder (creates image placeholder with the text from the Rule
Title). This is useful for media files such as .WAV files. To customize the
placeholder, click Select metadata fields. This opens the Custom Placeholder Configuration dialog. See the section Customizing Placeholders on
page A-18 for additional information.
Placeholder with Document Text (creates image placeholder but still
extracts the original document text). To customize the placeholder, click
Select metadata fields. This opens the Custom Placeholder Configuration dialog. See the section Customizing Placeholders on page A-18 for
additional information.
Remove (removes the document from the results).
•
Data Extract Job:
•
Data Extract (performs text and metadata extraction on the files)
•
Text Placeholder (creates an extracted text placeholder text file
to replace any text that would be extracted but still includes a link
to the native file)
•
Remove (removes the document from the results).
Note: The Actions only affect those files that adhere to the Scope parameter
chosen.
Scope: The Scope is the level on which the document and its relationships
must match the rule in order for the rule to apply. (Note: Scope numbers 1
and 4 are the same compound options from previous Ipro eCapture versions.)
One of four different scope criteria can be selected if the Process Job DupliA-16
Ipro eCapture User Guide
Q1 2014
www.iprotech.com
877-324-4776
Using the Rule Set Management Wizard
cates and/or the Data Extract Job Duplicates options are not selected under
the General Criteria Tab. If either or both of these options are selected, the
Scope options change to: Maintain compound document structure and Treat
documents individually. The four scope criteria options are as follows:
1.
Apply this rule to all items of a compound document if the parents match: The action will be performed on a file if the criteria match
the file or the file's parent. To look at it from the other direction, if a parent file matches a Rule's criteria, the action of that Rule will be applied to
that parent document and all of its children. This may be used in a deduplication Rule.
2.
Apply this rule to all items of a compound document if at least
one item matches: The action will be performed on a file if the criteria
match any item in that file's family. In other words, if a file matches a
Rule's criteria, the action of that rule will be applied to all files in the
family (parents and siblings). This may NOT be used in a de-duplication
Rule.
3.
Apply this rule to all items of a compound document if ALL items
match: The action will be performed on a file if the criteria match ALL
items in that file's family. This may NOT be used in a de-duplication Rule.
Useful for keyword filtering.
4.
Treat individual items of compound documents separately: The
action will be performed only on files where the Rule criteria match that
particular file. The file is evaluated independent of its family. This may
be used in a de-duplication Rule.
Category: Select an existing category or enter a category. The category is
applied to the effective rule. Once the category is entered, it is available from
the pick list for newly defined rules. See the section Rule Bar Options on page
A-7 for additional information about categories and search terms.
Set QC Flags: (Note: QC Flags can be set for all Actions but Remove.) Use
QC flags to organize data and create Export Sets in QC. The QC flag is set
when the rule action is applied. Click
to open the New Flag dialog.
Type the new flag and click OK. Newly created flags will display in the QC job
and allow filtering on the flag. Specify whether you want the affected files to
be assigned a QC flag during processing.
www.iprotech.com
877-324-4776
Ipro eCapture User Guide
Q1 2014
A-17
Appendix A, Using the Flex Processor Rules Manager
Customizing Placeholders
Custom placeholders can be created for each rule in a Processing Job. To utilize this option the ‘Action:’ must be set to ‘Placeholder’ or ‘Placeholder with
Document Text’ to display the Customize Placeholder option ‘Select metadata
fields’. Customize the placeholder by selecting from Available Fields: ‘All Fields’,
‘System’, ‘Flags’, ‘Metadata’, and ‘User Defined’. By default, the metadata fields
display in the top left corner in a list format.
Starting with version 5.6.1, a custom placeholder will be used in the event an
item is marked as an error for a Processing Job. The labels for the placeholder
are retained with the exception of the metadata fields which will display as
blank. The standard generic default error placeholder will still be used for Data
Extract Jobs.
Just as in Export, custom fields can be created consisting of a field name and a
user input field value (text). Similar fields may be grouped into a single group.
The order of the metadata fields may be changed.
When the System Field, FLEX_PROCESSOR_RULE_TITLE, is selected, the Rule
Title will display.
A maximum of 10 fields may be selected.
Font options are available for each selected field.
1.
A-18
From the Action drop-down list, select either Placeholder or Placeholder
with Document Text. The Customize Placeholder link appears to the right
of the Action field.
Ipro eCapture User Guide
Q1 2014
www.iprotech.com
877-324-4776
Using the Rule Set Management Wizard
2.
Click Select metadata fields to display the Custom Placeholder Configuration dialog.
3.
Click the drop-down list located above the Available Fields list, and
select a specific field type. By default, All Fields display. To further narrow the field list, enter a value in the Filter Value field located below
the Available Fields list. For example, to see only those fields that contain the word “date”, enter date and click
delete the value and click
www.iprotech.com
877-324-4776
. To display all fields,
.
Ipro eCapture User Guide
Q1 2014
A-19
Appendix A, Using the Flex Processor Rules Manager
: Click to move a selected field from the Available Fields box to
the Selected Fields box.
: Click to move a selected field from the Selected Fields box to
the Available Fields box.
: Opens the Insert Custom Field dialog where you
can create new group fields and new user fields. Inserting Custom Group
Fields is discussed in Chapter 7, Creating Export Series and Export Jobs
in the section, Inserting Custom Group Fields on page 7-27.
and
: Use these arrows to change the order of the fields in the
Selected Fields box. Select a field (or contiguous fields) and then use
either arrow to reposition it (or the selected fields) accordingly.
4.
Select a field in the Selected Fields box. The selected field appears in the
Font section. Click
to open the Font dialog. Select from the Font
options and click OK to return to the Custom Placeholder Configuration
dialog. Repeat for each additional field.
5.
Select from the following options:
Field Options
Include labels with values: When selected both the field label and its
value are included.
Placement Options
Select from the following metadata field placement options.
Alignment
•
•
Vertical Alignment: Determines placement along the vertical
axis. Options include Top, Center, or Bottom. Top is the default.
Horizontal Alignment: Determines placement along the horizontal axis. Options include Left, Center, or Right. Left is the default.
Indentation: Indicate space for the Left and Right. This setting determines the horizontal spacing to the left or right of the page margins.
A-20
Ipro eCapture User Guide
Q1 2014
www.iprotech.com
877-324-4776
Using the Rule Set Management Wizard
Line Spacing: Determines the number of lines or font points that separate each metadata field. Options include None, Single, 1.5 Lines, and
Double. Single is the default.
Truncation: Determines the number of characters at which the field
value will be truncated. Default value is 128 characters.
www.iprotech.com
877-324-4776
Ipro eCapture User Guide
Q1 2014
A-21
Appendix A, Using the Flex Processor Rules Manager
Date Field Formatting Options
Click
Options dialog.
to open the Date Field Formatting
Legacy Date Field Formatting: By default, this option is selected. Deselect
this option to select from the Invalid date options and to select fields for date
format handling.
Date Field Formatting: If you want to change the date field to a different
format, select from the following formats:
•
A-22
YYYYMMDD
Ipro eCapture User Guide
Q1 2014
www.iprotech.com
877-324-4776
Using the Rule Set Management Wizard
•
•
•
•
YYYY/MM/DD
MMDDYYYY
MM/DD/YYYY
DD/MM/YYYY
Otherwise, select the option, Do Not Convert Date Fields.
Time Format: Select from:
•
•
•
12-hour [displays time in 12 hour format e.g. 1:04]
24-hour [displays time in 24 hour format, e.g. 13:04]
Regional [formats the time according to the “default” Regional Settings
of the Worker the document is being exported on. Note: Changing the
format strings using the “Customize” button of Regional Settings will
have no effect; the actual region needs to be changed to see any effect.
Resolve Times to Second Precision: Select this option if you want to add
seconds to all metadata date fields that have time. This does not apply to the
images.
Invalid date options
Treat date values outside of specified range as invalid dates - Select a
start date and end date range. Any dates outside of the selected range will be
considered as invalid dates. The start date default is set to SQL minimum date.
The end date default is set to SQL maximum date.
Select one of the following options:
•
•
Invalid date field output value - enter text to display in the event an
invalid date is encountered. This field may be left blank.
Invalid date field output do not convert - invalid dates will be output
as a text field.
Field Selection
The only fields that are not present in the list are *DATE_ONLY* and
*TIME_ONLY*. The fields in the available field list are comprised of fields that
are marked as valid for date formatting. This is determined by the value of
TRUE in the ExportAttemptDateParse field located in the EncounteredMetatdataFieldList table.
Date field formatting options affect only those fields in the Fields Selected for
Date Format Handling box.
www.iprotech.com
877-324-4776
Ipro eCapture User Guide
Q1 2014
A-23
Appendix A, Using the Flex Processor Rules Manager
Date field formatting options are set at the Job level.
Available Fields: Displays all fields available to be exported. Click the dropdown list located above the field list, and select a specific field type. By
default, All Fields display. Ctrl-click to select non-contiguous fields. Shift-click
to select a contiguous range.
Filter Value - enter a value to filter the list. For example, to see only those
fields that contain the word “date”, enter date and click
fields, delete the value and click
. To display all
.
Select a field for date format handling by selecting the field from the Fields
Available for Date Format Handling and clicking
to move the single
field to the Fields Selected for Date Format Handling box.
For two or more fields, ctrl-click to select non-contiguous fields or shift-click to
select a contiguous fields. Once the fields are selected, click
them to the Fields Selected for Date Format Handling box.
to move
Ipro eCapture creates two additional fields that “split” the date and time into a
Date Only field and a Time Only field. These two additional fields will be displayed in the Available Fields list in the Export Wizard, Select Export Fields
screen. For example, if the DueDate field was moved to the Fields Selected for
Date Format Handling, the following additional DueDate fields would appear in
the Available Fields list: DueDate*DATE ONLY* and DueDate*TIME ONLY*.
Click OK to close the Date Field Formatting Options dialog and return to the
Custom Placeholder Configuration dialog.
Saving Custom Placeholder Definitions
The Custom Placeholder settings and definitions may be saved and later
retrieved for loading rather than creating them manually each time.
1.
If necessary, click Select metadata fields in the Flex Processor Rules
Manager.
2.
Select the options in the Custom Placeholder Configuration dialog.
A-24
Ipro eCapture User Guide
Q1 2014
www.iprotech.com
877-324-4776
Using the Rule Set Management Wizard
3.
Click
. The Enter Description dialog appears.
4.
Enter an optional description. A maximum of 100 characters is permitted. Use a single space if a description is not necessary.
5.
Click OK. A dialog prompt appears stating Placeholder saved as ID n.
The settings are saved to the CONFIG database.
6.
Click OK to close the Custom Placeholder Configuration dialog.
Loading Saved Custom Placeholder Definitions
Existing definitions can be loaded into the Custom Placeholder Configuration
dialog.
1.
If necessary, click Select metadata fields in the Flex Processor Rules
Manager.
2.
Click
3.
Select a Stored Placeholder.
4.
Click OK. The Custom Placeholder Configuration dialog populates with
the settings replacing the previous settings.
to open the Load Stored Placeholder dialog.
Deleting Stored Placeholder Definitions
1.
If necessary, click Select metadata fields in the Flex Processor Rules
Manager.
www.iprotech.com
877-324-4776
Ipro eCapture User Guide
Q1 2014
A-25
Appendix A, Using the Flex Processor Rules Manager
2.
Click
3.
Select a Stored Placeholder.
4.
Click
5.
Click Yes to delete the placeholder.
A-26
to open the Load Stored Placeholder dialog.
. The Confirm Deletion dialog appears.
Ipro eCapture User Guide
Q1 2014
www.iprotech.com
877-324-4776
Defining Selection Criteria
Defining Selection Criteria
General Criteria Tab Options
All Files: A rule with this option selected will apply to all of the files in the Processing Job. It is typically used as the first Rule in a Rule set so you can start
with everything and then remove or placeholder certain files based on more
specific criteria. From the Action drop-down list select Image (if a Processing
Job) or Data Extract (if a Data Extract Job).
This is an exclusive criterion (it cannot be combined with other criteria).
Duplicates: Select Process Job Duplicates and/or Data Extract Job Duplicates
and then select the level from their respective drop-down lists. (Selecting one,
or both of these options enables de-duplication.) The options are:
•
•
•
•
Current: documents which are duplicates of the current job only will be
removed (Processing Job Duplicates only)
Custodian: documents which are duplicates of any job within the custodian will be removed
Project: documents which are duplicates of any job within the project
will be removed
Client: documents which are duplicates of any job within the client will
be removed
Duplicates are determined by matching the MD5 hashes of files.
www.iprotech.com
877-324-4776
Ipro eCapture User Guide
Q1 2014
A-27
Appendix A, Using the Flex Processor Rules Manager
If Advanced Duplicate Checking is enabled, then MD5 hash matches are verified with bit-by-bit comparison before being flagged as a match.
File Name Match requires that the filenames of the two files (loose files only,
not e-mails) must be the same. Bit-by-bit comparison and file name comparison does not occur for e-mail types.
(If de-duplication is selected all other criteria is not available.)
A file is checked for duplication when a job starts. At this time, the SelectionIDs are assigned to the documents. These SelectionIDs are closely tied with
the order that the documents were discovered. Documents are distributed to
workers; and it is at this time, that the document is checked against all previously ‘processed’ documents (the originals) in line with the selected scope and
duplication options.
Ensure the appropriate Action is selected. See the section Defining Actions for
a Flex Processor Rule on page A-15. If necessary, determine whether or not a
de-duplication flag should be set.
There are two scope options available when using Duplicates:
a) Maintain Compound Document Structure: The action will be performed
on a file if the criteria match the file or the file's parent. To look at it from the
other direction, if a parent file matches a Rule's criteria, the action of that Rule
will be applied to that parent document and all of its children. Only an entire
family of documents are considered duplicates. If a parent document is not
identified as a duplicate, but its child document is, no documents would be
identified as a duplicate and hence no documents removed.
The Allow Child Originals option is selected by default and controls how child
documents are compared during de-duplication when the option Maintain
Compound Document Structure is selected. This allows documents, including
loose files, to de-duplicate against child documents predicated on order they
are processed. For example, if two Word documents exist with the same
MD5Hash value; one as child attachment to an Email parent, the other as a
loose Parent, the loose Parent (Word document) is removed. However, if the
loose Parent (Word document) is encountered before the Email (parent) and
its Word (child attachment) the Word (child attachment) is not removed.
Deselect this option to force duplicate checks at the parent level only. Note: A
system-level default can be set by updating the DedupAllowChildOriginals column in the ConfigurationProperties table in the CONFIG database to either
true or false. However, the setting in the Flex Processor rule takes precedence.
A-28
Ipro eCapture User Guide
Q1 2014
www.iprotech.com
877-324-4776
Defining Selection Criteria
In addition, versions prior to 6.1 would treat children as originals unless otherwise specified.
An example follows when de-duplication is enabled:
Compound Doc Scope = MAINTAIN STRUCTURE
Child items still inherit the status of the parent. If the parent is deduplicated, the child is also de-duplicated.
Loose (independent) files can still be filtered if they match the rule
criteria or are not selected by rule criteria (no Effective Rule). With
de-duplication enabled, loose files will always be checked against
parent documents, but have the potential to be checked against
child documents ONLY if the parent/child combination are marked
as "originals". If the loose file is marked as an original the parent
document will still be checked against the loose file, but the child
document will not because it inherits its parent's status due to the
selected Compound Doc Scope.
For example:
EM1 (e-mail) as 3 attachments, Doc1_Att, Tiff1_Att, & Excel1_Att. Two
independent files, Tiff1 & Excel1, are duplicates of Tiff1_Att and
Excel1_Att. The documents are selected in this order:
EM1
Doc1_Att
Tiff1_Att
Excel1_Att
Tiff1
Excel1
Assuming the parent is not a duplicate, it is then considered an original,
as are all of its children. When the loose documents are checked, they
are checked against all files, including the children. Because they are
duplicates of two of the attachments, they are removed.
If the documents are selected in this order:
Tiff1
www.iprotech.com
877-324-4776
Ipro eCapture User Guide
Q1 2014
A-29
Appendix A, Using the Flex Processor Rules Manager
Excel1
EM1
Doc1_Att
Tiff1_Att
Excel1_Att
the loose files are now considered originals. The parent is checked
against these two files; it is not a duplicate, so it is not removed. The
attachments, though duplicates of the loose files, inherit the status of
the parent, and are also not removed.
b) Treat Documents Individually: The file is evaluated independent of its
family. Any document can be considered a duplicate regardless if it is a parent
document or a child document.
An example follows when de-duplication is enabled:
EM1 (e-mail) selected for processing
EM1 is selected to process.
Doc1 is selected to process as child of EM1 unless a duplicate, not
selected if a duplicate.
Tiff1 is processed as child of EM1 unless a duplicate, not selected if
a duplicate.
Excel1 is processed as child of EM1 unless a duplicate, not selected
if a duplicate.
EM1 not selected (filtered, not a search result, or a duplicate)
EM1 not selected to process.
Doc1 is selected to process as normal document unless a duplicate, not selected if a duplicate.
Tiff1 is selected to process as normal document unless a duplicate,
not selected if a duplicate.
Excel1 is selected to process as normal document unless a duplicate, not selected if a duplicate.
A-30
Ipro eCapture User Guide
Q1 2014
www.iprotech.com
877-324-4776
Defining Selection Criteria
Allow Child Originals: Allows documents, including loose files, to de-duplicate against child documents. If unchecked, forces duplicate checks at the parent level only. This option is disabled for the Scope: Treat documents
individually.
File Size: When File Size is selected for a rule, it applies to the files in the Processing Job which have sizes on disk of either greater than or equal to, or less
than or equal to, the size specified. The size is expressed in KB. For example, a
1 MB file will be entered as 1024 KB.
File Types: Filters determine the types of files that you can bring into an electronic discovery job during a Discovery session. The settings made here determine the file types you will be able to select during a Discovery session.
Ipro eCapture recognizes documents by their actual content and not the file
extension. Keep this in mind as you exclude/include file types for a Processing
Job.
You can filter (exclude) a myriad of file types by simply selecting the file type
check box. When the processing job runs, it will process only those file types
that you want and exclude all others that you selected in the Filters dialog.
For example, you discovered a directory containing 15 different types of files.
Some of these files were word processing documents. You want to run a Processing Job that includes only Microsoft Word documents.
There is a separate category for Microsoft Word documents (and subcategories
of all the versions of Microsoft Word under the Microsoft Word category) as
well as a separate generic Word Processing category which contains subcategories of all other word processing file types such as Lotus Word Pro, WordStar, .RTF, etc.
If you ask for only Microsoft Word .DOC files then you would also select the
generic Word Processing category to automatically exclude any other type of
word processing file that exists in the Discovery Job that you selected. The
Processing Job will process those documents that it recognizes as Microsoft
Word documents based on their actual content.
These file types are based on the Oracle’s Outside-In identification criteria.
Select All: Select every file type.
Clear All: Clear all the selected file types.
www.iprotech.com
877-324-4776
Ipro eCapture User Guide
Q1 2014
A-31
Appendix A, Using the Flex Processor Rules Manager
File Extensions: You can specify specific extensions of files you do not want
to process. Click Add... to add the extension to the list. Repeat for each extension.
To import a list of file extensions from a .CSV file, click Load From File. Select
the .CSV file and click Open. An Import From File progress bar appears. If any
errors were encountered during the import, such as duplicates, an Information
dialog appear with the errors. The .CSV file may contain extensions with or
without . (period). Ensure the .CSV file contains only one column of file extensions with each extension occupying its own row, e.g. Range A1 through A50
or Range E1 through E50. The file extensions are alphabetized upon import
into the Flex Processor.
If you want to remove a specific extension from the list, select the extension
and click Remove.
Clear removes all the extensions from the list.
Date Criteria Tab Options
Date Filters
E-mails will use E-mail Date, while loose files will be filtered by Last
Modified Date. For e-mails with no E-mail Date, you may select a
behavior from the drop-down list as described in step 3 below.
You may select as many different data selections as needed.
A-32
Ipro eCapture User Guide
Q1 2014
www.iprotech.com
877-324-4776
Defining Selection Criteria
To limit discovery to files created within a specific date range:
1.
Select the option Filter by Date.
2.
Specify the date range (Start Date and End Date) for files that you
want to select. Only files whose dates fall within the selected range will
be selected during discovery sessions. Note: If the work is ongoing, use
an end date as far into the future as possible so you may re-use the
Rule, if necessary. The filter starts/ends at midnight on the selected
date.
3.
(Optional) For e-mails with no E-mail Date, select from one of the following behaviors:
•
•
•
•
Use Creation Date
Use Last Modification Date
Always Include
Never Include
Example
Set the Start Date to 2/12/2004 to include files created on or after 2/12/
2004.
Set the End Date to 2/20/2004 to include files created on or before 2/20/
2004.
www.iprotech.com
877-324-4776
Ipro eCapture User Guide
Q1 2014
A-33
Appendix A, Using the Flex Processor Rules Manager
Search Criteria Tab Options
If you do not run a search, then every item from the Discovery Job will be
selected. Otherwise, you can run a search and specify the search criteria when
creating Data Extraction Jobs or Processing Jobs.
If the option, Create dtSearch index during initial discovery, was deselected for
a new Discovery Job, then searching is not available for a new Processing Job
that includes that non-indexed Discovery Job.
A search filters the Data Extraction Job and the Processing Job results according to text contained within the files.
A-34
Ipro eCapture User Guide
Q1 2014
www.iprotech.com
877-324-4776
Defining Selection Criteria
Search Request box: Where the search phrase or the search words are
entered.
During a word search, parents are automatically selected when a child
meets a search requirement. The compound document settings determine this behavior.
Using Previous Searches
Click
located in the upper right portion of the Search Request box to display the Search Request dialog.
This dialog shows a list of previously run searches conducted for a Project’s
Processing and/or Data Extract Jobs and the search strings for each of the Processing and/or Data Extract Jobs.
The Search Request dialog can be dragged around the desktop and resized if
necessary.
www.iprotech.com
877-324-4776
Ipro eCapture User Guide
Q1 2014
A-35
Appendix A, Using the Flex Processor Rules Manager
This feature allows you to use the same search options and search string for a
new Processing and/or Data Extract Job rather than manually selecting the
search options again and retyping in the same search string.
Note: If you Cancel out of this dialog, then the search terms remain
unchanged.
1.
Select the search item in the listview screen. When you select it, you will
see its search string displayed in the text box below. Note: Clicking a
search item in the listview will replace whatever is in the textbox with
the search string of the selected search.
2.
Select one of the following options:
•
•
Use all search options - to use the search options that were
selected for that search item.
Use search string only - to change only the search string.
3.
Click OK. It will replace the search form’s search string with the current
contents of the search request textbox. It will also return you to the
Search Criteria tab where you may modify the search options, if necessary.
4.
Continue selecting additional options in the Flex Processor Rules Manager. The search will be added to the listview in the Search Request dialog. You may then select that search item for a future search.
Search Options
There are 4 options under Search for: Any Words, All Words, Boolean-Search
(and, or, not, ...), and Natural Language. Only one can be selected at a time.
•
Any Words: This search request is for unstructured natural language or
“plain English” queries. The Boolean operators AND & OR are disregarded. Examples follow:
You may use "quotation marks" around phrases. For example, “personal
computer”. Quotes are used when the search requires that the words are
contiguous and in the order they are indicated.
add + in front of any word or phrase to require it
add - in front of any word or phrase or to exclude it
Example: "personal computer" -monitor +"flash drive"
A-36
Ipro eCapture User Guide
Q1 2014
www.iprotech.com
877-324-4776
Defining Selection Criteria
•
•
All Words: This search request is similar to Any Words (previous bullet
item), with the exception that all of the words in the search request
must be present for a document.
Boolean Search: Activates and, or, not, w/5, w/25, and fields under the
Search Request box. Use these as you compose your search request.
The following table describes Boolean examples/interpretations and
additional search options.
Boolean Usage Examples
Interpretation
computer and monitor
both words must be present
computer or monitor
either word can be present
computer w/5 monitor
computer must occur within 5
words of monitor
computer not w/5 monitor
computer must occur, but not within
5 words of monitor
computer not monitor
only computer must be present
[fieldname] contains smith
the field name must contain smith
computer w/5 xfirstword
computer must occur in the first
five words
computer w/5 xlastword
computer must occur in the last five
words
Using Special Characters
Use ? to match any single character. For example, appl? matches apple or
apply
Use * to match any characters. For example, m*g matches mustang, morning,
mug, etc.
~~ matches a numeric range. For example, 14~~18 looks for 14, 15, 16, 17,
or 18
www.iprotech.com
877-324-4776
Ipro eCapture User Guide
Q1 2014
A-37
Appendix A, Using the Flex Processor Rules Manager
Click
to display the Search Fields dialog.
Select the metadata field from the list and click OK. For example, if
you selected Filename, the Search Request box would contain the following:
From the Search Request box: (Filename contains ( ))
A-38
Ipro eCapture User Guide
Q1 2014
www.iprotech.com
877-324-4776
Defining Selection Criteria
The cursor automatically appears between ( )) ready for an entry. Enter
the filename. The finished result would look like this:
From the Search Request box: (Filename contains (ProfessionalReport.doc))
To select an additional metadata field, click
instructions.
. Repeat the above
Searching for Dates, Email Address, or Credit Card Numbers
Ensure that the option, Recognize Dates, Email Addresses, and Credit
Card Numbers, is selected under Search Indexing in the Discovery
Options dialog.
To search for dates (in various formats), email addresses (complete or
partial addresses), or credit card numbers, enter:
•
date() e.g. date(Jan 15 2006) or date(15 Jan 06) or any of these
other formats:
date(2006/01/15)
date(1/15/06)
date(1-15-06)
•
•
date(The fifteenth of January, two thousand six)
mail() - e.g. mail([email protected]) or mail(s*@iprotech.com)
creditcard() - e.g. creditcard(5555 6666 9999 3333) or any of
these other formats:
creditcard(5555-6666-9999-3333)
creditcard(5555666699993333)
www.iprotech.com
877-324-4776
Ipro eCapture User Guide
Q1 2014
A-39
Appendix A, Using the Flex Processor Rules Manager
•
Natural Language: Automatically weights the words in an “Any Words”
search to disregard words such as AND and OR and focus on the more
relevant, less frequently found words. An example follows:
Enter the terms Find the memo on ski-induced paralysis to weight
“ski-induced” and “paralysis” very high in the search results, helping to
weed out hits for “memo”.
Stemming: Extends a search to cover grammatical variations. Use ~ at the
end of the word to search for stemming variations. An example follows:
Enter the terms fish~ swamp applied~ to find fish, fishing, swamp, as
well as applying, applies, and apply.
Stemming rules are designed to work with the English language. They
are stored in the stemming.dat file in the dtSearch folder. The default
path starts with the directory you indicated during the Ipro eCapture
installation followed by \Shared\dtSearch.
Phonic: Looks for words that sound like the word you entered in the search
request. An example follows:
Enter #Smith to find Smith, Smithe, and Smythe.
For best results, use a # in front of individual words to be searched phonically. If you simply select Phonic searching under Search Features, the
search will apply phonic rules to all words and can return too many inappropriate results.
Synonyms: Finds synonyms established by Ipro eCapture’s dtSearch function
or user-defined. Use & at the end of the word to search for its synonyms. An
example follows:
Enter watchful& monitor to search for the word watchful or its synonyms and/or the word monitor (without synonyms).
Related Words: Select this option to support synonym searches. Standard synonyms and related words are supplied by WordNet (supplied
with dtSearch and built into Ipro eCapture). For example, the related
words for Face would be eyes, nose, mouth, etc.
A-40
Ipro eCapture User Guide
Q1 2014
www.iprotech.com
877-324-4776
Defining Selection Criteria
Fuzzy Searching: Finds words even if they are misspelled. A search for
alphabet with a fuzziness of 1 would also find alphaqet. With a fuzziness of 3,
the same search would find both alphaqet and alpkaqet. It is useful for text
that may contain typographical errors or that has been imaged and OCRed.
Use the slide meter to adjust the fuzzy search level.
Include Non-indexed Files as Matches: Pulls all Non-Indexed files that
dtSearch could not Index and whose hits could not be applied. This is a useful
option because it can create and apply a flag, such as NON-Indexed File, and
then export out only this data collection for review in order to verify that no
Privileged or Hot documents were missed. File examples include: PDF, Graphics, JPEGs, TIFFs, etc.
Apply Language Analyzer: This option is disabled by default. Select this
option and create a new rule if you have a Job that requires multi-language
capability handling. For example, CJK (Chinese, Japanese, Korean) text
appears as lines of characters with no spaces between the words. The Language Analyzer provides a way to add customized word breaking and morphological analysis (components, morphemes, that comprise words) to the
dtSearch engine. The ApplyLanguageAnalyzer field (FilterManager) carries
over to rules for importing, exporting, and Master Rules operations.
Click
to display the Search Status dialog.
The Rule ID is displayed in the Title Bar.
Immediately after the search progress completes, the Search Hits Preview dialog appears. (Note: Not available if the Discovery Job is not completed.) The
Search Hits Preview dialog displays the following search results in a grid format for each file that meets the criteria:
www.iprotech.com
877-324-4776
Ipro eCapture User Guide
Q1 2014
A-41
Appendix A, Using the Flex Processor Rules Manager
•
•
•
•
•
•
ItemID
Name of the File
Score (Percentage Value)
Hits - total number of search terms that appear in a single document.
For example, the number 7 may indicate that a single term appeared 7
times in the document or that 2 terms appeared, one term 3 times and
the other term 4 times.
Location (File’s path)
Size of the File
Select an item and click
to view the file in its native application.
The native application must be installed on the workstation. If it is not, the
Windows dialog appears with a message stating that “Windows cannot open
this file:” and offers additional options for opening the file.
To save the results to a .CSV file, click
to open the Save As a .CSV
File dialog. Navigate to the location to save the file. Accept or change the
default filename. Click Save.
Close the Search Hits Preview dialog to return to the New Rule Wizard.
NOTE: The Load Search Terms from a File button has been removed. The
functionality is now located in the Rule Set Management Wizard.
A-42
Ipro eCapture User Guide
Q1 2014
www.iprotech.com
877-324-4776
Defining Selection Criteria
Advanced Criteria Tab Options
There are several new ways to select files for action mapping. These different
selection types depend on hash values or Item IDs, which need to be identified
in order to be used. The NIST NSRL files have already been identified through
NIST.
Keep in mind that when loading or importing lists, the existing list is overwritten. If you want to import more than one list, create a separate, additional
Rule.
Item IDs
Importing of Item IDs is useful for targeted TIFFing.
Item ID list rules will not transfer to other jobs, master rule sets, or
project default options.
Filtering by Item ID is typically done when producing files that were part of
previous jobs from the same Client. (Note: Because Item IDs apply only
within a given Client, importing Item ID lists from other Clients will lead to
incorrect results.)
Filtering by Item GUIDs (Globally Unique Identifiers) - gives a more reliable
method to positively identify Ipro eCapture Items records for a Client.
www.iprotech.com
877-324-4776
Ipro eCapture User Guide
Q1 2014
A-43
Appendix A, Using the Flex Processor Rules Manager
Import from Another Job
ItemIDs can be imported from another job by clicking
Import from Job dialog appears.
1.
Select the job from which to import items.
2.
Select one of the following:
•
•
A-44
. The
Items Processed - Specify which statuses (e.g. Queued, Error,
etc.) to import.
Items with no effective rule - This option allows for the capability of using all items not in the results of the selected job.
Ipro eCapture User Guide
Q1 2014
www.iprotech.com
877-324-4776
Defining Selection Criteria
The Flex Processor Rules Manger will then place the Item IDs that meet those
criteria into the list.
Load from File
Click
if you want to load a file of ItemIDs or ItemGUIDs
into a rule. The file’s format should be one ItemID or one ItemGUID per line,
with no punctuation.
Only the ItemIDs or ItemGUIDs that are already part of the selected Discovery
Jobs of the current Job will be included. Use the Data Extract Import option
when creating a new Job to automatically select Discovery Jobs based on the
ItemIDs or Item GUIDs.
E-mail Entry IDs
Import the list of IDs into the Flex Processor Rules Manager to produce just
the desired files from that same PST. A Rule with a list of E-mail Entry IDs
loaded will apply to the files in the Processing Jobs whose e-mail entry IDs are
an exact match.
The file’s format is one EntryID per line, with no punctuation. If the PST from
which the entry IDs were extracted is not part of the job, there will be no
matches for the Rule.
Flex Processor Rules Manager will match the filenames, without extensions,
with the EntryID imported from the file.
Note: This will not extract files from the containers; nor is it effective for
removing e-mail.
NIST NSRL Matches: (Note: The optional NIST database must be loaded
and set up for use with Ipro eCapture in order to use this feature.) See the
Ipro eCapture Installation and Setup Guide for instructions.
This is an exclusive criterion (it cannot be combined with other criteria).
A rule with this selected will apply to the files in the Processing Job whose MD5
hashes match those of files in the NSR Library published by NIST. It is typically
used in a Remove rule to eliminate non-responsive files such as OS files.
The option will be disabled unless the NIST match was completed on all Discovery Jobs that contribute to this Process Job/Data Extract Job.
www.iprotech.com
877-324-4776
Ipro eCapture User Guide
Q1 2014
A-45
Appendix A, Using the Flex Processor Rules Manager
Custom Hash List Matches: (Note: The hash lists must be loaded before
using this feature. See Chapter 2, Ipro eCapture Controller and the section
Loading the Hash Lists on page 2-23 for loading hash list information.)
This is an exclusive criterion (it cannot be combined with other criteria).
In most cases, the Action will either be Remove or Placeholder. Multiple Custom Hash Lists can be used on one Job; however, a separate Rule must be created for each list.
When the Job is processed, the MD5 hashes of the times in the job will be
matched against the MD5 hashes of the entries in the Custom Hash List. Any
matching items will have the appropriate action applied. At this point, the later
Rules will supersede the earlier Rules.
Create Parent Item ID List or Child Item ID List
Item ID list rules will not transfer to other jobs, master rule sets, or
project default options. The rule is set individually for each job.
The original item IDs associated with the native files that were included in the
selected Discovery job or jobs can be loaded for use in a rule.
A Parent item ID rule loads the item IDs for the parent documents. This essentially suppresses embedded file extraction items from being processed.
The Child item ID rule loads the item IDs for the attachments. This option
allows for attachments to be exported or to be used as a last rule to remove
attachments and maintain parent (top level) item IDs only. The processing
would be matched to the original source media.
These rule options are used in conjunction with the Export option, Use filename for Image Key (located in the last export wizard screen), in order to
maintain the original document numbering as the file goes through each phase
in Ipro eCapture.
A-46
Ipro eCapture User Guide
Q1 2014
www.iprotech.com
877-324-4776
Using the Flex Processor Rules Manager Wizard
See Chapter 7, Creating Export Series and Export Jobs and the sections Use
filename: Formerly called Use filename for Image Key. on page 7-49 or Using
Generated Numbering on page 7-179 for specific information regarding the
Use Filename for Image Key feature and the caveats for the data to be
exported.
This feature is grayed out and not available until the Discovery Job has
completed.
Click
or
to load all Parent item IDs or
Children item IDs (respectively). The Scope rule is automatically changed to,
Treat individual items of compound documents separately to ensure desired
output. Changing the scope rule may produce incorrect output.
Using the Flex Processor Rules Manager Wizard
The Flex Processor Rules Manager Wizard can be used as an alternative to the
Flex Processor Rules Manager Interface as a simplified way of creating rules to
cull and manage the data set. The Wizard has the same options, displayed on
separate screens. However, one exception would be importing a key search
terms list. This can only be accomplished through the Flex Processor Rule Set
Management Wizard. See Using the Rule Set Management Wizard on page A-9
for additional information.
www.iprotech.com
877-324-4776
Ipro eCapture User Guide
Q1 2014
A-47
Appendix A, Using the Flex Processor Rules Manager
When you click
General Options.
to start the New Rule Wizard and display the
See the section General Criteria Tab Options on page A-27 for information on
the options in this screen. After selecting the options, click Next to display the
Date Range Filtering Options.
A-48
Ipro eCapture User Guide
Q1 2014
www.iprotech.com
877-324-4776
Using the Flex Processor Rules Manager Wizard
See the section Date Criteria Tab Options on page A-32 for information on the
options in this screen. After selecting the options, click Next to display the
Search Options.
See the section Search Criteria Tab Options on page A-34 for information on
the options in this screen. After selecting the options, click Next to display the
Advanced Options.
www.iprotech.com
877-324-4776
Ipro eCapture User Guide
Q1 2014
A-49
Appendix A, Using the Flex Processor Rules Manager
See the section Advanced Criteria Tab Options on page A-27 for information on
the options in this screen. After selecting the options, click Next to display the
Title and Action Options.
See the section Defining Actions for a Flex Processor Rule on page A-15 for
information on the options in this screen. After selecting the options, click Next
to display the Summary Information.
A-50
Ipro eCapture User Guide
Q1 2014
www.iprotech.com
877-324-4776
Using the Flex Processor Rules Manager Wizard
Do any of the following that apply:
•
Go back through the screens if you need to change any settings.
•
Click
to create another rule. The system displays
the General Criteria screen. Proceed to create a new rule.
•
Click
to close the Rule Wizard. The Rule appears in the Current
Filtering Rules list (Processing Job Options or Data Extract Job
Options:Filtering Tab).
www.iprotech.com
877-324-4776
Ipro eCapture User Guide
Q1 2014
A-51
Appendix A, Using the Flex Processor Rules Manager
A-52
Ipro eCapture User Guide
Q1 2014
www.iprotech.com
877-324-4776
Appendix B Fail Task
Warning Messages
Overview
This Appendix lists Fail Task types and their associated warning messages
detailing the impact of failing the task. Not all task types can be failed.
Failing tasks is performed from the Controller’s Worker Status Information tab
- Activity grid. (Note: Failing tasks is not available in the Limited Controller.)
See Chapter 2, Ipro eCapture Controller and the section Worker Status Information Tab View on page 2-49 for information on how to fail a task.
Fail Task Type
Warning Given
DiscoverDirectory
Failing this task will prevent any items in the
specified directory path from being discovered.
DetectContainers
This task is not eligible for failure.
ReadEmailFields, ReadLotusEmailFields
This task is not eligible for failure.
CalculateMD5Hash
Failing this task will prevent all files in this node
or related files from having accurate de-duplication results.
DiscoverOutlookFolders,
DiscoverGroupWiseFolders, DiscoverLotusFolders
Failing this task will prevent any items in the
mail store from being discovered.
ExtractMessagesFromOutlookStoreFolder, ExtractMessagesFromOutlookExpr
essStore, ExtractMessagesFromGroupWiseStoreFolder,ExtractMessagesFro
mMboxStore
Failing this task will prevent any messages
from this e-mail folder or node from being
extracted.
www.iprotech.com
877-324-4776
Ipro eCapture User Guide
Q1 2014
B-1
Appendix B, Fail Task Warning Messages
Fail Task Type
Warning Given
ExtractMessagesFromLotusStore, ExtractMessagesFromLotusStoreFolder
Failing this task will prevent any messages
from being extracted from this group of files.
ExtractFilesFromArchive
Failing this task will result in no files being
extracted from this archive.
ExtractEmbeddedFilesFromFile
Failing this task will prevent embedded files or
e-mail attachments from being extracted from
this file.
CalculatePageCount
Failing this task will result in no page count
being estimated for this file.
OCRImage
Failing this task will result in no text file being
generated for this file.
DiscoveryRetry
This task is not eligible for failure.
Process
Failing this task will result in a placeholder
image being generated for this file.
DataExtraction
Failing this task will result in text placeholder
being generated for this file.
ExportDocumentPrepare,
ExportLargeDocumentPrepare
Failing this task will result in this document
missing from the load file and some or all files
will be missing in the export directory.
CommitLoadFile
Failing this task will result in the failure to write
a load file to disk.
IndexFolderX, IndexRetryExceptions
This task is not eligible for failure.
RestartWorker
This task is not eligible for failure.
PrepareNotes
This task is not eligible for failure.
ImageNotesPreparedDocument
Failing this task will result in a process task
being inserted for this file.
B-2
Ipro eCapture User Guide
Q1 2014
www.iprotech.com
877-324-4776
Overview
Fail Task Type
Warning Given
DataExtractNotesPreparedDocument
Failing this task will result in a data extract task
being inserted for this file.
ApplyFlexProcessorRule
Failing this task will result in the rule being set
to error status and the job being returned to
unstarted status after rule application completes.
www.iprotech.com
877-324-4776
Ipro eCapture User Guide
Q1 2014
B-3
Appendix B, Fail Task Warning Messages
B-4
Ipro eCapture User Guide
Q1 2014
www.iprotech.com
877-324-4776
Appendix C Lotus Notes
In This Appendix
Overview ......................................................................... C-1
Locating the User ID File .................................................C-1
Copying the User ID File ..................................................C-2
Switching the ID.............................................................C-3
Changing the Password ...................................................C-4
Switching Back to the Original User ID (if necessary) ..........C-6
Applying the Lotus Notes .ID to Password Protected Files C-6
Overview
This Appendix describes the procedures for using the Notes.ID file for Lotus
Mailstores. This feature applies to Ipro eCapture version 4.1 and later. Lotus
Notes 8.5.2 is highly recommended. This version stabilizes Lotus Notes handling to produce more consistent output.
The most basic features are required: Mail client only, disable Sametime (chat
program), and turn off Domino server features. The procedures in this Appendix apply to Lotus Notes 8.5.2.
Locating the User ID File
1.
From the Lotus Notes menu bar, choose File > Security > User Security to display the Password dialog.
2.
Enter your password.
www.iprotech.com
877-324-4776
Ipro eCapture User Guide
Q1 2014
C-1
Appendix C, Lotus Notes
3.
Click
. The User Security dialog appears and shows the location
of the ID file in the ID File field located in the Who You Are section.
4.
Make note of the location.
5.
Close the User Security dialog.
Copying the User ID File
1.
Open Windows Explorer and navigate to the path where the User ID file
is located.
2.
Make a copy of the User ID file. This copy will be used for switching the
ID.
C-2
Ipro eCapture User Guide
Q1 2014
www.iprotech.com
877-324-4776
Overview
Switching the ID
1.
From the Lotus Notes menu bar, choose File > Security > Switch ID. A
prompt dialog appears stating the Lotus Notes Client supports multiple
users.
2.
Click Yes. The Choose User ID to Switch To dialog appears.
3.
Select the Copy of the ID file.
4.
Click Open. The Password dialog appears.
5.
Enter your password.
www.iprotech.com
877-324-4776
Ipro eCapture User Guide
Q1 2014
C-3
Appendix C, Lotus Notes
6.
Click
.
7.
Choose File > Security > User Security. The User Security dialog
appears.
8.
Ensure the ID File is the copy that was created under the section Copying the User ID File on page C-2.
9.
Leave the User Security dialog open.
10.
Proceed to the section Changing the Password on page C-4.
Changing the Password
1.
From the User Security dialog, click
dialog appears.
2.
Enter your password.
C-4
Ipro eCapture User Guide
Q1 2014
. The Password
www.iprotech.com
877-324-4776
Overview
3.
Click
4.
Click
5.
Click Yes. A prompt appears stating the password change succeeded.
6.
Click OK to return to the User Security dialog.
7.
Close the User Security dialog. The Copy of User ID file may be opened
from this point without having to enter a password.
www.iprotech.com
877-324-4776
. The Change Password dialog appears.
. A prompt appears to confirm choice for No Password.
Ipro eCapture User Guide
Q1 2014
C-5
Appendix C, Lotus Notes
Switching Back to the Original User ID (if necessary)
1.
From the Lotus Notes menu bar, choose File > Security > Switch ID to
display the Choose User ID to Switch To dialog.
2.
Select the original User ID file.
3.
Click Open. The Password dialog appears.
4.
Enter the original password.
5.
Click
6.
Exit Lotus Notes.
.
Applying the Lotus Notes .ID to Password Protected Files
This procedure only works with Lotus Notes 8.5x Basic and Ipro eCapture 4.1.x and later.
If you receive an .NSF file that is Password protected and includes an ID profile
associated with it, do the following:
1.
Create a folder and place the .NSF, .ID, and password file in it. The discovery will be run on this folder.
2.
Name the ID file the same as the NSF. (Example: ImportantMail.NSF and
ImportantMail.ID)
3.
Open Text pad or Notepad and type the password at the top. Do not
include any other information in the file.
4.
Save this as a .TXT file in the new folder that was created in step 1.
5.
Rename this .TXT file the same as the .NSF and change the extension to
*.PWD (Example: ImportantMail.PWD).
C-6
Ipro eCapture User Guide
Q1 2014
www.iprotech.com
877-324-4776
Applying the Lotus Notes .ID to Password Protected Files
You should now have a new folder with the .NSF, .ID and .PWD file in it; no
other files should be included. When you discover this folder, Ipro eCapture will
open the NSF and find that it is Password protected. A pop up dialog appears
noting that it is password protected and it will prompt for the password. Give
Ipro eCapture a few seconds and it will insert the password in and the box will
disappear.
www.iprotech.com
877-324-4776
Ipro eCapture User Guide
Q1 2014
C-7
Appendix C, Lotus Notes
C-8
Ipro eCapture User Guide
Q1 2014
www.iprotech.com
877-324-4776
Appendix D LFP Files
In This Appendix
Overview ......................................................................... D-1
Changing Boundaries ...................................................... D-5
Adding Information to Images ........................................ D-8
Highlighting Search Text ............................................... D-12
Removing Information from Images ............................. D-14
Moving Images ............................................................. D-16
Removing Images from a Project .................................. D-19
Securing Images ........................................................... D-20
Comment Line (##) ...................................................... D-20
Overview
LFP files (also called load files) instruct Ipro View how to display a project’s
images. Different commands in the LFP files provide:
•
•
•
•
The image’s file location, file type, boundary, and image key number
The position, size, and color of redactions or highlights
The content of any information only fields
Any embedded text or sticky notes
•
The search words and their position on the image (if your project supports highlighted searching in Ipro View)
Generally, the imaging vendor provides an LFP file upon completion of the
imaging phase of a litigation project.
An LFP file can also be created by:
•
•
Converting a database
Using the optional Ipro Build module
•
Using Ipro OCR or one of Ipro Tech’s OCR partners to generate full text
search files
www.iprotech.com
877-324-4776
Ipro eCapture User Guide
Q1 2014
D-1
Appendix D, LFP Files
•
Using the Ipro Tech Utility program to export a project range or export
volume entries
You can view and edit an LFP file using a text editor. Each record (or line) in
the LFP file begins with a 2-letter code that determines the action that line will
perform. Commas separate each part of the record. The sequence of the
records in the file does not matter.
The commands in the LFP file take effect after you load or import the LFP file
(Import > Import LFP File from the Ipro Tech Utility menu).
Generally, you should load (import) LFP files into your projects at a time
when no one is using the project.
Figure D-1 shows a sample LFP file.
IM,MSC-00001,S,0,@MDEMO;IMAGES\00\00;001.PDF;6
IM,MSC-00002,C,0,@MDEMO;IMAGES\00\00;002.PDF;6
IM,MSC-00003,C,0,@MDEMO;IMAGES\00\00;003.PDF;6
IM,MSC-00004, ,0,@MDEMO;IMAGES\00\00;003.PDF;6
IM,MSC-00005,D,0,@MDEMO;IMAGES\00\00;005.JPG;4
IM,MSC-00006, ,0,@MDEMO;IMAGES\00\00;006.JPG;4,0
IM,MSC-00007,D,0,@MDEMO;IMAGES\00\00;007.TIF;2,0
IM,MSC-00008, ,0,@MDEMO;IMAGES\00\00;008.TIF;2,0
IM,MSC-00009, ,0,@MDEMO;IMAGES\00\00;009.TIF;2,0
IM,MSC-00010,D,0,@MDEMO;IMAGES\00\00;010.TIF;2,0
Figure D-1. Sample LFP File
A sample LFP file record such as
IM,MSC-00014,D,0,@MDEMO;IMAGES\00\00;014.TIF;2,1
consists of:
IM - import code identifier (Importing New Page)
MSC-00014 - an image key
D - Document; a boundary flag
@MDEMO;IMAGES\00\00;014.TIF - volume name, directory path and filename for the image
The boundaries in the LFP file are used for navigating in Ipro View. You can
define additional boundaries beyond the default boundaries in an LFP file by:
D-2
Ipro eCapture User Guide
Q1 2014
www.iprotech.com
877-324-4776
Overview
•
•
Using the View/Update Boundaries function in the Ipro Tech Utility program to insert boundary definitions.
Importing another LFP file that provides the image’s new boundary.
Ipro Tech supports Group IV TIFF files, JPEG, PDF, PNG, PCX, BMP, and two
internal formats: STF and IMG (no longer used).
Importing a New Page (IM)
This command is used to build the image master database for a project or to
append additional image master records to an existing project. An image master record is the basis for displaying the images in Ipro View and for other
image management functions. The image master records for the project’s
images must be loaded into a project before any other LFP commands are
loaded. The image master records facilitate the display and management of all
of the annotations, highlights, and other information associated with a project’s images.
Generally the scanning vendor supplies an image master record for each
image they produce, and delivers the image master along with the images.
Format:
IM,[Image Key],[Boundary Flag],[Offset],[Unique Filename];[Type],[Rotate]
[Image Key] is the unique image key for the image. Maximum length is 70
characters.
[Boundary Flag] is a single letter that identifies a particular record as a boundary. Ipro View allows up to eight boundary levels, and you may use any letter
to identify the project boundaries as long as it matches the boundary level
defined in the project setup. To simplify your internal procedures, we also recommend consistency between projects. Whether you set boundaries at scan
time depends on your project needs and the capabilities of your scanning vendor. Following are some common boundary flags and the identifiers:
S = Source
B = Box
F = Folder
D = Document
C = Child - Note: For page without boundaries, uses a space or empty.
www.iprotech.com
877-324-4776
Ipro eCapture User Guide
Q1 2014
D-3
Appendix D, LFP Files
[Offset] is the location of the Ipro Tech image in the file. If your images are
standard single image files, the offset for each record will be 0 (zero). For
example, the fourth image in the file has an offset of 3.
[Unique Filename] is the complete filename and path to the image.
The first part of the filename portion is the volume name. All volume names
are preceded by the at sign (@). If the volume name is supplied, the drive letter is not necessary. The volume name can be up to 30 characters.
The path to the image is next. If a volume name exists, the drive letter is not
entered with the path. If there is no volume name, the drive letter and the
complete path must be included in the format provided in the examples below.
The filename of the image follows the path.
Length Limitations
Image Key
70 characters
Volume Name in IM or VN command
30 characters
File Name in IM command
80 characters
Path to Volume in VN command plus path
to file in IM command
197 characters
Path to Volume (in VN command) plus
path to file plus filename in IM command
217 characters
[Type] is a code for the image file format:
2 - Single or multiple page TIFF (.TIF)
4 - Color Image .JPG, .BMP, .PNG, .PCX
7 - .PDF
Older formats
5 - Early version black and white PDF
6 - Early version Color PDF
3 - Ipro Tech stacked TIFF (.STF)
1 - Ipro Tech image (.IMG)
D-4
Ipro eCapture User Guide
Q1 2014
www.iprotech.com
877-324-4776
Changing Boundaries
99 - Placeholder
[Rotate] is the degree that a page is rotated. This setting is not present until
the image has been rotated. Values include: 0=0, 1=90, 2=180, 3=270
Example 1
IM,ALG-1-000001,S,87576658,0000001K.TIF;2
IM,ALG-1-000001,S,87576658,0000001K.JPG;1
This example shows two Ipro Tech image master records for the same image.
The first image is upside down and the second image is rotated 90 degrees to
the right.
Example 2
IM,0001,F,1,@FLD02;IMAGES\00\00;0000.PDF;7
This example loads one image in a PDF file. The color PDF is rotated 90
degrees.
Example 3
IM,ABC-00010,,2,@Vol01;Vol001/001;ABC-00010.TIF;2
IM,ABC-00011,,3,@Vol01;Vol001/001;ABC-00010.TIF;2
This example shows pages 2 and 3 of a multi-page Tiff file. Notice that the file
name is the same for both images (ABC-00010 and ABC-00011). The offset
indicates the page number and is immediately before the at sign (@) in the
LFP command.
Example 4
IM,MSC-00025,D,0,@;;;99
IM,MSC-00036, 0,@;;;99
This example shows image format type 99; a placeholder image.
Changing Boundaries
These commands change an image’s boundary or unitization.
www.iprotech.com
877-324-4776
Ipro eCapture User Guide
Q1 2014
D-5
Appendix D, LFP Files
Setting an Image’s Boundary Flag (BF)
This command sets the boundary flag to the value specified in the LFP file. If
you do not supply a boundary flag parameter in the command, you will delete
any current boundary flag and the image will become a page.
The boundary flag must match one of the boundary flags specified in the project setup.
Format:
BF,[Image Key],[Boundary Flag]
Examples:
BF,ALG-001,B
This example marks ALG-001 as the first image in a Box.
BF,ALG-010,
This example turns ALG-010 into a page in a document.
Applying a Higher Boundary to an Image (BM)
This command changes an image key’s boundary level only if the boundary
supplied in the command is higher than the image’s current boundary setting.
If a boundary is not supplied in the BM command, the image’s current boundary flag is deleted and the image becomes a page.
This command is useful for correcting boundary designations, entering new
boundary designations, and deleting boundary designations.
Source or Box boundaries can be maintained by loading a document-based list
that includes the first page of a Source or Box.
The boundary flag must match one of the import boundary flags specified in
the project setup.
Format:
BM,[Image Key],[Boundary Flag]
Examples:
BM,ALG-001,B
This example marks ALG-001 as the first image in a Box.
D-6
Ipro eCapture User Guide
Q1 2014
www.iprotech.com
877-324-4776
Changing Boundaries
BM,ALG-010,
This example turns ALG-010 into a page in a document.
Grouping a Range of Images (BR)
This command can be used to group a range of images together. For example,
you can group 100 images into a single folder while retaining their document
and child settings. Because the syntax of the BR command includes an image
key begin/end range, you can easily modify an ASCII file of begin/end ranges
and use the BR command to set document breaks.
The first image key you specify in the BR command will receive the boundary
you specify in the command.
If the beginning image key has a higher boundary flag than the one you supply
in the BR command, the existing boundary setting is retained.
All subsequent images in the range will retain their boundary settings unless
their current settings are higher than the boundary you are applying. In other
words, if you are grouping images into a folder, all documents and children in
the range will retain their document/child boundary settings.
Any images in the range that are originally marked with a boundary higher
than the one you are supplying in this LFP command will become pages.
If necessary, the boundary of the first image following the range will be
changed so it will continue to be separate from the image range whose boundary you are changing.
The boundary flag specified in this record must match one of the boundary
flags defined in the project’s setup.
This record format is the same for both an Ipro Tech internal image (.IMG) and
a standard single image file.
Format:
BR,[Begin Image Key],[End Image Key],[Boundary Flag]
Example:
BR,ALG-001,ALG-099,F
www.iprotech.com
877-324-4776
Ipro eCapture User Guide
Q1 2014
D-7
Appendix D, LFP Files
This example groups 99 images into a single folder. Any images in the range
ALG-002 through ALG-099 that are set to Document and Child will retain their
boundary settings. If ALG-100 is not already set to Folder or higher, it will be
set to Folder in order to prevent it from being unintentionally grouped with the
image range specified in this BR command.
Assigning Level Codes (LC)
This command is used for tracking physical binding elements of a scanned collection. Binding elements include paper clips, rubber bands, staples, etc. This
information is usually applied during scanning with Ipro Premium Scan, but
can be applied later.
Format:
LC,[Image Key],[Level Code String (40 char max)]
LC is the identifier that identifies the file as a level code record.
[Image Key] is the image key to which the information field is to be applied.
[Level Code String] is a binding element
The Level Code String field cannot contain any embedded commas.
Example:
LC,A0010007,1:MF;2:BC;3:ST
Adding Information to Images
These commands add information to images, such as info only fields or issue
tags.
Loading Information Only Field Data (IO)
After you define the Info Only field labels in the project setup, and load the
images, you can load the Info Only field data. To do this, you create an LFP file
that lists the image key, the information only field, and its data. The data in
each field must not exceed 80 characters.
Format:
IO,[Image Key],[Information Field Number],[Information]
D-8
Ipro eCapture User Guide
Q1 2014
www.iprotech.com
877-324-4776
Adding Information to Images
IO is the identifier that tells the system this is an information field import process.
[Image Key] is the image key to which the information field is to be applied.
[Information Field Number] is the field number assigned to the information.
Valid information field numbers are 1, 2, 3, 4, 5, 6, 7, 8, 9, and 10. You can
use a single file to load multiple fields into the same image key. You must have
a separate record for each information field number.
[Information] is the text (up to 80 characters) you want to place in the specified Information Only field. The Information Only field can contain alphanumeric characters and the dash (-), period (.), forward slash (/), or asterisk (*).
Example:
IO,ALG-1-000001,2,Misc files from front credenza
Appending Data to Information Only Fields
(IA)
This command appends data to the information only fields that were defined
during project setup and were previously populated by loading an LFP file with
the IO command (see page D-8). If you want to load multiple fields into the
same image key in a single file, you must create a separate IA record for each
information only field.
The information you append can include letters, numbers, the dash (-), period,
forward slash (/), and asterisk (*). The command adds a semicolon (;) after
the original information and before the information it appends.
Format:
IA,[Image Key],[Information Field Number],[Information]
Example:
IA,ALG-003,2,Phoenix
IA,ALG-003,3,Accounting files from back closet
www.iprotech.com
877-324-4776
Ipro eCapture User Guide
Q1 2014
D-9
Appendix D, LFP Files
Importing Boundary (Folder) Descriptions
(FD)
Ipro Premium Scan enables imaging shops to capture descriptive names to aid
in reviewing an image collection.
These descriptions are called “folder descriptions” because they provide an
efficient way to capture the name of a manila folder (or other physical binding
element) at scan time. The descriptions provide additional information about
how images in a collection are grouped together and enable reviewers to more
readily see how a collection is organized.
When the completed scan project is loaded into Ipro View, these descriptions
appear in place of the image key in the Project Boundaries window. (The
image key still appears in the title bar.)
You can create an LFP file to load these alternative descriptions to display in
Ipro View even if they were not captured at scan time.
Each record in the LFP file provides the image key, boundary level, and text to
display in the Project Boundaries window.
Format:
FD,[Image Key],[Boundary],[Folder Description]
FD is the identifier that tells the system this is a folder description.
[Image Key] is the image key (Bates number) that the folder description
appears in place of (in the Project Boundaries window).
[Boundary] is the boundary level of the image. Generally the image is simply a
copy of the folder with its label. Any boundary (other than page) is valid.
[Folder Description] is the text description that appears in place of the image
key. The description is generally the text that was written on the folder label.
Example:
FD,MTIFF00231,F,Smith Patient Folder
In this example, “Smith Patient Folder” will appear in place of “MTIFF00231” in
the Project Boundaries window to aid litigation support staff in reviewing the
images. “MTIFF00231” will still appear in the title bar while this image is being
viewed.
D-10
Ipro eCapture User Guide
Q1 2014
www.iprotech.com
877-324-4776
Adding Information to Images
Creating a New Issue Tag (IN)
You can create a new issue tag without applying it to any images. The Ipro
View user can add the tag to their palette and apply it to images as they work.
Format:
IN,[Issue Name]
IN is the identifier that tells the system to create the new issue tag.
[Issue Name] is the name of the tag being created, such as marginalia or correspondence. Limit: 40 characters.
Example:
IN,Correspondence
This command creates a tag called Correspondence.
Applying a Tag to an Image (IS)
This command applies a specific issue tag to an image.
Format:
IS,[Image Key],[Issue Name]
IS is the identifier that tells the system this is an issue (or tagged database)
record.
[Image Key] is the image key to which the issue (or tagged database) is being
assigned.
[Issue Name] is the actual name, such as marginalia or correspondence, of the
issue (tag). Limit: 40 characters.
Example:
IS,ALG-1-000006,Correspondence
This example shows that image ALG-1-000006 has a tag called Correspondence.
www.iprotech.com
877-324-4776
Ipro eCapture User Guide
Q1 2014
D-11
Appendix D, LFP Files
Highlighting Search Text
Full Text Search Highlights (FT)
This LFP command provides the search words for an image along with the necessary information to highlight the word when it is found in an OCR text
search.
Each command in the LFP file starts with the command FT, followed by the
search word and the word’s size and position on the page.
If the OCR program provides the level of confidence, it is preceded by a colon.
In the example below, the OCR program had 97 percent confidence in the OCR
generated.
Example:
FT,ABC-002,2544,3304:97,TERRITORY|373|79|226|27^
OF|616|79|48|27^ARIZONA|681|79|179|27^
SS|978|120|39|25^COUNTY|373|161|165|29^
OF|554|161|49|29^
COCHISE|620|161|171|29^
JOSEPH|524|244|143|26
Original Text (OT)
This LFP command provides the image key and the location of the path where
the original text files reside.
Example:
OT,EXH-01-0001,C:\DATA\OCRTEXT\EXH-01-0001.TXT
Original File for EDD Image (OF)
This command provides the location and original filename for a file discovered
and produced by an Ipro Tech electronic discovery tool. This command enables
the recipient of the electronic discovery files to open the file directly from the
Ipro View project.
D-12
Ipro eCapture User Guide
Q1 2014
www.iprotech.com
877-324-4776
Highlighting Search Text
To view the original document, open the project in Ipro View, navigate to the
image and click the
button in the Ipro View toolbar. If the currently displayed image does not have an OF command loaded, this button is disabled.
Format:
OF,[Image Key],[Unique Filename (complete filename and path to the
file)],[Page in File]
OF is the identifier that tells the system this is an original filename (EDD)
record.
[Image Key] is the image key to which the issue (or tagged database) is being
assigned.
[Unique Filename] is the complete filename and path to the file.
[Page in File] is the position or sequence of this image in the file (for example,
the third page in the document).
Examples:
In the following example, the Ipro Tech electronic discovery tool copied files to
the export location.
The Tiff image was exported to:
Export\suedoc001\BAT0001\IMG_0001\XN-0001.TIF
And the original file for this image is copied to:
Export\suedoc001\BAT0001\OF_0001\XN-0001\whitepaper.doc
The Ipro LFP file OF command is:
OF,XN-0001,@suedoc001;BAT0001\OF_0001\XN-0001;whitepaper.doc,1
In the following example, the Ipro Tech electronic discovery tool did not copy
the original files to a different location, but created the path to the location of
the original file.
The Ipro LFP file OF command is:
OF,XN-0001,T:\Data\suedoc.prj\BAT0001.bch\000001\V000\D001\
whitepaper.doc,1
www.iprotech.com
877-324-4776
Ipro eCapture User Guide
Q1 2014
D-13
Appendix D, LFP Files
Including OCR Text in the LFP File (OI)
An option in Ipro OCR, Include Original OCR Text in Ipro LFP File, will automatically include the OCR text in the LFP file when it generates the Word List LFP
file during OCR processing. For every image OCRed, the LFP file will contain
the LFP command OI, followed by the Image Key, and then the OCR text for
that image. This command and its data will follow the FT command and its
data for each image in the LFP file.
An option in Ipro Build, Include OCR Text in LFP File, will generate an .LFP file
that contains the LFP command OI, followed by the Image Key, and then the
OCR text for that image.
Format:
OI,[Image Key] The image’s OCR text immediately follows.
OI is the identifier that tells the system to include the OCR Text
[Image Key] is the image key from which the OCR text was generated
The image’s OCR text is the actual OCR text from the image. Two empty boxes
will appear at the end of the OCR text to indicate a line return feed.
Example:
OI,ALG-01-011,the chromium levels were especially high in the east well
OI,ALG-01-011,<< ALG-01-011 >>,
cially high in the east well
the chromium levels were espe-
This example shows the image key enclosed in << >> which signifies that the
option to include the image key was selected during the OCR process. It is
OCR text.
Removing Information from Images
Removing Data from Information Only Fields
(IO)
You can remove data from information only fields that you have previously
populated either in scanning or with an IO or IA LFP file command. To do this,
simply load an LFP file with the IO command, and do not provide any information after the field number.
D-14
Ipro eCapture User Guide
Q1 2014
www.iprotech.com
877-324-4776
Removing Information from Images
Format:
IO,[Image Key],[Information Field Number],[leave information empty]
IO is the identifier that tells the system this is an information field import process.
[Image Key] is the image key from which the information field data is to be
deleted.
[Information Field Number] is the field number assigned to the information.
Valid information field numbers are 1, 2, 3, 4, 5, 6, 7, 8, 9, and 10. You can
use a single file to load multiple fields into the same image key. You must have
a separate record for each information field number.
[Information] is blank. Because the IO command overwrites any existing data
for the field, overwriting any existing data with nothing essentially deletes the
previous contents of the IO field.
Be sure to supply the comma after the IO field number.
Example:
IO,ALG-1-000001,2,
Removing All Tags from a Page (DT)
This command removes all issues/tags from an image.
Format:
DT,[Image Key]
Example:
DT,ALG-007
This example removes all tags from ALG-007.
Removing a Tag from a Page (RT)
This command removes an issue/tag from an image.
Format:
RT,[Image Key],[Issue Name]
RT is the identifier that tells the system to remove an issue record from an
image.
www.iprotech.com
877-324-4776
Ipro eCapture User Guide
Q1 2014
D-15
Appendix D, LFP Files
[Image Key] is the image key from which the issue is being removed.
[Issue Name] is the name of the tag being removed, such as Marginalia or
Correspondence.
Example:
RT,ALG-1-000006,Correspondence
Moving Images
These commands effectively move or rename an image or volume.
Moving an Image File to Another Volume (VF)
This command updates the volume location for the filename. It does not
change the image key.
Format:
VF,[Image Filename],[Volume Name][Sub Dir][Image Type]
VF is the identifier that tells the system this is a volume filename record.
[Image Filename] is the filename of the image key to which the information
field is to be applied.
[Volume Name] is not required. If it is missing, the subdirectory should include
the drive letter for direct access (e.g. F:\IMAGES).
[Sub Dir] is not required. If it is missing, the image file is assumed to be at the
root of the drive.
[Image Type]
2= Single or Multiple Page .TIF
4=Color (.PCX, .BMP, .JPEG, and .PNG)
3= Stacked TIFF (.STF)
1=Ipro Tech Internal Image (.IMG) - Note: No longer used.
Example:
VF,LH200007.TIF,DEMO,IMAGES,1
D-16
Ipro eCapture User Guide
Q1 2014
www.iprotech.com
877-324-4776
Moving Images
This example applies to any Ipro Tech supported image format. In the above
example, the volume location for the filename LH200007.TIF is changed to the
DEMO volume under the IMAGES subdirectory for an Ipro Tech image type 2
(.TIF).
Changing the Location of a Volume (VN)
This command updates storage location.
Format:
VN,[Volume Name],[Storage String][Access Type]
VN is the identifier that tells the system that this is a volume name record. It
is required.
[Volume Name] is required. Can be up to 30 characters.
[Storage String] = Direct Access Path
[Access Type] includes:
Alternate Volume Path = 99
Direct Access = 0
Local CD-ROM = 10
Example:
VN,EDDONLY001,C:\IMAGES\EDDONLY001\,99
This example shows an alternate path.
Length Limitations
Image Key
70 characters
Volume Name in IM or VN command
30 characters
File Name in IM command
80 characters
Path to Volume in VN command plus path
to file in IM command
197 characters
Path to Volume (in VN command) plus
path to file plus filename in IM command
217 characters
www.iprotech.com
877-324-4776
Ipro eCapture User Guide
Q1 2014
D-17
Appendix D, LFP Files
Changing an Image’s Filename (FN)
This command changes an image’s filename.
If this is a standard single image file and the filename appears in more than
one directory in the project, the command must include the complete path to
each image key.
The Offset is the position of the Ipro Tech image in the file. If the images are
standard single image files, the offset will be 0 (zero) for each record. For IMG
or STF files, the old offset is retained if you do not supply one in the command.
Format:
FN,[Image Key],[Unique File Name],[Offset]
Example:
FN,IPR-1-000004,@Ipro;D:\Ipro;001004.TIF;2,0
This example shows how a standard single image TIFF (.TIF) in a project with
duplicate filenames might be written.
Changing an Image Key (CK)
This command changes an image key (Bates number) while retaining the
image’s issue tags and annotations.
Format:
CK,[Old Image Key],[New Image Key]
Example:
CK,ALG-006,AAA-022
This example changes an image’s Bates number from ALG-006 to AAA-022.
Changing the Date for an Image Key (DA)
This command updates the date assigned to the image key.
Format:
DA, [Image Key],[YYYYMMDD]
Example:
DA,ALG-006,20050415
D-18
Ipro eCapture User Guide
Q1 2014
www.iprotech.com
877-324-4776
Removing Images from a Project
Removing Images from a Project
Removing a Single Page (RP)
You may occasionally want to remove records from the image master database. For example, you might need to delete images that have been rescanned for corrections. This command removes the requested image keys
and all associated tags and annotations from the database.
Format:
RP,[Image Key]
RP is the identifier that tells the system this is a Remove Page function.
[Image Key] is the image key to be removed.
Example:
RP,ALG-1-000001
This example applies to any Ipro Tech internal image format. If you were
removing 20 image keys, this file would contain 20 comma-delimited records,
each on a separate line.
Removing a Range of Pages from a Project
(RR)
This command removes a range of image keys along with any tags, annotations, etc. associated with the images.
Format:
RR,[Start Key],[End Key]
RR is the identifier that tells the system this is a Remove Range function.
[Start Key] is the first image key in the range to be removed.
[End Key] is the last image key in the range to be removed.
Example:
RR,ALG-1-001,ALG-1-099
www.iprotech.com
877-324-4776
Ipro eCapture User Guide
Q1 2014
D-19
Appendix D, LFP Files
Securing Images
If you restrict individual images, only users with special privileges can view
them. The project must be set up to support restricted images.
Restricting a Page from Being Viewed (SR)
This command restricts a page from being viewed or included in image sets.
Users who have the View Restricted Images, Full Project Level Update,
or System Level Administration privileges will be able to view the restricted
images.
Format:
SR,[Image Key]
SR is the identifier that tells the system to add a page restriction record.
[Image Key] is the image key to which the restriction is to be applied.
Removing a Page Restriction (RS)
This command removes a restriction from a page so it can be viewed or
included in image sets.
Format:
RS,[Image Key]
RS is the identifier that tells the system to remove a page restriction record.
[Image Key] is the image key whose restriction is to be removed.
Comment Line (##)
This command inserts a comment line in your LFP file. You should insert comments where ever an explanation would help someone troubleshoot or maintain the file.
The ## must be at the beginning of the line, and applies to the entire line. You
cannot place comments at the end of a line.
Format:
##,[Comment Text]
D-20
Ipro eCapture User Guide
Q1 2014
www.iprotech.com
877-324-4776
Comment Line (##)
Example:
##,This is the new path for the volume.
www.iprotech.com
877-324-4776
Ipro eCapture User Guide
Q1 2014
D-21
Appendix D, LFP Files
D-22
Ipro eCapture User Guide
Q1 2014
www.iprotech.com
877-324-4776
Appendix E Password
Protected Detection
OutsideIn File Types
Overview
This list represents a default list of file types that are checked for password
protection if the Discovery Job option, Enhanced Password Detection, is
selected in the Discovery Options dialog box. See Chapter 5, Creating Clients,
Projects, Custodians, and Jobs and the section Setting Discovery and Indexing
Options on page 5-35.
A password-protected document is defined as a document where a prompt
asks for a password upon opening the document in its native application. Otherwise, if the document can be opened and viewed in its native application, the
document is not considered to be password protected.
Internal password protection settings (such as printing in a PDF or individual
worksheet password protection in an Excel spreadsheet) are not detected.
For file types not listed in this Appendix, the DetectPasswordProtection column
in the StellentDefs table of the configuration database may be manually modified. Set the value for the file type to 1 to perform the check for password protection.
Disclaimer: It is possible that an error may occur for flagged file type(s) that
will be checked for password protection at Discovery time; or that flagged file
type(s) will not be identified.
Run the Discovery Detailed Error Report to view any password-protected
errors. For information about running this report, see Chapter 8, Running
Reports and the section Selecting Discovery Report Options on page 8-9.
Automatic Inclusions
1313, FI_ENCRYPTED_WORD2007
1340, FI_ENCRYPTED_WORD2010
1355, FI_ENCRYPTED_WORD2010_840
1456, FI_ENCRYPTED_EXCEL2007
www.iprotech.com
877-324-4776
Ipro eCapture User Guide
Q1 2014
E-1
Appendix E, Password Protected Detection OutsideIn File Types
1470, FI_ENCRYPTED_EXCEL2007_BINARY
1482, FI_ENCRYPTED_EXCEL2010
1483, FI_ENCRYPTED_EXCEL2010_BINARY
1637, FI_ENCRYPTED_PPT2007
1819, FI_ENCRYPTED_UNKNOWNMSFTOFFICEDOC
2228, FI_ENCRYPTED_PPT2010O
Microsoft Access
1218, FI_ACCESS1, Microsoft Access
1222, FI_ACCESS7, Microsoft Access 7
1229, FI_ACCESS2000, Microsoft Access 2000
1230, FI_ACCESS2007, Microsoft Access 2007/2010
1231, FI_ACCESSWEBDATABASE, Microsoft Access Web Database
1232, FI_ACCESS2007TEMPLATES, Access 2007/2010 Database Template File
2217, FI_ACCESSSNAPSHOT, Access Snapshot
Microsoft Excel
1405, FI_EXCEL, Microsoft Excel 2.x
1415, FI_EXCEL3, Microsoft Excel 3.0
1419, FI_EXCEL4, Microsoft Excel 4.0
1424, FI_EXCEL5, Microsoft Excel 5.0/7.0
1436, FI_MACEXCEL4, Microsoft Excel 4.0
1437, FI_MACEXCEL5, Microsoft Excel 5.0
1438, FI_EXCEL97, Microsoft Excel 97/98
1439, FI_EXCEL3WORKBOOK, MS Excel 3.0 Workbook
1440, FI_EXCEL4WORKBOOK, MS Excel 4.0 Workbook
1441, FI_MACEXCEL4WORKBOOK, MS Excel 4.0 Workbook Mac
1442, FI_REGMACEXCEL4WB, MS Excel 4.0 Workbook Reg Mac
1446, FI_EXCEL2000, Microsoft Excel 2000
E-2
Ipro eCapture User Guide
Q1 2014
www.iprotech.com
877-324-4776
Overview
1448, FI_EXCEL2002, Microsoft Excel 2002
1451, FI_EXCEL2003, Microsoft Excel 2003
1455, FI_EXCEL2007, Excel 2007
1457, FI_EXCEL2007_BINARY, Excel 2007 Binary format
1458, FI_DRM_EXCEL, Excel DRM
1459, FI_DRM_EXCEL2007, Excel 2007 DRM
1464, FI_EXCELTEMPLATE2007, Excel Template 2007
1465, FI_EXCEL2007_MACRO, Excel Macro Enabled
1466, FI_EXCELTEMPLATE2007_MACRO, Excel Template Macro Enabled
1467, FI_EXCELXML2003, Microsoft Office Excel 2002/2003 XML
1471, FI_EXCEL2007_ADDINMACRO, Excel 2007 Addin Macro
1476, FI_EXCEL2010, Excel 2010
1477, FI_EXCEL2010_MACRO, Excel 2010 Macro
1478, FI_EXCELTEMPLATE2010, Excel 2010 Template
1479, FI_EXCELTEMPLATE2010_MACRO, Excel 2010 Template Macro
1480, FI_EXCEL2010_ADDINMACRO, Excel 2010 Addin Macro
1481, FI_EXCEL2010_BINARY, Excel 2010 Binary
1487, FI_EXCELXML2007, Excel 2007 XML File
1488, FI_EXCEL2013, Microsoft Excel 2013
1489, FI_EXCEL2013_MACRO, Excel Macro Enabled
1490, FI_EXCELTEMPLATE2013, Excel Template 2013
1491, FI_EXCELTEMPLATE2013_MACRO, Excel Template Macro Enabled 2013
1492, FI_EXCEL2013_ADDINMACRO, Excel 2013 Add-in Macro
1493, FI_EXCEL2013_BINARY, Microsoft Excel 2013 Binary
1529, FI_EXCELCHART, Excel 2.x Chart
1530, FI_EXCEL3CHART, Excel 3.0 Chart
1531, FI_EXCEL4CHART, Excel 4.0 Chart
1536, FI_EXCEL5CHART, Excel 5.0/7.0 Chart
www.iprotech.com
877-324-4776
Ipro eCapture User Guide
Q1 2014
E-3
Appendix E, Password Protected Detection OutsideIn File Types
Microsoft Word
1000, FI_WORD4, Word for DOS 4.x
1001, FI_WORD5, Word for DOS 5.x
1029, FI_MACWORD3, Mac Word 3.0
1030, FI_MACWORD4, Mac Word 4.0
1052, FI_MACWORD4COMPLEX, MACWORD4COMPLEX
1054, FI_WINWORD1, Word for Windows 1.x
1055, FI_WINWORD1COMPLEX, Word for Windows 1.x
1064, FI_WINWORDSTAR, Wordstar for Windows
1065, FI_WINWORD2, Word for Windows 2.0
1073, FI_MACWORD5, Mac Word 5.x
1076, FI_WORD6, Word for DOS 6.0
1082, FI_WINWORD6, Word 6.0 or 7.0
1086, FI_WINWORD1J, Word for Windows 1.2 J
1087, FI_WINWORD5J, Word for Windows 5.0 J
1096, FI_WINWORD2_OLECONV, Word for Windows 2.0 Object
1102, FI_WINWORD7, Word 7.0
1125, FI_MACWORD6, Mac Word 6
1126, FI_WINWORD97, Microsoft Word 97/98
1133, FI_MACWORD97, Mac Word 97
1145, FI_WORDPRO97, Lotus WordPro 97/Millennium
1146, FI_WINWORD2000, Microsoft Word 2000
1185, FI_WORD2002, Microsoft Word 2002
1186, FI_WORD2003, Microsoft Word 2003
1307, FI_WORDXML2003, MS Office 2003 Word XML format
1308, FI_WORDXML12, MS Office 12 Word format
1312, FI_WINWORD2007, MS Office 12 (2007) Word XML format
E-4
Ipro eCapture User Guide
Q1 2014
www.iprotech.com
877-324-4776
Overview
1314, FI_WINWORDTEMPLATE2007, Unused as new schemas of Office do not
differentiate them
1317, FI_DRM_WORD, Word DRM
1318, FI_DRM_WORD2007, Word 2007 DRM
1327, FI_WINWORD2007_MACRO, MS Office 12 2007 Word - Macro Enabled
XML format
1328, FI_WINWORDTEMPLATE2007_MACRO, MS Office 12 2007 Word Template - Macro Enabled XML format
1336, FI_WINWORD2010, MS Office Word 2010
1337, FI_WINWORDTEMPLATE2010, MS Office Word 2010 Template
1338, FI_WINWORD2010_MACRO, MS Office Word 2010 Macro
1339, FI_WINWORDTEMPLATE2010_MACRO, MS Office Word 2010 Template
Macro
1372, FI_WINWORD2013, Microsoft Word 2013
1373, FI_WINWORDTEMPLATE2013, Microsoft Word 2013 Template
1374, FI_WINWORD2013_MACRO, MS Office 15 (2013) Word - Macro Enabled
XML format
1375, FI_WINWORDTEMPLATE2013_MACRO, MS Office 15 (2013) Word Template - Macro Enabled XML format
Microsoft PowerPoint
1538, FI_POWERPOINT4, PowerPoint 4.0
1540, FI_POWERPOINT3, PowerPoint 3.0
1543, FI_POWERPOINT7, PowerPoint 7.0
1548, FI_POWERPOINTMAC3, Mac PowerPoint 3.0
1549, FI_POWERPOINTMAC4, Mac PowerPoint 4.0
1562, FI_EXTPOWERPOINT4, PowerPoint 4.0 (extracted from .doc file)
1563, FI_EXTPOWERPOINTMAC4, Mac PowerPoint 4.0 (extracted from .doc
file)
1566, FI_POWERPOINTMACB3, Mac PowerPoint 3.0
www.iprotech.com
877-324-4776
Ipro eCapture User Guide
Q1 2014
E-5
Appendix E, Password Protected Detection OutsideIn File Types
1567, FI_POWERPOINTMACB4, Mac PowerPoint 4.0
1581, FI_POWERPOINT97, Microsoft PowerPoint 97/98
1592, FI_POWERPOINT9597, Microsoft PowerPoint 95/97
1600, FI_POWERPOINT2000, PowerPoint 2000
1605, FI_POWERPOINT2, POWERPOINT2
1635, FI_POWERPOINT2007, PowerPoint 2007
1642, FI_DRM_POWERPOINT, PowerPoint DRM
1643, FI_DRM_POWERPOINT2007, PowerPoint 2007 DRM
2208, FI_POWERPOINTTEMPLATE2007, PowerPoint Template 2007
2209, FI_POWERPOINT2007_MACRO, PowerPoint 2007 Macro enabled
2210, FI_POWERPOINTTEMPLATE2007_MACRO, PowerPoint 2007 Template
Macro enabled
2211, FI_POWERPOINTSLIDESHOW2007, PowerPoint 2007 Slideshow file
2212, FI_POWERPOINTSLIDESHOW2007_MACRO, PowerPoint 2007 Slideshow
Macro enabled
2222, FI_POWERPOINT2010, PowerPoint 2010
2223, FI_POWERPOINTTEMPLATE2010, PowerPoint 2010 Template
2224, FI_POWERPOINTTEMPLATE2010_MACRO, PowerPoint 2010 Template
Macro Enabled
2225, FI_POWERPOINTSLIDESHOW2010, PowerPoint 2010 Slideshow
2226, FI_POWERPOINT2010_MACRO, PowerPoint 2010 Macro Enabled
2227, FI_POWERPOINTSLIDESHOW2010_MACRO, PowerPoint 2010 Slideshow
Macro Enabled
2235, FI_POWERPOINT2013, Microsoft PowerPoint 2013
2236, FI_POWERPOINTTEMPLATE2013, PowerPoint 2013 Template
2237, FI_POWERPOINTTEMPLATE2013_MACRO, PowerPoint 2013 Template
Macro Enabled
2238, FI_POWERPOINTSLIDESHOW2013, PowerPoint 2013 Slideshow
2239, FI_POWERPOINT2013_MACRO, PowerPoint 2013 Macro Enabled
E-6
Ipro eCapture User Guide
Q1 2014
www.iprotech.com
877-324-4776
Overview
2240, FI_POWERPOINTSLIDESHOW2013_MACRO, PowerPoint 2013 Slideshow
Macro Enabled
Microsoft Project
1223, FI_MSPROJECT98, Microsoft Project 98,
1224, FI_MSPROJECT2000, Microsoft Project 2000
1225, FI_MSPROJECT2002, Microsoft Project 2002
1226, FI_MSPROJECT2007, Microsoft Project 2007
1228, FI_MSPROJECT2010, Microsoft Project 2010
Microsoft Visio
1586, FI_VISIO4, VISIO4
1595, FI_VISIO5, Visio 5
1597, FI_VISIO6, Visio 6
1607, FI_VISIO3, VISIO3
1631, FI_VISIO2003, Visio 2003
2012, FI_XML_VISIO, XML Visio
PDF
1557, FI_PDF, Adobe Acrobat (PDF)
1584, FI_PDFMACBIN, PDFMACBIN
1609, FI_PDFIMAGE, PDF Image
1655, FI_PDFA, PDF-A
13050, IPRO_FI_PDF_PORTFOLIO, PDF Portfolio
Setting Debugging for Loading File Errors
Debug logging can be enabled by editing the Ipro.eCapture.ecProcess.ServiceHost.exe.log4net file located in the Worker subdirectory.
The root section is located toward the bottom of the log file.
Change the following:
www.iprotech.com
877-324-4776
Ipro eCapture User Guide
Q1 2014
E-7
Appendix E, Password Protected Detection OutsideIn File Types
<root>
<level value="INFO" />
<appender-ref ref="RollingLogFileAppender" />
</root>
to
<root>
<level value="DEBUG" />
<appender-ref ref="RollingLogFileAppender" />
</root>
This will write debug output to the log files into the same location as the
Worker log. The log files are named "ServiceHost-log4net[Premium EDD Driver
<thread number>].log.
E-8
Ipro eCapture User Guide
Q1 2014
www.iprotech.com
877-324-4776
Appendix F
Glossary
<jobID>_ImageKeyErrors.TXT: Contains image key errors encountered during
export.
<jobID>_ImageKeyWarnings.TXT: Contains image key warnings encountered
during export.
.LFP File: Also referred to as a load file. A file used to load images and image
data into the Ipro View database. Each record in the file contains a 2-letter
command followed by various parameters, such as the image key and the data
to be loaded.
.LOG File: A file that shows the status of a process. Ipro eCapture has several
different .LOG files called Controller, DeletionHistory, QueueManager, Worker,
WorkerAgent, and WorkerDiagnostics. Each of these files is described in this
Glossary. When .LOG files are accessed through the User Interface, the
associated application is launched. If there is no associated application,
Notepad will be launched instead.
.MHT File: An Archived Web Page file with information in Multipurpose Internet Mail Extension HTML (MHTML) format with an .MHT file extension. All relative links in the Web page are remapped and the embedded content is
included in the .MHT file.
Activity: Sets of tasks performed by the Worker, to accomplish a specified
objective.
Assigned: From the Worker Status Information Tab, Status column. Either the
Worker has been assigned a task and hasn't picked it up, or, more commonly,
all threads are busy.
Bandwidth Limit Reached: From the Worker Status Information Tab, Status
column. The Worker would have been assigned a task, but it is doing too much
at the present time. The Worker bandwidth is set with the Worker Bandwidth
Throttle value in QueueManager.
Binary Files: Examples include executables, fragments of documents that were
recovered from an undelete process, or blocks of data recovered forensically.
Black Ice Drivers: Printer drivers that are installed with Ipro eCapture and
used by the software during Discovery and Processing Jobs.
www.iprotech.com
877-324-4776
Ipro eCapture User Guide
Q1 2014
F-1
Appendix F, Glossary
Blank Page Threshold: A value (in bytes) that is used to determine whether
Ipro eCapture should discard any file, as a blank page, that is below the
indicated threshold value.
Busy: From the Worker Status Information Tab, Status column. All threads are
currently performing a task.
Categories: In Ipro eCapture, used to describe the file type(s) by which to
open a QC Job.
Client: The highest level in the Ipro eCapture hierarchy. A Client is required to
create Projects.
Color Depth (Image or PDF): Color depth refers to the number bits per pixel
(bpp) in any given image. 1bit would be a black and white image, 8 bits may
be grayscale/color and 24 bits may be a full color image.
Compound Documents: Documents that are part of or contain other
documents. These documents can be treated as a whole or with each item
treated individually.
Comprehensive Report: Combination Report consisting of summaries of
discovery, filtering, de-duplication, and processing.
Connection Setting: In Ipro eCapture, used to establish a connection between
it and Microsoft SQL Server.
Container File: A file that contains embedded files, archives, Microsoft Office
documents, Adobe Acrobat files, e-mail message files, etc.
Controller.LOG file: Located in the path of ...eCapture\Controller, this file
records all job status changes and any timeouts or errors reported during the
job start sequence or during the job queue refresh. It also records starting of
the deletion agent.
Custodian: In Ipro eCapture, the level that is beneath Projects in the
hierarchy. Custodians have Jobs. A Custodian is also an agent or organization
that had charge and legal responsibility of a supplied document or piece of
data to a a case.
Data Extraction Reports: Two types are available - Summary and Detailed.
Data: In Ipro eCapture, refers to the electronic files that are discovered and
processed.
F-2
Ipro eCapture User Guide
Q1 2014
www.iprotech.com
877-324-4776
Database: A collection or records. Each record contains a set of fields. Each
field contains a unit of information. For example, a residential telephone
directory (the database) contains a collection of records (the residential
listings) that contain fields (name, address, and phone number of each
resident).
De-duplication Reports: Two types are available - Summary (summary report
of items not processed due to de-duplication settings) and Detailed (list of
errors and status messages encountered during discovery).
De-duplication: A process of identifying and separating identical electronic
documents. In Ipro eCapture, the MD5 hash value of each document is
generated during the discovery phase. When de-duplication is performed, a
look-up for the same MD5 hash is performed across the specified deduplication scope (Current Job, Custodian, Project and Client) for all
previously-processed data. If a match is found, the item is marked a duplicate;
if not, it is marked an original. Additional scope options within Ipro eCapture
allow families of documents to be maintained through de-duplication such that
if the top-level parent document is marked a duplicate, the entire family is
marked as duplicates. Alternatively, items within a family can be de-duplicated
individually. Only items selected for processing can be eligible for deduplication, and only non-filtered (i.e. processed) items are marked as an
original. If two items have matching MD5 hashes, the SHA-1 hash value is
checked as well. If those values still match and the documents are parents, a
family hash is generated by hashing the concatenated MD5 hash values of the
entire family. This allows for a through hash comparison for the entire family in
the event of differences between child documents. Bit-by-bit comparisons
between files can also be performed during de-duplication, and matching file
names can also be made a requirement for de-duplication.
DeletionHistory.LOG file: Located in the path of ...eCapture\Controller, this file
records all activities conducted by the Deletion Agent.
Discovery Job: In Ipro eCapture, a single directory is chosen to run the
discovery job from in order to determine file types. During the discovery
process, the MD5 hash for files (sans container files) are calculated and
indexing occurs.
Discovery Reports: Two types are available - Summary (summary of items
discovered by item type and category) and Detailed (list of all items
discovered).
www.iprotech.com
877-324-4776
Ipro eCapture User Guide
Q1 2014
F-3
Appendix F, Glossary
Discovery: Process used to determine file type(s) to later be processed. The
process of making data known to the Ipro eCapture system and assigning an
index value to this data.
Document: In Ipro eCapture, refers to an electronic file (letter, spreadsheet,
slideshow, etc.) that can be discovered; or discovered and processed.
Electronic Data Discovery (EDD): The act or process of discovering data by
using a computer and appropriate software.
Embedded File: A file that is embedded in another file such as a graphic (.GIF)
file embedded in a Word document. For example, the company logo (.GIF file)
was inserted into the Word document.
Extended metadata: metadata that consists of all the regular, standard
metadata as well as additional metadata that was captured and placed in the
extended list.
Extracted Text: Based on the native file and is completely accurate. Unlike
OCR, it does not rely on character recognition. A separate text file is created
for each page processed.
Filtering: In Ipro eCapture, options that include processing only specific file
types, processing by date range, or processing only those files that do not
contain specified extensions.
Filtering Reports: Two types are available - Summary (summary of items not
processed due to filter settings) and Detailed (list of items not processed due
to filter settings).
Flags: In Ipro eCapture, a status/description list the QCer can select from and
apply to a document/page at QC time. Flag types include, but are not limited
to, Foreign Language, Passed QC, Exception, and Threshold.
Fuzzy Searching: Finds misspelled or poorly imaged word. Use a % within the
word to allow for extra fuzziness.
Going Nuclear: A task has time out, or n (configurable, 10 default) errors have
been encountered during task execution.
Graceful Shutdown: From the Worker Status Information Tab, Status column.
Planned restart when the worker has performed 2500 tasks, has been running
for 6 hours since its first task, or when physical available memory falls below
20%. These can be configured in the WORKER.INI file.
F-4
Ipro eCapture User Guide
Q1 2014
www.iprotech.com
877-324-4776
GUID: Globally Unique Identifier - In Ipro eCapture, used to more positively
identify Ipro eCapture items records. Can be selected as a Content Type when
performing a Data Extract Job - Data Extract Import. Also available as an
Advanced Criteria option in the Flex Processor.
ID: In the Ipro eCapture Controller, a number assigned (through the SQL
database) to every Project, Discovery Job, or Processing Job.
Inaccessible Path: From the Worker Status Information Tab, Status column. A
task has been received where the target item was not accessible to the
Worker. The Worker will suspend task acceptance for one minute if this
condition occurs. This message is erroneously displayed when the Worker
patches itself.
Inactive: From the Worker Status Information Tab, Status column. The Worker
registered itself at some point, but is not currently available. (Not running,
assigned elsewhere, etc.).
Indexing: In Ipro eCapture, you can choose whether or not to create the
dtSearch index during initial discovery. Indexing prepares files for full-text
searching prior to processing. Ipro eCapture integrates dtSearch, a third party
program that facilitates advanced searching functions such as fuzzy searching,
synonym searching, and more. A processing job can be created that utilizes
searching. The items found will be processed.
Information Panel: Located in the Client Management tab. It is the area to the
right of the Tree View. When you click an item in the Tree View, its information
displays in the Information Panel.
Ipro eCapture Controller: Used to create projects, run discovery jobs, and
processing jobs. The Controller manages the status of executing the jobs
along with performing other functions such as changing a project’s priority,
managing Worker task tables, viewing Worker status information from a grid,
modifying project options for both discovery and processing jobs, running
reports, and exporting data.
Item ID: In Ipro eCapture, this field is unique per Client database.
Limited Controller: Designed to give full viewing access to Clients, Projects,
and Jobs. The Controller is required to perform a number of functions including, but not limited to, performing NIST matches, modifying Job Priorities, etc.
Note: The Save as default option is not available.
www.iprotech.com
877-324-4776
Ipro eCapture User Guide
Q1 2014
F-5
Appendix F, Glossary
Load File: A file used to load images or data into a third-party application such
as Concordance® or into Ipro Tech’s Suite. In Ipro eCapture, these load files
are created during the export process. Several load file formats are available.
Low Disk Space: From the Worker Status Information Tab, Status column. The
free space available on the network storage used by eCapture has dropped
below the allowable limit. The Worker will suspend task acceptance for one
minute if this condition occurs.
MD5 Hash Value: A 128-bit algorithm performed on a document (during
discovery) that results in a 32 digit hexadecimal value. It is a unique
representation of the data contained in a document. It is always 40 characters.
metadata: Created by the native program (e.g. Microsoft Word, Outlook) and
is maintained with the native file (the letter or e-mail). Ipro eCapture uses a
component called Oracle® Outside-In Technology (formerly Stellent), which
extracts the metadata from the native files during the electronic discovery
process. metadata can show the history of a document, where it went, how it
was used, what it “did”. It shows how a document was created, the date it was
created, modified, and/or transmitted, and the person or persons who handled
the document.
metadata Report: List of all processed items and selected metadata values.
Natural Language: (Search Function) Automatically weights the words in an
“Any Words” search to disregard words such as AND and OR and focus on the
more relevant, less frequently found words.
NIST: (National Institute of Standards and Technology) For more information
visit the website: www.nsrl.nist.gov. Ipro Tech allows for the optional loading
and use of the NIST database for use with Ipro eCapture.
Node: Used to describe items in the Client Management tree view such as Client, Custodian, Project, etc. In reports, an error may be defined as a Node
level error (e.g. email store).
OCR Status Report: List of image files sent through the OCR engine and the
OCR results.
Optical Character Recognition (OCR): Ipro eCapture will create OCR text
during a Processing Job if possible. Otherwise it creates extracted text. A
separate text file is created for each page processed.
Original Size (Column in Export Summary Report): This is the sum of the
native file size of parent documents in the export; not the Discovery Job.
F-6
Ipro eCapture User Guide
Q1 2014
www.iprotech.com
877-324-4776
Page Threshold: a setting (in page numbers) used for bypassing larger files
and inserting a placeholder for them. For example, if you set a threshold page
value of 10, then Ipro eCapture will process items with 1 to 10 pages and
insert a placeholder for items with 11 or more pages.
Page Threshold Report: Shows a list of processed items that exceeded the
page threshold. The page threshold is set under the Processing Option,
General Options tab.
Pending Cleanup: From the Worker Status Information Tab, Status column.
Status given when the Worker is waiting for active tasks to complete before
Going Nuclear or restarting.
Phonic: (Search Function) Finds words that sound like the requested word. Use
a # in front of the word to search phonetically.
Premium EDD Printer Drivers: These drivers are installed during the
installation process. They appear in the Ipro eCapture Worker screen. A
maximum of eight drivers can be installed.
Print Spooler Error: From the Worker Status Information Tab, Status column.
The print spooler service on the Worker isn't running and could not be
automatically restarted. The Worker will suspend task acceptance for one
minute and try again. Manual intervention may be necessary.
Processing Errors Reports: There are two types available - Summary
(summary of errors encountered during processing) and Detailed (list of errors
encountered during processing).
Processing Job: There are two types - Search and Standard. The Search
Processing Job allows the culling of data by the dtSearch indices created
during discovery. The Standard Processing Job acts upon all files of the
selected Discovery Job or Jobs. If more than one Discovery Job is selected, the
contents are treated as a single, combined Discovery job for the purposes of
searching and de-duplication. During this process task, images are created,
raw text is extracted, word positions are extracted, and metadata is extracted
for an item.
Project Directory: An empty directory (mapped) that is selected each time a
new project is created. Discovery Job data and Processing Job data is stored in
this directory. Path structure example: \\projects\Discovery
Jobs\DJ00005\Attach (E-mail) (SearchIndex) and \\projects\Processing
Jobs\PJ00001\Output\1000\1 (2) (3), and so on.
www.iprotech.com
877-324-4776
Ipro eCapture User Guide
Q1 2014
F-7
Appendix F, Glossary
Project Priority: In Ipro eCapture, a project’s priority (place in the queue) can
be changed. Priority values range from 1 to 10 with 1 representing the highest
priority. When a project’s priority is changed from 5 to 1 for example, then it
will be moved into the appropriate position in the Project Tree of the Client
Management tree view.
Project: In Ipro eCapture, the level beneath Client in the hierarchy. Projects
can have one or more Custodians.
QC: Quality Control: A process performed on a Processing Job to ensure
accuracy of the final, delivered data. QCing can be performed on one, some, or
all available categories and/or one, some, or all flags (Passed QC, Text
Missing, Low Priority, etc.)
Query: A set of criteria and logical operators used together or separately to
search documents during a processing job.
Queue: In Ipro eCapture, a term used to describe jobs that waiting to be
processed.
Queue Manager: The Queue Manager is responsible for the tasks that it
receives from the Ipro eCapture Controller. It assigns jobs to the Workers for
processing.
Queue Manager Configuration: Includes setting SQL Connection, Task
Distribution (System wide bandwidth throttle, queue manager task cache
count, queue manager bullpen trigger count, worker bandwidth throttle, queue
manager non-blocking update count, queue manager blocking update count,
and queue manager system exclusive update count), Functionality (allowed
embedded file extraction error percentage, allowed extraction error
percentage, allowed password protected percentage), Size Limits, and Worker
Instance Quantity.
QueueManager.LOG file: Located in the path of ...eCapture\QueueManager,
this file records: each task distributed by the Queue Manager, all hung job
detection activities, and any errors encountered by the Queue Manager when
attempting to query the SQL tables to distribute tasks.
Raw Text: In Ipro eCapture, extraction of raw text (text without any special
attributes) occurs when a Processing Job runs. Extract Raw Text is an option
available under Processing Options, General Options tab.
Ready: From the Worker Information Status Tab, Status column. The Worker
has one or more free threads and is waiting to be assigned a task.
F-8
Ipro eCapture User Guide
Q1 2014
www.iprotech.com
877-324-4776
Ready Unlicensed: From the Worker Information Status Tab, Status column.
The Worker is Ready, but there are more Workers than licenses and the Queue
Manager has designated this worker as unlicensed.
Restricted Documents: Though multi-threaded processing is supported, certain
document types can only be processed one at a time. For example, when using
Internet Explorer to print HTML documents, we are forced to set a systemwide default printer. Since there can only be one default printer at any given
time, HTML files are restricted. Other restricted types include but are not
limited to Word, Excel, PowerPoint, Lotus Notes, and GroupWise documents.
Restarting: From the Worker Information Status Tab, Status column. The
Worker has completed its tasks and is completing the scheduled restart.
Search Reports: Two types are available - Summary (summary of items
selected for processing resulting from search hits) and Detailed (list of items
selected for processing by search string).
Scope: The level on which the document and its relationships must match the
rule in order for the rule to apply.
Stemming: (Search Function) Finds formats of the word such as apply, applies,
etc. Use ~ at the end of the word to search for stemming variations.
Synonyms: (Search Function) Finds synonyms of the requested word. Use & at
the end of the word to search for synonyms in individual words.
Task: A single process performed by the worker.
Task Table: A list of tasks for the Workers to perform. Task tables are setup
and given customized names through the Ipro eCapture Controller. Once the
task tables are set up, then each Worker is assigned a task table. Task tables
are used to partition certain Workers to work on certain projects.
Unicode: An encoding system where a unique number exists for every
character regardless of the platform, application, or language.
Worker.LOG file: Located in the path of ...eCapture\Worker, this file records
each task assigned to the worker and any subsequent status updates to that
task. Records any errors encountered while completing the assigned tasks.
Records any errors encountered when communicating with the SQL server.
Worker: An Ipro eCapture module. The Worker (also called the Client) runs
from individual workstations and processes tasks.
www.iprotech.com
877-324-4776
Ipro eCapture User Guide
Q1 2014
F-9
Appendix F, Glossary
WorkerAgent.LOG file: Located in the path of ...eCapture\Worker, this file
records information related to the worker agent and worker restarts.
WorkerDiagnostics.LOG file: Located in the path of ...eCapture\Worker, this file
records status information every time worker diagnostics is run.
Zero-byte File: Files that contain no data.
Zero-byte Files Report: Two types are available - Discovery Reports tab - A
discovery report that lists any discovered items with zero length. Processing
Reports, Other tab - A list of zero-length files encountered while processing
that made it through discovery.
F-10
Ipro eCapture User Guide
Q1 2014
www.iprotech.com
877-324-4776
Index
Symbols
B
.LFP file D-1, D-4, D-17
appending to information only fields D-9
assigning level codes D-8
changing a boundary flag D-6
changing an image key D-18
changing an image master’s filename
D-18
changing date for image key D-18
changing volume based on image filename D-16
changing volume location D-17
creating an issue tag D-11
full text search highlights D-12
importing a new page D-3
importing an issue collection D-11
including OCR text D-14
loading folder (boundary) descriptions
D-10
loading information only fields D-8
removing a page D-19
removing a page restriction D-20
removing a tag D-15
removing all tags D-15
removing image master records D-19
removing info only field data D-14
setting a boundary flag D-6
setting a page restriction D-20
.original file
electronic discovery D-12
blank page threshold 5-62, 6-78
A
appending image records to a project D-3
appending to information only fields D-9
assigning
level codes D-8
attachments
handling for data extract import jobs
5-59, 5-101
authorization
viewing status of 2-54
viewing type of 2-54
auto QC
setting options 6-24
www.iprotech.com
877-324-4776
C
calculate page count
discovery jobs 5-35
changing
date for image key D-18
image key D-18
import file’s boundary flag D-6
volume based on image filename D-16
volume location D-17
clients
creating 5-3
deactivating 2-25
described 5-3
reactivating 2-26
color depth 5-62, 6-81
Concordance DAT
exporting 7-256
Controller
Client Management Tab described 2-27
connection, establishing 2-2
creating
a data extraction export job 7-147
standard processing jobs 5-51
initial startup 2-2
interface, described 2-26
jobs, changing priority of 2-55
low disk space cutoff 2-4
purpose described 2-1
Queue Manager, default setting 2-4
Queue Status Information Tab, described
2-51
search Client Management tree view 2-46
SQL server 2-3
stopping 2-7
system options
fail task type enabling setting 2-5
low disk space cuttoff setting 2-4
NIST database configuration 2-6
Queue Manager settings 2-4
remote desktop settings 2-5
search progress setting 2-5
tree node setting 2-5
tree view sorting settings 2-5
Ipro eCapture User Guide
Q1 2014
Index-1
Index
viewing 2-3
testing, connection of 2-4
Worker Status Information Tab, described
2-49
creating
clients 5-3
custodians 5-8
data extract import processing jobs 5-56
data extraction export job 7-147
data extraction jobs 5-94
export jobs 7-3
processing jobs, standard 5-51
projects 5-4
Task Tables 2-13
custodians
creating 5-8
described 5-8
custom image load file formats 7-262
D
data extraction job options
described 5-97, 5-102
data extraction jobs
creating 5-94
creating import data extraction job 5-98
described 5-94
export job, creating 7-147
date
changing date for image key D-18
email and de-duplication 5-24, 5-37
filtering A-33
handling 5-20
de-duplicatio
email 5-23, 5-37
de-duplication
reports 8-4
time zones 5-20
described 3-1
discovery job options
binary files 5-28, 5-43
calculate page count 5-35
e-mail de-duplication 5-23, 5-37
embedded file handling 5-38
legacy Lotus Notes handling 5-23
legacy lotus notes handling 5-36
mailstores 5-23
Index-2
treat archives as directory 5-36
discovery jobs
creating 5-16
described 5-16
project options, described 5-19
documents/records list window
using 6-49
documents/records list window toolbar 6-45
E
eCapture
authorization status, type 2-54
Controller, see Controller
described 1-1
error handling 2-60
interval updating 2-60
maintaining of 2-59
modules 1-3
Project Options, see Project Options
QC, see QC
reports, see reports
toolbar, described 2-52
Worker, see Worker
workflow 1-3
eCapture Monitor
accessing 2-9
Eclipse
exporting, autoloading into 7-52, 7-184
electronic discovery
opening original files from IPRO View D-12
e-mail message time zone handling 6-80
enterprise
assigning worker as 2-18
status of in Worker Status Information tab
2-50
Excel
custom paper size 5-73, 6-87
extraction of documents 5-39
metadata, about 5-72, 5-77, 6-91, 6-95
processing job options, setting 5-67
exception files
described 6-99
reprocessing 6-99
export
Concordance DAT 7-256
custom formats 7-262
Ipro eCapture User Guide
Q1 2014
www.iprotech.com
877-324-4776
Index
IPRO Eclipse autoloading 7-52, 7-184
IPRO Eclipse DLF format 7-262
kCura Relativity autoloading 7-100, 7-218
OCR CONTROL.LST file 7-259
Ringtail format 7-259
save settings to an .INI file 7-86, 7-209
sets 7-264
Summation Case 7-257
export job
completed data extract 7-6, 7-55, 7-103,
7-187, 7-221
creating from existing export series 7-269
creating processed data 7-3
export series, creating 7-266
export series, deleting 7-268
export series, editing 7-268
exporting
.INI, saving 7-270
completed processing jobs 7-2
custom image load file formats 7-262
data load formats 7-3, 7-146
defining fields for databases 7-18, 7-66,
7-112, 7-159, 7-195, 7-227
image load formats 7-2
exporting jobs
image
out file formats, described 7-9, 7-44,
7-57, 7-92, 7-105, 7-136
volume options, described 7-43
F
file
G
general
color depth options QC 6-81
QC processing options 6-77
setting QC options 6-23
H
hash
compatibility and legacy handling 5-36
compatibility and legacy Lotus Notes handling 5-23
de-duplication 5-24, 5-37
discovery jobs 5-2, 5-16
email 5-21
email generation 5-25, 5-38
flex processor and custom matches A-46
loading lists 2-23
Nist matches updating 5-32
I
opening original file from EDD D-12
file name and path
length limitations D-4, D-17
files
discovery 5-17
flags
clearing for multiple records 6-58
deleting user-defined 6-36
QC Flags Window 6-29
setting for multiple records 6-58
setting up user-defined 6-35
Flex Processor Rules Manager
actions, defining A-15
described A-1
www.iprotech.com
877-324-4776
preparing rules A-1
rule bar A-7
selection criteria, defining A-27
folder descriptions
loading (in .LFP file) D-10
full text search
fuzzy search A-41
natural language search A-40
phonic search A-40
stemming search A-40
synonym search A-40
fuzzy search A-41
image key
changing D-18
length limitations D-4, D-17
numbering convention
data extraction job 7-47, 7-95, 7-139,
7-176, 7-213, 7-249
image records
changing filename D-18
image resizing 7-10, 7-58, 7-105
image view
described 6-43
importing
issue collection D-11
including OCR Text in LFP D-14
Ipro eCapture User Guide
Q1 2014
Index-3
Index
indexing
discovery job options 5-41
exceptions errors 8-3, 8-10
items shown 2-53
search 5-43
info only fields
removing data D-14
information only fields
appending to (in .LFP file) D-9
loading (in .LFP file) D-8
IPRO Eclipse autoloading
exporting 7-52, 7-184
IPRO Eclispe DLF
exporting 7-262
IPRO Enterprise
integrating with 2-20
IPRO Tech
contact information 1-7
customer support, assisting 1-7
issue collection
importing D-11
issue tag
creating D-11
Item ID list
loading child A-46
loading parent A-46
J
jobs
completed processing, exporting 7-2,
7-146
data extract import processing, creating
5-56
data extraction export, creating 7-147
data extraction, creating 5-94
discovery, creating 5-16
export, creating 7-3
exporting completed processing 7-2,
7-146
standard processing, creating 5-51
K
kCura Relativity
integrating with 2-21
kCura Relativity autoloading
exporting 7-100, 7-218
Index-4
L
length limitations D-4, D-17
in .LFP file D-4, D-17
level codes
assigning (in .LFP file) D-8
load files D-1
defined 7-262
export only 7-46, 7-94, 7-138, 7-176,
7-213, 7-249
load formats
listed for Data Extraction Export Jobs
7-147
loading folder (boundary) descriptions D-10
loading information only fields D-8
Lotus Notes
legacy Lotus Notes handling 5-36
M
metadata
defined 5-72, 5-77, 6-91, 6-95
described 5-72, 5-77, 6-91, 6-95
N
native files
exporting 7-12, 7-60, 7-108, 7-152, 7-190,
7-223
include file types and QC flags 7-14, 7-63,
7-110, 7-155, 7-193, 7-225
natural language search A-40
NIST
Flex Processor Rules Manager, defining
criteria for 5-91
updating matches for discovery job 5-32
NIST database
testing, connection of 2-6
numbering
generated 7-48, 7-96, 7-140, 7-179, 7-251
predefined 7-49, 7-97, 7-141, 7-180,
7-215, 7-251
O
OCR CONTROL.LST file
exporting 7-259
OCR pages missing text 5-61, 5-85, 6-78
options
saving 6-67
Ipro eCapture User Guide
Q1 2014
www.iprotech.com
877-324-4776
Index
P
page
removing a restriction (in .LFP file) D-20
restricting (in .LFP file) D-20
PDF
convert to 5-117, A-16
exporting 7-9, 7-45, 7-57, 7-93, 7-105,
7-137
placeholders
custom A-16, A-18
Flex Processor A-15
setting up user-defined 6-36
post process operations, for completed processing jobs 5-115
PowerPoint
extraction of 5-39
processing job options, setting 5-78
processing
job options
blank page threshold 5-62, 6-78
color depth 5-62, 6-81
described 5-54, 5-60
Excel 5-67
metadata described 5-72, 5-77, 6-91,
6-95
OCR pages missing text 5-61, 5-85
PowerPoint 5-78
time zone handling 6-102
time zones 5-66
Word 5-74
OCR pages missing text 5-61, 5-85
processing jobs
creating, standard 5-51
exporting of completed 7-2, 7-146
options, described 5-54, 5-60
running batch operations on 5-115
project options
data extraction jobs, see data extraction
jobs
discovery jobs, settings 5-19
modifying 2-56
processing jobs, settings 5-54, 5-60
viewing 2-56
projects
creating 5-4
www.iprotech.com
877-324-4776
Q
described 5-4
QC
Auto-QC options, setting 6-24
connection, testing 6-104
data extract jobs, selecting 6-14
Excel options 6-84
exception files, described 6-74
export sets, creating 6-63
export sets, described 6-62
export sets, modifying existing 6-66
extracted text, reviewing 6-76
flags, described 6-29
functions performed 6-1
general
native reprocess timeout, setting 6-24
processing options, setting 6-77
reprocess timeout, setting 6-24
identical file handling 6-59
interface
components, described 6-5, 6-68
icons, described 6-69
layout, saving 6-21
shown 6-13, 6-20
keyboard shortcuts 6-104
metadata, reviewing 6-76
multiple QCers, handling 6-2
options, setting 6-77
processing jobs, selecting 6-7, 6-14
starting 6-3
system options, configuring 6-103
unknown files, described 6-74
user defined flags, setting 6-35
user defined placeholders, setting 6-36
Queue Manager 3-1
bandwidth throttle, setting 3-6
configuring 3-2
exiting 3-16
LOG file described 3-16
polling interval value, setting 3-3
settings, modifying 3-14
SQL
database, selecting 3-3
Server, selecting 3-3
status activity, viewing 3-15
Ipro eCapture User Guide
Q1 2014
Index-5
Index
stopping execution of 3-14
testing connection of 3-4
Queue Status Information Tab
components described 2-51
R
records
displaying group that meets criteria 6-58
modifying fields of 6-50
sorting columns of 6-52
Relativity
exporting, autoloading into 7-100, 7-218
removing
all tags from a page D-15
image records from a project D-19
info only field data D-14
tag D-15
reports
closing application 8-6, 8-15
custodian pivot 8-12, 8-14
described 8-1
discovery, running 8-3, 8-9
export 8-14
extract, running 8-5, 8-12
processing, running 8-4, 8-10
source container 8-9
starting from Controller 8-2, 8-8
warnings vs errors 8-3, 8-10
restricting pages D-20
removing a restriction D-20
Ringtail
exporting 7-259
S
search
conducting advanced 6-57
conducting session 6-55
searches
binary files
described 5-28, 5-43
filtering options for 5-43
described A-34
dtSearch, supported file types 5-28, 5-43
entering words A-37
full text searching 5-43
hyphenation, treatment of 5-28, 5-44
index numbers, searching 5-27, 5-43
Index-6
using previous options and strings A-35
searching
text D-12
session tab
closing 6-62
using 6-49
setting
import file’s boundary flag D-6
SQL database
EncounteredMetadataFieldList 7-264
Queue Manager, selecting 3-3
selecting 2-3
viewing current 2-54
Worker, selecting from 4-2
SQL Server
Queue Manager, selecting 3-3
selecting 2-3
viewing current 2-54
Worker, selecting from 4-2
Summation (exporting data and image files)
7-257
synonym search A-40
system options
accessing existing configuration databases 2-7
T
tag
creating D-11
removing all from page (in .LFP file) D-15
removing from page (in .LFP file) D-15
Task Tables
assigning to Workers 2-15
best practices reassignment 2-17
creating 2-13
described 2-13
reassigning workers to different configuration databases 2-17
text
searching D-12
threshold
max page, setting 5-90, 5-118
threshold (for blank pages) 5-62, 6-78
thumbnail window
described 6-46
tree view
Ipro eCapture User Guide
Q1 2014
www.iprotech.com
877-324-4776
Index
U
described 2-27
functions accessed from 2-46
refreshing 2-48
searching in 2-46
sorting 2-29
unknown files
described 6-99
reprocessing 6-99
user guide
caution icon, explained 1-7
conventions used 1-7
described 1-5
note icon, explained 1-7
V
volume
changing (in .LFP file) D-16
changing location (in .LFP file) D-17
volume name
length limitations D-4, D-17
W
Word
extraction of documents 5-39
filtering, embedded file handling 5-39
processing job options, setting 5-74
Worker
assigning Task Tables to 2-15
components described 2-49
configuration, modifying 4-3
connection, testing 4-3
described 4-1
exiting 4-7
interface components, described 4-4
LOG file, described 4-7
print drivers, selecting 4-2
SQL
database, selecting 4-2
Server, selecting 4-2
status, viewing 4-6
stopping execution of 4-4
workstation, running 4-1
worker
assigning enterprise 2-18
www.iprotech.com
877-324-4776
Ipro eCapture User Guide
Q1 2014
Index-7
Index
Index-8
Ipro eCapture User Guide
Q1 2014
www.iprotech.com
877-324-4776