1
ASTi Telestra 4 Quick Start (Ver. 1, Rev. E)
3.0. Setting up the Telestra 4 Target
To complete the set up you will need the following hardware:
• monitor
• keyboard
• ACE Studio Development Workstation
• Category 5e cable or better
• Target
Follow the steps below to setup the Target and assign an IP address.
1. Connect the monitor and keyboard to the Target.
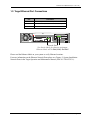
2. Using a Category 5e cable, connect the Target to the ASTiNet/DIS network using Eth0.
See “Top Level Hardware Layout” on page 1.
3. Power on the Target and allow it to boot.
4. Login with the following:
Username: root Password: abcd1234
5. The Target will not have an IP address without a DHCP network connection. To set an IP
address, type:
ace-net-config -a xxx.xxx.xxx.xxx -n yyy.yyy.yyy.yyy
where ‘x.x.x.x’ is the IP address and ‘y.y.y.y’ is the subnet mask.
This sets the IP address and netmask for Eth0 which is used to access the Remote Management System (RMS) via a web browser.
6. Optional: For more network setup options type:
ace-net-config -h
7. Once you have configured Eth0, you can use RMS to make additional changes to the network settings.
8. On the development workstation or any computer on the network with a web browser,
open a browser and in the address bar type in the IP address to open the Remote Management System (RMS).
Note: Depending on your web browser and browser version, the browser may show a
failed connection due to a self signed security certificate. Bypass the warning by following
the prompts to add a security exception.
8
Copyright © 2011 Advanced Simulation Technology inc.