1
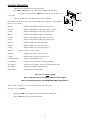
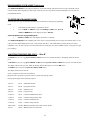
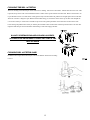
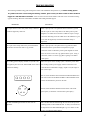
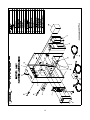
TABLE OF CONTENTS
INTRODUCTION
Equipment Features
Other Jamex Products
USER'S MANUAL
Operating Guide
Page 1-2
Page 3-4
Power-up
Operation of the Vending System
Using the Stored-Value Cards (optional)
Adding Value to a Card
Receipt Printer (optional)
Stopping a Transaction
Bypass Operation
Totaling the System, Reading the Meters
and Removing the Cash
Page 5-8
Totaling the Vending System
Reading the Meters
Resetting the Cash Totals
Dispensing Coins
Emptying the Cash Drawer
Removing Bills From the Bill Acceptor
INSTALLATION and SERVICE GUIDE
Installation & Set up
Page 9-10
Unpacking the Vending System
Environmental Specifications
Physical Mounting
Loading the Change Tubes
Setting the Bill Acceptor
Display Contrast
Signs and Stickers
Programming Your Jamex Vend System
Page 11-13
Adjusting the Price Per Copy
Adjusting the Maximum Allowable Escrow Amount
Maintenance
Page 14-16
Coin Changer
Bill Acceptor
Cardreader (optional)
Reciept Printer (optional)
Trouble-Shooting Guide
Illustrations
Parts Illustration
Electrical Installation
Wiring Diagram
Page 17-18
Page 19-21
INTRODUCTION
Thank you for choosing Jamex for your vending needs. This manual provides instructions for operating your Jamex Vend
System as well as technical information necessary to install and maintain the system. Please keep this manual available and refer
to it when calling for technical support.
FEATURES OF YOUR JAMEX VEND SYSTEM
Jamex Vending Systems are sturdy, compact units designed to allow you to create and monitor a revenue stream using your
existing office equipment. Your Jamex Vend System incorporates the following features:
- Accepts any combination of nickels, dimes, quarters, and dollar coins as well as $1,$5,$10, and $20 bills
- Deposits of up to $30 can be held in escrow
- Price per copy adjustable in $.05 increments up to $99.95
-Accepts proprietary cards, maintaining the highest level of security (optional)
-Cards can be programmed with values up to $654.50 (optional)
- Multiple pricing capability allows you to charge different prices for paper size and B/W and Color (copier dependant)
- Full refund of escrow
- Includes a "change checker"
TM
feature. To ensure proper change payback
-Change verification, which insures that enough change is available before accepting a bill.
- Over $34 in self replenishing change storage
- Bypass key for staff and service use
- Solid state copier interface with polarity-independent connections
- Full feature display for cash, bypass, and card copies
- Perpetual change tube inventory
- Electronic coin validation for increased rejections of slugs and foreign coins
-Totaling of the system is accomplished through use of the display (and the optional receipt printer)
gives the number of copies made at each price, as well as the amounts in the change tubes, the bill stacker,
drawer.
- Sturdy steel housing with quartz white textured powder-coat epoxy finish
- Two year warranty with "overnight" shipment of warranty parts
- Toll free technical support
1
which
and the coin
OPERATING GUIDE
POWER - UP
When first powered, and after any hardware or software reset, the Jamex Vend System will display a revision number, a serial
number and a copyright notice on the LCD Display. During normal operation, when not in use, the LCD Display will read as
follows:
"Copies
Copies $ x.xx $x.xx and $x.xx & $x.xx DEPOSIT UP TO $x.00
MAKE SINGLE OR MULTIPLE COPIES"
COPIES
OPERATION OF THE Jamex Vend System
The Jamex Vend System accepts any combination of nickels, dimes, quarters, or dollar coins, as well as $1, $5, $10, and $20
bills and the proprietary cards intended for use with this system. Coins are deposited in the slot on the top of the housing. Bills
are inserted face up, in the slot on the front of the housing (for instructions on card use please see below). Once the payment is
deposited, the display shows the credit or escrow amount. When the amount in escrow equals or exceeds the vend price, the
vending system will enable the copier. The copier will remain enabled as long as the amount in escrow is equal to or greater than
the vend price, allowing the patron to make single or multiple copies. If the amount in escrow drops below the vend price or the
coin return is pressed, the transaction will be terminated and any remaining escrow returned.
Your Jamex Vend System includes a "change checker"
TM
feature. When a bill is inserted, the system makes sure that there are
enough coins in the tubes to give change if only one copy is made. If there is not enough change the bill will be returned and the
display will flash the message "LoChange".
The display will show a "TOO MUCH" message and return the bill if the bill is of a value greater than the maximum allowable
escrow amount. (Please see ADJUSTING THE MAXIMUM ESCROW AMOUNT)
3
USING THE STORED-VALUE CARDS (optional)
Insert a “Copy Card” face up, arrow point first, into the card reader slot on the front of the Jamex Vend System.
System The card reader
will accept the card and the display will show the current value on the card. When this value is equal to or greater than the vend
price the copier will be enabled to allow single or multiple copies to be made. When the required number of copies have been
made, press the white Card Return button. This will encode the card’s magnetic strip with any unused value and return the card
to the slot. The card reader will display “Take Card” and the copier will be disabled.
Caution: it is very important not to interrupt the power source or to remove the
“Copy Card” without pressing the Card Return button. If either of
these actions is attempted, the card will not be encoded with the
unused value and the card will no longer be useable.
ADDING VALUE TO A CARD
Insert a “Copy Card” face up, arrow point first, into the card reader slot. Deposit the desired amount of coins or bills into their
appropriate slots and the value will be credited to the card.
(Please Note: If a card is in the card reader then all cash payments inserted will be credited to the card. Cash can not be
diverted to pay for copies when a card is in the reader.
RECEIPT PRINTER (optional)
After each transaction is complete the customer may request a printed receipt by pressing the button on the front of the vend
system. The receipt printer will also print the Meter Totals every time the Meter Readings are accessed. (Please see "READING
THE METERS")
STOPPING A TRANSACTION
The user may terminate a cash transaction at any time by pushing the COIN RETURN plunger. The copier is immediately
disabled and after a short delay any remaining credit is returned. The system will pay out the fewest coins possible for exact
change. To terminate a card transaction, simply press the white “Card Return” button. Upon exit, the card’s information will be
updated with the remaining value.
BYPASS OPERATION
A key controlled bypass switch is provided for staff and service personnel. When the switch is keyed on, the copier will be able
to make full speed single or multiple copies in the normal manner. The bypass switch may be used at any time. If the vending
system has a credit amount on the display, this amount will still be available and will return to the display after the bypass switch
is keyed off. No coins or bills will be accepted while the vending unit is in the "BYPASS" mode.
4
Totaling the Vending System
The Jamex Vend System allows you to track your revenue by reading and recording meter amounts shown on the display. The
meter readings will show the total number of copies made with cash and card, as well as the number of "Bypass" copies. These
meters cannot be reset and a log should be maintained noting the readings each time the cash is removed. The "Cash" reading
shows the total amount of revenue (this does not include value added to cards) that the Jamex Vend System has taken in since
this meter was last reset. The cash meter should be reset to "$0.00" each time the cash drawer and bill acceptor are emptied. The
number of "PAID" copies made multiplied by the price per copy should equal the total cash in the bill box, plus the coin drawer,
plus or minus any change in the change tube inventory.
5
READING THE METERS
- Unlock and open the housing to reveal the PC board
- Press YES and NO buttons on the control board simultaneously and release
The display will begin flashing "Meter E" and will show the number of cash
copies made
- Pressing the YES button once will then bring up the next display
The table below shows the sequence of information displayed by continuing to press the YES
button once for each item:
Meter E
Number of Small black & white cash copies made *
Bypass E
Number of Small black & white copies made on “bypass” *
Card E
Number of Small black & white copies paid by card *
Meter F
Number of Large black & white cash copies made *
Bypass F
Number of Large black & white copies on “bypass” *
Card F
Number of Large black & white copies paid by card *
Meter G
Number of Small color cash copies made *
Bypass G
Number of Small color copies on “bypass” *
Card G
Number of Small color copies paid by card *
Meter H
Number of Large color cash copies *
Bypass H
Number of Large color copies on “bypass” *
Card H
Number of Large color copies paid by card *
Card Add / $XX.xx
Amount of value added to cards *
Cash / $XX.xx
Amount of cash copies made since data last cleared
Box / $XX.xx
Amount of money routed to coin drawer since data last cleared
Bill / $XX.xx
Total bills accepted since data last cleared
Tube / $XX.xx
Amount currently in change tubes
*These meters are NOT resettable
Note: If cardreader option is not installed card meters will not appear
(Before proceeding further please read “RESETTING THE CASH TOTALS”)
TOTALS”
When you have completed your review of the information in the meters once,
the display will read "Done?".
- Pressing the YES button will place the system back into the vending mode.
- Pressing NO will place you in the dispense mode.
6
RESETTING THE CASH TOTALS
While the "Tube" amount is displayed, the cash meters may be reset to $00.00
- Press and hold the NO button
- Press the YES button and hold both for five seconds
The meters are cleared and the display will show "Cash" and a $00.00 value
- Press the YES button once each for "Box",
"Box" "Bill",
"Bill" and "Tube"
The "Box" and "Bill" meters are cleared and the display will show
$00.00 values for “Box” and “Bill” and “$XX.xx” (the actual value in the tubes).
The display will read "Done?"
(Before proceeding further please read “DISPENSING COINS”)
- Press the YES button once to return to vending mode and NO to proceed to dispensing coins.
DISPENSING COINS
After clearing the meters, you may dispense coins from the tubes rather than returning to vending mode. When the display reads
"Done?"
Done?",
- Press the NO button once more to continue and REMOVE COINS FROM THE CHANGE TUBES.
The display will show DSP .05
- Press the NO button to pay out one nickel
- Press and hold the NO button to continuously pay out the nickels
- Press the YES button to advance to the next coin type
- Follow the same sequence to pay out dimes and quarters.
The display will show “Done?”
- Press the YES button to return to vending mode
- Press NO to repeat the resetting and payout sequence
- Remember that there must be at least $3.00 in the tubes to ensure proper change return.
(Please see "Loading The Change Tubes")
EMPTYING THE COIN DRAWER
To remove coins from the lower coin drawer, unlock and remove the drawer. When replacing the drawer be sure it is in place
and locked.
7
REMOVING BILLS FROM THE BILL ACCEPTOR
To remove bills from the bill acceptor inside the system housing, you must first remove the silver colored locking bracket which
is designed to be used with a customer supplied cable type lock. Lift up on the front of the bracket so that it rotates up and
releases the forked end. Then remove the bracket. On top of the bill box there is a release latch. Gently push it away from the
bill box lid, pull the box straight up and out from the unit. The front of the box is hinged to open. Hold it with the label facing you,
release the catches at the top on either side and pull the cover down toward you. Remove the bills and then replace the box with
care ensuring that the lock is secure.
8
INSTALLATION AND SET UP
UNPACKING THE VENDING SYSTEM
The following equipment is included in your Vend System shipment
- Model 6552/57 vending unit
- This Operation Manual & Installation and Service Guide
- Parts Kit which includes
Power Supply, 2 sets of keys (each set has one key to open the system door,
one for bypass operation and one to open the cash drawer)
- Interface Cable (and an extension cable if applicable)
- Mounting Hardware
- Sign Kit
ENVIRONMENTAL SPECIFICATIONS
Power Requirements --- 120VAC, 60Hz 0.7 Amps
Operating Temperature --- 30 to 95 Degrees Fahrenheit ( -1 to 35 Degrees Celsius)
Relative Humidity --- 20% to 98% Non-condensing
Do not place Vend System in direct sunlight
PHYSICAL MOUNTING
Your Jamex Vend System may be mounted on one of the stands or supports available from Jamex or it can be bolted to a wall,
or cabinet. If securing to a wall or cabinet, route all the cabling through the opening in the bottom of the housing next to the
hinge. Ensure that the cables cannot be caught or pinched.
LOADING THE CHANGE TUBES
Fill the change tubes through the coin slot on top of the vending system (just like a patron would) making sure that the system is in
vending mode (normal scrolling display). This method of inserting change is required to ensure the
accuracy of the coin tube inventory and the “Change Checker” features of your Jamex Vend System.
DO NOT LOAD COINS DIRECTLY INTO THE COIN
TUBES IN THE COIN CHANGER
The maximum allowable escrow amount is the largest cash payment that can be inserted into the vending
system before beginning to make copies. Your Jamex Vend System has been pre-set with a maximum
escrow amount of $5 but this is a programmable feature. (Please see " Programming Your Jamex
Vend System".) As you are loading change you will notice that when the escrow value is reached, the
changer will stop accepting coins. If you wish to load more coins press the RESET button, then add more
coins. A minimum of $.85 in nickels, $1.40 in dimes, and $.75 in quarters is required before the "NO CHANGE" light will go
out. Your Jamex Vend System automatically replenishes the change tubes during normal operations.
9
SETTING THE BILL ACCEPTANCE
Your Jamex Vend System can be programmed to accept $1, $5, $10, and $20 bills. This feature is controlled by the
MAXIMUM ALLOWABLE ESCROW setting. (Please see ADJUSTING THE MAXIMUM ALLOWABLE ESCROW
AMOUNT). Because your vending system has been delivered with this amount preset at $5, it will currently accept $1 and $5
bills.
DISPLAY CONTRAST
The display contrast can be adjusted by turning the variable resistor R2 (DISPLAY) on the control board.
Adjust the display contrast for the best readability.
SIGNS AND STICKERS
A complete Sign Kit with decals, stickers and mounting instructions is included with your Jamex Vend System.
System This kit includes
copyright disclaimers, descriptions of features, operating instructions, and various price stickers. For the convenience of your
customers, and to minimize interruptions for you and/or your staff, please be sure to install the appropriate signs and decals on
your Jamex Vend System and the accompanying copy machine.
10
PROGRAMMING YOUR JAMEX Vend System
Your Jamex Vend System has been preprogrammed to vend copies starting at $0.10 each and to accept a maximum of $5 in
coins and/or bills before beginning to make copies. Both the price per copy and the maximum allowable escrow amount are
programmable features.
TO ENTER PROGRAMMING MODE
Adjust the price per copy and maximum allowable escrow amounts by entering the programming
mode.
1.
Unlock and open the housing to reveal the PC board.
2.
Press and hold the YES button then while holding the YES button press &
release the RESET button. The display will show “Service”.
“Service”
Your Vend System is now in programming mode.
mode
3.
Release the YES button. The display will advance to “Price E “
Your Jamex Vend System has the capability with some copiers to charge different prices for paper size, black & white vs color
copies as well as differentially between cash or stored-value cards sales. (Check with Jamex for details about your copier’s
capabilities. Go to the end of the next section for instructions on setting only two prices for B&W copiers or one price for single
price vending.)
ADJUSTING THE PRICE PER COPY -- “Price E”
To increase the price per copy press & release the NO button once for each $.05 increment. The display will show the new
price.
To decrease the price per copy press and hold the NO button and press & release the YES button once for each $.05 decrease.
The display will show the new price. When the display reads the desired price release the NO button.
To advance to the next price field press & release the YES button.
The display will then read “Price F”.
(Note: Card prices increase in $.01 increments)
Repeat the above procedure to program “Price F” and the other pricing options.
Pricing options appear in the following sequence:
“Price E”
$0.10
Small black & white
“Price F”
$0.20
Large black & white
“Price G”
$1.00
Small full color
“Price H”
$2.00
Large full color
“Cd Prc E”
$0.10
Card Price Small black & white
“Cd Prc F”
$0.20
Card Price Large black & white
“Cd Prc G”
$1.00
Card Price Small full color
“Cd Prc H”
$2.00
Card Price Large full color
“Max Card $
$25.00" Maximum allowable card (value) escrow amount
“Escrow
$5.00"
Maximum cash escrow amount
11
When the display reads the desired prices press and releasethe YES button.
The display will read “DONE?”.
“DONE?”
Press & releaseNO to continue programming.
Press & release YES to return to the vending mode.
Note: For a B/W copier set the B/W prices the same as the Color prices. This will change the scrolling message to show only the
two B/W prices. For a single price setup, setting all prices the same will show only a single price on the scrolling display.
ADJUSTING THE MAXIMUM ALLOWABLE ESCROW AMOUNT
If you are not presently in programming mode from adjusting the price per copy you must enter the programming mode
from the beginning (See “To Enter Programming Mode”) After entering the programming mode simply step through the price
per copy items using the YES button until you pass “Done?” then press & release NO to start programming.
The display will change to “ESCROW” and show $5.
To increase the escrow limit press and releasethe NO button
once for each $.50 increment.
To decrease the escrow limit press and hold the NO button
then press & release the YES button once for each $.50 decrease.
When the amount shown is the desired value release the NO button.
To exit the programming mode press & release the YES button once.
The display will show “DONE?”.
Press & releasethe YES button once more to return to vending mode.
Press the NO button to continue to setting the time and date.
ADJUSTING RECEIPT PRINTER TIME AND DATE
The Display will display 12:01 AM with the first digit highlighted
-To change the number press the NO button.
The number will increase to 9 and roll over to 0
-Once you have the desired number press the YES button to continue to the next digit.
-After the time is correct press the YES button to continue to the date.
The Display will show 01/01/98 with the first digit highlighted
-To change the number press the NO button.
The number will increase to 9 and roll over to 0
-Once you have the desired number press the YES button to continue to the next number.
-To exit the programming mode press the YES button once
The display will show DONE ?
-Press YES once more to return to vending mode
-Press NO to continue
-Next there will either be a blank display or a copier Brand name. To change the name press the NO button until the desired
name appears. Once the desired name is being displayed press the YES button.
12
-The display will now read 1Copymin - NO. To require one copy to be made before change will be given back when using coins
press NO to change the setting. Press the YES button to advance to the next progamming mode item.
- The display will now read 1BillMin - YES this requires that one copy be made before change will be given back from a bill.
Press the YES button to advance to the next progamming mode item.
-The display will now read CardRdr - YES . If an optional MDB card reader is installed this setting should be set to YES.
YES If no
card reader is installed press the NO button once to change to NO.
NO This will also remove meters and prices for cards from the
service modes. Press the YES button to advance to the next progamming mode item.
-The display will now read Color - NO. This setting determines how the scrolling message is displayed. Should be set to NO for
B/W copiers and YES for Color copiers. When set to YES the display will show B/W Copies $ .xx & $ .xx and Color $ .xx and $
.xx . Use the NO setting for B/W copiers when prices E,G and F,H are the set the same or when all prices are set the same, as for
a single price installation. Press the YES button to advance to the next progamming mode item.
-The display will now read PayoutT - 00 this is for 4 tube changers and should only be changed if instructed to do so by Jamex.
Press the Yes button.
-Done
Done ? - press YES
Additional programming sequences are available, but should not be changed without the assistance of a Jamex Technical
Support Representative.
13
MAINTENANCE
ALWAYS DISCONNECT VEND SYSTEM POWER BEFORE CLEANING OR CLEARING JAMS.
JAMS The only
maintenance which should be necessary to ensure smooth performance of your Jamex Vend System is occasional cleaning of the
coin changer and the bill acceptor. Frequency of cleaning will depend on environment and number of transactions. It is possible
that odd sized coins or other foreign objects inserted into the vending system may cause a jam. Instructions for clearing such jams
are therefore included for your convenience.
CLEANING THE COIN CHANGER
The coin changer should only be cleaned with warm water and mild detergent.
CAUTION:
- NEVER SUBMERGE CHANGERS IN WATER.
- DO NOT USE PETROLEUM SOLVENTS, STEEL WOOL,
- SCOURING PADS OR A METAL BRUSH FOR CLEANING.
- DO NOT SPRAY ANY PART OF CHANGER WITH ANY TYPE OF LUBRICANT.
Since all coins share a common coin ramp, heavy usage or a dirty environment can result in dirt build up. To clean the coin ramp,
lift the acceptor gate upward and diagonally to the right. Hold the gate firmly to prevent it from snapping back. Wipe the
exposed coin ramp and inner surface with a damp cloth. For excessively dirty units, use a damp cloth with a mild soap.
CLEARING COIN JAMS
ALWAYS DISCONNECT VEND SYSTEM POWER BEFORE CLEANING OR CLEARING JAMS
Should a coin jam occur in the cash drawer chute area, use the following steps to help dislodge coins:
- To remove the changer; after unplugging system, raise the two acceptor
latches and pull the top of the acceptor forward and away from the changer
housing, unplug the acceptor ribbon cable from the main logic board, raise the
acceptor and pull outward until the acceptor clears the housing slots.
- Using a 1/4" drive remove the 3 aluminum spacers located behind the
acceptor, and the 2 for the bracket at the bottom of the changer. Now the
changer can be removed from the vend system
- Keeping the changer in an upright position, insert a narrow screwdriver into
cash drawer chute or reject chute from the bottom of the changer to relieve
jam.
- Access holes are also provided at the rear of the changer housing to help
relieve coin jams.
CAUTION: EXCESSIVE SCREWDRIVER PRESSURE OR TWISTING CAN CAUSE PERMANENT
DAMAGE TO THE COIN CHANGER.
14
CLEANING THE BILL ACCEPTOR
The lower housing of the bill acceptor can be removed for cleaning. First remove the bill box. Unlock and remove the lock cable
if present, lift up on the front of the metal latch bracket so that it rotates up and releases the forked end. Remove this bracket. On
top of the bill box there is a release latch. Gently push it away from the bill box lid, pull the box straight up and out from the unit.
The front of the box is hinged to open. Hold it with the label facing you, release the catches at the top on either side and pull the
cover down toward you. Then remove the bill acceptor lower unit; push up and back on the tab located on the bottom of the
lower housing and pull the unit toward you. Plastic parts and belts can be cleaned with a mild soap solution and a soft cloth. The
magnetic head and optic sensors should be cleaned using a swab and isopropyl alcohol.
DO NOT USE PETROLEUM BASED CLEANING SOLVENTS,
SCOURING PADS OR BRUSHES TO CLEAN ANY PART OF THE
BILL ACCEPTOR
CLEARING BILL ACCEPTOR JAMS
If a bill becomes lodged in the bill acceptor, remove the bill box and the lower housing
to free it.
15
CLEANING THE CARD READER (optional)
The Card Reader should be cleaned using a double sided cleaning card designed especially for credit card magnetic stripe readers.
Insert the card into the reader, it will be returned to exit position. Remove the cleaning card and dispose of it according to the
manufacturer's directions.
RECEIPT PRINTER (optional)
ALWAYS DISCONNECT VEND SYSTEM POWER BEFORE CLEANING OR CLEARING JAMS
PAPER - The external side of the rolled paper is the heat sensitive side. Always insert the paper so that the heat sensitive side
can touch the print head. Set paper so that its edge is parallel to the paper guide.
PAPER STORAGE - Heat sensitive paper is liable to deteriorate in a high temperature, high humidity environment. Store heat
sensitive paper in a cool dry place.
PAPER MISFEED - If paper misfeeds, unplug the vend system and allow the print head to cool. Lift the print head, and remove
the misfed paper. If this paper removal is performed without turning off the power, the print head may be damaged if the
connector is removed. If printing continues in a paper misfeed state, printer errors may occur.
CLEANING PRINT HEAD - The print head should be cleaned every second time the paper is replaced. Lift the print head off
the platen. Wipe the print head with a cotton swab slightly damped with ethyl alcohol. After the ethyl alcohol is completely dry
return the head to the down position.
PRINT HEAD - The print head may become very hot when printing. Do not touch the print head or head support board until it is
completely cooled. If the print head is lowered onto the platen without paper, the platen may be deformed due to high
temperature.
HEATING MOTOR - The motor and motor drive element also becomes very hot. Never touch them until they have cooled
completely.
16
TROUBLE SHOOTING
The following troubleshooting guide is designed to assist in the installation and operation of your Jamex Vending System.
System
If a problem can not be corrected using the following solutions, please contact your Jamex reseller or Jamex Technical
Support at 1-800-289-6550 for assistance. There is a barcode with a serial number on the side of the vend station housing
opposite the hinge. Have this serial number available when calling technical support.
PROBLEM
SOLUTION
The copier does not come ready when money is inserted
Most copiers provide a 5v signal that when connected to ground
or with the bypass key turned on.
tells the copier to come ready. Refer to the Jamex point to point
diagram to see which wires are used to enable the copier. Using a
volt meter measuring across the enable wires check that the 5v goes
to 0v when the bypass key is turned on and when money is
deposited.
The copier comes ready when money is inserted but the
Most copiers provide a 24v pulse when a copy has been made.
amount does not decrease when a copy is made
Check between the copier and the vend system for proper
connection. Refer to the Jamex point to point diagram for which
wires are used to receive the copy pulse from the copier. Using a
volt meter, check to see if the copy pulse is getting to the Jamex
vend system.
The vending system's display is blank, it rejects all coins,
There is no power to the vending system. Check the power outlet,
the bypass key does not work, and the LED on the control
the vending system's power supply, and the connections to the
board is not flashing.
controller board. Determine if supply output is AC (flat 4 pin) or
DC (round 4 pin).
For AC, there should be 24VAC between the Black and Red wires
and 12VAC between the Black and White or Red and White wires.
Check circuit breakers if present on the side.
For DC, There should be 24VDC between either of the wider
spaced pins (+) and either of the narrower spaced pins (-).
The NO CHANGE light remains on after coins are
The coin tubes must be filled through the coin slot in the top of the
deposited.
vending system, not from inside the unit. A variety of coins need to
be deposited for the NO CHANGE light to go out. Please see the
section "Loading the Change Tubes".
17
The LCD display is blank, but the vending system
Adjust the resistor R2 on the PC board. Rotate the adjuster fully
operates.
counter clock-wise, then rotate back until the display is readable.
Check multi color ribbon cable to ensure it is properly seated and
that there are no broken pins.
The vending system rejects all coins, but the bypass key
Check the Coin Return Plunger for full travel. Check the display to
works.
ensure that the vending system is not in the "Service" mode. Check
inside the upper portion of the Coin Changer to ensure the POWER
ON light is illuminated. Check the vending system programming to
ensure that the escrow value is set for at least $3.00. All coins will
be rejected if the escrow amount is less than the price of a copy .
The vending system will accept coins but not bills.
The vending system will only accept a bill if there is a sufficient
balance in the change tubes to make change. (See "Loading The
Change Tubes" and "Adjusting the Escrow Amount". Check on the
inside of the unit and look for the RED led on the bill acceptor, it
should be on steady. If it is flashing then there may be a bill jam.
(See "Clearing Bill Acceptor Jams" )
Card Reader Display shows "Incorrect Site Code
Reformat the card
Card Reader Display reads "Value Too High"
The value on the card exceeds the maximum card value acceptable
to the system. Either adjust the maximum card value or reformat
the card with a lower value.
The vending system will accept coins and bills and
Check Serial Interface Cable for proper connection or an open
display an escrow amount, but the job will not print.
circuit. Check the Software Manual for NOT READY conditions
of the printer. Press the RESET button on the PC board
Reader Display shows "Misread! Try Again"
The card may be inserted incorrectly or the card may be blank.
Insert the card arrow end first with the printed side up. Check the
format and reformat if necessary. The reader may be dirty. Use a
cleaning card
The vend system is only charging one price for all paper
Some copiers do not provide the signal information for multiple
sizes.
pricing. Unless requested at time of ordering the interface cable
may be for single price only. If the interface cable from the vend
system only has 4 wires then it will only charge one price.
18
19
20