1
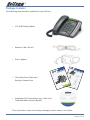
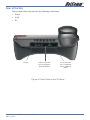
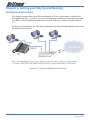
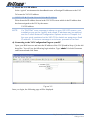
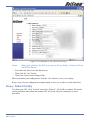
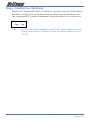
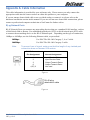
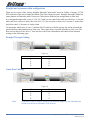
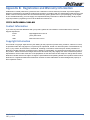
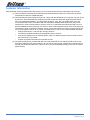
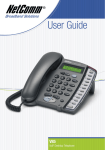
Contents
Chaper 1: Introduction ......................................................................................... 3
About VoIP ................................................................................................... 3
Chapter 2: Getting to know your V85 ..................................................................... 5
Before you begin... ......................................................................................... 5
Package Contents ........................................................................................... 6
Rear of the V85 .............................................................................................. 7
Chapter 3: Getting your V85 Up and Running .......................................................... 8
Installation Environment .................................................................................. 8
Step 1: Connecting your V85........................................................................... 9
Step 2: Getting the V85 up and running ........................................................... 9
Step 3: Configuring your VoIP Account Details ................................................. 11
Step 4: Reboot the V85 ................................................................................ 13
Step 5: Checking Your V85 Status .................................................................. 14
Appendix A: Cable Information ............................................................................ 15
Appendix B: Registration and Warranty Information .............................................. 17
2
V85 Desktop VoIP Phone Quick Start Guide
YML771 Rev1
Chaper 1: Introduction
NetComm’s V85 VoIP Desktop Phone is a next-generation IP Phone that provides a costeffective solution for home and SOHO users who want to use their broadband Internet
connections to make telephone calls. The V85 supports the popular SIP protocol allowing
for ease of installation with VoIP service providers. By using state-of-the-art DSP (Digital
Signal Processing) technology, the V85 delivers outstanding voice quality that is comparable
to the PSTN (normal phone) voice quality.
With the built-in LCD display, the user can easily configure and view phone settings and
phone book entries. Besides providing advanced VoIP functions, the V85 also provides rich
telephone features such as last number redial, call forward/transfer, call history, and volume
adjustment for loudspeaker and handset. NetComm’s V85 is an ideal VoIP solution for nextgeneration telephone communication.
About VoIP
Voice Over Internet Protocol uses Broadband technology to establish a communications link
between two (or more) communications devices. In so doing, VoIP bypasses the call charges
associated with the standard Public Switched Telephone Network (PSTN).
VoIP service providers offer various levels of VoIP service up to a full-service VoIP plan
which provides for ‘gateway’ access to the PSTN network, allowing you to make and
receive calls from your VoIP device to the normal telephone network.
Following is a sample of some of the kinds of services available in the current VoIP market.
Manually-Configured VoIP devices
VoIP devices can be configured manually to operate in a Peer-to-Peer mode by connecting
IP address to IP address; the user stores quick-dial numbers in the device memory
corresponding to the device addresses of other VoIP user(s). Use of this facility requires
some knowledge of IP addresses and network configuration. VoIP handsets can be used
in this manner without subscribing to any services provided by a VoIP Service Provider.
However you still need a broadband connection and router.
Basic VoIP Services
A basic VoIP service issues you with a ‘virtual’ VoIP phone number that allows you to
make and receive VoIP calls to other subscribers on the same VoIP service, normally free of
charge.
VoIP Network–to-VoIP-Network
Some VoIP plans have provision to for VoIP-to-VoIP across networks via a ‘VoIP Gateway’.
Charges for these calls are generally minimal or free.
VoIP-to-PSTN Services
VoIP-to-PSTN services provide all of the services above, along with the ability to make calls
to ‘real world’ PSTN telephones - local, Interstate and International – through a gateway
service. However, PSTN telephones are not able to call VoIP ‘virtual’ numbers so this level
of service does not provide complete connectivity with PSTN.
V85 Desktop VoIP Phone Quick Start Guide
YML771 Rev1
3
PSTN-to-VoIP Services
This is part of a full-service VoIP plan that also provides a real-world telephone number
instead of just a virtual VoIP (telephone) number. Normally these plans have a monthly
subscription fee and enable you to make free calls to other subscribers on the same VoIP
service and also to make and receive calls from PSTN numbers local, Interstate and
International through a ‘gateway’ service. Charges made for calls going through the
Gateway service are a fraction of normal PSTN service charges, hence the saving
What is SIP?
You will often see references to SIP or SIP Service Providers. SIP is the Internet protocol
which manages VoIP connections; a VoIP Service Provider will have a ‘SIP Server’ which
maps device IP addresses against telephone numbers and enables the connection to be made
between PSTN and Internet. For more information, check the NetComm website.
4
V85 Desktop VoIP Phone Quick Start Guide
YML771 Rev1
Chapter 2: Getting to know your V85
Before you begin...
Before you proceed to set up and configure your V85, there are several things you need to
check:
Minimum Requirements
If you want to use your V85 to make VoIP calls to and from PSTN phones , you will need:
� An account with VoIP service provider
� Broadband modem/router and connection
� An available Ethernet port on your broadband router or network switch
� A PC with Web browsing application (required only for V85 initial configuration)
Your VoIP Service Provider must provide you with some or all of the following account
information so you can complete the configuration of the V85 (* indicates mandatory field).
This includes:
VoIP Account Information
Write your details here:
*Phone Number (also called SIP username):
*Password:
*VoIP account authentication ID [=Auth. ID]
*SIP Domain Name:
*SIP Proxy Address:
*SIP Proxy Port:
STUN Server Address:
STUN Server Port:
V85 Desktop VoIP Phone Quick Start Guide
YML771 Rev1
5
Package Contents
The following items should be contained in your V85 box:
• V85 VoIP Desktop Phone
• Ethernet Cable (RJ-45)
• Power Adaptor
• This Quick Start Guide and a
Package Contents Note
• Installation CD (Containing a copy of this User
Guide and Adobe Acrobat Reader)
If any of the above items are missing or damaged, please contact your reseller.
6
V85 Desktop VoIP Phone Quick Start Guide
YML771 Rev1
Rear of the V85
The rear panel shows the ports for the following connections:
•
Power
•
LAN
•
PC
Power
LAN to connect
to your Modem/
Router/Switch
PC to connect
your Computer
via an ethernet
cable
Figure 2-2 Rear Panel of the IP Phone
V85 Desktop VoIP Phone Quick Start Guide
YML771 Rev1
7
Chapter 3: Getting your V85 Up and Running
Installation Environment
This chapter assumes that you will be installing the V85 in a typical home or small-office
broadband network i.e. you have one or several computers connected to the Internet through
an ADSL or cable broadband modem router (with or without a switch) as shown in figure
3-1.
In this type of installation, the V85 shares Internet access through the Broadband router with
the other network devices.
Figure 3-1 Typical Installation Environment
8
V85 Desktop VoIP Phone Quick Start Guide
YML771 Rev1
Step 1: Connecting your V85
a) Remove IP phone and handset from packaging and connect the handset to the phone
body via handset cable.
b) Connect the V85’s LAN Ethernet port to an available Ethernet port on your broadband
router using the Ethernet cable (supplied).
If you would like your PC to be connected to the network through the V85, you can
connect another Ethernet cable (not supplied) from your PC to the V85’s PC Ethernet
port. This enables your PC and V85 to share one Ethernet port on your router/switch.
c) Connect V85 power adaptor to power board or wall outlet.
d) At this point, the cable connections are complete; the next section describes the basic
key functions, and the configuration of VoIP account details.
Step 2: Getting the V85 up and running
Next, configuration of VoIP account details will be described, starting with a basic
description of the keypad functions you will need to know in order to proceed.
Description of essential key functions are provided here; for a detailed description please see
Chapter 4 of the user guide contained on the V85 CD.
Key
Description
Menu / OK
Pressing this button will display menu options; press
repeatedly to scroll through options.
Also functions as an “OK” button to confirm settings.
When the unit is in dial mode, the “OK/Menu” key is
used as “Dial Out” key.
◄ UP
When the menu is displayed, this key is used to scroll
up the menu items. When editing menu item content,
this key functions as “left delete”.
► DOWN
When the menu is displayed, this key is used to
scroll down the menu items. When editing menu item
content, this key is used as “right shift”.
Cancel
When the menu is displayed, this key is used to
escape to an higher level of the menu. When editing
menu item content, this key is used to cancel the
current edit and to escape to a higher level of the
menu.
a) Power on the V85
As soon as power cord is connected, the V85 will boot. This will take up to 30 seconds.
Initial display should show current Australian Eastern Standard Time.
b) Power on your PC
V85 Desktop VoIP Phone Quick Start Guide
YML771 Rev1
9
c) Check the V85 IP address
In the ‘typical’ environment the broadband router will assign IP addresses to the V85.
To locate the V85’s IP address:
MENU/OK ► View ► Network Value ► IP Address
Write down the IP address shown in the V85 LCD screen which is the IP address that
has been assigned to the V85 by the router:
V85 IP Address:
NOTE:
If a “DHCPfail” error message is shown on your V85 LCD screen, your
installation may not be ‘typical’ and a fixed IP address may be required;
see the Further Network Configuration Options section in Chapter 4 of
the user guide contained on the V85 CD for details on assigning a fixed
IP address. If this error message is not shown, proceed to the next.
d) Connecting to the V85 Configuration Page on your PC
Open your Web browser and enter the IP address of the V85 [found in Step c)] in the Address Bar. You will see the following login window. Type “admin” for both Username
and Password and click Enter.
Figure 3-2
Once you login, the following page will be displayed.
10
V85 Desktop VoIP Phone Quick Start Guide
YML771 Rev1
Figure 3-3
If you can not connect from your PC or the configuration screen is not displayed
If your V85 does not show the “DHCP fail” error message in its LCD screen, you can
assume the V85 is connected to your network. However in some cases you still may not be
able to open the V85 Configuration Page by entering the IP address of the device in your
PC web browser. This is generally due to network configuration issues. Try the following
procedure.
Check the connection between your PC and the V85 by using your PC’s “Ping” utility.
To do this, open the DOS prompt (Start ► Run ► cmd) and execute the command ‘ping
[V85 IP address]’. If you receive a ping reply from the V85, the PC and the V85 are able
to communicate with each other. If you receive a time out or error message from your PC,
there is a problem with the network configuration of your PC. Please refer to Appendix C
in the User Guide on the V85 CD for instructions on network configuration under different
Windows Operating Systems.
Step 3: Configuring your VoIP Account Details
The next step is to enter your VoIP account details. Entering these details registers your
device on the VoIP service provides ‘SIP Server’ which allows other callers to connect to
you. Click on the left-hand menu item in the Overview screen, called ‘SIP’
If you have subscribed to a VoIP service, please consult your VoIP service provider for the
following account details required to complete your V85 SIP configuration. Items marked
with * are mandatory; others are optional and if no setting is indicated, leave as default.
V85 Desktop VoIP Phone Quick Start Guide
YML771 Rev1
11
VoIP Account Identifiers
Description
Phone Number:*
(also called SIP username) In a full-service plan this
number is mapped against your regular PSTN phone
number
Password:*
Provides account security to protect against
unauthorised use
VoIP account authentication ID:* [=Auth. ID] Account Identifier
SIP Domain Name:*
Enter SIP Domain Name supplied by your VoIP
Service Provider
Local Port:
Leave as default unless advised by Service Provider
Optional VoIP Configuration
Refer to Service Provider Instructions
Proxy On:*
[Check for ‘Yes’] Select “Yes” to register in the
proxy server. This is required for SIP services to be
enabled. When this item is checked, the Proxy Addr
and Proxy Port can be entered.
Proxy Addr:*
Set the IP address or domain name address of the
proxy server.
Proxy Port:
Leave as default unless advised by Service Provider
Outbound Proxy:
[Check for ‘Yes’] Set this item to “Yes” if the call
requests need to pass through the Outbound Proxy
server.
Outbound Proxy IP:
Set the IP address of the outbound proxy server
Outbound Proxy Port:
Set the port number of outbound proxy server
STUN Server:
[Check for ‘Yes’] STUN server assists with
traversing NAT (Network Address Translation) which
sometimes prevents VoIP calls
STUN Server Address:
Set the IP Address of the STUN server
STUN Server Port:
Set the port number of the STUN server
RTP Packet Interval:
Set the RTP packet interval. Leave as default.
Port Forwarding:
Allows use of Port Forwarding method to let the V85
traverse a NAT/Firewall; enter the public IP address
of your router in “NAT WAN IP Address” option.
In the following example the V85 uses 676485 as its VoIP phone number to register on
SIP proxy server at “fwd.pulver.com” and uses STUN to traverse the router NAT Firewall
function.
12
V85 Desktop VoIP Phone Quick Start Guide
YML771 Rev1
Figure 3-4 Example of SIP account setting
Notes:
When you configure the SIP proxy server (Proxy Addr:), Outbound Proxy
and STUN Server,
� First check the box to turn the function on
� Then click the “Set” button
� Then enter values in the settings fields.
When you finish your configuration, click the “Set” button to save your settings.
Keep a copy of your configuration settings handy in case you need to re-enter them later.
Step 4: Reboot the V85
To reboot your V85, click “System” and select “Reboot”. Click OK to confirm. The whole
reboot procedure takes about one minute. DO NOT turn off power during the re-boot
procedure.
V85 Desktop VoIP Phone Quick Start Guide
YML771 Rev1
13
Step 5: Checking Your V85 Status
When the V85 completes the reboot, you should see a message in your V85 LCD similar to
that shown as below. If you see this kind of message and note that the V85 shows correct
time (Australian EST), it means configuration is successful and your V85 is ready to use.
SIP (number)
Date
Note:
14
Time
If you don’t see this message in the V85 LCD, please check the ‘Phone
Configuration’ section in Chapter 5 of the user guide contained on the
V85 CD.
V85 Desktop VoIP Phone Quick Start Guide
YML771 Rev1
Appendix A: Cable Information
This cable information is provided for your reference only. Please ensure you only connect the
appropriate cable into the correct socket on either this product or your computer.
If you are unsure about which cable to use or which socket to connect it to, please refer to the
hardware installation section in this manual. If you are still not sure about cable connections, please
contact a professional computer technician or NetComm for further advice.
RJ-45 Network Ports
RJ-45 Network Ports can connect any networking devices that use a standard LAN interface, such as
a Hub/Switch Hub or Router. Use unshielded twisted-pair (UTP) or shield twisted-pair (STP) cable
to connect the networking device to the RJ-45 Ethernet port. Depending on the type of connection,
10Mbps or 100Mbps, use the following Ethernet cable, as prescribed.
10Mbps:
Use EIA/TIA-568-100-Category 3, 4 or 5 cable.
100Mbps:
Use EIA/TIA-568-100-Category 5 cable.
Note:
To prevent loss of signal, make sure that the length of any twisted-pair
connection does not exceed 100 metres.
RJ-45 Connector
Pin Assignment
1
2
3
6
4,5,7,8
Normal Assignment
Input Receive Data +
Input Receive Data Output Transmit Data +
Output Transmit Data Not used
Figure 1
RJ-45 plug
attached to cable
Figure 2
V85 Desktop VoIP Phone Quick Start Guide
YML771 Rev1
15
Straight and crossover cable configuration
There are two types of the wiring: Straight-Through Cables and Crossover Cables. Category 5 UTP/
STP cable has eight wires inside the sheath. The wires form four pairs. Straight-Through Cables has
same pinouts at both ends while Crossover Cables has a different pin arrangement at each end.
In a straight-through cable, wires 1,2,3,4,5,6,7 and 8 at one end of the cable are still wires 1~8 at the
other end. In a crossover cable, the wires of 1,2,3,6 are reversed so that wire 1 become 3 at the other
end of the cable, 2 becomes 6, and so forth.
To determine which wire is wire 1, hold the RJ-45 cable tip with the spring clip facing towards the
ground and the end pointing away from you. The copper wires exposed upwards to your view. The
first wire on the far left is wire 1. You can also refer to the illustrations and charts of the internal
wiring on the following page.
Straight-Through Cabling
Figure 3
Wire
1
2
3
6
Becomes
1
2
3
6
Cross-Over Cabling
Figure 4
Wire
1
2
3
6
Note:
16
Becomes
3
6
1
2
To prevent loss of signal, make sure that the length of any twisted-pair
connection does not exceed 100 metres.
V85 Desktop VoIP Phone Quick Start Guide
YML771 Rev1
Appendix B: Registration and Warranty Information
All NetComm Limited (“NetComm”) products have a standard 12 month warranty from date of purchase against
defects in manufacturing and that the products will operate in accordance with the specifications outlined in the User
Guide. However some products have an extended warranty option (please refer to your packaging). To be eligible
for the extended warranty you must supply the requested warranty information to NetComm within 30 days of the
original purchase by registering on-line via the NetComm web site at:
www.netcomm.com.au
Contact Information
If you have any technical difficulties with your product, please do not hesitate to contact NetComm’s Customer
Support Department.
Email:
[email protected]
Fax:
(+612) 9424-2010
Web:
www.netcomm.com.au
Copyright Information
This manual is copyright. Apart from any fair dealing for the purposes of private study, research, criticism or review,
as permitted under the Copyright Act, no part may be reproduced, stored in a retrieval system or transmitted in any
form, by any means, be it electronic, mechanical, recording or otherwise, without the prior written permission of
NetComm Limited. NetComm Limited accepts no liability or responsibility, for consequences arising from the use of
this product. Please note that the images used in this document may vary slightly from those of the actual product.
Specifications are accurate at the time of the preparation of this document but are subject to change without notice.
NetComm Limited reserves the right to change the specifications and operating details of this product without notice.
NetComm is a registered trademark of NetComm Limited. All other trademarks are acknowledged the property of
their respective owners.
V85 Desktop VoIP Phone Quick Start Guide
YML771 Rev1
17
Customer Information
ACA (Australian Communications Authority) requires you to be aware of the following information and warnings:
(1) This unit shall be connected to the Telecommunication Network through a line cord which meets the
requirements of the ACA TS008 Standard.
(2) This equipment has been tested and found to comply with the Standards for C-Tick and or A-Tick as set
by the ACA. These standards are designed to provide reasonable protection against harmful interference in a residential installation. This equipment generates, uses, and can radiate radio noise and,
if not installed and used in accordance with the instructions detailed within this manual, may cause
interference to radio communications. However, there is no guarantee that interference will not occur
with the installation of this product in your home or office. If this equipment does cause some degree of
interference to radio or television reception, which can be determined by turning the equipment off and
on, we encourage the user to try to correct the interference by one or more of the following measures:
• Change the direction or relocate the receiving antenna.
• Increase the separation between this equipment and the receiver.
• Connect the equipment to an alternate power outlet on a different power circuit from that to which
the receiver/TV is connected.
• Consult an experienced radio/TV technician for help.
(3) The power supply that is provided with this unit is only intended for use with this product. Do not use
this power supply with any other product or do not use any other power supply that is not approved for
use with this product by NetComm. Failure to do so may cause damage to this product, fire or result in
personal injury.
18
V85 Desktop VoIP Phone Quick Start Guide
YML771 Rev1
Product Warranty
The warranty is granted on the following conditions:
1. This warranty extends to the original purchaser (you) and is not transferable;
2. This warranty shall not apply to software programs, batteries, power supplies, cables or other accessories supplied in or with the product;
3. The customer complies with all of the terms of any relevant agreement with NetComm and any other
reasonable requirements of NetComm including producing such evidence of purchase as NetComm
may require;
4. The cost of transporting product to and from NetComm’s nominated premises is your responsibility;
and,
5. NetComm does not have any liability or responsibility under this warranty where any cost, loss, injury
or damage of any kind, whether direct, indirect, consequential, incidental or otherwise arises out of
events beyond NetComm’s reasonable control. This includes but is not limited to: acts of God, war, riot,
embargoes, acts of civil or military authorities, fire, floods, electricity outages, lightning, power surges,
or shortages of materials or labour.
6. The customer is responsible for the security of their computer and network at all times. Security features may be disabled within the factory default settings. NetComm recommends that you enable these
features to enhance your security.
The warranty is automatically voided if:
1. You, or someone else, use the product, or attempts to use it, other than as specified by NetComm;
2. The fault or defect in your product is the result of a voltage surge subjected to the product either by
the way of power supply or communication line, whether caused by thunderstorm activity or any other
cause(s);
3. The fault is the result of accidental damage or damage in transit, including but not limited to liquid spillage;
4. Your product has been used for any purposes other than that for which it is sold, or in any way other
than in strict accordance with the user manual supplied;
5. Your product has been repaired or modified or attempted to be repaired or modified, other than by a
qualified person at a service centre authorised by NetComm; and,
6. The serial number has been defaced or altered in any way or if the serial number plate has been
removed.
Limitations of Warranty
The Trade Practices Act 1974 and corresponding State and Territory Fair Trading Acts or legalisation of another
Government (“the relevant acts”) in certain circumstances imply mandatory conditions and warranties which cannot
be excluded. This warranty is in addition to and not in replacement for such conditions and warranties.
To the extent permitted by the Relevant Acts, in relation to your product and any other materials provided with the
product (“the Goods”) the liability of NetComm under the Relevant Acts is limited at the option of NetComm to:
• Replacement of the Goods; or
• Repair of the Goods; or
• Payment of the cost of replacing the Goods; or
• Payment of the cost of having the Goods repaired.
V85 Desktop VoIP Phone Quick Start Guide
YML771 Rev1
19