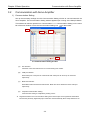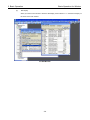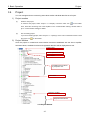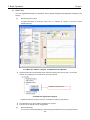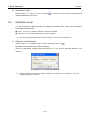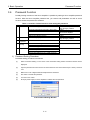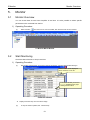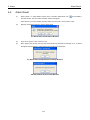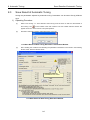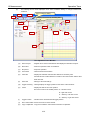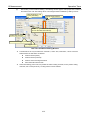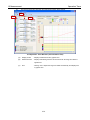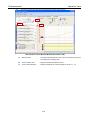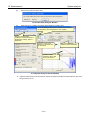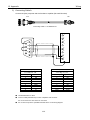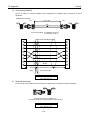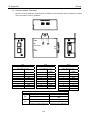
1
M0008487C
TYPE
S
R ADVANCED MODEL-SETUP
Setup Software
Preface
Thank you for selecting our AC Servo Amplifier R ADVANCED MODEL. This User’s Manual is a
support tool explaining the use and specifications of the Setup Software in order to completely
utilize all the functions of the servo amplifier.
■
Keep this manual close when you start or adjust the Servo Amplifier so that it can be referred to at any
time.
■
Refer to the Instruction Manual for the AC Servo Amplifier R ADVANCED MODELl together with the Setup
Software manual.
Note: Images of the message windows shown in this user’s manual are for reference only and may
not match actual windows of the set-up software on the screen.
i
Contents
1.
System Overview ................................................................................................................................................... 1-1
1.1
1.2
1.3
1.4
1.5
2.
Functions Overview ............................................................................................................................................. 1-1
Corresponding devices ........................................................................................................................................ 1-2
System Environment ............................................................................................................................................ 1-2
Program Installation ............................................................................................................................................. 1-3
Uninstall Program................................................................................................................................................. 1-9
Connect to Servo Amplifier................................................................................................................................... 2-1
2.1
2.2
3.
Connection for Single Device............................................................................................................................... 2-1
Connection (Multiple Devices) ............................................................................................................................. 2-2
Basic Operation ..................................................................................................................................................... 3-1
3.1
1)
2)
3.2
1)
2)
3)
3.3
1)
2)
3)
3.4
1)
2)
3)
4)
5)
3.5
1)
3.6
1)
2)
3.7
4.
Running Setup Software ...................................................................................................................................... 3-1
Running from Start Menu.................................................................................................................................. 3-1
Running from Shortcut...................................................................................................................................... 3-1
Communication with Servo Amplifier.................................................................................................................... 3-2
Communication Setting .................................................................................................................................... 3-2
Communication Confirmation ........................................................................................................................... 3-3
End Communication ......................................................................................................................................... 3-4
Basic Operation for Screen(s)/Window(s) ............................................................................................................ 3-4
Main window..................................................................................................................................................... 3-4
Start Methods for Function Window. ................................................................................................................. 3-5
Window Display Method ................................................................................................................................... 3-5
Project.................................................................................................................................................................. 3-7
Project creation ................................................................................................................................................ 3-7
Project Window ................................................................................................................................................ 3-7
Project Setting .................................................................................................................................................. 3-8
Data Files ......................................................................................................................................................... 3-9
Saving the Project .......................................................................................................................................... 3-10
Operation Level.................................................................................................................................................. 3-10
Operation Level Selection .............................................................................................................................. 3-10
Password Function ............................................................................................................................................ 3-11
Password Setting Procedure .......................................................................................................................... 3-11
Password Verification Procedure.................................................................................................................... 3-12
Software Version Information ............................................................................................................................. 3-12
Parameters ............................................................................................................................................................. 4-1
4.1
1)
2)
4.2
1)
2)
3)
4.3
1)
4.4
1)
4.5
1)
2)
3)
4.6
1)
4.7
1)
5.
Parameter Editing, Function Overview................................................................................................................. 4-1
Function List ..................................................................................................................................................... 4-1
Types of Parameters ........................................................................................................................................ 4-1
Parameter Setting ................................................................................................................................................ 4-2
Starting Parameter Setting ............................................................................................................................... 4-2
Setting General and System Parameters ......................................................................................................... 4-3
Setting Motor Parameters................................................................................................................................. 4-4
Parameter Transmission from Servo Amp to File................................................................................................. 4-8
Operating Procedure ........................................................................................................................................ 4-8
Parameter Transmission from File to Servo Amp................................................................................................. 4-9
Operating Procedure ........................................................................................................................................ 4-9
Parameter Verification........................................................................................................................................ 4-11
Parameter Verification window ....................................................................................................................... 4-11
Operating Procedure for Parameter Verification............................................................................................. 4-11
Parameter Copy ............................................................................................................................................. 4-12
Saving to Backup Memory ................................................................................................................................. 4-13
Operating Procedure ...................................................................................................................................... 4-13
Restoring from Backup Memory......................................................................................................................... 4-14
Operating Procedure ...................................................................................................................................... 4-14
Monitor ................................................................................................................................................................... 5-1
5.1
1)
5.2
1)
5.3
1)
Monitor Overview ................................................................................................................................................. 5-1
Operating Procedure ........................................................................................................................................ 5-1
Start Monitoring.................................................................................................................................................... 5-1
Operating Procedure ........................................................................................................................................ 5-1
Selecting Parameter(s) to Monitor ....................................................................................................................... 5-2
Operating Procedure ........................................................................................................................................ 5-2
ii
6.
Alarm ...................................................................................................................................................................... 6-1
6.1
1)
2)
6.2
7.
Alarm History ....................................................................................................................................................... 6-1
Alarm Histor display.......................................................................................................................................... 6-1
Alarm History Clear .......................................................................................................................................... 6-2
Alarm Reset ......................................................................................................................................................... 6-3
Test Operations ..................................................................................................................................................... 7-1
7.1
1)
7.2
1)
2)
7.3
1)
7.4
1)
8.
JOG Operation..................................................................................................................................................... 7-1
Operating Procedure ........................................................................................................................................ 7-1
Positioning Operation........................................................................................................................................... 7-3
Operating Procedure ........................................................................................................................................ 7-3
Notice ............................................................................................................................................................... 7-5
Magnetic Pole Position Presumption ................................................................................................................... 7-5
Operating Procedure ........................................................................................................................................ 7-5
Serial Encoder Clear ............................................................................................................................................ 7-7
Operating Procedure ........................................................................................................................................ 7-7
Automatic Tuning .................................................................................................................................................. 8-1
8.1
1)
8.2
1)
8.3
1)
9.
Automatic Notch Filter Tuning .............................................................................................................................. 8-1
Operating Procedure ........................................................................................................................................ 8-1
Automatic FF Vibration Suppression Frequency Tuning ...................................................................................... 8-3
Operating Procedure ........................................................................................................................................ 8-3
Save Result of Automatic Tuning ......................................................................................................................... 8-5
Operating Procedure ........................................................................................................................................ 8-5
Adjustment............................................................................................................................................................. 9-1
9.1
1)
9.2
9.3
1)
9.4
10.
10.1
1)
10.2
1)
10.3
1)
11.
11.1
11.2
11.3
1)
2)
11.4
1)
2)
3)
4)
5)
6)
12.
12.1
1)
2)
3)
4)
5)
Automatic Offset Adjustment of V-REF Terminal .................................................................................................. 9-1
Operating Procedure ........................................................................................................................................ 9-1
Automatic Offset Adjustment of T-COMP Terminal............................................................................................... 9-2
Manual Offset Adjustment of V-REF Terminal ...................................................................................................... 9-2
Operating Procedure ........................................................................................................................................ 9-2
Manual Offset Adjustment of T-COMP Terminal ................................................................................................... 9-3
Measurement ....................................................................................................................................................... 10-1
Operation Trace.............................................................................................................................................. 10-1
Operating Procedure ...................................................................................................................................... 10-1
Operation Scrolling ......................................................................................................................................... 10-7
Operating Procedure ...................................................................................................................................... 10-7
System analysis ............................................................................................................................................. 10-9
Operating Procedure ...................................................................................................................................... 10-9
Troubleshooting .................................................................................................................................................. 11-1
Upon Installation............................................................................................................................................. 11-1
Wiring, Connection and Communication Status check ................................................................................... 11-2
Parameter Setting .......................................................................................................................................... 11-3
Parameter Verification .................................................................................................................................... 11-3
Parameter Transmission (To Amplifier)........................................................................................................... 11-3
Support Functions .......................................................................................................................................... 11-3
Monitor ........................................................................................................................................................... 11-3
Alarm .............................................................................................................................................................. 11-3
Test Operation ................................................................................................................................................ 11-4
Automatic Tuning............................................................................................................................................ 11-4
Adjustments.................................................................................................................................................... 11-5
Measurement ................................................................................................................................................. 11-5
Appendix .............................................................................................................................................................. 12-1
Wiring ............................................................................................................................................................. 12-1
Servo Amplifier Connectors ............................................................................................................................ 12-1
Connecting Cable A........................................................................................................................................ 12-2
Connecting Cable B........................................................................................................................................ 12-3
Network terminator ......................................................................................................................................... 12-3
Communication Converter.............................................................................................................................. 12-4
Reference Material
・ Instruction Manual for Servo Amplifier R ADVANCED MODEL: M0008424
iii
No Text on This Page.
1. System Overview
Functions Overview
1.
System Overview
1.1
Functions Overview
R ADVANCED MODEL Setup Software (Setup Software hereafter) performs the following functions
when connecting with the R ADVANCED MODEL Servo Amplifier (Servo Amp hereafter).
Table 1-1 Function List
No
1
2
3
4
5
6
7
✔
✔
✔
Explanation
Edit each parameter of Servo Amp
Save the parameter values of Servo Amp in
file
Transmit values of parameter file to Servo
Amp
Verify parameter in parameter file with Servo
Amp
Save to Backup Memory*
Back up parameters in Backup memory built
into Servo Amp
Restore from Backup memory*
Restore parameters of Servo Amp with the
values of Backup memory
Monitor
Monitor Servo Amp status
Alarm
Display alarm history
Displays the present and past seven (7)
Alarm Histories
Alarm Reset
Releases Alarm
Test
JOG Operation*
Performs JOG Operation
Operation
Positioning Operation
Performs Positioning Operation
Serial Encoder Clear
Clears multi-turn data and the status of the
motor serial encoder
Magnetic Pole Position Presumption Presumes the magnetic pole position of the
linear motor
Automatic
Auto Notch Filter Tuning*
Detects the resonance frequency of
Tuning
mechanical devices and sets up the torque
command notch filter automatically
Auto FF Vibration Suppression
Detects the anti-resonance frequency of
Frequency Tuning
mechanical devices and sets the FF Vibration
Suppression Frequency automatically
Save Results of Auto Tuning
Saves proper gain calculated by the Auto
tuning function of the Servo Amp as the
parameter
Adjustment
Auto Offset Adjustment of V-REF
Adjusts the offset of Analog
Terminal
velocity/torque(force) command automatically
Auto Offset Adjustment of T-COMP
Adjusts the offset of the Analog torque(force)
Terminal
compensation command automatically
Manual Offset Adjustment of V-REF Adjusts the offset of Analog
Terminal
velocity/torque(force) command manually
Manual Offset Adjustment of
Adjusts the offset of the Analog torque(force)
T-COMP Terminal*
compensation command manually
Measurement Trace Operation++
Displays the status of the Servo Amp in
waveform
System Analysis*++
Analyzes the characteristics of mechanical
devices, such as frequency response, etc.
Operation Scrolling
Displays multiple axes of the Servo Amp in
waveform
Some functions may not be used depending on the specifications of the Servo Amplifier.
Functions with the * mark cannot be used together (simultaneously).
Functions with the ++ mark cannot be used together (simultaneously).
Parameters
Function
Parameter Setting
Parameter Transmission
(Servo Amp to File
Parameter transmission
(File to Servo Amp
Parameter Verification
1-1
1.System Overview
1.2
Corresponding Devices
Corresponding devices
This Setup Software corresponds to the following Servo Amp:
■
RS2_____*
✔
1.3
Some functions may be unable to be used depending on the Servo Amp model and/or the combined
Servo motor and Encoder. You will not be able to select a menu and/or icon for the non-functioning
items.
System Environment
The following system is required to utilize this Software Setup:
PC
CPU
Memory
Hard disk free space
Display
Corresponding OS
Necessary Software
Other
IBM PC/AT Compatible machine
Minimum:Equivalent to Intel Pentium 600MHz or greater.
Recommended:Equivalent to Intel Pentium 800MHz or greater.
When executing Operation scrolling, a selection with additional reserve space
is necessary.
128MB(More than 256MB is recommended)
400MB or greater
(including Microsoft .NET Framework 2.0)
Greater than 800x600, Colors: 256 colors or greater
Windows® 98/SE, Windows Me,
Windows® 2000 Service Pack4
Windows® XP Service Pack2 or newer
Windows® Vista
Windows® 7 32bit/64bit
Microsoft Internet Explorer 6.0 Service Pack 1
A RS-232C connection(COM) port or more
1-2
1.System Overview
1.4
Program Installation
Program Installation
Installation procedure of Setup Software is as follows:
(1)
Exit all active applications.
(2)
Insert the installation CD into the CD-ROM drive of the PC (name it E: drive)
(3)
From the Start menu on the task bar, select [Specify file name and Run(R)].
Click “Reference (B)”and select [E:Setup.exe]. Click “Open(O)”.
After completing the specifying of the file name, click “OK”.
The next window will appear and installation will begin.
1-1 Installation Preparation window
An alternate way to start the installation is to double-click [Setup] in the [E:¥] folder after Explorer is run.
(4)
Select the language for installation and click “OK”.
1-2 Installation Selection window
1-3
1.System Overview
(5)
Program Installation
The installer will detect the following modules and perform installation. Click “Install”.
These required modules will be installed prior to the installation of the application. If these items are
◆
◆
installed, then bypass this step.
Crystal Reports For .NET Framework 2.0(X86)
Microsoft .NET Framework 2.0
1-3 Crystal Report Installation window
1-4 Microsoft .NET Framework 2.0 Setup Window
1-4
1.System Overview
(6)
Program Installation
To start installing Setup Software, Click “Next”.
1-5 Setup Software installation start window
(7)
This License Agreement window will be displayed. Please read the contents carefully and click “Next”
if the terms and conditions are acceptable.
1-6 Software License Agreement
1-5
1.System Overview
(8)
Program Installation
Select user for installation. Either select All Users or Administrator only and click “Next”.
1-7 User Installation selection window
(9)
Specify the destination folder.
If you want to change the installing folder, click “Change” and specify the folder you want.
After completing this option, click “Next”.
1-8 Destination folder selection window
1-6
1.System Overview
(10)
Program Installation
If you use custom motor, input a keyword. If you use a standard product, click “Next” without inputting
any keyword.
1-9 Keyword input window
(11)
Click “Install” to begin the installation.
1-10 Installation Confirmation window
1-7
1.System Overview
(12)
Program Installation
This window will appear during installation. Please wait.
1-11 Installation Progress window
(13)
Installation has completed. Click “Finish”.
1-12 Installation Completed window
1-8
1.System Overview
1.5
Uninstall Program
Uninstall Program
Uninstall Setup Software as follows:
(1)
Exit all running applications before proceeding.
(2)
From Start Menu of windows, select the icon [Add/Remove Programs] and
the next window
appears.
1-13 Uninstall Window
(3)
✔
✔
Select ”R ADVANCED MODEL Setup Software”and click ”Remove”.
When uninstalling this Setup Software, the following applications will not be uninstalled automatically:
z
Microsoft .Net Framework 2.0
z
Crystal Reports For .Net Framework 2.0 (X86)
1-9
1.System Overview
No Text on This Page.
1-10
2. Connect to Servo Amplifier
Connection for Single Device
2.
Connect to Servo Amplifier
2.1
Connection for Single Device
Connect the Servo Amplifier and computer using an exclusive cable. (Optional product: Model #
AL-00689703-01)
■
Connection to Servo Amp: Use the CN2 connector port on the front of the amplifier.
■
Connection to PC: Use the RS232C connection port (Dsub9 pin).
PC
Exclusive cable : AL-00689703-01
For connector model and wiring, refer to [Chapter 12 Appendix].
Connect to COM port on PC side.
Connect to CN2 port on Servo Amplifier side. Do not connect to CN3.
2-1
Servo Amplifier
2. Connect to Servo Amplifier
2.2
Connection (Multiple Devices)
Connection (Multiple Devices)
Connect PC and Servo Amplifier using the communication cables listed below, communication
converter and final connector (All optional products).
A maximum of 15 Servo Amplifiers can be connected at the same time.
■
Communication Converter:
SAU-024-01
■
Communication Cable A:
General RS-232C cable (both straight and cross cable are available)
* CN3 of communication convertor (SAU-024-01) is a D-Sub 9pin male connector.
■
Communication Cable B:
AL-00695974-01 (0.2m)
AL-00695974-02 (3m)
■
Network Terminator:
AL-00695977-01
(CN3)
(COM)
Communication cable A
Communication convertor (SAU-024-01)
(CN1)
Communication cable B
Communication cable B
Communication cable B
Communication cable B
(CN2)
(CN3)
(CN2)
(CN2)
(CN2)
(CN3)
(CN3)
(CN3)
Network terminator
(AL-00695977-01)
<First axis>
<Second axis>
<Third axis>
<’n th axis>
Follow the illustration above for CN2 and CN3 connection of Servo Amplifiers.
If you connect them in reverse order, communication will fail.
For accurate communication, connect SW1 to 422A side and set SW2 according to the type of
cable (straight or cross) connected to the higher position device.
2-2
3. Basic Operation
Running Setup Software
3.
Basic Operation
3.1
Running Setup Software
There are two methods to run the Setup Software.
■
Run from Start Menu.
■
Run from Shortcut.
After the following image appears, the main window will appear regardless of running method.
3-1 Running window
1) Running from Start Menu
(1)
Click “Start” on the Windows task bar.
(2)
Select [All Programs] to open the programs folder.
(3)
Select [SANYO DENKI] to open the SANYODENKI folder.
(4)
Click “R ADVANCED MODEL-Setup Software”.
2) Running from Shortcut
(1)
Double click the “R ADVANCED MODEL-Setup Software” Shortcut on the desktop.
3-2 Icon (Short-cut)
3-1
Chapter 3 Basic Operation
3.2
Communication with Servo Amplifier
Communication with Servo Amplifier
1) Communication Setting
Set up the necessary settings from this Communcation Setting window to communicate with the
Servo Amplifier. The Communication Setting window appears upon running of the Setup Software.
This window can also be opened from “Communication” >>> “Communication Setting” on the menu
bar of the main window or from the Communication Setting Icon
on the toolbar.
(A)
(C)
(B)
(D)
3-3 Communication Setting window
(A)
Axis selection:
Check the correct axis selection box for communicating axis number.
(B)
COM port selection:
Select COM port of computer to communicate with. COM port can be set up for each axis
respectively.
(C)
Baud Rate selection:
Select Baud rate from Baud rate selection list. Baud rate can be selected for each COM port
respectively.
(D)
Complete Communication Setting:
Communication setting is completed by clicking “Close”.
✔
Registered values in the Communication Setting in the New Project are recognized as initial values
because the previously registered project values are read automatically when Setup Software is run.
3-2
Chapter 3 Basic Operation
Communication with Servo Amplifier
2) Communication Confirmation
Following are the methods of establishing communication with the Servo Amplifier.
(1)
From the Communication Setting window:
Communication begins with a selected axis by clicking “Connect” at the right side of each axis
selected.
◆ Communication starts with all axes (checked axes in axis selection boxes) by clicking “On-Line” at
the lower left of the window.
◆
Change to “Connect” when
communication is established.
3-4 Communication Conformation window
✔
When communication starts normally, a green light appears and amplifier models are displayed.
(2)
◆
From Main Window
Communication starts with all selected axes (axes checked in axis selection boxes on the
Commincation Setting window) by selecting “Communication” >>> “On-Line” on the menu bar or by
clicking the “On-Line” icon
on the toolbar.
When communication begins
normally, the Axis lamp is green.
3-5 Project window at the time of Communication Confirmation
✔
The Axis lamp on the Project window lights green when communication starts normally.
3-3
3. Basic Operation
Communication with Servo Amplifier
3) End Communication
The following methods are used to terminate communication with the Servo Amplifier.
(1)
◆
✔
From Communication Setting window
Communication with Servo Amplifier on selected axes/axis terminates by clicking “Disconnect” on
the right side of each selected axis.
When communication terminates, the light goes off.
(2)
◆
From Main Window
Commincation terminates with all Servo Amp axes by selecting "Communication” >>> “Off-Line” on
the menu bar or by clicking the “Off-Line” Icon
✔
3.3
on the toolbar.
When communication is terminated, the Axis light on the Project windiw goes off.
Basic Operation for Screen(s)/Window(s)
Setup screens consist of Main window, Project window and Individual Function screens/windows.
1) Main window
Can perform individual Function windows from the displayed function name in the menu (A) and/or
the Project window (C) of the Main window.
(A)
(B)
(C)
3-6 Main Window (At the time of Communication On-Line)
(A)
Menu:
Select function and perform.
(B)
Toolbar:
Select function and perform.
(C)
Project window:
Refer to [3.4 Project].
3-4
3. Basic Operation
Basic Operation for Window
2) Start Methods for Function Window.
Can select from one of two methods to perform individual functions.
(1)
◆
◆
From Menu and Toolbar of Main window
Select the function you need from the Menu or Toolbar of the Main window.
Select an axis from the axis selection list. The function window starts after clicking “OK”.
3-7 Execute Function window
(2)
◆
From Project window
Execute the Function window of the selected axis by double clicking the Function name in the tree of
the Project window.
3) Window Display Method
Switches the display method of individual function window(s) between MDI (Multi Document
Interface) and SDI (Single Document Interface).
(1)
MDI display
When you want function window to show the MDI display, select “Window” >>> “Window To MDI(M)”
on the menu of the main window.
3-8 MDI Window
3-5
3. Basic Operation
(2)
Basic Operation for Window
SDI Display
When you want function window to show the SDI display, select “Window” >>> “Window To SDI(S)” on
the menu of the main window.
3-9 SDI Window
3-6
3. Basic Operation
3.4
Project
Project
You can manage and save connecting axes values and/or individual data files as a Project.
1) Project creation
(1)
Create a new project.
To create a new project, select “Project” >>> “New(N)” or click the “New” icon
on the toolbar.
Then, select the connecting axis of the amplifier on the “Communication Setting” window. Refer to
[3.2.1 Communication Setting] for details.
(2)
Use an existing project.
If you use an existing project, select “Project” >>> “Open(O)” on the menu of the Main window or click
the “Open” icon
on the toolbar.
2) Project Window
Once the project is created and communication has been established with the Servo Amplifier,
axis/axes values, available functions and registered data files will be displayed as a tree.
Project name
Current operation level
Axis 1 name
Available functions listed
by respective axis
Axis 2 name
Operation scrolling
Registered data file list.
3-10 Project Window
3-7
3. Basic Operation
Project
3) Project Setting
(1)
Project property
Set Project name, Author and Project Contents.
To open the Project Property setting window, select the project name on the Project window and click
right button, then select “Property” from the pop-up menu.
3-11 Project Property Window
(2)
Axis Property
Set up the axis name. You can check software version for Servo Amplifier etc.
Toopen the Axis Property window, select the axis name on the Project window and click right button, then
select “Property” on the pop-up menu.
3-12 Axis Property Window
3-8
3. Basic Operation
Project
4) Data Files
You can register data file(s) for Operation Trace, System Analysis and Operation Scrolling to the
project.
(1)
Registering data to project:
To register data file(s) to the project, select “File” >>> “Addition To a Project” in the menu of each
individual function.
3-13 Menu for “Add to a Project” in Operation Trace Window
✔
Registered data file is automatically saved under the following name format “date + consecutive
number” and is displayed in the data file on the Project window.
Registered data file name
3-14 Data file registered to project
Registered data file to project is saved to a sub folder containing the project file.
✔
✔
(2)
Each data file can be saved without registering it to a project.
The name of the data file can be changed later.
Retrieve data file(s)
You can retrieve saved data file(s) by double clicking the data file name on the Project window.
3-9
3. Basic Operation
Project
5) Saving the Project
Select “Project” >>> “Save” (or icon on toolbar)
or “Save As”. Set up project information and
registered data file(s) are saved.
3.5
Operation Level
You Can limit/restrict editing parameters by setting the operation level. There are two operation
levels: Basic and Advanced.
■
Basic : You can only edit Basic parameters of the Servo Amplifier.
■
Advanced : You can edit all parameters of the Servo Amplifier.
✔
Refer to the Instruction Manual for the Servo Amplifier in use for each parameter level.
1) Operation Level Selection
Select “Project” >>> “Operation Level”, or click “Operation Level” icon
.
Operation level selection window will be displayed.
Select the appropriate operation level and click “OK”. If you need to stop the selection, click
“Cancel”.
3-15 Operation Level Selection Window
✔
Regarding Authority, make certain to select “Authority A”. “Authority B” and “Authority C” are for our
company maintenance staff only.
3-10
3. Basic Operation
3.6
Password Function
Password Function
Partially limiting functions of the Servo Amplifier is possible by setting a Servo amplifier password
function. With the Servo Amplifier password set, you cannot edit parameters as well as some
functions unless the password is released.
Table 3-1 Invalid or limited functions from setting the password
No
1
Parameters
Function
Parameter setting
Parameter transmission from file to Servo Amp
Parameter verification
2
Alarm
3
Test
Operation
Automatic
Tuning
4
5
Adjustment
Save to Backup memory
Restore from Backup memory
Alarm History display
Serial encoder clear
Auto notch filter tuning
Auto FF vibration suppression frequency tuning
Save auto tuning results
Auto offset adjustment of V-REF Terminal
Auto offset adjustment of T-COMP Terminal
Manual offset adjustment of V-REF Terminal
Manual offset adjustment of T-COMP Terminal
Explanation
You can not edit parameters.
Only viewing is possible.
Invalid.
You can not copy the value of
files to Servo Amplifier.
Invalid.
Invalid.
You can not clear alarm history.
Only viewing is possible.
Invalid.
Invalid.
Invalid.
1) Password Setting Procedure
Password setting procedure is as follows:
(1)
Select “Password Setting” on the menu of the Parameter setting window. Password window will be
displayed.
(2)
Input the password into each text box at “New Password” and “New Password (for a check)” and click
“OK”.
(3)
Make sure to use 4-digit hexadecimal alphanumeric characters.
(4)
Set “0000” to release the password.
(5)
You cannot use “FFFF”.
(6)
Re-input power supply for Servo Amplifier to validate the new password.
3-16 Password Setting Window
3-11
3. Basic Operation
Password Function
2) Password Verification Procedure
While the Password to Servo Amplifier condition is already set, you wanto to execute the function ,
shown in figure 3-1, the Password Verification window appears.
If the entered password does not match the current password, the individual functions cannot be
used.
(1)
Enter the correct password into the box and click “OK”.
(2)
When you have entered the correct password for the Servo Amplifier, the function window will appear.
3-17 Password Enter Window
3.7
Software Version Information
When “Help” >>> “Version Information” is selected from the menu of the main window, the Software
version of Setup Software, Database and Motor Parameters can be checked.
3-18 Version Information Window
3-12
4. Parameters
Parameter Editing, Function Overview
4.
Parameters
4.1
Parameter Editing, Function Overview
You can perform, edit, transmit, verify and backup Servo Amplifier parameters using this Setup
Software.
1) Function List
The following parameter functions can be performed using the Setup Software:
No
1
Parameter Function
Parameter Setting
Explanation
Edit individual parameters of the Servo Amplifier.
2
Parameter Transmission
Servo Amp to file
Save parameters of the Servo Amp in the file.
3
Parameter Transmission
file to Servo Amp
Transmit the value of the parameter file to the Servo Amplifier.
4
Parameter Verification
Transmit the value of the parameter Servo Amp to the file.
5
Save to Backup memory
Backup parameters to the built in Backup memory of the Servo
Amplifier.
6
Restore from Backup memory
Restore parameters of the Servo Amp with values from Backup
memory.
2) Types of Parameters
2)
Types of
Parameters
There are three (3) groups of parameters. All of these parameters can be modified from the
Parameter Setting window:
(1)
General parameters:
Parameters to set each servo gain and I/O function arrangement according to use. These parameters
outline the group 0 - F.
(2)
System parameters:
Basic system parameters such as those for classified power source, combining encoder, etc. These
parameters outline the group “System Parameters”.
(3)
Motor parameters:
Combining motor parameters.
4-1
4. Parameters
4.2
Parameter Setting
Parameter Setting
The parameters of the Servo Amplifier can be changed using the Parameter Setting function.
1) Starting Parameter Setting
The Parameter Setting window can be executeted by any of the three (3) following procedures:
(1)
Select “Parameter” >>> “Parameter Setting” on the menu of the main window and select the
appropriate axis number from the axis selection window.
(2)
Click the “Parameter Setting” icon
on the toolbar of the main window and select the appropriate
axis number from the axis selection window.
(3)
Double click “Parameter” >>> “Parameter Setting” >>> Parameter “Group Name” of the setting axis
on the Project window.
(A)
(B)
(C)
(E)
(I)
(D)
(J)
(F)
(G)
(H)
4-1 Parameter Setting window
(A)
Menu
: Select and perform each function.
(B)
Toolbar
: Select and perform each function.
(C)
Model
: Displays combined model of Servo Amplifier, Servo motor.
(D)
Combining motor
: Displays currently combined motor model.
(E)
System information
: Displays Servo Amplifier system information.
(F)
Group tab
: Displays Parameter name and group number.
(G)
Parameter list
: Displays selected group of Parameter.
(H)
Parameter edit history
: Displays history of edited/changed parameter.
(I)
“Edit”
: Opens edit window for general and system parameters.
(J)
“Select from the List”
: Opens motor parameter selection window.
4-2
4. Parameters
Parameter Setting
2) Setting General and System Parameters
Procedure for setting General and System Parameters is as follows:
(1)
Click the group tab where the parameter to be changed is displayed and click the specific parameter
to be changed.
① Click the Group Tab
② Edit window is opened by selecting parameter to
be changed and double clicking.
4-2 Parameters List Display Window
(2)
Open the Parameter Edit window by double clicking the selected parameter or by clicking “Edit”.
Inputs the setting values in the box provided (or select the setting value from the list box) and click
“OK” or press the “Enter” key. The Edit window will close after the value is established and the new
value will be displayed in the Input Value column of the parameter list.
Input the value to be changed
Estabish the value
4-3 Parameter Edit Window
(3)
Repeat the same procedures (1)-(2) for the other parameters to be changed.
4-3
4. Parameters
(4)
Parameter Setting
Select “Amplifier” >>> “Write in amplifier” from the menu or click the “Write in Amplifier” icon
to
begin writing to the amplifier. When the parameters have been completely written correctly, the
parameter values, both before and after the change will be displayed on the Parameter Change
History window.
Perform “Write in Amplifier”.
4-4 Icon for Write in Amplifier
Motor model number after change.
Motor model number before change.
4-5 Parameter Change History display
3) Setting Motor Parameters
Follwoing windows show how to set up motor parameters. If the motor with the absolute encoder
type is used, parameters for that can be set automatically based on the information from its encoder.
There are two options available to set up parameters for the motor - “Motor Automatic setting”
and ”Motor Manual setting” – as below.
(A)
(1)
Choosing “Motor Automatic setting”
On the Parameters List Display Window, Click “Motor Automatic Setup”.
Click “Automatic Setup” button.
4-6 Parameters List Display Window(Motor Automatic Setting)
4-4
4. Parameters
(2)
Parameter Setting
Then the dialog box appears as shown in the figure 4-7 and click “OK” button. Choosing “Cancel”
button will stop its execution.
4-7 Motor Automatic Setting Confirmation Window
(3)
The dialog will pop up displaying the message for a few seconds during execution as shown in the
figure 4-8.
4-8 Motor Automatic Setting Execution Window
(4)
When the setting is completed successfully, the appearing window will show the message as shown in
the figure 4-9.
Click “OK” to complete the setting, and then re-input control power supply of the servo
amplifier.
4-9 Motor Automatic Setting Successful Completion Window
4-5
4. Parameters
(5)
Parameter Setting
If an alarm is activated because the setting did not complete correctly for some reasons, “Motor
Automatic Setting unsuccessful“ window will appears.
Resolve the problem of unsuccessful
completion, and then restart execution.
4-10 Motor Automatic Setting Unsuccessful Window
Failure reasons for Motor Automatic Setting:
・ The status of servo amplifier is “Servo-ON” or “Alarm”.
・ The servo motor is not supported by the servo amplifier or set-up software.(It is not listed in the
“Motor selection window” (Figure 4-11))
・ The motor is not supported by “Automatic setting” .
・ Combination of the amplifier and the motor is not matched.
・ ”Encoder clear” has already been executed.
✔
To validate the motor change parameter, Re-input the control power supply of the servo amplifier.
4-6
4. Parameters
(B)
Parameter Setting
Choosing “Motor Manual setting”
(1)
Open Motor Selection window by clicking “Select from the List” from the Parameter Setting window.
(2)
Select the motor to be combined and click “OK” or press the “Enter” key. The selected motor model
number to be combined will be displayed in the Input Value column on the Parameter setting window.
Select motor
Establish
4-11 Motor Selection window
(3)
Perform the writing of the selected motor parameter into the Servo Amp by clicking the “Write in
Amplifier” icon
on the toolbar.
Perform the writing of the selected motor
parameter into the Servo Amplifier.
Selected motor model number is displayed.
4-12 Combining Motor display
(4)
When writing the value into the Servo Amplifier is complete, the motor model numbers, both before
and after change, will be displayed on the Parameter Change History window. Refer to [4-5 Parameter
Change History display].
✔
Re-input the power supply for the Servo Amplifier to validate the motor change parameter.
4-7
4. Parameters
4.3
Parameter Transmission from Servo Amp to File
Parameter Transmission from Servo Amp to File
Parameters of Servo Amplifier can be saved in parameter file. This enables batch setting of
parameters into the other Servo Amplifier(s) from the saved parameter file.
1) Operating Procedure
(1)
Perform any of the following three (3) methods to transmit parameters from Servo Amplifier to file:
(A)
Select “Parameter” >>> “Parameter Transmission (To File)” from the menu or click the “Parameter
Transmission (To File)” icon
on the toolbar on the main window. Then, after the Axis Selection
window appears, select the axis number where the parameter transmission is located.
(B)
Select “Disk” >>> “Parameter Transmission (To File)” from the menu or click the “Parameter
Transmission (To File)” icon
(C)
on the toolbar of the Parameter Setting window.
Double click “Parameter” on the transmitting axis >>>“Parameter Transmission (To File)” on the
project window.
4-13 Parameter Transmission (To File) Window
(2)
When “Transmission” is clicked on the Parameter Transmission (To File) window, “Save As” is
displayed. Specify the file name to be saved. The extension automatically becomes *ap1. Click “Save”
to save the file.
4-14 Save As Dialog Window
4-8
4. Parameters
(3)
Parameter Transmission from Servo Amp to File
Wait for a few seconds until the transmission is complete.
4-15 Transmitting Window
(4)
4.4
The file will be created in the designated folder.
Parameter Transmission from File to Servo Amp
You can transmit saved parameter file to Servo Amplifier. Necessary parameters can be transmitted
only to Servo Amplifier by selecting the type of parameters to be transmitted.
1) Operating Procedure
(1)
Perform any of the following three (3) methods to transmit parameters from the file to the Servo
Amplifier.
(A)
Select “Parameter” >>> “Parameter Transmission (To Amplifier)” from the menu or click the
“Parameter Transmission (To Amplifier) icon
on the toolbar of the main window. Then, after the
Axis Selection window appears, select the axis number where the parameter transmission is
located.
(B)
Select “Disk” >>> “Parameter Transmission (To Amplifier)” from the menu or click the “Parameter
Transmission (To Amplifier)” icon
(C)
on the toolbar of the Parameter Setting window.
Double click “Parameter” on the transmitting axis >>>“Parameter Transmission (To Amplifier)” on
the project window.
4-16 Parameter Transmission (To Amplifier) Window
4-9
4. Parameters
(2)
Parameter Transmission from File to Servo Amp
Check the boxes of the types of parameters to be transmitted on the Parameter Transmission (To
Amplifier) window and click “Transmission”.
(3)
Select the file to be transmitted from the “Open File” dialog window and click “Open”.
4-17 Open File Dialog Window
(4)
Wait for a few seconds until the transmission is complete.
4-18 Transmitting Window
(5)
When the Transission window isdisappeared, Transmission is completed. If necessary, re-power on.
4-10
4. Parameters
4.5
Parameter Verification
Parameter Verification
You can verify the parameter value of the Servo Amp with that of the parameter file because it likely
could be different. Copy the different parameters (if necessary) to the amplifier and/or the file.
1) Parameter Verification window
Open the Parameter Verification window using any of the following three (3) methods:
(1)
Select “Parameter” >>> “Parameter Verification” from the menu of the main window or click the
“Parameter Verification” icon
on the toolbar of the main window.
The Axis number selection window will appear.
Select the Axis number to be verified.
(2)
Select “Disk” >>> “Parameter Verification” from the menu of the Parameter Setting window or click the
“Parameter Verification” icon
(3)
on the toolbar of the Parameter Setting window.
Double click “Parameter” >>> “Parameter Verification” on the axis to be verified on the project window.
(A)
(D)
(B)
(C)
(E)
4-19 Parameter Verification window
(A)
Menu
: Select and perform each function.
(B)
Toolbar
: Select and perform each function.
(C)
Servo Amp Information
: Display the connecting amplifier/motor model.
(D)
File Information
: Display the amplifier/motor model of the file.
(E)
Verification Result
: Display the parameters that differed after verification.
2) Operating Procedure for Parameter Verification
(1)
Select “File” >>> “Open” from the menu or click the “Open” icon
Verification window.
4-11
on the toolbar of the Parameter
4. Parameters
(2)
Parameter Verification
Select the file to be verified from the dialog window of “Open File” and click “Open”. Verification will
begin. The following window will be displayed during verification.
4-20 Parameter Verification Window (Processing)
(3)
Displays the differing parameters from the Verification Results window after the verification has been
completed.
4-21 Parameter Verification Results Window
3) Parameter Copy
Differing parameters can be copied to Servo Amp or file. The following are the types of copies:
(1)
Copy the value of the Servo Amplifier to file all parameters.
Select “Copy” >>> “Copy the value of amplifier to file (All)“ or click the icon
(2)
on the toolbar.
Copy the value of the Servo Amplifier to the file for selected parameters only.
Select parameters to be copied from the Parameter Verification Results window.
Select “Copy” >>> “Copy the value of amplifier to file (only in case of selection)“ from the menu or click
the icon
(3)
on the toolbar.
Copy the value of the file to the Servo Amp for all parameters.
Select “Copy” >>> “Copy the value of amplifier to file (All)“ or click the icon
(4)
on the toolbar.
Copy the value of the file to the Servo Amp for selected parameters only.
Select the parameters to be copied from the Parameter Verification Results window.
Select “Copy” >>> “Copy the value of amplifier to file (only in case of selection)“ from the menu or click
the icon
✔
✔
on the toolbar.
When the value of the file changes as a result of a copy, save the file before closing the application.
Parameters (such as motor parameters) that cannot be copied may be displayed in the Verification
Results window. The background color of these parameters will be gray.
4-12
4. Parameters
4.6
Saving to Backup Memory
Saving to Backup Memory
You can save the current parameter values of the Servo Amplifier into the backup memory domain
of the Servo Amplifier. Parameters can be restored at any time by saving the setup values of the
parameters in the backup domain.
1) Operating Procedure
(1)
Perform Save to Backup memory using one of the following methods:
(A)
Select "parameter” >>> “Save to the Backup Memory” from the menu of the main window or click
the "Save to Backup Memory” icon
on the toolbar of the main window.
The Axis selection window will appear. Select the axis number to be performed.
(B)
Double click “Parameter” >>> “Save to Backup Memory” on the Project window for the axis to be
performed.
(2)
Saving to Backup Memory will begin processing by clicking “OK” on the Save to Backup Memory
window.
4-22 Confirmation Window (Save to the Backup Memory)
(3)
The following window will be displayed while executing the backup. It displays the remaining data
number.
4-23 Processing Window (Save to the Backup Memory)
(4)
The following window is displayed when the backup process has been completed successfully. Click
“OK”.
4-24 Completed Window (Save to the Backup Memory)
✔
✔
✔
The standard value is saved in the backup memory domain at the time of shipment from our factory. The
standard value cannot be restored after you perform this Save to Backup Memory operation once.
Saving the parameters into a separate file prior to execution is strongly recommended.
Refer to [4.3 Parameter Transmission from Servo Amp to File] for the save procedure.
Do not power off until processing has been completed. Perform the program again in case of stoppage
of the processing.
4-13
4. Parameters
4.7
Restoring from Backup Memory
Restoring from Backup Memory
You can restore the parameters of the Servo Amplifier with the values stored in the Backup
Memory.
1) Operating Procedure
(1)
Restore parameters from the Backup Memory using one of the following methods:
(A)
Select “Parameter” >>> “Restoration from the Backup Memory” from the menu on the main window
or click the “Restoration from the Backup Memory” icon
on the toolbar of the main window. The
Axis number selection window will appear. Select the axis number to be performed.
(B)
Double click “Parameter” >>> “Restoration from the Backup Memory” on the axis to be performed
from the project window.
(2)
Parameter restoration with the value stored in the Backup Memory will begin after clicking “OK” on the
Restoration window.
4-25 Confirmation Window (Restoration from the Backup Memory)
(3)
The following window appears while executing the restoration and displays the remaining data
numbers.
4-26 Processing Window (Restoration from the Backup Memory)
(4)
The following window appears upon successful completion of the Restoration. Click “OK”.
4-27 Completed Window (Restoration from the Backup Memory)
✔
✔
Do not power off until processing has been completed. Perform the program again in case of stoppage
of the processing.
Some parameters only become valid after the power source has been re-input. Make certain to input the
power source for the Servo Amplifier after execution of these procedures.
4-14
5 Monitor
Monitor Overview
5.
Monitor
5.1
Monitor Overview
You can check Data of each Servo Amplifier in real time. It is also possible to select specific
parameters to be monitored from the list.
1) Operating Procedure
(1)
Select “Monitor”
from the menu or from the toolbar, then select the axis to be monitored.
5-1 Monitor Menu Window
5.2
Start Monitoring
Check the data of the Servo Amp in real time.
1) Operating Procedure
(1)
After clicking “Monitor Start” on the upper right of the window, a monitor data update will begin.
“Monitor Start” will be displayed
when monitor is not in use.
Selection availability is Decimal
<<< >>> Hexadecimal by right
clicking Present Value.
5-2 Monitor Window
✔
(2)
Displays “Monitor Stop” as in the above image.
To stop the monitor update,click“Monitor Stop”
5-1
5. Monitor
5.3
Selecting Parameter(s) to Monitor
Selecting Parameter(s) to Monitor
Parameters to be monitored can be selected when monitor is stopped.
1) Operating Procedure
(1)
Click “Parameter Selection” when monitor is stopped.
The following Parameter Selection window will be displayed.
Check Parameter
(s) to be monitored
5-3 Parameter Selection Window
(2)
Check the box (es) of the parameter(s) you want to monitor and click “OK”.
5-2
6 Alarm
Alarm History
6.
Alarm
6.1
Alarm History
Alarm History display, Alarm History clear, and Alarm Reset can be performed from this window. It
displays the last seven (7) alarms generated by the Servo Amplifier. It also indicates the state of the
amplifier at the time the alarm is generated along with alarm generating time and alarm code name.
6-1 Alarm Menu Window
1) Alarm Histor display
(1)
Select “Alarm” >>> “Alarm History” from the menu or click the “Alarm History” icon
on the toolbar
of the main window. The Axis Number selection window will appear. Select the axis to display the
alarm history for and click “OK”. Click “Cancel” to exit.
(2)
Alarm History is displayed.
6-2 Alarm History Window
(3)
Alarm History can be printed. Select “File” >>> “Print” from the menu or click the “Print” icon
(4)
If you want to quit, Click Windows exit button.
6-1
.
6. Alarm
Alarm History
2) Alarm History Clear
Alarm history generated in the past can be cleared from the Alarm History window.
(1)
Select “Amplifier” >>> “Alarm History Clear” from the menu.
6-3 Alarm History Clear Window
(2)
The confirmation window to perform the Alarm History Clear will be displayed. Click “OK” to perform
and click “Cancel” to exit.
6-4 Alarm History Clear Confirmation Window
(3)
When Alarm History Clear has been completed successfully, click “OK”.
6-5 Alarm History Clear Successfully Completed Window
6-2
6. Alarm
6.2
Alarm Reset
Alarm Reset
(1)
Select “Alarm” >>> “Alarm Reset” from the menu or click the “Alarm Reset” icon
on the toolbar of
the main window. The axis number selection window will appear.
Select the axis you want to display the alarm history and click “OK”. Click “Cancel” to quit.
(2)
Displays confirmation window to perform Alarm Reset.
6-6 Alarm Reset Confirmation Window
(3)
Click “OK” to perform. Click “Cancel” to quit.
(4)
Alarm factors have all been removed and Alarm Reset was performed successfully. If not, a window
will appear with the following: “Alarm Reset was not able to be performed”.
6-7 Alarm Reset Completed Successfully Window
6-8 Alarm Reset Unsuccessful Window
6-3
6. Alarm
No Text on This Page.
6-4
7 Test Operations
7.
JOG Operation
Test Operations
You can perform JOG Operation, Positioning Operation, Magnetic Pole Position Presumption and
Serial Encoder Clear as test operations.
7.1
JOG Operation
In the JOG Operation, Servo motor’s test run under constant velocity command can be performed
easily by setting the rotation speed of the Servo motor. Secure the safety of the surroundings
completely because the Servomotor runs during the JOG Operation. When the amplifier alarm
occurs during the JOG Operation, motor excitation turns OFF. Prepare the control devices as ready
to be used before execution of the JOG Operation.
7-1 Test Operation Menu Window
1) Operating Procedure
(1)
Select “Test Operation” >>> “JOG Operation” from the menu or click the “JOG Operation icon
on
the toolbar of the main window. The Axis number selection window will appear. Select the axis on
which to perform the velocity JOG Operation and click “OK”. Click “Cancel” to quit.
7-2 Axis Selection Window
(2)
Confirmation window for performing the JOG Operation will appear.
Click “OK” to perform the JOG Operation.
Click “Cancel” to quit the operation.
7-3 JOG Operation Confirmation Window
7-1
7 Test Operations
(3)
JOG Operation
Click “OK” for JOG Operation display.
(A)
(B)
(C)
(E)
(D)
(F)
(G)
7-4 JOG Operation Window
(A)
Selection of alarm function at the time of the JOG Operation is ended. Choose either “is selected” or
“is not selected” at the time of end.
(B)
Selection of stoppping method:
Choose either “It will stop if a button is pushed” or “It will stop, if the execution button
(Positive/Negative direction) is detached.
(C)
Monitoring the current state of the Servo Amplifier including torque (force), velocity and actual
position.
(D)
Setting the operation conditions. JOG acceleration/deceleration time constant and torque (force)
command limit can be set as well as the JOG velocity command.
(E)
Editing operating conditions. Click “Edit” to edit the conditions. Click “Decision” when editing is
complete. Click “Cancel” to cancel the editing.
(F)
ON/OFF operation of motor excitation: Servomotor does not run if this is not ON.
(G)
Execution buttons. Click either Positive/Negative Direction, depending on the direction needed to
operate the device.
When the “It will stop, if a button is pushed” is selected as a stop method, the motor will not stop until
a Stop button is clicked.
7-2
7 Test Operations
(4)
JOG Operation
To end the JOG operation, click quit button of the Windows. When the following window appears, click
“OK”. To continue the JOG operation, click “Cancel”.
7-5 End JOG Operation confirmation Window
(5)
When other factors prevent JOG operation from being performed during operation or at the start of
operations (for example Communication errors, Amplifier alarm detection, etc.) the following window
will be displayed and operation will stop.
7-6 Preparation incomplete for JOG Operation Window
(6)
7.2
Click “OK”. You will return to main window.
Positioning Operation
In the Positioning Test Operation, by setting the feed velocity and the pulse number to be moved for
the Servomotor moving the axis for a set number of the pulse can be performed easily.
Secure the safety of the surroundings completely because the Servomotor runs during the
Positioning
Operation. When the amplifier alarm occurs during the positioning operation, the
motor excitation switches to OFF. Prepare the control devices as “Ready to use” before execution.
1) Operating Procedure
(1)
Select “Test Operation” >>> “Positioning Operation” from the main menu or click the “Positioning
Operation icon
on the toolbar of the main window. The Axis number selection window will appear.
Select the axis to be operated and click “OK”. Click “Cancel” to stop the operation.
(2)
The Positioning Operation performing confirmation window will appear. Click “OK”.
7-7 Positioning Operation performing Confirmation Window
7-3
7 Test Operations
(3)
Positioning Operation
The Following Positioning Operation window appears.
(B)
(A)
(C)
(E)
(D)
(F)
(G)
7-8 Positioning Operation Window
(A)
Selection of alarm function at the time of the Positioning Operation is ended. Choose either “is
selected” or “is not selected” at the time of end.
(B)
Selecting operation mode. Single position operation or continuous round-trip positioning operation
can be selected for a specified number of times.
(C)
Monitors the current state of the Servo Amplifier, including torque (force), velocity, actual position
and the number of times of continuous repeating operation.
(D)
Setting the operating conditions. Acceleration/Deceleration time constant, torque (force) command
limit, dwell time and the number of continuous repeating operations can be set to a value other than
that of the number of the positioning pulse and feed velocity.
(E)
Edit the operating conditions. Click “Edit” to edit the conditions. Click “decision” when editing is
complete. Click “Cancel” to stop the editing.
(F)
ON/OFF operation for motor excitation: The Servo motor will not run if the condition is OFF.
(G)
Execution buttons. Click either Positive/Negative Direction, depending on the direction needed to
operate the device. The Positioning Operation is performed only once in a single direction when in
Single Operation mode. The round-trip operation is repeated continuously for a specified number of
times in Continuous Repeat Operation mode. When Zero (0) is specified as the number of operating
times, the rond-trip operation will repeat an unlimited number of times until “Stop” is clicked. Pause
time during operation can also be set.
7-4
7 Test Operations
(4)
Positioning Operation
To quit the Positioning operation, click “quit”button of the Windows. When the following window
appears, click “OK”. To continue the Positioning Operation click “Cancel”.
7-9 Positioning Operation End confirmation Window
(5)
When other factors prevent the Positioning Operation from being performed during operation or at the
start of operations (for example Communication errors, Amplifier alarm detection, etc.) the following
window will be displayed and operation will stop.
7-10 Preparation incomplete for JOG Operation Window
Click “OK” to return to the main window.
2) Notice
(1)
7.3
Pause time has a maximum 0.5 seconds margin of error.
Magnetic Pole Position Presumption
When you perform the Magnetic pole position presumption, the pole position is presumed without
moving the motor at all. This function is performed for a linear motor.
1) Operating Procedure
(1)
Select “Test Operation” >>> “Magnetic Pole Position Presumption” from the menu or by clicking the
“Magnetic Pole Position Presumption” icon
on the toolbar of the main window. The Axis number
selection window will appear. Select the axis to presume the magnetic pole position and click “OK”.
Click “Cancel” to stop the operation.
7-11 Axis selection Window for Magnetic Pole Position Presumption
(2)
Confirmation window for execution will appear. Click “OK”.
Secure the safety of your surroundings. Motor moves slightly.
7-5
7. Test Operations
(3)
Magnetic Pole Position Presumption
Click “Cancel” to quit Magnetic Pole Position Presumption.
7-12 Magnetic Pole Position Presumption Execution Confirmation Window
(4)
Magnetic Pole Position Presumption is in progress.
7-13 Magnetic Pole Position Presumption Execution Window
(5)
When Magnetic Pole Position Presumption is complete, motor excitation will complete automatically.
7-14 Magnetic Pole Position Presumption Successful Completion Window
(6)
When the Magnetic Pole Position Presumption is not presumed successfully, the following window will
appear. Check the status.
(A)
◆
◆
Factors for incompletion/malfunction:
Linear sensor feedback error.
Motor is sticking and cannot move.
7-15 Magnetic Pole Position Presumption Preparation Incomplete Window
7-6
7. Test Operations
7.4
Serial Encoder Clear
Serial Encoder Clear
When the motor encoder is a serial encoder connected to the Servo Amplifier, a zero-clear of the
multiple revolution data in the encoder as well as encoder status clear can be performed using this
function.
1) Operating Procedure
(1)
Select “Test Operation” >>> “Serial Encoder Clear” from the menu or click the “Serial Encoder Clear”
icon
on the toolbar of the main window. The Axis number selection window will appear. Select the
axis to perform the Serial Encoder Clear function on and click “OK”. Click “Cancel” to stop the
operation.
(2)
The confirmation window for execution of the Serial Encoder Clear will be displayed. Click “OK”.
7-16 Serial Encoder Clear Execution Confirmation Window
(3)
Serial Encoder Clear execution window will appear. Click “Cancel” to quit.
7-17 Serial Encoder Clear Processing Window
(4)
After several seconds, the following window will be displayed after successful completion of the Serial
Encoder Clear operation. Click “OK”.
7-18 Serial Encoder Clear Successful Completion Window
(5)
When Serial Encoder Clear cannot be performed, the following window appears. Click “OK” and quit
the operation.
7-19 Serial Encoder Clear Preparation Incomplete Window
7-7
7. Test Operations
(6)
Alarm (ALM_DF) will occur at the same time as step (5).
(A)
◆
◆
◆
✔
✔
Serial Encoder Clear
Factors for incompletion/malfunction
Motor is operated externally.
Cannot perform zero-clear.
Alarm factors cannot be cleared.
A case could occur where only the encoder status is cleared and the multiple revolution data is not
cleared, which will depend on the parameter settings of the Servo Amplifier.
There is a possibility that the encoder clear has already been performed when the operation was
stopped by clicking “Cancel” and the window displayed “Serial Encoder Clear cannot be performed
(Preparation un-completing)”. Make certain to confirm Serial Encoder PS Data of Monitor window.
7-8
8. Automatic Tuning
8.
Automatic Notch Filter Tuning
Automatic Tuning
Automatic tuning functions consist of Automatic Notch Filter Tuning, Automatic FF Vibration
Suppression Frequency Tuning and Save Results of Automatic Tuning.
8.1
Automatic Notch Filter Tuning
8-1 Automatic Tuning Menu Window
1) Operating Procedure
(1)
Select “Auto Tuning” >>> “Auto Notch Filter Tuning” from the menu or click the “Auto Notch Filter
Tuning” icon
on the toolbar of the main window. The Axis number selection window will appear.
Select the axis to perform the “Auto Notch Filter Tuning” and click “OK”. Click “Cancel” to stop.
(2)
Confirmation window will appear. Click “OK”.
8-2 Auto Notch Filter Tuning Execution Confirmation Window
(3)
Click “Servo ON” after checking the conditions shown in the window.
8-3 Auto Notch Filter Tuning Window
8-1
8. Automatic Tuning
(4)
Automatic Notch Filter Tuning
Click “Execute” to perform tuning.
Click “Servo OFF” to stop the motor exitation.
(5)
The following window will appear when executing the operation.
8-4 Auto Notch Filter Tuning Execution in Progress Window
(6)
When the tuning is completed successfully, the following window will appear. Check the frequency to
be set. Also, secure the safety of the surroundings because Servo ON status continues until “OK” is
clicked.
(7)
Auto Notch Filter Tuning window (3) will be displayed by clicking “OK”.
8-5 Results of Auto Notch Filter Tuning Window
(8)
When you click “quit” button of the upper right of the Auto Notch Filter Tuning Windows (3), the
following
window will appear. Click “OK” to close. Click “Cancel” to return (3) window.
8-6 Close Auto Notch Filter Tuning Confirmation Window
(9)
When tuning cannot be performed or some irregularity occurs during tuning, the following window
will appear and tuning will be closed involuntarily.
8-7 Auto Notch Filter Tuning Incomplete Window
8-2
8. Automatic Tuning
8.2
Auto FF Vibration Suppression Frequency Tuning
Automatic FF Vibration Suppression Frequency Tuning
This function set the vibration suppression frequency automatically.
1) Operating Procedure
(1)
Select “Auto Tuning” >>> “Automatic FF Vibration Suppression Frequency Tuning” from the menu or
click the Automatic FF Vibration Suppression Frequency Tuning icon
on the toolbar of the main
window. The Axis number selection window will appear. Select the axis to be tuned and click “OK”.
Click “Cancel” to stop operation.
(2)
Execution confirmation window will be displayed. Click “OK”.
8-8 Automatic FF Vibration Suppression Frequency Tuning confirmation Window
(3)
Click “Servo ON” after checking the conditions displayed in the following window:
8-9 Automatic FF Vibration Suppression Frequency Tuning Window
(4)
Click “Execute” to perform tuning.
Click “Servo OFF” to servo off.
8-3
8. Automatic Tuning
(5)
Auto FF Vibration Suppression Frequency Tuning
When tuning is performed, the following window will appear:
Click “Cancel” to stop.
8-10 Automatic FF Vibration Suppression Frequency Tuning in Progress Window
(6)
Results of the operation execution will appear in the following window:
To confirm the results of the tuning, click “OK”.
8-11 Automatic FF Vibration Suppression Frequency Tuning Results Window
8-4
8. Automatic Tuning
8.3
Save Results of Automatic Tuning
Save Result of Automatic Tuning
Saving the parameters adjusted by automatic tuning: Parameters can be saved five (5) different
ways.
1) Operating Procedure
(1)
Select “Auto Tuning” >>> “Save Result of Auto Tuning” from the menu or click the “Save Result of
Auto Tuning” icon
on the toolbar of the main window. The Axis number selection window will
appear. Click “OK”. Click “Cancel” to stop the operation.
(2)
Execution confirmation window will be displayed. Click “OK”.
8-12 Save Result of Auto Tuning Execution Confirmation Window
(3)
After checking the conditions and selecting the parameter combination to be saved in the following
window, Click “Save the Monitor Value”.
Specify the parameter
combination to be saved.
8-13 Save Result of Auto Tuning Execution Window
8-5
8. Automatic Tuning
(4)
Save Results of Automatic Tuning
Monitoring values from the auto tuning parameter monitor values are applied to the values for the
selected parameters.
Combination of parameters can be
chosen from the following 5 options
8-14 Save Result of Auto Tuning Parameter Selection Window
(5)
Click “Close” on the upper right of the window to close the application. The confirmation window for
ending the operation will appear. Click “OK”.
8-15 Save Result of Auto Tuning Ended Confirmation Window
8-6
9. Adjustment
9.
Automatic Offset Adjustment of V-REF Terminal.
Adjustment
With this function, Automatic offset adjustment of V-REF Terminal, Automatic Offset of T-COMP
Terminal, and Manual offset adjustment of V-REF Terminal and Manual Offset of T-COMP Terminal
can be performed.
9-1 Adjustment Menu Window
9.1
Automatic Offset Adjustment of V-REF Terminal
This is the function to operate the Automatic Offset Adjustment of analog velocity/torque(force)
command input terminal.
1) Operating Procedure
(1)
Select “Adjustment” >>> “Automatic Offset Adjustment of V-REF Terminal” from the menu or click the
“Automatic Offset Adjustment of V-REF Terminal” icon
on the toolbar of the main window. The
Axis number selection window will appear. Select the axis to be adjusted and click “OK”. Click “cancel”
to stop.
(2)
Confirmation window will appear. Click “OK”.
9-2 Automatic Offset Adjustment of V-REF Terminal Execution Confirmation Window
(3)
The following window will be displayed when operation is completed normally:
9-3 Automatic Offset Adjustment of V-REF Terminal Successfully Completed Window
✔
Automatic offset cannot be completed normally when extremely high command voltage has been input.
(Higher than 5v standard)
9-1
9. Adjustment
9.2
Automatic Offset Adjustment of T-COMP Terminal.
Automatic Offset Adjustment of T-COMP Terminal
This is the function to operate automatic offset adjustment for analog torque (force) compensation
command input terminal. Refer to [9.1 Automatic Offset Adjustment of V-REF Terminal] for actual
operation.
9.3
Manual Offset Adjustment of V-REF Terminal
This is the function for manual offset adjustment of analog velocity/torque command input terminal.
1) Operating Procedure
(1)
Select “Adjustment” >>> “Manual Offset Adjustment of V-REF Terminal” from the menu or click the
“Manual Offset Adjustment of V-REF Terminal” icon
on the toolbar of the main window. The Axis
number selection window will appear. Select the axis to be adjusted and click “OK”. Click “Cancel” to
stop.
(2)
Confirmation window will appear. Click “OK”.
9-4 Manual Offset Adjustment of V-REF Terminal Execution Confirmation Window
(3)
Set the offset value in the following window manually:
Click “Edit” to Edit/Setup offset value directly. In
this case, the offset value will be set for Servo
Amp when “Decision” is clicked.
Can set the offset value for Servo Amp
continuously with the Up/Down control on
the right side of the offset value.
9-5 Manual Offset Adjustment of V-REF Terminal Execution Window
(4)
Click “End” to finish the offset adjustment. The following window will appear. Click “OK”.
9-6 Manual Offset Adjustment of V-REF Terminal End Confirmation Window
9-2
9. Adjustment
9.4
Manual Offset Adjustment of T-COMP Terminal.
Manual Offset Adjustment of T-COMP Terminal
This is the function for the manual offset adjustment of analog torque (force) compensation
command input terminal. Refer to [9.3 Manual Offset Adjustment of V-REF Terminal for the actual
operation].
9-3
9. Adjustment
.
No Text on This Page.
9-4
10 Measurement
10.
Operation Trace
Measurement
You can display operation status in waveform (Operation Trace Function). You can also check the
status in real time by scrolling operation data (Operation Scrolling Function) and check frequency
characteristics of mechanical devices (System Analysis Function).
10-1 Measurement Menu Window
10.1
Operation Trace
You can display current operation status in waveform with the image of an oscilloscope.
1) Operating Procedure
You can display operation status in graphic form.
(1)
Select “Measurement” >>> Operation Trace” from the menu or click the “Operation Trace” icon
on the toolbar of the main window. The Axis number selection window will appear. Select the axis to
be used and click “OK”. Click “Cancel” to stop.
10-1
10 Measurement
(2)
Operation Trace
The following window will be displayed. Click “Trace Conditions Setting” to change individual trace
conditions.
Trace Conditions Setting
(K)
(B)
(A)
Displays information by switching tabs
(H)
(C)
(F)
(D)
(G)
(E)
(I)
(J)
10-2 Operation Trace Window
(A)
Add to Project
: Register-Save current measurement data displayed in data file of Project.
(B)
Start Trace
: Start trace operation under set conditions.
(C)
Stop Trace
: Stop trace operation.
(D)
Trace Clear
: Clear the measured waveform
(E)
CH Scale
: Displays the selected channel scale. Attention is necessary here
because this is the scale selected in “Scale CH” and does not link with the other
scale channels.
(F)
Time-Axis
: Setting for Time-Axis Range
(G)
Trigger Centering : Clicking displays the trigger position as the center of the waveform.
(H)
Cursor
: Displays the data of the cursor position.
The cursor moves to the clicked position: t1 = left click mouse
t2 = right click mouse
v1 = shift key + left click mouse
v2 = shift key + right click mouse
(I)
Trigger Position
: Indicates each vertical/horizontal trigger position.
(J)
Zero Level Position: Shows zero level for each channel.
(K)
Copy to Clipboard : Copy trace conditions and measured waveform to clipboard.
10-2
10 Measurement
(3)
Operation Trace
After clicking “Trace Conditions Setting”, the following window appears. Setup/Input each condition in
the window. Click “OK” after setting values. The changes will be invalidated by clicking “Cancel”.
Click this button to call
up the past setting.
Specify trigger channel.
Set sampling interval. Total Traceable
time is calculated automatically.
Select edge of trigger.
Set Horizontal trigger position.
Set Trigger level.
10-3 Trace Conditions Setting Window
✔
✔
The data below can only be selected on Channel 1,3 and 5. Also, Channels 2, 4 and 6 cannot be
selected when the data below is selected.
z
Position Monitor (Motor)
z
Position Monitor (External)
z
Position Command Integrated Value
z
Motor Serial Encoder PS Data
When the buffering point is 256, it is possible to select 6 analog channels, at 512 points 3 analog
channels, and at 1024 points only 1 analog channel can be selected.
10-3
10 Measurement
(4)
Operation Trace
This window shows the view when the Channel Information tab is opened.
(B)
(A)
(C)
10-4 Operation Trace Window (CH Information Tab)
(A)
Display section
: Displays checked channel in graphic form.
(B)
Waveform Items
: Displays selected signal name for each channel. Set range and offset of
signals here.
(C)
Auto
: Clicking “Auto” adjusts the range and offset automatically and displays the
in graphic form.
10-4
10 Measurement
(5)
Operation Trace
This window shows the view when the Measurement Value Tab is opened.
(A)
(B)
(C)
10-5 Operation Trace Window (Measurement Value Tab)
(A)
Effective Value
: Calculates data between the t-axis cursors of the selected channel
and displays the resulting value.
(B)
Cursor Position Data
: Displays the data specified at cursor t1.
(C)
Cursor Differential Data
: Displays the difference of data specified in cursors v1 – v2.
10-5
10 Measurement
(6)
Operation Trace
This window displays the view when the Measurement Information Tab is opened.
(A)
(B)
10-6 Operation Trace Window (Measurement Information Tab)
(A)
Overwrite of Trace
: Overwrite the measured state of this time in waveform over the
waveform measured the previous time.
(B)
Measure Displayed on Top
: Selected waveform is displayed as a solid line.
10-6
10. Measurement
10.2
Operation Scrolling
Operation Scrolling
You can display operating state of waveform in real time.
It is possible to display waveforms for multiple axes simultaneously when multiple axes Servo
Amplifiers are connected.
✔
Sampling time is restricted depending on the processing capacity of the PC.
1) Operating Procedure
(1)
Select “Measurement” >>> “Operation Scrolling” from the menu or click on the “Operation Scrolling”
icon
on the toolbar of the main window. The Axis number selection window will appear. Select
“Online” at the axis number and click “OK”. Click “Cancel” to stop.
(2)
The following Operation Scrolling window will appear. Click “Scrolling Conditions Setting” to change
the individual scrolling conditions.
(A)
Scrolling Conditions Setting
Information is displayed by switching tabs.
(B)
10-7 Operation Scrolling Window
(A)
Start Scrolling
: Starts the scrolling operation under the set conditions.
(B)
Stop Scrolling
: Stops scrolling operation.
Apply trace operation methods to other operations.
10-7
10. Measurement
(3)
Operation Scrolling
The following is the Operation Scrolling Conditions window.
(A)
(C)
(B)
10-8 Operation Scrolling Conditions Setting Window
(A)
Axis Selection
: Select the axis of the Servo Amplifier to be displayed.
(B)
Selection Items
: Display signal(s) for each channel that has been selected.
(C)
Sampling Period
: Set the period to request data for the Servo Amplifier.
Setting a short period for a low processing capacity PC results in extremely slow
processing speed. So be careful.
10-8
10. Measurement
10.3
System analysis
System analysis
In system analysis, the system can be easily analyzed by operating the Servo Amp and Servo
Motor for a duration of hundreds of ms to tens of seconds. Secure the safety; the Servo Motor runs
during this function.
1) Operating Procedure
(1)
Select “Measurement” >>> “System Analysis” from the menu or click the “System Analysis” icon
on the toolbar of the main window. The Axis number selection window will appear. Select the axis to
be analyzed and click “OK”. Click “Cancel” to stop.
(2)
Confirmation window to perform System Analysis will appear. Click “OK” to proceed. Click “Cancel” to
stop.
10-9 System Analysis Execution Confirmation Window
(3)
The following System Analysis Execution window will appear. Click “Data Measure & Analysis” to
proceed. Click “Close” to stop.
Close
Click Data Measure &
Analysis to start.
10-10 System Analysis Execution Window
10-9
10. Measurement
(4)
System analysis
Window for setting conditions will appear. Set the conditions of data measurement.
Set torque (force) command
value and frequency range to
be measured.
10-11 System Analysis Data Measurement & Analysis Window
(5)
After setting the conditions, check the safety and surroundings of the motor to be operated. Then,
click “Servo ON”. Motor excitation starts and “Execute” button becomes effective.
(6)
Measurement will start by clicking “Execute”. The progress will be displayed in the status bar.
10-12 System Analysis Data “Now Reading” Status bar Window
(7)
The following window will be displayed when the measurement and data reading has been completed.
Click “OK”. The motor excitation will continue until “OK” is clicked.
10-13 Data Analysis waiting Window
10-10
10. Measurement
(8)
System analysis
Data is being analyzed. Please wait.
10-14 Data Under Analysis Window
(9)
When analysis is complete, the results will be displayed in graphic form.
Cursor is displayed when box is checked. You can confirm
the frequency, gain and phase at cursor position.
Save the measurement
conditions and the waveform to
clipboard by clicking “Save to
Clipboard”.
Cursor 1 moves to its
frequency with a left click
of the mouse.
0% of the restriction
incidence rate is desirable.
Cursor 2 moves to its
frequency with a right
click of the mouse.
10-15 System Analysis Results Window
✔
Adjust the torque(force) command value so that the torque(force) restriction status incidence rate, while
being measured, is 0%.
10-11
10. Measurement
(10)
System analysis
Antiresonance/resonance frequencies of a model control system can be set from analyzed graphs.
Move cursor t1 (Green) to the frequency to be set for model control antiresonance frequency; cursor
t2 (Yellow) to the frequency to be set for model control resonance frequency and click “Setting” in the
analysis results window.
(11)
The Setting window will be displayed. Confirm the setting values for antiresonance/resonance
frequencies and click “OK”. Set parameters at this point.
10-16 Resonance/antiresonance Frequency Setting Window (System Analysis)
10-12
11. Troubleshooting
Upon Installation
11.
Troubleshooting
11.1
Upon Installation
No.
1
2
Error message
Insufficient hard disk
space
Major cause
Not enough space
on hard disk to
install program
Check points – Corrective Mesures
About 400MB of HD space is required because this
application needs space for Microsoft .NET
Framework 2.0 as well as the application itself to
operate.
Cannot install
OS/IE versions are
too old.
Installation cannot continue if the OS and IE(Internet
Explorer) versions are too old. Please rebuild the
environment by referring to 1.3 [System Environment].
11-1
11. Troubleshooting
11.2
Wiring, Connection and Communication Status check
Wiring, Connection and Communication Status check
No.
1
Malfunction-Error message
“Error occurred at the time of
port opening.”
Major cause
Communication port
cannot be used with
this software.
2
Communication status check
results in “Receiving Data
Error”
Communication status check
results in “Timeout error”.
Error in the settings of
the communication
port.
Error in
communication
velocity setting.
Note 1)
Error in Axis selection
setting.
Note 1)
3
Failure of the
communication cable.
Control power supply
4
5
Communication status check
results in “Overlap”.
Note 3)
Communication status check
results in “Not-corresponding”
Wrong operation due
to noise
Setting error related to
communication.
(when multiple amps
are connected)
Wrong operation due
to noise.
Version mismatch.
Software mismatch.
6
When executing the following,
communication shuts down.
-Write/Transmit parameter
-Test Operation
-Automatic Tuning
-Adjustment
-Measurement
“Parameter lock
function” for password
is set.
11-2
Check points – Corrective measures
Check if the communication port connected with a
cable (PC side) has been used with other
applications or if Setup Software has already been
activated.
Check if the communication port connecting cable
(PC side) matches the “COM Port”.
Check if the communication baud rate of the Servo
Amp corresponds to the “Communication Velocity”.
Check if the Communication axis number selection
of the Servo Amp corresponds to the chosen “Axis
Number Selection”.
Check if the communication cable for the Servo
Amp is connected correctly to both the PC side and
the (D-sub9 pin).
Check that there is no break in the communication
cable.
Check the Control Power supplied to the Amp.
Apply countermeasures. Note2)
Check if the communication axis number settings
overlap in the connected amplifiers. Note 1)
Apply countermeasures. Note 2)
This Setup Software is not corresponding to the
Servo Amplifier software version. Install the latest
version of the Setup Software.
R ADVANCED MODEL Setup Software cannot
communicate with Amp,RS1,RR1. Use R-SETUP
Software to communicate with those models.
R ADVANCED MODEL Servo Amp cannot
communicate with R-SETUP Software.
Permit “Parameter Edit”.
Refer to [3.6 Password Function].
11. Troubleshooting
Note 1)
Note 2)
The communication baud rate (GroupA-20) and the communication axis number can be set at
parameters. The initial value is #1 for the axis number and 38400bps for the baud rate.
Changes for the baud rate and axis number become valid when re-input of the control power
for the amplifier is accomplished. However, the initial value and the setting procedure are
different or the setting cannot be changed due to the amplifier types.
When communication cannot be performed correctly due to noise, the noise influence should
be reduced by the following countermeasures:
z
Ground the Servo Amplifier and PC appropriately.
z
Keep the Servo Amplifier and PC away from the noise source.
z
Install noise filter.
Note 3)
11.3
Wiring, Connection and Communication Status check
When “Overlap” remains after countermeasures are implemented, take one of the following
measures:
z
Turn OFF the Servo Amplifier control power and turn it on again.
z
Disconnect the communication cable (amplifier side) and reconnect it.
Parameter Setting
1) Parameter Verification
No.
1
2
Malfunction - Error
message
Because of mismatch
in amplifier type and
amplifier main ID file
communication
cannot be
established.
“Amplifier ID is not
supported”
Major cause
Check point – Corrective measure
The type of amplifier
is different.
Cannot verify because connecting amplifier type
is different than the parameter file to be verified.
Tried to verify with old
version amplifier file.
Update Setup Software to latest version.
2) Parameter Transmission (To Amplifier)
No.
1
11.4
Malfunction - Error
message
Because of mismatch
in amplifier and
amplifier ID file
communication
cannot be
established.
Major cause
Type of amplifier is
different.
Check point – Corrective measure
Cannot transmit because connecting amplifier
type is different than the parameter file to be
transmitted.
Support Functions
1) Monitor
No.
1
Malfunction - Error
message
“Communication error
occurred at Axis x.
Cause: Timeout error”
Major cause
Breaking of
communication cable.
Check point – Corrective measure
Check if the communication cable between
Servo Amplifier and PC is connected correctly,
has broken or disconnected.
2) Alarm
No.
1
Malfunction - Error
message
“Alarm reset could not
be performed”
Major cause
Alarm state is active.
Check point – Corrective measure
Cannot reset because alarm state is active.
Change the alarm state.
An alarm that cannot perform alarm reset exists.
Change the alarm state and re-input both the
control power of the amplifier and the main circuit
power source.
11-3
11. Troubleshooting
Support Functions
3) Test Operation
No.
1
2
3
4
Malfunction - Error
message
“*** cannot be
performed
(Preparation
incomplete).”
Major cause
Check point – Corrective measure
Servo Amplifier is not
ready. (Not in SRDY
mode). Other support
function is being
performed.
Check if the Alarm state is active. Change the
alarm state.
Encoder clear cannot
be performed.
(outputs ALM_DF).
Motor does not run in
Positioning Operation
or Velocity JOG
Operation
Motor is operating
externally.
Encoder clear cannot be performed if the motor is
operating with more than 50min-1(mm/s)
externally from some factor.
Check the Velocity Command setting or specified
pulse number.
“Magnetic Pole
Position Presumption
has not been
performed
(completing
abnormally)”
(ALM_44h)
Could not successfully
complete for some
reason.
Setting error.
Over-travel, etc.
Check if the main circuit power is supplied.
Exit other support functions (Velocity JOG,
Position JOG, Auto tuning, Adjustments, System
analysis, etc.) if not already done.
Communication error has occurred for some
reason. Initiate Communication Confirmation
again.
Cannot perform when Test Operation, Auto
Tuning, and Adjustment functions are initiated
from Digital Operator.
Cannot perform when switching control mode.
Over-travel is still effective. Change the
Over-travel status.
Check the operational range of the motor
(approx.+-10mm)
Check the force command value for the Magnetic
Pole Position Presumption. Magnetic Pole
Position Presumption cannot be completed
successfully if the value is not sufficient against
stationary friction.
Check if the polarity of the linear encoder signals
or wiring of the motor power line has been
reversed.
4) Automatic Tuning
No.
1
Malfunction - Error
message
“*** cannot be
performed
(Preparation
incomplete).”
Major cause
Servo Amplifier is not
ready. (Not in SRDY
mode). Other support
function is being
performed.
Check point – Corrective measure
Check if the Alarm state is active. Change the
alarm state.
Check if the main circuit power is supplied.
Exit other support functions (Velocity JOG,
Position JOG, Auto tuning, Adjustments, System
analysis, etc.) if not already done.
Communication error has occurred for some
reason. Initiate Communication Confirmation
again.
Cannot perform when Test Operation, Auto
Tuning, and Adjustment functions are initiated
from Digital Operator.
Cannot perform when switching control mode.
Cannot use Auto tuning when Over-travel has
occurred. Change the status of Over-travel.
Cannot perform correct measurement while
holding brake release delay time (BOFFDLY) and
perform at the same time.
11-4
11. Troubleshooting
Support Functions
5) Adjustments
No.
1
Malfunction - Error
message
“***Automatic Offset
Adjustment cannot be
performed.
(Preparation
incomplete)”
Major cause
Check point – Corrective measure
Specified analog
voltage exceeds 5.2V.
Check analog voltage input. Automatic Offset
cannot be performed if the voltage exceeds 5.2V
in adjustment.
Communication error occurred for some reason.
Initiate Communication Confirmation again.
Cannot perform when Test Operation, Auto
Tuning and Adjustment functions are initiated
from Digital Operator.
Cannot perform when switching control mode.
2
Manual Offset Setting
Value changed when
Automatic Offset was
performed.
The Offset values of auto-offset and manual
offset are the same in value. The manual offset
changed when auto-offset was performed.
6) Measurement
No.
1
Malfunction - Error
message
“System Analysis
cannot be performed.
(Preparation
incomplete)”
Major cause
Servo Amplifier is not
ready. (Not in SRDY
mode). Other support
function is being
performed.
Check point – Corrective measure
Check if the Alarm state is active. Change the
alarm state.
Check if the main circuit power is supplied.
Exit other support functions (Velocity JOG,
Position JOG, Auto tuning, Adjustments, System
analysis, etc.) if not already done.
Communication error has occurred for some
reason. Initiate Communication Confirmation
again.
Cannot perform when Test Operation, Auto
Tuning, and Adjustment functions are initiated
from Digital Operator.
Cannot perform when switching control mode.
Cannot use Auto tuning when Over-travel has
occurred. Change the status of Over-travel.
Cannot perform correct measurement while
holding brake release delay time (BOFFDLY) and
perform at the same time.
2
Window response is
delayed or inactive
during Scrolling
Operation
Limited by PC
processing capacity
11-5
This depends on the processing ability/capacity
of the PC because real time communication is
implemented for the amplifier and displays its
waveform on window.
Adjust it either by closing other applications or by
setting the sampling time of the Scrolling
Operation longer.
11. Troubleshooting
No Text on This Page.
11-6
12. Appendix
Wiring
12.
Appendix
12.1
Wiring
1) Servo Amplifier Connectors
Servo Amplifier Side : CN2
MUF-RS8DK-GKXR
J.S.T. Mfg. Co., Ltd.
Number of pins
Signal name
1
422RXD+
2
422RXD3
422TXD+
4
+5V
5
232RXD
6
422TXD7
232TXD
8
GND
Shell
Shield
■
■
Servo Amplifier Side : CN3
MUF-RS8DK-GKXR
J.S.T. Mfg. Co., Ltd.
Number of pins
Signal name
1
422RXD+
2
422RXD3
422TXD+
4
+5V
5
NC
6
422TXD7
NC
8
GND
Shell
Shield
Use CN2 cable when connecting to the (first) PC.
When connecting multiple axes, connect the cable from the first amplifier or (first) PC to CN2 and the
cable from the last amplifier to CN3.
12-1
12. Appendix
Wiring
2) Connecting Cable A
Connect the (first) computer and the first Servo Amplifier (RS-232CTerminal).
COM
9
5
6
1
CN2
Connecting Cable A : AL-00689703-01
1
2
1
3
2
4
3
5
4
6
6
7
8
9
5
7
8
PC Side (COM)
JEZ-9S-3(LF)
J.S.T. Mfg. Co., Ltd.
Number of pins Signal name
1
DCD
2
RD
3
TD
4
DTR
5
SG
6
DSR
7
RS
8
CS
9
RI
Servo Amplifier Side : CN2
MUF-PK8K-X
J.S.T. Mfg. Co., Ltd.
Number of pins
Signal name
1
NC
2
NC
3
NC
4
NC
5
RXD
6
NC
7
TXD
8
SG
Case
Shield
■
Use shielded wire for cable.
■
Connect cable (shielded wire) to case of amplifier side connector.
Do not connect to the case of the PC connector.
■
Do not wire except to the specified terminals shown on the wiring diagram.
12-2
12. Appendix
Wiring
3) Connecting Cable B
This is a cable to connect between Servo amplifiers for multiple axes connection of Servo
amplifiers.
(RS422A connection)
CN1
NO.8
200 or 3000
CN2
NO.1
NO.8
NO.1
Cable
Connecting Cable B : AL-00695974-01 (0.2m)
AL-00695974-02 (3m)
1
1
2
2
3
3
4
4
5
5
6
6
7
7
Shield
8
Notes:
8
shows twisted pair
CN1 / 2 Common
MUF-PK8K-X
J.S.T. Mfg. Co., Ltd.
4) Network terminator
Connector to end RS422A communication for multiple axes connections of Servo Amplifier.
NO.8
NO.1
Network terminator: AL-00695977-01
(A resistor (120ohm) is inserted between 1pin and 2pin)
Connector model number
MUF-PK8K-X
J.S.T. Mfg. Co., Ltd.
12-3
12. Appendix
Wiring
5) Communication Converter
Module to convert RS232C communication to RS422A communication that is required for multiple
axes connections of Servo Amplifiers.
STRAIGHT
CROSS
422A
SW2
SW1
CN1
(232C/422A)
232C
POWER
CN3
(PC)
CN2
(422A)
Communication Converter: SAU-024-01
CN1
MUF-RS8DK-GKXR
J.S.T. Mfg. Co., Ltd.
Number of pins
Signal name
1
2
3
4
5
6
7
8
shell
422TXD+
422TXD422RXD+
+5V
232TXD
422RXD232RXD
GND
Shield
Number
SW1
SW2
CN2
MUF-RS8DK-GKXR
J.S.T. Mfg. Co., Ltd.
Number of pins
Signal
name
1
422TXD+
2
422TXD3
422RXD+
4
+5V
5
6
422RXD7
8
GND
shell
Shield
CN3
DELC-J9PAF-23L9E
J.S.T. Mfg. Co., Ltd.
Number of pins
Signal
name
1
DCD
2
RD
3
TD
4
DTR
5
SG
6
DSR
7
RS
8
CS
9
RI
shell
Shield
SW Selection
Selection
232C
422A
RS232C signal of CN1 is valid
RS422A signal of CN1 is
valid
STRAIGHT
CROSS
Cable between PC-CN3
Under the straight cable spec.
12-4
Cable between PC-CN3
Under the cross cable spec.
Index
D
A
Data File ..................................................................... 3-9
Adjustment .............. 1-1, 3-11, 9-1, 9-2, 11-2, 11-4, 11-5
E
Advanced ................................................................. 3-10
AL-00689703-01......................................... 2-1, 2-2, 12-2
Effective Value ......................................................... 10-5
AL-00695974-01................................................ 2-2, 12-3
End Communication ................................................... 3-4
AL-00695974-02................................................ 2-2, 12-3
H
Alarm History.............................................. 3-11, 6-1, 6-2
Alarm History Clear .................................................... 6-2
History ................................................................. 4-7, 6-1
Alarm Reset ................................................. 1-1, 6-1, 6-3
I
Amplifier ID............................................................... 11-3
Authority A................................................................ 3-10
Installation ............................ 1-3, 1-4, 1-6, 1-7, 1-8, 11-1
Authority B................................................................ 3-10
J
Authority C ............................................................... 3-10
Automatic FF Vibration Suppression Frequency Tuning
JOG Operation .............................. 1-1, 7-1, 7-2, 7-3, 7-5
.................................................................. 8-1, 8-3, 8-4
M
Automatic Notch Filter Tuning .................................... 8-1
Automatic Offset Adjustment of V-REF Terminal 9-1, 9-2
Magnetic Pole Position Presumption ....1-1, 7-1, 7-5, 7-6,
Automatic Tuning .....................1-1, 3-11, 8-1, 11-2, 11-4
11-4
Axis Property .............................................................. 3-8
Main Window....................................................... 3-3, 3-4
Axis Selection......................................4-8, 4-9, 7-1, 10-8
Manual Offset Adjustment of T-COMP Terminal . 1-1, 9-3
Manual Offset Adjustment of V-REF Terminal.... 1-1, 9-2,
B
9-3
Basic ...................................................3-1, 3-4, 3-10, 4-1
Measurement ... 1-1, 10-1, 10-5, 10-6, 10-7, 10-9, 10-10,
Baud Rate selection ................................................... 3-2
11-2, 11-5
Measurement Information Tab ................................. 10-6
C
Measurement Value Tab .......................................... 10-5
Channel Information ................................................. 10-4
Monitor ............................... 1-1, 5-1, 7-8, 8-5, 10-3, 11-3
Communication Cable A............................................. 2-2
Motor Parameter ............................................... 3-12, 4-4
Communication Cable B............................................. 2-2
N
Communication Confirmation ................... 3-3, 11-4, 11-5
Communication Converter................................. 2-2, 12-4
Network Terminator .................................................... 2-2
Communication Setting .........................3-2, 3-3, 3-4, 3-7
Not-corresponding .................................................... 11-2
Connecting Cable A ................................................. 12-2
O
Connecting Cable B ................................................. 12-3
Connection for Single Device ..................................... 2-1
Operation Level ........................................................ 3-10
Cursor Position Data ................................................ 10-5
Operation Scrolling .................. 1-1, 3-9, 10-1, 10-7, 10-8
Operation Trace............ 3-9, 10-1, 10-2, 10-4, 10-5, 10-6
vi
Index
Operation Trace Window...............10-2, 10-4, 10-5, 10-6
SDI Display................................................................. 3-6
Overlap............................................................ 11-2, 11-3
Selecting Parameter(s) to Monitor .............................. 5-2
Serial Encoder Clear .............................1-1, 7-1, 7-7, 7-8
P
Servo Amplifier Connectors...................................... 12-1
Parameter Change History.................................. 4-4, 4-7
Software Version ...................................................... 3-12
Parameter Edit ........................................... 4-1, 4-3, 11-2
SW1................................................................... 2-2, 12-4
Parameter Setting 1-1, 4-1, 4-2, 4-7, 4-8, 4-9, 4-11, 11-3
SW2................................................................... 2-2, 12-4
Parameter Verification..............1-1, 4-1, 4-11, 4-12, 11-3
System Analysis1-1, 3-9, 10-1, 10-9, 10-10, 10-11, 10-12,
11-5
Password Function.......................................... 3-11, 11-2
System Parameters ............................................. 4-1, 4-3
Positioning Operation ........... 1-1, 7-1, 7-3, 7-4, 7-5, 11-4
Project ... 3-2, 3-3, 3-4, 3-5, 3-7, 3-8, 3-9, 3-10, 4-2, 4-13,
T
10-2
Test Operation... 1-1, 3-11, 7-1, 7-3, 7-5, 7-7, 11-2, 11-4,
Project Property.......................................................... 3-8
11-5
Project Setting ............................................................ 3-8
Project Window .......................................................... 3-7
Troubleshooting........................................................ 11-1
R
V
Running Setup Software ............................................ 3-1
Velocity JOG Operation............................................ 11-4
Version Information .................................................. 3-12
S
Save Result of Automatic Tuning ............................... 8-5
W
Save to Backup Memory ................................... 1-1, 4-13
Wiring .............................................................. 11-2, 12-1
vii
Release
Revision A
Revision B
Revision C
Dec. 2008
Feb. 2010
Mar. 2012