1
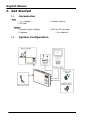
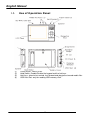
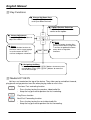
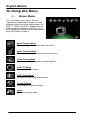
Product Name
User Manual
English
LINDY No. 42770
www.LINDY.com
© LINDY ELECTRONICS LIMITED
&
LINDY
LINDY-ELEKTRONIK
GMBH
-
FIRST EDITION (Oktober 2009)
English Manual
The lighting flash with arrowhead symbol within an
equilateral triangle is intended to alert the user to the
presence of uninsulated dangerous voltage within the
product’s enclosure that may be of sufficient magnitude to
constitute a risk at electric shock to persons.
The exclamation point within an equilateral triangle is
intended to alert the user to the presence of important
operating and maintenance (servicing) instructions in the
literature accompanying the appliance
CAUTION: TO REDUCE THE RISK OF ELECTRIC SHOCK –
DO NOT REMOVE COVER (OR BACK)
NO USER-SERVICEABLE PARTS INSIDE REFER
SERVICING TO QUALIFIED SERVICE PERSONNE;
CAUTION: TO PREVENT ELECTRIC SHOCK, MATCH WIDE BLADE OF POWER PLUG TO WIDE SLOT OF AC OUTLET AND FULLY
INSERT.
An appliance and cart combination should be moved with
care. Quick stops, excessive force, and uneven surfaces
may cause the appliance and cart combination to overturn
Electrical energy can perform many useful functions. This unit has been engineered and manufactured to assure your personal safety.
Improper use can result in potential electrical shock or fire hazards. In order not to defeat the safeguards, observe the following basic rules
for its installation, use and servicing.
1.
2.
3.
4.
5.
Read Instructions: All the safety and operating instructions should be read before the product is operated.
Retain Instructions: The safety and operating instructions should be retained for future reference.
Heed Warnings: All warnings on the product and in the operating instructions should be adhered to.
Follow Instructions: All operating and use instructions should be followed.
Cleaning: Unplug this product from the wall outlet before cleaning. Do not use liquid cleaners or aerosol cleaners. Use a damp cloth
for cleaning.
6. Attachments: Do not use attachments not recommended by the product manufacturer as they may cause hazards.
7. Water and Moisture: Do not use this product near water-for example, near a bath tub, wash bowl, kitchen sink, or laundry tub, in a
wet basement, or near a swimming pool, and the like.
8. Accessories: Do not place this product on an unstable cart, stand, tripod, bracket, or table. The product may fall, causing serious
injury to a child or adult and serious damage to the product. Use only with a cart, stand, tripod, bracket, or table recommended by
the manufacturer, or sold with the product. Any mounting of the product should follow the manufacturer's instructions, and should
use a mounting accessory recommended by the manufacturer.
9. Carts and Stands: The product should be used only with a cart or stand that is recommended by the manufacturer.
9A. A product and cart combination should be moved with care. Quick stops, excessive force, and uneven surfaces may cause the
product and cart combination to overturn.
10. Ventilation: Slots and openings in the cabinet are provided for ventilation and to ensure reliable operation of the product and to
protect it from overheating, and these openings must not be blocked or covered. The openings should never be blocked by placing
the product on a bed, sofa, rug, or other similar surface. This product should not be placed in a built-in installation such as a
bookcase or rack unless proper ventilation is provided or the manufacturer's instructions have been adhered to.
11. Power Sources: This product should be operated only from the type of power source indicated on the marking label. If you are not
sure of the type of power supply to your home, consult your product dealer or local power company. For products intended to
operate from battery power, or other sources, refer to the operating instructions.
1
English Manual
12. Grounding or Polarization: This product may be equipped with a polarized alternating-current line plug (a plug having one blade
wider than the other). This plug will fit into the power outlet only one way. This is a safety feature. If you are unable to insert the plug
fully into the outlet, try reversing the plug. If the plug should still fail to fit, contact your electrician to replace your obsolete outlet. Do
not defeat the safety purpose of the polarized plug.
Alternate Warnings: This product is equipped with a three-wire grounding-type plug, a plug having a third (grounding) pin. This plug will
only fit into a grounding-type power outlet. This is a safety feature. If you are unable to insert the plug into the outlet, contact your
electrician to replace your obsolete outlet. Do not defeat the safety purpose of the grounding-type plug.
13. Power-Cord Protection: Power-supply cords should be routed so that they are not likely to be walked on or pinched by items placed
upon or against them, paying particular attention to cords at plugs, convenience receptacles, and the point where they exit from the
product.
14. Protective Attachment Plug: The product is equipped with an attachment plug having overload protection. This is a safety feature.
See Instruction Manual for replacement or resetting of protective device. If replacement of the plug is required, be sure the service
technician has used a replacement plug specified by the manufacturer that has the same overload protection as the original plug.
15. Outdoor Antenna Grounding: If an outside antenna or cable system is connected to the product, be sure the antenna or cable
system is grounded so as to provide some protection against voltage surges and built up static charges. Article 810 of the National
Electrical Code, ANSI/NFPA 70, provides information with regard to proper grounding of the mast and supporting structure,
grounding of the lead-in wire to an antenna discharge unit, size of grounding conductors, location of antenna-discharge unit,
connection to grounding electrodes, and requirements for the grounding electrode. See Figure A on page 5.
16. Lightning: For added protection for this product during a lightning storm, or when it is left unattended and unused for long periods of
time, unplug it from the wall outlet and disconnect the antenna or cable system. This will prevent damage to the product due to
lightning and power-line surges.
17. Power Lines An outside antenna system should not be located in the vicinity of overhead power lines or other electric light or power
circuits, or where it can fall into such power lines or circuits. When installing an outside antenna system, extreme care should be
taken to keep from touching such power lines or circuits as contact with them might be fatal.
18. Overloading: Do not overload wall outlets, extension cords, or integral convenience receptacles as this can result in a risk of fire or
electric shock.
19. Object and Liquid Entry: Never push objects of any kind into this product through openings as they may touch dangerous voltage
points or short-out parts that could result in a fire or electric shock. Never spill liquid of any kind on the product.
20. Servicing: Do not attempt to service this product yourself as opening or removing covers may expose you to dangerous voltage or
other hazards. Refer all servicing to qualified service personnel.
21. Damage Requiring Service Unplug this product from the wall outlet and refer servicing to qualified service personnel under the
following conditions:
a) When the power-supply cord or plug is damaged,
b) If liquid has been spilled, or objects have fallen into the product,
c) If the product has been exposed to rain or water,
d) If the product does not operate normally by following the operating instructions. Adjust only those controls that are covered by
the operating instructions as an improper adjustment of other controls may result in damage and will often require extensive
work by a qualified technician to restore the product to its normal operation,
e) If the product has been dropped or damaged in any way, and
f)
When the product exhibits a distinct change in performance, this indicates a need for service.
22. Replacement Parts: When replacement parts are required, be sure the service technician has used replacement parts specified by
the manufacturer or have the same characteristics as the original part. Unauthorized substitutions may result in fire, electric shock,
or other hazards.
23. Safety Check: Upon completion of any service or repairs to this product, ask the service technician to perform safety checks to
determine that the product is in proper operating condition.
24. Wall or Ceiling Mounting: The product should be mounted to a wall or ceiling only as recommended by the manufacturer.
25. Heat: The product should be situated away from heat sources such as radiators, heat registers, stoves, or other products (including
amplifiers) that produce heat.
2
English Manual
Precaution
Preface
On Safety
Do not use wet hands to pull out the plug. It may cause electrical shock.
If the player does not work, please pull out the plug for safety. Contact us for further technical support.
Before moving the player, please make sure the power adapter is disconnected from the wall outlet.
Do not move the player when playing. It may cause a fire or electrical shock.
Should any solid object or liquid fall into the cabinet, unplug the player and have it checked by qualified personnel before operating it any
further.
If you are not going to use the player for a long while, be sure to disconnect the player from the wall outlet. To disconnect the power
adapter, grasp the plug itself; never pull the cord.
On Placement
Please keep a sufficient distance between the player and a radio set. A sufficient distance is also needed between the player and any
other devices with electromagnetic field.
Please place the player in a location with adequate ventilation to prevent heat build-up in the player.
Do not place the player on a soft surface such as a rug that might block the ventilation holes on the bottom.
Do not place the player in a location near heat sources, or in places subject to direct sunlight, excessive dust, or mechanical shock.
Do not place the player in a location exposed to cool air. Condensation may occur and cause the player work incorrectly.
On Operation
The player may not work because of improper operation. The limited warranty does not cover consequent losses that rise from improper
usage.
Turn off the player when you are watching regular TV program. It may cause a picture distortion.
The player will not work correctly when affected by exterior elements such as static electricity. In such cases, pull out the power adapter
and plug it back to the outlet again.
3
English Manual
Table of Contents
Preface……………………………………………………………………………………...5
I. Get Started ................................................................................... 6
I.1. Accessories ................................................................................... 6
I.2. System Configuration ................................................................... 6
I.3. Use of Operation Panel ................................................................. 7
II. Using the Menu ............................................................................. 9
II.1. Home Menu .............................................................................. 9
III. Quick Guide for First-time User.................................................... 10
III.1. DVB-T TV Watching ................................................................. 10
III.2. DVB-T Radio Listening ............................................................. 11
III.3. Record Function ...................................................................... 12
III.4. Movie Watching ....................................................................... 13
III.5. Music Listening ....................................................................... 13
III.6. Photo Viewing ......................................................................... 15
IV. Technical Settings........................................................................ 16
IV.1. System Settings ...................................................................... 16
IV.2. DVB-T TV/Radio Menu ............................................................. 17
V. Trouble Shooting Q&A ................................................................. 21
VI. Specification ................................................................................ 22
4
English Manual
Preface
Warning
Unauthorized duplication of copyrighted material may infringe upon the right of third parties and
may be contrary to copyright laws.
Safety Notes
Do not bend, drop, crush, puncture, incinerate, or open this device.
Keep this device within acceptable temperatures. Do not submit it to extreme temperatures.
Do not use this device in rain, or near washbasins or other wet locations. Take care not to
spill any food or liquid into it. In case this device gets wet, unplug all cables, turn it off and
allow it to dry thoroughly before turning it on again.
Never attempt to repair this device by yourself. It does not contain any user serviceable
parts. The battery should be replaced only by authorized service providers.
Do use headphones safely. Use of headphones while operating a vehicle is not
recommended and is illegal in some areas. Be careful and attentive while driving. Stop
using this device if you find it disruptive or distracting while driving or performing any other
activity that requires your full attention.
5
English Manual
I. Get Started
I.1.
Accessories
Basic
○ Power Adaptor
○ AV Cord
○ Portable Antenna
Optional
○ Cigarette Lighter Adaptor
○ Earphone
I.2.
○ MCX-to-IEC connector
○ Car Holder Kit
System Configuration
6
English Manual
I.3.
(1)
(2)
(3)
(4)
Use of Operation Panel
Power button: Power on/off.
Hold Switch: Enable/Disable the keypad and the hot-keys.
Hot-Keys: allow to fast rewind, fast forward and play/pause/record media files.
USB Host Port: only for reading USB memory stick.
7
English Manual
Key Functions
Channel Up/Down Keys
Press [CH+]/[CH-] buttons to
scroll up or down channels.
Option/Service Selection
Press this button to select the
service or the option.
Volume Adjustment
Press [VOL+]/[VOL-] buttons to
adjust the volume.
Menu
Home
Press this button to return to
the home menu screen except
in service menu of DVB-T
services and game selections.
HOME
MENU
Press this button to enter the
service menu when using DVBT services or go back to home
menu when using other
functions.
Navigating the Menu
In home menu, press [CH+]/[CH-] buttons to move cursors
up and down. Press [VOL+]/[VOL-] buttons to move the
cursor left and right.
Media HOT KEYS
Hot keys are located on the top of the device. They allow you to rewind/fast forward,
play/pause and go previous/next file when playing video or music files.
Previous/ Fast rewinding function.
- Press the key to play the previous video/audio file.
- Keep the key pressed to perform the fast rewinding.
Play/Pause function.
Next/Fast Forwarding function.
- Press the key to play the next video/audio file.
- Keep the key pressed to perform the fast forwarding.
8
English Manual
II. Using the Menu
II.1.
Home Menu
This is the home menu screen. You can
highlight the video playback mode, the music
playback mode, the picture viewing mode, the
DVB-T TV mode, the DVB-T Radio mode, the
display settings and Game. Use [VOL+] and
[VOL-] buttons to highlight the desired item and
press [OK] button to select it.
Movie Playback Mode
To enter playback mode and watch movie files.
Music Playback Mode
To enter audio playback mode and listen to music.
Photo Viewing Mode
To enter photo viewing mode and watch pictures.
DVB-T TV Mode
To enter DVB-T TV mode.
DVB-T Radio Mode
To listen to DVB-T radio broadcasting.
System Settings
To configure the device settings.
Game
To enter the game mode.
9
English Manual
III.
Quick Guide for First-time User
III.1. DVB-T TV Watching
Step 1: Charging the device
1. Connect power adaptor to the main unit.
2. When battery charge starts, the charging LED indicator will be turned on as RED.
3. After battery charge is completed and if the unit is still connected to the power
adaptor, this indicator LED will be turned to GREEN instead.
NOTE: you can enjoy mobile TV while battery is charging.
Step 2: Turn on the unit
(Power button is on top side of the unit)
Step 3: Press [VOL+]/[VOL-] buttons to select “TV” option and press [OK]” button to
enter the TV mode.
10
English Manual
Step 4: Press [OK] button to enter the
scan setup.
Step 5: Select your own OSD Language,
your located region, whether it’s
summer time at present.
1. Use [CH+]/[CH-] buttons to
highlight the item.
2. Use [VOL+] button to set the
highlight item.
3. Press [CH+]/[CH-] buttons to scroll up and down the options.
4. Select one by pressing the [OK] button or exit the setting by pressing the [MENU]
button.
NOTE: Time zone setting will be automatically updated once the Region setting is
changed.
Step 6: Perform auto search to find available TV DVB-T channels.
1. Use [CH+]/[CH-] buttons to highlight the Auto Search item.
2. Press [OK] button to start.
Step 7: Job well-done! You may now sit back and enjoy your mobile TV.
NOTE: Keep [OK] button pressed to change the aspect ratio of current TV program.
III.2. DVB-T Radio Listening
1. Press [VOL+]/[VOL-] buttons to select the
Radio item and then press [OK] button to
enter the radio mode.
2. Press [CH+]/[CH-] to select your preferred
radio channel.
3. The radio service will instantly start.
NOTE: Keep [OK] button pressed to change the
aspect ratio of current TV program.
11
English Manual
III.3. Record Function
NOTE: The Mobile Media Player supports DVB-T TV and DVB-T Radio recording.
1. During TV/Radio mode press
to start
recording TV/Radio programs.
When unit is recording,
icon will appear on
the upper left screen.
NOTE: please ensure that you connect unit to USB
device/ SD Card.
2. Press
again or [HOME] to stop recording.
NOTE:
a. Recorded program will be stored in default folder named as “PVR”, as “.mpg” file
for TV program and “.mp3” file for Radio program.
b. Recorded file is named as (Channel Name) + (RecordedDate_RecordedTime), for
example BBC ONE (090131_101336).mpeg.
c. Maximum file size of FAT/FAT32 is 4 GB, so unit will cut the recorded file into 2
parts if the recorded file size is larger than 3.9 GB.
3. Recorded TV program can be played back in Movie mode.
4. Recorded Radio program can be played back in Music mode.
Important notes:
i.
1 GB storage device can record approximately 45 minutes programs.
ii.
Storage files system support only FAT/FAT32format.
iii.
Generally all SD Card and USB 2.0 can be used as recorded file storage. However,
there are cases when the USB device/ SD Card can’t store recorded programs. It’s
strongly suggested to format USB device/ SD Card before use it as recorded file
storage.
iv.
WARNING! Please do not edit the “*.PLT” & “RECORD.TMP” files. Modifying/deleting
this file will cause error on recorded file.
12
English Manual
III.4. Watching Movies
The Mobile Media Player supports mpg, dat, vob,
and avi (MPEG4ASP, XVid, Div 4.0/5.0) format
video files. The section below will explain you how
to quickly play a video file stored on SD/MMC Card
or USB device.
1. After selecting movie playback mode on the
home screen, file browser screen will
appear. Press [OK] button to select the root
folder.
2. The available video files will appear on
screen. Use [CH+] and [CH-] buttons to
scroll up and down the files, then select the
desired file by pressing [OK] button.
NOTE: Users can only choose video files
under this mode. If users choose music or
photo files, the system will not support.
3. The video file will instantly start playing.
NOTE: Press the
(FR)/
(FF)
button to select next/previous movie. Long press
/
button to increase or decrease
the speed of track. Press the
(Play/Pause)
button to pause or resume movie playing.
III.5. Listening to Music
The Mobile Media Player supports mp3 and wav format audio files. The section below will
explain you how to quickly play a music file stored on SD/MMC Card or USB device.
1. After selecting music playback mode on the
home screen, file browser screen will
appear. Press [OK] button to select the root
folder.
13
English Manual
2. The available audio files will appear on
screen. Use [CH+] and [CH-] buttons to
scroll up and down the files, then select the
desired file by pressing the [OK] button.
NOTE: users can only choose music files
under this mode. If users choose video or
photo file, the system will not support.
3. The audio file will instantly start playing.
NOTE: Press the
(FR)/
(FF) button to select next/previous music. Long press
/
button to increase or decrease the speed of track. Press the
(Play/Pause) button to pause or resume music playing.
14
English Manual
III.6. Photo Viewing
The Mobile Media Player supports jpeg, bmp, and gif
picture files. The section below will explain you how
to view a picture file stored on the SD/MMC Card or
USB device.
1. After selecting photo viewing mode on the
home screen, file browser screen will appear.
Press [OK] button to select the root folder.
2. Available picture and folders will appear on
screen.
Use
[CH+]/[CH-]/[VOL+]/[VOL-]
buttons to browse the folder, then select the
desired one by pressing [OK] button.
Note: users can only choose photo files
under this mode. If users choose music
or video files, the system will not
support.
3. A picture preview will appear. Press
[CH+]/[CH-]/[VOL+]/[VOL-] to select a picture,
and press [OK] button to display the picture in
full screen mode.
NOTE: Press the
(FR)/
(FF) button
to select next/previous photo. Press the
(Play/Pause) button to pause or resume the
slideshow.
Advanced Functions
Rotating picture
Press [VOL+] button to rotate the picture clockwise, press [VOL-] button to rotate it
counterclockwise.
Slideshow
Press
(Play/Pause) to start/stop the photo slideshow.
Zoom
1. When viewing a picture, presses [OK] button to active the zoom function.
2. Press [OK] or
to zoom in.
3. Press
to zoom out.
4. Use [CH+]/[CH-]/[VOL+]/[VOL-] to navigate the picture.
5. Press [MENU] button to exit the zoom function.
15
English Manual
Technical Settings
III.7. System Settings
This is the system settings menu screen. Users
can adjust the country/language setting, the sound
setup, display, time, and proceed to a software
upgrade. Use [VOL+] and [VOL-] buttons to
highlight the desired item and press [OK] button to
select one.
IV.1.1. Display Settings
To set up the TV system (PAL, NTSC,
AUTO), the aspect ratio, adjust
brightness and to switch on/off the
auto backlight.
1. Press [CH+]/[CH-] buttons to highlight the
item you want to adjust.
2. Press [VOL+] button and use [CH+]/[CH-] to
scroll up and down the options.
3. Select one by pressing the [OK] button or
exit the setting by pressing the [MENU]
button.
4. After adjusting, press [MENU] button to exit
the “Display Settings”.
IV.1.3. Region & Language Settings
To set up the OSD language and DVBT regional settings.
1. Press [CH+]/[CH-] buttons to highlight the
item you want to adjust.
2. Press [VOL+] button and use [CH+]/[CH-] to
scroll up and down the options.
3. Select one by pressing the [OK] button or
exit the setting by pressing the [MENU]
button.
4. After adjusting, press [MENU] button to exit
the “Region & Language Settings”.
16
English Manual
IV.1.3. Sound Setup
To select a sound effect and set up the equalizer.
1.
2.
3.
4.
Press [CH+]/[CH-] buttons to highlight the item you want to adjust.
Press [VOL+] button and use [CH+]/[CH-] to scroll up and down the options.
Select one by pressing the [OK] button or exit the setting by pressing the [MENU] button.
After adjusting, press [MENU] button to exit the “Sound Setup”.
IV.1.4. Software Version and Upgrade
To upgrade the user interface software
version.
1. Insert the SD/MMC card containing the
software upgrade file into the card slot.
2. After entering the Version/Upgrade menu,
press [CH-] button until highlighting the
software upgrade function.
3. Press [OK] button to start the upgrade.
III.8. DVB-T TV/Radio Menu
After entering the DVB-T TV or Radio service, press
[MENU] button to make the menu appear. By
navigating the different options, you can have access
to the program list, the channel management, the
automatic channel search function, the DVB-T audio
settings, the channel info, the subtitle function, the
teletext, the antenna selection, and the parental lock.
IV.2.1. Program List
The display channel information, preview the program, and to access the
Electronic Program Guide (EPG)
1. Select “Program List” in the TV menu and
press [OK] button. The “Program List” will
appear on screen.
2. Press [CH+]/[CH-] buttons to scroll up/down the
channel list to preview the program.
3. Press [VOL+] button to show the details of the
channel.
4. Press [MENU] button to exit.
17
English Manual
IV.2.2. Channel Management
To rearrange and to edit the TV channel listing using skip, move, lock, and
delete functions.
1. Select “Channel Management” in the TV
Menu and press [OK] button. The
management screen will appear as on the
picture on the right.
2. Press [CH+]/[CH-] buttons to scroll up/down
the channel list. Press [OK] button to enter
the editing menu for a chosen channel.
3. Press [MENU] button to exit anytime.
Skip a Channel
1. After entering the channel editing menu, select the “SKIP” visual-button on screen by
pressing [VOL+]/[VOL-] buttons.
2. Press [OK] button to activate or deactivate it.
NOTE: this function “temporarily” removes the channel from the program list. Users can restore
the channels by deactivating the function.
Lock a Channel Access
1. After entering the channel editing menu, select “LOCK” visual-button on screen by
pressing [VOL+]/[VOL-] buttons.
2. Press [OK] button to activate or deactivate it.
NOTE: Users need to key passwords when they watch locked channels. Please refer to IV.2.9.
Parental Lock page 20 for further details.
Channel Movement
1. After entering the channel editing menu, select the “MOVE” visual-button on screen by
pressing [VOL+]/[VOL-] buttons.
2. Use [CH+]/[CH-] buttons to move the channel up or down in the list.
3. Press [OK] button to save the new listing.
Channel Delete
1. After entering the channel editing menu, select the
“DELETE” visual-button on screen by using
[VOL+]/[VOL-] buttons.
2. Press [OK] button to delete the channel.
NOTE: this function will “permanently” delete the channel
from the current program list. Users restore the channels
only by performing auto search.
18
English Manual
IV.2.3. Automatic Channel Search
To search the available channels
automatically.
1. Browse the TV menu screen using [CH+]/[CH]/[VOL+][VOL-] buttons to highlight the
automatic search option.
2. Press [OK] button to start the channel search.
IV.2.4. DVB-T Audio Settings
To select either master or secondary language as well as the audio channel of
current service.
1. Browse the TV menu screen using [CH+]/[CH-]/[VOL+]/[VOL-] buttons to highlight the
audio option. Press [OK] button to enter the audio menu.
2. Use [VOL+]/[VOL-] buttons to select stereo/left/right audio channel. Scroll the available
language using [CH+]/[CH-] buttons. Press [OK] button to select the language.
3. Press [MENU] key to exit.
IV.2.5. Channel Information
Provide the information of current service’s system parameters and signal
information.
1. Browse the TV menu screen using [CH+]/[CH]/[VOL+]/[VOL-] buttons to highlight the
channel information option.
2. Press [OK] button to display the channel
information.
3. Press [MENU] button to exit
IV.2.6. Antenna Selection
To choose to receive DVB-T broadcasting either via built-in antenna or external
antenna.
1. Browse the TV menu screen using [CH+]/[CH]/[VOL+]/[VOL-] buttons to highlight the
antenna selection option.
2. Press [OK] button to enter.
3. Press [VOL+] key to access the option-list.
4. Use [CH+]/[CH-] to scroll up/down. Press [OK]
button to select one option.
5. Press [MENU] key to exit.
19
English Manual
IV.2.7. Subtitle
To activate or deactivate the subtitle function.
IV.2.8. Teletext
To enter the teletext menu.
IV.2.9. Parental Lock
To set the password of the parental lock.
1. Browse the TV menu screen use [CH+]/[CH]/[VOL+]/[VOL-] buttons to highlight the
parental lock option.
2. Press [OK] button to enter the parental lock.
3. Press [VOL+] button to access the numerical
pad.
4. Use [CH+]/[CH-]/[VOL+]/[VOL-] buttons to
browse the on-screen-numerical-pad.
NOTE: the initial password is 0000
5. Select the appropriate password by pressing
[OK] button after each number.
6. Press [MENU] key to exit.
NOTE: parental lock only appears on locked channels. Please see IV.2.2. Channels
Management page 18 for further details about locked channels
20
English Manual
IV. Trouble Shooting Q&A
Most of the troubleshooting issues can be easily solved. The common cases and their
respective solutions are listed in the table below. If the problem persists, please contact the
after sales service.
Problem
Possible Reason
Solution
The battery is totally discharged.
Connect the unit to an external power
source to charge the battery.
The power cord is not properly
inserted into the unit.
Check the power lead connection.
When using the in-car power connector,
check if the power is available at the
socket.
The unit is not switched on.
Slide [POWER SWITCH] to “ON”
position.
The SD/MMC Card or USB device
is not properly inserted.
Check the SD/MMC Card or USB
device to ensure it is properly inserted
into unit.
The lock function has been
switched on.
Check the lock switch position and
unlock.
The number of available channels
is limited due to the local
broadcasting system. The available
channels can vary depending on
the area.
Perform “Auto Search” to rescan all the
channels.
The signal quality of some TV
channels is too low.
Use the external antenna to increase
the reception sensitivity. For indoor use,
place the antenna close to a window
and place it on high point.
Some TV channels are not
available.
Only the locally free broadcasted
channels can be viewed. They can
differ depending on the area.
Some TV channels signal quality is
too low.
Use the external antenna to increase
the reception sensitivity. For indoor use,
place the antenna close to a window
and place it on high point.
Wrong antenna is used.
Use only the external antenna provided
with this unit.
No DVB-T service is provided in the
area.
Check your country DVB-T coverage
map. It is not possible to watch digital
TV/listen to digital radio in non-covered
areas.
The audio volume is too low.
Press [VOL+] button to raise the
volume.
The audio is muted.
Press [MUTE] button to disable the
mute function.
The earphones are not connected
properly.
Check if the earphone plug is clean and
well inserted.
The device is located close to a
strong magnetic field.
Move the device to another location
and use it again.
No picture, no audio.
The device does not
respond.
In DVB-T mode, the
number of DVB-T
channels is not as much
as we expected.
In DVB-T mode, all of
the channels show “no
signal or random mosaic
tiles appear on the
display.”
The video is fine but
there is no sound.
21
English Manual
V. Specification
Display
3.5” Colour TFT-LCD
Resolution
320RGB(W)x240(H) pixels
Brightness
250 nits
Contrast Ratio
400:1
View Angle
120 (Horizontal)/105 (Vertical)
Antenna
UHF and VHF band reception
Built-in whip antenna
Support external antenna input
Speaker
Built-in 0.5 W/8 Ω
Media Support
SD(HC)/MMC Card up to 32GB
Mini USB (USB 2.0 supported)
User Interface
7 buttons: [CH+], [CH-], [VOL+], [VOL-], [OK], [MENU], [HOME]
Power button and hold switch
3 hot-keys: FF/Next, Play/Pause/REC, FR/Previous
A/V output, Earphone
OSD Language
English, German, French, Portuguese, Spanish, Italian, Dutch, Finnish
Features
DVB-T TV/Radio, Auto Channel Search, Multi–Language EPG, Channel
Preview, Teletext, Subtitle, TV/Radio Recording
Power Supply
5 V/ 1.4 A DC
Built-in rechargeable polymer lithium battery, 3.7 V/ 2000 mA
Operating Time
DVB-T TV/Radio operation: typical 3 hours
Video playback: typical 4 hours
Dimension
120 x 78 x 20 (mm)
Weight
200 g (including battery)
Media Format Supported
Audio Format: *.mp3, *.wav
Video Format: *.mpg, *.dat, *.vob, *.avi (MPEG4 ASP, XviD, DivX4.0/5.0)
Photo Format: *.jpg
Audio Recorded Format: *.mp3
Video Recorded Format: *.mpg
o
o
22
Radio Frequency Energy, Certifications
CE Statement, EMC Compatibilty
This device complies with EN Standards EN55022 and EN55024 according to the relevant EC EMC
Directive. It must be used with shielded cables only to maintain EMC compatibility.
Dieses Produkt entspricht den einschlägigen EMV Richtlinien der EU und darf nur zusammen mit
abgeschirmten Kabeln verwendet werden.
LINDY Herstellergarantie
LINDY gewährt für dieses Produkt über die gesetzliche Regelung hinaus eine zweijährige
Herstellergarantie ab Kaufdatum. Die detaillierten Bedingungen dieser Garantie finden Sie auf der
LINDY Website aufgelistet bei den AGBs.
WEEE (Waste of Electrical and Electronic Equipment),
Recycling of Electronic Products
In 2006 the European Union introduced regulations (WEEE) for the collection and recycling of all waste
electrical and electronic equipment. The wheelie bin symbol shown indicates that this product must not
be disposed of with household waste. Instead the product
product must be recycled in a manner that is
environmentally friendly. For more information on how to dispose of this product, please contact your
local recycling centre or your household waste disposal service. Each individual EU member state has
implemented the WEEE regulations into national law in slightly different ways. Please follow your
national law when you want to dispose of any electrical or electronic products.
More details can be obtained from your national WEEE recycling agency.
Germany / Deutschland
Die Europäische Union hat mit der WEEE Direktive umfassende Regelungen für die Verschrottung und
das Recycling von Elektro- und Elektronikprodukten geschaffen. Diese wurden von der Bundesregierung
im Elektro- und Elektronikgerätegesetz – ElektroG in deutsches Recht umgesetzt. Dieses Gesetz
verbietet vom 24.März 2006 an das Entsorgen von Elektro- und Elektronikgeräten über die
Hausmülltonne! Diese Geräte müssen den lokalen Sammelsystemen bzw. örtlichen Sammelstellen
zugeführt werden! Dort werden sie kostenlos entgegen genommen. Die Kosten für den weiteren
Recyclingprozess übernimmt die Gesamtheit der Gerätehersteller.
LINDY No 42770
1st Edition, October 2009
www.lindy.com