1
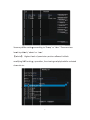
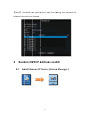
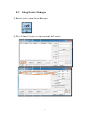
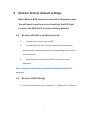
BavonoNVRQuickGuide
TableofContents
BavonoNVRQuickGuide..................................................................................................................1
1 DefaultIP...................................................................................................................................2
2 NVRusernameandpassword...................................................................................................2
2.1 Defaultusernameandpassword.....................................................................................2
2.2 Addnewusersandpermissionsettings...........................................................................2
3 BavonoNVRIPaddresssearch..................................................................................................4
3.1 InstallBavonoIPDevice(DeviceManager)......................................................................4
3.2 UsingDeviceManager.....................................................................................................5
4 Restorefactorydefaultsettings................................................................................................6
4.1 Restoredefaultaccountpassword....................................................................................6
4.2 RestoreNVRSettings.........................................................................................................6
5 AddingIPcamerastoBavonoNVR............................................................................................9
5.1 AddingBavonoIPCameras.............................................................................................10
5.2 AddingIPcamerasofotherbrands.................................................................................15
6 Localrecordingstatus.............................................................................................................16
6.1 Monitoringstatus............................................................................................................17
6.2 Recordingsettings...........................................................................................................17
7 Localplayback.........................................................................................................................20
8 Localbackup............................................................................................................................22
9 DDNSSettings.........................................................................................................................24
9.1 NVRIPaddresssettings...................................................................................................24
9.2 NVRportforwarding.......................................................................................................26
9.3 NVRDDNSactivation.......................................................................................................26
10 Accessviamobileapp.............................................................................................................27
10.1Connectviadomainname..............................................................................................27
10.2Connectviacloudnetworking.........................................................................................28
11 RemoteMonitoringviaIE.......................................................................................................31
1
Bavo
onoNV
VRQu
uickG
Guide
1 DefaaultIP
ThedefaaultIPadd
dressis:1192.168.1.9
Rusern
nameaandpaassworrd
2 NVR
2
2.1 De
efaultussername
eandpa
assword
d
Thedefaaultusern
nameis‘ad
dmin’,bydefaultth
hereisno password
d.
2
2.2 Ad
ddnewu
usersan
ndperm
missionssettingss
Goto‘M
MainMenu’Æ‘Advvanced’Æ
Æ‘Account’
2
You
umaydefiinesettinggsaccordingto‘Gro
oup’or‘Usser’.Thereearetwo
leveelsbydefaault;‘adm
min’or‘useer’.
Ǐaadminǐ˖Highestle
evelofperrmission;aactionsalllowedincllude
mo
odifyingNV
VRsettinggs,operatiion,liveviewingand
dplaybackkforseleccted
chaannelsetc.
3
Ǐu
userǐ˖Standardusserpermisssions;on
nlylivevie
ewinganddplaybackkfor
seleectedchannelsareallowed. 3 Bavo
onoNV
VRIPaaddressssearrch
3
3.1 InsstallBav
vonoIPDevice(Device
eManagger)
4
3
3.2 UssingDev
viceMan
nager
1)D
Doubleclicktoopen
nDeviceM
Manager
2)C
Click‘IPSeearch’buttontorunnautomatticNVRsearch
5
4 Restorefactorydefaultsettings
Note:BavonoNVRcannotberestoredviahardwarereset.
YouwillneedtoperformaresetlocallyattheNVRhost
oraccesstheNVRviaIEtorestorefactorydefaults.
4.1
Restoredefaultaccountpassword
1˅
ProvidethecurrenttimeofNVR 2˅
Accordingtothetimeyouprovided,technicalsupport
personnelwillprovideyouwithacorrespondingresetcodeto
resetpassword
3˅
EntertheresetcodeattheNVRtorestoreorreset
password
Note:Passwordresetprocessmustbecompletedwithin30
minutes
4.2
RestoreNVRSettings
1˅Atthelocalmachine,goto‘Settings’Æ‘Advanced’Æ‘Restore’ 6
7
2˅Onceyou
uhavegaiinedaccessstoNVRviaIE,gotto‘Device
ecfg’
Æ
Æ‘Advance
ed’Æ‘Deefault’ 8
5 AddiingIPcamerrastoB
BavonoNVR
R
Ć
ĆNote1˖IPaddrressofNV
VRandIPa
addressofIPcamerramust
PaddressoofNVRha
as
belonggtothesamesubneet.PleaseensureIP
beenp
properlyco
onfigured priortoa
addingIPcameras. Ć
ĆNote2˖ThedefaultconffigurationmodeofNVRism
manualmo
ode,
ommendeedmode.
whichiisthereco
9
AutoconnnectedMode::IPcameraadd
dresswill
beassignnedautomatica
ally.Notrecomm
mended.
Manual Mode:manualconfigurationo
ofIP
cameraaaddress;whichisunaffectedb
byNVR.
Recomm
mendedmode.
5
5.1
Ad
ddingBa
avonoIP
PCamerras
55.1.1Add
dBavonocameram
manuallyy(singleccamera)
1.Doubleclickseelectedchanne
eltoenterchannelsettingswinndow
10
2.Se
elect‘Enable’th
henclick‘Add’
N
Notethefollowingdefaultsettiings˖
1 ˅DeviceType˖IPC
2 ˅Protocol˖NETIP
3 ˅Port˖34567
7
4 ˅Bydefaultthe
ereisnopassw
word;can
leeavethisblank.
4.Doublleclickthedeviiceyou
wishtoa
add
3.Click‘Search’
5.Click‘OK’
11
6.Se
electthedeviceeyouwishtoad
dd
7.Click‘OK’tocomplete
5.1.2Add
dgroupo
ofIPcameeras(multiplecam
meras)
1˅AddIPcam
merasbygrroup
12
Placemousseoveranycha
annelandclick‘+’
2.Click‘Search’tofind
dallIPcameras withinthesam
menetworkwith
hconfiguredIPaddresses.
13
3.Click‘Quicckset’toaddccamerastoselecctedNVRchannnel. Notte:When cameras areaddeddtoaNV
VRchannelviaQuic kset,the
elist
of ccameras will
w appeaar in randoom order.. If the cameras aree required
d to
bearrangedinaparticcularordeer,followtthestepsb
below. 3.Click‘AAdd’tocomplette
2.SeelecttheIPcamerayouwishtooadd
1.SeelectNVRchann
nel
14
5
5.2
Ad
ddingIP
Pcamera
asofoth
herbran
nds
BavvonoNVRsupportsotherIPccamerabrands,butonlylimittedto
cam
meraswith
hONVIF2.0supporrt.
Stepstoaddcamerasaarethesaameas5.1
1.1,excepttthatProttocolmust
bechangedttoONVIF.
15
Note:SelectON
NVIFforprotoccol
Note:E
Entertheusernaame
andpassswordoftheIP
camera
a
Selectthedeevicethenclick‘OK’
6 Locaalrecordingsstatus
TThe follow
wing explaains how to determ
mine whetther or n ot an NVR is
rrecordingnormally,andhow toconfigu
urethereccordingseettings. 16
6
6.1
Mo
onitorin
ngstatuss
Norrecordingsym
mbol
indiccatesnorecoording
istakingplace.
Thereccordingsymbbol
indicattesrecording is
takingplace.
Reccordingstatus
If
symbolappearsattheboottomrigh
htcorner,recordinggistaking
place.
Ifth
hereisno
sym
mbolattheebottomrrightcorner,norecoordingis
takingplace.
6
6.2
Re
ecording
gsettinggs
6.22.1Operaationsettings
Un
nlessotheerwisereq
questedbyyclienttoconfigure
escheduleedrecording,
th
hedefaultrecordinggmodewi llbe‘Man
nual’.
17
onfiguratio
on
Reccordingco
ǏSScheduleǐ
ǐRecordin
ngwilltakkeplaceacccordingtocustomiizedsettin
ngs
ofeeachchan
nnel(cand
defineattrributesinccludingtim
me,motio ndetectio
on,
and
dalarm).
18
ǏManualǐForchannelswith‘Manual’selected,recordingwilltakeplace
ona24hourongoingbasis. ǏStopǐNorecordingwilltakeplaceforchannelswith‘Stop’selected.
6.2.2StreamingSettings
IPcameramustbesuccessfullyaddedpriortoconfiguringstreaming
settings.Stepsareasfollows:
19
ƾWhenVBR((variablebitratte)isselected,‘BitRate’
fieldbecomessnonselectable
e
ƾWhenCBR((constantbitra
ate)isselected,‘BitRate’
fieldisselectaable.
ĆRecommenndedsettingsfo
orrecording˖
1.
BitRateeType:CBR(constantbitrate)
2.
BitRatee:2048kbps
7 Locaalplayb
back
1)R
Rightclickkanywherreonthe screento
olaunchm
menu,seleect‘Playbaack’
assshownbelow:
22)The‘Plaayback’scrreenshow
wnbeloww
willappea
ar:
20
Selectdate,cam
S
mera,andclickthesearchbuttton
Notte:
wrepresentsmanuaalrecordin
ng
Yellow
Green
nrepresen
ntsscheduuledrecorrding
Greyrepresenttsnorecording
3)V
Videofoottagethatccorresponndstothefiltercrite
eriawillapppearon
Playybackscreeen,asshownbelow
w: 21
8 Locaalbackkup
Notte:USBstoragedevvicewithssufficientsstorageca
apacitymuustbe
pro
operlyinseertedpriortoperforrmingbacckup.
11)Goto‘M
MainMenu
u’Æ‘Recoord’Æ‘Baackup’
22
22)OnceUSSBstorage
edevicehhasbeend
detected,cclick‘Backkup’butto
on 33)Selectcchannel,tiime,andcclick‘Add’’.Whenth
hecorrespponding
d
documenttappearaasselectedd(indicate
edbythettick),clickk‘Start’.
!
23
4)Progrressbarap
ppearsduuringbackup
5))Oncebacckupiscom
mpleted,iinstallthe
emediaplayersoftw
warethat
omeswith
hthebackupfile.Onnceinstalled,youm
mayplaythhebackup
pfile
co
withthismeediaplaye
er.
9 DDN
NSSetttings
9
9.1
NV
VRIPad
ddressse
ettings
1)G
Goto‘MainMenu’Æ
Æ’System
m’Æ‘Netw
work’toconfigureIIPaddresss
24
and
dportnum
mber.
25
9.2
NVRportforwarding
PortforwardingfortwoportsoftheNVRisrequired(HTTPPort:80˗
MediaPort:34567)
9.3
NVRDDNSactivation
1)Inthisexample,wewilluseCN99DDNSservice.Visit3322.org (http://www.3322.org)toregisteradomainname.DŽ
2)Goto‘Settings’Æ‘SystemÆ‘Network’,doubleclick‘DDNS’,enterthe
domainnameyouregistered.
26
10 Accessviamobileapp
Belowareinstructionsforinstallingandusingthemobileappon
iOSorAndroidsystems.
AppforiOS/Android:vMEyeCloudDŽ
DŽ
10.1 Connectviadomainname
Toallowaccessfromanexternalnetwork,itisnecessarytohavea
correctIPaddress,theappropriateportforwarded(mediaport:
34567),andDDNSsetupperformed.
27
10.2 Connectviacloudnetworking
Toallowaccessviacloudnetworking,firstofallyouwillneedtoensure
that the IP address settings are correct to enable internet access. Next
youwillneedtoobtainthecloudnetworkingserialnumberbyscanning
the serial number QR code at the NVR launch guide or by looking up
systemdetails.
Select‘CloudEnable’,thenclick‘Next’.
28
ScantheeSNQRco
ode. OR
Rgoto‘MainMenu
u’Æ‘Systeem’Æ‘Info’Æ‘Version’,anddlookforthe
seerialnumb
ber
29
Note:iP
Phone–yo
oumayennterthese
erialnumb
berbydireectly
sccanningth
heQRcode
Android–Q
QRcodem
mustbeen
nteredmanually
ForiOSdevicesˈclickhere
andscanQRcod
de
30
11
1 Rem
moteM
MonitorringviaIE
Rem
motemon
nitoringviaaabrowserwillbeenabledo
oncetheN
NVRhostiis
swiitchedon..
1)Open
nInternetExplorer
2)EnterrtheIPad
ddressorddomainnaameofthe
eNVRhosstatthe
addresssbar,assh
hownbeloow: Upo
onopenin
ngthepagge,apopu pmessagewillappearprompptingthe
useertodown
nloadActiveXcontrrol.InstallActiveXco
ontroltoccontinue.
Notte: You will
w need to
t downlooad ActiveX contro
ol when cconnectingg to
NVR for the first time
e. Please modify IEE settings to allow download
d of
nectedto theInternet,
unssignedActtiveXconttrols.Ifthhecomputterisconn
pleasedownloadActivveXcontroolmanually.
31
3)EEnteruserrnameand
dpassworrdofNVRhost
4))Click‘Loggin’,for‘BitRateTyype’selectt‘Connectallvideo (Main
wing,clickk‘OK’tola
aunchlivemonitoring
Sttream)’forbetterqualityview
sccreen.
32
5)TToviewplaybackoffaspecificcsceneviaaIE,click‘‘Playback’’toopen
seaarchcriteria,asshow
wnbelow :
Enttersearchcriteria,cclick‘Searcch’toope
en‘Playback’screenn,selectfile,
theenclick‘Play’toview
wplaybacck.
33
6)C
Click‘Dow
wnload’tobackupplaybackviideofoota
age.
Videoformatt˖H.264/AVI
Selectpathttosavefile
34
ListofIncludedAccessories
Accessory
Qty(pcs)
Mouse
1
Poweradaptor
1
ScrewsforHDD
1
CD(usermanual)
1
35
Model
BVN1004
BVN2016
BVN1008
BVN4032
BVN8032
Product Image
Main Processor
System
Industrial embedded micro-controller
embedded Linux
Operating System
Display
Synchronous multi-channel recording, single-channel playback, multi-channel multi-user remote access, USB backup
—
System Resources
support 16-bit true color graphical menu interface and mouse operation
Operating Interface
Display
1/4/9(8ch)/16
1/4/9
1/4
1/4/8/16/24/32
PAL,NTSC
Video Standard
PAL(625line,50f/s);NTSC(525line,60f/s)
H.264(High Profile)
Video Compression
Video
monitor:D1,VGA/HDMI: HD
Output
Playback
Input
VGA/HDMI: HD
1080P/D1
1080P/720P/960H/D1/HD1/CIF/QCIF
3M/1080P/720P
4*1080P/8*D1
8*1080P/8*720P/16*D1
4*3M/8*1080P/16*720P
5M/3M/1080P/720P
Motion Detection
Audio
Recording &
Playback
Support
Audio Compression
—
G.711A
Two-way Audio
—
Support
Manual > Alarm > Motion Detection > Timer
Recording Mode
Local Playback
1080P (1/2 ch) / 720P (4ch)
1080P (1ch) / D1 (4ch)
5M (2ch) / 3M (4ch) / 1080P (4ch) / 960P (8ch)
3M (1ch) / 1080P (2ch) / 720P (4ch)
Search Mode
Disk Usage
Time, Calendar, Events, Channel
—
Interfaces
Video: CIF: 4~5G per day per channel / D1: 8~10G per day per channel
Video: CIF: 4~5G per day per channel / D1: 8~20G per day per channel
960H: 12~20G per day per channel / 720P: 24~30G per day per channel
960H: 12~30G per day per channel / 720P: 20~50G per day per channel
1080P: 40G per day per channel / Audio: 691.2M per day per channel
Storage
Local HDD, Network
Backup
Network, USB drive, USB writer
Video Input
Video Output
Audio Input
RJ45
1ch BNC, 1ch VGA, 1ch HDMI
1ch VGA,1ch HDMI
—
960H: 12~20G per day per channel / 720P: 24~30G per day per channel
1080P: 40G per day per channel / Audio: 691.2M per day per channel
1ch RCA
1ch RCA
Alarm Input
—
16ch
Alarm Output
—
4ch
Network
PTZ control
1 RJ45 10M/100M adaptive Ethernet interfaces
1 RJ45 10M/100M/1000M adaptive Ethernet interfaces
1 RS485 port, support multiple PTZ protocols
1 RS485 port, 1 RS232 port, support multiple PTZ protocols
2 interfaces
USB
HDD
2 SATA interface (up to 4TB per HDD)
1 SATA interface (up to 4TB per HDD)
Dimensions
8 SATA interface (up to 4TB per HDD), 1 eSATA interface
3G, WIFI (via USB)
Support
ONVIF
Power Supply
4 SATA interface (up to 4TB per HDD), 1 eSATA interface
—
Wireless
General
Video: CIF: 4~5G per day per channel / D1: 8~10G per day per channel
1080P: 40~100G per day per channel / Audio: 691.2M per day per channel
—
Audio Output
Interfaces
5M/3M/1080P/720P
8*5M/16*3M/24*1080P/32*960P
12V/2A
255mm(L)* 225mm(W)* 45mm(S)
12V/4A
350mm(L)* 295mm(W)* 45mm(S)
12V/6A
ATX power for DVR
440mm(L)* 345mm(W)* 60mm(S)
442mm(L)* 430mm(W)* 91mm(S)