1
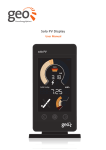
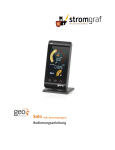
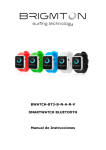
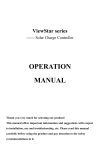
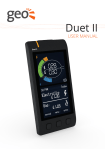
GreenEnergyOptions
Solo PV Display
User Manual
Introduction
We would like to thank you for buying the
Solo PV which is designed to show you how
much electricity your solar panels are
generating. This manual explains how to
set up and use your Solo PV.
The Solo PV gives you lots of visual
feedback on the energy you are
generating and the money and carbon you
are saving in comparison with using
electricity from the grid.
The Solo PV is designed to help you learn
about the electricity that you are
generating, and to spot the best times to
use your energy hungry appliances.
The data shown on the Display is live, so
you can see instantly how much electricity
you are generating from your solar panels.
This will help you to reduce your CO2
output and save money.
The next few pages tell you how to install
and get the best out of your Solo PV.
Safety Notice
It is important to observe some simple
safety precautions when using this product.
Please read this important information
before continuing. Safe operation of the
Solo PV is impaired if used in a manner not
specified by the manufacturer.
The Solo PV product is designed to
be installed simply without the need for a
qualified electrical installer. There is no
need to open fuse boxes, connect or
disconnect any cabling. It is designed to
be used inside a suitable building or
meter cabinet.
Do not fit rechargeable batteries.
When fitting the LED Reader, ensure the
meter connection is clear of debris and is
not perished in any way (cracked or burned) or
page 2
wet. If you have any doubts about its
condition, do not install the LED Reader,
contact your solar panel installer.
For use in dry environments only. Keep
the Solo PV away from water and other
liquids. Disconnect before cleaning and
do not immerse in water or other liquids.
Please contact Green Energy Options if
any components appear damaged or
faulty (contact details are at the back of
this manual).
To protect the environment, this
product and its batteries must be disposed
of safely at the end of their life. Please take
to a recycling centre for safe disposal.
RoHS compliant.
CE approved. For use within the EU.
Solo PV Display User Manual
Contents
Solo PV Installed
What’s in the Box?
Power Supply
Solo PV Display
Transmitter
LED Reader
Alkaline AA batteries
Display Stand
SD Card
My Energy
Display Overview
Installation Guide
Step 1 - Display
Step 2 - Transmitter
Step 3 - LED Reader
Step 4 - LED Reader & Transmitter
Step 5 - Confirming Connection
4
5
5
5
5
5
5
5
5
5
6-7
8 - 10
8
8
9
9
10
Settings
11 - 13
MyEnergy Online Service
14
Settings Overview
Setting the Year, Time & Date
Setting the Currency
Setting the Tariff
Setting the Array
Setting the Display Power Down
Setting the On & Off Display
Setting the Pulse
Uploading to MyEnergy
Step 1 - Login
Step 2 - Download
Step 3 - Upload
Step 4 - View
11
12
12
13
13
13
13
13
15 - 17
15
16
16 - 17
17
Troubleshooting
18 - 20
Speedometer Segments
21
Generation Meters
22
Technical Specifications
23
Legal Information
23
Contact us
24
MAN-SO-005
Solo PV Display User Manual
page 3
Solo PV Installed
The Solo PV enables you to visibly see
how much electricty your installed solar
panels are generating. The Transmitter’s
sensor takes the reading from the
generation meter, connected to your
inverter, and transmits it to the Solo PV
Display wirelessly. The data collected is
stored on an SD memory card, which you
can use to analyse your data Online, using
the free MyEnergy Online Service.
Solar Panels
MyEnergy
Online Service
Inverter
Zigbee
Zigbee
Generation Meter
LED Reader
page 4
Transmitter
Solo PV Display
Solo PV Display User Manual
What’s in the Box?
Solo PV Display
Transmitter
Power Supply
LED Reader
Display Stand
Alkaline AA batteries
SD Card
Power Supply
Please do not use any other supply to
power the Display.
Display
The Display shows the amount of electricty
generated. It receives a wireless signal
from the Transmitter unit. The Display is
mains powered and can be mounted on
the Display stand.
Transmitter
The Transmitter unit will sit next to your
existing generation meter and sends the
readings to the Display. The Transmitter is
powered by 3 X Alkaline AA batteries and
has already been pre-paired with the
Display.
Solo PV Display User Manual
LED Reader
The LED Reader will work with any
generation meter with a visible pulse
output (you will be able to find the pulse
output on the face of your meter).
SD Card
The SD card included is already inserted into
the top of the Display. This memory card is
used to store the generation data and
allows the user to upload this data to
MyEnergy Online Service (see page 14).
page 5
Display Overview
Left button
Used to navigate through the units of measurement
(when in settings mode, use this button to decrease
the value - see page 11).
Middle (Set) button
Used to navigate through the history: (L1) = Yesterday
(L7) = Last 7 days, (MR) = Total gereration since
installation. To enter the settings menu, press and hold
the button for 3 - 5 secounds.
Right button
Used to navigate through the units of measurement
(when in settings mode, use this button to increase the
value - see page 11).
page 6
Solo PV Display User Manual
Transmitter battery life
This will flash to indicate that the Transmitter’s batteries
are running low and will need replacing.
Speedometer
This gives a graphical view of the amount of electricity
your solar panels are generating.
PV array size indicator
This will display the solar panel size that has been
selected to match your installed system:
1 bar = 2kW, 2 bar = 3kW or 3 bar = 4kW.
Units of measurement: /CO2/kW
You can select what you want to view on the Display:
= Earnings per hour,
= CO2 per hour,
= Kilowatt,
= Kilowatt hour.
Current generation
This is a numerical version of the speedometer indicating
how much electricity is currently being generated.
Communications Icon
This indicates that the Display is paired and connected to
the Transmitter. If the is flashing see page 18.
Total use
This shows the history of generation, earnings and CO2
for today, yesterday and the last 7 days or only the total
generation since installation.
Outer & Inner gauge
The Outer gauge is a graphical view of today’s
generation, e.g. if you have selected a 2kW PV array the
outer dial will show up to 16kWh of possible generation,
for a 3kW PV array 24kWh, for a 4kW PV array 32kWh.
The inner gauge is the target, and is set to 50% of what
we expect your solar panels to generate.
Tick
The Tick is displayed when it is currently the best time for
you to turn on your main appliances (750W or above) as
sufficient electricity is now being generated.
Solo PV Display User Manual
page 7
Installation Guide
The instructions below show you how to
set up your Solo PV, which has already been
paired to the Transmitter at the factory.
Step 1 - Display
1. Begin the set-up by powering up the
Display with the power supply provided
the Display will show the software version
then ‘Card in’ screen followed by the
main screen.
1
2. Hold the middle (Set) button in for
three to four seconds until ‘Set Year’ is
displayed. You can now set up your Display
by following the steps show on page 12 & 13.
2
Step 2 - Transmitter
1. Open the unit by pressing the button
and pulling the outer cover away from
the bottom.
3. The green light will flash to show that
the batteries are working.
2. Remove the battery tab from
the Transmitter.
2
1
MAC : 00 00BC00 0B0 1 0 DA0
SN : 000000000 000 00
3
page 8
Solo PV Display User Manual
Step 3 - LED Reader
3. Place the LED Reader over the velcro
circle on the generation meter, ensuring
that the GEO logo is facing you.
1. Find the pulse output on the
generation meter.
2. Stick the velcro circle over the pulse
output on the generation meter.
1
2
3
Step 4 - LED Reader & Transmitter
1. Ensure the LED Reader is firmly
connected to the Transmitter, sometimes
requiring a second push to make
a connection.
Solo PV Display User Manual
page 9
Step 5 – Confirming Connection
1. On the Display, the will now be on
(this could take up to two minutes), otherwise please refer to the troubleshooting
section (see page 18). The shows that
the Display is communicating with
the Transmitter.
Note: We strongly recommend that you
only power up the Display using the
power supply provided.
1
Congratulations, the Display is
successfully set up and ready to use.
page 10
Solo PV Display User Manual
Settings Overview
Below is an overview of all the settings that
can be set on the Solo PV. This is done by
pressing and holding the middle button
until you see the words ‘Set Year’ and the
year starts to flash. Pressing the middle
button will then cycle you through each
setting screen as displayed below.
Set Array
Set Power Down
Set Year
Set Display On
Set Month
Set Display Off
Set Day
Set Pulse
Set Hour
Set Minute
Set Currency
Set Tariff
Solo PV Display User Manual
Use the & buttons to set the current
menu settings.
page 11
Setting the Year, Month, Day, Hour & Minute:
Press and hold the middle button for 3
seconds to enter the settings menu.
When the year starts to flash you can use
the & to set the correct year.
Press the middle button:
Use the & to set the correct month.
Press the middle button:
Use the & to set the correct day.
Press the middle button:
Use the & to set the correct hour.
Press the middle button:
Use the & to set the correct minute.
Setting the Currency:
Press the middle button:
Use the & to set the correct
currency Kr > $ > £ > €.
page 12
Solo PV Display User Manual
Setting the Tariff:
Press the middle button:
Use the
& to set the correct tariff.
This will be the feed in tariff (FIT) that
applies to your installation.
Setting the Array:
Press the middle button:
Use the
&
to set the array to the
nearest kW matching your installation:
2, 3 or 4 kW.
Setting the Display Power Down:
Press the middle button:
Use the & to set the power down to ‘OFF’,
which means that the screen will be on all of
the time or select ‘1min’ which turns off the
Display screen after 1 minute or ‘2min’ which
turns off the Display screen after 2 minutes.
Setting the On & Off Display:
Press the middle button:
Use the & to set the time at which you
want the Display to come on.
Then press the middle button:
Use the & to set the time you wish the
display to turn off.
Note: if the Display power down is set, this
function will be invalid.
Setting the Pulse:
Press the middle button:
Use the & to set the correct pulse rate.
This will be displayed on your meter and will
typically be 1000 impulses. If in doubt, locate
your generation meter and match the Solo
PV Display pulse rate with the meter pulse
rate for accurate readings.
Solo PV Display User Manual
page 13
MyEnergy Online Service
Upload the data from your Solo PV Display
to your own webpage to see all your solar
generation information. For free you will
be able to view, day by day, all of your
generation information plus how much you
have been earning through the Feed in
Tariff and how much carbon you have
saved by making your own electricity. The
website even allows you to drill down into
a single day to see the pattern of
generation over the course of that day.
You can use the uploader tool to upload
your generation data, which the display
stores on its SD card, to our secure servers.
Once uploaded you will be able to see
graphical information for kWh’s generated,
money earned and carbon saved.
The top section shows activity over the
year – the slider window selects a 14 day
period to display the information
graphically below it. Click on a day within
the graph and that days’ data is shown in a
box in the bottom right of the screen.
Hover over the kWh, £ or CO2 icons to see
cumulative totals since the Solo was
installed and recording data. All data is
available for download into an excel
spreadsheet if needed.
SD Card:
Before trying to upload any data, ensure
that you have the SD card installed
correctly. It will say “Card In” on the main
display when inserted correctly and “Card
Out” when removed. This can be done by
pushing down on the card and releasing so
that the card pops out.
page 14
Solo PV Display User Manual
Uploading to MyEnergy
STEP 1 - Login
1. Enter the following URL in the Browser
address bar:
www.fromgeo.eu/pv
2. The Home Login page will then be
shown. Enter the Serial ID and Password
found on the back of the Solo PV.
www.fromgeo.eu/pv
www.fromgeo.eu/pv
XXXSFX4X
XXXSFX4X
www9w99w
www9w99w
3. Once logged in you will see the Terms
and Conditions screen. Read and tick to
confirm“ I have read and agree to the terms
and conditions” and continue.
4. You will now be taken to the welcome
screen. The Data Window will be greyed
out as there has not been any data
uploaded yet.
Solo PV Display User Manual
page 15
STEP 2 - Download
1. Select the Data Uploader button to
start the procedure of installing the SD
Uploader tool.
2. First of all download Adobe AIR, the
uploader needs this to run the program.
Download for free at:
http://get.adobe.com/air/
3. Now download the SD uploader tool
from here: GEO SD Uploader. Choose the
location to save the downloaded program.
Once downloaded run the program.
4. When the GEO SD Uploader program
starts you are prompted to insert your SD
card into your computer.
STEP 3 - Upload
1. Once the card is inserted you will be
asked to enter your login details, which
can be found on the back of your Solo
PV Display.
page 16
Solo PV Display User Manual
2. When data files are found on the SD
card you will be prompted with a message
to start the upload.
3. Select “Start upload” to begin the
upload. When the upload is complete you
will see the following message.
STEP 4 - View
1. Log back into (if not still logged in)
www.fromgeo.eu/pv and the Data
Window should now be active. Press the
data window button to view the
energy generated.
2. The following buttons can provide
extra information about the electricity
you generate:
kWh
Electricity you have produced
that day.
The amount you generated in £’s.
The amount of Carbon you would
have used if pulled from the grid.
The ability to download and save
daily totals or daily breakdowns into
a CSV fomat.
Solo PV Display User Manual
page 17
Troubleshooting
Q. The icon is flashing or is not lit.
A. The icon will flash if the Display and
Transmitter are unable to communicate
for over 20 seconds. The Solo PV is
designed to operate within a range of 30m
with two walls in between the Transmitter
and Display.
This range will vary depending on the
construction of your property. If you
suspect range is causing a problem, try
moving the Display and Transmitter closer
together. Communication should resume
within 2 minutes. Other reasons for the
units not communicating are:
• There is radio interference. Try moving
the Display to a different location or
follow the re-pairing process below. This
process will change the channel that the
Solo PV operates on, isolating it from
interference from other radio/
wireless devices.
• The Transmitter is inside a metal meter
cabinet. Radio communication does not
work as well through metal so you will
have to move the Display closer, or
preferably mount the Transmitter
outside the metal cabinet.
Q. How do I re-pair the Display with the
Transmitter?
A. Following the steps below to re-pair the
Transmitter with the Display will prompt a
scan for available channels and if
necessary update the channel it is
currently operating on. This will resolve
many interference based
communication problems:
page 18
1. With the Solo PV Display turned on
and displaying the main screen, press
and hold the Pair button on the back
until the NET LEFT message is displayed.
2. Press the middle (Set) button to
return to the main screen.
middle (Set) button
3. Now get the Transmitter, remove the
lid and take out one battery.
4. On the Display, press the Pair button
on the back (this time just a short press,
you do not want to see NET LEFT). You
should see a ‘pairing’ screen with the
channel indicated at the top.
5. While the ‘pairing’ screen counts
round, press and hold the Pair button on
the Transmitter (small, brown button
next to the green light mentioned in
Step 2 on page 8) and put the battery
back in. Keep the button held in for 2
seconds. The green light next to the
pairing button should flash. Wait for a
couple of seconds and the Display will
show a ‘Pair’ screen with a Tick.
Solo PV Display User Manual
6. Once paired, press the middle (Set)
button to return to the main screen.
Within 2 minutes the should light up.
7. If the pair ‘X’ screen appears you
have not managed to pair in the time
allocated - simply press the middle (Set)
button and go back to step 1.
Q. The icon is on but the Display is still
not receiving information.
A. Ensure that the LED Reader is placed
correctly over the Pulse output and
securely fastened using the Velcro,
ensuring that the GEO logo is facing you
(as shown in the picture below).
Q. The screen Display has turned off,
what has caused this?
A. If you have fitted batteries in the Display
they may have gone flat. Please ensure
that the Solo PV is running only with the
supplied mains power lead. All batteries
should be removed from the Display.
• The screen may be set to ‘Power
Down’ after 1 or 2 minutes. This setting
can be turned off (see page 13).
• The Display On/Off time may be set
to be off at the present time. This setting
can be adjusted (see page 13).
Q. Can I use the Solo PV’s generation
information to give to my energy suppliers?
A. If you provide your electricity supplier
with readings, please use your generation
meter readings.
Q. I want to move the unit to another
property, how do I erase the data?
Q. Why is the Battery symbol flashing?
A. We expect the Transmitter batteries to
last for at least one year. Towards the end
of their life the battery symbol will flash to
let you know to replace them. Please
ensure you replace batteries with Alkaline
AA batteries (LR6). Do not use
rechargeable batteries.
A. If you want to reset the Solo PV and
erase all generation data and tariffs,
disconnect the Display from the power
supply. Press and hold the Pair button on
the back of the display while you re-plug in
the power supply until you see the
MEMCLR message, then let go of the
button. It can take up to 2 minutes to clear
all of the memory, after this time the main
screen will return.
Q. Can I power the Display using batteries?
A. Yes, however we strongly recomend
you only use the power supply provided.
Q. Can I use more than one Display?
A. No, this is not possible at the moment.
Solo PV Display User Manual
page 19
Q. What do I need to do if I have entered
the wrong date during setup and
continued using my Solo PV?
A. If you have entered the incorrect date
you will have to erase all data that has
been recorded onto the SD card. You
should remove the SD card from the Solo
PV and then change the date on the Solo
PV Display. Then insert the SD card into
your computer (either using the SD port or
a card reader) and erase all the data that is
stored on the card. You can now insert the
SD card back into the Solo PV.
Q. What if I cannot locate my address bar
in my web browser?
A. If you are having trouble typing in the
URL www.fromgeo.eu/pv into the address
bar of your web browser you can do a
Google search with the following:
www.fromgeo.eu. This will take you to a
holding page like below where you can
select the Solo PV button to proceed.
If this message is displayed then you will
need to contact the Helpline (08455 198
524) to unlock your account. Your data will
not be lost in doing so.
Q. Where do I find my Login Details?
A. On the back of the Display you will find
your Serial ID and Password. This is what
is used to Login to www.fromgeo.eu/pv
and to upload data using the SD
uploader tool.
Q. What is the USB port used for on the
back of the Solo PV?
www.greenenergyoptions.co.uk
4 x 1.5V AA CELLS
A. This is used by Green Energy Options to
diagnose and upgrade the Solo PV.
Q. What is the icon used for (top left of
the Display)?
Q. What if I am locked out of my account?
A. The login gives you 5 attempts to enter
your correct login details. If you go over
this you will see the following message:
login
There have been too many unsuccessful login attempts made, please
contact support to unlock this account
A. This is not used on the Solo PV and
therefore will not light up or flash.
page 20
Solo PV Display User Manual
Speedometer Segments
Each segment of the Speedometer will
light up when the generation exceeds the
value as shown below. The segments on
the Speedometer have different values
depending on the size of your array. The
images below show three figures; the first
shows the value for a 2kW array, the
second shows 3kW and the third a 4kW
array. You can set the size of your array
using the instructions on page 7.
2kW: Array size
Each segment of the speedometer will
light up when the generation exceeds
the values shown. When
is selected
the segments are:
0 to 1555 kW
1620 to 1945 kW
2010 to 2200 kW
N/A
N/A
N/
A
w.greenenergyoptions.co.uk
3kW:
Array size
4 x 1.5V AA
CELLS
Each segment of the speedometer will
light up when the generation exceeds
the values shown. When
is selected
the segments are:
0 to 2330 kW
2430 to 2910 kW
3010 to 3300 kW
N/A
N/A
N/
A
4kW: Array size
Each segment of the speedometer will
light up when the generation exceeds
the values shown. When
is selected
the segments are:
0 to 3110 kW
3240 to 3880 kW
4015 to 4400 kW
Solo PV Display User Manual
N/A
N/A
N/
A
page 21
Generation Meters
The Solo PV is designed to work with any
pulse output generation meter with a pulse
rate of between 50 and 10,000 (maximum).
We have listed some of the meters and the
pulse rates you should set on the Solo PV
below. Many meters will have the pulse
rate written on them e.g. 1,000 impulses
/kWh, however if you are unsure please call
the Helpline (08455 198 524)
These are the three most common
generation meters:
Indicates where the LED reader should
be placed
Elster A100C
Pulse rate: 1000
pulses/kWh
Landis+Gyr 5235
Pulse rate: 1000
pulses/kWh
Iskra ME372
Pulse rate: 1000
pulses/kWh
page 22
Solo PV Display User Manual
Technical Specifications
Model
Display
Transmitter
LED Reader
Rated voltage 230Vac 50Hz
3 x AA size 1.5V batteries N /A
Input power 0.25W
0.2W
Operation
Humidity
N /A
0 to 40�C
-20 to 50�C
85% non-condensing 85% non-condensing
-20 to 50�C
85% non-condensing
Legal Information
GEO is a registered trademark of Green
Energy Options Ltd. Copyright 2010 Green
Energy Options Ltd. All rights reserved.
Green Energy Options Limited (GEO)
makes no representations and gives no
warranties of any kind in relation to the
contents of this document and all
warranties, conditions and other terms
implied by statute or common law are, to
the fullest extent permitted by law,
hereby excluded.
In particular, GEO assumes no
responsibility for any errors or omissions
that may appear in this document and
makes no commitment to neither update
nor keep current the information
contained in this document.
GEO retains the right to make changes to
this
document
(including
any
specifications contained here in) at any
time without notice.
No part of this document may be
modified,
copied,
reproduced,
republished, published, transmitted or
distributed in any form or by any mean
Solo PV Display User Manual
without the prior written consent of GEO.
The contents of this document are to be
used solely for the purpose for which they
are provided by GEO and for no other
purpose. All content, text, graphics and all
other materials contained in this
document are owned by GEO (or its
licensors), and all proprietary and
intellectual property rights (including
copyright, design rights, trade secrets,
trade names, logos and trade marks)
wherever arising in relation to this
document vest in GEO (or its licensors)
and all such rights are reserved.
Conforming Standards:
Radio Device RF Performance (UK &
Europe) Emissions EMC (UK & Europe)
EN300328V1.7.1
EN301489-3V1.4.1
En55022
EN61000-3-2
EN61000-3-3
EN55024
EN60335-1
CE
Safety Requirements (UK & Europe)
UK standards
page 23
Contact us
For Sales:
T: +44 (0)1223 850 210
F: +44 (0)1223 850 211
E: [email protected]
W: www.greenenergyoptions.co.uk/solopv
Helpline:
T: +44 (0)8455 198 524
E: [email protected]
W: www.greenenergyoptions.co.uk/support
page 24
Solo PV Display User Manual