1
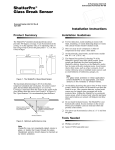
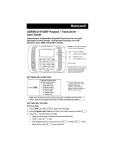
PROGRAMMING THE CODE ENCRYPTOR 3
Programming involves first associating the module with the control with which it is being used (auto recognition), and then
programming the remote control’s user code.
Automatic Recognition
1. Make sure the alarm panel is powered up and operating. The wire harness
should still be disconnected from the Receiver.
2. While watching the LED light on the CE3 Receiver, plug the wire harness
connector into the Receiver.
3. The Receiver’s LED will blink one time on power up. After about 2 seconds,
count the flashes that you see. The corresponding flashes indicate which
panel the Code Encryptor 3 has detected. Refer to the table below.
CODE
ENCRYPTOR 3
PROGRAM
BUTTON
RECEIVER
LED
CE3-012-V0
Control Panel Detection Table
No. of Flashes Alarm Panel detected by the CE 3
No Alarm connected (CE3 defaults to relay mode) See “Default Mode”
1
2
Future use
3
**GE/NX4, NX6, NX8, NX8V2
4
Future use
5
Honeywell - Non-Addressable (Vista & 4110, XM, XMP)
6
Honeywell - VISTA Addressable (Vista P series controls 10, 15, 20, 21iP, 40, 50, 128, 250)
7
DSC- PowerSeries 816/832/5010/5020, PC1616/1832
8
DSC PC1550, 2525, 2550, 3000
9
**Napco P816/1632/3200
10
Future use
** For these panels, open top cover and slide switch away from LED
The Code Encryptor 3 on the following panels self-enroll themselves as a specific keypad address code.
Control
Address
Honeywell addressable
3 (VISTA-40, 50, 128, 250)
Honeywell addressable (P controls) 17
IMPORTANT: DO NOT USE ANY OF THESE ADDRESS CODES IF YOU ARE USING ONE OF THE ABOVE CONTROLS.
Example: If you are using a Honeywell Vista P series control, no keypads can use address 17 because the CE 3 will automatically
enroll itself as address 17.
NOTE: If you are using the Honeywell Touchscreens, please remove them when Programming the Code Encryptor 3.
Programming the User Code
A user code for the Code Encryptor 3 must be programmed in the security system and in the CE3 Receiver. This provides the
system with a user code for arming and disarming of the control.
To program a user code into the Receiver, do the following:
1. Verify that the four-digit code you plan to teach the Code Encryptor 3 is a valid four-digit user code. Example: From the
keypad use that four-digit code to arm the panel. If the panel arms, the code is good. If it does not, program that user code into
the alarm panel. – The Code Encryptor 3 uses that four-digit code to arm and disarm the panel, thus that code must be valid.
NOTE: We recommend using a user code that the user cannot change. If the user code that is programmed into the Receiver
module is changed, the Code Encryptor 3 will not disarm the control panel.
2. Press and HOLD the program button on the Receiver. The LED will light. Continue to hold program button until the LED
turns OFF (in about 7 seconds). When the LED turns off, release the program button. The LED will begin to flash rapidly.
3. Using the keypad, slowly and firmly enter the four-digit user code (no other commands). After the fourth entry the LED will
stop flashing. This code has now been entered into the Code Encryptor’s non-volatile memory. The Code Encryptor will
remember this user code in the event of a power failure. To change to a new user code, repeat steps 2 and 3 above.
Adding/Deleting Remotes
To Add a New Remote
To Delete All Remotes
To add a remote to your Code Encryptor 3, do the following:
1. PRESS AND RELEASE the program button on the receiver.
The LED on the receiver will come ON.
2. Immediately PRESS button 1 on the new remote control
THREE TIMES. The LED on the receiver should go OFF
indicating the remote has been learned.
If the LED on the receiver stays ON, the remote has not
been learned. Remove and replace the harness, wait 15
seconds while auto recognition occurs and follow these
instructions again.
–2–
To delete a lost or stolen remote from the Code Encryptor 3,
you must purge the entire memory. This will delete all of the
current remotes. You will then have to add them back into
memory.
To purge, PRESS AND HOLD the program button. The LED
will come ON for four seconds, then go OFF, and finally it will
come ON again, indicating that all the remotes in memory
have been purged. Release the program button and follow the
To Add a New Remote instructions.