1
Tutorial 4: Build and Edit
Content
By Terence Peak
Rev. Fall, 2008
Contents
Blackboard File Manager ....................................................................................................... 4
Upload Files ................................................................................................................................ 4
Editing Options ........................................................................................................................... 6
Create HTML Object .................................................................................................................. 7
Create Folder ............................................................................................................................... 7
Search File Manager ................................................................................................................... 8
Build Content ............................................................................................................................. 8
Create ......................................................................................................................................... 10
Create Item ................................................................................................................................ 10
Create File ................................................................................................................................. 10
Create Audio ............................................................................................................................. 11
Create Image ............................................................................................................................. 12
Create Video ............................................................................................................................. 13
Create URL ............................................................................................................................... 14
Create Learning Module ........................................................................................................... 15
Create Lesson Plan .................................................................................................................... 16
Create Syllabus ......................................................................................................................... 18
Create Course Link ................................................................................................................... 19
New Page ................................................................................................................................... 20
Create Content Folder ............................................................................................................... 20
Create Blank Page ..................................................................................................................... 21
Create Module Page .................................................................................................................. 22
Create Link to Tools Area......................................................................................................... 23
Mashups ..................................................................................................................................... 24
Flickr Photo ............................................................................................................................. 24
Slide Share Presentation .......................................................................................................... 25
You Tube Video ...................................................................................................................... 26
Assign Textbook...................................................................................................................... 27
Search for Textbook .................................................................................................................. 27
Manually Entry Textbook ......................................................................................................... 28
Edit Course Content .............................................................................................................. 29
The Text Editor ......................................................................................................................... 29
Edit Content .............................................................................................................................. 30
2
UIW Department of Instructional Technology
Copy Content ............................................................................................................................ 30
Delete Content .......................................................................................................................... 31
Mashups: Adding Links, Images and Multimedia to Content .................................................. 32
Manage Course Content ...................................................................................................... 34
Adaptive Release ...................................................................................................................... 34
Advanced Adaptive Release ..................................................................................................... 38
Review Status............................................................................................................................ 39
Statistics Tracking ..................................................................................................................... 39
Content Metadata ...................................................................................................................... 40
User Progress ............................................................................................................................ 41
3
UIW Department of Instructional Technology
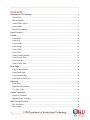
Blackboard File Manager
The Blackboard File Manager feature allows instructors to upload, download store and manage
folders or documents into one central location within their Blackboard course. Documents (i.e.
PowerPoint sideshows, Word documents, or Multimedia files) can be uploaded to a Blackboard
course with a single upload, instead of uploading documents one document at a time.
The instructor will choose the Browse from Course option in the Content Area, to upload
content. All files added to the course can be copied to another course using the course copy
feature in Blackboard. These files may also be archived for use in future courses.
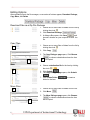
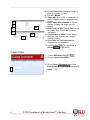
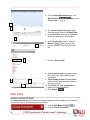
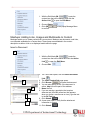
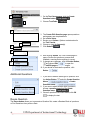
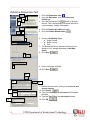
Open the Course Homepage and locate the Control Panel. Click the Action Button to open the
Files Page. The Files page opens with a series of buttons.
Upload: Allows the instructor to upload a single document, a
folder containing multiple files, or upload a pre-packaged set of
documents prepared for Blackboard by a textbook company.
Create an HTML Object: Allows the instructor to create a
Reusable document with text and multimedia content in HTML
format that is then stored in the File Manager. This document
may be uploaded to any Content Area. The student can open
and read the information in the same manner as course
content. This option works best for any items that are not time
or date sensitive, but are reused frequently.
Create Folder: The instructor can create a folder to house a
single document, a folder or HTML Objects, or a pre-packaged
set of documents.
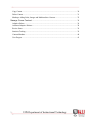
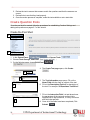
Upload Files
The instructor can upload a single document, a folder containing multiple files, or upload
a pre-packaged set of documents prepared for Blackboard by a textbook company.
4
UIW Department of Instructional Technology
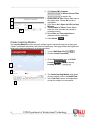
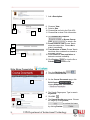
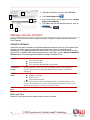
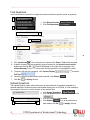
1
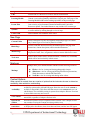
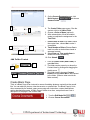
1. Open the course homepage and locate the
Control Panel, and click the Action Button
to open the Files Page.
2. Click Upload
and choose Upload
Files.
3. On your computer, open the file or folder that
contains the items that will be uploaded.
3
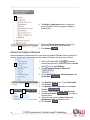
4. The Upload Multiple Files and Folders page
4
opens.
5. Click and Drag the files into the area marked
5
“To begin uploading. drag and Drop files
and folders here”
7
8
6. When all of the folders have loaded, click
Submit.
7. To remove files click Remove All.
8. Alternatively, Click Browse
to locate
and download files or folders.
6
9. It will take a few minutes upload large files.
10. Click Submit
again, and you will be
returned to the Files: page.
5
UIW Department of Instructional Technology
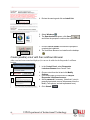
Editing Options
After uploading files to the file manager, a new series of buttons appear; Download Package,
Copy Move, and Delete
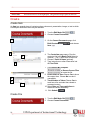
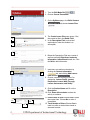
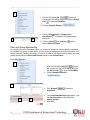
Download Files as a Zip File Package
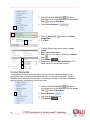
1. Choose one or more files or folders from the list by
clicking the circle.
2. Click Download Package.
3. A dialogue Box opens, click Save
and
choose a location on your computer to save the
file.
Copy Files
1. Choose one or more files or folders from the list by
clicking the circle.
2. Click Copy.
1
3. The Copy Dialogue page opens, Click Browse
to choose a destination where the item
3will be copied.
3
4. Choose a destination file for the item by clicking
the circle.
4
5. Click Submit.
6. The Copy Dialogue page opens, click Submit.
7. Click Create Folder
folder for the item.
to create a
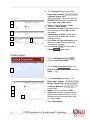
Move Files
1. Choose one or more files or folders from the list.
2. Click Move.
1
3. The Move Dialogue page opens, click Browse.
3
6
to choose a destination where the item
will be copied.
UIW Department of Instructional Technology
4. Choose a destination file for the item by clicking
the circle.
4
5. Click Submit.
6. The Move Dialogue page opens, click Submit.
7. Click Create Folder
folder for the item.
to create a
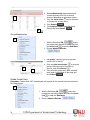
Delete Files
1. Choose one or more files or folders from the list by
clicking the circle.
2. Click Delete.
1
3. Click OK.
3
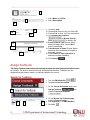
Create HTML Object
The instructor can create a Reusable document with text and multimedia content in HTML
format that is then stored in the File Manager. This document may be uploaded to any
Content Area. The student can open and read the information in the same manner as
course content. This option works best for any items that are not time or date sensitive,
but are reused frequently.
1.
2.
3.
4.
Click Create HTML Object.
The Create Reusable Object page opens
Name the document
Add content in the content section
5. Click Submit.
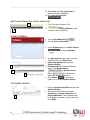
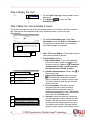
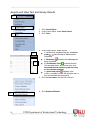
Create Folder
The instructor can create a folder to house a single document, a folder or HTML
Objects, or a pre-packaged set of documents.
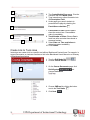
1. Click Create Folder.
2. Type a Folder Name.
2
7
3
3. Click Submit.
UIW Department of Instructional Technology
6
7
4. The File Page opens.
5. Locate the folder and click the Action Button
next to the folder.
6. The Options Menu Opens.
7. Click Open.
8. The folder opens. Upload, Create HTML, or create
another Folder in the folder.
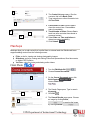
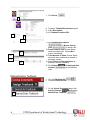
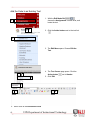
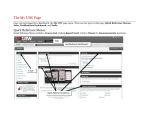
Search File Manager
1. Click Files in the Control Panel.
2. The Search Window opens
3. Type a document name in the window
1
2
4. Clock GO.
5. The document will appear in the File manager The
File Page opens.
3
4
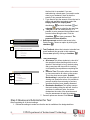
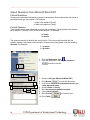
Build Content
The Build button opens up several options for creating content. There are three categories
within Build Content; Create, New Page, and Mashups.
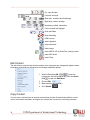
Create
Item
File
8
An Item is a general piece of content such as a document, presentation,
image, or text to which a description and other items may be attached.
Multiple documents can be attached to a single item.
A single file document such as a PowerPoint, PDF, Spreadsheet, or Word
Document. Only one file may be uploaded.
UIW Department of Instructional Technology
Image, Video, Audio
URL
Learning Module
Lesson Plan
Syllabus
Course Link
Allows instructors to attach a multimedia file to a Content Area.
External link to a Web site or resource outside of Blackboard.
Provides access to multiple types of content through one access point.
Content is accessed sequentially and follows a logical pace. Each page of the
Learning Module builds on the learning experience of the previous page.
The Lesson Plan enables the instructor to develop course content by choosing
from a variety of pre-formatted Content Information and Curriculum
Resources options. Curriculum Resources may include ANY content type.
The Syllabus Builder option enables an instructor to build a course syllabus
or course outline by walking through a series of steps.
Link to another item within the same course.
New Page
Content Folder
Allows instructors to create an assignment with multiple types of content.
Any Content Type or Tool can be placed in a Folder.
Blank Page
Creates a link, that when accessed by the student opens a new page with
instructions, content descriptions, and/or attached documents.
Module Page
A page containing dynamic personalized content modules that help users
keep track of tasks, tests, assignments, and new content added to the course.
Tools Area
Links to tools (such as email, discussion boards, a contacts list, or calendar)
which will be used exclusively in their course.
Mashups
Mashups allow you to add multimedia content from the following resources:
Flickr: a site for viewing and sharing photographic images.
Slideshare: a site for viewing and sharing PowerPoint presentations,
Word documents, or Adobe PDF Portfolios.
YouTube: a site for viewing and sharing online videos.
Mashups
Content Options
When content is created, there are a series of options that the instructors choose to determine
availability, date restrictions, and tracking.
When a content item is added to a Course it is not automatically available. An
availability option on the Add and Edit pages allows the user to set the content to
available or unavailable. This allows the Instructor to create content and save it in
Availability
a draft format. The availability setting is separate from Adaptive Release. If an item
is not available users may not access it.
Select Yes to make the content available to users. If No is selected this content is
View content
unavailable, regardless of Adaptive Release rules.
Select Yes to open the item in a separate browser window. This is helpful as users
Open in new
may continue viewing the Content Area along with the item.
window
A range of dates that an item will be available to students. Select the Display After
Date and time
or Display After checkboxes, then select dates and times, and the item will appear
restrictions
9
UIW Department of Instructional Technology
until or after the selected dates.
Select Yes to turn on Tracking Reports. This generates usage reports for the item.
Track views
Create
Create Item
An Item is a general piece of content such as a document, presentation, image, or text to which
a description and other items may be attached.
1. Turn the Edit Mode ON.
2. Choose Course Documents.
3
3. On the Course Documents page, click
Build Content
and choose
Item.
4
4. The Create Item page opens. Give the
content a title in the Name Field. Note the
asterisk (*). All (*) fields must be filled out.
5. Choose a Color of Name (optional).
6. Type instructions or other information into
the Text Field.
5
6
7. Click Browse My Computer
or Browse Course Files
7
8
9
10
to locate the file.
8. Permit users to View Choose Yes to show
the content item. Choose No to make it
unavailable.
9. Track Number of Views Choose Yes to
track how often a student has viewed or
accessed content.
10. Select Date and Time restrictions to
determine content availability.
11. Click Submit.
Create File
1. Turn the Edit Mode ON.
2. Choose Course Documents.
10
UIW Department of Instructional Technology
3. On the Course Documents page, click
3
Build Content
and choose
File.
4. The Create File page opens. Click Browse
My Computer
or
4
5
6
7
8
9
Browse Course Files
to
select the file.
5. Name the File, and choose a Color.
6. Choose whether or not to Open in a New
Window.
7. Permit users to View Choose Yes to show
the content item. Choose No to make it
unavailable.
8. Track Number of Views Choose Yes to
track how often a student has viewed or
accessed content.
9. Select Date and Time restrictions to
determine content availability.
10. Click Submit.
Create Audio
1. Turn the Edit Mode ON.
2. Choose Course Documents.
3. On the Course Documents page, click
3
11
Build Content
Audio.
UIW Department of Instructional Technology
and choose
4. The Create Audio page opens. Click
Browse My Computer
or Browse Course Files
4
5
6
7
8
9
to locate the audio file.
Blackboard will only play the following file
types: .mp3, .wav, .wma, .wmv.
5. Name the File, and choose a Color.
6. Choose an Audio Option.
7. Permit users to View Choose Yes to show
the content item. Choose No to make it
unavailable.
8. Track Number of Views Choose Yes to
track how often a student has viewed or
accessed content.
9. Select Date and Time restrictions to set
when the Content will be available and
unavailable to Students.
10. Click Preview
to hear the file or
Submit
to add the file.
Create Image
1. Turn the Edit Mode ON.
2. Choose Course Documents.
3. On the Course Documents page, click
Build Content
Image.
3
and choose
4. The Create Image page opens. Click
Browse My Computer,
Browse Course Files,
4
5
6
7
12
or Browse Mashups
to
locate the file.
5. Name the File, and choose a Color.
6. Alt Text will provide a text description for
students with impaired vision. Alt Text is
displayed so that the image can be read
by screen readers.
7. Write a Description.
UIW Department of Instructional Technology
8
9
10
11
12
13
14
8. Choose Dimensions change the height or
width of the image in pixels.
9. Choose a Border.
10. Target URL Enter a URL to create a link to
a file or website outside of the Blackboard
course.
11. Open Target in New Window to choose
whether to display the image in a new
window.
12. Permit users to View Choose Yes to show
the content item. Choose No to make it
unavailable.
13. Track Number of Views Choose Yes to
track how often a student has viewed or
accessed content.
14. Select Date and Time restrictions to
determine content availability.
15. Click Preview
Submit
to view the file or
to add the file.
Create Video
1. Turn the Edit Mode ON.
2. Choose Course Documents.
3. On the Course Documents page, click
3
13
Build Content
Video.
UIW Department of Instructional Technology
and choose
4. The Create Video page opens. Click
Browse My Computer,
4
5
6
7
8
1
10
9
1
Browse Course Files,
or Browse Mashups
to
locate the file. Blackboard will only play the
following file types: asf, .avi, .mpg,
.mpeg, .wmv, qt, moov, .mov.
5. Name the File, and choose a Color.
6. Choose Dimensions change the height or
width of the image in pixels.
7. Choose the Autostart or Loop Video
Options.
8. Permit users to View Choose Yes to show
the content item. Choose No to make it
unavailable.
9. Select Date and Time restrictions to
determine content availability.
10. Select Date and Time restrictions to
determine content availability.
11. Click Preview
to view the file or
Submit
to add the file.
Create URL
1. Turn the Edit Mode ON.
2. Choose Course Documents.
3. On the Course Documents page, click
Build Content
URL.
3
4
5
14
and choose
4. The Create URL page opens. Give the
content a title in the Name Field. Note the
asterisk (*). All (*) fields must be filled out.
5. Type instructions or other information into
the Text Field.
UIW Department of Instructional Technology
6. Click Browse My Computer
or Browse Course Files
6
1
7
1
8
1
9
1
10
to attach a file.
7. Permit users to View Choose Yes to show
the content item. Choose No to make it
unavailable.
8. Click Yes or No to Open the URL in a New
Window.
9. Track Number of Views Choose Yes to
track how often a student has viewed or
accessed content.
10. Select Date and Time restrictions to
determine content availability.
11. Click Submit.
Create Learning Module
The Learning Module provides access to multiple types of content through one access point.
Content is accessed sequentially and follows a logical pace. Each page of the Learning Module
builds on the learning experience of the previous page.
1. Turn the Edit Mode ON.
2. Choose Course Documents.
3. On the Assignments page, click Build
Content
and choose
Learning Module.
3
4
4. The Create Learning Module page opens.
Give the content a title in the Name Field.
5. In the Text Field, write a brief explanation
of what the student is to accomplish.
5
15
UIW Department of Instructional Technology
6. Permit users to View Click Yes to show
the content item, choose No to make it
unavailable.
7. Select Date and Time restrictions to
determine content availability.
8. Enforce Sequential Viewing Click Yes,
and students must view content in the
sequence. Click No to access the module at
random.
9. Open in New Window If checked, a new
browser window opens for the Module.
10. Track Number of Views Choose Yes to
track how often a student has viewed or
accessed content.
11. Click Yes to show the Table of Contents.
12. Choose a Hierarchy Display.
6
7
8
8
10
11
12
13. Click Submit.
Add Content to the Learning Module
1
1. Click the Module Link (Module) to open
the Learning Module.
2. The Module opens, choose a Content
Button from the Action Bar to add content
to the Module.
2
Learning Module Views
Learning Module in Sequential View
In the Sequential
View, Content is not
lnked. Content is
accessed by clicking
the next or previous
page button.
Learning Module in Random View
In the Random View,
each item is linked;
students can click on
the link to access
Content.
Create Lesson Plan
The Lesson Plan enables the instructor to develop course content by choosing from a variety of
pre-formatted Content Information and Curriculum Resources options. Curriculum Resources
may include ANY content type. The Lesson Plan outlines how the course will proceed though
the semester. The instructor can plan activities, prepare lessons, outline resources, identify
course outcomes, and assess outcomes.
16
UIW Department of Instructional Technology
1. Turn the Edit Mode ON.
2. Choose Course Documents.
3
3. On the Syllabus page, click Build Content
and choose Lesson Plan.
4. The Create lesson Plan page opens. Give
the content a title in the Name Field.
5. In the Description Field, write a brief
explanation of what the student is to
accomplish.
4
5
6
6. Below the Description Filed are a series of
sections outlining Objectives, Instructor
Information, Instructional Level, etc. Click
the field to add information.
7
8
10
9. Click the Section Name and fill out the
Description.
10. Click Share with students to show the
activity to students.
9
11
12
13
17
7. Instructors can add more sections by
clicking the Content Information
tab, and clicking Add Lesson
Plan Section.
8. Choose a section from any of the five
categories; Lesson Profile, Lesson
Preparation, Lesson Walk Through,
Lesson Assessment, and SetUp.
11. Permit users to View Choose Yes to show
the content item. Choose No to make it
unavailable.
12. Track Number of Views Choose Yes to
track how often a student has viewed or
accessed content.
UIW Department of Instructional Technology
13. Select Date and Time restrictions to
determine content availability.
14. Click Save and Continue.
Add Content Resources to the Lesson Plan
1
2
1. The Curriculum Resource Tab
opens.
2. Use any of the Content Buttons to add
content to the Lesson Plan.
Create Syllabus
1. Turn the Edit Mode ON.
2. Choose Course Documents.
3. On the Syllabus page, click Build Content
and choose Syllabus.
4. The Add Syllabus page opens. Give the
Syllabus a title in the Name Field.
5. Create New Syllabus will open the
Syllabus Builder.
6. Use Existing File will open the Browse
option. Click Browse button
or Browse Course
4
5
6
Files
to locate and
upload the Syllabus document.
7. Click Submit.
to submit the
syllabus or open the Syllabus Builder.
The Syllabus Builder
2
18
1. Clicking Create New Syllabus will open the
Syllabus Builder.
2. There are three sections to the page:
Description, Learning Objectives, and
Required Materials. These headings can
be changed if necessary. Type instructions
in the Body.
UIW Department of Instructional Technology
3. The Syllabus Design section allows you to
choose page Style and Colors for the
borders and text. Click the Action Button
3
to choose from a list of colors.
4. Click Yes or No to make the Syllabus
Available.
5. Track Number of Views Choose Yes to
track how often a student has viewed or
accessed content.
6. Select Date and Time restrictions.
4
5
6
7. Click Submit.
Add Lessons to the Syllabus
Lessons are modules that outline the instructor’s lesson plan for the semester. Lessons further
enhance the Syllabus by providing the title, description and dates that a specific course topic will
be covered in the course.
1. On the Syllabus Builder page, click Add
2
3
Lesson.
2. Type the Lesson Title.
4
5
6
7
3. Uncheck the No Lesson Date box
to
add a date for the lesson.
4. To add a date, click the Calendar icon.
5. Uncheck the No Lesson Times box to add
a date for the lesson.
6. To add a time, click the clock icon.
7. Add a Description.
8. Click Submit.
Edit the Syllabus
1. Click the Edit Syllabus Button.
2. Thie will reopen the Syllabus Builder
page.
3. Make any necessary change to the
Syllabus, click Submit.
4. To exit the Syllabus Builder, click OK.
Create Course Link
A Course Link is a link to another item in a course or in another part of the system such as a
Course Objective or the Content Collection.
1. Turn the Edit Mode ON.
2. Choose Course Documents.
19
UIW Department of Instructional Technology
3. On the Course Documents page, click
Build Content
Course Link.
and choose
3
4
4. The Create Course Links page opens.
Give the content a title in the Name Field.
5. In the Text Field, write a brief explanation
of what the student is to accomplish.
5
6
7
8
6. In the Course Links section, click the
Browse
button to locate the
Course Content or Tool that you wish to
link.
7. Choose a Course Link.
9
10
8. Permit users to View Click Yes to show
the content item, choose No to make it
unavailable.
9. Track Number of Views Choose Yes to
track how often a student has viewed or
accessed content.
10. Select Date and Time restrictions to
determine content availability.
11. Click Submit.
New Page
Create Content Folder
The Content Folder allows instructors to create an assignment with multiple types of content.
Any Content Type or Tool can be placed in a Folder.
1. Turn the Edit Mode ON.
2. Choose Course Documents.
20
UIW Department of Instructional Technology
3
3. On the Course Documents page, click
Build Content
and choose
Content Folder.
4
4. The Create Folder page opens. Give the
content a title in the Name Field.
5. Choose a Color of Name (optional).
6. Write a description of that the student
needs to complete the assignment in the
Text Field.
5
6
7
7. Permit users to View Click Yes to show
the content item, choose No to make it
unavailable.
8. Track Number of Views Choose Yes to
track how often a student has viewed or
accessed content.
9. Select Date and Time restrictions to
determine content availability.
10. Click Submit.
8
9
Add Folder Content
1
2
3
1. Click the Folder name (New Folder) to
open the folder.
2. The folder can be moved up or down the
Content Area by clicking and dragging the
double arrow.
3. The folder opens, choose a Content
Button from the Action Bar to add content
to the folder. (Refer to other tutorials for
folder content).
Create Blank Page
Think of a Blank Page as an instructor’s canvas for adding whatever content that they would
like. You can add text, photos, vides documents, or external links. The Blank Page is a link,
when accessed by the student, opens a new page with instructions, content descriptions,
and/or attached documents. A Blank Page is similar to an item, except that there is not a
description of the page in the content area.
1. Turn the Edit Mode ON.
2. Choose Course Documents.
21
UIW Department of Instructional Technology
3. On the Course Documents page, click
3
Build Content
Blank page.
and choose
4. Type instructions into the Content Area.
4
1
5. Click Browse My Computer
6.
5
1
6
7.
7
8
8.
9.
or Browse Course
Files
to attach a file.
Permit users to View Choose Yes to
show the content item. Choose No to
make it unavailable.
Track Number of Views Choose Yes to
track how often a student has viewed or
accessed content.
Select Date and Time restrictions to
determine content availability.
Click Submit.
Create Module Page
Module Pages contain dynamic personalized content modules that help users keep track of
tasks, assessments, assignments, tools, links and new content added to the course. A content
module can be created at the course level or within a course group. The information is specific
to each course or group. Instructors can edit, add content to, or re-arrange. Students (If given
permission), can personalize a Module Page.
1. Turn the Edit Mode ON.
2. Choose Course Documents.
3. On the Course Documents page, click
3
22
Build Content
choose Module Page.
UIW Department of Instructional Technology
and
4
4. The Create Module Page opens. Give the
content a title in the Name Field.
5. Type instructions or other information into
the Description Field.
6. Under page type, permit students to
personalize the page by checking the
Permit Users checkbox.
5
6
7
8
9
7. Permit users to View Choose Yes to
show the content item. Choose No to
make it unavailable.
8. Track Number of Views Choose Yes to
track how often a student has viewed or
accessed content.
9. Select Date and Time restrictions to
determine content availability.
10. Click Submit.
Create Link to Tools Area
Instructors can create a link to a specific tool within a Blackboard Content Area. For example, In
course Documents, an instructor can have a link to the Blackboard User’s Manual or a Glossary
of Blackboard terminology
1. Turn the Edit Mode ON.
2. Choose Course Documents.
3. On the Course Documents page, click
3
Build Content
choose Tools Area.
and
4
4. Choose ONE tool by clicking the button
next to the Tool Name.
5. Click Next.
23
UIW Department of Instructional Technology
6
6. The Create Link page opens. Give the
content a title in the Name Field.
7. Type instructions or other information into
the Text Field.
7
8
8. Permit users to View Choose Yes to
show the content item. Choose No to
make it unavailable.
9. Track Number of Views Choose Yes to
track how often a student has viewed or
accessed content.
10. Select Date and Time restrictions to
determine content availability.
11. Click Submit.
9
10
Mashups
Mashups allow you to add content that is pulled from an external web site. Blackboard Learn
supports adding content from the following sources:
Flickr: a site for viewing and sharing photographic images.
Slideshare: a site for viewing and sharing PowerPoint presentations, Word documents,
or Adobe PDF Portfolios.
YouTube: a site for viewing and sharing online videos.
Flickr Photo
1. Turn the Edit Mode ON.
2. Choose Course Documents.
3. On the Course Documents page, click
3
Build Content
choose Flickr Photo.
4
6
5
and
4. The Search Page opens. Type in search
Keywords.
5. Click GO.
6. The Search Results page opens. Choose
an image by clicking Select,
, or preview the image
by clicking Preview.
24
UIW Department of Instructional Technology
7. Add a Description.
7
8
9
10
11
8. Choose a View.
9. Select a Size.
10. Choose Yes too link to the Flickr URL.
11. Choose Yes to show Flickr Information.
12. Click Browse My Computer
or Browse Course
Files
to attach a file.
13. Permit users to View Choose Yes to
show the content item. Choose No to
make it unavailable.
14. Track Number of Views Choose Yes to
track how often a student has viewed or
accessed content.
15. Select Date and Time restrictions to
determine content availability.
16. Click Preview
to view the file or
Submit
to add the file.
12
13
14
15
Slide Share Presentation
1. Turn the Edit Mode ON.
2. Choose Course Documents.
3. On the Course Documents page, click
Build Content
and
choose Slideshare Presentation.
3
4
6
25
5
4. The Search Page opens. Type in search
Keywords.
5. Click GO.
6. The Search Results page opens. Choose
an image by clicking Select,
or preview the image
by clicking Preview.
UIW Department of Instructional Technology
7. Add a Description.
7
8. Choose a View.
9. Choose Yes to link to the Slideshare URL.
10. Choose Yes to show Slideshare
Information.
11. Click Browse My Computer
9
8
10
or Browse Course
Files
to attach a file.
12. Permit users to View Choose Yes to
show the content item. Choose No to
make it unavailable.
13. Track Number of Views Choose Yes to
track how often a student has viewed or
accessed content.
14. Select Date and Time restrictions to
determine content availability.
15. Click Preview
to view the file or
Submit
to add the file.
11
12
13
You Tube Video
1. Turn the Edit Mode ON.
2. Choose Course Documents.
3. On the Course Documents page, click
3
4
6
26
Build Content
choose You Tube Video.
5
and
4. The Search Page opens. Type in search
Keywords.
5. Click GO.
6. The Search Results page opens. Choose
an image by clicking Select,
or preview the image
by clicking Preview.
UIW Department of Instructional Technology
7
7. Add a Name and Color.
8. Add a Description.
3
8
10
11
9. Choose a View.
10. Choose Yes too link to the YouTube URL.
11. Choose Yes to show YouTube Information.
12. Click Browse My Computer
9
1
or Browse Course
Files
to attach a file.
13. Permit users to View Choose Yes to
show the content item. Choose No to
make it unavailable.
14. Track Number of Views Choose Yes to
track how often a student has viewed or
accessed content.
15. Select Date and Time restrictions to
determine content availability.
16. Click Submit.
12
13
14
15
Assign Textbook
The Assign Textbook button allows the instructor to assign the online textbook that will be used
by students. The book is accessed through the Blackboard interface. Textbooks can be
assigned through textbook search, or manually added to the course.
Search for Textbook
1. Turn the Edit Mode ON.
2. Choose Course Documents.
3. On the Course Documents page, click
Assign Textbook
choose `Search for textbook.
3
4
5
6
4. On the Browse for Textbook page,
choose a Search Option.
5. Add Keywords. (i.e. ISBN Number)
6. Click GO.
27
and
UIW Department of Instructional Technology
7. Click Select.
7
8. Choose a Textbook Requirement option.
9. Add a Description.
10. Ad Textbook Location URL.
8
9
10
11. Click Browse My Computer
or Browse Course
Files
to attach a file.
12. Permit users to View Choose Yes to
show the content item. Choose No to
make it unavailable.
13. Track Number of Views Choose Yes to
track how often a student has viewed or
accessed content.
14. Select Date and Time restrictions to
determine content availability.
15. Click Submit
or Submit and Add
Another
to add addional
texts.
11
12
13
14
Manually Entry Textbook
1. Turn the Edit Mode ON.
2. Choose Course Documents.
3
28
3. On the Course Documents page, click
Assign Textbook
and choose
Manual Entry Textbook.
UIW Department of Instructional Technology
4
4. Fill out the textbook information page. Not
that the Title is REQUIRED.
5. Choose a Textbook Requirement option.
5
1
6. Click Browse My Computer
or Browse Course
Files
to attach a file.
7. Permit users to View Choose Yes to
show the content item. Choose No to
make it unavailable.
8. Track Number of Views Choose Yes to
track how often a student has viewed or
accessed content.
9. Select Date and Time restrictions to
determine content availability.
10. Click Submit
or Submit and Add
6
7
8
9
Another
texts.
to add addional
Edit Course Content
Turning the Edit Mode ON allows the instructor to edit and manage course content. Editing
features include text editing; content copy and content delete functions.
Edit Mode OFF shows the Student View of the course.
Edit Mode ON shows the Edit View. Instructors may edit content and
tools in the course using the Text Editor.
The Text Editor
The Text Editor includes the ability to modify content, correct spelling and grammar, add
images, text, multimedia, and HTML content.
Spell check
29
UIW Department of Instructional Technology
Cut, copy & paste
Font size and style
Bold, italic, underline & strikethrough
Right align, center, left align
Numbering, bullets, indentation
Font color and text highlight
Undo and Redo
Clear formatting
HTML source
Insert Hyperlink
Insert document
Insert image
Insert MPEG, API or QuickTime (video) content
Insert MP3 audio
Insert Flash
Edit Content
The edit function re-opens the content creation area. Instructors can change and update content
information, attach links or documents, and change availability options.
1. With the Edit Mode ON,
locate the
content item that will be edited and click the Action
Link
to open the Edit Menu.
2. Choose Edit.
3. Make changes as necessary.
4. Click Submit.
Copy Content
You can copy a content item (or several content items) to other Content Areas within a course
or from one course to another, as long as your course role is instructor or teaching assistant.
30
UIW Department of Instructional Technology
1. With the Edit Mode ON,
locate the
content that will be copied, and click the Action
Link
to open the Edit Menu.
2. Choose Copy.
3. To copy the item to another course, choose the
Destination Course by clicking the drop-down
2
menu
to see a course list. The courses listed
are those in which your role is instructor or teaching
assistant.
4. If you want to copy an item to another location within
3
4
the current course, click the Browse
button.
5. The Copy or Move page opens. Choose a copy to
location on the Select Location menu by clicking
on the file folder.
5
6
6. If you want a single copy of the content, choose
Yes to delete the content after it is copied.
7. Click Submit.
Delete Content
Use Delete button ONLY if content items need to be removed. If the content was created using
the Evaluate button (Test, Survey or Assignment), you must also remove the column form the
Grade Center. DO NOT use Delete if you want to make content unavailable to students.
31
UIW Department of Instructional Technology
1. With the Edit Mode ON,
locate the
content item that will be deleted, and click the
Action Link
to open the Edit Menu.
2. Choose Delete.
3. Click OK
to confirm.
on the popup Message Menu
Mashups: Adding Links, Images and Multimedia to Content
Mashups enable you to create content that is more robust. Mashups are documents, web links,
or multimedia embedded in a Content Area. These items are embedded in the content
description as either a link or as displayed media within the page.
Insert a Document
2
1. With the Edit Mode ON,
locate the
content item that will be edited and click the Action
Link
to open the Edit Menu.
2. Choose Edit.
3. The Text Editor opens, click the Insert Document
3
Link.
4. The Insert Content link page opens.
4
5
6
6
7
8
9
5. Click Browse
to locate the document.
6. You can also specify a URL if the document is
online. http:// must be part of the address
7. Name the link.
8. If you are serving a population that requires
alternate text (that little yellow box that appears
when you hover a mouse over an icon), type the text
in the Alt Text box.
9. Click Submit.
10. A new menu opens. Verify that the attachment
information is correct.
11. Click Submit.
32
UIW Department of Instructional Technology
Insert a Media (Audio/Video/Image) File
2
1. With the Edit Mode ON,
locate the
content item that will be edited and click the Action
Link
to open the Edit Menu.
2. Choose Edit.
3. Click an Insert Multimedia Icon.
3
82
4
5
6
7
4. Click Browse
to locate the
audio/video/image file.
5. You can also specify a URL (if the document is
online). http:// must be part of the address.
6. Set a size (Width and Height) for the image.
Anything larger than 3 inches by 3 inches is
probably too large. For assistance editing a/v files,
contact Adela Gott at extension 3946.
7. If you are serving a population that requires
alternate text (that little yellow box that appears
when you hover a mouse over an icon), type the
text in the Alt Text box.
8. Click Submit.
9. A new menu opens. Verify that the attachment
information is correct.
10. Click Submit.
Launch Website (URL) from a Content area
2
1. With the Edit Mode ON,
locate the
content item that will be edited and click the Action
Link
to open the Edit Menu.
2. Choose Edit.
33
UIW Department of Instructional Technology
3. Highlight a sentence or word in the Text field.
4
4. Click Insert Hyperlink.
3
7
5
5. In the URL section, type or paste the URL (include
http:// in the address).
6. The Title is the text that activates the link, such as
Click here.
7. Click Submit.
6
Manage Course Content
Manage Content options include; Adaptive Release, Statistics Tracking, Review Status and
User Progress.
Adaptive Release
Instructors can require students to complete assignments based on a set of rules regarding the
sequence in which content is presented, the date and time content is available, group
membership, or the grade posted in the Grade center. Only one rule can be enforced for each
content item. If multiple rules need to be placed on a content item, use the Advanced Adaptive
Release option. The following chart outlines the Adaptive Release Rules:
Display content based on a date or time. Options include:
After a specific date.
Until a specific date.
After a specific date and until a specific date.
Display content to one or more users or members of one or more groups in a
Username or
course. Groups are set up in through Manage Groups in the Control Panel.
Group
(Module 3).
There are three Grade Center options:
Grade Center:
Items
Number of attempts.
Specific score.
Score between X and Y.
In other words, the next item is not displayed unless a student completes a test,
passes with a specific score, or earns a score between two values. Content is not
displayed until a grade is entered in the Grade Center.
Review Status an Content is visible to users only after an associated item has been reviewed by the
user.
item
Date / Time
Date and Time
Date and Time options can be enabled when content is created.
34
UIW Department of Instructional Technology
2
1. With the Edit Mode ON,
locate the
content item that will be edited and click the Action
Link
to open the Edit Menu.
2. Choose Adaptive Release.
3. Click the Display After or Display Until
4
3
checkboxes
to determine the display dates
and times.
4. Click the clock
and calendar
icons to
choose dates and times.
User and Group Membership
By using the Group or Username option, it is possible to customize content specific to students
or members of a group. In other words, you can create an assignment ad it will only appear to a
certain individual, several individuals, or a group. In order to use this rule with a group, you must
create groups within the Users and Groups section of the Control Panel.
User Membership
2
1. With the Edit Mode ON,
locate
the content item that will be edited and click
the Action Link
to open the Edit Menu.
2. Choose Adaptive Release.
3
3. Click Browse
Username.
4
35
5
to locate a
4. The Course Membership page opens. Type
the first few letters of the name in the
search window.
5. Click GO.
UIW Department of Instructional Technology
6. Course Membership page reopens and
reveals anywhere from one to several
choices, depending on the search criteria.
7
7. Click the check boxes
next to the name
to choose one or more users.
8. Click Submit.
9. The Adaptive Release page Re-opens.
Review and click Submit.
8
Group Membership
2
1. With the Edit Mode ON,
locate
the content item that will be edited and click
the Action Link
to open the Edit Menu.
2. Choose Adaptive Release.
3. For groups, choose a group (or groups)
from the list on the left.
3
4
4. Click the right arrow button
to move the
group to the right side of the menu (to
remove, click the left arrow
).
5. Once all of the groups have been selected,
scroll down to the bottom of the page and
click Submit.
Grade Center Item
Remember: Content WILL NOT be displayed until a grade for the content has been entered in
the Grade Center.
2
1. With the Edit Mode ON,
locate the
content item that will be edited and click the Action
Link
to open the Edit Menu.
2. Choose Adaptive Release.
36
UIW Department of Instructional Technology
3. Select a Grade Center Column.
4. Choose a Condition by clicking the button.
a. With the Attempt option, the student must
attempt the Grade Center item.
b. With the Score option, you must choose an
option and value for the score.
Less than or equal to a point value.
Equal to a point value.
Greater than or equal to a point value.
c. With the Score Between option, type the score
variables into the spaces provided.
5. When all setting choices have been made, click
3
4
Submit.
Review Status
Review Status places a link labeled Mark Reviewed next to the content. When the user clicks
Mark Reviewed, the link name changes to Reviewed and signifies that a user has reviewed the
content item. This action simultaneously makes the content visible to the user.
For example, if the instructor requires that a user read the syllabus before they attempt the first
assignment, the instructor can place an Adaptive Release rule on the on the first assignment.
The student must open the syllabus review it, then click the Mark Reviewed link next to the
syllabus, changing the status to Reviewed. The first assignment will appear in the Content Area.
This Adaptive Release Rule places the responsibility for reviewing specific course information
(i.e. the syllabus) on the user. The instructor tracks Review Status using User Progress.
1. With the Edit Mode ON,
locate the
content item that will be edited (Assignment) and
2
click the Action Link
to open the Edit Menu.
2. Choose Adaptive Release.
3
37
3. Scroll down to Adaptive Release and click Browse.
UIW Department of Instructional Technology
4
4. The Select Content menu opens. Choose the
content (Syllabus) that will trigger the Adaptive
Release Rule.
5. Check the Review Status menu to ensure the
correct item has Review Status attached.
5
6. Click Submit.
Advanced Adaptive Release
Advanced Adaptive Release allows for more than one Adaptive Release rule to be placed on
content. Content will not be visible untill ALL Adptive Release rules have been followed.
1. With the Edit Mode ON,
locate the
content item that will be edited and click the Action
2
Link
to open the Edit Menu.
2. Choose Adaptive Release: Advanced.
3. On the Adaptive Release: Advanced page, click
Create Rule
4. The Add Rule Page Opens. Type a Rule Name.
4
6
8
7
5. Click Submit.
6. The Manage Criteria page opens, click Create
Criteria.
7. Choose a criteria (Date, Name ,Membership).
8. Click Review Status
if you want to
use that option.
9. Follow the instructions for Date, Grade, and
Membership rules to create the rules.
10. Click Submit.
38
UIW Department of Instructional Technology
11. The Manage Criteria page opens. Review the rules.
12. If you desire to delete rules, click the checkbox
next to the rule.
11
13. Click Delete.
Review Status
Review Status can be enabled without Adaptive Release. In this mode, the review status
changes from Mark Reviewed to Reviewed, but content is not released. The instructor still
tracks Review Status using User Progress.
1. With the Edit Mode ON,
locate the
content item that will be edited and click the Action
2
Link
to open the Edit Menu.
2. Choose Review Status.
3. The Review Status menu opens, click Enable.
3
4. Click Submit.
Statistics Tracking
Statistics Tracking gives instructors the ability to review who (by name), when and how often a
content item is being accessed. This will allow you to track and analyze how a student’s
success relates to when and how often they review the material. Statistics Tracking can be
enabled when content is created.
1. With the Edit Mode ON,
locate the
content item that will be edited and click the Action
Link
2
to open the Edit Menu.
2. Choose Tracking.
3. The Statistics Tracking menu opens, click Enable.
3
4. Click Submit.
View Statistics
Once enabled, statistics can be quickly viewed.
39
UIW Department of Instructional Technology
1. With the Edit Mode ON,
locate the
content item that will be edited and click the Action
Link
to open the Edit Menu.
2. Choose View Statistics.
2
3
4
3. Click the Action Link
Usage Menu.
4. Click Run.
to open the Content
5. The Run Reports page opens, select a report
format.
6. Select one or more users.
7. Select start and end date by clicking the calendar
icon.
5
8. Click Submit.
9. On the next page, click Download Report. The
report opens in a new browser window.
6
7
Content Metadata
Content Metadata stores information about a piece of content. Metadata allows for IMS
compatibility when content is imported and exported. The information entered in Content
Metadata cannot be tracked or reported on. It can only be viewed on the Content Metadata
page as reference information for the Content Item.
1. With the Edit Mode ON,
locate the
content item that will be edited and click the Action
Link
2
to open the Edit Menu.
2. Choose Metadata.
3. Select the Metadata options.
4. Click Submit.
40
UIW Department of Instructional Technology
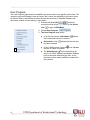
User Progress
The User Progress page tracks the availability and review status for a specific content item. The
Instructor may use this page to view all users in the Course, the availability of the item to them,
the Review Status, and the date and time the item was reviewed. If Adaptive Release rules
have been created, a rule summary is also shown.
3. With the Edit Mode ON,
locate the
content item that will be edited and click the Action
Link
to open the Edit Menu.
4. Choose User Progress.
5. The User Progress page opens:
In the Review column, checkmarks
that content that has been reviewed.
Unchecked circles
not been reviewed.
2
41
indicate
indicate that the item has
In the Visibility column, the eye
icon indicates
the item is visible to students.
The Strikethrough
icon indicates that the
item is not visible, because the Adaptive Release
rule has not been followed by the user, or the
item has not been made available to students bu
the instructor
UIW Department of Instructional Technology
Module 6 Tutorials
Blackboard Evaluation Tools:
Assignments, Tests, Surveys
and Question Pools
By Terence Peak
Spring, 2010
42
UIW Department of Instructional Technology
Contents
Module 6 Tutorials ................................................................................................................. 42
Blackboard Evaluation Tools: ............................................................................................ 42
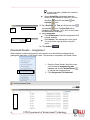
Create and Download Assignments ................................................................................. 44
Create Assignment................................................................................................................. 44
Download Results – Assignment ......................................................................................... 45
Create, Modify, & Administer Tests or Surveys ......................................................... 46
Types of Test, Survey and Pool Questions........................................................................ 46
Create Tests or Survey in the Content Area ...................................................................... 47
Step 1 Create the Shell ..................................................................................................... 47
Step 2 Creation Settings ................................................................................................... 48
Step 3 Add Questions........................................................................................................ 48
Step 4 Deploy the Test ...................................................................................................... 54
Step 5 Make the Test Available to Users ....................................................................... 54
Step 6 Review and Administer the Test ......................................................................... 55
Create Question Pools .......................................................................................................... 56
Create the Pool Shell ......................................................................................................... 56
Import Tests ............................................................................................................................. 57
Test Options ............................................................................................................................. 57
Edit a Test ............................................................................................................................... 58
Edit Point Values for Reused Questions ............................................................................ 58
Acquire and View Test and Survey Results ....................................................................... 59
Disable Print Screen and Screen Copy on a Test ............................................................ 60
Respondus Assessment Builder ........................................................................................ 63
Types of Questions ................................................................................................................ 63
Download Respondus ........................................................................................................... 64
Create a Test as a New Respondus File............................................................................ 64
Import Questions from Microsoft Word 2007 ..................................................................... 66
Publish a Respondus Test .................................................................................................... 67
The Respondus LockDown Browser ................................................................................ 68
Install the Respondus LockDown Browser ........................................................................ 68
Create (enable) a test with the LockDown Browser ......................................................... 69
43
UIW Department of Instructional Technology
Create and Download Assignments
Create Assignment
Assignments are created by clicking the Evaluate button in any Content Area. By choosing the
Create Assignment option, Blackboard simultaneously creates the assignment and a Grade
Center column for the assignment.
Students click the “View/Complete assignment link” in the Content Area to complete the
assignment, which is returned to the instructor through the Grade Center. When the assignment
has been completed by all of the students, the instructor can download all of the assignments at
once and grade them, and enter grades in the Grade Center.
1. With the Edit Mode ON,
choose the
Assignments Content Area.
2. The Assignments page opens, click Create
Assessment.
3. From the Create Assessment menu, choose
1
Assignment.
4
5
6
7
8
4. The Create Assignment page opens. Give the
content a title in the Name Field. (All (*) fields must
be filled out).
5. Choose a Color of Name (optional).
6. Type instructions or other information into the Text
Field.
7. Click Browse My Computer
to attach a file, image or audio content.
8. If you attach a file, an additional option opens to
name the file.
9. Click Attach File
9
10
11
44
to attach the file, or Do
Not Attach
to skip this step. Multiple
files may be added to assignments by repeating
steps 7 through 9.
10. Add Points Possible. This is the point value the
assignment will have in the Grade Center. For ease
of grading, use a 100 point scale.
11. Availability Options – The Make Assignment
Available Checkbox
must be checked for
students to see the assignment.
Set Number of attempts. This feature will allow
student to attempt the assignment until a
desired grade is obtained.
Track Number of Views Click the checkbox
UIW Department of Instructional Technology
to track how often a student has viewed or
accessed content.
Select Availability to determine when the
content will be available to Students. Click the
checkbox,
calendar
and click the clock
and
icons.
12. Set a Due Date and Time by clicking the clock
12
13
and calendar
icons. The Due Date will be
reflected in the students “To Do List” on the Course
and Blackboard Homepages.
13. Select Recipients.
Click All Students to send the assignment to all
enrolled students.
Click Groups if the assignment is for a group.
You must create a group before using this
option.
14. Click Submit.
Download Results – Assignment
When students complete assignments, the instructor must download the assignments for
grading and grade entry in the Grade Center. This process is completed in the Grade Center.
3
45
1. Open the Grade Center. Move the cursor
over the desired assignment grade
column, and click the Action Button
to activate the contextual menu.
2. Click Assignment File Download.
UIW Department of Instructional Technology
3. A new page opens. Select the checkboxes
4. Click Submit.
to download student assignments.
5
5. A new page opens, click Download results
now.
6
6. Click Save
in the Dialogue Box.
7. Open the Zip file to review and grade the
assignments.
Create, Modify, & Administer Tests or Surveys
Test and surveys are created by clicking the Evaluate button in any Content Area. Blackboard
simultaneously creates the test or survey and a Grade Center column.
Tests and surveys are automatically evaluated, and the grade is entered in the Grade Center. If
a Test contains an essay or short answer question, the instructor must download the results of
the test to grade those answers and then update the score in the Grade Center. Surveys do not
receive a numeric score; the survey column will contain a checkmark to confirm completion.
Types of Test, Survey and Pool Questions
There are several options for tests within Blackboard:
Multiple-Choice: In multiple-choice questions, you ask a question and provide possible
answers, only one of which is correct. There is no limit to the number of answer choices.
True / False: These are similar to multiple-choice but have the fixed answer options of
True and False.
Fill in the Blank: Fill in the blank questions allow a student to type in a word or series of
words into a text field in order to answer the question. In order for the computer to mark
this type of question, you must enter every possible answer, or the student’s answer
must be an exact match.
Multiple Answer: This question permits more than one acceptable answer from the list
of choices.
Matching: Students answer these questions by matching items that belong in pairs,
such as indicating a word and its definition, date with event etc.
Essay: The students are provided with a question or statement and they enter an
answer into a text field. Blackboard's software does not grade essay questions
automatically. An instructor must enter the Grade Center and review the answers to the
essay questions before assigning a grade.
Calculated Numeric Response: Resembles a fill-in-the-blank question except a
number or range of numbers number completes the statement.
Fill in Multiple Blanks: Similar to multiple answer, multiple responses are inserted into
a sentence or paragraph.
Random Block: The instructor can assign a randomly select block of questions from a
Question Pool. You can choose as many questions as you like from the pool, and the
questions appear on student tests in random order. This feature makes test creation a
snap.
46
UIW Department of Instructional Technology
Question Pool or Assessment: Allows you to select questions from previous tests or
question pools.
Opinion Scale / Likert: A rating scale used to measure attitudes or reactions. This is an
excellent survey tool.
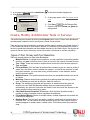
Create Tests or Survey in the Content Area
The process for creating a Test or Survey in the Content Area is a 6-step process:
1. Create a shell for the Test or Survey.
2. Review and determine the Creation Settings.
3. Compose, add, reuse, or import questions and answers.
4. Deploy the test.
5. Make the test available to students.
6. Review, edit and administer the Test or Survey.
Step 1 Create the Shell
1. With the Edit Mode ON,
choose the
Assignments Content Area.
2. The Assignments page opens, click Create
Assessment.
3. From the Create Assessment menu, choose
1
Test
or
Survey
4. The Create Test page opens, click Create.
4
5
5. The Test Information page opens. Fill out the
Name Field with the name or subject of the test.
6. Fill out the Description Field with a description of
the test. For example “20 Questions True/False”.
6
7
7. Fill out the Instruction Field. Let test takers know
the parameters of the test such as time limits,
opportunities to skip questions, or if they can return
and finish the test later.
8. Once all of the fields have been completed, Click
Submit.
This will open the Test Canvas,
and begin the next step – Creation Settings.
47
UIW Department of Instructional Technology
Step 2 Creation Settings
Test Creation Settings are located on the Test Canvas Page. These settings are the
parameters for creating and administering test questions. Creation settings include:
Feedback-Allows the instructor to provide for correct or incorrect answers.
Images, Files and External Links- The instructor can include images, files and web
links as an integral part of questions and answers. Adding images will slow down the
testing process for students.
Question Metadata- Adding a category or keyword to a question allows you to search
and locate test questions for use in other tests.
Scoring- This feature allows you to set a point value or partial point credit for each
question within the test. Partial values are useful in multiple answer questions.
Display- Allows you to determine options for question order, view and numbering.
1. Click Creation Settings.
2. Choose the test creation options that best suit your
needs by checking or un-checking the boxes.
3. When finished, Click Submit.
the Test Canvas to Add Questions.
To return to
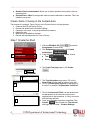
Step 3 Add Questions
There are three options for adding questions: Create Question, Reuse Question and Upload
Questions.
Create Question
The process for creating questions in Blackboard is relatively simple. Follow the same basic
steps below to create any type of question.
48
UIW Department of Instructional Technology
1
1. On the Test Canvas page, click the Create
Question button.
2
2. Choose True/False.
3
3. The Create /Edit Question page opens questions
and answers are completed here.
4. Set a Point Value.
5. Review your Options. Options are determined in
the Test Canvas.
6. Choose or type the Answer(s).
4
5
7. Click Submit.
6
8. After clicking Submit, the Test Canvas page reopens. Review the questions, answers and
feedback, ensuring that everything is correct.
9. If changes are necessary, click the Action Button,
9
10
and choose Edit
to open the
Create/Edit page and make changes.
10. If you decide to eliminate the question, click
Delete.
Additional Questions
1. If you want to add the same type of question, click
the Action Button,
and click Create Question
Above
or Create
Question Below.
2. If you want to add a different type of question,
choose a question type from the Create
2
Question menu.
3. Once all questions have been added, click OK
to deploy the test.
Reuse Question
The Reuse button allows you to generate a Question Set, create a Random Block of questions
or Find Questions from previous tests.
49
UIW Department of Instructional Technology
Question Set - Question Sets are groups of questions that can be presented in a
random fashion determined by the instructor. Instructors create a Question Set by
searching and selecting questions, determining the number of points per question and
then choosing the number of questions to display to the user.
Random Block - A Random Block is a group of questions retrieved from a Question
Pool. Questions are randomly retrieved from the Question Pool based on the question
type and the number of questions available. To use this option, you must first create a
Question Pool.
Find Questions - Questions are organized by the Criteria listed on the page. Use the
Criteria drop-down lists to search for questions to add to the test.
Create Question Set
The Question Set is an option for instructors who want to create a comprehensive final exam
drawn from concepts assessed in earlier tests. When the Question Set option is chosen,
Instructors are able to search a database of test questions used in previous tests, and test
questions located in question pools. They can select any or all of those questions, and insert
them into the test. There are two search options:
Browse Criteria – Instructors can narrow their search by selecting the following criteria
for their search: Note that Category, Topic, Level of Difficulty, and Keyword searches
can only be used if the instructor chose the Metadata option from the Test Canvas.
Pools
Tests
Question Types
Categories
Topics
Level of Difficulty
Keywords
Search for questions - The search can be narrowed by focusing the criteria search on
words or phrases to locate a test question.
1
1
2
1. Click Reuse Question.
2. Click Create Question Set.
3. The Create Question Set window opens.
50
UIW Department of Instructional Technology
4
5
10
6
11
7
8
9
4. A specific question may be located by typing a keyword in the Search current results window
and clicking GO.
5. Otherwise,
under Browse Criteria.
6. Click Expand All
7. Click All Tests
to view all of the Criteria Options.
to select questions from all administered tests.
8. Click the checkboxes
in the criteria area to choose which Pools, Tests or Question
Types will be browsed for test questions.
9. After each checkbox is selected, the results will appear on the right side of the page in the
Criteria Summary. Note that chosen tests and test questions are highlighted in yellow.
10. To see the full text of the question, click Custom Display
and select
Full Text.
11. Questions may be sorted by Question Text, Question Type, Source Name, and Source
Type, by clicking the links at the top of the Criteria Summary.
12. Once all of the test questions have been selected, click Submit.
13. On the next menu, click OK
to deploy the test.
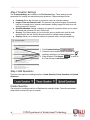
Create Random Block
A Random Block is a group of questions retrieved from a Question Pool, based on the question
type and the number of questions available in the pool.
51
UIW Department of Instructional Technology
1
1. Click Reuse Question.
2
2. Click Create Random Block.
3
4
3. Choose a Pool.
4. On the next page, click the checkboxes
Multiple Choice, etc.).
to choose the types of questions (True/False,
5. Once all of the test questions have been selected, click Submit.
6
7
6. The Test Canvas re-opens. You may add more questions by clicking Create, Reuse or
Upload.
7. Click OK
52
to deploy the test.
UIW Department of Instructional Technology
Find Questions
Use Find Question to search for a single test question based on specific criteria or keywords.
1
1. Click Reuse Question.
2. Click Find Questions.
2
4
5
3
3. Click checkboxes
in the criteria area to choose which Pool or Test will be searched.
4. A specific question may be located by typing a keyword in the Search current results
window and clicking GO.
Results will appear on the right side of the page in the
Criteria Summary. Note that chosen tests and test questions are highlighted in yellow.
5. To see the full text of the question, click Custom Display
and select
Full Text.
6. Once all of the test questions have been selected, click Submit.
7. Click OK
to deploy the test.
Upload Questions
The Upload Question option allows instructors to upload a block of questions prepared by a
textbook publisher. Questions can be downloaded directly from a CD-ROM, or a file located on
the computer. Be sure to note the location of the question files.
1. Click Upload Questions.
2. Click the Browse button to locate the question file.
3. Give the questions a point value.
1
3
53
2
4. Click Submit.
been added, click OK
Once all questions have
to deploy the test.
UIW Department of Instructional Technology
Step 4 Deploy the Test
1. On the Create Test page, choose a test from the
add test list
1
2. Click Submit
Availability page.
to open the Test
Step 5 Make the Test Available to Users
This is the most important step in the test creation process, as it will allow students to take the
test. This step can be completed as part of the creation process, or prior to the test
administration.
1. On the Test Information page, locate Test
Information, review the Name and Description of
the test that you entered when you created the
test. Make changes as necessary.
1
2. Open Test in new Widow - Choose Yes to open a
new browser window for the test.
2
3. Test Availability Options:
a. Make link available: If you are finished with
the test and want to make it available to your
students, select the Yes button
Otherwise,
students won't actually see the link to the
test and thus won't be able to take it.
3a
3c
3d
3e
3f
3g
54
3b
b. Add New Announcement: Choose Yes
to
Announce the test.
c. Allow multiple attempts: Select this option
to allow students to attempt the test as
often as necessary to achieve a certain score.
The Grade Center records the last score the
student received.
d. Force completion: This option requires
completing the test on the first attempt.
Students will not be allowed to save an
assessment and return to it later. This option
is not recommended, as it will close the test if
the student uses the Back button
e. Set timer: Select this option for a timed test.
Use the drop down boxes to allocate the time
allowed. This option provides students with a
running clock and a warning when time is up.
The student may finish the test past the time
allotment, with a notation in the Grade Center if
UIW Department of Instructional Technology
f.
the time limit is exceeded. If you are
administering a timed exam, you need to make
clear to your students if there is what the
penalty if they exceed the time limit.
If you want to limit the amount of time the test is
visible and available to students, select the
Display Until and/or Display After
checkboxes,
and click the clock
and
calendar
icons to select the day and time.
g. . Set password: For added security, it is
possible to set a password that students need
to enter before taking the test. Click the
4
checkbox,
and type a password. The
password is case sensitive.
4. Self-Assessment sends the test score to the
Grade Center. Choose an option by clicking the
checkbox.
5
5. Test Feedback allows the instructor to decide how
much feedback they provide to their students.
Choose one option by clicking a checkbox.
6a
6b
6c
6. Test Presentation
a. All at once This allows students to view all of
the questions before deciding which ones to
answer If the test/quiz is long, students using
dial-up services with time-outs for inactivity,
could possibly have problems completing the
test.
b. One at a Time This option allows the student
to view one question at a time on the screen.
This is the most secure option. Prohibit
Backtracking In conjunction with the option of
viewing one question at a time it is possible to
prevent students from returning to previous
questions that they have already answered.
c. Randomize Questions This option ensures
that each student sitting the test will view the
questions in a different order, the server
randomizes the order of the questions each
time the assessment is taken by students.
7. Once all options are chosen Click Submit.
Step 6 Review and Administer the Test
After completing all of the test settings:
1. Review the settings to make sure that the test is available at the designated time.
55
UIW Department of Instructional Technology
2. Review the test to ensure that answers match the questions and that the answers are
correct.
3. Review links to see that they load properly.
4. Once the review process is complete, make the test available or set a start date.
Create Question Pools
Once the pool shell is created, follow the procedures for establishing Creation Settings and
adding test questions on pages 5-7 of this tutorial.
Create the Pool Shell
1
2
1. In the Control Panel,
click Course Tools.
2. Choose Tests Surveys, and Pools.
3. On the following page, choose Build Pool.
4. The Create Test page opens, click Create.
4
5
5. The Test Information page opens. Fill out the
Name Field with the name or subject of the test.
6. Fill out the Description Field with a description of
the test. For example “20 Questions True/False”.
6
7
7. Fill out the Instruction Field. Let test takers know
the parameters of the test such as time limits,
opportunities to skip questions, or if they can return
and finish the test later.
8. Once all of the fields have been completed, Click
Submit.
56
UIW Department of Instructional Technology
Import Tests
Textbook publishers also create complete test formatted for the Blackboard interface. The
process for using one of these tests is very simple:
1
2
1. In the Control Panel,
click Course Tools
2. Choose Tests Surveys, and Pools.
5
4
3. On the following page, choose Import Test
4. On the next page, cllick Browse My Computer or Browse Course Files
to locate the file. Tests can be downloaded
directly from a CD-ROM, or a file located on the computer. Be sure to note the location of
the files.
5. Click Submit.
The test is preformatted, and will not require additional editing. However, you may want to edit
point values for individual questions. In addition, the Availability Options well need to be set.
Test Options
Edit Tests, Download and review test results from the Grade Center, disable screen printing use
the Respondus Test Builder, and Respondus Lockdown Browser.
57
UIW Department of Instructional Technology
Edit a Test
2
3
1. Click the Action button next to the test link
open the Edit Menu.
to
2. Choose Edit the Test
to add, edit,
delete or re-arrange questions. This option will open
the Test Canvas.
3. Choose Edit the Test Options
to make the test available or set Availability
Options.
4. Choose Delete
to remove a test.
4
Edit Point Values for Reused Questions
Since test questions are being copied from others tests, point values for each question may
differ from the point value of questions on the current test. The point value for reused questions
may be changed.
1
2
3
1. Once the questions have been added to the test click the checkbox
type (Random Block, Question Set)
next to the question
2. Change the point value for the question in the Points window.
3. Click Update.
58
UIW Department of Instructional Technology
Acquire and View Test and Survey Results
1
2
1. Click Control Panel.
2. In the Control Panel, locate Grade Center
3. Click Tests.
3
4. In the Grade Center, locate the test.
If a student has completed the test, a numeric
grade
indicates that a Test has been
completed.
5
A Checkmark
indicates that a Survey has
been completed.
4
An Exclamation Point
indicates that the
Test has been taken, but the instructor must
download the test results to grade an essay
or short answer question.
If a pencil and paper
appears in the
column, a student is either still taking the test, or
has not submitted the test properly.
5. Click the test name at the top of the column.
6. Click Download Results
6
59
UIW Department of Instructional Technology
7
7. A new page opens. DO NOT change any of the
Default settings.
8. At the bottom left of the page, Click to Download
Results.
9. A File Download option appears, click Open
9
or Save.
Survey results will
download in Excel format.
10. If a warning pops up, click Yes.
Disable Print Screen and Screen Copy on a Test
As an added tool for test security, you can add a string of HTML code to a Blackboard test to
disable the computer’s screen capture, copy, paste, and print functions to obtain a copy of the
test. When inserted in the instruction field, the code disables these functions as soon as the test
is attempted. The HTML code can be added to new or existing tests.
Add the Code to a New Test
1. With the Edit Mode ON,
choose the
Assignments Content Area.
2. The Assignments page opens, click Create
1
Assessment.
3. From the Create Assessment menu, choose Test
4. The Create Test page opens, click Create.
4
5. The Test Information page opens. Fill out the
Name Field with the name or subject of the test.
6. Fill out the Description Field with a description of
the test. For example “20 Questions True/False”.
5
6
7. In the Instruction Field locate the triangle
on
the left corner of the Instruction Toolbar (just
below the word "Normal" on the font menu). Click
the triangle to expand the toolbar.
7
8
60
8. Locate and click on the HTML icon.
9. Copy and paste the following line of HTML code in
UIW Department of Instructional Technology
the Instructions window.
<style media="print">body {display:none;visibility: hidden;}</style> <style
media="screen">body, html {-moz-user-select:none; height:95%;}</style> <script
type="text/javascript" src="http://support.uiwtx.edu/Blackboard/noCopy/noCopyr2.js"></script>
<body onkeypress="return noSelectAll(event);" onkeydown="return noSelectAll(event);"
onmousemove="stripSelected();"> noSelectAll(event);" onkeydown="return noSelectAll(event);"
onmousemove="stripSelected();">
You MUST be in HTML mode prior to pasting the script.
Be sure to include the carrot (<>) symbols.
The completed instruction section should look like this:
9
10. Click Submit.
61
to open the Test Canvas, and complete the test as normal
UIW Department of Instructional Technology
Add the Code to an Existing Test
1. With the Edit Mode ON,
choose the Assignments Content Area, and
locate the test.
1
2
2. Click the Action button next to the test link.
3
3. The Edit Menu opens. Choose Edit the
Test.
4. The Test Canvas page opens. Click the
4
5
Action button
5. Click Edit
next to Header.
6
7
8
6. Scroll Sown to the Instructions Field
62
UIW Department of Instructional Technology
7. Locate the triangle
on the left corner of the Instruction Toolbar (just below the word
"Normal" on the font menu). Click the triangle to expand the toolbar.
8. Locate and click on the HTML icon.
9. Copy and paste the following line of HTML code in the Instructions window.
<style media="print">body {display:none;visibility: hidden;}</style> <style
media="screen">body, html {-moz-user-select:none; height:95%;}</style> <script
type="text/javascript" src="http://support.uiwtx.edu/Blackboard/noCopy/noCopyr2.js"></script>
<body onkeypress="return noSelectAll(event);" onkeydown="return noSelectAll(event);"
onmousemove="stripSelected();"> noSelectAll(event);" onkeydown="return noSelectAll(event);"
onmousemove="stripSelected();">
You MUST be in HTML mode prior to pasting the script.
Be sure to include the carrot (<>) symbols.
The completed instruction section should look like this:
9
10. Click Submit.
to open the Test Canvas, and complete the test as normal
Respondus Assessment Builder
Respondus is a software tool that assists instructors in creating assessments. Respondus converts
documents created in rich text format (.rtf), or Microsoft Word (.docx) formats, and converts
them to a format suitable for uploading to Blackboard. Users may also create new tests, replace
existing tests, or create question pools. Respondus can also be used to print tests and answer
keys. In addition to creating tests, users may also spell check tests and answers, add images and
media, or use a question to tests.
Types of Questions
Only eight question types are available for use with Respondus:
Question Type
Description
Up to 20 answer choices, but only one correct answer can (and must) be
Multiple Choice
selected.
With Surveys, “True and False” is replaced with “Yes and No”.
True or False
Essay/Short
Answer
Matching
Ordering
Fill in the Blank
Multiple Answer
63
Allow students to enter complete sentences or paragraphs for their answer.
Answers are graded manually.
Require students to match items from two columns.
Answers are provided in a specific order or series.
Students to enter a word, short phrase, or string of characters. Students
must give an answer that exactly matches one of the answers provided by
the teacher. You are permitted to enter multiple forms of the correct
answer.
Students can (and generally should) select more than one correct answer.
UIW Department of Instructional Technology
Algorithmic
Students to apply a mathematical formula to answer the question.
Download Respondus
The licensing information listed below is entered each time the Respondus software is installed.
Institution Name
University of the Incarnate Word
Local Support Contact
Kenneth Rogers ([email protected])
Installation Password
ZR021375037-241612815 (Password valid through:
July 31st 2010)
1. On the Blackboard homepage, locate and click on
the Download Respondus Link.
1
2. Click Run,
and then follow the prompts to
complete the installation.
2
Create a Test as a New Respondus File
1. Click the Respondus icon.
2
2. From the Start menu, click Create
a new file.
3
to create
3. Enter a file name and a description.
4. Choose Exam or Survey.
4
5. Click OK.
5
6
7
8
9
6. The Edit menu Opens. Choose a Question Type.
7. Type the question and title.
8. Type the answer(s).
9. Select the correct answer.
10. Type a point value.
11. Select the location for the question.
12. Repeat the process until all questions are added.
10
11
64
UIW Department of Instructional Technology
65
UIW Department of Instructional Technology
Import Questions from Microsoft Word 2007
Format Questions
Questions are numbered followed by a period or parenthesis. Place a space after the period or
parenthesis and type the question. For Example:
1. What is the capital of Texas?
1) What is the capital of Texas?
Format Answers
Type answers with a letter followed by a period and the answer. Correct answers are denoted
by an asterisk (*) directly in front of the correct answer. For Example:
*a. Austin
*a) Austin
The answers can also be listed at the end of the file. This list must be formatted with the
question number, and answer choice answer. All answers must be placed under the heading
Answers. For Example:
1. *a. Austin
1) *a) Austin
1. Click the Respondus icon.
2. From the Start menu, click Import Questions
to create a new file.
2
3
4
3. Choose a file type (Microsoft Word 2007)
6
5
8
7
9
10
4. Click Browse
to locate the document.
5. In the menu Create a new document named: type
a new document name.
6. Choose Exam or Survey.
7. Click Use stem plus question number.
8. Type a stem (test-001).
9. Click Preview
to review the test.
10. Click Finish.
66
UIW Department of Instructional Technology
Publish a Respondus Test
1. Click the Respondus icon.
2. From the Start menu, click the Preview and
Publish tab.
2
3
3. Click the Preview the File
button to preview
the test. This is an opportunity to review the test for
correct answers, images, and content.
4
4. Click the Preview & Publish tab again.
5. Click the Publish Wizard button.
5
6
7
6. Choose a Publishing Type:
Single Course
Batch Course
Pool
7. The Blackboard Server window will have a server
address. If not, change the setting to Add New
Server.
8. Click Next.
8
8
9. On the next page, click No.
10. Click Next.
10
11
15
11. Review the instructions, and type in the server and
course settings.
12
13
14
12. Click Extract.
13. Type your Username and Password in the spaces
provided.
14. Type the Test Title in the description window.
15. Click OK.
67
UIW Department of Instructional Technology
16
16. Review the server information from step 6,
17. Click Next.
17
18
19
20
18. Click the drop down list to choose the course to
add the test.
19. Choose the test settings.
20. Click Next.
TWICE
21. When the status changes to Completed
Successfully, the test has been successfully
uploaded. Login to your course and open the test to
modify the test settings and make the test available.
The Respondus LockDown Browser
The Respondus LockDown Browser increases the security of online testing for Blackboard
administered tests and quizzes. When installed, the Lockdown Browser prevents:
Access the address bar on their browser or the start button on their desktop.
Access to the function keys and right-click options using the mouse.
Exiting the test until the test is complete.
Assessment attempts without the LockDown browser installed.
Access to other areas of Blackboard.
Screen captures.
Any added test features such as images, external files, or links to other websites are still
available. External links attached to tests open in another LockDown Browser.
Install the Respondus LockDown Browser
2
1. Log into Blackboard.
2. On the course homepage, locate the banner
Respondus Lockdown Browser.
3. Choose Windows Setup
3
68
UIW Department of Instructional Technology
4. Review the warning and click an Install Link
4
5. Select Windows
5
6. The Download menu opens, click Save.
and follow the prompts to continue the download
7. Choose Click to Install, and follow the prompts to
complete the installation
8. The LockDown Browser icon installs on the desktop.
7
Create (enable) a test with the LockDown Browser
After a test has been created and deployed, it can now be added to the Respondus LockDown
browser.
1
1. In the Control Panel, select Respondus
Lockdown Browser from Course Tools.
2
3
4
2. Choose a test from the list and click Modify
Settings.
3. On the next page click the button for Require
Respondus LockDown browser.
4. Add a password if necessary. (Note that if a test is
password-protected, remove the password from the
Modify Test options, and add a password here).
5. Click Submit.
69
UIW Department of Instructional Technology