1
User Reference Manual
Retail 7
Information in this document is subject to change without notice. Companies, names and data used in examples herein are fictitious or used by
permission. No part of this document may be reproduced or transmitted in any form or by any means, electronic or mechanical, for any purpose,
without the express written permission of IT Retail, Inc.
© 1993-2010 ITRETAIL, Inc. All rights reserved.
Printed in the United States of America
RETAIL™ is a registered trademark of ITRETAIL, Inc.
Microsoft, Access, Visual Basic, MS SQL Server, Windows and Windows NT are registered trademarks of Microsoft Corporation.
Crystal Reports for Visual Basic is a registered trademark of Crystal Computer Services, Inc.
RETAIL 7 ™User Manual
TABLE OF CONTENTS
INTRODUCTION ........................................................................................................................................................ 11
INTENDED AUDIENCE ................................................................................................................................................. 11
PURPOSE OF DOCUMENT .......................................................................................................................................... 11
GUIDELINES FOR USE ................................................................................................................................................ 11
OVERALL FUNCTIONAL OVERVIEW ..................................................................................................................... 12
INTRODUCTION .......................................................................................................................................................... 12
HIGH LEVEL FUNCTIONAL OVERVIEW DIAGRAM ............................................................................................. 13
FRONT-END FUNCTIONAL OVERVIEW ................................................................................................................ 14
INTRODUCTION .......................................................................................................................................................... 14
FUNCTIONAL OVERVIEW DIAGRAM ............................................................................................................................ 15
FRONT END FUNCTIONS - HOW TO … ................................................................................................................ 16
INTRODUCTION .......................................................................................................................................................... 16
SIGNING ON .............................................................................................................................................................. 17
MAIN CHECKSTAND FORM/RECEIPT .......................................................................................................................... 18
Main Checkstand Form ...................................................................................................................................... 18
Stand-Alone Mode .............................................................................................................................................. 19
Cash Drawer/Printer Errors ................................................................................................................................ 20
Checkstand Receipt ............................................................................................................................................ 20
POS CONFIGURATION............................................................................................................................................... 22
SECURITY FEATURES ................................................................................................................................................ 22
KEYBOARD USE ........................................................................................................................................................ 22
KEYBOARD USE WITH REGULAR KEYBOARD .............................................................................................................. 23
TRANSACTION DISCOUNTS AND SURCHARGES .......................................................................................................... 27
Line Item Discounts ............................................................................................................................................ 28
Entering a % Discount for an Item .................................................................................................................................... 28
Entering a Dollar Amount Discount for an Item................................................................................................................ 28
Customer Specific Discounts ............................................................................................................................. 29
Removing Discount % for entire order for a Customer discount ..................................................................................... 29
Order Level Discounts and Surcharges............................................................................................................. 29
Entering a Discount % for entire order for products categorized as “A” .......................................................................... 29
Entering a Discount % for entire order for products categorized as “B” .......................................................................... 29
Entering a Surcharge % for entire order for products categorized as “A” ....................................................................... 30
Entering a Surcharge % for entire order for products categorized as “B” ....................................................................... 30
CUSTOMER PROCESSING .......................................................................................................................................... 31
Tracking Customer Transactions ....................................................................................................................... 31
Adding Customers .............................................................................................................................................. 32
CHECKSTAND FUNCTIONS ......................................................................................................................................... 32
Overall Order Functions...................................................................................................................................... 32
Tax exempt an entire order............................................................................................................................................... 32
Entering a Salesperson ID ................................................................................................................................................ 33
Customer Search .............................................................................................................................................................. 33
Convert Amount to a Foreign Currency ........................................................................................................................... 33
Processing WIC Items ...................................................................................................................................................... 33
Accepting/Canceling HALOS/LALOS Limits.................................................................................................................... 33
Re-print Checkstand Receipt............................................................................................................................................ 33
Clear Message from Screen ............................................................................................................................................. 34
Open Cash Drawer ........................................................................................................................................................... 34
Canceling a Transaction ................................................................................................................................................... 34
Line Item Functions ............................................................................................................................................. 34
Age Verification ................................................................................................................................................................. 34
Repeating a Transaction ................................................................................................................................................... 35
Scanning a Product ........................................................................................................................................................... 35
Keying in a Product ........................................................................................................................................................... 35
Keying in a Price and Department .................................................................................................................................... 36
Keying in a Price and Section ........................................................................................................................................... 36
Manually Overriding a Price.............................................................................................................................................. 36
Overriding a Price on a Scanned Product ........................................................................................................................ 36
RETAIL USER REFERENCE MANUAL – RETAIL 7
3
RETAIL 7 ™User Manual
TABLE OF CONTENTS
Entering Multiple Quantities for Keyed Items ................................................................................................................... 36
Entering Multiple Quantities for Scanned Items ............................................................................................................... 37
Manually Entering Unit of Measure for a Product ............................................................................................................ 37
Manually Entering a Weighted Item (Department or Section) ......................................................................................... 37
Entering a Weighted Product (UPC) ................................................................................................................................ 37
Deducting Tare Weight from a Weighted Product ........................................................................................................... 37
Manually Deducting Tare Weight from a Product ............................................................................................................ 38
Overriding a Price on a Weighted Product ....................................................................................................................... 38
Splitting up Multi-Pack Products ....................................................................................................................................... 38
Toggle a Product‟s Tax Status.......................................................................................................................................... 38
Scanning a Coupon with a Barcode ................................................................................................................................. 38
Keying in a Department Coupon ...................................................................................................................................... 39
Entering a Paid Out (that is miscellaneous payment from the till, for example lottery winnings) ................................... 39
Entering a Paid in (that is Non Product Sale - for example Postage Stamps)................................................................ 39
Entering a Received on Account (that is Payment on Customer Charge)...................................................................... 39
Verifying the Price of a Product (UPC) ............................................................................................................................. 40
Verifying the Price of a Product (Description) .................................................................................................................. 40
TENDERING ............................................................................................................................................................... 41
Cash Tendering................................................................................................................................................................. 41
Check Tendering (applies to any tender that has a “CK” tender type)............................................................................ 42
Food Stamp Tendering ..................................................................................................................................................... 43
Credit Card Tendering ...................................................................................................................................................... 43
Debit Card Tendering ....................................................................................................................................................... 44
Manual Electronic Tender ................................................................................................................................................. 46
In Store Charge Tendering ............................................................................................................................................... 46
VOIDING AND REFUNDING.......................................................................................................................................... 47
Voiding the Previous item ................................................................................................................................................. 47
Voiding an Earlier Product ................................................................................................................................................ 47
Voiding an Earlier Product by Scrolling ............................................................................................................................ 47
Voiding a Weighted Product ............................................................................................................................................. 47
Voiding a Product to a Section ......................................................................................................................................... 47
Voiding an Entire Sale....................................................................................................................................................... 47
Refunding a Product to a Department.............................................................................................................................. 47
Refunding a Product through Key Entry........................................................................................................................... 48
Refunding a Product through Scanned Entry .................................................................................................................. 48
Refunding Multiple Quantities of a Product ...................................................................................................................... 48
Refunding a Product to a Section ..................................................................................................................................... 48
MANAGER FUNCTIONS............................................................................................................................................... 49
Option 1 - Loan.................................................................................................................................................................. 49
Option 2 - Pickup ............................................................................................................................................................... 50
Option 3 - Check List......................................................................................................................................................... 51
Option 4 - Till Status .......................................................................................................................................................... 51
Option 5 - Check Override ................................................................................................................................................ 51
Option 6 - Limit Override ................................................................................................................................................... 52
Option 7 - Resume or Suspend ........................................................................................................................................ 53
Option 8 - Media Swap ..................................................................................................................................................... 54
Option 9 - Maintain Data - Add Customer ........................................................................................................................ 55
Option 9 - Maintain Data - Add Product ........................................................................................................................... 55
Training Mode ................................................................................................................................................................... 56
LOADING PICTURES AND VIDEOS ............................................................................................................................... 56
RETAIL™ SYSTEM MANAGER.................................................................................................................................. 57
BACK END FUNCTIONAL OVERVIEW ................................................................................................................... 58
INTRODUCTION .......................................................................................................................................................... 58
BACK END FUNCTIONAL OVERVIEW DIAGRAM ........................................................................................................... 59
GENERAL TOPICS ...................................................................................................................................................... 60
Multiple Windows ................................................................................................................................................ 60
User Activity Tracking ......................................................................................................................................... 60
BACK END FUNCTIONS - HOW TO … ................................................................................................................... 61
INTRODUCTION .......................................................................................................................................................... 61
SIGNING ON .............................................................................................................................................................. 62
MANAGE CUSTOMERS ............................................................................................................................................... 63
RETAIL USER REFERENCE MANUAL – RETAIL 7
4
RETAIL 7 ™User Manual
TABLE OF CONTENTS
Maintain Customer Data ..................................................................................................................................... 63
Customer Rewards ............................................................................................................................................. 64
Frequent Shopper Points.................................................................................................................................... 65
ELECTRONIC COUPONS............................................................................................................................................. 66
TRACK BAD CHECKS ................................................................................................................................................. 71
TRACK CUSTOMER SALES ......................................................................................................................................... 72
MANAGE IN-STORE CHARGES ................................................................................................................................... 73
MANAGE PRODUCTS ................................................................................................................................................. 74
MAINTAIN PRODUCTS DATA....................................................................................................................................... 74
MASS PRODUCT CHANGES ....................................................................................................................................... 77
TRACK PRODUCT MOVEMENT ................................................................................................................................... 78
ANALYZE PRODUCT CATEGORIES.............................................................................................................................. 78
TRACK PRODUCT SALES ........................................................................................................................................... 79
ENTER PRODUCT BATCHES....................................................................................................................................... 79
MANAGE INVENTORY ................................................................................................................................................. 81
ENTER INVENTORY COUNT ........................................................................................................................................ 81
ORDER GOODS ......................................................................................................................................................... 83
RECEIVE GOODS ....................................................................................................................................................... 84
ANALYZE INVENTORY ................................................................................................................................................ 85
ALLOWANCES/BILL BACKS......................................................................................................................................... 86
MANAGE EMPLOYEES................................................................................................................................................ 87
ENTER EMPLOYEE DATA ........................................................................................................................................... 87
Review Checker Statistics .................................................................................................................................. 88
Monitor Tills ......................................................................................................................................................... 88
Monitor Checkstands .......................................................................................................................................... 89
BOOKKEEPING & ACCOUNTING.................................................................................................................................. 90
Make Deposits .................................................................................................................................................... 90
Balance Tills ........................................................................................................................................................ 91
Safe Statistics ...................................................................................................................................................... 91
Balancing Overview ............................................................................................................................................ 92
SYSTEM ADMINISTRATION .................................................................................................................................... 93
CLOSE THE STORE .................................................................................................................................................... 93
View System Log Files ....................................................................................................................................... 94
BACKEND DETAIL DOCUMENTATION .................................................................................................................. 95
PURPOSE .................................................................................................................................................................. 95
CUSTOMER MAINTENANCE................................................................................................................................... 97
Toolbar................................................................................................................................................................. 99
Customer Photo .................................................................................................................................................. 99
Customer Address ............................................................................................................................................100
Customer Area ..................................................................................................................................................100
Customer Category ...........................................................................................................................................101
Customer Link ...................................................................................................................................................101
RETAIL™ Search .............................................................................................................................................102
Redeem Customer’s Frequent Shopper Points ..............................................................................................102
IN-STORE CHARGE MAINTENANCE ...........................................................................................................................103
Toolbar...............................................................................................................................................................105
New (Edit) In-store Charges .............................................................................................................................105
New (Edit) Payments ........................................................................................................................................107
New Credit Memos ...........................................................................................................................................108
In-store Charge Finance ...................................................................................................................................109
Customer In-store Charge Attributes ...............................................................................................................111
In-store Charge Terms......................................................................................................................................112
Customer Memo ...............................................................................................................................................113
BAD CHECK MAINTENANCE .....................................................................................................................................114
Toolbar...............................................................................................................................................................115
Customer Bad Checks......................................................................................................................................116
RETAIL USER REFERENCE MANUAL – RETAIL 7
5
RETAIL 7 ™User Manual
TABLE OF CONTENTS
Set Check Return Fee ......................................................................................................................................116
ELECTRONIC COUPONS...........................................................................................................................................117
RETAIL™ Search .............................................................................................................................................120
Target Customers .............................................................................................................................................120
Toolbar...............................................................................................................................................................121
Coupon Settings................................................................................................................................................122
Print Coupons Report .......................................................................................................................................123
Delete Inactive Coupons ..................................................................................................................................123
ELECTRONIC COUPON MOVEMENT..........................................................................................................................124
Toolbar...............................................................................................................................................................125
Electronic Coupon Movement Report..............................................................................................................125
FREQUENT SHOPPER RANGES ................................................................................................................................126
RESET FREQUENT SHOPPER POINTS ......................................................................................................................127
SYNCHRONIZE CHECKSTANDS WITH CUSTOMERS / ELECTRONIC COUPONS ............................................................128
PRINT CUSTOMER REPORT .....................................................................................................................................129
PRINT CUSTOMER BAD CHECKS REPORT................................................................................................................129
IN STORE CHARGE REPORT - AGING .......................................................................................................................130
CHARGE ACTIVITY REPORT .....................................................................................................................................131
CHARGE BALANCE DETAIL REPORT.........................................................................................................................132
CHARGE BALANCE SUMMARY REPORT....................................................................................................................132
IN-STORE CHARGE STATEMENT ..............................................................................................................................133
CUSTOMER FOCUS..................................................................................................................................................134
Toolbar...............................................................................................................................................................135
Show Times Customer Shops the Store .........................................................................................................136
Show Customer’s Favorite Cashiers ...............................................................................................................136
Show Customer’s Favorite Products ...............................................................................................................137
Show Customer’s Discounts ............................................................................................................................137
Show the Departments Shopped by the Customer ........................................................................................138
Show Customer’s 12-Week Department Distribution .....................................................................................138
Customer Focus Report ...................................................................................................................................139
INVENTORY COUNT .................................................................................................................................................141
Toolbar...............................................................................................................................................................142
Inventory Count Report.....................................................................................................................................142
OPEN A NEW/REVIEW A PURCHASE ORDER ............................................................................................................143
Toolbar...............................................................................................................................................................144
P. O. Adjustments .............................................................................................................................................145
Purchase Order Document...............................................................................................................................146
Multiple Vendor Cost.........................................................................................................................................147
Find P.O.............................................................................................................................................................147
Cost Calculator ..................................................................................................................................................148
RECEIVE AN INVOICE ...............................................................................................................................................148
Toolbar...............................................................................................................................................................150
Select an Invoice ...............................................................................................................................................151
Invoice Document .............................................................................................................................................151
INVENTORY ANALYSIS..............................................................................................................................................152
Calculations .......................................................................................................................................................153
Toolbar...............................................................................................................................................................153
Inventory Analysis Report.................................................................................................................................153
DSD DISCREPANCIES .............................................................................................................................................154
ALLOWANCE/BILL BACKS.........................................................................................................................................155
Toolbar...............................................................................................................................................................156
Allowance/Bill Back Reports .............................................................................................................................157
PRINT STOCK ON HAND REPORT .............................................................................................................................158
SETUP REASON CODES ..........................................................................................................................................159
PRINT TOTAL INVOICES BY DEPARTMENT ................................................................................................................159
PRINT ALLOWANCES BY VENDOR ............................................................................................................................160
PRINT POS BY VENDORS ........................................................................................................................................161
PAID/UNPAID INVOICES BY VENDORS ......................................................................................................................162
SHOW STORE SALES...............................................................................................................................................164
RETAIL USER REFERENCE MANUAL – RETAIL 7
6
RETAIL 7 ™User Manual
TABLE OF CONTENTS
Toolbar...............................................................................................................................................................165
Store Sales Report............................................................................................................................................166
Store Sales Graph ............................................................................................................................................167
Store Sales Memo ............................................................................................................................................167
Store Sales Taxes.............................................................................................................................................168
Store Sales Taxes (Detail) ................................................................................................................................169
Store Sales Tax Detail Report ..........................................................................................................................169
Aggregate Store Sales Report .........................................................................................................................170
SHOW PRODUCT SALES ..........................................................................................................................................171
Tool Bar .............................................................................................................................................................172
Product Sales Report........................................................................................................................................173
Sales Filter .........................................................................................................................................................173
SHOW PRODUCT MOVEMENT ..................................................................................................................................174
Toolbar...............................................................................................................................................................175
Product Movement Report ...............................................................................................................................175
SHOW CUSTOMER SALES........................................................................................................................................176
Toolbar...............................................................................................................................................................177
Sales Filter .........................................................................................................................................................177
Customer Group ...............................................................................................................................................178
Customer Group - Buttons ...............................................................................................................................178
Customer Sales Report ....................................................................................................................................179
WEEKLY BALANCE SUMMARY ..................................................................................................................................179
PRODUCT MAINTENANCE ........................................................................................................................................182
Toolbar...............................................................................................................................................................184
Product Pricing Methods ..................................................................................................................................186
Product Grouping Updates ...............................................................................................................................190
Pending Products..............................................................................................................................................191
Product Groups .................................................................................................................................................191
Product Pricing Levels ......................................................................................................................................192
Product Additional Vendors ..............................................................................................................................192
Product Inventory ..............................................................................................................................................193
Product Kits .......................................................................................................................................................194
Export Labels ....................................................................................................................................................195
Price History ......................................................................................................................................................196
Coupons Triggered ...........................................................................................................................................196
Tab Ordering .....................................................................................................................................................197
Product Settings ................................................................................................................................................197
RETAIL™ Search .............................................................................................................................................198
Cost Calculator ..................................................................................................................................................199
Product Memo ...................................................................................................................................................200
Product Miscellaneous......................................................................................................................................201
Picture Browser .................................................................................................................................................201
QUICK ADD/QUICK EDIT ..........................................................................................................................................202
PRODUCT GROUP MAINTENANCE ............................................................................................................................203
Toolbar and Form Buttons ................................................................................................................................204
Product Group Report.......................................................................................................................................204
MASS PRODUCT CHANGES .....................................................................................................................................205
Toolbar...............................................................................................................................................................207
Print Mass Product Changes ...........................................................................................................................207
ANALYZE PRODUCT CATEGORIES............................................................................................................................208
Note: ..................................................................................................................................................................208
Toolbar...............................................................................................................................................................208
PRODUCT BATCHES MAINTENANCE .........................................................................................................................209
Toolbar...............................................................................................................................................................212
Print Product Batches Report ...........................................................................................................................213
Apply Batch .......................................................................................................................................................214
Search Product Batch .......................................................................................................................................214
Create New Batch .............................................................................................................................................214
Review Related Batches ..................................................................................................................................215
RETAIL USER REFERENCE MANUAL – RETAIL 7
7
RETAIL 7 ™User Manual
TABLE OF CONTENTS
PRINT AD/BATCH MARKDOWN REPORT...................................................................................................................216
BATCH PRIORITY MANAGEMENT ..............................................................................................................................217
REPORTS ................................................................................................................................................................218
PRINT LABELS .........................................................................................................................................................219
PRINT MIX-MATCH REPORT ....................................................................................................................................219
PRINT PRODUCT PRICE CHANGES...........................................................................................................................220
SYNCHRONIZE CHECKSTANDS WITH PRODUCTS ......................................................................................................221
POWER EDIT ...........................................................................................................................................................222
TILL STATISTICS AND BALANCING ............................................................................................................................225
Toolbar...............................................................................................................................................................226
Select an Employee ..........................................................................................................................................226
Till Statistics Report...........................................................................................................................................228
Till Status Report ...............................................................................................................................................228
SAFE STATISTICS AND BALANCING ..........................................................................................................................229
Toolbar...............................................................................................................................................................230
Safe Statistics Report .......................................................................................................................................231
Format Safe Statistics Label.............................................................................................................................231
Find Records .....................................................................................................................................................232
Safe Audit Report ..............................................................................................................................................232
Safe Adjustments ..............................................................................................................................................233
MAKE / REVIEW A BANK DEPOSIT ............................................................................................................................233
Toolbar...............................................................................................................................................................235
Deposit Report ..................................................................................................................................................235
Find Deposit ......................................................................................................................................................236
Deposit Memo ...................................................................................................................................................236
BALANCING OVERVIEW ............................................................................................................................................237
Tool Bar .............................................................................................................................................................238
Balancing Overview Report ..............................................................................................................................238
Bookkeeping Memo ..........................................................................................................................................239
Discount & Coupon Summary..........................................................................................................................240
CASHIER ANALYSIS .................................................................................................................................................240
CASHIER PERFORMANCE.........................................................................................................................................241
CASHIER PERFORMANCE EVALUATION ....................................................................................................................242
CASHIER PERFORMANCE EVALUATION: SET POINT VALUES ....................................................................................243
MONITOR TILLS .......................................................................................................................................................243
Toolbar...............................................................................................................................................................244
Print Monitor Tills Report ..................................................................................................................................244
Select a Tender .................................................................................................................................................245
Pickups & Loan-Ins ...........................................................................................................................................246
Pickup Slip or Loan-In Slip Reports .................................................................................................................246
MONITOR CHECKSTANDS ........................................................................................................................................247
PRINT EFT CHARGES REPORT................................................................................................................................248
PRINT FRONT END SERVICE REPORT ......................................................................................................................248
PRINT FRONT END SERVICE REPORT (CONTINUED).................................................................................................249
PRINT REGISTER PRODUCTIVITY REPORT ...............................................................................................................250
PRINT TRANSACTIONS BY REASON REPORT ............................................................................................................250
PRINT SALES PERSON PRODUCTIVITY REPORT .......................................................................................................251
ELECTRONIC JOURNAL ............................................................................................................................................252
Electronic Journal Report .................................................................................................................................254
CLOSE STORE .........................................................................................................................................................256
VIEW SYSTEM LOG FILES ........................................................................................................................................257
NOTIFY CHECKSTANDS WITH SERVER INFORMATION ...............................................................................................258
CLEAR CHECKER LOGIN ENTRIES............................................................................................................................258
RESET PRODUCT MOVEMENT .................................................................................................................................258
POS PARTITIONED DISPLAY DIMENSIONS ...............................................................................................................259
SYSTEM INFORMATION ............................................................................................................................................261
POS INFORMATION .................................................................................................................................................263
SECURITY ADMINISTRATION.....................................................................................................................................267
Checkstand Functions ......................................................................................................................................267
RETAIL USER REFERENCE MANUAL – RETAIL 7
8
RETAIL 7 ™User Manual
TABLE OF CONTENTS
Manager Functions ...........................................................................................................................................268
Toolbar...............................................................................................................................................................269
Reason Codes ..................................................................................................................................................269
SYNCHRONIZE CHECKSTANDS WITH SETUP.............................................................................................................270
WIRELESS SETTINGS...............................................................................................................................................270
EMPLOYEE MAINTENANCE.......................................................................................................................................272
Reset Password ................................................................................................................................................273
Toolbar...............................................................................................................................................................273
SECURITY ADMINISTRATION.....................................................................................................................................274
Assigning security to Front End Transaction Keys..........................................................................................274
Assigning security to Front End Manager functions........................................................................................274
DEPARTMENT MAINTENANCE...................................................................................................................................275
Toolbar...............................................................................................................................................................276
Department Report ...........................................................................................................................................276
SECTION MAINTENANCE ..........................................................................................................................................277
Toolbar...............................................................................................................................................................278
Sections Report.................................................................................................................................................278
TENDER MAINTENANCE ...........................................................................................................................................279
Toolbar...............................................................................................................................................................281
Set Defaults .......................................................................................................................................................281
Select a Tender Form .......................................................................................................................................282
Currency Maintenance Form............................................................................................................................282
Tenders Report .................................................................................................................................................283
VENDOR MAINTENANCE ..........................................................................................................................................283
Toolbar...............................................................................................................................................................285
Find Vendor .......................................................................................................................................................285
Vendor Up-charge.............................................................................................................................................286
Vendor Report ...................................................................................................................................................286
TEMPLATES MAINTENANCE .....................................................................................................................................287
PROFILE MAINTENANCE...........................................................................................................................................288
Assigning Profiles to Back End menus ............................................................................................................288
SCHEDULE MAINTENANCE .......................................................................................................................................288
REPORTING SERVICES ............................................................................................................................................289
PRINT EMPLOYEE REPORT ......................................................................................................................................292
SYNCHRONIZE CHECKSTANDS WITH CUSTOMERS/EMPLOYEES ...............................................................................292
SYNCHRONIZE CHECKSTANDS WITH ALL TABLES.....................................................................................................293
APPENDICES ...........................................................................................................................................................294
APPENDIX A - INITIALIZING THE SYSTEM .........................................................................................................294
Introduction ........................................................................................................................................................294
Step 1- Setup System Setup Information ........................................................................................................294
Setup POS Information .....................................................................................................................................295
Setup Receipt Banner.......................................................................................................................................295
Setup Savings Messages .................................................................................................................................296
Setup Totals ......................................................................................................................................................296
Setup Taxes ......................................................................................................................................................296
Tax Table Setup .............................................................................................................................................................. 297
Setup Discounts ................................................................................................................................................298
Step 2 - Setup Maintenance Information .........................................................................................................299
Step 3 - Setup Products Information ................................................................................................................301
Step 4 - Setup Safe Balance ............................................................................................................................303
Step 5 – Store Close .........................................................................................................................................304
Finish .................................................................................................................................................................304
APPENDIX B – RUNNING A 24-HOUR STORE ...................................................................................................305
Overview............................................................................................................................................................305
Setup..................................................................................................................................................................305
Special Considerations .....................................................................................................................................305
RETAIL USER REFERENCE MANUAL – RETAIL 7
9
RETAIL 7 ™User Manual
TABLE OF CONTENTS
Special Pricing ................................................................................................................................................................. 305
Checkstand Operation ......................................................................................................................................306
Checkstand Screen......................................................................................................................................................... 306
Store Close ...................................................................................................................................................................... 306
Stand Alone ..................................................................................................................................................................... 307
Back End Operation ..........................................................................................................................................307
Store Close ...................................................................................................................................................................... 307
Manually Changing the Processing Date ....................................................................................................................... 308
APPENDIX C – FOREIGN CURRENCIES.............................................................................................................309
Overview............................................................................................................................................................309
Setup..................................................................................................................................................................309
Currency Maintenance.................................................................................................................................................... 309
Tender Setup................................................................................................................................................................... 309
Checkstand Operation ......................................................................................................................................310
Example 1........................................................................................................................................................................ 310
Example 2........................................................................................................................................................................ 311
Back End Operation ..........................................................................................................................................311
Currency Conversion ...................................................................................................................................................... 312
APPENDIX D – EFT PROCESSING.......................................................................................................................313
CONCORD - INTRODUCTION .....................................................................................................................................314
Concord – Transaction Flow ............................................................................................................................314
Concord – RETAIL™ Host Program................................................................................................................315
Concord – Response Mapping ........................................................................................................................315
CONCORD WEB - INTRODUCTION.............................................................................................................................316
INGENICO - INTRODUCTION ......................................................................................................................................317
APPENDIX E- REPORT SAMPLES .......................................................................................................................318
RETAIL USER REFERENCE MANUAL – RETAIL 7
10
RETAIL 7™ User Manual
INTRODUCTION
Introduction
The introduction of the technical document follows:
Intended Audience
This document is intended to provide the reader with a technical overview of the RETAIL™ system developed
by IT RETAIL, INC. This document is geared towards information technology professionals who wish to gain an
in-depth understanding of the technical foundation supporting the RETAIL™ system.
Purpose of Document
The purpose of this document is to help the reader gain a technical perspective of RETAIL™. IT RETAIL, INC.
has endeavored to provide a document that allows the reader to gain an insight into then RETAIL™ system.
This document contains the following:
Functional Overview Diagrams
Technical Overview Diagrams
Data Flow Diagrams for key system processes
Entity Relationship Diagram
Database Schemas
Object Definitions (Classes) Used by RETAIL™
Programming Standards
Guidelines for Use
In order to help you locate information quickly, this document is organized in the following sections:
Overall Functional Overview - provides a functional and technical overview of the system.
Database Overview - provides entity relationships, data model, definition of stored procedures,
and schema of database in RETAIL™.
System Flows - provides data flows of key processes contained in the system.
Programming Reference - provides programming standards and DLL documentation.
This document should be used in conjunction with other documentation available for RETAIL™, which includes
User Reference Manuals and Installation Manuals.
RETAIL USER REFERENCE MANUAL – RETAIL 7
11
RETAIL 7™ User Manual
OVERALL FUNCTIONAL OVERVIEW
Overall Functional Overview
Introduction
RETAIL™ consists of three main modules – Front End, Back End, and Wireless. The Functional Overview
diagrams contained in the following pages provides an overview of the functions supported by RETAIL™. The
functions supported by the Front End, Back End, and Wireless modules are as follows:
Front End
Customer Purchases: Captures the register transactions for customer orders.
Register Management: Complete management functions at the register including cash loan-ins,
cash pick-up, running register reports (for example, till status, list of checks), overriding a check,
media swaps, adding customers, adding products, and setting up the register in training mode.
Interface to critical devices: Support of the receipt printer, cash drawer, scanner/scale, and
ATM/Credit Card Pin Pad are some of the critical devices that are interfaced from RETAIL™.
Back End
Store Management: Manage customers, employees, and products; complete product price
changes; import price changes from a wholesaler; manage purchase orders, and invoices;
monitor and manage tills; complete safe balancing; manage bank deposits.
Store Trends: Analyze store sales by department, product, group of products or customer for a
given time period; track product movement for a given time period filter data to analyze specific
areas.
Personnel Management: Set up employee data; monitor checkstands as orders are processed
from the Back End system; review till statistics and balancing; review Front End service levels for
each checker; review register productivity for a given time period; review transactions by
salesperson.
System Administration: Set up tenders, set up departments, sections and vendors; set up
system security; complete the store close process; set up system limits; set up store information
(for example, company name, receipt banners).
Wireless
Wireless Functions: Shelf Audit, Inventory Count, DSD receiving, and Ordering.
The Technical Overview diagram, which follows the functional overview diagrams, gives a high level overview
of the technical composition of RETAIL™. RETAIL™ is a client-server based system developed using
Microsoft® development tools. The Front End and Back End modules were developed using Microsoft® Visual
Basic version 6.0. The database system supporting both modules is Microsoft® SQL Server.
The diagram shows the interfaces supporting both modules. The following table gives a brief description of each
interface:
Interface
Scanner/ Scale
Printer
Other Serial Devices
ATM/Credit Card
Wholesaler Cost
Changes
RETAIL™ Wireless
Module
Front End
Front End
Front End
Credit/Debit
Back End
Back End
RETAIL USER REFERENCE MANUAL – RETAIL 7
Description
Product scanning and weighing
Prints customer receipts and register reports
Other devices (for example, gas pump)
ATM, credit card and EBT transactions
Download of product changes from a wholesaler (this is
supported by your reseller)
Wireless functions including Shelf Audit, Inventory Count,
DSD, Purchase Order
12
RETAIL 7™ User Manual
OVERALL FUNCTIONAL OVERVIEW
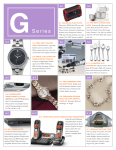
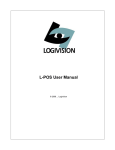
High Level Functional Overview Diagram
Customer
Purchases
Serial Device
Interfaces
RETAIL
FRONT-END
Register
Management
Store
Management
RETAIL
BACK-END
Personnel
Management
Store Trends
RETAIL USER REFERENCE MANUAL – RETAIL 7
System
Administration
13
RETAIL 7™ User Manual
FRONT END FUNCTIONAL OVERVIEW
Front-End Functional Overview
Introduction
This section of the manual will describe the Front End module in detail. As pictured in the Front End functional
overview diagram, the Front End module supports the following functions:
Process Customer Transactions
Receive Tenders
Process Credit/Debit Transactions
Support Supervisor Functions
Print Checkstand Reports
Print Checkstand Receipts
Following the Front End functional overview diagram is a “How To…” section, which contains detailed
instructions on how to perform certain functions using the Front End module. This will provide the reader with a
good understanding of how to perform certain critical functions within RETAIL™.
RETAIL USER REFERENCE MANUAL – RETAIL 7
14
RETAIL 7™ User Manual
FRONT END FUNCTIONAL OVERVIEW
Functional Overview Diagram
Process
Customer
Transactions
Support
Supervisor
Functions
RETAIL
FRONT-END
Receive
Tenders
Process
Credit/Debit
Transactions
RETAIL USER REFERENCE MANUAL – RETAIL 7
Print Register
Reports
Print Register
Receipts
15
RETAIL 7™ User Manual
FRONT END FUNCTIONS - HOW TO …
Front End Functions - How to …
Introduction
This section of the manual is an overview of the Front End portion of the RETAIL™ system. The areas covered
in this section include:
Signing On
Main Checkstand Screen/Receipt
POS Configuration
Security Features
Keyboard Use
Transaction Discounts
Customer Processing
Checkstand Functions
Manager Functions
Loading Pictures and Videos
Retail System Manager
Credit/Debit Processing
Important Note: If you plan on using the RETAIL™ Credit/Debit module to process credit and/or debit cards,
you need to ensure that it is running all the time while you are processing Checkstand transactions. Refer to the
Credit/Debit Processing section found later in this manual.
Important Note: Use of a mouse is not required to use the Front End. Use of the tab, enter and arrow keys are
permitted to maneuver through fields and buttons on the forms.
RETAIL USER REFERENCE MANUAL – RETAIL 7
16
RETAIL 7™ User Manual
FRONT END FUNCTIONS - HOW TO …
Signing On
Double-click on the RETAIL™ Professional Icon to
sign-on to the RETAIL™ Front End module.
The Splash form will then display.
While this form is displayed, the system is initializing
itself and checking to make sure it can connect to the
server. If any problems occur, messages will be
displayed. Once the system has completed its
initialization, the Front End desktop form will display. To
log-on to the Front End, type your password in the box.
If you are using touch screen, touch in the Password
box to open the touch pad. Enter the password and
press OK or Enter.
Employees are setup using the Employee
Maintenance function and are assigned a Cashier
Password.
Note: To enable the prompt for a User Name, change
the Ros.ini file to UseUserName=1. This setting
requires a User Name along with a Password.
When signing-off, RETAIL™ can also prompt for a
password (optional). The password entered must have
a high enough security to sign-off of the system. The
security level assigned to the sign-off function (MGSO)
is entered in the Security Administration function in the
Back End.
If the password is not valid, the system will display an
error message. Clear the error message by clicking on
the OK button and try again.
RETAIL USER REFERENCE MANUAL – RETAIL 7
17
RETAIL 7™ User Manual
FRONT END FUNCTIONS - HOW TO …
Main Checkstand Form/Receipt
Main Checkstand Form
Upon verification of your password, the system
will now display the Main Checkstand form.
The Front End module is now ready to accept
Checkstand transactions. As you enter
transactions, they will be displayed on the
Checkstand form as depicted to the right. The
Command Line of the Main Checkstand form is
where RETAIL™ transaction codes can be
Typed through the keyboard to process a
customer order (refer to the Keyboard Use topic
for more information). The Processing Date for
the transaction is displayed in the lower right
hand corner. This date will be the same as the
current date (displayed at the bottom of the form)
unless you are operating a 24-hour store.
Note: RETAIL 7 ™ offers three different screen modes.
Please see the Installation Guide for more details.
As you can see on the form, a lot of information related to a customer order is displayed. The receipt header
information setup through the Receipt Banners function is displayed at the top of the form followed by the
transaction lines. The main Checkstand form can display up to 12 transaction lines. The transaction lines are
color-coded for ease of identification. Voided transactions or refunded items are displayed in red. Transactions
related to items that are an advertised special (special pricing in effect) are displayed in green.
RETAIL USER REFERENCE MANUAL – RETAIL 7
18
RETAIL 7™ User Manual
FRONT END FUNCTIONS - HOW TO …
Main Checkstand Form (continued)
The transaction line displays the following information, which can be configured through the POS Information
function:
Product description
UPC
Transaction amount
Up to 2 tax schedules for the product (entered on the Tax tab of the POS Information function) or 1
tax schedule and the discount category for the product (A or B or C (if A and B selected for the
product)) – discount category will print after the Foodstamp Eligibility
Foodstamp Eligibility for the product. Displays as “F”
The bottom portion of the Checkstand form also displays the weight for a weighted item, a running total of the
customer‟s savings, a running total for the order and a running total of the number of items purchased. The
name of the employee signed-on to the system is displayed on the top of the Checkstand form. Options are
available through the POS Information function to display/not display these items. (Refer to the POS
Configuration topic in this section).
Important Note: if there is a problem with the software license file (RETAIL.lic), the licensee name from the
license file will print in lieu of the receipt header information. Contact your solution provider if there is a problem
with the license.
Stand-Alone Mode
If the system is unable to communicate or connect
to the server, the Checkstand will automatically
shift into stand-alone mode. An indication will
display in the lower left hand corner of the form
when the system is in stand-alone. While in standalone mode, transactions will be written to the local
database on the Checkstand machine.
Certain processes will not function in stand-alone
mode including:
Certain Manager functions. A message will be
displayed informing the user that the function is not
available.
The system notifies the checkstands that the server is up when the Notify Checkstands with Server
Information function is used on the Back End. The checkstands will then automatically come out of stand-alone
mode and all of the transactions will be transferred to the server.
RETAIL USER REFERENCE MANUAL – RETAIL 7
19
RETAIL 7™ User Manual
FRONT END FUNCTIONS - HOW TO …
Cash Drawer/Printer Errors
Depending on your installation (if OPOS compliant – refer to the RETAIL Installation Guide), various messages
may be displayed on the main Checkstand form related to the cash drawer and printer. These include:
Cash Drawer Open – a message displays
whenever the cash drawer is open
Cash Drawer Time Limit Exceeded – a
message will display and an alarm will sound if
the cash drawer has been open longer than
the time allowed through the POS Information
function.
Force Cash Drawer Closed – a message will
display and an alarm will sound if the cash
drawer must be closed prior to beginning a
new order. One can configure and check this
option through POS Information function.
Printer Error – a printer error message will be
displayed if the system is having difficulty
printing. The system will check the status of
the printer at the beginning of each transaction
and when printing a till status or checklist.
It may become necessary to reset the printer
by turning it off and then on. The system will
display an error message if this is needed.
Checkstand Receipt
The Checkstand receipt takes on the same characteristics as the Checkstand form. Items and messages printed
on the receipt can be configured using the POS Information function (Refer to the POS Configuration topic in
this section). In addition to the information displayed on the Checkstand form, the receipt contains the following
information:
Checkstand number, Employee number, Till number, and Transaction number - These fields are
displayed on the date/time line of the Checkstand receipt.
Cashier Name
Note: Transaction numbers are reset on a daily basis. If there is a need to have transaction numbers be
continuous over a period of days, this can be configured through the Continuous Transaction # option
in the POS Information function (refer to the POS Configuration topic in this section). The transaction
numbers will be continuous from one day to the next until a specific maximum is reached whereby the
transaction numbers will then reset to 1.
RETAIL USER REFERENCE MANUAL – RETAIL 7
20
RETAIL 7™ User Manual
FRONT END FUNCTIONS - HOW TO …
Checkstand Receipt (continued)
Receipt banners, trailers, saving messages, and tenders printed on the receipt can be changed through the
POS Information function in the Back End. As well as content, certain properties (for example position – left;
centered; right; Bold, Italic and font size) can be set for each receipt banner, trailer and other messages (for
example: You Saved message) printed on the receipt.
A logo can be printed on the top of the receipt by completing the following:
Set the Print Receipt Logo option to “Yes” through the POS Information function
Save the image of the company logo in the logo.bmp file in the C:\Program Files\RETAIL\POS
directory on each checkstand (Note Microsoft® Paint can be used to edit the contents of this file)
As transactions are processed, they are saved to the database. The Electronic Journal function in the Back
End can then be used to re-print Checkstand transactions matching certain criteria. This is useful for analysis
and audit trail purposes.
Signatures that have been captured when using credit cards by signing the pin-pad are also available for viewing
and reprinting in Electronic Journal.
Customer receipts for electronic transactions are also available for viewing if signature capture is being used.
RETAIL USER REFERENCE MANUAL – RETAIL 7
21
RETAIL 7™ User Manual
FRONT END FUNCTIONS - HOW TO …
POS Configuration
Certain Checkstand features can be configured using the POS Information function in the Back End system.
These include:
1.
2.
3.
4.
5.
6.
7.
8.
9.
Printing of a logo on the receipt
Loan-in amounts for specific tenders
Layout of main Checkstand form (including fields displayed)
Prefixes used to identify Random Weight Items (002), Customer Card Numbers (004), and
Manufacturer Coupons (005).
Contents and format of messages displayed on the Checkstand form and printed on the
Checkstand receipt
Transaction limits on checks per day/week and data entry error checking
Coupon days, limits and multiple applied
Time limits – cash drawer open, clear screen, jumping to stand alone
Prompt displayed on credit card pin pad
Refer to the POS Information topic contained in the Back End – Administration Maintenance section of this
manual for more information.
Security Features
Checkstand security features within RETAIL™ are powerful and easy to use. Detailed thought needs to be given
on setting up and testing the security features prior to using the Checkstand in a “live” environment. Security can
be configured at the following levels:
Secured access by employee number and security level. Refer to the Employee Maintenance
topic of the Back End – Administration Maintenance section of this manual.
Transaction Key security including dollar limits by security level. Refer to the Security
Administration topic of the Back End – Administration Maintenance section of this manual.
Manager function security refers to the Security Administration topic of the Back End –
Administration Maintenance section of this manual.
Tender attributes and dollar limits refer to the Tender Maintenance topic of the Back End –
Administration Maintenance section of this manual.
Keyboard Use
RETAIL™ will accept transaction codes from a programmed Point of Sales (POS) keyboard or by inputting the
transaction codes directly on the command line of the main Checkstand form (refer to the main Checkstand form
depicted earlier).
The following is a POS keyboard layout depicting a sample keyboard supporting a grocery store that has been
programmed with the RETAIL™ commands. When a POS keyboard is programmed, there is no need to enter
transaction codes. Pressing the programmed keys will do this for you. Refer to the commands supported by
RETAIL™ in the Command Line Transaction Codes table below. Refer to the keyboard manufacturer‟s
instructions in order to program your keyboard.
RETAIL USER REFERENCE MANUAL – RETAIL 7
22
RETAIL 7™ User Manual
FRONT END FUNCTIONS - HOW TO …
Keyboard Use (continued)
Note: The POS keyboard
depicted is a POS Preh
Keyboard.
Keyboard Use with Regular Keyboard
If you don‟t have a POS programmed keyboard, the transaction codes can be entered through a regular
keyboard. The following table defines the transaction codes used within RETAIL™. These transaction codes can
be typed in through a regular keyboard on the Main Checkstand form command line or programmed into a POS
keyboard. For the examples included in the table the following data was used: UPC (product code) 28 and in
most cases $5.00 as the amount.
Note: Refer to the Checkstand Functions topic in this section for more information on these transaction codes.
RETAIL USER REFERENCE MANUAL – RETAIL 7
23
RETAIL 7™ User Manual
FRONT END FUNCTIONS - HOW TO …
Keyboard Use with Regular Keyboard (continued)
MAIN CHECKSTAND FORM - COMMAND LINE TRANSACTION CODES
CODE
PARAMETERS AND
EXAMPLE
DESCRIPTION
KEYSTROKES
AG
AG {ENTER}
AG {ENTER}
Age Verification The system will prompt for date of birth. Example 052575
CA
Tender Amount, CA {ENTER}
500CA {ENTER}
Cash Tender used to pay for the order.
CK
Tender Amount, CK {ENTER}
500CK {ENTER}
Check Tender used to pay for the order. The amount required is can be flagged
off via the Tender Maintenance.
CL
CL {ENTER}
CL {ENTER}
Clear key to clear error code, products verify, and price verify windows as so on.
CM
CM {ENTER}
CM {ENTER}
Manual Electronic Tender used to pay for the order when the card cannot be
swiped through the Pin Pad. Also used for Checks when bypassing Electronic
Check Authorization (through WinEPS).
CN
CN {ENTER}
CN {ENTER}
Cancels the entire order.
CS
CS {ENTER}
CS {ENTER}
Customer search key.
CU
Currency ID, CU {ENTER}
1CU {ENTER}
Currency conversion key. Used to convert an amount into a foreign currency.
Applies discount to the entire order for all products categorized as “A”. In the
DA
Percentage, DA, {ENTER}
5.25DA {ENTER}
example, a 5 1/4% discount is applied to the order. Note that discounts are
entered with a decimal point.
Applies discount to the entire order for all products categorized as “B”. In the
DB
Percentage, DB, {ENTER}
5.25DB {ENTER}
example, a 5 1/4% discount is applied to the order. Note that discounts are
entered with a decimal point.
DG
DG{ENTER} or Amount
2000DG{ENTER}
DG{ENTER} is used to bring up options for using gift cards, for example,
DG{ENTER}
deactivate, re-load, view balance. {Amount} DG is used to initially activate or
purchase the gift card.
DN
Amount, DN, UPC {ENTER}
100DN28 {ENTER}
Discount amount applied to a product. In the example, a $1.00 discount is
applied to product 28. Discount can also be entered for a section or department
transaction.
DP
Amount, DP, Dept #, Sub Dept
500DP10 {ENTER}
Assigns dollar sales to a selected department. Example assigns five dollars to
#, {ENTER}
department 1 - main department. 0- sub-department.
DR
DR {ENTER}
DR {ENTER}
Discount removal. Removes any customer discount from the order.
DT
Percentage, DT, UPC
5.25DT28 {ENTER}
Discount percentage applied to product. In the example, a 5 1/4% discount is
applied to the product 28. Note: discounts are entered with a decimal point.
{ENTER}
Discount can also be entered for a section or department transaction.
EB
EB{ENTER}
EB{ENTER}
Electronic Balance for EBT Food or Cash cards.
ET
ET {ENTER}
ET {ENTER}
Electronic Tender used to pay for the order for all Electronic Tenders
FA
FA {ENTER}
999FA{ENTER}
Used to tender Flex Spending Accounts.
FN
FN, UPC {ENTER}
FN28 {ENTER}
Food stamp / no Food stamp used to enable or disable the food stamp eligibility
for a product.
FS
Tender Amount, FS {ENTER}
500FS {ENTER}
Food stamp Tender used to pay for the order.
ID
ID {ENTER}
ID {ENTER}
Customer identification key used to request the customer ID number for checks
or to apply discounts. The system will prompt you to enter a customer ID.
Customer IDs can also be scanned bypassing this step.
MC
MC, Coupon $, Dept. {ENTER}
MC50DP10
Coupon key to manually enter a manufacturer coupon. In the example, a 50-cent
{ENTER}
coupon is being applied to department 1– sub-dept. 0 (main dept.). Coupon
usage is tracked to the Coupon tender (CP).
MG
MG {ENTER}
MG {ENTER}
Manager Function used to activate the supervisor window (will prompt for a
supervisor password).
MM
Amount, MM, UPC {ENTER}
500MM28 {ENTER}
Manual Measure entered for a product that is sold in units of measure. The unit of
measure is identified for the product in the product maintenance function. In the
example, 5 lbs. of product 28 were sold.
MI
Tender Amount, MI {ENTER}
500MI {ENTER}
In Store charges tender used to pay for the order.
NS
NS {ENTER}
NS {ENTER}
No sale key used to open the cash drawer with no active transaction (will prompt
for cashier/supervisor password)
OD
Amount, OD {ENTER}
OD {ENTER}
Open department key – brings up a list of departments to choose from to ring up
a transaction directly to a department – similar to the DP key
OS
Amount, OS {ENTER}
OS {ENTER}
Open section key – brings up a list of sections to choose from to ring up a
transaction directly to a section – similar to the SE key
PI
Amount, PI {ENTER}
500PI {ENTER}
Paid-In key used for non-product items (for example. postage stamps). Five
additional Paid In functions can be configured via the Security Administration
screen. The additional Front-end keystrokes are I1, I2, I3, I4, and I5.
PK
Price, PK, UPC {ENTER}
500PK28 {ENTER}
Price key used to assign a price to a product. No decimal in amount. In the
example, $5.00 is being entered as the price for product 28.
RETAIL USER REFERENCE MANUAL – RETAIL 7
24
RETAIL 7™ User Manual
FRONT END FUNCTIONS - HOW TO …
Keyboard Use with Regular Keyboard (continued)
MAIN CHECKSTAND FORM - COMMAND LINE TRANSACTION CODES
CODE
PARAMETERS AND
EXAMPLE
DESCRIPTION
KEYSTROKES
PO
Amount, PO {ENTER}
500PO {ENTER}
Paid-Out key used for non-product items (for example lottery ticket winnings) Five
additional Paid Out functions can be configured via the Security Administration
screen. The additional Front-end keystrokes are O1, O2, O3, O4, and O5.
PS
PS, UPC {ENTER}
PS28 {ENTER}
Product Search used to search for additional information about a product. The
information is entered in Product Maintenance via the Product Info button.
PV
PV, UPC {ENTER}
PV28 {ENTER}
Price verify / Product verify used to verify a price or to identify a product by viewing
PV, Product Description
PVapp {ENTER}
the product‟s picture. (Enter in a portion of the product description)
{ENTER}
RA
Amount, RA {ENTER}
500RA {ENTER}
Received on Account key used to apply payments to customer charges on the
Checkstand. RA transaction must be the only item on the order. No other
transactions can be rung up on the same order.
RE
RE {ENTER}
RE {ENTER}
Repeats previous line item. Only applies to the following types of transactions:
Scanned or entered product, DP, SE, RA, PI and PO transaction keys.
RF
RF, Amount, Dept. {ENTER}
RF500DP10
Refund key used to refund a product. In the example a $5.00, refund is being
{ENTER}
applied to department 1 – sub-dept 0 (main dept). Product UPC or section no can
also be entered.
RP
RP {ENTER}
RP {ENTER}
Reprints receipt for previous transaction.
Applies surcharge to the entire order for all products categorized as “A”. In the
SA
Percentage, SA, {ENTER}
5.25SA {ENTER}
example, 5 1/4% surcharge is applied to the order. Note that surcharges are
entered with a decimal point.
Applies surcharge to the entire order for all products categorized as “B”. In the
SB
Percentage, SB, {ENTER}
5.25SB {ENTER}
example, 5 1/4% surcharge is applied to the order. Note that surcharges are
entered with a decimal point.
SC
SC {ENTER}
SC {ENTER}
Manually ring up scaled items to a department or section.
100DP10
Enter in price per unit weight (for example price per pound) followed by
100SE100
department or section. In the example, price per pound is $1.00 multiplied by
weight.
SE
Amount, SE, Section #,
500SE600
Assigns dollar sales to a selected section. In this example, $5.00 is rung up to
{ENTER}
{ENTER}
section 600.
SO
SO {ENTER}
SO {ENTER}
Sign-off key used to sign-off the checkstand.
SP
Employee #, SP {ENTER}
1SP {ENTER}
Toggles-on the assignment of a salesperson # to the transaction lines. 0SP can be
used to toggle-off the salesperson # for items on the order.
ST
ST, Coupon $, Dept. {ENTER}
ST50DP10
Store coupon key to manually enter a store coupon. In the example, a 50-cent
{ENTER}
coupon is being applied to department 1– main department, 0 – sub-department.
Coupon usage is tracked to the Store Coupon tender (SN).
TE
TE, TL
TETL {ENTER}
Makes the entire order tax exempt. Reduces order amount by the total tax amount.
Enter in this command after you have totaled the order.
TL
TL {ENTER}
TL {ENTER}
Total Key used to total the transaction amount for the current order.
TN
Tax Table #, TN, {ENTER}
1TN {ENTER}
Tax / No Tax used to add or subtract tax to a product. In the example, tax table 1
UPC, {ENTER}
28 {ENTER}
tax criteria are being applied to product 28.
TW
TW {ENTER} or
TW {ENTER}
Place the empty container on the scale and press the “TW” key. The weight of the
item will be reduced by the tare weight.
TW weight {ENTER}
TW100 {ENTER}
If a weight is manually entered, the amount of the weight entered will be deducted
from the weighted item.
VD
VD, UPC {ENTER}
VD28 {ENTER}
Void key used to void a specific product.
VD {ENTER}
VD {ENTER}
Void key used to void last entry on order (for example tender, product).
VD scroll to item {ENTER}
Void‟s item highlighted by scrolling on order.
WF
WF {ENTER}
WF {ENTER}
Begins a Wic CVV order. Cashier will be prompted to enter voucher dates and
amounts before ringing up products. Only Wic CVV items will be allowed.
WI
WI {ENTER}
WI {ENTER}
Identifies a Wicable order. Enter this command at the beginning of the order. All
products entered from this point forward must be WIC eligible products.
WV
WV (ENTER}
999WV{ENTER}
Used to tender a Wic CVV order. The amount must be entered. Use WNTL to
obtain the Wic CVV amount and deduct the taxable amount.
*
Quantity being purchased, *,
2*28 {ENTER}
Multiply key used to enter multiple quantities of a given product.
UPC {ENTER}
/
Total number of items in pack, /, 3/2*28 {ENTER}
Divide key used to divide multi-pack items for purchasing a quantity less than the
Number of items purchased,
amount in the pack. In the example, 2 items (upc 28) are being purchased out of a
UPC {ENTER}
multi-pack that contains 3 items.
Table 1
RETAIL USER REFERENCE MANUAL – RETAIL 7
25
RETAIL 7™ User Manual
FRONT END FUNCTIONS - HOW TO …
Certain transaction codes can be combined with others to form a command sequence. These include:
COMMAND SEQUENCE
FA, TL {ENTER}
FN, TL {ENTER}
VD, TL {ENTER}
EXAMPLE
FATL
FNTL
VDTL
WN, TL {ENTER}
WNTL
RETAIL USER REFERENCE MANUAL – RETAIL 7
DESCRIPTION
Will display the Flex Spending Account eligible amount.
Will display the running total of the food stamp eligible amount for the order.
Will void the entire order entered to that point. Enter “0CA” ($0.00 cash) to clear the
transaction once the void total is complete.
Will display the Wic CVV eligible amount. The customer can use another tender after
Wic CVV.
Table 2
26
RETAIL 7™ User Manual
FRONT END FUNCTIONS - HOW TO …
Transaction Discounts and Surcharges
Discounts for a transaction can be done at the following levels:
Line Item
Customer Specific
Order Level
Surcharges for a transaction can be done only at the Order Level. The system applies only one discount to a
given transaction line by default. However, through an attribute setting on the Back End, the system can be
configured to allow multiple discounts. When applying a discount, the system uses a predefined pecking order
when applying the discounts. This order is defined as follows:
Order Level Discounts Customer Specific Discounts Line Item Discounts
The order level discounts take precedence over customer specific discounts, which in turn take precedence over
line item discounts.
RETAIL USER REFERENCE MANUAL – RETAIL 7
27
RETAIL 7™ User Manual
FRONT END FUNCTIONS - HOW TO …
Transaction Discounts and Surcharges (continued)
When multiple discounts are allowed, the discounts are calculated on the net amount remaining after previous
discounts are applied. Discounts are applied in the order in which they are entered. Example: a 10% Line Item
discount is taken on a $100.00 item ($10.00), and then a 5% Customer Specific discount is applied. The 5%
discount is only applied to the balance of $90.00 resulting in a discount of $4.50 and a total overall discount of
$14.50.
Discount and surcharge amounts are summarized within the system by department. You can track the discounts
by department by using the Discount Link field in the Department Maintenance function. The discount link is
simply a UPC setup in the product file using the Product Maintenance function. These UPCs should not be
UPCs that can be sold at the Checkstand, rather they are simply “dummy” products that are used to track these
discount amounts. The same “dummy” product can be assigned to all departments or a separate dummy
product can be assigned to each department depending on how the data needs to be tracked. Using the
“dummy” products, you can view the discount information using the Product Sales
Function. They can also be viewed in the Store Sales function if the “dummy” products have been assigned to a
“dummy” department (that is setup a department called “Department Discounts”, and then assign the “dummy”
UPCs to this department on the Product Maintenance function. The “Department Discounts” will then display on
the Store Sales form).
Note: The discount and surcharge category for a product can be printed on the Checkstand form and
Checkstand receipt. Refer to the Main Checkstand form topic earlier in this section.
Line Item Discounts
Two types of line item discounts are supported: % deduction and $ amount deduction. Two different
transaction codes are used to apply these discounts – “DT - % deduction”; “DN - $ deduction”.
Note: products for an entire department can be discounted by entering a percentage discount for the
department through the Department Maintenance function in the Back End. If a percentage is entered
for the department, then all product sales will have line item discount automatically applied (this will
also apply to any open department or open section sales for the department).
Line item discounts are reflected after the final sub-total on the Checkstand receipt. The message that prints on
the receipt for line item discounts can be configured through the POS Information function in the Backend.
Entering a % Discount for an Item
1. Key in the percentage discount – use decimal point (for example 5=5%, 5.25 = 5.25%)
2. Press the “Discount” key (“DT” through the keyboard)
3. Ring up the item (either a product, department or section transaction) {ENTER}
Example from the keyboard: 5.25T28 = 5.25% discount off product 28.
Entering a Dollar Amount Discount for an Item
1. Key in the dollar discount (for example 500 = $5.00)
2. Press the “Discount” key (“DN” {ENTER} through the keyboard)
3. Ring up the item (either a product, department or section transaction) {ENTER}
Example from the keyboard: 500DN28 = $5.00 discount off product 28.
RETAIL USER REFERENCE MANUAL – RETAIL 7
28
RETAIL 7™ User Manual
FRONT END FUNCTIONS - HOW TO …
Customer Specific Discounts
Customer discounts are automatically applied when a Customer ID is entered on a transaction. Customers are
assigned a discount schedule through the Customer Maintenance function in the Back End. The discount
schedules reflect a % discount to be given based on product category (A, B or both). Discount schedules are
entered through the POS Information function in the Back End. Product categories are assigned to products
through the Product Maintenance function. (Refer to the Order Level Discounts topic below for more
information on product categories). Customer discounts are reflected after the final sub-total on the Checkstand
receipt. The message that prints on the receipt can be configured through the POS Information function in the
Backend.
Note: refer to the Customer Rewards topic in the Back End How To… section of this manual for more
information on rewarding your customers with other types of incentives (for example electronic coupons).
Removing Discount % for entire order for a Customer discount
1. Ring up the item (a product, department or section transaction).
2. Key in the Customer number. Note: Customers must be set up to receive discounts.
3. Press the “DR discount removal” key (“DR” {ENTER} through the keyboard)
Example from the keyboard DR = Discount Removed off the entire order for all products.
Order Level Discounts and Surcharges
Order level discounts and surcharges are applied in two ways based on the categories selected on products (A,
B, or both). Products are categorized through the Product Maintenance function as either category A, category B
or as both category A and B. Discounts and surcharges can then be applied to either the category A products or
category B products. This gives the user capability to discount products in different ways.
Order Level discounts are reflected after the final sub-total on the Checkstand receipt in the same fashion as
customer discounts. The message that prints on the receipt for customer discounts and surcharges can be
configured through the POS Information function in the Back End.
Entering a Discount % for entire order for products categorized as “A”
1. Ring up the item (either a product, department or section transaction)
2. Key in the percentage discount (for example 5.25 = 5.25%)(Discounts must be keyed in with
decimal points)
3. Press the “DA Discount” key (“DA” {ENTER} through the keyboard)
Example from the keyboard: 5.25DA = 5.25% discount off of the entire order for all Products, Departments or
Sections with Category A selected
Entering a Discount % for entire order for products categorized as “B”
1. Ring up the item (either a product, department or section transaction)
2. Key in the percentage discount (for example 5.25 = 5.25%) (Discounts must be keyed in
with decimal points)
3. Press the “DB Discount” key (“DB” {ENTER} through the keyboard)
Example from the keyboard: 5.25DB = 5.25% discount off of the entire order for all Products, Departments or
Sections with Category B selected
RETAIL USER REFERENCE MANUAL – RETAIL 7
29
RETAIL 7™ User Manual
FRONT END FUNCTIONS - HOW TO …
Entering a Surcharge % for entire order for products categorized as “A”
1. Ring up the item (either a product, department or section transaction)
2. Key in surcharge percentage (for example 5.25 = 5.25%)(Surcharge % must be keyed in
with decimal points)
3. Press the “SA Surcharge” key (“SA” {ENTER} through the keyboard)
Example from the keyboard: 5.25SA = 5.25% surcharge applied to the entire order for all Products, Departments
or Sections with Category A selected
Entering a Surcharge % for entire order for products categorized as “B”
1. Ring up the item (either a product, department or section transaction)
2. Key in surcharge percentage (for example 5.25 = 5.25%)(Surcharge % must be keyed in
with decimal points)
3. Press the “SB Surcharge” key (“SB” {ENTER} through the keyboard)
Example from the keyboard: 5.25SB = 5.25% surcharge applied to the entire order for all Products, Departments
or Sections with Category B selected
RETAIL USER REFERENCE MANUAL – RETAIL 7
30
RETAIL 7™ User Manual
FRONT END FUNCTIONS - HOW TO …
Customer Processing
Tracking Customer Transactions
RETAIL™ provides the capability to track sales for customers. Customers are entered into the system through
the Customer Maintenance function in the Back End. Once customers have been setup, the card number of
the customer can then be tracked against their transactions. Customer sales can then be viewed using the
Customer Sales function in the Back End.
Scan a customer card number (refer to the note below on scanning a customer ID) or use the “ID” command on
the Checkstand form to enter a customer card number.
When the ID command is entered, the Customer ID
form will be displayed allowing the user to enter in the
customer card number. If the Customer ID is not
known for the customer, you can search by driver‟s
license, last name, or telephone number.
Note: you can bypass this form by entering in the
customer ID followed by “ID” on the command line for
example 123456789ID{ENTER}. Scanning a customer
card also bypasses this step.
Note: to scan a customer number, the card number
used must be 13 digits in length beginning with
004 for example 004123456789 or 004000000123.
The leading prefix 004 can be configured through
the POS Information function in the Backend.
Click on the Search button on the Customer ID
form or enter in “CS” from the Checkstand form
command line to search for a customer. Select
search option (Driver License, Phone Number
or Last Name) and key in the search criteria.
Click on the Match Partial String field (for
example if search criteria are 123, then all items
that contain 123 somewhere in the field will be
displayed) if desired. Click on the Execute
Search button
to begin the search.
Note: use the Tab, Enter and Arrow keys to move between
fields if a mouse is not available.
A list of customers matching the criteria will then
be displayed on the Search Results form.
Select the customer desired and click OK button
to select a customer. Click New Search button
to return to the Customer Search form or click
Cancel to exit the form without selecting a
customer.
Note: Click Balance button to display the customer’s instore charge balance (normal screen mode only)
Once a customer has been selected, the customer name and any discount applied will be displayed on the
Checkstand form. If a customer uses the in-store, charge tender to pay for the order, the customer‟s current
account balance will print on the receipt. These items can be configured to display or not display through the
POS Information function in the Back End.
RETAIL USER REFERENCE MANUAL – RETAIL 7
31
RETAIL 7™ User Manual
FRONT END FUNCTIONS - HOW TO …
Adding Customers
Customer data can be added from the Checkstand.
Access the manager menu (“MG” command) and
select Add Customer. Enter the data for the customer
and click on the OK button. Pay special attention to
and select the appropriate attributes for the customer:
Write Checks, Charge Account, Print Invoice (not
used at this time), and Frequent Shopper.
Note: Adding customers is not available in standalone mode.
Note: use the Tab, Enter and Arrow keys to move
between fields if a mouse is not available.
Checkstand Functions
The functions described below are subject to the security levels, limits and attributes established by the user.
Refer to the Security Features topic above for more information.
In addition to the security features that can be
associated with various Checkstand functions,
reason codes can also be assigned. Reason codes
are assigned to Checkstand functions as well as
Checkstand manager functions through the Security
Administration function. When a reason code is
required for a particular function, the system will
prompt for the selection of a reason code from a list.
Selection of a reason code is mandatory when the
function is flagged to require reason codes. From the
list displayed, select the reason code desired and the
reason will be captured with the transaction.
Note: a report of transactions by reason code is
available through the Print Transactions By
Reason Report function.
Overall Order Functions
This section will describe the various functions that can be used that affect the entire order.
Tax-exempt an entire order
1. Enter items and total the order
2. Press the Tax Toggle key (“TE” through the keyboard)
3. Press the Total key (“TL” through the keyboard) {ENTER}
Example from the keyboard: TETL {ENTER}
RETAIL USER REFERENCE MANUAL – RETAIL 7
32
RETAIL 7™ User Manual
FRONT END FUNCTIONS - HOW TO …
Overall Order Functions (continued)
Entering a Salesperson ID
1. Key in the Employee # (setup through the Back End) of the Salesperson
2. Press the Salesperson key (“SP” through the keyboard) {ENTER}
Example from the keyboard: 1SP {ENTER} = Assigns salesperson # 1 to the order or transaction line
Note: A salesperson ID can be entered at any time during the order. The ID will be applied to each transaction
line following the entry of the ID. You can configure the system to automatically prompt for an ID at the beginning
of each order (Refer to POS Configuration topic in this section).
Note: You can cancel the assignment of the salesperson ID by keying in 0SP. This will stop the system from
applying the ID to any transaction line following the entry of this command. Any transaction lines before this
command will still contain the salesperson ID.
Customer Search
1. Press the Customer Search key (“CS” through the keyboard) {ENTER}
Note: Refer to the Customer Processing topic in this section for more information on processing
customers.
Convert Amount to a Foreign Currency
1. Type the Currency ID of the currency desired
2. Press the Currency Conversion key (“CU” through the keyboard) {ENTER}
Example from the keyboard: 2CU {ENTER} = Converts the total amount of the order into currency 2
Note: Refer to the Foreign Currencies topic in the Appendices for more information.
Processing WIC Items
1. Type the WIC key (“WI” through the keyboard). This will edit that all items following this
command are wicable. (Note: this command must be entered at the beginning of the order).
2. The system will prompt for a WIC voucher ending date. This date cannot be earlier than today
(an error message will appear) meaning that the voucher cannot be expired.
3. Process the items and total the order. If a product is not flagged as WIC, an error message will
display.
4. Tender the order with a WIC tender (“WC” tender entered through the Tender Maintenance
function).
Processing Wic CVV Items
1. Type the Wic CVV Start key (“WF” through the keyboard). This will open an entry form for start
and end dates, and amounts of Wic CVV vouchers. (Note: this command must be entered at
the beginning of the order).
2. Process the items and total the order. If a product is not flagged as Wic CVV, an error message
will display. If the amount of the order exceeds the amount of the Wic Voucher, the cashier will
be warned. The customer can decide to proceed and pay with additional tenders.
3. Tender the order with a Wic CVV tender (“WV” tender entered through the Tender
Maintenance function).
4. The customer can use additional tenders, but the Wic Vouchers MUST be used first.
5. If using Food Stamps, the foodstamp card MUST be used second. The cashier will be warned.
6. Additional tenders then may be used.
Accepting/Canceling HALOS/LALOS Limits
1. To Accept the transaction, simply press {ENTER}
2. To Cancel the transaction press the “Clear” key (“CL” {ENTER} through the keyboard)
Note: Halos/Lalos are set up for each department to avoid checker error. The HALOS is the
maximum amount used in checking for keyboard entry errors while LALOS is the minimum
amount.
Re-print Checkstand Receipt
1. To reprint a receipt press the “Reprint receipt” key (“RP” {ENTER} through the keyboard)
RETAIL USER REFERENCE MANUAL – RETAIL 7
33
RETAIL 7™ User Manual
FRONT END FUNCTIONS - HOW TO …
Overall Order Functions (continued)
Clear Message from Screen
1. Press the clear key (“CL” {ENTER} through the keyboard)
Open Cash Drawer
1. Press the “No Sale” key (“NS” {ENTER} through the keyboard) – System will prompt for a
password
Canceling a Transaction
1. Press the “Cancel Transaction” key (“CN” through the keyboard)
2. Depending on level of security, enter a manager‟s password in the Managers Security Code
form. Example from the keyboard: CN {ENTER}. The entire order will be cancelled. RETAIL™
will then be ready to start the next transaction.
Line Item Functions
This section will describe some of the various line item functions that can be used through the Front End module
of RETAIL™.
Age Verification
a) Age verification will be required on any product that has been flagged as requiring age verification in
the Back End Product Maintenance function. Two types of age verification will be completed on a
product:
1. Customer’s Date of Birth - The system will
prompt for the date of birth for the customer.
Enter the birth date in mm/dd/yy or mmddyy
format (note if no slashes are used, you
must enter six digits for the date for example
050198). The system will calculate the
customer‟s age based on the date of birth
entered and compare to the required age for
purchase on the product. If the customer is
not old enough to purchase the product, an
error message will be displayed. On the
touch screen, an Age Override button can
also be used.
2. Employee’s Date of Birth – The system will
also check to make sure that the cashier is
old enough to sell the product. The
employee‟s date of birth (entered through
the Employee Maintenance function in the
Back End) will be used to calculate the age
of the employee. The employee‟s age will
then be compared to the required age for
purchase on the product.
3. Manager’s Date of Birth – The system will
also check the manager‟s date of birth and
will not allow an override if the manager is
under the minimum age requirement.
RETAIL USER REFERENCE MANUAL – RETAIL 7
34
RETAIL 7™ User Manual
FRONT END FUNCTIONS - HOW TO …
Line Item Functions (continued)
Repeating a Transaction
a) Press the repeat key (“RE” {ENTER} through the keyboard)
Note: only the following transactions can be repeated: Scanned or entered products, department
items (DP key), section items (SE key), Received on Account (RA key), Paid Ins (PI key) and Paid
Outs (PO key)
Scanning a Product
a) Scan the product using the scanner.
b) A message of "Product not found" will be displayed if product is not in the products file.
Note: Press the Clear key (“CL” {ENTER} through the keyboard) to clear the message.
Keying in a Product
a) Key in the product code - UPC (see note on UPCs below) or PLU code {ENTER}.
b) A message of "Product not found" will be displayed if product is not in the products file.
Note: Press the Clear key (“CL” through the keyboard) to clear the message.
Note: Below are examples of four types of UPC codes supported by RETAIL™: UPC-A, UPC-E, EAN13, and
EAN8.
Enter in the leading digit as
the first character of the
UPC followed by the
product code (in this case
12345678901)
Enter in the leading digit
as the first character of
the UPC followed by the
product code (in this
case 0123456)
RETAIL USER REFERENCE MANUAL – RETAIL 7
Enter in the leading digit
as the first character of
the UPC followed by the
product code (in this
case 123456789012)
Enter in the product
code only for this code
(in this case 1234567)
35
RETAIL 7™ User Manual
FRONT END FUNCTIONS - HOW TO …
Line Item Functions (continued)
Keying in a Price and Department
a) Key in the price
b) Press the Department key (“DP” through the keyboard)
c) Followed by a department and sub-department number {ENTER}
Example from the keyboard: 500DP10 {ENTER} = $5.00 for department 1 and sub-department 0
Note: The department number is set up in the Department Maintenance task. See the Department Maintenance
function under the Administration menu.
Note: You can bring up a list of departments to choose from by using the “OD” key. Instead of keying in the price
followed by the “DP” key, enter the price and type in “OD” and press {ENTER}. A list of departments will then be
displayed to select. Example from the keyboard: 500OD {ENTER} then select a department.
Keying in a Price and Section
a) Key in the price
b) Press the Section key (“SE” through the keyboard)
c) Followed by a section number {ENTER}
Example from the keyboard: 500SE100 {ENTER} = $5.00 for section 100
Note: The section number (100) is set up in the Section Maintenance task. See the Section Maintenance
function under the Administration menu.
Note: You can bring up a list of sections to choose from by using the “OS” key. Instead of keying in the price
followed by the “SE” key, type in “OS” and press {ENTER}. A list of sections will then be displayed to select from.
Example from the keyboard: 500OS {ENTER} then select a department.
Manually Overriding a Price
a) Type the new price and press the “Price” key (“PK” through the keyboard)
b) Followed by the product code (PLU or UPC) {ENTER}
Example from the keyboard: 500PK028 {ENTER} = $5.00 for product 028
Overriding a Price on a Scanned Product
a) Type in the new price of the product
b) Press the “Price” key (“PK” through the keyboard)
c) Scan the product
Example from the keyboard: 500PK {Scan the product} = $5.00 for the product scanned
Entering Multiple Quantities for Keyed Items
a) Type the quantity being purchased of the product
b) Followed by an “*” (Press the (*) key)
c) Followed by the product code {ENTER}
Example from the keyboard: 5*028 {ENTER} = Quantity of 5 for product 28
RETAIL USER REFERENCE MANUAL – RETAIL 7
36
RETAIL 7™ User Manual
FRONT END FUNCTIONS - HOW TO …
Line Item Functions (continued)
Entering Multiple Quantities for Scanned Items
a) Type the quantity being purchased of the product
b) Followed by an “*” (Press the (*) key)
c) Scan the product code
Manually Entering Unit of Measure for a Product
Some products are sold in units of measure (for example pounds, inches). The unit of measure is entered for the
product in the Product Maintenance form.
a) Type the amount being purchased based on unit of measure (for example 500 = 5 inches or 5
pounds)
b) Press the “Manual Measure” key (“MM” through the keyboard)
c) Scan or Key in the product code {ENTER}
Example from the keyboard: 500MM028 = 5 units of measure for product 28.
Manually Entering a Weighted Item (Department or Section)
a) Place product on scale
b) Press the “Scale” key (“SC” through the keyboard) {ENTER}
c) Key in a price (per unit of weight – for example price per pound) and department or section
{ENTER}
Example from the keyboard: SC {ENTER}; 100DP10 {ENTER} (Dept. Sale) or 100SE100 {ENTER} (Section
Sale)
The price entered will be multiplied by the weight on the scale to calculate the transaction amount.
Entering a Weighted Product (UPC)
a) Place product on scale
b) Key in the product code {ENTER}
Note: The product must be setup as scaled in the product file.
Deducting Tare Weight from a Weighted Product
The tare weight for a product will automatically be deducted from the weight entered on the Checkstand form.
a) The tare weight for a product is entered in the Product Maintenance form
b) Enter in the tare weight you want deducted in the Tare Weight field
c) The tare weight will automatically be deducted from the weight entered on the checkstand
transaction
RETAIL USER REFERENCE MANUAL – RETAIL 7
37
RETAIL 7™ User Manual
FRONT END FUNCTIONS - HOW TO …
Line Item Functions (continued)
Manually Deducting Tare Weight from a Product
Normally the tare weight for a product will automatically be deducted from the weight entered on the Checkstand
form, but if the product is not set up for tare weight in the products file use one of the following:
a) Place empty container on scale
b) Key in TW {ENTER}
OR
a) Key in <Weight>TW {ENTER} (Example: 20TW = .20 of a pound)
Once the Tare Weight either has been entered by of the two above methods, Key in or Scan the product code.
The tare weight will be deducted from the total weight of the scanned item.
Note: The product must be setup as scaled in the product file. The tare weight for the empty container will be
deducted from the overall weight of the product.
Overriding a Price on a Weighted Product
a) Place product on scale
b) Key in price
c) Press the “Price” key (“PK” through the keyboard)
d) Followed by the product code {ENTER}
Note: The product must be setup as scaled in the product file.
Example from the keyboard: 500PK028 = $5.00 per pound for product 28.
Splitting up Multi-Pack Products
a) Type the total number of items in the multi-pack (i.e. 6 for 6 pack)
b) Followed by a “/” (Press the (/) key)
c) Followed by the quantity the customer is buying
d) Followed by the “*” (Press the (*) key),
e) Followed by the product code for the multi-pack (either scan or key the code) {ENTER}
Example from the keyboard: 6/3*028 {ENTER} = 3 products out of a 6 pack for product 28
Toggle a Product’s Tax Status
a) Key in the Tax Table number (set up in the Tax tab in the POS Information task)
b) Followed by the tax toggle key and {ENTER} (“TN” {ENTER} through the keyboard)
c) Ring up the item (either a product, department or section) transaction)
Example from the keyboard: 1TN {ENTER} 28 {ENTER} = Product 28 will now include tax from tax plan one.
Scanning a Coupon with a Barcode
a) Scan the coupon‟s barcode with the scanner
Note: Coupon will be deducted only if a product’s manufacturer’s number matches the coupon. If you are unable
to scan the coupon, key in the coupon as a department coupon (see next section).
RETAIL USER REFERENCE MANUAL – RETAIL 7
38
RETAIL 7™ User Manual
FRONT END FUNCTIONS - HOW TO …
Line Item Functions (continued)
Keying in a Department Coupon
a) Press the “Coupon” key (“MC” through the keyboard)
b) Followed by coupon amount
c) Followed by a “Department” Key (refer to Keying in a Price Department)
Example from the keyboard: MC500DP10 {ENTER} = $5.00 coupon for department 1
Entering a Paid Out (that is miscellaneous payment from the till, for example lottery winnings)
a) Key in the amount of the Paid Out
b) Press the “Paid Out” key (“PO” through the keyboard) {ENTER}
Example from the keyboard: 500PO {ENTER} = $5.00 Paid out.
Note: RETAIL™ supports five “Paid In” keys that are configurable via the Security Administration screen. The
Keystrokes are I1, I2, I3, I4 and I5.
Entering a Paid in (that is Non Product Sale - for example Postage Stamps)
a) Key in the amount of the Paid In
b) Press the “Paid in” key (“PI” through the keyboard) {ENTER}
Example from the keyboard: 500PI {ENTER} = $5.00 Paid in.
Note: RETAIL™ supports 5 “Paid Out” keys that are configurable via the Security Administration screen. The
Keystrokes are O1, O2, O3, O4 and O5.
Entering a Received on Account (that is Payment on Customer Charge)
a) Key in the amount being received
b) Press the “Account Received” key (“RA” through the keyboard)
c) Enter the Customer ID in the Customer entry dialog
Example from the keyboard: 500RA {ENTER} = $5.00 Received on Account for a charge customer.
Note: RA transactions cannot be completed with other transactions on an order. This must be the only
transaction for the order. A valid customer ID with charge account privileges must be entered.
Note: Customer balances can be configured to print or not print on the receipt through the POS Information
function in the Back End.
RETAIL USER REFERENCE MANUAL – RETAIL 7
39
RETAIL 7™ User Manual
FRONT END FUNCTIONS - HOW TO …
Line Item Functions (continued)
Verifying the Price of a Product (UPC)
1.
2.
3.
Press the “Price Verify” key (“PV” through the
keyboard)
Scan the product or key in the product code {ENTER}
The product description and price will be displayed.
Note: A message of "Product not Found" will be displayed if
the product is not in the product file.
Verifying the Price of a Product (Description)
1. Press the “Price Verify” key (“PV” through the
keyboard)
2. Enter in a description (partial or full) or leave blank
for all products
3. A list of products will be displayed
4. A picture of the product will display if the product
has a picture associated with it.
5. If using Touch Screen, press Price Inquiry.
6. All of the products with Allow Lookup will be
shown.
7. The order of the pictures changes, with the most
commonly looked up items appearing first.
Note: To enable the product lookup on the Checkstand
mark the Allow Lookup flag for each product you wish to
display.
Note: Refer to the Loading Pictures and Videos topic for information on loading product pictures.
RETAIL USER REFERENCE MANUAL – RETAIL 7
40
RETAIL 7™ User Manual
FRONT END FUNCTIONS - HOW TO …
Tendering
This section will describe some of the various functions that can be used when tendering an order through the
Front End module of RETAIL™. Various tender attributes, security levels and limits can be configured through
the Tender Maintenance function in the Back End. An example of this is whether an amount must precede the
entry of a Tender Code (that is tender-as-ordered).
An unlimited number of tenders can be entered into RETAIL™. Tenders can be entered to meet different needs
(for example gift certificates, WIC tender, stand-aside credit card). Foreign currencies and tenders can also be
setup (refer to the Foreign Currencies topic in the Appendices).
When tendering an order, the system can be
configured to prompt for information. This information
will be tracked with the transaction. Example uses of
this feature include: prompting for a check # when
tendering with a check, prompting for information
about the customer (for example zip code for survey
purposes), prompting for additional ID when a tender
is used. The user can tailor the message that displays
as part of the prompt through the Tender
Maintenance function. The data entered is freeformat and is printed on the electronic journal
(Electronic Journal function).
The steps below are an outline of how to use the pre-configured system tenders. The steps followed for other
tenders would generally follow the same pattern but are dependent on the attributes entered for the tenders.
Cash Tendering
a) Enter items and total order
b) Enter amount of cash and press the “Cash” tendering key (“CA” {ENTER} through the keyboard)
Note: Balance due to customer will be highlighted at the end of the order
Example from the keyboard: 500CA {ENTER} = $5.00 cash tender
RETAIL USER REFERENCE MANUAL – RETAIL 7
41
RETAIL 7™ User Manual
FRONT END FUNCTIONS - HOW TO …
Line Item Functions (continued)
Check Tendering (applies to any tender that has a “CK” tender type)
a) Enter items and total order
b) Scan or Type in the customer‟s card number followed by the "ID" key (“ID” {ENTER} through the
keyboard) or Press the “ID” key (“ID” {ENTER} through the keyboard) and type the customer card
number when prompted
c) Type the amount of the check and press the “Check Tender” key (“CK” {ENTER} through the
keyboard)
d) If the MICR reader is being used, the cashier will be prompted to insert the check into the printer.
The Read Check options must be selected in POS Information, and the MICR must be set up in
OPOS. The check information will be captured in addition to the customer ID.
e)
The front of the check can be printed by
selecting the Print Front of Check option in
the POS Information function (your printer
must support this option)):
Select 1 to print the front of a short check
OR
Select 2 to print the front of a long check
OR
Select #3 to frank the check only
OR
Select 4 to cancel the franking. NOTE:
This only cancels the franking, not the
check tender.
f)
If you choose to print the check
Place the check face up along the right side of the printer (the light should be flashing on the
printer)
The front of the check will now print
The back of the check can be franked by
selecting the Require Franking option for the
tender
The light should be flashing on the printer
Insert check, back facing up
Back of the check will now print
The system will not continue to process
until the back of the check is printed. You
can cancel the printing by clicking Cancel
button.
g)
Note: Any balance due to the customer will be highlighted at the bottom of the order
Print Check Single Pass
Retail 7 includes the option to read the MICR, print the front of the check and frank the back of the
check in a single pass. In ros.ini, enter PrintCheckSinglePass=1. The check should be entered face up
with the MICR to the right. The MICR will be read, and the front of the check will be printed (if selected),
then the check franked. If Electronic Check Conversion is used (through MicroTrax), and the check is
converted, then the check will be printed with Void, to be handed back to the customer.
RETAIL USER REFERENCE MANUAL – RETAIL 7
42
RETAIL 7™ User Manual
FRONT END FUNCTIONS - HOW TO …
Tendering (continued)
Paper Food Stamp Tendering
a) Enter items and total order
b) To calculate food stamp balance press the “Food Stamp Toggle” key (“FN” through the keyboard)
followed by the “Total Key” (“TL” {ENTER} through the keyboard)
c) The food stamp eligibility amount will be highlighted at the bottom of the form
d) Type the food stamps amount and hit the “Food Stamps” tender key (“FS” {ENTER} through the
keyboard)
e) Any balance still due will be highlighted at the bottom of the form
f) Complete the sale by tendering the remainder of the order with a different tender.
Note: balance due (cash or food stamps) to customer will be highlighted at the bottom of the order
Credit Card Tendering
a) Enter items and total order. Press the Credit/Debit/EBT key. (ET through the keyboard)
b) A message box will appear prompting customer to slide card through the pin pad
c) The customer should slide their card through the pin pad
d) A message will appear prompting customer to select a tender type on the MSR. The customer
should select a tender type.
Note: The customer does not have to wait until the cashier is finished to complete this step. As soon as the
cashier begins ringing up items, the customer can slide the card, and select the card type from the pin-pad.
Note: If the magnetic strip on the card cannot be reader by the MSR, the customer can click clear button on the
pin pad and the checker can key in account number and expiration date
e) If customer wishes to tender less than the total order, the cashier should key in the desired tender
amount and the Electronic Tender tendering key. For example, 2000ET.
f) The customer is then asked to verify the amount and press enter on the pin pad to confirm the
transaction
Note: If the amount is not correct, customer can click the clear button on the pin pad and checker can begin the
electronic order again.
g) A processing message will appear on the screen while the transaction is being processed
Note: Do not interrupt process once customer has accepted the transaction. Interruption may prevent the
transaction approval message from being displayed even though transaction has been approved.
h) Once authorization is received a message will be displayed: "Approved"
i) If you are using a pin-pad that accepts signatures, the customer will be prompted to sign the pinpad after the transaction has been approved.
Note: If the transaction has been denied or an error has occurred a message will be displayed and/or an error
code will be displayed.
j) The customer copy of the receipt will print out.
k) The merchant copy of the receipt will print. If you are using signature capture, you can skip the
printing of the merchant copy.
l) The customer will keep the first receipt and the checker will have the customer sign the second
receipt.
m) Checker will save the merchant receipt for balancing at the end of the shift.
RETAIL USER REFERENCE MANUAL – RETAIL 7
43
RETAIL 7™ User Manual
FRONT END FUNCTIONS - HOW TO …
Tendering (continued)
Debit Card Tendering
a) Enter items and total order.
b) A message box will appear prompting customer to slide card through the pin pad. The customer
should slide his/her card through the pin pad.
c) A message box will appear prompting customer to select a tender type. The customer should
select a tender type.
d) The customer is prompted enter his/her pin number and click enter button on the pin pad.
e) A message box will appear prompting customer if he/she would like cash back. Enter “Yes” or
“No”.
f) If “Yes”, a message box will appear prompting customer to select an amount from the predefined
amounts, or press the “Other” key and enter an amount (whole dollars only)
Note: The customer does not need to wait until the cashier is finished to complete this step. As soon as the
cashier begins ringing up items the customer can slide the card through the MSR.
g) Select the Electronic Tender tendering key (“ET{ENTER}” through the keyboard). If customer
wishes to tender less than the total order, the cashier should key in the desired tender amount and
the Electronic Tender tendering key. If the customer would like cash back for an amount different
from the predefined amounts, the cashier would key for cash back plus the total order and press the
Electronic Tender tendering key.
h) The customer is then asked to verify the amount and press enter on the pin pad to confirm the
transaction.
i) A processing message will appear on the screen while the transaction is being processed
Note: Do not interrupt process once customer has accepted the transaction. Interruption may prevent the
transaction approval message from being displayed even though transaction has been approved.
j) Once authorization is complete a message will be displayed: "Transaction Approved"
Note: If the transaction has been denied or an error has occurred a message will be displayed :(“Transaction
Declined”) and/or an error code will be displayed.
k) The customer and merchant copies of the receipt will print out.
l) If you do not want to print a merchant copy, enter SkipPrintMerchant=1 in the ros.ini.
m) The customer will keep the customer copy and the checker will save the merchant copy for
balancing at the end of the shift.
RETAIL USER REFERENCE MANUAL – RETAIL 7
44
RETAIL 7™ User Manual
FRONT END FUNCTIONS - HOW TO …
Tendering (continued)
Electronic Food stamps/EBT Cash Tendering
a) Enter items and total order
b) To calculate food stamp balance press the “Food Stamp Toggle” key (“FN” through the keyboard)
followed by the “Total Key” (“TL” {ENTER} through the keyboard).
c) The food stamp eligibility amount will be highlighted at the bottom of the form.
d) A message box will appear prompting customer to slide card through the pin pad.
e) A message box will appear prompting the customer to select a tender type. The customer should
select the EBT tender type.
f) A message box will appear prompting customer to select either Food stamps or Cash (Electronic
Benefits)
g) The customer is prompted to enter his/her pin number and click enter button on pin pad.
Note: The customer does not have to wait until the cashier is finished to complete this step.
h) Press the Electronic Tender tendering key (ET {ENTER} through the keyboard). If customer
wishes to tender less than the total order, the cashier should key in the desired tender amount and
the Electronic Tender key.
i) The customer is then asked to verify the amount and press enter on the pin pad to confirm the
transaction.
j) Once authorization is complete a message will be displayed: "Transaction Approved"
Note: If the transaction has been denied or an error has occurred a message will be displayed and/or an error
code will be displayed.
Note: if the transaction has been denied for insufficient funds, current account balances will be printed on the
receipt for verification. The transaction can then be tendered for up to the balance remaining for the account.
k) The customer copy of the receipt will print out
l) The merchant copy will print out, unless the system is set to SkipPrintMerchant=1 in the ros.ini.
m) The customer will keep the first one and the checker will save the second receipt for balancing at
the end of the shift
Note: If the transaction was denied, once the transaction is tendered or voided, a receipt will be printed
specifying the denial reason and other electronic benefits information.
Gift Card Activation, Reload, Balance Inquiry, Deactivation, and Tendering
a) To activate a gift card, enter the amount and press the Gift Card button (“DG” {ENTER}) through
the keyboard.
b) A message box will appear prompting customer to slide card through the pin pad.
c) If the card is activated successfully, the amount will be displayed on the Front End. The customer
will pay using a different tender.
d) To reload a gift card, press the gift card
button (“DG” {ENTER}). A form will open up
showing several options: Card Reload, Card
Deactivate, Balance Inquiry, and Manual
Balance Inquiry.
e) Select Reload. Enter the amount that the customer wants added to the gift card. The customer will
be prompted to slide the card. If successful, the amount will show up on the front end, and the
customer will pay for the card.
f) A processing message will appear on the screen while the transaction is being processed
Note: The card is activated before the customer pays for it. For this reason, if the cashier tries to Void or Cancel
the order, the customer will need to slide the card again, and the card will be Deactivated so that it will have no
value.
g) The customer and merchant copies of the receipt will print out.
h) If you do not want to print a merchant copy, enter SkipPrintMerchant=1 in the ros.ini.
i) The customer will keep the customer copy and the checker will save the merchant copy for
balancing at the end of the shift.
RETAIL USER REFERENCE MANUAL – RETAIL 7
45
RETAIL 7™ User Manual
FRONT END FUNCTIONS - HOW TO …
Tendering (continued)
Manual Electronic Tender (All Electronic Tenders)
n) Enter items and total order
o) If applicable, calculate food stamp balance press the “Food Stamp Toggle” key (“FN” through the
keyboard) followed by the “Total Key” (“TL” {ENTER} through the keyboard).
p) The food stamp eligibility amount will be highlighted at the bottom of the form.
q) Press the Credit Manual (“CM” {ENTER} through the keyboard).
r) Select the appropriate tender for the transaction. Follow the process for each tender as described
above.
s) A message box will appear prompting the customer to select a tender type. The customer should
select the tender type. Follow the prompts according the tender type.
t) The customer is then asked to verify the amount and press enter on the pin pad to confirm the
transaction.
u) Once authorization is complete a message will be displayed: "Transaction Approved"
Note: If the transaction has been denied or an error has occurred a message will be displayed and/or an error
code will be displayed.
v) The customer copy of the receipt will print out
w) The merchant copy of the receipt will be printed.
x) The customer will keep the customer copy and the checker will save the merchant receipt for
balancing at the end of the shift
Note: Electronic tender transactions are processed through an interface to a specific EFT processor (that is
Concord, Microtrax, Mercury). Refer to Appendix E for information on EFT processing.
In Store Charge Tendering
a) Enter items and total order
b) Scan the customer‟s card number or Type the card number followed by the "ID" key (“ID” {ENTER}
through the keyboard) or Press the “ID” key (“ID” {ENTER} through the keyboard) and Type the
customer card number when prompted
c) Key in the total and press the “In Store Charge Tender” key (“MI” {ENTER} through the keyboard)
d) First copy of the receipt will print out
e) When the first copy is finished press {ENTER} to print a second copy of the receipt
f) The customer will keep the first one and the checker will have the customer sign the second. Save
the second receipt for balancing at the end of the shift
Note: Refer to Appendix E – EFT processing for more information on credit/debit/EBT processing.
RETAIL USER REFERENCE MANUAL – RETAIL 7
46
RETAIL 7™ User Manual
FRONT END FUNCTIONS - HOW TO …
Voiding and Refunding
This section will describe some of the various functions that can be used when completing void and refund
transactions through the Front-end module of RETAIL™. Please note that these functions are subject to
requiring a manager‟s override depending on the security levels that have been set within RETAIL™.
Voiding the Previous item
a) To void the previous item (for example product, tender) press the "Void" key (“VD” {ENTER}
through the keyboard)
Voiding an Earlier Product
a) To void a product (for example product) other than the previous product press the "Void" key (“VD”
through the keyboard) then re-enter the product using the same key sequence used to ring it up
Example from the keyboard: VD28 {ENTER} = Void product 28
Voiding an Earlier Product by Scrolling
a) To void a product by scrolling, press the “void” key and scroll to the item with the up or down arrow
key to select the item and press enter
Example from the keyboard: VD (Scroll to Item) {ENTER} = Void product highlighted
Voiding a Weighted Product
a) To void a weighted product, place the product back on the scale, then the press the “Void” key
(“VD” through the keyboard)
b) Followed by the product code {ENTER}
Voiding a Product to a Section
a) Press the “Void” key (“VD” through the keyboard)
b) Followed by the product price
c) Press the Section key (“SE” through the keyboard)
d) Following by a Section number {ENTER}
Example from the keyboard: VD500SE100 {ENTER} = Void $5.00 for a product from section 100
Voiding an Entire Sale
a) Press the “Void” key (“VD” through the keyboard), then press the “Total” key (“TL” {ENTER}
through the keyboard) (all items will be voided)
b) Key "0", then press the “Cash” key (“CA” through the keyboard) to finalize the transaction
Example from the keyboard: VDTL {ENTER} = Void the entire sale
Refunding a Product to a Department
a) Press the “Refund” key (“RF” through the keyboard)
b) Followed by the product price
c) Followed by a department key {ENTER}
Note: If this is the only transaction press the “Total” key (“TL” through the keyboard), key in “0” and
press the “Cash” key (“CA” through the keyboard) to clear the transaction
Example from the keyboard: RF500DP10 {ENTER} = Refund $5.00 for a product from department 1
RETAIL USER REFERENCE MANUAL – RETAIL 7
47
RETAIL 7™ User Manual
FRONT END FUNCTIONS - HOW TO …
Voiding and Refunding (continued)
Refunding a Product through Key Entry
a) Press the “Refund” key (“RF” through the keyboard)
b) Followed by the product code {ENTER}
Note: If this is the only transaction press the “Total” key (“TL” through the keyboard), key in “0” and
press the “Cash” key (“CA” through the keyboard) to clear the transaction
Example from the keyboard: RF028 {ENTER} = Refund for product 28
Refunding a Product through Scanned Entry
a) Press the “Refund” key (“RF” through the keyboard)
b) Scan the product
Note: If this is the only transaction press the “Total” key (“TL” through the keyboard), key in “0” and press the
“Cash” key (“CA” through the keyboard) to clear the transaction
Refunding Multiple Quantities of a Product
a) Press the “Refund” key (“RF” through the keyboard)
b) Followed by the quantity of the product
c) Followed by an “*” (Press the “*” key)
d) Followed by the product code (either scan or keyed in {ENTER}
Note: If this is the only transaction press the “Total” key (“TL” through the keyboard), key in “0” and press the
“Cash” key (“CA” through the keyboard) to refund the amount in cash. If the refund will be applied to an
electronic tender, enter TL, then ET {ENTER}. The customer will be prompted to slide the card through the MSR
and follow the prompts on the pin-pad.
Example from the keyboard: RF5*028 {ENTER} = Refund for quantity of 5 for product 28
Refunding a Product to a Section
a) Press the “Refund” key (“RF” through the keyboard)
b) Followed by the product price
c) Press the Section key (“SE” through the keyboard)
d) Following by a Section number {ENTER}
Note: If this is the only transaction press the “Total” key (“TL” through the keyboard), key in “0” and press the
“Cash” key (“CA” through the keyboard) to refund the amount in cash. If the refund will be applied to an
electronic tender, enter TL, then ET {ENTER}. The customer will be prompted to slide the card through the MSR
and follow the prompts on the pin-pad.
Example from the keyboard: RF500SE100 {ENTER} = Refund $5.00 for a product from section 100
RETAIL USER REFERENCE MANUAL – RETAIL 7
48
RETAIL 7™ User Manual
FRONT END FUNCTIONS - HOW TO …
Manager Functions
This section will describe the functions that can be
performed by someone who has manager security level
privileges. In order to access the manager functions,
type in the manager transaction code (MG {ENTER}) or
press the manager transaction key on the keyboard.
When a selection is made, the system will prompt for a
manager's password.
When using Normal Screen Mode: Option 9 - Maintain
Data is selected; Option 8 and Option 9 will change to
Add a Customer and Add a Product allowing access to
these functions.
Note: A manager’s number can be set up as a bar code
that will scan when the manager function is selected.
Simply create a barcode containing the manager
password (for example 19).
Listed below are instructions on how to complete each of the options listed above.
Option 1 - Loan
Function: Loan-in cash to a drawer.
a) Choose #1 from the Supervisor Menu.
b) A message box will prompt you to Type the amount
to be loaned-in. (the amount must be entered in
whole dollars for example enter 20000CA for
$200.00). Click OK.
c) Select number 10 or enter „0‟ to exit.
Note: The Loan-In Slip prints on the receipt printer.
RETAIL USER REFERENCE MANUAL – RETAIL 7
49
RETAIL 7™ User Manual
FRONT END FUNCTIONS - HOW TO …
Option 2 - Pickup
Function: Pick up cash from drawer.
a) Choose no 2 from the Supervisor menu on Normal
Screen, or press Pickup on the Touch Screen.
b) For check tenders, for example, Check, Wic, or Wic
CVV, or charge tenders (tender type = “CH”), the
entire amount for the tender must be picked up. On
the Touch Screen, highlight the tender and press
OK. The Amount field is grayed out so that the
manager cannot enter an amount. All of the checks
must be picked up and the Pick-Up Slip will print out
on the receipt printer, with the details of the checks.
c) To pick up other tender types, for example, Cash,
enter the amount and press OK. The receipt printer
will print out the Pick-Up Slip.
d) If using Normal Screen mode, select the tender type
from the drop-down. If picking up a tender with the
type CK (for example: Check, Wic, or Wic CVV), the
list of the checks will be displayed. Press OK, and all
of those checks will be picked up, and a slip will be
printed. ALL of the checks must be picked up.
e) For cash tenders (tender type = “CA”), type in the
amount, then pick CA – CASH from the drop-down.
Click OK to complete the pickup.
f)
When you have finished, select Cancel to exit.
Note: The Pick-Up Slip prints on the receipt printer.
RETAIL USER REFERENCE MANUAL – RETAIL 7
50
RETAIL 7™ User Manual
FRONT END FUNCTIONS - HOW TO …
Manager Functions (continued)
Option 3 - Check List
Function: Run a list of checks accepted by the checkstand.
a) Choose no 3 from the Supervisor Menu.
b) This will run a list of checks for the checker‟s countdown.
c) Select no 10 or enter „0‟ to exit.
Note: The checklist prints on the receipt printer.
Option 4 - Till Status
Function: Runs a till status report for the checkstand.
a) Choose no 4 from the Supervisor Menu.
b) This will run a till status report for the checker‟s countdown reflecting the statistics for the
checkstand.
c) Select no 10 or enter „0‟ to exit.
Note: The till status report prints on the receipt printer.
Option 5 - Check Override
Function: Overrides security to allow a check to be accepted for the current transaction.
A manager message (as depicted on the right) will
appear if there is a problem with the customer‟s check
writing privileges. The message numbers will change
depending on the type of problem encountered. The
error messages are configured via the POS Information
Point of Sale tab:
st
1 message – Customer has no check writing
privileges.
nd
2 message – Number of checks written by the
customer has exceeded the number allowed
per day (set through the POS Information
form)
rd
3 message - Number of checks written by the
customer has exceeded the number allowed
per week (set through the POS Information
form)
te: The Pick-Up
To override the system and allow the check to be tendered, complete the following steps:
a) The checker should now hit the “Clear” key or Type “CL” {ENTER} through the keyboard to clear
the message.
b) The manager can complete a check override to allow a check to be accepted for this transaction by
following these steps:
1. Access the Supervisor menu and choose #5.
2. Click OK or {ENTER} to the message, "All checks will now be allowed for the current
transaction".
3. Select #10 or enter „0‟ to exit.
4. Press the “Total” key (or Type “TL” {ENTER} as the transaction code) to total the order.
The checker should now be able to accept the check as the tender for the order.
RETAIL USER REFERENCE MANUAL – RETAIL 7
51
RETAIL 7™ User Manual
FRONT END FUNCTIONS - HOW TO …
Manager Functions (continued)
Option 6 - Limit Override
Function: Overrides security to allow an in-store charge to be accepted as the tender.
A manager message (as depicted on the right) will appear if
there is a problem with the customer‟s in-store charge
account privileges. The message numbers will change
depending on the type of problem encountered. The error
numbers are as follows:
th
1. 4 message– Customer has no charge account
privileges (set through the Customer Maintenance
function)
th
2. 5 message– Customer‟s charge balance has
exceeded the customer‟s limit (set through the
Customer Maintenance function)
To override the system and allow the in-store charge to be tendered, complete the following steps:
a) The checker should now hit the “Clear” key or Type “CL” {ENTER} through the keyboard to clear
the message.
b) The manager can complete a in-store charge override to allow the in-store charge to be accepted
for this transaction by following these steps:
1. Access the Supervisor menu and choose #6.
2. Click OK or {ENTER} to the message, "In-store charge will now be allowed for the current
transaction".
3. Select #10 or enter „0‟ to exit.
4. Press the “Total” key (or Type “TL” {ENTER} as the transaction code) to total the order.
The checker should now be able to accept the check as the tender for the order.
RETAIL USER REFERENCE MANUAL – RETAIL 7
52
RETAIL 7™ User Manual
FRONT END FUNCTIONS - HOW TO …
Manager Functions (continued)
Option 7 - Resume or Suspend
Function: Resumes a suspended order or Suspends a current order. Menu option will toggle: In between orders,
the Resume option will be available; in the middle of an order the Suspend option will be available.
Note: The transaction can be resumed by scanning the bar code that was printed when the transaction was
suspended. The security to suspend or resume will still be enforced with this method.
a) Choose # 7 from the Supervisor Menu
b) If suspending an order, the order will be suspended
and a Transaction ID displayed and printed on the
receipt (a barcode may also print if the printer
supports printing of barcodes). The transaction ID will
be required to resume the order.
c) If resuming an order, the system will prompt for a
Transaction ID. Either scan in the transaction ID (if a
barcode was printed) or key in the transaction ID and
hit {ENTER}.
A search option is also available if the Transaction ID is
not known. Click Search button and a list of suspended
transactions will be displayed. Select the item desired and
click OK button.
Once a transaction is selected, the order will be resumed.
Note: An entry in the ros.ini file will determine whether a manager‟s password will be necessary to suspend an
order. UseSecurityOnSU=1. To force a manager‟s password when resuming a transaction, enter
UseSecurityOnRE=1. Without the entry, the cashier can suspend and resume an order without a manager
override.
Note: resumed orders can be configured to display all of the detailed transaction lines or a summary line through
the POS Information function.
Transactions that have been suspended by the cashier and never resumed are captured during Store Close. If
Clear Suspended Transactions is set to Yes in System Information, when the Store Close is run, all suspended
transactions, including the details of the items that were rung up, are stored in a table in POSTrans. The table is
named “TTSArchive”. We have had reported instances of cashiers partially tendering an order, sometimes with
an electronic tender, then suspending the transaction and never resuming it. In Retail, the transaction will not
show up in Store Sales or in the Electronic Journal because it was never completed. Some cashiers and
customers think that because the transaction is suspended, the charge will not be made to the card. The card is
charged immediately when the customer presses OK on the pin-pad, and it is not removed if the transaction is
suspended. The electronic card processor has a record, but Retail does not show the corresponding record. The
new table is used to research discrepancies. The user can go into the database to search for the missing record.
As shown in the screen shot below, a Gift Card was used to partially tender the order, and then the order was
suspended. The Authorization number for the Gift Card is also shown (by scrolling to the right).
RETAIL USER REFERENCE MANUAL – RETAIL 7
53
RETAIL 7™ User Manual
FRONT END FUNCTIONS - HOW TO …
Manager Functions (continued)
Option 8 - Media Swap
Function: Allows swapping of amounts from one tender to another.
Media swaps can be performed for any tender that has
the Media Swap attribute checked () through the
Tender Maintenance function. Tenders and the current
till amount will be listed on the Media Swap form. Follow
the steps below to complete a media swap:
a) Type the Transaction # of the transaction where the
tender was entered (transaction #s are printed on the
Checkstand receipt – refer to the Checkstand
Receipt topic earlier in this section). Transaction # is
an optional field. If it is entered, then the media swap
will be written to the electronic journal using the
transaction #, otherwise new transaction # will be
used.
b) Highlight the From Tender from the list of tenders
displayed. In Normal Screen mode, if swapping from
a CK tender type, highlight Check and press OK. The
Check List will be displayed and you can choose the
check to swap from. The amount will be filled in
automatically.
c) Highlight the To Tender. In Normal Screen mode,
select the To Tender from the drop-down.
d) Type the Amount of the swap.
e) Click Apply button to accept the media swap or click
OK button to accept the media swap and exit the
form.
RETAIL USER REFERENCE MANUAL – RETAIL 7
54
RETAIL 7™ User Manual
FRONT END FUNCTIONS - HOW TO …
Manager Functions (continued)
Option 9 - Maintain Data - Add Customer
Function: Allows adding of a customer from the Front End checkstand.
Customer data can be added from the Checkstand. Enter
the data for the customer and click OK button. Pay special
attention to and select the appropriate attributes for the
customer: Write Checks, Charge Account, Print Invoice (not
used at this time), and Frequent Shopper.
Note: The Add a Customer form is not available in standalone mode.
Refer to the Customer Processing topic earlier in this
section for more information on customers.
Note: use the Tab, Enter and Arrow keys to move between
fields if a mouse is not available.
Option 9 - Maintain Data - Add Product
Products can be added from the Checkstand. Type the data
for the product and click OK button. Products added on the
Checkstand are immediately available to all checkstands.
Products are added into the system in a “Pending” status.
“Pending” products can be reviewed and changed to an
“Active” status through the Product Maintenance function in
the Back End.
If you do want cashiers to be able to add products, enter
AllAddProducts=0 in the ros.ini.
Note: The Add a Product form is not available in standalone mode.
Note: use the Tab, Enter and Arrow keys to move between
fields if a mouse is not available.
RETAIL USER REFERENCE MANUAL – RETAIL 7
55
RETAIL 7™ User Manual
FRONT END FUNCTIONS - HOW TO …
Manager Functions (continued)
Training Mode
Function: Puts the checkstand into Training Mode.
a) Press the Training button when logging onto the main Checkstand form.
b) The system will prompt you for your manager‟s password. Type it in and press enter.
c) Click OK or {ENTER} to the message, “Training mode is now on”. This will now put the Checkstand
into training mode.
d) To sign off, press the “Sign Off” key (or Type “SO” {ENTER} as the transaction code) and Click OK
or {ENTER} to the message, “Training mode is now off”.
Note: the screen will change to a different color (blue or green) when the system is in training mode. The color is
configurable through the ros.ini file. Refer to the RETAIL™ Installation manual for more information.
Loading Pictures and Videos
RETAIL™ supports multimedia capabilities in displaying pictures and running videos from the Front End system.
Pictures or videos (depending on your selection during the installation/setup process) will be displayed when the
screen-lock feature goes into effect on the Front End checkstands. The pictures or videos will be shown
sequentially as they exist in the system directory that contains the picture/video files. RETAIL™ supports the
display of .jpg and .bmp files (pictures) and .avi files (videos).
In order for RETAIL™ to access picture/video files, the files must exist in the following directories on your
system:
File Type
Picture Files
Video Files
Picture Files
for Lookup
Items
Front End
\Program Files
RETAIL™\POS\BmpProducts
\Program Files RETAIL™\\POS\Videos
\Program Files\
Retail\POS\LookupImages
Back End
\Program Files\
Retail\POS\
LookupImages
Server*
C:\POSServer\ LookupImages
Load your .jpg or .bmp files into the Picture Files directory and load your .avi files into the Video Files directory
listed above.
Pictures of products will also be available for use with the Price Verify function. If a product has been associated
to a picture file on the Back End, load the picture file(s) to the Checkstand as well and the picture of the product
will display when price verification is performed on the product.
* Note: If you are going to attach pictures to the product files for lookup on the Front End, create a folder in the
POSServer folder so that you can browse to and select the pictures. If the Back End is installed on the Server,
you can browse to the default folder.
RETAIL USER REFERENCE MANUAL – RETAIL 7
56
RETAIL 7™ User Manual
FRONT END FUNCTIONS - HOW TO …
RETAIL™ System Manager
The RETAIL™ System Manager form is used to setup all the system parameters to configure the Front End
module of RETAIL™. This form is only accessible to supervisors having the proper security levels. This is
accessed from All Programs>Retail v.7> Configuration Tools> Setup Front End. Typically, this information is
setup one time during the installation process. However, if there is a need to re-initialize this data, be very careful
in its use.
The General tab displays product information and
licensee information regarding the Front End system.
The Database tab is used to configure the databases
and their locations for use by the Front End. Only very
experienced users should alter information on this tab.
The Comm Info tab is used to configure devices used
by the Front End including the pin-pad, scanner/scale,
printer, cash drawer, and MICR reader. Press the test
button to verify the communication between the front
end and the device. If the front end cannot
communicate, the status will be “Fail”. If testing a
printer or MICR reader, a test receipt will be printed,
and you will be prompted to put a check through the
MICR.
The Checkstand tab is used to configure the printer
settings, multimedia options and screen lock feature.
The Till # and Lane # print on the receipt and must be
unique for each checkstand. The Screen Lock is the
number of seconds of inactivity allowed before the
system locks the checkstand (the cashier‟s password
is then needed to unlock the checkstand).
RETAIL USER REFERENCE MANUAL – RETAIL 7
57
RETAIL 7™ User Manual
BACKEND - FUNCTIONAL OVERVIEW
Back End Functional Overview
Introduction
This section of the manual will describe the Back End module in detail and provide “How To” guidelines. As
pictured in the Back End functional overview diagram, the Back End module has four menu icons including:
Customers
Inventory
Point of Sales
Administration
The following is a representation of the menu used in the Back End module:
Each functional area contains a menu of supported functions. To access each of the menus, click on the icons
displayed along the left border. A list of supported functions for the selected area will be displayed in the center
portion of the screen. Rest the cursor on each item to display a high level description of the tasks that can be
completed for the selected area. In order to access a given function, click on the function‟s name.
RETAIL USER REFERENCE MANUAL – RETAIL 7
58
RETAIL 7™ User Manual
BACKEND - FUNCTIONAL OVERVIEW
Back End Functional Overview Diagram
RETAIL USER REFERENCE MANUAL – RETAIL 7
59
RETAIL 7™ User Manual
BACK END FUNCTIONAL OVERVIEW
General Topics
Multiple Windows
RETAIL™ will support having multiple windows
open at the same time. This feature will save the
user time in not having to return to the menu
every time they would like to go to a particular
form. From the menu selections on the left, the
user is able to switch between forms. In this
example, the user can switch between the
Electronic Coupons form and the Product
Maintenance form without having to close one
of the forms.
User Activity Tracking
Certain user activities are captured in a log to serve as an audit trail of critical functions performed in the system.
RETAIL™ uses the User Activity Log to track data, which is removed, from the system and to track other critical
changes (e.g., Mass Product Changes).
Anytime one of the following activities is
performed, a form will display requesting the
user to enter a reason for the action.
Delete a Customer
Delete an Electronic Coupon
Delete an Employee
Delete an Inventory Count
Delete a Product
Delete a Vendor
Complete a Mass Product Change
An entry will then be created in the User Activity
Log capturing the person completing
The change, the date and time of the transaction, the reason for the transaction and the contents of certain key
fields for the record effected (e.g., UPC for products, Card Number for Customer, Customer Name).
The contents of the log can then be viewed by using the View System Log Files function contained under the
Administration menu.
RETAIL USER REFERENCE MANUAL – RETAIL 7
60
RETAIL 7™ User Manual
BACK END FUNCTIONS – HOW TO…
Back End Functions - How to …
Introduction
This section of the manual provides an overview on how to complete certain key functions using the RETAIL™
Back End module. The intent is to give the user a good overview on how to complete these specific functions.
The important functions supported in the Back End module are covered here. The functions covered include:
∙ Manage Customers
∙ Manage Products
∙ Manage Inventory
∙ Manage Employees
∙ Bookkeeping & Accounting
∙ System Administration
The On-line Help within RETAIL™ and the Initializing the System section contained in the Appendix are also
good resources to assist you in understanding the functions supported in the RETAIL™ Back End module.
RETAIL USER REFERENCE MANUAL – RETAIL 7
61
RETAIL 7™ User Manual
BACK END FUNCTIONS - HOW TO …
Signing On
Double-click the RETAIL™ Icon
to sign-on to the RETAIL™ Back End module. The RETAIL™ splash
screen will open up and the Password form will be displayed:
Type your password and click OK. If the
password you type is not a valid
password, the “Invalid User for Front or
Back End” error message is displayed.
Click OK and then try again. If you type
a valid password, the RETAIL™ Back
End menu form appears.
Click the appropriate icon to select
the menu you want to use. The
menu choices will change
depending on the icon selected.
Select a function by clicking the name.
RETAIL USER REFERENCE MANUAL – RETAIL 7
62
RETAIL 7™ User Manual
BACK END FUNCTIONS - HOW TO …
Manage Customers
Customers are an integral part of RETAIL™. Customer data needs to be set up to track information by customer
(for example: sales data, bad checks, and charge accounts). This section steps the reader through the basic
functionality within RETAIL™ to assist in managing customers.
Maintain Customer Data
The first step in managing customer data is to
enter the customer information into RETAIL™.
To do this, select the Customer Maintenance
function on the Customers or Administration
menu.
To add a customer, click Add
from the
toolbar. The Card Number field is an important
piece of information for customers. This is the
number that will be entered on the Main
Checkstand screen of the Front End module to
enable the system to track sales to a customer.
The system tracks the customer sales, applies
frequent shopper points/coupons, and verifies
check writing privileges based on the card
number entered.
Enter all the applicable data on the form. Select the Card Type: Regular or Preferred. The customer must be a
PC (Preferred Customer) in order to get Electronic Coupons. Pay special attention to the Store Coupons,
Discount, and Pricing Level fields. The store coupons (in conjunction with the PC card type) field allows the
customer to receive electronic coupons at the checkstand. The discount field allows you to assign a particular
discount arrangement to a customer, while the pricing level allows you to assign a specific product pricing level
to the customer (refer to the Customer Rewards section below). These tools are useful to reward your best
customers.
You can also indicate if the customer can have charge account privileges and establish the customer‟s credit
limit. Specify if the customer can Write Checks and what if any cash back is allowed when the customer writes a
check.
By clicking the Customer Photo field, you can select a photo file (for example, .jpg file) to assign to the
customer. Click Customer Address field and a form pops up allowing you to enter the customer‟s mailing
address, billing address, and e-mail address. When you have entered an e-mail address, click Customer e-mail
and the program automatically takes you to your e-mail program and loads the customer‟s e-mail address.
When you have finished entering the desired information, click Save
on the toolbar to save the information.
You can now enter another customer if required.
Note: If you want to scan customer card numbers at the checkstand, the customer card numbers must be
preceded by 004 and must be a total of 13 digits (for example, 0040001234567). 004 prefix is the default prefix –
this default can be changed through the POS Information function.
RETAIL USER REFERENCE MANUAL – RETAIL 7
63
RETAIL 7™ User Manual
BACK END FUNCTIONS - HOW TO …
Maintain Customer Data (continued)
To edit a customer, click Edit
on the toolbar. You can search for customers by Customer Card Number,
Driver‟s License, or by Name. To search by Card Number, enter the customer‟s card number into the Search by
Card No field. To search by name, click Search
on the toolbar. A search form is displayed allowing you to
search for customers by name, driver‟s license or card number. Partial search criteria can be entered, for
example, entering “Ja” will display customers Jackson, James, etc. Select a customer by clicking the appropriate
customer and clicking OK. When you have selected a customer, you can edit the data related to that customer.
Click Show Bad Check History
on the toolbar to display a list of bad checks written by the customer.
To delete a customer, click Delete
on the toolbar. A customer can only be deleted if the customer does not
have any sales data associated with it or any bad checks with any outstanding balances. You can make the
customer inactive if you cannot delete it.
Important: Whenever you add or update customer information, make sure you update the information to the
checkstands using the Synchronize Checkstands with Customers function. This ensures that the
checkstands have the current customer data in the event that the checkstands need to operate in stand-alone
mode.
Customer Rewards
RETAIL™ has various ways to reward your customers. The following is a list of functions that can be used within
RETAIL™:
Customer Discounts
Pricing Levels
Frequent Shopper Points
Electronic Coupons
Customer Discounts
Customers can be given discounts by establishing discount levels within RETAIL™ and then assigning those
discount levels to customers. The discount levels are entered using the Discounts tab in the POS Information
function (refer to the POS Information topic in the Back End Administration section of this manual). When the
discount levels have been entered, assign the discount level to the customer(s) through the Discount field on
the Customer Maintenance function. When the customer Card Number is entered at the checkstand, the
discount is automatically applied to the customer‟s order. The amount the customer saves is printed on the
receipt.
Pricing Levels
Customers can be assigned to different pricing arrangements by using the pricing level feature in RETAIL™.
Ten different pricing levels can be supported. For each pricing level, simply determine which products should be
affected and what the pricing should be. Then enter the pricing level for each product through the Pricing
Levels button in the toolbar of the Product Maintenance function. Next, assign the pricing level to the
customer(s) through the Pricing Level field on the Customer Maintenance form. When the customer Card
Number is entered or scanned at the checkstand, the pricing for the pricing level assigned is applied to the
customer‟s order. The customer‟s savings amount is printed separately on the receipt preceded by a message
that is user configurable through the Pricing Levels Message field in the POS Information function.
RETAIL USER REFERENCE MANUAL – RETAIL 7
64
RETAIL 7™ User Manual
BACK END FUNCTIONS - HOW TO …
Manage Customers (continued)
Frequent Shopper Points
A reward system based on points earned is
supported with RETAIL™. Establish ranges based on
purchase amount for the points to be awarded using
the Frequent Shopper Ranges function. Through
this form, you can input different ranges of points to
be awarded for purchases up to a certain level. For
example, to reward a customer who purchased $100
of goods with 50 points, type $100 in the Amount
field and 50 into the Points field. When the ranges
have been established, check the Frequent
Shopper field in the Customer Maintenance form to
allow a customer to begin accumulating points. When
the customer‟s Card Number is scanned or entered
at the checkstand, points are awarded to the
customer automatically. The number of points
awarded is printed on the receipt preceded by a
message that can be configured through the Pricing
Levels Message field in POS Information function.
The Redeem Customer’s Frequent Shopper
Points form is used to redeem points for customers.
This form is accessed when the Redeem Shopper
Points
is clicked on the toolbar from the
Customer Maintenance form. Type the number of
points to redeem in the Redeem Points field, select
a Date and enter a reason for the redemption in the
Comments field. Click on the
button to
apply the changes and the customer‟s points will be
adjusted based on the points redeemed.
Note: Points for all customers can be reset to a certain level by using the Reset Frequent Shopper Points
function. This could be used to support a special promotion where all customers need to start from a specific
point.
RETAIL USER REFERENCE MANUAL – RETAIL 7
65
RETAIL 7™ User Manual
BACK END FUNCTIONS - HOW TO …
Electronic Coupons
RETAIL™ gives you the ability to create Electronic
Coupons for your customers either for their current
purchase or for their next purchase. The coupons
are processed automatically through the
Checkstand when the customer‟s Card Number is
scanned or entered.
NOTE: If you would like electronic coupons to be
applied to all customers, with or without a customer
card, go to POS Information. Select “Yes” in the
field “E. Coupons for All”
Open Electronic Coupons. Press Add
on the
toolbar. You can now enter the information related
to the coupon you want to add.
The various criteria entered for the coupon are as
follows:
Triggers
The various fields contained in the left portion of the coupon form, are the fields available to trigger the use of the
coupon at the checkstand. Coupons can be triggered based one of the following:
Purchase of a specific product (UPC)
Purchase of a product that belongs to a specific mix match group (Mix Match)
Purchase of a product that belongs to a specific Department, Section, or Vendor
Purchase of a product that belongs to a specific Product Group. A separate coupon is created for
each UPC in the product group.
Purchase of a specified quantity of items in a “Coupon Group”. The group is created when “Pick
Quantity” is chosen as the coupon type.
When a trigger is entered, the Description field is automatically set. You can override the description by typing
in a new value in the field. The description is printed on the receipt when the coupon is triggered on the
checkstand.
RETAIL USER REFERENCE MANUAL – RETAIL 7
66
RETAIL 7™ User Manual
BACK END FUNCTIONS - HOW TO …
Coupon Type
Six Coupon types are supported:
Preferred Customer – coupon is applied to all preferred customers (Type = PC in Customer
Maintenance function)
Target Customer – coupon is applied to a specific customer or customers. Card number of each
customer is required. When selected, a form is displayed allowing selection/entry of one or more
customers to which the coupon is assigned. In edit mode, an Ellipse (…) is displayed which
allows viewing of the customers selected
Linked Coupon – coupon is allowed to link another coupon. This type of coupon would be
generated when the coupon it is linked to is triggered. Instead of the customer receiving a discount
on the item being purchased, the customer would receive a coupon for a different product either
being purchased in the same order or purchased in the future
BOGO – Buy One Get One Free. This type of coupons allows any customer to purchase one
selected item and get the second item free. This type of coupon is not dependent on a customer
card number.
Pick Quantity – Pick a specified quantity and receive all for a reduced price. This type of pricing is
commonly used for random weight meat items (buy 5 packages of meat for 20.00). Or, a free item
may be rewarded after the quantity has been purchased.
Total Order – A dollar amount or percentage off the order after the Minimum Order is reached.
Or, award an item free after the minimum order is reached.
If Pick Quantity is chosen as the Coupon Type, the
form will change to display the Trigger Price From
and Trigger Price To. From the Group Name,
select <Add New Group>. An item can only belong
to one coupon group, and a Coupon Group can
only have one coupon.
On the right side, the field “Free Item” appears.
Free items can be applied to Pick Quantity or Total
Order coupons.
You will need to create a Coupon Group for Pick
Quantity coupons. Add a coupon group Description
and press Save. Select the products you want in
the group by entering the UPC code, items code,
manufacturer code, or selecting the product group.
Or, you can use the Retail Power Search part of
the form to look for products by description,
department, or price, for example. Press the arrow
buttons to send the Products you want to the
Product Group side.
You can flag one or more of the products in the
group to be “Required” by pressing the Show
Required Product button. This will enforce that the
customer buys the item flagged “Required”.
RETAIL USER REFERENCE MANUAL – RETAIL 7
67
RETAIL 7™ User Manual
BACK END FUNCTIONS - HOW TO …
Electronic Coupons (continued)
Coupon Method/Amount
The Coupon Method field defines to the system what coupon reimbursement method is given to the customer.
The available methods are defined as follows:
Price Reduction – reduces the price of the item by a set amount
% Reduction – reduces the price of the item by a set percentage
Specified Price – replaces the price of the item with the price specified
Generate Coupon – generates a coupon for use in the current order or a future order
The Coupon Method options that are available depend on the type of trigger selected for the coupon.
Trigger Type
UPC, Mix Match
Department, Section, Vendor
Product Group
Coupon Methods Available
Price Reduction, Specified Price, Generate Coupon
Price Reduction, % Reduction, Generate Coupon
Price Reduction, Generate Coupon
The Coupon Amount field defines to the system the amount of the discount that is given when the coupon is
triggered. The coupon amount is dependent on the Coupon Method selected.
Coupon Method
Price Reduction
Specified Price
% Reduction
Generate Coupon
Amount Entered
Amount that is deducted from the price of the product
Price that is used in place of the price of the product
Percentage that price of product is reduced by
Entry of an amount is not allowed
Trigger Qty/Amount
Each coupon must have a trigger quantity or amount defined. This indicates to the system the quantity or
amount that must be purchased in order for the coupon to be triggered. The entry of a quantity or an amount is
dependent on the trigger type of the coupon
Trigger Type
UPC, Mix Match, Product Group
Department, Section, Vendor
Quantity or Amount
Quantity of product which must be purchased before coupon is
triggered
Amount ($) that must be purchased before the coupon is triggered
Coupon Link/Next Use
Coupon Link and Next Use fields are only used for Generated Coupons. When you select Generate Coupon
as the coupon method, you must specify which coupon (coupon link) should be generated when the coupon is
triggered. To select a Coupon Link, either type in the Coupon ID or click ellipse button to display a list of coupons
to select from (only coupons with a Coupon Type of Linked Coupon can be specified as the Coupon Link)
The Next Use field indicates to the system if the coupon being generated can be used immediately (on the
current customer order) or for use on customer‟s next visit. Leave the field blank if the coupon is to be used in
the current order or check () the field if the coupon will be available for use on a future order.
RETAIL USER REFERENCE MANUAL – RETAIL 7
68
RETAIL 7™ User Manual
BACK END FUNCTIONS - HOW TO …
Electronic Coupons (continued)
Example of a Generated Coupon: you want to have customer who purchases cola have a free coupon for
chips if they purchase chips.
1. First setup the Linked coupon for “Free chips”
Trigger
UPC – Chips
Coupon Type
Linked Coupon
Coupon Method
Price Reduction
Trigger Qty
1
Coupon Amount
Purchase Price of Chips
Description
“Free Chips”
2. Next setup the Generating coupon for Cola
Trigger
UPC – Cola
Coupon Type
Preferred Customer
Coupon Method
Generate Coupon
Trigger Qty
1
Coupon Link
Coupon ID of “Free Chips” Coupon
Next Use
- Coupon will be given on next visit if customer buys chips
Blank – Coupon will be give in current order if customer buys chips
Description(s)
Enter one or more descriptions that should be printed at the bottom of the
receipt. The descriptions are printed if the coupon has been flagged for
Next Use.
When the customer purchases Cola, a “Free Chips” coupon is generated. Depending on the Next Use flag,
when the customer purchases chips, the “Free Chips” coupon is awarded to the customer either on the current
order or on a future order.
Note: If a coupon is not flagged for Next Use, the linked coupon (for example, “Free Chips”) is only available for
use during the customer’s current visit. If the customer does not buy the chips, the coupon is no longer available
for use.
Restrictions
Certain restrictions can be entered regarding the coupon. Restrictions include:
Restriction
Start and End dates
Multiple
Order Limit
Min Order
Description
Limits when the coupon can be used
Indicates if coupon can be used more than once (can only be changed for
Target Customer coupons)
Limits the number of times a coupon can be used in an order
The minimum amount of the order before the coupon is awarded. This field is
also used for Total Order coupons.
RETAIL USER REFERENCE MANUAL – RETAIL 7
69
RETAIL 7™ User Manual
BACK END FUNCTIONS - HOW TO …
Electronic Coupons (continued)
UPC Link
The UPC Link field can be used to track the losses generated by a coupon. When a coupon is applied, the
amount lost is tracked against the Department assigned to the UPC Link.
UPC Links for electronic coupons are assigned at the Department level. In the Department Maintenance
function, the UPC Link for electronic coupons is entered in the Electronic Coupon Link field (under
Miscellaneous tab). The UPC Link is an actual product setup in the Product Maintenance function where it is
assigned a department to which you would like the coupon loss reported.
When the coupon is added or the trigger criteria are changed, the UPC Link is automatically assigned to the
electronic coupon. The UPC link assigned is based on the Department of the trigger criteria entered (for
example, if you enter UPC 1 as the trigger, the department assigned to UPC 1 is used to determine the UPC
Link).
Thus, separate departments can be set up to track coupon losses. One or more UPC Links can be set up in the
system and assigned to these coupon loss departments. The coupon loss departments are then displayed in the
Store Sales function reporting the losses due to electronic coupons.
Click Save
from the toolbar to save the information.
Edit/Delete Coupons
To edit a coupon, click Edit
from the toolbar. Type in a specific Coupon ID or search for a coupon by
clicking ellipse button (...) located next to the Coupon ID field.
A list of coupons matching certain criteria can be displayed at the bottom of the form. Click Coupon Settings
from the toolbar to enter in the criteria (Display Filter section) that would affect the list of coupons
displayed. When the criterion has been set, display a list of coupons by clicking Show/Hide Coupon List
from the toolbar. A list of coupons is displayed in the bottom portion of the form. You can scroll through the
coupons by using the scroll arrows located to the right of the list. Select a coupon to edit from the list by doubleclicking the coupon.
To delete a coupon, click Delete
is not attached to another coupon.
from the toolbar. RETAIL™ will allow you to delete a coupon if the coupon
Coupon Movement
Coupon Movement (usage) can be viewed for a specific coupon or group of coupons. Coupon Movement for a
specific coupon can be viewed by clicking Coupon Movement
movement for the specific coupon that is edited.
from the toolbar. This displays the coupon
You can also display coupon movement for a group of coupons by accessing the Electronic Coupon
Movement function from the main menu. Enter in the criteria desired (specific coupon, department, date range)
and click Movement. The data can be displayed in Summary (totals by coupon) or Detail (display totals by
customer for each coupon) format by selecting a Report Type.
RETAIL USER REFERENCE MANUAL – RETAIL 7
70
RETAIL 7™ User Manual
BACK END FUNCTIONS - HOW TO …
Track Bad Checks
Bad checks can be a problem for retailers.
RETAIL™ gives you the ability to track
customer bad checks and automatically
produce bad check notification letters. The
system can also warn the checkstands of any
customer trying to write checks that have had
their check writing privileges removed. Select
the Bad Check Maintenance function on the
Customers menu.
To add a bad check, click Add
from the
toolbar. The first thing to do is select the
customer who wrote the bad check. You can
search for customers by Customer Card
number, Driver’s License or by Last Name.
Type the customer‟s card number in the Search by Card No field. To search by name or driver‟s license, Birth
Date, City, or many other options, click Search
from the toolbar. Select a customer by clicking the correct
name and clicking OK. When you have selected the customer, a list of bad checks is displayed in the bottom
portion of the form. You can now enter the remainder of the information for the bad check. Click Save
from the toolbar to save the information.
To edit a bad check, click Edit
from the toolbar. Select the customer. To edit a check, double-click a
check listed on the bottom portion of the form.
To generate notification letters to the customer, select which letter you want to send by clicking the box to the
right of one of the letter selections (for example, Letter 1, 2, 3). This allows you to view and/or print the letter.
The system also captures the date and time the letter was sent.
NOTE: Microsoft Word must be installed in order to print the letters.
Note: To disable check writing privileges for a customer, make sure the Write Checks field is not selected
both on this form and on the Customer Maintenance form. The program also allows you to update any
customer that is linked to the customer being modified.
RETAIL USER REFERENCE MANUAL – RETAIL 7
71
RETAIL 7™ User Manual
BACK END FUNCTIONS - HOW TO …
Manage Customers (continued)
Track Customer Sales
How about Customer sales? Who are your
best customers? The answers are at your
fingertips. RETAIL™ tracks sales by
customer automatically. To view customer
sales, select the Show Customer Sales
function of the Store Sales section on the
Point of Sales menu. The Show Customer
Sales form is displayed.
Enter the start and end dates for the time
period you want to view (for example,
06/1/2010 to 12/31/2010). Now click the
down arrow next to Other, select Total
Store from the list and then click Execute
Query in the toolbar. RETAIL™ gets your
customers and sums their purchases for the
time period. The sales information is
listed in the bottom portion of the screen. Click Include Related Products to include items related by item code
or pricing product group. Click Sales Filter
to refine the data you have selected. The Sales filter allows you
to apply specific criteria to the data displayed (for example, Profit > 10%, Total Sales < $100.00) and allows you
to sort the data in different ways.
You can also narrow down your search to a particular category (for example, specific products, department,
section, and vendor). Click the down arrow next to one of the selections (for example, Dept, Section, and
Vendor) to select from a list of items or select a specific product or range of products by typing the UPC code(s)
in the fields to the left of the UPC. When you have selected the category you require, click the appropriate
selection next to your selection. The customer sales data matching your selection is displayed.
Click Group Customers
from the toolbar on the Customer Sales form to group the customers in order to
reward your best customers. By grouping selected customers, you can attach a Gift Certificate, Thank you letter,
or Electronic Coupons to each customer in the group. This provides you the ability to target your best customers
and reward them for their business.
Note: RETAIL™ also displays total figures for the category you have selected. The total figures are located to
the right of the category selection (for example, Customers/Items, Purchases, and so on).
RETAIL USER REFERENCE MANUAL – RETAIL 7
72
RETAIL 7™ User Manual
BACK END FUNCTIONS - HOW TO …
Manage Customers (continued)
Manage In-Store Charges
In-Store charges for a customer can be managed
using the In-store Charge Maintenance form
accessible from the Customers Menu or through
on the toolbar of the Customer Maintenance
form.
All in-store charges or payments made through the
Front End checkstands will be available for review
through this form. Any additional charges or
payments or miscellaneous entries can be added
through this form. All entries pertaining to the
customer are displayed in the bottom of the form.
Note: Only the memo field can be modified for an entry.
Offsetting entries must be added to adjust amounts. Click
an entry in the list to make it available for edit.
To print a customer statement for a specific time period, click on the Statement button in the toolbar. This
generates a Statement of Accounts that can be mailed to the selected customer for payment. Additional
reports listing in-store charge activity and customer balances activity are also available.
RETAIL USER REFERENCE MANUAL – RETAIL 7
73
RETAIL 7™ User Manual
BACK END FUNCTIONS - HOW TO …
Manage Products
Managing products is one of the most critical tasks within RETAIL™. Product information is the heart and soul
of RETAIL™. This section explains the basic functionality within RETAIL™ supporting the management of
products.
Maintain Products Data
Maintaining products data is done through the
Product Maintenance of the Point of Sales
menu. The Edit a Product form will be displayed:
To add a product, click Add
on the toolbar.
You can now enter the information related to the
product you want to add. Make sure to assign the
product to the appropriate department, section,
and vendor. When a department is selected, the
attributes for the department are loaded to the
product. The pricing information (for example, type
of pricing that applies, price amount) for the
product is also critical. Enter the pricing data for
the normal pricing of the product and if necessary,
any special pricing that is in effect for the product
(type start and end dates for the special pricing).
For each type of pricing, you can click the down arrow next to the Pricing Method field and a list of pricing
methods is displayed that you can choose. Click Ellipse (…) next to either of the price fields to pop-up the Cost
Calculator form. The Cost Calculator allows you to perform what-if scenarios related to pricing, cost, and
margins and applies the pricing information to the product.
Enter all other applicable POS related and attribute related data for the product on the main form. Other data for
the product can be entered through different options accessible by clicking on the toolbar. These options
include:
Assigning a product to product groups – This option allows you to assign a product to a pricing
product group and/or one or more reporting product groups. Pricing product groups streamlines
the maintenance of products by allowing you to group like products together that share the same
pricing information (for example, various flavors of Jell-O). When a pricing change is made to one
product in the pricing group, the system prompts you to update all products in the pricing product
group with the change. The use of pricing product groups simplifies the Price Management
functions in RETAIL™. Refer to the Product Grouping Updates discussion in the Product
Maintenance topic in the Back End Detail Documentation section.
Entering pricing levels for a product - Enter different pricing levels (up to 10) for the product using
the Pricing Levels tab (refer to the Pricing Levels topic in the Customer Rewards section
above)
Assigning additional vendors to a product – This option allows you to assign secondary vendors to
a product and cost-related information for the vendor(s)
Update inventory level (stock on hand) - Enter inventory-related data for the product including the
initial quantity-on-hand (this is your initial/beginning inventory for the product). In edit mode, you
can enter inventory adjustments (depleting or increasing) to the stock on hand
Enter product kits - Enter in the products and quantities that make up the kit.
RETAIL USER REFERENCE MANUAL – RETAIL 7
74
RETAIL 7™ User Manual
BACK END FUNCTIONS - HOW TO …
Maintain Products Data (continued)
When you have entered all the information for the product, click Save
on the toolbar to save the
information. There are many other options accessible through the toolbar. Refer to the Product Maintenance
topic in the Back End Detail Documentation section for more information on all the options available.
Note: Scan the product UPC codes to ensure they are entered correctly. While in the Add mode and with the
cursor in the UPC field, scan the product and the UPC code should appear in the field. If you type the UPC
codes, then follow the examples below:
Enter in the leading digit as
the first character of the
UPC followed by the
product code (in this case
12345678901)
Enter in the leading digit
as the first character of
the UPC followed by the
product code (in this
case 0123456)
Enter in the leading digit
as the first character of
the UPC followed by the
product code (in this
case 123456789012)
Enter in the product
code only for this code
(in this case 1234567)
Products can also be added through the Front End module of RETAIL™. Any product added through the
checkstand is flagged as “pending” in the system. This allows reviewing and finalizing the product on the Back
End. To view a list of all of the “pending” products in the system, click Get
on the toolbar. The bottom
portion of the form now lists all pending products that have been added from the checkstand but have to be
finalized. Either finalize each product individually by clicking the product in the list or finalize all pending
products at one time by clicking Set
on the toolbar. The Set function will only be accessible if a vendor is
not required to enter in products (Require a Vendor option is set through the System Information function).
To edit a product, click Edit
on the toolbar. Type a specific UPC or search for a product by clicking Ellipse
(…) next to the UPC field. When a product is selected, the information related to that product is displayed. To
display a list of products, click Hide/Show Product List
on the toolbar. A list of products is displayed in
the bottom portion of the form. You can scroll through the products by using the scroll arrows located to the
right of the list. Select a product to edit from the list by double-clicking the product. Click Settings
on the
toolbar to type the criteria affecting the products that is displayed in the product list. View all of the electronic
coupons entered for the product, batches to which the product belongs, product movement, and pricing history
by clicking the appropriate on the toolbar.
RETAIL USER REFERENCE MANUAL – RETAIL 7
75
RETAIL 7™ User Manual
BACK END FUNCTIONS - HOW TO …
Maintain Products Data (continued)
If you like to print shelf labels for the products, click Labels
on the toolbar. This prints labels for all products
that have a check mark in the Label field. If you prefer to export the product data to import into a separate label
program, click Export Labels
on the toolbar. A file (ProductLabels.txt) is created containing product data
for the products selected. This file can then be imported into any label-making program that supports importing
of files.
Note: Product labels do not include a barcode. If you would like to print labels with barcodes check to see if your
printer supports downloading of fonts. Refer to your Printer User Manual about the fonts supported.
Important: Whenever you add or update product information, make sure you update the information to the
checkstands using the Synchronize Checkstands with Products function. The checkstand data is used when
checkstands are operating in stand-alone mode.
To delete a product, click Delete
on the toolbar. RETAIL™ allows you to delete a product if the product has
not been sold or ordered. If sales exist for the item, then the product can be flagged Inactive instead of Deleted.
A product is not removed from the system until the Synchronize Checkstands with Products function has
been executed.
RETAIL USER REFERENCE MANUAL – RETAIL 7
76
RETAIL 7™ User Manual
BACK END FUNCTIONS - HOW TO …
Maintain Products Data (continued)
Mass Product Changes
RETAIL™ also gives you the ability to make
mass changes to entire categories of products.
Access this function by selecting the Mass
Product Changes function under the Products
section on the Point of Sales menu.
Select a category of products (for example,
department, section, vendor, other) by clicking
the down arrow next to one of the selection
fields to select from a list of items. When you
have selected the appropriate category, the
products are displayed in the bottom portion of
the form. To enter data into a field, move the
mouse pointer over the field name.
If the cursor changes from a pointer to a hand, then the field accepts entry of data. Click the field name and the
field changes to allow input. Click the Pricing tab to make changes to the normal or special pricing for the
products. Click the POS Information tab to make changes to the product (for example, to assign a mix match
code, change the unit of measure). Click the Attributes tab to change attributes for the products selected (for
example, change or set up a discount, or change the tax plan) and the Percent tab to increase or decrease the
cost or unit price of the selected group.
Changes, with the exception of special pricing changes, are applied to the products file immediately. Click Apply
on the toolbar to apply your changes. The program requires that you apply the changes for each tab
separately. If you are entering changes for more than one tab, click Apply before clicking any other tab.
Special pricing changes must be applied through a batch. To create a batch, click Create Batch
on the
toolbar. Enter in a batch ID in the Batch ID field, press ENTER and type the start and ending dates. When the
batch is created, it must be applied to the product file using the Product Batches Maintenance function. Click
Find a Batch from the toolbar to locate the batch. When the batch is loaded to the screen, click Apply on the
toolbar.
Note: Take care in using this task. If you click on Apply, the changes become permanent and
cannot be reversed.
Note: Pricing changes will only update the unit price (normal or special) for a product. If a product using a pricing
method other than unit price, the group price is not affected. Prices for products using split price as the pricing
method is not updated (since a unit price does not exist for these products).
Note: An audit trail of changes performed by the Mass Product Changes function is kept in the User Activity
Log. Access this log by using the View System Log Files function under the Administration menu.
RETAIL USER REFERENCE MANUAL – RETAIL 7
77
RETAIL 7™ User Manual
BACK END FUNCTIONS - HOW TO …
Maintain Products Data (continued)
Track Product Movement
Tracking product movement is critical for
retailers to enable them to make important
decisions related to the products they offer.
RETAIL™ displays product movement for a
specific product. Access this function either by
clicking Product Movement
on the
toolbar while editing a product or by selecting
the Show Product Movement function under
the STORE SALES section of the Point of
Sales menu.
Product movement can be shown for any time
period you wish. Simply enter the start and end
dates for the time period desired and press
. The product movement for the time
period you entered is displayed in the upper
portion of the form. You can also display
product movement for the past 13 weeks, or the past 12 months or even the past 10 years. Simply click Total
to the right of the time frame you wish and the product movement is displayed. To include totals for products
having the same item code as the product selected, click Include all products with the same item code field.
Analyze Product Categories
RETAIL™ also gives you the ability to analyze
categories of products. Access this function
either by clicking Analyze Product Category
when editing a product in the Product
Maintenance function or by selecting the
Analyze Product Categories function under
the PRODUCTS section of the Point of Sales
menu.
From this form, you can analyze a particular
product or category of products. To analyze a
particular product enter the UPC code of the
product in the UPC field and press {ENTER}. If
you would like to select a category of products
(for example, department, section, vendor),
click the down arrow next to one of the
selections (Dept, Section, Vendor) to select
from a list of items. When you have made your
selection, press the Execute Query
button.
Statistical data for products matching your selection is displayed in the bottom portion of the screen. Total data
including gross margin and total items for the category you selected is displayed in the upper portion of the
form.
RETAIL USER REFERENCE MANUAL – RETAIL 7
78
RETAIL 7™ User Manual
BACK END FUNCTIONS - HOW TO …
Manage Products (continued)
Track Product Sales
How about Product sales? What are your best
products? To view product sales select the
Show Product Sales function under the
STORE SALES section of the Point of Sales
menu.
You can display product sales for a specific
product or for a particular category (for
example, department, section, vendor, total
store). Enter the start and end dates for the
time period you want. Then, either click the
down arrow next to one of the selection s (for
example, Dept, Section, Vendor, Other) to
select from a list of items or select a specific
product by typing the UPC code in the field to
the left of the UPC. When you have selected
the category you wish, press the Execute
Query button in the toolbar.
Sales data for products matching your selection will now be displayed in the bottom portion of the form. Click
Include Related Products field to include sales for any products having the same item code as products
selected. Click Sales Filter
to refine the data you have selected. The Sales filter allows you to apply
specific criteria to the data displayed (for example, Quantity < 10, Revenue > $100.00) and allows you to sort the
data in different ways.
Note: RETAIL™ also displays total figures for the category you have selected. The total figures are located to
the right of the category selection (for example, Gross Profit, Number of Customers, and so on.).
Enter Product Batches
RETAIL™ gives you the capability to create
product changes for an ad or to create a batch
of product changes for multiple products, or to
review a previous ad/batch. Select the Product
Batches Maintenance function under the
PRODUCTS section of the Point of Sales
menu.
RETAIL™ allows you to create three types of
batches: Normal Price Change, Ad Batches,
or Pull Shelf Tags. A Normal price change
batch is used to make a permanent price
change, on a group of products. An Ad batch
is used to invoke special (temporary) changes
to a group of products that would be in effect
for a period. Pull Shelf Tags is used to print
labels for items when the sale has expired.
RETAIL USER REFERENCE MANUAL – RETAIL 7
79
RETAIL 7™ User Manual
BACK END FUNCTIONS - HOW TO …
Manage Products (continued)
Enter Product Batches (continued)
To create a batch, type a batch ID in the Batch ID field and press {ENTER}, or, press the Add button in the
toolbar. The Create New Batch dialogue box pops up. Select the Batch Type from the drop-down and enter the
start and ending dates and times for the ad batch. For a Normal Price Change batch, only enter the Start Date.
The dates cannot be selected for the Pull Shelf Tags batch. Now you are ready to begin entering products. Type
the UPC code of a product for this batch and press {ENTER}. Now type the pricing information related to this
product for this batch. Click the down arrow of the method field to produce a drop-down menu of several different
pricing methods. Select the pricing method you wish and enter in the pricing information as it applies to this
product. Click the POS Information tab to view information about the product. From this tab, you can specify a
Mix Match code that would be in effect while the product is on ad (Note: The Mix Match code for the product
resets to spaces when the ad has expired). Click Attributes tab and view attributes for the product. From this
tab, you can indicate whether discounts should be allowed while the product is on ad by using the Allow
Discount field. (Allow Discount may be set as the default from the System Information task). Products you enter
are listed in the bottom portion of the screen. You can repeat this process for as many products as you like. If a
product you enter belongs to a Pricing Product Group, the system prompts you to add all products belonging
to the pricing product group to the batch. The use of pricing product groups simplifies the price management
functions in RETAIL™.
To apply the batch to the products file, click Apply
on the toolbar. If the date of the batch is currently in
effect, then the batch is updated to the products file immediately. If the date of the batch is a future date, then the
batch will be scheduled for update and the products file will be updated on the appropriate date as part of a SQL
job.
To get information for a past batch click Find Batches
and a list of batches are displayed. Select one of the
batches from the list and a list of products for the batch are displayed in the bottom portion of the form. You can
sort the list of products (either by Movement, Profit, Gross, or UPC) by clicking Sort Products
from the
toolbar. If you want to look at a specific product, select it from the list by double-clicking the product. To analyze
the product's activity, click Sales tab and then click Quantity Sold
. The quantity sold for the past 13 weeks
is displayed for your review. Click Review Batches
on the toolbar to view a list of all the batches that
contain the product you are entering/editing. This allows you to identify any conflicts that might exist for the
product.
Note: Use the Batch Priority Management function under the PRODUCTS section of the Point of Sales menu
to manage and prioritize batches that have been entered.
RETAIL USER REFERENCE MANUAL – RETAIL 7
80
RETAIL 7™ User Manual
BACK END FUNCTIONS - HOW TO …
Manage Inventory
Entering inventory counts, ordering goods, receiving goods, and analyzing your inventory are all important
functions of managing your inventory. RETAIL™ provides you with the ability to perform all these functions in an
automated fashion.
Enter Inventory Count
To be able to analyze your inventory, the first
step required is to establish the beginning
inventory (physical inventory) for the products.
This function should be performed when a store
first opens to establish the beginning inventory
count for the products as well as periodically
when physical inventory counts are performed.
Select the Inventory Count function of the
Inventory menu. The Inventory Count form is
now displayed.
One advantage of RETAIL™‟s Inventory Count
application is that it allows you to take a physical
count of your store‟s inventory over a period of
several days. This is useful if the count needs to
span several days.
Note: You should enter the product counts into the system the same day the count for the product is taken. The
system stamps the date and time entered on the product count and uses this date to recalculate the net quantityon-hand when you mark the ending inventory.
To begin entering an inventory count, type the Category that you wish to assign to the count (this can be the
date of the inventory count if you wish) and press ENTER. Enter the UPC code of a product you have counted
and press ENTER. Enter the quantity for the product in the Quantity field and press ENTER. The product is
displayed in the bottom portion of the form. Continue this process until you have entered your counts.
Note: When you exit the form, the system will update the quantity-on-hand for each product based on the counts
entered to that point.
Once you are completely done entering your inventory count (this could have spanned several days), you would
want to mark the ending inventory to establish a baseline to be used when analyzing inventory. Click Mark
Ending Inventory
to complete this process. The system confirms your request and asks you to enter an
ending inventory date (this should be the ending date of the count). RETAIL™ recalculates the quantity for each
product in the count; taking into account all receipts and sales through the close of business on the ending date
you entered.
Note: RETAIL™ requires that the ending date you enter be the same date as a successful store close. If this is
not the case, an error message appears.
RETAIL USER REFERENCE MANUAL – RETAIL 7
81
RETAIL 7™ User Manual
BACK END FUNCTIONS - HOW TO …
Manage Inventory (continued)
Enter Inventory Count (continued)
The inventory count and ending date you enter is the basis for calculating inventory levels in the Inventory
Analysis function. When using the Inventory Analysis function, the ending date can be used as a Start Date
when calculating inventory or as a Start and End Date when calculating shrinkage. You can access previous
counts that you‟ve entered by clicking the down arrow next to the Category field. This will bring up a drop-down
list of the inventory counts that currently exist in the system. Select the one you desire and the information
related to the inventory count will be displayed.
To delete an inventory count, click Delete
the associated product entries.
RETAIL USER REFERENCE MANUAL – RETAIL 7
in the toolbar. RETAIL™ deletes the inventory count and all of
82
RETAIL 7™ User Manual
BACK END FUNCTIONS - HOW TO …
Manage Inventory (continued)
Order Goods
Ordering products is a critical function within the inventory system. RETAIL™ supports the ordering of goods
through the entry of purchase orders. To enter a purchase order, select the Open a New Purchase Order
function of the Inventory menu.
Select the vendor/supplier of the goods by
clicking the down-arrow to the right of the Vendor
field. This will bring up a drop-down list of all
vendors in the system allowing you to select the
one you desire. Once you‟ve selected the
vendor, the system will automatically generate
the purchase order number. You can now enter
the products you are ordering by entering in the
UPC of the product into the UPC field. You can
also enter in products using their item code by
clicking the UPC and toggling to item code. Once
you‟ve entered a product, specific product
information will be loaded to the form. To view
the more detailed information, click on the
Product Detail field. You are now ready to enter a
purchase amount for the product.
Three purchase types are supported in RETAIL™: Received which is the normal type; Free indicates goods are
being received for free (no charge); Returned indicates goods are being returned to the vendor which will result
in a negative entry on the P.O. Enter in the quantity that applies to the product. Allowances for a product(s) will
automatically be applied as products are entered. To view the allowances, click the Allowances next to the
Allowance total field. As you enter the products, they will be listed on the bottom portion of the form.
Click Cost Calculator
to adjust a product‟s cost, price, and margin data. The calculator can be used to
perform what-if scenarios in adjusting the cost and pricing data. Cost and pricing data can also be updated and
applied to the product file from this function. When the Apply is clicked, the system will update the data in the
product file. Only users with security access to the Product Maintenance function will have access to this
function.
Click Save
in the toolbar to save the information. Click Print Preview
or click Print
to preview a printout of the P.O.
to print the P.O.
To edit a purchase order, use the Review a Purchase Order function of the Inventory menu. Select the vendor
that is on the P.O. you wish to modify. Once you have selected the vendor you will be able to select the P.O. you
wish to modify by clicking the down-arrow next to the P.O. No. field. This will bring up a drop-down list of the
purchase orders for the vendor that you can select. Once you‟ve selected a P.O., the information related to the
P.O. will be displayed. To edit a product listed, type the UPC number of the product into the UPC field and you
will be able to modify the data for that product. To add a new product to the P.O., simply enter the UPC of the
new product in the UPC field and the system will allow you to add the product. To enter adjustments to the P.O.
click Adjustment
in the toolbar.
RETAIL USER REFERENCE MANUAL – RETAIL 7
83
RETAIL 7™ User Manual
BACK END FUNCTIONS - HOW TO …
Manage Inventory (continued)
Receive Goods
When goods are on order, at some point they
will need to be received. You can receive
goods ordered by using the Receive an
Invoice function of the Inventory menu.
First, select the vendor that is on the P.O. you
wish to receive. Once you‟ve selected the
vendor select a P.O. by clicking the downarrow next to the P.O. No. field. A drop-down
list of P.O.s for the vendor will appear that you
can select from. If you‟d like to receive goods
without a P.O., simply enter in the first UPC or
Item Code (toggle by clicking the UPC) and
the program will prompt you to create a P.O.
Once a PO has been selected, the information
related to the purchase order will be displayed.
Enter the UPC or Item code of the product in the UPC/Item Code field for which you want to receive goods. You
will then be able to enter a received quantity for that product (refer to the Order Goods topic in the previous
section in regards to Purchase Types that can be selected). Enter the received quantity for all the products
individually or if you‟d like to update the received quantity with the quantity ordered for all products, click Receive
as Ordered on the toolbar. (Refer to the Cost Calculator function described in the Order Goods topic in the
previous section)
Once you have entered all of the received quantities, enter other information pertaining to the invoice (that is,
Date, Invoice Number). As a last step, to update the received goods into inventory, click Mark Invoice as
Received
in the toolbar.
RETAIL USER REFERENCE MANUAL – RETAIL 7
84
RETAIL 7™ User Manual
BACK END FUNCTIONS - HOW TO …
Manage Inventory (continued)
Analyze Inventory
Once you‟ve used RETAIL™ to establish your
beginning inventory and to receive and sell
goods, you will want to analyze your inventory.
To do this, select the Inventory Analysis
function of the Inventory menu.
Select a start date by clicking the down arrow
next to the Start Date field (these are the dates of
inventory counts that currently exist in the
system). Enter an ending date or select one from
the list by clicking the down arrow next to the End
Date field. Select a particular product by entering
in the UPC of the product in the UPC field and
press {ENTER}. If you‟d like to select a category
of products, (for example, vendor, section, or
department), click the down arrow next to one of
the selection boxes (for example, Department,
Section, Vendor, Other) to select from a drop-down list. To calculate the inventory for the category you selected,
click the Calculate Inventory button
in the toolbar. The system will now list all of the products matching the
category you selected in the bottom portion of the screen.
In the middle of the screen, you will see three columns of information displayed by the system: Quantity,
Profitability and Shrink. Under the Quantity column, you'll be able to see your initial inventory (based on the
inventory count entered matching the start date you specified), the number of items received, the number of
items sold, the inventory adjustments (edit column) and your ending inventory. Under Profitability, you'll see your
price, your cost, your profit and gross margin of your ending inventory. RETAIL™ calculates your ending
inventory by taking the beginning inventory count plus the received invoices, minus the sold products.
To calculate any inventory shrink, click the Calculate Shrink
in the toolbar. The system will then search for
an inventory count for the ending date you specified on this form. The inventory count will be displayed in the
Ending inventory column on the form. This ending inventory count will be used to calculate the shrink. Under
Shrink, you'll see your price, your cost, any loss of product and the actual margin of your ending inventory
including your shrink.
Remember: You will not be able to use this function until an inventory count(s) is entered in the system. The
system will search for an inventory count matching the start date you entered and use the inventory count as the
initial/beginning inventory. To calculate shrink, the system will search for an inventory count matching the End
Date you entered. Refer to the Enter Inventory Count topic covered earlier in this section
RETAIL USER REFERENCE MANUAL – RETAIL 7
85
RETAIL 7™ User Manual
BACK END FUNCTIONS - HOW TO …
Manage Inventory (continued)
Allowances/Bill Backs
Enter in any vendor allowances and bill backs
by using this form. Allowances will automatically
be applied to any P.O. or invoice entered via
the Back End module or the RETAIL™
Wireless module. The allowance amount will
automatically reduce the PO or invoice amount
when the product is entered.
Bill Backs and any amount due (in the form of
rebates) from the vendor can be tracked. The
amount due from the bill back is calculated by
clicking calculate in the toolbar. The system
will calculate the quantity sold of the product
based on the most current product movement
data available.
RETAIL USER REFERENCE MANUAL – RETAIL 7
86
RETAIL 7™ User Manual
BACK END FUNCTIONS - HOW TO …
Manage Employees
Employee data is necessary within RETAIL™ to grant users access to the system and to track employee
performance statistics. This section will step the reader through the basic functionality within RETAIL™ that
supports the setup of employee data.
Enter Employee Data
In order to maintain employee data using
RETAIL™, select the Employee Maintenance
function under the MAINTENANCE section of
the Administration menu.
To add an employee, click the Add
in the
toolbar. You can now enter the employee
information. The employee # is automatically
assigned by the system. This number is used in
the system to track statistics on the employee
and it appears on various reports and screens
within the system. Make sure to set the security
level of the employee based on the security
levels established in the Security Administration
function. To view the Security Administration
data, click the
next to the Cashier Security
field. Also, make sure you enter the Front End password (grants access to the Front End module) and their Back
End Password (grants access to the Back End module). The Birth Date of the employee will be used to verify
the age of the employee when selling products that require age verification. Select a Back End Profile (only if the
employee will have access to the Back End) from the drop-down list, or press the ellipsis button to the right of the
field to access Profile Maintenance. Profiles are created in Profile Maintenance as a security measure.
Employees can view and access only forms that have been assigned to them via Profile Maintenance. Click the
Save
in the toolbar to save the information.
To edit an employee, click the Edit
in the toolbar. You can search for employees by employee number or by
name. To search by employee #, click the down-arrow next to the “Employee Number” field. A drop down list of
employee numbers will be displayed for you to select. To search by name, click the down-arrow next to the
“Employee Name” field. A drop down list of employee names will be displayed for you to select.
To delete an employee, click the Delete
in the toolbar. You can also make an employee inactive by clicking
off the Active check box. When an employee is inactive, access is denied to the Front End and/or Back End
systems.
Remember: Whenever you add or update employee information, make sure you update the information to the
checkstands using the Synchronize Checkstands with Employees function. RETAIL™ prompts the user to
synchronize checkstands each time an employee has been added or modified.
RETAIL USER REFERENCE MANUAL – RETAIL 7
87
RETAIL 7™ User Manual
BACK END FUNCTIONS - HOW TO …
Manage Employees (continued)
Review Checker Statistics
RETAIL™ also gives you the capability to review
checker statistics for a particular time period.
Select the Till Statistics and Balancing function
under the REGISTERS section of the Point of
Sales menu.
Once the form is displayed, enter or select the
start date and end date for the time period you
wish. Data for the first cashier for the time period
selected will now be displayed on the form. You
can display information for other cashiers by
clicking the left or right scroll arrows next to the
Cashier field. This will allow you to scroll through
the statistics for the various cashiers that exist in
the system. Reports are also available to assist
you in monitoring checker performance.
The Print Front End Service Report and Print Register Productivity Report functions under the
REGISTERS section of the Administration menu will allow you to print checkstand statistic reports. These
functions give you the option of reviewing the reports on-line or of printing the reports.
Monitor Tills
RETAIL™ also gives you the capability to view till
activity for each cashier in real time and also to
perform tender pickups from the tills from the
back office. Select the Monitor Till function from
the Administration menu.
This form will display current tender totals for
each cashier and whether the cashier is active or
inactive. Click the Time
to configure the
amount of time used to determine if a cashier is
inactive. To display active cashiers only, select
the Active Cashiers Only check box.
This form also allows pickups and loan-ins to be done to the checkstand from the Back End system. Highlight a
cashier and click the Pickup/Loan-In
from the toolbar. When the Pickup/Loan-in form displays, select
Pickup or Loan In, fill in the desired amount for each tender (checks must be picked up in full) pickup, and press
the “Print & Save” (this prints to a standard printer, not a receipt printer).
Note: The Monitor Till screen refreshes the data every 10 seconds.
Note: If the Till limit for a tender displayed has been exceeded, the information will display in blue. If the
Mandatory Limit for a tender displayed has been exceeded, the information will display in red.
RETAIL USER REFERENCE MANUAL – RETAIL 7
88
RETAIL 7™ User Manual
BACK END FUNCTIONS - HOW TO …
Manage Employees (continued)
Monitor Checkstands
RETAIL™ gives you the ability to monitor
checkstand transactions as they are occurring.
This function will also give you a current till status
for the employee. Select the Monitor
Checkstands function from the Administration
menu.
Select a checkstand from the checkstands drop
down box. The cashier‟s name will display in the
lower left corner. The current order being rung up
on the checkstand displays under the POS
portion of the screen. Till Status information, Void
and Refund information displays on the right
portion of the screen.
Note: The Till Status information shows the total
as of the time you enter the form. This data is not
refreshed until the current order is tendered.
RETAIL USER REFERENCE MANUAL – RETAIL 7
89
RETAIL 7™ User Manual
BACK END FUNCTIONS - HOW TO …
Bookkeeping & Accounting
RETAIL™ gives you the capability to perform daily bookkeeping functions within the system. All of these
functions should be performed on a daily basis. This can be done at any time regardless if the store close has
completed. RETAIL™ will allow you to balance your tills, balance your safe, balance your cash-on-hand, and
make bank deposits. The Bookkeeping tasks should be performed in the following sequence:
1. Balance all of the tills for the day using the Till Statistics and Balancing function (this can be done
any time after the cashier has completed his/her shift.)
2. Enter all the bank deposits for the day using the Make a Deposit function (this can be done anytime
throughout the day)
3. Balance the safe and store using the Safe Statistics and Balancing function
4. Review and compare the store sales with the tenders and verify the deposits made by using the
Balancing Overview function.
Make Deposits
RETAIL™ provides you the capability of
entering bank deposits made during different
times of the day. The system will allow you to
track deposits by deposit number. Each new
deposit is assigned a consecutive number for
the current day. Select the Make a Bank
Deposit function form from within the Safe
Statistics and Balancing task.
The form opens to the Deposit Totals tab for
the same date as selected in the Safe Statistics
dialogue. Any previously created deposits for
the selected day will display in the beginning
balance column. Enter a Deposit amount for
any of the depositable Tenders (Depositable
field in Tender Maintenance) or the deposit,
with the exception of checks, including WIC (Tender Type = “CK” in Tender Maintenance function). The
system will automatically load the checks that have been picked up and can be deposited. To view or edit check
information, click the Check List tab. This tab allows you to view a list of checks for the current deposit and
make any corrections to the current list of checks by using the Add, Edit or Delete functions. You may also select
checks to be deposited in the next deposit by removing the check mark on one or more of the checks. When you
are satisfied with the data you‟ve entered, click the Save
in the toolbar to save the information.
Use the Review a Bank Deposit function to view a previously created deposit, select the Review a Bank
Deposit function under the REGISTERS section of Point of Sales menu. You can search for a deposit by
clicking the Find a Deposit
in the toolbar. You can scroll through each deposit for the selected day by
clicking the scroll arrows
next to the Deposit No. field. Click the Print Preview
toolbar to view/print a bank deposit slip.
or the Print
in the
Note: No changes can be made from within the Review a Deposit task. All changes must be made by creating a
negative or positive deposit to offset the error through the Make a Deposit function.
Note: Only deposits created with your own password are displayed through the Find a Deposit function unless
your manager’s security is above security level 10.)
RETAIL USER REFERENCE MANUAL – RETAIL 7
90
RETAIL 7™ User Manual
BACK END FUNCTIONS - HOW TO …
Bookkeeping & Accounting (continued)
Balance Tills
RETAIL™ provides you the capability to
balance your tills for every checker. Prior to
using this function, you‟ll need to have the
entire checkers countdown their tills manually
for the day you wish to balance. Having these
countdowns, you‟ll now be ready to balance.
Select the Till Statistics and Balancing
function under the REGISTERS section of the
Point of Sales menu.
The system will automatically bring up the
information for the first cashier. You will be able
to scroll through the different cashiers and view
their information by clicking the right and left
scroll arrows located next to the Cashier field.
Till Balancing and Till Statistics information will be displayed on the form. The Till Statistics portion of the form will
display various statistics for the checker for the time period specified.
The Till Balancing portion of the form will allow you to balance the till for a specific day. The system calculated
totals for the till would be displayed in the gray column labeled System of the Till Balancing portion of the form
(see the form above). Enter the countdown information for the cashier in the white column labeled Actual. As
you enter the information, RETAIL™ will calculate the over/shorts (variance) and display it in the gray column
labeled O/S. Totals for each column will be displayed on the bottom portion of the form. When you are satisfied
with the data you‟ve entered, click the Save
in the toolbar to save the information.
Remember: Till balancing data for the current day is updated based on a specified interval (default is 10
minutes). If you need to re-enter cashier information press the Get in the toolbar. This will reload cashier
information for the selected cashier.
Safe Statistics
RETAIL™ also provides you with the ability to
balance the safe and balance the total store.
Select the Safe Statistics and Balancing
function under the REGISTERS section of the
Point of Sales menu. The system will display
current information on the form. The form is
divided into two tabs: Current Safe and
Balance Information.
The first tab, Current Safe, displays what is in
your safe at any given time. The Ending Safe
amount is calculated as follows (Opening safe
balance + Pickups (checkstands) – Loans
(checkstands) + Reconciled (Till Statistics) –
Deposits (Make a Deposit).
Note: click the Help button then Adjustments, Pickups, Loans,
Deposits headings to view details related to these items.
RETAIL USER REFERENCE MANUAL – RETAIL 7
91
RETAIL 7™ User Manual
BACK END FUNCTIONS - HOW TO …
Safe Statistics (continued)
The second tab, Balance Information,
displays System Generated Deposit totals. This
includes total sales and cashier reconciliation
information based on the till statistics
information entered into the system (refer to the
Balance Tills section for more information). It
also contains the actual deposit information
based on deposits made using the Make a
Bank Deposit function The system takes into
account any fluctuation in the safe in the “Safe
Variance” field. The system will compare the
amounts entered to the system generated
deposit information and actual deposit
information and display any variance in the
“Variance” field. When you are satisfied with the
data you‟ve entered, click Save in the toolbar
to save the information. Another portion of the Balance Information is the Safe Contents section. This allows you
to enter the actual countdown of your safe. This amount can then be compared to the system generated Ending
Safe amount. The labels displayed on the form can be changed to meet the needs of the user based on the
types of currency kept in the safe. Click the Change Labels
to modify these labels. Up to 12 different
currency labels can be entered to meet your needs.
Note: Adjustments can be made to the safe to change balances on specific tenders. This function would be
used when moneys need to be added or removed from the safe. Click the Safe Adjustments
to access this
feature.
Note: The system uses the previous day’s ending safe amount as the starting point for the current day in order
to calculate the safe variance.
Balancing Overview
Select the Balancing Overview function under
the REGISTERS section of the Point of Sales
menu. This form will give you a complete
financial picture at a glance. This form
combines data from three different areas to
give you a summary of the financial data. Once
the form is displayed, information for the
previous day will be displayed on the form (if
you are balancing for the current day, enter the
current day‟s date). The information on this
form includes: Store Sales data, System
Generated Deposit data from the Safe Statistics
form, and Till Statistics totals from the Till
Statistics and Balancing form.
To preview or print a report of the information on the form, click the Print Preview
toolbar. A report of the financial data will be available for you to review or print.
or the Print
You may also view or print a summary of the discounts and coupons for the time period selected. Press
view the report.
RETAIL USER REFERENCE MANUAL – RETAIL 7
in the
to
92
RETAIL 7™ User Manual
BACK END FUNCTIONS - HOW TO …
System Administration
Close the Store
The store close process is one of the most
critical processes in RETAIL™. This process
will transfer all of the checkstand transaction
data from the Front End module to the SQL
Databases and Back End module. It will also
aggregate data that supports the various Back
End processes. Normally, this process should
be run on a daily basis after the store closes or
in the case of a 24-hour store anytime during
the day. If for some reason it is not run on a
daily basis, then the process will allow you to
catch up for the days missed. To execute the
store close process, select the Close Store
function of the Administration menu.
Click the Run Now button to start the store close process. When the store close process is complete, a
message will appear informing you that it was completed successfully. If you‟d like to see a log of the completed
steps proceed to the View System Log Files task.
The Store Close can also be set up to run automatically every day at a specific time. This function is set up in
System Information. From the Default tab, under the Auto Store Close section, press the Setup Store Close
button. Enter the time of day for the Store Close to occur, using the AM or PM format. For example, 10:00 PM.
Press O.K. to save your selection. The store close will then occur daily at the specified time. After the store close
has been set up, the Date of the last successful store close will be displayed to the right of the Setup Store Close
button.
Note: If suspended transactions exist for the day being closed, a message may be displayed requiring that the
suspended transactions are cleared. The options on how the system should handle suspended transactions at
store close can be configured via the System Information function.
Note: If the store close process does not complete successfully, the next time you select this function a Store
Close Recovery process will execute. This will restart the store close process from the point it encountered the
error. If the automatic store close has failed, for example, due to suspended transactions, then store close
recoveries will begin to run. For this reason, you should regularly view the store close form to make sure the
normal store close is running.
24-HOUR STORE: Refer to the Store Close topic in the Administration section of this document and the
Running a 24 Hour Store topic in the Appendices.
RETAIL USER REFERENCE MANUAL – RETAIL 7
93
RETAIL 7™ User Manual
BACK END FUNCTIONS - HOW TO …
View System Log Files
RETAIL™ gives you the ability to review various system log files. These log files contain a history of when
certain functions were performed. Information on who performed the function, when it was performed and other
descriptive information are captured in the log files. The log files that are available to view are:
Update Checkstand Log: displays a history on the Update Checkstand process.
Store Close Log: displays a history on the store close process.
History Backup Log: displays a history of when historical transaction data was backed up.
RETAIL™ Error Log: displays a history of errors that have occurred within the RETAIL™ system.
User Activity Log: displays a history of certain user activities including deleting customer data, deleting
products data, deleting employee data, deleting customer coupons, mass product changes as well as other
activities.
The View System Log Files form is used to view
information stored in the various system logs
maintained by RETAIL™. The form displayed
depends on the menu selection chosen from the Log
drop-down menu on this form. The menu selections
include: Store Close Log, Update Checkstands Log,
History Backup Log, Database Error Log and
RETAIL™ User Activity Log.
Click the log you wish to view and the information
related to that log will now be displayed.
Click the Close selection of the Log menu to close
this form and return to the main menu.
RETAIL USER REFERENCE MANUAL – RETAIL 7
94
RETAIL 7™ User Manual
BACK END DOCUMENTATION
Backend Detail Documentation
Purpose
The purpose of this section of the document is to provide the reader with a high-level understanding of the Back
End module of RETAIL™. The detail documentation included in this section contains the following types of
documents:
Form flow documents for each menu section (for example, customers, employees, products)
Snapshots of all forms used in the Back End module
A brief description of the form‟s use and functions supported
Detailed descriptions of form fields
Report definitions and layouts
The Back End detail documentation is broken-up into sections for each menu function contained in the Back
End module.
RETAIL USER REFERENCE MANUAL – RETAIL 7
95
RETAIL 7™ User Manual
BACK END DOCUMENTATION
Customers
Retail
Search
(Customer)
Customer Maintenance
Bad Check Maintenance
Customer
Status
Bad Checks
In-Store
Charge
Maintenance
Retail
Search
(Customer)
Redeem
Shopper
Points
Customer
Memo
View
Customer
Report
Electronic Coupon
Movement
View Bad
Checks
Report
Electronic Coupons
Electronic
Coupons
Bad Checks
Report
Customer
Report
Update
Checkstands
Coupon
Movement
Coupons
Report
Coupon
Movement
Reset Frequent
Update Checkstands with
Frequent
Customer Changes
Shopper Ranges Shopper Points
Frequent
Shopper
Ranges
Reset Points
View
Coupons
Report
Coupon
Settings
Find Coupon
Customer Focus
Customer
Focus
In-Store Charge Reports
View Coupon
Movement
Report
Coupon
Movement
Report
- Activity
- Balance Detail
- Balance Summary
- Statements
Checkstand 1
RETAIL USER REFERENCE MANUAL – RETAIL 7
Checkstand 2
View Customer
Ranking Report
Customer
Ranking Report
Checkstand n...
96
RETAIL 7™ User Manual
CUSTOMERS
Customer Maintenance
To add a customer, click Add
from the
toolbar. The Card Number field is an
important piece of information for customers.
This is the number that is entered on the
Main Checkstand screen of the Front End
module to enable the system to track sales
to a customer. The system tracks the
customer sales, applies frequent shopper
points/coupons, and also verifies check
writing privileges/charge privileges based on
the Card Number entered. Fill in General
information: Birth Date, Type (PC –
Preferred Customer which allows Electronic
Coupons or REG - Regular), Driver license,
and so on. Click Customer Photo field and
save a customer‟s picture in the system.
Click Customer Address and enter the
mailing, billing, and e-mail address for the
customer. When an e-mail address has been entered, you may click Customer e-mail to send an e-mail
message to the customer. Set up the customer‟s charge account information and their check writing privileges.
In edit mode, click Show Bad Check History
to display a list of bad checks that have been entered in the
system for the customer. A list of bad checks is displayed at the bottom of the form. Click the button to return to
normal edit mode.
Refer to the Manage Customers topic in the Back End How To… section for more information on managing
your customers with RETAIL™.
Note: The Checkstands should be updated with the customer information when you have finished your updates
by using the Synchronize Checkstands with Customers function (covered later in this section). This ensures that
the checkstand database contains the most current customer data in the event the Front End system needs to
operate in stand-alone mode.
Note: If you want to scan customer card numbers at the checkstand, the customer card numbers must be
preceded by 004 and must be a total of 13 digits number, for example, 0040001234567.
Table 2.1 contains a description of each field contained in the Customer form.
CUSTOMER FORM -- FIELD DESCRIPTIONS
FORM FIELD
DESCRIPTION
Search by Card No.
Used to enter customer‟s card number in add mode/Used to find a customer by card number in
edit mode
First Name
Customer‟s first name
MI
Customer‟s middle initial
Last Name
Customer‟s last name
Birth Date
Date of customer‟s birth (can use the calendar drop down menu)
Sex
Customer‟s gender (can use the selection drop down menu)
Marital Status
Customer‟s marital status (can use the selection drop down menu)
Type
Identify the Customer as a Regular (REG) or Preferred (PC) customer
Driver License
Customer‟s driver‟s license number
Expiration Date
Date driver‟s license expires (can use the calendar drop down menu)
Card Number of another customer linked to the current Customer (refer to the Customer Link
Customer Link
topic in this section)
RETAIL USER REFERENCE MANUAL – RETAIL 7
97
RETAIL 7™ User Manual
CUSTOMERS
Customer Maintenance (continued)
CUSTOMER FORM -- FIELD DESCRIPTIONS
FORM FIELD
DESCRIPTION
Area Button
Click to access the area selection box (covered later in this section)
Click to browse and attach a photo to selected customer (used in Customer Focus function)
Customer Photo
Customer Address
Click to access customer address detail (covered later in this section)
Click to access your email browser (email address is entered through the Customer Address
Customer e-mail
button)
Category Button
Click to access the set up category selection box (covered later in this section)
Customer Secondary IDs
Click to access the set up form to add additional customer numbers, such as drivers license,
account number, spouses account number etc, etc for bad check checking.
Active Customer
Flag to enable or disable the active status of a customer. If a customer is inactive, sales is not
captured for this customer on the checkstand.
Frequent Shopper
Flag to enable or disable the customer‟s privilege to earn and accumulate frequent shopper
points
Store Coupons
Flag to enable or disable customer to automatically receive store coupon discounts
Print invoice
Flag to enable or disable the system to print invoices for the customer
Pricing Level
Product pricing level associated with this customer. Product pricing levels are maintained for
each product. Refer to the Product Maintenance section.
Finance Charge
Indicates if a finance charge will be applied to charge balances
Tax Exempt
Indicates if the tax will be removed from the sales transaction via the Front-end
Points Earned
Balance of frequent shopper points earned by the customer
Discount
Discount number to be applied to the current Customer (discount numbers are maintained in
the POS Information function under the Administration menu)
Purchases
Customer‟s total amount of purchases stored in the system
Shops for
Number of people this customer shops for
Flagged from Customer In-Store Charge Attributes form of the In-Store Charge AR
Charge Account
Maintenance form to enable or disable customer‟s privilege to have a charge account. “MI”
tender and “RA” transaction key is allowed for this customer.
Maximum amount (default amount is maintained in the POS Information function under the
Credit Limit
Administration menu) extended to the current Customer
Terms
Displays the number of days before a finance charge is accrued, as entered in In-store Charge
Current Balance
Customer‟s outstanding credit balance stored in the system
Write Checks
Flag to enable or disable customer‟s privilege to write checks at the checkstand
Cash Back
Maximum amount of cash back customer can receive when paying by check
Checks Written
Customer‟s weekly check count
Created
Date and time stamped by system when the current Customer was first entered in the system
Modified
Date and time stamped by system of the last modification
Modified By
Person who last modified the customer‟s information
BAD CHECK LIST
Displays only while Show/Hide Bad Check History is toggled on
Date
The date of the bad check
Check #
The check number of the bad check
Amount
The amount of the bad check
Fee
The fee amount charged by the store for the bad check
Total
The total of the bad check plus the bad check fee
Paid
The amount paid on the bad check
Paid Date
The last date that a payment was received against the bad check
Balance
The balance due on the bad check
Called
Date customer was called in regards to the bad check
Letter1
Date the first notification letter was sent
Letter2
Date the second notification letter was sent
Letter3
Date the third notification letter was sent
Memo
Displays any notes on the bad check
Table 2.1
RETAIL USER REFERENCE MANUAL – RETAIL 7
98
RETAIL 7™ User Manual
CUSTOMERS
Toolbar
The following describes the functions supported by the tool bar located on the Customer form.
Button
Description
Exits the current window
Prints a customer report
(Refer to the Print Customer Report section)
Displays the customer report on the screen
(Refer to the Print Customer Report section)
Saves your entries or changes for the current record
Opens the Add a Customer form.
Opens the Edit a Customer form.
Flags the customer as deleted in the system
The customer is physically deleted when the Synchronize Checkstands with Customers
function is executed.
Redeems shopper points for customers that are flagged as frequent shoppers
(Refer to the Redeem Shopper Points topic in this section)
Helps to access the In-Store Charge Maintenance function
(Refer to the In-Store Charge Maintenance topic in this section)
Finds a customer by name or card number
(Refer to the RETAIL™ Search topic in this section)
Displays bad checks received from the selected customer
(Refer to Bad Check Maintenance topic in this section)
Maintains notes about a customer
(Refer to the Customer Memo topic in this section)
Activates the context-sensitive help
Customer Photo
The Customer Photo form is used to select and save a photo
(saved in .jpg or .bmp format) to the selected customer.
Press Browse to search for the photo.
Note: Photos are used in the Customer Focus form.
Table 2.2 contains a description of each field contained in the Customer Photo form.
CUSTOMER PHOTO – FIELD DESCRIPTIONS
FORM FIELD
DESCRIPTION
Photo
Displays customer‟s photo
Browse
Browse allows for selection of a photo from another location
Table 2.2
RETAIL USER REFERENCE MANUAL – RETAIL 7
99
RETAIL 7™ User Manual
CUSTOMERS
Customer Maintenance (continued)
Customer Address
The Customer Address form is used to maintain the
customer‟s current address, bill to information, phone
numbers, and e-mail address. This form is displayed
when the Customer Address is clicked. Click OK and
the address information are saved.
Note: Click Customer E-mail on the Customer
Maintenance form to open your e-mail service to
send e-mail directly to your customer (provided your
computer supports e-mail)
Table 2.3 contains a description of each field contained in the Customer Address form.
CUSTOMER ADDRESS – FIELD DESCRIPTIONS
FORM FIELD
DESCRIPTION
Street
Customer‟s street number and P.O. Box number if available
City
Customer‟s city
State/Province
Customer‟s state or province as applicable
Zip/Postal Code
Customer‟s zip code
Home Phone Number
Customer‟s home phone number
Business Phone Number
Customer‟s business phone number
Bill to Address
Customer‟s bill to address, City, State/Province, and zip code (address to mail charge statements if
different than customer‟s address)
Bill to Name
Name of customer or company responsible for charge statements
E-mail
Customer‟s or companies e-mail address
Show this again when address is
Flag to force entry of data in every field on the form. This causes the system to edit all fields filled in with
incomplete or unclear
data.
Table 2.3
Customer Area
The Geographic Code Maintenance form is used
to categorize customers into different geographic
areas (for example, city, county, and province). This
form is displayed when the Area field
within
the Customer form is clicked. Click Add to add new
codes to the list. Select a code in the list using the
mouse and click OK.
Table 2.4 contains a description of each field contained in the Geographic Code Maintenance form.
CUSTOMER AREA – FIELD DESCRIPTIONS
FORM FIELD
DESCRIPTION
Definition
Number sequentially assigned by the system starting from number 1
Geographic Description
Free format description of the area
Modified
Date and time stamped by the system
Modified By
Number of the employee who made the last modification
Table 2.4
RETAIL USER REFERENCE MANUAL – RETAIL 7
100
RETAIL 7™ User Manual
CUSTOMERS
Customer Maintenance (continued)
Customer Category
The Category Maintenance form is used to group
customers into different categories (as defined by the
user). This form is displayed when the Category field
within the Customer form is clicked. Click Add
to add new categories to the list. Select a code in the
list and click OK.
Table 2.5 contains a description of each field contained in the Customer Category Maintenance form.
CUSTOMER CATEGORY MAINTENANCE– FIELD DESCRIPTIONS
FORM FIELD
DESCRIPTION
Definition
Number sequentially assigned by the system starting from number 1
Category Description
Description
Modified
Date and time stamped by the system
Modified By
Number of the employee who made the last modification
Table 2.5
Customer Link
The Customer Link feature is used to link two
customers together. This feature is useful in
synchronizing data between two customers. Either
type the Card Number of the customer to link to or
click Link Search
to access the RETAIL™
Search form to search for a customer. When you
have entered the customer, a link customer
message box is displayed. Click Yes to update the current customer with the following data from the linked
customer: customer address, marital status, area, category, discount, pricing level, purchases, shops for, credit
limit, terms, writing check privilege, cash back, checks written, frequent shoppers, points earned, store coupons,
and print invoice.
When modifying a customer that is linked to another
customer, a message box appears when saving the
changes. Clicking Yes results in the synchronization
of the fields listed above for the two customers.
RETAIL USER REFERENCE MANUAL – RETAIL 7
101
RETAIL 7™ User Manual
CUSTOMERS
Customer Maintenance (continued)
RETAIL™ Search
The RETAIL™ Search form is used to search for a
customer by First Name, Last Name, Driver‟s License,
Card Number, Birth Date, City, Zip, Home Phone,
Write Checks, Points Earned, or Modified Date. This
form is displayed when the Find
is clicked from
the toolbar on the Customer form or the Bad Checks
form. All customers matching the Find criteria are
displayed on the form. Partial search criteria may be
entered. When accessed from the Bad Checks form
in edit mode, only the customers matching the criteria
entered and having bad checks in the system are
displayed. When the customer is selected and OK is
clicked, the customer information is displayed on the
Customer form.
Table 2.6 contains a description of each field contained in the RETAIL™ Search form.
RETAIL™ SEARCH - FIELD DESCRIPTIONS
FORM FIELD
DESCRIPTION
Column
Search field to find customers by last name, card number, driver‟s license, etc.
Operator
Select the Operator for the search function, such as = Equal To, Like, > Greater Than
Value
Enter the Value, such as the name. For partial search criteria, use the Like operator.
Find Button
Used to initiate the search request
Customer Name
List of customer names matching the search criteria
Card Number
List of the card number for each customer
Driver‟s License
List of customer driver‟s licenses
Table 2.6
Redeem Customer’s Frequent Shopper Points
The Redeem Customer’s Frequent Shopper Points
form is used to redeem points for the current customer
selected. This form is accessed when the Redeem
Shopper Points
is clicked from the toolbar on
the Customer form. The displayed form shows the
current earned points and the card number of the
customer. Type the number of points to redeem in the
Redeem Points field, select a date and type a reason
for the redemption in the Comments field. When the
redeem points, date, and comments are typed, click
Apply to apply the changes.
When Apply is clicked, a RETAIL™ dialogue box
appears prompting whether or not a redemption slip
should be printed. The Earned Points is reduced by
the number redeemed and an entry is created at the
bottom of the list.
RETAIL USER REFERENCE MANUAL – RETAIL 7
102
RETAIL 7™ User Manual
CUSTOMERS
Customer Maintenance (continued)
Redeem Customer’s Frequent Shopper Points (continued)
Table 2.7 contains a description of each field in the Redeem Customer’s Frequent Shopper Points form.
REDEEM CUSTOMER’S FREQUENT SHOPPER POINTS - FIELD DESCRIPTIONS
FORM FIELD
DESCRIPTION
Earned Points
To-date balance of points earned stored in the system
Card No
Current customer‟s card number
Redeem Points
Number of points to be redeemed
Date
Date of points redemption (may use the calendar drop down menu)
Comments
Notes as to the nature of points redeemed
Redemption List
Points Redeemed
List of points redeemed
Date
List of dates of each point redemption
Comments
List of comments related to each point redemption
Table 2.7
In-store Charge Maintenance
The In-store Charge Maintenance form is
used to view and maintain in-store charge
activities of customers. This form is accessed
when the In-store Charge Maintenance
is clicked from the toolbar of the Customer
Maintenance form. This form can also be
accessed from the Customer menu. This form
displays an accumulation of the charges (MI
transaction key) and payments (RA transaction
key) data entered from the checkstand.
Additional entries (for example, charges,
payments, credit memos, and finance charges)
can be entered through this form. All entries
pertaining to the customers are displayed in the
bottom grid.
Table 2.8 contains a description of each field contained in the In-store Charge Maintenance form.
IN STORE CHARGE AR MAINTENANCE -- FIELD DESCRIPTIONS
FORM FIELD
DESCRIPTION
Customer:
Type a customer‟s card number; click Search to find a customer or click any column/ row of the grid where
Card No/Search by Card No.
customers are listed to work on specific customer desired.
Min Bal
Entered amount sets the minimum limit of customers‟ balance of customers to be displayed in the bottom
grid. Blanking the field includes customers‟ with zero or negative balances. Field‟s default is $0.01.
Max Bal
Entered amount sets the maximum limit of customers‟ balance of customers to be displayed on the bottom
grid. Field‟s default is blank. Leaving the field blank includes every customer with outstanding balance.
Proc Date:
Field‟s default is current date. Entered “From” date has grid display charge customers transactions with the
From
“From Proc Date” entered and onward.
To
Entered “To” date has grid display charge customers transactions with dates before through “To Proc Date”
entered.
Due Date:
Entered “From” date has grid display charge customers transactions with the “From Due Date” entered and
From
onward.
To
Entered “To” date has grid display charge customers transactions with dates before through “To Due Date”
entered.
Payments:
Applied
Flag to include or exclude charge customers applied payments from the grid list.
Unapplied
Flag to include or exclude charge customers unapplied payments from the grid list.
Partial Applied
Flag to include or exclude charge customers partially applied payments from the grid list.
Table 2.8
RETAIL USER REFERENCE MANUAL – RETAIL 7
103
RETAIL 7™ User Manual
CUSTOMERS
Customer Maintenance (continued)
In-store Charge AR Maintenance (continued)
IN STORE CHARGE AR MAINTENANCE -- FIELD DESCRIPTIONS
FORM FIELD
DESCRIPTION
Credit Memos:
Applied
Flag to include or exclude charge customers applied credit memos from the Grid List.
Unapplied
Flag to include or exclude charge customers unapplied credit memos from the Grid List.
Partial Applied
Flag to include or exclude charge customers partially applied credit memos from the Grid List.
Charges:
Paid Charges
Flag to include or exclude charge customers paid charges (for example, In-store Charges, Misc Charges,
and Financial Charges) from the grid list.
Unpaid Charges
Flag to include or exclude charge customers unpaid charges (for example, In-store Charges, Misc Charges,
and Financial Charges) from the grid list.
In-store Charges
Flag to include or exclude customers paid or unpaid Front-end originated (checkstand) charges
Misc Charges
Flag to include or exclude customers‟ paid or unpaid Backend originated charges.
Financial Charges
Flag to included or exclude customers‟ paid or unpaid recorded finance charges.
Refresh Button
Click to refresh grid information based on the above listed (from Card Number to Financial Charges flag
field) selection criteria.
Grid Columns:
Click any column heading to sort data on the grid in ascending or descending orders.
Card No
Lists customer card numbers meeting selection criteria. Clicking a customer row once or twice writes the
customer‟s card number in the Card No field and refreshes grid to display this customer‟s data only.
Name
Lists customer names meeting selection criteria. Clicking a customer row once or twice writes the
customer‟s card number in the Card No field and refreshes grid to display this customer‟s data only.
Balance
Lists customer balances meeting selection criteria. Clicking a customer row once or twice writes the
customer‟s card number in the Card No field and refreshes grid to display this customer‟s data only.
Proc Date
Lists customer transactions with process dates meeting selection criteria.
Type
Lists customer transaction types meeting selection criteria.
Amount
Lists customer transaction amounts meeting selection criteria
Terms
Lists individual transaction or customer term of transactions meeting selection criteria.
Due Date
Lists customer transaction due dates meeting selection criteria.
Status
Lists customer transaction status – Not Paid, Paid, Not Applied, Applied or Partial.
Ref No
Transactions originating from the checkstand, this number is made up the Till No + Checkstand No +
Transaction Number For transactions originating from Backend, displays the entered reference number (for
example, check number) Entry is optional.
Memo
Displays the entered detailed reason of the recorded transaction.
Trans No
Lists the unique transaction number sequentially assigned by the system
Table 2.8
RETAIL USER REFERENCE MANUAL – RETAIL 7
104
RETAIL 7™ User Manual
CUSTOMERS
Customer Maintenance (continued)
Toolbar
The following describes the functions supported by the toolbar located on the In-store Charge Maintenance
form.
Button
Description
Exits the current window.
Access New In-store Charges form
(Refer to the New/Edit In-store Charge topic in this section).
Access New Payment Payments form
(Refer to New/Edit Payments topic in this section).
Access In-store Charge Finance form
(Refer to the In-store Charge Finance topic in this section).
Access Customer In-store Charge Attributes form
(Refer to the Customer In-store Charge Attributes topic in this section).
Generates an In-store Charge Aging Report (Summary or Detail)
(Refer to the Print an In-store Charge Aging Report section)
Generates In Store Charge Statements
(Refer to the Print an In Store Charge Statement section).
Generates Customer In-store Charge Activity Report(s)
(Refer to the Print Customer In-store Charge Activity Report section).
Generates Customer In-store Charge Balance Detail Report(s)
(Refer to the Print Customer In-store Charge Balance Detail Report section).
Generates Customer In-store Charge Balance Summary Report
(Refer to the Print Customer In-store Charge Balance Summary Report section).
Activates the context-sensitive help
New (Edit) In-store Charges
The New In-store Charges form is used to add
charges not taken up at the Front End. This form is
displayed if you click Charges on the In-store Charge
form. The Edit In-store Charges form displays when
a charge row is double-clicked in any column from
Proc Date to Trans No column of the In-store Charge
form. The upper part of the screen displays the charge
clicked. The grid displays data of the same transaction
and payment(s) applied to the charge, if any. From
this form, a Back End charge can either be modified or
deleted.
Note: Front End charges are viewable on this form but cannot be modified nor deleted. Finance charges can be
viewed on this form only when a related transaction is being viewed.
RETAIL USER REFERENCE MANUAL – RETAIL 7
105
RETAIL 7™ User Manual
CUSTOMERS
Customer Maintenance (continued)
In-store Charge AR Maintenance (continued)
Table 2.9 contains a description of each field contained in the New (Edit) In-store Charges form
NEW (EDIT) IN-STORE CHARGES– FIELD DESCRIPTIONS
FORM FIELD
DESCRIPTION
Displays whether a customer in the Customer Attributes form is set up as charge customer or not. Charge
In-store Charge box
activities can still be processed, but a reminder, “This is not a charge customer,” is encountered until customer is
set up.
Card No
Displays the card number of the current customer. When displayed, only the current customer‟s activities display
on the grid.
Name
Displays the name of the current customer.
Balance
Displays the current outstanding balance of the current customer.
Terms
Displays the current setup terms of the current customer.
Trans ID
Displays either “New Trans” when on add mode of the system assigned sequential number of the retrieved
charged transaction.
Proc Date
Displays the effective date of the transaction. In new charge form, the field defaults to current date, but allows user
to enter other dates – back date or future date.
Type
Defaults to Misc. Charge.
Amount
Displays the amount of the charge transaction. When on add mode enter the amount of the transaction to be
recorded. This field accepts positive or negative amount.
Ref No
Displays the entered reference number for Backend originated charges and a system assigned number for Frontend originated charges
Due Date
Displays the due date of the new or retrieved charge. Defaults to a date calculated from current date + the number
of days of the customer‟s credit terms. Accepts other entered due date. Note: Default date does not automatically
change when a different date other than current is entered in the Proc Date field.
Memo
Displays the entered reason of the recorded transaction.
Grid Columns:
Proc Date
Lists the effective date(s) of the charge transactions.
Lists the types: Charge for Front-end charges, Misc. Charge for Backend entries, and Payment for
Type
Amount
Lists the amount(s) of the charge transactions.
Terms
Lists the terms of the charge transactions.
Due Date
Lists the due date of the charge transactions.
Lists the status of the charge activity, whether – Paid, Unpaid, Partial
Status
Ref No
Lists the reference number of the charge transactions
Memo
Lists the reason related to charge transactions
Trans No
Lists the sequentially assigned trans id of the charge transactions
Table 2.9
Processing buttons:
The following describes special notations on the buttons used to process charge transactions on the New (Edit)
In-store Charges form.
Button
Description
When grayed out, the New Charges form accepts entries for a new charge. When the form is
on edit mode, click this button to change to New Charge form for new charge transaction entry.
Saves entries made for the new charge transaction. When clicked, upper form‟s field is blanked
and data saved directly goes to In-store Charge AR Maintenance form grid not to New
Charge form‟s grid.
Deletes charge entries. Deletion is only allowed on Back End originated charges and on
charges not paid or partially paid.
Disregards entries made for new charge.
RETAIL USER REFERENCE MANUAL – RETAIL 7
106
RETAIL 7™ User Manual
CUSTOMERS
Customer Maintenance (continued)
New (Edit) Payments
The New Payments form is used to record
payments received at the Back End. This form is
displayed if you click Payment field from the toolbar.
The Edit Payments form displays when a payment
row is clicked twice in any column from Proc Date to
Trans No column of the In-store Charge form. The
upper part of the screen displays the payment
clicked. The grid displays the charges where
payment is applied and all unpaid and partially paid
invoices. Use this form to apply Front End payments.
Table 2.10 contains a description of each field contained in the New (Edit) Payments form.
NEW (EDIT) PAYMENTS – FIELD DESCRIPTIONS
FORM FIELD
DESCRIPTION
Displays whether a customer in the Customer Attributes form is set up as charge customer or not. Charge
In-store Charge box
activities can still be processed, but a reminder, “This is not a charge customer,” is always encountered until a
customer is set up.
Card No
Displays the card number of the current customer.
Name
Displays the name of the current customer.
Balance
Displays the current outstanding balance of the current customer.
Trans ID
Displays either “New Trans” when on add mode of the system assigned sequential number of the retrieved
payment transaction.
Displays the effective date of the payment. In New Payments form, the field defaults to current date, but then
Proc Date
allows user to enter other dates – back date or future date.
Amount
Displays payment amount.
Ref No
Displays the entered reference number for Backend originated payment or a system assigned number for Frontend originated payment.
Displays the amount available for application to invoices. Click Reset to apply payment automatically to charges
Available
from earliest to latest.
Memo
Displays the entered reason of the recorded transaction.
Grid columns: Applied
Click Applied boxes to apply payment to specific charges.
Due Date
Lists the due dates of charge transactions.
Status
Lists the status of the charge transactions.
Proc Date
Lists the effective dates of the charge transactions.
Type
Lists the type of the charge activities: “Charge”, “Finance Charge”, or “Misc. Charge”.
Amount
Lists the original amount of the charge transactions.
Balance
Lists the current balances of the partially paid charge transactions.
Paying Amount
Lists the amount paid or amount being applied to the payment.
Ref No
Lists the reference numbers of the charge transactions.
Trans No
Lists the sequentially assigned trans ids of the charge transactions.
Table 2.10
RETAIL USER REFERENCE MANUAL – RETAIL 7
107
RETAIL 7™ User Manual
CUSTOMERS
Customer Maintenance (continued)
Processing buttons:
The following describes special notations on the buttons used to process payments on the New (Edit)
Payments form.
Button
Description
When grayed out, the form is on new (add) a payments mode. From Edit Payments form,
click this button to change to New Payments form for new payment transaction entry.
Saves edited, applied, and new payment transactions. Payment saved without applying to
invoices needs to be retrieved from the In-store Charge AR Maintenance form to apply to
charges then click Save again.
Deletes payment. Payment deletion is allowed only to Back End originated entries and as
long as it is not yet applied to charges.
Disregards new payment entry. Click this button to exit form.
Applies payment automatically to open charges from earliest to latest. Available field displays
zero when payment is applied. This button changes to Reset after it is clicked.
Changes application of payment. Available field goes back to original amount equal to
payment amount. Note: After the payment application is saved, the Reset button does not
work. User needs to manually click Yes fields corresponding to invoices where payment need
not apply. This button changes to No after it is clicked.
New Credit Memos
The New Credit Memos form is used to
record and issue credit memos entered on
the Back End. This form is displayed if you
click Credit Memo from the toolbar. The
Edit Credit Memos form displays when a
credit row is clicked twice in any column
from Proc Date to Trans No column of the
In-store Charge form. The upper part of the
screen displays the credit memo clicked.
The grid displays the charges where
payment is applied and all unpaid and
partially paid invoices. Front End returns
(RF) made by customer and 0MI tender are
also reflected as In Store Charge credit
memos. Use this form to apply payments
made by credit memos.
Table 2.11 contains a description of each field contained in the New (Edit) Credit Memos form.
NEW (EDIT) CREDIT MEMOS – FIELD DESCRIPTIONS
FORM FIELD
DESCRIPTION
In-store Charge box Displays whether a customer in the Customer Attributes form is set up as charge customer or not. Charge activities can
still be processed, but a reminder, “This is not a charge customer,” is always encountered until a customer is set up.
Card No
Displays the card number of the current customer.
Name
Displays the name of the current customer.
Balance
Displays the current outstanding balance of the current customer.
Trans ID
Displays either “New Trans” when on add mode of the system assigned sequential number of the retrieved credit
transaction.
Displays the effective date of the credit. In New Credit Memos form, the field defaults to current date, but then allows
Proc Date
user to enter other dates – back date or future date.
Amount
Displays credit amount.
Ref No
Displays the entered reference number for Back End originated credit.
Displays the amount available for application to invoices. Click Reset to apply credit automatically to charges from earliest
Available
to latest.
Memo
Displays the entered reason of the recorded transaction.
RETAIL USER REFERENCE MANUAL – RETAIL 7
108
RETAIL 7™ User Manual
CUSTOMERS
New Credit Memos (continued)
NEW (EDIT) CREDIT MEMOS – FIELD DESCRIPTIONS
FORM FIELD
DESCRIPTION
Grid columns:
Applied
Click Applied boxes to apply credit to specific charges.
Due Date
Lists the due dates of charge transactions.
Status
Lists the status of the charge transactions.
ProcDate
Lists the effective dates of the charge transactions.
Type
Lists the type of the charge activities: “Charge”, “Finance Charge”, or “Misc Charge”.
Amount
Lists the original amount of the charge transactions.
Balance
Lists the current balances of the partially paid charge transactions.
Paying Amount
Lists the amount paid or amount being applied to the credit memo.
Ref No
Lists the reference numbers of the charge transactions.
TransNo
Lists the sequentially assigned trans IDs of the charge transactions.
Table 2.11
Processing buttons:
The following describes special notations on the buttons used to process payments on the New (Edit) Credit
Memos form.
Button
Description
When grayed out, the form is on new (add) a credit memo mode. From Edit Credit Memos form,
click this button to change to New Credit Memo form for new credit transaction entry.
Saves edited, applied, and new credit transactions. Credit saved without applying to invoices needs
to be retrieved from the In-store Charge AR Maintenance form to apply to charges then click
Save again.
Deletes credit. Credit deletion is allowed only to Back End originated entries and as long as it is not
yet applied to charges.
Disregards new credit entry. Click this button to exit form.
Applies credit automatically to open charges from earliest to latest. Available field displays zero
when credit is applied. This button changes to Reset after it is clicked.
Changes application of credit. Available field goes back to original amount equal to credit amount.
Note: After the credit application is saved, the Reset button does not work. User needs to manually
click Yes fields corresponding to invoices where credit need not apply. This button changes to No
after it is clicked.
In-store Charge Finance
The In-store Charge Finance form is used to calculate
and record finance charges imposed on overdue
accounts. This form is displayed when Finance Charge
is clicked from the toolbar. Finance charge calculated is
the product of unpaid charges, balance of a partially
paid charges, unpaid finance charges, unapplied
payments, and unapplied credit memos times the
Percentage entered. Finance charges are calculated
according to terms (15 days, 30 days, etc.). Each
customer is set up to have finance charges imposed
through Customer In-store Charge Attributes form,
where the terms can also be selected, or new terms can
be created.
RETAIL USER REFERENCE MANUAL – RETAIL 7
109
RETAIL 7™ User Manual
CUSTOMERS
Customer Maintenance (continued)
In-store Charge Finance (continued)
Table 2.12 contains a description of each field contained in the In-store Charge Finance form.
IN-STORE CHARGE FINANCE – FIELD DESCRIPTIONS
FORM FIELD
DESCRIPTION
Proc Date
Defaults to current date, but user can use any effective date for the finance charge calculation
Percentage
Defaults to previous % used, but user is allowed to enter any percentage so desired
Grace Period
Defaults to previous number of days, but user is allowed to enter any number of days desired to be added on top
of the invoices‟ terms (or due date) after which finance charge is calculated.
Finance Charge
Displays total of the currently calculated finance charge.
Memo
Reason or special notation in the finance charge currently being calculated
Last Finance Charge:
Proc Date
Displays effective date of the last finance charge calculated
Percentage
Displays the percentage of the last effective finance charge calculated
Grace Period
Displays the number of days given as grace period on the last calculated finance charge.
Finance Charge
Displays the total of the last finance charge calculated
Grid Columns:
Card No
Lists card numbers of customers whose finance charges were (will be) computed
Name
Lists customer names whose finance charges were (will be) computed.
Proc Date
Lists effective dates of the charges finance charges were (will be) computed.
Type
Lists type of the charges finance charges were (will be) computed
Amount
Lists the original amount of charges finance charges were (will be) computed.
Due Date
Lists the due dates of the charge transactions finance charges were (will be) computed.
Status
Lists the status of the charge transactions finance charges were (will be) computed.
Balance
Lists the balance of partially paid charges finance charges were (will be) computed.
Finance Charge
Lists the individual computed finance charges.
Trans No
Lists the trans id number of the charge transactions finance charges were (will be) computed.
Table 2.12
Processing buttons:
The following describes the buttons used to process finance charge calculations on the In-store Charge
Finance form.
Button
Description
Calculates finance charges.
Resets to original defaults and grid to display the old data when not satisfied with the calculated
finance charges, but before saving.
Saves calculated finance charges. Finance charges are totaled by customer and are added to
customers‟ accounts.
Deletes the latest calculated finance charges. More than one set of calculated finance charges
can be deleted starting from the latest set. Deletion does not skip dates and is allowed only
when no payments or finance charge on top of the finance charges have been made.
Ignores the new calculated finance charges. Use this button to exit the form.
RETAIL USER REFERENCE MANUAL – RETAIL 7
110
RETAIL 7™ User Manual
CUSTOMERS
Customer Maintenance (continued)
Customer In-store Charge Attributes
The Customer In-store Charge Attributes form
is used to set up customers who would enjoy
charge privileges. This form is displayed when the
Customer Attributes is clicked from the toolbar.
Note: Column headings can be toggled for desired
data sorting.
Table 2.13 contains a description of each field contained in the Customer In-store Charge Attributes form.
CUSTOMER IN-STORE CHARGE ATTRIBUTES – FIELD DESCRIPTIONS
FORM FIELD
DESCRIPTION
Card No
Displays the current customer‟s card number. User can also enter or double-click grid row to display another
customer‟s data.
Name
Displays the name of the current customer.
Balance
Displays the current outstanding balance of current customer.
In-store Charge Box
Flagged when customer is set up as charge customer.
Terms
Displays the selected term enjoyed by the current customer.
Credit Limit
Displays the allowed credit limit given to customer. Credit limit defaults to the amount entered on the System
information form in the Administration menu.
Finance Charge Check off Box Flagged to allow calculation of finance charge on overdue invoices of current customer.
Grid columns:
Card No
Lists the card numbers of all customers properly set up to enjoy charge privileges.
Name
Lists the names of al customers properly set up to enjoy charge privileges.
Terms
Lists the Terms ID No selected for the charge customers
Credit Limit
Lists the credit limits granted to charge customers.
Balance
Lists the current outstanding (unpaid) balances of the charge customers.
Finance Charge
Identifies when customers are imposed finance charges. “Yes” means Finance Charge box is checked off
for the customer
Table 2.13
RETAIL USER REFERENCE MANUAL – RETAIL 7
111
RETAIL 7™ User Manual
CUSTOMERS
Customer Maintenance (continued)
In-store Charge Terms
The In-store Charge Terms form is used to set up
various credit terms extended to a customer. This
form is displayed when the Terms field
is
clicked from the Customers In-store Charge
Attributes form. Click Add to add new categories
to the list. To modify a term, retrieve the data by
clicking any column of a desired term.
Table 2.14 contains a description of each field contained in the In-store Charge Terms form.
IN-STORE CHARGE TERMS– FIELD DESCRIPTIONS
FORM FIELD
DESCRIPTION
Number assigned sequentially by the system starting from number 1. This number displays on the Terms
Terms ID
column of Customer In-store Charge Attributes form
Period
Number of days paired with the Terms ID being set up. This number is used in determining the default due
date of the charge transactions in the New In-store Charge form. This number displays on the Terms
column of the In-store Charge AR Maintenance form.
Displays the description of the set up term. This description is used on the Terms field of the New (Edit) InDescription
store Charges form.
Terms ID Column
Lists all the current terms ID
Terms Period Column
Lists the various number of days assigned to each Terms ID‟s
Term Description Column
Lists the descriptions corresponding to the different Terms ID‟s
Table 2.14
Processing buttons:
The following describes the buttons used to process finance charge calculations on the In-store Charge Terms
form.
Button
Description
Adds new term. When clicked a system assigned number is displayed in the Terms ID field.
Type desired data on Terms and Description fields.
Saves the new term that is added. Use this button to save changes made to a term.
Deletes a retrieved term.
Exits the form.
RETAIL USER REFERENCE MANUAL – RETAIL 7
112
RETAIL 7™ User Manual
CUSTOMERS
Customer Maintenance (continued)
Customer Memo
The Customer Memo form is used to maintain
miscellaneous information about a customer. The
customer‟s card number stores the data. This form
is displayed when the Memo
is clicked from
the toolbar on the Customer form.
Table 2.15 contains a description of each field contained in the Customer Memo form.
CUSTOMER MEMO - FIELD DESCRIPTIONS
FORM FIELD
DESCRIPTION
Name
Displays the Customer‟s first and last name
Created
Date the memo was created
Memo
Miscellaneous information entered for the customer
Modified
Date of last modification
By
Person who last modified the information
Table 2.15
RETAIL USER REFERENCE MANUAL – RETAIL 7
113
RETAIL 7™ User Manual
CUSTOMERS
Bad Check Maintenance
The Bad Check Maintenance form is used
to add and maintain bad check information for
customers. Management of bad checks is a
critical function that should be managed
closely. This function does not only allow the
user to maintain bad checks written by a
customer, but also provides a good audit trail
for tracking purposes. A customer‟s check
writing privilege can also be maintained from
this form by updating the Write Checks box
resulting in an update to the customer‟s data.
Clicking one of the letter fields triggers the
generation of a bad check letter to the
customer. The system makes the letter
available for editing and printing through
Microsoft Word.
If a customer with bad checks is linked to
another customer, the Links button can be
clicked to view information about the linked
customer. If the user un-flags the write checks
field, a message will be displayed asking if the
check-writing privileges should be removed
from the linked customer.
Table 3.1 contains a description of each field contained in the Bad Check form.
BAD CHECK - FIELD DESCRIPTIONS
FORM FIELD
DESCRIPTION
Search by Card No.
Search field to find a Customer by card number.
Name
Displays customer‟s last and first name
D/L #
Customer‟s driver license number
Check #
Bad check number
Paid
Amount the customer has paid on the bad check
Date
Date of the bad check
Paid Date
Date the customer paid the bad check and fee amount
Amount
Amount of the bad check
Total
Total amount on the bad check including fee
Fee
Fee charged to customer for writing a bad check
Balance
Remaining balance due on the bad check
Memo
Miscellaneous notes about a customer‟s bad check
Called
Flag to indicate customer has been called - Date when call made is system generated
Letter 1
Flag to indicate 1st notification letter sent - Date when letter sent is system generated
Letter 2
Flag to indicate 2nd notification letter sent - Date when letter sent is system generated
Letter 3
Flag to indicate 3rd notification letter sent - Date when letter sent is system generated
Write Checks
Flag to enable or disable customer‟s privilege to write checks (updates customer table)
Links Button
Click to show the name and card number of a linked customer, if any
BAD CHECK LIST
(Multiple occurrences of the following)
Date
The date of the bad check
Check #
The check number of the bad check
Amount
The amount of the bad check
Fee
The fee amount charged by the store for the bad check
Table 3.1
RETAIL USER REFERENCE MANUAL – RETAIL 7
114
RETAIL 7™ User Manual
CUSTOMERS
Bad Check Maintenance (continued)
BAD CHECK - FIELD DESCRIPTIONS (CONTINUED)
FORM FIELD
DESCRIPTION
BAD CHECK LIST (cont.)
Total
The total amount of the bad check
Paid
The amount paid on the bad check
Paid Date
The last date that a payment was received against the bad check
Balance
The balance due on the bad check
Called
Date customer was called in regards to the bad check
Letter1
Date the first notification letter was sent
Letter2
Date the second notification letter was sent
Letter3
Date the third notification letter was sent
Memo
Displays any notes on the bad check
Table 3.1
Toolbar
The following describes the functions supported by the toolbar located on the Bad Check form.
Button
Description
Exits the current window
Prints a bad check report
(Refer to the Print Customer Bad Checks Report section)
Displays the bad check report on the screen
(Refer to the Print Customer Bad Checks Report section)
Saves your entries or changes for the current record
“Jumps” to the Add a Bad Check Function
“Jumps” to the Edit a Bad Check Function
Finds a customer by name
(Refer to the RETAIL™ Search topic in the Customer Maintenance section)
Gives a quick view of all the bad checks in the system
(Refer to the Customer Bad Checks topic in this section)
Helps to access the form used to change the check return fee
(Refer to the Set Check Return Fee topic in this section)
Activates the context-sensitive help
RETAIL USER REFERENCE MANUAL – RETAIL 7
115
RETAIL 7™ User Manual
CUSTOMERS
Bad Check Maintenance (continued)
Customer Bad Checks
The Customer Bad Checks form is used to
perform a quick view of all the bad checks in
the system. The data is sorted in alphabetical
order by customer last name. This form is
displayed when the Display Customers’ Bad
Checks
is clicked from the toolbar from
the Bad Check form.
Table 3.2 contains a description of each field contained in the Customer Bad Checks form.
CUSTOMER BAD CHECKS - FIELD DESCRIPTIONS
FORM FIELD
DESCRIPTION
Card No
Display the customer‟s card number
Name
Display the customer‟s Last Name and First Name
Check Date
Display the bad check date
Check No
Display the bad check number
Check Amt
Display the bad check amount
Check Fee
Display the fee amount on the bad check
Home Phone
Display the Customer‟ s phone number
Due
Display the amount due on the bad check
Table 3.2
Set Check Return Fee
The Set Check Return Fee form is
displayed when the Set Check Return Fee
is clicked from the toolbar on the Bad
Check form. The form is used to set or
change the required check return fee on
customers‟ returned checks. When the fee
is changed, the new fee applies only to
future returned check entries for all
customers.
RETAIL USER REFERENCE MANUAL – RETAIL 7
116
RETAIL 7™ User Manual
CUSTOMERS
Electronic Coupons
The Electronic Coupons form is used to create and
edit coupons. Coupons can be targeted for use by all
preferred customers (Customer Type = “PC”) or for
use by a specific customer (Target). The coupon can
be for a price reduction amount, a specific price, or a
percentage discount. Specific criteria can be
assigned to the coupon to limit the use for a specific
product or mix match code, department, section,
vendor, or product group. The coupon can also be
restricted for use during a certain time period or to
restrict use based on a minimum quantity or amount
purchased. The coupon is automatically applied to
the purchase at the checkstand when the customer
ID is entered. To edit a coupon, select it from the list
or enter a Coupon ID in the Coupon ID field.
Coupon Type includes 6 different types of coupons:
Preferred – coupon is applied to preferred
customers (Type = PC in Customer
Maintenance). This is for basic cents off or
specified price coupons for UPCs,
departments, sections, vendors, and
product groups.
Target – coupon is applied to one or more
specific customers. A customer card
number is required.
Linked – Generates a coupon that the
customer can use on the next shopping trip.
BOGO – Buy One Get One (applies to all
customers), not just PC.
Pick Quantity – Pick a specified quantity
and receive all for a reduced price. This type
of pricing is commonly used for random
weight meat items (buy 5 packages of meat
for 20.00). Or, a free item may be rewarded
after the quantity has been purchased.
Total Order – A dollar amount off the order
after the Minimum Order is reached. Or,
award an item free after the minimum order
is reached.
Restrictions include Trigger Quantity or Amount, Start and
End dates, if the coupon can be used on multiple orders
(Multiple Use), limit the number of times a coupon can be
used in an order (Limit per Order) and the minimum
purchase amount before the coupon is awarded (Min
Purchase). If you do not want the price of the trigger item
included in the minimum purchase amount, set Exclude
Trigger Items to „Yes‟ in POS Information.
The Coupon Method options depend on the type of trigger
selected. For UPC and Mix Match triggers, a Price
Reduction or a Specified Price can be applied. For most
others, a Price Reduction or % Reduction can be applied.
Generate Coupon rewards the customer with an additional
coupon instead of an instant discount. The coupon
generated as the reward could be applied to the current
customer‟s order or to a future order. If the option is grayed
out, the method cannot be used.
The Description is used to enter the description of the
coupon. Description 1 prints on the checkstand receipt for
non-generated coupons, Description 2–4 prints on the
receipt for generated coupons. By default, the Description
is taken from the Product Maintenance file preceded by a
prefix (see Coupons Settings below).
Note: When deleting an electronic coupon, an entry is created in the user activity log in order to provide an audit
trail. (Refer to the User Activity Tracking topic in the General Topics section)
Refer to the Electronic Coupons discussion in the Manage Customers topic in the Back End How to…
section of this document for a detailed description on electronic coupons.
RETAIL USER REFERENCE MANUAL – RETAIL 7
117
RETAIL 7™ User Manual
CUSTOMERS
If Pick Quantity is chosen as the Coupon Type, the
form will change to display the Trigger Price From
and Trigger Price To. From the Group Name,
select <Add New Group>. An item can only belong
to one coupon group, and a Coupon Group can
only have one coupon.
On the right side, the field “Free Item” appears.
Free items can be applied to Pick Quantity or Total
Order coupons.
You will need to create a Coupon Group for Pick
Quantity coupons. Add a coupon group Description
and press Save. Select the products you want in
the group by entering the UPC code, items code,
manufacturer code, or selecting the product group.
Or, you can use the Retail Power Search part of
the form to look for products by description,
department, or price, for example. Press the arrow
buttons to send the Products you want to the
Product Group side.
You can flag one or more of the products in the
group to be “Required” by pressing the Show
Required Product button. This will enforce that the
customer buys the item flagged “Required”.
RETAIL USER REFERENCE MANUAL – RETAIL 7
118
RETAIL 7™ User Manual
CUSTOMERS
Electronic Coupons (continued)
Table 4.1 contains a description of each field contained in the Electronic Coupons form.
ELECTRONIC COUPONS - FIELD DESCRIPTIONS
FORM FIELD
DESCRIPTION
Coupon ID
Coupon Number automatically generated by the system.
Trigger
UPC
Used to select a specific UPC as the trigger criteria. The field next to the UPC field allows for a UPC search
by description or Item code.
Mix match
Used to select a specific Mix Match as the trigger criteria. The field next to the mix match field allows for a
mix match search.
Dept.
Used to select a specific Department as the trigger criteria.
Section
Used to select a specific Section as the trigger criteria.
Vendor
Used to select a specific Vendor as the trigger criteria.
Product Group
Used to select a specific Product Group as the trigger criteria.
Description 1
Main description for this coupon. Displays on the checkstand for all coupons. By default, this is filled in with a
prefix (set in the Coupon Settings) and the product‟s description from Product Maintenance.
Effective Date
Date when this coupon is in effect
End Date
Expiry date of the coupon (if no Date entered the coupon does not expire)
Multiple Use check box
Check the box if coupon can be used multiple times. Only accessible when coupon is for Target Customer.
Order Limit
To limit the number of times this coupon is triggered in the same order
Min Order
Minimum purchase required to trigger this coupon.
Priority
To set the priority for this coupon in case multiple coupons are triggered at the same time.
Coupon Status
“Active” if this coupon is still active in the system.
Coupon Type (Combo Box)
Used to select the type of customer that coupon applies to: Preferred, Target (specific customer card
number required), or Link (used when the coupon is created as the link to a generated coupon)
Ellipse button appears to allow selection of customer numbers when the coupon type is Target
Card Number(s)
To select the coupon method: Price Reduction (Amount to be subtracted from the price of the product.)
Coupon Method
Specified Price (Price that overrides the price of the product) % Reduction (Percent reduction to be applied
(combo Box)
to the price of the product), or Generate Coupon
Trigger Qty/Amt
Minimum quantity or amount required to trigger this coupon.
Coupon Amount
Specifies the amount deducted at the time of sale as long as all the criteria has been met.
Coupon ID of linked coupon – Used for Generate Coupons only
Coupon Link
UPC Link
This UPC is used to absorb the loss generated by this coupon. The dollar amount is tracked against this
UPC code. Links are assigned in the Department Maintenance form.
Only used for Generate Coupons. Indicates if the generated coupon is used in the current customer
Next Use
transaction or will be used in a future (next use) customer transaction.
Purchase Required
Not used.
Description 2, 3, 4
Other description lines for this coupon. Displays on checkstand if coupon is a generated coupon.
Modified By
Displays the employ who last modified the selected coupon
Modified
Displays the date the coupon was last modified
Lists all coupons currently in the system. Criteria defining coupons listed are defined in the Coupon
Coupon List Box
Settings form.
Table 4.1
Note: If a coupon is generated for the same customer multiple times, then the field Multiples in the Customer
Coupons table is incremented by 1 for each occurrence. As the coupon is used on the Front End system,
Multiples are reduced by 1 for each occurrence.
RETAIL USER REFERENCE MANUAL – RETAIL 7
119
RETAIL 7™ User Manual
CUSTOMERS
Electronic Coupons (continued)
RETAIL™ Search
To edit or view a particular coupon, use the
search function. The RETAIL™ Search form is
accessible through the Ellipse button (…) next
to the Coupon ID field. Select the criteria from
the Column drop-down. You can select
Description, Coupon ID, Department, or
Modified Date. Select the Operator, such as =
Equals or Like. Enter the Value, or select from
the ellipsis button. Press the Find button to
populate the grid.
Highlight the coupon that you would like to view
or edit and press the OK button.
Table 4.2 contains a description of each field contained in the RETAIL™ Search form.
RETAIL SEARCH FORM - FIELD DESCRIPTIONS
FORM FIELD
DESCRIPTION
Column
Select the first criteria from the drop-down, such as Description, Coupon ID, Department, or Modified Date
Operator
Select the Operator from the drop-down. For partial search criteria, choose Like.
Value
Enter the value, which will be dependent on the column and operator that were chosen.
Description
The description of the coupon that is shown on the Front End and receipt.
Coupon ID
Coupon ID of coupon being added/edited
Trigger Group
Used when a group, such as Department or Section, triggers the coupon.
Trigger Qty
The number of items that need to be purchased to trigger the coupon.
Trigger Amount
The amount that must be purchased to trigger the coupon.
Table 4.2
Target Customers
The Customer Coupons form is accessible
through the Ellipse button (…) next to the
Coupon Method field for Target Coupons.
Enter one or more customers to which the
coupon applies. Only the customers entered
will have the coupon available to them for use.
Type a card number or search for a customer
by clicking the down arrow next to the Card No
field. Entries are displayed in the bottom portion
of the form as they are added.
You can also access Target coupons in
Customer Focus, and apply the coupon to your
top customers.
Table 4.3 contains a description of each field contained in the Customer Coupons form.
CUSTOMER COUPONS FORM - FIELD DESCRIPTIONS
FORM FIELD
DESCRIPTION
Coupon ID
Coupon ID of coupon being added/edited
Card No
Type card number or click arrow to search for a customer
Card No
Card Number of customer assigned to the coupon
Name
Name of customer assigned to the coupon
Coupon ID
Coupon ID of coupon being added/edited
Multiples
Number of times coupon has been used
Table 4.3
RETAIL USER REFERENCE MANUAL – RETAIL 7
120
RETAIL 7™ User Manual
CUSTOMERS
Electronic Coupons (continued)
Toolbar
The following describes the functions supported by the toolbar located on the Electronic Coupons form.
Button
Description
Exits the current window
Prints an Electronic Coupons report
(Refer to the Print Coupons Report topic in this section)
Displays the Electronic Coupons report on the screen
(Refer to the Print Coupons Report topic in this section)
Shows/Hides Coupon List
Deletes the current coupon record. Coupons are not deleted until the Synchronize
Checkstands with Electronic Coupons function is executed.
Saves your entries or changes for the current record
“Jumps” to the Edit a Coupon function
“Jumps” to the Add a Coupon function
Creates a new coupon by cloning the current coupon displayed
Deletes inactive and expired coupons
(Refer to the Delete Inactive Coupons topic in this section)
“Jumps” to the Electronic Coupon Movement function
(Refer to the Electronic Coupon Movement section)
Enters specific settings related to the coupons displayed in the coupon list and to set the
default prefix used in for the coupon descriptions.
(Refer to the Coupon Settings topic in this section)
Activates the context-sensitive help
RETAIL USER REFERENCE MANUAL – RETAIL 7
121
RETAIL 7™ User Manual
CUSTOMERS
Electronic Coupons (continued)
Coupon Settings
The Coupon Settings form is used to set fields
to be used as a search engine to find electronic
coupons that meet certain criteria for a specific
start date. Criteria can be specified based on
trigger group and coupon type. When the
criteria are specified and OK is clicked,
coupons matching the criteria are displayed in
the bottom portion of the Electronic Coupons
form.
Table 4.4 contains a description of each field contained in the Coupon Settings form.
COUPON SETTINGS - FIELD DESCRIPTIONS
FORM FIELD
DESCRIPTION
Display Filter
Used to select a specific UPC as the filter criteria. (Displays selected criteria when the Show/Hide Coupons Lists
UPC
button is toggled on)
Mix match
Used to select a specific Mix match code as the filter criteria.
Dept.
Used to select a specific Department as the filter criteria.
Section
Used to select a specific Section as the filter criteria.
Vendor
Used to select a specific Vendor as the filter criteria.
Coupon Type
Linked Coupon
Used to select all Linked Coupons as filter criteria.
Preferred Customer
Used to select all Preferred Coupons as filter criteria
Target Customer
Used to select all Target Coupons as filter criteria
Misc.
Start Date
Used to select a Start Date as a filter criteria
Description Prefix
Used to display as the default prefix for the descriptions of each coupon created.
Table 4.4
RETAIL USER REFERENCE MANUAL – RETAIL 7
122
RETAIL 7™ User Manual
CUSTOMERS
Electronic Coupons (continued)
Print Coupons Report
This function produces an Electronic Coupons report listing all electronic coupons currently listed on the
Electronic Coupons form. The layout of this report is contained in Appendix F. This function is executed when
or
is clicked from the Electronic Coupons form.
Table 4.5 contains a description of each field contained in the Coupon Report.
Report field
Description
Format
Coupon ID
Description
Trigger Type
Amount
Coupon Link
Trigger
Trigger Amt/Qty
Min Purchase
Limit
Next Use
No Purchase Req
Effect.
Expir.
Priority
Multi Use
UPC link
Coupon Id
Description which is printed on receipt
Trigger type for the coupon
Price strategy amount
Coupon ID of linked coupon
Trigger UPC or trigger group
Trigger of product or trigger amount of purchase to trigger coupon
Minimum purchase required to trigger coupon
Limit per order
Coupon is for next visit
Displays if coupon requires a purchase. Used with generating
coupons.
Coupon effective date
Coupon ending date
Priority of coupon
Can coupon be used multiple times
The default Electronic coupon link for the dept or a typed in UPC
set up for the coupon loss
Calculation
Number
Text
Text
Currency
Number
Text
Currency
Currency
Number
Yes / No
None
None
None
None
None
None
None
None
None
None
Date / Time
Date / Time
Number
Yes / No
Text
None
None
None
None
None
Table 4.5
Selection Criteria:
Select coupons matching criteria specified in the Coupon Setting function of the Electronic Coupons form
Sort Criteria: Coupon ID - Ascending
Delete Inactive Coupons
The Delete Inactive Coupons form is used
to delete inactive coupons by virtue of dates
being expired. The date entered is the latest
date for which coupons can be deleted. If
OK is clicked, all expired coupons with
dates on or before the entered date are
deleted. This form is displayed when the
Delete Inactive Coupons
on the
Electronic Coupons form is clicked.
RETAIL USER REFERENCE MANUAL – RETAIL 7
123
RETAIL 7™ User Manual
CUSTOMERS
Electronic Coupon Movement
The Electronic Coupon Movement form is
used to view coupon movement for a desired
time period. This form can be accessed from
the Electronic Coupon form by clicking
Coupon Movement
from the toolbar or
from the main Customer menu. Movement can
be displayed for a specific coupon, an entire
department, and/or coupons meeting a specific
date range.
The coupon movement can be displayed in one
of two formats based on the Report Type
selected:
Detail - customer usage for each coupon
Summary - one line per coupon
When the criteria have been entered, click Movement. The movement is displayed in the bottom portion of the
form.
Table 5.1 contains a description of each field contained in Electronic Coupon Movement form.
ELECTRONIC COUPON MOVEMENT- FIELD DESCRIPTIONS
FORM FIELD
DESCRIPTION
Coupon Id assigned in the Electronic Coupon form
Coupon Id
Coupon Description in the Electronic Coupon form
Description
Department assigned to the trigger in the Electronic Coupon form
Department
Start Date
Start Date of Coupon
End Date
End Date of coupon
Report Type
Report Type - Detail (customer usage for each coupon) or Summary (one line per coupon)
Total Movement
Total quantity of items sold
Total Retail
Total Retail Price of the trigger at the time of the sale
Total Discount
Total actual coupon discount (coupon amount) at the time of the sale
Coupon Movement List-Detail
Proc Date
Date coupon was used
Coupon ID assigned in the Electronic Coupon form
Coupon ID
Customer
Customer assigned to coupon at the time of the sale
Department assigned to the trigger in the Electronic Coupon form
Dept
Link
Department assigned to the coupon link
Trigger
Trigger (either UPC code or Group Code)
Start Date
Start Date of Coupon
End Date
End Date of Coupon
Qty
Quantity of coupon purchased per sales transaction
Retail Price
Retail price of the trigger at the time of the sale
Discount
Actual coupon discount (coupon amount) at the time of the sale
Coupon Movement List-Summary
Coupon ID assigned in the Electronic Coupon form
Coupon ID
Descriptions as assigned in the Electronic Coupon form
Description
Department assigned to the trigger in the Electronic Coupon form
Dept
Trigger
Trigger (either UPC code or Group Code)
Start Date
Start Date of Coupon
End Date
End Date of Coupon
Qty
Quantity of coupon purchased per sales transaction
Retail Price
Retail price of the trigger at the time of the sale
Discount
Actual coupon discount (coupon amount) at the time of the sale
Table 5.1
RETAIL USER REFERENCE MANUAL – RETAIL 7
124
RETAIL 7™ User Manual
CUSTOMERS
Electronic Coupon Movement (continued)
Toolbar
The following describes the functions supported by the toolbar located on the Electronic Coupon Movement
form.
Button
Description
Exits the current window
Prints an Electronic Coupon Movement report
(Refer to the Electronic Coupon Movement Report topic in this section)
Displays the electronic coupon report on the screen
(Refer to the Electronic Coupon Movement Report topic in this section)
Activates the context-sensitive help
Electronic Coupon Movement Report
The Electronic Coupon Movement Report function produces a Coupon Movement Summary/Detail report
listing all movement currently listed on the Electronic Coupon Movement form. The report is sorted in
Department name sequence. The layout of these reports is contained in Appendix F. This function is executed
when
or
is clicked from the Electronic Coupon Movement form.
Table 5.2 contains a description of each field contained in the report.
Report field
Description
Movement by Detail
Trigger
Start Date
End Date
Proc Date
Customer
Movement
Price
Coupon Price
Loss
Total Loss
Movement by Summary
Coupon id
Description
Trigger
Start Date
End Date
Movement
Price
Coupon Price
Loss
Total Loss
Table 5.2
Format
Trigger (either UPC code or Group Code)
Start Date of Coupon
End Date of Coupon
Date coupon was processed on the Checkstand
Customer number assigned to the sale
Quantity of items sold
Retail price of the trigger
Price of trigger less the coupon amount
Coupon Amount (discount amount)
Total coupon amount
Text
Date
Date
Date
Text
Number
Currency
Currency
Currency
Currency
Coupon Id assigned in the Electronic Coupon form
Coupon Description in the Electronic Coupon form
Trigger (either UPC code or Group Code)
Start Date of Coupon
End Date of Coupon
Quantity of items sold
Retail price of the trigger
Price of trigger less the coupon amount
Coupon Amount (discount amount)
Total coupon amount
Number
Text
Text
Date
Date
Number
Currency
Currency
Currency
Currency
RETAIL USER REFERENCE MANUAL – RETAIL 7
125
RETAIL 7™ User Manual
CUSTOMERS
Frequent Shopper Ranges
The Frequent Shopper Ranges form is used to set
up shopper point ranges being earned by customers.
The ranges are automatically established based on
the entries entered. The amount represents the highend of the range (that is, purchase up to the amount
entered receives the points assigned to the range).
New entries are automatically inserted into the list as
they are entered. To delete an entry, select the entry
in the list and click Delete.
Table 6.1 contains a description of each field contained in the Frequent Shopper Point Ranges form.
FREQUENT SHOPPER POINT RANGES- FIELD DESCRIPTIONS
FORM FIELD
DESCRIPTION
Amount
Maximum amount of purchase of a level (range)
Points
Number of points earned within a purchase range
Modified
Date and time stamped by system when the point range was created/modified
By
Person who created or the last person who modified the range
Save Button
Use to save the information
Delete Button
Use to delete a desired point range
Close Button
Click to exit this function or form, the same as
button on the tool bar
Help Button
Click to access Help file for this function.
Range List
From Amount
Displays the minimum amount of the point range
Amount
Displays the maximum amount of the point range
Points
Displays the points earned for each point range
Modified
Displays the date and time modified for each point range
Modified By
Displays the Number of the Employee who modified/created each range
Table 6.1
RETAIL USER REFERENCE MANUAL – RETAIL 7
126
RETAIL 7™ User Manual
CUSTOMERS
Reset Frequent Shopper Points
The Reset Frequent Shopper Points form is used to
reset the Points Earned value for all customers to a
specified point value. Type the value and click OK.
The system then prompts for confirmation of the
update. The system then updates the Points Earned
value for all customers to the specified value.
Table 7.1 contains a description of each field contained in the Frequent Shopper Point Ranges form.
RESET FREQUENT SHOPPER POINTS- FIELD DESCRIPTIONS
FORM FIELD
Reset Point Value
A new across the board point set
OK Button
Click to confirm new set point
Cancel Button
Click to cancel entry
Table 7.1
RETAIL USER REFERENCE MANUAL – RETAIL 7
DESCRIPTION
127
RETAIL 7™ User Manual
CUSTOMERS
Synchronize Checkstands with Customers / Electronic Coupons
The two forms, Synchronize Checkstands with
Customers and Synchronize Checkstands with
Electronic Coupons are used to update the checkstand
databases with the latest customer information, frequent
shopper ranges, and coupon data. After adding, editing, or
deleting customers, adding or editing bad checks, editing
frequent shopper point ranges, and adding or editing
coupons, the checkstand computers should be updated so
they have the latest information. Confirm which checkstands
to update, and then click OK. The data is then be updated to
each of the Front End checkstands selected.
Note: When deleting customers or electronic coupons,
these functions physically delete the customers and
coupons from the Back End and checkstand customer
databases.
Note: The checkstand databases are only used when
the Front End checkstands are running in stand-alone
mode.
Processing Restrictions:
No restrictions - can be run at any time
Processing Specifications:
1. Select the checkstands to be updated (usually all). To de-select, click in the box next to the
checkstand name to remove the . Click OK to start the process.
2. By default, “Use Fast Update for Customers and Products” is selected. Only the new and updated
products will be updated to the checkstands. To de-select, click in the box to remove the
checkmark, which will cause all the products in the database to be updated.
3. The system connects to all Check Stands selected. If there is an error, the system prompts you with
“Cannot connect to some of the checkstand" "Do you still want to continue? “
a. If you choose NO, the system aborts this function.
b. If you choose YES, then the system continues with this function. However, the checkstands
that caused the error is not updated with the customer information.
c. In either case, the system is having a problem connecting to the checkstands and action
should be taken. Either there is a network problem in connecting to the checkstand or the
checkstand name is incorrect in RETAIL™ (see the System Information section under the
Administration Tab for more information).
RETAIL USER REFERENCE MANUAL – RETAIL 7
128
RETAIL 7™ User Manual
CUSTOMERS
Print Customer Report
The Print Customer Report function (accessed from the Administration Menu or the toolbar of Customer
Maintenance) produces a Customers report listing all customers that currently exist in the system. The layout
of this report is contained in Appendix F. This function is executed when
or
is clicked from the
Customer form or from the Print Customer Report function in the Customers menu.
Table 8.1 contains a description of each field contained in the Customer report.
Report field
Description
Customer Name
Address
Card Number
Link
Home Phone
Purchases
Shopped
Table 8.1
Format
Customer name
Customer Address
Customer Card Number
Customer Card Number linked to this customer
Customer home phone
Total purchases for this customer
Total number of people this customer shops for
Text
Text
Text
Number
Number
Number
Number
Calculation
None
None
None
None
None
None
None
Selection Criteria:
Select all records contained in the Customer Status table
Sort Criteria:
Dependent on user selection
Print Customer Bad Checks Report
The Print Customer Bad Checks Report function produces a Bad Checks report listing all bad checks that
are currently outstanding in the system. The report is sorted in customer name sequence. The layout of this
report is contained in Appendix F. This function is executed when
or
is clicked from the Bad Check
form or from the Print Bad Checks Report function in the Administration menu.
Table 8.2 contains a description of each field contained in the Bad Checks report.
Report field
Names
Card Number
Date
Check #
Amount
Fee
Total
Balance
Description
Customer name
Card ID Number
Check date
Check Number
Amount of the check
Fee applied for the bad check
Total owed by the customer for the bad check
Outstanding balance owed by the customer for
the bad check
Format
Text
Number
Date/Time
Text
Currency
Currency
Currency
Currency
Calculation
None
None
None
None
None
None
Check Amount + Check Fee
Total Amount – Payments Made
by customers
Table 8.2
Selection Criteria:
Select all bad check records
Sort Criteria:
Purchases - Descending
RETAIL USER REFERENCE MANUAL – RETAIL 7
129
RETAIL 7™ User Manual
CUSTOMERS
In Store Charge Report - Aging
The In Store Charge Report – Aging function
produces a Customer Charge Aging report listing all
outstanding charges by customers. This report is
generated from the Charge Maintenance toolbar. The
report‟s process date is always the current date. The
aging report can be generated either by Summary
Report or by Detail Report. The Age Group number of
days displayed on the report is by default.
The layouts of these reports are found in Appendix F. Tables 9.1 and 9.2 contain description of each field
contained in the In Store Charge Aging Report – Summary and In Store Charge Aging Report – Detail.
Report field
Columns:
Card No
Name
Amount
Payment
Balance
Rows:
Current
Age Groups
Customers
Sub-Totals/ Total
Description
Format
Calculation
Card numbers of customers with outstanding balances. Card
number displays separately for each age group.
Names of customers with outstanding balances listed separately
for each age group.
Outstanding charges, credit memos, Front-end returns, and Frontend pay outs, (if MI tender is used) falling into each age group
Text
None
Text
None
Currency
Unapplied payments and payments applied partially to a charge.
Unapplied payment is aged by the payment date; whereas
payment partially applied to a charge takes the age of the charge
it is applied to.
Outstanding customers‟ balances belonging to each age group.
Includes all charge transactions falling within the outstanding
invoices‟ due dates
Includes transactions falling within the given age group after the
invoices‟ due dates.
Lists customer card numbers and names by account age group
Sub-totals by account age group; grand total of all age group.
Currency
Total have unpaid and
partially paid charges
less credit charges.
Total of
Currency
Text/Currency
Amount less Payment
None
Text/Currency
None
Text
Currency
None
Add amounts by
columns
Table 9.1
Report field
Columns:
Proc Date
Type
Re No
Due Date
Amount
Balance
Rows:
Age Groups
Customers
Charges
Sub-Totals/Total
Description
Format
Calculation
Effective dates of every outstanding charge transactions
Charge, Misc. Charge, Finance Charge or Payment
Receipt number, invoice number, check number, and so on.
Due dates of every charge item
Original amounts of the charge transactions
Unpaid charges and unapplied credits and payments
Text
Text
Text
Date
Currency
Currency
None
None
None
None
None
Amount less Partial
Payments
Main data groupings
Data groups under age groups
Itemized charge transactions
Sub-totals by customers, by age groups/ grand total of all age
groups
Text
Text
None
None
Currency
Add amounts in
columns
Table 9.2
Selection Criteria: Shows unpaid charges, partially paid charges, unapplied payments, and credits
Sort Criteria: Age – current to latest; Customers - alphabetical
RETAIL USER REFERENCE MANUAL – RETAIL 7
130
RETAIL 7™ User Manual
CUSTOMERS
Charge Activity Report
The In Store Charge Activity Report function produces a
report listing all customers or a selected customer having
charge activities within the period selected. This report is
generated from the In-store Charge Maintenance toolbar.
Select records inclusive of the Start Date and End Date
entered in the In-store Charge Report- Activity access
form. Besides date selection, the report also selects
records either by customer Card No or All Customers as
shown in the form.
Table 9.3 contains a description of each field contained in the In-store Charge Activity report.
Report field
Description
Format
Calculation
Columns:
Date
Activity
Reference No.
Memo
Amount
Rows:
Names
Card Numbers
Current Balance
Charge Activities
Charge activity date in descending chronological
order
Charge activity short description
Till No - Checkstand No – Transaction No (when
activity originated at the checkstand. Backend entry
reference is the text input by the user).
Detailed description of activity. Applies to the
Backend entry only.
Charge activity amount
Date/Time
None
Text
Text
None
None
Text
None
Currency
None
Names of customers
ID numbers of customers
Current account balance for the customer
Itemized charge transactions within the selected
period
Text
Text
Currency
Currency
None
None
None
None
Table 9.3
Selection Criteria:
Based on input form – only customers with activity during the time period
Sort Criteria:
By customer in alphabetical order
RETAIL USER REFERENCE MANUAL – RETAIL 7
131
RETAIL 7™ User Manual
CUSTOMERS
Charge Balance Detail Report
The Print Charge Balance Detail Report function
generates a report listing all activities and a running
balance for the time period selected. This report is
generated from the In-store Charge Maintenance
toolbar. This allows for a detailed review of account and
balances for a customer or all customers.
Select the start date and customer(s) desired. The end
date is automatically set to the current date and is used
as the starting point to calculate customer balances.
Table 9.4 contains a description of each field contained in the Customer In-store Charge Balance Detail report.
Report field
Columns:
Date
Activity
Reference No.
Memo
Amount
Balance
Rows:
Names
Card Numbers
Table 9.4
Description
Format
Calculation
Charge activity date
Charge activity short description
Till No - Checkstand No – Transaction No (when
activity originated at the checkstand. Backend entry
reference is the text input by the user).
Detailed description of activity. Applies to the
Backend entry only.
Charge activity amount.
Displays the charge account‟s running balance.
Activity is listed in descending chronological order.
Date/Time
Text
Text
None
None
None
Text
None
Currency
Currency
None
Current balance plus/minus charge
activity for the next row balance.
Names of customers
ID numbers of customers
Text
Text
None
None
Selection Criteria:
Based on input form – customer selected or all customers with activities during the selected period
Sort Criteria:
By customer in alphabetical order
Charge Balance Summary Report
The Charge Balance Summary Report function
produces a Customer In-store Charge Balance
Summary report listing all customers with outstanding
balances as of the current (End) date. The Start Date and
specific Customer Card number as selections are ignored
in the generated report.
RETAIL USER REFERENCE MANUAL – RETAIL 7
132
RETAIL 7™ User Manual
CUSTOMERS
Charge Balance Summary Report (continued)
The layout of this report is found in Appendix F. Table 9.5 contains a description of each field contained in the
Customer In-store Charge Balance Summary report.
Report field
Card Number
Customer Name
Home Phone
D/L
Current Balance
Description
Card ID Number
Charge customer name
Charge customer phone number
Charge Customer driver‟s license
Charge customer outstanding balance owed
Also shows customers with negative balances
Format
Calculation
Text
Text
Text
Text
Currency
None
None
None
None
None
Table 9.5
Selection Criteria:
Select all charge account customers‟ outstanding balances
Sort Criteria:
By customer in alphabetical order
In-Store Charge Statement
The In-Store Charge Statement function produces
statements for all customers or a selected customer. This
report is generated from the In-store Charge Maintenance
toolbar. This report serves as a Customer‟s Statement of
account that can be mailed to the customer for payment.
Type the start date and end date for the statement period.
The End Date selected is limited to be within 30 days from
current date. Statements can be printed for all customers
or for a specific customer.
Table 9.6 contains a description of each field contained in the In-store Charge Statement.
Report field
Description
Format
Calculation
Customer Data
Period
Statement Ending
Balance
Customer name, ID Number, and address
Displays the selected dates
Displays the outstanding balance at ending date
Text
Date
Currency
Terms
Columns:
Date
Activity
Reference No
Displays the terms description extended to the customer
Date
None
None
Statement beginning
balance plus/ minus
transactions within the
selected period
None
Charge activity dates
Transaction short description
Checkstand No – Till No – Transaction No for checkstand
transactions. Entered reference number for Backend entries.
Charge activity transaction amounts
Displays the beginning balance of the period selected
Date
Text
Text
None
None
None
Currency
Currency
None
Current balance plus/minus
transactions from the current
date to beginning date
Amount
Statement
Beginning Balance
Table 9.6
Selection Criteria:
Based on input form – customers with outstanding balances
Sort Criteria:
Transaction date
RETAIL USER REFERENCE MANUAL – RETAIL 7
133
RETAIL 7™ User Manual
CUSTOMERS
Customer Focus
The Customer Focus function allows retailers to
focus on their customers and improve their customer
loyalty. This function allows retailers to:
Rank their top customers for specific
weeks, months, and years
View customer buying patterns (for
example, which departments they are
shopping in, which products they are
purchasing)
View discounts consumed by the customer
(for example, electronic coupons,
manufacturer coupons)
View preferred times they shop
View the customer‟s favorite cashier(s)
The customer focus data consists of weekly, monthly, and yearly data. Data is updated daily by system tasks
that are executed automatically. Click a specific time period and select which type of data (week, month, and
year) you want to view. A list of customer data is displayed at the bottom of the screen. Double-click a particular
line to view the specific data for that customer including the customer‟s photo (if a photo has been assigned to
the customer in the Customer Maintenance form).
Table 10.1 contains a description of each field contained in Customer Focus form.
CUSTOMER FOCUS- FIELD DESCRIPTIONS
FORM FIELD
DESCRIPTION
Customer Information
Photo assigned through the Customer Maintenance form
Customer Photo
Customers name set up through the Customer Maintenance form
Name
Customers phone set up through the Customer Maintenance form
Phone
Customers address set up through the Customer Maintenance form
Address
Criteria
Date
Information is calculated from the Sunday previous to this date
Week
Information is displayed by the week, from Sunday to Saturday of the week selected.
Month
Information is displayed by the Month, from the first to the current or last day of the month selected.
Year
Information is displayed by the Year, from the first to the current or last day of the year selected.
Sales Information
Sales
Total sales for the customer for the time period
CGS
Cost of Goods Sold for the customer for the time period
Profit
Total profit for the time period (sales minus cost)
Price minus Cost divided by Price
Gross Margin
Total Sales
Total sales for the customer for all instances of the time criteria selected (that is, if criteria is week, total is for all
weeks)
#1 Dept Profits
Department where customer purchases had highest profit
#1 Dept Sales
Department where customer purchased most
Profit Contributions
The percentage of profits contributed by highest ranking department
Statistics
Amt/Trip
Total amount purchased per trip
Profit/Trip
Amount of profit per shopping trip for the customer
The number of people customer shops for (from Customer Maintenance screen)
Shopped for
Times/Prd
Number of times shopped during the time period selected
Trans Time
Average time to complete a transaction for the customer
Times Shop
Times (that is, clock time) when customer shops
Favorite Products
Top 20 products this customer purchases the most
Favorite Cashier
Top 20 cashiers this customer uses
Department Distribution
Top 20 departments this customer purchases from
List
Customer‟s card number assigned through the Customer Maintenance form.
Card Number
Customer‟s name assigned through the Customer Maintenance form.
Customer Name
RETAIL USER REFERENCE MANUAL – RETAIL 7
134
RETAIL 7™ User Manual
CUSTOMERS
Customer Focus (continued)
CUSTOMER FOCUS- FIELD DESCRIPTIONS
FORM FIELD
DESCRIPTION
Rank
Customer rank (based on sales) for the time period
Customer‟s zip assigned through the Customer Maintenance form.
Zip
Cost
Total Cost of goods sold purchased for the current period
Sales
Total Sales for the current period
Items
Total Items purchased for the current period
Sales minus Cost
Gross Profit
Price minus Cost divided by Price
Gross Margin
Table 10.1
Toolbar
The following describes the functions supported by the toolbar located on the Customer Focus form.
Button
Description
Exits the current window
Prints a Customer Focus report
(Refer to Customer Focus topic in this section)
Displays the Customer Focus report on the screen
(Refer to Customer Focus topic in this section)
Groups customers
(Refer to Show Customer Sales-Group Customers topic in POS Store Sales section)
Finds a customer by name or card number
Shows times customer shopped in the store
Shows customer‟s favorite cashiers
Shows customer‟s favorite products
Shows types of discounts customer was given (for example, coupons)
Shows the departments shopped by the customer
Shows customer‟s12 week department distribution
Shows ranking of top 100 customers for the last 12 months
Shows a graph of customer‟s activity for the last 12 months
Shows Electronic Coupon Form
Maintains notes about a customer
Activates the context-sensitive help
RETAIL USER REFERENCE MANUAL – RETAIL 7
135
RETAIL 7™ User Manual
CUSTOMERS
Customer Focus (continued)
Show Times Customer Shops the Store
The Times Shop form can be accessed by clicking
Show Times Customer Shops the Store . This
form lists the days and times the current customer
shopped in the store the first time the customer
shopped to current date. This form is not subject to
the parameter of dates selected by week, by month,
or by year.
Note: This form lists only one entry per day. It picks
up the last time a customer shopped during any
given day. It totals the sales and number of items of
all the times the customer shopped in that one day.
Table 10.2 contains a description of each field contained in the Times Customer Shops form.
TIMES SHOP COLUMNDESCRIPTIONS
FORM FIELD
DESCRIPTION
Shop Day
Days the customer shops
Shop Time
Latest time the customer shopped in one day
Shop Date
Dates the customer shops
Sales
Net Sales
Items
Number of all the items
Table 10.2
Show Customer’s Favorite Cashiers
The Favorite Cashiers for a Customer form
displays when the Show Customer’s Favorite
Cashiers
is clicked. This form lists the 20
cashiers the customer visits most often.
Table 10.3 contains a description of each field contained in the Customer Favorite Cashiers form.
FAVORITE CUSTOMER COLUMN DESCRIPTIONS
FORM FIELD
DESCRIPTION
Cashier
Displays the name(s) of the cashier(s) that the customer visited
Frequency
The number of times the customer visited that cashier during the time period selected
Table 10.3
RETAIL USER REFERENCE MANUAL – RETAIL 7
136
RETAIL 7™ User Manual
CUSTOMERS
Customer Focus (continued)
Show Customer’s Favorite Products
The Favorite Products for a Customer form
displays the top products the customer purchased
from the first time to current date. This form is
displayed when the Show Customer’s Favorite
Products
is clicked. An item displays more
than once if the same UPC number is transferred
to another department.
Table 10.4 contains a description of each field contained in the Customer’s Favorite Products form.
CUSTOMER FAVORITE PRODUCTS COLUMN DESCRIPTIONS
FORM FIELD
DESCRIPTION
UPC
Displays he UPCs of the customer‟s favorite products
Description
Displays the Description of the products
Department
Displays the Department assignment of the products listed
Items
The number of times the customer bought each favorite item is displayed
Sales
Displays the total sales price of the favorite items
Table 10.4
Show Customer’s Discounts
The Discounts History for a Customer lists
discount savings enjoyed by a customer. The
discounts are categorized as:
Coupon Multiple
Department Discounts
Electronic Coupons
Manufacturer‟s Coupons
This form is accessed when Show Customer’s
Discounts
is clicked.
Table 10.5 contains a description of each field contained in the Discount History for a Customer form.
DISCOUNT HISTORY FOR A CUSTOMER COLUMN DESCRIPTIONS
FORM FIELD
DESCRIPTION
Department
Displays the department the coupon is assigned to
Coupon Multiple
The coupon multiple amounts that the customer accumulated. (For example, a doubled manufacturer
coupon will display the amount that was doubled)
Department Discount
Displays department discounts for example, Discounts A or B assigned to the customer and the
department.
Electronic Coupon
Displays the discounts received on electronic coupons.
Manufacturer‟s Coupon
Displays the total amount of discounts received on manufacturers coupons, not including multiple
amounts.
Table 10.5
RETAIL USER REFERENCE MANUAL - RETAIL 7
137
RETAIL 7™ User Manual
CUSTOMERS
Customer Focus (continued)
Show the Departments Shopped by the Customer
The Department Distribution for a Customer form
lists all the departments with the corresponding
sales, cost, and gross profit figures attributable to the
customer. The data displayed are either by week,
by month, or by year as selected by the user. This
form is accessed when Show Departments
Shopped by the Customer
is clicked.
Table 10.6 contains a description of each field contained in the Department Distribution for a Customer form.
DEPARTMENT DISTRIBUTION FOR A CUSTOMER COLUMN DESCRIPTIONS
FORM FIELD
DESCRIPTION
Department
The Department as entered in Department Maintenance
Sales
The total sales contributed by the customer during the time period selected
Cost
The cost of goods in each department
Gross Profit
The gross profit contributed by the customer: Sales minus Cost
Table 10.6
Show Customer’s 12-Week Department Distribution
The Department Distribution History for a
Customer form lists the department sales
segregated by 12-week period, 12-month period,
or 12-year period. This form is accessed when
Show Customer’s 12-Week Department
Distribution
is clicked.
Table 10.7 contains a description of each field contained in the Department Distribution History for a
Customer form.
DEPARTMENT DISTRIBUTION HISTORY FOR A CUSTOMER COLUMN DESCRIPTIONS
FORM FIELD
DESCRIPTION
Department
Displays the name of the Departments as entered in Department Maintenance
Week, Month, or Year
The sales totals for the weeks, month, or year as per the user‟s selection are displayed.
Table 10.7
RETAIL USER REFERENCE MANUAL - RETAIL 7
138
RETAIL 7™ User Manual
CUSTOMERS
Customer Focus (continued)
Customer Group
The Customer Group form is used to group
your top 100 customers. Thank you letters or
gift certificates can then be printed for each
customer in the group. Electronic Coupons can
be attached to these top customers. The criteria
used in the Customer Focus form are the same
criteria used on this form to display the
customers that can be categorized. This form is
displayed when the Group Customers button
is pressed from the toolbar on the
Customer Focus form.
If the Preferred Customers option is selected as
the Select Type, then the top of the form will
change as depicted to the right. This will allow
for the selection of a coupon to be assigned to
the selected category of customers. This is very
useful to apply a Target Coupon to your top
customers.
Customer Focus Report
The Customer Focus Report function produces a Customer Focus report listing all selected criteria currently
listed on the Customer Focus form. The layout of this report is contained in Appendix E. This function is
executed when
or
is clicked from the Customer Focus form. Table 10.8 contains a description of
each field contained in the Customer Focus report.
Report field
CardNo
Customer
Rank
Cost
Sales
Items
Gross Profit
GM
Table 10.8
Description
Customer‟s card number assigned through the Customer
Maintenance form.
Customer‟s card number assigned through the Customer
Maintenance form.
Customer rank (based on sales) for the time period
Total Cost of goods sold purchased for the current period
Total Sales for the current period
Total Items purchased for the current period
Sales minus Cost
The Gross Margin %
RETAIL USER REFERENCE MANUAL - RETAIL 7
Format
Calculation
Number
None
Text
None
Number
Currency
Currency
Number
Currency
Currency
Calculation
Calculation
Calculation
Calculation
Sales - Cost
Price - Cost / Price
139
RETAIL 7™ User Manual
INVENTORY
Inventory
Inventory Count
Open a New/Review a Purchase Order
Inventory
Count
Purchase
Order
View
Inventory
Count Report
Inventory
Count Report
P.O.
Adjustment
View
Adjustments
Find PO
Product
Movement
(see Form Flow Sales)
Select
Invoice
Receive an Invoice
Receive an
Invoice
Product
Memo
Cost
Calculator
Multiple
Vendor
Costs
Purchase Order
Select
Invoice
Cost
Calculator
P.O.
Adjustment
View
Adjustments
Invoice
Inventory Analysis
DSD Discrepancies
Allowances/Billbacks
Reason Codes
Reports
Inventory
Analysis
DSD
Discrepancies
Allowances/
Billbacks
Setup Reason
Codes
- Stock on Hand
- Total Invoices by Dept
- Allowances by Vendor
- POs by Vendor
- Paid/Unpaid Invoices by
Vendor
View Inventory
Analysis Report
Inventory
Analysis
RETAIL USER REFERENCE MANUAL – RETAIL 7
Allowances &
Billbacks
Reports
Allowances &
Billbacks
140
RETAIL 7™ User Manual
INVENTORY
Inventory Count
You can use the Inventory Count form to enter
and review physical inventory count for a
product or set of products. You can also use it
to display or print an inventory report. Only one
inventory count can exist per day. This function
should be performed when a store first opens to
establish the beginning inventory count for
products and periodically when physical
inventory counts are performed. Inventory Click
the appropriate column heading to sort in an
ascending or descending order.
The quantity on hand of the product is updated
when the Mark-ending Inventory has been
processed.
Note: When deleting an inventory count, an entry will be created in the user activity log in order to provide an
audit trail of data deleted from the system. (Refer to the User Activity Tracking topic in the General Topics
section)
Table 11.1 contains a description of each field contained in the Inventory Count form.
INVENTORY COUNT - FIELD DESCRIPTIONS
FORM FIELD
DESCRIPTION
PRODUCT INFO.
Category
Category becomes the Inventory ID
UPC
The UPC or PLU of the product for which the count is entered
Description
Displays the description of the product being counted
Label
Flag to enable printing of a label for the product being counted
Qty
The quantity of the product being counted
Description
Displays the description of the product being counted
Section
Displays the section number of the product being counted
Vendor
Displays the primary vendor of the product being counted
Pack/Size
Displays the pack and size of the product being counted
Cost
Displays the cost of the product being counted
Price
Displays the price of the product being counted
PRODUCT LIST INFO
(Multiple occurrences of the following)
Displays the various products for which a count was entered for the day
UPC
Displays the UPC or PLU of the product
Description
Displays the description of the product
Qty
Displays the quantity of the product
Count Date
Displays the date when this product was count
Dept.
Displays the department number of the product
Section
Displays the section name of the product
Vendor
Displays the vendor number of the product
DSD
Displays a 1 if this product has direct service delivery
Cost
Displays the cost of the product
Price
Displays the price of the product
Pack
Displays the pack number of the product
Size
Displays the size of the product
Table 11.1
RETAIL USER REFERENCE MANUAL – RETAIL 7
141
RETAIL 7™ User Manual
INVENTORY
Inventory Count (continued)
Toolbar
The following describes the functions supported by the toolbar located on the Inventory Count form.
Button
Description
Exits the current window
Prints an Inventory Count report
(Refer to the “Inventory Count Report” topic in this section)
Displays the Inventory Count report on the screen
(Refer to the “Inventory Count Report” topic in this section)
Saves item count (or a changed count) of an item
Deletes the current category with all its records
Deletes the whole inventory count category
Marks the ending of the current inventory count
An end date is requested and is stored as the ending inventory date. This date can then be
used in the Inventory Analysis function.
Creates a job to mark the ending inventory count.
Activates the context-sensitive help
Inventory Count Report
This function will produce an Inventory Count Report for the selected count date.
This function is executed when
or
is selected on the Inventory Count form. Table 11.2 contains a
description of each field contained in the Inventory Count report.
Report field
UPC
Description
Quantity
Unit Cost
Total Cost
Unit Price
Total Price
Dept.
Section
Vendor
Pack
Size
Count Date
Applied On
Applied Qty
Table 11.2
Description
UPC
Product description
Quantity entered
Unit cost for the product
Total cost for the inventory entered
Unit price for the product
Total price for the inventory entered
Department
Section
Vendor
Pack size
Size of the product if a pack
Inventory count date
Date inventory count applied
Quantity applied
Format
Text
Text
Number
Currency
Currency
Currency
Currency
Number
Number
Number
Number
Text
Date / Time
Date / Time
Number
Calculation
None
None
None
None
quantity * cost
None
quantity * price
None
None
None
None
None
None
None
None
Selection Criteria
All products in the inventory count currently displayed on the Inventory Count form
Sort Criteria
None
RETAIL USER REFERENCE MANUAL – RETAIL 7
142
RETAIL 7™ User Manual
INVENTORY
Open a New/Review a Purchase Order
You can use the New Purchase Order form to
create new and review existing purchase orders
by vendor. A Purchase Order is required prior to
receiving goods in RETAIL™. Select a vendor
from the list and the next available PO number
will be displayed (New Purchase Order) or a list
of PO numbers will be available for selection
(Review a Purchase Order). Products can be
entered on the PO either by UPC or by Item
Code. Click UPC button to toggle between Item
Code and UPC. Click Product Detail field to
display order and movement data related to the
UPC entered.
Note: To delete an item from the PO, select the
item in the list and press DELETE.
Note: Cost and pricing data can be updated from this form by using the Cost Calculator function. Refer to the
Cost Calculator topic in the Product Maintenance section.
Table 12.1 contains a description of each field contained in the New Purchase Order form.
NEW PURCHASE ORDER -- FIELD DESCRIPTIONS
FORM FIELD
DESCRIPTION
Vendor / Supplier
The name of the vendor or supplier.
P. O. No.
Existing P.O numbers for the vendor or system assigns the next available purchase order number for
entry.
Date
The date of the purchase order. This is usually the date on the purchase order is created.
Acct #
Displays the vendor‟s account number as entered in the accounting module.
Address
Displays the vendor‟s address as entered in the vendors form.
PRODUCT INFORMATION
UPC/Item Code
UPC or Item Code of the product being entered or modified. Toggle between UPC and Item Code by
clicking UPC button.
Cost
Displays unit cost of the product.
Description
Displays the description of the product.
Case Cost
Displays the case cost of the product. If no case cost exists, the case cost is calculated based on
units in a pack. The calculation is unit cost * pack units.
Department
Displays the product‟s department.
Quantity
Quantity ordered for the product. If a pack size exists for the product then the default quantity ordered
is in cases, otherwise it is in units. Precede the quantity ordered with a “U” to specify units instead of
cases.
GL #
Displays the Account number (not available in this version).
Purchase Type
Purchase type that applies to the product. Three choices are available: Received, Free, Returned.
Received adds to the amount of the PO, Free is a $0.00 amount and Returned reduces the amount
of the PO.
Pack/Size
Displays the pack units in a case. Size displays the size of the individual products.
Allowances
Allowance amount(s) applied to the PO. Allowances are entered in the Allowances/Bill Backs
function. Click the Allowances button to view the allowances applied.
Salesman
The name of the sales person who sold the product(s).
Buyer
Displays the name of the employee who created the purchase order.
Adjustment
Displays the dollar amount of any adjustments made to the P.O. (see P.O. Adjustments).
Total
Displays the total amount of the purchase order.
Product Detail
Flag to display product detail information.
On Hand
Displays the inventory on-hand for the product.
Memo
Displays an X if a memo has been entered for this product
On Order
Displays the amount of previous ordered units or cases
RETAIL USER REFERENCE MANUAL – RETAIL 7
143
RETAIL 7™ User Manual
INVENTORY
Open a New/Review a Purchase Order (continued)
NEW PURCHASE ORDER -- FIELD DESCRIPTIONS (CONTINUED)
FORM FIELD
DESCRIPTION
On Order
Displays the amount of previous ordered units or cases
Ad
Displays an X if this product is an advertised product
Min / Req.
Displays the minimum amount that you should have and the required amount
Daily Average
Displays the daily movement for the product (this information is calculated from the product
movement)
Last Week Move
Displays the last week‟s movement for the product
PRODUCT LIST
(Multiple occurrences of the following)
List all products being ordered on the P.O.
UPC
Displays the UPC or PLU of the product
Description
Displays the description of the product
Item Code
Displays the item code of the product
Cost
Displays the unit cost of the product
Price
Displays the sales price per unit from the Product Maintenance form
Case Cost
Displays the case cost of the product
Qty
Displays the units ordered of the product (if product ordered in units)
Qty Case
Displays the cases ordered of the product (if product ordered in cases)
Unit
Displays the unit of measure for the product (pieces if ordered in units, unit of measure of the product
if in cases)
Type
Displays purchase type that applies to the line item.
Total
Displays the extended amount for the product: # of (units * unit cost) or (# of cases * case cost). For
purchase type Free the extended amount will be $0.00. For purchase type Returned, the extended
amount will be negative.
Table 12.1
Toolbar
The following describes the functions supported by the toolbar located on New Purchase Order form.
Button
Description
Exits the current window
Prints a Purchase Order Document
(Refer to the Purchase Order Document topic in this section)
Displays the Purchase Order Document on the screen to preview before printing
(Refer to the Purchase Order Document topic in this section)
Saves your entries or changes for the current record
Deletes the current P.O
To delete an item from the P.O., select the item in the list at the bottom of the P.O. and press
DELETE.
Adjusts a P.O.
(Refer to P. O. Adjustments topic in this section)
Shows the multiple vendors and the cost for the current item
(Refer to Multiple Vendor Cost topic latter in this section)
Shows all the P.O.s. currently in the system
(Refer to Find P.O. topic in this section)
“Jumps” to the Show Product Movement function.
(Refer to Show Product Movement topic contained in the Point of Sales section)
Maintains notes about a product on the purchase order
(Refer to the Product Memo topic contained in the Product Maintenance section)
Gives access to cost calculator
The user must have a profile allowing him to access Product Maintenance in order to use this
function. Changes applied will update the product in the Product file.
(Refer to Cost Calculator topic in this section)
Activates the context-sensitive help
RETAIL USER REFERENCE MANUAL – RETAIL 7
144
RETAIL 7™ User Manual
INVENTORY
Open a New/Review a Purchase Order (continued)
P. O. Adjustments
You can use the P.O. Adjustment form to enter
adjustments to a P.O. This form is displayed when the
P.O. Adjustments button
is clicked from the New
Purchase Order form or from the Receive an
Invoice form. Adjustments can either be made for the
entire P.O. (select Purchase Order) or made for a
particular line item on the P.O. (select UPC). Type a
description for the adjustment, the amount, and select
an adjustment type. Adjustments listed as
Reductions are treated as negative adjustments (i.e.,
reducing the amount of the PO or invoice).
Adjustments listed as Added Charges are treated as
positive adjustments (i.e., adding to the amount of the
PO or invoice).
Table 12.2 contains a description of each field contained in the P. O. Adjustments form.
P. O. ADJUSTMENTS -- FIELD DESCRIPTIONS
FORM FIELD
DESCRIPTION
PO Number
Displays the purchase order number for which adjustments are entered.
Proc Date
Displays the date (defaults to current date) for which the adjustment is processed.
Amount
The dollar amount of the adjustment entered.
Description
Additional detail of the adjustment entered.
Reductions
Select from Allowance, Credit, Damaged, Rebate, Spoil, and Misc. Reductions category accepts
negative amount. In this case, the adjustment is added.
Surcharges
Select from Shipping and Other. This accepts positive amount only.
Adjust by: Purchase Order
If selected, the adjustments are made (pro-rated) to all products on the P. O.
Adjust by: UPC
If selected, the adjustments are made to the product selected.
PRODUCT LIST
(Multiple occurrences of the following)
UPC
Displays the product UPC or PLU.
Description
Displays the product description.
Adjust Type
Displays the type of adjustment.
Details
Displays a brief description about the adjustment.
Amount
Displays the dollar amount of the adjustment.
Table 12.2
RETAIL USER REFERENCE MANUAL – RETAIL 7
145
RETAIL 7™ User Manual
INVENTORY
Open a New/Review a Purchase Order (continued)
Purchase Order Document
This function will produce a Purchase Order document for the selected purchase order on the New Purchase
Order form. A layout of this document is contained in Appendix F.
This function is executed when
or
is selected. Table 12.3 contains a description of each field contained
in the Purchase Order document.
Report field
Comp name
compadd1
comadd2
compadd3
compadd4
name
add1
add2
add3
phone
P. O. Date
P. O. #
Requisition
Ship Via
Terms
UPC
Item Code
Quantity
Unit
Description
G.P.
G.M.
Price
Cost
Ext. RETAIL™
Total
Adjustment:
Total:
Vendor Total
Table 12.3
Description
Company name
Company Address
Company Address
Company Address
Company Address
Customer name
Customer Address
Customer Address
Customer Address
Customer phone
P.O. date
PO #
Person requisitioning goods
Ship via
Terms
UPC/UPL number of product
Item Code of product
Product quantity
Unit description
Product description
Gross Profit
Gross Margin
Product price
Cost of product
Extended RETAIL™ price
Total due
Adjustment amount
Net total
Vendor total on vendor‟s invoice
Format
Text
Text
Text
Text
Text
Text
Text
Text
Text
Text
Date / Time
Number
Text
Text
Text
Number
Text
Number
Text
Text
Number
Number
Currency
Number
Number
Currency
Currency
Currency
Currency
Calculation
None
None
None
None
None
None
None
None
None
None
None
None
None
None
None
None
None
None
None
None
Price – Cost
Price – Cost /Price
None
None
Price * Units Purchased
None
Total of all Adjustments
Sum of total - adjustment
None
Selection Criteria
All products within the selected PO
Sort Criteria
None
RETAIL USER REFERENCE MANUAL – RETAIL 7
146
RETAIL 7™ User Manual
INVENTORY
Multiple Vendor Cost
You can use the Multiple Vendor Cost form to display
the different vendors and costs that exist for the current
product entered or selected on a PO. This form is
displayed when the View Vendor Cost button
is
clicked from the Open a New/Review a Purchase Order
form.
Table 12.4 contains a description of each field contained in the Multiple Vendor Cost form.
MULTIPLE VENDOR COST – FIELD DESCRIPTIONS
FORM FIELD
DESCRIPTION
Vendor
Displays the Vendor‟s name
Unit Cost
Displays the unit cost of the current product (if any)
Case Cost
Displays the case cost of the current product (if any)
Table 12.4
Find P.O.
You can use the Find P.O. form to display all the POs
currently in the system. This form is displayed when Find
a P.O. button
is clicked when Reviewing a Purchase
Order. Select a PO from the list and click OK.
Table 12.5 contains a description of each field contained in the Find P.O. form.
FIND P.O. -- FIELD DESCRIPTIONS
FORM FIELD
Vendor
PO Number
PO Date
Table 12.5
DESCRIPTION
Displays the Vendor‟s name
Displays the purchase order number corresponding to the Vendor
Displays the purchase order date for the corresponding PO Number
RETAIL USER REFERENCE MANUAL – RETAIL 7
147
RETAIL 7™ User Manual
INVENTORY
Open a New/Review a Purchase Order (continued)
Cost Calculator
You can use the Cost Calculator form to change the unit
cost, case cost, unit price, or margin for a product.
Changes made on this form, when applied will not only
affect the change on the current purchase order but will
also apply the changes to the product itself.
This form is displayed when the RETAIL™ Calculator
button
is clicked when preparing or reviewing a
Purchase Order.
Note: Description of every field of this form is detailed in the same topic found in the Product Maintenance
form.
Receive an Invoice
You can use the Receive an Invoice form to
receive merchandise ordered via a PO. When
products are received, the inventory is
automatically updated. Select a vendor from the
list and a list of P.O.s not received will be
available for selection in the P.O. No. field. If
receiving goods without a PO, simply input the
first UPC in the UPC field and the system will
prompt if a new PO should be created. RETAIL™
supports receiving the entire PO “as ordered” by
clicking the Receive as Ordered button
or
inputting individual received quantities for each
line item.
Note: Click UPC to toggle to Item Code.
Note: Cost and pricing data can be updated from this form by using the Cost Calculator function. Refer to the
Cost Calculator topic in the Product Maintenance section.
Note: When the vendor has a set percentage up-charge, the unit price printed in the invoice would reflect the
up-charged retail price; the unit price in the Receive an Invoice form reflects the actual unit price.
RETAIL USER REFERENCE MANUAL – RETAIL 7
148
RETAIL 7™ User Manual
INVENTORY
Receive an Invoice (continued)
Table 13.1 contains a description of each field contained in the Receive an Invoice form.
RECEIVE AN INVOICE -- FIELD DESCRIPTIONS
FORM FIELD
DESCRIPTION
Vendor
Displays the name of the vendor or supplier
Acct #
Displays the vendor‟s general ledger account number as entered in the accounting module
P. O. No.
Displays all the available purchase order numbers not received for that vendor
Date
Displays the date of the invoice, this is usually the date when the PO was created
Address
Displays the vendor‟s address as entered in the vendors form
UPC
Enter the UPC of the product to update in the product list. Toggle to item code by clicking UPC button.
Description
Displays the description of the product
Department
Displays the department of the product
Pack/Size
Displays the pack units in a case. Size displays the size of the individual products.
Unit
Units of quantity ordered – either units (pieces) or cases.
Qty Ordered
Quantity ordered for the product. If a pack size exists for the product then the default quantity ordered is in
cases, otherwise it is in units.
Qty Received
Quantity received for the product. Enter in the quantity and press the ENTER.
Purchase Type
Purchase type that applies to the product. Three choices are available: Received, Free, Returned. Received
adds to the amount of the invoice, Free is a $0.00 amount and Returned reduces the amount of the invoice.
PRODUCT LIST
UPC
Displays the UPC or PLU number of the product
Description
Displays the description of the product
ItemCode
Displays the item code of the product
CaseCost
Displays the cost of the products if the product is in cases
UnitCost
Displays the cost of the products if the product is in units
Unit Price
Displays the sales price per unit of the product
Ordered
Displays the quantity ordered for the product
Unit
Displays units for the product as ordered (either pieces or unit of measure for the product if received in
cases)
Rec‟d
Display quantity received for the product
Type
Displays purchase type that applies to the line item.
Diff
Displays the difference between ordered and received
Total
Displays the extended amount for the product: # of (units * unit cost) or (# of cases * case cost). For
purchase type Free the extended amount will be $0.00. For purchase type Returned, the extended amount
will be negative.
INVOICE INFO
Date
Invoice receipt date
Number
Invoice number assigned to P.O.
Shipped By
Name of the person who delivered the product
Received By
Name of the person who received the product
Adjustment
Displays the total dollar amount of adjustments
Total
Displays the net total amount for the invoice (sum of total $ - adjustment/s)
Vendor Total
Enter the net total amount for this invoice as copied from the vendor‟s actual invoice
Paid Date
Enter the date this invoice is paid
Table 13.1
RETAIL USER REFERENCE MANUAL – RETAIL 7
149
RETAIL 7™ User Manual
INVENTORY
Receive an Invoice (continued)
Toolbar
The following describes the functions of the buttons on the Receive an Invoice form‟s toolbar:
Button
Description
Exits the current window
Prints an Invoice Document
(Refer to the Invoice Document topic in this section)
Displays an Invoice Document on the screen
(Refer to the Invoice Document topic in this section)
Press to make adjustments to an invoice
(Refer to P. O. Adjustments topic in the Open a New/Review a Purchase Order section)
Receives the invoice as ordered.
This will set the quantity received on all line items to the amount ordered.
Marks the invoice as received
The invoice will no longer be available for modification.
Creates a product batch for this invoice.
Apply the batch using the Enter Prices for Ad Batch function.
(Refer to Create a New Batch topic in Enter Prices for Ad/Batch section)
Finds all invoices for the current vendor
(Refer to Select an Invoice topic in this section)
Deletes the current invoice
Press to access cost calculator
The user must have a user profile to access Product Maintenance to use this function.
Changes applied will update the product in the Product file.
(Refer to Cost Calculator topic in the Open a New/Review a Purchase Order section)
Activates the context-sensitive help
RETAIL USER REFERENCE MANUAL – RETAIL 7
150
RETAIL 7™ User Manual
INVENTORY
Receive an Invoice (continued)
Select an Invoice
You can use the Select an Invoice form to show all
invoices that currently exist in the system for the
selected vendor. The form will allow selection of an
invoice to be displayed on the Receive an Invoice
form. This form is displayed when the find button
is clicked on the Receive an Invoice form.
Table 13.2 contains a description of each field contained in the Select an Invoice form.
SELECT AN INVOICE -- FIELD DESCRIPTIONS
FORM FIELD
DESCRIPTION
Invoice Number
Displays the Invoice Number
PO Number
Displays the Purchase Order number
PO Date
Displays the Purchase Order date
Table 13.2
Invoice Document
This function will produce a Receiving Invoice document for the selected invoice. This function is executed when
or
is selected on the Invoice form.
Report field
Comp name
compadd1
compadd2
compadd3
compadd4
name
add1
add2
add3
phone
PO Date
P.O.#
Invoice #
Receiver
Ship Via
Terms
UPC
Item C.
Qty
Unit
Description
G.P.
G.M.
Price
Cost
Ext. Retail
Total
Adjustment:
Total:
Vendor Total
Table 13.3
Description
Company name
Company address
Company address
Company address
Company address
Customer name
Customer address
Customer address
Customer address
Customer phone
Purchase Order Date
Purchase Order #
Invoice #
Receiver name
Ship via
Terms
Product UPC
Item code of product
Quantity purchased
Unit description
Product description
Gross Profit
Gross Margin
Product price
Cost of product
Extended Retail price
Total billed
Adjustment amount
Net total
Vendor total on vendor‟s invoice
Format
Text
Text
Text
Text
Text
Text
Text
Text
Text
Text
Date / Time
Text
Number
Text
Text
Text
Text
Text
Number
Text
Text
Number
Number
Currency
Number
Number
Currency
Currency
Currency
Currency
Calculation
None
None
None
None
None
None
None
None
None
None
None
None
None
None
None
None
None
None
None
None
Price – Cost
Price – Cost /Price
None
None
Price * Units Purchased
None
Total of all Adjustment amounts
Sum of total - adjustment
None
Selection Criteria: All products for the selected invoice
Sort Criteria: None
RETAIL USER REFERENCE MANUAL – RETAIL 7
151
RETAIL 7™ User Manual
INVENTORY
Inventory Analysis
You can use the Inventory Analysis form to
perform an Inventory Analysis for a specific
category including Department, Section,
Vendor, Total Store, or for a specific UPC
Code. Once a category and date range is
selected and the Calculate Inventory button
is clicked, the system will calculate and
display the beginning and ending inventory for
the category and time frame. Inventory shrink
can also be calculated via this form by clicking
Calculate Shrink button
(refer to the
Calculations topic in this section). This function
is only usable once an inventory count has
been entered into the system (refer to the
Inventory Count section).
Note: Refer to the Back End How To… section for more information on the inventory process supported within
RETAIL™.
Table 14.1 contains a description of each field contained in the Analyze Inventory form.
INVENTORY ANALYSIS -- FIELD DESCRIPTIONS
FORM FIELD
DESCRIPTION
Start Date
Displays the start date for the current analysis
End Date
Displays the end date for the current analysis
Category
Displays the category to be analyzed
Clear Button
Press to clear the form before entering different criteria.
UPC
Displays the UPC or PLU to be analyzed
Department
Displays the department to be analyzed
Section
Displays the section to be analyzed
Vendor
Displays the vendor to be analyzed
Other
Display the DSD or Total Store to be analyzed
Quantity- Initial
Displays the initial quantity for the analyzed category
Quantity- Rec‟vd
Displays the quantity received for the analyzed category
Quantity- Sold
Displays the quantity sold for the analyzed category
Quantity – Adjt
Displays the quantity related to inventory adjustments made during the time period (Inventory
adjustments are entered via the Inventory function in the Product Maintenance form)
Quantity- Ending
Displays the ending quantity for the analyzed category
Profitability - Price
Displays the total price for the analyzed category
Profitability - Cost
Displays the total cost for the analyzed category
Profitability - Profit
Displays the total profit for the analyzed category
Profitability - GM %
Displays the percent gross margin for analyzed category
Shrink - Price
Displays the total price of item losses for the analyzed category
Shrink - Cost
Displays the total cost of item losses for the analyzed category
Shrink - Loss
Displays the count of item losses for the current category
Shrink - Act‟l
Displays the gross margin now including shrink
ANALYSIS LIST BOX
UPC
Displays the UPC or PLU number
Description
Displays the product description
Beginning
Displays the beginning quantity
Received
Displays the quantity received
Sold
Displays the quantity sold
Ending
Displays the ending quantity
Shrink
Displays the quantity lost
Table 14.1
RETAIL USER REFERENCE MANUAL – RETAIL 7
152
RETAIL 7™ User Manual
INVENTORY
Inventory Analysis (continued)
Calculations
The Inventory Analysis function reads and aggregates data from a number of areas.
The process to calculate inventory includes the following steps:
1. Get initial inventory count based on the Inventory Count entered for the start date selected
2. Get the quantity sold based on Product movement during the time period specified
3. Get the quantity received from invoices for the time period specified
4. Get the quantity from inventory adjustments for the time period specified
5. Calculate the ending inventory = (((Initial Inventory + Received) - Sold) – Adjustments)
6. The process to calculate shrink uses the same process as calculating inventory with the following
changes:
1) Get ending inventory from inventory count for the ending date specified
2) Calculate the shrink = (Initial Inventory + Received - Sold - Ending Inventory)
Toolbar
The following describes the functions supported by the toolbar on the Inventory Analysis form.
Button
Description
Exits the current window
Prints an Inventory Analysis report
(Refer to the Inventory Analysis Report topic in this section)
Displays the Inventory Analysis report on the screen
(Refer to the Inventory Analysis Report topic in this section)
Calculates the inventory for the category selected for the date specified
Calculates the shrink (for example, theft, spoilage, breakage) for the category selected for the
date specified
Activates the context-sensitive help
Clears the screen to allow the selection of different criteria, (for example, UPCs to Total Store)
Inventory Analysis Report
The Inventory Analysis function will produce an Inventory Analysis report based on the data displayed on the
form.
This function is executed when
or
is selected from the Inventory Analysis form. Table 14.2 contains a
description of each field contained in the report.
Report field
Start Date
End Date
UPC
Description
Qty Beginning
Qty Received
Qty Sold
Qty Ending
Shrink
Ending Cost
Ending Price
Table 14.2
Description
Start date of user query
End date of user query
UPC
Product description
Beginning inventory
Quantity received
Quantity sold
Ending inventory
Inventory shrink
Cost of product based on ending inventory
Value of product based on ending inventory
RETAIL USER REFERENCE MANUAL – RETAIL 7
Format
Date / Time
Date / Time
Text
Text
Number
Number
Number
Number
Number
Currency
Currency
Calculation
None
None
None
None
None
None
None
None
Beginning + Received - Sold - Ending Inventory
Qty Ending * Cost
Qty Ending * Price
153
RETAIL 7™ User Manual
INVENTORY
DSD Discrepancies
You can use the DSD Discrepancies form to
display discrepancies created when a DSD
invoice is received via the RETAIL™ Wireless
module. A discrepancy is created for any invoice
where the extended (calculated) total of the
invoice varies from the vendor‟s total. This form
contains two tabs:
General – Displays summary level data for each
DSD Discrepancy.
Details – Displays details for a specific invoice
selected from the General tab. Click an entry
listed on the General tab and then click Details
tab.
Table 15.1 contains a description of each field contained in the DSD Discrepancies form.
DSD DISCREPANCIES -- FIELD DESCRIPTIONS
FORM FIELD
DESCRIPTION
General Tab
PO Number
Purchase Order number of the listed invoices with discrepancies
Invoice Date
Date invoice received
Invoice Number
Invoice number
Name
Vendor name from invoice
Total Vendor
Vendor total as entered via the hand-held device
Store Total
System calculated total based on products received
RETAIL™ Total
System calculated total based on quantity received x unit price listed in the Product
Maintenance form
Details Tab
Summary Data
Summary data from the General tab (for example, invoice date)
(Multiple occurrences of:)
UPC
UPC of the product
Item
Item code of the product
Description
Product description
C Cost
Case cost of the product
Received
Quantity received
C Total
Extended total for the product
Pack
Pack units in a case
Size
Size of the individual product
Table 15.1
RETAIL USER REFERENCE MANUAL – RETAIL 7
154
RETAIL 7™ User Manual
INVENTORY
Allowance/Bill Backs
You can use the Allowances tab of the
Allowances/ Bill Backs form to support the
entry and maintenance of allowances for a
vendor and product. In add mode, enter the UPC
of the product for which the allowance applies. A
list of vendors (if multiple vendors exist for the
product) will be displayed in the Vendor Name
field for selection. To edit an allowance, enter the
UPC and the first allowance will be displayed.
Sort the list below by UPC or any other field by
clicking the appropriate column heading.
Note: Allowances will automatically be applied to any PO or Invoice entered via the Back End module or via a
hand-held device using the RETAIL™ Wireless module.
Table 16.1 contains a description of each field contained in the Allowances tab:
ALLOWANCES -- FIELD DESCRIPTIONS
FORM FIELD
DESCRIPTION
UPC
Product UPC
Product Group
Allows user to set up allowance for every product in the product group selected
Description
Product description
Item Code
Item Code of product
Pack/Size
Pack units in a case and size of the individual product
Vendor name
Vendor name for the allowance. In add mode, a list of vendors to select from will be displayed if the product has multiple
vendors
Allowance Desc.
Enter description of the allowance. This will appear on the PO or invoice when the allowance is applied
Start Date
Start date of the allowance
Sugg. Price
Suggested price of the product while the allowance is in effect (does not effect pricing of product at the checkstand)
End Date
End date of the allowance
Case Cost
Case cost for the product
Allowance
Enter in the amount per case
Net Cost
Net case cost for the product (Case Cost – Allowance). This is the cost that will be used to compute total cost on PO or
invoice
Product Grid
Displays a list of current allowances in the system. Sort this grid by any of the columns listed by clicking the column
heading.
Table 16.1
You can use the Bill Backs tab of the
Allowances/ Bill Backs form to support the
entry and maintenance of bill backs for a vendor
and product. In add mode, enter the UPC of the
product for which the bill back applies. A list of
vendors (if multiple vendors exist for the product)
will be displayed in the Vendor Name field for
selection. To edit a bill back, enter the UPC and
the first bill back will be displayed. Sort the list
below by UPC or any other field by clicking the
appropriate column heading.
RETAIL USER REFERENCE MANUAL – RETAIL 7
155
RETAIL 7™ User Manual
INVENTORY
Allowance/Bill Backs (continued)
Use the calculate button
to calculate the quantity sold and amount due for the bill back based on the latest
product movement figures available.
Table 16.2 contains a description of each field contained in the Bill Backs tab.
BILLBACKS -- FIELD DESCRIPTIONS
FORM FIELD
DESCRIPTION
UPC
Product UPC
Product Group
Allows user to set up bill backs for every product in the product group selected
Description
Product description
Item Code
Item Code of product
Pack/Size
Pack units in a case and size of the individual product
Vendor name
Vendor name for the allowance. In add mode, a list of vendors to select from will be displayed if the product has
multiple vendors
Rebate ID
Rebate identification number
Rebate Amount
Rebate amount per unit sold
Bill Back Desc.
Enter description of the bill back
Start Date
Start date of the allowance
Sugg. Price
Suggested price of the product while the allowance is in effect (does not effect product pricing at the checkstand)
Quantity
Quantity sold based on latest product movement figures available at the time the calculate button was clicked
End Date
End date of the allowance
Status
Status of the bill back - 1=Received payment; 2=Waiting payment
Amount Due
Amount due based on quantity sold (quantity * rebate amount)
Product Grid
Displays a list of current bill backs in the system. Sort this grid by any of the columns listed by -clicking column
heading
Table 16.2
Toolbar
The following describes the functions supported by the toolbar located on the Allowance/Bill Backs form.
Button
Description
Exits the current window
Prints an Allowance or Bill back report
(Refer to the Allowance/Bill Back Reports topic in this section)
Displays the Allowance or Bill Back report on the screen
(Refer to the Allowance/Bill Back Reports topic in this section)
Saves your entries or changes for the current record
“Jumps” to the Add mode from Edit mode
“Jumps” to the Edit mode from Add mode
Deletes the current allowance or bill back selected
Recalculates the bill back quantity and amount due based on the most current product
movement figures for the product. Only applies to Bill Backs.
Applies a filter to the allowances or bill backs listed in the grid
This filter can help isolate the allowances or bill backs for edit.
Maintains notes about an allowance or bill back
“Jumps” to the Show Product Movement function
(Refer to Show Product Movement topic contained in the Store Sales section)
Deletes expired deals
Activates the context-sensitive help
RETAIL USER REFERENCE MANUAL – RETAIL 7
156
RETAIL 7™ User Manual
INVENTORY
Allowance/Bill Backs (continued)
Allowance/Bill Back Reports
The Allowances and Bill Backs reports are produced when
or
are clicked from the Allowance/Bill
Backs form. Table 16.3 contains a description of each field contained in the Allowances Report:
Report field
UPC
Item Code
Product Description
Allowance Description
Start Date
End Date
Vendor
RETAIL™ Price
Amount
Table 16.3
Description
UPC of the product
Item Code of the product
Description of product
Description of the allowance
Start date of the allowance
End date of the allowance
Vendor that allowance applies to
Suggested RETAIL™ price as entered on the
allowance
Amount of the allowance (per case)
Format
Calculation
Text
Text
Text
Text
Date
Date
Text
Currency
None
None
None
None
None
None
None
None
Currency
None
Table 16.4 contains a description of each field contained in the Bill Backs Report:
Report field
Description
Format
Rebate ID
Bill back Description
UPC
Item Code
Vendor
Start Date
End Date
Amount per Rebate
Suggested Price
Status
Table 16.4
Rebate id of the bill back
Description of the bill back
UPC of the product
Item Code of the product
Vendor that bill back applies to
Start date of the bill back
End date of the bill back
Rebate amount per unit sold
Suggested RETAIL™ price as entered on the bill back
1=Received Payment; 2=Waiting Payment
RETAIL USER REFERENCE MANUAL – RETAIL 7
Text
Text
Text
Text
Text
Date
Date
Currency
Currency
Text
Calculation
None
None
None
None
None
None
None
None
None
None
157
RETAIL 7™ User Manual
INVENTORY
Print Stock on Hand Report
The function will produce a Stock On Hand report for
products whose stock on hand is less than or equal to
a specified threshold. Enter the threshold desired and
click OK. The system will compare the stock on hand
for each product in the system and list out products
whose stock on hand is less than or equal to the
threshold entered.
Table 17.1 contains a description of each field contained in the Stock On Hand report
Report field
Section
UPC
Description
Stock on Hand
Cost
Extended Cost
Table 17.1
Description
Section name
UPC of product
Product description
Current stock on hand of product
Product cost
Value of inventory based on current cost
Format
Text
Text
Text
Numeric
Currency
Currency
Calculation
None
None
None
None
None
Stock on Hand * Cost
Selection Criteria
Any product whose stock on hand is less than or equal to threshold entered
Sort Criteria
Department Name
RETAIL USER REFERENCE MANUAL – RETAIL 7
158
RETAIL 7™ User Manual
INVENTORY
Setup Reason Codes
You can use the Setup Reason Codes form to
enter reason codes for functions supported by
the Wireless module. Wireless functions that use
reason codes include Purchase Order entry and
DSD receiving. Reason Codes can be
established for:
Credits
Debits
Rebates
Select a transaction key from the drop down list.
Reason Codes will be displayed in the bottom of
the form. To edit a reason, click a reason code
from the list. To add additional reason codes,
click Add.
Table 18.1 contains a description of each field contained in the Setup Reason Codes form.
SETUP REASON CODES -- FIELD DESCRIPTIONS
FORM FIELD
DESCRIPTION
Transaction Key
Transaction keys available are: Credits, Debits, and Rebates
Description
Transaction key description
Reason Code
System generated number
Description
Reason description that will appear for selection
Table 18.1
Print Total Invoices by Department
The Print Total Invoices by Department function will
produce a list of all invoices by departments for all or
specific vendors for a desired time period.
Table 18.2 contains a description of each field contained in the Invoice Total Report.
Report field
Description
Format
Invoice Date
Invoice Number
Total Cost
Total Price
Gross Margin
Gross Profit
Table 18.2
Date of invoice
Vendor‟s invoice number
Total (net of adjustment) amount of the invoice
Ext. retail amount total reflected in the invoice
Percentage of Gross Profit to Total Price
Difference between Total Price less Total Cost
Text
Text
Currency
Currency
Percent
Currency
Calculation
None
None
None
None
Gross Profit / Total Price *100
Total Price – Total Cost
Selection Criteria
Criteria entered by user
Sort Criteria
Non-DSD/DSD followed by Department and Vendor Name
RETAIL USER REFERENCE MANUAL – RETAIL 7
159
RETAIL 7™ User Manual
INVENTORY
Print Allowances by Vendor
The Print Allowances by Vendor function will produce a
list of all allowances or specific allowances by vendor for a
desired time period.
Table 18.3 contains a description of each field contained in the Allowance Report. The layout of this report is
contained in Appendix F.
Report field
UPC
Description
Item Code
Amount
Start Date
End Date
Table 18.3
Description
UPC of product
Product Description
Item code of product
Allowance amount for the item
Allowance start date
Allowance end date
Format
Text
Text
Text
Currency
Date
Date
Calculation
None
None
None
None
None
None
Selection Criteria
Criteria entered by user
Sort Criteria
Vendor Name
RETAIL USER REFERENCE MANUAL – RETAIL 7
160
RETAIL 7™ User Manual
INVENTORY
Print POs by Vendors
The Print POs by Vendors function will produce an
Outstanding Purchase Orders Report by vendors within
a desired time frame.
Table 18.4 contains a description of each field contained in the Outstanding Purchase Orders report.
Report field
PO Date
PO Number
Total Cost
Total Price
Gross Margin
Gross Profit
Table 18.4
Description
Date PO was originally prepared
PO number assigned by the RETAIL™ system
Total (net of adjustment) amount of the invoice
Ext. retail amount total reflected in the invoice
Percentage of Gross Profit to Total Price
Difference between Total Price less Total Cost
Format
Text
Text
Currency
Currency
Percent
Currency
Calculation
None
None
None
None
Gross Profit / Total Price *100
Total Price – Total Cost
Selection Criteria:
Criteria entered by user.
Sort Criteria:
Vendor Name
RETAIL USER REFERENCE MANUAL – RETAIL 7
161
RETAIL 7™ User Manual
INVENTORY
Paid/Unpaid Invoices by Vendors
The Paid/Unpaid Invoices by Vendors function will
produce a list of paid and/or unpaid purchase invoices
by vendors within a desired time frame. Select the
vendor desired, start and end dates and whether you
want Paid and/or unpaid invoices. Click Print to print a
report of the data displayed on the form.
Table 18.5 contains a description of each field contained in the Invoice Report form. A printed Invoice Report is
generated when the Print button is clicked.
INVOICE REPORT -- FIELD DESCRIPTIONS
FORM FIELD
DESCRIPTION
Vendor
Select a vendor or all vendors from the drop down menu
Start Date
Enter the beginning of the inclusive date desired
End Date
Enter the ending of the inclusive date desired
Paid Invoices
Flag to include paid invoices to the report
Unpaid Invoices
Flag to include unpaid invoices to the report
Invoice Date
Date of invoice
Vendor
Vendor name
Dept
Department of the items purchased
Invoice No.
Vendor (s‟) Invoice number
Total Cost
Total amount (net of adjustment, if any) of the purchase
Total Price
Total sales price of all the items purchased; total up-charged sales price when vendor has a
set up % up-charge in the Vendor Maintenance form
Vendor Total
Total amount of purchases as stated in the vendor‟s invoice
Paid Date
Date the invoice is paid
Table 18.5
Selection Criteria
Criteria specified by user
Sort Criteria
Vendor Name and Date (descending order)
RETAIL USER REFERENCE MANUAL – RETAIL 7
162
RETAIL 7™ User Manual
POINT OF SALES – STORE SALES
Point of Sales – Store Sales
Show Product Sales
Show Store Sales
Store Sales
Product Sales
(Department
or Section)
Store Sales
Taxes
Store Sales
Memo
View Store
Sales Report
Store Sales
Report
Sales Filter
Product
Movement
(see Form Flow Sales)
Store Sales
Graph
View Product
Sales Report
Product Sales
Report
Aggregate
Store Sales
Report
Show Customer Sales
Show Product Movement
Product
Movement
Product
Memo
Product
Memo
View Product
Movement
Report
Customer
Sales
Product
Movement
Report
RETAIL USER REFERENCE MANUAL – RETAIL 7
Sales Filter
Customer
Groupings
Sales by
Department
View
Customer
Sales Report
Customer
Sales Report
163
RETAIL 7™ User Manual
POINT OF SALES – STORE SALES
Show Store Sales
The Store Sales form is used to display sales
data by departments or by sections for a
desired time period. Enter in or select the start
and end dates for the time period to view.
Select the following options:
Include Hash Departments – Click this if
you‟d like data for the hash (non-sales)
departments to be included.
Include Non Movers – Click this if you‟d like
display data for departments that had no sales
for the time period you select.
The sales data for the time period by
department will be displayed on the form with
overall totals displayed at the bottom of the
form. A graph of the store sales is also
available for viewing from this form by clicking
on the graph button
. Detailed tax information can be displayed for the department sales
by using the
button on the toolbar (refer to
the Store Sales Taxes topic covered later). The
amount of Open Department and Section
sales and the Cost Of Sales will be reported on
the Store Sales report accessible via
or
the
buttons on the toolbar.
Note: The Department Sales amount displayed on this form is calculated as follows: Total Sales (excluding
taxes & coupons) – Coupon Multiples (e.g., double coupon amounts) – Discounts (customer, line item &
order level) – Electronic Coupons
The Store Sales data can also be displayed by
sections. Simply click on the Display Sections
button
and data will be displayed for each
section matching the criteria you selected. The
criteria you entered can be changed at any time
and the data will be re-displayed. To toggle
back to the department sales simply click on
the Display Departments button
on the
toolbar.
Note: The Section Sales form uses the same
calculation as the department sales. However,
any sales made directly to the department (i.e.,
open department sales) will be excluded from
the section sales.
st
RETAIL USER REFERENCE MANUAL – RETAIL 7
164
RETAIL 7™ User Manual
POINT OF SALES – STORE SALES
Note: Customers in the total line represents the total number of customers that shopped in the store for the
criteria selected. Customers in the detail lines represent the number of customers that purchased items from the
department or section. The same customer could be represented multiple times in the detail since the same
customer can purchase items from multiple departments or sections in the same order.
Note: Number of items may differ between department sales and section sales if UPC links are being used to
track electronic coupons. For the same, the number of items includes the number of electronic coupons used.
24-HOUR STORE: Remember current date is the current processing date, which may not necessarily be the
current date.
Table 19.1 contains a description of each field contained in the Stores Sales form.
Stores Sales -- FIELD DESCRIPTIONS
FORM FIELD
Start Date
End Date
Include Hash Department
Include Non Movers
Departments/Sections
Sales
%
Items
Avg. Price
Avg. Order
Customers
Table 19.1
DESCRIPTION
Displays the start date for the report period
Displays the end date for the report period
If checked, the Store Sales will include all sales for the department flagged as “Hash”
If checked, non movers (departments or sections with zero sales) will be displayed
Displays the Department or Section name for which the sales apply
Displays the total sales for the respective department/section
Displays the total percent for the respective department/section
Displays the number of items sold for the respective department/section
Displays the average price of the products in the department/section
Displays the average number of items per order
Displays the number of customers purchasing products in the department/section
Toolbar
The following describes the functions supported by the tool bar located on the Show Stores Sales form.
Button
Description
Use to exit the current window
Use this button to print a Store Sales report.
(Refer to the “Store Sales Report” topic in this section)
Use this button to display the Store Sales report on the screen
(Refer to the “Store Sales Report” topic in this section)
Use these buttons to toggle between displaying sales by section or by department.
Use this button to display the sales data in graph form
(Refer to the “Store Sales Graph” topic in this section)
Use this button to maintain memo information for the sales data
(Refer to “Store Sales Memo” topic in this section)
Use this button to display the department taxable sales data and the corresponding sales
taxes.
Use this button to print Aggregate Store Sales report. (Refer to the “Aggregate Store Sales
Report” in this section)
Use this button to activate the context-sensitive help in this dialogue
RETAIL USER REFERENCE MANUAL – RETAIL 7
165
RETAIL 7™ User Manual
POINT OF SALES – STORE SALES
Show Store Sales (continued)
Store Sales Report
This function will produce a Store Sales report by department or section for the time period selected on the
Stores Sales form. The layout of this report is contained in Appendix F. This function is executed when
or
is selected from the Stores Sales form. The following describes each field contained in the report.
Report field
Departments/Sections
Sales
%
Open Dept Sales
Cost of Sales
Gross Margin
Items
Avg Price
Avg Order
Customers
SUMMARY TAXES
Tax A
Tax B
Tax C
Tax D
Total
Table 19.2
Description
Department or Section name
Total sales for the department or section
Percentage of the total sales
Total sales to open departments or sections
Total cost of sales excluding sales to open dept/section
Percentage profit on sales excluding sales to open
department/section
Total items purchased
Average price
Average Order size
Total number of customers
Format
Text
Currency
Number
Currency
Currency
Percent
Calculation
Dept Sales * 100 / Total Sales
Number
Currency
Number
Number
Sales / Items
Items/ Customers
Total of tax amount using tax schedule A
Total of tax amount using tax schedule B
Total of tax amount using tax schedule C
Total of tax amount using tax schedule D
Total taxes
Currency
Currency
Currency
Currency
Currency
Amount of tax applied using Tax Table A
Amount of tax applied using Tax Table B
Amount of tax applied using Tax Table C
Amount of tax applied using Tax Table D
Total of tax amounts
Sales – Cost of Sales / Sales * 100
Selection Criteria:
Data selected on the Stores Sales form.
Sort Criteria:
Department Number - Ascending.
RETAIL USER REFERENCE MANUAL – RETAIL 7
166
RETAIL 7™ User Manual
POINT OF SALES – STORE SALES
Show Store Sales (continued)
Store Sales Graph
This form is used to display store sales in graph
form. There are 3 selections available via the
drop down list on the graph for the amount of
sales data displayed:
Previous 12 days (Daily Sales)
Previous 12 weeks (Weekly Sales)
Previous 12 months (Monthly Sales)
To change the style of graph displayed, click on
the drop-down boxes displayed at the bottom of
the form. A list of options for you to choose
from will be displayed.
This form is displayed when the Show Store
Sales Graph
button is clicked from the
Stores Sales form. To return to the Store
Sales form, click on the Show Store Sales
Graph
button again.
Store Sales Memo
The Store Sales Memo form is used to maintain memo
information related to sales data. This form is displayed
when the memo button
is clicked from the Store
Sales form.
Table 19.3 contains a description of each field contained in the Store Sales Memo form.
STORE SALES MEMO - FIELD DESCRIPTIONS
FORM FIELD
DESCRIPTION
ProcDate
Start date of the sales information time period on the Stores Sales form
Created
Date the memo was created
Memo
Memo data for this entry
Modified
Date of last modification
By
Person who last modified the information
Table 19.3
RETAIL USER REFERENCE MANUAL – RETAIL 7
167
RETAIL 7™ User Manual
POINT OF SALES – STORE SALES
Show Store Sales (continued)
Store Sales Taxes
The Store Sales Taxes form is used to display taxable
sales by department and the corresponding sales
taxes collected from those sales. This form is
displayed when the View Taxes button
is clicked
from the Store Sales form. Click on the Detail button to
view detail totals by tax plan.
Tax-exempt amounts are also calculated and
displayed in aggregate on the Store Sales Tax Detail
report.
Note: if food stamps are used in the store, taxable sales may be understated in a situation where food stamp
sales are tax exempt and a customer does not pay the entire food stamp eligible amount with food stamps.
Tax amounts collected however will always be accurate.
Table 19.4 contains a description of each field contained in the Store Sales Taxes form.
STORE SALES TAXES - FIELD DESCRIPTIONS
FORM FIELD
DESCRIPTION
Tax Plan
Names of Tax Plans
Taxable Sales
Department sales where sales taxes were collected
Tax Amount
Total sales taxes collected from taxable sales
Tax Exempt
Tax amount exempted from sales
FS Tax Exempt
Food Stamp amount exempted from sales
Discount
Discounts, including electronic coupons, store coupons, order discounts and coupon
multiple amounts
Coupon Amount
Manufacturer coupon amounts
Table 19.4
RETAIL USER REFERENCE MANUAL – RETAIL 7
168
RETAIL 7™ User Manual
POINT OF SALES – STORE SALES
Show Store Sales (continued)
Store Sales Taxes (Detail)
The Store Sales Taxes (Detail) form further breaks
down the department taxable sales & the sales taxes
by Tax Plans. This form is displayed when the Detail
button
is clicked from the Store Sales Taxes
form. The Store Sales Taxes Summary form can be
viewed again by clicking the Summary
button
in the same form.
Table 19.5 contains a description of each field contained in the Store Sales Taxes (Detail) form.
STORE SALES TAXES - FIELD DESCRIPTIONS
FORM FIELD
DESCRIPTION
Departments
Department names
Tax Plans
Tax Plans applicable to each department
Taxable Sales
Department sales where sales taxes were collected
Tax Amount
Total sales taxes collected from taxable sales
Tax Exempt
Taxes exempted from sales, not including food stamp sales
FS Tax Exempt
Taxes exempted from food stamp sales
Cpn Amount
Manufacturer Coupon amount
Discount
Discounts deducted from sales, including electronic coupons, store coupons, order
discounts and coupon multiple amounts.
Table 19.5
Store Sales Tax Detail Report
This function will produce a Store Sales Tax Detail report showing the taxable sales and the corresponding
sales taxes collected by tax plans per department for the time period selected on the Stores Sales form. This
function is executed when the
button is selected from the Stores Sales Tax form. Table 19.6
contains a description of each field contained in the Store Sales Tax Detail report.
Report field
Detail
Tax ID
Description
Taxable Sales
Taxes
Sales
Tax Exempt Sales
FS Tax Exempt Sales
Table 19.6
Description
Tax plan numbers by department
Tax plans descriptions
Sales taxable under specific tax plan of particular department
Sales taxes applicable to the above taxable sales
Total Sales by department agreed to Sales reported in Store Sales
report
Total tax-exempt store sales
Total tax-exempt store sales due to FS tenders received
RETAIL USER REFERENCE MANUAL – RETAIL 7
Format
Calculation
Text
Tex
Currency
Currency
Currency
Currency
Currency
169
RETAIL 7™ User Manual
POINT OF SALES – STORE SALES
Show Store Sales (continued)
Aggregate Store Sales Report
This function will produce an Aggregate Store Sales Report showing departments under Non-Hash or Hash
department and then aggregated to department/(s) as set up in the Department Maintenance form. This function
is executed when the Aggregate Sales Report
button is selected from the Stores Sales form. Table 19.7
contains a description of each field contained in the Aggregate Store Sales report.
Report field
Departments
Sales
%
Open Dept Sales
Cost of Sales
Gross Margin
Items
Avg. Price
Avg. Order
Customer
Description
Department name listed in order of
aggregate departments
Total Sales for the department
Percentage of total sales
Total sales to open departments
Total Cost of sales excluding sales to open
department
Percentage profit on sales excluding sales
to open department
Total number of items sold
Average price of items sold
Average Order size
Total number of customers
Format
Text
Total of tax amount using tax schedule A
Total of tax amount using tax schedule B
Total of tax amount using tax schedule C
Total of tax amount using tax schedule D
Total taxes
Currency
Percent
Currency
Currency
Calculation
Dept Sales * 100/Total Sales
Percent
Sales –Cost of Sales/Sales * 100
Number
Currency
Number
Number
Sales / Items
Items / Customers
Currency
Currency
Currency
Currency
Currency
Amount of tax applied using Tax A
Amount of tax applied using Tax B
Amount of tax applied using Tax C
Amount of tax applied using Tax D
Total of tax amounts
SUMMARY TAXES
Tax A
Tax B
Tax C
Tax D
Total
Table 19.7
RETAIL USER REFERENCE MANUAL – RETAIL 7
170
RETAIL 7™ User Manual
POINT OF SALES – STORE SALES
Show Product Sales
The Product Sales form is used to display
product sales data for specified criteria. Enter in
the start and end dates for the time period to
view. Then select a specific category of data to
view. Categories available for selection are
displayed on the left side of the form (e.g.,
UPC, Dept). Enter the selection criteria desired
and click on the appropriate button. The
product sales data for the time period will then
be displayed as well as totals for the category
selected. A list of the products included will be
displayed in the grid at the bottom of the form.
Click on the Sales Filter button
to refine
your selection. Click on the Include Related
Products field to summarize data for products
having the same item code.
Note: The Sales amount displayed on this form is calculated as follows: Total Sales (excluding taxes &
coupons) – Department Level Sales – Section Level Sales – Electronic Coupons
Note: Number of items includes any UPC Links used by Electronic Coupons. If UPCs have been entered into
the system to track electronic coupons usage, the UPCs will be included in the selection of data.
Table 20.1 contains a description of each field contained in the Product Sales form.
PRODUCT SALES -- FIELD DESCRIPTIONS
FORM FIELD
DESCRIPTION
Start Date
Displays the start date for the query
End Date
Displays the end date for the query
UPC
Displays the UPC or PLU to be queried for the selected time period
Dept
Displays the department name to be queried (if UPC selected then displays the department name corresponding to
the UPC)
Section
Displays the section name to be queried (if UPC selected then displays the section name for the UPC)
Vendor
Displays the vendor name to be queried (if UPC selected then displays the vendor name for the UPC)
Other
Displays “other” options to be queried for the selected time period
Total
Displays the total sales amount of the selected category
Cost
Displays the total cost of all items queried in this category
Quantity
Displays the total number of items sold for the queried category
Customers
Displays the number of customers buying the products in the queried category
Profit
Displays the gross profit for the selected category (sales - cost)
Margin %
Display the gross margin for the selected category (profit/sales)
Include Related
Indicates if sales for products having the same item code should be included in totals
Products
Zero Movers Only
Flag to display only the products without sales during the time period
PRODUCTS LIST
List all products found for the specified category
UPC
Displays the UPC or PLU of the product
Item Code
Displays the item code of the product
Cost
Displays the cost for the product
Price
Displays the price for the product
Qty
Displays the quantity sold of the product for the time period
Total Cost
Displays the total cost (cost * quantity) of the product sold for the time period
Profit
Displays the total profit made for the product during the time period
Margin
Displays the gross margin percentage for the product
Customer
Displays the number of customers who purchased the product
Revenue
Displays the gross sales of the product in the selected time period
Table 20.1
RETAIL USER REFERENCE MANUAL – RETAIL 7
171
RETAIL 7™ User Manual
POINT OF SALES – STORE SALES
Show Product Sales (continued)
Note: Movement for weighted items is tracked either by total weight sold or by number sold based on the setting
Track Weighted Items Count in the System Information function. If the setting is then weighted items are
tracked based on number sold instead of total weight sold. Refer to the System Information section for more
information.
Tool Bar
The following describes the functions supported by the tool bar located on the Product Sales form.
Button
Description
Use to exit the current window.
Use this button to print a Product Sales report.
(Refer to the “Product Sales Report” topic in this section)
Use this button to display the Product Sales report on the screen.
(Refer to the “Product Sales Report” topic in this section)
Use this button to “jump” to the Show Product Movement function.
(Refer to “Show Product Movement” section)
Use this button to maintain memo information for the selected product.
(Refer to the “Product Memo” topic contained in the Product Changes section)
Use this button to refine the selection of data displayed.
(Refer to the “Sales Filter” topic in this section)
Use this button to activate the context-sensitive help in this dialogue.
RETAIL USER REFERENCE MANUAL – RETAIL 7
172
RETAIL 7™ User Manual
POINT OF SALES – STORE SALES
Show Product Sales (continued)
Product Sales Report
This function will produce a Product Sales report for the selected category on the Product Sales form. This
function is executed when
or
is selected from the Product Sales form. Table 20.2 contains a
description of each field contained in the Product Sales report.
Report field
Description
Format
Calculation
Start Date
Start date of user query
Date / Time
End Date
End date of user query
Date / Time
Gross Margin
Total Gross margin
Currency
Total of Gross
UPC
UPC
Text
None
Description
Product description
Text
None
Cost
Cost of product
Currency
None
Price
Price of product
Currency
None
Gross
Gross margin of product
Number
(Price-Cost) /
Price
Qty
Quantity sold
Number
None
Revenue
Revenue for product
Currency
None
Total Cost
Total Cost of the product
Currency
Cost * Quantity
Profit
Profit for the product
Currency
Revenue - Cost
Grand Total - Qty
Total
Number
Sum of Qty
Grand Total - Revenue
Total
Currency
Sum of Revenue
Grand Total - Total Cost
Total
Currency
Sum of Total
Cost
Grand Total - Profit
Total
Currency
Sum of Profit
Table 20.2
Selection Criteria:
Select products for the selected category on the Product Sales form.
Sort Criteria:
UPC - Ascending.
Sales Filter
The Sales Filter form is used to refine the
selection criteria for the product sales data and
to specify a sort option for the product list
portion of the Product Sales form. This form is
displayed when the Sales Filter button
is
selected from the Product Sales form.
Select the field to be used as a filter from the list
displayed under the Filter heading. Once you‟ve
selected the field, select the filter criteria using a
combination of the operators and criteria
displayed. Select the sort option desired from
the list displayed and whether you want the sort
order in descending or ascending sequence.
Click OK and the filter will be applied to the data
displayed on the Product Sales form.
RETAIL USER REFERENCE MANUAL – RETAIL 7
173
RETAIL 7™ User Manual
POINT OF SALES – STORE SALES
Show Product Movement
The Show Product Movement form is used to
view movement (sales) for a product for a
desired time period. Movement is not only
displayed for the time period selected, but can
also be displayed for the following time frames:
Previous 13 Weeks
Previous 12 months
Previous 10 years
The amount of movement available for display
depends on the amount of history maintained in
the system.
Note: The calculation of Total Revenue is the
same calculation used in the Show Product
Sales function.
Note: Movement for weighted items is tracked either by total weight sold or by number sold based on the setting
Track Weighted Items Count in the System Information function. Refer to the System Information section for
more information.
Table 21.1 contains a description of each field contained in the Show Product Movement form.
Show Product Movement -- FIELD DESCRIPTIONS
FORM FIELD
DESCRIPTION
Start Date
Displays the start date for the query
End Date
Displays the end date for the query
UPC
Displays the UPC or PLU of the product to be queried
Description
Displays the description of the product being queried
Pack / Size
Displays the pack and the size of the product being queried
Qty
Displays the number of items sold for the product for the time period specified
Customers
Displays the number of customers who bought the product for the time period specified
Total Cost
Displays the total cost of the product being queried for the selected time period
Total Revenue
Displays the gross sales of the product being queried for the selected time period
Margin
Displays the gross margin (revenue - cost) of the product for the selected period
Gross Profit
Displays the gross profit of the product for the selected period
Include all products with same item code
Indicates if movement for products having the same item code should be included in
totals
Movement during Previous 13 Weeks
Displays the movement for the product for the past 13 weeks
Movement during Previous 12 Months
Displays the movement for the product for the past 12 months
Movement during Previous 10 Years
Displays the movement for the product for the past 10 years
Total Buttons
This button will execute the function to display the movement for the desired time
period
Total - Fields
Displays the total items sold for the desired time period
Table 21.1
RETAIL USER REFERENCE MANUAL – RETAIL 7
174
RETAIL 7™ User Manual
POINT OF SALES – STORE SALES
Toolbar
The following describes the functions supported by the tool bar located on the Product Movement form.
Button
Description
Use to exit the current window.
Use this button to print a Product Movement report.
(Refer to the “Product Movement Report” topic in this section)
Use this button to display the Product Movement report on the screen.
(Refer to the “Product Movement Report” topic in this section)
Use this button to maintain memo information for the selected product.
(Refer to the “Product Memo” topic contained in the Product Maintenance section)
Use this button to activate the context-sensitive help in this dialogue.
Product Movement Report
The Product Movement report is a printed copy of Show Product Movement form. The entire field on this report
is a duplicate of the fields on the form. The layout of this report is contained in Appendix F. This function is
executed when
or
is selected on the Show Product Movement form.
RETAIL USER REFERENCE MANUAL – RETAIL 7
175
RETAIL 7™ User Manual
POINT OF SALES – STORE SALES
Show Customer Sales
The Show Customer Sales form is used to
display customer sales data for specified
criteria. Enter in the start and end dates for the
time period to view. Then select a specific
category of data to view. Categories available
for selection are displayed on the left side of the
form (e.g., UPC, Department). Enter the
selection criteria desired and click Execute
Query in the toolbar. The customer sales data
for the time period will then be displayed as well
as totals for the category selected. A list of the
customers included will be displayed in the grid
at the bottom of the form. Click on the Sales
Filter button
to refine your selection.
Note: The calculation used for the Sales is the same calculation used in the Show Store Sales (Department)
function: Total Sales (excluding taxes & coupons) – Coupon Multiples (e.g., double coupon amounts) –
Discounts (customer, line item & order level) – Electronic Coupons.
Table 22.1 contains a description of each field contained in the Customer Sales form.
CUSTOMER SALES -- FIELD DESCRIPTIONS
FORM FIELD
DESCRIPTION
Start Date
Displays the start date for the selected time period
End Date
Displays the end date for the selected time period
UPC (field #1)
Displays the start UPC or PLU number for the product range
UPC (field #2)
Displays the end UPC or PLU number for the product range
UPC (button)
Used to run the query for the UPCs entered
Dept (field)
Displays the department name
Dept (button)
Used to run the query for the selected department category
Section (field)
Displays the section name
Section (button)
Used to run the query for the selected section category
Vendor (field)
Displays the vendor name
Vendor (button)
Used to run the query for the selected vendor category
Other (field)
Displays the DSD Only, Total Store, or Product Group selections to be queried
Other (button)
Used to run the DSD Only, Total Store, or Product Group category
Total
Displays the total sales for the reporting period for the selected category
Cost
Displays the total cost of the purchases for the reporting period for the selected category
Quantity
Displays the number of items for the reporting period for the selected category
Customers
Displays the number of customers who purchased products
Profit
Displays the gross profit (purchases - cost) for the reporting period for the selected category
Margin
Displays the gross profit % (gross profit / cost) for the reporting period for the selected category
Include Related Products
When flagged, depending on the category selected includes those items with the same item code. On
Total Store category, sales to open departments are included.
CUSTOMER LIST BOX
(Multiple occurrences of the
Lists the customers who matched the category selected
following)
Customer
Displays the customer‟s name
Zip
Displays the customer‟s zip code
Home Phone
Displays the customer‟s phone number
Total
Displays the total amount purchased by the customer
Cost
Displays the cost of goods sold for the purchases by the customer
Quantity
Displays the number of items purchased by the customer
Profit
Displays the profit amount for that customer
Margin
Displays the gross profit % for that customer
Table 22.1
RETAIL USER REFERENCE MANUAL – RETAIL 7
176
RETAIL 7™ User Manual
POINT OF SALES – STORE SALES
Show Customer Sales (continued)
Toolbar
The following describes the functions supported by the tool bar located on the Customer Sales form.
Button
Description
Use to exit the current window
Use this button to print an Customer Sales report
(Refer to the “Customer Sales Report” topic in this section)
Use this button to display the Customer Sales report on the screen
(Refer to the “Customer Sales Report” topic in this section)
Use to show the total sales by department. A form will be displayed showing a breakdown of
sales by department
Use this button to refine the selection of data displayed.
(Refer to the “Sales Filter” topic in this section)
Access the Customer Group form where thank you letters, gift certificates or coupons can be
printed for a customer
(Refer to “Customer Group” topic in this section)
Use this button to select/find a specific customer. The customer selected will be highlighted
Use this button to activate the context-sensitive help in this dialogue
Sales Filter
The Sales Filter form is used to refine the
selection criteria for the customer sales data
and to specify a sort option for the customer list
portion of the Customer Sales form. This form
is displayed when the Sales Filter button
is
selected from the Customer Sales form.
Select the field to be used as a filter from the list
displayed under the Filter heading. Once you‟ve
selected the field, select the filter criteria using a
combination of the operators and criteria
displayed. Select the sort option desired from
the list displayed and whether you want the sort
order in descending or ascending sequence.
Click OK and the filter will be applied to the data
displayed on the Customer Sales form.
RETAIL USER REFERENCE MANUAL – RETAIL 7
177
RETAIL 7™ User Manual
POINT OF SALES – STORE SALES
Show Customer Sales (continued)
Customer Group
The Customer Group form is used to group
customers into a specific category. Thank you
letters, coupons or gift certificates can then be
printed for each customer in the specific
category. The criteria used in the Show
Customer Sales form are the same criteria
used on this form to display the customers that
can be categorized. This form is displayed
when the Group Customers button
is
pressed from the toolbar on the Show
Customer Sales form.
If the Preferred Customers option is selected as
the Select Type, then the top of the form will
change as depicted to the right. This will allow
for the selection of a coupon to be assigned to
the selected category of customers. This is very
useful to apply a Target Coupon to your top
customers.
Table 22.2 contains a description of each field contained in the Customer Group form.
CUSTOMER GROUP -- FIELD DESCRIPTIONS
FORM FIELD
Category
From
To
Select Type
Select Type: Preferred Customer
Coupon Link
Description
Customer List
Customer Group List
Table 22.2
DESCRIPTION
Displays the Category querying in Customer Sales form
Starting date for the query
Ending date for the query
Used to select the type of function to execute (print Tank you letter, print gift certificate or
attach coupon to customer)
Coupon selected from the list.
Description of the coupon selected
List of customers available for selection
List of customers selected as part of the group
Customer Group - Buttons
The following describes the functions supported by the buttons located on the Customer Group form.
Button
Description
Use this button to print and/or preview the document selected (thank you letter or gift
certificate. Samples of these documents are included in Appendix F (Not available in
electronic form).
Use to sort the customers in the Customer List box.
Use to move a selected customer from/to the customer list and customer group list boxes.
Use to move all customers from/to the customer list and customer group list boxes.
Use to attach the selected coupon to the selected customers displayed in the customer
group list box. A coupon entry will be created for each customer.
RETAIL USER REFERENCE MANUAL – RETAIL 7
178
RETAIL 7™ User Manual
POINT OF SALES – STORE SALES
Show Customer Sales (continued)
Customer Sales Report
The Customer Sales Report will report on the customer sales information for the selected category on the
Customer Sales form. The layout of this report is contained in Appendix F (Not available in electronic form). This
function is executed when
or
is selected from the Customer Sales form.
Table 22.3 contains a description of each field contained in the Customer Sales report.
Report field
Category
Start Date
Description
Displays the category selected
Start date of selection
Format
Text
Date / Time
End Date
End date of selection
Date / Time
Customer
Card #
Home Phone
Zip Code
Qty
Cost
Total
Profit
Gross
Customer name
Customer card #
Customer home phone
Customer zip code
Quantity purchased by customer
Cost of products purchased
Total purchase amount
Total profit
Gross margin %
Text
Text
Text
Text
Number
Currency
Currency
Currency
Percent
Calculation
Selected Category
Selected Time
Period
Selected Time
Period
None
None
None
None
None
None
None
Total - Cost
(Total - Cost) /
Total
Table 22.3
Selection Criteria:
Shows customer sales data for the category selected on the Customer Sales form.
Weekly Balance Summary
The Weekly Balance Summary form gives the
user a summary of all sales for the week
selected. The purpose is to give the user a feel
for the week‟s business from a cash flow
perspective. The form begins with Sales and
then arrives at the Deposit.
Begin by selecting the Start Date. The End
Date will automatically default to one week.
The days of the week are displayed across the
top of the columns. The days are dependent
upon the date that the user selected, so the
user may begin from any day of the week.
Store Sales are displayed by Department.
Under the department, the Tax summary for
each day is shown. This is tax collected and is
included in the sum calculation below. The total
sales are shown under the department
information. This sum is all the monies that
were collected for the day.
RETAIL USER REFERENCE MANUAL – RETAIL 7
179
RETAIL 7™ User Manual
POINT OF SALES – PRODUCTS
Point of Sales – Products
Item Search
Pricing
Levels
Review
Batches
Product
Memo
Product Maintenance
Analyze Product Categories
Product
Changes
Analyze
Products
Product
Movement
Product
Groups
Coupons
Triggered
Allowances/
Billbacks
Misc Data
(see Form Flow Sales)
Price History
Product Kits
Select Label
Type
Cost
Calculator
Product
Vendors
Serial
Numbers
Item Search
Coupons
Triggered
(see Form Flow Sales)
Review
Batches
Misc Data
Select Label
Type
Product
Labels
Price History
Quick Add/
Quick Edit
Product Group
Maintenance
Mass Product
Changes
Product
Quick Add/
Quick Edit
Product
Groups
Mass Product
Changes
Product
Labels
Product
Memo
RETAIL USER REFERENCE MANUAL – RETAIL 7
Product
Movement
Product
Memo
Product
Group Report
Create
Batch
Product Mass
Changes List
180
RETAIL 7™ User Manual
POINT OF SALES - PRODUCTS
Point of Sales – Products
Enter Prices for Ad/Batch
Price Management
Product
Batches
Product
Batches
Management
Display
Batch
Numbers
Cost
Calculator
Create New
Batch
Product
Memo
Product
Movement
(see Form Flow Sales)
Product Batch
Report
Reports
Print Labels
Select
Product
Report
Select Label
Type
Product
Reports
Product
Labels
- On hand
- Sold by product
- Sold by customer
Serial Tracking
Reports
Price
Changes
Product
Movement
(see Form Flow Sales)
Select Product
Update Labels
Product
Labels
Mix Match
Report
Price Changes
Report
Update Checkstands with
Products Information
View Mix
Match Report
View Price
Changes
Update
Checkstands
Mix Match
Report
Price Changes
Report
Checkstand 1
RETAIL USER REFERENCE MANUAL –RETAIL 7
Apply Batch
Product
Memo
Ad Labels
Serial Tracking
Reports
Edit Wholesaler Cost Changes
View
Ad/Batch
Markdown
Ad/Batch
Markdown
Report
Analyze Item
Movement
Ad Markdown
Report
Ad Markdown
Checkstand 2
Checkstand n...
181
RETAIL 7™ User Manual
POINT OF SALES - PRODUCTS
Product Maintenance
The Product Maintenance form is used to add,
maintain, and delete product information. The
Product file is the heart and soul of RETAIL™.
This file is used at the core of the critical system
operations. The integrity of this file dictates the
integrity of the entire system. From this form, the
product pricing arrangements and attributes can
be maintained. The Front End and Back End
modules will make use of the product
information, which will be added directly into the
system. Product data can be retrieved by UPC,
Item Code, or Description by clicking
button
located to the right of the UPC field. Use the
clone function in edit/add mode to add a new
product that is similar to an existing product.
Make a product inactive (Active field unchecked)
to not allow it to be sold at the checkstand.
Click Hide/Show Product List button
to
display related products, either by a consecutive
selected number of items (after the current item),
Item Group Number or by Product Groups in
which the current item is included. Selections of
items displaying in the grid is made through the
Settings form discussed later in this section.
Many other options are available through the
toolbar (refer to the Toolbar section).
Note: With Pricing Product groups and Item Codes, data for a group of products can be automatically updated.
Refer to the Product Grouping Updates topic in this section.
Note: The Checkstands should be updated with the product information once you have finished your updates by
using the Synchronize Checkstands with Products function (this function is covered later in this section). This
will ensure that the checkstand database contains the most current product data in the event the checkstand
system needs to operate in stand-alone mode.
Note: When deleting a product, an entry will be created in the user activity log in order to provide an audit trail of
data deleted from the system. (Refer to the User Activity Tracking topic in the General Topics section)
RETAIL USER REFERENCE MANUAL – RETAIL 7
182
RETAIL 7™ User Manual
POINT OF SALES - PRODUCTS
Product Maintenance (continued)
Table 23.1 contains a description of each field contained in the Product Maintenance form.
PRODUCT MAINTENANCE - FIELD DESCRIPTIONS
FORM FIELD
DESCRIPTION
PRODUCT INFO:
UPC
Product‟s UPC or PLU (13 digits).
Description
Description of the product.
Item Code
Wholesaler‟s code for the product.
Depts
Product‟s department. In Analyze Product Categories function, this becomes a list box for selection.
Section
Product‟s section. In Analyze Product Categories function, this becomes a list box for selection of a section.
Vendor
Product‟s vendor. In Analyze Product Categories function, this becomes a list box for selection of a vendor.
Others
Displays the name of the Product Group the product belongs to, joined via Product Group Maintenance. In
Analyze Product Categories function, this becomes a list box for selection of other categories.
NORMAL PRICING:
Pricing Method
Select from four pricing methods: Unit Pricing, Split Package Pricing. Group Threshold, Group Adjusted,
Limited Pricing.
Unit Price – Cost
Cost for the product.
Unit Price – Price
Retail price for the product.
Group/Deal Price – Qty
Quantity for this product to be priced under group pricing.
Group/Deal Price – Price
Group pricing applied to this product.
Target Margin
Target gross margin percentage for a product.
Gross Margin
Gross margin percentage for a product. System generated once you have entered the (normal) cost and
price for the product.
Product Group
Displays the name of the Pricing Product Group the item belongs to, added via Product Group Maintenance
SPECIAL PRICING:
Pricing Method
Select from four pricing methods: Unit Pricing, Split Package Pricing. Group Threshold, Group Adjusted,
Limited Pricing.
Unit Price – Cost
Special Cost for the product.
Unit Price – Price
Special Price for the product.
Group/Deal Price – Qty
Quantity for this product to be priced under special group pricing.
Group/Deal Price – Price
Special group pricing applied to this product.
Start
The date the special pricing begins.
Time
The time of day the special pricing begins.
End
The date the special pricing ends.
Time
The time of day the special pricing ends.
Mix match
Indicates if mix match code is assigned to product for special pricing only. When the pricing expires, the mix
match code will be removed.
Allow Disc
Indicates if discounts will be allowed while, the special pricing is in effect.
PROPERTY:
Fdstamp
Flag to enable or disable purchase of the product with food stamps.
Active
Flag to indicate that the item is currently carried in inventory (or is backordered).
Wicable
Flag to indicate if the product can be purchased with a WIC tender.
Wic CVV
Flag to indicate the product can be purchased with Wic CVV tender. FS will automatically be flagged.
Ad
A flag will indicate if the product is currently advertised.
DSD
Flag to indicate if the product is delivered directly to the store (For example: bread vendor, beer vendor).
Enforce Qty
Flag to indicate if the quantity must be entered at the Checkstand.
Print Label
Flag to indicate if a label needs to be printed for this product.
Allow Lookup
Flag to allow cashiers to do price verification (PV) or product search (PS) on the product. This must be
flagged to allow the user to search by picture on the front end (entered via the Picture button) or to search for
additional information about the product, if entered using the Product Info. button in the toolbar.
DISCOUNT:
Category A
Flag this product as belonging to Category A to enable Category A discounts to be taken on the product.
Discounts are maintained as part of the POS Information function of the Administration menu.
Category B
Flag this product as belonging to Category B to enable Category B discounts to be taken on the product.
Discounts are maintained as part of the POS Information function of the Administration menu.
Line Item
Flag to allow a line item discount.
Max Discount
Maximum % discount allowed to an item limits the total discounts (Dept discounts, DA, DB, DT, DN and
customer discounts) applied to a product.
FSA Eligible
Flag to indicate product can be purchased with Flex Spending Account. Select the category from the dropdown to the right:: None, Medical, Dental, or Vision.
TAX PLAN:
Tax A
Flag to indicate if the product is taxable with the tax plan A.
Tax B
Flag to indicate if the product is taxable with the tax plan B.
Tax C
Flag to indicate if the product is taxable with the tax plan C.
Tax D
Flag to indicate if the product is taxable with the tax plan D.
Points
Used to enter the amount of extra points the customer may accumulate when purchasing this item.
Not Accumulate
Flag to prevent the item from accumulating any frequent shopper points on the Front End.
RETAIL USER REFERENCE MANUAL – RETAIL 7
183
RETAIL 7™ User Manual
POINT OF SALES - PRODUCTS
Product Maintenance (continued)
PRODUCT MAINTENANCE - FIELD DESCRIPTIONS
FORM FIELD
DESCRIPTION
Picture
Type the picture name corresponding to this item including its extension, (tomato.bmp, and so on) or click on
the button to the right and search for the correct bmp.
Memo Button
Click to access Product Memo form, discussed later in this section.
Misc Button
Click to access Product Miscellaneous form, discussed later in this section.
RESTRICTIONS:
Sale Hours Schedule
Select the schedule number to apply to this item. See Schedule Maintenance in the Administration Menu.
Verify Age
Indicates if the age of the customer and cashier must be checked in order to purchase/sell the product.
Age
Age required to purchase/sell product.
MISCELLANEOUS:
UPC Link
UPC code of a linked product. Provides ability to link two products together for the purposes of pricing. When
product is rung up at the checkstand, the linked product will also ring up.
Str Coupon
Flag to indicate if this product is joined to another UPC link when using a store coupon.
Pack/Size
Type packaging breakdown if product is packaged with one or more units and the size of the units.
Case Cost
Show case cost for this product for the selected vendor from the vendor list.
Stock On Hand
In add mode, allows entry of the quantity on hand for the product. In edit mode, displays the current quantity
on hand for the product.
Scaled
Flag to indicate that the product requires a scale to determine price.
Tare Weight
Enter the weight to be deducted for packaging when the product is rung up at the Checkstand.
Unit Of Measure
Select the unit of measure of this product (For example: lb, ft, and in).
Mix Match Code
Use this field to group multiple like products together for pricing purposes.
Modified (box)
Date and time of last modification.
Modified By
Name of the employee who last modified the form.
PRODUCT LIST (GRID)
UPC
Display the Product‟s UPC or PLU.
Description
Display the Product‟s Description.
Item Code
Display the Item Code used by the wholesaler to identify the product.
Product Group
Displays the product group that product is assigned to.
PG type
Displays the product group type: RP = Reporting Group, PR = Pricing Group.
Cost
Displays the cost of the product.
Price
Displays the current price (normal or special) of the product.
Ad
Flag indicating if product is currently on ad
Table 23.1
Note: Picture Files must exist in a specific directory on the server to be accessed from this screen. The files must
exist in a directory named BMPFILES within the same directory where the Back End databases exist.
Toolbar
The following describes the toolbar displayed on the Product Maintenance form.
Button
Description
Press to exit the current window.
Hides or shows the bottom grid, which displays a list of products as selected in “Settings”.
Press to “Jump” to the Edit mode from Add mode.
Press to “Jump” to the Add mode from Edit mode.
Clones the current product information to a new product. All data will be cloned except for UPC
code, description and certified number.
Helps to view pending products added from the Front End checkstands. Click to return to normal
mode. (Refer to the Pending Products topic in this section)
Deletes the product. The product will be flagged deleted and will be removed by the system when
the Synchronize Checkstands with Products function is executed.
RETAIL USER REFERENCE MANUAL – RETAIL 7
184
RETAIL 7™ User Manual
POINT OF SALES - PRODUCTS
Product Maintenance (continued)
Saves your entries or changes for the current record.
Press to assign the product, to a product group. (Refer to the Product Groups topic in this
section)
Press to set up different pricing levels for the current record. (Refer to the Product Pricing
Levels topic in this section)
Press to add other vendors as well as the primary vendor. (Refer to the Product Additional
Vendors topic in this section)
Press to maintain the product‟s inventory count and to complete inventory adjustments. (Refer to
the Product Inventory topic in this section)
Accesses the Allowance and Bill Backs form. (Refer to Allowance/Bill Backs topic in the
Inventory section)
Opens the Product Kits dialogue, to maintain UPCs assigned to a product kit. (Refer to the
“Product Kits” topic in this section)
Opens the Product Information sheet, used to enter additional information about the item, which
may be viewed on the front end by entering PS. “Allow Lookup” must also be flagged.
Press to view and assign serial numbers to a product. (Refer to the Serial Tracking topic in this
section)
Opens the Select a Label dialog box. (Refer to the Print Labels section)
Helps to export product data for importing into a label-making program. (Refer to the Export
Labels topic in this section)
Press to “jump” to the Show Product Movement function. (Refer to Show Product Movement
topic contained in the Store Sales section)
View a history of price changes made for this product. (Refer to the Price History topic in this
section)
Helps to display a list of electronic coupons that product is assigned to. (Refer to the Coupons
Triggered topic in this section)
Helps to access list of batches, which contain the current UPC. (Refer to Review Related Batches
topic in Enter Prices for Ad/Batch section)
Press to set the Tab Order for the Product Maintenance form. This allows the user to select the
most commonly used fields to tab to when entering products.
Opens the Maintain Seafood COOL (country of origin labeling) form to enter seafood‟s place of
origin and production method (farm-raised, wild caught, etc.). This information is used for seafood
labels.
Opens PLUM Item Maintenance. (Requires additional software and license). PLUM is used to
synchronize pricing, ingredient, nutrition, and other label information with your scales.
Opens Power Edit. Used to edit groups of products by user-configurable criteria. (Refer to Power
Edit in the Products section)
Opens the Product Settings form. This enables the user to select criteria for the “Show/Hide
Product List” such as number of products viewed in the grid. This also controls the “Automatic
Update of Products with same Item Code”, and price limitation to prevent data entry errors.
Activates the context-sensitive help.
RETAIL USER REFERENCE MANUAL – RETAIL 7
185
RETAIL 7™ User Manual
POINT OF SALES - PRODUCTS
Product Maintenance (continued)
Product Pricing Methods
IT Retail supports 2 categories of pricing:
a. Regular Pricing – Always in effect unless Special Pricing is effect as defined by Special Pricing
Effective and Expiration Dates.
b. Special Pricing – overrides Regular Price if current date is within the special pricing effective and
expiration dates inclusive. The Special Pricing is displayed when products are entered on Ads
through Product Batches Maintenance. Special Pricing may also be entered directly into the
Product Maintenance form.
Within each category of Pricing (Regular and Special) - IT Retail supports 5 different Price Types: (1) Unit, (2)
Split (3) Group Threshold (4) Group Adjusted (5) Limited
Pricing Methods:
1. Unit Pricing
This is the normal – most usual pricing in the supermarket – for example: $1.99
In the Unit Price fields, enter the cost in the Cost field and the unit price in the Price field.
Example:
2. Split Package Pricing
Products are bundled together. For example: 3 for $1.00 = .34 + .34 + .32. If the customer buys more
than the 3 for $1.00 the sequence will start over at .34 + .34 + .32.
For this example enter as follows: Enter the cost in the Cost field. In the Group/Deal Price field, enter
3 in the Qty, and $1.00 in the price field.
Example:
RETAIL USER REFERENCE MANUAL – RETAIL 7
186
RETAIL 7™ User Manual
POINT OF SALES - PRODUCTS
Product Maintenance (continued)
Product Pricing Methods (continued)
3. Group Threshold:
The unit price is paid until the specified quantity is reached, which will then adjust the qualifying items
price to reflect the Group Price. For example: Normal price: $0.89, buy 2 get 1 free for a total of $1.78.
The customer must purchase the specified quantity to get the deal, which is reflected when the final
item in the deal is scanned. If the customer buys more than the deal, the sequence will start over.
For this example enter as follows: In the Unit Price fields, enter the normal cost and unit price: $0.89.
In the Group/Deal Price fields, enter 3 in the Qty, and the total price of 2 of the items in the price field:
$1.78. The price you enter is the total deal price.
a. Unit Price – price the first or more items scans at.
b. Qty – qualifying quantity of items for the special group price.
c. Group / Deal Price – when the customer buys the qualifying quantity of items (Qty) then the
qualifying item‟s price is adjusted to reflect the Group Price.
Example:
RETAIL USER REFERENCE MANUAL – RETAIL 7
187
RETAIL 7™ User Manual
POINT OF SALES - PRODUCTS
Product Maintenance (continued)
Product Pricing Methods (continued)
4. Group Adjusted
The unit price is paid until the specified quantity is reached, then the group deal price is applied to all
previous and subsequent items entered. For example: Normal Price: $.25. Group/Adjusted: 5 for
$1.00. The item will scan at the regular price until the 5th item is scanned, with the adjustment made on
the final item. The customer will continue to get the deal after the 5th item. (in this example .20 each).
For this example enter as follows: In the Unit Price fields, enter the normal cost and unit price $0.25.
In the Group/Deal Price fields, enter 5 in the Qty, and .20 in the price field.
a. Unit Price – price the first or more items scans at.
b. Qty – qualifying quantity of items for the special group price.
c. Group / Deal Price – when purchases reach the qualifying quantity of items (Qty) then the
item‟s price is adjusted to reflect the Group Price. All subsequent items will ring at this price.
Example:
RETAIL USER REFERENCE MANUAL – RETAIL 7
188
RETAIL 7™ User Manual
POINT OF SALES - PRODUCTS
Product Maintenance (continued)
Product Pricing Methods (continued)
5. Limited (Limited Quantity Discount Pricing)
The first items are purchased at a limited (usually discounted) price, then all subsequent items are sold
at the regular price. For example: the first 4 items at $0.25 each, all subsequent items at the normal
price of $0.29 each.
For this example enter as follows: In the Unit Price fields, enter the normal cost and unit price $0.29.
In the Group/Deal fields enter 4 in the Qty, and .25 in the price field.
a. Unit Price – Regular Price post limited discount
b. Qty – number of units to be sold at “limited” price
c. Group / Deal Price – limited quantity unit price.
Example:
RETAIL USER REFERENCE MANUAL – RETAIL 7
189
RETAIL 7™ User Manual
POINT OF SALES - PRODUCTS
Product Maintenance (continued)
Product Grouping Updates
Updates made to one product can automatically be propagated to a group of products with pricing product
groups and item codes.
Pricing Product Groups
When a product is assigned to a pricing product group, any change made to one of the products in the group
can be propagated to all products in the group. The system will confirm if all products in the pricing product group
should be updated. The following fields will be updated for all products in the pricing product group:
Pricing Data: Normal Pricing Method, Unit Cost, Unit Price, Normal Group/Deal Qty and Price,
Target Margin, Case Cost, Special Pricing Method, Special Unit Cost, Special Unit Price, Special
Group/Deal Qty and Price.
Note: Unit cost and case cost will only be updated for the Primary Vendor.
Pricing Levels: Pricing Level, Price, Start, and End.
Item Code
If the Automatically Update All Products with Same Item Code flag is checked in the Product
Settings function (refer to the topic later in this section), the system will confirm if all products
belonging to the same item code should be updated (if an item code is assigned to the product).
The following fields will be updated for all products having the same item code:
Static Data: Dept., Section, Primary Vendor
Pricing Data: Normal Pricing Method, Unit Cost, Unit Price, Normal Group/Deal Qty and Price,
Target Margin, Case Cost, Special Pricing Method, Special Unit Cost, Special Unit Price, Special
Group/Deal Qty and Price. Note: unit cost and case cost will only be updated for the Primary
Vendor.
Misc.: Pack, Unit of Measure, Scaled, UPC Link, and Mix Match.
Attributes: Foodstamp, DSD, Wicable, Ad, Enforce Qty. Effective Schedule, Tax Plan A thru D,
Discount Category A and B, Line Item Discount, Max Discount.
Pricing Levels: Pricing Level, Price, Start, End.
RETAIL USER REFERENCE MANUAL – RETAIL 7
190
RETAIL 7™ User Manual
POINT OF SALES - PRODUCTS
Product Maintenance (continued)
Pending Products
Products added through the Checkstand are assigned a
“pending” status. These products can be sold through
the checkstand but contain only minimal information. To
view all pending products, click Get
button. A list of
pending products will be displayed at the bottom of the
Product Maintenance form. Click the Get button again
to restore the list back to normal. To update pending
products complete one of the following: (a) Select each
pending product from the list and update/save the
product information. (b) Click the Confirm All button
located at the bottom of the form to accept all the
pending products. This will change the pending status of
all products listed to active. This is a quick way to
update the pending products. A confirmation message
will be displayed.
Note: Department attributes (For example, tax status)
are assigned to all pending products. Click “Yes” to
accept all pending products and change their status to
active.
Note: If the Required Vendor flag is set to “True”
through the System Information function, the
Confirm All button will not be available for use and
each product will need to be confirmed individually, so
that the vendor can be added at this time.
Product Groups
The Product Groups form is used to add the current
product to an existing Pricing Group or to one or more
existing Reporting Groups. Available product groups are
displayed on the left side of the form. Product groups to
which the product is already assigned are listed under the
Joined Groups section. In the Joined Groups section, a
“P” precedes the pricing product group. Select a group
and click the Arrow key (>) to assign the product to the
selected group. Click on the >> to assign the product to all
reporting groups. To remove the product from a group,
click on the group in the Joined Groups list and click on
the reverse arrow (<) or click on the double reverse arrow
to remove the product from all groups.
Click Add Group button and the form expands
allowing user to add a new group to the system.
RETAIL USER REFERENCE MANUAL – RETAIL 7
191
RETAIL 7™ User Manual
POINT OF SALES - PRODUCTS
Product Groups (continued)
Note: A product can belong to one pricing product group and many reporting product groups. Refer to the
Product Grouping Updates topic earlier in this section for more information on the use of pricing product
groups.
Table 23.2 contains a description of each field contained in the Products by Group form.
PRODUCTS BY GROUP - FIELD DESCRIPTIONS
FORM FIELD
DESCRIPTION
UPC
Current item‟s UPC.
Description
Current item‟s description.
Pricing Groups
Lists all available pricing groups.
Reporting Group
Lists all available reporting groups.
Joined Group
List of pricing group and reporting groups, the current product is joined to.
Add Group:
Group ID
Group ID for the product group.
Description
Enter the group description; it may be the same as the Group ID.
Group Type
Select the type: Reporting or Price Group from the drop down menu.
Table 23.2
Product Pricing Levels
Click Pricing Levels button
from the toolbar to
access the Product Pricing Levels form. This form is
used to set up different pricing levels available to
customers. Pricing levels provide flexibility in assigning
various levels of unit pricing arrangements to a
product. Up to 10 different pricing levels can be
entered for a product. A pricing level is then assigned
to a customer and when the customer ID is entered at
the check stand the pricing level will be applied to the
order. A start and end date must be entered for the
pricing level. The pricing will only be applied if it is
currently in effect.
Table 23.3 contains a description of each field contained in the Pricing Levels form.
PRICING LEVELS – FIELD DESCRIPTIONS
FORM FIELD
DESCRIPTION
UPC
Current item‟s UPC.
Level
Pricing level number. Select from 1 to 10 by clicking on the drop down menu button.
Price
Unit price for this pricing level.
Start
Start date for this pricing level.
End
End date for this pricing level.
Table 23.3
Product Additional Vendors
Click Additional Vendors button
on the toolbar to
access Product Additional Vendors form. This form
displays the current product‟s primary vendor, unit cost
and case cost coming from the Product Maintenance
form. This form is also used to assign additional
vendors to the product. Separate item code and cost
information can be entered for each additional vendor.
When a secondary vendor is selected, the form displays
the Cost Calculator
button next to the unit cost
field providing access to it.
RETAIL USER REFERENCE MANUAL – RETAIL 7
192
RETAIL 7™ User Manual
POINT OF SALES - PRODUCTS
Product Additional Vendors (continued)
Table 23.4 contains a description of each field contained in the Additional Vendors form.
ADDITIONAL VENDORS - FIELD DESCRIPTIONS
FORM FIELD
DESCRIPTION
UPC
Displays the current item‟s UPC.
Primary Vendor
Displays the current item‟s primary vendor.
Vendor
Defaults to the primary vendor, but additional vendors can be selected or set up by using the drop down menu.
Unit Cost
Defaults to the primary vendor‟s unit cost the field being grayed out; but when other vendor is selected, the user is
able to enter the selected vendor‟s unit cost or may enter the cost through the cost calculator form.
Case Cost
Displays the case cost of the current item for the selected vendor.
Split Cost
Displays the cost for a split cost of the current item for the selected vendor.
Half Cost
Displays the cost for a half case of the current item for the selected vendor.
Vendors list (Grid)
Lists all the set up supplier of the current items, listing attributes for each different vendors in the columns.
Table 23.4
Product Inventory
Click Inventory button
from the toolbar to access the
Inventory form. This form maintains inventory data for
the product. The UPC, Item Code and Stock on Hand
fields are displayed from the Product Maintenance form.
The only fields that can be changed from this form are the
Stock min, Stock Max, and Re-Order Point.
Click
to process the adjustments for stocks on
hand at which time the lower portion of the form appears.
The fields on this form are defined as follows: Quantity
entered can be positive (increases the stock on hand) and
negative (decreases the stock on hand). Effective date
defaults to today‟s date. This date is used by the inventory
analysis function. Reason allows for a selection of a
reason for adjustments. Click Apply to save the
Note: The grid displays a history of the adjustments
adjustment data entered.
Note: Once an adjustment is applied, it cannot be previously entered for the product.
modified. An offsetting entry can be made to affect the
stock on hand.
Reason codes for adjustments can be added or edited by
clicking the ellipse button
next to the reason field.
Click Add to add a new reason code. The reason code
will automatically be assigned.
RETAIL USER REFERENCE MANUAL – RETAIL 7
193
RETAIL 7™ User Manual
POINT OF SALES - PRODUCTS
Product Inventory (continued)
Table 23.5 contains a description of each field contained in the Product Inventory form.
PRODUCT INVENTORY - FIELD DESCRIPTIONS
FORM FIELD
DESCRIPTION
UPC
Current item‟s UPC.
Item Code
Current item‟s item code assigned.
Stock on Hand
Displays the quantity on hand with adjustments being considered.
Stock Min
Displays minimum quantity to have on-hand.
Stock Max
Displays maximum quantity to have on-hand.
Reorder Point
Displays threshold used for re-ordering.
Adjustment
Quantity
Enter the correct quantity needed to adjust the stock-on-hand of the current item.
Reason
Enter the desired reason code number selected from the drop-down menu.
Effective Date
Defaults to current date, but user can select an earlier date.
Adjustment Grid
Displays all the adjustments created for the current item with all the data related to each adjustment.
Reason Codes
Transaction Key
Inventory Adj.
Description
Inventory Adjustments.
Reason Code
Lists the set up and available reason code numbers.
Description
Lists the set up and available reasons for an adjustment.
Table 23.5
Product Kits
Click Product Kits button
from the toolbar to access
the Product Kit form. Product kitting allows assignment
of multiple products to make up a product kit. The UPC
entered on the main product form is the main UPC and
identifies the kit. This UPC will be sold at the Checkstand.
When a product kit is sold, the product movement and
inventory for the main UPC as well as all UPCs assigned
to the kit through the kit item tab will be updated. The
quantity entered for each UPC will be used when
updating product movement and inventory. Use the Add
button to add additional UPCs to the kit. Use the Delete
button to remove UPCs from the kit.
Note: When a product kit is sold, the product
movement and stock on hand for each product in the
kit will be updated as well as the movement and
stock on hand for the product kit UPC itself.
Table 23.6 contains a description of each field contained in the Product Kits form.
PRODUCT KITS - FIELD DESCRIPTIONS
FORM FIELD
DESCRIPTION
UPC
Displays the assigned UPC or PLU to a kit.
Description
Displays the kit description.
Kit UPC
Type the item to be included in the Kit in terms of Kit.
Description
Displays the description of the selected UPC included in the Kit.
Kit Qty
Type the UPC included in the kit in terms of quantity.
Product List
Lists all UPCs and the quantity of every item included in the Kit.
Table 23.6
RETAIL USER REFERENCE MANUAL – RETAIL 7
194
RETAIL 7™ User Manual
POINT OF SALES - PRODUCTS
Product Maintenance (continued)
Export Labels
Click the Export Labels
button from the toolbar to
access the Export Labels function. Data can be
exported for products in an entire department, section or
other (For example, product group). By not selecting
any criteria, all products with the Label field will be
selected. Data for each product will be written to a text
file (ProductLabels.txt). Data in this file can then be
imported into a label program that supports importing of
data.
Table 23.8 contains a description of each field contained in the Export Labels form.
EXPORT LABELS - FIELD DESCRIPTIONS
FORM FIELD
DESCRIPTION
Department
List of departments for selection.
Section
List of sections for selection.
Other
List of other types of selection (For example, product groups).
Table 23.8
RETAIL USER REFERENCE MANUAL – RETAIL 7
195
RETAIL 7™ User Manual
POINT OF SALES - PRODUCTS
Product Maintenance (continued)
Price History
Click the Price History
button from the toolbar in
the Product Maintenance form to view the Price
History form. This form will display a history of price
changes made to the product selected. The data is
sorted so that the most recent price change appears
first. A price history entry is made each time a price
change is made to a product.
Table 23.9 contains a description of each field contained in the Price History form.
PRICE HISTORY - FIELD DESCRIPTIONS
FORM FIELD
DESCRIPTION
Modified On
Displays the modified date and time.
Cost
Displays cost of the product for that modified date and time.
Unit Price
Displays price of the product for that modified date and time.
Deal Qty
Displays the quantity available at the price.
Deal Price
Displays the group price for that product.
P. Method
Displays the pricing method.
Special
Flag to indicate if the price is a special price (Yes) or a normal price (No).
Who Modified
Displays the number corresponding to the employee that modified this product.
Table 23.9
Coupons Triggered
Select Coupons button
from the toolbar to
access the Coupons Triggered form. This form
displays a list of electronic coupons that the product is
assigned to. The coupons listed all contain the UPC
as the trigger criteria for the coupon.
Table 23.10 contains a description of each field contained in the Product Coupons form.
PRODUCT COUPONS – FIELD DESCRIPTIONS
FORM FIELD
DESCRIPTION
Coupon ID
Coupon ID of the electronic coupon.
Description
Displays coupon description.
Coupon Link
Coupon Link assigned to the coupon.
Start
Start date of the coupon.
End
End date of the coupon.
Priority
Priority of the coupons.
Pricing
Pricing methods of the coupon – 0 = Price Reduction; 1= Specified Price; 2 = % Reduction; 3 =
Generate Coupon.
Amount
Amount applied to product sale when coupon takes effect.
Type
Customer type coupon applies to: RG = Linked Coupon; PC = Preferred Customer; TG = Target
Customer.
Table 23.10
RETAIL USER REFERENCE MANUAL – RETAIL 7
196
RETAIL 7™ User Manual
POINT OF SALES - PRODUCTS
Product Maintenance (continued)
Tab Ordering
Select Tab Ordering button
from the toolbar to access
the Tab Order Setting form. This form lists all the fields
contained in the Product Maintenance form. Put a check
in the fields in the order you would like the cursor/focus to
move when tab or enter is pressed. Press O.K. after
making your selection or press cancel to exit the form.
Product Settings
Click the Settings button
from the toolbar of the
Product Maintenance form to access the Product
Settings form. The parameters entered on the form
controls the data displayed on the grid of the product
maintenance form. Control of automatic updates for
products with the same item code is controlled through
this form as well.
Table 23.11 contains a description of each field contained in the Product Settings form.
PRODUCT SETTINGS - FIELD DESCRIPTIONS
FORM FIELD
DESCRIPTION
Search Product by UPC
This is the Default setting and cannot be un-checked.
Search Product by Item Code
Flag to enable the system to search by Item Code. When the user enters the item code in Product
Maintenance, the system will search for the item and populate the fields.
Product Limitation (Maximum Price)
Enter the maximum price of products. An error message will appear when a higher amount is
entered in the products file.
Limited number of products
Flag to have product form grid display a range of products after the selected UPC
Number of product display
Number of products in range that will be displayed
All products in the same product group or
Display all products which have the same product group or item code assigned as the product
with the same item codes
being edited
All products with the same item code
Display all products which have the same item code assigned as the product being edited
Automatically update all product with the
Flag to allow user to specify if they want products of the same item code to be automatically
same Item Code
updated when a product with a matching item code is changed.
Table 23.11
Note: Refer to the Product Grouping Updates topic covered earlier in this section for more information on
updating products with the same item code.
RETAIL USER REFERENCE MANUAL – RETAIL 7
197
RETAIL 7™ User Manual
POINT OF SALES - PRODUCTS
Product Maintenance (continued)
RETAIL™ Search
The RETAIL™ Search form is used to search for a
product by Description, UPC, Item Code, Cost, Normal
Price, Special Cost, Special Price, Department, Section,
Vendor, Pack, Size, DSD, Modified Date, or Current
Batch No. This form is displayed when the Find UPC
button
next to the UPC field is clicked. Select search
criteria from the Column field. Select the Operator, such
as Like or = Equal, then type in the Value field (a
character or sequence of characters to search for). Click
the Find button and all the products matching the
criteria will be displayed on the form.
The results may be filtered further by entering addition
criteria. Flag the Checkbox in the second row, then
make further selections. For example, you may want to
search for items that have “app” in the description, only
in the Produce Department.
Once the product is selected and OK is clicked, the
product information will be displayed on the Product
Maintenance form.
Table 23.12 contains a description of each field contained in the RETAIL™ Search form.
RETAIL™ SEARCH – FIELD DESCRIPTIONS
FORM FIELD
DESCRIPTION
Column
Select the search criteria from the drop-down
Operator
Select the Operator, such as = Equal or Like. Use Like to enter partial search criteria.
Value
Type in the search criteria, or select from the Ellipsis button when searching by Department,
Section, or Vendor.
Find Button
Press Find after selecting all of the search criteria.
Description
The name of the products meeting the criteria.
UPC
UPC of the items
Item Code
The product‟s item code, if it exists
Size
The size of the item, such as 12 oz.
Vendor
The primary vendor of the item.
Table 23.12
RETAIL USER REFERENCE MANUAL – RETAIL 7
198
RETAIL 7™ User Manual
POINT OF SALES - PRODUCTS
Cost Calculator
The Cost Calculator form allows the user to calculate
the cost, price, and margin data for a product. The form
allows the user to perform “what-if” scenarios by
changing data and having the system re-calculate the
cost and pricing data. Click Cancel to ignore the
calculated figures or Apply to accept the figures. Click
the RETAIL™ Calculator button
located next to
one of the Unit Price fields to access this form.
The cost calculator function is also accessible from other functions in the system including the Enter/Review a
Purchase Order, Receive an Invoice, and Enter Prices for Ad/Batch. Users must have security access to the
Product Maintenance function to access the Cost Calculator function from other parts of the system.
When the Rounding Table button is clicked, the Cost
Calculator expands, displaying fields to allow entry of a
rounding table. The user selects the last digit of the
price (drop down list 0-9) and enters the rounding
criteria (drop down list –9 to +9). For example: If the
user wants all prices, which end in 4 to be rounded up
to, 9 then +5 would be selected as the rounding criteria.
To round down to 9, enter –5 as the criteria. Once
entered, the rounding criteria are applied to all prices
entered in the Product Maintenance form.
RETAIL USER REFERENCE MANUAL – RETAIL 7
199
RETAIL 7™ User Manual
POINT OF SALES - PRODUCTS
Product Maintenance (continued)
Table 23.13 contains a description of each field contained in the Cost Calculator form.
COST CALCULATOR – FIELD DESCRIPTIONS
FORM FIELD
DESCRIPTION
Description
Displays the description of the current product
Vendor
Displays the primary vendor of the product
Unit Cost
Displays the unit cost of the product from or to the Product Maintenance form
Case Cost
Displays the calculated or entered cost on packaged product
Pack
Displays the quantity per pack
Pricing Method
Pricing method of product
Unit Price – Cost
Unit cost
Unit Price - Price
Unit price
Group/Deal Price – Qty
Group deal quantity (if applicable)
Group/Deal Price – Price
Group deal price (if applicable)
Gross Margin
Displays the calculated gross margin (a % to cost) of the product.
Target Margin
Displays the desired margin of the product entered in the product form.
Rounding Table:
Last Digit Price
Last digit price ends in which will be rounded based on the rounding criteria.
Rounding Criteria
Rounding criteria to be applied to price.
Table 23.13
Product Memo
The Product Memo form is used to maintain
miscellaneous notes and information about a product.
This form is displayed when the memo button
located next to the Memo field of the Product
Maintenance form is clicked. Type the free format text
in the Memo field; click OK to save the memo.
Table 23.14 contains a description of each field contained in the Product Memo form.
PRODUCT MEMO - FIELD DESCRIPTIONS
FORM FIELD
DESCRIPTION
UPC
Displays the UPC or PLU number of the product
Description
Displays the description of the product
Created
Date the memo was created
Text Section
Miscellaneous information entered for the product
Modified
Date of last modification
By
Person who last created or modified the information
Table 23.14
RETAIL USER REFERENCE MANUAL – RETAIL 7
200
RETAIL 7™ User Manual
POINT OF SALES - PRODUCTS
Product Maintenance (continued)
Product Miscellaneous
Use the Product Miscellaneous form to enter
additional descriptions for a product. Click the Misc.
button
to access the Product Maintenance form.
This is where the Zero Pricing Details are entered.
You must also have “Allow Zero Pricing” flagged in
System Information. If the price is “0.00” for the current
UPC, these fields will be enabled.
Table 23.15 contains a description of each field contained in the Product Miscellaneous form.
PRODUCT MISCELANEOUS - FIELD DESCRIPTIONS
FORM FIELD
DESCRIPTION
Long Description
Long description for the product. Up to 120 characters.
Short Description
Secondary description for the product. Up to 40 characters.
Zero Price Eligible
Flag to make this product eligible for zero pricing
Negative Price Eligible
Flag to make this item negative price eligible, for example, pay-outs
Allow only when scanned
Flag to allow zero or negative price only when the product is scanned
Prompt for price
Flag to prompt for price at the Front End, for example, deli sandwiches
Table 23.15
Picture Browser
The Picture Browser can be accessed with the help of the
Find Picture button
located next to the Picture field of
the Product Maintenance form. Browse, select, and
associate a picture to the product. The picture will also be
available for viewing on the Checkstand when a Price Verify
function is performed. To set a folder for the pictures (on the
Back End), press the Set Folder button.
The pictures must also exist on each Front End so that the
cashier can view it in Product Lookup.
RETAIL USER REFERENCE MANUAL – RETAIL 7
201
RETAIL 7™ User Manual
POINT OF SALES - PRODUCTS
Quick Add/Quick Edit
The Product Quick Add and Quick Edit are
accessed from the Point of Sale menu under
the Product category. When either one is
selected, the Product Template Selection
form displays. The drop down menu lists the
Default Template and all templates created
from the Administration menu – Templates
Maintenance.
The Product Quick Add and Quick Edit are
user customizable forms that support adding
and editing of products. The fields displayed on
the form are defined using the Templates
Maintenance function in the Administration
menu. If a template is not defined, then default
fields are displayed for both quick add and
quick edit as depicted on the right.
Templates are user specific and the template
selection is based on the user‟s password. This
functionality provides the ability to customize
the product data maintenance function to be
specific to a user or group of users. The
template name will be displayed at the top of
the form. The fields available for selection on
the template are a subset of the fields on the
Product Maintenance form.
RETAIL USER REFERENCE MANUAL – RETAIL 7
202
RETAIL 7™ User Manual
POINT OF SALES - PRODUCTS
Product Group Maintenance
The Product Groups form is used to group
products together for use in applying price
changes to a group of products, reporting a
group of products and performing analytical
functions (For example: show product sales,
analyze product categories). The product
groups will appear under the Other category on
the respective forms. This function allows the
user to select products for grouping using
different criteria. Enter the Group ID,
Description, and Group Type. Use a Group
ID that best describes the product group for
easy reference. Enter the product criteria for the
group, for example: UPC, Item Code,
Manufacturer Code, or Product Group. Or,
you can search for products by using the Retail
Power Search Column and Operators. Once
the criteria has been entered, one, many, or all
of the products displayed can be added to the
product group by clicking on the arrow fields
located in the center of the form.
Note: A product can only belong to one pricing product group but to many reporting product groups.
Note: A pricing product group effects the way pricing updates are completed. When a cost/price change is
made to a product belonging to a pricing product group, the system will allow the changes to be propagated to
all products in the pricing product group.
Table 24.1 contains a description of each field contained in the Product Groups form.
PRODUCT GROUPS- FIELD DESCRIPTIONS
FORM FIELD
DESCRIPTION
Group type
Designates group type of product group - either Report or Pricing
Group ID
Displays the product group Id assign to the current group, can be Alpha-Numeric
Description
Displays the description for the current group, if not entered defaults to the Group ID
Select Products
Mfg Code
The first five digits after the leading digit. 0 1234567890 5, Mfg Code would be 12345.
Size
Used along with Mfg Code, or Vendor, etc. to limit the items pulled up by size, for example 12 oz soda.
UPC
Allows for a selection of a UPC or a range of UPCs.
Column
Used to select your search criteria, for example, Description or Section
Operator
Select the operator for your search. Description might be “Like”, Department would be “=”
Value
Enter or select the value. Press the ellipsis button to retrieve a list of Departments, Sections, or
Vendors (if selected in Column). Or enter a partial description such as “app”. Press the Find button after
you have made your selections.
Product Group
Displays a selection list of product groups that currently exist.
Products
Displays a list of products matching the search criteria selected.
UPC
Displays the UPC or PLU for each product within the selected criteria
Description
Displays the description corresponding to each UPC shown in the grid
Product Group
Displays a list of products that have been selected to be part of the product group.
UPC
Displays the UPC or PLU of each product added to the current product group
Description
Displays the description corresponding to each product within this product group
Table 24.1
RETAIL USER REFERENCE MANUAL – RETAIL 7
203
RETAIL 7™ User Manual
POINT OF SALES - PRODUCTS
Product Group Maintenance (continued)
Toolbar and Form Buttons
The following describes the functions supported by the toolbar and buttons located on the Product Groups
form.
Button
Description
Exit the current window.
Print a Product Group report. (Refer to the Print Product Group Report topic in this section)
Display the Product Group report on the screen. (Refer to the Print Product Group Report
topic in this section).
Delete a Product Group.
Enter a memo. Refer to the Product Memo topic in the Product Maintenance section.
Activates the context-sensitive help.
Move a selected product from/to the product list and product group list boxes.
Move all products from/to the product list and product group list boxes.
Product Group Report
The Product Group Report function will produce a Product Group report listing all products for the selected
group. This function is executed when
or
is selected from the Product Group Maintenance form.
Table 24.2 contains a description of each field contained in the Product Group Report.
Report field
Description
Format
Calculation
Description
Product group description
Text
UPC
UPC
Text
Description
Product description
Text
Normal Cost
Product cost
Currency
Normal Price
Product price
Currency
Normal Gross
Gross margin
Percent
Price-Cost/Price
Special Cost
Special cost for the product
Currency
Special Price
Special price for the product
Currency
Special Gross
Special gross margin
Percent
Special-Price - Special-Cost/
Special-Price
FS
Foodstamp flag
Yes / No
Scale
Scale flag
Yes / No
DSD
DSD flag
Yes / No
Vendor
Vendor for the product
Number
Section
Section of the product
Number
Dept
Department for the product
Number
Table 24.2
Selection Criteria:
Select from lists of all products for the selected product group on the Product Groups form.
RETAIL USER REFERENCE MANUAL – RETAIL 7
204
RETAIL 7™ User Manual
POINT OF SALES - PRODUCTS
Mass Product Changes
The Mass Product Changes form is used
to complete various types of data changes to
a group of products at the same time.
Products for a specific department, section,
vendor or product group (other) can be
selected for update. Once a group of
products has been selected, price changes,
POS data changes, and product attributes
can be immediately applied to the entire
selection. Special Price changes can also be
scheduled for a later update by creating a
product batch from this form. Select the field
you‟d like to update by moving the mouse
pointer over the field name. The mouse
pointer will change into a hand indicating that
this field is available for updating. Select the
field by clicking the field name and the field
will change to allow entry of data.
If the POS Information tab is selected, the top portion
of the form will change as follows:
If the Attributes tab is selected, the top portion of the
form will change as follows:
If the Percent tab is selected, the top portion of the
form will change as depicted below:
If the Zero Pricing tab is selected, the top portion of the
form will change as depicted below:
Note: When completing mass product changes, an entry will be created in the user activity log in order to
provide an audit trail of data modified using this function. (Refer to the User Activity Tracking topic in the
General Topics section)
Note: Pricing changes will only update the unit price (normal or special) of a product. If a product is using a
pricing method other than the unit price, the group price will not be affected. Prices for products using split price
as the pricing method will NOT be updated (since a unit price does not exist for these products).
RETAIL USER REFERENCE MANUAL – RETAIL 7
205
RETAIL 7™ User Manual
POINT OF SALES - PRODUCTS
Mass Product Changes (continued)
Table 25.1 contains a description of each field contained in the Mass Product Changes form
MASS PRODUCT CHANGES - FIELD DESCRIPTIONS
FORM FIELD
DESCRIPTION
Section
Displays a list of sections for selected products.
Vendor
Displays a list of vendors for selected of products.
Others
Displays a list of product groups for selected products.
FORM FIELD
DESCRIPTION
Ad Batches
Displays a list of ad batches for selection of products
Displays an X if the products are updated as an “ON AD” product. This flag will trigger the Front
On Ad check box
End system to display a savings line of information (“You Saved”) when the product is rung up.
Refer to the field descriptions contained in the Product Changes form in the Product Maintenance section for the following TABS: Pricing,
POS Information, and Attributes.
Percent TAB
Normal Price
Button to indicate if change is to be made to the normal price of the products
Special Price
Button to indicate if change is to be made to the special price of the products
Discount Unit Price
Button to indicate that the unit price should be discounted by the percentage in the “by” field.
Increase Unit Price
Button to indicate that the unit price should be increased by the percentage in the “by” field.
Discount Cost
Button to indicate that the cost should be discounted by the percentage in the “by” field.
Increase Cost
Button to indicate that the cost should be increased by the percentage in the “by” field.
By
Percentage to use in updating the price or cost.
Table 25.1
RETAIL USER REFERENCE MANUAL – RETAIL 7
206
RETAIL 7™ User Manual
POINT OF SALES - PRODUCTS
Mass Product Changes (continued)
Toolbar
The following describes the functions supported by the toolbar located on the Mass Product Changes form.
Button
Description
Exit the current window.
Print a Product Mass Changes report. (Refer to the Print Mass Product Changes topic in
this section)
Displays the Product Mass Changes report on the screen. (Refer to the Print Mass
Product Changes topic in this section)
Apply the changes you have entered. This will immediately update the products file to reflect
the changes.
Create a batch to apply special pricing changes later. This button will become available when
special pricing changes are entered. (Refer to the Create New Batch and the Product
Batches topics contained in the Enter Prices for Ad/Batch section)
Activates the context-sensitive help.
Print Mass Product Changes
The Print Mass Product Changes function will produce a Mass Product Changes report listing all products
selected for the mass change. This function is executed when
or
is selected from the Mass Product
Changes form.
Table 25.2 contains a description of each field contained in the Mass Product Changes report as well as the
database fields used by the report.
Report field
Description
Format
Calculation
UPC
UPC
Text
Description
Product Description
Text
Normal Cost
Product Cost
Currency
Normal Price
Product Price
Currency
RETAIL USER REFERENCE MANUAL – RETAIL 7
207
RETAIL 7™ User Manual
POINT OF SALES - PRODUCTS
Print Product Mass Changes (continued)
Report field
Normal Gross
Special Cost
Special Price
Special Gross
FS
Scaleable
DSD
Vendor
Section
Dept
Description
Gross margin for the product
Special cost for the product
Special price for the product
Special gross margin for the
product
Foodstamp flag
Scale flag
DSD flag
Vendor ID # for the product
Section for the product
Department for the product
Format
Percent
Currency
Currency
Percent
Calculation
Price - Cost / Price
Special price - Special Cost /
Special Price
Yes / No
Yes / No
Yes / No
Number
Number
Number
Table 25.2
Selection Criteria:
Products selected for update in the Mass Product Changes form.
Sort Criteria:
UPC - Ascending.
Analyze Product Categories
The Analyze Product Categories form is selected from
the Point Of Sales menu. This function is used to analyze
products for a specific department, section, vendor, or other
user-defined categories. Enter the criteria desired and click
the button that applies to the criteria entered. Products
matching the criteria entered will be displayed in the bottom
portion of the form. The program will calculate the
cumulated gross margin percentage for all of the items in
the category selected and will display the total number of
items in the category.
Note:
Table 23.1(in Product Maintenance earlier in this section) contains a description of each field contained in the
Analyze Product Categories form.
Toolbar
See Product Maintenance earlier in this section for a description of each of the toolbar functions.
RETAIL USER REFERENCE MANUAL – RETAIL 7
208
RETAIL 7™ User Manual
POINT OF SALES - PRODUCTS
Product Batches Maintenance
The Product Batches form is used to batch
pricing changes together for selected products.
This function is used to support a temporary price
reduction, an advertisement special, or a
wholesalers pricing change. Three categories of
batches are supported: Normal (permanent price
changes), Ad (temporary price changes), and
Pull Shelf Tags (print price tags for products
when the sale is over). The pricing fields updated
(normal or special) depend on the category
selected (normal or ad respectively). Press “Add
New Batch”, then select from the “Batch Type”
drop-down.
If the POS information tab is selected, the top portion of If the Attributes tab is selected, the top portion of the
the form will change as follows and the data for the form will change and the attributes for the product will be
product being entered will be displayed:
displayed:
Note: POS Information cannot be changed using
ad/batch function. The only field available for change is
the Mix Match field. Once the ad has expired, the mix
match field will be cleared from the product.
Note: Product attributes cannot be changed using the
ad/batch function. The only field available for change is
the Allow Disc field. The Allow Disc will indicate to the
system that discounts will be allowed while the batch is in
effect.
If the Sales tab is selected, the top portion of the form
will change as depicted on the right and sales and
movement data for the time period of the batch will be
displayed.
Click the Movement button
weeks of movement.
to display the last 13
Note: Click the ellipse button next to the unit price field to generate the sales data.
RETAIL USER REFERENCE MANUAL – RETAIL 7
209
RETAIL 7™ User Manual
POINT OF SALES - PRODUCTS
Enter Prices for Ad/Batch (continued)
Note: If a product belongs to a pricing product group, the system will prompt if all other products belonging to the
group should be added to the batch. If the user responds by pressing OK, then each product in the product
group will be added to the batch with the same pricing changes applied. Refer to the Product Maintenance
section for more information.
Table 26.1 contains a description of each field contained in the Product Batches form.
PRODUCT BATCHES - FIELD DESCRIPTIONS
FORM FIELD
DESCRIPTION
PRODUCT INFO
Batch ID
Displays the batch Number (it can be alpha numeric).
Starts
Displays the date and time when the current batch starts.
Ends
Display the date and time when the current batch ends.
UPC
Display the UPC or PLU of the product being added to the batch.
Description
Displays the description of the product being added to the batch.
Item Code
Display the wholesaler code of the product being added to the batch.
Depts.
Displays the product‟s department.
Section
Displays the product‟s section.
Vendor
Displays the product‟s vendor.
SPECIAL PRICING
Only applies to an ad batch.
Pricing Method
Select from four pricing methods: 0 = Unit Pricing, 1 = Split Package Pricing. 2 = Group Threshold, 3 = Group
Adjusted, 4 = Limited Pricing.
Unit Price - Cost
Special Cost for the product.
Unit Price - Price
Special Price for the product.
Grp/Deal Price - Qty
Quantity for this product to be priced under special group pricing.
Grp/Deal Price - Price
Special group pricing applied to this product.
Print Shelf Label
Flag to indicate if a label needs to be printed for this product.
NORMAL PRICING
Only applies to a Normal Batch.
Pricing Method
Select from four pricing methods: 0 = Unit Pricing, 1 = Split Package Pricing. 2 = Group Threshold, 3 = Group
Adjusted, 4 = Limited Pricing.
Unit Price - Cost
Cost for the product.
Unit Price - Price
Price for the product.
Grp/Deal Price - Qty
Quantity for this product to be priced under group pricing.
Grp/Deal Price - Price
Group pricing applied to this product.
Print Shelf Label
Flag to print a label for the product.
POS INFO TAB
Target
Target gross margin percentage for a product.
Pack/Size
Packaging breakdown if product is packaged with one or more units and the size of the units.
UPC Link
UPC code of a product linked to the product being entered. Provides ability to link two products together for the
purposes of pricing.
Mix Match
Use this field to group multiple like products together for pricing purposes. The Mix Match code assigned through
the Ad/Batch will be in effect during the Ad/Batch only. Once the batch expires, the Mix Match code will be reset
to spaces. This only applies to Ad batches.
Ad Mix Match
Indicates if the Mix Match code was set during for the Ad/Batch. This only applies to Ad batches.
ATTRIBUTES TAB
FS
Flag to enable or disable purchase of the product with food stamps
Scale
Flag to indicate that the product requires a scale to determine price
DSD
Flag to indicate if the product is delivered directly to the store.
Discount A, B
Flag to indicate if the product is assigned to discount category A and/or category B.
Allow Disc
Flag to indicate if discounts should be applied to the product while the ad is in effect. Only applies to Ad batch.
Tax A, B, C, D
Flags to indicate tax table used with this product.
SALES TAB
Current Sales
Displays the sales made during the batch‟s time period.
Previous Sales
Displays the sales made during the time period covered by the amount of time of the batch prior to the start of the
batch (That is, if the batch period is one week, then previous week‟s sales are displayed. If batch period is one
month, then previous month‟s sales are displayed).
Ad Loss
Displays the loss amount for this batch during the ad period.
Product Movement
13 Weeks of product movement displayed when the movement button
is clicked.
Date
Qty Sold
Week Ending Date.
Quantity Sold during the week.
RETAIL USER REFERENCE MANUAL – RETAIL 7
210
RETAIL 7™ User Manual
POINT OF SALES - PRODUCTS
Enter Prices for Ad/Batch (continued)
PRODUCT BATCHES - FIELD DESCRIPTIONS
PRODUCT LIST
(Multiple occurrences of the following for an AD BATCH).
UPC
Displays the Product‟s UPC or PLU.
Description
Displays the Product‟s Description.
Item Code
Displays the Item Code used by the Wholesaler to identify the product.
Cost
Displays the ad cost for the product.
Ad Price
Displays the ad price for the product.
Margin
Displays the gross margin based on the normal price and normal cost.
Sp Margin
Displays the gross margin based on the special price and special cost.
Qty
Displays the quantity of items sold during the time period of the batch.
Ad Loss
Displays the add loss amount for this product.
PRODUCT LIST
(Multiple occurrences of the following for a NORMAL BATCH).
Normal Cost
Displays the normal cost of the product.
Normal Price
Displays the normal price of the product.
Table 26.1
RETAIL USER REFERENCE MANUAL – RETAIL 7
211
RETAIL 7™ User Manual
POINT OF SALES - PRODUCTS
Enter Prices for Ad/Batch (continued)
Toolbar
The following describes the functions supported by the toolbar located on the Product Batches form.
Button
Description
Exit the current window.
Print a product batches report. (Refer to the Print Product Batches Report topic in this section)
Display a product batches report on the screen. (Refer to the Print Product Batches Report topic
in this section)
Save your entries or changes for the current record.
Delete the selected product in the product batch list.
Delete the currently displayed batch.
Add a new Batch or to extend the batch end date. (Refer to Create New Batch topic later in this
section)
Find all the batches containing the selected UPC. (Refer to the Display Batch Numbers topic later
in this section)
Opens the Show Product Movement form. (Refer to Show Product Movement topic contained
in the Sales Tab section)
Calculate the ad loss for the batch.
Apply the batch to the products file. (Refer to the Apply Batch topic later in this section).
Print Ad Labels for all products in the current batch. The labels will be displayed on-line prior to
printing.
Export data for all the products in the batch. This data can then be imported into a label program
that supports data import. The product data will be exported to a text file (BatchLabels.txt).
Maintain notes about a product. (Refer to the Product Memo topic in the Product Maintenance
section).
Display other batches that contain the product you are entering/editing.
Print an ad markdown report for the batch. (Refer to the “Print Ad/Batch Markdown Report”
section).
Activates the context-sensitive help.
RETAIL USER REFERENCE MANUAL – RETAIL 7
212
RETAIL 7™ User Manual
POINT OF SALES - PRODUCTS
Enter Prices for Ad/Batch (continued)
Print Product Batches Report
The Print Product Batches Report function will produce a Product Normal Batch or a Product Ad Batch
report listing all products that exist in the selected batch. The layout of these reports is contained in Appendix F.
This function is executed when
or
is selected from the Product Batches form.
Table 26.2 contains a description of each field.
Report field
Description
Format
Calculation
Ad Batch
Start Date
End Date
Vendor
Section
Dept
UPC
Description
Normal Cost
Special Cost
Normal Price
Special Price
Price Diff
Normal Gross
Special Gross
Ad Loss
Sold
Batch start date
Batch end date
Product vendor
Product section
Product department
UPC
Product description
Product cost
Product special cost
Product price
Product special price
Difference between normal and
special price
Gross margin
Special gross margin
Date/Time
Date/Time
Number
Number
Number
Number
Text
Currency
Currency
Currency
Currency
Currency
None
None
None
None
None
None
None
None
None
None
None
Normal price - special price
Percent
Percent
Amount lost due to product being on
ad
Number sold during ad period
Currency
Price - cost / price
Special price-Specialcost/Special-price
Normal price - Special Price *
Quantity
None
Product vendor
Product section
Product department
UPC
Product description
Product cost
Product price
Normal gross margin
Number sold
Profit
Number
Number
Number
Text
Text
Currency
Currency
Currency
Number
Currency
Number
Normal Batch
Vendor
Section
Department
UPC
Description
Cost
Price
Normal Gross
Qty Sold
Profit
None
None
None
None
None
None
None
None
None
(Quantity * Price) - (Quantity
* Cost)
Table 26.2
Selection Criteria:
Records matching the selection time period
Sort Criteria:
Department number - Ascending.
RETAIL USER REFERENCE MANUAL – RETAIL 7
213
RETAIL 7™ User Manual
POINT OF SALES - PRODUCTS
Enter Prices for Ad/Batch (continued)
Apply Batch
When the Apply button
is selected from the Product Batches form, the following updates will occur in the
system:
Create a batch for the ad/batch, if an entry does not already exist (fields included batch #, start
and end dates).
If the batch is, a future batch (start date > today) then a scheduled job will run to complete the
remaining updates when the batch goes into effect. Otherwise the following updates will occur:
Update each product in the product file with information from the ad/batch.
Create an entry into the Price Changes History file for each product in the ad/batch.
Search Product Batch
The Search Product Batch form lists, all product batches
and is displayed when the button
is clicked on the
Product Batches form. Select the batch from the list and
click OK. The data for the batch selected will then be
displayed on the Product Batches form.
Table 26.3 contains a description of each field contained in the Display Batch Numbers form.
DISPLAY BATCH NUMBERS - FIELD DESCRIPTIONS
FORM FIELD
DESCRIPTION
PRODUCT INFORMATION
Batch No
Displays the batch number (it can be alpha numeric).
Start date
Displays the date when the current batch starts.
End date
Displays the date when the current batch ends.
Description
Displays the description of the batch (may be Alpha -numeric).
Table 26.3
Create New Batch
The Create New Batch form is used to create a new batch
or to change the date and time for an existing batch. This
form is displayed when the Add New Batch button
is
clicked on the Product Batches form or when the Create a
Batch button
is clicked from different forms within
RETAIL™. Select the Batch Type from the drop-down: AD
for temporary price changes; Normal Price Change for
permanent price changes; or, Pull Shelf Tags to print price
tags when the ad has expired.
Type the Batch ID and the Start and End Dates and
Times. An expired ad batch can be re-activated and
modified through this form by entering an existing Batch ID
and re-entering current start date and new end date.
RETAIL USER REFERENCE MANUAL – RETAIL 7
214
RETAIL 7™ User Manual
POINT OF SALES - PRODUCTS
Enter Prices for Ad/Batch (continued)
Review Related Batches
The Review Related Batches function is used to view
all the batches that contain the selected UPC or PLU
selected from the Product Batches form. This form is
displayed when the
button is clicked from the
Product Batches form.
This form can also be accessed from the Product
Maintenance form.
Table 26.4 contains a description of each field contained in the Batches Affecting a Product form.
BATCHES AFFECTING A PRODUCT - FIELD DESCRIPTIONS
FORM FIELD
DESCRIPTION
Current Batch
Displays Yes on the batch whose special price is taken up in the Product Maintenance form;
otherwise, the field is blank.
Batch No
Displays the Batch ID No
Description
Displays the description of the current product
Start Date
Displays the start date of the ad batch. For normal batch, this field is blank
End Date
Displays the end date of the ad batch. For a normal batch, this field is blank
Priority
Displays the number of priority of the batch
Cost
Displays the cost of the product taken up at the batch period
Price Method
Displays the special price method used by the batch
Special Price
Displays the special price of the product as entered on the batch
Special Group Price
Displays the special group price of the product as entered on the batch
Special Quantity
Displays the group/deal quantity of the product as entered on the batch
Table 26.4
RETAIL USER REFERENCE MANUAL – RETAIL 7
215
RETAIL 7™ User Manual
POINT OF SALES - PRODUCTS
Print Ad/Batch Markdown Report
The function will produce an Ad/Batch markdown report
for a specific batch. Select from the Report By drop-down:
Batches will show the ad loss within a specific batch. If
an item is in more than one batch, the ad loss for that item
may not show up in this report. UPC will generate a report
showing all UPCs with ad loss in a specific date range.
Total Ad Loss Within Batch will show the ad loss for
each item within the batch, even if the loss was in another
batch having higher priority.
Table 26.5 contains a description of each field contained in the Ad/Batch markdown report.
Report field
Description
Format
Vendor
Vendor number of the product
Text
Section
Section assigned to the product
Text
UPC
Product UPC
Text
Description
Description of the product
Text
Normal Price
Normal price of the product as entered in the Product
Currency
Maintenance function
Special Price
Special price of the product as entered on the batch
Currency
Special Cost
Special cost of the product as entered on the batch
Currency
Qty
Quantity sold of the product during the ad batch period
Text
Sales
Sales volume of the product during the ad batch period
Currency
Cost
Cost of sales for the product
Currency
Profit
Profit made on sales during the ad batch period
Currency
Markdown
Markdown amount for the product during the ad batch
Currency
period
Calculation
None
None
None
None
None
None
None
None
None
None
Sales-Cost
(Normal PriceSpecial Price) *
Quantity Sold
Table 26.5
Selection Criteria:
Batch selected
Sort Criteria:
Department
RETAIL USER REFERENCE MANUAL – RETAIL 7
216
RETAIL 7™ User Manual
POINT OF SALES - PRODUCTS
Batch Priority Management
The Batch Priority Management form is used
to manage product price change batches that
exist in the system. This form will allow the user
to immediately activate a particular batch or to
set priorities on batches when a product or a
group of products have multiple price changes
effective during a given time period. The priority
one (1) price changes take place during the
Start and End dates. The priority two (2) price
changes go into effect once the time period for
the priority one pricing has ended. The scenario
continues for batches with a priority greater than
2. Select a batch from the list and enter the new
priority in the Priority field. Click Activate to
activate the batch immediately (as opposed to
letting it take effect as of the start date), and
click Delete to delete a batch.
Table 27.1 contains a description of each field contained in the Price Management form.
PRICE MANAGMENT - FIELD DESCRIPTIONS
FORM FIELD
DESCRIPTION
BATCH INFORMATION
Description
Displays the current batch description.
Batch
Displays the current batch ID (batch number selected on the batch list portion of the form).
Priority
Displays the priority of the current batch.
Type
Displays the current batch type (“PB” = Product Batch - “PU”).
Start Date
Displays the start date when the current batch.
End Date
Displays the date when the current batch ends.
Applied
Displays the date when the current batch was applied.
Who Applied
Displays the name of the person who applied this batch.
Created
Displays the date when the current batch was created.
Who Created
Displays the name of the person who applied the current batch.
BATCH LIST
BatchNo
Displays the batch ID.
Description
Displays the batch description.
StartDate
Displays the date when the batch starts.
EndDate
Displays the date when the batch ends.
Priority
Displays the priority of the batch.
Type
Displays the batch type - “PB” or “PU”.
Table 2 7.1
Processing Specifications:
If the Activate button is clicked, the system will perform the following steps:
1. Determines the priority of price changes when there is a pricing conflict and store any required
pricing changes for later use in a Pending file (which is then processed by the Store Close
routine)
2. Updates price changes to the Products table (if necessary).
3. Appends the old price and cost to the Price Changes History file.
4. Updates the batch as applied.
If the Delete button is clicked, the system will delete the batch from the system.
RETAIL USER REFERENCE MANUAL – RETAIL 7
217
RETAIL 7™ User Manual
POINT OF SALES - PRODUCTS
Reports
The Product Reports form is used to create reports
listing product information for a specific selection. The
available selections are: Departments, Sections,
Vendors, and Other, which include Total Store, DSD
(Direct Service Delivery) products or other product
categories. Click the desired tab and a list of available
selections will be displayed. Click the Include Hash
Departments field and hash departments (That is, nonsale departments will be available for selection or
included in the selection).
Listed below is a description of the reports generated for each selection:
#
1
2
3
4
5
Selection
Department
Section
Vendor
Other - DSD
Other
Report File Name
RptbyDep.rpt
RptbySec.rpt
RptbyVen.rpt
RptbyDsd.rpt
RptbyTS.rpt
RptbyOT.rpt
Description
All active products for the selected department.
All active products for the selected section.
All active products for the selected vendor.
All active products that are flagged as DSD (direct service delivery).
All active products within a selected Product Group, or all the existing
products in the Products table (Total Store).
Table 2 8.1
Table 28.2 contains a description of each field contained in the Product reports as well as the database fields
used by the reports. The (#) preceding a field is the report number on which the field appears.
Report field
Description
Format
Calculation
(1), (2), (3), (4), (5) Vendor Name
Product Group
The fields below will be included on
all reports:
Vendor name
Product Group
Text
Text
None
None
UPC
Description
Normal Cost
Normal Price
Special Cost
Special Price
Gross Profit
Disc.
UPC
Product description
Product cost
Product price
Special cost for the product
Special price for the product
Profit for the product
Discount category for the
product
Product schedule assigned to
the product
Product mix match code
Department for the product
Section for the product
Taxable flag
Scale flag
Foodstamp flag
Text
Text
Currency
Currency
Currency
Currency
Percentage
Number
None
None
None
None
None
None
Price- cost/Price
1 = “A”, 2=”B”
Number
None
Text
Number
Number
Number
Yes/No
Yes/No
None
None
None
None
None
None
Effective Schedule
Mix Match Code
Dept.
Section
Tax
Scale
FS
Table 28.2
RETAIL USER REFERENCE MANUAL – RETAIL 7
218
RETAIL 7™ User Manual
POINT OF SALES - PRODUCTS
Reports (continued)
Selection Criteria:
1. Select all products for the selected department.
2. Select all products for the selected section.
3. Select all products for the selected vendor.
4. Select all products that are flagged as DSD (Direct Store Delivery).
5. Select all products in the selected product group, DSD or all the products (Total Store).
Sort Criteria:
1.
2.
3.
4.
5.
This report is sorted by department name.
This report is sorted by section name.
This report is sorted by vendor name.
This report is sorted by DSD vendors‟ names.
This report is sorted by vendor name (Total Store or DSD) or UPC (Product Group).
Print Labels
The Print Products Label form is displayed when the
label check box is set for a product on the Product
Maintenance form or when the Print Labels function is
selected from the Products Menu. This form will allow
you to select the type of label to be printed for the product
being maintained on the Product Maintenance form. If
you select the Print Labels function from the Products
Menu, it will allow you to select the type of labels you want
printed for all the products matching the selected criteria
(That is: Regular, DSD, Ad, Seafood, or Discontinued).
Note: Retail™ supports custom label printing through its
interface with Bar Tender by Seagull. See the Retail
Custom Label Printing Manual for help with this option.
You must have a license to use Print Custom Labels.
The following reports are used to support this function:
#
1
2
3
4
Selection
Regular Labels
DSD Labels
Discontinued Items
AD Labels
Report File Name
ProdClrg.rpt
ProdCldr.rpt
ProdClds.rpt
ProdClds.rpt
Description
Regular product label(s)
DSD product label(s)
Discontinued product label(s)
Advertised product Label (s)
Table 2 8.3
Print Mix-Match Report
The Print Mix Match Report function will produce a report listing all products that have been assigned a mix
match code. The layout of these reports is contained in Appendix F. This function is executed when the Print
Mix Match Report function is selected from the main menu.
Report field
Description
Format
Mix Match Code
Mix match code assigned to product Text
UPC
Product UPC
Text
Description
Product Description
Text
Section
Section # assigned to product
Text
Normal Cost
Normal cost entered for the product
Currency
RETAIL USER REFERENCE MANUAL – RETAIL 7
219
RETAIL 7™ User Manual
POINT OF SALES - PRODUCTS
Print Mix-Match Report (continued)
Report field
Special Cost
Special Price
Normal Margin
Special Margin
Description
Special cost entered for the product
Special Price entered for the product
Gross margin of normal cost and
price
Gross margin of special cost and
price
Format
Currency
Currency
Currency
Calculation
None
None
Cost – Price/Price
Currency
Special Cost – Special
Price/Special Price
Table 2 8.4
Selection Criteria:
All products assigned a mix match code
Sort Criteria:
Department/Mix Match/UPC
Print Product Price Changes
The Print Product Price Changes function will produce
a Price Changes History report of all product price
changes for a selected date range. A range of UPCs can
also be selected by entering a starting and ending UPC.
This function is executed when the Print Product Price
Changes report option is selected from the main menu.
Report field
UPC
Description
Cost
Price
Method
Deal Price
Deal Quantity
Special
Date Modified
Who Modified
Description
Product UPC
Product Description
Normal cost entered for the product
Normal price entered for the product
Pricing Method entered for the product
Deal price (depends on pricing method)
Deal Quantity (depends on pricing method)
Indicates if price change was a special price
change
Date price change was made
Employee # and name of person who made
the price change
Format
Text
Text
Currency
Currency
Text
Currency
Number
Checkbox
Date
Text
Table 2 8.5
Selection Criteria:
Selection criteria signify all products having a price change matching the criteria specified.
Sort Criteria:
UPC – Date Modified (in descending order)
RETAIL USER REFERENCE MANUAL – RETAIL 7
220
RETAIL 7™ User Manual
POINT OF SALES - PRODUCTS
Synchronize Checkstands with Products
The Synchronize Checkstands form is used to update the
checkstand databases with the latest products‟ information. After
adding, editing, or deleting products, the checkstand computers
should be updated so they have the latest information. When
deleting products, this function will physically delete the products
from the Back End products database. You may also set up all
of the tables to be synchronized at a scheduled time and day
from System Information.
Note: The checkstand databases are only used when the Front
End checkstands are running in stand-alone mode.
Processing Restrictions:
No restrictions. It can be run at any time.
Processing Specifications:
This function will update all checkstands with product information that has changed since the last update was
completed. To update checkstands with all of the products, un-flag the field “Use Smart Update for Products
and Customers”. Select the checkstands to be updated (usually all) by flagging the check box next to the
Checkstand name (by default all checkstands are updated). Click OK to start the process.
1. The system connects to all checkstands selected. If an error occurs, the system will prompt you
with a message “Cannot connect to some of the checkstands" "Do you still want to continue? “
a. If you click NO the system will abort this function.
b. If you click YES then the system will continue this function. However, the checkstands
which caused the error will not be updated with the products‟ information.
c. In either case, the system is having a problem connecting to the checkstands and
corrective action should be taken. Either there is a network problem in connecting to the
checkstand or the checkstand name is incorrect in RETAIL™ (see the System
Information section under the Administration Menu for more information).
RETAIL USER REFERENCE MANUAL – RETAIL 7
221
RETAIL 7™ User Manual
POINT OF SALES - PRODUCTS
Power Edit
Power Edit is a customizable form to support editing of
groups of products. This form can be accessed from the
main menu under Products, or in Product Maintenance
from the toolbar.
From the Point of Sale Icon select the Power Edit task
from the Products section of the menu.
1. From the toolbar, press “Select Fields and
Sequence”.
2. Select the fields you want to be able to edit. You
must select them in the order that you want them to
appear on the screen. For example: Description,
Price, Disc A and Tax A (UPC is displayed by
default). The order number will appear to the right of
your selection. This number cannot be edited. To
change the order, un-flag the fields and select them
in the correct order according to your preferences.
3. After making your selections, press OK.
4. Now, you can select the groups of products to edit.
5. From the Column drop-down, select your first
criterion, for example, Section. Then select the
Operator, for example = (equals). Next, select the
Value, in this case, by pressing the ellipsis button to
the right of the field. The list of Sections will be
displayed, enabling the user to select the section.
6. To further filter the products to be edited, flag the
check box next to the second row and make your
selections. For example, select “Normal Price”, then
“>” (greater than), then enter the price “2.00”.
7. You may filter the products to be edited further by
selecting the third check box. When you are finished
with your selections, press the Find Button.
8. The list of the products is displayed in the grid on the
bottom half of the form, beginning with the UPC.
9. All of the fields can now be edited. After editing any
field, you must tab or click in another field with the
cursor to save your changes. The changes are
applied immediately.
10. You can print a report of the products you have
edited. Press Print or Print Preview in the toolbar.
RETAIL USER REFERENCE MANUAL – RETAIL 7
222
RETAIL 7™ User Manual
POINT OF SALES - REGISTERS
Point of Sales – Registers
Find
Records
Safe Statistics and Balancing
Make/Review a Bank Deposit
Safe Statistics
Make/Review
Deposit
Format Safe
Statistics
Label
Monitor Tills
View Safe
Statisics Report
Safe
Adjustments
Safe Statistics
Report
View Safe Audit
Report
Safe Audit
Report
Till Statistics and Balancing
View Till
Statistics
Report
Deposit
Memo
Currency
Conversion
Select
Employee
List Checks
by Employee
View Bank
Deposit
Bank Deposit
Slip
Review and Update G/L
Review and
Update G/L
Till Statistics
Select an
Employee
Find Deposit
Till Statistics
Report
RETAIL USER REFERENCE MANUAL – RETAIL 7
Currency
Conversion
Bookkeeping
Memo
Create
Journal
Entries
Store
Discounts &
Coupons
View G/L
Report
G/L Report
223
RETAIL 7™ User Manual
POINT OF SALES - REGISTERS
Point of Sales – Registers
Print Frontend Service Report
Print Register Productivity Report
Select Report
Dates
Select Report
Dates
View Front
End Service
Report
View Register
Productivity
Report
Front End
Service
Print Transactions
By Reason Report
Print Salesperson
Productivity Report
Select Report
Dates
Select Report
Dates
View
Transactions
Report
Transactions
Report
RETAIL USER REFERENCE MANUAL – RETAIL 7
View
Salesperson
Report
Register
Productivity
Electronic Journal
Select Criteria
Salesperson
Report
View
Electronic
Journal
Electronic
Journal
224
RETAIL 7™ User Manual
POINT OF SALES – REGISTERS
Till Statistics and Balancing
The Till Statistics and Balancing form
displays a cashier‟s till counts and overall till
statistics for a given time period or day. This
form is used to reconcile totals between each
cashier‟s till count and the computer totals for
the specified date. Till balancing can be done
during the day if needed (before a store close
is completed – see Note on Get button below)
or the following day (after a store close has
been completed). The till totals are updated
periodically (default is every 10 minutes) for
the current day. Each cashier‟s till statistics is
accessible by scrolling through the list of
cashier names.
Enter the cashier‟s actual countdown amount
into the Actual column for the tender. Any
over/shorts will be displayed in the Balance
column. The right-hand side of the form
contains various statistics for the particular till
displayed. Use the scroll bar on the right to
scroll through the various statistics. Statistics
displayed include gross sales, refund and
void amounts, number of customer and items
sold, Paid in and Paid Out totals, Received on
Account amount, and coupon totals including
a count. Double coupon totals are displayed
only if the Track Double Coupons option
has been selected on the Default tab of the
System Information form.
Note: Use the Get button
to re-calculate the till totals for the current day (before store close). This will insure
that all transactions for the day have been accounted for by the system. This option can be used to re-calculate
totals for a start and end period, however this option should be used sparingly and for small time periods,
preferably one day.
Note: The Gross Sales amount displayed on this form is calculated using the same calculation as Show Store
Sales except that sales tax is added to the total: Total Sales (including taxes & excluding coupons) –
Coupon Multiples (e.g., double coupon amounts) – Discounts (customer, line item & order level) –
Electronic Coupons
RETAIL USER REFERENCE MANUAL – RETAIL 7
225
RETAIL 7™ User Manual
POINT OF SALES – REGISTERS
Till Statistics and Balancing (continued)
Table 29.1 Contains a description of each field contained in the Till Statistics and Balancing form.
TILL STATISTICS AND BALANCING – FIELD DESCRIPTIONS
FORM FIELD
DESCRIPTION
Start Date
Displays start date for balancing period
End Date
Displays end date for balancing period
Cashier
Displays the name of the cashier. Use scroll buttons to scroll through different cashiers
TILL BALANCING
Tender
Displays all the active tenders (Cash, Check, etc)
Actual
These fields are used to enter the actual countdown amounts for each tender
System
Displays the amount calculated for each tender by the system
O/S
The over or short amounts: the difference between the Actual amount and the System generated amount
Totals
Displays the total amount of each column.
TILL STATISTICS
Gross Sales
Total amount in sales made by current cashier
Ave. Order
Average order size in dollar amounts
Customers
Number of customers attended by cashier
Items
Number of items sold by cashier
Items Scanned
Numbers of items sold that were scanned. Note: the definition of an item scanned is user configurable via
the POS Information function.
% Scanned
Percentage of items scanned to total items
Rings / Min
Average Number of items rang up per minute
Refunds
Amount of total refunds made by cashier
Voids
Amount in voids made by cashier
Paid Ins
Amount received by cashier that are non-sale related, e.g. payment recd for bad check
Paid Outs
Amount paid by cashier that are non-sale related, e.g. payment made for products on consignment
Recvd On Acct
Amount of payments made to customers‟ charge account
Over / shorts
Total of over/shorts from Till Balancing portion of the form
Last Balanced
Last date and time cashier‟s records were changed
Coupons
Amount of coupons redeemed by customers
Coupon Count
Number of coupons redeemed by customers
Dbl Coupons
Amount of doubled coupons redeemed by customers. Visible if option to track double coupons is selected
via the System Information function (applies to double coupon count as well).
Dbl Coupon Cnt
Number of doubled coupons redeemed by customers.
Table 29.1
Toolbar
The following describes the tool bar displayed on the Till Statistics and Balancing form.
Button
Description
Exit the current window.
Print a Till Statistics and Balancing Report.
(Refer to the “Till Statistics Report” topic in this section)
Display the Till Statistics and Balancing Report on the screen.
(Refer to the “Till Statistics Report” topic in this section)
Save your entries or changes for the current record.
Refresh the till statistics for an employee for the selected time period.
(Refer to the “Select an Employee” topic in this section)
Display the Currency Conversion form to convert amounts between different currencies
(Refer to the “Foreign Currencies” topic in the Appendices)
Preview and print a Till Status report.
(Refer to the “Till Status Report” topic in this section)
Activate the context-sensitive help in this dialogue.
Till Statistics and Balancing (continued)
Select an Employee
RETAIL USER REFERENCE MANUAL – RETAIL 7
226
RETAIL 7™ User Manual
POINT OF SALES – REGISTERS
The Select an Employee form is used to select an
employee for which the till statistics are to be recalculated for the selected time period. This function can
be used to re-calculate the tills for the current day (prior to
the store close) or to re-calculate the till statistics for a
prior day. This form is displayed when the Get button
is selected.
Note: Any existing data entered for the period will be
deleted when this function is used.
RETAIL USER REFERENCE MANUAL – RETAIL 7
227
RETAIL 7™ User Manual
POINT OF SALES – REGISTERS
Till Statistics and Balancing (continued)
Till Statistics Report
This function will produce a Till Statistics Report listing all till statistics that currently exist in the system for the
selected time period. This function is executed when
or
is selected from the Till Statistics and Balancing
form. Table 29.2 contains a description of each field contained in the Till Statistics Report.
REPORT FIELD
Start Date
End Date
Name
Sales
Average Order
Customers
Items
% Scanned
Rings/Minute
Refunds
Coupons
Coupon Count
Voids
Over/Shorts
Total - Sales
Total - Average Order
Total - Customers
Total - Items
Total - Rings/Min
Total - Refunds
Total - Coupons
Total – Coupon Count
Total - Voids
Total - Over/Shorts
Table 29.2
DESCRIPTION
Start date for the data
End date for the data
Employee name
Total sales
Average order size
No of customers
No of items sold
Percentage of items scanned to total
items
Average rings per minute
Amount of refunds
Amount of coupons
No of coupons
Amount of voids
Amount of over/shorts
Totals
Totals
Totals
Totals
Totals
Totals
Totals
Totals
Totals
Totals
FORMAT
Date/Time
Date/Time
Text
Currency
Currency
Number
Number
Number
None
None
None
None
None
None
None
None
CALCULATION
Number
Currency
Currency
Number
Currency
Currency
Currency
Number
Number
Number
Number
Currency
Currency
Number
Currency
Currency
None
None
None
None
None
None
Sum of detail
Simple Average of detail
Sum of detail
Sum of detail
Simple Average of detail
Sum of detail
Sum of detail
Sum of detail
Sum of detail
Sum of detail
Selection Criteria:
Select the data for the selected time period on the form.
Sort Criteria
None.
Till Status Report
This function will produce a Till Status Report listing all tender amounts (system and countdown) for each
cashier for the selected time period. This function is executed when the Till Status Report button
is selected
from the Till Statistics and Balancing form. Table 29.3 contains a description of each field contained in the Till
Status Report.
REPORT FIELD
Employee Name
Tender Name
Count
Actual Amount
System Amount
Balance
Table 29.3
DESCRIPTION
Name of employee
Tender name that totals apply to
No of times tender was used for the time period
Actual (countdown) amount entered
System (calculated) amount
Difference between actual & system amounts
FORMAT
Text
Text
Text
Currency
Currency
Currency
CALCULATION
None
None
None
None
None
Actual – System
Selection Criteria:
Data for the selected time period on the form.
Sort Criteria
Employee Name
RETAIL USER REFERENCE MANUAL – RETAIL 7
228
RETAIL 7™ User Manual
POINT OF SALES – REGISTERS
Safe Statistics and Balancing
The Safe Statistics and Balancing form provides
the ability to monitor and audit safe balances,
make safe adjustments, make bank deposits,
review and balance system deposits and enter
daily countdown safe amounts. Under the
Current Safe tab, current safe amounts for each
depositable tender (Depositable attribute for the
Tender set to in the Tender Maintenance
function) are displayed. These amounts are
system generated and based on various data
entered in the system. It provides an up-to-date
total of the contents of the safe showing an
opening balance, all of the transactions for the
day and a computed ending balance. Previous
day‟s totals can also be viewed from this form.
Note: double click on the column heading for the
Adjustments, Pickups, Loans and Deposits columns to
display detailed data for these columns. A security level of 10
is required to view this data.
Note: Each day’s safe balance must be saved in order to ensure that subsequent days will be calculated
properly. This is critical since the ending balance of one day becomes the starting balance of the next day.
System generated bank deposit information is
displayed and the actual safe contents can be
entered under the Balance Info tab. The deposit
information is calculated by the system and a
variance is displayed if one exists compared to
the actual deposits entered. The safe can be
counted down and the amounts entered in the
Safe Contents portion of this form. A safe audit
can then be performed (see Toolbar section) to
correct any variances in the safe.
Note: The safe content labels represent a target
amount that is to be stored in the safe. The user
can configure these labels. Refer to the Toolbar
section.
Note: The Total Sales amount displayed on this form is calculated using the same calculation as Till Statistics &
Balancing: Total Sales (including taxes & excluding coupons) – Coupon Multiples (e.g., double coupon amounts)
– Discounts (customer, line item & order level) – Electronic Coupons
Table 30.1 Contains a description of each field contained in the Safe Statistics and Balancing form.
SAFE STATISTICS AND BALANCING - FIELD DESCRIPTIONS
FORM FIELD
DESCRIPTION
Balancing Date
The date of the balancing transaction
CURRENT SAFE TAB
Opening
Opening safe balance based on previous day‟s ending balance.
Adjustments
Adjustments entered for the tender for the day. Refer to the Safe Adjustments topic later in this section.
Pickups
Displays the amount of pickups for the day. Based on Till Statistics.
Loans
Displays the amount of loan-ins for the day. Based on Till Statistics.
Reconcile
Displays the reconciled amount entered in Till Statistics for each cashier for the day.
RETAIL USER REFERENCE MANUAL – RETAIL 7
229
RETAIL 7™ User Manual
POINT OF SALES – REGISTERS
Safe Statistics and Balancing (continued)
SAFE STATISTICS AND BALANCING - FIELD DESCRIPTIONS (CONTINUED)
FORM FIELD
DESCRIPTION
Deposits
Displays the deposits made for the day
Ending
Calculated ending safe balance. Calculation: Opening Balance +Adjustments + Pickups - Loans + Reconcile Deposits.
Totals
Totals of detail lines.
BALANCE INFO TAB
System Gen. Deposit
Total Sales
Sum of sales amounts for the day. Should balance to Till Statistics form.
Over / Shorts
Over/Short variances from the Till Statistics for the day.
Paid Ins
Sum of paid in amounts for the day. Should balance to Till Statistics form
Paid Outs
Sum of paid out amounts for the day. Should balance to Till Statistics form
Received On Acct
Sum of customers‟ received on accounts payments for the day. Should balance to Till Statistics form
- ATM/ Credit
Sum of all ATM and Credit Card transactions taken at the checkstands for the day.
- Mfr Coupons
Sum of all coupons taken at the checkstands for the day.
- Non Depositable
Total of tenders not flagged as depositable (e.g., In store Charges)
Safe Variance
Displays the difference between the Opening and the Ending Safe Balances
Safe Adjustments
Total safe adjustments entered for the time period.
To be Deposited
Displays the calculated amount to be deposited. Calculation: Total Sales +(-) Over (Shorts)+PdInsPdOuts+Received on Acct - ATM/Credit - Mfr. Coupons - Non Depositable + Safe Adjustments+(-) Safe Variance
Actual Deposit
Any deposits made for the day (See Make/Review Bank Deposit section)
Variance
Displays the difference between the To be Deposited and Actual Deposit amounts
Safe Contents
Left field is the safe contents label and the right field is the actual countdown amount. The safe contents labels can
be configured (see toolbar section)
Table 30.1
Toolbar
The following describes the tool bar displayed on the Till Statistics and Balancing form
Button
Description
Exit the current window.
Print a Safe Statistics report.
(Refer to the “Safe Statistics Report” topic in this section)
Display the Safe Statistics report on the screen.
(Refer to the “Safe Statistics Report” topic in this section)
Save your entries or changes for the current record.
Create or edit a Bank deposit.
(Refer to the “Make a Bank Deposit” topic in this section)
Display the Monitor Tills form.
(Refer to “Monitor Tills” topic in the Administration section)
Find records for a particular date.
(Refer to “Find Records” topic in this section)
Change the safe statistics labels displayed under the Balance Info tab.
(Refer to “Format Safe Statistics Label” topic in this section)
Perform a safe audit. This will allow entry of opening balance totals to reset the balances.
Display the Safe Audit Report.
(Refer to “Safe Audit Report” topic in this section)
Make safe adjustments.
(Refer to “Safe Adjustments” topic in this section)
Activate the context-sensitive help in this dialogue.
RETAIL USER REFERENCE MANUAL – RETAIL 7
230
RETAIL 7™ User Manual
POINT OF SALES – REGISTERS
Safe Statistics and Balancing (continued)
Safe Statistics Report
This function will produce a Safe Statistics Report listing the safe statistics data for the specified period. This
report lists the data in the same format as displayed on the Safe Statistics and Balancing form. The layout of this
report is contained in Appendix F. This function is executed when
or
is selected from the Safe Statistics
and Balancing form.
Format Safe Statistics Label
The Format Safe Statistics Label form gives the user
the ability to change the field labels contained on the
Safe Statistics and Balancing form. This provides
flexibility in assigning currency types contained in the
safe and to establish target levels for each currency.
This information is displayed on the Safe Contents
portion of the form under the Balance Info tab. This form
is displayed when the Format Safe Statistics Label
button
is clicked on the toolbar on the Safe
Statistics and Balancing form.
Table 30.2 Contains a description of each field contained in the Format Safe Statistics Label form.
FORMAT SAFE STATISTICS LABEL - FIELD DESCRIPTIONS
FORM FIELD
DESCRIPTION
Row 1 trough Row 15
Label description to be displayed on the Safe Statistics and Balancing form.
Table 30.2
RETAIL USER REFERENCE MANUAL – RETAIL 7
231
RETAIL 7™ User Manual
POINT OF SALES – REGISTERS
Safe Statistics and Balancing (continued)
Find Records
This form allows the user to select a desired date to
retrieve records for the Safe Statistics and Balancing
data. This form is displayed when the find Records button
is clicked on the toolbar on the Safe Statistics and
Balancing form. Select the date desired and click on the
OK button. The safe statistics information for the date
selected will then be displayed.
Safe Audit Report
This function will produce a Safe Audit Report listing all safe audits that have been completed. This function is
executed when the Show Safe Audit Report button
is selected from the Safe Statistics and Balancing
form. Table 30.3 contains a description of each field contained in the Safe Audit Report.
REPORT FIELD
Date
Time Stamp
Tender
Safe Amount
Audited Amount
Safe Change
Manager
Table 30.3
DESCRIPTION
Date of audit
Time of audit
Tender names
Original safe amount
Audited amount entered
Difference between original & audit amounts
Name of manager performing audit
FORMAT
Date/Time
Date/Time
Text
Currency
Currency
Number
Text
CALCULATION
None
None
None
None
None
Safe Amount – Audited Amt
None
Selection Criteria:
All Safe Statistics data.
Sort Criteria:
None.
RETAIL USER REFERENCE MANUAL – RETAIL 7
232
RETAIL 7™ User Manual
POINT OF SALES – REGISTERS
Safe Statistics and Balancing (continued)
Safe Adjustments
The safe adjustments form supports the entry of
adjustments to the tenders listed on the Safe Statistics
form. This form is accessible by clicking on the Safe
Adjustments button in the toolbar. This function would
be used anytime amounts need to be added or
subtracted from the safe (e.g., cash is added to the
safe).
Select a tender from the Tenders field. Enter in the
Adjustment amount (positive or negative) and type in a
memo describing the adjustment. Click on the Save
button to save the entry. All entries will be displayed at
Note: entries cannot be modified. Enter in an offsetting
the bottom of the form.
entry if an entry needs to be adjusted.
Table 30.4 Contains a description of each field contained in the Safe Adjustments form.
SAFE ADJUSTMENTS - FIELD DESCRIPTIONS
FORM FIELD
DESCRIPTION
Tenders
List of tenders for which adjustments can be made
Adjustment
Adjustment amount
Memo
Description of the adjustment
ADJUSTMENTS LIST
List of adjustments made for the day. Lists Modified By (person making adjustment) and Date
Modified (date adjustment entered).
Table 30.4
Make / Review a Bank Deposit
The Deposits form allows the user to create
new deposits or review existing deposits. This
form allows the user to make deposits for any
tender that has been flagged as depositable
(Depositable attribute for the Tender set to in
the Tender Maintenance function). Deposits
cannot be modified only created or displayed.
To adjust an existing deposit, an offsetting
deposit (either negative or positive) would have
to be created. Under the Deposit Totals tab,
the totals for the deposit are displayed. Scroll
through the deposits for a day by clicking on the
scroll arrows next to the Deposit No. field. This
form is displayed when the Make a Deposit
button
is selected on the Safe Statistics
and Balancing form or when the Review a
Bank Deposit function is selected from the
Point of Sales menu.
RETAIL USER REFERENCE MANUAL – RETAIL 7
233
RETAIL 7™ User Manual
POINT OF SALES – REGISTERS
Make / Review a Bank Deposit (continued)
Under the Checks List tab, a detailed list of the
checks that make up the Check amount under
the Deposit Totals tab is displayed. When
making a new deposit, the system
automatically displays any checks that have
been picked up from the checkstands and have
not been previously deposited. By using the
Pull Checks button
in the toolbar, ALL
checks for the day that have not been
deposited will be displayed. De-select a check
by clicking off the in order to exclude a check
from this deposit. Use the Add Button to add a
manual check to the deposit, use the Edit
Button to edit an existing check, and use the
Delete Button to delete a check from the
system.
Table 30.4 contains a description of each field contained in the Deposits form.
DEPOSITS - FIELD DESCRIPTIONS
FORM FIELD
DESCRIPTION
Process Date
Displays the date for the deposit.
Deposit No.
Displays deposit No assigned by RETAIL™ to this deposit.
Time Stamp
Displays the Date and Time when the deposit was saved.
Print Slip
Flag to view or print detail of deposits by tender type totals
Print Checks
Flag to view or print detail of all checks deposited
Bank Information Section
Displays bank information as entered in the Receipt Banners section of POS Information function.
Deposit Totals TAB
Tenders
Displays the name of all depositable tenders
Beginning Balance
Displays amount deposited for the tender in previous deposits for the day
Deposit
Displays the deposited amount for each tender on this deposit
Ending Balance
Displays the sum of the Beginning Balance plus Deposit amount
Check List TAB
Customer No
Displays the Customer Card Number corresponding to the check (if entered at the Front-end)
Date
Displays the date when this check was written/received
Amount
Displays the amount of the check.
Employee
Displays the name of the employee who accepted the check
Tenders
Displays the tender type received
Ref Info
Displays any reference information entered at the Front-end if the user was prompted
Table 30.4
RETAIL USER REFERENCE MANUAL – RETAIL 7
234
RETAIL 7™ User Manual
POINT OF SALES – REGISTERS
Make / Review a Bank Deposit (continued)
Toolbar
The following describes the tool bar displayed on the Deposits form.
Button
Description
Exit the current window.
Print a Deposit Report.
(Refer to the “Deposit Report” topic in this section)
Display the Deposit Report on the screen.
(Refer to the “Deposit Report” topic in this section)
Save your entries or changes for the current record.
Pull all Checks for the current date and any check that has not been deposited from previous
dates.
Find deposits for a particular date.
(Refer to “Find Deposit” topic in this section)
Display the Currency Conversion form to convert amounts between different currencies
(Refer to the “Foreign Currencies” topic in the Appendices)
Maintain notes about the deposit.
(Refer to the “Deposit Memo” topic in this section)
Activate the context-sensitive help in this dialogue.
Deposit Report
This function will produce a Deposit Slip Report for the bank deposit currently displayed on the Deposits form.
This function is executed when
or
is selected from the Deposits form. Table 30.5 contains a description
of each field contained in the Bank Deposit Slip report.
REPORT FIELD
Time
Your Bank Information
Process Date
Deposit ID
Total Amount
List of all Deposits
Type
Amount
List of Checks
Date
D/L #
Employee
Ref Info
Amount
Total
Table 30.5
DESCRIPTION
Report time
Bank information
Date of deposit
Deposit ID
Total deposit amount
FORMAT
Date / Time
Text
Date / Time
Date / Time
Currency
None
None
None
None
None
CALCULATION
Tender names/description
Total Amount of each tender deposited
Text
Currency
None
None
Check date
D/L No of customer
Employee No who accepted the check
Message written by the employee who
accepted the check
Amount of each check
Sum of all checks deposited
Date/Time
Text
Text
Text
None
None
None
None
Currency
Currency
None
Sum of detail
Selection Criteria:
Data selected on the form.
Sort Criteria:
None
RETAIL USER REFERENCE MANUAL – RETAIL 7
235
RETAIL 7™ User Manual
POINT OF SALES – REGISTERS
Make / Review a Bank Deposit (continued)
Find Deposit
The Find Deposit form allows the user to select a desired
deposit to be reviewed or changed. This form is displayed
when the find button
is clicked on the toolbar on the
Deposits form. After a selection has been made, the
selected deposit will be displayed on the Deposits form.
Table 30.6 contains a description of each field contained in the Find Deposit form.
FIND DEPOSIT - FIELD DESCRIPTIONS
FORM FIELD
Date
Displays the deposit date
Deposit
Displays the deposit number
Table 30.6
DESCRIPTION
Deposit Memo
The Deposit Memo form allows entry and maintenance
of notes associated with a deposit. This form is displayed
when the user clicks on the Memo button
on the tool
bar from the Deposits form.
Table 30.7 contains a description of each field contained in the Deposit Memo form.
DEPOSIT MEMO - FIELD DESCRIPTIONS
FORM FIELD
DESCRIPTION
Date
Displays the date of process of the deposit
Deposit ID
Displays the current deposit number
Created
Date and time when the memo entry was created
Memo:
Memo information entered
Modified
Displays date and time of last modifications
By
Displays the Employee name that made the last modification
Table 30.7
RETAIL USER REFERENCE MANUAL – RETAIL 7
236
RETAIL 7™ User Manual
POINT OF SALES – REGISTERS
Balancing Overview
The Balancing Overview form is used to
review and compare Department Sales, Safe
Statistics and Till amounts for a specified date.
This form gives the user an overview of the
tenders, sales and deposits. Enter or select a
Balance Date and the data for the date selected
will be displayed.
Note: The Total Sales amount displayed on this form is calculated using the same calculation as Till Statistics &
Balancing: Total Sales (including taxes & excluding coupons) – Coupon Multiples (e.g., double coupon amounts)
– Discounts (customer, line item & order level) – Electronic Coupons
Table 30.8 contains a description of each field contained in the Balancing Overview form.
BALANCING OVERVIEW - FIELD DESCRIPTIONS
FORM FIELD
DESCRIPTION
Balance Date
Date the data pertains to.
Sales
This section contains a list of all departments and their sales created for the specified balance date.
System Gen.Deposit
Total Sales
Sum of sales coming from Sales Section + tax field
Over / Shorts
Over/shorts for the day from the Till Statistics form
Paid Ins
Sum of paid ins received from the Till Statistics form
Paid Outs
Sum of paid outs from the Till Statistics form
Received on Acct
Sum of customer payments received on account from the Till Statistics form
-Electronic Tenders
Sum of ATM‟s and Credit Cards from checker table for specified date
-Mfr. Coupons
Mfr. Coupon field from checker table for specified date
-NonDepositables
Displays the total amount representing the non depositable departments or Hash Department
Safe Variance
Calculates the difference between previous day‟s Actual Safe Amount and current day‟s Actual Safe
Amount and deducts it or adds it to the sales amount.
Safe Adjustments
Total safe adjustments entered for the time period.
Total
Calculation: Total Sales +(-) Over (Shorts)+PdIns-PdOuts+Received on Acct-ATM-Mfr CouponsNon depositable + Safe Adjustments +(-) Safe variance
Actual Deposits
Sum of all deposits made for specified date
Variance
Difference between Total from System Generated Deposit and Actual Deposit field
TILLS SECTION
This section contains the sum of each tender entered on the Till Statistics form for the specified date
Over/Shorts
Difference between totals from Total Sales field and the Totals field in the Tills Section
Totals
Sum of all Tenders above, does not include Over/Shorts
Table 30.8
RETAIL USER REFERENCE MANUAL – RETAIL 7
237
RETAIL 7™ User Manual
POINT OF SALES – REGISTERS
Balancing Overview (continued)
Tool Bar
The following describes the tool bar displayed on the Balancing Overview form.
Button
Description
Exit the current window.
Print a Balancing Overview report.
(Refer to the “Balancing Overview Report” topic in this section)
Display the Balancing Overview report on the screen.
(Refer to the “Balancing Overview Report” topic in this section)
Print the Store Discount and Coupons Summary Report.
(Refer to the “Discount and Coupon Summary” topic in this section)
Display the Currency Conversion form to convert amounts between different currencies
(Refer to the “Foreign Currencies” topic in the Appendices)
Maintain notes for the specified date.
(Refer to the “Bookkeeping Memo” topic in this section)
Activate the context-sensitive help in this dialogue.
Balancing Overview Report
This function will produce a Balancing Overview Report for the specified date on the Balancing Overview form.
This function is executed when
or
is selected from the Balancing Overview form. Table 30.9 contains a
description of each field contained in the report.
REPORT FIELD
Balance Date
Total Taxes
Tax A
Tax B
Tax C
Tax D
This Deposit
Variance
Over / Shorts
Totals
Sales - Name
Sales - Amounts
Safe - Description
Safe - Amounts
Tills - Description
Tills - Amounts
Table 30.9
DESCRIPTION
Balance date
Total of tax amounts
Total amount under Tax schedule A
Total amount under Tax schedule B
Total amount under Tax schedule C
Total amount under Tax schedule D
Deposit amount for the day
Variance amount
Tills Over/Shorts for the day
Totals for the day
Department name
Department sales for the day
Safe label description
Amount for the safe
Till tender breakdown
Amount for till breakdown
FORMAT
Date/Time
Currency
Currency
Currency
Currency
Currency
Currency
Currency
Currency
Currency
Text
Currency
Text
Currency
Text
Currency
CALCULATION
N/A
TaxA+ TaxB+TaxC+TaxD
Sum of TaxA
Sum of TaxB
Sum of TaxC
Sum of TaxD
N/A
To be deposited-Actual deposit
N/A
Total of Tills detail
None
None
None
None
None
None
Selection Criteria:
Where date processed = the selected date
Sort Criteria:
Department number - Ascending
RETAIL USER REFERENCE MANUAL – RETAIL 7
238
RETAIL 7™ User Manual
POINT OF SALES – REGISTERS
Balancing Overview (continued)
Bookkeeping Memo
The Bookkeeping Memo form allows entry and
maintenance of notes associated with the Balancing
Overview information. This form is displayed when the
user clicks on the memo button
on the tool bar on
the Balancing Overview form.
Table 30.10 contains a description of each field contained in the Bookkeeping Memo form.
BOOKKEEPING MEMO - FIELD DESCRIPTIONS
FORM FIELD
DESCRIPTION
Proc Date
Date specified on the Balancing Overview form
Memo
Memo information entered
Created
Date and time memo entry created
Modified
Date and time entry was last modified
By
Employee who made the last modification
Table 30.10
RETAIL USER REFERENCE MANUAL – RETAIL 7
239
RETAIL 7™ User Manual
POINT OF SALES – REGISTERS
Balancing Overview (continued)
Discount & Coupon Summary
A Discount and Coupon Summary Report is produced for a specified date when the Print button
clicked from the Balancing Overview form. Table 30.11 contains a description of each field in the report.
REPORT FIELD
Balance Date
Departments
Discount
Coupons
Totals- Discounts
Total Coupons
Table 30.11
DESCRIPTION
Balance date
Department name
Discount amount for each department
Coupon amount for each department
Total discounts
Total coupons
FORMAT
Date / Time
Text
Currency
Currency
Currency
Currency
is
CALCULATION
N/A
None
None
N/A
Sum of all discounts
Sum of coupons
Cashier Analysis
The Cashier Analysis form consists of 3 tabs which give a detailed analysis of all your cashiers‟ transactions
and are useful for tracking cashier performance. The Cashier Performance Evaluation tab produces a report
that summarizes all the transaction statistics and rates your cashiers‟ performance on a scale of 1-5, including
the over/shorts, errors and corrections, and achievements and profits. This report can be used as an incentive to
reward your cashiers‟ performance or improvement.
The Cashier Analysis form displays the
details of each cashiers‟ transactions,
including over/shorts, voids, etc.
Following is a list of each field and the
calculations for each.
1. Cash Balance – The cashier‟s till amount if over or short, as calculated in Till Statistics and Balancing,
is displayed.
2. Voids/Errors – The sum of the cashier‟s voided amounts and error corrects (a void entered
immediately after the product is rung up).
3. Store Coupons – The sum of all Store Coupons rung up by the cashier.
4. Vendor Coupons – The sum of all Vendor Coupons rung up by the cashier.
5. Canceled Transactions – The number of canceled transactions. Canceled transactions are logged
when the cashier presses the Cancel (CN) button after ringing up items.
6. No Sale – Number of times the cashier pressed the No Sale key to open the cash drawer,
independent of a transaction, for example, to give a customer change.
7. Refunds – The dollar amount and percentage of refunds made by the cashier.
8. Open Dept. Amount – Total dollar amount entered into Open Departments.
9. Open Dept. Percentage – Total amount entered into Open Departments divided by Total Sales.
10. Trans Total – The total number of transactions for the time period.
11. Avg. Trans. – The average dollar amount of the transactions for the time period.
12. Total Sales – The total dollar amount of sales for the time period.
RETAIL USER REFERENCE MANUAL – RETAIL 7
240
RETAIL 7™ User Manual
POINT OF SALES – REGISTERS
Cashier Performance
The Cashier Performance task lists the following:
1.
Employee – The names and
employee numbers of the Employees
who performed transactions during the
time period selected.
2.
Total Sales – Total sales for each
employee during the period.
3.
Total Hours- Total hours the employee was signed on.
4.
Average Sales Per Hour – Total Sales divided by Total Hours signed on.
5.
Total Items – Total number of items sold, including sales keyed into open departments.
6.
Scanned Items – Total number of items scanned.
7.
Percentage of Items scanned - (Items Scanned/Total Items) * 100
8.
Average Items Per Hour – The average number of items sold per hour.
9.
Ring Percentage – The sum of the items scanned, divided by the sum of the total items.
10. Rings per Minute – Total rings per minute.
11. Average Tender Time in Seconds – The average time of each transaction, including tender time,
that is, the time that the customer takes to pay for the transaction.
12. Idle Hours – The total time during which the cashier was not involved in a transaction.
RETAIL USER REFERENCE MANUAL – RETAIL 7
241
RETAIL 7™ User Manual
POINT OF SALES – REGISTERS
Cashier Performance Evaluation
The Cashier Performance Evaluation task
consolidates the information from the
Cashier Analysis & Cashier Performance
forms and will generate a report that is useful
as an incentive to reward your cashiers‟
performance or improvement. Each cashier
is rewarded points on a scale of 1-5. The
amounts used to reward points are userconfigurable via the “Settings” button.
When calculating the averages, the system will disregard the highest and lowest amounts, and average
the remainder of the amounts.
Example: You have 10 cashiers. The highest and lowest amounts are disregarded. The 8 remaining
amounts are added, and then the sum is divided by 8. This gives us the means. Subtract the means from
each cashier amount, then divide by the means, and that gives us the cashier‟s percentage. The
percentage is a measurement of the cashier‟s performance based upon the average. This percentage is
used as a method of ranking each cashier, using the “means” as the yardstick measurement. A positive
amount is above average and negative is below average.
The following fields are displayed:
1.
Employee – The name and employee number of each cashier that was signed on during the
period selected.
2.
Over or Short - The dollar amount over or short per day, the employee‟s percentage as
explained above, and the points awarded.
3.
Errors and Corrections – Details of all voids: number of voids, total dollar amount of voids, and
total dollar amount of voids into open departments. The Sub Total column shows the total amount
of points for the Errors and Corrections section. The percentage shows the ranking of the
cashier‟s sales. The average number of points for this section is shown in the last column of the
section.
4.
Achievements and Profits – This section displays the average dollar amount per hour, the
average number of items per hour, and the average item price per hour. Again the employee‟s
percentage is used to rank the employees according to the average.
5.
Grand Total – The total number of points from each section, the sales person‟s average, and the
average number of points. This data is used to sort the cashier‟s performance according to the
number of points. These points can be used for rewards and incentives.
RETAIL USER REFERENCE MANUAL – RETAIL 7
242
RETAIL 7™ User Manual
POINT OF SALES – REGISTERS
Cashier Performance Evaluation: Set Point Values
Press the Settings button to establish the
point ranges for your cashiers‟ performance.
Here you can set the dollar amount of Over
or Short per day. Enter the amounts and
press Save.
You can also change the average
performance percentages. This is the
employee‟s average using the means as
explained in the previous section.
Monitor Tills
The Monitor Tills form is used to monitor the tills
of the checkstands currently in use. This form
can be displayed by clicking the Monitor Tills
button
from the toolbar in the Safe
Statistics and Balancing form or when you
select the Monitor Tills function from the Point
of Sales menu. Various amounts are displayed
for each cashier. This data is refreshed every 10
seconds to provide up to date statistics. If the Till
Limit for a displayed tender has exceeded, the
information will be displayed in blue font color. If
the Mandatory Limit for a displayed tender has
exceeded, then the information will be displayed
in red font color.
A pickup request (covered later in this section) can then be completed from this form. The user can configure the
tenders displayed on the form by clicking the select a tender
button. (Note: User must have security rights
to access the Tender Maintenance function). This form will also distinguish between active and inactive
cashiers. Click the Time
button to change the criteria used to determine an active versus inactive cashier.
Table 31.2 contains a description of each field contained in the Monitor Tills form.
MONITOR TILLS - FIELD DESCRIPTIONS
FORM FIELD
DESCRIPTION
Lane
Displays the checkstand number.
Cashier
Displays the employee name assigned to the checkstand.
Tenders
Displays the current amount for the tender (5 tenders can be displayed at a time).
Totals
Displays the total amount of the tenders currently displayed.
Table 31.2
RETAIL USER REFERENCE MANUAL – RETAIL 7
243
RETAIL 7™ User Manual
POINT OF SALES – REGISTERS
Monitor Tills (continued)
Toolbar
The following describes the functions supported by the toolbar located on the Monitor Tills form.
Button
Description
Exit the current window.
Display the Monitor Tills report on the screen. (Refer to the Print Monitor Tills Report
topic in this section)
Display the Select Tenders to Monitor. (Refer to the Select a Tender topic in this section}
Display the Currency Conversion form to convert amounts between different currencies.
(Refer to the Foreign Currencies topic in the Appendices)
Set up the number of minutes that qualify a cashier as inactive. A form will be displayed
accepting entry of the period of time in minutes.
Make a pickup or a loan-in for a cashier. (Refer to Pickups and Loan-Ins topic in this
section)
Activates the context-sensitive help.
Print Monitor Tills Report
The Print Monitor Tills Report function will produce a Monitor Tills report. This function is executed when you
select the
from the Monitor Tills form.
Table 31.3 contains a description of each field contained in the Monitor Tills report.
Report field
Till
Cashier Name
Tender Name
Tendered Amount
Type
Database Field
Database Field
Database Field
Database Field
Format
Number
Text
Text
Currency
Total
Formula Field
Currency
Calculation
None
None
None
Sum of
Amounts
Sum of
Amounts
Table Name
Monitor Tills Report
Monitor Tills Report
Monitor Tills Report
Monitor Tills Report
Field Name
Name
N/A
N/A
Table 31.3
Selection Criteria:
All tills currently displayed.
RETAIL USER REFERENCE MANUAL – RETAIL 7
244
RETAIL 7™ User Manual
POINT OF SALES – REGISTERS
Monitor Tills (continued)
Select a Tender
The Select a Tender form is used to select tenders that
are displayed in the Monitor Tills form as configured by
the user. This form is displayed when the Select a
Tender to Monitor
button is clicked from the
toolbar from the Monitor Tills form.
Note: The system will check that the user’s security
level allows access to the Tender Maintenance
function before giving access to this form.
Table 31.4 contains a description of each field contained in the Select a Tender form.
SELECT A TENDER - FIELD DESCRIPTIONS
FORM FIELD
DESCRIPTION
Tender Names
Lists all the tenders stored in the system.
Depositable
List whether a tender is depositable or not as maintained in the Tender Maintenance function.
Shows that the selected tender is to be monitored in the Monitor Tills form.
Field
Flagged to de -select a tender to show in the Monitor Tills form.
Field
Table 31.4
RETAIL USER REFERENCE MANUAL – RETAIL 7
245
RETAIL 7™ User Manual
POINT OF SALES – REGISTERS
Monitor Tills (continued)
Pickups & Loan-Ins
The Pickup & Loan-Ins form is used to make
tender pickups or additional loan-ins for a
particular cashier. This form is displayed
when the Pickups/Loan-Ins
button is
selected from the Monitor Tills form. This
form will display the current till amount till the
time this form is accessed. Click Pickup or
Loan-in and enter the amount of the pickup
or loan-in for the tenders. Checks (Tenders
with Tender Type = “CK”) can only be picked
up in their entirety whereas partial pickups
can be completed for the other tenders. Click
Save & Print to print a pickup slip (or a loanin slip) once the data is entered on this form.
Table 31.5 contains a description of each field contained in the Pickups & Loan-Ins form.
PICKUPS & LOAN-INS – FIELD DESCRIPTIONS
FORM FIELD
DESCRIPTION
Cashier
Displays the name of the selected employee.
Till
Displays the Till number for the selected employee.
Tenders
Displays the tenders allowed to be picked up as flagged in Tender Maintenance.
Till Amount
Displays the current Till Amount for the various tenders for the selected employee.
Pickup/ Loan In
Used to type the amount of the pickup or loan in.
Balance
Displays the balance for the tenders displayed after the pickup or loan in.
Total
Displays the total amount of the pickup or loan in.
Table 31.5
Pickup Slip or Loan-In Slip Reports
The Pickup Slip or Loan-In Slip Reports function will produce a Pickup Slip or Loan-In report. The layout of
this report is contained in Appendix F. This function is executed when you click Save & Print from the Pickup a
Cashier form.
Table 31.6 contains a description of each field contained in the Pickup Slip (or Loan In Slip) Report.
Report field
Type
Format
Calculation
Cashier
Formula Field
Text
None
Manager
Formula Field
Text
None
Till No
Formula Field
Number
None
Tender Name
Database Field
Text
None
Amount
Database Field
Currency
None
Customer No.
Database Field
Text
None
Sub Total
Formula Field
Currency
Subtotal of the tender
Total Pickup
Formula Field
Currency
Total of all the tenders
Table 31.6
RETAIL USER REFERENCE MANUAL – RETAIL 7
246
RETAIL 7™ User Manual
POINT OF SALES – REGISTERS
Monitor Checkstands
The Monitor Checkstands form is used to
monitor the activity and the till statistics of the
checkstands. When a checkstand is selected,
the name of the employee signed on to the
checkstand, current till status and other
miscellaneous totals will be displayed. If a
transaction is being completed on the
checkstand, the activity will be displayed on the
form as it is occurring.
Table 31.7 contains a description of each field contained in the Monitor Checkstands form.
MONITOR CHECKSTANDS -- FIELD DESCRIPTIONS
FORM FIELD
DESCRIPTION
Checkstands
Displays all the available Checkstands.
POS#
Displays the name of the selected Checkstand.
Activity Field (multiple occurrences)
Displays the description of the current transactions being processed by the Checkstand.
Employee Name
Displays the name of the employee working on the selected Checkstand.
Current Total
Displays the current total for the order being processed.
TILLSTATUS
Cash
Displays the current total amount of cash for the Checkstand being monitored.
Checks
Displays the current total amount of checks for the Checkstand being monitored.
Food Stamps
Displays the current total amount of food stamps for the Checkstand being monitored.
Credit Cards
Displays the current total credit card amount for the Checkstand being monitored.
ATM Cards
Displays the current total ATM amount for the Checkstand being monitored.
MISC.
# / Amt. Refunds
Displays the current amount of refunds for the Checkstand being monitored.
# / Amt. Voids
Displays the current amount of voids for the Checkstand being monitored.
# / Amt. Pickups
Displays the current amount of manager pickups for the Checkstand being monitored.
Table 31.7
RETAIL USER REFERENCE MANUAL – RETAIL 7
247
RETAIL 7™ User Manual
POINT OF SALES – REGISTERS
Print EFT Charges Report
This function will produce an EFT (electronic fund transfer)
Charges report listing all checkstand EFT charges transactions
for the selected time period. The layout of this report is
contained in Appendix F. The EFT Charges Report form will be
displayed when the Print EFT Charges Report function is
selected from the Point of Sales menu. This form will accept
entry of a start and end date for selection on the report.
When the report first opens up, the summary for each day, for
every card type will be displayed. To view the details for the
day, for a particular card type, double-click on the card name,
for example, VISA. A new tab will open up showing the details.
Note: This report can only be run for previous day’s sales. It is available to print current day sales after a store
close is run.
Table 30.12 contains a description of each field contained in the EFT Charges Report as well as the database
fields used by the report.
REPORT FIELD
Start Date
End Date
EFTCardNo
Card No.
EmpNo
TillNo
TransNo
Amount
Table 30.12
DESCRIPTION
Start date for the period selected
End date of the period selected
Customer‟s EFT card number
Customer‟s ID number
Employee ID number who processed the
transaction
Till number where the transaction was
processed
Transaction number of the processed EFT
Amount of the EFT transactions
FORMAT
Date/Time
Date/Time
Text
Text
Text
None
None
None
None
CALCULATION
Text
None
Text
Currency
None
None
Selection Criteria:
Data for the selected time period on the form.
Sort Criteria:
Date
Card Type (e.g. debit, credit, electronic food stamp)
Print Front End Service Report
This function will produce a Front End Service report
listing key checkstand statistics for the selected time
period. The layout of this report is contained in Appendix
F. The Checkstand Service Report form will be
displayed when the Print Front End Service Report
function is selected from the Point of Sales menu. This
form will accept entry of a start and end date for
selection on the report.
Note: This report can be run for current day sales even prior to a store close run.
Note: Definition of items scanned used in calculating percentage of Items Scanned is configurable via the POS
Information function. The default definition is any valid UPC scanned or hand-keyed into the system is defined as
an item scanned.
RETAIL USER REFERENCE MANUAL – RETAIL 7
248
RETAIL 7™ User Manual
POINT OF SALES – REGISTERS
Print Front End Service Report (continued)
Table 30.13 contains a description of each field contained in the Front End Service Report as well as the
database fields used by the report.
REPORT FIELD
Start Date
End Date
Name
Total Hrs On
Total Hrs On %
Over Short
Average Order Size
% Scanned
Ring Time
Coupon #
Coupon $
Coupon %
Void #
Void $
Void %
Refunds #
Refunds $
Refunds %
Gross Sales
Total fields
Table 30.13
DESCRIPTION
Start date for the period selected
End date of the period selected
Employee name
Total hours logged in
Percentage of report total
Over and short amount
Average order size
Percentage of items scanned
FORMAT
Date/Time
Date/Time
Text
Text
Percent
Currency
Currency
Percent
Time spent ringing items
No of coupons accepted
Coupon amount
Percentage of report total
No of voids performed
Void amount
Percentage of report total
No of refunds completed
Refund amount
Percentage of report total
Gross sales for the employee
Total of details
Number
Number
Currency
Percent
Number
Currency
Percent
Number
Currency
Percent
Currency
Text
CALCULATION
None
None
None
None
None
None
Percentage of scanned vs.
total
None
None
None
None
None
None
None
None
Sum of detail fields
Selection Criteria:
Data for the selected time period on the form.
Sort Criteria:
Hour - Ascending.
RETAIL USER REFERENCE MANUAL – RETAIL 7
249
RETAIL 7™ User Manual
POINT OF SALES – REGISTERS
Print Register Productivity Report
The function will produce a Register Productivity report
listing productivity totals for the selected time period.
The layout of this report is contained in Appendix F. The
Register Productivity Report form is displayed when the
Print Register Productivity Report function is selected
from the Point of Sales menu. This form will accept
entry of a start and end date for selection on the report.
You may also select the time interval of hourly or every
15 minutes. The data can be further refined to display
by total store, departments, or by a single department.
Table 30.14 contains a description of each field contained in the Register Productivity report.
REPORT FIELD
Start Date
End Date
Hour
No. of Checkers
Sign on Hours
Sales Amount
Items Sold
No. of Customers
Avg. Order Size
Avg. Item Price
Total Fields
Table 30.14
DESCRIPTION
Start date of selected period
End date of selected period
Time span
No of checkers logged in
Amount of sign-on hours
Total sales
Items sold
No of customer serviced
Average order size
Average item price
Total of details
FORMAT
Date/Time
Date/Time
Number
Number
Number
Currency
Number
Number
Currency
Currency
Text
CALCULATION
N/A
N/A
None
None
None
None
None
None
Sales/Customers
Sales/Items
Sum of detail Fields
Selection Criteria:
Based on dates, time period, and department selection entered on form.
Sort Criteria:
Listed in order by the (chronological) hour
Print Transactions by Reason Report
The function will produce a Transaction by Reason report
for the selected time listing checkstand transactions
where a reason code was entered. The layout of this
report is contained in Appendix F. The Transactions by
Reason Report form is displayed when the Print
Transactions by Reason Report function is selected
from the Point of Sales menu. This form will accept entry
of a start and end date for selection on the report and is
sorted either by Cashier Name or by Front End
Transaction Key (e.g., RF = refund).
RETAIL USER REFERENCE MANUAL – RETAIL 7
250
RETAIL 7™ User Manual
POINT OF SALES – REGISTERS
Print Transactions by Reason Report (continued)
Table 30.15 contains a description of each field contained in the Transactions by Reason Report.
REPORT FIELD
Start Date
End Date
Sorted by
Cashier Number
Cashier Name
Reason
Transaction Key
Transaction Numbers
UPC
Amount
Manager
Table 30.15
DESCRIPTION
Start date of selected period
End date of selected period
Select from: Cashier Name or Transaction Key
Employee No of the active cashiers
Employee Name
Reason selected for the transaction
Transaction key description
No of transactions with the same reason codes
UPC No on the transaction
Total Amount of the transaction
Manager No of person who completed a mgr. override function (if applicable)
FORMAT
Date/Time
Date/Time
Text
Number
Text
Text
Text
Number
Number
Currency
Number
Selection Criteria:
Based on selected dates entered on form.
Sort Criteria:
Cashier Name
Transaction Key
Print Sales Person Productivity Report
The function will produce a Sales Person Productivity
report listing the transaction totals by salesperson. Only
those transactions where a salesperson number was
entered will display on the report. To require cashiers to
enter their employee number before each transaction,
select “Ask For Salesperson‟s ID” in POS Information.
The layout of this report is contained in Appendix F. The
Checkstand Sales Person Productivity form is displayed
when the Print Sales Person Productivity Report
function is selected from the Point of Sales menu. This
form will accept entry of a start and end date for selection
on the report.
Table 30.16 contains a description of each field contained in the Sales Person Productivity Report.
REPORT FIELD
Start Date
End Date
Employee # Name
Sales
Cost
Profit
% Sales
% Profit
Items
Customers
Avg. Price
Avg. Order
Total Fields
Table 30.16
DESCRIPTION
Start date of selected period
End date of selected period
Employee No and name of the active cashiers
Total sales of an employee for the selected time period
Total cost of items sold
Gross Profit on items sold
Percentage of an employee‟s sale to total sales for the
selected time period
Gross Profit % on items sold
No of items sold by the signed on employee
No of customers
Average price of items sold
Average order size sold to customers
Total of details
FORMAT
Date/Time
Date/Time
Text
Currency
Currency
Currency
Percent
CALCULATION
N/A
N/A
None
None
None
Line Item Sale – Cost of Items Sold
Line Item Sale/Total Sales
Percent
Number
Number
Currency
Currency
Text
Gross Profit/Cost of Items Sold
None
None
Line Item Sale/ No of items
Line Item Sale/No of customers
Sum of detail Fields
Selection Criteria:
Based on selected dates entered on form.
Sort Criteria:
None
RETAIL USER REFERENCE MANUAL – RETAIL 7
251
RETAIL 7™ User Manual
POINT OF SALES – REGISTERS
Electronic Journal
The Electronic Journal form is used to search for and
report on detailed checkstand transaction activity. This
function will search the entire checkstand transaction
history and match records to the criteria specified.
Different types of search criteria can be specified:
Date range
Specific cashier
Specific tender
Specific transaction types
Specific Customer Card #
A secondary criteria can be added to the search
parameter:
a time range
a minimum and maximum transaction
amount
a transaction range
a range of UPC codes
a specific register #
tax status
transaction level
discount type
Press the Filter button after entering your criteria.
If using Signature Capture, the signature may be
viewed after highlighting and double-clicking on a
specific transaction, then pressing the View Signature
button. The customer copy of the receipt will also be
shown in the View Signature form.
Desired number of rows in the display grid can be set
using the above RETAIL™ form when the Setting
button
in the tool bar form is clicked.
Once the criteria are entered and the Analyze Transactions button
in the toolbar is clicked, the data will be displayed
in Display grid and more queries can be performed. Use the Analyze Order button
to analyze the selected data
further. To view details of one selected transaction, double click on an item in the display grid.
If checkstand transaction history has been archived for
a portion of the time period entered, a message will be
displayed. The date of the last archival will be displayed
and a request will be made to retrieve the archived data
(if available on the system). Clicking the OK button will
begin the process of retrieving the archive data for
reporting. The amount of time needed to accomplish
this task depends on the amount of data being
retrieved. Clicking cancel cancels the entire request and
allows to user to specify a different date range.
Note: Checkstand Transaction history is archived automatically by the system. The amount of data maintained
on the system is defined via the Defaults tab of the System Information function. The archived data is stored in
a directory defined via the Archive Data File field of the System Information function.
Note: Canceled Transaction amounts are captured in the Electronic Journal. Select Cancel as the Type. You will
need to scroll over to the right to view the amount of the order before the cashier canceled it. The amount will not
be displayed on the report.
RETAIL USER REFERENCE MANUAL – RETAIL 7
252
RETAIL 7™ User Manual
POINT OF SALES – REGISTERS
Electronic Journal (continued)
Canceled Transactions
The amount of the order is captured when a
transaction is cancelled. The amount of the
canceled order is shown in the new field
“Cancel Amount”. The user will be able to see
the amount of the order before the cashier
canceled.
Note: The amount of the canceled transaction
will not show up on the Electronic Journal
Report (used to reprint receipts).
View Signatures
In Electronic Journal, highlight a Credit Card or Electronic Check (CE) transaction, and press View Signature.
The signature is displayed and the Customer Copy of the receipt is included in the signature viewer. You can
easily see if the card was slid or entered manually (“S” for swipe, or “M” for manual are displayed in front of the
card number), the type of card, the authorization number, and the sequence number. On the Front End, if the
cashier did NOT accept the signature, the signature form is displayed with a message “Signature was rejected.
A paper copy was printed.” To capture signatures, enter UseSignaCapture=1 in the ros.ini. You can also choose
to skip the printing of the merchant copy by entering SkipPrintMerchant=1.
RETAIL USER REFERENCE MANUAL – RETAIL 7
253
RETAIL 7™ User Manual
POINT OF SALES – REGISTERS
Electronic Journal (continued)
Table 30.17 contains a description of each field contained in the Electronic Journal form.
ELECTRONIC JOURNAL FORM -- FIELD DESCRIPTIONS
FORM FIELD
DESCRIPTION
Start Date
Start date of the date range in U.S. format (MM/DD/YY)
End Date
End date of the date range in U.S. format (MM/DD/YY)
Cashier
Select a cashier via the drop down menu
Tender
Select a tender via the drop down menu
Type
Select a transaction type via the drop down menu
CardNo
Enter a card number or use the ellipse button to search for a customer
Time
Enter the start time and the end time of the range
Amount
Enter the minimum and maximum amount of the range
Trans No
Enter the beginning transaction No and the ending transaction No of the range
Start UPC / End UPC
Enter the beginning UPC No and the ending UPC No
Lane No.
Enter a specific checkstand
Tax Status
Select Tax Exempt of Food Stamp Exempt from the drop down menu
Trans Level
Select a transaction level via the drop down menu
Disc Type
Select a discount type via the drop down menu
Grid
Data in the electronic journal report are listed in the display grid columns
Table 30.17
Electronic Journal Report
This function will produce an Electronic Journal Report listing all the transactions matching the selected
criteria. This report is displayed when the Search button
on the Electronic Journal form is clicked.
Table 30.18 contains a description of each field contained in the electronic journal report.
REPORT FIELD
TYPE
FORMAT
Processed
Date report processed
Date/Time
Cashier
Cashier No
Number
Customer
Customer No
Number
Points Earned
No of points earned by customer if applicable
Number
Trans Date
Date of transaction
Date/Time
Trans Time
Time of transaction
Date/Time
Trans #
Transaction No assigned by system by cashier
Number
Trans Total
Transaction total amount
Currency
Total Tax A
Total amount for tax schedule A
Currency
Total Tax B
Total amount for tax schedule B
Currency
Total Tax C
Total amount for tax schedule C
Currency
Total Tax D
Total amount for tax schedule D
Currency
Type
Type of detail line: Tender key & applicable message
Text
Sub Type
Sub type of detail line: Transaction key description
Text
Status
Status of the detail line: Transaction type
Text
Dept
Product department
Text
Qty
Quantity recorded
Number
UPC
Product UPC/Product Description (when requested)
Text
Amt
Amount purchased
Text
Tax A, B, C, D
Checked if tax rate used
Text
FS
Checked if food stamp product
Text
These next fields are only visible if a Customer Debit/Credit card number is selected:
Card Type
Card type (Debit or Credit)
Number
Cardno
Card No
Number
Expired
Expiration date
Number
Authno
Authorization No received
Number
RefNo
Reference No
Text
Table 30.18
CALCULATION
None
None
None
None
None
None
None
None
None
None
None
None
None
None
None
None
None
None
None
None
None
None
None
None
None
Selection Criteria:
Criteria selected on the Electronic Journal form.
Sort Criteria:
Employee no. & transaction no. & line no. in ascending order.
RETAIL USER REFERENCE MANUAL – RETAIL 7
254
RETAIL 7™ User Manual
ADMINISTRATION
Close Store View System Log Files
POS Information
Reset Product
Movement
Clear Checker Login
System
Information
POS
Information
Reset Product
Movement
Clear Checker
Login
View System
Log Files
Store Close
Pickups
System Information
Monitor Tills
Security Administration
Modem for
Communication
Monitor Tills
Security
Administration
Modem for
Communication
Pickup
Cashier
Monitor Tills
Report
Notify Checkstands with
Server Information
Notify
Checkstands
Monitor Tills
Reason
Codes
View
Security
Report
Security
Report
Monitor Checkstands
Update Checkstands with
Setup Information
Serial Tracking
Settings
Wireless
Settings
Monitor
Checkstands
Update
Checkstands
Serial
Tracking
Settings
Wireless
Settings
Checkstand 1
RETAIL USER REFERENCE MANUAL – RETAIL 7
Checkstand 2
Checkstand 3
Checkstand n...
255
RETAIL 7™ User Manual
ADMINISTRATION
Close Store
The Store Close form is used to execute the
store close process. This process transfers
data from the client systems (checkstands) and
updates the Back End server databases. It also
calculates the product movement, sales, and
updates the history files. This process should
be run on a daily basis. If for some reason it is
not executed daily, then the Store Close
Recovery process will be executed. The log
displays the last step completed of the store
close and a description of the process, whether
the store close was successful or could not
connect to a checkstand.
The Store Close can be set up to run automatically at a specified time every day. This is set up in System
Information, by pressing the Setup Store Close button in the toolbar. See System Information in the
Administration Menu for more information.
Note: This process must be run after the store has closed for the day (exception: 24 hour stores – see
below). Ringing up transactions for the current day after the store close has run will result in the loss of those
transactions.
Note: If suspended transactions exist for the closing day, the following may occur depending on the Clear
Suspended Transactions setting in the System Information function.
Clear Suspended Transactions
Setting
Clear
Review
Resume
Action performed by Store Close
Clears all suspended transactions without prompting the user.
Allows user to review suspended transactions and then continue with
the store close which will clear the transactions.
All suspended transactions must be resumed from the checkstand
before the store close can proceed.
24 Hour Store: For 24-hour stores, the Store Close process can be run at any time of the day even while
transactions are being processed at the checkstand. The Store Close process will update the processing date
stamped on each transaction to the next consecutive day. If the store close cannot be run because of a system
or other problem, use the change date feature to force the update of the processing date to the next day. For
more information on running a 24-hour store, refer to the Running a 24 Hour Store topic in the Appendices.
RETAIL USER REFERENCE MANUAL – RETAIL 7
256
RETAIL 7™ User Manual
ADMINISTRATION –SETUP
View System Log Files
The View System Log Files form is used to
view information stored in the various system
logs maintained by RETAIL™. The form
displayed depends on the menu selection
chosen from the Log drop-down menu on this
form. The menu selections include: Store
Close, Update Checkstands, History
Backup, Database Error, and User Activity.
Table 31.1 contains a description of each field contained in the View System Log Files form.
VIEW SYSTEM LOG FILES -- FIELD DESCRIPTIONS
FORM FIELD
STORE CLOSE LOG
Employee
Date
Execute Time
Activity
Step
Description
UPDATE CHECKSTAND LOG
Employee
Time
Activity
At
Status
From
HISTORY BACKUP LOG
Employee
Backup Time
Status
From
DATABASE ERROR LOG
Time
Error No
Source
Description
USER ACTIVITY LOG
Employee
Date/Time
Work Station
Action Performed
Key Value
Text ID #
Table 31.1
DESCRIPTION
Displays the name of the employee performing the store close.
Displays the date of the store close.
Displays the time, when the step was executed.
Displays the name of the executed activity.
Displays the number of the step executed.
Displays the description of the step executed.
Displays the name of the employee who executed the update.
Displays the date and time of the update.
Displays the name of the executed activity.
Displays the name of the checkstand updated.
Displays the status of the update.
Displays the workstation ID of the workstation where the update was executed.
Displays the name of the employee who executed the history backup.
Displays the date and time of the Poshist.mdb backup.
Display the status of the backup.
Display the workstation ID from where the backup was executed.
Displays the date and time when the error was generated.
Displays the error number.
Displays the source of the error generated.
Displays the description of the error.
Displays the name of the employee who executed the user activity.
Displays the date and time of the activity.
Displays the workstations where the activity occurred.
Displays the activity performed (For example: delete customer, delete product).
Key value of data affected (For example: UPC code, Customer #).
Displays other critical information contained in the record affected by the activity.
RETAIL USER REFERENCE MANUAL - RETAIL 7
257
RETAIL 7™ User Manual
ADMINISTRATION –SETUP
Notify Checkstands with Server Information
The Notify Checkstands with Server Information form is used to
notify all the checkstands that the server is available. The user can
select which checkstands are to be notified by clicking in the
checkbox to select or de-select. This feature would be used if the
server becomes unavailable and the checkstands were operating in
stand-alone mode. This function will broadcast a message to each
checkstand informing that the server is available. The checkstands
would then switch back into regular mode.
Processing Restrictions:
This requires no restrictions and can be run whenever needed.
Processing Specifications:
1. Select the checkstands to be notified (usually all) by clicking in the beside the checkstand
name. Press OK to start the process.
2. The system connects to all Checkstands selected. If an error occurs, the system will prompt you
with a message “Cannot connect to some of the checkstands" "Do you still want to continue? “
If you select NO, the system will abort this function.
If you select YES, then the system will continue this function. However, the checkstands, which
caused the error, will not be notified that the server is available.
Clear Checker Login Entries
The Clear Checker login Entries form lists
those checkstands that were not properly signed
off, which caused the store closing process to
stop. This form allows the user to clear the
unnecessary entries, which hinder the store close
process.
Entries displayed are only for checkstands that
were not able to sign-off properly. In order for an Note: Signing-on to the checkstand using the same employee
entry to be cleared, the checkstand must be number listed on this screen and then signing-off will clear the
signed-off (to the desktop).
entry.
Reset Product Movement
Reset Product Movement function is used to
clear product movement entries from the
product movement table only on specific dates
when the store close process does not finish
properly while executing step #4 – Creating
Daily Product Movement (last entry written to
Store Close Log is step #3 for the day). The
store close date(s) affected will automatically
load to the drop down selection list. This
function must be completed in order to execute
a store close recovery for the affected date.
Note: Time to complete this process is dependent on the
volume of data processed.
RETAIL USER REFERENCE MANUAL - RETAIL 7
258
RETAIL 7™ User Manual
ADMINISTRATION –SETUP
POS Partitioned Display Dimensions
The POS Partitioned Display Dimensions task
gives the user the ability to manipulate the Split
Screen Display which can be used at the Front
End.
Important Note: The POS Partitioned Display
form is intended for use by the reseller and fields
should not be modified unless necessary. Any
changes made to the split screen, especially to the
alignment, may have a negative effect on the
appearance.
The Split Screen is used to display a video (.avi file) and the store logo on the right hand side. The products
which are being rung up, discounts, totals and all other Front End information are displayed on the left side of the
split screen. By default, normal screen is selected when signing on to the Front End. To select partitioned
display, sign on to the Back End, then check the box for Front End Administrator. From the Retail System
Information screen, click the Checkstand Tab. In Mode, select Split Screen from the drop-down box.
Note: The reseller or experienced user may create a logo for the Upper Right and Bottom Right areas of the
screen. These must be named botright.jpg and topright.jpg and placed in the directory C:\Program
Files\Retail\POS\BMPfiles. The dimensions must be 442x152 for the bottom right logo, and 461x159 for the top
right logo. Videos may be added in C:\Program Files\Retail\POS\Videos.
RETAIL USER REFERENCE MANUAL - RETAIL 7
259
RETAIL 7™ User Manual
ADMINISTRATION –SETUP
POS Partitioned Display Dimensions (continued)
Table 31.2 lists all of the fields on the POS Partitioned Display Dimensions form.
POS PARTITIONED DISPLAY DIMENSIONS -- FIELD DESCRIPTIONS
FORM FIELD
DESCRIPTION
Name
Displays the name of the field the changes are being applied to.
Internal Name
Displays the name the system uses for the form.
Control Type
Not available for modification.
Font button
Used to change the font on the Front End.
Name
Displays the name of the font.
Size
Displays the size of the font.
Bold
A flag indicates that the font is bold, selected by pressing the Font button.
Underline
A flag indicates that the font is underlined, selected by pressing the Font button.
Italic
A flag indicates that the font is italicized, selected by pressing the Font button.
Font Color
Select the font color by pressing the ellipsis button.
Back Color
Select the back color by pressing the ellipsis button.
Alignment
Select the alignment from the drop-down list.
Multimedia Type
Select the multimedia type displayed, either none, video, or image.
Background Type
Select the background type from the drop-down list.
Control Style
Not available for modification.
Attributes
Not available for modification.
Text
Displays the message displayed.
File Name
Displays the file name the system uses for the various parts of the screen.
Left
Not available for modification.
Top
Not available for modification.
Height
Displays the height of the field being modified.
Width
Displays the width of the field being modified.
Sample Template
Displays the position of the selected part of the form being modified.
Table 31.2
RETAIL USER REFERENCE MANUAL - RETAIL 7
260
RETAIL 7™ User Manual
ADMINISTRATION –SETUP
System Information
The System Information form is used to setup various system
related information. The types of system information setup
through tabs on this form include:
1) Defaults: Parameters used by the Back End system.
These parameters are critical to system operations.
Transaction history backup (archival) and system log files
history time frames are entered as well as configurable
attributes used in the Back End system. The Files section
is used to inform RETAIL™ of the location of certain files
used in various processes.
2) Databases: RETAIL™ database information is setup
with the help of this tab. This informs the system of the
location of the database.
3) License: This is used to display the licensee name used
by the system as well as the contents of the logo file. The
logo is a bitmap file (accessible by Microsoft Paint) that
can be easily modified. The logo file is used by the Back
End and Front End systems to print on reports and
receipts respectively. The logo file must exist in the
C:\Retail\logo.bmp directory on the Back End
computer(s) and in the C:\Program Files\Retail\POS
directory on the Front End computers. NOTE: Changing
the name of the licensee will invalidate the license.
4) Checkstands: Used to identify the network names of the
Front End checkstands.
5) Notification: Used to automatically generate an email to
notify the user of low disk space.
Note: Refer to the Running a 24-Hour Store topic contained in the Appendices
RETAIL USER REFERENCE MANUAL - RETAIL 7
261
RETAIL 7™ User Manual
ADMINISTRATION –SETUP
System Information (continued)
Table 32.1 contains a description of each field contained in the System Information form.
SYSTEM INFORMATION -- FIELD DESCRIPTIONS
FORM FIELD
DESCRIPTION
DEFAULTS
Transaction History Backup
How often transactions are to be archived from the system and written to archive files.
24 Hour Store
Flag to indicate if the store is operating as a 24-hour store.
System Log History
How long to keep system log files displayed in the View System Log Files function.
Auto Sign Off after…minutes
Enter the number of minutes the Back End will be allowed to stay idle until automatically closing down.
Default Credit Limit for Customer Default customer credit limit. This limit is displayed on the Customer Maintenance form when a
customer who has charge account privileges is being added.
Clear Suspended Transactions
Indicates how suspended transactions should be treated during store close. Options available are:
Clear=Clear suspended transactions without prompting; Review=Allow user to review suspended
transactions and proceed with the store close; Resume=User must resume all suspended transactions
from the checkstand before proceeding with the store close.
Track Weighted Items Count
Indicates if weighted items should be tracked based on a count of items sold or total weight sold in
product movement. For example, a whole chicken can be tracked as 3.5 lbs, or as 1 chicken.
Allow Alpha Updates
A flag in this box allows the entry of alpha and/or numerical characters in the Item Code.
Allow Discount While on Sale
Flag this field to allow additional discounts to be applied to an item while the product is on ad
Allow Zero Prices
Flag to allow product prices to be set at zero. The cashier can enter the price on the Front End.
Apply Best Allowance Only
Flag to indicate if best allowance is to apply when a vendor‟s product has two or more effective
allowance set up. When not set, all existing effective allowances would apply.
Require Vendor
Flag to indicate if a vendor is required when adding or editing products in the Product Maintenance
function.
Track Double Coupons
Flag to indicate whether or not double coupon counts and amounts are to be tracked and displayed on
the Till Statistics form.
Auto Store Close button
Press to set up the time of day for the automatic store close to run.
Archive Data File
The path name where the archived transaction data files is created.
Cost Changes File
No longer used.
PASSWORDS
Cashier Expire Days
Enter the number of days for the cashier password to remain valid, after which a new password must be
selected. (Optional)
Admin Expire Days
Enter the number of days for the Back End password to remain valid, after which a new password must
be selected. (Optional)
Minimum Length
Enter the minimum length of the password. (Optional)
DATA SYNCHRONIZATION
Setup Synchronization Jobs
Press to setup a job to automatically synchronize all of the tables on a set schedule.
QUANTITY HALO
Halo
Enter the maximum number of an item that may be keyed in on the Front End (for example, 10*UPC)
before a warning message is given to the cashier. (Used to prevent entry errors)
DATABASE TAB
SQL Name
The name of the computer hosting the SQL Server database.
User Name
The login ID used to access the SQL database (default „sa‟).
Password
The password to access the SQL Server.
Test Connection
Press the button to test the connection from the checkstands to the server.
LICENSEE TAB
Licensed Company Name
Displays the name of the company to which RETAIL™ is licensed and which is contained in the license
file (Retail.lic) Changing the name will invalidate the License.
Company Logo
Displays the path name where the company logo file exists. (C:\Retail\logo.bmp)
Preview Logo
Displays the logo is it has been entered in C:\Retail\logo.bmp
CHECKSTANDS
Name
Displays the network name of the Checkstands.
Refresh Link
Press to Refresh the information on the form.
Create Link
Press to add a checkstand to the system information form.
Delete Link
Highlight the name of the checkstand you would like to delete and press this button.
Deactivate
Press to activate or deactivate a checkstand.
NOTIFICATION TAB
SQL Name
The name of the computer hosting the SQL Server database.
User Name
The login ID used to access the SQL database (default „sa‟).
Password
The password to access the SQL Server. A password is required.
Test Connection
Press the button to test the connection from the checkstands to the server.
Table 32.1
RETAIL USER REFERENCE MANUAL - RETAIL 7
262
RETAIL 7™ User Manual
ADMINISTRATION –SETUP
POS Information
The POS Information form is used to setup various parameter data that will be used to support various
functions within RETAIL™. This includes 1) Checkstand Point of Sale data, 2) Discount arrangements and 3)
Tax tables.
The POS Information tab is used to enter limits, The Discounts tab is used to enter/maintain discount
defaults and configurable attributes used by the Front arrangements. The discounts are assigned to customers
in the Customer Maintenance function.
End checkstands.
The Tax tab is used to enter/maintain tax tables and
rates. Up to 4 different tax arrangements can be
entered into RETAIL™. Entry of a tax table is also
supported (refer to the Tax Table Setup topic
contained in Appendix A)
Note: Refer to the Initializing the System section in the Appendices for more information on the use of these
functions.
Table 33.1 contains a description of each field contained in the POS Information form.
POS INFORMATION -- FIELD DESCRIPTIONS
FORM FIELD
DESCRIPTION
POS INFORMATION TAB
AGE RESTRICTIONS
Configurable to allow employees to sell age-restricted products
Age 21
Enter the age allowable by law for cashiers to sell products marked as 21 for buying.
Age 18
Enter the age allowable by law for cashiers to sell products marked as 18 for buying.
BIOMETRIC DATA
Server information for systems running BioCert; fingerprints used to access front and back ends
Server IP
Enter the IP address of the server running the BioCert software
Server Port
Enter the port number for bio cert.
CHECK TENDER
Applies to the MICR reader which enables reading o f the check number by the receipt printer
Read Check
Select Yes or No to enable the receipt printer to read the check number
Account No is Check No
Select Yes to store the number from the check as the user‟s account number
Show Check Memo
Indicates if the memo field will be displayed
CHECKSTAND RECEIPT
Configurable attributes effecting the checkstand receipt
Print Employee Name
Flag to indicate if the employee name should be printed on the checkstand receipt
Print Front of Check
Flag to indicate if front of check should be printed. This option only works with tenders having the “Require
Franking” option set
Print Receipt Logo
Flag to indicate if the company‟s Logo should be printed on the checkstand receipt. Logo must be in the
logo.bmp file in the C:\POS directory on the checkstand computers.
RETAIL USER REFERENCE MANUAL - RETAIL 7
263
RETAIL 7™ User Manual
ADMINISTRATION –SETUP
POS Information (continued)
FORM FIELD
Print Authorization Code
Split Tax Total
Print Zero Tax
Print UPC
Print Customer DOB
Print Discount Category
Suppress Customer
Balances
Till Information
Print Non-Taxable Amount
Suppress Receipt Printing
Item Sequence
CHECKSTAND RECEIPT:
Buffered Receipt
Receipt Consolidate
Receipt Sort by Alphabet
Receipt Sort by UPC
CHECKSTAND SCREEN:
Ask for Card #
Ask for Salesperson ID
Display Customer Name
Display Customer Card No.
Display Charge Balance
Display Savings Messages
Pricing Level Best Price
Display Weight
Display Weight Unit
Display Discounts
Food stamp Items Tax
Exempt
Price Includes Tax
Price Includes Tax Dept.
Auto Sign Off Time
Resume Trans – Print Detail
Check Printer Status
Open Drawer on Sign Off
Show Food stamp Total
Static Product Pricing
Cashier Override No Sale
Force Resume Transactions
Force Countdown
Show Item Count
Track Scanned Items Only
Continuous Transaction No.
Max Transaction Number
Customer Card Prefix
Random Weight Prefix
Manufacturer Coupon Prefix
Ask for Password on Sign
Off
Product Point $ Value
Till Audit
Force Drawer Close
POS INFORMATION -- FIELD DESCRIPTIONS
DESCRIPTION
Flag to indicate if authorization code will be printed on receipt.
Flag to print taxes separately on the checkstand receipt
Flag to print tax total even if no tax.
Flag to print the UPC code on the checkstand receipt in addition to the product description
Indicates if customer‟s date of birth should be printed on receipt.
Indicates if the discount category (A, B, C (if product has A and B)) should be printed on the transaction line
Flag to indicate if customer balances should be suppressed from printing on receipt for in-store charge
transactions.
Indicates where the till information (Date, Time, Cashier Name) will be printed; in the header or footer
Flag to indicate if the total amount NOT taxed should be printed as separate line on the receipt following the
taxable totals.
Flag to suppress receipt printing. On the Front End, receipt can be printed by press “RP”
Indicates whether Quantity or Description will print on first line of double line printing.
Flag to buffer (not print) the receipt until the end of the transaction.
Flag to consolidate data when receipt is buffered.
Flag to sort the items alphabetically when receipt is buffered.
Flag to sort the items by UPC when receipt is buffered.
Flag to indicate Card Number must be entered at Front End.
Flag to force cashier to enter ID number before transaction. Used for Sales Person Productivity Report.
Flag to indicate Customer Name will be displayed on the checkstand screen.
Flag to indicate Card Number will be displayed on the checkstand screen.
Flag to indicate the customer‟s in-store Charge Balance will be displayed on the checkstand screen.
Flag to indicate the savings messages will be displayed on the checkstand screen.
Flag to indicate the lowest price between normal, special, and pricing level will be used. If not set, the pricing
level price will always be used (if one exists for the product).
Flag to indicate if the weight of weighted items is to be displayed in the weight field of the checkstand screen.
Displays the weight unit (selected from the drop down menu) that will be displayed in the weight field of the
checkstand screen.
Flag to indicate if the customer discount amount should be displayed on the Front-end checkstand screen.
Flag to indicate if food stamp purchases are tax exempted.
Flag to indicate if the price in the products file includes tax.
Indicates department where tax savings given to customers will be reported. Only used if Price Include Tax is
set to Yes.
Select the time the checkstands will automatically sign off.
Flag if the user wants the detail (do not flag if the user wants the summary) printed when a transaction is
resumed.
Flag to indicate if the printer status (For example, out of paper) should be checked at the beginning of every
transaction.
Flag to indicate that the system should automatically open the drawer when the cashier signs off.
Flag to indicate the system should display the current food stamp total.
Indicates if product prices will remain static during a transaction.
Indicates that the cashier will be able to override No Sale security.
Flag to indicate if the system should force the cashier to resume all suspended transactions before cashier
signs off.
Indicates if blind till balancing should be enforced at sign on.
Flag to indicate if the system will display the item count on the screen and on the receipt.
Flag to indicate if a scanned item is an item that is scanned through the scanner. Otherwise, a scanned item is
an item scanned or entered through the keyboard. This is used to track items in order to calculate checker
percentage correctly.
Flag to indicate if checkstand transaction numbers will be continuous from one day to the next. If not set, the
system will reset checkstand transaction numbers daily.
Maximum transaction number allowed before being reset to 1. Used in conjunction with Continuous
Transaction No. THE NUMBER OF TRANSACTIONS PROCESSED IN ONE DAY SHOULD NOT EXCEED
THAN THE MAX. TRANSACTION NUMBER, OTHERWISE DUPLICATE TRANSACTIONS WILL BE
CREATED IN THE SYSTEM.
Prefix used to identify scanned customer card number. Default is 004.
Prefix used to identify scanned random weight items. Default is 002.
Prefix used to identify scanned manufacturer coupons. Default is 005
Flag to force the cashier to enter a password on sign off.
Amount to use as a ratio when calculating points at the checkstand.
Flag to indicate if till audit data will be captured for all transactions.
Flag to indicate if the system should force the cashier to close the cash drawer before proceeding to a new
order.
RETAIL USER REFERENCE MANUAL - RETAIL 7
264
RETAIL 7™ User Manual
ADMINISTRATION –SETUP
POS Information (continued)
FORM FIELD
COUPONS/ DISCOUNTS:
Days
Multiple Limit
Multiple
Maximum
Tax Exempt
Apply Multiple MC
Apply Multiple SC
Allow Multiple Discounts
Item Discount Sequence
Enable Electronic Coupons
DEBIT DESIGN
DELIVERY INFORMATION
INITIAL LOAN:
Cash
Food stamp
TIME LIMITS (SECONDS):
Drawer Open
Clear Screen
TRANSACTION LIMITS:
Max Checks / Day
Max Checks / Week
Transaction Max Amount
Transaction Max Digits
Level 1 Check Msg.
Level 2 Check Msg.
Level 3 Check Msg.
Level 4 Check Msg.
Level 5 Check Msg.
RECEIPT BANNER:
Check Franking
Credit Card Header
Deposit Information
Header
Trailer
SAVINGS MESSAGE:
Customer Discount Msg
Customer ID
Customer Surcharge Msg
Frequent Shopper Message
Item Discount Message
Next use Coupon Desc1
Next use Coupon Desc2
Next use Coupon Desc3
Next use Coupon Desc4
Pricing Level Message Abbr
Pricing Level Message
Savings Message
TOTALS:
Change
Non-Taxable
Subtotal
Tax A
Tax B
Tax C
Tax D
Tender Amount
Total
DESCRIPTION
Configurable attributes and limits for coupons and discounts
Flag days to apply coupon multiple.
Displays the $ limit of coupon multiple amount when applying coupon multiple. Example if coupon multiple limit
= $1.00, coupons up to $1.00 will have the multiple applied. If this limit is used Maximum Limit will be set to
zero.
Displays the amount of coupon multiple to be applied on coupon days.
Displays the $ limit of overall coupon amounts when applying coupon multiple. Example: If Coupon Maximum
= $1.00, and a coupon is $.75 the coupon will be multiplied up to $1.00. If this limit is used than, Multiple Limit
will be set to zero.
Flag to indicate if the coupon amount is tax exempted.
Flag to indicate if coupon multiples should be applied to manufacturer coupons (scanned or MC transaction
key on Checkstand).
Flag to indicate if coupon multiple should be applied to store coupons (ST transaction key on Checkstand).
Flag to enable multiple discounts. This will allow a product to be discounted multiple times (For example: line
item discount, customer discount, and overall order discount).
Allow item discounts to be rung up before or after scanning UPC.
Flag to enable the electronic coupons feature. These coupons are automatically applied when a customer ID is
entered.
Activates the Debit Design in house gift card program.
Enter the PLU that is used to print a delivery receipt.
Amount to be loaned in at sign on
Starting drawer cash to be given as change.
Starting drawer food stamps to be given as change.
Configurable time limits
Displays the number of seconds the drawer can remain open at the end of a transaction. An alarm will be
heard when the drawer has been open longer than this limit.
Displays the number of seconds before the program clears the screen between checkstand transactions.
Configurable transaction limits
Displays the maximum number of checks that can be written by a customer per day
Displays the maximum number of checks that can be written by a customer per week
Displays the limit for amounts entered on the checkstand. Used to prevent data entry errors.
Displays the designated number of keyed digits (including decimals) that the system will accept. This will affect
the numbers of digits entered for amounts accepted by the checkstand, to prevent data entry errors.
Message on the Front End when customer does not have check writing privileges.
Message on the Front End when number of checks per day is exceeded.
Message on the Front End when number of checks per week has been exceeded.
Message on the Front End when customer does not have in-store charge account.
Message on the Front End when account balance has been exceeded.
Displays the Check Franking information.
Displays the Credit Card information.
Enter your bank‟s deposit information.
Displays the information that appears on the top of the receipt and checkstand screen.
Displays the information that appears on the bottom of the receipt and checkstand screen.
Message printed on receipt for the total amount that applies to customer discount.
Displays the customer ID number.
Message printed on receipt for the total amount that applies to customer surcharges.
Message printed on receipt for frequent shopper points awarded to the customer.
Message printed on receipt for the total amount that applies to customer item discounts.
Description 1 of electronic coupons generated for next use will be printed on receipt.
Description 2 of electronic coupons generated for next use will be printed on receipt.
Description 3 of electronic coupons generated for next use will be printed on receipt.
Description 4 of electronic coupons generated for next use will be printed on receipt.
Abbreviation displayed on the Front-end checkstand screen and receipt preceding products discounted by a
customer‟s pricing level.
Message displayed on the Front-end checkstand screen and receipt when customers receive savings based
on there assigned pricing level.
Savings message text displayed on the Front-end checkstand screen and receipt.
Allows you to format the change as displayed on the checkstand receipt.
Allows you to format the non-taxable amount as displayed on the checkstand receipt.
Allows you to format the sub-total as displayed on the checkstand receipt.
Allows you to format the tax as displayed on the checkstand receipt.
Allows you to format the tax as displayed on the checkstand receipt.
Allows you to format the tax as displayed on the checkstand receipt.
Allows you to format the tax as displayed on the checkstand receipt.
Allows you to format the tender amount as displayed on the checkstand receipt.
Allows you to format the total as displayed on the checkstand receipt.
RETAIL USER REFERENCE MANUAL - RETAIL 7
265
RETAIL 7™ User Manual
ADMINISTRATION –SETUP
POS Information (continued)
DISCOUNTS TAB
Discount Threshold
Discount Category Number
Product Category A
Product Category B
Discount Days
Discount Percent
TAX TAB
Tax Plan
Description
Identifier
Using Tax Rate
Tax Rate
Using Tax Table
Repeat Range
Repeat Tax
Tax Table
Table 33.1
The amount the customer has to purchase before the discount will be applied.
The Discount number, used to apply to a customer via Customer Maintenance.
Flag if the discount applies to products flagged as category A products.
Flag if the discount applies to products flagged as category B products.
Flag each day that discount can be used.
Displays the discount percentage to be applied.
Displays the selected tax plan.
Displays the description of the tax plan.
Displays the identifier code that will be printed on the checkstand receipt in the Front-end system.
If selected, the system will use the specified tax rate.
Displays the tax rate used by the selected tax plan.
If selected, the system will use the tax table.
Displays the amount of the repeat range of the tax table.
Displays the tax amount for the given repeat range of the tax table.
Displays the tax table entries for the tax table selected.
RETAIL USER REFERENCE MANUAL - RETAIL 7
266
RETAIL 7™ User Manual
ADMINISTRATION –SETUP
Security Administration
The Security Administration form supports the assignment of security levels and limits to checkstand
transaction keys, checkstand manager functions and Back End functions. This form also allows for the entry and
assignment of reason codes to checkstand functions and manager functions.
Note: (The setup of this data is critical to the security of the entire system)
Checkstand Functions
The Checkstand Functions tab supports entry
of attributes and limits for checkstand
transaction keys used in the Front End program
(discussed in detail at the Checkstand
Functions section of this manual). The
General tab allows the user to specify a
minimum and maximum amount that can be
entered for the transaction key. This specifies
whether to require a manager override when
the minimum is not met, and whether or not a
reason is required when using the transaction
key.
The Security Levels tab allows entry of
maximum limits by security level for a
transaction key. Click
to add an entry
for the next security level. Type the maximum
amount allowed for the security level, which
indicates whether a manager can override the
amount. Security levels NOT entered will be
allowed amounts up to the maximum specified
on the General tab. Only the highest level can
be deleted for a transaction key. This will insure
that no security level gaps exist.
Note: If you enter security level “20” for a
checkstand function, a manager will NOT be
able to override the transaction key if the
amount is greater than the amount listed in
Security Levels.
Note: For transaction keys where no amount is involved (For example: NS, SO) the system will only allow entry
of a security level required to perform the function. The Security Levels tab will not be accessible for these
transaction keys.
RETAIL USER REFERENCE MANUAL - RETAIL 7
267
RETAIL 7™ User Manual
ADMINISTRATION –SETUP
Checkstand Functions (continued)
Table 34.1 contains a description of each field contained in the Checkstand Functions tab.
CHECKSTAND FUNCTIONS – FIELD DESCRIPTIONS
FORM FIELD
DESCRIPTION
Transaction Key
Displays the description of a selected transaction key function.
Key List
Itemizes the checkstand keys and descriptions being administered in this form.
GENERAL TAB
Minimum
Minimum amount allowed for a selected transaction key.
Maximum
Maximum amount allowed for a selected transaction key.
Allow Reason Code
Flag designating if reason codes are allowed for this transaction key.
Require Manager Override
Flag if manager override is required on the minimum amount.
Update GL
Not applicable to this version.
Reasons Required
Flag designating if a reason code is required when the transaction key is used.
SECURITY LEVELS TAB
Level
Security level that entry applies to.
Amount
Maximum amount allowed for the transaction key for the security level.
Override
Flag if a manager override is allowed for a particular level of security.
Table 34.1
Manager Functions
The Manager Functions tab allows entry of a
security level and whether or not to prompt for
reason codes for checkstand manager
functions. The manager functions are
displayed on the checkstand manager form
when a MG command is used. Select a
function, select the security level for the
function and indicate if reasons are required
for the function. The security level will then
restrict access to the function based on the
employee‟s assigned security level
Table 34.2 contains a description of each field contained in the Manager Functions tab of the Security
Administration form.
MANAGER FUNCTIONS -- FIELD DESCRIPTIONS
FORM FIELD
DESCRIPTION
Function
Displays the description of a selected manager function.
Function (Column Heading)
Itemizes the 9 manager functions being administered in this form.
Description Column
Displays the descriptions of the 9 itemized manager functions.
General Tab
Security Level
Displays the selected security level (from the drop-down menu) that can execute the function.
Allow Reason Code
Flag designating if reason codes are allowed for this transaction key.
Reasons Required
Flag designating if a reason code is required when the transaction key is used.
Table 34.2
RETAIL USER REFERENCE MANUAL - RETAIL 7
268
RETAIL 7™ User Manual
ADMINISTRATION –SETUP
Security Administration (continued)
Toolbar
The following describes the functions supported by the toolbar located on the Security Administration form.
Button
Description
Exits the current window.
Saves your entries or changes for the current record.
Helps to enter reason codes for a checkstand transaction or manager function. (Refer to the
Reason Codes topic in this section)
Activates the context-sensitive help.
Reason Codes
Click the Reason Codes
button from the
Security Administration form to access the
Reason Codes form. This form allows entry of
reason codes for checkstand transaction keys
and manager functions. When reason codes
are entered and the Reasons Required field is
flagged, the reason codes will be displayed on
the Front End checkstand screen when the
transaction key or manager function is used.
The cashier will then be required to select a
reason code. Transactions assigned a reason
code can be reviewed by printing a report with
the Print Transactions by Reason Report
function.
Table 34.5 contains a description of each field contained in the Reason Codes form.
REASONS CODES -- FIELD DESCRIPTIONS
FORM FIELD
DESCRIPTION
Transactions Key
Displays the transaction key code selected.
Description
Displays the description of the selected transaction key.
Reason Code
Displays the reason code id assigned by system.
Description
Displays the reason code description that will display at the Checkstand.
Table 34.5
RETAIL USER REFERENCE MANUAL - RETAIL 7
269
RETAIL 7™ User Manual
ADMINISTRATION –SETUP
Synchronize Checkstands with Setup
The Synchronize Checkstands process is used to update the
checkstands with all the latest System Information whenever
you are adding or editing the following:
POS Information
Sections
Tenders
Departments
Work Stations
Tax Table
Currencies
Reason Codes
Transactions Keys
Dimensions
User Menus
Click on Synchronize Checkstands with Setup from the
Administration menu under the Maintenance sub-menu to
update your checkstands after making changes to your data.
This process will update all of your checkstands immediately,
and the changes will take effect for the next transaction.
Wireless Settings
The Wireless Settings form is used to maintain settings that
affect the use of the RETAIL™ Wireless program. The settings
are defined as follows:
Update Stock On Hand – Indicates if stock on hand should be
updated immediately when using the Inventory Count
function. If set to blank, then the stock on hand will be updated
from the Inventory Count function in the Backend module.
Play sound - Indicates if a sound will be played when an error message is displayed.
Use Cases as Default - Indicates that cases will be the default unit of measure of goods received or ordered in
the DSD and Ordering module. If set to blank, then units will be the default unit of measure for received or
ordered goods.
Display Names - Indicates that department, section, and vendor names should be displayed on the screen. If it
is set to blank, then department, section, and vendor numbers will be displayed.
Maximum Log Size – Type maximum size of log file (In MB – Mega Bytes). The Log file will not exceed this size
and will open a new file.
RETAIL USER REFERENCE MANUAL - RETAIL 7
270
RETAIL 7™ User Manual
ADMINISTRATION – MAINTENANCE
Administration - Maintenance
Accounting G/Ls
Accounting
G/Ls
Change
Password
Employee
Maintenance
Print Employee
Report
Update Checkstands
with Employees
Information
Employees
View
Employee
Report
Update
Checkstands
View
Employee
Report
Security
Levels
Vendor
Maintenance
Sections
Vendors
View Section
Report
Section
Report
Find Vendor
View Vendor
Report
Vendor Report
RETAIL USER REFERENCE MANUAL - RETAIL 7
Departments
Employee
Report
View Dept
Report
Checkstand 1
Section
Maintenance
Department
Maintenance
Checkstand 2
Department
Report
Checkstad n...
Tender Maintenance
Templates Maintenance
Tender
Maintenance
Templates
Maintenance
Select Tender
Currency
Maintenance
Tenders
Report
Currency
Conversion
Tenders
Report
271
RETAIL 7™ User Manual
ADMINISTRATION
Employee Maintenance
The Employees form is used to add, edit, and delete
employee information. The employee information will be
added directly into the system for use by the Back End
module. Click the Security
button to display the
Front End and Back End security levels established in
the system (refer to the Security Levels topic below).
This will allow the user to assign the appropriate security
levels to the employee. Passwords for the Checkstand
(Cashier) and Back End are maintained through this
form as well. If the Biometric option has been installed,
the employee‟s fingerprints can be added through this
form.
Note: The Checkstands must be updated with the
employee information once you have finished your
updates by using the Synchronize Checkstands with
Employees.
This will ensure that the Checkstand database contains the most current employee data for use by the Front
End module.
Note: When deleting an employee, an entry will be created in the user activity log in order to provide an audit
trail of data deleted from the system. (Refer to the User Activity Tracking topic in the General Topics section)
Table 35.1 contains a description of each field contained in the Employees form.
EMPLOYEES - FIELD DESCRIPTIONS
FORM FIELD
Employee Number
Employee Name
Employee #
Last Name
First Name
SSN
D/L#
Birth Date
Job Title
Cashier Security
Admin Security
Back End Profile
Purchases
Active
User Name
Setup Biometric Data
Remove Biometric Data
Front End Password
Back End Password
Created
Modified
Modified By
Memo
Back End Security Level
Table 35.1
DESCRIPTION
Drop down list to search for an existing employee record by employee number.
Drop down list to search for an existing employee record by employee name.
System-generated employee number.
Employee‟s last name.
Employee‟s first name.
Employee‟s social security number. (Optional)
Employee‟s driver license number.
Employee‟s date of birth. Used to verify age on products that must be verified, such as alcohol.
Employee‟s job title.
Assign a Checkstand security level to this employee.
Assigns a Manager security level to this employee.
Select a profile to allow access to back end screens.
Employee‟s year-to-date amount of purchases from the store. (Currently not available).
Flag to indicate employee‟s status (Set = active - Not Set = inactive). If it is set to inactive, the
employee will not be able to access the RETAIL™ system.
Enter the User Name the cashier will enter to sign on to the system.
Press to capture the employee‟s fingerprint to use to access the front and back end
Press to remove employee‟s fingerprint from the system
Employee‟s password for the Checkstand POS portion of the system.
Employee‟s password for the Backend portion of the system.
The employee record creation date.
The date the record was modified.
The name of the employee who last changed the information.
Miscellaneous notes entered for the employee.
Displays the back end security level.
RETAIL USER REFERENCE MANUAL – RETAIL 7
272
RETAIL 7™ User Manual
ADMINISTRATION - MAINTENANCE
Employee Maintenance (continued)
Clicking on the
buttons next to the security
level fields to display forms listing security
levels for the Checkstand and Back End
functions. These security levels are established
using the Security Administration function.
For the Checkstand, security levels for both the
manager functions and Checkstand functions
are displayed. Each manager function is
displayed with the assigned security level. For
the Checkstand functions, each amount
established for each security level is displayed
for each transaction key.
Reset Password
Force Reset Password will require the employee to change his or her
password. When these fields are flagged from the Employees form, the
password is reset. The next time this employee logs on to either the
checkstand or Back End the prompt will appear to key in a new password.
Toolbar
The following describes the functions supported by the toolbar located on the Employees form.
Button
Description
Exit the current window.
Print an employee report. (Refer to the Print Employee Report topic in this section)
Display the employee report on the screen. (Refer to the Print Employee Report topic in this
section)
Save your entries or changes for the current record.
Add an Employee Function.
Edit an Employee Function.
Flag the employee as deleted in the system. The employee will be flagged deleted and
inactive when the Synchronize Checkstands with Employees function is executed. The
employee‟s name will still remain in the Employee table in the database, in order to preserve
the audit trail.
Activates the context-sensitive help.
RETAIL USER REFERENCE MANUAL – RETAIL 7
273
RETAIL 7™ User Manual
ADMINISTRATION - MAINTENANCE
Security Administration
Assigning security to Front End Transaction keys
Assigning security to Front End Manager functions
Access the Security Administration function under the SETUP section of the Administration menu and
complete the following tasks: (The setup of this data is critical to the security of the entire system)
Assigning security to Front End Transaction Keys
Establish security levels, limits and reason codes
for the Front End functions. For each Front End
Function designate an overall minimum and
maximum amount that can be completed at the
Front End as well as a limit for each security
level. Indicate if reasons are required when using
the function and enter the reason codes for the
function by pressing the Reason Code button.
Assigning security to Front End Manager functions
Establish security levels, limits and reason codes
for the Front End manager functions. For each
Front End Manager Function designate the
security level required to complete the function
and indicate if reasons are required when using
the function. Enter reason codes by clicking on
the Reason Code button. The Reason Code field
will only be available on certain functions. If it is
grayed out, reasons cannot be assigned to that
specific function.
RETAIL USER REFERENCE MANUAL – RETAIL 7
274
RETAIL 7™ User Manual
ADMINISTRATION - MAINTENANCE
Department Maintenance
The Department Maintenance form is used to enter
and maintain data related to departments. An
unlimited number of departments can be added into
RETAIL™ providing the ability to establish an
unlimited number of product categories. Attributes
entered for the department will only effect
transactions that are rung up to the department from
the checkstands. The Attributes tab allows
maintenance of various attributes related to the
department.
The Attributes tab will allow entry of data entry limits
(lalo and halo) and UPC links for coupon and
discount amounts.
Note: When products are added and assigned to a department, the attributes for the department will
automatically be applied to the product. These attributes can be edited for the product in Product Maintenance if
required.
Table 36.1 contains a description of each field contained in the Department Maintenance form.
DEPARTMENT MAINTENANCE -- FIELD DESCRIPTIONS
FORM FIELD
DESCRIPTION
Dept No
Displays the number of the department being added or edited.
Sub No
Displays the sub number of the department being added or edited. Up to 9 sub-departments can exist for a
department. Sales are tracked to the department level but sub-departments allow assignment of different
attributes
Dept Name
Displays the name of the department being added or edited
Modified
Displays the last date and time when the current department was modified
Modified By
Displays name of person who last modified the department
DEPARTMENT LIST
Displays department #, sub #, name and department names in the system
ATTRIBUTES TAB
Food Stamp
Check if items can be paid with food stamps
Hash Dept.
Flag to indicate if department is a non-sale department (For example, postage stamps)
Require Auth
Flag to indicate authorization is required to ring into an open department
Flag if open department rings should be negative, for example, Bottle Returns. If items assigned to this
Negative Department
department should also ring up negatively, then enter NegativeItemsIfDepartmentNegative=1 in the ros.ini
Not Accumulate
Flag to indicate that this department or items in this department will not collect Frequent Shopper Points.
Unit of Measure
Unit of measure assigned to products in this department
Scale
Flag to indicate products in this department need to be weighed on the Front End
Gift Card Department
Flag if using Gift Card software
Cash Card Department
Flag if using Cash Card on the front end
Verify Age
When flagged, prompts the Checkstand user for the date of birth of the customer to an open department sale
Valid Age
Displays the minimum age of the customer allowed to buy an open department
Disc A - B
Check if Category A and/or B discounts will apply to this department
Line Item Discount
Check if a line item discount can be applied to items rung up in this department.
Percent
Displays the % discount that applies to a department, and all sections and all products under this department.
This is not dependent upon any discount categories that may or may not be assigned.
Tax A - D
Check appropriate tax tables assigned to this department
MIISCELLANEOUSL TAB
Lalo Limit
Specifies the minimum amount of transaction that can be rung up directly to the department
Halo Limit
Specifies the maximum amount of transaction that can be rung up directly to the department
Coupon Link
Assign product UPC to be used to track coupon (department coupon and mfg double coupon) amounts
deducted from sales
Electronic coupon Link
Assign product UPC to be used to track electronic coupon amounts deducted from sales
Discount Link
Assign product UPC to be used to track discount amounts deducted from sales
Aggregate Department
Displays the assigned department to be the aggregate of a selected department.
Table 36.1
RETAIL USER REFERENCE MANUAL – RETAIL 7
275
RETAIL 7™ User Manual
ADMINISTRATION - MAINTENANCE
Department Maintenance (continued)
Toolbar
The following describes the functions supported by the toolbar located on the Department Maintenance form.
Button
Description
Exit the current window.
Print a Department report. (Refer to the Department Report topic in this section)
Display the Department report on the screen. (Refer to the Department Report topic in this
section)
Save your entries or changes for the current record.
Add a New Department function.
Edit a Department function.
Activates the context-sensitive help.
Department Report
The Department Report function will produce a Department report listing departments and sub-departments
currently in the system. This function is executed when
or
is selected.
Table 36.2 contains a description of each field contained in the Department report.
Report field
Description
Format
Calculation
Dept No
Department number
Number
None
Sub No
Sub-department number
Number
None
Name
Department name
Text
None
Date Modified
Last time department was modified
Date / Time None
Modified By
Employee number who last modified the department
Number
None
Food Stamps
Indicates if food stamp items can be rung to the department
N/A
None
Hash
Flag to indicate if department is a non-sale department (For
example, postage stamps)
Discount A
Indicates if discount A applies to this department
N/A
None
Discount B
Indicates if discount B applies to this department
N/A
None
Unit of Measure
Unit of measure to be used on manual weight items rung into
Text
None
the department
Coupon Link
UPC number where coupons used are tracked for the
Number
None
department
Discount Link
UPC number where discounts availed are tracked for the
Number
None
department
Halo Limit
Maximum amount a transaction can be rung to the dept
$ Amount
None
Lalo Limit
Minimum amount a transaction can be rung to the dept
$ Amount
None
Tax A
Indicates if Tax schedule A applies to items rung to this dept.
N/A
None
Tax B
Indicates if Tax schedule B applies to items rung to this dept.
N/A
None
Tax C
Indicates if Tax schedule C applies to items rung to this dept.
N/A
None
Tax D
Indicates if Tax schedule D applies to items rung to this dept.
N/A
None
Table 36.2
RETAIL USER REFERENCE MANUAL – RETAIL 7
276
RETAIL 7™ User Manual
ADMINISTRATION - MAINTENANCE
Selection Criteria:
Selection criteria consist of all the departments that currently exist in the system.
Sort Criteria:
Department - Ascending.
Sub Department - Ascending.
Section Maintenance
The Section Maintenance form is used to
enter/maintain data related to sections. An
unlimited number of sections can be added into
RETAIL™ providing the ability to establish an
unlimited number of product categories.
Attributes entered for the section will only effect
transactions that are rung up to the section from
the checkstands.
When adding a section, the attributes for the
department selected will automatically be
applied to the section. In edit mode, if the
department of the section is changed, the
system will prompt as to whether or not the
attributes for the new department should be
applied to the section.
Table 37.1 contains a description of each field contained in the Section Maintenance form.
SECTION MAINTENANCE -- FIELD DESCRIPTIONS
FORM FIELD
DESCRIPTION
Section #
Displays the number of the section being added or edited
Section Name
Displays the name of the section being added or edited
Department
Displays the department name to which this section belongs
Modified
Displays the last date when the current section was modified
Modified By
Displays name of person who last modified the section
SECTION LIST
Displays section #, name and department of sections in the system.
Schedule
Product Schedule # assigned to this section. Limits when products can be purchased.
Unit of Measure
Unit of measure assigned to products in this section
Verify Age
When flagged, prompts the Checkstand user to enter the date of birth of the customer to an open section
sale.
Valid Age
Displays the starting age of the customer allowed to buy to an open section sale.
Unit of Measure
Unit of measure assigned to products in this section
Disc A – B
Check if Category A and/or B discounts will apply to this section.
Tax A – D
Check appropriate tax tables assigned to this section.
Table 37.1
RETAIL USER REFERENCE MANUAL – RETAIL 7
277
RETAIL 7™ User Manual
ADMINISTRATION - MAINTENANCE
Section Maintenance (continued)
Toolbar
The following describes the functions supported by the toolbar located on Section Maintenance.
Button
Description
Exit the current window.
Print the Sections report. (Refer to the Sections Report topic in this section)
Display the Sections report on the screen. (Refer to the Sections Report topic in this section)
Save your entries or changes for the current record.
“Jump” to the Add a Section function.
“Jump” to the Edit a Section function.
Sections Report
The Sections Report function will produce a Sections report listing sections currently in the system. . This
function is executed when
or
is selected from the Section Maintenance form.
Table 37.2 contains a description of each field contained in the Sections report.
Report field
Description
Section
Section number
Name
Section name
Department
Department section assigned to
Modified Date
Last time section was modified
Modified By
Employee number who last modified the section
Food Stamps
Indicates if food stamp items can be rung to the section
Discount A
Indicates if discount A applies to this section
Discount B
Indicates if discount B applies to this section
Unit of Measure
Unit of measure to be used on manual weight items
rung into the section
Effective Schedule
Product schedule assigned to the section
Tax A
Indicates if Tax schedule A applies to items rung to this
section
Tax B
Indicates if Tax schedule B applies to items rung to this
section
Tax C
Indicates if Tax schedule C applies to items rung to this
section
Tax D
Indicates if Tax schedule D applies to items rung to this
section
Format
Number
Text
Number
Date/ Time
Number
N/A
N/A
N/A
Text
Calculation
None
None
None
None
None
None
None
None
None
Number
N/A
None
None
N/A
None
N/A
None
N/A
None
Table 37.2
Selection Criteria:
Selection criteria consist of all sections that currently exist in the system.
Sort Criteria:
Section - Ascending.
RETAIL USER REFERENCE MANUAL – RETAIL 7
278
RETAIL 7™ User Manual
ADMINISTRATION - MAINTENANCE
Tender Maintenance
The Tender Maintenance form is used to add
and edit tender information. An unlimited
number of tenders can be supported by
RETAIL™. A pre-configured set of tenders is
distributed with the system (refer to Set
Defaults topic below). Only certain attributes
will be available for edit in regards to these
tenders. However, for all other tenders added to
the system, all attributes are available for
modification. Tenders can be assigned to
currencies entered in the system in order to
facilitate
currency
conversion
at
the
Checkstand (Refer to the Foreign Currencies
topic in the Appendices). The tender form is a
powerful tool that allows the user to configure
and limit the way tenders are used in the
Checkstand system. The General tab is used
to maintain general attributes and amounts for
the tender.
The Limits tab is used to enter
various limits for functions related to
the tender, such as refunds and
pickup amounts.
The Miscellaneous tab is used to
setup prompts on the Front End for
the tender. For example, to collect
additional customer information.
The Electronic Service tab is used
to enter data related to electronic
transactions: Credit, Debit, EBT
Cards.
Table 38.1 contains a description of each field contained in the Tender Maintenance form.
TENDER MAINTENANCE – FIELD DESCRIPTIONS
FORM FIELD
DESCRIPTION
Tender ID #
Displays the unique identifier number assigned by the system for the tender.
Tender Code
Displays the Checkstand code used for the tender.
Tender Name
Displays the tender description.
Tender Type
Displays the general classification for the tender.CA: used for Credit, Debit, EBT, and Gift. CK: used for
checks and WIC. CH: used for in-store charge (MI)
Currency
Displays the name of the currency in which the tender is valued.
Modified
Displays the date and time when the tender was last modified.
Modified By
Displays the name of the employee who last modified the currently viewed tender.
GENERAL TAB
Active
Flag to activate tender for Checkstand tendering. If this flag is not set, then the tender will not be accepted
for transactions at the Checkstand.
Require Mgr Auth
Flag to indicate if manager authorization is required for the tender.
Depositable
Flag to indicate if the tender can be deposited.
Monitor
Flag to indicate if the tender can be monitored through monitor tills function
Accept for Change
Flag to indicate if the tender can be given out as change. It will then display as an option in the change
tender field for itself and other tenders.
Use MSR
Flag to indicate if a magnetic swipe reader can be used to gather information for the tender.
RETAIL USER REFERENCE MANUAL – RETAIL 7
279
RETAIL 7™ User Manual
ADMINISTRATION - MAINTENANCE
Tender Maintenance (continued)
TENDER MAINTENANCE – FIELD DESCRIPTIONS (CONTINUED)
FORM FIELD
DESCRIPTION
Require ID
Flag to indicate if an ID is required to accept the tender. The cashier will be prompted to enter a customer
id on the order.
Valid ID
Flag to indicate if valid customer ID must be entered to accept the tender.
Secondary Id
Flag to indicate is a secondary Id must be entered to accept the tender. Secondary Id checks check
writing privileges against the secondary id entered via the customer maintenance form.
Require Franking
Flag to indicate if franking is required for the tender.
Open Drawer
Flag to indicate if the cash drawer is to be opened when the tender is used.
Track Count
Flag to indicate if tender counts should be tracked as well as the amount.
Allow Media Swap
Flag to indicate if media swaps can be done for the tender at the Checkstand.
Print Tender Count
Flag to print the number of transactions a particular tender has in the Front-end till statistics.
Tender Amount
Required
Flag to indicate if amount must be entered to use the tender. If not flagged then the tender can be entered
without an amount and the order will be tendered for sale.
Min
Displays the lowest value of tender that can be accepted.
Max
Displays the highest value of tender that can be accepted without an approval. An mgr override will be
required if this max is exceeded.
Negative Amount Required
Flag to indicate if an amount needs to be entered when the tender is in a negative state. Example when
sale is a refund only.
Overall Max
Displays the absolute highest value of tender that can be accepted. An mgr override will not be allowed
for this maximum.
LIMITS TAB
Refund OK
Flag to indicate if the tender can be given out as refund.
Require Mgr Auth
Flag to indicate if manager authorization is required to give the tender as refund
Max
Displays the highest refund that can be given out without an approval.
Overall Max
Displays the absolute highest value of tender that can be given out as refund.
Pickups
Allow Pickups & Loans
Flag to indicate if pickups or loans can be made to the till for the tender.
Till Limit
Displays the till pickup limit for tender where a soft warning is issued.
Mandatory Limit
Displays the till pickup limit for tender where a mandatory warning is issued and tender pickup must be
done.
Change
Change Tender
Displays the type of tender that can be given out as change to this tender.
Message
Displays the message when change for the tender is given.
Max
Displays the highest amount of change (usually cash back) that can be given out for this tender. This
maximum can be overridden by amount of change allowed to a customer in the Customer Maintenance
function. This can be a flat dollar amount or a percentage (percentage of sale).
%
Flag to indicate that the Max field is in percentage. Otherwise, Max field is in dollar amount.
MISC TAB
Prompt for Information
Flag to indicate if the user will be prompted to enter data for the tender. (For example, serial number).
Data entered will be tracked on the transaction and can be reported on using the Electronic Journal
function.
Message
Message that should be displayed when prompting for data.
ELEC SRVC TAB
Require Ext Auth
Flag to indicate if external approval is required for the tender.
Time Allowed
Displays the maximum acceptable delay allowed to wait for an external payment authorization.
Balance Inquiry
Flag to indicate if balance inquiry is allowed for Electronic Tenders (ET).
Partial Amount
Flag to indicate if the Electronic Tender can pay a portion of an order.
Manual Authorization
Flag to indicate if manual authorization is allowed for the Electronic Tender.
Require Gen #
Flag to indicate if gen number is required for electronic benefits.
Require Pin #
Flag to indicate if a pin number must be entered for the Electronic Tender.
Require Expiration
Flag to indicate if an expiration date is required for the Electronic Tender.
Stand-In Approval
Flag to indicate if stand in approval is allowed for the Electronic Tender.
Require Luhn Check
Flag to indicate if luhn check is to be done locally for the Electronic Tender.
Table 38.1
RETAIL USER REFERENCE MANUAL – RETAIL 7
280
RETAIL 7™ User Manual
ADMINISTRATION - MAINTENANCE
Tender Maintenance (continued)
Toolbar
The following describes the functions supported by the toolbar located on the Tender Maintenance form.
Button
Description
Exit the current window.
Print a Tenders report. (Refer to the Tenders Report topic in this section)
Display the Sections report on the screen. (Refer to the Tenders Report topic in this section)
Save your entries or changes for the current record.
Press to Add a Tender.
Press to Edit a Tender.
Press to Add or Edit a Currency. (Refer to the Currency Maintenance topic in this section.
Display the Currency Conversion form to convert amounts between different currencies.
(Refer to the Foreign Currencies topic in the Appendices)
Activates the context-sensitive help.
Set Defaults
There are several pre-configured tenders included in
RETAIL™: “CA”–Cash, “CK”-Check, “CC”–Credit
Card, “DC”-Debit Card, “FS”- Food Stamps, “CP”Coupons, “MI”- In-store Charge, “WC” -WIC, “Wic
CVV” – Wic CVV Vouchers, “SN” –Store Coupons,
“EF”-Electronic Food stamps and “EC” –Electronic
Cash, and
“CE” – Check that has been
electronically converted (used with Telecheck or
Solupay), . Default settings for these tenders can be
reset at any time by clicking
button. This
will prompt a message (refer to the dialogue box
figure on the right) to confirm the resetting of the
tender attributes.
Note: “SN” is no longer used as a tender. Store
Coupons are now applied as discounts in Retail.
This can be flagged Inactive.
RETAIL USER REFERENCE MANUAL – RETAIL 7
281
RETAIL 7™ User Manual
ADMINISTRATION - MAINTENANCE
Tender Maintenance (continued)
Select a Tender Form
The Select a Tender form lists all tenders that have been
set up in the system. This form is displayed when the
button next to the Tender Code field on the Tender
Maintenance form is clicked. Double-click on the Tender
Code to retrieve the tender for a detailed viewing and
modifying.
Table 38.2 contains a description of each field contained in the Select a Tender form.
SELECT A TENDER FORM– FIELD DESCRIPTIONS
FORM FIELD
DESCRIPTION
Code
Lists all the tender codes in the system
Name
Displays the description of all the tenders
Table 38.2
Currency Maintenance Form
The Currency Maintenance form is used to add
and/or maintain different currencies for currency
conversion purposes. Currencies are then assigned to
the tenders. The local currency is always represented
as currency ID “1” with a value of 1.00. This form is
displayed when you click the Currency button
the toolbar in the Tender Maintenance form.
on
Table 38.3 contains a description of each field contained in the Currency Maintenance form:
CURRENCY MAINTENANCE FORM– FIELD DESCRIPTIONS
FORM FIELD
DESCRIPTION
No
Displays the list of all ID numbers of the set up currencies in the system.
Description
Displays the names of all the currencies in the system.
ID
Displays the ID number of the retrieved currency or the ID number assigned by system sequentially
in Add mode.
Description
Displays the name of the retrieved currency, or the currency name entered by user in Add mode.
Symbol
Displays the symbol assigned by user of the retrieved currency.
Displays the current value of the denomination in the local currency (conversion rate).
Value
Created
Displays the date and time the currency was created.
Modified
Displays the date and time the currency was last modified.
Modified By
Displays the name of the employee who set up the currency and/or last modified the currency.
Table 38.3
RETAIL USER REFERENCE MANUAL – RETAIL 7
282
RETAIL 7™ User Manual
ADMINISTRATION - MAINTENANCE
Tender Maintenance (continued)
Tenders Report
The Tenders Report function will produce a Tenders report listing all tenders currently in the system. This
function is executed when
or
is selected from the Tender Maintenance form.
Table 38.4 contains a description of each field contained in the Tenders report.
Report field
Description
Tender #
Unique identifier number for the tender.
Tender Code
Checkstand code used by user.
Tender Name
Description of the tender.
Tender Type
General classification for the tender. CA: used for
cash, credit, debit, EBT, and gift. CK: used for
checks and WIC. CH: used for in-store charge (MI).
Depositable
Indicates if tender can be deposited.
Require ID
Indicates if an ID is required for the tender.
Active
Indicates if tender is currently active.
Currency ID
Currency ID associated to the tender and in which it
is valued.
Currency Description
Currency name associated to the tender.
Refund OK
Indicates if tender can be used/given out for refund.
Require MGR Override
Indicates tender transaction requires a manager
override to be completed if Require MGR Override
is equal to “Yes”. The tender transaction is allowed
to be completed when the value is No.
Format
Number
Text
Text
Text
Calculation
None
None
None
None
N/A
N/A
N/A
Number
None
None
None
None
Text
N/A
N/A
None
None
None
Table 38.4
Selection Criteria:
Selection criteria consist of all tenders that currently exist in the system.
Sort Criteria:
Tender # - Ascending.
Vendor Maintenance
The Vendor Maintenance form is used to
add, edit and delete vendor information.
Note: When deleting a vendor, an entry will
be created in the user activity log in order to
provide an audit trail of data removed from the
system. (Refer to the User Activity Tracking
topic in the General Topics section)
RETAIL USER REFERENCE MANUAL – RETAIL 7
283
RETAIL 7™ User Manual
ADMINISTRATION - MAINTENANCE
Vendor Maintenance (continued)
Table 39.1 contains a description of each field contained in the Vendor Maintenance form.
VENDOR MAINTENANCE – FIELD DESCRIPTIONS
FORM FIELD
DESCRIPTION
Vendor ID
Displays all of the vendor numbers that can be selected (disabled in add mode)
Vendor ID
Displays the vendor number assigned by RETAIL™
Discount
Displays the discount given by the vendor. Discount is reflected on purchase orders and
invoices.
Name
Displays the name of the vendor.
Contact
Displays the name of the person to contact.
Address 1
Displays line 1 of the vendor‟s address.
Address 2
Displays line 2 of the vendor‟s address.
City
Displays the city of the vendor‟s address.
State
Displays the state of the vendor‟s address.
Zip
Displays the zip code of the vendor‟s address.
Phone #
Displays the vendor‟s phone number.
Fax #
Displays the vendor‟s fax number.
Modem #
Displays the vendor‟s modem number.
DSD
Flag to indicate if the vendor delivers products directly to the store.
Misc. 1
Displays miscellaneous information for the vendor.
Misc. 2
Displays miscellaneous information for the vendor.
Memo
Displays miscellaneous information of the vendor.
Created
Displays the date and time when this vendor was created.
Modified
Displays the date and time when this vendor was last modified.
Modified by
Displays the name of person who made the last modification.
Table 39.1
RETAIL USER REFERENCE MANUAL – RETAIL 7
284
RETAIL 7™ User Manual
ADMINISTRATION - MAINTENANCE
Vendor Maintenance (continued)
Toolbar
The following describes the functions supported by the toolbar located on the Vendor Maintenance form.
Button
Description
Exit the current window.
Print a Vendor report. (Refer to the Vendor Report topic in this section)
Display the Vendor report on the screen. (Refer to the Vendor Report topic in this section)
Save your entries or changes for the current record.
Press to Add a Vendor.
Press to Edit a Vendor.
Delete the vendor currently displayed. The system will only allow you to delete a vendor if the
vendor has no associated POs.
Search for a vendor. (Refer to the Find Vendor topic in this section)
Enter a vendor % up-charge. (Refer to Vendor Up-charge topic in this section)
Activates the context-sensitive help.
Find Vendor
The Find Vendor form is used to search for a Vendor by
Name, ID, City, State, Zip, Phone, Contact, or Modified Date.
This form is displayed when the Find Vendor
button is
clicked in the Vendor Maintenance form. All vendors matching
the specified criteria will be displayed when the
button is clicked from the form; the vendor selected and OK
clicked. The vendor information will be displayed on the
Vendor Maintenance form.
RETAIL USER REFERENCE MANUAL – RETAIL 7
285
RETAIL 7™ User Manual
ADMINISTRATION - MAINTENANCE
Vendor Maintenance (continued)
Vendor Up-charge
The Vendor Up-charge form is used to enter
percentage up-charge amount that will be applied to the
price data printed on purchase orders and invoices. This
feature would be used only when up-charges will be
charged to customers at the checkstand. The same upcharge percentage charged to customers should be
loaded here. This will then ensure that the gross
margins printed on the purchase orders and invoices
correctly reflect the price that will be charged when the
product is sold. This form is displayed when the Setting
button is clicked from the Vendor Maintenance
form toolbar. Click OK to apply the % up-charge to the
purchases.
Vendor Report
The Vendor Report function is executed by selecting
or
on the Vendor Maintenance form. The
Vendors Report form will display allowing selection of
types of vendors to print on the report: DSD, Non-DSD
Only, or both.
Table 39.2 contains a description of each field contained in the Vendor report, layout of which is contained in
Appendix F.
Report field
Vendor ID
Name
Phone #
Address 1
Address 2
City
State
Zip Code
Discount
Description
Vendor #
Vendor name
Vendor phone #
Vendor Address
Vendor P.O. Box
Vendor city
Vendor state
Vendor zip
Vendor Discount %
Format
Number
Text
Text
Text
Text
Text
Text
Text
Number (percentage)
Calculation
None
None
None
None
None
None
None
None
None
Table 39.2
Selection Criteria:
Selection criteria consist of all vendors that currently exist in the system.
Sort Criteria:
DSD/Non-DSD
Vendor No - Ascending.
RETAIL USER REFERENCE MANUAL – RETAIL 7
286
RETAIL 7™ User Manual
ADMINISTRATION - MAINTENANCE
Templates Maintenance
The Templates Maintenance form is used to
set up templates used by the RETAIL™
Wireless module and the Quick Add/Edit
function in the Back End. Templates are used
to define the fields that will be displayed on the
form used in a specific function. This provides a
very flexible way of defining the look and use of
a screen.
Each template type from the drop down menu
represents the functions for which templates
can be defined. Shelf Audit, DSD, Inv Count
and Order are functions supported by
RETAIL™ Wireless while Quick Add and
Quick Edit are functions available in the Back
End.
To create and define a template:
1.
2.
3.
4.
5.
6.
Click the Add
button from the toolbar.
Select a template type from the Template Type list.
Type a name and a description.
Select fields that will be available on the template from the Products Field.
De-select the product by clicking on the product.
Select the users that will be able to use this template from the list of Available Users.
The assigned template will be used based on the user‟s password when signing-on to the Wireless
or Back End modules.
Click Save to save the information.
For the Shelf Audit templates, the Update Type field will be available for use. Shelf Audit will allow the user to
update product information from a wireless device. The Update Type determines how these updates will be
completed either immediately or through a Batch. Immediately indicates that changes will be updated
immediately to the system. Batch indicates that a product batch will be created with the changes that can then
be applied later using the Enter Prices for Ad/Batch function.
The Display field is only accessible for those templates where date will be modified (That is: Shelf Audit, Quick
Add, and Quick Edit). This field will indicate to the system, which fields should be available for modification and
which fields will be display only (no modification) on the template. By default, all fields are editable on a template.
To set the Display field, click on the field in the Current box and set the Display field to .
Table 40.1 contains a description of each field contained in the Template Maintenance form.
TEMPLATE MAINTENANCE – FIELD DESCRIPTIONS
FORM FIELD
DESCRIPTION
Template Type
Select a template type desired from the drop down menu.
Name
Name of the template, which will be displayed in the selection list.
Description
Optional description of the template being defined.
Product Fields
List of items that can be selected for the template.
Display Only
Identify whether the selected product is modifiable or not.
First Name / Last Name
List of available users that can be assigned the template.
Display Only field
Indicates if the item selected from the Product field will be display only (cannot be modified) or
will be available for modification.
Template Grid
List of current set up and defined templates.
Table 40.1
RETAIL USER REFERENCE MANUAL – RETAIL 7
287
RETAIL 7™ User Manual
ADMINISTRATION - MAINTENANCE
Profile Maintenance
Note: The setup of this data is critical to the security of the entire system
Assigning Profiles to Back End menus
The Profile Maintenance form is used to assign menu
profiles to employees to control the Back End menus
each employee may view and access.
Menu Profiles are assigned to each employee in the
Employee Maintenance form.
Example: a menu profile could be created for a Pricing
Coordinator that allow access to the Product
Maintenance, Enter Prices for Ad Batch, Product
Movement screens, but prohibits access to Accounting
information.
Table 41.1 contains a description of each field contained in the Profile Maintenance form.
PROFILE MAINTENANCE -- FIELD DESCRIPTIONS
FORM FIELD
DESCRIPTION
Profile ID
Displays the name of the profile, used in assigning profiles in Employee Maintenance.
Profile Description
Displays a more detailed descriptive name of the profile.
Select All
Flag this field to select all of the forms within the RETAIL™ Back End.
Menu Grid
Lists all of the forms in the Back End, select by clicking in the box next to the form name.
Table 41.1
Schedule Maintenance
The Schedule Maintenance form is used to
enter/maintain product schedules. These schedules can
be used to limit the days and times in which a product
can be sold. The schedule number is assigned to a
product in the Product Maintenance function.
Click in the boxes in the Grid to select or deselect times
that the product may be sold. Red signifies that the
product cannot be purchased at that time, whereas Blue
signifies a time that the product may be sold.
Table 42.1contains a description of each field contained in the Schedule Maintenance form.
SCHEDULE MAINTENANCE -- FIELD DESCRIPTIONS
FORM FIELD
DESCRIPTION
Product Schedule Number
Displays the number of the schedule, used in assigning schedules to products via Product Maintenance.
Add New button
Press to create a new Schedule
Allow All
Press to clear the fields in the Detail section, to allow the product to be sold at all times.
Select All
Press to select all of the fields in the Detail section, to prohibit the product from being sold at all times.
Table 42.1
RETAIL USER REFERENCE MANUAL – RETAIL 7
288
RETAIL 7™ User Manual
ADMINISTRATION - MAINTENANCE
Reporting Services
Reporting Services is used to generate various sales,
till statistics, and cashier reports in Retail, and create
schedules to e-mail those reports automatically to one
or more recipients. The reports can be scheduled to be
sent daily, weekly, monthly, or once, and at the time of
day you specify. They can be generated for the current
day, previous day, week, month, or year, or a custom
range of dates.
Begin by entering Windows task and E-mail information
in the Reporting Services Settings form, accessed by
pressing the Settings button in the upper right of the
toolbar.
Enter the Windows User Account information. This is
the User Name and Password. This must be the Retail
Tasks user name and password that were created
when Retail was installed.
Enter the E-mail settings. This is the account
information used to send the reports by E-mail, that is,
the E-mail from information.
After entering all the information in the settings form,
you can create tasks. Return to Reporting Services to
create tasks to schedule reports.
Create Tasks to generate reports.
Enter the Task Name, such as Daily Store Sales.
The Enabled field should be checked. If you want to
disable this task so that it will not run, un-flag the
checkbox.
Choose the Report that you want created from the
drop-down.
Enter the E-mail Information.
Begin with the E-mail address that the report will be
sent to. Separate multiple addresses with semi-colons.
Enter the Subject that will appear in the subject line of
the E-mail.
RETAIL USER REFERENCE MANUAL – RETAIL 7
289
RETAIL 7™ User Manual
ADMINISTRATION - MAINTENANCE
Select Report Parameters.
In Report Parameters, select from the drop-down the
criteria for generating the report in the Schedule
Report field. You can choose from Current Day,
Previous Day(s), Previous Weeks(s), Previous
Calendar Month(s), Previous Calendar Year(s), or a
Custom range of dates.
If you selected Custom, enter the Start and End dates
in the date fields.
Depending on your selection in the previous field, the
remaining fields may or may not be enabled. If the
field is grayed out, it is not available for editing. For
example, if you select Current Day for the Store
Sales report, then none of the additional fields are
available. If you select Custom dates, then the Start
Date and End Date fields will be available for editing.
To generate a Product Sales report, make selections in
the fields below. You can enter a range of UPC s, or
select a Department, Section, Vendor, or Product
Group. To view movement for products with the same
item code, select “Include products with same items
codes”. To generate a report with “Zero Movers Only”,
flag this field.
If you select Previous Day(s), Weeks(s), Month(s), or
Year(s), then the field to the right will be available for
editing. Select the number of days, weeks, months,
or years by using the arrows to the right of the field.
Press Save in the toolbar when you have entered all of
the parameters. This will enable the Task Trigger
fields.
Create Task Triggers
Select the Schedule Task criteria from the dropdown. You can select Daily, Weekly, Monthly, or
Once.
Enter the Time of day in the time field.
Press the Add Trigger button. The trigger for the job
will be displayed in the box to the left. To create
another trigger, repeat by making another selection
from the drop-down.
Depending on your selection in the Schedule Task
drop-down, other fields may become available. For
example, if you select “Weekly”, then fields will be
displayed for you to select the days of the week to Email the report.
RETAIL USER REFERENCE MANUAL – RETAIL 7
To remove a trigger, highlight the trigger in the list
box, and press the Remove Trigger button.
290
RETAIL 7™ User Manual
ADMINISTRATION - MAINTENANCE
Table 43.1contains a description of each field contained in the Reporting Services form.
NOTE: Some of the fields listed will not be displayed unless the corresponding option is chosen.
REPORTING SERVICES -- FIELD DESCRIPTIONS
FORM FIELD
DESCRIPTION
Task Name
Enter the name of the Task you are creating.
Enabled
Task is enabled. Clear the check box to disable the task so that it will not run.
Report
Select the name of the Report that you want generated.
E-mail To
Enter the email address that the report will be sent to. Separate multiple emails with semi-colons.
Subject
Type in a description that will appear in the subject line of the email.
Report Parameters
Schedule Report
Drop-down to select the date criteria for creating reports, for example, Daily or Weekly.
Days/Weeks
This field is dependent on what was selected in the Schedule Report field. For example, if you choose
Previous Days, you can select the number of Days to generate the report for.
Start Date
This field will be enabled if “Custom” was selected in the Schedule Report field.
End Date
This field will be enabled if “Custom” was selected in the Schedule Report field.
UPC
A UPC or range of UPCs can be entered for Product Reports.
Include Hash Department
Hash Departments are “non-sales” departments and do not usually appear in Store Sales. For example, Bottle
Returns. Flag this field to include Hash Departments in the report.
Department
The Department for Product Sales Report (optional).
Section
The Section for Product Sales Report (optional).
Vendor
The Vendor for Product Sales Report (optional)
Other
The Product Group for Product Sales Report (optional)
Task Trigger
Schedule Task
Select the criteria for emailing the report, such as Daily, Weekly, Monthly, or Once.
Time of Day
Enter the time of day that the report will be e-mailed.
Schedule Task Weekly
Use the arrows to select the number of weeks between e-mailing of reports. For example, select „1‟ to e-mail
the report every week, or „2‟ to e-mail the report every other week. Put a checkmark next to the day or days of
the week you would like to report sent.
Schedule Task Monthly
Use the arrows to select the number of months between e-mailing of reports. For example, select „1‟ to e-mail
the report every month, or „2‟ to e-mail the report every other month. Put a checkmark next to the months that
you would like the reports sent.
Add Trigger
Press the Add Trigger button to create the task.
Table 43.1
Table 43.2contains a description of each field contained in the Reporting Services Settings form.
REPORTING SERVICES SETTINGS-- FIELD DESCRIPTIONS
FORM FIELD
DESCRIPTION
Windows Account
Windows Account for Scheduling Tasks
User Name
The name used to sign on to Windows when you first sign on to your computer.
Password
The password used to sign on to Windows. This field is encrypted.
E-mail Settings
User Information for the E-mail that will be sent from.
Name
Enter your name as you want it to appear on the E-mail being sent.
E-mail Address
Enter the E-mail address that the report will be mailed FROM.
Server Information
SMTP Server
Enter the SMTP Server name. For example: smtp.gmail.com
Logon Information
SMTP Requires Authentication Put a checkmark in this field if your SMTP server requires a name and password.
User Name
Enter the User Name which is used for your email account.
Password
Enter the Password used to access your email account.
Table 43.2
RETAIL USER REFERENCE MANUAL – RETAIL 7
291
RETAIL 7™ User Manual
ADMINISTRATION - MAINTENANCE
Print Employee Report
This function will produce an Employees report listing all employees that currently exist in the system. The
layout of this report is contained in Appendix F. This function is executed when
or
is selected from the
Employees form or when the Print Employee Report function is selected from the Administration menu.
Table 44.2 contains a description of each field contained in the Employee report.
Report field
Description
Format
Employee
Employee number
Number
Cashier Password
Cashier password
Number
Checkstand Security
Checkstand security level
Number
Admin Password
Administrator (Back End) password
Number
Admin Security
Administrator (Back End) security level
Number
First Name
Employee name
Text
Last Name
Employee name
Text
DL #
Employee D/L number
Text
Job Title
Employee job title
Text
Active
Indicator if employee is active
True/False
Purchases
Amount of purchases made by the employee Currency
(not used)
Calculation
None
None
None
None
None
None
None
None
None
None
None
Table 44.1
Selection Criteria:
Select all records contained in the Employees table where the deleted field is set to “No”.
Sort Criteria:
None.
Synchronize Checkstands with Customers/Employees
The Synchronize Checkstands form is used to update the
checkstand databases with the latest customer and employee
information. After adding, editing, or deleting customers and
employees the checkstand computers must be updated so they
have the latest information. When editing or adding a new
employee, the system will open this form automatically. When
deleting customers or employees, this function will physically
delete (or flag in the information from the Back End employee and
customer databases.
Processing Restrictions:
There is no restriction. It can be run any time.
RETAIL USER REFERENCE MANUAL – RETAIL 7
292
RETAIL 7™ User Manual
ADMINISTRATION - MAINTENANCE
Synchronize Checkstands with Employees (continued)
Processing Specifications:
1. Select the Checkstands to be updated (usually all) under the Checkstands tab. Click OK to start
the process.
2. The system connects to all Check Stands selected. If an error occurs the system will prompt you
with a message “Cannot connect to some of the Checkstands" "Do you still want to continue? “
3. If you select NO, the system will abort this function.
If you select YES, then the system will continue this function. However, the checkstands, which
caused the error, will not be updated with the employee information.
In either case, the system is having problem connecting to the checkstands and corrective action
should be taken.
Synchronize Checkstands with All Tables
The Synchronize Checkstands with All Tables form is used to
update the checkstand databases with the latest information. All of
the tables in RETAIL™ are updated by this function. Information
includes POS Information and Receipt Banners, Sections, Tenders,
Departments, Work Stations, Tax Table, Currencies, Reason Codes,
Transaction Keys (Security) data, Customers, Products, and
Employees. After making any changes to data, the checkstand
computers must be updated so they have the latest information.
Data may also be updated to the checkstands on a set schedule. To
set up a schedule, go to the System Information task in the
Administration Menu. Press the Setup Synchronization Job button
on the form.
Processing Restrictions:
No restrictions - can be run at any time. Checkstands will use updated information when next order is processed.
Processing Specifications:
1. Select the Checkstands to be updated (usually all) by clicking in the next to the Checkstand
name. Click OK to start the process.
2. The system connects to all Checkstands selected. If an error occurs the system will prompt you
“Cannot connect to some of the Checkstands" "Do you still want to continue? “
If you select NO the system will abort this function.
If you select YES then the system will continue this function. However, the checkstands that
caused the error will not be updated with the system information. In either case, you should look
into the reason that the checkstand is not recognized.
RETAIL USER REFERENCE MANUAL – RETAIL 7
293
RETAIL 7™ User Manual
APPENDIX A – INITIALIZING THE SYSTEM
Appendices
Appendix A - Initializing the System
Introduction
Now that you‟ve got the RETAIL™ system installed, you‟ll want to initialize the system with critical data. The
purpose of this section is to give a good understanding of the sequence of tasks required to initialize RETAIL™
prior to use. These steps are required in order to properly setup the data that is required to support RETAIL™.
Note: Failure to properly complete these steps will result in errors when using RETAIL™.
The steps are listed sequentially and should be completed in the order they appear. The steps refer you to the
menu selection that is required to support the specific step.
Note: RETAIL™ should be installed prior to completing these tasks.
Access the RETAIL™ Back End module and complete the following steps listed below. You can use the default
password (Back End = 19; Front End = 13) to access the system.
Step 1- Setup System Setup Information
You will find the tasks related to step 1 under the SETUP section of the Administration menu. You will need to
complete the following tasks in order to configure the system setup information:
1. Setup System Information attributes that effect the Back End system (e.g., 24 hour store)
2. Setup POS (point of sale) Information which includes system limits, tax tables, discounts, receipt banners,
and savings messages.
3. Setup Security Administration data which includes security levels for both Checkstand and Back End
functions
1)
Access the System Information function under the SETUP section of the Administration menu and
complete the following tasks:
Click on the Defaults tab to setup various system
parameters used by the Back End. Under the
Defaults section, transaction history backup (archival)
and system log files history time frames are entered
as well as configurable attributes used in the Back
End system. Under the Licensee tab, the licensee
name used by the system is displayed as well as the
contents of the logo file. Changing the name will
invalidate the license. The logo is a bitmap file
(accessible by Microsoft Paint) that can be easily
modified. The logo file is used by the Back End and
Front End systems to print on reports and receipts
respectively. The logo file must exist in the
C:\Program Files\Retail\Backend directory on the
Back End computer(s) and in the C:\Program
Files\Retail\POS directory on the Checkstand
computers.
Note: Refer to the Running a 24-Hour Store topic
contained in the Appendices.
RETAIL USER REFERENCE MANUAL – RETAIL 7
294
RETAIL 7™ User Manual
APPENDIX A – INITIALIZING THE SYSTEM
Step 1- Setup System Setup Information (continued)
Click on the Checkstands tab to add all of the
checkstands to the system. Press the Create Link button
and enter the Name, User Name (default sa) and
password of the checkstand. Press OK. If the server
cannot connect an error message will display.
Continue to add all of the checkstands to System
Information.
2) Access the POS Information function under the SETUP section of the Administration menu and complete
the following tasks:
Setup POS Information
Point of Sale tab is where the initial checkstand loan-in
amounts, configuration settings, various tendering limits
and coupon setup occurs. This is needed so the frontend system can operate efficiently and enforce certain
store policies. Scroll down the list and enter appropriate
data in each of the fields. The data is automatically
saved as it is entered. As you select the different fields a
description of the field is displayed in the Description
field at the bottom of the form.
Setup Receipt Banner
The Receipt Banners section is used to
setup information that will print on the various
receipts generated by RETAIL™. Multiple
lines can be entered for each type of banner
as well as the font size, bold property and print
alignment for each line.
The banner types include:
Check Franking: Prints on the back of the checks.
Credit Card Header: Prints on the top of the credit card slips.
Check Deposit: Prints on the back of the checks.
Receipt Header: Prints at the top of the receipt and checkstand screens.
Receipt Trailer: Prints at the bottom of the receipt and checkstand screens.
RETAIL USER REFERENCE MANUAL – RETAIL 7
295
RETAIL 7™ User Manual
APPENDIX A – INITIALIZING THE SYSTEM
Step 1- Setup System Setup Information (continued)
Setup Savings Messages
The Savings Messages section is used to
setup messages that will print on the
checkstand receipt and screen for certain
checkstand functions. Select the message you
wish to modify by clicking on the particular line.
The system will allow you to modify the content
of the message, as well as the font size, bold
property and print alignment for each message.
Setup Totals
The Totals section is used to modify
messages that will print on the checkstand
receipt and screen for certain checkstand
functions. Select the message you wish to
modify by clicking on the particular line. The
system will allow you to modify the content of
the message, as well as the font size, bold
property and print alignment for each
message.
Setup Taxes
The Tax tab is where the tax information is setup. RETAIL™
allows up to 4 taxes on any product or department. Taxes
can be setup as a percentage rate or as a tax table. Click on
the Using Tax Rate button and enter the percentage into the
Tax Rate field or click on the Using Tax Table button to
setup a tax table.
RETAIL USER REFERENCE MANUAL – RETAIL 7
296
RETAIL 7™ User Manual
APPENDIX A – INITIALIZING THE SYSTEM
Step 1- Setup System Setup Information (continued)
Tax Table Setup
Example of 7.00% Tax Table
Beginning Value
Ending Value
Tax Amount
.01
.10
.15
.29
.43
.58
.72
.86
1.10
1.15
1.29
1.43
1.58
1.72
1.86
2.10
2.15
2.29
.09
.14
.28
.42
.57
.71
.85
1.09
1.14
1.28
1.42
1.57
1.71
1.85
2.09
2.14
2.28
2.42
.00
.01
.02
.03
.04
.05
.06
.07
.08
.09
.10
.11
.12
.13
.14
.15
.16
.17
Difference (BeginningEnding)
.08
.04
.13
.13
.14
.13
.13
.23
.04
.13
.13
.14
.13
.13
.23
.04
.13
.13
st
Light = 1 Repeat Range; Dark = same range being repeated.
Based on the tax table above, the following entries would be made into the Tax form in RETAIL™:
Tax Form Entries
st
1) Repeat Range = Sales value of end of repeat range ($1.09) minus Sales value of record before 1
entry in repeat range ($.09) = $1.00
2) Repeat Tax = # of entries in repeat range. In this case .14 through 1.09 = 7. So enter in $0.07
st
3) Tax Table - Enter in all entries (ending values) through end of 1 repeat range. Including entries
st
which precede the repeat range (in this case only 1 entry .01 - .09)
RETAIL USER REFERENCE MANUAL – RETAIL 7
297
RETAIL 7™ User Manual
APPENDIX A – INITIALIZING THE SYSTEM
Step 1- Setup System Setup Information (continued)
Setup Discounts
The Discounts is used to enter/maintain
discount arrangements. These discounts are
assigned to customers in the Customer
Maintenance function.
To create a new discount, press the Add button.
To edit an existing discount scroll using the right
or left arrows. Check Product Category A or
Product Category B or both. Select the days of
the week for the discount to apply and fill in a
discount percentage. The discount will only work
with product, departments, or sections flagged
with either Product Category A, B or both. The
Discount Threshold is the dollar amount the
customer has to purchase in order to be eligible
to receive the discount.
3) Access the Security Administration function under the SETUP section of the Administration menu and
complete the following tasks: (The setup of this data is critical to the security of the entire system)
Establish security levels, limits, and reason codes
for the checkstand and back-end functions.
For each Checkstand Function designate an
overall minimum and maximum amount that can
be completed at the front-end as well as a limit
for each security level. Indicate if reasons are
required when using the function and enter the
reason codes for the function by clicking on the
Reason Code button
.
For each checkstand Manager Function
designate the security level required to complete
the function and indicate if reasons are required
when using the function. Enter reason codes by
clicking on the Reason Code button
.
Note: The highest security level an employee
can be assigned is level 20. If you assign security
level 20 to a transaction key (for example, Paid
In), the transaction cannot be overridden by a
manager.
RETAIL USER REFERENCE MANUAL – RETAIL 7
298
RETAIL 7™ User Manual
APPENDIX A – INITIALIZING THE SYSTEM
Step 2 - Setup Maintenance Information
You will find the tasks related to step 2 under the MAINTENANCE section of the Administration menu. The
following tasks will need to be completed in order to complete the setup of maintenance information:
1)
2)
3)
4)
5)
1)
Setup Tenders in order to support checkstand tendering of orders.
Setup Departments in order to classify the products that will be entered.
Setup Sections in order to classify products that will be entered.
Setup Vendors in order to correctly assign vendors to products.
Setup Employees and assign their security levels.
Access the Tender Maintenance function under the MAINTENANCE section of the Administration
menu and complete the following task:
An unlimited number of tenders can be supported
by RETAIL™. A pre-configured set of tenders is
distributed with the system. Only certain attributes
will be available for edit in regards to these tenders.
However, for all other tenders added to the system,
all attributes are available for modification. Tenders
can be assigned to currencies entered in the
system in order to facilitate currency conversion at
the checkstand (Refer to the Foreign Currencies
section contained in the Appendices). Proper
setup of the Tenders will ensure that checkstand
tendering will function properly.
2)
Access the Department Maintenance function under the MAINTENANCE section of the Administration
menu and complete the following task:
Departments are the largest classification for a
product and are necessary before you start to build
your product file. Determine the major
classifications of products in your store and enter in
the departments under this tab. Sub-Departments
(up to 9 per department) can also be added. This is
important to setup before you begin adding
products so they are correctly classified as you add
them. You cannot add an item in Product
Maintenance without assigning a department. Click
on the Add button
in the toolbar to add a
department. Enter in the department information
and attributes. Click on the Miscellaneous tab to
enter additional data and press the Save button
. To edit a department, click on the Edit button.
Select the department you want to edit by clicking
on it from the list.
RETAIL USER REFERENCE MANUAL – RETAIL 7
299
RETAIL 7™ User Manual
APPENDIX A – INITIALIZING THE SYSTEM
Step 2 - Setup Maintenance Information (continued)
3)
Access the Section Maintenance function under the MAINTENANCE section of the Administration
menu and complete the following task:
Sections need to be setup so products can be
further classified into sections and subsections. This
is important to setup before you begin adding
products so they are correctly classified as you add
them. Decide how you want the sections established
and add the sections you desire. To add a section,
click on the Add button
. Enter the section
number, section name and department the section
belongs to. Enter section attributes and press the
Save button
. To edit a section, click on the Edit
button
. Select the section you want to edit by
clicking on a section from the list.
4) Access the Vendor Maintenance function under the MAINTENANCE section of the Administration menu
and complete the following task:
Vendors are important to setup for many of the same
reasons as sections. This is important to setup before
you begin adding products so they are correctly
assigned a vendor as you add them. Click on the Add
button
in the toolbar to add a vendor. Enter the
appropriate data for the vendor. Press the Save button
in the toolbar to save your data. Click on the Edit
button
entered.
on the toolbar to edit a vendor you have
If you have set “Require Vendor” in System
Maintenance, vendors must be setup, or you will not
be able to add items in Product Maintenance.
RETAIL USER REFERENCE MANUAL – RETAIL 7
300
RETAIL 7™ User Manual
APPENDIX A – INITIALIZING THE SYSTEM
5) Access the Employee Maintenance function under the MAINTENANCE section of the Administration
menu and complete the following task:
Employees need to be setup in order to gain normal
access to the system. When RETAIL™ is installed, a
default employee exists that allows you to gain access
to the system (password = 19). Now you need to
setup your employees that need to use the RETAIL™
Back End and Front End. Click on the Add button
and enter the appropriate information for each
employee. Set the security level of the employee
based on the security levels you established earlier in
the Security Administration function (click on the
buttons next to the Security fields to view the security
levels). Enter the employee‟s Cashier Password
(password for the front-end module) and Back-End
Password.
Press the Save button
in the toolbar to save your changes. Click on the Edit button
edit an employee you have entered.
in the toolbar to
Step 3 - Setup Products Information
You will find the task related to step 3 under the Point of Sales menu. You must enter all Products into the
main product file.
1)
Access the Product Maintenance function under the PRODUCTS section of the Point of Sales menu
and complete the following task:
Products are the heart and soul of RETAIL™. Up
to this point we have just been preparing the
system for the creation of the product file. To add
a product, click on the Add button
. When you
enter products make sure they are classified with
the proper department, section, and vendor. Enter
the normal pricing for the product and any special
pricing that may be in effect. (See the note below
on entering product codes). Enter the appropriate
properties, discount arrangements, tax plans and
other information related to the product. Enter in a
Stock on Hand in order to establish your
beginning inventory for the product. Other data
for the product (e.g., pricing levels, secondary
vendors, product groups) can be entered by
clicking on the various toolbar buttons. Make sure
you refer to the Manage Products topic of the
Back End How To… section and the Product Maintenance topic in the Back End Detail Documentation
section for more information on all of the data that can be entered for a product. Press the Save button to save
the product information. Click on the Edit button in the toolbar to edit a product you have entered. To delete a
product, click on the Delete button in the toolbar.
RETAIL USER REFERENCE MANUAL – RETAIL 7
301
RETAIL 7™ User Manual
APPENDIX A – INITIALIZING THE SYSTEM
Step 3 - Setup Products Information (continued)
Note: Scan the product UPC codes to ensure they are entered correctly. While in the Add mode and with the
cursor in the UPC field, scan the product and the UPC code should appear in the field. If you manually key in the
UPC codes, then follow the examples below:
If you‟d like to print shelf labels for the products, click on the Labels button
in the toolbar. This will print
labels for all products that have a check mark in the Label field or click on the Export Labels button
export the product data to a text file (ProductLabels.txt) for use in importing into a label-making program.
RETAIL USER REFERENCE MANUAL – RETAIL 7
to
302
RETAIL 7™ User Manual
APPENDIX A – INITIALIZING THE SYSTEM
Step 4 - Setup Safe Balance
You need to establish a starting balance for your safe in order to balance the safe at the end of the first business
day. The starting balance needs to be entered into RETAIL™ prior to the first business day. Access the Safe
Statistics and Balancing function under the REGISTERS section of the Point of Sales menu.
To enter the starting safe balance press the
Safe Audit button in the toolbar and answer
“yes” to the prompt “:Do you want to perform a
safe audit now?” Enter the date for the audit to
take effect. Answer “yes” to the prompt “Would
you like to enter your balances now?” After you
enter your new safe balances for Cash, Food
stamps, etc, press the save button in the
toolbar.
Note: Make sure to include any till amounts in
your safe count. Whatever money you have set
aside for the tills for the first day need to be
included otherwise your safe count will be out of
balance.
Click on the Labels button in the toolbar and
enter the currency levels into the appropriate
Rows as you will want them to be displayed.
Press the Save button to save the information.
Safe Contents allows you keep a record of the
contents of your actual safe on a daily basis.
Once you‟ve entered all the amounts, the Total
amount should equal the ending amount in your
safe. The numbers entered in the Safe
Contents section are not counted in the
Balancing.
RETAIL USER REFERENCE MANUAL – RETAIL 7
303
RETAIL 7™ User Manual
APPENDIX A – INITIALIZING THE SYSTEM
Step 5 – Store Close
If running a normal store, you should set up a
store close job that will run automatically every
day at a specified time. From the System
Information form, press Setup Store Close
and enter the time of day you would like the
store close to run.
If running a 24-hour Store, you must run a store
close before beginning operation. You cannot
run an automatic store close, but instead need
to run Store Close manually from the
Operations menu.
In order to establish the correct processing date
in the system, a Store Close must be
completed at the end of the first business day. If
there is a chance a store close cannot be
completed, execute a Store Close the night
before the first business day (no data will be
processed) but the processing date will be
initialized properly.
Store Close should be executed daily in order
to ensure the system runs efficiently. Certain
data files are cleaned out as part of a regular
store close and not part of a store close
recovery (i.e., store close run next day).
Finish
You have now completed the initialization of RETAIL™. The system is now ready to begin processing customer
transactions. You‟ll want to test the system to ensure that it has been setup properly.
Another task that could be done now is to setup your current customers within RETAIL™ using the Customer
Maintenance function. This is not a mandatory step since RETAIL™ will function without this data. It‟s up to the
user to decide if they‟d like to establish their customer file at this point.
RETAIL USER REFERENCE MANUAL – RETAIL 7
304
RETAIL 7™ User Manual
APPENDIX B – RUNNING A 24 – HOUR STORE
Appendix B – Running a 24-Hour Store
Overview
RETAIL™ supports the operation of a 24-Hour store which includes stores which operate under one of the
following scenarios:
1) A store which never physically closes
2) A store that wishes to do a store close prior to actually physically closing the store
3) A store that operates passed 12:00 AM
When a Store Close function is performed on a 24-Hour store, the transactions processed up to that point will be
posted against the day being closed. All transactions processed after the store close is run will be posted to the
following day. During the Store Close process, the front-end checkstands can continue to function without
signing-off. However, they will be required to insert a new drawer and will be loaned-in for the new processing
day.
In a regular store, RETAIL™ uses the calendar date as its processing date. Each transaction is posted with the
current date. In a 24-Hour store, RETAIL™ keeps its own processing date that is independent of the calendar
date. This processing date is changed whenever the Store Close process is completed. In other words, if the
Store Close process is run at 10:00pm on 12/10/08, the processing date will now become 12/11/08 even though
the calendar date is still 12/10/08.
Setup
Setup of a 24-Hour store is very easy. Using the System
Information function under the Administration menu, click on
the Default tab. Click on the 24-Hour Store field. Make sure
to update all of the checkstands once you have completed this
selection.
Note: This should be done prior to the first business day of
operating as a 24-Hour store and after a store close if the store
has been operational for any period of time.
Special Considerations
Special Pricing
Running a 24-Hour store does not affect the way that special pricing is treated in the system. Special pricing still
becomes effective based on the calendar date. If a product has special pricing, then at 12:00 AM of the start
date, the pricing will become effective regardless of the processing date.
RETAIL USER REFERENCE MANUAL – RETAIL 7
305
RETAIL 7™ User Manual
APPENDIX B – RUNNING A 24-HOUR STORE
Checkstand Operation
Checkstand Screen
The Checkstand operation is basically the
same for a 24-Hour store. The most notable
difference is in the display of the processing
date on the checkstand. The processing date is
displayed In the bottom left-hand corner of the
checkstand screen. The date in the bottom right
portion of the form reflects the current system
date. In this case the current system date is
11/06/07, while the processing date is 11/07/07.
In this scenario, each transaction is posted with
11/07/07 as the processing date.
The functions for the checkstand will operate in
the exact same manner, regardless of whether
or not the store is a 24-Hour store.
Store Close
When the store initiates a store close for the
current processing date, any checkstands that
are currently signed on will receive a message
that the store close is in process and they need
to insert a new drawer. This message will
appear as soon as the cashier begins a new
transaction after the store close process has
begun. While the store close is running, the
checkstand will be put into Store Close mode
and this will be reflected in the title bar in the
left-hand corner of the screen.
At this point, the cashier needs to insert a new
drawer prior to processing the next transaction.
When the user responds to this message, the following will occur:
1) A till status for the current processing date will print (a manager password will be required).
2) The checkstand will be loaned-in for the new processing date and a till status will be printed for the
new processing date.
3) The processing date on the checkstand screen will be changed to reflect the new processing date.
The cashier can continue to ring-up transactions while in Store Close mode. The transactions will now be posted
under the new processing date. When the Store Close has finished, the Store Close message will be removed
from the checkstands‟ title bar.
RETAIL USER REFERENCE MANUAL – RETAIL 7
306
RETAIL 7™ User Manual
APPENDIX B – RUNNING A 24-HOUR STORE
Checkstand Operation
Stand Alone
If for some reason the checkstand is operating
in stand-alone (e.g., server or network is down),
there may be a need to manually change the
processing dates on the checkstand. This will
usually only need to be done if the checkstand
has been operating in stand alone for an
extended period of time. The processing date
can be changed via the manager menu on the
checkstand. The Close Store button will
become available for selection on the menu.
Select this option and a new processing date
can be entered. The processing date will then
be changed for the checkstand where the
update is occurring. This process will need to
be completed for every checkstand.
Note: transactions will be posted with the new processing date as soon as it is changed. Make sure to only use
this feature in the event that the network is inaccessible beyond the time that the store close process normally
changes the processing date.
Back End Operation
Store Close
The store close process for a 24-Hour store
can be run at any time during the day. The
steps are the same as a regular store close
except for an additional step that updates the
processing date on each of the checkstands
to the new date (the next day). This update
should occur without any user intervention
except if a checkstand is in the middle of
ringing-up a transaction. In this case, the
processing date cannot be modified and a
message will be displayed as depicted on the
right displaying the name of the workstations
that are currently processing transactions.
Clicking on the Yes button will instruct the store close to attempt to change the date again. The message will be
continue to be displayed until the store close process is successful in changing the processing date on all
checkstands. NOTE: Under normal circumstances, you should continue to press the Yes button until all
checkstands have been successfully updated.
Clicking on the No button will stop the store close process which can be re-started at a future time. NOTE: The
processing date for those checkstands NOT listed will already be changed to the next date leaving
some checkstands with the old processing date and some with the new processing date.
RETAIL USER REFERENCE MANUAL – RETAIL 7
307
RETAIL 7™ User Manual
APPENDIX B – RUNNING A 24-HOUR STORE
Manually Changing the Processing Date
The processing date on each of the
checkstands can be manually changed in the
event that a store close cannot be run. The
Change Date button will become available for
selection via the Store Close form when the
system detects that a store close operation has
failed. Click on the Change Date button to
initiate the process of changing the processing
date on the checkstands.
Once this button is clicked, a message will be
displayed informing you that the program will
update the dates on the checkstands. Click on
the Yes button to complete the updates and the
program will change the processing date on
each checkstand to the next day.
Note: The store close process (recovery) will still need to be completed once the problem with the store close
has been corrected.
RETAIL USER REFERENCE MANUAL – RETAIL 7
308
RETAIL 7™ User Manual
APPENDIX C – FOREIGN CURRENCIES
Appendix C – Foreign Currencies
Overview
RETAIL™ supports the conversion of foreign currencies when tendering orders on the Front End system. The
functions required to support this include:
1. Setup of currencies and their conversion value (in the local currency)
2. Setup of tenders assigned to the currencies
3. Conversion of tendered amounts on the checkstand
Although RETAIL™ supports tendering in foreign currencies, all of the data within the system is tracked in the
local currency. This is done in order to ensure the integrity of the data in the system as it is processed and
summarized. The amount tendered in the foreign currency is tracked on the transaction detail for audit purposes.
Setup
Currency Maintenance
Each foreign currency that will be tendered in the
system must be entered into the system. Via the Tender
Maintenance function, click on the Currency button
to access the Currency Maintenance form. The local
currency is established as part of the setup process and
is always assigned a Currency ID of 1. To add additional
currencies, click on the Add button and the next
available ID will be assigned. Enter in the description of
the currency, the symbol to be displayed (e.g., $), and
the value of the currency in terms of the local currency
(i.e., if one dollar is worth 8 pesos, then enter .125 as
the value of the peso in dollars). Click on the Save
button to save the currency.
Tender Setup
Once the currencies have been entered, they will
appear as entries in the Currency field on the
Tender Maintenance form. In order for a
transaction to be tendered in a foreign currency, a
Tender Code must be setup. Example if a Peso
currency has been setup, a Peso tender
associated to the Peso currency must be entered
in order for it to be used at the Checkstand. Add
the new tender using the Tender Maintenance
function. Make sure to select the appropriate
currency in the Currency field.
When setting up the tender, take into consideration
how change should be given for the tender. If you
wish to give change back in the foreign currency,
click () the Accept for Change field.
RETAIL USER REFERENCE MANUAL – RETAIL 7
309
RETAIL 7™ User Manual
APPENDIX C – FOREIGN CURRENCIES
Tender Setup (continued)
Tender Setup (continued)
This will allow the tender to be selected as the Change
Tender under the Limits tab of the form. Examples:
If you are setting up a Peso tender and would like to
give change back in Pesos, select Peso as the Change
Tender
If you want to give change back in the local currency
(e.g., dollars) then select CA (cash tender) as the
change tender. The system will automatically calculate
the correct change in the local currency.
Enter in any additional data for the tender and press the
save button.
Checkstand Operation
Example 1
Now let‟s see how to tender the order in the foreign currency at the checkstand. The following example will lead
you through the steps involved in tendering the order.
Setup two currencies: Local Currency = US Dollars, Currency 2 = Pesos. The value of the Pesos is .125
dollars (e.g., 8 Pesos = 1 Dollar).
Currency ID
Amount
Description
Symbol
1
1.00
US Dollars
$
2
.125
Pesos
P$
Setup Peso Tender – give change back in Pesos.
Tender ID
Tender Code
Tender Name
10
PE
Pesos
Tender Type
CA
Currency
2
Change Tender
PS
Tendering an order using a foreign currency involves a couple of steps.
1) Convert the order total to the foreign currency using the Currency Conversion command – CU. The
currency command is used as follows: <Currency ID> “CU”.
Example: The order total is currently $200.00 and the order is going to be tendered in Pesos. Enter in
2CU and the system will convert the $200.00 into Pesos = P$1600.00.
2) Now that the value of the order in Pesos is known, tender the order in Pesos.
Example: Tender the order with P$2000.00 by entering in 200000PS. The system will display the
value of the tender in the local currency as well, in this case $250.00 (US Dollars).
3) The system will compute the amount of change to be given.
Example: The change tender is designated as Pesos so the system will display the change as
P$400.00 and also as $50.00 (US Dollars).
Now let‟s say that the change is to be given back in the local currency in this case US Dollars. The Pesos tender
would be setup to give change back in cash (Tender CA):
Setup Peso Tender – give change back in US Dollars.
Tender ID
Tender Code
Tender Name
10
PS
Pesos
Tender Type
CA
Currency
2
Change Tender
CA
The steps as outlined above are the same except for step 3 but the change will be given in US Dollars.
3) The system will compute the amount of change to be given.
Example: The change tender is designated as US Dollars so the system converts the amount of
change, in this case P$400.00 (Pesos), and display the change as $50.00 (US Dollars).
RETAIL USER REFERENCE MANUAL – RETAIL 7
310
RETAIL 7™ User Manual
APPENDIX C – FOREIGN CURRENCIES
Checkstand Operation (continued)
Example 2
Now let‟s take a different example where the local currency is Pesos and US Dollars is setup as a currency.
Note: The Windows Regional Settings would be changed in this case to reflect the local currency as
Pesos.
Setup two currencies: Local Currency = Pesos, Currency 2 = US Dollars. The value of the US Dollars is 8
Pesos (e.g., .125 Dollars = 1 Peso).
Currency ID
Amount
Description
Symbol
1
1.00
Pesos
P$
2
8.00
US Dollars
$
Setup US Dollars Tender – give change back in US Dollars.
Tender ID
Tender Code
Tender Name
Tender Type
10
US
US Dollars
CA
Currency
2
Change Tender
US
The process for tendering is exactly the same as the other example.
1) Convert the order total to the foreign currency using the Currency Conversion command – CU. The
currency command is used as follows: <Currency ID> “CU”.
Example: The order total is currently P$1800.00 and the order is going to be tendered in US Dollars.
Enter in 2CU and the system will convert the P$1800.00 into US Dollars = $225.00.
2) Now that the value of the order in US Dollars is known, tender the order in US Dollars.
Example: Tender the order with $250.00 by entering in 25000US. The system will display the value of
the tender in the local currency as well, in this case P$2000.00 (Pesos).
3) The system will compute the amount of change to be given.
Example: The change tender is designated as US Dollars so the system will display the change as
$25.00 and also as P$200.00 (Pesos).
Again let‟s change the example to give change back in the local currency, in this case Pesos. The US Dollars
tender would be setup to give change back in cash (Tender CA). The cash tender represents cash in Pesos
since the local currency is Pesos.
Setup US Dollars Tender – give change back in Pesos.
Tender ID
Tender Code
Tender Name
10
US
US Dollars
Tender Type
CA
Currency
2
Change Tender
CA
The steps as outlined above are the same except for step 3.
3) The system will compute the amount of change to be given but now in Pesos.
Example: The change tender is designated as Pesos (cash) so the system will convert the amount of
change, in this case $25.00 (US Dollars), and display the change as P$200.00 (Pesos).
Note: When a foreign currency is used at the checkstand, the Till Status report will print the amount in both the
local currency and in the currency tendered.
Back End Operation
The Back End functions operate the same; however remember that all foreign currency amounts (tenders where
the currency is not the local currency) are displayed in the local currency. This affects all screens where dollar
amounts are displayed for the tender (e.g., Till Statistics, Safe Statistics and Balancing, Balancing Overview,
Monitor Tills, Tender Maintenance).
RETAIL USER REFERENCE MANUAL – RETAIL 7
311
RETAIL 7™ User Manual
APPENDIX C – FOREIGN CURRENCIES
Back End Operation (continued)
Currency Conversion
A Currency Conversion function has been added to each of these forms to allow conversion of amounts to
different currencies. Click on the Currency Conversion button
contained on the toolbar of each of these
forms.
This form supports the conversion of amounts from the
local currency to a foreign currency (Foreign mode) and
from a foreign currency to the local currency (Local
mode). The form displays in the Foreign mode when first
selected. Enter in the amount to be converted in the
Local Amount field (in this example the amount would be
in US Dollars). Select the Currency desired from the list
displayed. The system will then display the converted
amount in the Foreign Amount field.
To convert a foreign currency amount into the local
currency, click on the Foreign button. The form will now
change into Local mode. Enter in the amount to be
converted into the Foreign Amount field. Select the
Currency desired from the list displayed. The system will
then display the converted amount in the Local Amount
field.
RETAIL USER REFERENCE MANUAL – RETAIL 7
312
RETAIL 7™ User Manual
APPENDIX D –EFT PROCESSING
Appendix D – EFT Processing
RETAIL™ supports interfaces to several EFT (Electronic Fund Transfer) processors – Concord Web,
Concord, Ingenico, MPS, and Microtrax. Contact your reseller for an updated list.
The types of transactions supported for each processor is as follows:
Concord – Credit Card, Debit Card, Electronic Food Stamps, and Electronic Cash
Concord Web – Credit Card, Debit Card, Electronic Food Stamps, Gift Cards, and Electronic Cash
Ingenico - Credit Card, Debit Card, Electronic Food Stamps, and Electronic Cash
MPS (Mercury Payment Systems) - Credit Card, Debit Card, Electronic Food Stamps, Gift Cards, and
Electronic Cash
Microtrax – Credit Card, Debit Card, Electronic Food Stamps, Texas WIC, Gift Cards, Blackhawk Gift Cards,
Electronic Check Conversion, and Electronic Cash
In addition to an additional RETAIL™ program (optional for Concord installs only), Concord, Ingenico, and
Microtrax require the installation of a separate program developed by their own companies. Concord Web runs
from each checkstand over the internet. Information and documentation related to their programs are provided
by their own organizations. Listed below are instructions related to the RETAIL™ program required to interface
to each processor.
RETAIL USER REFERENCE MANUAL – RETAIL 7
313
RETAIL 7™ User Manual
APPENDIX D –EFT PROCESSING
Concord - Introduction
This section only applies to installations using Concord as their EFT processor. This section documents the use
of the RETAIL™ Concord Host software program. This documentation should be used in conjunction with
documentation supplied by Concord. Concord EFT Processing requires the following configuration:
-
Concord EFT Hardware (supplied by Concord)
Concord EFT Software (supplied by Concord)
RETAIL™ Concord Host Software
The interaction between the systems is as follows:
Checkstand
Retail
Front-End
Retail Concord
Host
Concord EFT
Manager
* Runs on Windowsbased PC
* Runs on Concord
supplied hardware
Concord EFT
Processing
Center
Request
Response
Note: all data is passed directly (via socket connection) between all 3 systems.
Note: in order for transactions to be processed correctly, all three systems must be up and running and
able to communicate over the network. Specific installation and setup instructions for the RETAIL™
Concord Host program are contained in the RETAIL™ Installation manual.
Concord – Transaction Flow
When an EFT transaction is processed using Concord, a number of different transaction records (record types)
are passed directly between the various system components. The most common transaction flow for an EFT
transaction is as follows:
Step
1) Checkstand initiates EFT transaction to RETAIL™ Host
2) RETAIL™ Host sends transaction to Concord EFT Manager
3) EFT Manager sends transaction to processing center
4) EFT Manager receives response from processing center and
responds to RETAIL™ Host
5) RETAIL™ Host sends response to checkstand
(Refer to Concord Response Mapping topic)
6) Checkstand confirms receipt of response from RETAIL™ Host
Checkstand Display
Processing
Processing
Processing
Approved or
Denied or
Error
Record Type
0200
0200
0210
0210
0680
Records processed are displayed on the EFT Events tab of the RETAIL™ Concord Host screen. The first four
characters of the record displayed contain the Record Type of the transaction.
Note: 0800 (Log-on to EFT Manager) and 0810 (Confirm log-on) are other record types that will display when
the checkstand logs on to the Concord EFT Manager.
Note: If confirmation is not received by the Concord EFT Manager, the transaction WILL NOT BE
AUTOMATICALLY REVERSED. A manual reversal will need to be completed at the Concord Manager station.
RETAIL USER REFERENCE MANUAL – RETAIL 7
314
RETAIL 7™ User Manual
APPENDIX D –EFT PROCESSING
Concord – RETAIL™ Host Program
The RETAIL™ Concord Host program is executed
by clicking on the
Icon located on
the Windows desktop of the computer where the
host program was installed.
The RETAIL™ Concord Host program acts as a “gobetween” for the RETAIL™ Front End system and
the Concord EFT Manager system. All EFT
transactions flow to and from this host program.
The EFT Events tab is where transaction records will
be displayed as they are passed from the
checkstand to the EFT Manager. Refer to the
Concord Transaction Flow topic discussed earlier for
record types displayed on this screen.
The Message Queues field displays the number of
EFT transactions that are waiting to be processed.
The clear button will clear all data currently displayed on
the screen.
The other tabs on the form are used to display client (checkstand) events, status of current (checkstand)
connections and system settings (configuration properties). This data should not be changed once
initialized at the time of installation. (Refer to the RETAIL™ Installation manual)
The RETAIL™ Concord Host Program should be left running at all times while checkstand transactions are
being processed. Closing of this program will terminate all EFT processing for the store.
Concord – Response Mapping
Response codes returned from the Concord Host are translated by the Concord EFT Manager. The translated
code is then displayed at the checkstand by the RETAIL™ Front-End program. Listed below is a mapping of the
Concord error codes. RETAIL™ will process the errors as follows:
1)
2)
Approvals – RETAIL™ will display the word Approved on the screen and complete the transaction.
Denials/Errors – RETAIL™ will do one of the following:
a)
Display the error code and description if a RETAIL™ description has been defined for the code (in
the RETAIL™ Error Text field in the Concord Response Table below)
b)
If a RETAIL™ description does not exist, the program will display the word Declined or Error and
the Error Code received from Concord. The word Declined or Error will display depending on the
RETAIL™ Error Type assigned to the code (D=Declined; E=Error - refer to the Concord
Response Table below)
c)
Denials/Errors will display and remain on the screen until the cashier hits a key.
Examples:
Conversion Code Received by
RETAIL™
08
11
12
Message displayed on checkstand
08: Worn Card (Manual Entry)
Declined – 11
12: Bad Pin
RETAIL USER REFERENCE MANUAL – RETAIL 7
315
RETAIL 7™ User Manual
APPENDIX D –EFT PROCESSING
Concord Web - Introduction
This section only applies to installations using Concord Web as their EFT processor. This documentation should
be used in conjunction with documentation supplied by Concord EFT Processing. Concord EFT Processing
requires the following configuration:
-
Direct connection to the Web (web address supplied by Concord)
Store Id and Store Key (supplied by Concord)
Concord WEB does not require any software installation on the store side. Each register needs access to the
Internet.
The following entries must be added to the Ros.ini file on each Front End machine:
Variable
Value
Description
AllowEBT=
1
CdHostType=
EFTName=
WebService
StoreID=
StoreKey=
CONCORD
ROSEFTCW
https://
Indicates that EBT (Electronic Benefits Transactions) will be
supported.
Indicates that Concord WEB is being used for EFT processing.
Indicates the ROSEFTC Dll is called
Indicates web address assigned by Concord
Indicated store id assigned by concord
Indicated store key assigned by concord
Section of Ros.ini
[Misc]
[Misc]
[Misc]
[Concord]
[Concord]
[Concord]
Note: Consideration should be made in the event the store loses connection to the web. This can be
accomplished with either a standalone unit purchased from Concord or a router can be purchased with a
automatic backup dial system.
Note: Some type of Web security such as a file wall should be setup prior to processing transactions
RETAIL USER REFERENCE MANUAL – RETAIL 7
316
RETAIL 7™ User Manual
APPENDIX D –EFT PROCESSING
Ingenico - Introduction
This section only applies to installations using Ingenico as their EFT processor. This documentation should be
used in conjunction with documentation supplied by Ingenico Processing. Ingenico EFT Processing requires the
following configuration:
-
Ingenico Software installed on Windows 2000 Server (supplied by Ingenico)
Connection from the checkstands to the Ingenico Software
The following entries must be added to the Ros.ini file on each front-end machine:
Variable
Value
Description
AllowEBT=
1
CdHostType=
EFTName=
HostIP=
HostPort=
IVI
ROSEFTING
TCP/IP Address
9001
HostLog=
1
Indicates that EBT (Electronic Benefits Transactions) will be
supported.
Indicates that Ingenico is being used for EFT processing.
Indicates the ROSEFTING.dll is called
TCP/IP address where Ingenico Software resides
Local port where Ingenico Software resides. Make sure port
is consistent on all front-ends.
Log errors to a log file
Section of Ros.ini
[Misc]
[Misc]
[Misc]
[IVI]
[IVI]
[[IVI]
Note: Consideration should be made in the event the store loses connection to the web. This can be
accomplished with either a standalone unit purchased from Ingenico or a router can be purchased with an
automatic backup dial system.
Note: Some type of Web security such as a file wall should be setup prior to processing transactions.
RETAIL USER REFERENCE MANUAL – RETAIL 7
317
RETAIL 7™ User Manual
APPENDIX E –REPORT SAMPLES
Appendix E- Report Samples
This appendix contains a list of most of the reports used within RETAIL™. All reports were developed using
Crystal Reports© for Microsoft® Visual Basic. The reports contained in this appendix include:
Report Title
Aggregate Store Sales
Allowances
Allowance Report
Bad Checks
Bad Checks Letter 1
Bad Checks Letter 2
Bad Checks Letter 3
Balancing Overview
Bill Backs
Checkstand Productivity
Checkstand Service
Coupon Movement Detail
Coupon Movement Summary
Customer Gift Certificates
Customer In Store Charge Activity
Customer In Store Charge Balance Detail
Customer In Store Charge Balance Summary
Customer Letters
Customer Ranking
Customer Sales
Customers
Departments
Discount & Coupon Summary
Electronic Coupons
Electronic Journal
Employees
Inventory Analysis
Inventory Count
Invoice
Invoice Total
In-Store Charge Statement
Loan-In Slip/Pickup Slip
Mass Product Changes
Monitor Tills
Outstanding Purchase Orders
Price Changes History
Product Ad Batch
Product Ad Markdown
Product Mix Match
Product Normal Batch
Products by Department
RETAIL USER REFERENCE MANUAL – RETAIL 7
Report File
SalesAgg.rpt
Allwnc.rpt
ALLbyVend.rpt
CustBcs.rpt
BadChk1.dot
BadChk2.dot
BadChk3.dot
RegBook.rpt
Bllbcks.rpt
RegPrdty.rpt
RegSevc.rpt
CpnLossD.rpt
CpnLossS.rpt
CusGrpG.doc
InStrAct.rpt
InStrBal.rpt
InstrSum.rpt
CusGrpL.doc
CustF.rpt
SalesCus.rpt
CustPus.rpt
Departmt.rpt
Regbcd.rpt
CustCpns.rpt
RegEJ.rpt
Employee.rpt
InvAnaly.rpt
InvCount.rpt
InvR.rpt
InvDept.rpt
In-storeC.rpt
Pickups.rpt
ProdMC.rpt
MTills.rpt
PobyVend.rpt
Prodcpch.rpt
ProdBadv.rpt
ProdBMrk.rpt
MixMatch.rpt
Prodbnml.rpt
RptByDep.rpt
318
RETAIL 7™ User Manual
APPENDIX E –REPORT SAMPLES
Appendix E - Report Samples (continued)
Report Title
Report File
Product Group
Product Movement
Product Sales
Safe Audit
Safe Statistics
Sales Person Productivity
Sections
Stock On Hand
Store Sales (Department or Section)
Store Sales Tax Detail
Tenders
Till Statistics
Till Status
Transactions by Reason
Vendors
ProdGrp.rpt
ProdMove.rpt
SalesPd.rpt
RegSafeA.rpt
RegSafe.rpt
RegSpS.rpt
Sections.rpt
InvOnHnd.rpt
SalesSt.rpt
SalesTax.rpt
Tenders.rpt
RegTills.rpt
RegTsub.rpt
Regtrans.rpt
Vendors.rpt
RETAIL USER REFERENCE MANUAL – RETAIL 7
319
RETAIL 7™User Manual
APPENDIX E Aggregate Store Sales
Goodwin’s Market
Aggregate Store Sales
Start Date: 10/31/2005
Departments
Sales
%
Open Dept
End Date: 10/31/2005
Cost of
Gross
Sales
Sales
Margin
$48.11
$57.92
84%
$48.11
$57.92
$14.43
$0.00
$14.43
$0.00
$117.04
$1,147.49
$117.04
$1,147.49
$792.33
$0.00
$792.33
$0.00
$273.32
$12,850.96
$273.32
$12,850.96
$179.55
$1,527.59
$179.55
$1,527.59
Items
Avg Price
Avg Order
Customers
$0.00
Non-Hash Aggregate Departments
BAKERY - 3
BAKERY
$643.20
$643.20
SubTotal:
DELI - 8
DELI
$1,352.15
SubTotal:
GENERAL MERCHANDISE - 7
GENERAL
MERCHANDISE
SubTotal:
$1,979.80
$19,766.94
63.97%
$19,766.94
$2,968.73
SubTotal:
2.59%
$801.24
SubTotal:
MEAT - 5
MEAT
6.41%
$1,979.80
$801.24
SubTotal:
4.38%
$1,352.15
GIFTS - 10
GIFTS
GROCERY - 1
GROCERY
2.08%
$2,968.73
Tuesday, November 01, 2005 04:55 PM Page: 1
RETAIL USER REFERENCE MANUAL – RETAIL 7
9.61%
193.00
$3.33
1.25
154
$3.81
1.70
209
$3.39
1.80
325
$2.11
2.41
158
$2.13
6.72
1,383
$0.22
39.52
346
193.00
99%
354.94
354.94
36%
584.00
584.00
1%
380.00
380.00
34%
9,293.92
9,293.92
42%
13,673.29
13,673.29
Aggregate Store Sales
320
RETAIL 7™User Manual
APPENDIX E –Aggregate Store Sales
Start Date: 10/31/2005
Departments
Sales
%
Open Dept
Sales
End Date: 10/31/2005
Cost of
Sales
Gross
Margin
Items
Avg Price
Avg Order
Customers
PHOTO - 2
PHOTO
$25.65
$25.65
$0.00
$25.65
$0.00
$144.49
$812.93
$144.49
$812.93
$10.00
$926.04
0%
3.00
$8.55
3.00
1
$0.61
6.95
473
$8.29
1.30
125
$1.11
17.39
1,606
0.08%
SubTotal:
$25.65
3.00
PRODUCE - 4
PRODUCE
$2,009.67
SubTotal:
6.50%
$2,009.67
52%
3,288.62
3,288.62
WINE / LIQUOR - 6
WINE / LIQUOR
$1,351.28
4.37%
31%
163.00
SubTotal:
$1,351.28
$10.00
$926.04
163.00
Non-Hash SubTotal:
$30,898.66
$1,604.92
$17,322.93
27,933.77
Total Sales:
$30,898.66
$1,604.92
$17,322.93
27,933.77
Tax A:
$807.65
Tax B:
$0.00
Tax C:
$0.00
Tax D:
$0.00
Total Tax:
$807.65
Total:
100.00%
$31,706.31
Aggregate Store Sales
Tuesday, November 01, 2005 04:55 PM Page: 2
RETAIL USER REFERENCE MANUAL – RETAIL 7
321
RETAIL 7™User Manual
APPENDIX E –Allowances
Goodwin’s Market
Allowances
UPC
Item
Product
Allowance
Start
End
Vendor
Retail
Amount
Code
Description
Description
Date
Date
0000000001007
Canned Dog Food
Allowance
8/24/2005
9/7/2005
4
$1.90
$0.10
0000000001008
Dry Dog Food
Allowance
8/24/2005
9/7/2005
4
$2.87
$0.20
Price
0000000012301
234
Arrowhead Water
Allowance
11/14/2005 11/21/2005
3
$2.50
$0.25
0000001234501
123
Aqua Lite
Allowance
11/14/2005 11/21/2005
2
$1.75
$0.33
Monday, November 14, 2005 03:01 PM Page: 1
RETAIL USER REFERENCE MANUAL – RETAIL 7
Allowances
322
RETAIL 7™User Manual
APPENDIX E –Allowance Report
Goodwin’s Market
Allowance Report
Upc
Description
Item Code
Amount
Start Date
End Date
CERTIFIED/FROZEN FOOD
0000000001007
Allowance
$0.10
08/24/05
09/07/05
0000000001008
Allowance
$0.20
08/24/05
09/07/05
$0.30
Total
Monday, November 14, 2005 11:29 AM Page: 1
RETAIL USER REFERENCE MANUAL – RETAIL 7
$0.30
Allowance Report
323
RETAIL 7™User Manual
APPENDIX E- Bad Checks Report
Goodwin’s Market
Bad Checks
Names
Card Number
Date
0016569
0026981
0026981
0026981
0026981
0096487
0099351
0099351
0099351
0144961
0144961
0161992
0167345
0227645
0227645
0227645
0227645
0230662
0256272
0369269
0369269
0369269
0369269
0369269
0369269
0369269
0377052
0387805
0401376
0416186
0479572
0537089
0550230
0550230
0675512
0688224
0688224
0688224
0688224
0688224
0688224
0764748
0781973
08/07/94
03/12/93
03/12/93
03/13/93
03/17/93
06/30/95
01/01/01
10/18/95
02/06/95
05/27/95
01/01/01
10/23/93
05/14/96
09/19/93
07/24/94
02/11/95
01/12/96
01/01/01
10/04/93
09/12/93
09/14/93
09/15/93
09/16/93
12/29/95
12/28/95
12/30/95
10/25/94
02/18/94
03/05/93
03/29/94
12/08/94
06/23/96
08/19/93
01/01/01
02/10/95
05/17/92
06/06/92
06/07/92
06/07/92
07/04/92
07/06/92
12/22/93
10/29/94
Check #
Amount
Fee
Total
3495
9063
9064
9069
9070
262
351
115
3595
0
961
2325
3240
1993
2301
2490
2763
662
615
853
854
857
858
1124
1123
1125
335
805
7509
7002
2222
1240
162
338
1319
1062
1106
1107
1108
1093
1096
137
952
$51.75
$105.31
$134.03
$231.53
$178.00
$231.40
$20.00
$20.00
$20.00
$20.00
$20.00
$20.00
$71.75
$125.31
$154.03
$251.53
$198.00
$18.75
$7.52
$124.28
$20.00
$20.00
$20.00
$37.98
$55.99
$40.12
$99.38
$69.85
$74.04
$20.00
$0.00
$20.00
$100.00
$60.00
$60.00
$60.00
$55.00
$8.87
$11.72
$5.89
$24.59
$4.00
$26.00
$103.82
$25.97
$49.12
$33.30
$49.47
$40.00
$54.85
$40.00
$40.00
$22.58
$54.20
$61.35
$64.55
$14.00
$20.00
$20.00
$0.00
$20.00
$20.00
$20.00
$20.00
$20.00
$20.00
$20.00
$20.00
$20.00
$20.00
$20.00
$20.00
$20.00
$20.00
$0.00
$0.00
$0.00
$20.00
$20.00
$20.00
$57.98
$55.99
$60.12
$99.38
$74.04
$120.00
$55.00
$55.00
$75.00
$75.00
$28.87
$31.72
$25.89
$24.59
$24.00
$46.00
$123.82
$69.12
$53.30
$69.00
Balance
($125.31)
($154.03)
($251.53)
($198.00)
$251.40
$0.00
$38.75
$27.52
$144.28
$0.00
$0.00
$0.00
$89.85
$0.00
$0.00
$0.00
$0.00
$0.00
$0.00
$0.00
$0.00
$0.00
$0.00
$0.00
$0.00
($53.30)
$60.00
$74.85
$40.00
$40.00
$22.58
$74.20
$81.35
$84.55
$14.00
$0.00
Bad Checks
RETAIL USER REFERENCE MANUAL – RETAIL 7
324
RETAIL 7™User Manual
APPENDIX E –Bad Checks Letter 1
Goodwin’s Market
24089 Lake Gregory Drive
PO Box 3269
Crestline CA
First Written notification of Returned Check(s)
11/6/05
Jones, Tina
A8888888
Our records indicate that a check endorsed by you, or your company, has been returned by your bank unpaid
after 2 deposit attempts. Check number 1009 in the amount of $125.00 was accepted in our store.
A service charge of $30.00 for each returned check is applied. Please pay the balance due of $155.00
immediately. We must receive your check by Monday, November 21, 2005.
Please contact me at the phone number above if you have any questions or concerns regarding this matter.
Respectfully yours,
Amount Due: $155.00
Please make your check payable to: Goodwin’s Market
RETAIL USER REFERENCE MANUAL – RETAIL 7
325
RETAIL 7™User Manual
APPENDIX E –Bad Checks Letter 2
Goodwin’s Market
24089 Lake Gregory Drive
PO Box 3269
Crestline CA
Second Written notification of Returned Check(s)
11/6/05
Jones, Tina
A8888888
Our records indicate that a check endorsed by you, or your company, has been returned by your bank unpaid
after 2 deposit attempts. Check number 1009 in the amount of $125.00 was accepted in our store.
A service charge of $30.00 for each returned check is applied. Please pay the balance due of $155.00
immediately. We must receive your check by Monday, November 21, 2005.
Because this is our second notification, your company and/or personal checks will be entered into our computer
and you will be prohibited from further check cashing privileges in our store until this matter is resolved. In
addition, we may take one of the following actions if we do not hear from you immediately:
1. Proceed in the manner prescribed by state law which entitles us to collect THREE (3) TIMES the amount of
the returned check.
2. File your check with the local police department or Labor Board for such action as they deem appropriate.
3. Refer your check to our collection agency, which will be authorized to take legal action against you.
Please contact me personally at the phone number above if you have any questions or concerns regarding this
matter.
Respectfully yours,
Amount Due: $155.00
Please make your check payable to: Goodwin’s Market
RETAIL USER REFERENCE MANUAL – RETAIL 7
326
RETAIL 7™User Manual
APPENDIX E –Bad Checks Letter 3
Goodwin’s Market
24089 Lake Gregory Drive
PO Box 3269
Crestline CA
Third Written notification of Returned Check(s)
11/6/05
Jones, Tina
A88888888
Our records indicate that a check endorsed by you, or your company, has been returned by your bank unpaid
after 2 deposit attempts. Check number 1009 in the amount of $125.00 was accepted in our store.
A service charge of $30.00 for each returned check is applied. Please pay the balance due of $155.00
immediately. We must receive your check by Monday, November 21, 2005.
Because this is our third notification, your company and/or personal checks have been entered into our
computer and you are prohibited from further check cashing privileges in our store until this matter is resolved.
In addition, we are taking the following actions if we do not hear from you immediately:
1. Proceed in the manner prescribed by state law which entitles us to collect THREE (3) TIMES the amount of
the returned check. We will file this claim with the Local Small Claims Court to collect this amount.
2. File your check with the local police department for such action as they deem appropriate.
Please contact me personally at the phone number above if you have any questions or concerns
regarding this matter.
Respectfully yours,
Amount Due: $155.00
Please make your check payable to: Goodwin’s Market
RETAIL USER REFERENCE MANUAL – RETAIL 7
327
RETAIL 7™User Manual
APPENDIX E –Balancing Overview
Goodwin’s Market
Balancing Overview
Balance Date: 10/31/2005
Total Taxes
Tax A
Tax B
Tax C
Tax D
$807.65
$807.65
This Deposit
$14,220.09
Over/Shorts
$7.00
Variance
$1.20
Totals
$31,706.31
Sales
GROCERY
Tills (Actual)
$19,766.94
PHOTO
$25.65
BAKERY
$643.20
Deposit
$31,706.31
Cash
$9,078.32
Total Sales
Credit Card
$6,030.74
Over/Shorts
$7.00
Check
$5,142.97
Paid Ins
$0.00
Paid Outs
$0.00
PRODUCE
$2,009.67
Coupons
MEAT
$2,968.73
Debit Card
$11,248.30
Received On Acct
$0.00
WINE / LIQUOR
$1,351.28
Elec Cash
$61.58
-ATM/Credit Cards
$17,279.04
GENERAL
MERCHANDISE
DELI
$1,979.80
Elec Foodstamps
$83.95
-Mfr Coupons
$1,352.15
Food Stamps
GIFTS
$801.24
$42.67
$0.00
-NonDepositables
$170.31
Gift Certificates
$10.42
Safe Variance
$1.20
In Store Charges
$14.36
Safe Adjustments
$0.00
$0.00
To be Deposited
$14,221.29
Actual deposits
$14,220.09
Store Coupons
Variance
Total:
$42.67
$30,898.66
Tuesday, November 01, 2005 05:27 PM Page: 1
RETAIL USER REFERENCE MANUAL – RETAIL 7
$1.20
$31,713.31
Review and Update G/L
328
RETAIL 7™User Manual
APPENDIX E –Bill Backs Report
Goodwin’s Market
Bill Backs
RebateID
8778
766
Bill Back
Description
UPC
Sale
0000000000009
Rebate
0000000000123
Monday, November 14, 2005 02:36 PM Page: 1
RETAIL USER REFERENCE MANUAL – RETAIL 7
Item
Code
123
Vendor
Start
Date
End
Date
Rebate
Amount
Suggested
Price
Status
4
8/24/2005
9/7/2005
$0.15
$0.40
W
1
8/24/2005
9/7/2005
$0.30
$2.00
W
Bill Backs
329
RETAIL 7™User Manual
APPENDIX E –Checkstand Productivity Report
Goodwin’s Market
Checkstand Productivity Report
Start Date: 10/31/2005
End Date: 10/31/2005
Items
Sold
No. of
Customers
Avg Order
Size
Avg Item
Price
$659.27
577
63
$10.46
$1.14
1.05
$1,236.49
892
68
$18.18
$1.39
6
1.27
$1,471.99
890
80
$18.40
$1.65
10 - 11
6
1.08
$1,189.71
720
74
$16.08
$1.65
11 - 12
6
1.46
$1,932.27
1,617
112
$17.25
$1.20
12 - 13
7
2.06
$2,912.15
1,449
142
$20.51
$2.01
13 - 14
5
1.76
$3,053.98
2,982
111
$27.51
$1.02
14 - 15
9
1.95
$2,582.77
2,683
126
$20.50
$0.96
15 - 16
8
2.61
$4,476.40
5,198
193
$23.19
$0.86
16 - 17
9
2.40
$3,685.33
2,672
188
$19.60
$1.38
17 - 18
8
2.38
$3,355.72
2,995
173
$19.40
$1.12
18 - 19
6
1.28
$1,958.77
2,388
113
$17.33
$0.82
19 - 20
4
1.20
$1,599.68
2,183
75
$21.33
$0.73
20 - 21
4
1.00
$1,076.24
468
62
$17.36
$2.30
21 - 22
2
0.39
$472.53
201
25
$18.90
$2.35
22 - 23
1
0.01
$43.01
19
1
$43.01
$2.29
22.54
$31,706.31
27,934
1,606
$20.56
$1.43
Hour
No. of
Checkers
Sign-on
Hours
7 - 8
4
0.65
8 - 9
6
9 - 10
16 hours
5.69
Tuesday, November 01, 2005 05:34 PM Page: 1
RETAIL USER REFERENCE MANUAL – RETAIL 7
Sales
Amount
Checkstand Productivity Report
330
RETAIL 7™User Manual
APPENDIX E –Checkstand Service Report
Goodwin’s Market
Checkstand Service Report
Start Date: 10/31/2005
Over/Short
Average
Order
% Scan
Ring
Time
Total
Hours
End Date: 10/31/2005
Coupons
$
%
#
Void
%Total
$
%Sale
$
Refunds
%Total %Sale
Gross
Sales
Ashley Franks - 220
($0.01)
$20.92
95.93%
27.34
1.25
5.53%
0
$0.00
0.00%
$11.79
4.78%
0.62%
$0.00
0.00%
0.00%
$1,900.41
$3.89
83.78%
35.36
0.16
0.69%
0
$0.00
0.00%
$0.79
0.32%
0.83%
$0.00
0.00%
0.00%
$95.31
$21.76
94.39%
36.06
3.18
14.13%
5
$8.89
20.83%
$16.34
6.63%
0.27%
$4.66
4.04%
0.08%
$5,947.11
$16.64
95.08%
24.87
1.43
6.36%
1
$1.00
2.34%
$22.47
9.11%
1.39%
$0.40
0.35%
0.02%
$1,620.31
($0.31)
$21.22
94.43%
31.63
2.46
10.90%
2
$4.00
9.37%
$32.87
13.33%
0.82%
$65.00
56.30%
1.62%
$4,002.69
($0.10)
$5.67
92.86%
27.76
0.72
3.21%
0
$0.00
0.00%
$4.45
1.80%
1.00%
$0.00
0.00%
0.00%
$444.76
$0.00
0.00%
0.00
0.00
0.00%
0
$0.00
0.00%
$0.00
0.00%
0.00%
$0.00
0.00%
0.00%
$0.00
$24.32
93.29%
31.54
2.51
11.16%
6
$5.75
13.48%
$8.51
3.45%
0.21%
$11.26
9.75%
0.28%
$3,968.85
$17.50
93.93%
20.23
2.89
12.81%
0
$0.00
0.00%
$11.31
4.59%
0.35%
$1.20
1.04%
0.04%
$3,219.36
$17.58
94.38%
29.18
2.63
11.67%
1
$1.00
2.34%
$14.51
5.88%
0.43%
$0.00
0.00%
0.00%
$3,394.30
$17.76
94.63%
25.01
2.57
11.41%
2
$10.00
23.44%
$15.71
6.37%
0.50%
$22.98
19.90%
0.73%
$3,152.70
$17.27
92.44%
34.41
2.73
12.12%
14
$12.03
28.19%
$107.86
43.74%
2.72%
$9.95
8.62%
0.25%
$3,960.51
Bakery Dept - 43
$4.99
Brent Parker - 216
($0.05)
Catherine Jones - 109
$0.00
Cindy Williams - 178
Deli , - 42
Kim Nolan - 128
$0.00
Laura Hallmark - 172
$1.13
Marianne Roberts - 217
$2.00
Roseanne Smith - 206
($0.15)
Supervisor1 - 40
($0.15)
Vicki James - 219
($0.35)
Total:
$7.00
$15.38
22.54
RETAIL USER REFERENCE MANUAL – RETAIL 7
26.95
31
$42.67
$246.61
$115.45
$31,706.31
331
RETAIL 7™User Manual
APPENDIX E –Coupon Movement Detail
Goodwin’s Market
Coupon Movement Detail - Total Store
Start Date: 12/12/2004 End Date: 11/1/2005
Start
Date
Trigger
End
Date
ProcDate
Customer
Movement
Price
Coupon
Price
Loss
Total
Loss
GROCERY1
2 PS KRFT DLX MC&CZ
01/15/01
06/05/05
Donna Anderson
1.00
$2.79
$2.54
$0.25
$0.25
01/15/01
04/15/05
Doris Peterson
1.00
2.00
$2.79
$2.54
$0.25
$0.25
$0.50
Tuesday, November 01, 2005 05:48 PM Page: 1
RETAIL USER REFERENCE MANUAL – RETAIL 7
Subtotal
$0.50
Total
$0.50
Coupon Movement Detail - Total Store
332
RETAIL 7™User Manual
APPENDIX E –Coupon Movement Summary
Goodwin’s Market
Coupon Movement Summary - Total Store
Start Date: 12/12/2004 End Date: 11/1/2005
Coupon ID
Description
Trigger
Start
Date
End
Date
Movement
Price
Coupon
Price
2.00
$2.79
$2.54
Loss
Total
Loss
GROCERY1
2
PS KRFT DLX MC&CZ
01/15/01
$0.25
$0.50
$0.50
Total
Tuesday, November 01, 2005 05:48 PM Page: 1
RETAIL USER REFERENCE MANUAL – RETAIL 7
$0.50
Coupon Movement Summary - Total Store
333
RETAIL 7™User Manual
APPENDIX E –Gift Certificate Letter
Tuesday, December 06, 2005
GOODWIN’S MARKET
24089 Lake Gregory Dr.
P. O. Box 3269
Crestline, Ca.
Gary or Diane Anderson
004099282762
P.O. Box 1234
76543 Crest Forest Drive
92311
We here at GOODWIN‟S MARKET want to express our sincere thanks for your faithful
support of our store. Our success depends greatly upon your continued patronage. So, to show our
appreciation to you, we would like to give you a gift certificate. It‟s just our way of recognizing you, our
valued customer, and saying “Thank you for shopping at GOODWIN‟S MARKET“.
Sincerely,
Your Name
Your Title
The bearer of this certificate is entitled to $ 5.00 merchandise from GOODWINS
Redeemer‟s Signature
Corporate Seal
RETAIL USER REFERENCE MANUAL – RETAIL 7
334
RETAIL 7™User Manual
APPENDIX E –In Store Charge Activity
Goodwin’s Market
Customer In-store Charge Activity
Start Date: 10/15/2005
Date
10/21/05
Activity
Charge
Reference No
Charge
Charge
Current Balance: ($0.08)
$8.22
Current Balance: $0.00
3-3-112
$100.00, CRESTLINE CARD --- 0041000000545
Amount
$20.00
1-1-263
$100.00, CRESTLINE CARD --- 0041000000538
10/15/05
Memo
5-5-182
$100.00, CRESTLINE CARD --- 0041000000128
10/16/05
End Date: 11/1/2005
$24.15
Current Balance: ($20.75)
10/28/05
Charge
7-7-66
$8.21
10/19/05
Charge
6-6-42
$71.04
$100.00, CRESTLINE CARD --- 0041000000547
Current Balance: $0.00
10/23/05
Charge
3-3-192
$1.00
10/23/05
Charge
3-3-192
$99.00
$100.00, CRESTLINE CARD --- 0041000000548
10/30/05
Charge
Current Balance: ($88.71)
4-4-163
$100.00, CRESTLINE CARD --- 0041000000549
$11.29
Current Balance: ($39.86)
10/31/05
Charge
7-7-137
$14.36
10/30/05
Charge
6-6-156
$45.78
$100.00, CRESTLINE CARD --- 0041000000550
10/30/05
Charge
4-4-191
$250.00, CRESTINE CARD --- 0046990000045
10/28/05
Charge
Charge
6-6-23
$83.72
Charge
Current Balance: $0.00
3-3-206
$250.00, CRESTLINE CARD --- 0046990000044
10/19/05
$35.77
Current Balance: $0.00
$250.00, CRESTLINE CARD --- 0042500000018
10/20/05
Current Balance: ($64.23)
$2.36
Current Balance: $0.00
5-5-61
$43.03
$50.00, CRESTLINE CARD --- 0040500000124
Current Balance: ($33.06)
10/23/05
Charge
6-6-57
$11.58
10/21/05
Charge
4-4-55
$5.36
250.00, CRESTLINE CARD --- 0046990000050
Current Balance: $0.00
10/25/05
Charge
2-2-7
$3.99
10/25/05
Charge
2-2-8
$0.10
10/19/05
Charge
1-1-61
$9.58
10/18/05
Charge
3-3-103
$29.14
BOOSTERS, RIM BAND --- 0041000000170
Current Balance: $0.00
Tuesday, November 01, 2005 05:46 PM
RETAIL USER REFERENCE MANUAL – RETAIL 7
Customer Instore Charge Activity
335
RETAIL 7™User Manual
APPENDIX E –In Store Charge Balance Detail
Goodwin’s Market
Customer In-store Charge Balance Detail
Start Date: 10/15/2005
Date
Activity
Reference No
$100.00, CRESTLINE CARD --- 0041000000128
10/16/05
Charge
1-1-263
$100.00, CRESTLINE CARD --- 0041000000538
10/15/05
Charge
3-3-112
$100.00, CRESTLINE CARD --- 0041000000545
Memo
Amount
Current Balance:
$8.22
Current Balance:
$24.15
Current Balance:
Balance
($0.08)
($8.30)
$0.00
($24.15)
($20.75)
10/28/05
Charge
7-7-66
$8.21
($28.96)
10/19/05
Charge
6-6-42
$71.04
($100.00)
$100.00, CRESTLINE CARD --- 0041000000547
Current Balance:
$0.00
10/23/05
Charge
3-3-192
$1.00
($1.00)
10/23/05
Charge
3-3-192
$99.00
($100.00)
$100.00, CRESTLINE CARD --- 0041000000548
10/30/05
Charge
4-4-163
$100.00, CRESTLINE CARD --- 0041000000549
Current Balance:
$11.29
Current Balance:
($88.71)
($100.00)
($39.86)
10/31/05
Charge
7-7-137
$14.36
($54.22)
10/30/05
Charge
6-6-156
$45.78
($100.00)
$100.00, CRESTLINE CARD --- 0041000000550
10/30/05
Charge
4-4-191
$250.00, CRESTINE CARD --- 0046990000045
10/28/05
Charge
6-6-23
$250.00, CRESTLINE CARD --- 0042500000018
10/20/05
Charge
3-3-206
$250.00, CRESTLINE CARD --- 0046990000044
10/19/05
Charge
5-5-61
$50.00, CRESTLINE CARD --- 0040500000124
Current Balance:
$35.77
Current Balance:
$83.72
Current Balance:
$2.36
Current Balance:
$43.03
Current Balance:
($64.23)
($100.00)
$0.00
($83.72)
$0.00
($2.36)
$0.00
($43.03)
($33.06)
10/23/05
Charge
6-6-57
$11.58
($44.64)
10/21/05
Charge
4-4-55
$5.36
($50.00)
250.00, CRESTLINE CARD --- 0046990000050
Current Balance:
$0.00
10/25/05
Charge
2-2-7
$3.99
10/25/05
Charge
2-2-8
$0.10
($4.09)
10/19/05
Charge
1-1-61
$9.58
($13.67)
10/18/05
Charge
3-3-103
$29.14
($42.81)
BOOSTERS, RIM BAND --- 0041000000170
Tuesday, November 01, 2005 05:47 PM
RETAIL USER REFERENCE MANUAL – RETAIL 7
Current Balance:
($3.99)
$0.00
Customer Instore Charge Balance Detail
336
RETAIL 7™User Manual
APPENDIX E –In Store Charge Balance Summary
Goodwin’s Market
Customer In-store Charge Balance Summary
Date: 11/1/2005
Card Number
Customer Name
004000000030
$100.00, Crestline Card
0041000000030
0041000000028
0041000000108
0041000000114
0041000000127
0041000000128
0041000000130
0041000000131
0041000000135
0041000000137
0041000000138
0041000000142
0041000000144
$100.00, Crestline Card
$100.00, Crestline Card
$100.00, Crestline Card
$100.00, CRESTLINE CARD
$100.00, CRESTLINE CARD
$100.00, CRESTLINE CARD
$100.00, CRESTLINE CARD
$100.00, CRESTLINE CARD
$100.00, CRESTLINE CARD
$100.00, CRESTLINE CARD
$100.00, CRESTLINE CARD
$100.00, CRESTLINE CARD
0041000000028
0041000000108
0041000000114
0041000000127
0041000000128
0041000000130
0041000000131
0041000000135
0041000000137
0041000000138
0041000000142
0041000000144
0041000000528
0041000000529
0041000000531
0041000000534
0041000000535
0041000000536
0041000000539
0041000000540
0041000000541
0041000000545
0041000000548
0041000000549
$100.00, CRESTLINE CARD
$100.00, CRESTLINE CARD
$100.00, CRESTLINE CARD
$100.00, CRESTLINE CARD
$100.00, CRESTLINE CARD
$100.00, CRESTLINE CARD
$100.00, CRESTLINE CARD
$100.00, CRESTLINE CARD
$100.00, CRESTLINE CARD
$100.00, CRESTLINE CARD
$100.00, CRESTLINE CARD
$100.00, CRESTLINE CARD
0041000000528
0041000000529
0041000000531
0041000000534
0041000000535
0041000000536
0041000000539
0041000000540
0041000000541
0041000000545
0041000000548
0041000000549
0041000000550
0040200000141
0040200000004
0040200000007
0040200000015
0040200000017
0040200000018
0040200000020
0040200000102
0040200000103
0040200000104
$100.00, CRESTLINE CARD
$20.00, Crestline Card
$20.00, Crestline Card
$20.00, Crestline Card
$20.00, Crestline Card
$20.00, Crestline Card
$20.00, Crestline Card
$20.00, Crestline Card
$20.00, Crestline Card
$20.00, Crestline Card
$20.00, Crestline Card
0041000000550
0040200000141
0040200000004
0040200000007
0040200000015
0040200000017
0040200000018
0040200000020
0040200000102
0040200000103
0040200000104
0040200000105
0040200000106
0040200000108
0040200000109
$20.00, Crestline Card
$20.00, Crestline Card
$20.00, Crestline Card
$20.00, Crestline Card
0040200000105
0040200000106
0040200000108
0040200000109
Tuesday, November 01, 2005 05:47 PM Page: 1
RETAIL USER REFERENCE MANUAL – RETAIL 7
Home Phone
D/L
Current Balance
($100.00)
($100.00)
($69.49)
($86.90)
($88.27)
($0.08)
($100.00)
($100.00)
($12.90)
($100.00)
($100.00)
($100.00)
($100.00)
($8.35)
($100.00)
($100.00)
($100.00)
($100.00)
($72.19)
($48.62)
($100.00)
($100.00)
($20.75)
($88.71)
($39.86)
($64.23)
($2.36)
($20.00)
($20.00)
($12.79)
($20.00)
($20.00)
($20.00)
($0.95)
($20.00)
($16.95)
($2.60)
($20.00)
($20.00)
($20.00)
Customer Instore Charge Balance Summary
337
RETAIL 7™User Manual
APPENDIX E –Customer Letters
Tuesday, December 06, 2005
Goodwin’s Market
24089 Lake Gregory Drive
PO Box 3269
Crestline CA
Doe Jane
0049887891122
7 Sandford Drive
Crestline CA
97887
We here at Goodwin's Market want to express our sincere thanks for your faithful support
of our store. Our success depends greatly upon your continued patronage. In the future we
intend not only to recognize those of you who support our store, but to reward you as well. Gift
certificates, personalized coupons, and daily discounted items are just some of the things we will
be doing to say “Thank You”.
P. S. Once again the Goodwin's Market staff and I thank you for your loyal support, and therefore our
jobs!
Sincerely
Your Name
Your Title
RETAIL USER REFERENCE MANUAL – RETAIL 7
338
RETAIL 7™User Manual
APPENDIX E –Customer Ranking Report
Goodwin’s Market
Week of: October 30 2005 to November 5 2005
CardNo
Customer
Rank
Cost
Sales
Items
Gross Profit
GM
3176887
NORTON KAREN
1
$0.00
$200.63
16,065.00
$200.63
100.00%
3364759
WAGONNER SUZANNE
2
$98.33
$165.35
80.66
$62.53
38.87%
0677014
JOHNSON BARBARA
3
$67.50
$145.31
53.22
$77.81
53.55%
0621996
FREDERICK JOANNA
4
$69.51
$121.70
40.05
$48.90
41.29%
1929428
SMITH CYNTHIA
5
$60.76
$104.07
42.49
$38.33
38.68%
0921607
ROLLANDS BETTY
6
$63.23
$101.53
37.44
$38.30
37.72%
9310564
STEPHENS SHERYL
7
$58.32
$97.77
48.00
$39.45
40.35%
0040003949864
THOMAS TREVOR
8
$48.20
$97.73
26.00
$46.24
48.96%
3169779
MORRIS MIKE
9
$47.10
$97.16
18.32
$42.07
47.18%
0153125
MOORE RAYMOND
10
$53.14
$96.23
39.94
$38.78
42.19%
0116275
RAYMOND LINDA
11
$42.20
$94.92
51.70
$32.89
43.80%
0430738
LEE SARAH
12
$49.08
$90.66
252.13
$41.59
45.86%
0576903
SANDERSON ELIZABETH
13
$48.68
$88.72
37.30
$32.47
40.00%
0067073
BROWN LORIE
14
$56.47
$85.67
22.68
$28.21
33.31%
0162685
GILES LINDA
15
$58.78
$84.46
17.00
$25.68
30.40%
0806734
SHARKS LISA
16
$119.23
$84.02
59.76
($35.21)
-41.90%
0005084
BANKS GERALD
17
$52.20
$83.30
43.09
$31.10
37.33%
0040003948188
BURTON KATE
18
$30.18
$82.46
27.94
$50.30
62.49%
8813708
DENNIS JAMES
19
$32.24
$79.65
186.13
$36.33
52.98%
0205984
WALKER LLOYD
20
$42.13
$79.27
837.66
$33.95
44.62%
0506188
WILLIAMS FRANCIS
21
$44.85
$78.79
36.94
$32.95
42.35%
0012505
BRANDON AARRON
22
$56.81
$78.57
30.83
$21.76
27.68%
0910863
ROBERTS KATHY
23
$41.19
$71.93
32.00
$28.25
40.68%
RETAIL USER REFERENCE MANUAL – RETAIL 7
339
RETAIL 7™User Manual
APPENDIX E –Customer Sales Report
Goodwin’s Market
Customer Sales
Total Store
Start Date: 10/24/2005
Customer
Card #
Home Phone
BARBARA WATERS
Janet Winston
Brad Harolds
Catherine Jones
Miles Lansden
Laura Hallmark
Kate Burton
HEATHER FINCH
Brent Parker
LORI ANDERSON
GEORGE THOMAS
Tom Barns
Vera Nelson
Sally Crafton
Carol Williams
Mark Eagles
Linda Lewis
Elizabeth Krumstead
Andrew Martins
MARY SILVERS
Sara Wallace
Lynn Graham
Betty Morris
0029521
0040000404434
0040001571170
0040001642207
0040002252523
0040002965247
0040003948188
0040004160584
0040004260310
0040004592619
0040004799520
0040005077173
0040005430622
0040005579368
0040006804864
0040007269789
0043262
0043842
0065580
0168212
0178863
0204661
0306728
9195553262
Tuesday, November 01, 2005 05:06 PM Page: 1
RETAIL USER REFERENCE MANUAL – RETAIL 7
9195550433
9195557286
9195554766
9195554514
9195552419
9195553789
9195554775
End Date: 10/24/2005
Zip Code
92325
92325
92325
92325
92325
92325
92325
92322
Qty
Cost
Total
9.25
7.90
4.00
7.00
2.00
7.00
5.00
6.00
5.00
6.00
26.00
29.00
4.00
7.00
2.00
2.00
16.00
11.54
19.73
12.51
8.00
23.47
2.00
$7.39
$1.65
$9.16
$0.99
$0.00
$15.15
$8.07
$4.70
$0.70
$2.25
$23.45
$21.40
$1.91
$5.53
$1.14
$0.00
$32.58
$15.80
$20.77
$24.78
$7.70
$19.96
$4.11
$22.72
$13.91
$11.05
$4.83
$2.03
$20.93
$11.53
$10.88
$4.66
$5.09
$44.41
$38.37
$4.72
$13.17
$5.88
$3.49
$53.65
$33.51
$36.46
$44.78
$12.67
$48.07
$6.78
Profit
$15.33
$12.26
$1.89
$3.84
$2.03
$5.79
$3.46
$6.18
$3.96
$2.84
$20.96
$16.97
$2.81
$7.65
$4.74
$3.49
$21.07
$17.71
$15.69
$20.00
$4.97
$28.11
$2.67
GM
67.50%
88.14%
17.11%
79.57%
100.00%
27.64%
30.04%
56.84%
85.07%
55.83%
47.20%
44.23%
59.54%
58.05%
80.64%
100.00%
39.28%
52.86%
43.04%
44.68%
39.24%
58.49%
39.39%
Customer Sales
340
RETAIL 7™User Manual
APPENDIX E –Customers Report
Goodwin’s Market
Customers
Sorted by: Last Name
Customer Name
Address
Card Number
Home Phone
Purchases
Shopped
ALLEN, ART
2712 Little Bear Dr.
0730241
(919)555-9955
$1980.33
2
3647156
(919)555-6426
$345.50
1
4709938
(919)555-5025
$210.98
0
0845527
(919)555-0493
$318.48
1
9657543
(919)555-7535
$2988.54
3
3400018
(919)555-0393
$10,964.09
4
Link
131
Rim Forest, Ca 92378
ANDERSON, MARVIN
2234 Davis Ct
1546
Crestline, Ca 92325
BAINS, JANE
PO BOX 225
23133 BALSAM LN
CRESTLINE, CA 92325
DAVIS, ROBIN E
133 Bernard
Crestline, Ca 92325
EDWARDS, THOMAS
PO BOX 2177
4678 DARFO DR
CRESTLINE, CA 92325
EDWINS, JANNICE
PO BOX 3998
29872 LINX
CRESTLINE, CA 92325
Tuesday, November 01, 2005 05:40 PM Page: 1
RETAIL USER REFERENCE MANUAL – RETAIL 7
Customers
341
RETAIL 7™User Manual
APPENDIX E –Departments Report
Goodwin’s Market
Departments
Dept
Sub
No
No.
Name
Date
Modified
Food
Modified
By
Stamps
Discount
Hash
A
B
Unit of
Coupon
Discount
Halo
Lalo
Tax
Measure
Link
Link
Limit
Limit
A B C D
1
0 GROCERY
06/24/99
26
DEPTCOUPON001 DEPTDISCNT001
$30.00
$0.05
1
1 GROCERY TAXABLE 06/24/99
26
DEPTCOUPON001 DEPTDISCNT001
$30.00
$0.05
2
0 PHOTO
02/19/00
32
DEPTCOUPON002 DEPTDISCNT002
$20.00
$0.05
3
0 BAKERY
06/12/00
7
DEPTCOUPON003 DEPTDISCNT003
$15.00
$0.03
4
0 PRODUCE
12/04/01
2
DEPTCOUPON004 DEPTDISCNT004
$100.00
$0.05
5
0 MEAT
06/24/99
26
DEPTCOUPON005 DEPTDISCNT005
$20.00
$0.05
6
0 WINE / LIQUOR
06/24/99
26
DEPTCOUPON006 DEPTDISCNT006
$20.00
$0.05
7
0 GENERAL
MERCHANDISE
0 DELI
06/24/99
26
DEPTCOUPON007 DEPTDISCNT007
$20.00
$0.05
06/24/99
26
DEPTCOUPON008 DEPTDISCNT008
$30.00
$0.05
10
0 GIFTS
02/19/00
32
DEPTCOUPON010 DEPTDISCNT010
$20.00
$0.00
21
0 BAD CHECK
PAYMENT
04/26/02
2
DEPTCOUPON021 DEPTDISCNT021
$10.00
$0.00
8
Tuesday, November 01, 2005 05:51 PM Page: 1
RETAIL USER REFERENCE MANUAL – RETAIL 7
Departments
342
RETAIL 7™User Manual
APPENDIX E –Discount & Coupon Summary
Goodwin’s Market
Discount & Coupon Summary
Balance as of: 10/19/2005
Department
Discounts
GROCERY
($1.78)
($356.70)
PHOTO
$0.00
$0.00
MEAT
$0.00
($4.00)
WINE / LIQUOR
$0.00
$0.00
BAD CHECK PAYMENT
$0.00
$0.00
($0.26)
$0.00
PRODUCE
$0.00
($1.10)
GIFTS
$0.00
$0.00
GENERAL MERCHANDISE
$0.00
($84.32)
($3.10)
$0.00
($5.14)
($446.12)
BAKERY
DELI
Total:
Tuesday, November 01, 2005 05:27 PM Page: 1
RETAIL USER REFERENCE MANUAL – RETAIL 7
Coupons
Discount & Coupon Summary
343
RETAIL 7™User Manual
APPENDIX E –Electronic Coupons
Goodwin’s Market
Electronic Coupons
Coupon
ID
Coupon
Link
Trigger
Trigger
Amt/Qty
Min
Purchase
No
Limit NextUse
Purchase
Multi
Description
Type
Amount
Effect.
1
4th of July Celebration
PC
($$0.01)
0000000001101
1.00
$50.00
999
06/28/00
2
PS KRFT DLX MC&CZ
PC
($$0.25)
0002100065886
1.00
$0.01
999
01/15/01
3
PS NEAR EAST ORIG RICE PILAF
PC
($$0.10)
0007225100105
1.00
$0.01
999
06/22/01
Expir. Priority Use
UpcLink
Upc
Tuesday, November 01, 2005 05:48 PM Page: 1
RETAIL USER REFERENCE MANUAL – RETAIL 7
07/05/00
11/17/01
1
DEPTELECPN001
1
DEPTELECPN001
1
DEPTELECPN001
Electronic Coupons
344
RETAIL 7™User Manual
Processed:
Cashier:
Customer:
Points
Trans Date:
Trans Time:
Trans #:
Type
Sub Type
APPENDIX E –Electronic Journal
11/01/2005
27
0040000404434
Trans Total:
Total Tax A:
Total Tax B:
Total Tax C:
Total Tax D:
11/01/2005
4:07:00 pm
3
Status
Dept
Qty
UPC
$20.61
$0.00
$0.00
$0.00
$0.00
Amt
Tax
A B C D
FS
5
1.60 0026163100000
$6.38
------ -----------------------------------------FRYER BRST BNLS - - - - - - - - - - - - - - - - - - - - - - - - - - - - - - - - ----------------------------------------------------------------------------------------------------------5
1.62 0026163100000
$6.46
------ -----------------------------------------FRYER BRST BNLS - - - - - - - - - - - - - - - - - - - - - - - - - - - - - - - - ----------------------------------------------------------------------------------------------------------1
1.00 0007313000732
$3.29
------ -----------------------------------------OROWEAT POT BREAD - - - - - - - - - - - - - - - - - - - - - - - - - - - - ------------------------------------------------------------------------------------------------------------1
1.00 0004139001185
$2.29
------ -----------------------------------------KIKMN TRIYK HNY PNAPL - - - - - - - - - - - - - - - - - - - - - - - - - - ----------------------------------------------------------------------------------------------------------1
1.00 0004138085005
$2.19
------ -----------------------------------------7 GC HOMO MILK HF - - - - - - - - - - - - - - - - - - - - - - - - - - - - - - ---------------------------------------------------------------------------------------------------------Total
-0
1.00
Debit Card
($60.61)
------ -----------------------------------------------------------------------------------------Card type:
Card #: 4820XXXXXXXX7909
Expires: 0703- - - -Auth
#: 138096
Ref #:
-----------------------------------------------------------------------------------------------------Total
-0
-1.00
Cash
$40.00
------ ----------------------------------------------------------------------------------------------------------------------------------------------------------------------------------------------------
Tuesday, November 01, 2005 05:32 PM Page: 8
RETAIL USER REFERENCE MANUAL – RETAIL 7
Electronic Journal
345
RETAIL 7™User Manual
APPENDIX E –Employees
Goodwin’s Market
Employees
Employee
Cashier
Chkstnd
Admin
Admin
Password
Security
Password
Security
First Name
Last Name
DL #
Job Title
1
13
20
19
20
Employee
Generic
Checker
27
155
10
80
10
Cindy
Martins
Gen. Mer.
29
990
6
94
6
Janet
Windsor
Bookkeeper
30
867
20
867
20
Larry
Masterson
Grocery
33
5373
1
77
10
David
Goodyear
President
34
5512
20
180
20
Bridgette
Jones
Payroll
37
9108
1
11
4
John
Ralph
Grocery
40
2489
1
1
Supervisor1
Supervisor1
Front end
41
329
1
1
Supervisor2
Supervisor2
Front end
42
705
1
1
Deli
,
Deli Dept.
43
81706
1
1
Bakery
Dept
Bakery
97
9025
1
1
Supervisor 3
Supervisor 3
109
4740
6
60
10
Larry
Johnson
Checker
115
384
8
36
8
Mark
Eagles
Manager
117
179
20
39
20
Donna
Anderson
128
565
8
60
8
Kim
Newell
CASHIER
130
5977
10
41
10
Melinda
Martinez
Cashier
140
0
10
178
10
Jim
Barrister
Acctng
141
0
20
49
20
Store
Close
Store c
Tuesday, November 01, 2005 05:50 PM Page: 1
RETAIL USER REFERENCE MANUAL – RETAIL 7
Active
Purchases
Employees
346
RETAIL 7™User Manual
APPENDIX E –Inventory Analysis
Goodwin’s Market
Inventory Analysis by Crisps and Chips
EndDate: 11/28/2005
StartDate: 9/11/2005
UPC
Description
Beginning
Received
Sold
Adjt
Ending
Shrink
Cost
Price
$84.00
$147.00
0000000000022
Rice Cakes
71.00
0.00
29.00
0.00
42.00
0.00
0000000008888
Pretzels
98.00
0.00
24.00
0.00
74.00
0.00
$99.16
$173.16
0000000009999
Onion Pretzels
99.00
0.00
17.00
0.00
82.00
0.00
$109.88
$191.88
0000000456701
BBQ Potato Chips
87.00
0.00
15.00
0.00
72.00
0.00
$72.00
$216.00
355.00
0.00
85.00
0.00
270.00
0.00
$365.04
$728.04
Total:
Monday, November 28, 2005 01:
58 PM Page: 1
RETAIL USER REFERENCE MANUAL – RETAIL 7
Inventory Analysis by Crisps and Chips
347
RETAIL 7™User Manual
APPENDIX E –Inventory Count
Goodwin’s Market
Inventory Count
Inventory Count Id: Soda Aisle
UPC
Description
Qty
Unit
Cost
0000000000123
0000000000234
0000000000345
Cola
Lemon-Lime
Orange Soda
23.00
27.00
45.00
$0.50
$0.50
$0.50
Total:
Monday, November 14, 2005 11:24 AM Page: 1
RETAIL USER REFERENCE MANUAL – RETAIL 7
Total
Cost
$11.50
$13.50
$22.50
$47.50
Unit
Price
Total
Price
$1.75
$1.75
$1.75
$40.25
$47.25
$78.75
Dept Section Vendor
17
17
17
120
120
120
2
2
2
Pack Size
24
24
24
‟12oz‟
Count
Date
Applied Applied
On
Qty
11/14/05
11/14/05
11/14/05
$166.25
Inventory Count
348
RETAIL 7™User Manual
APPENDIX E –Invoice
Purchase Order
Goodwin’s Market
24089 Lake Gregory Drive
TO :
Ship To:
BRITISH WHOLESALE IMPORTS, INC.
Goodwin’s Market
5711 CORSA AVENUE
24089 Lake Gregory Drive
WESTLAKE VILLAGE, CA 91362
8189916644
8189918829
P. O. Date
P. O. #
11/28/2005
0000000028
UPC
Item C.
Invoice Date
Invoice #
Terms
Qty.
Unit
G.P.
G.M.
Price
Cost
Ext. Retail
Total
0123321123321
50.00
pieces
After Eight Dinner Mints
$69.53
53.68%
$2.59
$1.20
$129.53
$60.00
1234432234432
45.00
pieces
McVities Digestives
$45.46
78.30%
$1.29
$0.28
$58.06
$12.60
95.00
Description
Ship Via
Requisitioner
$114.99
$61.30
1. Please send two copies of your invoice.
2. Enter this order in accordance with the prices, terms,
delivery method, and specifications listed above.
3. Please notify us immediately if you are unable to ship as specified.
$3.88
$1.48
$187.59
$72.60
Adjustments:
$0.000
Total:
$72.600
Vendor Total:
11/28/2005 2:35:36PM Page: 1
RETAIL USER REFERENCE MANUAL – RETAIL 7
Authorized by
Date
349
RETAIL 7™User Manual
APPENDIX E –Invoice Report
Goodwin’s Market
Invoice Total Report - DSD and Non-DSD
Department: All Departments
Start: 11/27/2005
Invoice Date
Invoice Number
Vendor: All Vendors
End: 11/29/2005
Total Cost
Total Price
Gross Margin
Gross Profit
$72.60
$187.59
$61.30
$114.99
Non-DSD Vendors
GROCERY
BRITISH WHOLESALE IMPORTS, INC.
11/29/2005
1128
Vendor Total
$72.60
$187.59
$61.30
$114.99
Department Total
Sub Total
$72.60
$187.59
$61.30
$114.99
$72.60
$187.59
$61.30
$114.99
Grand Total
$72.60
$187.59
$61.30
$114.99
Tuesday, November 29, 2005 10:01 AM
RETAIL USER REFERENCE MANUAL – RETAIL 7
Invoice Total Report - DSD and Non-DSD
350
RETAIL 7™User Manual
APPENDIX E –In Store Charge Statement
IN STORE
CHARGE
GOODWIN’S
24089 Lake Gregory Dr.
P. O. Box 3269
Crestline, Ca.
(909) 338-1705
Bill to:
Ship to:
S.B. COUNTY REGIONAL PARK
,
,
0049093382233
Period
Terms
Current Balance
NET 30 DAYS
$67.35
11/1/2005 - 11/1/2005
Statement Beginning Balance:
Date
11/01/05
Activity
Charge
Reference No
05111-220-2-2-12
Statement Ending Balance:
$38.71
Amount
$28.64
$67.35
Please send your payment with this note.
RETAIL USER REFERENCE MANUAL – RETAIL 7
351
RETAIL 7™User Manual
APPENDIX E –Loan In and Pickup Slip
Goodwin’s Market
Pickup Slip
Cashier
Linda Harrison
Cashier Signature
Manager
Lori Miller
Manager Signature
Lane
Till 4
4
Tender Name
Amount
Cash
Customer No.
$600.00
SubTotal:
$600.00
Total:
$23.32
0049989989231
Check
$75.55
0043987677874
Check
$22.38
0045677834238
Check
$25.44
0049877891225
Check
$137.21
0046788766652
Check
$144.50
0049887822877
Check
$56.11
0047225511662
Check
$151.82
0048773377228
Check
$109.67
0046787655467
Check
SubTotal:
$746.00
Total:
$1,346.00
Tuesday, November 29, 2005 02:29 PM Page: 1
RETAIL USER REFERENCE MANUAL – RETAIL 7
Pickup Slip
352
RETAIL 7™User Manual
APPENDIX E –Mass Product Changes Report
Goodwin’s Market
Mass Product Changes
BatchNo: BIG3d
Normal
Normal
Normal
Special
Special
Special
Upc
Description
Cost
Price
Gross
Cost
Price
Gross
0003200000146
SPARKLETTS WTR 24 PACK
$2.75
$4.99
$44.89
$3.05
$2.99
0004138070095
GC EGGS 20 CT
$1.37
$2.99
$54.18
$1.01
0004240001363
TOOTIE FRUITIES
$2.66
$3.19
$16.61
0004240040463
MOM GOLDEN PUFFS
$2.56
$3.29
0007480040306
OHSE BACON 12 OZ
$1.47
$2.99
$10.80
$17.45
Total:
Tuesday, November 01, 2005 05:39 PM
RETAIL USER REFERENCE MANUAL – RETAIL 7
FS
Scale DSD
Vendor
Section
Dept
($2.14)
1
140
1
$1.49
$32.21
1
157
1
$1.76
$1.79
$1.96
1
125
1
$22.30
$1.76
$1.79
$1.79
1
125
1
$50.90
$1.46
$0.99
($47.78)
1
526
5
$9.04
$9.05
Mass Product Changes
353
RETAIL 7™User Manual
APPENDIX E –Monitor Tills
Goodwin’s Market
Monitor Tills
Lane
4
Till Cashier Name
4
Tender Name
Tendered Amount
Linda H.
Cash
$587.58
Credit Card
$146.18
Check
$146.69
Coupons
$16.99
Debit Card
$106.76
Elec Foodstamps
$46.71
Food Stamps
$191.28
InStore Charges
$208.06
Store Coupons
$16.26
Total:
5
5
$1,466.51
Sarah M.
Cash
$384.87
Credit Card
$205.86
Check
$172.19
Coupons
$8.00
Debit Card
$145.36
Elec Foodstamps
$61.66
Food Stamps
$15.58
InStore Charges
$144.61
Store Coupons
$6.44
Total:
Tuesday, November 29, 2005 11:04 AM Page: 1
RETAIL USER REFERENCE MANUAL – RETAIL 7
$1,144.57
Monitor Tills
354
RETAIL 7™User Manual
APPENDIX E –Outstanding Purchase Orders
Goodwin’s Market
Outstanding Purchase Orders - Total Store
Start Date: 11/14/2005
PO Date
PO Number
A J GRIFFITHS
11/14/05
0000000027
End Date: 11/29/2005
Total Cost
$120.00
$120.00
AMIZETTA WINERY
11/14/05
0000000026
$127.83
$127.83
Total
Tuesday, November 29, 2005 11:07 AM Page: 1
RETAIL USER REFERENCE MANUAL – RETAIL 7
$247.83
Total Price
$205.39
Gross Margin
Gross Profit
41.57%
$85.39
$205.39
$250.84
$250.84
$456.23
$85.39
49.04%
$123.01
$123.01
$208.40
Outstanding Purchase Orders - Total Store
355
RETAIL 7™User Manual
APPENDIX E –Price Changes History
Goodwin’s Market
Price Changes History
Start Date: 11/1/2005
Cost
Price Method
Deal
Price
End Date: 11/1/2005
Date
Qty Special Modified
Who Modified
0000000000222 - D.F. BULK COFFEE
$5.30
$7.39
Unit-Pricing
11/01/05
21 - Gary Parker
11/01/05
160 - Leslie Morris
11/01/05
160 - Leslie Morris
11/01/05
160 - Leslie Morris
0000000000403 - RUSSET POTATOES
$0.29
Unit-Pricing
0000000000404 - POTATOES:10 LBS
$2.10
$2.59
Unit-Pricing
0000000000553 - TANGERINES
$0.50
$0.69
Unit-Pricing
0001111178040 - AXE SHOWER GEL UNL
$2.51
$3.99
Unit-Pricing
11/01/05
30 - Larry Johnson
11/01/05
30 - Larry Johnson
11/01/05
30 - Larry Johnson
0001254667151 - TRID STRAW FUSION
$0.64
$0.99
Unit-Pricing
0001254867153 - TRID WINTERGREEN FUSION
$0.64
$0.99
Unit-Pricing
0001380004546 - ST HSD GRILL LME CHKN
$2.33
$3.59
Unit-Pricing
11/01/05
160 - Leslie Morris
0001480064600 - HAWAIIAN PUNCH RED
$1.39
$1.99
Unit-Pricing
11/01/05
30 - Larry Johnson
11/01/05
30 - Larry Johnson
11/01/05
30 - Larry Johnson
11/01/05
30 - Larry Johnson
11/01/05
30 - Larry Johnson
11/01/05
30 - Larry Johnson
11/01/05
30 - Larry Johnson
11/01/05
30 - Larry Johnson
0001480064601 - HAWAIIAN PNCH ORNGE
$1.39
$1.99
Unit-Pricing
0001480064602 - HAW PUNCH STRW SRF
$1.39
$1.99
Unit-Pricing
0001480064603 - HAWAIIAN PNCH GRAPE
$1.39
$1.99
Unit-Pricing
0001600026081 - BC C/M FETT ALFREDO
$3.83
$4.59
Unit-Pricing
0001600026083 - BC CM CH BUTTERMILK BIS
$3.83
$4.59
Unit-Pricing
0002200000775 - JUICY FRUIT TROP KIWI
$0.64
$0.99
Unit-Pricing
0002870000300 - TREE TOP APPLE CIDER
$3.87
$4.99
Unit-Pricing
0003000005040 - AJ PANCAKE MIX
$0.00
$0.99
Unit-Pricing
$0.00
0.00
11/01/05
JobPendingCPC7805
0.00
11/01/05
JobPendingCPC7805
11/01/05
JobPendingCPC7805
11/01/05
JobPendingCPC7805
0003000005070 - A.J. COMP PNCKE MIX
$0.00
$0.99
Unit-Pricing
$0.00
0003000005240 - A.J BCKWHEAT PNCKES
$0.00
$0.99
Unit-Pricing
$0.00
0.00
0003000005300 - A.J. COMP BTRMLK PNCKE
$0.00
$0.99
Unit-Pricing
$0.00
0.00
Tuesday, November 01, 2005 05:40 PM Page: 1
RETAIL USER REFERENCE MANUAL – RETAIL 7
Price Changes History
356
RETAIL 7™User Manual
APPENDIX E –Product Ad Batch
Goodwin’s Market
Product Ad Batch - Gavina
Start Date: 8/8/2005
Upc
Description
0000000000222
0007232300060
0007232300061
0007232300062
0007232300063
0007232300064
0007232300065
0007232300066
0007232300067
0007232300068
0007232300070
0007232300073
0007232300074
0007232300078
0007232300080
0007232300088
0007232300333
0007232300334
0007232300335
0007232300336
0007232300338
0007232300340
0007232300357
0007232300358
0007232300359
0007232300360
0007232300361
0007232300362
0007232300363
0007232300364
0007232300376
0007232300467
D.F. BULK COFFEE
D.F. COLOMBIA COFFEE
D.F. DECAF FRENCH
D.F. DECAF REGULAR
D.F. ESPRESSO ROAST
D.F. FRENCH ROAST
DF GUATE ANTIGUA WHL
D.F. KONA BLEND WHL BN
D.F. MOKA JAVA
D.F. OWN FAMILY BLND
D.F. VIENNA ROAST
DF DCAF FRN VAN WHL
D.F. DECAF AU CHOC
D.F. CAFE FR VAN WHL
D.F. CAFE AU-CHOC
DF HAWAII HZLNUT WHL
DF COLOMBIA SUPREME
D.F. VANILLA NUT
D.F. CINN HAZELNUT
D.F. FRENCH ROAST
D.F. HAWAIIAN BLEND
D.F. HAWAIIAN HAZEL
D.F. CAFE VAN NUT WHL
DF CARAMEL CREME
D.F. CAFE FR CARAMEL
DF DECAF VANILLA NUT
D.F. DECAF CINN HAZEL
D.F. DECAF FR CARM WHL
D.F. DECAF HAWAII HAZ
D.F. CAFE CINN HZL WHL
D.F. ESPRESSO
D.F. BUTTERSCOTCH
Vendor
Dept
321
321
321
321
321
321
321
321
321
321
321
321
321
321
321
321
321
321
321
321
321
321
321
321
321
321
321
321
321
321
321
321
1
1
1
1
1
1
1
1
1
1
1
1
1
1
1
1
1
1
1
1
1
1
1
1
1
1
1
1
1
1
1
1
Tuesday, November 01, 2005 05:35 PM Page: 1
RETAIL USER REFERENCE MANUAL – RETAIL 7
Section
900
133
133
133
133
133
133
133
133
133
133
133
133
133
133
133
133
133
133
133
133
133
133
133
133
133
133
133
133
133
133
133
Normal
Cost
$5.80
$5.15
$5.15
$5.15
$5.15
$5.15
$5.15
$5.15
$5.15
$5.15
$5.15
$5.15
$5.15
$5.15
$5.15
$5.15
$3.95
$3.95
$3.95
$3.95
$3.95
$3.95
$5.15
$3.95
$5.15
$5.15
$5.15
$5.15
$5.15
$5.15
$3.95
$3.95
End Date: 12/31/2005
Special
Cost
$5.30
$4.65
$4.65
$4.65
$4.65
$4.65
$4.65
$4.65
$4.65
$4.65
$4.65
$4.65
$4.65
$4.65
$4.65
$4.65
$3.55
$3.55
$3.55
$3.55
$3.55
$3.55
$4.65
$3.55
$4.65
$4.65
$4.65
$4.65
$4.65
$4.65
$3.55
$3.55
Normal
Price
$7.89
$6.79
$6.79
$6.79
$6.79
$6.79
$6.79
$6.79
$6.79
$6.79
$6.79
$6.79
$6.79
$6.79
$6.79
$6.79
$5.29
$5.29
$5.29
$5.29
$5.29
$5.29
$6.79
$5.29
$6.79
$6.79
$6.79
$6.79
$6.79
$6.79
$5.29
$5.29
Special
Price
$7.39
$6.29
$6.29
$6.29
$6.29
$6.29
$6.29
$6.29
$6.29
$6.29
$6.29
$6.29
$6.29
$6.29
$6.29
$6.29
$4.89
$4.89
$4.89
$4.89
$4.89
$4.89
$6.29
$4.89
$6.29
$6.29
$6.29
$6.29
$6.29
$6.29
$4.89
$4.89
Price
Diff
Normal
Gross
$0.50
$0.50
$0.50
$0.50
$0.50
$0.50
$0.50
$0.50
$0.50
$0.50
$0.50
$0.50
$0.50
$0.50
$0.50
$0.50
$0.40
$0.40
$0.40
$0.40
$0.40
$0.40
$0.50
$0.40
$0.50
$0.50
$0.50
$0.50
$0.50
$0.50
$0.40
$0.40
26.49%
24.15%
24.15%
24.15%
24.15%
24.15%
24.15%
24.15%
24.15%
24.15%
24.15%
24.15%
24.15%
24.15%
24.15%
24.15%
25.33%
25.33%
25.33%
25.33%
25.33%
25.33%
24.15%
25.33%
24.15%
24.15%
24.15%
24.15%
24.15%
24.15%
25.33%
25.33%
Special
Gross Ad Loss
28.28%
26.07%
26.07%
26.07%
26.07%
26.07%
26.07%
26.07%
26.07%
26.07%
26.07%
26.07%
26.07%
26.07%
26.07%
26.07%
27.40%
27.40%
27.40%
27.40%
27.40%
27.40%
26.07%
27.40%
26.07%
26.07%
26.07%
26.07%
26.07%
26.07%
27.40%
27.40%
$0.00
$0.00
$0.00
$0.00
$0.00
$0.00
$0.00
$0.00
$0.00
$0.00
$0.00
$0.00
$0.00
$0.00
$0.00
$0.00
$0.00
$0.00
$0.00
$0.00
$0.00
$0.00
$0.00
$0.00
$0.00
$0.00
$0.00
$0.00
$0.00
$0.00
$0.00
$0.00
Sold
0.00
0.00
0.00
0.00
0.00
0.00
0.00
0.00
0.00
0.00
0.00
0.00
0.00
0.00
0.00
0.00
0.00
0.00
0.00
0.00
0.00
0.00
0.00
0.00
0.00
0.00
0.00
0.00
0.00
0.00
0.00
0.00
Product Ad Batch - Gavina
357
RETAIL 7™User Manual
Upc
Description
0007232300524
0007232301118
Price
DF N/W DARK ROAST
DF DECAF COLOMBIAN
APPENDIX E –Product Ad Batch
Vendor
Dept
321
321
1
1
Tuesday, November 01, 2005 05:35 PM Page: 2
RETAIL USER REFERENCE MANUAL – RETAIL 7
Section
Normal
Cost
Special
Cost
Normal
Price
133
133
$3.95
$3.95
$3.55
$3.55
$5.29
$5.29
Total:
$162.55
$146.65
$215.46
Special
Price
$4.89
$4.89
$199.56
Diff
Normal
Gross
$0.40
$0.40
25.33%
25.33%
$15.90
Special
Gross Ad Loss
27.40%
27.40%
Sold
$0.00
$0.00
0.00
0.00
$0.00
0.00
Product Ad Batch - Gavina
358
RETAIL 7™User Manual
APPENDIX E –Product Ad Loss by Batch
Goodwin’s Market
Product Ad Loss By Batch
Batch - Coffee
8/8/2005 - 12/31/2005
Normal
Price
Special
Price
Special
Cost
Qty
D.F. BULK COFFEE
$7.89
$7.39
$5.30
305.52
0007232300060
D.F. COLOMBIA COFFEE
$6.79
$6.29
$4.65
28.00
133
0007232300061
D.F. DECAF FRENCH
$6.79
$6.29
$4.65
4.00
$25.66
$19.10
$6.56
$1.50
133
0007232300062
D.F. DECAF REGULAR
$6.79
$6.29
$4.65
4.00
$26.16
$19.60
$6.56
$1.00
321
133
0007232300063
D.F. ESPRESSO ROAST
$6.79
$6.29
$4.65
11.00
$70.69
$52.65
$18.04
$4.00
321
133
0007232300064
D.F. FRENCH ROAST
$6.79
$6.29
$4.65
31.00
$199.99
$149.15
$50.84
$10.50
321
133
0007232300065
DF GUATE ANTIGUA WHL
$6.79
$6.29
$4.65
15.00
$97.85
$73.25
$24.60
$4.00
321
133
0007232300066
D.F. KONA BLEND WHL BN
$6.79
$6.29
$4.65
51.00
$330.79
$247.15
$83.64
$15.50
321
133
0007232300067
D.F. MOKA JAVA
$6.79
$6.29
$4.65
31.00
$204.49
$153.65
$50.84
$6.00
321
133
0007232300068
D.F. OWN FAMILY BLND
$6.79
$6.29
$4.65
8.00
$50.82
$37.70
$13.12
$3.50
321
133
0007232300070
D.F. VIENNA ROAST
$6.79
$6.29
$4.65
6.00
$39.24
$29.40
$9.84
$1.50
321
133
0007232300073
DF DCAF FRN VAN WHL
$6.79
$6.29
$4.65
6.00
$39.74
$29.90
$9.84
$1.00
321
133
0007232300074
D.F. DECAF AU CHOC
$6.79
$6.29
$4.65
6.00
$39.24
$29.40
$9.84
$1.50
321
133
0007232300078
D.F. CAFE FR VAN WHL
$6.79
$6.29
$4.65
12.00
$78.48
$58.80
$19.68
$3.00
321
133
0007232300080
D.F. CAFE AU-CHOC
$6.79
$6.29
$4.65
3.00
$19.87
$14.95
$4.92
$0.50
321
133
0007232300088
DF HAWAII HZLNUT WHL
$6.79
$6.29
$4.65
12.00
$78.48
$58.80
$19.68
$3.00
321
133
0007232300333
DF COLOMBIA SUPREME
$5.29
$4.89
$3.55
47.00
$239.83
$176.85
$62.98
$8.80
321
133
0007232300334
D.F. VANILLA NUT
$5.29
$4.89
$3.55
84.00
$430.36
$317.80
$112.56
$13.60
321
133
0007232300335
D.F. CINN HAZELNUT
$5.29
$4.89
$3.55
52.00
$265.08
$195.40
$69.68
$10.00
321
133
0007232300336
D.F. FRENCH ROAST
$5.29
$4.89
$3.55
20.00
$100.20
$73.40
$26.80
$5.60
321
133
0007232300338
D.F. HAWAIIAN BLEND
$5.29
$4.89
$3.55
27.00
$135.63
$99.45
$36.18
$7.20
321
133
0007232300340
D.F. HAWAIIAN HAZEL
$5.29
$4.89
$3.55
63.00
$318.47
$234.05
$84.42
$14.40
321
133
0007232300357
D.F. CAFE VAN NUT WHL
$6.79
$6.29
$4.65
21.00
$136.59
$102.15
$34.44
$6.00
321
133
0007232300358
DF CARAMEL CREME
$5.29
$4.89
$3.55
55.00
$278.55
$204.85
$73.70
$12.40
Vendor
Section
UPC
Description
GROCERY - 1
900
321
0000000000222
321
133
321
321
RETAIL USER REFERENCE MANUAL – RETAIL 7
Sales
Cost
Profit
$2,325.5 $1,686.9 $638.65
8 $136.70
3
$182.62
$45.92
Mark Down
$83.74
$7.50
359
RETAIL 7™User Manual
APPENDIX E –Product Ad Loss by Batch
Batch - Coffee
Vendor
Section
UPC
Description
8/8/2005 - 12/31/2005
Normal
Price
Special
Price
Special
Cost
Qty
Sales
Cost
Profit
Mark Down
321
133
0007232300359
D.F. CAFE FR CARAMEL
$6.79
$6.29
$4.65
8.00
$51.82
$38.70
$13.12
$2.50
321
133
0007232300360
DF DECAF VANILLA NUT
$6.79
$6.29
$4.65
9.00
$59.11
$44.35
$14.76
$2.00
321
133
0007232300361
D.F. DECAF CINN HAZEL
$6.79
$6.29
$4.65
8.00
$52.32
$39.20
$13.12
$2.00
321
133
0007232300362
D.F. DECAF FR CARM WHL
$6.79
$6.29
$4.65
12.00
$78.98
$59.30
$19.68
$2.50
321
133
0007232300363
D.F. DECAF HAWAII HAZ
$6.79
$6.29
$4.65
10.00
$63.90
$47.50
$16.40
$4.00
321
133
0007232300364
D.F. CAFE CINN HZL WHL
$6.79
$6.29
$4.65
15.00
$98.35
$73.75
$24.60
$3.50
321
133
0007232300376
D.F. ESPRESSO
$5.29
$4.89
$3.55
27.00
$138.03
$101.85
$36.18
$4.80
321
133
0007232300467
D.F. BUTTERSCOTCH
$5.29
$4.89
$3.55
51.00
$255.79
$187.45
$68.34
$14.00
321
133
0007232300524
DF N/W DARK ROAST
$5.29
$4.89
$3.55
14.00
$70.86
$52.10
$18.76
$3.20
321
133
0007232301118
DF DECAF COLOMBIAN
$5.29
$4.89
$3.55
28.00
$142.92
$105.40
$37.52
$5.20
$215.46
$199.56
$146.65
1,084.52
$6,726.4
9
$4,950.6 $1,775.81
8
$269.44
$215.46
$199.56
$146.65
1,084.52
$6,726.4
9
$4,950.6 $1,775.81
8
$269.44
Total:
11/1/2005 5:36:43PM Page: 2 of 2
RETAIL USER REFERENCE MANUAL – RETAIL 7
Product Ad Loss By Batch
360
RETAIL 7™User Manual
APPENDIX E –Product Mix Match Report
Goodwin’s Market
Product Mix Match Report
Mixmatch-Code
UPC
Description
0001200000016
0001200000169
0001200000190
0001200000225
0001200000491
0001200000495
0001200000856
0001200001003
0001200001283
0001200001343
0001200001344
0001200001359
0001200001360
0001200001368
0001200001369
0001200001458
0001200001465
0001200001474
0001200001481
0001200001506
0001200001507
0001200001519
0001200001520
0001200001661
0001200010015
0001200010046
0001200010129
0001200010176
0001200010631
PEPSI SODA 12 PACK
DIET MTN DEW 12 PACK
DIET PEPSI 12 PACK
MTN DEW 12 PACK
CAF FREE PEPSI 12 PAK
CAF FREE DIET PEPSI 12 PAK
ORANGE SLICE 12 PACK
MTN DEW PTCH BLK 12 PK
PEPSI HOLIDAY SPICE
TROP ORANGEADE
TROP ORNGEADE 12 PAK
TROP ORNGEADE 12PAK
TROP S/F ORANGEADE
TROP FRUIT PUNCH 12 PAK
TROP S/F FRT PUNCH
TROP DT ORNG TWST 12 PAK
TROP TWST GRAPE 12 PK
TROP TWST ORNG 12 PAK
TROPICANA STRAWBRY
PEPSI LIME
PEPSI W/LIME 12 PACK
DIET PEPSI W/LME 12 PAK
DIET PEPSI W/LME 12 PAK
MTN DW PTCH BLK II 12 PK
MUG ROOT BEER 12 PAK
MTN DEW CODE RD 12 PAK
SIERRA MIST 12 PACK
DIET MTN DEW CDE RD
PEPSI TWIST 12 PACK
Section
Normal
Cost
Normal
Price
Special
Cost
$2.90
$2.90
$2.90
$2.90
$2.90
$2.90
$2.90
$2.90
$2.90
$2.90
$2.90
$2.90
$2.90
$2.90
$2.90
$2.90
$2.90
$2.90
$2.90
$2.90
$2.90
$2.90
$2.90
$2.90
$2.90
$2.90
$2.90
$2.90
$2.90
$3.99
$3.99
$3.99
$3.99
$3.99
$3.99
$3.99
$3.99
$3.99
$3.99
$3.99
$3.99
$3.99
$3.99
$3.99
$3.99
$3.99
$3.99
$3.99
$3.99
$3.99
$3.99
$3.99
$3.99
$3.99
$3.99
$3.99
$3.99
$3.99
$2.95
$2.95
$2.95
$2.95
$2.95
$2.95
$2.95
$2.95
$2.95
$2.95
$2.95
$2.95
$2.95
$2.95
$2.95
$2.95
$2.95
$2.95
$2.95
$2.95
$2.95
$2.95
$2.95
$2.95
$2.95
$2.95
$2.95
$2.95
$2.95
Special
Price
Normal
Margin
Special
Margin
$3.00
$3.00
$3.00
$3.00
$3.00
$3.00
$3.00
$3.00
$3.00
$3.00
$3.00
$3.00
$3.00
$3.00
$3.00
$3.00
$3.00
$3.00
$3.00
$3.00
$3.00
$3.00
$3.00
$3.00
$3.00
$3.00
$3.00
$3.00
$3.00
27.32%
27.32%
27.32%
27.32%
27.32%
27.32%
27.32%
27.32%
27.32%
27.32%
27.32%
27.32%
27.32%
27.32%
27.32%
27.32%
27.32%
27.32%
27.32%
27.32%
27.32%
27.32%
27.32%
27.32%
27.32%
27.32%
27.32%
27.32%
27.32%
1.67%
1.67%
1.67%
1.67%
1.67%
1.67%
1.67%
1.67%
1.67%
1.67%
1.67%
1.67%
1.67%
1.67%
1.67%
1.67%
1.67%
1.67%
1.67%
1.67%
1.67%
1.67%
1.67%
1.67%
1.67%
1.67%
1.67%
1.67%
1.67%
GROCERY - 1
1218
1218
1218
1218
1218
1218
1218
1218
1218
1218
1218
1218
1218
1218
1218
1218
1218
1218
1218
1218
1218
1218
1218
1218
1218
1218
1218
1218
1218
Tuesday, November 01, 2005 05:39 PM Page: 1
RETAIL USER REFERENCE MANUAL – RETAIL 7
139
139
139
139
139
139
139
139
139
139
139
139
139
139
139
900
139
139
139
900
900
900
900
139
139
139
139
139
139
(2/$6.00)
(2/$6.00)
(2/$6.00)
(2/$6.00)
(2/$6.00)
(2/$6.00)
(2/$6.00)
(2/$6.00)
(2/$6.00)
(2/$6.00)
(2/$6.00)
(2/$6.00)
(2/$6.00)
(2/$6.00)
(2/$6.00)
(2/$6.00)
(2/$6.00)
(2/$6.00)
(2/$6.00)
(2/$6.00)
(2/$6.00)
(2/$6.00)
(2/$6.00)
(2/$6.00)
(2/$6.00)
(2/$6.00)
(2/$6.00)
(2/$6.00)
(2/$6.00)
Product Mixmatch Report
361
RETAIL 7™User Manual
APPENDIX E –Product Normal Batch Report
Goodwin’s Market
Product Ad Batch - kcpc2
Start Date: 7/12/2005
UPC
Description
0002820000127
0002820000156
0002820000159
0002820000160
0002820000161
0002820000162
0002820000163
0002820000178
0002820000179
0002820000270
0002820000271
0002820000274
0002820000275
0002820000276
0002820000302
0002820000304
0002820000305
0002820000306
0002820000316
0002820000327
0002820000338
0002820000341
0002820000342
0002820000343
0002820000410
0002820000620
0002820000621
0002820000622
MARLBORO (SP)
MARLBORO MENTH (SP)
MARLBORO (SP)
VIRG SLIMS (SP)
VIRG SLIMS (SP)
VIRG SLIMS (SP)
VIRG SLIMS (SP)
MARLBORO (SP)
MARLBORO (SP)
MARLBORO (SP)
MARLBORO (SP)
MARLBORO (SP)
MARLBORO (SP)
MARLBORO (SP)
MARLBORO BLEND N27
HRD
PAK BLND 27
MARLBORO
MARLBORO MENT 72 BLUE
MARLBORO MENT 72 GRN
PARLIAMENT MENT
LIGHTS
VIRGINIA SLIMS REG (SP)
PARLIAMENT MEN (SP)
MARLBORO (SP)
MARLBORO (SP)
MARLBORO (SP)
MARLBORO (SP)
BASIC (SP)
BASIC (SP)
BASIC (SP)
Vendor
RETAIL USER REFERENCE MANUAL – RETAIL 7
1
1
1
1
1
1
1
1
1
1
1
1
1
1
1
1
1
1
1
1
1
1
1
1
1
1
1
1
Dept Section
1
1
1
1
1
1
1
1
1
1
1
1
1
1
1
1
1
1
1
1
1
1
1
1
1
1
1
1
141
141
141
141
141
141
141
141
141
141
141
141
141
141
141
141
141
141
141
141
141
141
141
141
141
141
141
141
Normal
Cost
$3.67
$3.67
$3.67
$3.67
$3.67
$3.67
$3.67
$3.67
$3.67
$3.67
$3.67
$3.67
$3.67
$3.67
$3.67
$3.67
$3.67
$3.67
$3.67
$3.67
$3.67
$3.67
$3.67
$3.67
$3.67
$3.38
$3.38
$3.38
End Date: 7/12/2005
Special
Cost
$2.46
$2.46
$2.46
$2.46
$2.46
$2.46
$2.46
$2.46
$2.46
$2.46
$2.46
$2.46
$2.46
$2.46
$2.46
$2.46
$2.46
$2.46
$2.46
$2.46
$2.46
$2.46
$2.46
$2.46
$2.46
$2.46
$2.46
$2.46
Normal
Price
$4.69
$4.69
$4.69
$4.69
$4.69
$4.69
$4.69
$4.69
$4.69
$4.69
$4.69
$4.69
$4.69
$4.69
$4.69
$4.69
$4.69
$4.69
$4.69
$4.69
$4.69
$4.69
$4.69
$4.69
$4.69
$4.29
$4.29
$4.29
Special
Price
Price
Diff
Normal
Gross
$3.19
$3.19
$3.19
$3.34
$3.34
$3.34
$3.34
$3.19
$3.19
$3.19
$3.19
$3.19
$3.19
$3.19
$3.19
$3.19
$3.19
$3.19
$3.34
$3.19
$3.34
$3.19
$3.19
$3.19
$3.19
$2.99
$2.99
$2.99
$1.50
$1.50
$1.50
$1.35
$1.35
$1.35
$1.35
$1.50
$1.50
$1.50
$1.50
$1.50
$1.50
$1.50
$1.50
$1.50
$1.50
$1.50
$1.35
$1.50
$1.35
$1.50
$1.50
$1.50
$1.50
$1.30
$1.30
$1.30
21.75%
21.75%
21.75%
21.75%
21.75%
21.75%
21.75%
21.75%
21.75%
21.75%
21.75%
21.75%
21.75%
21.75%
21.75%
21.75%
21.75%
21.75%
21.75%
21.75%
21.75%
21.75%
21.75%
21.75%
21.75%
21.21%
21.21%
21.21%
Special
Gross Ad Loss
22.88%
22.88%
22.88%
26.35%
26.35%
26.35%
26.35%
22.88%
22.88%
22.88%
22.88%
22.88%
22.88%
22.88%
22.88%
22.88%
22.88%
22.88%
26.35%
22.88%
26.35%
22.88%
22.88%
22.88%
22.88%
17.73%
17.73%
17.73%
$0.00
$0.00
$0.00
$0.00
$0.00
$0.00
$0.00
$0.00
$0.00
$0.00
$0.00
$0.00
$0.00
$0.00
$0.00
$0.00
$0.00
$0.00
$0.00
$0.00
$0.00
$0.00
$0.00
$0.00
$0.00
$0.00
$0.00
$0.00
Sold
0.00
0.00
0.00
0.00
0.00
0.00
0.00
0.00
0.00
0.00
0.00
0.00
0.00
0.00
0.00
0.00
0.00
0.00
0.00
0.00
0.00
0.00
0.00
0.00
0.00
0.00
0.00
0.00
362
RETAIL 7™User Manual
APPENDIX E –Products by Department
Goodwin’s Market
Products by Department - GENERAL MERCHANDISE
Average Gross Profit:
UPC
Description
0000000005727
0000000005728
0000000005729
0000000005730
0000000005731
0000000007681
0000000007691
0000000007711
0000000007721
0001575900432
0002097233109
0002252304012
0002252304013
0002252304015
0002252304310
0002252304578
0002252334611
0002252334615
0002252334618
0002252334624
0002351378202
0002737104015
0002743400618
0003600001915
0003899333882
0003980004012
0003993800616
0004130510102
0004160412141
0004160412418
CREST TOOTHPASTE
NYQUIL, DAYQUIL
HRBL ESSENCE SHMP/CON
KOTEX
SCOPE MOUTHWASH
0
0
0
0
CITRONELLA TORCH
10 LIGHT SET
WINE BAG
WINE BAG
WINE BAG
WINE BAG
WINE BAG
WINE BAG
WINE BAG
WINE BAG
WINE BAG
PROGSTRN.CREME
STERNO LIQUID FUEL
TWNLB.CHOLINE CAP
KTX MAXI PAD 27CT
CALICO 2PK LIGHTERS
4 HRNG.AID BATT.
PLSTC. TABLE COVER
NO BUGS
SM.INSULATED MUG
LG.INSULATED MUG
Tuesday, November 01, 2005 05:39 PM Page: 1
RETAIL USER REFERENCE MANUAL – RETAIL 7
Normal
Cost
Normal
Price
$0.00
$0.00
$0.00
$0.00
$0.00
($0.01)
($0.01)
($0.01)
($0.01)
($0.01)
$0.01
$0.01
$0.01
$0.01
$2.49
$0.99
$1.59
$1.59
$1.59
$1.59
$1.59
$1.59
$1.59
$1.59
$1.59
$6.99
$5.99
$8.99
$3.49
$1.09
$5.99
$1.99
$2.29
$2.19
$3.79
$0.00
$0.00
$0.99
$0.99
$0.99
$0.99
$0.99
$0.99
$0.99
$0.99
$0.99
$0.00
$3.14
$0.00
$2.61
$0.61
$0.00
$0.00
$0.00
$0.00
$0.00
Special
Cost
Special
Price
Gross
Margin
100.00%
100.00%
100.00%
100.00%
100.00%
100.00%
100.00%
37.74%
37.74%
37.74%
37.74%
37.74%
37.74%
37.74%
37.74%
37.74%
100.00%
47.58%
100.00%
25.21%
44.04%
100.00%
100.00%
100.00%
100.00%
100.00%
Disc.
Effective
Schedule
Mix Match
Code
Vendor Tax Scale
$37.43
FS DSD
1
1
1
1
1
1
1
1
1
1
1
1
1
1
1
1
1
1
1
1
1
0
1
1
1
1
1
1
1
1
Products by Department - GENERAL MERCHANDISE
363
RETAIL 7™User Manual
APPENDIX E –Product Group Report
Goodwin’s Market
Product Group - 7 UP 6 PACK 12 OZ
Normal
Normal
Normal
Special
Gross
Cost
Upc
Description
Cost
Price
0007800000038
7-UP SODA 6 PACK
$1.83
$2.39
$23.43
0007800000079
DIET 7-UP SODA 6 PACK
$1.83
$2.39
$23.43
0007800000256
A&W DIET RT BEER 6 PK
$1.83
$2.39
$23.43
0007800000187
A&W ROOT BEER 6 PACK
$1.83
$2.39
$23.43
0007800000240
DIET RITE COLA 6 PACK
$1.83
$2.39
$23.43
0007800000244
DIET RITE RASP 6 PACK
$1.83
$2.39
$23.43
0007800000280
DIET SUNKIST 6 PACK
$1.83
$2.39
$23.43
0007800000274
SUNKST ORANGE 6 PAK
$1.83
$2.39
$23.43
0007800000264
A&W CRM SODA 6 PACK
$1.83
$2.39
$23.43
0007800000196
RC COLA SODA 6 PACK
$1.83
$2.39
$23.43
0007800000383
DIET RTE WHT GRP 6 PAK
$1.83
$2.39
$23.43
0007800000269
DIET A&W CRM SDA 6 PAK
$1.83
$2.39
$23.43
0007800000579
7-UP UPSIDE DWN 6 PAK
$1.83
$2.39
$23.43
0007800000530
CHERRY 7-UP 6 PACK
$1.83
$2.39
$23.43
0007800000830
DIET CHRY 7-UP 6 PACK
$1.83
$2.39
$23.43
0007800000400
HAWAIIAN PUNCH 6 PAK
$1.83
$2.39
$23.43
0005020000125
SUNNY DELIGHT 6 PACK
$1.83
$2.39
$23.43
0007686000000
WELCHS GRAPE 6 PACK
$1.83
$2.39
$23.43
0004300000690
CNTRY TME LMNADE 6 PK
$1.83
$2.39
$23.43
0007686000002
WELCHS STRAW 6 PACK
$1.83
$2.39
$23.43
$36.60
$47.80
Total:
Tuesday, November 01, 2005 05:38 PM Page: 1
RETAIL USER REFERENCE MANUAL – RETAIL 7
Special
Special
Price
Gross
D
S
2
V
1
0
2
3
1
0
9
2
3
1
0
9
2
1
3
1
0
9
2
1
3
1
0
9
2
1
3
1
0
9
2
1
3
1
0
9
2
1
3
1
0
9
2
1
3
1
0
9
2
1
3
1
0
9
2
1
3
1
0
9
2
1
3
1
0
9
2
1
3
1
0
9
2
1
3
1
0
9
2
1
3
1
0
9
2
1
3
1
0
9
2
1
3
1
0
9
2
1
3
1
0
9
2
1
3
1
0
9
2
1
3
1
0
9
1
3
9
1
1
FS
Product Group - 7 UP 6 PACK 12 OZ
364
RETAIL 7™User Manual
APPENDIX E –Product Movement Report
Goodwin’s Market
Product Movement
Start Date: 10/24/2005
UPC
0007114200001
End Date: 10/31/2005
Description
ARROWHEAD SP WTR
Total Cost
$9.061
Pack/Size
1 LTR
Total Revenue
$13.43
Quantity
17
Customers
15
Margin
32.53%
Ad Loss
$0.00
Movement during Previous Weeks
8/06
8/13
8/20
8/27
9/03
9/10
9/17
9/24
10/01
10/08
10/15
10/22
10/29
45
37
26
37
22
41
24
38
28
28
32
24
17
Week Total
399
Movement during Previous Months
10/04
11/04
12/04
1/05
2/05
3/05
4/05
5/05
6/05
7/05
8/05
9/05
44
52
29
58
39
43
74
79
123
248
145
125
Month Total
1,059
Movement during Previous Years
1995
1435
1996
1904
1997
1724
Tuesday, November 01, 2005 05:06 PM
RETAIL USER REFERENCE MANUAL – RETAIL 7
1998
2558
1999
3174
2000
2001
2002
4862
3423
3628
$136.91
$18.36
$35.34
2003
2192
2004
833
Year Total
25,733
Product Movement
365
RETAIL 7™User Manual
APPENDIX E –Product Sales Report
Goodwin’s Market
Product Sales
Total Store
Start Date: 10/24/2005
End Date: 10/24/2005
Gross Margin: 43.29%
Upc
Description
Cost
0000000000368
0001070070202
0001300000105
0001510000039
0001600042040
0001850005106
0002110820216
0002400001481
0002680000445
0002840000818
0003120035027
0003500039161
0003700080172
0004100000332
0004138001502
ENDIVE
WHOPPERS BAG
HEINZ KETCHUP
CREMETTA MOSTACOLI
BISQUICK 40 OZ
PADRINOS R/F ORIG
ROMERO'S BURRITO
DEL MONTE SPINACH
A.B. WIDE NOODLES
F.L. TOST MILD SALSA
O.S. LGHT CRNBRYRASP JCE
SUAVITEL SOFT FLOWER
DWNY SNGL MTN SPG
LIPTON CH NOODLE
SF Y/C SLCD PCHES H/S
0004138018700
0004138049304
0004138080625
0004156500008
0004300021704
0004440015650
0004740013070
0004960000034
SF LRGE ELBOW MAC
S.F. DRY RST SNFLWR
346 CH STONE GR WHEAT
PACE PCIANTE SCE MED
JELLO FRT CHRY CHZ CK
GOR CRNCH FSHSTK
SERIES GEL S/SKN
ANTHONYS MANICOTTI
$0.50
$0.76
$1.32
$0.79
$2.29
$1.84
$1.25
$1.06
$0.93
$2.04
$2.68
$3.05
$3.71
$1.01
$1.06
$0.69
$1.09
$1.32
$0.97
$2.54
$3.11
$2.06
$1.09
Tuesday, November 01, 2005 05:01 PM Page: 1
RETAIL USER REFERENCE MANUAL – RETAIL 7
Price
$1.09
$1.09
$1.99
$1.29
$3.79
$2.69
$1.69
$1.49
$1.69
$2.99
$2.99
$3.69
$4.99
$1.69
$1.69
$1.19
$1.69
$1.99
$1.49
$3.59
$4.99
$2.99
$1.59
GM
Qty
Revenue
54.13%
30.28%
33.87%
100.00%
1.00
1.00
1.00
2.00
2.00
1.00
3.00
2.00
3.00
2.00
2.00
1.00
1.00
1.00
2.00
1.00
4.00
4.00
1.00
1.00
1.00
1.00
1.00
$1.09
$1.09
$1.99
$2.38
$7.58
$2.69
$5.07
$2.98
$5.07
$5.98
$7.78
$3.19
$4.99
$1.69
$3.38
$1.19
$6.76
$7.96
$1.49
$3.59
$4.99
$2.99
$1.59
39.64%
31.60%
26.04%
29.09%
44.87%
31.78%
31.11%
100.00%
25.70%
40.41%
37.48%
42.23%
35.66%
33.67%
34.90%
29.20%
37.76%
31.11%
31.45%
Total Cost
$0.50
$0.76
$1.32
$0.00
$4.58
$1.84
$3.75
$2.11
$2.80
$4.08
$5.36
$0.00
$3.71
$1.01
$2.11
$0.69
$4.35
$5.28
$0.97
$2.54
$3.11
$2.06
$1.09
Profit
$0.59
$0.33
$0.67
$2.38
$3.00
$0.85
$1.32
$0.87
$2.27
$1.90
$2.42
$3.19
$1.28
$0.68
$1.27
$0.50
$2.41
$2.68
$0.52
$1.05
$1.88
$0.93
$0.50
Product Sales
366
RETAIL 7™User Manual
APPENDIX E –Safe Audit Report
Goodwin’s Market
Safe Audit
Time
Safe
Audited
Safe
Amount
Amount
Change
$10,000.00
$14,915.00
$0.00
$0.00
$0.00
James Henderson
$250.00
$85.00
$165.00
James Henderson
$7,528.58
James Henderson
Date
Stamp
Tender
10/22/96
12/30/99
Cash
10/22/96
12/30/99
Check
10/22/96
12/30/99
Food Stamps
11/17/98
12/30/99
Cash
$22,528.58
$15,000.00
11/17/98
12/30/99
Check
($8,171.48)
$0.00
08/30/99
09/02/99
Cash
($253,901.12)
$15,000.00 ($268,901.12) James Henderson
08/30/99
09/02/99
Check
($447,810.90)
$0.00 ($447,810.90) James Henderson
03/19/00
03/22/00
Cash
($10,287.10)
$15,000.00
($25,287.10) Donna Anderson
03/19/00
03/22/00
Check
($31,026.95)
$0.00
($31,026.95) Donna Anderson
09/09/00
09/12/00
Cash
($9,633.23)
$0.00
($9,633.23) Jaime Henderson
09/09/00
09/12/00
Check
($22,253.79)
$0.00
($22,253.79) James Henderson
09/10/00
09/12/00
Cash
($8,895.17)
$0.00
($8,895.17) James Henderson
09/10/00
09/12/00
Check
($9,598.81)
$0.00
($9,598.81) James Henderson
01/12/01
01/15/01
Cash
($80,355.65)
$15,000.00
($95,355.65) Barbara Carter
01/12/01
01/15/01
Check
($95,718.28)
$0.00
($95,718.28) Barbara Carter
03/05/01
03/07/01
Cash
$14,437.99
$15,000.00
($562.01) James Henderson
03/05/01
03/07/01
Check
($100.01)
$0.00
($100.01) James Henderson
03/05/01
03/07/01
Food Stamps
$0.00
$0.00
07/28/01
07/30/01
Cash
($95,384.09)
$15,000.00 ($110,384.09) James Henderson
07/28/01
07/30/01
Check
($144,617.66)
$0.00 ($144,617.66) James Henderson
09/26/01
09/28/01
Cash
($15,333.95)
$15,000.00
($30,333.95) James Henderson
09/26/01
09/28/01
Check
($28,951.95)
$0.00
($28,951.95) James Henderson
09/26/01
09/28/01
Food Stamps
$20.58
$0.00
03/06/02
03/08/02
Cash
($105,797.43)
$15,000.00 ($120,797.43) James Henderson
03/06/02
03/08/02
Check
($126,462.04)
$0.00 ($126,462.04) James Henderson
03/06/02
03/08/02
Food Stamps
12/01/04
12/03/04
Cash
($483,501.76)
12/01/04
12/03/04
Check
($401,453.82)
($401,453.82)
$0.00
Larry Martin
12/01/04
12/03/04
Food Stamps
($14,370.29)
($14,370.29)
$0.00
Larry Martin
$60.50
$0.00
Manager
($4,915.00) James Henderson
($8,171.48) James Henderson
$0.00
$20.58
$60.50
James Henderson
James Henderson
James Henderson
$454,876.76 ($938,378.52) Larry Martin
Tuesday, November 01, 2005 05:26 PM Page: 1
Safe Audit
RETAIL USER REFERENCE MANUAL – RETAIL 7
367
RETAIL 7™User Manual
APPENDIX E –Safe Statistics Report
Goodwin’s Market
Safe Statistics
Balance Date: 10/12/2005
System Generated Deposit
Safe Contents
$32,115.79
Total Sales
($1.95)
OverShort
Food Stamps - $50.00
$0.00
$0.00
$0.00
Paid Ins
$0.00
Coin (vault tray)
Pennies - $50.00
Paid Outs
$0.00
Nickels - $100.00
$0.00
Received On Acct
$0.00
Dimes - $350.00
$0.00
Quarters - $1200.00
$0.00
($241.81)
Ones - $2000.00
$0.00
($1,570.40)
Fives - $1000.00
$0.00
Tens - $1000.00
$0.00
Tills Cash -$4165.00
$0.00
Tills Food Stamps - $85.0
$0.00
Miscellaneous
$0.00
Misc Checks
$0.00
Bad Checks
$0.00
Total Safe - $15000.00
$0.00
Total
$0.00
($17,152.17)
- Atm/Credit
- Mfg Coupons
- Non Depositables
$0.00
Safe Adjustments
$13,149.46
To be Deposited
$13,159.86
($10.40)
Actual Deposit
Variance
Starting
Tender Name
Safe
Ending
Adjustments
Pickups
Loans
Reconcile
Deposits
Safe
Cash
$298,367.61
$0.00
$0.00
$2,995.00
$10,839.17
$7,854.57
$298,357.21
Check
($409,871.14)
$0.00
$0.00
$0.00
$5,305.29
$5,305.29
($409,871.14)
($14,056.16)
$0.00
$0.00
$0.00
$0.00
$0.00
($14,056.16)
($125,559.69)
$0.00
$0.00
$2,995.00
$16,144.46
$13,159.86
($125,570.09)
Food Stamps
Total:
Tuesday, November 01, 2005 05:25 PM Page: 1
RETAIL USER REFERENCE MANUAL – RETAIL 7
Safe Statistics
368
RETAIL 7™User Manual
APPENDIX E –Sales Person Productivity Report
Goodwin’s Market
Sales Person Productivity
Start Date: 11/29/2005
Employee #
Sales
End Date: 11/29/2005
Costs
Profit
% Sales
% Profit
Items
Customers
Avg Price
Avg Order
$627.87
$219.69
408.18
39.82%
41.51%
40
5
$15.70
$125.57
($10.00)
-$5.30
-4.70
-0.63%
-0.48%
-1
1
$10.00
($10.00)
$749.30
$303.83
445.47
47.53%
45.30%
65
7
$11.53
$107.04
$144.50
$44.80
99.70
9.17%
10.14%
15
1
$9.63
$144.50
$64.97
$30.30
34.67
4.12%
3.53%
12
1
$5.41
$64.97
$1,576.64
$593.32
983.32
Bob Jones
2
Katy Harris
6
Linda Morris
1
Sarah Parker
5
Store Manager
3
Total :
Tuesday, November 29, 2005 02:48 PM Page: 1
RETAIL USER REFERENCE MANUAL – RETAIL 7
Sales Person
369
RETAIL 7™User Manual
APPENDIX E –Sections Report
Goodwin’s Market
Sections
Dept
Modified
Date
Modified
By
101 Club Packs
1
10/16/00
3
102 Dietetic Foods
1
10/16/00
3
0
103 Canned Fruits
1
10/16/00
3
0
104 Fruit Juices
1
10/16/00
3
0
105 Canned Vegetables
1
10/16/00
3
0
106 Condiments
1
10/16/00
3
0
107 Spaghetti Sauce
1
10/16/00
3
0
108 Pickles
1
10/16/00
3
0
109 Mayo/mustard
1
10/16/00
3
0
110 Salad Dressings
1
10/16/00
3
0
111 Cooking Oils
1
10/16/00
3
0
112 Canned Fish
1
10/16/00
3
0
113 Canned Meats
1
10/16/00
3
0
114 Mexican Specialties
1
10/16/00
3
0
115 Oriental Noodles
1
10/16/00
3
0
116 Disposable Diapers
1
10/16/00
3
0
117 Baby Food & Formula
1
10/16/00
3
0
118 Soups
1
10/16/00
3
0
119 Canned & Powdered Milk
1
10/16/00
3
0
120 Pet Food
1
10/16/00
3
0
121 Packaged Beans & Rice
1
10/16/00
3
0
122 Popcorn
1
10/16/00
3
0
123 Packaged Dinners
1
10/16/00
3
0
124 Dried Pasta
1
10/16/00
3
0
125 Cereal
1
10/16/00
3
0
126 Snack Bars & Fruit Rolls
1
10/16/00
3
0
Section Name
Food
Stamps
Discount
A
B
Unit of
Measure
Effective
Schedule
-1
0
A
Tax
B C
Tuesday, November 01, 2005 05:51 PM Page: 1
RETAIL USER REFERENCE MANUAL – RETAIL 7
D
Sections
370
RETAIL 7™User Manual
APPENDIX E –Stock on Hand Report
Goodwin’s Market
Stock On Hand
Stock On Hand Threshold: 20
Section
UPC
Description
Stock On Hand
Cost
Extended Cost
0000000001001
Cherry Cola
18.00
$0.50
$9.00
Canned Goods
0000000000163
Canned Beans
5.00
$1.00
$5.00
Cereal
0000000022022
Rice Cakes
7.00
$1.00
$7.00
GROCERY
0000000000079
Brown Rice
8.00
$1.59
$12.72
GROCERY
0000000000159
Frankfurters
7.00
$0.89
$6.23
GROCERY
0000000000164
Tuna Helper
4.00
$2.00
$8.00
GROCERY
0000000000171
Hot Dog Relish
12.00
$1.50
$18.00
GROCERY
0000000000666
Strawberry Jam
4.00
$1.00
$4.00
GROCERY
0000000000777
Grape Jelly
10.00
$5.00
$50.00
Packaged Foods
0000000003434
Small Noodles
14.00
$1.00
$14.00
Packaged Foods
0000000034343
Medium Noodles
12.00
$1.00
$12.00
Potato Chips
0000000000876
Salt & Vinegar Chips
6.00
$1.00
$6.00
Books
0000000000321
Tale of Two Cities
7.00
$2.53
$17.71
Health and Beauty
0000000012343
Body Wash
6.00
$2.00
$12.00
0000678678678
Peanuts
13.00
$0.00
$0.00
0000000001000
Potato Bread
5.00
$1.00
$5.00
0000000098765
12 Pack Cupcakes
18.00
$1.00
$18.00
0000000123401
Pen Set
17.00
$5.00
$85.00
0000000087601
California Red Wine
20.00
$2.40
$48.00
BEVERAGE
Fizzy Drinks
GROCERY
NON FOOD
SALAD
Snacks
SERVICE BAKERY
SERVICE
BAKERY
SERVICE
BAKERY
STATIONARY
Paper
WINE
WINE
Total:
RETAIL USER REFERENCE MANUAL – RETAIL 7 - 10/29/2010
$337.66
371
RETAIL 7™User Manual
APPENDIX E –Store Sales by Department
Goodwin’s Market
Store Sales
Start Date: 10/31/2005
Departments
Sales
%
Open Dept
Sales
End Date: 10/31/2005
Cost of
Gross
Sales
Margin
Items
Avg Price Avg Order
Customers
$19,766.94
63.97%
$273.32
$12,850.96
34%
9,293.92
$2.13
6.72
1,383
PHOTO
$25.65
0.08%
$25.65
$0.00
-%
3.00
$8.55
3.00
1
BAKERY
$643.20
2.08%
$48.11
$57.92
90%
193.00
$3.33
1.25
154
PRODUCE
$2,009.67
6.50%
$144.49
$812.93
56%
3,288.62
$0.61
6.95
473
MEAT
$2,968.73
9.61%
$179.55
$1,527.59
45%
13,673.29
$0.22
39.52
346
WINE / LIQUOR
$1,351.28
4.37%
$10.00
$926.04
31%
163.00
$8.29
1.30
125
GENERAL MERCHANDISE
$1,979.80
6.41%
$117.04
$1,147.49
38%
584.00
$3.39
1.80
325
DELI
$1,352.15
4.38%
$14.43
$0.00
100%
354.94
$3.81
1.70
209
$801.24
2.59%
$792.33
$0.00
100%
380.00
$2.11
2.41
158
Total Sales:
$30,898.66
100.00%
$1,604.92
17.39
1,606
Tax A:
Tax B:
Tax C:
Tax D:
Total Tax:
$807.65
$0.00
$0.00
$0.00
$807.65
Total:
$31,706.31
GROCERY
GIFTS
Tuesday, November 01, 2005 04:54 PM Page: 1
RETAIL USER REFERENCE MANUAL – RETAIL 7 - 10/29/2010
$17,322.93
27,933.77
$1.11
Store Sales
372
RETAIL 7™User Manual
APPENDIX E –Store Sales by Section
Goodwin’s Market
Store Sales
Start Date: 10/31/2005
Sections
Sales
%
Open Section
Sales
End Date: 10/31/2005
Cost of
Gross
Sales
Margin
Items
Avg Price Avg Order
Customers
$118.80
0.42%
20.00
$5.94
1.11
18
Dietetic Foods
$26.12
0.09%
8.00
$3.27
2.00
4
Canned Fruits
$75.82
0.27%
58.00
$1.31
1.93
30
Fruit Juices
$350.45
1.24%
184.00
$1.90
2.16
85
Canned Vegetables
$186.65
0.66%
161.00
$1.16
2.12
76
Condiments
$240.65
0.85%
151.00
$1.59
1.57
96
Spaghetti Sauce
$64.00
0.23%
50.00
$1.28
1.92
26
Pickles
$15.43
0.05%
7.00
$2.20
1.40
5
Mayo/mustard
$56.44
0.20%
26.00
$2.17
1.08
24
Salad Dressings
$77.77
0.28%
33.00
$2.36
1.14
29
Cooking Oils
$68.49
0.24%
21.00
$3.26
1.17
18
Canned Fish
$80.93
0.29%
51.00
$1.59
2.32
22
Canned Meats
$115.92
0.41%
54.00
$2.15
1.74
31
Mexican Specialties
$207.38
0.73%
128.00
$1.62
1.58
81
$44.81
0.16%
126.00
$0.36
4.20
30
$112.19
0.40%
11.00
$10.20
1.22
9
Club Packs
Oriental Noodles
Disposable Diapers
Tuesday, November 01, 2005 04:57 PM Page: 1
RETAIL USER REFERENCE MANUAL – RETAIL 7
Store Sales
373
RETAIL 7™User Manual
APPENDIX E –Store Sales Tax Detail
Goodwin’s Market
Store Sales Tax Detail
Start Date: 10/31/2005
Tax ID
Description
End Date: 10/31/2005
Taxable
Sales
Taxes
$5.65
$0.44
Sales
Tax Exempt
Amount
FSTax Exempt
Amount
BAKERY - 3
1
TAX 7.75%
$0.44
$643.20
DELI - 8
1
TAX 7.75%
$808.88
$62.61
$62.61
$1,352.15
GENERAL MERCHANDISE - 7
1
TAX 7.75%
$1,945.83
$150.61
$150.61
$1,979.80
GIFTS - 10
1
TAX 7.75%
$792.33
$61.33
$61.33
$801.24
GROCERY - 1
1
TAX 7.75%
$5,411.30
$418.83
$418.83
$19,766.94
PHOTO - 2
1
TAX 7.75%
$25.65
$1.99
$1.99
$25.65
PRODUCE - 4
1
TAX 7.75%
$81.40
$6.30
$6.30
$2,009.67
WINE / LIQUOR - 6
1
TAX 7.75%
$1,351.28
Total
Tuesday, November 01, 2005 04:56 PM Page: 1
RETAIL USER REFERENCE MANUAL – RETAIL 7
$104.59
$104.59
$1,351.28
$806.69
$30,898.66
$0.31
$0.31
Store Sales Tax Detail
374
RETAIL 7™User Manual
APPENDIX E –Tenders Report
Goodwin’s Market
Tenders
Tender Tender Tender
#
Code Name
Tender
Type
Require
Depositable
ID
Currency
Active
ID
Currency
Description
1
CA
Cash
CA
1
Dollars
2
CK
Check
CK
1
Dollars
3
CC
Credit Card
CA
1
Dollars
4
DC
Debit Card
CA
1
Dollars
5
FS
Food Stamps
CA
1
Dollars
6
CP
Coupons
CA
1
Dollars
7
MI
In Store Charges
CH
1
Dollars
8
SN
Store Coupons
CA
1
Dollars
9
EF
Elec Foodstamps
CA
1
Dollars
10
EC
Elec Cash
CA
1
Dollars
11
GC
Gift Certificates
CA
1
Dollars
Tuesday, November 01, 2005 05:51 PM Page: 1
RETAIL USER REFERENCE MANUAL – RETAIL 7
Refund
OK
Require
MGR Override
Tenders
375
RETAIL 7™User Manual
APPENDIX E –Till Statistics
Goodwin’s Market
Till Statistics
Start Date: 11/1/2005
Sales
Average
Order
$0.22
$443.08
$5,786.25
$315.77
$42.20
$1,496.43
$3,357.87
$990.27
$2,414.44
$1,868.40
$1,856.49
$0.11
$26.06
$22.00
$5.26
$2.34
$16.27
$23.32
$21.07
$24.64
$21.23
$19.34
2
17
263
60
18
92
144
47
98
88
96
2.00
177.00
2,391.00
110.00
29.00
654.00
1,300.00
409.00
978.00
650.00
763.00
$18,571.42
$20.08
925
7,463.00
Name
Generic, Employee
Martin, Cindy
Supervisor1
Dept, Deli
Dept, Bakery
Johnson, Catherine
Norton, Kim
Hall, Laura
Roberts, Marianne
Aguila, Lupe
Frances, Ashley
Tuesday, November 01, 2005 05:00 PM Page: 1
RETAIL USER REFERENCE MANUAL – RETAIL 7
Customers
End Date: 11/1/2005
%
Items Scanned
0.00%
94.35%
94.19%
87.27%
96.55%
93.88%
90.08%
90.22%
93.05%
93.69%
95.81%
Rings /
Minute Refunds
Coupon
Coupon
Count
Voids
Over /
Shorts
$0.00
$0.00
$63.53
$4.69
$0.79
$0.00
$17.24
$0.00
$2.69
$9.44
$38.84
($245.22)
($688.08)
($6,731.25)
($560.77)
($287.20)
($1,941.43)
($3,802.87)
($1,435.27)
($2,659.44)
($2,113.40)
($2,451.49)
1.73
11.28
13.36
14.07
21.38
12.02
13.85
12.47
12.34
12.85
15.06
$0.00
$2.99
$8.46
$0.00
$0.00
$0.00
$1.20
$1.00
$0.00
$0.00
$0.00
$0.00
$0.00
$9.79
$0.00
$0.00
$2.00
$3.35
$1.00
$7.00
$1.00
$0.30
0
0
6
0
0
2
4
1
10
1
1
12.76
$13.65
$24.44
25
$137.22 ($22,916.42)
Till Statistics
376
RETAIL 7™User Manual
APPENDIX E –Till Status
Goodwin’s Market
Till Status
Start Date: 11/29/2005
Employee Name
Tender Name
Count
Linda Harrison
1
1
End Date: 11/29/2005
Actual Amount
System Amount
Balance
CA
Cash
4
$1,008.99
$1,008.99
$1,010.56
($1.57)
CC
Credit Card
2
$271.46
$271.46
$271.46
$0.00
CK
Check
9
$746.00
$746.00
$746.00
$0.00
$17.98
$0.00
CP
Coupons
4
$17.98
$17.98
DC
Debit Card
2
$181.24
$181.24
$181.24
$0.00
$299.15
$0.00
EF
Elec Foodstamps
4
$299.15
$299.15
FS
Food Stamps
1
$191.28
$191.28
$191.28
$0.00
$474.14
$0.00
$0.00
MI
InStore Charges
3
$474.14
$474.14
SN
Store Coupons
6
$18.70
$18.70
$18.70
$3,208.94
$3,210.51
Tuesday, November 29, 2005 01:12 PM Page: 1
RETAIL USER REFERENCE MANUAL – RETAIL 7
($1.57)
Till Status
377
RETAIL 7™User Manual
APPENDIX E –Transactions by Reason
Goodwin’s Market
Transactions by Reason
Start Date: 10/31/2005
End Date: 10/31/2005
Sorted by: Cashier Name
Trans
Cashier Number and Name
42 Deli ,
216 Brent Parker
219 Vicki Parks
43 Bakery Dept
220 Ashley Francis
172 Laura Hallston
Reason
Transaction Key
Num
UPC
Amount
Manager
No Divider between orders
Void
24
0000000000803
($0.89)
0
No Divider between orders
Void
50
0000000000064
($0.24)
0
Employee error
Void
50
0001200000013
($2.39)
0
Employee error
Void
50
0000000000055
($0.89)
0
Employee error
Void
50
0000000000062
($0.04)
Credit Card Decline
Cancel Transaction
30
Customer Return-Explain
Refund
237
Customer Return-Explain
Refund
165
Shelf Price Discrepancy
Void
152
Shelf Price Discrepancy
Void
Customer did not have enough
money
Customer did not have enough
money
Employee error
Void
0
178
($2.07)
0
($2.59)
178
0003800007648
($4.99)
178
152
0003800007648
($4.99)
178
223
0003600028112
($1.99)
0
Void
4
0005050000400
($1.79)
0
Void
108
($0.99)
0
Employee error
Void
250
($1.59)
0
Customer Return-Explain
Refund
88
($9.95)
178
Customer did not have enough
money
Customer did not have enough
money
Customer did not have enough
money
Employee error
Void
203
0004138033957
($4.99)
128
Void
84
0004000015128
($3.29)
128
Void
104
0004000015178
($3.19)
178
Void
145
0007774520716
($3.19)
178
Employee error
Void
2
0000000001105
($60.98)
128
Employee error
Void
13
0000000000020
($0.48)
0
Employee error
Void
218
0060577623462
($1.79)
0
Employee error
Void
223
0008399371750
($1.79)
0
Employee error
Void
192
0004138085001
($3.79)
128
Employee error
Void
192
($21.78)
128
Employee error
Void
195
($2.59)
128
Credit Card Decline
Cancel Transaction
11
No Divider between orders
Void
12
Credit Card Decline
Cancel Transaction
14
No Divider between orders
Void
82
0007684040021
($3.79)
128
Employee error
Void
31
0007314001435
($1.99)
0
Employee error
Void
69
0028085600000
($6.01)
128
Credit Card Decline
Cancel Transaction
50
Customer Return-Explain
Refund
84
Tuesday, November 01, 2005 05:34 PM Page: 1
RETAIL USER REFERENCE MANUAL – RETAIL 7
0004138005900
0000000000008
0000000000046
190
($0.79)
0
128
178
0001150900263
($8.29)
128
Transactions by Reason
378
RETAIL 7™User Manual
APPENDIX E –Vendors
Goodwin’s Market
Vendors Report - Total Store
ID Name
Phone #
DSD Vendors
117 AMSCAN
800-444-8887
119 ALPINE WEST
800-366-6113
120 OBR FOO - OBRIEN
805-642-5263
161 FOODS
NATURE'S BLESSINGS
805-646-3225
235 QUPE VINEYARD
805-937-9801
300 DPI WEST
909-975-1019
330 GBL DISTRIBUTING
805-964-2571
349 HAPPY DOG ALL
831-726-7198
360 NATURAL
HOSTESS
323-753-3521
6005 BACCALA
760-564-6146
6036 PRINCESS OF YUM
805-466-3655
6052 KASILOF FISH CO.
800-322-7552
6073 PICNIC AT ASCOT, INC
310-676-9266
6115 BO DEREK'S BLESS THE 805-688-4243
6116 BEASTS
AMBERLAND FOODS, INC. 701-324-4804
6117 LA PICCOLINA
404-296-1624
6118 EMPIRE INTERNATIONAL 909-392-1396
6123 ZYLISS USA CORP.
949-699-1884
6124 G&G FOODS
805-898-3819
6125 MJL GOURMET
310-663-7167
6128 TOO GOOD GOURMET,
510-985-0400
6129 INC.
MARICH
800-624-7055
6130 CONFECTIONERY
GRACE GOURMET,INC
415-642-7008
6139 COMPANY
JILLSON & ROBERTS
800-233-0070
6140 RECYCLED PAPER
800-777-9494
6141 GREETINGS
IVETA GOURMET
831-423-5149
6142 LIZARD LIPS
310-305-4047
6143 PASTA PARTNERS
801-977-9077
6145 TURTLE ISLAND, INC.
815-759-9000
6146 KYSELA IMPORTS, INC.
805-278-9332
6150 SIMPLY SCRUMPTIOUS
714-505-3955
CONFECTIONS
Wednesday, November
30, 2005 01:28 PM Page: 1
RETAIL USER REFERENCE MANUAL – RETAIL 7
Address 1
Address 2
P.O. BOX 71603
445 CONEY ISLAND DR.
1932 EASTMAN AVE. #112
P.O. BOX 395
PO BOX 440
601 ROCKEFELLER AVENUE DPI WEST, FILE
#42338,LOS
PO BOX 6130
ANGELES,CA 90074
2935 REA COURT
FILE 55263
79-725 MANDARINA
PO BOX 1202
3912 134TH ST. NE
3237 131st STREET
P.O. BOX 1940
P.O.BOX 185
2834 FRANKLIN ST.
294 WEST BONITA AVE.
19751 DESCARTES
2403 DE LA VINA #8
176-B SLOAT AVE.
3862 PIEDMONT AVE.
PO BOX 1477
715 CESAR CHAVEZ ST
3300 WEST CASTOR ST
PO BOX 95337
PO BOX 376
4712 ADMIRALITY WAY #113
P.O. BOX 271097
1910 BAY ROAD
701 DEL NORTE BLVD.
PO BOX 50141
City
State
CHICAGO
IL
SPARKS
NV
VENTURA
CA
OJAI
CA
LOS OLIVOS
CA
ONTARIO
CA
SANTA BARBARA CA
AROMAS
CA
LOS ANGELES
CA
LA QUINTA
CA
SAN LUIS
CA
OBISPO
MARYSVILLE
WA
HAWTHORNE
CA
SANTA YNEZ
CA
HARVEY
ND
AVONDALE
GA
ESTATES
POMONA
CA
FOOTHILL
CA
RANCH
SANTA BARBARA CA
PACIFIC GROVE CA
OAKLAND
CA
HOLLISTER
CA
SAN FRANCISCO CA
SANTA ANA
CA
CHICAGO
IL
SANTA CRUZ
CA
MARINA DEL REY CA
SALT LAKE CITY UT
MC HENRY
IL
OXNARD
CA
IRVINE
CA
Zip Code
Discount
60694-1603
89431
93003
93024
93441
91761
93160-6130
95004
90074
92253
93406
98271
90250
93460
58341
30002
91767
92610-2620
93105
93950
94611
95024-1477
94124
92704-3908
60694-5337
95061
90292
84127
60050
93030
92619
0.00%
0.00%
0.00%
0.00%
0.00%
0.00%
0.00%
0.00%
0.00%
0.00%
0.00%
0.00%
0.00%
0.00%
0.00%
0.00%
0.00%
0.00%
0.00%
0.00%
0.00%
0.00%
0.00%
0.00%
0.00%
0.00%
0.00%
0.00%
0.00%
0.00%
0.00%
Vendors Report - Total Store
379
RETAIL 7™User Manual
APPENDIX E Reports
<This Page Intentionally Left Blank>
RETAIL USER REFERENCE MANUAL – RETAIL 7
380