1
User Manual for
Sales2LS
The program for Big Bookers! ©
Copyright by ChrisCo Software Development, Inc., 2004
All rights reserved
2
Table of Contents
Acknowledgements ____________________________________________________________________________ 4
Introduction_________________________________________________________________________________ 5
About t he software___________________________________________________________________________ 5
Sales2LS Lite and Sales2LS Professional __________________________________________________________ 5
Ease of Use________________________________________________________________________________ 6
In-Home Estimating _________________________________________________________________________ 6
The Sales2LS enabled Sales Process______________________________________________________________ 7
Minimum PC requirements for i nstallation: ________________________________________________________ 8
To install the software:________________________________________________________________________ 8
Quick Start Guide _____________________________________________________________________________ 9
To begin using the Sales2LS Interstate Estimate: ____________________________________________________ 9
Important i nput requirements: __________________________________________________________________ 9
County Input is Critical: 412 tariff Note ___________________________________________________________ 9
Zip Code Input is Critical: 400N tariff Note_________________________________________________________ 9
L/U City or Zip-New for 2004___________________________________________________________________ 9
The County Database: 412 tariff Note____________________________________________________________ 10
The Rand McNally/AMSA Database: 400N tariff Note _______________________________________________ 10
Other Critical Fields:________________________________________________________________________ 10
Other Advanced Features:____________________________________________________________________ 11
The Interstate Estimate_________________________________________________________________________ 12
Creating an Estimate ________________________________________________________________________ 12
Using the Sales2LS Single User Save Estimate Routine _______________________________________________ 12
Using the MOVE STATUS field and Book Move click box:____________________________________________ 13
Discounting ______________________________________________________________________________ 14
Using the Cube Sheet: Form Based Piece Count ____________________________________________________ 14
Bulky Articles _____________________________________________________________________________ 15
Crating for the Form Based Cube Sheet __________________________________________________________ 16
Using the Cube Sheet: Room by Room Piece Count-New for 2004 _______________________________________ 16
Crating for the Room by Room Piece Count _______________________________________________________ 17
Packing and Un-Packing _____________________________________________________________________ 18
Pricing __________________________________________________________________________________ 18
Accessorials ______________________________________________________________________________ 19
SIT_____________________________________________________________________________________ 19
Order for Service (Estimate Worksheet) __________________________________________________________ 20
Generic Estimate Printout: New for 2004 _________________________________________________________ 20
Move Types_______________________________________________________________________________ 21
Valuation ________________________________________________________________________________ 21
Shipment Dates – Transit Guide________________________________________________________________ 21
Extra Pick-Ups ____________________________________________________________________________ 22
Printing the Estimate________________________________________________________________________ 22
Transferring the Estimate ____________________________________________________________________ 22
Appendix A _______________________________________________________________________________ 23
Frequently Asked Questions___________________________________________________________________ 23
Technical Support _________________________________________________________________________ 25
Bonus Sections ______________________________________________________________________________ 26
Sales2LS Lite______________________________________________________________________________ 26
Sales2LS Professional ______________________________________________________________________ 26
WebSync Product Description _______________________________________________________________ 26
Claims2LS ________________________________________________________________________________ 27
Appointment Setter ________________________________________________________________________ 27
3
Acknowledgements
In 1989, as a new sales person struggling to keep up with all the appointments and paperwork, I thought,
“there has to be a better way to do this job”.
I soon realized that computers could automate the repetitive parts of the job and I started creating programs
in my spare time to automate all of the many tasks involved in high-volume sales. When the programs
helped me to become more successful, other salespeople asked to use the programs to make their work
more efficient.
As a sales manager, and general manager, I trained many sales representatives to use computers with
these programs to increase their sales and make their working hours more productive. As a software
developer I have been lucky enough to work with some very talented programmers and technology
specialists to make the dream of effective sales force automation come true.
Many sales reps have helped with the testing, and given feedback, that has affected the evolution of these
programs. Working with hundreds of salespeople over the years has given me a keen appreciation for the
difficulties of the job that they do, and the dedication and professionalism they apply on a daily basis.
Because of their input and assistance, Sales2LS is truly software for salespeople, by salespeople.
I would like to express my sincere appreciation for all the assistance of the many excellent salespeople,
managers, and technologists who have helped to make this a better program.
Chris Fultz
4
Introduction
Welcome to computerized estimating using the Sales2LS Interstate estimate. If you’ve never used a
computerized estimating system, you are about to find out what so many have learned; computers can
make estimating fast, easy, and even fun.
Today’s computers are faster, easier and more useful than ever. Even a novice can become proficient in
using a computer in a very short time, if they have programs on the computer that are designed to help
them accomplish their goals with a minimum of fuss and bother.
About the software
To be useful, computer software should be easy to learn and useful to the end user. The learning curve
should be short, as short as possible and the software should accomplish as many of the users goals as
possible.
To accomplish that end, Sales2ls is graphical and form based, so the user can input into forms that look
and feel familiar. Wherever possible, existing forms have been modeled into the computer and automated
with programming that allows fast and easy input and provides extended functionality and automation of
calculations on the user’s behalf.
Also, in as much as possible, customer information is captured and retained from the users input, and the
programs calculations. This allows easy reuse of that information as needed to further automate the work of
salespeople, co-workers and management in the moving and storage industry.
Quick and Accurate Quotes
The ability to quickly and accurately quote shipments with the customers supplied information often results
in booking the order over the phone. Even the most complicated interstate estimate you can imagine, from
anywhere to anywhere, can be generated in less than two minutes if the client can answer simple questions
regarding their service needs.
Many clients have previously had estimates and are calling around to get additional rate quotes. In our
experience, the real reason they are calling is to locate a competent service provider who is easy to work
with and customer oriented, that can give them a quote now, without having to call them back.
Influencing the Customer
From the first call, the Sales2LS enabled Customer Service Representative (CSR) can create the
perception of a higher level of competence in the eyes of your clients. With ball-parking of shipments
available at the touch of button and scheduling or appointment setting tools at their fingertips, the CSR can
help the customer understand that this is not the average moving company they are calling. This will give
the company a decided advantage over any other company that the potential customer has contacted. The
CSR can also print and fax the Sales2LS order to the client for signature. If the client prefers a sales call
and guaranteed price an appointment can be set and the clients file saved. The file is then transmitted to
the outside rep via the internet, computer network, floppy disk or even via e-mail.
Sales2LS Lite and Sales2LS Professional
The Sales2LS Lite and Sales2LS Professional programs have been designed to address the
communication of information throughout the sales force.
5
The interstate estimator is part of an entire system of software for the automation of virtually all sales
processes. Almost all of the sales tasks required of both customer service representatives and inside and
outside salespeople in the moving and storage industry have been addressed.
Acting in conjunction with the hardware and other software required to accomplish information exchange
between individuals and departments, the Sales2LS software also improves the speed of information
transfer and accomplishes the goal of complete sales force automation.
For a description of the Sales2LS Lite, Sales2LS Professional and WebSync programs available from CSD,
please see the Bonus Sections at the end of the user manual.
Ease of Use
The key to popular software is simplicity of operation and the ability to produce results, quickly and
accurately.
Therefore, ease of use and the needs of the salesperson have been the primary design requirements
considered in developing this system. However, it stands to reason that all departments in a moving
company will benefit by a more effective sales effort.
Sales2LS is a graphical form based program so simple even beginners can use it right away. It’s easy to
use because it mirrors the typical interstate, local and intrastate paperwork that salespeople are used to and
also speeds up and makes more automatic and efficient the other tasks required of sales people in the
moving industry.
A small investment of the new user’s time is all it takes to learn to use Sales2ls. The program works the way
sales people do and is very flexible in fulfilling their diverse needs. When deployed on the CSD provided
Fujitsu touch screen laptops, the portable estimating system is highly adapted for input via the touch screen
interface. This allows the representative to get the estimate information into the computer quickly while
walking, talking and interacting with clients. If the Sales2LS inside sales system is being used to set
appointments for estimates, the outside rep doesn’t even need to type in the customers basic origin and
destination information as it can be downloaded from the Sales2LS Appt Setter by clicking on the Create
Estimate button.
In-Home Estimating
The personal nature of the services movers supply to the public necessitates that sales consultants meet
with a client in the home to plan, estimate, and present their services. Each quotation is as individual as
each client; however, in all cases the pricing si based on a list of goods to be shipped which the
representative typically prepares prior to calculating prices and presenting their services.
Due to the complexity of the variety of pricing methods we use (tariffs dictated by regulatory agencies like
the DOT and PUC), in most cases the pricing of the proposal takes from fifteen minutes to one hour per job,
when done by calculator and hand written on manual forms. To compete effectively in the market place
these quotations must be prepared and delivered on site.
Most clients, after an hour or more of answering service questions and waiting for the estimate, are weary
of the sales call and not very interested in hearing the representative’s sales pitch. At this point they typically
just want the representative to deliver the pricing information and get going. This is the standard customer
scenario that occurs with manual estimating and the situation we affect by the use of the Sales2LS
software.
6
The Sales2LS enabled Sales Process
In the new scenario, the field rep picks up the customer appointment card from the office via e-mail or from
the server in the office from their network connection or via the Internet with CSD’s WebSync application
described in the Bonus Sections of the User Manual. The pickup and delivery information has already been
filled in by the customer service representative during their initial conversation with the prospect when they
called to schedule the appointment.
The outside sales rep can fill out the estimate from the customer’s appointment card with the click of a
button. From this base of information, building a client’s estimate file is a straight forward and fast process.
The rep can walk through the residence, chatting with the customer about their service needs while they fill
out the cube sheet (piece count) and requested shipment accessorial’s electronically on the touch screen
ultra-light laptop computer. If the client has questions regarding their service needs, the rep can click into a
full motion video of expert movers in action to help answer their concerns and educate them on how real
moving experts perform complex moving requirements. By the time they finish the walk through the
estimate is done.
This efficiency allows additional time for the rep to spend selling their services before the client’s time and
patience is exhausted. While much of the selling task is typically accomplished during the walk through
there is still time to make the final presentation of pricing information and negotiate the corresponding
service quality expectation level. To that end, the Sales2LS full multimedia (video with sound)
1
presentations, forms and other selling tools have been created to demonstrate the high-end materials and
techniques that will be used to protect the client’s valuable possessions and deliver the quality of service
that the customer expects.
The representative can ask for the client’s approval of the order and print the hard copy for the client to a
portable color printer. With the Sales2LS Tablet PC Professional bundle, the client can sign the order right
on the screen. The high quality color order printout has a great deal of appeal to the eye in comparison to
the scribbled forms used by the competition, another subtle but powerful competitive advantage. Faster
print outs can be enabled by specifying black and white printing as the portable printers default setting.
The goal of course is product differentiation, a difficult task when selling intangible services. The Sales2LS
software and hardware can help to illustrate the dedication of your company to exemplary service levels.
That your company is willing to invest in high quality tools for the sales force in itself sends a powerful
unstated message to your potential clients.
As a side note, a Corporate Sales Assistant using Sales2LS on an office PC can complete an accurate
order so quickly that they can handle much more volume than previously.
1
These multi- media features and other persuasive and time saving features are only available in the Sales2LS Professional software
suite.
7
Installation Instructions and Program Requirements
Minimum PC requirements for installation:
•
Pentium III processor or greater
•
Windows 98 or above,
•
Microsoft Excel 97 or above
•
One megabyte of hard drive space
•
128 megabytes of RAM
•
CDROM drive
To install the software:
Insert the 400N Install diskette into the machines floppy disk drive.
Insert CD into CD Rom drive.
Please note the CD Key printed on the CD Rom label on a piece of paper. You will need it when the install
program prompts you for the CD Key.
When the installation menu comes up, choose install Sales2LS.
Follow the on-screen prompts to set up Sales2LS on your PC
8
Quick Start Guide
To begin using the Sales2LS Interstate Estimate:
To begin using the Sales2LS Interstate Estimate Module click on the Main Menu Icon on your desktop.
From the Main Menu, under the heading Estimating Templates, click on Interstate. Microsoft Excel will
open and the estimate will open inside the Excel window. The estimate will open to the APPT CARD
worksheet tab view, allowing you to input customer information into the estimate.
If you are using the complete Sales2LS system and received an Appointment Card for this client in your
inbox, you would double click on the clients Appointment Card to open it and click on Create Estimate
button to simultaneously open a new interstate estimate and transfer the origin and destination information
(and any other information that was collected by the CSR) from the Appointment Card to the new Estimate.
Important input requirements:
Important
i
Hey!
U
The essential or required fields that must be filled out to perform an Interstate estimate are
•
Origin City, State and County, 412 only*
•
Destination City, State and County 412 only *
•
Zip Codes at Origin and Destination, 400N only**
•
Mileage
•
Estimated HHG (household goods) Weight
County Input is Critical: 412 tariff Note
*Note the input into the county field must match exactly the spelling of the county in the Sales2LS
database. Computers are very literal.
Sales2LS 412 estimating module does not use zip code based lookup’s. Zip codes are irrelevant to the
estimating program, although they are not irrelevant to the rest of your organization. The lookup of ATC’s
and cost schedules at origin and destination are based on the user input of county and state at origin and
destination.
Hey!
U
Zip Code Input is Critical: 400N tariff Note
**Note the input into the zip code field must be a valid (first) three digit zip in the 400N tariff. Computers are
very literal.
Sales2LS 412 estimating module uses the three digit zip code based lookup’s developed by the AMSA.
Counties are irrelevant to the 400N estimating program, although they are not irrelevant to the rest of your
organization. The lookup of ATC’s and cost schedules at origin and destination are based on the user input
of zip codes at origin and destination.
L/U City or Zip-New for 2004
The L/U City or Zip Button on the Appt Card tab of the Estimating Templates can help you locate a valid
County or Zip Code at origin or destination. To use, merely type the shipper’s city and state at origin or
destination into the appropriate field and click the button. The database will immediately find the correct
county and zip code for that city and state. To insert click the Apply button and the information will be
9
added to your estimate. The database will also look up from a zip code the corresponding city and state
and county.
The County Database: 412 tariff Note
Important
i
If you do not know the correct spelling of the county at origin and destination you will not be able to continue
with the estimate. To aid the user in getting county information quickly, 3500 major cities and their
associated counties have been programmed into Sales2LS and will come up automatically, from the correct
city and state input. If the county at origin or destination does not come up automatically, you will have to
input it manually or use the L/U City or Zip Button described above.
To assist the user in checking the correct spelling of the counties, Sales2LS Interstate Estimate has
hyperlinked access to the master counties database available from the APPT CARD worksheet tab. Just
click on the County field name (underlined and highlighted in blue) to jump to the counties database where
the county can be looked up. If you know what state the county is in, you can click on the State field and
choose the state from the list of states. This will narrow your search for the county to the correct state. All
counties are listed in alphabetical order.
To return to the estimate, merely click on the blue backwards pointing arrow on the “Web” toolbar that
appears when you follow a hyperlinked reference in Excel. It will instantly return you to the exact place in
the estimate where you left off. When you eventually close Excel and it asks you if you want to save the
changes to the counties file Click NO.
The Rand McNally/AMSA Database: 400N tariff Note
With the zip codes fields filled out correctly, all other features of the estimate are available to the user after
pushing the Get Miles button. The Cost Schedules and Item 170’s (ATC’s) for the origin and destination will
be returned while the Service Area to Service Area Mileage is calculated by the Get Miles function.
Important
400N Note
i
(It is important to realize that if you should change the origin or destination for a shipper after you have
looked up the corresponding schedules that you will need to push the Get Miles But ton again to make sure
that you have the correct cost schedules for the new origin or destination).
Most of the other features of the estimator are represented by a worksheet tab at the bottom of the screen
and can be accessed by clicking on the appropriate tab.
Other Critical Fields:
Hey!
U
In order to use the Sales2LS automated save routine to save the estimate file, it is important for the user to
fill out several other fields on the APPT CARD page. These critical fields are:
•
Customer at origin
•
Sales #
•
Customer ID
The information in these fields will be used to automatically name the file and save it to the appropriate file
folder on the hard drive when you use the Sales2LS Single User Save Routine. For detailed instructions on
using the automated saving features of Sales2LS please see Using the Sales2LS Single User Save
Estimate Routine in Chapter 1.
10
Other Advanced Features:
Some of the other advanced features of Sales2LS Interstate Estimate are listed below and are covered in
detail in The Interstate Estimate.
•
Cube Sheet, Form Based or Room by Room
•
Crating Worksheet
•
Packing and Unpacking Worksheet
•
Pricing Worksheet, Accessorial’s and SIT
•
Estimate Worksheet :
•
Estimate Types - Actual Weight, Not to Exceed and Guaranteed Price
•
Valuation
•
Shipment Dates - Transit Guide and Scheduling the move in Outlook
•
Miscellaneous Features: Extra Pickup’s, Agent Info, Booking the Move and Saving and printing the
estimate
For more information on each of these features please read the corresponding section of the next section
The Interstate Estimate.
11
The Interstate Estimate
Creating an Estimate
The instructions in the Quick Start Guide will help you get started with creating your first estimate. Please
take a few minutes to read these important instructions as they could save you time and frustration in trying
to use the program without knowing what basic information is required in order to calculate an Interstate
Estimate.
We will cover saving the estimate next because it should be the first thing you do after creating a new
estimate and inputting critical information.
Using the Sales2LS Single User Save Estimate Routine
After filling out the Customer Name, your Sales ID number and the Customer ID (push the Get New #
button) fields per the instructions in the Quick Start Guide, you are ready to save your initial estimate.
Saving the estimate should be done as soon as possible after starting a new estimate.
Careful!
N
If you don’t save your estimate, and your computer should lock up, or you should experience an Excel error
that causes the program to close, you may lose all the work you’ve done and have to start over again.
To save the estimate:
1.
Click on the Sales2LS menu (just to the left of the Excel Help Menu) and choose Sales2LS Single
User Save Estimate Routine.
The program will respond by prompting you to save your estimate to the Outbox and the Pending folder.
Important
i
The user who is not intending to exchange their estimate files with the office (using Sales2LS as a stand
alone estimating system) has no need to save estimates to the Outbox at any time and can always cancel
2
this step. Even if you are intending to exchange estimates with the office, you should realize that you only
need to save a FINISHED estimate to the Outbox for upload to the office system.
This preliminary save is just intended to create a copy of the initial estimate info in your pending folder so
that your estimate can be saved periodically as you are developing the complete estimate. When you have
finished the estimate you will want to save a completed copy of the estimate to the Outbox for exchange
with the office.
2.
The first prompt will tell you: This is a new Estimate. Please save it to the Pending Folder and the
Outbox.
Click OK
3.
The next prompt will ask you: Would you like to save a copy of the estimate to the Outbox?
Click NO, if you do not want an initial copy of the estimate saved to the Outbox, YES if you have
finished the estimate and plan to send a copy to the office system.
2
Another program available from CSD, Websync can automate the exchange of both estimates and appointments between the office
and outside sales representatives via any Internet connection. Please call CSD for more information.
12
4.
Important
i
The Please Save the Estimate dialog box will ask you to save the es timate to the Pending folder.
The program has picked up the customers name, your sales ID number and the customer ID number from
your estimate and incorporated this information into the file’s name along with the abbreviations, IS and
Pnd. The IS stands for InterState and the Pnd stands for pending, the status of the estimate at this point.
We will cover the move status in greater detail in a minute.
5.
Click Save: The program will save a copy of your new estimate to the pending folder on the hard
drive of your computer.
The program now tells you that your estimate was saved to the Pending Folder. Click OK.
Tip !
U
Important
i
You can now safely use your new estimate without fear of losing the work you have done to this point.
Please remember the computer users mantra and “Save Early and Save Often” to avoid the frustration of
ever losing your work.
Always remember that computers are designed by and programmed by people and people are imperfect.
Machines (computers) also sometimes develop glitches with hard use or abuse. There has never been a
computer program to this point that doesn’t at least occasionally “crash” and your best protection against
this eventuality is to save your work. Windows PC based programs of all types do infrequently crash and
many a hapless user has lost a lot of valuable work because they didn’t make a habit of saving frequently.
When you have input more information into your estimate and want to save your work again you can push
the Save Icon on the Excel Standard Toolbar or use the File menu’s Save command (or hold down the
Control key {Ctrl} on the keyboard and hit the {s} key) to keep your hard drive copy of the estimate up to
date. Excel will continue to update the file name in the Pending Folder that you have established using the
Sales2LS Single User Save Estimate Routine.
(This is a short cut method for saving as you go that can save you time and effort. In order to use this
method you need to understand how computers save files. The important thing is that you must have
already established the file name and location for your estimate by first using the Single User Save Routine
described previously before you can click the Save button to update that file).
When you have finished the estimate and want to save the final copy to the hard drive you should repeat
the Single User Save Routine procedure described above. This will offer you another opportunity to save
the estimate to the Outbox.
If you intend to exchange files with a Sales2LS user in the office and you are done with the estimate you
should click OK when the prompt asks you to save a copy of the estimate to the Outbox. This will create an
identical copy of the finished estimate on your hard drive for you to transfer from the Outbox on your
computer to the office computer. Your copy of the estimate in your Pending or Booked folder will remain on
your computer for your use.
Using the MOVE STATUS field and Book Move click box:
Important
i
It is vitally important that a salesperson track which estimates are booked and which are pending. The
Sales2LS Interstate Estimate has an easy to use method of keeping track of all your pending and booked
moves. To book an interstate estimate:
1.
Click the Book Move click box on the APPT CARD worksheet tab (located just to the right of the
Customer field at Origin).
13
Notice that the MOVE STATUS field now changes to booked and the BKD-LST DATE field has been filled
out with today’s date. Also, notice that the VANS OR # field has been filled out with the Customer ID
number. This is only relevant to companies that use the VanS computer system by CompuSource. Please
call CSD if you would like more details on our integration with the CompuSource VanS system.
2.
Use the Sales2LS menu’s Single User Save Estimate routine to save the file again.
The program will prompt you once more to save a copy to the Outbox. The same logic applies here as in
the original save: if you are exchanging files with the office, save a copy of the booked order to the Outbox:
otherwise,
3.
Click NO.
This time the Please Save the Estimate dialog box will prompt you to save the estimate to the Booked
Folder.
4.
Click Save.
Notice that the program has changed the filename slightly. The code Pnd in the middle of the file name has
been changed to Bkd.
Important
i
You now have two copies of the customers estimate on your hard drive, one in the Pending Folder and one
in the Booked Folder. Since this could potentially cause some confusion as to the true Status of this
customers move, the program will prompt you:
5.
Would you like the old estimate removed from the Pending Folder? Click Yes.
The last dialog box confirms that your pending estimate has been removed from the Pending Folder. Now
you have only the one copy of the customer’s order on your hard drive (Unless you saved a copy of the
booked estimate to the Outbox to exchange with the office. This copy of the customers file will be removed
from the Outbox and sent to the office system the next time you use our Web Sync program to synchronize
files with your office system). This procedure will allow you to track which customers have ordered service
and which ones are still pending.
Discounting
Important
i
Discounting is accessed from the Appt Card worksheet. From the Shipment Info section find the L/H or B/L
DISC. Field next to the miles field. All discounts default to bottom line discounts unless the user overrides
the default by typing in a separate accessorial discount into the ACC. DISC. field just below the L/H or B/L
DISC. field.
The discount fields are set to default to the pricing grid for your Van Line based on the weight and mileage
of the shipment. So if you are ball-parking a shipment the discount will continue to shift to the appropriate
discount for the shipment as you quote the customer on various weights. To override the default discount,
merely type in the preferred discount level that you want to use for this particular estimate. Be aware that
once a preferred discount has been typed in by the user, the worksheets discount level will no longer
automatically shift as the weight of the shipment is increased or decreased on that particular estimate.
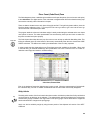
Using the Cube Sheet: Form Based Piece Count
14
Piece Count (Cube Sheet) Form
The field salesperson does a walk-through at residence and inputs the pieces (via touch screen and stylus)
to the Cube Sheet. The digital version of the cube sheet is a digital model of the cube sheet that many reps
have used to manually collect information in the past.
There are buttons located next to each piece facing right and left. The right facing button adds a piece; the
left facing button subtracts a piece. To put a piece in the not to go column, type a one into the not to go
column to the left of the desired piece label.
The program totals the cubes and calculates weight, instantly recalculating the estimate as the user inputs
more pieces or cartons. The sales representative can see what they have input and check to make sure
they have recorded each piece properly.
Important
i
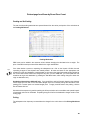
The Cube input toolbar helps the user jump from room to room to keep up with their fast talking client. This
toolbar is activated (pops up at the bottom of the screen) automatically when the user chooses the CUBE
SHEET worksheet. The buttons are coded by the abbreviation of the room they represent.
In order to make the cube sheet easier to use, Zoom buttons are also available on this toolbar. When used
in the field during an estimate walkthrough the representative can Zoom in with the touch of a button to
make the screen larger and easier to use while walking.
Cube Sheet, Zoomed View
Even in the darkest of homes the lighted screen is easy to read. When the representative is finished with
the cube sheet they can click on another worksheet tab and the cube toolbar conveniently disappears.
Bulky Articles
Tip !
U
The bulky article section of the form based cube sheet contains a hidden drop down list of bulky articles that
can be clicked on to add them to the estimate. The selected bulky articles are added to the pricing page
and their bulky charge is added to the origin section of the pricing page. Pianos added to the Living Room
section also add Piano charges to the pricing page.
Auto’s can also be added by weight by using the auto portion of the shipment info section of the APPT
CARD tab.
15
Crating for the Form Based Cube Sheet
The Crating worksheet (Click on the Crating worksheet tab) automatically calculates the exterior
dimensions of any crate based on the actual dimensions of the piece to be crated plus 3 inches on each
dimension. The cube is calculated from the exterior dimension and priced according to the cost schedule at
origin.
Important
i
Discounting of crates is applied separately from the bottom line or accessorial discounting specified on the
APPT CARD discount fields. The discount on crating is set from the PRICING TAB on the crating discount
field near the bottom of the pricing page.
All crating cubes computed on the crating sheet automatically roll back to the cube sheet so that total weight
and cube of the estimate are updated. On the crating section of the cube sheet the user can unselect the
rd
3 Party crating click box if they want the crating charges rolled into the packing worksheet or they can
rd
leave 3 Party selected if they want the crating charges detailed as a line item on the Pricing worksheet.
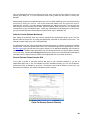
Using the Cube Sheet: Room by Room Piece Count-New for 2004
As an alternative to the Form Based Piece Count you can use the Room by Room Cube Sheet located on
the tab labeled New Cube. This will build an inventory list for you that details exactly which pieces are in
each room, to go and not to go, including the cartons by room as you estimated them.
Room by Room Piece Count (Cube Sheet)
To use the Room by Room or Touch Screen Cube Sheet just click on the New Cube worksheet tab, then
click on the Input Cubes button. This brings up the Touch Screen Cube Sheet as shown above, without an
inventory list in it. To add pieces, you must first indicate which room you are starting in, so it can track
which pieces belong in that room. Click on the Room menu item and click on Add A Room. You can either
click on a listed Room or click on Custom Room and create a room name of your own design.
Important
i
After creating your first room, the title bar will show which room you are currently inputting into. The tabs
across the top; Living Room, Kitchen, Dining Room, etc. describe the typical origin of the list of items that
are available on that tab. Bear in mind that no matter which tab you are currently using, the Room you
are inputting into is determined by the choice that you most recently made on the Room Menu and
16
is always displayed on the title bar. The tabs are just a way to organize the item display in a way that is
easy to remember.
To input a piece, merely click on the up button next to the item name. If you want to remove one of that
item from the list, click the down button. To make an item not to go, just click on the up button on the left
next to the item in the leave column. You can change the cube for an item just by clicking and editing the
default cube for that item.
To make a custom item, just click on the custom tab and double click on the first empty item. A description
dialog box will pop up and you can input the description of your item. Click okay when you are finished and
give it a cube and a quantity. It will be included in your list of items to go for the room you are currently
inputting into.
Crating for the Room by Room Piece Count
Tip !
U
You can crate any item or create a custom item by double clicking on the empty item description on the
custom tab. This will bring up a comment dialog box where you can type in a custom comment for any item
or create a crate for any item by using the crate method. To use the crate method, first create a description
for the piece as described above. Then double click on that description to bring up the comment dialog and
input the crate dimensions in the comment dialog in this format: CRT 63x48x5 and a crate of that size and
the calculated cube will be added to your piece count.
You can also do a cube calculation for a piece on the fly by using the DIM method. To use the DIM
method, double click on any items description to bring up the Comment’s dialog then input the dimensions
of the piece in this format: DIM 72x18x24 and the calculated cube will override the default cube on that item.
Important
i
To finish your cube sheet you must do a save on the Touch Screen Cube Sheet program with the File
menus Save command. The piece count data will be automatically saved by prospect number in the
Cubes folder of the Sales2LS Customers directory on your computers hard drive. Since this is a separate
application from the estimating programs you will now need to close the Touch Screen Cube Sheet
program and import the piece count into your estimate.
Close with either File Exit or the X in the upper right hand corner of the program and your estimate should
now be visible with the New Cube tab as the active worksheet. Just click on the Create Printout Button and
the piece count will be imported and formatted into a precise Room by Room Cube Sheet format ready to
be printed out for your customer.
17
Printout page from Room by Room Piece Count
Packing and Un-Packing
The user checks packing totals that have posted forward from the carrier pack portion of the cube sheet to
the Packing Worksheet
Packing Worksheet
PBO boxes can be added in the customer column without changing the calculated cube or weight. The
price of the PBO boxes input here will be added to the origin material total.
Tip !
U
If the client desires a quote on unpacking, the salesperson can click on the Unpack Y/N click box and
unpacking charges for the shipment are instantly added. All rates are based on the appropriate cost
schedule for origin and destination counties based on the input on the Appt Card worksheet and will shift to
the correct rates if those entries are changed at any time. (On the 400N tariff, you must update the cost
schedules at origin and destination by pressing the Get Miles button, after making changes to either the
origin or destination info.)
Hundred weight packing, 400N tariff only: If you would like to add a full unpack based on the shipment
carton weight you can click on the Use Carton Weight click box to instantly change the calculation of the
packing from a custom pack to a hundred weight pack. To apply overtime rates to the packing, click the
Use OT Rates click box.
Should the client request only partial unpacking the full unpack units can be overridden and a partial unpack
of requested units can be calculated. Unpacking charges will roll to the destination charges section of the
Pricing page.
Pricing
The salesperson then inputs any Accessorials to be charged in the unit’s column of the Pricing Worksheet
form
18
Pricing Worksheet
All calculations are automatic and instantaneous. All common estimating situations have been anticipated
and automated as much as possible. All calculations are based on the correct cost schedule item based on
the county of origin and destination.
Accessorials
The accessorials available from the PRICING worksheet tab are all line items from the interstate tariff.
User’s have the option of changing the default Fuel Surcharge to any value between 1 and 10 percent by
clicking on the Full Surcharge % cell and then clicking the drop down box that appears on the right and
selecting another value from the list box. The user can also type in import or export charges for shipments
to or from Canada or Mexico on the Import Export charges line.
Packing and unpacking totals from the PACKING worksheet post forward automatically and roll into the
appropriate origin or destination totals. Bulky articles can also be picked from the drop down list by clicking
on the appropriate field, although bulky articles that were selected from the Bulky section of the cube sheet
will appear and price themselves automatically.
Auto’s that have been input in the Shipment Info section of the APPT CARD worksheet will automatically be
added. All other accessorials, such as long carries, stair carries, shuttle charges are input by the user in the
Units column to the right of the appropriate label. Origin and destination accessorials will be priced
according to the appropriate origin or destination cost schedules.
Tip !
U
For those accessorials that are computed by weight, such as stairs, shuttles, etc., a total HHG’s weight
appears on the line. Total HHG’s weight can be overridden by the user when only a partial shipment weight
needs to be computed for that particular accessorial.
SIT
Even the charges for Storage In Transit at origin and destination are automatically calculated and available
at the bottom of the PRICING worksheet form. The discount at origin and destination can be set by the
user and defaults to 25%. Number of days SIT can be set by the user and defaults to 30 days.
Tip !
U
When the user wishes to calculate storage by local pricing methods, they can manually type in local storage
charges below the SIT section on the open area below the SIT section. To print out these sections, the
19
user must highlight the area to be printed and use File, Print and click the Print Selection choice on the
resulting print dialog box. For more information about Printing, please see the section on Printing the
Estimate.
Adding storage charges to the estimate totals on the Van Line Order (labeled by Van Line) varies according
to the form in use by your Van line. Look for the section that relates to SIT and click on the origin or
destination SIT click box. In this way storage recalculations are added to the order. For most Van Lines
these sections will be separate from the other shipment estimate totals, bec ause SIT is a separate item
controlled by the origin or destination agent. Please pay close attention to this distinction so that you don’t
give your client the impression that the shipment totals include origin or destination SIT.
Order for Service (Estimate Worksheet)
After adding the accessorial items to the Pricing worksheet the representative brings up the Van Line
Specific Order for Service form by clicking the appropriately named tab on the bottom of the screen. The
estimate is almost ready by the end of the walkthrough.
The salesperson can also check the calculated minimums and pricing on valuation by clicking the Valuation
worksheet tab. Should the representative need to find a destination agent for the shipment they can click
the Dest. Agent hyper link and search the agency directory for an appropriate destination agent number to
input on the APPT CARD’s Origin agent field (if you have purchased the Van Line specific agency directory
for your Van Line). Inputting the four-digit destination agent number in the correct field calls up that agent’s
information from the agency directory and fills out the appropriate area on the Order for Service.
Generic Estimate Printout: New for 2004
If you prefer a printout of just those services that apply to your customers estimate (or you are an
Independent agent with no Van Line affiliation and have Interstate Authority) you can use the Generic
Printout tab to print an estimate for your client. The Generic Printout tab will create a concise list of only
those services included on your client’s estimate and prints out quickly.
Order For Service (Generic Printout)
20
Move Types
Important
i
To select a different move type, click on Actual Weight and Charges at the top of the Generic Estimate
Printout tab and select another move type from the drop down list that appears. Available types are the
default Actual Weights and Charges, Guaranteed Price, and Not to Exceed. Selecting Guaranteed Price
adds the verbiage from the Guaranteed Price estimate form to the Order for Servi ce, Not to Exceed and
Actual Weight and Charges do like wise. If you are using a Van Line Specific Print out please see the
appropriate section of your printout to set the move types allowed by your Van Line.
In most cases all other input on the Van Line specific Estimate Tab or Generic Printout Tab is prohibited
except for the Remarks section. Valuation requested by the shipper is input on the Valuation worksheet
and Move Dates are entered on the SHIPMENT DATES section of the APPT CARD worksheet.
Valuation
Valuation coverage can be added to the Valuation Worksheet and will roll to the Van Line Specific
worksheet or Generic Printout tab. Valuation minimums will be computed on the Valuation minimums table
at the bottom of the page.
Tip !
U
The user should input the clients requested level of coverage in the Requested Valuation cell and the
Pricing for Valuation Requested table will return the correct premiums for the coverage selected from the
premiums table on the left side of the page with the available deductible options. The user then inputs the
Premium for Coverage Selected and the premium rolls into the total cost on the Van Line Specific
worksheet or Generic Printout tab.
Shipment Dates – Transit Guide
Important
i
To add shipment dates to the Estimate, the user should click on the APPT CARD tab and go to the
Shipment Dates section. Inputting the customer’s shipment dates here will cause the dates to display
properly on the Order for Service (Van Line Specific worksheet or Generic Printout tab).
The initial pack date input will also fill out the Preferred Pack Date by default. The user then inputs the first
load date to cause the last date of the load spread as well as the beginning and ending dates of the pickup
spread to be filled out by default from the TRANSIT GUIDE worksheet based on the weight and mileage of
the shipment (applies to those Van Lines that have provided a transit guide to CSD).
st
Users who wish to narrow the delivery spread or view the transit guide can click on the hyperlinked label, 1
DEL DATE and the Transit Guide will be instantly displayed. (Users may also simply click on the TRANSIT
GUIDE worksheet tab.) After viewing the transit guide users can click back on the APPT CARD tab to
override the default pickup and delivery spreads and override the calculated pickup or delivery dates.
The preferred date’s fields will default to the first date of the Pickup Spread and the first date of the Delivery
Spread. Users can of course override the defaults by inputting the dates of their choice.
Tip !
U
When the move is booked, the user can schedule the move in their Outlook calendar by clicking the
Schedule Move button. This creates an all day event for the load date that will cause an alarm to go off in
Outlook the day before the move, thereby reminding the user of the pending business.
21
Extra Pick-Ups
Important
i
The Extra Pickup and Delivery fields on the Appt Card will add an extra pickup charge or delivery charge to
the Pricing Worksheet. Users are cautioned to consider whether an extra pickup or delivery that is off-route
from the origin or destination of the shipment will increase the total mileage of the shipment.
If so the shipment mileage should be recalculated and the revised mileage input into the MILES field of the
SHIPMENT INFO section of the APPT CARD.
After adding the Pickup or Delivery address, city and state input into the appropriate fields, the user must
indicate P for Pickup or D for Delivery in the PU or DEL? field. Pickups should be listed above Delivery’s.
Printing the Estimate
Printing the Van Line Specific worksheet or Generic Printout tab worksheet or any other worksheet desired
is accomplished by using Excel’s File Print command while the desired worksheet is active. All worksheets
are preformatted to print only the section of the worksheet ordinarily needed by the user.
Tip !
U
3
If the user should wish to alter the Print Setup due to a printer that interprets the printout differently (prints
out on multiple pages), they should just use File, Print Preview, Setup button and change the settings while
previewing how the new settings will be interpreted by their printer. Alternatively, the user may select View,
Page Break Preview to reset page break options prior to printing.
Transferring the Estimate
To transfer the estimate to another Sales2LS user merely cut and paste the files that have been saved to
the outbox during the Sales2LS Single User Save Estimate routine to the other users Inbox via any valid file
transfer technique. Most likely this will involve the use of a network connection to facilitate fast file transfers.
The CSD program WebSync (described later in the manual) can automate the uploading of estimates and
booked orders and the downloading of appointments between the outside sales persons laptop and the
office system.
Emailing the Estimate
Tip !
U
Alternatively, the user who wishes to email an estimate may use the Sales2LS menu’s Email Estimate
command to quickly create an Outlook email and attach the currently open estimate to that email. The
emails Subject line will be automatically filled out with the estimate file name (which includes the shippers
name, your sales code, the IS abbreviation, the move status code, and the Customer ID number). The user
can then select the recipient of the email by pushing the To; button and pressing Send.
If the user is currently off-line (not connected to the Internet) the file will be held in the Outlook outbox (not to
be confused with the Sales2LS outbox). The next time the user connects to the Internet, opens Outlook
and presses the Send and Receive button, all pending estimates will be sent. If the Internet connection is a
slow one, such as a dial up connection, the sending of the files may take a considerable amount of time.
Upon receiving the file, the other user merely clicks on the file to open it up. If they wish to save the file to
the Sales2LS customers directory of their hard drive, they should use the Sales2LS menu’s Single User
Save Estimate Routine and the file will be saved to the appropriate directory based on the current status of
the file.
3
Different printers interpret and format worksheets differently. Please preview your printers output prior to your first worksheet printout.
22
4
For the ultimate in convenience and trouble free file exchange between disconnected sales people and
users in the office, user’s should check into CSD’s Appointment Setter and WebSync applications
described in the Bonus Section of the manual.
Appendix A
Trouble Shooting Guide
Frequently Asked Questions
CLIENT INFORMATION CARD OF ESTIMATING TEMPLATES
Q.
What do you do when the city & state begin with the same letters i.e., IOWA CITY, IA and the state cell
automatically finishes with the city name in its place?
A.
Type the state abbreviation as usual, then simply press the “delete” key to erase the rest of the text, then press
the enter key. Or you can permanently disable the auto-complete function in excel from the tool, options menu
choice and unc heck the enable autocomplete for cell values checkbox on the edit tab.
Q.
What should I do when the county & ATC’s don’t come up yet the miles are there?
A.
st
1 make sure the city & state are input correctly, check spelling. Frequently users enter a space (invisible
character) at the end of the city or state abbreviation. Try typing them again.
nd
2 you may have to enter the county manually. Sales2ls has 4500 major cities and their associated counties in
a database that come up automatically. Other origins and destinations will not pull up an associated county so
you will have to type in the county (spelled correctly) in the county field to pull up the correct rates for that county
(412 tariff only). You can look up the counties in the Milemaker program or tariff or rating program if you don’t
know the county spelling.
Q.
What are all those little red arrows in the corner of some cells?
A.
The red arrows indicate useful tool tips to help assist the user with entering the correct information for the
current field. If your tool tips don’t display when you point your mouse at the red arrows you can turn on the
display of tool tips in excel with the tools options menu choice. Click on comment indicator only on the view tab.
It is a good idea to get familiar with these helpful tips. They will help you use the program more successfully.
You can turn off their display if you like when you are familiar with all of them.
**
Q.
A.
How do I get the information attached to those red arrows to appear and/or disappear?
To make the tool tip information appear, point at the red arrow. To make the tip disappear, point at something
else on the worksheet. Use the technique from the proceeding question to make them appear or disappear
permanently.
Q.
A.
When I input the weight, why does a discount automatically come up? Can it be changed?
The default discount is based on the weight and mileage, and the pricing zones at origin and destination. The
discount is pulled from the Van Lines specific pricing grid on the pricing worksheet tab. To change the discount
just type in the discount you want over the default discount that the program retrieves from the grid.
Q.
A.
When I change a discount in the “BL” field, why does it change the discount in the “ACC” field?
The program defaults to a bottom line discount by setting the accessorial discount to the same discount as the
linehaul. If you want a different accessorial discount from the linehaul, just type the discount you want over the
default level of discount in the accessorial discount field.
4
See WebSync heading in the bonus section of the User Manual
23
Q.
A.
st
st
When I type in the 1 Pickup date, why does the last Pickup date and 1 and last delivery date
automatically fill in?
The program defaults to the pickup spread and delivery spread that is specified by your Van Lines on the transit
st
guide grid. You can view the grid on the transit guide worksheet tab. Use the 1 delivery date hyperlink to
quickly view the grid. To change the defaults to the customer’s preferences, merely type the dates you want in
place of the default dates.
Q.
A.
When inputting Extra Pickups into the Extra Pickups field why doesn’t it change the mileage?
The extra pickup and delivery field are not included in the mileage lookups for technical reasons (it creates a lot
of opportunities for errors). When you have extra pickups or deliveries that will affect your mileage use
Milemaker or your Van Lines tariff or rating application to determine the correct overall HHG’s route mileage and
input the result into the mileage field on your estimate. Make sure you input the cities in geographical order to
retrieve a correct mileage.
Q.
A.
Do I have to fill in every field?
Technically no. However… let’s just say that too much customer information is better than not enough. Required
input to calculate a ballpark quote is origin city, state and county and the same for destination. You must also
input a weight and mileage and the discount will be filled in by default. If the counties at origin and destination
aren’t returned from the database you must also supply a county at origin or destination to calculate a price (412
tariff only).
Cube sheet
Q.
A.
How do I get the cube menu bar to return to the page?
Right click on any menu or toolbar and pick cube off the list of available toolbars.
Pricing sheet
Q.
A.
Q.
A.
When I pick an option from the choices on the drop down list i.e., fuel surcharge, bulky charges, etc.
Why isn’t that choice reflected in the price?
You must also point and click on the option you’ve displayed to complete your choice and have the choice
register.
There are only 2 lines for Bulky Articles, what if I have more than two?
You can add more Bulky Articles in the “other” field, found further down on the Packing worksheet. You must
type the description of the bulky in that field, the number of Bulky Articles in the unit’s column and the price in
the rate column. If you have more than one bulky of the same type you can change the number of Bulky Articles
in the units column to the total number you want to charge for of that type. If you are using the Room by Room
cube sheet module you will have to input all of the Bulky Articles listed at the bottom of the New Cube Sheet
page on the Pricing page to add the Bulky prices to the shipment pricing totals.
Valuation
Q.
A.
What if the valuation level the shipper wants isn’t an option on the FAIW chart provided?
If it isn’t on the chart, it isn’t an option. Use only the values the chart provides if you want your registration to be
accepted. To get prices for values above those provided on the table you must call your van line for excess
valuation coverage and input the total cost into the Requested Valuation and Premium fields .
Estimate sheet
Q.
When using a hyper-link (destination agent for instance) where does my estimate go? And how do I get
back to it?
24
A.
The estimate is still open in the background (behind the document you are currently viewing). When you are
done with the document or worksheet you’ve jumped to, click on the blue backwards pointing arrow (far left) on
the web toolbar to jump right back into your es timate where you were working previous to the jump.
Q.
A.
Wha t happened to my estimate when I closed the document I had jumped to with a hyper-link?
If you are lucky your estimate is still open and you can click on it from the task bar. Closing the document you
jumped to destroyed the hyperlink connection. Be wary of the error message that precedes this and try to
remember not to close a hyper-linked document if you need to go back to the source document again.
Packing sheet
Q.
A.
Can I use the packing sheet to calculate crating?
No. You must calculate crating from the crating worksheet. If you want the crating moneys included in the
rd
packing totals you can unclick the 3 Party Crating click box on the Crating section of the cube sheet.
Q.
A.
Can I calculate unpacking on the packing sheet?
Yes. To add a complete unpack, just click on the Unpack Y/N click box and a “y” will be added in place of the “n”
in the “unpack yes/no?” field and the unpack will be instantly calculated and added to the destination charges.
To do a partial unpack, override the default full unpack units by typing in the number of units that your client
wants unpacked.
Technical Support
Contact Info:
ChrisCo Software Development, Inc.
25590 Prospect Ave. Suite 42G
Loma Linda, CA 92354
Voice 909.478.9339
Fax 909.799.8211
[email protected]
25
Bonus Sections
Sales2LS Lite
The Sales2LS Lite program contains all CSD’s famous estimating templates (Interstate, Intrastate,
International and O & I Cube Sheet) as well as the Customers Database and the Appointment Setter (for a
detailed description of the Appointment Setter, see the section below) applications. The other estimating
templates function very much like the Interstate Estimator, providing users with the ability to handle their
other business lines digitally as well. The ideal tools for the inside Sales Person, Sales2LS Lite will help you
unite the efforts of your company in a coordinated customer service effort that can put you miles ahead of
your competition.
Sales2LS Professional
The Sales2LS Professional Program contains all of the functionality the Sales2LS software suite is famous
for. With all of the features of the Sales2LS Lite package, plus Sales Forms, mail merge enabled Sales
Letters and Proposals, Marketing pieces and Multimedia Presentations, the Sales2LS Professional version
has all of the tools salespeople need to put some sizzle in their sales efforts.
WebSync Product Description
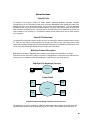
Overview: The WebSync application was developed to give remote users the ability to exchange
information with the office via any Internet connection. The application is configured to move batched excel
documents from a standalone client laptop/desktop to a central server point via ftp protocol.
WebSync File Exchange Process
Internet
Laptop
Server
Folder Detail
Salesperson\
Appt’s
Inbox
Internet
Outbox
Returned
Estimates
Simplified flowchart of WebSync batch file transfer process.
The application runs from a combination of MS-DOS based batch files to execute scripts that control file
upload/download locations and archiving with the push of a button. User variables like central server IP
26
address, username and password are added by the products installation package. Users are typically
provided this information by their network administrator, or in certain cases CSD.
Claims2LS
The Claims2LS program from CSD has everything the Moving and Storage Professional needs to handle
claims efficiently. The Claims2LS database tracks all your vital customers claims data and provides the
forms you need to execute inspection and repair orders, administer quick claims and request checks to
settle your claims. Also, detailed claims letters are available from the main menu to allow efficient,
automated communications with customers and vendors.
Appointment Setter
Overview:
The Appt Setter is designed to assist with high-volume high-quality sales and customer service in the
modern Moving and Storage enterprise and the rapid scheduling of customer estimates.
The Appt Setter was developed to meet the needs of office users who cooperatively set and schedule
appointments, save customer information to be sent to other users, and exchange data with other software
applications . The Appt Setter is a multipurpose platform for customer information input, display and
exchange between connected and disconnected Sales2LS users.
Capabilities:
The Appt Setter was designed to automate many common tasks of the data capture and transfer
processes. Some of the features available from buttons on the main screen are:
For the Customer Service Representative (CSR)
o
o
o
o
o
o
o
Prospect numbering
Automated saving and file naming
Creation and output of a VanS Prospect
Creation and output of a Act!2000 Contact Record
Creation of an email of the current Appointment File
Output to and creation of an Estimate File
Automatic creation of a Customer Database Appointment Record
For the Outside Sales/Relocation Consultant
o
o
o
o
o
Output to and creation of an Estimate File
Output and creation of a Outlook Contact Record
Scheduling of appointments in Outlook
Automatic creation of a Customer Database Appointment Record
All of the features in the CSR list are available to the Outside Salesperson, if desired
All of the features listed are designed to accomplish the goal of Single Data Input (SDI) to multiple
enterprise and local applications and platforms. These features help to connect all users, eliminate
redundant data input, and enable high-speed, high performance customer service.
27
Inputting a customer’s record once, and re-using that data to fill out other applications required for the
needs of an organization can result in a great deal of efficiency gains for the user and their company . Also,
having the necessary customer information available to all users, in the appropriate application can enable
improved customer service throughout the organization.
Instructions for Use:
Getting started:
The Appt Setter application can be opened from the Sales2LS Main Menu by clicking on the hyperlinked
choice Appt Setter.
First, the user should turn the Caps Lock key on to input all information into the Appt Setter in capital letters
(for compatibility with other applications).
The new prospect number for this client will be automatically added to the appointment . Begin filling out the
top portion of the form with the customer’s information.
Input the customer’s name, Last Name First, Comma, First Name.
There are fields for Origin and Destination contact information as well as descriptive click boxes to quickly
describe the customer’s moving needs. More fields are available by scrolling down the page or using the
page down button from the keyboard. At the top of the form you will see push buttons that will assist you to
accomplish the various tasks described below.
Saving your work:
When you have recorded all the customers supplied information you should save your work.
Push the Save Appt and Get New button. If you are working on a network in a multi-user environment, you
should save the appointment file to the shared S:\ drive in the Customers \ Appointments directory. With
our Client Server version, this drive and directory will be selected automatically. The file will be
automatically named with the customer name and the prospect number with the abbreviation APPT in the
middle of the file name and saved in the directory that you choose from the Save As dialog box (defaults to
the local Appointments directory).
After saving the file a message box will ask “Would you like a new appointment file?”(network version only).
Clicking “Yes” will pull up a new file while the current file stays open in the background. You can go back to
that record easily at any time by clicking the Excel Window Menu and choosing the file name from the list of
open files. Clicking No will keep the current file on screen as the active record.
Scheduling Appointments:
Next you should set an appointment time in the Scheduling application in use by your company.
Regardless of which application your company uses for scheduling you must output the current customer
record in the appropriate data format in order to use that customer data in that application. There are output
buttons for output to VanS, Act! 2000, and Outlook.
Click the appropriately labeled button to output a rec ord to the application of your choice. If the application
of your choice is already open in the background you should see it listed on the task bar and click that to
check available dates and times.
Transferring Files:
28
To transfer the file to a Outside Sales Representative through email, simply click on the Email Appt Card
button. A copy of the current appointment file will be created and attached to a standard Outlook email
form.
Click the To: button on the email to retrieve your list of email contacts and pick the email address of the
outside sales representative. The Subject Line of the email will be automatically filled out with the text
“Appointment Card for (name of appt file)”.
If you would like to add a message to accompany the attached appointment file you may type in the desired
text message in the portion of the email immediately below the Subject Line.
To transfer the file to a Outside Sales Representative through the network no further actions is required if
the shared drive on your network can be accessed by the Outside Sales Representative. The CSR must
merely save the file to the appropriate folder for the Salesperson to retrieve.
It may be convenient for your network administrator to setup folders on the shared drive for each
Salesperson where their new appointment files are to be kept. This setup should work similarly to an inbox
that the Sales Representative clears out every time they come in to the office. Most companies set up the
S:\Customers\Appointment \ directory with sub directories for each Outside Sales Representative to act as
an inbox for new appointments.
If the Sales Representative copies the contents of this shared directory they should then archive the
appointment files they have copied into their Old Appointments directory inside their Appointment inbox
directory. Archiving old appointment files is a good practice because they can always be retrieved and
revised, should a customer make changes to their appointment date or time. The CSR can use the
Windows Find Files feature to quickly retrieve the archived file for revisions and resave the file in revised
status to the salespersons appointments folder.
29