1
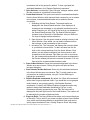
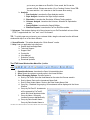
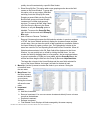
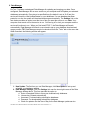
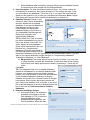
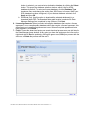
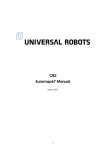
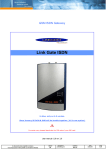
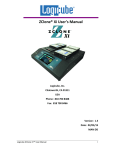
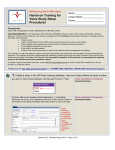
COPYRIGHT 2010, PERTRAC FINANCIAL SOLUTIONS, PERTRAC ANALYTICAL PLATFORM V.7.0.1 PerTrac Analytical Platform 7 User Manual – Table of Contents I. Installation II. PerTrac Analytical Platform 7 - Features Overview III. PTAP 7 Upgrade Utility IV. PTAP Home Window V. Data Manager Appendix A: Database structure changes from PTAP 6 to PTAP 7 Appendix B: New Statistics Definitions COPYRIGHT 2010, PERTRAC FINANCIAL SOLUTIONS, PERTRAC ANALYTICAL PLATFORM V.7.0.1 I. Installation Please click the links below to access the PerTrac Knowledge Base installation articles for Single User licenses, Network Access licenses and SQL licenses. 1. Single User Installation 2. Network Access Version Installation 3. SQL Installation COPYRIGHT 2010, PERTRAC FINANCIAL SOLUTIONS, PERTRAC ANALYTICAL PLATFORM V.7.0.1 II. PerTrac Analytical Platform 7 - Features Overview PerTrac Analytical Platform 7 provides new functionality that greatly enhances the user experience. PTAP 7 includes a new Home window design, new Data Manager, additional risk statistics, and duplicate investment grouping option. The new PTAP 7 user interface resembles those of PerTrac CMS and PerTrac Portfolio Manager, which takes us to the next level of providing a consistent look and feel across the PerTrac Suite. Home Window Modernization Phase 1 of the PerTrac Analytical Platform user interface conversion from a VB platform to a .Net platform. New Home window design and user experience: streamlines the user’s workflow and greatly decreases the load time when launching the application. Consolidation of the Home Window menu options: removes all of the redundant buttons. More Efficient User Workflow New universe creation/edit process: streamlines universe creation and editing. New Home window “Quick Search”: build universes or find funds quickly by searching directly from the Home window. Custom Views: User created custom views/dashboards on the Home Window, which could include both qualitative and quantitative fields. Export to Excel: quickly export data based on the fields selected for the Home Window view. New duplicate investment grouping prioritization: group on latest return. New risk statistics : o VaR o Modified VaR o Expected Tail Loss (ETL) or Conditional VaR (CVaR) o Modified ETL (CVaR) o Rolling Skewness o Rolling Kurtosis o Omega as a single statistic o Omega rolling o Omega rolling average Removes the Access version’s 32,728 limit on the number of investments. New Data Manager New Data Manager: provides a seamless/automated process for updating and merging data and will reduce the level of support calls associated with data downloads, merging, proxy settings and corruption issues. COPYRIGHT 2010, PERTRAC FINANCIAL SOLUTIONS, PERTRAC ANALYTICAL PLATFORM V.7.0.1 III. PTAP 7 Upgrade Utility: Existing PerTrac Clients PTAP 7 installations include a few changes to the current PTAP 6 structure. 1. Database: The PerTrac database structure has a slightly different structure than previous versions of PTAP. See Appendix A for the database table changes. Due to the changes, existing PTAP 6 version databases must be converted to the new format. This applies to both the Access and SQL versions. Note: When upgrading from a PTAP 6 version to PTAP 7, you MUST convert your PTAP 6 database to the new PTAP 7 structure with the built-in Upgrade Utility. If your current Access database is located in the default PerTrac database folder, the converted PTAP 7 database will be relocated to the new default locations listed shown in #3 below. If on the other hand, your PTAP 6 database was located in a non-default location, the converted PTAP 7 database will remain located in that folder. To convert your SQL database, backup your existing PTAP 6 SQL database and restore it with a new name. When you run the upgrade utility, select the restored backup with the new name as your PTAP 7 database. Important note: We will only move files from existing default folders to the new default folders. If your files are located on a network drive, or non-default folder on your local drive, the files will remain in those locations. 2. Universes: PTAP 7 universe file extensions have changed from the “.unv” flat file format to a “.unvx” XML format. Note: You are NOT required to upgrade your universe file formats. PTAP 7 supports both the “.unv” and “.unvx” formats. Upgrading will not affect your universe file content. If your current universes are located in the default PerTrac Universe folder, the converted “.unvx” universes will be relocated to the new default locations listed shown in #3 below. If on the other hand, your current “.unv” universes are located in a non-default location, the converted universes will remain located in that folder. Important note: We will only move files from existing default folders to the new default folders. If your files are located on a network drive, or non-default folder on your local drive, the files will remain in those locations. 3. New default file locations: The default application and folder paths have changed from C:\Program Files\PerTrac Financial Solutions\PerTrac to: a. Windows 7: C:\Users\Public\Documents\PerTrac b. XP operating system = C:\ Documents and Settings\All Users\Shared Documents\PerTrac c. Vista operating system = C:\Users\Public\Documents\PerTrac The following steps will walk you through upgrading you data with the Upgrade Utility. 1. Launch PTAP 7 after installation. 2. By default PTAP 7 will prompt you to select a database, Access or SQL. If you are an existing Access version client, please select your PTAP 6 Access database. Note: This process will make a copy of your existing database (the original will remain in your COPYRIGHT 2010, PERTRAC FINANCIAL SOLUTIONS, PERTRAC ANALYTICAL PLATFORM V.7.0.1 3. 4. 5. 6. 7. file location), and then upgrade the copy to the new PTAP 7 format. For existing SQL database clients, backup your PTAP 6 SQL database, and then restore that database with a new name. The restored database will then be selected at this step of the upgrade utility. Click File, Open New Database. Select your existing PTAP 6 database. Selecting your PTAP 6 database will launch the Upgrade Utility. The Utility will quickly walk you through a wizard process to upgrade your database, universes and file location. The database path is displayed in the Database Upgrade window. Click Next. The next step is the Universe upgrade. Click Next. This step will upgrade your universe files from the “.unv” format to the new “.unvx” XML format. If your current universe files were located in the PTAP 6 default Universe folder, the new “.unvx” universe files will be moved to the new PTAP 7 default folders. Your PTAP 6 “.unv” files will remain in their current location. PTAP 7 supports both universe formats, allowing you to open and use either. By default the first time the utility is run, your PerTrac default universe folder will be selected. However, you can add universe folders from any location to upgrade. Click “Add Universe Folder” to select the folder path. To delete a universe path click the red X to the right of the path name. TIP: After the initial upgrade, you can upgrade additional universes at any time by launching the Upgrade Utility directly from PerTrac. Click File on the upper PerTrac menu bar, and then select Upgrade Universe Files to launch the upgrade utility. Ready to Upgrade: The next window displays the database, universe and new file folder paths that will be updated with the utility. Click Start to begin the upgrade process. The status progress for each upgrade item will be displayed as well. Upgrade Completed: When the process is complete, the Upgrade Progress window displays the upgraded feature and COPYRIGHT 2010, PERTRAC FINANCIAL SOLUTIONS, PERTRAC ANALYTICAL PLATFORM V.7.0.1 status. At this point you can also set your default folders by clicking “Help”, “View Default Folders” on the upper PTAP menu bar. COPYRIGHT 2010, PERTRAC FINANCIAL SOLUTIONS, PERTRAC ANALYTICAL PLATFORM V.7.0.1 IV. PTAP 7 Home Window Overview The PTAP Home Window Navigation Panel 1. Quick Search: The Quick Search window allows the user to search the database on selected criteria. The search criteria includes: a. Investment Name: Type in a partial or full investment name and then click the magnifying glass icon to search for funds/investments with that name. b. Company Name: Type in a partial or full investment company name to search for funds managed by that company. c. Strategy: Type in a partial or full strategy description name. This criterion will access the data located in the “Strategy Description” field on the General Investment Information page. d. Only Include: When searching on the criteria listed above, the search output can be limited to the following asset class types: All, Indices, Non-Indices, CTA, Futures Funds, Hedge Funds, Mutual Funds, User Allocation. 2. Tasks: The “Tasks” tab consolidates the universe and PerTrac module functions. a. Universe Tasks: i. Show All Investments: Will load the entire database of investments back into the Home Window. When this option is selected, the database COPYRIGHT 2010, PERTRAC FINANCIAL SOLUTIONS, PERTRAC ANALYTICAL PLATFORM V.7.0.1 ii. iii. iv. v. vi. vii. investments will not be grouped by default. To view a grouped (deduplicated) database, click “Replace Duplicate Investments”. Open Universe: Launches the “Open Universe” dialogue window, which lists the universes in your default universe folder. Create New Universe: This option removes all investments/benchmarks from the Home Window, which leaves a blank canvass for you to create a new universe. Investments/benchmarks can be added to the new universe by: 1. Searching with the Quick Search. The search results are displayed in the Search Results window. Once displayed, all investments can be added, or only selected investments can be added. Searching on “All” lists all of the funds in your database in the Search Results window. Tip: The Search Results window includes icons to Select All or Add Selected. Use your Shift and Ctrl keys to highlight multiple selections. 2. Open Universe: Use this option to add an existing universe to the Home Window. Once added, you can delete investments from that universe or add investments to that universe. 3. Universes Tab: The “Universes” tab displays the universes listed in your default universe folder. To add a universe from the list click on the universe and drag it into the Home Window. Once added, you can delete investments from that universe or add investments to that universe. Tip: When you click on a universe file, the investments/benchmarks in that universe are displayed in the Preview window just below the universe list window. You can then select the investments/benchmarks to add. Save As New Universe: Saves the investments displayed in the Home Window as a new universe. Clicking this option will open the Save Universe dialog box. Save Selected As New Universe: Saves only the selected investments in the Home Window as a new universe. Tip: To quickly create a new universe from an existing universe, use your Ctrl and Shift keys to highlight the investments. Replace Duplicate Investments: By default, the “Show All Investments” option does not group duplicate funds. If you would like to view grouped funds, based on your grouping priority, click Replace Duplicate Investments. Currently, the Replace Duplicate Investments option only applies to hedge fund databases distributed by PerTrac, or any investments manually grouped by the user. Tip: The fund count is displayed in the lower right corner of the Home Window. The number will be reduced by the number of duplicate funds. Export to Excel: The Home Window information can be saved directly as an Excel file. This is useful if you create a multiple column Home Window view, which could include qualitative or quantitative fields, and want to quickly export that data to Excel. Clicking “Export to Excel” will prompt COPYRIGHT 2010, PERTRAC FINANCIAL SOLUTIONS, PERTRAC ANALYTICAL PLATFORM V.7.0.1 you to save your data as an Excel file. Once saved, the file can be opened in Excel. Please see section VII on Creating Custom Views. TIP: You must add the “.xls” extension to the file name when saving. b. Analysis i. Peer Analysis: Launches the Peer Analysis module. ii. Style Analysis: Launches the Style Analysis module. iii. Simulation: Launches the Simulation & Stress Testing module. iv. Universe Analysis: Launches the Universe, Allocation & Optimization module. v. Search Builder: Launches the Search Builder. vi. RiskPlus Reports: Launches the PerTrac RiskPlus module. 3. Universes: This window displays all of the universes in your PerTrac default universe folder. PTAP 7 supports both the “.unv” and “.unvx” file formats. TIP: To quickly open any universe in your universe folder, drag the universe from the left-hand window and drop it on to the Home Window. 4. Search Results: This widow displays the “Quick Search” results. 5. Help: Lists our application help resources: a. Search the Knowledge Base b. Technical Support c. Support Chat d. Contact Us e. View Manual f. Schedule Training g. Download Updates The PTAP Home Window New Menu Bar (Left to right) 1. Open New Universe: Launches the Open Universe dialog box. 2. Save: Saves the universe currently open in the Home Window. 3. Sort & Grouping Options: Provides option to a. Sort by File Order: Sorts the funds based on the order the file was saved in. b. Sort by Name: Sorts on the Investment Name field. c. Sort by Data Vendor Name: Sorts on the Data Vendor Name field. d. Group by – Disabled: No grouping. All investments will be displayed in the Home Window. e. Group by PerTrac ID: Investments will be grouped by PerTracID, which will include duplicate funds. f. Group by Name: Groups by investment names alphabetically. g. Group by Data Vendor Name: Group by Data Vendor Name to COPYRIGHT 2010, PERTRAC FINANCIAL SOLUTIONS, PERTRAC ANALYTICAL PLATFORM V.7.0.1 quickly view all investments by a specific Data Vendor. h. Show Group By Box: This option adds a new grouping section above the field names on the Home Window. To group with this option, click on any column field label and drag it onto the Group By Box area. Dragging a second field onto the Group By Box area will group your Home Window investments in a tiered (sub-grouped) structure. To remove the field, drag it back off of the Group by Box on to the Home Window, or set your Group By option to disabled. To remove the Group By Box, right click on the box and select Group By Box again. i. Add or Remove Columns: The Add or Remove Columns option opens the field selection window. In previous versions of PTAP, the Home Window would only display the investment name and data vendor name. Now you have the option to add quantitative or qualitative fields to the Home Window to create a custom view. The field selection window is the same form used for PerTrac Reporting Studio and PerTrac PowerLink. When all fields have been selected, click OK. Each field will be displayed at the Home Window. You can quickly sort on a field by clicking the field name. You can reorder the fields by dragging them to a new position. And as mentioned above, to group investments on a field you have added, add the Group By Box to the window and then drag the field onto the Group By Box area. Important Note: The larger the universe in the Home Window and the more fields selected for view on the Home Window, the longer it will take for the data to load. 4. Move Up: Use the Up arrow to reorder the funds in your universe. Saving the universe will save the new order. 5. Move Down: Use the Down arrow to reorder the funds in your universe. Saving the universe will save the new order. 6. Investment options a. Add New Investment b. Remove Investment: You can now remove investments directly from a universe as well as the database. c. Duplicate Investment d. Rename Investment e. Find Related Funds: Displays all funds managed by the same company. COPYRIGHT 2010, PERTRAC FINANCIAL SOLUTIONS, PERTRAC ANALYTICAL PLATFORM V.7.0.1 7. Info: Launches the investment information window. 8. Returns: Launches the investment data windows. 9. Stats: Launches the investment statistics window. Note: We have added a VaR table to the Drawdown table area, and added Omega Ratio and Jarque-Bera to the Risk Table. 10. Charts: Launches the investment charts. TIP: You can access the functions above by right clicking on any investment. COPYRIGHT 2010, PERTRAC FINANCIAL SOLUTIONS, PERTRAC ANALYTICAL PLATFORM V.7.0.1 V. Data Manager PerTrac 7 includes a redesigned Data Manager for updating and merging your data. Once configured, Data Manager will run as a service on your computer and will update your selected databases automatically. Every day at a specified time (the default is set at 12:00 am) the service will check the Last Updated dates on your databases. If a new database has been posted to our site, the system will download and merge automatically. The Settings link on the form below provides an option to set the time of day you want the service to run. Note: Your computer must remain on for the service to run. You can log off or lock your computer and the service will continue to run. When you first install PTAP 7, the Data Manager will launch automatically. Data Manager will launch a new wizard to set up your database download and merge process. TIP: Data Manager can also be launched from the “Tools” tab on the menu bar. When launched, the following window will appear. 1. New Update: The first time you run Data Manager, click New Update to set up and schedule your database updates. 2. Data Manager Settings: Click the Settings link near the lower right corner of the Data Manager window above. This form provides the option to: a. Enter a Download Folder to store your download only databases. b. License key: Entered automatically c. Username: For downloading subscription databases d. Password: For downloading subscription databases e. Check for updates: Set the time of day for the Data Manager update service. COPYRIGHT 2010, PERTRAC FINANCIAL SOLUTIONS, PERTRAC ANALYTICAL PLATFORM V.7.0.1 f. Delete databases after successfully merging: Deletes the new database file after its contents have been merged into the existing database. 3. User Information: The User Information window will open. Your license number will automatically be entered into the License Number box. The window also asks: “Have you subscribed to any databases?” Click Yes or No. If you select Yes, new fields will appear on this window for you to enter your User Name and Password. Note: A single User Name and Password will be used for all databases you subscribe to. 4. Database Selection: Based on your answers in step 2 above the database selection window lists all available databases. If you selected Yes above, Data Manager will list your User, complimentary and subscription databases based on your license. If you selected No, Data Manager will display your proprietary and complimentary databases. TIP: By default, the “Type” box listed just above the database list on the left side of the window is set to All. This option displays all User databases (these will be represented by the very light blue icon), complimentary databases (which are represented by the mid-range shade of blue), and the subscription databases (which are represented by the darkest shade of blue). If you only want to view certain databases, change the option to “Complimentary Databases”, “Subscription Databases”, or “User Databases”. a. Merge Options: The merge options include “Limit by Universe” if you only want to merge a specific universe with a database, “Include User Data” when merging that universe, and “Merge performance instead of overwriting it”. Check any you prefer. Click Next. TIP: The databases listed in the “Available Databases” window list all databases in your default database folder. However, your database(s) may be stored in another location. You have the ability to select and add databases to the “Available Databases” window by clicking the database icon the left of the “Reorder” button on the right hand window. When clicked, the following window will open. Select your database, SQL or Access. If you would like to add this database to the list of databases check the box in the lower left: Add Connection to Available Databases. 5. Download and Merge Options: a. Automated Update: The automated download works similar to the old Data Manager in PTAP 6 where the selected databases will be downloaded and merged with your PerTrac database. When this radio COPYRIGHT 2010, PERTRAC FINANCIAL SOLUTIONS, PERTRAC ANALYTICAL PLATFORM V.7.0.1 button is selected, you must select a destination database by clicking the Select button. This opens the database selection window, which is set for a SQL database by default. To select an Access database, click the Database Type dropdown menu and change the setting from SQL Server to Access. When your SQL database has been configured, or your Access database selected, click Apply and then OK. b. Download Only: Use this option to download the selected database(s) to a download folder. TIP: The download folder path location is selected on Data Manager Settings form, explained in step 2 above. Click Next. 6. License Agreements: When you select subscription databases that require a license agreement, or our complimentary database which also require a license agreement, this step allows you to accept all agreements at once. When all required agreements have been agreed to, click Finish. 7. Finish: Closes the wizard and posts your saved download process as a new job listed in the Data Manager home window. At any point you have the options per the icons on the right hand side to Run the update by clicking the green arrow, Edit your process with the edit icon, or Delete the process with the red X. COPYRIGHT 2010, PERTRAC FINANCIAL SOLUTIONS, PERTRAC ANALYTICAL PLATFORM V.7.0.1 Appendix A: PerTrac Analytical Platform 7 Database structure changes (compared to version 6.0.19) 1. Mastername table has been renamed to Investment table: This table contains the key information and identifiers for an Investment. 2. DataVendorName and DataVendorID have been removed from all tables and added to the Investment table: Data vendor name and ID were moved to the Investment Table to solve the problem of data vendor Names & IDs being or potentially being out of sync in multiple tables. 3. Performance table has a new column: SeriesID, which classifies the type of performance data (Daily, Weekly, Month-To-Date, Monthly, Quarterly): This change helps us more fully support Daily/Weekly/MTD Estimates. It provides us the means to give the client more detail for higher frequency data, by adding the SeriesID. 4. DailyData table has been removed. Daily and weekly data are now stored in the Performance table: Done in conjunction with number 3 above, this is a much improved way to store the daily data. 5. PerformanceSeries table has been removed. Month-To-Date estimates are now stored in the Performance Table: Done in conjunction with number 3 above, this is a much improved way to store the Month-to-Date Estimates. 6. LastUpdated column has been removed from all tables and replaced with three columns on the Investment table (LastUpdated, PerformanceLastUpdated, and QualitativeLastUpdated): This change provides better visibility into when information has changed, both performance and qualitative data. We got rid of LastUpdated from all areas in the application to one table. This is a huge benefit for us internally. Increased database performance. 7. Enhanced lock information has been added to the Investment table: Database locking can now time out. This was a big problem for clients where if they were editing a record and their system crashed, the database would lock up indefinitely. If they reopened PTAP, that record would remain locked. Now after 10-15 minutes the record will unlock and allow the users access to that record. We need locking to work for the new Data Manager in order to make it more stable. This change benefits us and the client. 8. PerTracID table has been removed. A PerTracID column has been added to the Investment table: This change improves the performance and stability of the application and is one of the most valuable changes for the user. Most of the performance gains in PTAP 7 were the result of this change, affecting database load at application COPYRIGHT 2010, PERTRAC FINANCIAL SOLUTIONS, PERTRAC ANALYTICAL PLATFORM V.7.0.1 launch, investment creation, investment renaming, and investment deletion. Greatly speeds up some of the most common functions. Since users didn’t have access to the PerTrac IDs, there should be no impact to users accessing the database directly. 9. Foreign keys to the Investment table have been added from the Information and Performance tables: This was also done to improve stability of data and consistency of the data. Helps the database maintain itself without support from us. This change should not impact writing against the database and is considered low impact. 10. AuditLog table has been added. All database updates done through the API are recorded in the AuditLog table. This is a big enhancement for the user in that we now log all changes made to a record. The user making the change, date and function. However, it won’t state the exact change. For example, if a user changes a return for a fund the log will include the user, date and performance table as being changed but not the actual return. Provides an audit trail of sorts. Designed to work with PTAP and PTPM. 11. DataMap, DataMapCategory, DataMapField, DataMapSource, FieldDataGroupedText, tables have been added. These support dynamic data. These are currently subject to change and additional related tables may be added: These changes were required for P-Card and will have no impact on the user. 12. All stored procedures have been removed: Data Manager used store procedures which caused numerous client problems around permissions, missing stored procedures and procedures that were not up to date. We now work directly with the database. This has will have no impact on users accessing the database directly. 13. Various indices have been renamed or added: This was done for consistency and performance of the data. It increases data access speed and provides more consistency of data. This has will have no impact on users accessing the database directly. COPYRIGHT 2010, PERTRAC FINANCIAL SOLUTIONS, PERTRAC ANALYTICAL PLATFORM V.7.0.1 Appendix B: New Statistics Definitions Value at Risk (VaR) The Value at Risk is the maximum loss that can be expected within a specified holding period with a specified confidence level. In the API the Value at Risk is expressed as a percentage loss. The VaR is returned as a positive percentage even though it represents a loss. The VaR calculation assumes a normal distribution of returns. VaR = E(R) + zcσ E(R) = Arithmetic Mean Return for the fund Zc = the Z-score at a given confidence level. We use the following Z-scores for the four confidence levels: 90.0% Z-score 95.0% Z-score 97.5% Z-score 99.0% Z-score -1.28155 -1.64485 -1.95996 -2.32635 = Monthly Standard Deviation for the fund Expected Tail Loss (ETL) The Expected Tail Loss is the average of returns that exceed VaR. Modified Value at Risk The Modified Value at Risk is calculated in the same manner as Value at Risk but doesn’t assume a normal distribution of returns. In contrast it “corrects” the Value at Risk using the calculated skewness and kurtosis of the distribution of returns. VaRm = E(R) + [zc + S(zc2 – 1)/6 + K(zc3 – 3zc)/24 – S2(2zc3 – 5zc)/36] where S is the skewness of then returns, and K is the kurtosis of returns. Modified Expected Tail Loss The calculation of then Modified Expected Tail Loss is identical to the Expected Tail Loss with the exception that it uses the Modified Value at Risk. COPYRIGHT 2010, PERTRAC FINANCIAL SOLUTIONS, PERTRAC ANALYTICAL PLATFORM V.7.0.1 Jarque Bera The Jarque Bera test is a measure of the normality of a distribution of returns. It uses the calculated skewness and kurtosis of the distribution of returns. Jarque Bera = n[S2 + (K – 3)2/4]/6 where n is the number of returns, S is the skewness of the returns, and K is the kurtosis of the returns. Omega Ratio The Omega Ratio is a measure of performance that doesn’t assume a normal distribution of returns. Where r is the threshold return, and F is cumulative density function of returns. COPYRIGHT 2010, PERTRAC FINANCIAL SOLUTIONS, PERTRAC ANALYTICAL PLATFORM V.7.0.1