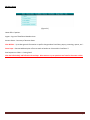
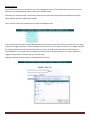
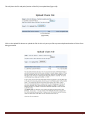
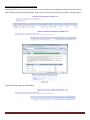
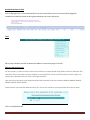
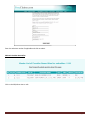
1
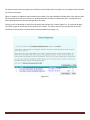
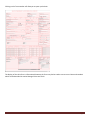
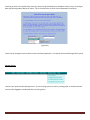
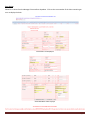
FreeClaims.com
User Manual
Visit FreeClaims ……………………… ………………………………………………………………………………………………………………….page 1
Join FreeClaims ……………… ……………………………………………………………………………………………………………………………page 2
Secure Members Login ……………………………………………………………………………………………………………………………….page 4
Account Summary ………………………………………………………………………………………………………………………………………page 5
Members Home .……………………………………………………………………………………………………………………………………..page 6
Upload Claim File …...…………………………………………………………………………………………………………………………………..page 8
View Reports ………………………………………………………………………………………………………………………………………………..page 11
View Claims ………………………………………………………………………………………………………………………………………………….page 13
Manage Claims …………………………………………………………………………………………………………………………………………..page 15
Error Claims …………………………………………………………………………………………………………………………………………………page 16
Pending Payer ID or Edit My Payer ID Match ………………………………………………………………………………………………..page 17
Pending Network ID or Edit My Network ID Match (NPI) ……………………………………………………………………………...page 18
Resubmitted Claims to Send ………………………………………………………………………………………………………………………page 19
Tools …………………………………………………………………………………………………………………………………………………………….page 20
Access to FreeClaims.com can be obtained by entering our URL in your internet browser address bar:
www.freeclaims.com
Please Browse our Website to find out about all of our time and cost saving services…
FreeClaims.com
Page 1
Join Freeclaims
Completing the Join FreeClaims screen will present you with an email as follows:
Thank you for joining FreeClaims. We have set up an account for you.
UserId: 1234
Password: aaBBx45c
Please follow the steps below to continue. You are in TEST mode which means no claims will be sent to the payers for processing
however, TEST mode gives you an opportunity to set up the system and learn how to use it. Following all the steps below will allow
you to be in production mode within 30 minutes in most cases.
STEP 1: prepare about 20 test claims from your billing software and submit them to Freeclaims (using your UserId and Password
above). Test claims should be real claims but old and have been paid. If you can’t get old real claims then it is acceptable to make
up claims. If you need help to create the test data from your billing software, please contact your software vendor.
FreeClaims.com
Page 2
If asked by your software vendor, please inform them that we accept Print Image, National Standard Format (NSF), MCDS (old NEIC
format) or Ansi X12 4010.
STEP 2: send in your first test file, please login using the userID and password above. Once logged in, you will see a menu bar.
STEP 3: upload your test file, select PROCESS CLAIMS, then UPLOAD CLAIM FILE.
STEP 4: click on BROWSE and locate the file in your hard drive (Please do not zip the file).
STEP 5: Click UPLOAD FILE to initiate the transfer (Please only click once). You will see a progress bar at the bottom of your browser
moving from left to right. Once the file has uploaded completely, the website will let you know the filename it had assigned to this
file. This is an indication that the file was received successfully.
*Please note until we set your account to production, your file will not appear right away like it normally does when you are in
production (i.e. disregard the message about ‘waiting for up to 30 minutes’). Instead, after you see the Server Assigned Batch No,
please contact us by email to let us know that the test file has been uploaded. [email protected]
STEP 6: Read the User Manual and follow each step.
We will ‘map’ the file and load it to our database under TEST mode allowing you to learn how to use the system.
Later we will provide you with information on our 7 steps to processing which will assist you in making sure you complete the
necessary steps to complete the claim payment cycle.
Again, thank you for your interest in FreeClaims.com. Please browse our website to learn about our other valuable time and cost
saving services.
NOTE:
BROWSER: It is important that you use Microsoft Internet Explorer Version 5.5 or higher. While other browser may work, we only
guarantee that our site will work with IE5.5 or higher. If you are using AOL, login to AOL as normal then stay connected but minimize
AOL (click on the dash icon at the top right of the AOL window). Then double click on Internet Explorer (BlueE Icon on your desktop).
TEST FILE: A test file is a claim file extracted from your billing software. The file can be in print image or National Standards Format.
If you don’t know how to create this test file from your billing software, please contact your billing software vendor. They should be
able to help. If your vendor cannot or is not willing to help, please contact us. If you use another clearinghouse, a good step is to
send us the same data file you sent the old clearinghouse
************************************************************************************************************
FreeClaims.com
Page 3
Secure Members Login
Enter your userID and password. Your userID is how we identify your account so please remember this number and reference it
when emailing support or speaking with FreeClaims personnel.
Enter your userID and Password and click on Login and you will have secure access to your account.
Successful login will result in one of several screens. The example 2.1 below identifies this account as TEST status, example 2.2
indicates a price change for ERA.
Example 2.1
Example 2.2
FreeClaims.com
Page 4
The “Account Summary” page contains important summarized information about your account. While all the
information on this page is important, flashing text indicates immediate attention to a batch or specific claims.
FreeClaims.com Members Area Toolbar (Figure 3.0) contains 6 links which expand into dropdown items to complete
tasks associated with working on claims and claims related functions. Placing the mouse over the link will display the
dropdown selections.
Figure 3.0
FreeClaims.com
Page 5
Members Home
(Figure 3.1)
Home offers 5 options:
Logout – log out of FreeClaims Members Area.
Account Status – Summary of Account Status.
View Bulletin – Up to date general information or specific changes about FreeClaims, payers, processing, reports, etc.*
Seven Steps – Summarized description of how to work on batches or claims within FreeClaims.**
Post Payments to Claims – Coming Soon!
View the Bulletin daily and follow the Seven Steps. Most answers to your questions are found in these two articles.
FreeClaims.com
Page 6
IMPORTANT
In an effort to maintain the low cost, quality service business model for our customers we ask that you print and review
our Seven Step Process immediately upon your first login. The Seven Steps summarize the full document in a quick and
easy process to ensure you complete the required steps to ensure each claim in a batch is processed. Once logged in to
FreeClaims Members Area, go to the Home Link on the task bar and select option 4. Seven Steps, Figure 3.1 above. Use
your browser print option to print the steps
FreeClaims.com
Page 7
Upload Claim File
Create a batch of claims from your billing or practice management system. If you need help to create the claim data
batch from your billing software, please contact your software vendor.
If asked by your software vendor, please inform them that we accept Print Image, National Standard Format (NSF),
MCDS (old NEIC format) or ANSI 837p X12 4010.
Click on Process Claims then Upload Claim File from the dropdown menu
At the Upload Claim File Screen click the Browse button on the screen to search for the file you create from your billing
or practice management system. The file should be saved in a directory or file folder on your local or network computer.
The example below shows the file saved on the Root (C: drive) in the folder called ClaimFiles and the filename is
claims041408.txt. You can place the file anywhere you desire and the naming convention is up to you however we
suggest placing the file in a location that you can find easily.
Highlight the filename and click Open or simply double click the file.
FreeClaims.com
Page 8
This will place the file and path (location of the file) into upload box (Figure 4.0)
(Figure 4.0)
Click on the Upload File button to upload the file. Do this only once per file to prevent duplicate batches of claims from
being processed.
FreeClaims.com
Page 9
View Mailbox/Invoices – Confirmation Report
The first report received after you submit a batch of claims to FreeClaims will be a Batch Confirmation report. This
report lists all the claims received within the uploaded file and the total dollar amount of the batch. Some claims may
contain errors and need to be corrected which is covered under error correction of the user documentation.
Clicking on the underlined link of the report you wish to view will display the report on the screen. Figure 5.0 displays a
Batch report for claims uploaded and processed. Figure 5.1 displays the contents of the Batch Confirmation report.
(Figure 5.0)
(Figure 5.1)
FreeClaims.com
Page 10
The report list will contain new reports as FreeClaims receives information from payers or intermediaries which forward
the claims to the payers.
Figure 5.2 displays an additional report posted to the mailbox. This report would be available within 24 to 48 hours after
the claims have been cleared or all errors or pending status and the claims are batched to payer. Pending and Error
claims will be described in sections Manage Claims and Tools.
Clicking on the link identified as report No 1 will display the contents of the report (Figure 5.3). This example displays
one of many types of reports that can be posted to the mailbox. This report contains one zero payment claims and
verification of the two claims from the batch numbered 1027325 (see Figure 5.1).
(Figure 5.2)
FreeClaims.com
Page 11
(Figure 5.3)
Search Reports (NEW Feature)
You can now search for information in the reports in your mailbox from the <View Mailbox / Invoices> select Search
Reports from the dropdown. Enter your search criteria (must be exact match to find) and click submit. The results will
display all reports containing the criteria you entered. Select the report you want to view.
FreeClaims.com
Page 12
View Claims
Claims can be viewed by all claims in a Batch or by Claim search. Figure 6.0a displays claims by batch, figure 6.0b
displays each claim after clicking on the Batch number to drill down to the claim level of the batch
(Figure 6.0a)
(Figure 6.0b)
The Trace number is underlined indicating you can view the claim in full by clicking on it.
FreeClaims.com
Page 13
Clicking on the Trace number will allow you to open up the claim.
The display of the claim form is informational however the form may also be used to correct error claims and resubmit
which will be described in section Manage Claims and Tools.
FreeClaims.com
Page 14
Searching by Claim is accomplished by entering a search string identified by the dropdown search criteria. Entering no
data and selecting submit displays all claims. This is the fastest way to find a claims submitted to FreeClaims.
(Figure 6.1)
Claims can be managed in several places on the FreeClaims application. First we will look at the Manage Claims option
Manage Claims
There are four options under Manage Claims. You can manage your error claims, pending payer or network ID claims
and see claims flagged as resubmitted after correcting online.
FreeClaims.com
Page 15
Error Claims
Select Error claims from the Manage Claims toolbar dropdown. Click on the trace number of the claim containing an
error to display the claim.
Claim with Error displayed
Correct Claim with Insured ID entered
Select Resubmit claim to payer
FreeClaims.com
Page 16
Pending Payer ID Claims or Edit Payer ID Match
Pending payer ID claims occur when a new payer is sent to FreeClaims or the spelling or address information for the
payer is different than previously submitted. In this case you must match the payer to a payer ID. See figure below.
Click submit and the payer ID will be added
FreeClaims.com
Page 17
Pending Network ID Claims or Edit My Network ID Match
Click on the Seq ID (underlined) to allow changes or entries
Enter the correct ID numbers (for Medicare enter the NPI or Group NPI in the network ID and Group Network ID fields
then click on submit
FreeClaims.com
Page 18
Resubmitted Claims to Send
Click on Manage Claims > View Submitted Claims to send and all claims that are corrected will be flagged for
resubmission and will be picked up during payer batching to be sent to the payers.
Tools
Edit my Payer ID Match and Edit my Network ID Match are covered on pages 17 and 18.
Maintain EMC Submitter ID
For some payors, in order to receive claims from FreeClaims, the payor would assign what we call Emc Submitter ID to
each of our client. This ID does not exist anywhere on the HCFA form. This ID is used internally so that the payor can
verify that the provider claims can come in through FreeClaims.
Here are some of the payors who implemented this EMC Submitter ID scheme. Noridian (AZMCR, WAMCR, NVMCR,
ORMCR, HIMCR). ALBCS, ALMCR
Please maintain your own EMC Submitter Id by fill in the correct number as you received this data from the payer.
Click on the SEQ NO to edit
FreeClaims.com
Page 19
Enter the submitter number if applicable and click on submit.
Maintain Provider Name Alias
Click on the SEQ NO to view or edit.
FreeClaims.com
Page 20
View Edit Referring Doctor
Select View/Edit Refer Dr. from the main toolbar. You can then search by name or other information by entering a
search string or you can simply click on submit to list all.
Edit as required. Click Submit.
View /Edit Facility ID
Click on Tools > View/Edit Facility ID. Edit as required. Click Submit.
Forms
FreeClaims.com
Page 21
The forms page is set up to assist with required paperwork and documentation for payer setups. Not all payers require
setup. Complete the paperwork for any of the following payers or payers that indicate enrollment = Y on our payer list.
Should a form not be found contact [email protected] for assistance. Some forms are pre-filled with FreeClaims
/Anvicare information. Contact [email protected] if you have other questions.
FreeClaims.com
Page 22
Contact Anvicare
If you need additional information about FreeClaims or any of the AnviCare systems or services, contact
AnviCare Sales.
To inquire about employment opportunities or to submit a resume, contact [email protected]
For technical assistance with any of the AnviCare products, contact AnviCare Customer Support or call (877) 2684676
To report problems with this site, notify our webmaster
Corporate Headquarters
12946 Dairy Ashford Rd, Ste 230
Sugar Land, TX 77478
FreeClaims.com
Toll Free: (877) 268-4676
Phone: (281) 325-0208
Fax: (281) 313-0925
Page 23