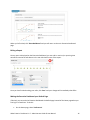
1
What’s New in FootPrints11.5 Administrator Guide & User Manual University of New Brunswick UNB FootPrints Acceptable Use and Best Practices Table of Contents Note: items in italics indicate administrator functions Getting Started - New Terminology ....................................................................................................3 Accessing FootPrints 11.5 ...................................................................................................................3 Navigating the Homepage ..................................................................................................................4 Preferences/Help/Sign-Out Buttons ......................................................................................................... 4 The Search Field ........................................................................................................................................ 4 The Toolbar ............................................................................................................................................... 5 Administration Button............................................................................................................................... 5 Workspace Selector .................................................................................................................................. 5 The Dashboard .......................................................................................................................................... 5 Actions drop-down ................................................................................................................................... 6 Display drop-down .................................................................................................................................... 6 Ticket List .................................................................................................................................................. 6 Ticket View Options .............................................................................................................................. 7 Working with Tickets .........................................................................................................................7 Ticket Look and Feel.................................................................................................................................. 8 About the tabs/sections........................................................................................................................ 8 Saving a Ticket........................................................................................................................................... 9 The Form Designer .............................................................................................................................9 Look and Feel .......................................................................................................................................... 10 Working with the Tabs ......................................................................................................................... 10 Adding a New Tab ............................................................................................................................ 10 Moving a Tab ..................................................................................................................................... 11 Deleting a Tab .................................................................................................................................... 11 The Palette ............................................................................................................................................. 11 Adding a New Field ............................................................................................................................ 12 Moving a Field .................................................................................................................................... 12 Editing/Deleting a Field ...................................................................................................................... 12 Dynamic drop-down dependency groups ............................................................................................... 13 Reports............................................................................................................................................ 14 What’s New in FootPrints 11.5 – Administrator Guide & User Manual 1 The Executive Dashboard........................................................................................................................ 14 Accessing the Executive Dashboard.................................................................................................... 14 Adding a New Report .......................................................................................................................... 15 Editing a Report................................................................................................................................... 16 Making the Executive Dashboard your Default Page ......................................................................... 16 Other Resources .............................................................................................................................. 17 FootPrints Acceptable Use and Best Practices .....................................................................................1 FootPrints Usage ....................................................................................................................................... 1 Data Collection and Retention .................................................................................................................. 2 What’s New in FootPrints 11.5 – Administrator Guide & User Manual 2 What’s New in FootPrints 11.5 Getting Started - New Terminology Workspace – Formerly referred to as Projects, Workspaces are simply the different sub-databases within the FootPrints system. Each Workspace contains its own tickets and custom fields, options, and users. Form Designer – The Form Designer refers to the customizable ticket entry form, previously called Field Maintenance. Accessing FootPrints 11.5 To access FootPrints 11.5, login in to the myUNB Portal (https://my.unb.ca) and select FootPrints from the Quick Launch Menu. The first time you log in to FootPrints 11.5, you will need to enable pop-up windows in your browser. A yellow bar will appear at the top of the screen with instructions on how to do this. What’s New in FootPrints 11.5 – Administrator Guide & User Manual 3 Navigating the Homepage The FootPrints 11.5 Home page has a new design that is intended to emphasize the data most important to you and your use of the system. The components of the Home Page include: Preferences/Help/Sign-Out Buttons In the top right-hand corner of the Home page, you will find the following buttons: 1. Help Link – links to the full online FootPrints Help document. 2. Preferences Button – allows you to set your individual user preferences, such as your email address and how the New Ticket window is displayed. 3. Sign-out link – Logs you out of FootPrints. The Search Field Located at the top and center of the Home page, The Search field gives you the option of searching for tickets by Title or Key word. Searching by ticket number is no longer an option, however, typing a number in the search field will automatically pull up the corresponding ticket. What’s New in FootPrints 11.5 – Administrator Guide & User Manual 4 The Toolbar Found directly below the BMC FootPrints logo, the Toolbar gives you quick access to key FootPrints functions, such as creating a new ticket, accessing reports including your personal flashboards, and returning to the Home page. Administration Button Located to the right-hand side of the tool bar, the Administration > Workspace button takes you to the workspace administration page where you can edit general workspace options, users and roles, the Form Designer, etc. Workspace Selector Directly Above the Administration button, you will see the name of your current Workspace in blue text. If you are in multiple Workspaces, you can click on this name to reveal a drop down menu of all your Workspaces then select the one you would like to go to. The Dashboard The Home page Dashboard found above the ticket list contains lists of specific information such as a summary of ticket totals for the Workspace. By default, Workspace Totals and Global Issues are displayed. What’s New in FootPrints 11.5 – Administrator Guide & User Manual 5 To change which Dashboard components are displayed on your Home page: 1. From the Home page, click the ‘Preferences’ button. 2. Select the ‘Homepage’ tab. 3. Select which of the available components you would like to appear, enter your Password to confirm the changes, then click ‘Save’. Actions drop-down The Actions drop-down menu is now located to the left above the ticket list and allows you to perform quick actions to multiple tickets at once, such as closing or deleting tickets. Display drop-down Located above the ticket list to the right of the Actions menu, the Display menu lets you choose which tickets appear in your ticket list, such as ‘My Assignments in All Workspaces’. By default, ‘My Assignments’ are displayed upon logging into FootPrints. Ticket List The ticket list is in the same location as it was in the previous version of FootPrints but with a few minor differences. Beside the title you can now see the beginning of the most recent description that has been added to the ticket. Also, the priority of all tickets are no longer displayed as they were previously. In the new interface, only high priorities are shown to make them more visible. What’s New in FootPrints 11.5 – Administrator Guide & User Manual 6 Ticket View Options To open a ticket, simply click on the ticket number or title (shown in bright blue), or press the ‘more…’ button under the title for the following options: Descriptions – gives you the ticket description(s) only. Details – gives you full details of the ticket in a non-edit window. Edit – provides the full edit window for the ticket. Depending on your level of access, the ticket Edit options may not always be available to you. Working with Tickets To create a new ticket: 1. From Home page, in the Tool Bar, select ‘New Ticket’. What’s New in FootPrints 11.5 – Administrator Guide & User Manual 7 Ticket Look and Feel By default, ticket details are now displayed on tabs along the left-hand side of the ticket window. If preferred, you can switch the view of your ticket window so details are displayed as expandable sections rather than tabs. To do this: 1. 2. 3. 4. From the Home page, click the ‘Preferences’ button. Select the ‘Ticket Page’ tab. Next to Interface Style, select ‘Expand/Collapse’. Enter your Password at the top of the window to confirm the changes, then click ‘Save’. About the tabs/sections Contact Information – Enter contact information for the ticket. Issue Information – Give additional information about the ticket. Description – Update the ticket description. Attachments – Add files associated with the ticket. Assignees and Notifications – Assign individuals to your ticket and select who you would like to send a notification email to. Time Tracking: o In the top right hand corner of the Ticket Edit window, you will notice a running timer. This automatic time-tracking feature records the total time you will have spent working within the ticket. If at any point you would like to pause the time tracker, press the green pause button. o If you have spent additional time on the ticket, you can enter the Hours and Minutes in the Additional Time Spent boxes on the Time Tracking tab. If you wish to add multiple time tracking entries, click the ‘Add Another’ button and enter your additional time. What’s New in FootPrints 11.5 – Administrator Guide & User Manual 8 Saving a Ticket When you are finished adding details to a ticket, you must press either of the SAVE buttons located in the top left- and bottom right-hand corner of the window. Using Dynamic drop-down dependency groups By default, all fields in a FootPrints workspace are displayed on the Create Ticket and Edit Ticket pages, however, administrators have the option of creating dependencies so only certain fields appear depending on the selection made in a previous field. In FootPrints 11.5, these dependency groups appear by default as subsequent drop-down menus on the same page rather than as pop-up windows. The Form Designer FootPrints 11.5 includes improved functionality for customizing the ticket entry form, now referred to as the Form Designer. To access the Form Designer administration page: 1. From the FootPrints Home page, go to Administration > Workspace. 2. Under ‘Fields’, Select Form Designer. 1 4 3 2 What’s New in FootPrints 11.5 – Administrator Guide & User Manual 9 Look and Feel The form designer in FootPrints 11.5 can be divided into the following sections: 1. Static Information – Details of the ticket form that cannot be changed by the administrator, such as the ticket number and who created/updated the ticket. 2. Tabs – The different categories of details in the form. 3. Canvas – The area in which the ticket page form is developed. 4. Palette – Contains the fields and special features available to be added to the form. Working with the Tabs The following tabs appear in the Form Designer by default: Adding a New Tab If desired, additional tabs can be added by doing the following: 1. Clicking the green ‘Add’ button at the bottom of the list of tabs Or 2. Clicking ‘Add Tab’ under the ‘Actions’ section of the palette. What’s New in FootPrints 11.5 – Administrator Guide & User Manual 10 Moving a Tab You also have the option of reordering tabs so they appear in a different order on the ticket screen. To do this: 1. Position your cursor over the tab you want to move. This will cause a Move symbol to appear in the right hand corner of the tab. 2. Click on the symbol and drag the tab up or down to where you want it to appear. Deleting a Tab Deleting a tab will remove all fields within that tab. To delete a tab: Position your curser over the tab you want to delete and press the trash button. When you delete a tab, all fields within that tab will be moved to the previous tab on the list. If there is no previous tab, the fields will be moved to the top of the next tab. Tabs cannot be deleted if there is no previous or next tab. Note: Default Tabs cannot be deleted. The Palette The Palette contains the various controls available to you to help build your form. These controls are divided into three categories: Fields – The different fields available to be added to your form. Special Features—Special Features are: o Submission Tracking—A special field for tracking the way the ticket was submitted (ex: email, web form, telephone, etc.) o Custom HTML—A way to add HTML to the ticket page. The HTML can be any HTML content, such as a link to a web page or text. Actions—These are general controls that allow you to: o Preview Form—View the form as it would appear if it were published as the ticket page. o View Dependencies—View a map of the field dependencies. o Discard Draft—Discard all changes to a draft without leaving the Form Designer page. o Save Draft—Save a copy of the ticket page as edited in Form Designer without publishing it so you can return to it later. What’s New in FootPrints 11.5 – Administrator Guide & User Manual 11 Adding a New Field To add a new field to your form: 1. Click and hold the field you would like from the list of controls. 2. Drag it to the desired location on your canvas. Once you release the field, a pop-up window will appear for you to set the field properties, including permissions and access for that field. Enter the properties you would like and click Save. Moving a Field Once a field has been added, it can easily be moved by simply clicking and dragging it to the desired location using the blue arrow button that appears when you hover your curser over the field. Editing/Deleting a Field To edit the properties of a field or to delete it entirely, hover your curser over the field and click either the pencil (edit) icon or the trash icon that appears. What’s New in FootPrints 11.5 – Administrator Guide & User Manual 12 Dynamic drop-down dependency groups By default, all fields in a FootPrints workspace are displayed on the Create Ticket and Edit Ticket pages. As an administrator, you have the option of creating dependencies so only certain fields appear depending on the selection made in a previous field. In FootPrints 11.5, these dependency groups appear by default as subsequent drop-down menus on the same page rather than as pop-up windows. To help keep you organized, dependency groups are grouped by colour on the Form Designer. Before setting up a drop-down dependency group, you must first create your different drop-down fields and the choices available for each one. To create a new Dropdown: From the Palette, select ‘Dropdown’ and drag it onto the canvas. Once you release your curser, a Dropdown Properties window will appear. To enter your choices, simply press the ‘Add’ link and type in the name of your choice. After you have entered choices for the dropdown, you can set dependencies by clicking the link icon next to each choice. What’s New in FootPrints 11.5 – Administrator Guide & User Manual 13 Reports In FootPrints 11.5, Flashboard and Knowledge Base links have been incorporated in the Reports menu. New to 11.5 is the Executive Dashboard. To access your Reports: From the Home page, in the Toolbar, select Reports. The Executive Dashboard The Executive Dashboard allows you to view trends over a particular time in a single view rather than having to compile multiple reports for that time period. It also displays multiple report types at once so all your report information is in the same place. Only users who have been granted access by the Workspace Administrator are able to view the Executive Dashboard. Accessing the Executive Dashboard To access the Executive Dashboard: 1. From the Home page, in the tool bar, select Reports > Executive Dashboard. What’s New in FootPrints 11.5 – Administrator Guide & User Manual 14 The following reports are built in to the Executive Dashboard by default: Statistics Report – Similar to an activity report. Shows information such as how many issues were created in a particular time period, etc. Watchlist Report – Allows you to track a certain ticket field or problem type and how many have occurred during a specific time period. Service Level Agreement (SLA) Report – Lets you monitor whether tickets are being maintained within the expected up time for a customer. Resolution Rate Report – Provides both the First Contact Resolution Rate and a Resolution Rate report. Activity Report – Shows how many tickets were active for a specific period of time. Adding a New Report If desired, you can add new reports to the dashboard by doing the following: 1. At the top of the dashboard, click ‘Change Dashboard’. 2. Click the ‘+Add’ button for the type of report you would like to add. What’s New in FootPrints 11.5 – Administrator Guide & User Manual 15 When you’re finished, click ‘Show Dashboard’ and you will return to the main Executive Dashboard page. Editing a Report Once a report is displayed on the Executive Dashboard, you can edit its metrics (ex: reporting time period) by pressing the edit button in the top right-hand corner of the report. Once you have finished making your edits, click ‘Save’ and your changes will immediately take effect. Making the Executive Dashboard your Default Page If desired, you can make the Executive Dashboard the default page instead of the Home page when you first log in to FootPrints. To do this: On the Home page, select ‘Preferences’. What’s New in FootPrints 11.5 – Administrator Guide & User Manual 16 On the ‘Personal Info’ tab, next to Default Page for Current Workspace, select ‘Executive Dashboard’. Other Resources For full access to the BMC FootPrints Service Core User Guide – Version 11.5, click the Help button on the FootPrints Home page, or point your browser to http://support.numarasoftware.com/support/docs/12/11/1/FPSC_User_Guide_11.5.pdf What’s New in FootPrints 11.5 – Administrator Guide & User Manual 17 FootPrints Acceptable Use and Best Practices Revised: March 26, 2013 FootPrints Usage FootPrints software is intended to be used as a service desk tool, providing a consolidated platform for tracking interactions with a customer on a particular activity, issue or question. Functional requirements for an incoming mailbox or online form data repository may be better handled through other services offered through ITS. The following are best practices for the standard usage of the FootPrints application: Workspace agents “take” or are assigned to new request tickets within a period of time determined by the unit. Ticket assignees update tickets using the FootPrints application rather than replying to the associated email as this will result in much cleaner data and make it easier to track the activity related to the ticket. Assignees maintain the proper status on each assigned ticket, ensuring resolved tickets are marked Closed. When appropriate, assignees update title and any other relevant fields with meaningful information when updating tickets. Assignees delete unneeded attachments (e.g., earlier document versions, email signature graphics) prior to submitting an update to a ticket. When planning to copy or move a ticket to another workspace, either belonging to the same or a different unit, the following are general guidelines: o Move tickets when the work in the ticket is being completely passed off to the new workspace. In this case, it is advisable to first update the ticket with the reason for moving and any other pertinent information, being sure to clearly inform the customer that the ticket is being passed to another team or unit and to which emails they should respond in future. o Copy tickets when there is remaining work for both workspace contexts. o Link copied tickets when persons connected to each workspace need to receive updates from both tickets. Workspace administrators delete agents who no longer work within the unit from the workspace list. It may also be appropriate to change an agent’s role upon a change of job function. If using escalation rules or need to track ticket resolution time, workspace administrators should configure the workspace Work Schedule in order to not count non-working days/times. UNB FootPrints Acceptable Use and Best Practices A-1 Data Collection and Retention The collection and storage of the data associated with tickets must conform to UNB's Policy for the Protection of Personal Information and Privacy. Every FootPrints workspace must have a record use and retention schedule documenting the workspace purpose and ticket data collection and retention criteria. Record retention schedules are to be established under the direction of the Records Management group in the University Secretariat. All original record retention schedules are held with the University Secretariat. Workspace administrators will be responsible to ensure ticket data, including attachments, are retained only according to the established schedule; and existing data not meeting the retention criteria are disposed of. To this end, the following are considered acceptable and best practices: Remove credit card numbers, social insurance numbers, birthdates and any other unnecessary personal information from ticket data once processed, where they occur in the most recent previous description. Workspace administrators will need to ensure assignees are able to edit the most recent previous description in order to enable this practice. (It is acknowledged that functionality prevents editing other than the single previous description.) Refrain from using multiple personal identifiers (e.g., student/employee #, login id and name) in ticket updates. Units should determine and document internal guidelines for identifying persons based on situations normally dealt with, and also share these guidelines with customers/clients submitting requests where reasonable. Delete tickets which no longer meet the retention criteria on an annual (or more often) basis and/or develop deletion guidelines for the workspace and enable agents to delete tickets which do not need to be retained. Review the attachments lists on an annual (or more often) basis and delete attachments that are not required. Enable a knowledge base for the workspace and instruct agents on how and when to use in order to facilitate a lean retention of ticket data. Examples of ticket content that should be saved as knowledge base solutions are approvals, process steps and problem resolutions. Personal data should be stripped from the knowledge base solution description when not required for the solution. Workspace administrators are responsible for ensuring best practices with respect to data collection and retention are followed by agents within their workspaces. The workspace record retention schedule must be reviewed in the timeframe indicated in the schedule. ITS will regularly review workspace activity and require units to justify the workspace need where there has not been activity for two years. UNB FootPrints Acceptable Use and Best Practices A-2