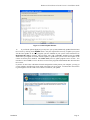
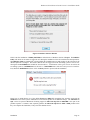
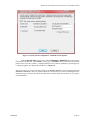
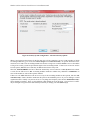
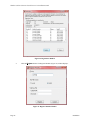
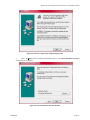
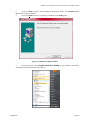
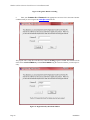
1
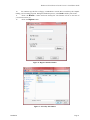
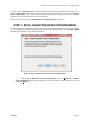
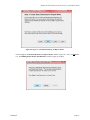
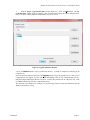
Windows GUI & Character-based Version 7.4 Installation Guide WINDOWS “GUI” & WINDOWS “CHARACTER-BASED” INSTALLATION GUIDE This chapter of the Installation Guide is designed to specifically provide you with complete installation instructions when installing Infinity POWER in a Single-User operating environment or on a Local Area Network (LAN). This installation guide contains instruction for both the Windows “Character-based” product and Windows “Graphical User Interface” or “Windows GUI” product. The “Character-based” product looks and feels exactly like our former DOS/LAN products of prior versions. However, the software engines underneath these programs have been completely redesigned to exclusively operate in a Windows 2000/XP/2003/Vista/Windows 7 operating environment. At the end of the installation section, there are also specific instructions on what is necessary to install the software on a Microsoft SQL Server 2005 or 2008 platform. For regular users, the standard selection when prompted for a “database selection” is “FoxPro.” However, for more advanced users seeking higher levels of data security and data mining features, the Infinity POWER applications will operate the exact same way by simply selecting the MS SQL Database option. This does require an additional purchase of Microsoft SQL Server software sold separately. All versions of Infinity POWER WILL NOT operate on any version of DOS. NOTE All users, including the POWERServer user, MUST be logged out of the accounting system prior to performing any accounting software upgrades/updates. Also, the POWERServer MUST be completely shut down. HARDWARE/SOFTWARE REQUIREMENTS All Infinity POWER Windows modules require the following hardware and software specifications. If your computer system does not meet these specific requirements, you may encounter a wide range of problems. Make sure that your system has the items listed here or check with your hardware dealer to verify your system configuration. Most Intel Pentium-based systems Minimum of 512 MB RAM Memory for Infinity POWER programs 500 MB Hard Disk Windows 2000/XP/2003/Vista/Windows 7 Microsoft SQL Server 2005 / 2008 Printer Requirements: The system requires a printer that prints 132 columns in normal pitch or compressed print. Check your printer manual for details. Computers Supported: Installation Most Intel Pentium/AMD-based PC systems Page 1 Windows GUI & Character-based Version 7.4 Installation Guide Networks Supported: Windows 2000/XP/2003/Vista/Windows 7 and most other “Share” compatible networks. Microsoft SQL Server 2005 / 2008 NOTE Other Local Area Networking products are “known” to work with Infinity POWER Windows products. However, since they have not been officially certified by Data Pro Accounting Software and documented for in-house support, no warranty or guarantee of support can be made. Data Pro Accounting Software will attempt to provide billable support for these products, but no warranty can be made on them, or other products supporting the Windows 32-bit application mode, at this time. Vendors seeking officially supported status should contact the Data Pro Development Group directly. SETUP.EXE (FOR WINDOWS GUI AND CHARACTER-BASED INSTALLATION) This function pertains to initial installations and update/upgrade installations. You MUST have a Registration File to complete the installation of your software. If you are connected to the Internet, you can register your software online during the installation process. If you do not have Internet access, you must request a Registration File be sent to you Prior to Installation. If your accounting server is NOT connected directly to the Internet where this Registration File may be downloaded during the installation process on-line, you may use the “GETREG Utility” on another PC that does have Internet access to download the file and save it to a floppy disk, CD-ROM or networked drive so that it is available during the installation procedure. See the special section on the GETREG Utility on how to use this feature. Page 2 1. Place the CD-ROM into your CD drive on your computer system. The Presentation should begin automatically. If it does not, from Windows, click on Start>Run from the Task Bar. In the Open text box, enter the drive letter for your CD (i.e. F:\intro.exe) or you may click on the Browse… button to search for the file on the CD ROM. The installation program launches (Figure 1). 2. Select the Install Applications option from the left menu tabs. Installation Windows GUI & Character-based Version 7.4 Installation Guide Figure 1 Data Pro Installation Program Window 3. Then, click on Install Infinity POWER Applications option (Figure 2) from the main window. NOTE Both the Windows GUI and the Character-based versions are simultaneously installed. Once the applications are installed, you can access the Windows GUI version by selecting Start>Programs>Data Pro>DPWIN. You can access the Character-based version by selection Start>Programs>Data Pro>Power. Figure 2 Install Applications Option Installation Page 3 Windows GUI & Character-based Version 7.4 Installation Guide 4. <Click> the Yes button to continue. The InstallShield Wizard window (Figure 3) displays initializes the installation process. Figure 3 InstallShield Wizard – Preparing to Install Window NOTE If you have already installed this new version on your workstation, and you need to re-install the program on the same workstation, then you will need to REMOVE the program from your system before reinstalling this version. The Installation Wizard will prompt you to remove the program. You will then be able to run the installation again and install the program again. When the InstallShield Wizard initialization is complete, the Welcome to the InstallShield window (Figure 4) displays. This window introduces you to the Infinity POWER Windows Installation (both Character-based and GUI). Page 4 Installation Windows GUI & Character-based Version 7.4 Installation Guide Figure 4 Welcome to the InstallShield Window 5. If you wish to continue the installation, click on the Next > button. The License Agreement window (Figure 5) displays. Figure 5 License Agreement Window Installation Page 5 Windows GUI & Character-based Version 7.4 Installation Guide 6. Make sure to read through the entire Software License Agreement. If you agree to accept the terms of the Software License Agreement, then click on the “I accept…” button and then click the Next > button to proceed with the next step of the installation. The Destination Folder window (Figure 6) displays. This defines to the system where the program files will be loaded on your computer system. The default directory path is c:\power\. Figure 6 Destination Window 7. <Click> the Next > button to install the program in the default folder. The Module Selection window (Figure 7) displays listing all the modules available for installation. NOTE <Click> the Change… button to select a different folder other than the default. Each individual module is listed, including Sample Data Files, and may be checked or unchecked according to the modules you wish to load for this installation. Page 6 Installation Windows GUI & Character-based Version 7.4 Installation Guide Figure 7 Module Selection Window If you click on the “Space” button, the following screen will display the amount of available and required space the installation will utilize on your various hard drives. Installation Page 7 Windows GUI & Character-based Version 7.4 Installation Guide 8. To change the installation option for any of the listed modules, <click> the pull-down menu (Figure 8) and select the desired installation option for that module. Figure 8 Module Selection Window – Select Install Settings NOTE This defines to the system which Infinity POWER modules to install for this system. By default, ALL modules are selected to be installed. IT IS THE USER'S RESPONSIBILITY TO SELECT ONLY THOSE MODULES WHICH THE COMPANY HAS PURCHASED. Therefore, make sure to select the “This feature will not be available” option for those modules you DID NOT purchase prior to continuing with this installation procedure. 9. After all module selections have been made, <click> the Next > button to proceed with the installation. If you choose to continue, the next screen is used to verify all the previously entered data for this installation before the program files are transferred. The Ready to Install the Program window (Figure 9) displays. Page 8 Installation Windows GUI & Character-based Version 7.4 Installation Guide Figure 9 Ready to Install the Program Window 10. <Click> the Install button to continue with the installation. If you choose to continue, the Installation program will begin to transfer the files to the Destination Directory. The “Installing Infinity POWER for Windows” window (Figure 10) displays. Figure 10 Installing Infinity POWER for Windows Installation Page 9 Windows GUI & Character-based Version 7.4 Installation Guide After the files are copied to the specified directory, the “Infinity POWER Update Utility” window (Figure 11) displays prompting if you would like to check for updates on the Data Pro remote site. Figure 11 Infinity POWER Update Utility Window 11. <Click> the Check button to have the system check for updates or <click> the Skip button to cancel the update utility. If the Accounting Server or workstation with access to the Accounting Server DOES NOT have Internet access, the following screen (Figure 12) will be displayed. Figure 12 FTP Connect Error Click the OK button and continue without any checking. If you DO have Internet access, the system will compare the current version you have installed and the latest update available on the Data Pro Accounting Software website for immediate download. If there are any downloads available, a screen similar to the Confirm Update window (Figure 13) will display on your screen. Page 10 Installation Windows GUI & Character-based Version 7.4 Installation Guide Figure 13 Confirm Update Window 12. If you like the options displayed, you may have your system automatically updated from the Data Pro web site by clicking on the Update button. Only the required files necessary to update your system with the latest updates to all of the programs you have installed on your system will be transferred. No Registration Key File is required. This will allow users with a “current” Annual License Fee (ALF) which makes you eligible for current software updates to update their systems to the latest update of the current version they have installed. This WILL NOT, however, update programs across versions. You must have a current ALF to receive the latest version of the programs and download them from the Data Pro web site. If you have an Anti-Virus or Windows Firewall configuration set that protects your computer, you may get a screen similar to the following screen which will prompt you for an action. You must allow the software to get through the firewall or Anti-Virus software to check for your updates. Installation Page 11 Windows GUI & Character-based Version 7.4 Installation Guide If you run this option and you already have the most current set of programs available, the following window (Figure 14) displays: Figure 14 Checking for Updates Window Once completed, the following screen will appear. This is the Welcome screen in which you will tell the system whether you are a “New User” or an “Existing User.” Depending on your status you would select one or the other option. If you are an existing Data Pro customer and are upgrading your software, you should choose the option on the right. New users should choose the option on the left. Either way, this information is vital so that the system can provide registration and activation information on-line during the rest of this process. If you are a new user, click on the left side of the screen in the red button titled “New User.” The following screen will appear. Page 12 Installation Windows GUI & Character-based Version 7.4 Installation Guide Any field in “red” is a required field to complete the registration process. Make sure that when you enter the password at the bottom that it is a combination of five alpha characters and two numeric characters. It can be in either upper or lower case. However, make sure to write this password down and keep it for your files as you will use it repeatedly in the future. Once you have completed this information, the primary phone number field that is highlighted in red will be used as your main customer login identification number when prompted. When you are satisfied with your entries, click on the bottom button, “Continue Installation.” For existing users, when you click on the right side of the screen, the following screen will appear. Installation Page 13 Windows GUI & Character-based Version 7.4 Installation Guide Enter your User ID and your password and click on “Login.” You will be taken to the following screen where you may review your current account profile, make any applicable edits or just continue with the installation process. If you make any edits to your account, be sure to click the “Update Accounts” button at the bottom right of the screen. If no edits are made, click the “Continue Installation” button at the bottom to continue. The installation process for either choice (new or existing users) will now continue to allow you to select which database you want to use. This will include FoxPro, dBase, or Microsoft SQL 2005. The Database Selection window (Figure 15) displays. Proceed to the next section. DATABASE SELECTION This utility allows you to select or change the database format that will be used with the installation of Infinity POWER. Once the database format has been selected during your initial installation of Infinity POWER, any subsequent changes will require a conversion of your existing data. If you are upgrading to Version 7.3 or higher, this is not considered your initial installation. The system will scan your data files and mark the appropriate database selection on the following screen (Figure 15). Page 14 Installation Windows GUI & Character-based Version 7.4 Installation Guide Figure 15 Database Selection Window If this is the first installation of Infinity POWER, the default choice of database selection is Foxpro. The DBSelect Utility will check for the status of logged in users during the installation of the GUI and character-based products. This DBSelect Utility is automatically executed during the installation process and prompts for the selection of the database platform to configure. This ensures that all users are logged out of the accounting system as well as confirming that the POWERServer module has been shut down. A notification will be given if users are still in the accounting system or if POWERServer is still active. If POWERServer is still active and you receive a notification, shut down POWERServer, then <click> the Retry button to proceed will the installation. Please keep in mind that the use of the default Foxpro and dBase IV compatible files structures used with the Standard version of the System Administrator come with the product at no additional charge. The Client/Server SQL version of System Administrator featuring support for Microsoft SQL Server 2005/2008 is also part of the purchase equation. Customers must separately purchase the Microsoft SQL Server 2005 or 2008 product before they can complete this installation, if they select this database choice. Installation Page 15 Windows GUI & Character-based Version 7.4 Installation Guide NOTE Starting with Version 6.4 and higher, it has been found that users may find that the FoxPro database format is designed to take best advantage of the file system under the Windows operating system environment. For those new users installing the application for the first time, it is highly recommended that FoxPro be the default database format select here unless a Client/Server SQL choice is being made instead. For existing Infinity POWER users who are upgrading from a prior version and have been using the default dBase IV compatible file structure until now, these users will most likely find a major gain in file access and speed by switching their default database structure from dBase IV compatible to FoxPro compatible. To do so, see the instructions later in this manual. The following screens will only apply if you have selected the “Client/Server - Microsoft SQL Server 2005/2008” database selection. If you have chosen either the “FoxPro” or “dBase” database selection on this screen, you may skip through this section. 1. From the Database Selection window (Figure 15), <click> on the appropriate database selection and then click on the Select button. If you have selected the Client/Server - Microsoft SQL Server 2005/2008, proceed to step 2. If you have selected FoxPro or dBase as your database selection, proceed to step 4 to continue the installation process. 2. If you have selected the Client/Server – Microsoft SQL Server 2005/2008 option, it is necessary that the Microsoft SQL Server software (2005 or 2008) is installed and operational before attempting this installation. It is also necessary that the SQL Native Client 2005 or 2008 software is installed and operational. Instructions for installing the SQL Native Client software are located at the end of this installation section. Once this option is selected, the following screen (Figure 16) displays. Figure 16 Client/Server – Microsoft SQL Server 2005 or 2008 Configuration Page 16 Installation Windows GUI & Character-based Version 7.4 Installation Guide The information on this screen is required to communicate with the Microsoft SQL Server 2005 or 2008 Database Server. Server Name This is the server name of the Microsoft SQL Server 2005 or 2008 Database Server. Database Name This is the database name set up within the Microsoft SQL Server 2005 or 2008 Database Server to define the database utilized. Default Username This is the default username set up within the Microsoft SQL Server 2005 or 2008 Database Server. Password This is the password defined to gain access to the Microsoft SQL Server 2005 or 2008 Database Server. Number of Result Set Rows This is the default number of rows that will be retrieved from the database tables when printing reports. This value can be increased to tune the performance of your database access. Enter the required information in the appropriate text boxes and <click> the Ok button. The Introduction window (Figure 17) displays. 3. <Click> the Select button to continue with the installation. The Introduction window (Figure 17) displays. Figure 17 Introduction Window From the Introduction window (Figure 17), <click> the Next button. The Step 1: Configuring Security System window (Figure 18) displays. Proceed to the next section. Installation Page 17 Windows GUI & Character-based Version 7.4 Installation Guide STEP 1: CONFIGURING SECURITY SYSTEM During the installation, the user has the ability to define which method of security is to be deployed in the Infinity POWER accounting software system. If you have previously installed the software, when you click “Next,” you will be prompted for the existing “SYSADM” password that is in place as shown on the following screen. Figure 18 Step 1: Configuring Security System Window 1. From the Step 1: Configuring Security System window, <click> the Next button to proceed with the installation process. The Security System Configuration window (Figure 19) displays. Page 18 Installation Windows GUI & Character-based Version 7.4 Installation Guide Figure 19 Security System Configuration – Standard Security Options 2. From the Security Type section, select either the Standard or Advanced options. Each option is discussed in detail below. The “default” security type is “Standard” which is the most basic and simplified version of security available. Companies that desire more powerful capabilities in protecting specific options, programs, users and groups, should select “Advanced.” This screen allows you to specify which variation of the Security System you wish to install at this point (Standard or Advanced). There are significant differences between the two versions and management considerations must be taken into account to determine which variation makes the most sense for your company and installation. Installation Page 19 Windows GUI & Character-based Version 7.4 Installation Guide Figure 20 Security System Configuration – Advanced Security Options When a user logins into the software for the first time, they will be counted as a one user count regardless of which accounting module they go to access (i.e. General Ledger or Accounts Receivable). No specific allocation of user counts has to be made on an accounting module basis because a single user count has FULL access to all modules as long as the security system has provided the rights to that accounting module. If more users at one time need to be in the system, additional user counts may be added to the software at any time. Therefore, MANAGEMENT now has to determine whether they want to control on a “user-by-user” basis whether each user has full access to ALL accounting modules installed or whether they should have “limitations” on some of the modules or some of their options installed. If there are to be ANY limitations at all on access to any of the accounting modules or their options, then the “Advanced Security” feature should be installed at this point of the installation process. If you are dealing in a small organization where virtually everyone has access to everything, then simplicity rules and the “Standard Security” feature should be installed. These are the guidelines which should prevail at this point. The good news is that it may be changed at any point in the future should you decide you change your mind (either way!). Page 20 Installation Windows GUI & Character-based Version 7.4 Installation Guide Standard Security If you select Standard Security as the “Security Type” as shown above (Figure 19), this means that all users will be allowed to enter the accounting system and will be provided with COMPLETE access to every option in every accounting module that is installed. No advanced setup of users is required and no passwords are even required unless you decide to have them prompted for a password by clicking on the “Password Prompt” box in the center of the screen. In other words, you can keep security to the system to a bare minimum with this option. All a user would have to do is enter their “User Name” to enter the accounting system, if you desired. If you click on the “Standard Security Options” section in the middle of the screen for “Auto-Add New User,” the system will automatically add a new user id to the system each time someone attempts to enter the accounting system with a name/id if the name/id does not exist. For example, if this is a new install and “Mary” has never been into the accounting system before, the first time she attempts to enter the software she will be prompted for a User Name/Login ID. If she enters “Mary” and it does not exist, she will be prompted that it does not exist and allowed to add it or change her entry. It’s just that simple. If you <click> off the box in the center of the screen “Auto-Add New User,” the system will restrict access to the accounting system from those users with no prior setup. Therefore, only the SYSADM user will have the ability to add new users in the software and will control who has the ability to enter the accounting software system. The SYSADM user must login first and load the Security System module to set up the valid users you wish to allow access to the system. Because you have defined Standard Security in this setup, any new user added will be allowed full access to ALL programs and options once they are added and logged into the software. The key is the software has tracked “Mary” as one of the valid “logged in” users in the software at this point in time. Regardless of which variation of the System Administrator module that is installed, the user “Mary” counts towards the available user counts that are being maintained. If, as the Administrator or Owner of the company, you would like “Mary” to have to enter a “Password” to gain access to the accounting system, then click on the box just below titled “Password Prompt.” This will force all users in the Standard Security mode to have to enter a password along with their user name/id. All implementations of Standard Security and Advanced Security will have one default System Administrator user id in the company called “SYSADM.” It comes standard with the system and has rights to all options. The boxes on the right side of the screen allow you to set the SYSADM password. IT IS VERY IMPORTANT TO REMEMBER THIS PASSWORD. If you click on the box just below the password called “Clear Old Password,” this option will allow you to remove the prior SYSADM password on a subsequent installation or running of WINSTALL. This ONLY works for the Standard Security implementation and does not work for the Advanced Security implementation. Otherwise, if you install the Advanced Security feature and forget the SYSADM password, you have a major problem and it is not easy to fix. Your only solution will be to contact Data Pro Support Services at that point at 727-8031550. Therefore, whoever is in charge of implementing the system, regardless of which version is being implemented, should write down the SYSADM password and make sure it is secure and available for future access. Once installation of the software is complete, it is important to set up additional user ids so that the SYSADM user is not used in day to day accounting functions by staff members. Installation Page 21 Windows GUI & Character-based Version 7.4 Installation Guide Advanced Security If you select the Advanced Security option the system will shade out the Standard Security options (Figure 20) since they will no longer be available. You may assign the SYSADM password which is REQUIRED at this point. As it applies throughout the Advanced Security mode, all User ID's are supplemented with an optional password. The password must be at least seven (7) characters in length. The password must contain at least three (3) alpha characters and at least two (2) numeric characters. Passwords are “case sensitive.” Case sensitive means the system recognizes the difference between upper and lower case characters. User ID's are not case sensitive. THIS PASSWORD IS VERY IMPORTANT!!! Do not forget this password or special steps will have to be taken to re-install the software completely. This password should be written down and implemented by the designated “System Manager” and one other person such as the business owner or president. This is the individual who will be responsible for the daily implementation and maintenance of the security system. If this password is not remembered and no other user logins are created first, then no users will be able to access the software. The “SYSADM” or administrator password is case sensitive. Therefore, you should decide, in advance, the format you will generally use throughout the system. If you want to use all capital letters, then you should be consistent throughout and use all caps for all passwords. If you use all caps with some passwords, but then use other combinations, you will find that only the exact format will work. Even if the password is entered correctly, but not the correct upper and lower case format, it will not be accepted. <Click> the Save button. The Step 2: Registration window (Figure 21) displays. Proceed to the next section. STEP 2: REGISTRATION Figure 21 Step 2: Registration Window Page 22 Installation Windows GUI & Character-based Version 7.4 Installation Guide This Registration Utility allows you to activate the program modules that have been installed. You should use this step to activate all of the modules you have purchased. Otherwise, the software will install in “Demo” mode with limits on the number of transactions and records that may be added to the software. This Registration Utility may be run without installation of program files as in the case of changing user counts. In order to run the Registration Utility separately; execute the Register Product option from the Help>Register Product menu in the application option (Figure 22). Figure 22 Help Menu >Register Product Option If you would like to see a short animated demonstration of the Registration process, go to our web site at www.dpro.com. Select the Tech Support Option. Select the Registration Procedures option (Figure 23) in the Installation & Registration Info box. Figure 23 Tech Support> Registration Procedures Option NOTE You MUST have a Registration File to complete the installation of your software. If you are connected to the Internet, you can register your software online during the installation process. Proceed to step 1 of this section. If you DO NOT have Internet access, you must get a Registration File prior to completing the installation. Skip to the GETREG Utility section on page 26. 1. From the Step 2: Registration window (Figure 21), <click> the Next button to proceed with the registration. The Registration window (Figure 24) displays. Installation Page 23 Windows GUI & Character-based Version 7.4 Installation Guide Figure 24 Registration Window 2. Click the Register button. The Register Modules (Figure 25) window displays. Figure 25 Register Modules Window Page 24 Installation Windows GUI & Character-based Version 7.4 Installation Guide 3. Enter your CDP Key. 4. If you have internet access, select Web as the Key File Source. 5. Enter your Customer # and Password in the appropriate text boxes. This is the same Customer Number and Password you use when logging into our website at www.dpro.com. 6. <Click> the Register button. The system displays your registered modules (Figure 26). If this is a subsequent installation, you will see this screen immediately upon clicking on “Register.” Figure 26 Register Window>Display Modules 7. <Click> the Done button. The Step 3: Build Character-based Program Menu window displays. If you DO NOT have Internet Access on your accounting server, go to the following GETREG Utility section first. Installation Page 25 Windows GUI & Character-based Version 7.4 Installation Guide GETREG Utility If you DO NOT have Internet Access on your accounting server, you can load the GetReg.exe utility from the current CD. This utility will allow you to receive your Registration File via the Internet on any computer connected to the Internet and Save the Registration File to a CD-ROM, Floppy Disk or Network Drive for use during the registration process. If you do not have Internet Access at all, please request a Registration File disk from Data Pro PRIOR to INSTALLATION. 1. ROM. The GetRegSetup.exe is located in the Products>Windows directory (Figure 27) of the CD- Figure 27 Products/Windows Directory 2. <Double-click> on GetRegSetup.exe (Figure 28). Figure 28 GetRegSetup.exe The Welcome screen (Figure 29) displays. Page 26 Installation Windows GUI & Character-based Version 7.4 Installation Guide Figure 29 Welcome – Registration Utility Setup Program 3. Click> the Next > button to continue the installation process. The Choose Destination Location window (Figure 30) displays. Figure 30 Choose Destination Location Window Installation Page 27 Windows GUI & Character-based Version 7.4 Installation Guide 4. Install the GetReg Utility in whichever directory you want the Registration File to be saved into. You may choose the default, or click the Browse… button to select another location. <Click> the Next > button. The Select Program Manager Group window (Figure 31) displays. Figure 31 Select Program Manager Group Window 5. Select Data Pro or the program name you specified when installing Infinity POWER as the Program Manager group the <click> the Next > button. The Start Installation window (Figure 32) displays. Figure 32 Start Installation Window Page 28 Installation Windows GUI & Character-based Version 7.4 Installation Guide 6. <Click> the Next > button to begin installing the Registration Utility. The Installation Complete window (Figure 33) displays. 7. <Click> the Finish > button to complete the installation of the GetReg utility. Figure 33 Installation Complete Window 8. To run the program, choose Programs>Data Pro> GetReg from the Window’s Start Menu. The Registration Key Download window displays. Installation Page 29 Windows GUI & Character-based Version 7.4 Installation Guide Figure 34 Programs>Data Pro>GetReg 9. Enter your Customer # and Password in the appropriate text boxes. This is the same Customer # and Password you use to login to the www.dpro.com Web Site. The program writes a .key file to the directory where the GetReg program is loaded. The filename will be of the format CUSTNUMBER.key with CUSTNUMBER being the Customer Number you entered previously. Figure 35 Registration Key Download Window Page 30 Installation Windows GUI & Character-based Version 7.4 Installation Guide 10. You can then copy this file to a floppy, a CD-ROM or a network drive accessible by the computer running your accounting programs. During the Installation process, select Local as the Key File Source. 11. <Click> the Browse… button and locate the key file. The filename will be in the form of yourcustomernumber.key. 12. <Click> the Register button. Figure 36 Register Modules Window Figure 37 Select Key File Window Installation Page 31 Windows GUI & Character-based Version 7.4 Installation Guide 13. <Click> the Open button. NOTE Please note that this screen lists only one System Administrator module. Although Data Pro Accounting Software offers two (2) choices of this product (the Standard or Client/Server SQL version), you will only see the version you have purchased on the screen. This Serial Number’s first three characters represent the actual part number of the product and therefore, the actual version of the System Administrator you are installing. If your Serial Number does not include the correct part number for what you believe you should be installing at this time, please contact Data Pro Accounting Software or your Dealer immediately. The possible choices for part numbers are: Page 32 Standard Version (Part #100) Client/Server SQL Version (Part #695) Installation Windows GUI & Character-based Version 7.4 Installation Guide If you do not have a Registration File, you may continue the installation process and allow the software to be installed in “Demo Mode.” This will allow you to evaluate the software until such time you receive your Registration file. “Demo Mode” does have file size limitations and other restrictions that will prevent you from completely being able to process on-line, but does allow you to get started. The next screen will prompt you to “Build Character-based Program Menu” (Figure 38). STEP 3: BUILD CHARACTER-BASED PROGRAM MENU This may be done later but should be done now since it does not take long, depending on the speed on your computer. This information is generated to provide the program menu for the character based version of Infinity POWER depending on the modules you have installed or updated. Figure 38 Step 3: Build Character-based Program Menu Window 1. From the Step 3: Build Character-based Program Menu, <click> the Next button. The Building Program Menu window (Figure 39) displays. If you are not going to run the character-based version, <click> the Skip button. Installation Page 33 Windows GUI & Character-based Version 7.4 Installation Guide Figure 39 Building Program Menu Window 2. <Click> the Begin button. Depending on the speed on your system, it may be very quick or take a few minutes. 3. Once the Data Dictionary has been built, <click> the Continue button. The Step 4: Create Data Dictionary for Report Writer window (Figure 40) displays. STEP 4: CREATE DATA DICTIONARY FOR REPORT WRITER The next screen will prompt you to “Create Data Dictionary for Report Writer.” This may be done later but should be done now since it does not take long, depending on the speed on your computer. This information is generated to provide the Infinity POWER Report Writer module with an information set of all of the installed modules so it knows the whole scope of data files and fields reports can be generated from. Page 34 Installation Windows GUI & Character-based Version 7.4 Installation Guide Figure 40 Step 4: Create Data Dictionary for Report Writer From the Step 4: Create Data Dictionary for Report Writer window (Figure 40), <click> the Next button. The Building Report Writer Data Dictionary window (Figure 41) displays. Installation Page 35 Windows GUI & Character-based Version 7.4 Installation Guide Figure 41 Building Report Writer Data Dictionary Window 2. <Click> the Begin button. Depending on the speed on your system, it may be very quick or take a few minutes. 3. Once the Data Dictionary has been built, <click> the Continue button. The Step 5: Upgrade Data Files window (Figure 45) displays. STEP 5: UPGRADE DATA FILES This option allows you to check all of your data files to determine if they need to be converted. This step should be performed to ensure your data files are compatible with the new version being installed. Figure 42 Step 5: Upgrade Data Files Window Page 36 Installation Windows GUI & Character-based Version 7.4 Installation Guide 1. From the Step 5: Upgrade Data Files window (Figure 42), <click> the Next button. The Upgrade Data Files window (Figure 43) displays. This step will list the company files in the data path and allow you to choose which companies and the number of years to convert. Figure 43 Upgrade Data Files Window <Click> the Browse button to select your data file directory. A listing of companies will display in the Companies list. Select the desired companies and <click> the Upgrade button to begin the upgrade process. Once you are completed with your upgrade, you may click on the “View Log” button to view a detailed listing of everything that transpired during the data file conversion. You may also print this out for analysis as well. Click the “Close” button when you have completed the process. The following screen illustrates an example of a conversion log and how it loads the information into the Windows Notepad for viewing. Installation Page 37 Windows GUI & Character-based Version 7.4 Installation Guide STEP 6: UPDATE COMPANY RIGHTS This step allows users to update company rights security tables when running in advanced security mode. Security rights enable a system administrator to grant specific access rights to different security objects throughout the Infinity POWER application. NOTE You do not have to update all your companies at this time. Depending on how many companies and files you have, it may take a while to update the security tables. You can update these security rights for other companies in Infinity POWER. See the Security Objects Definitions Reference Manual found in your System Administrator User Manual for a listing of security objects by module and their definitions. Page 38 Installation Windows GUI & Character-based Version 7.4 Installation Guide Figure 44 Step 6: Update Company Rights Click “Next” to continue with the update of the Company Rights. The following screen will be displayed afterwards illustrating how many companies have been updated during this process. Installation Page 39 Windows GUI & Character-based Version 7.4 Installation Guide STEP 7: INSTALLATION COMPLETED This step completes your Infinity POWER installation process. Figure 45 Step 7: Installation Completed Window 1. From the Step 7: Installation Completed window (Figure 45), <click> the Next button. The InstallShield Wizard Completed window (Figure 46) displays. Figure 46 Installation Complete Window Page 40 Installation Windows GUI & Character-based Version 7.4 Installation Guide 2. <Click> the Finish button to complete the installation process. Congratulations! You have successfully completed the normal Installation Procedure! Microsoft SQL Server Installation Special Notes During the normal installation procedure just completed above, if you selected the database option for “Client/Server – Microsoft SQL Server” as shown below: whether you are installing the software on MS SQL Server 2005 or 2008, there are a few additional configuration options that you must be sure to do to complete the installation process. First, the Microsoft SQL Server (2005 or 2008) are sold separately by Microsoft or an authorized Microsoft reseller. Many users may also be using the widely distributed SQL Server “Express” version which has been known to be provided at no charge. This installation manual assumes that the Microsoft SQL Server has been installed “previous” to installing the Infinity POWER software products. In the configuration of the SQL Server 2008, there are setting options that should be defined as shown on the following screen: Installation Page 41 Windows GUI & Character-based Version 7.4 Installation Guide The “Database Engine Configuration” option should have the setting for “Mixed Mode” clicked “on.” This applies to both the 2005 and 2008 version of the SQL Server. Page 42 Installation Windows GUI & Character-based Version 7.4 Installation Guide Under Server Properties, Connections, there is a setting to “Allow remote connections to this server.” This option must be turned on so that other users on the network can connect to the SQL server. Otherwise, only the administrator or single user defined for the database will be able to access the SQL database. This is of particular importance for those SQL Express users to get the “free” version of the product. This setting is normally not turned on because the “Express” version of the product is designed to be used by a single user on a single computer. However, by changing this setting you will be able to allow other accounting users on the network to gain access to the accounting data in the database. Installation Page 43 Windows GUI & Character-based Version 7.4 Installation Guide Install the Client Software! One of the primary requirements is that each user on the network that is going to access the Infinity POWER accounting software has two functions that MUST be installed so that they can access both the SQL database and the Infinity POWER accounting software. The first “client” piece of software that must be installed on each workstation is the SQL Client from Microsoft that is automatically distributed in the program directory of Infinity POWER when the installation is completed. The following screen illustrates how you can use Windows Explorer to go to the Infinity POWER program directory to locate the two possible versions of this installer application. The “sqlncli” installer is for 32 bit Windows PCs. The “sqlncli_x64” installer is for 64 bit Windows PCs. Double click on the version that matches your particular PC. Each Windows PC that will be accessing the accounting software MUST have one of these two client pieces of software installed first. Once you click on the “sqlncli” or the “sqlncli_64” installer, you will be prompted to follow the Microsoft installation process. Once completed, you will conclude with a screen similar to the following: Page 44 Installation Windows GUI & Character-based Version 7.4 Installation Guide SETUPCLIENT The second “client” piece of software that MUST be installed on each workstation is the Infinity POWER “setupclient.” Very simple to install, this utility allows network administrators to create shortcuts that point directly to the accounting programs and data without having to install the accounting software over and over on each workstation. The following screen illustrates how you can use Windows Explorer to go to the Infinity POWER program directory to locate this installer application. Installation Page 45 Windows GUI & Character-based Version 7.4 Installation Guide Prior to running the “setupclient” application installer, you would first make sure to “map” a drive letter for the network drive that is housing the accounting application and data files so that each workstation knows where to point during the running of the “setupclient” installation. If, for example, the accounting server can be found across the network on “Drive P,” you would use the Windows Explorer function to go to the accounting programs directory on Drive P and run the “setupclient” installation from that directory while logged in at the various remote workstations. Once you double click on the “setupclient” application installer, a black windows command screen will appear briefly showing that commands have executed successfully and will disappear after just a second or two. However, the result will be that two icons will now appear on your desktop. One is for the Windows Graphical Interface (GUI) version of the product and the other is for the Character-based version of the product. The following screen illustrates the information that you will find when you right click on the “Properties” of each icon that is placed on your desktop. Remember, the purpose of these icons is to point each remote accounting user to the location of the “Accounting Server” and the firm’s accounting data files. This is true regardless of the type of installation that has been made in regards to the database selection for the product (i.e. Foxpro, dBase or to an SQL Server). As such, the icon will reflect the correct directory path to the remote network drive as its point of destination to the location the accounting application and the data files. This may be run on as many workstations as desired. Page 46 Installation Windows GUI & Character-based Version 7.4 Installation Guide The only limitation within the Infinity POWER application when it comes to users is the number of “simultaneous” users that can be inside the application at one time. You could, in practice, load the “setupclient” utility on 100 PCs within the same office. However, may you have a license for 20 Data Pro users. As long as the need doesn’t require that more than 20 users at one time be in the software at once, you can choose which of the 100 workstations are using the software at any given time. The net effect of being able to use this set up option for client workstations is that you never have to upgrade their workstations software! When new version releases become available, your network administrator simply has to make sure that all users are out of the software, at one time, make sure the POWERServer is shut down, and load the new upgrade for the software on the main accounting server in one location. Then, when each workstation enters the software the next time, they have all automatically been upgraded at once! The shortcut for the Character-based version of the software is displayed in the following screen which illustrates the installation properties when the software is installed on a local drive: Installation Page 47 Windows GUI & Character-based Version 7.4 Installation Guide MULTI-USER OVERVIEW General Concepts of (File and Record Locking) Local Area Networking (LAN) and Multi-User operating systems (Linux) provide a very useful way to allow different computer systems to share common hardware devices and information. It is the sharing of these hardware devices and the need to share information that is the whole basis of networking/multi-user systems. Though conceptually a network shares information in much the same way as a full multi-user system, such as a minicomputer or mainframe; networking as referenced here with Infinity POWER Windows GUI and Windows Character-based modules primarily deals with smaller independent computers which may stand alone, or through the use of networking, share common information. The hardware aspects of how networking truly works will not be covered here. However, a brief discussion may be necessary to fully understand why there are differences between the programs running in Single-User mode verses multi-user mode. Unlike other software systems that have been modified to operate in a semi-patchwork way in a network environment, the Infinity POWER modules have been specifically developed to work in a LAN environment. There are no cumbersome manager programs to contend with, no real limitations on the number of users that may access the system at one time, (other than the specific network's limitations), and the system is designed to operate at the fastest level of performance capable by the specific network you are utilizing. You will find virtually no difference in operating one Infinity program that is running on a network verses running that same program under a Single-User operating environment. However, internally the system is automatically performing what is termed “File and Record Locking” procedures to protect the integrity of your data files, while not requiring the user to do anything different than what would normally be performed while operating single-user on a single computer. In order to appreciate the need for “file and record locking,” you should understand the general concepts of how information is handled by a network. The following explanation draws an analogy between a “two bookkeeper” manual accounting system and a “two user” computerized/networked accounting system. In our discussion here, we will use the Accounts Receivable accounting cycle to illustrate the differences between performing the same tasks manually and performing them on a computer network. Definitions: All information is stored in a central location in both environments. A manual system would use a file cabinet while the computer system uses a disk drive (fileserver). The file cabinet contains several groups of related information called hanging file folders. The computer system calls these data files. Examples of data files might include a customer file, a tax rate file, a salesman file, etc. Within each hanging file folder are numerous pieces of related information called documents. The computer system treats these as data records within a data file. Examples of data records might include the outstanding invoices and credit memos that a customer may have on their account. Actual Usage: The following procedures are typically utilized on a daily basis. Page 48 Each bookkeeper updates the customer files for addresses, phone numbers, credit limits and/or billing terms changes. Invoices written to customers and payments received from customers are recorded in each customer's hanging file. Installation Windows GUI & Character-based Version 7.4 Installation Guide Customer inquiries and reports are compiled from the information in the customer's files. Periodically, old customer information is cleared out of the customer files. In a manual bookkeeping system, if a bookkeeper “pulls” the file for a customer, it no longer exists in the file cabinet until it is returned after any updates occur. Moreover, if both bookkeepers try to “pull” the same customer's file simultaneously, each would have to either take just the documents out of the file that they need to use or one bookkeeper would have to wait until the other is done. Similarly, if one bookkeeper is purging old information out of a customer's file, the other bookkeeper would have to wait until the purging is done. If both bookkeepers simply wanted to read information out of a customer's file or to review a document together, both could do so without interfering with each other. These manual bookkeeping operations are very similar to the operations required in a computerized system. Any time one user has to wait for another user to be done with a customer's file (data file) or specific document (data record), a file or record lockout occurs. When the first user is done with the file or record, it becomes unlocked, thus allowing access by the waiting user. In a manual system, it is easy to police the tracking of who is using what information. A bookkeeper goes to the file and sees that a particular file is being used and either decides to wait until the other bookkeeper is done or simply selects another file to work on. The Infinity POWER products do this type of policing automatically for you. This saves you from having to concern yourself about performing the wrong function at the wrong time and creating an error in the system. Only if you are performing a function that would be in conflict with another user in the system would you be warned. The level of warning will specifically depend on the exact function you are attempting to perform. This is where “file and record locking” comes in. The system keeps track of the exact type of function you are attempting to perform. This may range from simply doing an inquiry into a customer's account, writing an invoice, or adding a new customer to the file. Depending on the exact function, the system will make sure that no one else in the system is going to do anything that would create a problem for the data files. There are different levels of locking going on at all times depending on the options being used by different users. If bookkeeper number one was adding a customer to the file, the system would not allow bookkeeper number two to do the same function at the exact same moment since the entire customer file would need to be adjusted to reflect the new addition to the file. However, as soon as that addition had been made to the file, the second bookkeeper would then immediately be allowed to continue and add her new customer also. The only pause in the system would be for the exact second or two that the files are actually being altered. Typically, record locks only occur at the point in which a piece of information is being validated and entered to the data file. This is why you will be allowed to enter an option and input the information, such as the information for a new customer, and not be locked out of that option until you attempt to validate that information to the file. A record lock condition normally occurs when you are trying to access a specific record (e.g., customer) that has already been opened by another user. If User #1 then decides to write an invoice while User #2 is performing customer inquiries, no conflicts or warning message would appear in the system. However, if User #2 then goes to the option to change customer information and calls up Customer Number 1200 while User #1 is writing an invoice to the same customer, the system will perform a record lockout to keep User #1 from accessing that customer until User #2 is finished. This however, does not stop User #2 from going to another customer and performing changes. The system has then performed a record lock and not a file lock that would keep anyone out of the file entirely. The file lock could occur for instance, when User #1 would perform the option to “start new files for the new fiscal year.” Since the data files from the old year are being copied to an entirely new set of files for the new year, you would not want changes being made to the old files once the procedure began. This is a perfect example of when a complete file lockout (or Absolute Lock) would occur. Other examples of times when a file lock would occur include the options to “pack files” and “remove completed sales orders.” Installation Page 49 Windows GUI & Character-based Version 7.4 Installation Guide Again, the system will do all of the tracking automatically. Warning messages will simply appear on your screen to inform you of the type of locking procedures that are being implemented. You will find, however, that many times the locking and releasing procedures are implemented so quickly that no message will even appear. This, in part, will be decided by the type of network configuration you select when installing the system. The system allows you to decide whether you want to be warned immediately of a lock out condition or to have the system retry for approximately 6-10 seconds before warning you. The second option is generally recommended for all users since most updates of files takes no more than two to five seconds, depending on your configuration. The key to a Network/LAN system is that more than one user may access the same programs and the same data files simultaneously and perform their daily routines without worrying if their actions could damage the system in any way. The software does all of these functions automatically and quickly so that processing may continue at a very high speed without jeopardizing the integrity of your information. Locking/Types Warning Messages This section outlines the overall instances when certain locking conditions occur under Network/LAN configurations. These are intended as a guideline only, since the programs have been specifically designed to perform certain locking levels on an option-by-option basis for optimum processing capability. In addition, a section discussing warning messages and what to do in a lock out situation is covered here. Locking Types Throughout all of the Infinity POWER Windows modules, there are four basic types of locking that take place. Depending on the option that has been selected, the system will automatically implement the proper locking type. This eliminates the necessity of the user to concern himself that the particular function he is performing will cause problems for other users in the system. The four lock levels performed throughout the system are: Page 50 Inquiry Lock Record Lock File Lock Absolute Lock Installation Windows GUI & Character-based Version 7.4 Installation Guide Lock Level Description Inquiry Lock This is the primary lock mode that is being implemented while performing inquiries upon customers, vendors, employees, inventory items, etc. and while you are printing graphs and reports. This lock level will not stop another user from performing any other function within the system, but basically keeps track of each user and what function they are performing in the system. Record Lock This is the lock level that protects a specific record in a file while updates or changes are being made to that particular record. This lock level is primarily implemented during the posting of transactions (invoice writing, journal entries, recording of inventory receipts, etc.) and while making changes to the master file. This lock level will not keep other users from posting other transactions or making changes to the master files, except for the specific record that has already been called up. For instance, if User #1 wants to write an invoice to customer #1200 while User #2 has already called up the same customer in the “Change” mode to change their address, User #1 will be locked out of that customer's file until User #2 either validates the changes he has made or ESCAPES from that customer. Once User #2 does either, User #1 will have immediate access to proceed with that particular customer. The changes made by User #2 will be immediately reflected on User #1's screen. If User #1 did not want to wait for User #2 to finish, he may ESCAPE and proceed to work with another customer. Record Locks only protect a single record in the file and do not prohibit the use of other records in the same file. File Lock This Lock Level protects an entire file from being altered at the same time. File Locks protect the files from being changed by more than one user simultaneously. A File Lock will normally occur at the point where information is being validated into the system. This lock will only allow one user to make a validation to a file at one time. A validation could include adding new customers, deleting account numbers, or copying inventory items. It is not at the point where you are entering the information that the files are locked, but when you finally make your entries and are ready to “Press ENTER to validate” or “Click to Save” and actually do it that the file lock will be implemented. Installation Page 51 Windows GUI & Character-based Version 7.4 Installation Guide Absolute Lock Absolute Locks are designed to keep any other users from having access to the particular data file you are currently working on. This type of protection is necessary when major changes are being made to the file structures. Options that would require this kind of protection would include “Starting New Files from Scratch,” “Starting a New Year's Files,” and “Consolidating Entities” in the General Ledger program. These options cannot allow any changes to be made to the files until these options are fully executed. Otherwise, the integrity of the information would be highly jeopardized. The following chart outlines what types of locks are implemented when two users are selecting options that require a specific lock level. For instance, if User #1 on the left executes an option that requires an inquiry lock, then only if User #2 on the top is performing an option that would require an Absolute Lock would User #1 be locked out of the option. However, if both users are executing options that require File Locks, then the first user in will lock the other user out. Warning Messages Selected from the normal warning messages issued throughout the system, the following warning messages are the most common to be encountered while operating in a Network/LAN environment. Error Code Description/Solution #20 - Disk Access Error You are attempting to access a disk drive which has one of the following invalid parameters: 1) The drive does not exist 2) The disk is not mounted properly 3) Hardware/Media problems exist Please inspect the specified disk drive. #40 - File is Not Shareable This message will appear when attempting to: #41 - File Already Locked You are attempting to update a data file which is currently being updated by another user. When the other user is done with this data file, the system will allow you to access this file. Press ENTER to continue the access attempt; or press ESC to proceed with other processing. NOTE: Do not press ESC if entering transactions. Part of the transaction will not be updated. Page 52 Access a data file which is not shareable Installation Windows GUI & Character-based Version 7.4 Installation Guide #42 - Record Already Locked You are attempting to update a data record which is currently being updated by another user. When the other user is done with this data record, the system will allow you to access this file. Press ENTER to continue the access attempt; or press ESC to proceed with other processing. DO NOT press ESC if entering transactions. Part of the transaction will not be updated. NOTE: Pressing ESC when you get a lock out condition is normally all right. However, as noted above, if you are posting transactions such as a journal entry, as the updates to the file are being made, one account may be accessed by another user when you choose to validate your entry. If the system starts posting to other accounts and then receives the lock out condition, you DO NOT want to exit at this point. You must complete the full update to keep from throwing your whole Chart of Accounts out of balance. You must wait until the other user has unlocked the record, and press ENTER to continue the update. #43 - File in Use You are attempting to perform major file maintenance while another user is accessing the file. While you perform the current option, no other users are allowed to access this file. #45 - File is Read Only You are attempting to write data to a file which can only be read. Normally, this error is caused by the improper configuration of a Network/LAN operating system. Please note that at the point in which a warning message appears on your screen with a lock out condition, you may either press ESC to exit or press ENTER to continue. If the lock out condition still exists, the same message will again appear to you. If you continue to try and still get the same lock out condition after 3-5 attempts, physically check with other users in the system to verify that someone has not tied up a record or file and left their station unattended. Printer Setup in Windows 2000/XP/2003/Vista/Windows 7 (Windows Character-based Version) Local Printers ONLY: 1. <Click> the Start button, the select Settings>Printers. Double click on the printer you will be using in conjunction with the Infinity POWER programs. 2. <Click> on Printer>Properties and the printer’s property window displays (Figure 47). 3. <Click> on the Details tab and the following screen will appear. 4. <Click> on Port Settings and make sure that the Spool MS-DOS setting is unchecked. Installation Page 53 Windows GUI & Character-based Version 7.4 Installation Guide Figure 47 Printer>Properties>Details 5. Select the printer that begins with LPT1, LPT@, etc. For network printers, the syntax would be \\server name\printer name. Click on the Spool Settings button. The Spool Settings window displays. Figure 48 Spool Settings 6. Select Spool print jobs so the program finishes printing faster with either setting and be sure the Spool data format is set to RAW not EMF. 7. Page 54 <Click> the OK button and then Apply. Installation Windows GUI & Character-based Version 7.4 Installation Guide CBSQLCVT.EXE This utility is used to convert from the CodeBase version to the SQL operating platform and vice versa. This will allow you to convert all DBF files to tables in the database system. Figure 49 CodeBase SQL Conversion Window In all cases, either new installs or upgrades to a SQL, you will need to convert the system files to tables. Figure 50 List CodeBase Files to Convert Window These system files are located in the Infinity POWER program directory. By default, that would be, C:\POWER. Select all the files beginning with “sys” and convert them. Also, select the file “printers.dbf” and convert that file as well. Installation Page 55 Windows GUI & Character-based Version 7.4 Installation Guide Specifying the proper directory will populate the window labeled “Select Listed Files To Convert.” The “Conversion Options” specifies the following: Confirm Overwrite YES (checked) Confirm Overwrite NO Confirm All YES (checked) Allow this utility to automatically overwrite the destination files. Confirm All NO Allow this utility to ask you each time “YES” or “NO” to overwrite every file. Allow this utility to notify you to confirm overwriting the destination files. Allow this utility to automatically assume “YES” to overwrite every file. The “Optional File Screen” section of this utility allows filtering on all files listed in the “Select Listed Files To Convert” section. This may also be considered as a “masking” tool. When converting the data, it is important to convert the data in the following order: The POWER directory The DATA directory The DPSS directory For new installations, you will want to convert the INS Sample Company Files. These files are located in the C:\POWER\DATA directory. Select all files beginning with “INS” in this directory and convert them. In the case of an upgrade from CodeBase to SQL, you will need to convert all security files for all companies used in the Infinity POWER system. Convert all files located in the C:\POWER\DPSS directory. You will also need to convert all data files for all companies in the Infinity POWER system. These data files are normally located in the C:\POWER\DATA directory. Select and convert all data files for all companies. Once completed with this set of instructions, SQL can now be accessed. STAY CURRENT WITH DP/UPDATE All Version 6.3 and higher users will find a great utility located in their program directory designed to help them keep up to date with the latest features, fixes, and enhancements from Data Pro Accounting Software. It’s called “dpupdate!” 1. If you have already loaded the programs, you can then load this new software utility by clicking on Start> Run>Browse then select the drive and then the Infinity POWER program directory (i.e. c:\power). 2. <Double-click> on the dpupdate utility icon. Once loaded, the system will automatically prompt the user if it should “check” for updates or “skip” the process. Page 56 Installation Windows GUI & Character-based Version 7.4 Installation Guide Figure 51 Infinity POWER Update Utility>Check for Updates Window If your Accounting Server, or workstation with access to the Accounting Server, DOES NOT have Internet access, the following screen will be displayed. Figure 52 FTP Connect Window 3. <Click> the OK button and continue without any checking. If you DO have Internet access, the system compares the current version you have installed and the latest update available on the Data Pro Accounting Software website for immediate download. If there are any downloads available, a screen similar to the one shown here will be displayed on your screen. Installation Page 57 Windows GUI & Character-based Version 7.4 Installation Guide Figure 53 Confirm Update Window 4. If you like the options displayed, you may have your system automatically updated by Data Pro over the web by clicking on the Update button. Only the required files necessary to update your system with the latest updates to all of the programs you have installed on your system will be transferred. No Registration Key file is required. This will allow both users with and without a current Annual License Fee (ALF) to update their systems to the latest update of the current version they have installed. This WILL NOT, however, update programs across versions. You must have a current ALF to receive the latest version of the programs and download them from the Data Pro web site. If you run this option and you already have the most current set of programs available, the following screen will be displayed: Figure 54 No Updates Found Window This is one more great benefit and reason for upgrading to the current version. Make sure to stay current with your updates! Page 58 Installation Windows GUI & Character-based Version 7.4 Installation Guide This page intentionally left blank. Installation Page 59