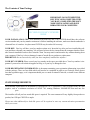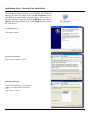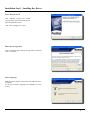
1
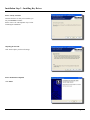
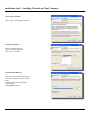
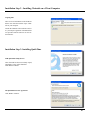
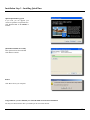
Table of Contents
The Contents of the Package..............................................................................................................3
System Requirements.........................................................................................................................3
Installation Step 1 - Starting Your Installation...................................................................................4
Installation Step 2 - Installing Chairside Network.............................................................................5
Installation Step 3 - Installing Key Driver.........................................................................................6
Installation Step 4 - Adjusting firewall.............................................................................................7
Installation Step 5 - Finishing Installation........................................................................................7
Part 2 - Installation Guide for Chairside 2008 Client on Windows
Part 1 - Installation Guide for Chairside Network 2008
Installation Step 1 - Starting Your Installation..................................................................................8
Installation Step 2 - Installing Chairside...........................................................................................9
Installation Step 3 - Enter License Number.....................................................................................10
Installation Step 4 - Installing QuickTime.......................................................................................13
Part 3 - User Manual For Chairside 2008
The Chairside Homescreen..............................................................................................................13
Education.........................................................................................................................................14
Introduction..................................................................................................................................14
Viewing Education.......................................................................................................................14
Navigating Education......................................................................................................................15
The Storyboard.............................................................................................................................15
Education Quick Launch..............................................................................................................16
Movies..........................................................................................................................................16
Searching For Education..............................................................................................................16
Favorite Education.......................................................................................................................17
Education Series...........................................................................................................................17
Creating a Series...........................................................................................................................17
Adding to The Series....................................................................................................................17
Editing The Series List.................................................................................................................18
Saving Your Series.......................................................................................................................18
Modifying, Renaming or Deleting a Series..................................................................................18
Playing a Series............................................................................................................................18
Series Education Controls............................................................................................................18
Creating a Slideshow....................................................................................................................19
Customizing Chairside.....................................................................................................................20
The Education-Maker...................................................................................................................20
Adding a Shape.............................................................................................................................20
1
Table of Contents
Selecting Objects...........................................................................................................................21
Moving Objects.............................................................................................................................21
Re-sizing Objects..........................................................................................................................21
Deleting Objects............................................................................................................................21
Creating a Text Page......................................................................................................................21
Text Elements................................................................................................................................21 Frames...........................................................................................................................................22
Colors............................................................................................................................................22
Layers............................................................................................................................................22
Adding and Deleting Pages...........................................................................................................23
Changing the Order of Your Pages...............................................................................................23
Grid Setup.....................................................................................................................................23
Importing Media............................................................................................................................23
Cropping Pictures..........................................................................................................................24
Layouts..........................................................................................................................................24
Naming Our Presentation..............................................................................................................25
Sequence Number and Label Color..............................................................................................25
Language......................................................................................................................................25
Importing and Exporting Presentations........................................................................................25
Configuration................................................................................................................................26
Frequently Asked Questions..................................................................................................................27
Troubleshooting.....................................................................................................................................28
QuickTime.............................................................................................................................................29
Help.......................................................................................................................................................30
2
The Contents of Your Package
IMPORTANT: DO NOT INSERT THE
KEY INTO YOUR COMPUTER UNTIL
YOU HAVE COMPLETED THE SOFTWARE INSTALLATION AND HAVE
REBOOTED YOUR COMPUTER!
RECORD YOUR KEY NUMBER HERE
YOUR INSTALLATION CDS: Your installation includes one disk. Your CD/DVD should have the software
version number and your key number written on it. Before installing the software, make sure that the underside is
clean and free of scratches. A replacement CD/DVD may be ordered if necessary.
YOUR KEY: Your key will have your key number written on it. Insert the key after you have installed the software and have rebooted your computer. You will need to have the key inserted into the computer that has Chairside Network installed in order to use Chairside Client. You may remove and insert the key without shutting down
your computer. If the key is lost or damaged, contact Consult-Pro to purchase a replacement.
IMPORTANT: Do not insert the key until you have completely installed the software!
YOUR KEY NUMBER: Please record your key number in the space provided above. Your key number is important if you need to call technical support for help, or if your key is damaged or lost.
YOUR REGISTRATION INFORMATION: A document containing your registration information is provided
with the package. There are four fields which will need to be completed in order to use Chairside. Please do not
lose that registration page, as it is important should you ever need to reinstall Chairside, or install it on a different
computer.
SYSTEM REQUIREMENTS
The minimum requirements for Installation of Chairside on a PC is a Pentium II with 128 MB of Ram, an 8 MB
graphics card at a minimum resolution of 1024X 768, running Windows 2000/ME/XP/Vista and one free
port.
The installer will tell you how much disk space is required. The exact amount will vary slightly from product to
product, but 1GB per CD/DVD is ample.
Please note that additional free hard disk space will be required to store any custom education presentations
which you create.
3
Installation Step 1 -Starting Your Installation
To insert the installation disk into your CD-ROM. The CD should
autoplay. If it does not, double click on the My Computer icon on
your desktop to open the My Computer folder. Once you are inside My Computer, right-click on the CD-ROM drive and choose
explore. From there, double-click on the Setup.exe file to begin
the setup process.
The Welcome Screen
Click Next to Continue.
The License Agreement
After reading, click Yes to continue.
Selecting Components
Chairside 2007 NetManager, Apple Bonjour,
USB key, and Java Runtime Environment
1.5.0
Click “Next” to continue.
4
Installation Step 2 - Installing Chairside Network on Server
The Destination Directory
Netmanager can be installed to the folder of your choice,
otherwise it will be installed under C:\Program Files\
Consult-PRO/ChairsideServer. Click Next to continue.
Installing
Remember to share the
folder ChairsideServer when
you are finished the installation. Click OK to continue.
Copying Files
There is a lot of information on the CD/DVD. Please
wait while the installer copies Chairside 2008 Network
to your computer.
5
Installation Step 3 - Installing Key Driver
Driver Welcome Screen
After Chairside Network has finshed
copying all the files The Sentinel System
Driver Installation will start.
Click “Next” through every screen.
Driver License Agreement
Click “I accept the terms in the license agreement”, then click
“Next” to continue.
Driver Setup Type
Make sure that “Complete” has been selected, and click “next”
to continue.
Tip: If you are asked to Upgrade your installation, it is safe
to do so.
6
Installation Step 3 - Installing Key Driver
Driver - Ready to Install
Now that the driver is ready to be installed, you
may click Install to continue.
Please remove all USB SuperPro keys before
continuing the installation.
Adjusting the Firewall
Click YES to adjust your firewall settings.
Driver Installation Completed
Click Finish.
7
Installation Step 1 -Starting Your Installation
Install Chairside on client machines from the shared folder on the Server computer.
Go to ‘My Network Places’ and you should see a folder called “ChairsideServer”. If
you do not see the folder, click on ‘View Workgroup computers’ and click on your main
Server.
In the Chairside-Server folder click on the file ‘SetupClient’ to start the client installation and follow the steps
The Welcome Screen
Click Next to continue.
8
Installation Step 2 - Installing Chairside on Client Computer
The License Agreement
After reading, click I Agree to continue.
Selecting Components
For The Chairside Client you
will need to install QuickTime.
Click “Next” to continue.
The Destination Directory
Chairside can be installed to the folder of
your choice, otherwise it will be installed
under
C:\Program Files\Chairside Premium
Network Client.
Click Install to continue.
9
Installation Step 2 - Installing Chairside on a Client Computer
Copying Files
There is a lot of information on the CD/DVD.
Please wait while the installer copies Chairside to your computer.
Launch the Chairside Client software and enter your unique registration information that
was provided with the software on each client machines.
Installation Step 3- Installing QuickTime
THE QuickTime Setup Screen
After Chairside has been successfully copied,
QuickTime’s setup will be launched.
Click Next to continue.
The QuickTime License Agreement
Click, Next to continue.
10
Installation Step 3- Installing QuickTime
Choose Destination Location
You may choose to customize the destination directory which
QuickTime will be installed in.
Click, Install to continue.
Choose Installation Type
Ensure that “Recommended” is selected.
Click Next to continue and allow the files to be installed.
QuickTime installation Complete
After the installation of Quicktime has completed,
Click Finish to continue.
11
Installation Step 3 - Installing QuickTime
Optional QuickTime Upgrade
If you wish, you can upgrade your
version of Quicktime to Quicktime Pro.
Click Go Pro Now or No Thanks to
continue.
QuickTime Installed successfully
After QuickTime has been installed
Click Next to continue.
Reboot
Click Yes to reboot your computer.
Congratulations, you have finished your Chairside 2008 Network Client installation!
You may run Chairside from either your desktop or the start menu shortcut.
12
The Chairside Home Screen
Below is the Chairside Premium Home Screen. You will see the various education topics on the left. At the topright of the Home Screen you can access the other sections of the program.
Note:
For the purposes of the manual we have used the Chairside Premium version of the software to show how to use
the program. Included in the following pages are screen shots of the General Denistry, and Implant Edition Home
Screens.
Updates
Flags
(Click to Change)
Patient Information
Help
Favorite Education
Chairside
Configuration
Find Education
Series
(30 Pre-made)
Exit Chairside
The Education-Maker
(create new education)
Program Sections:
Educational Modules
Over 130
Pre-made
Brochures
The Chairside Home Screen
13
Education
Introduction
Chairside has a comprehensive library of patient-friendly graphics, clinical images and animations depicting various conditions, treatment options and consequences of non-treatment. During a consultation, Chairside’s education will help your patient fully understand their condition and their available treatment options. All Education
modules can be customized (with your own voice-overs, for example) and saved as a new Education.
Viewing Education
Clicking on one of these will reveal a list of presentations.
Select a presentation from the list to view it.
A series of quick-launch icons will appear at the top of
your screen, allowing you to easily select a different presentations.
Education:
Player
Controls
14
Education
Navigating Education
Here you will become familiar with choosing an education presentation and navigating through its frames..
Stop
Last
Forward
Looking at the presentation, at the top-right you
will see the navigation buttons.
To progress to the next slide, click Forward.
You can walk forward through each slide in a
presentaion this way.
To skip to the last slide, click Last.
To exit the presentation, click Stop.
First
Backward
When you click Forward, you will be brought
to the second page of the presentation.
Two new buttons will become available.
To go to the previous slide, click Backward.
You can return to the first slide by clicking
First.
Storyboard
Another way of navigating through a presentation is the Storyboard button. This button appears with presentations which have multiple
pages.
Clicking the Storyboard button reveals thumbnails that represent each slide in the current presentation.
These thumbnails appear on the right side of
your screen and can be clicked on for quick and
easy access to any slide.
15
Education
Education Quick Launch
When you are viewing a presentation, you will see a row of
icons at the top-right. Each icon represents one of the education categories that appears in the main screen of the program.
Select a category to see a list of its presentations.
Education Quick Launch Selection
Movies
To begin a movie, click Play. You may also press the Enter
key on your keyboard.
Print Button Draw Button
Once a movie begins playing, the Play button will become a
Pause button.
When the movie is not playing, you may click on the Fast
Forward or Rewind buttons to walk through the movie
frame-by-frame.
You may also click and drag the Seek button to skip to a specific part of the movie.
Play Seek
Rewind
Fast Forward
The Draw Button allows you to pause and draw on the movie.
The Movie Navigation Bar
The Print Button prints whatever is onscreen including what
you have drawn
Find Education
Searching for Education
You can search for any piece of education in Chairside. From
the Chairside Home Page, click Find and type any word or
phrase. In the Premiuim Edition, the entire database in all
sections is searched at the same time.
To view one of the presentations, select it and click Open.
The Search Window
16
Education
Favorite Education
Favorite Education
Clicking the Favorites button will present
a list of your favorite presentations. Select
a favorite from the list to view it.
When viewing a presentation, you can click the Favorites button to add it to your favorites list.
Education Series
The series feature allows you to combine a number of presentations into one large one for easy play back. Over
30 pre-made series are included with the program. They can be customised or changed in any way.
The series feature allows staff to get involved in a patient’s treatment planning, because they are able to easily
discuss any number of complex cases by simply playing a series. because the series can be prepared beforehand,
there is no worry that some things can be forgotten.
The series feature assists in preventing patients from being misinformed or asking for a second opinion rather
then proceeding with the procedures that have been proposed to them by providing a consistent message to all
patients.
Creating a Series
Click the Series button and select New Series.
Education Series
Adding to The Series
1) Select a category from the quick launch icons above to see
its list of education.
2) Select a presentation.
You will see the presentation appear in the series list.
Adding Education Into A Series
17
Education Series
Remove
Up
Editing The Series List
Once you have added an item to the series list, you
can select it and then click Remove to remove it
from the list, click Up to move it up, or click Down
to move it down.
Down
Editing a Series
Saving Your Series
Clicking the Save button will prompt you to give your series a name.
You have two options of saving a series. The first is to save the series as a person’s name which can easily be
found for future reference. The second method is to save it as a generic name (e.g. 3 unit bridge versus implant)
which then enables you to easily find the required information for other patients.
Modifying, Renaming, or Deleting A Series
To modify a series, select Modify Series and you will be brought back to
the series editor screen. See the Editing The Series List section of this
document.
Education Series
To rename a series, select Rename Series.
To delete a series, select Delete Series.
Playing a Series
You can play a series by clicking on the Education Series button, hovering
your mouse down to your presentation and selecting Play Series from the
menu.
Series Education Controls
When playing a series, the Next button will continue to the next slide, and
when you have reached the last slide it will continue to the next presentation.
The First and Last buttons will let you move from presentation to
presentation.
First
Stop
Backward
Last
Forward
18
Education
Creating a Slideshow
Chairside can automatically play a piece of education or an entire series. To begin a slideshow, play your education or series, then adjust your settings to have
Chiarside automatically play.
Within the Confirguration menu, there are three choices which you need to customize.
“Play Mode”
“Loop”
“Duration”
Chairside Configuration
Set to Auto, so movies will begin automatically.
Set to On, so that the series will play indefinitely.
Set the number of seconds you wish Chairside to wait before continuing to the next slide.
Configuration
19
Customizing Chairside
The Education-Maker
Chairside’s Education-Maker will allow you to create your own
custom presentations.
The Education-Maker
(create new education)
Creating Custom Education
There are two different ways to enter into the Education-Maker:
1) An icon in your row of tools at the top-right.
2) From any education category icon.
Creating A Slide
The Education-Maker Screen
Layers
Text Elements
Frames
Add or Remove
Pages
Thumbnails
Adding a Shape
You can easily add different kinds of simple shapes using the Shapes menu. Select
the shape you wish to add and it will appear on your page.
Shape Tools
A Circle
A Square
20
Customizing Chairside
Selecting Ojects
To select an object, click on it once. You will see a blue outline surround it.
Moving Objects
To move an object, click it once and hold the mouse button d o w n .
When you move your mouse, you will be able to “drag” the object to
a new location.
Re-sizing Objects
To resize an object, select it and you will see two small squares on its
border. One square at the buttom and the other on the right-hand side
of the object. Click and drag either of theses boxes to change both their
width and height at the same time, other objects only allows you to
change either its width or it height.
A Circle
A Circle, Selected
A Circle
A Circle, Resized
Deleting Objects
To delete an object, select it and press the backspace key on your keyboard.
Creating a Text Box
Click the Text button to add a text box.
New Text Box
A Text Box
Editing A Text Box
Text Elements
At the top-middle of your Education-Maker main page, there are controls to customize
the text in a text box. You may select a text box and then change one of its attributes with
these controls.
You can:
a) Change the font.
b) Change the font size.
c) Change the typeface (Plain, Bold, Italics).
d) Change the text alignment (left, centered, right).
Font
Font Size
Plain, Bold
and Italics
Left, Centered
and Right
21
Customizing Chairside
Frames
At the top-right there are controls to customize borders. Select your object and
click Frame to add a frame. Then you can change the thickness of the frame
with the size button.
Frame Tools
A Text Box
Thin Border
A Text Box
No Border
A Text Box
Thick Border
Colors
You can change the color of objects, text or borders. Select the object and click
the appropriate Color button and you will see a rainbow of colors to chose
from.
A Black Square And A Grey Square
Layers
You can select an object and click Front or Back to push an object either underneath or on top of other object. This feature allows you to layer objects on
top of one another in a specific order.
Black on Grey
Layering Tools
Grey on Black
22
Customizing Chairside
Adding and Deleting Pages
A presentation can have more then one page. Click New to add a new page or click
Delete to remove the currently viewed page.
Add or Remove
A Page
Changing The Order of Your Pages
You can click on a thumbnail on the left-hand side of the page and drag it up or down
to a new location to change the order your pages are presented in.
Grid Setup
There is grid of lines on the main page of the Education-Maker. You may customize
these lines by clicking File and selecting Grid Setup from the Menu.
Grid Width The space of the vertical lines.
Grid Height The spacing of the horizontal lines.
Grid Visible Turns the grid on or off.
Snap To GridWhen the grid is active, objects that are moved will automatically line upu with the grid.
Grid Setup
Importing Media
At the top-left is the Import button. It lets you explore your computer for pictures and
movies and then insert them onto your page.
Import
23
CUSTOMIZING CHARISIDE
CROPPING PICTURES
Cropping is like zooming in on a picture. The Crop tool allows you to select which part of a picture you would like to keep.
1) Select an image.
2) Click on the Crop tool. You will see the picture grey out and the two boxes at the right and the bottom will then have arrows.
3) Click and drag either of the arrows to change the size of the grey box. You may freely move the grey box by drag
ging it. The idea is to resize the box and move it over the area you wish to keep.
4) Double-click the grey area to finalize your crop.
Cropping Examples
LAYOUTS
A layout allows you to create a template for future use.
To make a layout, place all of your pictures and text exactly where
you desire, then click on the Layouts button and select Save Layout. You will be asked to give your layout a name. Chose a name
that makes sense to you, such as “2 pictures and 2 text fields” and
click Save.
The next time you wish to use the same layout, simply chose it from
the Layouts menu and it will place text and graphical element placeholders in that exact layout or move and resize existing objects to
suit your layout.
24
Customizing Chairside
Sequence Number
and Label Color
Presentation Title
Language
Naming Your Presentation
Click the Presentation Title (displayed above as “Translate Title
Here”) to set a title for your work. This feature is only available in
multi-lingual editions of Chairside.
Naming Your Presentation
Sequence Number and Label Color
You can specify the order in which your presentation will appear in
the list of education that you save your work in. For example, you
can set the sequence number to 1 to make it the first item in the list.
You can also specify the color which the item will be displayed in.
Sequence Number
and Label Color
Language
Language options are used in multi-lingual editions of Chairside.
This allows you to change the text in your text boxes and re-type the
text in a different language.
Importing and Exporting Presentations
You can import a presentation by selecting Import from the File menu.
Instead of backing up your entire library, you can choose to export a
single presentation at a time.
To export a presentation, open the presentation and select Export
from the File menu.
Note: Chairside does not integrate with other software. It is not possible to import and export Chairside presentations to other programs.
25
Configuration
Configuration
“Play Mode”
Set to Auto, so movies will begin automatically.
“Presentation Mode”
“Loop”
“Duration”
Allows users to hide the navigation menu.
“Audio”
Allows users to turn on/off sound.
“Restore corrupt
Movies”
Allows users to restore damaged movies from disk
“Software Mode”
Chairside can open in a window or full-screen
Set to On, so that the series will play indefinitely.
Set the number of seconds you wish Chairside to
wait before contiuing to the next slide.
“Import Print Logo” Import a custom logo for printing
“Delete Print Logo” Deletes custom logo
“Main Image”
Main image on right can change or remain static
“Select Image”
Allows users to select which main image displays
“Log In”
“Language”
Users must log in with administrative privileges
to create new educations
“Backup”
Allows users to create a backup of your presentations to your Documents folder or restore it from a location of your choice. This is used to transfer custom education to another Chairside installation.
To import or export a single presentation, see the Importing And Exporting Presentations section of this document.
“Chairside”
Displays your registration information.
Confirguration
Allows users to change the language used in the presentations.
26
Frequently Asked Questions
Can I install Chariside on multiple computers?
Yes! You may install Chairside on as many computers as you wish. However, only the computer which has a
Chairside USB key inserted will be able to launch the software.
Is Chairside compatible with Microsoft’s “Terminal Services”?
No it is not.
Can I move information from one Chairside installation to another?
Yes. Refer to the Manual, under Configuration, for “Backup”. You can backup information from one workstation
and restore it to another.
Can I make Chairside windowed instead of full-screen?
Yes. This is particularly important when using Chairside with a second monitor. In Chairside’s application folder
there is a .ini file. Edit it and change two settings:
Full Screen=0
UseTitleBar=1
What file formats does the Education-Maker support?
Chairside relies on QuickTime to display its pictures and videos. Any picture or movie type which is supported
by QuickTime may be used.
Can I use Chairside images or movies in a presentation (e.g. Powerpoint)?
No. Instead, you can launch Chairside and switch between your presentation and Chairside.
Can I use Chairside images or movies on my website?
No. Chairside has no integration with other software.
Can I import information from other programs, or export to other programs?
No. Chairside has no integration with other software.
27
Troubleshooting
Entering registration information does not work.
- Was the information entered exactly as shown on the registration sheet?
- Is the key inserted?
- Is the light on the key lit? If not, try another USB port.
If the key was inserted before the software was installed, it may need to be reinstalled. If you are running Windows XP, a hardware wizard should appear when you first insert the key. You must complete the wizard to use
Chairside.
When saving education: “You do not have permission to save new files”
The user that is logged into the machine does not have permission to change information in Chairside’s
application folder. Try logging in as the computer’s administrator to create custom education.
My key is broken.
If you are certain that your key is damaged, you can contact Consult-Pro sales to purchase a replacement. You will
need to return your damaged key.
28
Quicktime Troubleshooting
Movies Do Not Display Correctly
Chairside uses QuickTime to play movies. If there is a problem with movie color, quality or speed then the issue
lies with QuickTime. Reinstalling, or downloading and installing the latest version of QuickTime from the internet solves most issues.
Please be sure to quit Chairside before installing QuickTime.
Movies Appear Black
This is a common with users who have displays or are displaying movies on a projector screen.
- Quit Chairside.
- Go to your Control Panel > QuickTime > Video Settings
- Turn “Safe Mode” on.
- Restart Chairside.
29
Help
Consult-Pro Technical Support
Please do not hesitate to contact Consult-Pro’s technical support department in order to assist with any technical
issues you may have with Chairside, or to answer any questoins about our software.
Feature requests and bugs should be reported via e-mail.
Toll-free in North America
International
E-mail
1-800-519-6569
1-416-429-6545
[email protected]
30