1
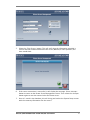
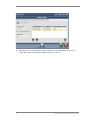
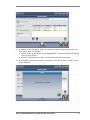
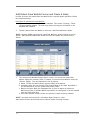
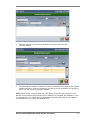
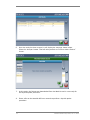
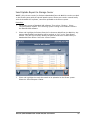
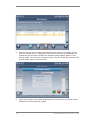
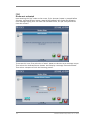
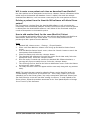
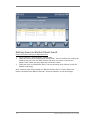
DICOM USERS MANUAL
FOR ATOMLAB 960 THYROID UPTAKE SYSTEM, MODELS 187-600 AND 187-601.
187-146
BIODEX
Biodex Medical Systems, Inc.
20 Ramsey Road, Shirley, New York, 11967-4704, Tel: 800-224-6339 (Int’l 631-924-9000), Fax: 631-924-9241, Email: [email protected], www.biodex.com
FN: 13-204 7/13
Dicom User Manual
DICOM — Digital Imaging and Communications in Medicine — is the international
standard for medical images and related information. It defines the formats for medical
images that can be exchanged with the data and quality necessary for clinical use.
Patient information that is created on Dicom system can be downloaded/ added from
Dicom system to the Atomlab 960 software. Once its available to the Atomlab 960
software, the thyroid uptake operation can be performed and the test result can be
uploaded/ sent back to the Dicom system.
The following describes the setup procedure as well as how to use Dicom with Atomlab
960 software.
Prerequisite:
1.
2.
This Flat Panel PC will have to be connected to a Hospital/Facility Network
(preferably wired connection).
This machine will require an IP address.
Once connection is established and connected to the network, the following steps are
required for Atomlab 960 software:
a.
b.
Dicom Licensing/ Activation
Dicom Setup/ Configuration
NOTE: We used some mock values for licensing/ server setup configuration for this
document. Screen values may not match with the actual customer values/entry.
Dicom Licensing/Activation
The user must purchase a software license (Part #187-146) for Dicom from Biodex to
activate the Dicom features on Atomlab 960 software. This is a one time process.
Steps:
1.
2
From the Atomlab 960 software home screen, click on <Utilities> System Setup. It
will display a tab based screen. Go to “Dicom” tab. Initially, there will be only one
button <Activate Dicom Features>.
Biodex Medical Systems, Inc. © 2013
2.
Select <Activate Dicom Features> button. It will display the following screen which
will display the “License Number” and a blank text box to enter the “Key” value. At
this stage, it will also display “X Dicom Not Activated”.
3.
Contact the Biodex Service Department, Software Support ext. 2120, with the
“License Number” information. Based on that information, Biodex will generate and
provide a “Key” number to the customer.
4.
Upon receipt of the “Key”, type the number provided in the “Key” text box; Select
the <Activate Dicom> button.
DICOM USER MANUAL FOR ATOMLAB 960 SOFTWARE
3
5.
If the “License Number” and the “Key” match, the Atomlab 960 software will display
the message “Dicom Activated” and the <Activate Dicom> button will be grayed out.
If the license key does not match it will display error message on the screen.
6.
Now, select the <Accept> button to finish the Dicom licensing process.
7.
Dicom is now licensed, activated and ready for next step- Dicom system setup/
configuration.
4
Biodex Medical Systems, Inc. © 2013
Dicom Setup/Configuration
Once the Dicom licensing part is complete, Atomlab 960 software will then display more
setup options. Follow the steps below to complete the Dicom Setup/ configuration of
the servers.
Setup Procedure:
1.
Atomlab 960 software will display the following screen. The user must provide the
necessary information.
2.
On the above screen, fill in the following information:
a. Station AE Title - By default, value will be “Atomlab960”. Please confirm
that, same “Station AE Title” is used on the Hospital’s/Facility’s (PACs/) Dicom
system. This title MUST match; otherwise it will not work.
b. Invert Dicom Reports - By default, this will be checked. If this is checked, this
will display inverted color on the Dicom report -background black, text white.
c. Modality Filter – Modality filter is a drop-down box that includes some
predefined modality values. By default, value “NM” will be selected
(abbreviation for nuclear medicine). This will filter the patient list from Dicom
Worklist server. If it’s set to “NM” only patients associated with the NM
(Nuclear Medicine) modality will appear in the list of patients. To view all
patients from the list, delete the selected value and leave it as blank. You can
also type any other value in the modality filter as well. Any new value used
will also be saved for later use.
3.
Now configure the Worklist and Storage Server to the Atomlab 960 software, select
the <Add> button.
DICOM USER MANUAL FOR ATOMLAB 960 SOFTWARE
5
4.
To add a Worklist- after selecting the <Add> button in #3, this will present the
following “Dicom Server Management” screen. Type all required information on that
screen.
a. Server name- Delete the default value in the text box and type a name for the
server (for example, Worklist server)
b. IP Address – Delete the default value in the text box and type the IP address
of the server. (It also allows entering server machine name / hosting name.)
c. Port- Delete the default value on the text box and type the port for the server
d. AE Title- Delete the default value in the text box and type the AE title of the
server
e. Service List- Typically it will appear with a value “ATOMLAB_SCU_Service_List”.
You may leave it as is unless the server setting is different.
f. Dicom features – select the type of server, whether it’s a C-Store or
Worklist Provider.
Once all the information has been provided, it will look like the following screen.
6
Biodex Medical Systems, Inc. © 2013
5.
Select the <Test Server> button. This will verify that the information provided is
correct and that communication with the server (Worklist/C-Store provider) has
been established.
6.
If the server connection is successful, it will display the message. Select <Accept>
button to return to the Dicom Server Management screen. Then select the <Accept>
button again to save the entered value for Dicom server.
7.
Once it’s saved in the database, this will bring you back to the System Setup screen
with the summary information for the servers.
DICOM USER MANUAL FOR ATOMLAB 960 SOFTWARE
7
8.
8
Repeat steps 4 to 7 to add the c-store provider and any additional servers. The
screen will look as follows with multiple servers in the list.
Biodex Medical Systems, Inc. © 2013
9.
If changes to the configured servers are required, select the row from the list and
then select <Edit> or < Delete>.
a. Edit will bring up the “Dicom Server Management” screen which will allow editing
of the existing values.
b. Delete will prompt the user with a confirmation message to that item.
10. Once everything mentioned above is complete, select the <Accept> button to save
to the database.
DICOM USER MANUAL FOR ATOMLAB 960 SOFTWARE
9
Add Patient From Worklist Server and Create A Study
In-order to access the patient from the Worklist for a thyroid uptake operation, follow
the procedure below:
Procedure To Add Patient From Worklist:
1. Select <Home> screen of Atomlab 960 software. Then select <Testing>. Select
<Thyroid Uptake> button. This will bring up the existing list of Patients in the
Atomlab 960 software.
2.
To add a patient from the Worklist, select the <Add From Worklist> button.
NOTE: Patients added not using the <Add From Worklist> button cannot be sent to
Dicom. ONLY patients added thru Dicom can have the Uptake test results sent to
Dicom.
3.
This will open the Worklist Patient Search screen. This screen has some filter
options. Apply the necessary filter, if needed. To search from a Worklist select the
<Search> button. This will populate the list of patients.
a. Name- To filter by patient name, type the name of the patient.
b. Procedure Date- You can choose either Specific Date or Any date. By default it
will be selected for current system date/ today’s date.
c. Worklist Provider- With this dropdown box, it gives an option to select the
Worklist provider. If multiple Worklist providers are configured, it can be selected
from the drop down box.
d. Accession Number- Allows to filter the patient list with Accession number.
NOTE: You must select a specific <Procedure Date> button or <Any>
date button and one of the other search options before selecting <Accept>.
10
Biodex Medical Systems, Inc. © 2013
4.
From the patient list, click on the patient to highlight and select the
<Accept> button.
5.
The Atomlab 960 software prompts the user to select the study type for the Thyroid
Uptake procedure. Select the Study type by clicking on the procedure to highlight it
on the list and select the <Accept> button.
NOTE: Selecting the <Cancel> button on “Add Study” screen will take you back to the
Worklist screen and no patient/study will be added to the Atomlab 960 database. It has
to complete the cycle – add patient from Worklist and then add study for that patient
and procedure to be listed in the Atomlab 960.
DICOM USER MANUAL FOR ATOMLAB 960 SOFTWARE
11
6.
Once the study has been created, it will display the message shown below.
Select the <Accept> button. That will take you back to “Select or Add A Patient”
Screen.
7.
At this point, the Patient was downloaded from the Worklist and is now ready for
the thyroid uptake procedure.
8.
Please refer to the Atomlab 960 user manual to perform a thyroid uptake
procedure.
12
Biodex Medical Systems, Inc. © 2013
Send Uptake Report to Storage Server
NOTE: Only the test results for Patients downloaded from the Worklist can be sent back
to the Dicom system with the thyroid uptake report. Patient test results created locally
with the Atomlab 960 software, cannot be uploaded to the Dicom system.
Procedure:
1.
Go to Home screen of Atomlab 960 software. Then select <Testing>. Select
<Thyroid Uptake> button. This will bring up the existing list of Patients stored in
the Atomlab 960 software.
2.
Select and highlight the Patient from the list that was added from the Worklist. Any
patient downloaded from Worklist will be marked as “Yes” in the “From Dicom”
column. This will help to easily identify the patients that were created locally vs.
downloaded from Dicom. Select the <Next> button.
3.
Select and highlight the study that needs to be uploaded to the Dicom system.
Select the <Dicom Report> button.
DICOM USER MANUAL FOR ATOMLAB 960 SOFTWARE
13
4.
Select the Dicom Server to where you would like the results to be loaded. If more
than one storage server is configured, choose the server from the drop-down list.
Choose the type of report needed to be uploaded- Detail Uptake report or Time
Activity report. Then select the <Accept> button. This will display the preview of the
thyroid uptake report in Dicom format.
5.
Confirm the report on the Dicom Report preview. Then select the <Send to Dicom>
button to send it to the Dicom system.
14
Biodex Medical Systems, Inc. © 2013
6.
Once uploaded, the Atomlab 960 software will display a confirmation message.
If any error occurs, a message will be displayed stating the problem.
DICOM USER MANUAL FOR ATOMLAB 960 SOFTWARE
15
FAQ
Dicom not activated
Upon entering the “Key” value on the screen, if the <Accept> button is pressed before
selecting <Activate Dicom> button, Atomlab 960 software will display the following
error message stating that “You have not activated Dicom, are you sure you want to
close this screen?”
To correct this issue, first select the <Cancel> button to close the error message screen.
Then select the <Activate Dicom> button. It will display a message “Dicom Activated”.
Then select <Accept> to finish the licensing process.
16
Biodex Medical Systems, Inc. © 2013
Will it create a new patient each time we download from Worklist?
No. Same patient can be downloaded several times. However, Patient information will be
added once to the Atomlab 960 database. Once it’s added, even with the multiple
download from Worklist, it will not create a new entry for the same patient each time.
Deleting a patient from the Atomlab 960 software will delete Dicom
patient?
No. If any patient is deleted from the Atomlab 960 software, it will only delete the
information from the Atomlab database and NOT from Dicom system. Once the patient
is deleted from the Atomlab 960 software, it will delete all the associated study/test
results of that patient in the Atomlab system.
How to add another Study for the same (Worklist) Patient
If it is needed to add another study for the same patient downloaded from Worklist to
Atomlab 960, follow the steps shown below. This is the same procedure used
previously to add a patient from the Worklist.
Steps:
1.
2.
3.
4.
5.
6.
7.
8.
Atomlab 960 <Home screen>, <Testing>, <Thyroid Uptake>
Select <Add From Worklist> button. It will bring up the Worklist Patient Search
screen.
From the Worklist Patient Search screen, select the <Search> button to search the
same patient from the Worklist.
Select that Patient and select the <Accept> button.
Then Atomlab 960 software will provide the option for the New study. Select the
appropriate study. Select the <Accept> button.
Once the study is created and saved to the Atomlab 960 Software database, a
message will pop-up to notify the user. Select the <Accept> button.
This will bring the user back to the Select or Add Patient screen. Select the Patient
and select the <Next> button.
The Study Selection screen will appear with the new study along with any previous
study.
NOTE: The study that was created to upload to Dicom, can be identified under the
column heading “From Dicom” of the patient list. Those study/ studies only can be
uploaded/ sent to the Dicom system. Any study created with “Add Study” button from
the Study Selection screen will not allow sending it to Dicom. To send/ upload to the
Dicom system, follow the procedure mentioned in the “Send Uptake Report to Storage
Server” section of this document.
DICOM USER MANUAL FOR ATOMLAB 960 SOFTWARE
17
Nothing shows on Worklist Patient Search
Check the Dicom settings/configuration first.
1.
2.
3.
Go to <Utilities> <System Setup> <Dicom tab>.
Check for all the server configuration/connections. You can confirm the settings by
selecting any row, click on <Edit> button and then click on the <Test Server>
button. It will inform the user about the connection status.
Check the value in the Modality Filter. If its set to wrong value, Patient list will be
filtered accordingly.
Also, check the Search filter option on “Worklist Patient Search” Screen. Make sure
Name, Procedure Date, Worklist Provider, Accession Number are set accordingly.
18
Biodex Medical Systems, Inc. © 2013
DICOM USER MANUAL FOR ATOMLAB 960 SOFTWARE
19
20
BIODEX
Biodex Medical Systems, Inc.
Biodex Medical Systems,
20 Ramsey Road, Shirley, New York, 11967-4704, Tel: 800-224-6339 (Int’l 631-924-9000), Fax: 631-924-9241, Email: [email protected], www.biodex.com
Inc. © 2013